

HSS Hire 920 Operating & Safety Manual

Commercial
Floor
Finishing
Sander
Hire Shops
A professional machine with built in
dust extraction for final sanding of
large floor areas.
Operating & Safety Guide 920
When the machine first starts, depending on its
angle,
it will try to run away. You will be able to
control its direction by the angle of the unit.
Sand floorboards along their length, levelling any
that are uneven by first working diagonally across them.
Starting in a corner, tackle the floor in strips;
overlapping these by about 75mm
. Once you have
sanded the entire floor
repeat using progressively
finer grades
to achieve the desired finish.
Never switch the sander OFF or ON without the
abrasive pad in contact with the floor.
To sand a strip, set the control lever in the
operating position and switch the unit on.
Never apply too much pressure to the sander
, its
weight alone is enough.
Keep the sander moving across the floor at a
constant speed. Any hesitation or stopping will
result in the floor’s surface being damaged
. Rutting
will occur on the surface and the floor will require resanding. This rutting effect will occur on any type of
wood (Hard or Soft).
Once you have sanded as much as possible with
the sander you can then tackle the perimeter with
an orbital hand sander.
Note that you may have to adjust the angle of the
control handle to suit localised conditions as the
work proceeds
.
Never push the equipment beyond its design
limits
. If it will no do what you want with reasonable
ease, assume you have the wrong machine for the job.
Ask at your local HSS Hire Shop for advice.
Keep the equipment clean. You will find this less of a
chore if you clean up regularly, rather than wait until the
end of the hire period.
Check the debris bag at regular intervals and
replace as necessary
, following the instructions in
‘GETTING STARTED’. Remember, it is your responsibility to
dispose of any debris in a responsible manner.
Handle the equipment with care. Avoid dropping it,
knocking it, or otherwise exposing it to damage.
Dispose of wood dust carefully.
Never use a sander that has not got an abrasive
fitted.
Always use the right abrasive for the job and change
it as soon as it becomes clogged or damaged.
When not in use, store the equipment with its dust
collection bag emptied and removed, somewhere
clean, dry and safe
from thieves.
EQUIPMENT CARE
Use only abrasive pads supplied by HSS Hire
Shops
. Anything else may damage the equipment and
your floor.
Sand the floor and seal before decorating.
Wallpaper paste and paint spills can be wiped up more
easily – without staining – if the floor is sealed first. A floor
finish is available from your HSS Hire Shop, on a sale or
return basis.
You must follow the manufacturers
instructions for its correct application.
Wear all necessary protective clothing and
ventilate the room when applying.
A respiratory protective system is available for hire,
for details contact your local HSS Hire Shop.
Before varnishing sweep and vacuum the floor.
Wipe over with a lint free cloth, lightly dampened with
white spirit. Leave to dry for approximately 2 hours,
keeping windows open and doors shut – allow the spirit
to evaporate.
Switch OFF and unplug the machine.
Reset the control handle to upright, then remove
the abrasive pad.
Remove the debris bag and replace the cover.
Give the machine a thorough clean and neatly coil
its flex ready for return to your local HSS Hire
Shop.
FINISHING OFF
BEFORE DECORATING
Code 05218
©HSS Hire Service Group Plc 2000 No. 920/01
Group Office: 25 Willow Lane, Mitcham, Surrey CR4 4TS
Web Site: http://www.hss.co.uk
Contact your local
0845 728 2828
…any comments?
If you have any suggestions to enable us to improve
the information within this guide please fax your
comments or write to the Product Manager at the
address below
Fax: 020 8687 5001
920/01
For advice on the safety and suitability of this equipment
contact your local HSS Hire Shop.
There is a serious risk of personal injury if you do
not follow all instructions laid down in this guide.
This equipment should be used by an able bodied,
competent adult
who has read and understood these
instructions. Anyone with either a temporary or
permanent disability, should seek expert advice before
using it.
Keep children, animals and bystanders away from
the work area. Cordon off a NO GO area using
cones and either barriers or tape, available for hire
from your local HSS Hire Shop.
Never use this equipment if you are ill,
feeling tired, or under the influence of
alcohol or drugs.
Safety goggles MUST be worn by everyone in
the work area.
Some materials when sanded contain
substances which, when inhaled, can be
harmful to health.
A suitable mask must be worn when
using this equipment. Respiratory protective equipment is
available for hire, contact your local HSS Hire Shop for
details.
This equipment generates potentially harmful
noise levels.
To comply with health and safety at
work regulations,
ear defenders must be worn by
everyone in the vicinity.
Wear practical, protective clothing,
gloves and footwear.
Avoid loose
garments and jewellery that could catch in moving parts,
tie back long hair.
This equipment is heavy, never attempt to lift
it on your own, always get help.
Ensure the work area is well lit,
if in doubt, ask about
lighting equipment at your local HSS Hire Shop.
GENERAL SAFETY
This type of floor sander MUST NOT be used on
Parquet or overlay flooring which has a veneer
finish.
Veneer is only a couple of millimetres thick and
should be sanded with a light orbital type machine.
Never carry, lift or pull the equipment by its power
supply cable.
Check the equipment before use
. If it shows signs of
damage or excessive wear, return it.
Always isolate the equipment from its power
supply, when not in use.
COSHH Information sheets are available from your local
HSS Hire Shop.
Most HSS equipment is designed to plug straight
into a standard 240v 13A power socket. However,
110V models
(with a round yellow plug) must be
powered only from the mains via a suitable
transformer.
Extension leads should be fully unwound and
loosely coiled away from the equipment. Never run
them through water, over sharp edges, or where they
could trip someone.
Using electrical equipment in very damp or wet
conditions can be dangerous.
To reduce the risk of electric shock, always
use a suitable RCD
(Residual Current-Operated
Device)
available from your local HSS Hire Shop.
If the equipment fails, or if its power supply cable
or plug gets damaged, return it
. Never try to repair it
yourself.
Ensure the sander and power socket are switched
OFF before plugging into the power supply.
Clear the floor area of all furniture,
if this is
impractical, the furniture will have to be moved around
as the work progresses
. Tie up any long curtains that
touch the floor. Sweep and clear the entire floor
area.
Ensure the floor is free from nails and screws. If
these cannot be removed, drive them well below the
surface.
Close all doors and seal them with masking tape, then
open all windows.
Take the unit into the room and unroll the power
lead.
NOTE; This machine must be switched OFF and
unplugged from its power supply whenever you
are making any adjustments to it.
GETTING STARTED
ELECTRICAL SAFETY
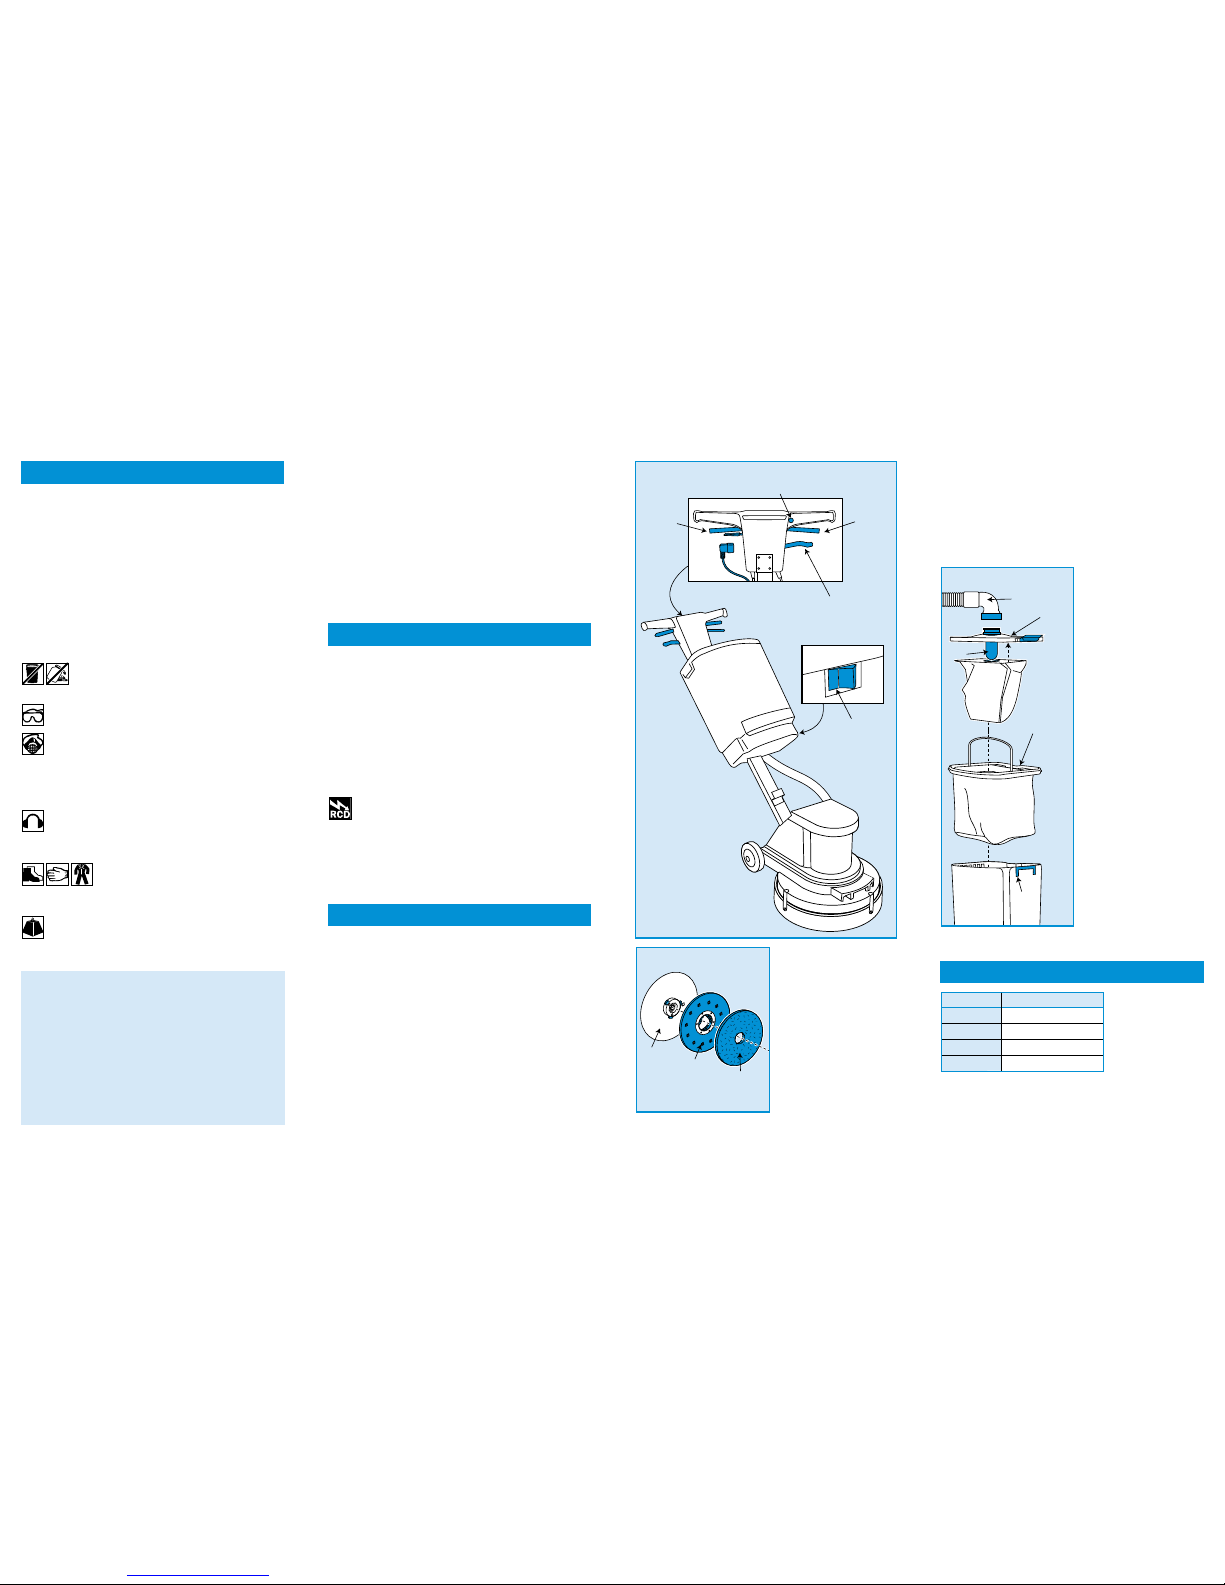
Tilt the machine back
to reveal the base
drive.
Fit the nipple pad to
the base drive. Simply
align the centre of the
pad with the base
drive and turn anticlockwise 90 degrees.
Fit the sander with the
appropriate abrasive
. In
general, start with a
medium grade, then
work through to a fine
grade until the desired finish is achieved.
Line the dust extraction holes on the sanding pad
with the holes on the nipple pad. Push the
abrasive sheet firmly against the pad until the
Velcro surface has adhered.
Now raise the machine up again and familiarise
yourself with the controls.
Move the unit on its rear transport wheels, to the
furthest area of the floor.
Fit the vacuum unit
with a new dust
collection bag. Unclip
and remove the top
cover, then remove any
existing bag from the
unit.
Where necessary,
remove the filter and
safely dispose of any
loose debris.
Take a new bag and open
it to shape. Be careful not
to rip or otherwise
damage it.
Push the new bag over
the inlet
on the top cover
then refit the top cover
complete with bag,
securing in place with the
2 side clips.
Connect the hose to
the top
by screwing on
clockwise.
To switch the vacuum
ON
simply move the
ON/OFF switch to the
‘I’ position
. To switch
OFF move the switch to
the ‘0’ position.
All that remains is to
plug the unit into its power
supply and switch the supply ON.
Raise the tilt
control lever to
disengage the
control handle
lock. Lower the
control handle to
suit, then simply
release the lever to lock in position.
To switch the machine ON, depress the lock off
button with your thumb and squeeze in the
ON/OFF lever.
BASIC TECHNIQUES
Fire Warning
WOOD DUST IS EXPLOSIVE.
Never store wood dust it can be dangerous.
Empty dust-bags when they are approximately
1/3 full and before leaving or storing the machine.
Never tip wood dust into a fire or incinerator – it
may explode.
Never leave it packed in a dust-bag or similar
container – it can ignite spontaneously.
To dispose of it safely, mix it with general rubbish.
Lock OFF Button
ON / OFF
Lever
Vacuum
ON/OFF
Switch
ON / OFF
Lever
Tilt Control
Lever
1
0
ON
OFF
Side
Clip
Hose
Inlet
Top
Cover
Filter
Bag
Base
Drive
Nipple
Pad Abrasive
Disc
Tilt Angle Direction of Travel
Backward Left
Forward Right
Left Backward
Right Forward
Floor Finishing Sander
Bag Fitting
Disc Fitting
 Loading...