

HSS Hire 805 Operating & Safety Manual
must press the Black main power switch for complete
shutdown.
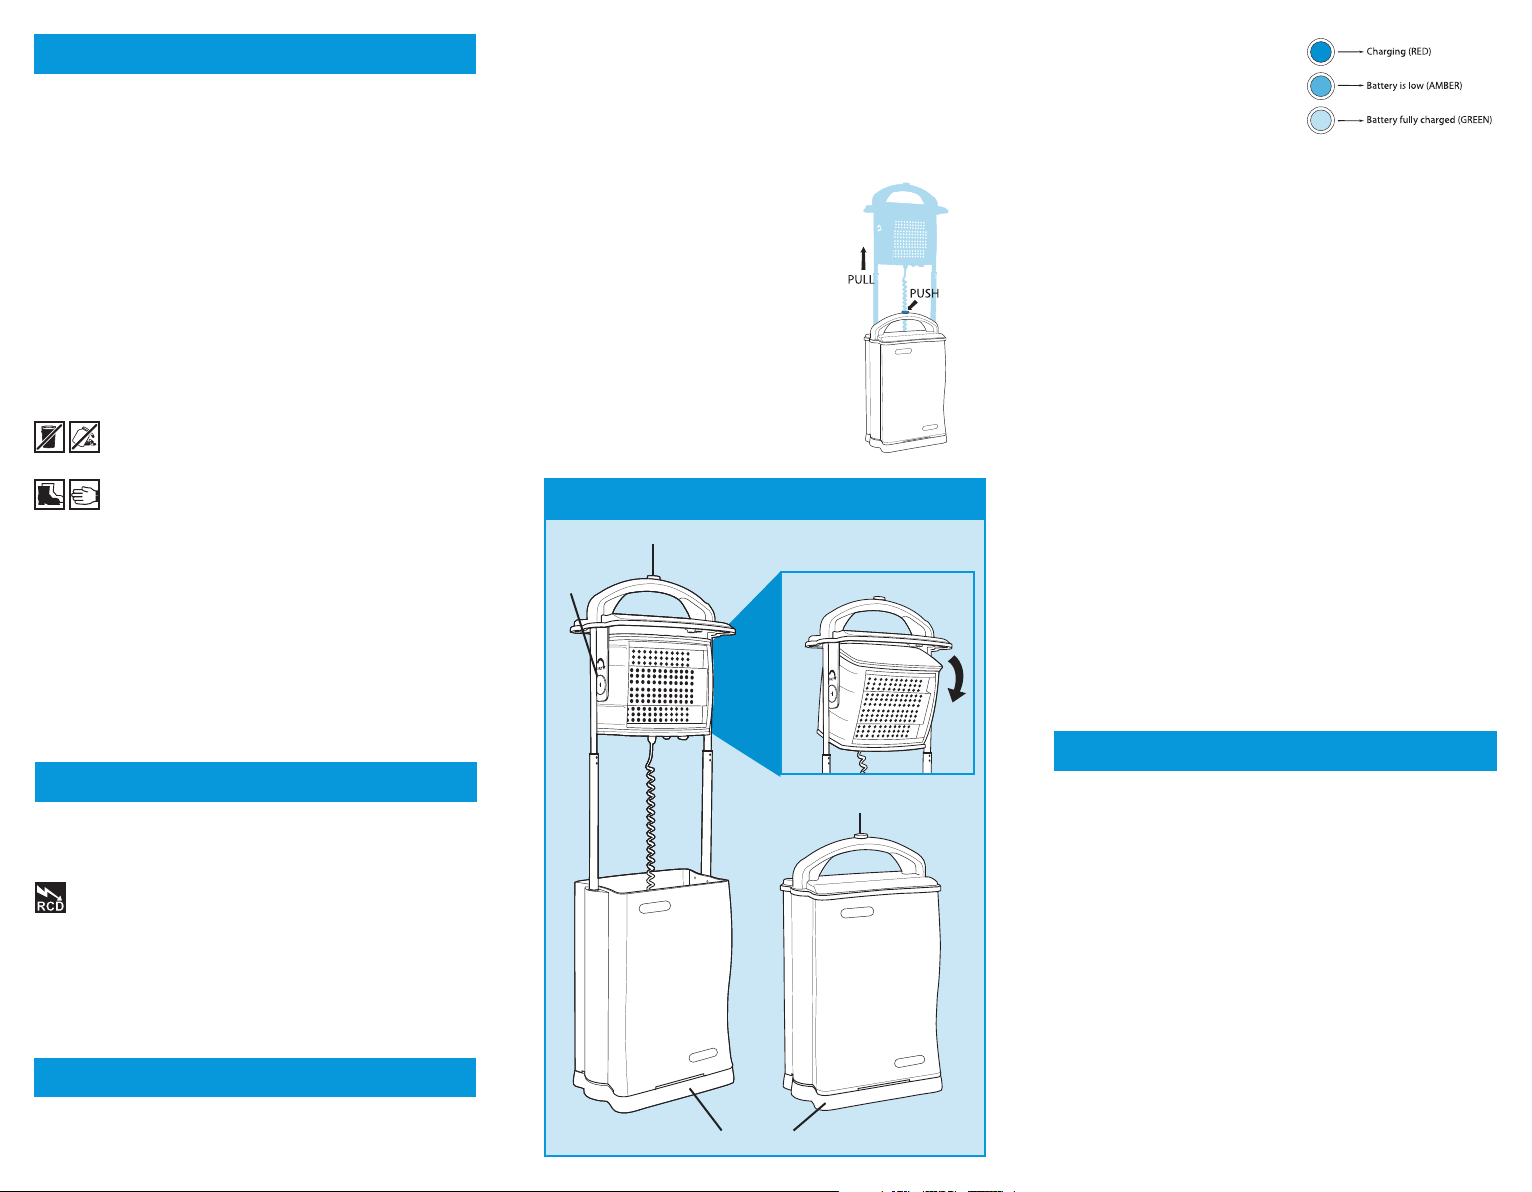
To close the Smithlight, push the button In the middle of
the handle, hold in, lower the lid of the light until the lid
meets the top of the light body, release button, and you will
hear and feel the locking pins go into place. It is then locked
in the closed position allowing you to carry the Smithlight
to your next job.
EQUIPMENT CARE
Never push the equipment beyond its design limits. If it
will not do what you want with reasonable ease and speed,
assume you have the wrong equipment for the job. Contact
your local HSS Hire for advice.
If the bulbs fail, do not attempt to replace or fix them,
contact your local HSS Hire for advice.
If the battery is discharged it must be recharged within
24 hours to avoid battery damage.
Keep the equipment clean - you will find this less of a
chore if you clean it regularly, rather than wait until the end
of the hire period.
When not in use, store the equipment somewhere
clean, dry and safe from thieves.
FINISHING OFF
Switch the lamp OFF, disconnect battery charger from
mains and it lower down.
Give the unit a final clean up ready for return, to your local
HSS Hire.
805/01
805/01
Operating & Safety Guide 805
Operating & Safety Guide 805
... have you been trained
The law requires that personnel using this type of equipment in
the workplace must be competent and qualified to do so. Training
is available at HSS Training Solutions
0845 766 7799
…any comments?
If you have any suggestions to enable us to improve the
information within this guide please e-mail your comments or
write to the Safety Guide Manager at the address below
e-mail: safety@hss.com
©HSS Hire Service Group Ltd 2011 No. 805/01
Group Office: 25 Willow Lane, Mitcham, Surrey CR4 4TS
Web Site: http://www.hss.com
Smithlight LED
Smithlight LED
Easy to set up portable light. Doesn’t
require generators, power extension
leads etc; cutting down set up times
and running costs
Code 57454
GENERAL SAFETY
For advice on the safety and suitability of this equipment
contact your local HSS Hire.
There is a serious risk of personal injury if you do not
follow all instructions laid down in this guide.
The hirer has a responsibility to ensure that all
necessary risk assessments have been completed prior
to the use of this equipment.
This equipment should only be used by an operator
who has been deemed competent to do so by his/her
employer.
This equipment should be used by an able bodied,
competent adult who has read and understood these
instructions. Anyone with either a temporary or permanent
disability, should seek expert advice before using it.
Keep children, animals and bystanders away from the
work area. Cordon off a NO GO area using cones and
either barriers or tape, available for hire from your local
HSS Hire.
Never use this equipment if you are ill, feeling
drugs.
that could catch in moving parts, tie back long hair.
Ensure the work area is well ventilated, if in doubt, ask
about ventilation equipment at your local HSS Hire.
Do not work near flammable gases or liquids, petrol or
paint thinner fumes for example. Keep combustible
materials at a safe distance – at least 5m.
Always switch off and unplug the charger when not in
use.
Never carry or pull the charger by its power supply
cable.
Check the condition of the equipment before use. If it
shows signs of damage or excessive wear, return it to your
local HSS Hire.
Never try to repair the equipment.
The battery charger is designed to plug straight into a
standard 240V 13A power socket, or standard 12/24V
vehicle system (plugs into standard vehicle Close Space
socket / lighter plug).
electrocution.
To reduce the risk of electric shock, use a suitable RCD
(Residual Current-Operated Device) available from your
local HSS Hire, or power the charger from a mains circuit
with a built-in RCD.
If the lamp or its charger fail, return unit. Never try to
repair it yourself.
tired, or under the influence of alcohol or
Wear practical, protective clothing, gloves and
footwear. Avoid loose garments and jewellery
ELECTRICAL SAFETY
Never charge the unit in a hazardous environment.
Wet environment poses numerous risks including
GETTING STARTED
Never use the Smithlight LED until you have fully read
and understood this User Guide and the machine has
been properly set up using the information it contains.
CHARGING
The Smithlight LED can be recharged by mains charger
suitable for 240 volt 50Hz supply. The charger should only
be used indoors and not exposed to the weather.
It can also be charged by standard 12/24 volt vehicle
system (plugs into standard vehicle Close Space socket /
lighter plug).
To charge the light ensure that it is
placed on a firm level surface. Open
the lid of the light by pushing the
button in the middle of the carry
handle, raise the light head, lift the
sealed storage lid located inside the
body of the unit, the storage area
contains both chargers; remove the
appropriate lead (240 volt AC or
12/24 volt DC). Place the relevant
end of the charging lead into the
socket located at the bottom rear of
the light, this socket has a keyway
which allows easy entry for the plug,
turn the circular collar of the plug
clockwise and this will lock the plug
into place.
Raising light head
IDENTIFIER
Locking Push Button
Swivel
Point
Non Marking Rubber Base
60oDownwards Tilt
Locking Push Button
When using 240 volt AC supply,
insert the charger into a 3 pin
outlet. During charging, the
LED indicator located in the
light reflector, on both sides of
the light head will display
three colours, RED when in the charging mode and
GREEN when the battery is fully charged and AMBER
when the battery is in a low discharging position.
When using 12/24 volt DC supply, insert the male plug into
a fused 12/24 volt (negative earthed) power socket. Please
check that the socket selected is on a constant supply.
Some plugs may be connected to a circuit on the vehicles
accessory supply.
(This means that the keys would need to be left in the
vehicle with the ignition switch in the accessory position
and this may constitute an unacceptable risk; for both
safety and theft).
The AMBER low battery LED indicator in the light reflector,
on both sides of the light head will turn on when the
battery is approximately 1 hour from discharge, (may
vary depending on battery condition) and will sound an
audible reminder
beep approximately every 15 minutes. Also when the
AMBER LED is on, and when charging, only one side of the
light head will operate.
Full recharge time is 7-8 hours. To ensure optimum battery
life the unit must not be left in a discharged condition. The
battery must be recharged within 24 hours of being
discharged to avoid battery damage.
Charging and running the lamp whilst being charged is
not recommended. Ensure the light is switched off when
charging. For the best performance we recommend that
the Smithlight LED be kept on charge when not in use.
If disconnected from charge and not used for prolonged
periods the battery will start to discharge, than you must
charge the battery at least once every three months.
BASIC TECHNIQUES
When setting up the Smithlight ensure that it ls placed on a
firm level surface. Confirm that the unit is fully charged.
Charge the unit, when required (see Getting Started).
Push the button in the middle of the handle, keep the
button pressed in until you choose the lower or full height,
you must go to full height before you select lower height.
Ensure that your desired height has been accepted by the
locking pins.
Once you have released the push button in the middle of
the handle, you will hear and feel the pins go into place.
remove your finger from the push button and if the handle
cannot move up or down you are In the locked position.
The on off switches for each side of the light head are
located on the underside of the light head. There are two
switches, the Black main power switch and the Red
activation switch. After starting the Black main switch press
the Red switch once for the front of the light head (only) to
turn on, press twice for the back of the light head (only) to
turn on, press three times for both front and back to stay on.
The red switch will not turn the light completely off, you
 Loading...