

HSS Hire 723 Operating & Safety Manual
Logging Saw
A heavy-duty general purpose
electric saw for cutting
through a variety of materials.
Always cut
in a straight
line, never
twist the
blade in the
cut.
The 230V
version of
the Model 2
saw is fitted
with an
adjuster to
vary the
speed of
the blades.
The speed
adjuster dial
is located on
the top of
the rear
handle.
If you are
cutting
plastic,
which may
melt and
clog the
blades,
reduce the
speed
withthe
adjuster
dial. For
best results
when
cutting
wood, keep
the speed
set to
maximum
(6).
Avoid prolonged heavy use at low speed settings as this
may lead to overheating of the motor. DO NOT adjust the
speed of the blades with the unit running. Release the
ON/OFF trigger, make the adjustment and restart the unit.
Never push the equipment beyond its design limits. If it
will not do what you want with reasonable ease and speed,
assume you have the wrong type or size of extractor for the
job. Ask at your local HSS Hire for advice.
Keep the equipment clean. You will find this less of a
chore if you clean it up regularly rather than wait until the
end of the hire period.
When not in use, store the equipment somewhere
clean, dry and safe from thieves.
Remove the saw from the cut while still running, then
release the ON/OFF trigger and wait for the blade to
stop.
Then unplug the saw and refit the plastic guard strip
supplied to protect the blades. Take care though - the
blades are very sharp.
All that remains is to give the unit a final clean up ready
for return, to your local HSS Hire
FINISHING OFF
Code 03151/2
Logging Saw
Operating & Safety Guide 723
Operating & Safety Guide 723
723/03723/03
... have you been trained
The law requires that personnel using work equipment
have received adequate training and must be competent
when using the equipment within the workplace.
Training is available at HSS Training Solutions
0845 766 7799
…any comments?
If you have any suggestions to enable us to improve the
information within this guide please e-mail your
comments or write to the Safety Guide Manager
at the address below
e-mail: safety@hss.com
©HSS Hire Service Group Ltd 2009 No. 723/03
Group Office: 25 Willow Lane, Mitcham, Surrey CR4 4TS
Web Site: http://www.hss.com
Blade Replacement
Switch the unit OFF and unplug it from the power
supply. Wearing suitable gloves, turn the unit upside-down and where tted, remove the dust
extraction cover.
Model 1.
Working on one blade at a time, turn the blade
locking hex bolt anticlockwise with the hex key
until the blade and bolt separate. The bolt is spring
loaded and held captive.
Lift the blade by the heel end. Fully raise the
blade until it disconnects from the front guide slot
of the main bar. Repeat with the remaining blade.
The blades can only be replaced one way and left
and right cannot be incorrectly tted.
To ret, insert the tip of one blade into the main
bar until the tip clicks into the guide slot. Lower
the heel and align its female thread with the
captive hex bolt and turn the bolt clockwise to
secure in place. Repeat with the remaining blade.
Model 2.
Depress the blade lock button and lift the blades
by the heel end. Fully raise the blades until they
disconnect from the front guide slots of the main
bar.
The blades are colour coded red and green. When
replacing, t the red set rst followed by the green.
To ret, depress the blade lock button and insert
the heel of the red blade onto the drive pin then
lower it into the main bar until the tip clicks into
the guide slot.
Repeat with the green blade then release the
blade lock button.
Blade Locking Hex Bolt
Blade
Female
Thread
Lift
Blade
Blade Tip
Insert Tip
Blade Heel
Lock Button
1
3
42
EQUIPMENT CARE
723_03.qxp 04/03/2009 11:45 Page 1
For advice on the safety and suitability of this
equipment contact your local HSS Hire.
There is a serious risk of personal injury if you do not
follow all instructions laid down in this guide.
The hirer has a responsibility to ensure that all
necessary risk assessments have been completed prior
to the use of this equipment.
This equipment should only be used by an operator
who has been deemed competent to do so by his/her
employer.
This equipment should be used by an able bodied,
competent adult who has read and understood these
instructions. Anyone with either a temporary or
permanent disability, should seek expert advice before
using it.
Keep children, animals and bystanders away from the
work area. Cordon off a NO GO area using cones and
either barriers or tape, available for hire from your local
HSS Hire.
Never use this equipment if you are ill, feeling
tired, or under the influence of alcohol or
drugs.
Safety Goggles MUST be worn by everyone in the
work area.
This equipment generates potentially harmful
noise levels. To comply with health and safety at work
regulations, ear defenders must be worn by everyone in
the vicinity.
Wear practical, protective clothing, gloves and
footwear. Avoid loose garments and jewellery
that could catch in moving parts, tie back long hair.
Never lift or move this equipment by its power supply
cable.
Always switch OFF and unplug the equipment when not
in use.
Ensure the work area is well lit and ventilated, if in
doubt, ask about lighting and ventilation equipment at
your local HSS Hire.
Do not work near flammable gases or liquids, petrol or
paint thinner fumes for example. Keep combustible
materials at a safe distance - at least 5m.
Make sure you know how to switch this machine OFF
before you switch it ON in case you get into difficulty.
Never leave the unit connected to the power supply and
unattended.
GENERAL SAFETY
Always ensure plastic guard is fitted to the blades when
the unit is not in use.
Always disconnect the machine from its power supply
before making adjustments to it. Having switched OFF,
always wait for moving parts to come to rest.
Make sure that everyone is warned of what you are
doing.
Check the condition of the equipment before use. If it
shows signs of damage or excessive wear, return it to your
local HSS Hire
Most HSS equipment is designed to plug straight into a
standard 230V 13A power socket. However, 110V
equipment (with a round, yellow plug) must be supplied
from either a 110V generator or from the mains via a
suitable transformer.
If the equipment fails, or if its power supply cable or plug
becomes damaged, return it. Never try to repair it yourself.
Keep cables out of harm’s way, and clear of the work area.
Extension leads should be fully unwound and loosely
coiled, away from the equipment. Never run them
through water, over sharp edges or where they could
trip someone.
Keep the equipment dry, using electrical equipment in
very damp or wet conditions can be dangerous.
To reduce the risk of electric shock, always use a
suitable RCD (Residual Current-Operated Device)
available from your local HSS Hire . Or power the
equipment from a mains circuit with a built in RCD.
Ensure the unit and the power socket are switched OFF
before plugging into the power supply.
Remove the clip on plastic strip used to protect the
blades. You can now plug the saw into its power supply
and switch the supply ON.
On Model 2 only, if required, connect the unit to a
standard dust extractor unit by placing the extractor
hose over the dust extractor outlet. For advice on dust
extractors, contact you local HSS Hire.
If the blades become blunt or require changing to a
different type, please refer to the instructions in BLADE
REPLACEMENT.
GETTING STARTED
ELECTRICAL SAFETY
Where necessary, secure the workpiece with a vice or
clamps, making sure off cuts have enough support to
stop them breaking off unexpectedly or pinching the
blades. Ensure that the workpiece is free from screws,
nails etc.
Switching ON Model 1...
To switch the saw ON, depress the safety catch with your
thumb, and squeeze the ON/OFF trigger.
Switching ON Model 2...
To switch the saw ON, depress the operators presence
button (OPB) with your thumb, and squeeze the ON/OFF
trigger. The saw is fitted with a OPB on either side of the
rear handle. Use the button that is most comfortable for
you.
Both Models:
Grip the saw firmly in both hands one on the trigger grip,
the other on the front handle. Never use the saw using
only one hand. Adopt a comfortable, stable stance that
gives a clear view of what you are doing while keeping
the whole of your body behind the cutting edge.
You can then start work when the blades reach
operating speed.Let the saw do the work, apply just
enough pressure to ensure reasonable progress.
BASIC TECHNIQUES
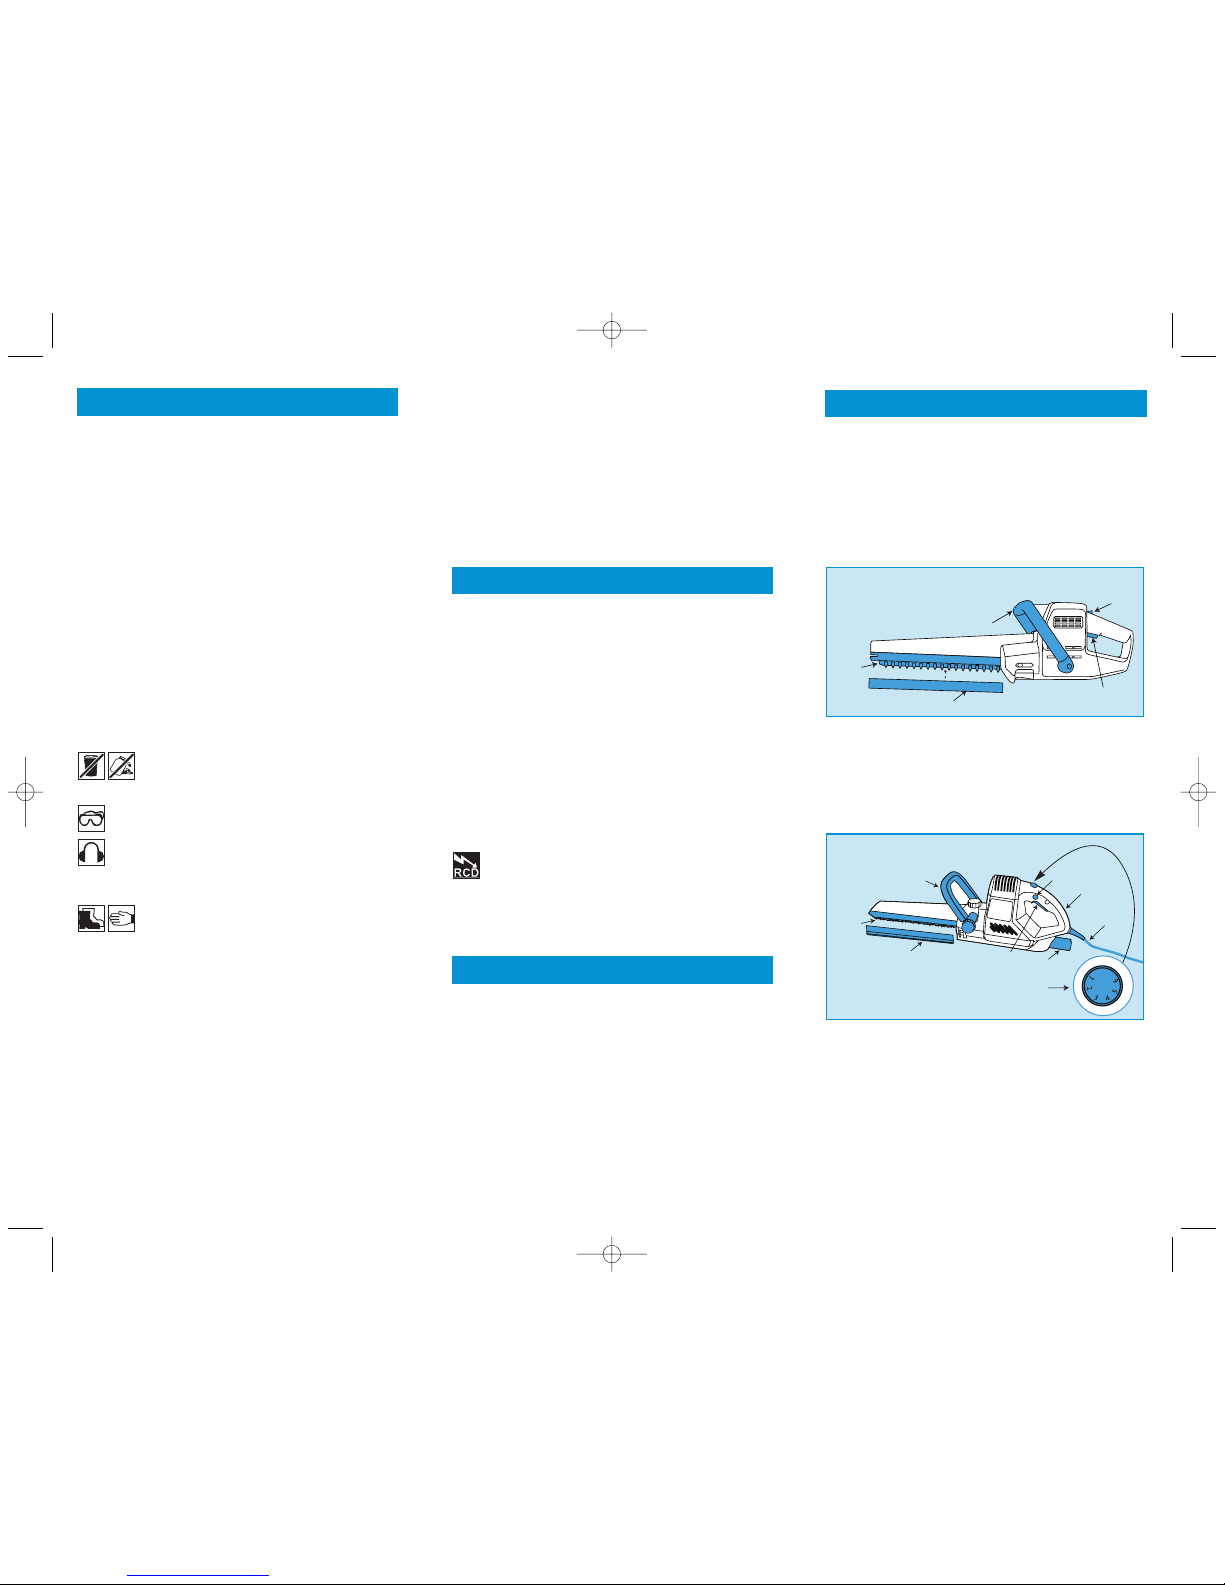
Plastic Guard
Front Handle
Safety
Catch
ON/OFF
T
rigger
Blades
Model 1
Plastic Guard
Front Handle
ON/OFF
T
rigger
OPB
Rear handle
Dust extractor
Power cable
Blades
Speed adjustment dial
Model 2
723_03.qxp 04/03/2009 11:45 Page 2
 Loading...