

HSS Hire 511 Operating & Safety Manual

Edging
Sanders
©HSS Hire Service Group Plc 1997 No. 511/02
Group Office: 25 Willow Lane, Mitcham, Surrey CR4 4TS
Hire Shops
Edge sanders for smoothing
wood floors.
Operating & Safety Guide 511
Tackle the perimeter with the edging sander,
starting with a medium abrasive and work
through to a fine grade.
Using both hands and in a kneeling position, tilt
the sander back on its castors, switch ON, then
lower the machine until it comes into contact with the
floor – beware the disc turns anti-clockwise. Move it
back and forth along the boards, without pressing. Do
not restrain the sander in one place, allow the
machine’s own weight to carry it over the floor.
Keep the sander moving in a straight line or it may
rut the work. Tilt the disc clear of the floor before
switching OFF, and wait for moving parts to stop
before putting it aside.
Never push the equipment beyond its design
limits. If it will not do what you want with reasonable
ease, assume you have the wrong tool for the job. Ask at
your local HSS Hire Shop for advice.
Dust bags are simply clipped or tied in place.
Empty them when about a third full, and before
leaving the sander for any length of time.
Dispose of wood dust carefully.
Always use the right absasive for the job and change it
as soon as it becomes clogged or damaged.
Never use a sander that has not got an
abrasive fitted.
When not in use, store the equipment somewhere
dry and safe from thieves.
Keep the equipment clean. You will find this less of a
chore if you clean up regularly rather than wait until the
end of the hire period.
A floor finish is available from your HSS Hire Shop,
on a sale or return basis. You must ensure you follow
the manufacturers instructions.
Before Decorating
Sand the floor and seal before decorating. Wallpaper
paste and paint spills can be wiped up more easily –
without staining – if the floor is sealed first.
FLOOR FINISH
EQUIPMENT CARE
BASIC TECHNIQUES
Wear all necessary protective clothing and
ventilate the room when applying.
A respiratory protective system is available for hire,
for details contact your local HSS Hire Shop.
Before varnishing sweep and vacuum the floor.
Wipe over with a lint free cloth, lightly dampened with
white spirit. Leave to dry for approximately 2 hours,
keeping windows open and doors shut – allow the spirit
to evaporate.
Switch OFF and unplug the sander.
Remove any fitted abrasive, empty the dust bag
and clean the sander.
Neatly coil its flex ready for return to your local HSS
Hire Shop.
FINISHING OFF
Code 05422
Contact your local
0990 282828
For advice on the safety and suitability of this
equipment contact your local HSS Hire Shop.
Keep children, animals and bystanders out of the
work area.
Never use this equipment if you are ill, feeling
tired, or under the influence of alcohol or drugs.
This equipment should only be used by a
competent person who has read and understood
these instructions.
Safety goggles must be worn by anyone in
the work area.
NOTE: Some materials contain substances
which, when sanded, can be harmful to
health. A suitable mask must be worn when using
this equipment.
Note that this equipment generates
potentially harmful noise levels. To comply
with Health and Safety at Work regulations, ear
defenders must be worn by everyone in the vicinity.
Wear practical protective clothing,
footwear and gloves must be worn.
Avoid loose garments and jewellery that could
catch in moving parts. Tie back long hair.
Ensure work area is tidy, well lit and ventilated.
Always switch equipment OFF before making any
adjustments to it. Never leave it switched ON
and unattended.
Check the equipment before use, if it shows signs
of damage or excessive wear, return it.
Information on COSHH regulations is available from your
local HSS Hire Shop.
Fire Warning
WOOD DUST IS EXPLOSIVE.
Never store wood dust it can be dangerous.
Empty dust-bags when they are approximately
1/3 full and before leaving or storing
the machine.
Never tip wood dust into a fire or incinerator –
it may explode.
Never leave it packed in a dust-bag or similar container
– it can ignite spontaneously.
To dispose of it safely, mix it with general rubbish.
GENERAL SAFETY
Most HSS equipment is designed to plug straight
into a standard 240V 13A power socket.
However, 110V models (with a round yellow plug)
must be powered only from the mains via a
suitable transformer.
Keep flexes and extension leads out of harm’s way.
Extension leads should be fully unwound and
loosely coiled away from the equipment. Never run
them through water, over sharp edges, or where they
could trip someone.
Remember, using electrical equipment in very
damp or wet conditions can be dangerous.
To reduce the risk of electric shock, use a
suitable RCD (Residual Current-Operated Device)
available from your local HSS Hire Shop, or power the
equipment from a mains circuit with a built-in RCD.
If the tool fails, or if its flex or plug gets damaged,
return it. Never try to repair it yourself.
Never carry or pull the machine by its flex.
Ensure the machine and power socket are
switched OFF before plugging into the power supply
and when making any adjustments.
Ensure the work is free from nails and screws. If
these cannot be removed, drive them well below the
surface.
Fit the sander with the appropriate abrasive. In
general, start with a medium grade, then work through
to a fine grade until the desired finish is achieved.
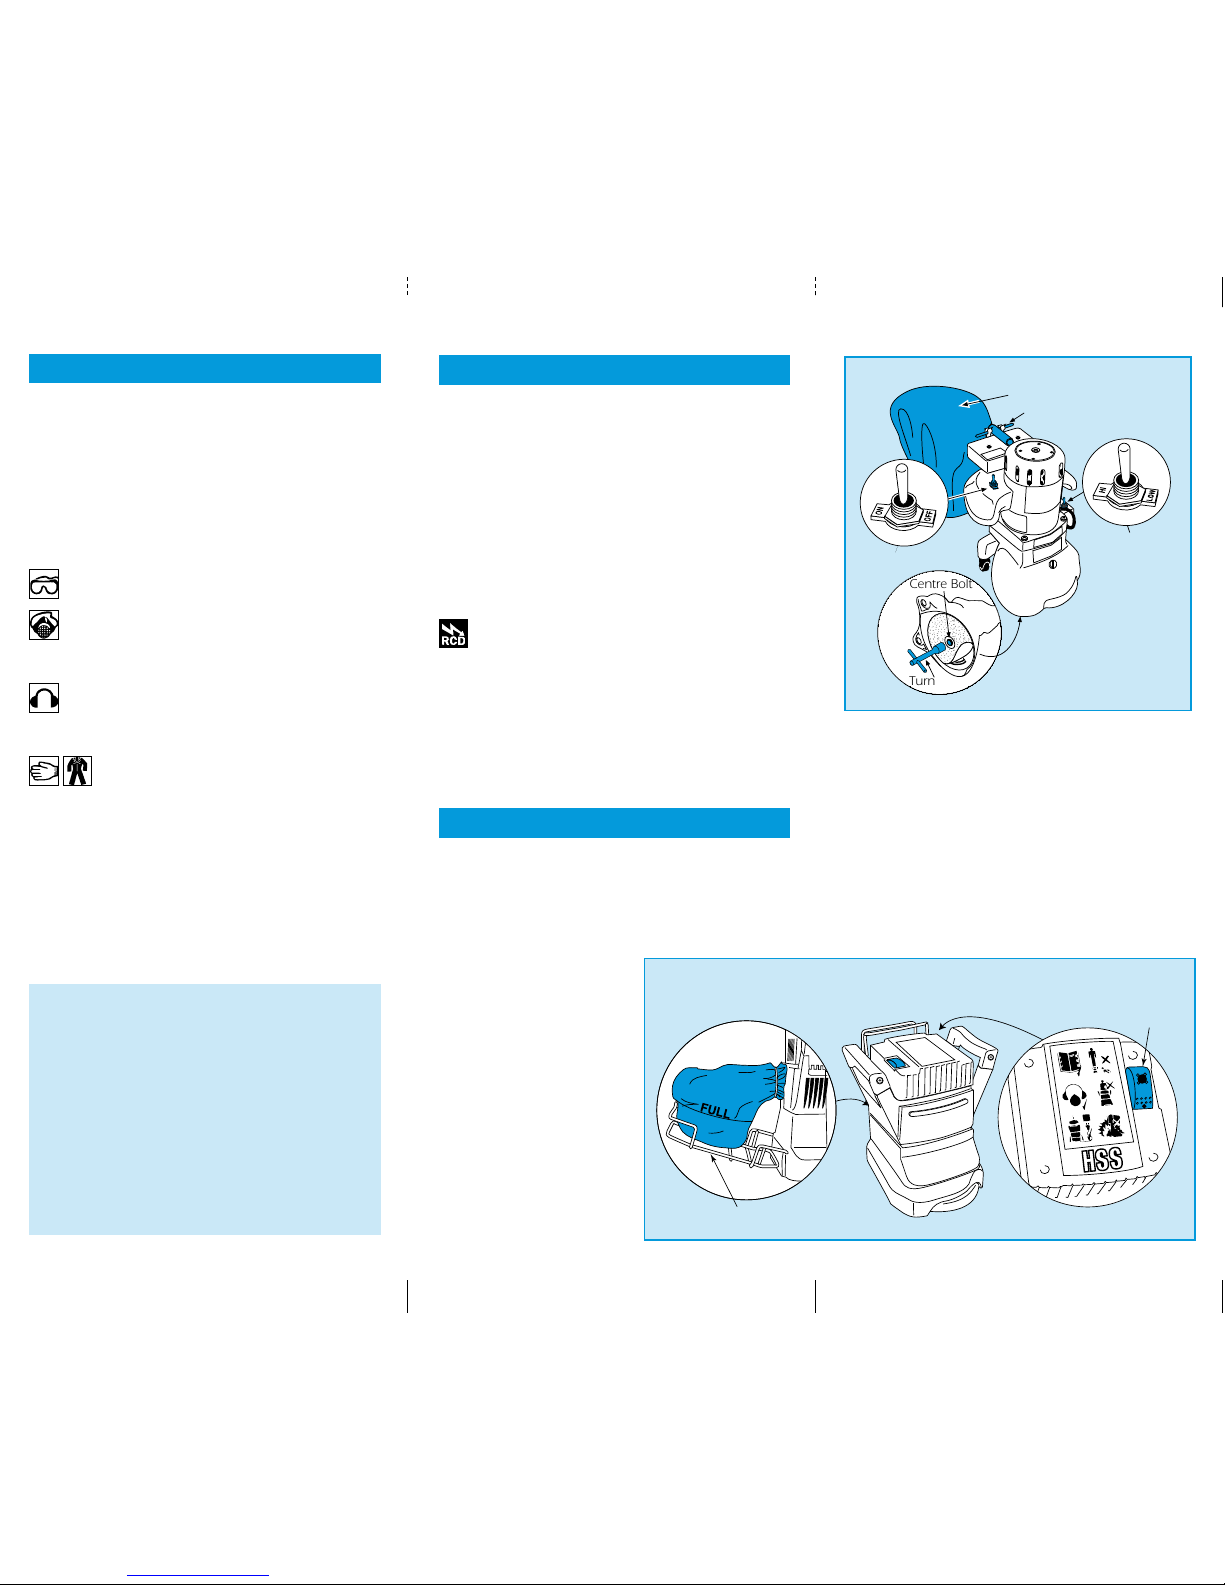
With the machine switched
OFF and isolated from the
power supply, turn the
sander upside down,
unscrew the centre bolt (and
washer if not captive) using the
key provided, push the centre
bolt (with washer) through
the abrasive and retighten,
making sure the abrasive
disc is correctly centred.
To Switch ON…
The Chrome model (two
versions) is fitted with either
a standard ON/OFF toggle
switch or an NVR (No Volt
Return) switch.
GETTING STARTED
ELECTRICAL SAFETY
Tilt the sander back on its castors making sure that
the abrasive is clear of the floor. Plug the machine
into the power supply then push the ON/OFF
switch to the ‘ON’ position, if the machine fails to
run, push the switch beyond ‘ON’ to start.
To switch ‘OFF’ simply move the switch to the OFF
position. The NVR model has the facility of two
speeds, you may select high or low using the speed
selection switch. Do not attempt to change speeds
while the machine is running.
The square model, is fitted with a switch which
only engages if held down with your right thumb.
The machine will stop when you release
the switch.
Centre Bolt
Turn Key
Turn Key
Dust Bag
ON / OFF
Speed
Selection Switch
Chrome Model
Dust Bag
ON / OFF
Square Model
 Loading...