

HSS Hire 433 Operating And Safety Manual
Sand Glider
For sanding or preparing floor
ready for varnishing/polishing
Code 05426
Sand Glider
Operating & Safety Guide 433
Operating & Safety Guide 433
433/01
433/01
©HSS Hire Service Group Ltd 2012 No. 433/01
Group Office: 25 Willow Lane, Mitcham, Surrey CR4 4TS
Web Site: http://www.hss.com
…any comments?
If you have any suggestions to enable us to improve the
information within this guide please e-mail your comments or
write to the Safety Guide Manager at the address below
e-mail: safety@hss.com
... have you been trained
The law requires that personnel using this type of equipment in
the workplace must be competent and qualified to do so.
Training is available at HSS Training
0845 766 7799
Never push the equipment beyond its design limits. If it
will not do what you want with reasonable ease and speed,
assume you have the wrong equipment for the job. Contact
HSS Hire for advice.
Dust bags must be emptied when indicated via the full
line on the bag and before leaving the sander for any
length of time.
Dispose of wood dust carefully.
Never use a sander that has not got an sanding disc
fitted. Always use the right sanding disc for the job and
change it as soon as it becomes clogged or damaged.
Keep the equipment clean - you will find this less of a
chore if you clean it regularly, rather than wait until the end
of the hire period.
When not in use, store the equipment somewhere
clean, dry and secure.
EQUIPMENT CARE
FINISHING OFF
Release ON/OFF levers and unplug the sander.
Remove and dispose of the dust bag and clean the
sander.
Neatly coil its flex ready for return to HSS Hire.
BASIC TECHNIQUES
OPERATING THE SANDER
The HSS Sand Glider is designed to be operated in the
upright position with all sanding discs in contact with
the floor. DO NOT tilt the unit
back before switching it ON.
Having fitted a full set of four
sanding discs, wheel the machine
to the far corner of the floor,
placing it as close to the corner as
possible. You will be walking
backwards when you first
progress. Connect the power
supply lead to the sander then
to the power supply and switch the supply ON.
Drape the cable over your shoulder to prevent it being
damaged by the sanding action.
With all four sanding discs in contact with the floor surface,
take a firm hold of the control handles. Squeeze in the
lock off lever followed by ON/OFF lever to start the
motor.
Once the sander motor reaches operating speed, slowly
walk backwards manoeuvring the unit over the floor
surface.The machine will try to move around when in
contact with the floor so be prepared.
Try to overlap the previous strip to ensure that you do not
have ‘unsanded’ areas.
The slower you move the sander the greater the removal so
keep a close eye on the surface finish and adjust your speed
as necessary.
Do not exert pressure on the machine, let it work at its
own pace. Rushing the job will result in a poor finish and
will wear out the sanding discs quicker.
Periodically stop and inspect the condition of the
sanding discs. Discs should be replaced when the abrasive
is worn, damaged or clogged.
Once the entire floor area has been sanded, release the
ON/OFF lever to switch the sander OFF.
edge of the card on to the outlet’s lower hook.
Pivot the card to bring the bags centre opening over the
outlet until card and outlet are flush. Finally, lower the
two tabs over the outlets clips to retain the bag in place.
Removal is simply a reverse of the fitting instruction.
There is also a dust
skirt which fits
onto the outer
edge of the base
and is used to
contain the dust.
The skirt is held in
place by a
continuous velcro
strip which allows
for the skirt to be
adjusted as its
leading edge
wears. The skirt MUST be fitted and correctly positioned
whenever the sander is in use.
Clips
Tabs
Lower
Hook
Dust
Collection
Outlet
Dust
Collection
Bag
SandGlider ©
Before fitting the next grade of disc, thoroughly vacuum
the floor and give a visual inspection to ensure the floor has
been correctly sanded.
If you rush into the job your floor may be damaged.
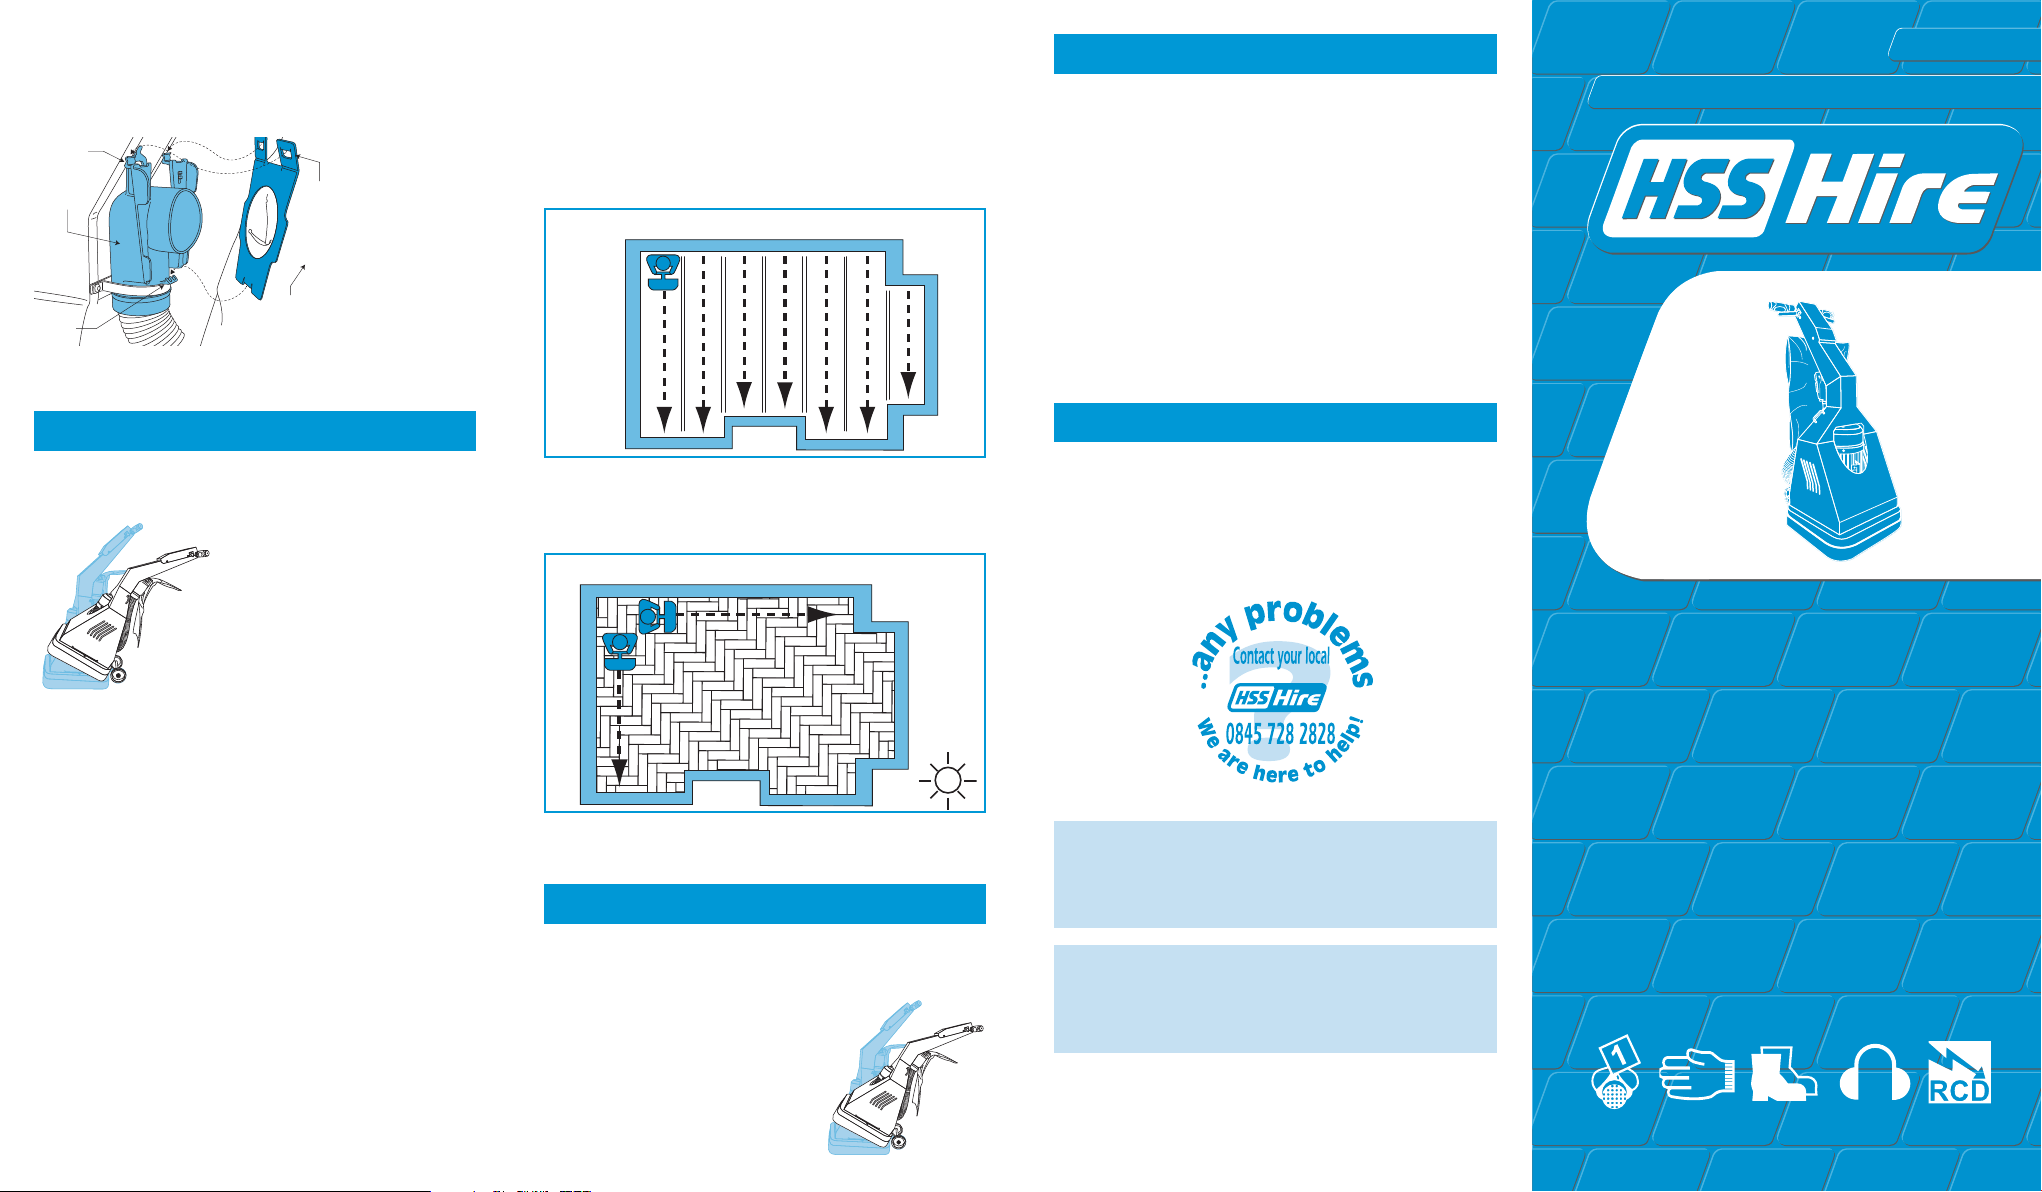
SANDING TECHNIQUES
The following information is for guidance only and is not
necessarily suited to your particular floor. No responsibility
will be accepted for flooring damaged by this technique.
Where the floor is in a bad condition or the boards have
warped, you can rough sand diagonally from top left to
bottom right then top right to bottom left. Once rough
sanded, continue sanding along the grain for a finish.
Always sand towards the source of light, never across or
diagonally from it. The light will show all imperfections
when sanded in any other direction.
Floor Boards
Parquet
TRANSPORTING
VEHICULAR
When transporting the machine, do not lay the unit down,
always keep the sander upright with all four protected
backing pads in contact with the
floor. Do not transport on an open
vehicle in adverse weather.
PEDESTRIAN
Tilt the sander back onto its
transport wheels, making sure that
the dust collection bag is kept clear
of the ground and the wheels.
For advice on the safety and suitability of this equipment
contact HSS Hire.
There is a serious risk of personal injury if you do not
follow all instructions laid down in this guide.
The hirer has a responsibility to ensure that all
necessary risk assessments have been completed prior
to the use of this equipment.
This equipment should only be used by an operator
who has been deemed competent to do so by his/her
employer.
This equipment should be used by an able bodied,
competent adult who has read and understood these
instructions. Anyone with either a temporary or permanent
disability, should seek expert advice before using it.
Keep children, animals and bystanders away from the
work area. Cordon off a NO GO area using cones and
either barriers or tape, available for hire from HSS Hire.
Never use this equipment if you are ill, feeling
tired, or under the influence of alcohol or drugs.
Wear practical, protective clothing, gloves and
footwear. Avoid loose garments and jewellery
that could catch in moving parts, tie back long hair.
Some materials contain substances which, when
sanded, can be harmful to health. A suitable mask
must be worn when using this equipment.
This equipment generates potentially harmful noise
levels. To comply with Health and Safety at Work
regulations, ear defenders must be worn by everyone in
the vicinity.
Keep the equipment dry and protect this equipment
from damp or wet conditions.
Ensure the work area is well ventilated and free from
anything that could ignite wood dust.
Never carry or pull the machine by its power supply
cable. Check the equipment before use, if it shows signs
of damage or excessive wear, return it.
Make sure you know how to switch this equipment OFF
before you switch it ON in case you get into difficulty.
Make sure you know how to operate this equipment
safely and are aware of its limitations before you use it.
Always switch OFF and unplug the machine before
making any adjustments to it.
GENERAL SAFETY
IDENTIFIER
ELECTRICAL SAFETY
FIRE WARNING
WOOD DUST IS EXPLOSIVE!
Never store wood dust it can be dangerous. Dispose
of the bag when indicated to do so via the full line on
the bag and before leaving or storing the machine.
Never tip wood dust into a fire or incinerator
it may explode.
Never leave it packed in a dust-bag or similar
container it can ignite spontaneously.
To dispose of it safely, mix it with general rubbish.
Dust
collection
outlet
GETTING STARTED
The HSS Sand Glider is designed for sanding and
polishing the floor. It is able to sand a floor right up to the
edge, eliminating the need for an edging sander.
Never use the HSS Sand Glider until you have fully read
and understood this User Guide and the machine has
been properly set up using the information it contains.
Prior to using this equipment you must prepare the room.
It is advisable to have the room empty of all furniture,
curtains and wall hangings.
Clear the room and thoroughly vacuum the floor. If you
do not, you risk damaging the machine backing discs.
If there are nails, screws, tacks, staples or any other type
of fixing in the floor make sure they are all either removed
or driven 2mm below the floor surface.
Pipework passing through flooring to a radiator will be
vulnerable to damage by the sanding discs/disc and must
be protected to avoid water leakage and property damage.
This precaution must also be taken with cables and wires.
Ideally, all windows should be opened and all doors
closed and sealed with tape. The HSS Sand Glider will
collect up to 95% of wood dust but not all, so sealing the
doors will help prevent dust travelling throughout the
building.
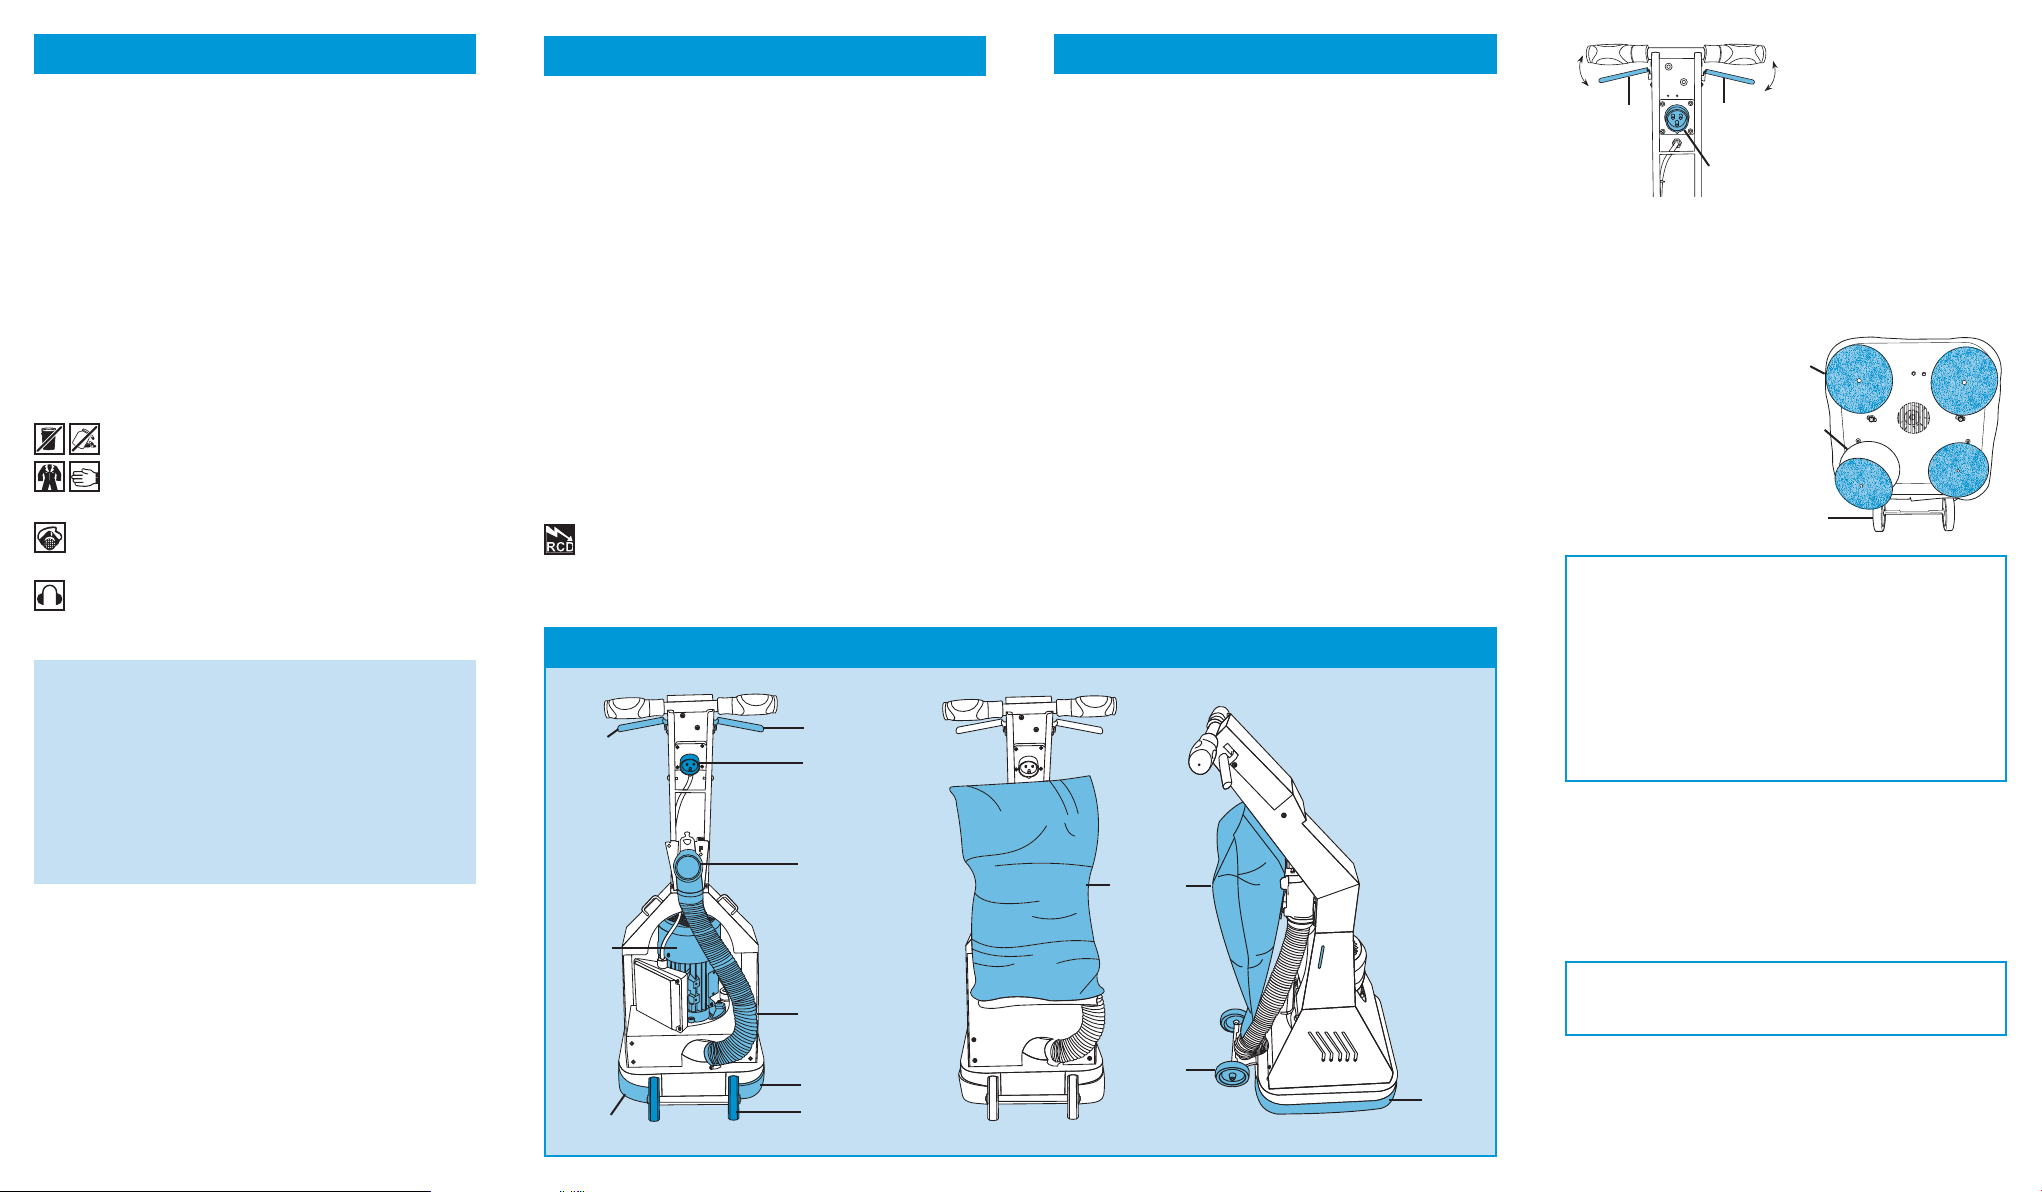
CONTROLS
To safeguard the operator, the The HSS Sand Glider is
fitted with a switch that must be held in the ON position
by the operator. If the switch is released, the machine
The HSS Sand Glider plugs into a standard 230V 13amp
socket. The lead then simply connects to the captive
male plug fitted to the underside of the main control
handle.
If the equipment fails, or if its power supply cable or
plug becomes damaged, return it. Never try to repair it
yourself.
Keep cables out of harm’s way, and clear of the work area.
The maximum overall length of cable you can use with this
machine is 30M and any extension used must be at least
2.5mm 3 core.
Extension leads should be fully unwound and loosely
coiled, away from the equipment. Never run them
through water, over sharp edges or where they could trip
someone.
Always remove the plug from the power socket before
undertaking any type of intervention on the HSS Sand
Glider or if it is left unattended or within children or
people’s reach not quite conscious of their own actions.
Ensure the machine and power socket are switched OFF
before plugging into the power supply.
Before removing the plug, switch off the machine.
To reduce the risk of electric shock, always use a
suitable RCD (Residual Current-Operated Device)
available from HSS Hire.
Dust
collection
tube
will stop. In addition, there
is a lock off lever, which will
prevent the ON/OFF lever
being operated on its own.
To switch the machine ON
you must firstly operate the
lock off lever. This lever
prevents the ON/OFF lever
from being accidentally
operated. Next, squeeze and hold the ON/OFF lever to
start the motor.
You must hold the control handles with both hands
during operation.
If you release the ON/OFF lever, the machine will stop.
FITTING A SANDING DISC
Fit the sander with the
appropriate abrasive.
In general, start with a
medium grade, then
work through to a fine
grade until the desired
finish is achieved.
Isolate the sander from
the power supply and
carefully tilt the sander
back until its handles are
touching the floor.
The machine should remain in position but it is advisable to
have someone hold it in case it tips back up.
Sanding discs are fitted with the Velcro fastening system.
Firstly, remove any fitted disc by pulling it from the
backing pad. Simply align the new disc with the backing
pad and press on firmly.
It is also advisable to keep a set of sanding discs fitted to
the backing pads when not in use, to protect the pads
Velcro surface from damage.
DISPOSABLE BAG
The disposable bag fits to the outlet at the upper rear of the
machine and requires no tools to release or fit.The inlet is
fitted with stiff card, which attaches to the dust
extraction outlet.
Take a new bag and fully unfold it. Position the bottom
ONON
OFF
OFF
230V 16amp
connector
Lock
OFF
Lever
ON/
OFF
Lever
SANDING DISC SELECTION
Selection of the correct grade of sanding disc is very
important. Generally you can start with a medium grade
but care must be taken in case this is too coarse.
If unsure, start with fine and change to a coarse grade if
required. If you start with a coarse grade and remove too
much material you will have to sand the entire floor to
the same level.
Work through the grades until the desired finish is
achieved.
Offset
Rotating
Head
Abrasive
Disc
Transport
Wheels
DUST CONTROL
The HSS Sand Glider is designed with its own dust
collection system.
16A 230V
Captive
Connector
ON/OFF
Lever
Lock OFF
Lever
Disposal
Dust
Collection
Bag
Dust Skirt
Dust Skirt
Transport
Wheels
Transport
Wheels
Electric
Motor
Dust Skirt
 Loading...