

Page 1
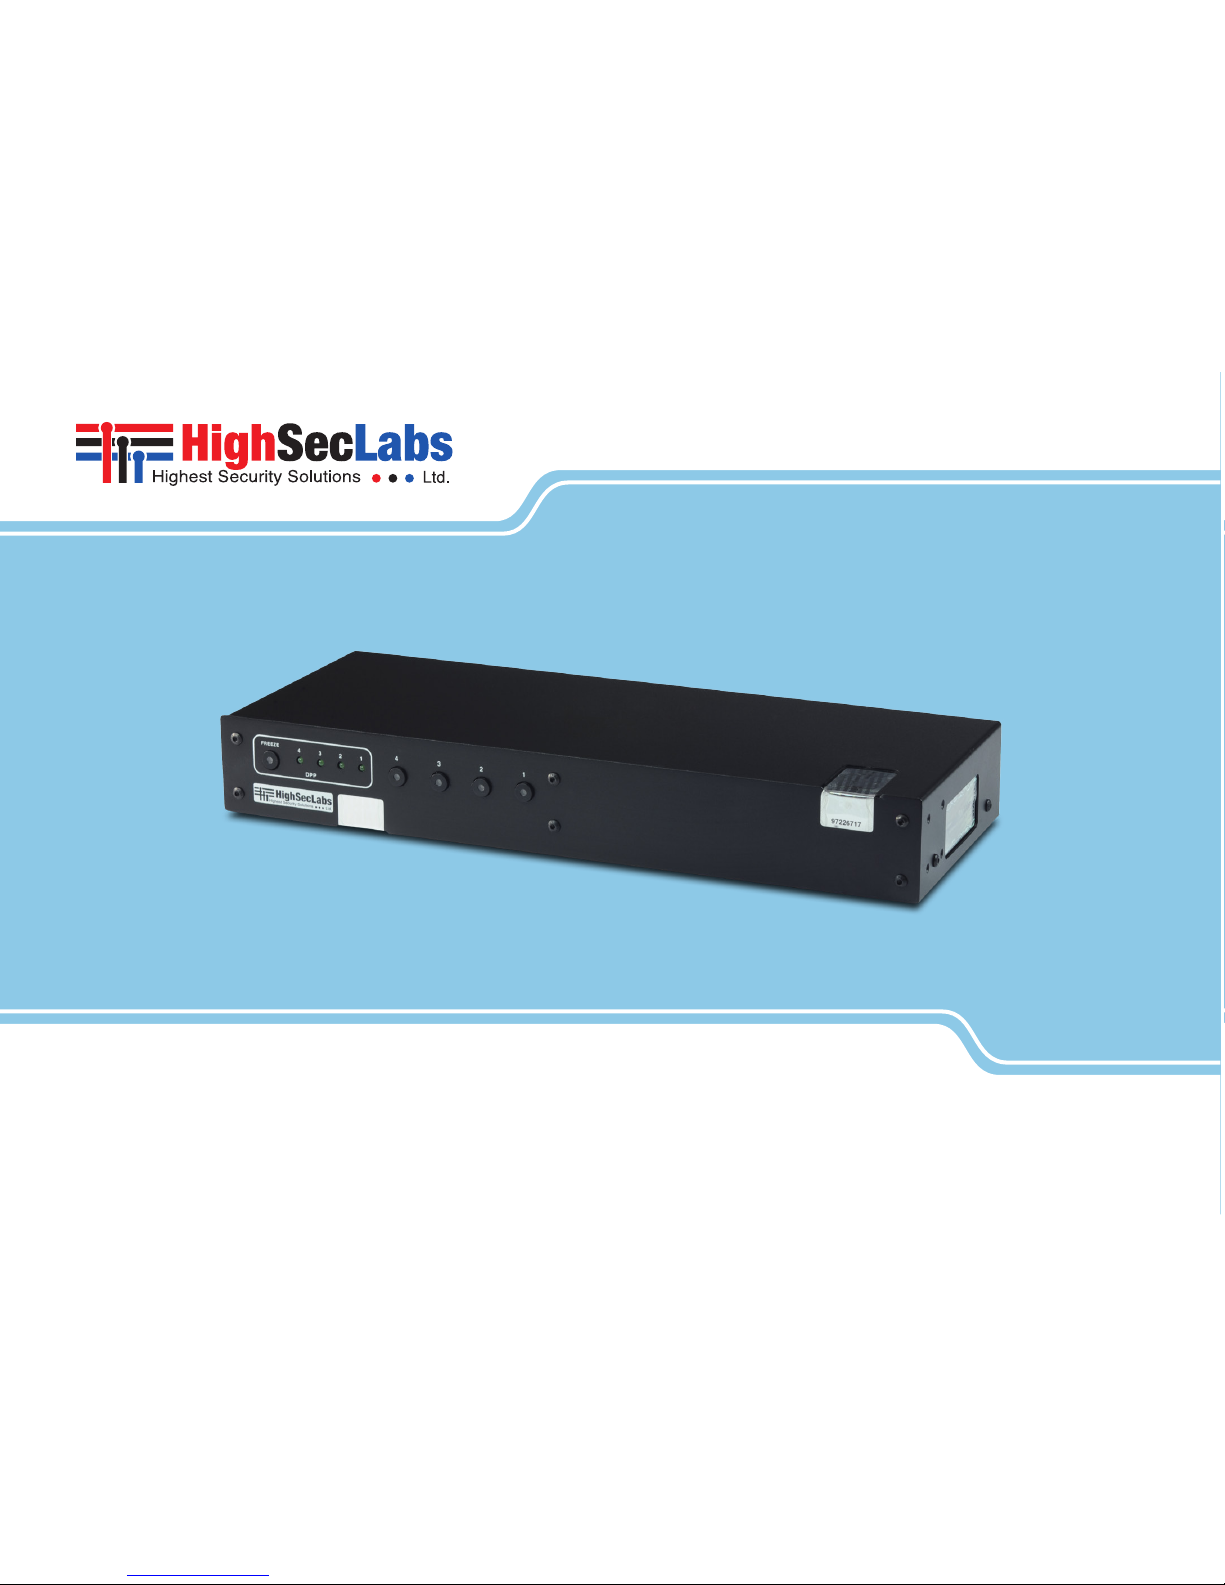
Secure KVM Combiner
Models:
K424F – Secure 2 to 4 Port DVI Video KVM Combiner w/fUSB
K426E – Secure 2 to 6 Ports DVI Video KVM Combiner w/fUSB
Document Number HDC09867 Rev. 1.0
K424F • K426E | QUICK START GUIDE
Page 2

1
HSL Secure KVM Combiner Quick Star t Guide
TABLE OF CONTENTS
SECTIONS
Table of Contents
1 2 3 4
Section 1 - Introduction ............................................... 2
HSL Secure KVM Combiner....................................................2
Section 2 - Installation................................................. 3
Installing the Combiner . . . . . . . . . . . . . . . . . . . . . . . . . . . . . . . . . . . . . . . . . . . . . . . . . . . . . . .3
Step 1 – Combiner Setup Overview ...........................................3
Step 2 – Cable Installation.....................................................4
Step 3 – Power ON the Combiner .............................................5
Step 4 – Configure Display Output ............................................6
Step 5 – Working with Dual Displays ..........................................8
Step 6 – Reset to Factory Defaults.............................................9
Section 3 - Operation................................................. 10
Operating the Combiner .....................................................10
Step 1 – Operation Modes Overview.........................................10
Step 2 – View Modes Overview ..............................................11
Step 3 – Toggling Options ...................................................12
Step 4 – Complete toggling options table ...................................14
Step 5 – Customize Channel Window Layout ............................... 20
Section 4 - Combiner Cascading ......................................26
Introduction .................................................................26
Cascading Setup Scheme ....................................................27
Page 3

2
HSL Secure KVM Combiner Quick Star t Guide
INTRODUCTION
SECTIONS
Table of Contents
2 3 41
HSL Secure KVM Combiner
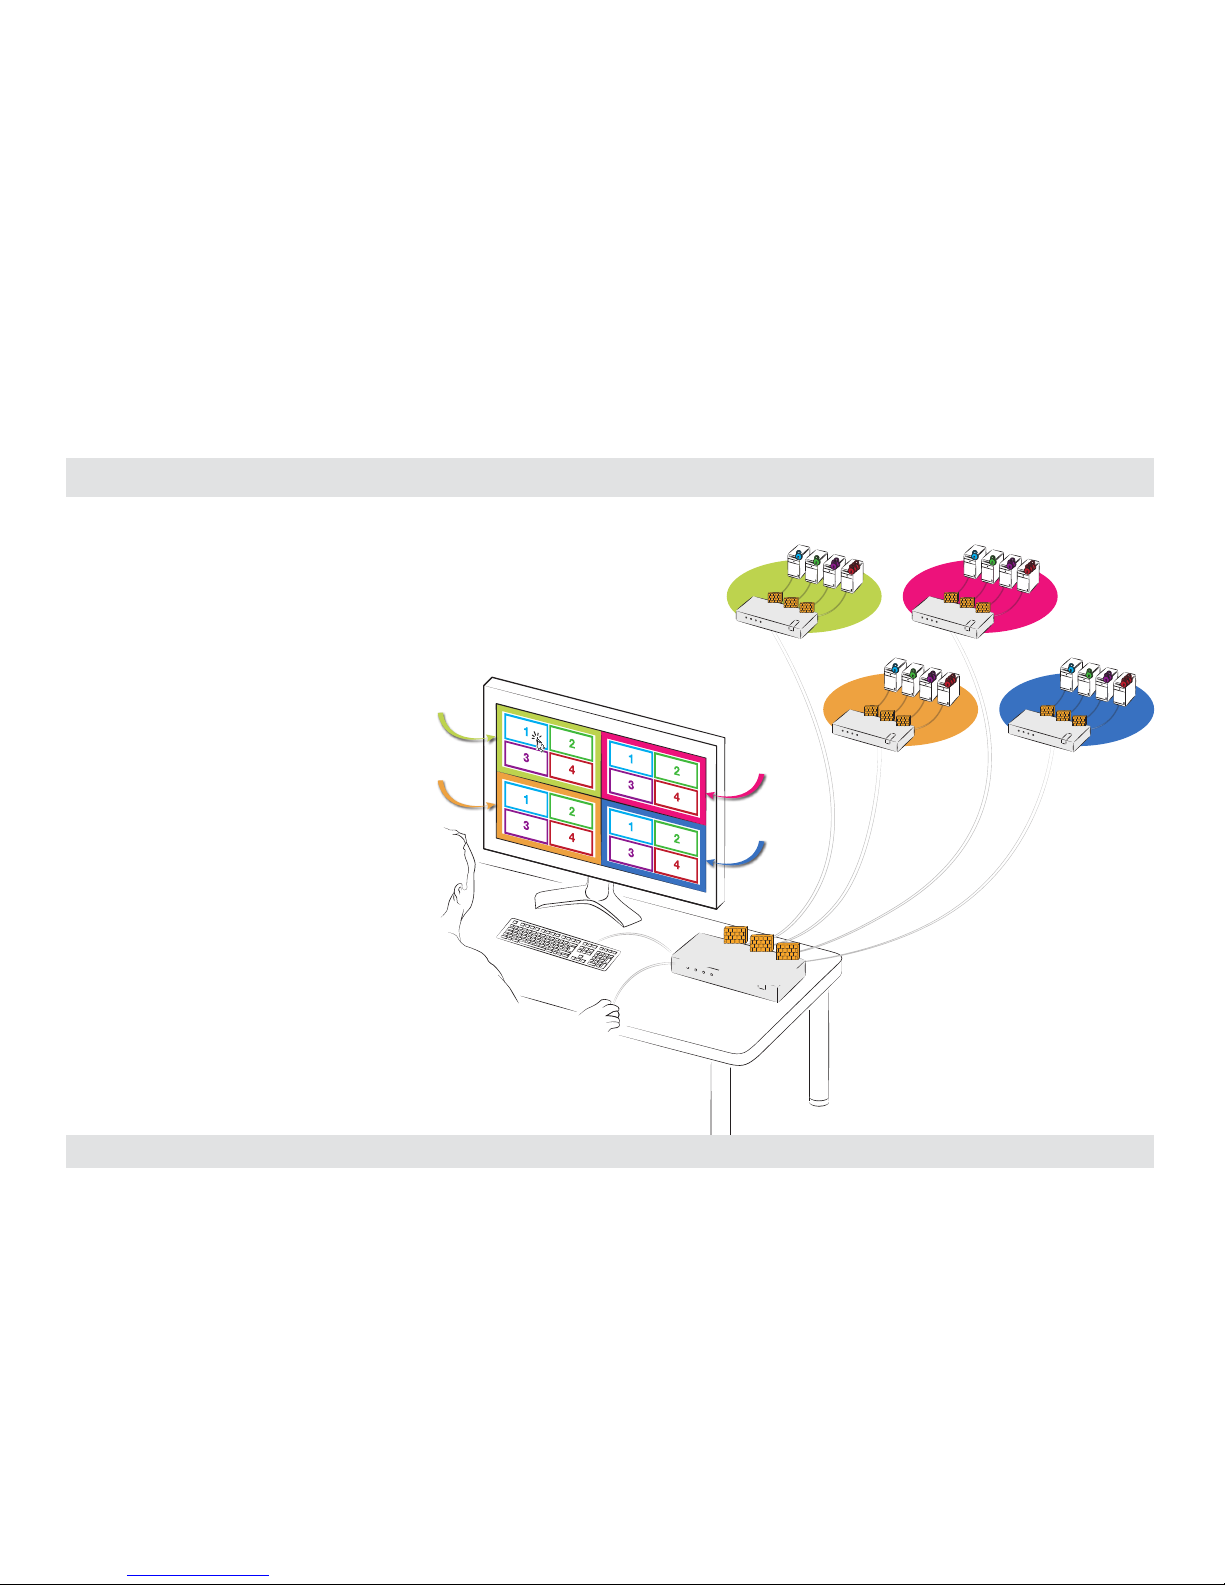
HSL’s secure KVM combiner switches allow simultaneously interacting
and presenting up to six computers from different security classification
levels on two displays while isolating all coupled hosts from each
other, keeping the data of each computer completely separate and
protecting against data leakage and malicious attacks through shared
USB, keyboard, mouse, video and audio peripherals.
This guide instructs how to install, configure and operate HSL’s KVM
Combiner.
Page 4
3
HSL Secure KVM Combiner Quick Star t Guide
INS TALLATION
SECTIONS
Table of Contents
1 3 4
2
Installing the Combiner
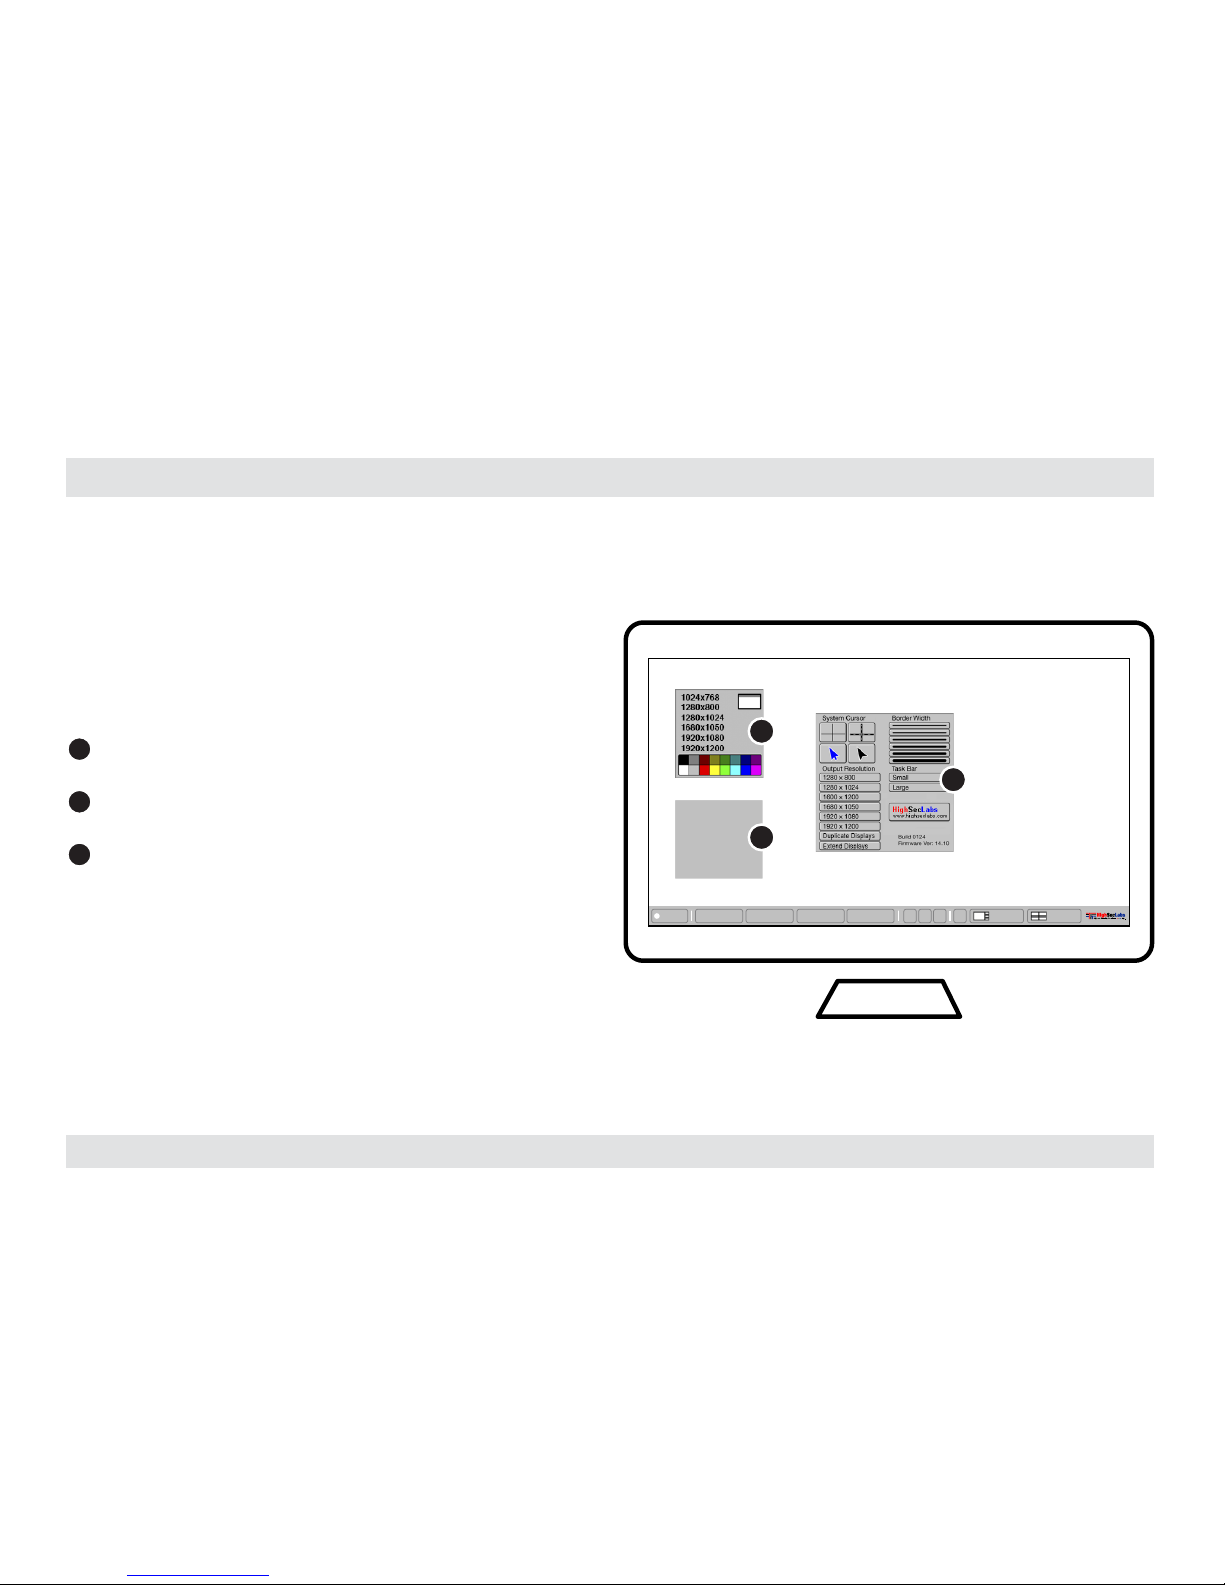
Step 1 – Combiner Setup Overview
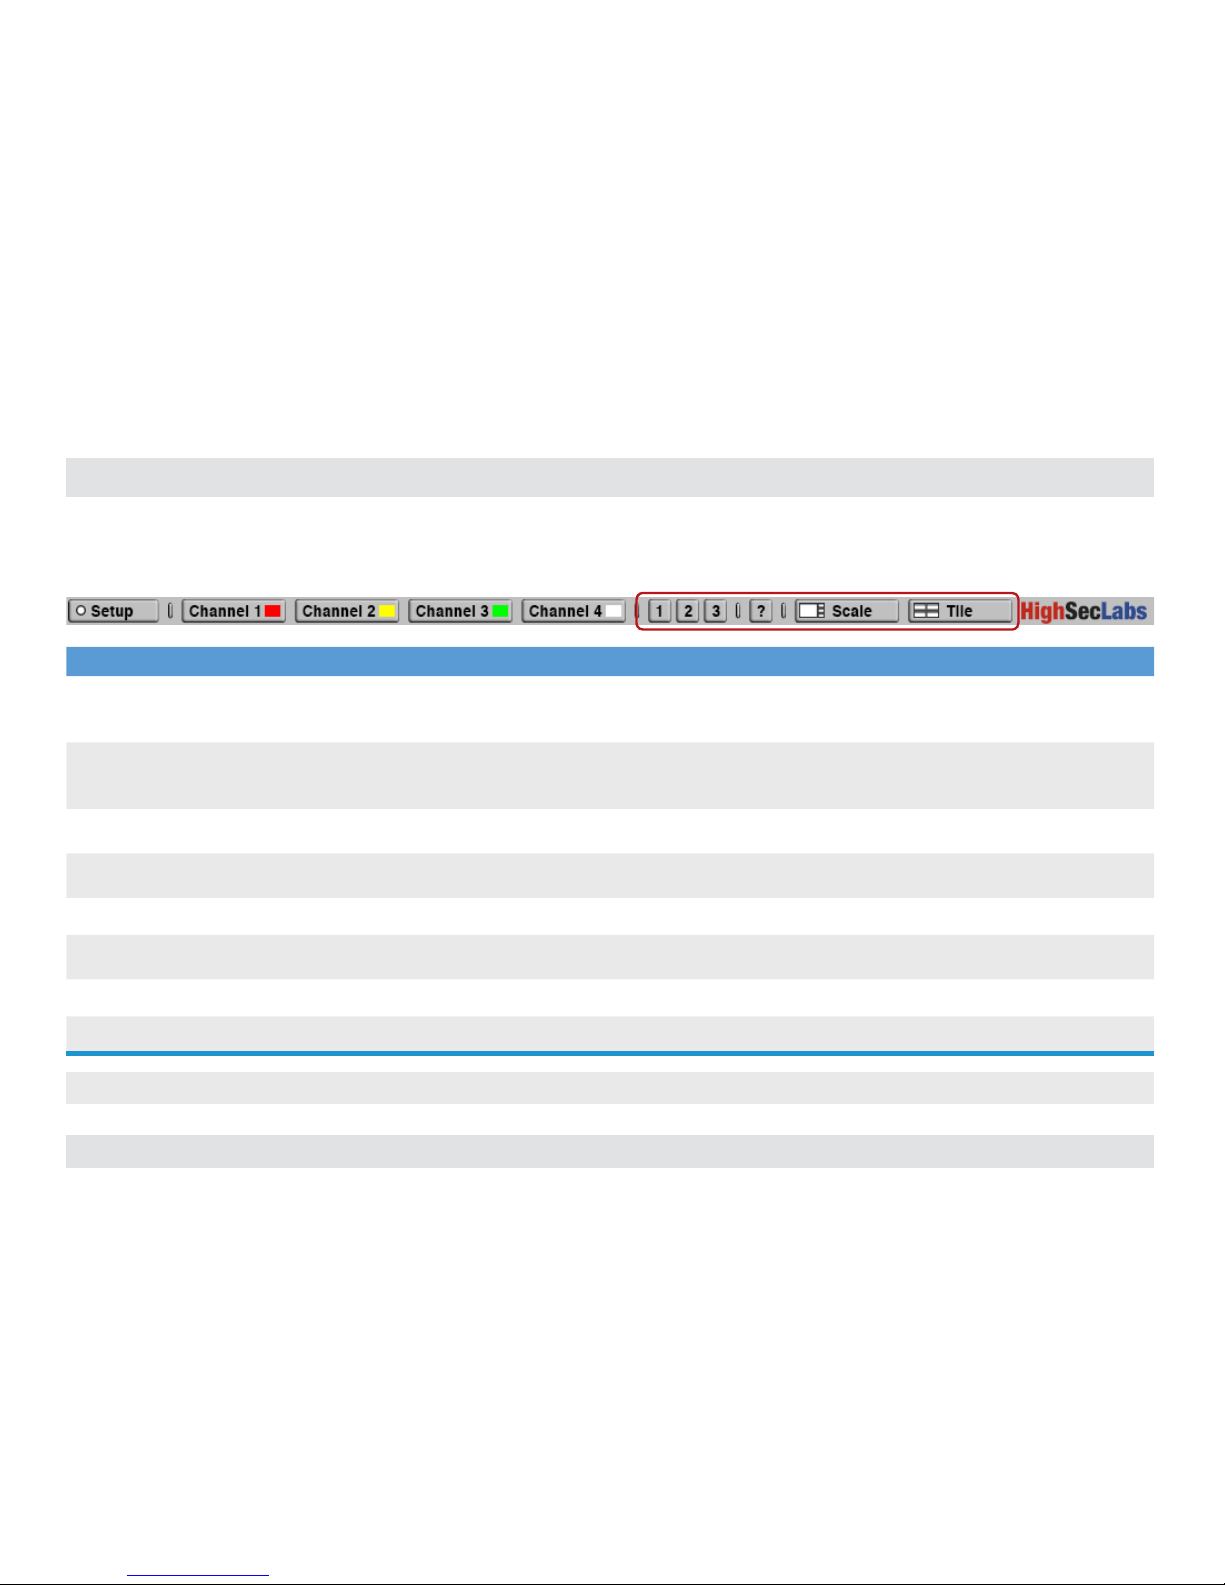
The Setup Menu: accessible through the lower left screen corner.
Allows configuring various system settings, such as, output resolution,
screen duplication, cursor color and more.
Setup Menu Description:
1
Main Admin Menu: select which settings to configure (system
settings / channel settings).
2
Channel Settings: set the screen resolution and frame color of the
selected channel number.
3
System Settings: Change display output resolution, screen
duplication, frame border width, operation-taskbar size and system
cursor type.
Channel 1Setup Channel 2 Channel 3 Channel 4 1 2 3 ? Scale Tile
System
Channel 1
Channel 2
Channel 3
Channel 4
2
1
3
Page 5
4
HSL Secure KVM Combiner Quick Star t Guide
INS TALLATION
SECTIONS
Table of Contents
1 3 4
2
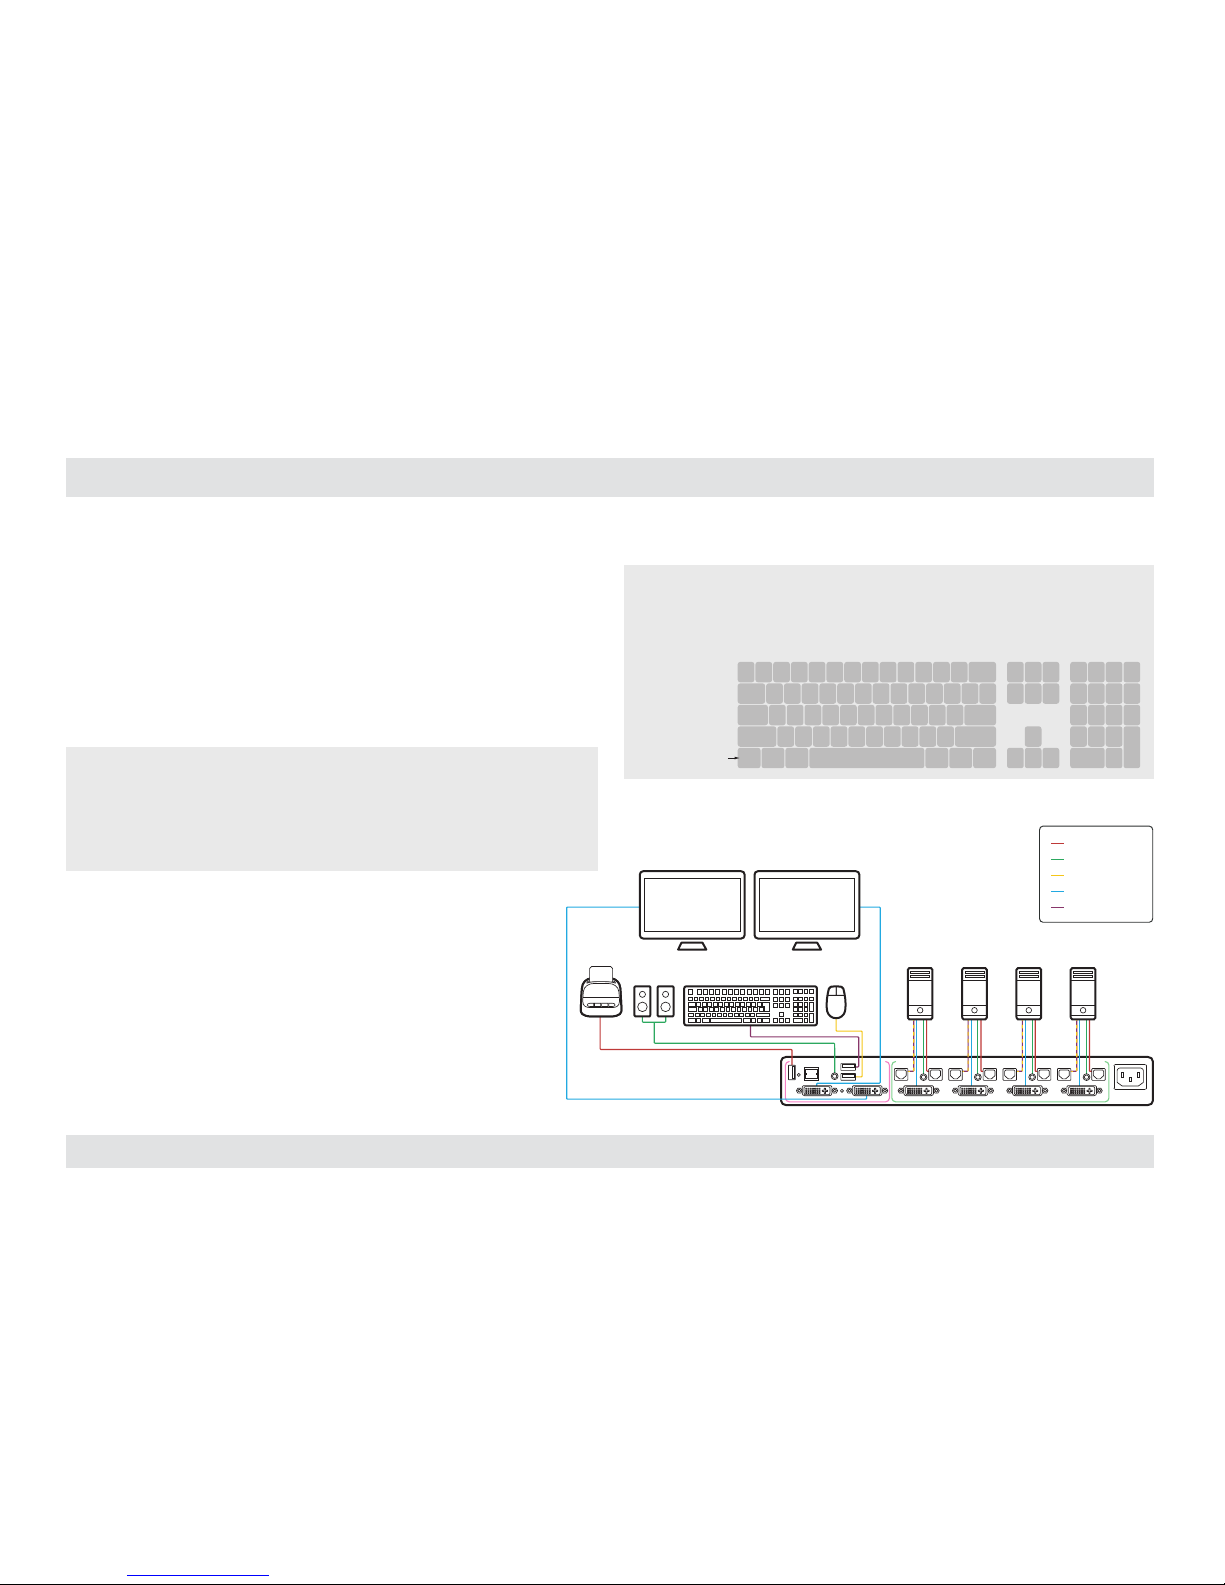
Step 2 – Cable Installation
1. Connect console port peripherals:
• Connect video, keyboard, mouse and audio peripherals to the
combiner’s console ports. These will be shared securely between
all computers.
• Connect a smartcard/biometric reader to the combiner’s console
fUSB secure port to support user authentication across multiple
isolated computers.
Notes:
• For optimum compatibility use the supplied 5-button mouse with the
combiner’s console port.
• The mechanical key lock on the front panel of legacy devices is no longer
in use.
2. Computer channel ports:
• For each PC, connect the video, keyboard, mouse, fUSB
and audio cables to the combiner’s computer ports.
Notes:
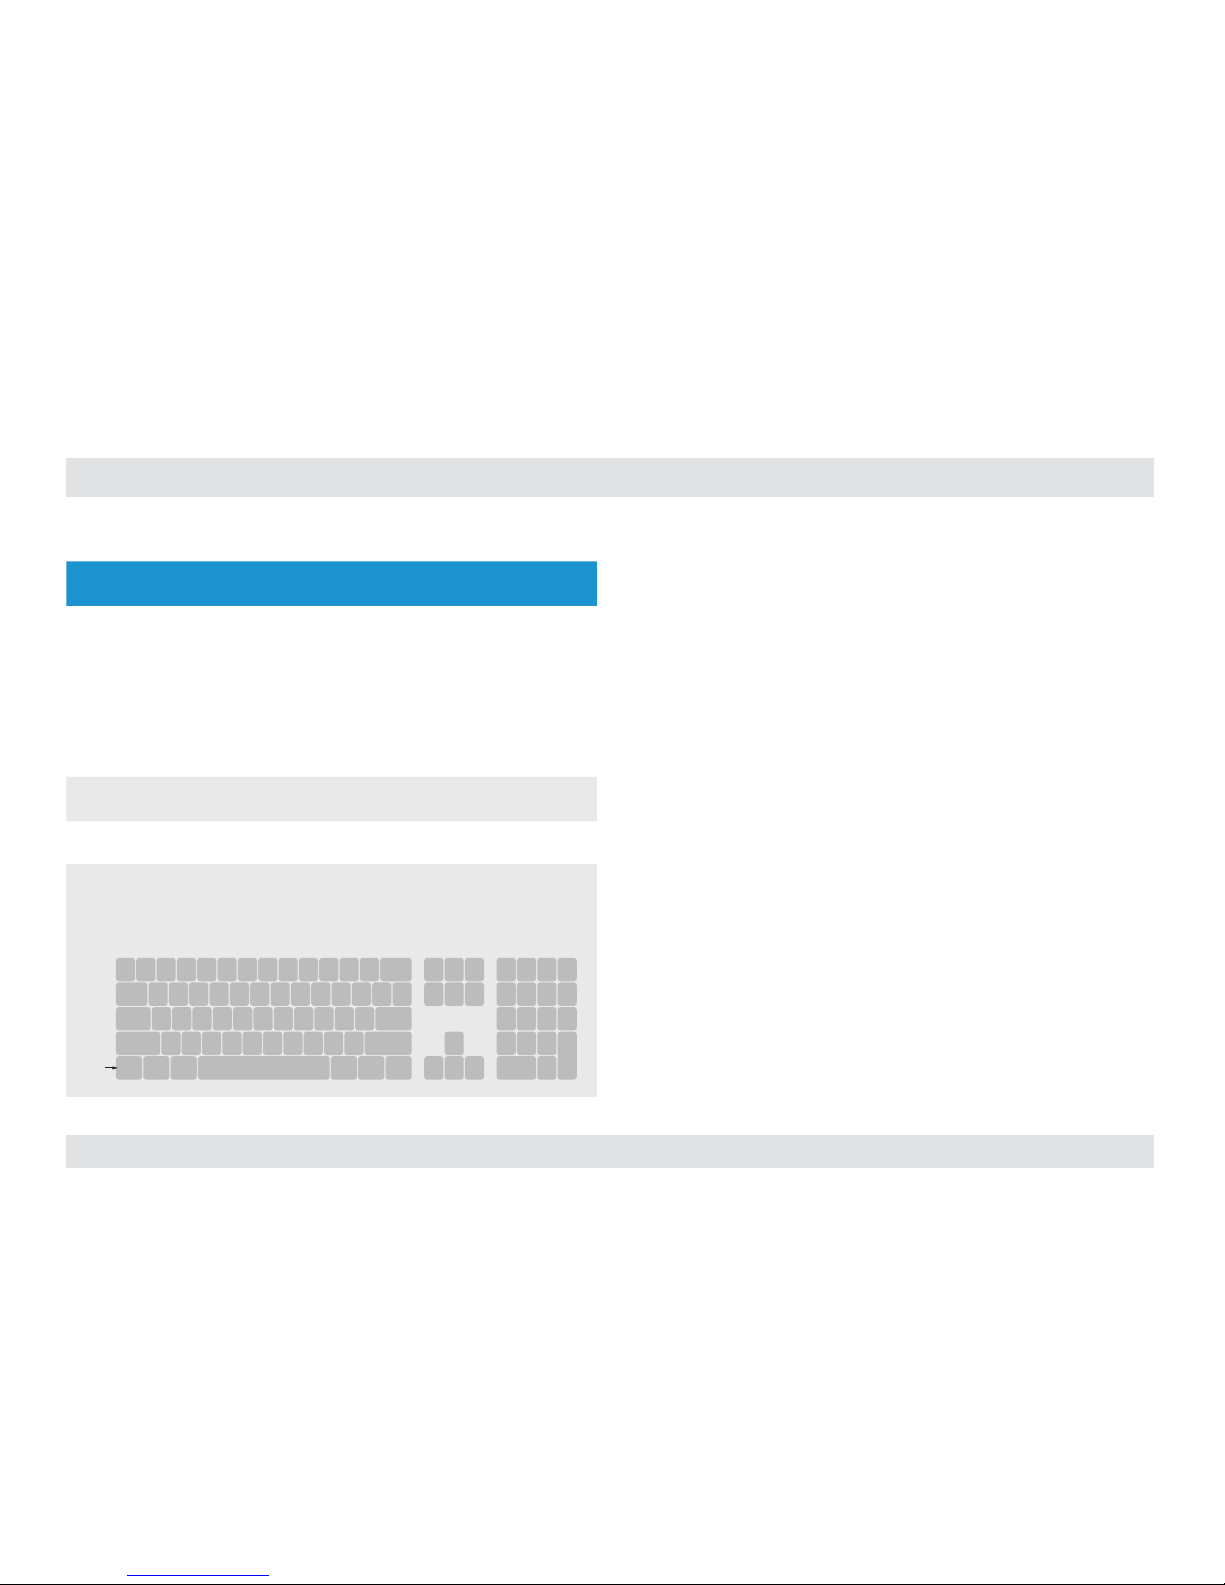
1. Keyboard shortcut keys are to be pressed sequentially
2. CTRL key refers to LEFT CTRL key.
`~1!2@3#4$5%6^7&8*9(0)-_=
+
Tab
Q W E R T Y U I O P
[{]
}
Caps
A S D F G H J K L
:
;
‘
“
Shift
CtrlCtrl Alt Alt
Delete
Enter
\
|
Shift
Ctrl
é
ç ê è
0
1 2 3
4 5 6
7 8 9
-
+
Num
Lock
Enter
=
/
*
,
Insert
Delete
Home
End
Page
UP
Page
Down
Z X C V B N M
?/>.<
,
Smart-Card
Reader
Computers
CONSOLE PORTS COMPUTER/SOURCE PORTS
fUSB Cable
Audio Cable
Mouse Cable
Display Cable
Keyboard Cable
Audio Keyboard Mouse
1 2 3 4
Secondary DisplayPrimary Display
Page 6
5
HSL Secure KVM Combiner Quick Star t Guide
INS TALLATION
SECTIONS
Table of Contents
1 3 4
2
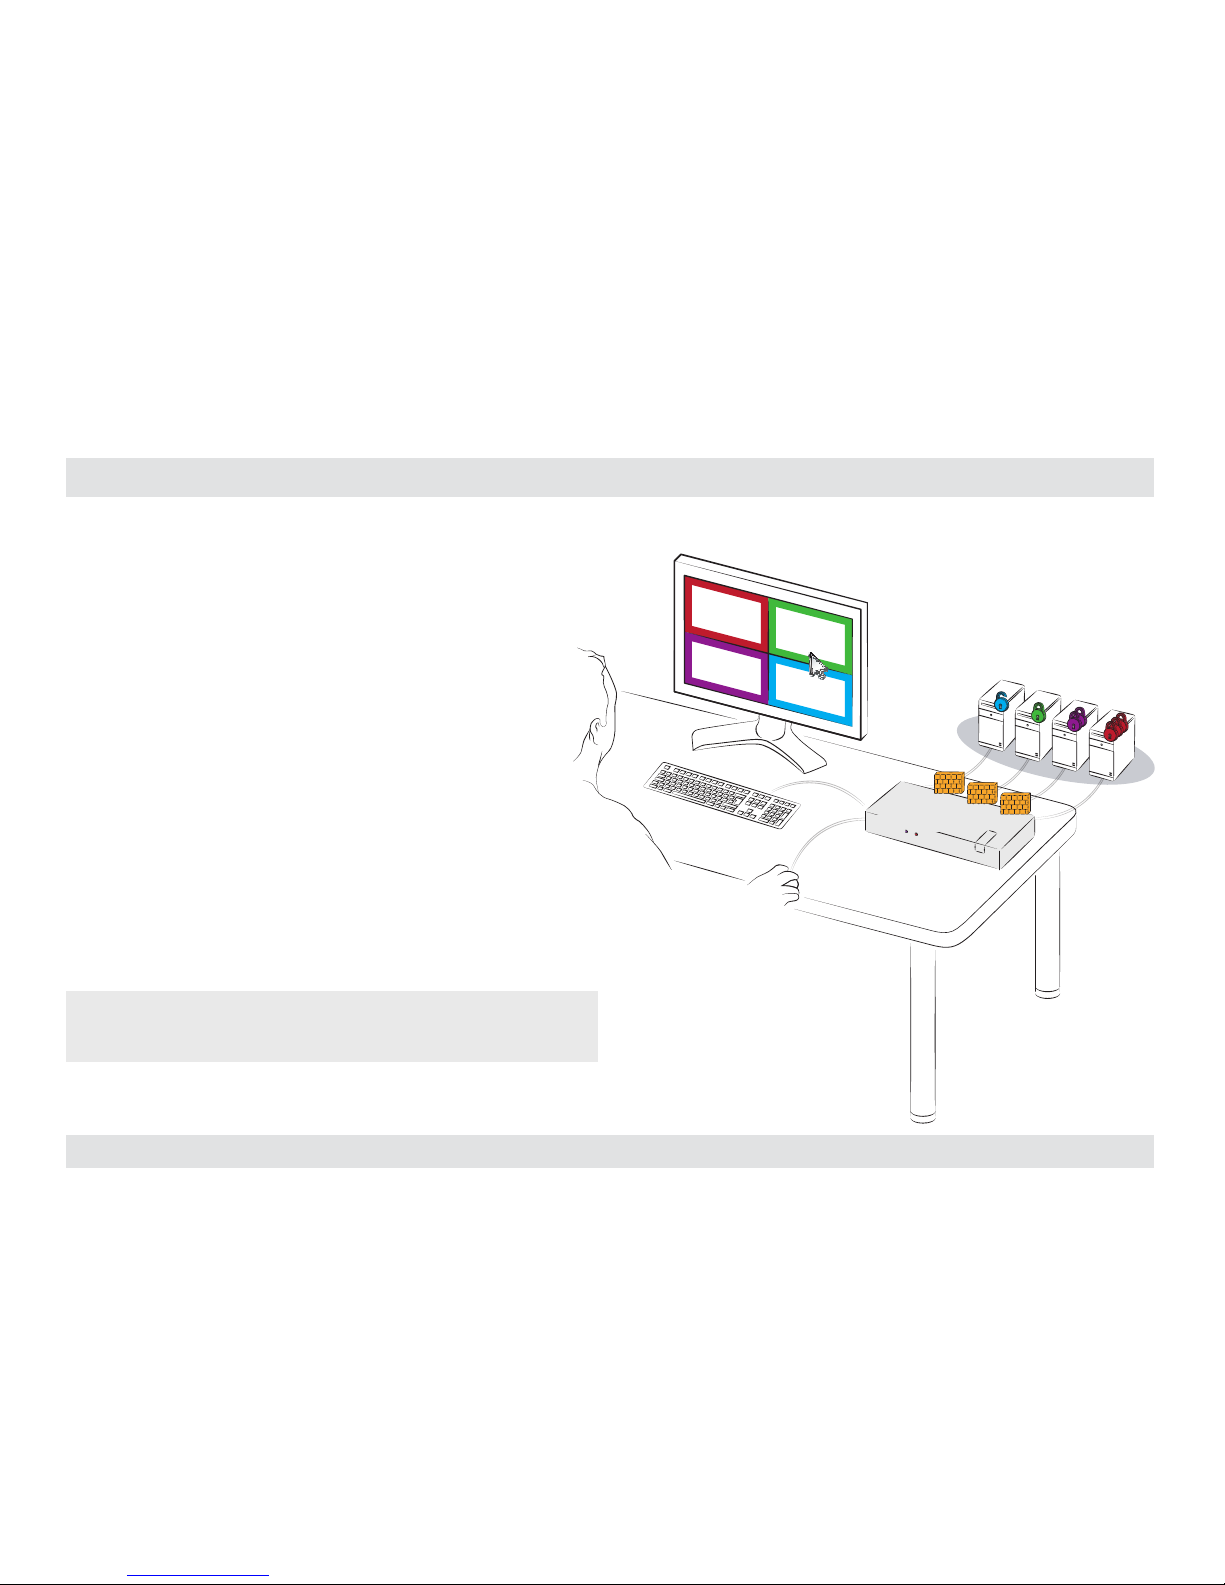
Step 3 – Power ON the Combiner
• Turn ON all the PCs.
• Connect the power supply and power ON the combiner
(approximate boot time is 30 seconds).
• The combiner boots into Tile view-mode, where all
sources are presented equally on the screen.
Note: In case no picture is presented after powering ON the combiner,
connect an alternate display to the combiner’s display console port, or
perform a reset to factory default.
Multiple
Sources
#4#3#2
#1
Single
Keyboard & Mouse
SECURE
KVM COMBINER
SECURE
KVM COMBINER
PC #4
PC #3
PC #1
PC #2
Move mouse
to switch PCs
Page 7
6
HSL Secure KVM Combiner Quick Star t Guide
INS TALLATION
SECTIONS
Table of Contents
1 3 4
2
Step 4 – Configure Display Output
Important Notes:
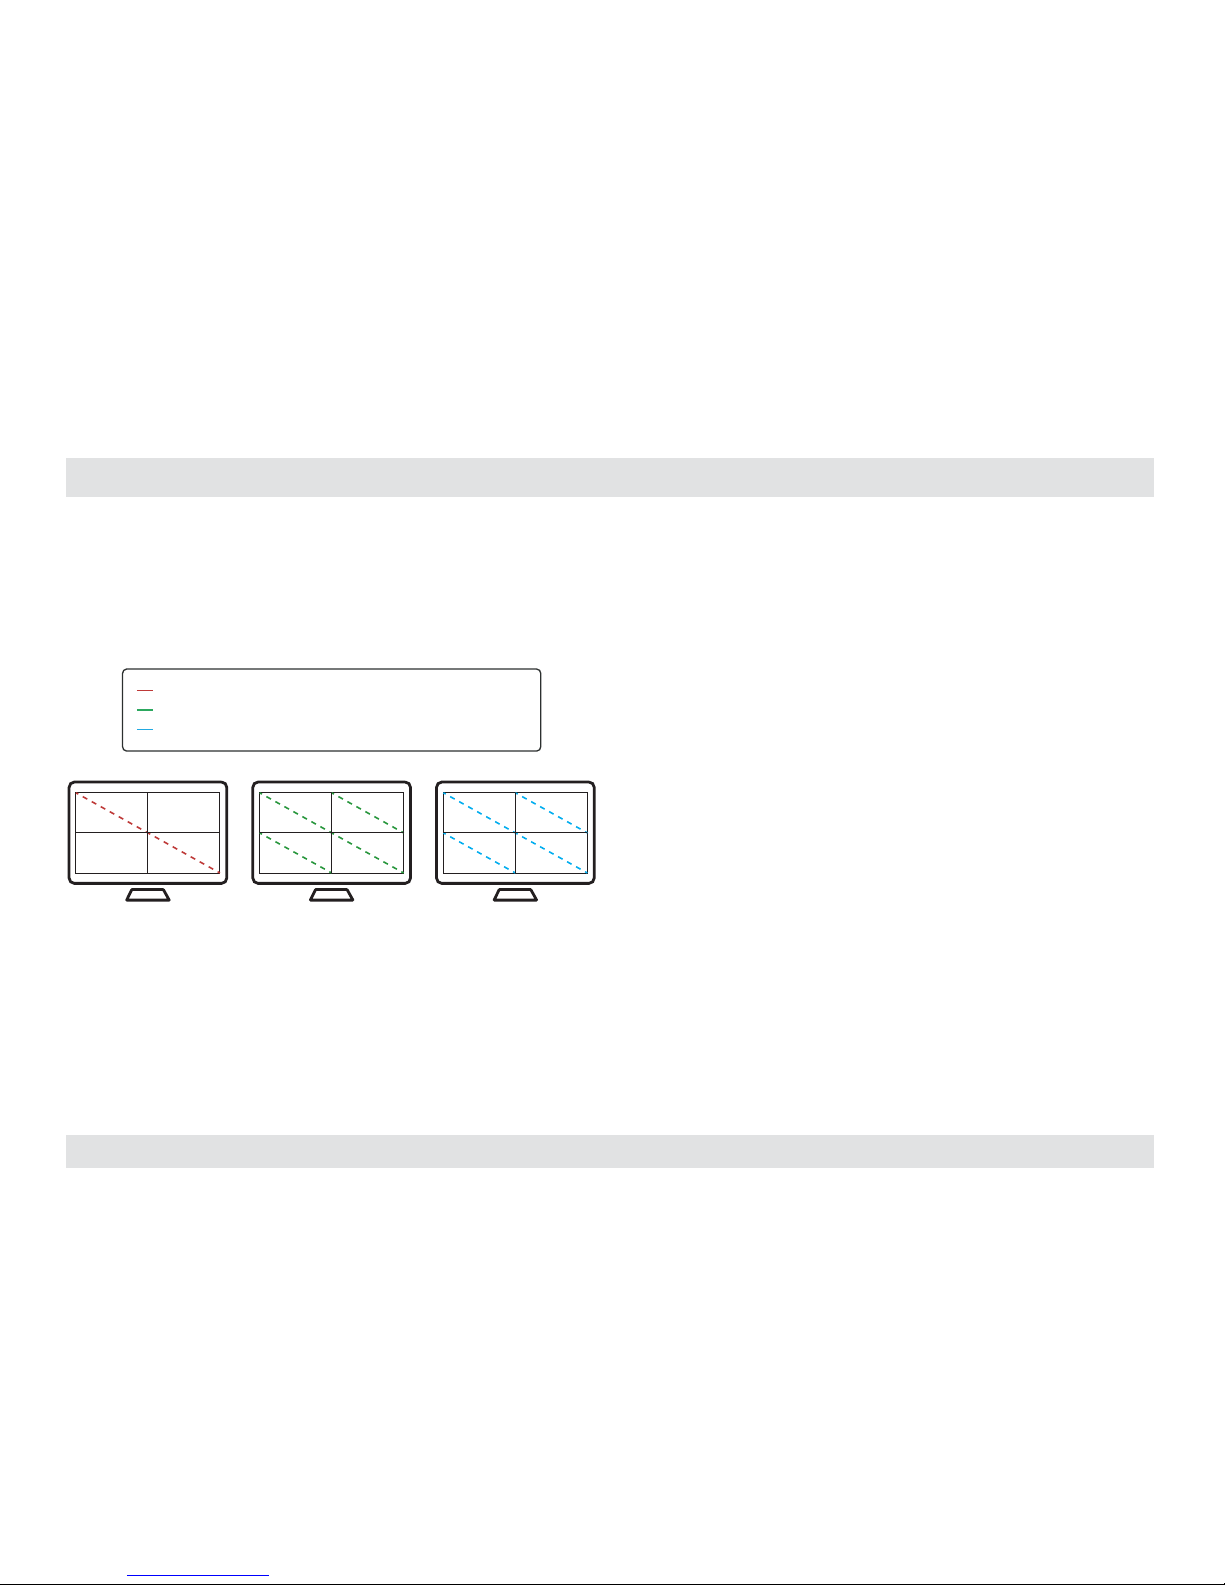
1. It is highly recommended to use the same screen resolution settings
across all levels as described below.
#1 #2
#3 #4
#1 #2
#3 #4
Output Resolution (Match Monitor Resolution)
Channel Resolution (Match PC Resolution)
Computer Resolution = (Windows/Linux/Mac OS Screen Resolution)
Use the s ame screen r esolutio n across al l level
2. Selecting a resolution that is not supported by your screen will
result in a blank display which might require connecting a monitor
that supports the selected resolution or resetting the combiner to
factory default.
3. For working with dual displays, please refer to the appendix.
Page 8
7
HSL Secure KVM Combiner Quick Star t Guide
INS TALLATION
SECTIONS
Table of Contents
1 3 4
2
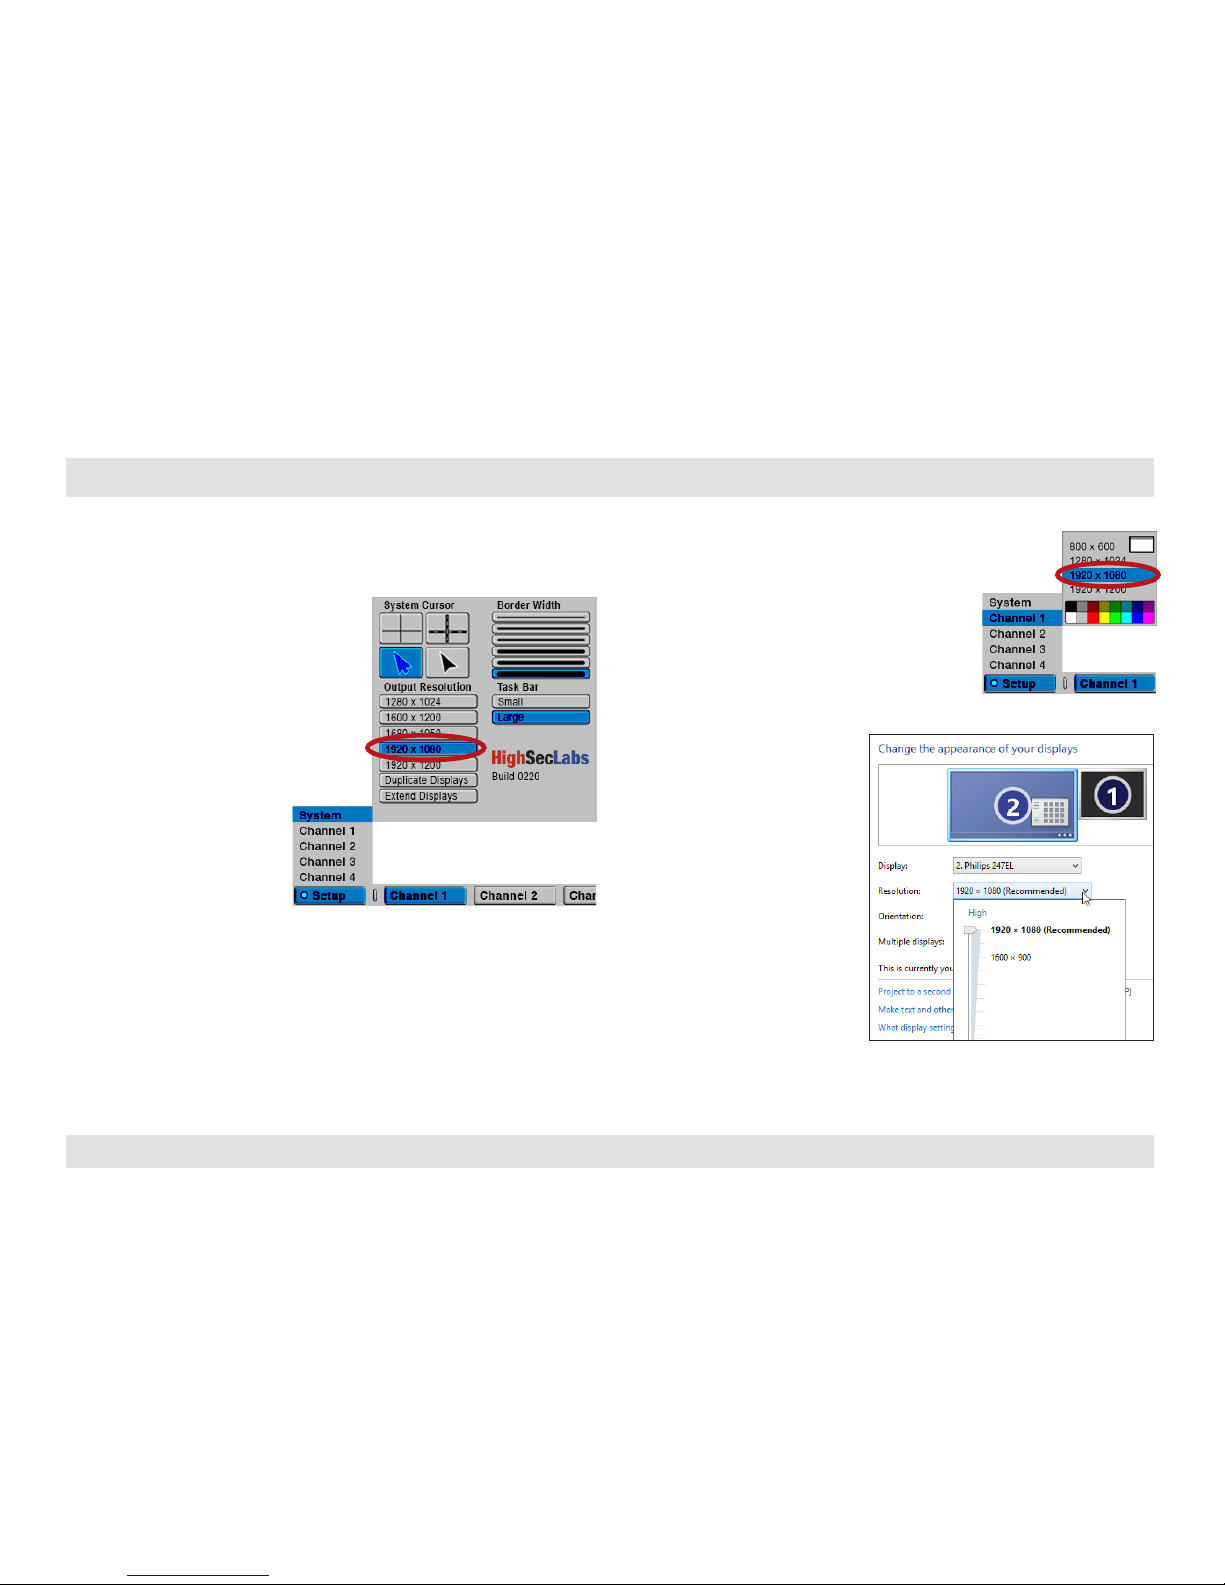
• Enter System mode: type: { CTRL | CTRL | o }. When active, an
operation taskbar appears at the bottom of the screen.
• Set Output Resolution:
on the lower left screen corner
click Setup -> System ->
Output Resolution and
select the screen resolution
that matches your display (for
example: 1920x1080).
• Set Channel Resolution:
Click Setup -> Channel# and select
the screen resolution for the selected
channel number (for example:
1920x1080).
• Set Computer
Resolution:
Under the computer’s
operating system
settings set the screen
resolution to match
the Output & Channel
resolution (for example:
1920x1080).
Set output resolution
Page 9
8
HSL Secure KVM Combiner Quick Star t Guide
INS TALLATION
SECTIONS
Table of Contents
1 3 4
2
Step 5 – Working with Dual Displays
Connecting two displays to the combiner’s console output ports allows
working in Extended or Duplicate mode.
Note: Skip this section if your combiner model does not support dual screens
or you’ve connected only one display.
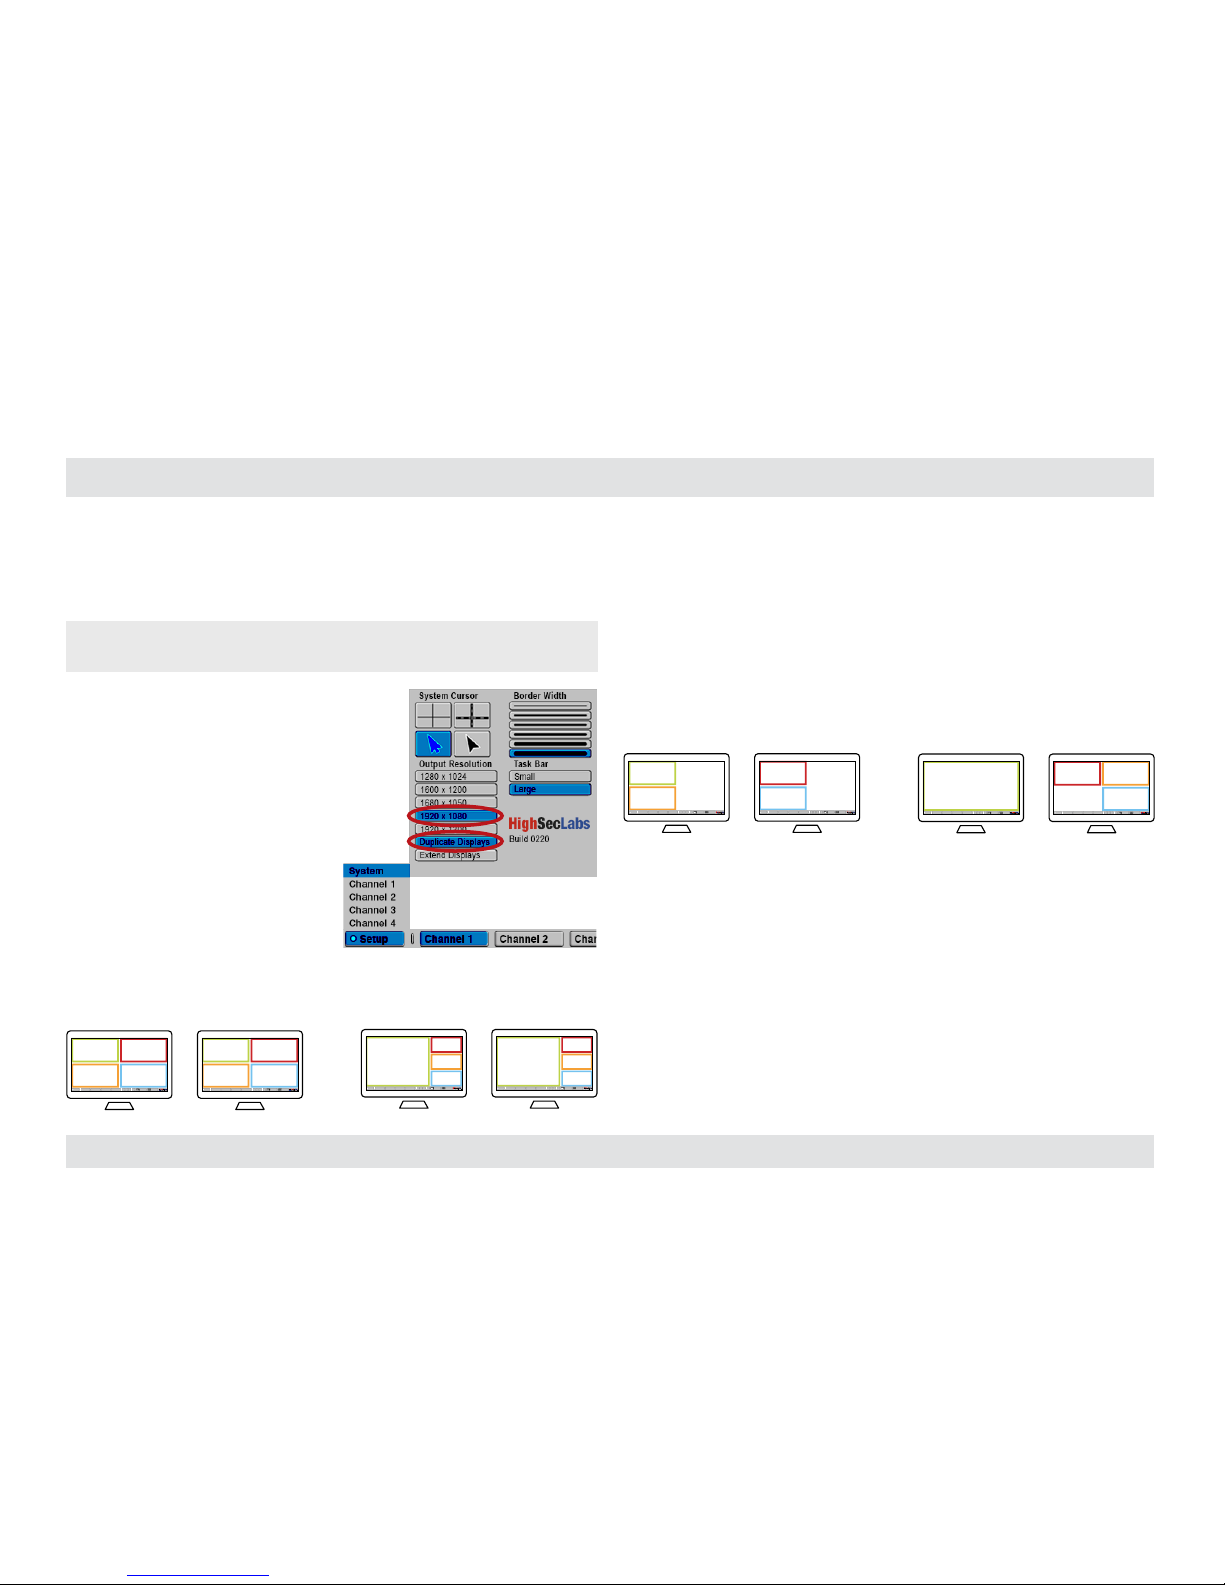
• Set Screen Duplication Mode: click
Setup -> System -> Output Resolution
and select Duplicate Displays.
In screen duplication mode
all incoming sources are
presented on the primary
display which is duplicated to
a second display. This layout
is ideal for meeting / control
room and big screen TV
projection scenarios.
Primary Secondary
2
Channel 1Setup Channel 2 Channel 3 Channel 4 1 2 3 ? Scale Tile
3 4
1 2
Channel 1Setup Channel 2 Channel 3 Channel 4 1 2 3 ? Scale Tile
3 4
1
“Duplicate” in Tile Mode
Channel 1Setup Channel 2 Channel 3 Channel 4 1 2 3 ? Scale Tile
1
2
3
4
Channel 1Setup Channel 2 Channel 3 Channel 4 1 2 3 ? Scale Tile
1
2
3
4
Primary Secondary
“Duplicate” in Scale Mode
• Set Screen Extending Mode: click Setup -> System -> Output
Resolution and select Extend Displays.
In extended view mode the incoming channel presentation is split
between two displays.
2
Channel 1Setup Channel 2 Channel 3 Channel 4 1 2 3 ? Scale Tile
4
Channel 1Setup Channel 2 Channel 3 Channel 4 1 2 3 ? Scale Tile
3
1
Primary Secondary
“Extend” in Tile Mode
Channel 1Setup Channel 2 Channel 3 Channel 4 1 2 3 ? Scale Tile
1
2
Channel 1Setup Channel 2 Channel 3 Channel 4 1 2 3 ? Scale Tile
3
4
Primary Secondary
“Extend” in Scale Mode
Page 10

9
HSL Secure KVM Combiner Quick Star t Guide
INS TALLATION
SECTIONS
Table of Contents
1 3 4
2
Step 6 – Reset to Factory Defaults
Reset to factory defaults clears the device settings and restores the
device to its original configuration.
• System reset: Clears behavioral characteristics such as mouse
settings and display presets. Type { L CTRL | L CTRL | F11| r } key
combination.
Page 11
10
HSL Secure KVM Combiner Quick Star t Guide
OPERATION
SECTIONS
Table of Contents
1 2 43
Operating the Combiner
Step 1 – Operation Modes Overview
Operation modes determine the device state.
In System mode combiner settings can be modified, the mouse is
not passed-through to the source computers and the user can toggle
between various channels and view layout modes (Scale/Tile/Custom)
using the operation-taskbar, a mouse click, keyboard shortcuts or touch
screen gestures. In system mode the user can’t interact with the source
computers.
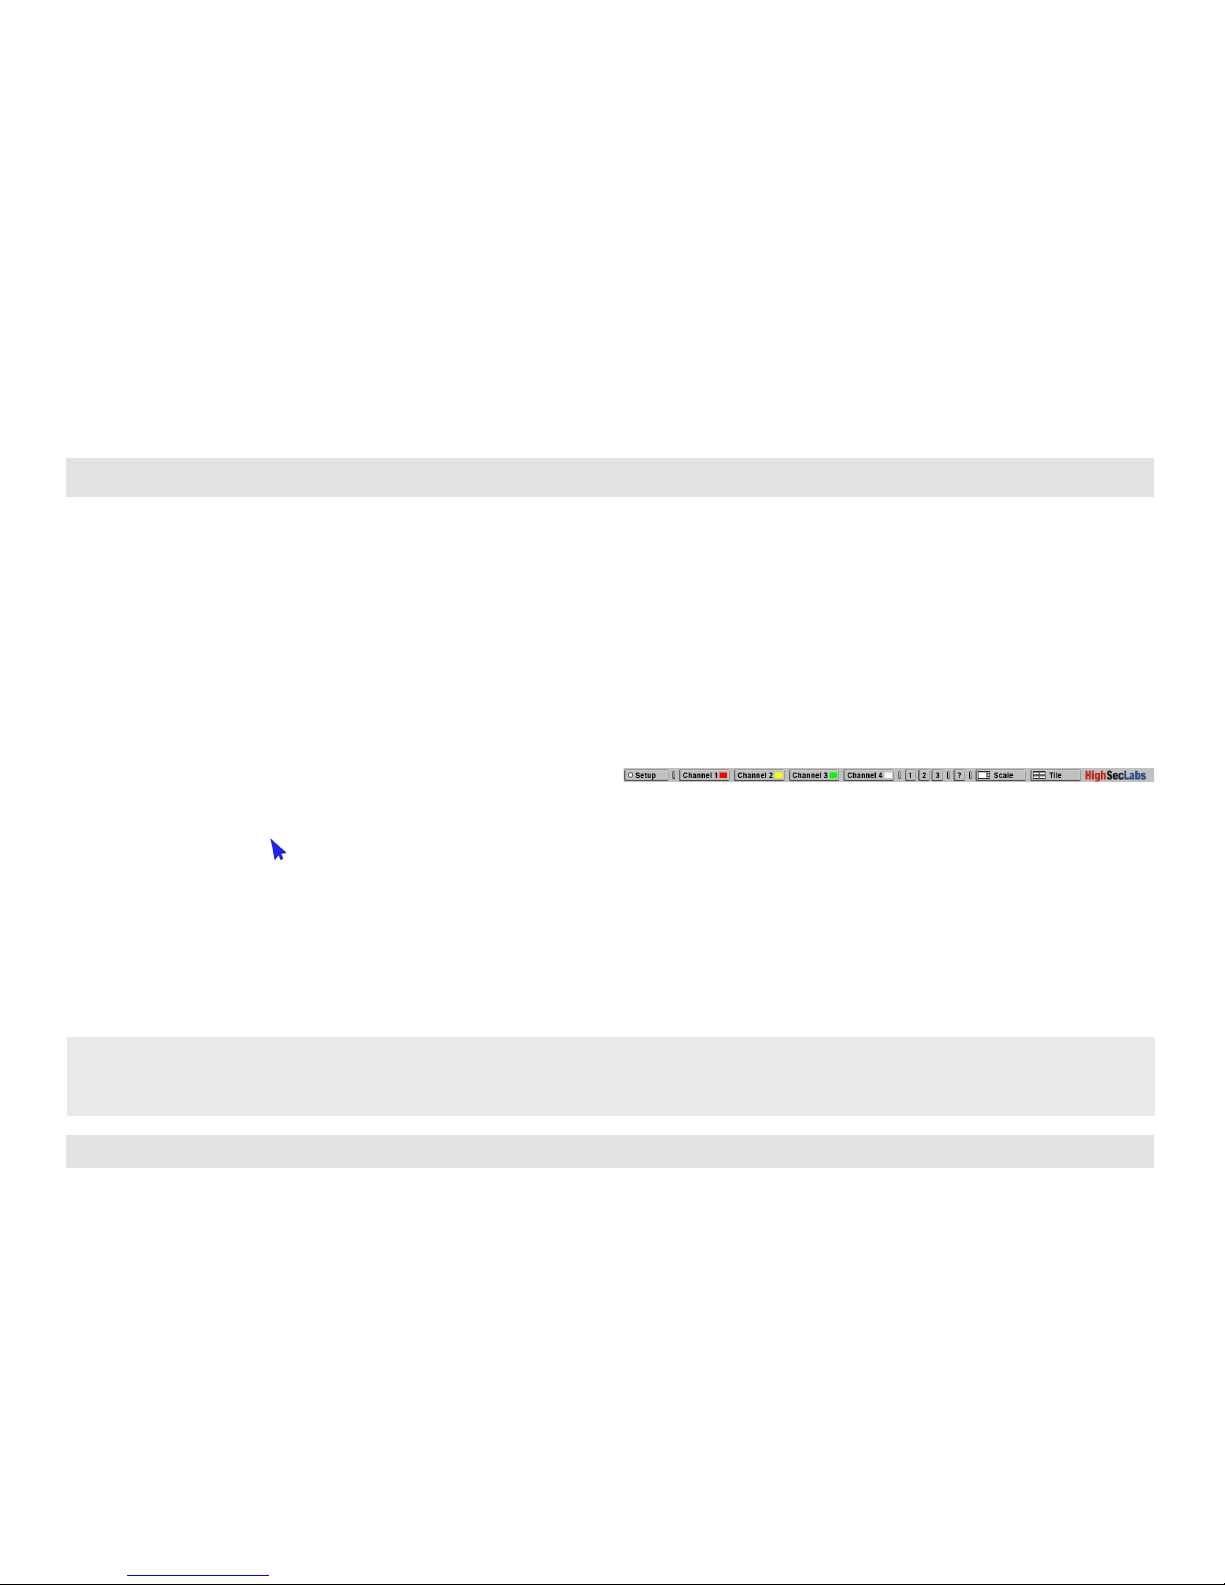
• System mode taskbar & mouse: an operation-taskbar appears
at the bottom of the screen and the mouse cursor is set to System
mode (appears in blue).
• System mouse functionality: the mouse is used for operation-
purposes, such as, changing channels, toggling between view modes,
entering the setup...etc. It can’t be used for interacting with sources.
• Setup menu: accessible through the lower left screen corner. Allows
configuring various system settings, such as, output resolution,
screen duplication, cursor color and more.
• Operation-taskbar:
– Toggle between channels by clicking on a channel number.
– Toggle between view modes by clicking Scale/Tile/Custom
menu buttons.
– Save custom screen layouts as presets by long-pressing the
1/2/3 buttons.
In User mode the user can simultaneously interact with multiple
source computers at the same time using a single set of keyboard and
mouse. The user can toggle between various channels and view layout
modes (Scale/Tile/Custom) using a mouse click, keyboard shortcuts or
touch screen gestures.
• Cursor Navigation (Virtual Display Technology - VDT): With
cursor navigation the user can move from one highly isolated
computer system to another by simply moving the mouse cursor
across display borders. No need to push any buttons. Audio and
keyboard follow mouse as cursor crosses display borders.
Notes:
1. A complete list of toggling options is described further in this document.
2. When VDT is disabled and the combiner is set to User mode, the mouse cursor will not move between screen boarders. To change sources, use toggling options.
Page 12
11
HSL Secure KVM Combiner Quick Star t Guide
OPERATION
SECTIONS
Table of Contents
1 2 43
Step 2 – View Modes Overview
View modes determine how multiple sources are presented on the
combiner’s screen. Toggle between view modes in a mouse click, using
keyboard shortcuts or touch screen gestures.
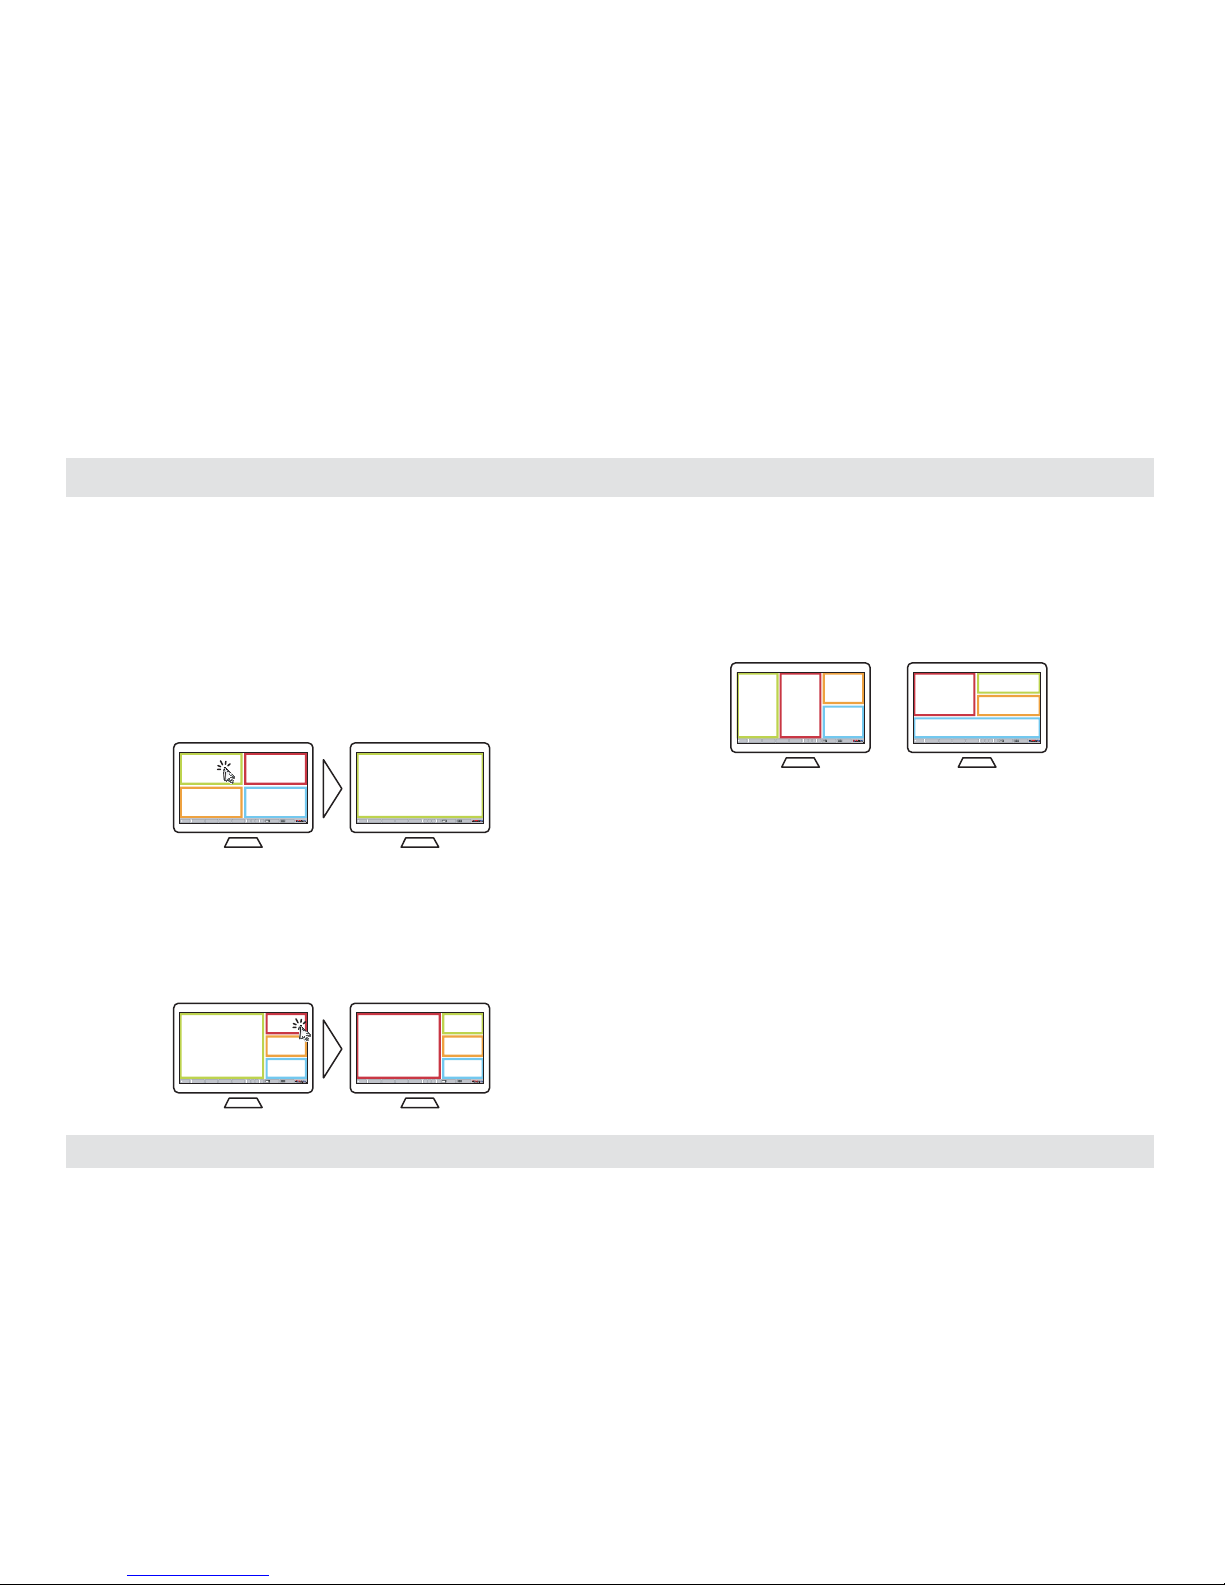
• Tile View mode: In Tile mode all sources are spread equally on the
screen, the user can independently interact with each source and
enlarge any given source to maximum screen size by clicking on it.
Channel 1Setup Channel 2 Channel 3 Channel 4 1 2 3 ? Scale Tile
3 4
21
Channel 1Setup Channel 2 Channel 3 Channel 4 1 2 3 ? Scale Tile
3 4
2
1
Click t o Enlarge
• Scale View mode: In Scale mode the user can interact with all
sources while one source is enlarged and others are aligned vertically
on the right screen side. Switch between the enlarged sources by
clicking on any of the aligned sources on the right.
Channel 1Setup Channel 2 Channel 3 Channel 4 1 2 3 ? Scale Tile
1
2
3
4
Channel 1Setup Channel 2 Channel 3 Channel 4 1 2 3 ? Scale Tile
2
1
3
4
Click t o Enlarge
• Custom View mode: Custom views allow rearranging, positioning
and saving screens as needed by the user for future work.
Channel 1Setup Channel 2 Channel 3 Channel 4 1 2 3 ? Scale Tile
1 2
3
4
Channel 1Setup Channel 2 Channel 3 Channel 4 1 2 3 ? Scale Tile
2
1
3
4
Rearr ange and Pos ition scre ens as you want
2.1 Active Source
Active source is the source that has current access to the combiner’s
peripherals (keyboard, mouse, audio and authentication-device).
The user can select which source will be active in various ways including
a mouse click, keyboard shortcuts, touch screen gestures and by using
the combiner’s front panel push buttons.
Page 13
12
HSL Secure KVM Combiner Quick Star t Guide
OPERATION
SECTIONS
Table of Contents
1 2 43
Step 3 – Toggling Options
Once you have connected all the sources and completed the initial
steps, you can start working with the combiner. The next section
explains how to switch between operation modes and operate the
combiner using its versatile view and control options.
Important Notes:
1. A complete list of toggling options is described further in this document.
2. Always use the left control key (CTRL) unless otherwise specified.
3. Do not use the numeric keypad for toggling shor tcuts unless otherwise
specified.
4. ALL KEYBOARD SHORTCUTS REFER TO QWERT Y KEYBOARDS. In case a nonqwerty keyboard is in use, keep using the QWERT Y layout. For example,
in AZERTY keyboard, where the letter A is equivalent to the location of
the letter Q on a QWERTY keyboard, type { CTRL | CTRL | a } to switch to
tile view.
Most useful toggling options:
#
Action
Description
Keyboard Mouse
1
Toggle bet ween
System / User
modes
(system) - C TRL | CTRL | o
(user) - CTRL | CTRL | u
Click the side-mouse
button to toggle between
System / User modes.
2
Switch be tween
Tile / Scale Views
(Tile) - CTRL | CTR L | q
(Scale) - CTRL | CTRL | s
1. Click the side-mouse
button to toggle to
System mode.
2. In System mode: Click
“Tile” or “Scale” on the
operation-taskbar.
3
Enable /
Disable Cursor
Navigation VDT
(enable) - CTRL | CTRL | F11 | c
(disable) - CTRL | CTRL | F11 | b
N/A
4
Enlarge a source
to full screen
CTRL | C TRL | f
1. In System mode, Tile
view: Double click
any tile.
2. In System mode, Scale
view: Double click on
the enlarged window.
5
Go back to last
layout be fore
enlarging to full
screen
CTRL | C TRL | z
1. Click the side-mouse
button to toggle to
System mode.
2. Click Scale / Tile /
Custom but tons on the
operation-taskbar.
Page 14
13
HSL Secure KVM Combiner Quick Star t Guide
OPERATION
SECTIONS
Table of Contents
1 2 43
Most useful toggling options (Cont.):
#
Action
Description
Keyboard Mouse
6
Resize channel
& content
simultaneously*
* First, switch to
System mo de,
Tile view.
Select a channel -
CTRL | C TRL | Channel# (1-6)
Reduce scaling -
CTRL | C TRL | “-“
Increase scaling -
CTRL | C TRL | “+“
Note: use the “-“ and “=”
keys instead of the numeric
pad keys.
1. Click to select a channel.
2. Press and hold the side
mouse button & scroll
the mouse wheel to
reduce/increase scaling.
3. For fast scaling hold the
left C TRL
7
System Reset to
factory defaults
CTRL | C TRL | F11 | r
Notes:
1. Keyboard shortcut keys are to be pressed sequentially.
2. CTRL key refers to LEFT CTRL key.
`~1!2@3#4$5%6^7&8*9(0)-_=
+
Tab
Q W E R T Y U I O P
[{]
}
Caps
A S D F G H J K L
:
;
‘
“
Shift
CtrlCtrl Alt Alt
Delete
Enter
\
|
Shift
Ctrl
é
ç ê è
0
1 2 3
4 5 6
7 8 9
-
+
Num
Lock
Enter
=
/
*
,
Insert
Delete
Home
End
Page
UP
Page
Down
Z X C V B N M
?/>.<
,
Page 15
14
HSL Secure KVM Combiner Quick Star t Guide
OPERATION
SECTIONS
Table of Contents
1 2 43
Step 4 – Complete toggling options table
Toggle between view modes in a mouse click, using keyboard shortcuts or touch screen gestures.
# Action / Mode Keyboard Mouse Touch Screen
1 Enter System Mode CTRL | C TRL | o
Click the side-mouse button to toggle between
System / User modes.
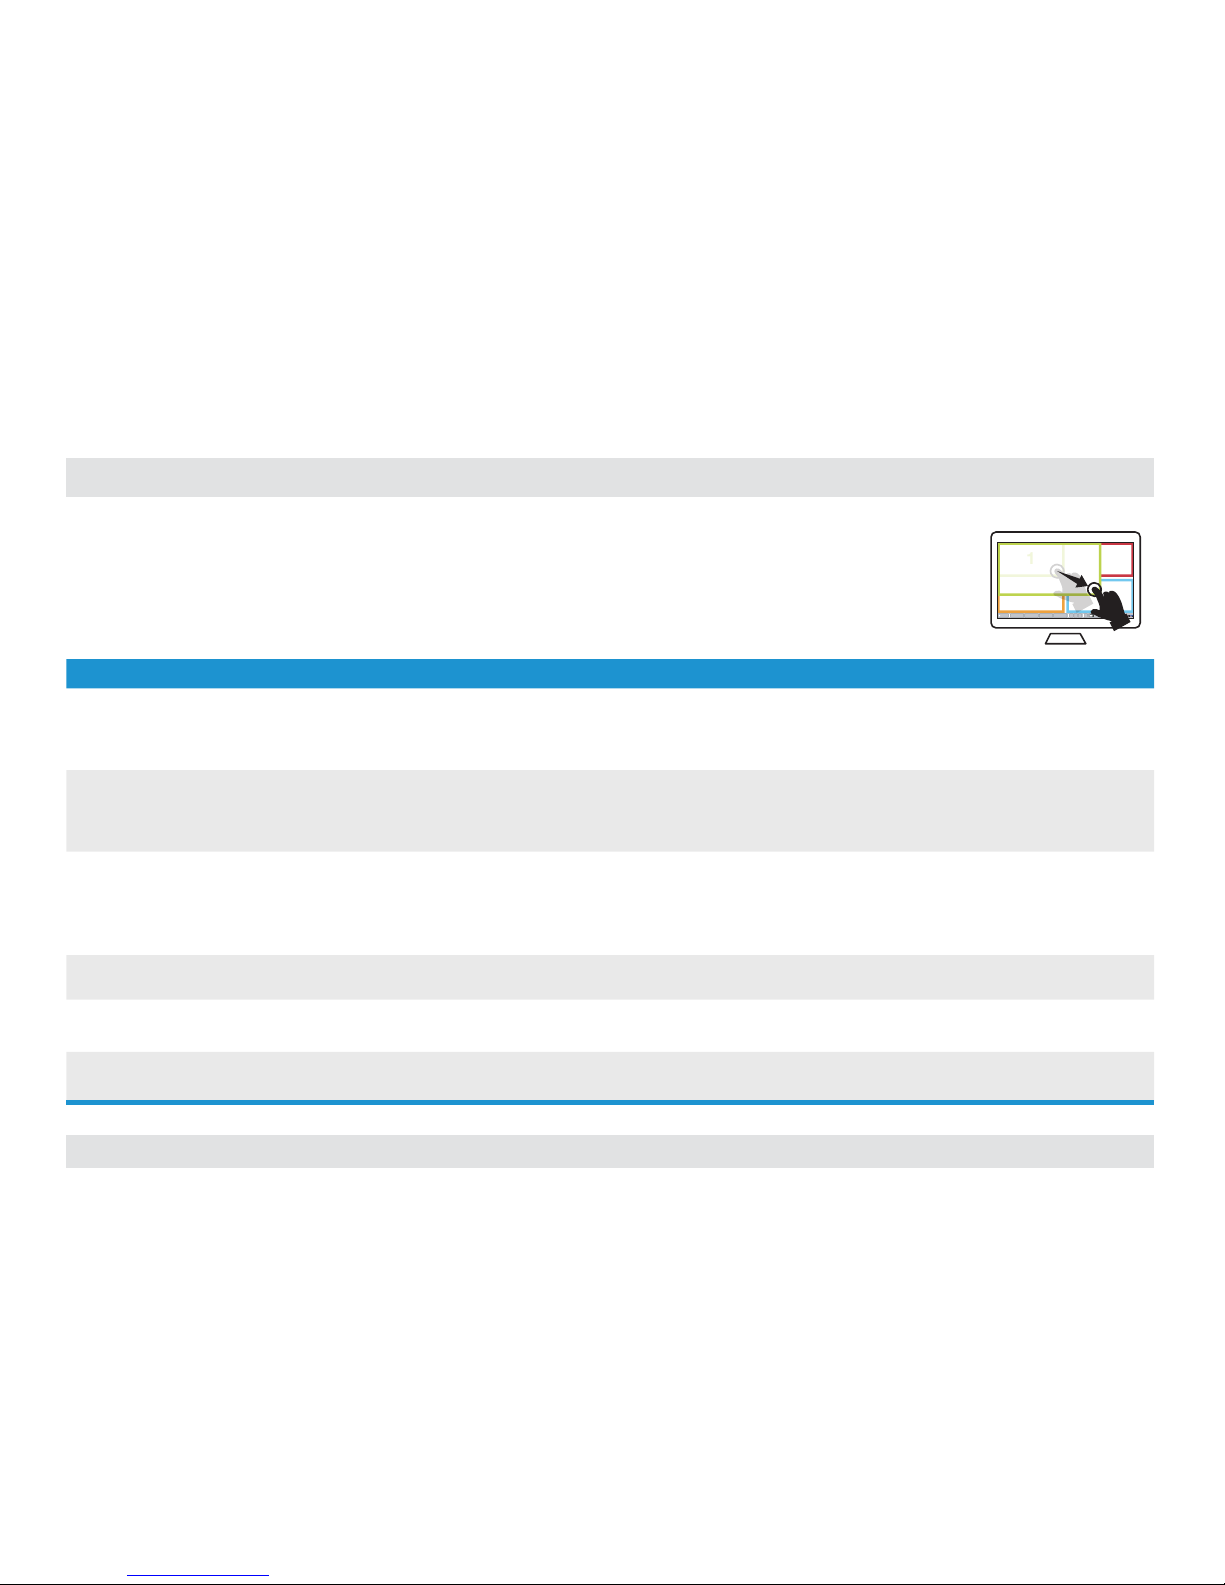
1. In Scale view: Tap 4 times on the enlarged
window.
2. In Tile view: Touch and hold the uppermost
right corner of the screen for 4 seconds.
2 Enter User Mode CTRL | C TRL | u
Click the side-mouse button to toggle between
System / User modes.
1. In Tile view: Tap 4 times on the uppermost
right corner of the screen.
2. In Scale view : Tap 4 times on the enlarged
screen.
3 Switch to Tile View CTRL | C TRL | q
1. Click the side-mouse button to to ggle
betwe en System / User modes.
2. In System mode: Click “Tile” on the operationtaskbar.
1. In Scale view, User mode: Tap 4 times on
the enlarged window.
2. In Scale view, Sys tem mode: Tap 4 times on
the enlarged window to switch to User mode,
then tap 4 times (again).
4 Switch to Scale View CTRL | CTRL | s
1. Click the side-mouse button to to ggle
betwe en System / User modes.
2. In System mode: Click “Scale” on the operationtaskbar.
1. In Tile view, User mode: Touch and hold
the uppermost right corner of the scre en for
4 seconds.
2. In Tile view, System mode: Tap “Scale” on
the operation-taskbar.
5
View Custom Presets
Note: read “Save custom views as
presets” section first.
CTRL | C TRL | F1-F4
1. Click the side-mouse button to to ggle
betwe en System / User modes.
2. In System mode: Click 1/2/3 buttons on the
operation-taskbar.
N/A
(Custom Tile Preset can be viewed by clicking
“Tile” on the operation-taskbar)
Page 16
15
HSL Secure KVM Combiner Quick Star t Guide
OPERATION
SECTIONS
Table of Contents
1 2 43
# Action / Mode Keyboard Mouse Touch Screen
6
Enable Cursor Navig ation VDT
Note: allow 10 seconds de lay after
enabling for the 1st time.
CTRL | C TRL | F11 | c N/A N/A
7 Disable Cursor Navigation VDT CTRL | C TRL | F11 | b N/A N/A
8
Change Active Source
Note: sources can also be switched
by using the combiner ’s front panel
push buttons.
CTRL | C TRL | Channel#
(1-6)
In System mode:
Click the channel window.
or Click the channel number on the operationtaskbar.
or Scroll the mouse wheel.
In User mo de (with VDT ON):
Move mouse cursor across display boarders.
Touch the channel’s screen area.
9 Enlarg e a source to full screen CTRL | C TRL | f
In System mode, Tile view: Double click any tile.
In System mode, Scale view: Double click on the
enlarged window.
In User mo de, Tile view: Tap 4 times on any tile.
In System mode, tile view: Tap 4 times on any
tile to switch to User mode, then tap 4 times
(again) on any tile.
10
Go back to last layout before
enlarging to full screen
CTRL | C TRL | z
1. Click the side-mouse button to to ggle to
System mode.
2. Click Scale / Tile / Custom buttons on the
operation-taskbar.
Tap 4 times anywhere on the screen.
11
Presentation mode ON; Enlarge each
channel to full screen when changing
active source using
5.6
CTRL | C TRL | Channel# (1-4)
CTRL | C TRL | p N/A N/A
12 Presentation mode OFF
5.6
CTRL | C TRL | n N/A N/A
5.6
This action is explained in detail using a step by step description ahead.
Page 17
16
HSL Secure KVM Combiner Quick Star t Guide
OPERATION
SECTIONS
Table of Contents
1 2 43
# Action / Mode Keyboard Mouse Touch Screen
13
Resize channel
5.1
1. First, switch to System mode, Tile
view.
2. See Actions 13a / 13b
N/A
1. Click to select a channel.
2. Place the mouse cursor at the channel’s lower
right corner.
3. Press and hold the right mouse but ton and
drag the channel’s screen to resize.
Tap and hold the lower right corner of a specific
channel and drag to resize.
13a
Fit content to newly resized channel
area while keeping aspect ratio
* First, resize channel.
CTRL | C TRL | w N/A N/A
13b
Fit content to newly resized channel
area without keeping aspect ratio
* First, resize channel.
CTRL | C TRL | y N/A N/A
14
Resize channel & content
simultaneously
5.2
* First, switch to Syste m mode, Tile
view.
1. Select a channel
CTRL | C TRL | Channel#
(1-6)
2. Reduce scaling
CTRL | C TRL | “-“
3. Increase scaling
CTRL | C TRL | “+“
Note: use the “-“ and
“=” keys instead of the
numeric pad keys.
1. Click to select a channel.
2. Press and hold the side mouse but ton & scroll
the mouse wheel to reduce/increase scaling.
3. For fast scaling hold the lef t CTRL
Tap and hold the midpoint of the vertical or
horizontal channel border and drag to scale.
* This action is explained in detail using a step by step description ahead.
Page 18
17
HSL Secure KVM Combiner Quick Star t Guide
OPERATION
SECTIONS
Table of Contents
1 2 43
# Action / Mode Keyboard Mouse Touch Screen
15
Drag & rearrange channel windows
5.3
* First, switch to Syste m mode,
Tile view.
N/A
1. Click to select a channel.
2. Press and hold the left mouse button and drag
the channel window.
Tap and hold the upper left corner of a channel
and drag the window.
16
Save custom views as presets
5.4
1. First, switch to System mode,
Tile view.
2. Rearrange channel windows
layout.
N/A
On the operation-taskbar, long press the “1” or “2”
or “3” button for 3 seconds to save your preset.
N/A
17 View custom presets* CTRL | CTRL | F1-F3
1. First, switch to System mode, Tile view.
2. Click 1/2/3 buttons on the operation-taskbar.
N/A
18
Save a custom tile preset
5.4
1. First, switch to System mode,
Tile view.
2. Rearrange channel windows
layout.
N/A
On the operation-taskbar, long press the “Tile”
button for 3 seconds to save your preset.
N/A
19 View custom tile
5.4
CTRL | C TRL | F4
1. First, switch to System mode, Tile view.
2. Click the “Tile” button.
1. First, switch to System mode, Tile view.
2. Tap on “Tile” button on the operation-taskbar.
* This action is explained in detail using a step by step description ahead.
Page 19
18
HSL Secure KVM Combiner Quick Star t Guide
OPERATION
SECTIONS
Table of Contents
1 2 43
# Action / Mode Keyboard Mouse Touch Screen
20
Dual Screen
Duplicate Screens (On/Off )
CTRL | C TRL | F11 | l
21
Dual Screen
Duplicate Primary
Projec t primary display on both
displays
CTRL | C TRL | F11 | j | j N/A N/A
22
Dual Screen
Duplicate Secondary
Projec t secondary display on both
displays
CTRL | C TRL | F11 | k | k N/A N/A
23
Dual Screen
Switch Positions
Switch position bet ween primar y and
secondary displays
CTRL | C TRL | F11 | k | j
CTRL | C TRL | F11 | j | k
N/A N/A
* This action is explained in detail using a step by step description ahead.
Page 20
19
HSL Secure KVM Combiner Quick Star t Guide
OPERATION
SECTIONS
Table of Contents
1 2 43
# Action / Mode Keyboard Mouse Touch Screen
24 Freeze channel layer
5.5
CTRL | C TRL | F11| F | (1-6) N/A N/A
25 E nable Right CTRL
Toggles between the left & right C TRL
keys for system commands
L CTRL | L C TRL | F11| i N/A Once enabling the Right CTRL, touch screen
gestures switch to the Lef t screen side. For
example, touch and hold the upper lef t screen
corner to switch from Tile view, user mode to
Scale view.
26 Enable Left CTRL
Toggles between the right CTRL keys
for system commands
R CTRL | R C TRL | F11| i N /A N/A
27 Disable front panel and DCU
Disable/Enable the front panel push
buttons and DCU functionality.
Once disabled, switching channels is
only functional through mouse and
keyboard shortcuts.
CTRL | C TRL | F11 | e N /A N/A
28 Reset to factory default CTRL | C TRL | F11| r N/A N/A
* This action is explained in detail using a step by step description ahead.
Page 21
20
HSL Secure KVM Combiner Quick Star t Guide
OPERATION
SECTIONS
Table of Contents
1 2 43
Step 5 – Customize Channel Window Layout
Each channel’s window layout can be customized beyond the default
Tile / Scale view modes and saved as a custom view mode preset.
5.1 Resize a channel window:
# Action Description Keyboard Mouse Touch Screen
1 Enter System Mode CTRL | C TRL | o
Click the side-mouse button to toggle
betwe en System / User modes.
In Scale view: Tap 4 times on the enlarged
window.
In Tile view: Touch and hold the uppermos t
right corner of the screen for 4 seconds.
2 Switch to Tile view C TRL | CTRL | q
Click the side-mouse button to toggle
betwe en System / User modes.
In System mode: Click “Tile” on the
operation-taskbar.
<you should already be in T ile view>
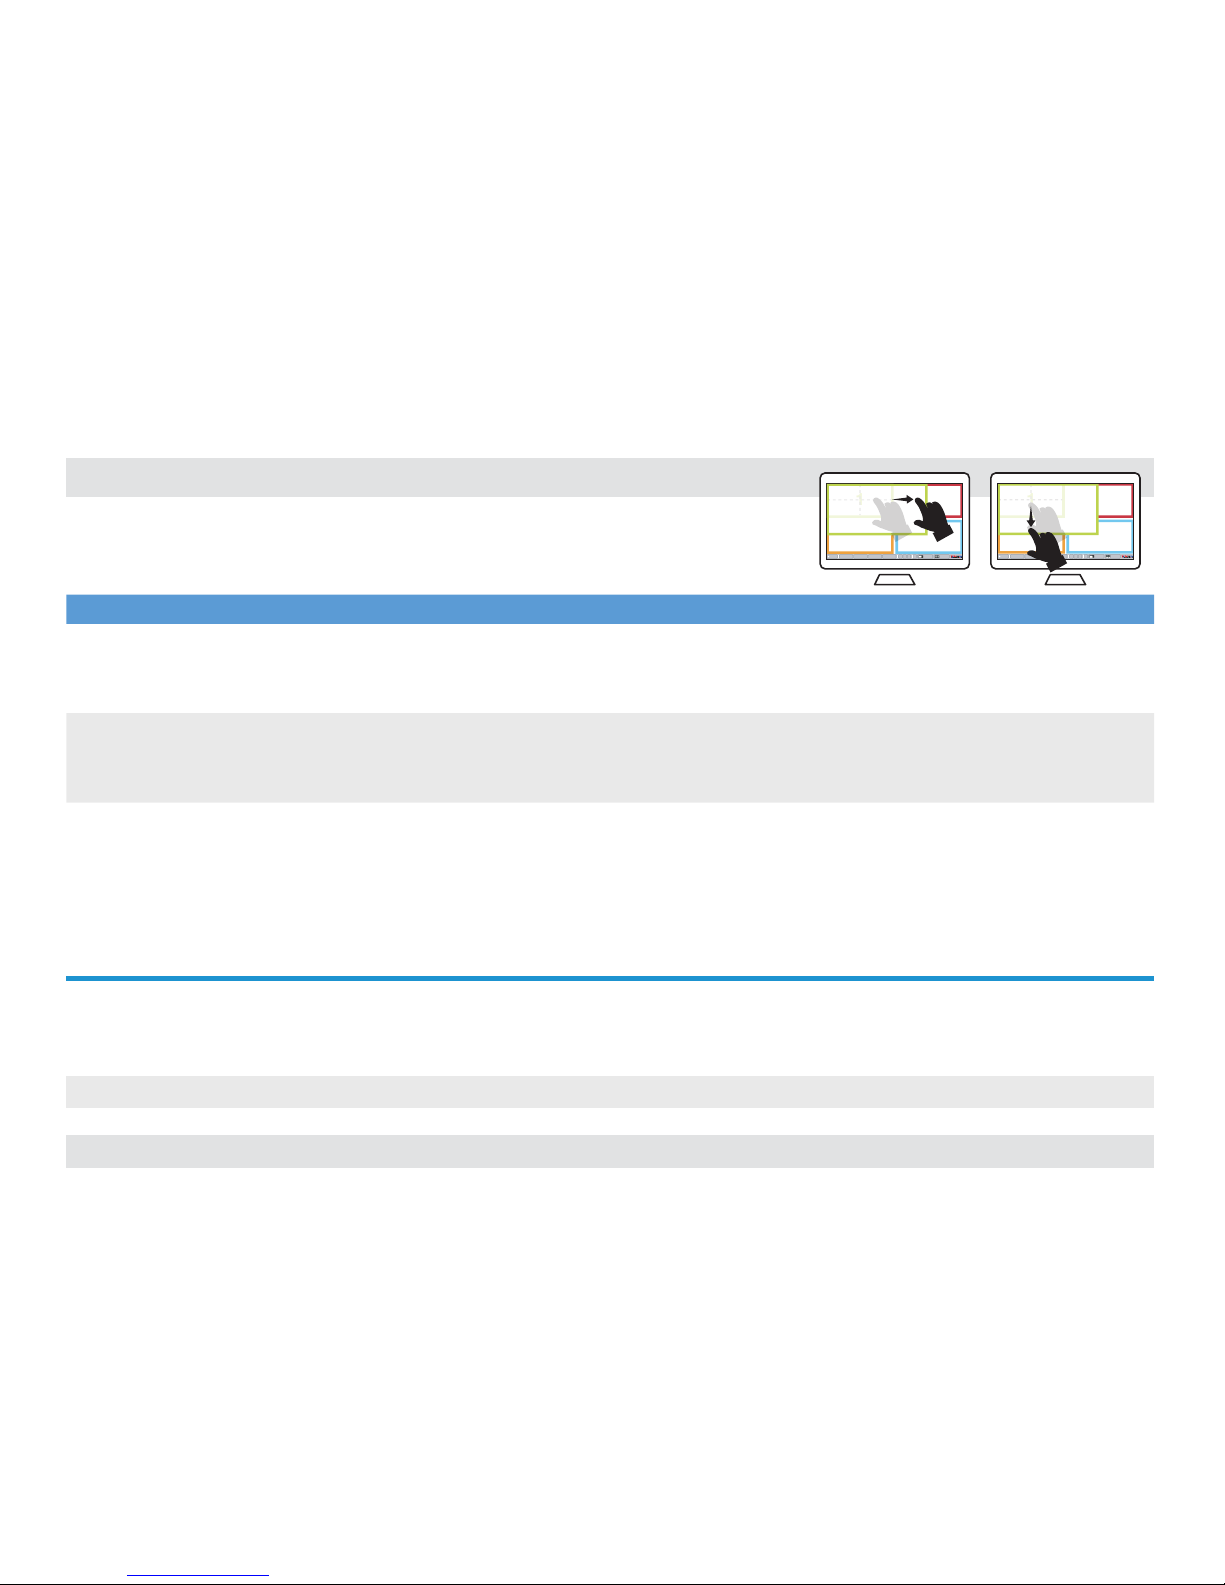
3 Resize channel
Click to select a channel.
Place the mouse cursor at the channel’s
lower right corner.
Press and hold the right mouse button
and drag the channel’s screen to resize.
Tap and hold the lower right corner of a
specific channel and drag to resize.
4
Fit content to newly resized channel
area
CTRL | C TRL | w
5
Fit content to newly resized channel
area without keeping aspect ration
CTRL | C TRL | y
6 Optional: Revert to Tile mode CTRL | CTRL | q
Channel 1Setup Channel 2 Channel 3 Channel 4 1 2 3 ? Scale Tile
3 4
2
1
Page 22
21
HSL Secure KVM Combiner Quick Star t Guide
OPERATION
SECTIONS
Table of Contents
1 2 43
5.2 Resize channel window & content at the same time:
# Action Description Keyboard Mouse Touch Screen
1 Enter System Mode CTRL | C TRL | o
Click the side-mouse button to toggle
betwe en System / User modes.
In Scale view: Tap 4 times on the enlarged
window.
In Tile view: Touch and hold the uppermos t
right corner of the screen for 4 seconds.
2 Switch to Tile view C TRL | CTRL | q
Click the side-mouse button to toggle
betwe en System / User modes.
In System mode: Click “Tile” on the
operation-taskbar.
<you should already be in T ile view>
3 Resize channel & content
Select a channel
CTRL | C TRL | Channel# (1-6)
Reduce scaling
CTRL | C TRL | “-“
Increase scaling
CTRL | C TRL | “+“
Note: use the “-“ and “=” keys ins tead
of the numeric pad keys .
Click to select a channel.
Press and hold the side mouse button
& scroll the mouse wheel to reduce/
increase scaling.
For fast scaling hold the left CTRL
Tap and hold the midpoint of the vertical or
horizontal channel border and drag to scale.
Note: see ‘Save custom views as presets’ section ahead, to save a custom screen layout.
Channel 1Setup Channel 2 Channel 3 Channel 4 1 2 3 ? Scale Tile
3 4
2
1
Channel 1Setup Channel 2 Channel 3 Channel 4 1 2 3 ? Scale Tile
3 4
2
1
Page 23
22
HSL Secure KVM Combiner Quick Star t Guide
OPERATION
SECTIONS
Table of Contents
1 2 43
5.3 Drag and Rearrange channel windows:
# Action Description Keyboard Mouse Touch Screen
1 Enter System Mode CTRL | C TRL | o
Click the side-mouse button to toggle
betwe en System / User modes.
In Scale view: Tap 4 times on the enlarged
window.
In Tile view: Touch and hold the uppermos t
right corner of the screen for 4 seconds.
2 Switch to Tile view C TRL | CTRL | q
Click the side-mouse button to toggle
betwe en System / User modes.
In System mode: Click “Tile” on the
operation-taskbar.
<you should already be in T ile view>
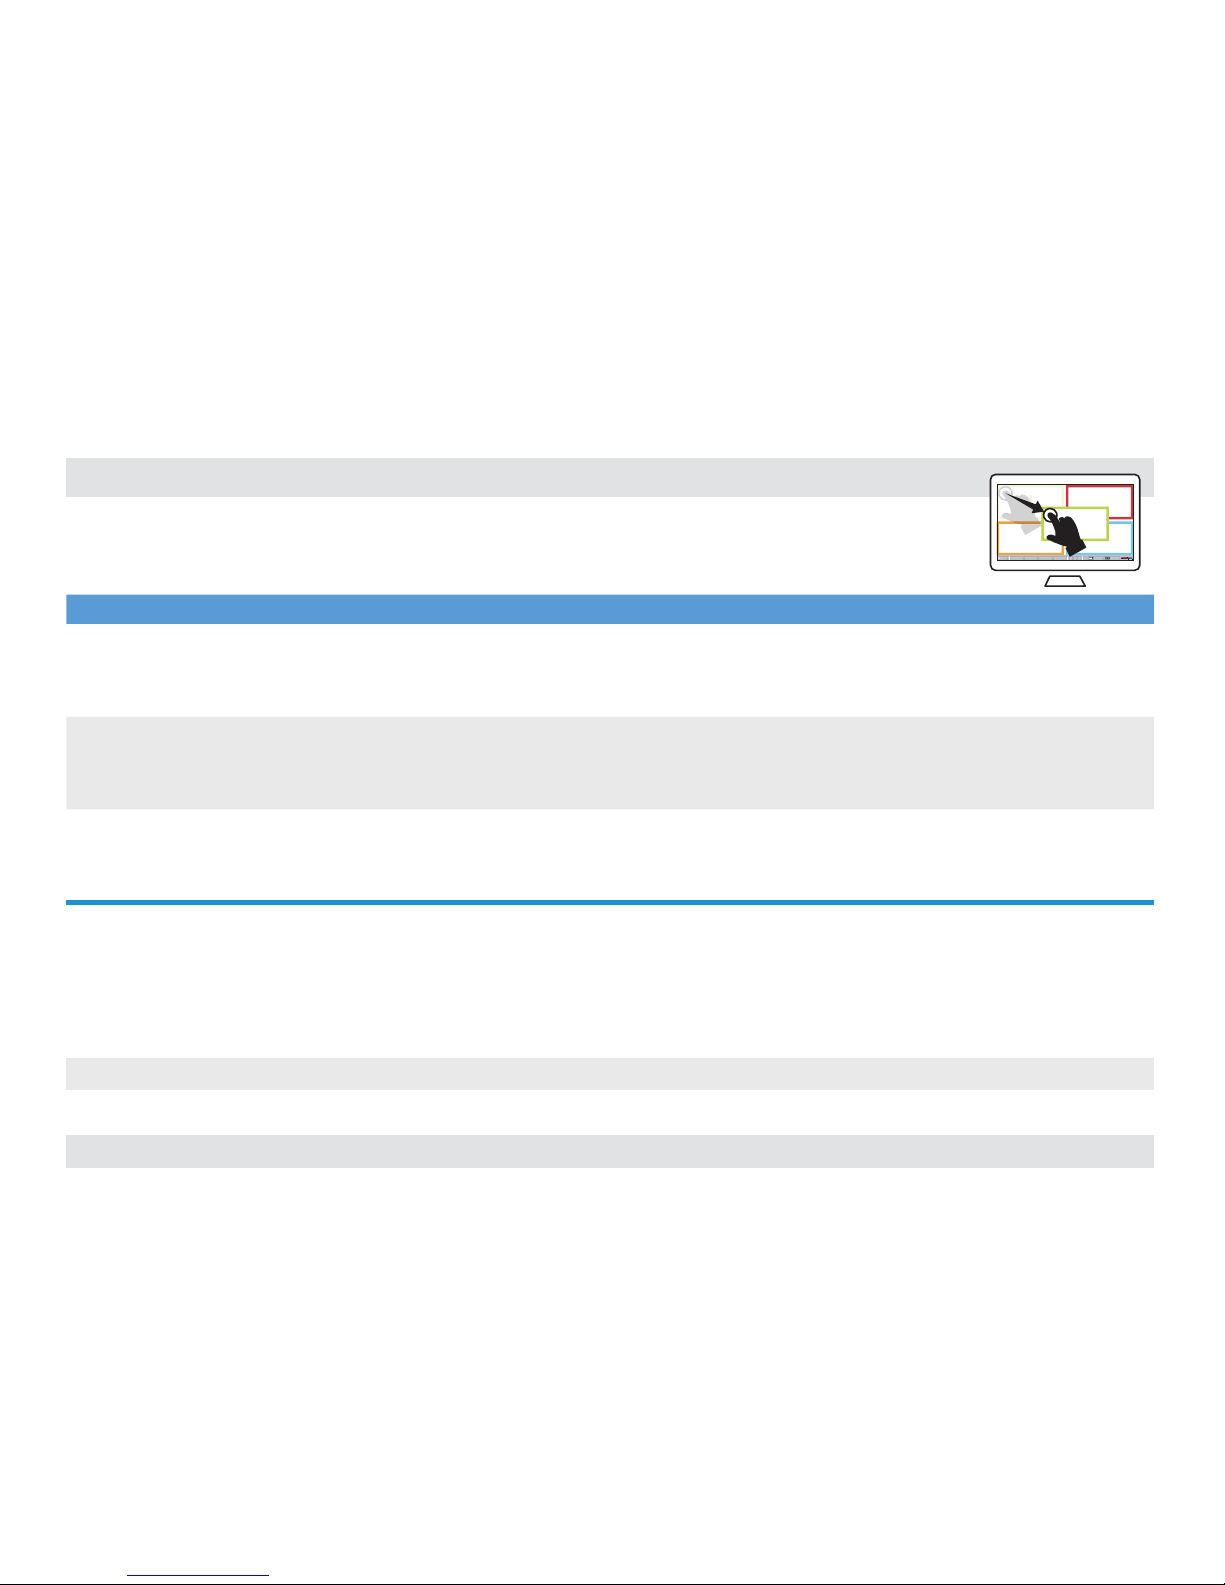
3 Drag channel window
Click to select a channel.
Press and hold the left mouse button and
drag the channel window.
Tap and hold the upper left corner of a
channel and drag the window.
Note: to revert from the custom tile to the original tile mode, type CTRL | CTRL | q and then long press the “Tile” button to save.
2
Channel 1Setup Channel 2 Channel 3 Channel 4 1 2 3 ? Scale Tile
3 4
1
1
Page 24
23
HSL Secure KVM Combiner Quick Star t Guide
OPERATION
SECTIONS
Table of Contents
1 2 43
5.4 Save custom views as presets:
Save custom screen layouts as presets by long-pressing the 1/2/3 buttons.
# Action Description Keyboard Mouse Touch Screen
1 Enter System Mode CTRL | C TRL | o
Click the side-mouse button to toggle between
System / User modes.
In Scale view: Tap 4 times on the enlarged window.
In Tile view: Touch and hold the uppermos t right
corner of the screen for 4 seconds.
2 Switch to Tile view C TRL | CTRL | q
Click the side-mouse button to toggle between
System / User modes.
In System mode: Click “Tile” on the operation-taskbar.
<you should already be in T ile view>
3
Rearrange channels as described in
the previous steps
4 Save a custom preset to 1/2/3 button
On the operation-taskbar, long press the “1” or “2” or
“3” button for 3 seconds to save your preset.
5 View custom preset s CTRL | CTRL | F1-F3 Click 1/2/3 buttons on the op eration-taskbar.
6 Save a custom Tile preset
On the operation-taskbar, long press the “Tile” button
for 3 seconds to save your preset.
7 View custom Tile pre set CTRL | C TRL | F4 Click the “ Tile” button. Tap on “Tile” button on the operation-taskbar.
8 View original Tile preset CTRL | C TRL | q
Note: to revert from the custom tile to the original tile mode, type CTRL | CTRL | q and then long press the “Tile” button to save.
Page 25
24
HSL Secure KVM Combiner Quick Star t Guide
OPERATION
SECTIONS
Table of Contents
1 2 43
5.5 Freeze channel layer (Applicable only for 6 port products)
In scenarios where a specific channel window has to remain on top of others, for example when a live camera has to be constantly viewed, it is
possible to freeze the selected channel window and pinpoint its position so that it remains on top when switching between active sources.
# Action Description Keyboard Mouse Touch Screen
1 Enter System Mode CTRL | C TRL | o
Click the side-mouse button to toggle
betwe en System / User modes.
In Scale view: Tap 4 times on the enlarged
window.
In Tile view: Touch and hold the uppermos t
right corner of the screen for 4 seconds.
2 Switch to Tile view CTRL | CTRL | q
Click the side-mouse button to toggle
betwe en System / User modes.
In System mode: Click “Tile” on the
operation-taskbar.
<you should already be in T ile view>
3
Rearrange channels as described in the
previous steps
Example: place the resized channel (#2)
on top of another channel window
4 Save a custom preset to 1/2/3 button
On the operation-taskbar, long press the
“1” or “2” or “3” button for 3 seconds to
save your preset.
5 Freeze channel layer
CTRL | C TRL | F11 | F | 2
From now on, channel #2 window will
remain on top.
6 Switch Active Channels CTRL | CTRL | 1-6
7 Toggle off Freeze chann el #2 C TRL | CTRL | F11 | F | 2
Page 26
25
HSL Secure KVM Combiner Quick Star t Guide
OPERATION
SECTIONS
Table of Contents
1 2 43
5.6 Presentation mode:
In presentation mode, when changing active channels, every channel is automatically enlarged to full screen size.
Once in full screen, use the key sequence CTRL | CTRL | Channel# (1-4) or push the front panel buttons to switch back to Tile mode and then
repeat the CTRL | CTRL | Channel# (1-4) sequence to enlarge another channel (see example below).
# Action Description Keyboard Mouse Touch Screen
1 Switch to Tile View CTRL | C TRL | q
Click the side-mouse button to toggle
betwe en System / User modes.
In System mode: Click “Tile” on the
operation-taskbar.
In Scale view, User mode: Tap 4 times on the
enlarged window.
In Scale view, System mode: Tap 4 times
on the enlarged window to switch to User
mode, then tap 4 times (again).
2
Presentation mode ON; Enlarge each
channel to full screen when changing
active source using
CTRL | C TRL | Channel# (1-6)
CTRL | C TRL | p N/A N/A
3
Change Active Source
Note: sources can also be switched by
using the combiner ’s front panel push
buttons.
Example:
Enlarge Channel#1
CTRL | C TRL | 1
Revert to Tile View
CTRL | C TRL | 1-4
--------------------------Enlarge Channel#2
CTRL | C TRL | 2
Revert to Tile View
CTRL | C TRL | 1-4
Use steps described in previous actions Use steps described in previous ac tions
4 *Prese ntation mode OFF CTRL | C TRL | n N/A N/A
Page 27
26
HSL Secure KVM Combiner Quick Star t Guide
COMBINER CASCADING
SECTIONS
Table of Contents
1 2 3 4
Introduction
Cascade combiners to view and control up to 36 sources on a single
display, using one set of keyboard, mouse and audio.
• Keep all combiner-features throughout
the cascaded chain (View modes,
VDT…etc .)
• Native touchscreen support across
all sources.
• Independently resize and rearrange
the screen layouts of each source.
• Expand any source to full screen.
• Support RS232 commands for easy
screen layout switching programming.
Child
Combiner 2
Child
Combiner 1
Child
Combiner 3
Child
Combiner 4
#4#3#2
#1
#4#3#2
#1
#4#3#2
#1
#4#3#2
#1
Single
Keyboard & Mouse
Child
Combiner 2
Child
Combiner 1
Child
Combiner 3
Child
Combiner 4
Master
Combiner
Page 28
27
HSL Secure KVM Combiner Quick Star t Guide
COMBINER CASCADING
SECTIONS
Table of Contents
1 2 3 4
Cascading Setup Scheme
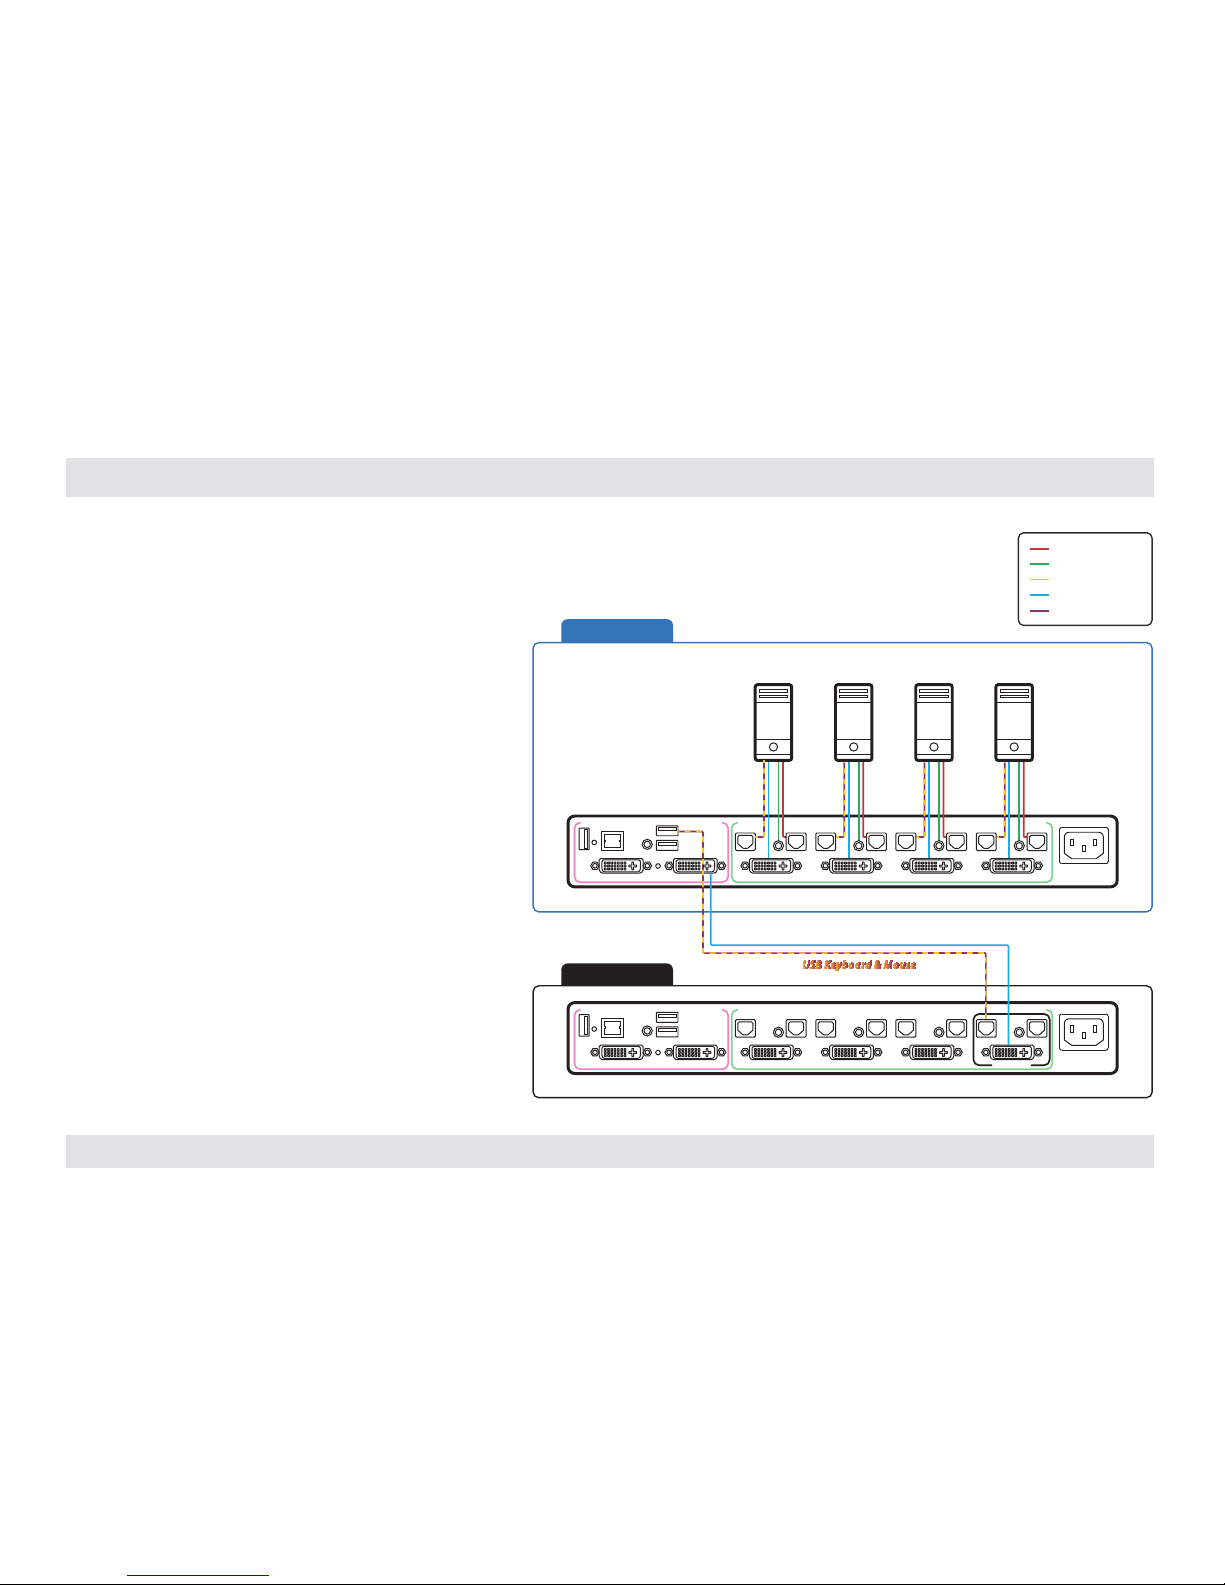
Installation & Setup:
• Step 1 - Connect PCs to Child Combiners.
• Step 2 - Connect the Child Combiners to the
Computer/Source ports on the Root combiner.
• Step 3 - Type: { L CTRL | L CTRL | F11 | i } to enable
RIGHT CTRL on the Root combiner. Once done,
LEFT CTRL keyboard shortcuts will apply on Child
Combiners while RIGHT CTRL shortcuts will apply on
the Root Combiner. Also, touch screen gestures on
the Root Combiner will switch to the LEFT.
Root Combiner
Child Combiner
Computers
CONSOLE PORTS COMPUTER/SOURCE PORTS
fUSB Cable
Audio Cable
Mouse Cable
Display Cable
Keyboard Cable
CONSOLE PORTS COMPUTER/SOURCE PORTS
Connect Keyboard &
Mouse to top USB port
Display Cable
Source #1
Page 29
28
HSL Secure KVM Combiner Quick Star t Guide
COMBINER CASCADING
SECTIONS
Table of Contents
1 2 3 4
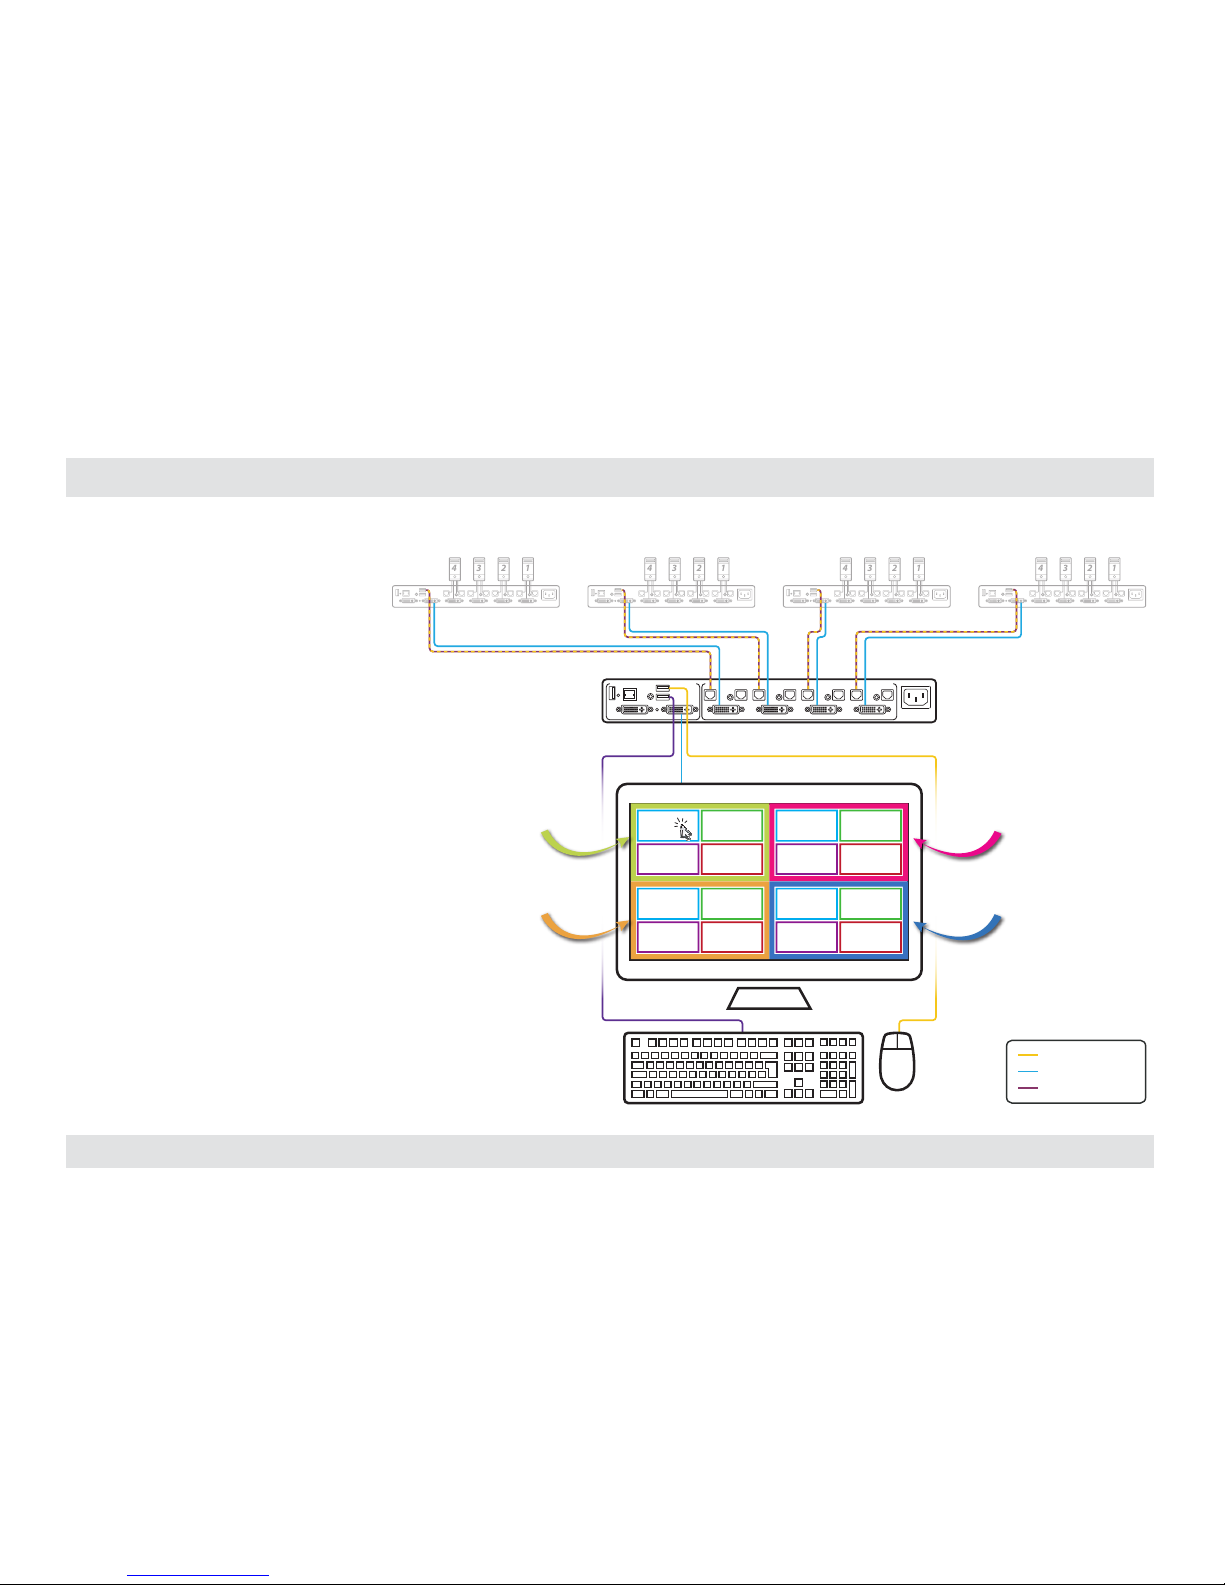
• Step 4 - Enable VDT by typing
{ CTRL | CTRL F11 | c } key
sequence on all combiners.
Remember to use RIGHT CTRL
on the Root Combiner.
• Step 5 - To easily distinguish
between the Child and Root
Combiner’s System Modes it is
recommended to change the
Root Combiner mouse cursor
color through the operationtaskbar setup -> system menu.
• Step 6 - Start working.
CONSOLE PORTS COMPUTER/SOURCE PORTS
4 3 2 1
4 3 2 1
4 3 2 1
4 3 2 1
Child Combiner 4 Child Combiner 3
Root Combiner
Child Combiner 2 Child Combiner 1
3 4
21
3 4
21
3 4
21
3 4
21
Child
Combiner 1
Child
Combiner 3
Child
Combiner 2
Child
Combiner 4
Mouse Cable
Display Cable
Keyboard Cable
Page 30
©2016 All rights reserved. HSL logo and product names are trademarks or service trademark s of HighSecLabs Ltd (HSL). All other marks are the property of their respective owners.
Images fo r demonstratio n purposes only. This document may cont ain confidential an d/or proprietar y information of HSL Cor poration, and it s receipt or posses sion does not convey any
right to repro duce, disclose its contents, or to manufacture or sell anything that it may describ e. Reproduction, disclosure, or use without specific authorization f rom HSL Corporation
is strictly prohibited.
Highseclabs.com
 Loading...