


PoC Radio User Manual
PoC Radio User Manual
Safety Matters
Please read the rules below. Nonobservance of these rules may cause danger or violation of
law.
• The use of this radio must comply with regulations of local government.
• Tu rn of f the radio before you enter places of potentially explosive or flammable environme nt.
• Do not replace or charge battery pack in places of potentially explosive or flammable
environment.
• Turn off the radio before you approach blast area and detonator area.
• Do not use the damaged antenna which may cause a minor burn on skin.
• Only qualified technicians are allowed to maintain this two-way radio. Do not disassemble
the radio by yourself.
• To avoid problems caused by electromagnetic interference or electromagnetic compatibility,
please turn off the radio in places with “Wireless Communication Transmit Equipment
Prohibited” mark, such as hospitals or other health care places. When taking a plane, turn off
the radio if required.
• In a car with an air bag, do not place the radio within possibly involved area when air bag
inflates.
• Do not expose the radio to direct sunlight or near heating devices for a long time.
• Keep the radio vertical and speak near the microphone during transmitting.
• Make sure that the antenna is 2.5 cm away from the body during transmitting if you wear the
radio on your body.
Product Inspection
Thanks for using HQT PoC radio. Before use, we recommend that:
First check the package for any signs of damage;
Carefully open the package and identify the items listed below;
If any item is missing or damaged during shipment, please contact your dealer.
Item List
Item Quantity Item Quantity
Main Unit 1 Belt Clip 1
Antenna 1 User Manual 1
Battery 1 USB Charging Cable 1
Hand Strap 1 USB Power Adapter 1
1
PoC Radio User Manual
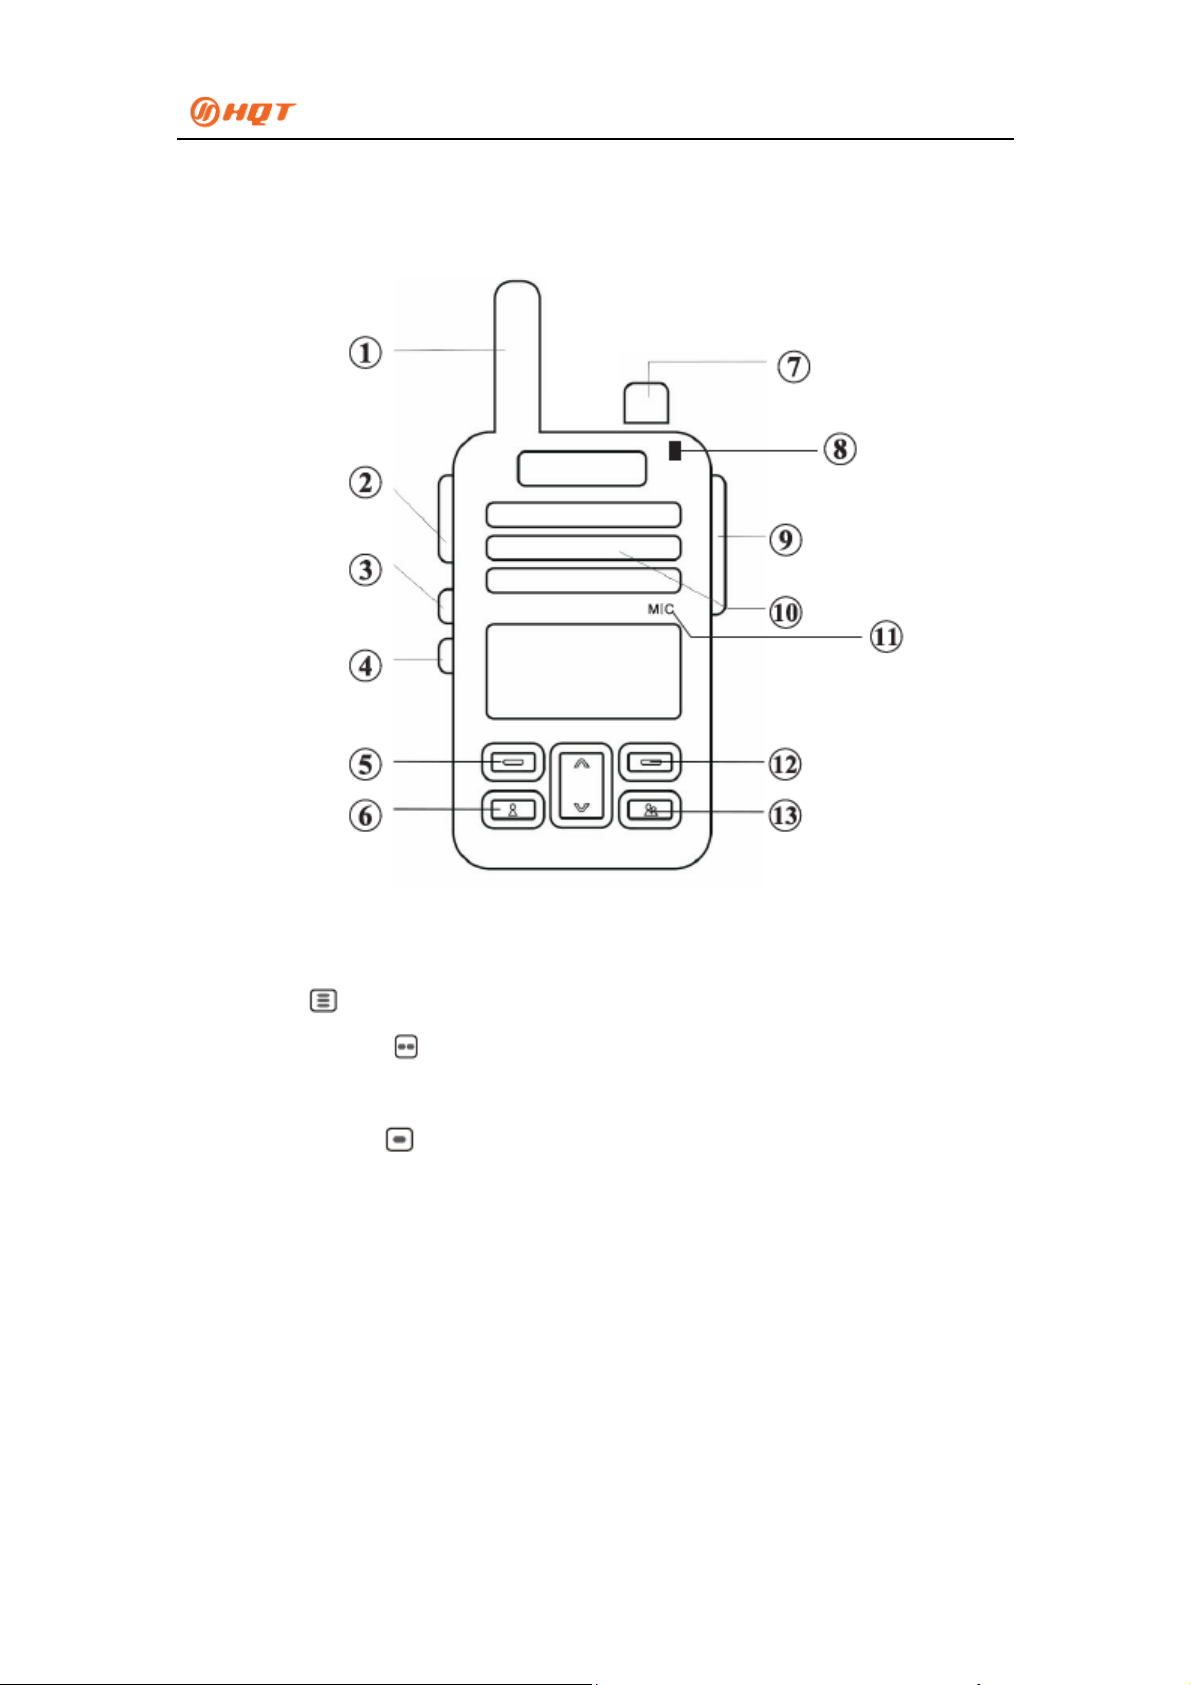
Product Overview
Radio Schematic Diagram
1. Antenna: To receive and transmit signals with helical connector
2. PTT Button
3. Programmable Key
members
4. Programmable Key
group selection mode
5. Menu
6. Emergency Contact
7. Power On-Off/Volume Control Knob: To turn on/off the radio and adjust the volume
8. LED Indicator: LED glows red when transmitting, flashes green slowly when standing by,
and glows green when receiving.
9. Earphone Jack
10. Speaker
11. Microphone
12. Cancel/ Back
: Hold down PTT button to transmit; release PTT button to standby
: Short Press: battery power/user query; Long Press: to select
: Short Press: group/ number of online member query; Long Press:
2
PoC Radio User Manual
13. Emergency Group
LED Indicator Radio Status
LED flashes green slowly Group standby mode
LED flashes green rapidly Weak/ No network signal
LED flashes orange slowly Private Call mode (standing by)
LED glows red Transmitting
LED glows green Receiving
Features
1. Turning the Radio On/ Off
Rotate the “Power On-Off/ Volume Control Knob” clockwise to turn on the radio. Rotate it
counter-clockwise to adjust the volume or turn off the radio (There is prompt when the radio is
powering off).
2. Making a Call
Hold down the PTT button
standby mode.
3. Standing By and Receiving
It indicates the radio network connection is normal and the radio is in standby mode when the
LED flashes green slowly.
It indicates the radio network connection is abnormal or there is no network signal when the
LED flashes green rapidly.
It indicates the radio is in receiving mode when the LED glows green.
It indicates the radio is in private call standby mode when the LED flashes orange slo wly.
4. Private Call (Cross-group/ Intragroup Private Call)
Long press the
rotating the Selector Knob (or pressing the
enter “Private Call Mode” and hold down
Exit “Private Call Mode” by pressing the
key to enter “Member Selection” mode, and select the desired member by
to enter call mode and the LED glows red; release it to enter
key and key). Press PTT button to
button to call the selected member.
key and key (or rotating the Selector Knob)
after the private call is finished.
Note: “Cross-group Private Call” or “Intragroup Private Call” permission can be set via the Use r
Management Platform.
5. Selecting a Group
3

PoC Radio User Manual
Long press the key to enter “Group Selection Mode” and select a group by rotating the
Selector Knob (or pressing the
enter the selected group.
6. Programmable Key Control
Long press the
to lock and unlock the Selector Knob.
Long press the
turn on/ off Call Start/ End Tone.
7. Network Settings (Only applicable to E series)
To switch network between 2G and 3G, press the
turn on the radio, release the
Press the “Menu” key and select “Network Settings” to switch net work among 2G, 3G and Auto,
it indicates 2G/ 3G network auto switch when “Auto” is selected and “AT” is displayed on the
top left corner of the screen.
8. Status Query
key to turn on the radio and release it when LED glows red, this enables
key to turn on the radio and release it when LED glows red, this enables to
key and key), press PTT button to confirm and
button when the radio is turned off and
button when a sound of “du” is heard.
Press the
name/ network.
Press the
online member.
9. Setting an Emergency Contact
Press the “Menu” key and select “Select Member”, press the “Menu” key to enter and select a
member by pressing the “∧” and “∨” keys. Long press the
selecting the desired member, and it means the emergency contact is set successfully when
there is corresponding voice prompts.
Exit emergency contact call by pressing any key except the
10. Setting an Emergency Group
Press the “Menu” key and select “Select Group”, press the “Menu” key to enter and select a
group by pressing the “∧” and “∨” keys. Long press the
selecting the desired group, and it means the emergency group is set successfully when there
is corresponding voice prompts.
key in standby mode, there would be voice prompts of battery power/ device
key in standby mode, there would be voice prompts of current group/ number of
key for 2 seconds after
button.
key for 2 seconds after
Exit the call by pressing any key except the
button.
4

PoC Radio User Manual
11. Emergency Contact/ Emergency Group Query
Press the
Emergency Group.
If no Emergency Contact or Emergency Group is set, there would be corresponding voice
prompts of “Emergency Contact Not Set” or “Emergency Group Not Set”.
12. Calling/ Exiting the Emergency Contact/ Emergency Group
Long press the
pressing any key except the
13. Icons and Description
Icon Description Icon Description
Parameter Settings
or key in standby mode to check the current Emergency Contact or
or key in standby mode to transmit a call, and exit the call by
button when the call is finished.
Signal Strength
Battery Power
Menu Indication
Signal Strength
Signal Strength
Mute
TX Disable
Member
Group
CDMA 2G Network
CDMA 3G Network
CDMA 4G Network
WCDMA 3G Network
User Management Platform
Login User Management Platform
1. Input URL: http://user.hqtpoc.com to enter the login page of the User Management Platform
as below:
5

PoC Radio User Manual
2. Enter the User Account and Login Password your dealer offers and Verification Code to log
in.
Functions of User Management Platform
Device Management
1. My Device: To check the user’s Device ICCID, Device Name, Status, Online/ Offline,
Creation Date, Payment Status, Expiration Date and Operation (Disable/ Delete the device).
2. My Order: When you need to do the payment, you can click the ICCID to select the device
(Several devices can be selected at the same time) in Device List o f “My Device”, and click the
“Go pay” button to create the order. System would display “Order created”, and the order can
be checked in “My Order”, then you can request your dealer to pay it for you.
6

PoC Radio User Manual
Group Management
My Group
In “My Group”, current group and its “Group ID”, “Group Name”, “Note” and “Operation
(Member Management, Permissions Management, Edit and Delete)” can be checked.
1. Member Management: To add or delete members in the selected group of the user.
2. Permissions Management: To set permissions of the devices in the selected group of the
user.
Low/ High TX Priority: When High TX Priority is enabled, you can press the PTT button to
interrupt the transmitter while your radio is receiving, and you can transmit while the
transmitter would be automatically switched to receiver (The prerequisite is that the transmitt er
has low TX priority).
TX Disable/ Enable: To set whether the user can transmit or not in the group, the radio can
only receive if it is TX disabled.
GPS: To set whether to turn on GPS in the group if the radio has GPS positioning function (It
will cause consumption of battery power when GPS is enabled).
Private Call: To set whether to allow users to transmit a private call in the group. Users can
select another one to do one-to-one conversation in the group when Private Call is enabled. I n
Private Call mode, no Group Call can be received and users can manually exit Private Call
mode by pressing any key except the PTT button.
3. Edit: To edit group name and note.
4. Delete: To delete the selected group.
Add Group
Enter new “Group Name” and “Note” and submit, and system would indicate the group is
added successfully.
Personal Settings
Reset Password
FCC RF Exposure Information and Statement
7

PoC Radio User Manual
This device meets the government's requirements for exposure to radio waves. The guidelines are
based on standards that were developed by independent scientific organizations through periodic
and thorough evaluation of scientific studies. The standards include a substantial safety margin
designed to assure the safety of all persons regardless of age or health. The SAR limit of USA
(FCC) is 1.6 W/kg averaged. Device types: Two way radio (FCC ID: P6NGH-555LTE) has also
been tested against this SAR limit. SAR information on this and other pad can be viewed on‐line
at http://www.fcc.gov/oet/ea/fccid/. Please use the device FCC ID number for search. This device
was tested simulation typical 0mm to body and 25 mm front of face. To maintain compliance with
FCC RF exposure requirements, use accessories should maintain a separation distance between
the user's bodies mentioned above, the use of belt clips, holsters and similar accessories should not
contain metallic components in its assembly, the use of accessories that do not satisfy these
requirements may not comply with FCC RF exposure requirements, and should be avoided.
FCC Warning
This device complies with Part 15 of the FCC Rules. Operation is subject to the following two
conditions:
(1) This device may not cause harmful interference, and (2) this device must accept any
interference received, including interference that may cause undesired operation.
NOTE:
1. RF energy will be generated only when the radio is transmitting.
2. The EUT must be 2.5cm away from human face when transmitting. The belt clip can be
removable only when install a SIM card. With body worn SAR, the typical use of the products
is with the belt clip, and the belt clip is not to remove.
Any changes or modifications to this unit not expressly approved by the party responsible for
3.
compliance could void the user's authority to operate the equipment.
8
 Loading...