

Page 1

LPQ58/80
User Manual
Xiamen Hanin Electronic Technology Co.,Ltd.
ADD: Room 305A,Angye Building, Pioneering Park,
Torch High-tech Zone, Xiamen, China 361009
Tel: +86-(0)592-5885993
Fax: +86-(0)592-5885992
Page 2

REVISION RECORDS
REV. DATE DESCRIPTION Drawn Checked Approved
1.0 2014.10.24 Primary Cui Xiao Yang Kaiqu Ren Xiaowei
Page 3

CONTENTS
Important Safety Instructions
.................................................................................................................
1
Chapter1. Introduction
...........................................................................................................................
2
1.1 POS Printer Packing
..........................................................................................................
2
1.2 Printer Components
.........................................................................................................
3
Chapter 2 Specification
..........................................................................................................................
4
2.1 Specification
.....................................................................................................................
4
Chapter 3 Operation Methods
...............................................................................................................
6
3.1 Paper Installation
..............................................................................................................
6
3.2 Functions use
....................................................................................................................
8
3.2.1 Power on
................................................................................................................
8
3.2.2 Power off
...............................................................................................................
8
3.2.3 Self-test
..................................................................................................................
8
3.2.4 Paper feeding (manual operation)
........................................................................
8
3.2.5 Power Supply
.........................................................................................................
8
3.2.6 Parameter setting
..................................................................................................
9
Chapter 4 Interface
...............................................................................................................................
12
4.1 USB interface
..................................................................................................................
12
4.2 Cash drawer interface
....................................................................................................
12
4.3 RS232 interface
...............................................................................................................
13
Page 4

LPQ58/80 User Manual
Rev 1.0 www.hprt.com
1
Important Safety Instructions
1. Safety warning
Warnings: The print head will become very hot during printing; avoid contact with the print
head after printing has finished.
Warnings: Do not touch the printer head and connector in case static damage the printer
head.
2. Instructions
Read the following instructions thoroughly before starting up your printer.
1) Place the printer on a solid and even base so that it cannot fall.
2) Leave enough space around printer for operation and maintenance.
3) Keep all liquids away from the printer.
4) Do not expose the printer to high temperatures, direct sunlight or dust.
5) Protect the printer from shock, impact and vibration.
6) Ensure the printer is connected to a socket with the correct mains voltage.
7) Switch off the printer power supply when it’s not in use for a long time.
8) To ensure the printing quality and reliability, suggest use the same quality or recommend paper
supplier.
9) Pls. switch off the power supply when connect/disconnect all the ports or it will cause damage
to the printer control circuit.
10) Never carry out maintenance or repair work yourself. Always contact a qualified service
technician.
11) Keep this User Manual in a place which is easily accessible at all times.
Page 5
LPQ58/80 User Manual
Rev 1.0 www.hprt.com
2
Chapter1. Introduction
Pls. follow the following procedures to install the printer and print out the test paper.
1.1 POS Printer Packing
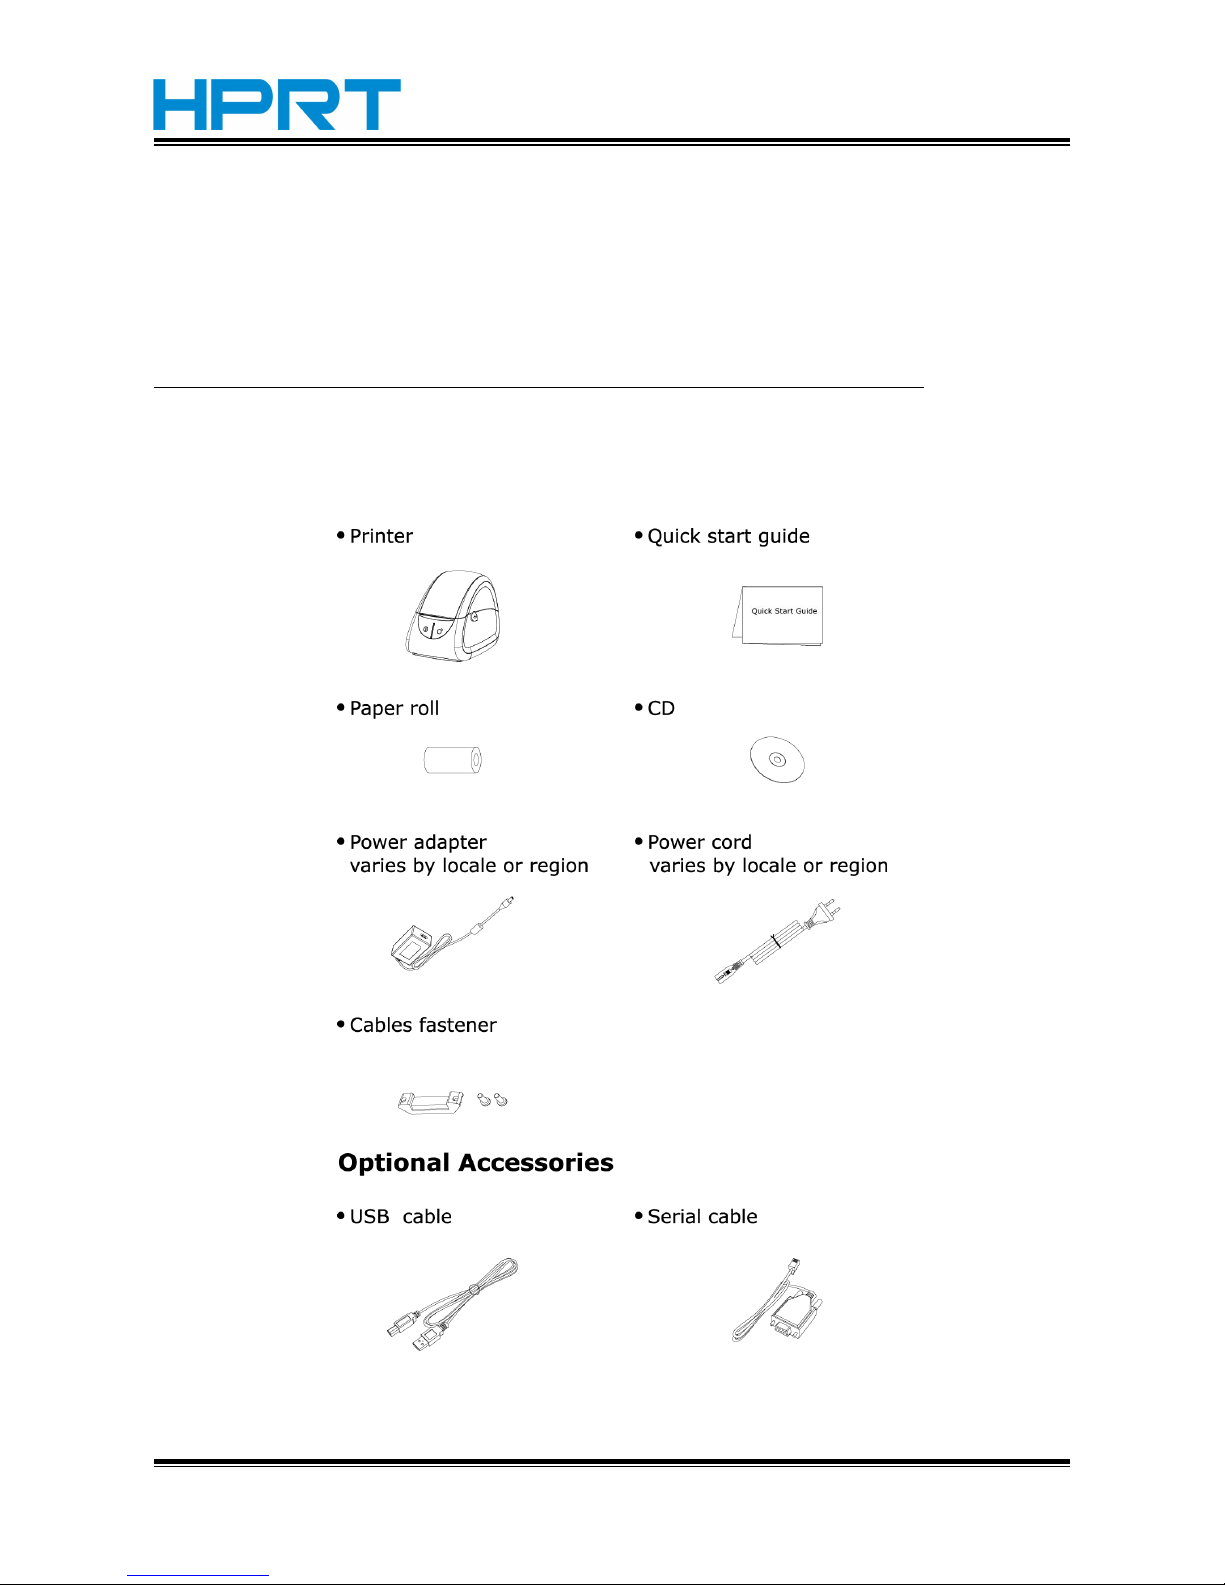
Note: Pls. do not connect the printer to the computer before the installment finished.
1 Open the packing of printer and keep the packing material.
2 Make sure you own all parts as follows:
Figure 1-1
Page 6
LPQ58/80 User Manual
Rev 1.0 www.hprt.com
3
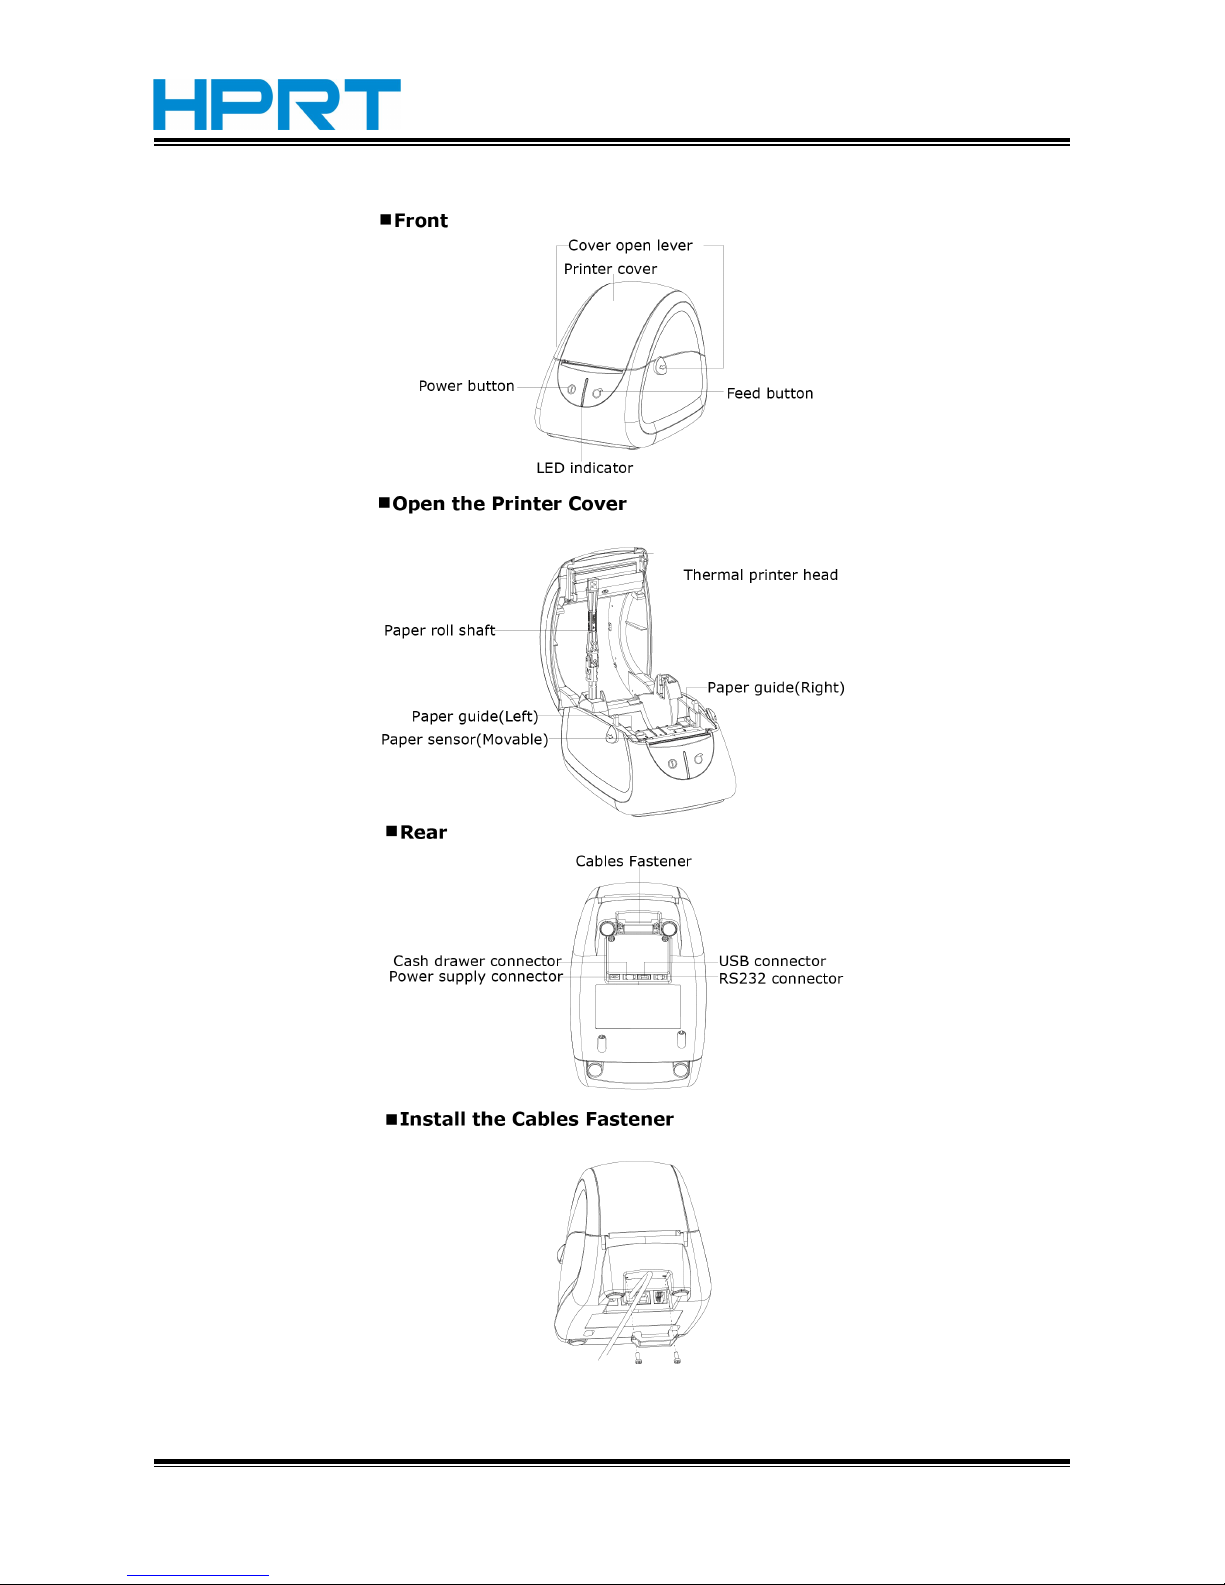
1.2 Printer Components
Figure 1-2
Page 7
LPQ58/80 User Manual
Rev 1.0 www.hprt.com
4
Chapter 2 Specification
2.1 Specification
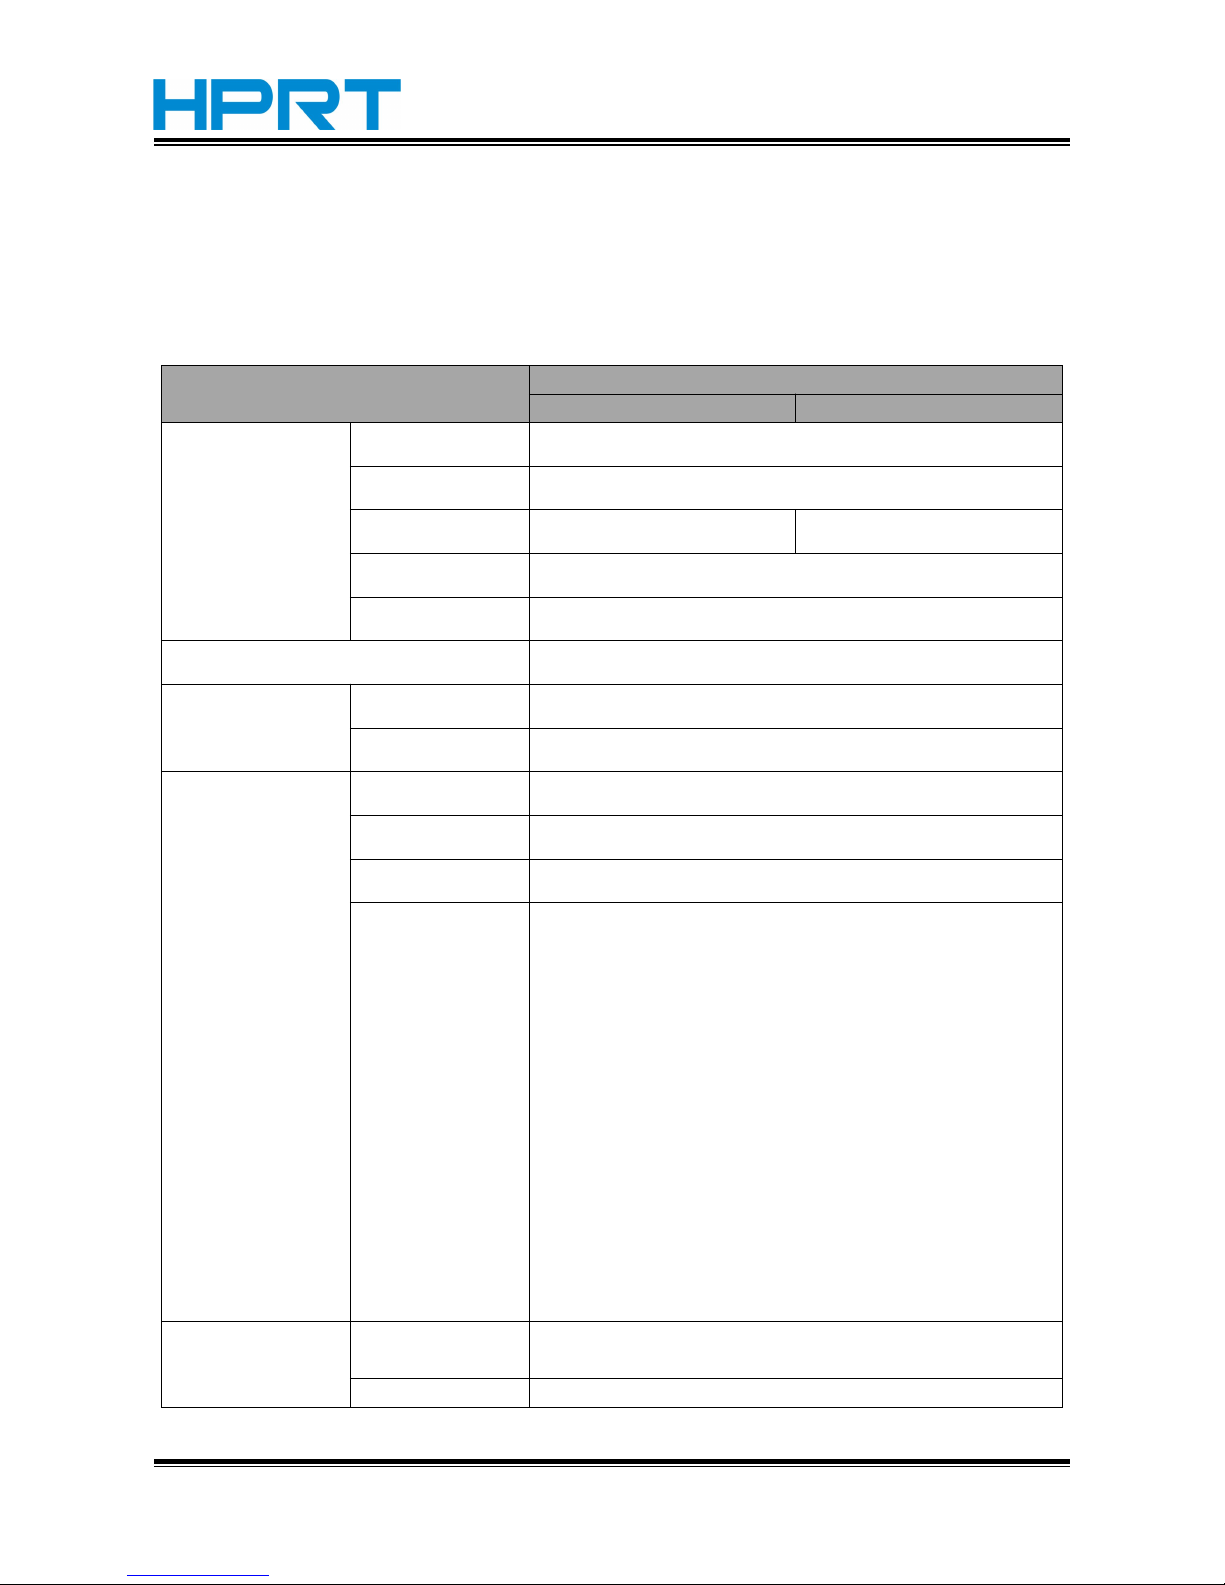
Table 2-1 General Specifications
(1/2)
Items
Parameter
LPQ58 LPQ80
Printing
Printing method Thermal line printing
Resolution 203dpi
Printing width 56mm 72mm
Printing speed 100mm/s
Interface RS232/USB/Cash drawer
Page mode Support
Memory
RAM 1M Byte
Flash 4M Byte
Character
Chinese
GB18030
Alphanumeric
ASCⅡ9×17,12×24
User-defined Yes
Codepage
[PC437(USA:StandardEurope)],[Katakana],[PC850(Multil
ingual)],[PC860(Portuguese)],[PC863(Canadian-French)]
,[PC865(Nordic)],[PC857(Turkish)],[PC737(Greek)],[ISO8
859-7(Greek)],[WPC1252][PC866(Cyrillic#2)],[PC852(Lat
in2)],[PC858(Euro)],[KU42],[TIS11(Thai)],[TIS18(Thai)],[P
C720],[WPC775],[PC855(Cyrillic)],[PC862(Hebrew)],[PC
864(Arabic)],[ISO8859-2(Latin2)],[ISO8859-15(Latin9)],[
WPC1250],[WPC1251(Cyrillic)],[WPC1253],[WPC1254],[
WPC1255],[WPC1256],[WPC1257],[WPC1258],[MIK(Cyr
illic/Bulgarian)],[CP755(EastEurope,Latvian2)],[Iran],[Ira
nian],[Latvian],[ISO-8859-1(WestEurope)],[ISO-8859-3(L
atin3)],[ISO-8859-4(Baltic)],[ISO-8859-5(Cyrillic)],[ISO-8
859-6(Arabic)],[ISO-8859-8(Hebrew)],[ISO-8859-9(Turki
sh)],[PC856]
Barcode
1D
UPC-A,UPC-E,EAN8,EAN13,CODE39,ITF,CODEBAR,CODE
128,CODE93
2D PDF417、QR code
Page 8
LPQ58/80 User Manual
Rev 1.0 www.hprt.com
5
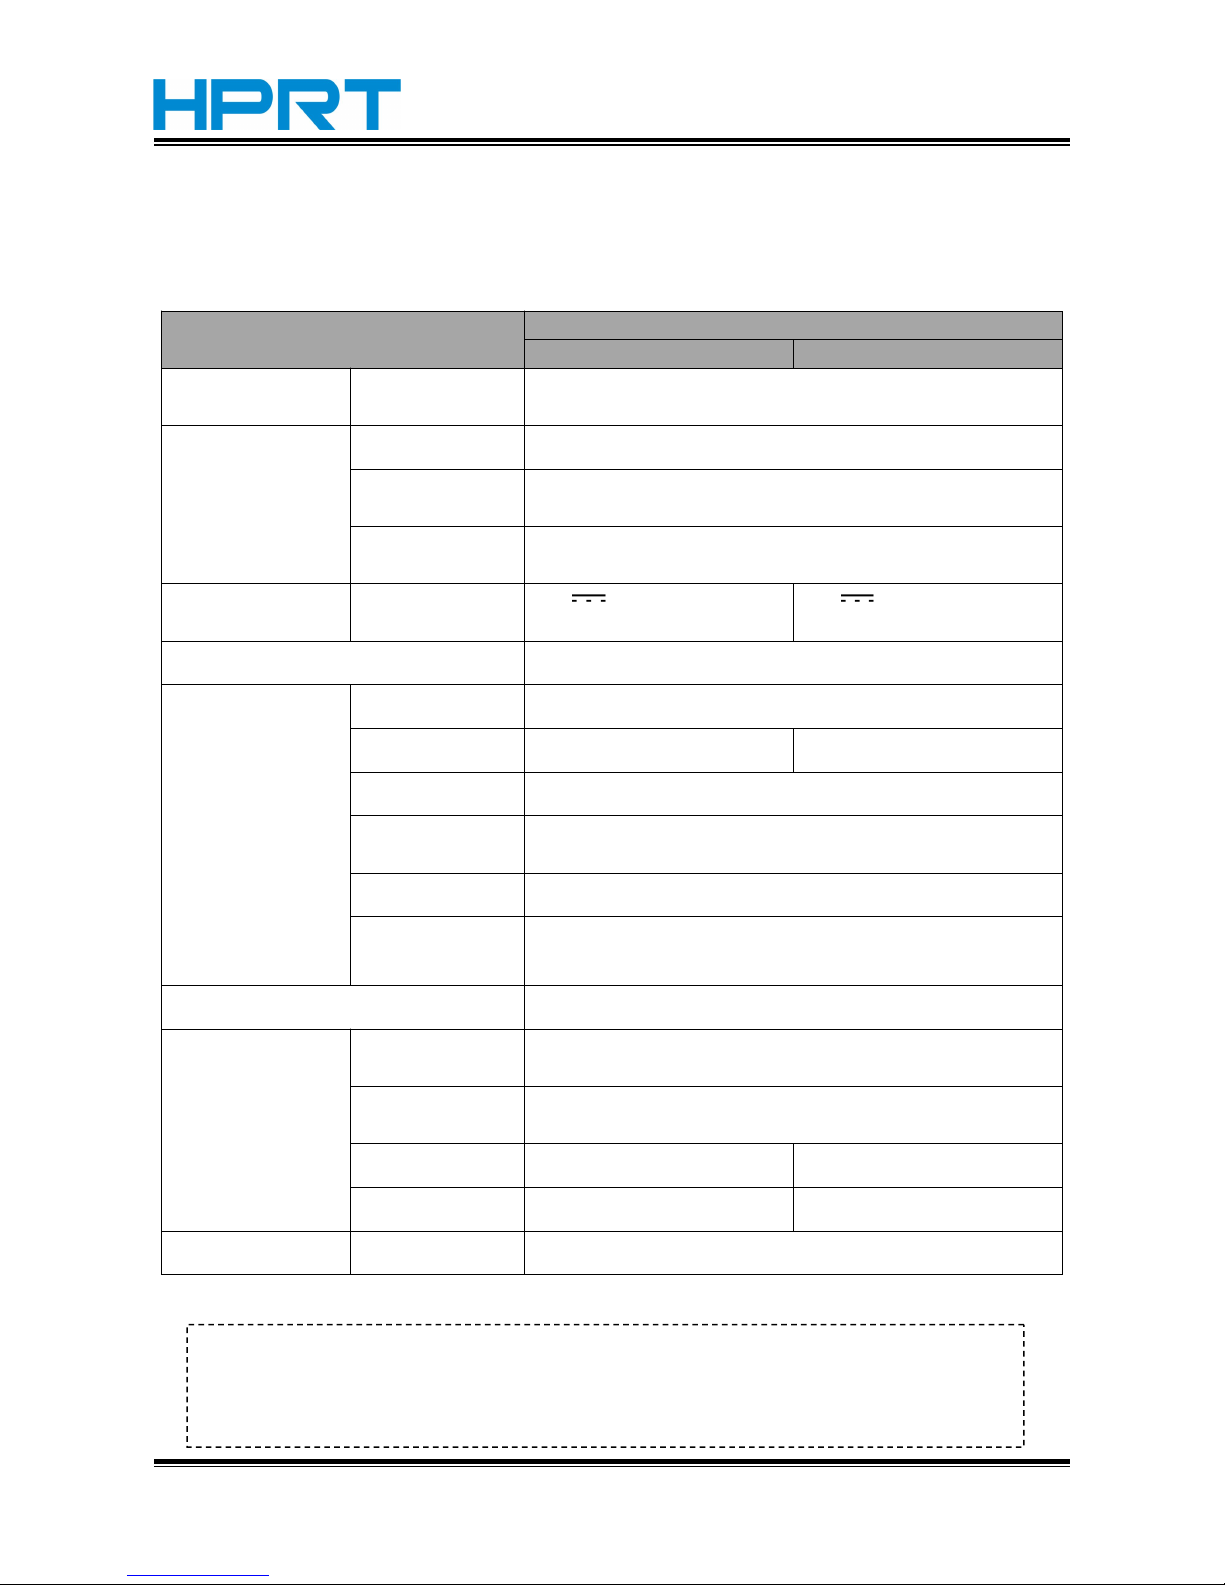
Table 2-1 General Specifications(Continued)
(2/2)
Items
Parameter
LPQ58 LPQ80
Detection
Sensors
Cover open detection,out of paper detection,label gap
detection and black mark detection
LED
indicator
Power indicator Blue
Normal working
indicator
Green
No paper/Error
indicator
Red
Power supply Input
12V 2A
(External power adapter)
12V 2A
(External power adapter)
Cash drawer control 12V
Paper loading
Paper type Thermal paper/thermal label paper/black mark paper
Paper width 58mm 80mm
Paper thickness 0.25mm Max.
Paper roll
diameter
90mm Max for inner paper feeding, (no Max when
outer paper feeding)
Paper loading Easy loading
Recommended
paper
FD210,PD150R,PD160R
(OJI Paper CO.,LTD.)
Command TSPL/ESC
Physical
characteristics
Working
condition
0~40℃/20~85%RH
Storage
condition
-20~70℃/5~95%RH
Dimension 186(L)*128(W)*133(H)mm 188(L)*150(W)*134(H)mm
Weight 805g (without paper roll) 880g (without paper roll)
Reliability TPH 150km
NOTE:
Pls. use the recommended thermal paper or same quality paper, otherwise it will
influence the printing quality and decrease the thermal print head life.
Page 9
LPQ58/80 User Manual
Rev 1.0 www.hprt.com
6
Chapter 3 Operation Methods
3.1 Paper Installation
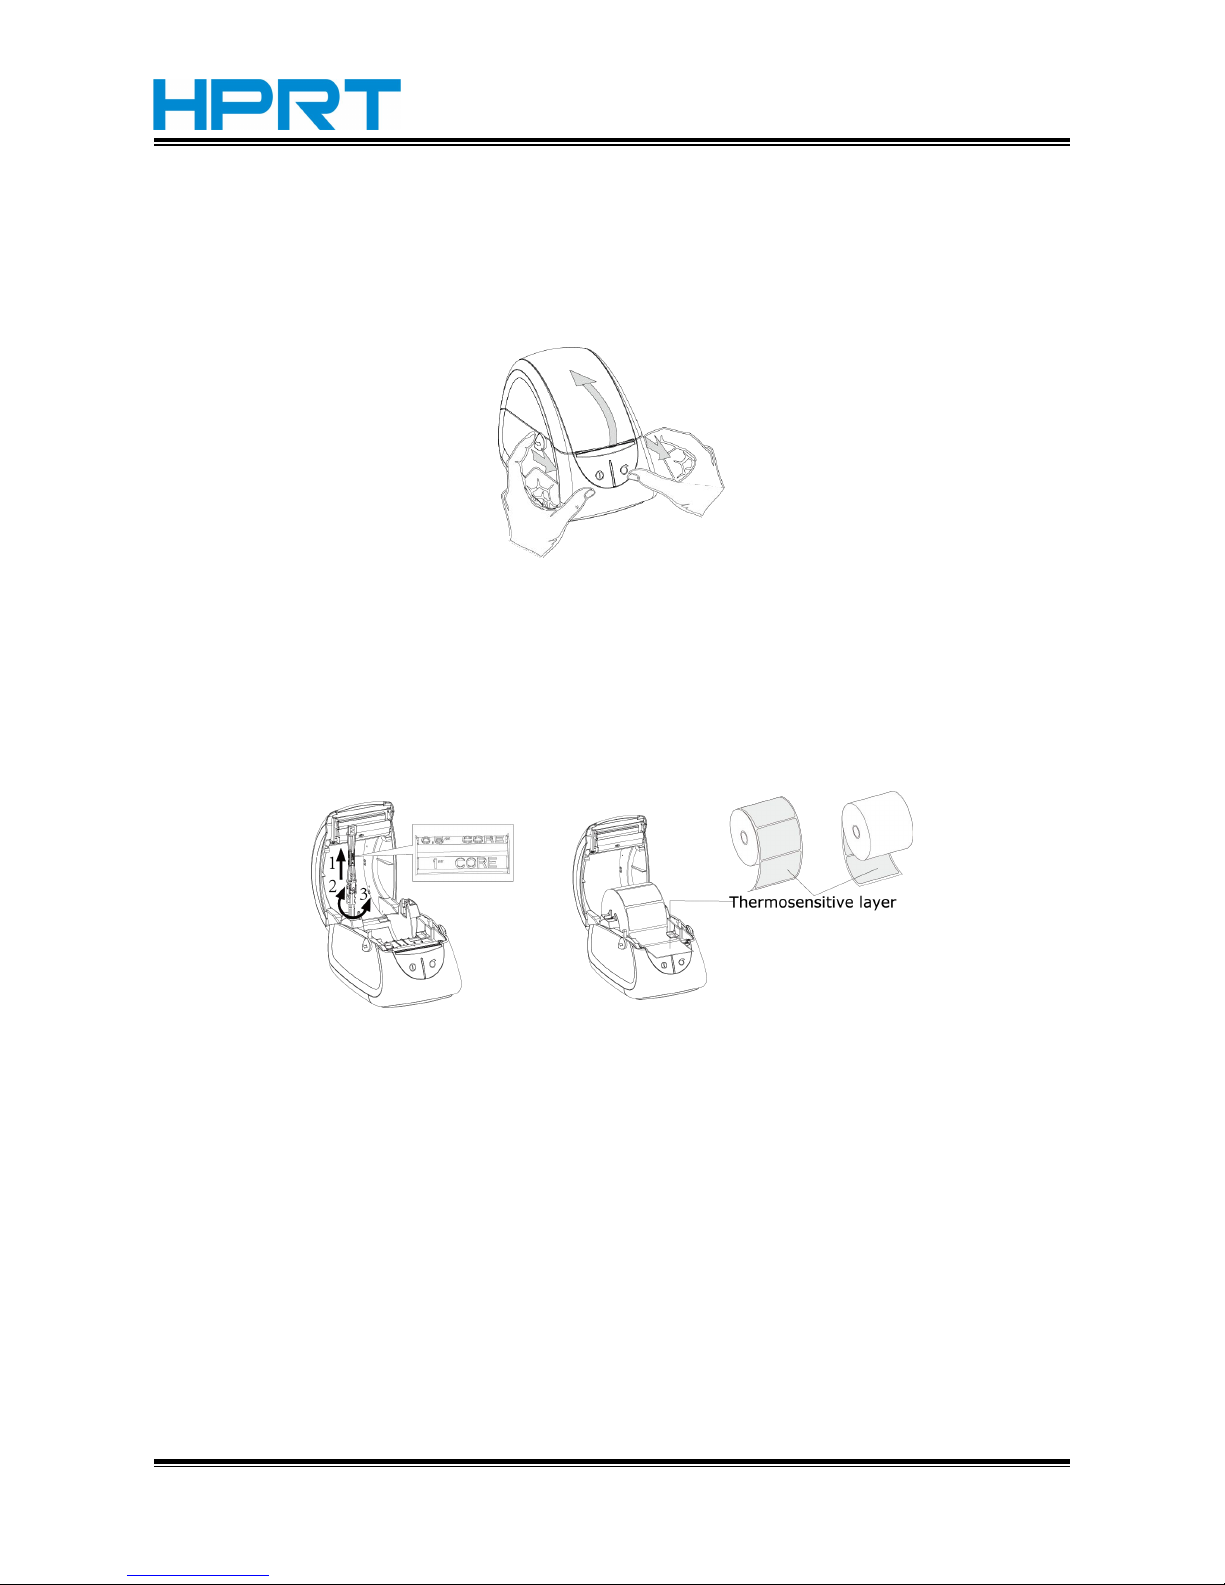
1.Pull the cover open lever towards you and lift the cover.
2.Firstly,pull up the paper roll shaft.Then adjust the shaft according to the internal diameter of
paper roll(There is detailed illustration which is about internal diameter of paper roll on the
shaft).Next,install the paper roll and fix the shaft.
Figure 3-2
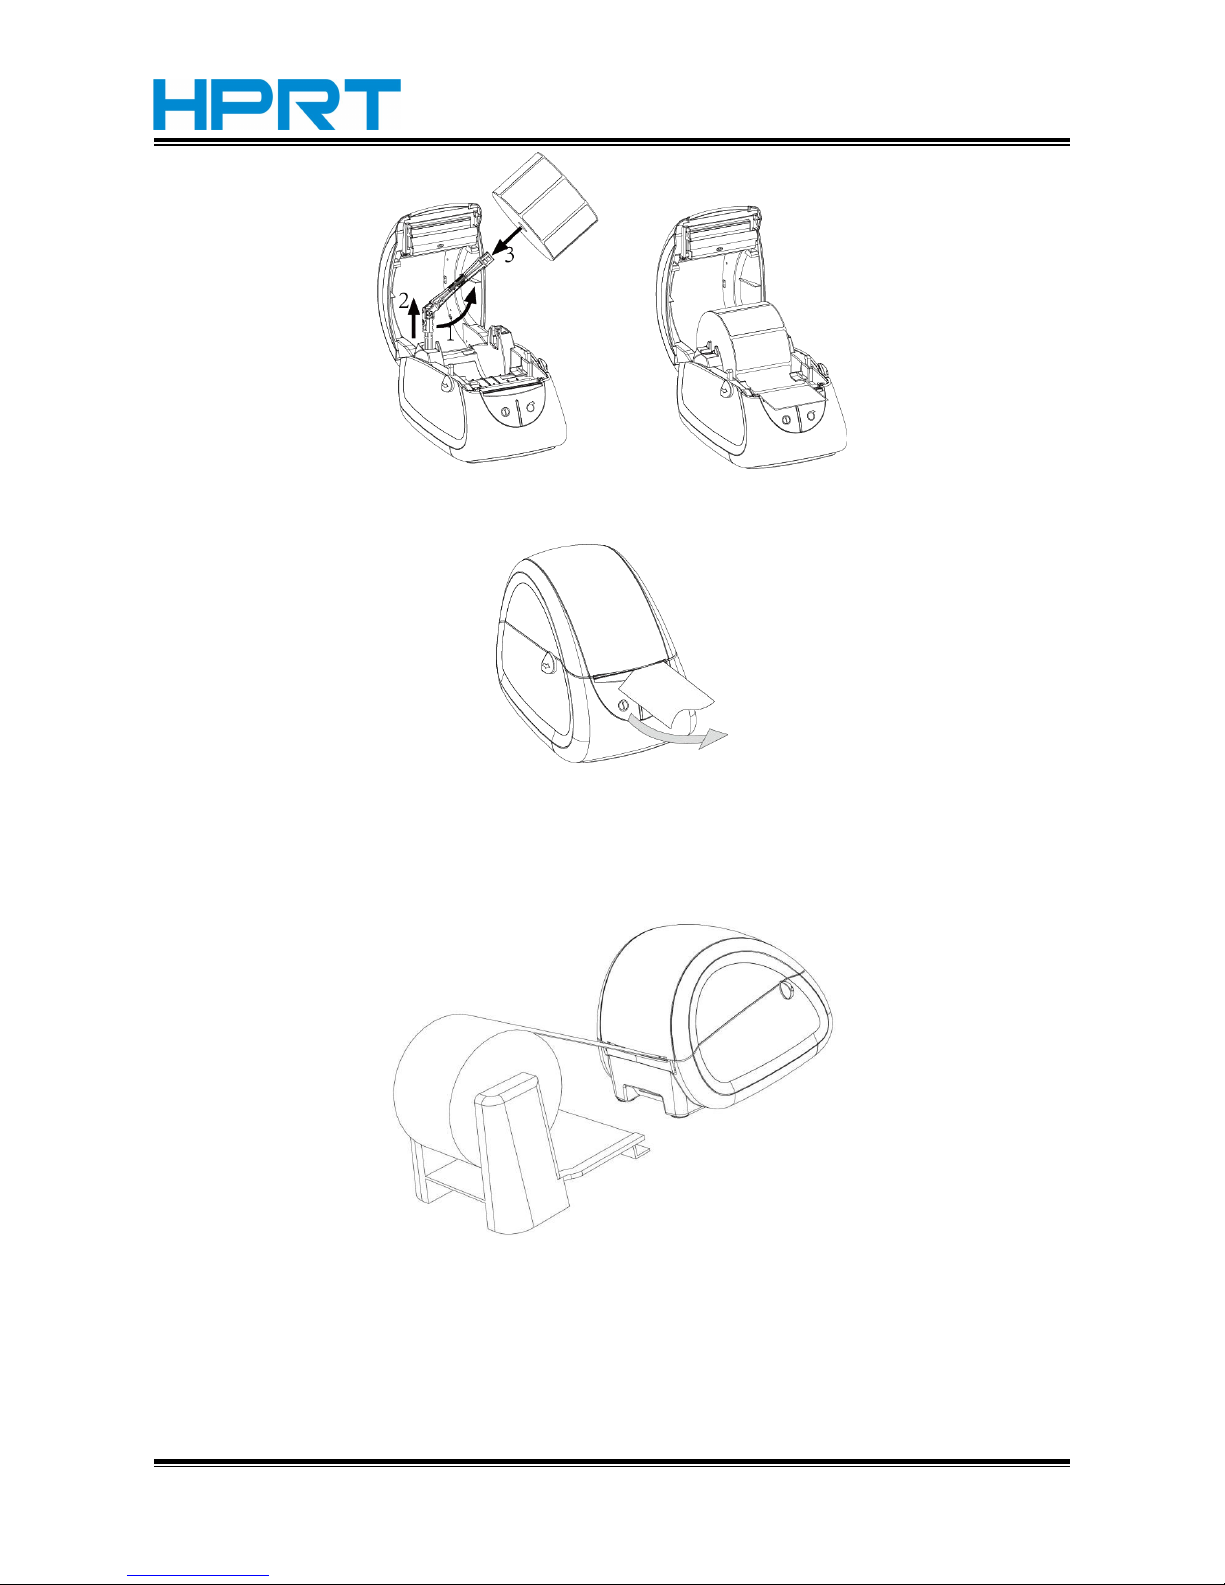
3.Pull out some paper roll,then open the paper guides to the max width and pass the paper through
the paper guides.Next,adjust the paper guides to the paper width.
Figure 3-1
Page 10
LPQ58/80 User Manual
Rev 1.0 www.hprt.com
7
3.Press down the center if the printer cover to close the cover,then tear off the excess paper.
Figure 3-4
Loading External Paper Roll
Figure 3-5
Figure 3-3
Page 11
LPQ58/80 User Manual
Rev 1.0 www.hprt.com
8
3.2 Functions use
3.2.1 Power on
When printer power off, keep pressing 【POWER】 button about 1 second,then printer power on
and the LED indicator is blue.When printer works normally,the LED indicator is green. When paper
out or abnormal working, the LED indicator is red.
3.2.2 Power off
When printer power on, keep pressing 【 POWER】 button about 1 second,then printer power
off.LED indicator goes out.
3.2.3 Self-test
When user get the printer,user can have a self test to find the current setting and state.
The method of self-test:
Make sure it is powered off then press 【FEED】 button.While you hold 【FEED】 button,press
【POWER】 button.Printer will print out demo paper which includes the current state of printer,
printer setting and example of print.
3.2.4 Paper feeding (manual operation)
Under the normal working state ,press 【FEED】 button,then printer starts to feed.
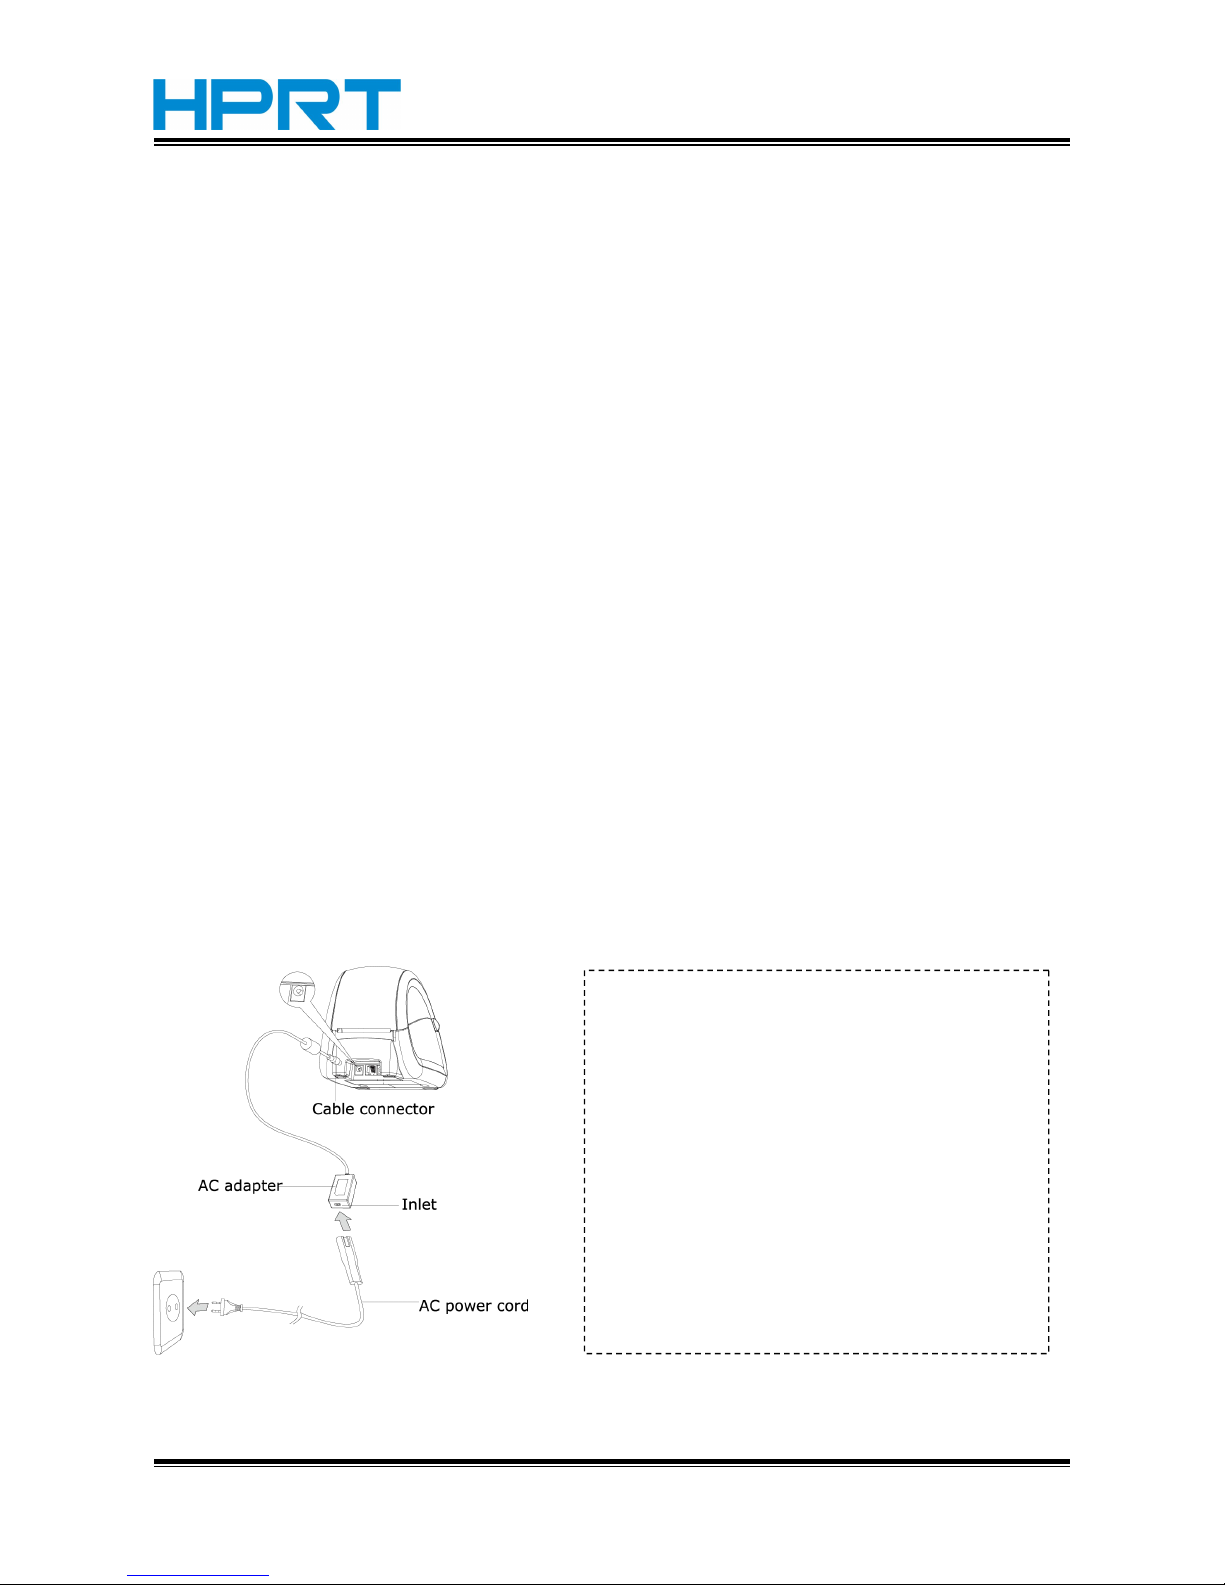
3.2.5 Power Supply
1) Plug in the cable connector of the AC
adapter to the power connector at the rear of
the printer.
2) Connect the AC power cord to the inlet of AC
adapter and insert AC power cord plug into a
suitable wall outlet.
Warning:
Be sure to use the specified power adapter
provided by our company. Connection to an
improper power source may cause fire,
explosion or damage to the printer.
Figure 3-6
Page 12

LPQ58/80 User Manual
Rev 1.0 www.hprt.com
9
3.2.6 Parameter setting
1. Please follow the following steps to enter parameters setting mode:
NOTE:The two actions should be done in the 2 seconds after printer power on.
a. Press 【POWER】 button three times
b. Press 【FEED】 button one time
2. When printer succeeds in entering the parameters setting mode, it prints the following contents
and enters the first parameter setting – baud rate setting.
Enter setting mode:
Setting baud:
Baud = 9600
It prints current baud rate 9600 and please press 【 POWER 】 button to select the baud rate
required. Press 【POWER】 button one time, the printer prints the current ‘ baud= ***** ’.When
the printer prints the baud rate required, press the 【FEED】 button to confirm and quit, then enter
the second setting – paper type setting.
Optional baud rates: 9600, 19200, 38400,57600, 115200.
3. After entering paper type setting mode, it prints the following contents:
setting paper type:
Paper type: Label
If user wants to change the paper type, press【POWER】 button to select. Press 【POWER】 button
one time, and the printer prints the current paper type: ***** When the printer shows the paper
type required, press 【FEED】button to confirm and quit The printer enters the third setting – print
density setting.
Optional paper type: receipt, label ,black mark and auto
Note:
Default media/paper type is label. Under auto mode, printer feeds paper automatically to
identify the media type after power on. Max label gap is 8mm. The default label height is
120mm. Max label height which can be located by printer is 500mm. It can be modified
according to the user’s need by printer utility tool.See more information in <<Printer Utility Tool
In parameter setting mode,【 POWER】 button is used for choosing the option and
【FEED】 button is used for confirmation and quit the current menu to enter the next
menu.
Page 13
LPQ58/80 User Manual
Rev 1.0 www.hprt.com
10
Instructions>>.
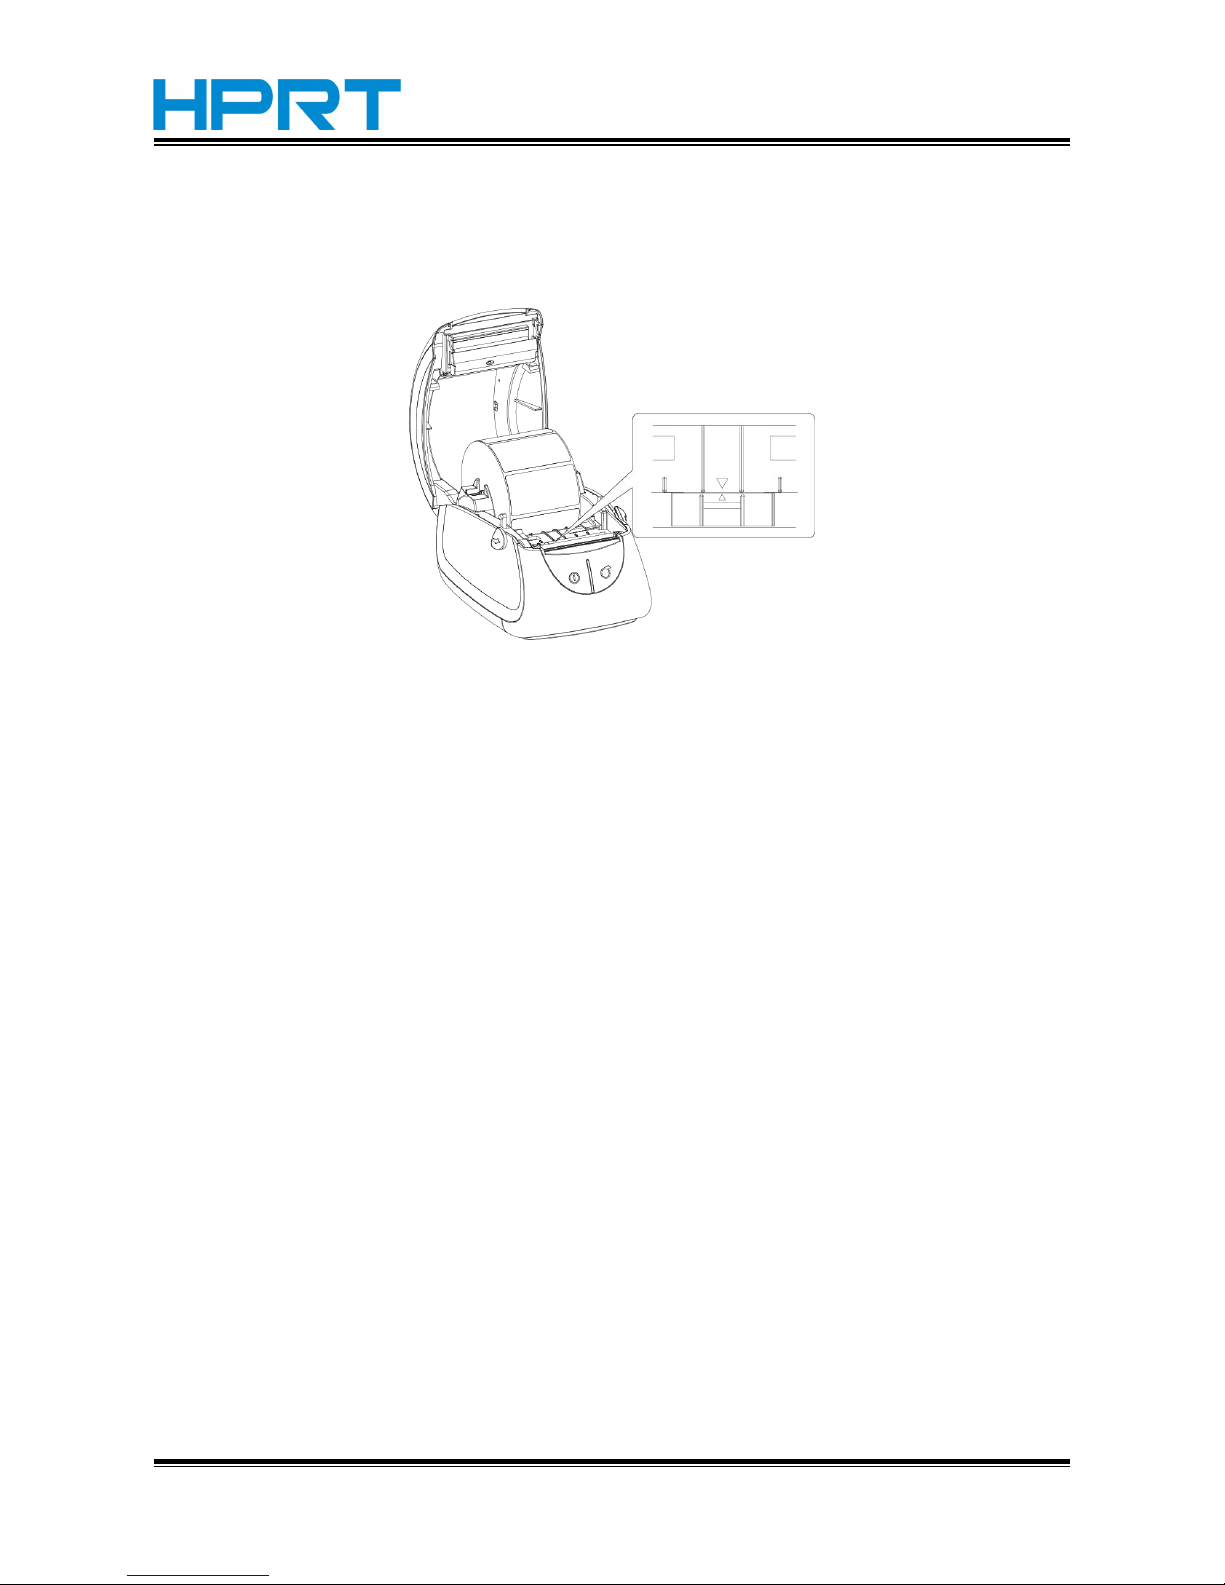
The movable paper sensor must be fastened in the correct position to make sure that paper
sensor can detect the paper status and label location under label printing mode.
Correct position: the little triangle on movable paper sensor frame must be opposite to the one
on the printer guide frame.
Figure 3-7
4. After entering density setting mode, it prints the following contents:
Setting density:
Density: middle
If user want to change the density, press 【POWER】 button to select. Press 【POWER】 button one
time, and the printer prints the current density : ***** . When the printer shows the density
required, press 【FEED】 button to confirm and quit. The printer enters the forth setting – print
width setting.
Optional density: high, middle and low.
5. After entering print width setting mode, it prints the following contents:
Set print width mode:
Print width: default
If user want to change the print width, press 【POWER】 button to select. Press 【POWER】 button
one time, and the printer prints the current print width ***** . When the printer shows the print
width required, press【FEED】button to confirm and quit.The printer enters the fifth setting – print
protocol setting.
Optional printing width: default (384dots) and full area (448dots).
Page 14

LPQ58/80 User Manual
Rev 1.0 www.hprt.com
11
6. After entering protocol setting mode, it prints the following contents:(NOTE:The setting mode
is only available when you use label paper.)
Set protocol:
Protocol: TSPL
Users can change the protocol by pressing 【POWER】 button one time, and press 【FEED】 to
confirm the chosen protocol. After this setting, printer will automatically power off.
Optional protocol: TSPL, ESC/POS
NOTE: When receipt paper is used , only ESC/POS protocol is working.
When label paper is used, protocol type can be set to either ESC/POS or TSPL.
7.Power on ,then above settings will take effect.
Page 15
LPQ58/80 User Manual
Rev 1.0 www.hprt.com
12
Chapter 4 Interface
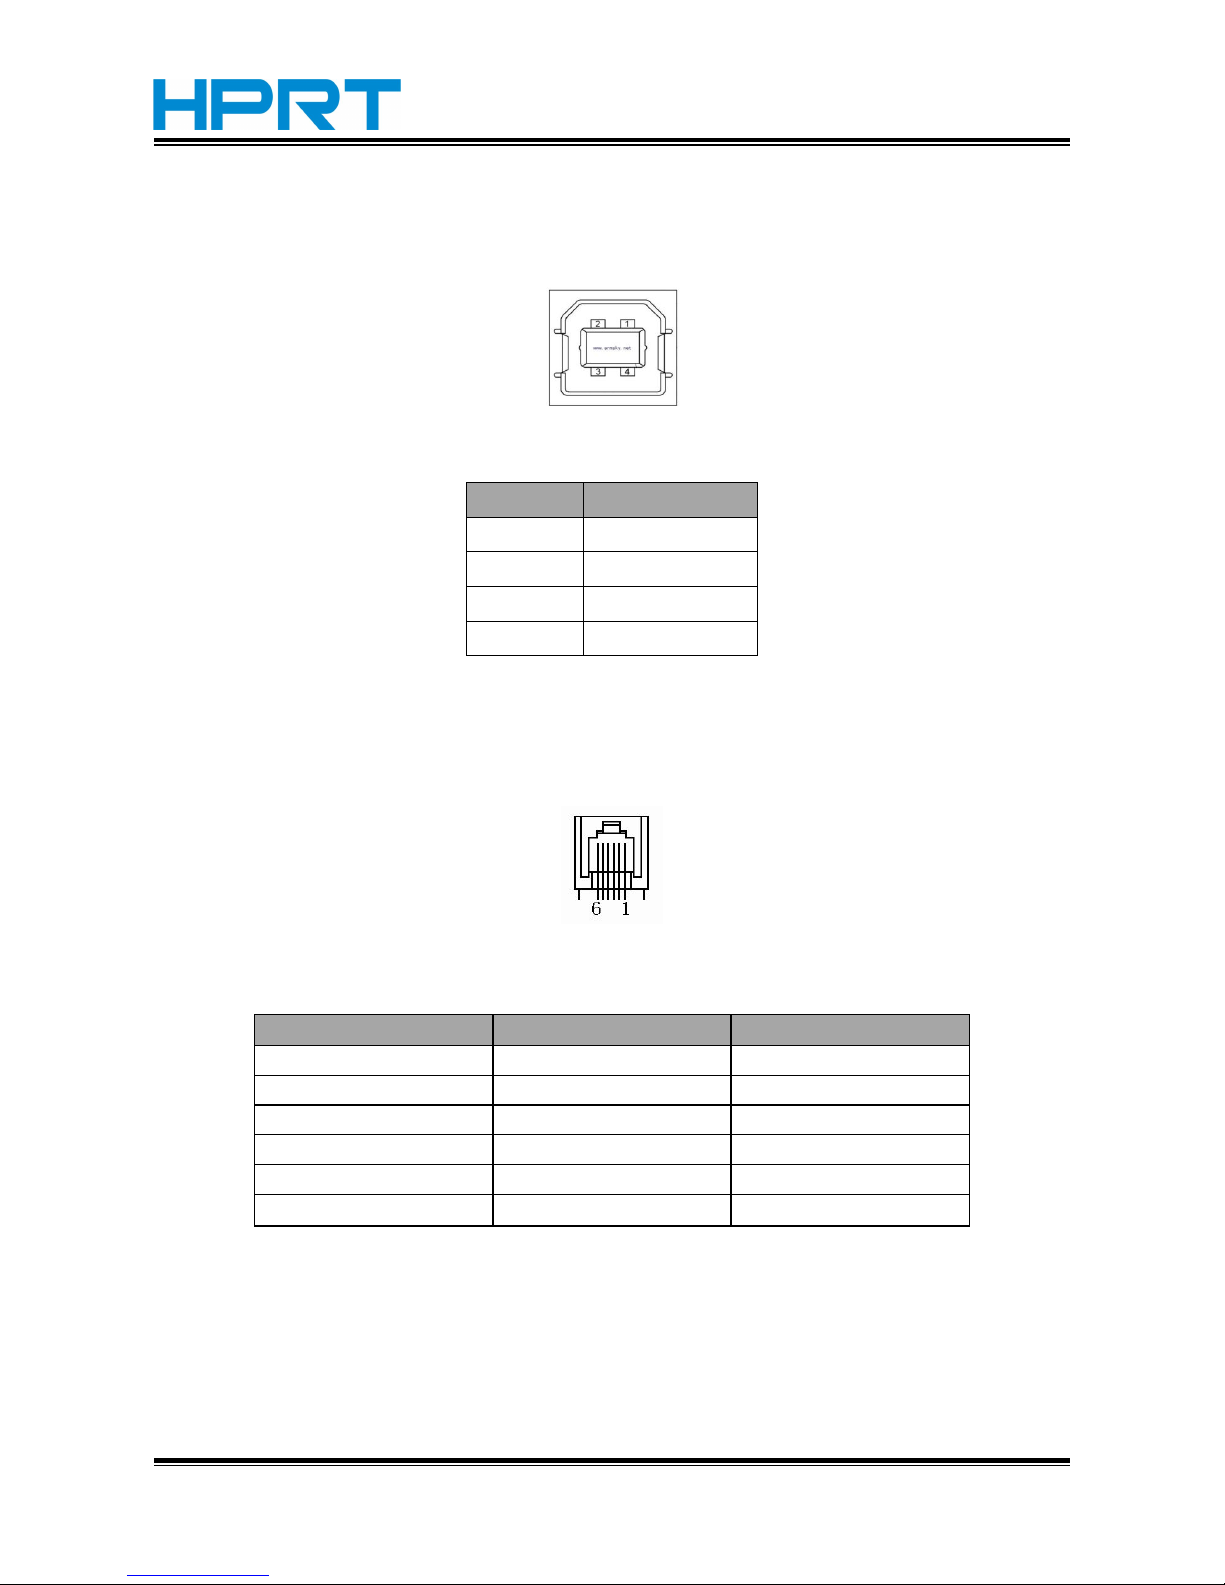
4.1 USB interface
Figure 4-1
PIN No. Signal name
1
VBUS
2
D-
3
D+
4
GND
4.2 Cash drawer interface
Figure 4-2
Pin No.
Signal
Function
1
FG
Frame Ground
2
DRAWER 1
Drawer kick-out drive
3
DRSW
Drawer open/close signal
4
VDR
Drawer driving source
5
DRAWER 2
Drawer kick-out drive
6
GND
GND
Page 16
LPQ58/80 User Manual
Rev 1.0 www.hprt.com
13
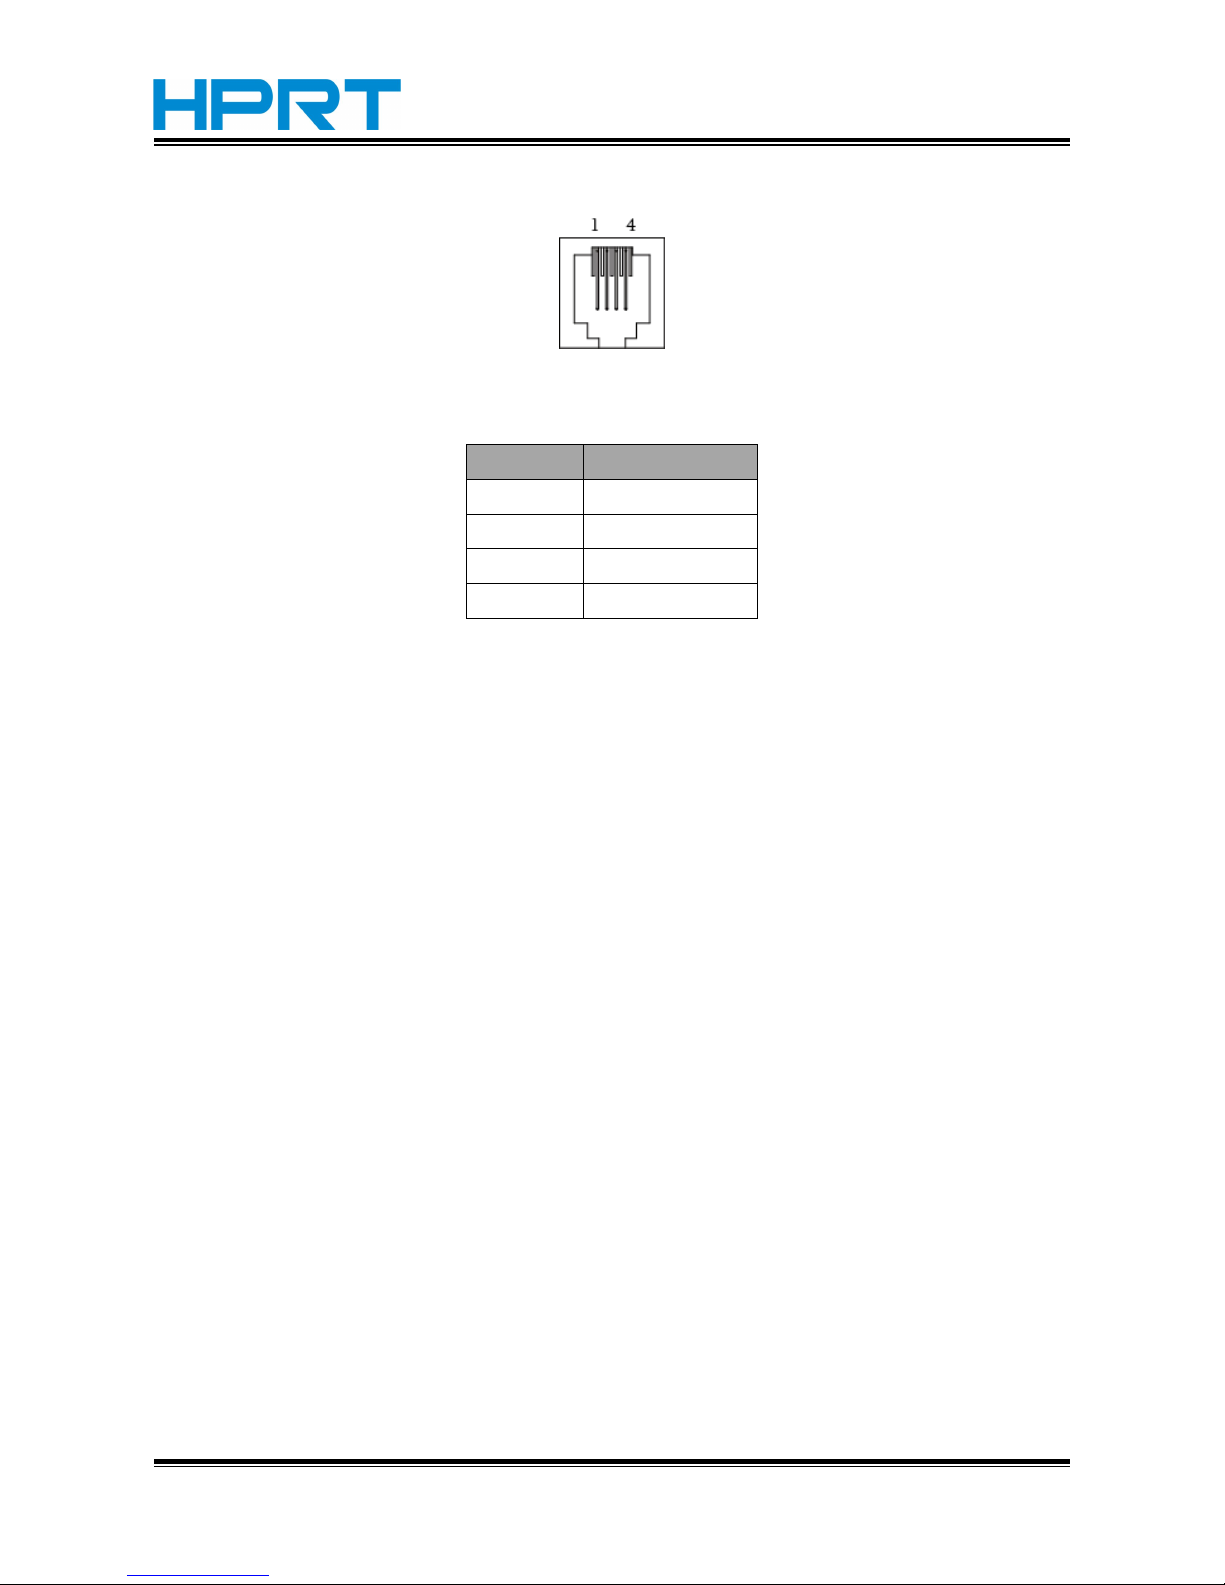
4.3 RS232 interface
Figure 4-3
PIN No. Signal name
1
RTS
2
RXD
3
GND
4
TXD
 Loading...