

Page 1
hp photosmart
7200 series
reference guide
Page 2

hp photosmart 7200 series
Page 3

contents
1 welcome . . . . . . . . . . . . . . . . . . . . . . . . . . . . . . . . . . . . . 1
find more information . . . . . . . . . . . . . . . . . . . . . . . . . . . . . . 1
what’s in the box?. . . . . . . . . . . . . . . . . . . . . . . . . . . . . . . . . 2
printer overview . . . . . . . . . . . . . . . . . . . . . . . . . . . . . . . . . . 3
front . . . . . . . . . . . . . . . . . . . . . . . . . . . . . . . . . . . . . . . . 3
back. . . . . . . . . . . . . . . . . . . . . . . . . . . . . . . . . . . . . . . . 3
control panel . . . . . . . . . . . . . . . . . . . . . . . . . . . . . . . . . . 4
indicator lights . . . . . . . . . . . . . . . . . . . . . . . . . . . . . . . . . 5
memory card slots . . . . . . . . . . . . . . . . . . . . . . . . . . . . . . 6
print cartridge information . . . . . . . . . . . . . . . . . . . . . . . . . . . 6
supported print cartridges . . . . . . . . . . . . . . . . . . . . . . . . . 6
install or replace print cartridges . . . . . . . . . . . . . . . . . . . . 7
calibrate the print cartridges . . . . . . . . . . . . . . . . . . . . . . . 9
2 print from a memory card. . . . . . . . . . . . . . . . . . . . . . . . 11
supported memory cards . . . . . . . . . . . . . . . . . . . . . . . . . . . 11
insert a memory card . . . . . . . . . . . . . . . . . . . . . . . . . . . . . 12
use the hp photosmart 7200 series assistant . . . . . . . . . . . . . . 13
print from a memory card using the control panel . . . . . . . . . . 13
print 4 x 6 inch (10 x 15 cm) photos . . . . . . . . . . . . . . . . 13
print a photo collage . . . . . . . . . . . . . . . . . . . . . . . . . . . 14
print camera-selected photos using the control panel. . . . . . 14
3 installation troubleshooting . . . . . . . . . . . . . . . . . . . . . . . 15
4 support and specifications . . . . . . . . . . . . . . . . . . . . . . . 17
support . . . . . . . . . . . . . . . . . . . . . . . . . . . . . . . . . . . . . . . 17
hp phone support. . . . . . . . . . . . . . . . . . . . . . . . . . . . . . 18
specifications . . . . . . . . . . . . . . . . . . . . . . . . . . . . . . . . . . . 19
system requirements . . . . . . . . . . . . . . . . . . . . . . . . . . . . 19
printer specifications. . . . . . . . . . . . . . . . . . . . . . . . . . . . 20
hardware services. . . . . . . . . . . . . . . . . . . . . . . . . . . . . . . . 22
software services. . . . . . . . . . . . . . . . . . . . . . . . . . . . . . . . . 22
limited warranty statement . . . . . . . . . . . . . . . . . . . . . . . . . . 23
safety information . . . . . . . . . . . . . . . . . . . . . . . . . . . . . . . . 24
environmental statements . . . . . . . . . . . . . . . . . . . . . . . . . . . 25
protecting the environment. . . . . . . . . . . . . . . . . . . . . . . . 25
ozone production . . . . . . . . . . . . . . . . . . . . . . . . . . . . . . 25
energy consumption . . . . . . . . . . . . . . . . . . . . . . . . . . . . 25
paper use . . . . . . . . . . . . . . . . . . . . . . . . . . . . . . . . . . . 25
plastics . . . . . . . . . . . . . . . . . . . . . . . . . . . . . . . . . . . . . 25
material safety data sheets . . . . . . . . . . . . . . . . . . . . . . . 25
recycling program . . . . . . . . . . . . . . . . . . . . . . . . . . . . . 25
reference guide i
Page 4

regulatory statements . . . . . . . . . . . . . . . . . . . . . . . . . . . . . 26
copyrights and trademarks . . . . . . . . . . . . . . . . . . . . . . . . . 26
hp photosmart 7200 seriesii
Page 5

welcome
1
Thank you for purchasing an HP Photosmart 7200 Series printer! With your new
photo printer, you can print beautiful photos, save photos to your computer, and
create fun and easy projects.
find more information
Your new printer comes with the following documentation to help you get started
and take full advantage of your printer’s capabilities:
• Setup Guide—The HP Photosmart 7200 Series Setup Guide contains quick
and easy instructions to help you set up your printer and install the printer
software.
• Reference Guide—The HP Photosmart 7200 Series Reference Guide is the
booklet you are reading. The Reference Guide provides an overview of
your printer, installation troubleshooting information, selected printer
specifications, warranty information, and support information.
• HP Photosmart Printer Help—The HP Photosmart Printer Help describes
how to use the more advanced features of your new printer. The Printer
Help includes information about printer care and maintenance, printing
and saving photos using your computer, advanced troubleshooting, and
error messages.
After you have installed the HP Photosmart printer software on your
computer, you can view and print the HP Photosmart Printer Help.
Note: If you are using a Windows
Photosmart Printer Help in Arabic, Croatian, Estonian, Hebrew, Latvian,
Lithuanian, or Slovak, insert the CD labeled “User’s Guide” that came in the
box with your printer.
®
PC, and you want to install the HP
view the hp photosmart printer help
– Windows PC: From the Start menu, select Programs (in Windows XP,
select All Programs); Hewlett-Packard; Photosmart 140, 240, 7200,
7600, 7700, 7900 Series; Photo & Imaging Director. From the Photo &
Imaging Director, click Help.
®
– Macintosh
select your language, then double-click the photosmart 7260.html file.
print the hp photosmart printer help
– Windows PC: Click Print in the top navigation bar of the HP Photosmart
Printer Help window.
– Macintosh: Click in the frame you want to print. From the File menu,
select Print, or click Print in the top navigation bar of the browser.
reference guide 1
: Insert the HP Photosmart CD. In the User Docs folder,
Page 6

chapter 1
what’s in the box?
9
1
2
5
7
8
6
4
Your printer box contains the following items:
1 HP Photosmart 7200 Series printer
2 Photo paper storage bag
3 HP Photosmart 7200 Series Setup Guide
4 HP Photosmart 7200 Series Reference Guide
5 HP Photosmart CD (some countries or regions may have more than one
CD)
6 HP #57 tri-color print cartridge and HP #58 photo print cartridge
7 Print cartridge protector
8 Photo cassette
9 Power supply (may vary in appearance or have an additional power cord)
Note: Some contents may vary by country or region.
3
2
hp photosmart 7200 series
Page 7
printer overview
This section describes the front and back of your printer, the control panel, the
indicator lights, and the memory card slots.
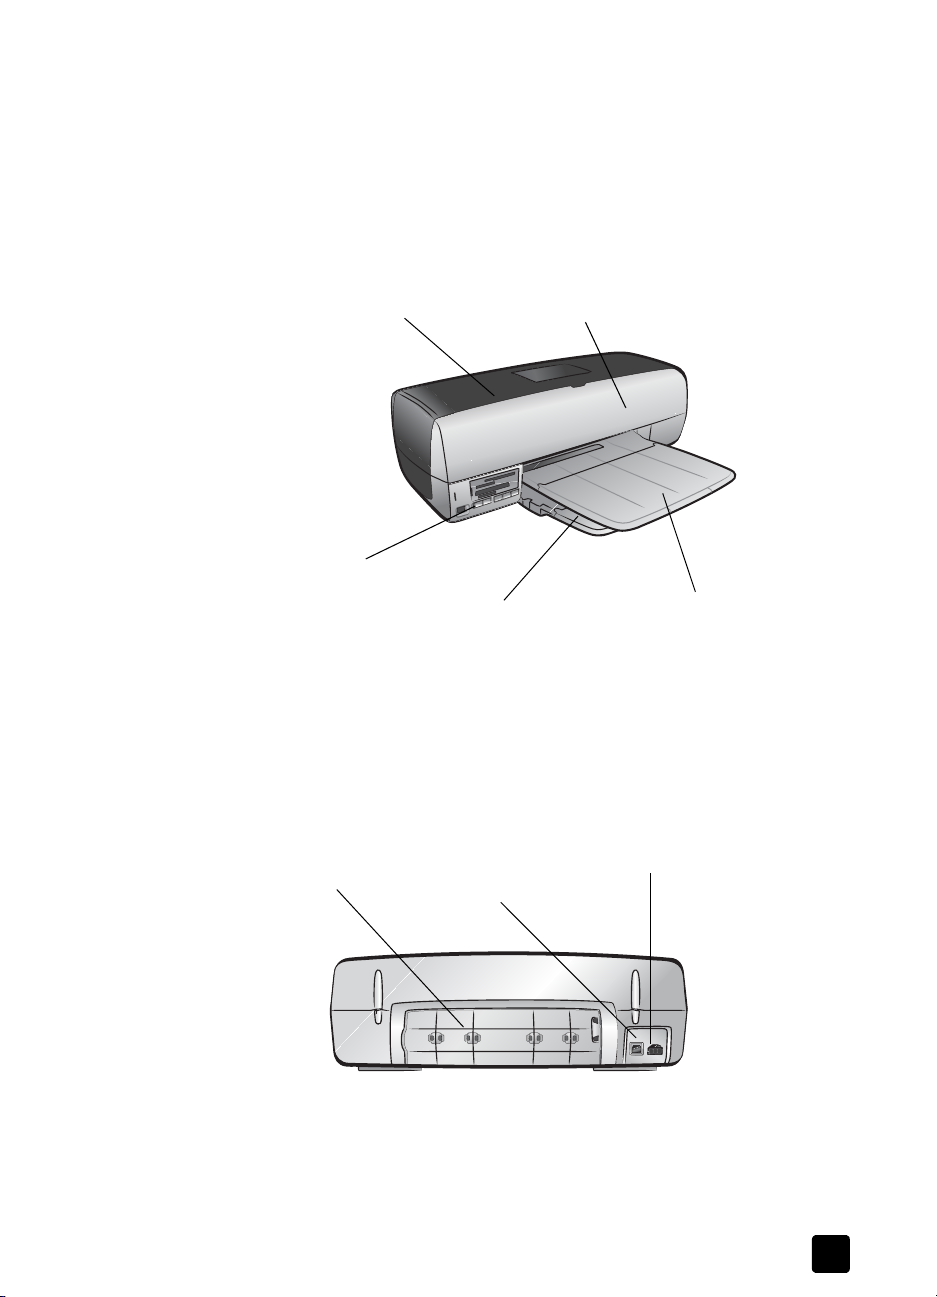
front
welcome
back
Top cover
Lift this cover to access
the removable photo
cassette
Control panel
Use these buttons to
print or save photos
Rear access door
Remove this door to
clear a paper jam
Main cover
Lift this cover to extend the
paper trays and access
the print cartridges
In tray
Place paper or
envelopes in this tray
for printing
USB port
Use this port to
connect the
printer to your
computer
Out tray
Use this tray to catch
your printed photos
or documents
Power cord connection
Use this port to connect the
power cord included with
the printer
reference guide
3
Page 8
chapter 1
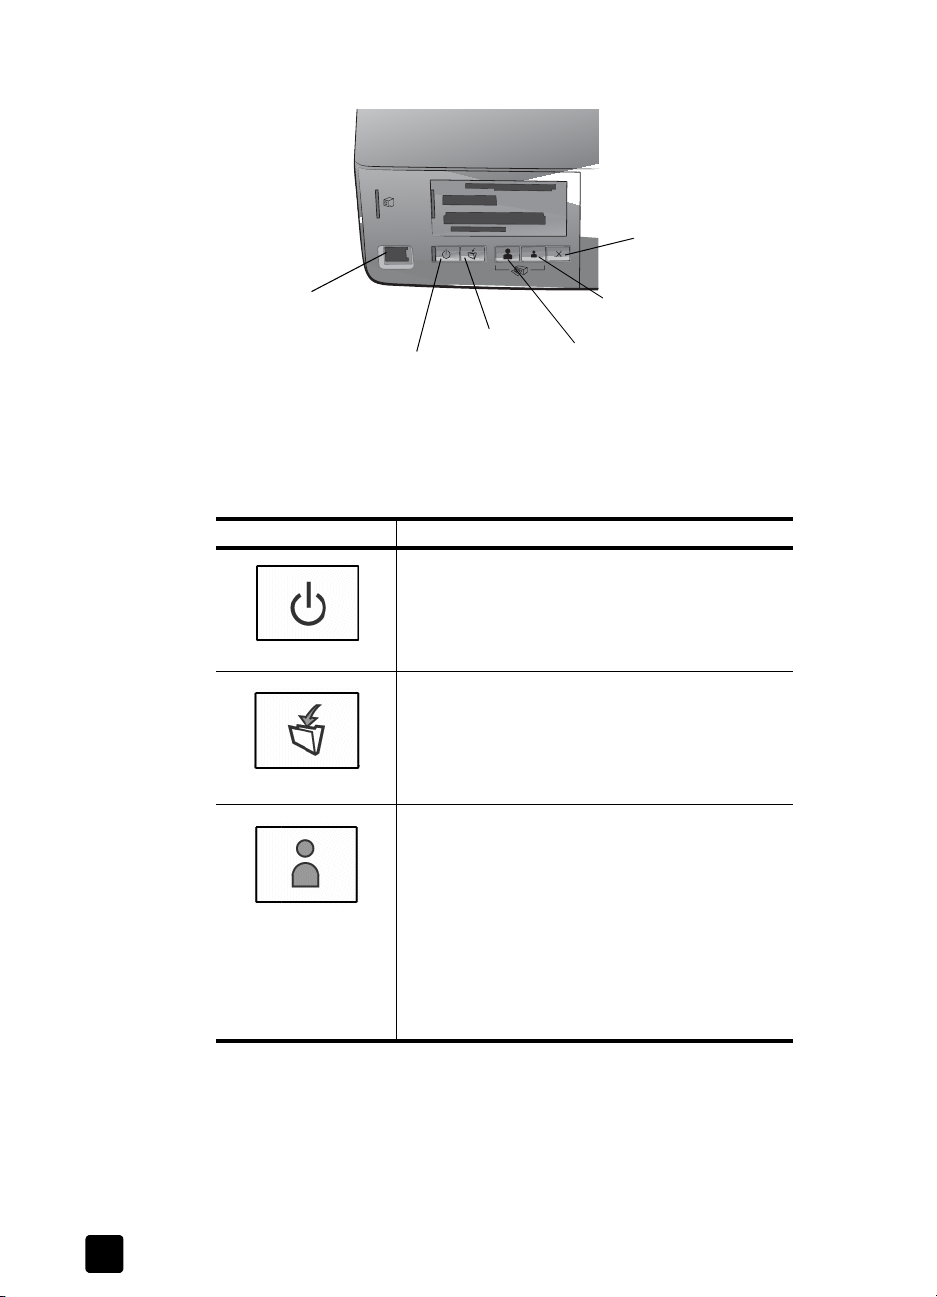
control panel
CANCEL
Direct-printing port
Use this port to
connect a notebook
computer or an HP
direct-printing digital
camera to the printer
ON
SAVE
PRINT 4 X 6 PHOTOS
PRINT PHOTO
COLLAGE
See the following table for a description of the button functions.
Button Description
ON
Press this button to turn the printer on or off.
SAVE
Press this button to save the contents of the memory card
to your computer.
PRINT 4 X 6 PHOTOS
Use this button to print 4 x 6 inch photos:
• Press this button to print all photos or all cameraselected photos on the memory card.
•Press and hold this button to print all photos on a
memory card that have not been previously printed
from the control panel.
• Press this button to continue printing after resolving a
printing error.
• Press this button to continue printing after reloading
paper.
4
hp photosmart 7200 series
Page 9
Button Description
indicator lights
welcome
PRINT PHOTO COLLAGE
Use this button to print photo collage pages:
Note: A photo collage prints four images on 4 x 6 inch
paper or nine images on 8.5 x 11 inch paper.
• Press this button to print all photos or all camera-
selected photos on the memory card on photo
collage pages.
•Press and hold this button to print on photo collage
pages all photos on a memory card that have not
been previously printed from the control panel.
• Press this button to continue printing after resolving a
printing error.
• Press this button to continue printing after reloading
paper.
CANCEL
Use this button to stop a process:
• Press this button to stop printing.
• Press this button to stop saving images from the
memory card to your computer.
• Press this button to skip printing camera-selected
photos on a memory card so you can print unmarked
photos.
Print cartridge status light
Green
A print cartridge is low on ink
Red
One of the print cartridges is not
installed correctly or has failed
Printer status light
Off
The printer is off
Green
The printer is on
Blinking (Green)
The printer is busy
Blinking (Red)
The printer requires attention
Memory card light
Off
There is no memory card
inserted
Green
The memory card is inserted
correctly
Blinking (Green)
Information is being
transmitted between the
memory card and the printer
or computer
Blinking (Red)
There is a problem with the
memory card or more than
one memory card is inserted
into a memory card slot
Blinking (Red then Green)
after pressing the P
button
There are no photos on the
memory card
RINT
reference guide
5
Page 10

chapter 1
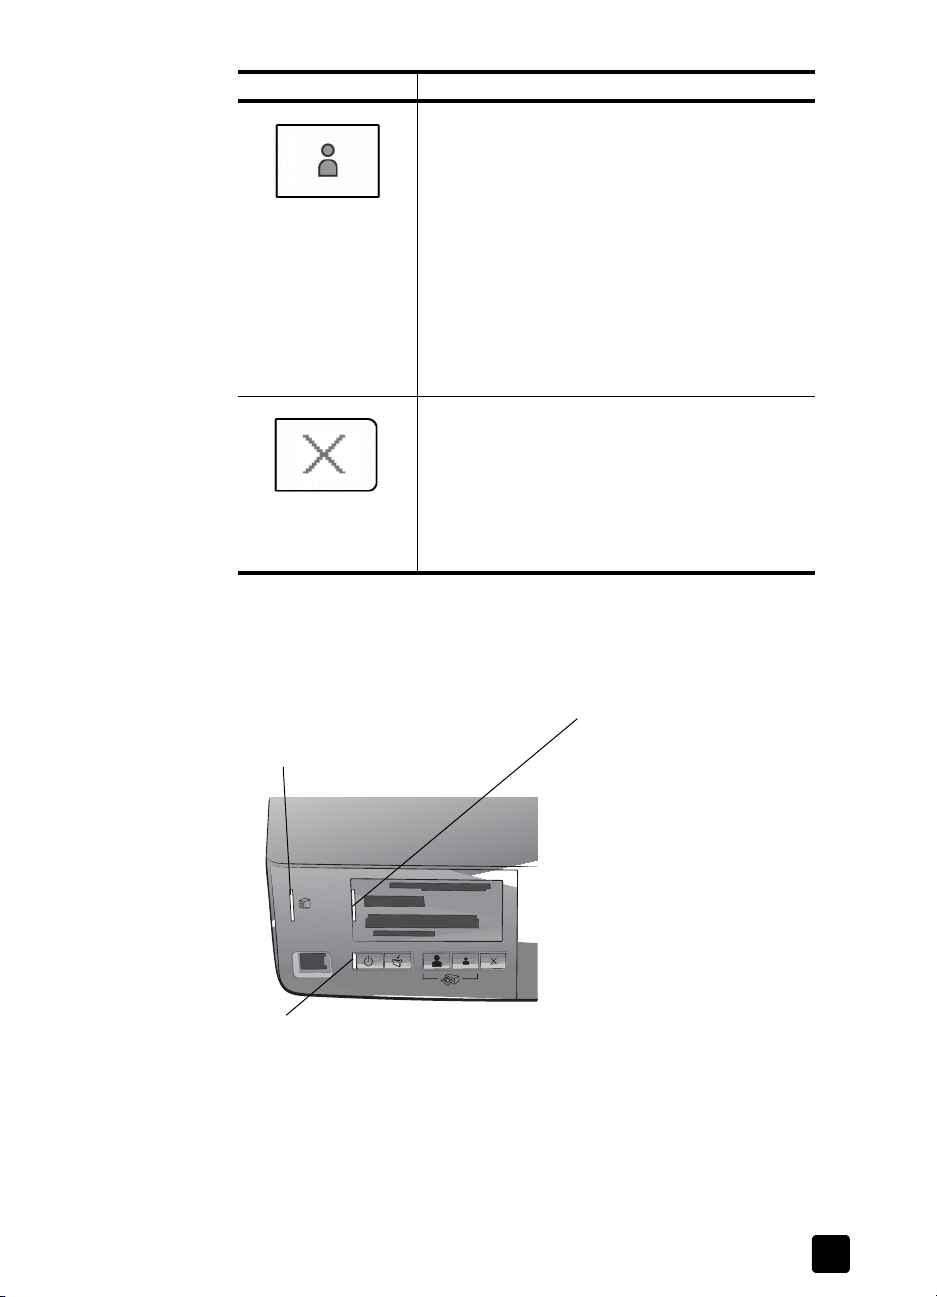
memory card slots
®
Sony
Memory Stick
memory card slot
You ca n i n ser t a
supported Sony
Memory Stick
memory card into
this slot
MultiMediaCard™/Secure Digital
memory card slot
You can insert a MultiMediaCard
memory card or a Secure Digital
memory card into this slot
print cartridge information
Your HP Photosmart 7200 Series printer prints in color and in black and white.
HP provides a range of print cartridges so that you can choose the best print
cartridges for your project.
supported print cartridges
SmartMedia
Card
You c a n i n sert a
SmartMedia memory card
into the upper portion of
this slot or an xD-Picture
Card memory card into
the lower-right portion of
this slot
™
CompactFlash™/IBM® Microdrive
memory card slot
You can insert a CompactFlash or an
IBM Microdrive memory card into this
slot
™
™
/xD-Picture
memory card slot
Installing a print cartridge that is not in this table may invalidate your printer
warranty.
To print... Use these print cartridges...
Color or black and
white documents
HP #57 (C6657A)—Tri-color print cartridge
and
HP #56 (C6656A)—Black print cartridge
Color photos HP #57 (C6657A)—Tri-color print cartridge
and
HP #58 (C6658A)—Photo print cartridge
When you install a print cartridge, match the number on the print cartridge to
the number on the inside of the main cover. The printer holds two print cartridges
at a time.
Caution! Check that you are using the correct print cartridges. Also, note
that HP does not recommend modifying or refilling HP print cartridges.
Damage that results from modifying or refilling HP print cartridges is not
covered by HP’s warranty.
6
hp photosmart 7200 series
Page 11

Note: Whenever you remove a print cartridge from the printer, store it in the
print cartridge protector that came with your printer. Failure to properly store
a print cartridge can cause the print cartridge to fail. For more information
about storing your print cartridges, see the HP Photosmart Printer Help. For
information about viewing the Printer Help, see view the hp photosmart
printer help on page 1.
For information about printing in Ink-backup Printing Mode, see the HP
Photosmart Printer Help. For information about viewing the Printer Help see view
the hp photosmart printer help on page 1.
install or replace print cartridges
To get the best performance from your printer, use only genuine HP factory-filled
print cartridges.
To get maximum use from your print cartridges, turn off the printer when it is not
in use. Do not unplug the printer or turn off the power source (such as a power
strip) until the Printer Status light is off. Waiting to turn the printer off allows the
printer to store the print cartridges properly.
To install or replace the print cartridges:
1 If the printer is off, press the ON button on the printer’s control panel to turn
on the printer.
2 Lift the main cover of the printer. The print cartridge cradle moves to the
middle of the printer.
welcome
reference guide
7
Page 12

chapter 1
3 If you are replacing a print cartridge, push down and pull outward on the
print cartridge to unsnap it from the print cartridge cradle. Remove the print
cartridge and store, recycle, or discard it.
Note: For information about recycling print cartridges, go to www.hp.com/
recycle.
4 Take the new print cartridge out of its package.
5 Grasp the pink tab and gently peel off the clear plastic tape. Make sure
you remove only the clear tape. Be sure to install the print cartridge
immediately after removing the tape; ink nozzles exposed longer than one
minute may dry out and cause printing problems later. Once the tape is
removed, do not attempt to replace it.
8
hp photosmart 7200 series
Page 13

6 Insert the print cartridge:
Note: The tri-color print cartridge must be installed in the left stall of the print
cartridge cradle. The black or photo print cartridge must be installed in the
right stall of the print cartridge cradle.
– Hold the print cartridge so the copper contacts go into the print
cartridge cradle first. Line up the ridges on the left and right sides of the
top of the print cartridge with the grooves on the inside of the print
cartridge cradle. The label on the print cartridge should face upwards.
– Carefully slide the print cartridge into the print cartridge cradle at a
slight angle, then firmly push the print cartridge in until it snaps into
place.
welcome
7 Repeat steps 3–6 to install the second print cartridge.
8 Close the main cover.
calibrate the print cartridges
To ensure high-quality prints, each time you install or replace one or both of the
print cartridges, calibrate the cartridges to check that they are properly aligned.
You can calibrate the print cartridges using a Windows PC or a Macintosh
computer.
To calibrate the print cartridges using your Windows PC:
1 From the Devices Services tab on the HP Photosmart Series Toolbox, click
Calibrate the Device. For information about opening the HP Photosmart
Series Toolbox, see the HP Photosmart Printer Help. For information about
viewing the Printer Help, see view the hp photosmart printer help on
page 1.
The Align the Print Cartridges screen appears.
reference guide
9
Page 14

chapter 1
2 Click Calibrate. Your printer will print a calibration page with seven sets of
alignment patterns. The Align the Print Cartridges screen reappears asking
you to review the alignment patterns and select the best page alignment,
pen alignment, and color calibration for your printer.
3 Follow the onscreen instructions, and use the or buttons to make your
selections. Determine the appropriate selections from the printed page.
4 Click Continue. Your printer prints a second page, and the Align the Print
Cartridges screen reappears.
5 Follow the onscreen instructions to complete the print cartridge calibration.
To calibrate the print cartridges using your Macintosh:
Note: The following steps are specific to OS X. For OS 9, the steps may be
slightly different. Be sure you have selected your HP Photosmart printer in
the Print Center (OS X) or in the Chooser (OS 9) before you begin printing.
1 Select Calibrate from the HP Inkjet Utility drop-down menu. For information
about opening the HP Inkjet Utility, see the HP Photosmart Printer Help. For
information about viewing the Printer Help, see view the hp photosmart
printer help on page 1.
The Calibrate panel appears.
2 Click Align. Your printer prints a calibration page with five sets of
alignment patterns.
3 Follow the onscreen instructions to review the alignment patterns, and use
the sliders to select the best alignment for your print cartridges. Use the
printed page to determine your selections.
4 Click Verify when you have finished making your selections. Your printer
prints a second page, and the Calibrate panel appears with new
instructions.
5 Follow the onscreen instructions to complete the print cartridge calibration.
10
hp photosmart 7200 series
Page 15

print from a memory card
2
It’s easy to print high-quality photos for yourself, family, and friends. If your
digital camera uses a memory card to store photos, you can insert the memory
card into the printer to print your photos.
Note: You can also print photos using your computer. For more information,
see the HP Photosmart Printer Help. For information about viewing the
Printer Help, see view the hp photosmart printer help on page 1.
supported memory cards
Your HP Photosmart printer can read the following memory cards:
CompactFlash Association (CFA) certified Type I and II, IBM Microdrive,
MultiMediaCard, Secure Digital, SmartMedia, Sony Memory Sticks, and xD-
Picture Card.
These cards are manufactured by several vendors and are available in a variety
of storage capacities. You can purchase memory cards where you purchased
your digital camera or at most computer supply stores.
Caution! Using any other type of memory card may damage the memory
card and the printer.
IBM Microdrive
Sony Memory Sticks
reference guide 11
Secure Digital
CompactFlash
Type I and II
MultiMediaCard
SmartMedia
xD-Picture Card
Page 16

chapter 2
insert a memory card
After you have taken pictures with your digital camera, remove the memory card
from your camera and insert it into your printer. You can print photos immediately
or save the photos to your computer.
When the memory card is inserted correctly, the memory card light blinks and
then remains solid.
Caution! Do not pull out the memory card while the memory card light is
blinking. Removing a memory card while it is being accessed may damage
the printer or the memory card, or corrupt the information on the memory
card.
To insert a memory card:
1 Remove any memory cards that may already be inserted into any of the
memory card slots.
For information about removing memory cards, see the HP Photosmart
Printer Help. For information about viewing the Printer Help, see view the
hp photosmart printer help on page 1.
2 Find the correct slot for your memory card.
Sony Memory Stick
CompactFlash/
IBM Microdrive
Note: To use a Sony Memory Stick Duo
™
memory card, insert the memory
SmartMedia/
xD-Picture Card
MultiMediaCard/
Secure Digital
card into the adapter that came with the Memory Stick Duo before you insert
it into the printer’s memory card slot.
3 Insert the memory card into the appropriate memory card slot. The end
with the metal contacts or pinholes must go into the printer first.
Caution! Inserting the memory card any other way may damage the
memory card or the printer.
4 Gently push the memory card into the printer until it stops. The memory
card may not insert all the way into the printer.
Caution! Forcing the memory card into the printer too far may damage the
memory card or the printer.
Note: If you insert a SmartMedia memory card upside down, the red
memory card light will begin blinking. Remove the memory card and
reinsert it properly.
12
hp photosmart 7200 series
Page 17

print from a memory card
use the hp photosmart 7200 series assistant
If your printer is connected to a Windows PC, the HP Photosmart 7200 Series
Assistant (Assistant) appears on the computer screen when a memory card is
inserted. The Assistant provides information about the memory card slots and the
indicator lights. The Assistant also provides information about printing photo
collages and 4 x 6 inch (10 x 15 cm) photos from the control panel. For more
information about the Assistant, see the HP Photosmart Printer Help. For
information about viewing the Printer Help, see view the hp photosmart printer
help on page 1.
print from a memory card using the control panel
From the control panel you can print all of the photos on the memory card, only
the new photos on the memory card, or the camera-selected photos on the
memory card. For a list of supported digital photo file types, see printer
specifications on page 20.
Note: If the printer detects camera-selected photos, it prints only those
photos when you press one of the Print buttons. If you wish to print both
unmarked and camera-selected photos, you must press the CANCEL button
after inserting the memory card then press one of the Print buttons.
Note: Be sure to load photo paper into the In tray or the photo cassette
before printing. For information about loading paper, see the HP Photosmart
Printer Help. For information about viewing the Printer Help, see view the hp
photosmart printer help on page 1.
You can print photos from the control panel in the following ways:
• Print 4 x 6 inch (10 x 15 cm) photos
• Print a photo collage
• Print camera-selected photos using the control panel
print 4 x 6 inch (10 x 15 cm) photos
Press the PRINT 4 X 6 PHOTOS button to print 4 x 6 inch (10 x 15 cm) photos
from the memory card. If the photo cassette is loaded with 4 x 6 inch (10 x 15
cm) photo paper, each photo prints on a separate sheet. If the In tray is loaded
with letter size or A4 paper, three 4 x 6 inch (10 x 15 cm) images print on a
single sheet of paper.
To print 4 x 6 inch (10 x 15 cm) photos:
1 Load the appropriate paper:
– To print individual 4 x 6 inch (10 x 15 cm) photos, load 4 x 6 inch (10
x 15 cm) photo paper into the In tray using the photo cassette
– To print three 4 x 6 inch (10 x 15 cm) photos on a single sheet of
paper, load letter size or A4 paper into the In tray
2 Insert a memory card into the printer’s memory card slot.
reference guide
13
Page 18

chapter 2
If the printer is connected to a Windows PC, the HP Photosmart 7200
Series Assistant window opens to provide additional information about the
photos on the memory card.
3 Choose one of the following:
– If your digital camera allows you to mark photos for printing and you
want to print only the marked photos, press the P
RINT 4 X 6 PHOTOS
button.
– If you have marked photos for printing and you want to print all the
photos on the memory card, press C
X 6 PHOTOS button.
ANCEL, and then press the PRINT 4
– If there are no marked photos on the memory card and you want to
print all of the photos on the memory card, press the P
HOTOS button.
P
RINT 4 X 6
– If there are no marked photos on the memory card and you want to
print only the new (previously unprinted from the control panel) photos
on the memory card, press and hold the P
RINT 4 X 6 PHOTOS button
for three to five seconds.
If there are no new photos (previously unprinted from the control panel)
on the memory card, nothing happens if you press and hold this print
button.
Note: The photos print in reverse order; the last photo taken is the first photo
printed.
To stop printing, press the C
ANCEL button.
Note: If the printer runs out of paper while printing, load more paper in the
In tray or photo cassette, and press one of the Print buttons to resume
printing.
print a photo collage
Press the PRINT PHOTO COLLAGE button to print small photos from the memory
card. If the photo cassette is loaded with 4 x 6 inch (10 x 15 cm) photo paper,
four images print on a single sheet. If the In tray is loaded with letter size or A4
paper, nine images print on a single sheet of paper. For information about
printing a photo collage, see the HP Photosmart Printer Help. For information
about viewing the Printer Help, see view the hp photosmart printer help on
page 1.
print camera-selected photos using the control panel
Your printer can print camera-selected digital photos that are stored on your
memory card. If the printer is connected to a computer, and a memory card with
camera-selected photos is inserted into a memory card slot, the HP Photosmart
7200 Series Assistant displays instructions for how to print camera-selected
photos on the computer screen. For information about printing camera-selected
photos, see the HP Photosmart Printer Help. For information about viewing the
Printer Help, see view the hp photosmart printer help on page 1.
14
hp photosmart 7200 series
Page 19

installation troubleshooting
3
Your HP Photosmart printer is designed to be reliable and easy to use. This
chapter contains solutions to Windows PC printer software installation problems.
For detailed troubleshooting information about all aspects of your printer,
including Macintosh installation and error messages, see the HP Photosmart
Printer Help. For information about viewing the Printer Help, see view the hp
photosmart printer help on page 1.
Before contacting HP support, read this section for troubleshooting tips or go to
the online support services at www.hp.com/support.
Note: In the presence of high electromagnetic fields, printed documents or
photos may be slightly distorted.
Note: HP recommends using a USB cable of less than 10 feet (3 meters) in
length to minimize injected noise due to potential high magnetic fields.
Problem Possible cause Solution
When I connected the printer
to my computer, the Found
New Hardware Wizard
opened but did not recognize
the printer.
During installation, the system
requirements dialog box
appears, indicating that my
computer monitor’s display
resolution does not meet the
minimum system requirements.
You connected the printer to
your computer before inserting
the HP Photosmart CD.
You r m onitor’ s d i sp lay
resolution is set below
minimum system requirements.
For more information, see
system requirements on
page 19.
1 Disconnect the USB cable from the
printer and close the Found New
Hardware Wizard.
2 Insert the HP Photosmart CD that came
with your printer. When the Install
Wizard appears, click Cancel.
3From the Start menu, click Run.
4 Click Browse and navigate to your CD
drive.
5 Select the Uninstaller.bat file and click
Open.
6 Click OK to launch the Uninstaller.
7 Click Continue to uninstall the files
created when you connected the printer
to your computer.
8 Click Restart. When the computer
restarts, remove the HP Photosmart CD
and follow the setup instructions in the
HP Photosmart Setup Guide that came
with your printer.
1 Click Cancel in the system requirements
dialog box.
2 Right-click on the Desktop and select
Properties.
3Click the Settings tab.
4 Move the slider to the right until the
resolution is 800 x 600 or higher.
5 Click Apply. A Monitor Settings
message appears.
6 Click Yes to accept the changes.
7 Reinstall the printer software.
reference guide 15
Page 20

chapter 3
Problem Possible cause Solution
The software did not install
correctly on my computer.
OR
I need to reinstall the printer
software.
Windows 98 only
When I connect a USB cable
between the printer and my
computer, the Add New
Hardware Wizard appears
once, but the printer driver
does not install completely. The
Add New Hardware Wizard
does not appear again.
Windows 98 only
When I connect a USB cable
between the printer and my
computer, the Add New
Hardware Wizard does not
appear.
There may be a conflict with
your virus protection program.
OR
There may be a conflict with
another software program.
Installation was cancelled, was
not completed, or there was an
error.
Your USB cable may not be
working or may not be
connected properly.
1 Uninstall the printer software. To do
this, insert the HP Photosmart CD into
your computer, click Uninstall, then
follow the instructions on your computer
screen.
2 When the uninstall is complete, restart
your computer.
3 Pause or disable any active virus
protection programs.
4 Reinstall the printer software.
1 Turn off the printer and disconnect the
USB cable from the printer.
2 Unplug the power cord from the printer.
3 Wait about 10 seconds.
4 Plug the power cord into the printer and
turn on the printer.
5 Uninstall the printer software. To do
this, insert the HP Photosmart CD into
your computer, then follow the
instructions on your computer screen.
6 When the uninstall is complete, restart
your computer.
7 Reinstall the printer software.
1 Turn off the printer and disconnect the
USB cable from the printer.
2 Unplug the power cord from the printer.
3 Wait about 10 seconds.
4 Plug the power cord into the printer and
turn on the printer.
5 Reconnect the USB cable to the printer.
If you are still having problems, try using
another USB cable.
OR
1 Click Start, Settings, Control Panel.
2 Double-click the System icon.
3Click the Device Manager tab.
4 Click the (+) icon next to the Universal
Serial Bus controllers option. If you see
a USB host controller and a USB root
hub listed, USB is probably enabled. If
you do not see these devices listed,
refer to your computer’s documentation
or contact the computer manufacturer
for more information about enabling
and setting up USB.
16
hp photosmart 7200 series
Page 21

4
support
support and specifications
This chapter contains the following information about your printer:
• support on page 17
• specifications on page 19
• hardware services on page 22
• software services on page 22
• limited warranty statement on page 23
• safety information on page 24
• environmental statements on page 25
• regulatory statements on page 26
• copyrights and trademarks on page 26
If you have a problem, follow these steps:
1 Go to the HP Photosmart Printer Help for detailed information about how to
use your printer and troubleshoot problems. For information about viewing
the HP Photosmart Printer Help, see view the hp photosmart printer help on
page 1.
2 If you are unable to solve the problem using the information in the HP
Photosmart Printer Help, Web and E-mail support are available in the
following languages: Dutch, English, French, German, Italian, Portuguese,
Spanish, and Swedish.
–Go to www.hp.com/support to access online support pages or send
HP an E-mail message for one-on-one answers to your questions.
–Go to www.hp.com to check for software updates.
3 If you are unable to solve the problem using the HP Photosmart Printer Help
or HP Web sites, call HP support using the number for your country or
region. For a list of country and region phone numbers, see the following
section.
reference guide 17
Page 22

chapter 4
hp phone support
Your printer comes with a limited time of free phone support. To check the
duration of your free support, see the limited warranty statement on page 23 or
go to www.hp.com/support.
After the free phone support period, help is available from HP at an additional
cost. Contact your HP dealer or call the support phone number for your country
or region for support options.
To receive HP support by phone, call the appropriate support phone number for
your location. Standard phone company charges apply.
Note: Customers in Western Europe should go to www.hp.com/support to
access phone support numbers in their country or region.
Country Phone number
Algeria (+212) 22404747
Bahrain 800 728
Czech Republic 42 (0)2 6130 7310
Egypt 02 532 5222
Greece + 30 1 60 73 603
Hungary + 36 (0)1 382 1111
Israel 972 (0) 9 830 4848
Morocco (+212) 22404747
Poland + 48 22 865 98 00
Romania 01 315 44 42
Russia, Moscow 7 095 923 50 01
Russia, St. Petersburg 7 812 346 7997
Saudi Arabia 800 897 14440
Slovakia + 421-2-68208080
South Africa 086 000 1030 inside RSA
+ 27-11 258 9301 outside RSA
Tunisia + 216 1 891 222
Turkey 1 216 579 71 71
Ukraine + 7 (380-44) 490-3520
United Arab Emirates 971 4 883 8454
18
hp photosmart 7200 series
Page 23

place a call
Call HP support while you are near the computer and printer. Be prepared to
provide the following information:
• Printer model number (located on the front of the printer).
• Printer serial number (located on the bottom of the printer).
• Computer operating system.
• Version of printer driver.
• Messages displayed on the computer monitor.
• Answers to the following questions:
specifications
support and specifications
– Windows PC: To see the printer driver version, right-click the memory
card icon in the Windows taskbar and select About.
– Macintosh: To see the printer driver version, use the Print dialog box.
– Has the situation you are calling about happened before? Can you
recreate the situation?
– Did you install any new hardware or software on your computer
around the time that the situation occurred?
This section lists minimum system requirements needed to install your HP
Photosmart printer on a computer, and provides selected printer specifications.
For a complete list of printer specifications, see the HP Photosmart Printer Help.
For information about viewing the Printer Help, see find more information on
page 1.
system requirements
Component Windows PC minimum Macintosh minimum
Operating system Windows 98, 2000 Professional, ME, XP
Processor Pentium
RAM 64 MB (128 MB recommended) Mac OS 9.1 and OS 9.2: 64 MB (128
Free disk space 500 MB 500 MB
Video display 800 x 600, 16-bit or higher 800 x 600, 16-bit or higher
CD-ROM drive 4x 4x
Connectivity USB 2.0 Full speed (Windows 98, 2000
Home, and XP Professional
®
II (or equivalent) or higher G3 or greater
Professional, ME, XP Home, and XP
Professional)
Mac® OS 9 v9.1 or later, OS X v10.1
through v10.2
MB recommended)
Mac OS X v10.1 and OS X v10.2: 128
MB
USB: Front and back ports (Mac OS 9
v9.1 or later, OS X v10.1 through
v10.2)
reference guide
19
Page 24

chapter 4
Component Windows PC minimum Macintosh minimum
Browser Microsoft® Internet Explorer 5.5 or
higher
Not required for installation
printer specifications
Connectivity, maximum HP JetDirect External Print Servers: 175x, 310x, 380x
Connectivity, standard USB: Front and back ports
Image file formats JPEG Baseline
In tray capacity 25 sheets of photo paper
Media sizes Photo paper (4 x 6 inches, 10 x 15 cm)
Media specifications,
maximum
Windows 98, 2000 Professional, ME, XP Home, and XP
Professional
Mac OS 9 v9.1 or later, OS X v10.1 through v10.2
TIFF 24-bit RGB uncompressed interleaved
TIFF 24-bit YCbCr uncompressed interleaved
TIFF 24-bit RGB packbits interleaved
TIFF 8-bit gray uncompressed/packbits
TIFF 8-bit palette color uncompressed/packbits
TIFF 1-bit uncompressed/packbits/1D Huffman
100 sheets of plain paper
20–40 cards (depending on thickness)
15 envelopes
20 sheets of banner paper
20 sheets of labels
25 transparencies
25 sheets of iron-on transfers
Photo paper with tab (4 x 6 inches with 0.5 inch tab, 10
x 15 cm with 1.25 cm tab)
Index cards (4 x 6 inches, 10 x 15 cm)
Hagaki cards (3.94 x 5.83 inches, 100 x 148 mm)
A6 cards (4.13 x 5.85 inches, 105 x 148.5 mm)
L-size cards (3.5 x 5 inches, 90 x 127 mm)
L-size cards with tab (3.5 x 5 inches with 0.5 inch tab, 90
x 127 mm with 12.5 mm tab)
Recommended maximum length: 14 inches (356 mm)
Recommended maximum thickness: 11.5 mil (292 µm)
per sheet
20
hp photosmart 7200 series
Page 25

support and specifications
Media sizes, standard Photo paper
3 x 3 inches to 8.5 x 14 inches (76 x 76 mm to 216 x
356 mm)
Plain paper
Letter, 8.5 x 11 inches (216 x 280 mm)
Legal, 8.5 x 14 inches (216 x 356 mm)
Executive, 7.5 x 10 inches (190 x 254 mm)
A4, 8.27 x 11.7 inches (210 x 297 mm)
A5, 5.8 x 8.3 inches (148 x 210 mm)
B5, 6.9 x 9.8 inches (176 x 250 mm)
Cards
Hagaki, 3.94 x 5.83 inches (100 x 148 mm)
L-size, 3.5 x 5 inches (90 x 127mm)
L-size with tab, 3.5 x 5 with 0.5 inch tab (90 x 127 mm
with 12.5 mm tab)
Index, 3 x 5 inches, 4 x 6 inches, and 5 x 8 inches (76
x 127 mm, 10 x 15 cm, and 127 x 203 mm)
A6, 4.13 x 5.85 inches (105 x 148.5 mm)
Envelopes
No. 9, 3.875 x 8.875 inches (98.4 x 225.4 mm)
No. 10, 4.125 x 9.5 inches (105 x 240 mm)
A2 Invitation, 4.375 x 5.75 inches (110 x 146 mm)
DL, 4.33 x 8.66 inches (110 x 220 mm)
C6, 4.5 x 6.4 inches (114 x 162 mm)
Custom
3 x 5 inches to 8.5 x 14 inches (76 x 127 mm to 216 x
356 mm)
Transparencies
Letter, 8.5 x 11 inches (216 x 280 mm)
A4, 8.27 x 11.7 inches (210 x 297 mm)
Label sheets
Letter, 8.5 x 11 inches (216 x 280 mm)
A4, 8.27 x 11.7 inches (210 x 297 mm)
Media types Paper (plain, inkjet, photo, and banner)
Envelopes
Transparencies
Labels
Cards (index, greeting, Hagaki, A6, L-size)
Iron-on transfers
Memory cards CompactFlash Type I and II
IBM Microdrive
MultiMediaCard
Secure Digital
SmartMedia
Sony Memory Sticks
xD-Picture Card
Memory card-suppor ted
file formats
Printing: See supported Image file formats on page 20
Saving: All file formats
reference guide
21
Page 26

chapter 4
Out tray capacity 20 sheets of photo paper
Paper trays One letter-size tray
Photo media cassette
capacity
Print cartridges 1 black HP #56 (C6656A)
USB support USB: Front and back ports
hardware services
50 sheets of plain paper
10 cards
10 envelopes
20 transparencies
20 sheets of banner paper
25 sheets of labels
25 sheets of iron-on transfers
One 4 x 6 inch (10 x 15 cm) photo cassette
24 sheets of photo paper
1 tri-color HP #57 (C6657A)
1 photo HP #58 (C6658A)
Windows 98, 2000 Professional, ME, XP Home, and XP
Professional
Mac OS 9 v9.1 or later, OS X v10.1 through v10.2
HP recommends that the USB cable be less than 10 feet
(3 meters) in length
If you are experiencing printer hardware failure, contact the store where you
purchased your printer. Or, go to www.hp.com/cpso-support/guide/psd/
repairhelp.html for the nearest sales and service office. Service is free of charge
during the limited warranty period. Beyond the warranty period, a service fee
will be charged. For more information about the HP limited warranty, see limited
warranty statement on page 23.
software services
HP periodically provides updates to the printer software. You can download
these updates by going to www.hp.com/support or by using the software that
came with your printer. Updates of the HP Photo & Imaging software are
available on CD only.
To receive printer software updates using the software that came with your
printer, follow these steps:
• Windows PC: From the Start menu, select Programs (in Windows XP, select
All Programs); Hewlett-Packard; then HP Software Update.
• Macintosh: From the HP Inkjet Utility, select Support from the pop-up menu,
then click Support.
22
hp photosmart 7200 series
Page 27

support and specifications
limited warranty statement
Region Europe, Middle East, Africa
Software warranty 90 days
Printer warranty 1 year
A. Extent of Limited Warranty
1 Hewlett-Packard (HP) warrants to the end-user customer that the HP products specified above will be free from
defects in material and workmanship for the duration specified above, which duration begins on the date of
purchase by the customer.
2 For software products, HP's limited warranty applies only to a failure to execute programming instructions. HP
does not warrant that the operation of any product will be uninterrupted or error free.
3 HP's limited warranty covers only those defects which arise as a result of normal use of the product, and does
not cover any other problems, including those which arise as a result of:
• Improper maintenance or modification;
• Software, media, parts, or supplies not provided or supported by HP; or
• Operation outside the product's specifications.
4 For HP printer products, the use of a non-HP ink cartridge or a refilled ink cartridge does not affect either the
warranty to the customer or any HP support contract with the customer. However, if printer failure or damage is
attributable to the use of a non-HP or refilled ink cartridge, HP will charge its standard time and materials
charges to service the printer for the particular failure or damage.
5 If HP receives, during the applicable warranty period, notice of a defect in any product which is covered by HP's
warranty, HP shall either repair or replace the defective product, at HP's option.
6 If HP is unable to repair or replace, as applicable, a defective product which is covered by HP's warranty, HP
shall, within a reasonable time after being notified of the defect, refund the purchase price for the product.
7 HP shall have no obligation to repair, replace, or refund until the customer returns the defective product to HP.
8 Any replacement product may be either new or like-new, provided that it has functionality at least equal to that
of the product being replaced.
9 HP products may contain remanufactured parts, components, or materials equivalent to new in performance.
10 HP's limited warranty is valid in any country or region where the covered HP product is distributed by HP.
Contracts for additional warranty services, such as on-site service, are available from any authorized HP service
facility in countries or regions where the product is distributed by HP or by an authorized importer. For phone
support in Europe please check for the details and conditions of phone support in your country or region by
consulting the following Web site: www.hp.com/support. Alternatively, you can ask your dealer or call HP at the
phone number indicated in this booklet. As part of our constant efforts to improve our phone support service, we
advise you to check our Web site on a regular basis for new information regarding service features and
delivery.
B. Limitations of Warranty
TO THE EXTENT ALLOWED BY LOCAL LAW, NEITHER HP NOR ITS THIRD PARTY SUPPLIERS MAKE ANY OTHER
WARRANTY OR CONDITION OF ANY KIND, WHETHER EXPRESS OR IMPLIED, WITH RESPECT TO THE HP
PRODUCTS, AND SPECIFICALLY DISCLAIM THE IMPLIED WARRANTIES OR CONDITIONS OF MERCHANTABILITY,
SATISFACTORY QUALITY, AND FITNESS FOR A PARTICULAR PURPOSE.
C. Limitations of Liability
1 To the extent allowed by local law, the remedies provided in this Warranty Statement are the customer's sole
and exclusive remedies.
2 TO THE EXTENT ALLOWED BY LOCAL LAW, EXCEPT FOR THE OBLIGATIONS SPECIFICALLY SET FORTH IN
THIS WARRANTY STATEMENT, IN NO EVENT SHALL HP OR ITS THIRD PARTY SUPPLIERS BE LIABLE FOR
DIRECT, INDIRECT, SPECIAL, INCIDENTAL, OR CONSEQUENTIAL DAMAGES, WHETHER BASED ON
CONTRACT, TORT, OR ANY OTHER LEGAL THEORY AND WHETHER ADVISED OF THE POSSIBILITY OF SUCH
DAMAGES.
reference guide
23
Page 28

chapter 4
D. Local Law
1 This Warranty Statement gives the customer specific legal rights. The customer may also have other rights which
vary from state to state in the United States, from province to province in Canada, and from country to country or
region to region elsewhere in the world.
2 To the extent that this Warranty Statement is inconsistent with local law, this Warranty Statement shall be
deemed modified to be consistent with such local law. Under such local law, certain disclaimers and limitations
of this Warranty Statement may not apply to the customer. For example, some states in the United States, as well
as some governments outside the United States (including provinces in Canada), may:
• Preclude the disclaimers and limitations in this Warranty Statement from limiting the statutory rights of a
consumer (e.g. the United Kingdom);
• Otherwise restrict the ability of a manufacturer to enforce such disclaimers or limitations; or
• Grant the customer additional warranty rights, specify the duration of implied warranties which the
manufacturer cannot disclaim, or not allow limitations on the duration of implied warranties.
3 FOR CONSUMER TRANSACTIONS IN AUSTRALIA AND NEW ZEALAND, THE TERMS IN THIS WARRANTY
STATEMENT, EXCEPT TO THE EXTENT LAWFULLY PERMITTED, DO NOT EXCLUDE, RESTRICT, OR MODIFY,
AND ARE IN ADDITION TO, THE MANDATORY STATUTORY RIGHTS APPLICABLE TO THE SALE OF THE HP
PRODUCTS TO SUCH CUSTOMERS.
safety information
Always follow basic safety precautions when using this product to reduce risk of
injury from fire or electric shock.
Warning! To prevent fire or shock hazard, do not expose this product to rain
or any type of moisture.
Warning! Potential shock hazard.
• Read and understand all instructions in the HP Photosmart Setup Guide.
• Use only a grounded electrical outlet when connecting the unit to a power
source. If you do not know whether the outlet is grounded, check with a
qualified electrician.
• Observe all warnings and instructions marked on the product.
• Unplug this product from wall outlets before cleaning.
• Do not install or use this product near water or when you are wet.
• Install the product securely on a stable surface.
• Install the product in a protected location where no one can step on or trip
over the power cord, and where the power cord will not be damaged.
• If the product does not operate normally, see the troubleshooting
information in the HP Photosmart Printer Help.
• There are no operator serviceable parts inside. Refer servicing to qualified
service personnel.
• Use in a well-ventilated area.
24
hp photosmart 7200 series
Page 29

environmental statements
Hewlett-Packard Company is committed to providing quality products in an
environmentally sound manner.
protecting the environment
This printer has been designed with several attributes to minimize impact on our
environment. For more information, go to HP’s Commitment to the Environment
Web site a t www.hp.com/hpinfo/globalcitizenship/environment/index.html.
ozone production
This product generates no appreciable ozone gas (O3).
energy consumption
Energy usage drops significantly while in ENERGY STAR® mode, which saves
natural resources, and saves money without affecting the high performance of
this product. This product qualifies for ENERGY STAR, which is a voluntary
program established to encourage the development of energy-efficient office
products.
EN ERGY STAR is a U.S. registered mark of the U.S. EPA. As
an ENERGY STAR partner, Hewlett-Packard Company has
determined that this product meets the ENERGY STAR
guidelines for energy efficiency. For more information, go
to www.energystar.gov.
support and specifications
paper use
This product is suited for the use of recycled paper according to DIN 19309.
plastics
Plastic parts over 0.88 ounces (24 grams) are marked according to international
standards that enhance the ability to identify plastics for recycling purposes at
the end of the printer’s life.
material safety data sheets
Material Safety Data Sheets (MSDS) can be obtained from the HP Web site at
www.hp.com/go/msds. Customers without Internet access should contact HP
support.
recycling program
HP offers an increasing number of product return and recycling programs in
many countries and partners with some of the largest electronic recycling centers
throughout the world. HP conserves resources by reselling some of its most
popular products.
This HP product contains lead in the solder, which may require special handling
at the end of its life.
reference guide
25
Page 30

chapter 4
regulatory statements
For regulatory identification purposes, your product is assigned a Regulatory
Model Number. The Regulatory Model Number for your product is
SDGOA-0372. This regulatory number should not be confused with the
marketing name (hp photosmart 7200 series printer) or product numbers
(A6214A, A6214AZ).
Australia EMC statement
This equipment complies with Australian EMC requirements.
Canada EMC statement
Le présent appareil numérique n'émet pas de bruit radioélectrique dépassant les
limites applicables aux appareils numériques de la classe B prescrites dans le
Règlement sur le brouillage radioélectrique édicté par le ministère des
Communications du Canada.
This digital apparatus does not exceed the Class B limits for radio noise
emissions from digital apparatus set out in the Radio Interface Regulations of the
Canadian Department of Communications.
copyrights and trademarks
© Copyright 2003 Hewlett-Packard Company
All rights are reserved. No part of this document may be photocopied, reproduced, or translated to
another language without the prior written consent of Hewlett-Packard Company.
The information contained in this document is subject to change without notice. Hewlett-Packard shall
not be liable for errors contained herein or for consequential damages in connection with the furnishing,
performance, or use of this material.
HP, the HP logo, and Photosmart are property of Hewlett-Packard Company.
The Secure Digital logo is a trademark of the SD Association.
Microsoft and Windows are registered trademarks of Microsoft Corporation.
CompactFlash, CF, and the CF logo are trademarks of the CompactFlash Association (CFA).
Sony Memory Stick is a registered trademark of Sony Corporation.
MultiMediaCard is a trademark of Infineon Technologies AG of Germany, and is licensed to the MMCA
(MultiMediaCard Association).
SmartMedia is a trademark of Toshiba Corporation.
xD-Picture Card is a trademark of Fuji Photo Film Co., Ltd., Toshiba Corporation, and Olympus Optical
Co., Ltd.
IBM is a registered trademark of International Business Machines Corporation.
Mac, the Mac logo, and Macintosh are registered trademarks of Apple Computer, Inc.
Pentium is a registered trademark of Intel Corporation.
Other brands and their products are trademarks or registered trademarks of their respective holders.
The embedded software in your printer is based in part on the work of the Independent JPEG Group.
The copyrights to certain photos within this document are retained by the original owners.
26
hp photosmart 7200 series
Page 31

Page 32

Printed on recycled paper
Printed in U.S., 5/03
ENERGY STAR® is a U.S. registered mark.
As an ENERGY STAR
Hewlett-Packard Company has determined that this
product meets the ENERGY STAR
energy efficiency.
www.hp.com
© 2003 Hewlett-Packard Company
®
partner,
®
guidelines for
v1.2.0
 Loading...