

Page 1

ELECTROGLIDE
ELECTRIC POWERHEAD
™
OWNER’S MANUAL
Review this manual before operating your
Electroglide Electric Powerhead
Page 2

2 ELECTROGLIDE
Subject Page
Safety Instructions 3
Parts and Features 4
Assembling Vacuum System 5
General Operation 6
Electroglide Attachments
Handle Attachments 6
Wand Assembly Attachments 6
Performance Features
Edge Cleaner 7
Overload Protector 7
Suction Control 7
TABLE OF CONTENTS
Maintenance and Care
Light Bulb Replacement 8
Cleaning the Brush Assembly 8
Belt Removal and Replacement 9-11
Brush Replacement 11
Replacement Parts 12-13
Limited Warranty 14
Service Information 15
©Copyright 2000 H-P Products, Inc.
Page 3

ELECTROGLIDE 3
IMPORTANT SAFETY INSTRUCTIONS
Read all instructions before using this vacuum system.
When using an electrical appliance, basic precautions
should always be followed, including the following:
WARNING
To reduce the risk of fire, electrical shock or injury:
· Unplug and disconnect power
before servicing.
· Do not use on wet surfaces.
· Do not allow to be used as a toy.
Close attention is necessary when
used by or near children.
· Use only as directed in this
manual. Use only manufacturer’s
recommended attachments.
· Do not use with damaged cord or
plug. If appliance is not working
as it should, has been dropped,
damaged or exposed to water,
return it to a service center.
· Do not pull or carry by cord, use
cord as a handle, close a door on
cord, or pull cord around sharp
objects or corners. Do not run
appliance over cord. Keep cord
away from heated surfaces.
· Do not unplug by pulling on cord.
To unplug, grasp the plug, not
the cord.
· Do not handle system or appliance
with wet hands.
· Do not put any object into
openings.
· Do not use with any opening
blocked; keep free of dust, lint,
hair, and anything that may
reduce airflow.
· Keep hair, loose clothing, fingers,
and all parts of body away from
openings and moving parts.
· Do not pick up anything that is
burning or smoking, such as
cigarettes, matches, or hot ashes.
· Turn off all controls before
unplugging.
· Use extra care when cleaning on
stairs.
· Do not pick up flammable or
combustible liquids such as
gasoline or use it in any areas
where they may be present.
· The hose contains electrical wires.
Do not use if damaged, cut or
punctured. Avoid picking up
sharp objects.
· Always turn off this appliance
before connecting or disconnecting either hose or motorized
nozzle.
SAVE THESE INSTRUCTIONS
Intended for Household Use Only
Page 4
4 ELECTROGLIDE
PARTS AND FEATURES
It is important to know your Electroglide parts and features to assure
its proper and safe use. Review these before using your Electroglide.
Upper
Wand
Cord and
Cord Holder
Power Cord
Wand Swivel
Cord Holder
Belt
Pile Height Indicator
Headlight
Wand Easy
Release Pedal
Light Cover
ELECTROGLIDE
Model/Serial Numbers
(On Bottom)
Handle
Release
Pedal
Pile Height Pedal
Edge Cleaner
(Not Shown)
Overload Protector
(Reset Button)
WARNING
Always unplug the Electroglide before cleaning the brush area as brush
may suddenly restart. Failure to do so can result in personal injury.
Page 5

ELECTROGLIDE 5
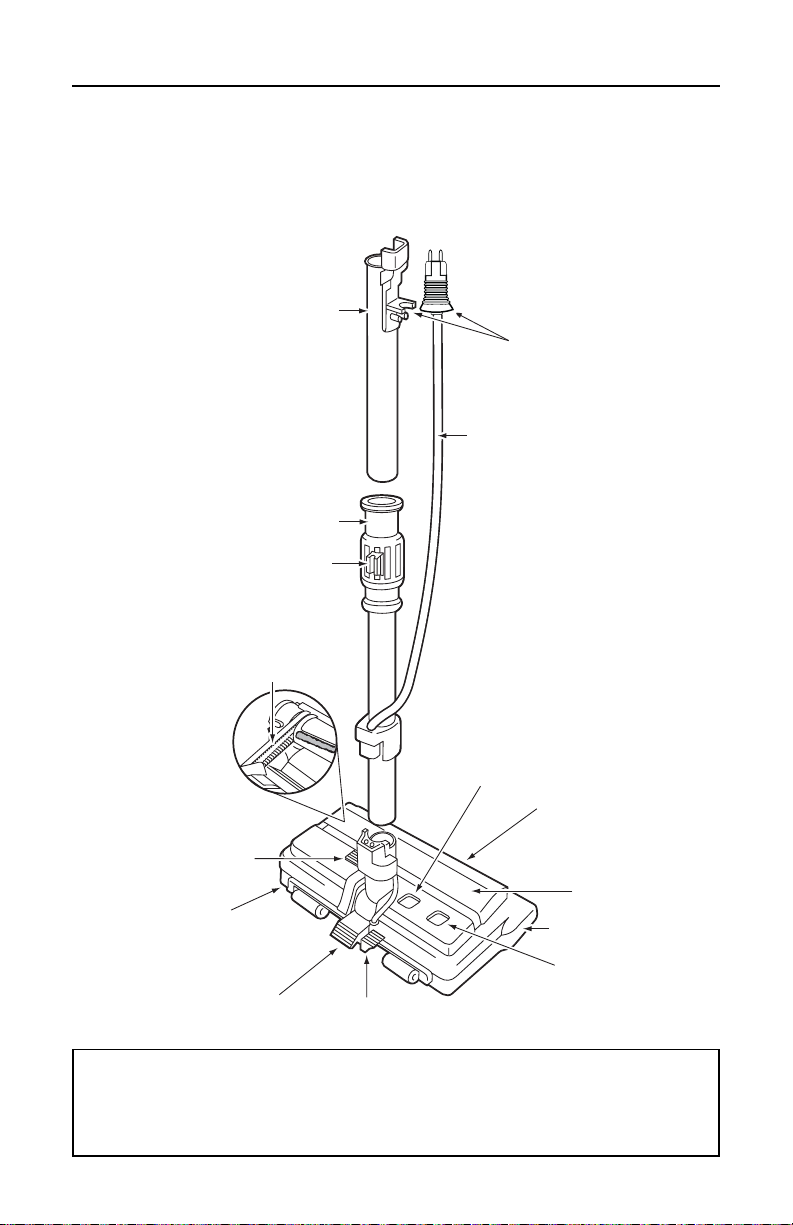
ASSEMBLING VACUUM SYSTEM
Before assembling your Electroglide Electric Powerhead,
be sure you have all parts shown in PARTS AND FEATURES.
WARNING
Do not plug into electrical supply until assembly is complete.
Failure to do so could result in electrical shock or injury.
1. Connect the upper and lower wand
Hose
Handle
Handle
Button
Upper
Wand
Button
Lock
Wand
Swivel
Suction
Control
Plug
Holder
Power
Cord
Cord
Holder
Lower
Wand
Wand
Button
sections. (The wand swivel is located
on the lower wand.)
2. Slide the upper and lower wands together
until the wand button snaps into place.
Turn wand button to the slotted area of
the wand swivel. (The swivel allows
you to turn the handle to the left side to
reach farther under low furniture.)
3. Insert the wand assembly into the wand
socket located on the neck of the
electric powerhead. The lower wand
button lock will prevent the wand
assembly from detaching from the
Electroglide while in use.
4. Plug the power cord from the wand
assembly into the receptacle at the top
of the upper wand. DO NOT FORCE.
5. Secure the electric cord into the cord
holder on the wand swivel.
6. Insert the hose handle into the wand
assembly. Insert the hose wall adapter
into the vacuum inlet valve. Plug the
120V power cord into the nearest
electrical outlet.
Wand Easy
Release Pedal
To remove wands, disconnect the power cord
and step on the wand release pedal, then pull
up on the wands.
Page 6

6 ELECTROGLIDE
GENERAL OPERATION
The Electroglide is controlled by
pressing the three-position on/off
Pile Height
Indicator
power control switch located on
the hose handle. The headlight
will operate when the Electroglide
is turned on.
The powerhead has a height
adjustment pedal for various
carpet heights. Use the low setting
for short napped carpets, and the
high setting for plush carpets.
Handle Release
Pedal
Pile Height
Pedal
ELECTROGLIDE ATTACHMENTS
Hose Handle Attachments
If the Electroglide is attached, turn cleaner OFF before removing hose
handle from wands.
1. Press lock button, then pull toremove handle from wand.
2. Slide attachments firmly on handle as needed.
Wand Assembly Attachments
To remove wands from the Electroglide
Powerhead, lock wands in straight up
position.
1. Press easy release pedal with foot and
pull the wands straight up out of the
Wand Easy
Release Pedal
Electroglide Powerhead. The Electroglide plug and cord do not have to be
removed to use attachments on the
wands.
2. Put attachments on wands as needed.
Caution: Do not attach or remove handle or wands while cleaner is
ON. This could cause sparking and damage the electrical contacts.
Page 7

Handle
Release Pedal
PERFORMANCE FEATURES
Edge Cleaner
Active brush edge cleaners are on
both sides of the Electroglide.
Therefore, guide either side of the
Electroglide along baseboards or
next to furniture to help remove
dirt trapped at carpet edges.
Overload Protector
The Electroglide has built-in
protection against motor and belt
damage should the brush jam. If
the brush slows down or stops, the
overload protector button pops up
and shuts off the Electroglide
automatically, while the power unit
motor continues to run. To reset
the system, just push in the overload protector button.
ELECTROGLIDE 7
Suction Control
The suction control allows you to
easily change the vacuum suction
for different fabric and carpet
weights. Opening the control
decreases suction for drapes and
lightweight rugs, while closing the
control increases suction for
upholsteries and carpets.
Handle Release Pedal
The handle release pedal allows
you to lower the wand and handle
for extended and easier reach
under furniture.
Decrease
Suction
Increase
Suction
Page 8

8 ELECTROGLIDE
MAINTENANCE AND CARE
WARNING
Always unplug electrical cord and vacuum hose before
servicing and maintaining the Electroglide Electric
Powerhead. Failure to do so could result in electrical shock
or personal injury from cleaner suddenly starting. Always
follow all safety precautions specified when caring
for your Electroglide.
Light Bulb Replacemnent
1. Disconnect cleaner from
electrical outlet.
2. Remove light cover by pressing
in and lifting both sides of
cover as shown.
Push In
And Turn
3. Push in and turn bulb counter
clockwise to remove.
4. Replacement bulb must not be
higher than 15 watts
(Part #7967).
5. Close light cover until it snaps
in place.
Brush Cleaning
Check the brush roll and brush support areas frequently in order to
maintain optimum efficiency. If hair, string, thread, carpet fiber or lint
becomes wound around the brush roll, remove by unwinding them by
hand or carefully cutting with scissors. If buildup becomes excessive,
disconnect the Electroglide Powerhead from the wand assembly and
follow the Brush Replacement steps on Page 11. Instructions can also
be found under the light cover.
Page 9

ELECTROGLIDE 9
MAINTENANCE AND CARE
Belt Removal and Replacement
The belt should also be checked periodically to be sure it is in good
condition. It should be replaced if it is stretched, cracked or broken. If
the belt needs replaced, use only Electroglide Belt # 7960.
To remove belt:
1. Remove light cover and light
bulb as shown on Page 8.
2. Unscrew the Electroglide
Powerhead cover screws.
4. Turn Electroglide Powerhead
right side up. Press handle
release pedal and lower the
swivel. Tilt cover forward from
back until front snaps free.
3. Turn Electroglide Powerhead
over. To remove cover, insert
screwdriver at cover tabs on both
sides and twist to release tabs.
Tab
Easy
Release
5. Carefully insert and twist
screwdriver at each brush
support to free brush from
base.
Brush
Support
Base
Page 10

10 ELECTROGLIDE
MAINTENANCE AND CARE
Belt Removal (continued)
6. Remove worn belt.
7. Slide brush supports off to
check and clean brush support
areas.
To replace belt:
1. Slide washers and brush
supports onto brush assembly.
3. Snap brush supports into place
on base. Be sure brush supports
are not upside-down.
2. Install new belt over motor
drive, then over brush sprocket.
Brush
Brush
Support
Brush Sprocket
Motor
Drive
4. Line up front of cover and base.
Rest cover on front edge of
base as shown.
Cover
Base
Page 11

MAINTENANCE AND CARE
Belt Replacement (continued)
5. Tilt cover to back. Press cover
firmly until side tabs snap into
place. Replace cover screws,
light bulb and light cover.
ELECTROGLIDE 11
Brush Replacement
1. Remove the Electroglide
Powerhead cover, belt and
brush assembly.
2. Remove brush supports,
washers, screws, end brush,
and brush sprocket pieces from
ends of brush assembly.
3. Reassemble brush assembly as
shown below.
4. Replace belt, brush assembly,
Electroglide Powerhead cover,
light bulb and light cover.
Washer
Brush
Support
Brushes
Brush Dowel
Replace brushes when the brushes
are worn to the level of the base
support bars.
Base Support Bars
Brush
Sprocket
Flange
Brush
Sprocket
End
Brush
Screw
Brush
Support
Screw
Washer
Page 12

12 ELECTROGLIDE
REPLACEMENT PARTS
ELECTROGLIDE
Page 13

ELECTROGLIDE 13
ELECTROGLIDE
REPLACEMENT PARTS
Illus.
No.
1
3
4
5
6
7
8
9
10
11
12
13
14
15
16
17
18
19
20
21
22
23
24
25
26
Part
No.
7922
7923
7972
7925
7926
7927
7967
7965
7929
7930
7931
7932
7933
7934
7935
7936
7937
7938
7939
7940
7941
7942
7943
7944
7945
Part
Description
Wand (Upper)
Wand (Lower)
Cover, Power
Head
Screw
8-18 x 1-7/8 (2)
Nozzle Housing
Bumper
Bulb, Light
(15 Watt)
Socket, Bulb
Swivel
Swivel Seal (2)
Pad, Foot Pedal
Indicator Lever
Indicator Cam
Indicator Block
Spring Assist
Brush Assembly
Washer, Metal
(12 x 1/2) (2)
Bearing & Housing Assembly (2)
(includes Illus. 18)
Lifter
Handle Release
Overload
Protector
Wire Connector
Roller, Rear (2)
Rear Axel (2)
Base
Illus.
No.
27
28
29
30
31
32
33
34
35
36
37
40
41
42
43
44
45
46
51
53
55
Part
No.
7946
7947
7948
7949
7950
7951
7952
7953
7954
7955
7928
7958
7959
7960
7961
7962
7963
7964
7973
7969
7968
Part
Description
Front Axel Assembly
Swivel Cap
Washer Thrust
Washer
Catch Indexing
Ratchet Catch
Screw Type 25
#6 Pan (2)
End Brush Tufted
Brush Sprocket
Brush Sprocket
Flange
Easy Release Pedal
Screw
8-18 x 5/8 (2)
Motor Bridge
Belt, Cogged
Motor
Motor Adjustment
Spring
Lens, Height
Adjustment
Button, Extention
Seal, Overload
Cover, Plug
Lens, Light
Page 14

14 ELECTROGLIDE
LIMITED WARRANTY
H-P PRODUCTS, INC. warrants that the Electroglide Electric Po werhead,
when used for household purposes, pursuant to Seller’s instructions, will
be free from defects in materials and workmanship for a period of one year
from the date of the initial consumer purchase. H-P PRODUCTS, INC.
warrants that the Electroglide Electric Powerhead, when used in a commercial application, pursuant to Seller’s instructions, will be free from
defects in materials and workmanship for a period of ninety (90) days from
the date of the initial sale by H-P PRODUCTS, INC. This warranty is
limited to the replacement of defective parts and any costs of shipping
shall be incurred by the purchaser. THIS WARRANTY IS EXCLUSIVE
AND IS IN LIEU OF ALL O THER WARRANTIES, EXPRESS, IMPLIED,
OR STATUTORY, AND H-P PRODUCTS, INC. SPECIFICALLY DISCLAIMS RESPONSIBILITY FOR CONSEQUENTIAL AND INCIDENTAL DAMA GES, AND LIMITS THE IMPLIED WARRANTY OF MERCHANTABILITY TO THE PERIOD OF EFFECTIVENESS OF THIS
EXPRESS WARRANTY.
WARNING:
ELECTRIC SHOCK
COULD OCCUR IF USED
ON WET SURFACES
Page 15

ELECTROGLIDE 15
SERVICE INFORMATION
The instructions in this booklet serve as a guide to routine maintenance.
If additional service or repairs are required, please call 1-800-822-8356
for your nearest authorized service dealer.
H-P PRODUCTS, INC.
512 W. GORGAS STREET
LOUISVILLE, OHIO 44641
Page 16

®
H-P Products, Inc.
512 W. Gorgas Street
Louisville, Ohio 44641-0912
HVS-968-NL 02/02
 Loading...