

Page 1
Deutsch
Français
9
Engine Manual エンジン取扱説明書
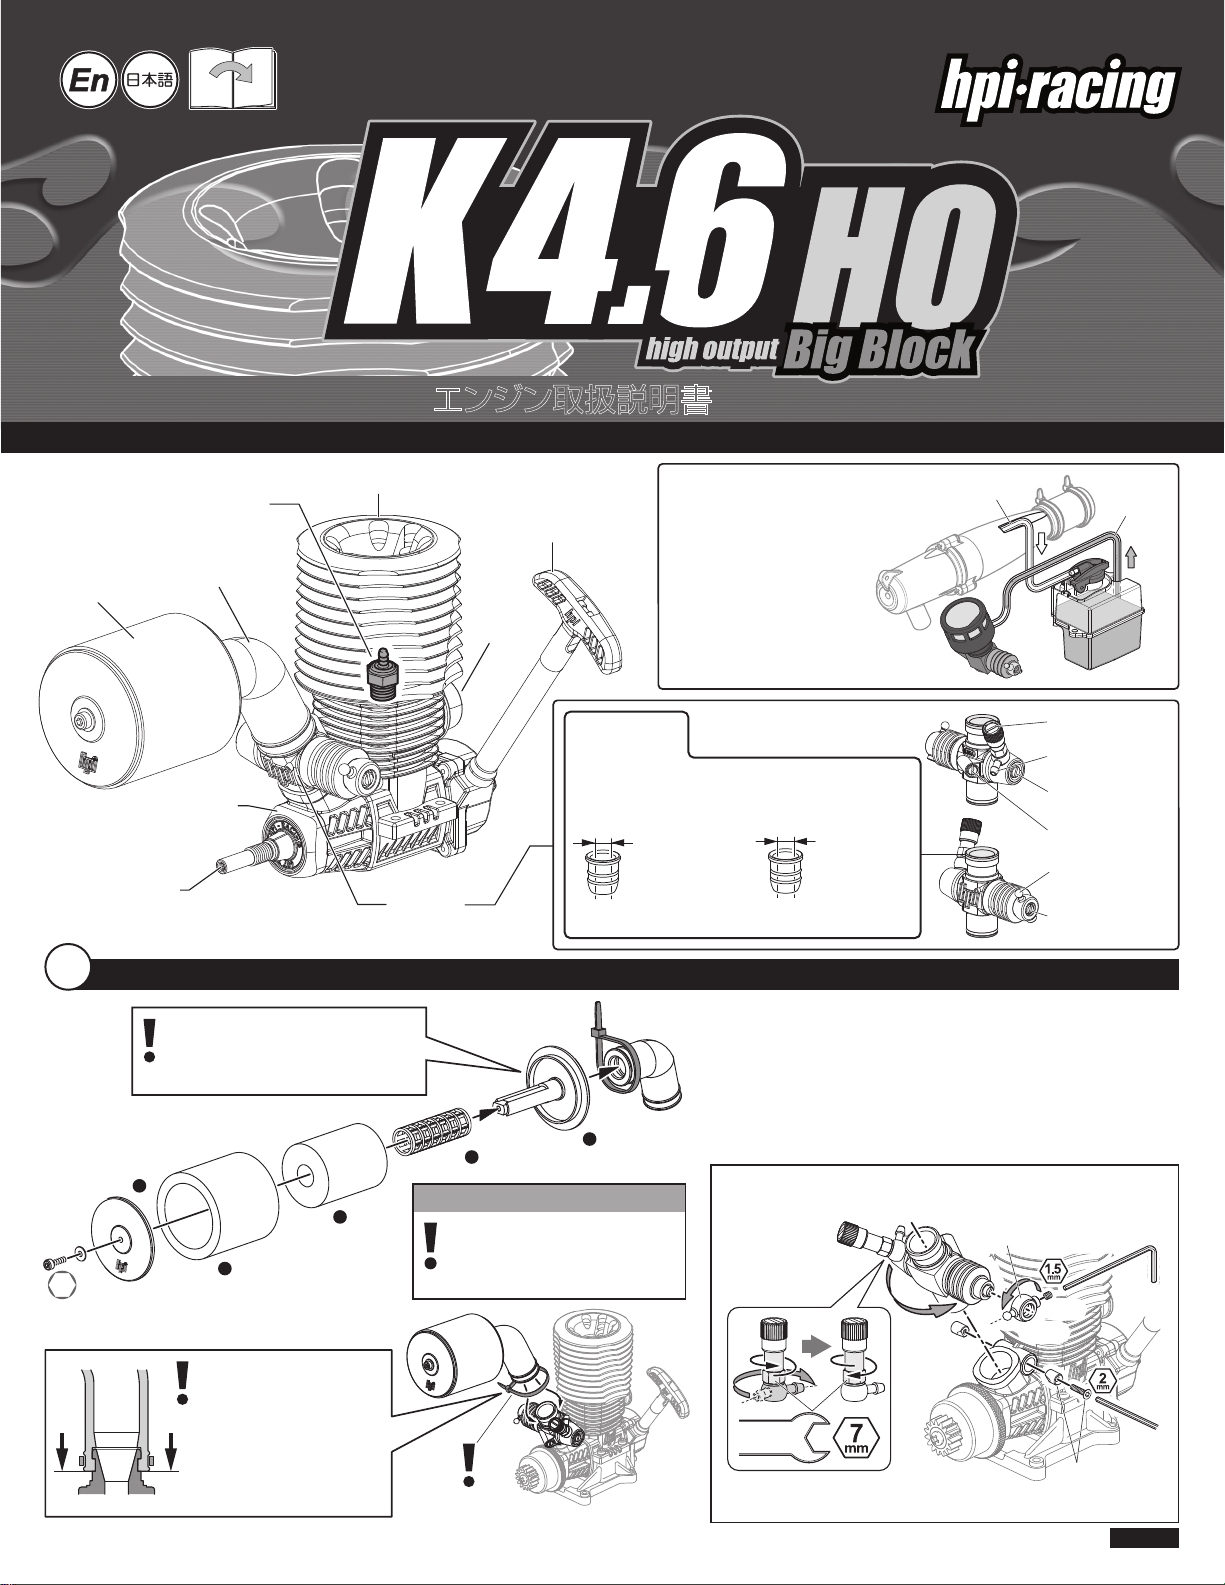
Engine Features
Glow Pulug
グロープラグ
Air Filter Boot
Air Filter
エアフィルター
エアフィルターブーツ
エンジン解説
Heat Sink
ヒートシンクヘッド
Pull Starter
リコイルスターター本体
Exhaust Outlet
排気口
Fuel Line System
The Fuel Line supplies fuel to
the engine. The Pressure line
pressurizes the fuel tank to
keep the fuel flow even.
燃料系統
燃料チューブは、燃料をエンジンに供給
します。エアプレッシャーチューブは、
燃料タンクに圧力をかけ燃料の供給が
安定して行われるようにします。
Pressure Line
エアプレッシャーチューブ
Fuel Line
燃料チューブ
Crankcase
クランクケース
Crankshaft
クランクシャフト
1
Reinstalling the Filter Element エアフィルターの取り付け
Carburetor
キャブレター
Make sure the air filter is fully seated
on the carburetor and secure it with
a nylon tie strap (6154).
ナイロンストラップ(6154)で確実に固定してください。
87199
b
87199
a
Z224
M3x8mm
2.5
mm
Z543
M3x10mm
87199
87204
b
87204
a
Attention注意
If the air filter falls off, you must
stop the engine immediately.
走行中にエアフィルターが外れた場合はすぐ
に走行をやめエンジンを停止してください。
Make sure the air filter is
fully seated on the carburetor and secure it with a
nylon tie strap (6154).
エルボーをしっかり溝にはめ込みナ
イロンストラップ(6154 )で確実に
固定してください。固定されていな
いと走行中に外れ、エンジン内にゴ
ミが入りエンジンが破損します。
6154
Option
オプション
You can change the engine characteristics by installing
a restrictor.
レデューサーを交換することでエンジンの特性を変更できます。
8.0mm
Restrictor 8.0mm
レデューサー
For less fuel consumption
燃費が良くなります。
6154
8.5mm
More top end power
パワーが出やすくなります。
Use thread lock on mounting screws when installing the engine in to the chassis.
エンジンをシャーシに取り付ける時は、取り付けネジにネジ止め剤を使用してください。
Carburetor
キャブレター
Restrictor 8.5mm
レデューサー
Make sure the throttle and brake linkage are in the correct position.
スロットルリンケージの位置を確認してください。
Do not adjust carburetor needles until break in is complete. The needle are set
87509
c
flush with the carburetor body from the factory, this is the proper break in setting.
キャブレターのニードルは変更しないでください。
出荷時にブレークイン用のセッティングになっています。
For use with savage rotate the carburetor 180 degrees.
SAVAGEに使用する時は、キャブレターの向きを逆にします。
Push down on carburetor while tightening the carburetor lock pin screw.
キャブレターを固定するときは押し込みながらロックピンを固定します。
Page 1/16
15231
High Speed Needle
メインニードル
Fuel Inlet
燃料取入れ口
Mid Range Needle
ミッドレンジニードル
Idle Adjustment Screw
アイドリング調整ネジ
Throttle Linkage
スロットルリンケージ
ボールジョイント
Low Speed Needle
スローニードル
Horizontal position.
水平にします。
Z700
15266
15231
Z901
Z904
I-15204-1
Page 2
2
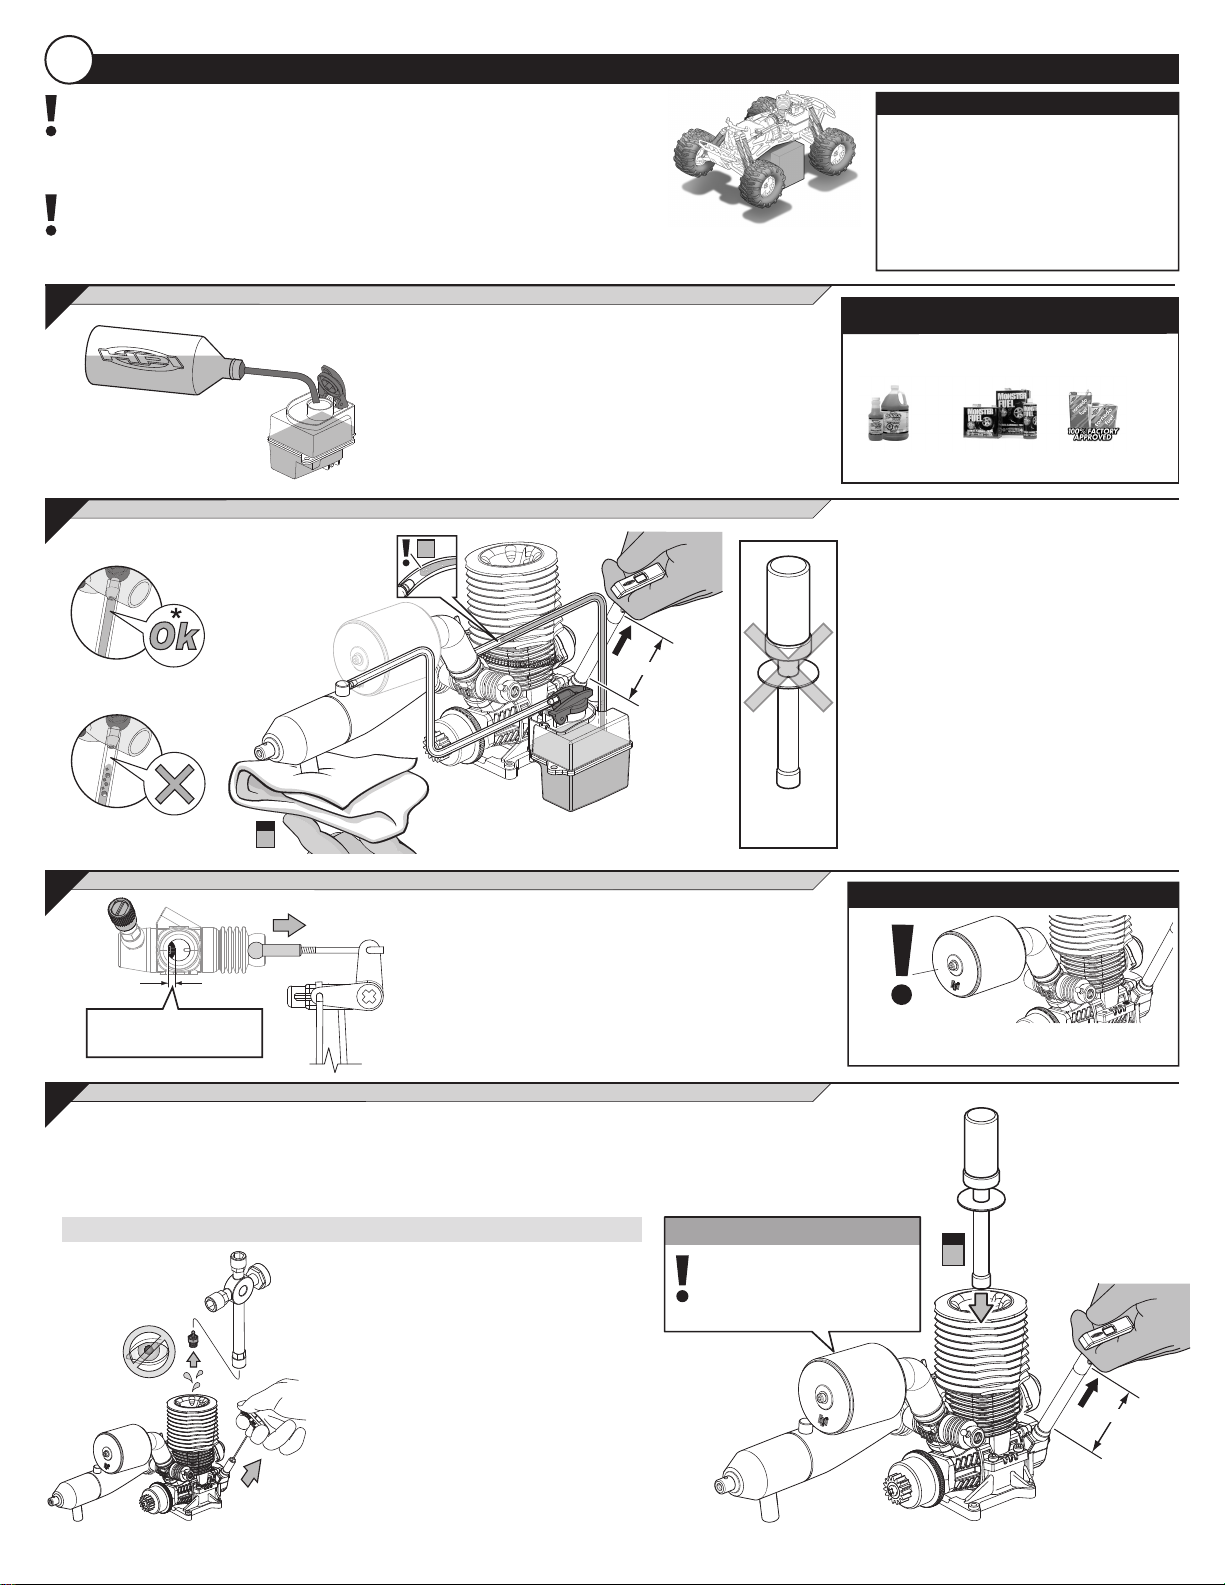
Engine Break In エンジンブレークイン
Important:
HPI engines will feel tight at the top of their stroke when they are new or when they have not
reached their normal operating temperatures. The piston and cylinder sleeves are designed
to achieve proper running tolerances when they are properly broken in and are operating at
the correct temperature. New engines need a break in period of about 3 to 4 tanks of fuel
before they can be run at Full throttle, if not the engine could be damaged.
重要
HPI製のエンジンは新品時及びエンジンが十分に温まっていないときには動きが硬く感じることがあります。これは適切なブレ
ークインがされ、エンジンが十分に温まったときにピストンとシリンダーがスムーズに作動するように設計されているためです。
新品のエンジンは全開走行するまでに3-4タンク分のブレークインが必要です。ブレークインが不十分な場合はエンジンを破損
する恐れがあります。
Fill Fuel Tank 燃料タンクに燃料をいれます。
1
Fill the tank completely with fuel. Use only 20 to 25% Nitro content
fuel. Use high quality branded model car fuel only. Using the non-car
fuels could void your warranty.d be damaged.
燃料タンクに燃料をいっぱいまで入れてください。燃料はHPI製RCカー専用燃料もしくは、ニト
ロ含有量20-25%の高品質RCカー専用燃料をご使用ください。カー専用燃料以外の燃料をご
使用された場合の保障は致しかねます。
Priming Engine 燃料をキャブレターに送る
2
3
12"30cmMAX!
Keep the wheels off the ground.
ダイなどを使ってタイヤが地面から離れて
いる状態にします。
Attention 注意
For non-pull start engines, please refer to
the engine start up section of your car kit
manual for proper starting procedures.
プルスターター装着者 でない場合 は、お手持ちのキットの
説明書を参考にしてエンジンを始動させてください。
Recommended Nitro Content
下記ニトロ含有量の燃料をお使いください。
20% - 25%
74318/ 74348
20% Glow Fuel
(US only)
To prime the engine, use your finger to cover the
exhaust tip. Pull the starter chord several times
until fuel reaches the carburetor and no bubbles
are seen. Never pull the starter chord more than
30cm max as it will damage the starter.
エンジン始動準備のため、マフラー出口を指で塞いでプルスター
ターを数回引き、燃料がキャブレターまで行き渡るようにします。こ
のとき燃料に気泡が混ざっていないように気をつけてください。気
泡がみられるときにはもう一度プルスターターを引いてください。(
プルスターターを何度も引くと、燃料がエンジン内にあふれエンジ
ンが始動できなくなりますので注意してください)。
また、プルスターターの破損を防ぐために30cm以上引かないでく
ださい!
38704/ 38705
38706 グロー燃料
(JP only)
25% Nitro Content
25% Kraftstoff
25% Carburant
Step
1
Open the Carburetor スロットルを開きます
3
Make sure the receiver switch is off. Manually turn the throttle
servo by hand until the carburetor is 1/4 of the way open.
受信機スイッチが切れていることを確認します。手動でスロットルサーボを動かしてキャブレ
ターを1/4開けます。
1/4 of the way open.
キャブレターを1/4開けます。
Glow Plug and Starter エンジン始動
4
Attach the glow igniter to the glow plug. Start the engine by pulling the starter chord in short pulls (no longer than 30cm max). Adjust
the throttle servo so the engine runs fast enough to idle smoothly without engaging the clutch or turning the wheels. Remove the glow
igniter as soon as the engine is running. Run the engine for one tank of gas. If the motor shuts off, repeat steps 1-4.
グロープラグにプラグブースターを取り付け、プルスターターを短く引きます。(30cm以上は絶対に引っ張らないでください。) アイドリングが安定し、クラッチがつながっていない状
態になるようスロットルを調節します。エンジンが始動したらプラグブースターを取り外してください。
そのままの状態でエンジンを1タンクまわしてください。もしエンジンが燃料を使い切る前にストップした場合はステップ1-4を繰り返してください。
Flooded Engine オーバーチョーク
70332
If there is too much fuel in the cylinder, the
engine will not start.
Follow the step below to remove excess fuel
from the cylinder.
NO!
Attention 注意
The engine must never be run without the air filter in place!
エアフィルターなしでは絶対にエンジンを始動しないでください。
Attention注意
The engine must never be run
without the air filter in place!
エアフィルターなしでは絶対にエンジン
を始動しないでください。
Remove the glow plug and pull the starter
cord several times to remove excess fuel.
Reinstall the glow plug .
燃料を多く送りすぎるとエンジン内に燃料があふれ、エンジ
ンの始動ができなくなります。
次の手順でエンジン内の燃料を取り除いてください。
グロープラグを取り外し、プルスターターを数回引き、エンジン
内にあふれた燃料を抜き取ります。この時プラグ穴から燃料が
吹き出すので燃料が目にはいらないように注意してください。
燃料が抜けた後、再びグロープラグを取り付けます。
Step
1
12"30cmMAX!
Page 2/16
Page 3
Keeping it Running 走行ブレークインの準備
5
Slowly.
ゆっくりとスロ
ット ル を開 け
ていきます。
Tip エンジンの停止方法
Turn on the transmitter and receiver, re-fill the fuel tank and follow the starting procedures in steps 1-4. With the tires
off the ground, use the radio to slowly increase the throttle until it reaches full speed, then release. This will help
clean the excess oil out of the engine. Because of the rich break-in settings, the motor needs to periodcally be
"cleaned out" to prevent it from stalling.
送信機、受信機の順に電源を入れます。燃料タンクに燃料を入れ、1-4の順にスタートをしてください。タイヤが地面から離れている状態のまま、送信機を操作
してゆっくりスロットルを開けます。最高速になったら、スロットルを緩めてください。こうすることでエンジン内にたまったオイルを排出することが出来ます。ブ
レークイン時は燃料が濃い状態になっています。そのためエンストを防ぐために時々エンジン内のオイルを排出する必要があります。
Use a Rag 布を使う
Use a rag to cover the exhaust tip. This will
stop the engine. Be careful! The exhaust is
extremely hot so be sure to use a thick rag.
排気口を布で覆うことでエンジンを停止することができます。
排気口は大変熱いので必ず厚手の布を使い火傷をしないよう
にに十分注意してください。
1/2 Throttle Driving ハーフスロットルによるブレークイン走行
6
20' (6mm)
1/2 Throttle
ハーフスロットル
3
Tuning After Break In ブレークイン後の調整
Rag
ウエス
Place the vehicle on the ground. The vehicle should not move when idling. If it does, adjust the trim setting on the
transmitter so the vehicle does not move. Drive the vehicle in a 20 foot (6m) oval applying throttle (below 1/2
throttle), coast for a short period of time to allow the engine to cool, then accelerate again. Continue this process for
a total of two tanks of fuel.
エンジンを始動して、車を地面に置いてください。アイドリング状態では車は動きません。もし車が進み始める場合は、スロットルトリムで車が走らないように調
節してください。スロットルを半分ほど開けた状態で、車が直径6mほどの円を描くように走らせます。エンジンの温度を上げないためにアクセルを戻したり、
1/2ほど開けたりを繰り返します。2タンク分、この動作を繰り返してください。
Pinch the Fuel Line 燃料チューブをつまむ
In extreme cases or emergencies you can pinch
the fuel line to stop the flow of fuel to the carb.
燃料チューブをつまむことで燃料の供給を止めエンジンを停
止することができます。
Important! Read this section carefully: Failure to follow these tuning steps could result in damage your engine, and void your warranty !
重要この項目にはエンジンの破損につながる大切なことが書かれています。必ずよくお読みください。この項目に従わなかった場合の破損には保障をいたしかねますのでご承知ください。
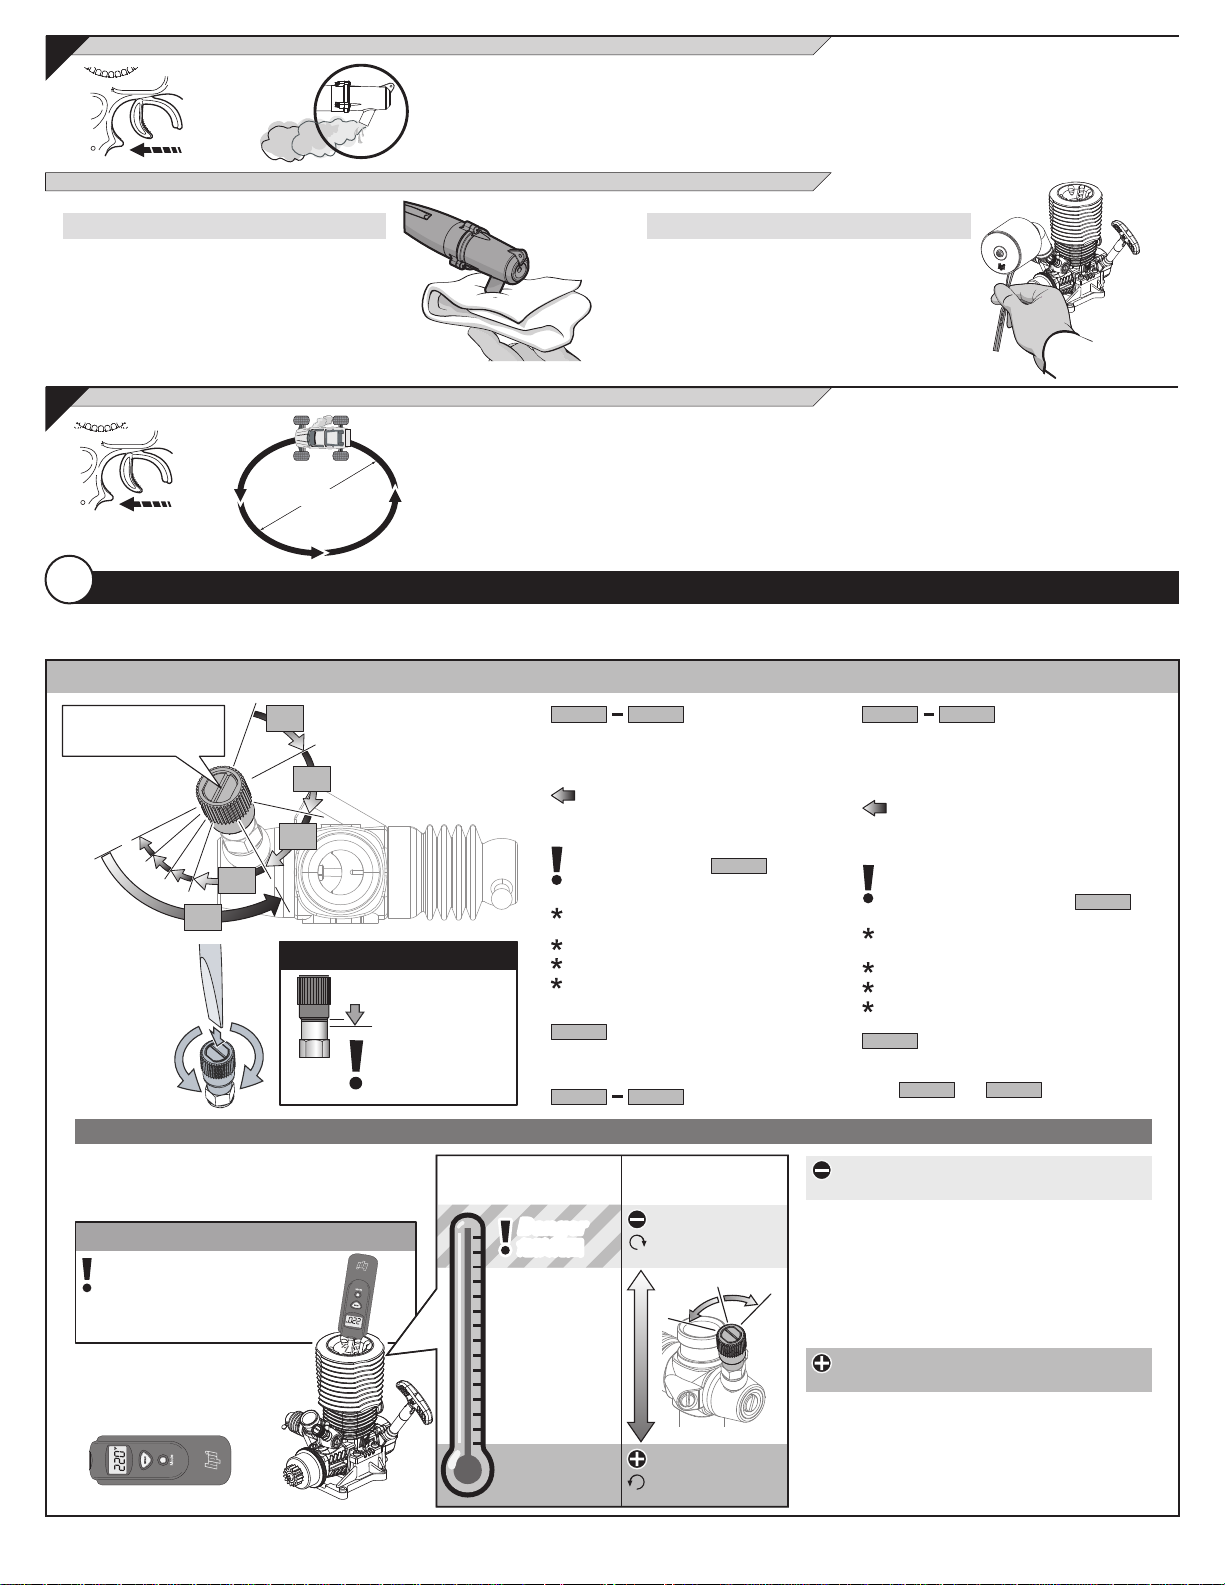
Tuning for Optimum Performance エンジンの性能を引き出す為の調節
High Speed Needle
メインニードル
Step X
ステップ
Use screwdriver to
adjust high speed
needle.
ニードルはマイナスドラ
イバーで回します。
Step 4
ステップ4
X
1/8
1/4
Step 1
ステップ1
Step 2
ステップ2
Step 3
ステップ3
Caution 警告
2 1/2 turn
MAX
2 1/2 turn MAX
clockwise from Groove.
溝切り部から2 1/2回転以上は
締め込まないでください。
STEP 1 STEP 4
Turn the high speed needle clockwise in 1/8 turn
increments to lean out the fuel mixture for increased
top speed and throttle performance. Drive the car to
notice changes in speed and throttle response.
Continue Tuning:
Continue leaning the carb in Clockwise 1/8
turn increments.
(Maximum of 2 1/2 turns from flush.)
STOP Tuning:
Stop tuning and go to if your
engine shows any of the follow signs.
(Engine is running too lean.)
At full throttle, these is no smoke from the
exaust.
STEP X
The engine hesitates or bogs.
Reduced top speed and loss of power.
Overheating
Temperatures above 250°C (120°F)
at the glow plug.
STEP X
If your engine is running lean, turn the needle
counter clockwise 1/4 turn to richen the fuel
mixture and repeat
STEP X
STEP 1
ステップ1 ステップ4
メインニードルを時計回りにの方向に1/8回転ずつ締めこん
でいきます。こうすることで燃料の混合比を薄くすることがで
き、最高速、スロットル操作に対する反応が向 上します。車を
運転しながら、スピードとスロットル操作に対する反応の違い
に注意してください。
調節を続けます
メインニードルを1/8回転 ずつ締め込み、混合 比を薄くして
いきま す。(最大 締め 込み量 はキャブレター 同 一面 から2
1/2回転までです。)
調整の中止
もし、エンジンが以下に記した症状のうちのどれか一つで
も示したときは、チューニングを中止してに
戻ってください。
スロットルを全開にした状態で、マフラーから煙が排出さ
れていない。
スロットル操作に対して反応が鈍い。息継ぎをする。
最高速が落ちる、またはパワーが出ていない。
オーバーヒート
エンジン(グロープラグの位置で計測)の温度が120度以上
ステップX
もし燃料の混 合比が薄すぎる場合は、メインニードルを1/4
回転反時計回りにまわし、混合比を濃くします。
そして から を繰り返します。
ステップ1
ステップX
ステップ4
Fuel Mixture Tuning Tip 適切な燃料混合比のヒント
Engine temperature can tell you if the engine is
running lean or rich.
燃料混合比とエンジン温度の関係は比例しています。
Attention 注意
Adjust carburetor to keep the
operating temperature below
250°F.
エンジン温度が120℃以下になるように
燃料混合比を調整します。
74151
HPI Racing Temp Gun
HPI温度計
Engine Temperature
エンジン温度
Danger
Danger
危険範囲
危険範囲
250°F
(
)
120°C
230°F
(
)
110°C
Safe Range
安全範囲
210°F
(
)
99°C
190°F
(
)
90°C
Break in
ブレークイン
Page 3/16
Fuel Mixture Tuning
燃料混合比の調節
Less Fuel = Lean
ニードルを時計回り=
混合比が薄くなる
More Fuel = Rich
ニードルを反時計回り=
混合比が濃くなる
Less Fuel = Lean
ニードルを時計回り=混合比が薄くなる
Lean Fuel Mixture
Provides strong and efficient combustion and power,
but if you lean out too much the result is less lubrication, more engine heat and shorter engine life.
混合比が薄い状態
燃料の燃焼 が効率よく行われパワーがでます。しかし、薄くしすぎると
燃料の潤滑が行われずオーバーヒートを招きエンジンの寿命が短くな
り破損します。
More Fuel = Rich
ニードルを反時計回り=混合比が濃くなる
Rich Fuel Mixture
A slightly rich fuel mixture delivers a cooler running
temperature and more lubrication but with slightly
less power and longer engine life.
混合比が濃い状態
混合比が濃い状態ではエンジン内の潤滑が良くエンジン温度も低めに
安定します。エンジンに対して優しいですが、パワーはやや落ちます。
Page 4
4
Optional Tuning その他のエンジン調整
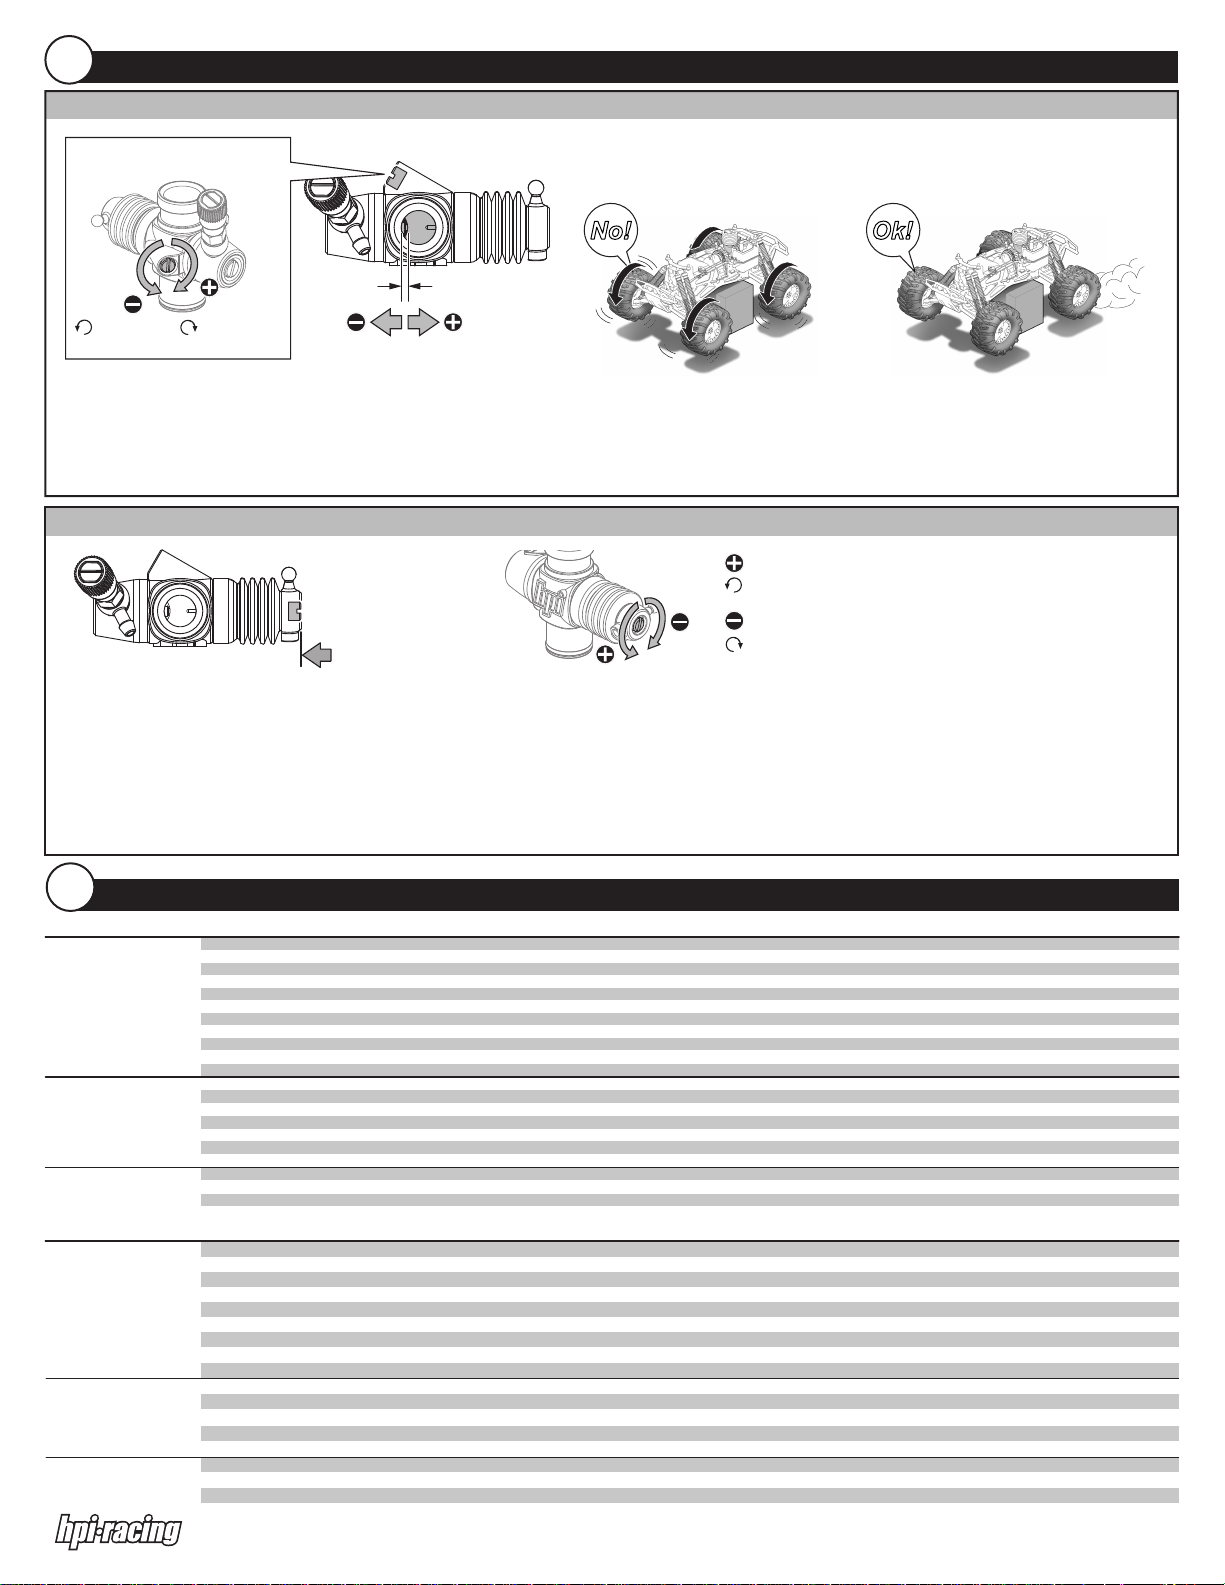
Idle Adjustment Screw アイドリング調整ネジ
Idle Adjustment Screw
アイドリング調整ネジ
Improper Idle Speed Setting
Clutch engaged and wheels turning.
アイドリングの調整ができていない場合
クラッチがつながった状態で、タイヤが回転します。
Proper Idle Speed Setting
Engine runs smoothly without wheels turning.
アイドリングの調整が正しくできている状態
アイドリングが安定した状態で、タイヤが回転していません。
No! Ok!
About 1mm (0.04")
約1mm
RPM Low
回転数低くなる
The idle speed is set after the high-speed needle is adjusted and the engine is up to operating temperature. To properly set the Idle Adjustment Screw, turn on your radio system and
set the throttle trim on the transmitter so that the throttle is in its neutral position. This will ensure that the throttle slide is fully closed and resting against the idle adjustment screw. Turn
the idle adjustment screw counter clockwise to reduce the idle speed, or clockwise to increase it. The idle speed should be set high enough to keep the engine running smoothly but not
engage the clutch and turn the wheels. Too high of an idle speed will prematurely wear out the clutch shoes and brake disk.
アイドリングの調整はスロットルがニュートラルの時にタイヤが回転してしまう場合に調整が必要となります。アイドリングの調整はメインニードルの調整が済んだ後、エンジンが充分に温まった状態で行います。アイドリングスピードを
上げたいときにはアイドリング調整ネジを時計回りに、下げたいときには反時計回りに回してください。アイドリングはエンジン回転が安定しながらクラッチはつながらずタイヤが回転していない状態が最適の状態です。アイドリングの
回転が高すぎるとクラッチシューやブレーキディスクの消耗が早くなります。
Low Speed Needle Adjustment スローニードルの調節
RPM High
回転数高くなる
Flush (Factory Setting)
キャブレター本体と同一面
(工場出荷時設定)
Low Speed Needle
スローニードル
More Fuel = Rich
ニードルを反時計回り=
混合比が濃くなる
Less Fuel = Lean
ニードルを時計回り=
混合比が薄くなる
If idle is unstable, adjust the low
speed needle to get a stable idle.
Afterwards, you need to readjust
the idle adjustment screw.
スローニードルを調整するとアイドリング状態
の燃料混合比が 変化します。再度アイドリング
の調整を行ってください。
We recomend that you do not touch the Low Speed Needle. If adjustment is needed, the low-speed mixture is set after the high-speed needle is adjusted and the engine is up to
operating temperature. Set the needle flush (Factory Setting) with the carburetor body, this setting is ideal for and breaking in and starting your motor. For increased performance turn the
needle in 1/8 turn increments; this will improve bottom end throttle response. To test your setting, place the car on the ground and let the engine idle for 30 seconds then accelerate to 3/4
throttle. If there is a lot of white smoke and the car accelerates slowly, the mixture is too rich. If the engine accelerates quickly and then sputters, the mixture is too lean.
When the low-speed needle is set correctly the engine's throttle response should be smooth and quick. CAUTION: Never turn in more than 2 turns from flush this will cause the
engine to run too lean and may damage your engine! If the Low Speed Needle is set too lean you will experience the following: Flame out at part or 3/4 throttle, Overheating
(Temperatures above 250°C (120°F) at the glow plug). If your engine is running too lean, reset the Low Speed Needle to its factory setting (Flush) and start the tuning process again.
スローニードルの調節は工場出荷時設定(初期設定)のままにしておくことをお勧めします。調整が必要な場合はメインニードルの調整が済んだ後、エンジンが十分に温まった状態で行います。
スローニードルはエンジンの反応を調節することができます。適切な調整か確認するためには、車を地面に置いて30秒ほどアイドリング状態にした後、スロットルを3/4ほど開けてください。このとき白い煙がたくさん排出されエンジ
ン反応が悪い場合には混合比が濃すぎます。エンジンが素早く反応した後エンジン回転がばらつく場合は混合比が薄すぎる状態です。スローニードルの調節が適切にできているときには、スロットル操作に対する反応が素早くスムーズ
になります。注意;スローニードルはキャブレター本体と同一面(工場出荷時設定)の状態から2回転以上締めないでください。混合比が薄すぎる状態になりエンジンが破損します。
5
Troubleshooting トラブルシューティング
Description Possible Problem Solution
Engine does not start
Engine starts, then stalls
Ralenti trop haut
Fuel mixture needle settings are out of range
Engine could be worn out
Out of fuel
Contaminated fuel
Glow plug igniter is not charged
Glow plug is bad
No fuel flow
Engine flooded
Engine has overheated
Throttle valve isn’t adjusted properly
Air cleaner is blocked
Idle speed is set too low
Air bubbles in the fuel line
Glow plug is bad
Engine is overheated
Airflow through system is bad
Throttle servo is improperly set up
Throttle servo glitch
Idle adjustment screw is set too high
Low speed needle set too lean
Improperly set neutral on transmitter throttle trigger See your radio and car kit instructions for setting neutral on transmitter throttle trigger
Set the needles to the factory setting, see page 5 sec 6
Replace piston and sleeve
Refill fuel tank
Replace fuel
Charge glow igniter
Replace glow plug
Check fuel lines for cracks, leaks, and holes. Replace fuel line if necessary.
Remove glow plug and discharge fuel
Allow engine to cool, richen the fuel mixture and then restart
Set idle and adjust neddle valve to the maunfacturers recommended settings
Check air filter. Clean or replace if necessary
Adjust the idle speed
Check for leaks or cracks in the fuel line
Replace glow plug
Allow engine to cool and then restart
Check connections between tank, engine and exhaust
Set servo to neutral and reset linkages according to radio and model manufacturer’s specifications.
Replace the radio batteries
Set idle screw to factory setting, see page 5 for proper idle speed adjustment
Set low speed needle to factory setting, see page 5 for proper low speed needle adjustment
症状 原因 調べる箇所と直し方
エンジンがかからない
エンジンはか かるが
すぐに止まる
アイドリングが高すぎる
ニードルの調節が適切に出来ていない
エンジンが傷んでいる
燃料が入っていない。燃料がエンジンまで来ていない。
プラグが切れている。プラグヒート用電池が減っている。
燃料チューブ・燃料タンクのつまり
エアクリーナー・マフラー内の汚れ
オーバーチョーク(チョークのしすぎ)
キャブレターの調整不良
サーボリンケージの調整不良
燃料タンクに燃料が入っていない
燃料チューブ・エアクリーナー・マフラー内の汚れ
スロットルバルブの調整不備
エンジンのオーバーヒート
スロットルサーボの動作不良
アイドリングの設定が高すぎる
低速の燃料混合比が薄すぎる
送信機のスロットルのニュートラルが出ていない
説明書5ページの6を参照に工場出荷時の設定に戻す
ピストンとシリンダーを交換する
燃料タンクに燃料をいれ、エンジンまで燃料を送る。(チョーク)
プラグを交換する。電池を新品に交換する。
燃料チューブ・燃料タンクの掃除、又は交換
エアクリーナー・マフラー内の掃除、又は交換
プラグを外しエンジン内の燃料を空にする。
ニードルバルブ・アイドリング調整ネジを元の位置に戻す
サーボをニュートラルにしてから、再度リンケージを調整
燃料タンクに燃料を入れる
汚れている部分の掃除、又は交換
スロットルバルブ及びアイドル・ニードルの調整
エンジンが冷えるのを待ってからニードルを1/4開ける。
プロポのバッテリーを交換する
アイドリング調整ネジを説明書5ページを参照に工場出荷時の設定に戻す
スローニードルを説明書5ページを参照に工場出荷時の設定に戻す
お手持ちのプロポ、キットの説明書を参照にスロットルのニュートラルの設定をする
Page 4/16
Page 5
6
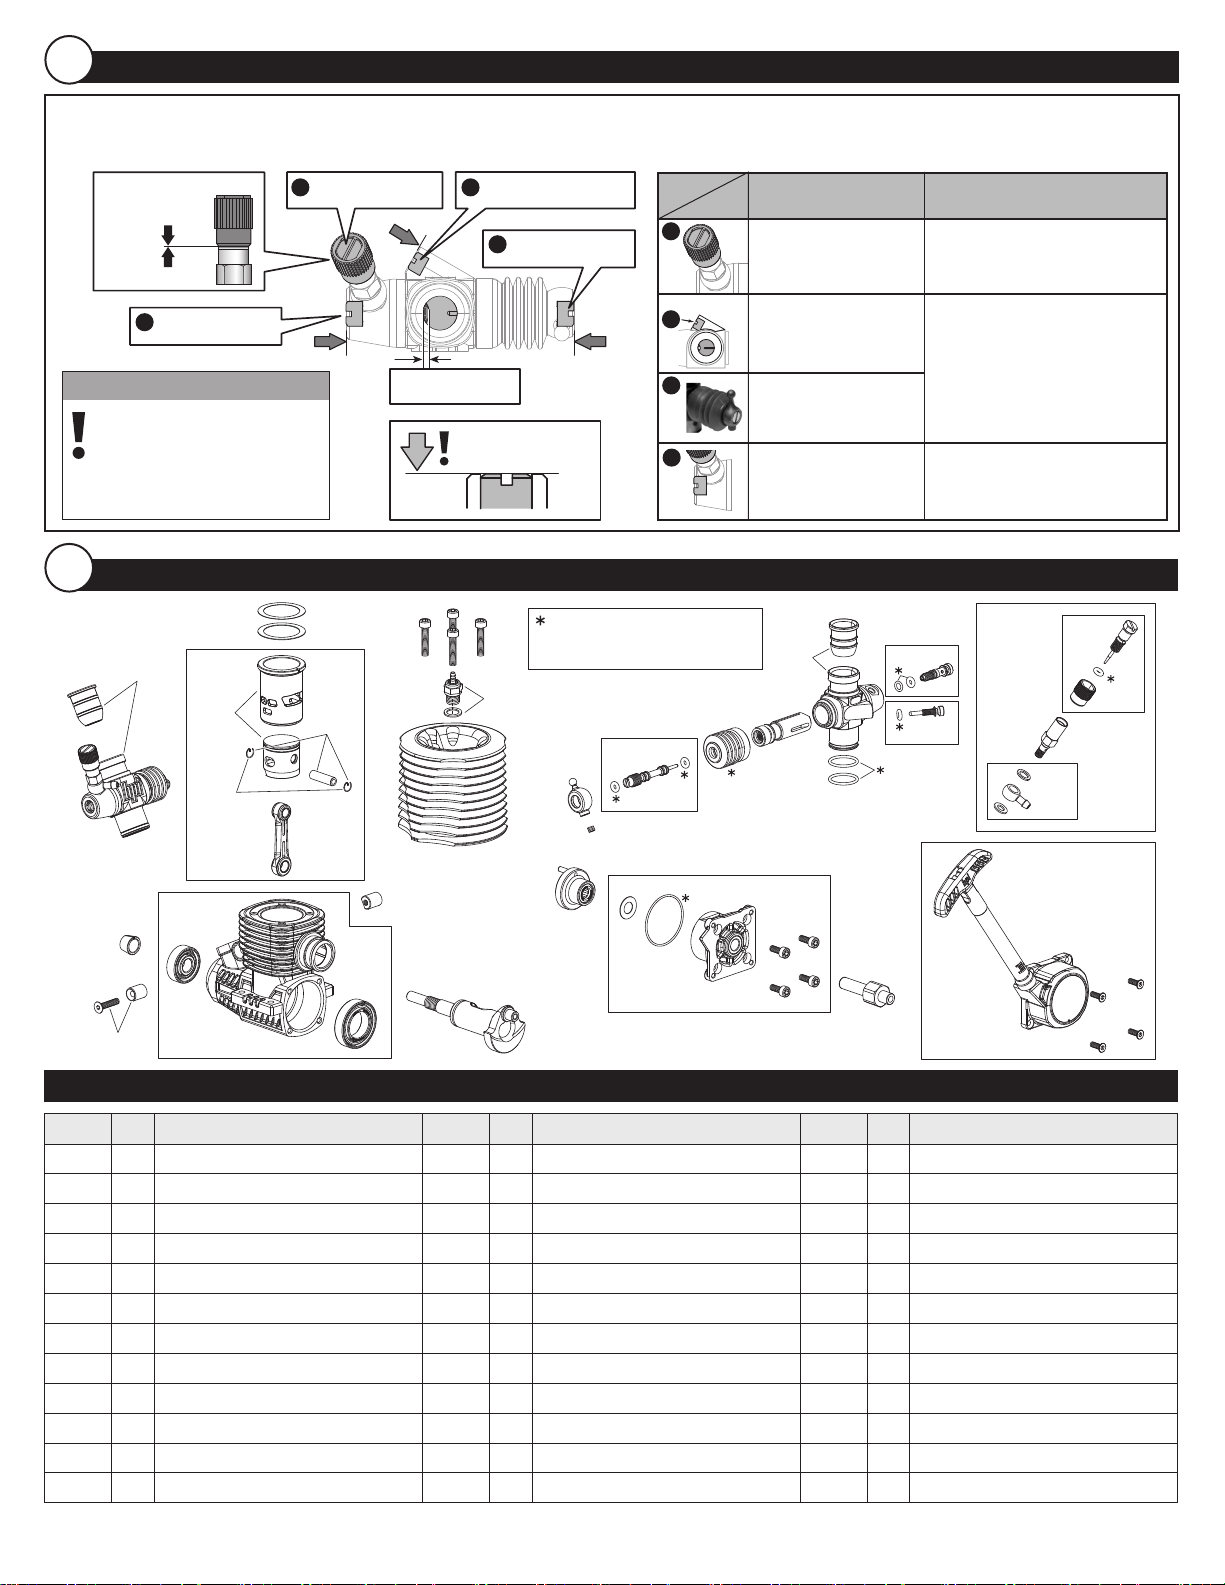
Carburetor Factory Setting (Break In Setting) キャブレター工場出荷時設定(初期設定)
High Speed Needle is set flush with groove, Idle Adjustment Screw, Low speed needle and Mid Range Needle are designed to be set flush with the carburetor body. This makes
it easy to reset the carburetor to the Factory Break In Setting if needed.
工場出荷時設定(初期設定)に戻しやすいよう、各ニードルの工場出荷時設定(初期設定)はメインニードルは本体溝切り部と同一線上、アイドリング調整ネジ、スローニードル及び、ミッドレンジニードルはキャブレター本体と同一面上にな
るように設計されています。
Flush with Groove.
溝切り部と同一線上
High Speed Needle
a
メインニードル
Idle Adjustment Screw
b
アイドリング調節ネジ
Low Speed Needle
c
スローニードル
Break-in Setting
ブレークイン時の設定
a
Flush with groove
溝切り部と同一線上
After Break-in Setting
ブレークイン終了後の設定
Please refer to the Tuning After Break-in
section on pg. 3 for tuning tips.
3ページのブレークイン後の調整を参照してください。
Mid Range Needle
d
ミッドレンジニードル
Attention 注意
When needle is over tightened
the needle is damaged.
ニードルが止まる所ま閉めてしまうとニード
ルの先端に傷がつき(破損)、燃料混合比が
調節できなくなります。ニードルが止まるま
で閉めないでください。
7
Exploded View 分解図
15261
15218
15217
15215
,
15228
15214
15213
About 1mm (0.04")
約1mm
Flush
キャブレター本体と同一面
15237
15243
15241
Dust Protection And O-ring Complete Set
スロットルカバー/Oリングセット
1504
15268
15266
Z700
b
c
Flush with groove
キャブレター本体と同一面上
Flush with groove
キャブレター本体と同一面上
Please refer to the Optional Tuning
section on pg. 4 for tuning tips.
4ページのその他のエンジン調整を参照してく
ださい。
d
Flush with groove
キャブレター本体と同一面上
15283
15269
Do not need to adjust
設定変更はしないでください。
15282
15271
15285
15275
15274
15272
15226
86077
15231
15244
Spare Parts スペアパーツ
Number
品番
15204 x1 Nitro Star K4.6 HO Engine With Pullstart
1504 x1 Glow Plug Cold R5
15213 x1 Connecting Rod
15214 x1 Piston Pin/retainer Set
15215 x3 Retainer For Piston Pin
15217 x1 Cylinder/Piston Set
15218 x1 Cylinder/piston/connecting Rod Set
15226 x1 Pullstart Assy. (W/o One-way Bearing)
15228 x1 Gasket Set For Cylinder (0.15mm/0.3mm)
15231 x1 Lock Pin Set For Carburetor
15233 x1 Pullstart Shaft Holder
15234 x1 Starting Shaft
Qty.
Description
入数
品名
ナイトロスターK4.6HOエンジン(リコイル付)
グロープラグコールドR5
コンロッド
ピストンピン/リテーナーセット
リテーナー
シリンダー/ピストンセット
シリンダー/ピストン/コンロッドセット
リコイルスターターセット(ワンウェイ無)
ガスケットセット(0.15mm/0.3mm)
キャブレターロックピンセット
ワンウェイホルダー
スターターシャフト
15231
15233
15236
15245
Number
品番
15236 x1 Cover Plate Set
15237 x4 Screw M3.5x16mm For Heatsink Head
15241 x1 Dust Protection And O-ring Complete Set
15243 x1 Heatsink Head (Gray/K4.6 HO)
15244 x1 Crank Case (K4.6 HO)
15245 x1 Crankshaft (K4.6 HO)
15261 x1
15266 x1 Uniball
15268 x1 Low Speed Needle Valve With O-ring
15269 x1 Slide Valve
15271 x1 Idle Adjustment Screw With O-ring
15272 x1 Fuel Line Fitting/Washer Set
Qty.
Description
入数
品名
カバープレートセット
シリンダーヘッドスクリュー
スロットルカバー/Oリングセット
ヒートシンクヘッド(グレー/K4.6HO)
クランクケース
クランクシャフト
Slide Carburetor Complete W/ Restrictors (Type KB)
スライドキャブレターセットレデューサー付(タイプKB)
スロットルバルブボール
スローニードルバルブ
スライドバルブ
アイドルアジャストスクリュー
ニップル
Z542
15234
Number
品番
15274 x1 High Speed Needle Valve Holder
15275 x1 High Speed Needle Valve With O-ring
15282 x1 Mid Range Needle Valve With O-ring
15283 x1
15285 x1 High Speed Needle Valve Set
86077 x2 Collet 7x6.5mm (Brass/21 Size)
87198 x1 Air Cleaner (21+ Size)
87199 x1 Air Cleaner Sleeve Set (For #87198)
87204 x1 Air Cleaner Foam Element Set (For #87198)
94154 x12 Flat Head Screw M2.6x8mm (Hex Socket)
Z542 x12 Cap Head Screw M3x8mm
Z700 x6 Set Screw M3x3mm
Qty.
Description
入数
品名
メインニードルバルブホルダー
メインニードル
ミッドレンジニードルバルブ(Oリング付)
Slide Carburetor Main Body W/restrictors(Type KB)
スライドキャブレターメインボディー(コンポジット)
メインニードルバルブセット
コレット(21サイズ)
エアフィルター(21サイズエンジン以上)
スリーブセット(#87198エアクリーナー用)
エレメントセット(#87198エアクリーナー用)
サラネジ(六角ソケット)
キャップネジ
セットスクリュー
94154
Page 5/16
Page 6

8
Optional Tuning メンテナンス
Glow Plug グロープラグ
How Glow Plugs Work:
Unlike full sized car engines that use spark plugs and a distributor to fire the cylinders in the combustion cycle, glow engines rely on glow plugs. In a Nitro engine,
ignition is initiated by the application of a glow igniter. When the igniter is disconnected, the heat inside the combustion chamber keeps the glow plug filament
glowing, firing the next cycle thereby keeping the engine running. Ignition timing in a glow engine is automatic. At higher RPM’s the plug becomes hotter, firing the
fuel/air mixture earlier, effectively advancing the timing. At lower RPM’s the plug becomes cooler, firing the fuel/air mixture later, effectively retarding the timing. Since
the glow plug performs so many important functions, proper plug selection and maintenance are crucial to a properly running engine.
グロープラグの仕組み
スパークプラグと点火装置によって点火する実車のエンジンと異なり、グローエンジンの点火はグロープラグによってのみ行われます。最初はグロープラグブースターを使用しエンジンに点火します。グロープ
ラグブースターが外された後は、エンジン燃焼室内の温度によりグロープラグのフィラメントが発熱し、次の燃焼を起こします。この繰り返しによりエンジンが回り続けるのです。また、グローエンジンの点火時
期は回転数、エンジン温度に合わせて変化します。高回転時にはグロープラグが高温になり、点火時期が早くなります。反対に、低回転時にはグロープラグが低温になり、点火時期が遅くなります。以上のように
グロープラグはエンジンにとって非常に重要な働きをしています。そのためグロープラグの選択、メンテナンスを適切に行うことがたいへん重要になります。
Outdoor Temp
外気温
Hot
暑い
Cold
寒い
When to replace the glow plug:
Fuel and temperature will have an effect on the performance, reliability, and life span of the
glow plug and therefore should be considered expendable engine components. Aside from
burnout or plug failure, there are several signs that can indicate the plug should be replaced.
Plug filament/plug body is discolored or the surface is rough.
Engine cuts out when idling.
グロープラグの交換時期
グロープラグの性能、寿命は使用燃料や条件により異なります。そのため、グロープラグは消耗品と考えてください。プ
ラグの焼き切れや損傷以外にも以下のような症状が出た場合にはプラグの交換が必要な可能性があります。
プラグフィラメントや本体が変色しているか、表面が荒れている
アイドリング時にエンジンが止まる
Glow Plug
グロープラグの種類
Glow Plug Cold R5
グロープラグコールドR5
Glow Plug Medium Cold R4
グロープラグミディアムコールドR4
Glow Plug Medium R3
グロープラグミディアムR3
Glow Plug Characteristics
グロープラグの特性
Cold plug will have better mid, high
RPM power and will last longer at
high temperature.
エンジン中高速の性能が安定する。
エンジンが高温になった時の耐久性が高い。
Hot plug will be easy to start and
stable for tuning. But will fail
sooner at high engine temperature.
エンジンの始動性、低速安定性が良い。
エンジンが高温になった時の耐久性が低い。
Plug filament is distorted or bent.
Engine becomes difficult to start.
プラグフィラメントが変形している
エンジンのかかりが悪くなる
Proper Glow Plug Selection:
Proper glow plug selection depends on several factors. Fuel type, nitro methane content, weather, and
altitude can drastically effect performance. Finding the best combination of fuel and plug temperature
for your driving condition is the key to getting the maximum performance out of your Nitro Star Engine.
Extending the life of your Glow Plug:
To maximize and extend the life of your glow plug follow these simple tips:
Remove the glow igniter when using more than 1/2 throttle or if the engine does not start after a few seconds.
Do not run the engine lean. Lean conditions will overheat the plug causing the element to be damaged or fail.
Use the best Fuel/Plug combination for your driving conditions.
Use a fuel that has a lower nitro content.
適切なグロープラグの選択
グロープラグの選択は、使用燃料、燃料のニトロ含有量、天候、走行場所の標高など、環境により大きく左右されます。
燃料と使用プラグを正しく選択することで、エンジンの持つ性能を最大限に引き出すことができます。
グロープラグを長持ちさせるコツ
グロープラグを長持ちさせるためには、以下の点を守ってください。
エンジン始動時にスロットルを1/2以上開けるとストップしてしまう、またはエンジンが始動しなかったときには
すぐにプラグヒーターを外してください。
燃料の混合比が薄すぎる状態では使用しないでください。エンジンがオーバーヒートを起こしプラグを損傷します。
エンジンを使用する環境に最適な燃料とプラグを使用してください。
ニトロ成分の含有率が低い燃料を使用することでプラグへの負担が減ります。
Filament
フィラメント
Bad Plug
Element may be damaged or
broken if it doesn’t light up
completely.
不合格
よく光らない場合はエレメントが破
損している恐れがあります。
Bad Plug
Element is broken or doesn’t
light up at all.
不合格
全く光らない場合はエレメントが破
損しています。
HOT!
高温!
Glow Plug Igniter
プラグブースター
Glow Plug
グロープラグ
Pliers
ペンチ
Good Plug
Element glows when tested.
合格
エレメントが光ります。
Air Filter エアフィルター
Proper Air Filter Maintenance:
Dirt is the biggest enemy of a nitro engine and proper air filter maintenance is one of the most important factors
that will effect your engines longevity. If you are using the air filter supplied with your kit, we recommend cleaning the
element after every run. If you are using an after market air filter, please follow the manufacturers recommendations.
Regardless, it is always a good habit to check the element after every run to make sure it is properly seated in the
filter body and that the body is fully seated on the carburetor. Never run the engine without the airfilter!
エアフィルターのメンテナンス
エンジンにとって大敵である泥やホコリからエンジンを守るために、エアフィルターのメンテナンスを正しく行ってください。キットに付属のエアフィ
ルターをご使用の場合は、一回の走行が終了するごとにエアフィルターの洗浄を行うことをお勧めします。他社製のエアフィルターをご使用の場合は
、他社製品の説明書にしたがってください。走行ごとにエアフィルターの状態(フィルターの汚れ具合、エアクリーナーの取り付け状態)を確認される
ことをお勧めします。エアフィルターを付けない状態では、決してエンジンをかけないでください!
Z190
Air Filter Oil
エアフィルターオイル
1 2 3
Reinstalling The Air Filter:
After properly cleaning the filter element make sure it is reinstalled
correctly. If you are using the filter that came with your kit, follow the
illustration to reinstall the filter element in the filter body. Make sure
there are no gaps between the element and body. Make sure the
filter is fully seated on the carburetor and secure it with a tie strap
(HPI part #6154). Never run the engine without the air filter!
エアフィルターの取り付け
エアフィルターの洗浄後、エアフィルターを正しく付け直します。キット付属のエアフィル
ターをご使用の場合は、付属の説明書を参考にエアフィルターの再装着を行ってくださ
い。フィルターを取り付ける際には、エアフィルターエレメントとエアクリーナー本体の間
に隙間がないように十分注意してください。そして、エアフィルターがキャブレター本体
にしっかりと取り付けられているか確認し、ストラップ(HPI製品番号#6154)で固定して
ください。エアフィルターを付けない状態では、決してエンジンをかけないでください!
Cleaning The Filter Element:
Remove and clean the air filter with nitro fuel when soiled. Spray fuel through the clean side to ensure proper dirt
removal.Squeeze the filter to remove excess fuel. To re-coat the air filter with oil, place the element in a plastic bag
with several drops of air filter oil. Using your fingers, work the oil into the element making sure it is evenly distributed.
エアフィルターの洗浄
エアフィルターが汚れた場合には、フィルターエレメントをエアフィルター本体から外して走行用燃料で洗います。フィルターエレメントのきれいな側か
ら走行用燃料をかけ、汚れを流し落としてください。そして、フィルターエレメントを絞り余分な燃料を取り除きます。洗い終わったフィルターエレメント
に市販のエアフィルターオイルを数滴注ぎ、ビニール袋等にいれ指先で揉むようにしてオイルをフィルターエレメント全体にいきわたらせてください。
87204
b
87199
6154
Z224
M3x8mm
Z543
M3x10mm
87199
87204
a
a
Never run the engine without the air filter!
エアフィルターを付けない状態では、決してエンジンをかけないでください!
6154
c
87199
87509
b
Note: Hinweis: 重要
OK!
Page 6/16
Page 7

Engine Storage Tips エンジンの保管上の注意
Storing The Engine:
Using proper storage techniques are not only a good habit but are critical to the life of your engine. Nitro fuel contains castor for lubrication. If the castor is not burned out of the engine, over
time it can gum up and damage the crank bearings. Using your fuel bottle, drain all remaining fuel from the tank. Use a fully charged igniter and try to restart the engine to burn any
remaining fuel out of the lines. Repeat this step until the engine will not start. After burning off the fuel, remove the glow plug and add several drops of after run oil then crank the engine over
to spread it throughout the engine. If you plan on storing your engine for long periods of time (more than 3 months), the after run oil may gum up as well but will not damage the bearings. To
prepare the engine for re use, use 70% Isopropyl Alcohol or Denatured Alcohol and cycle it through the engine using the pull starter or roto start. DO NOT TRY TO START THE ENGINE
WITH THE ALCOHOL! The few minutes you take to properly prepare your engine for storage can add valuable time to its operating life and maintain its optimum performance.
エンジンの保管方法
エンジンを長期間使用しないときには以下に示す方法により保管することでエンジンの寿命を延ばすことができます。走行用燃料内に含まれてる潤滑油が十分に燃焼されないと、残った潤滑油がエンジン内で固まり、ベアリングを破損すること
があります。そうならないために、まず燃料ボトルを使用し、燃料タンクに残った燃料を全て取り除いてください。次に、タンクを空にした状態でエンジンを始動させ、燃料パイプ内に残った燃料も全て燃焼させます。この作業を、エンジンがかから
なくなるまで繰り返します。燃料を完全に燃焼させた後、グロープラグを取り外し、プラグ口から市販のエンジンメンテナンスオイルを数滴、エンジン内部に注入します。数回エンジンをクランキングし、メンテナンスオイルをエンジン内部にいきわ
たらせます。3ヶ月以上エンジンを使用しない場合には、エンジンメンテナンスオイルがエンジン内で固まることがありますが、ベアリングを損傷させることはありません。エンジンを使用する際には、工業用アルコールをエンジン内に注入し、シャ
フトをクランクしてエンジン内部にいきわたらせてください。アルコールを使用してエンジンを始動させることは絶対にしないでください。適切なエンジンの保管方法を心がけることで、エンジンの寿命、性能を長時間維持することができます。
Engine Rebuilding エンジンのリビルト
There comes a time when your engine just won’t provide the performance it did when it was new. When that time comes a rebuild is in
order. Follow the steps below to disassemble, repair and then
reassemble the engine.
エンジンが新品時と同等の性能を発揮しないと感じたときは、エンジンのリビルドを行います。
下記の手順を参考に分解、修理及び組み立てをしてください。
Check engine compression.
If there is no compression, the
engine will not start.
エンジン圧縮の確認
エンジンの圧縮がなくなるとエンジンは始
動しません。
OK! NO!
Z903
2.5
mm
Allen Wrench 2.5mm
六角レンチ
Z904
2
mm
Allen Wrench 2.0mm
六角レンチ
70332
Glow Plug Wrench
グロープラグレンチ
Z164
Grease
グリス
39014
Oil Spray (Japan only)
オイルスプレー(日本のみ)
Z159
Thread Lock
ネジロック剤
1 2 3
2.5
mm
8
mm
1504
15237
Thread Lock
ネジロック剤
15243
2
94154
mm
15228
15217
5 4
15217
15215
15214
15215
Note Direction.
向きに注意
15213
0.1mm
NO!
Note: 重要
1
a
15236
15236
Before removing the back plate,
rotate crankshaft so the piston is at
the top of its stroke. If piston is in the
lower position, It will be damaged.
バックプレートを取り外す際、ピストンの位置に注
意してください。クランクシャフトをまわしてピス
トンの位置を上側にします。ピストンが下側にあ
るとエンジンが破損するので注意してください。
2
2.5
mm
Z542
15236
b
Grease
グリス
Z164
c
15234
6
15245
Engine Assembly エンジンの組立
After completely disassembling the engine, examine the components to determine which parts need to be
replaced. Scratches on the crankshaft, or piston and sleeve are signs that dirt has entered the engine.
Before reassembly, thoroughly clean all parts to make sure they are free of foreign debris. Reassemble the
engine in the reverse order of disassembly (Step 6 - Step 1). Make sure to note the direction of the oil hole
on the rod and the direction of the sleeve as they are critical to proper engine function. As you assemble the
engine, use a small amount of oil on each part to make sure they are well lubricated and move freely. When
you are finished, the new components will need to be broken in. Please turn to Page 2 and follow the
instructions to break in the new components.
エンジンを完全に分解した後、交換が必要な部品をチェックをします。クランクシャフトやピストン、シリンダー等に傷が入っている場合はエンジン内に異物
が入り込んだ可能性があります。再組み立てをする前に、異物の付着がないようにしっかりと洗浄してください。エンジンの組み立ては、分解の逆の順番で
行います。(ステップ6- ステップ1)組み立てる際には、コンロッドの油溝の向きとシリンダーの向きに充分注意してください。各部がスムーズに動くように、
少量のオイルを付けながら組み立てを行います。リビルド終了後は、新しく組み込んだパーツのブレークインが必要です。説明書2ページを参考にブレーク
インを行ってください。
Page 7/16
Page 8

9
Optional Tuning 保障
North American and European Customers
Your HPI product is warranted to be free from defects in materials and workmanship for a period of two (2) years from the purchase date. For verification,
please keep your original receipt in a safe place. If there are any defects with the materials, workmanship, or assembly of your engine, HPI will gladly
repair or replace it for you at our discretion. Products which have been worn out, abused, or improperly operated will not be covered under warranty.
Due to the complex nature of HPI Products and the legal requirements of different regions, warranties issued by HPI USA are only valid for products
sold to and used in the USA, Canda and South America. HPI USA warranties are not transferable to other parts of the world.
Not Covered By Warranty:
This warranty does not cover problems from normal wear, abuse, neglect, or any damage arising as a result of improper use, use of improper fuel, overheating, continuous
neglect, or damage from glow plugs. Please see the warranty cautions contained in this instruction manual to identify damage that may have been caused by improper use
or care of your engine.
HPI Racing shall not be liable for any loss or damages, whether direct, indirect, special, incidental, or consequential, arising from the use, misuse, or abuse of this product
and any accessory or chemical required to operate this product.
DO NOT return engines without prior approval. Please note any returned engine, which is inspected by our staff and is found to have an invalid warranty claim may be
subject to an inspection & handling fee before it can be returned. Any repairs made to engines resulting from neglect or misuse will be charged (parts & labor) before the
work is started.
Please contact Customer Service at Hobby Products International, Inc. for any warranty claims at 949 . 753 . 1099. Our Customer Service hours are Monday
7:30am-4:30pm, Tuesday to Friday 7:30am-5:00pm, Pacific Standard Time.
If directed to send your engine in for evaluation, customer service will issue an RMA#. When sending an engine to HPI for warranty service, the RMA# must be
clearly written on the packaging and must include a copy of the original receipt (please keep your original), a written description of the problem, and a daytime
phone number where you can be reached for questions. The engine must be returned complete with crankcase, crankshaft, piston, sleeve, connecting rod,
cylinder head, carburetor, and pull starter. You should not return the clutch, flywheel, flywheel collet, nut, air cleaner, manifold or muffler.
USA EUROPE
Send it prepaid UPS to:
Hobby Products International, Inc.
Attn: Customer Service
70 Icon Street
Foothill Ranch, CA 92610
For warranty claims please return the engine to the shop where you bought it, along with a copy of the original receipt (please keep the original), if directed by
HPI's distributor the shop will then return the engine for professional inspection. The engine must be returned with a written description of the problem, showing
a daytime phone number where you can be reached for questions. The engine must be returned complete with crankcase, crankshaft, piston, sleeve, connecting
rod, cylinder head, complete carburetor & pull starter. You should not return the clutch, flywheel, flywheel collet, nut, air cleaner, manifold or muffler.
In case of any further problems, please contact your local distributor, please check www.hpi-europe.com for details or call HPI Europe in the UK on 44 1283
229400 in normal office hours.
Asian and Oceania Customers:
アジア、オセアニア地区のお客様へ
If you have any questions or problems with your HPI product, please see a local HPI retailer in your country.
HPI製品に関して疑問や問題がございましたら、お住まいの国のHPI販売店へご相談ください。
Please return to your each instruction manual for proper after-run maintenance tips.
走行後のメンテナンスは各取り扱い説明書を参照してください。
Page 8/16
Page 9

De Fr
1
Motoranleitung Manuel du moteur
English
Motor Teile
Glühkerze
Luftfilter
Filtre à air
Bougie
Kühlkopf
Radiateur de refroidissement
Caractéristiques du moteur
Auslass
Sortie d'échappement
Seilzugstarter
Lanceur
Kraftstoffleitungs-System
Die Kraftstoffleitung versorgt den
Motor mit Kraftstoff. Die Druckleitung
setzt den Tank unter Druck, um für
einen gleichmäßigen Kraftstofffluss
zu sorgen.keep the fuel flow even.
Système d'alimentation en carburant
L'alimentation amène le carburant
au moteur. La conduite de surpression pressurise le réservoir afin de
réguler le débit de carburant.
Vergaser
Carburateur
Sie können die Charakteristik des Motors verändern, indem Sie
Luftfiltergehäuse
Gaine du filtre à air
Vergaser
87204
Carburateur
b
87199
Falls sich der Luftfilter lösen sollte,
müssen Sie den Motor sofort stoppen.
Si le filtre à air tombe, vous devez arrêter
le moteur immédiatement.
Kurbelwelle
Vilebrequin
1
Montage des Luftfilters Remise en place du filtre à air
Achten Sie darauf, dass der Luftfilter immer korrekt auf dem Vergaser
sitzt und verwenden Sie einen Kabelbinder (6154) um ihn zu befestigen.
Vérifiez que le filtre à air est bien installé sur le carburateur et
fixez-le avec un collier souple en nylon (6154).
a
87199
Z224
M3x8mm
2.5
mm
Z543
M3x10mm
Kurbelwellengehäuse
Carter
a
87204
Luftmengenbegrenzer einbauen.
Vous pouvez modifier les caractéristiques du moteur en installant
un restricteur.
8.0mm
Begrenzer 8.0mm
Restricteurs
Für weniger Kraftstoffverbrauch.
Moins de consommation de carburant
6154
c
87199
b
AchtungAttention
Druckleitung
Conduite de surpression
Vergaser
Carburateur
8.5mm
Begrenzer 8.5mm
Restricteurs
Mehr Leistung im hohen Drehzahlbereich.
Plus de puissance à haut régime
Verwenden Sie Schraubensicherung an den Schrauben, mit denen Sie den Motor ins Chassis einbauen.
Utilisez du frein à filet sur les vis de montage lorsque vous installez le moteur sur le châssis.
Achten Sie darauf, dass das Gas- und Bremsgestänge korrekt montiert sind.
Vérifiez que la tringlerie d'accélération et de freinage sont dans la bonne position.
Verstellen Sie den Vergaser nicht, bis der Einlaufvorgang abgeschlossen ist. Die Werkseinstellung (für die Einlaufphase) sieht vor, dass alle Nadeln bündig mit dem Gehäuse sind.
Ne réglez pas les pointeaux du carburateur avant que le rodage soit terminé. Les pointeaux sont
87509
d'origine en affleurement avec le corps du carburateur, c'est le réglage correct pour le rodage.
Bei Verwendung im Savage, muss der Vergaser um 180 Grad gedreht werden.
Pour une utilisation avec le Savage, faites tourner le carburateur de 180 degrés.
15231
Nadel für hohe Drehzahlen
Pointeau de haut régime
Kraftstoffanschluss
Admission du carburant
Nadel für mittleren Drehzahlbereich
Pointeau de régime moyen
Leerlaufdrehzahlschraube
Vis de réglage du ralenti
Gasanlenkung
Commande d'accélération
Nadel für niedrige Drehzahlen
Pointeau de bas régime
Horizontale Ausrichtung.
Position horizontale
Z700
15266
Kraftstoffleitung
Conduite de
carburant
Z901
Achten Sie darauf, dass der
Luftfilter immer korrekt auf dem
Vergaser sitzt und verwenden
Sie einen Kabelbinder (6154)
um ihn zu befestigen.
Vérifiez que le filtre à air est
bien installé sur le carburateur et fixez-le avec un collier
souple en nylon (6154).
6154
Page 9/16
Z904
Drücken Sie den Vergaser nach unten, wenn Sie die Schraube zum Festklemmen des Vergasers anziehen.
Poussez le carburateur vers le bas pendant que vous serrez la vis.
15231
I-15204-1
Page 10

2
Einlaufphase Rodage du moteur
Achtung!
HPI Motoren klemmen ein wenig am oberen Totpunkt, wenn sie neu sind, oder noch nicht ihre
Betriebstemperatur erreicht haben. Der Kolben und die Laufbuchse sind so entwickelt worden,
dass sie genau passen, wenn sie ordentlich eingelaufen sind und die richtige Temperatur
haben. Neue Motoren brauchen eine Einlaufphase von ungefähr 3 bis 4 Tankfüllungen, bevor
sie bei Vollgas betrieben werden können. Andernfalls kann der Motor beschädigt werden.
Rodage du moteur
Les moteurs HPI n'ont pas le jeu suffisant à régime maximal lorsqu'ils sont neufs ou qu'ils n'ont pas
atteint leur température de fonctionnement normale. Le piston et la chemise sont conçus pour avoir des
tolérances adéquates lorsqu'ils sont correctement rodés et atteignent la température correcte de
fonctionnement. Les moteurs neufs nécessitent une période de rodage d'environ 3 à 4 réservoirs de
carburant avant de pouvoir fonctionner à plein régime, faute de quoi le moteur pourrait être endommagé.
Befüllen des Tanks Remplir le réservoir
1
Füllen Sie den Tank komplett mit Kraftstoff. Verwenden Sie nur
Kraftstoff mit 20 bis 25% Nitromethan Anteil. Verwenden Sie nur
hochwertigen Kraftstoff für Modellautos. Kraftstoff der nicht speziell
für Modellautos ist, kann einen Verlust der Garantie bewirken.
Remplissez le réservoir complètement de carburant. N'utilisez que
du carburant avec 20 à 25 % de nitro. N'utilisez que du carburant de
marque de haute qualité. L'utilisation de carburants non spécifiques
aux voitures pourrait annuler votre garantie.
Füllen des Vergasers Amorçer le moteur
2
3
12"30cmMAX!
Achten Sie darauf, dass die Räder den
Boden nicht berühren.
Positionnez les roues au-dessus du sol.
Achtung Attention
Bei Motoren ohne Seilzugstarter, beachten
Sie bitte den Abschnitt über das Starten
des Motors in ihrer Baukasten Anleitung.
Pour les moteurs sans lanceurs, veuillez
vous reporter au chapitre sur le démarrage
du moteur du manuel de votre voiture pour
y voir les procédures adéquates.
Empfohlener Nitromethan Gehalt
Concentration conseillée en nitro
20% - 25%
74318/ 74348
20% Glow Fuel
(US only)
Um den Vergaser mit Kraftstoff zu füllen, decken
Sie den Auslass des Reso-Rohres ab und
ziehen mehrmals an der Startschnur bis der
Kraftstoff den Vergaser erreicht und keine
Luftblasen mehr zu sehen sind. Ziehen Sie die
Schnur niemals weiter als 30cm, da dies den
Starter beschädigt!
Pour amorçer le moteur, bouchez l'échappement avec votre doigt. Tirez le lanceur plusieurs
fois jusqu'à ce que le carburant arrive dans le
carburateur et qu'il n'y ait plus de bulles. Ne
tirez jamais le lanceur de plus de 30 cm car cela
pourrait endommager son mécanisme !
38704/ 38705
38706 グロー燃料
(JP only)
25% Nitro Content
25% Kraftstoff
25% Carburant
Step
1
Öffnen Sie den Vergaser Ouvrir le carburateur
3
Drehen Sie das Gasservo (bei ausgeschaltetem Empfänger)=
soweit, dass der Vergaser zu ca. 1/4 geöffnet ist.
Veillez à ce que la commande du récepteur soit en position
d'arrêt. Tournez à la main le servo du carburateur jusqu'à ce que
1/4 geöffnet.
le carburateur soit ouvert à un quart du maximum.
un quart de l'ouverture maximum.
Glühkerze und Seilzugstarter Bougie et lanceur
4
Stecken Sie den Glühkerzenstecker auf die Glühkerze. Ziehen Sie den Seilzugstarter in kurzen, schnellen Zügen. Ziehen Sie nie weiter
als 30cm (12 inches). Stellen Sie das Gasservo so ein, dass der Motor ruhig im Leerlauf läuft, ohne dass die Kupplung schleift und die
Räder sich drehen. Entfernen Sie den Glühkerzenstecker sobald der Motor läuft. Lassen Sie den Motor eine Tankfüllung laufen.
Stoppt der Motor, wiederholen Sie die Schritte 1 bis 4.
Fixez le chauffe-bougie sur la bougie. Tirez sur le lanceur par à-coups brefs, ne tirez jamais plus de 30 cm (12 pouces). Réglez la
tringlerie du servo d'accélérateur afin que le moteur tourne suffisamment vite au ralenti pour ne pas débrayer ou tourner les roues.
Retirez le chauffe-bougie dès que le moteur tourne. Faites tourner le moteur pendant un réservoir de carburant. Si le moteur s'arrête,
recommencez les étapes 1 à 4
Abgesoffener Motor Moteur noyé
70332
Falls zuviel Kraftstoff im Zylinder ist, kann der Motor
nicht starten. Folgen Sie den aufgeführten Schritten,
um den überflüssigen Kraftstoff zu entfernen.
Retirez la bougie et tirez le lanceur plusieurs fois pour
NO!
Achtung Attention
Der Motor darf niemals ohne Luftfilter betrieben werden.
Le moteur ne doit jamais tourner sans que le filtre à air soit en place.
AchtungAttention
Der Motor darf niemals ohne
Luftfilter betrieben werden.
Le moteur ne doit jamais tourner
sans que le filte à air soit en place.
retirer l’excédent de carburant. Remettez la bougie.
Entfernen Sie die Glühkerze und ziehen Sie ein
paar Mal am Seilzugstarter um den überflüssigen
Kraftstoff zu entfernen. Montieren Sie anschließend
wieder die Glühkerze.
S’il y a trop de carburant dans le cylindre, le moteur
ne démarrera pas. Suivez l’étape ci-dessous pour
retirer le carburant en excès du cylindre.
Step
1
12"30cmMAX!
Page 10/16
Page 11

Am Laufen halten Continuer à le faire tourner
5
LANGSAM
LENTEMENT
Tipp Astuce
Schalten Sie den Sender und Empfänger ein. Befüllen Sie den Kraftstofftank neu und folgen Sie den Start-Schritten 1-4.
Während die Reifen weiter i n der Luft sind, geben Sie an der Fernsteuerung langsam Gas. Nachdem Sie Vollgas erreicht
haben, gehen Sie wieder vom Gas. Damit entfernen Sie überschüssiges Öl aus dem Motor, welches sich dort durch die
fetten Einlauf Einstellungen angesammelt hat. Der Motor muß regelmäßig "freigeblasen" werden, damit er nicht verfettet.
Allumez l'émetteur et le récepteur, remplissez de nouveau le réservoir et suivre les étapes 1 à 4 de la procédure de départ. Les roues
étant au-dessus du sol, accélérez légèrement à l'aide de l'émetteur jusqu'à la vitesse maximale, puis relâchez. Cela fera partir l'excès
d'huile du moteur. Du fait des réglages de rodage riches, le moteur doit être périodiquement "décrassé" pour l'empêcher de caler.
Verwenden Sie ein dickes Tuch Utilisez un chiffon
Bei Ausnahmen oder Notfällen kann man auch die Kraftstoffleitungzudrücken und somit verhindern, dass weiterer Kraftstoff in
denVergaser fliesst. Durch diese Methode läuft der Motor aber
kurzzeitig zu mager, was zu Defekten am Motor führen kann.
Verwenden Siedeswegen grundsätzlich die Methode mit dem Tuch.
Dans des situations extrêmes ou en cas d'urgence, vous pouvez
pincer la conduite de carburant pour bloquer l'arrivée du carburant
dans le carburateur. Attention, le moteur risque d'être endommagé
s'il continue à tourner sur un mélange pauvre. Il vaut mieux arrêter
le moteur à l'aided'un chiffon.
Einfahren mit Halbgas Demi-accélération
6
Halbgas
Moins de la moitié
du plein régime
3
Einstellung nach dem Einlaufen Réglage après le rodage
Putzlappen
Chiffon
Stellen Sie das Auto auf den Boden. Es sollte sich nicht im Leerlauf bewegen. Wenn doch, stellen Sie die Trimmung
am Sender so ein, dass sich das Auto nicht bewegt. Fahren Sie das Auto in einem Kreis mit ca. 6m (20 feet)
Durchmesser. Geben Sie dabei nur kurze Halbgasstöße um dem Motor immer wieder Zeit zum Abkühlen zu geben.
Machen Sie dies für zwei komplette Tankfüllungen.
Placez le véhicule sur le sol. Il doit être immobile au ralenti. S'il bouge, ajustez le réglage de la manette de l'émetteur
pour qu'il ne bouge plus. Faites le tourner sur un ovale de 6 m (20 pieds) de diamètre, laissez-le continuer sur son
élan pendant de courts moments pour faire refroidir le moteur, puis accélérez de nouveau. Continuez à faire cela
pendant deux réservoirs de carburant.
Zudrücken der Kraftstoffleitung Pincez l'alimentation en carburant
Wenn das Fahrzeug außer Kontrolle ist, oder bei Notfällen,
können Sie die Kraftstoffleitung zudrücken, so dass der
Vergaser keinen Kraftstoff mehr bekommt.
Dans les cas extrêmes ou les urgences, vous pouvez pincer
l'alimentation en carburant pour empêcher le carburant
d'arriver au carburateur.
Wichtig! Lesen Sie diesen Teil besonders aufmerksam: Fehler bei der Vergasereinstellung können zu Schäden an Ihrem Motor sowie zum Verlust der Garantie führen!
Important Lisez soigneusement ce chapitre : ne pas suivre ces étapes pourrait conduire à endommager votre moteur, et faire annuler votre garantie !
Einstellung für optimale Leistung Réglage pour des performances optimales
Nadel für hohe Drehzahlen
Pointeau de haut régime
Schritt X
ÉTAPE
Verwenden Sie einen
Schraubenzieher, um
die Nadel zu verstellen
Utilisez un tournevis
pour régler le pointeau
de haut régime.
Schritt 4
ÉTAPE
X
Schritt 1
ÉTAPE
1
1/8
Schritt 2
ÉTAPE
Schritt 3
ÉTAPE
3
4
1/4
Achtung Attention
2
2 1/2 Umdrehungen maximal
2 tours 1/2 MAXI
Maximal 2 1/2 Umdrehungen
can not be split this way.
2 tours 1/2 MAXI dans le sens
horaire à partir de la rainure
Schritt 1
Drehen Sie die Nadel für hohe Drehzahlen in 1/8
Schritten im Uhrzeigersinn um das Gemisch magerer
zu stellen. Damit erreichen Sie höhere Geschwindigkeiten und eine bessereGasannahme. Fahren Sie das
Auto um die Veränderungen zu spüren.
Weitere Einstellung:
Stellen Sie den Motor weiter in 1/8 Schritten magerer.
(Maximal 1 1/2 Umdrehungen von bündig)
STOPP :
Drehen Sie den Motor nicht magerer, wenn
Ihr Motor eines der folgenden Zeichen zeigt.
(Der Motor läuft zu mager)
Bei Vollgas ist keine Rauchentwicklung zu sehen.
Schritt 4
Der Motor stottert oder stockt
Abnehmende Höchstgeschwindigkeit oder
Leistung.
Überhitzung Temperatur über 120°C (250F)
an der Glühkerze.
Schritt X
Falls Ihr Motor zu mager läuft, drehen Sie die Nadel
in 1/4 Schritten gegen den Uhrzeigersinn um das
Gemisch fetter zu stellen und wiederholen Sie
Schritt 1
Schritt 4
ÉTAPE 1 ÉTAPE 4
Tournez le pointeau de haut régime dans le sens
horaire par incréments de 1/8ème de tour pour
appauvrir le mélange et augmenter la vitesse de
pointe et les performances en accélération. Essayez
de piloter la voiture pour voir les modifications.
Continuez la mise au point :
Continuez à appauvrir la carburation par incréments
de 1/8ème de tour dans le sens horaire.
(Maximum 1 tour 1/2 de l'affleurement.)
ARRÊTEZ :
ARRÊTEZ le réglage et allez à l'
ÉTAPE X si votre moteur montre l'un des
signes suivants.
À l'accélération, il n'y a pas de fumée blanche
à l'échappement.
ÉTAPE X
(Moteur réglé trop pauvre.)
Le moteur tousse ou cale.
Vitesse maximale réduite, perte de puissance.
Surchauffe
Températures supérieures à 120°C (250°F) à la bougie.
ÉTAPE X
Si votre moteur est réglé trop pauvre, tournez le
pointeau dans le sens antihoraire par quarts de tours
pour enrichir le mélange et recommencez les étapes :
ÉTAPE 1 ÉTAPE 4
Tipps zum Einstellen des Vergasers Astuce de réglage de la richesse
Die Motortemperatur kann zeigen, ob der Motor mager
oder fett läuft.
La température du moteur peut vous dire si le moteur
tourne pauvre ou riche.
Achtung Attention
Stellen Sie den Vergaser so ein, dass
die Temperatur unter 120°C leigt.
Réglez le carburateur de façon à
ce que la température reste endessous de 120°C (250° F).
74151
Hpi Racing Temperaturmesspistole
Sonde de température Hpi Racing
Motortemperatur
Température du moteur
GEFAHR
GEFAHR
DANGER
DANGER
250°F
(
)
120°C
230°F
(
)
110°C
Sicherer Bereich
Plage de sécurité
210°F
(
)
99°C
190°F
(
)
90°C
Einlaufphase
Rodage
Gemischeinstellung
Réglage du mélange
Page 11/16
Weniger Sprit = Mager
Moins de carburant =
pauvre
Mehr Sprit = Fett
Plus de carburant =
Riche
Weniger Sprit = Mager
Moins de carburant = Pauver
Magere Gemischeinstellung
Führt zu einer besseren Verbrennung und zu mehr Leistung.
Bei zu magerer Einstellung, mangelt es jedoch an Schmierung.
Dies führt zu erhöhter Motortemperatur und einer kürzeren
Lebensdauer.
Mélange de carburant pauvre
Donne une combustion plus efficace et plus de puissance, mais si
vous appauvrissez trop le résultat est une moindre lubrification,
plus de chaleur et une durée de vie du moteur plus courte.
Mehr Sprit = Fett
Plus de carburant = Riche
Fette Gemischeinstellung
Ein fetteres Gemisch führt zu mehr Kühlung und Schmierung, somit zu einer höheren Lebensdauer, jedoch auch zu
etwas weniger Leistung.
Mélange de carburant riche.
Un mélange légèrement riche donne une température de
fonctionnement plus basse et une meilleure lubrification mais un
peu moins de puissance et une durée de vie du moteur plus longue.
Page 12

4
Weitere Einstellungen Réglage optionnel
Leerlaufdrehzahlschraube Vis de réglage du ralenti
Falsche Leerlaufdrehzahl
Leerlaufdrehzahlschraube
Vis de réglage du ralenti
ca. 1mm (0.04")
About 1mm (0.04")
Kupplung packt und die Räder drehen sich.
Mauvais réglage de la vitesse du ralenti
L'embrayage est engagé et les roues tournent
No! Ok!
Korrekte Leerlaufdrehzahl
Motor läuft ruhig ohne Drehen der Räder.
Réglage correct de la vitesse du ralenti
Le moteur tourne régulièrement sans que les roues ne tournent.
weniger U/min
Bas régime
Die Leerlaufdrehzahlschraube wird eingestellt nachdem die Nadel für hohe Drehzahlen eingestellt wurde und der Motor auf Betriebstemperatur ist. Um die Leerlaufdrehzahlschraube korrekt
einzustellen, schalten Sie die RC Anlage ein und stellen Sie die Gastrimmung am Sender auf neutral. Dies stellt sicher, dass der Vergaser vollständig geschlossen ist und gegen die Leelaufdrehzahlschraube drückt. Drehen Sie die Leelaufdrehzahlschraube gegen den Uhrzeigersinn um die Leerlaufdrehzahl zu verringern, oder im Uhrzeigersinn um sie zu erhöhen. Die leerlaufdrehzahl sollte
so hoch sein, dass der Motor ruhig läuft, aber die Kupplung nicht schleift und die Räder dreht. Eine zu hohe Leelaufdrehzahl führt zu erhöhtem Kupplungs- und Bremsverschleiß.
La vitesse du ralenti est ajustée après le réglage du pointeau de haut régime et de la température du moteur. Pour ajuster correctement la vis de réglage du ralenti, allumez votre système
radio et mettez la manette d'accélérateur de l'émetteur en position neutre. Cela garantit que la commande d'accélération est fermée et se trouve contre la vis de réglage du ralenti. Tournez la vis
de réglage du ralenti dans le sens antihoraire pour réduire la vitesse ou dans le sens horaire pour l'augmenter. La vitesse du ralenti doit être suffisamment élevée pour que le moteur tourne
régulièrement mais que l'embrayage ne soit pas engagé et que les roues ne tournent pas. Une vitesse de ralenti trop élevée usera prématurément les sabots d'embrayage et le disque de frein.
mehr U/min
Haut régime
Einstellung der Nadel für niedrige Drehzahlen Réglage du pointeau de bas régime
Bündig (Werkseinstellung)
En affleurement (réglage d'usine)
Nadel für niedrige Drehzahlen
Pointeau de bas régime
Mehr Sprit = Fett
Plus de carburant = Riche
Weniger Sprit = Mager
Moins de carburant = Pauvre
Die Nadel für niedrige Drehzahlen wird eingestellt, nachdem die Nadel für hohe Drehzahlen eingestellt wurde und der Motor auf Betriebstemperatur ist. Stellen Sie die Nadel so ein, dass sie bündig mit dem
Vergasergehäuse ist. Diese Einstellung ist ideal um den Motor einlaufen zu lassen und um ihn zu starten. Für mehr Leistung drehen Sie die Nadel in 1/8 Schritten im Uhrzeigersinn. Dies verbessert die Beschleunigung und die
Gasannahme. Um die Einstllung zu überprüfen, stellen Sie Ihr Auto auf den Boden und lassen Sie den Motor für ca. 30 Sekunden im Leerlauf laufen. Geben Sie dann 3/4 Gas. Wenn dann viel Rauch zu sehen ist, und dass
Auto langsam beschleunigt, ist die Einstellung zu fett. Wenn das Auto schnell beschleunigt und dann stottert, ist die Einstellung zu mager. Wenn die Nadel für niedrige Drehzahlen korrekt eingestellt ist, sollte die Gasannahme
des Motors gleichmäßig und schnell sein. ACHTUNG: Drehen Sie die Nadel niemals mehr als 2 Umdrehungen von bündig in das Gehäuse, da dies eine zu magere Einstellung für den Motor ist und er beschädigt werden
kann! Wenn die Nadel für untere Drehzahlen zu mager eingestellt ist, werden Sie folgendes merken: Ausgehen bei Halb- oder 3/4 -Gas, Überhitzung (Temperatur über 120°C an der Glühkerze). Wenn Ihr Motor zu mager läuft,
stellen Sie die Nadel für niedrige Drehzahlen wieder in die Werkseinstellung (bündig) und beginnen Sie erneut mit dem Einstellvorgang. Wir empfehlen die Nadel für untere Drehzahlen nicht zu verstellen.
Le réglage du bas régime est effectué après le réglage du pointeau de haut régime et de la température de fonctionnement du moteur. Positionnez le pointeau en affleurement (réglage d'usine)
avec le corps du carburateur, ce réglage est idéal pour le rodage et pour les débuts de votre moteur. Pour de meilleures performances tournez le pointeau par incréments de 1/8ème de tour, cela améliorera
l'accélération à bas régime. Pour tester votre réglage, posez le véhicule sur le sol et laissez-le au ralenti pendant 30 secondes puis accélérez aux ¾. S'il y a beaucoup de fumée blanche et que la voiture
accélère lentement, le mélange est trop riche. Si la voiture accélère rapidement puis se met à tousser, le mélange est trop pauvre. Lorsque le pointeau de bas régime est correctement réglé, la réponse du
moteur à l'accélération doit être régulière et rapide. ATTENTION : Ne jamais tourner plus de ¾ de tours à partir de la position en affleurement car cela appauvrirait trop le moteur qui pourrait s'abîmer ! Si le
pointeau de bas régime est réglé trop pauvre vous verrez les signes suivants : extinction à accélération partielle ou ¾, surchauffe (températures supérieures à 120°C, 250°F). Si votre moteur est trop
pauvre, remettez le pointeau de bas régime à son réglage d'origine (affleurement) et recommencez le processus de réglage. Nous vous conseillons de ne pas toucher au pointeau de bas régime.
Falls das Standgas unruhig läuft, verstellen
Sie die Nadel für den unteren Drehzahlbereich. Stellen Sie danach wieder die Standgasschraube ein.
Si le ralenti est instable, ajustez le pointeau de bas
régime de manière à obtenir un ralenti stable. Vous
devrez ensuite régler de nouveau la vis de ralenti.
5
Problembehebung
Problem Ursache Lösung
Motor startet nicht
Motor startet und geht
dann aus
Motor läuft im Leerlauf
zu hoch
Problème Cause Solution
Le moteur ne démarre pas
Le moteur démarre, puis cale
Ralenti trop haut
Gemischeinstellung stimmt nicht.
Motor ist verschlissen.
Kein Kraftstoff.
Verunreinigter Kraftstoff.
Glühkerzenstecker ist nicht geladen.
Glühkerze ist kaputt.
Kein Kraftstofffluss.
Motor geflutet.
Motor ist überhitzt.
Vergaserküken nicht korrekt eingestellt.
Luftfilter ist verdreckt.
Leelaufdrehzahl ist zu niedrig.
Luftblasen in der Kraftstoffleitung.
Glühkerze ist kaputt.
Motor ist überhitzt.
Luftstrom im System ist nicht OK.
Gasservo ist nicht korrekt eingestellt.
Aussetzer des Gasservos.
Leerlaufdrehzahlschraube ist falsch eingestellt.
Nadel für niedrige Drehzahlen ist auf zu mager gestellt.
Neutralstellung am Sender stimmt nicht. Schauen Sie in die Anleitung Ihrer RC Anlage sowie in die Anlage Ihres Autos um die Neutralstellung korrekt einzustellen.
Réglages de pointeau hors plage.
Moteur usé.
Manque de carburant.
Carburant contaminé.
Chauffe-bougie non chargé.
Bougie défectueuse.
Pas d'alimentation en carburant.
Moteur noyé.
Moteur ayant surchauffé.
Mauvaise installation du papillon d'accélérateur.
Filtre à air bouché.
Ralenti trop bas.
Bulle d'air dans l'alimentation de carburant.
Bougie défectueuse.
Moteur qui surchauffe.
Flux de l'air défectueux.
Servo d'accélérateur mal monté.
Problème du servo d'accélérateur (mouvements erratiques).
Vis de ralenti réglée trop haut.
Pointeau de bas régime réglé trop pauvre.
Position neutre mal ajustée sur la manette de l'émetteur.
Pannes et remèdes
Stellen Sie die Nadeln auf Werkseinstelung, siehe Seite 13 Abschnitt 6.
Ersetzen Sie Kolben und Laufbuchse.
Füllen Sie den Kraftstofftank.
Ersetzen Sie den Kraftstoff.
Laden Sie den Glühkerzenstecker.
Ersetzen Sie die Glühkerze.
Überprüfen Sie die Kraftstoffleiungen auf Risse, Lecks oder Löcher.
Entfernen Sie die Glühkerze und entfernen Sie den Kraftstoff.
Lassen Sie den Motor abkühlen. Drehen Sie den Motor fetter und starten Sie ihn wieder.
Stellen Sie das Vergaserküken wieder in Werkseinstellung.
Überprüfen Sie den Luftfilter. Reinigen oder Ersetzen Sie ihn, falls nötig.
Stellen Sie die Leelaufdrehzahl korrekt ein.
Überprüfen Sie die Kraftstoffleitungen auf Risse, Lecks oder Löcher.
Ersetzen Sie die Glühkerze.
Lassen Sie den Motor abkühlen und starten Sie dann erneut.
Überprüfen Sie die Verbindungen zwischen Tank, Motor und Auspuff.
Stellen Sie das Servo auf neutral und stellen Sie das Gasgestänge anhand der Anleitung Ihrer RC Anlage und Ihres Autos neu ein.
Ersetzen Sie die Empfängerbatterien.
Stellen Sie die Leerlaufdrehzahlschraube zurück auf die Werkseinstellung, siehe Seite 13.
Stellen Sie die Nadel für niedrige Drehzahlen zurück auf die Werkseinstellung, siehe Seite 13.
Remettre les pointeaux aux réglages d'usine.
Remplacer le piston et la chemise.
Remplir le réservoir.
Changer le carburant.
Charger le chauffe-bougie.
Remplacer la bougie.
Vérifier qu'il n'y ait pas de fissures, fuites ou trous sur l'alimentation. Remplacer celle-ci si nécessaire.
Retirer la bougie et évacuer le carburant.
Laisser refroidir le moteur, puis enrichir le mélange et redémarrer.
Régler le ralenti et positionner le papillon d'accélérateur suivant les indications du fabricant.
Vérifier le filtre à air. Le nettoyer ou le remplacer si nécessaire.
Ajuster la vitesse du ralenti.
Vérifier qu'il n'y ait pas de fissures ou de fuites dans l'alimentation de carburant.
Remplacer la bougie.
Laisser le moteur refroidir puis redémarrer.
Vérifier les connexions entre le réservoir, le moteur et l'échappement.
Mettre le servo en position neutre et re-monter la tringlerie en fonction des spécifications des fabricants de la radio et du modèle.
Remplacer les batteries du système radio.
Régler la vis de ralenti aux réglages d'usine, voir page 13 le réglage correct de la vitesse de ralenti.
Remettre le pointeau de bas régime aux réglages d'usine, voir page 13 les réglages de bas régime corrects.
Voir les instructions de votre radio et de votre kit de voiture pour le réglage de la position neutre de la manette de l'émetteur.
Page 12/16
Page 13

6
Werkseinstellungen des Vergasers (Einlaufphase) Réglage usine du carburateur (réglage de rodage)
Alle Nadeln des Vergasers sind so gebaut, dass die Werkseinstellung genau bündig mit dem Vergasergehäuse ist. Dies macht es einfach den Vergaser wieder auf die Grundeinstellung zu bekommen.
Le pointeau de haut régime, la vis de ralenti, le pointeau de bas régime et le pointeau de moyen régime sont conçus pour être mis en affleurement avec le corps du carburateur.
De ce fait il est facile de remettre le carburateur aux réglages d'usine si nécessaire.
Nadel für hohe Drehzahlen
Mit der Nut bündig
En affleurement
avec la rainure
Nadel für mittleren Drehzahlbereich
d
Pointeau de régime moyen
AchtungAttention
a
Pointeau de haut régime
Ungefähr 1mm (0.04")
Environ 1mm (0.04")
Wenn die Nadel zu weit gedreht
wird, wird sie beschädigt.
Si le pointeau était trop serré il
pourrait être endommagé.
7
Explosionszeichnung Vue éclatée
15228
15237
15261
15218
15217
15215
15214
Leerlaufdrehzahlschraube
b
Vis de réglage du ralenti
Nadel für niedrige Drehzahlen
c
Pointeau de bas régime
Bündig
En affleurement
15241
Staubschutz und O-Ring Set
Prot. anti-poussière et jeu comp. joints toriques
1504
15266
15268
Einstellung für Einlaufphase
Réglage de rodage
a
b
c
Mit der Nut bündig
En affleurement avec
la rainure
Bündig
Affleurement
Bündig
Affleurement
d
Bündig
Affleurement
Nach der Einlaufphase
Réglage après le rodage
Bitte schauen Sie bei den Einstellung
nach dem Einlaufen auf Seite 11 für Tipps.
Veuillez vous reporter à la section
Réglage après le rodage à la page 11
pour les astuces de réglage
Bitte schauen Sie bei den weiteren
Einstellungen auf Seite 12 für Tipps.
Veuillez vous reporter à la section
réglages optionnels à la page 12
pour les astuces de réglage
Verstellen Sie die Nadel nicht.
N'ajustez pas
15285
15275
15282
15283
15269
15271
15274
15272
15213
86077
15231
Ersatzteile
Nummer
Numéro
15204 x1
1504 x1
15213 x1
15214 x1
15215 x3
15217 x1
15218 x1
15226 x1
15228 x1
15231 x1
15233 x1
15234 x1 Welle Fuer Seilzugstarter K-serie
15244
Pièces détachées
Anzahl
Beschreibung
Qté.
Description
Nitro Star K4.6 HO Motor Mit Seilzugstarter
Moteur Nitro Star K4.6 HO Avec Lanceur
Gluehkerze Kalt R5
Bougie Froide R5
Pleuel Ns K4.6
Bielle
Kolbenbolzen Mit Clip Ns K4.6
Jeu Axe De Piston/clips
Kolbenbolzen Clips Ns K4.6
Clips Pour Axe De Piston
Zylinder/kolben Set K4.6
Jeu Cylindre/piston
Zylinder/kolben/pleuel Set K4.6 (Montiert)
Jeu Piston/cylindre/bielle (Monte)
Seilzugstarter Ohne Freilauflager Ns K4.6
Ensemble Lanceur (Sans Roulement Roue Libre)
Zylinderkopfdichtungs-set (0.15mm/0.3mm) Ns K4.6
Jeu De Joints Pour Cylindre (0.15mm/0.3mm)
Vergaser Sicherungspin Set K-serie
Jeu Butee Pour Carburateur
Seilzugstarter-welle Halter (Gebaut) Ns K4.6
Support De Lanceur (Monte)
Arbre De Demarreur
15231
15243
15245
Nummer
Numéro
15236 x1
15237 x4
15241 x1
15243 x1
15244 x1
15245 x1
15261 x1
15266 x1
15268 x1
15269 x1
15271 x1
15272 x1
Anzahl
Qté.
Z700
15233
Z542
15236
Beschreibung
Description
Abdeckplatte (Set) K-serie
Jeu Plaque De Fermeture
Schraube M3.5x16mm Fuer Zylinderkopf Ns K4.6
Vis M3.5x16mm Pour Tete De Refroidissement
Staubschutz Und O-ring Set Ns K4.6
Prot. Anti-pouss. Et Jeu Comp. Joints Toriques
Kuehlkopf (Grau-schwarz/k4.6hO)
Tete De Refroidissement (Gris Noir/k4.6 HO)
Krubelwellengehaeuse (K4.6hO)
Carter (K4.6 HO)
Kurbelwelle (K4.6HO)
Vilebrequin (K4.6 HO)
Schiebevergaser Komplett Mit Begrenzern (Typ Kb)
Carb. A Tiroir Complet Av.restricteur (Type Kb)
Vergaser Kugelkopf Ka-serie
Uniball
Duesennadel Unterer Bereich Mit O-ring Ka-serie
Pointeau De Ralenti Avec Joint Torique
Schiebevergaser Einsatz Ka-serie
Tiroir
Leerlaufschraube Mit O-ring Ka-serie
Vis De Reglage De Ralenti Avec Joint Torique
Einlasstutzen Mit Unterlagscheiben Ka-serie
Jeu Adaptateur Alim. En Carburant/rondelles
15234
Nummer
Numéro
15274 x1
15275 x1
15282 x1
15283 x1
15285 x1
86077 x2
87198 x1
87199 x1
87204 x1
94154 x12
Z542 x12
Z700 x6
Anzahl
Qté.
15226
94154
Beschreibung
Description
Hauptdusennadelhalter Ka-serie
Siege Du Pointeau De Haut Regime
Hauptdusennadel Mit O-ring Ka-serie
Pointeau De Haut Regime Avec Joint Torique
Duesennadel Mittlerer Bereich Mit O-ring Ka-serie
Pointeau Moyen Avec Joint Torique
Schiebevergasergehause Mit Begrenzern (Typ Kb)
Corps De Carb. A Tiroir Av.restricteur (Type Kb)
Hauptduesennadel Set Ka-serie
Jeu Pointeau De Haut Regime
Lagerhuelse 7x6.5mm (Messing)
Cone Volant (Laiton/21 Dim)
Luftfilter (21+ Motoren)
Filtre A Air (Taille 21+)
Luftfilter Schlauch Set (Fuer #87198)
Jeu Manchon De Filtre A Air (Pour Ref.87198)
Luftfilter Schaumstoff Set (Fuer #87198)
Jeu Element Mousse Filtre A Air (Pour Ref.87198)
Senkkopfschraube M2.6x8mm (Inbus)
Vis Tete Plate (Six Pans Creux)
Inbusschraube M3x8mm
Vis Tete Cylindrique
Madenschraube M3x3mm
Vis Hallen Sans Tete
Page 13/16
Page 14

8
Wartung Entretien
Glühkerze Bougie
Wie Glühkerzen funktionieren:
Anders als beim echten Auto, das Zündkerzen und einen Verteiler besitzt, um im richtigen Moment zu zünden, haben Modellmotoren eine Glühkerze. Die erste Zündung wird durch das Aufsetzen
des Glühkerzensteckers verursacht. Wenn dieser entfernt wurde, ist es die Hitze des Motors, die die Glühkerze am Glühen hält und somit die nächsten Zündungen verursacht um den Motor am
Laufen zu halten. Der Zündzeitpunkt ist bei Modellmotoren automatisch. Bei höheren Drehzahlen wird die Glühkerze heisser und zündet das Gemisch früher. Bei niedrigeren Drehzahlen bleibt
die Glühkerze kälter und zündet später. Da die Glühkerze so wichtig für den Motor ist, muss sie sehr sorgfältig ausgewählt und überprüft werden um einen guten Lauf des Motors zu garantieren.
Comment fonctionne la bougie :
Contrairement aux moteurs des voitures de taille réelle qui utilisent des bougies à étincelles et un distributeur pour allumer les cylindres lors du cycle de combustion, les moteurs à bougie luisante n'utilisent que la bougie.
Dans un moteur thermique nitro, l'allumage est déclenché par l'application du chauffe-bougie. Lorsque celui-ci est débranché, la chaleur à l'intérieur de la chambre de combustion suffit à continuer à faire luire le filament,
provoquant l'allumage du cycle suivant et par là le moteur continue à tourner. La vitesse d'allumage dans un moteur à bougie luisante se règle automatiquement. À plus haut régime la bougie est plus chaude, déclenchant
l'allumage du mélange carburant/air plus rapidement, et accélérant donc la vitesse d'allumage. À plus bas régime la bougie est plus froide, déclenchant l'allumage du mélange carburant/air plus tard, et retardant donc la
vitesse d'allumage. Dans la mesure où les fonctions de la bougie luisante sont aussi nombreuses et importantes, l'adéquation de son choix et son entretien sont cruciaux pour un fonctionnement correct du moteur.
Umgebungstemperatur
Température extérieure
Heiss
Heiss
Kalt
Froide
Wann muss die Glühkerze ausgetauscht werden:
Der Kraftstoff sowie die Temparatur haben Einfluss auf die Leistung, Zuverlässigkeit und Lebensdauer der Glühkerze.
Sie sollten also als wichtige Komponenten für den Motor betrachtet werden. Mögliche Gründe für den Austausch sind,
dass die Kerze gar nicht mehr glüht oder beschädigt ist. Weitere Zeichen für einen Wechsel sind:
Die Wendel oder das Gehäuse der Glühkerze sind verfärbt
oder haben eine rauhe Oberfläche.
Der Motor stirbt im Leerlauf ab.
Quand remplacer la bougie :
Le carburant et la température ont un effet sur la performance, la fiabilité et la durée de vie de la bougie
et celle-ci doit par conséquent être considérée comme une pièce d'usure du moteur. En dehors du fait
qu'elle soit grillée ou défaillante, il y a plusieurs signes qui peuvent indiquer que la bougie doit être
remplacée.
Le filament/le corps de la bougie est décoloré et la surface
est rugueuse.
Le moteur s'arrête au ralenti. Le moteur devient difficile à démarrer.
Glühkerze
Glühkerze
Glühkerze Kalt R5
Bougie Froide R5
Glühkerze Mittel Kalt R4
Bougie Médium Froide R4
Glühkerze Mittel R3
Bougie Médium R3
Charakteristik der Glühkerze
Caractéristiques de la bougie
Eine kalte Glühkerze bringt im mittleren und
hohen Drehzahlbereich mehr Leistung und
hält auch länger bei hohen Temperaturen.
Une bougie froide a plus de puissance
dans les tours hauts et moyens, et durera
plus longtemps à haute température.
Der Motor startet leichter und läuft stabiler mit
einer heißen Glühkerze, allerdings geht diese
bei hohen Temperaturen auch leichter kaputt.
La bougie sera facile à démarrer et stable
pour les réglages. Mais elle faiblira plus vite
lorsque la température du moteur est haute.
Die Wendel ist verbogen.
Der Motor ist schwer zu starten.
Le filament de la bougie est tordu ou
courbé.
Wahl der richtigen Glühkerze :
Die Wahl der richtigen Glühkerze hängt von mehreren Faktoren ab. Kraftstoffmarke, Nitromethan-Gehalt,
Wetter und Höhe über NN können die Leistung enorm beeinflussen. Die richtige Kombination aus
Kraftstoff und Glühkerze ist die Lösung um maximale Leistung aus Ihrem Nitro Star Motor zu holen.
Die Lebensdauer der Glühkerze verlängern :
Um eine möglichst lange Lebensdauer der Glühkerze zu haben, folgen Sie einfach diesen Tipps:
Entfernen Sie den Kerzenstecker, wenn Sie mehr als 1/2Gas geben oder wenn der Motor
nicht nach einigen Sekunden startet.
Fahren Sie keine magere Motoreinstellung. Eine magere Einstellung überhitzt die Kerze,
was zu einem Schaden an der Wendel führt.
Benutzen Sie die beste Kombination aus Kraftstoff und Kerze.
Benutzen Sie einen Kraftstoff mit weniger Nitromethan.
Choisir la bougie adaptée :
Le choix de la bougie dépend de plusieurs facteurs. Le type de carburant, la concentration en nitro méthane, le temps et l'altitude
peuvent considérablement influer sur les performances. Trouver la meilleure combinaison entre le carburant et la température de
la bougie pour vos conditions de pilotage est la façon d'obtenir des performances maximales de votre moteur Nitro Star.
Prolonger la vie de votre bougie :
Pour prolonger et augmenter la durée de vie de votre bougie suivez ces simples conseils :
Retirez le chauffe- bougie au-delà de la moitié de l'accélération maximale, ou si le moteur ne part pas après quelques secondes.
Ne faites pas tourner le moteur trop pauvre. Cela ferait surchauffer la bougie et pourrait endommager l'élément.
Utilisez la meilleure combinaison carburant/bougie pour vos conditions de conduite.
Utilisez un carburant avec une plus faible concentration en nitro.
Heizdraht
Glühkerze
Bougie chaude
Heiß !
Chaud !
Glühkerzenstecker
Dispositif d’amorçage
Spitzzange
Pinces
Dispositif d'amorçage
Kerze in Ordnung
Heizdraht glüht, wenn
derGlühkerzensteckeraufgesteckt wird.
Bonne bougie
L’élèment brille pendant
le test
Schlechte Kerze
Wenn der Draht nur leicht
oder unregelmäßig glimmt
ist die Kerze defekt und
muss getauscht werden.
Mauvaise bougie
L’élèment est défectueux ou
il ne s’allume pas.
Defekte kerze
Der Heizdraht ist gebrochen
oder glüht nicht.
Mauvaise bougie
L’élèment est endommagé ou
défectueux s’il ne s’allume pas.
Luftfilter
Korrekte Wartung des Luftfilters :
Schmutz ist der größte Feind des Verbrennungsmotors und die korrekte Wartung des Luftfilters ist einer der wichtigsten Faktoren für
ein langes Leben des Motors. Wenn Sie den Luftfilter verwenden, der bei Ihrem Baukasten dabei ist, sollten Sie ihn nach Abschluss Ihrer
Fahrten reinigen. Wenn Sie einen Tuning-Luftfilter verwenden, folgen Sie bitte den Hinweisen des Herstellers. Es ist jedoch grundsätzlich
eine gute Angewohnheit, den Luftfilter nach jeder Tankfüllung auf korrekten Sitz und Verschmutzungsgrad zu untersuchen. Lassen Sie den
Motor niemals ohne Luftfilter laufen!
Entretien correct du filtre à air :
La poussière est le pire ennemi d'un moteur nitro et un bon entretien du filtre à air est un des facteurs les plus importants de la longévité de
votre moteur. Si vous utilisez le filtre à air fourni avec votre kit, nous vous conseillons de nettoyer le filtre à chaque fois. Si vous utilisez un
filtre de rechange, suivez les conseils du fabricant. De toutes les façons, c'est toujours une bonne habitude de vérifier l'élément après
chaque usage pour vérifier qu'il est correctement installé sur le carburateur. Ne faites jamais tourner le moteur sans le filtre à air !
1 2 3
Einbau des Luftfilters :
Nachdem Sie den Luftfilter gründlich gereiningt haben, müssen Sie ihn wieder
korrekt einbauen. Wenn Sie den Luftfilter aus Ihrem Baukasten verwenden,
folgen Sie bitte dieser Anleitung. Achten Sie darauf, dass keine Lücken
zwischen dem Schaumstoff und dem Gehäuse bestehen und dass der Luftfilter
richtig auf dem Vergaser sitzt. Befestigen Sie ihn mit einem Kabelbinder (HPI
#6154). Lassen Sie niemals den Motor ohne Luftfilter laufen!
Remise en place du filtre à air :
Après avoir correctement nettoyé l'élément du filtre à air, assurez-vous qu'il est
bien remis en place. Si vous utilisez le filtre livré avec votre kit, suivez
l'illustration pour réinstaller l'élément dans le corps du filtre. Assurez-vous qu'il
n'y a pas d'interstice entre l'élément et le corps. Vérifiez que le filtre est
correctement installé sur le carburateur et attachez-le avec un collier (pièce HPI
Ref.6154). Ne faites jamais tourner le moteur sans le filtre à air !
Filtre à air
Z190
Luftfilter Oel
Huile P. Filtre A Air
Reinigen des Luftfilters :
Entfernen Sie den Luftfilter und reinigen Sie ihn mit Ihrem Kraftstoff, wenn er verschmutzt ist. Sprühen Sie den Kraftstoff von der
sauberen Seite aus durch den Luftfilter. Drücken Sie den Luftfilter aus. Um den Luftfilter wieder zu ölen, geben Sie ihn mit ein paar
Tropfen Luftfilteröl in eine kleine Plastiktüte. Kneten Sie nun den Luftfilter um sicher zu gehen, dass das Öl gleichmäßig verteilt ist.
Nettoyage de l'élément du filtre :
Retirez le filtre à air et nettoyez-le avec du carburant nitro s'il est sale. Faites passer du carburant à partir du côté propre pour bien
éliminer les saletés. Essorez le filtre pour retirer l'excédent de carburant. Pour ré-enduire le filtre d'huile, placez l'élément dans un sac
en plastique avec plusieurs gouttes d'huile à filtre à air. En pétrissant avec vos doigts, faites entrer l'huile dans l'élément en vérifiant
qu'elle est répartie de manière homogène.
87204
b
6154
Z224
M3x8mm
Z543
M3x10mm
87199
87204
a
a
87199
87199
Lassen Sie den Motor niemals ohne Luftfilter laufen !
Ne faites jamais tourner le moteur sans le filtre à air !
6154
c
87509
b
Hinweis : Note :
OK!
Page 14/16
Page 15

Tipps zur Lagerung des Motors Conseils de rangement du moteur
Lagerung des Motors:
Die richtige Lagerung des Motors ist nicht nur eine gute Angewohnheit, sondern sehr wichtig für Ihren Motor. Modellkraftstoff enthält Öl zur Schmierung. Wenn dieses Öl nicht verbrannt ist, kann es mit der Zeit
verharzen und die Kurbelwellenlager beschädigen. Mit Ihrer Kraftstoffflasche können Sie den gesamten Kraftstoff aus Ihrem Tank saugen. Versuchen Sie nun mehrfach mit einem geladenen Glühkerzenstecker
den Motor zu starten um den restlichen Kraftstoff im Motor zu verbrennen. Nachdem Sie den restlichen Kraftstoff verbrannt haben, entfernen Sie die Glühkerze und geben ein paar Tropfen "After-Run Öl" in den
Motor. Drehen Sie ihn dann ein paar Mal durch. Falls Sie vorhaben den Motor längere Zeit zu lagern (mehr als 3 Monate), kann es auch sein, dass sich das "After-Run Öl" verändert. Es beschädigt aber nicht
die Lager. Um den Motor wieder zu benutzen, spülen Sie ihn mit 70% Isopropyl Alkohol oder mit Spiritus, indem Sie den Motor mit dem Seilzugstarter oder dem Roto Start durchdrehen. VERSUCHEN SIE
NICHT DEN MOTOR MIT SPIRITUS ZU STARTEN! Die wenigen Minuten, die es dauert, den Motor für die Lagerung zu präparieren, zahlen sich durch eine längere Lebensdauer und maximale Leistung aus.
Rangement du moteur :
De bonnes techniques de rangement sont non seulement une bonne habitude mais un point fondamental pour la durée de vie de votre moteur. Le carburant nitro contient du ricin pour la lubrification. Si
le ricin n'est pas brûlé dans le moteur, avec le temps il peut encrasser et endommager les roulements du carter. Avec votre bouteille de carburant, retirez tout le carburant restant dans le réservoir.
Essayez de démarrer le moteur avec un chauffe-bougie bien chargé pour brûler tout le carburant qui pourrait rester dans les conduites. Répétez cette manoeuvre jusqu'à ce que le moteur ne démarre
plus. Après avoir brûlé tout le carburant, retirez la bougie et ajoutez plusieurs gouttes d'huile de stockage puis retournez le moteur pour bien la répandre dans tout le moteur. Si vous pensez laisser votre
moteur rangé pendant de longues périodes (plus de 3 mois), l'huile de stockage peut également encrasser mais n'abîmera pas les roulements. Pour préparer le moteur pour une réutilisation, prenez de
l'alcool isopropylique à 70° ou de l'alcool dénaturé et faites le circuler dans le moteur en utilisant le lanceur ou le roto start. N'ESSAYEZ PAS DE DÉMARRER LE MOTEUR AVEC L'ALCOOL ! Les
quelques minutes que vous passerez à préparer votre moteur correctement pour le stockage peuvent se révéler utile pour sa durée d'utilisation et le maintien de ses performances optimales.
Überholen des Motors
Es wird die Zeit kommen, in der Ihr Motor nicht mehr die Leistung wie im
Neuzustand hat. Wenn diese Zeit gekommen ist, ist eine einfache Überholung des Motors an der Reihe. Folgen Sie diesen Schritten um Ihren Motor
zu zerlegen, ihn zu reparieren und wieder zusammenzubauen.
Il arrive un moment où les performances de votre moteur ne sont plus ce qu'elles
étaient dans le neuf. À ce moment une reconstruction simple est de mise. Suivez
les étapes ci-dessous pour le démontage, la réparation et le remontage du moteur.
Überprüfen Sie die Motorkompression. Bei zu wenig Kompression
wird der Motor nicht starten.
Vérifiez la compression du moteur.
S'il n'y a pas de compression, le
moteur ne démarrera pas.
1 2 3
15228
Reconstruction du moteur
OK! NO!
Schraubensicherungslack
Frein à filet
2
94154
mm
54
15215
15217
15214
2.5
mm
15237
Richtung beachten
Noter la direction
Z903
2.5
mm
Inbusschlüssel 2.5mm
Clé Allen
Z904
2
mm
Inbusschlüssel 2.0mm
Clé Allen
70332
Glühkerzenschlüssel
Clé à bougie
8
mm
1504
15243
Z164
Fett
Graisse
Hinweis:
Note:
1
39014 (JP)
Öl-Spray
Vaporisateur d'huile
Z159
Schraubensicherungslack
Frein à filet
Drehen Sie die Kurbelwelle so, dass der
Kolben am oberen Totpunkt ist, bevor
Sie die hintere Abdeckplatte entfernen.
Wenn sich der Kolben in einer anderen
Position befindet, wird er beschädigt.
Avant de retirer la plaque arrière, faites
tourner le vilebrequin de façon à ce que
le piston soit tout en haut de sa course.
Si le piston est en position basse, il sera
endommagé.
2
15213
15215
0.1mm
NO!
15236
a
15236
2.5
mm
Z542
Z164
Fett
c
15236
b
Graisse
15234
15217
6
15245
Zusammenbau des Motors Remontage du moteur
Nachdem Sie den Motor vollständig zerlegt haben, untersuchen Sie die einzelnen Komponenten, um zu sehen, welche Teile
getauscht werden müssen. Kratzer auf der Kurbelwelle, dem Kolben oder der Buchse sind Zeichen dafür, dass Schmutz in
den Motor gelangt ist. Bevor Sie den Motor wieder zusammen bauen, reinigen Sie alle teile sorgfältig. Montieren Sie den
Motor wieder in umgekehrte Reihenfolge zur Demontage (Schritt 6 - Schritt 1). Achten Sie auf die Richtung des Öl-Lochs im
Pleuel und auf die Richtung der Laufbuchse, da diese wichtig für die Funktion des Motors sind. Verwenden Sie während
dem Zusammenbau auf jedem Teil ein wenig Öl, so dass sich alles gut bewegen läßt. Wenn Sie fertig sind, müssen die
neuen teile natürlich wieder dem Einlaufvorgang unterzogen werden. Schauen Sie dazu bitte wieder auf Seite 10.
Après avoir complètement démonté le moteur, examinez les composants pour savoir quelles pièces doivent être remplacées. Des griffures sur le vilebrequin, ou le piston et sa chemise, sont des signes que de la poussière a pénétré dans le
moteur. Avant le remontage, nettoyez soigneusement toutes les pièces pour vous assurez qu'il ne reste pas de corps
étrangers. Remontez le moteur dans l'ordre inverse du démontage (étape 6 à étape 1). N’oubliez pas de bien noter la
direction du trou de graissage sur la bielle et la direction de la chemise car elles sont fondamentales pour que le moteur
fonctionne correctement. Tout en remontant le moteur, mettez un peu d’huile sur chaque pièce afin de vous assurer qu’elles
soient bien lubrifiées et se déplacent librement. Lorsque vous avez terminé, les nouveaux composants devront être rodés.
Veuillez vous reporter à la page 10 et suivre les instructions afin de roder les nouveaux composants.
Page 15/16
Page 16

9
Garantie
HPI Racing gewährt ab Kaufdatum eine Garantie von zwei (2) Jahren auf Material-und Produktionsfehler dieses Produktes. Bewahren Sie deshalb Ihren
Kaufbeleg an einem sicheren Ort auf. Sollte es Probleme mit dem Material oder der Montage Ihres Produktes geben, wird HPI Racing dies nach eigenem
Ermessen reparieren oder ersetzen.
Die Garantie schließt normale Abnutzung, Missbrauch, unsachgemäßen Gebrauch oder jeglichen Defekt durch die falsche Handhabung dieses Produktes aus. HPI Racing ist nicht verantwortlich für jegliche Schäden oder Verluste, die mittelbar oder unmittelbar durch die Verwendung, den unsachgemäßen Gebrauch oder Missbrauch dieses Produktes entstehen oder durch Chemikalien oder Werkzeuge, die zum Betreiben dieses Produktes
notwendig sind.
SCHICKEN SIE KEINESFALLS dieses Produkt ohne vorherige Überprüfung ein. Für ein Produkt, welches nach der Überprüfung durch HPI Racing keinen
Garantieanspruch erhält, wird eine Bearbeitungsgebühr erhoben, bevor das Produkt wieder zurückgeschickt wird. Alle Reparaturen, die aus unsachgemäßen Gebrauch oder Missbrauch resultieren, sind kostenpflichtig.
Bringen Sie bei einem Garantieanspruch das Produkt zu dem Händler zurück, bei dem Sie es gekauft haben. Dieser wird dann das Produkt zur weiteren
Bearbeitung an die Serviceabteilung weiterleiten. Dem Produkt muss eine Fehlerbeschreibung beiliegen, in der auch die Telefonnummer angegeben ist,
unter der man Sie bei Bedarf tagsüber erreichen kann.
Bei weiteren Problemen können Sie uns jederzeit im Internet unter www.hpiracing.com besuchen oder sich direkt beim zuständigen Distributor Ihres
Landes telefonisch melden.
HPI Racing garantit que ce produit sera exempt de défaut de matériaux ou de façon pendant une période de deux (2) ans à compter de la date d'achat
initial. Veuillez conserver le reçu dans un endroit sûr car il vous sera demandé de le présenter pour vérification. En cas de défaut des matériaux, de la
façon ou de l'assemblage de ce produit, HPI Racing le réparera ou le remplacera à son seul gré.
Cette garantie ne couvre pas les problèmes résultant de l'usure normale, de négligence ou d'utilisation abusive ni les dommages résultant d'une utilisation incorrecte de ce produit. HPI Racing dénie toute responsabilité pour les pertes et dommages, qu'ils soient directs ou indirects ou survenus des
suites de l'utilisation incorrecte ou abusive de ce produit ou de tout accessoire ou produit chimique utilisé en conjonction avec ce produit.
NE PAS retourner ce produit sans autorisation préalable. Veuillez noter que tout produit retourné et dont il s'avère dans le cadre de l'inspection effectuée
par nos employés que la demande d'indemnité assurance afférente n'est pas valide peut faire l'objet de frais d'inspection et de manipulation avant son
renvoi. Toutes les réparations de défaut résultant d'une utilisation incorrecte ou abusive de ce produit seront facturées (coût des pièces et de la main
d'oeuvre) avant que les réparations ne commencent.
Pour les demandes de réparation sous garantie, veuillez retourner le produit au magasin où vous l'avez acheté avec une copie du reçu initial (veuillez
conserver l'original). Si le distributeur HPI en donne l'autorisation, le magasin enverra le produit ou une partie du produit à des fins d'inspection professionnelle. Le produit doit être renvoyé avec une description écrite du problème et le numéro de téléphone à utiliser pendant la journée pour répondre aux
questions éventuelles.
Si vous avez d'autres problèmes, veuillez contacter votre distributeur local. Veuillez visiter le site Web www.hpi-europe.com ou appeler HPI Europe au
Royaume-Uni au 44 1283 229400 pendant les heures d'ouvertures de bureau pour un complément d'information.
Bitte schauen Sie in Ihrer Anleitung für weitere Tipps zur Wartung Ihres Modells.
Veuillez vous reporter à votre manuel d'utilisation pour y trouver les astuces d'entretien
après-usage adéquats.
Page 16/16
 Loading...