

Page 1

日本語
EN / DE / FR /
120026 FLUX EMH-80A ESC
Caution
the battery from the ESC when you are nished using your vehicle.
The switch on the ESC controls the power that is delivered to the receiver and servos. The controller will always draw current when it is connected to the battery
and will completely discharge batteries if they are connected or long durations. This may cause failure of your batteries.
Caution
This is an extremely powerful brushless motor system. We strongly recommend removing your tyres for your own safety and the safety of
those around you before performing calibration and programming functions with this system. Please keep your hands, hair, and loose clothing clear from the gear train and wheels of an armed high performance system.
Rubber tyres will “expand” to extreme size on a high speed vehicle. DO NOT hold the vehicle in the air and run it up to full throttle. Tyre
failures at that speed can cause serious injury! Make sure your tires are securely glued to the rims and check them often! Always disconnect
Failure to follow these instructions can cause injury to yourself or others. You might also cause property damage or damage your kit. As with
any extremely high powered electric power system, the primary limitations to ultimate vehicle performance are the batteries and connectors.
Use the best batteries and connectors you can nd. The better the batteries, the more performance you will have! We do not recommend the
use of low quality batteries referred to as “stick packs”. Use of “stick packs” may result in personal injury or re.
Features
1. Water-resistant* and dust-proof. The ESC has been designed to work in wet conditions.
a.*Please remove the cooling fan when using the ESC in very wet conditions.
b.*After using the ESC in wet conditions, please clean and dry it to avoid the oxidation to copper connectors
2. 2-3S Capalable (for 3S you must change the standard 5V cooling fan to a 12V cooling fan, or supply the 5V cooling fan from the receiver 5-6V)
3. Compatible with sensorless brushless motor.
4. 3 running modes (“Forward with brake” mode, “Forward/Backward with brake” mode, and “Rock Crawler” mode).
5. Proportional ABS brake function with 4 steps of maximum brake force adjustment, 8 steps of drag-brake force adjustment.
6. 9 Punch modes from “Soft” to “Very aggressive” to be suitable for different chassis, tires and tracks.
7. Multiple protection features:
Low voltage cut-off protection for Lipo or NiMH battery / Over-heat protection /Throttle signal loss protection / Motor blocked protection.
8. Easily programmed with the “SET” button on the ESC or with the LED Program Card.
Specication
Continuous Current 80A
Burst Current 540A
Resistance 0.0004 ohm
Application 1/10 scale On-Road and Off-Road
Motor
Limit
Battery 4-9 cells NiMh or 2-3S LiPo
Built-in BEC 6V/2A Linear
Program Port Multiplexed with cooling fan port
Motor Type Sensorless Brushless
Dimension 46*34*35mm
Weight 82g
2S LiPo
6 cell NiMh
3S LiPo
9 cell NiMh
On-Road: ≥ 5.5T
Off-Road: ≤ 6000Kv
3650 Size Motor
On-Road: ≥ 8.5T
Off-Road: ≤ 4000Kv
3650/3660 Size Motor
1) For 4-6 cells NiMH or 2S Lipo: You needn’t change the 5V cooling fan on the ESC;
2) For 7-9 cells NiMH or 3S Lipo: You must change the original 5Vcooling fan to 12V cooling fan, or supply the 5V cooling fan from the receiver (5-6V);
1
Vol.1117108
Page 2
LED LED
LED LED
LED LED
LED
LED
LED
LED
LED
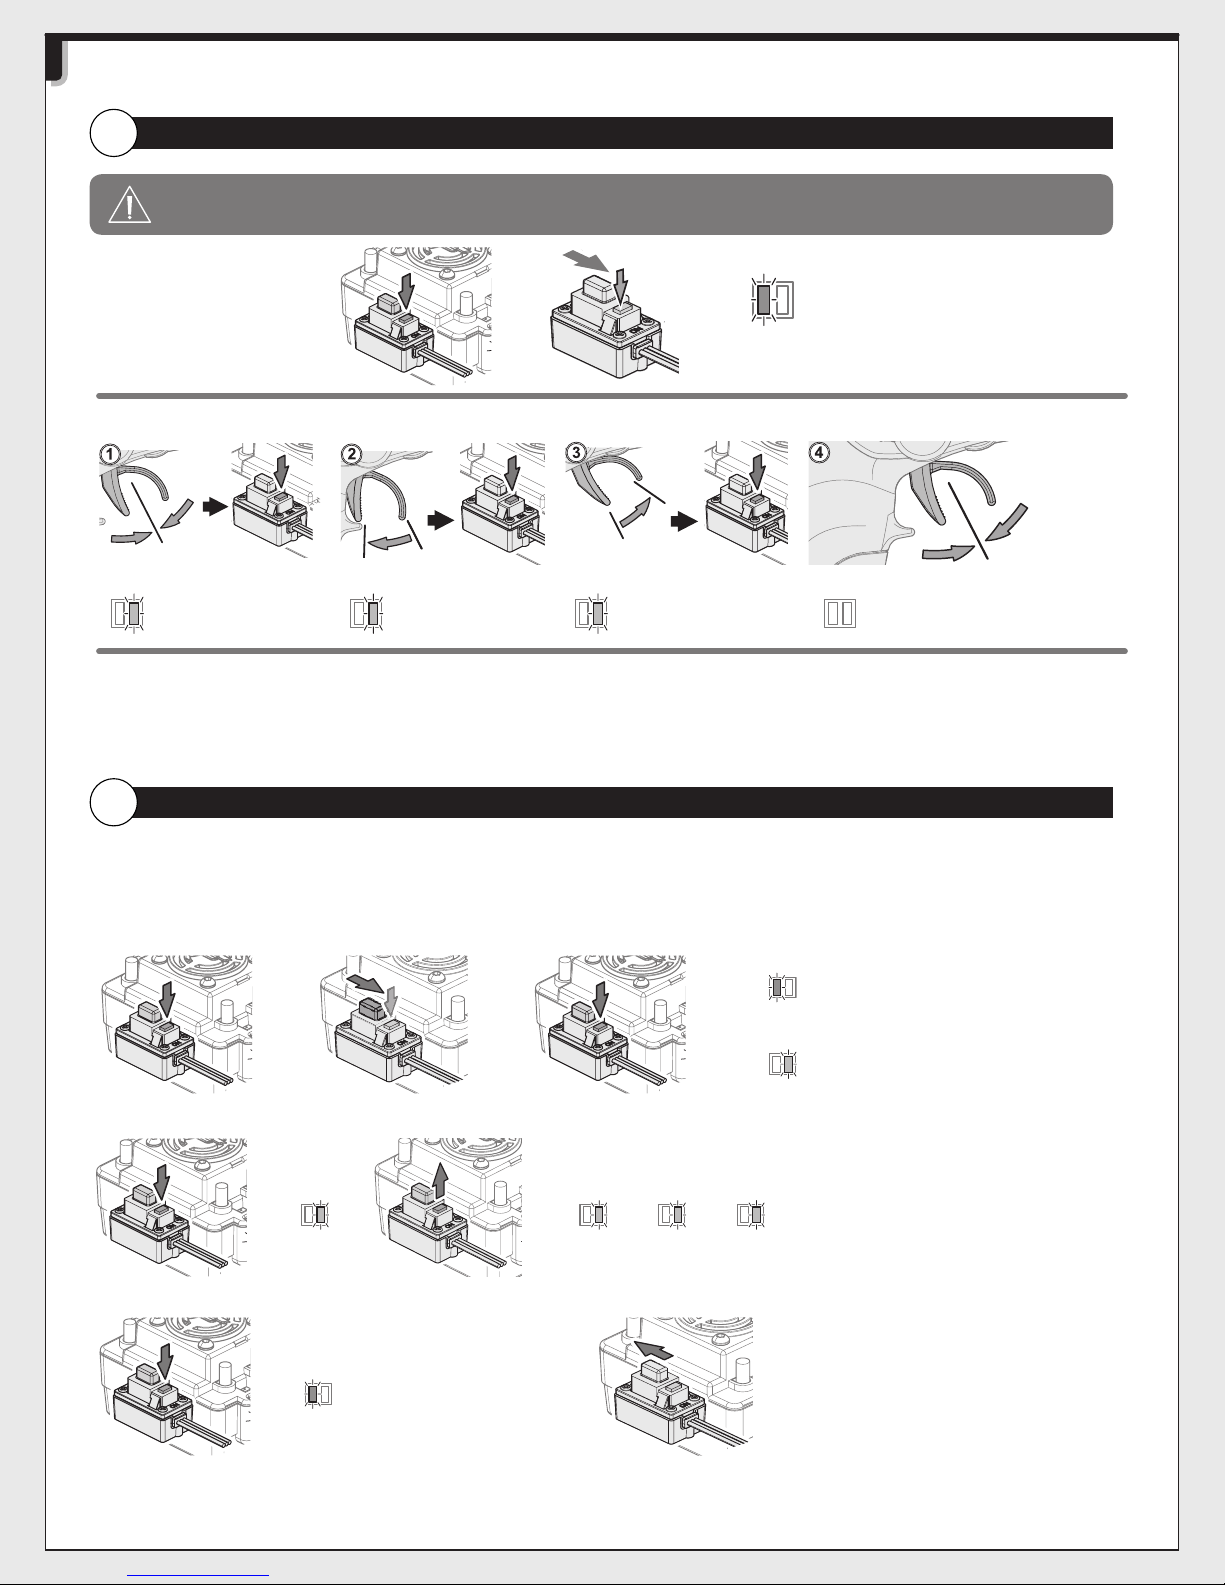
ESC Setup
Setup Before Starting
1
Important!
Hold down the setup button while
turning on the ESC.
Leave the trigger in the neutral
position. Press the setup button.
Green LED
ashes and a Beep
sound comes from the
motor.
If the LED on the speed control does not work as described below, the speed control may not be setup correctly. Repeat the above process.
THE LED STATUS IN NORMAL RUNNING:
a) In normal use, if the throttle stick is in the neutral range,neither the red nor green LED will light.
b) The red LED lights when the car is run forward or backwards and will ash quickly when the car is braking.
c) The green LED lights when the throttle stick is moved to the top point of the forward zone (full throttle).
You must set up the ESC before running the rst time. Initial setup, it is not required before every run.
Release the setup button once the Red
LED starts to ash
Move the trigger to full throttle.
Press the setup button.
Green LED
ashes twice. Beeps
twice from the motor.
Move the trigger to full brake.
Press the setup button.
Green LED
ashes three times.
Beeps three times from
the motor.
When the process has nished, motor
control will be activated in 3 seconds
No LED Lighting
Changing the settings
2
The ESC has a number of programmable modes that can be altered to suite a variety of functions. Each set of green LED ashes/beeps represents the programmable mode
(1 ash = Running mode, 2 ashes = Drag brake force and 3 ahes = Auto-lipo settings etc..) and each set of red LED ashes/beeps represents that modes value. See the table
below for all the programmable modes and their values. When you enter the setup mode you need to keep the button pressed until you enter the desired programme mode
(green ashes/beeps). Once you reach that mode release the button and that will allow you to change the mode value (red ashes/beeps). You need to switch off the ESC to
save the settings then re-do the process to change to a different mode or mode value setting. If you lose your way with setup then you can return the unit to default settings by
turning on the ESC, keeping the transmitter in neutral and pressing the setup button for 3 seconds. Both red and green LED’s will ash together 3 times to conrm this.
LED
Red LED ashes for 4 seconds.
LED
Green LED will begin to ash.
While switching on the ESC hold down the setup button. Continue to hold the setup button while the red LED ashes. Continue to hold the setup button until the green LED starts to ash.
LED
Each green LED ash represents the programmable mode number. Release the setup button when you reach the desired mode. You are now in the program mode setting.
LED
1 red LED ash
represents the
“No Protection” setting
LED
LED
LED
3 green LED ashes represent the Low Voltage Cut-Off
setting for example.
Press the setup button to change the mode value. Each mode value will have
different amounts of red LED ashes.
In order to save the changes and settings you must switch off the ESC. When you next
switch it back on it will have saved your new settings. To make further alterations you
need to re-enter the mode values again.
2
Page 3
Program Modes
3
PROGRAM
BASIC SETTINGS
1. Running Mode
2. Drag Brake Force 0% 5% 10% 20% 40% 60% 80% 100%
3. Low Voltage Cut-off Non-Protection 2.6V/cell 2.8V/cell
4. Start Mode (Punch) Level 1 (Soft) L2 L3 L4 L5 L6 L7 L8
ADVANCED SETTINGS
5. Max Brake Force 25% 50% 75% 100%
6. Max Reverse Force 25% 50% 75% 100%
7. Initial Brake Force
8. Neutral Range 6% (Narrow) 9% (Normal)
9. Timing 0.00 3.75 7.50 11.25 15.00 18.75 22.50 26.25
10. Overheat Protection Enable Disable
PROGRAMMABLE VALUE
1 2 3 4 5 6 7 8 9
Forward with
Brake
=Drag Brake
Force
Forward/Reverse
with Brake
0% 20% 40%
Rock
Crawler
(Wide)
12%
3.0V/
cell
3.2V/
cell
3.4V/
cell
L9 (Very
Aggressive)
Running Modes FWD w/Brake This mode is for forward and brake only
Fwd/Rev/Brake This mode offers forward, brake and reverse. Note, The reverse uses a soft start
“Double Click” function which will only allow reverse to be activated once the motor
has stopped moving forwards.
Rock Crawler This mode allows the reverse function to happen immediately. Drag Brake should also
be set to 100% to use this function for Rock Crawling.
Drag Brake Force This allows the setting of an automatic drag brake when the throttle stick is returned to
neutral, simulating the slight braking effect of a brushed motor while coasting.
Low Voltage Cut-Off If the voltage of a LiPo battery pack is lower than the set threshold, the ESC will cut
off the output power by 50%. The ESC will completely cut off the output power in 10
seconds.
Start Mode (Punch) This mode selects the level of “punch” from a standing start.Level 1 is soft, right up to
level 9 which is very aggressive. Please note, If levels 7-9 are selected, battery packs
with low discharge rates or are poor quality will not be able to supply the needed
power. It can also cause the motor to not run smoothly or tremble.
Max Brake Force This mode sets the brakes force applied when the throttle is at full brake. A
very large
brake force may slow the car quickly but be aware
it can also do damage to the cars drivetrain.
Max Reverse Force This mode will set the reverse power applied by the ESC. The higher the value the
quicker the reverse function will be.
Initial Brake Force This setting refers to the very rst part of the braking zone. As default this is set to
equal the Drag Brake Force which will give a smooth transition into braking. It can also
be set higher to allow for a more aggressive braking function initially.
Neutral Range The neutral range is the area around the centre of the throttle movement. This mode
will increase or decrease this area to suit your individual preference.
Timing Different types of Brushless motors will react differently to timing values. Generally the
higher the timing setting the more output power and performance you will gain. This
is however balanced off with less run time, heat build up and efciency of the system.
We recommend the default timing as a good balance of performance and run time.
Overheat Protection If the function is activated, the output power will be cut off when the
temperature of the ESC is up to the factory threshold for more than 5 seconds. When
the protection happens, the green LED will ash.
Resetting Default Values
The ESC can be reset to it default settings at any time. When the ESC is on (not in Setup Calibration or Programmable Settings
modes) and the throttle is in the neutral position, hold the setup button for more than 3 seconds. The red and green LED’s will ash
at the same time 3 times to indicate that the defaults have been reset.
3
Page 4
日本語
EN / DE / FR /
120026 FLUX EMH-80A ESC
Warnhinweise
Dies ist ein extrem leistungsstarkes Brushless Motor System. Wir empfehlen, dass Sie aus Sicherheitsgründen das Ritzel vom Motor entfernen, wenn Sie die
Einstellung oder Programmierung des Systems vornehmen. Achten Sie darauf, dass Sie nicht mit Ihren Händen, Haaren und lockerer Kleidung in die Nähe des
Antriebsstrangs und der Räder kommen, wenn das System aktiv ist.
Gummireifen “wachsen” extrem im Durchmesser bei hohen Drehzahlen. Auf KEINEN FALL sollten Sie das Auto in der Luft halten und Vollgas geben. Ein Reifenplatzer bei
hoher Drehzahl kann zu schweren Verletzungen führen! Stellen Sie sicher, dass Ihre Reifen sicher mit den Felgen verklebt sind und kontrollieren Sie dies oft!
Ziehen Sie immer den Akku vom Regler ab, wenn Sie nicht mehr fahren. Der Schalter am Regler kontrolliert die Leistung die zum Empfänger und den Servos geliefert wird. Der Regler zieht
immer Strom, wenn er mit dem Akku verbunden ist und entlädt diesen dann vollständig, wenn Regler und Akku lange verbunden sind. Dies kann Ihre Akkus beschädigen.
Warnhinweise
Wenn Sie diesen Anweisungen nicht folgen, können Sie oder andere verletzt werden.Es kann auch sein, dass dabei Sachschaden an
anderen Dingen oder ihrem Auto entsteht. Wie bei jedem besonders leistungsstarken, elektrischen System sind der begrenzende Faktor die
Akkus und die Stecker. Verwenden Sie nur die besten Akkus und Stecker die Sie nden können. Je besser die Akkus, umso mehr Leistung
steht Ihnen zu Verfügung! Wir empfehlen nicht den Einsatz von niederqualitativen Akkus wie “Stick-Packs”. Der Gebrauch dieser Akkus
kann zu Personenschaden oder Feuer führen.
Eigenschaften
1. Wasser-* und Staubfest. Der Regler wurde entwickelt bei feuchten Bedingungen zu arbeiten.
a.*Bitte entfernen Sie den Lüfter, wenn Sie den Regler bei sehr feuchten Bedingungen verwenden wollen.
b.*Nach dem Gebrauch bei feuchten Bedingungen, säubern und trocknen Sie den Regler um Oxidation der Kupfer-Verbinder zu verhindern.2.
Für 2-3S LiPos geeignet (beim Einsatz von 3S LiPos müssen Sie den Standard-5V-Lüfter gegen einen 12V-Lüfter tauschen oder den 5V-Lüfter
vom Empfänger mit 5-6V versorgen).
3. Kompatibel mit sensorlosen Brushless Motoren.
4. 3 Betriebsmodi („Vorwärts mit Bremse”-Modus, „Vorwärts/Rückwärts mit Bremse”-Modus und „Rock Crawler“-Modus).
5. 9 Anfahr-Modi von “sanft” bis “sehr aggressiv” zur Abstimmung auf verschiedene Chassis, Reifen und Strecken.
Multi-Schutz-Funktion: Unterspannungsschutz für LiPo oder NiMh Akkus / Übertemperaturschutz / Signal-Verlust-Schutz / Motorblockade-Schutz
7.
8. Einfach programmierbar über die “SET”-Taste des Reglers oder mit der LED Programmierkarte.
Eigenschaften
Dauerstrom 80A
Spitzenstrom 540A
Widerstand 0.0004 ohm
Anwendung 1/10 scale On-Road und Off-Road
Motorlimit 1/10 scale
Akku 4-9 Zellen NiMh oder 2-3S LiPo
Integriertes BEC 6V/2A Linear
Programmieranschluss Gebündelt (Multiplex) mit Lüfteranschluss
Motortyp Sensorlos Brushless
Abmessungen 46 x 34 x 35mm
Gewicht 82g
On-Road
und OffRoad
3S LiPo /
9-Zellen
NiMh
On-Road: ≥ 5.5T
Off-Road: ≤ 6000Kv
3650 Motorgröße
On-Road: ≥ 8.5T
Off-Road: ≤ 4000Kv
3650/3660 Motorgröße
1) Bei 4-6 Zellen NiMh oder 2S LiPo: Der 5V-Lüfter des Reglers muss nicht getauscht werden.
2) Bei 7-9 Zellen NiMh oder 3S LiPo: Tauschen Sie den originalen 5V-Lüfter gegen einen 12V-Lüfter oder versorgen Sie den 5V-Lüfter über den Empfänger (5-6V)
4
Vol.1117108
Page 5

LED LED
LED LED
LED LED
LED
LED
LED
LED
LED
ESC Setup
Einstellungen vor dem Start
1
Wichtig!
Halten Sie den
Setup-Knopf beim
Sie müssen den Regler beim ersten Einsatz einstellen.
Dieser Einstellvorgang ist danach nicht mehr bei jedem Einschalten nötig.
Lassen Sie den Setup-Knopf
los, sobald die LED blinkt
Einschalten gedrückt.
Lassen Sie den Gashebel in der
Neutralstellung und drücken Sie den
Setup-Knopf.
Grüne Led Blinkt Und
Der Motor Piept
Bewegen Sie den Gashebel in die
Vollgasposition und drücken Sie den
Setup-Knopf.
Grüne Led Blinkt Zwei
Mal Und Der Motor Piept
Zwei Mal
Bewegen Sie den Gashebel vollständig
in die Bremsposition und drücken Sie
den Setup-Knopf.
Grüne Led Blinkt Drei
Mal Und Der Motor Piept
Drei Mal
Wenn der Vorgang abgeschlossen ist, wird die
Motorkontrolle nach 3 Sekunden aktiviert.
KEINE LED leuchtet
Sollte die LED am Regler nicht wie unten abgebildet leuchten, kann es sein, dass der Regler nicht korrekt eingestellt ist. Wiederholen Sie dann den Setupvorgang.
ZUSTAND DER LED BEIM FAHREN:
a) In der Neutralstellung leuchten weder die rote noch die grüne LED.
b) Die rote LED leuchtet wenn das Auto vorwärts oder rückwärts fährt und blinkt schnell wenn das Auto gebremst wird.
c) Die grüne LED leuchtet wenn am Gashebel Vollgas gegeben wird.
Ändern der Einstellungen
2
Der Regler hat eine Reihe von programmierbaren Modi, mit denen verschiedene Funktionen eingestellt werden können. Die Auswahl des einstllbaren Modi wird über die grüne LED und Pieptöne
angezeigt (1 x Blinken = Fahrmodus, 2 x Blinken = Stärke der Motorbremse, 3 x Blinken = Auto-LiPo Einstellung, usw.). Der jeweils eingest ellte Wert wird über die rote LED und Pieptöne angezeigt.
In der untenstehenden Tabelle nden Sie die einstellbaren Modi und die möglichen Werte. Wenn Sie in den Einstellmodus gehen, müssen Sie den Knopf so lange gedrückt halten, bis Sie bei dem
gewünschten Modus sind (grünes Blinken/Piepen). Sobald Sie diesen Modus erreicht haben, lassen Sie den Knopf los und Sie können nun den Wert (rotes Blinken/Piepen) ändern. Sie müssen
den Regler ausschalten um die Einstellung zu speichern und den Vorgang dann erneut ausführen um einen andern Modus oder Wert zu ändern. Falls Sie bei den Einstellungen den Überblick
verloren haben, können Sie Ihren Regler wieder auf die Grundeinstellungen setzen. Schalten Sie dazu den Regler ein, lassen Sie den Sender in der Neutralposition, drücken und halten Sie dann den
Einstellknopf für 3 Sekunden. Die rote und grüne LED blinken dann 3 Mal zusammen um den Vorgang zu bestätigen.
LED
Die rote LED blinkt für 4 Sekunden
LED
Grüne Led Beginnt Zu Blinken.
Halten Sie beim Einschalten des Reglers den Setup-Knopf gedrückt. Halten Sie ihn weiter gedrückt, wenn die LEDs blinken. Halten Sie den Einstellknopf weiter gedrückt bis die grüne LED blinkt.
LED
LED
LED
LED
3 green LED ashes represent the Low Voltage Cut-Off
setting for example.
Jedes Blinken zeigt den einstellbaren Modus an. Lassen Sie den Einstellknopf los, wenn Sie den gewünschten Modus erreichet haben. Sie können nun den Wert des ausgewählten Modus einstellen.
LED
Ein Blinken der roten LED zeigt die
Einstellung „Kein Schutz“ an.
Drücken Sie den Einstellknopf um den Wert des Modus zu ändern. Die Anzahl
der einstellbaren Werte (rotes Blinken der LED) kann bei verschiedenen Modi
unterschiedlich sein.
Um d ie Änd eru ngen zu speich ern, m üssen Sie den Regler ausschalten. Wenn
Sie ihn wieder anschalten, sind die neuen Einstellungen gespeichert. Um weitere
Änderungen durchzuführen, müssen Sie wieder in den Einstellmodus.
5
Page 6

Programm Modi
3
PROGRAMM
GRUNDEINSTELLUNGEN
1. Fahrmodus
2. Stärke der
Motorbremse
3. UnterspannungsAbschaltung
4. Anfahr-Modus L1 (Sanft) L2 L3 L4 L5 L6 L7 L8 L9 (Aggressiv)
ERWEITERTE EINSTELLUNGEN
5. Maximale Bremskraft 25% 50% 75% 100%
6. Max. Rückwärts 25% 50% 75% 100%
7. Initial-Bremse =Initial-Bremse 0% 20% 40%
8. Neutralbereich 6% (Schmal) 9% (Normal)
9. Motor-Timing 0.00 3.75 7.50 11.25 15.00 18.75 22.50 26.25
10. Überhitzungsschutz Aktiviert Deaktiviert
Fahrmodus Vorwärts/Bremse In diesem Modus stehen nur Vorwärts und Bremse zur Verfügung.
Kraft Der Roll-Bremse In diesem Modus können Sie einstellen wie stark der Motor von sich aus bremsen soll, wenn Sie
Unterspannungs-Abschaltung Wenn die Spannung eines LiPo-Akkus unter dem eingestellten Grenzwert liegt, wird der ESC die
Anfahr-Modus Bei diesem Modus können Sie das Anfahrverhalten (Punch) bei einem stehenden Start einstellen.
Maximale Bremskraft In diesem Modus wird eingestellt, wie stark die Bremse bei einer Vollbremsung ist. Eine große
Maximale Rückwärtsgeschwindigkeit In diesem Modus können Sie einstellen wie stark der Motor von sich aus bremsen soll, wenn Sie
Kraft Der Roll-Bremse Dieser Einstellung bezieht sich auf den allerersten Bereich der Bremszone. Als Standard ist hier
Neutralbereich Der Neutralbereich beschreibt die Zone um die Mittelstellung des Gashebels. Sie können diesen
Motor-Timing Verschiedene Arten von Brushless-Motoren reagieren auf die eingestellten Timingwerte
Überhitzungsschutz Wenn diese Funktion aktiviert ist, schaltet der Regler ab, wenn die ab Werk eingestellte
Programm-Werte
1 2 3 4 5 6 7 8 9
Vorwärts /
Bremse
0% 5% 10% 20% 40% 60% 80% 100%
Kein Schutz 2.6V/Zelle 2.8V/Zelle
Vorw./Rückw./Bremse In diesen Modus stehen Vorwärts, Rückwärts und Bremse zur Verfügung. Der Rückwärtsgang
Rock Crawler Dieser Modus wird bei Rock Crawler verwendet. Er erlaubt sofortiges Umschalten von Vorwärts
Vorw./Rückw./
Bremse
besitzt eine Anfahrüberwachung.
Auch bei zweimaligem Betätigen des Bremshebels läuft der Motor erst dann rückwärts an, sobald
er einmal komplett stehengeblieben ist.
nach Rückwärts für eine schnellere Kontrolle des Autos. Stellen Sie bitte die Roll-Bremse auf
100% wenn der Rock Crawler Modus verwendet wird. Dieser Modus sollte nicht bei anderen Autos
eingesetzt werden.
den Gashebel auf Neutral stellen.
Abgabeleistung um 50 % kürzen. Nach 10 Sekunden wird der ESC die Abgabeleistung vollständig
abschalten.
Level 1 ist sanft und Level 9 sehr aggressiv. Wenn Level 7-9 ausgewählt ist, sind Akkus mit
schwacher Entladerate oder Akkus schlechter Qualität nicht in der Lage die nötige Leistung zu
liefern. Dies kann dazu führen, dass der Motor nicht ruhig läuft oder sogar zittert.
Bremskraft kann das Auto schnell zum Stehen bringen, beachten Sie aber bitte auch, dass dies zu
Beschädigungen am Antriebsstrang führen kann.
den Gashebel auf Neutral stellen.
der gleiche Wert wie für die Roll-Bremse eingestellt. Somit ergibt sich ein weicher Übergang in
den Bremsbereich. Sie können auch einen höheren Wert einstellen und somit zu Beginn eine
aggressivere Bremse erreichen.
Bereich vergrößern oder verkleinern und ihn so an Ihre persönlichen Vorlieben anpassen.
unterschiedlich. Generell lässt sich sagen, dass ein Motor mehr
Leistung abgibt, je höher das Timing ist. Allerdings leiden darunter die Fahrzeit und die Efzienz
des System. Es entsteht mehr Wärme. Wir empfehlen das
eingestellte Timing als guten Kompromiss zwischen Leistung und Fahrzeit.
Temperatur für mehr als 5 Sekunden erreicht wird.
Wenn die Abschaltung eintritt, blinkt die grüne LED.
Rock
Crawler
12%
(Breit)
3.0V/
Zelle
3.2V/
Zelle
3.4V/
Zelle
Auf Standardeinstellungen zurücksetzen
Der ESC kann jederzeit auf seine Standardeinstellungen zurückgesetzt werden. Wenn der ESC eingeschaltet ist (nicht im Modus
„Einstellungen-Kalibrierung“ oder „Programmierbare Einstellungen“) und der Gashebel sich in Neutralstellung bendet, halten Sie
die Setup-Taste (Einstellungen) für länger als 3 Sekunden gedrückt. Die roten und grünen LEDs blinken gleichzeitig dreimal, um
anzuzeigen, dass auf die Standardeinstellungen zurückgesetzt wurde.
6
Page 7

日本語
EN / DE / FR /
120026 FLUX EMH-80A ESC
Précautions
Il s’agit d’un moteur sans balais extrêmement puissant. Nous vous conseillons fortement de retirer vos pignons avant d’effectuer la calibration et la programmation de ce système, pour votre propre sécurité et celle des personnes qui vous entourent. Veuillez éviter d’approcher
vos mains, vos cheveux, et vos vêtements de la transmission et des roues d’un système haute performance en cours de fonctionnement.
Les pneus en caoutchouc vont « grossir » jusqu’à leur taille extrême lorsqu’ils sont utilisés sur un véhicule à haute vitesse. NE MAINTENEZ
PAS le véhicule en l’air en l’accélérant au maximum. Une défaillance des pneus à haute vitesse peut provoquer des blessures graves !
Vériez que vos pneus sont bien collés aux jantes, et vériez-les souvent ! L’interrupteur du contrôleur électronique de vitesse contrôle la puissance qui est
transmise au récepteur et aux servos. Le contrôleur utilise en permanence du courant lorsqu’il est raccordé à la batterie, et il la déchargera complètement s’il
reste branché pour de longues durées. Cela peut provoquer une défaillance de vos batteries.
Précautions
En ne suivant pas ces instructions vous pourriez vous blesser vous-même ou blesser d’autres personnes. Vous pourriez également provo-
quer des dégâts matériels ou endommager votre kit. Comme pour tout système électrique de forte puissance, les limitations principales aux
performances extrêmes du véhicule sont les batteries et les connexions. Utilisez les meilleures batteries et connexions que vous pourrez
trouver. Meilleures sont les batteries, et meilleures seront vos performances ! Nous ne conseillons pas l’utilisation de batteries de faible
qualité, connues sous le nom de « stick pack » ou « pack forme stick », qui pourraient provoquer des blessures corporelles ou prendre feu.
Caractéristiques
1. Résistant à l’eau* et à la poussière. L’ESC a été conçu pour fonctionner dans des conditions humides.
a.*Veuillez retirer le ventilateur de refroidissement lorsque vous utilisez l’ESC dans des conditions très humides.
b.*Après avoir utilisé l’ESC dans des conditions humides, veuillez le nettoyer et le sécher an d’éviter l’oxydation des connecteurs en cuivre.
2. Capacité 2-3S (pour 3S, vous devez remplacer le ventilateur de refroidissement standard de 5V par un ventilateur de refroidissement de 12V ou
fournir le ventilateur de refroidissement de 5V du récepteur 5-6V) ;
3. Compatible avec un moteur sans balai et sans capteur.
4. 3 modes de fonctionnement (« Marche avant avec frein », « Marche avant/arrière avec frein »,
et « Rock Crawler »).
5. Fonction frein ABS proportionnelle avec 4 niveaux de réglage de la force de freinage maximale, 8 niveaux de réglage de la force du frein de
ralentissement.
6. 9 modes de perforation, de « Doux » à « Très agressif », pour s’adapter aux différents châssis, pneus et pistes.
7. Fonctions de protection multiple : Protection contre les coupures à faible voltage pour batterie Lipo ou NiMH / Protection contre la surchauffe /
Protection contre la perte de signal du papillon des gaz / Protection moteur bloqué.
8. Programmation facile avec le bouton « SET » sur l’ESC ou avec la LED Program Card.
Caractéristiques
Courant continu 80A
Courant d’explosion 540A
Résistance 0.0004 ohm
Application échelle 1/10 sur route et hors route
Limite du
moteur
Batterie NiMH 4-9 cellules ou 2-3S Lipo
BEC intégré 6V/2A Linéaire
Port de programme Multiplexé avec port pour ventilateur de refroidissement
Type de moteur Sans balai et sans capteur
Dimensions 46*34*35mm
Poids 82g
2S Lipo
/ NiMH 6
cellules
3S Lipo
/ NiMH 9
cellules
Sur route: ≥ 5.5T
Hors route: ≤ 6000Kv
Moteur de taille 3650
Sur route: ≥ 8.5T
Hors route: ≤ 4000Kv
Moteur de taille 3650/3660
1) Pour NiMH 4-6 cellules ou 2S Lipo : Vous ne devez pas nécessairement remplacer le ventilateur de refroidissement de 5V sur l'ESC ;
2) Pour NiMH 7-9 cellules ou 3S Lipo : Vous devez remplacer le ventilateur de refroidissement original de 5V par un ventilateur de refroidissement de 12V
ou fournir le ventilateur de refroidissement de 5V du récepteur 5-6V ;
7
Vol.1117108
Page 8

LED LED
LED LED
LED LED
LED
LED
LED
LED
LED
ESC Setup
Réglages avant le démarrage
1
Important !
Maintenez le bouton de
réglage enfoncé
Vous devez régler le contrôleur électronique de vitesse avant de le faire fonctionner pour la première fois. Après le réglage
initial, il n’est pas nécessaire de le régler de nouveau avant chaque utilisation
Maintenez-le enfoncé tant
que la LED clignote
pendant que vous mettez en
marche le
contrôleur électronique de
vitesse.
Laissez la gâchette en position neutre.
Appuyez sur le bouton de réglage.
La Led Verte Clignote Et Un
Bip Retentit Du Moteur
Si la LED sur la commande de vitesse ne fonctionne pas comme indiqué ci-dessous, la commande de vitesse peut ne pas être installée correctement. Répétez le
processus d’installation.
LE STATUT DE LA LED EN FONCTIONNEMENT NORMAL;
a) En cas d’utilisation normale, si la barre du papillon des gaz est en position neutre, ni la LED rouge, ni la LED verte ne s’allume.
b) La LED rouge s’allume lorsque la voiture avance ou recule et elle clignote rapidement lorsque la voiture freine.
c) La LED verte s’allume lorsque la barre du papillon des gaz est déplacée au point le plus haut de la zone de la marche avant (pleins gaz).
Déplacez la gâchette vers
l’accélération complète puis appuyez sur
le bouton de réglage
Led Verte Clignote Deux Fois
Et Deux Bips Retentissent
Du Moteur
Déplacez la gâchette vers le freinage
complet puis appuyez sur le bouton de
réglage
La
La Led Verte Clignote
Trois Fois Et Trois Bips
Retentissent Du Moteur
À la n de ce processus, le contrôle du moteur
s’activera sous 3 secondes
AUCUNE LED allumée
Modier le réglage
2
Le régulateur possède un nombre de programme qui peut être modié en fonction. Chaque clignotement de la LED verte représente le mode de programme (1 clignotement
= Mode Running, 2 clignotements = Force du frein au neutre et 3 clignotements = Réglage Auto-LiPo). Chaque clignotement de la LED rouge indique le mode Valeur. Voici
ci-dessous une tabelle d’indication des différents réglages. Le numéro 5 est représenté par un long clignotement an de l’identier facilement. Le numéro 6 possède un long
clignotement suivi d’un court, etc etc Pour entrer dans le mode setup, vous devez appuyer sur le bouton jusqu’à ce que vous arrivez au mode désiré (Clignotement vert). Lâchez le
bouton dès que vous avez atteint le mode (Clignotement rouge). Pour enregister le réglage, éteigner le régulateur. Vous devez toujours effectuer cette procédure pour modier le
mode. Vous pouvez revenir au réglage d’usine gardant le manche des gaz au neutre et en appuyant 3 secondes sur le bouton setup. La LED rouge et verte va clignoter 3 fois pour
conrmer la réinitialisation.
LED
La LED rouge clignote pendant 4 secondes.
LED
La Led Verte Commence À Clignoter.
Tout en commutant le contrôleur électronique de vitesse, maintenez enfoncé le bouton de réglage. Continuez de le maintenir enfoncé tant que la LED clignote.
LED
LED
LED
LED
3 clignotements de LED verte représentent le
réglage de coupure pour faible voltage par exemple.
Continuez d’appuyer sur le bouton setup jusqu’à ce que la LED verte clignote. Chaque clignotement indique le mode du programme. Lâcher le bouton setup
lorsque vous atteignez le mode désiré. Vous êtes maintenant dans le mode réglage.
LED
1 clignotement de LED rouge
représente le réglage « Aucune
protection »
Appuyer sur le bouton setup pour changer le réglage. Chaque réglage a un
nombre de clignotement différent (LED rouge).
An de sauver les réglages, vous devez éteindre le régulateur. Lors de la prochaine
mise en marche, les réglages seront sauvés automatiquement. Pour effectuer de
nouveaux réglages, vous devez à nouveau passer par le mode réglages.
8
Page 9

Modes de Programme
3
Modes de
Programme
REGLAGES DE BASE
1. Mode D’Allumage
2. Freinage de
Ralentissement
3. Coupure Auto-Lipo Sans Protection 2.6V / cellule
4. Mode démarrage
(énergie)
RÉGLAGES AVANCÉS
5. Force maximale de
freinage
6. Force maximale
marche arrière
7. Force de freinage
initiale
8. Plage Point mort 6% (étroit) 9% (normal)
9. Distribution Moteur 0.00 3.75 7.50 11.25 15.00 18.75 22.50 26.25
10. Protection contre la
Surchauffe
Mode D’Allumage Marche avant avec frei Ce mode ne permet que la marche avant et le freinage.
Freinage de Ralentissement
Coupure Auto-Lipo Si le voltage d’un ensemble de batterie LiPo est inférieur au seuil xé, l’ESC diminuera le courant
Mode démarrage (énergie) Ce mode sélectionne le niveau d’ « énergie » à partir d’un démarrage donné. Le niveau 1 est
Force maximale de freinage
Force maximale marche arrière Ce mode permet de régler un freinage de ralentissement automatique quand le levier
Force de freinage initiale Ce réglage se rapporte à la toute première partie de la zone de freinage. Par défaut, il est ajusté
Plage Point mort Le point mort est la zone près du mouvement central de l’accélérateur. Ce mode permet
Distribution Moteur
Protection contre la Surchauffe Si la fonction est activée, la puissance de sortie sera coupée si la température du contrôleur
Valeurs du Programme
1 2 3 4 5 6 7 8 9
Marche avant
avec frei
0% 5% 10% 20% 40% 60% 80% 100%
L1 (doux) L2 L3 L4 L5 L6 L7 L8 L9 (Agressif)
25% 50% 75% 100%
25% 50% 75% 100%
=Force de
freinage initiale
Actif Inactif
Marche avant/arrière
avec frein
Rock Crawler Ce mode est utilisé pour le Rock Crawlers. Il permet de basculer instantanément de l’avant à
Marche avant/
arrière avec frein
0% 20% 40%
Ce mode permet la marche avant, arrière et le frainage. Remarque : la fonction marche arrière
utilise une fonction souple « Double clic » qui ne permet la marche arrière que si le moteur ne
fonctionne plus en marche avant.
l’arrière pour un contrôle rapide de la voiture. Veuillez ajuster la Force de Ralentissement sur
100% si vous êtes en mode Rock Crawler. Ce moden’est pas recommandé pour utiliser avec des
voitures n’admettant pas cette fonction.
Ce mode permet de régler un freinage de ralentissement automatique quand le levier d’accélération est au
point mort, en simulant un effet de léger freinage d’un moteur à balai tout en avançant en roue libre.
de sortie de 50%. L’ESC coupera complètement le courant de sortie en 10 secondes.
souple et va jusqu’au niveau 9 qui est très agressif. Veuillez
remarquer que si les niveaux 7-9 sont sélectionnés, les packs de batterie à faible intensité de
décharge ou de faible qualité ne pourront alimenter la puissance nécessaire. Cela peut aussi
provoquer que le moteur ne fonctionne pas souplement ou qu’il frémisse.
Ce mode ajuste la force des freins appliquée quand l’accélérateur est sur le freinage complet. Une très
grande force de frein peut ralentir la voiture rapidement mais peut également endommager la transmission.
d’accélération est au point mort, en simulant un effet de léger freinage
d’un moteur à balai tout en avançant en roue libre.
de manière égale à la Force de Ralentissement an d’apporter une transition souple au freinage. Il
peut aussi être supérieur an de freiner plus agressivement au départ.
d’augmenter ou de réduire cette zone an de s’adapter à vos préférences personnelles.
Différents types de moteurs sans balai réagissent différemment aux valeurs de distribution. En général, plus
le réglage de distribution est élevé, plus vous gagnerez en performance et puissance de sortie du réglage de
distribution. Cela apporte toutefois en contrepartie un temps de course inférieur, acumulation de chaleur et
efcacité du système. Nous vous recommandons la distribution par défaut pour obtenir un bon équilibre entre
performance et temps de course.
électronique de vitesse Flux Reload atteint le seuil d’usine pendant plus de 5 secondes. Si la
protection se déclenche, la LED verte clignote.
Rock
Crawler
2.8V /
cellule
12%
(large)
3.0V /
cellule
3.2V /
cellule
3.4V /
cellule
Réinitialisation des valeurs par défaut
L’ESC peut être réinitialisé à ses paramètres par défaut à tout moment. Lorsque l’ESC est en marche (pas en modes Calibrage
d’installation ou Paramètres programmables) et lorsque le papillon des gaz est en position neutre, maintenez le bouton d’installation
enfoncé pendant plus de 3 secondes. Les LED rouge et verte clignoteront en même temps 3 fois pour indiquer que les valeurs par
défaut ont été rétablies.
9
Page 10

日本語
EN / DE / FR /
120026 FLUX EMH-80A ESC
特徴
警告
警告
本製品は非常に強力なブラシレスモーターシステムです。セットアップの際には、タイヤを外して作業されることを強くお勧めします。また、髪の毛や洋服
などが巻き込まれる可能性がありますので、走行時もギヤボックスやタイヤなどに触れないよう注意してください。
車体を持ち上げてタイヤを回転させるのは大変危険ですのでおやめください。ラバータイヤは高速回転時に 遠心力で 大きく膨らみますので、触れるなどし
て怪我をする可能性があり大変危険です。また定期的にホイールとタイヤが確実に接着されているか確認してください。
本製品を使用しない時は常にスピードコントローラーの電源を切り、バッテリーを外して保管してください。スピードコントローラーにバッテリーをつな
いでいる状態で保管されると過放電によりバッテリーを破損してしまいます。
バッテリーの使用はバッテリーに付属の説明書に従って使用してください。本製品の最大限のパフォーマンスを引き出すためには高性能バッテリーの使用
をお勧めします。スティックパックタイプのバッテリーの使用は発熱、または発火の恐れがあるので使用しないでください
1. 防水*・防塵使用
a*.クーリングファンは外してください
b*.使用後は良く乾かしてください
2. 2-3SLipoバッテリー使用可能。(3S LiPoバッテリーを使用の場合は12Vファンを使用してください。
5Vファンをそのまま使用する場合は受信機よりとってください)
3.センサーレスモーター対応
4. 3ランニングモード
5. 4段階の最大ブレーキ調節、8段階のドラッグブレーキ調節が可能
6. 車種に合わせた変更が可能なパンチモード
7. オーバーヒート、オートLiPoカットオフ等のプロテクション機能
仕様
定格電流 80A
最大電流 540A
抵抗 0.0004 ohm
適応車種 1/10 オンロード、オフロード
適応
モーター
使用可能バッテリー 4-9セル NiMh/2-3S LiPo
BEC電圧 6V/2A リニア
プログラムポート クーリングファンポート兼用
適応モータータイプ センサーレスブラシレスモーター
サイズ 46*34*35mm
重量 82g
2S LiPo
6セル
NiMh
3S LiPo
9セル
NiMh
オンロード: ≥ 5.5T
オフロード: ≤ 6000Kv
3650モーター
オンロード: ≥ 8.5T
オフロード: ≤ 4000Kv
3650/3660モーター
7-9セル NiMH/3S LiPoを使用の際はクーリングファン電源を受信機よりとってください。もしくは12Vクーリングファンに変更してください。
10
Vol.1117108
Page 11

LED LED
LED LED
LED LED
LED
LED
ESC セットアップ
使用前の準備
1
重要!
本製品購入後初めての走行の前に必ずスピードコントローラーのセットアップを行ってください。セットアップされた設定は記憶されますので2回目からの走行の際はセットアップは不要です。
スイッチのセットアップボタンを
押しながら電源をONにします。
LEDが1度点灯したらセットアップボタンから手を離します。
スロットルトリガーをニュートラルの状態に
したままセットアップボタンを押します。
LED
グリーンの
モーターからビーという音が
します。
スピードコントローラーが下記のように作動する場合はもう一度セットアップを最初から行います。
が点灯し
スロットルトリガーをフルスロットルに
しセットアップボタンを押します。
グリーンのLEDが2回点滅
しモーターかビーという音
が2回します。
スロットルトリガーをフルブレーキにし
セットアップボタンを押します。
グリーンの
LED
モーターらビーという音が3
回します。
が3回点滅し
セットアップが完了し、3秒後にモーターが
動作する状態になります。
LEDは点灯しません。
a) スロットルがニュートラル位置でLEDが点灯する場合
b) 前進、後進時にレッドLEDが点灯しない、またはブレーキをかけた場合にLEDが点滅しない場合
c) フルスロットル時にグリーンLEDが点灯しない場合
設定変更
2
Fluxスピードコントローラーは様々な機能を設定可能です。グリーンLEDの点滅と確認音はプログラムモード(1回点滅=ランニングモード、2回点滅=ドラックブレーキモード、3回点滅=オートLiPo設定な
ど)であることを表示しています。
レッドLEDの点滅と確認音はモード設定であることを表示しています。下記の表でプログラムモードとモード設定の内容を参照してください。5番目の設定はLEDの長い点灯と確認音で設定の確認が分かりや
すくなっています。
設定を変更するプログラムモードにするためにグリーンLEDの点滅と確認音が鳴るまでボタンを押し続けます。希望のモードになったらボタンを離すとレッドLEDの点滅と確認音になりモード設定が可能にな
ります。設定を変更した後、スピードコントローラーのスイッチをオフにして設定を保存します。
他の設定をする場合は繰り返してください。
LED
レッドのLEDが4秒間点滅します。
スピードコントローラーのセットアップボタンを押しながら電源をONにします。LEDが点灯しますがセットアップボタンを押し続け、グリーンLEDが点滅するまでボタンを押し続けます。
LED
点滅回数でプログラムモードを選択します。 希望のモードになったらボタンを離します。
LED
1 red LED ash
represents the
“No Protection” setting
モード設定を変更するためにボタンを押します。レッドLEDの点滅で設定内容がわかります。
LED
グリーンのLEDの点滅に替わります。
設定を保存するためにスピードコントローラーのスイッチをオフにします。スイッチを再度オンにすると
保存された内容が反映されます。他のモードを設定する場合は再度設定をします。
11
Page 12

プログラムモード
3
プログラム プログラムモード
1 2 3 4 5 6 7 8 9
基本設定
1. ランニングモード 前進/ブレーキ
2. ドラッグブレーキ 0% 5% 10% 20% 40% 60% 80% 100%
3. オートLiPoカットオフ カットオフなし 2.6V/セル 2.8V/セル
4. スタートパンチモード Level 1 (ソフト) L2 L3 L4 L5 L6 L7 L8
オプション設定
5. 最大ブレーキフォース 25% 50% 75% 100%
6. 最大リバースフォース 25% 50% 75% 100%
7. 初期ブレーキフォース
8. ニュートラルレンジ 6% (Narrow) 9% (標準)
9. モータータイミング 0.00 3.75 7.50 11.25 15.00 18.75 22.50 26.25
10.
オーバーヒートプロテクション
ドラッグブレーキ
と同等
On O
前進/後進
ブレーキ
0% 20% 40%
クローラー
12%
(ワイド)
3.0V/セル3.2V/セル3.4V/
セル
L9
(アグレッシブ)
ランニングモード 前進/ブレーキ
前進/後進/ブレーキ
クローラー
ドラッグブレーキ
オートLiPoカットオフ
スタートパンチモード
最大ブレーキフォース
最大リバースフォース
初期ブレーキフォース
ニュートラルレンジ
モータータイミング
オーバーヒートプロテクション
前進とブレーキのみの設定。
前進、ブレーキ、後進の設定。 後進はモーターが停止している状態でスロットルをリバース側に2回動かすと動作します。
ロッククローラー専用設定。 スロットルの動きにあわせて前後進が切り替わります。本設定の場合はドラッグブレーキの設定を100%
にしてください。
スロットルをニュートラルに戻した時のブレーキの効き具合を調整できます。ブラシモーターのようなモーター特性を再現できます。
LiPoバッテリーの種類によて電圧カット設定をします。リチウムバッテリーを使用する場合はバッテリーの保護の為に必ず電圧カット
設定をしてください。
注意:リチウムバッテリーを使用する場合は”電圧カット保護なし”設定を使用しないでください。 Fluxスピードコントローラーはバ
ッテリー電圧を測定しています。
設定値より低い電圧を2秒感知すると出力電圧を50%下げ、10秒後に停止します。RCカーを回収するためには十分な時間と動力です。
スタート時のモーターのパンチ力を設定できます。パンチ力はレベルが上がると強くなります。 レベル7~9に設定する場合は高品質、
放電レートの高いバッテリーを使用してください。
フルブレーキの強さを調整できます。
ブレーキ力が強いとRCカーのスピードは素早く落ちますが、駆動系にダメージを与えることがあります。
後進時のスピードを調整できます。
ブレーキの初期の効き方を調整できます。 標準設定ではドラッグブレーキと同じ強さのブレーキ力になりますが、ブレーキ力をさらに
強くしたい場合は設定を変更します。
スロットルの動きに対してスピードコントローラーの動き出しタイミングを調整できます。
ブラシレスモーターの種類によって異なりますが、一般的にモータータイミングを大きく設定するとブラシレスモーターの出力が向上し
ますが、走行時間は減少します。
ヒートプロテクトが動作するとスピードコントローラーは5秒間放電を停止し、グレーンのLEDが点灯します。
設定のリセット
設定がわからなくなった場合は送信機のスロットルをニュートラルのままスピードコントローラーのボタンを3秒間押し続け、レッドとグリーンのLEDが3回点滅し基本セットに戻ります。
12
 Loading...