

Page 1
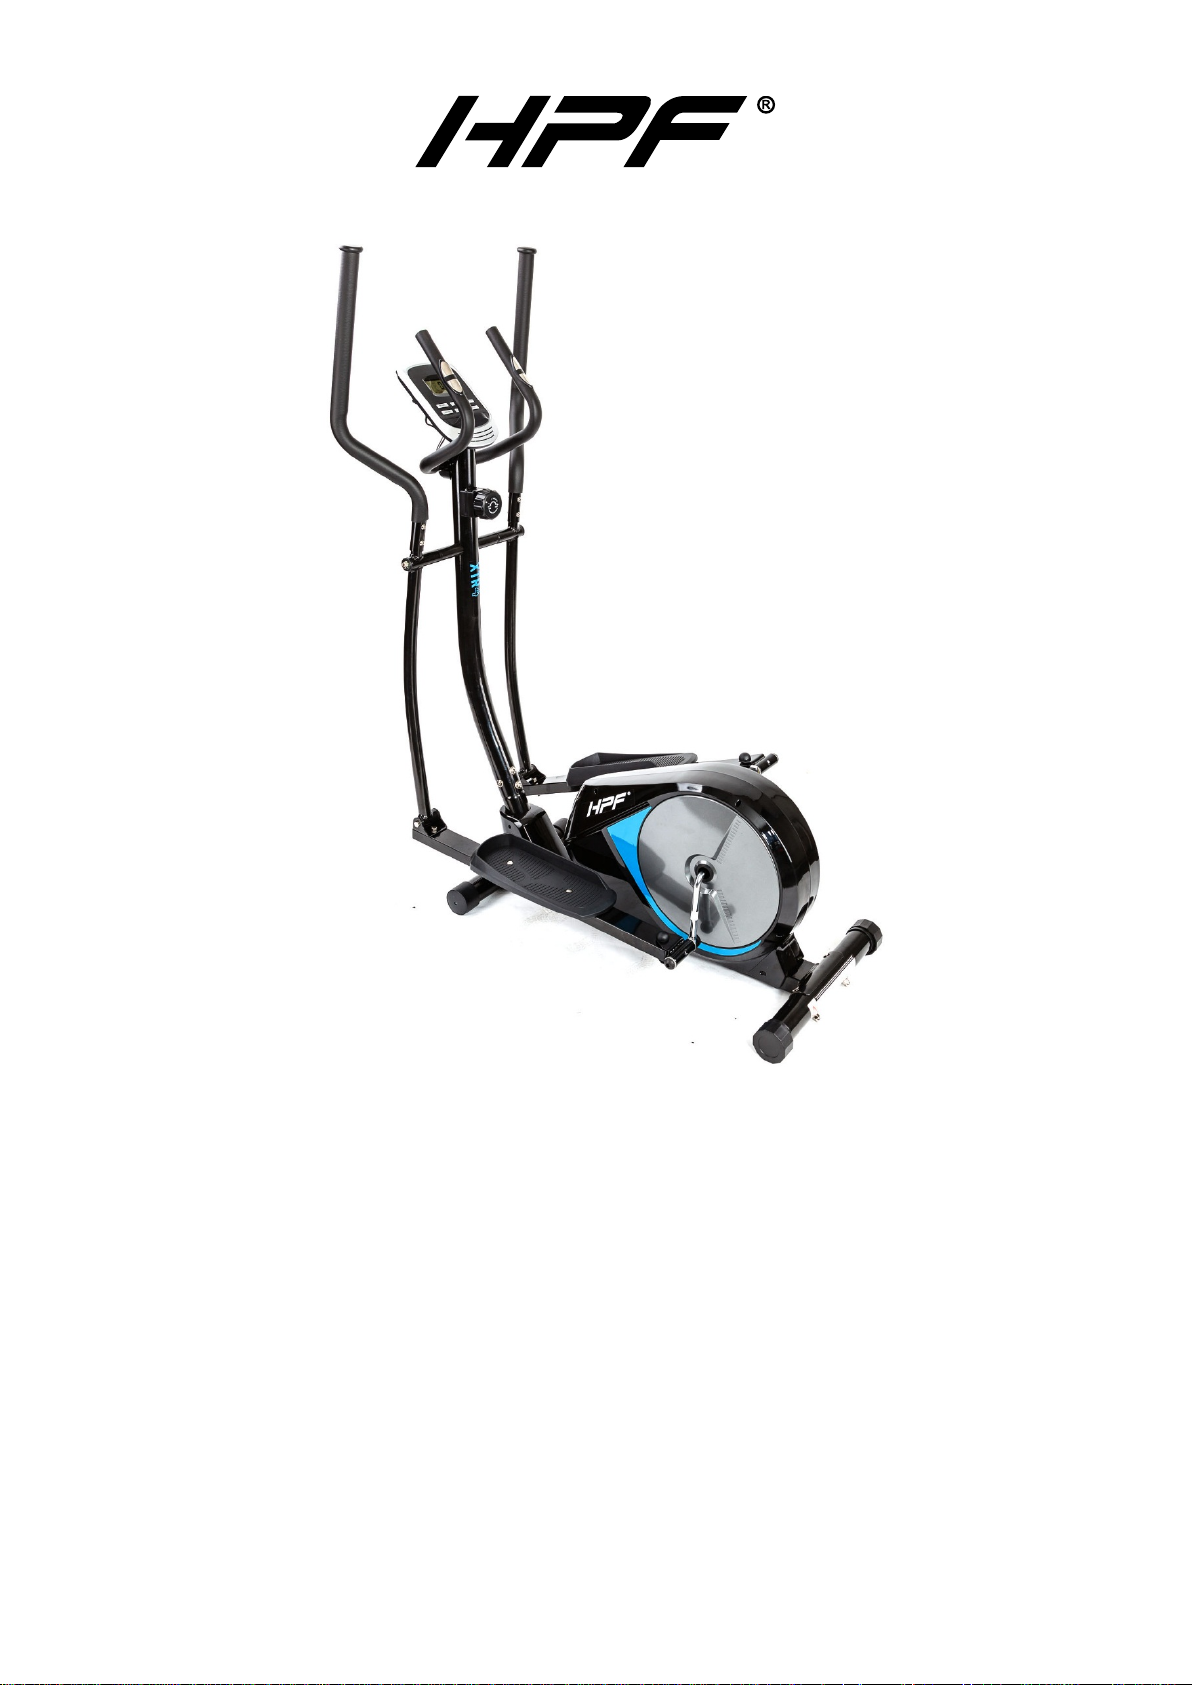
Cross Trainer - XTR4
User Manual
RETAIN THIS MANUAL FOR FUTURE REFERENCE
PLEASE READ THIS MANUAL CAREFULLY BEFORE USE
Page 2

Cross Trainer - XTR4
Table of Contents
Safety ................................................................................................................................................................. 1
Set-up ................................................................................................................................................................. 2
Included Parts ............................................................................................................................................... 2
Assembly I nstructions ................................................................................................................................... 3
Operation ........................................................................................................................................................... 9
User Data ...................................................................................................................................................... 9
Clock Mode ................................................................................................................................................... 9
Functions and Feat ures ................................................................................................................................. 9
Key Func tions ............................................................................................................................................. 10
Suggested Warm-up Exercises ................................................................................................................... 11
i
Page 3

Cross Trainer - XTR4
Safety
1. It is important to read this entire manual before assembling and using the equipment. Safe and effec tive use
can only be achieved if t he eq uipment is assembled, mainta ined and used properly.
2. Ensure user is aware of speed w hen starting. Turning on devic e at a high speed then starting exercise can
cause ser ious injury.
3. Before starting any exer cise program you should consult your doctor to determine if you have any medical or
physical conditio ns that could put your health and safety at risk, or prevent you from using the equipment
properly. Your doctor’s advice is essentia l if you are taking medication that affects your heart rate, blood
pressure or cholesterol level.
4. Be aware of your body’s s ignals. Incorrect or exc essive exercise can damage your health. Stop exercising if
you experience any of the fol lowing symptoms : pain, tightness in your chest, irregular heartbeat , and
extreme shortness of breath, light headedness, dizziness or feelings of nausea. If you do experience any of
these conditions you should consult your doctor before continuing with your exercise program.
5. Keep children and pets awa y from the equipment. The equipment is designed for adult use only.
6. Use the equipment on a solid, flat level surface with a protective cover for your floor or carpet. To ensure
safety, the equipment should have at least 0.6 meters of free space all around it, and should have enough
free space when users get on and off the equipment.
7. Before using the equipment, check that the nuts and bolt s are securely tightened. Always use the equipment
as indicated. If you find any defective com ponents while assembling or checking the equipment, or if you
hear any unusual noi ses coming from the eq uipm ent during use, stop immediatel y. Do not use the
equipment until the pr oblem has been rectified.
8. There are many functions w hich will be displayed when using t he equipment. These meas urements are as
accurate as poss ible but are not 100% exact. They are to be used as a guide, not scientific evidence.
9. Wear suitable clothing while using the equipment. Avoid wearing loose clot hing that may get caught in the
equipment or t hat may restrict or prevent movement.
10. This equipment is designed for indoor and family use only. Max imum weight of user: 120KG.
11. Car e must be taken when lifting or moving the eq uipm ent so as not to injure your back .
12. The equipment is not suitable f or therapeutic use.
13. Please save this manual and ass embling tools well.
1
Page 4
Cross Trainer - XTR4
Set-up
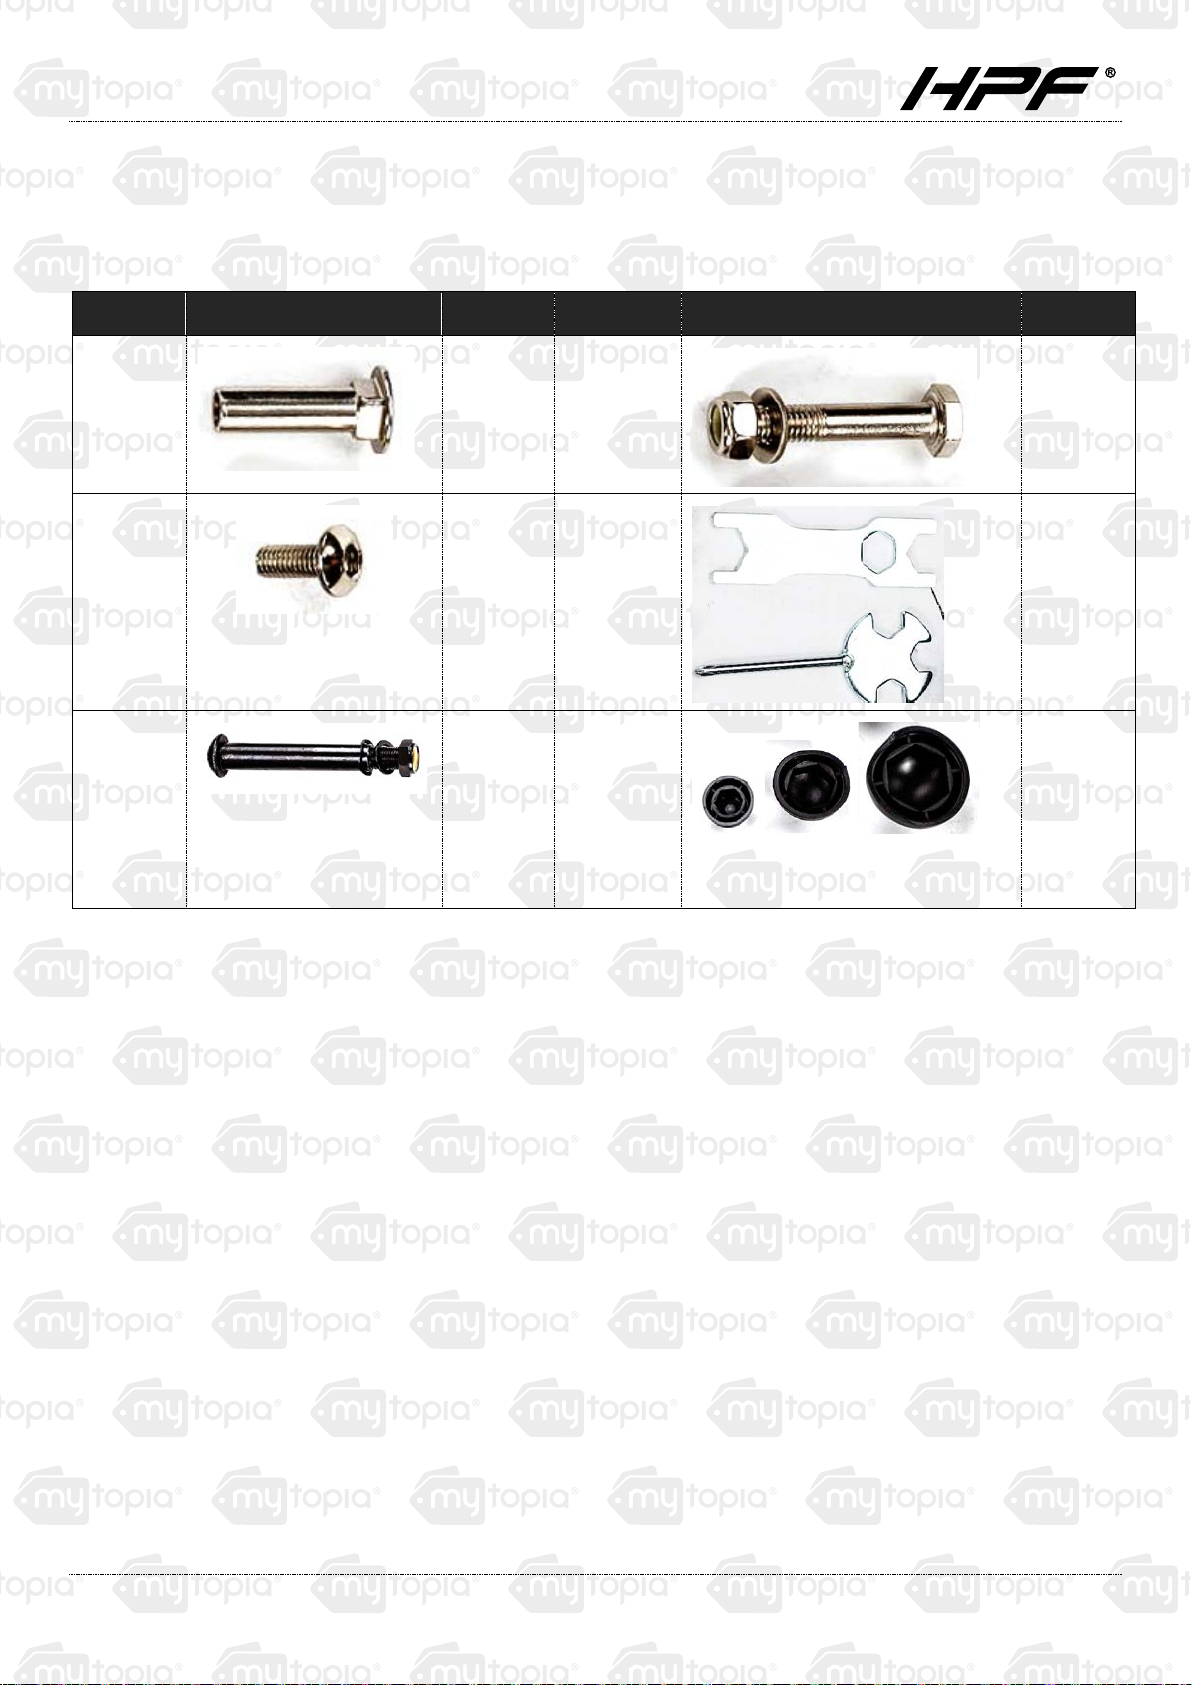
Included Parts
Size Image Quantity Size Image Quantity
Ø8 x 27
M6 x
16mm
Ø16 x
89mm
4 M8 x 45
4 Multi tools
2 Caps
A. 13mm
B. 17mm
C. 19mm
4
1 (set)
A. 6
B. 2
C. 2
2
Page 5

Cross Trainer - XTR4
Assembly Instructions
Step 1
Connect the base f eet
Also ensure that the bolt s are inserted from underneath
and the nut is on top. This will ensure that when
transporting, the nut cap does not drag along the floor.
1.1
1.2
Step 2
Prepare front frame
Do not remove elast ic band - This will ensure that
the cables are easily accessible when needed.
Also turn the dial to 1 - This wil l give the cable more
slack to work with
3
Page 6

Cross Trainer - XTR4
Step 3
Connect the wires t ogether
3.1
3.3
3.2 Fit tension cable
3.4
Insert the ball end into the pulling arm
Pull the tension cable up and over the shoulder and
sit into place and remove the screws placed at the
neck of the frame bas e.
4
Page 7

Cross Trainer - XTR4
Step 4
Remove screws from base. Attach the front frame
and screw the screws back to where they were.
Step 5
Attach the side frames
5.1 Locate the side frames and place on the corr ect
sides of the base
5.2
5
Page 8

Cross Trainer - XTR4
•
•
•
BEFORE CONTINUING ASSEMBLY YOU MUS T READ THE FOLLOWING
IMPORTANT INFORMATION.
PLEASE NOTE:
ANY DAMAGES TO THE BOLT OR PRODUCT CAUSED BY FAILURE TO FOLLOW THESE STEPS
BELOW MAY RENDER THE PRODUCT’S WARRANTY VOID.
IMPORTANT: THE LEFT HAND BOLT AND NUT (BLUE) IS A REVERSE THREAD (ANTI-CLOCKWISE).
The bolt has an L imprinted on the head. Be sure to
use the correct bolt s (m arked L or R) and the correct
nuts (Left-blue/Right-beige) on the appropriate side.
When installing, ensure the wave washer and spri ng
washer are corr ectly located
Tighten the bolt through the crank arm as pictured.
Ensure the wave washer pushes up hard against the
bolt head once installed.
Tighten the nut on the bolt until the spring washer is
flat against t he crank. As it is a threaded nut, this will
require extra force.
FAILURE TO FOLLOW THE PROCEDURE EXACTLY
AS DESCRIBED MAY CAUSE DAMAGE TO THE BOLTS/CRANK/NUTS AND COULD VOID YOUR
WARRANTY.
In order to install the hi nge bolt properly, keep it
perfectly str aight as the bolt goes through the pedal
tubing and the cranks haft. If the hinge bolt is
connected to the crankshaft at an angle, damage to
both the hinge bolt and t he crankshaft may occur.
6
Page 9

Cross Trainer - XTR4
Step 6
Attach the foot pads
Step 8
Attach the sensor hand le
Step 7
Attach the long handles using the 4x Ø8 x 27 & M6 x
16mm provided.
8.1
8.2
7
Page 10

Cross Trainer - XTR4
Step 9
9.1 Attach t he control panel
9.3
9.2
8
Page 11

Cross Trainer - XTR4
Operation
User Data
Before your first workout, it’s ideal to s etup your user data for training and tracking purposes. P lease press the
BODY FAT key then enter your sex, age, height and weight. This data will be saved at all times, unless the
batteries are removed.
Clock Mode
•
After 4 minutes of inact ivity (no pedals/wheels turned or buttons pressed) the monitor will go into clock
mode. Pressing t he ENTER key will switch between temperature and clock while pressing any other key will
quit clock mode.
•
To set up the TIME or ALARM, hold down the ENT ER key for 3-5 seconds. Press the UP and DOWN keys
to change parameter and ENTER to confirm.
•
When the monitor is displaying “NO SPEED”, holding down the ENTER and UP keys for 3-5 seconds will
enter into clock mode.
Functions and Features
CLOCK: Displays the time in hours, minutes and seconds.
ALARM: The trainer will sound an alarm according t o parameters set by user.
TEMPERATURE: Dis plays t he current temperature.
SCAN: This function will display each feature (TIME, SPEED, DISTANCE, CALORIES, PULSE, RPM, BODY
FAT and PULSE RECOVERY) for 6 seconds each. When the monitor exits manual-scan, “SCAN” will d isplay for
2 seconds then s witch to auto-scan. Pressing the ENTER key will exit the auto-scan function.
TIME: Shows your workout time in minutes and seconds. The m onitor will automatically count up from 0:00 to
99:59 (1 hour and 40 minutes) in one second intervals. You many also program the monitor to count down from
a set time by pressing the UP and DOWN keys. If you continue exercising once the time has reached 0:00, the
monitor will begin beeping, and reset its elf to the original time set, letting you know your workout is done.
SPEED: Displays your workout speed in KM/MILE per hour. If there is no input for speed, then the monitor will
display “NO SPEED” on t he wi ndo w.
DISTANCE: Displays the accumulative distance travelled during each workout up to a maximum of
99.9KM/MILE.
CALORIES: The monitor will es timate the cumulative calories burned at a ny given time during your workout.
PULSE: The monitor displa ys your pulse rate in beats per minute during your workout. I f there is no input for
pulse, then the monitor will display “NO PULSE” on the window.
RPM: Your pedal cadence (revolutions of 1 pedal, per minute).
AGE: The monitor can be programed from ages 10 to 99 years. The defa ult age is 35 if it is not set.
PULSE RECOVERY: During the ST A RT stage, grip your hands on the handles or place the chest transm itter
attached and then press the “PULSE RECOVERY” key, then the monitor will show “HOLD SENSOR” to remind
you. Time starts counting from 01:00 - 00:59 - - to 00:00. As soon as 00:00 is reached, the monitor will show
9
Page 12

Cross Trainer - XTR4
your heart rate recovery status with a grade of F 1.0 to F6.0 and message window will show your workout
situation. The deta ils are as follows:
1 Means OUTSTANDING
Between 1 and 2 Means EXCE LLE NT
Between 2 and 3 Means GOOD
Between 3 and 4 Means FA IR
Between 4 and 5 Means BELOW AVERAGE
6 Means POOR
NOTE: If there is no input for pulse, then the monitor will show “N O PU LSE ” on the message window. If the
monitor displays “DETECTED FAIL”, please r e-press the PULSE RECOVERY key and please make sure that
your hands have a firm hold on the gr ips or the chest transm itter is attached well.
Key Functions
UP key: When entering data or setting paramet ers, pressing the up key will increase value.
DOWN key: When entering dat a or setting parameters, pressing the down key will decrease value
NOTE: During the set ting mode, you can hold UP and DOWN keys toget her for over two seconds then the
setting value will reset to Zero or default val ue.
ENTER/RESET key:
Press this key to confirm any parameter setting or data entry.
“NO SPEED” mode, by holding this key for over two seconds, the monitor will re-power-on.
BODY FAT key: Press the key to enter your personal data before measure your body fat ratio.
MEASURE key: Press the key to get your body fat ratio and BMI and BMR.
FAT %: Indicate your bod y fat percentage after measurement.
BMI (Body Mass Index): BMI is a measure of body fat based on height and weig ht t hat applies to both adult men
and women.
BMR (Basal Metabolic Rate): Your Basal Metabolic Rate (BMR) shows the number of calories your body needs
to operate. This doesn’t account for any activity, it’s simply the energy needed to sustain a heartbeat, breathing
and normal body temperature. It measures the body at rest, not during sleep, in room temperature.
PULSE RECOVERY key: Press the key to activate heart rate recovery function.
Error Message
E: If the speed is over 999.9 MPH/KPH, then the monitor will dis play “E”.
Err: When you are in either t he measure the body fat function or pulse recovery function, if there is no pulse
signal input wit hin 20 seconds, then the monitor wil l display “Err”. You can repress any key to remove the Err
message.
10
Page 13

Cross Trainer - XTR4
Suggested Warm-up Exercises
These exercis es are ideal maintaining strength and flexibility and help avoid stiffness which can result from
workouts. A few minutes of these, before and after your workouts, are the best t im es to do them.
Inner Thigh Stretch
Sit with the soles of your feet together and your knees pointing outward. Pull your feet as
close into your groin as possible. Gently push your knees towards the floor with you elbows.
Hold this position for 30 seconds.
Hamstring Stretch
Sit with your leg extended and rest the sole of your other foot against your inner thigh. Lean
toward your toe as far as possible. Hold this position for 15 seconds. Relax and then repeat
with opposite leg extended.
Head Roll & Shoulder Lifts
Lean your head to the right for 5 seconds feeling the stretch up the left side of your neck.
Bend your head back for 5 seconds, stretching your chin to the ceiling. Lean your head to the
left for 5 seconds and finally, drop your head forward with your chin touching your chest for 5
seconds.
Lift your right shoulder towards your ear for 10 seconds. Lift you left shoulder up for 5
seconds as you lower your right shoulder.
Calf-Achilles Stretch
Lean against a wall with your left leg in front and your arms forward. Keep your right leg
straight and your left foot on the floor; then bend the left leg and lean forward by moving your
hips toward the wall. Hold this position for 15 seconds then do the same on the opposite side.
Toe Touch
Stand up straight and slowly bend forward at your waist, letting your back and shoulders
relax. Reach as far as you can and hold for 15 seconds
Side Stretch
Spread your arms to the side (like a plane) and slowly lift them up to the ceiling. Bend one
hand in at the wrist and hold for 15 seconds. Spread your arms to the side and repeat with
opposite hand.
11
Page 14

Some experts believe the incorrect or prolonged use of almost any
product could cause
serious inju
ry or de
a
th. F
or inf
orm
ation th
at
may reduce your risk of serious injury or death consult thepoints
below and additionally, the information available at
www.datastreamserver.com/safety
- Consult all docume ntation, packaging and
product labelling before use. Note that some
products feature online documentation which
should be printed and kept with the p roduct.
- Check product for loose / broken / damaged /
missing parts, wear or leaks (if applicable) be fore
each use. Never use a product with loose / b roken
/ damaged / missing pa rts, wear or leaks (if
applicable).
- Products must be inspected and serviced (if
applicable) by a qualified specialist every 6
months assuming average residential use by a
person of average weight and strength, ab ove
average technical aptitude, on a property
matching average metropolitan specification.
Intended use outside these guidelines could
indicate the product is not suitable for intended
use or may require more regular inspection or
servicing.
- Ensure all possible users of the p roduct have
completed an industry recognised training course
before being given access to the product.
- The product has been supplied by a general merchandise
retailer that may not be familiar with your specific applic ation or
your description of the applic ation. Be sure to attain third party
approval for your application from a qualified specialist before use
regardless of prior assurances by the retailer or its representatives.
- This product is not intended for use where fail-safe operation is
required. As with any product (take an automobile, aircraft,
computer or ball poi nt pen for example) there is always a small
chance of a technical issue that needs to be repaired or may
require replacement of the product or a part. If the possibility of
such failure and the associated time it takes to rectify could in any
situation inconvenience the user, business or employee or could
financially affect the user, business or employee then the product
is not suitable for your requirements. This p roduct is not for use
where incorrect operation or a failure of any kind, including but
not limited to a condition requiring product return, replacement,
service by a technician or replacement of parts could cause a
financial loss, loss of employee time or an in c
onvenience
requiring compensation.
- If this item has been purchased in error considering the points
above simply contact the retailer directly for details of their
returns policies if required.
 Loading...