

Page 1
TRX2 Treadmill
User Manual
[Revision 6.0 March 2017]
READ THIS MANUAL CAREFULLY BEFORE USE – FAILURE TO DO SO MAY RESULT IN INJURY, PROPERTY DAMAGE AND
MAY VOID WARRANTY. • KEEP THIS MANUAL FOR FUTURE REFERENCE. • Products covered by this manual may vary in
appearance, assembly, inclusions, specifications, description and packaging.
Page 2

TREADMILL
Table of Contents
Safety ................................................................................................................................................................. 1
Included Items ................................................................................................................................................... 2
Parts List ....................................................................................................................................................... 2
Set-Up ................................................................................................................................................................ 3
Folding Instruction ......................................................................................................................................... 6
Operation ........................................................................................................................................................... 7
Button Functions ........................................................................................................................................... 7
Detailed Operation ........................................................................................................................................ 8
Exercise Instruction ..................................................................................................................................... 10
Warm-Up..................................................................................................................................................... 11
Maintenance .................................................................................................................................................... 12
Running Belt Adj ustment ............................................................................................................................. 12
Running Belt Lubrication ............................................................................................................................. 12
Securing the Running Belt ........................................................................................................................... 13
Error Code Table ......................................................................................................................................... 14
Specifications .................................................................................................................................................. 14
E&OE © 2017 HPF i
Page 3

TREADMILL
Safety
WARNING: Please consult w it h your physician or health professional before starting your workout, especially for
ages up to 35-years old, or for those with history health issues. We take no responsibility for any troubles or
injuries due to prod uct misuse.
•
Assembly requires 2 people.
•
Do not power on until assem bly is complete.
•
Ensure the safety clamps are attached to your clothi ng or waist belt before using t he treadmill.
•
The safety clam p is to st op any m oving parts of the treadmill if t he speed setting is s et unexpectedly high.
•
Please do not insert any items into any part of the equipme nt. This may damage the unit.
•
Position the treadmill on a level, flat surface. Do not place the treadm ill o n thick carpet as it may interfere
with gears and moving par ts. Do not place the treadmill ne ar water or outdoors .
•
Never start the treadmill while you are standing on the walking belt. After turning the power on and adjust ing
the speed control, t here may be a pause before the walking belt begins to move. Always stand on the foot
rails on the sides of the fr am e until the belt is moving.
•
Wear appropriat e clot hing when exercising on t he treadmill. Do not wear long, loose fitting clothi ng that may
be caught in the treadmill. Always wear running or aerobic shoes with rubber soles.
•
Keep children and pets awa y from the treadmill while during your workout.
•
Don't exercise wit hin 40 minutes after eating a heavy meal.
•
This equipment is suitable for adults; childr en need be accompanied with adults during workout.
•
You must hol d on to t he handrails until you become comfortable and familiar with the treadm ill at the
beginning of your workout.
•
This treadmill is for indoor use, not outdoor use. Keep the storage area clean, f lat and dry. Please do not use
this equipment other t han for intended use.
•
Only use the power cor d supplied with the product.
•
Any modification to t his product is strict ly unauthorised. Should any changes be made to this product, all
warranty will be voided.
•
Unplug the power cor d when the equipment is not in use.
•
Do not pull the power cord by the cord. Always grip at the plug a nd pull.
•
This treadmill is for hom e -use only. The max user weight is 100KG on running station.
E&OE © 2017 HPF 1
Page 4

TREADMILL
No.
Item
Specs
Qty. No.
Item
Specs
Qty.
1
Main frame
1
58
Lock nut
M8 4 12
Allen Key
5mm
1
60
Bolt
M8*45
2
13
Multi Tool
1
64
Locking Washer
14
17
Safety Key/Clamp
1
70
External Frame 1
1
39
Lubricant
1
74
External Frame 2
1
51
Bolt
M8*16
10
75
Foam 1
53
Bolt
M8*40
1
Included Items
The spare parts below are included in the carton:
Parts List
E&OE © 2017 HPF 2
Page 5
TREADMILL
Set-Up
Please note, this assembly requires 2 people at certain steps. Please do not att empt to do this as a sole
task! Also, do not power on item until fully assembled.
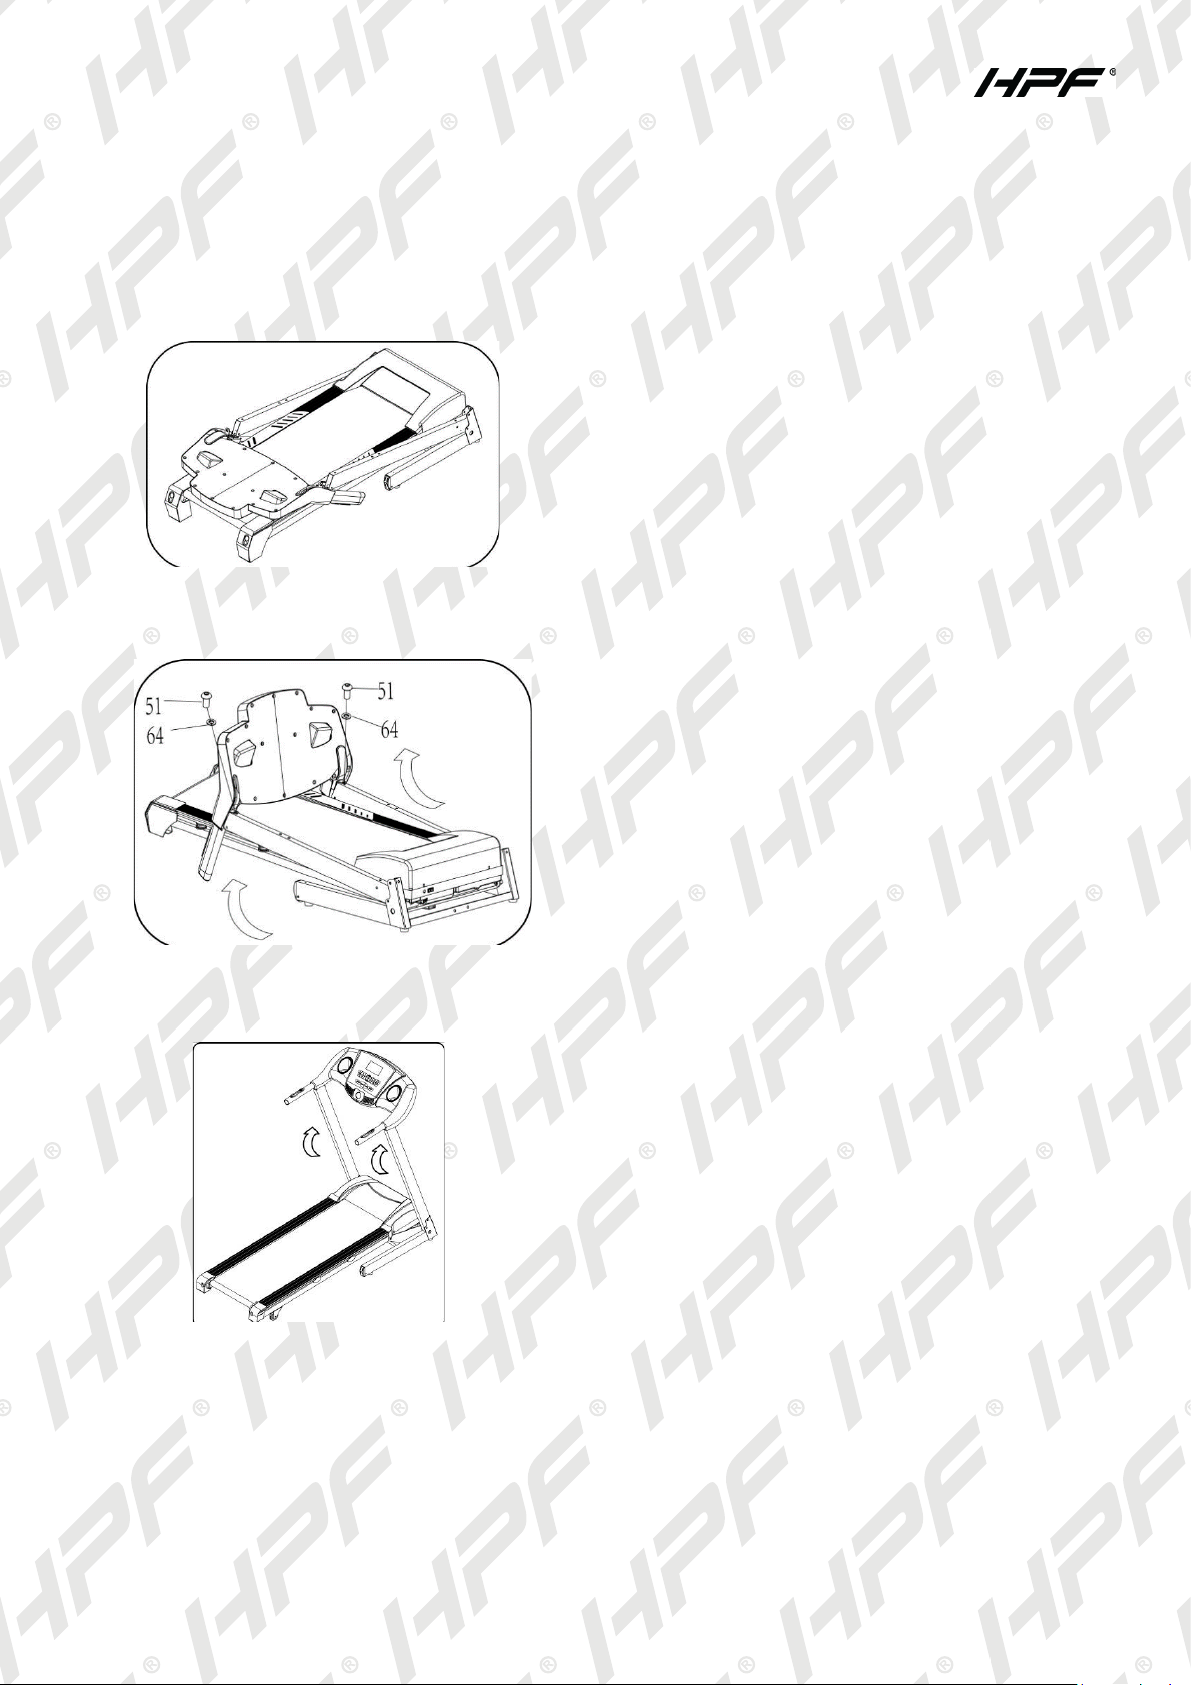
Step 1:
Step 2: Installing the Display
Lay the main frame flat on the ground and locat e all
included parts an d tools.
Attach t he display and plac e the locki ng washer #86 onto
the screw #51 as illustrated.
Use the multi-tool to tighten these items.
Step 3:
Pull upright.
E&OE © 2017 HPF 3
Page 6
TREADMILL
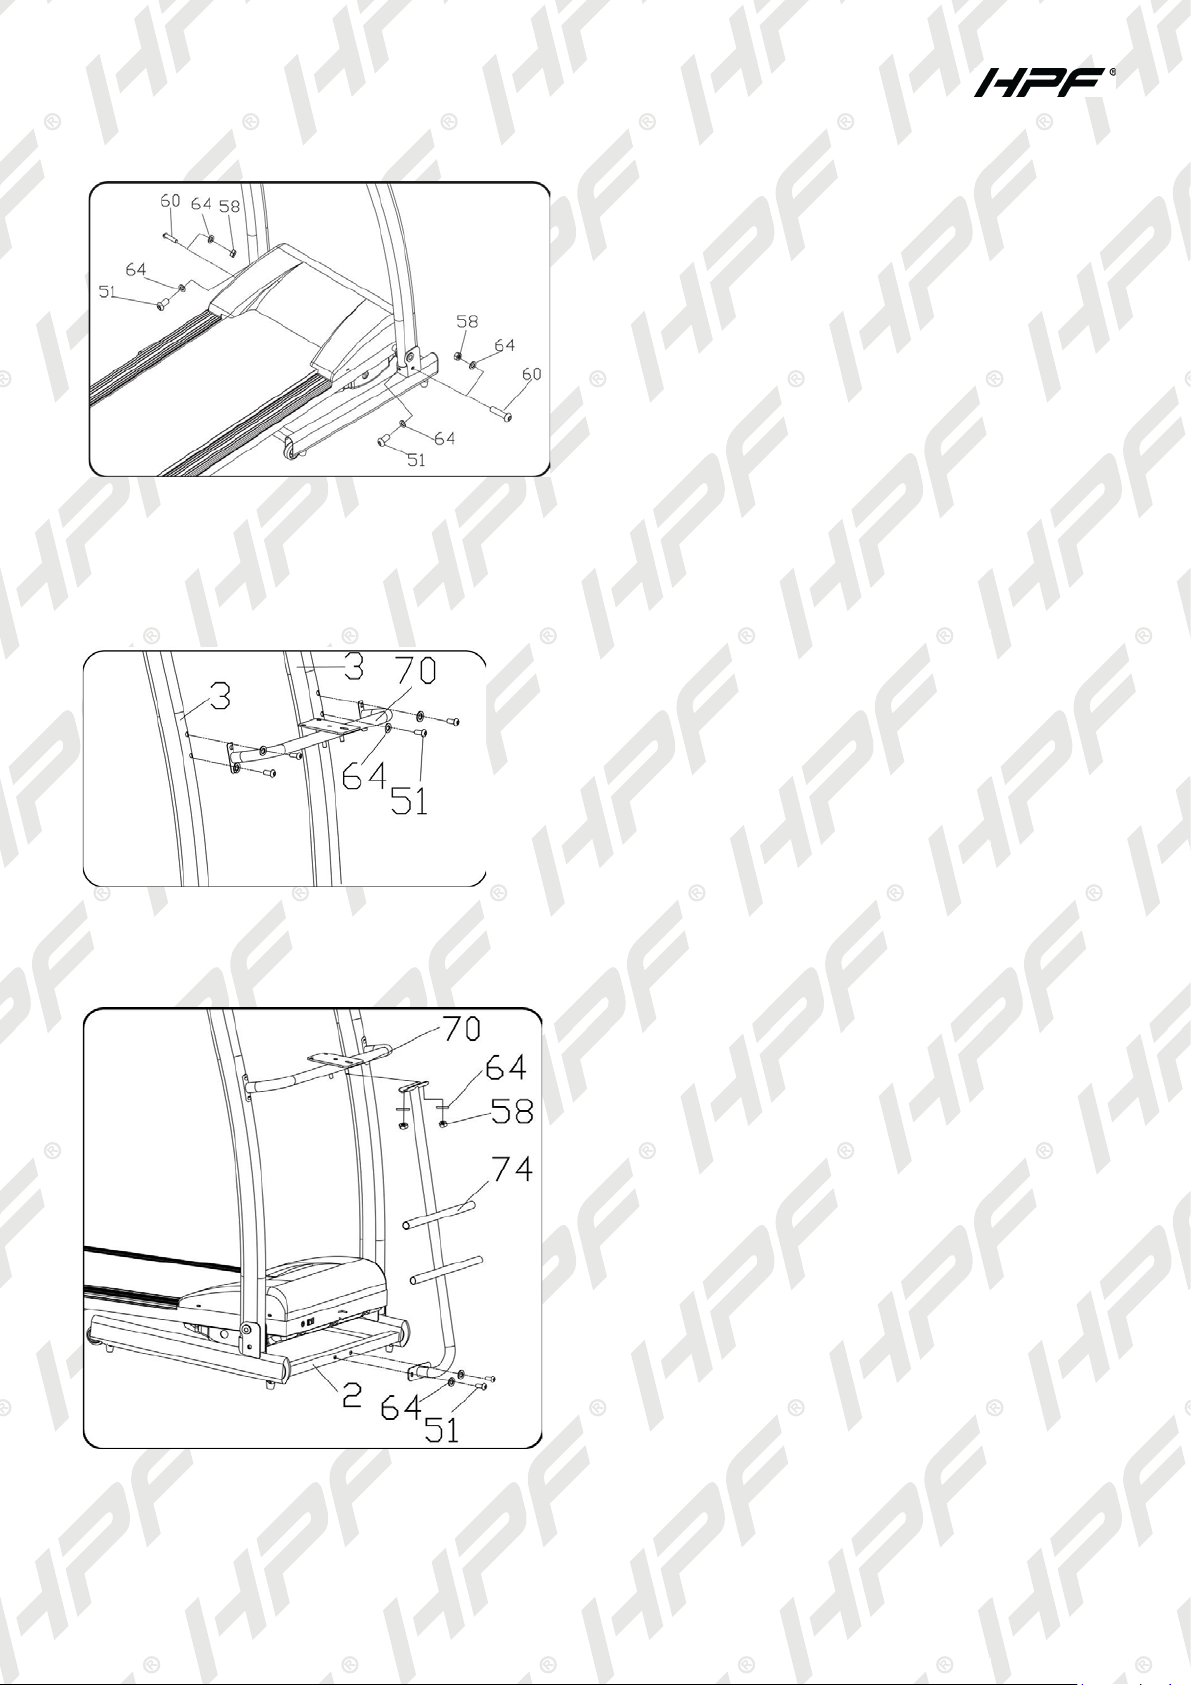
Step 4:
Ensure t hat the top frame is secured by anothe r person
during this step!
Place locking was her #64 onto bolt #51 and tighten with
Allen key #12.
Insert bolt #60 into s ide and tighten with locking w as her
#64 and nut #58.
Step 5: At taching si de covers
Step 6: Att aching the weight holder fr ame
Using the Allen key #12, screw bolt 51 and lock washer
#64, and fix the massager fixing frame #70 upri g ht on 3 and
4.
Insert t he arc panel whic h is on the massager support
frame #74 into the massager fixing fr ame #70. Fix it with
locknut #58 and lock washer #64. Then use the Al len key
#5 and screw the bolt #51, lock washer #64, and fix the
massager support fram e #74 on b ase 2.
E&OE © 2017 HPF 4
Page 7

TREADMILL
Step 7:
Step 8:
Put the foams #75 on the horizont al tube of the massager
fixing frame #74; the foam and the tube must be aligned,
then put on the massager he ad.
Place the safety k ey #17 ont o the dash.
E&OE © 2017 HPF 5
Page 8

TREADMILL
Folding Instruction
Pulling up:
Pull up base fram e to posit ion A. There will be a slight
tapping sound of part B locking into place .
Pulling down:
Support base at pos it ion A while l ightly tapping part B
forward with your foot .
Pull down, but not too f ast. It will ease down by itself
at a steady pace.
NOTE: Always set-up the equipment on a flat and level surface. If the equipment "rocks", (if applicable) rotate
feet under front of machine to move up or down as needed so equipment is steady.
E&OE © 2017 HPF 6
Page 9

TREADMILL
Operation
1) LCD DISPLAY
“PROG”: Displays programs
“TIME”: Displays workout duration time
“SPEED”: Displays r unning speed.
“PULSE”: Displays pulse/heart rates
accordingly
“CAL/DIST”: Dis plays calories or
distance.
W hen the contro l panel is initi ally turned
on, it wi ll display CAL and DIS T
alternately for 5 seconds.
Button Functions
“PROGRAM”: Press t his butt on to choose different program modes (P1-P12-FAT)
“MODE”: Press this button to choose what unit of measurement is being displayed, for example; tim e, count
down, distance, calories or FAT; When Program is in FAT mode, press this button to choose sex, age, weight or
height
“START” button: Pr ess this button to start the m achine, t he m achine will run at the lowest speed or at the speed
of default program after 3 seconds
“STOP” button: Pres s this button to stop the machine. It will not come to an abrupt stop for safety reas o ns. It will
slow down then fully stop.
“SPEED”▲/▼: Adjust the speed. Press the button to adjust the speed when running, and adjust the data
when stopped
“INCLINE”▲/▼: Adjust the incline. Press the button to adjust incline sect ion when running, and adjust the
data when stopped.
E&OE © 2017 HPF 7
Page 10

TREADMILL
Detailed Operation
Turn on the power, all the windows light 2 seconds, and then enter the manual mode.
a. Quick start -up (Manual)
To turn on power, attach the safety lock. After the 3 seconds countdown, the treadmill will start and run
from the lowest speed, adjust the speed using the speed button. Please press the stop button or remove
the safety lock dir ectly to stop.
b. Countdown mode
Press the ‘MODE’ button. It can choose time countdown mode, distance countdown mode, and calories.
Countdown mode, and the window will show the default data and light up. At the same time, press SPEED
▲/▼ and INCLINE ▲/▼ to set the data. Press ‘START’ button, the machine will run at the lowest speed,
You can press SPEED ▲/▼ to change the speed and press INCLINE ▲/▼ to change the incline. When it
Counts down to 0, the machine will stop smoothly. Certainly, you can press ‘STOP’ button or take out the
safety key from the console to stop the machine.
c. Pre-set programs
Press ‘PROG’ button to choose the inner install program from P1----P15. When set the program, the time
window will show default data and glitter, press SPEED button to set the running time. Each program has
been divided into 15 section, each exercise time=the setting time/15. Press ‘START’, the machine will run at
the first section speed. When the section is over, it will enter into next section automatically, the speed and
incline will change as next section data. When finish one program, the machine will stop smoothly, and incline
will be 0.
During the running, you can change the speed and incline by the SPEED ▲/▼ and INCLINE ▲/▼ whenever,
when the program enter next sect will come back to the current speed and incline. And you can press ‘STOP’
or take out the safety key to stop the machine.
1. HEART RATE
When holding the hand puls e by two hands, the pulse window wil l show your heart rate after 5 seconds. In
order to get the heart rate exactly, please do a test when the machine stop and hold the hand pulse more
than 30 seconds. T he heart rate data is just for reference and cannot be used as the medical data.
2. BODY FAT TEST
Press ‘PROGRAM’ button under ready condition, till ‘FAT’ show in the speed window. ‘FAT’ is body fat t est
mode. Press ‘MODE’ to choose parameter ‘SEX / AGE / HEIGHT / WEIGHT’, and TI ME/D IST window will
show “-1-”,“-2-”、“-3-”“-4-". When set each parameter, press SPEED ▲/▼ to adjust the data, and
CAL/PULSE window will show the data and press ‘MODE’ button to finish, and the window will show“-5-”
and“---” enter into ready condition. Hold the handle pulse wit h two hands, it will show your BMI data after 5
seconds.
a. Data display and set range
Parameter Default Range Remark
Sex (-1) 0 (Male) 1-2 1: Male, 2: Female
Age (-2-) 25 10-99
Height (-3-) 170 CM 100-220 CM
Weight (-4-) 70 KG 20-150 KG
E&OE © 2017 HPF 8
Page 11

TREADMILL
c. Body fat index compar ison
Body fat index (BMI) Obesity Level
< 19 Too thin
19 – 26 Normal
26 – 30 Overweight
> 30 Too fat
3. MP3 (OPTIONAL)
Put external audio equipment (such as: MP3) audio through audio line inserted to an audio input port. You
can then play music.
4. SLEEP FUNCTION:
a. Stop for more than 10 minutes without any operation, the syst em completed all showed off into the body
of sleep sate.
b. Press any key to wake up console under s leep status.
5. EXERCISE PARAMETER AND SETTING
Showing Range Mode Default Program Default Setting Range
INCLINE 1-15 1-15
TIME 0:00-99:59 30:00 30:00 5:00-99:00
DISTANCE 0.00 KM-99.9 KM 1:00 KM --------------------------- 1.0 KM – 99.0 KM
CALORIES 0 KCL-999KCL 50KCL --------------------------- 20 KCL – 990 KCL
E&OE © 2017 HPF 9
Page 12

TREADMILL
Exercise Instruction
WARM-UP
If you are over 35 years old, or not very healthy, also if it ’s your first time exercise, please consult with your
doctor or to a health professional.
Before you use the mot orized t readmill, please learn how to control the mac hine, k no w well how to start, stop,
adjust the speed and so on, don’t stand on the machine at this time. After that, you can use the machine. Stand
on anti-slip pad both sides and handle the handle bar with your both hands. Keep the machine at the low speed
about 1.6~3.2 km/h, then test the running machine b y one foot, after get used to the speed, then you can run on
the machine and you can add the speed between 3 and 5 km/h. Keep the speed about 10 minutes, then stop t he
machine.
EXERCISE STAGE
Learn how to adjust the speed and incline before using. Walk about 1 km at stable velocity and write down the
time, it will take you about 15-25 minutes. If walking at 4.8 km/h, it will take you about 12 minutes in 1 km. If you
feel comfortable at the stable velocity, you can add the speed and incline, after 30 minutes, you can have a good
exercise. At this s tage, you cannot add the speed or incli ne too much at one time, it can keep you feel
comfortable.
EXERCISE INTENSITY
Warm up at the speed 4.8 km/h in 2 minute s, then add the speed to 5.3 km/h and keep walking in 2 minutes,
then add to 5.8km/h and walk in 2 minutes. After that, add up 0.3 km/h in each 2 minutes, until your breathing is
rapid and not completely comfortable.
How to burn calories best:
Warm-up for 5mints by the v elocity: 4-4.8KM/H, then slowly increase the speed by 0.3KM/ H/2 minutes,
until up to the stable speed which you feel is comf ortable for 45Mints.For improving the intensity of m ovement,
you can maintain the speed during 1H of TV program, then increase the speed by 0.3KM/H each Advertisement
interval time, after that return to the original speed. You can acquaint the best efficiency of workout for calorie
burning during the advertisement t ime and subseque nt he art frequency increasing time. Finall y, you should slow
down the speed step by st ep for 4 minutes.
EXERCISE FREQUENCY
The cycle time: 3-5t imes/Week, 15-60mints/T imes. Make up the schedule of workout s cientific, not only for your
hobby.
You can cont rol the running intensity through adjus ting the velocity and incline of treadmi ll. We suggest t hat you
don’t set the incline at f irst; improv e the incline is the effective way to st rengthen the exercise’s intensity.
Consult wi th yo ur p h ysician or health professional before starting your workout. The professional people can
help you make up the suitable exercise time-chart according to your age and health condit ion, determine t he
velocity of movem ent, the intensity of exercise. Please stop at once, if you feel chest tightness , chest pain,
irregular heart beat, breath diffic ulty, dizziness or other discomfort during exer cise. You should consult w ith your
physician or health professional as keep going.
You can choose the normal walking speed or the jogging speed, if you always workout with a treadmill.
Attention: The velocity of movement ≤6KM/H, on normal walking; the velocity of movement ≥8.0KM/H, on
running.
E&OE © 2017 HPF 10
Page 13

TREADMILL
Warm-Up
Take warm-up exercis e before workout for 5-10mints.It’
easy to start tr aining with warm-muscle. Training
following this method for 5-times, eac h leg doing for 10
seconds or more. Do it again after finished-training.
1. Dow n spread your body: Knees slightly curved, body
bends slowly, then relax your back and shoulders,
tr ying to touch your toes in hands for 10-15 minutes,
then standing up.
Repeat this action for 3 times.
2. Ham string stretch: sitting on the clean seat, keepi ng
on leg straight and the other leg bending littl e close to
the straight one. Touch the toes in hands.
Keep the pose for 10-15 seconds, then relax. Repeat
the action for 3 tim es.
3. Legs and feet stretched tendon: Standing close to the
wall or tree, on foot in the post and keep straight, the
heel hit ground at the direction of the wall and tree.
Stay for 10-15 seconds, then relax, repeat this action
for 3 times.
4. Quadriceps stretch: Keep balance by the hands hold
up the tree or close t o the wall, then the right hand
back stretch until c atch the right leg and clos e to the
hip, while you feel tense w ith the muscle in front of
thigh.
Keep the pose for 10-15 seconds. Repeat this action
for 3 times.
5. Sartorius muscle (inne r thigh muscles) stretch: si tting
with foot in contras t and knee outward. The hands
grasp the feet to t he groin pul ling .Maintain the pose
for 10-15 seconds, then relax.
Repeat this action for 3 times.
E&OE © 2017 HPF 11
Page 14

TREADMILL
Maintenance
Running Belt Adjustment
ALWAYS UNPLUG THE TREADMILL FROM THE ELECTRICAL OUTLET BEFORE CLEANING OR
SERVICING THE UNIT.
General cleaning of the unit will great ly prol ong the treadmill.
Keep treadmill clean by dusting regularly. B e sure to clean the exposed part of the deck on either side of the
walking belt and also t he side rails. This reduces the build-up of foreign material underneath the walking belt by
wearing the clean running shoes.
Always unplug the treadmill from the electrical outlet before removing the mot or cover. At least once a year
remove the motor cover and vacuum under the motor cover.
Running Belt Lubrication
Lubricating the running belt helps maintain performance and extends service life. Lubricate the belt after t he fir st
25 hours of use (or 2 to 3 months), then every 50 hours of use (or 5 to 8 months, or m ore frequently under
extended usage).
To check if the belt req uires lubrication, lift each side of it and feel the top surface of the running deck. If the deck
is slick to the touch, no lubr ication is required; if it is dry, l ubricate.
To apply lubricant:
1. Lif t the edge of the running belt s o the running deck is expos ed.
2. Place several drops of the supplied lubricant along the centre of
the running deck.
3. Run the equipment at a slow speed for 3 to 5 minutes to evenly
distribute the lubricant.
Note: Do not over lubricate. Wipe away any excess lubricant from the
running belt. • All-purpose household oil or sewing machine oil can also
be used.
E&OE © 2017 HPF 12
Page 15

TREADMILL
Securing the Running Belt
Place treadmill on a lev el surface. Run Treadmill at approximately 6-8KM/H,
checking the running condition.
If the belt has drifted to the right, pull out of the save clock and switch, turn the
right adjusting bolt 1/4 turn clockwise, then start running until the belt is centred
(pic A) .
If the belt has drifted to the left, pull out of the safety clock and switch, turn the
left adjusting bolt 1/4 turn clockwise, then start running until belt is centred (pic
B).
Timely adjust the tig htness of the belt for t he looseness after a period of t ime
running. Pull out of the safety clock and switch , t urn the left and right adjusting
bolt 1/4 turn clock wise ,then re-start running, confirm the belt-tightness u ntil the
belt be right tightness (pic C).
E&OE © 2017 HPF 13
Page 16

TREADMILL
Error Code Table
Fault Code Main Reason Solution
E01 Connection to the control panel
display is poor
E02 - E05 Motor/G ear error Please check motor connections. If they are OK, it may be
E06 - E08 Circuit error The internal computer has encounter ed an error. Circui t board
Equipment
unsteady
Surface not fl at. Set-up equipment on a flat surface. • If applicable, rotate feet
Check al l connecti ons of the control display
damaged and nee ds replacing. Please contact MyT opia for a
resolution.
my need replacing. Please contact MyTopia for a resolution.
under front of machine to m ove up or down as nee ded so
equipment is steady.
Specifications
Motor Power-drive motor
Continuous Power 1.5CHP
Speed 0.8 - 14 km/h
Running Belt 103 x 37cm
Computer Functions Pulse, Speed, Distance, Time, Calor ies, and Body Fat
Programs 12 programs
Inclin e System 3 step manual
Max User Weight 100 KG
Bonus 2x 2lbs Hand W eights
Folding System manual fold up, soft drop fold down
Product Dimensions 64 x 145 x 128cm
Folded Dimensions 64 x 70 x 132cm
Gross Weight 47 KG
Net Weight 40 KG
Carton Dimension 144 x 67 x 26cm
E&OE © 2017 HPF 14
Page 17

TREADMILL
Some experts believe the incorrect or prolonged use of almost any product could cause
serious injury or death. For information that may reduce your risk o f serious injury or
death, consult the points below and additionally, the information available at
www.datastreamserver.com/safety
• Consult all documentation, packaging and product
labelling before use. Note that some products feature
online documentation which should be printed and kept
with the product.
• Check product for loose / broken / damaged / missing
parts, wear or leaks (if applicable) before each use. Never
use a product with loose / broken / damaged / missing
parts, wear or leaks (if applicable).
• Products must be inspected and serviced (if applicable)
by a qualified specialist every 6 months assuming
average residential use by a person of average weight
and strength, above average technical aptitude, on a
property matching average metropolitan specification.
Intended use outside these guideli ne s could indicate t he
product is not suitable for intended use or may require
more regular inspection or servicing.
• Ensure all possible users of the product have completed
an industry recognized training course before being given
access to the product.
• The product has been supplied by a general merchandise retailer that
may not be familiar with your specific application or your description of
the application. Be sure to attain third-party approval for your
application from a qualified specialist before use regardless of prior
assurances by the retailer or its representatives.
• This product is not intended for use where fail-safe operation is
required. As with any product (take an automobile, aircraft, computer
or ball point pen for example), there is always a small chan ce of
technical issues that needs to be repaired or may requi re replacement
of the product or a part. If the possibility of such failure and the
associated time it takes to rectify could in any situation inconvenience
the user, business or employee then the product is not suitable for
your requirements. This product is not for use where incorrect
operation or a failure of any kind, including but not limited to a
condition requiring prod uct retur n, replacem e nt, serv ice by a technic ian
or replacement of parts could cause a financial loss, loss of employee
time or an inconvenience requiring compensation.
• If this item has been purchased in error after considering the points
above, simply contact the retailer directly for details of their returns
policy, if required.
©2017 HPF. All rights reserved. No part of this document, including descr iptive content, concept s, ideas,
diagrams or images may be reproduced or transmitted in any form or by any means, electronic or m echanical,
including photocopying, scanning or recording, or any information storage and retrieval s ystem, wi thout expr ess
permission or c onsent f rom the publisher.
E&OE © 2017 HPF 15
 Loading...