

Page 1
INSTRUCTION MANUAL
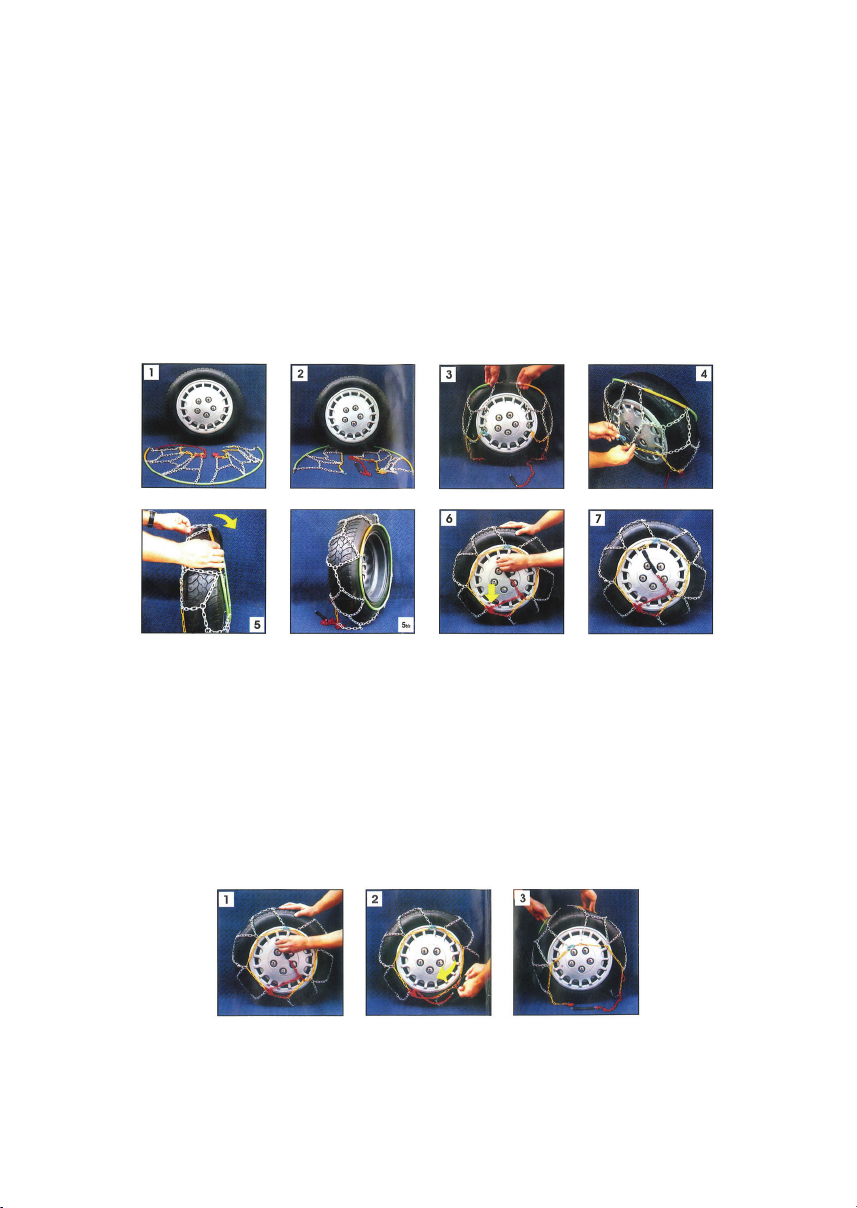
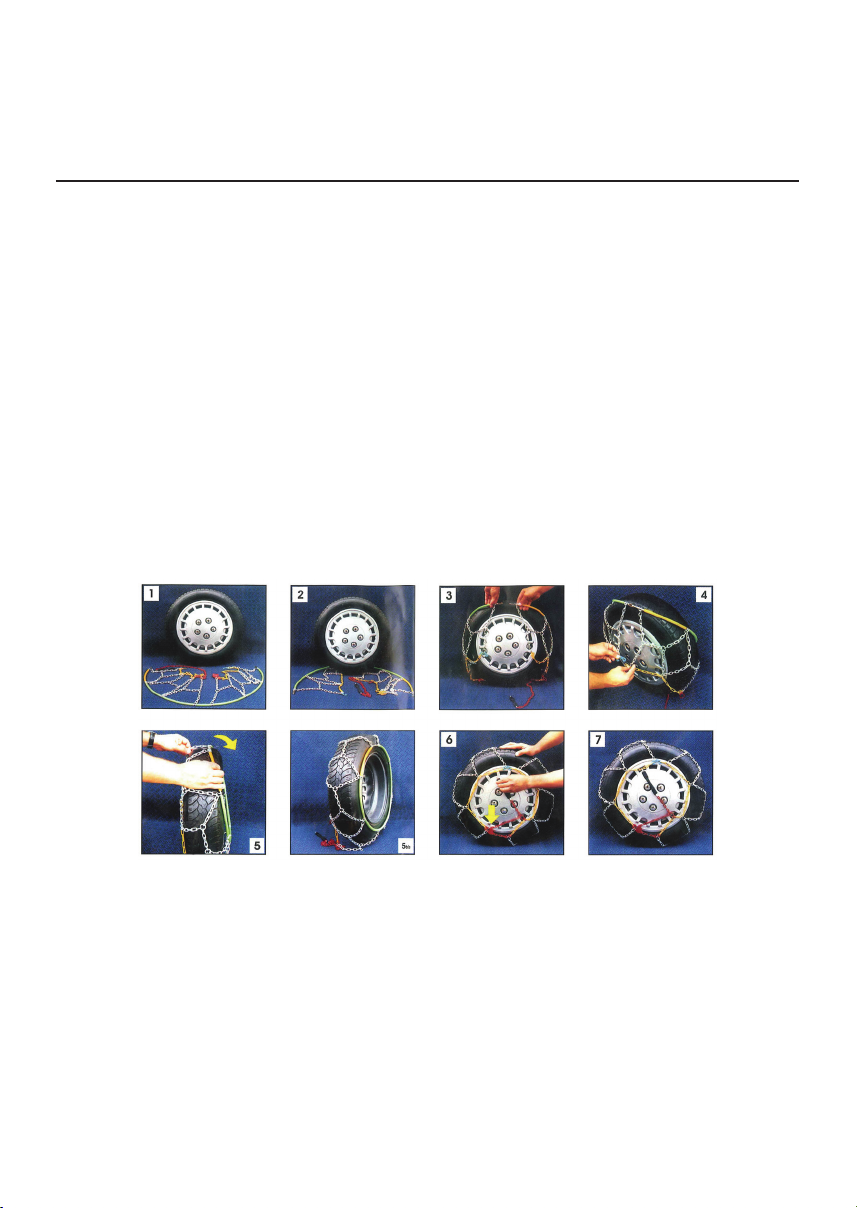
Fitting instructions:
1. Unfold the chain on the ground, with the yellow plastic end of the cable towards the left.
2. Pass the flexible cable (yellow plastic end first) behind the tyre from the left to the right.
3. Pull upwards the flexible cable so that the two steel ends can be fastened together.
4. Hook the outside flat green connector to the last link of the yellow chain end.
5. Push the flexible cable towards the interior of the wheel and make sure it is not on the tyre
tread.
6. Pass the red chain into the red self-locking slide gear.
7. Thread the elastic tensioner into the red metal ring, pull as much as possible, and fasten the
elastic tensioner into a link of the side chain.
Removal instructions:
1. Stop the vehicle so that the outside flat green hook is in the upper of the wheel for vehicles
with rear-wheel drive. (Towards the front for vehicles with front-wheel drive).
2. Unhook the elastic tensioner and release the tensioning chain first from the red ring, then
from the red slide gear.
3. Unfasten the cable and allow the chain to fall down on the ground. Move the vehicle enough
to release the chain from beneath the tyre. (For front wheel drive cars it is better to turn the
wheel to make unfastening the inside cable easier).
ATTENTION:
A snow chain is always a means of emergency. With the chains mounted, the driving
characteristics of the car will be different. Avoid sudden breaking or accelerating if possible and
don’t exceed 50 km/h.
Page 2
• Try mounting the snow chains before your trip.
• This chain can be used bilaterally.
• Pay attention to have the right chains for your tyres.
• Do not use the chains on snow-free streets.
HANDLEIDING
Montage instructies:
1. Vouw de sneeuwketting uit op de grond, zo dat het gele uiteinde aan de linkerzijde ligt.
2. Schuif de sneeuwketting van links naar rechts (met het gele uiteinde eerst) achter de band.
3. Trek de sneeuwketting omhoog, zodat de 2 stalen uiteinden aan elkaar gemaakt kunnen
worden.
4. Haak de buitenste groene verbinding aan de laatste schakel van de gele kant van de
sneeuwketting.
5. Trek de sneeuwketting zover naar de binnenzijde van de band zodat deze niet over het profiel
van de band loopt.
6. Bevestig de rode ketting in de rode vergrendelingschuif.
7. Rijg de elastische spanner in de rode metalen ring en trek hard mogelijk, maak vervolgens de
elastische band aan een schakel van de gele ketting.
Demontage instructies:
1. Plaats de auto zo dat de buitenste groene haak bovenaan het wiel zit (voor auto’s met
achterwielaandrijving). Plaats de auto zo dat de buitenste groene haak aan de voorkant van
het wiel zit (voor auto’s met voorwielaandrijving).
2. Haak de elastische spanner los en maak de gespannen ketting eerst los uit de rode ring,
vervolgens van de vergrendelingschuif.
3. Maak de ketting los en laat deze op de grond vallen. Rijd de auto zover door, zodat de ketting
onder de band vandaan gehaald kan worden. (Voor auto’s met voorwielaandrijving is het
beter om de wielen te draaien, zodat de kabel aan de binnenzijde makkelijker los te maken
is).
Page 3

ATTENTIE:
Een sneeuwketting is altijd een noodoplossing. Met gemonteerde kettingen zullen de
rijeigenschappen van de auto anders zijn. Voorkom zo mogelijk plotseling remmen of accelereren
en rijd niet harder dan 50 km per uur.
• Doe een proefmontage voordat u op reis gaat.
• Deze ketting kan dubbelzijdig gebruikt worden.
• Zorg ervoor de juiste ketting voor uw bandenmaat te hebben.
• Gebruik de kettingen niet op sneeuwvrije wegen.
GEBRAUCHSHINWEISE
Montageanleitung:
1. Die Kette flach auf dem Boden ausbreiten, so dass das gelbe Bügelende nach links gewandt
ist.
2. Das gelbe Kabel von links nach rechts hinter dem Rad durchführen.
3. Den Bügel etwas hochziehen und die beiden Enden einhaken.
4. Den grünen extern Haken in das Ende der gelben Kette einhaken.
5. Das Kabel zum Radinneren schieben und darauf achten, dass er die Lauffläche nicht berührt.
6. Die rote Kette durch die rote, Selbstsperrende Forderrutsche führen.
7. Den Gummizug in den roten Ring einfädeln. Die Spannkette so kräftig wie möglich anziehen,
und den Gummizug in ein Seiten Kettenmasche einhaken.
Page 4

Demontage Anleitung:
1. Das Fahrzeug so anhalten, dass der grüne äußeren Haken nach oben, nach vorn (Fahrzeuge
mit Vorderradantrieb) ist.
2. Den Gummizug aushaken und die Spannkette zunächst aus dem Ring und anschließend aus
der roten Spannvorrichtung ausfädeln.
3. Das Kabel aushaken und die Kette auf den Boden legen. Das Fahrzeug von der Kette
fahren. (Bei Fahrzeugen mit Vorderradantrieb wird das Ausrasten des internen Bügels durch
Einschlagen der Rader erleichtert).
ACHTUNG:
Eine Schneekette ist immer ein Notbehelf. Die Fahreigenschaften des Fahrzeuges verändern sich
mit der Kette. Vermeiden Sie soweit möglich brüskes Anfahren oder Bremsen und fahren Sie nich
über 50km/h.
• Probieren Sie das Kettenauflegen vor Reisebeginn.
• Diese Kette kann zweiseitig (links oder rechts) aufgelegt werden.
• Achten Sie darauf, dass Sie für Ihren Fahrzeugtyp die richtige Kettengrösse haben.
• Nicht auf schneefreier Strasse benutzen.
INSTRUCTIONS
Instructions pour le montage:
1. Bien étendre la chaîne à même le sol en veillant a ce que l’extrémité jaune soit tournée vers
la gauche.
2. Faire passer la câble flexible derrière la roue enfilant avant le côté jaune, de gauche a droite.
3. Soulever la chaîne suffisamment pour pouvoir accrocher les deux extrémités.
4. Accrocher le crocher externe vert au dernier chaînon de la chaîne jaune.
5. Pousser le câble flexible à l’interieur de la roue de façon que il ne s’appuie pas contre le
bande de roulement.
6. Faire passer la chaîne rouge dans la glissière autobloquante rouge.
7. Faire passer le tirant en caoutchouc dedans le maillon rouge puis, que se extiende en la
medida de lo posible la chaîne de mise en tension, accrocher le tirant en caoutchouc sur un
maillon latéral de la chaîne.
Page 5

Instructions pour le démontage:
1. Arríter la roue de façon à ce que le crochet externe vert soit tourné vers le haut (vers l’avant
pour les voitures à traction avant).
2. Décrocher le tirant élastique noir et retirer la petite chaîne de mise en tension du maillon,
puis de la glissière rouge.
3. Décrocher le câble et laisser la chaîne tomber à même le sol. Déplacer ce qu’il suffit la voiture
pour enlever la chaîne de sous le pneu. (Pour les voitures à traction avant, il est conseillé de
braquer les roues pour décrocher plus facilement le câble intérieur).
ATTENTION:
On met en évidence que la chaîne à neige est un moyen d’émergence. Lorsque on conduit avec les
chaînes à neige, la voiture se comporte irrégulièrement. Pour cela, on doit conduire doucement
sans serrer le frein ou accélérer brusquement, ne dépasser pas 50 km/h.
• Essayer le montage des chaînes a neige chez vous, à votre aise.
• Cette chaîne a usage bilatéral.
• Pour l’usage voir la liste des types.
• Eviter l’usage des chaînes sur l’asphalte.
INSTRUCCIONES
Instrucciones de montaje
1. Desplege la cadena en el suelo, con el extremo amarillo de plástico del cable hacia la
izquierda.
2. Pase el cable flexible (primero el extremo de plástico amarillo) detrás de la rueda de la
izquierda a la derecha.
3. Tire el cable flexible hacia arriba, de modo que los dos extremos de acero pueden
Page 6

ensamblarse.
4. Enganche el conectador externo plano verde en el último acoplamiento de la cadena amarilla.
5. Empuje el cable flexible hacia el interior de la rueda y asegúrese de que no está en el banda
de rodadura.
6. Pase la cadena rojo en el mecanismo autocerrado rojo.
7. Tire el tensor elástico en el aro de metal rojo, tense lo mejor possible y fije el tensor elástico
en un eslabón de la cadena lateral.
Instrucciones de demontaje:
1. Pare el vehículo para que el gancho verde más remoto está en la parte superior de la
rueda para vehículos con tracción trasera. (Hacia adelante para los vehículos con tracción
delantera).
2. Desenganche el tensor elástico y primero libere la cadena de tensión desde el anillo rojo,
entonces desde el parte mecanismo autocerrado rojo.
3. Suelte el cable y permita que la cadena caiga en el suelo. Mueva el vehículo bastante para
extraer la cedena desde abajo de la llanta. (Para vehículos de tracción delantera es mejor
girar la rueda para facilitar aflojamiento del cable en el interior.
ATENCION :
Se pone en su conocimiento que la cadena de nieve es una solucion de emergencia. Cuando
se conduce con las cadenas el coche se comporta irregularmente. Por esto se debe conducir
suavemente sin usar el freno o acelerar bruscamente, sin pasar de 50km/h.
- Ensayar el montaje de las cadenas de nieve en su casa, comodamente.
- Esta cadena es de uso bilateral.
- Pare al uso ver la lista de modelos.
- Evitar el uso de las cadenas sobre el esfalto.
 Loading...