

Page 1
3Com® X Family Command Line Interface Reference
X5 (25-user license) – 3CRTPX5-25-96
X5 (unlimited license) – 3CRTPX5-U-96
X506 – 3CRX506-96
Version 2.5.1
Part Number TECHD-178 Rev B01
Published April 2007
http://www.3com.com/
Page 2

3Com Corporation
350 Campus Drive
Marlborough, MA
01752-3064
Copyright © 2005–2007, 3Com Corporation. All rights reserved. No part of this
documentation may be reproduced in any form or by any means or used to make any
derivative work (such as translation, transformation, or adaptation) without written
permission from 3Com Corporation.
3Com Corporation reserves the right to revise this documentation and to make
changes in content from time to time without obligation on the part of 3Com
Corporation to provide notification of such revision or change.
3Com Corporation provides this documentation without warranty, term, or condition
of any kind, either implied or expressed, including, but not limited to, the implied
warranties, terms, or conditions of merchantability, satisfactory quality, and fitness
for a particular purpose. 3Com may make improvements or changes in the product(s)
and/or the program(s) described in this documentation at any time.
If there is any software on removable media described in this documentation, it is
furnished under a license agreement included with the product as a separate
document, in the hardcopy documentation, or on the removable media in a directory
file named LICENSE.TXT or !LICENSE.TXT. If you are unable to locate a copy, please
contact 3Com and a copy will be provided to you.
UNITED STATES GOVERNMENT LEGENDS:
If you are a United States government agency, then this documentation and the
software described herein are provided to you subject to the following:
United States Government Legend: All technical data and computer software is
commercial in nature and developed solely at private expense. Software is delivered
as Commercial Computer Software as defined in DFARS 252.227-7014 (June 1995)
or as a commercial item as defined in FAR
such rights as are provided in 3Com’s standard commercial license for the Software.
Technical data is provided with limited rights only as provided in DFAR 252.227-7015
(Nov 1995) or FAR
remove or deface any portion of any legend provided on any licensed program or
documentation contained in, or delivered to you in conjunction with guide.
Unless otherwise indicated, 3Com registered trademarks are registered in the United
States and may or may not be registered in other countries.
3Com, the 3Com logo, TippingPoint, the TippingPoint logo, and Digital Vaccine are
registered trademarks of 3Com Corporation or one of its subsidiaries.
OpenView is a trademark of Hewlett-Packard Development Company. Microsoft and
Windows are registered trademarks or trademarks of Microsoft Corporation in the
United States and other countries. Oracle is a registered trademark of Oracle
Corporation.
Other brand and product names may be registered trademarks or trademarks of their
respective holders.
52.227-14 (June 1987), whichever is applicable. You agree not to
2.101(a) and as such is provided with only
Page 3

Contents
Contents iii
About This Guide v
Chapter 1: X Family Startup Configuration 1
Welcome to the X Family CLI v
Target Audience vi
Conventions vi
Related Documentation viii
Customer Support viii
Overview 1
Initial Configuration 1
Configuration Categories 2
Initiating the Setup Wizard 4
Account Security Level 4
Super-User Data 5
Host Configuration 7
Timekeeping Options 7
Network Deployment Configuration 9
Virtual Interface Configuration 9
Basic Security Zone Configuration 10
Assigning Zones to Virtual Interfaces 11
Configuring DNS Settings 11
Setup Firewall Rules 12
Enabling SMS Configuration 13
Web, CLI, and SNMP Server Options 14
NMS Settings 16
Restrict SMS 16
Additional Configuration 16
After the Setup Wizard 20
Chapter 2: Command Reference 21
Overview 21
X Family CLI Reference V 2.5.1 iii
Page 4

! 28
alias 28
boot 29
bugreport 30
clear 31
cls 33
configure 33
debug 81
exit 81
halt 82
help 82
high-availability 82
history 83
logout 83
ping 84
quarantine 85
quit 85
reboot 85
setup 86
show 86
snapshot 118
traceroute 118
traffic-capture 119
tree 120
who 121
whoami 122
Chapter 3: Navigation 123
Index 131
iv X Family CLI Reference V 2.5.1
Overview 123
Logging in to the CLI 123
Navigation 124
Console Settings 128
Page 5

About This Guide
Explains who this guide is intended for, how the information is organized, where information
updates can be found, and how to obtain customer support if you cannot resolve a problem.
Welcome to the X Family CLI
Welcome to the X family Command Line Interface (CLI). The CLI is the interface for issuing commands
via a command line prompt for the X family device. You use this interface to configure, monitor, and
report on the X family devices in your network.
This section covers the following topics:
• “Target Audience” on page vi
• “Conventions” on page vi
• “Related Documentation” on page viii
• “Customer Support” on page viii
X Family CLI Reference V 2.5.1 v
Page 6

About This Guide
Target Audience
This guide is intended for super-users and administrators who manage one or more X family devices.
Knowledge, Skills, and Abilities
This guide assumes you, the reader, are familiar with general networking concepts and the following
standards and protocols:
•TCP/IP
•UDP
•ICMP
•Ethernet
• Network Time Protocol (NTP)
• Simple Mail Transport Protocol (SMTP)
• Simple Network Management Protocol (SNMP)
Conventions
This guide follows several procedural and typographical conventions to provide clear and
understandable instructions and descriptions. These conventions are described in the following
sections.
This book uses the following conventions for structuring information:
• Cross References
• Ty p e f a ce
• Messages
Cross References
When a topic is covered in depth elsewhere in this guide, or in another guide in this series, a cross
reference to the additional information is provided. Cross references help you find related topics and
information quickly.
Internal Cross References
This guide is designed to be used as an electronic document. It contains cross references to other
sections of the document that act as hyperlinks when you view the document online. The following text
is a hyperlink: M
essages.
External Cross References
Cross references to other publications are not hyperlinked. These cross references will take the form:
see <chapter name > in the Publication Name.
vi X Family CLI Reference V 2.5.1
Page 7

Conventions
Typeface
This guide uses the following typographical conventions:
bold used for commands or parameters, which must be entered exactly as shown.
light font used for variables, for which you supply a value.
brackets [] used to indicate an optional element.
<1 | 2 > angle brackets and vertical bars are used to indicate a choice that must be made.
Italic used for guide titles, variables, and important terms.
H
yperlink used for cross references in a document or links to a Web site.
Messages
Messages are special text that are emphasized by font, format, and icons. There are four types of
messages in this guide:
• Wa r n i n g
• Caution
• Note
• Tip
A description of each message type with an example message follows.
Warning
Warnings tell you how to avoid physical injury to people or equipment. For example:.
WARNING: The push-button on/off power switch on the front panel of the server does not
turn off the AC power. To remove AC power from the server, you must unplug the AC power
cord from either the power supply or the wall outlet.
Caution
Cautions tell you how to avoid a serious loss that could cause physical damage such as the loss of data,
time, or security. You should carefully consider this information when determining a course of action
or procedure. For example:
CAUTION: You should disable password caching in the browser you use to access the
LSM. If you do not disable password caching in your browser, and your workstation is not
secured, your system security may be compromised.
X Family CLI Reference V 2.5.1 vii
Page 8
About This Guide
Note
Notes tell you about information that might not be obvious or that does not relate directly to the
current topic, but that may affect relevant behavior. For example:
Note: Some command examples in this document are split across several lines
due to space constraints; however, you must enter them on a single line (with no
carriage returns).
Tip
Tips are suggestions about how you can perform a task more easily or more efficiently. For example:
Tip: You can collect firewall statistics using configure terminal firewall
monitor.
Related Documentation
The X family devices have a full set of documentation. These publications are available in electronic
format on CD. For the most recent updates, check the Threat Management Center (TMC) web site at
https://tmc.tippingpoint.com.
Customer Support
We are committed to providing quality customer support to all customers. A customer is provided with
detailed customer and support contact information. For the most efficient resolution of your problem,
please take a moment to gather some basic information from your records and from your system before
contacting customer support.
Information Location
Your X family device serial
number
Your TOS version number You can find this information in the LSM in the System Summary
Your X family system boot
time
Contact Information
Please address all questions regarding the software to your authorized representative.
You can find this number in the LSM in the System Summary page,
on the shipping invoice that came with the device, or on the bottom
of the device.
page, or by using the CLI
You can find this information in the LSM in the System Summary
page.
show version
command.
viii X Family CLI Reference V 2.5.1
Page 9

1
X Family
Configuration
The X family device is a high-speed, comprehensive security system. This section describes the steps required
to start managing the X family device.
Overview
You must complete basic configuration of the X family device to pass traffic in the default
configuration. The X Family Setup Wizard provides a convenient way for you to enter the necessary
configuration data when you install a new device on your network, or when you move or reconfigure a
device within your network. Refer to the following documents for hardware installation:
•Quick Start Guide
•
Hardware Installation and Safety Guide
For the most recent updates, check the Threat Management Center (TMC) website. The Customer
Support phone number is 1-866-681-8324.
Startup
Initial Configuration
You can perform initial configuration on the X family device with OBE Setup Wizard or with the CLI
Setup Wizard.
The OBE Setup Wizard
The OBE Setup Wizard runs when you first connect to the device through the Local Security Manager
(LSM) with your web browser. The LSM is a web-based GUI for managing one X family device. The
X Family CLI Reference V 2.5.1 1
Page 10
Chapter 1. X Family Startup Configuration
LSM provides HTTP and HTTPS (secure management) access. This access requires one of the
following browsers:
• Microsoft Internet Explorer 6.0 or later
• Firefox 1.5 or later
• Mozilla 1.7 or later
• Netscape 8.1 or later
Using the LSM, you have a graphical display for reviewing, searching, and modifying settings. The GUI
interface also provides graphical reports for monitoring the device traffic, triggered filters, and packet
statistics.
For more information about using the OBE Setup Wizard to configure the device, refer to the
Start Guide
Security Manager User’s Guide
for the X family device model. For more information about the LSM, refer to the
.
The CLI Setup Wizard
The Setup Wizard runs automatically on a console via a serial port connection when you first boot the
X family device. You can also run the setup wizard from the Command Line Interface (CLI) at any time
by entering the
This chapter describes the initial configuration process with the CLI Setup Wizard.
setup
command.
Configuration Categories
The CLI Setup Wizard runs a series of short interactive dialogs to set several basic configuration
variables on the X family device. The Out-of-the-Box Terminal Setup Wizard runs when the setup
wizard is activated for the first time or at another time with the
on a serial port connected system, such as a workstation and laptop.
After you run the setup wizard using a serial terminal, you can further configure the device using
subsequent setup commands through the CLI. See “
Quick
Local
setup
Additional Configuration” on page 16 for details.
command. This wizard is run
The Out-of-the-Box Setup Wizard runs on a workstation or laptop connected to the serial port of the
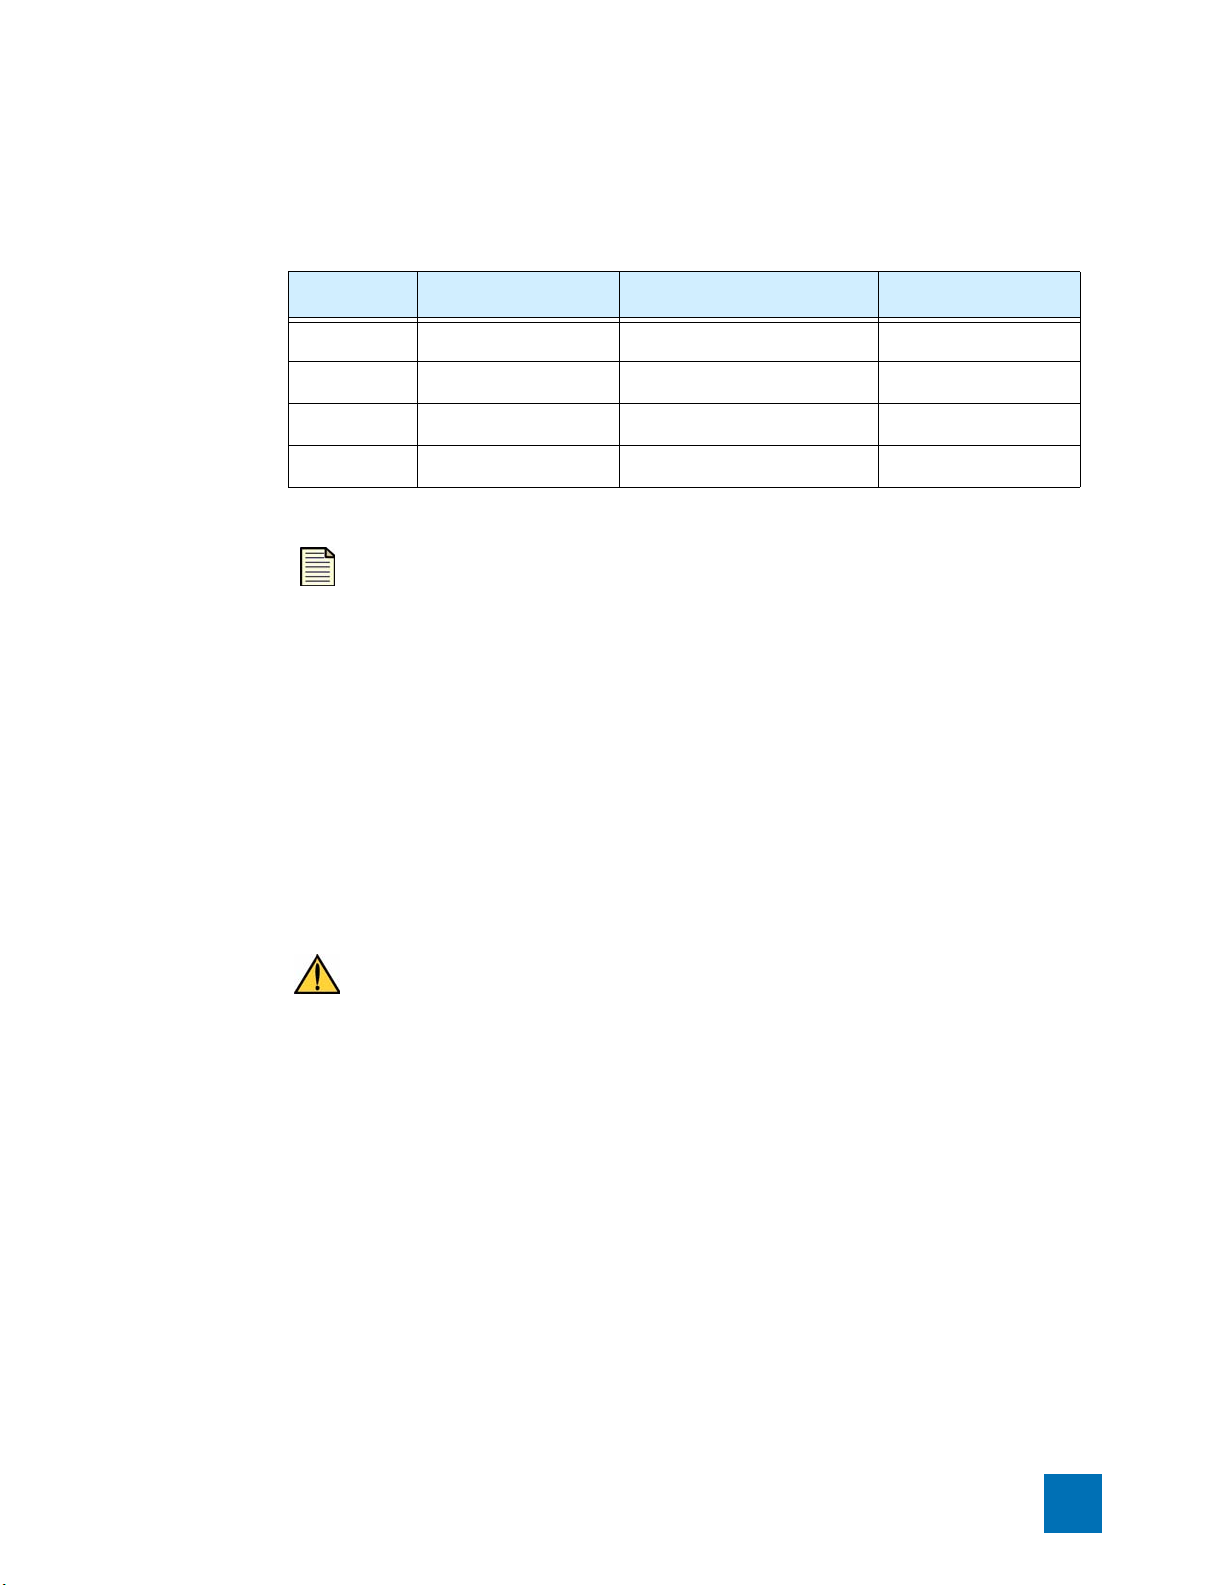
device. The configuration dialogs are shown in the following table:
Table 1–1: Out-of-the-Box Terminal Setup Wizard Configuration Settings
Out-of-the-Box Setup Subsequent Setups Settings
Account Security Level — account security level
Super-user Data — super-user login name
2 X Family CLI Reference V 2.5.1
super-user password
Page 11

Configuration Categories
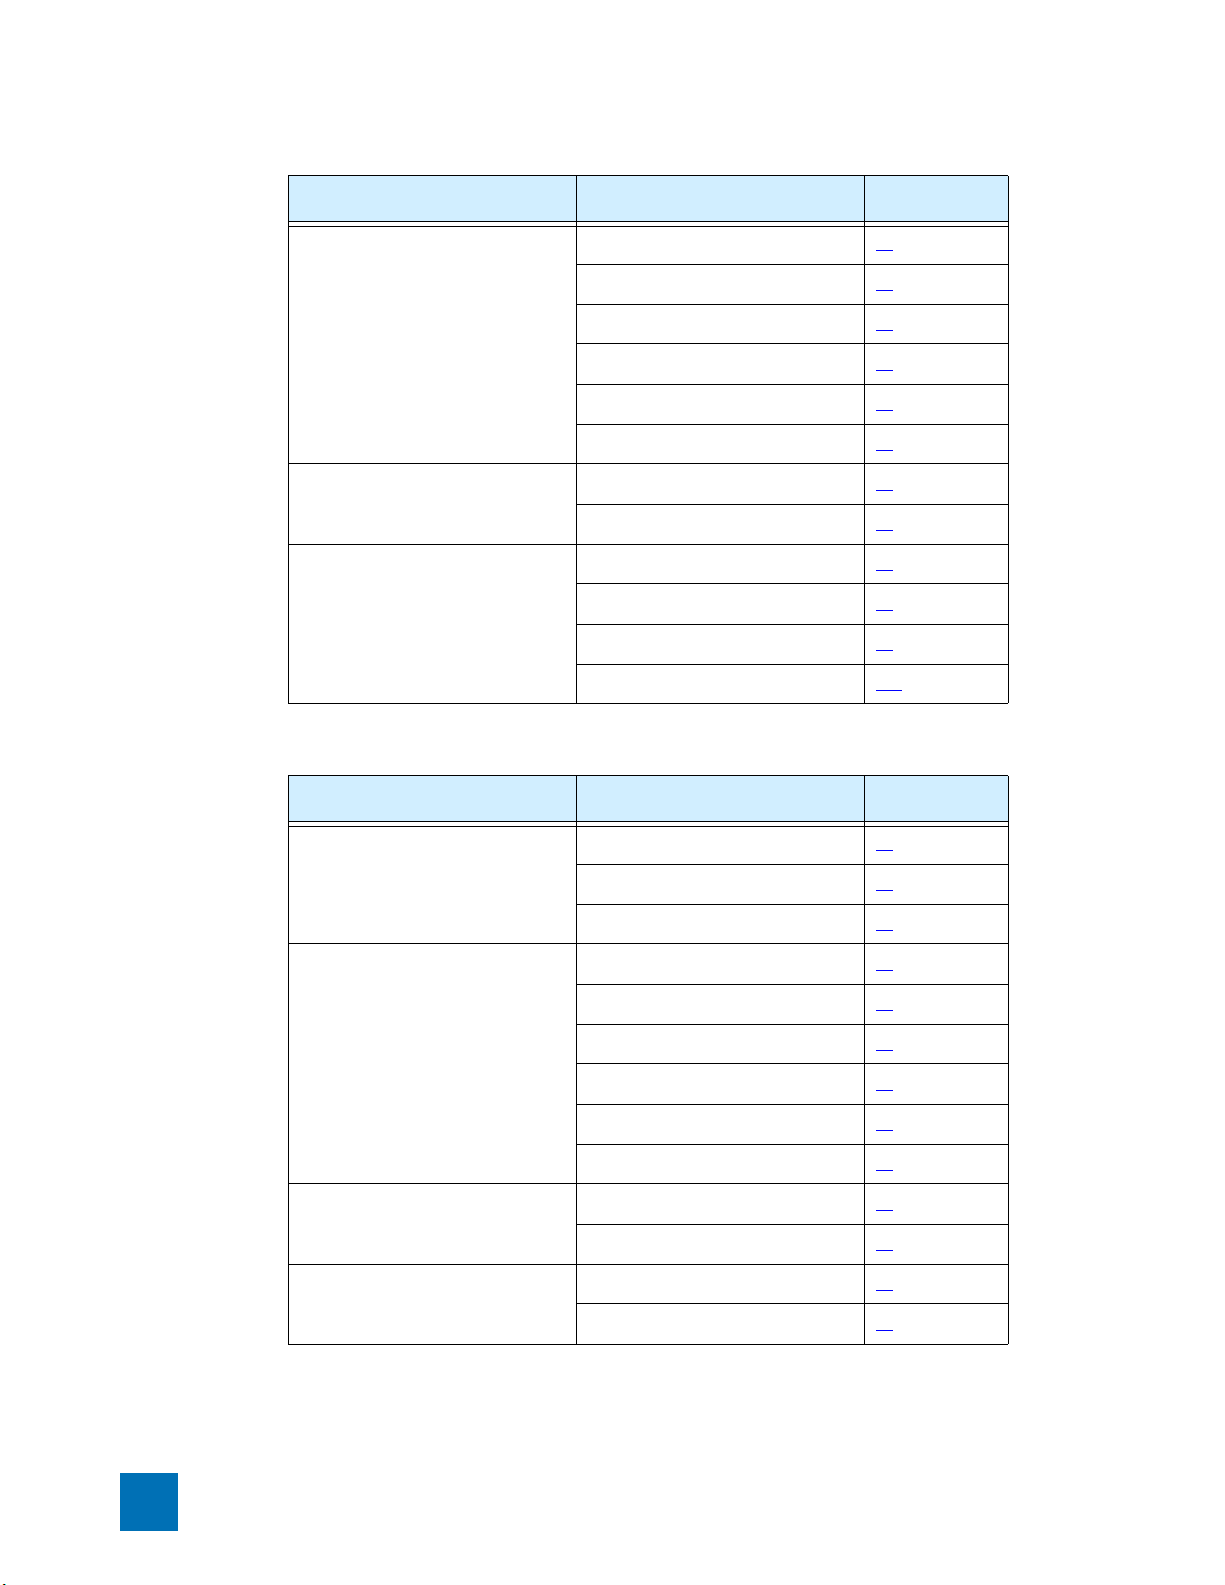
Table 1–1: Out-of-the-Box Terminal Setup Wizard Configuration Settings (Continued)
Out-of-the-Box Setup Subsequent Setups Settings
Timekeeping Options Timekeeping Options NTP or CMOS clock
time zone
daylight saving time
NTP: up to four time servers
or peers
CMOS clock:
date
time
Modify interfaces Modify virtual interfaces IP allocation settings
Subnet mask
NAT enable/disable
Modify security zones Modify security zones Create zone
Allocate ports to zones
Assign zones to interfaces
Enable DHCP on an internal
interface
Setup basic firewall rules Modify firewall rules View default firewall rules
Allow all internal zones
access to the Internet
Apply web filtering
Allow management of
device from WAN
Enable SMS Configuration Enable SMS Configuration enable SMS configuration
select the SMS device that
will configure the X family
device
Web, CLI, and SNMP Server
Options
Web, CLI, and SNMP Server
Options
HTTPS or HTTP
SSH
SNMP
NMS Configuration NMS Configuration NMS IP address and port
NMS community string
Restricted SMS Access Restricted SMS Access SMS IP address
— Ethernet Ports enable ports
line speed
duplex setting
auto negotiation
X Family CLI Reference V 2.5.1 3
Page 12
Chapter 1. X Family Startup Configuration
Table 1–1: Out-of-the-Box Terminal Setup Wizard Configuration Settings (Continued)
Out-of-the-Box Setup Subsequent Setups Settings
— Default E-Mail Contact TO: email
— Remote Syslog Server IP address
Initiating the Setup Wizard
When the Setup Wizard runs, the following screen displays:
Welcome to the TippingPoint Technologies Initial Setup wizard.
Press any key to begin Initial Setup Wizard.
When you press a key, you see the following:
FROM: email
email domain
SMTP server IP
email aggregation period
You will be presented with some questions along with default values in
brackets[]. Please update any empty fields or modify them to match your
requirements. You may press the ENTER key to keep the current default
value. After each group of entries, you will have a chance to confirm
your settings, so don't worry if you make a mistake.
Continue to the following section for instructions on account security.
Tip: During initial setup, use the Ctrl-H key combination to erase characters you
have already typed. Ctrl-H deletes from right to left one character at a time.
Account Security Level
The Security Level dialog sets the security level settings that restrict user names and passwords. The
default security level is Level 2, but you have the option to select any of the three available levels:
Table 1–2: Security Levels
Level Description
Level 0 User names cannot contain spaces.
Passwords are unrestricted.
Level 1 User names must contain at least 6 characters without spaces.
4 X Family CLI Reference V 2.5.1
Passwords must contain at least 8 characters without spaces.
Page 13

Table 1–2: Security Levels
Level Description
Level 2 Includes Level 1 restrictions and requires the following:
•2 alphabetic characters
•1 numeric character
•1 non-alphanumeric character (special characters such as ! ? and *).
Example
There are three security levels for specifying user names and
passwords:
Level 0: User names and passwords are unrestricted.
Level 1: Names must be at least 6 characters long; passwords
at least 8.
Level 2: In addition to level 1 restrictions, passwords must
contain:
- at least 2 alpha characters
- at least 1 numeric character
- at least 1 non-alphanumeric character
Super-User Data
Please specify a security level to be used for initial superuser name and password creation. As super-user, you can modify
the security level later on via Command Line Interface (CLI) or
Local Security Manager (LSM).
Security level [2]:
Super-User Data
The Super-User Data dialog sets the super-user login name and password. The login name and
password must meet the restrictions of the security level that you set in the Security Level dialog. The
following tables list examples of valid and invalid login names and passwords.
Table 1–3: Login Name Examples
Valid Login Names Invalid Login Names
fjohnson fredj (too short in Levels 1 and 2, valid for Level 0)
fredj123 fred j 123 (contains spaces)
fredj-123 fj123 (too short)
fredj-*123 fj 123 (contains spaces)
Table 1–4: Password Examples for Level 2 Security
Valid Passwords Invalid Passwords
my-pa55word my-pa55 (too short)
X Family CLI Reference V 2.5.1 5
Page 14

Chapter 1. X Family Startup Configuration
Table 1–4: Password Examples for Level 2 Security
Valid Passwords Invalid Passwords
my-b1rthday mybirthday (must contain numeric)
myd*g’snam3 mydogsnam3 (must contain a non-alphanumeric
character)
6 X Family CLI Reference V 2.5.1
Page 15

Host Configuration
Example
In this example, the password is presented in italics. In the actual dialog, the password would not be
visible.
Please enter a user name that we will use to create your superuser account. Spaces are not allowed.
Name: superuser
Do you wish to accept [superuser] <Y,[N]>:Y
Please enter your super-user account password: root--00
Verify password: root--00
Saving information...Done
Your super-user account has been created.
You may continue initial configuration by logging into your
device. After logging in, you will be asked for additional
information.
Host Configuration
The Host Configuration dialog configures the host name and host location. You also have the option to
configure the host management port.
CAUTION: Do not configure the host management port unless you have been specifically
instructed to do so by technical support.
Example
In this example, the host management port is not configured, and the host name is set as device11 in
the location lab.
The host management port is used to configure and monitor this device via
a network connection (e.g., a web browser).
Have you been directed by technical support to configure
the management port? <Y,[N]>:N
Enter Host Name [myhostname]: device11
Enter Host Location [room/rack]: lab
Host Name: device11
Host Location: lab
Enter [A]ccept, [C]hange, or [E]xit without saving [C]: A
Timekeeping Options
The Timekeeping Options dialog configures the X family device clock. You can configure the following
options.
X Family CLI Reference V 2.5.1 7
Page 16

Chapter 1. X Family Startup Configuration
Time Zone
The time zone option calculates and shows the local time. System logs are kept in Universal Time
(UTC), but the device calculates local time for display purposes. Entering the proper time zone enables
the device to display local time properly.
Daylight Saving Time
The daylight saving time option enables and disables the calculation of time based on the time of year.
NTP
The X family device can keep time using its internal CMOS clock or it can use a Network Time Protocol
(NTP) server.
Note: Use the show ntp session and sshow stp status commands to inspect
the operation of the NTP protocol.
NTP Server
Configuring a host as an NTP server causes the X family device to query that host to obtain
information on the current time. If multiple time servers are specified, the device aggregates data from
all available servers to calaculate the best time estimate. Providing multiple sources improves both the
reliability and accuracy of the time data.
NTP Peer
Configuring a host as an NTP peer causes the X family device to both send time information to and
receive time information from the host. This allows multiple devices to mutually exchange time
information, allowing for a higher resilience against the failure of one or more time servers.
Date and Time
If you are not using NTP, you must specify the current date and time.
Example
In this example, the time zone is set to Central Standard Time (CST), Daylight Saving Time changes are
enabled, and NTP is not enabled. The default date is accepted, and the current time is entered
manually:
Timekeeping options allow you to set the time zone, enable or
disable daylight saving time, and configure or disable NTP.
Would you like to modify timekeeping options? <Y,[N]>: y
Enter time zone or '?' for complete list [GMT]: CST
Automatically adjust clock for daylight saving changes? [Ye s]: N
Do you want to enable the NTP client? [No]: N
Enter date <YYYY-MM-DD> [2006-06-09]:
Enter time <HH:MM:SS> in 24 hour notation [09:02:40]: 08:02:00
TimeZone: CST
DST enabled: No
NTP enabled: No
Date: 2006-06-09
Time: 08:02:00
8 X Family CLI Reference V 2.5.1
Page 17

Network Deployment Configuration
Enter [A]ccept, [C]hange, or [E]xit without saving [C]: A
Network Deployment Configuration
The Network Deployment Configuration dialog selects the type of network deployment that the X
family device will use. The following deployments are available:
• Routed mode: All IP subnets are unique, and addressees that traverse to the WAN zone may be
subject to Network Address Translation (NAT).
• NAT mode: Hosts in the LAN zone run in a private IP address range, and hosts in the WAN zone run
in a public IP address range. Addressees that traverse to the WAN zone may be subject to Network
Address Translation (NAT).
• Transparent (Layer 2) mode: Firewalls are enforceable between security zones, but all zones are are
in the same broadcast domain.
NAT mode and Routed mode require internal and external virtual interfaces (VIs). The device has a
single internal VI and a single external VI configured by default. Virtual Interface Configuration is
discussed in detail in “
Virtual Interface Configuration” on page 9.
Example
The X-Series device may be configured into a number of well known
network deployments.
Would you like to modify the network deployment mode? <Y,[N]>:y
Please choose a network deployment option:
1) Routed mode
2) NAT mode
3) Transparent (layer 2) mode
Please Select []: 1
Virtual Interface Configuration
The virtual interface dialog of the initial setup wizard modifies the configuration of the internal and
external interfaces and includes IP allocation, IP subnet, default gateway, and enabling or disabling
NAT.
Example
In this example, the default interface IP addresses are reviewed and accepted:
Virtual inte rf ac es def in e ho w thi s de vi ce int eg ra te s wit h th e IP lay er 3
network. You mu st con fi gu re one vi rt ua l in te rf ac e fo r eve ry IP su bn et tha t is
directly con nected to the X-Seri es device. For example , you need one for the WAN
connection (external virtual interface) and one for every directly connected
network subnet (internal virtual interfaces).
Would you like to modify virtual interfaces? <Y,[N]>:y
X Family CLI Reference V 2.5.1 9
Page 18

Chapter 1. X Family Startup Configuration
Virtual interfaces:
Id Type Mode IP Address Subnet Mask NAT
1 internal static 192.168.1.254 255.255.255.0 external-ip
2 external dhcp 10.0.1.200 255.255.255.0 disable
3 <empty>
4 <empty>
5 <empty>
6 <empty>
Enter [A]ccept, [C]hange, [R]emove or [E]xit without saving [C]:
a
Basic Security Zone Configuration
The Security Zone dialog modifies the basic configuration of security zones, which divide your
network into logical security domains. Network traffic between security zones is routed and scanned
by the firewall and the IPS policies that you create.
In the setup process, you can assign security zones to different ports. You can change the zone
configuration at any time afterwards.
Example
In this example, a new security zone called MyZone is created:
Security zones enable you to section your network logically into security
domains. As network traffic travels between zones, it is routed and securityscanned by th e fi re wa ll an d I PS a cc or din g to th e po li cie s yo u d ef in e. Y ou ne ed
to create se cu ri ty z on es t hat n at ur al ly m ap on to y ou r in te nd ed ne tw or k se cu ri ty
boundaries. A security zone may or may not be connected (mapped) to a virtual
interface.
Would you like to modify security zones? <Y,[N]>:y
Security zones:
# Zone na me Ports
1 LAN 1
2 VPN None
3 WAN 6
4 <empty>
5 <empty>
6 <empty>
7 <empty>
8 <empty>
9 <empty>
10 <empty>
Enter [A]ccept, [C]hange, [R]emove or [E]xit without saving [C]:
c
Enter the number of the entry you want to change []: 2
Zone Name [LAN2]: MyZone
Network port (0 for None) [0]: 1
*** WARNING: Accepting this change will move port 1 from "LAN"
to "VPN".
***
10 X Family CLI Reference V 2.5.1
Page 19

Assigning Zones to Virtual Interfaces
Security zones:
# Zone na me Ports
1 LAN None
2 VPN 1
3 WAN 6
4 <empty>
5 <empty>
6 <empty>
7 <empty>
8 <empty>
9 <empty>
10 <empty>
Enter [A]ccept, [C]hange, [R]emove or [E]xit without saving [C]:
a
Assigning Zones to Virtual Interfaces
The Modify Security Zones Mapping to Virtual Interfaces dialog maps existing zones to existing
interfaces.
Example
Would you like to modify security zone to Virtual Interfaces mapping? <Y,[N]>:y
Virtual inte rf ac e to sec ur it y zon e ma pp in g:
Id Type Zones Mode IP Address Subnet Mask
1 internal LAN static 192.168.1.254 255.255.255.0
VPN
2 external WAN dhcp
Enter [A]ccept, [C]hange, or [E]xit without saving [C]: c
Enter the number of the entry you want to change []: 1
Enter [A]dd, [R]emove, or [E]xit without saving [E]: r
Zone name []: LAN
Virtual interface to security zone mapping:
Id Type Zones Mode IP Address Subnet Mask
1 internal VPN static 192.168.1.254 255.255.255.0
2 external WAN dhcp
Enter [A]ccept, [C]hange or [E]xit without saving [C]: a
Configuring DNS Settings
The Domain Name Services (DNS) dialog configures DNS settings. By default, the X family device
acquires DNS settings using DHCP. You can use a custom DHCP server or specify a static address.
Example
DNS (Domai n Na me Se rv ic e) i s a s ys te m wh ic h t ra ns la te s com pu te r ho st na me s t o IP
addresses. The X-Series device requires DNS configuration in order to perform
web filtering.
X Family CLI Reference V 2.5.1 11
Page 20

Chapter 1. X Family Startup Configuration
Would you like to configure DNS? <Y,[N]>:y
Would you like to use the DNS configuration obtained from the
WAN connection ? <[Y],N>:n
Enter DNS Server 1 IP Address (0.0.0.0 to clear): []: 10.0.0.1
Enter DNS Server 2 IP Address (0.0.0.0 to clear): []: 10.0.0.2
Enter DNS Server 3 IP Address (0.0.0.0 to clear): []:
Enter DNS Search Domain 1 ("" to clear): []: example.com
Enter DNS Search Domain 2 ("" to clear): []:
Enter DNS Search Domain 3 ("" to clear): []:
DNS settings manually configured.
DNS Server 1: 10.0.0.1
DNS Server 2: 10.0.0.2
DNS Server 3:
DNS Domain 1: example.com
DNS Domain 2:
DNS Domain 3:
Enter [A]ccept, [C]hange, or [E]xit without saving [C]: a
Setup Firewall Rules
The Setup Firewall Rules dialog will reset all firewall rules back to the factory defaults and then enable
you to view and modify them.You are also able to configure web filtering.
Example
Firewall pol ic y ru le s co nt ro l the flo w of net wo rk tra ffi c be tw ee n se cu ri ty
zones. Firewall policy rules control traffic flow based on source and
destination security zones and network protocol.
Would you like to modify firewall policy rules? <Y,[N]>:y
The current state of firewall rules is as follows:
ID Action Source Destination Service E
1 permit LAN WAN ANY X
2 permit WAN this-device vpn-protocols X
3 permit LAN this-device management X
4 permit LAN this-device network-protocols X
Key: (E)nabled
Modifying the firewall rules via this wizard resets the rules to
a default state and allows you to configure basic policies for
Internet access, web filtering, and device management.
Do you want to continue? <Y,[N]>:y
Would you like default policies allowing all internal security
zones access to the Internet? <Y,[N]>:y
You may now choose to enable the web filtering service. Note
that access to this service requires a subscription.
12 X Family CLI Reference V 2.5.1
Page 21

Would you like to enable web filtering (license required) and
set up firewall rules for all internal security zones? <Y,[N]>:y
Please choose a web filtering server. For best performance,
select the server location that is closest to you. Available
locations are:
# Location
1 North America (us.surfcpa.com)
2 Europe 1 (uk1.surfcpa.com)
3 Europe 2 (uk2.surfcpa.com)
4 Asia (asia.surfcpa.com)
Enter web filtering server selection []: 3
Would you like to allow management of the device from the
external security zone (inband management)? <Y,[N]>:y
Would you like to enable DHCP server on internal security zon es
<Y,[N]>:y
Enabling SMS Configuration
Enabling SMS Configuration
The SMS Configuration dialog enables or disables configuration of the device by a Security
Management System (SMS). If you enable this feature, you will be prompted to enter the IP address of
the SMS device that you want to manage the X family device. The X family device will initiate a call to
the SMS to begin the acquisition of the configuration files.
Note: The SMS must be correctly configured to enable remote deployment to the
device. For detailed information about the SMS and remote deployment, see “X
Family Remote Deployment” in the SMS User’s Guide.
By default, the external virtual interface on the X family device uses DHCP to acquire a dynamic IP
address from a DHCP Server. You do not need to make any changes to the default setting when you
enable SMS configuration. Additional configuration will be required if you use other external IP
address options such as static, PPPoE, PPTP, or L2TP. The following example assumes that the X family
device is using the default external virtual interface settings.
Example
SMS-based configuration allows the device to retrieve the
configuration for a secure management VPN to the SMS system.
This ensures that the device can be managed securely from the
SMS
Would you like to enable SMS-based configuration? <Y,[N]>:y
Enter Primary Security Management System IP Address []:
10.24.54.210
Do you have a redundant SMS server? <Y,[N]>: n
Primary SMS IP address: 10.24.54.210
Enter [A]ccept, [C]hange, or [E]xit without saving [C]: a
X Family CLI Reference V 2.5.1 13
Page 22

Chapter 1. X Family Startup Configuration
When the SMS is on a different site than the device, a potential
misconfiguration in the SMS may result in the loss of remote
management access to the device. To protect against this you can
enable a firewall rule to allow SSH and HTTPS access into the
device from the WAN security zone and the internet. This rule
will only be enabled after the SMS has timed out trying to
acquire the device. During the time the firewall rule is
enabled, management access to the device will be available to
any IP address on the internet providing the correct username
and password.
Would you like to enable WAN access on SMS configuration
failure? <Y,[N]>: N
Web, CLI, and SNMP Server Options
The Web, CLI, and SNMP Server Options dialog turns the X family device servers on and off. You
should always use the secure Web and CLI servers (HTTPS and SSH) when conducting normal
operations. You should only use the non-secure (HTTP) servers for troubleshooting if you cannot get
the secure alternatives running for some reason.
Note: You do not need to run any servers if you want to control the X family
device only through the serial port, but you will be unable to manage filters
without servers. You can turn off all servers by using the following commands:
• conf t server no http
• conf t server no https
• conf t server no ssh
• conf t sms no v2
You must reboot the device for changes to HTTP or HTTPS to take effect.
Secure and Non-Secure Operation
You can enable the secure and non-secure servers for the CLI (SSH and HTTP). You cannot enable both
the secure and non-secure servers for the Web. This is to prevent inadvertent security lapses within
your network security infrastructure. In practical terms, this means that if you enable the HTTPS
server, the HTTP server is disabled.
SMS Operation
The HTTPS server is required for SMS management. The implication of this is that if you will be using
the SMS to manage the devices, you cannot run the non-secure HTTP server.
14 X Family CLI Reference V 2.5.1
Page 23
Web, CLI, and SNMP Server Options
Default Server Settings
The default settings of the Web, CLI, and SNMP servers are:
Table 1–5: Default Web, CLI, and SNMP Server Options
Name Default Setting Required By Reboot Required
SSH ON secure CLI over network no
HTTPS ON SMS, secure LSM yes
HTTP OFF non-secure LSM yes
SNMP ON SMS, NMS yes
Note: You can use the CLI
reboot
command to reboot the X family device if
you modify settings for which a reboot is required.
SSH Server
The SSH Server enables encrypted terminal communications. The SSH server must be enabled to
establish a secure CLI session over your network.
HTTPS Server
The HTTPS web server enables encrypted file transfers over the network. The HTTPS server must be
enabled to use SMS management. You can also run the LSM using the HTTPS server.
HTTP Server
You can enable the HTTP server to run non-secure LSM sessions on your network.
CAUTION: HTTP is not a secure service. If you enable HTTP, you endanger the security of
the X family device. Use HTTPS instead of HTTP for normal operations.
SNMP Server
The SNMP Server provides access to interface counters and other statistics, configuration data, and
general system information via the Simple Network Management Protocol (SNMP). The SNMP server
must be enabled to use SMS management or to allow NMS access.
Example
The Server Options dialog follows:
Server options allow you to enable or disable each of the
following servers: SSH, , HTTPS, HTTP, and SNMP.
Would you like to modify the server options? <Y, [N]>: y
Enable the SSH server? [Yes]:y
Enable the HTTPS server ('No' disables SMS access)? [Yes]:y
Enable the HTTP server? [No]:n
X Family CLI Reference V 2.5.1 15
Page 24

Chapter 1. X Family Startup Configuration
Enable the SNMP agent ('No' disables SMS and NMS access)?
[Yes]:y
SSH: Yes
HTTPS: Yes
HTTP: No
SNMP: Yes
Enter [A]ccept, [C]hange, or [E]xit without saving [C]: e
NMS Settings
The NMS Options dialog configures the Network Monitoring System (NMS) settings available for the
device. This feature enables monitoring of the device by an NMS, such as HP OpenView.
Example
The NMS Options dialog follows:
A Network Management System (NMS) such as HP OpenView (TM) can
be used to monitor and receive traps from your device.
Would you like to configure a Network Management System?
<Y,[N]>: y
Restrict SMS
This option configures the device to accept management only from an SMS at a specified IP address.
Example
The Restricted SMS Access dialog follows:
SMS sourced co nfig urat ion all ows th e devi ce to ret riev e the co nfigu rati on for a
secure management VPN to the SMS system. This will ensure that the device can be
managed securely from the SMS
Would you like to enable SMS based configuration? <Y,[N]>:n
Additional Configuration
After you have run the initial setup wizard through the Command Line Interface via a serial terminal,
you can further configure the device. These subsequent setup options include the following:
• “Changing Network Deployment Configuration” on page 16
• “Ethernet Port Settings” on page 17
• “Default Email Contact Information” on page 18
Changing Network Deployment Configuration
Use the setup x-series command to change network deployment options. Depending on the options
that you select, you may also be required to change your virtual interface configuration.
16 X Family CLI Reference V 2.5.1
Page 25

Additional Configuration
Example
In this example, the X family device was originally configured in Routed mode, as described in
“
Network Deployment Configuration” on page 9. In changing to NAT mode, an external virtual
interface must also be configured, and you are prompted to do so after selecting NAT mode. The
default IP addresses are accepted, and no additional configurations are made.
device11# se tu p x- se ri es
Would you like to modify the network deployment mode? <Y,[N]>:y
Please choose a network deployment option:
1) Routed mode
2) NAT mode
3) Transparent (layer 2) mode
Please Select []: 2
You must now configure the external interface.
Mode (static, dhcp, pppoe, pptp, l2tp) [static]: dhcp
Your selected deployment mode requires an internal interface in
order to function correctly. Would you like to create one now?
<Y,[N]>:y
IP Address [192.168.1.254]:
Mask [255.255.255.0]:
Would you like to modify virtual interfaces? <Y,[N]>:n
Would you like to modify security zones? <Y,[N]>:n
Would you like to modify security zone to virtual interface
mapping? <Y,[N]>:n
Would you like to modify firewall policy rules? <Y,[N]>:n
Would you like to enable SMS based configuration? <Y,[N]>:n
Ethernet Port Settings
The Ethernet port configuration dialog does not run in the Out-of-the-Box Setup Wizard. You can only
access the Ethernet Port Setup by using the
Tip: You can configure Ethernet ports individually using the conf t interface
ethernet command.
CAUTION: When you configure an Ethernet port using the command line interface, the
port will be shut down. Use the conf t int ethernet <slot> <port> no shutdown
command to restart the port.
setup
command in the CLI.
Ethernet Port Options
The Ethernet Port Options dialog sets individual port values for the Ethernet interface.
X Family CLI Reference V 2.5.1 17
Page 26

Chapter 1. X Family Startup Configuration
Line Speed
The line speed setting for port. A valid entry will meet the following criterion:
• either 10 or 100
Duplex Setting
The duplex setting for the port. A valid entry must be one of the following:
• copper - full or half
Auto Negotiation
The auto negotiation setting determines whether the port will negotiate its speed based on the
connection it can make. A valid entry must be one of the following:
•on
•off
Example
An excerpt of the Ethernet Port Options dialog follows:
device18# se tu p et h
Configure slot 3 (Ethernet Ports)? <Y,[N]>:y
Configure port 1 (Ethernet Port)? <Y,[N]>:y
This port is currently enabled, would you like to disable it?
<Y,[N]>:n
Please enter values for the following options
Line speed [100]:
Duplex setting [Full]:
Auto negotiation [On]:
The settings entered for slot 3, port 1 are as follows:
Line speed: 100
Duplex setting: Full
Auto negotiation: On
Enter [A]ccept, [C]hange, or [E]xit without saving [C]: a
Configure port 2 (Ethernet Port)? <Y,[N]>:
CAUTION: When you configure a Ethernet port using the command line interface, the port
will be shut down. Use the
shutdown
command to restart the port.
conf t int ethernet <s lot> <port> no
Default Email Contact Information
The Default Alert options dialog does not run in the Out-of-the-Box Setup Wizard. You can only access
the Management Port Routing options by using the
These options enable you to establish the default sender and recipient for filter alert e-mails.
18 X Family CLI Reference V 2.5.1
setup
command in the CLI.
Page 27

Additional Configuration
TO email address
The TO email address is the email address to which alert notifications will be sent. A valid entry must
meet the following criteria:
• must be less than 129 characters long
• must be a valid email address. For example: johndoe@mycompany.com
FROM email address
The FROM email address is the address that alert notifications will contain in the from field. A valid
entry will meet the following criteria:
• must be less than 129 characters long
• must be a valid email account name on the SMTP server
• must be a valid email address on the SMTP server
Domain
The Domain Name is the domain name of the SMTP server. A valid entry will meet the following
criteria:
• must be a valid domain name with a DNS entry on the network the device is located on
• must be the domain name where the SMTP server is located
Email Server IP address
The email Server IP address should be the address where the SMTP server is located. A valid entry will
meet the following criterion:
• must be a valid IP address for an SMTP server
Period
The Period is the aggregation period for email alerts. The first time a filter that calls for email
notification is triggered, the device sends an email notification to the target named in the filter. At the
same time, the aggregation timer starts. The device counts additional filter triggers, but does not email
another notification until it sends a count of all filter triggers that occurred during that period. The
timer continues to count and send notifications at the end of each period. A valid entry will meet the
following criterion:
• an integer between 1 and 10,080 representing minutes between notifications
Example
The Default Email Contacts Dialog follows:
Would you like to modify the default Email contact? <Y,[N]>:y
Enter TO: email address (128 max. characters)
Must be a full email address (e.g., recipient@company.com) []:
employee@company.com
Enter FROM: email address (128 max. characters)
Must be a full email address (e.g., sender@company.com) []:
acme@company.com
Enter FROM: Domain Name (128 max. characters, e.g., company.com)
[]: company.com
X Family CLI Reference V 2.5.1 19
Page 28

Chapter 1. X Family Startup Configuration
Enter email server IP address []: 1.2.3.4
Enter period (in minutes) that email should be sent (1 - 1 0080)
[1]: 5
To: employee@company.com
From: acme@company.com
Domain: company.com
Email Server: 1.2.3.4
Period (minutes): 5
Enter [A]ccept, [C]hange, or [E]xit without saving [C]: a
After the Setup Wizard
After you have completed the setup wizard, if you have changed from the HTTPS to HTTP server or
SNMP, you must reboot. You can accomplish this by issuing the
After the device reboots, you can use the Local Security Manager graphical user interface (GUI) to
perform monitoring and configuration tasks.
Note: The X family device allows for 10 web client connections, 10 SSH (for CLI)
connections, and 1 console connection at any given time.
reboot
command from the CLI.
20 X Family CLI Reference V 2.5.1
Page 29

2
Command Reference
Descriptions and usage of CLI commands.
Overview
The following tables list the CLI commands by functionality, grouped according to the corresponding
LSM pages. Some CLI commands do not have corresponding functions in the LSM, and are listed in
Table 2–9 on page 27.
Table 2–1: LSM Home Page
LSM Home Page reboot 85
LSM Screen CLI Command Page
show log 98
show version 117
logout 83
Table 2–2: IPS Commands
LSM Screen CLI Command Page
Security Profiles: Category Settings conf t category-settings 38
show conf category-settings 88
Traffic Threshold conf t filter 44
show conf filter 89
show filter 94
X Family CLI Reference V 2.5.1 21
Page 30
Chapter 3 Command Reference
Table 2–2: IPS Commands (Continued)
LSM Screen CLI Command Page
Action Sets conf t notify-contact 58
IPS Services conf t port 59
Preferences conf t protection-settings 60
conf t default-alert-sink 40
show action-sets 87
show conf default-alert-sink 89
show conf notify-contacts 91
show default-alert-sink 93
show conf port 91
conf t tse 67
show conf tse 92
show protection-settings 111
Table 2–3: Firewall Commands
Firewall Rules conf t firewall rule 45
show conf firewall rule 89
show firewall rules 94
Services conf t firewall service 48
show conf firewall service 90
show conf firewall service-group 48
conf t firewall alg 45
conf t firewall service-group 48
show conf firewall alg 90
Schedules conf t firewall schedule 47
show conf firewall schedule 90
Virtual Servers conf t firewall virtual-servers 49
22 X Family CLI Reference V 2.5.1
show conf firewall virtual-servers 90
Page 31

Table 2–3: Firewall Commands (Continued)
Web Filtering conf t web-filtering 78
show conf web-filtering 92
show conf web-filtering filter-service 93
show conf web-filtering manual-filter 93
Table 2–4: VPN Commands
IPSec Status conf t vpn ipsec 74
show conf vpn ipsec 92
show conf vpn ipsec sa 92
show vpn ipsec 117
conf t vpn debug 71
IKE Proposals conf t vpn ike 71
show conf vpn ike 92
L2TP Status conf t vpn l2tp 76
show conf vpn l2tp 117
show vpn l2tp 92
PPTP Status conf t vpn pptp 77
show conf vpn pptp 92
show vpn pptp 117
Table 2–5: Event Commands
Logs clear log 31
conf t log audit select 56
show conf log 91
show log 98
show np 101
show policy counters 111
Health show health 95
X Family CLI Reference V 2.5.1 23
Page 32

Chapter 3 Command Reference
Table 2–5: Event Commands (Continued)
Reports show tse 116
Table 2–6: System Commands
Upd ate b oot 29
show firewall monitor 94
show firewall rules counters 94
conf t autodv 37
show autodv 87
show conf autodv 89
snapshot 118
Configuration: Time Options conf t clock 38
show clock 88
conf t ntp 58
show ntp 111
show timezones 115
Configuration: SMS/NMS conf t sms 66
conf t nms 58
show conf sms 92
show conf nms 91
show sms 115
Configuration: High Availability high-availability 82
conf t high-availability 49
show conf high-availability 90
show high-availability 96
Configuration: Thresholds conf t monitor threshold 57
Configuration: Email Server conf t default-alert-sink 40
24 X Family CLI Reference V 2.5.1
conf t email-rate-limit 43
show conf email-rate-limit 89
show default-alert-sink 93
Page 33

Table 2–6: System Commands (Continued)
show conf default-alert-sink 89
Configuration: Syslog Servers conf t remote-syslog 62
show conf remote-syslog 91
Configuration: Setup Wizard setup 86
show conf host 64
conf t server 64
show conf server 92
show chassis 87
conf t clock 38
conf t ntp 58
show clock 88
show timezones 115
conf t interface virtual 51
show conf interface virtual 91
conf t zone 80
show conf zone 93
conf t dns 43
show conf dns 89
conf t interface ethernet 50
show conf interface ethernet 90
conf t default-alert-sink 40
show conf default-alert-sink 89
Table 2–7: Network Commands
Configuration: Network Ports conf t int ethernet 50
show conf int ethernet 90
show int ethernet 96
Configuration: Security Zones conf t zone 80
show conf zone 93
X Family CLI Reference V 2.5.1 25
Page 34

Chapter 3 Command Reference
Table 2–7: Network Commands (Continued)
Configuration: IP Interfaces conf t interface virtual 51
Configuration: IP Address Groups conf t address-group 35
Configuration: DNS conf t dns 43
Configuration: Default Gateway conf t default-gateway 41
Routing conf t routing 63
show conf interface virtual 91
show interface virtual 96
show conf address-group 89
show conf dns 89
show conf default-gateway 87
show conf routing 91
show conf routing multicast 91
show routing 113
DHCP Server conf t dhcp-server 41
show conf dhcp-server 89
show dhcp-server 93
To o l s p i n g 84
traceroute 118
traffic-capture 119
Table 2–8: Authentication Commands
User List conf t local-user 55
conf t user 67
show conf user 92
show local-user 98
26 X Family CLI Reference V 2.5.1
show user 116
who 121
whoami 122
Page 35

Table 2–8: Authentication Commands (Continued)
Privilege Groups conf t authentication privilege-
groups
show conf authentication privilegegroup
RADIUS conf t authentication radius 36
show conf authentication radius 89
Preferences conf t user options 68
Table 2–9: CLI Commands
CLI history commands ! 28
history 83
CLI management commands alias 28
bugreport 30
cls 33
conf t session 65
36
89
show conf session 92
show session 114
exit 81
help 82
logout 83
quit 85
reboot 85
setup 86
show version 117
tree 120
X Family CLI Reference V 2.5.1 27
Page 36

Chapter 3. Command Reference
!
access: global; all
The ! command executes a command in the history
buffer. Use !! to repeat the previous command executed.
! #
indicates an item number in the history
“
execute command <number> from history buffer” on page 83 for an example.
buffer. Use ! # to execute command # in the history buffer. See
alias
access: global; all
The alias command lists defines abbreviated commands. The command accepts an alias and the string that the alias
will represent.
alias-name
The character string that you will type instead of the full command string. It must be a unique
combination of letters, numbers, and hyphens or underscores.
create a new
alias
show aliases
"command-string"
A text string that is either a valid CLI command or part of a command. If the string contains blanks,
you must enclose the string in quotes.
Using the alias command
Enter the alias command with an alias name and a command string enclosed in quotes.
hostname# alias eth "ethernet"
Enter the alias command without any parameters to show a list of currently defined aliases.
hostname# alias
eth ethernet
28 X Family CLI Reference V 2.5.1
Page 37

boot
delete an alias
Enter the alias command with an existing alias and no other parameters to delete that alias.
hostname# alias eth
boot
access: local; super, admin
The boot command lists, rolls back to, and removes prior boot images on the device.
list-image
shows a list of all available boot images.
Note: You cannot define an alias for an alias. Every alias must refer directly to a
valid CLI command, or to valid command input.
Note: The device can store several software images. A minimum of one saved
image is required for rollback purposes.
remove-image version
removes a boot image from the device’s hard disk. This command is disabled when the SMS manages
the device.
CAUTION: When you remove a boot image, the image is permanently erased from the
device’s hard drive. The only way to reinstall that image is to perform the update process
using the Local Security Manager.
rollback
rolls the boot image back to the next most current valid boot image. This command can be used to
revert the operating system to a previous version. For example, if you install the wrong update image to
the device, you can use the boot rollback command to restore the previous image. This command is
disabled when the SMS manages the device.
CAUTION: When you perform a rollback, you permanently erase the most current boot
image on the device’s hard drive. The only way to replace this image is to perform the
update process through the Local Security Manager.
X Family CLI Reference V 2.5.1 29
Page 38

Chapter 3. Command Reference
Using the boot command
view available
Enter boot list-image to list all available boot images.
boot images
hostname# boot list-image
image1 image2 image3
remove a boot
Enter boot remove-image
image-name
to remove a boot image from the device.
image from
the device’s
hostname# boot remove-image image2
hard disk
roll back to
Enter boot rollback to roll back to a previous boot image.
the next most
current image
hostname# boot rollback
bugreport
access: local; super, admin, operator
The bugreport command polls the device for statistics and other relevant information and sends the information as
a clear-text e-mail message to the specified e-mail address. You should only execute this command when requested
by support personnel.
The command may take a minute to execute. The default e-mail options must be configured for the e-mail transfer to
succeed. This can be accomplished using the setup email-default command.
CAUTION: Since this information is transferred via e-mail, it is transferred on an
unsecured channel in clear text. While we do not consider the system snapshot information
to constitute a security risk, you may choose to report system problems by other methods. If
so, please contact the Technical Assistance Center (TAC) to make other arrangements.
email-address
the email address of your designated bug report recipient. This must be a valid email user name on the
email notification server.
"description"
a short description (in double quotes) of the bug that the user is experiencing.
30 X Family CLI Reference V 2.5.1
Page 39

clear
access: global; super, admin
The clear command resets logs or hardware interfaces. The command requires one of the following subcommands.
arp-cache
clears dynamic entries from the Address Resolution Protocol (ARP) cache. ARP is an internet protocol
used to map an IP address to a MAC address.
connection-table blocks
clears all connection table block entries.
counter interface
clears interface counters. This command is disabled when the SMS manages the device.
clear
ethernet
clears Ethernet interface counters. When used without slot and port information, it clears the
counters for all Ethernet interfaces on the device.
mgmtEthernet
clears the counters for the Management Ethernet port on the device.
counter policy
clears all policy counters. This command is disabled when the SMS manages the device.
interface
clears the interface. When used without parameters, the command resets all interfaces on the
This command is disabled when the SMS manages the device.
ethernet [slot] [port]
clears the Ethernet interface. When used without parameters, the command clears all
Ethernet ports.
slot
clears all Ethernet ports in the blade that sits in
slot
.
device.
port
clears the numbered port.
X Family CLI Reference V 2.5.1 31
Page 40

Chapter 3. Command Reference
log [alert | audit | block | firewallblock | firewallsession | packet-trace | system | vpn]
clears the specified log or logs. When used without parameters, the command erases all entries in all
logs. This command is disabled when the SMS manages the device.
Note: When admin-level users issue the clear log command without
parameters, the audit log is not cleared. Only super-user-level users can clear the
audit log.
np [rule-stats | softlinx]
clears the statistical information related to either rules or the Softlinx.
ramdisk stats
clears the statistical information related to the RAM disk.
clear all
ethernet
counters
clear ethernet
counters of a
specific slot
clear ethernet
counter for a
specific port
clear all
Management
Ethernet
counters
rate-limit streams
clears rate limited streams from the data table.
Using the clear command
Enter clear counter interface ethernet without the slot or port parameters to clear the counters for all
Ethernet ports in all slots.
hostname# clear count int ethernet
Enter clear counter interface ethernet
slot-number
without the port parameter to clear the counters
for all Ethernet ports in a slot.
hostname# clear count int ethernet 7
Enter clear counter interface ethernet
slot-number port-number
to clear the counters for a specific
Ethernet port.
hostname# clear count int ethernet 7 2
Enter clear counter interface mgmtEthernet to clear all Management Ethernet counters.
hostname# clear count int mgmtethernet
reset all
interfaces
32 X Family CLI Reference V 2.5.1
Enter the clear interface command without any other parameters to reset the chassis. You will be
asked to confirm this command.
Page 41

hostname# clear interface
cls
reset the card
Enter the clear interface command and a slot number to reset the interface card in the specified slot.
in slot n
hostname# clear interface 2
reset port x on
Enter the clear interface command, a slot number, and a port number to reset the specified port.
the interface
card in slot n
erase all
hostname# clear interface 2 1
Enter the clear log command without any parameters to erase all entries in all logs.
entries in all
logs
hostname# clear log
Are you sure you want to clear out ALL logs? <Y,[N]>:Y
cls
access: global; all
The cls command clears the screen.
Using the CLS command
clear the
Enter the cls command to clear the screen.
screen
hostname# cls
configure
access: local; super, admin, operator can configure own session and change own password; clock - super; ntp super
The configure commands configure X family
terminal
The configure terminal commands change settings for many features of the device.
Tip: You can use the abbreviated form: conf t. You can also use a predefined alias:
cft.
Note: When you enter 8 asterisks (********) as a password in a configure
terminal command. the password will be set to the default value, which is
password.
software and hardware settings.
X Family CLI Reference V 2.5.1 33
Page 42

Chapter 3. Command Reference
conf t action-set action-set-name threshold threshold-period
The configure terminal action-set command configures new or existing action sets. The following
subcommands determine the action that each named action set takes.
allowed-dest [add | remove]
adds or removes a quarantine allowed destination.
apply-only [add | remove]
adds or removes a CIDR from the quarantine apply-only list.
block
creates or modifies an action set that blocks traffic.
quarantine
creates or modifies an action set that quarantines blocked traffic.
reset-both
creates or modifies an action set that performs a TCP reset on both the source and
destination of blocked traffic.
reset-destination
creates or modifies an action set that performs a TCP reset on the destination of
blocked traffic.
reset-source
creates or modifies an action set that performs a TCP reset on the source of blocked
traffic.
delete
deletes the named action set.
non-web-block
blocks non-web requests from quarantined hosts. Use non-web-block no to permit non-web
requests.
notify-contact [add | remove]
adds or removes a notification contact from an action set
packet-trace
enables and sets packet trace settings. You can enter a priority (high, medium, or low) and
the number of bytes to capture (64-1600).
permit
creates or modifies an action set that permits traffic.
rate-limit rate
creates or modifies an action set that rate-limits. Enter the desired rate in Kpbs.
34 X Family CLI Reference V 2.5.1
Page 43

configure
rename
renames the action set.
web-block
blocks web requests from quarantined hosts.
web-page
creates an internal web page to display web requests from a quarantined host.
web-redirect url
redirects web requests from a quarantined host to the URL that you specify.
whitelist [add | remove]
adds or removes a CIDR from a quarantine whitelist. Whitelisted CIDRs are always permitted.
conf t address-groups
The configure terminal address-groups commands configure IP address groups for the devices.
update an IP
address group
add an IP
subnet to an
IP address
group
add-entry name < host ip | subnet ip netmask mask | range ip1 ip2 >
adds an IP subnet, IP host, or IP range to an IP address group.
remove name
deletes an IP address group.
remove-entry name < host ip | subnet ip netmask mask | range ip1 ip2 >
removes an IP subnet, IP host, or IP range from an IP address group.
update name < host ip | subnet ip netmask mask | range ip1 ip2 >
updates the settings of an existing IP address-group or creates a new IP address-group.
Using the conf t address-group command
Use configure terminal address-group update to update an IP address group. In this example, the
group “test” is set as the single host 1.2.3.4”
hostname# conf t address-group update test host 1.2.3.4
Use configure terminal address-group add-entry to add an entry to an IP address group. In this
example, the 192.168.1.0/24 subnet is added to the “test” group:
hostname# conf t address-group add-entry test subnet 192.168.1.0
netmask 255.255.255.0
delete an IP
subnet from
an IP address
group
Use configure terminal address-group remove-entry to delete an entry from an IP address group.
In this example, the 192.168.1.0/24 subnet is deleted from the “test” group:
hostname# conf t address-group remove-entry test subnet 192.168.1.0
netmask 255.255.255.0
X Family CLI Reference V 2.5.1 35
Page 44

Chapter 3. Command Reference
delete an IP
address group
Use configure terminal address-group remove to delete an IP address group. In this example, the
“test” group is deleted:
hostname# conf t address-group remove test
conf t authentication
The configure terminal authentication command configures RADIUS authentication and privilege
groups on the device.
privilege-groups remove name
deletes a privilege group.
privilege-groups update name [web-filtering-bypass] [firewall-authentication] [vpn-client-access]
adds privileges to the named privilege group. These privileges will be assigned to users that
authenticate either via RADIUS or via the local database.
radius
controls RADIUS authentication.
default-privilege-group priv-group
defines a privilege group for a user currently unassigned to a privilege group on the
RADIUS server.
disable
disables RADIUS authentication.
enable
enables RADIUS authentication.
retries number
defines the number of times that the device will attempt to connect to the RADIUS
server. If the RADIUS server does not respond after that number of retries, the
device will use the local database for authentication.
server < primary | secondary > address [port port] shared-secret string
auth-method < pap | chap >
configures the settings for the RADIUS server. You can configure both a primary
and secondary server.
server secondary none
removes the configuration for a secondary RADIUS server.
timeout seconds
defines the time in seconds before the device will again attempt to connect to the
RADIUS server (if no response was originally received from the server).
36 X Family CLI Reference V 2.5.1
Page 45

user-authentication < enable | disable >
enables or disables RADIUS for user authentication.
vpn-clients < enable | disable >
enables or disables RADIUS authentication for VPN clients.
Using conf t authentication
configure
enable
RADIUS
configure
primary
RADIUS
server
create a
privilege
group
assign users to
a privilege
group
Use configure terminal authentication radius to enable RADIUS on the device.
hostname# conf t auth radius enable
Use configure terminal authentication radius server to configure the IP address, port, shared
secret, and authentication mehtod of the primary RADIUS server. In this example, the primary
RADIUS server is configured with the address 10.0.0.10 on port 581, with shared secret “TheSecret.”
and with pap as the authentication method:
hostname# conf t auth radius server primary 10.0.0.10 port 581 shared-secret
"TheSecret" auth-method pap
Use configure terminal authentication privilege-groups update to create or edit a privilege group.
In this example, the privilege group PrivGroup1 is granted VPN client access privilege only:
hostname# conf t auth priv update PrivGroup1 vpn-client-access
Use configure terminal authentication radius default-privilege-group to assign RADIUS users to
the default privilege group. In this example, RADIUS users are added to the privilege group
PrivGroup1:
hostname# conf t auth radius default-privilege-group PrivGroup1
conf t autodv day day time time [-period days]
The configure terminal autodv command schedules the day and time when the digital vaccine
definition files are updated. conf t no autodv disables the digital vaccine automatic updates.
By default, that the digital vaccine update will happen weekly on the specified day. Use the [-period
days
] option to specify a different number of days between updates. For example, to schedule an
update every five days, you would enter the command as follows:
hostname# conf t autodv 1200 -period 5
X Family CLI Reference V 2.5.1 37
Page 46

Chapter 3. Command Reference
conf t category-settings
The configure terminal category-settings command enables and disables filter categories. The
command also allows you to assign a specific action set to each category. The following categories can
be configured:
•exploits
• identity-theft
•im
•network-equipment
•p2p
•reconnaissance
•security-policy
•spyware
• streaming-media
• traffic-normal
•virus
•vulnerabilities
category disable
disables the filter category.
category enable [-action-set action]
enables the filter category. Use [-action-set
action
] to set a specific action set for the enabled
category, such as block or recommended.
conf t clock
The configure terminal clock command sets time and date functions on the device.
date YYYY-MM-DD
sets the system date.
dst
enables daylight saving time on the system clock.
no dst
disables daylight saving time.
time HH:MM [:SS]
sets the system time. The time is entered as two-digit values for hours, minutes and seconds.
Valid hours entries are from 00-23. Seconds are optional.
38 X Family CLI Reference V 2.5.1
Page 47

timezone
sets the timezone for the device.
Tip: Use the show timezones command to view a list of available timezone
abbreviations.
Note: You cannot set the time or date on the device while the NTP server is
enabled. You can set the time zone.
Using conf t clock
configure
set the system
date
set the system
clock to
daylight
saving time
turn daylight
saving time
off
set the system
time
set the system
timezone
Use configure terminal clock date to set the system date. In this example, the date is set to March 30,
2006.
hostname# conf t clock date 2006-03-30
Use configure terminal clock dst to enable daylight saving time on the system clock.
hostname# conf t clock dst
Use configure terminal clock no dst to disable daylight saving time.
hostname# conf t clock no dst
Use configure terminal clock to set the system time. In this example, the system time is set to 3:30
PM:
hostname# # conf t clock time 15:30:00
Use configure terminal clock timezone to set the system timezone. In this example, the system
timezone is set to Central Standard Time (CST):
hostname# conf t clock timezone CST
conf t ddos
The configure terminal ddos command defines the settings for managing Distributed Denial of Service
attacks.
connection-flood
configures the settings for connection flood attacks.
X Family CLI Reference V 2.5.1 39
Page 48

Chapter 3. Command Reference
cps
configures the settings to generate alerts on the number of connections per second.
conf t default-alert-sink
The configure terminal default-alert-sink command defines the default email recipient of
traffic-triggered alerts. no default-alert-sink disables the sending of alert emails.
domain domain-name
defines the domain name of the email notification server.
from email-address
defines the email address of the device. This must be a valid email user name on the email
notification server.
aggregate-alerts
enables aggregation of connection flood alerts. Use no aggregate-alerts to disable
alert aggregation.
aggregate-alerts
enables aggregation of alerts. Use no aggregate-alerts to disable alert aggregation.
set default
notification
recipie nt
set default
notification
sender
period minutes
defines the default period of time in which the device accumulates notifications before
sending an aggregate notification email
server ip
defines the IP address of the email notification server.
to email-address
defines the email recipient of traffic-triggered notifications. This must be a valid email
address.
Using conf t default-alert-sink
Use configure t default-alert-sink to set the default email notification recipient.
hostname# conf t default-a to kwalker@mycompany.com
Use configure terminal default-alert-sink from to set the default email notification sender.
hostname# conf t default-a from u1-corpnet3@mycompany.com
set email
notification
Use configure terminal default-alert-sink server to set the email notification server’s IP address. In
this example, the address is defined as 101.202.33.44.
server IP
address
40 X Family CLI Reference V 2.5.1
hostname# conf t default-a server 101.202.33.44
Page 49

configure
set email
notification
server domain
name
set the default
gateway
Use configure terminal default-alert-sink domain to set the email notification server’s domain
name.
hostname# conf t default-a domain mycompany.com
conf t default-gateway ip
The configure terminal default-gateway command defines a default gateway for the device. The
command configures the default route which is used to direct traffic when the device has no specific
route information for the destination. Normally this is the address of the ISP or upstream router
attached to the external virtual interface on the WAN port. In some network topologies another
internal device provides the route to the nternet; if so, this address can be a router on an internal
virtual interface. conf t no default-gateway disables the default-gateway feature.
Use conf t default-gateway to set the default gateway. In this example, the gateway address is defined
as 111.222.33.200:
conf t default-g 111.222.33.200
conf t dhcp-server
The configure terminal dhcp-server command configures the DHCP server inside the
device.
addresses < group group-name | subnet ip netmask mask | range ip1 ip2 | none >
configures the pool of IP addresses that are available to DHCP clients. The none option
removes an address group which was previously configured as the DHCP server address pool
source.
bootp < enable | disable >
enable or disable bootp.
disable
disables the DHCP server.
dns < default | server1 ip1 [server2 ip2 [server3 ip3] ] [domain domain-name] >
configures DNS settings for the DHCP server.
enable
enables the DHCP server.
lease-duration mins
set the lease duration time in minutes.
nbx nbx-ip
provides the NBX call processor address to phones that acquire their address via DHCP.
relay < disable | broadcast | <server ip [ relay-from-vpn] | tunnel tunnel-name >
configures DHCP relay.
X Family CLI Reference V 2.5.1 41
Page 50

Chapter 3. Command Reference
static-map add ip mac mac
assigns a static IP address to the device with the specified MAC address.
static-map remove ip
deletes a static mapping.
broadcast
enables a central VPN DHCP relay agent that will broadcast DHCP requests received
from a VPN tunnel.
disable
disables DHCP relay.
server ip [ relay-from-vpn]
sets the device to relay DHCP messages to a DHCP server at the IP address specified.
Use the relay-from-vpn option to relay DHCP messages received from a VPN
tunnel to the specified DHCP server.
tunnel tunnel-name
sets the device to relay DHCP messages over the named VPN tunnel.
enable DHCP
on the device
configure the
address pool
of the DHCP
server
remove DHCP
scope settings
relaying
messages
wins [primary server] [secondary server]
defines a primary or secondary WINS server.
Using conf t dhcp-server
Use configure terminal dhcp-server to enable the device’s DHCP server.
hostname# conf t dhcp-server enable
Use configure terminal dhcp-server addresses to configure the IP address pool of the DHCP server.
In this example, the DHCP scope is set as the address group 'dhcp':
hostname# conf t dhcp-server addresses group dhcp
Use configure terminal dhcp-server addresses none to deconfigure the DHCP scope settings when
the DHCP server is disabled.
hostname# conf t dhcp-server addresses none
Use configure terminal dhcp-server relay server relay-from-vpn to relay messages received over a
VPN tunnel to DHCP server 192.168.0.200 (Central VPN Relay Agent):
hostname# conf t dhcp-server relay server 192.168.0.200 relay-from-vpn
Use configure terminal dhcp-server relay tunnel to relay DHCP messages over the VPN tunnel
VPNTUNNEL (Remote VPN Relay Agent):
hostname# conf t dhcp-server relay tunnel VPNTUNNEL
42 X Family CLI Reference V 2.5.1
Page 51

configure
mapping a
static DHCP
entry
Use configure terminal dhcp-server static-map add to map a static DHCP entry for a MAC address
to the IP address 1.2.3.4:
hostname# conf t dhcp-server static-map add 1.2.3.4 mac 00:22:44:55:66:77
conf t dns
The configure terminal dns command manually configures the DNS server information for the
device.
domain-name domain-name [domain-name2 [domain-name3] ]
configures up to three domain names which will be used to resolve DNS lookups.
server server-name [server2 server-name [server3 server-name] ]
configures up to three IP addresses of DNS servers. You can also use this command to remove
DNS servers by entering 0.0.0.0 as the IP address.
use-external-dns < enable | disable >
enables or disables the use of a DNS configuration that is obtained through the WAN
connection.
using
manually
configured
DNS settings
specifying
DNS servers
remo vi ng D NS
servers
resolving DNS
lookups
Using conf t dns
Use configure terminal dns use-external disable to disable the use of a DNS configuration obtained
through the WAN connection:
hostname# conf t dns use-external disable
Use configure terminal dns server to specify the IP addresses of DNS servers:
hostname# conf t dns server 10.0.0.1 10.0.0.2
Use configure terminal dns server 0.0.0.0 to remove custom DNS servers:
hostname# conf t dns server 0.0.0.0
Use configure terminal dns domain-name to set the search domain for DNS lookups:
hostname# conf t dns domain-name mycompany.com
conf t email-rate-limit number
The configure terminal email-rate-limit command configures the maximum number of email
notifications the system will send every minute. The minimum is 1; the maximum is 35.
X Family CLI Reference V 2.5.1 43
Page 52

Chapter 3. Command Reference
conf t filter
The configure filter command configures a filter’s state and category for action set usage. The
available states include disabled and enabled. When you configure a filter, you must know and enter
the number for the filter. Only the reset subcommand supports “all” as an option.
number [-profile “profile-name”] adaptive-config
enables adaptive filtering for the filter. You must enter a filter number. You can optionally
include a profile and slot for the filter’s setting.
number [-profile “profile-name”] no adaptive-config
disables adaptive filtering for the filter. You must enter a filter number. You can optionally
include a profile and slot for the filter’s setting.
number [-profile “profile-name”] add-exception source dest
creates and adds an exception to a filter. You must include a filter number, source IP address,
and destination IP address. You can optionally include a profile and slot.
number [-profile “profile-name” ] delete-copy
deletes a copy of the filter. You must enter a filter number and profile in the command. The
slot is optional.
number [-profile “profile-name”] disable
disables a filter given the number. You must enter a filter number. You can optionally include a
profile and slot.
number [-profile “profile-name”] enable
enables a filter given the number. Do not use all in this command. You must enter a filter
number. You can optionally include a profile and slot. The command also includes an option
for action set.
-action-set string
specifies an action set for the filter.
number [-profile “profile-name”] remove-exception source dest
deletes an exception from a filter. You must include a filter number, source IP address, and
destination IP address. You can optionally include a profile and slot.
number [-profile profile-name] threshold threshold
enables you to modify threshold settings of port scan and and host sweep filters. A scan/
sweep user policy must already exist.
number [-profile profile-name] timeout seconds
enables you to modify timeout settings of port scan and and host sweep filters. A scan/sweep
user policy must already exist.
number [-profile “profile-name”] use-category
sets the specified filter to use the action set of its category, removing any previous overrides.
You must enter a filter number. You can optionally include a profile and slot.
44 X Family CLI Reference V 2.5.1
Page 53

configure
all reset
removes all user changes to all filters’ configuration and resets all filters to the default values.
conf t firewall alg sip
The configure terminal firewall alg sip command configures an application layer gateway (ALG) to
permit Session Initiation Protocol (SIP) sessions.
sdp-port-range [any | port-range]
configures the range of port numbers that SIP sessions can use. You can enter up to 20
separate port ranges, separated by commas, such as:
8000-8500, 10000-12000, 50000-51000
The any parameter enables all ports to accommodate SIP sessions.
services [any | service-name | service-group]
configures the service name or service group that permits SIP operations. The any parameter
enables the use of any service for the sessions.
conf t firewall monitor < clients | services | website >
The configure terminal firewall monitor command controls the collection of statistics related to
firewall sessions. Data is gathered about each session when the session closes down. By default,
monitors are enabled when the device starts up. Data is lost if the device is rebooted.
reset
immediately resets counters.
conf t firewall rule
The configure terminal firewall rule command creates and edits firewalls on the device. The
firewalls control traffic passing between security zones.
add [id] < permit | block | web-filter src-zone dst-zone service >
adds a firewall rule. If no ID is specified, the system assigns one and displays it.
counters-clear
clears counters for all firewall rules.
disable id
disables a firewall rule.
enable id
enables a firewall rule.
move id < after id | before id | to position-number >
moves a firewall rule within the firewall table.
X Family CLI Reference V 2.5.1 45
Page 54

Chapter 3. Command Reference
remove id
deletes a firewall rule.
update id
updates or creates a firewall with the specified ID. When a new rule is created, permit, block,
or web-filter must be specified.
authentication < disable | any | group name >
enables or disables authentication.
bandwidth < disable | < rule | session > guaranteed kbps max kbps pri pri >
restricts the bandwidth.
comment “description”
stores a comment for the rule.
counter-clear
clears counters for the rule.
dst-addr < all | group name | subnet ip netmask mask | range ip1 ip2 >
restricts destination addresses in the specified IP range.
logging < enable | disable >
enables or disables logging for the rule.
< permit | block | web-filter > src-zone dst-zone service
Required for a new rule. The variables
src-zone
and
dst-zone
can be this-device to
indicate the local device.
position position
the rule is placed in the specified position.
remote-logging < enable | disable >
enables or disables remote logging for the rule.
schedule < always | name >
schedules execution of the rule, either always or according to a named schedule.
src-addr < all | group name | subnet ip netmask mask | range ip1 ip2 >
restricts source addresses in the specified IP range.
timeout mins
specifies a timeout interval in minutes for the rule.
Using conf t firewall rule
create/update
firewall rule
46 X Family CLI Reference V 2.5.1
Use configure terminal firewall rule update to create or update a firewall rule. In this example,
firewall rule 10 is created as a “permit” rule for LAN to WAN and for telnet service only:
Page 55

hostname# conf t firewall rule update 10 permit LAN WAN telnet
configure
update source
and
destination
addresses
move a
firewall rule
above another
move a
firewall rule to
a specific
position
Use configure terminal firewall rule update to update source and destination addresses for a firewall
rule. In this example, firewall rule 10 is updated so that it restricts source addresses to the address
group 'engineers', but permits any destination address:
hostname# conf t firewall rule update 10 src-addr group engineers dst-addr all
Use configure terminal firewall move to move a firewall rule. In this example, rule 10 is moved above
rule 7:
hostname# conf t firewall move 10 above 7
Use configure terminal firewall move to move a firewall rule to a specific position. In this example,
rule 10 is moved to position 1 in the table:
hostname# conf t firewall move 10 to 1
conf t firewall schedule
The configure terminal firewall schedule command limits when a firewall rule will operate.
add-entry schedule-name day_letters [from time1 to time2]
add an entry to the named firewall schedule (without overwriting the other days).
create a
schedule
remove schedule-name
deletes the named schedule.
remove-entry schedule-name day_letters [from time1 to time2]
deletes an entry from a named schedule.
update schedule-name [days day_letters [from time1 to time2] ]
creates a named firewall schedule or updated an existing schedule..
Note: The variable day_letters is seven characters to represent the days and
time1 and time2 are the time in 24 hours clock.
Using conf t firewall schedule
Use configure terminal firewall schedule to create a schedule. In this example, a schedule named
'work' is created and scheduled for Monday through Friday from 9am to 5pm:
hostname# conf t firewall schedule update work days -MTWTF- from 0900 to 1700
In this example, a schedule named 'weekend' is created and scheduled for all day Saturday and Sunday:
hostname# conf t firewall schedule update weekend days S-----S
X Family CLI Reference V 2.5.1 47
Page 56

Chapter 3. Command Reference
conf t firewall service
Use configure terminal firewall service to configure the services that are used by the firewall rules.
remove service-name
deletes a service.
update service-name < tcp | udp | icmp | esp | ah | gre | igmp | ipcomp | number > [port port-number [to port-number] ]
creates a service or updates an existing service.
Using conf t firewall service
configure a
service for an
IP protocol
create a
service
Use configure terminal firewall service to create a service for an arbitrary IP protocol. In this
example, a service called 'ospf' is created for IP protocol 89:
hostname# conf t firewall service update ospf 89
Use configure terminal firewall service update to create a service that will be used by a firewall rule.
In this example, a service called 'Telnet' is created for TCP port 23:
hostname# conf t firewall service update Telnet tcp port 23
conf t firewall service-group
The configure terminal firewall service-group command groups services together.
add-service group-name service-name
adds a service to an existing service group.
remove group-name
deletes a service group.
remove-service group-name service-name
deletes a service from a service group.
update group-name service-name
creates or updates a service group. You can enter multiple service names.
Using conf t firewall service-group
create/update
a service
Use configure terminal firewall service-group update to create or update a service group. In this
example, a service group called ‘group1’ is created, and includes Telnet and rlogin:
group
hostname# conf t firewall service-group update group1 Telnet rlogin
48 X Family CLI Reference V 2.5.1
Page 57

configure
add a service
to a service
group
create a
virtual server
Use configure terminal firewall service-group add-service to add a service to a service group. In
this example, DNS service is added to the service group named ‘group1’:
hostname# conf t firewall service-group add-service group1 dns-udp
conf t firewall virtual-server
The configure terminal firewall virtual-server command configures a virtual server or servers that
will redirect traffic to a physical server on the LAN.
remove < all-services | service > public-ip <external | ip >
removes a virtual server.
update < all-services | service > public-ip < external | ip > internal-ip ip [pat < disable | port >]
updates or creates a virtual server.
Using conf t firewall virtual-server
Use configure terminal firewall virtual-server update to create a virtual server. In this example, an
HTTP virtual server is created and assigned to 192.168.1.1 port 90. The server accesses the external
virtual interface with port address translation (PAT):
create a NAT
mapping
hostname# conf t firewall virtual-server update http public-ip external
internal-ip 192.168.1.1 pat 90
Use configure terminal zone virtual-server update to create a one-to-one NAT mapping. In this
example, a 1-to-1 NAT mapping of 192.168.1.2 to 10.245.230.44 is created:
hostname# conf t firewall virtual-server update all-service public-ip 10.245.230.44
internal-ip 192.168.1.2
conf t high-availability
The configure terminal high-availability command configures High Availability. High Availability
supports stateless failover for up to two redundant devices.
disable
disables high availability on the device.
enable
enables high availability on the device.
heartbeat poll-timer wait-interval retry-count
sets the values for the poll timer, wait interval in milliseconds, and retry count for the
heartbeat ping.
X Family CLI Reference V 2.5.1 49
Page 58

Chapter 3. Command Reference
id id-number
configures an ID number that will be used when a MAC address conflict occurs. Because
MAC address conflicts normally do not occur, the ID number is not required. A standby
device must have the same ID number as the active device for which it is on standby.
conf t interface
The configure terminal interface command configures device interfaces. The command
abbreviation is conf t int.
Note: When referring to an interface, use the slot number and the port number
separated by a blank space. Do not use slashes, dashes, colons or any character
other than a single space between the slot number and the port number when
naming an interface on the command line.
ethernet slot-number port-number
configures Ethernet ports on the device. The command abbreviation is conf t int eth.
duplex < half | full >
sets the duplex for the port to either half or full.
set the line
speed for a
Ethernet port
linespeed < 10 | 100 | 1000 >
sets the line speed for a port.
negotiate
turns auto-negotiation on. no negotiate turns auto-negotiation off.
shutdown
administratively closes the port. no shutdown restarts a port after a shutdown
command or after configuration has changed.
Note: When you configure a Ethernet port, the port will be shut down. Use the
conf t int eth slot port no shutdown command to restart the port.
Using conf t interface ethernet
Use configure terminal interface ethernet linespeed to set the line speed for a Ethernet port. In this
example, the line speed on slot 7, port 2 is set to 100 Mbps. The port is then restarted.
hostname# conf t int eth 7 2 linespeed 100
hostname# conf t int eth 7 2 no shutdown
50 X Family CLI Reference V 2.5.1
Page 59

configure
turn auto
negotiation on
for a Ethernet
port
deactivate a
Ethernet port
reactivate a
Ethernet port
Use configure terminal interface ethernet negotiate to enable auto negotiation for a particular
Ethernet port. In this example, auto negotiation is enabled on port 8, slot 2. The port is then restarted.
hostname# conf t int eth 8 2 negotiate
hostname# conf t int eth 8 2 no shutdown
Use configure terminal interface ethernet shutdown to deactivate a Ethernet port. In this example,
port 8, slot 2 is deactivated.
hostname# conf t int eth 8 2 shutdown
Use configure terminal interface ethernet no shutdown to reactivate a Ethernet port. In this
example, port 8, slot 2 is reactivated.
hostname# conf t int eth 8 2 no shutdown
settings
configures the interface to enable/disable MDI-detect when auto-negotiation is off and to set
the polling interval for Ethernet port status changes.
detect-mdi [enable|disable]
sets the detect option for MDI as enabled or disabled.
mdi-mode [mdi | mdix]
indicates whether the connection is MDI or MDI-X.
poll-interval value
sets the polling interval for Ethernet port status changes. The value is in
milliseconds.
virtual
configures a virtual interface.
add id < external | gre | internal >
adds a virtual interface of the type you specify.
external id
configures the external interface.
bridge-mode < enable | disable >
enables or disables bridge mode. (If bridge mode is enabled, proxy ARP mode
is disabled; if bridge mode is disabled, proxy ARP mode is enabled.)
connect
permits a PPPoE/PPTP/L2TP interface to be connected.
disconnect
permits a PPPoE/PPTP/L2TP interface to be disconnected.
X Family CLI Reference V 2.5.1 51
Page 60

Chapter 3. Command Reference
ha-mgmt-ip ip
sets the virtual IP address that is used to manage the device in a high
availability configuration.
idle-disconnect < never | 15m | 30m | 1hr | 4hr >
selects the length of period of inactivity after which the interface will
disconnect.
igmp [enable | disable] [query-interval seconds]
[query-timeout seconds] [max-query-time seconds ]
enables and configures IGMP.
local-ip < dhcp | ip netmask mask gw gateway-ip >
sets the local IP address for connection to the server, either use DHCP or enter
the local WAN address of the device, the subnet mask and default gateway.
pim-dm < enable | disable >
enables PIM-DM.
release-dhcp-lease
releases the DHCP lease for the external virtual server’s IP address.
renew-dhcp-lease
renews the DHCP lease for the external virtual server’s IP address.
rip < enable | disable >
enables or disables RIP on this interface.
rip advertise-routes < enable | disable >
enables or disables the advertisement of RIP routes on this interface.
rip auth < disable | simple key | md5 key >
configures RIP v2 authentication type.
rip poison-reverse < enable | disable >
enables or disables poison reverse.
rip receive-mode < disable | v1 | v2 | all >
configures the RIP receive-mode.
rip send-mode < disable | v1 | v2-broadcast | v2-multicast >
configures the RIP send-mode.
rip split-horizon < enable | disable >
enables split horizon.
52 X Family CLI Reference V 2.5.1
type < dhcp | < pptp | l2tp > server-ip user username password password
| ppoe user username password password | static netmask netmask-IP >
configures the method by which the external interface can be allocated its IP
address.
Page 61

zone < add | remove > zone-name
adds a security zone to (or removes it from) this virtual interface.
gre id
Configures a GRE interface.
igmp [enable | disable] [ query-interval secs] [query-timeout secs]
[max-query-time secs]
Enables and configures IGMP.
local-ip ip-local
Configures the IP Address of the tunnel. Choose an unused IP address that is
routable through your network
peer-ip ip
configures the IP address of the tunnel on the remote device.
pim-dm < enable | disable >
enables PIM-DM.
configure
remote-endpoint-ip remote-ip-address
configures the IP address of the remote device (the tunnel endpoint) when GRE
is not secured by IPSec SA.
rip < enable | disable >
enables or disables RIP on this interface.
rip advertise-routes < enable | disable >
enables or disables the advertisement of RIP routes on this interface.
rip auth < disable | simple key | md5 key >
configures RIP v2 authentication type.
rip poison-reverse < enable | disable >
enables poison reverse.
rip receive-mode < disable | v1 | v2 | all >
configures the RIP receive-mode.
rip send-mode < disable | v1 | v2-broadcast | v2-multicast >
configures the RIP send-mode.
rip split-horizon < enable | disable >
enables split horizon.
sa sa_name
configures the IPSec Security Association that the GRE interface will use.
X Family CLI Reference V 2.5.1 53
Page 62

Chapter 3. Command Reference
zone < add | remove > zone-name
adds a security zone to (or removes it from) this virtual interface. A GRE tunnel
requires a security zone in order to function.
internal id
Configures an internal interface.
bridge-mode < enable | disable >
enables or disables bridge mode. (If bridge mode is enabled, proxy ARP mode
is disabled; if bridge mode is disabled, proxy ARP mode is enabled.)
ha-mgmt-ip ip
sets the virtual IP address that is used to manage the device in a high
availability configuration.
igmp [enable | disable] [ query-interval secs] [query-timeout secs]
[max-query-time secs]
enables and configures IGMP.
ip ip netmask netmask
configures the IP address that you have allocated for this interface and the
associated subnet mask.
nat < disable | external-ip | ip nat-ip >
enables NAT on this interface.
pim-dm < enable | disable >
enables PIM-DM.
rip < enable | disable >
enables or disables RIP on this interface.
rip advertise-routes < enable | disable >
enables or disables the advertisement of RIP routes on this interface.
rip auth < disable | simple key | md5 key >
configures RIP v2 authentication type.
rip poison-reverse < enable | disable >
enables poison reverse.
rip receive-mode < disable | v1 | v2 | all >
configures the RIP receive-mode.
rip send-mode < disable | v1 | v2-broadcast | v2-multicast >
configures the RIP send-mode.
54 X Family CLI Reference V 2.5.1
rip split-horizon < enable | disable >
enables split horizon.
Page 63

remove id
Deletes an interface.
Using conf t interface
configure
zone < add | remove > zone-name
adds a security zone to (or removes it from) this virtual interface.
create a new
internal
interface
configure
external
interface
enable RIP
configure RIP
send mode
Use configure terminal interface virtual int to create a new internal interface. In this example, an
internal interface with an ID of 3 is created:
hostname# conf t int vi add 3 int
The examples that follow assume that the following command has been executed (which puts the CLI
into the external interface context):
hostname# conf t int vi ext 2
Use type to configure the external interface. In this example, the interface is set to use L2TP server
1.2.3.4 and DHCP for local communication with a user “jdoe.” The interface will disconnect after 30
minutes of inactivity.
hostname(2)# type l2tp 1.2.3.4 user jdoe password bar
hostname(2)# idle-disconnect 30m
hostname(2)# local-ip dhcp
Use rip to enable RIP.
hostname(2)# rip enable
Use RIP send-mode to configure RIP send mode. In this example, send mode is configured to send
updates as RIPv2 multicast.
add a security
zone to an
interface
hostname(2)# rip send-mode v2-multicast
Use zone add to add a security zone to an interface. In this example, the WAN zone is added to the
external interface.
hostname(2)# zone add WAN
conf t local-user
The configure terminal local-user command creates, modifies, removes, or logs out a local user.
add username privilege-group group-name password password
adds a local user, assigns a password, and adds the user to a privilege group.
logout username [ip]
logs out the specified user. An IP address can be used to further specify the user.
X Family CLI Reference V 2.5.1 55
Page 64

Chapter 3. Command Reference
modify username [password password] [privilege-group group-name]
modifies an existing local user.
remove username
removes the specified user.
conf t log audit select
The configure terminal log command enables or disables what is contained in the audit log.
-all
sets the log to gather all information.
boot | no boot
enables or disables gathering of boot information for the system.
configuration | no configuration
enables or disables gathering of configuration information.
conn-table | no conn-table
enables or disables gathering of connection table information.
general | no general
enables or disables gathering of general information.
high-availability | no high-availability
enables or disables gathering of high availability information for the system.
host | no host
enables or disables gathering of host information.
host-communications | no host-communications
enables or disables gathering of host communication information.
ip-filter | no ip-filter
enables or disables gathering of HOST IP filter information.
login | no login
enables or disables gathering of login information, such as user accounts and system access.
logout | no logout
enables or disables gathering of logout information, such as user accounts and system
closing.
monitor | no monitor
enables or disables gathering of monitor information, such as packet and network traffic
scanning and events.
56 X Family CLI Reference V 2.5.1
Page 65

configure
oam | no oam
enables or disables gathering of OAM information.
policy | no policy
enables or disables gathering of policy information.
report | no report
enables or disables gathering of report information.
segment | no segment
enables or disables gathering of segment information, such as port and system settings per
segment of a device.
server | no server
enables or disables gathering of server information.
sms | no sms
enables or disables gathering of SMS information.
time | no time
enables or disables gathering of system time information.
tse | no tse
senables or disables gathering of information about the Threat Suppression Engine.
update | no update
enables or disables gathering of information about system and software updates, such as
Digital Vaccine and software updates.
user | no user
enables or disables gathering of information about the user, such as account information and
access capabilities.
conf t monitor
< enable | disable > power-supply
enables or disables monitoring of the power supply. If any of the power supplies for an IPS
device are interrupted, the power supply monitor feature logs a critical message in the system
log and sends a notification to the SMS if the device is under SMS management. This feature
is available on the following models: 200,400,1200,2400 and 600E, 1200E, 2400E, 5000E.
threshold
The configure terminal monitor command enables you to set hardware monitoring
thresholds for IPS disk usage, memory, and temperature values. Threshold values represent a
percentage and should be between 60-100. Temperature values are displayed as degrees
Celsius. When setting thresholds, the major threshold must be set at a value less than the
critical threshold value. A major threshold should be set to a value to give you time to react
X Family CLI Reference V 2.5.1 57
Page 66

Chapter 3. Command Reference
before a problem occurs. A critical threshold should be set to a value to warn you before a
problem causes damage.
conf t nms
The configure terminal nms command sets the trap IP address, trap port, and SNMP community
string for a Network Monitoring System (NMS). The NMS community string is separate from the
string used by SMS. conf t no nms turns off the NMS options for the system.
community NMS-community-string
sets the NMS community string, 1-31 characters.
disk [-major <60-100>] [-critical <60-100>]
sets the threshold for warnings about the disk usage of the device hard disk.
memory [-major <60-100>] [-critical <60-100>]
sets the threshold for device memory usage warnings.
temperature [-major <40-80>] [-critical <40-80>]
sets the threshold for device temperature warnings.
no nms
turns off the NMS options for the system.
trap-destination <add | remove > ip [port trap-port]
adds or removes a trap IP address and trap port of the NMS.
conf t notify-contact contact-name agg-period
The configure terminal notify-contact command sets the aggregation period of a notification
contact. You must enter a name of an existing notification contact and aggregation period (in minutes)
for the entry.
CAUTION: Short aggregation periods increase system load and can significantly affect
system performance. In the event of a flood attack, a short aggregation period can lead to
system performance problems.
In this example, the management console aggregation period is set to 2 minutes.
hostname# conf t notify-contact "Management Console" 2
conf t ntp
The configure terminal ntp command configures the NTP settings for the device.
disable
turns off NTP timekeeping.
58 X Family CLI Reference V 2.5.1
Page 67

configure
duration minutes
interval at which the X family
device will check with the time server.
enable
turns on NTP timekeeping.
fast < enable | disable >
enables the device to trust the NTP server after the first time query. This sets the local time on
the device immediately, but there is a risk that the set time will be incorrect.
offset seconds
If the difference between the new time and the current time is equal to or greater than the
offset, the new time is accepted by the device. A zero value will force time to change every
time the device checks.
peer server1[:port1] [server2[:port2] [server3[:port3] [server4[:port4] ] ] ]
sets the IP address of the network peer. The port number default is the IANA NTP port
number (123).
server server1[:port1] [server2[:port2] [server3[:port3] [server4[:port4] ] ] ]
sets the IP address of the NTP server. The port number default is the IANA NTP port number
(123).
turn NTP
timekeeping
on
turn off NTP
timekeeping
Using conf t ntp
Use conf t ntp to enable NTP timekeeping.
hostname# conf t ntp enable
Use the conf t ntp disable to turn off NTP timekeeping and use the device CMOS clock instead.
hostname# conf t ntp disable
conf t port protocol [add port-number | delete port-number]
The configure terminal port command configures additional ports associated with specific
applications, services, and protocols to expand scanning of traffic.
Note: The following protocols are allowed: auth, dnstcp, dnsudp, finger, ftp, http,
imap, ircu, mssql, nntp, pop2, pop3, portmappertcp, portmapperudp, rlogin, rsh,
smb, smtp, snmptcp, snmpudp, ssh, and telnet.
conf t profile profile-name
The configure terminal profile command enables you to create, modify, and delete security or traffic
management profiles.
X Family CLI Reference V 2.5.1 59
Page 68

Chapter 3. Command Reference
add-pair [in name | out name]
adds a security zone pairing to a profile.
delete
deletes an existing profile.
description description-string
enters a description for the profile.
remove-pair [in name | out name]
removes a security zone pairing from a profile.
rename profile-name
renames an existing profile.
security
creates a security profile.
creating a
profile
Using conf t profile
In this example, the security profile “LAN WAN” is created, and a security zone pairing is added:
hostname# conf t profile "LAN WAN" security
hostname# conf t profile "LAN WAN" add-pair LAN WAN
conf t protection-settings
The configure terminal protection-settings command creates global exceptions and apply-only
restriction rules for Application Protection, Infrastructure Protection, and Performance Protection
filters.
Note: If the profile name contains spaces, it must be enclosed in double quotes;
for example:
conf t protection-settings app-except add 111.222.33.44
111.222.55.66 -profile "Test Lab"
app-except
creates a global exception for Application Protection and Infrastructure Protection filters.
add -profile profile-name srcIP destIP
adds a global exception for an entered source or destination IP address according to
profile.
remove -profile profile-name srcIP destIP
removes a global exception for an entered source or destination IP address
according to profile.
60 X Family CLI Reference V 2.5.1
Page 69

configure
app-limit
creates an apply-only restriction for Application Protection and Infrastructure Protection
filters.
add -profile profile-name srcIP destIP
adds a global exception for an entered source or destination IP address according to
profile.
remove -profile profile-name srcIP destIP
removes a global exception for an entered source or destination IP address
according to profile.
perf-limit
creates an apply-only restriction for Performance Protection filters.
add -profile profile-name srcIP destIP
adds a global exception for an entered source or destination IP address according to
profile.
remove -profile profile-name srcIP destIP
removes a global exception for an entered source or destination IP address
according to profile.
conf t ramdisk
The configure terminal ramdisk command configures the synchronization of the RAM disk with the
hard disk.
force-sync filename
immediately synchronizes the RAM disk with the hard disk, either for all files or for the
specified file.
X Family CLI Reference V 2.5.1 61
Page 70

Chapter 3. Command Reference
sync-interval < alert | audit | block | firewallblock | firewallsession | sys | vpn > seconds
sets the synchronization interval in seconds for the specified file. A value of 0 means all writes
to that file are immediately written to the hard disk. A value of -1 means the specified file is
only written to the hard disk under one of the following conditions:
•the user enters a conf t ramdisk force-sync command
•the device is rebooted or halted
conf t remote-syslog
The configure terminal remote-syslog command configures a remote syslog server to record device
attack and block messages. Many operating systems and third-party remote syslog packages provide
the ability to receive remote syslog messages.
Note: Designating a remote syslog server does not automatically send attack and
block notifications to that server. You must also select the Remote System Log
contact by going to the Filters/Vulnerability filters/Action Sets area in the LSM
and either creating or editing an action set. After you apply these changes, active
filters that are associated with this action set will send remote messages to the
designated server.
CAUTION: Only use remote syslog on a secure, trusted network. Remote syslog, in
adherence to RFC 3164, sends clear text log messages using the UDP protocol. It does not
offer any additional security protections. You should not use remote syslog unless you can
be sure that syslog messages will not be intercepted, altered, or spoofed by a third party.
delete ip port
deletes a remote syslog collector.
update ip port
creates or updates a remote syslog collector. A collector is specified by the required
parameters IP address and port, plus a delimiter and facility numbers for alert messages,
block messages, and misuse/abuse messages. The facility numbers are all optional.
[-alert-facility 0-31]
optional facility setting for alert. The range is 0-31.
[-block-facility 0-31]
optional facility setting for block. The range is 0-31.
[-misuse-facility 0-31]
optional facility setting for misuse and abuse. The range is 0-31.
[-delimiter < tab | comma | semicolon | bar >]
setting for the log delimiter. Valid delimiters include tab, comma, semicolon, and
bar.
62 X Family CLI Reference V 2.5.1
Page 71

Using conf t remote-syslog
configure
designate a
system to
receive remote
syslog
messages
stop sending
syslog
messages to a
remote system
Use configure terminal remote-syslog upd
IP-address
to designate a remote syslog system. In this
example, the remote syslog system is configured on the IP address 1.2.3.4.
hostname# conf t remote-syslog upd 1.2.3.4 514
Use configure terminal delete to stop sending syslog messages to a remote system.
hostname# conf t remote-syslog delete 1.2.3.4 514
conf t routing
The configure terminal routing command configures the unit for static, dynamic, and multicast
routing.
multicast igmp < enable | disable >
globally enables IGMP.
multicast pim-dm [enable | disable] [query-interval seconds] [prune-timeout seconds]
globally enables PIM-DM and configures the query interval and the prune timeout.
rip [enable | disable] [update-timer seconds]
globally enables RIP and configures the interval between updates of RIP routes to neighbors.
enable RIP
add a static
route
static-route add ip netmask mask gw gateway [metric number]
adds a static route.
static-route remove ip netmask mask
deletes a static route.
Using conf t routing
Use configure terminal routing RIP to enable RIP. In this example, RIP is enabled with an update
timer of 30 seconds.
hostname# conf t routing rip enable update-timer 30
Use configure terminal static add to add a static route. In this example, a static route of metric 2 is
added to the 192.168.1.0/24 network via 192.168.10.2:
hostname# conf t routing static add 192.168.1.0 netmask 255.255.255.0 gw
192.168.10.2 metric 2
X Family CLI Reference V 2.5.1 63
Page 72

Chapter 3. Command Reference
enable
PIM
-
DM
Use configure terminal routing to globally enable PIM-DM.
hostname# conf t routing multicast pim-dm enable
conf t server
The configure terminal server command activates and deactivates communications services on the
device.
Note: When you turn HTTP or HTTPS on or off, you must reboot the device before
changes will take effect.
CAUTION: The conf t server command activates HTTP. HTTP is not a secure service. If
you enable HTTP, you endanger the security of the device. Use HTTPS instead of HTTP for
normal operations.
The SMS requires HTTPS communications. If you turn off the HTTPS server, the SMS will
not be able to manage the device.
browser-check | no browser-check
enables or disables browser checking. For browser compatibility information, refer to the
LSM User’s Guide
.
http | no http
enables or disables the HTTP server.
https | no https
enables or disables the HTTPS server.
ssh | no ssh
enables or disables the SSH server.
conf t service-access
The configure terminal service-access command enables and disables a special remote access user
login that can be used by a technical support representative to retrieve diagnostic information. This
login only functions when you enable it, and it will be deleted once the technical support representative
logs out. If you need technical support again in the future, you must reissue the command. conf t no
service-access disables the remote access login.
Note: When you issue the configure terminal service-access command, the
device will return the serial number and a “salt” value. You must retain these
numbers for the technical support representative.
64 X Family CLI Reference V 2.5.1
Page 73

configure
enable
technical
support
diagnostic
access
disable
technical
support
diagnostic
access
Use configure terminal service-access to enable technical support diagnostic access to the device.
hostname# conf t service-access
Use configure terminal no service-access to disable technical support diagnostic access to the
device.
hostname# conf t no service-access
conf t session
The configure terminal session command configures the display of the CLI session on your
management terminal. This command is enabled when the SMS manages the device. The command
abbreviation is conf t sess.
These commands are not persistent and session changes will be lost when you log out. Only superusers can create a persistent timeout option.
columns columns
sets the column width of the terminal session.
configure
session
settings
more
enables page-by-page output to the terminal screen. no more disables page-by-page output
to the terminal screen. The output appears as one continuous stream of text.
rows rows
controls the height of the session display by number of rows.
timeout minutes [-persist]
sets the inactivity timeout for the CLI session. The -persist option is super-user only, and it
applies the specified timeout value to all future sessions for all users as well as the current
session.
wraparound
controls text-wrapping for text longer than the set width of the session. The text is wrapped.
no wraparound turns off the text-wrapping option. The text is truncated.
Using conf t session
Use configure terminal session to configure session settings. In the following example, the display is
set to a size of 80 columns by 40 rows, page-by-page display, and wrapped text. The session will time
out after 25 minutes.
hostname# conf t session columns 80
hostname# conf t session more
hostname# conf t session wrap
hostname# conf t session rows 40
X Family CLI Reference V 2.5.1 65
Page 74

Chapter 3. Command Reference
hostname# conf t session timeout 25
hostname# show session
Current Session Settings
Terminal Type = Console
Screen width = 80
Screen height = 40
Hard wrap = Enabled
More = Enabled
Session Timeout = 25
conf t sms
The configure terminal sms command enables or disables SMS management of the device and
configures communications with the SMS. conf t no sms turns off SMS management and restores local
control to the device.
ip ip [port <0-65535>]
the IP address and port of the SMS that you want to monitor the device.
must-be-ip ip
restricts SMS management to the specified IP address or CIDR range. Only the SMS with this
IP can manage the device. no must-be-ip turns off SMS restriction, allowing any SMS to
manage the device.
remote-deploy primary-ip-address secondary-ip-address [-fallback]
enables configuration of the device by a primary and optional secondary SMS device,
specified by IP address. When the command is executed, the device will initiate a call to the
SMS to begin the acquisition of the configuration files. conf t sms no remote-deploy
disables the remote deployment.
When the SMS is on a different site than the device, a potential misconfiguration in the SMS
may result in the loss of remote management access to the device. To protect against this, you
can use -fallback to enable a firewall rule to allow SSH and HTTPS access into the device
from the WAN security zone and the Internet. This rule will only be enabled after the SMS
has timed out trying to acquire the device. While the rule is enabled, management access to
the device is available from any IP address on the Internet providing the correct username
and password.
For more information about remote deployment, refer to the
v2 | no v2
enables or disables SNMP v2 communications.
Using conf t sms
SMS User’s Guide
.
enable sms
management
66 X Family CLI Reference V 2.5.1
Use conf t sms to enable SMS management of the device. In this example, the command enables the
SMS device at the IP address 111.222.34.200 to manage the device:
hostname# conf t sms ip 111.222.34.200
Page 75

configure
enable remote
deployment
disable sms
management
Use conf t sms remote-deploy to enable configuration of the device by a remote SMS. In the first
example, the device will be configured by the SMS with the IP address 111.222.34.200:
hostname# conf t sms remote-deploy 111.222.34.200
In the next example, configuration by primary and secondary SMS devices is enabled. The primary
SMS IP address is 111.222.34.200, and the secondary SMS IP address is 111.222.34.201:
hostname# conf t sms remote-deploy 111.222.34.200 111.222.34.201
Use conf t no sms command to turn off SMS management of the device.
hostname# conf t no sms
conf t tse
The configure terminal tse command configures settings for the Threat Suppression Engine (TSE).
adaptive-filter mode [automatic | manual]
sets the adaptive filter mode to automatic or manual for the TSE.
afc-severity [critical | error | warning | info]
sets the severity of messages logged by the Adaptive Filter Configuration (AFC).
connection-table timeout <30-1800>
defines the global connection table timeout in seconds. The range is 30 to 1800 seconds.
logging-mode conditional [-threshold nn.n] [-period seconds]
enables improved performance by turning off alert/block logging when the device
experiences a specified amount of congestion. This feature is enabled by default.
The -threshold setting configures the percentage of packet loss that turns off logging. The
-period setting configures the amount of time logging remains off.
logging-mode unconditional
enables logging even when traffic is dropped under a high load. This command disables the
threshold option for disabling alert and block logging when a specified amount of congestion
passes through the device.
quarantine duration minutes
specifies the length of time for which a host will remain on the quarantine list when it is
identified by the device, SMS, or an administrator as having a security issue.
conf t user
The configure terminal user command configures user accounts. All users can change their own
passwords, but the majority of the command functionality is limited to super-users. This command is
enabled even when the SMS manages the device.
X Family CLI Reference V 2.5.1 67
Page 76

Chapter 3. Command Reference
add username
adds a user account to the system. You can add the password and role for the account with the
following flags.
Note: Do not use quotation marks in passwords. Quotation marks are treated
differently depending on how they are entered and where they are placed within a
password and may lead to confusion when attempting to log on to the device.
enable name
enables users who have been disabled by lockout or expiration. no enable
user account.
-password password
enters a password for the account. If you do not include the password on the
command line, you will be prompted for the password after entering the configure
terminal user add command.
-role < operator | admin | super-user >
assigns a user access role to the new user account.
name
disables a
modify name
modifies an existing user account.
[-password password]
enters a password for the account. If you do not include the password on the
command line, you will be prompted for the password after entering the configure
terminal user modify command.
-role < operator | admin | super-user >
assigns a user access role to the user account.
options
configures the security options for all user accounts on the device. If you use the conf t user
options command without any parameters, it displays the current settings.
attempt-action
controls how an device handles an account after the max-attempts setting is
exceeded. An attempt is recorded when an invalid password entry is submitted.
disable
disables the account when max-attempts is exceeded. A super-user must
re-enable the account with the conf t user enable command.
expire-action
configures the actions that the device takes on an account when a password expires.
68 X Family CLI Reference V 2.5.1
lockout
locks out an account for the period of time specified in lockout-period when
max-attempts is exceeded.
Page 77

configure
disable
disables the account when expire-period is reached. A super-user must
re-enable the account.
expire
expires the account when expire-period is reached. The user must enter a new
password when logging on.
notify
nothing is done to the account. The user is notified that the account is expired
and the user should change the password
expire-period days
sets the period of time in days that account passwords are valid. The expire-action
setting controls what happens next to the account. Valid periods, in days, include 0,
10, 20, 30, 45, 90, 332, and 365.
lockout-period minutes
sets a lockout period on a user account. Valid periods, in minutes, include 0, 1, 5, 10,
30, 60, and 360.
max-attempts <1-10>
sets the number of maximum login attempts on a single account. The attemptaction setting configures the action that occurs when max-attempts is exceeded.
The valid number of attempts is an integer from 1 to 10.
security-level <0-2>
sets the level of security checking that is performed when you add a new user or
change a password. Enter a level value of 0, 1, or 2.
The restrictions for the security levels includes the following:
Table 3-1: Security Levels
Level Description
Level 0 User names cannot have spaces in them.
Passwords are unrestricted.
Level 1 User names must be at least 6 characters long without spaces.
Passwords must be at least 8.
Level 2 Includes Level 1 restrictions and requires the following: 2 alphabetic
characters, 1 numeric character, 1 non-alphanumeric character
(special characters such as ! ? and *).
CAUTION: Using any security level less than 2 is counter to accepted business practice. If
you use a security level less than 2, the security of the device may be easily compromised
by a password guessing program.
X Family CLI Reference V 2.5.1 69
Page 78

Chapter 3. Command Reference
user remove username
removes a user account.
Using conf t user
add a new
user
enable a user
who has been
locked out
disable a user
change
security
checking level
disable or
lockout
account after
action is
attempted
many times
Use configure terminal user add to add a new user. In this example, the user kwalker is added with
the password tap2-tap2:
hostname# cft user add kwalker -role super -password tap2-tap2
Use cft user enable to enable a user who has been locked. In this example, the account kwalker is
enabled:
hostname# cft user enable kwalker
Use cft user no enable to disable a user. In this example, the account kwalker is disabled:
hostname# cft user no enable kwalker
Use cft user options security-level to change the security checking options. In this example, the
security level is changed to Level 2:
hostname# cft user options security-level 2
Use cft user option attempt-action to set the option to disable or lockout an account after repeated
and invalid attempts.
hostname# cft user option attempt-action disable
hostname# cft user option attempt-action lockout
disable an
account when
Use cft user option expire-action disable to set the option to disable an account when the password
expires.
it expires
hostname# cft user option expire-action disable
expire a user
when account
Use cft user option expire-action expire to set the option to expire an account when the password
expires.
expires
hostname# cft user option expire-action expire
notify a user
Use cft user option expire-action notify to set the option to notify a user when the password expires.
when account
expires
expire an
account after
hostname# cft user option expire-action notify
Use cft user option expire-period to cause accounts to expire after a set number of days. In this
example, this option will expire accounts after 10 days.
10 days
hostname# cft user option expire-period 10
70 X Family CLI Reference V 2.5.1
Page 79

configure
locks out an
account for
three minutes
locks out an
account after
five attempts
change the
password
expiration
period
remove a user
login
Use cft user option lockout-period to set the number of minutes that a user is locked out after the
maximum number of failed login attempts. In this example, the lockout period is 3 minutes:
hostname# cft user option lockout-period 3
Use cft user option max-attempts to set the maximum number of failed login attempts on user
accounts. In this example, the maximum number of attempts is 5:
hostname# cft user option max-attempts 5
Use cft user options expire-period to change the password expiration period. In this example, the
expiration period is 30 days:
hostname# cft user options expire-period 30
Use cft user remove to remove a user account. In this example, the account kwalker is removed:
hostname# cft user remove kwalker
conf t vpn debug
The configure terminal vpn debug command control VPN debugging.
logging < disable | enable >
disables or enables logging of all VPN-related events to the system log.
conf t vpn ike
The configure terminal vpn ike command adds and configures Internet Key Exchange (IKE)
proposals.
add proposal-name
adds an IKE proposal.
local-id [domain domain-name email email-address]
configures the local ID with a domain name and email address.
proposal proposal-name
takes you into the context of that IKE proposal.
aggressive-mode < enable | disable >
enables aggressive mode for authentication.
auth-type < psk | x509 >
selects the authentication type: pre-shared key or X.509 certificates.
auto-connect < enable | disable >
enables phase 1 auto-connect. Use auto-connect if you want to initiate the VPN
upon startup with IKE phase 1 proposals automatically established.
X Family CLI Reference V 2.5.1 71
Page 80

Chapter 3. Command Reference
Note: To enable phase 2 auto-connect, phase 1 autoconnect (auto-connect
enable) must also be enabled.
auto-connect-phase2 < enable | disable >
enables phase 2 auto-connect. Use auto-connect if you want to initiate the VPN on
startup with IKE phase 2 proposals automatically established.
ca-cert < any | certificate-name >
specifies the name of the CA certificate, if you are using certificates for
authentication.
dpd < enable | disable >
enables dead peer detection.
local-id-type < ip | email | domain | dn >
configures the identifier that the device will use for validation purposes. Use this if
you are using pre-shared key with aggressive mode. This identifier must match the
remote Peer ID Type.
Note: The local IDs for the email address and domain name types are configured
in the IKE Proposal. The local ID for the IP address type is the WAN IP address.
local-x509-cert certificate-name
specifies the name of the local certificate if you are using certificates for
authentication.
nat-t < enable | disable >
enables NAT-Transversal. Use NAT-Transversal if there is a NAT device between the
two VPN devices.
peer-id-type < ip | email | domain | dn >
selects the identifier for the device to use for validation purposes, either IP address,
email address or domain name. This must match the local ID type.
pfs < enable | disable >
enables or disables Perfect Forward Secrecy.
phase1-dh-group < 1 | 2 | 5 >
selects the Diffie-Hellman group number for IKE phase 1.
phase1-encryption < des-cbc | 3des-cbc | aes-cbc-128 | aes-cbc-192 |
aes-cbc-256 >
configures encryption for IKE phase 1. Some options are only valid on the High
Encryption agent, which can be downloaded from the TMC.
phase1-integrity < md5 | sha1 >
configures integrity for IKE phase 1.
72 X Family CLI Reference V 2.5.1
Page 81

configure
phase1-lifetime < 600–999999 >
selects the length of time in seconds you want the Security Association to last before
new authentication and encryption keys must be exchanged (between 600 and
999999 seconds, default 28800).
phase2-dh-group < 1 | 2 | 5 >
selects the Diffie-Hellman group number for IKE phase 2.
phase2-encryption < null | des-cbc | 3des-cbc | aes-cbc-128 | aes-cbc-192
| aes-cbc-256 >
configures encryption for IKE phase 2. Some options are only valid on the High
Encryption agent, which can be downloaded from the TMC.
phase2-integrity < none | esp-sha1-hmac | esp-md5-hmac | ah-md5 |
ah-sha1 >
configures integrity for IKE phase 2.
phase2-lifetime < 300–999999 >
selects the length of time in seconds you want the Security Association to last before
new authentication and encryption keys must be exchanged (between 300 and
999999 seconds, default 3600).
config ure local
ID to be a
domain name
or email
address
phase2-strict-id-check < enable | disable >
enables or disables strict ID checking.
phase2-zero-id < enable | disable >
enables the IP subnet tunnels without specified local and remote IDs. When this
option is enabled, administrators must control traffic through the routing
configuration and firewall rules.
tight-phase2-control < enable | disable >
when enabled, improves interoperability with VPN devices that automatically delete
all the phase 2 Security Associations when the phase 1 Security Association
terminates.
remove name
deletes an IKE proposal.
Using conf t vpn ike
Use configure terminal vpn ike local-id to configure the local ID as a domain name or email address.
In this example, the domain name is set as xyz.com and then the email address is set as
jdoe@xyz.com:
hostname# conf t vpn ike local-id domain xyz.com
hostname# conf t vpn ike local-id email jdoe@xyz.com
X Family CLI Reference V 2.5.1 73
Page 82

Chapter 3. Command Reference
name an IKE
proposal and
enter its
context
configure
phase 1
encryption
Use configure terminal vpn ike proposal to create an IKE proposal, which also opens the context for
that proposal. In this example, an IKE proposal named london is created, and the next command line
is in the context of that proposal:
hostname# conf t vpn ike add london
hostname# conf t vpn ike proposal london
hostname(london)#
Use phase1-encryption within the context of the IKE proposal to configure phase 1 encryption. In
this example, phase 1 encryption to 3DES-CBC is set in the context of the proposal named london:
hostname# conf t vpn ike proposal london
hostname(london)# phase1-encryption 3des-cbc
conf t vpn ipsec
The configure terminal vpn ipsec command configures an IPSec VPN tunnel.
Note: The name “Default” represents the default SA (Security Association).
In the command-line interface, you cannot renegotiate or delete a Security
Association terminating on the device if that device did not initiate that Security
Association.
add name
configures the name for a new Security Association.
disable
disables IPSec.
enable
enables IPSec.
remove name
deletes the configuration of a Security Association.
sa name
takes you into the context of the named Security Association.
delete
brings down any tunnels using this Security Association.
disable
disables this Security Association.
enable
enables this Security Association.
74 X Family CLI Reference V 2.5.1
Page 83

configure
key
selects and configures the keying mode. Some options are only valid on the High
Encryption agent, which can be downloaded from the TMC.
manual incoming-spi spi outgoing-spi spi encryption
< des-cbc | 3des-cbc | aes-cbc-128 | aes-cbc-192 | aes-cbc-256 >
authentication <esp-sha1-hmac | esp-md5-hmac | ah-md5 | ah-sha1>
encryption-key key auth-key key
configures manual mode.
ike proposal proposal-name [shared-secret secret] [ peer-id id]
configures IKE proposal. If included, the shared secret must be at least 8
characters long.
negotiate
starts negotiation of the tunnel.
peer ip
configures the IP address of the terminating VPN unit or network device (the
remote target of the VPN link).
transport < enable | disable >
enables or disables transport mode. Use this if you are using L2TP or if you are
configuring a Security Association to use with a GRE interface.
tunnel
controls tunneling.
disable
disables tunneling.
enable
enables tunneling.
local < default-route | dhcp | group group-name |
subnet ip netmask netmask | range ip1 ip2 >
select the source IP addresses that are allowed to use this IPSec tunnel by
specifying an IP address group, subnet, or range. You should use an IP address
group that contains all the source IP addresses of devices that can use the IPSec
tunnel.
Choose default-route if the remote IPSec peer uses this IPSec tunnel as its
default route. Choose dhcp if the local network devices receive IP addresses by
DHCP over this IPSec tunnel. DHCP relay must first be configured to use this
tunnel before selecting this option.
nat < disable | ip >
enables or disables NAT tunneling.
X Family CLI Reference V 2.5.1 75
Page 84

Chapter 3. Command Reference
Using conf t vpn ipsec
remote < default-route | dhcp | group group-name |
subnet ip netmask netmask | range ip1 ip2 >
select the destination IP addresses that can be reached over this IPSec tunnel by
specifying an IP address group, subnet, or range.
Choose default-route if this device uses this IPSec tunnel as its default route
for all network traffic that does not have a more specific route. Choose dhcp if
the remote device receives IP addresses by DHCP over this IPSec tunnel.
zone zone
specify the security zone on which you want the VPN terminated.
create and
enter the
context of an
SA
configure the
IP address of
the IPSec
gateway
configure the
termination
zone
configure the
keying mode
Use configure terminal vpn ipsec sa to create and enter the context of a Security Association. In this
example, an SA called tunnelone is created. The next command line is within the context of the SA.
hostname# conf t vpn ipsec add tunnelone
hostname# conf t vpn ipsec sa tunnelone
hostname(tunnelone)#
Use peer in the context of an SA to configure the IP address of the IPSec gateway. In this example, the
IPSec gateway 192.168.1.5 is configured within the context of the SA tunnelone:
hostname(tunnelone)# peer 192.168.1.5
Use zone within the context of an SA to configure the security zone where a VPN tunnel will terminate.
In this example, the termination zone is set to LAN within the context of the SA tunnelone:
hostname(tunnelone)# zone LAN
Use key within the context of an SA to configure the keying mode. In this example, set in the context of
the SA tunnelone, the keying mode is set to IKE with the proposal ike-propsal1, the peer ID is
xyz.abc.com and the shared secret is bananas!:
hostname(tunnelone)# key ike proposal ike-proposal1 peer-id xyz.abc.com
shared-secret bananas!
configure the
destination
Use tunnel within the context of an SA to set the destination network of the tunnel. In the example, the
destination network is configured on the subnet 192.168.2.0 and netmask 255.255.255.0:
network
hostname(tunnelone)# tunnel subnet 192.168.2.0 netmask 255.255.255.0
conf t vpn l2tp
The configure terminal vpn l2tp command configures an L2TP VPN connection.
76 X Family CLI Reference V 2.5.1
Page 85

configure
addresses < radius | group name | none >
configures how L2TP addresses are assigned. Either specify none, specify a RADIUS server,
or specify an IP address group from which to have addresses assigned.
disable
disables the L2TP server.
dns < relay | server-ip-1 [server-ip-2] >
configures DNS servers. Use relay if you want the device to act as a proxy-DNS server (DNS
relay), passing DNS queries to its configured DNS servers. You can also specify up to two DNS
server IP addresses.
enable
enables the L2TP server.
encryption < enable | disable >
enables Microsoft Point-to-Point Encryption.
logout username [ip]
forces a logout of the named user or the named IP address.
configure
address group
for L2TP
clients
configure a
termination
zone for L2TP
clients
wins server-ip-1 [server-ip-2]
specifies the IP addresses of the primary and secondary WINS servers (if you are using
Microsoft Networking).
zone zone-name
selects the remote security zone on which to terminate the VPN.
Using conf t vpn l2tp
Use configure terminal vpn l2tp addresses to configure the address group from which L2TP clients
will be assigned their IP addresses. In this example, addresses are assigned from an address group
called l2tp:
hostname# conf t vpn l2tp addresses group l2tp
Use configure terminal vpn l2tp zone to configure the security zone where L2TP clients will
terminate. In this example, clients will terminate in the LAN zone:
hostname# conf t vpn l2tp zone LAN
conf t vpn pptp
The configure terminal vpn pptp command configures a PPTP VPN connection.
addresses < radius | group name | none >
configures how PPTP addresses are assigned. Either specify none, specify a RADIUS server,
or specify an IP address group from which to have addresses assigned.
X Family CLI Reference V 2.5.1 77
Page 86

Chapter 3. Command Reference
disable
disables the PPTP server.
dns < relay | server-ip-1 [server-ip-2] >
configures DNS servers. Use relay if you want the device to act as a proxy-DNS server (DNS
relay), passing DNS queries to its configured DNS servers, or specify up to two DNS server IP
addresses.
enable
enables the PPTP server.
encryption < disable | enable >
enables Microsoft Point-to-Point Encryption.
logout username [ip]
logs out the named user or the named IP address.
wins server-ip-1 [server-ip-2]
specifies the IP addresses of the primary and secondary WINS servers (if you are using
Microsoft Networking).
configure
address to be
assigned by
RADIUS
config ure DNS
servers for
PPTP clients
zone zone-name
specifies the remote security zone on which to terminate the VPN.
Using conf t vpn pptp
Use configure terminal vpn pptp addresses to configure the VPN connection to assign addresses to
clients from a RADIUS server.
hostname# conf t vpn pptp addresses radius
Use configure terminal vpn pptp dns to configure DNS servers for PPTP clients. In this example,
DNS servers at 192.168.1.2 and 192.168.1.3 are configured:
hostname# conf t vpn pptp dns 192.168.1.2 192.168.1.3
conf t web-filtering
The configure terminal web-filtering command is the parent command for all web content-filtering
related options. The command must be used with a subcommand.
default-rule < permit | block >
configures the device response to a request for a web site that is not a member of a currently
filtered category or covered by a Manual Filtering rule. The default rule can be set to permit,
which serves the request and allows access, or to block, which blocks the request and blocks
access. This rule is also applied when the Content Filter Service is not licensed, or the CPA
(Content Portal Authority) server cannot be contacted by the device.
78 X Family CLI Reference V 2.5.1
Page 87

configure
filter-action < block | log | block-and-log >
specifies the actions that occur when a web request is filtered. The device can block web
requests, log them in the device’s system log, or both block and log them. Filtering actions
apply to both the filtering service and manual filtering mode.
filter-service cache
configures the web filter cache.
expiry hours
configures the number of hours that the web filter cache will retain web pages.
size bytes
configures the size of the web filter cache in bytes.
filter-service < enable | disable >
enables the subscription-based Content Filter Service.
filter-service < permit | block > category-name
permits or blocks a Content Filtering Service category.
add a manual
filtering rule
delete a
manual
filtering rule
filter-service server < america | europe1 | europe2 | asia | address address >
specifies the content filtering server that will provide the Content Filter Service.
manual-filter < add | remove > < permit | block > < string | regexp > string-or-expression
configures the manual filter. You can add or remove, a combination of URLs, domain names,
IP addresses, keywords, and regular expressions to determine which web requests are
permitted or blocked.
manual-filter < enable | disable >
enables or disables manual filtering.
Using conf t web-filtering
Use configure terminal content-filtering manual-filter add permit to add a manual web filtering
rule. In this example, URLs containing the string google are permitted:
hostname# conf t web-filtering manual-filter add permit string google
Use configure terminal content-filtering manual-filter remove to delete a manual filtering rule. In
this example, the rule created in the example above is removed:
hostname# conf t web-filtering manual-filter remove permit string google
permit a
category
Use configure terminal content-filtering filter-service to permit or block categories in the Content
Filtering Service. In this example, all web sites and domains in the gambling category are permitted:
hostname# conf t web-filtering filter-service permit gambling
X Family CLI Reference V 2.5.1 79
Page 88

Chapter 3. Command Reference
conf t zone
Use the configure terminal zone command to create and configure security zones on the device.
add zone-name
adds the named security zone.
remove zone-name
deletes a security zone.
update zone-name
updates the named security zone.
addresses < disable | group group-name | subnet ip netmask mask |
range ip1 ip2 >
specifies the devices that are permitted inside a security zone by group, subnet, or IP
address range.
bandwidth [ outbound <1–100000> ] [ inbound <1–100000> ]
configures the bandwidth for the security zone in kbps.
update a
Security Zone
configure
network
protection
mtu mtu
specifies the MTU number.
ports < [slot/port [slot/port] ...] [vlan-tagged slot/port [slot/port] ...] ] | none >
designates the ports on which the security zone exists, and which port, if any, is
tagged with VLAN.
vlan-id vlan-ID-number
specifies the VLAN ID number, if used.
vpn-tunnel-access < enable | disable >
enables or disables VPN tunnel access to the security zone.
Using conf t zone
Use configure terminal zone update to modify a security zone. In this example, the security zone
LAN is updated with port 1 from slot 3 and 2 from slot 3 un-tagged, and port 4 from slot 3 vlan-tagged:
hostname# conf t zone update LAN ports 3/1 3/2 vlan-tagged 3/4
Use configure terminal zone update addresses to restrict the devices permitted inside a security
zone to a particular subnet. In this example, only devices on the subnet 192.168.10.0/24 are permitted
inside the security zone:
hostname# conf t zone update LAN addresses subnet 192.168.10.0 netmask
255.255.255.0
80 X Family CLI Reference V 2.5.1
Page 89

debug
access: super user
Most debug commands should only be used when you are instructed to do so by technical support, but some
commands can be useful in managing the device.
factory-reset
The debug factory-reset command returns the device to its factory defaults.
CAUTION: Use this command only when instructed to do so by technical support.
log syslog
The debug log syslog command is used to review syslog server settings.
debug
audit ip
reviews the settings of the audit log on the syslog server. Specify the IP address of the server
that you want to review.
systemlog ip
reviews the settings of the system log on the syslog server. Specify the IP address of the server.
exit
access: global; all
The exit command backs you out of one level of submenu or, if you use exit all, backs you out of all submenus. For
more information about sub-menus and local commands, see Chapter 4‚ “
Using exit
back out of
one menu
Use exit to back out of one submenu. In this example, the user moves from the cfg-server level to the
config level:
level
hostname(cfg-svr)# exit
hostname(config)#
Navi gation”.
back out of all
submenus
Use exit all back out of all submenus.
hostname(cfg-svr)# exit all
X Family CLI Reference V 2.5.1 81
Page 90

Chapter 3. Command Reference
hostname#
halt
access: local; super-user, admin
The halt command shuts down the device.
seconds
instructs the device to wait from 0-3600 seconds before initiating the halt sequence.
now
instructs the device to halt immediately.
shut down X
Family
device
Use halt to shut down the device.
hostname# halt
Are you sure you want to halt the system? <Y,[N]>:y
hostname#
Achieved RunLevel 0
Safe to power-off
help
access: global; all
The help command shows brief descriptions of keyboard editing commands and global commands.
edit
shows the keyboard editing commands.
commands
lists the global commands.
high-availability
access: admin
The high-availability command sets the high availability status of the device.
force active
forces the device into Active state.
82 X Family CLI Reference V 2.5.1
Page 91

force standby
forces the device into Standby state.
history
access: global; all
The history command displays the last 30 commands typed from the command line. The command abbreviation is
hist.
history
The history command can be used in combination with the !
Using history
view history
Use history to view the commands in the history buffer.
(command)
buffer
execute
command
hostname# history
1 show chassis
2 show session
3 conf term
Use history followed by ! and a number execute a particular command from the history buffer. In this
example, the second command in the buffer is executed:
<number>
from history
buffer
hostname# hist
1 ls
2 show clock
3 conf t sess wrap
4 hist
hostname# !2
hostname# show clock
Local Time: 2002-05-01 12:14:12
Timezone: CDT
DST: disabled
command to execute a command in the history buffer.
logout
access: global; all
The logout command logs you off of the device.
Using logout
log off the
device
Use logout command to log off of the device.
X Family CLI Reference V 2.5.1 83
Page 92

Chapter 3. Command Reference
hostname# logout
ping
access: global; all
The ping command tests whether you can reach a particular IP address and how long it takes to receive a reply.
ip
selects the destination IP address.
count
the number of packets to send.
-d
specifies reverse DNS lookup on responding IP address.
-i
specifies the interval between packets.
test whether
you can reach
a particular
IP address
-q
suppresses statistics.
-R
records the route.
-t
specifies theTTL to use.
-v
sets verbose format.
Use ping test whether you can reach a particular IP address. In this example, the IP address
111.222.34.200 is tested:
hostname# ping 111.222.34.200
PING 111.222.34.200: 56 data bytes
64 bytes from 111.222.34.200: icmp_seq=0. time=0. ms
64 bytes from 111.222.34.200: icmp_seq=1. time=0. ms
64 bytes from 111.222.34.200: icmp_seq=0. time=0. ms
64 bytes from 111.222.34.200: icmp_seq=1. time=0. ms
64 bytes from 111.222.34.200: icmp_seq=0. time=0. ms
----111.222.34.200 PING Statistics---5 packets transmitted, 5 packets received, 0% packet loss
round-trip (ms) min/avg/max = 0/0/0
84 X Family CLI Reference V 2.5.1
Page 93

quarantine
access: global; all
The quarantine command displays a list of quarantined hosts, and is used to add hosts to or remove hosts from
from the list.
add ip "action-set"
adds a device to the list of quarantined devices.
empty
removes all devices from quarantine.
list [filter ip]
lists all devices that are quarantined, or those quarantined within a particular range of IP
addresses that you specify using filter.
remove ip
removes the device at the specified IP address from quarantine.
quarantine
quit
access: global; all
The quit command logs you out of the CLI. After the command is executed, a Login prompt is displayed.
Using quit
log out of the
Use quit to log out of the CLI.
CLI
hostname# quit
Login:
reboot
access: local; super, admin
The reboot command reboots the system software. If you use reboot without any parameters, the device will initiate
the reboot in 5 seconds.
seconds
instructs the device to begin the reboot process in from 0 to 3600 seconds.
X Family CLI Reference V 2.5.1 85
Page 94

Chapter 3. Command Reference
now
instructs the device to reboot immediately.
Using reboot
reboot the
device
Use the reboot to reboot the system. You will be asked to confirm the command. Enter Y to proceed
with the reboot, enter N to cancel the reboot.
hostname# reboot
Are you sure you want to reboot the system? <Y,[N]>: Y
Broadcast message from kscanlon
Rebooting local processor in 5 seconds...
setup
access: local; super, admin (time for super only)
The setup command invokes setup wizards for default email, Ethernet port, NMS, Web/CLI/SNMP servers,
restricted SMS, and time settings. If you use the setup command without any parameters, it will execute all of the
wizards. For detailed information on the setup command and wizards, see Chapter 1‚ “
X Family Startup
Configuration”.
show
access: local; all (except log audit), log audit - super
The show command displays current system configuration, status, and statistics.
Note: There are two important forms of the show command, which offer
different information:
• show retrieves information from the component itself and provides the current status of a
device hardware or software component.
• show configuration retrieves information from the configuration files and provides the
current entries in the device configuration files.
86 X Family CLI Reference V 2.5.1
Page 95

show action-sets
The show action-sets command lists the action sets.
hostname# show action-sets
Action Set Name Action TCP Reset Pkt Trace Channel
--------------- ------ --------- --------- ------Block+Notify+Trace Block Enabled Management Console
Block Block
Recommended Category Dependent
Block + Notify Block Management Console
Permit+Notify+Trace Permit Enabled Management Console
Permit + Notify Permit Management Console
show arp
The show arp command shows the link level ARP table.
hostname# show arp
Link Level ARP table
Destination IP Destination Mac Address Interface Entry Type
--------------------------------------------------------------------------
192.168.1.254 00:50:c2:12:1e:29 1 Permanent
10.0.3.100 00:10:f3:01:eb:58 2 Dynamic
10.0.3.200 00:50:c2:12:1e:28 2 Permanent
show
show all slots
show autodv
The show autodv shows the settings for the automatic updating of Digital Vaccine files.
show chassis [-details]
The show chassis command shows configuration and status information, including slot, module type,
configuration, state, and qualifier status. Use show chassis alone to view all slots and modules. Use
show chassis -slot <1–8> to view a single module. Add the -detail flag to get additional qualifier and
port quantity information.
-details
the -details flag can be used either with the show chassis or show chassis -slot <1-8>
command
Using show chassis
Use show chassis with no parameters to show the status of the modules in all chassis slots.
hostname# show chassis
Serial: : X-X5-STLAB-0005
Slot Type Config State Qual-1 Qual-2
---- ---------------------- -------- ------------------ -------- --------
X Family CLI Reference V 2.5.1 87
Page 96

Chapter 3. Command Reference
SLT1 Management Processor Simplex Active No Info No Info
SLT3 Port Health Simplex Active No Info No Info
SLT5 Threat Suppression Eng Simplex Active No Info No Info
show all slots
with more
detail
Use show chassis -details to show the status of a single module with more detail.
hostname# hostname# show chassis -details
Serial: : X-X5-STLAB-0005
Slot Type Config State Qual-1 Qual-2 Ports
---- --------------- -------- ------------------ -------- -------- ----SLT1 Management Proc Simplex Active No Info No Info 1
SLT3 Port Health Simplex Active No Info No Info 4
SLT5 Threat Suppress Simplex Active No Info No Info 0
show clock
The show clock command shows the local time, the timezone setting, and the daylight saving time
setting.
-details
adds information about timezone offsets, UTC (Universal Time), and whether the clock is
under NTP or local control.
Using show clock
show local
time,
timezone
setting, and
daylight
saving time
setting
show local,
timezone, and
universal time
information
Use show clock to show the local time, the timezone, and the daylight saving time setting.
hostname# show clock
Local Time: 2007-04-30 12:23:01
Timezone: CST
DST: disabled
Use show clock -details to show local, timezone, and universal time information.
show clock -details
Local Time: 2007-04-30 15:15:47
Timezone: CST
DST: disabled
TIMEZONE: CST::360:040702:102702
UTC: 2007-04-30 20:15:47
Clock Master: NTP
show configuration
The show configuration command shows persistent configuration settings on the device. The
command abbreviation is show conf.
88 X Family CLI Reference V 2.5.1
Page 97

show
Show configuration commands can be used to feed configuration information back to the console.
Without parameters, the command shows the system’s configuration.
action-set
lists all action sets that have been defined for this device. Can be changed with conf t
action-set action-set-name threshold threshold-period.
address-group
shows the configuration of the address group or groups. Can be changed with conf t
address-groups.
authentication [radius | privilege-group]
shows authentication configuration.
autoDV
shows configuration settings for the automatic update service for Digital Vaccine packages.
Can be changed with c
onf t autodv day day time time [-period days].
category-settings
shows configuration settings for filter categories. Can be changed with conf t
category-settings.
clock
shows timezone and daylight saving time settings. Can be changed with c
onf t clock.
ddos
shows the current ddos settings. Can be changed with conf t ddos
.
default-alert-sink
shows the default email address that attack alerts will be directed to. Can be changed with
conf t default
-alert-sink.
default-gateway
shows the device default gateway. Can be changed with conf t default
-gateway ip.
dhcp-server
shows the configuration of the DHCP server. Can be changed with conf t dhcp
-server.
dns
shows the configuration of the DNS server.
email-rate-limit
shows the maximum number of email notifications the system will send every minute. The
mimimum is 1; the maximum is 35. Can be changed with conf t interface
.
filter number
shows the filter data for a specific filter. Can be changed with conf t filter
firewall
shows firewall configurations.
X Family CLI Reference V 2.5.1 89
.
Page 98

Chapter 3. Command Reference
alg
shows the application layer gateway (ALG).
alg sip
show the Session Initiation Protocol (SIP) sessions.
rule [id] [from src] [to dst]
shows firewall rules. Enter a rule ID to display a single rule. The value of
can be “this-device” to indicate the local device.
schedule
shows firewall schedules.
service
shows firewall services.
service-group
shows firewall service groups.
virtual-servers
shows firewall virtual servers.
src
or
dst
high-availability
shows the configuration for the transparent high-availability. Can be changed with conf t
high-availability.
host
shows the host name and host location.
interface
shows configuration of all ports if no further qualifiers (port type, slot number, port number)
are entered. To view the settings for the interface configuration, enter show conf int settings.
Can be changed with conf t interface
.
TIP You can use the abbreviation show conf int. Also, you
can define an alias using the alias command.
ethernet [slot port]
shows Ethernet port information. The command abbreviation is show conf int eth.
Use the command without parameters to show the status of all Ethernet ports. Use
with a slot number and port number, separated by spaces, to view the status of a
single port.
mgmtEthernet
shows Management Ethernet port information. The command abbreviation is show
conf int mgmt.
90 X Family CLI Reference V 2.5.1
Page 99

show
settings
shows the persistent configuration settings for MDI-detection and the Ethernet
polling interval setting.
virtual
shows settings for all virtual interfaces.
log
shows the persistent configuration of the audit log. Can be changed with conf t log audit
select.
monitor
shows the persistent configuration of monitor thresholds. Can be changed with conf t
monitor.
nms
shows the NMS settings for community string, IP address, and port. Can be changed with
conf t nms
.
notify-contacts
shows the notification contacts. Can be changed with c
onf t notify-contact contact-
name agg-period.
ntp
shows the NTP configuration.
port
shows the port configuration.
profile
lists all profiles that have been configured on the device. To view an individual profile, use
show profile
profile-name. To change a profile, use conf t profile profile-name.
protection-settings
shows the commands for configuring the protection settings. Can be changed with c
onf t
protection-settings.
ramdisk
shows the persistent configuration of the RAM disk sync interval. Can be changed with conf t
ramdisk.
remote-syslog
shows the persistent configuration of the remote-syslog. Shows the destination IP address for
remote logging. Can be changed with conf t remote
-syslog.
routing
shows routing configuration.
multicast
shows multicast routing configuration.
X Family CLI Reference V 2.5.1 91
Page 100

Chapter 3. Command Reference
server
shows the persistent configuration of ssh, telnet, http, and https servers on the device. Can be
changed with c
service-access
shows whether service-access is enabled or not. Can be changed with conf t service
session
shows default session timeout for all sessions. Can be changed with conf t session
Note: show conf session does not show session settings because session
settings are not persistent. Use show session
configuration.
sms
shows if SMS is enabled (“sms” or “no sms”) and other SMS configuration information. Can
be changed with conf t sms
tse
shows the configuration for the Threat Suppression Engine (TSE). This information includes
connection table timeout, asymmetric network setting, adaptive aggregation threshold, and
adaptive filter mode.
onf t server
.
-access.
.
to view current session
.
user [-details]
displays user options that can be read back in as commands. The command abbreviation is
show conf u.
vpn
shows VPN configuration.This is a recursive command that executes all the show
configuration vpn commands below.
ike
shows IKE configuration.
ipsec [sa]
shows IPSec configuration. Use show configuration vpn ipsec sa to show the
configuration of IPSec Security Association.
l2tp
shows L2TP configuration.
pptp
shows PPTP configuration.
web-filtering
shows the configuration of web content filtering.
default-rule
shows the default rule.
92 X Family CLI Reference V 2.5.1
 Loading...