

Page 1

HP StorageWorks P9000 Command View
Advanced Edition Suite Software
User Guide
Part number: TB581-96053
Third edition: April 2011
Page 2

Legal and notice information
© Copyright 2010-2011 Hewlett-Packard Development Company, L.P.
Confidential computer software. Valid license from HP required for possession, use or copying. Consistent with FAR 12.211
and 12.212, Commercial Computer Software, Computer Software Documentation, and Technical Data for Commercial Items
are licensed to the U.S. Government under vendor's standard commercial license.
The information contained herein is subject to change without notice. The only warranties for HP products and services are set
forth in the express warranty statements accompanying such products and services. Nothing herein should be construed as
constituting an additional warranty. HP shall not be liable for technical or editorial errors or omissions contained herein.
Acknowledgments
Hitachi® and Universal Replicator® are registered trademarks of Hitachi, Ltd.
Itanium® is a registered trademark of Intel Corporation or its subsidiaries in the United States and other countries.
ShadowImage® and TrueCopy® are registered trademarks of Hitachi Data Systems Corporation.
Java® and Oracle® are registered trademarks of Oracle and/or its affiliates.
Microsoft®, Windows®, Windows Server®, and Windows Vista® are US registered trademarks of Microsoft Corporation.
Revision history
DescriptionEditionVersionDate
First editionFirst7.0-00October 2010
Added information for new and changed features.Second7.0.1-00January 2011
Added information for new and changed features.Third7.1.0-00April 2011
Page 3

Contents
Preface ................................................................................................ 9
1 Overview ........................................................................................ 11
About P9000 Command View AE Software ................................................................................. 11
Features ................................................................................................................................... 11
System configuration ................................................................................................................. 11
Navigating the main window ..................................................................................................... 12
Operational flows ..................................................................................................................... 12
Process flow ...................................................................................................................... 13
Logging in ......................................................................................................................... 13
About configuring P9000 Command View AE Software .......................................................... 14
About storage resource settings ............................................................................................ 14
About users and access control settings ................................................................................. 14
About developing a virtualized storage environment ............................................................... 15
About allocating storage ..................................................................................................... 15
About managing storage resources hierarchically ................................................................... 15
About monitoring storage .................................................................................................... 16
2 Registering managed targets ............................................................. 17
Registering storage systems ........................................................................................................ 17
About registering a storage system ....................................................................................... 17
Prerequisites for registering a storage system .......................................................................... 17
Registering a storage system ................................................................................................ 17
Prerequisites for changing storage system information ............................................................. 18
Changing storage system information .................................................................................... 18
About acquiring the most recent storage system information ..................................................... 18
Acquiring the most recent storage system information .............................................................. 18
Registering hosts ....................................................................................................................... 19
About registering a host ...................................................................................................... 19
Conditions for acquiring the WWN ...................................................................................... 19
Prerequisites for registering a host ........................................................................................ 19
Registering a host ............................................................................................................... 20
Prerequisites for changing host information ............................................................................ 20
Changing host information .................................................................................................. 21
About scanning and discovering hosts .................................................................................. 21
Prerequisites for scanning for hosts ....................................................................................... 21
Scanning for new hosts ....................................................................................................... 21
About merging hosts ........................................................................................................... 22
Prerequisites for merging hosts ............................................................................................. 22
Merging hosts .................................................................................................................... 22
About acquiring the most recent host information .................................................................... 22
Acquiring the most recent host information ............................................................................. 22
Managing data collection tasks .................................................................................................. 23
About data collection tasks .................................................................................................. 23
User Guide 3
Page 4

3 Setting up and operating a SAN environment ...................................... 25
Virtualizing storage ................................................................................................................... 25
About virtualizing volumes ................................................................................................... 25
Prerequisites for virtualizing volumes ..................................................................................... 25
Virtualizing volumes ........................................................................................................... 26
Virtualizing storage capacity ...................................................................................................... 26
About virtualizing storage capacity by creating THP pools ....................................................... 26
Prerequisites for creating THP pools ...................................................................................... 27
Creating a THP pool ........................................................................................................... 27
Verifying THP pools ............................................................................................................ 28
Prerequisites for expanding THP pools .................................................................................. 28
Expanding THP pools ......................................................................................................... 28
Shrinking a THP pool .......................................................................................................... 29
Modifying THP pool settings ................................................................................................ 29
Expanding THP volumes ...................................................................................................... 29
Reclaiming zero page ......................................................................................................... 30
Allocating volumes .................................................................................................................... 30
About allocating volumes .................................................................................................... 30
Prerequisites for allocating volumes to hosts .......................................................................... 30
Allocating volumes to hosts .................................................................................................. 30
About path management ..................................................................................................... 31
Editing paths from hosts ...................................................................................................... 31
Editing paths from storage systems ........................................................................................ 32
Editing paths from logical groups ......................................................................................... 32
Editing paths from volume search results ................................................................................ 33
About creating volumes ....................................................................................................... 33
Prerequisites for creating volumes ......................................................................................... 33
Creating volumes ............................................................................................................... 34
About unallocating volumes ................................................................................................. 34
Prerequisites for unallocating volumes from hosts .................................................................... 34
Unallocating volumes from hosts ........................................................................................... 34
About deleting unallocated volumes ..................................................................................... 35
Deleting unallocated volumes .............................................................................................. 35
Replicating volumes .................................................................................................................. 35
About replicating volumes (pair management) ........................................................................ 35
Copy pair management operations ...................................................................................... 36
Adding command devices ................................................................................................... 36
Editing command devices .................................................................................................... 37
Defining copy pairs ............................................................................................................ 37
Changing the status of a copy pair ....................................................................................... 38
Migrating volumes .................................................................................................................... 38
About volume migration ...................................................................................................... 38
Prerequisites for migrating volumes ....................................................................................... 39
Migrating volumes .............................................................................................................. 40
Managing tasks ....................................................................................................................... 41
About tasks ....................................................................................................................... 41
Viewing task status ............................................................................................................. 41
Rescheduling uncompleted tasks ........................................................................................... 42
Pausing Tiered Storage Manager tasks .................................................................................. 42
Canceling scheduled tasks .................................................................................................. 42
Moving a failed task summary ............................................................................................. 43
4 Grouping resources .......................................................................... 45
Managing logical groups .......................................................................................................... 45
4
Page 5

About logical groups .......................................................................................................... 45
Prerequisites for creating a logical group ............................................................................... 45
Creating logical groups ...................................................................................................... 46
Viewing logical group reports .............................................................................................. 46
Editing logical groups ......................................................................................................... 46
Performing operations from a logical group .......................................................................... 46
Managing storage tiers ............................................................................................................. 47
About tier-based storage management .................................................................................. 47
Creating tiers ..................................................................................................................... 47
Prerequisites for allocating volumes from a tier ....................................................................... 48
Allocating volumes from a tier .............................................................................................. 48
Expanding a tier ................................................................................................................ 48
Labeling volumes ...................................................................................................................... 49
About volume labels ........................................................................................................... 49
Editing a volume label ........................................................................................................ 49
Using volume labels to locate volumes to perform tasks ........................................................... 49
5 Monitoring operations in a SAN environment ...................................... 51
Viewing information summaries .................................................................................................. 51
About the dashboard .......................................................................................................... 51
Accessing the dashboard .................................................................................................... 51
Customizing the dashboard ................................................................................................. 52
About the storage systems tree ............................................................................................. 52
Viewing current storage system information ............................................................................ 53
About the hosts tree ............................................................................................................ 53
Viewing current host information ........................................................................................... 53
About checking system status in the global monitoring area ..................................................... 53
Setting data retention for task status indicators ....................................................................... 54
Managing alerts ....................................................................................................................... 54
About alerts ....................................................................................................................... 54
Confirming an alert ............................................................................................................ 54
Searching resources .................................................................................................................. 54
About searching storage resources ....................................................................................... 54
Searching storage resources ................................................................................................ 55
Saving search conditions ..................................................................................................... 55
Generating resource reports ....................................................................................................... 56
About generating reports .................................................................................................... 56
Differences in output between P9000 Command View AE Software v7.x and earlier versions ....... 56
Exporting host lists to a CSV file ........................................................................................... 66
Exporting logical group information to a CSV file ................................................................... 67
Exporting search results to a CSV file .................................................................................... 67
Exporting access control information for resources to a CSV file ................................................ 67
Optimizing storage ................................................................................................................... 67
About optimizing storage .................................................................................................... 67
6 Setting up P9000 Command View AE Software ................................... 69
Configuring your browser to access ............................................................................................ 69
About configuring browser settings ....................................................................................... 69
Disabling pop-up blocking ................................................................................................... 69
Setting security options for Internet Explorer ........................................................................... 70
Configuring proxy settings ................................................................................................... 71
Configuring log output settings ............................................................................................. 72
Configuring Java Web Start settings when multiple JRE versions are installed ............................. 72
Clearing the cache when upgrading P9000 Command View AE Software ................................. 72
User Guide 5
Page 6

Managing users ....................................................................................................................... 73
About managing users ........................................................................................................ 73
User permissions ................................................................................................................ 73
Creating a user account ...................................................................................................... 76
Editing the profile for a user account ..................................................................................... 77
Editing your own profile ...................................................................................................... 77
Changing the password for a user account ............................................................................ 77
Changing your password .................................................................................................... 77
Changing permissions for a user account .............................................................................. 77
Changing the lock status of user accounts .............................................................................. 78
Prerequisites for changing the user authentication method ........................................................ 78
Changing the user authentication method .............................................................................. 78
Enabling connections to an external authorization server ......................................................... 78
Controlling access to resources ................................................................................................... 79
About controlling access ..................................................................................................... 79
Prerequisites for creating resource groups .............................................................................. 81
Creating resource groups .................................................................................................... 81
Editing a resource group ..................................................................................................... 81
Prerequisites for creating user groups .................................................................................... 82
Creating user groups .......................................................................................................... 83
Editing a user group ........................................................................................................... 83
Assigning resource groups and roles to a user group .............................................................. 83
Changing a user’s user group .............................................................................................. 83
Setting up security ..................................................................................................................... 84
About configuring security options ........................................................................................ 84
Setting a password policy ................................................................................................... 84
Setting automatic account locking ........................................................................................ 84
Setting a warning banner message ...................................................................................... 84
Downloading components ........................................................................................................ 85
About downloading components .......................................................................................... 85
Downloading agents, CLI, and Host Data Collector files .......................................................... 85
Managing licenses ................................................................................................................... 85
About license management ................................................................................................. 85
Registering a license ........................................................................................................... 85
Checking licenses ............................................................................................................... 86
Information for checking the input history of license keys .......................................................... 86
7 Launching related products ................................................................ 89
About launching other P9000 Command View AE Software products .............................................. 89
Launching related products ........................................................................................................ 89
Launching related products from a list of hosts ............................................................................. 89
Starting Element Manager ......................................................................................................... 89
8 Troubleshooting ............................................................................... 91
About troubleshooting ............................................................................................................... 91
Troubleshooting examples .......................................................................................................... 91
9 Support and other resources .............................................................. 93
Contacting HP .......................................................................................................................... 93
HP technical support ........................................................................................................... 93
Subscription service ............................................................................................................ 93
Documentation feedback ..................................................................................................... 93
New and changed information in this edition ............................................................................... 93
6
Page 7

Related information ................................................................................................................... 94
Conventions ............................................................................................................................. 94
Glossary ............................................................................................ 97
Index ............................................................................................... 101
User Guide 7
Page 8

Tables
Host information ..................................................................................................... 571
Logical group information ........................................................................................ 592
Volume information from search results ....................................................................... 623
Access control information ....................................................................................... 664
Information for checking the input history of license keys .............................................. 865
Product reference conventions ................................................................................... 946
8
Page 9

Preface
This manual provides information for P9000 Command View AE Software.
User Guide 9
Page 10

Preface10
Page 11

1 Overview
This module provides an overview of the P9000 Command View AE Software.
About P9000 Command View AE Software
P9000 Command View AE Software is a group of storage management software products that allow
you to manage storage resources in large-scale, complex SAN environments.
P9000 Command View AE Software includes:
• HP StorageWorks P9000 Device Manager software
• HP StorageWorks P9000 Tiered Storage Manager software
• Hitachi Dynamic Link Manager Software
• HP StorageWorks P9000 Performance Advisor software
• HP StorageWorks P9000 Replication Manager software
Features
P9000 Command View AE Software includes the following functionality:
• Storage task operations
• Allocating volumes
• Unallocating volumes
• Creating volumes
• Virtualizing storage systems (virtualizing volumes)
• Virtualizing storage capacity (THP pools)
• Volume replication management (copy-pair management)
• Storage resource management
• Group management of storage resources (logical groups, volume labels)
• Searching storage resources and outputting reports
• User management
• Security
If you have an HP StorageWorks P9000 Tiered Storage Manager software license, you can also
perform:
• Hierarchical management of storage resources (tier management)
• Online data migration (Volume Migration)
System configuration
The following graphic illustrates basic system configuration and components when using P9000
Command View AE Software.
User Guide 11
Page 12
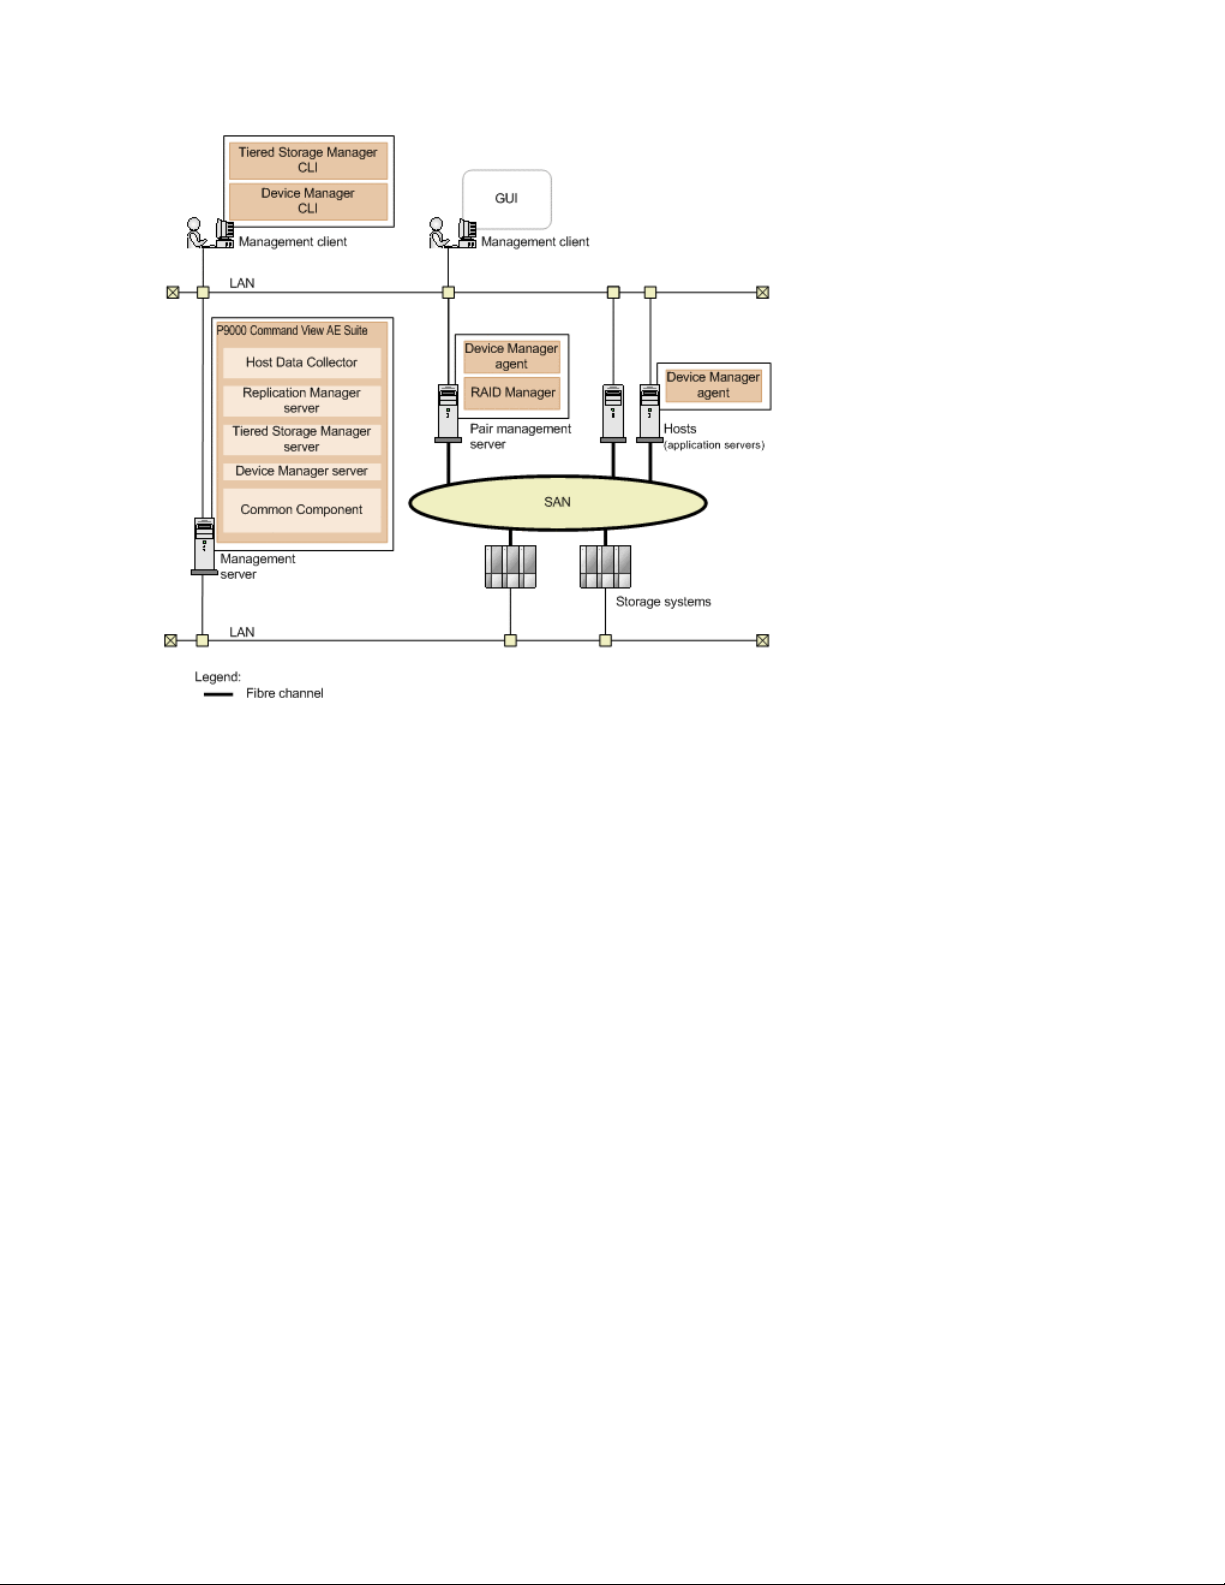
For detailed information about system configuration, see the HP StorageWorks P9000 Command
View Advanced Edition Suite Software Administrator Guide.
Navigating the main window
The main window includes of the following areas:
• Global task bar area
• Global tabs area
• Navigation area (including General Tasks)
• Application area
• Global Monitoring bar area
Tasks can be performed by using these methods:
• Right-click
• Drag-and-drop
• Choosing from the menu
• Running tasks
You can perform operations using multiple methods:
• Selecting multiple lines by using the Ctrl or Shift key
• Sorting
• Filtering
Operational flows
This module provides diagrams of operational flows.
Overview12
Page 13
Process flow
The following graphic illustrates the flow of system operations when using P9000 Command View
AE Software and HP StorageWorks P9000 Tiered Storage Manager software.
Logging in
Before you can log on to P9000 Command View AE Software, you must register valid P9000
Command View AE Software licenses. For information about how to register licenses, see “Registering
a license” on page 85.
NOTE:
To log in on a user account other than a built-in user account, set up user groups and roles in advance.
User groups and roles can be set up only by users who have the User Management permission and
the Admin role for All Resources
User Guide 13
Page 14

To log in to P9000 Command View AE Software:
1. Start a Web browser and enter the URL of the P9000 Command View AE Software server:
http://Device-Manager-server-address:port-number/DeviceManager/
Device-Manager-server-address: IP address or host name of the Device Manager server
port-number: Port number of the HBase Storage Mgmt Web Service
Example:
http://localhost:23015/DeviceManager/ (for non-SSL)
https://localhost:23016/DeviceManager/ (for SSL)
2. Enter a user ID and password to log in.
If Replication Manager users are registered, use a user account and password. If authentication
through an external authentication server is enabled, use the password that is registered in the
external authentication server.
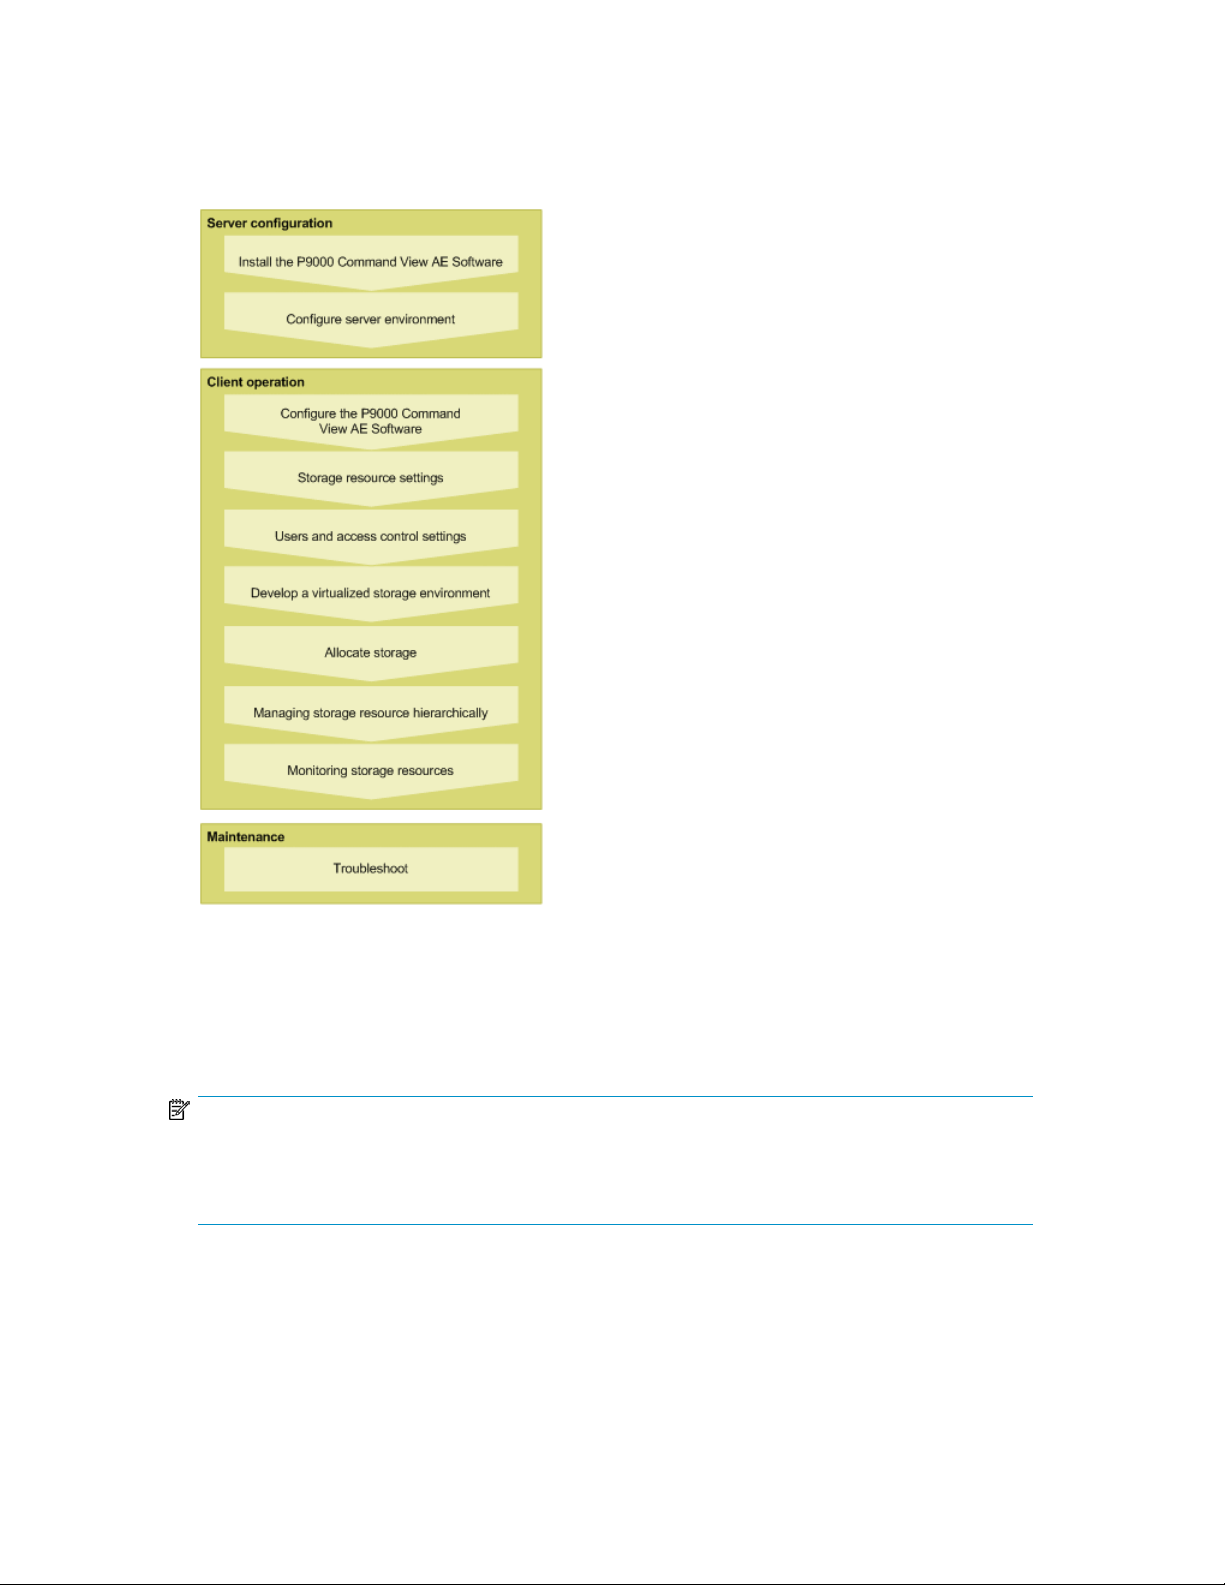
About configuring P9000 Command View AE Software
The following graphic illustrates the flow for getting started with P9000 Command View AE Software.
About storage resource settings
Storage systems and hosts must be registered for storage resources to be managed by P9000 Command
View AE Suite. A host can be managed by its group based on its organization and user tasks by
using logical groups. Below is shown the flow for setting up storage resources.
About users and access control settings
After users are registered, you can limit the scope of allowed operations for each user by configuring
access control settings for users and other storage resources.
Overview14
Page 15
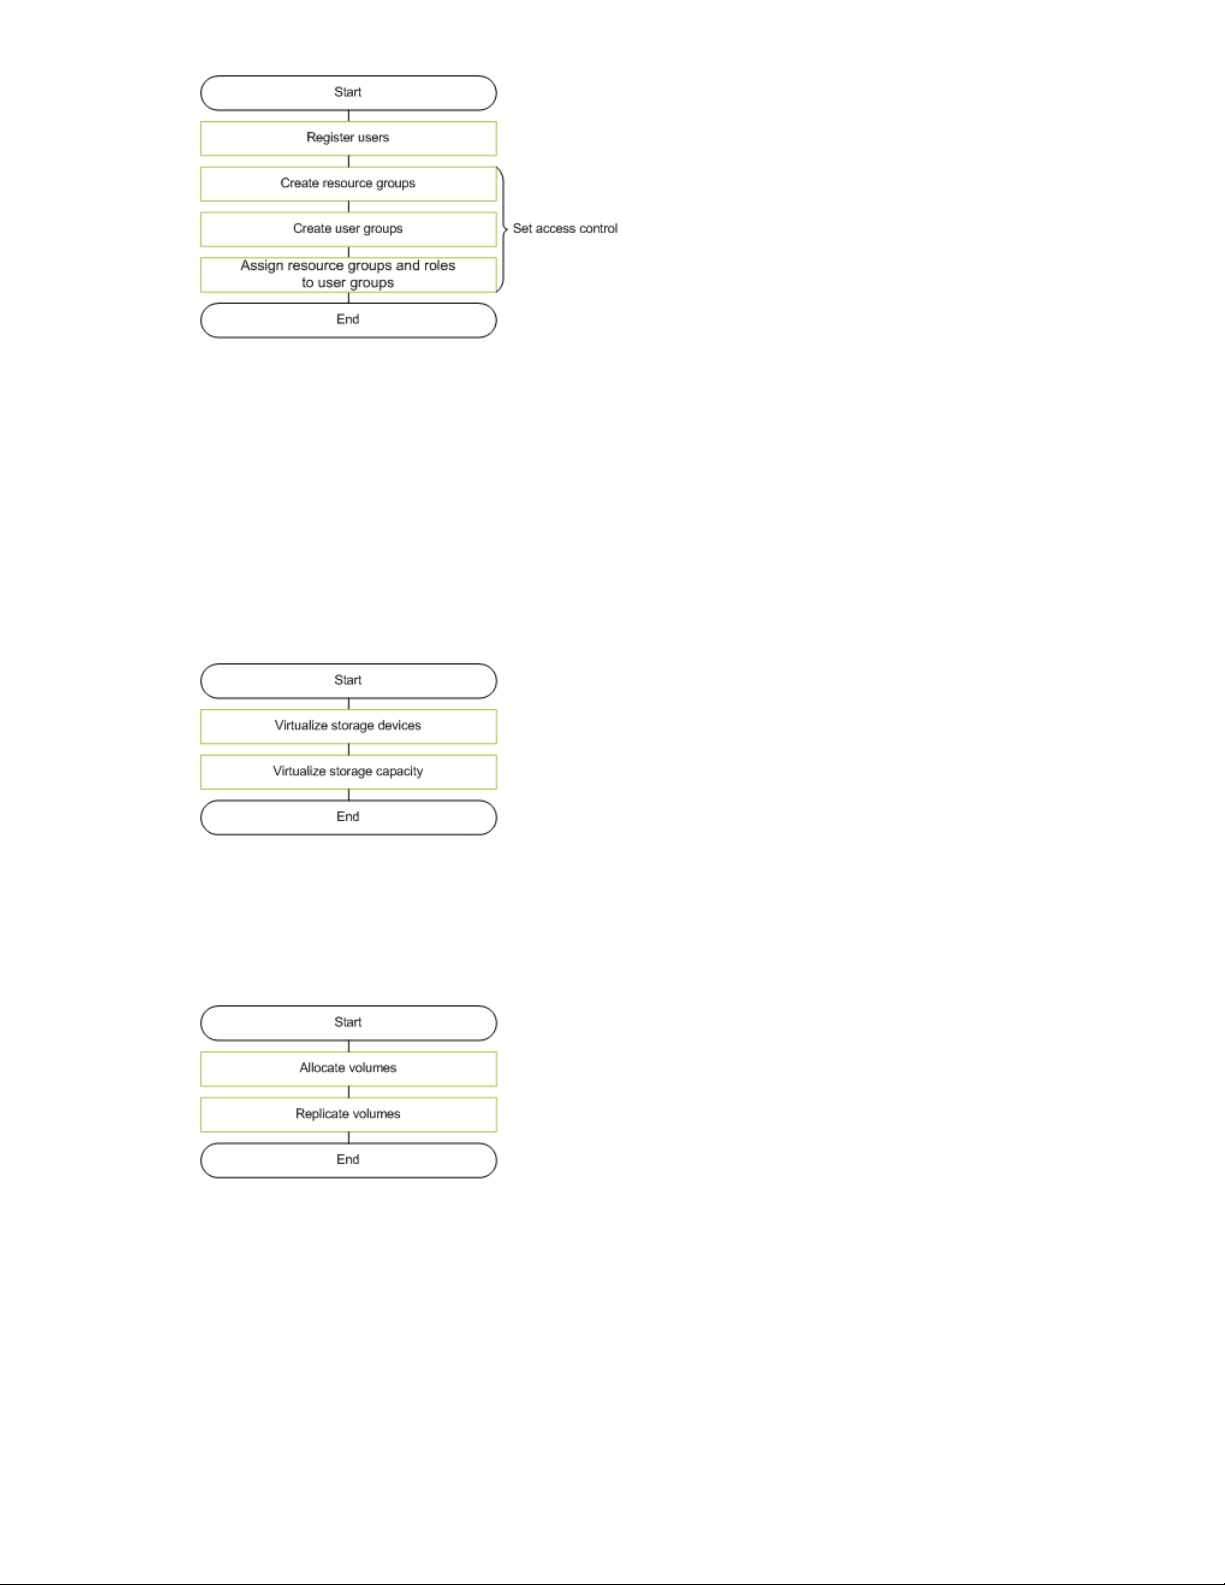
To set access control:
1. Create resource groups
2. Create user groups
3. Assign resource groups and roles to user groups
About developing a virtualized storage environment
Virtualization of storage allows a larger than physical storage capapcity for a stand-alone host, thus
reducing equipment and operational costs as well as permiting the integration heterogenous storage
devices. The following graphic illustrates the flow for setting up a virtual storage environment.
About allocating storage
To be prepared against any possible loss of data due to equipment failure, it is important to replicate
critical data by allocating storage volumes based on logical groups. The following graphic illustrates
the flow of allocating storage resources.
About managing storage resources hierarchically
Tiers are created by grouping volumes and THP pools based on their usage, performance, and
reliability. By migrating volumes, data can be placed into appropriate tiers based on how often the
data is accessed. This allows data to be migrated collectively by groups while business is being
continued, for instance when replacing storage systems. The task flow for managing storage resources
by placing them in hierarchies is shown below.
User Guide 15
Page 16
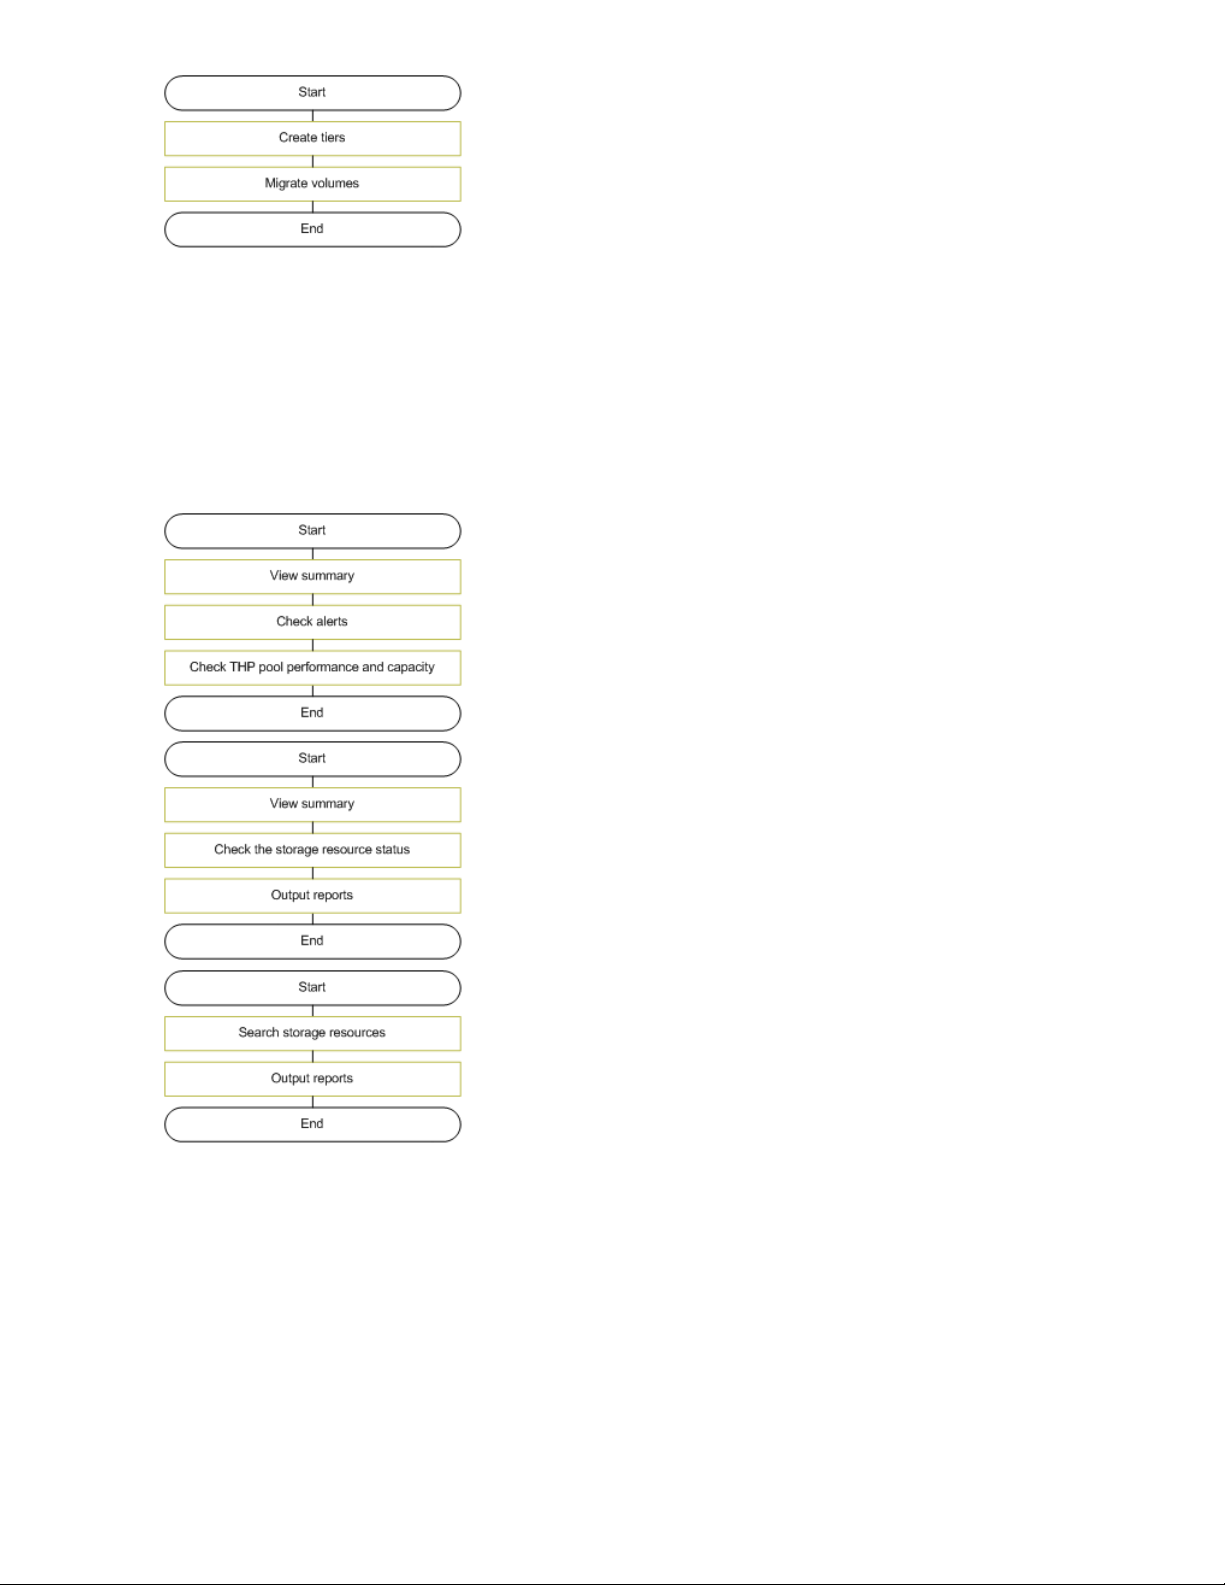
About monitoring storage
You can check the status of storage resources to detect problems and output reports to a CSV file
containing search results or configuration and capacity information about hosts, logical groups, and
other storage resources. This information can be used to migrate volumes or add THP pool volumes
to optimize storage resources. The following graphics illustrate the flow of monitoring and checking
the status of storage resources. To check daily operational status, inquiries from a host or application
administrator, or for Service Level Objective (SLO) and Service Level Agreement (SLA) inquiries, see
the respective figures below:
Overview16
Page 17

2 Registering managed targets
This module describes how to register storage systems and hosts.
Registering storage systems
This module describes how to register storage systems.
About registering a storage system
Registering a storage system enables you to monitor and manage storage resources, such as volumes,
parity groups, THP pools, and external storage connections. Information about a storage system can
be changed after the storage system is registered.
When you specify an IP address and authentication information for a storage system in the network,
the storage system is discovered based on the specified information. The registered storage systems
can be used as resources.
Prerequisites for registering a storage system
Before registering a storage system, verify the following:
• Target storage system is connected to the network.
• Target storage system type (device type).
• Target storage system IP address (IPv4 or IPv6) or host name.
• User name and password of the storage system for Password Protection or Account Authentication
(mid-range storage systems).
• User name and password of the storage management tool such as Remote Web Console (HP
P9500, XP24000/XP20000, or XP12000/XP10000/SVS200) . If you have a different storage
system, then use your user name and password for Account Authentication or Password Protection.
Registering a storage system
Register a storage system to monitor and manage it from P9000 Command View AE Software, along
with the other registered storage systems and hosts.
Before you perform this task, review “Prerequisites for registering a storage system” on page 17.
To add a storage system to the list of managed resources:
1. On the Administration tab, select Managed Resources.
2. On the Storage Systems tab, click Add Storage System.
3. Specify the appropriate information.
4. Click OK.
5. Check the Data Collection Tasks tab to verify that the task has completed successfully.
User Guide 17
Page 18

6. When the task completes, confirm that the storage system appears on the Storage Systems tab
of Managed Resources.
Or, you can confirm that the storage system name appears in the Storage Systems tree on the
Resources tab.
Prerequisites for changing storage system information
Before changing storage system information, make a note of:
• Target storage system name.
• Storage system IP address (IPv4, IPv6) or host name.
• Management tool such as Remote Web Console (HP P9500, XP24000/XP20000, or XP12000/
XP10000/SVS200) .
• User name and password of the storage system.
For other storage systems, use the user name and password for Password Protection or Account
Authentication.
Changing storage system information
You can modify the IP address or login username and password for a storage system. You can select
multiple storage systems to modify at one time, but when selecting multiple storage systems, only the
login username and password can be modified.
To modify information about a storage system:
1. On the Administration tab, select Managed Resources.
2. On the Storage Systems tab, select the storage system, or storage systems, you want to modify.
3. Click Edit Storage Systems.
4. Specify the appropriate items and click OK.
5. Check the Data Collection Tasks tab to verify that the task has completed successfully.
6. Confirm that the information in the storage system list is updated.
About acquiring the most recent storage system information
You can manually refresh the information displayed about a target storage system at any time.
When you refresh a storage system, the following displayed information is updated:
• Volumes
• Parity groups
• Pools
• External storage connections
Acquiring the most recent storage system information
You refresh storage systems to update the information that is displayed in the Storage Systems list.
To update storage system information:
1. On the Administration tab, select Managed Resources.
2. On the Storage Systems tab, select the storage systems you want to refresh.
Registering managed targets18
Page 19

3. Click Refresh Storage Systems and then click OK.
4. Check the Data Collection Tasks tab to verify that the task has completed successfully.
5. When the task completes, confirm that the storage system information is updated on the Storage
Systems tab of Managed Resources.
Or, you can confirm that the storage system information is updated in the Storage Systems tree
the Resources tab.
Registering hosts
This module describes how to register hosts.
About registering a host
Registering hosts lets you monitor and manage them along with the other registered hosts and storage
systems.
The following hosts can be registered:
• Normal hosts: hosts in an environment where no virtual software is installed
• Virtual servers: hosts in a physical environment where virtual software is installed
• Virtual machines: hosts in a virtual environment created with virtual software
To register a host, specify the IP address and authentication information so can discover it automatically,
or you can add a host manually by specifying the WWN. Virtual server hosts must be registered
manually. Information about a host can be changed after it has been registered.
If you register a host by specifying its IP address and authentication information, the total capacity of
volumes that are allocated to the host can be automatically acquired only if the storage system that
provides the volumes is registered.
You can view information about registered hosts on the Resources tab.
Conditions for acquiring the WWN
If the specified IP address range includes a host with a WWN that is registered, or includes multiple
hosts that have the same WWN, which host acquires the WWN depends on the following conditions:
• A host detected by VMware® ESX (VMware ESX and VMware ESXi) has top priority.
• A host detected by a Device Manager agent has priority over a host detected by the Host Data
Collector.
• If multiple hosts with the same WWN are detected by VMware ESX, the host that was registered
most recently acquires the WWN. The same condition applies for hosts detected by Device
Manager agents. For hosts detected by the Host Data Collector, the host that was registered first
maintains the WWN.
Prerequisites for registering a host
• Target host is connected to the network.
• Target host IP address (IPv4).
• To detect multiple hosts at the same time, specify a subnet or range of up to 256 IP addresses, or
specify individual IP addresses.
User Guide 19
Page 20

• To register a virtual server, an IPv6 address also can be specified. However, multiple hosts cannot
be detected at the same time for an IPv6 address.
• User name (who must have Administrator or superuser permissions) and password for logging on
the host.
Although you can modify host settings for sudo, if you specify a user other than a root user, you
must configure the required settings for the environment when information about the host is collected
only through a general user account. For more information on these settings, see the HP Storage-
Works P9000 Command View Advanced Edition Suite Software Administrator Guide.
• Host name.
• Unregistered WWN.
• Register virtual server information into the Device Manager (if registering virtual servers). For details
on the system requirements for virtual servers, see the HP StorageWorks P9000 Command View
Advanced Edition Suite Software Administrator Guide.
Registering a host
Register a host to monitor and manage it from P9000 Command View AE Software, along with the
other registered hosts and storage systems.
Before you perform this task, review “Prerequisites for registering a host” on page 19.
To register a host:
1. On the Administration tab, select Managed Resources.
2. On the Hosts tab, click Add Hosts.
3. Select Discover Hosts or Add Host Manually.
4. Specify the appropriate information.
5. Click OK.
6. Check the Data Collection Tasks tab to confirm that the task has completed successfully.
7. When the task completes, confirm that the host name appears on the Hosts tab of Managed
Resources.
Or, you can confirm that the host name appears in the Hosts list displayed by using the Hosts
tree on the Resources tab.
Prerequisites for changing host information
Before changing host information, note the following:
• Target host IP address (IPv4).
• If registering a virtual server, the IPv6 address also can be specified.
• User name (who must have Administrator or superuser permissions) and password for logging on
the host.
Sudo users do not have to be root users. However, if you specify a user other than a root user,
you must configure the required settings for the environment when information about the host is
collected. Do this by using a general user account. If registering a virtual server, the IPv6 address
also can be specified. For more information on these settings, see the HP StorageWorks P9000
Command View Advanced Edition Suite Software Administrator Guide.
Registering managed targets20
Page 21

Changing host information
You can change the information that P9000 Command View AE Software displays for registered
hosts.
To change information about registered hosts:
1. On the Administration tab, select Managed Resources.
2. On the Hosts tab, select the host, or hosts, you want to edit.
3. Click Edit Hosts.
4. Modify the appropriate items and click OK.
5. Check the Data Collection Tasks tab to verify that the task has completed successfully.
6. Confirm that the information in the Hosts list is updated.
About scanning and discovering hosts
Scanning for hosts creates a host whose name is the host group name for each host group name in
the storage system.
Adding a host by scanning automatically registers to the created host any WWNs that have been
previously registered to the discovered hosts.
NOTE:
Only WWNs that have not been previously registered for a host in HP P9000 Command View
Advanced Edition Suite products are registered for the created hosts.
Prerequisites for scanning for hosts
Before scanning for hosts, verify the following:
• The name of the host group is the same as the actual host, and the WWN name for that host is
set for LUN security.
• Only a single host can be related to each host group.
• A LUN Manager, or LUN Management, must be installed on the target storage system.
Scanning for new hosts
Before you perform this task, review the “Prerequisites for scanning for hosts” on page 21.
To scan for new hosts:
1. On the Administration tab, select Managed Resources.
2. On the Hosts tab, select the More Actions pull-down menu and select Host Scan.
3. Specify the appropriate information and run the host scan.
User Guide 21
Page 22

About merging hosts
WWN names that are registered to multiple hosts can be merged into one destination host. The source
host will be deleted upon completion of the merge.
Information about WWN names are also merged. If the host that is monitored by the Host Data
Collector or Device Manager agent is merged as a source host, the source IP address will not be
migrated.
Prerequisites for merging hosts
Before you merge hosts, the destination host cannot be:
• mainframe
• virtual
• not registered with a WWN
Merging hosts
To merge hosts:
1. On the Administration tab, select Managed Resources.
2. On the Hosts tab, select the target host and from the More Actions pull-down menu, select Merge
Hosts.
3. Select the source host to merge the hosts.
4. Check the task status to confirm that the task has completed successfully.
5. When the task completes, confirm that the source hosts are deleted from the Hosts list in the
Resources tree.
About acquiring the most recent host information
You can manually refresh the information displayed about a host at any time.
When you refresh registered hosts, the following displayed information is updated:
• Host names
• WWNs
• Volume capacity allocated to the host
• Times and dates for the most recent updates
Acquiring the most recent host information
Refresh registered hosts to update the information that is displayed in the Hosts list.
You must have Modify permission or higher to perform this task.
To update host information:
1. On the Administration tab, select Managed Resources.
2. On the Hosts tab, select the host, or hosts, you want to refresh.
3. Click Refresh Hosts and then click OK.
Registering managed targets22
Page 23

4. Check the Data Collection Tasks tab to verify that the task has completed successfully.
5. When the task completes, confirm that the host information is updated on the Hosts tab of Managed
Resources.
Or, you can confirm that the host information is updated in the Hosts list displayed by using the
Hosts tree on the Resources tab.
Managing data collection tasks
This module describes how to manage data collection tasks.
About data collection tasks
Storage system and host information is updated through data collection tasks that appear in a list.
User Guide 23
Page 24

Registering managed targets24
Page 25

3 Setting up and operating a SAN environment
This module describes setting up and operating a Storage Area Network (SAN).
Virtualizing storage
This module describes how to virtualize storage.
About virtualizing volumes
Virtualizing volumes is the process of mapping volumes in a source storage system to a target storage
system. The volumes in the source storage system (registered and referred to as external volumes)
can then be managed in the same way as the volumes in the target storage system (registered and
referred to as internal volumes).
Virtualizing volumes allows you to use P9000 Command View AE Software to centrally manage
volumes in multiple source storage systems from a single storage system.
External volumes can be used for various purposes, including:
• External volumes can be allocated to hosts the same as internal volumes are.
• Important data on internal volumes can be backed up to external volumes.
• Infrequently accessed data on internal volumes can be moved to external volumes for archiving.
NOTE:
To virtualize volumes, External Storage Software must be installed on the target storage system.
Prerequisites for virtualizing volumes
Before virtualizing volumes, verify the following:
• The internal and external storage systems are registered in P9000 Command View AE Software.
• External Storage Software is installed on the target storage system.
• The external storage system is connected to one or more external ports of the internal storage
system.
In addition, determine:
• The required number and capacity of volumes you are virtualizing.
• The number of paths between the external and internal storage systems.
User Guide 25
Page 26

Virtualizing volumes
Before you perform this task, review “Prerequisites for virtualizing volumes” on page 25.
To virtualize volumes:
1. From the Actions menu, select Virtualize Volumes.
2. Specify the appropriate information.
To change default values, click Path Priority Setting, Host Group and LUN Settings, or External
Volume Configuration to specify new values.
3. Click Show Plan to review the plan and specify additional information, as appropriate:
• Verify the information that is displayed.
• Enter a name in Task Name.
• Specify when the task should run.
4. Click Submit.
The plan is registered as a task.
5. When the task completes, check the Storage Systems list to confirm that the external volumes are
mapped to the target storage system.
Virtualizing storage capacity
This module describes how to virtualize storage capacity.
About virtualizing storage capacity by creating THP pools
HP StorageWorks P9000 Thin Provisioning Software (THP) provides virtual volumes to a host and
allocates the actual capacity from a storage pool when a host makes a write request. By using Thin
Provisioning Software, you can allocate more capacity to a host than that allowed by the actual
physical configuration of the storage system.
Thin Provisioning Software provides the following advantages:
• You can reduce system setup and operational costs.
• You can use resources more efficiently.
• You can distribute workload equally among volumes.
HP StorageWorks P9000 Smart Tiers Software (Smart) improves the Thin Provisioning Software storage
performance. If you create a pool that combines volumes with different cost performance, such as
combining higher cost, high-speed volumes (SSD or SAS) with inexpensive low-speed volumes (SATA),
Smart Tiers Software rearranges the volume load automatically. This rearrangement is performed
depending on the I/O load; high-load pages are allocated to high-speed volumes, and low-load
pages are allocated to low-speed volumes.
You can create virtual volumes (THP) from physical volumes that are grouped into a THP pool. You
can then allocate those virtual volumes to hosts.
The volumes used to create a THP pool are called THP pool volumes.
P9000 Command View AE Software automatically selects volumes, and then creates a THP pool
according to the conditions you specify:
• Thresholds for consumed capacity or virtualization
Setting up and operating a SAN environment26
Page 27

• Options for rearranging volumes
You must specify the following items when you create a Smart Tiers Software tier.
For HP StorageWorks P9500 Disk Array:
• Drive type (hardware tier). You can specify up to three types.
• Parity groups for each drive type.
In addition, you can specify volumes to create a THP pool. After you create a pool, you can create
THP volumes from the pool, or allocate a THP volume to a host by specifying a THP pool.
Naming a THP pool allows you to search, filter, and sort on pool names, which makes tasks, such as
allocating and creating volumes, easier.After you create a THP pool, you can check the pool information
to determine if you need to add capacity or migrate volumes. A pool for Thin Provisioning Software
that is in use can be expanded into a multi-tier configuration by changing it to a pool for Smart Tiers
Software.
If a THP pool includes zero pages, usability is poor. You can reclaim zero pages periodically and
when performing a backup or restoring data from tape storage.
Prerequisites for creating THP pools
Before creating THP pools, you must register the target storage system and verify these items, depending
on the storage system.
When using XP24000/20000 and HP StorageWorks P9500 Disk Array for THP pools:
• Parity group
When using HP StorageWorks P9500 Disk Array for Smart Tiers Software pools:
• Hardware tier: drive type and drive speed (RPM)
• Parity group for each hardware tier
Creating a THP pool
To create a THP pool:
1. On the Resources tab, select THP Pools under the target storage system.
2. Click Create Pool.
The Create Pool dialog box opens.
3. Specify the pool name and other information.
4. Click Show Plan to review the plan and specify additional information, as appropriate:
• Verify the information that is displayed.
• Enter a name in Task Name.
• Specify when the task should execute.
5. Click Submit.
The plan is registered as a task.
6. In the Storage Systems tree, return to the target storage system, click THP Pools and confirm that
the pool is created.
User Guide 27
Page 28

Verifying THP pools
Before you can verify THP pools, you must have created the pools you want to verify.
To verify THP pool operation conditions:
1. On the Resources tab, select THP Pools under the target storage system.
A list of THP pools, (THP pool volumes and THP volumes), and associated information appears.
A pools summary provides summary information such as the number of pools, virtual volume
capacity, usage, and total and used capacity.
2. Select a THP pool to display more detailed information about that pool.
Configuration information for each Smart Tiers Software volume can be displayed by clicking
the volume link from the list displayed on the THP Vols tab.
Prerequisites for expanding THP pools
Before creating THP pools, register the storage system and verify these items, depending on the storage
system:
When using XP24000/20000 and HP StorageWorks P9500 Disk Array for THP pools:
• Parity groups to add
When using HP StorageWorks P9500 Disk Array for THP pools:
• Parity group for each hardware tier
Expanding THP pools
You can expand a THP pool by adding volumes to the pool.
To expand a THP pool:
1. On the Resources tab, select Storage Systems in the navigation tree.
2. Expand the tree for the target storage system that includes the THP pool you want to expand.
3. Select a pool and click Expand Pool.
4. Follow the instructions to create a plan.
5. Click Show Plan to review the plan and specify additional information, as appropriate:
• Verify the information that is displayed.
• Enter a name in Task Name.
• Specify when the task should execute.
6. Click Submit.
The plan is registered as a task.
7. On the Tasks & Alerts tab, confirm that the task has completed successfully by clicking the History
tab.
8. In the Storage Systems tree, return to the target storage system, click TPH Pools and confirm that
the information is updated.
Setting up and operating a SAN environment28
Page 29

Shrinking a THP pool
To shrink a THP pool:
select a THP pool's name.
1. Expand the tree for the target storage system that includes the THP pool you want to shrink, and
select THP Pools.
2. In the THP Pool Vols tab, select THP pool volumes, and then click Shrink Pool.
3. Review the plan and specify additional information, as appropriate:
• Verify the information that is displayed.
• Enter a name in Task Name.
• Specify when to execute the task.
4. Click Submit.
The plan is registered as a task.
5. On the Tasks & Alerts tab, confirm that the task completed by clicking the History tab.
6. In the Storage Systems tree, return to the target storage system, click Pools, and confirm that the
information is updated.
Modifying THP pool settings
To modify THP pool settings:
1. On the tab, select Storage Systems in the navigation tree.
2. Expand the tree for the target storage system that includes the THP pool you want to modify.
3. Select the pool you want to modify and click Edit Pool.
4. Modify the settings as appropriate and click Submit.
5. On the Tasks & Alerts tab, confirm that all tasks are completed.
6. In the Storage Systems tree, return to the target storage system and click THP Pools to confirm
that the information is updated.
Expanding THP volumes
To expand the size of THP volumes:
1. On the Resources tab, select Storage Systems in the navigation tree.
2. Expand the tree for the target storage system that includes the pool you want to modify.
3. On the THP Vols tab, select one or more volumes you want to expand and click Expand THP
Volume.
4. Specify the new capacity for the volume.
5. Click Submit.
6. On the Tasks & Alerts tab, confirm that all tasks are completed.
7. In the Storage Systems tree, return to the target storage system, click THP Pools and view the THP
Vols tab to confirm that the information is updated.
User Guide 29
Page 30

Reclaiming zero page
1. On the Resources tab, select Storage Systems in the navigation tree.
2. Expand the tree for the target storage system that includes the appropriate THP pool.
3. On the THP Vols tab, select one or more volumes and click Reclaim Zero Pages.
4. Click Submit.
5. In the task list, confirm that the task is completed.
Allocating volumes
This module describes how to allocate (provision), unallocate, delete, and create volumes, and manage
paths.
About allocating volumes
You must allocate volumes to a host so the host system can recognize them. The settings you assign
for allocating the first volume to a host become the default settings for the next time you allocate
volumes to the same host.
When you allocate volumes to a host, P9000 Command View AE Software assigns the paths between
volumes and the host.
If the volumes cannot be allocated with the specified settings, new volumes are created from unused
capacity, and then allocated to the host.
In a cluster environment, volumes can be allocated to multiple hosts at the same time.
Prerequisites for allocating volumes to hosts
Before allocating volumes to a host, verify that the host and storage systems are registered in P9000
Command View AE Software, and that appropriate permissions are set for all resources.
If you want to select volumes from a tier, an HP StorageWorks P9000 Tiered Storage Manager
software license must be enabled.
In addition, determine:
• The target host name
• The number and size of the volumes you are allocating
• An appropriate storage system
Allocating volumes to hosts
Before you allocate volumes to a host, review “Prerequisites for allocating volumes to hosts
” on page 30.
To allocate volumes to a host:
1. From the Resources menu, select Hosts.
2. Expand the tree and select the desired operating system.
Setting up and operating a SAN environment30
Page 31

3. From the list of hosts, select one or more target hosts, click Allocate Volumes, then click Show
Plan and perform the following:
• Verify the information that is displayed.
• Enter a name in Task Name.
• Specify when the task should execute.
4. Click Submit to register the plan as a task.
5. When the task completes, confirm that the volumes are recognized by the target host.
NOTE:
When allocation completes, the host administrator must mount the volume and create a file
system to make the volume writable.
About path management
When you allocate a volume to a host, P9000 Command View AE Software assigns paths between
the volumes and the host. You can add, delete, or change these paths from either the host or storage
system.
You can manage paths from a list of allocated volumes in the Storage Systems tree, Hosts tree, logical
group, and from a list of volumes returned from a search. You can manage paths by selecting multiple
volumes.
Volumes allocated to hosts belong to a specific host group. The same target host port is set for all
volumes in any given host group. Therefore, when adding or deleting a target host port for one or
more volumes, you must select all of the volumes in that host group.
Editing paths from hosts
You can add, delete or change the paths between the host and storage system.
To edit a path from a host:
1. On the Resources tab, click Hosts and expand the tree to display a list of hosts.
2. In the Hosts List, click the link for the name of the host with the path you want to change.
3. In the Volume List, select a volume and click Edit LUN Paths.
The Edit LUN Paths dialog box opens.
4. Add or delete host or storage ports.
5. Click Show Plan to review the plan and specify additional information, as appropriate:
• Verify the information that is displayed.
• Enter a name in Task Name.
• Specify when the task should execute.
6. Click Submit.
The plan is registered as a task.
7. Confirm that the task is Completed on the Tasks & Alerts tab.
You can confirm the task details by clicking the task name and viewing the task summary.
User Guide 31
Page 32

Editing paths from storage systems
You can add, delete, or change the paths between the storage systems and hosts.
To edit paths from a storage system:
1. On the Resources tab, click Storage Systems and expand the tree to display a list of
Open-Allocated volumes.
2. In the Volume List, select the volume for which you want to edit the paths.
3. Click Edit LUN Paths.
The Edit LUN Paths dialog box opens.
4. Add, delete, or change paths.
5. Change any other required settings.
6. Click Show Plan to review the plan and specify additional information, as appropriate:
• Verify the information that is displayed.
• Enter a name in Task Name.
• Specify when the task should execute.
7. Click Submit.
The plan is registered as a task.
8. Confirm that the task is Completed on the Tasks & Alerts tab.
You can confirm the task details by clicking the Task name and viewing the Task Summary.
Editing paths from logical groups
To edit the path from a logical group:
1. On the Resources tab, click Logical Groups.
2. In the Logical Groups list, select the logical group to view a list of hosts or volumes assigned to
the logical group.
3. Select a host or volume from the Hosts or Volumes tab.
4. Click Edit LUN Paths.
The Edit LUN Paths dialog box opens.
5. Add, delete, or change paths.
6. Change any other required settings.
7. Click Show Plan to review the plan and specify additional information, as appropriate:
• Verify the information that is displayed.
• Enter a name in Task Name.
• Specify when the task should execute.
8. Click Edit LUN Paths.
The plan is registered as a task.
9. Confirm that the task is Completed on the Tasks & Alerts tab.
You can confirm the task details by clicking the Task name and viewing the Task Summary.
Setting up and operating a SAN environment32
Page 33

Editing paths from volume search results
To edit the path from a list of returned search results:
1. On the Search tab, click LDEV as the search target click Search.
NOTE:
If necessary, click Clear to configure search options.
2. In the list of returned search results, locate the LDEV ID and click on the row to select the volume.
3. Click Edit LUN Paths.
The Edit LUN Paths dialog box opens.
4. Add, delete, or change paths.
5. Change any other required settings.
6. Click Show Plan to review the plan and specify additional information, as appropriate:
• Verify the information that is displayed.
• Enter a name in Task Name.
• Specify when the task should execute.
7. Click Submit.
The plan is registered as a task.
8. Confirm that the task is Completed on the Tasks & Alerts tab.
You can confirm the task details by clicking the Task name and viewing the Task Summary.
About creating volumes
You create volumes by using the available space in a Thin Provisioning (THP) pool or parity group.
You can then access the volumes when you are ready to allocate them to a host. If, while allocating
volumes to a host, no volumes match the specified requirements, volumes are automatically created
using the available space.
Newly created volumes are included in the list of Open-Unallocated volumes until you allocate them
to a host.
Because creating volumes takes time, you should create volumes in advance.
Prerequisites for creating volumes
Before creating volumes, verify that the storage systems are registered in P9000 Command View AE
Software.
In addition, determine:
• number of volumes you are creating
• volume size
• target storage system name
• volume type
User Guide 33
Page 34

Creating volumes
Before you create volumes, review “Prerequisites for creating volumes” on page 33.
To create volumes:
1. From the Actions menu, select Create Volumes.
2. Specify the appropriate information.
3. Click Show Plan to review the plan and specify additional information, as appropriate:
• Verify the information that is displayed.
NOTE:
The LDEV IDs for the volumes you are creating appear in the Plan Detail.
• Enter a name in Task Name.
• Specify when the task should execute.
4. Click Submit.
5. When the task completes, verify that the volumes appear in the Open-Unallocated volume list on
the Resources tab.
About unallocating volumes
You must unallocate a volume before you can reuse it or take it offline. Unallocating a volume deletes
all paths that connect the volume to ports, hosts.
Prerequisites for unallocating volumes from hosts
Before unallocating volumes, verify the following:
• The host and storage systems are registered in HP P9000 Command View Advanced Edition Suite
products.
• The IT administrator has unmounted the volumes you plan to unallocate.
In addition, determine:
• The host name
• The volume for unallocation
CAUTION:
When you unallocate a volume, the information stored on it is no longer accessible. To retain this
data, back this volume up before unallocating.
Unallocating volumes from hosts
Before you unallocate volumes, review “Prerequisites for unallocating volumes from hosts” on page 34.
Setting up and operating a SAN environment34
Page 35

To unallocate volumes:
1. From the Resources page, select Hosts.
2. Expand the tree and select the target OS.
3. From the list of hosts, select one or more hosts from which you want to unallocate all volumes,
and then click the Unallocate Volumes button.If you want to unallocate specific volumes, click the
link of the host name to select the target volumes, and then click the Unallocate Volumes button.
4. If the displayed volumes are correct, unallocate the volumes with the appropriate options.
5. In the task list, confirm that the task has completed.
When the unallocation completes, the data stored on the volume is no longer accessible. You can
then allocate the volume to another host.
About deleting unallocated volumes
Volumes that are not allocated to any host can be deleted and their space added to the unused
capacity of Thin Provisioning (THP) pools or parity groups.
Deleting unallocated volumes
To delete volumes:
1. On the Resources tab, select the target storage system.
2. Expand the tree and select the storage system from which you want to delete volumes.
3. Select Open-Unallocated or THP Pool and then select the THP Vol tab of the target THP pool.
4. From the volume list, select the volumes that you want to delete, and then click Delete Volumes.
5. Specify additional information, as appropriate:
• Verify the information that is displayed.
• Enter a name in Task Name.
• Specify when to execute the task.
6. Click Submit.
7. When the task completes, verify that the volumes do not appear in the Open-Unallocated or THP
volume list.
Replicating volumes
This module describes how to replicate volumes.
About replicating volumes (pair management)
Volume replication is used to make copies of critical data. You can make a local copy of a volume
in the same storage system, or make a remote copy of a volume in a different storage system.
P9000 Command View AE Software uses a light version of Replication Manager which allows you
to perform basic volume replication operations.
To use the complete Replication Manager functionality, you must register a Replication Manager
license and log in to P9000 Command View AE Software with Replication Manager permissions.
User Guide 35
Page 36

When you register a Replication Manager license, you can use wizards to visualize complex replication
configurations while defining, editing, viewing, and troubleshooting copy pairs.
For more information about how to set up Replication Manager for volume replication, see the HP
StorageWorks P9000 Command View Advanced Edition Suite Software Administrator Guide and
HP StorageWorks Command View Advanced Edition Software Release Notes.
Copy pair management operations
You can perform the following pair management functions in P9000 Command View AE Software:
• Define, create, and delete open volume copy pairs
• Modify copy-pair tasks
• create: Creates a copy pair
• split: Separates a copy pair
• resync: Synchronizes a secondary volume with the primary volume
• restore: Restores the copy pair from a secondary volume to the primary volume
• delete: Releases a copy pair and changes the status to simplex
• View information from the Hosts, Storage Systems, and Copy-Pair Configuration Definitions trees
• View tasks
• View workflows
• Refresh configuration information
• Add, edit, or delete command devices
• Delete information sources
• View event logs
• Switch to maintenance mode
To access other pair management functionality, you must register a Replication Manager license and
log in to P9000 Command View AE Software with Replication Manager permissions.
Adding command devices
To add a command device:
1. From the Actions menu, select Manager Replication to start the Replication Manager.
2. From the Explorer menu, select Settings and then select Refresh Setting.
3. Click the Configuration Setting link.
4. Select the local DevMgr check box and then click Refresh Configuration.
5. From the Explorer menu select Resources and then Storage Systems.
6. Expand the tree and select the desired storage system.
7. Click the Open link and then on the Cmd Devs tab click the Add Cmd Devices button and add
the command device.
To view a command device:
• Click the Open link from the storage system name shown in the Replication Manager. Next, click
on the Cmd Devs tab to see a list of added command devices
Setting up and operating a SAN environment36
Page 37

Editing command devices
To edit a command device:
1. From the Actions menu, select Manage Replication to start the Replication Manager.
2. From the Explorer menu, select Settings and then select Refresh Setting.
3. Click the Configuration Setting link.
4. Select the local DevMgr check box and then click Refresh Configuration.
5. From the Explorer menu select Resources and then Storage Systems.
6. Expand the tree and select the desired storage system.
7. Click the Open link and then on the Cmd Devs tab click the pencil and paper icon and edit the
command device.
To view a command device:
• Click the Open link from the storage system name shown in the Replication Manager. Next, click
on the Cmd Devs tab to see a list of edited command devices
Defining copy pairs
Before you define copy pairs, determine the volumes that will be used to define copy pairs and that
the volumes are allocated to a host.
To define copy pairs:
1. From the Actions menu, select Manage Replication to access the pair management functionality.
2. From the Explorer menu, select Settings and then select Refresh Setting.
3. Click the Configuration Setting link.
4. Select the local DevMgr check box and then click Refresh Configuration.
The volume and copy pair configuration information is refreshed.
5. Display a list of volumes from the Hosts tree or the Storage Systems tree.
6. On the Unpaired tab, select the volumes from which copy pairs will be defined and then click
Pair Management.
The Pair Configuration wizard opens.
7. Follow the steps in the Pair Configuration wizard to define copy pairs.
For details about how to specify copy-pair conditions and how to use the Pair Configuration
wizard, see the Replication Manager online help.
8. From the Explorer menu, select Tasks, and then select Tasks again to confirm that the task was
properly executed.
9. Confirm the copy-pair definitions by viewing the Copy pair configuration view in Replication
Manager.
From the list of volumes in the Hosts tree or the Storage Systems tree, view the defined volumes
in the Paired tab.
User Guide 37
Page 38

Changing the status of a copy pair
To change the status of a copy pair:
1. From the Actions menu, select Manage Replication to access the pair management functionality.
2. From the Explorer menu, select Settings and then select Refresh Setting.
3. Click the Configuration Setting link.
4. Select the local DevMgr check box and then click Refresh Configuration.
5. From the Hosts tree, select a host and click Refresh Hosts.
All copy pairs associated with that host are refreshed.
6. Display the list of volumes from the Hosts tree.
7. Click the icon to change the pair status.
8. Change the status of the copy pair by using the Change Pair Status wizard.
For details on the conditions under which certain copy pair statuses can be changed and on how
to change the status of a copy pair by using the Change Pair Status wizard, see the Replication
Manager online Help.
9. From the Explorer menu, select Tasks, and then select Tasks again to confirm that the task is
completed.
10. Confirm the copy pair status was changed by viewing the Copy pair configuration view in
Replication Manager.
From the list of volumes in the Hosts tree or the Storage Systems tree, view the current copy pair
status.
Migrating volumes
This module describes Volume Migration.
About volume migration
Volume Migration involves moving data from one set of volumes to another set of volumes or HP
StorageWorks P9000 Thin Provisioning Software (THP) pools, including externally connected storage
systems. For example, you can migrate data when your volume performance decreases or your
environment changes.
The source volumes being migrated are called a migration group. The migration destination is
determined by selecting a tier from which migration destination volumes are automatically selected.
If the automatically selected destination volumes are not appropriate, you can manually select different
destination volumes. The migration group and the tier specified as the destination must be in the same
storage system.
After you select a migration group and a tier, the source migration volumes are paired with their
respective target migration volumes or THP pools.
Note the following:
• During migration, data can still be accessed.
• If an emulation type OPEN-V volume is a normal volume and the size of the target is larger than
the source, a volume with the same size as the source is created. The remaining capacity can then
Setting up and operating a SAN environment38
Page 39

be reused. If you use the server properties, you can specify how many volumes appear as migration
target candidates.
• When you create a tier, you specify resource conditions. A tier that has been created by specifying
the following attributes cannot be selected as a migration target:
• If you specified one of the following attributes for volumes:
- Storage type
- Port
- Host group
• If you specified one of the following attributes for THP pools:
- Storage type
- Drive type
- Drive speed (RPM)
- RAID level
- Storage system
• After migrating, you can delete the source volumes.
• After volumes are migrated to a THP pool, unused capacity in the target volumes is returned to
the pool.
• You cannot work with volumes until the migration tasks are completed.
You must have a HP StorageWorks P9000 Tiered Storage Manager software license registered to
perform Volume Migration.
Prerequisites for migrating volumes
Before migrating volumes, verify the following:
• An HP StorageWorks P9000 Tiered Storage Manager software license is registered.
• You have Tiered Storage Manager Modify permission.
• A tier has been created.
• You know which volumes to migrate and which storage systems they belong to.
• The emulation type, number of blocks, and size are the same for the source and target migration
volumes.
• You can access the volumes and they are not reserved by other programs or tasks.
• Nothing appears under Migration Restrictions in the volume information area. If (target) is
displayed at the end of the name, then the volume can be used as a source.
LUSE volume conditions
If the source volume is LUSE volume:
• Target volumes must be either all internal or all external volumes.
• The LUSE volume can be migrated only if the target volume is not a THP volume.
• The emulation type, drive type, I/O suppression mode, cache mode, and CLPR of all migration
target volumes must be the same.
• For the Tiered Storage Manager to automatically determine migration target volumes, external
migration target volumes require that all of the volumes must be in the same external storage system
and the RAID level and SLPR (storage management logical partition) of all migration target volumes
be the same.
User Guide 39
Page 40

Pool conditions
If the target is a pool:
• The status cannot be blocked.
• The number of virtual volumes must be fewer than 8,192.
• When the target is an THP volume, the source and target volumes must be in different pools.
• The target volume must have more unused capacity than the source volume.
• The usage rate must not exceed the larger threshold value (threshold 1 or threshold 2), when a
THP pool volume is created in a THP pool.
Restrictions
The following volumes cannot be migrated, even if nothing appears under Migration Restrictions:
• Cross-system copy-pair volumes.
• Volumes configured for XRC. Note that a volume in a suspended status can be a source volume,
but not a target volume.
• Volumes configured for concurrent copying.
• The migration source volume is configured as a Continuous Access Synchronous pair or Hitachi
TrueCopy for Mainframe pair, and the migration target is an external storage subsystem.
Migrating volumes
You can migrate volumes to a different volume or THP pool by creating migration plans and executing
them as tasks.
To migrate volumes:
1. From the Actions menu, select Migrate Volumes.
2. Select the appropriate storage system.
3. On the Migration Groups tab, click Create MG.
If a migration group already exists, go to step 7.
4. On the General tab, specify a name, volumes, and other information.
5. On the Rule tab, specify the following rules:
Parity Group Selection: From the following three methods, specify how the parity groups from
which migration target volumes can be selected are chosen.
• BalanceCapacity: Selects migration target volumes so that the parity groups that are selected
as the migration destination have the same amount of remaining capacity.
• MaximumCoverage: Selects migration target volumes from as many parity groups as possible.
• MinimumCoverage: Selects migration target volumes from as few parity groups as possible.
Parity Group Avoidance of Migration Groups (option): Selects migration target volumes from a
parity group that is different than the migration destination.
6. If necessary, specify required items on the Notification tab. Click OK and then close the Create
MG window.
7. Select a migration group.
8. Select a tier and click Check Compatibility.
A copy pair is created for each migration source volume and its target volume or THP pool.
Setting up and operating a SAN environment40
Page 41

9. Confirm that the pairs are properly created.
To edit pairs, click Edit Pairs.
10. Specify the appropriate options and create the task.
11. Verify that the migration task completed successfully in the Tiered Storage Manager Task view
on the Tasks & Alerts tab.
Managing tasks
This module describes how to manage tasks.
About tasks
When you perform any operation, P9000 Command View AE Software registers the operation as a
task. When a task is registered, P9000 Command View AE Software reserves any resources that the
task requires (such as, volumes, parity groups, pools, and host groups), and denies access to other
operations until the task either completes or is canceled.
If the server stops before a task starts, the task will run the next time the server starts. If the server stops
while a task is running, the task will fail. Scheduled tasks can be rescheduled after the server is
restarted.
You can check the progress or the results of all previously executed tasks on the Tasks & Alerts tab.
NOTE:
Information about previously run tasks is automatically deleted, starting with the oldest task, after the
number of tasks exceeds 100,000.
Viewing task status
All users can perform this task.
If you have an HP StorageWorks P9000 Tiered Storage Manager software license enabled and
Tiered Storage Manager permissions, you select tasks by task type.
To view the status of a task:
1. On the Tasks & Alerts tab, click All Tasks and, if necessary, select a Category from the Summary
list.
If you have a Tiered Storage Manager license enabled, choose either the Device Manager
(DevMgr) or Tiered Storage Manager (TSMgr) task type.
2. Check the task status, depending on the task type.
• Check the status of a Device Manager task on the Tasks tab or the History tab.
View the task status in the Status column.
• Check the status of a Tiered Storage Manager task by specifying search conditions to find
the target task.
View the task status in the search results.
3. To display task details and a task summary, click the task name link to open the Task Details
dialog box.
User Guide 41
Page 42

Rescheduling uncompleted tasks
NOTE:
You can only cancel tasks that are in Waiting status.
To reschedule an uncompleted task:
1. On the Tasks & Alerts tab, select one or more Device Manager tasks.
2. Click Reschedule Tasks.
3. Reschedule the tasks to refresh the Tasks list.
4. Confirm that the tasks are rescheduled by viewing the Tasks list.
Pausing Tiered Storage Manager tasks
NOTE:
You can only pause tasks that are in In Progress status.
To pause Tiered Storage Manager tasks:
1. On the Tasks & Alerts tab, select one or more Tiered Storage Manager tasks.
2. Click Stop Tasks.
3. In the confirmation dialog box, click OK.
4. In the list of Tasks, the status of the paused tasks changes to Stopping.
You can verify the point at which a task was paused by selecting a task and viewing the Task
Details.
Canceling scheduled tasks
You can cancel scheduled Device Manager or Tiered Storage Manager tasks that have not yet started.
NOTE:
You can only cancel tasks that are in Waiting status.
NOTE:
You can view the status of a task while it is running or scheduled to run.
Setting up and operating a SAN environment42
Page 43

To cancel a scheduled task:
1. On the Tasks & Alerts tab, select one or more tasks.
You can select either Device Manager tasks from the task list, or Tiered Storage Manager tasks
by specifying search conditions to find the target tasks.
2. Click Cancel Tasks.
3. Verify the task has been canceled.
To verify cancellation of a Device Manager task, view the History tab to confirm that the status
of the task is Canceled. To verify cancellation of a Tiered Storage Manager task, specify search
conditions to find the target task and verify it is canceled.
Moving a failed task summary
When a task fails, P9000 Command View AE Software notes the location and summarizes the status
under the Tasks & Alerts tab. After you have addressed the problem, you can move the failed task
summary to the History tab.
NOTE:
You can only cancel tasks that are in Waiting status.
To move a failed task summary to the History tab:
1. On the Tasks & Alerts tab, select DevMgr Tasks in the Category column.
NOTE:
You cannot manually move a Tiered Storage Manager task summary to the History tab.
2. Select one or more tasks on the Tasks tab.
3. Click Move to History.
4. Verify that the task, or tasks, are moved to the History tab.
User Guide 43
Page 44

Setting up and operating a SAN environment44
Page 45

4 Grouping resources
This module describes how to group logical groups and storage tiers (resources).
Managing logical groups
This module describes how to manage logical groups.
About logical groups
A logical group is a group of hosts and volumes. A storage administrator creates logical groups and
assigns hosts and volumes to each logical group.
Logical groups allow you to:
• Create summary reports that indicate the current resource use in a storage environment by organ-
ization.
If you manage an entire system, you can create logical groups to generate usage summary reports
for each organization that uses storage.
• Monitor volumes and perform storage system operations by grouping managed resources (hosts
and volumes).
If you manage part of a system, you can categorize volumes according to the organizations that
use the storage. Grouping and categorizing volumes makes finding volumes easier and allows
you to perform daily operations for volume resources.
You can register multiple hosts or volumes to a logical group at one time by specifying a range of IP
addresses, or multiple items, such as operating system type and drive type.You can also change the
hierarchy of existing logical groups, or add and remove hosts and volumes.
Prerequisites for creating a logical group
Before creating a logical group, review the following conditions:
• The hosts and storage systems are registered in P9000 Command View AE Software.
• When a host is assigned to a logical group, the volumes allocated to that host are also automat-
ically assigned to that logical group.
Only virtual hosts that are detected by Host Data Collector or Device Manager agent can be as-
signed to a logical group. Hosts detected by VMware™ ESX cannot be assigned.
• Mainframe volumes (MF-Vols) cannot be assigned to a logical group.
• Child groups cannot be created below host or volume groups. Child groups can be created only
below folders.
User Guide 45
Page 46

Creating logical groups
Before creating logical groups, review the rules for creating logical groups in “Prerequisites for creating
a logical group” on page 45.
To create logical groups:
1. On the Resources tab, select Logical Groups.
2. Click Create Logical Group.
3. Create a folder for each new logical group:
1. Click Create Logical Group.
2. Enter the appropriate information.
3. Select Create.
4. Click OK.
5. Repeat for each new folder required.
4. To create a hierarchy of logical groups, repeat step 3.
5. On the Resources tab, click Logical Groups and confirm that the logical groups you created
appear.
Viewing logical group reports
You can view summary reports for specified logical groups.
To view the summary report for a logical group:
1. On the Resources tab, click Logical Groups.
2. Expand the tree and select the target logical group.
Editing logical groups
To edit a logical group:
1. On the Resources tab, click Logical Groups.
2. Expand the tree and select the parent group of the target logical group.
3. From the Logical Groups list, select the logical group you want to edit.
4. Click Edit Logical Group.
5. Change the parent group or change the host and volume settings.
6. Click OK.
7. Confirm the change by selecting the logical group and viewing the logical groups summary or
the host or volume list. If you change the parent logical group, you can confirm the new hierarchy
by reviewing the logical groups tree.
Performing operations from a logical group
You can perform operations on storage systems by starting from a logical group.
Grouping resources46
Page 47

To perform operations from a logical group:
1. On the Resources tab, select Logical Groups.
2. Expand the tree and select the target logical group.
3. Select a host or volume.
4. Perform one or more of the following operations:
• Allocate volumes to a specified host in a logical group
• Manage LUN paths for specified volumes in a logical group
• Allocate volumes by selecting a volume in a logical group
• Unallocate volumes from a host in a logical group
• Unallocate volumes by selecting a volume in a logical group
• Edit the labels of specified volumes in a logical group
5. In the task list, confirm that the task is completed.
Managing storage tiers
This module describes how to manage tiers.
About tier-based storage management
In a tier-based storage management system, storage system resources are grouped and managed in
tiers. Tiers can be created for volumes or for Thin Provisioning (THP) pools to allow high-capacity
resources to be centrally managed.
Tiers allow you to allocate data according to its purpose. This allocation can be done by grouping
drives in a storage system by type, or by creating groupings of particular tasks or functions. For
example, you can allocate frequently accessed data to a tier of high-reliability drives or storage
systems.
You can also use storage system resources more efficiently by storing data that is only for archive
purposes on a tier of SATA drives or older storage systems.
In P9000 Command View AE Software, you must have an HP StorageWorks P9000 Tiered Storage
Manager software license to perform tier-based storage management operations.
Creating tiers
Before you can create a tier, you must enable an HP StorageWorks P9000 Tiered Storage Manager
software license.
To create a tier:
1. On the Resources tab, click Tiers.
2. Select the storage system in which to create a tier.
3. Click Create Tier.
4. Specify the appropriate information.
5. Click OK.
6. Confirm that the tier is included in the storage system selected in the Tiers tree.
User Guide 47
Page 48

Prerequisites for allocating volumes from a tier
Before you allocate volumes from a tier, verify that:
• The hosts and storage systems are registered in P9000 Command View AE Software.
Verify that P9000 Command View AE Software detects the host and storage arrays by confirming
that the HP StorageWorks XP disk array is registered in P9000 Command View AE Software.
• An HP StorageWorks P9000 Tiered Storage Manager software license is enabled.
In addition, determine the requirements for the volumes and ports to be used according to the
environment and operational policies, including:
• The target host name
• The number and size of volumes required
• The storage systems to use
Allocating volumes from a tier
You must allocate volumes to a host so the host system can recognize them.
Before you allocate volumes from a tier, review the requirements in “Prerequisites for allocating volumes
from a tier” on page 48.
To allocate volumes from a tier:
1. From the Actions menu, select Allocate Volumes.
2. Specify the appropriate information.
3. In Advanced Options, select Select a Tier.
4. Specify the tier from which to allocate volumes.
5. Specify the paths between the hosts and the volumes.
When you specify the number of paths you want, the system displays the candidate paths. To
specify a particular path, click the Edit Paths button, and then specify the path.
To reuse paths that have been used before, click Select Path Setting from the History and select
the paths from the list.
6. Click Show Plan to review the plan and specify additional information, as appropriate:
• Verify the information that is displayed.
• Enter a name in Task Name.
• Specify when the task should execute.
7. Click Submit.
8. View a list of tasks to verify that all tasks completed.
9. On the Resources tab, select Hosts to confirm that an appropriate tier has been allocated to the
target host.
Expanding a tier
Before expanding a tier, verify that:
• An HP StorageWorks P9000 Tiered Storage Manager software license is enabled.
• A HP StorageWorks XP disk array has been registered.
Grouping resources48
Page 49

To expand a tier:
1. On the Resources tab, click Tier.
2. Expand the tree, select the storage system that contains the tier you want to expand and click
Edit Tier.
3. Specify the appropriate values.
4. Click OK.
5. Confirm that the tier has expanded.
Labeling volumes
This module describes how to use volume labels.
About volume labels
Volume labels allow you to more easily differentiate individual volumes in a storage system by labeling
them with meaningful names.
Volume labels can be up to 64 characters and can include any of the following characters:
A-Z, a-z, 0-9 ~ ! @ # $ % ^ & * ( ) _ + - = { } [ ] | : ; ' < > , . ? /
You can use spaces, but the label cannot contain only spaces. Leading and trailing spaces are ignored.
Volume labels are case-sensitive.
Editing a volume label
To assign or edit a volume label:
1. On the Resources tab, select Storage Systems, Hosts, or Logical Groups.
2. Select an appropriate resource to display a list of volumes.
3. Select the volume to which you want to assign a label, or with an existing label you want to edit
or delete.
4. Click Edit Label.
5. Specify a new label, edit the current label, or select Delete the current label and click OK.
6. Confirm that changes are made in the volume list.
Using volume labels to locate volumes to perform tasks
After you assign volume labels to groups of volumes, you can use those labels to search for groups
of volumes to perform specific tasks. You can also filter volume list results to display only those volumes
that use a specific label.
To search for volumes:
1. Locate volumes by using one of the following methods:
• Search for volume labels by using the search function under the Search tab.
• Find specific volumes by filtering the results of the volume list on the Resources tab.
2. Select volumes from the returned results.
3. Perform the desired task.
User Guide 49
Page 50

Grouping resources50
Page 51

5 Monitoring operations in a SAN environment
This module describes how to monitor operations in a Storage Area Network (SAN).
Viewing information summaries
This module describes how to view summary information for registered storage systems and hosts.
About the dashboard
The P9000 Command View AE Software dashboard provides a summary of tasks, alerts, and activities
for registered storage systems, including:
• Storage System Alerts
A list of links for each registered storage system and the associated alerts.
• Datacenter Utilization
A bar chart that provides volume capacity information for Open-Allocated, Open-Unallocated,
Open-Reserved, Mainframe, and Free. This chart applies to all of the managed storage systems,
collectively. Because capacities are calculated based on actual volume capacities, the capacity
of virtual volumes, such as THP volumes, is not include.
• Failed Tasks
A list of links for each failed user-executed task. Each item includes the task name, task type, and
a description.
• Top 10 Consumers
A list of links for each of the ten hosts with the highest allocated storage capacity.
• Tier Residency
A chart checking the usage of hardware layers for each logical group. You can compare the operating information of a logical group and the usage of hardware layers by checking whether the
hardware layers for the logical group are configured appropriately. You can also select logical
groups whose configuration is to be displayed.
Accessing the dashboard
All users can perform this task.
When you log in to P9000 Command View AE Software, the dashboard appears.
To access the dashboard from a different view, click the Dashboard tab.
User Guide 51
Page 52

Customizing the dashboard
You can customize the dashboard to show only the reports you want. P9000 Command View AE
Software retains the customizations you make so that the dashboard displays your customized settings
the next time you log in.
All users can perform these tasks.
To customize the dashboard by using the report title bar:
• Drag a report to another location to rearrange the dashboard.
• Double-click the title bar to minimize a report or to restore a minimized report.
• Click the maximize, restore, or close button.
Reopen a closed report by clicking Dashboard Settings and selecting the checkbox for the report
you want to reopen.
•
Click the icon to go to a specific view.
To customize the dashboard using the Dashboard Settings:
1. Click Dashboard Settings.
2. Choose the number of columns and select the checkboxes for the reports you want to display.
3. Click OK.
To clear the dashboard:
1. Click Dashboard Settings.
2. Clear the Report Name checkbox.
3. Click OK.
To restore the default dashboard:
1. Click Dashboard Settings.
2. Set Number of Columns to 2.
3. Select the Report Name check box to select all of the reports in the reports list.
4. Click OK.
About the storage systems tree
P9000 Command View AE Software lists registered storage systems and summaries of the following
associated information on the Resources tab:
• Pools
• Parity groups
• Volumes
• Open-Allocated
• Open-Unallocated
• Open-Reserved
• Mainframe-Unspecified
• External Storage
The Storage Systems tree is the starting point for changing the configuration of these resources.
Monitoring operations in a SAN environment52
Page 53

Viewing current storage system information
You can view current information about each registered storage system.
All users can perform this task.
To view current storage system information:
1. Click the Resources tab.
2. Click Storage Systems.
3. Select the parent group to see a volume summary and additional detailed information.
4. Click on the link for a storage system to access additional details.
5. Continue to refine the details by clicking the links on subsequent views.
About the hosts tree
P9000 Command View AE Software displays lists of registered hosts organized by operating system
on the Resources tab.
You can register both physical hosts and virtualization servers. You can also group the WWNs used
by specific storage systems and set up that group as a host.You select a host from the Hosts tree to
allocate or unallocate volumes.
Viewing current host information
All users can perform this task.
To view current host information:
1. On the Resources tab, click Hosts to expand the tree.
2. Select the operating system to see a Summary and Host List with additional detailed information.
3. Click on the link for a host to access additional details.
4. Continue to refine the details by clicking the links on subsequent views.
About checking system status in the global monitoring area
The Task Status in the global monitoring area shows the number of alerts and user tasks for these
conditions:
• Waiting
• In Progress
• Completed
• Failed
Information displayed in the global monitoring area includes links with details. Clicking these links
allows you to perform task or license-related operations from a dialog box, or to display the Task List
window.
You can configure how long tasks that have a specific status appear.
User Guide 53
Page 54

Setting data retention for task status indicators
To set data retention:
1. Click the Completed or Failed task link.
2. Click Edit Duration.
3. Specify the aggregation period for number of tasks.
Managing alerts
This module describes how to view, confirm, and manage alerts.
About alerts
Whenever a problem occurs in a storage system that is being managed by using P9000 Command
View AE Software, an alert is shown in the Storage System Alerts report on the Dashboard.
Alert details can be confirmed on the Tasks & Alerts tab. Resolved alerts can be deleted manually
from the list.
Confirming an alert
You can track an alert, update the status, or attach comments to share information with other P9000
Command View AE Software administrators.
To confirm the details of an alert:
1. On the Tasks & Alerts tab, click Alerts.
2. Click on an alert to review the alert details and take appropriate action.
3. If appropriate, delete the alert:
1. To delete an alert, or multiple alerts, select the row, or rows, for the alerts.
2. Click Delete Alerts.
3. Click OK.
4. Confirm that the list no longer includes the alerts.
Searching resources
This module describes how to search and report on storage resources.
About searching storage resources
• Volumes
• Parity groups
• Pools for Thin Provisioning Software
• Free space
Monitoring operations in a SAN environment54
Page 55

When the search completes, you can export the results to a CSV file. You can also name and save
search conditions for future use, and, if appropriate, make the saved search public for use by other
users.
You can also perform searches by entering a keyword into the Quick Find and selecting a search
target from the drop-down list.
Searching storage resources
You can search P9000 Command View AE Software to locate storage resources that meet criteria
you specify.
Before you can use shared searches, advanced searches, or save searches, you must have a license
for HP StorageWorks P9000 Tiered Storage Manager software.
To specify search criteria and search storage resources:
1. On the Search tab, select the type of storage resource you want to search.
2. Confine the search to a single storage system (if appropriate).
3. Use one of these methods to specify the search conditions:
• Select the Use saved searches to select from a list of previously saved searches.
• Specify the search conditions on either the Basic or Advanced tab.
NOTE:
The Advanced tab is not available unless you have a license for HP StorageWorks P9000
Tiered Storage Manager software.
4. Click Search.
The Search Result view lists the storage resources (and related information) that meet the search
criteria. From the list, select the resources for which you want to perform storage system operations.
5. Perform post-search operations, if appropriate:
• Click Export to CSV to export the displayed search results to a CSV file, as described in “Ex-
porting search results to a CSV file” on page 67.
• Click Save Search to save and name the search conditions for later use.
• Select an item from the list and click an operation button to perform that operation on the
selected item.
6. Click Back to perform another search.
NOTE:
If you prefer, you can use the Quick Find option to perform a search. Enter a keyword in the Quick
Find field and select a search target from the list to display the resources that include that keyword.
Saving search conditions
After saving the search conditions, you can change the name or description of a saved search, or
delete it from P9000 Command View AE Software.
User Guide 55
Page 56

In addition, you must have an HP StorageWorks P9000 Tiered Storage Manager software license
registered to edit your own saved searches.
To save search conditions:
1. Select the Search tab.
2. Specify a resource type, search range, and search conditions.
3. Click the Save button.
4. Specify the necessary items, and then save the search conditions.
To edit the explanation of a saved search or share a saved search with other users, you must overwrite
the search by using the same name. In the list of saved searches also confirm that the save has been
properly performed.
Generating resource reports
This module describes how to export information about hosts, logical groups, and searches to a CSV
file.
About generating reports
Information about registered storage systems and hosts can be output to a CSV file which can then
be used to generate reports.
The following information can be output to a CSV file:
• Host information
• Total logical unit capacity allocated to a host
• Logical group information
• Total logical unit capacity allocated to a logical group
• List of volumes that belong to a logical group
• List of hosts that belong to a logical group
• Resource search results
• Information about volumes displayed in search results
• Access control information
• Relationship between user groups and users
• Relationship between resource groups and resources
• Relationship between user groups, resource groups, and roles
Differences in output between P9000 Command View AE Software v7.x and earlier versions
These tables describe the differences in output between P9000 Command View AE Software and
earlier versions of Device Manager.
The following information is not output in version 7.0 and later:
Monitoring operations in a SAN environment56
Page 57

• Storage system physical configuration
Table 1 Host information
• Host
Host list
Information for each host
• Capacity
• % Used
• Host
• Group
• Number of LUNs
• Storage system
Version 7.0 and laterEarlier than version 7.0Item
• Host
• WWN
• IP Address
• OS
• Capacity
• Type
• Host
• WWN
• IP Address
• OS
• Capacity
• Type
User Guide 57
Page 58

Information for LDEVs
assigned to each host
Information for LDEVs
assigned to virtual
machines
• LDEV
• Label
• Type
• Array Group
• SLPR
• CLPR
• Port/HSD(iSCSI Target)/LUN or Port/LUN
• Port Type
• LUN Group
• EMU Type
• Pair Information
• Volume Attr
• Pool ID
• CMD DEV
• Host Information
• Capacity
• Consumed Capacity
• % Used
• Last Updated
• External Subsystem
• Information
Version 7.0 and laterEarlier than version 7.0Item
• Volume
• Label
• Storage system
• Serial No.
• Model
• Vendor
• Host
• WWN
• Port
• Host group
• LUN
• No. of Paths
• Capacity
• Parity group
• Pool
• Pool Name
• Used Capacity
• RAID Level
• Volume Attribute
• Drive Type
• Drive Speed (RPM)
• Drive Capacity
• Ext. Storage System
• Filesystem
• Filesystem Used %
• Target ID
• SLPR
• CLPR
• Copy Info (P-VOL)
• Copy Info (S-VOL)
• Emulation Type
• Encryption
• Protection Level
• CMD DEV
• Default Controller
• Current Controller
• Related Task
• Resource Group
Monitoring operations in a SAN environment58
Page 59

• VM
Information for a virtual
machine created on the
virtualization server
• Guest OS Version
• Number of LUNs
• Subsystem
Table 2 Logical group information
• Storage System
• Model
• Serial No.
Storage system list
• IP Address
• Configured Capacity
• Open-Allocated
• Open-Unallocated
• Mainframe-Unspecified
Version 7.0 and laterEarlier than version 7.0Item
The Virtualization Server
must be registered as a
host in the Device
Manager to output any of
the following:
• Virtualization Server
• WWN
• Capacity
• Type
Version 7.0 and laterEarlier than version 7.0Item
--
Information for each logical group
--Logical groups list
• Logical Group
• Storage Group
• storage-subsystem-name
• number-of-LUNs
• LDEV-capacity
• Name
• Description
• No. of Hosts
• No. of Volumes
• Total Capacity
• Logical Group Path
Folder:
• Name
• Description
• No. of Hosts
• No. of Volumes
• Total Capacity
• Logical Group Path
Group of Hosts:
• Host
• WWN
• IP Address
• OS Type
• Capacity
• Type
User Guide 59
Page 60

Version 7.0 and laterEarlier than version 7.0Item
Group of Volumes:
• Volume
• Label
• Storage System
• Serial No.
• Model
• Vendor
• Host
• WWN
• Port
• Host Group
• LUN
• No. of Paths
• Capacity
• Parity Group
• Pool
• Pool Name
• Used Capacity
• RAID Level
• Volume Attribute
• Drive Type
• Drive Speed (RPM)
• Drive Capacity
• Ext. Storage system
• Filesystem
• Filesystem Used %
• Target ID
• SLPR
• CLPR
• Copy Info (P-VOL)
• Copy Info (S-VOL)
• Emulation Type
• Encryption
• Protection Level
• CMD Dev
• Default Controller
• Current Controller
• Related Task
• Resource Groups
Monitoring operations in a SAN environment60
Page 61

Information for volumes
assigned to each logical
group
• LDEV
• Label
• Type
• Array Group
• SLPR
• CLPR
• Port/HSD/LUN or Port/LUN
• Port Type
• LUN Group
• EMU Type
• Pair Information
• Volume Attr
• Pool ID
• CMD DEV
• Host Information
• Capacity
• Consumed Capacity
• % Used
• Last Updated
• External Subsystem Information
Version 7.0 and laterEarlier than version 7.0Item
• Volume
• Label
• Storage System
• Serial No.
• Model
• Vendor
• Host
• WWN
• Port
• Host Group
• LUN
• No. of Paths
• Capacity
• Parity Group
• Pool
• Pool Name
• Used Capacity
• RAID Level
• Volume Attribute
• Drive Type
• Drive Speed (RPM)
• Drive Capacity
• Ext. Storage system
• Filesystem
• Filesystem Used %
• Target ID
• SLPR
• CLPR
• Copy Info (P-VOL)
• Copy Info (S-VOL)
• Emulation Type
• Encryption
• Protection Level
• CMD Dev
• Default Controller
• Current Controller
• Related Task
• Resource Groups
User Guide 61
Page 62

A list of volumes assigned
to each logical group
--
Table 3 Volume information from search results
Version 7.0 and laterEarlier than version 7.0Item
• Host
• WWN
• IP Address
• OS
• Capacity
• Type
Version 7.0 and laterEarlier than version 7.0
Monitoring operations in a SAN environment62
Page 63

• Model
• Serial Number
• DevNum
• Label
• Disk Type
• SLPR
• CLPR
• Port Display Name
• HSD Target Nickname
• LUN
• Logical Path
• Logical Group Name
• LUN Group Nickname
• Host Name
• WWN
• File System
• Emulation Type
• DevCount
• Capacity
• Cylinders
• Percent Used
• Volume Attr
• Pool ID
• Cmd Dev
• Copy Type
• Copy Role
• Copy Status
• External Subsystem
• Last Updated
• Default Port Controller
• Array Group Display Name
• Stripe Size
• DEVN
• VolSer
• WWN Nickname
• Consumed Capacity
• Port Type
• Current Port Controller
Version 7.0 and laterEarlier than version 7.0
Volume search:
• Volume
• Label
• Storage System
• Model
• Vendor
• Host
• WWN
• No. of Paths
• Port
• Host Group
• LUN
• Port Type
• Capacity
• Parity Group
• Pool
• Pool Name
• RAID Level
• Volume Attribute
• Drive Type
• Drive Speed (RPM)
• Drive Capacity
• Filesystem
• Filesystem Used %
• Target ID
• Ext. Storage System
• Ext. Storage Model
• Ext. Storage Vendor
• Ext. Parity Group
• CLPR
• Emulation Type
• VOLSER
• DEVN
• Cylinders
• Copy Info (P-VOL)
• Copy Info (S-VOL)
• Encryption
• Protection Level
• CMD DEV
• Default Controller
• Current Controller
• SLPR
• Related Task
• Used Capacity
• Resource Group
User Guide 63
Page 64

Version 7.0 and laterEarlier than version 7.0
Parity group search:
• Parity Group
• Storage System
• Total Capacity
• Open Capacity
• Mainframe Capacity
• Free Capacity
• RAID Level
• Drive Type
• Drive Speed (RPM)
• Drive Capacity
• SLPR
• CLPR
• Emulation Type
• Ext. Storage System
• Ext. Storage Vendor
• Ext. Storage Volume
• Cache Mode
• Inflow Control
• Encryption
• Resource Group
Monitoring operations in a SAN environment64
Page 65

Version 7.0 and laterEarlier than version 7.0
Pool search:
• Pool
• Name
• Storage System
• No. of THP Pool Vols
• Capacity
• Used Capacity
• Used %
• No. of THP Vols
• Subscribed Capacity
• Subscription
• Pool Type
• Status
• Used Threshold 1
• Used Threshold 2
• Usage Rate Warning
• Subscription Limit
• CLPR
• Mixable
• Tier Management
• Monitoring Mode
• Cycle Time
• Monitoring Start Time
• Monitoring End Time
• Resource Group
User Guide 65
Page 66

Table 4 Access control information
• resource-group-name
Information for user
groups and users
• user-ID
• full-name
• user-description
Version 7.0 and laterEarlier than version 7.0
Free space search:
• Parity Group/Free Space Number
• Capacity
• Storage System
• Vendor
• Total Free Capacity
• Emulation Type
• RAID Level
• Drive Type
• Drive Capacity
• Drive Speed (RPM)
• Related Task
• Resource Group
Version 7.1 and laterEarlier than version 7.1Item
Information for user groups:
-------------------------
• User Group
• Description
• No. of Users
• Resource Group
• Description
• Storage System
• Serial No.
• Model
• Role
Information for users:
-------------------------
• User ID
• Full Name
• Description
• User Group
Exporting host lists to a CSV file
You can save your host lists to a CSV file. This allows you to see the LU capacity allocated to hosts.
To export host lists to a CSV file:
1. On the Resources tab, select Hosts.
2. Expand the tree and select the host, host operating system whose information you want to export
a CSV file.
3. Click Export to CSV and click Save.
4. Specify the download location and click Save.
Monitoring operations in a SAN environment66
Page 67

5. Confirm that the CSV file is saved in the specified location.
Exporting logical group information to a CSV file
You can save information about your logical groups to a CSV file. This allows you to see the volume
capacity allocated to a logical group and the hosts or volumes that are assigned.
To export logical group information to a CSV file:
1. On the Resources tab, select Logical Groups.
2. Expand the tree and select the logical group, hosts, or volumes whose information you want to
export to the CSV file.
3. Click Export to CSV and click Save.
4. Specify the download location and click Save.
5. Confirm that the CSV file is saved in the specified location.
Exporting search results to a CSV file
You can save your storage resource search results to a CSV file.
To export search results to a CSV file:
1. From the Search tab, specify search conditions and then search for storage resources.
2. Click Export to CSV and click Save.
3. Specify the download location and click Save.
4. Confirm that the CSV file is saved in the specified location.
Exporting access control information for resources to a CSV file
You can output user-related information to a CSV file.
To output access control information to a CSV file:
1. In the Administration tab, select User Groups
2. From the User Groups tab or Users tab, click Export to CSV.
3. Confirm that the CSV file is saved in the specified location.
Optimizing storage
This module describes how to improve your storage.
About optimizing storage
P9000 Command View AE Software allows you to manage storage by allocating volumes, expanding
tiers and THP pools, and performing migration, based on information acquired from checking
summaries, alerts, performance statistics, and the operating status of storage resources. The following
examples represent some common problem/solution scenarios.
If it’s not possible to assign a high-performance volume to a host because all unassigned volumes are
low performance, perform volume migration so that less frequently used data is migrated to a
User Guide 67
Page 68

low-performance volume, and then assign the now-available high-performance volume to an appropriate
host.
If the used capacity of a THP pool has reached a threshold value and volume that satisfies the capacity
requirement cannot be created or assigned because the unused capacity is insufficient, add THP pool
volumes to increase the capacity of the THP pool.
If the performance of a THP pool has decreased and data I/O is slow, add more THP pool volumes
to distribute loads within the THP pool. It is also helpful to perform volume migration to distribute I/O
loads on the THP pool.
If the load on a volume is too high when volume data is backed up to tape, create a copy pair for
the volume. Then do a tape backup by using the copied volume (as a secondary volume).
Monitoring operations in a SAN environment68
Page 69

6 Setting up P9000 Command View AE Software
This module describes how to configure basic P9000 Command View AE Software settings.
Configuring your browser to access
This module describes how to configure browser settings for use with P9000 Command View AE
Software.
About configuring browser settings
Before using a browser to access P9000 Command View AE Software, you need to perform the
following configuration tasks:
• Disable pop-up blocking
• Set security options
• Configure proxy settings
• Configure log output settings
• Configure Java™ Web Start settings
• Clear your browser’s cache when upgrading
After you configure your browser settings, verify the following:
• The Java software environment is installed and the Java software is configured.
• Communications with P9000 Command View AE Software are secure.
Disabling pop-up blocking
If you are using P9000 Command View AE Software on a browser for which pop-up blocking is
enabled, you must disable pop-up blocking for P9000 Command View AE Software. If you are using
Internet Explorer for Windows XP (SP2), for example, use the following procedure.
To disable pop-up blocking for P9000 Command View AE Software
1. Start Internet Explorer and, from the Tools menu, select Internet Options.
2. In the Internet Options dialog box, click the Security tab.
3. Select Trusted Sites, and then click Sites.
User Guide 69
Page 70

4. In the Trusted Sites dialog box, enter the URL for P9000 Command View AE Software.
Make sure the URL you specify is in the following format:
• The URL for communicating with the HBase Storage Mgmt Web Service of the Device Manager
server:
http://Device-Manager-server-address:port-number/DeviceManager/
Device-Manager-server-address is the IP address or host name of the Device Manager
server
port-number is the port number of the HBase Storage Mgmt Web Service
Example:
http://Device-Manager-server-address:23015/DeviceManager/ (for nonSSL)
https://Device-Manager-server-address:23016/DeviceManager/ (for SSL)
• The URL for communicating with the Device Manager server:
http://Device-Manager-server-address:port-number/
Device-Manager-server-address is the IP address or host name of the Device Manager
server
port-number is the port number of the Device Manager server
Example:
http://Device-Manager-server-address:2001/ (for non-SSL)
https://Device-Manager-server-address:2443/ (for SSL)
5. In When a pop-up is encountered, select a radio button other than Always open pop-ups in a
new tab.
If Always open pop-ups in a new tab is selected, the pop-up might be displayed behind another
window.
If you receive a pop-up blocked warning message for Replication Manager pop-ups, select Always
Allow Pop-Ups From This Site to prevent continued warnings.
Setting security options for Internet Explorer
To configure security options for communicating with P9000 Command View AE Software when using
Internet Explorer:
1. Start Internet Explorer.
2. From the Tools menu, select Internet Options.
3. In the Internet Options dialog box, click the Security tab.
4. Click Custom Level.
Setting up P9000 Command View AE Software70
Page 71

5. In the Security Settings dialog box, verify that the items in the dialog box are configured as
follows:
• Run ActiveX controls and plug-ins is set to Enable.
• Script ActiveX controls marked safe for scripting is set to Enable.
• Launching programs and files in an IFRAME is set to Prompt or Enable.
• Submit nonencrypted form data is set to Prompt or Enable.
• Active scripting is set to Enable.
• File download is set to Enable.
• Allow Web sites to prompt for information using scripted windows is set to Enable.
• If your browser is Internet Explorer 7 or 8, Automatic prompting for file downloads is set to
Enable
6. On the Advanced tab of the Internet Options dialog box, select Warn about certificate address
mismatch.
Configuring proxy settings
To set the Java™ Web Start proxy to link with other products:
For Java Web Start Version 1.4.2_xx:
1. Start the Java Web Start application manager.
2. From the File menu, select Preferences.
3. On the Java Web Start Preferences panel, click the General tab.
4. Select the method to be used to set up the proxy.
• If the proxy setting is enabled in the browser, select Use Browser.
• To manually set up a proxy, select Manual and enter the following values:
- HTTP Proxy: IP address or name of the proxy server
- HTTP Port: Port number of the proxy server
- No Proxy Hosts: IP address or name of the Device Manager server
- If not setting a proxy: Select None.
5. Click OK and exit the Java Web Start application manager.
For Java Web Start Version 5.0 and 6.0:
1. Start the Java Control Panel.
The Network Settings window appears.
2. On the General tab, click Network Settings.
3. In the Network Settings window, select the method to be used to set up the proxy.
• If the proxy setting is enabled in the Web browser, select Use browser settings, and then
proceed to step 7.
• To manually set up a proxy, select Use proxy server, enter the following values, and proceed
to step 4.
- Address: IP address or name of the proxy server
- Port: Port number of the proxy server
• If not setting a proxy, select Direct connection and proceed to step 7.
User Guide 71
Page 72

4. Click Advanced.
The Advanced Network Settings window appears.
5. In Exceptions, enter the IP address or the name of the Device Manager server.
6. Click OK.
7. In the Network Settings window, click OK.
8. In the Java Control Panel, click OK and exit the control panel.
Configuring log output settings
To configure the log output option in Java Web Start Version 1.4.2_xx:
1. Start the Java Web Start application manager.
2. From the File menu, select Preferences.
3. From the Java Web Start Preferences panel, select the Advanced tab.
4. (Optional) Select the Show Java Console check box to display messages that are output to the
log.
5. Specify the log file name, using one of the following options:
• In the Output Options box, select the Log Output check box, and then enter the log file name
in the Log File Name field.
• Click Choose Log File Name to select an existing log file name.
6. Click OK to save your changes, and exit the Java Web Start application manager.
Configuring Java Web Start settings when multiple JRE versions are installed
When there are multiple versions of JRE and some of these versions are the same as or later than the
version required for a Java application, Java™ Web Start determines which version of JRE to use.
Because of this, you must set up Java Web Start so that it uses the correct version of JRE to execute
the Java GUI. The setup method depends on the Java Web Start version.For Java Web Start version
1.4.2 xx, use the Java Web Start application manager to set up Java Web Start.For Java Web Start
version 5.0 or 6.0, use the Java Control Panel to set up Java Web Start.
Clearing the cache when upgrading P9000 Command View AE Software
Before upgrading P9000 Command View AE Software, you must clear the cache for Java™ Web
Start and for your browser.
To clear the cache for Java Web Start:
1. For Java Web Start version 1.4.2:
Clear the application folder of the Java Web Start Application Manager.
2. For Java Web Start version 5.0 or 6.0:
Delete the Temporary Internet Files by using the Java Control Panel.
To clear the cache for the browser:
• Delete the Temporary Internet Files for the browser you are using.
Setting up P9000 Command View AE Software72
Page 73

Managing users
This module describes how to manage users.
About managing users
Two built-in user accounts are automatically established when P9000 Command View AE Software
is installed. Note that Device Manager users must be registered and assigned to a user group. By
setting up resource groups and permissions (roles) for user groups, resource control can be performed
for users in the user groups. For other P9000 Command View AE Software products, the permitted
range of operations for each user can be limited by registering the user as a login user and setting
user permissions. The user management window makes it possible to manage user accounts that are
common to all P9000 Command View AE Suite products. Specifically:
• The System account (default password: manager) is used to manage P9000 Command View AE
Software operations and all P9000 Command View AE Software user accounts.
• The HaUser account (default password: haset) is the default user account used by P9000 Com-
mand View AE Software agents. The default permission for the HaUser account is Peer and the
PeerGroup is set for the HaUser account. The HaUser account belongs to PeerGroup as soon as
the installation completes. Only after installation, can the HaUser account be allocated to other
user groups.
You log in by using the System account to access the user management window and to manage user
access to storage systems registered in P9000 Command View AE Software.
You can also manage user accounts by linking to an external authentication server, such as an LDAP
directory server, RADIUS server, or Kerberos server. However, the built-in accounts (System and
HaUser) cannot be authenticated on an external authentication server.
The P9000 Command View AE Software user account used to connect to external authentication
servers and external authorization servers are managed as a Windows Active Directory (authorization)
group.
User permissions
You can assign the following permissions to a P9000 Command View AE Software groups:
• Admin: A user with Admin permission can register resources to be managed, change settings,
and view information. If the user is assigned to All Resources, the user can manage resource
groups.
• Modify: A user with Modify permission can register resources to be managed, change settings,
and view information.
• View: A user with View permission can reference managed resources.
• Peer: A user with Peer permission can access only Device Manager agents, and cannot log into
HP P9000 Command View Advanced Edition Suite products by using the browser. A resource
group cannot be assigned to users that have the Peer permission.
NOTE:
Peer permission cannot be assigned in combination with any user permission level other than User
Management.
User Guide 73
Page 74

• User Management: A permission common to all P9000 Command View AE Software products.
This permission can be assigned to users. This permission enables the management of P9000
Command View AE Software users. User Management enables the creation of Device Manager
user groups and the output of user group and user information to CSV files. If the Admin role is
assigned for All Resources, User Management enables the allocation of resource groups and roles
to user groups.
NOTE:
User Management permission can be assigned along with all other permissions.
Additionally, you can assign the following Tiered Storage Manager permissions:
• Admin: A user with Admin permission can only view Tiered Storage Manager resources and tasks.
• Modify: A user with Modify permission can perform volume migrations and all operations in the
Tiers tree on the Resources tab.
• Execute: A user with Execute permission can view Tiered Storage Manager resources and execute
Tiered Storage Manager tasks.
• View: A user with View permission can view Tiered Storage Manager resources and tasks.
Users registered in an external authentication group have the permissions of the user group to which
users are assigned. By specifying roles, resources that belong to a resource group for which a user
has the Admin or View permissions are displayed. The user can operate, or reference information
for, the displayed resources.
Other roles and resource groups required for operations are as follows:
Necessary
Resource GroupFunction
Device Manager
Roles
Add host
Edit host
Refresh host
Scan host
Merge host
View details of data collection
tasks (add or delete storage systems)
View details of data collection
tasks (edit storage systems)
All Resources
All Resources
Admin or the user
who created the
task
Admin, Modify or
the user who created the task
Necessary Tiered
Storage Manager Permissions
NAAdminAll ResourcesAdd storage system
NAAdmin or ModifyAll ResourcesEdit storage system
NAAdmin or ModifyAssigned Resource GroupsRefresh storage system
NAAdmin or ModifyAssigned Resource Groups
NAAdmin or ModifyAll Resources
NA
NA
Setting up P9000 Command View AE Software74
Page 75

View details of data collection
tasks (update storage systems)
Create pool
Edit Pool
Expand pool
Delete pool
Shrink pool
Expand the THP volume size
Reclaim zero pages
Allocate volumes
Edit LUN paths
Create volumes
Cancel volume allocation
Delete volumes
Resource GroupFunction
All Resources or the resource
groups to which the storage
systems to be updated belong.
The Admin or Modify role for All
Resources is required for deleting
data collection tasks when
updating storage systems.
Necessary
Device Manager
Roles
Admin, Modify or
the user who created the task
Necessary Tiered
Storage Manager Permissions
NA
NAAdmin or ModifyAssigned Resource GroupsVirtualize volumes
NAAdmin or ModifyAssigned Resource Groups
NAAdmin or ModifyAssigned Resource Groups
Define copy pairs
Change the status of copy pairs
View task details
Execute tasks
Change task schedules
Cancel tasks
Move tasks to the history (Device
Manager only)
View tasks (Tiered Storage
Manager only)
Stop or cancel tasks (Tiered
Storage Manager only)
Execute tasks (Tiered Storage
Manager only)
Assigned Resource Groups (see
Note below)
All Resources
Admin, Modify or
the user who created the task
NAAdmin or ModifyAssigned Resource GroupsAdd or delete command devices
NAAdmin or Modify
NA
View or higherAdmin or ModifyAll Resources
ModifyAdmin or ModifyAll Resources
Modify or ExecuteAdmin or ModifyAll Resources
NAAdmin or ModifyAnyCreate logical group
NAAdmin or ModifyAnyEdit logical group
User Guide 75
Page 76

Create tiers
Edit tiers
Delete tiers
Edit saved search conditions,
Make saved search conditions
private
Necessary
Resource GroupFunction
Device Manager
Roles
Necessary Tiered
Storage Manager Permissions
ModifyAdmin or ModifyAll Resources
ModifyAdmin or ModifyAll ResourcesMigrate volumes
NAAdmin or ModifyAssigned Resource GroupsEdit label
NAAdminAll Resources
Create resource groups
Edit resource groups
Create user groups
Edit user groups
Assign resource groups and
roles to user groups
NA
NAAdd users to user groups
All Resources
User Management
Admin
User Management
Admin
User Management
Admin (permission)
Device Manager
Admin (role)
NAAdminAll Resources
NA
NA
NA
NAAdmin or ModifyAnyDownload related programs
NOTE:
If a command device is used to manage copy pairs, command device access permissions viewable
from the host are required. If a virtual command device is used to manage copy pairs, access
permissions for the volumes that make up the host-managed copy pairs are required.
To perform replication management if a Replication Manager license is not registered, target resources
must be assigned to Device Manager resource groups and roles must be assigned for those resource
groups.
Creating a user account
Access to P9000 Command View AE Software requires a user account.
You can grant Admin, Modify, View, or Execute permission to a P9000 Command View AE Software
user account and then add that user group to a resource group. After the user account is a member
of the resource group, it can be used to manage the other included resources.
To create a user account:
1. On the Administration tab, click Users and Permissions and then click Users.
2. Click Add User and specify the appropriate user profile information.
Setting up P9000 Command View AE Software76
Page 77

3. Click OK.
Editing the profile for a user account
You can modify the name, e-mail address, and description for a user account.
To edit a user profile:
1. On the Administration tab, click Users and Permissions and then click Users.
2. Select the target user and click Edit Profile.
3. Edit the profile information for the user and click OK.
4. Confirm that the updated user profile information appears in the Users area.
Editing your own profile
To edit your profile:
1. On the Administration tab, click User Profile.
2. Click Edit Profile.
3. Edit the profile information and click OK.
4. Confirm that the updated user profile information appears in the Users area.
Changing the password for a user account
To change the password for a user account:
1. On the Administration tab, click Users and Permissions and then click Users.
2. Select the target user.
3. Click Change Password.
4. Enter the new password and verify it.
5. Click OK.
6. Confirm that the user account can log in with the new password.
Changing your password
To change your password:
1. On the Administration tab, click User Profile.
2. Click Change Password.
3. Type the new password and verify it.
4. Click OK.
Changing permissions for a user account
You can change the permissions for a user account. If you plan to add the user account to a resource
group, change the user account permissions first. For the Device Manager, instead of setting the
permission to the user account, set a role to the user group allocated for the user.
User Guide 77
Page 78

To change permissions for a user:
1. On the Administration tab, click Users and Permissions and then click Users.
2. Select the target user and click Change Permission.
3. Edit the permissions for the user and click OK.
4. Verify that the correct permissions for the user are checked in Granted Permission.
Changing the lock status of user accounts
To change the lock status of a user account:
1. On the Administration tab, select Users and Permissions and then click Users.
2. Select the check box for the user whose lock status you want to change.
3. Click Lock Users or Unlock Users to change the current status.
4. Verify that the selected user accounts have been locked, or that the previously locked user can
now log in.
Prerequisites for changing the user authentication method
Before you can change the user authentication method for a user, verify that:
• A connection to an external authentication server is configured (on the management server)
• The user ID and password is registered both in P9000 Command View AE Software and on the
external authentication server.
Changing the user authentication method
To specify the user authentication method:
1. On the Administration tab, select Users and Permissions.
2. Select Users in the tree and select the check box for the user whose authentication method you
want to change.
3. Click Change Auth.
4. Specify an authentication method and refresh the settings.
5. Verify that the authentication method is correct by viewing the Authentication column in the Users
list.
Enabling connections to an external authorization server
Before you can enable a connection to an external authorization server, the connection to the external
authentication server and external authorization server must be set up on the management server and
the user ID and password must be registered in the authenticated group.
To enable a connection to an external authorization server:
1. On the Administration tab, select Users and Permissions.
2. Click Groups, select the Domain-Name, and click Add Groups.
3. Specify the necessary items. For Distinguished Name, register the distinguished name of the
authorized group. Click Check DN to confirm that the distinguished name has been registered
on the external authorized server.
Setting up P9000 Command View AE Software78
Page 79
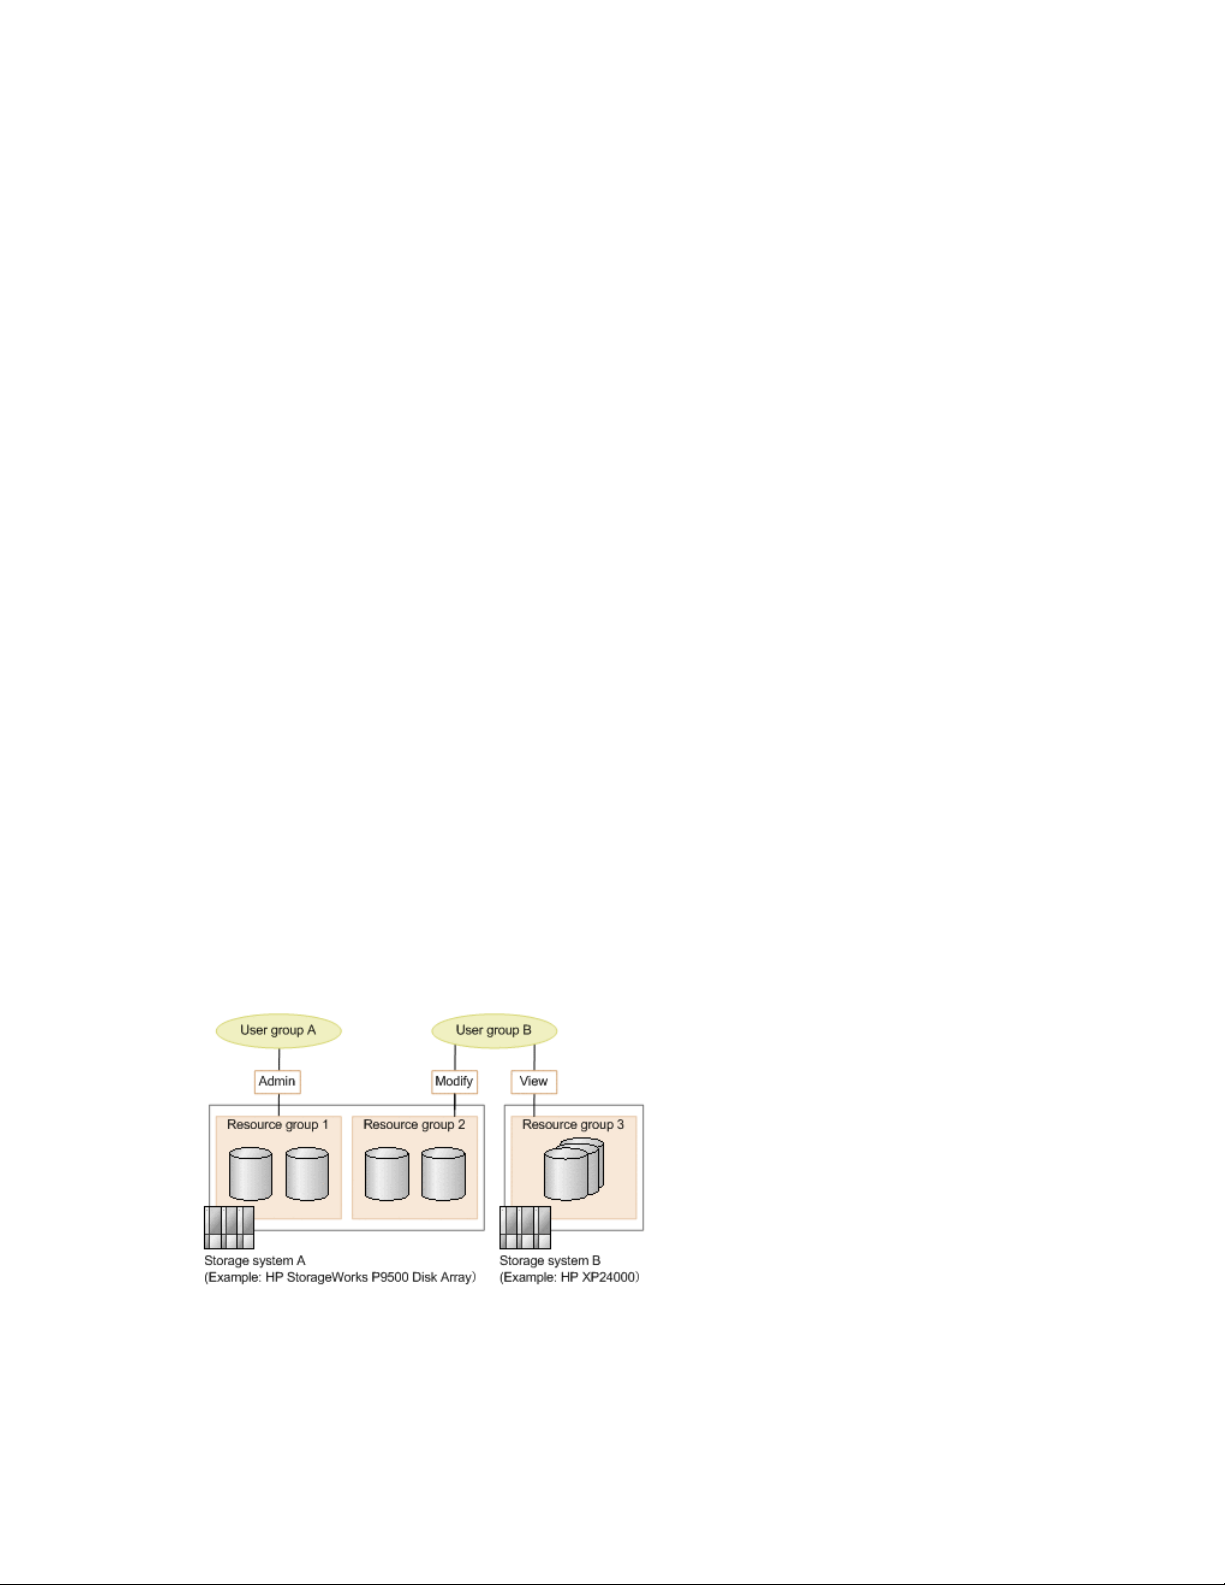
4. From Domain-Name select the group that was just added and then click Change Auth.
5. Set the permissions for products.
6. Similarly, to set up Device Manager roles, open the Select Resource Groups window as you would
set up roles for normal user groups.
Controlling access to resources
This module describes how to control access to resources.
About controlling access
When a SAN environment is managed by storage administrators, resources are managed by resource
and user groups. This allows secure data handling in multi-tenant environments and more efficient
operations. Access control can be used for data center hosting services and managing departments
in a company.
A resource group is a group of similar storage system resources (storage systems, storage ports, LDEV
IDs, parity groups, etc.).
Three types of resource groups exist:
• All Resources is a resource group that includes all resources managed by . This group is automat-
ically created during installation.
• Default resource groups are resource groups created for each storage system and include all re-
sources in that storage system. This group is automatically created when a storage system is registered.
• User-defined resource groups are resource groups that the user can define under the HP Storage-
Works P9500 Disk Array and depend on the operating environment. Resources can be grouped
by parity group, LDEV ID, storage port, etc..
A user group is a group of users with the same permissions and range of access.
Externally-authenticated groups can also be used as user groups by assigning them to user groups.
When assigning resource groups and roles (collections of operation permissions such as Modify or
View) to a user group, resources can be controlled for the users in that group.
The resource group can be created in this configuration only when the storage system is HP
StorageWorks P9500 Disk Array. The following figure shows a typical scenario of user groups and
their associated permissions to access resources.
Physical configurations such as parity groups, and logical configurations such as LDEV IDs, can be
used to create resource groups. Resource groups can then be assigned to user groups.
User Guide 79
Page 80

The following is an example of using resource groups to control access in a HP StorageWorks P9500
Disk Array storage system. One method for division would be to separate resources by company
location. For example, if you create resource groups based on locations, the administrators in each
location can use only the resources that have been assigned to them and are restricted from accidentally
accessing the resources of other locations.
It is also possible to share physical resources (such as parity groups or storage ports) among
departments, and divide only logical resources (such as LDEV IDs or host group numbers) by
department. For example, you can assign resource groups that contain shared physical resources to
all departments and then assign individual resource groups that contain specific logical resources to
the appropriate departments. This allows department administrators to use only the resources assigned
to them, while still allowing for effective sharing of physical resources.
Setting up P9000 Command View AE Software80
Page 81

Prerequisites for creating resource groups
Resource groups, which are user defined, can be set for the HP StorageWorks P9500 Disk Array.
Each resource is automatically registered in the All Resources and in Default resource groups created
for its storage system (this group cannot be deleted). Note that if a volume that is part of a LUSE or
THP pool is registered in a resource group, other volumes in that LUSE or THP pool are also registered
in the same resource group. If the resource is in a HP StorageWorks P9500 Disk Array storage system,
you can register it in only one user-defined resource group. Resources in different HP StorageWorks
P9500 Disk Arrays cannot be registered in the same resource group. The only resource group that
can be assigned to an externally authorized group is All Resources.
All of the following resources can be set in order to create a user-defined group. However, the only
resource group that can be assigned to an externally authorized group is All Resources:
• Parity Groups: Includes parity groups and volumes in external storage systems. If a user has the
Modify or higher roles for parity groups or pools and an unused Volume ID is assigned to the
user, the user can create a volume.
• LDEV IDs: Includes parity groups and volumes in external storage systems. Non-existent ranges
can also be specified. Users with Modify or higher roles for parity groups or pools and assigned
an unused volume ID, can create a volume.
• Storage Ports: Users with Modify or higher roles for ports and assigned an unused Host Group
Number can create a host group that has that host group number.
• Host Group Number: Non-existent ranges can also be specified. Users with Modify or higher roles
for ports and assigned an unused Host Group Number can create a host group that has that host
group number.
Creating resource groups
1. On the Administration tab, select Resource Groups.
2. Click Create Resource Group.
3. Specify the resources that can be managed by the group.
The created resource group is now shown.
4. From the Actions menu, select Manage Replication to access the pair management functionality.
5. From the Explorer menu, select Settings and then select Refresh Setting.
6. Click the Configuration Setting link.
7. Select the local DevMgr check box and then click Refresh Configuration.
If volume replication is performed by using Replication Manager with only a Device Manager license,
the Replication Manager information must be updated after the resource group is created.
Editing a resource group
To modify information about a resource group:
1. On the Administration tab, select Resource Groups.
2. Select the target resource group and click Edit Resource Group.
3. Change the name of the resource group, or resources to be managed. Verify that the changes
will be applied.
4. From the Actions menu, select Manage Replication to access pair management.
User Guide 81
Page 82

5. From the Explorer menu, select Settings and then select Refresh Setting.
6. Click the Configuration Setting link.
7. Select the local DevMgr check box and then click Refresh Configuration.
If volume replication is performed by using Replication Manager with only a Device Manager license,
the Replication Manager information must be updated after the resource group is created.
Prerequisites for creating user groups
Users are granted permissions based on permissions set for roles assigned to the user group they
belong to. A user can be registered to multiple user groups. A resource group can be registered to
multiple user groups. The system account does not belong to any user group.
The user roles that can be assigned to each resource group for user groups are:
• Admin
• Modify
• View
A user who belonging to a built-in user group cannot be registered to another user group.
The default user groups assigned to the All Resources group are:
• AdminGroup (role:Admin and the permission for creating resource groups)
• ModifyGroup (role:Modify)
ViewGroup (role:View)
• PeerGroup (role:Peer This user group cannot be assigned to a resource group)
Two special case user group assignments exist. The built-in account (user ID: HaUser) used by Device
Manager agents is set to the PeerGroup immediately after the installation is completed, but can be
set to another group later. To assign the Peer role to a user, register the user in PeerGroup.
For a HP StorageWorks P9500 Disk Array storage system, if different roles are set as follows, the
highest-level role among those is applied to all of the resource groups in that storage system:
• When different roles are assigned to multiple resource groups assigned to one user group in the
same storage system.
• When one user belongs to multiple user groups to which different roles are assigned to multiple
resource groups in the same storage system.
Ranked from highest to lowest, these roles are:
• Admin,
• Modify
• View
If the storage system is not a HP StorageWorks P9500 Disk Array, the above scenario does not
apply.For example, in the figure below, User A and User B can access each resource group (RG)
with the following roles, respectively. Notice that User A has the Admin role with respect to RG1,
RG2, and RG3, but the View rolewith respect to RG4. Also notice that User B, on the other hand, has
the Modify role with respect to RG3, but the View role with respect to RG4.
Setting up P9000 Command View AE Software82
Page 83

Creating user groups
1. On the Administration tab, select User Groups.
2. Click Create User Group.
3. Specify the the users that can be managed by the group. The created user group now appears.
Editing a user group
To modify information about a user group:
1. On the Administration tab, select User Groups.
2. Select the target user group and click Edit User Group.
3. Change the name of the user group, or the user who manages the user group. The editing changes
appear in the list in the User Groups tab.
Assigning resource groups and roles to a user group
To assign resource groups and roles to a user group:
1. Select the Administration tab and click on User Groups.
2. In the User Groups tab, click the name of the target user group.
3. In the Resource Groups tab, click Add Resource Groups.
4. Set the roles to be assigned to the user group. The assigned resource groups and roles are
displayed in detail by clicking the link for the user group name.
Changing a user’s user group
To modify information about the user groups that a user belongs to:
1. On the Administration tab, select User Groups.
2. In the Users tab select the target user group and click Assign User Groups.
3. Change the user groups to which a user belongs and the changes will appear in the Users tab.
User Guide 83
Page 84

Setting up security
This module describes how to configure security settings and policies.
About configuring security options
For tighter login security, you can specify security options, such as:
• Setting password policy conditions to prevent users from specifying easy-to-guess passwords.
• Enabling automatic locking of user accounts for which successive login attempts have failed.
• Displaying a specified message (a warning banner) on the user login window.
You can specify security options by using either the management server configuration file or by using
commands. For information about how to specify security options by using commands, see the HP
StorageWorks P9000 Command View Advanced Edition Suite Software Administrator Guide.
Setting a password policy
To set password policy:
1. On the Administration tab, select Security.
2. Select Password in the tree.
3. Click Edit Settings and enter the conditions for the new password policy.
4. Confirm the changes by selecting Password in the tree to view the updated password policy.
Setting automatic account locking
A user account can be automatically locked after a specified number of failed login attempts. You
can specify the number of failed attempts before a user account is locked by configuring an account
lock policy.
To specify the number of failed login attempts before a user account is locked:
1. On the Administration tab, select Security.
2. From the tree, select Account Lock.
3. Click Edit Settings and specify a number.
4. Confirm the settings were changed by selecting Account Lock in the Security tree and viewing
the current settings.
Setting a warning banner message
To set a warning banner message:
1. On the Administration tab, select Security.
2. From the tree, select Warning Banner.
3. Click Edit Message and enter the warning message text in the Message box.
You can preview the message by clicking Preview and viewing the message in the Preview box.
4. Click OK to save the message.
Setting up P9000 Command View AE Software84
Page 85

5. Confirm the warning banner displays in the Login window.
Downloading components
This module describes how to download components.
About downloading components
A download menu allows you to download CLI and Agent commands.
Downloading agents, CLI, and Host Data Collector files
To download agents, the CLI application, or Host Data Collector files:
1. From the Tools menu, select Download.
The download dialog box opens.
2. Choose from the links in the dialog box to download the desired installation files.
3. Click the ReadMe links for installation instructions.
Managing licenses
This module describes how to manage licenses.
About license management
Before you can log on to P9000 Command View AE Software, you must register valid P9000
Command View AE Software licenses. Each product managed from P9000 Command View AE
Software also requires a registered licence.
Licenses that are registered while you are logged in are not enabled until you log out and log in
again.
The following license types are available:
• Permanent
• Meter-based Term
• Emergency
• Temporary
NOTE:
Before you log on for the first time, a License Alert appears on the login window.
When a license expires, an alert is displayed in the main window.
Registering a license
To register a license:
User Guide 85
Page 86

1. On the login window, click License.
If you are already logged in, from the Help menu, select About.
2. Click OK for each license message and check the status of each license as it appears on your
screen.
3. Register the license using one of these methods:
• Enter the license key.
• Specify the license key file.
4. Click Save.
If you registered the license after you logged in, you must log out and then log in again for the
license to be enabled.
5. Confirm that the license is successfully registered by viewing the displayed message.
Checking licenses
All users can perform this task.
To check license information and expiration date:
1. On the login window click License. If you are already logged in, select Help > About.
2. Check the License Status and License Messages.
If you have a permanent license or subscription license, you can check detailed information by
clicking the link for each product.
Information for checking the input history of license keys
To check the input history of license keys, log in to the management server as a user with Administrator
permissions in Windows, or as the root user in Linux, and check the information in the licensehistory
file (input history is stored for 90 days) located at
Installation-folder-for-P9000-Command-View-AE-Suite\Base\common\lic\hist
in Windows, and Installation-directory-for-P9000-Command-View-AE-Suite/Base/
common/lic/hist in Linux.The table below describes the history record items output to the
licensehistory file. The items are output separated by commas.
Table 5 Information for checking the input history of license keys
DescriptionOutput Item
Date and time (example: 2011/01/13 15:14:26)YYYY/MM/DD hh:mm:ss
Time zone (example: TZ=GMT+09:00)TZ=time-zone
Setting up P9000 Command View AE Software86
Page 87

Operation
Family Name
=character-string-indicating-the-device-type
DescriptionOutput Item
One of the following is output:
• Add: A new license was added or a license was added when the
current license had expired.
• Update: A license was added in an environment in which another li-
cense had already been registered.
• Uninstall: A product was uninstalled.
• Increase: A new meter-based term license was added.
• Used: The used storage system capacity was checked in an environ-
ment in which a meter-based term license was registered.
• Convert: The license information file was migrated.
Name of the product that was registered or deleted.PPname=product-name
Code specific to the product.ID
One of the following values:
• 0: Does not depend on the device
• Q: XP1024 or XP128
• R: XP12000 or XP10000
• S: SVS200
• T: XP24000 or XP20000
• U: P9500
Key-type
capacityTB
permanent-licensed-capacityTB/meter-based-term-licensedcapacityTB(number-of-days-in-thegrace-period)
Serial numberS/N=serial-number
One of the following values:
• P: Permanent license
• T: Temporary license
• E: Emergency license
• M: Meter-based term license
One of the following values:
• If this operation is used, then the used storage system capacity is re-
turned. If this value exceeds the capacity for the permanent license,
the capacity for the meter-based term license will be used. For the
used storage system capacity, the value is output rounded up to the
nearest terabyte.
• If the operation is not used, then licensed capacity is returned.
The character string used by the system appears.character-string-used-by-the-system
License expiration date (if the key type is T or E)YYYYMMDD
Any of the following values:
• Capacity for the permanent license
• Total capacity for the registered meter-based term license. If the capa-
city for the meter-based term license is used, the capacity minus the
used capacity is output.
• Number of days of the grace period that have passed after the capa-
city for the meter-based term license becomes negative. This value is
not output if the grace period is not been exceeded.
User Guide 87
Page 88

Setting up P9000 Command View AE Software88
Page 89

7 Launching related products
This module describes the link and launch feature that is used to access other related P9000 Command
View AE Software products.
About launching other P9000 Command View AE Software products
An integrated single sign-on is used for all P9000 Command View AE Software products for which
you have a license installed and registered. Related P9000 Command View AE Software products
must be installed on the same system as P9000 Command View AE Software to use the link-and-launch
feature.
Link-and-launch enables you to easily move across storage management software for a full view of
storage resources. P9000 Command View AE Software provides link-and-launch integration with the
following software applications:
• HP StorageWorks P9000 Replication Manager software
• HP Storage Essentials
• Element Manager
Launching related products
Before you launch related products, you must register their licenses.
To start related products:
1. From the Tools menu, select the product you want to launch.
2. Navigate to the newly launched browser to access the product.
Launching related products from a list of hosts
You must register the licenses of all products you want to launch.
To launch related products from a list of hosts:
1. On the Resources tab, select Hosts.
2. From the Actions menu, select Protection Manager.
3. Navigate to the newly launched browser to access the product.
Starting Element Manager
You must register Element Manager in the storage system.
All users can perform this task.
User Guide 89
Page 90

To start Element Manager:
1. On the Resources tab, select Storage Systems.
2. Select a storage system and select Element Manager from the Actions menu.
Launching related products90
Page 91

8 Troubleshooting
This module describes how to troubleshoot P9000 Command View AE Software.
About troubleshooting
If you are having trouble with the P9000 Command View AE Software web client, first make sure the
problem is not with the P9000 Command View AE Software server.
For troubleshooting problems related to Device Manager servers, see the HP StorageWorks P9000
Command View Advanced Edition Suite Software Administrator Guide.
Troubleshooting examples
The following table lists errors and solutions.
A database blockage occurred during execution of a
task.
ActionError
If an error message indicating a database blockage
displays, terminate the Device Manager server, and
then recover the database. After recovering the database, start the Device Manager server, and then update the recent status of the storage systems. For the
task that ended in an error during execution, review
the storage system logs and then run the task again if
necessary.
A window is not displayed or the information to be
displayed cannot be obtained. Cannot access the
P9000 Command View AE Software or HiRDB processes.
P9000 Command View AE Software products or Element Manager cannot be activated from the Device
Manager menu.
Confirm the displayed message.Follow the instructions
indicated in the message, check the network status,
and then run the task again or contact the server administrator.
Confirm the displayed message.Follow the instructions
indicated in the message, check the network status,
and then re-execute or report to the server administrator which product could not be activated.
User Guide 91
Page 92

Troubleshooting92
Page 93

9 Support and other resources
Numerous support options are available.
Contacting HP
HP technical support
For worldwide technical support information, see the HP support website:
http://www.hp.com/support
Before contacting HP, collect the following information:
• Product model names and numbers
• Technical support registration number
• Product serial numbers
• Error messages
• Operating system type and revision level
• Detailed questions
Subscription service
HP recommends that you register your product at the Subscriber's Choice for Business website:
http://www.hp.com/go/e-updates
After registering, you will receive email notification of product enhancements, new driver versions,
firmware updates, and other product resources.
Documentation feedback
HP welcomes your feedback.
To make comments and suggestions about product documentation, send a message to
storagedocsFeedback@hp.com. All submissions become the property of HP.
New and changed information in this edition
The following additions and changes were made for this edition:
• The Device Manager agent no longer supports Red Hat Enterprise Linux AS/ES 3.
• Windows Firewall exception settings required for the Device Manager agent have changed from
being on a program basis to being on a port basis.
• Storage resources managed by Device Manager can now be divided up based on user permissions.
User Guide 93
Page 94

• You no longer have to manually update information when an upgrade installation of is performed;
settings in the Tiered Storage Manager properties file are automatically inherited.
• When Replication Manager is used in Windows to monitor or perform operations on copy pairs
in either of the following configurations, an add-on function can now be used to install and set up
Device Manager agents with settings suitable for the corresponding configuration:
• Configurations in which SVPs are used for virtual command devices to manage copy pairs
• Configurations in which copy pairs are defined as device groups
Related information
For additional information, see the following HP websites:
• http://www.hp.com/
• http://www.hp.com/go/storage/
• http://www.hp.com/support/manuals/
• http://www.hp.com/support/cvae/manuals/
• http://www.hp.com/storage/spock/
Conventions
This guide follows the conventions shown in Table 6 to refer to HP StorageWorks P9000 products.
Table 6 Product reference conventions
Auto LUN
Business Copy
Cache Residency Manager
Full name or meaningProduct reference
This abbreviation is used when it is not necessary to distinguish
the following products:
• XP Auto LUN Software
• Auto LUN XP (Volume Migration)
• Auto LUN
This abbreviation is used when it is not necessary to distinguish
the following products:
• Business Copy/Snapshot
• XP Business Copy
• Business Copy XP
• P9000 Business Copy
This abbreviation is used when it is not necessary to distinguish
the following products:
• Cache Residency Manager
• XP Cache Residency Manager
• Cache LUN XP
• P9000 Cache Residency Manager
Support and other resources94
Page 95

Continuous Access Asynchronous
Continuous Access Journal
Continuous Access
Continuous Access Synchronous
Full name or meaningProduct reference
This abbreviation is used when it is not necessary to distinguish
the following products:
• XP Continuous Access Asynchronous
• Continuous Access XP Asynchronous
• Continuous Access XP Extension
This abbreviation is used when it is not necessary to distinguish
the following products:
• Continuous Access Journal
• XP Continuous Access Journal
• Continuous Access XP Journal
• P9000 Continuous Access Journal
This abbreviation is used when it is not necessary to distinguish
the following products:
• XP Continuous Access
• Continuous Access XP
• P9000 Continuous Access
This abbreviation is used when it is not necessary to distinguish
the following products:
• Continuous Access Synchronous
• XP Continuous Access Synchronous
• Continuous Access XP Synchronous
• P9000 Continuous Access Synchronous
Data Retention Utility
External Storage
Flex Copy
LUN Expansion
This abbreviation is used when it is not necessary to distinguish
the following products:
• Data Retention Utility
• XP Data Retention Utility
• LUN Security XP Extension
This abbreviation is used when it is not necessary to distinguish
the following products:
• XP External Storage Software
• External Storage XP
• External Storage
This abbreviation is used when it is not necessary to distinguish
the following products:
• XP Flex Copy
• Flex Copy XP
• Flex Copy
This abbreviation is used when it is not necessary to distinguish
the following products:
• XP LUN Expansion
• LUN Configuration and Security Manager XP (LUN Expansion)
• LUN Expansion
User Guide 95
Page 96

LUN Manager
Open Volume Management
RAID Manager
Snapshot
Full name or meaningProduct reference
This abbreviation is used when it is not necessary to distinguish
the following products:
• LUN Manager
• XP LUN Manager
This abbreviation is used when it is not necessary to distinguish
the following products:
• Open Volume Management
• XP Virtual LVI/LUN (VLL)
• Security Manager XP
• XP Data Shredder
• LUN Configuration and Security Manager XP (Virtual LVI)
This abbreviation is used when it is not necessary to distinguish
the following products:
• XP RAID Manager
• RAID Manager XP
• RAID Manager
This abbreviation is used when it is not necessary to distinguish
the following products:
• Snapshot
• XP Snapshot
• Snapshot XP
• P9000 Snapshot
Volume Shredder
This abbreviation is used when it is not necessary to distinguish
the following products:
• Volume Shredder
• XP Volume Shredder
• P9000 Volume Shredder
Support and other resources96
Page 97

Glossary
This glossary defines the special terms used in this document. Click the desired letter at the bottom of
every glossary page to display the glossary entries that start with that letter.
allocated volume An LDEV for which one or more host paths are defined.
cache A set of RAM (Random Access Memory) modules used to store data temporarily.
capacity The amount of data storage space available on a disk drive or storage system.
CLI Command Line Interface
CLPR Cache Logical Partition
copy pair A primary and secondary volume pair linked by the volume replication
CSV Comma Separated Value
CU (Control Unit) Created in an storage system. Also called a CU image. The LDEVs created in a
Measured in MB, but it can also be measured in other units such as TB and PB,
depending on the total storage space.
functionality of a storage system.
storage system are connected to a single CU, and a number is assigned to each
CU for identifying its LDEVs. Therefore, volumes (LDEVs) in a storage system are
specified by the CU number (CU#) and LDEV number.
data drive A physical data storage device that can be either a hard disk drive (HDD) or a
flash (solid-state) drive.
data pool One or more logical volumes designated to temporarily store original data.
When a snapshot is taken of a primary volume, the data pool is used if a data
block in the primary volume is to be updated. The original snapshot of the volume
is maintained by storing the changeable data blocks in the data pool.
DB Database
device A physical or logical unit with a specific function.
DEVN Device number that is assigned to each logical address.
DHCP Dynamic Host Configuration Protocol
DKCMAIN Disk controller main
DKP Disk processor
DKU Disk unit
external volume A logical volume whose data resides on drives that are in an externally connected
storage system.
User Guide 97
Page 98

FC Fibre Channel
GUI Graphical user interface
HBA Host bus adapter
host group A means of segregating hosts by operating system.
HSD Host storage domain. A group used to strengthen the security of volumes in
storage systems. By associating and grouping hosts and volumes by storage
system port, host storage domains can be used to restrict access from hosts to
volumes.
Device Manager defines the host groups set up with the storage system LUN
security function as host storage domains. Host storage domains for storage
systems that do not have host groups are defined in the same manner as if they
had been set with the LUN security function.
HTML Hypertext Markup Language
HTTP Hypertext Transfer Protocol
HTTPS Hypertext Transfer Protocol Secure
IBM International Business Machines Corporation
internal volume A logical volume whose data resides on drives that are physically located within
the storage system. See also external volume.
IO Input/output
IOPS I/Os per second
IP Internet protocol
iSCSI Internet Small Computer Systems Interface
JRE Java Runtime Environment
JVM Java Virtual Machine
JWS Java Web Start
LAN Local area network
LDAP Lightweight Directory Access Protocol
LDEV (logical
A volume created in a storage system. See also LU.
device)
LDKC Logical disk controller
LU (logical unit) A volume created in an open storage system. See also LDEV.
LUN (logical unit
number)
A management number assigned to an LU in a storage system. A LUN is a number
assigned to identify an LU for the port in the storage system to which the LU is
connected, either by the port or by the host group assigned to the port. An open
system host uses a LUN to access a particular LU.
LUSE LU size expansion
Glossary98
Page 99

management client A computer used to operate P9000 Command View AE Software. web client or
CLI client can be used.
NAS Network attached storage
NIC Network interface card
OS Operating system
pair status Copy pair status.
pool A set of volumes that are reserved for storing snapshot data or Dynamic or Thin
Provisioning write data.
pool-VOL A logical volume that is reserved for storing snapshot data for snapshot operations
or write data for Dynamic or Thin Provisioning.
P-VOL (primary
volume)
properties files Files that define the operating environment. The operating environment can be
RACF (Resource
Access Control
Function)
RADIUS Remote Authentication Dial In User Service
RAID Redundant array of inexpensive disks
RAID level The type of RAID implementation. RAID levels include RAID 0, RAID 1, RAID 2,
refresh To update the database using the most recent information.
resource group Resources grouped by storage system, parity group, LDEV ID, storage port, etc.
role Operation(s) permission that users in a user group have for resources in a resource
SAN Storage area network
The source volume that is copied to another volume using the volume replication
functionality of a storage system.
modified by changing the appropriate property files.
Functionality for controlling user authentication and resource access on the
mainframe host.
RAID 3, RAID 4, RAID 5 and RAID 6.
group.
SAS (Serial
Attached SCSI)
SATA (Serial
Advanced
Technology
Attachment)
SCSI (Small
Computer System
Interface)
SLPR Storage Local Partition
SNMP Simple Network Management Protocol
A replacement for Fibre Channel drives in high performance applications. See
SCSI.
A version of the ATA interface that uses a serial connection architecture.
Standards that define I/O buses primarily intended for connecting storage systems
and devices to hosts through host bus adapters.
User Guide 99
Page 100

SSD Solid-state drive
SSL Secure Sockets Layer
S-VOL (secondary
volume)
The copy destination volume of two volumes that are associated in a copy pair
by a storage system volume replication functionality.
THP Thin provisioning. An approach to managing storage. Instead of reserving
storage, it removes capacity from the available pool only when data is actually
written to the drive.
THP-VOL Thin Provisioning virtual volume. A virtual volume with no memory space used
by Thin Provisioning.
tiered storage A layered structure of performance levels, or tiers, that matches data access
requirements with the appropriate performance tiers.
unallocated
An LDEV for which no host paths are assigned.
volume
URL Uniform Resource Locator
user group A group of users who use the same resources and have the same operation(s)
permission (see “role”) for the resources. Externally authenticated groups can be
used as user groups.
VMA Volume management area
VOLSER The label of a volume assigned by the mainframe host.
volume A collective name for the logical devices (LDEVs) and logical units (LUs) that are
created in a storage system.
web client browser
WWN Worldwide name. A node name that is unique.
WWPN worldwide port name
XML extensible markup language
Glossary100
 Loading...