

Page 1

HP P9000 Command View Advanced Edition
Suite Software
User Guide
Part number: TB581-96350
Tenth edition: May 2013
Page 2

Legal and notice information
© Copyright 2010, 2013 Hewlett-Packard Development Company, L.P.
Confidential computer software. Valid license from HP required for possession, use or copying. Consistent with FAR 12.211
and 12.212, Commercial Computer Software, Computer Software Documentation, and Technical Data for Commercial Items
are licensed to the U.S. Government under vendor's standard commercial license.
The information contained herein is subject to change without notice. The only warranties for HP products and services are set
forth in the express warranty statements accompanying such products and services. Nothing herein should be construed as
constituting an additional warranty. HP shall not be liable for technical or editorial errors or omissions contained herein.
Acknowledgments
Hitachi® and Universal Replicator® are registered trademarks of Hitachi, Ltd.
Itanium® is a registered trademark of Intel Corporation or its subsidiaries in the United States and other countries.
Java is a registered trademark of Oracle and/or its affiliates.
Microsoft®, Windows®, Windows Server®, and Windows Vista® are US registered trademarks of Microsoft Corporation.
ShadowImage® and TrueCopy® are registered trademarks of Hitachi Data Systems Corporation.
Revision history
DescriptionEditionVersionDate
First editionFirst7.0-00October 2010
Added information for new and changed features.Second7.0.1-00January 2011
Added information for new and changed features.Third7.1.0-00April 2011
Added information for new and changed features.Fourth7.1.1-00August 2011
Added information for new and changed features.Fifth7.2.0-00November 2011
Added information for new and changed features.Sixth7.2.1-00March 2012
Added information for new and changed features.Seventh7.3.1-00August 2012
Added information for new and changed features.Eighth7.4.0-00November 2012
Added information for new and changed features.Ninth7.4.1-00February 2013
Added information for new and changed features.Tenth7.5.0-00May 2013
Page 3

Contents
Preface .............................................................................................. 11
1 Overview of HP StorageWorks P9000 Command View Advanced Edition
Suite ................................................................................................. 13
About HP StorageWorks P9000 Command View Advanced Edition Suite ......................................... 13
Features ................................................................................................................................... 13
What's new ............................................................................................................................. 14
System configuration ................................................................................................................. 15
Logging in ............................................................................................................................... 17
Navigating the interface ............................................................................................................ 18
Navigating help ....................................................................................................................... 19
Operational workflows .............................................................................................................. 20
Process flow ...................................................................................................................... 20
Configuring HP StorageWorks P9000 Command View Advanced Edition Suite .......................... 21
Setting up storage resources ................................................................................................ 21
Setting up users and access control ...................................................................................... 21
Creating a storage operating environment ............................................................................. 22
Allocating storage .............................................................................................................. 22
Monitoring storage ............................................................................................................. 23
2 Discovering, registering, and adding management targets ..................... 25
Registering storage systems ........................................................................................................ 25
About registering and removing a storage system ................................................................... 25
Prerequisites for registering a storage system .......................................................................... 25
Registering a storage system ................................................................................................ 26
Changing storage system information .................................................................................... 27
About acquiring the most recent storage system information ..................................................... 27
Acquiring the most recent storage system information .............................................................. 27
Operations available to SMI-S Enabled storage systems .......................................................... 28
Registering hosts ....................................................................................................................... 28
About registering and removing a host .................................................................................. 28
Methods for registering hosts ............................................................................................... 29
Priority for acquiring the WWN ........................................................................................... 30
Registering hosts by using Host Data Collector ....................................................................... 30
Registering hosts manually by specifying the WWN target ...................................................... 32
Registering hosts by using vMA ............................................................................................ 32
Workflow for detecting hosts ................................................................................................ 33
Registering hosts using host scan .......................................................................................... 34
Registering hosts using merge hosts ...................................................................................... 35
About changing host settings and information ........................................................................ 35
Updating host information registered by using Host Data Collector ........................................... 35
Changing settings for a manually registered host .................................................................... 36
Updating host information registered by using vMA ................................................................ 37
Changing settings for a host registered by using Device Manager agent ................................... 38
User Guide 3
Page 4

Reviewing data collection tasks ................................................................................................... 39
About data collection tasks .................................................................................................. 39
3 Managing storage resources in a SAN environment ............................. 41
Creating and deleting volumes ................................................................................................... 41
About creating volumes ....................................................................................................... 41
Creating volumes ............................................................................................................... 41
Create volumes dialog box .................................................................................................. 42
About deleting unallocated volumes ..................................................................................... 43
Deleting unallocated volumes .............................................................................................. 43
About creating a LUSE volume ............................................................................................. 44
Creating a LUSE volume ...................................................................................................... 44
About releasing a LUSE volume ............................................................................................ 44
Releasing a LUSE volume ..................................................................................................... 44
Virtualizing external storage ....................................................................................................... 45
About virtualizing volumes ................................................................................................... 45
Virtualizing volumes ........................................................................................................... 45
Virtualizing storage capacity (THP/Smart) .................................................................................... 46
About virtualizing storage capacity ....................................................................................... 46
Creating a THP/Smart pool ................................................................................................. 47
Create pool dialog box ....................................................................................................... 48
Verifying THP/Smart pool information ................................................................................... 50
Expanding THP/Smart pools ............................................................................................... 50
Shrinking a THP/Smart pool ................................................................................................ 51
Modifying THP/Smart pool settings ...................................................................................... 51
Deleting THP/Smart pools ................................................................................................... 52
Expanding THP/Smart volumes ............................................................................................ 52
Reclaiming zero pages ........................................................................................................ 52
Virtualizing storage tiers (Smart) ................................................................................................. 52
About virtualizing storage tiers ............................................................................................. 53
Manually starting or stopping the monitoring of Smart pools .................................................... 54
Manually starting or stopping the tier relocation of Smart pools ................................................ 54
Scheduling monitoring and tier relocation of Smart pools ........................................................ 54
Editing tier relocation for Smart volumes ................................................................................ 55
Applying a tiering policy to Smart volumes ............................................................................ 55
Customizing a tiering policy for Smart volumes ...................................................................... 56
Notes on data placement profiles for Smart volumes ............................................................... 56
Creating a data placement profile for Smart volumes .............................................................. 57
Updating a data placement profile for Smart volumes ............................................................. 58
Editing a data placement profile for Smart volumes ................................................................. 59
Applying a data placement profile for Smart volumes .............................................................. 59
Scheduling data placement profiles for Smart volumes ............................................................ 60
Editing an external LDEV tiering rank for a Smart pool ............................................................ 60
Allocating and unallocating volumes ........................................................................................... 61
About allocating volumes .................................................................................................... 61
Volume allocation methods .................................................................................................. 62
Prerequisites for allocating volumes ....................................................................................... 63
Allocating volumes from general tasks ................................................................................... 63
Allocating volumes to selected hosts ...................................................................................... 63
Allocating selected volumes to hosts ...................................................................................... 64
Allocating volumes to clustered hosts ..................................................................................... 64
Allocating volumes by using a keyword search ....................................................................... 65
Allocating volumes by using a criteria search ......................................................................... 65
Allocating volumes by using existing volume settings ............................................................... 66
4
Page 5

Allocate Volumes dialog box ............................................................................................... 66
About LUN path management .............................................................................................. 71
Editing LUN paths .............................................................................................................. 71
About unallocating volumes ................................................................................................. 72
Unallocating volumes from hosts ........................................................................................... 72
Unallocate volumes dialog box ............................................................................................ 73
Replicating volumes .................................................................................................................. 74
About replicating volumes (pair management) ........................................................................ 74
Copy pair management operations ...................................................................................... 75
Adding command devices ................................................................................................... 75
Editing command devices .................................................................................................... 76
Defining copy pairs ............................................................................................................ 76
Changing the status of a copy pair ....................................................................................... 76
Data mobility ........................................................................................................................... 77
About data mobility ............................................................................................................ 77
Reports for logical groups displayed in the Mobility tab .......................................................... 78
Reports for THP/Smart pools displayed in the Mobility tab ...................................................... 79
Optimizing data placement in a logical group ....................................................................... 80
Optimizing data placement in a THP/Smart pool ................................................................... 81
Data migration ......................................................................................................................... 81
About data migration ......................................................................................................... 81
Notes on performing data migration ..................................................................................... 82
Conditions for data migration .............................................................................................. 82
Migrating data for volume performance ................................................................................ 88
Migrating data to a different storage system .......................................................................... 89
Prerequisites for migrating data from an SMI-S Enabled storage system to another storage
system .............................................................................................................................. 90
Migrating data from an SMI-S Enabled storage system to another storage system ........................ 90
Managing tasks ....................................................................................................................... 92
About tasks ....................................................................................................................... 92
Viewing task status ............................................................................................................. 93
Rescheduling tasks waiting to be executed ............................................................................. 93
Stopping running data migration or data placement profile tasks .............................................. 93
Canceling scheduled tasks .................................................................................................. 93
Moving tasks to the History tab ............................................................................................ 94
4 Grouping resources .......................................................................... 95
Managing logical groups .......................................................................................................... 95
About logical groups .......................................................................................................... 95
Creating logical groups ...................................................................................................... 95
Viewing logical group reports .............................................................................................. 96
Editing logical groups ......................................................................................................... 96
Performing operations from a logical group ........................................................................... 96
Managing storage tiers ............................................................................................................. 96
About tier-based storage management .................................................................................. 97
Values to ensure acceptable tier performance ........................................................................ 97
Creating tiers ..................................................................................................................... 97
Expanding a tier ................................................................................................................ 98
Managing resource labels ......................................................................................................... 98
About managing resource labels .......................................................................................... 98
Editing resource labels ........................................................................................................ 99
Searching resource labels .................................................................................................... 99
Importing storage system resource labels ............................................................................. 100
User Guide 5
Page 6

5 Monitoring managed resources and resolving alerts .......................... 101
Viewing information summaries ................................................................................................ 101
About checking system status in the dashboard .................................................................... 101
Accessing the dashboard .................................................................................................. 102
Customizing the dashboard ............................................................................................... 102
About the storage systems tree ........................................................................................... 103
Viewing current storage system information .......................................................................... 103
About the hosts tree .......................................................................................................... 103
Viewing current host information ......................................................................................... 103
About tasks in the global monitoring bar ............................................................................. 104
Configuring displayed tasks from the global monitoring bar ................................................... 104
Managing alerts ..................................................................................................................... 104
About alerts ..................................................................................................................... 104
Confirming an alert .......................................................................................................... 105
Searching Command View AE Suite resources ............................................................................ 105
About searching Command View AE Suite resources ............................................................. 105
Keyword search ............................................................................................................... 106
Criteria search ................................................................................................................. 106
Criteria search dialog box ................................................................................................. 107
Generating resource reports ..................................................................................................... 109
About generating reports .................................................................................................. 109
Exporting host information to a CSV file .............................................................................. 110
Exporting logical group information to a CSV file ................................................................. 110
Exporting search results to a CSV file .................................................................................. 110
Exporting access control information for resources to a CSV file .............................................. 111
Optimizing storage ................................................................................................................. 111
About optimizing storage .................................................................................................. 111
6 Setting up HP StorageWorks P9000 Command View Advanced Edition
Suite ............................................................................................... 113
Configuring your browser and Java for HP StorageWorks P9000 Command View Advanced Edition
Suite ..................................................................................................................................... 113
About configuring browser settings ..................................................................................... 113
Checking management server name resolution ..................................................................... 113
Disabling pop-up blocking for IE 7 and later ........................................................................ 113
Disabling pop-up blocking for IE 6 ..................................................................................... 114
Setting security options for using Internet Explorer ................................................................. 115
Setting security options for Firefox ....................................................................................... 116
Setting the Java™ Web Start proxy Version 1.4.2 to link with other products ........................... 116
Setting the Java™ Web Start proxy Version 5.0 and 6.0 to link with other products .................. 116
Configuring log output settings ........................................................................................... 117
Configuring JRE versions from JWS ..................................................................................... 117
Clearing the cache when upgrading HP StorageWorks P9000 Command View Advanced Edition
Suite ............................................................................................................................... 118
Managing users ..................................................................................................................... 118
About managing users ...................................................................................................... 118
User ID and password policies ........................................................................................... 118
User operation permissions ................................................................................................ 119
Creating a user account .................................................................................................... 123
Editing the profile for a user account ................................................................................... 123
Editing your own user profile ............................................................................................. 123
Changing the password for a user account .......................................................................... 124
Changing your password .................................................................................................. 124
Changing permissions for a user account ............................................................................ 124
6
Page 7

Changing the lock status of user accounts ............................................................................ 124
Configuring external authentication for users ........................................................................ 125
Configuring external authentication for groups ..................................................................... 125
Controlling access to resources ................................................................................................. 126
About access control ......................................................................................................... 126
Access control examples for P9500 Disk Array ..................................................................... 127
Resource groups ............................................................................................................... 128
Prerequisites for creating resource groups ............................................................................ 128
Creating resource groups .................................................................................................. 129
Editing a resource group ................................................................................................... 129
Prerequisites for creating user groups .................................................................................. 129
Creating user groups ........................................................................................................ 131
Editing a user group ......................................................................................................... 132
Assigning resource groups and roles to a user group ............................................................ 132
Changing a user’s user group ............................................................................................ 132
Setting up security ................................................................................................................... 132
About configuring security options ...................................................................................... 132
Setting a password policy ................................................................................................. 133
Setting automatic account locking ...................................................................................... 133
Setting a warning banner message .................................................................................... 133
Downloading components ....................................................................................................... 133
About downloading components ........................................................................................ 133
Downloading agents, CLI, and Host Data Collector files ........................................................ 133
Managing licenses ................................................................................................................. 134
About license management ............................................................................................... 134
Registering a license ......................................................................................................... 134
Checking license information ............................................................................................. 135
Information for checking the input history of license keys ........................................................ 135
7 Linking related products .................................................................. 137
Launching other HP StorageWorks P9000 Command View Advanced Edition Suite products ............ 137
About launching other HP StorageWorks P9000 Command View Advanced Edition Suite
products .......................................................................................................................... 137
Starting related products ................................................................................................... 137
Starting Element Manager ................................................................................................. 137
8 Troubleshooting ............................................................................. 139
About troubleshooting ............................................................................................................. 139
Troubleshooting examples ........................................................................................................ 139
9 Support and other resources ............................................................ 141
Contacting HP ........................................................................................................................ 141
HP technical support ......................................................................................................... 141
Subscription service .......................................................................................................... 141
Documentation feedback ................................................................................................... 141
Related information ................................................................................................................. 141
Conventions ........................................................................................................................... 142
A Managing storage resources that have virtual IDs .............................. 145
About managing storage resources that have virtual IDs ............................................................... 145
Displaying virtual ID information ............................................................................................... 146
Allocating volumes to hosts with virtual IDs ................................................................................. 146
User Guide 7
Page 8

B Operations in Legacy mode ............................................................ 149
About Legacy mode ................................................................................................................ 149
User permissions in Legacy mode ............................................................................................. 149
Notes on performing data migration in Legacy mode .................................................................. 150
Conditions for data migration in Legacy mode ............................................................................ 151
Migrating volume data in Legacy mode ..................................................................................... 157
C CSV export v7 differences .............................................................. 159
Differences in output between Command View AE Suite v7.x and earlier versions ........................... 159
Glossary .......................................................................................... 173
Index ............................................................................................... 179
8
Page 9

Tables
Methods for registering hosts .................................................................................... 291
Updating host information using Host Data Collector .................................................. 362
Updating host information using vMA ....................................................................... 373
Updating host information using Device Manager agent ............................................. 384
Create volumes dialog box ..................................................................................... 425
Create pool dialog box .......................................................................................... 486
Allocate volumes dialog box ................................................................................... 667
Unallocate volumes dialog box ................................................................................ 738
Migration sources and targets by volume type and state .............................................. 839
Volumes that cannot be used as migration sources ...................................................... 8610
Tiered Storage Manager operational values ............................................................... 9711
Search dialog box ................................................................................................ 10712
User operation permissions by Role ......................................................................... 11913
Required roles and resource groups for performing functions ....................................... 12014
Information for checking the input history of license keys ............................................ 13515
Troubleshooting errors and actions .......................................................................... 13916
Product reference conventions ................................................................................. 14217
Roles and resource groups required for migrating data in Legacy mode ....................... 15018
Data migration operational values in Legacy mode ................................................... 15019
Tiered Storage Manager user count values in Legacy mode ........................................ 15120
Migration sources and targets by volume type and state ............................................ 15221
Volumes that cannot be used as migration sources or targets ..................................... 15422
Volumes that can be used as migration sources, but not as migration targets ................. 15623
Host information .................................................................................................. 15924
Logical group information ...................................................................................... 16225
Volume, parity group, THP pool, and free space information from search results ............ 16826
Access control information ..................................................................................... 17227
User Guide 9
Page 10

10
Page 11

Preface
This manual provides information for HP StorageWorks P9000 Command View Advanced Edition
Suite software.
User Guide 11
Page 12

Preface12
Page 13

1 Overview of HP StorageWorks P9000 Command View Advanced Edition Suite
HP StorageWorks P9000 Command View Advanced Edition Suite is a comprehensive software suite
providing management services for storage systems and hosts. Storage configuration, virtualization,
reporting, and monitoring tools are fully supported.
About HP StorageWorks P9000 Command View Advanced Edition Suite
HP StorageWorks P9000 Command View Advanced Edition Suite software is a group of storage
management software products that allow you to manage storage resources in large-scale, complex
SAN environments.
Command View AE Suite includes:
• HP StorageWorks P9000 Device Manager software: Supports registration of physical resources
to be managed, including storage systems, hosts, and related tasks such as volume allocation and
grouping of resources for eased management and access.
• HP StorageWorks P9000 Tiered Storage Manager software: Supports storage tiers of differing
performance characteristics so that volume data storage costs and performance can be optimized.
• HP StorageWorks P9000 Replication Manager software: Supports volume data replication for
backup and disaster recovery.
• HP StorageWorks P9000 Performance Advisor software: Supports optimizing the performance of
storage resources.
Each product must be licensed for use in Command View AE Suite. At minimum, you must license
Device Manager. Additional licensing can be added as needed for other storage management
products. Related functionality becomes available in the Command View AE Suite user interface in
the form of activated menu choices, and new or updated tabs and related screens and buttons.
Instances of the management software products above can be installed on one or more Command
View AE Suite servers depending on the scale of resources under management and geographic
location. For information about supported Command View AE Suite server operating systems, related
requirements, and product installation options, see the HP P9000 Command View Advanced Edition
Suite Software Installation and Configuration Guide.
Features
HP StorageWorks P9000 Command View Advanced Edition Suite software includes the following
functionality:
• Server architecture supports resource scalability (millions of storage objects) and geographic
scalability.
User Guide 13
Page 14

• Provides secure remote management over Internet and wide area networks (WANs) using a
sophisticated web client.
• Provides multiple levels of security and access for storage administrators, integration with external
authentication servers, and use of resource groups to control access to specific resources.
• Security tools to prevent unauthorized access, such as account locking, and restricted login retry
attempts.
• Provides for automation scripts using component CLIs.
• Supports agentless discovery and mapping of servers (hosts) and storage.
• Supports hosts such as Microsoft Windows, Sun Solaris, HP-UX, IBM AIX, and Linux.
• Supports virtualization servers such as Microsoft Hyper-V and VMware ESX.
• Supports FC and FCoE connected hosts.
• Supports a wide variety of block and SMI-S compliant storage systems.
• Supports virtualization of volumes from external storage.
• Supports volume migration between supported source and target storage systems.
• Provides simplified volume provisioning in complex environments.
• Provides logical, physical, and host view storage management.
• Provides efficient, cost effective use of storage capacity as needed using THP pools.
• With a Tiered Storage Manager license, optimized application performance is provided when
THP pools are configured to support performance tiers. You can also use the Mobility tab to optimize data placement and operation for online data migration between tiers.
• Provides volume replication services for data protection. .
• Provides keyword and criteria based searching of managed resources, and managed resource
reporting with data export to CSV files.
What's new
HP StorageWorks P9000 Command View Advanced Edition Suite software includes the following
new or enhanced functionality:
NOTE:
The enhancements below are primarily intended to highlight new software (GUI) features, and are
not an exhaustive list of enhancements. For complete information about new features and
enhancements, see the:
•
HP P9000 Command View Advanced Edition Suite Software Release Notes
•
HP P9000 Tiered Storage Manager Software Release Notes
For complete information about management server, host data collector, device manager agent, CLI,
and storage system requirements, see the:
•
HP P9000 Command View Advanced Edition Suite Software System Requirements
Device Manager enhancements
For the P9500:
• Device Manager now supports:
• Setting the buffer space for tier relocation within a Smart pool
• Setting the buffer space for new page assignments to tiers within a Smart pool
• Display of virtual IDs in the Logical Groups volume lists
Overview of HP StorageWorks P9000 Command View Advanced Edition Suite14
Page 15

For XP24000/XP20000 or XP12000/XP10000/SVS200, from System Center Virtual Machine
Manager (SCVMM) 2012 SP1 on Windows Server 2012, or Windows Server 2012 Power Shell
3.0:
• The SMI-S provider of Device Manager server now supports:
• Add or delete storage system
• Create or delete volume
• Allocate or unallocate volume
• Mount or unmount volume
Device Manager agent supports:
• Additional operating systems
Host Data Collector supports:
• Additional server operating systems
• Additional target host operating systems
Host Data Collector (Linux and Solaris) supports:
• Virtualization servers as target hosts.
Tiered Storage Manager enhancements
For the P9500:
• Tiered Storage Manager GUI now supports:
• Display of tier information, and frequency distribution graphs, which show the relationship
between total number of pages and I/O load.
System configuration
The following figure illustrates HP StorageWorks P9000 Command View Advanced Edition Suite
software management server components, and the basic configuration of the storage network.
User Guide 15
Page 16
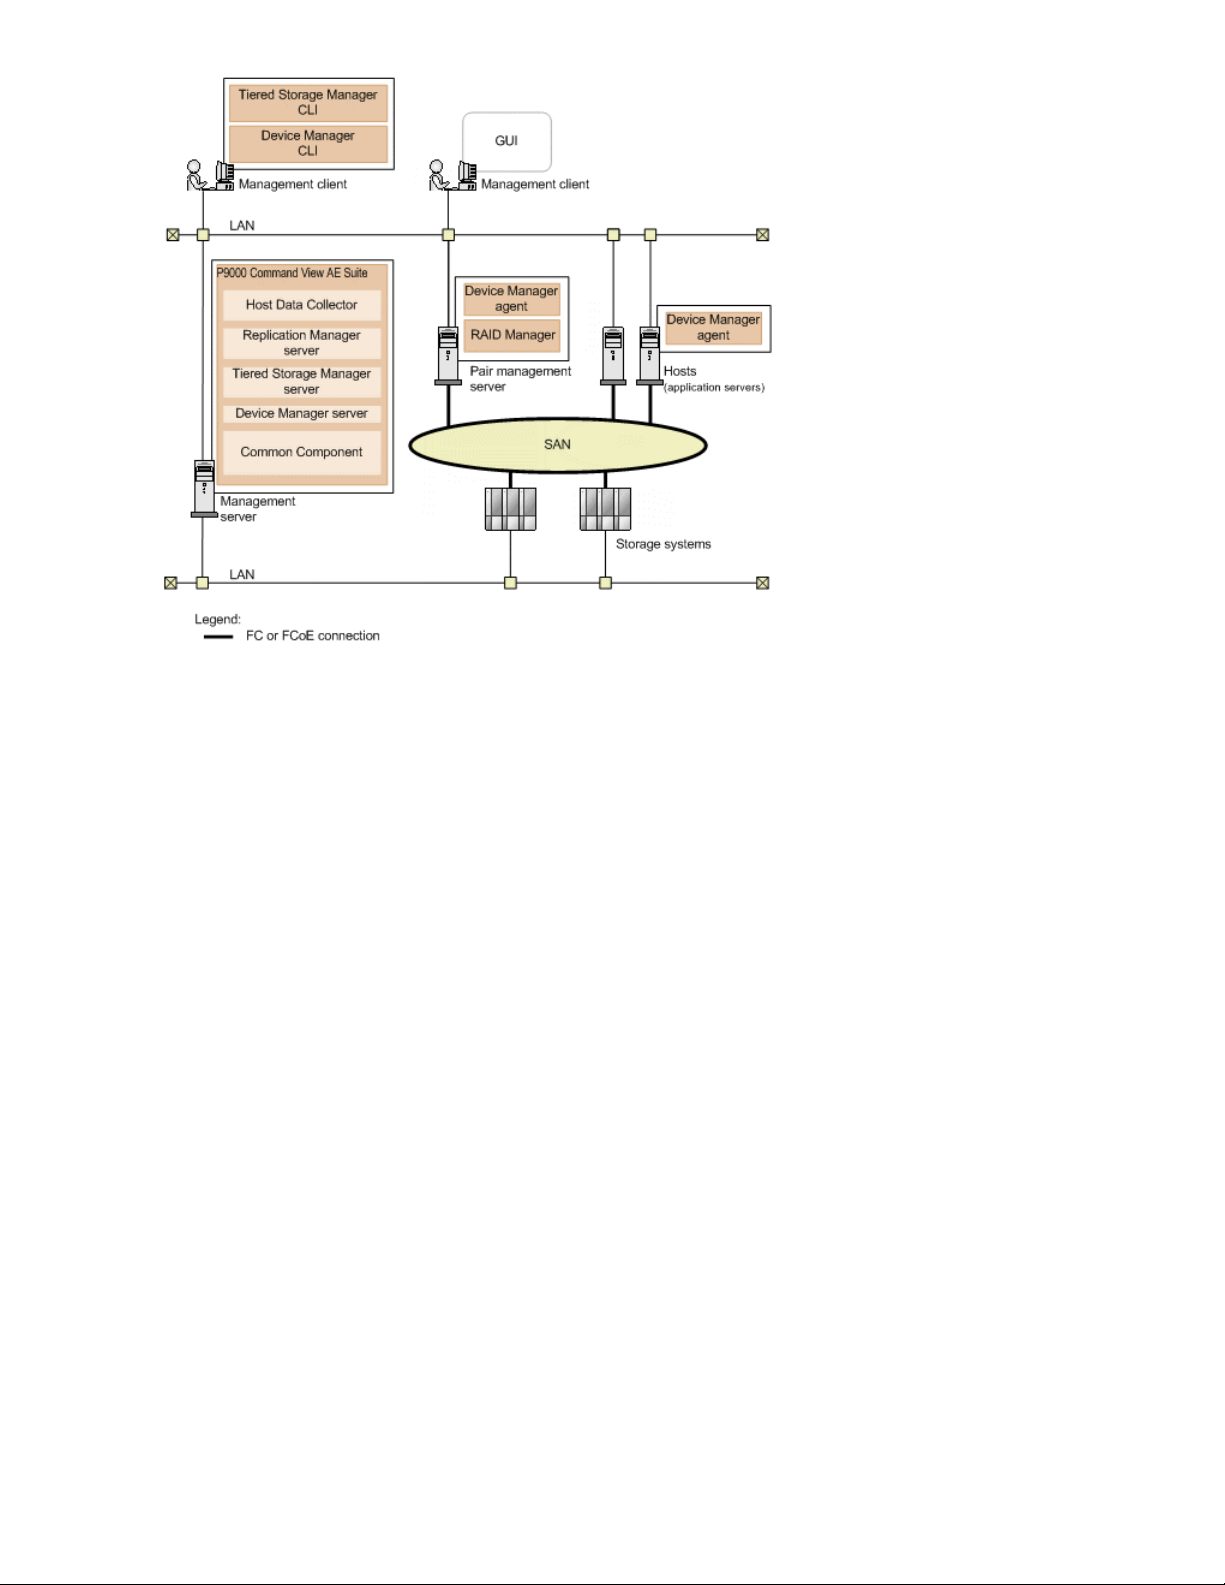
Management servers
• The management server is where P9000 Command View AE Suite is installed.
• The management server communicates with management clients, storage systems, pair management
servers, and hosts over LAN connections.
• Additional software can be installed on the management server to provide extended management
capabilities.
Managerment server components
P9000 Command View AE Suite consists of the following base installation components, which are
always installed or removed together on the management server:
• HP StorageWorks P9000 Command View Advanced Edition Suite Common Component
Provides user account management, security monitoring, and other functions common to all P9000
Command View AE Suite products.
• Device Manager server
The component used by P9000 Command View AE Suite to manage storage system volumes.
• Tiered Storage Manager server
The component used by Tiered Storage Manager to manage storage system volume migration.
• Replication Manager server
The component used by Replication Manager to manage storage system volume replication.
• Host Data Collector
The component used to collect information about the volumes used by the hosts.
Overview of HP StorageWorks P9000 Command View Advanced Edition Suite16
Page 17

NOTE:
The Host Data Collector component can be installed on other servers and accessed remotely by
P9000 Command View AE Suite.
Management clients
• You can manage storage resources via the management server using the P9000 Command View
AE Suite web client (GUI), or CLI client software to issue commands.
• CLI client components (Device Manager and Tiered Storage Manager) require a separate install-
ation from the web client.
• From the web client, with a Device Manager license, Replication Manager can be launched to
use a subset of Replication Manager functionality.
Hosts
• Hosts (application servers) access volumes in storage systems that are managed by P9000 Com-
mand View AE Suite.
• Hosts access storage over SAN (Fibre Channel) or LAN (FCoE) connections.
• Hosts can be virtualization servers (VMware ESX/ESXi) and their virtual machines, and mainframe
hosts.
Hosts (application servers) access volumes in storage systems that are managed by P9000 Command
View AE Suite over a Storage Area Network (SAN).
Pair management servers
• Collects management information about copy pair configurations and related status information,
and provides for copy pair operations.
• RAID Manager and Device Manager agent are installed for copy pair monitoring and management.
For information about performing the base installation, see the HP P9000 Command View Advanced
Edition Suite Software Installation and Configuration Guide.
For information about customizing and extending the base installation, see the HP P9000 Command
View Advanced Edition Suite Software Administrator Guide.
Logging in
Before you can log in to HP StorageWorks P9000 Command View Advanced Edition Suite software,
you must register valid licenses using the Licenses button. For information about how to register licenses,
see “Registering a license” on page 134.
NOTE:
To log in with a user account other than a built-in user account, set up new user accounts, or user
groups and roles (this requires the User Management permission, and the Admin role for All Resources).
1. Start a web browser and enter the URL of the Command View AE Suite server:
http://server-IP-or-name:port-number/DeviceManager/
• server-IP-or-name: IP address or host name of the Device Manager server.
• port-number: Port number of the HBase Storage Mgmt Web Service.
URL examples:
User Guide 17
Page 18

• http://localhost:23015/DeviceManager/
• https://localhost:23016/DeviceManager/
NOTE:
The localhost name entry above implies you are sitting at the server. To access the interface from
another system, specify an IP address or host name in the URL. For a secure connection, use the
https URL on port 23016.
2. Enter values in the User ID and Password fields, and click Log In.
TIP:
If authenticating with an external authentication server, use the external authentication server
password.
Navigating the interface
Interface elements
• Global task bar - always visible, use for help, licensing, launching installed options (Tools menu),
and logging out.
• Global tabs - always visible, access to applications.
• Search - always visible, provides keyword and criteria based search.
• Navigation area - differs by tab, access to resources and commonly-used tasks.
• Application area - differs by tab, resource summary information, resource object list, and related
drill down details.
• Global monitoring bar - always visible, status of submitted tasks and alerts from the Tasks & Alerts
tab.
Navigation area
• Accordion menus provide easy access to many resource trees.
Overview of HP StorageWorks P9000 Command View Advanced Edition Suite18
Page 19

• Re-size panes with divider bar.
• Access frequently needed tasks under General Tasks.
Application area
• Minimize and expand panes by using the double arrow symbol in the title.
• Click Column Settings to display or hide columns, change column order, or review column explan-
ations.
• Right-click a table header and select menu options like Hide Column or Show all Columns.
• Arrange columns by using drag and drop.
• Sort lists by clicking a column.
• Navigate large lists by using Page controls.
• Use Filter to reduce large lists, or to find specific items. Filter allows multiple conditions to be
defined.
• In a list, click a link to display more detail about the item. As you drill-down, the breadcrumb list
(item > detail) above the summary pane will be updated. The breadcrumbs are a useful navigation tool.
• In a list, rows will highlight lightly as you roll your mouse over the rows, indicating your row pos-
ition. To select a specific item, click on the row and confirm the dark highlight indicating the row
is selected. Click a selected row to de-select the row.
• To perform an action on multiple items, select multiple rows by selecting your first row, then using
Ctrl click to select multiple items or Shift click to select a range of items. To select all rows, click
Select All, or click again to de-select all rows.
• Selecting rows implies you intend to perform an action on the selected item. Actions are initiated
with buttons at the bottom of the pane, or from an Actions menu.
• To copy cell or row data, select one or more rows with data, right-click and use Copy This Cell or
Copy Selected Rows. For example, this is useful for emailing small amounts of data about a storage
resource. Note that if you select empty rows, the copy options will not appear when you rightclick. For reporting on large numbers of objects and for more complete data, use CSV export.
Navigating help
When you access Help from the menu bar, the navigation pane displays.
If you select Help from a dialog box, click Show All Contents to launch the navigation pane and
access the contents, index, search, and glossary.
Navigating
• To navigate between topics, use the navigation pane, or right-click the topic and select Back or
Forward.
• Use the breadcrumb trail at the top of each topic to see your location, or to return to a higher level
topic.
• To find information for a specific topic, click the Related topics links.
Using navigation buttons
• Contents
Open book icons in the navigation pane to reveal topic entries and subsections. As you move
through help, the current topic is highlighted.
• Index
An alphabetical list of topics. Clicking an Index entry will display one or more topics to choose
from for display.
User Guide 19
Page 20
• Search
Search for word or phrase occurrences. Click search results to display topics.
• Glossary
Brief explanations of terms.
Printing topics
• To print topics, right-click the topic and select Print or click the printer icon on the button bar.
Operational workflows
This module provides high-level workflow diagrams that describe the operations for setting up HP
StorageWorks P9000 Command View Advanced Edition Suite software.
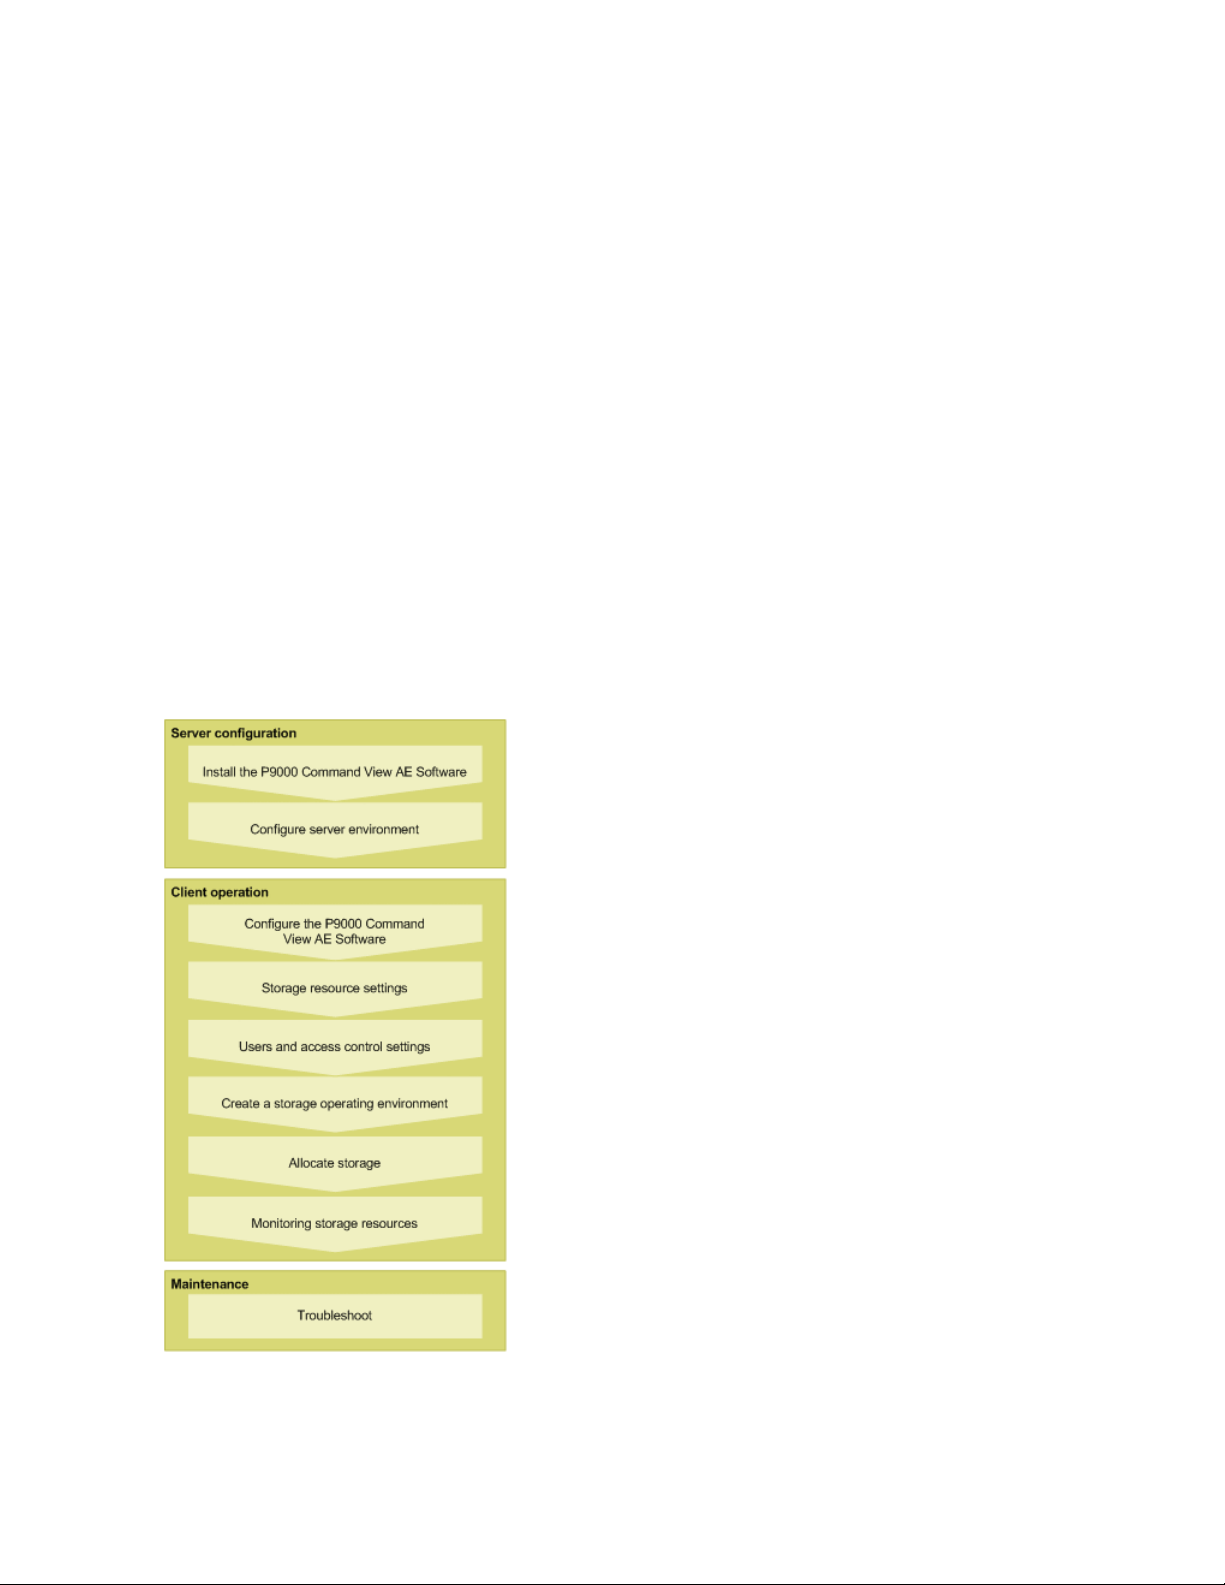
Process flow
The following graphic illustrates the flow of system operations when using HP StorageWorks P9000
Command View Advanced Edition Suite software and HP StorageWorks P9000 Tiered Storage
Manager software.
• Server configuration steps are related to installing and configuring the server itself.
• Client operation steps are illustrated and explained further with workflow graphics and comments
in this user guide.
• Maintenance refers to troubleshooting the server if issues arise when running HP StorageWorks
P9000 Command View Advanced Edition Suite.
Overview of HP StorageWorks P9000 Command View Advanced Edition Suite20
Page 21
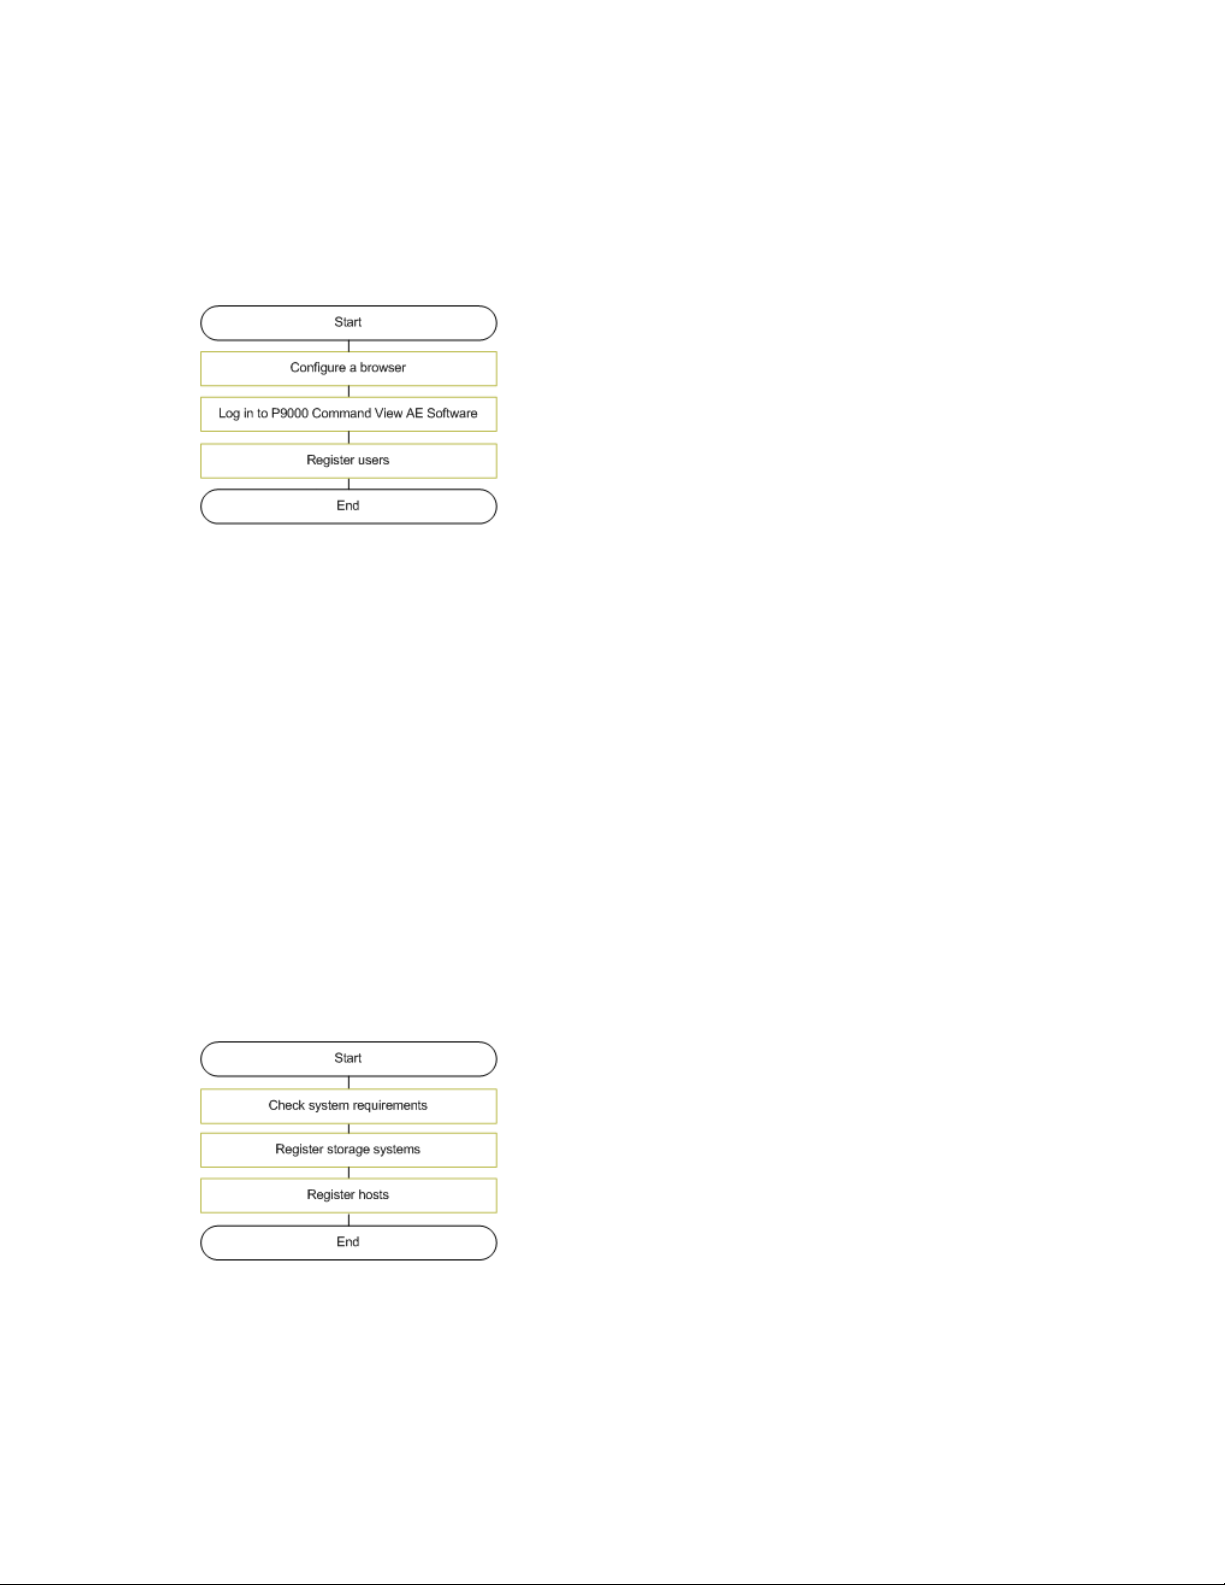
Configuring HP StorageWorks P9000 Command View Advanced Edition Suite
In the graphic below, configuring a browser means setting up the browser environment to correctly
display and run HP StorageWorks P9000 Command View Advanced Edition Suite. If you have issues,
check your browser setup.
After you set up the browser environment, you can log in.
If storage administration is to be shared, investigate the topic on managing users.
Setting up storage resources
Collectively, storage systems and hosts are called storage resources. For storage resources to be
managed by Command View AE Suite, they must be registered.
Registration of storage resources requires the resource to be reachable on the network by IP address.
After you register storage and host resources, you can begin allocating volumes to hosts.
Before setting each resource, check the system prerequisites, and check settings requirements for the
corresponding system configuration described in the HP P9000 Command View Advanced Edition
Suite Software Administrator Guide.
Configure the prerequisite environment based on requirements. For example, set software licenses by
using Remote Web Console or other storage management tools, or configure a network based on
the system configuration.
If Device Manager is set up in an environment that has already been configured using Remote Web
Console, and if you want to use volume labels THP/Smart pool names from a storage system in Device
Manager, register the storage system in Device Manager, and then apply the storage system labels
to Device Manager.
This diagram describes the basic task flow for setting up storage resources.
Setting up users and access control
After users are registered, you can limit the scope of allowed operations for each user by configuring
access control settings for users and storage resources.
User Guide 21
Page 22
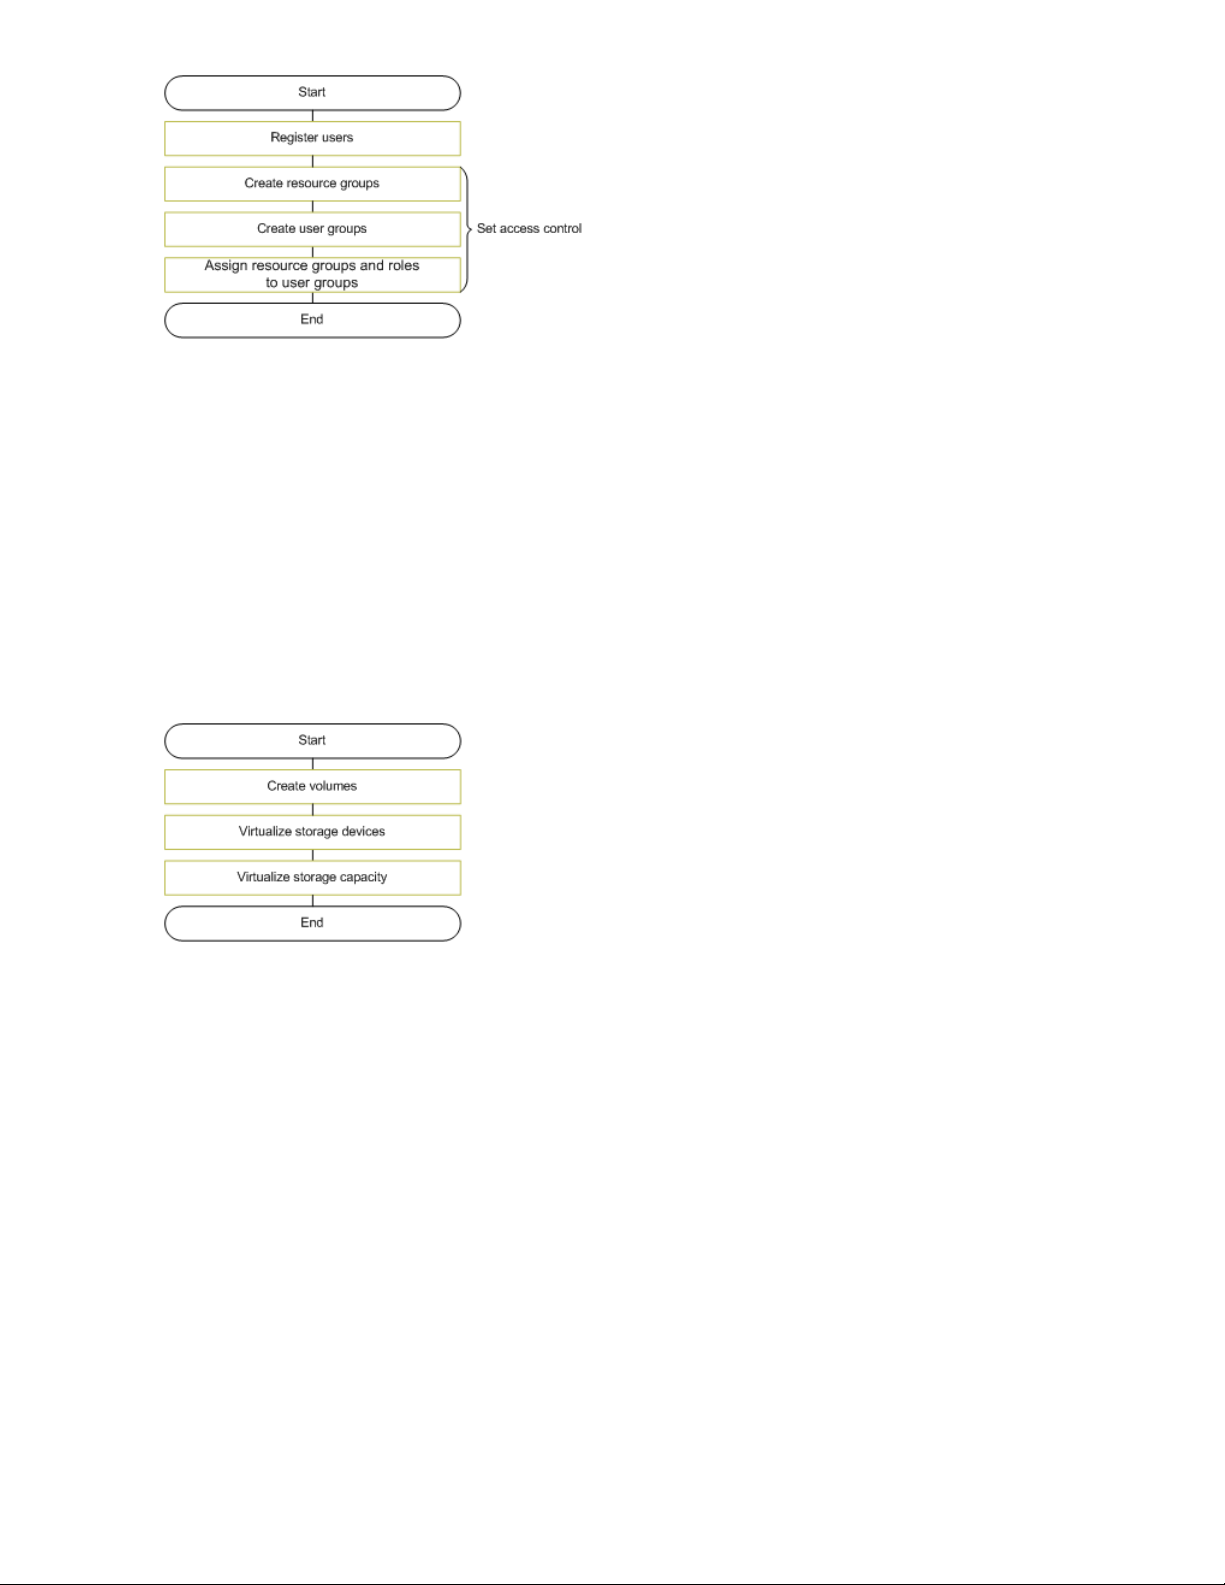
To set access control you will need to create resource groups and user groups, then assign the resource
groups and roles to the user groups.
Creating a storage operating environment
To be able to use volumes of a storage system from hosts configure the operating environment
beforehand. The workflow for configuring the environment differs depending on the scale and operation
method of the storage systems.
In some environments, you can virtualize storage devices so that multiple, different storage systems
can be used as a single storage system.
If your storage system supports THP/Smart pools, you can create THP/Smart pools such that virtual
volumes can be allocated to hosts. By virtualizing storage devices and storage capacity, you can
decrease both management and operational costs by more effectively using physical resources.
Allocating storage
Volumes are allocated to hosts for applications needing storage. A variety of methods for allocating
volumes is available. For example, you can select one or more hosts, then identify and allocate existing
volumes. You can also select one or more volumes, then identify the host that needs the volumes. You
can also establish I/O paths between hosts and volumes when you allocate volumes.
To prepare for loss of data caused by disk failure, disasters, or other issues, you can manage the
redundancy of important operational data by creating a replication environment for volumes within
a storage system or between storage systems, as necessary.
By using logical groups, volumes can be managed as a group for purposes of organization and
simplification of user tasks.
Overview of HP StorageWorks P9000 Command View Advanced Edition Suite22
Page 23
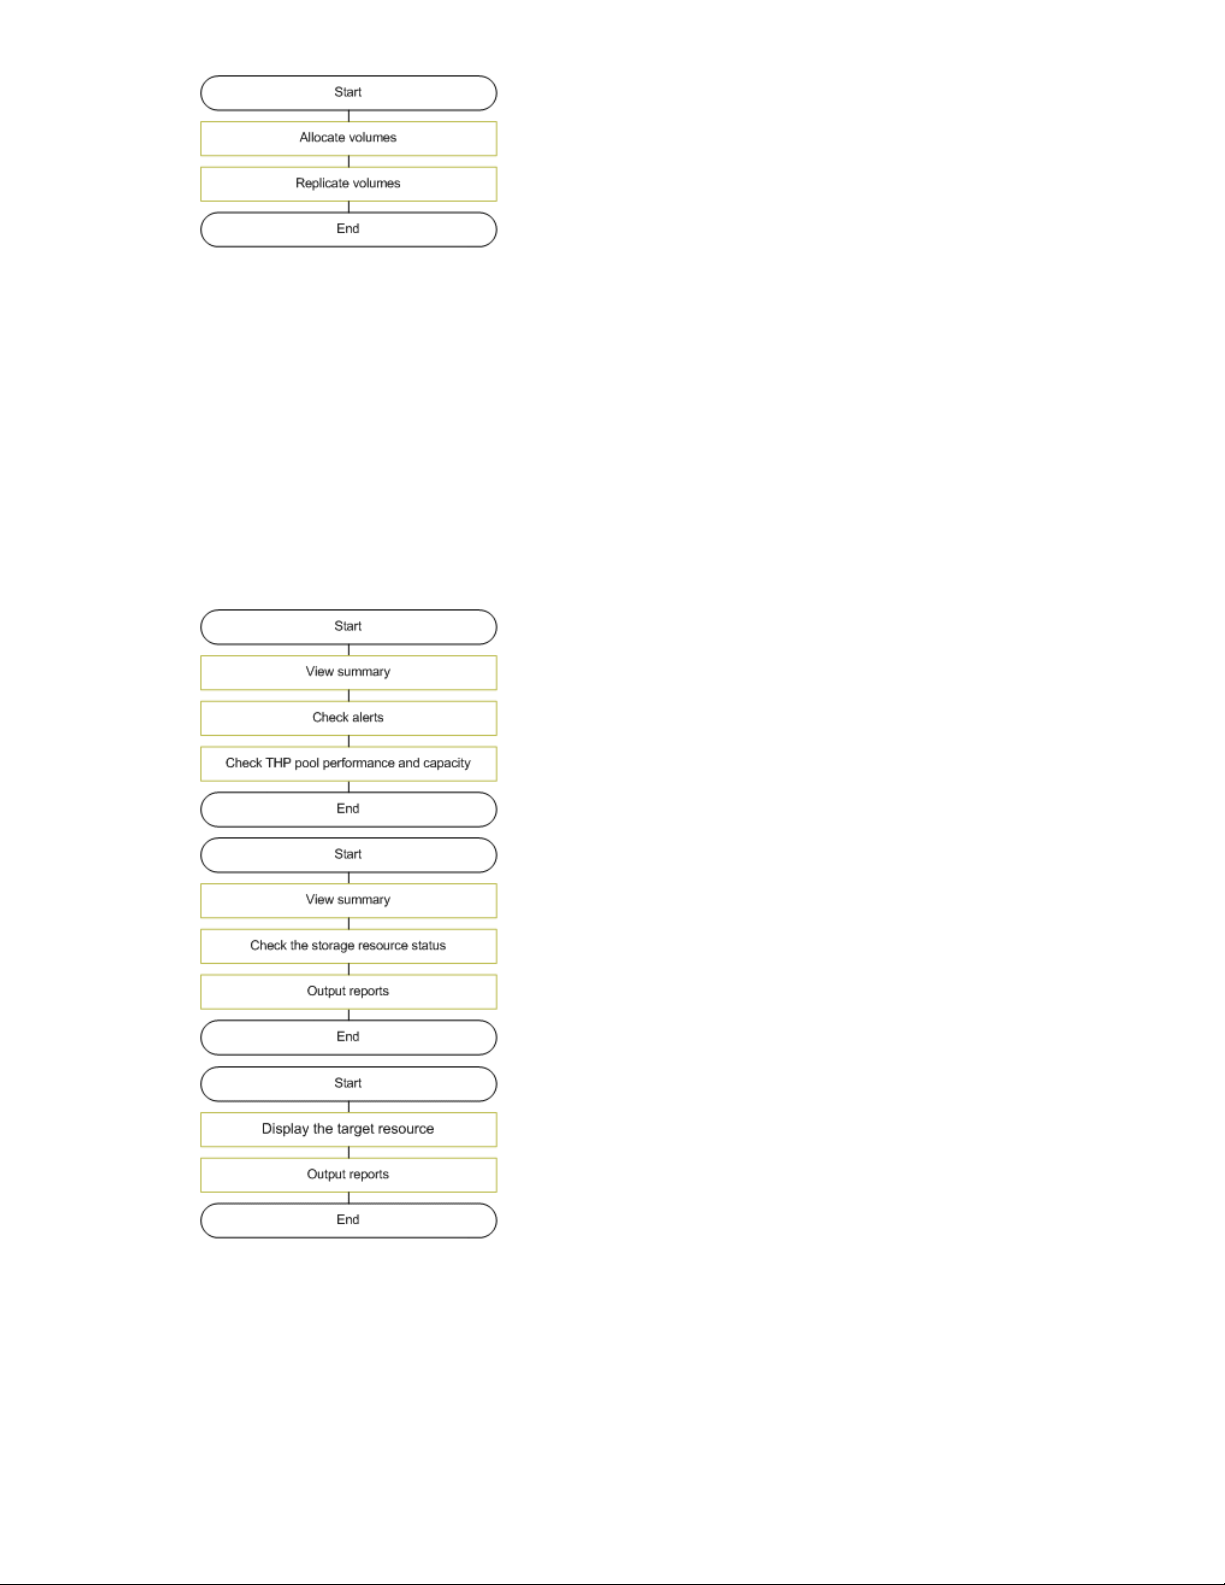
Monitoring storage
You can check the status of storage resources to detect problems and output reports to a CSV or PDF
file containing search results or configuration and capacity information about storage systems, hosts,
volumes, logical groups, and other storage resources.
If you have the Tiered Storage Manager license, you can see the operational status of storage resources
from the Mobility tab and perform integrated operations to optimize data placement.
This information can be used to migrate volumes or add THP/Smart pool volumes to optimize storage
resources. The following graphics illustrate the flow of monitoring and checking the status of storage
resources. To check daily operational status, inquiries from a host or application administrator, or for
Service Level Objective (SLO) and Service Level Agreement (SLA) inquiries, see the respective figures
below:
In summary, you can:
• View summary information from the Dashboard tab.
• Check alerts from the Tasks & Alerts tab or the dashboard.
• Search storage resources from the Search box on the tabs bar.
User Guide 23
Page 24

• Reference data migration information from the Mobility tab.
Overview of HP StorageWorks P9000 Command View Advanced Edition Suite24
Page 25

2 Discovering, registering, and adding management targets
This module describes how to discover SAN resources, such as storage systems, and hosts.
Registering storage systems
This module describes how to register storage systems.
About registering and removing a storage system
Registering (discovering) a storage system in Command View AE Suite enables you to manage the
storage system's resources, including:
• Parity Groups
• LDEVs
• Volumes
• THP/Smart pools
• Resources available through external storage connections
When you specify IP address (or host name) and authentication information for a storage system, the
storage system is discovered based on the specified information. For SMI-S enabled storage systems,
the SMI-S provider's IP address is used for discovery.
Note that information about a storage system can be changed after the storage system is registered.
If managing a storage system with Command View AE Suite is no longer necessary, for example
because of reorganization, you can remove the registered storage system. Removal will result in the
following:
• Configuration information such as parity groups, volumes, and allocated paths will be retained
in the storage systems themselves.
• When storage systems are excluded from management by Command View AE Suite, the information
set in Command View AE Suite, such as tiers and data placement profiles, is deleted.
Prerequisites for registering a storage system
Before you can discover and register a storage system, you must collect and confirm the following
storage system information:
• Storage system type.
• Storage system IP address (IPv4 or IPv6) or host name (alias name).
• User name and password for the storage system management tool, such as Remote Web Console.
• Host name (alias name) or IP address for the SMI-S provider (IPv4 or IPv6), user name, password,
port number (for SMI-S Enabled storage systems).
User Guide 25
Page 26

• Protocol used for Device Manager and SMI-S provider communication (for SMI-S Enabled storage
systems).
Tasks to be completed beforehand:
• Connect the target storage system to the network.
• Verify that fibre Channel port settings (such as topology and transfer rate) are specified in the
management tool of the storage system, such as Remote Web Console.
• Register accounts to be used for Device Manager in the management tool of the storage system,
such as Remote Web Console.
NOTE:
If the storage system is P9500 Disk Array set the "Administrator" user group (built-in group) for
the accounts to be registered.
• Verify that the SMI-S provider is set (for SMI-S Enabled storage systems) before registration.
Registering a storage system
A storage system must be registered to manage it from HP StorageWorks P9000 Command View
Advanced Edition Suite. When registered, the storage system becomes a managed resource.
1. On the Administration tab, select Managed Resources.
2. On the Storage Systems tab, click Add Storage System.
3. Specify registration information. This means:
• An IP address (or hostname) and authentication information (username, password) for most
supported storage systems.
• For SMI-S enabled storage systems, you will need to specify the SMI-S provider IP address,
authentication, protocol (secure, not secure) and possibly a non-default port number.
TIP:
If an SMI-S provider that manages multiple SMI-S enabled storage systems is specified, all the
SMI-S enabled storage systems under that provider are registered.
4. Click OK.
5. Check the Data Collection Tasks tab to verify that the task has completed successfully.
6. When the task completes, confirm that the storage system appears on the Storage Systems tab
of Managed Resources, or in the Storage Systems tree on the Resources tab.
The storage system is now a managed resource. This typically means volumes can be allocated to
registered hosts.
TIP:
To remove storage systems, select one or more storage systems, and click Remove Storage Systems.
Discovering, registering, and adding management targets26
Page 27

Changing storage system information
You can modify the IP address or host name or login user name and password for a storage system.
You can select multiple storage systems to modify at one time, but when selecting multiple storage
systems, only the login user name and password can be modified.
1. On the Administration tab, select Managed Resources.
2. On the Storage Systems tab, select the storage system, or storage systems, you want to modify.
3. Click Edit Storage Systems.
4. Specify the appropriate items and click OK.
5. Check the Data Collection Tasks tab to verify that the task has completed successfully.
6. Confirm that the information in the storage system list is updated.
About acquiring the most recent storage system information
To get current information about a target storage system, you can manually refresh the system at any
time.
When you refresh a storage system, displayed information is updated for storage resources, such as:
• Volumes
• Parity groups
• THP/Smart Pools
• External storage connections
TIP:
When data placement profiles for Smart volumes are being managed, you can specify an option in
the Refresh Storage Systems dialog box to search for inconsistencies in data placement profiles.
To update information about hosts, such as the host name, WWNs, refresh the hosts.
To update host bus adapter (HBA) WWN nicknames, refresh one or more storage systems. Refreshing
host information does not update WWN nicknames. When several WWN nicknames are assigned
to a single HBA, only one of the nicknames is displayed for that HBA.
If connected to P9000 Performance Advisor Software, users can also update performance information
that is displayed in the Mobility tab. To automatically update the storage system information, specify
proper settings in the server.properties file or dispatcher.properties file of the
management server. For details about specifiable values, see the HP P9000 Command View Advanced
Edition Suite Software Administrator Guide.
Acquiring the most recent storage system information
You refresh storage systems to update the displayed information.
1. From the Administration tab, select Managed Resources.
2. On the Storage Systems tab, select one or more storage systems to refresh.
3. Click Refresh Storage Systems, then OK.
4. Check the Data Collection Tasks tab to verify the completed task.
Check for updated storage system information from the Storage Systems tab. Updated storage system
information is also displayed from the Resources tab, Storage Systems tree.
User Guide 27
Page 28

TIP:
Label information for volumes and THP/Smart pools is not refreshed. To apply label information being
managed on a storage system to Device Manager, click Refresh Labels.
Operations available to SMI-S Enabled storage systems
You can register storage systems that are managed by an SMI-S provider (SMI-S Enabled storage
systems) as HP StorageWorks P9000 Command View Advanced Edition Suite resources.
The user can perform the following operations to SMI-S Enabled storage systems:
• Register, change, delete, and update SMI-S Enabled storage systems.
• View summary information for SMI-S Enabled storage systems.
• Operate SMI-S Enabled storage systems from the SMI-S Enabled storage system management tool
(activate the management tool from Element Manager).
• Connect or disconnect as external storage systems (by executing CLIs).
Users must be assigned All Resources to reference or perform operations on SMI-S Enabled storage
systems.
For the operations that are executed by CLI, see the HP P9000 Command View Advanced Edition
Suite Software CLI Reference Guide.
Registering hosts
This module describes how to register hosts.
About registering and removing a host
You can register hosts as managed resources using Device Manager so that storage system volumes
can be used by the hosts and their applications.
The following hosts can be registered for Command View AE Suite:
• Normal hosts (An open host that is not virtualized)
• Virtualization servers (A physical server where virtualization software is installed)
• Virtual machines (A machine that is created on the virtualization server and operates on virtualiz-
ation software)
Depending on the user's purpose, multiple methods are provided for registering one or more hosts,
including manual registration, Host Data Collector (agent-less discovery) or Device Manager agent.
For host prerequisites and environment settings, see the HP P9000 Command View Advanced Edition
Suite Software Administrator Guide.
You can also monitor the usage status of storage resources from the host point of view, such as
generating reports for charging each host that meets its actual capacity.
If hosts no longer have to be managed, for example because of reorganization, remove the registered
hosts. Configuration information, such as LUN paths set during volume allocation, are retained on
the storage systems, but because the host is excluded from management by Command View AE Suite,
information about deleted hosts is deleted from the logical groups that are set in Command View AE
Suite.
Discovering, registering, and adding management targets28
Page 29

Methods for registering hosts
Methods for registering one or more hosts, using host installed agents or agent-less discovery include:
Table 1 Methods for registering hosts
DescriptionMethodPurpose
To manually register individual
hosts.
To register multiple
hosts in a batch.
To know the usage
status of storage
resources for the
virtualization servers, or the correspondence with the
virtual machines.
Register each
host by
WWN.
Use Host
Data Collector.
Use Host
Data
Collector
or
Use vMA
(vSphere
Management
Assistant).
When you want to register hosts in Command View AE Suite based on
WWN, manually specify the host name, OS type, and WWN information.
Hosts can be registered without Host Data Collector or Device Manager
agent setup.
When you want to register multiple hosts in a batch, register multiple
hosts by specifying the IP address (range specification and listing
addresses are available), and the authentication information of the host
on the network. The host’s WWN information will automatically be
obtained.
If you want to allocate volumes to an FCoE port, you need to manually
add a WWN.
Host Data Collector setup is required.
When you want to know the usage status of storage resources for the
virtualization servers, or the correspondence with the virtual machines
and you want to register both the virtualization server and the virtual
machine, the virtualization server must use NPIV (N-Port ID Virtualization)
HBAs, and be connected with Fibre Channel. For some virtualization
server software versions, the virtualization server can be discovered by
either specifying the vMA IP address and account, or by using Host Data
Collector.
For VMware ESX 4.x and VMware ESXi 4.x, a discovery can be
performed either by specifying the vMA information, or by using Host
Data Collector.
For VMware ESXi 5.x, a discovery can be performed only by using Host
Data Collector.
For virtual machines, install Device Manager agent or use Host Data
Collector to specify the IP address (range specification and listing
addresses are available), and the authentication information of the host
on the network.
Note that if the virtualization server is not using NPIV HBAs, either a
virtualization server or a virtual machine can be registered per HBA unit
(both a virtualization server and a virtual machine cannot be registered
in the same WWN).
To automatically
acquire host information, or to
manage a copy
pair by using the
replication functionality of the volume.
Use Device
Manager
agent.
When you want to automatically acquire host information, or to manage
a copy pair by using the replication functionality of the volume, install
Device Manager agent on each host or on the management server of the
copy pair. Host information or copy pair information will be sent from
Device Manager agent. For details about how to install the Device
Manager agent, see the HP P9000 Command View Advanced Edition
Suite Software Installation and Configuration Guide.
To exclude a host from management by Command View AE Suite, uninstall
the Device Manager agent, and then remove the host using Command
View AE Suite.
If you want to allocate volumes to an FCoE port, you need to manually
add a WWN.
User Guide 29
Page 30

To newly install HP
P9000 Command
View Advanced
Edition Suite Software to an existing environment
that was configured with Remote Web Console.
Scan a host.
TIP:
To register multiple hosts in a batch operation, you can use the ImportHosts command to import
host information such as host name and WWNs from a CSV file, and then register multiple hosts in
a batch operation. Hosts that are registered by using the ImportHosts command are managed as
manually registered hosts. For details about the ImportHosts command, see the
View Advanced Edition Suite Software CLI Reference Guide
Priority for acquiring the WWN
DescriptionMethodPurpose
Use Host Scan when you want to newly install HP P9000 Command View
Advanced Edition Suite Software to an existing environment that was
configured by using Remote Web Console.
HP P9000 Command
.
When registering hosts, if the hosts you want to register include a host that has a WWN that has
already been registered, or includes multiple hosts that have the same WWN, the host which acquires
the WWN is determined based on the product or application that detects it.
When hosts are registered by multiple methods, the WWN acquisition priority, listed from highest to
lowest, is as follows:
1. A virtualization server.
2. A host registered by using Device Manager agent.
3. A normal host or a virtual machine registered by using Host Data Collector.
4. A manually registered host.
When hosts with the same WWN are registered by the same method:
• The WWN is registered to the host that was registered last.
• When a normal host or a virtual machine is registered by a virtualization server or Host Data
Collector, WWN is registered to the host that was registered first.
Registering hosts by using Host Data Collector
Use Host Data Collector to register multiple hosts, virtualization servers, and virtual machines in a
single operation.
Items to check beforehand:
• Host OS type
• Host IP address (IPv4)
Discovering, registering, and adding management targets30
Page 31

NOTE:
To detect multiple hosts at the same time, specify a subnet or a range of 256 or fewer IP addresses,
or specify individual IP addresses.
• User name and password for logging on to the host (with Administrator or superuser permissions)
NOTE:
When specifying users other than the root, you need to specify environment settings for when
general users are used to collect host information on the host side. For details on how to specify
settings, see the
• IP address of Host Data Collector (IPv4 or IPv6) or Host Name
Items to check beforehand (when registering a virtualization server):
• IP address of Host Data Collector (IPv4 or IPv6) or Host Name
• IP address of VMware vCenter Server or a virtualization server (IPv4 or IPv6)
NOTE:
To register a virtualization server, you cannot specify a subnet, a range, and multiple IP addresses.
HP P9000 Command View Advanced Edition Suite Software Administrator Guide.
• User name and password of a user (who has the role of system administrator) for logging on to
vCenter Server or virtualization servers
NOTE:
If vCenter Server is being used, enter the user name and password for vCenter Server. If vCenter
Server is not being used, you need to enter and register user names and passwords of virtualization
servers one by one if multiple virtualization servers are being managed.
Tasks to be completed beforehand:
• Target hosts are connected to the network
• When registering virtualization servers, specify environment settings for virtualization server regis-
tration. For details see the HP P9000 Command View Advanced Edition Suite Software Administrator Guide.
1. From the Administration tab, select Managed Resources.
2. From the Hosts tab, click Add Hosts.
3. In the Add Hosts window, select Discover Hosts.
If you are registering a virtualization server, select VMware from OS Type.
4. Specify the necessary items, select the Host Data Collector to be used, and then execute the task.
The task is registered in the Data Collection Tasks tab.
5. Check the execution result in the Data Collection Tasks tab.
Registered hosts can be viewed in the resource tree view.
User Guide 31
Page 32

TIP:
If you want to allocate volumes to an FCoE port, you need to manually add a WWN.
To remove registered hosts, select the hosts to be removed, and click Remove Hosts.
Registering hosts manually by specifying the WWN target
You can register hosts manually to manage and monitor the hosts by specifying a WWN address.
Items to check beforehand:
• Host name
• OS type
• Unregistered WWN
1. From the Administration tab, select Managed Resources.
2. From the Hosts tab, click Add Hosts.
3. In the Add Hosts dialog box, select Add Hosts Manually.
4. Specify the appropriate information, and then execute the task.
Registered hosts can be viewed in the resource tree view.
TIP:
To remove registered hosts, select the hosts to be removed, and click Remove Hosts.
Registering hosts by using vMA
You can register hosts using vMA to manage and monitor the hosts.
Items to check beforehand:
• Host IP address for vMA (IPv4 or IPv6)
NOTE:
To register a virtualization server, you cannot specify a subnet, a range, and multiple IP addresses.
• User name and password for logging on to vMA (with Administrator or superuser permissions)
• Version of the virtualization server
NOTE:
The virtualization server must be VMware ESX 4.x or VMware ESXi 4.x. For VMware ESXi 5.x,
use Host Data Collector. For details about supported versions, see the
Advanced Edition Suite Software System Requirements
Tasks to be completed beforehand:
• Target hosts are connected to the network
HP P9000 Command View
.
Discovering, registering, and adding management targets32
Page 33

• When registering virtualization servers, specify environment settings for virtualization server regis-
tration. For details see HP P9000 Command View Advanced Edition Suite Software Administrator
Guide.
1. From the Administration tab, select Managed Resources.
2. From the Hosts tab, click Add Hosts.
3. In the Add Hosts window, select Discover Hosts.
4. From OS Type, select VMware.
5. Enter the IP address, user ID, and password of vMA.
6. In Host Data Collector, clear the Use Host Data Collector check box.
7. Check the entered data, and if there are no problems, execute the task.
The task is registered in the Data Collection Tasks tab.
8. Check the execution result in the Data Collection Tasks tab.
Registered hosts can be viewed in the resource tree view.
TIP:
Hosts registered by using vMA can be changed to be managed by using Host Data Collector. To do
so, in the Edit Host dialog box, select the Host Data Collector check box. Note that management
cannot be changed from Host Data Collector to vMA.
To remove registered hosts, select the hosts to be removed, and click Remove Hosts.
Workflow for detecting hosts
This topic describes how hosts are detected and registered in Device Manager. Read this topic if you
are installing HP StorageWorks P9000 Command View Advanced Edition Suite software in an
environment that was configured by using Remote Web Console.
A host group is configured on the storage system side, and the storage system is registered in Device
Manager. After that, if a host is detected by Device Manager, a host group in the storage system that
is selected at the time of detection of the host is registered in Device Manager. If the same WWN is
registered to multiple hosts, only the WWN with the same name as the host that is already registered
in Device Manager is added to the host. The following shows an example of host detection:
User Guide 33
Page 34

In this diagram, the WWN of 22.22.22.22.22.22.22.22 for host group AAA is added to host AAA,
which has the same name as the host group. The WWN of host group BBB is already registered to
host AAA, and host BBB cannot be registered in Device Manager. Host CCC, which has the same
name as host group CCC, is added to Device Manager, and the WWN of 33.33.33.33.33.33.33.33
for host group CCC is registered to host CCC.
If one host that has multiple WWNs is detected, even if it is one host in the actual environment, it
might occasionally be registered as multiple hosts by Device Manager. This is because hosts are
generated in host groups when one host has multiple WWNs. In this case, the hosts must be merged.
Merge the WWNs . Merge the hosts that have been added as multiple hosts in Device Manager into
one host. WWN information is merged, and the source hosts are deleted automatically.
TIP:
If one host that has multiple WWN is detected, even if it is one host in the actual environment, it might
occasionally be registered as multiple hosts by Device Manager. This is because hosts are generated
in host groups when one host has multiple WWNs. In this case, the hosts must be merged. Merge the
WWNs. Merge the hosts that have been added as multiple hosts in Device Manager into one host.
WWN information is merged, and the source hosts are deleted automatically.
Registering hosts using host scan
You can register hosts by scanning hosts to manage and monitor the hosts.
Information to check beforehand:
• Host names
• The name of a host group is the same as the actual host, and the WWN for that host is set for
LUN security.
• Only a single host can be related to each host group.
Tasks to be completed beforehand:
• LUN Manager or LUN Management must be installed on the target storage system.
1. From the Administration tab, select Managed Resources.
2. From the Hosts tab, click Host Scan.
3. Specify the necessary items, and then execute the host scan.
Registered hosts can be viewed in the resource tree view.
TIP:
If one host has multiple WWNs detected, even if it is one host in the actual environment, it might
occasionally be registered as multiple hosts by Device Manager. This is because hosts are generated
in host groups when one host has multiple WWNs . In this case, the hosts must be merged, meaning
merge the WWNs. Merge the hosts that have been added as multiple hosts in Device Manager into
one host, meaning that WWN information is merged, and the source hosts are deleted automatically.
TIP:
To remove registered hosts, select the hosts to be removed, and click Remove Hosts.
Discovering, registering, and adding management targets34
Page 35

Registering hosts using merge hosts
You can use merge hosts to combine source and target host information into a single surviving target
host that is registered.
Tasks to complete beforehand:
• Identify the names of the source and target host. Note that the source host is merged into the target
host, then the source host is deleted.
• Ensure the source host has been registered either manually or by host scan
• Ensure the target host is not a mainframe host, or a virtual host
• Ensure the target host has at least one registered WWN.
1. From the Administration tab, select Managed Resources.
2. Select the Hosts tab, select the target host row, click More Actions and select Merge Hosts.
3. In the merge hosts window, select the source host, then click Confirm.
4. Review the target (surviving host) and source (host to be deleted) information.
• If the target and source host information is correct, click Ok.
• If the target or source host information must be changed, click Back.
• To abandon the task, click Cancel.
On the Resources tab, in the hosts tree, confirm the target host information and the source host removal.
You can also confirm this on the Administration tab > Managed Resources > Hosts tab.
About changing host settings and information
You can change host settings and update previously registered host information.
Depending on how a host was registered, there are two ways to change host settings and information:
• Refresh Hosts
• Edit Hosts
Choose the appropriate method to change host settings and information, depending on how the hosts
were registered and the operational status. For example, Refresh Hosts updates a host by obtaining
information from Host Data Collector or Device Manager agent. Edit Hosts allows the user to manually
change host settings.
The host editing method allows the user to manually change host settings.
TIP:
The settings for the host's WWN are not linked to the settings for the host group on the storage system
side. Use the ModifyPort command to change settings for host groups, or host mode options. For
a description of how to change the settings,
Software CLI Reference Guide.
HP P9000 Command View Advanced Edition Suite
Updating host information registered by using Host Data Collector
You can update information for registered hosts using Host Data Collector.
Use Refresh Hosts to update host information registered by using Host Data Collector.
User Guide 35
Page 36

To change authentication information about a registered IP address or user account, edit the IP address
or user account by using the Edit Hosts dialog box, and then execute a refresh operation.
To make changes to each item, see the following table:
Table 2 Updating host information using Host Data Collector
Edit HostsRefresh HostsItem
NYHost Name
NNOS Type
NHost IP Address
NHost Data Collector IP Address
Port Type
WWN
WWN Nickname
Legend:
• Y : Can be edited or refreshed
• N : Cannot be edited or refreshed
Notes:
1. For virtualization servers, you can specify IPv4 or IPv6.
2. You can specify IPv4 or IPv6.
3. Clicking Refresh Hosts will discover new or updated WWNs and their port types. Deleted WWNs require
that you click Edit Hosts and delete the WWNs that need to be removed.
4. If you want to allocate volumes to a FCoE port, you need to manually add a WWN.
5. To update WWN nicknames that have been specified by using storage system management tools such
as Remote Web Console, refresh the storage system information. When several WWN nicknames are
assigned to a single HBA, only one of the nicknames is displayed for that HBA.
3
Y
3
Y
5
N
1
Y
YNUser ID/PW
2
Y
YNProtocol
3
Y
3,4
Y
N
To edit and refresh hosts using Host Data Collector:
1. From the Administration tab, select Managed Resources.
2. On the Hosts tab, select the host to update, then click either Refresh Hosts, or Edit Hosts depending
on the items that you want to update.
3. Execute the processing. The task is registered to Data Collection Tasks tab. If you changed settings
in the Edit Hosts dialog box, after the task has completed successfully, execute a refresh operation
using Refresh Hosts.
The host list is updated.
Changing settings for a manually registered host
You can use Edit Hosts to update host information registered by specifying WWN, or registered by
using the host detection function.
1. From the Administration tab, select Managed Resources.
Discovering, registering, and adding management targets36
Page 37

2. On the Hosts tab, select the host to change, and click Edit Hosts.
3. Specify the required items, and then execute the process.
The host list is updated.
Updating host information registered by using vMA
Use Refresh Hosts to update host information registered by using vMA.
To change authentication information about a registered IP address or user account, edit the IP address
or user account by using the Edit Hosts dialog box, and then execute a refresh operation.
To make changes to each item, see the following table:
Table 3 Updating host information using vMA
Edit HostsRefresh HostsItem
NYHost Name
NNOS Type
NIP Address
NUser ID/PW
Whether or not to use Host Data
Collector
WWN Nickname
Legend:
• Y : Can be edited or refreshed
• N : Cannot be edited or refreshed
Notes:
1. IP address, user ID, and password of vMA.
2. You can specify IPv4 or IPv6.
3. A host registered by using vMA can be set to be managed by Host Data Collector, but if it is managed
by Host Data Collector, it cannot be set to be managed by vMA. If a host has been set to be managed
by Host Data Collector, see the description of how to update registered host information by using Host
Data Collector.
4. To update WWN nicknames that have been specified by using storage system management tools such
as Remote Web Console, refresh the storage system information. When several WWN nicknames are
assigned to a single HBA, only one of the nicknames is displayed for that HBA.
N
4
N
1,2
Y
1
Y
3
Y
YNProtocol
NYPort Type
NYWWN
N
To edit and refresh hosts using vMA:
1. From the Administration tab, select Managed Resources.
2. On the Hosts tab, select the host to update, then click either Refresh Hosts or Edit Hosts depending
on the items that you want to update.
User Guide 37
Page 38

3. Execute the processing. The task is registered to Data Collection Tasks tab. If you changed settings
in the Edit Hosts dialog box, after the task has completed successfully, execute a refresh operation
using Refresh Hosts.
The host list is updated.
Changing settings for a host registered by using Device Manager agent
When the Device Manager agent is being used, host information is automatically sent from the Device
Manager agent periodically. Execute Refresh Hosts as necessary. Additionally, after changing settings
from the Edit Hosts dialog box, depending on the changed settings, it may be necessary to use Refresh
Hosts to update host information.
To make changes to each item, see the following table:
Table 4 Updating host information using Device Manager agent
Edit HostsRefresh HostsItem
NHost Name
Port Type
WWN
WWN Nickname
Legend:
• Y : Can be edited or refreshed
• N : Cannot be edited or refreshed
Notes:
1. When copy pairs are managed by a host where Device Manager agent is installed, you need to restart
the Device Manager agent service after changing the host name. After the Device Manager agent service
is restarted, the new host name is applied by updating the storage system.
2. WWNs and their port types that have been added can be affected by the Refresh Hosts button, but deleted
WWNs and their port types cannot be affected. To delete such WWNs, the Edit Hosts button needs to
be used.
3. If you want to allocate volumes to a FCoE port, you need to manually add a WWN.
4. To update WWN nicknames that have been specified by using storage system management tools such
as Remote Web Console, refresh the storage system information. When several WWN nicknames are
assigned to a single HBA, only one of the nicknames is displayed for that HBA.
2
Y
2
Y
4
N
1
Y
NYOS Type
NYIP Address
NNUser ID/PW
2
Y
2,3
Y
N
To edit and refresh hosts using Device Manager agent:
1. From the Administration tab, select Managed Resources.
2. On the Hosts tab, select the host to update, then click either Refresh Hosts or Edit Hosts depending
on the items that you want to update.
3. Execute the processing. The task is registered to Data Collection Tasks tab. If you changed settings
in the Edit Hosts dialog box, after the task has completed successfully, execute a refresh operation
using Refresh Hosts.
Discovering, registering, and adding management targets38
Page 39

The host list is updated.
NOTE:
If a host name is changed, both of the host names (before and the after change) might be displayed
on the Resource tab. In this case, delete the host before making the change. When copy pairs are
managed by the host where Device Manager agent is installed, in addition to deleting the host, the
storage system also needs to be updated.
Reviewing data collection tasks
This module describes reviewing data collection tasks to verify the success or failure of managed
target operations, such as registration.
About data collection tasks
From the Administration tab, Managed Resources you can add, refresh, edit, and remove storage
systems and hosts. This adds or changes Command View AE Suite information about the storage or
host resource.
You can also add or refresh storage systems and hosts from the Resources tab, but not edit or remove
them.
From the Administration or Resources tab you get the same dialog, and are informed that you are
performing a data collection task for the resource. As they are performed, these operations are listed
under the Administration tab, Managed Resources, Data Collection Tasks tab, and can be sorted,
filtered, and deleted.
NOTE:
The Tasks & Alerts tab does not list data collection tasks. Also, the global monitoring bar task status
links are for Tasks & Alerts tab items only, not data collection tasks.
For each data collection task:
• Type indicates the performed operation (for example, Add Storage System)
• Status indicates completion or failure of the operation
TIP:
Click the status link to review the diagnostic message for a failed task.
Delete finished tasks if they are no longer necessary.
User Guide 39
Page 40

Discovering, registering, and adding management targets40
Page 41

3 Managing storage resources in a SAN environment
This module describes managing storage resources such as THP/Smart pools and volumes in a Storage
Area Network (SAN).
Creating and deleting volumes
This module describes how to create volumes (including LUSE volumes), and delete unallocated
volumes.
About creating volumes
You create volumes, then allocate them to a host.
You create volumes by using the available space in a THP/Smart pool or parity group. You can then
access the volumes when you are ready to allocate them to a host. If, while allocating volumes to a
host, no volumes match the specified requirements, volumes are automatically created using the
available space. Note that when a basic volume is created, the volume is also formatted at the same
time.
Newly created volumes are included in the list of Open-Unallocated volumes until you allocate them
to a host.
Because creating volumes takes time, you should create volumes in advance.
Creating volumes
For registered storage systems, volumes are created so they can be allocated to hosts.
Tasks to complete beforehand:
• Identify the storage system
• Identify the number of volumes to create
• Identify volume types and capacities
1. On the Resources tab you can create volumes from several locations:
• From General Tasks, select Create Volumes.
• Select the storage system, click Actions, and select Create Volumes.
• Select the storage system, list existing parity groups, and click Create Volumes.
• Select the storage system, list existing THP/Smart pools, and click the Create Volumes button
or select Create Volumes from Actions.
2. In the create volumes dialog box, configure volumes and their characteristics.
3. Click Show Plan:
a. Review all plan information. If changes are needed click Back.
User Guide 41
Page 42
b. Enter a task name and description.
c. Schedule the task for now, or a later date and time.
d. If scheduled for now, select View task status to monitor the task when submitted.
e. Click Submit to queue the task.
4. On the Tasks & Alerts tab, confirm task completion. If status is not completed, click the task name
to review the message.
Created volumes are added to the target storage system Open-Unallocated volume list.
Create volumes dialog box
Created volumes are placed in the Open-Unallocated folder of the user selected storage system so
they can be allocated to hosts as required.
TIP:
It is not required that you configure every dialog box field. When the minimum required information
is entered, the Show Plan button will activate allowing review of the recommended plan. If desired,
use Back to customize the plan with specifications that meet your requirements.
Below, field groups are indicated by >>. Field groups expose information or fields when clicked, and
hide information or fields when clicked again.
When using a dialog box, errors are displayed at the top of the dialog box with a problem description.
Table 5 Create volumes dialog box
-No. of Volumes
-Volume Capacity
-Storage System
-Volume Type
-Internal/External
DescriptionsSubfieldsFields
Manually enter the number of volumes to create, or use the arrows
(click, or click and hold) to increment or decrement the volume
count.
This number (in blocks, MB, GB, or TB) is the capacity to allocate
for each volume.
The total capacity to be allocated is calculated as No. of Volumes
* Volume Capacity and is displayed.
This field will either display the selected storage system name, or
prompt the user to select the storage system from a list.
Select the volume type to create. For example Basic Volume, Thin
Provisioning or Smart Pool. The displayed volume types are determined by your selected storage system. If you do not see an expected
volume type, check that you have selected the correct storage system.
When volume type is Basic Volume, or Thin Provisioning, volumes
can be created using available capacity from the selected storage
system (internal) or from an external storage system physically
connected to the selected storage system (external).
-Pool
Managing storage resources in a SAN environment42
When volume type is Smart Pool, volumes can be created using
Select Pool.
Page 43

DescriptionsSubfieldsFields
>> Advanced Options
Drive Type
Drive Speed (RPM)
RAID Level
Parity Group
Pool
Label
If multiple drive types are displayed, you can designate a specific
drive type.
If multiple drive speeds are displayed, you can designate a specific
drive speed, or accept the default of any available speed.
If multiple RAID levels are displayed, you can designate a specific
RAID level, or accept the default of any available RAID level.
When volume type is Basic Volume, based on drive type, drive
speed, and RAID level selections an appropriate parity group is
selected and displayed for you. You can also manually select a
parity group by clicking Select Parity Group. In the displayed list
of parity groups, you can use sort and filter features on columns
such as RAID level, or unallocated capacity (or other fields) to
identify the preferred parity groups.
When volume type is Thin Provisioning, volumes can be created
using Select Pool. The listed pools can vary depending on drive
type, drive speed, and RAID level selections.
Volume labels are searchable, and therefore recommended as a
way to find volumes. The Initial value is not required, but can be
useful for differentiation when creating multiple volumes. Reflect a
label to the storage system is checked by default so that naming
is consistent between Command View AE Suite and the storage
system itself.
About deleting unallocated volumes
Volumes that are not allocated to any host can be deleted and their space added to the unused
capacity of THP/Smart pools or parity groups.
Deleting unallocated volumes
Information that must be checked before deletion:
• Target storage system
• Target volumes
Tasks that must be completed before deletion:
• Register the target storage system
1. On the Resources tab, select the target storage system.
2. Expand the tree and select the storage system from which you want to delete volumes.
3. Select Open-Unallocated or THP Pools and then select the THP Vols tab of the target THP/Smart
pool.
4. From the volume list, select the volumes that you want to delete, and then click Delete Volumes.
5. Specify additional information, as appropriate:
• Verify the information that is displayed.
An LDEV ID can be assigned automatically or manually.LDEV ID
You can request a quick format, or a basic format.Format Type
User Guide 43
Page 44

• Enter a name in Task Name.
• Specify when to execute the task.
6. Click Submit, and confirm task completion.
About creating a LUSE volume
A LUSE volume is collection of two or more basic volumes that have been grouped together to increase
available capacity.
If the capacity of the LUSE volumes or basic volumes that have already been allocated to hosts becomes
insufficient, you can increase capacity by adding unallocated volumes or creating LUSE volumes.
LUSE volumes are created by using volumes that belong to the same resource group, have the same
drive type, and are at the same RAID level.
Creating a LUSE volume
Information needed before creating a LUSE volume:
• The name of the target host
• The target volumes (LUSE volumes or basic volumes that are already allocated to the host).
Tasks to complete before creating a LUSE volume:
• Creating volumes to be added
1. From the Resources tab, select Hosts.
2. Expand the tree and select the target OS.
3. Select the target host from the list of hosts, and from the displayed list of volumes select the LUSE
volume or basic volume, and then click the Create LUSE Volume button.
4. Click the Add Volumes button.
5. Select a volume(s) to be added, and then create a plan.
6. If there is no problem, execute the plan.
7. View the list of tasks to make sure that all tasks are complete.
From the list of volumes of the target host displayed by expanding the tree of the Resources tab,
information about the created LUSE volume can be checked.
About releasing a LUSE volume
To release a LUSE setting, the LUSE volume must first be unallocated from all hosts. Users can release
a LUSE setting either by selecting it or using the Unallocating Volumes dialog box.
Releasing a LUSE volume
To release a LUSE volume, you release the LUSE setting for the target volume.
Before releasing a LUSE volume, make sure that it has been unallocated from all hosts.
1. On the Resources tab, expand the Storage Systems tree, and for the target storage system, select
Volumes and Open-Unallocated.
2. From the list of volumes, select the volume for which the LUSE setting is to be released, and click
the Release LUSE Volumes button.
3. If there is no problem, execute the plan.
Managing storage resources in a SAN environment44
Page 45

4. View the list of tasks to make sure that all tasks are complete.
Virtualizing external storage
This module describes virtualizing external storage so external volumes can be managed.
About virtualizing volumes
Virtualizing volumes is the process of mapping external storage system volumes to an internal storage
system.
This allows centralized management of volumes from multiple external storage systems, in addition
to the volumes from the single storage system being managed with HP StorageWorks P9000 Command
View Advanced Edition Suite.
The volumes in the external storage system (registered and referred to as external volumes) can
be managed in the same way as the volumes in the internal storage system (registered and referred
to as internal volumes).
When external storage is managed by an internal storage system, external volumes will be listed in
the External Storage folder of the internal storage system.
External volumes can be used for various purposes, including:
• External volumes can be allocated to hosts the same as internal volumes are.
• Important data on internal volumes can be backed up to external volumes.
• Infrequently accessed data on internal volumes can be moved to external volumes for archiving.
To externally connect an SMI-S Enabled storage system, CLI commands are required. For details about
how to use CLI commands to externally connect a storage system, or disconnect an external connection,
see the HP P9000 Command View Advanced Edition Suite Software CLI Reference Guide.
Virtualizing volumes
Volume virtualization provides the capability to optimize storage services to applications by facilitating
movement of data between tiers and migration of data between different generations of technology.
Tasks to complete beforehand:
• The internal and external storage systems are registered in HP StorageWorks P9000 Command
View Advanced Edition Suite.
• The external storage system is connected to one or more external ports of the internal storage
system.
• External Storage Software is installed on the target storage system.
• Identify the number and capacity of volumes you are virtualizing.
• Identify the number of external paths between the external and internal storage systems.
1. From the Actions menu, or General Tasks, select Virtualize Volumes.
2. Specify the appropriate information.
To change default values, select one or more of the following:
• External Path Priority Settings
• Host Group and LUN Settings
• External Volume Configuration
3. Click Show Plan:
User Guide 45
Page 46
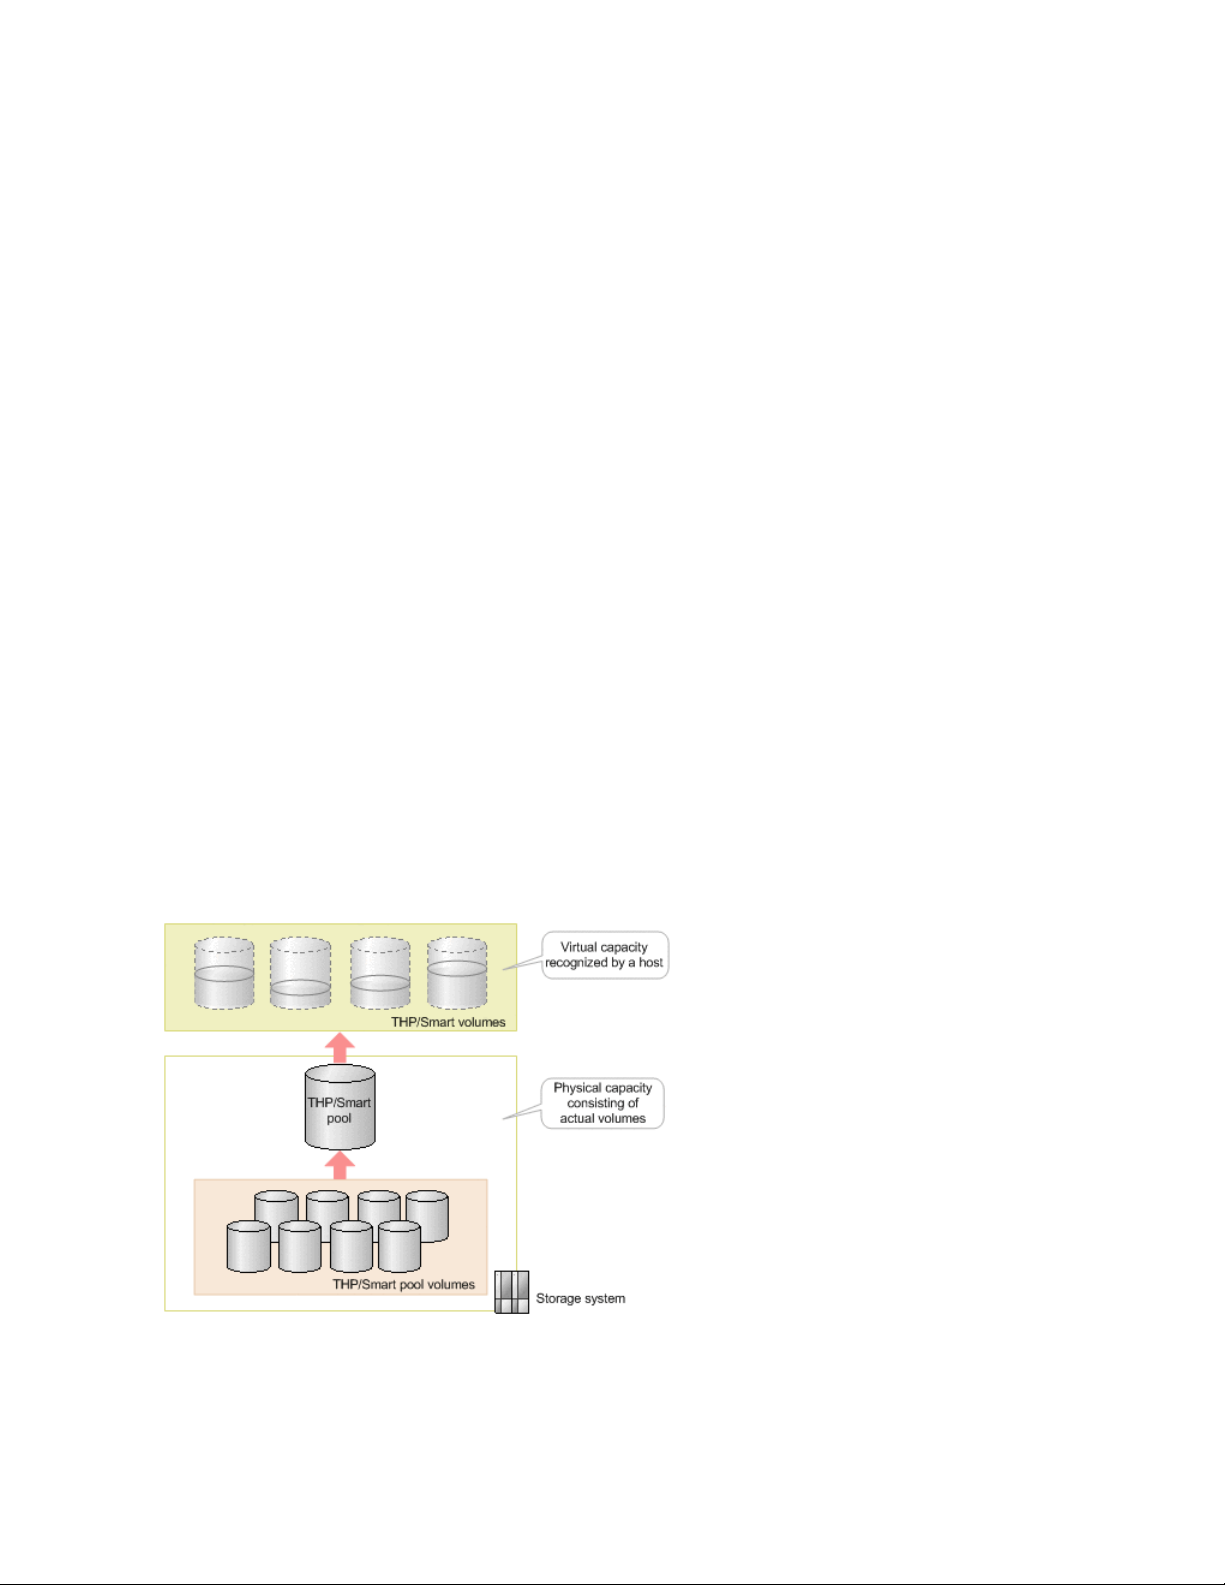
a. Review all plan information. If changes are needed click Back.
b. Enter a task name and description.
c. Schedule the task for now, or a later date and time.
d. If scheduled for now, select View task status to monitor the task when submitted.
e. Click Submit to queue the task.
4. When the task completes, check the internal storage systems External Storage folder to confirm
the external volumes are mapped to the internal storage system.
Virtualizing storage capacity (THP/Smart)
This module describes how to virtualize storage capacity.
About virtualizing storage capacity
HP StorageWorks P9000 Thin Provisioning (THP) provides virtual volumes to a host and allocates the
actual capacity from a THP pool when a host makes a write request. By using THP pools, you can
allocate more capacity to a host than that allowed by the actual physical configuration of the storage
system.
THP pools provide the following advantages:
• You can reduce system setup and operational costs.
• You can use resources more efficiently.
• You can distribute workload equally among volumes.
Smart Tiers (Smart) improves THP pools storage performance further by taking advantage of
performance differences between hardware tiers.
You can create virtual volumes (THP/Smart volumes) from physical volumes that are grouped into
THP/Smart pools. You can then allocate those virtual volumes to hosts.
In the illustration below, note that the volumes used to create the THP/Smart pool are called THP/
Smart pool volumes. The THP/Smart pool is then used to provide capacity as needed to allocated
THP/Smart volumes.
THP/Smart pools are created by Device Manager, which automatically selects volumes based on
user-specified conditions. Users can also directly specify parity groups to create a THP/Smart pool.
Managing storage resources in a SAN environment46
Page 47

Users can also specify settings such as values for the usage rate threshold and reservation threshold.
If a Tiered Storage Manager license has been registered, user can use the Mobility tab to evaluate
and analyze the operation status that is related to a THP/Smart pool. When you delete an unnecessary
THP/Smart pool, THP/Smart volumes created from that pool are also deleted. For this reason, a
prerequisite to deleting a THP/Smart pool is that no THP/Smart volumes from that pool are allocated
to a host.
Creating a THP/Smart pool
You can create a THP/Smart pool using physical volumes. This provides more efficient use of physical
storage for virtual volumes allocated to hosts from the THP/Smart pool.
Tasks to be completed beforehand:
• Register the target storage system.
• When defining an external LDEV tier rank, a storage system that has multiple performance levels
must be externally connected.
Verify the following when using XP24000/20000 and HP StorageWorks P9500 Disk Array for THP
pools:
• Only parity groups from which volumes have already been created can be targets
Verfiy the following when using HP StorageWorks P9500 Disk Array for Smart pools:
• Hardware tier: drive type and drive speed (RPM)
• Only parity groups for each hardware tier from which volumes have already been created can
be targets
1. On the Resources tab you can create pools from several locations:
• From General Tasks, select Create Pool.
• Select the storage system, list existing THP Pools, and click Create Pool.
• Select the storage system, list existing THP Pools, and click Actions, then select Create Pool.
2. In the create pool dialog box, configure THP or Smart pools and their characteristics.
NOTE:
If you want to manually monitor or relocate Smart pools, set Tier Management in Smart Options
to Manual.
3. Click Show Plan:
a. Review all plan information. If changes are needed click Back.
b. Enter a task name and description.
c. Schedule the task for now, or a later date and time.
d. If scheduled for now, select View task status to monitor the task when submitted.
e. Click Submit to queue the task.
4. On the Tasks & Alerts tab, confirm task completion. If status is not completed, click the task name
to review the message.
Created pools are added to the target storage system THP Pools list.
User Guide 47
Page 48

Create pool dialog box
Pools can be created for storage systems that support THP. Additionally, Smart pools of differing
performance levels can be used to improve application performance.
TIP:
It is not required that you configure every dialog box field. When the minimum required information
is entered, the Show Plan button will activate allowing review of the recommended plan. If desired,
use Back to customize the plan with specifications that meet your requirements.
Below, field groups are indicated by >>. Field groups expose information or fields when clicked, and
hide information or fields when clicked again.
When using a dialog box, errors are displayed at the top of the dialog box with a problem description.
Table 6 Create pool dialog box
DescriptionsSubfieldsFields
-Storage System
-Pool Name
THP or SmartPool Type
-Pool Summary
This field will either display the selected storage system name, or
prompt the user to select the storage system from a list.
Accept the default pool name, or enter your own name. Do not
confuse pool name with pool id. The pool id is an assigned
number, the value of pool name is user definable.
Reflect a pool name to the storage system is selected by default,
and provides naming consistency between Command View AE
Suite and the storage system. If it is not displayed, it does not
apply to the selected storage system.
If Pool Type with THP and Smart options is displayed, the selected
storage system supports both THP and Smart. If Pool Type options
are not displayed, it means the selected storage system supports
THP only.
Select THP to create a pool using one or more parity groups.
Select Smart to create a pool with tiers, using one or more parity
groups. Note that Smart options will be displayed at the bottom
of the dialog box when Smart is selected.
Pool Summary information is updated as parity groups are selected
and advanced options are set for items like thresholds.
For THP, Pool Configuration displays the physical attributes of the
pool, including drive type, drive speed, form factor, RAID level,
and parity group capacity.
For Smart, Tier Configuration displays the attributes of one or more
tiers, including tier no (1-3), volume location (internal/external),
drive type, drive speed, external LDEV tier rank, No. of parity
groups, and parity group capacity.
Managing storage resources in a SAN environment48
Page 49

Additional Parity Groups
DescriptionsSubfieldsFields
The use of this panel changes depending on your pool type.
For THP, use Add Parity Groups to add one or more parity groups
to a pool. When finished, Close the window and review the
selected parity groups. If necessary, use Release Parity Groups to
remove selected parity groups from the list. You may select Allow
to mix different drive types/speeds, RAID levels, or volume
locations to create pools using parity groups with different
attributes.
For Smart, click the + tab to display eligible drive types and
speeds. Select a drive type (for example SAS, 15000 RPM) and
click Select. This will update Tier Configuration with drive
information, and create a Tier 1 tab. On the Tier 1 tab, use Add
Parity Groups to add one or more parity groups to the tier. Click
the + tab again to create Tier 2, and again to create Tier 3.
-
Note the following important items regarding Smart configuration:
• The web client will automatically arrange your tiers from
highest performance (Tier 1) to lowest performance (Tier 3),
regardless of the order used while defining your tiers. For example, if SAS 15000 is your final tier definition, but is the
highest performance tier, SAS 15000 will be displayed as
Tier 1, not Tier 3. Essentially, the web client re-arranges and
re-orders your tier definitions so that they are correctly ordered
in terms of performance levels. This provides easy and flexible
tier creation for the administrator.
• When all 3 tiers are defined, the + tab is no longer displayed
since 3 tiers is the limit. If you delete a tier tab using the close
box (X), the + tab is again displayed, allowing for a new tier
definition. With only 1 or 2 tiers defined, the + tab is visible,
and you can easily delete and create tier definitions as required.
>> Advanced
Options
Pool ID
Used Threshold 1
Used Threshold 2
Subscription Thresholds
Warning
You can change the default pool id number. Use Show Pool ID
Usage to display pool id number and names in use.
At the specified level of physical capacity usage (as a percentage
of physical THP/Smart pool capacity) generate an alert, an email,
or both. Alerts can be seen on the Dashboard and the Tasks &
Alerts tab.
Same as above.
Note that all threshold values are displayed in the pool summary
panel, both graphically and in text.
Subscription thresholds are optional. Select Enabled to set the
warning and limit thresholds.
At the specified level of logically subscribed capacity (as a percentage of THP/Smart pool capacity) generate an alert, an email,
or both. These warnings are generated when volume allocation
from the pool would cause the warning level to be exceeded,
however the volume allocation is allowed (soft limit). Alerts can
be seen on the Dashboard and the Tasks & Alerts tab.
User Guide 49
Page 50

Limit
Tier management
Auto
DescriptionsSubfieldsFields
Same as above, except that if volume allocation will cause the
limit threshold to be exceeded, the volume allocation will not be
allowed (hard limit). You must reduce the capacity of the volume
to be created, or increase the subscription limit.
The storage system automatically starts and stops performance
monitoring and tier relocation based on the Cycle time and Mon-
itoring period. Cycle times range from 30 minutes to 24 hours.
Monitoring period is a user configurable time period, such as
13:00 to 19:00 hours. Related to Cycle time is Continuous and
Periodic monitoring mode (see below).
>> Smart Options
Tier management
Manual
Tier management
Custom
Monitoring mode
Continuous
Monitoring mode
Periodic
Buffer Space for New
page assignment
Buffer Space for Tier relocation
The administrator manually starts and stops performance monitoring and tier relocation.
The administrator creates performance monitoring and tier relocation plans in the form of named templates with different performance monitoring and tier relocation settings. Multiple templates
can be created, edited, and assigned to different tiers.
Continuous monitoring mode uses weighted-average performance
data over several monitoring cycles (see Cycle time above) so that
tier relocation does not respond immediately to workload changes.
Basically, this is used to prevent an over-reaction to workload
changes, resulting in unnecessary tier relocation I/O.
Periodic monitoring mode uses the performance data from the last
monitoring cycle (see Cycle time above). Tier relocation responds
immediately to workload changes. Basically, this is a more aggressive tier relocation monitoring mode.
Sets the buffer space used for new page assignments to Smart
tiers. The default values are recommended.
Sets the buffer space used for tier page relocations between Smart
tiers. The default values are recommended.
Verifying THP/Smart pool information
Before you can verify THP/Smart pools and their operation conditions, you must have created the
pools you want to verify.
1. On the Resources tab, select THP Pools under the target storage system.
A list of THP/Smart pools, (THP/Smart pool volumes and THP/Smart volumes), and associated
information appears. A pools summary provides summary information such as the number of
pools, virtual volume capacity, usage, and total and used capacity.
2. Select a THP/Smart pool to display more detailed information about that pool.
Configuration information for each THP/Smart volume can be displayed by clicking the volume
link from the list displayed on the THP Vols tab.
Expanding THP/Smart pools
By expanding THP/Smart pools, pool capacity can be increased or THP pools can be converted to
Smart pools. You can expand a THP/Smart pool by adding volumes to the pool.
Managing storage resources in a SAN environment50
Page 51

Before expanding THP/Smart pools, you must:
• register the storage system
• When defining an external LDEV tier rank, a storage system that has multiple performance levels
must be externally connected
Verify the following when using XP24000/20000 and HP StorageWorks P9500 Disk Array for THP
pools:
• Only parity groups from which volumes have already been created can be added.
Verify the following when using HP StorageWorks P9500 Disk Array for Smart pools:
• Only parity groups for each hardware tier from which volumes have already been created can
be added.
1. On the Resources tab, select THP Pools under the target storage system.
2. In the list of THP pools, select a pool and click Expand Pool.
3. Follow the instructions to create a plan.
4. Click Show Plan to review the plan and specify additional information, as appropriate:
• Verify the information that is displayed.
• Enter a name in Task Name.
• Specify when the task should execute.
5. Click Submit.
The plan is registered as a task.
6. On the Tasks & Alerts tab, confirm that the task has completed successfully.
7. In the Storage Systems tree, return to the target storage system, click THP Pools and confirm that
the information is updated.
Shrinking a THP/Smart pool
Shrinking a THP/Smart pool allows the recovery of excess free capacity.
1. On the Resources tab, select Storage Systems in the navigation tree.
2. Expand the tree for the target storage system that includes the THP/Smart pool you want to shrink,
and select it in THP Pools.
3. In the THP Pool Vols tab, select THP/Smart pool volumes, and then click Shrink Pool.
4. Review the plan and specify additional information, as appropriate:
• Verify the information that is displayed.
• Enter a name in Task Name.
• Specify when to execute the task.
5. Click Submit.
The plan is registered as a task.
6. On the Tasks & Alerts tab, confirm that the task completed.
7. In the Storage Systems tree, return to the target storage system, click THP Pools, and confirm that
the information is updated.
Modifying THP/Smart pool settings
After setting up a THP/Smart pool, you can modify THP/Smart pool settings.
1. On the Resources tab, select THP Pools under the target storage system.
User Guide 51
Page 52

2. From the list of THP/Smart pools, select the pool you want to modify and click Edit Pool.
3. Modify the settings as appropriate and click Submit.
4. On the Tasks & Alerts tab, confirm that all tasks are completed.
5. In the Storage Systems tree, return to the target storage system and click THP Pools to confirm
that the information is updated.
Deleting THP/Smart pools
After unallocating the THP/Smart volumes belonging to a THP/Smart pool, you can delete the THP/
Smart pool.
Unallocate the THP/Smart volumes that belong to the THP/Smart pools to be deleted.
1. From the Resources tab, select Storage Systems and expand the All Storage Systems tree, or look
for storage systems listed in the Storage Systems detail pane.
2. From the tree or detail pane view, select the target storage system, then select THP Pools.
3. Select one or more target THP/Smart pools to delete, and click Delete Pools.
4. Check the THP/Smart pools to be deleted, and if there are no problems, execute the task.
5. On the Tasks & Alerts tab, confirm that all tasks are completed.
Expanding THP/Smart volumes
You can expand the size of a THP/Smart volume to expand its capacity.
1. On the Resources tab, select Storage Systems in the navigation tree.
2. Expand the tree for the target storage system that includes the pool you want to modify, and select
the THP/Smart pool in THP Pools.
3. On the THP Vols tab, select one or more volumes you want to expand and click Expand THP
Volume.
4. Specify the new capacity for the volume.
5. Click Submit.
6. On the Tasks & Alerts tab, confirm that all tasks are completed.
7. In the Storage Systems tree, return to the target storage system, click the target THP/Smart pool
and view the THP Vols tab to confirm that the information is updated.
Reclaiming zero pages
Reclaiming unused zero pages for a THP/Smart pool releases unused capacity.
1. On the Resources tab, select Storage Systems in the navigation tree.
2. Expand the tree for the target storage system that includes the appropriate THP/Smart pool, and
select the THP/Smart pool in THP Pools.
3. On the THP Vols tab, select one or more volumes and click Reclaim Zero Pages.
4. Click Submit.
5. In the task list, confirm that the task is completed.
Virtualizing storage tiers (Smart)
This module describes how to manage data relocation for Smart volumes.
Managing storage resources in a SAN environment52
Page 53

About virtualizing storage tiers
Smart Tiers functionality monitors the frequency at which data is accessed and relocates that data
based on the results. The user creates a pool that combines volumes of different cost performances,
such as combining high-speed volumes (SSD or SAS) with inexpensive low-speed volumes (SATA).
The data in this pool is then automatically relocated among the volumes. This relocation is performed
depending on the I/O load:
• high-load pages are allocated to high-speed volumes
• low-load pages are allocated to low-speed volumes
By using HP StorageWorks P9000 Command View Advanced Edition Suite software, you can fine-tune
settings related to the monitoring of Smart pools and data relocation depending on operating
conditions. By specifying settings that correspond to business conditions or the characteristics of certain
applications, you can optimize data placement, improve volume performance, and reduce costs
through the effective use of resources.
Smart settings that can be specified by using Command View AE Suite include:
• Monitoring Smart pools and relocating data - Smart pool monitoring and data relocation can be
performed. Monitoring and data relocation can be set to execute automatically by specifying a
time or interval in advance, or you can manually execute at a time of your choice according to
the requirements of your work.
• Specifying the buffer space for Smart pools - When Smart pools are created or edited, on each
hardware tier, you can specify a ratio corresponding to the buffer space for new page assignment,
an area reserved for increasing used capacity. Similarly, you can specify a ratio corresponding
to the buffer space for tier relocation, a working area reserved for the storage system to use when
relocating data. Changing the default values, however, might degrade performance, so we recommend using the defaults.
• Applying a tiering policy to Smart volumes - In a Smart pool, data that has a high frequency of
I/O operations is preferentially placed in a high-speed hardware tier automatically. To ensure
that data with high importance but with few I/O operations is placed in a hardware tier that
maintains a certain speed at all times, you can fix the target hardware tier. You can also apply
a tiering policy to Smart volumes that determines the capacity ratio of each hardware tier, by
defining such a policy in advance. You can regulate tiering to allow for operation that balances
performance and cost, such as by preventing more data than is necessary from being placed in
a fast hardware tier and thereby reducing management costs. After a tiering policy has been applied, regularly review the status of the settings of that tiering policy and the amount of capacity
in use by each hardware tier to verify that resources are being appropriately allocated. Tiering
policy definitions can be changed if costs are greater or performance is lower than expected.
• Editing a tier rank for an external Smart pool volume - When an external volume is included in a
Smart pool volume that is one of the volumes making up a Smart pool, you can define the external
LDEV tier rank (high, medium, or low) according to the performance.
A registered Tiered Storage Manager license enables the following:
• Evaluating and analyzing the operation status of Smart pools - Use the Mobility tab to evaluate
and analyze the operation status that is related to a Smart pool.
• Setting a schedule for relocating data and monitoring Smart pools - Register the time of Smart
pool monitoring and data replacement as a template schedule.
• Editing tier relocation for Smart volumes (preventing relocation by volume) - Users can set whether
data can be relocated for each Smart volume. Tier relocation can be controlled according to
characteristics and the operating status of the applications using Smart volumes, such as by preventing other applications from relocating data of the volumes they are using when there is an
application for which data relocation takes a high priority.
User Guide 53
Page 54

• Restoring a data placement by applying a data placement profile of Smart volumes - Users can
restore a past data placement by saving data placements of optimized Smart volumes per page
as profiles, and applying them according to operation. For example, if a Smart volume is being
used for multiple operations that have different access characteristics (such as online and batch
processing), users can create data placement profiles that fit the different processes, and apply
the appropriate profile before beginning processing. By doing so, users can restore a data
placement that fits the characteristics of the target processing in advance, which prevents I/O
performance from dropping. In addition, by setting up a schedule, users can update and apply
profiles at regular intervals to suit the operation of applications. Profiles are applied only to pages
placed in Tier 1 of Smart pools.
Manually starting or stopping the monitoring of Smart pools
You can start or stop monitoring of Smart pools manually. A Tiered Storage Manager license is
required to perform the operation from the Mobility tab.
After confirming that the Smart pools setting for Tier Management is set to Manual, you can start or
stop monitoring of Smart pools.
1. From the tree view in the Resources tab, select Storage Systems (or use the Mobility tab).
2. Expand the tree and select THP Pools under the target storage system.
3. Select one or more Smart pools and click either the Start Monitoring or Stop Monitoring button,
both found in the More Actions menu.
4. Set the desired items and execute the task.
5. View the list of tasks to check execution results.
6. Click the link for the task name and check that monitoring of each Smart pool has started or
stopped.
Manually starting or stopping the tier relocation of Smart pools
You can manually start or stop tier relocation of Smart pools.
A Tiered Storage Manager license is required to perform the operation from the Mobility tab.
After confirming the following, you can start relocation of Smart pools:
• Existence of two or more hardware tiers in the target Smart pools
• The Smart pools setting for Tier Management is Manual
To stop relocation of Smart pools, confirm:
• The Smart pools setting for Tier Management is Manual
1. From the tree view in the Resources tab, select Storage Systems (or use the Mobility tab).
2. Expand the tree and select THP Pools under the target storage system.
3. Select one or more Smart pools and click either the Start Relocation or Stop Relocation button.
4. Set the desired items and execute the task.
5. View the list of tasks to make sure that all tasks have completed.
6. Click the link for the task name and check that tier relocation of each Smart pool has started or
stopped.
Scheduling monitoring and tier relocation of Smart pools
You can specify the schedule for monitoring and relocating Smart pools.
A Tiered Storage Manager license must be registered.
Managing storage resources in a SAN environment54
Page 55

1. From the Mobility tab, select THP Pools.
2. Expand the tree view and select the target storage system. From the list of THP/Smart pools, select
the Smart pool for which the schedule is to be set.
3. On the Summary panel, click Actions, and select Edit Pool.
4. In the Edit Pool dialog box, click Smart Settings. In Tier Management select the Custom radio
button. Click Select Template to use an existing schedule template, or click Create Template to
create a new schedule template.
5. Specify the necessary items by following the instructions in the window and create and execute
the plan.
6. View a list of tasks to make sure that all tasks completed.
7. In the Mobility tab select the Smart pool. Then from Tier Management in Summary confirm the
template names.
Editing tier relocation for Smart volumes
There are conditions where it is useful to disable tier relocation of volumes to prevent unnecessary
data movement. For example, to preferentially perform tier relocation of volumes whose I/O activity
varies greatly, suppress tier relocation of other volumes.
A Tiered Storage Manager license must be registered.
1. From the tree view of the Mobility tab, select Logical Groups.
This operation can also be performed at the host level from the Resources tab.
2. Expand the tree view to select the target logical group.
3. If you want to set all Smart volumes in the logical group at the same time, select Actions (in the
upper-right corner of the application area), then Edit Tier Relocation. If you want to specify the
target volumes, select one or more Smart volumes from the list of volumes, and then click the Edit
Tier Relocation button.
4. Select Enable to enable tier relocation for Smart volumes. Select Disable to disable tier relocation.
5. Set any required items in the window, and then execute the task.
6. Verify that the task completed.
The applied tier location settings can be checked from Summary or the list of volumes, which are
displayed by selecting a logical group from the Mobility tab.
Applying a tiering policy to Smart volumes
Conditions to check beforehand:
• Two or more hardware tiers exist in a Smart pool.
• If selecting multiple Smart volumes from a logical group, all selected Smart volumes belong to the
same Smart pool.
• A Tiered Storage Manager license is required to perform operations from the Mobility tab.
1. From the tree view in the Resources tab, select Storage Systems.
You can also perform this step from the Mobility tab.
If editing per logical group, perform this step from the Mobility tab.
2. Expand the tree and select the target Smart pools.
3. Select one or more Smart volumes from the THP Vols or from the list of volumes, and then click
the Edit Tiering Policy button.
4. Select the tiering policy, and then execute the task.
User Guide 55
Page 56

You can schedule the task to be executed later.
5. View the list of tasks to make sure that all tasks are complete.
TIP:
If a data placement profile and a tiering policy are being used concurrently, the capacity ratio of Tier
1 might exceed the value specified for the maximum allocation threshold.
Customizing a tiering policy for Smart volumes
You can set the value for the allocation threshold of a hardware tier. When a tiering policy is specified
for Smart volumes, make sure changing the definition will not cause a problem.
Tasks to complete beforehand:
• A Tiered Storage Manager license must be registered if the operations described in this topic will
be performed from the Mobility tab.
Information to check beforehand:
• Check the definition of the tiering policy to be changed.
1. On the Resources tab, expand the Storage Systems tree.
Note that you can also perform these operations from the Mobility tab.
2. For the applicable storage system, select THP Pools.
3. In the Tiering Policies tab, select a tiering policy to change, and click Customize Tiering Policy.
4. Specify the required items, and then execute the task.
On the Resources tab, by selecting THP Pools and then the Tiering Policies tab, you can verify that the
definition of the tiering policy was changed.
Notes on data placement profiles for Smart volumes
When using data placement profiles for Smart volumes, it is useful to understand the following:
• Data placement profiles are applied only to pages placed in Tier 1 of Smart pools.
• For pages to which both a data placement profile and tiering policy are set, the settings of the
profile are prioritized.
• After a data placement profile has been applied and monitoring and data relocation of Smart
pools has been performed, a data placement is restored. Therefore, users need to determine the
timing at which to apply a profile by taking into account the period during which the monitoring
and data relocation are performed.
• When performing a create, update, apply, or release of a data placement profile, or when
searching for or repairing an inconsistency in a data placement profile, users cannot perform
other operations for the target storage system.
• A task to create, update, apply, or release a data placement profile or to search for or repair an
inconsistency in a data placement profile takes time to complete after it is executed. This time
might affect other operations, so make a plan based on the displayed time estimate. Keep in mind
that the larger the number of target volumes, the more likely that the estimated time and the actual
execution time will differ greatly. You can also stop tasks that are being executed.
• Regardless of the allocated resource groups, data placement profiles created by another user can
also referenced in the list of profiles. However, operation that can be performed on such profiles
are restricted based on the allocated resource group and role.
Managing storage resources in a SAN environment56
Page 57

• If the number of managed data placement profiles exceeds 200, displaying the profile list might
take some time. In this case, set the [Rows/page] of the profile list to no more than 100.
• When the operations listed below are performed, users need to perform a search inconsistency
operation from the Refresh Storage Systems dialog because the profile that is actually applied to
the volume in a storage system might not match the profile information that can be referenced
from HP StorageWorks P9000 Command View Advanced Edition Suite.
• When the HP StorageWorks P9000 Command View Advanced Edition Suite database was
overwritten, due to an import or restoration, while the applied profile existed.
• When the storage system that contains an applied profile is deleted, and the storage system
is re-registered.
TIP:
If inconsistencies are detected, a message will be displayed in Manage Data Placement Profiles dialog.
From the link shown in the message, perform the repair inconsistencies operation and
release the profile. This can avoid unintended data to be fixed into a high-speed hardware tier by a
profile that was applied in the past.
Creating a data placement profile for Smart volumes
To restore a data replacement appropriate for application processing, the user creates a data placement
profile when Smart volumes provide sufficient performance. A profile can be created for each logical
group, and is managed with the corresponding logical group.
Perform the following tasks beforehand:
• A Tiered Storage Manager license must be registered
• Acquire the name of the target logical group
• Specify settings for checking performance information, such as settings for linking to HP Storage-
Works P9000 Performance Advisor software, or settings for the performance monitoring software
of each application.
TIP:
If linked to HP StorageWorks P9000 Performance Advisor software, you can view performance trend
charts for the volumes in the logical group from the Manage Data Placement Profiles dialog box.
For details on the linking method, see the
HP P9000 Command View Advanced Edition Suite Software
Administrator Guide.
1. From the Mobility tab, General Tasks pane, select Manage Data Placement Profiles.
2. Click the Logical Group View button, and specify the necessary items. Check the performance
of the target logical group by using the performance trend charts or software for checking performance information, and then click the Create Profile button.
3. To create a plan, specify the necessary items by following the instructions in the window.
4. If there is no problem with the plan, execute it.
5. View the list of tasks to see the execution results.
The created profile can be checked in the list of profiles displayed by clicking the Logical Group View
button in the Manage Data Placement Profiles dialog box.
User Guide 57
Page 58

TIP:
To delete data placement profiles, select the data placement profiles to be deleted, and click
Delete Profiles.
NOTE:
Regardless of the allocated resource groups, data placement profiles created by another user can
also be referenced in the list of profiles. However, operations that can be performed on such profiles
are restricted based on the allocated resource group and role. Therefore, specify profile names and
descriptions to make it clear which operations are available.
Updating a data placement profile for Smart volumes
You can update an existing data placement profile to reflect the latest Smart volume data placement
in the profile.
TIP:
To change the target Smart volumes of a profile due to changes in the logical group configuration or
other reasons, re-create the profile.
Perform the following tasks beforehand:
• Register a Tiered Storage Manager license.
• Determine the name of the target logical group.
• Specify settings for checking performance information, such as settings for linking to HP Storage-
Works P9000 Performance Advisor software, or settings for the performance monitoring software
of each application.
TIP:
If linked to HP StorageWorks P9000 Performance Advisor software, you can view performance trend
charts for the volumes in the logical group from the Manage Data Placement Profiles dialog box.
For details on the linking method, see the
HP P9000 Command View Advanced Edition Suite Software
Administrator Guide.
1. From the Mobility tab, General Tasks pane, select Manage Data Placement Profiles.
2. Click the Logical Group View button, specify the necessary items. Check the performance of the
target logical group by using the performance trend charts or software for checking performance
information, select the row of the profile to be updated (only one profile can be selected) from
the list of data placement profiles, and then click the Update Profile button.
3. To create a plan, specify the necessary items by following the instructions in the window.
4. If there is no problem with the plan, execute it.
5. View the list of tasks to see the execution results.
The updated profile information can be viewed from the profile operation history list, which is displayed
by clicking the Logical Group View button in the Manage Data Placement Profiles dialog box.
Managing storage resources in a SAN environment58
Page 59

TIP:
When you want to periodically update the profile according to the intervals for monitoring Smart
pools and replacing data, you can set a schedule for updates by using the Schedule Profiles button.
Also, When an applied profile is updated, the profile in a condition before the update will continue
to be used until the updated profile is reapplied.
Editing a data placement profile for Smart volumes
Users can change the name and description of a data placement profile.
• A Tiered Storage Manager license must be registered
1. From the Mobility tab, General Tasks pane, select Manage Data Placement Profiles.
2. Click the Overall Profile View button, or the Logical Group View button, and select the row of
the profile to be edited from the list of data placement profiles (only one profile can be selected),
and then click the Edit Profile button.
3. Edit the necessary items, and then perform the processing.
The edited profile can be checked in the list of profiles displayed by clicking the Overall Profile View
button, or the Logical Group View button, in the Manage Data Placement Profiles dialog box.
Applying a data placement profile for Smart volumes
Before beginning application processing, the user applies a data placement profile to restore a data
placement that fits the characteristics of the processing. After confirming that the data placement is
restored and performance is improved, the user releases the applied profile to return to normal Smart
operation.
Perform the following tasks beforehand:
• A Tiered Storage Manager license must be registered
• A data placement profile must be created
• Acquire the name of the target logical group
• Specify settings for checking performance information, such as settings for linking to HP Storage-
Works P9000 Performance Advisor software, or settings for the performance monitoring software
of each application
TIP:
If linked to HP StorageWorks P9000 Performance Advisor software, you can view performance trend
charts for the volumes in the logical group from the Manage Data Placement Profiles dialog box.
For details on the linking method, see the
HP P9000 Command View Advanced Edition Suite Software
Administrator Guide.
1. From the Mobility tab, General Tasks pane, select Manage Data Placement Profiles.
2. Click the Overall Profile View button, or Logical Group View button, to view the creation date,
usage, and effect of applying profiles in the past, and select the row of the profile to be applied
(only one profile can be selected) from the list of data placement profiles, and then click the Apply
Profile button.
3. To create a plan, specify the necessary items by following the instructions in the window.
4. If there is no problem with the plan, execute it.
User Guide 59
Page 60

5. View the list of tasks to see the execution results.
After the monitoring and data relocation of Smart pools finish, perform the following operations
to check the effect of applying the profile, and to release the applied profile.
6. Using the software for checking the performance information, check the effects of applying the
profiles.
If linked with HP StorageWorks P9000 Performance Advisor software, from the Manage Data
Placement Profiles dialog box, click the Logical Group View button to check the performance
trend chart of the target logical group.
7. To return to normal Smart pools operation, click the Release Profile button, specify the necessary
items, and then release the applied profile.
TIP:
• When you want to apply or release the profile periodically to match the operation of an application,
you can use the Schedule Profiles button to schedule the applying and releasing of the profile.
When applying the profile, you can also specify a release schedule.
• If a data placement profile and a tiering policy are being used concurrently, the capacity ratio of
Tier 1 might exceed the value specified for the maximum allocation threshold.
Scheduling data placement profiles for Smart volumes
You can set weekly or monthly schedules for applying, releasing, and updating data placement
profiles.
Tasks to complete beforehand:
• Register a Tiered Storage Manager license.
• Create a data placement profile.
• Identify the name of the target logical group.
1. On the Mobility tab, select General Tasks, then select Manage Data Placement Profiles.
2. Click the Overall Profile View button, or Logical Group View button, then click the Schedule Profiles
button.
3. To create a plan, specify the necessary items by following the instructions in the window.
4. If there is no problem with the plan, execute it.
5. View the list of tasks to make sure that the operation for which a schedule is set is registered as
a task.
TIP:
If multiple operation schedules are registered for a single logical group, the task list displays the
operation that will be executed first. For example, if a schedule to apply a profile is set followed by
a schedule to release the profile, then the application task is displayed until the profile is applied.
After the profile is applied, the task to release the profile is displayed.
Editing an external LDEV tiering rank for a Smart pool
Users can configure external LDEV tiering rank.
Perform the following tasks beforehand:
Managing storage resources in a SAN environment60
Page 61

• Connect the external storage system.
• Define hardware tiers that consist of external volumes.
1. From the Resources tab, select Storage Systems. Expand the tree and select the target THP Pools
of the storage system.
2. Select the target Smart pools, and click the THP Pool Vols tab.
3. Select the target Smart pool volume, and click the Edit External LDEV Tier Rank button.
4. Specify the necessary items, and execute the plan.
When you select the target Smart pool from the tree view in the Resources tab, check that the external
LDEV tiering rank for the Smart pool volume has been changed.
Allocating and unallocating volumes
This module reviews volume allocation requirements, methods, and related procedures for allocating,
or provisioning, volumes.
About allocating volumes
Volume allocation makes storage capacity available to host applications or clustered hosts and
applications. Hosts must be registered before volume allocation.
Depending on your registered storage systems, volumes can be allocated using basic volumes, pool
volumes, or volumes from a tier. Basic volumes are volumes from a parity group. Any storage system
can provide basic volumes. Allocating THP/Smart pool volumes involves grouping resources on
storage systems that support this feature. THP/Smart pools must exist prior to volume allocation from
a THP/Smart pool. To allocate volumes from a tier, a Tiered Storage Manager license is required,
and tier policies must be established for storage systems that support tier policy configuration.
Volume allocation behaviors include:
• The settings assigned when allocating volumes to a host become the default settings for the next
volume allocation to the same host, but can be changed during volume allocation.
• If a variety of volumes with different characteristics have been allocated to a host, you can allocate
a new volume by selecting an existing volume to set the volume allocation criteria.
• If no volumes match the specified requirements, new volumes are created from unused capacity
and allocated to the host. When a basic volume is created, the volume is also formatted at the
same time.
• You can use keyword or criteria based searches to find existing unallocated volumes that meet
your requirements.
• When you allocate volumes to a host, LUN paths are assigned automatically. LUN paths are
storage port to host port mappings providing host access to volumes. The host port is a host bus
adapter (HBA). WWN nicknames can be displayed by the user to confirm target HBAs for a host
while editing LUN paths during, or after, volume allocation.
• Volumes can be allocated on ports where LUN security is not enabled. All hosts with access to the
port can access the volume.
• Volume allocation to a cluster should be done with logical groups. This ensures the same volumes
are allocated to all hosts in the cluster.
• Volume allocation does not occur until you approve the volume allocation plan and submit the
volume allocation task.
• When volumes are allocated to a host OS, you must create a file system on them and mount them,
before they can be used by host applications.
User Guide 61
Page 62

NOTE:
Before allocating volumes, review the available volume allocation methods. This will optimize your
ability to perform volume allocation, and help you understand the Allocate Volumes dialog box.
Volume allocation methods
When you allocate volumes, you can either:
• Select resources, such as volumes or hosts, then start the Allocate Volumes dialog box.
• Start the Allocate Volumes dialog box without first selecting a resource such as a volume or host.
If you select resources first, the Allocate Volumes dialog box will prompt you for less information.
Note that every volume allocation method involves clicking Allocate Volumes using a button, an Actions
pull-down menu item, or a General Tasks menu item, to start the Allocate Volumes dialog box. The
visible fields in the dialog will vary depending on your allocation method.
Volume allocation methods include:
• General tasks
From the Resources or Mobility tab, from General Tasks, click Allocate Volumes. This starts the
allocate volumes dialog screen. Because no resource was selected, you must configure host,
volume, and other volume allocation requirements.
• Selecting hosts
From the Resources tab, select one or more hosts, and click Allocate Volumes. The dialog will
display the selected host names instead of prompting.
• Selecting volumes
From the Resources tab, select one or more volumes, and click Allocate Volumes. The dialog will
prompt for host name, but will not prompt for volume criteria.
• Selecting clustered hosts
Configuring clustered hosts in a logical group helps ensure that volume allocations will be consistent
for all members of the cluster. From the Resources tab, select a logical group, select all host
members of the group, and then click Allocate Volumes. If clustered hosts are not in a logical
group, from General Tasks or Actions, click Allocate Volumes and select multiple hosts. You may
also use the Resources tab to locate clustered hosts, and then Allocate Volumes. The use of logical
groups is recommended to avoid host selection errors.
• Searching
You can search for volumes meeting specific criteria (such as storage system, specific allocation
status, volume type, drive type, or drive speed, etc.), select one or more volumes from the search
results, and click Allocate Volumes.
You can also search using full or partial text keywords such as storage system name or host name,
and allocate volumes to the selected resource. This eliminates manual navigation to the resource.
• Using existing volume settings
From the Resources tab, select an allocated volume that has desired attributes for the new volume
to allocate, and click Allocate Like Volumes.
Managing storage resources in a SAN environment62
Page 63

Prerequisites for allocating volumes
Before allocating volumes to a host you must verify that the host, and storage systems are registered
in HP StorageWorks P9000 Command View Advanced Edition Suite.
If you want to select volumes from a tier, Tiered Storage Manager license must be enabled.
In addition, determine:
• The target host
• The volume type, count, capacity, and performance characteristics
• An appropriate storage system
Allocating volumes from general tasks
You can allocate volumes from the General Tasks pane.
1. From the Resources or Mobility tab, select Allocate Volumes.
TIP:
If you do not see Allocate Volumes listed, click more... to see all menu items.
2. Because you have not selected a resource such as a volume or host, the Allocate Volume dialog
box will launch and prompt you for all needed information.
3. Specify your volume allocation requirements.
4. Click Show Plan to check your volume allocation.
5. If the plan is correct, submit the task.
6. Check for a Completed task status.
Allocating volumes to selected hosts
You can allocate volumes to one or more selected hosts.
1. From the Resources tab, select Hosts.
2. Hosts are grouped by operating system. Click the operating system for the target hosts.
TIP:
If you do not know the host OS, searching for the host may be the better method for locating the
host and allocating volumes.
3. Select one or more hosts, and then click Allocate Volumes.
4. Specify your volume allocation requirements.
5. Click Show Plan to check your volume allocation.
6. If the plan is correct, submit the task.
7. Check for a Completed task status.
User Guide 63
Page 64

Allocating selected volumes to hosts
You can allocate selected volumes to one or more hosts.
1. From the Resources tab, select Storage Systems.
2. Expand All Storage Systems, and select a specific storage system. This will list volume group links
in the Detailed Information pane. Listed groups represent available pools, parity groups, and
volumes.
3. Select a group from the Resources pane tree structure, or using the Detailed Information links.
This will list individual pools, parity groups, or volumes.
4. Select an appropriate resource, for example, a pool or parity group with available capacity, or
an open-unallocated volume.
5. Click Allocate Volumes.
TIP:
Open-reserved volumes cannot be allocated. Open-allocated can be used to allocate like volumes.
6. Specify one or more hosts, and other volume allocation requirements.
7. Click Show Plan to check your volume allocation.
8. If the plan is correct, submit the task.
9. Check for a Completed task status.
Allocating volumes to clustered hosts
You can group hosts that belong to a cluster into a logical group. This prevents possible errors with
host selection. If logical groups have not been created you can select multiple hosts in the Allocate
Volumes dialog box.
Tasks that need to be completed beforehand:
• Register clustered hosts into a logical group
• If you have not registered clustered hosts into a logical group, you must confirm the names of the
hosts that belong to the target cluster
1. From the Resources tab, select Logical Groups.
2. Expand All Logical Groups folder, continue down the folder structure to locate your logical group.
3. Drill down until you get the Hosts and Volumes tabs under the summary pane. Select all hosts
for the cluster.
4. Click Allocate Volumes.
TIP:
To allocate volumes to cluster hosts, verify that all cluster host names are displayed in the Allocate
Volume dialog box. Do this as an extra check to prevent an incorrect allocation.
5. Specify your volume allocation requirements.
6. Click Show Plan to check your volume allocation.
7. If the plan is correct, submit the task.
Managing storage resources in a SAN environment64
Page 65

NOTE:
You can allocate volumes to cluster hosts that are not in a logical group. However, you must
ensure that your host selection is correct. Logical groups are strongly recommended.
8. Check for a Completed task status.
The same volumes have been allocated to individual hosts that belong to a cluster.
Allocating volumes by using a keyword search
A keyword search is a full or partial text search. For example, you can search for storage systems,
hosts, volumes, parity groups, THP/Smart pools, and logical groups by entering a full or partial name.
This provides an alternate method of navigating to a resource and performing volume allocation.
1. Enter a value in the search box on the tabs bar, and press Enter. All Resources is the default se-
lection. You can limit the scope of searched resources using the drop down menu.
NOTE:
As the number of searchable objects grows, identify a specific resource to search, for example
Logical Groups, to decrease search time.
2. As an example, assuming you searched for hosts, from your search results, click the host name
link. The appropriate location in the Resources tab is displayed. The host is effectively selected.
Click Actions > Allocate Volumes on the summary pane. Confirm the hostname is displayed in
the dialog box.
3. Specify your volume allocation requirements.
4. Click Show Plan to check your volume allocation.
5. If your plan is correct, submit the task.
6. Check for a Completed task status.
Allocating volumes by using a criteria search
You can allocate volumes to a storage system by using criteria search to search for the volumes.
1. From the search box drop-down menu, select More Searches.
2. Specify the search criteria and execute your search. There are Basic and Advanced tabs
presenting criteria options. Basic criteria for volume status, type, drive performance, RAID level,
or capacity requirement should meet most needs. Advanced criteria are more specialized.
TIP:
Searches can be saved for re-use, and can be saved as private or public. Note that saving or
sharing a search requires the Tiered Storage Manager license.
3. From the search results, select the volumes and click Allocate Volumes.
4. Specify your host, and other volume allocation requirements.
5. Click Show Plan to check your volume allocation.
6. If your plan is correct, submit the task.
User Guide 65
Page 66
7. Check for a Completed task status.
Allocating volumes by using existing volume settings
If you have allocated at least one volume to a host, you can allocate new volumes for the host by
using the attributes of an existing volume as the default for the Allocate Volume dialog box. Your
volume allocation can be exactly like, or similar to, the selected existing volume.
1. From the Resources tab, in the Resources pane, select Hosts or Logical Groups.
2. Navigate down the tree structure until you reach the host or logical group of interest, click the
host or logical group link and look at the list of existing volumes.
3. Select an existing volume that matches or is similar to your requirement, and click Allocate Like
Volumes.
4. The host or logical group name will be displayed, and you will be prompted for other volume
allocation requirements. You can retain existing settings, or change them.
5. Click Show Plan to check your volume allocation.
6. If your plan is correct, submit the task.
7. Check for a Completed task status.
Allocate Volumes dialog box
The display order of fields in this dialog box is consistent, but some fields might not be displayed
because your volume allocation method makes the fields unnecessary. For example, if you select a
basic volume from a specific storage system, then click Allocate Volumes, you are not prompted for
storage system and volume information as this information is already known.
TIP:
As a general rule, when using a dialog box, errors are displayed at the top of the dialog box with a
problem description.
Below, field groups are indicated by >>. Field groups expose information or fields when clicked, and
hide information or fields when clicked again.
Table 7 Allocate volumes dialog box
DescriptionsSubfieldsFields
If you selected one or more hosts (includes virtualization servers) prior to
clicking Allocate Volumes, the host names are displayed. If you did not
select hosts, you are prompted. The host drop-down list provides selection
of a single host, by name. Additionally, The Select Hosts button is provided
for selecting multiple hosts, and displays related details such as OS and
WWN. For example, you can select cluster hosts for volume allocation.
-Host
Note that the host drop-down list provides a special selection called Allocate
without LUN security. When you enter adequate volume information, LUN
Path Options will expand to a list of storage ports with LUN security
disabled. You can select one or more ports, and Add them to the Selected
Storage Ports list as part of the Allocate Volume dialog box. All hosts with
LUN paths on the selected storage ports will have access to the volumes
on the ports.
No. of
Volumes
Specify the number of volumes to allocate to the selected hosts.-
Managing storage resources in a SAN environment66
Page 67

Volume Capacity
Storage system
DescriptionsSubfieldsFields
Specify the volume size and select the unit of measure, for example GB
for Gigabytes.
The total capacity to be allocated (No. of Volumes * Capacity) is displayed.
-
-
-Volume type
Note: When entered volume criteria, such as volume capacity, cannot be
satisfied by existing volumes, a new volume can be created for you. This
is indicated in Advanced Options > Creating Volume Settings by formatting
and stripe size options for the new volume (see below).
If you select a storage system prior to clicking Allocate Volumes, the name
is displayed. Otherwise, select the storage system providing the volumes.
Any storage system can provide basic volumes.
Volumes to be allocated from THP/Smart pools must be provided by a
storage system supporting this feature. Allocating volumes from a tier
requires configured tier policies for the storage system.
Note that Any means the volume can be sourced from any storage system
that meets the criteria of the dialog box.
Select the volume type. For example Basic, Thin Provisioning or Smart
Pool. The displayed volume types are determined by your selected storage
system. If you do not see an expected volume type, check that you have
selected the correct storage system.
The selected volume type affects the Advanced Options fields described
below. For example, selecting a Basic volume will populate Advanced
Options > Volume Selection > Automatic with a default drive type, drive
speed, RAID level, and parity group. These specifications may be altered.
For example, if you change the drive speed, the parity group may change
automatically. These changes are determined by available resources. You
may also select an available tier from which to allocate the volume, or
manually locate available unallocated volumes.
If you select volume type Thin Provisioning, Advanced Options > Volume
Selection > Automatic will populate with a THP pool, instead of a parity
group. The specifications may be altered.
If you select Smart Pool, the Volume Selection field appears. Volume
selection is automatic or manual. See the volume selection field below.
Note that Any means the volume can be sourced from any available volume
type that meets the capacity criteria and is available from the storage
system.
Volume location
Select Internal if you want your volume to come directly from your selected
storage system, or External if volumes are mapped from external storage
systems (virtualized volumes) and are adequate for your needs. The external
-
option can appear for basic volumes and THP pools. Note that when
viewing a list of THP/Smart pools, the volume location column will indicate
internal or external.
Note: This field is replaced by Volume Selection when Smart Pool is
selected (see Volume type above).
User Guide 67
Page 68

Volume Selection
>> Advanced
Options
-
(See next 5
fields below)
DescriptionsSubfieldsFields
This field displays only if Smart Pool is selected as the volume type (see
above).
Note: This field is not the same field as the Volume Selection field below
in the Advanced Options Group.
Select Automatic to allow the system to configure volume allocation space
for you from available THP/Smart pools.
Select Automatic and click Select Pool to list available THP/Smart pools.
Make an appropriate selection for your capacity requirements, click OK.
Verify the name is correctly displayed on your screen. When displayed
under Advanced Options, you can tailor the Tiering Policy Setting (see
below). When you submit the task a volume will be created for the host.
Select Manual to see the selected volumes list, select Add Volumes, select
Unallocated Volumes or Allocated Volumes. Choose an appropriate
volume, click Add to update Selected Volumes and OK to return to volume
allocation.
Note that when you set the volume type to Basic or Thin Provisioning you
will see Tier, Automatic and Manual options as explained below. When
the volume type is Smart Pool, the fields will be displayed as noted above
in Volume Type.
The fields below can be displayed or hidden by clicking Advanced Options.
These fields support explicit volume allocation (Tier, Manual) or volume
allocation based on criteria such as drive type or RAID level.
Tiering Policy
Setting
Volume Selection
-
Tier
Automatic
Manual
This field displays only if Smart Pool is selected as the volume type, and
aSmart pool has been selected with Select Pool (see Volume Selection
above). You can select a specific tier policy for the volume to be allocated,
or select All.
Note: This field is not the same field as the Volume Selection field above
when Volume Type is set to Smart Pool.
If your selected storage system is configured with storage tiers, you can
Select a Tier for volume allocation. If your selected storage system was
ANY, you can see which storage systems have tiers available with Select
a Tier and make a selection.
Device Manager automatically selects volumes based on the specified
volume criteria.
For Basic volumes, Device Manager will select a parity group based on
volume criteria. The selected parity group changes with changes in criteria.
If desired, you can click Select Parity Groups to make a selection.
For Thin Provisioning volumes the system will select a THP pool based on
volume criteria. The selected THP pool changes with changes in criteria.
New volumes might be created or existing volumes used. If desired, you
can click Select Pool to make a selection.
Drive type, speed, RAID level and parity group or pool can be adjusted
if desired, but the primary purpose of this field is to rely on the storage
system to decide the resources used for volume allocation.
For Basic and Thin Provisioning volumes, clicking Manual will bring up
the Selected Volumes screen. Click Add Volumes to select basic volumes
or Thin Provisioning volumes.
Managing storage resources in a SAN environment68
Page 69

Drive Type
DescriptionsSubfieldsFields
Keep in mind that volume criteria may have some impact on volume performance. Changing the drive type can change the parity group or THP
pool.
Volume Criteria
Creating
Volume Settings
Drive Speed
RAID Level
Parity Groups
Pool
Format Type
Stripe Size
Changing the drive speed (rotational RPM) can change the parity group
or THP pool.
Changing the RAID level can change the parity group or THP pool.
Note that RAID levels and parity group configuration can vary depending
on the selected storage system. For example, RAID6 may be supported
on one storage system, but not on another. Additionally, RAID6 is displayed
only if RAID6 parity groups have been configured on the selected storage
system.
As noted above, changing volume criteria can change the system selected
parity group. If desired, you can click Select Parity Groups to make a se-
lection.
Use Select Pool to select the THP pool from which to allocate volumes. As
noted above, changing the volume criteria can change the system selected
THP pool.
Creating Volume Settings, and related fields, is only displayed when
entered volume criteria require a new volume to be created. See Volume
Capacity field above for an example.
This field displays formatting methods available for the volume to be
created, as available for basic volumes on the specified storage system.
For example, you might see options for a quick or basic format.
This field displays stripe size options for the volume to be created, as
supported by the specified storage system. For example, 64KB.
Resource
Group
>> LUN Path
Options
No. of LUN
paths per
Volume
-
(See next 2
fields below)
-
This field only displays for created users (non built-in accounts) allocating
volumes, who can potentially source the volume or volumes from multiple
resource groups the user has access rights to, as configured for their account.
Clicking LUN Path Options displays fields and buttons to set or change
the LUN paths, which are storage port to host port mappings that connect
volumes and hosts.
Specify the number of LUN paths to allocate per host. Note that changing
the path count may cause the system to suggest a new path for you
automatically.
Click Edit LUN Paths to assign or change LUN paths. The paths are
displayed graphically or in table format. In both views, you can use links
to view WWN nickname information to confirm the target host bus adapter
(HBA).
• In graph view, click on a storage port row to add it to the LUN Path
Editor panel. Connect the line to the target HBA. Another line is dis-
played, which you can connect to another HBA or discard with a click.
• In table view, select a storage port, then a host port row, then click
Add to move the mapping to Selected host Ports panel.
You can delete default or incorrect mappings by clicking on the connector
line in graph view, or using the remove button in table view.
User Guide 69
Page 70

LUN Security
Disabled Storage Ports, Selected Storage
Ports
DescriptionsSubfieldsFields
These related screens only display under LUN Path Options when Allocate
without LUN security is selected from the host drop-down. See Hosts field
above.
-
Unsecured ports are listed in LUN Security Disabled Storage Ports. You
select the port or ports to make the volume available on, and click Add to
move them to Selected Storage Ports. You can review your plan and submit
the allocation task. All hosts that can access the port or ports the volume
is on can access the volume.
>> Host
Group and
LUN Settings
(dropdown)
Host Groups
LU Number
(See next 2
fields below)
Shared by All
Hosts
Separate for
Each Host
Name
Host Group Settings in Detail
Host mode
Host mode options
auto or manual
selection buttons
Volume allocations using Fibre Channel will prompt for items such as host
group name, host mode, host mode options, and LU number.
The following fields can be displayed or hidden by clicking Host Group
and LUN Settings.
When volumes are allocated to multiple hosts simultaneously, this option
specifies configuring all hosts in a single host group.
When volumes are allocated to multiple hosts simultaneously, this option
specifies configuring a separate host group for each host.
For hosts in a host group, host group information is displayed. For hosts
not in a host group, a host group can be created. Enter a name if a host
group is needed.
This button is used to display a list of host groups to be used during volume
allocation, or which were previously set during prior volume allocations.
Select the host mode that supports the host type for which you are allocating
volumes.
Select one or more host mode options for supporting special requirements
for specific applications.
LU numbers can be assigned automatically or manually for the volumes
being allocated.
To automatically assign LU numbers to the allocated volumes, select auto
and enter a start from number (or use the default). LU numbers are set in
ascending order while avoiding existing numbers.
To manually assign LU numbers to the allocated volumes, select manual
and click Select LU Number to choose a starting LU number.
>> Virtual ID
Settings
Starting virtual LDEV ID
Targets
Managing storage resources in a SAN environment70
(See next field
below)
LDKC
Option for manually specifying the starting virtual LDEV ID to use for
allocated volumes. Volumes for which virtual IDs have not been specified
are assigned a new virtual LDEV ID when they are allocated to a host that
belongs to resource groups used for a data migration that uses virtual IDs.
Virtual LDEV IDs are assigned automatically by default, with unused IDs
assigned to volumes in ascending order. If a user manually specifies an
ID, volumes will receive the lowest available ID that is equal to or greater
than the specified value.
The logical disk controller number that forms part of the starting virtual
LDEV ID.
The control unit number that forms part of the starting virtual LDEV ID.CU
The device number that forms part of the starting virtual LDEV ID.DEV
Page 71

About LUN path management
When you allocate a volume to a host, HP StorageWorks P9000 Command View Advanced Edition
Suite allows you to assign or edit LUN paths between one or more volumes and one or more hosts.
LUN paths provide volume access for the host by pairing storage ports and host ports. For example,
one or more storage ports can be mapped to one or more host ports (host bus adapters (HBAs)).
After volumes have been allocated to a host, you can edit existing LUN path information to add new
paths and/or delete existing paths from a list of allocated volumes in the Storage Systems tree, Hosts
tree, Logical Groups tree, and from a list of volumes returned from a search.
When initially allocating volumes and setting LUN paths, or editing LUN paths later, WWN nickname
information can be displayed to confirm the host port (HBA). Please note the following conditions for
displaying WWN nicknames:
• WWN nicknames become visible when storage system information is refreshed. If WWN nicknames
are updated on the storage system, another refresh is needed to ensure the latest information.
Refreshing host information, including host names and WWNs, does not update storage system
WWN nicknames in HP StorageWorks P9000 Command View Advanced Edition Suite.
• If several WWN nicknames (for example, as set on different storage systems) exist for a host HBA,
only one of the nicknames is displayed for that HBA.
• In addition to the edit LUN paths dialog, WWN nicknames are displayed in the LUN paths panel
during volume allocation, the LUN paths information panel during volume unallocation, and the
Volumes panel on the Resources tab.
Because allocated volumes belong to a specific host group, the same target host port is set for all
volumes in any given host group. Therefore, when adding or deleting a host port for one or more
volumes, you must select all of the volumes in that host group to maintain consistent LUN path
assignments for all volumes.
Editing LUN paths
You can add and delete LUN paths between storage systems and hosts.
1. On the Resources tab, expand the storage, hosts, or logical group trees to display volumes.
2. Select one or more volumes for which you want to edit LUN paths. Selected volumes should belong
to the same host group, and the host group should belong to a single storage system.
3. From your current tree click Edit LUN Paths, or click More Actions and select Edit LUN Paths to
display the Edit LUN Paths dialog box.
4. Use the graph or table view to map storage ports to host ports. In both views, you can use links
to view WWN nickname information to confirm the target host bus adapter (HBA).
a. In graph view, click on a storage port row to add it to the LUN Path Editor panel. Connect
the line to the target HBA. Another line is displayed, which you can connect to another HBA
or discard with a click.
b. In table view, select a storage port, then a host port row, then click Add to move the mapping
to Selected host Ports panel.
Note that if you add an incorrect mapping you can delete it by clicking on the connector line in
graph view, or using the remove button in table view, or you can cancel the dialog and start
over.
5. To delete an existing in use path as indicated by a green line in graph view, or by the 'In Use'
state in table view, do the following:
a. In graph view, click the green line. The line will now be gray and thin.
User Guide 71
Page 72

b. In table view, select the mapping row and click Remove to change the state from 'In Use' to
'Remove.'
6. Change any other required settings.
7. Click Show Plan to review the following:
• Verify the storage, host and mapping information that is displayed.
• Optionally review plan details, update the task name, and enter a description.
• Schedule the task for Now (the default), or for a later Date and Time.
• Check View task status to monitor the task on Tasks & Alerts upon submission.
8. Click Submit.
9. On the Tasks & Alerts tab, confirm the task is completed.
If the task is not completed, click the task name for details.
About unallocating volumes
You can unallocate volumes from clusters, or hosts. Unallocated volumes can be:
• Re-allocated (with existing data) to a cluster, or host that can recognize the existing data (file sys-
tem).
• Used for other storage requirements.
Unallocating a volume deletes all LUN paths that connect the volumes to the cluster, or host.
NOTE:
Unallocating volumes does not delete existing volume data by default. However, during the unallocation
there is an option to delete the volume (volume data is lost) and return it to unused capacity, or you
can delete the unallocated volume later. As a precaution, to retain volume data, back up volumes
before unallocating them (for example, for volumes to be re-allocated to a new host).
Unallocating volumes from hosts
Unallocated volumes can be re-allocated (with existing data) or can be made available for other
storage requirements.
Tasks to complete beforehand:
• Identify the name of the target cluster or host, and the volumes to unallocate.
• If necessary, backup data on the target volumes.
• Unmount all allocated volumes that you plan to unallocate. An IT administrator might have to
perform this task.
1. On the Resources tab you can unallocate volumes from several locations:
• From General Tasks, select Unallocate Volumes.
• Select a host OS, select one or more target hosts, and click Unallocate Volumes.
• Select a host OS, click a target host name to display volumes, select one or more volumes,
and click Unallocate Volumes. You can also search for a host, click the host name and go
directly to the volume list.
2. In the unallocate volumes dialog box, you will either select the host and host volumes to unallocate
and click Show Plan to continue, or if the host and host volumes were selected prior to launching
Managing storage resources in a SAN environment72
Page 73
the dialog box, you will go directly to the plan summary. In both cases, you will see Advanced
Options in the dialog box that may be of interest.
3. Whether you clicked Show Plan, or went directly to the plan summary, do the following:
a. Review all plan information. If you clicked Show Plan and changes are needed, click Back.
If you went directly to the plan summary and changes are needed, click Cancel.
b. Enter a task name and description.
c. Schedule the task for now, or a later date and time.
d. If scheduled for now, select View task status to monitor the task when submitted.
e. Click Submit to queue the task.
4. On the Tasks & Alerts tab, confirm task completion. If status is not completed, click the task name
to review the message.
Unallocated volumes are added back to the storage system Open-Unallocated volume list.
Unallocate volumes dialog box
Successfully unallocated volumes are placed in the Open-Unallocated folder of the storage system
they originated from. Unallocated volumes can be re-allocated to another host, with data intact.
Volumes can be deleted using the unallocate volumes dialog box and returned to unused capacity,
or previously un-allocated volumes can be deleted and returned to unused capacity as a separate
step.
TIP:
As a general rule, when using a dialog box, errors are displayed at the top of the dialog box with a
problem description.
Below, field groups are indicated by >>. Field groups expose information or fields when clicked, and
hide information or fields when clicked again.
Table 8 Unallocate volumes dialog box
DescriptionsSubfieldsFields
Note: It is recommended that volumes be unmounted from hosts prior to
unallocating the volumes.
The unallocate volumes dialog box works slightly differently depending
on where you launch the dialog box, for example:
If you select Unallocate Volumes from General Tasks, you will be
prompted to select a host. Selecting the host will display the host volumes.
Select one or more volumes and click Show Plan to display the fields
and options below.
-Host
If you select Unallocate Volumes by selecting a host row from the Hosts
panel, you will not be prompted to select a host. Host volumes are
displayed. Select one or more volumes and click Show Plan to display
the fields and options below.
If you click the host name to list host volumes, you can identify and select
volumes using details such as host group, or volume attribute (for
example, LUSE). Select volumes and click Unallocate Volumes to display
the fields and options below. In this case, Show Plan is not displayed
because the host volumes were known prior to launching the dialog box.
User Guide 73
Page 74

DescriptionsSubfieldsFields
>> Plan Details
-Plan Summary
Volume Information
LUN Path Information
Host Group Delete
Only unallocate
volumes
For one or more volumes the volume id, storage system, volume type,
drive type, and host for each volume is displayed.
There is a Deletable column with a yes or no value to indicate whether
the volume can be deleted. For example, volume conditions preventing
deletion include:
• The volume is in use by another host
• The volume is a command device
• The volume is a pair volume
For one or more volumes the volume id, storage system, storage port,
port type, host port, LU number, host group, host mode, and 'other options' for each volume is displayed. This provides complete storage and
host LUN path information.
If you select all volumes for a host group, a host group deletion option
is displayed. Deleting a host group is only done under very specific circumstances, such as the target server having been replaced with a new
server. Do not select this option unless you know the exact status of the
target server and the server volumes (data), and are confident this option
is appropriate.
This default selection unallocates volumes only without deleting volume
data or the volume. Unallocated volumes can be re-allocated to another
host, for example a newer and faster server.
>> Advanced
Options
Release LUSE
volumes
Delete volumes
Virtual Information
A LUSE volume is created by aggregating (combining) multiple smaller
LDEVs into a larger volume that is allocated to a host. If one or more
LUSE volumes are selected, this option is activated and can be selected
to un-allocate LUSE volumes and release the component LDEVs of the
LUSE volume.
For volumes where Plan Details > Volume Information indicates the
volume is eligible to be deleted (Deletable=yes), the eligible volumes
will be deleted and returned to unused capacity.
Select Delete Virtual Information from volumes to delete virtual id information. This option should only be used by an administrator knowledgable
about the status of migrated volumes with virtual id information.
Replicating volumes
This module describes how to replicate volumes.
About replicating volumes (pair management)
Volume replication is used to make copies of critical data for volumes allocated to hosts. You can
make a local copy of a volume in the same storage system, or make a remote copy of a volume in a
different storage system.
Command View AE Suite provides several volume replication solutions based on pair management
requirements and related licensing:
Managing storage resources in a SAN environment74
Page 75

• This section addresses using a basic version of Replication Manager (included with the Device
Manager license) that provides for common pair management tasks (for example, create a pair)
using the Actions menu, Manage Replication.
• To use full Replication Manager functionality from the Tools menu, you must register a Replication
Manager license, and launch Replication Manager with a user account that has Replication
Manager permissions. You can use wizards to visualize complex replication configurations while
defining, editing, viewing, and troubleshooting copy pairs.
For information about setting up Replication Manager, see the:
• HP P9000 Command View Advanced Edition Suite Software Administrator Guide
• HP P9000 Command View Advanced Edition Suite Software System Requirements
For information about using Replication Manager, see the:
• HP P9000 Command View Advanced Edition Suite Software Replication Manager Users Guide
Copy pair management operations
You can perform the following pair management functions in HP StorageWorks P9000 Command
View Advanced Edition Suite:
• Define, create, and delete open volume copy pairs
• Modify copy-pair tasks
• create: Creates a copy pair
• split: Separates a copy pair
• resync: Synchronizes a secondary volume with the primary volume
• restore: Restores the copy pair from a secondary volume to the primary volume
• delete: Releases a copy pair and changes the status to simplex
• View information from the Hosts, Storage Systems, and Copy-Pair Configuration Definitions trees
• View tasks
• View workflows
• Add, edit, or delete command devices
• View event logs
• Switch to maintenance mode
To access other pair management functionality, you must register a Replication Manager license and
log in to Command View AE Suite with Replication Manager permissions.
Adding command devices
A command device supports replication operations by providing a communication channel between
hosts and storage for replication commands.
1. From the Actions menu, select Manage Replication to start the Replication Manager.
2. From the Explorer menu, select Resources and then Storage Systems.
3. Expand the tree and select the desired storage system.
4. Click the Open link, and then on the Cmd Devs tab, click Add Cmd Devices and add the command
device.
The added command device can be viewed by clicking the Open link from the storage system name
shown in the Replication Manager. The list of added command devices are displayed in the Cmd
Devs tab.
User Guide 75
Page 76

TIP:
To delete command devices, select the check boxes of the command devices to be deleted, and click
Delete Cmd Devices.
Editing command devices
You can edit an existing command device.
1. From the Actions menu, select Manage Replication to start Replication Manager.
2. From the Explorer menu select Resources and then Storage Systems.
3. Expand the tree and select the desired storage system.
4. Click the Open link and then on the Cmd Devs tab click the pencil and paper icon and edit the
command device.
5. Follow the instructions in the window to edit the command device.
The edited command device can be viewed by clicking the Open link from the storage system name
in Replication Manager. The list of edited command devices are displayed in the Cmd Devs tab.
Defining copy pairs
Before you define copy pairs, determine the volumes that will be used to define copy pairs and verify
that the volumes are allocated to a host.
1. From the Actions menu, select Manage Replication to start Replication Manager.
2. Display a list of volumes from the Hosts tree or the Storage Systems tree.
3. On the Unpaired tab, select the volumes from which copy pairs will be defined and click Pair
Management.
The Pair Configuration wizard opens.
4. Follow the steps in the Pair Configuration wizard to define copy pairs.
For details about how to specify copy-pair conditions and how to use the Pair Configuration
wizard, see the Replication Manager online help.
5. From the Explorer menu, select Tasks, and then select Tasks again to confirm that the task was
properly executed.
6. Confirm the copy-pair definitions by viewing the Pair Configurations view in Replication Manager.
From the list of volumes in the Hosts tree or the Storage Systems tree, view the current copy pair
status.
TIP:
To display the most recent SplitTime in Device Manager after performing operations on a Snapshot
or Fast Snap copy pair, you need to refresh the storage system information.
Changing the status of a copy pair
You can change the status of a copy pair.
1. From the Actions menu, select Manage Replication to start Replication Manager.
Managing storage resources in a SAN environment76
Page 77

2. From the Hosts tree, select a host and click Refresh Hosts.
All copy pairs associated with that host are refreshed.
3. Display the list of volumes from the Hosts tree.
4. Click the icon to change the pair status.
5. Change the copy pair status by using the Change Pair Status wizard.
For details on the conditions under which certain copy pair statuses can be changed and on how
to change the status of a copy pair by using the Change Pair Status wizard, see the Replication
Manager online Help.
6. From the Explorer menu, select Tasks, then select Tasks again to confirm that the task is completed.
7. Confirm the copy pair status was changed by viewing the list of volumes in the Hosts view or the
Storage view in Replication Manager.
From the list of volumes in the Hosts tree or the Storage Systems tree, view the current copy pair
status.
TIP:
To display the most recent SplitTime in Device Manager after performing operations on a Snapshot
or Fast Snap copy pair, you need to refresh the storage system information.
Data mobility
An administrator can obtain information required to see the operating status of storage resources and
optimize data placement.
About data mobility
The Mobility tab provides information required to see the operating status of storage resources and
optimize data placement.
To efficiently use a storage resource, use the Mobility tab to optimize the data arrangement. In the
Mobility tab, information used to determine whether the data arrangement is appropriate is collectively
displayed. In addition, you can use the Mobility tab to centrally perform operations regarding moving
data such as data migration. To use the Mobility tab, you must first register a Tiered Storage Manager
license. Using Mobility tab information, you can evaluate and analyze whether the hardware tiers
are being used appropriately and whether the volumes are providing the expected performance.
Based on these results, you can optimize data placement by migrating data and setting up a Smart
Tiers Software tiering policy (which specifies the hardware tiers in which volumes are to be placed).
After completing these operations, check their effect from the Mobility tab and then perform any other
necessary data optimization operations. By repeating this process, the placement of data can be
optimized. The following figure shows the process of optimizing data placement.
User Guide 77
Page 78

From the Mobility tab, data placement can be optimized from either the application (logical group)
perspective or from the THP/Smart pool perspective. To respond to requests from host or application
administrators, or to confirm whether Smart pools and storage resources are being used according
to the needs of each application, check the balance between the performance and the configuration
ratio of logical groups. To regularly monitor storage resources, or if there is a problem in the analysis
of logical groups, check the balance between the performance and the configuration ratio of each
THP/Smart pool. If there is a problem, you must check the operating status of each volume in the
THP/Smart pool and then optimize the configuration.
When periodically monitoring logical groups or THP/Smart pools during routine work, check the
ranking reports in the Mobility tab so you can efficiently find logical groups or THP/Smart pools that
have problems in their operational status.
The Mobility tab can be used to check the total capacity and usage rate for each logical group, THP/
Smart pool, or each volume in a logical group or THP/Smart pool. As with Smart pools, you can also
check which volumes are using the largest proportions of each hardware tier. In addition, the following
performance information can also be viewed:
• Quantity of I/O operations compared to the calculated maximum number of I/O operations
In addition, if linked with HP StorageWorks P9000 Performance Advisor software, the following
performance information can also be viewed:
• Throughput (IOPS) for THP/Smart pools, volumes, and hardware tiers
• Past volume performance data (to look for trends)
• Response time of the volume
• Busy rate for parity groups
For details on linking to HP StorageWorks P9000 Performance Advisor software, see the HP P9000
Command View Advanced Edition Suite Software Administrator Guide.
NOTE:
If HP StorageWorks P9000 Performance Advisor is not linked, or information cannot be obtained
due to storage system type, or the HP StorageWorks P9000 Performance Advisor software version,
hyphens are displayed in performance information columns.
From the Mobility tab, the following operations can be performed to optimize data placement:
• Configuration and editing of aSmart Tiers Software tiering policy
• Migration of volumes
• Manually starting or stopping the monitoring and relocation of Smart pools
• Editing tier relocation of Smart volumes
• Expanding, shrinking, or changing of the settings for THP/Smart pools
• Expanding THP/Smart volumes and reclaiming zero pages
By creating tiers of volumes or THP/Smart pools based on use or performance, you can migrate data
to volumes or THP/Smart pools that match the relevant conditions simply by specifying a tier as the
migration target.
Reports for logical groups displayed in the Mobility tab
The following ranking reports for logical groups are displayed in the Mobility tab:
• Bottom 10: Logical Groups with High Response Time
Managing storage resources in a SAN environment78
Page 79

Checks for logical groups including volumes whose response time is slow. Used to determine logical groups which do not satisfy required performances. This ranking is displayed only when you
have the license for HP StorageWorks P9000 Performance Advisor software.
• Top 10: Logical Groups with Lowest Unused Capacity
Checks for logical groups that have little unused capacity left for the allocated THP/Smart volumes.
Used to determine logical groups which do not have enough capacity.
• Top 10: Logical Group Used Capacity by Drive Types
Checks for logical groups that use a large amount of capacity by drive type. Used to determine
whether an unexpected volume is occupying a high-speed drive or logical groups which have invalid data arrangements.
The following information is displayed when a logical group is selected:
• Summary
Provides summarized information in a list, such as the number of volumes and the total capacity
of a logical group, or the last update date. Based on this information, you can review the usage
status of the storage resources in the logical group.
• Drive Type Summary
Checks whether the logical group has the necessary capacity. Checks the total capacity of the
volumes and the used capacity of each drive type within the logical group.
• Drive Type Distribution
Checks how many of each drive type is used for each THP/Smart pool that is included in a logical
group. Used to check whether the configuration of the hardware tier is appropriate.
Reports for THP/Smart pools displayed in the Mobility tab
The Mobility tab displays several types of reports, each with its own purpose.
Ranking reports for THP/Smart groups displayed in the Mobility tab are as follows:
• Top 10: Pools with the Highest Used %
Checks for THP/Smart pools with a high capacity usage rate to determine THP/Smart pools that
need pool expansion or data migration.
• Top 10: Pools with the Highest Subscription
Checks for THP/Smart pools with a high reservation rate to determine THP/Smart pools that need
pool expansion or data migration.
• Top 10: Tiers with the Highest Performance Utilization
Checks for hardware tier configurations with high ratio of actual I/O operations to the calculated
maximum number of I/O operations. Used to determine Smart pools that include hardware tier
configurations with saturated performance.
The information displayed when each THP/Smart pool is selected is as follows:
• Summary
Summarizes information in a list, such as the total capacity and usage of THP/Smart pools, and
the reservation rate. Based on this information, you can review the usage status of the THP/Smart
pool.
If a Smart pool is selected, the following information can also be viewed:
• Tier Summary
User Guide 79
Page 80

Checks information such as drive type, drive rotational speed, and capacity usage rate of each
hardware tier. Based on this information, you can review the usage status of hardware tiers. Note
that this summary only appears for Smart pools.
• Capacity Utilization
Checks the total capacity and used capacity of the Smart pools for each hardware tier. Used to
check whether the Smart pool has the necessary capacity and which hardware tier needs more
capacity added to it. This summary only appears for Smart pools.
• Performance Utilization
Checks the ratio of actual I/O operations to the calculated maximum number of I/O operations
for each hardware tier. Used to check for hardware tiers with performance in a saturated state
requiring optimization (editing the tiering policy, or data migration). This summary only appears
for Smart pools.
• Top 10: Volumes Sharing Tier Capacity
Checks the usage ranking of volumes that have the largest use capacity in each hardware tier.
Based on this information, you can check whether data placement is appropriate, for example by
checking whether an unexpected volume is occupying a high-speed drive. This summary only
appears for Smart pools.
• View Tier Properties
Checks the page access distribution per average number of I/O operations, which is based on
the monitoring information of Smart pools.
Based on this information, you can check whether the hardware tier configuration or tiering policy
settings are appropriate.
From the page access distribution for Smart pools, you can narrow the range of displayed items
to only tiering policies or only Smart volumes, as required.
Optimizing data placement in a logical group
Tasks to complete beforehand:
• A Tiered Storage Manager license must be registered.
• An HP StorageWorks P9000 Performance Advisor software license must be registered (when ref-
erencing performance information).
Data placement can be optimized in a logical group.
1. From the tree view of the Mobility tab, select Logical Groups.
2. Select All Logical Groups, and in the logical group ranking, check for logical groups that are
responding late, have a small unused capacity, or have a large used capacity for each drive
type.
3. If the capacity or performance of the entire logical group is not satisfactory, click the link of the
logical group name to check the total capacity of the volumes and the used capacity of each
drive type within the logical group. If the HP StorageWorks P9000 Performance Advisor software
license is registered, click the Analyze Performance button to check performance information as
required.
4. If the balance between the logical group performance and configuration ratio is not satisfactory,
select the row of the target volume, and click either the Migrate Data button, the Edit Tiering Policy
button, or other buttons, to remedy the problem.
5. Select Logical Groups from the Mobility tab to check optimization of the data placement.
Managing storage resources in a SAN environment80
Page 81

Optimizing data placement in a THP/Smart pool
Tasks to complete beforehand:
• A Tiered Storage Manager license must be registered.
• An HP StorageWorks P9000 Performance Advisor software license must be registered (when ref-
erencing performance information).
• Smart pools are being monitored (when referencing Performance Utilization, IOPS for a hardware
tier, or View Tier Properties).
Data placement can be optimized in a THP/Smart pool.
1. From the tree view of the Mobility tab, select THP Pools.
2. Select THP Pool to check for THP/Smart pools whose usage rate, reservation rate, or performance
usage rate is high.
3. If a THP/Smart pool does not meet the expectations for capacity or performance, click the link
of the logical group name in the ranking.
4. Check the usage status of the THP/Smart pools. For Smart pools, also check the usage status and
performance of each hardware tier. To check page access distribution per average number of
I/O operations, from the Actions menu (in the upper-right corner of the application area), select
View Tier Properties.
5. Select the THP/Smart volumes that have a problem and optimize the data placement by clicking:
• the Migrate Data button
• the Edit Tiering Policy button
• the Expand THP Volume button, or other buttons.
6. On the Mobility tab, select THP Pools to confirm data placement optimization.
Data migration
This module describes data migration.
About data migration
Data migration involves moving data from one set of volumes to another set of volumes or THP/Smart
pools, including those in externally-connected storage systems. For example, you can migrate data
when your volume performance decreases or your environment changes. When relocating data based
on the results of performance monitoring for volumes being used by servers and applications, or when
migrating data from an old storage system to a newly set-up storage system, the data in multiple
volumes can be migrated to other volumes or THP/Smart pools.
The source volume can be selected by host or by logical group. The source volume also can be selected
from some of the volumes allocated to a host some of the volumes in a logical group, some of the
volumes in a tier. Migration source volumes can also be selected from volume search results. If a
volume that cannot be migrated is included in the selected volumes, that volume is excluded from
migration and only volumes that can be migrated, will be migrated.
Migration targets are selected from tiers, THP/Smart pools, or resource search results. If THP/Smart
pools are selected, THP/Smart volumes with the same capacity as the migration-source volumes are
automatically created. The existing THP/Smart volumes also can be specified as migration targets.
Note the following:
User Guide 81
Page 82

• When the migration source and the migration target are selected, individual pairs of migration
source volumes and migration target volumes (or THP/Smart pools) are automatically created.
Although, you can change these pairs, pairs of volumes that cannot be migrated will not be created.
• During migration, data can still be accessed.
• When data migration is completed normally, the LDEV ID and host I/O of the migration source
volumes are changed to those of the migration target volumes. The procedure for accessing migrated
data is not changed before or after migration.
• If linked with HP StorageWorks P9000 Performance Advisor software, parity group busy rate for
the migration source volume and migration target volume can be checked.
• After migrating, you can delete the data of the source volumes.
• After volumes are migrated to a THP/Smart volumes, unused capacity in the target volumes is re-
turned to the pool (zero page reclaim) if the zero page reclaim option is on.
• You cannot work with volumes (such as copy pair or volume allocation) until the migration tasks
are completed.
You must have a Tiered Storage Manager license registered to perform Data Migration.
For details about data migration in Legacy mode, using migration groups earlier than v7.1.1, see
“About Legacy mode” on page 149.
Notes on performing data migration
The number of volumes that are candidates for migration target volumes are narrowed down and
displayed when selecting a migration target volume. If you want to display all the volumes, in the
migration.properties file on the Device Manager server set a value for the
migration.plan.candidateVolumeCountLimit property.
For details on the properties file, refer to the HP P9000 Command View Advanced Edition Suite
Software Administrator Guide. To avoid insufficient memory, we recommend that you use the default.
The maximum number of volumes that can be displayed as migration target candidates is 2,000
volumes. Exceeding this value will produce an error.
The maximum number of volumes that can be displayed as migration source candidates is 500
volumes. Exceeding this value will produce an error.
Data migration tasks take a long time from start of execution to completion. This might affect the
performance of access from hosts to target volumes. To avoid executing such tasks while the access
frequency is high, check the time required to complete the tasks and set a task execution schedule
before registering the tasks. Actual required time might differ considerably in cases such as performing
migration for the first time, migrating a volume smaller than 170 GB, or migrating many volumes at
the same time.
When storage systems or hosts are under a heavy load, migration might fail. In this case, reduce the
load on the storage systems, and then perform data migration again.
If data migration fails, the integrity of data on the migration target cannot be ensured. Therefore, data
migration must be performed again.
If a data migration fails, and operations for the migration target such as re-execution of data migration
and volume allocation cannot be performed, the storage system must be refreshed.
Conditions for data migration
Data migration conditions include conditions that apply to all volumes (volume migration requirements),
and conditions that depend on the type of volume (volume migration requirements related to volume
type).
Managing storage resources in a SAN environment82
Page 83

For some volumes, when you try to select those volumes as migration-source volumes, the reasons
why they cannot be selected as migration-source volumes are displayed on-screen.
Volume migration requirements
All volumes for which data migration is to be performed must meet the following conditions:
• Migration-source and migration-target volumes exist within one of the following storage systems
(chassis):
• P9500 Disk Array
• XP24000/XP20000
• XP12000/XP10000/SVS200
• The emulation type, number of blocks, and size are the same for the source and target migration
volumes. However, note the following exceptions:
• If the micro version of XP24000/XP20000 is 60-03-20-00/00-xx or later and if both the migration source and the migration target volumes are THP/Smart volumes, the emulation type
can be between OPEN-V and OPEN-0V.
• If a volume whose emulation type is OPEN-V is a normal volume, and if the size of a migration
target volume is larger than a migration source volume, a volume that has the same size of the
migration source volume is re-created. The remaining capacity can be reused. If you set a
value for the property migration.plan.candidateCapacityGroupDisplayMaxCount
in the migration.properties file, you can specify how many volumes with a larger capacity
than the migration source volume to display, in addition to the volumes with the same capacity
as the migration source volume.
• The LDKC:CU:LDEV number for the volume is in the range from 00:00:00 to 00:FF:FF
• Volumes can be accessed, and are not reserved by other programs, Device Manager, or tasks.
• If the emulation type is not OPEN-V, and both the migration source and the migration target
volumes are normal, or both are CVS volumes.
Volume migration requirements related to volume type
Whether you can select a volume as a migration source or migration target depends on the volume
type. The following table shows which volume types can and cannot be selected as migration sources
and targets.
Table 9 Migration sources and targets by volume type and state
TargetSourceVolume Type, State
YYNormal volumes
YYExternal volumes
LUSE volumes
THP/Smart
volumes
2
1
Y
Y
NNSmart volumes to which a data placement profile is applied
NNVirtual volumes that are not associated with a THP/Smart pool
YYVolumes other than the above
NTHP/Smart pools
3
Y
NNTHP/Smart pool volumes
NNVolumes for which Cache Residency, Cache Residency for Mainframe is set
User Guide 83
Page 84

TargetSourceVolume Type, State
NNCommand Device
NNVolumes that are configured as a Cross-system Copy pair
NYNAS system volumes
NNSystem Disk
NNVolumes that are configured for concurrent copying
NNOn-demand device volumes
NNIntermediate volumes
NYMainframe volumes for which a path is set
YYMainframe volumes for which SYSPLEXID is set
YYMainframe volumes for which DEVN is set
NYMainframe volumes for which VOLSER is set
NNQuorum disks used for External Storage Access Manager
External Storage
Access Manager
Business Copy,
Hitachi ShadowImage for Mainframe
Continuous Access,
Hitachi TrueCopy
for Mainframe
P-VOL
S-VOL
Volumes for which pairs are configured with a P-VOL and three
S-VOLs
Volumes for which pairs are configured with an S-VOL and an
SP-VOL
Volumes for which pairs are configured with an SP-VOL and
two S-VOLs
PSUS
PSUE
[Suspended]
PAIR
P-VOL
S-VOL
[Duplex]
(PAIR and Duplex can be a migration source
when using Continuous Access Synchronous
with XP24000/XP20000, or P9500 Disk
Array)
4
Y
(In the
case of
an
internal
storage
system)
NN
NN
NN
NN
NYVolumes other than the above
N
NNVolumes other than the above
Continuous Access
Journal, Hitachi
Universal Replicator
for Mainframe
Managing storage resources in a SAN environment84
P-VOL
S-VOL
COPY
PAIR
[Pending duplex]
[Duplex]
NN
Page 85

TargetSourceVolume Type, State
P-VOL
Snapshot
V-VOL
POOL
Fast Snap NNV-VOL
Data Retention Util-
5
ity
Volumes that are
configured for XRC
Volumes other than the above
4
Y
N
NNJNL-VOL
NYPAIR (1 to 63 generations)
NNVolumes other than the above
NN
NNP-VOL
NNPOOL
YYRead/Write
NYVolumes other than the above
NYSuspended status
NNVolumes other than the above
YVolumes for which virtual IDs are specified
6
Y
User Guide 85
Page 86

TargetSourceVolume Type, State
Legend:
• Y: Can be selected
• N: Cannot be selected
• [ ]: Names indicated are those for mainframe-based programs
Notes:
1. When the migration source volume is a LUSE, a migration target must be selected for each volume that
constitutes the LUSE. Migration target volumes must also satisfy the following conditions:
• All of the migration target volumes are internal volumes, or all are external volumes.
• The I/O suppression mode, cache mode, and CLPR of all migration target volumes are the same.
• Migration target volumes are not THP/Smart volumes.
Also, for Tiered Storage Manager to automatically create pairs for migration sources and migration targets,
we recommend that the following conditions also be met:
• If the migration target volumes are external volumes, all of the volumes are in the same external storage
system.
• The RAID level, drive type, and SLPR (storage management logical partition) of all migration target
volumes are the same.
Note that if you are migrating a LUSE volume of an XP24000/XP20000 storage system for which the
micro version is earlier than 60-05-12-00/00, you must not perform I/O operations on the volumes while
migration is being executed.
2. The migration-source volumes and migration target volumes or pools are in different THP/Smart pools.
3. The following conditions must be satisfied:
• The status is not blocked.
• The THP/Smart pool has more unused capacity than the migration-source volumes.
• Used THP/Smart pool capacity does not exceed both used thresholds 1 and 2 (even after a migration
is performed).
• THP/Smart pool subscription does not exceed the subscription warning and subscription limit (even
after a migration is performed).
• When selecting migration-target resources, if the option to create new THP/Smart volumes is selected,
the number of virtual volumes in the THP/Smart pool is less than the limit (P9500 Disk Array: 63,232;
XP24000/XP20000: 8,192).
4. The CLPRs for the migration target and migration source are the same.
5. If an external storage system is locked (not Read/Write), it cannot be a migration source or migration
target.
6. Volumes with virtual IDs specified cannot be selected as migration target volumes when:
• The migration target is a THP/Smart pool, and Create new THP volumes is selected in the migration
target creation options.
• The specified capacity differs from the capacity of the migration source.
Reasons why volumes cannot be selected as migration sources
If a volume cannot be made a migration source and the reason for it is displayed, in the Data Migration
wizard, a character string is displayed in the Migration Restriction column for Selected Column on
the Migration Source page. The following table shows the character strings and corresponding reasons
why a volume cannot be made a migration source.
Table 10 Volumes that cannot be used as migration sources
Reason preventing use as a migration sourceDisplayed character string
The volume is part of an unsupported storage system.Array Type
Managing storage resources in a SAN environment86
Page 87

Reason preventing use as a migration sourceDisplayed character string
Cache LUN XP
XP Snapshot Status
XP Thin Provisioning [Unassigned]
Cache Residency or Cache Residency Manager for Mainframe is set for
the volume.
The volume is used as a command device.Command Device
The volume is one of the following:
• The volume is the P-VOL of a Snapshot pair, its status is PAIR, and
the number of generations is 64
• The volume is the P-VOL of a Snapshot pair and its status is not PAIR
• The volume is the V-VOL of a Snapshot pair
• The volume is the POOL of a Snapshot pair
The volume is a THP/Smart pool volume.XP Thin Provisioning [Pool Volume]
The volume is a virtual volume and is not associated with a THP/Smart
pool.
The volume is locked by Data Retention Utility (not Read/Write).Externally Locked
The volume is an intermediate volume.Intermediate volume
The volume has already been reserved as a migration target.Migration Reserved
Information for the volume cannot be acquired.Not Acquired Volume Information
The volume is an on-demand device volume.On Demand Device
Business Copy Configuration [Leaf]
Business Copy XP Configuration
[Leaf]
Business Copy Configuration [Node]
Business Copy XP Configuration
[Node]
Business Copy Configuration [Root],
Business Copy XP Configuration
[Root]
Continuous Access Asynchronous
Status
Continuous Access XP Asynchronous
Status
The volume has already been reserved in Device Manager.Reserved
Only the View role is assigned.Role
The volume is part of a Business Copy or Hitachi ShadowImage for
Mainframe S-VOL, and paired with an SP-VOL.
The volume is part of a Business Copy or Hitachi ShadowImage for
Mainframe SP-VOL, and paired with two S-VOLs.
The volume is part of a Business Copy or Hitachi ShadowImage for
Mainframe P-VOL, and paired with three S-VOLs.
The volume is a system disk.System Disk
This is a Fast Snap P-VOL, V-VOL, or Pool.Fast Snap
The volume is one of the following:
• The volume is part of a Continuous Access Asynchronous pair, and
the status is neither PSUS nor PSUE
• The volume is part of a Hitachi TrueCopy Asynchronous for Mainframe
pair, and the status is not suspended
User Guide 87
Page 88

Continuous Access Synchronous
Status
Continuous Access XP Synchronous
Status
Continuous Access Journal Status
Continuous Access XP Journal Status
Reason preventing use as a migration sourceDisplayed character string
The volume is one of the following:
• The volume is part of a Continuous Access Synchronous pair, and
the status is other than PSUS, PSUE, or PAIR
• The volume is part of a Hitachi TrueCopy for Mainframe pair, and
the status is not suspended
• The volume is in an XP12000/XP10000/SVS200, and a part of a
Continuous Access Synchronous pair, and the status is PAIR
• The volume is from an XP12000/XP10000/SVS200, and part of a
Hitachi TrueCopy for Mainframe pair, and the status is Duplex
The volume is one of the following:
• The volume is part of a Continuous Access Journal pair, and the status
is either COPY or PAIR
• The volume is part of a Hitachi Universal Replicator for Mainframe
pair, and the status is either Pending duplex or Duplex
• The volume is part of a Continuous Access Journal journal volume
• The volume is a Hitachi Universal Replicator for Mainframe journal
volume
Auto LUN V2 is not installed in the storage system.Auto LUN V2
Migrating data for volume performance
You can migrate data based on the results of monitoring volume performance:
Tasks that must be completed beforehand:
• A Tiered Storage Manager license must be registered.
• Set up an external connection to a P9500 Disk Array, XP24000/XP20000, XP12000 Disk Array.
• Creation of a tier in which the target mainframe volumes are grouped (only when migrating
mainframe volumes).
Information that should be obtained beforehand:
• Migration source host, logical group, tier, or storage system.
• Migration target THP/Smart pools, tier or migration target volumes.
1. In the Resources or Mobility tab, select a migration source host or logical group. From a list of
hosts or logical groups, you may also select migration source volumes. If migrating data from a
mainframe volume, expand the Tiers tree on the Resources tab or the Mobility tab, and then select
the corresponding tier.
2. Click the Migrate Data button.
3. Verify that the correct migration source volumes are selected, and then click the Next button.
4. Specify the migration target, THP/Smart pool or tier and then click the Next button. When the
parity group selection rule is set, a candidate volume that is appropriate as a migration target
will be selected depending on the application that is being used or the usage rate of the parity
group. Specifically:
• Balance Capacity: System attempts to select a migration target candidate so that the remaining
capacity of the targeted parity group is equalized with other parity groups.
• Maximum Coverage: Select a candidate for the migration target from as many parity groups
as possible.
Managing storage resources in a SAN environment88
Page 89

• Minimum Coverage: Select a candidate for the migration target from as few parity groups as
possible.
5. Confirm that all migration source volumes and target volumes or THP/Smart pools are paired
properly, confirm that no other problems exist, and then click the Next button. If necessary,
change the pairs. To change a pair, first select the volume pair, then from the Other Candidates
for Migration list, select the target volume to change to, and then click the Map Volume button.
6. Specify plan options as necessary and then execute the task.
7. In the tasks list, confirm the execution result of the task. After a task is created, you must not perform
operations on volumes included in the task by using HP StorageWorks P9000 Command View
Advanced Edition Suite or other programs until the task has finished executing.
Migrating data to a different storage system
You can migrate data to a different storage system.
Tasks to complete beforehand:
• Register a Tiered Storage Manager license
• Set up an external connection to a P9500 Disk Array, XP24000/XP20000, XP12000 Disk Array
.
• Create a tier in which the target mainframe volumes are grouped (only when migrating mainframe
volumes).
• Identify the migration source host, logical group, tier, or storage system.
• Identify the migration target THP/Smart pools, tier, or migration target volumes.
1. On the Resources tab, select Storage Systems.
2. Expand the tree for the source storage system that is to be migrated, select the volumes to be
migrated from the list of external storage systems, and then click the Migrate Data button.
3. Confirm that the correct migration source volumes are selected, and then click the Next button.
4. Specify the migration target, THP/Smart pools, or tier and then click the Next button. When the
parity group selection rule is set, a candidate volume that is appropriate as a migration target
will be selected depending on the application that is being used or the usage rate of the parity
group. Specifically:
• Balance Capacity: System attempts to select a migration target candidate so that the remaining
capacity of the targeted parity group is equalized with other parity groups.
• Maximum Coverage: Select a candidate for the migration target from as many parity groups
as possible.
• Minimum Coverage: Select a candidate for the migration target from as few parity groups as
possible.
5. Confirm that all migration source volumes and target volumes or THP/Smart pools are paired
properly, confirm that no other problems exist, and then click the Next button. If necessary,
change the pairs. To change a pair, first select the volume pair, then from the Other Candidates
for Migration Target list, select the target volume to change to, and then click the Map Volume
button.
6. Specify plan options as necessary and then execute the task.
7. In the tasks list, confirm the execution result of the task. After a task is created, you must not perform
operations on volumes included in the task by using HP StorageWorks P9000 Command View
Advanced Edition Suite or other programs until the task has finished executing.
User Guide 89
Page 90

Prerequisites for migrating data from an SMI-S Enabled storage system to another storage system
You can migrate data between an old and new storage system for abolishing or merging systems by
using the external storage connection function (Universal Volume Manager). The figures below provide
an example of migrating data to HP XP24000 when the SMI-S Enabled storage system is abolished.
To perform migration, use the GUI or CLI to migrate data by the system.
Migrating data from an SMI-S Enabled storage system to another storage system
You can migrate data from an SMI-S Enabled storage system to another storage system.
Tasks that must be completed beforehand:
• The Device Manager CLI is set up.
• A Tiered Storage Manager license is registered.
• The Tiered Storage Manager CLI is set up (if necessary).
• The port of the SMI-S Enabled storage system is connected to the External port of the storage system
via Fibre Channel.
Managing storage resources in a SAN environment90
Page 91

• The volumes of the SMI-S Enabled storage system are assigned to the External port (performed by
the management tool of the SMI-S Enabled storage system).
Information that should be obtained beforehand:
• Name or IP address of the allocation target host.
• The WWN and LUN associated with the migration source SMI-S Enabled storage system that was
assigned to the External port.
For details about the values specified for the parameters and syntax of each CLI command of Device
Manager and Tiered Storage Manager to be used for operations, see the HP P9000 Command View
Advanced Edition Suite Software CLI Reference Guide and the HP P9000 Tiered Storage Manager
CLI Reference Guide.
1. Register the migration target storage system and the migration source SMI-S Enabled storage
system in HP StorageWorks P9000 Command View Advanced Edition Suite. Use the GUI to register the storage systems, or execute the AddStorageArray command (Device Manager CLI).
NOTE:
Registering or updating a storage system might take a long time depending on its configuration
or scale, so you need to perform these operations systematically.
NOTE:
If the migration target or source storage system has already been registered, you need to update
the migration target or source storage system in order to obtain the latest configuration
information.
2. Stop the hosts to which the storage systems are connected.
Note that steps 3 - 4 below need to be performed while the host is stopped, so you need to make
a plan in consideration of host operations.
3. Map the volumes of the migration source SMI-S Enabled storage system to the migration target
storage system as external volumes.
Execute the AddExternalArrayGroup command (Device Manager CLI).
4. Allocate the external volumes mapped to the migration target storage system to the host.
Use the GUI to allocate the volumes, or execute the AddLun command (Device Manager CLI).
5. Start the host, and then change the target that the host (applications) accesses from the migration
source storage system to the migration target storage system.
Perform this step by using the configuration tools of the host while applications are stopped.
6. Migrate data in the external volumes (migration source) to an internal volume of the migration
target storage system (data migration). Use the GUI to migrate data, or execute the following
commands (Tiered Storage Manager CLI):
• CreateStorageTier command
• CreateMigrationGroup command
• CreateMigrationPlan command
• CreateMigrationTask command
• ExecuteTask command
7. Unmap the external volumes (migration source) from the migration target storage system.
User Guide 91
Page 92

Execute the DeleteExternalArrayGroup command (Device Manager CLI).
8. Delete the migration source SMI-S Enabled storage system from the management targets of HP
StorageWorks P9000 Command View Advanced Edition Suite.
Use the GUI to delete a storage system, or execute the DeleteStorageArray command (Device
Manager CLI).
The data of the migration source SMI-S Enabled storage system can be used as an internal volume
of the migration target storage system. The migration source SMI-S Enabled storage system can be
removed.
Managing tasks
This module describes how to manage tasks.
About tasks
When you perform any operation, the operation is registered as a task.
• Tasks can be performed immediately or at a specified date and time. This allows the storage ad-
ministrator to schedule storage operations appropriately.
• You can check the progress or the results of all previously executed tasks on the Tasks & Alerts
tab.
• The schedule of a task that is waiting can be changed.
• Specifying an email address when registering migration tasks enables email notification for migra-
tion task completion (tasks whose status is success, failure, or stopped).
TIP:
An email notification makes it unnecessary to monitor the progress of a task. This setting is used
in cases where you want to verify the execution results for a task, or when it is necessary to contact
a server administrator or application administrator regarding changes to storage system settings,
or when you plan to execute a task that will take a long time to finish.
• When a task is registered, Command View AE Suite reserves any resources that the task requires
(such as, volumes, parity groups, pools, host groups), and denies access to other operations until
the task either completes or is cancelled.
• Data migration tasks and data placement profile tasks can be stopped during execution.
• If the server stops before a task starts, the task will run the next time the server starts. If the server
stops while a task is running, the task will fail. Scheduled tasks can be rescheduled after the server
is restarted.
NOTE:
Information about previously run tasks is automatically deleted, starting with the oldest task, after the
number of tasks exceeds 100,000. Tasks can also be deleted manually. Until the task is complete, do
not perform operations on any volume included in the task by using HP StorageWorks P9000
Command View Advanced Edition Suite or any other program.
Managing storage resources in a SAN environment92
Page 93

Viewing task status
Viewing the status of a task allows you to see if a task has completed, as well as other details.
1. From the Tasks & Alerts tab, Tasks & Alerts pane, click All Tasks.
2. You can check the task Status column from the Tasks tab, or History tab, to determine if a task
completed.
3. Click the task name link in the Tasks column to review the Task Details dialog box. If a task has
failed, look for a diagnostic message (Message field).
Rescheduling tasks waiting to be executed
You may reschedule tasks waiting to be executed.
1. On the Tasks & Alerts tab, select All Tasks.
2. Select the waiting task you want to reschedule from the Tasks tab and click the Reschedule Tasks
button specify a new schedule from the dialog box.
3. You can now either execute the rescheduled task or confirm that the waiting task is rescheduled
by viewing the Tasks list.
Stopping running data migration or data placement profile tasks
Data migration or data placement profile tasks can be stopped during execution, in the following
ways:
• Normal stop - A task stop request is issued and processing that is currently being performed is
continued. For data migration, tasks are stopped when data moving processing completes. For
Data Placement Profile operations, tasks are stopped when processing for each storage system
completes. Processing that has not been started is stopped. It might take a long time after a task
stop request is issued before the task stops completely.
• Immediate stop - If you select the Stop the tasks immediately check box (immediate stop), or if a
task is performed that searches for inconsistent data placement profiles when a storage system is
refreshed, all processes are stopped immediately. For data migration tasks, since data that was
being migrated remains in the target volume, the user must delete the data in the target volume.
Therefore, we recommend that you use immediate stop only for emergencies.
The storage administrator checks the task progress and results in the Tasks & Alerts tab allowing the
schedule of a task that is waiting to be changed.
1. In the Tasks & Alerts tab, select All Tasks.
2. Select one or more running tasks that you want to stop, and click Stop Tasks.
3. In the confirmation dialog box, click OK.
4. In the task list window, confirm that the status of the task is stopped.
NOTE:
To access the Task Details dialog box to see the point at which a task was stopped, click All Tasks
in the Tasks & Alerts tree and click the task name link in the summary column of the Tasks tab.
Canceling scheduled tasks
You can cancel scheduled tasks that have not yet started.
User Guide 93
Page 94

NOTE:
You can view the status of a task while it is running or scheduled to run. You can only cancel tasks
that are in Waiting status.
1. On the Tasks & Alerts tab, select All Tasks and select a task from the task list.
2. Click Cancel Tasks.
3. Upon cancellation of a task the status of the task appears as Canceled.
Moving tasks to the History tab
You can move completed, failed, stopped, or canceled tasks from the Tasks tab to the History tab.
For example, you could move completed and cancelled tasks to the History tab and keep submitted,
stopped, and failed tasks in the Tasks tab until the tasks run to completion, or are resolved. Note that
moved tasks cannot be moved back to the Tasks tab.
1. From the Tasks & Alerts tab, select All Tasks.
2. Select one or more tasks on the Tasks tab, and click Move to History.
The tasks are moved to the History tab.
TIP:
To delete tasks from the Tasks or History tabs , select one or more tasks and click Delete Tasks.
Managing storage resources in a SAN environment94
Page 95

4 Grouping resources
This module describes how to group logical groups and storage tiers (resources).
Managing logical groups
This module describes how to manage logical groups.
About logical groups
A logical group is a group of hosts and volumes. A storage administrator creates logical groups and
assigns hosts and volumes to each logical group.
Logical groups allow you to:
• Create summary reports that indicate the current resource use in a storage environment by organ-
ization.
If you manage an entire system, you can create logical groups to generate usage summary reports
for each organization that uses storage.
• Monitor volumes and perform storage system operations by grouping managed resources (hosts
and volumes).
If you manage part of a system, you can categorize volumes according to the organizations that
use the storage. Grouping and categorizing volumes makes finding volumes easier and allows
you to perform daily operations for volume resources.
You can register multiple hosts or volumes to a logical group at one time by specifying a range of IP
addresses, or multiple items, such as operating system type and drive type. You can also change the
hierarchy of existing logical groups, or add and remove hosts and volumes. The same host(s) or
volume(s) can be registered to different logical groups. If a Tiered Storage Manager license has been
registered, use the Mobility tab to check the operation status of volumes per logical group or optimize
data arrangements. To efficiently find logical groups that have usage problems, use the Mobility tab
to check their rankings (e.g. logical groups that have small amount of unused capacity or use a large
amount of capacity per drive type).
Creating logical groups
Tasks to complete beforehand:
• Identify that the host to be assigned to a logical group is a normal host, a virtualization server, or
a virtual machine registered as a host. The volumes allocated to the host are automatically assigned
to the logical group.
Note the following restrictions:
• Mainframe volumes (MF-Vols) cannot be assigned to a logical group.
• Child groups cannot be created below host or volume groups. Child groups can be created only
below folders.
User Guide 95
Page 96

1. On the Resources tab, select Logical Groups.
2. Click Create Logical Group.
3. Create a folder for each new logical group:
a. Click Create Logical Group.
b. Enter the appropriate information.
c. Click OK.
d. Repeat for each new folder required.
4. To create a hierarchy of logical groups, repeat step 3.
On the Resources tab, click Logical Groups and confirm that the logical groups you created appear.
TIP:
To delete logical groups, select the logical groups to be deleted, and click Delete Logical Groups.
Viewing logical group reports
You can view summary reports for specified logical groups.
1. On the Resources tab, click Logical Groups.
2. Expand the tree and select the target logical group.
Editing logical groups
You can edit a logical group to change the parent group or change the host and volume settings.
1. On the Resources tab, click Logical Groups.
2. From the Logical Groups list, select the logical group you want to edit.
3. Click Edit Logical Group.
4. Change the parent group or change the host and volume settings.
5. Click OK.
6. Confirm the change by selecting the logical group and viewing the logical groups summary or
the host or volume list. If you change the parent logical group, you can confirm the new hierarchy
by reviewing the logical groups tree.
Performing operations from a logical group
You can perform operations on storage systems by starting from a logical group.
1. On the Resources tab, select Logical Groups.
2. Expand the tree and select the target logical group.
3. Select a host or volume.
4. Click on the operation to perform (Allocate Volumes, Unallocate Volume, Edit LUN Path, or Edit
Label).
5. In the task list, confirm that the task is completed.
Managing storage tiers
This module describes how to manage tiers.
Grouping resources96
Page 97

About tier-based storage management
In HP StorageWorks P9000 Command View Advanced Edition Suite, you must have a Tiered Storage
Manager license to perform tier-based storage management operations.
In a tier-based storage management system, storage system resources are grouped and managed in
tiers. Tiers can be created for volumes or for HP StorageWorks P9000 Thin Provisioning (THP/Smart)
pools to allow high-capacity resources to be centrally managed.
Tiers allow you to allocate data according to its purpose. This allocation can be done by grouping
drives in a storage system by type, or by creating groupings of particular tasks or functions. For
example, you can allocate frequently accessed data to a tier of high-reliability drives or storage
systems.
You can also use storage system resources more efficiently by storing data that is only for archive
purposes on a tier of SATA drives or older storage systems. A volume can also have a volume belong
to multiple tiers.
When you are managing a large variety of resources in tiers, you can check the performance status
of all the resources in the tiers at the same time, and you can select the migration-source and
migration-target volumes for data migrations from the tiers. By selecting tiers that match all the
requirements when volumes will be allocated to hosts, you can allocate all the necessary volumes
from the selected tiers at the same time.
Values to ensure acceptable tier performance
The values below ensure the operation of Tiered Storage Manager. Performance might slow down
or memory might become insufficient if a value exceeds these values.
Table 11 Tiered Storage Manager operational values
Number of tiers in a
single storage system
Number of unused
volumes a tier
Creating tiers
Before you can create a tier, you must:
• Enable a license for Tiered Storage Manager.
• Register one or more of the following HP storage systems:
• HP P9500 (HP StorageWorks P9500 Disk Array)
• XP24000/XP20000
• XP12000/XP10000/SVS200
1. On the Resources tab, click Tiers.
2. Select the storage system in which to create a tier.
3. Click Create Tier.
4. Specify the appropriate information.
5. Click OK.
Recommended valueValue for which performance is ensuredItem
30 or less100
1,000 or less1,300
User Guide 97
Page 98

Confirm that the tier is included for the storage system selected in the Tiers tree.
TIP:
To remove tiers, select the tiers to be deleted, and click Delete Tier.
Expanding a tier
Before expanding a tier, verify that:
• A Tiered Storage Manager license is registered
1. On the Resources tab, Resources pane, click Tiers.
2. Expand the tree, select the storage system with the tier you want to expand, and click Edit Tier.
3. Specify the appropriate values.
4. Click OK.
5. Confirm that the tier has expanded.
Managing resource labels
This module describes how to manage resource labels.
About managing resource labels
User defined resource labels can be assigned to volumes and THP/Smart pools. Specifically, resource
labels can be volume labels, or THP/Smart pool names.
Resource labels help users:
• Search for volumes or THP/Smart pools
• Differentiate between listed volumes or THP/Smart pools
• Confirm the correct resource is being acted upon
When resources are located with a label search, tasks can be performed including:
• Allocating volumes or THP/Smart pools
• Editing volume LUN paths
Note that resource labels can be created using:
• Device Manager
• Remote Web Console
For storage systems where resource labels have already been configured using Remote Web Console,
you can apply (import) the resource labels to Device Manager in a batch operation.
If Device Manager and Remote Web Console are both actively used, and Command View AE Suite
is the primary management software, labels set in Device Manager can be applied (exported) to
storage systems managed by Remote Web Console.
Grouping resources98
Page 99

NOTE:
Due to differences between Device Manager and storage systems, incompatible character type or
string length issues will be reported with pop-up messages. Use the message to resolve resource label
naming issues.
Editing resource labels
You can create or edit volume labels or THP/Smart pool names.
1. In the Resources tab, expand Storage Systems, and list volumes or THP/Smart pools.
2. To edit a volume label, select Edit Labels, and to edit the name of a THP/Smart pool select Edit
Pool.
3. Edit the necessary settings, and submit the task.
4. Check the task execution results in Tasks & Alerts.
Confirm changes in the volume and THP/Smart pool list.
TIP:
To apply the current labels to the storage system with no changes, specify the following settings:
• For volume labels, without entering new labels, select Reflect current labels to the storage systems
radio button.
• For THP/Smart pool names, without editing the pool names, select
Reflect this pool name to the storage system check box.
Searching resource labels
You can search, filter and sort on resource labels to locate volumes or THP/Smart pools and perform
actions on them.
1. Locate volumes or THP/Smart pools by using one of the following methods:
• Using the search box, enter a volume label or THP/Smart pool name, and perform a search.
You can use Search Keyword for to specify the resources you want to search, for example
Volumes.
• From the search box, you can also search volume labels by using More Searches, selecting
Volume, and selecting the category Label from the Advanced tab.
• To filter, from the Resources tab expand the tree to display the list of volumes or THP/Smart
pools, and click Filter to specify the volume label or THP/Smart pool name.
• To sort, from the Resources tab expand the tree to display the list of volumes or THP/Smart
pools, and click Label or Name column headings to sort by volume label or THP/Smart pool
name.
2. Select volumes or THP/Smart pools from the search, filter, or sort results.
3. Perform the desired task.
User Guide 99
Page 100

Importing storage system resource labels
In an environment where storage system labels have already been set using Remote Web Console,
you can apply (import) the storage system labels to Device Manager.
NOTE:
Applying storage system labels overwrites all the volume labels and THP/Smart pool names of Device
Manager for the selected storage system.
1. From the Resources tab, expand the Storage Systems tree and select the storage system whose
labels you want to apply.
2. Click Refresh Labels.
3. Select the resource labels to apply, and submit the task.
4. Check the task execution results in Tasks & Alerts.
Make sure the labels are changed in the volume list, and that pool names are changed in the THP/
Smart pool list.
Grouping resources100
 Loading...