

Page 1

HP XP7 Command View Advanced Edition
User Guide
Part number: TK981-96007
First edition: April 2014
Page 2

Legal and notice information
© Copyright 2014 Hewlett-Packard Development Company, L.P.
Confidential computer software. Valid license from HP required for possession, use or copying. Consistent with FAR 12.211
and 12.212, Commercial Computer Software, Computer Software Documentation, and Technical Data for Commercial Items
are licensed to the U.S. Government under vendor's standard commercial license.
The information contained herein is subject to change without notice. The only warranties for HP products and services are set
forth in the express warranty statements accompanying such products and services. Nothing herein should be construed as
constituting an additional warranty. HP shall not be liable for technical or editorial errors or omissions contained herein.
Acknowledgments
Microsoft, Windows, and Windows XP are U.S. registered trademarks of Microsoft Corporation.
UNIX is a registered trademark of The Open Group.
Export Requirements
You may not export or re-export this document or any copy or adaptation in violation of export laws or regulations.
Without limiting the foregoing, this document may not be exported, re-exported, transferred or downloaded to or within (or to
a national resident of) countries under U.S. economic embargo, including Cuba, Iran, North Korea, Sudan, and Syria. This
list is subject to change.
This document may not be exported, re-exported, transferred, or downloaded to persons or entities listed on the U.S. Department
of Commerce Denied Persons List, Entity List of proliferation concern or on any U.S. Treasury Department Designated Nationals
exclusion list, or to parties directly or indirectly involved in the development or production of nuclear, chemical, biological
weapons, or in missile technology programs as specified in the U.S. Export Administration Regulations (15 CFR 744).
Hitachi and Universal Replicator are registered trademarks of Hitachi, Ltd. ShadowImage and TrueCopy are registered
trademarks of Hitachi, Ltd. and Hitachi Data Systems Corporation.
Revision history
DescriptionEditionVersionDate
First editionFirst8.0-00April 2014
Page 3

Contents
Preface .............................................................................................. 11
1 Overview of HP XP7 Command View Advanced Edition ........................ 13
About HP XP7 Command View Advanced Edition ......................................................................... 13
Features ................................................................................................................................... 14
What's new ............................................................................................................................. 14
System configuration ................................................................................................................. 15
Process flow ............................................................................................................................. 17
Navigating the interface ............................................................................................................ 18
Navigating help ....................................................................................................................... 20
2 Setting up HP XP7 Command View Advanced Edition ........................... 21
Configuring HP XP7 Command View Advanced Edition ................................................................. 21
Configuring your browser and Java for HP XP7 Command View Advanced Edition ............................ 21
About configuring browser settings ....................................................................................... 21
Checking management server name resolution ....................................................................... 22
Disabling pop-up blocking for IE .......................................................................................... 23
Setting security options for using Internet Explorer ................................................................... 24
Setting security options for Firefox ......................................................................................... 25
Setting the Java™ Web Start proxy Version 1.4.2 to link with other products ............................. 26
Setting the Java™ Web Start proxy Version 5.0 and 6.0 to link with other products .................... 26
Configuring log output settings ............................................................................................. 27
Configuring JRE versions from JWS ....................................................................................... 27
Clearing the cache when upgrading HP XP7 Command View Advanced Edition ........................ 28
Logging in ............................................................................................................................... 28
Setting up security ..................................................................................................................... 29
About configuring security options ........................................................................................ 29
Setting a password policy ................................................................................................... 30
Setting automatic account locking ........................................................................................ 30
Setting a warning banner message ...................................................................................... 30
Downloading components ......................................................................................................... 31
About downloading components .......................................................................................... 31
Downloading agents, CLI, and Host Data Collector files .......................................................... 31
Managing XP7 Command View AE licenses ................................................................................. 31
About XP7 Command View AE license management ............................................................... 31
Registering an XP7 Command View AE license ...................................................................... 32
Checking XP7 Command View AE license information ............................................................ 32
Information for checking the input history of license keys .......................................................... 33
Managing Remote Web Console licenses .................................................................................... 34
About license key types ....................................................................................................... 34
Installing a software application ........................................................................................... 35
Enabling a license .............................................................................................................. 36
Disabling a license ............................................................................................................. 36
Removing a software application .......................................................................................... 37
User Guide 3
Page 4

Updating license status ....................................................................................................... 37
Viewing license information ................................................................................................. 38
License information on the License Keys window ..................................................................... 38
3 Discovering, registering, and adding management targets ..................... 41
Setting up storage resources ....................................................................................................... 41
Registering storage systems ........................................................................................................ 41
About registering and removing a storage system ................................................................... 41
Prerequisites for registering a storage system .......................................................................... 42
Registering a storage system ................................................................................................ 43
Changing storage system information .................................................................................... 44
About acquiring the most recent storage system information ..................................................... 44
Acquiring the most recent storage system information .............................................................. 45
Operations available to SMI-S enabled storage systems .......................................................... 45
Registering hosts ....................................................................................................................... 46
About registering a host ...................................................................................................... 46
Methods for registering hosts ............................................................................................... 47
Priority for acquiring the WWN ........................................................................................... 48
Registering hosts by using Host Data Collector ....................................................................... 49
Registering hosts manually by specifying the WWN target ...................................................... 50
Registering hosts using host scan .......................................................................................... 50
Registering hosts using merge hosts ...................................................................................... 51
About changing host settings and information ........................................................................ 52
Workflow for detecting hosts ................................................................................................ 52
Updating host information registered by using Host Data Collector ........................................... 53
Changing settings for a manually registered host .................................................................... 55
Changing settings for a host registered by using Device Manager agent ................................... 55
About removing hosts and releasing associated resources ........................................................ 56
Removing hosts and releasing associated resources ................................................................ 57
4 Setting up users and access control .................................................... 59
Setting up users and access control ............................................................................................. 59
About user accounts and controlling access to resources ................................................................ 59
Creating and managing user accounts ........................................................................................ 61
Creating a user account ...................................................................................................... 61
User ID and password policies ............................................................................................. 62
Editing the profile for a user account ..................................................................................... 63
Editing your own user profile ............................................................................................... 63
Changing the password for a user account ............................................................................ 64
Changing your own password ............................................................................................. 64
Changing permissions for a user account .............................................................................. 64
Changing the lock status of user accounts .............................................................................. 65
Configuring external authentication for users .......................................................................... 65
Configuring external authentication for groups ....................................................................... 66
Controlling access to resources ................................................................................................... 67
About access control ........................................................................................................... 67
Access control examples ..................................................................................................... 69
About resource groups ........................................................................................................ 70
Prerequisites for creating resource groups .............................................................................. 71
Creating resource groups .................................................................................................... 71
Editing a resource group ..................................................................................................... 72
About user groups .............................................................................................................. 73
User group roles ................................................................................................................ 74
Custom roles ...................................................................................................................... 75
4
Page 5

Required roles and resource groups by function ...................................................................... 78
Creating user groups .......................................................................................................... 92
Editing a user group ........................................................................................................... 93
Assigning resource groups and roles to a user group .............................................................. 93
Changing a user’s user group .............................................................................................. 94
5 Provisioning storage ......................................................................... 95
Creating a storage operating environment ................................................................................... 95
Allocating storage .................................................................................................................... 95
Creating and deleting volumes ................................................................................................... 96
About creating volumes ....................................................................................................... 96
Notes on performing quick formats ....................................................................................... 97
Creating volumes ............................................................................................................... 97
Create Volumes dialog box ................................................................................................. 98
About shredding volume data ............................................................................................ 100
Shredding volume data ..................................................................................................... 101
About deleting unallocated volumes ................................................................................... 102
Deleting unallocated volumes ............................................................................................ 102
About creating a LUSE volume ........................................................................................... 102
Creating a LUSE volume .................................................................................................... 103
About releasing a LUSE volume .......................................................................................... 104
Releasing a LUSE volume ................................................................................................... 104
Virtualizing external storage ..................................................................................................... 105
About virtualizing and unvirtualizing volumes ....................................................................... 105
Virtualizing volumes of a registered storage system ............................................................... 106
Discovering and virtualizing volumes of an unregistered storage system ................................... 107
Unvirtualizing volumes ...................................................................................................... 108
Virtualize Volumes dialog box ............................................................................................ 109
Virtualizing storage capacity (THP/Smart) .................................................................................. 113
About virtualizing storage capacity ..................................................................................... 114
Creating a THP/Smart pool ............................................................................................... 115
Create Pool dialog box ..................................................................................................... 117
Verifying THP/Smart pool information ................................................................................. 121
Expanding THP/Smart pools ............................................................................................. 122
Shrinking a THP/Smart pool .............................................................................................. 124
Modifying THP/Smart pool settings .................................................................................... 124
Deleting THP/Smart pools ................................................................................................. 125
Expanding THP/Smart volumes .......................................................................................... 125
Reclaiming zero pages ...................................................................................................... 126
Virtualizing storage tiers (Smart) ............................................................................................... 126
About virtualizing storage tiers ........................................................................................... 126
Manually starting or stopping the monitoring of Smart pools .................................................. 128
Manually starting or stopping the tier relocation of Smart pools .............................................. 129
Scheduling monitoring and tier relocation of Smart pools ...................................................... 129
Editing tier relocation for Smart volumes .............................................................................. 130
Applying a tiering policy to Smart volumes .......................................................................... 131
Customizing a tiering policy for Smart volumes .................................................................... 131
Notes on data placement profiles for Smart volumes ............................................................. 132
Creating a data placement profile for Smart volumes ............................................................ 133
Updating a data placement profile for Smart volumes ........................................................... 134
Editing a data placement profile for Smart volumes ............................................................... 135
Applying a data placement profile for Smart volumes ............................................................ 135
Scheduling data placement profiles for Smart volumes .......................................................... 136
Editing an external LDEV tiering rank for a Smart pool .......................................................... 137
User Guide 5
Page 6

Allocating and unallocating volumes ......................................................................................... 137
About allocating volumes .................................................................................................. 138
Volume allocation methods ................................................................................................ 139
Prerequisites for allocating volumes ..................................................................................... 140
Allocating volumes from general tasks ................................................................................. 140
Allocating volumes to selected hosts .................................................................................... 141
Allocating selected volumes to hosts .................................................................................... 142
Allocating volumes to clustered hosts ................................................................................... 143
Allocating volumes by using a keyword search ..................................................................... 144
Allocating volumes by using a criteria search ....................................................................... 145
Allocating volumes by using existing volume settings ............................................................. 146
Allocate Volumes dialog box ............................................................................................. 146
About clustered-host storage .............................................................................................. 152
Creating clustered-host storage ........................................................................................... 153
About unallocating volumes ............................................................................................... 155
Unallocating volumes from hosts ......................................................................................... 155
Unallocate volumes dialog box .......................................................................................... 156
Configuring Fibre Channel ports ............................................................................................... 158
Enabling LUN security on a port ......................................................................................... 158
Disabling LUN security on a port ........................................................................................ 159
Setting the data transfer speed on a Fibre Channel port ........................................................ 160
Setting the Fibre Channel port address ................................................................................ 161
Setting the fabric switch .................................................................................................... 161
Managing LUN Paths .............................................................................................................. 162
About LUN path management ............................................................................................ 162
Editing LUN paths ............................................................................................................ 163
Editing the host mode and host mode options ...................................................................... 164
Editing LUN paths when exchanging a failed HBA ............................................................... 165
Editing LUN paths when adding or exchanging an HBA ........................................................ 167
Removing LUN paths after adding an HBA .......................................................................... 168
Replicating volumes ................................................................................................................ 168
About replicating volumes (pair management) ...................................................................... 168
Copy pair management operations .................................................................................... 169
Adding command devices ................................................................................................. 170
Editing command devices .................................................................................................. 170
Defining copy pairs .......................................................................................................... 171
Changing the status of a copy pair ..................................................................................... 171
6 Optimizing storage performance ...................................................... 173
About optimizing storage ......................................................................................................... 173
About optimizing HBA configurations ........................................................................................ 174
Adding an HBA ............................................................................................................... 175
Managing cache logical partitions ............................................................................................ 176
Creating a CLPR ............................................................................................................... 176
Migrating resources to and from a CLPR .............................................................................. 177
Editing the settings of an existing CLPR ................................................................................ 178
Adjusting the cache capacity of a CLPR ............................................................................... 179
Deleting a CLPR ............................................................................................................... 180
Data mobility ......................................................................................................................... 180
About data mobility .......................................................................................................... 180
Reports for logical groups displayed in the Mobility tab ........................................................ 182
Reports for THP/Smart pools displayed in the Mobility tab .................................................... 182
Optimizing data placement in a logical group ..................................................................... 184
Optimizing data placement in a THP/Smart pool ................................................................. 185
6
Page 7

Data migration ....................................................................................................................... 185
About data migration ....................................................................................................... 185
Notes on performing data migration ................................................................................... 186
Conditions for data migration ............................................................................................ 187
Migrating data for volume performance .............................................................................. 192
Migrating data to a different storage system ........................................................................ 193
Migrate data dialog box ................................................................................................... 194
Prerequisites for migrating data from an SMI-S enabled storage system to another storage
system ............................................................................................................................ 199
Migrating data from an SMI-S enabled storage system to another storage system ...................... 200
7 Grouping resources ........................................................................ 203
Managing logical groups ........................................................................................................ 203
About logical groups ........................................................................................................ 203
Creating logical groups .................................................................................................... 207
Viewing logical group reports ............................................................................................ 208
Editing logical groups ....................................................................................................... 208
Performing operations from a logical group ......................................................................... 209
Deleting logical groups ..................................................................................................... 209
Managing storage tiers ........................................................................................................... 209
About tier-based storage management ................................................................................ 210
Values to ensure acceptable tier performance ...................................................................... 210
Creating tiers ................................................................................................................... 210
Expanding a tier .............................................................................................................. 211
8 Managing storage system information ............................................... 213
Managing resource labels ....................................................................................................... 213
About managing resource labels ........................................................................................ 213
Editing resource labels ...................................................................................................... 214
Searching resource labels .................................................................................................. 214
Importing storage system resource labels ............................................................................. 215
Managing WWNs by using nicknames ..................................................................................... 215
About managing WWNs by using nicknames ..................................................................... 216
Editing a WWN nickname ................................................................................................ 217
Searching XP7 Command View AE resources ............................................................................. 218
About searching XP7 Command View AE resources .............................................................. 218
Keyword search ............................................................................................................... 219
Criteria search ................................................................................................................. 219
Criteria search dialog box ................................................................................................. 220
Generating resource reports ..................................................................................................... 223
About generating reports .................................................................................................. 223
Exporting host information to a CSV file .............................................................................. 223
Exporting logical group information to a CSV file ................................................................. 224
Exporting search results to a CSV file .................................................................................. 224
Exporting access control information for resources to a CSV file .............................................. 225
Using reports to verify system changes ....................................................................................... 225
Viewing a Remote Web Console report ............................................................................... 225
Downloading and viewing a system configuration report ....................................................... 225
Displaying a report in the Reports window ........................................................................... 226
Creating a configuration report .......................................................................................... 226
Deleting a configuration report ........................................................................................... 226
9 Managing tasks ............................................................................. 229
User Guide 7
Page 8

About tasks ............................................................................................................................ 229
Customizing which tasks display in the global monitoring bar ....................................................... 231
Viewing CVAE task status ......................................................................................................... 232
Rescheduling CVAE tasks waiting to be executed ........................................................................ 232
Stopping running data migration or data placement profile tasks .................................................. 232
Canceling scheduled CVAE tasks .............................................................................................. 233
Moving CVAE tasks to the CVAE Task History tab ....................................................................... 233
Restarting a failed or stopped CVAE task ................................................................................... 234
Viewing system task status ........................................................................................................ 235
Managing system tasks ............................................................................................................ 235
Troubleshooting system tasks .................................................................................................... 236
Viewing data collection task status ............................................................................................ 237
Restarting a data collection task ............................................................................................... 238
10 Monitoring managed resources and resolving alerts ........................ 239
Monitoring storage resources ................................................................................................... 239
Viewing information summaries ................................................................................................ 240
About checking system status in the dashboard .................................................................... 240
Accessing the dashboard .................................................................................................. 241
Customizing the dashboard ............................................................................................... 241
About the Storage Systems tree .......................................................................................... 242
Viewing current storage system information .......................................................................... 242
Viewing MP Blade information ........................................................................................... 243
About the Hosts tree ......................................................................................................... 243
Viewing current host information ......................................................................................... 243
Analyzing Continuous Access Journal performance ..................................................................... 244
About analyzing Continuous Access Journal performance ...................................................... 244
Prerequisites for analyzing Continuous Access Journal performance ........................................ 244
Monitoring Continuous Access Journal performance .............................................................. 245
Configuring network bandwidth for analysis ........................................................................ 246
Metrics for Continuous Access Journal performance analysis .................................................. 247
Analyzing Continuous Access Journal performance in wizard mode ........................................ 247
Analyzing Continuous Access Journal performance in advanced mode ................................... 248
Exporting Continuous Access Journal performance reports ..................................................... 249
About refreshing Replication tab data ................................................................................. 250
Managing alerts ..................................................................................................................... 250
About alerts ..................................................................................................................... 250
Confirming an alert .......................................................................................................... 250
11 Support and other resources .......................................................... 253
Contacting HP ........................................................................................................................ 253
HP technical support ......................................................................................................... 253
Subscription service .......................................................................................................... 253
Documentation feedback ................................................................................................... 253
Related information ................................................................................................................. 253
Conventions ........................................................................................................................... 254
A Managing virtual storage machines ................................................. 257
About managing resources by using virtual storage machines ....................................................... 257
Creating virtual storage machines ............................................................................................. 259
Allocating volumes to hosts by using virtual storage machine resources .......................................... 261
Editing virtual storage machines ............................................................................................... 262
Deleting virtual storage machines .............................................................................................. 262
8
Page 9

B Managing storage resources that have virtual IDs ............................... 265
About managing storage resources that have virtual IDs ............................................................... 265
Displaying virtual ID information ............................................................................................... 267
Allocating volumes to hosts with virtual IDs ................................................................................. 267
C Linking related products .................................................................. 269
Launching other HP XP7 Command View Advanced Edition products ............................................. 269
About launching other HP XP7 Command View Advanced Edition products ............................. 269
Starting related products ................................................................................................... 269
Starting Element Manager ................................................................................................. 270
Glossary .......................................................................................... 271
Index ............................................................................................... 277
User Guide 9
Page 10

Tables
Information for checking the input history of license keys .............................................. 331
Methods for registering hosts .................................................................................... 472
Updating host information using Host Data Collector .................................................. 543
Updating host information using Device Manager agent ............................................. 554
XP7 Command View AE, SVP, and RAID Manager login account requirements ............... 625
User permissions by role .......................................................................................... 756
Custom roles .......................................................................................................... 767
Required resource groups and roles for performing functions ......................................... 798
Required roles or custom roles for performing XP7 specific functions ............................... 909
Create volumes dialog box ..................................................................................... 9810
Virtualize Volumes dialog box ............................................................................... 11011
Create Pool dialog box ......................................................................................... 11712
Allocate Volumes dialog box ................................................................................. 14713
Unallocate volumes dialog box .............................................................................. 15714
Migration sources and targets by volume type and state ............................................ 18815
Volumes that cannot be used as migration sources .................................................... 19116
Migrate Data dialog box ...................................................................................... 19517
Logical groups structure ........................................................................................ 20518
Tiered Storage Manager operational values ............................................................. 21019
Search dialog box ................................................................................................ 22120
Continuous Access Journal performance metrics ........................................................ 24721
Product reference conventions ................................................................................. 25422
10
Page 11

Preface
This manual provides information for HP XP7 Command View Advanced Edition software.
User Guide 11
Page 12

Preface12
Page 13

1 Overview of HP XP7 Command View Advanced Edition
HP XP7 Command View Advanced Edition software is a comprehensive software suite providing
management services for storage systems and hosts. Storage configuration, virtualization, reporting,
and monitoring tools are fully supported.
About HP XP7 Command View Advanced Edition
HP XP7 Command View Advanced Edition software consists of a number of storage management
software products used for managing storage resources in large-scale, complex SAN environments.
XP7 Command View AE includes:
• HP XP7 Device Manager Software: Supports registration of physical resources to be managed,
including storage systems, hosts, and related tasks such as volume allocation and grouping of resources for easier management and access.
• HP XP7 Tiered Storage Manager: Supports storage tiers of differing performance characteristics
so that volume data storage costs and performance can be optimized.
• HP XP7 Replication Manager: Supports volume data replication for backup and disaster recovery.
• HP XP7 Performance Advisor: Supports optimizing the performance of storage resources.
Each product must be licensed for use in XP7 Command View AE. At minimum, you must license
Device Manager. Additional licensing can be added as needed for other storage management
products. Related functionality becomes available in the XP7 Command View AE user interface in the
form of activated menu choices, and new or updated tabs and related screens and buttons.
For HP XP7 Storage, additional functionality for configuring the storage system is available from
launch points in XP7 Command View AE to Remote Web Console. Use the right-click menu from the
list of storage systems on the Resources tab, or click the System GUI link on the application pane to
access the additional functionality.
Instances of the management software products above can be installed on one or more XP7 Command
View AE servers depending on the scale of resources under management and geographic location.
For information about supported XP7 Command View AE server operating systems, related
requirements, and product installation options, see the HP XP7 Command View Advanced Edition
Installation and Configuration Guide.
Related topics
• Features, page 14
• What's new, page 14
• System configuration, page 15
• Logging in, page 28
• Navigating the interface, page 18
• Navigating help, page 20
User Guide 13
Page 14

Features
HP XP7 Command View Advanced Edition software provides a wide variety of security, scalability,
data migration, replication, performance, and administrative features for managing your storage
system needs in this release.
HP XP7 Command View Advanced Edition software includes the following functionality:
• Server architecture supports resource scalability (millions of storage objects) and geographic
• Provides secure remote management over Internet and wide area networks (WANs) using a
• Provides multiple levels of security and access for storage administrators, integration with external
• Security tools to prevent unauthorized access, such as account locking, and restricted login retry
• Provides for automation scripts using component CLIs.
• Supports agentless discovery and mapping of servers (hosts) and storage.
• Supports hosts such as Microsoft Windows, Sun Solaris, HP-UX, IBM AIX, and Linux.
• Supports virtualization servers such as Microsoft Hyper-V and VMware ESX.
• Supports FC and FCoE connected hosts.
• Supports a wide variety of block and SMI-S compliant storage systems.
• Supports virtualization of volumes from external storage.
• Supports volume migration between supported source and target storage systems.
• Provides simplified volume provisioning in complex environments.
• Provides logical, physical, and host view storage management.
• Provides efficient, cost effective use of storage capacity as needed using THP pools.
• Supports optimized application performance with an installed Tiered Storage Manager license
• Provides volume replication services for data protection and supports analyzing Continuous Access
• Provides keyword and criteria based searching of managed resources, and managed resource
scalability.
sophisticated web client.
authentication servers, and use of resource groups to control access to specific resources.
attempts.
when THP pools are configured to support performance tiers. Using the Mobility tab, you can
optimize data placement tasks when migrating online data between tiers.
Journal C/T delta performance on the Replication tab (with an installed Replication Manager and
Performance Advisor license).
reporting with data export to CSV files.
Related topics
• About HP XP7 Command View Advanced Edition, page 13
What's new
HP XP7 Command View Advanced Edition software includes the following new or enhanced
functionality:
Overview of HP XP7 Command View Advanced Edition14
Page 15

NOTE:
The enhancements below are primarily intended to highlight new software (GUI) features, and are
not an exhaustive list of enhancements. For complete information about new features and
enhancements, see the:
•
HP XP7 Command View Advanced Edition Release Notes
•
HP XP7 Tiered Storage Manager Release Notes
For complete information about management server, host data collector, Device Manager agent, CLI,
and storage system requirements, see the:
•
HP XP7 Command View Advanced Edition System Requirements
Device Manager enhancements
Device Manager now supports:
• Support for HP XP7 Storage
• Single pane of glass - Command View AE/Remote Web Console GUI integration
• Consolidated user resource management
• Integrated Command View AE/Remote Web Console task management
• Central control for virtual storage machine configuration, management, and monitoring
• Improved synchronization of Command View AE/Remote Web Console configuration for reduced
refresh times
• Enhanced GUI design for improved usability
• New performance evaluation metrics on the Replication tab, including P-VOL Write Transfer Rate
• Enhanced Smart Tiers reporting
Tiered Storage Manager enhancements
Tiered Storage Manager now supports:
• Provides relocation speed adjustment for Smart Pools for HP XP7 Storage
• Supports deleting migration source volumes after data is migrated
Related topics
• About HP XP7 Command View Advanced Edition, page 13
System configuration
As part of a basic storage network configuration, HP XP7 Command View Advanced Edition software
is comprised of XP7 Command View AE server-based components, agents, and clients that enable
you to manage storage resources.
The following figure illustrates HP XP7 Command View Advanced Edition management server
components, and the basic configuration of the storage network.
User Guide 15
Page 16
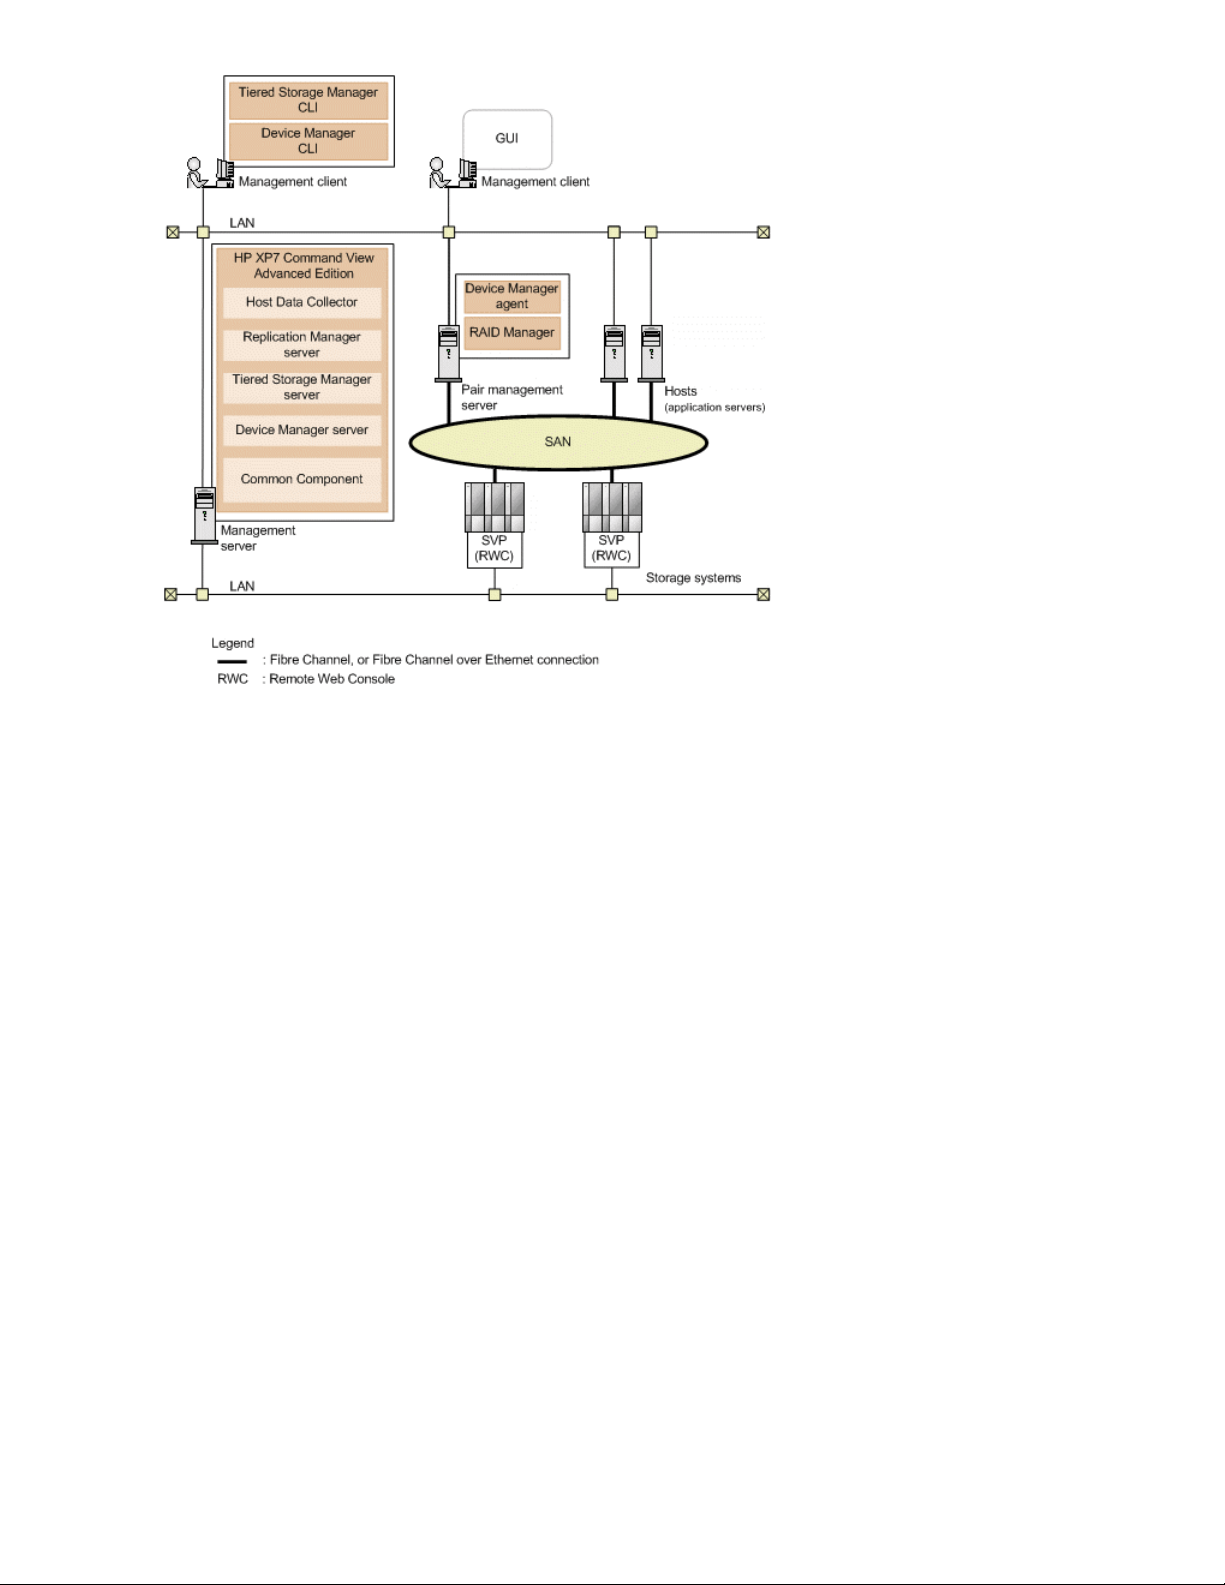
Management servers
• The management server is where XP7 Command View AE is installed.
• The management server communicates with management clients, storage systems, pair management
servers, and hosts over LAN connections.
• Additional software can be installed on the management server to provide extended management
capabilities.
• The management server can be configured in an active-standby cluster configuration consisting
of two physical servers.
Management server components
The XP7 Command View AE base installation consists of the following components, which are always
installed or removed together on the management server:
• HP XP7 Command View Advanced Edition Common Component
Provides user account management, security monitoring, and other functions common to all XP7
Command View AE products.
• Device Manager server
XP7 Command View AE uses this component to manage storage system volumes.
• Tiered Storage Manager server
Tiered Storage Manager uses this component to manage storage system volume migration.
• Replication Manager server
Replication Manager uses this component to manage storage system volume replication.
• Host Data Collector
Overview of HP XP7 Command View Advanced Edition16
Page 17

XP7 Command View AE uses this component to collect information about the volumes used by the
hosts.
NOTE:
The Host Data Collector component can be installed on other servers and accessed remotely by
XP7 Command View AE.
Management clients
• Manage storage resources via the management server by using the XP7 Command View AE web
client (GUI), or by using the CLI client software to issue commands.
• CLI client components (Device Manager and Tiered Storage Manager) require a separate install-
ation from the web client.
• From the web client, with a Device Manager license, launch Replication Manager to use a subset
of Replication Manager functionality.
Hosts
• Hosts (application servers) access volumes in storage systems that are managed by XP7 Command
View AE.
• Hosts access storage over SAN (Fibre Channel) or LAN (FCoE) connections.
• Hosts can be virtualization servers (VMware ESX/ESXi) and their virtual machines, and mainframe
hosts.
Hosts (application servers) access volumes in storage systems that are managed by XP7 Command
View AE over a Storage Area Network (SAN).
Pair management servers
• Collects management information about copy pair configurations and related status information,
and provides for copy pair operations.
• RAID Manager and Device Manager agent are installed for copy pair monitoring and management.
For information about performing the base installation, see the HP XP7 Command View Advanced
Edition Installation and Configuration Guide.
For information about customizing and extending the base installation, see the HP XP7 Command
View Advanced Edition Administrator Guide.
Related topics
• About HP XP7 Command View Advanced Edition, page 13
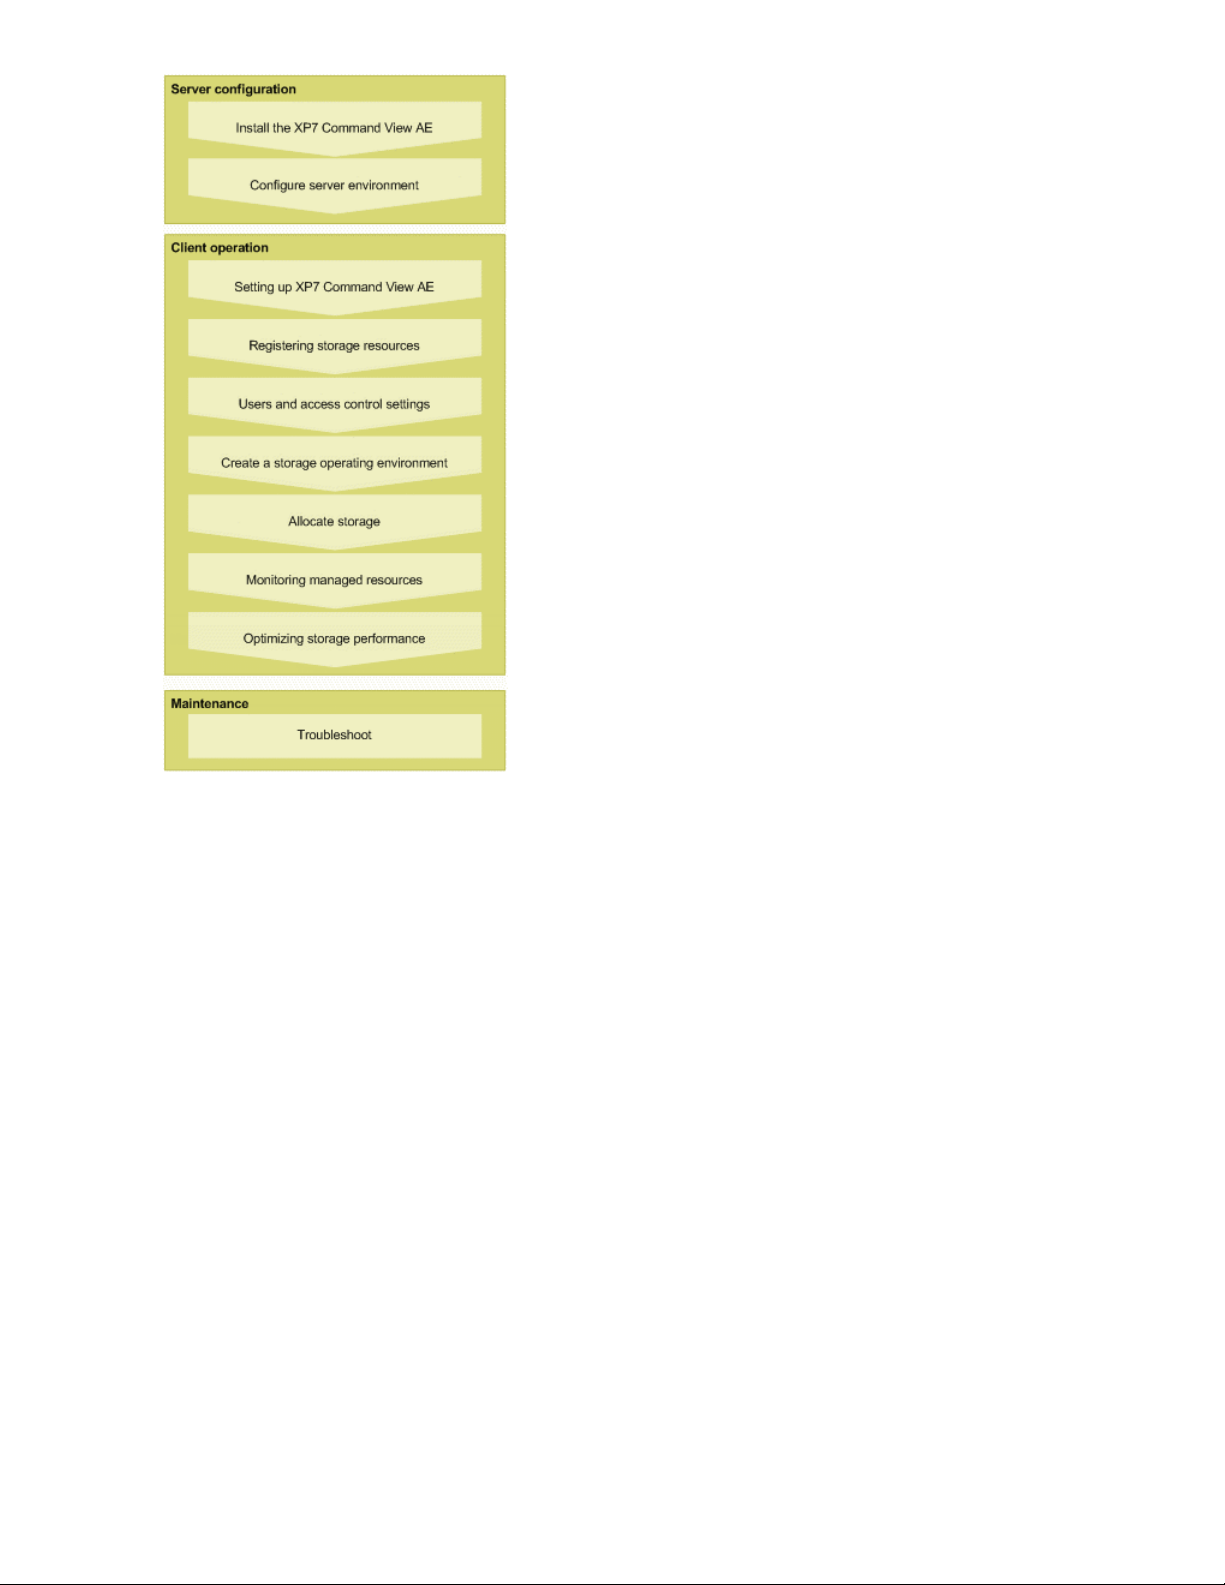
Process flow
The following graphic illustrates the flow of system operations when using HP XP7 Command View
Advanced Edition software and HP XP7 Tiered Storage Manager.
• Server configuration steps are related to installing and configuring the server itself.
• Client operation steps are illustrated and explained further with workflow graphics and comments
in this user guide.
• Maintenance refers to troubleshooting the server if issues arise when running HP XP7 Command
View Advanced Edition.
User Guide 17
Page 18
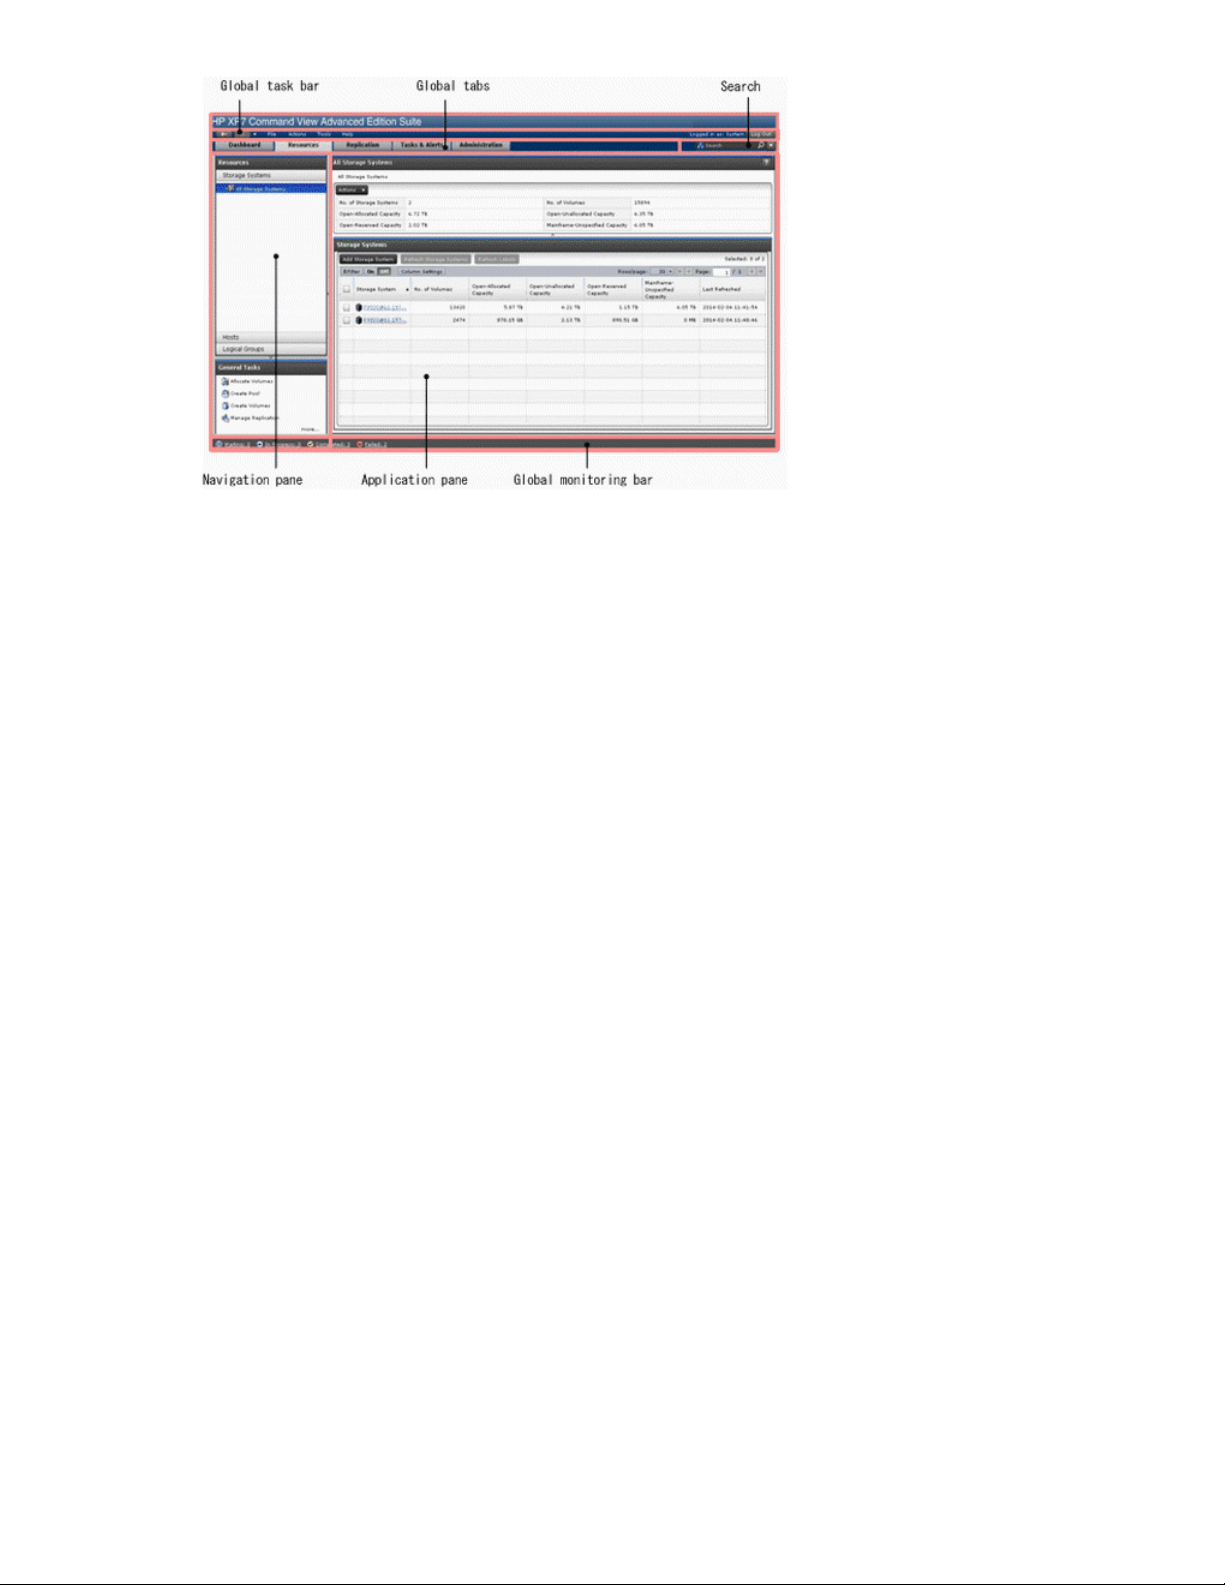
Navigating the interface
HP XP7 Command View Advanced Edition software provides a sophisticated interface with elements
such as menus, tabs, navigation options, application details, status information and search options
supporting ease of use and flexibility for storage and server resources.
Interface elements
• Global task bar - always visible, forward/back navigation buttons, clickable navigation history
(down arrow), menu access to licensing and help (Help), launching licenced options (Tools), and
Log Out for exiting XP7 Command View AE.
• Global tabs - always visible, provides access to applications.
• Search - always visible, provides keyword and criteria-based search.
• Navigation pane - differs by tab, provides access to resources and commonly-used tasks.
• Application pane - differs by tab, provides resource summary information, resource object list,
and related drill down details.
• Global monitoring bar - always visible, provides links for submitted tasks by status.
Overview of HP XP7 Command View Advanced Edition18
Page 19
Navigation pane
• Accordion menus provide easy access to resource trees.
• Resize panes by dragging divider bars. Collapse panes by clicking divider bar arrows.
• Access frequently needed tasks under General Tasks. Click More... to see hidden general tasks.
Application pane
• Minimize and expand panes by using the double arrow symbol in the title.
• Click Column Settings to display or hide columns, change column order, or view column descrip-
tions.
• Right-click a table heading and select menu options, such as Hide Column or Show all Columns.
• Arrange columns by using drag-and-drop.
• Sort lists by clicking the column title.
• Navigate large lists by using Page controls.
• Click Filter to reduce large lists, or to find specific items by defining specific search conditions.
Filter allows multiple conditions to be defined.
• In a list, click a link to display more detail about the item. As you drill-down, the breadcrumb list
(item > detail) above the summary pane is updated and serves as a useful navigation tool.
• In a list, rows are highlighted as you roll your mouse over them, indicating your row position. To
select a specific item, select the desired check box or click the row and the darker highlight indicates
the row is selected.
• To select multiple rows, select the desired check boxes or rows. You can also use Shift+click to
select a range of items. To select all rows, select the check box for the title row, or uncheck the
check box to de-select all rows.
• Selecting rows implies you intend to perform an action on the selected item or items. Actions are
initiated with buttons or from the Actions menu.
• To copy cell or row data, select one or more rows with data, right-click and select Copy This Cell
or Copy Selected Rows. This is useful for emailing small amounts of data about a storage resource.
If you select empty rows, the copy options do not appear when you right-click. For reporting on
large numbers of objects and for more complete data, use CSV export.
Related topics
• About HP XP7 Command View Advanced Edition, page 13
User Guide 19
Page 20

• Navigating help, page 20
Navigating help
The Help system provides brief explanations of the features of this product and helps you understand
its capabilities. Navigating is the means by which you access the information in the Help system.
When you access Help > Online Help from the menu bar, the navigation pane displays.
If you select the help icon [?] from the application pane or a dialog box, click Show All Contents to
display the navigation pane and access the Contents, Index, Search, and Glossary.
Navigating
• To navigate between topics, use the navigation pane, or right-click the topic and select Back or
Forward.
• Use the breadcrumb trail at the top of each topic to see your location, or to return to a higher level
topic.
• To find information for a specific topic, click the Related topics links.
Using navigation buttons
• Contents
Open book icons in the navigation pane to reveal topic entries and subsections. As you move
through Help, the current topic is highlighted.
• Index
An alphabetical list of topics. Click an Index entry to display one or more topics that you can
choose to view.
• Search
Search for word or phrase occurrences. Click search results to display the corresponding topics.
• Glossary
Provides brief explanations of product-related terms.
Printing topics
• To print topics, right-click the topic and select Print or click the printer icon on the button bar.
Related topics
• About HP XP7 Command View Advanced Edition, page 13
• Navigating the interface, page 18
Overview of HP XP7 Command View Advanced Edition20
Page 21
2 Setting up HP XP7 Command View Advanced Edition
This module describes how to configure basic HP XP7 Command View Advanced Edition software
settings.
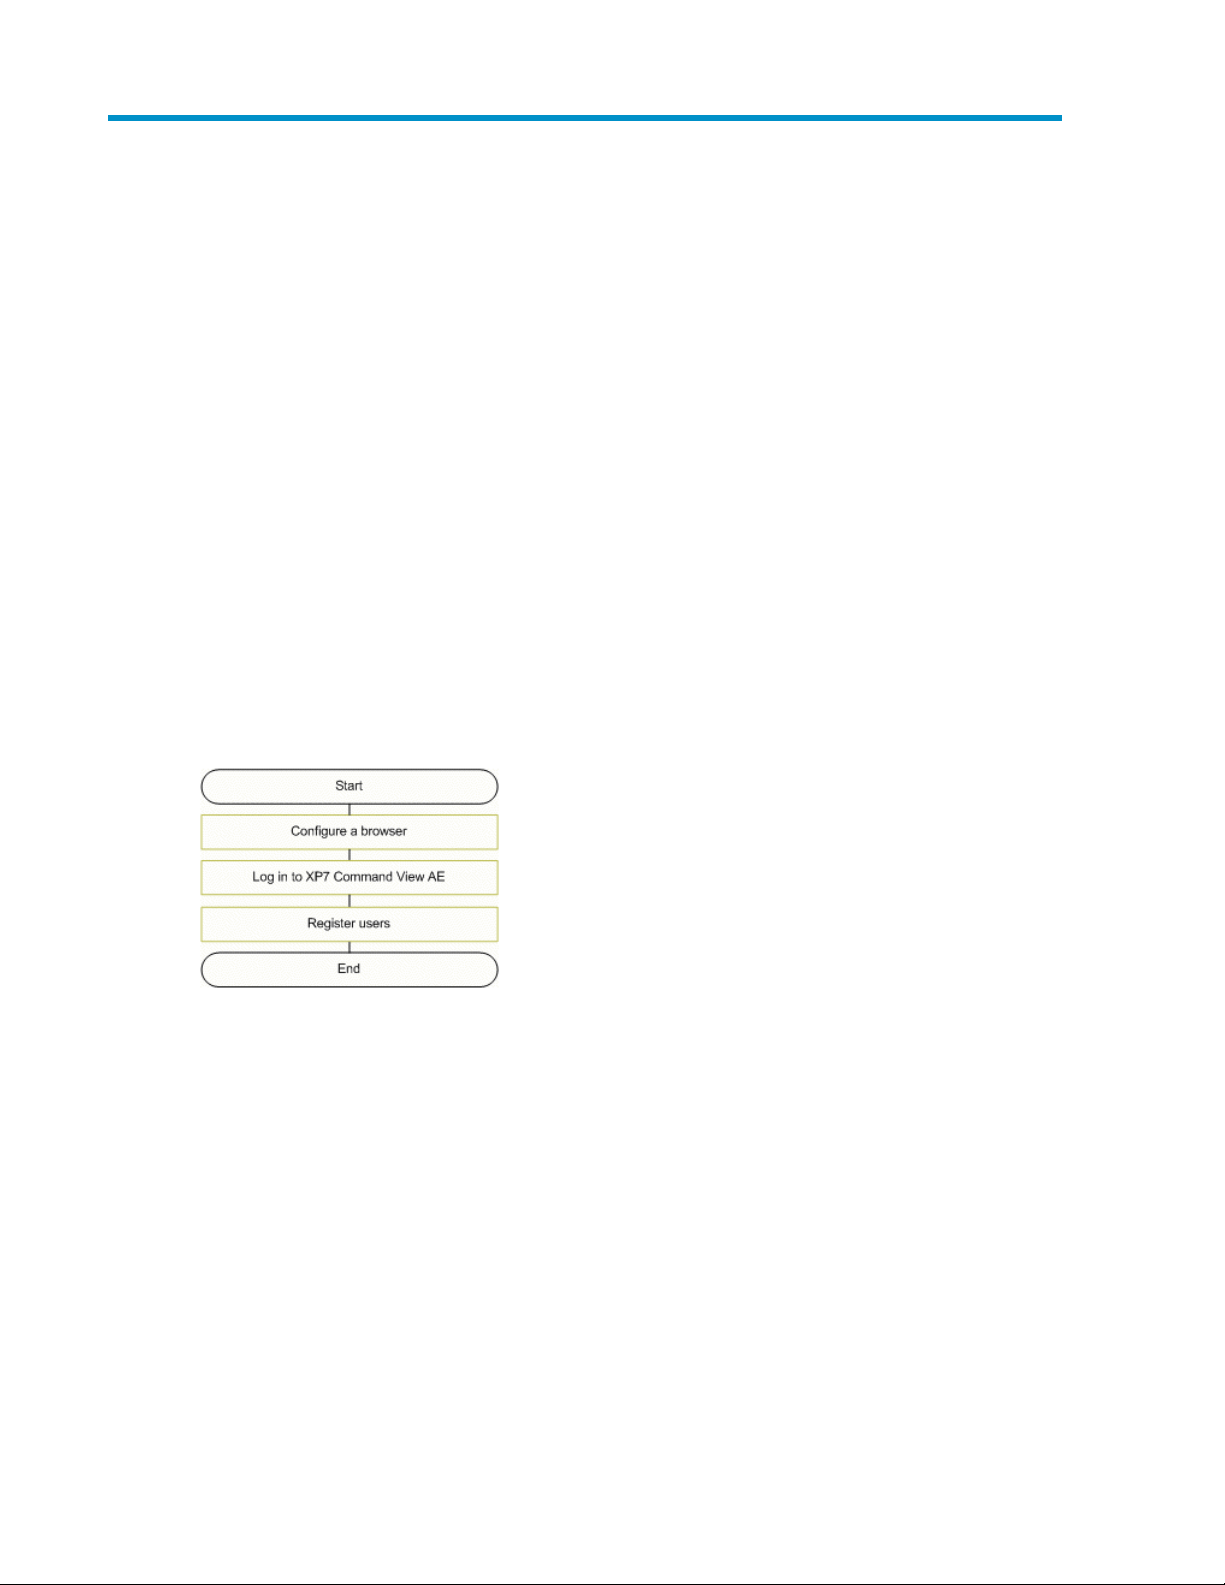
Configuring HP XP7 Command View Advanced Edition
Initial configuration of XP7 Command View AE, including configuring access to Remote Web Console
requires setting up the browser environment, licensing, logging in, and registering users.
The following graphic illustrates the required tasks:
• Configure your browser environment to correctly display and run HP XP7 Command View Advanced
Edition. If you have issues, verify your browser setup.
• Log in to XP7 Command View AE. Note that you can register licenses from the login screen.
• Register your users.
For information about sharing storage administration, see “Creating and managing user
accounts” on page 61.
Configuring your browser and Java for HP XP7 Command View Advanced Edition
To communicate with the HP XP7 Command View Advanced Edition management server and Remote
Web Console, you must configure your browser and Java settings.
About configuring browser settings
Before using a browser to access XP7 Command View AE or Remote Web Console, configure security
and other settings.
Perform the following configuration tasks:
User Guide 21
Page 22

NOTE:
When using an HP XP7 storage system, the IP address or host name of the service processor (SVP)
must be set.
• Disable pop-up blocking
• Disable plug-ins
• Set security options
• Configure proxy settings
• Configure log output settings
• Configure Java Web Start settings
• Clear your browser’s cache when upgrading
• Browser must allow first-party, third-party, and session cookies
NOTE:
For specific instructions on configuring your browser, refer to the browser product documentation.
After you configure your browser settings, verify the following:
• The Java™ software environment is installed and the Java software is configured
• Communications with XP7 Command View AE are secure
• Check the management server name resolution
NOTE:
If you have issues with general access, or with using a component of HP XP7 Command View Advanced
Edition, first verify that the problem is not related to the management server, or a network connectivity
issue.
For troubleshooting problems related to Device Manager servers, see the
Advanced Edition Administrator Guide
.
Related topics
• Checking management server name resolution, page 22
• Setting security options for using Internet Explorer, page 24
• Setting security options for Firefox, page 25
• Setting the Java™ Web Start proxy Version 5.0 and 6.0 to link with other products, page 26
• Setting the Java™ Web Start proxy Version 1.4.2 to link with other products, page 26
• Configuring JRE versions from JWS, page 27
• Configuring log output settings, page 27
• Clearing the cache when upgrading HP XP7 Command View Advanced Edition, page 28
Checking management server name resolution
XP7 Command View AE management servers host names must resolve to an IP address.
HP XP7 Command View
Setting up HP XP7 Command View Advanced Edition22
Page 23

After logging in to HP XP7 Command View Advanced Edition, before you can start other XP7 Command
View AE products, such as Replication Manager, the host name of the management server must be
set so that it can be resolved to the IP address. If the name cannot be resolved, an attempt to start
another XP7 Command View AE product will fail.
• Verify whether the management server on which products such as the Device Manager server or
Replication Manager server are installed can be accessed by using the host name.
NOTE:
If you are having issues with general access, or with using a component of HP XP7 Command
View Advanced Edition, first make sure the problem is not related to the management server,
or related to networking.
For troubleshooting problems related to Device Manager servers, see the
View Advanced Edition Administrator Guide
Related topics
• About configuring browser settings, page 21
Disabling pop-up blocking for IE
You can disable pop-up blocking, or configure URLs, so that XP7 Command View AE can display all
windows.
HP XP7 Command
.
If you are using XP7 Command View AE on a browser for which pop-up blocking is enabled, you
must disable pop-up blocking.
Alternatively, you can register the URLs of XP7 Command View AE products and the IP address or
host name of SVP as allowed sites.
If SSL or TLS is being used for communication between the management server and the management
client, also register the URLs for SSL communication in the pop-up blocker settings.
Prerequisites
The IP address or host name of the Device Manager server
TIP:
For Internet Explorer, in When a pop-up is encountered, select a radio button other than
Always open pop-ups in a new tab, or the pop-up might be displayed behind another window. If
you receive a pop-up blocked warning message, you can unblock pop-ups so that they will be
displayed at all times.
1. Start Internet Explorer.
2. From the Tools menu, select Pop-up Blocker, then select Pop-up Blocker Settings.
3. Add the URLs below to the Address of website to allow text box, and then click Add.
For SSL: https://IP-address-or-host-name-of-the-Device-Manager-server
For non-SSL: http://IP-address-or-host-name-of-the-Device-Manager-server
User Guide 23
Page 24

Related topics
• About configuring browser settings, page 21
Setting security options for using Internet Explorer
To communicate with the XP7 Command View AE management server and Remote Web Console,
and for correctly displaying windows when using Internet Explorer, configure Internet Explorer security
options.
NOTE:
To communicate with Remote Web Console on an HP XP7 storage system, the IP address or host
name of the service processor (SVP) must be registered as a trusted site in Internet Explorer.
1. Start Internet Explorer.
2. From the Tools menu, select Internet Options.
3. In the Internet Options dialog box, click the Security tab, and then click Trusted sites.
4. Click Sites and add the IP address or host name (alias name) for Device Manager and the related
management servers that contain the software to be started from Device Manager. To manage
an HP XP7, you must also add the URL for the SVP.
5. Click Custom Level.
6. In the Security Settings dialog box, verify that the items in the dialog box are configured as
follows:
• Run ActiveX controls and plug-ins is set to Enable.
• Script ActiveX controls marked safe for scripting is set to Enable.
• Launching programs and files in an IFRAME is set to Prompt or Enable.
• Submit non-encrypted form data is set to Prompt or Enable.
• Active scripting is set to Enable.
• File download is set to Enable.
• Allow Web sites to prompt for information using scripted windows is set to Enable.
7. In the Internet Options dialog box, select the Privacy tab, and then enable cookies.
8. In the Internet Options dialog box, select the Advanced tab, then select Use TLS 1.0, Use TLS 1.1,
and Use TLS 1.2, Warn about certificate address mismatch, and Show pictures. For the HP XP7
clear the do not save encrypted pages to disk check-box.
9. If the logged-in user does not have administrator permissions and uses Internet Explorer 10 or
11, disable the protected mode.
10. From the Tools menu, select Manage Add-ons, and enable Shockwave Flash Object.
11. If Internet Explorer 10 or 11 is used in Windows Server 2012, start the server manager. Select
in the sequence of Dashboard, Add roles and features wizard, and Features, and then install
Desktop Experience.
Security options are set.
Note that when using Internet Explorer in Windows Server 2008 or Windows Server 2012, if the
loading animation does not start or if files cannot be downloaded from a server for which HTTPS is
enabled, disable Internet Explorer Enhanced Security Configuration.
Setting up HP XP7 Command View Advanced Edition24
Page 25

If you use Internet Explorer 10 or 11, specify the same protected mode for the Internet domain for
accessing Device Manager, and for the Internet domains of other programs that cooperative with
Device Manager, and for the Internet domain of the HP site (http://www.hp.com). If different modes
are specified, the other programs cannot start or the Online Help cannot access the HP site.
The following problems might occur:
• Online Help might not display properly.
• An error message displays that indicates that Adobe Flash Player is not installed.
If you encounter these problems, disable ActiveX filtering, and from Internet Explorer, in Compatibility
View settings, register the IP address or the host name of the Device Manager server. If the online
Help does not display properly even after these settings are applied, press F5 to refresh the browser
window.
TIP:
Set the text size to Medium or Larger. If you set text size to Largest, text characters might overlap.
Related topics
• About configuring browser settings, page 21
• Disabling pop-up blocking for IE, page 23
Setting security options for Firefox
To communicate with the XP7 Command View AE management server and Remote Web Console,
configure Firefox security options.
Firefox settings not described here are optional.
NOTE:
To communicate with Remote Web Console on an HP XP7 storage system, the IP address or host
name of the service processor (SVP) must be set.
1. Start Firefox.
2. In the environment settings window, set the items as follows:
• Enable first-party, third-party, and session cookies.
• Disable pop-up blocker and plug-ins.
• Enable TLS 1.0, TLS 1.1, and TLS 1.2 when using HP XP7.
• Load images automatically (for Firefox versions earlier than ESR 24).
• Enable JavaScript (for Firefox versions earlier than ESR 24).
• Use the default font.
Related topics
• About configuring browser settings, page 21
User Guide 25
Page 26

Setting the Java™ Web Start proxy Version 1.4.2 to link with other products
You must set up Java Web Start so that it uses the correct version of JRE to execute the JAVA GUI to
run with other products.
NOTE:
To connect to Remote Web Console behind restrictive firewalls, you must set up a proxy to route
communications between XP7 Command View AE and Remote Web Console, and then configure
Java Web Start to use the correct proxy settings to enable communication.
1. Start the Java™ Web Start application manager.
2. Select the File menu, then select Preferences.
3. On the Java Web Start Preferences panel, select the General tab.
4. Select the method to be used to set up the proxy:
• If proxy settings are enabled in the web browser, select Use browser settings.
• To manually set up a proxy, select Manual, and enter the following values:
- HTTP Proxy: IP address or name of the proxy server
- HTTP Port: Port number of the proxy server
- No Proxy Hosts: IP address or name of the Device Manager server
• If not setting a proxy, select None.
5. Click OK, and exit the Java™ Web Start application manager.
Related topics
• About configuring browser settings, page 21
• Configuring log output settings, page 27
Setting the Java™ Web Start proxy Version 5.0 and 6.0 to link with other products
You must set up Java Web Start so that it uses the correct version of JRE to execute the JAVA GUI to
run with other products.
NOTE:
To connect to Remote Web Console behind restrictive firewalls, you must set up a proxy to route
communications between XP7 Command View AE and Remote Web Console, and then configure
Java Web Start to use the correct proxy settings to enable communication.
1. Start the Java Control Panel.
The Network Settings window appears.
2. On the General tab, click Network Settings.
Setting up HP XP7 Command View Advanced Edition26
Page 27

3. In the Network Settings window, select the method to be used to set up the proxy.
4. Click Advanced.
5. In Exceptions, enter the IP address or the name of the Device Manager server.
6. Click OK.
7. In the Network Settings window, click OK.
8. In the Java Control Panel, click OK and exit the control panel.
Related topics
• About configuring browser settings, page 21
• If the proxy setting is enabled in the web browser, select Use browser settings, and then
proceed to step 7.
• To manually set up a proxy, select Use proxy server, enter the following values, and proceed
to step 4.
- Address: IP address or name of the proxy server
- Port: Port number of the proxy server
• If not setting a proxy, select Direct connection and proceed to step 7.
The Advanced Network Settings window appears.
Configuring log output settings
You can configure the log output option in Java™ Web Start Version 1.4.2.
1. Start the Java Web Start application manager.
2. From the File menu, select Preferences.
3. From the Java Web Start Preferences panel, select the Advanced tab.
4. (Optional) Select the Show Java Console check box to display messages that are output to the
log.
5. Specify the log file name, using one of the following options:
• In the Output Options box, select the Log Output check box, and then enter the log file name
in the Log File Name field.
• Click Choose Log File Name to select an existing log file name.
6. Click OK to save your changes, and exit the Java Web Start application manager.
Related topics
• About configuring browser settings, page 21
Configuring JRE versions from JWS
When there are multiple versions of JRE and some of these versions are the same as or later than the
version required for a Java application, Java Web Start determines which version of JRE to use.
Because of this, you must set up Java Web Start so that it uses the correct version of JRE to execute
the GUI.
User Guide 27
Page 28

NOTE:
For GUI requirement details, please see the
Requirements
• Set up the JRE version required to use the GUI. The setup method is determined by the JWS
version.
• For GUI requirement details, please see the HP XP7 Command View Advanced Edition System
• For JWS version 5.0 or 6.0, use the Java control panel.
.
Requirements.
For JWS version 1.4.2, use the JWS application manager.
HP XP7 Command View Advanced Edition System
Related topics
• About configuring browser settings, page 21
Clearing the cache when upgrading HP XP7 Command View Advanced Edition
After upgrading XP7 Command View AE, you must clear the cache for Java™ Web Start and for your
browser.
1. For Java Web Start version 1.4.2 use Java Web Start Application Manager to clear the application
folder.
2. For Java Web Start version 5.0 or 6.0 use the Java Control Panel to delete temporary internet
files.
3. For the browser you are using, delete temporary internet files.
Related topics
• About configuring browser settings, page 21
Logging in
Prerequisites
Before you can log in to HP XP7 Command View Advanced Edition software, you must first register
valid licenses using the Licenses button.
For information about how to register licenses, see “Registering an XP7 Command View AE
license” on page 32.
NOTE:
To log in with a user account other than a built-in user account, you must first set up new user accounts,
or user groups and roles. This requires the User Management permission, and the Admin role for All
Resources.
Setting up HP XP7 Command View Advanced Edition28
Page 29

1. Start a web browser and enter the URL of the XP7 Command View AE server:
http://server-IP-or-name:port-number/DeviceManager/
• server-IP-or-name: IP address or host name of the Device Manager server.
• port-number: Port number of the HBase Storage Mgmt Web Service.
URL examples:
• http://localhost:22015/DeviceManager/
• https://localhost:22016/DeviceManager/
NOTE:
Using the localhost name entry implies you are logged in at that server. To access the
interface from another system, specify an IP address or host name in the URL. For a secure
connection, use the https URL on port 22016.
2. Enter values in the User ID and Password fields, and click Log In.
TIP:
To authenticate with an external authentication server, use its authentication password.
For information about user ID and password policies, see “User ID and password
policies” on page 62.
Related topics
• About XP7 Command View AE license management, page 31
• About user accounts and controlling access to resources, page 59
• About access control, page 67
• About launching other HP XP7 Command View Advanced Edition products, page 269
• About HP XP7 Command View Advanced Edition, page 13
• About configuring browser settings, page 21
Setting up security
This module describes how to configure security settings and policies.
About configuring security options
For tighter login security, you can specify security options from XP7 Command View AE, such as:
• Password policy conditions to prevent users from specifying easy-to-guess passwords.
• Automatic locking of user accounts when successive login attempts have failed.
• Display of a specific message (a warning banner) during user login.
You can also set security options from the management server. For details, see the HP XP7 Command
View Advanced Edition Administrator Guide.
User Guide 29
Page 30

Related topics
• Setting a password policy, page 30
• Setting automatic account locking, page 30
• Setting a warning banner message, page 30
Setting a password policy
Create a password policy to enforce the use of strong passwords.
1. On the Administration tab, select Security to launch the security window.
2. On the Security window, select Password to display the current password policy.
3. Click Edit Settings and configure a password policy. For example, configure a minimum password
length, and a minimum number of required uppercase, lowercase, numeric, and symbolic
characters. For the list of valid password characters, see “User ID and password
policies” on page 62.
4. Click OK to save the new password policy.
5. Select Password again to confirm the updated password policy.
Related topics
• About configuring security options, page 29
• Setting automatic account locking, page 30
Setting automatic account locking
A user account can be automatically locked after a specified number of failed login attempts. You
can specify the number of failed attempts before a user account is locked by configuring an account
lock policy.
1. On the Administration tab, select Security.
2. From the tree, select Account Lock.
3. Click Edit Settings and specify a number.
4. Confirm the settings were changed by selecting Account Lock in the Security tree and viewing
the current settings.
Related topics
• About configuring security options, page 29
• Setting a password policy, page 30
• Setting a warning banner message, page 30
Setting a warning banner message
You can set a warning banner message that will appear in the Login window when a user logs on.
1. On the Administration tab, select Security.
2. From the tree, select Warning Banner.
Setting up HP XP7 Command View Advanced Edition30
Page 31

3. Click Edit Message and enter the warning message text in the Message box.
You can preview the message by clicking Preview and viewing the message in the Preview box.
4. Click OK to save the message.
5. Confirm the warning banner displays in the Login window.
Related topics
• About configuring security options, page 29
• Setting automatic account locking, page 30
• Setting a password policy, page 30
Downloading components
This module describes how to download components.
About downloading components
A download menu allows you to download Device Manager agent, the CLI application, or Host Data
Collector installation files.
Related topics
• Downloading agents, CLI, and Host Data Collector files, page 31
Downloading agents, CLI, and Host Data Collector files
Use the download feature to download agents, the CLI application, or Host Data Collector installation
files:
1. From the Tools menu, select Download.
The download dialog box opens.
2. Choose from the links in the dialog box to download the desired installation files.
3. Click the ReadMe links for installation instructions.
Related topics
• About downloading components, page 31
Managing XP7 Command View AE licenses
This module describes how to manage XP7 Command View AE licenses.
About XP7 Command View AE license management
Before you can log on to HP XP7 Command View Advanced Edition, you must register valid XP7
Command View AE licenses.
Each product managed from XP7 Command View AE also requires a registered license.
User Guide 31
Page 32

Licenses that are registered while you are logged in are not enabled until you log out and log in
again.
The following license types are available:
• Permanent
• Meter-based Term
• Emergency
• Temporary
NOTE:
Before you log in for the first time, a License Alert appears on the login window.
When a problem occurs, such as when a license expires or capacity limits are exceeded, an alert is
displayed in the main window.
Related topics
• Registering an XP7 Command View AE license, page 32
• Checking XP7 Command View AE license information, page 32
Registering an XP7 Command View AE license
Before you can log on to HP XP7 Command View Advanced Edition, you must register valid XP7
Command View AE licenses.
Each product managed from XP7 Command View AE also requires a registered license.
1. On the login window, click Licenses.
2. See License Type and License Messages to review the current status of licenses.
3. Register one or more licenses using one of these methods:
4. Click Save.
5. Confirm that the license is successfully registered by viewing the displayed message.
Related topics
• About XP7 Command View AE license management, page 31
• Checking XP7 Command View AE license information, page 32
If you are already logged in, from the Help menu, select About.
• Enter the license key manually
• Specify the license key file (recommended)
If you registered the license after you logged in, you must log out and then log in again for the
license to be enabled.
Checking XP7 Command View AE license information
You can check license information and the license expiration date. All users can perform this task.
1. On the login window click Licenses. If you are already logged in, from the Help menu, select
About.
Setting up HP XP7 Command View Advanced Edition32
Page 33

2. Check the license status displayed in License Type and License Messages.
3. Click the license name link for each product to check the storage capacity limit and expiration
date for each license.
Related topics
• About XP7 Command View AE license management, page 31
• Registering an XP7 Command View AE license, page 32
• Information for checking the input history of license keys, page 33
Information for checking the input history of license keys
To check the input history of license keys, log in to the management server as a user with Administrator
permissions in Windows, or as the root user in Linux, and check the information in the
licensehistory file (input history is stored for 90 days) located at
Installation-folder-for-XP7-Command-View-AE\Base64\common\lic\hist in
Windows, and Installation-directory-for-XP7-Command-View-AE/Base64/common/
lic/hist in Linux. The table below describes the history record items output to the licensehistory
file. The items are output separated by commas.
Table 1 Information for checking the input history of license keys
DescriptionOutput Item
Operation
Family Name
=character-string-indicating-the-device-type
Date and time (example: 2011/01/13 15:14:26)YYYY/MM/DD hh:mm:ss
Time zone (example: TZ=GMT+09:00)TZ=time-zone
One of the following is output:
• add: A new license was added or a license was added when the
current license had expired.
• update: A license was added in an environment in which another li-
cense had already been registered.
• uninstall: A product was uninstalled.
• increase: A new meter-based term license was added.
• used: The used storage system capacity was checked in an environ-
ment in which a meter-based term license was registered.
• convert: The license information file was migrated.
Name of the product that was registered or deleted.PPname=product-name
Code specific to the product.ID
One of the following values:
• 0: Does not depend on the device
• Q: XP1024 or XP128
• R: XP12000 or XP10000
• S: SVS200
• T: XP24000 or XP20000
• U: P9500
• V: XP7
Serial numberS/N=serial-number
User Guide 33
Page 34

Key-type
capacityTB
permanent-licensed-capacityTB/meter-based-term-licensedcapacityTB(number-of-days-in-thegrace-period)
DescriptionOutput Item
One of the following values:
• P: Permanent license
• T: Temporary license
• E: Emergency license
• M: Meter-based term license
One of the following values:
• If this operation is used, then the used storage system capacity is re-
turned. If this value exceeds the capacity for the permanent license,
the capacity for the meter-based term license will be used. For the
used storage system capacity, the value is output rounded up to the
nearest terabyte.
• If the operation is not used, then licensed capacity is returned.
The character string used by the system appears.character-string-used-by-the-system
License expiration date (if the key type is T or E)YYYYMMDD
Any of the following values:
• Capacity for the permanent license
• Total capacity for the registered meter-based term license. If the capa-
city for the meter-based term license is used, the capacity minus the
used capacity is output.
• Number of days of the grace period that have passed after the capa-
city for the meter-based term license becomes negative. This value is
not output if the grace period is not been exceeded.
Related topics
• About XP7 Command View AE license management, page 31
• Registering an XP7 Command View AE license, page 32
• Checking XP7 Command View AE license information, page 32
Managing Remote Web Console licenses
This module describes how to manage Remote Web Console licenses.
About license key types
To use a particular software application, you must enter a unique license key for the software
application in Remote Web Console. License keys are provided when you purchase XP7 software.
The license key types are described in the following table:
DescriptionType
Effective
1
term
Estimating licensed capacity
RequiredNo limitFor purchasepermanent
Required365 daysFor purchaseterm
Setting up HP XP7 Command View Advanced Edition34
Page 35

DescriptionType
For purchase (prepaid licensed capacity)Meter
Notes:
1. When you log in to Remote Web Console, a warning message appears if 45 days or less remain before
the expiration.
Related topics
• Enabling a license, page 36
• Viewing license information, page 38
• Installing a software application, page 35
Installing a software application
1. On the Resources tab, expand the Storage Systems tree, and select the target storage system.
Effective
1
term
Varies according to
the capacity
Estimating licensed capacity
Not required120 daysFor trial use before purchase (Try and Buy)temporary
Not required30 daysFor emergency useemergency
Required
2. Choose one of the following options.
• For HP XP7 storage systems:
Select License Keys.
• For other available storage systems:
From the Actions list in the application pane, select Element Manager. Refer to the documentation for the native management tool for your storage system.
3. In the License Keys window, click Install Licenses.
4. Select whether to enter a key code or specify a license key file.
• Key Code: Enter a key code to install the software. In Key Code, enter the license key code
for the software.
• File: Specify a license key file to install the software. Click Browse and specify the license
key file. You can use a file name of up to 200 alphanumeric characters (ASCII codes) excluding
several symbols (", \, ; , : , *, ?, <, >, |, /, ,). The file extension is "plk".
5. Click Add.
6. In the Selected License Keys table, set the status of license keys for each software application.
• Enable Licenses: Installs license keys in enabled status. You can select more than one software
application to install licenses for.
• Disable Licenses: Installs license keys in disabled status. You can select more than one software
application to install licenses for.
• Clear All: Delete all license keys from the Selected License Keys table.
7. Click Finish. The Confirm window opens.
8. In the Confirm window, check the settings and enter a task name in Task Name.
User Guide 35
Page 36

9. Click Apply. The task is registered. If the Go to tasks window for status check box is checked,
the Task window opens.
If a software installation fails, the Error Message window opens. To display the cause of the error,
from the Error Message window, select the software and click Detail.
Related topics
• About license key types, page 34
• Removing a software application, page 37
Enabling a license
You can enable a license that is in disabled status.
1. On the Resources tab, expand the Storage Systems tree, and select the target storage system.
2. Choose one of the following options.
• For HP XP7 storage systems:
Select License Keys.
• For other available storage systems:
From the Actions list in the application pane, select Element Manager. Refer to the documentation for the native management tool for your storage system.
3. Select the license to enable. You can select more than one license to enable at the same time.
4. In the License Keys window, click Enable Licenses.
5. Check the settings and click Apply.
Related topics
• About license key types, page 34
• Updating license status, page 37
• Disabling a license, page 36
Disabling a license
You can disable a license that is in enabled status.
1. On the Resources tab, expand the Storage Systems tree, and select the target storage system.
2. Choose one of the following options.
• For HP XP7 storage systems:
Select License Keys.
• For other available storage systems:
From the Actions list in the application pane, select Element Manager. Refer to the documentation for the native management tool for your storage system.
3. Select the license to disable. You can select more than one license to disable at the same time.
4. In the License Keys window, click Disable Licenses.
5. Click Finish.
6. Check the settings and click Apply.
Setting up HP XP7 Command View Advanced Edition36
Page 37

Related topics
• Enabling a license, page 36
Removing a software application
NOTE:
On rare occasions, a software option that is listed as Not Installed but still has available licensed
capacity (shown as XX TB) might remain in the list. In this case, select that option and uninstall the
software.
1. On the Resources tab, expand the Storage Systems tree, and select the target storage system.
2. Choose one of the following options.
• For HP XP7 storage systems:
Select License Keys.
• For other available storage systems:
From the Actions list in the application pane, select Element Manager. Refer to the documentation for the native management tool for your storage system.
3. In the License Keys window, select the license to remove. You can select more than one license
at the same time.
4. In the License Keys window, click Uninstall Licenses.
5. Check the settings and click Apply.
Related topics
• Installing a software application, page 35
Updating license status
In the following cases, the status of software may remain at Not Enough License or Grace Period. In
that case, update the license status.
• When the licensed capacity exceeds the mounted capacity after you reduce the number of LDEVs
• When the licensed capacity exceeds the used capacity after you delete pairs or pool volumes
1. On the Resources tab, expand the Storage Systems tree, and select the target storage system.
2. Choose one of the following options.
• For HP XP7 storage systems:
Select License Keys.
• For other available storage systems:
From the Actions list in the application pane, select Element Manager. Refer to the documentation for the native management tool for your storage system.
3. In the License Keys window, click Update License Status.
4. Check the settings and click Apply.
User Guide 37
Page 38

Related topics
• Enabling a license, page 36
Viewing license information
You can view license information for each software product using the License Key window.
1. On the Resources tab, expand the Storage Systems tree, and select the target storage system.
2. Choose one of the following options.
• For HP XP7 storage systems:
Select License Keys.
• For other available storage systems:
From the Actions list in the application pane, select Element Manager. Refer to the documentation for the native management tool for your storage system.
To review descriptions of fields in the License Keys window, see “License information on the License
Keys window” on page 38.
Related topics
• About license key types, page 34
License information on the License Keys window
The information you see on the License Keys window is described below.
License key status (example)
Installed with the permanent key
Installed with the term key
and set to Enabled
Installed with the term key
and set to Disabled
Installed with the temporary key.
Installed with the emergency key.
Key typeStatus
Licensed capacity
PermittedtermInstalled
-temporaryInstalled
-emergencyInstalled
Term (days)
BlankBlankblankNot installedNot installed
-PermittedpermanentInstalled
Number of remaining days before
expiration
-PermittedtermInstalled (Disabled)
Number of remaining days before
expiration
Number of remaining days before
expiration
A temporary key was installed, but has expired.
Setting up HP XP7 Command View Advanced Edition38
Number of remain-
-temporaryExpired
ing days before
expiration
Page 39

License key status (example)
A term key or an emergency key was installed,
but has expired.
Installed with the permanent key or the term key,
but the licensed capacity
was insufficient.
Installed with the permanent or term key, and then
LDEVs are added, but the
license capacity was insufficient.
Installed with the temporary key, and then reinstalled with the permanent key, but the license
capacity was insufficient.
Not Enough License
Key typeStatus
permanent or term
permanent or termGrace Period
temporaryInstalled
Licensed capacity
Permitted and
Used
Permitted and
Used
Permitted and
Used
Term (days)
BlankBlankblankNot installed
-
Number of remaining days before
expiration
Number of remaining days before
expiration
Installed with the permanent or term key, then reinstalled with the emergency key.
Related topics
• Viewing license information, page 38
emergencyInstalled
Permitted and
Used
Number of remaining days before
expiration
User Guide 39
Page 40

Setting up HP XP7 Command View Advanced Edition40
Page 41

3 Discovering, registering, and adding management targets
Managing storage resources requires them to be registered in HP XP7 Command View Advanced
Edition software. Registration automatically occurs after discovery.
Setting up storage resources
Collectively, storage systems and hosts are called storage resources. For storage resources to be
managed by XP7 Command View AE, they must first be discovered and registered.
Registering storage resources requires each resource to be reachable on the network by its IP address.
After storage and host resources are registered, you can begin allocating volumes to hosts.
Before discovering each resource, verify the system prerequisites, and check settings requirements for
the corresponding system configuration described in the HP XP7 Command View Advanced Edition
Administrator Guide.
Configure the prerequisite environment based on requirements. For example, install and enable
software licenses by using XP7 Remote Web Console or other storage management tools, or configure
a network based on the system configuration.
If Device Manager is set up in an environment that has already been configured using XP7 Remote
Web Console, and if you want to use volume labels and THP/Smart pool names from a storage
system in Device Manager, register the storage system in Device Manager, and then apply the storage
system labels to Device Manager.
The following figure describes the basic task flow for setting up storage resources.
Registering storage systems
Before you can manage a storage system's resources, you must first register the storage system.
About registering and removing a storage system
Registering a storage system in XP7 Command View AE is done when it is discovered, which then
enables you to manage its storage system's resources including:
User Guide 41
Page 42

• Parity Groups
• LDEVs
• Volumes
• THP/Smart pools
• Resources available through external storage connections
When you specify IP address (or host name) and authentication information for a storage system, the
storage system is discovered and registered based on the specified information. For Storage
Management Initiative Specification (SMI-S) enabled storage systems, the SMI-S provider's IP address
is used.
You can modify information about a storage system after a storage system is registered.
If managing a storage system with XP7 Command View AE is no longer necessary (for example
because of reorganization), you can remove the registered storage system. Removal results in the
following:
• Configuration information such as parity groups, volumes, and allocated paths are retained
within the storage systems.
• When storage systems are excluded from management by XP7 Command View AE, the information
set in XP7 Command View AE, such as tiers and data placement profiles, is deleted.
Related topics
• Prerequisites for registering a storage system, page 42
• Registering a storage system, page 43
• Changing storage system information, page 44
• About acquiring the most recent storage system information, page 44
Prerequisites for registering a storage system
Before registering a storage system, collect storage system-related information and complete a number
of prerequisite tasks.
Collect and confirm the following storage system information:
• Storage system type.
• Storage system IP address (IPv4 or IPv6) or host name (alias name).
• Authentication information: user name and password for the storage system management tool,
such as Remote Web Console.
• Host name (alias name) or IP address for the SMI-S provider (IPv4 or IPv6), user name, password,
port number (for SMI-S enabled storage systems).
• Protocol used for Device Manager and SMI-S provider communication (for SMI-S enabled storage
systems).
Complete these tasks:
• Connect the target storage system to the network.
• Verify that Fibre Channel port settings (such as topology and transfer rate) are specified in the
management tool of the storage system, such as Remote Web Console.
• Register accounts for Device Manager in the management tool of the storage system, such as Remote
Web Console.
Discovering, registering, and adding management targets42
Page 43

NOTE:
If the storage system is HP XP7, or HP P9500 you must select the Administrator user group (which
is a built-in group) to register the accounts.
• When using XP7 Command View AE authentication on an HP XP7 for SVP and RAID Manager
logins, you must enable SSL communication on the Device Manager server. In addition, configuring
firewall exceptions might be required. For details, see the HP XP7 Command View Advanced
Edition Administrator Guide.
• Verify that the SMI-S provider is specified (for SMI-S enabled storage systems) prior to discover
and registration.
Related topics
• About registering and removing a storage system, page 41
• Registering a storage system, page 43
Registering a storage system
A storage system must be registered in HP XP7 Command View Advanced Edition before it can be
managed. After a storage system is discovered and registered, it becomes a managed resource.
1. On the Administration tab, select Managed Resources.
2. On the Storage Systems tab, click Add Storage System.
3. Specify the storage system type and provide the following information:
• An IP address (or hostname).
• Authentication information (username and password) for most supported storage systems.
• If the storage system that is to be registered is an XP7 and authentication of user accounts in
HP XP7 Command View Advanced Edition software is enabled, user accounts are authenticated
by XP7 Command View AE when they log in to Raid Manager and SVP. If this setting is enabled, user accounts that are created in XP7 Command View AE can be used in Raid Manager
and in SVP, allowing centralized management of user accounts.
After the setting is enabled, from Raid Manager or the SVP you will be able to perform tasks
(such as adding users to a user group, and assigning resource groups and roles to a user
group) according to the access control settings made from XP7 Command View AE. If you
want to create, in XP7 Command View AE, a new user account for performing tasks on Raid
Manager or the SVP, in XP7 Command View AE set up access control for the storage resources.
Note that in the event of the unavailability of the XP7 Command View AE server, Raid Manager
authentication will be forwarded directly to the SVP. Be sure that if using XP7 Command View
AE for Raid Manager authentication that the user account used for Raid Manager authentication is added to both XP7 Command View AE and the SVP.
• For SMI-S enabled storage systems, provide the SMI-S provider IP address, authentication
information, protocol information (secure, not secure), and possibly a non-default port number.
TIP:
If an SMI-S provider that manages multiple SMI-S enabled storage systems is specified, all
the SMI-S enabled storage systems under that provider are registered.
User Guide 43
Page 44

4. Click OK.
5. Check the Data Collection Tasks tab to verify that the task completed successfully.
6. When the task completes, confirm that the registered storage system appears on the Storage
Systems tab of Managed Resources, or in the Storage Systems tree on the Resources tab.
The storage system is now a managed resource and volumes can be allocated to managed hosts.
TIP:
To remove storage systems, select one or more storage systems, and click Remove Storage Systems.
Related topics
• About registering and removing a storage system, page 41
• Prerequisites for registering a storage system, page 42
• Changing storage system information, page 44
Changing storage system information
You can modify the IP address, host name, or login information (user ID and password) for a storage
system. You can select multiple storage systems to modify at one time, but when selecting multiple
storage systems, only login information (user ID and password) can be modified.
1. On the Administration tab, select Managed Resources.
2. On the Storage Systems tab, select the storage system, or storage systems, you want to modify.
3. Click Edit Storage Systems.
4. Specify the appropriate information and click OK.
5. Check the Data Collection Tasks tab to verify that the task has completed successfully.
6. Confirm that the information in the storage system list is updated.
Related topics
• About registering and removing a storage system, page 41
• Registering a storage system, page 43
About acquiring the most recent storage system information
To get the most current information about a target storage system, manually refresh the system to
display it.
When you click Refresh Storage System to refresh it, the following information is updated for storage
resources:
• Volumes
• Parity groups
• THP/Smart Pools
• External storage connections
Discovering, registering, and adding management targets44
Page 45

TIP:
When data placement profiles for Smart volumes are being managed, you can specify an option in
the Refresh Storage Systems dialog box to search for inconsistencies in data placement profiles.
To update information about hosts, such as the host name, WWNs, refresh the hosts.
To update host bus adapter (HBA) WWN nicknames, refresh one or more storage systems. Refreshing
host information does not update WWN nicknames. When several WWN nicknames are assigned
to a single HBA, only one of the nicknames is displayed for that HBA.
If connected to HP XP7 Performance Advisor, users can also update performance information that is
displayed in the Mobility tab. To automatically update the storage system information, specify proper
settings in the server.properties file or dispatcher.properties file of the management
server. For details about specifiable values, see the HP XP7 Command View Advanced Edition
Administrator Guide.
Related topics
• About registering and removing a storage system, page 41
• Acquiring the most recent storage system information, page 45
• Viewing current storage system information, page 242
Acquiring the most recent storage system information
Refreshing a storage system updates and displays the latest storage system information.
1. On the Administration tab, select Managed Resources.
2. On the Storage Systems tab, select one or more storage systems to refresh.
3. Click Refresh Storage Systems, then click OK.
4. Check the Data Collection Tasks tab to verify that the task completed.
Updated storage system information displays in the list of storage systems. Updated storage system
information is also displayed on the Resources tab, in the Storage Systems tree.
NOTE:
Label information for volumes and THP/Smart pools is not refreshed. To apply existing label information
from a storage system to XP7 Command View AE, click Refresh Labels. For HP XP7, refreshing labels
is unnecessary since label information from the storage system to XP7 Command View AE will always
match.
Related topics
• About acquiring the most recent storage system information, page 44
Operations available to SMI-S enabled storage systems
Discovering and registering storage systems that support an SMI-S provider for storage system
management enables you to perform certain tasks.
User Guide 45
Page 46

The Storage Management Initiative Specification (SMI-S) defines software development standards in
support of storage management interoperability. An SMI-S provider is the software component that
resides on a resource, such as a storage system, providing network management (over HTTP) by
management clients, such as HP XP7 Command View Advanced Edition.
When you manage storage systems that support an SMI-S provider, the SMI-S enabled storage systems
become HP XP7 Command View Advanced Edition resources on which you can perform the following
tasks:
• Register, change, delete, and update the SMI-S enabled storage systems.
• Display summary information for SMI-S enabled storage systems.
• Operate SMI-S enabled storage systems from the SMI-S enabled storage system management tool
(launch the management tool from Element Manager).
• Externally connect and virtualize an SMI-S enabled storage system for migrating data.
TIP:
Virtualizing an SMI-S enabled storage system without registering the system in XP7 Command View
AE can also be done by using the port scan and volume discovery functionality.
You must be assigned All Resources to view or perform tasks on SMI-S enabled storage systems.
Related topics
• Migrating data from an SMI-S enabled storage system to another storage system, page 200
• Discovering and virtualizing volumes of an unregistered storage system, page 107
Registering hosts
You can register hosts as managed resources using Device Manager so that storage system volumes
can be used by hosts and their applications.
About registering a host
Discover and register hosts to manage them in HP XP7 Command View Advanced Edition software.
The following host types can be added to XP7 Command View AE:
• Normal hosts (an open host that is not virtualized)
• Virtualization servers (a physical server on which virtualization software is installed)
• Virtual machines (a machine that is created on the virtualization server and uses virtualization
software)
Depending on the purpose, there are multiple methods for discovering and adding hosts, including
manually, by using Host Data Collector (agentless discovery), or by using a Device Manager agent.
For host prerequisites and environment settings, see the HP XP7 Command View Advanced Edition
Administrator Guide.
You can also monitor the usage status of storage resources from the host point of view by generating
reports that reflect the actual capacity being used by each host.
Related topics
• Methods for registering hosts, page 47
Discovering, registering, and adding management targets46
Page 47

• Priority for acquiring the WWN, page 48
• About changing host settings and information, page 52
Methods for registering hosts
There are a variety of methods to register one or more hosts including using its WWN, using
host-installed agents, or agentless discovery.
The following table describes the methods you can use to register one or more hosts:
Table 2 Methods for registering hosts
To manually register individual
hosts.
To register multiple
hosts in a batch.
Register each
host by WWN.
Use Host Data
Collector.
DescriptionMethodPurpose
To register hosts in XP7 Command View AE based on WWN, manually
specify the host name, OS type, and WWN information.
Hosts can be registered without Host Data Collector or Device Manager
agent setup.
Virtualization servers can also be manually registered, but the virtual
machine information cannot be referenced or displayed.
To register multiple hosts in a batch, register multiple hosts by specifying
the IP address (range specification and listing addresses are available),
and the authentication information of the host on the network. The host’s
WWN information is automatically obtained.
To allocate volumes to an FCoE port, you must manually add a WWN.
Host Data Collector setup is required.
To know the usage
status of storage
resources for the
virtualization servers, or the correspondence with the
virtual machines.
To automatically
acquire host information, or to
manage a copy
pair by using the
replication functionality of the
volume.
Use Host Data
Collector.
Use Device
Manager
agent.
To know the usage status of storage resources for the virtualization
servers, or the correspondence with the virtual machines, and you want
to register both the virtualization server and the virtual machine, the
virtualization server must use NPIV (N-Port ID Virtualization) HBAs, and
be connected with Fibre Channel.
For virtual machines, install Device Manager agent or use Host Data
Collector to specify the IP address (range specification and listing
addresses are available), and the authentication information of the host
on the network.
If the virtualization server is not using NPIV HBAs, either a virtualization
server or a virtual machine can be registered per HBA unit (both a
virtualization server and a virtual machine cannot be registered in the
same WWN).
To automatically acquire host information, or to manage a copy pair
by using the replication functionality of the volume, install Device
Manager agent on each host or on the management server of the copy
pair. Host information or copy pair information is sent from Device
Manager agent. For details about installing the Device Manager agent,
see the HP XP7 Command View Advanced Edition Installation and
Configuration Guide.
To exclude a host from management by XP7 Command View AE,
uninstall the Device Manager agent, and then remove the host using
XP7 Command View AE.
To allocate volumes to an FCoE port, you must manually add a WWN.
User Guide 47
Page 48

To newly install HP
XP7 Command
View Advanced
Edition to an existing environment
that was configured with XP7
Remote Web Console.
TIP:
To register multiple hosts in a batch operation, use the ImportHosts command to import host
information such as host name and WWNs from a CSV file, and then register multiple hosts in a
batch operation. Hosts that are registered by using the ImportHosts command are managed as
manually registered hosts. For details about the ImportHosts command, see the
View Advanced Edition CLI Reference Guide
Related topics
• About registering a host, page 46
• Registering hosts by using Host Data Collector, page 49
• Registering hosts manually by specifying the WWN target, page 50
• Priority for acquiring the WWN, page 48
• Registering hosts using host scan, page 50
Scan a host.
DescriptionMethodPurpose
Use Host Scan when you want to newly install HP XP7 Command View
Advanced Edition to an existing environment that was configured by
using XP7 Remote Web Console.
HP XP7 Command
.
Priority for acquiring the WWN
If hosts you want to register include a host that has a WWN that has already been registered, the
host that acquires the WWN is determined based on the product or application that detects it, and
is registered according to the following acquisition priority list.
When hosts are registered by using multiple methods, the WWN acquisition priority, listed from
highest to lowest is:
1. A virtualization server (other than one registered manually).
2. A virtualization server that is registered manually .
3. A host registered by using Device Manager agent.
4. A normal host or a virtual machine registered either manually or by using Host Data Collector.
When hosts with the same WWN are registered by using the same method:
• If a host is registered without using the Device Manager agent, the WWN of the host that was
registered first is retained.
• If a host is registered by using the Device Manager agent, the WWN is registered to the host that
was registered last.
Related topics
• About registering a host, page 46
• Methods for registering hosts, page 47
Discovering, registering, and adding management targets48
Page 49

Registering hosts by using Host Data Collector
Use Host Data Collector to discover and register multiple hosts, virtualization servers, and virtual
machines in a single task.
Prerequisites
• Gather the following information:
• Host OS type
• Host IP address (IPv4)
NOTE:
To detect multiple hosts at the same time, specify a subnet or a range of 256 or fewer IP
addresses, or specify individual IP addresses.
• User name and password for logging on to the host (with Administrator or superuser permissions)
NOTE:
When specifying users other than the root, you need to specify environment settings for when
general users are used to collect host information on the host side. For details about how to
specify settings, see the
HP XP7 Command View Advanced Edition Administrator Guide
.
• IP address of Host Data Collector (IPv4 or IPv6) or Host Name
• Gather the following information when registering a virtualization server:
• IP address of Host Data Collector (IPv4 or IPv6) or Host Name
• IP address of VMware vCenter Server or a virtualization server (IPv4 or IPv6)
NOTE:
To register a virtualization server, you cannot specify a subnet, a range, and multiple IP
addresses.
• User name and password of a user (who has the role of system administrator) for logging on
to vCenter Server or virtualization servers
NOTE:
If vCenter Server is being used, enter the user name and password for vCenter Server. If vCenter
Server is not being used, you need to enter and register user names and passwords of
virtualization servers one by one if multiple virtualization servers are being managed.
• Verify that target hosts are connected to the network.
• Specify environment settings for virtualization servers. For details see the HP XP7 Command View
Advanced Edition Administrator Guide.
1. On the Administration tab, select Managed Resources.
User Guide 49
Page 50

2. On the Hosts tab, click Add Hosts.
3. In the Add Hosts dialog box, click Discover Hosts.
If you are registering a virtualization server, select VMware from OS Type.
4. Specify the necessary items, select the Host Data Collector to be used, and then submit the task.
The task is registered and listed on the Data Collection Tasks tab.
5. Verify task status on the Data Collection Tasks tab.
Registered hosts can be viewed in the Resources list on the Navigation pane.
TIP:
If you want to allocate volumes to an FCoE port, you need to manually add a WWN.
Related topics
• Methods for registering hosts, page 47
Registering hosts manually by specifying the WWN target
You can register hosts manually to manage and monitor the hosts by specifying a WWN target.
Prerequisites
• Host name
• OS type
• Unregistered WWN target
1. On the Administration tab, select Managed Resources.
2. On the Hosts tab, click Add Hosts.
3. In the Add Hosts dialog box, select Add Hosts Manually.
4. Specify the appropriate information, and then click OK to submit the task.
If specifying a virtualization server, in OS Type select VMware.
All registered hosts, virtual machines, and virtualization servers are displayed by each host OS type
(for example: AIX, HP-UX, Linux, Solaris, Windows, Virtualization Servers, or Others) in the Resources
list on the Navigation pane.
Related topics
• Methods for registering hosts, page 47
Registering hosts using host scan
You can register hosts by using host scan to discover hosts so that they can be managed and monitored.
Scanning for hosts automatically creates hosts with host names that match the WWNs that are
registered in the host group on the storage system. For best results, your environment should satisfy
the following conditions:
Discovering, registering, and adding management targets50
Page 51

• The name of a host group should be the same as the actual host, and the WWN for that host is
• Only a single host can be related to each host group.
Prerequisites
• Install LUN Manager or LUN Management on the target storage system.
1. On the Administration tab, select Managed Resources.
2. On the Hosts tab, click Host Scan.
3. Confirm that your environment meets the recommended conditions, and then select storage systems
4. Click Submit.
All registered Data Collection Tasks hosts, virtual machines, and virtualization servers can be viewed
by host OS type (for example: AIX, HP-UX, Linux, Solaris, Windows, Virtualization Servers, or Others)
in the Resources list on the Navigation pane.
TIP:
If one host has multiple WWNs detected, even if it is one host in the actual environment, it might
occasionally be registered as multiple hosts by Device Manager. This is because hosts are generated
in host groups when one host has multiple WWNs . In this case, the hosts must be merged, meaning
merge the WWNs. Merge the hosts that have been added as multiple hosts in Device Manager into
one host, meaning that WWN information is merged, and the source hosts are deleted automatically.
set for LUN security.
on which to scan for hosts.
Related topics
• Methods for registering hosts, page 47
• Workflow for detecting hosts, page 52
• Registering hosts using merge hosts, page 51
Registering hosts using merge hosts
You can use merge hosts to combine source and target host information into a single surviving target
host that is registered. The maximum number of WWNs that you can merge at one time is 100.
Prerequisites
• Identify the names of the source and target host. Note that the source host is merged into the target
host, then the source host is deleted.
• Ensure the source host has been registered either manually or by host scan.
• Ensure the target host is not a mainframe host, or a virtualization server (except for manually re-
gistered virtualization servers).
• Ensure the target host has at least one registered WWN.
1. On the Administration tab, select Managed Resources.
2. Select the Hosts tab, select the target host row, click More Actions and select Merge Hosts.
3. In the merge hosts window, select the source host, then click Show Plan.
User Guide 51
Page 52

4. Review the target (surviving host) and source (host to be deleted) information.
• If the target and source host information is correct, click Submit.
• If the target or source host information must be changed, click Back.
• To abandon the task, click Cancel.
5. On the Resources tab, in the hosts tree, confirm the target host information and the source host
removal. You can also confirm this on the Administration tab in the Hosts tree under Managed
Resources.
Related topics
• Methods for registering hosts, page 47
About changing host settings and information
You can change host settings and update previously registered host information.
Depending on how a host is registered, you change host settings and information by using either of
the Refresh Hosts or Edit Hosts options. The Refresh Hosts option updates a host by obtaining
information from the Host Data Collector or Device Manager agent. The Edit Hosts option allows you
to manually change host settings.
If a host accesses storage using a Fibre Channel (FC) or Fibre Channel over Ethernet (FCoE) connection,
you must change host group names, host modes, and host mode options using the Edit Hosts option.
You can update other host-related information when replacing host HBAs by exchanging the WWN
settings in the LUN paths so that the new HBA inherits the WWN settings from the old HBA. Perform
this settings exchange by using the Exchange HBAs dialog box when you replace a host HBA due to
failure, or by using the Add HBAs dialog box and the Remove HBAs dialog box when you complete
a planned HBA replacement as part of scheduled maintenance to prevent performance degradation.
TIP:
The settings for the host WWN are not linked to the settings for the host group on the storage system
side. For example, even if you delete the host WWN , the WWN is not deleted from the host group.
To delete the WWN after replacing HBAs, use the Remove HBAs dialog box. To delete the WWN
from a host group at a time other than when replacing an HBA, use the ModifyPort command.
For details about using the ModifyPort command, see the
Edition CLI Reference Guide
Related topics
• About registering a host, page 46
• Updating host information registered by using Host Data Collector, page 53
• Changing settings for a manually registered host, page 55
• Changing settings for a host registered by using Device Manager agent, page 55
HP XP7 Command View Advanced
.
Workflow for detecting hosts
This topic describes how hosts are detected and registered in Device Manager. Read this topic if you
are installing HP XP7 Command View Advanced Edition software in an environment that was configured
by using Remote Web Console.
Discovering, registering, and adding management targets52
Page 53

A host group is configured on the storage system side, and the storage system is registered in Device
Manager. After that, if a host is detected by Device Manager, a host group in the storage system that
is selected at the time of detection of the host is registered in Device Manager. If the same WWN is
registered to multiple hosts, only the WWN with the same name as the host that is already registered
in Device Manager is added to the host. The following shows an example of host detection:
In this diagram, the WWN of 22.22.22.22.22.22.22.22 for host group AAA is added to host AAA,
which has the same name as the host group. The WWN of host group BBB is already registered to
host AAA, and host BBB cannot be registered in Device Manager. Host CCC, which has the same
name as host group CCC, is added to Device Manager, and the WWN of 33.33.33.33.33.33.33.33
for host group CCC is registered to host CCC.
If one host that has multiple WWNs is detected, even if it is one host in the actual environment, it
might occasionally be registered as multiple hosts by Device Manager. This is because hosts are
generated in host groups when one host has multiple WWNs. In this case, the hosts must be merged.
Merge the WWNs. Merge the hosts that have been added as multiple hosts in Device Manager into
one host. WWN information is merged, and the source hosts are deleted automatically.
TIP:
If one host that has multiple WWN is detected, even if it is one host in the actual environment, it might
occasionally be registered as multiple hosts by Device Manager. This is because hosts are generated
in host groups when one host has multiple WWNs. In this case, the hosts must be merged. Merge the
WWNs. Merge the hosts that have been added as multiple hosts in Device Manager into one host.
WWN information is merged, and the source hosts are deleted automatically.
Related topics
• Registering hosts using host scan, page 50
Updating host information registered by using Host Data Collector
You can update information for registered hosts using Host Data Collector.
Use Refresh Hosts to update host information registered by using Host Data Collector.
To change authentication information about a registered IP address or user account, edit the IP address
or user account by using the Edit Hosts dialog box, and then refresh host information.
User Guide 53
Page 54

To make changes to each item, use the method in the following table:
Table 3 Updating host information using Host Data Collector
Edit HostsRefresh HostsItem
NYHost Name
NNOS Type
NHost IP Address
NHost Data Collector IP Address
Port Type
WWN
WWN Nickname
Legend:
• Y : Can be edited or refreshed
• N : Cannot be edited or refreshed
Notes:
1. For virtualization servers, you can specify either IPv4 or IPv6.
2. You can specify either IPv4 or IPv6.
3. Clicking Refresh Hosts will discover new or updated WWNs and their port types. Deleted WWNs require
that you click Edit Hosts and delete the WWNs that need to be removed.
4. If you want to allocate volumes to a FCoE port, you need to manually add a WWN.
5. You cannot specify this for a virtualization server.
6. To update WWN nicknames that have been specified by using storage system management tools such
as Remote Web Console, refresh the storage system information. When several WWN nicknames are
assigned to a single HBA, only one of the nicknames is displayed for that HBA.
3
Y
3
Y
5
N
1
Y
YNUser ID/PW
2
Y
YNProtocol
3
Y
3,4
Y
N
1. On the Administration tab, select Managed Resources.
2. On the Hosts tab, select the host to update, then click either Refresh Hosts, or Edit Hosts, depending
3. If necessary, specify updated information and click OK. The task is registered and added to the
The host list is updated.
Related topics
• About changing host settings and information, page 52
on the items that you want to update.
task list on the Data Collection Tasks tab. If you updated information in the Edit Hosts dialog box,
after the task has completed successfully, refresh the hosts using Refresh Hosts.
Discovering, registering, and adding management targets54
Page 55

Changing settings for a manually registered host
You can use Edit Hosts to update host information registered by specifying WWN, or registered by
using the host detection function.
1. On the Administration tab, select Managed Resources.
2. On the Hosts tab, select the host to change, and click Edit Hosts.
3. Specify the required items, and then click OK.
The host information is updated.
Related topics
• About changing host settings and information, page 52
Changing settings for a host registered by using Device Manager agent
When the Device Manager agent is used, host information is periodically sent from the Device Manager
agent. To update displayed host information, use the Refresh Hosts button. Additionally, after changing
settings on the Edit Hosts dialog box, depending on which settings you changed, it may be necessary
to use Refresh Hosts to update host information.
To make changes or update host information to each item, see the following table:
Table 4 Updating host information using Device Manager agent
Port Type
WWN
WWN Nickname
Edit HostsRefresh HostsItem
NHost Name
2
Y
2
Y
4
N
1
Y
NYOS Type
NYIP Address
NNUser ID/PW
2
Y
2,3
Y
N
User Guide 55
Page 56

Edit HostsRefresh HostsItem
Legend:
• Y : Can be edited or refreshed
• N : Cannot be edited or refreshed
Notes:
1. When copy pairs are managed by a host where Device Manager agent is installed, you need to restart
the Device Manager agent service after changing the host name. After the Device Manager agent service
is restarted, the new host name is applied by updating the storage system.
2. WWNs and their port types that have been added can be affected by the Refresh Hosts button, but deleted
WWNs and their port types cannot be affected. To delete such WWNs, the Edit Hosts button needs to
be used.
3. If you want to allocate volumes to a FCoE port, you need to manually add a WWN.
4. To update WWN nicknames that have been specified by using other storage system management tools,
such as Remote Web Console, refresh the storage system information. When several WWN nicknames
are assigned to a single HBA, only one of the nicknames is displayed for that HBA.
1. From the Administration tab, select Managed Resources.
2. On the Hosts tab, select the host to update, then click either Refresh Hosts or Edit Hosts depending
on the items that you want to update.
3. Modify the settings and click OK.
The task is registered to Data Collection Tasks tab. If you changed settings in the Edit Hosts dialog
box, after the task successfully completes, refresh the hosts using Refresh Hosts.
The host list is updated.
NOTE:
After you change a host name, both host names (before and after the change) might display on the
Resources tab. In this case, delete the host before making the change. When copy pairs are managed
by the host where Device Manager agent is installed, in addition to deleting the host, the storage
system also needs to be updated.
Related topics
• About changing host settings and information, page 52
About removing hosts and releasing associated resources
When hosts no longer need to be managed, for example due to a reorganization, you can remove
the registered hosts and exclude them from XP7 Command View AE management. Related storage
resources, such as volumes allocated to the target host and path setting information, can also be
removed. Only storage resources allocated to the removed host can be released.
When removing storage resources, you can select to:
• Unallocate volumes
• Delete associated host groups
• Release LUSE volumes
• Delete virtual LDEV ID. This applies when managing resources that have virtual IDs set.
• Delete associated volumes
Discovering, registering, and adding management targets56
Page 57

• Shred associated volumes. Format the volumes if shredding is unavailable.
By automatically executing these options as an extension of removing a host, the process is simplified.
NOTE:
When removing storage resources related to a host, verify that there is not any related data remaining
on the volumes.
TIP:
If you are removing a host that was registered using Device Manager agent, uninstall the Device
Manager agent from the host, then remove the host using XP7 Command View AE.
Related topics
• Removing hosts and releasing associated resources, page 57
• About unallocating volumes, page 155
• About managing storage resources that have virtual IDs, page 265
• About deleting unallocated volumes, page 102
• About releasing a LUSE volume, page 104
Removing hosts and releasing associated resources
When you no longer need to manage a host, remove the host and release its associated related
storage resources, such as allocated volumes and path settings.
Prerequisites
• Gather the following information:
• Target host names
• Target volumes
• Back up the target volumes
• Stop input and output to the target volumes
1. On the Administration tab, select Managed Resources and click the Hosts tab.
2. From the lists of hosts, select the host you want to remove and click More Actions > Remove Hosts.
User Guide 57
Page 58

3. In the Remove Hosts dialog box, select one or more options from the following:
• Remove only selected hosts
• Unallocate volumes and remove hosts
When you unallocate the volumes that are used by the selected hosts and clean up the volumes,
select from the following:
• Delete associated host groups
• Delete associated volumes
• Shred associated volumes
NOTE:
Shred during off hours, such as overnight, so that the shredding process does not adversely
affect system performance. To verify the standard required times for shredding, see the
XP7 Volume Shredder for Open and Mainframe Systems User Guide
• Release LUSE volumes
• Delete virtual LDEV ID. This applies when managing resources that have virtual IDs set.
4. Click Plan Details to confirm that the information about associated resources is correct.
5. (Optional) Update the task name and provide a description.
6. (Optional) Expand Schedule to specify the task schedule.
.
HP
7. Click Submit.
8. (Optional) Check the progress and result of the task on the Tasks & Alerts tab. Click the task
When the task completes, the host is removed and the selected associated storage resources are
released.
Related topics
• About removing hosts and releasing associated resources, page 56
You can schedule the task to run immediately or later. The default setting is Now. If the task is
scheduled to run immediately, you can select View task status to monitor the task after it is
submitted.
If the task is scheduled to run immediately, the process begins.
name to view details of the task.
Discovering, registering, and adding management targets58
Page 59

4 Setting up users and access control
This module describes how to set up users and access control.
Setting up users and access control
After users are registered, you can limit the scope of allowed operations for each user by configuring
access control settings for users and storage resources.
To set access control you will need to create resource groups and user groups, then assign the resource
groups and roles to the user groups.
Related topics
• About user accounts and controlling access to resources, page 59
• About access control, page 67
About user accounts and controlling access to resources
HP XP7 Command View Advanced Edition provides built-in user accounts, and provides the ability
to add additional local user accounts and also users from external authentication servers. Additional
users are granted controlled access to storage resources by being added to user groups with assigned
resource groups and roles (permissions). Built-in resource groups and user groups exist for administrative
convenience.
Two built-in user accounts are created when HP XP7 Command View Advanced Edition is installed,
and you will see them listed when viewing user accounts. As you add additional user accounts they
will be listed.
• The System account (default password: manager) is a fully privileged administrator account, and
is used to manage all XP7 Command View AE functionality, including XP7 Command View AE
user accounts, user groups, and resource groups.
• The HaUser account (default password: haset) is the default user account used by Device Manager
agents. The default role for the HaUser account is Peer and the PeerGroup is set for the HaUser
account. The HaUser account belongs to PeerGroup as soon as the installation completes.
User Guide 59
Page 60

Login with the System account to access user management in the Administration tab to create local
XP7 Command View AE user accounts. While creating user accounts, you can list available applications
(as installed on the management server) and set user permissions for those applications. Users must
also be added to at least one (possibly more) resource groups to determine the storage they can
access. Together, application permissions and resource group/user group membership determines
the scope of what the user can do in XP7 Command View AE.
NOTE:
If you are managing XP7 by directly logging into the Remote Web Console, we strongly recommend
that the user account information and access control information for storage resources be the same
for XP7 Command View AE and Remote Web Console.
If the storage system being registered is an HP XP7, by enabling user authentication in XP7 Command
View AE so that user accounts are authenticated when they log in to RAID Manager and the SVP,
user accounts can be centrally managed. If you are centrally managing user accounts from XP7
Command View AE, please note the following:
• SSL communication must be configured between the Device Manager server and the storage system.
Also, you might need to add firewall exceptions between the Device Manager server and the
storage system. For details on implementing SSL communication and adding firewall exceptions
between the Device Manager server and the storage system, see the HP XP7 Command View
Advanced Edition Administrator Guide.
• User accounts should be created with user names and passwords compatible with XP7 Command
View AE and the HP XP7 components.
• If a user account that is used to perform operations by using RAID Manager or the SVP is already
registered in Remote Web Console, also register that user account in XP7 Command View AE.
Note that if XP7 Command View AE authentication of user accounts is disabled when logging into
RAID Manager or SVP, you must specify the same user account information and access control to
storage resources in both XP7 Command View AE and Remote Web Console.
You can also manage user accounts by linking to an external authentication server, such as an LDAP
directory server, RADIUS server, or Kerberos server. However, the built-in accounts (System and
HaUser) cannot be authenticated on an external authentication server. The XP7 Command View AE
user account used to connect to external authentication servers and external authorization servers is
managed as a Windows Active Directory (authorization) group. Permissions that are specified for
authorized groups are also applied to users who belong to nested groups.
Application permissions:
After adding basic user information such as username, password, email, and description, you set
permissions for available applications which could include, for example:
• Tier management (CLI)
• Replication management
• Tuning management
Permissions include View, Execute, Modify, and Admin. These permissions control what the user can
do from the related tabs, and possibly elsewhere.
Users can assist in user management tasks by selecting the admin permission for the User Management
application. The user will be able to assist in:
• Specifying user settings
• Creating user groups for Device Manager and Tiered Storage Manager
• Assigning resources and roles to user groups
Setting up users and access control60
Page 61

• Reporting user, and user group information in CSV format
• Specifying security settings (such as locking an account)
Resource groups and User groups:
The resource group All Resources is a built-in group (created by default) and contains the built-in user
groups called AdminGroup, ModifyGroup, PeerGroup, and ViewGroup. Adding a user to ViewGroup
would allow a user to see all registered storage systems and related underlying detail such as parity
groups. Putting the user in ModifyGroup enables task related buttons and tasks listed under General
Tasks, allowing the user to work with resources. For these built-in groups a user can only be in one
group, so a user would have to be removed from ViewGroup, then added to ModifyGroup. Essentially,
as a member of an All Resources group, you have access to the Device Manager GUI and Tiered
Storage Manager GUI elements.
Additionally, each storage system has a Default ResourceGroup. If you have three registered storage
systems you would see three of these groups in addition to All Resources listed. This group is used to
provide Admin, Modify, or View permissions (roles) to one or more users in a user-defined user group
so they have access to the specific resources of the storage system. In other words, instead of placing
a user in the All Resources group, you can place them in one or more storage system resource groups
and narrow the scope of what they can view or manage. To do this, you must create a named
user-defined group and edit the resource group to add the user-defined group and one or more users,
whose permissions (roles) can be set independently as you add them. Additionally, if the default
resource group is for a HP XP7, you can select Custom roles which are more specific, such as roles
for provisioning, or copy pair management and tasks. Mulitiple roles can be combined.
For very specific control over access to resources, consider creating user-defined resource groups.
You can identify specific parity groups and LDEVs that members of your user-defined user group can
access. As with default resource groups, for a HP XP7, you can select Custom roles.
TIP:
For details about the required permissions for executing each command of the Tiered Storage Manager
CLI, see:
•
HP XP7 Command View Advanced Edition Tiered Storage Manager CLI Reference Guide
Related topics
• Creating a user account, page 61
• User ID and password policies, page 62
Creating and managing user accounts
Create user accounts and assign permissions.
Creating a user account
All users not allowed to login with the System account require a user account for access to XP7
Command View AE.
A user account consists of general user profile information (User ID, Password, Full Name, E-mail,
and Description).
User Guide 61
Page 62

1. On the Administration tab, click Users and Permissions.
This will launch a user management window.
2. Click Users to display the current user list.
3. Click Add User and specify user profile information.
4. Click OK.
The user list is re-displayed and will include the new user.
TIP:
To delete registered users, select the check boxes of the users to be deleted, and click Delete Users.
Related topics
• User ID and password policies, page 62
• Editing the profile for a user account, page 63
User ID and password policies
User IDs and passwords must adhere to specific requirements.
The User ID and password requirements for XP7 Command View AE, the SVP, and RAID Manager
vary.
When using XP7 Command View AE as an authentication server for HP XP7, User IDs and passwords
must be valid for both XP7 Command View AE and the SVP, and for XP7 Command View AE and
RAID Manager.
Table 5 XP7 Command View AE, SVP, and RAID Manager login account requirements
RequirementsLengthItemComponent
A-Z, a-z, 0-9
! # $ % & ' ( ) * + - . = @ \ ^ _ |
Same as above1-256Password
Alphanumeric (ASCII code) characters
! # $ % & ' - . @ ^ _
Alphanumeric (ASCII code) characters
! # $ % & ' ( ) * + - . = @ \ ^ _ |
Alphanumeric (ASCII code) characters
- . @ _
Alphanumeric (ASCII code) characters
- . @ _
XP7 Command
View AE
SVP
RAID Manager
1-256User ID
1-128User ID
6-127Password
1-63User ID
6-63Password
Setting up users and access control62
Page 63

NOTE:
When using a Windows computer for RAID Manager, you can also specify a backslash ( \ ) for both
the User ID and password.
If using external authentication servers such as LDAP (and others), note the following:
• User IDs and passwords must be valid for the external authentication server and HP XP7 Command
View Advanced Edition products.
A password policy can be configured from the Administration tab to enforce stronger passwords. If
using external authentication, the password enforcement must be compatible.
See “Setting a password policy” on page 30.
Related topics
• About user accounts and controlling access to resources, page 59
• Creating a user account, page 61
• Changing the password for a user account, page 64
• Changing your own password, page 64
• Configuring external authentication for users, page 65
• Configuring external authentication for groups, page 66
Editing the profile for a user account
Modify the name, email address, and description for a user account.
1. On the Administration tab, click Users and Permissions.
This will launch a user management window.
2. Click Users, select the target user by clicking the User-ID link, and click Edit Profile.
3. Edit the profile information for the user, and then click OK.
The user profile is displayed.
4. Confirm the updated user profile information.
Related topics
• Changing permissions for a user account, page 64
• Editing your own user profile, page 63
Editing your own user profile
As your user attributes change, you will need to update your user profile.
1. On the Administration tab, click User Profile.
Your user information is displayed.
2. Click Edit Profile.
3. Edit the profile information and click OK.
4. Confirm that the updated user profile information appears in the Users area.
User Guide 63
Page 64

Related topics
• Changing your own password, page 64
Changing the password for a user account
As user passwords expire or are compromised, they can be changed.
1. On the Administration tab, click Users and Permissions.
This will launch a user management window.
2. Click Users, select the target user by clicking the User-ID link, and click Change Password.
3. Enter the new password and verify it.
4. Click OK.
5. Confirm that the user account can log in with the new password.
Related topics
• Changing your own password, page 64
• User ID and password policies, page 62
Changing your own password
As your password expires or is compromised, it will need to be changed.
1. On the Administration tab, click User Profile.
Your information is displayed.
2. Click Change Password.
3. Type the new password and verify it.
4. Click OK.
5. Login with your new password.
Your password is changed.
Related topics
• About user accounts and controlling access to resources, page 59
• Changing the password for a user account, page 64
• User ID and password policies, page 62
Changing permissions for a user account
To grant a user new permissions or remove existing permissions, change permission settings in the
user account.
TIP:
For a user of Device Manager or Tiered Storage Manager (GUI), specify a role for the user group
which is assigned to the user, instead of granting user permissions.
Setting up users and access control64
Page 65

1. On the Administration tab, click Users and Permissions.
This will launch a user management window.
2. Click Users, select the target user by clicking the User-ID link, and click Change Permission.
3. Edit the permissions and click OK.
The user account is re-displayed, including granted permission.
4. Verify the correct user permissions are selected.
The user permissions are changed.
Related topics
• Required roles and resource groups by function, page 78
Changing the lock status of user accounts
A user account can be locked or unlocked by an administrator.
1. On the Administration tab, select Users and Permissions.
This will launch a user management window.
2. Click Users, select the check box for the user whose lock status you want to change.
3. Click Lock Users or Unlock Users.
A verification dialog box displays.
4. Click Ok to lock or unlock the account, or click Cancel.
5. Verify that the user account has been locked (a lock icon displays in the user list), or that the
previously locked user can now log in.
Related topics
• About user accounts and controlling access to resources, page 59
• Changing the password for a user account, page 64
Configuring external authentication for users
External authentication systems can be used to authenticate user logins.
External authentication systems, such as LDAP (for example, Active Directory), RADIUS, or Kerberos
may be used to authenticate XP7 Command View AE users as they log in. You can re-configure existing
accounts, or create new accounts to use external authentication.
Prerequisites
• The XP7 Command View AE server must be linked to an external authentication server. See the
HP XP7 Command View Advanced Edition Administrator Guide.
• The XP7 Command View AE server must be configured to support user authentication, which ac-
tivates the Change Auth button in the GUI, and which presents authentication options such as Internal for a local account, or LDAP for external authentication.
• The XP7 Command View AE user ID must exist on the external authentication server. It is recom-
mended that user ID information be acquired from the external authentication server administrator
before creating accounts.
User Guide 65
Page 66

1. From the Administration tab, select Users and Permissions.
2. Select Users folder, then select one or more users (using the checkbox) whose authentication
method you want to change, or click Add User to create a new account.
NOTE:
When creating a new account, only the User ID is required for external authentication, and
must match a user ID on the external authentication server. For a local (internal) account,
a User ID and Password are both required. When external authentication is available, new
user accounts created without a password value are automatically configured to use external
authentication (for example, LDAP is selected for you). Fill in the desired fields, and click
OK to create the user account.
3. If you have selected existing users, click Change Auth. A dialog box is displayed. From the drop
down list, select the desired authentication method (for example, LDAP) and click OK. The user
list will be re-displayed.
4. Review the Authentication column to verify the authentication method.
On the next login attempt by each user, the users login credentials (user ID and password) will be
validated using the external authentication server.
TIP:
Set permissions or roles so that the registered user can perform necessary operations using XP7
Command View AE products. Also consider adding user accounts to user groups with assigned roles
for controlled access to resource groups.
Related topics
• About user accounts and controlling access to resources, page 59
• Configuring external authentication for groups, page 66
• User ID and password policies, page 62
Configuring external authentication for groups
External authentication systems can be used to authenticate user groups.
External authentication systems, such as LDAP (for example, Active Directory), RADIUS, or Kerberos
may be used to authenticate XP7 Command View AE user group members as they log in. You can
configure one or more user groups, from one or more external authentication servers.
When linking with an external authentication server, if using together with Active Directory as an
external authorization server, user permissions can be managed by using the Active Directory groups
(authorization groups) registered on the external authorization server. In this case, user permissions
are specified for each group.
Prerequisites
• The XP7 Command View AE server must be linked to an external authentication (authorization)
server. See the HP XP7 Command View Advanced Edition Administrator Guide.
• The XP7 Command View AE server must be configured to support group authentication, which
activates the Groups folder in the GUI.
Setting up users and access control66
Page 67

• The XP7 Command View AE user group must exist on the external authentication (authorization)
server. It is recommended that domain and group information, as required below, be acquired
from the external authentication server administrator.
1. From the Administration tab, select Users and Permissions.
2. Click the Groups folder to display the Domain List. This is a list of external authentication servers
listed by domain name, and host name or IP address. If the Groups folder is not displayed, see
the pre-requisites above.
3. Select the desired Domain Name to display the Group List, which may be empty ('No Groups'
is displayed). Click Add Groups.
4. Enter the Distinguished Name for the group. Use Check DN to verify a correct DN entry. Click
Ok to save your group and re-display the Group List. Note that the Group Name is derived from
the entered DN. To specify multiple groups, note that:
• You can add multiple DNs at the same time using the "+" button
• If multiple DNs are listed, you can remove an entry with the "-" button
• Reset clears all DN entries
5. From the Group List, click the Group Name link, then click Change Permission and set the XP7
Command View AE permissions for the group (repeat this for each new group).
6. Your groups will now be visible from the Administration tab, User Groups. You can affiliate the
groups with resource groups and roles, just like XP7 Command View AE user groups. If you
delete external authentication groups from Users and Permissions at a later time, the groups are
also removed from the User Groups list.
On the next login attempt by each group member, the users login credentials (User ID and Password)
will be validated using the external authentication (authorization) server.
TIP:
To delete registered authorization groups, select the check boxes of the groups to be deleted, and
then click Delete Groups.
Related topics
• About user accounts and controlling access to resources, page 59
• Configuring external authentication for users, page 65
• User ID and password policies, page 62
Controlling access to resources
This module describes how to control access to resources.
About access control
Within a managed SAN environment, user accounts are created, added to user groups, and the user
groups affiliated with resource groups and assigned roles to provide controlled access to functionality
available in Device Manager and Tiered Storage Manager (GUI).
• A user group consists of local user accounts, or accounts from external authentication systems
User Guide 67
Page 68

• A resource group consists of storage system resources (storage systems, ports, LDEV IDs, and
parity groups)
• Assigned roles for resource groups provide either full, partial, or read-only access to resource
group resources
This creates an access control policy that allows secure data handling in multi-tenant environments
and supports more efficient and secure operations. An access control policy can be used for:
• Data center hosting services
• Management of departments in an organization
• Management of locations in an organization
A user group is a group of users who can access the same resources with the same user permissions.
Externally authenticated groups can also be used as user groups. When you assign resource groups
and roles (user permissions, such as Admin, Modify, View or Custom) to a user group, resources are
consistently controlled for the users in that group.
When the storage system is HP XP7, you can use custom roles to specify one or more roles and user
permissions at a more detailed, granular level. For example, you can allow:
• Provisioning operations
• Remote copy operations
• System resource operations
• Storage encryption key and authentication management
• Audit log management
Resource groups can be created in this configuration only when the storage system is HP XP7, HP
P9500.
The following figure illustrates user groups and their permissions (standard Admin, Modify and View
roles) for accessing resources. The use of custom roles is not shown here, but is illustrated in the user
group topics. Custom roles provide more granular permissions to specific functionality.
For HP XP7,HP P9500 systems, physical configurations such as parity groups, and logical configurations
such as LDEV IDs, are used to create resource groups. After resource groups are created, they can
then be assigned to user groups.
Related topics
• Access control examples, page 69
Setting up users and access control68
Page 69

Access control examples
The following examples show how resource groups can control access in a HP P9500, HP XP7 system.
One method for dividing resources would be by separating resources based on company location.
For example, if you create resource groups based on location, the administrators in each location
are limited to using only the resources that have been assigned to them, and are restricted from
accessing the resources of other locations.
It is also possible to share physical resources (such as parity groups or storage ports) among
departments, and divide only logical resources (such as LDEV IDs or host group numbers) by
department. For example, you can assign resource groups that contain shared physical resources to
all departments, and then assign individual resource groups that contain specific logical resources to
the appropriate departments. This allows department administrators to use only the resources assigned
to them, while still allowing for effective sharing of physical resources.
User Guide 69
Page 70

Related topics
• About resource groups, page 70
• About user groups, page 73
• About access control, page 67
About resource groups
Resources can be grouped by system resource types that include storage system, parity group, LDEV
ID, and storage port. There are several types of resource groups:
• All Resources is a resource group that is created during management server installation and includes
all resources managed by XP7 Command View AE. For example, a user who is a member of one
of the built-in user groups for All Resources has access to all storage systems.
• Default ResourceGroup is the name for default resource groups that are created as storage systems
are discovered and registered. A user who is a member of a user group in a default resource
group has access to all of the storage system resources.
• Resource pool is another type of resource group. A resource pool is a resource group to which
resources of a virtual storage machine in an HP XP7 belong, when the resources have not been
added to any individual resource group. There are two types of resource pools. There are resource
pools on the default virtual storage machine, and resource pools that are automatically created
on user-defined virtual storage machines. You can check the resource pools on user-defined virtual
storage machines from the resource group list.
• User-defined resource groups defining more specific storage access can be created for the HP
P9500, HP XP7 and depend on the operating environment. Resources can be grouped by parity
group, LDEV ID, or storage port. Resource group definitions in Device Manager are applied to
the storage system when using the HP XP7. However, these resource group definitions are not
applied to other storage systems.
Resource groups, which are user-defined, can be set for the HP P9500 or HP XP7. Only default
resource groups are created for other storage systems. Each resource is automatically registered in
the All Resources and in Default resource groups created for its storage system (this group cannot be
deleted). If a volume that is part of a LUSE or THP/Smart pool is registered in a resource group, other
Setting up users and access control70
Page 71

volumes in that LUSE or THP/Smart pool are also registered in the same resource group. For the HP
XP7, when you register a part of a parity group that is part of a concatenated parity group to a
resource group, other parity groups that are a part of the concatenated parity group will also be
registered in the same resource group automatically. If the resource is in a HP P9500 or HP XP7
system, you can register it in only one user-defined resource group. The only resource group that can
be assigned to an externally authorized group is All Resources.
Related topics
• Creating resource groups, page 71
• Prerequisites for creating resource groups, page 71
• Editing a resource group, page 72
• About user groups, page 73
• Assigning resource groups and roles to a user group, page 93
• Access control examples, page 69
• About managing resources by using virtual storage machines, page 257
Prerequisites for creating resource groups
Resources are grouped by system resource types that include storage system, parity group, LDEV ID,
and storage port.
The following list identifies the conditions for creating a user-defined user group for the HP P9500,
HP XP7.
All of the following resources can be set to create a user-defined group for a HP P9500, HP XP7.
However, the only resource group that can be assigned to an externally authorized group is All
Resources:
• Parity Groups: Includes parity groups and volumes in external storage systems. Users with Modify,
Storage Administrator (Provisioning), or higher roles for parity groups, or the LDEV ID of a THP/
Smart pool volume, and an unused LDEV ID is assigned to the user, the user can create a volume.
For the HP XP7, when you register a part of a parity group that is part of a concatenated parity
group to a resource group, other parity groups that are a part of the concatenated parity group
will also be registered in the same resource group automatically.
• LDEV IDs: Includes parity groups and volumes in external storage systems. Non-existent IDs can
also be specified. Users with Modify, Storage Administrator (Provisioning), or higher roles for
parity groups or THP/Smart pools and assigned an unused volume ID, can create a volume.
• Storage Ports: Users with Modify, Storage Admininstrator (Provisioning), or higher roles for ports
and assigned an unused Host Group Number can create a host group that has that host group
number.
• Host Group Number: Non-existent numbers can also be specified. Users with Modify, Storage
Administrator (Provisioning), or higher roles for ports and assigned an unused Host Group Number
can create a host group that has that host group number.
Related topics
• About resource groups, page 70
• Creating resource groups, page 71
Creating resource groups
User created resource groups can be used to group system resource types including storage system,
parity group, LDEV ID, and storage port.
User Guide 71
Page 72

Resource groups, which are user defined, can be created for the HP P9500, HP XP7.
1. On the Administration tab, in the Administration pane, select Resource Groups.
2. Click Create Resource Group.
3. Enter a name and description, and select the storage system providing the resources.
4. Using the tabs, specify the parity groups, LDEVs, ports, or host groups (or a mix of resources) for
5. Click Submit to register this as a task.
6. You can check the progress and result of the task on the Tasks & Alerts tab. Click the task name
The new resource group is displayed, and can be assigned to an existing user group using the Edit
User Group button. You can also assign resource groups when creating new user groups with Create
User Group.
TIP:
To delete resource groups, select one or more resource groups and click Delete Resource Groups.
Related topics
the resource group.
to view details of the task.
• Access control examples, page 69
• Prerequisites for creating resource groups, page 71
• Editing a resource group, page 72
• Assigning resource groups and roles to a user group, page 93
Editing a resource group
You can edit storage system resources in an existing resource group.
Information about resource groups can be modified to reflect changing access control requirements.
1. On the Administration tab, in the Administration pane, select Resource Groups.
2. From the Resource Groups pane, select the resource group, and click Edit Resource Group.
Alternatively, if you click the resource group link, click Actions and select Edit Resource Group.
3. You can modify the resource group name and description, but not the storage system.
4. Modify the parity groups, LDEVs, ports, or host groups to reflect your access control requirements.
5. Click Submit to register this as a task.
6. You can check the progress and result of the task on the Tasks & Alerts tab. Click the task name
to view details of the task.
Depending on how you initiated your edit (see step 2), the resource group is displayed and you can
confirm your changes, or you will be in the Resource Groups pane and can click the resource group
link to confirm your changes.
Related topics
• Access control examples, page 69
• Creating resource groups, page 71
Setting up users and access control72
Page 73

• Assigning resource groups and roles to a user group, page 93
About user groups
A user group consists of one or more users having the same permissions (role) for the same resources.
An external authentication group can also be used as a user group. There are also built-in resource
and user groups for administrative convenience.
For a user group, one or more resource groups are added, and a role assigned for each resource
group. The types of roles are:
• Admin
• Modify
• View
• Custom
User group members will be able to work with each resource group according to the assigned role
(permissions) for the resource group. For example, a user group member with view access to a resource
group can monitor, but not change the resource. Also note the following:
• A user can belong to multiple user groups, each with assigned resource groups and roles
• A user belonging to a built-in user group cannot be registered to another user group
• A resource group can be registered to multiple user groups
If hosts and volumes are managed as logical groups that correspond to businesses or organizations
and the logical groups are registered as private logical groups, only users who belong to the same
user group will be able to use the logical groups.
The default (built-in) user groups assigned to the All Resources resource group (also built-in) are:
• AdminGroup (role: Admin and the permission for creating resource groups)
• ModifyGroup (role: Modify)
• ViewGroup (role: View)
• PeerGroup (role: Peer. This user group cannot be assigned to a resource group)
Two special case user group assignments exist:
• The built-in account (user ID: HaUser) used by Device Manager agents is set to the PeerGroup
immediately after the installation is completed, but can be set to another group later. To assign
the Peer role to a user, register the user in PeerGroup.
• Authorized groups that have been registered to HP XP7 Command View Advanced Edition products
can be used as user groups. Roles assigned to authorized groups are also applied to users who
belong to nested groups.
For an HP XP7 or HP P9500 storage system, if different roles are set as follows, the role set for each
resource group is applied to all resource groups within the same storage system.
• When multiple resource groups in the same storage system are assigned to one user group, and
a different role has been set for each resource group.
• When a user belongs to multiple user groups, and a different role has been set for the resource
groups in the same storage system.
If the storage system is not an HP XP7 or HP P9500 the previous scenario does not apply. For example,
in the following figure, User A and User B can access each resource group (RG) with the following
roles, respectively.
User A can access RG1, RG2, and RG3 with the Admin, Audit Log Administrator (View & Modify)
and Security Administrator (View Only) roles. User B can access RG3 with the Security Administrator
(View & Modify) role, and access RG4 with the View role.
User Guide 73
Page 74

Some special cases apply:
• If a user has the Storage Administrator (Provisioning), Modify, or higher roles for parity groups or
the LDEV ID of a THP/Smart pool volume, and an unused LDEV ID is assigned to this user, they
can create a volume.
• If a user has the Storage Administrator (Provisioning), Modify, or higher roles for ports, and an
unused Host Group ID is assigned to this user, they can allocate new volumes by using that Host
Group ID.
• If the LDEV ID of a THP/Smart volume is assigned to a user, this user can view the THP/Smart
pool to which the THP/Smart volume belongs and the THP/Smart pool volumes that compose the
THP/Smart pool. If the LDEV ID of a THP/Smart pool volume is assigned to this user, they can
view the pool to which the THP/Smart pool volume belongs.
• If a parity group is assigned to a user, this user can view all volumes that belong to the parity
group from a list of volumes that appears when displaying the parity group information. If a parity
group is not assigned to a user and only the LDEV IDs of the volumes belonging to the parity group
are assigned to this user, they cannot view that parity group.
NOTE:
The roles above determine the operation permissions of Device Manager and the Tiered Storage
Manager GUI. For users of the Tiered Storage Manager CLI, operation permissions are granted by
setting permissions for each user. For details about the permissions required to execute each command,
see the
HP XP7 Command View Advanced Edition Tiered Storage Manager CLI Reference Guide
.
Related topics
• Creating user groups, page 92
• About access control, page 67
User group roles
In Device Manager and Tiered Storage Manager (GUI), permissions are granted by assigning resource
groups and roles to users in a user group.
For other XP7 Command View AE products, operation permissions are granted by setting permissions
for each user. For example, this method can be used for granting permissions via Device Manager
GUI and CLI operations and via the Tiered Storage Manager GUI. To grant permissions via Tiered
Setting up users and access control74
Page 75

Storage Manager CLI operations, permissions must be set for each user, and not by assigning roles
to a user group.
The table below describes the types of roles and the operations that can be performed when those
roles are assigned.
By specifying roles, resources that belong to a resource group for which a user has permission to
reference or operate on are displayed. The user can perform operations or reference information for
the displayed resources.
Roles can be set for an external authentication group, just like for other user groups, when the external
authentication group is used as a user group. By default, the View role for All Resources is set.
Table 6 User permissions by role
Tiered Storage Manager TasksDevice Manager TasksRole
Admin
Modify
Peer
Custom
The user can register resources to be managed,
change settings, and view information.
If the user is assigned to All Resources, the user
can manage resource groups.
The user can register resources to be managed,
change settings, and view information.
The user can view (reference) managed resources.View
This role applies only to Device Manager agents
and cannot be assigned to resource groups.
The Peer role cannot be assigned in combination
with any permissions other than the User
Management permissions.
For XP7, granular roles are available and are referred to as custom roles. The Admin, Modify,
and View roles are broad in scope, while custom roles are more specific. When selecting permissions for a user group associated with a default user group or user-defined resource group, multiple
custom roles can be selected in combination to determine user capabilities. For users assigned to
an All Resources built-in group, custom roles are not available as the built-in groups grant Admin,
Modify, or View permissions only.
The user can create, edit, and delete tiers,
perform operations from the Mobility tab, and
perform migration tasks.
The user can create, edit, and delete tiers,
perform operations from the Mobility tab, and
perform migration tasks.
The user can view (reference) information
about tiers, information in the Mobility tab,
and list migration tasks.
Not applicable.
Related topics
• Custom roles, page 75
• Required roles and resource groups by function, page 78
Custom roles
Custom roles provide granular permissions for performing general XP7 Command View AE tasks, as
well as additional tasks specific to HP XP7 Storage. The custom roles available include Storage,
Security, Audit Log, and Support roles.
The table below describes additional XP7 tasks (functions) and the required custom roles when selecting
System GUI from menus or application panes to open Remote Web Console.
User Guide 75
Page 76

In addition to the table below, information is available about general XP7 Command View AE tasks
and required roles and custom roles, see “Required roles and resource groups by function” on page 78.
For a general overview of roles and custom roles, see “User group roles” on page 74.
Note that to use custom roles, they must be assigned to resource groups with users. The following
custom roles can be assigned to both the XP7 default resource group for broad access to storage
resources, and to user-defined resource groups for specific access to storage resources:
• Storage Administrator (Provisioning)
• Storage Administrator (Performance Management)
• Storage Administrator (Local Copy)
• Storage Administrator (Remote Copy)
Storage, security, and audit log custom roles not in the list above are generally for tasks concerning
the storage system as a whole, such as security and auditing. These roles are assigned to the XP7
default resource group only.
NOTE:
Custom roles cannot be assigned to users in the All Resources built-in resource groups as these groups
permit View, Modify, or Admin permissions only.
Note that multiple custom roles can be selected to provide specific custom role combinations for each
resource group with users. For more information on resource groups and user groups and how they
are used for access control, see “About access control” on page 67.
Table 7 Custom roles
Storage Administrator (Provisioning)
Storage Administrator (Performance Management)
Storage Administrator (Local Copy)
1
1
1
FunctionsCustom role (permission)
Allows provisioning related operations:
• Configuring caches
• Configuring LDEVs, pools, and virtual volumes
• Formatting and shredding LDEVs
• Configuring external volumes
• Configuring alias volumes for Parallel Access Volumes
• Configuring Thin Provisioning
• Configuring host groups, paths, and WWNs
• Configuring Volume Migration except splitting Volume Mi-
gration pairs when using Raid Manager.
• Configuring access attributes for LDEVs
• Configuring LUN security
Allows performance monitoring:
• Configuring monitoring
• Starting and stopping monitoring
Allows pair operations for local copy:
• Performing pair operations for local copy
• Configuring environmental settings for local copy
• Splitting Volume Migration pairs when using Raid Manager
Setting up users and access control76
Page 77

Storage Admininstrator (Remote Copy)
1
Storage Administrator (Initial Configuration)
Storage Administrator (System Resource
Management)
1
FunctionsCustom role (permission)
Allows remote copy operations:
• Remote copy operations in general
Allows initial configuration of storage systems:
• Configuring settings for storage systems
• Configuring settings for SNMP
• Configuring settings for e-mail notification
1
• Configuring settings for license keys
• Viewing, deleting, and downloading storage configuration
reports
• Acquiring all the information about the storage system and
refreshing
Allows configuring various storage system resources:
• Configuring settings for CLPR
• Configuring settings for MP Blade
• Deleting tasks and releasing exclusive locks of resources
• Completing SIMs
• Configuring attributes for ports
• Configuring LUN security
• Configuring Performance Control
• Configuring tiering policies
Security Administrator (View & Modify)
Security Administrator (View Only)
Audit Log Administrator (View & Modify)
With the exception of user management, allows management
of encryption keys and authentication for storage systems:
• Creating an encryption key, configuring encryption
• Viewing and switching the location at which to create an
encryption key
• Backing up and restoring an encryption key
• Deleting an encryption key that is backed up on the key
management server.
• Viewing and changing the password policies for backing up
an encryption key on the Remote Web Console computer.
• Configuring the certificate used for SSL communication on
the Remote Web Console computer2.
• Configuring the fibre channel authentication (FC-SP)
Allows viewing of storage system encryption keys and
authentication settings:
• Viewing information about encryption settings
• Viewing information about encryption keys on the key man-
agement server
Allows management of storage system audit logs:
• Configuring audit log settings
• Downloading audit logs
User Guide 77
Page 78

Audit Log Admininstrator (View Only)
FunctionsCustom role (permission)
Allows viewing of audit log settings for storage systems and
downloading of audit logs:
• Viewing storage audit log settings
• Downloading audit logs
Support Personnel
Notes:
1. Custom roles also apply to general tasks performed on the HP XP7, such as:
• Refreshing storage system information
• Registering storage systems and hosts
• Managing tasks, logical groups, and storage tiers
• Displaying information
• Downloading components
2. When a user account for logging in to the SVP or RAID Manager is authenticated by XP7 Command View
AE, if the user account created in XP7 Command View AE is assigned the Security Administrator (View
& Modify) role, that user account can be used to open the Tool Panel and configure the certificate. For
details about this procedure, see the HP XP7 Command View Advanced Edition Administrator Guide.
3. When a user account for logging in to the SVP or RAID Manager is authenticated by XP7 Command View
AE, if the user account created in XP7 Command View AE is assigned the Support Personnel role, that
user account be used to log in to the SVP and perform tasks.
4. Normally, the Support Personnel role is assigned to a service representative, but if the role is assigned
to a user account, dump files can be downloaded using the FD Dump tool. When a user account for
logging in to the SVP or RAID Manager is authenticated by XP7 Command View AE, if the user account
created in XP7 Command View AE is assigned the Support Personnel role, that user account be used to
open the Tool Panel and download dump files. For details about this procedure, see the HP XP7 Command
View Advanced Edition Administrator Guide.
34
Allows configuration from the SVP by service representatives:
• Downloading dump files using the FD Dump tool
Allows configuration of the SVPUser Maintenance
Required roles and resource groups by function
The following tables show the resource groups and roles that are required to perform each function
of Device Manager or Tiered Storage Manager.
The first table below lists XP7 Command View AE functions, and the required resource groups and
roles to perform the function.
The second table lists additional XP7 Command View AE functions for the XP7, and the required
custom roles or roles to perform the functions.
NOTE:
This topic describes only the operations that can be performed from the GUI. For the operations that
can be performed by using CLI, see the manuals
Reference Guide
Guide
.
and
HP XP7 Command View Advanced Edition Tiered Storage Manager CLI Reference
The following headings are used to group related or similar functions in the table below:
Setting up users and access control78
HP XP7 Command View Advanced Edition CLI
Page 79

• Access Control
• Downloads
• Link and Launch
• Storage Systems
• Hosts
• LUN Paths, HBAs, Host Modes
• Data Collection Tasks
• CVAE Tasks
• System Tasks
• Alerts
• Search & Reports (CSV)
• Volumes
• External Storage Systems
• Pools/Tiers
• Replication
• Virtual ID
• Mobility (migration)
• Resources of virtual storage machines
NOTE:
For custom roles, a hyphen (-) indicates that the task (function) cannot be performed with a custom
role.
Table 8 Required resource groups and roles for performing functions
Required Roles
Resource GroupFunction
Access Control (Administration tab, resource groups) (Resources tab, logical groups)
Admin
Assign resources and
roles to user groups
Create, delete, or edit
resource groups
All Resources
You must have User
Management Admin
permission.
Custom (XP7)Admin, Modify, View
-
-AdminAll Resources
User Guide 79
Page 80

Create, edit, or delete
public logical group
Required Roles
Resource GroupFunction
Custom (XP7)Admin, Modify, View
One of the following:
Storage Administrator
(Provisioning)
Storage Administrator
(Performance
Management)
Storage Administrator
Admin or ModifyAny
(Local Copy)
Storage Administrator
(Remote Copy)
Storage Administrator
(Initial Configuration)
Storage Administrator
(System Resource
Management)
Create, edit, or delete
private logical group
Downloads (Tools menu)
Download related programs
Link and Launch
Launch other XP7 Command View AE products.
Any
When starting Element
Manager, the resource
group to which the target
resource belongs
AnyAny
Admin or ModifyAny
Any
One of the following:
Storage Administrator
(Provisioning)
Storage Administrator
(Performance
Management)
Storage Administrator
(Local Copy)
Storage Administrator
(Remote Copy)
Storage Administrator
(Initial Configuration)
Storage Administrator
(System Resource
Management)
Storage Systems (Resources & Administration tabs)
Setting up users and access control80
-AdminAll ResourcesAdd storage systems
Page 81

Edit storage systems
(storage system name, IP
address, host name, user
name, or password)
Refresh storage systems
Resource GroupFunction
Resource group to which
the resources of the target system belong
Required Roles
Admin or Modify
Custom (XP7)Admin, Modify, View
-Admin or ModifyAll Resources
One of the following:
Storage Administrator
(Provisioning)
Storage Administrator
(Performance
Management)
Storage Administrator
(Local Copy)
Storage Administrator
(Remote Copy)
Storage Administrator
(Initial Configuration)
Storage Administrator
(System Resource
Management)
Acquire performance information when the storage systems are updated
Apply storage system labels to Device Manager
Hosts (Resources & Administration tabs)
Add hosts
Edit hosts
Refresh hosts
Delete host (when
deleting a host only)
Resource group to which
the resources of the target system belong
Resource group to which
the target storage system
belongs
Admin or Modify
Admin or ModifyAny
Storage Administrator
(Performance Management)
-AdminAll ResourcesDelete storage systems
-Admin or Modify
One of the following:
Storage Administrator
(Provisioning)
Storage Administrator
(Performance
Management)
Storage Administrator
(Local Copy)
Storage Administrator
(Remote Copy)
Storage Administrator
(Initial Configuration)
Storage Administrator
(System Resource
Management)
Delete host (when deleting a host and its related
storage resources)
Resource group to which
the storage resource to
be deleted belongs
Admin or Modify
Storage Administrator
(Provisioning)
User Guide 81
Page 82

Required Roles
Resource GroupFunction
Custom (XP7)Admin, Modify, View
Scan host
Merge host
LUN Paths, HBAs, Host Modes (Volume allocation, Edit LUN paths, Host HBA tasks)
Resource group to which
Edit WWN nickname
Edit LUN path, edit host
mode or host mode option, or edit LUN path
when the HBA is replaced
Data Collection Tasks (Administration tab)
View Data Collection
tasks list
Delete or view details of
data collection tasks (add
or delete storage systems)
the target resource belongs
Resource group to which
the target resource belongs
All Resources
You can perform actions
only on tasks that you
have created even if All
Resources is not
allocated.
Admin or Modify
Admin or Modify
AnyAny
-Admin or ModifyAll Resources
Storage Administrator
(Provisioning)
Storage Administrator
(Provisioning)
-Admin
Delete or view details of
data collection tasks (edit
storage systems)
View details of data collection tasks (refresh storage systems or update
database)
All Resources
You can perform actions
on tasks that you have
created even if All
Resources is not
allocated.
All Resources or resource
groups to which a target
storage system belongs
You can perform actions
on tasks that you have
created even if All
Resources is not
allocated.
If the storage system is an
XP7, the default resource
group can also perform
this action.
Admin or Modify
-Admin or Modify
Storage Administrator
(System Resource Management)
Setting up users and access control82
Page 83

Delete data collection
tasks (refresh storage
systems or update database)
View details of data collection tasks (add, edit,
update a host, or delete
only hosts)
Resource GroupFunction
All Resources
You can perform actions
on tasks that you have
created even if All
Resources is not
allocated.
If the storage system is an
XP7, the default resource
group can also perform
this action.
Required Roles
Admin or Modify
Admin or ModifyAny
Custom (XP7)Admin, Modify, View
Storage Administrator
(System Resource Management)
One of the following:
Storage Administrator
(Provisioning)
Storage Administrator
(Performance
Management)
Storage Administrator
(Local Copy)
Storage Administrator
(Remote Copy)
Storage Administrator
(Initial Configuration)
Storage Administrator
(System Resource
Management)
All Resources
You can perform actions
Restart data collection
tasks
CVAE Tasks (Task & Alerts tab)
View CVAE tasks related
to a storage system, task
details, stop tasks,
change task schedules,
cancel tasks, delete tasks,
or move tasks to the history.
on tasks that you have
created even if All
Resources is not
allocated.
All Resources
You can perform these
actions on tasks that you
have created even if All
Resources is not
allocated.
For an XP7, users can
also perform this
operation on the default
resource group.
Admin or Modify
For tasks that require
Admin permission, you
must have Admin
permission to register the
task.
AnyAnyView CVAE tasks list
Admin, Modify, or the user
who created the task.
-
Storage Administrator
(System Resource Management)
User Guide 83
Page 84

View details of CVAE
tasks (tasks related to
Smart monitoring schedule template), change
task schedules, stop
tasks, cancel tasks, delete
task, move tasks to the
history.
Restart CVAE tasks
System Tasks
Resource GroupFunction
All Resources
You can perform these
actions on tasks that you
have created even if All
Resources is not
allocated.
For tasks that require
Admin permission, you
must have Admin
permission to register the
task.
Required Roles
Custom (XP7)Admin, Modify, View
-Admin or ModifyAll Resources
-Admin or Modify
Manage system tasks
(when in the Tasks &
Alerts tab)
Manage system tasks
(when using Remote
Web Console)
Alerts
View alerts.
All Resources
Default resource group of
the storage system.
You can perform these
actions on tasks that you
have created even if All
Resources is not
allocated.
Resource group to which
the resources of the target storage system belong.
AnyAnyView system tasks
AnyAny
Admin or Modify
Any
Storage Administrator
(System Resource Management)
Setting up users and access control84
Page 85

Delete alerts.
Search & Reports (CSV)
Edit shared search conditions, or change them to
private.
Resource GroupFunction
Resource group to which
the resources of the tar-
get storage system be-
long.
Required Roles
Admin or Modify
Custom (XP7)Admin, Modify, View
One of the following:
Storage Administrator
(Provisioning)
Storage Administrator
(Performance
Management)
Storage Administrator
(Local Copy)
Storage Administrator
(Remote Copy)
Storage Administrator
(Initial Configuration)
Storage Administrator
(System Resource
Management)
-AdminAll Resources
Output CSV files containing resource information.
Volumes
Create volumes
Edit volume label
Allocate volumes, allocate like volumes, define
clustered-host storage, or
cancel volume allocation.
Delete volumes
Resource group to which
the target resource be-
longs.
Resource group to which
the target parity group or
the LDEV ID of a THP/
Smart pool volume to
which a THP/Smart pool
belongs and the resource
group to which unused
LDEV ID belongs.
Resource group to which
the target resource be-
longs
Resource group to which
the target resource be-
longs
Resource group to which
the target resource be-
longs
Any
Admin or Modify
Admin or Modify
Admin or Modify
Admin or Modify
Storage Administrator
(Provisioning)
Storage Administrator
(Provisioning)
Storage Administrator
(Provisioning)
Storage Administrator
(Provisioning)
Shred volumes
Resource group to which
the target resource be-
longs
Admin or Modify
Storage Administrator
(Provisioning)
User Guide 85
Page 86

Create LUSE volumes
Release LUSE volumes
External Storage Systems
Virtualize volumes of a
registered external storage system
Resource GroupFunction
Resource group to which
the LDEV ID of the target
volume belongs
Resource group to which
the LDEV ID of the target
LUSE volume belongs
Resource group that can
access the external port
and LDEV ID of an internal storage system, and
the port, LDEV ID, and
Host Group ID of an external storage system.
Required Roles
Admin or Modify
Custom (XP7)Admin, Modify, View
-Admin or Modify
-Admin or Modify
Storage Administrator
(Provisioning)
Virtualize volumes of an
unregistered external
storage system
Unvirtualize volumes of
a registered storage system
Unvirtualize volumes of
an unregistered storage
system
Pools/Tiers
Create, edit, expand,
delete, or shrink pools
Resource group that can
access external port and
LDEV ID of an internal
storage system.
Resource group that can
access the external port
and parity group of an
internal storage system,
and internal volumes that
belong to the external
parity groups, and host
group, volume, target
port of an external storage system.
Resource group that can
access the external port
and parity group of an
internal storage system
and the internal volumes
belong to external parity
groups.
Resource group to which
the target LDEV ID of a
THP/Smart pool volume
to which a THP/Smart
pool belongs.
Admin or Modify
Admin or Modify
Admin or Modify
Admin or Modify
Storage Administrator
(Provisioning)
Storage Administrator
(Provisioning)
Storage Administrator
(Provisioning)
Storage Administrator
(Provisioning)
Setting up users and access control86
Page 87

Create, edit, or delete
tiers
Resource GroupFunction
Resource group to which
the target resource be-
longs
Required Roles
Admin or Modify
Custom (XP7)Admin, Modify, View
One of the following:
Storage Administrator
(Provisioning)
Storage Administrator
(Performance
Management)
Storage Administrator
(Local Copy)
Storage Administrator
(Remote Copy)
Storage Administrator
(Initial Configuration)
Storage Administrator
(System Resource
Management)
Edit THP/Smart pool
name
Expand THP/Smart
volume size or reclaim
zero pages.
Manually start and stop
the monitoring and tier
relocation of Smart
pools.
Create, edit, or delete
schedule templates for
Smart pool monitoring
and tier relocation.
Apply schedule template
for Smart pool monitoring
and tier relocation.
Resource group to which
the target resource be-
longs
Resource group to which
the target LDEV ID of a
THP/Smart volume be-
longs and the resource
group to which the LDEV
ID of a THP/Smart pool
volume to which a THP/
Smart pool belongs.
Resource group to which
the target LDEV ID of aS-
mart pool volume to
which aSmart pool be-
longs.
Resource group to which
the target LDEV ID of aS-
mart volume belongs,
and the resource group
to which the LDEV ID of
aSmart pool volume to
which aSmart pool be-
longs.
Admin or Modify
Admin or Modify
Admin or Modify
Admin or Modify
Storage Administrator
(Provisioning)
Storage Administrator
(Provisioning)
Storage Administrator
(Provisioning)
-Admin or ModifyAll Resources
Storage Administrator
(Provisioning)
Edit tier relocation for
Smart volumes.
Resource group to which
the target LDEV ID of aS-
mart volume belongs.
Admin or Modify
Storage Administrator
(Provisioning)
User Guide 87
Page 88

Required Roles
Resource GroupFunction
Custom (XP7)Admin, Modify, View
Edit tiering policy for
Smart volumes.
Change tiering policy
definition for Smart
volumes (customize tiering policies).
Verify whether tiering
policies for Smart
volumes have been applied.
Manage data placement
profiles for Smart
volumes (creating, updating, editing, deleting,
applying profiles, releasing applied profiles, and
setting schedules).
Edit tier rank for external
Smart pool volumes.
Resource group to which
the target LDEV ID of aSmart volume belongs.
Resource group to which
the storage system of
Smart volumes, and to
which the target tiering
policy is applied belongs.
Resource group to which
the LDEV IDs of the
volumes to which the
tiering policy has been
applied belongs.
Resource groups to which
the LDEV ID of every
Smart volume included in
the target data placement
profile belongs.
Resource group to which
the target LDEV ID of an
external volume (Smart
pool volume) to which a
Smart pool belongs.
Admin or Modify
Admin or Modify
Any
Admin or Modify
Admin or Modify
Storage Administrator
(Provisioning)
Storage Administrator
(Provisioning)
Storage Administrator
(Provisioning)
Storage Administrator
(Provisioning)
Replication
Add, edit or delete command devices
Define copy pairs, or
change the status of copy
pairs.
Resource group to which
the target resource belongs
To perform replication
management in Device
Manager, the target resource must be allocated
to a Device Manager resource group, and that
resource group must have
a role assigned. Access
permissions are required
for the LDEV ID of the
command device or for
the LDEV IDs of the
volumes that make up the
copy pair.
Admin or Modify
Admin or Modify
Storage Administrator
(Provisioning)
For local copy:
Storage Administrator
(Local Copy)
For remote copy:
Storage Administrator
(Remote Copy)
Setting up users and access control88
Page 89

Update the configuration
and performance information of a copy group
(Replication tab), set the
network bandwidth (Replication tab).
Confirm and analyze
Continuous Access
Journal performance
(Replication tab), export
the analysis results (Replication tab).
Mobility (Migration)
Resource GroupFunction
All Resources
All Resources
Required Roles
Admin or Modify
You must have Replication
Manager View permissions.
Admin, Modify, or View
You must have Replication
Manager View permissions.
Custom (XP7)Admin, Modify, View
-
-
View the View Tier Properties dialog box for a
Smart pool or each tiering policy of Smart
volumes.
View the View Tier Properties dialog box for a
Smart volume.
View the Trend Chart
and output the CSV file
from the Mobility tab.
Data migration
Virtual ID
Display Virtual ID information
Resources of virtual storage machines
Create, edit or delete virtual storage machines.
Resource group to which
the target LDEV ID of a
Smart pool volume to
which a Smart pool be-
longs.
Resource group to which
the target LDEV ID of a
Smart volume belongs.
Resource group to which
the target resource be-
longs.
Resource group to which
the target resource be-
longs
Any
Any
AnyAll Resources
Admin or Modify
Any
Storage Administrator
(Provisioning)
-AdminAll Resources
View information of virtual storage machines.
Delete virtual information
of LDEVs in virtual storage machines.
Default resource group of
the storage system.
Resource group to which
the target resource be-
longs.
Any
Admin or Modify
Storage Administrator
(Provisioning)
User Guide 89
Page 90

Move resources in a virtual storage machine to a
default virtual storage
machine, or resources in
the default virtual machine to another virtual
storage machine.
Required Roles
Resource GroupFunction
Custom (XP7)Admin, Modify, View
-AdminAll Resources
Manage resources in a
virtual storage machine
(except the default virtual
storage machine).
Add virtual information
to resources in a virtual
storage machine.
Resource group to which
the target resource belongs in the virtual storage machine.
Resource group to which
the target resource belongs in the virtual storage machine.
Admin or Modify
Admin or Modify
Storage Administrator
(Provisioning)
Storage Administrator
(Provisioning)
For XP7 Command View AE, custom roles (Storage, Security, and Audit Log roles) provide specific
permissions for performing specific tasks (functions) on XP7. Additional tasks (functions) are available
when selecting System GUI from menus or application panes to open Remote Web Console, and are
listed in the table below.
Table 9 Required roles or custom roles for performing XP7 specific functions
Required Roles
Functions
Provisioning related operations:
• Configuring caches
• Configuring LDEVs, pools, and virtual volumes
• Formatting and shredding LDEVs
• Configuring external volumes
• Configuring alias volumes for Parallel Access
Volumes
• Configuring Thin Provisioning
• Configuring host groups, paths, and WWNs
• Configuring Volume Migration except splitting
Volume Migration pairs when using Raid Manager.
• Configuring access attributes for LDEVs
• Configuring LUN security
Resource
Group
Resource group
to which the resources of the
target system belong.
Admin,
Modify
Admin or
Modify
Custom (XP7)
Storage Administrator (Provisioning)
Performance related operations:
• Configuring monitoring
• Starting and stopping monitoring
Setting up users and access control90
Resource group
to which the resources of the
target system belong.
Admin or
Modify
Storage Administrator (Performance
Management)
Page 91

Functions
Resource
Group
Required Roles
Admin,
Modify
Custom (XP7)
Local copy management:
• Performing pair operations for local copy
• Configuring environmental settings for local copy
• Splitting Volume Migration pairs when using Raid
Manager
Remote copy operations in general.
Initial configuration:
• Configuring settings for storage systems
• Configuring settings for SNMP
• Configuring settings for e-mail notification
• Configuring settings for license keys
• Viewing, deleting, and downloading storage con-
figuration reports
• Acquiring all the information about the storage
system and refreshing
System resource management:
• Configuring settings for CLPR
• Configuring settings for MP Blade
• Deleting tasks and releasing exclusive locks of re-
sources
• Completing SIMs
• Configuring attributes for ports
• Configuring LUN security
• Configuring Performance Control
• Configuring tiering policies
Resource group
to which the resources of the
target system belong.
Resource group
to which the resources of the
target system belong.
Default resource
group of the storage system.
Default resource
group of the storage system.
Admin or
Modify
Admin or
Modify
Admin or
Modify
Admin or
Modify
Storage Administrator (Local Copy)
Storage Administrator (Remote
Copy)
Storage Administrator (Initial Configuration)
Storage Administrator (System Resource Management)
Encryption key and authentication management (does
not allow user management):
• Creating an encryption key, configuring encryption
• Viewing and switching the location at which to
create an encryption key
• Backing up and restoring an encryption key
• Deleting an encryption key that is backed up on the
key management server.
• Viewing and changing the password policies for
backing up an encryption key on the Remote Web
Console computer.
• Configuring the fibre channel authentication (FC-SP)
Default resource
group of the storage system.
Admin
Security Administrator (View &
Modify)
User Guide 91
Page 92

Functions
Resource
Group
Required Roles
Admin,
Modify
Custom (XP7)
Viewing storage encryption key and authentication:
• Viewing information about encryption settings
• Viewing information about encryption keys on the
key management server
Storage audit log management:
• Configuring audit log settings
• Downloading audit logs
Storage audit log access:
• Viewing storage audit log settings
• downloading audit logs
Related topics
• Changing permissions for a user account, page 64
• Editing the profile for a user account, page 63
• About user accounts and controlling access to resources, page 59
• User group roles, page 74
• Custom roles, page 75
Default resource
group of the storage system.
Default resource
group of the storage system.
Default resource
group of the storage system.
Admin
Admin
Admin
Security Administrator (View &
Modify) or Security
Administrator
(View Only)
Audit Log Administrator (View &
Modify)
Audit Log Administrator (View &
Modify) or Audit
Log Administrator
(View Only)
Creating user groups
You can create user groups and assign resource groups either immediately, or later as needed. The
assigned resource group rights provide user group members with view, modify, admin, or custom
roles for displaying, modifying, or managing the storage resources for this group.
Creating a user group also creates a private logical group for that user group.
1. On the Administration tab, select User Groups.
Existing user groups are displayed.
2. Click Create User Group and enter a name and description.
3. Click Add Users to select the user group members.
4. Click Add Resource Groups to assign specific storage system resources to the user group, and
for each resource group set the role (permissions) to one of the following:
• View
• Modify
• Admin
• Custom
Setting up users and access control92
Page 93

5. Click OK.
You can click the user group name to verify group membership (list of users) on the Users tab.
On the Resource Groups tab, you can verify the resource groups and roles specified during user
group creation. Add Resource Groups, Remove Resource Groups, and Edit Roles buttons allow
you to modify resources and access rights for the user group.
The new user group is displayed and a new private logical group is created.
TIP:
To delete user groups, select one or more user groups, and click Delete User Groups. Deleting a user
group deletes the associated private logical group and all logical groups that belong to that private
logical group. Deleting a user group does not delete related resource groups.
Related topics
• About user groups, page 73
• Editing a user group, page 93
• Assigning resource groups and roles to a user group, page 93
Editing a user group
As user information and membership in user groups change, you can update this information.
1. On the Administration tab, select User Groups.
2. Select the target user group and click Edit User Group.
3. Change the name of the user group, or the user who manages the user group.
Editing changes appear in the list in the User Groups tab.
Related topics
• About user groups, page 73
• About access control, page 67
• Creating user groups, page 92
• Assigning resource groups and roles to a user group, page 93
Assigning resource groups and roles to a user group
You can assign resource groups and roles to a user group.
1. Select the Administration tab and click on User Groups.
2. In the User Groups tab, click the name of the target user group.
3. In the Resource Groups tab, click Add Resource Groups.
4. Set the roles to be assigned to the user group. The assigned resource groups and roles are
displayed in detail by clicking the link for the user group name.
User Guide 93
Page 94

Related topics
• Creating resource groups, page 71
• Creating user groups, page 92
Changing a user’s user group
You can modify information about the user groups that a user belongs to.
1. On the Administration tab, select User Groups.
2. In the Users tab select the target user group and click Assign User Groups.
3. Change the user groups to which a user belongs.
Changes will appear in the Users tab.
Related topics
• Creating user groups, page 92
• About access control, page 67
• Assigning resource groups and roles to a user group, page 93
• Editing a user group, page 93
Setting up users and access control94
Page 95

5 Provisioning storage
This module describes provisioning storage.
Creating a storage operating environment
To be able to use volumes of a storage system from hosts configure the operating environment
beforehand. The workflow for configuring the environment differs depending on the scale and operation
method of the storage systems.
In some environments, you can virtualize storage devices so that multiple, different storage systems
can be used as a single storage system.
If your storage system supports THP/Smart pools, you can create THP/Smart pools such that virtual
volumes can be allocated to hosts. By virtualizing storage devices and storage capacity, you can
decrease both management and operational costs by more effectively using physical resources.
The following figure shows an example flow for building an environment for performing operations
with virtualized storage devices or volumes, when using storage systems such as the XP7 and P9500.
Related topics
• About creating volumes, page 96
• About virtualizing and unvirtualizing volumes, page 105
• About virtualizing storage capacity, page 114
• About virtualizing storage tiers, page 126
• Allocating storage, page 95
Allocating storage
Volumes are allocated to hosts for applications needing storage.
A variety of methods for allocating volumes is available. For example, you can select one or more
hosts, then identify and allocate existing volumes. You can also select one or more volumes, then
User Guide 95
Page 96

identify the host that needs the volumes. You can also establish I/O paths between hosts and volumes
when you allocate volumes.
To prepare for loss of data caused by disk failure, disasters, or other issues, you can manage the
redundancy of important operational data by creating a replication environment for volumes within
a storage system or between storage systems, as necessary.
Related topics
• Creating a storage operating environment, page 95
• About allocating volumes, page 138
• About replicating volumes (pair management), page 168
Creating and deleting volumes
This module describes how to create volumes (including LUSE volumes), and delete unallocated
volumes.
About creating volumes
You create volumes, then allocate them to a host.
You create volumes by using the available space in a THP/Smart pool or parity group. You can then
access the volumes when you are ready to allocate them to a host. If, while allocating volumes to a
host, no volumes match the specified requirements, volumes are automatically created using the
available space. Note that when a basic volume is created, the volume is also formatted at the same
time.
Newly created volumes are included in the list of Open-Unallocated volumes until you allocate them
to a host.
Because creating volumes takes time, you should create volumes in advance.
TIP:
When an XP7 is used, in the window that appears by clicking the System GUI link, you can block
volumes separated from parity groups, recover parity groups from errors, and format volumes. To
start System GUI, in the Resources tab, right-click Parity Groups of the target storage system, and
then either select System GUI from the menu, or click the System GUI link that appears in the
application pane.
Additionally, you can format, block, and restore volumes, configure command devices, edit command
devices, assign MP blades, and force delete pairs (TC pairs and UR pairs). To start System GUI, in
the Resources tab, right-click Volumes of the target storage system, and then either select System GUI
from the menu, or click the System GUI link that appears in the application pane.
Provisioning storage96
Page 97

Related topics
• Creating a storage operating environment, page 95
• Creating volumes, page 97
• Notes on performing quick formats, page 97
• Create Volumes dialog box, page 98
• About deleting unallocated volumes, page 102
Notes on performing quick formats
A quick format might impose a heavy workload on some components and lower I/O performance
of all hosts running in the target storage system.
We recommend running a quick format when system activity is low and major system operations are
not running.
We also recommend running a quick format on a maximum of eight volumes at first, and then
confirming that the quick format has not lowered host I/O performance. After that, when you perform
a quick format on other volumes, we recommend increasing the number of volumes to be formatted
in increments of four.
In particular, if the storage system components are configured as follows, the host I/O performance
is likely to be lowered when a quick format is performed:
• Components such as cache memory, CHAs (channel adapters), and DKAs (disk adapters) are in
the minimum configuration.
• The number of installed components is extremely different among DKCs (controller chassis) or
modules within a single storage system.
In these configurations, run a quick format on only one volume at first, review the host I/O performance,
and then continue to run a quick format on other volumes one by one.
Related topics
• About creating volumes, page 96
• Creating volumes, page 97
• Create Volumes dialog box, page 98
• Allocate Volumes dialog box, page 146
Creating volumes
For registered storage systems, volumes are created so they can be allocated to hosts.
Prerequisites
• Identify the storage system
• Identify the number of volumes to create
• Identify volume types and capacities
User Guide 97
Page 98

1. On the Resources tab you can create volumes from several locations:
• From General Tasks, select Create Volumes.
• Select the storage system, click Actions, and select Create Volumes.
• Select the storage system, list existing parity groups, and click Create Volumes.
• Select the storage system, list existing THP/Smart pools, and click the Create Volumes button
or select Create Volumes from Actions.
2. In the create volumes dialog box, configure volumes and their characteristics.
3. Click Show Plan and confirm that the information in the plan summary is correct. If changes are
required, click Back.
4. (Optional) Update the task name and provide a description.
5. (Optional) Expand Schedule to specify the task schedule.
You can schedule the task to run immediately or later. The default setting is Now. If the task is
scheduled to run immediately, you can select View task status to monitor the task after it is
submitted.
6. Click Submit.
If the task is scheduled to run immediately, the process begins.
7. (Optional) Check the progress and result of the task on the Tasks & Alerts tab. Click the task
name to view details of the task.
Created volumes are added to the target storage system Open-Unallocated volume list.
Related topics
• About creating volumes, page 96
• Notes on performing quick formats, page 97
• Create Volumes dialog box, page 98
Create Volumes dialog box
Newly created volumes are placed in the Open-Unallocated folder of the user selected storage system
until they can be allocated to hosts as needed.
When you enter the minimum required information in this dialog box, the Show Plan button activates
to allow you to review the plan. Click the Back button to modify the plan to meet your requirements.
The following table describes the dialog box fields, subfields, and field groups. A field group is a
collection of fields that are related to a specific action or configuration. You can minimize and expand
field groups by clicking the double-arrow symbol (>>).
As you enter information in a dialog box, if the information is incorrect, errors that include a description
of the problem appear at the top of the box.
Table 10 Create volumes dialog box
-No. of Volumes
DescriptionSubfieldField
Manually enter the number of volumes to create, or use the arrows
(click, or click and hold) to increment or decrement the volume
count.
Provisioning storage98
Page 99

DescriptionSubfieldField
This number (in blocks, MB, GB, or TB) is the capacity to allocate
-Volume Capacity
for each volume.
The total capacity to be allocated is calculated as No. of Volumes
* Volume Capacity and is displayed.
-Storage System
-Volume Type
-Internal/External
-Pool
Drive Type
Drive Speed (RPM)
Chip Type
RAID Level
This field will either display the selected storage system name, or
prompt the user to select the storage system from a list.
Select the volume type to create. For example Basic Volume, Thin
Provisioning or Smart Pool. The displayed volume types are determined by your selected storage system. If you do not see an expected
volume type, check that you have selected the correct storage system.
When volume type is Basic Volume, or Thin Provisioning, volumes
can be created using available capacity from the selected storage
system (internal) or from an external storage system physically
connected to the selected storage system (external).
When volume type is Smart Pool, volumes can be created using
Select Pool.
If multiple drive types are displayed, you can designate a specific
drive type.
If multiple drive speeds are displayed, you can designate a specific
drive speed, or accept the default of any available speed.
If multiple chip types are displayed, you can designate a specific
chip type.
If multiple RAID levels are displayed, you can designate a specific
RAID level, or accept the default of any available RAID level.
>> Advanced Options
Select Free Space
Parity Group
Pool
Tiering Policy Setting
After selecting a storage system and specifying Basic for the volume
type, you can specify free space for parity groups when creating
volumes.
Free space can be added only when the storage system is an HP
XP7 or HP P9500.
When volume type is Basic Volume, based on drive type, drive
speed, chip type, and RAID level selections an appropriate parity
group is selected and displayed for you. You can also manually
select a parity group by clicking Select Parity Group. In the dis-
played list of parity groups, you can use sort and filter features on
columns such as RAID level, or unallocated capacity (or other fields)
to identify the preferred parity groups.
When volume type is Thin Provisioning, volumes can be created
using Select Pool. The listed pools can vary depending on drive
type, drive speed, chip type, and RAID level selections.
Displays only if Smart Pool is selected as the volume type, and a
Smart pool has been selected with Select Pool (see previous Volume
Selection section). You can select a specific tier policy for the
volume to be allocated, or select All.
User Guide 99
Page 100

New Page Assignment Tier
DescriptionSubfieldField
For XP7 and P9500, selecting this option specifies to which hardware tier the new page of an Smart volume is to be assigned with
a specified priority. Within the hardware tiers for which the tiering
policy is set, specify High for an upper-level hardware tier, Middle
for a medium-level hardware tier, and Low for a low-level hardware
tier.
Relocation Priority
Label
Format Type
Related topics
• About creating volumes, page 96
• Notes on performing quick formats, page 97
• Creating volumes, page 97
About shredding volume data
For XP7 and P9500, selecting this option specifies whether you
want to prioritize the relocation of the data in Smart volumes.
Volume labels are searchable, and therefore recommended as a
way to find volumes. The Initial value is not required, but can be
useful for differentiation when creating multiple volumes. Reflect a
label to the storage system is checked by default so that naming
is consistent between XP7 Command View AE and the storage
system itself.
An LDEV ID can be assigned automatically or manually.LDEV ID
You can request a quick format, or a basic format.
Note that during a quick format, the load might become
concentrated on some components, lowering the I/O performance
of all hosts that are running in the target storage system.
Before deleting a volume that you no longer need, completely remove the data from the volume to
avoid unauthorized use of information. The data can be removed by shredding or reformatting the
volume.
Volume data is shredded by overwriting it repeatedly with dummy data, which securely destroys the
original data. Some volumes, such as basic volumes and THP/Smart volumes that are allocated to
hosts or used for replication, cannot be shredded.
CAUTION:
You cannot restore data after it is shredded.
Some storage systems do not support the shredding functionality. For those storage systems, delete
volume information by reformatting the volumes.
Related topics
• Shredding volume data, page 101
Provisioning storage100
 Loading...