

Page 1

HP StorageWorks P9000 Application Performance Extender Software User Guide
Abstract
This document describes how to use the HP StorageWorks P9000 Application Performance Extender Software
(P9000 Application Performance Extender) user interface to manage and monitor the performance of applications
running on P9500, XP20000 or XP24000 disk arrays. This document is intended for users and HP service
providers with the knowledge of HP StorageWorks P9500 and XP disk arrays, storage area networks, and
operating systems, including HP-UX, Linux, and Windows.
Part Number: 5697-0984
First edition: July 2011
Page 2

Legal and notice information
Copyright © 2010-2011 by Hewlett-Packard Development Company, L.P.
Confidential computer software. Valid license from HP required for possession, use or copying. Consistent with FAR 12.211
and 12.212, Commercial Computer Software, Computer Software Documentation, and Technical Data for Commercial Items
are licensed to the U.S. Government under vendor's standard commercial license.
The information contained herein is subject to change without notice. The only warranties for HP products and services are set
forth in the express warranty statements accompanying such products and services. Nothing herein should be construed as
constituting an additional warranty. HP shall not be liable for technical or editorial errors or omissions contained herein.
Acknowledgements
Intel, Itanium, Pentium, Intel Inside, and the Intel Inside logo are trademarks or registered trademarks of Intel Corporation or
its subsidiaries in the United States and other countries.
Microsoft, Windows, Windows XP, and Windows NT are U.S. registered trademarks of Microsoft Corporation.
Adobe and Acrobat are trademarks of Adobe Systems Incorporated.
Java is a registered trademark of Oracle and/or its affiliates.
UNIX is a registered trademark of The Open Group.
Page 3

Contents
1 Overview ....................................................................................... 11
Functional representation ........................................................................................................... 12
2 Installing and removing P9000 Application Performance Extender .......... 13
Installing the management station ............................................................................................... 13
Prerequisites ...................................................................................................................... 14
Install instructions ............................................................................................................... 14
Verifying installation on the management station .............................................................. 14
Installing the communication agent ............................................................................................. 15
Prerequisites ...................................................................................................................... 15
Installing the communication agent on HP-UX and Linux (x86 and x86_64) hosts ........................ 16
Installing the communication agent on a Linux IA64 host ......................................................... 17
Verifying communication agent installation on HP-UX and Linux hosts .................................. 17
Installing the communication agent on a Windows host ........................................................... 18
Verifying communication agent installation on a Windows host .......................................... 18
Installing the controller ............................................................................................................... 18
Prerequisites ...................................................................................................................... 19
Installing the controller on HP-UX and Linux (x86 and x86_64) hosts ......................................... 19
Installing the controller on a Linux IA64 host .......................................................................... 19
Verifying controller installation on HP-UX and Linux hosts ................................................... 20
Installing the controller on a Windows host ............................................................................ 20
Verifying controller installation on a Windows host ........................................................... 20
Upgrading P9000 Application Performance Extender .................................................................... 21
Upgrading the management station ...................................................................................... 21
Management station upgrade support ............................................................................ 21
Upgrading the communication agent .................................................................................... 22
Communication agent upgrade support .......................................................................... 22
Upgrading the controller ..................................................................................................... 23
Controller upgrade support ........................................................................................... 23
Removing P9000 Application Performance Extender ...................................................................... 25
Removing the management station ........................................................................................ 25
Removing the communication agent ...................................................................................... 25
Removing the communication agent on HP-UX and Linux hosts ........................................... 25
Removing communication agent on a Windows host ........................................................ 26
Removing the controller ....................................................................................................... 26
Removing the controller on HP-UX and Linux hosts ............................................................ 26
Removing the controller on a Windows host .................................................................... 26
3 Licensing P9500 disk arrays .............................................................. 27
License screen .......................................................................................................................... 28
Instant-on license ...................................................................................................................... 28
Instant-on license activation ........................................................................................................ 29
Instant-on license expiration ....................................................................................................... 29
Grace period expiration ............................................................................................................ 30
HP StorageWorks P9000 Application Performance Extender Software User Guide 3
Page 4

Proactive License Tracking .......................................................................................................... 31
Permanent License ..................................................................................................................... 32
Meter Based Term license .......................................................................................................... 32
Meter based Term license requirement .................................................................................. 33
Meter based Term license activation and consumption ............................................................ 34
Generating licenses at the HPAC license key website ..................................................................... 39
Installing licenses ...................................................................................................................... 40
Viewing license details .............................................................................................................. 41
Exceeding Permanent licensed capacity and grace period ............................................................. 41
Exceeding Meter based Term licensed capacity and grace period ................................................... 42
Violating licensed capacity ........................................................................................................ 45
Removing licenses ..................................................................................................................... 45
4 P9000 Application Performance Extender user interface layout .............. 47
Common tasks .......................................................................................................................... 49
5 Using P9000 Application Performance Extender .................................. 51
Discovering hosts and collecting configuration data ....................................................................... 52
Data Collection screen ........................................................................................................ 52
Adding ESX server ............................................................................................................. 53
Updating ESX Password ...................................................................................................... 54
Collecting configuration data ............................................................................................... 54
Specifying controller and command device settings ....................................................................... 55
Controller Settings screen .................................................................................................... 55
Specifying controller settings ................................................................................................ 57
Specifying command device settings ..................................................................................... 57
Specifying DLOM settings .......................................................................................................... 59
DLOM Settings screen ......................................................................................................... 59
Enabling DLOM settings ...................................................................................................... 61
Managing Service Level Objectives ............................................................................................. 63
SLO Settings screen ........................................................................................................... 63
Creating SLO profiles .......................................................................................................... 66
Updating SLO profiles ......................................................................................................... 66
Assigning SLO profiles to arrays ........................................................................................... 67
Removing SLO profiles ........................................................................................................ 67
Scheduling SLO profiles ...................................................................................................... 67
Creating a schedule ..................................................................................................... 67
Updating schedules ..................................................................................................... 69
Removing schedules ..................................................................................................... 69
Managing workloads ................................................................................................................ 69
Workload settings screen .................................................................................................... 69
Creating workloads ............................................................................................................ 71
Updating workloads ........................................................................................................... 72
Removing workloads ........................................................................................................... 72
Filtering workload records ................................................................................................... 72
Specifying workload settings in a cluster environment .............................................................. 73
Viewing utilization graphs .......................................................................................................... 73
MPB graphs screen ............................................................................................................. 73
Viewing and generating MPB graphs .................................................................................... 74
Monitoring workload performance .............................................................................................. 75
Workload graphs screen ..................................................................................................... 75
Viewing and generating workload graphs ............................................................................. 76
Specifying performance data collection interval ...................................................................... 77
Specifying array alias ......................................................................................................... 78
4
Page 5

Creating and viewing reports ..................................................................................................... 78
Generate Report screen ....................................................................................................... 78
Generating reports ............................................................................................................. 80
Schedule Report screen ....................................................................................................... 80
Creating report schedules .................................................................................................... 81
Updating report schedules ................................................................................................... 83
Removing report schedules .................................................................................................. 83
Configuring alarms ................................................................................................................... 83
Alarms screen .................................................................................................................... 83
Creating alarms ................................................................................................................. 85
Updating alarms ................................................................................................................ 86
Removing alarms ................................................................................................................ 86
Viewing alarms history ........................................................................................................ 86
Filtering alarm records ........................................................................................................ 87
6 Launching P9000 Application Performance Extender from P9000
Performance Advisor ........................................................................... 89
7 Troubleshooting P9000 Application Performance Extender .................... 91
8 Support and other resources .............................................................. 97
Contacting HP .......................................................................................................................... 97
Subscription service ............................................................................................................ 97
Related information ................................................................................................................... 97
Documents ........................................................................................................................ 97
Websites ........................................................................................................................... 97
Typographic conventions ........................................................................................................... 98
A Checking for valid user to support command device authentication for
APEX in Remote Web Console (RWC) .................................................. 101
B Configuring HP Process Resource Manager groups on HP-UX hosts ....... 103
Installing HP Process Resource Manager .................................................................................... 103
Using the command-line interface to configure HP Process Resource Manager ................................ 103
Setting PRM to start automatically at reboot ................................................................................ 103
Examples of configuring Process Resource Manager .................................................................... 103
C Deployment scenarios .................................................................... 107
Application level SLOs ............................................................................................................. 107
Host level SLOs ....................................................................................................................... 107
D Creating command devices ............................................................. 109
E Procedure to change LDEV ownership using Remote Web Console
(RWC) ............................................................................................. 113
F Configuring NPIV and RDM disk for VMware ESX Servers ................... 115
HP StorageWorks P9000 Application Performance Extender Software User Guide 5
Page 6

Glossary .......................................................................................... 117
Index ............................................................................................... 119
6
Page 7

Figures
Functional representation of P9000 Application Performance Extender .......................... 121
License screen ........................................................................................................ 282
Proactive License Tracking ........................................................................................ 313
License details window ............................................................................................ 414
Delete license window ............................................................................................. 455
Login Screen .......................................................................................................... 476
Change password screen ......................................................................................... 487
Home screen .......................................................................................................... 488
P9000 Application Performance Extender user interface .............................................. 499
Data Collection screen ............................................................................................. 5210
Discovered hosts table ............................................................................................. 5511
Array host connectivity details ................................................................................... 5512
Controller Settings screen ......................................................................................... 5613
Array information .................................................................................................... 5714
APEX controller list .................................................................................................. 5715
Command devices information .................................................................................. 5816
Command Device Authentication .............................................................................. 5817
DLOM settings screen .............................................................................................. 6018
SLO Settings screen (SLO Profile Management) ........................................................... 6419
SLO Settings screen (SLO Profile Scheduling) .............................................................. 6520
SLO profile definition table ....................................................................................... 6621
P9000 Array and SLO Profile(s) Summary table .......................................................... 6722
Schedule Summary table ......................................................................................... 6823
Schedule update window ......................................................................................... 6824
Workload settings screen ......................................................................................... 7025
Workload Summary table ........................................................................................ 7126
Create/update workload table ................................................................................. 7227
MPB graphs screen ................................................................................................. 7428
Workload graphs screen .......................................................................................... 7529
Preview graph ....................................................................................................... 7730
Performance Collection Settings ................................................................................ 7731
Personalize Array .................................................................................................... 7832
HP StorageWorks P9000 Application Performance Extender Software User Guide 7
Page 8

Generate report screen ............................................................................................ 7933
Schedule Report screen ............................................................................................ 8134
Report schedule update window ............................................................................... 8235
Alarms screen (Alarm Configuration) ......................................................................... 8436
Create Alarm window ............................................................................................. 8537
Alarm History screen ............................................................................................... 8738
HP StorageWorks P9000 Application Performance Extender Software screen .................. 9039
8
Page 9

Tables
Upgrade support (management station) ..................................................................... 211
Upgrade support (communication agent) ................................................................... 222
Upgrade support (controller) ..................................................................................... 243
Troubleshooting information ..................................................................................... 914
Document conventions ............................................................................................. 985
HP StorageWorks P9000 Application Performance Extender Software User Guide 9
Page 10

10
Page 11

1 Overview
In a typical Storage Area Network (SAN) environment, multiple I/O intensive applications share
storage resources. Not all applications are mission critical, but they compete with the mission critical
applications for the same I/O processing requirements. In such situations, there is a need to keep the
key (mission critical) applications at a desired performance level and other (non critical) applications
at an acceptable performance level.
P9000 Application Performance Extender enables you to monitor, analyze, and prioritize the
performance of critical applications running on P9500, XP20000 or XP24000 disk arrays.
The logical devices (LDEVs) of an array are mapped to Microprocessor (MP) blades. The I/Os
pertaining to an LDEV are processed by the MP blades associated with it. It is likely that a set of busy
LDEVs are owned by one MP blade, while other less loaded LDEVs are owned by a different MP
Blade. This may result in an uneven load distribution on MP blades. To achieve effective MP blade
utilization and I/O performance, there is also a need to balance the MP blade utilization of P9500
disk arrays.
P9000 Application Performance Extender supports MP blade resource load balancing through the
Dynamic LDEV Ownership Management (DLOM) feature. P9000 Application Performance Extender
monitors the load of MP blades and dynamically changes LDEV ownership in order to balance I/O
workloads across multiple MP blades.
XP and P9500 disk array resources can be prioritized by application and time, so high-priority host
traffic experiences the best performance always.
P9000 Application Performance Extender is supported on HP-UX, Windows, and Linux hosts connected
to XP and P9500 disk arrays in a SAN.
P9000 Application Performance Extender has the following components:
• Communication agent — Is a resident agent software that runs on all the hosts in a SAN environ-
ment. The communication agent discovers hosts, and communicates commands and information
between the host and the management station.
• Controller — Is a software that allocates resources to application groups (HP-UX), and hosts
(Windows, Linux). It helps applications achieve their Service Level Objectives (SLO). It also helps
balance the MP blade utilization of P9500 disk arrays. The controller communicates with the XP
and P9500 disk arrays through the command device.
• Management station — Is a software that communicates and coordinates between the graphical
user interface, the communication agent, and the controller. The management station also maintains
a database of all the XP Application Performance Extender settings and parameters.
With P9000 Application Performance Extender, you can:
• Achieve SLO targets of mission critical applications
• Dynamically change SLO targets based on real time resource requirements of your mission critical
applications
• Service peak load SLOs of critical applications without additional hardware investments
• Add more applications to the XP and P9500 disk arrays without penalizing the performance of
mission critical applications
• Get notified immediately about performance drops
HP StorageWorks P9000 Application Performance Extender Software User Guide 11
Page 12
• Dynamically balance the MP blade utilization of P9500 disk arrays
Functional representation
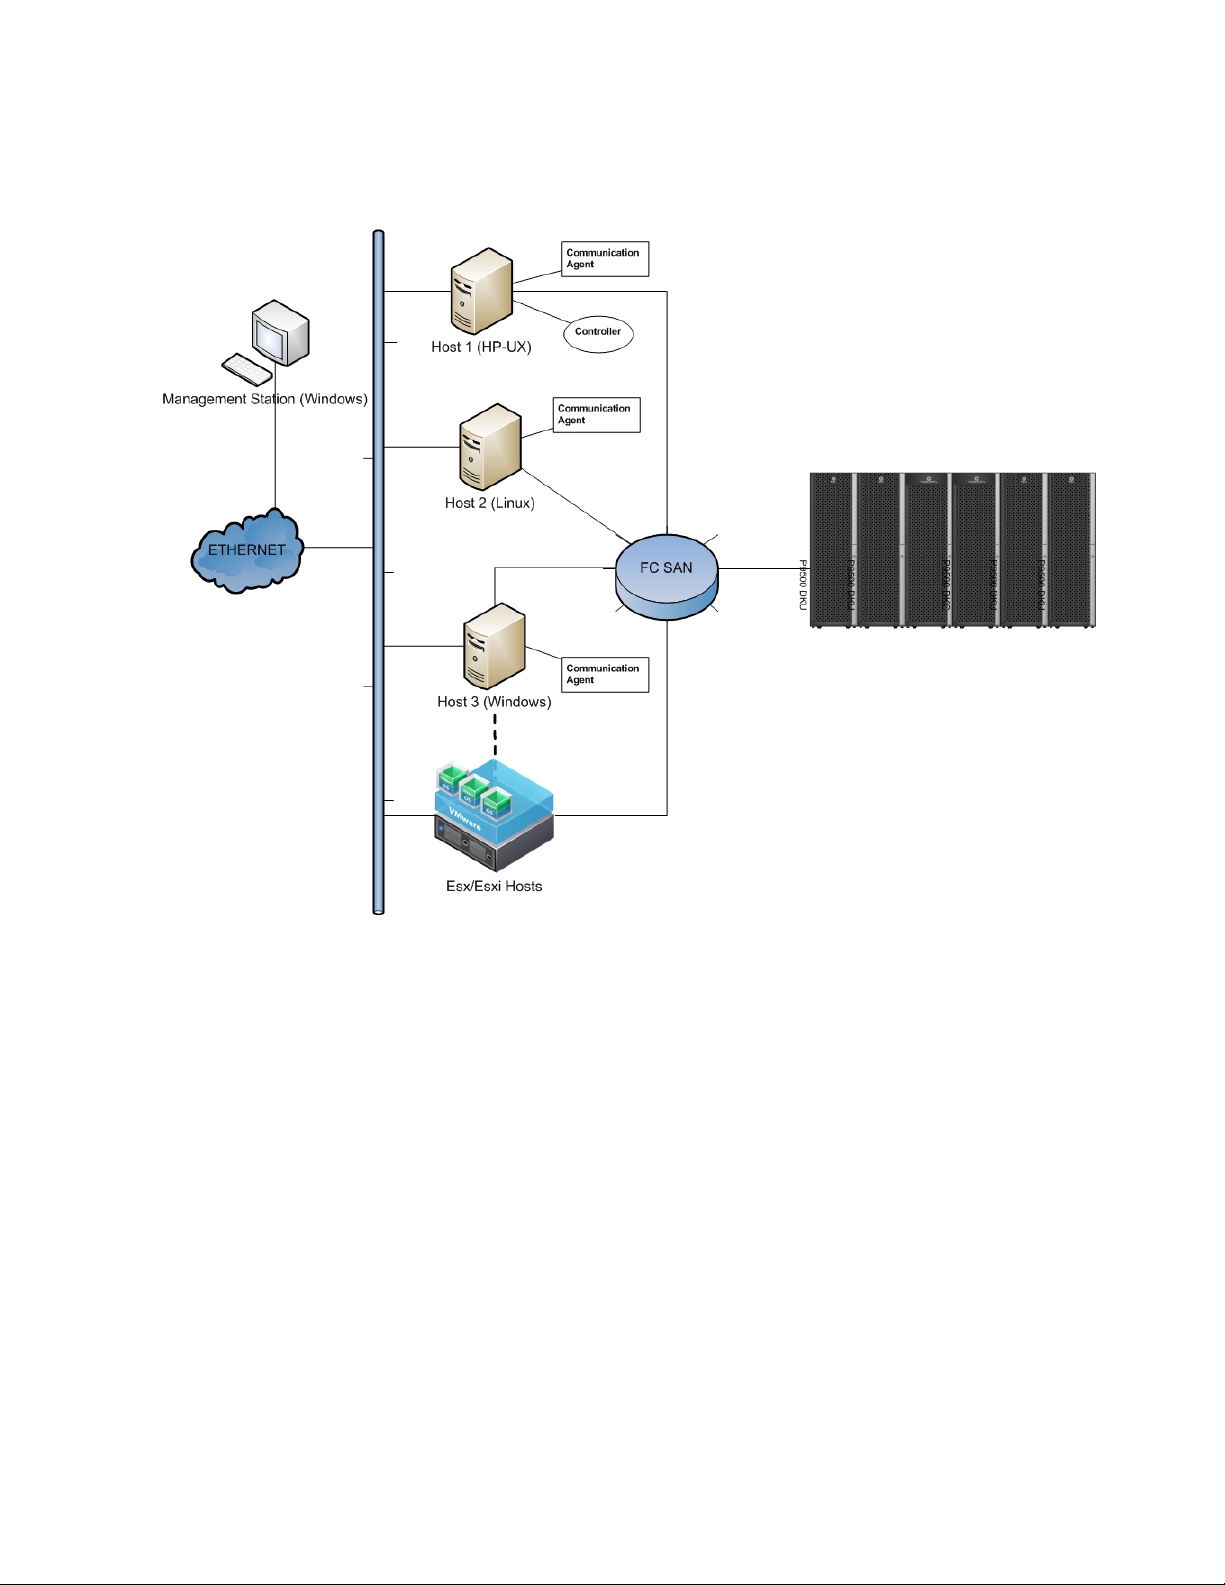
Figure 1 shows the working of P9000 Application Performance Extender in a SAN environment.
Figure 1 Functional representation of P9000 Application Performance Extender
.
P9000 Application Performance Extender is typically deployed in a LAN/SAN environment. The
management station is deployed in a LAN set up, while the communication agent and the controller
can have both LAN and SAN connectivity.
Management station— The management station is installed on a Windows host and is connected to
the communication agent and the controller through LAN.
Communication agent— The communication agent is installed on all the hosts (HP-UX, Linux, and
Windows). The hosts are connected to the management station through LAN. Hosts use SAN to connect
to the P9500 arrays though the Fibre Channel HBAs.
Controller— The controller is installed on an HP-UX, Linux, or Windows host that is connected to the
P9500 disk array.
Overview12
Page 13

2 Installing and removing P9000 Application Performance Extender
This chapter describes the procedure to install the P9000 Application Performance Extender in your
SAN environment.
IMPORTANT:
HP recommends that you meet the prerequisites for all the P9000 Application Performance Extender
components prior to initiating installation for quick deployment.
The P9000 Application Performance Extender installer kit includes the following:
• P9000 Application Performance Extender management station (P9000APEX_MS.exe) — Install
on a host running on Windows.
• P9000 Application Performance Extender communication agent (HP-UX and Linux x86 and x86_64
— P9000APEX_CA.bin) (Linux IA64 — P9000APEX_CAIA64.bin)(Windows —
P9000APEX_CA.exe) — Install on all the hosts (HP-UX, Linux, and Windows).
• P9000 Application Performance Extender controller (HP-UX and Linux x86 and x86_64 —
P9000APEX_Controller.bin) (Linux IA64 — P9000APEX_ControllerIA64.bin) (Windows
– P9000APEX_Controller.exe — Install on all the hosts (HP-UX, Linux, and Windows).
For information on supported software and hardware platforms, see the following documents:
• HP StorageWorks P9000 Application Performance Extender Release Notes
• HP StorageWorks P9000 Application Performance Extender Support Matrix
.
NOTE:
• P9000 Application Performance Extender supports one controller per XP or P9500 disk array.
For multiple XP and P9500 disk arrays, multiple instances of the controller on different hosts accessing each of the arrays are required.
• HP recommends that you reserve a dedicated port for command devices.
• Ensure that SOM696 and SOM716 are enabled on the XP disk arrays, and SOM696 is enabled
on the P9500 disk arrays.
Installing the management station
This section describes the procedure to install the P9000 Application Performance Extender management
station.
The following components are installed when you install the management station:
• Web Server
HP StorageWorks P9000 Application Performance Extender Software User Guide 13
Page 14

• PostgreSQL Database
• PostgreSQL ODBC Driver
Prerequisites
Before you install the management station:
• Read the HP StorageWorks P9000 Application Performance Extender Release Notes for any in-
stallation or post-installation requirements specific to the latest release
• Ensure that ports 8080, 51101, and 5432 are available for use
• Ensure that you have 5 GB of free space in the selected drive
• Ensure that JRE 1.6 or later is installed
Install instructions
NOTE:
• The default installation directory for a 32–bit system is C:\Program Files\Hewlett-
Packard\HP StorageWorks APEX Management Station\. However, you can install
the software in another directory.
• You should not cancel the InstallAnywhere application for P9000 Application Performance Extender
management station once installation has begun.
• If you have any version of PostgreSQL installed on your system, the installer will quit with the fol-
lowing message:
Detected that PostgreSQL is already installed on the system. Installation will quit now. Refer to troubleshooting steps in User Guide.
To install the P9000 Application Performance Extender management station:
1. Double-click P9000APEX_MS.exe to start the installation.
The Installation Wizard is displayed.
2. Click Next.
The License Agreement window is displayed.
3. Read and accept the terms of the license agreement, and click Next.
4. Select the install folder.
The Pre–installation Summary window is displayed.
5. Click Install to proceed.
When the installation is complete, installation Summary window is displayed.
6. Click Done.
The license entitlement is displayed.
Verifying installation on the management station
To verify that the P9000 Application Performance Extender management station was installed
successfully, ensure that:
• The following services are available:
Installing and removing P9000 Application Performance Extender14
Page 15

• HP StorageWorks APEX Web Server
• HP StorageWorks APEX DB
•
The software icon for P9000 Application Performance Extender appears on the desktop.
• The software is available from the Start menu (for example, Start > All Programs > Hewlett-Packard
> HP StorageWorks APEX Management Station > P9000ApplicationPerformanceExtenderManage-
mentStation).
Alternatively, open a browser window and enter the following URL to launch P9000 Application
Performance Extender:
http://<mgmt.server IP/DNS>:8080/P9000-APEX
Installing the communication agent
The communication agent must be installed on all the hosts except VMWare where I/O performance
control is required. These hosts must be connected to the target XP or P9500 disk array.
IMPORTANT:
You should not cancel the InstallAnywhere application for P9000 Application Performance Extender
communication agent once installation has begun.
Prerequisites
Before you install the communication agent, ensure the following:
• Read the HP StorageWorks P9000 Application Performance Extender Release Notes for any in-
stallation or post-installation requirements specific to the latest release
• Root or administrator credentials
• You have the IP address of the management station
• On HP-UX and Linux platforms, you have 150 MB of free space available in /var, /tmp, and /
opt
• On a Windows host, you have 150 MB of free space in C:\
• HP-UX 11i v3 (HP-UX 11iv3 March 2010 or above) for servers with QLogic HBA, PHKL_40311
patch
NOTE:
To install P9000 Application Performance Extender communication agent successfully on an HP-UX
host, HP recommends that you install the PHKL_40311 patch.
The PHKL_40311 patch can be downloaded from the following location:
http://itrc.hp.com.
• HP-UX 11i v3 (HP-UX 11iv3 September 2010) for servers with Emulex HBA
HP StorageWorks P9000 Application Performance Extender Software User Guide 15
Page 16

Installing the communication agent on HP-UX and Linux (x86 and x86_64) hosts
NOTE:
If the HP-UX PHKL_40311 cumulative patch is not installed, the following message is displayed:
Please contact HP service to install the "asyncdsk cumulative patch"
to get APEX support for I/Os through HP-UX asyncdsk driver. If you do
not need support for HP-UX asyncdsk driver or you will get this patch
installed later, you can continue with this installation. APEX would
not support I/Os through HP-UX asyncdsk driver without this patch.
To install the communication agent on HP-UX and Linux (x86 and x86_64) hosts:
1. Transfer the P9000APEX_CA.bin to the HP-UX or Linux host.
2. Run chmod +x P9000APEX_CA.bin to grant execute permission to the P9000APEX_CA.bin
file.
3. Run ./P9000APEX_CA.bin
The Welcome screen is displayed followed by the End User License Agreement.
4. Read and accept the terms of the agreement.
5. When prompted, enter the IP address of the management station.
NOTE:
Ensure that you enter the correct IP address of the management station as host names are not
supported.
The Pre–installation summary is displayed. Follow the instructions to proceed.
The communication agent is installed in the /opt/Hewlett-Packard/apex/com_agent directory.
Installing and removing P9000 Application Performance Extender16
Page 17

NOTE:
On Linux hosts, ensure that the driver corresponding to the QLogic HBAs is listed as the first
uncommented entry in the /etc/hba.conf file.
• For example, on 32 bit Linux hosts, if the /etc/hba.conf file includes the following entries:
lpfc /usr/lib/libemsdm.so
qla2xxx /usr/lib/libqlsdm.so
Change it to the following:
qla2xxx /usr/lib/libqlsdm.so
lpfc /usr/lib/libemsdm.so
• On 64 bit Linux hosts, if the /etc/hba.conf file includes the following entries:
lpfc /usr/lib/libemsdm.so
lpfc /usr/lib64/libemsdm.so
qla2xxx /usr/lib/libqlsdm.so
qla2xxx64 /usr/lib64/libqlsdm.so
Change it to the following:
qla2xxx64 /usr/lib64/libqlsdm.so
lpfc /usr/lib/libemsdm.so
lpfc /usr/lib64/libemsdm.so
qla2xxx /usr/lib/libqlsdm.so
Installing the communication agent on a Linux IA64 host
To install the communication agent on a Linux IA64 host:
1. Transfer the P9000APEX_CAIA64.bin to the Linux IA64 host.
2. Run chmod +x P9000APEX_CAIA64.bin to grant execute permission to the
P9000APEX_CA.bin file.
3. Run ./P9000APEX_CAIA64.bin
The Welcome screen is displayed followed by the End User License Agreement.
4. Read and accept the terms of the agreement.
5. When prompted, enter the IP address of the management station.
NOTE:
Ensure that you enter the correct IP address of the management station.
The Pre–installation summary is displayed. Follow the instructions to proceed.
Verifying communication agent installation on HP-UX and Linux hosts
HP-UX
To verify that the communication agent was installed successfully, run the following command to check
the status:
/sbin/init.d/apex_ca status
HP StorageWorks P9000 Application Performance Extender Software User Guide 17
Page 18

To start the communication agent service, run the /sbin/init.d/apex_ca start command.
To stop the communication agent service, run the /sbin/init.d/apex_ca stop command.
Linux
To verify that the communication agent was installed successfully, run the following command to check
the status:
service apex_ca status
To start the communication agent service, run the service apex_ca start command.
To stop the communication agent service, run the service apex_ca stop command.
Installing the communication agent on a Windows host
To install the communication agent on a Windows host:
1. Double-click P9000APEX_CA.exe to start the installation.
The Installation Wizard is displayed.
2. Click Next.
The License Agreement window is displayed.
3. Read and accept the terms of the license agreement, and click Next.
4. When prompted, enter the IP address of the management station, and click Next.
The Pre–installation Summary window is displayed.
5. Click Install to proceed.
When the installation is complete, the Installation Summary window is displayed.
6. Click Done.
Verifying communication agent installation on a Windows host
To verify that the communication agent was installed successfully, ensure that the HP StorageWorks
APEX Communication Agent service is running.
To confirm if the service is running:
1. Select Start > Run, type services.msc, and press Enter.
The Services window opens.
2. If the communication agent is installed, the status of the HP StorageWorks APEX Communication
Agent service is in the Started mode.
3. Close the Services window.
Installing the controller
This section describes the procedure to install the P9000 Application Performance Extender controller.
IMPORTANT:
Ensure that you install the communication agent before installing the controller.
Installing and removing P9000 Application Performance Extender18
Page 19

NOTE:
You should not cancel the InstallAnywhere application for P9000 Application Performance Extender
controller once installation has begun.
Prerequisites
Before you install the controller, ensure the following:
• Read the HP StorageWorks P9000 Application Performance Extender Release Notes for any in-
stallation or post-installation requirements specific to the latest release
• Ensure that JRE 1.6 or later is installed
• Port 22569 is available for use
• The host has access to at least one command device of the array that will be managed by the
controller
• On HP-UX and Linux hosts, you have 150 MB of free space in /opt and 75 MB of free space in
/var
NOTE:
• If RMLIB v01.15.00 or later is not present, RMLIB v01.15.01 will be installed as part of the con-
troller installation. If the installer detects an earlier version of RMLIB, it will exit with the following
message:
A lower version of RMLIB found on the Host. Please try to install on
the other Host. If appropriate remove or upgrade RMLIB.
Installing the controller on HP-UX and Linux (x86 and x86_64) hosts
To install the controller on HP-UX and Linux (x86 and x86_64) hosts:
1. Transfer the P9000APEX_Controller.bin to the HP-UX or Linux host.
2. Run chmod +x P9000APEX_Controller.bin to grant execute permission to the
P9000APEX_Controller.bin file.
3. Run ./P9000APEX_Controller.bin.
The Welcome screen is displayed followed by the End User License Agreement.
4. Read and accept the terms of the agreement.
The Pre–installation summary is displayed. Follow the instructions to proceed.
The controller is installed in the /opt/Hewlett-Packard/apex/controller directory.
Installing the controller on a Linux IA64 host
To install the controller on a Linux IA 64 host:
1. Transfer the P9000APEX_ControllerIA64.bin to the Linux IA64 host.
2. Run chmod +x P9000APEX_ControllerIA64.bin to grant execute permission to the
P9000APEX_ControllerIA64.bin file.
HP StorageWorks P9000 Application Performance Extender Software User Guide 19
Page 20

3. Run ./P9000APEX_ControllerIA64.bin.
The Welcome screen is displayed followed by the End User License Agreement.
4. Read and accept the terms of the agreement.
The Pre–installation summary is displayed. Follow the instructions to proceed.
Verifying controller installation on HP-UX and Linux hosts
HP-UX
To verify that the controller was installed successfully, run the following command:
/sbin/init.d/apex_controller status
To start the controller service, execute the /sbin/init.d/apex_controller start command.
To stop the controller service, execute the /sbin/init.d/apex_controller stop command.
Linux
To verify that the controller was installed successfully, run the following command:
service apex_controller status
To start the controller service, execute the service apex_controller start command.
To stop the controller service, execute the service apex_controller stop command.
Installing the controller on a Windows host
To install the controller on a Windows host:
1. Double-click P9000APEX_Controller.exe to start the installation.
The Installation Wizard is displayed.
2. Click Next.
The License Agreement window is displayed.
3. Read and accept the terms of the license agreement, and click Next.
The Pre–installation Summary window is displayed.
4. Click Install to proceed.
When the installation is complete, the Installation Summary window is displayed.
5. Click Done.
Verifying controller installation on a Windows host
To verify that the controller was installed successfully, ensure that the HP StorageWorks APEX Controller
Software service is running.
To confirm if the service is running:
1. Select Start > Run, type services.msc, and press Enter.
The Services window opens.
2. If the controller is installed, the status of the HP StorageWorks P9000 APEX Controller Software
service is in the Started mode.
3. Close the Services window.
Installing and removing P9000 Application Performance Extender20
Page 21
Upgrading P9000 Application Performance Extender
This section describes the procedure to upgrade the P9000 Application Performance Extender
management station, communication agent, and controller.
For unsupported upgrade paths, the previous version must be removed first. After removing the previous
version, install the latest version. For supported upgrade paths, you do not have to remove the earlier
version before upgrading to the latest version. For details about the supported upgrade paths, see
the following sections:
• Management station upgrade support
• Communication agent upgrade support
• Controller upgrade support
Upgrading the management station
Management station upgrade support
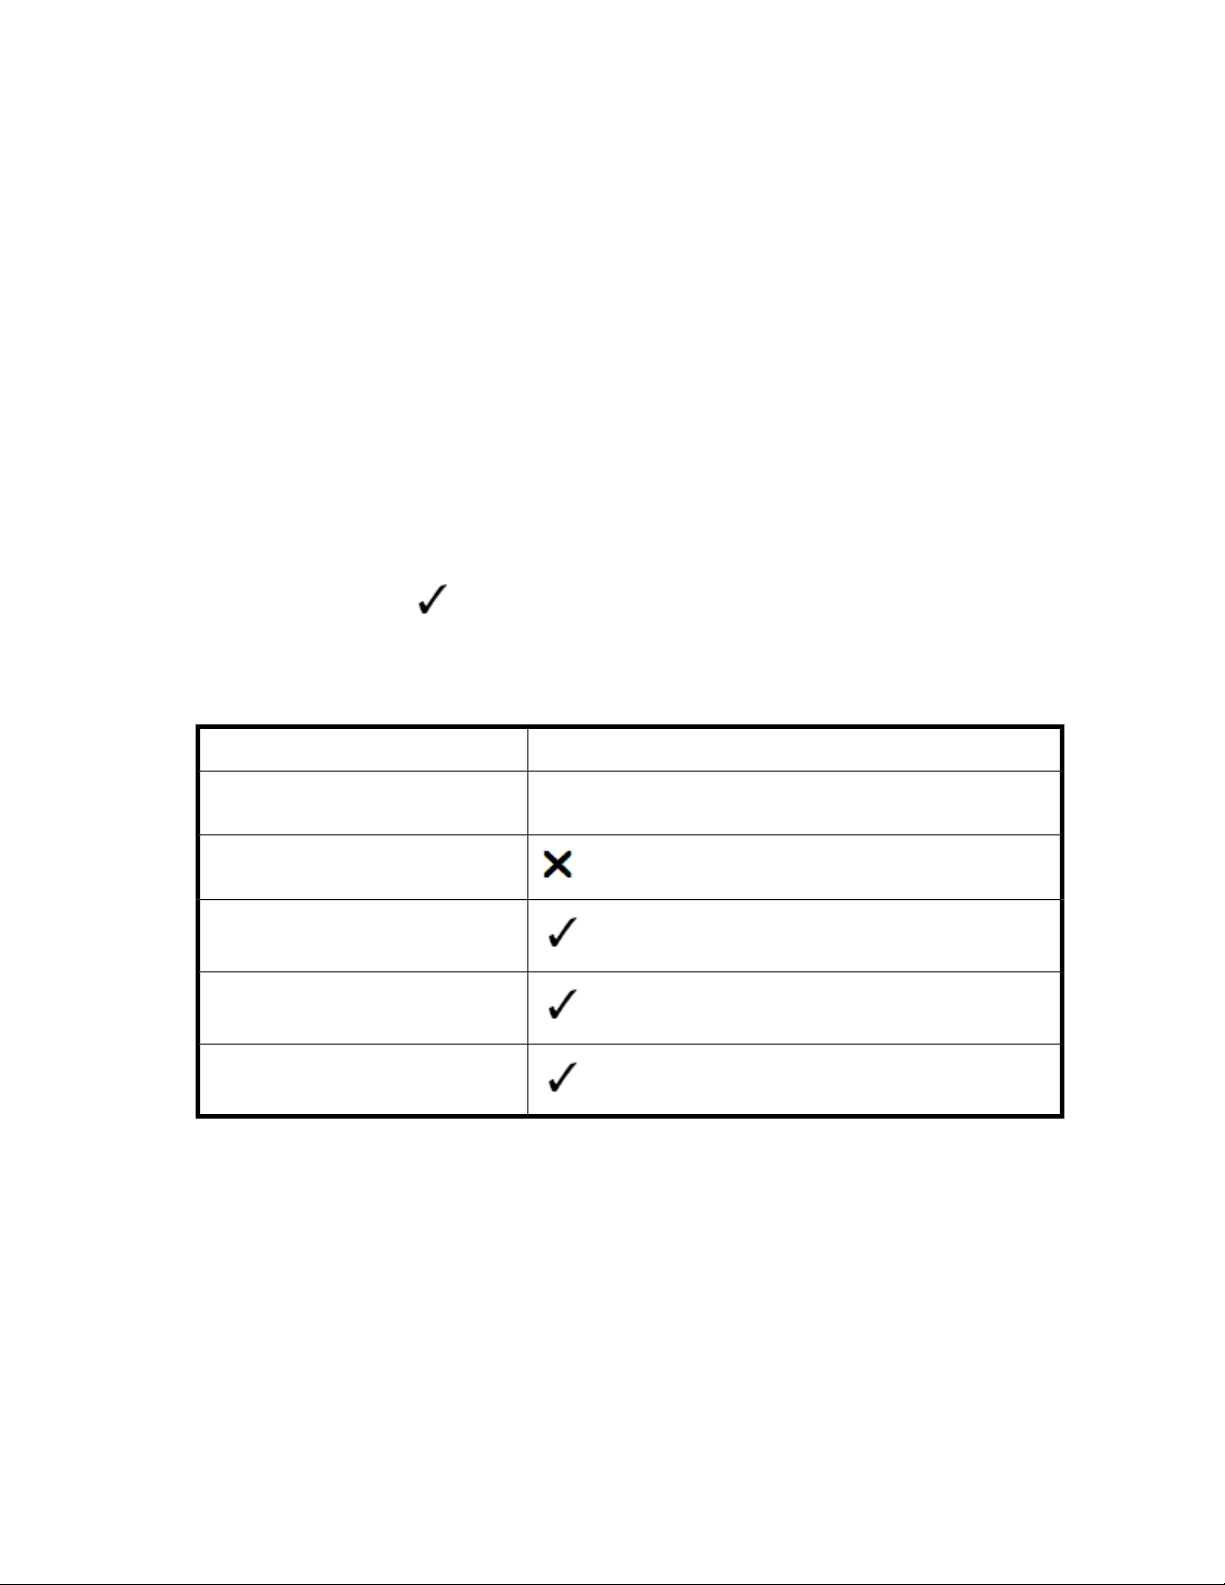
Table 1 shows upgrade support for P9000 Application Performance Extender management station
versions. A check mark ( ) indicates that you can perform an upgrade from the version in the
FROM column to the version in the TO column without removing the earlier version. A blank cell
indicates that an upgrade to a later version (without removing the earlier version) is not supported.
Table 1 Upgrade support (management station)
To P9000 Application Performance Extender version
From P9000 Application Performance
Extender version
1.0
2.0
2.1
2.1.1
To upgrade the P9000 Application Performance Extender management station to the latest version:
1. Double-click APEXMS_Setup.exe to start the upgrade process.
The Installation Wizard is displayed.
2. Click Next.
The following message is displayed:
The installer has detected an earlier version of HP StorageWorks P9000
Application Performance Extender Management Station. The earlier version
will be removed. Click OK to continue with the upgrade.
2.2
3. Click OK.
HP StorageWorks P9000 Application Performance Extender Software User Guide 21
Page 22
The End User License Agreement is displayed.
4. Read and accept the terms of the license agreement, and click Next.
5. Click Install to proceed.
When the installation is complete, the installation Summary window is displayed.
6. Click Done.
The license entitlement is displayed.
Upgrading the communication agent
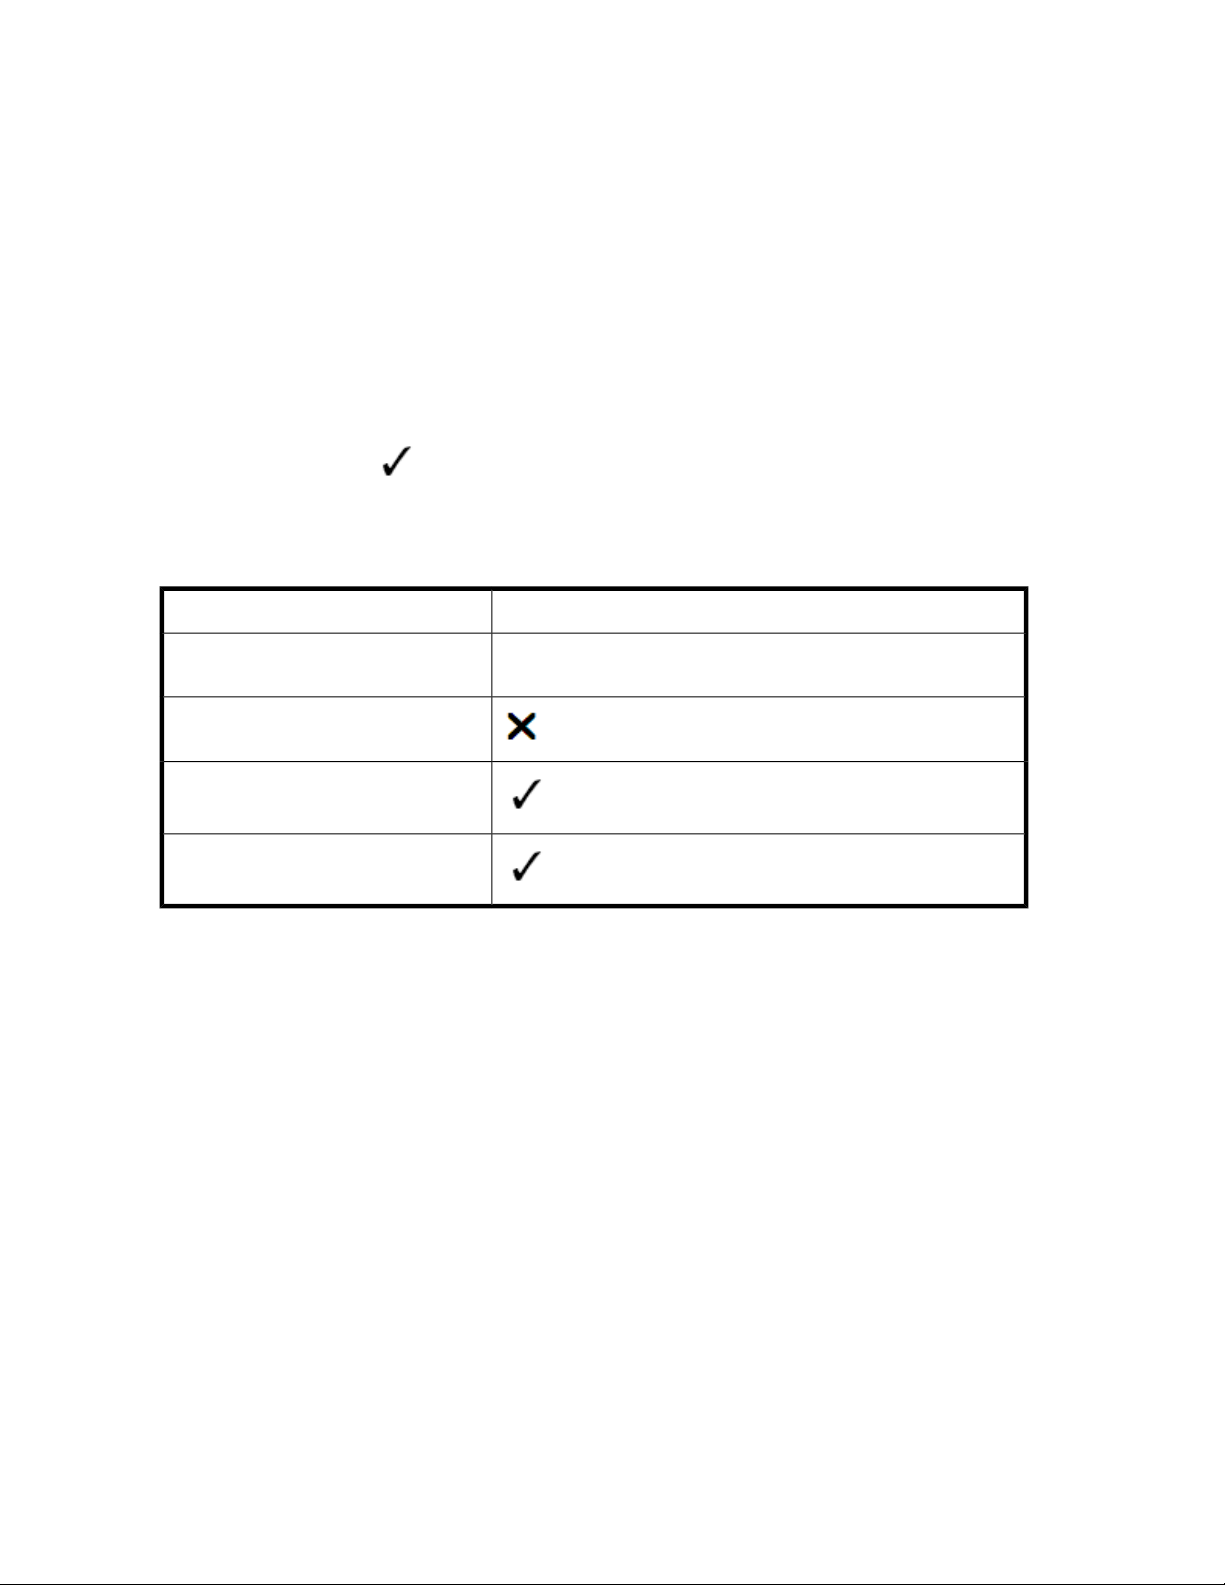
Communication agent upgrade support
Table 2 shows upgrade support for P9000 Application Performance Extender communication agent
versions. A check mark ( ) indicates that you can perform an upgrade from the version in the
FROM column to the version in the TO column without removing the earlier version. A blank cell
indicates that an upgrade to a later version (without removing the earlier version) is not supported.
Table 2 Upgrade support (communication agent)
To P9000 Application Performance Extender version
From P9000 Application Performance
Extender version
1.0
2.0
2.1
2.2
To upgrade the communication agent to the latest version:
HP-UX and Linux (x86 and x86_64) hosts
1. Transfer the P9000APEX_CA.bin to the HP-UX or Linux host.
2. Run chmod +x P9000APEX_CA.bin to grant execute permission to the P9000APEX_CA.bin
file.
3. Run ./P9000APEX_CA.bin.
The Welcome screen is displayed.
4. Click Next.
The following message is displayed:
An earlier version of APEX Communication Agent is installed on the
machine. Press OK to Upgrade.
5. Click OK.
The End User License Agreement is displayed.
6. Read and accept the terms of the agreement.
7. When prompted, enter the IP address of the management station.
Installing and removing P9000 Application Performance Extender22
Page 23

The Pre–installation summary is displayed. Follow the instructions to proceed.
Linux IA64 host
1. Transfer the P9000APEX_CAIA64.bin to the Linux IA64 host.
2. Run chmod +x P9000APEX_CAIA64.bin to grant execute permission to the
P9000APEX_CA.bin file.
3. Run ./P9000APEX_CAIA64.bin.
The Welcome screen is displayed.
4. Click Next.
The following message is displayed:
An earlier version of APEX Communication Agent is installed on the
machine. Press OK to Upgrade.
5. Click OK.
The End User License Agreement is displayed.
6. Read and accept the terms of the agreement.
7. When prompted, enter the IP address of the management station.
The Pre–installation summary is displayed. Follow the instructions to proceed.
Windows host
1. Double-click P9000APEX_CA.exe to start the installation.
The Installation Wizard is displayed.
2. Click Next.
The following message is displayed:
An earlier version of APEX Communication Agent is installed on the
machine. Press OK to Upgrade.
3. Click OK.
The License Agreement window is displayed.
4. Read and accept the terms of the license agreement, and click Next.
5. When prompted, enter the IP address of the management station, and click Next.
The Pre–installation Summary window is displayed.
6. Click Install to proceed.
When the installation is complete, the Installation Summary window is displayed.
7. Click Done.
Upgrading the controller
Controller upgrade support
Table 3 shows upgrade support for P9000 Application Performance Extender controller versions. A
check mark ( ) indicates that you can perform an upgrade from the version in the FROM column
HP StorageWorks P9000 Application Performance Extender Software User Guide 23
Page 24

to the version in the TO column without removing the earlier version. A blank cell indicates that an
upgrade to a later version (without removing the earlier version) is not supported.
Table 3 Upgrade support (controller)
To P9000 Application Performance Extender version
From P9000 Application Performance
Extender version
1.0
2.0
2.1
2.1.1
2.2
To upgrade the controller to the latest version:
HP-UX and Linux (x86 and x86_64) hosts
1. Transfer the P9000APEX_Controller.bin to the HP-UX or Linux host.
2. Run chmod +x P9000APEX_Controller.bin to grant execute permission to the
P9000APEX_Controller.bin file.
3. Run ./P9000APEX_Controller.bin.
The Welcome screen is displayed.
4. Click Next.
The following message is displayed:
An earlier version of APEX Controller is installed on the machine.
Press OK to Upgrade.
5. Click OK.
The End User License Agreement is displayed.
6. Read and accept the terms of the agreement.
The Pre–installation summary is displayed. Follow the instructions to proceed.
Linux IA64 host
1. Transfer the P9000APEX_ControllerIA64.bin to the Linux IA64 host.
2. Run chmod +x P9000APEX_ControllerIA64.bin to grant execute permission to the
P9000APEX_ControllerIA64.bin file.
3. Run ./P9000APEX_ControllerIA64.bin.
The Welcome screen is displayed.
4. Click Next.
The following message is displayed:
An earlier version of APEX Controller is installed on the machine.
Press OK to Upgrade.
5. Click OK.
Installing and removing P9000 Application Performance Extender24
Page 25

The End User License Agreement is displayed.
6. Read and accept the terms of the agreement.
The Pre–installation summary is displayed. Follow the instructions to proceed.
Windows host
1. Double-click P9000APEX_Controller.exe to start the installation.
The Installation Wizard is displayed.
2. Click Next.
The following message is displayed:
An earlier version of APEX Controller is installed on the machine.
Press OK to Upgrade.
3. Click OK.
The License Agreement window is displayed.
4. Read and accept the terms of the license agreement, and click Next.
The Pre–installation Summary window is displayed.
5. Click Install to proceed.
When the installation is complete, the Installation Summary window is displayed.
6. Click Done.
Removing P9000 Application Performance Extender
Removing the management station
NOTE:
Removing the management Station will also remove Postgre SQL 8.3.
To remove the P9000 Application Performance Extender management station:
1. Select Start > Control Panel > Add/Remove Programs.
2. Select HP StorageWorks P9000 Application Performance Extender Management Station.
3. Click Remove.
Removing the communication agent
Removing the communication agent on HP-UX and Linux hosts
To remove the communication agent on HP-UX and Linux hosts:
1. Using the command-line interface, navigate to the following location:
/opt/Hewlett-Pacard/APEX/com_agent/Uninstall_APEXCommunicationAgent
2. Run the ./UninstallAPEXCA command.
HP StorageWorks P9000 Application Performance Extender Software User Guide 25
Page 26

NOTE:
On a HP-UX host, do not remove the communication agent using the swremove option.
Removing communication agent on a Windows host
To remove the communication agent on a Windows host:
1. Select Start > Control Panel >Add/Remove Programs.
2. Select HP StorageWorks P9000 Application Performance Extender Communication Agent.
The InstallAnywhere window appears, indicating that it will remove the selected software.
3. Click Next.
Removing the controller
IMPORTANT:
During the removal of the controller, you will be prompted to confirm the removal of RMLIB. If RMLIB
is used by other applications such as P9000 Host Agent, do not remove RMLIB.
Removing the controller on HP-UX and Linux hosts
1. Using the command line interface, navigate to the following location:
cd /opt/Hewlett-Packard/apex/controller/Uninstall_APEXController
2. Run the ./Uninstall_APEXController command.
NOTE:
Do not remove the controller using the swremove option.
Removing the controller on a Windows host
1. Select Start > Control Panel >Add/Remove Programs.
2. Select HP StorageWorks P9000 Application Performance Extender Controller.
The InstallAnywhere window opens, indicating that it will remove the selected software.
3. Click Next.
Installing and removing P9000 Application Performance Extender26
Page 27

3 Licensing P9500 disk arrays
IMPORTANT:
Licensing is applicable only for P9500 disk arrays.
P9000 Application Performance Extender follows a band-based pricing structure. For a new purchase,
you buy the base license and then purchase all the capacity licenses from the capacity band that
matches the total capacity required.
For an upgrade purchase, first verify how much capacity is already installed. Then, add to it the
amount of capacity you intend to purchase. Further, locate the capacity band that contains the sum
you just calculated and purchase all of the desired upgrade license capacity from this band. P9000
Application Performance Extender is licensed on USABLE capacity for P9500 disk arrays and on
RAW capacity for XP disk arrays.
P9000 Application Performance Extender requires a valid license key for each P9500 disk array. If
an array does not have a valid license key, P9000 Application Performance Extender functionality
is disabled for that array.
The usable capacity is calculated as the sum of the following: Total allocated LDEV capacity + total
unallocated LDEV capacity + reserved capacity.
• Total allocated LDEV capacity includes the allocated internal LDEVs
• Total unallocated LDEV capacity includes the unallocated internal LDEVs
• Reserved capacity includes the pool volumes, such as thin provisioning, snapshot, and continuous
access journal volumes
So, usable capacity = Internal LDEVs — (External Volumes + Virtual Volumes)
You can generate a frame license of type, Permanent at the Hewlett-Packard Authorization Center
(HPAC) license key website, using the following URL: http://webkey.external.hp.com. The license
can be generated for a specified usable capacity of your choice, and for an unlimited duration. Each
permanent license is perpetual and unique to a P9500 disk array. After generating a license for a
P9500 disk array, the P9000 Application Performance Extender LTU and the registration number are
bound to the following:
• The P9500 disk array serial number
• The P9000 disk array type
• The usable capacity for which the license is generated
IMPORTANT:
• It is mandatory that you have the P9000 Application Performance Extender registration number
to generate a permanent frame license. This registration number is included in the product entitlement certificate that is provided with every P9000 Application Performance Extender License To
USE (LTU) purchased. For more information on generating licenses, see “Generating licenses at
the HPAC license key website” on page 39.
HP StorageWorks P9000 Application Performance Extender Software User Guide 27
Page 28
P9000 Application Performance Extender supports the following license types:
• Instant-on license
• Permanent license
• Meter based term (MBT) license
License screen
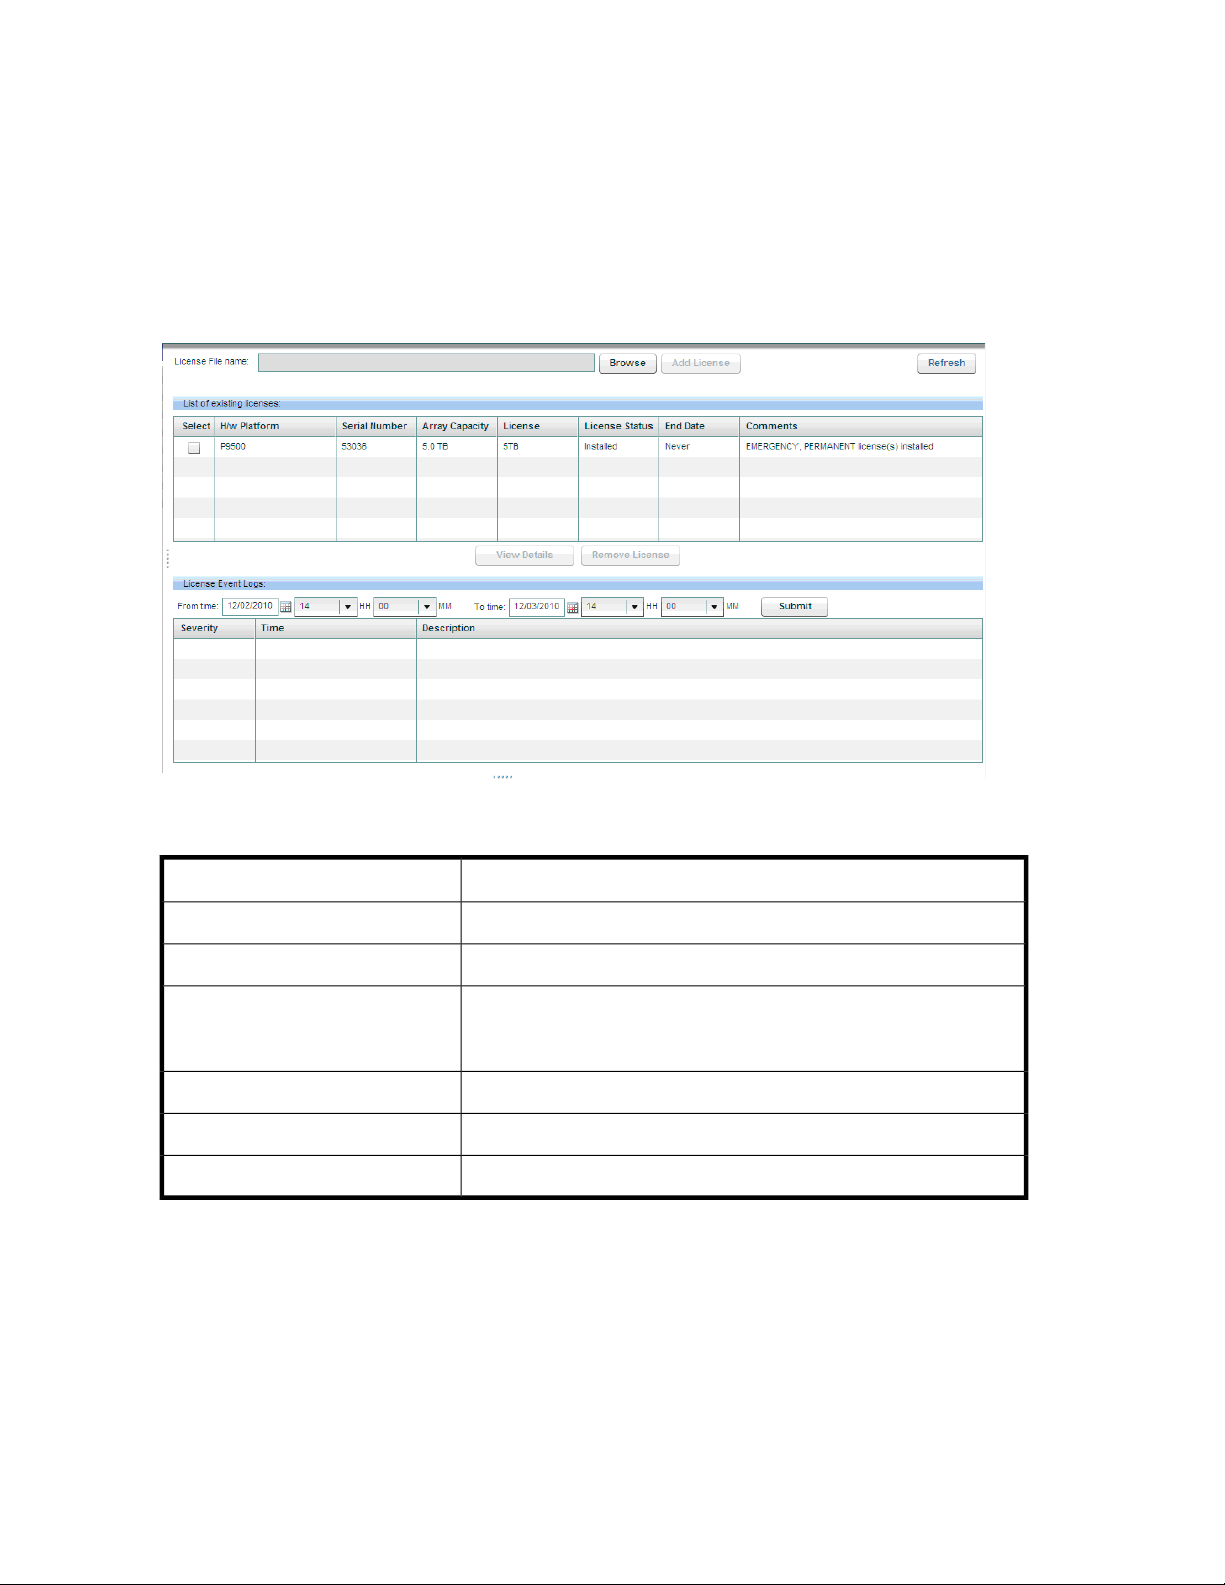
You can add new licenses and view the status of existing licenses on the License screen. The License
screen is displayed when you select License from the Navigation pane.
Figure 2 License screen
.
List of existing licenses
Instant-on license
The Instant-on license or the trial license is provided with every instance of P9000 Application
Performance Extender. By default, this license is automatically enabled when you install P9000
Application Performance Extender. The following are important notes on the Instant-on license:
DescriptionItem
Enables you to select a license.License File name
Enables you to add a license.Add License
Displays the details of all the existing licenses. It includes details such
as the license capacity, license status, array capacity, and the end date
of the license.
Displays information of the selected license.View Details
Enables you to remove the selected license.Remove License
Displays the events generated for each license key.License Event Logs
Licensing P9500 disk arrays28
Page 29

• It is either valid for a period of 120 days from the day you install P9000 Application Performance
Extender or until the time you generate, and install a new license for one or more P9500 disk arrays.
It cannot be generated from the HPAC license key website.
Consider the following example, where P9000 Application Performance Extender is installed on
20th Aug’10 and is controlling a P9500 disk array. The Instant-on license is enabled on the same
date and valid until the 19th Dec’10. If you add one more P9500 disk array on 31st Aug’10, it
is still controlled in the current Instant-on license mode only. The Instant-on duration of 120 days
is not calculated separately for the additional P9500 disk array.
• It is applicable across all the P9500 disk arrays that are controlled by the current instance of
P9000 Application Performance Extender. It is not bound to a specific P9500 disk array. During
the Instant-on license period, P9000 Application Performance Extender can monitor usable capacities of multiple P9500 disk arrays. You can perform all tasks that P9000 Application Performance
Extender supports.
• When the instant-on period expires and a valid license is not yet installed, P9000 Application
Performance Extender switches over to the grace period of 60 days for that P9500 disk array.
Instant-on license activation
P9000 Application Performance Extender indicates that the instant-on license is activated by displaying
the following status message on the License screen:
The P9000 Application Performance Extender trial license expire on month,
day, year. Please contact your HP Representative to purchase the requisite
P9000 Application Performance Extender licenses to avoid disruption of
the P9000 Application Performance Extender services.
Where, month, day, and year is calculated as 120 days from the date when you install P9000
Application Performance Extender.
Every day, a status message on the number of remaining Instant-on days is displayed under Comments
in the List of existing licenses section against each P9500 disk array record for which a permanent
license is not yet installed.
Instant-on license expiration
The Instant-on license expires when one of the following conditions are met:
• The Instant-on license period of 120 days is over and permanent license is not yet installed for
any of the controlled P9500 disk arrays, P9000 Application Performance Extender does the following:
• It initiates a grace period of 60 days for all the P9500 disk arrays. During the grace period,
you can monitor the usable capacities of multiple P9500 disk arrays. You can also perform
all the P9000 Application Performance Extender related operations on P9500 disk arrays.
After the grace period expires, P9000 Application Performance Extender will stop controlling
the P9500 disk arrays, for which permanent licenses are not installed.
• The following changes are displayed on the License screen for each P9500 disk array record:
DescriptionItem
Displays the type of the P9500 disk array.H/W Platform
Displays the serial number of the P9500 disk array.Serial Number
HP StorageWorks P9000 Application Performance Extender Software User Guide 29
Page 30

DescriptionItem
Displays the usable capacity of a P9500 disk array.Array Capacity
Displays the license capacity as 0.License Capacity
Displays the status as Expired.License Status
Displays the end date of the grace period.End date
Displays the following status message:
No License Installed. Grace Period expire on month,
day, year. Please purchase the required P9000
Comments
Application Performance Extender licenses now to
continue using P9000 Application Performance Extender
on this Array.
Where, month, day, year refers to the date till when the grace period is
valid.
• You have installed a permanent license on P9000 Application Performance Extender for at least
one P9500 disk array during the instant-on period, it does the following:
• Disables the instant-on license and initiates a grace period of 60 days on all the controlled
P9500 disk arrays, excluding those for which sufficient permanent licenses are installed on
P9000 Application Performance Extender.
• Displays the following details in the View License Details section for the P9500 disk array that
has a permanent license installed on P9000 Application Performance Extender:
License Capacity
You can start controlling the P9500 disk array after the permanent license is installed. Ensure
that you generate and install valid license keys for every P9500 disk array being controlled,
so that P9000 Application Performance Extender continues controlling the array.
Grace period expiration
The grace period that follows the instant-on license is valid for 60 days. After the grace period expires
and if valid licenses are not installed, the following changes occur:
• P9000 Application Performance Extender will stop controlling the P9500 disk array after the grace
period is over. However, it will continue to monitor the workload performance and MP blade
utilization.
• Configured alarms, notifications, reports, and all other functions continue to work.
• The License screen displays the following changes:
DescriptionItem
Displays the aggregate capacity of all valid license capacity (TB) keys
installed.
Displays the current status of the license, as Installed.License status
Displays Never, as permanent license is for an unlimited duration.End Date
Licensing P9500 disk arrays30
Page 31

DescriptionItem
Displays the status as Expired.License Status
Displays the capacity as 0.License Capacity
Displays the following status message:
License has expired. Grace Period has expired on month,
Comments
day, year. Please purchase the required licenses now to
continue using P9000 Application Performance Extender on
this Array.
Where, month, day, year refers to the date till when the grace period is valid.
For P9000 Application Performance Extender to continue controlling P9500 disk arrays, install
permanent licenses on P9000 Application Performance Extender for each of the P9500 disk arrays.
Contact your HP representative to procure the additional licenses.
Proactive License Tracking
Proactive license tracking automatically intimates you about the expiration of license(s) for P9500
array(s) monitored by APEX. The notification is done by sending an e-mail from the APEX software to
the user configured e-mail id against the corresponding array. The e-mail is sent three days prior to
the start of the grace period. The e-mail notifies you about the expiry of the license and to install the
license as soon as possible. However, the e-mail cannot be sent in advance in some particular cases
as the grace period cannot be identified in advance. This may happen if the array capacity exceeds
the license capacity. In such cases, the e-mail is sent when the grace period starts.
Figure 3 Proactive License Tracking
.
HP StorageWorks P9000 Application Performance Extender Software User Guide 31
Page 32

Figure 3 shows the proactive license tracking screen. Data collection discovers all the P9500 arrays
which need to be monitored. You have to select a particular array and enter the notification e-mail
id in the License Settings screen before adding any new valid license. Once the grace period starts,
the notification mails are sent depending on the notification interval set in the settings.ini file.
Permanent License
Permanent licenses are primary licenses that you generate and install on P9000 Application
Performance Extender to control a P9500 disk array. Permanent licenses are for an unlimited duration,
perpetual, and unique to a P9500 disk array. After generating a license for a P9500 disk array, the
P9000 Application Performance Extender LTU and the registration number are bound to the following:
• The P9500 disk array serial number
• The P9500 disk array type
• The usable capacity for which the license is generated
After installing a Permanent license, if you increase the usable capacity beyond the Permanent licensed
capacity, the existing Permanent license cannot be used. P9000 Application Performance Extender
considers it as a license capacity violation and initiates a grace period of 60 days for that P9500
disk array. To end the grace period:
For a P9500 disk array, you can generate and install one of the following based on your requirement:
• A Permanent license.
• A Meter based Term license, which is a secondary license that works only if a Permanent license
is already installed. For more information, see “Meter Based Term license” on page 32
IMPORTANT:
• It is mandatory that you have the P9500 Application Performance Extender registration number
to generate a permanent frame license. This registration number is included in the product entitlement certificate that is provided with every P9000 Application Performance Extender License To
USE (LTU) purchased.
• The unlimited frame license concept is not applicable for the P9500 disk arrays. You must purchase
the additional licenses if you increase the usable capacity, so that P9000 Application Performance
Extender can continue controlling those arrays. For example, if you increase the usable capacity
on a P9500 disk array from 50 TB to 70 TB, you must purchase licenses for P9000 Application
Performance Extender to monitor the additional usable capacity of 20 TB.
Meter Based Term license
Meter based Term licenses are secondary licenses that you generate at the HPAC website and install
as add-on licenses on P9000 Application Performance Extender. Meter based Term licenses cannot
work independently and always need to be installed on a Permanent license. They are not a
replacement to the Permanent license.
A Meter based Term license is generated in TB-Days for the usable capacity that you want to monitor
and the duration for which you want to control. To calculate the total TB-Days of Meter based Term
license that you require, use the following formula:
(Usable capacity - aggregate permanent license) * Duration (number of
days)= TB-Days Meter based Term license
Licensing P9500 disk arrays32
Page 33

IMPORTANT:
• Additional usable capacity refers to the usable capacity that is beyond the Permanent licensed
capacity.
• A Meter based Term license cannot be installed on multiple management stations.
• Multiple Meter based Term licenses can be generated and installed on a management station. In
such cases, the licenses are used successively.
Meter based Term license requirement
Meter based Term licenses are useful when you want additional usable capacity for a defined duration
or when there is an unplanned surge in the usable capacity that might subsequently reduce. For steady
state license requirements, use Permanent licenses. For dynamic license requirements arising out of
varying business needs, use appropriate TB-Days of Meter based Term license.
IMPORTANT:
For the installed TB-Days to function properly, you must install a minimum of 1TB Permanent license.
The following image illustrates the above mentioned cases.
Example scenario 1
Consider that a small-sized company books air tickets online for its customers. The company has one
P9000 disk array of 75TB usable capacity. A Permanent license is installed on 01/01/2010 to
monitor the 75TB usable capacity. Based on the heavy online booking trend during December'09 January'10 time frame due to Christmas and New Year celebrations, the company is expecting a
surge in the online booking traffic beginning December'10 and continuing till the end of 1st week of
January'11. The company is confident that at least 50TB additional usable capacity is required during
this time frame (estimated 39 days).
In such cases, the company has two options:
• Generate and install a Meter based Term license, as the 50TB spike in usable capacity is for a
limited duration.
• Generate and install a Permanent license for the 50TB usable capacity.
Because the 50TB usable capacity is required for a short duration, it is economical to install TB-Days
of Meter based Term license. If a Permanent license is installed for the 50TB usable capacity, it is
HP StorageWorks P9000 Application Performance Extender Software User Guide 33
Page 34

used only till the first week of January'11, after which it remains unused until the 75TB current usable
capacity increases by 50TB, and is constantly used.
Following is the suggested Meter based Term license configuration:
Generate 1950TB-Days of Meter based Term license to monitor 50TB additional usable capacity for
39 days. The 1950TB-Days are derived based on the following calculation:
50TB * 39 days = 1950TB-Days of Meter based Term license
The following figure illustrates the scenario described.
So, 50TB usable capacity is monitored every day beginning December'10 for the next 39 days. After
the spike in usable capacity reduces to 75TB, P9000 Application Performance Extender uses the
existing Permanent license that is already installed. So, the company has managed the short duration
spike in usable capacity with Meter based Term license and also retained the Permanent license to
monitor the existing 75TB usable capacity.
Example scenario 2
Consider the scenario of another company that has to use P9000 Application Performance Extender
to monitor a P9500 disk array (5TB usable capacity) for a duration of only 180 days. It is a one-time
activity for a specific project. As it is a time bound project, Meter based Term licenses are
recommended. Following is the suggested configuration:
1. Generate and install 1TB Permanent license.
Out of the 5TB usable capacity, 1TB is managed by the Permanent license.
2. Generate and install 720TB-Days Meter based Term license to monitor the additional 4TB usable
capacity for 180 days.
4TB * 180 days = 720TB-Days Meter based Term license
Meter based Term license activation and consumption
Similar to a Permanent license, a Meter based Term license is also bound to the disk array serial
number and the usable capacity for which the license is generated. Once installed, you can use the
TB-Days to monitor the additional usable capacity based on your requirement. For example, if 90
TB-Days Meter based Term license are installed, you can use the 90TB-Days in any of the following
ways:
• 90TB-Days to monitor 90TB additional usable capacity in one day.
• 90TB-Days to monitor 1TB additional usable capacity for 90 days.
• 90TB-Days to monitor 10TB additional usable capacity for nine days.
• Any usage where the duration (Y days) multiplied by the additional usable capacity (XTB) equals
90TB-Days.
Licensing P9500 disk arrays34
Page 35

The following figure illustrates the use of Meter based Term license.
At the time of installing the Meter based Term license, if the usable capacity is within the Permanent
licensed capacity, the installed TB-Days remain dormant till the usable capacity exceeds the Permanent
licensed capacity. They are activated only after the Permanent license is completely used. The TB-Days
are used for the duration when the usable capacity exceeds the installed Permanent licensed capacity
and the exceeded capacity can be managed by the installed TB-Days.
NOTE:
• After the installed TB-Days are activated, P9000 Application Performance Extender verifies the
remaining TB-Days every day after 1:00 PM and accordingly updates the TB-Days status on the
License screen - List of existing licenses section. For more information on the License screen, see
“License screen” on page 28.
• If the installed TB-Days are used in the first half of a day, the TB-Days status is updated after
1:00 PM on the same day.
• If the installed TB-Days are used in the second half of a day, the TB-Days status is updated
after 1:00 PM on the next day.
• An installed Meter based Term license cannot be removed.
For example, a Permanent license is installed on 11/30/2010 to monitor 50TB usable capacity. In
addition, 90TB-Days are also installed on the same day to monitor 10TB additional usable capacity
later for nine days. As the usable capacity is still within the Permanent licensed capacity, P9000
Application Performance Extender does not use the 90TB-Days. The following table lists the fields that
are updated on the License screen - List of existing licenses section when the 90TB-Days are installed
for a P9500 disk array record.
Column Headings - List of existing licenses section
License Capacity
Description
Displays Permanent licensed capacity plus the installed TB-Days.
Example, 50TB, +90TB-Days
HP StorageWorks P9000 Application Performance Extender Software User Guide 35
Page 36

Column Headings - List of existing licenses section
Term (Days)
Description
Displays N/A.
Term (Days) indicates the total number of days when the installed
90TB-Days can be used. In this case, as the usable capacity is within the
Permanent licensed capacity limit, the 90TB-Days are dormant and the
Term (Days) are not shown.
License Status
End Date
Displays the status as Installed.
Displays Never.
This is because, the Permanent license which is for an unlimited duration
is currently active.
Consider that the usable capacity exceeds the 50TB Permanent licensed capacity by 10TB in the first
half of 12/03/2010. As a result, the 90TB-Days are activated and P9000 Application Performance
Extender uses 10TB-Days, and updates the following fields after 1:00 PM on the same day.
On 12/03/2010:
Column Headings - List of existing licenses section
License Capacity
Term (Days)
License Status
Description
Displays 50TB, +80TB-Days
This is because, 10TB-Days are used on 12/03/2010 to monitor the
additional 10TB usable capacity on that day. It also indicates that
+80TB-Days remain that can be used.
Displays 8.
Eight days is the remaining duration when the +80TB-Days can be used.
Displays the status as Installed.
End Date
Displays 12/10/2010.
Calculated as eight days starting from 12/03/2010.
Consider that the usable capacity exceeds the 50TB Permanent licensed capacity by 10TB in the
second half of 12/03/2010. As a result, P9000 Application Performance Extender updates the
above listed fields after 1:00 PM only on the next day (12/04/2010), though the 10TB-Days are
already used from the 90TB-Days on 12/03/2010.
After the installed TB-Days are completely used and one of the following actions is not completed,
P9000 Application Performance Extender enters 60 days grace period for that particular P9500 disk
array:
• A Permanent or appropriate TB-Days of Meter based Term license installed to control the additional
usable capacity.
• The additional usable capacity reduced to match the Permanent licensed capacity.
In addition, P9000 Application Performance Extender reduces the installed TB-Days every day after
1:00 PM till one of the above-mentioned actions is performed. The reduction (negative count) of
TB-Days is proportional to the additional usable capacity that needs to be controlled. After 60 days,
a capacity violation is reported and P9000 Application Performance Extender stops controlling that
disk array.
Licensing P9500 disk arrays36
Page 37

Consider that the 90TB-Days are completely used in the first half of 12/11/2010 and appropriate
TB-Days are not yet installed to monitor the 10TB additional usable capacity. As a result, P9000
Application Performance Extender does the following:
1. Enters 60 days grace period at 1:00 PM on the same day and 0TB-Days are available.
2. Begins reduction (negative count) of installed TB-Days.
The reduction continues for the next 59 days and the every day reduction is proportional to the 10TB
additional usable capacity that needs to be monitored. After 60 days, a capacity violation is reported.
After 1:00 PM on 12/11/2010 (Day 1 of grace period), the following fields on the License screen
- List of existing licenses section display:
Column Headings - List of existing licenses
section
License Capacity
Description
50TB, 0TB-Days
This is because, 90TB-Days are completely used by
12/11/2010.
Term (Days)
License Status
End Date
Displays 0.
Zero days, as there are no TB-Days to use.
Displays Capacity Insufficient.
Displays Expired.
The License Capacity continues to display every day reduction in TB-Days till 02/08/2011 (60th day).
The remaining fields listed in the above table remain the same.
• On 12/12/2010, the License Capacity shows 50TB, –10TB-Days
• On 12/13/2010, the License Capacity shows 50TB, –20TB-Days
• On 02/08/2011, the License Capacity shows 50TB, –590TB-Days
NOTE:
If 90TB-Days are completely used in the second half of 12/11/2010, P9000 Application Performance
Extender enters 60 days grace period on the same day but updates the License screen - List of existing
licenses section only after 1:00 PM on 12/12/2010. In this case, the License Capacity shows 50TB,
–10TB-Days on 12/12/2010.
For information on calculating the appropriate TB-Days to end the grace period and also read
additional scenarios, see “Exceeding Meter based Term licensed capacity and grace
period” on page 42.
A Meter based Term license least count is 1TB-Days. By default, fractions of a TB of usable capacity
is considered as 1TB and fractions of a day is considered as one day.
Example scenario 3
Consider the following scenario:
1. A P9500 disk array has a usable capacity of 50TB.
2. A Permanent license is installed on 11/20/2010 to monitor the 50TB usable capacity.
3. Another 100TB usable capacity is added on 11/30/2010 and must be monitored for 10 days.
HP StorageWorks P9000 Application Performance Extender Software User Guide 37
Page 38

4. As the usable capacity is beyond the Permanent licensed capacity, P9000 Application Performance
Extender enters 60 days grace period on 11/30/2010.
5. 1000TB-Days Meter based Term license are installed on 12/02/2010.
The following fields in the License screen – List of existing licenses section display:
• License Capacity: 50TB, +1000TB-Days
• License Status: Installed
• Term (Days): N/A
• End Date: Never
After 1:00 PM, the above fields are updated to display:
• License Capacity: 50TB, +1000TB-Days
• License Status: Installed
• Term (Days): 10
• End Date: 12/11/2010
6. If 90.5TB is monitored on the same day, P9000 Application Performance Extender considers
91TB-Days and again updates the following fields to reflect the latest data, which is as follows:
• License Capacity: 50TB, +909TB-Days
• License Status: Installed
• Term (Days): 9
• End Date: 12/10/2010
Nine days count from 12/02/2010
If 85.5TB is used during the first half of 12/03/2010 and no additional TB-Days are used for
the rest of the day, P9000 Application Performance Extender uses 86TB-Days and considers the
0.5 days as one day. In addition, the following fields are updated after 1:00 PM to reflect the
latest data, which is as follows:
• License Capacity: 50TB, +823TB-Days
• License Status: Installed
• Term (Days): 8
• End Date: 12/09/2010
Eight days count from 12/02/2010
If 100.5TB is used during the second half of 12/04/2010, P9000 uses 101TB-Days and considers
the 0.5 days as one day. In addition, the following fields are updated after 1:00 PM on
12/05/2010 to reflect the latest data, which is as follows:
• License Capacity: 50TB, +722TB-Days
• License Status: Installed
• Term (Days): 7
• End Date: 12/08/2010
Seven days count from 12/02/2010
So, 722TB-Days remain which you can use for a duration of seven days.
A Meter based Term license is not bound to a specific start and end date. The TB-Days of Meter based
Term license are used according to the quantity of usable capacity that is monitored and only the
duration (number of days) matter. So, you have the flexibility to use the Meter based Term license at
a stretch for X number of days or for a long duration based on your requirement.
Example scenario 4
Consider the following scenario:
Licensing P9500 disk arrays38
Page 39

1. A P9500 disk array has a usable capacity of 50TB.
2. A Permanent license is installed on 11/15/2010 to monitor the 50TB usable capacity.
3. 5TB-Days are installed on 11/27/2010, because you plan to use another 1TB usable capacity
every day later for five days.
4. If the usable capacity rises beyond the 50TB Permanent licensed capacity on 11/30/2010 and
the additional usable capacity equivalent to 1TB-Days is used every day, P9000 uses the 5TBDays completely by 12/04/2010.
If the additional usable capacity equivalent to more than 1TB-Days is consumed a day, the 5TBDays of Meter based Term license is accordingly used. Consider that the usable capacity equivalent to 3TB-Days is monitored on 11/30/2010, followed by 2TB-Days on 12/01/2010. As
a result, the 5TB-Days ends by 12/01/2010.
Example scenario 5
Consider the following scenario:
1. A P9500 disk array has a usable capacity of 25TB.
2. A Permanent license is installed on 11/28/2010 to monitor the 25TB usable capacity.
3. 12TB-Days are installed on the same day, because you plan to use another 1TB usable capacity
every day later for 12 days.
4. If the usable capacity rises beyond the 25TB Permanent licensed capacity on 11/30/2010 and
3.5TB is used on the same day, P9000 Application Performance Extender considers 4TB-Days.
5. If there has been no activity from 11/30/2010 till 12/28/2010, the remaining 8TB-Days are
not used.
6. If 4TB is used on 12/29/2010 followed by another 4TB on 12/30/2010, P9000 considers
4TB-Days on each day, and the 8TB-Days are completely used by 12/30/2010.
So, the TB-Days are used only when the additional usable capacity must be monitored.
Generating licenses at the HPAC license key website
You can generate a permanent license for P9000 Application Performance Extender at the HPAC
license key website. Ensure that you have the registration number for P9000 Application Performance
Extender, which is required for generating a license.
IMPORTANT:
• P9000 Application Performance Extender entitlement certificate is generic. The registration number
included in the entitlement certificate can be used to generate a permanent license for any P9500
disk array serial number. After the registration number is used for a P9500 disk array serial
number, it cannot be further associated with another P9500 disk array serial number.
• You can generate permanent licenses for the unmonitored P9500 disk arrays and install them on
P9000 Application Performance Extender. However, the license details for those unmonitored
arrays appear in the List of existing licences section of the License screen, only after you collect
their configuration data.
To generate a permanent license:
1. Access the HPAC license key website, http://webkey.external.hp.com from your web browser.
The Hewlett-Packard Authorization Center license key web page appears.
2. Click Generate a License Key in the Main Menu section
The Generate License Key screen appears.
HP StorageWorks P9000 Application Performance Extender Software User Guide 39
Page 40

3. Enter the registration number in the Registration Number or Product Authorization Key box. Ensure
that the registration number is same as that mentioned in the product entitlement certificate.
4. Click Next >>.
The Array information input screen appears. The following details are displayed:
• Registration number
• P9000 Application Performance Extender base license
• Additional LTU that you purchased
• Usable capacity that the LTU supports
5. Provide the following details on the Array information input screen:
• Enter the Array DKC serial number, which is a five digit number, such as 10900, 53036.
• Select the Hardware platform from the list.
The supported P9000 disk array models, such as the P9500 are displayed for selection.
6. Click Next >>.
The Requestor Information screen appears.
7. Provide the requestor and the company related information, and click Next >>.
The Requestor Information screen appears again with all the details that you provided.
8. Click Next >> to confirm the details.
The Certificate screen appears and provides the license details. You can do the following on the
Certificate screen:
• Click Save to print a copy of the certificate.
• Click Keyfile to save the license file as a .dat file on your system.
• Click Email to send a copy of the license certificate and the key file through email to the inten-
ded recipient.
Installing licenses
NOTE:
Before installing any license, ensure that you enter the notification details in the License Settings screen.
To install a license:
1. Select License from the Navigation pane.
The License screen is displayed.
2. Click Browse.
3. Navigate to the folder where the license file (.dat) is stored.
4. Select the license that you want to add and click Open.
5. Click Add License.
The details of the added license (hardware platform, serial number, array capacity, license capacity, status, and end date) will be displayed in the List of existing licenses table.
Click Refresh to view the latest data on the License screen.
Licensing P9500 disk arrays40
Page 41

Viewing license details
To view the details of a license:
1. Select License from the Navigation pane.
The License screen is displayed.
2. Select a P9500 disk array from the List of existing licenses table.
3. Click View Details.
The details of the selected array is displayed in the View License Details windowas shown in
Figure 4.
Figure 4 License details window
.
Exceeding Permanent licensed capacity and grace period
When the usable capacity of a P9500 disk array exceeds the Permanent licensed capacity, P9000
Application Performance Extender switches to the grace period of 60 days for that particular disk
array.
The License Status for such P9500 disk arrays displays Capacity Insufficient in the View License Details
section.
To continue monitoring the usable capacity, you can generate a Permanent license or appropriate
TB-Days of Meter based Term license based on your requirement.
Example scenario 7
Consider the following points:
1. A P9500 disk array has a usable capacity of 50TB.
2. A Permanent license is installed on 11/20/2010 to monitor the 50TB usable capacity.
3. Due to a surge in storage requests, another 25TB usable capacity is added on 11/30/2010 for
a duration of five days.
4. As the additional usable capacity is greater than the Permanent licensed capacity, P9000 Ap-
plication Performance Extender enters 60 days grace period.
Because this is a short term unplanned surge in storage requests, you can install TB-Days of Meter
based Term license to monitor the additional usable capacity for the specified duration. To monitor
25TB for five days (at the rate of 25TB a day), generate and install 125TB-Days on 11/30/2010.
As 125TB-Days are sufficient for five days, P9000 Application Performance Extender ends the grace
period and updates the following fields in the License screen – List of existing licenses section:
• After installation on 11/30/2010:
• License Capacity: 50TB, +125TB-Days
HP StorageWorks P9000 Application Performance Extender Software User Guide 41
Page 42

• License Status: Installed
• Term (Days): N/A
• End Date: Never
• After 1:00 PM on 11/30/2010:
• License Capacity: 50TB, +100TB-Days
Consider that 25TB-Days are used after installation.
• License Status: Installed
• Term (Days): 4
• End Date: 12/04/2010
If the remaining 100TB-Days are completely used in the first half of 12/04/2010 and any of the
following is not done:
• The usable capacity is reduced to within the Permanent licensed capacity limit
• Extra TB-Days installed to monitor the 25TB usable capacity
• Another Permanent license installed to monitor the 25TB usable capacity
As a result, P9000 Application Performance Extender again enters 60 days grace period after 1:00
PM on the same day and 0TB-Days are available. In addition, it begins reducing (negative count) the
installed TB-Days by 25TB and updates the following fields in the License screen daily.
After 1:00 PM on 12/04/2010:
• License Capacity: 50TB, 0TB-Days
• License Status: Capacity Insufficient
• Term (Days): 0
• End Date: Expired
If 100TB-Days are completely used in the second half of 12/04/2010, P9000 Application Performance
Extender enters 60 days grace period on the same day but updates the License screen - List of existing
licenses section only after 1:00 PM on 12/05/2010. In this case, the License Capacity shows 50TB,
–25TB-Days on 12/05/2010.
Exceeding Meter based Term licensed capacity and grace period
When the existing TB-Days are not sufficient to monitor the additional usable capacity, P9000
Application Performance Extender considers it as a capacity violation and enters a grace period of
60 days. During the grace period, P9000 Application Performance Extender begins reducing the
installed TB-Days. Within 60 days, if a Permanent license is installed, P9000 Application Performance
Extender stops reducing the TB-Days and ends the grace period for that particular P9500 disk array.
If appropriate TB-Days are installed, P9000 Application Performance Extender uses part of the units
to nullify the negative count and the rest of the units to end the grace period.
The every day reduction in TB-Days is equal to the additional usable capacity because of which the
grace period has started.
Licensing P9500 disk arrays42
Page 43

NOTE:
Reduction or negative counting is only applicable for the installed TB-Days. It is not applicable for
Permanent licenses.
After 60 days grace period, P9000 Application Performance Extender stops controlling the P9500
disk array.
Example scenario 8
Consider the following points:
1. A P9500 disk array has a usable capacity of 50TB.
2. A Permanent license is installed on 11/23/2010 to monitor the 50TB usable capacity.
3. Due to a surge in storage requests around 11/30/2010, another 10TB usable capacity is added
for a duration of five days.
4. Because this is a short term unplanned request, it is addressed by installing 50TB-Days of Meter
based Term license on 11/30/2010.
5. After the installed TB-Days are consumed by 12/04/2010 and extra TB-Days are not added to
monitor the 10TB usable capacity, P9000 Application Performance Extender does the following:
a. Enters the grace period after 1:00 PM on 12/04/2010 and 0TB-Days are available. The
following fields are updated with the latest TB-Days data:
• License Capacity: Displays 50TB, 0TB-Days
• License Status: Capacity Insufficient
• Term (Days): 0
• End Date: Expired
b. Begins reducing the installed TB-Days by 10TB every day starting from 12/05/2010:
• On 12/05/2010, 0TB-Days are reduced to –10TB-Days
• On 12/06/2010, –10TB-Days are reduced to –20TB-Days
• On 12/06/2010, –20TB-Days are reduced to –30TB-Days
• On 12/07/2010, –30TB-Days are reduced to –40TB-Days
• On 12/08/2010, –40TB-Days are reduced to –50TB-Days
• On 12/09/2010, –50TB-Days are reduced to –60TB-Days
6. The reduction in TB-Days continues till you install the appropriate TB-Days, so that P9000 Applic-
ation Performance Extender does the following:
• Shows positive TB-Days
• Ends the grace period for that particular P9500 disk array
7. So, if you want to install TB-Days on 12/09/2010 for a duration of five days, generate 110TB-
Days of Meter based Term license. Out of the 110TB-Days:
• 60TB-Days (6 days * 10TB) are used to nullify the reduction in installed TB-Days.
• 50TB-Days (5 days * 10TB) is required for P9000 Application Performance Extender to con-
tinue monitoring the 10TB usable capacity for another five days.
With 110TB-Days, P9000 Application Performance Extender ends the grace period and continues
to monitor the 10TB usable capacity for another five days.
When fractions of a TB of additional usable capacity is monitored and the installed TB-Days are not
sufficient, P9000 Application Performance Extender considers it as a capacity violation and enters a
HP StorageWorks P9000 Application Performance Extender Software User Guide 43
Page 44

grace period of 60 days. In such a case, if you install the appropriate TB-Days, P9000 Application
Performance Extender ends the grace period for that particular P9500 disk array.
Example scenario 8
Consider the following points:
1. A P9500 disk array has a usable capacity of 75TB.
2. A Permanent license is installed on 11/24/2010 to monitor the 75TB usable capacity.
3. Due to a surge in storage requests around 11/30/2010, another 20TB usable capacity is added
for a duration of five days.
4. Because this is a short term unplanned request, it is addressed by installing 100TB-Days of Meter
based Term license on 11/30/2010.
5. As the usable capacity is beyond the Permanent licensed capacity, P9000 Application Performance
Extender uses the 100TB-Days of Meter based Term license.
Based on the usable capacity consumed, P9000 Application Performance Extender uses the
appropriate TB-Days of Meter based Term license. Following are sample consumptions from day
1 to day 3:
• 11/30/2010: 51.5TB monitored using 52TB-Days
• 12/01/2010: 20.3TB monitored using 21TB-Days
• 12/02/2010: 24.9TB monitored using 25TB-Days
6. As 4TB usable capacity is remaining and only 2TB-Days are available, P9000 Application Per-
formance Extender does the following:
a. Enters 60 days grace period after 1:00 PM on 12/02/2010 and updates the following
fields with the latest TB-Days data:
• License Capacity: Displays 75TB, +2TB-Days
• License Status: Capacity Insufficient
• Term (Days): 0
• End Date: Expired
b. Begins reducing the installed TB-Days by 20TB every day starting from 12/03/2010, which
is shown as follows:
• On 12/03/2010, 2TB-Days are reduced to –18TB-Days
• On 12/04/2010, –18TB-Days are reduced to –38TB-Days
• On 12/05/2010, –38TB-Days are reduced to –58TB-Days
7. The reduction in TB-Days continues till you install the appropriate TB-Days of Meter based Term
license, so that P9000 Application Performance Extender does the following:
• Shows positive TB-Days
• Ends the grace period for the particular P9500 disk array
8. So, if you want to install TB-Days on 12/05/2010 for a duration of five days, generate 160TB-
Days of Meter based Term license. Out of the 160TB-Days:
• 60TB-Days (3 days * 20TB) are used to nullify the reduction in installed TB-Days.
• 100TB-Days (5 days * 20TB) is required for P9000 Application Performance Extender to
continue monitoring the 20TB usable capacity for another five days.
With 160TB-Days, P9000 Application Performance Extender ends the grace period and continues
to monitor the 20TB usable capacity for another five days.
Licensing P9500 disk arrays44
Page 45

Violating licensed capacity
After 60 days of grace period, P9000 Application Performance Extender considers it as a capacity
violation and stops controlling the P9500 disk array. However, it continues to monitor the workload
performance and MP blade utilization.
During a capacity violation phase, if you do one of the following:
• Install a Permanent license or appropriate TB-Days of Meter based Term license for P9000 Applic-
ation Performance Extender to control the P9500 disk array.
• Reduce the usable capacity of the P9500 disk array to match the Permanent licensed capacity.
P9000 Application Performance Extender verifies the usable capacity of the P9500 disk array. If
it is less or equal to the licensed capacity, the existing capacity violation is removed.
Removing licenses
NOTE:
You can only remove a permanent license.
To remove a license:
1. Select License from the Navigation pane.
The License screen is displayed.
2. Select a P9500 disk array from the List of existing licenses table.
3. Click Remove.
The Delete License window is displayed as shown in Figure 5.
Figure 5 Delete license window
.
4. Select Permanent from the License Type list.
5. Click Remove License.
The license associated with the selected P9500 disk array is removed.
HP StorageWorks P9000 Application Performance Extender Software User Guide 45
Page 46

Licensing P9500 disk arrays46
Page 47

4 P9000 Application Performance Extender user interface layout
NOTE:
• The minimum supported screen resolution is 1024X768 pixels. However, HP recommends that
you set the screen resolution of your monitor to 1280X960 pixels or higher to reduce scroll bars.
• The time references except for the messages on the message pane of the user interface pertain to
the management station time. Status messages refer to the local time zone of the machine on which
the browser runs.
• The settings.ini file located at <management station installation path>\conf
can be modified to change the default management station settings. The settings that can be
modified are explained in the respective sections.
The Login screen (see Figure 6) is displayed when you launch P9000 Application Performance
Extender.
Figure 6 Login Screen
.
Enter the username and password and click Login. By default, the username and password are set
to administrator. You have an option to change your password by accessing the Security screen under
Other Settings tab. The screen to change the password is shown in Figure 7.
HP StorageWorks P9000 Application Performance Extender Software User Guide 47
Page 48

Figure 7 Change password screen
.
Enter the new password in the respective text boxes and click Save.
After successful login, the Home screen (see Figure 8) is displayed.
Figure 8 Home screen
.
The P9000 Application Performance Extender user interface consists of the following panes:
• Navigation pane
• Content pane
P9000 Application Performance Extender user interface layout48
Page 49

• Message pane
• Title pane
Figure 9 P9000 Application Performance Extender user interface
.
1. Navigation pane — Helps you navigate to the high level tasks that you can perform using P9000 Application
Performance Extender.
2. Content pane — Displays information about the task you select in the navigation pane and presents actions
you can perform.
3. Message pane — Displays the error messages and the status of the actions performed.
4. Title pane — Displays the product name and logo. It also displays Help. Click Help to launch the P9000
Application Performance Extender online help.
Common tasks
This section describes the common tasks that you can perform across the P9000 Application
Performance Extender user interface.
To navigate from one window to the other, click the <<Prev or Next>> button.
HP StorageWorks P9000 Application Performance Extender Software User Guide 49
Page 50

P9000 Application Performance Extender user interface layout50
Page 51

5 Using P9000 Application Performance Extender
Using P9000 Application Performance Extender involves the following tasks:
1. Identifying applications and hosts.
• For application level performance differentiation across applications on an HP UX 11.31
server:
• Identify the critical applications running on the host that you want to assign SLOs to
• Assign applications on your hosts to different Process Resource Manager (PRM) groups.
For more information on assigning applications to PRM groups, see Appendix
B on page 103.
• For host level performance differentiation across hosts running applications on Windows or
Linux servers:
• Identify the hosts (running the critical applications) that you want to assign SLOs to
• For ESX host/Guest level performance differentiation on ESX Servers:
• Identify the hosts that you want to assign SLOs to
• Configure NPIV for identified Guest VM
2. Launching the P9000 Application Performance Extender software.
3. Discovering hosts (with Fibre Channel HBAs and connected storage arrays) from the management
station.
4. Collecting host configuration data.
5. Setting the command device(s) for the controller.
6. Creating a profile and defining target Service Level Objectives (SLOs) for the workloads identified.
7. Assigning the profile to an array.
8. Adding workloads.
9. Enabling the controller.
10. Viewing and monitoring workload performance.
11. Modifying the defined SLOs to achieve the desired bandwidth or latency, if required.
Using P9000 Application Performance Extender to balance MP blade utilization involves the following
tasks:
1. Discovering hosts (with Fibre Channel HBAs and connected storage arrays) from the management
station.
2. Collecting host configuration data.
3. Setting the command device(s) for the controller.
4. Enabling the load balancing option.
5. Viewing and monitoring utilization graphs.
HP StorageWorks P9000 Application Performance Extender Software User Guide 51
Page 52

Discovering hosts and collecting configuration data
P9000 Application Performance Extender interacts with the XP or P9500 disk arrays through hosts
which have operating system specific communication agents installed. After the communication agents
are installed, the details of the corresponding hosts appear in the List Of Discovered Hosts table.
During host discovery, all the hosts registered with the management station are identified. After the
hosts are discovered, configuration data is collected.
For more information on collecting configuration data, see “Collecting configuration data” on page 54.
Data Collection screen
The Data Collection screen is displayed when you select Data Collection under Configuration in the
Navigation pane.
Figure 10 Data Collection screen
.
Availability
Using P9000 Application Performance Extender52
DescriptionItem
Displays the IP address of the host.Host IP Address
Displays the name of the host.Host Name
Displays the operating system installed on the host.Operating System
Online — Indicates that the host is online.
Offline — Indicates that the host is offline.
Auth Failed — Indicates that the user credentials given while adding ESX
Server does not match with the current ESX Server credentials.
Page 53

DescriptionItem
APEX Supported
Data Collection Status
Refresh Host List
Adding ESX server
To add an ESX server:
1. Click Add ESX Server. Thefollowing screen is displayed.
Yes — Indicates that the host is supported.
No — Indicates that the host is not supported.
Displays the status as New, Done, or Fail.
Done — Indicates that configuration data has been successfully collected.
New — Indicates that configuration data has not been collected.
Fail — Indicates that the configuration collection failed.
Displays only the hosts that are online.Hide Offline Hosts
Enables the selection of all the discovered hosts.Select All Hosts
Refreshes the host list and displays all the hosts connected to the management
station.
Collects configuration data for the selected hosts.Collect Configuration Data
2. Enter the ESX host details and click Submit.
3. The ESX server is added and visible in the data collection screen.
HP StorageWorks P9000 Application Performance Extender Software User Guide 53
Page 54

NOTE:
• Guest level I/O prioritization using APEX for VMware ESX/ESXi servers can be achieved by
configuring NPIV for virtual machines with RDM disk.
• On ESX Servers, the default remote CIM Client connection will be disabled. To enable it,
perform the following steps :
a. vi /etc/sfcb/sfcb.cfg
b. Look for httpLocalOnly: true and change this to httpLocalOnly: false
c. Execute service sfcbd-watchdog restart or/etc/init.d/sfcbd-
watchdog restart
• If connection is lost while adding the ESX server, an error message
displayed in the message pane of the data collection screen.
Updating ESX Password
To update the ESX password:
1. Click Update ESX/ESXi Password. The Update ESX Password screen is displayed.
Adding server Failed
is
2. Enter the ESX host details and click Update.
Collecting configuration data
To discover hosts and collect configuration data:
1. Select Data Collection from the Navigation pane.
The Data Collection screen is displayed (see Figure 10). The details (host IP, host name, operating
system, availability, and status) of the discovered hosts is displayed in the List of Discovered Hosts
table, as shown in Figure 11.
Using P9000 Application Performance Extender54
Page 55

Figure 11 Discovered hosts table
.
2. Click Refresh Host List to view the latest set of discovered hosts.
3. Select a host to collect configuration data.
You can also select multiple hosts. Select Select All Hosts to collect configuration data for all the
discovered hosts, or Select Hide Offline Hosts to view and collect configuration data only for the
online hosts.
4. Click Collect Configuration Data to collect configuration data for the selected hosts.
The array (XP and P9500) details are displayed under Array-Host Connectivity in the Navigation
pane, as shown in Figure 12.
Figure 12 Array host connectivity details
.
5. Click Next.
The Controller Settings screen is displayed.
Alternatively, you can select Controller Settings from the Navigation pane. For more information
on specifying controller settings, see “Specifying controller and command device set-
tings” on page 55.
Specifying controller and command device settings
This section describes the procedure to assign controllers to arrays.
Controller Settings screen
The Controller Settings screen is displayed when you select Controller Settings under Configuration
in the Navigation pane.
HP StorageWorks P9000 Application Performance Extender Software User Guide 55
Page 56

Figure 13 Controller Settings screen
.
DescriptionItem
Controller(s) And Managed Array(s)
Information
Attach Controller
In Use
Displays the controller connected to the selected XP or P9500 disk array.
Displays the IP address of the host running the controller.APEX Controller(s)
Displays the controllers. Available — Indicates that a controller is
available with the host.
Displays the command devices associated to the selected array.Command Device Settings
Displays the IP address of the host running the controller.APEX Controller
Displays the port number of the command device.Port Name
Displays the command devices associated to the selected array.Command Devices
Switches the controller between the controlling and monitoring mode.Controller Active
Sets the selected command devices for the controller.Use Command Devices
Enables the selection of an array.Select Array
Yes — Indicates that a command device is selected.
No — Indicates that a command device is not in use.
Using P9000 Application Performance Extender56
Page 57

Specifying controller settings
To specify controller settings:
1. Select Controller Settings from the Navigation pane.
The Controller Settings screen is displayed (see Figure 13).
2. Under Controller(s) And Managed Array(s) Information, select an array from the Select Array list.
3. Select the Controller Active check box to activate the controller.
NOTE:
If the Controller Active check box is selected, the controller will try to achieve the desired SLO
targets as specified in the assigned SLO profile. If the Controller Active check box is not selected,
the controller will continue to be in the monitoring state.
The controllers that have access to the selected XP or P9500 disk array is displayed in the Controller(s) And Managed Array(s) Information table, as shown in Figure 14.
Figure 14 Array information
.
4. Select a controller that is available from the Controller(s) And Managed Array(s) Information
table.
NOTE:
If the host running the controller encounters a shutdown, follow the steps in the troubleshooting chapter
to failover to another controller.
Specifying command device settings
To specify command device settings:
1. On the Controller Settings screen, under Command Device Settings, select an array from the Select
Array list.
The controller connected to the array is displayed in the APEX Controller list, as shown in Figure
15.
Figure 15 APEX controller list
.
The command devices associated with the selected array, which is visible to the controller is also
displayed in the Command Device Settings table, as shown in Figure 16.
HP StorageWorks P9000 Application Performance Extender Software User Guide 57
Page 58

Figure 16 Command devices information
.
2. Select a command device from the Command Device Settings table to configure the command
device of the host running the controller.
3. Click Use Command Devices.
NOTE:
The controller communicates with the XP and P9500 disk arrays through the command device
names stored in the controller. HP recommends that you add more than one command device
to enable the controller to use an alternative command device, if required.
After you set command devices for a P9500 disk array, the MP blades associated with the selected
P9500 disk array gets displayed on the DLOM Settings screen and the MP blade utilization data
is plotted on the MPB graphs screen.
For more information on specifying DLOM settings, see “Specifying DLOM settings” on page 59.
For more information on MP blade utilization, see “MPB graphs screen” on page 73.
4. The Command Device Authentication window may be displayed depending on whether authen-
tication is enabled for any one of the selected command devices.
Figure 17 Command Device Authentication
.
Enter the username and password and click Submit.
Using P9000 Application Performance Extender58
Page 59

NOTE:
• The username and password must be the same as specified in Remote Web Console (RWC).
More more information, see Appendix A
• If the password is incorrectly entered, the command device authentication screen continues
to appear until the correct password is entered or Cancel is clicked.
5. Click Next.
The DLOM Settings screen is displayed.
Alternatively, you can select DLOM Settings from the Navigation pane.
For more information on specifying DLOM settings, see “Specifying DLOM settings” on page 59.
Specifying DLOM settings
P9000 Application Performance Extender provides an option to balance the MP blade utilization of
P9500 disk arrays. The Dynamic LDEV Ownership Management (DLOM) feature enables load
balancing of P9500 disk arrays by dynamically changing LDEV ownership and balancing I/O
workloads across multiple MP blades. The I/Os pertaining to an LDEV are processed by the MP blade
associated with it. P9000 Application Performance Extender will collect, monitor, and maintain the
overall MP blade utilization data. When the load balancing option is enabled, and if there is a
considerable difference in the MP blade utilizations, the LDEVs from the busier MP blades are moved
to less busy MP blades. For more information on enabling DLOM, see Enabling DLOM settings.
DLOM Settings screen
The DLOM Settings screen is displayed when you select DLOM Settings under Configuration in the
Navigation pane.
HP StorageWorks P9000 Application Performance Extender Software User Guide 59
Page 60

Figure 18 DLOM settings screen
.
DescriptionItem
Enables you to select a P9500 disk array.Select a P9500 array
Place holder for assigning MP blades to achieve load balancing.Non QoS MPBs
Place holder for assigning MP blades to achieve I/O prioritization and load balancing.QoS MPBs
Enables you to balance MP blade utilization. MP blade utilization can be balanced
only if the following conditions are met:
• At least one MP blade must be above the set threshold
• At least one MP blade must be below the threshold band.
Load balancer
For example, if MP blade 1 is at 90% and MP blade 2 is at 65%, if you enable load
balancing, LDEVs from MP blade 1 are moved to MP blade 2.
If you want to load balance MP blade utilization, select the Non QoS MPBs Load
balancer check box. If you want to balance MP blade utilization and also prioritize
the performance of critical applications, select the QoS MPBs Load balancer check
box.
Enables you to commit the changes.
Submit
NOTE:
* indicates change in settings, and that the change is not committed.
Enables you to cancel any action performed on the DLOM settings screen.Cancel
Using P9000 Application Performance Extender60
Page 61

Enabling DLOM settings
There are three different modes to enable DLOM:
• DLOM only mode (Non QoS MPBs) — In this mode, P9000 Application Performance Extender
operates as a load balancer, where MP blade utilization for I/O processing is balanced by
changing LDEV ownership across multiple MP blades. This reduces load on overloaded MP blades.
• QoS-DLOM mode (QoS MPBs) — In this mode, you prioritize the performance of critical applications
and achieve the defined SLO targets, while P9000 Application Performance Extender operates
as a load balancer to reduce load on overloaded MP blades.
• Partial-QoS-DLOM mode — In this mode, P9000 Application Performance Extender operates as
a load balancer, while you can prioritize the performance of applications only on a selected set
of MP blades.
NOTE:
In Partial mode, ensure that the applications where I/O prioritization is required are running on
LDEVs owned by the MP blades present in the QoS MPB compartment. For more information on
changing LDEV ownership, see Appendix E
If there are no MP blades present in the Non QoS MPBs compartment, the mode is QoS-DLOM. If
there are no MP blades in the QoS MPBs compartment, the mode is DLOM only.
You can move MP blades from the Non QoS MPBs compartment to the QoS MPBs compartment and
vice versa. For the change to be effective, ensure that you click Submit.
Load balancing only
The amount of I/Os that are generated by applications are dynamic. This will lead to an imbalance
in MP blade utilization.
If you add or remove applications generating I/Os frequently, there is a need to balance MP blade
utilization.
NOTE:
You can use the load balancing feature of P9000 Application Performance Extender even if the
applications generating I/Os are hosted on platforms or operating systems where P9000 Application
Performance Extender I/O prioritization is not supported.
1. Select the array.
2. Ensure that all the MP blades are in the Non QoS MPBs compartment.
3. Click Submit.
4. Select the Non QoS MPBs Load balancer check box.
I/O prioritization only
If you do not want to change your pre-configured LDEV-MPB mapping, but want I/O prioritization,
do the following:
1. Select the array.
2. Ensure that all the MP blades are in the QoS MPBs compartment.
HP StorageWorks P9000 Application Performance Extender Software User Guide 61
Page 62

3. Click Submit.
4. Create a profile and define target Service Level Objectives (SLOs) for the workloads identified
5. Assign the profile to an array.
6. Add workloads.
7. Enable the controller.
8. View and monitor workload performance.
9. Modify the defined SLOs to achieve the desired bandwidth or latency, if required.
I/O prioritization with load balancing
If you want to balance MP blade utilization across all MP blades and also need I/O prioritization,
do the following:
1. Select the array.
2. Ensure that all the MP blades are in the QoS MPBs compartment.
3. Click Submit.
4. Select the QoS MPBs Load balancer check box.
5. Create a profile and define target Service Level Objectives (SLOs) for the workloads identified
6. Assign the profile to an array.
7. Add workloads.
8. Enable the controller.
9. View and monitor workload performance.
10. Modify the defined SLOs to achieve the desired bandwidth or latency, if required.
I/O prioritization with load balancing on selected MP blade sets
If you want to load balance all the MP blades, but you want I/O prioritization only on a few selected
MP blades, do the following:
1. Select the array.
2. Select MP blades for which you want I/O prioritization and move it to the QoS MPBs compartment.
3. Click Submit.
4. Select the Non Qos MPBs Load balancer check box.
5. Select the Qos MPBs Load balancer check box.
6. Create a profile and define target Service Level Objectives (SLOs) for the workloads identified
7. Assign the profile to an array.
8. Add workloads.
9. Enable the controller.
10. View and monitor workload performance.
11. Modify the defined SLOs to achieve the desired bandwidth or latency, if required.
I/O prioritization with load balancing on reserved set of MP blades
If you want to balance MP blade utilization, want I/O prioritization only on certain MP blades, and
you do not want to change the pre configured LDEV mapping on the other MP blades, do the following:
1. Select the array.
2. Select MP blades for which you want I/O prioritization and move it to the QoS MPB compartment.
3. Click Submit.
4. Select the QoS MPB Load balancer check box.
Using P9000 Application Performance Extender62
Page 63

5. Create a profile and define target Service Level Objectives (SLOs) for the workloads identified
6. Assign the profile to an array.
7. Add workloads.
8. Enable the controller.
9. View and monitor workload performance.
10. Modify the defined SLOs to achieve the desired bandwidth or latency, if required.
NOTE:
The Submit button is enabled only if the following conditions are met:
• If more than one MP blade is present in the Non QoS MPBs compartment.
• If MP blades have been moved from the Non QoS MPBs compartment to the QoS MPBs compart-
ment or vice versa.
In Partial modes, if the Load Balancer options of both the compartments (Non QoS MPBs and QoS
MPBs) are selected, load balancing happens amongst the MP blades present in the same compartment
only.
If you are only using the load balancing feature, select MPB graphs from the Navigation pane to view
MP blades utilization graphs.
To continue with I/O prioritization, click Next on the DLOM Settings screen.
The SLO Settings screen is displayed.
Alternatively, you can select SLO Settings from the Navigation pane. For more information on setting
SLOs, see “Managing Service Level Objectives” on page 63.
Managing Service Level Objectives
P9000 Application Performance Extender enables you to define service level objectives (SLOs) for XP
and P9500 disk arrays. A defined SLO profile includes 16 SLO targets based on bandwidth or latency.
This section describes the procedure to create SLO profiles, assign profiles to an array, and schedule
profiles.
SLO Settings screen
The SLO Settings screen is displayed when you select SLO Settings under Configuration in the
Navigation pane.
HP StorageWorks P9000 Application Performance Extender Software User Guide 63
Page 64

Figure 19 SLO Settings screen (SLO Profile Management)
.
DescriptionItem
Enables you to create, update, and remove SLO profiles.SLO Profile Management
Enables you to create, update, and remove SLO profile schedules.SLO Profile Scheduling
Enables you to select a profile.Select Profile
Enables you to specify a name to create a new profile.Enter New Profile Name
Displays the SLO profile details.SLO Profile Definition
Displays the workload numbers (0 to 15).Workload
Displays the type as minimum bandwidth or latency.Type
Value
Unit
Enables you to enter the bandwidth or latency value in kilobytes per
second or milliseconds respectively for the workload.
Displays the bandwidth value in kilo bytes per second and the latency
in milliseconds.
Enables you to save the changes and update a profile.Save Changes
Enables you to create a new profile.Save As New Profile
Removes a selected profile.Delete Profile
Enables you to select an array.Select Array
Assigns the profile as the current profile of the selected array.Apply Profile To Array
Displays the details of the arrays and their assigned profiles.XP Array And SLO Profile(s) Summary
Using P9000 Application Performance Extender64
Page 65

DescriptionItem
Displays the array serial number.Array Sl.No.
Default SLO Profile
Displays the default SLO profile of the selected array. A default profile
is the profile that is manually assigned to the array.
Displays the current SLO profile of the selected array.Current SLO Profile
Figure 20 SLO Settings screen (SLO Profile Scheduling)
.
DescriptionItem
Displays all the details of the existing SLO schedules in the system.Schedule Summary
Displays the name of the schedule.Schedule Name
Displays the array serial number.Array Sl. No.
Displays the profile associated to the array.SLO Profile
Displays the recurrence pattern.Recurs Every
Displays the start time of the schedule.From Time
Displays the end time of the schedule.To Time
Displays the start date for the range of recurrence.Effective From
Displays the end date for the range of recurrence.Stops By
Enables you to create a schedule.Create Schedule
Enables you to update an existing schedule.Update Schedule
HP StorageWorks P9000 Application Performance Extender Software User Guide 65
Page 66

Creating SLO profiles
To create SLO profiles:
1. Select SLO Settings from the Navigation pane.
The SLO Settings screen is displayed (see Figure 19).
2. Click the SLO Profile Management tab.
3. Select a profile from the profile list.
The workload details of the selected profile is displayed in the SLO Profile Definition table, as
shown in Figure 21.
DescriptionItem
Removes an existing schedule.Delete Schedule
Figure 21 SLO profile definition table
.
NOTE:
The value -1 is the Don’tCare SLO value. The default value of the Don’tCare SLO is 100
milliseconds latency. This can be configured by changing the value of the DontCareValue in
the settings.ini file located at < ms installation path>\conf folder.
4. Modify the type or value of a workload.
5. Enter a name in the Enter New Profile Name field.
6. Click Save As New Profile.
A new profile is created with the modified values.
Updating SLO profiles
To update SLO profiles:
1. Select a profile from the profile list.
2. Modify the workload values as required.
3. Click Save Changes.
The selected profile is updated with the new values.
You can also save the updated profile as a new profile. For more information, see “Creating
SLO profiles” on page 66.
Using P9000 Application Performance Extender66
Page 67

Assigning SLO profiles to arrays
To assign profiles to arrays:
1. Select a profile from the profile list.
2. Select an array from the Array list.
3. Click Apply Profile To Array.
This will assign the profile as the default and the current profile of the selected array. A profile
will become the current profile when SLO scheduling is enabled and the associated profile is
activated.
The details of the arrays and their assigned profiles are displayed in the P9000 Array And SLO
Profile(s) Summary table, as shown in Figure 22.
Figure 22 P9000 Array and SLO Profile(s) Summary table
.
Removing SLO profiles
NOTE:
An active or scheduled profile cannot be removed.
To remove SLO profiles:
1. Select a profile from the profile list.
2. Click Delete Profile.
The selected profile is removed from the system.
Scheduling SLO profiles
This section describes the procedure to create, update, and remove SLO schedules.
Creating a schedule
NOTE:
Ensure that all the workload numbers are associated with the required workloads (PRM groups or
hosts).
To create a schedule:
1. On the SLO Settings screen, click the SLO Profile Scheduling tab.
The details of the existing SLO schedules in the system are displayed in the Schedule Summary
table, as shown in Figure 23.
HP StorageWorks P9000 Application Performance Extender Software User Guide 67
Page 68

Figure 23 Schedule Summary table
.
2. Click Create Schedule to create a new schedule.
The SLO Schedule Update window is displayed, as shown in Figure 24.
Figure 24 Schedule update window
.
3. Select a profile from the SLO profile list.
4. Enter a schedule name.
5. Select an array from the array list.
6. Under SLO Effective Time, select the start time and end time to run the schedule.
7. Under Recurrence Pattern, select an appropriate option.
8. Under Range of Recurrence, select a date in the Effective From and Stop By fields. You can also
select the No End Date option.
9. Under Notifications, enter a valid email id to receive notifications.
10. Click Submit.
A schedule is created. The details of the created schedule will appear in the Schedule Summary
table.
11. Click Close to exit from the SLO Schedule Update Window.
NOTE:
After the created SLO schedule expires, the default profile is activated.
Using P9000 Application Performance Extender68
Page 69

Updating schedules
To update SLO schedules:
1. Select a schedule from the Schedule Summary table.
2. Click Update Schedule.
The SLO Schedule Update Window is displayed.
3. Modify the schedule settings as required.
4. Click Submit.
The selected schedule is updated. The updated details will appear in the Schedule Summary
table.
Removing schedules
To remove SLO schedules:
1. Select a schedule from the Schedule Summary table.
2. Click Delete Schedule.
The selected schedule is removed.
NOTE:
If a scheduled profile is active, before manually assigning a new profile to the same array, ensure
that you remove the active schedule.
Managing workloads
P9000 Application Performance Extender enables you to add workloads and assign priorities based
on the defined SLO profiles assigned to XP or P9500 disk arrays. A workload is a combination of
I/Os from a host (Windows or Linux) and I/Os from a PRM group in a host (HP-UX).
P9000 Application Performance Extender supports application level performance differentiation across
applications on HP-UX hosts, and host level performance differentiation across hosts running
applications on Windows and Linux hosts.
In HP-UX, using PRM, you can create PRM groups and assign IDs (PRM IDs) to uniquely identify a
PRM group. P9000 Application Performance Extender workloads map to PRM groups.
This section describes the procedure to create, update, and remove workloads.
Workload settings screen
The Workload settings screen is displayed when you select Workload Settings under Configuration
in the Navigation pane.
HP StorageWorks P9000 Application Performance Extender Software User Guide 69
Page 70

Figure 25 Workload settings screen
.
DescriptionItem
Displays the workload details.Workload Summary
Displays the IP address of the host.Host IP Address
PRM Group/Guest IP
ESX/VM-IP
Filter By
Select PRM Group
Displays the PRM group/ESX Host/VMs the workload belongs to.
PRM Groups are applicable only to HP UX.
Displays the ESX/VMs associated with the selected ESX server. This
is applicable only for VMWare hosts.
Displays the SLO value.SLO Value
Displays the SLO type as bandwidth or latency.SLO Type
Displays the workload numberWorkload Number
Enables you to filter workloads based on:
• Host
• Array
Enables you to create and update workloads.Create/Update Workloads
Enables you to select the IP address of the host.Select Host IP Address
Enables you to select a PRM group. This is applicable only for HP-UX
hosts.
Displays the array serial number.Array
Using P9000 Application Performance Extender70
Page 71

Creating workloads
To create workloads:
1. Select Workload Settings from the Navigation pane.
The Workload Settings screen is displayed (see Figure 25). The Workload Summary table displays
the workload details, as shown in Figure 26.
Figure 26 Workload Summary table
.
2. Under Create/Update Workload, do the following:
a. Select a host from the Host IP Address list.
b. Select a PRM group from the PRM Group list.
DescriptionItem
Enables you to select a workload number ranging from 1–15.Workload Number
Enables you to create a workload.Create Workload
Enables you to update a workload.Update Workload
Removes a workload.Remove Workloads
NOTE:
• This is applicable only for HP-UX hosts. The Select PRM Group field is disabled for
Windows and Linux hosts.
• After a PRM group configuration change, configuration data must be collected again
for that host.
c. Select the ESX host/VM.
NOTE:
Only after configuration data collection, the VMs associated with the ESX server is displayed
in the ESX/VM-IP list.
d. Select a workload from the Workload Number list.
3. Click Create Workload.
The details of the created workload will be displayed in the Workload Summary table.
NOTE:
All applications running on hosts that are not managed by P9000 Application Performance Extender,
or applications that are not specifically mapped to a workload gets mapped to workload zero.
HP StorageWorks P9000 Application Performance Extender Software User Guide 71
Page 72

Updating workloads
To update workloads:
1. Select a workload from the Workload Summary table.
The details of the selected workload will be displayed under Create/Update Workload, as shown
in Figure 27.
Figure 27 Create/update workload table
.
2. Modify the workload details.
3. Click Update Workload.
The updated details will appear in the Workload Summary table.
Removing workloads
To remove workloads:
1. Select a workload from the Workload Summary table.
2. Click Remove Workloads.
The selected workload is removed.
Filtering workload records
You can filter workloads based on the host IP address, array, or both. To filter workloads, do one of
the following:
• Select the Host check box and then select a host IP address to filter workloads by the host IP address.
• Select the Array check box and then select an array serial number to filter workloads by the array
serial number.
• Select the Host and the Array check box and then select a host IP address and an array serial
number to filter workloads based on both the host and the array.
Using P9000 Application Performance Extender72
Page 73

Specifying workload settings in a cluster environment
P9000 Application Performance Extender is not cluster aware, but it can work with both Active-Active
and Active-Standby clusters.
Active-Active (multinode) application in a cluster configuration
You must map all the hosts (Windows and Linux) and PRM groups (HP-UX) corresponding to the
multinode application to the same workload number. This will enable the controller to prioritize the
application depending on the SLO specified for that workload number.
Active-standby (failover) application in a cluster configuration
You must map the active and the standby hosts (Windows, Linux) and PRM groups (HP-UX) to the
same workload number. This will enable the controller to prioritize the application based on the
specified SLO, irrespective of the node that is hosting the application.
NOTE:
The communication agent must be configured on all the cluster nodes and they must point to the same
management station.
Viewing utilization graphs
You can view and generate MP blade utilization graphs for both the DLOM only mode and the
QoS-DLOM mode.
MPB graphs screen
The MPB graphs screen is displayed when you select MPB graphs in the Navigation pane, as shown
in Figure 28.
HP StorageWorks P9000 Application Performance Extender Software User Guide 73
Page 74

Figure 28 MPB graphs screen
.
DescriptionItem
Enables you to select a P9500 array.Array
Enables you to select a start date.From Date
Enables you to select a start time.From Time (HH:MM)
Enables you to select an end date.To Date
Enables you to select an end time.To Time (HH:MM)
Displays live graphs.Live
Displays historic graphs.View History
Enables you to select MP blades.Select MPBs
Viewing and generating MPB graphs
You can view the following MP blade utilization graphs:
• Live graphs
• Historic graphs
To generate graphs:
1. Select MPB graphs from the Navigation pane.
The MPB graphs window is displayed.
2. To generate historic graphs:
a. Select an array from the Array list.
b. Specify the date and time.
c. Select MP blades.
Using P9000 Application Performance Extender74
Page 75

You can select multiple MP blades.
d. Click View History.
Historic graphs for the specified period are displayed.
3. To generate live graphs:
a. Select an array from the Array list.
b. Select MP blades
c. Select the Live check box.
Live utilization graphs of the selected MP blades are displayed.
Monitoring workload performance
This chapter describes how to use P9000 Application Performance Extender to generate and view
performance graphs for the added workloads in your SAN environment.
Workload graphs screen
The workload graphs screen is displayed when you select Workload Graphs in the Navigation pane,
as shown in Figure 29.
Figure 29 Workload graphs screen
.
1. Resource selection area
2. Graph area
3. SLO target line
4. Preview graph area
HP StorageWorks P9000 Application Performance Extender Software User Guide 75
Page 76

DescriptionItem
Enables you to select an array.Array
Enables you to select a start date.From Date
Enables you to select a start time.From Time (HH:MM)
Enables you to select an end date.To Date
Enables you to select an end time.To Time (HH:MM)
Displays live graphs.Live
Displays historic graphs.View History
Enables you to select workloads.Select Workloads
Switches the controller the monitoring or controlling mode.Controller Active
Select this option to generate graphs based on bandwidth.Minimum Bandwidth
Select this option to generate graphs based on latency.Latency
Viewing and generating workload graphs
You can view the following graphs:
• Live graphs
• Historic graphs
To generate graphs:
1. Select Graphs from the Navigation pane.
The Graphs window is displayed.
2. To generate historic graphs:
a. Select an array from the Array list.
b. Specify the date and time.
c. Select workloads.
You can select multiple workloads. Select All to select all the work loads.
d. Click View History.
Historic graphs for the specified period are displayed in the Graph area. You can select a
region on the generated graph and zoom in on data points.
3. To generate live graphs:
a. Select an array from the Array list.
b. Select workloads.
You can select multiple workloads. Select All to select all the work loads. When All is selected,
the following message is displayed:
This operation takes some time to complete since it displays charts
for all the 16 workloads. When multiple charts are selected for
display, refresh is on a per chart basis and hence a complete refresh for all charts will consume additional time.
Using P9000 Application Performance Extender76
Page 77

c. Select the Controller Active check box.
d. Select the Live check box.
Live performance graphs of the selected workloads for an array are displayed in the Graph
area. To view performance graphs for a different array, select an array from the Array list.
NOTE:
• In the generated graph, a target line indicating the desired SLO value is displayed based
on the SLO types.
• HP recommends that you view only four live graphs at a time. Viewing more than four
live graphs can slow down the refresh rate of the graphs and the response to user operations.
If you double-click the generated graphs for any workload number (except for workload zero), the
corresponding hosts/PRM groups mapped to that workload number are displayed.
If you want to view only a portion of the graph, use the preview graph area (see Figure 30. Adjust
the slider to view specific areas of the graph.
Figure 30 Preview graph
.
Specifying performance data collection interval
The Other Settings screen enables you to set the interval time in seconds for performance data
collection.
Figure 31 shows the performance collection settings screen.
Figure 31 Performance Collection Settings
.
HP StorageWorks P9000 Application Performance Extender Software User Guide 77
Page 78

To specify performance data collection interval:
1. Select Other Settings > Performance Collection Settings from the Navigation pane.
The Performance Collection Settings screen is displayed.
2. Enter the performance data collection interval in seconds. The minimum performance data collec-
tion interval is five seconds.
3. Click Submit.
The default performance data collection interval is15 seconds.
Specifying array alias
This feature enables you to assign an alias to an array so that wherever an array is referred, the alias
name is also displayed along with the array serial number. Figure 32 shows the Personalize Array
screen.
Figure 32 Personalize Array
.
Creating and viewing reports
P9000 Application Performance Extender enables you to generate and schedule workload specific
reports for a defined period of time.
This chapter describes the procedure to create, view, and schedule reports.
Generate Report screen
The Generate Report screen is displayed when you select Generate Report under Reports in the
Navigation pane, as shown in Figure 33.
Using P9000 Application Performance Extender78
Page 79

Figure 33 Generate report screen
.
Archive Report
DescriptionItem
Enter a report name.Report Name
Select an array.Array Name
Enter your name.Customer Name
Select the type of report you want to generate.Report Type
Select the start date and time.Start Date
Select the end date and time.End Date
Select this option to save your report. The generated report is
saved at the following location:
<management station installation path>\Reports
Enter your email ID.Notify Errors To
Select Workload(s) For The Report
Select Below To Include Min. bandwidth
Chart (s) In Report
Select Below To Include Latency Chart (s)
In the Report
HP StorageWorks P9000 Application Performance Extender Software User Guide 79
Select a workload. You can also select multiple workloads, or all
workloads.
Select workloads from this list to include minimum bandwidth
charts in your report.
Select workloads from this list to include latency charts in your
report.
Creates a report based on the details entered.Generate Report
Page 80

Generating reports
To generate reports:
1. Select Generate Report from the Navigation pane.
The Generate Report screen is displayed (see Figure 33).
2. Select or enter the following details:
• Report Name
• Array Name
• Customer Name
• Report Type
• Start Date
• End Date
• Archive Report
• Notify Errors To
• Select Below To Include Min. bandwidth Chart(s) In Report
• Select Below To Include Latency Chart(s) In the Report
3. Select a workload. You can also select multiple workloads or all workloads.
4. To include workload bandwidth charts in your report, select workloads from the minimum band-
width workload list.
5. To include workload latency charts in your report, select workloads from the latency workload
list.
6. Click Generate Report.
The generated report is displayed.
If the report is not generated, an error notification mail stating the cause for failure is sent to the
email ID specified in the Generate Report screen.
Schedule Report screen
The Schedule Report screen is displayed when you select Schedule Reports under Reports in the
Navigation pane.
Using P9000 Application Performance Extender80
Page 81

Figure 34 Schedule Report screen
.
Creating report schedules
DescriptionItem
Displays the array serial number.Array
Displays the name of the schedule.Schedule Name
Displays the time when the schedule will trigger.Triggers At
Displays the start date of the schedule.Effective Date
Displays the end date of the schedule.Stops By
Displays the recurrence pattern of the schedule.Recurs Every
Enables you to create a schedule.Create Schedule
Enables you to update a schedule.Update Schedule
Enables you to remove a schedule.Delete Schedule
To create report schedules:
1. Select Reports > Schedule Reports from the Navigation pane.
The Schedule Report screen is displayed (see Figure 34 on page 81).
2. Click Create Schedule.
The Report schedule update window is displayed.
HP StorageWorks P9000 Application Performance Extender Software User Guide 81
Page 82

Figure 35 Report schedule update window
.
3. Under Report Settings, specify the following details:
a. Schedule Name: Enter a name for the schedule.
b. Array Name: Select an array from the array list.
c. Customer Name: Enter your name.
d. Report Type: By default, the report type is set to PDF. Reports can be generated only in the
PDF format.
e. Email Report To: Enter your email ID.
NOTE:
• SMTP with authentication is not supported.
• Ensure that you specify the SMTP server address, port number, and the sender's email
ID in the settings.ini file.
f. Create Report For Last: Enter the duration (in hours) for which you want to view the perform-
ance report.
g. Archive Report: Select the archive report check box to save your report.
4. Select a workload. You can also select multiple workloads or all workloads.
5. To include workload bandwidth charts in your report, select workloads from the minimum band-
width workload list.
6. To include workload latency charts in your report, select workloads from the latency workload
list.
7. Under Schedule Settings: specify the following details:
a. Trigger At: Select a suitable time to schedule reports.
Using P9000 Application Performance Extender82
Page 83

b. Recurrence Pattern: Select one of the options. The recurrence pattern can be hourly, daily,
weekly, or monthly.
c. Range Of Recurrence: Select the recurrence start and end date. You can also select the No
End Date option.
8. Click Submit to create a report schedule.
9. Click Close to exit the Report Schedule Update window.
A report schedule is created.
Updating report schedules
To update report schedules:
1. Select a schedule from the Schedule Summary table.
2. Click Update Schedule.
The Report schedule update window is displayed.
3. Modify the report and schedule settings as required. For more information, see “Creating report
schedules” on page 81.
The updated schedule details will be displayed in the Schedule Summary table.
Removing report schedules
To remove report schedules:
1. Select a schedule from the Schedule Summary table.
2. Click Delete Schedule.
The selected schedule is removed from the system.
Configuring alarms
P9000 Application Performance Extender enables you to activate alarms on resources and send out
timely notifications.
Alarms can be generated if there is a change in the availability status of the P9000 Application
Performance Extender components; or in the case of SLO violations.
Alarms screen
The Alarms screen is displayed when you select Alarms in the Navigation pane.
HP StorageWorks P9000 Application Performance Extender Software User Guide 83
Page 84

Figure 36 Alarms screen (Alarm Configuration)
.
DescriptionItem
Enables you to create, update, and remove alarms.Alarm Configuration
Alarm History
Source
Event
Severity
Displays the details of the alarm conditions met for the existing alarms in
the system.
Displays the source of the alarm. The source can be one of the following:
• APEX system
• Communication agent
• APEX controller
• Management station
Displays the IP address of the alarm source.Source Address
Displays the event of the alarm. Events can be of the following types:
• SLO violation
• Availability
Displays the state of the event.State
Displays the deviation amount in percentage.Deviation
Displays the severity level of the alarm. The severity levels are:
• INFORMATIONAL
• WARNING
• ERROR
• CRITICAL
Displays the notification type as EMAIL.Notification
Using P9000 Application Performance Extender84
Page 85

Creating alarms
To create alarms:
1. Select Alarms from the Navigation pane.
The Alarms screen is displayed (see Figure 36.
2. Click the Alarm Configuration tab.
3. Click Create Alarm.
The Alarm window is displayed, as shown in Figure 37.
DescriptionItem
Displays the email ID to which notifications are dispatched.Destination Address
Displays the alarm status as Active or Dormant.Active
Enables you to filter alarms.Disable Filter
Enables you to create an alarm.Create Alarm
Enables you to update an alarm.Update Alarm
Enables you to remove an alarm.Delete Alarm
Figure 37 Create Alarm window
.
4. Select the source of the alarm from the Alarm Source list.
5. Select the source IP address from the Source Address list.
The Source Address field is enabled only if the Source IP Address is applicable to the selected
Source.
6. Select an event from the Event list.
7. Select the event state from the Event State list.
8. Enter a Deviation amount in percentage.
HP StorageWorks P9000 Application Performance Extender Software User Guide 85
Page 86

The Deviation amount field is enabled only if it is applicable to the selected source.
9. Select a severity level from the Severity list.
10. Select a notification type from the Notification Type list.
11. Enter a valid email ID in the Destination field.
NOTE:
Ensure that you specify the SMTP server address, port number, and the sender's email ID in the
settings.ini file.
12. Select the enabled check box.
13. Click Submit.
14. Click Close to exit from the Alarm window.
Updating alarms
To update alarms:
1. Select Alarms from the Navigation pane.
The Alarms window is displayed.
2. Click the Alarm Configuration tab.
3. Select an alarm from the Alarm table.
4. Click Update Alarm.
The Alarm window is displayed.
5. Modify the alarm settings as required.
6. Click Submit.
Removing alarms
To remove alarms:
1. Select an alarm from the Alarms table.
2. Click Delete Alarm.
The selected alarm is removed.
Viewing alarms history
To view the alarm history, select Alarms from the navigation pane and then click the Alarms History
tab. The Alarm History screen (see Figure 38) maintains a record of the alarms that have been
generated.
Only the latest 1000 alarm records are displayed.
Using P9000 Application Performance Extender86
Page 87

Figure 38 Alarm History screen
.
Filtering alarm records
You can filter the alarm details based on the following:
• Source
• Event
• Notification
• Severity
• Status
NOTE:
Filtering can be toggled on or off by selecting or clearing the Disable Filter check box.
To filter alarms:
1. On the Alarm window, do one of the following:
a. Select a source from the Source list to filter alarms based on the source of the alarm.
b. Select an event from the Event list to filter alarms based on the event type.
c. Select a notification type from the Notification list to filter alarms based on the notification
type.
d. Select a severity level from the Severity list to filter alarms based on the severity level.
e. Select a status from the Active list to filter alarms based on the alarm status.
2. Clear the Disable filter check box.
The filtered data is displayed in the Alarms table.
HP StorageWorks P9000 Application Performance Extender Software User Guide 87
Page 88

Using P9000 Application Performance Extender88
Page 89

6 Launching P9000 Application Performance Extender from P9000 Performance Advisor
HP StorageWorks P9000 Performance Advisor Software collects, monitors, and displays the
performance of your HP StorageWorks XP/P9500 Disk Arrays. P9000 Performance Advisor collects
performance data for individual resources such as LDEV, CHIP/CHA, ACP/DKA, and DKC.
P9000 Application Performance Extender can be launched from P9000 Performance Advisor. To
launch P9000 Application Performance Extender from P9000 Performance Advisor, enter the IP
address or DNS name of the management station in the AppIntegrations.properties file,
where P9000 Application Performance Extender is installed.
APPL_SERVER = <IP address> or <DNS name> of the XP Application Performance
Extender management station
The AppIntegrations.properties file is located in the <Installation_drive>:hpss/pa/
properties folder on the management station where P9000 Performance Advisoris installed.
IMPORTANT:
• Ensure that the AppIntegrations.properties file name is not modified, as P9000 Perform-
ance Advisor refers to this file for the P9000 Application Performance Extender management
station address every time it launches P9000 Application Performance Extender.
• By default, the P9000 Application Performance Extender tomcat service uses port 8080 for its
communication with P9000 Performance Advisor. If you want to use a different port number, ensure
that you use a port number that is supported by P9000 Application Performance Extender.
• Do not modify the default values specified for the other parameters in the AppIntegra-
tions.properties file.
To launch P9000 Application Performance Extender from P9000 Performance Advisor:
1. Click HP P9000 APEX in the left pane on the Dashboard screen.
2. On the HP StorageWorks P9000 Performance Advisor Software screen, click Launch HP Storage-
Works P9000 Application Performance Extender Software.
The P9000 Application Performance Extender home page is displayed in a separate IE browser
window, as shown in Figure 39.
HP StorageWorks P9000 Application Performance Extender Software User Guide 89
Page 90

Figure 39 HP StorageWorks P9000 Application Performance Extender Software screen
.
The text displayed on the HP StorageWorks P9000 Application Performance Extender Software
screen is taken from the AppIntegrations.properties file. So, ensure that the text is not
changed in the AppIntegrations.properties file.
IMPORTANT:
• Only one session of P9000 Application Performance Extender can be active at a time.
• If you close the current session of P9000 Application Performance Extender, wait for at least 15
seconds before you launch another session.
• If you are not able to launch P9000 Application Performance Extender from P9000 Performance
Advisor, verify the following:
• If the P9000 Application Performance Extender management station is active and if the management station's IP address or DNS name specified in the AppIntegrations.properties
file is correct.
• If the port number specified for P9000 Application Performance Extender in the AppInteg-
rations. properties file is supported by P9000 Application Performance Extender
(default port number: 8080).
If P9000 Application Performance Extender cannot be launched even after you have verified the
above-mentioned, contact your HP representative for support.
Launching P9000 Application Performance Extender from P9000 Performance Advisor90
Page 91

7 Troubleshooting P9000 Application Performance Extender
This section describes how to troubleshoot problems that can occur while using P9000 Application
Performance Extender. It also includes tasks that you can perform for specific scenarios.
Table 4 Troubleshooting information
Recommended actionsProblem/Scenario
Ensure the following:
• Refresh the host list by clicking Refresh Host List on the Data Collection
screen
• The management station is accessible from the host
• The communication agent is running on all the hosts
For HP-UX and Linux hosts, use the following command to verify the
status:
/sbin/init.d/apex_ca status
Some or all hosts are not discovered during the host discovery
phase.
For a Windows host, verify if the HP StorageWorks APEX Communication Agent service is running.
• The communication agent is associated to the correct management
station
• For HP-UX and Linux hosts, the comagent.conf file located at /opt/
Hewlett-Packard/apex/com_agent/conf and for Windows,
the comagent.ini file located at C:\Program Files\HewlettPackard \apex\com_agent\conf includes the correct entry:
• IP address of the management station (in the first line)
• If the communication agent and management station ports are blocked
by firewall settings, unblock the ports.
Unable to start the communication
agent.
The management station fails to
discover the controller.
HP StorageWorks P9000 Application Performance Extender Software User Guide 91
Ensure that all the installation prerequisites are met.
For information on software and hardware requirements, see HP Storage-
Works P9000 Application Performance Extender Release Notes.
Ensure the following:
• The controller is running
For HP-UX and Linux hosts, use the following command to verify the
status:
/sbin/init.d/apex_controller status
For a Windows host, verify if the HP StorageWorks APEX Controller
Software service is running.
• The hosts running the controller are reachable from the management
station
• There are no firewalls or network settings blocking access to port
22569
Page 92

PRM data is not available during
data collection for HP-UX hosts.
Command devices are not displayed during data collection.
Recommended actionsProblem/Scenario
Check if the PRM groups are configured and the PRM service is enabled
on the host. You can verify if the PRM groups are configured by using the
following command:
/usr/bin/prmconfig
Ensure the following:
• The host running the controller has access to at least one command
device
• The host is accessing the array through a supported HBA
P9000 Application Performance
Extender does not display live
graphs for HP-UX workloads.
Unable to view the performance
report.
Opening multiple sessions of the
user interface fails with the following error:
Another session is active
on the <IP address>.
Please try after 15
seconds by refreshing the
current page.
The management station user interface fails to launch.
Ensure that the application processes are assigned to the correct PRM
group by using the following command:
/usr/bin/ps –efP |grep <process name>
The P9000 Application Performance Extender report is generated and
displayed as a PDF file. If you are not able to view the generated report,
ensure that:
• Your web browser is not blocking pop-up windows
• You have a PDF reader
The P9000 Application Performance Extender user interface does not
support multiple sessions.
Stop the active session, wait for 15 seconds for the session to expire, and
then open a new session.
By default, the management station uses port 8080. If port 8080 is in
use, the management station fails to launch.
As a workaround, do the following:
1. Navigate to the <installation path\Tomcat\conf>
2. Locate and open the server.xml file.
3. Find the first occurrence of port 8080, and modify the values with
the following:
<Connector port="8080" protocol="HTTP/1.1" connectionTimeout="20000" redirectPort="8443" />
The HP StorageWorks APEX Web
Server service fails to start.
Assigning profiles to an array
fails.
Troubleshooting P9000 Application Performance Extender92
4. Save the server.xml file.
5. Restart the HP StorageWorks APEX Web Server.
Do the following:
1. Start the services manually.
2. If the services does not start, remove the management station and
install it again.
OR
Install the management station on another system.
Verify if the controller service is running and try reassigning the profile.
Page 93

Email notifications are not dispatched.
Hosts are listed as offline.
Recommended actionsProblem/Scenario
Do the following:
• Set the SMTP server details and the sender's email ID in the set-
tings.ini file
• Verify the email ID provided to receive email notifications.
• Verify if the communication agent is running on all the hosts.
• Refresh host list to view all the hosts connected to the management
station.
Filtered data is not displayed in
the Alarms screen.
The value in the APEX Supported
column shows “No” for a host.
Unable to reinstall the management station.
Ensure that you clear the Disable filter check box on the Alarms screen.
Verify the HBA details in the following communication agent log files
against the details in the support matrix:
• HP-UX and Linux — opt/Hewlett-Packard/apex/com_agent/
tmp/adapterInfo
• Windows — <Install Path>\Hewlett-Packard\apex\
com_agent\log\adapterInfo.txt
For additional details of the problem, including error messages, see the
following communication agent log files:
• HP-UX and Linux — /opt/Hewlett-Packard/apex/com_agent/
log/apexcommagentlog.log
• Windows — <Install Path>\Hewlett-Packard\apex\
com_agent\log\commagentLog.txt
VMWare ESX Hosts – Verify that the proper QLogic driver and providers
are installed.
• To check installed driver version run cat /proc/scsi/qla2xxx/
<Entry no> | grep version command on ESX base OS.
• To check the installed provider version run esxupdate query --
vib-view | grep qlogic command.
Remove the management station installation folder. If you are still unable
to reinstall, reboot the system and try installing the management station.
Live graphs are not displayed.
If PostgreSQL is already installed
on your system, installation will
quit with the following message:
Detected that same
version of PostgreSQL is
already installed in the
system. Installation will
quit now. Please refer to
troubleshooting steps in
User Guide.
HP StorageWorks P9000 Application Performance Extender Software User Guide 93
Do the following:
• Verify if the controller service is running.
• If command devices are not accessible by the controller that is function-
ing , you must follow the controller restart procedure after restoring its
availability.
Remove the existing version of PostgreSQL from your system and try
reinstalling P9000 Application Performance Extender.
OR
Install P9000 Application Performance Extender on another system.
Page 94

Adding/updating workloads fails
on Linux hosts.
Recommended actionsProblem/Scenario
On Linux hosts, ensure that the driver corresponding to the QLogic HBAs
is listed as the first uncommented entry in the /etc/hba.conf file.
• For example, on 32 bit Linux hosts, if the /etc/hba.conf file includes
the following entries:
lpfc /usr/lib/libemsdm.so
qla2xxx /usr/lib/libqlsdm.so
Change it to the following:
qla2xxx /usr/lib/libqlsdm.so
lpfc /usr/lib/libemsdm.so
• On 64 bit Linux hosts, if the /etc/hba.conf file includes the follow-
ing entries:
lpfc /usr/lib/libemsdm.so
lpfc /usr/lib64/libemsdm.so
qla2xxx /usr/lib/libqlsdm.so
qla2xxx64 /usr/lib64/libqlsdm.so
Change it to the following:
qla2xxx64 /usr/lib64/libqlsdm.so
lpfc /usr/lib/libemsdm.so
lpfc /usr/lib64/libemsdm.so
qla2xxx /usr/lib/libqlsdm.so
The management station installation fails and rolls back on reinstallation.
Scenario: Removing RMLIB along
with the controller
Scenario: Planned reboot of the
host where the controller is installed.
Scenario: Changing HBAs on
Windows and Linux hosts.
Ensure that the <MS install folder>\DB folder is removed.
Ensure that you stop other applications such as P9000 , which are using
RMLIB.
After a controller reboot, do the following:
1. On the Controller Settings screen, select the array that was controlled
by the controller that rebooted.
2. Remove the controller associated with the array.
3. Select a controller that is available from the Controller(s) And Managed
Array(s) Information table.
4. On the Controller Settings screen, under Command Device Settings,
select an array from the Select Array list.
5. Select a command device from the Command Device Settings table
to configure the command device of the host running the controller.
6. Set Command devices.
7. Specify DLOM settings.
8. Select the profile that was applied to the array and click Save
Changes.
To change HBAs on Windows or Linux hosts:
1. Remove the workload settings of the host.
2. Change the HBAs with a supported HBA and collect configuration
data for the host.
3. Reconfigure the workload settings.
Troubleshooting P9000 Application Performance Extender94
Page 95

Scenario: Manual controller
failover procedure
Unable to add VMWare ESX
servers and the following error is
seen in the message panel: Could
not connect to CIMOM on
ESX Server “x.x.x.x”
.
Recommended actionsProblem/Scenario
1. On the Controller Settings screen, select the array that was controlled
by the controller that rebooted.
2. Remove the controller associated with the array.
3. Select another controller for the same array that is available from the
Controller(s) And Managed Array(s) Information table.
4. On the Controller Settings screen, under Command Device Settings,
select an array from the Select Array list.
5. Select a command device from the Command Device Settings table
to configure the command device of the host running the controller.
6. Set Command devices and provide authentication information if ne-
cessary.
7. Specify DLOM settings.
8. Select the SLO Profile that was previously assigned to that array and
apply it again.
Verify that the remote CIM Client connection is enabled on ESX server.
To enable it, perform the following steps
1. vi /etc/sfcb/sfcb.cfg
2. Look for httpLocalOnly: true and change this to httpLoc-
alOnly: false
3. Execute service sfcbd-watchdog restart or/etc/init.d/
sfcbd-watchdog restart
APEX is not showing ESX guest in
Workload addition screen.
1. Ensure that the NPIV is active on the ESX server. You can verify this
by seeing the entry in the /proc/scsi/qla2xxx/# file or in the
fabric switch.
2. Run service sfcbd-watchdog restart or/etc/init.d/
sfcbd-watchdog restart.
3. Run collect configuration data from APEX GUI for that ESX server.
HP StorageWorks P9000 Application Performance Extender Software User Guide 95
Page 96

Troubleshooting P9000 Application Performance Extender96
Page 97

8 Support and other resources
Contacting HP
For worldwide technical support information, see the HP support website:
http://www.hp.com/support
Before contacting HP, collect the following information:
• Product model names and numbers
• Technical support registration number (if applicable)
• Product serial numbers
• Error messages
• Operating system type and revision level
• Detailed questions
Subscription service
HP recommends that you register your product at the Subscriber's Choice for Business website:
http://www.hp.com/go/e-updates
After registering, you will receive e-mail notification of product enhancements, new driver versions,
firmware updates, and other product resources.
Related information
Documents
The following documents provide related information:
• HP StorageWorks P9000 Application Performance Extender Release Notes
• HP StorageWorks P9000 Application Performance Extender Support Matrix
You can find these documents from the Manuals page of the HP Business Support Center website:
http://www.hp.com/support/manuals
In the Storage section, click Storage Software and then select HP StorageWorks P9000 Application
Performance Extender Software under Storage Device Management Software.
Websites
For additional information, see the following HP websites:
• http://www.hp.com
• http://www.hp.com/go/storage
HP StorageWorks P9000 Application Performance Extender Software User Guide 97
Page 98

• http://www.hp.com/service_locator
• http://www.hp.com/support/manuals
• http://www.hp.com/support/downloads
• www.hp.com/go/hpuxservermatrix
• www.hp.com/go/p9000
• www.hp.com/go/p9500
• www.hp.com/go/p9000software
Typographic conventions
Table 5 Document conventions
Bold text
ElementConvention
Cross-reference links and e-mail addressesBlue text: Table 5
Website addressesBlue, underlined text: http://www.hp.com
• Keys that are pressed
• Text typed into a GUI element, such as a box
• GUI elements that are clicked or selected, such as menu
and list items, buttons, tabs, and check boxes
Text emphasisItalic text
• File and directory names
Monospace text
Monospace, italic text
Monospace, bold text
• System output
• Code
• Commands, their arguments, and argument values
• Code variables
• Command variables
Emphasized monospace text
WARNING!
Indicates that failure to follow directions could result in bodily harm or death.
CAUTION:
Indicates that failure to follow directions could result in damage to equipment or data.
IMPORTANT:
Provides clarifying information or specific instructions.
Support and other resources98
Page 99

NOTE:
Provides additional information.
TIP:
Provides helpful hints and shortcuts.
HP StorageWorks P9000 Application Performance Extender Software User Guide 99
Page 100

Support and other resources100
 Loading...