

Page 1

solution guide
hp StorageWorks
data integrity check
xp128
xp1024
This guide describes how to configure the DIC solution in Oracle
XP disk arrays.
second edition (april 2004)
part number: T1618-96002
®
database environments with
Page 2

© 2004, Hewlett-Packard Company.
Hewlett-Packard Company makes no warranty of any kind with regard to this material, including, but not limited to,
the implied warranties of merchantability and fitness for a particular purpose. Hewlett-Packard shall not be liable for
errors contained herein or for incidental or consequential damages in connection with the furnishing, performance,
or use of this material.
This document contains proprietary information, which is protected by copyright. No part of this document may be
photocopied, reproduced, or translated into another language without the prior written consent of Hewlett-Packard.
The information contained in this document is subject to change without notice.
Oracle is a registered U.S. trademark of Oracle Corporation, Redwood City, California.
All other product names mentioned herein may be trademarks of their respective companies.
Hewlett-Packard Company shall not be liable for technical or editorial errors or omissions contained herein. The
information is provided “as is” without warranty of any kind and is subject to change without notice. The warranties
for Hewlett-Packard Company products are set forth in the express limited warranty statements accompanying such
products. Nothing herein should be construed as constituting an additional warranty.
Printed in the U.S.A.
HP StorageWorks Data Integrity Check: Solution Guide
second edition (april 2004)
part number: T1618-96002
2
HP StorageWorks Data Integrity Check: Solution Guide
Page 3

contents
About this guide . . . . . . . . . . . . . . . . . . . . . . . . . . . . . . . . . . . . . . . . . . . . . . . . . . . .5
Intended audience. . . . . . . . . . . . . . . . . . . . . . . . . . . . . . . . . . . . . . . . . . . . . . . . . . . . . . . . . . . 5
Disk arrays . . . . . . . . . . . . . . . . . . . . . . . . . . . . . . . . . . . . . . . . . . . . . . . . . . . . . . . . . . . . . . . . 5
Related documentation . . . . . . . . . . . . . . . . . . . . . . . . . . . . . . . . . . . . . . . . . . . . . . . . . . . . . . . 5
Conventions . . . . . . . . . . . . . . . . . . . . . . . . . . . . . . . . . . . . . . . . . . . . . . . . . . . . . . . . . . . . . . . 6
Getting help . . . . . . . . . . . . . . . . . . . . . . . . . . . . . . . . . . . . . . . . . . . . . . . . . . . . . . . . . . . . . . . 6
HP technical support. . . . . . . . . . . . . . . . . . . . . . . . . . . . . . . . . . . . . . . . . . . . . . . . . . . . . . . . . 7
HP storage website . . . . . . . . . . . . . . . . . . . . . . . . . . . . . . . . . . . . . . . . . . . . . . . . . . . . . . . . . . 7
HP authorized reseller. . . . . . . . . . . . . . . . . . . . . . . . . . . . . . . . . . . . . . . . . . . . . . . . . . . . . . . . 7
Warranty statement. . . . . . . . . . . . . . . . . . . . . . . . . . . . . . . . . . . . . . . . . . . . . . . . . . . . . . . . . . 8
1 Data Integrity Check description . . . . . . . . . . . . . . . . . . . . . . . . . . . . . . . . . . . . . . .11
Introduction. . . . . . . . . . . . . . . . . . . . . . . . . . . . . . . . . . . . . . . . . . . . . . . . . . . . . . . . . . . . . . . 12
Architecture . . . . . . . . . . . . . . . . . . . . . . . . . . . . . . . . . . . . . . . . . . . . . . . . . . . . . . . . . . . . . . 13
Requirements for the disk array . . . . . . . . . . . . . . . . . . . . . . . . . . . . . . . . . . . . . . . . . . . . . . . 14
Requirements for the host server . . . . . . . . . . . . . . . . . . . . . . . . . . . . . . . . . . . . . . . . . . . . . . 15
Restrictions on DIC databases . . . . . . . . . . . . . . . . . . . . . . . . . . . . . . . . . . . . . . . . . . . . . . . . 16
2 Configuration requirements . . . . . . . . . . . . . . . . . . . . . . . . . . . . . . . . . . . . . . . . . . .19
Configuring DIC using RAID Manager XP. . . . . . . . . . . . . . . . . . . . . . . . . . . . . . . . . . . . . . 20
Configuring DIC on a raw disk device. . . . . . . . . . . . . . . . . . . . . . . . . . . . . . . . . . . . . . . . . . 24
Configuring DIC on LVM raw logical volumes (HP-UX only). . . . . . . . . . . . . . . . . . . . . . . 26
Configuring DIC on VxVM raw logical volumes . . . . . . . . . . . . . . . . . . . . . . . . . . . . . . . . . 28
Coexistence with HP MC/Service Guard . . . . . . . . . . . . . . . . . . . . . . . . . . . . . . . . . . . . . . . . 31
Contents
3 Troubleshooting . . . . . . . . . . . . . . . . . . . . . . . . . . . . . . . . . . . . . . . . . . . . . . . . . . .33
Reporting invalid write I/O. . . . . . . . . . . . . . . . . . . . . . . . . . . . . . . . . . . . . . . . . . . . . . . . . . . 34
SIM message information. . . . . . . . . . . . . . . . . . . . . . . . . . . . . . . . . . . . . . . . . . . . . . . . . . . . 35
HP StorageWorks Data Integrity Check: Solution Guide
3
Page 4

Contents
A RAID Manager XP commands for Data Integrity Check . . . . . . . . . . . . . . . . . . . . . . .37
raidvchkset . . . . . . . . . . . . . . . . . . . . . . . . . . . . . . . . . . . . . . . . . . . . . . . . . . . . . . . . . . . . . . . 38
raidvchkdsp. . . . . . . . . . . . . . . . . . . . . . . . . . . . . . . . . . . . . . . . . . . . . . . . . . . . . . . . . . . . . . . 42
raidvchkscan . . . . . . . . . . . . . . . . . . . . . . . . . . . . . . . . . . . . . . . . . . . . . . . . . . . . . . . . . . . . . . 46
B HP-UX utility . . . . . . . . . . . . . . . . . . . . . . . . . . . . . . . . . . . . . . . . . . . . . . . . . . . . . .51
lvmlbainfo(1) . . . . . . . . . . . . . . . . . . . . . . . . . . . . . . . . . . . . . . . . . . . . . . . . . . . . . . . . . . . . . 52
Glossary. . . . . . . . . . . . . . . . . . . . . . . . . . . . . . . . . . . . . . . . . . . . . . . . . . . . . . . . .55
Index . . . . . . . . . . . . . . . . . . . . . . . . . . . . . . . . . . . . . . . . . . . . . . . . . . . . . . . . . . .57
4
HP StorageWorks Data Integrity Check: Solution Guide
Page 5

about this
guide
This guide provides information about configuring the HP StorageWorks Data
Integrity Check (DIC) product on the HP StorageWorks XP family of disk arrays
for an Oracle database environment.
Intended audience
This guide is intended for use by system administrators who already have
expertise with the associated systems and software and knowledge of related
topics:
■ data processing concepts
■ direct-access storage device subsystems and their basic functions
■ disk arrays and RAID technology
■ operating system commands and utilities
■ Oracle database administration
Disk arrays
Unless otherwise noted, the term disk array refers to any of these disk arrays:
HP StorageWorks Disk Array XP128
HP StorageWorks Disk Array XP1024
About this guide
About this guide
Related documentation
HP provides the following related documentation:
■ HP StorageWorks RAID Manager XP: User’s Guide
■ HP StorageWorks Disk Array XP128: Owner’s Guide
■ HP StorageWorks Disk Array XP1024: Owner’s Guide
HP StorageWorks Data Integrity Check: Solution Guide
5
Page 6

About this guide
Conventions
For information about Oracle software, operating system commands, and
third-party products, refer to the manufacturer’s documentation.
This guide uses the following text conventions.
Figure 1 Blue text represents a cross-reference. For the online version
of this guide, the reference is linked to the target.
www.hp.com
Underlined, blue text represents a website on the Internet. For
the online version of this guide, the reference is linked to the
target.
literal Bold text represents literal values that you type exactly as
shown, as well as key and field names, menu items, buttons,
file names, application names, and dialog box titles.
variable
Italics indicates that you must supply a value. Italics is also
used for manual titles.
input/output Monospace font denotes user input and system responses,
such as output and messages.
Example Denotes an example of input or output. The display shown in
this guide may not match your configuration exactly.
[ ] Indicates an optional parameter.
{ } Indicates that you must specify at least one of the listed
options.
Getting help
6
| Separates alternatives in a list of options.
If you still have a question after reading this guide, contact an HP authorized
service provider or access our website:
www.hp.com
HP StorageWorks Data Integrity Check: Solution Guide
Page 7

HP technical support
In North America, call technical support at 1-800-652-6672, available 24 hours a
day, 7 days a week.
Outside North America, call technical support at the nearest location. Telephone
numbers for worldwide technical support are listed on the HP website under
support:
thenew.hp.com/country/us/eng/support.html
Be sure to have the following information available before calling:
■ technical support registration number (if applicable)
■ product serial numbers
■ product model names and numbers
■ applicable error messages
■ operating system type and revision level
■ detailed, specific questions
For continuous quality improvement, calls may be recorded or monitored.
About this guide
HP storage website
The HP website has the latest information on this product, as well as the latest
drivers. Select the appropriate product or solution from this website:
thenew.hp.com/country/us/eng/prodserv/storage.html
HP authorized reseller
For the name of your nearest HP authorized reseller, you can obtain information
by telephone:
United States 1-800-345-1518
Canada 1-800-263-5868
elsewhere See the HP website for locations and telephone numbers:
www.hp.com
HP StorageWorks Data Integrity Check: Solution Guide
7
Page 8

About this guide
Warranty statement
HP warrants that for a period of ninety calendar days from the date of purchase, as
evidenced by a copy of the invoice, the media on which the Software is furnished
(if any) will be free of defects in materials and workmanship under normal use.
DISCLAIMER
ALLOWED BY LOCAL LAW, THIS SOFTWARE IS PROVIDED TO YOU “AS
IS” WITHOUT WARRANTIES OF ANY KIND, WHETHER ORAL OR
WRITTEN, EXPRESS OR IMPLIED. HP SPECIFICALLY DISCLAIMS ANY
IMPLIED WARRANTIES OR CONDITIONS OF MERCHANTABILITY,
SATISFACTORY QUALITY, NON-INFRINGEMENT, TITLE, ACCURACY OF
INFORMATIONAL CONTENT, AND FITNESS FOR A PARTICULAR
PURPOSE. Some jurisdictions do not allow exclusions of implied warranties or
conditions, so the above exclusion may not apply to you to the extent prohibited
by such local laws. You may have other rights that vary from country to country,
state to state, or province to province.
. EXCEPT FOR THE FOREGOING AND TO THE EXTENT
WA R N I NG
! YOU EXPRESSLY ACKNOWLEDGE AND AGREE THAT
USE OF THE SOFTWARE IS AT YOUR SOLE RISK. HP DOES NOT
WARRANT THAT THE FUNCTIONS CONTAINED IN THE SOFTWARE
WILL MEET YOUR REQUIREMENTS, OR THAT THE OPERATION OF THE
SOFTWARE WILL BE UNINTERRUPTED, VIRUS-FREE OR ERROR-FREE,
OR THAT DEFECTS IN THE SOFTWARE WILL BE CORRECTED. THE
ENTIRE RISK AS TO THE RESULTS AND PERFORMANCE OF THE
SOFTWARE IS ASSUMED BY YOU. HP DOES NOT WARRANT OR MAKE
ANY REPRESENTATIONS REGARDING THE USE OR THE RESULTS OF
THE USE OF THE SOFTWARE OR RELATED DOCUMENTATION IN
TERMS OF THEIR CORRECTNESS, ACCURACY, RELIABILITY,
CURRENTNESS, OR OTHERWISE. NO ORAL OR WRITTEN
INFORMATION OR ADVICE GIVEN BY HP OR HP’S AUTHORIZED
REPRESENTATIVES SHALL CREATE A WARRANTY.
LIMITATION OF LIABILITY
. EXCEPT TO THE EXTENT PROHIBITED
BY LOCAL LAW, IN NO EVENT INCLUDING NEGLIGENCE WILL HP OR
ITS SUBSIDIARIES, AFFILIATES, DIRECTORS, OFFICERS, EMPLOYEES,
AGENTS OR SUPPLIERS BE LIABLE FOR DIRECT, INDIRECT, SPECIAL,
INCIDENTAL, CONSEQUENTIAL, PUNITIVE OR OTHER DAMAGES
(INCLUDING LOST PROFIT, LOST DATA, OR DOWNTIME COSTS),
ARISING OUT OF THE USE, INABILITY TO USE, OR THE RESULTS OF
USE OF THE SOFTWARE, WHETHER BASED IN WARRANTY,
CONTRACT, TORT OR OTHER LEGAL THEORY, AND WHETHER OR NOT
ADVISED OF THE POSSIBILITY OF SUCH DAMAGES. Your use of the
Software is entirely at your own risk. Should the Software prove defective, you
8
HP StorageWorks Data Integrity Check: Solution Guide
Page 9

About this guide
assume the entire cost of all service, repair or correction. Some jurisdictions do
not allow the exclusion or limitation of liability for incidental or consequential
damages, so the above limitation may not apply to you to the extent prohibited by
such local laws.
NOTE
. EXCEPT TO THE EXTENT ALLOWED BY LOCAL LAW, THESE
WARRANTY TERMS DO NOT EXCLUDE, RESTRICT OR MODIFY,
AND ARE IN ADDITION TO, THE MANDATORY STATUTORY RIGHTS
APPLICABLE TO THE LICENSE OF THE SOFTWARE TO YOU;
PROVIDED
, HOWEVER, THAT THE CONVENTION ON CONTRACTS FOR
THE INTERNATIONAL SALE OF GOODS IS SPECIFICALLY DISCLAIMED
AND SHALL NOT GOVERN OR APPLY TO THE SOFTWARE PROVIDED
IN CONNECTION WITH THIS WARRANTY STATEMENT.
HP StorageWorks Data Integrity Check: Solution Guide
9
Page 10

About this guide
10
HP StorageWorks Data Integrity Check: Solution Guide
Page 11

Data Integrity Check description
HP StorageWorks Data Integrity Check (DIC) for Oracle is a combination
hardware and software solution designed specifically for the XP family of disk
arrays. Specially designed array-server interfaces work in conjunction with array
firmware-based software and server host agents to provide the data integrity
protection facility.
DIC can detect and prevent potential data corruption emanating from the
following hardware and software elements or operator errors:
■ Defects in host-based software (for example, applications, volume managers,
operating systems, and I/O drivers). This represents the entire I/O software
stack.
■ Defects or failures in host-based hardware I/O paths (for example, HBAs).
■ Operator errors that would result in the accidental overwriting of an Oracle
database.
1
HP StorageWorks Data Integrity Check: Solution Guide
11
Page 12

Data Integrity Check description
Introduction
DIC is a solution that implements Oracle’s Hardware Assisted Resilient Data
(HARD) initiative. The HARD initiative is a program designed to prevent data
corruptions before they happen. Data corruptions, while rare, can have a
catastrophic effect on a database and, therefore, a business. By implementing
Oracle’s data validation algorithms within the HP StorageWorks Disk Array XP
hardware and firmware, data corruption is detected and a potentially inconsistent
write operation is rejected before it is written to permanent storage.
DIC prevents the following classes of data corruption:
■ writes of physically or logically corrupt blocks
■ erroneous writes by programs other than Oracle to Oracle data
■ partially written blocks
12
HP StorageWorks Data Integrity Check: Solution Guide
Page 13
Architecture
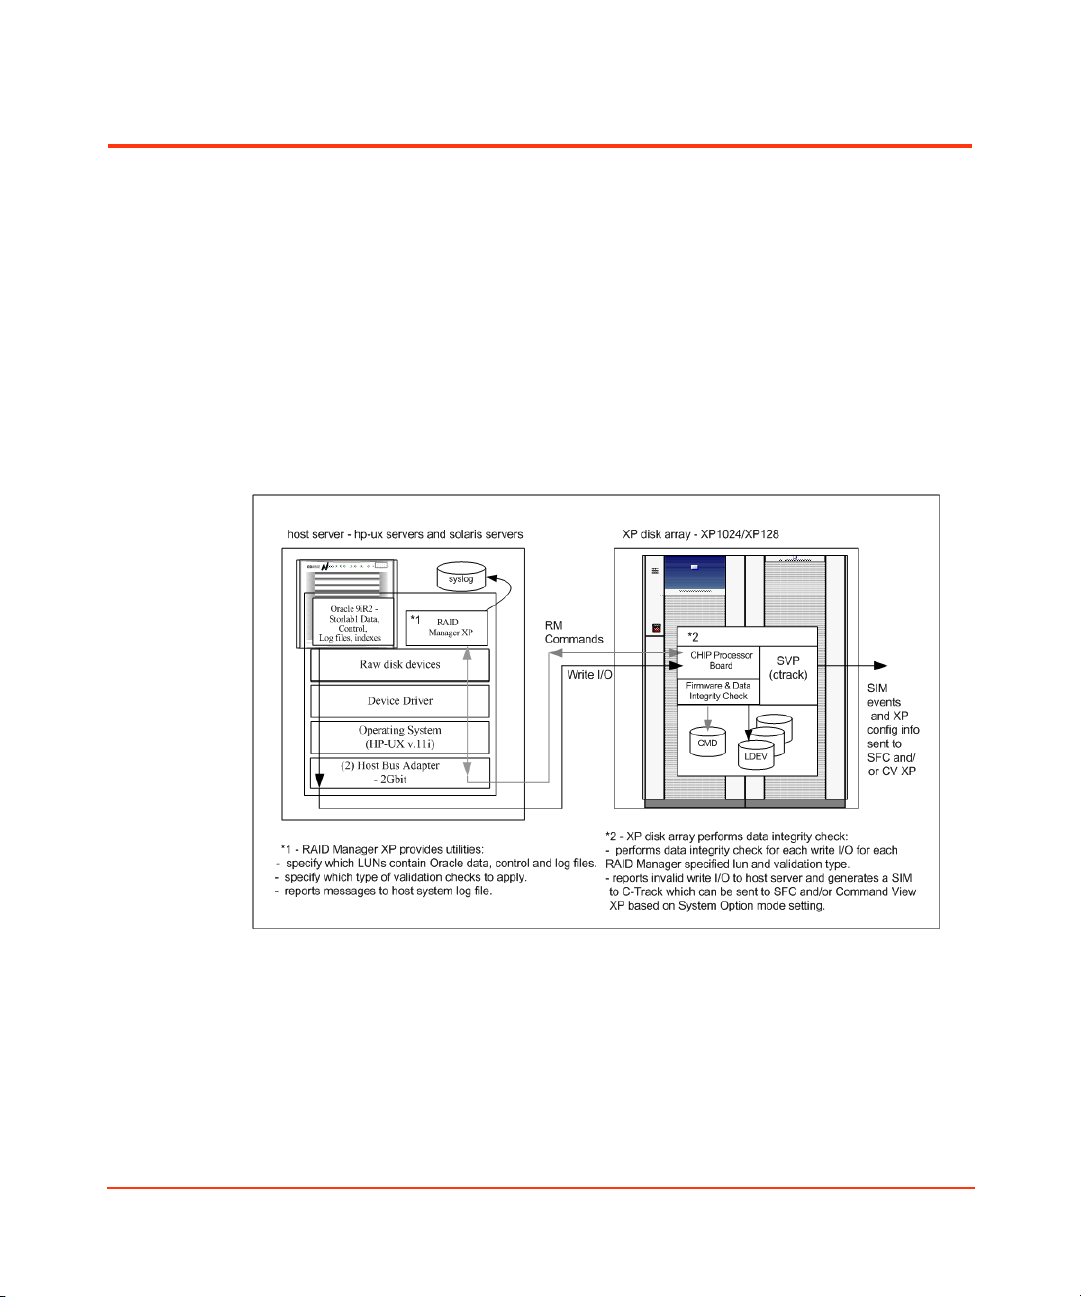
DIC consists of the following components:
■ RAID Manager XP (host server software)
■ XP CHIP (processor board that supports DIC)
■ XP firmware program product (license key)
Figure 1 shows the layers of software and hardware between the host server and
the disk array that contains the protected Oracle data. When an invalid write is
detected, the disk array reports this information to the host server and also
generates a SIM to Continuous Track XP or Command View XP, based on the
disk array system option mode setting.
Data Integrity Check description
Figure 1: DIC architecture
HP StorageWorks Data Integrity Check: Solution Guide
13
Page 14

Data Integrity Check description
Requirements for the disk array
For DIC capability, the disk array must meet these requirements:
■ XP128/XP1024 firmware 21-03-03-00/00 or later
■ HP StorageWorks RAID Manager XP version 01.10.02 or higher
■ disk array XP license key for HP StorageWorks Data Integrity Check
■ HP StorageWorks Command View XP version 1.60 or later
■ DIC-enabled CHIP (client/host interface processor) boards:
Product number Description
A7910B/BU 8 Port 1 Gbps Enhanced FC CHIP Pair
A7911B/BU 4 Port 1-2 Gbps Enhanced FC CHIP Pair
A7912B/BU 8 Port 1-2 Gbps Enhanced FC CHIP Pair
A7913B/BU 16 Port 1-2 Gbps Enhanced FC CHIP Pair
All CHIPs associated with all redundant paths to a DIC-enabled LUN must be
CHIPs that support DIC.
14
HP StorageWorks Data Integrity Check: Solution Guide
Page 15

Requirements for the host server
For DIC capability, the host server must meet these requirements:
■ Oracle products:
Oracle8i
Oracle9i, including Oracle 9i RAC (Real Application Cluster)
Oracle9i Release 2 (R2), including Oracle 9i R2 RAC
■ The Oracle initialization parameter DB_BLOCK_CHECKSUM must be set
to TRUE.
■ supported operating systems:
HP-UX 11.0 or later
Sun Solaris 8 or later
■ supported on:
raw disk on HP-UX and Solaris
LVM and SLVM raw logical volumes for HP-UX
VxVM raw logical volumes for HP-UX and Solaris
HFS and JFS file systems are not supported.
Data Integrity Check description
HP StorageWorks Data Integrity Check: Solution Guide
15
Page 16

Data Integrity Check description
Restrictions on DIC databases
For disk arrays:
■ If you uninstall the DIC program product (license key), you must remove the
integrity check on each LUN by using RAID Manager XP. If you reinstall the
program product license key, you must specify and enable the integrity check
functionality by using RAID Manager XP.
■ You cannot replace the XP CHIP processor boards that support DIC with XP
CHIP processor boards that are not supported. See “Requirements for the disk
array” (page 14).
■ Firmware (DKCMAIN) downgrade is not supported to firmware versions that
do not support DIC. See “Requirements for the disk array” (page 14).
For host servers:
■ Oracle tablespace location
Files system-based Oracle files are not supported.
All Oracle tablespace files, including LVM raw logical volumes and VxVM
raw logical volumes, must be placed on raw volumes directly.
16
If host-based striping is used on raw volumes, the stripe size must be a
multiple of the Oracle block size.
Oracle online redo log files must be on separate volumes or logical units with
respect to the Oracle data files and Oracle control files.
■ Restoring Oracle files
Before restoring Oracle data files from a backup, the data validation may need
to be temporarily turned off for those data files that were backed up prior to
the integrity check being enabled. If the database was running without the
integrity check enabled in the past, old Oracle data may continue to exist on
disk without the integrity check information in them.
■ Oracle on host-based volume managers (HP-UX LVM/SLVM and
Veritas VxVM)
The volume manager physical extent (PE) size must be a multiple of the
Oracle block size. For HP-UX LVM and SLVM, the Oracle block size must be
a power of two, must be less than or equal to the minimum LVM stripe size (4
KB) and less than or equal to the size of an LVM Logical Track Group
(256 KB).
HP StorageWorks Data Integrity Check: Solution Guide
Page 17

Data Integrity Check description
When adding new physical volumes (PVs) to a logical volume (LV) that is to
be used as an Oracle data file, control file or online log file, in order to have
integrity checking take effect on those new PVs, the DIC must be re-enabled.
Similarly, in order to have integrity checking no longer performed on PVs that
have been removed from an LV that had previously been used by Oracle, DIC
must be explicitly disabled on the device that corresponds to the PV.
Host-based mirroring (LVM, SLVM, or VxVM mirroring) is not supported
with DIC. That is, DIC cannot be used on Logical Volumes (LVs) that contain
Physical Volumes (PVs) that are DIC-enabled.
Host-based volume manager (LVM, SLVM, or VxVM) bad block relocation
is not allowed on PVs that are DIC-enabled.
HP StorageWorks Data Integrity Check: Solution Guide
17
Page 18

Data Integrity Check description
18
HP StorageWorks Data Integrity Check: Solution Guide
Page 19

Configuration requirements
This chapter describes how to configure the hardware and software environments
to integrate DIC functionality.
2
HP StorageWorks Data Integrity Check: Solution Guide
19
Page 20

Configuration requirements
Configuring DIC using RAID Manager XP
To set and verify the validation check parameters for DIC, HP StorageWorks
RAID Manager XP (RM) provides three commands:
raidvchkset Sets the parameters for validation checking on the specified
volumes.
raidvchkdsp Displays the parameters for validation checking on the
specified volumes, based on the RM configuration file.
raidvchkscan Displays the parameters for validation checking on the
specified volumes, based on the raidscan command.
For complete command descriptions, see “RAID Manager XP commands for Data
Integrity Check” (page 37).
To set up RAID Manager:
1. Transfer the RM distribution to the host /var/tmp directory.
The distribution is a single cpio archive file.
cd /opt
cpio –idmu < /var/tmp/rmxp
ln –s /opt/HORCM /HORCM
/HORCM/horcminstall.sh
20
2. (HP-UX only) To check the list of devices from the host, generate an ioscan
listing.
# ioscan -funCdisk
Class I H/W Path Driver S/W State H/W Type Description
==================================================================================
disk 0 0/0/1/1.15.0 sdisk CLAIMED DEVICE SEAGATE ST39204LC
/dev/dsk/c1t15d0 /dev/rdsk/c1t15d0
disk 1 0/0/2/0.0.0 sdisk CLAIMED DEVICE TOSHIBA CD-ROM XM-6201TA
/dev/dsk/c2t0d0 /dev/rdsk/c2t0d0
disk 2 0/0/2/1.15.0 sdisk CLAIMED DEVICE HP 18.2GST318406LC
/dev/dsk/c3t15d0 /dev/rdsk/c3t15d0
disk 3 0/4/0/0.8.0.4.0.0.0 sdisk CLAIMED DEVICE HP OPEN-3-CM
/dev/dsk/c4t0d0 /dev/rdsk/c4t0d0
disk 4 0/4/0/0.8.0.4.0.0.1 sdisk CLAIMED DEVICE HP OPEN-3
/dev/dsk/c4t0d1 /dev/rdsk/c4t0d1
disk 5 0/4/0/0.8.0.4.0.0.2 sdisk CLAIMED DEVICE HP OPEN-3
/dev/dsk/c4t0d2 /dev/rdsk/c4t0d2
disk 6 0/4/0/0.8.0.4.0.0.3 sdisk CLAIMED DEVICE HP OPEN-3
/dev/dsk/c4t0d3 /dev/rdsk/c4t0d3
disk 7 0/4/0/0.8.0.4.0.0.4 sdisk CLAIMED DEVICE HP OPEN-3
/dev/dsk/c4t0d4 /dev/rdsk/c4t0d4
HP StorageWorks Data Integrity Check: Solution Guide
Page 21

To set up the RM configuration file:
During RM installation, a template file called horcm.conf is located in /etc.
1. Make a copy of the configuration file.
cp /etc/horcm.conf /etc/horcmn.conf
where n represents the instance number.
2. Add port numbers to the /etc/services file.
Each instance of RM uses a service port for communication. Choose unused
and nonreserved port numbers.
Example hard01 17891/udp
3. Edit the configuration file.
For the HORCM_MON section, specify the host name for the ip_address
field and specify the service port for the service field. For the
HORCM_CMD section, specify the device file name of the command
device; leave the other two dev_name fields blank.
Example # cat /etc/horcm1.conf
HORCM_MON
#ip_address service poll(10ms) timeout(10ms)
hostora hard01 1000 3000
HORCM_CMD
#dev_name dev_name dev_name
/dev/rdsk/c4t0d0
HORCM_DEV
#dev_group dev_name port# TargetID LU# MU#
HORCM_INST
#dev_group ip_address service
4. Start the RM instance.
Example # horcmstart.sh 1
starting HORCM inst 1
HORCM inst 1 starts successfully.
5. Export the instance variable.
Example export HORCMINST=1
6. Obtain the port name, TargetID, and LunID for each device filename.
Example # ls /dev/rdsk/c4t0d* | raidscan -find -fx
DEVICE_FILE UID S/F PORT TARG LUN SERIAL LDEV PRODUCT_ID
/dev/rdsk/c4t0d0 0 F CL1-A 2 3 10033 0 OPEN-3-CM
/dev/rdsk/c4t0d1 0 F CL1-A 0 1 10033 2 OPEN-3
/dev/rdsk/c4t0d2 0 F CL1-A 1 2 10033 12c OPEN-3
/dev/rdsk/c4t0d3 0 F CL1-A 0 2 10033 23 OPEN-3
/dev/rdsk/c4t0d4 0 F CL1-A 0 6 10033 147 OPEN-3
Configuration requirements
HP StorageWorks Data Integrity Check: Solution Guide
21
Page 22

Configuration requirements
The output TargetID and LunID do not necessarily match the numbers in a
device file name.
7. In the /etc/horcmn.conf file, specify a unique dev_name for each device
under the appropriate dev_group.
Use the TargetID and LunID information obtained from the raidscan
command output.
Example # cat /etc/horcm1.conf
HORCM_MON
#ip_address service poll(10ms) timeout(10ms)
hostora hard01 1000 3000
HORCM_CMD
#dev_name dev_name dev_name
/dev/rdsk/c4t0d0
HORCM_DEV
#dev_group dev_name port# TargetID LU# MU#
vgdata disk1 CL1-A 0 1
vgdata disk2 CL1-A 1 2
vglog disk3 CL1-A 0 2
vglog disk4 CL1-A 0 6
HORCM_INST
#dev_group ip_address service
vgdata 127.0.0.1 hard02
vglog 127.0.0.1 hard02
For a typical Business Copy (BC) or Continuous Access (CA) setup, each
instance of RM normally communicates with another instance as its
counterpart. The counterpart information is specified in the HORCM_INST
section. In this example, BC or CA are not involved, so a loopback IP and
nonexistent service port name can be specified. If the same RM configuration
file is used for BC or CA, the correct information must be specified under
HORCM_INST.
8. Restart the RM instance.
Example # horcmshutdown.sh 1
Related
information
22
inst 1:
HORCM Shutdown inst 1 !!!
# horcmstart.sh 1
starting HORCM inst 1
HORCM inst 1 starts successfully.
For detailed information, see the RAID Manager XP documentation.
HP StorageWorks Data Integrity Check: Solution Guide
Page 23

To display DIC information:
Export the HORCMINST shell variable to the RM instance number.
Example export HORCMINST=1
inqraid indicates whether integrity check is enabled on the disk array logical
device by an asterisk (*).
Example # ls /dev/rdsk/c4t0d* | /HORCM/usr/bin/inqraid -CLI -fpd
DEVICE_FILE PORT SERIAL LDEV CTG C/B/12 SSID R:Group PRODUCT_ID
c4t0d0 CL1-A 10033 0 - - - - OPEN-3-CM
c4t0d1* CL1-A 10033 2 - s/s/ss 0004 1:01-01 OPEN-3
c4t0d2 CL1-A 10033 12c - s/s/ss 0005 1:01-02 OPEN-3
c4t0d3 CL1-A 10033 23 - s/s/ss 0004 1:01-01 OPEN-3
c4t0d4 CL1-A 10033 147 - s/s/ss 0005 1:01-02 OPEN-3
raidvchkscan displays validation parameters of disk array logical devices on
a port.
Example # raidvchkscan -p cl1-a -fx -v cflag
PORT# /ALPA/C TID# LU# Seq# Num LDEV# BR-W-E-E MR-W-B BR-W-B SR-W-B-S
CL1-A / e1/ 4 0 1 10033 1 2 D E B R D E E D E D D E E E
CL1-A / e1/ 4 0 2 10033 1 23 D D B W D D D D D D D D D D
CL1-A / e1/ 4 0 6 10033 1 147 D D B W D D D D D D D D D D
CL1-A / e1/ 4 1 2 10033 1 12c D D B W D D D D D D D D D D
CL1-A / e1/ 4 2 3 10033 1 0 D D B W D D D D D D D D D D
raidvchkdsp displays validation parameters of a user-defined dev_group; if
the command results in error or incorrect information is displayed, there may
be a mistake in the horcmX.conf file.
Example # raidvchkdsp -g vgdata -fxd
Group PairVol Device_File Seq# LDEV# BR-W-E-E MR-W-B BR-W-B SR-W-B-S
vgdata disk1 c4t0d1 10033 2 D D B W D D D D D D D D D D
vgdata disk2 c4t0d2 10033 12c D D B W D D D D D D D D D D
# raidvchkdsp -g vgdata -fxd -v offset
Group PairVol Device_File Seq# LDEV# Bsize STLBA ENLBA BNM
vgdata disk1 c4t0d1 10033 2 0 0 0 0
vgdata disk2 c4t0d2 10033 12c 0 0 0 0
# raidvchkdsp -g vglog -fxd
Group PairVol Device_File Seq# LDEV# BR-W-E-E MR-W-B BR-W-B SR-W-B-S
vglog disk3 c4t0d3 10033 23 D D B W D D D D D D D D D D
vglog disk4 c4t0d4 10033 147 D D B W D D D D D D D D D D
# raidvchkdsp -g vglog -fxd -v offset
Group PairVol Device_File Seq# LDEV# Bsize STLBA ENLBA BNM
vglog disk3 c4t0d3 10033 23 0 0 0 0
vglog disk4 c4t0d4 10033 147 0 0 0 0
Configuration requirements
HP StorageWorks Data Integrity Check: Solution Guide
23
Page 24

Configuration requirements
Configuring DIC on a raw disk device
For a raw disk device, each device file or volume is used directly without any
volume manager (LVM or VxVM). The entire device is used only by Oracle, and
so there is no logical volume to set up and the entire device is put under integrity
checking.
1. Determine the available disk array logical devices that can be used for the
Oracle data, control, and log files. Change the ownership of the raw device
files so that Oracle has permission to write to them.
Example /dev/rdsk/c4t2d0 for control01.ctl
/dev/rdsk/c4t2d1 for control02.ctl
/dev/rdsk/c4t2d2 for system01.dbf
/dev/rdsk/c4t2d3 for log01.log
/dev/rdsk/c4t2d4 for log02.log
2. Set up the RAID Manager horcm.conf configuration file.
3. Start the RAID Manager instance. Use RM inqraid or raidvchkset
commands to ensure that integrity checking is not yet enabled on the devices.
4. Create a database by using the raw devices and then shut down the database.
Verify or set the Oracle initialization parameter in the init.ora file.
db_block_checksum = true
Check the Oracle db_block_size initialization parameter value in the init.ora
file. This value determines the RM raidvchkset –vs bsize option.
5. Enable integrity checking on all devices by using the appropriate RM
raidvchkset –vt type command, either for data or redo. It is not necessary to
specify start LBA and end LBA.
For detailed information about the raidvchkset command, see “raidvchkset”
(page 38).
Example This example shows how to set and display validation parameters for the
Oracle data files:
# raidvchkset -g rdata2 -vt data9 -vs 16
# raidvchkdsp -g rdata2 -fxd
Group PairVol Device_File Seq# LDEV# BR-W-E-E MR-W-B BR-W-B SR-W-B-S
rdata2 oradb15 c4t2d0 10033 162 D E B R D E E D E D D E E E
rdata2 oradb16 c4t2d1 10033 163 D E B R D E E D E D D E E E
rdata2 oradb17 c4t2d2 10033 164 D E B R D E E D E D D E E E
bsize specifies the Oracle data block size in 512 byte units. If
db_block_size=2k, bsize is equal to 4. If db_block_size=8k, bsize is equal to
16.
24
HP StorageWorks Data Integrity Check: Solution Guide
Page 25

Configuration requirements
Example This example shows how to set and display the integrity check for the Oracle
log files:
# raidvchkset -g rlog2 -vt redo9 -vs 2
# raidvchkdsp -g rlog2 -fxd
Group PairVol Device_File Seq# LDEV# BR-W-E-E MR-W-B BR-W-B SR-W-B-S
rlog2 oradb18 c4t2d3 10033 165 D E B R D D D D E D D E E D
rlog2 oradb19 c4t2d4 10033 166 D E B R D D D D E D D E E D
6. Restart the database and verify the validation parameters. Use the RM
raidvchkdsp command to verify the settings.
HP StorageWorks Data Integrity Check: Solution Guide
25
Page 26

Configuration requirements
Configuring DIC on LVM raw logical volumes
For HP-UX logical volumes, determine the available disk array logical devices to
be used for the Oracle data, control, and log files. In this example, a volume group
vgdata is used for Oracle data and control files ,and a volume group vglog is used
for Oracle redo log files.
1. Set up the RAID Manager horcm.conf configuration file.
2. Use the RM inqraid or raidvchkset commands to ensure that integrity
checking is not yet enabled on the devices.
As an alternative, you can use the HP-UX SAM tool to set up volume groups
and logical volumes.
Example mkdir /dev/vgdata /dev/vglog
mknod /dev/vgdata/group c 64 0x020000
mknod /dev/vglog/group c 64 0x030000
pvcreate -f /dev/rdsk/c4t0d1
pvcreate -f /dev/rdsk/c4t0d2
pvcreate -f /dev/rdsk/c4t0d3
pvcreate -f /dev/rdsk/c4t0d4
vgcreate vgdata /dev/dsk/c4t0d1 /dev/dsk/c4t0d2
vgcreate vglog /dev/dsk/c4t0d3 /dev/dsk/c4t0d4
lvcreate -r n -m 1 -L 12 -n control01.ctl vgdata
lvcreate -r n -m 1 -L 12 -n control02.ctl vgdata
lvcreate -r n -m 1 -L 500 -n system01.dbf vgdata
lvcreate -r n -m 1 -L 500 -n log01.log vglog
lvcreate -r n -m 1 -L 500 -n log02.log vglog
chown oracle:oinstall /dev/vgdata/r*
chown oracle:oinstall /dev/vglog/r*
Logical volumes are created with Bad Block Relocation turned off because
Bad Block Relocation is not supported in DIC by using the lvcreate –r n
option.
3. Use lvmlbainfo to display the user data area for each disk array logical
devices.
(HP-UX only)
This utility is part of the swinstall lvmlbainfo.depot software package. To
install the lvmlbainfo utility, copy the lvmlbainfo.depot to /var/tmp and
execute the following HP-UX command:
swinstall –s /var/tmp/lvmlbainfo.depot \*
For a description of options, see “lvmlbainfo(1)” (page 52).
Example # lvmlbainfo /dev/rdsk/c4t0d1
26
All units refer to Logical Block Addresses(LBA).
LVM disk : /dev/rdsk/c4t0d1
Start user data : 2048
End user data : 4802559
# lvmlbainfo /dev/rdsk/c4t0d2
All units refer to Logical Block Addresses(LBA).
LVM disk : /dev/rdsk/c4t0d2
Start user data : 2048
End user data : 4802559
HP StorageWorks Data Integrity Check: Solution Guide
Page 27

Configuration requirements
In this case, the user data area is LBA 2048 to LBA 4802559. To protect only
the user data area in the volume group, use the numbers from the lvmlbainfo
command output for the raidvchkset –vs bsize slba elba option when
enabling integrity checking on devices.
4. Create an Oracle database using the LVM volumes and then shut down the
database.
5. Verify or set the Oracle initialization parameter in the init.ora file:
db_block_checksum = true
Check Oracle initialization parameter db_block_size value in the init.ora
file. This value determines the RM raidvchkset –vs bsize option.
6. Enable integrity checking on all devices with the appropriate RM raidvchkset
–vt [type] –vs bsize slba elba command, either for data or redo, and the
appropriate start LBA and end LBA.
For detailed information about the raidvchkset command, see “raidvchkset”
(page 38).
Example This example shows how to set and display the validation parameters for the
Oracle data files. Bsize units are bytes. For raidvchkset, STLBA and ENLBA
units are in decimal; for raidvchkdsp, units are in hexadecimal, as specified
by the –fx option.
# raidvchkset -g vgdata -vt data9 -vs 16 2048 4802559
# raidvchkdsp -g vgdata -fxd
Group PairVol Device_File Seq# LDEV# BR-W-E-E MR-W-B BR-W-B SR-W-B-S
vgdata disk1 c4t0d1 10033 2 D E B R D E E D E D D E E E
vgdata disk2 c4t0d2 10033 12c D E B R D E E D E D D E E E
# raidvchkdsp -g vgdata -fxd -v offset
Group PairVol Device_File Seq# LDEV# Bsize STLBA ENLBA BNM
vgdata disk1 c4t0d1 10033 2 8192 800 4947FF 9
vgdata disk2 c4t0d2 10033 12c 8192 800 4947FF 9
Example This example shows how to set and display the validation parameters for the
Oracle log files.
# raidvchkset -g vglog -vt
# raidvchkdsp -g vglog -fxd
Group PairVol Device_File Seq# LDEV# BR-W-E-E MR-W-B BR-W-B SR-W-B-S
vglog disk3 c4t0d3 10033 23 D D B W D D D D D D D D D D
vglog disk4 c4t0d4 10033 147 D D B W D D D D D D D D D D
7. Restart the database and verify the validation parameters data.
HP StorageWorks Data Integrity Check: Solution Guide
27
Page 28

Configuration requirements
Configuring DIC on VxVM raw logical volumes
For VxVM, determine the available disk array logical devices to be used. There
must be disk groups of devices for Oracle data and control files only and separate
disk groups for Oracle redo log files.
1. Set up the RAID Manager XP horcm.conf configuration file.
2. Start the RAID Manager XP instance. Use the RM inqraid or raidvchkset
commands to ensure that integrity checking is not yet enabled on the devices.
3. Use VxVM commands or the GUI to create the desired disk groups and
volumes.
Example /usr/lib/vxvm/bin/vxdisksetup -i c4t2d5
/usr/lib/vxvm/bin/vxdisksetup -i c4t2d6
vxdg init vxdg03 c4t2d5
vxdg init vxdg04 c4t2d6
vxassist -g vxdg03 make control01.ctl 12m
vxassist -g vxdg03 make control02.ctl 12m
vxassist -g vxdg03 make system01.dbf 500m
vxassist -g vxdg04 make log01.log 500m
vxassist -g vxdg04 make log02.log 500m
chown -R oracle:oinstall /dev/vx/rdsk/vxdg03
chown -R oracle:oinstall /dev/vx/rdsk/vxdg04
4. (HP-UX only) Use VxVM vxprivutil command to find the user data area
(public region) in a VxVM disk.
Use the output of this command to calculate the values for raidvchkset –vs
bsize slba elba.
slba = [(public offset × iosize) ÷ 512]
elba = [(public length × iosize) ÷ 512] + (slba – 1)
Example In this example, the public region starts at offset 1152 KB, the start LBA value
to use for raidvchkset.
The value for slba is [(1152 × 1024) ÷ 512] = 2304.
The public region has a length of 14225328KB; therefore, the value for elba is
[(14225328 × 1024) ÷ 512] + 2303 = 28452959.
# /etc/vx/diag.d/vxprivutil scan /dev/rdsk/c4t2d5
diskid: 1026940703.1358.rm3
group: name=vxdg03 id=1026940703.1363.rm3
flags: private autoimport
hostid: rm3
version: 2.1
iosize: 1024
public: slice=0 offset=1152 len=14225328
private: slice=0 offset=128 len=1024
update: time: 1026940703 seqno: 0.5
headers: 0 248
configs: count=1 len=727
logs: count=1 len=110
28
HP StorageWorks Data Integrity Check: Solution Guide
Page 29

5. (Solaris only) Use the prtvtoc command to verify the user data area (public
region) in a VxVM disk.
Example # prtvtoc /dev/rdsk/c4t2d5s2
* /dev/rdsk/c4t2d5s2 partition map
*
* Dimensions:
* 512 bytes/sector
* 96 sectors/track
* 15 tracks/cylinder
* 1440 sectors/cylinder
* 3338 cylinders
* 3336 accessible cylinders
*
* Flags:
* 1: unmountable
* 10: read-only
*
* First Sector Last
* Partition Tag Flags Sector Count Sector Mount Directory
2 5 01 0 4803840 4803839
3 15 01 0 2880 2879
4 14 01 2880 4800960 4803839
Column tag 15 is for the Private Region and Tag 14 is for public region. Each
sector is 512 bytes.
The public region starts at offset 2880; therefore, the start LBA to use for
raidvchkset is 2880.
The public region ends at offset 4803839; therefore, the end LBA to use for
raidvchkset is 4803839.
Configuration requirements
6. Create an Oracle database by using the VxVM volumes and then shut down
the database.
Verify or set the Oracle initialization parameter in the init.ora file:
db_block_checksum = true
Check the Oracle parameter db_block_size initialization value in the init.ora
file. This value determines the RM raidvchkset –vs bsize option.
7. Enable integrity checking on all devices by using the appropriate RM
raidvchkset –vt type –vs bsize slba elba command, either for data or redo,
and the appropriate start LBA and end LBA.
For detailed information about the raidvchkset command, see “raidvchkset”
(page 38).
Example This example shows how to set and display the validation parameters for the
Oracle data files:
# raidvchkset -g vxdg03 -vt data9 -vs 16 2304 28452959
# raidvchkdsp -g vxdg03 -fxd
Group PairVol Device_File Seq# LDEV# BR-W-E-E MR-W-B BR-W-B SR-W-B-S
vxdg03 oradb13 c4t2d5 10033 167 D E B R D E E D E D D E E E
HP StorageWorks Data Integrity Check: Solution Guide
29
Page 30

Configuration requirements
Example This example shows how to set and display the validation parameters for the
Oracle log files.
# raidvchkset -g vxdg04 -vt redo9 -vs 2 2304 28452959
# raidvchkdsp -g vxdg04 -fxd
Group PairVol Device_File Seq# LDEV# BR-W-E-E MR-W-B BR-W-B SR-W-B-S
vxdg04 oradb14 c4t2d6 10033 168 D E B R D D D D E D D E E D
8. Restart the database and verify the validation parameters data.
30
HP StorageWorks Data Integrity Check: Solution Guide
Page 31

Coexistence with HP MC/Service Guard
In an MC/Service Guard environment, the cluster lock disk is required. Either
provide a device dedicated for cluster lock, or share a device between data usage
and cluster lock usage.
If the device is shared with a MC/Service Guard cluster lock and Oracle user data,
the device must be under LVM management. Follow the LVM setup procedures
and ensure that only the user data area is under integrity checking.
Configuration requirements
HP StorageWorks Data Integrity Check: Solution Guide
31
Page 32

Configuration requirements
32
HP StorageWorks Data Integrity Check: Solution Guide
Page 33

Troubleshooting
This chapter provides examples of errors and messages that are related to DIC
operations.
3
HP StorageWorks Data Integrity Check: Solution Guide
33
Page 34

Troubleshooting
Reporting invalid write I/O
Oracle logs write I/O errors in the alert.log, which the database administrator can
monitor to take the appropriate action.
Example Errors in file /u00/app/oracle/admin/hard/udump/hard_ora_3158.trc:
Example horcm[2179]: [HORCM_101] Detected a validation check error on this volume(vgdata,
Example # raidvchkdsp -g vgdata -fxd -v errcnt
ORA-00206: error in writing (block 1, # blocks 1) of controlfile
ORA-00202: controlfile: '/dev/vg04/rcontrol01.ctl'
ORA-65535: Message 65535 not found; product=RDBMS; facility=ORA
Thu Aug 8 16:02:21 2002
ORA-221 signalled during: ALTER DATABASE MOUNT...
RAID Manager XP reports a message to the host system log file (syslog) when a
validation check has failed, usually within 10 to 30 seconds after the event occurs.
disk1, unit#0,ldev#2) : CfEC=4199, MNEC=0, SCEC=0, BNEC=0
raidvchkdsp can also be used to display error counters of different validation
checks.
For detailed information, see “raidvchkdsp” (page 42).
Group PairVol Device_File Seq# LDEV# CfEC MNEC SCEC BNEC
vgdata disk1 c4t0d1 10033 2 4199 0 0 0
vgdata disk2 c4t0d2 10033 12c 0 0 0 0
Your HP account representative can enable a corresponding SIM message to be
sent to HP StorageWorks Command View XP or HP StorageWorks Continuous
Track XP. By default, SIM events are not reported to Command View or
Continuous Track XP.
34
HP StorageWorks Data Integrity Check: Solution Guide
Page 35

SIM message information
AC90xx DIC has detected a write I/O, where xx is the reason code.
Within the SIM free information area, the following information is logged:
■ disk array serial number
■ LDEV number
■ start LBA in CDB
■ TL in CDB
■ WWN (host port)
■ check kind
The data integrity check SIMs are sent for each invalid write I/O block; therefore,
many SIMs can be generated for one particular transaction or write I/O. The SIMs
for this reference code are suppressed after receiving 16 SIMs within one hour.
Troubleshooting
HP StorageWorks Data Integrity Check: Solution Guide
35
Page 36

Troubleshooting
36
HP StorageWorks Data Integrity Check: Solution Guide
Page 37

RAID Manager XP commands for Data Integrity Check
This appendix describes RAID Manager commands for DIC. For information
about RAID Manager, refer to the product documentation.
a
HP StorageWorks Data Integrity Check: Solution Guide
37
Page 38

raidvchkset
raidvchkset
Integrity checking command DIC only
Syntax
raidvchkset { –h | –q | –z | –g group | –d pair_vol –d[g] raw_device [MU#] |
–d[g] seq# LDEV# [MU#] | –nomsg
Arguments
–h Displays Help/Usage and version information.
–q Terminates interactive mode and exits this command.
–z This option makes this command enter interactive mode.
–zx This option prevents using RM in interactive mode.
–g group Specifies a group name from the configuration definition file.
The command is executed for the specified group unless the
–d pair_vol option is specified.
| –vt [type] | –vs bsize [SLBA ELBA] }
38
–d pair_vol Specifies a paired logical volume name from the configuration
definition file. The command is executed only for the
specified paired logical volume.
–d[g] raw_device [MU#]
Searches the RM configuration file (local instance) for a
volume that matches the specified raw device. If a volume is
found, the command is executed on the paired volume (–d) or
group (–dg).
This option is effective without specification of the –g group
option.
If the volume is contained in two groups, the command is
executed on the first volume encountered. If MU# is not
specified, it defaults to 0.
–d[g] seq# LDEV# [MU#]
Searches the RM instance configuration file (local instance)
for a volume that matches the specified sequence # and LDEV.
If a volume is found, the command is executed on the paired
logical volume (–d) or group (–dg).
HP StorageWorks Data Integrity Check: Solution Guide
Page 39

raidvchkset
This option is effective without specification of the –g group
option.
If the volume is contained in two groups, the command is
executed on the first volume encountered only.
seq# LDEV# can be specified in hexadecimal by addition of
0x, or decimal.
–nomsg Used to suppress messages when this command is executed
from a user program.
This option must be specified at the beginning of the
command arguments.
–vt [type] Specifies the data type of the target volumes as an Oracle
database. If type is not specified, this option disables all
checking.
Valid values for type:
redo8
Sets the parameter for validation checking as Oracle redo log
files (including archive logs) prior to Oracle9i. This option
sets bsize to 1 (512 bytes) for Solaris or 2 (1024 bytes) for
HP-UX.
data8
Sets the parameter for validation checking as Oracle data files
prior to Oracle9i.
redo9
Sets the parameter for validation checking as Oracle redo log
files for Oracle9iR2 or later. This option sets bsize to 1 (512
bytes) for Solaris or 2 (1024 bytes) for HP-UX.
data9
Sets the parameter for validation checking as Oracle data files
(including control files) for Oracle9iR2 later.
–vs bsize [SLBA ELBA]
Specifies the data block size of Oracle I/O and a region on a
target volume for validation checking.
bsize is used for specifying the data block size of Oracle I/O,
HP StorageWorks Data Integrity Check: Solution Guide
39
Page 40

raidvchkset
Description
in units of 512 bytes. bsize is able to specify between 1 (512
bytes) and 128 (64 kilobytes), but the effective size for Oracle
is between 1 (512 bytes) and 64 (32 kilobytes).
If the –vs option is also used for redo log volumes to specify
SLBA ELBA, bsize must be set to 2 for HP-UX or 1 for Solaris.
SLBA ELBA specifies a region defined between Start_LBA
and End_LBA on a target volume for checking, in units of 512
bytes.
SLBA ELBA can be specified in decimal or hexadecimal by
pre-pending 0x to the hexadecimal number.
If this option is not specified, then a region for a target volume
is set as all blocks.
The raidvchkset command sets the parameters for integrity checking to the
specified volumes and can also be used to turn off all integrity checking without
specifying type.
The unit for the integrity checking is based on a group in the RAID Manager
configuration file.
When enabling DIC using raidvchkset, if there are redundant paths to the same
LUN (for example, when using HP StorageWorks Auto Path or LVM pv-links), it
is not necessary to enable raidvchkset on each path. Enable DIC on only one
path, usually the path specified in the RM horcm.conf configuration file.
This command is controlled as a protection facility.
Returned values
Return values in exit() allow you to check execution results from a user program.
Normal termination returns 0. See the RAID Manager XP manual for abnormal
exit codes.
40
HP StorageWorks Data Integrity Check: Solution Guide
Page 41

Examples
Error codes
raidvchkset
This example sets the volumes for the oralog group as redolog file prior to
Oracle9i.
raidvchkset –g oralog –vt redo8
This example sets the volumes for the oradat group as data file, where the Oracle
block size is 8 kilobytes.
raidvchkset –g oradat –vt data8 –vs 16
This example sets to the volumes for the oradat group as data file, where the
Oracle block size is 16 kilobytes.
raidvchkset –g oradat –vt data8 –vs 32
This example disables all volume checking for the oralog group.
raidvchkset –g oralog –vt
This command is rejected with EX_ERPERM by connectivity checking between
RAID Manager and the disk array.
HP StorageWorks Data Integrity Check: Solution Guide
41
Page 42

raidvchkdsp
raidvchkdsp
Integrity checking confirmation command DIC only
Syntax
raidvchkdsp { –h | –q | –z | –g group | –d pair_vol –d[g] raw_device [MU#] |
–d[g] seq# LDEV# [MU#] | –f[xd] | –v operation }
Arguments
–h Displays Help/Usage and version information.
–q Terminates interactive mode and exits this command.
–z This option makes this command enter interactive mode.
–zx This option prevents using RM in interactive mode.
–g group Specifies a group name from the configuration definition file.
The command is executed for the specified group unless the
–d pair_vol option is specified.
42
–d pair_vol Specifies a paired logical volume name from the configuration
definition file. The command is executed only for the
specified paired logical volume.
–d[g] raw_device [MU#]
Searches the RM configuration file (local instance) for a
volume that matches the specified raw device. If a volume is
found, the command is executed on the paired volume (–d) or
group (–dg).
This option is effective without specification of the –g group
option.
If the volume is contained in two groups, the command is
executed on the first volume encountered. If MU# is not
specified, it defaults to 0.
–d[g] seq# LDEV# [MU#]
Searches the RM instance configuration file (local instance)
for a volume that matches the specified sequence # and LDEV.
If a volume is found, the command is executed on the paired
logical volume (–d) or group (–dg).
HP StorageWorks Data Integrity Check: Solution Guide
Page 43

raidvchkdsp
This option is effective without specification of the –g group
option.
If the volume is contained in two groups, the command is
executed on the first volume encountered only.
seq# LDEV# can be specified in hexadecimal by addition of
0x, or decimal.
–f[xd] –fx displays the LDEV/STLBA/ENLBA number in
hexadecimal.
–fd displays the relationship between the Device_File and the
paired volumes, based on the group (as defined in the local
instance configuration definition file). If the Device_File
column shows unknown to either the local or the remote host
(instance), then the volume is not recognized on the current
host, and the command is rejected in protection mode.
–v operation Specifies an operation that displays the each parameter for
validation checking.
Valid values for operation:
cflag
Displays all flags for checking regarding data block validation
for target volumes.
BR-W-E-E: Displays the flags for checking data block size.
R=Read → E=Enable and D=Disable
W=Write → E=Enable and D=Disable
E=Endian format → L=Little and B=Big
E=Write rejected on validation error → W=Enable and
R=Disable
MR-W-B: Displays the flags for checking block header
information.
MR=Read → E=Enable and D=Disable
W=Write → E=Enable and D=Disable
B=Block #0 → E=Enable and D=Disable
BR-W-B: Displays the flags for checking data block number
information.
BR=Read → E=Enable and D=Disable
W=Write → E=Enable and D=Disable
B=Data Block → E=Enable and D=Disable
HP StorageWorks Data Integrity Check: Solution Guide
43
Page 44

raidvchkdsp
SR-W-B-S: Displays the flags for checking data block
checksum.
SR=Read → E=Enable and D=Disable
W=Write → E=Enable and D=Disable
B=Block #0 → E=Enable and D=Disable
S=Checksum → E=Enable and D=Disable
offset:
Displays the range setting for data block size of Oracle I/O
and a region on a target volume for validation checking.
Bsize: Displays the data block size of Oracle I/O, in units of
bytes.
STLBA: Displays the Start of LBA on a target volume for
checking, in units of LBAs.
ENLBA: Displays the End of LBA on a target volume for
checking, in units of LBAs. If STLBA and ENLBA are both
zero, this means to be checked as all blocks.
BNM: Displays whether this validation is disabled or enabled.
If BNM is 0 then this validation is disabled.
44
errcnt:
Displays statistical information for errors counted on the
target volumes. The error count is cleared when the individual
flag for integrity checking is disabled.
CfEC: Displays the error counter for checking of block size
validation.
MNEC: Displays the error counter for checking of block
header validation.
SCEC: Displays the error counter for checking of data block
checksum validation.
BNEC: Displays the error counter for checking of block
number validation.
HP StorageWorks Data Integrity Check: Solution Guide
Page 45

Description
Error codes
Examples
raidvchkdsp
The raidvchkdsp command displays the parameters for validation checking of
the specified volumes. The unit of checking for the validation is based on the
group of RM configuration file.
This command is controlled as protection facility.
A nonpermitted volume is shown without LDEV# information (LDEV#
information is - ).
This command is rejected with EX_ERPERM by connectivity checking between
RAID Manager and the disk array.
# raidvchkdsp -g vg01 -fd -v cflag
Group PairVol Device_File Seq# LDEV# BR-W-E-E MR-W-B BR-W-B SR-W-B-S
vg01 oradb1 Unknown 2332 - - - - - - - - - - - - - - vg01 oradb2 c4t0d3 2332 3 D E B R D D D D E E D E D D
# raidvchkdsp -g vg01 -fd -v offset
Group PairVol Device_File Seq# LDEV# Bsize STLBA ENLBA BNM
vg01 oradb1 c4t0d2 2332 2 1024 1 102400 9
vg01 oradb2 c4t0d3 2332 3 1024 1 102400 9
# raidvchkdsp -g vg01 -fd -v cflag
Group PairVol Device_File Seq# LDEV# BR-W-E-E MR-W-B BR-W-B SR-W-B-S
vg01 oradb1 c4t0d2 2332 2 D E B R D D D D E E D E D D
vg01 oradb2 c4t0d3 2332 3 D E B R D D D D E E D E D D
# raidvchkdsp -g vg01 -fd -v errcnt
Group PairVol Device_File Seq# LDEV# CfEC MNEC SCEC BNEC
vg01 oradb1 c4t0d2 2332 2 0 0 0 0
vg01 oradb2 c4t0d3 2332 3 0 0 0 0
HP StorageWorks Data Integrity Check: Solution Guide
45
Page 46

raidvchkscan
raidvchkscan
Integrity checking confirmation command DIC only
Syntax
raidvchkdsp { –h | –q | –z | –p port [hgrp] –pd raw_device | –s seq# | –t target |
–l LUN | –fx | –v operation }
Arguments
–h Displays Help/Usage and version information.
–q Terminates interactive mode and exits this command.
–z This option makes this command enter interactive mode.
–zx This option prevents using RM in interactive mode.
–p port Specifies the name of a port to be scanned by selecting it from
CL1-A to CL1-R (excluding CL1-I and CL1-O), or CL2-A to
CL2-R (excluding CL2-I and CL2-O). For the expanded port,
specify CL3-a to CL3-r or CL4-a to CL4-r. Port names are not
case sensitive
This option always must be specified if –pd raw_device
option is not specified.
[hgrp] is specified to display only the LDEVs mapped to a
host group on a port for disk array.
46
–pd raw_device Specifies a raw_device name.
Finds the Seq# and port name on the disk array and scans the
port of the disk array (which corresponds to the unit ID) and
searches for the unit ID from Seq#.
This option always must be specified if the –find or –p port
option is not specified. If this option is specified, the –s Seq#
option is invalid.
HP StorageWorks Data Integrity Check: Solution Guide
Page 47

raidvchkscan
–s seq# Specifies the serial number of the disk array on multiple disk
array connections when you cannot specify the unit ID that is
contained in the –p port option.
This option searches corresponding unit ID from Seq# and it
scans the port that is specified by –p port option.
If this option is specified, the unit ID that is contained in –p
port is invalid.
–t target Specifies a SCSI/Fibre target ID of a specified port. If this
option is not specified, the command applies to all targets.
–l LUN Specifies the LUN of a specified SCSI/Fibre target. If this
option is not specified, the command applies to all LUNs.
A LUN-only specification without designating a target ID is
invalid.
–fx Displays the LDEV/STLBA/ENLBA number in hexadecimal.
–v operation Specifies an operation that displays each parameter for
validation checking.
Valid values for operation:
cflag
Displays all flags for checking regarding data block validation
for target volumes.
BR-W-E-E: Displays the flags for checking data block size.
R=Read → E=Enable and D=Disable
W=Write → E=Enable and D=Disable
E=Endian format → L=Little and B=Big
E=Write rejected on validation error → W=Enable and
R=Disable
MR-W-B: Displays the flags for checking block header
information.
MR=Read → E=Enable and D=Disable
W=Write → E=Enable and D=Disable
B=Block #0 → E=Enable and D=Disable
BR-W-B: Displays the flags for checking data block number
information.
BR=Read → E=Enable and D=Disable
HP StorageWorks Data Integrity Check: Solution Guide
47
Page 48

raidvchkscan
W=Write → E=Enable and D=Disable
B=Data Block → E=Enable and D=Disable
SR-W-B-S: Displays the flags for checking data block
checksum.
SR=Read → E=Enable and D=Disable
W=Write → E=Enable and D=Disable
B=Block #0 → E=Enable and D=Disable
S=Checksum → E=Enable and D=Disable
offset
Displays the range setting for data block size of Oracle I/O
and a region on a target volume for validation checking.
Bsize
Displays the data block size of Oracle I/O, in units of bytes.
STLBA: Displays the Start of LBA on a target volume for
checking, in units of LBAs.
ENLBA: Displays the End of LBA on a target volume for
checking, in units of LBAs. If STLBA and ENLBA are both
zero, this means to be checked as all blocks.
BNM: Displays whether this validation is disabled or enabled.
If BNM is 0 then this validation is disabled.
48
errcnt
Displays the statistical information about errors on the target
volumes. Statistical information is cleared when the individual
flag for integrity checking is disabled.
CfEC: Displays the error counter for checking of block size
validation.
MNEC: Displays the error counter for checking of block
header validation.
SCEC: Displays the error counter for checking of data block
checksum validation.
BNEC: Displays the error counter for checking of block
number validation.
HP StorageWorks Data Integrity Check: Solution Guide
Page 49

Error codes
raidvchkscan
This command is rejected with EX_ERPERM by connectivity checking between
RAID Manager XP and the disk array.
RAID Manager XP reports the following message to the syslog file as an integrity
check error when each statistical information counted an error is updated.
HORCM_103 Detected a validation check error on this volume (dev_group,
dev_name, unit#X, ldev#Y): CfEC=n, MNEC=n, SCEC=n,
BNEC=n
Cause: A validation error occurred on the database volume, or
validation parameters for this volume are invalid.
Action to be taken: Confirm the following items, and use the
raidvchkdsp –v operation command for verifying the
validation parameters.
Check whether the block size (–vs size) is an appropriate size.
Check whether the type for checking (–vt type) is an
appropriate type.
Check whether the data validations are disabled for LVM
configuration changes.
Check whether the data validations are not used based on the
file system.
Check whether the redo log and data file are separated among
the volumes.
Examples
# raidvchkscan -p CL1-A -v cflag
PORT# /ALPA/C TID# LU# Seq# Num LDEV# BR-W-E-E MR-W-B BR-W-B SR-W-B-S
CL1-A / ef/ 0 0 0 2332 1 0 D E B R D D D D E E D E D D
CL1-A / ef/ 0 0 1 2332 1 1 D E B R D D D D E E D E D D
CL1-A / ef/ 0 0 2 2332 1 2 D E B R D D D D E E D E D D
CL1-A / ef/ 0 0 3 2332 1 3 D E B R D D D D E E D E D D
CL1-A / ef/ 0 0 4 2332 1 4 D E B R D D D D E E D E D D
HP StorageWorks Data Integrity Check: Solution Guide
49
Page 50

raidvchkscan
# raidvchkscan -p CL1-A -v offset
PORT# /ALPA/C TID# LU# Seq# Num LDEV# Bsize STLBA ENLBA BNM
CL1-A / ef/ 0 0 0 2332 1 0 1024 1 102400 9
CL1-A / ef/ 0 0 1 2332 1 1 1024 1 102400 9
CL1-A / ef/ 0 0 2 2332 1 2 1024 1 102400 9
CL1-A / ef/ 0 0 3 2332 1 3 1024 1 102400 9
CL1-A / ef/ 0 0 4 2332 1 4 1024 1 102400 9
# raidvchkscan -p CL1-A -v errcnt
PORT# /ALPA/C TID# LU# Seq# Num LDEV# CfEC MNEC SCEC BNEC
CL1-A / ef/ 0 0 0 2332 1 0 0 0 0 0
CL1-A / ef/ 0 0 1 2332 1 1 0 0 0 0
CL1-A / ef/ 0 0 2 2332 1 2 0 0 0 0
CL1-A / ef/ 0 0 3 2332 1 3 0 0 0 0
CL1-A / ef/ 0 0 4 2332 1 4 0 0 0 0
50
HP StorageWorks Data Integrity Check: Solution Guide
Page 51

HP-UX utility
This appendix describes an HP-UX utility for DIC.
b
HP StorageWorks Data Integrity Check: Solution Guide
51
Page 52

lvmlbainfo(1)
lvmlbainfo(1)
NAME
lvmlbainfo - identify the boundaries of LVM metadata regions on disks managed
by LVM.
SYNOPSIS
lvmlbainfo [–V] PhysicalVolumePath
lvmlbainfo –?
DESCRIPTION
The lvmlbainfo command displays the start and end block information of the user
data in the given LVM disk specified by the PhysicalVolumePath. The unit
displayed is logical block addresses (LBA). LBAs start at zero and are in units of
512 byte blocks.
Options
lvmlbainfo recognizes the following options:
–V Print the current version of lvmlbainfo and exit. Overrides all
other options.
52
PhysicalVolumePath Name of the LVM disk on which user data region is to be
identified.
–? Display the usage message for the application.
Display
lvmlbainfo displays the following information for the given LVM disk:
LVM Disk The character device path name of the LVM disk.
Start user data Starting block of the user data in the LVM disk.
End user data Ending block of the user data in the LVM disk.
EXAMPLES
Display information about an LVM disk:
lvmlbainfo /dev/rdsk/c2t1d0
Display version information for lvmlbainfo:
lvmlbainfo -V
AUTHOR
lvmlbainfo was developed by Hewlett-Packard. (July 2002)
HP StorageWorks Data Integrity Check: Solution Guide
Page 53

SEE ALSO
lvm(7).
lvmlbainfo(1)
HP StorageWorks Data Integrity Check: Solution Guide
53
Page 54

lvmlbainfo(1)
54
HP StorageWorks Data Integrity Check: Solution Guide
Page 55

glossary
This glossary defines acronyms used in this guide or related to this product and is
not a comprehensive glossary of computer terms.
BC
HP StorageWorks Business Copy XP
CA
HP StorageWorks Continuous Access XP
CHIP
channel host interface processor
ELBA
end logical block address
HARD
Hardware Assisted Resilient Data
DIC
HP StorageWorks Data Integrity Check
LBA
Logical Block Address
LDEV
logical device
LU
logical unit
Glossary
Glossary
LVM
Logical Volume Manager
PV
physical volume
RAC
Real Application Cluster (Oracle 9i)
HP StorageWorks Data Integrity Check: Solution Guide
55
Page 56

Glossary
RM
RAID Manager XP
SAM
System Administration Manager
SIM
service information message from the disk array
SLBA
start logical block address
SLVM
Shared Logical Volume Manager
VxVM
Veritas Volume Manager
56
HP StorageWorks Data Integrity Check: Solution Guide
Page 57

index
A
architecture
DIC
13
audience
intended
5
authorized reseller, HP
B
BC
definition
55
block size
LVM
16
C
CA
definition
55
CHIP
definition
55
CHIP boards
replacing
required
16
14
cluster lock disk
MC/Service Guard
configuration
requirements
19
conventions
documentation
6
31
7
D
Data Integrity Check (DIC)
description
introduction
11
12
databases
restrictions on
DB_BLOCK_CHECKSUM
required value
DIC
definition
55
disk arrays
requirements for
35
SIMs
supported
5
documentation
Index
Index
conventions
related
6
5
E
ELBA
definition
55
F
file systems
support for
15
files
horcm.conf
26
RAID Manager XP configuration
restoring Oracle data
firmware
required version
16
15
14
21
16
14
HP StorageWorks Data Integrity Check: Solution Guide
57
Page 58

Index
H
HARD
definition
55
Hardware Assisted Resilient Data
initiative
12
help
obtaining
6
HFS
support for
15
horcm.conf
RAID Manager XP file
26
HORCMINST variable
exporting
23
host server
requirements for
15
HP
authorized reseller
storage website
technical support
7
7
7
HP-UX operating system
utility for DIC
51
I
I/O
invalid write
34
introduction
DIC
12
J
JFS
support for
15
L
LBA
definition
55
LDEV
definition
55
Logical Volume Manager (LVM)
block size
16
LU
definition
55
LVM
definition
55
M
MC/Service Guard
requirements
31
O
operating systems
supported
15
Oracle
required products
15
Oracle tablespace
restrictions
16
P
PV
definition
55
R
RAC
definition
55
RAID Manager XP
commands for DIC
configuration file
configuring DIC
37
21
20
HORCMINST variable
required version
14
raidvchkdsp command
description
42
raidvchkscan command
description
46
raidvchkset command
description
38
raw disk
configuring DIC on
23
24
58
HP StorageWorks Data Integrity Check: Solution Guide
Page 59

Index
raw logical volumes
configuring
26
related documentation
list of
5
requirements
configuration
19
RM
definition
56
S
SAM
definition
56
SIM
definition
56
SIMs
logging
35
SLBA
definition
56
SLVM
definition
56
Sun Solaris operating system
support for
15
system administrator
required knowledge
5
T
technical support
HP
7
troubleshooting
DIC operations
33
V
VxVM
definition
56
VxVM raw logical volumes
configuring
28
W
warranty
statement of
8
websites
HP storage
7
X
XP1024
support for
5
XP128
support for
5
HP StorageWorks Data Integrity Check: Solution Guide
59
Page 60

Index
60
HP StorageWorks Data Integrity Check: Solution Guide
 Loading...