

Page 1

HP StorageWorks
Auto LUN XP user guide
for the XP12000/XP10000
Part number: T1715-96006
Sixth edition: September 2007
Page 2

Legal and notice information
© Copyright 2005, 2007 Hewlett-Packard Development Company, L.P.
Confidential computer software. Valid license from HP required for possession, use or copying. Consistent with FAR 12.211 and 12. 212, Commercial
Computer Software, Computer Software Documentation, and Technical Data for Commercial Items are licensed to the U.S. Government under
vendor’s standard commercial license.
The information contained herein is subject to change without notice. The only warranties for HP products and services are set forth in the express
warranty statements accompanying such products and services. Nothing herein should be construed as constituting an additional warranty. HP shall
not be liable for technical or editorial errors or omissions contained herein.
Adobe® and Acrobat are trademarks of Adobe Systems Incorporated.
ESCON, z/OS, and S/390 are registered trademarks or trademarks of International Business Machines Corporation (IBM).
HP-UX is a product name of Hewlett-Packard Company.
Java and all Java-based trademarks and logos are trademarks or registered trademarks of Sun Microsystems, Inc. in the United States and other
countries.
Netscape Navigator is a registered trademark of Netscape Communications Corporation in the United States and other countries.
Solaris is a trademark or registered trademark of Sun Microsystems, Inc. in the United States and other countries.
UNIX is a registered trademark of X/Open Company Limited in the United States and other countries and is licensed exclusively through X/Open
Company Limited.
Windows and Windows NT are registered trademarks of Microsoft Corporation.
All other brand or product names are or may be trademarks or service marks of and are used to identify products or services of their respective
owners.
Auto LUN XP user guide for the XP12000/XP10000
Page 3

Contents
About this guide. . . . . . . . . . . . . . . . . . . . . . . . . . . . . . . . . . . . . . . . . . . . . . . . . . . . . . . 7
Supported storage platforms and firmware . . . . . . . . . . . . . . . . . . . . . . . . . . . . . . . . . . . . . . . . . . . . . . 7
Intended audience . . . . . . . . . . . . . . . . . . . . . . . . . . . . . . . . . . . . . . . . . . . . . . . . . . . . . . . . . . . . . . . 7
Prerequisites. . . . . . . . . . . . . . . . . . . . . . . . . . . . . . . . . . . . . . . . . . . . . . . . . . . . . . . . . . . . . . . . . . . . 7
Related documentation . . . . . . . . . . . . . . . . . . . . . . . . . . . . . . . . . . . . . . . . . . . . . . . . . . . . . . . . . . . . 7
Document conventions and symbols . . . . . . . . . . . . . . . . . . . . . . . . . . . . . . . . . . . . . . . . . . . . . . . . . . . 8
HP technical support . . . . . . . . . . . . . . . . . . . . . . . . . . . . . . . . . . . . . . . . . . . . . . . . . . . . . . . . . . . . . . 8
Subscription service . . . . . . . . . . . . . . . . . . . . . . . . . . . . . . . . . . . . . . . . . . . . . . . . . . . . . . . . . . . . . . 9
HP web sites . . . . . . . . . . . . . . . . . . . . . . . . . . . . . . . . . . . . . . . . . . . . . . . . . . . . . . . . . . . . . . . . . . . 9
Documentation feedback . . . . . . . . . . . . . . . . . . . . . . . . . . . . . . . . . . . . . . . . . . . . . . . . . . . . . . . . . . . 9
1 Auto LUN XP for the XP12000/XP10000 . . . . . . . . . . . . . . . . . . . . . . . . . . . . . . . . . . 11
Auto LUN XP features . . . . . . . . . . . . . . . . . . . . . . . . . . . . . . . . . . . . . . . . . . . . . . . . . . . . . . . . . . . . 11
Auto LUN XP tasks . . . . . . . . . . . . . . . . . . . . . . . . . . . . . . . . . . . . . . . . . . . . . . . . . . . . . . . . . . . . . . 11
Reserve volumes . . . . . . . . . . . . . . . . . . . . . . . . . . . . . . . . . . . . . . . . . . . . . . . . . . . . . . . . . . . . . . . . 12
Volume migration . . . . . . . . . . . . . . . . . . . . . . . . . . . . . . . . . . . . . . . . . . . . . . . . . . . . . . . . . . . . . . . 12
Estimating usage rates. . . . . . . . . . . . . . . . . . . . . . . . . . . . . . . . . . . . . . . . . . . . . . . . . . . . . . . . . . . . 13
Automatic migration . . . . . . . . . . . . . . . . . . . . . . . . . . . . . . . . . . . . . . . . . . . . . . . . . . . . . . . . . . . . . 14
Storage management by maximum disk usage . . . . . . . . . . . . . . . . . . . . . . . . . . . . . . . . . . . . . . . . 14
Keep reserved volumes in high HDD classes . . . . . . . . . . . . . . . . . . . . . . . . . . . . . . . . . . . . . . . . . . 14
Auto migration sequence of events . . . . . . . . . . . . . . . . . . . . . . . . . . . . . . . . . . . . . . . . . . . . . . . . . 16
Manual migration . . . . . . . . . . . . . . . . . . . . . . . . . . . . . . . . . . . . . . . . . . . . . . . . . . . . . . . . . . . . . . . 16
Requirements and restrictions . . . . . . . . . . . . . . . . . . . . . . . . . . . . . . . . . . . . . . . . . . . . . . . . . . . . . . . 16
Selection of CU group . . . . . . . . . . . . . . . . . . . . . . . . . . . . . . . . . . . . . . . . . . . . . . . . . . . . . . . . . 16
Logical volumes . . . . . . . . . . . . . . . . . . . . . . . . . . . . . . . . . . . . . . . . . . . . . . . . . . . . . . . . . . . . . . 16
Source volumes . . . . . . . . . . . . . . . . . . . . . . . . . . . . . . . . . . . . . . . . . . . . . . . . . . . . . . . . . . . . . . 17
LUSE source volumes . . . . . . . . . . . . . . . . . . . . . . . . . . . . . . . . . . . . . . . . . . . . . . . . . . . . . . . . . . 18
Target volumes . . . . . . . . . . . . . . . . . . . . . . . . . . . . . . . . . . . . . . . . . . . . . . . . . . . . . . . . . . . . . . 18
Number of volumes . . . . . . . . . . . . . . . . . . . . . . . . . . . . . . . . . . . . . . . . . . . . . . . . . . . . . . . . . . . 19
Calculating the number of Auto LUN XP concurrent migration plans . . . . . . . . . . . . . . . . . . . . . . . . . . 19
Calculating differential tables for mainframe volume migration . . . . . . . . . . . . . . . . . . . . . . . . . . . 19
Calculating differential tables for open-system volume migration . . . . . . . . . . . . . . . . . . . . . . . . . . 21
Auto migration planning . . . . . . . . . . . . . . . . . . . . . . . . . . . . . . . . . . . . . . . . . . . . . . . . . . . . . . . . 22
Auto migration execution . . . . . . . . . . . . . . . . . . . . . . . . . . . . . . . . . . . . . . . . . . . . . . . . . . . . . . . 22
Manual migration execution . . . . . . . . . . . . . . . . . . . . . . . . . . . . . . . . . . . . . . . . . . . . . . . . . . . . . 22
Copy Threshold option . . . . . . . . . . . . . . . . . . . . . . . . . . . . . . . . . . . . . . . . . . . . . . . . . . . . . . . . . 22
Progress value . . . . . . . . . . . . . . . . . . . . . . . . . . . . . . . . . . . . . . . . . . . . . . . . . . . . . . . . . . . . . . . 23
Effects on other XP products . . . . . . . . . . . . . . . . . . . . . . . . . . . . . . . . . . . . . . . . . . . . . . . . . . . . . 23
Maintenance. . . . . . . . . . . . . . . . . . . . . . . . . . . . . . . . . . . . . . . . . . . . . . . . . . . . . . . . . . . . . . . . 23
Auto migration parameters . . . . . . . . . . . . . . . . . . . . . . . . . . . . . . . . . . . . . . . . . . . . . . . . . . . . . . 23
Powering off disk arrays . . . . . . . . . . . . . . . . . . . . . . . . . . . . . . . . . . . . . . . . . . . . . . . . . . . . . . . . 23
Starting Auto LUN XP . . . . . . . . . . . . . . . . . . . . . . . . . . . . . . . . . . . . . . . . . . . . . . . . . . . . . . . . . . . . 24
Auto LUN pane . . . . . . . . . . . . . . . . . . . . . . . . . . . . . . . . . . . . . . . . . . . . . . . . . . . . . . . . . . . . . . 24
Tabs and selection trees. . . . . . . . . . . . . . . . . . . . . . . . . . . . . . . . . . . . . . . . . . . . . . . . . . . . . . 24
Monitoring term section . . . . . . . . . . . . . . . . . . . . . . . . . . . . . . . . . . . . . . . . . . . . . . . . . . . . . . 25
Monitoring data section. . . . . . . . . . . . . . . . . . . . . . . . . . . . . . . . . . . . . . . . . . . . . . . . . . . . . . 25
Table section . . . . . . . . . . . . . . . . . . . . . . . . . . . . . . . . . . . . . . . . . . . . . . . . . . . . . . . . . . . . . 25
Graph section . . . . . . . . . . . . . . . . . . . . . . . . . . . . . . . . . . . . . . . . . . . . . . . . . . . . . . . . . . . . 25
WWN, Port-LUN, LDEV, and Physical tabs . . . . . . . . . . . . . . . . . . . . . . . . . . . . . . . . . . . . . . . . . . . 27
WWN tab . . . . . . . . . . . . . . . . . . . . . . . . . . . . . . . . . . . . . . . . . . . . . . . . . . . . . . . . . . . . . . . 27
Port-LUN tab. . . . . . . . . . . . . . . . . . . . . . . . . . . . . . . . . . . . . . . . . . . . . . . . . . . . . . . . . . . . . . 28
LDEV tab . . . . . . . . . . . . . . . . . . . . . . . . . . . . . . . . . . . . . . . . . . . . . . . . . . . . . . . . . . . . . . . . 28
Physical tab . . . . . . . . . . . . . . . . . . . . . . . . . . . . . . . . . . . . . . . . . . . . . . . . . . . . . . . . . . . . . . 29
Creating and executing migration plans . . . . . . . . . . . . . . . . . . . . . . . . . . . . . . . . . . . . . . . . . . . . . . . 30
Auto LUN XP user guide for the XP12000/XP10000 3
Page 4

Manual Migration tab . . . . . . . . . . . . . . . . . . . . . . . . . . . . . . . . . . . . . . . . . . . . . . . . . . . . . . . . . 31
Pane contents . . . . . . . . . . . . . . . . . . . . . . . . . . . . . . . . . . . . . . . . . . . . . . . . . . . . . . . . . . . . . 31
Tree view . . . . . . . . . . . . . . . . . . . . . . . . . . . . . . . . . . . . . . . . . . . . . . . . . . . . . . . . . . . . . 31
Table view . . . . . . . . . . . . . . . . . . . . . . . . . . . . . . . . . . . . . . . . . . . . . . . . . . . . . . . . . . . . 31
Buttons . . . . . . . . . . . . . . . . . . . . . . . . . . . . . . . . . . . . . . . . . . . . . . . . . . . . . . . . . . . . . . . 32
Migrating volumes manually . . . . . . . . . . . . . . . . . . . . . . . . . . . . . . . . . . . . . . . . . . . . . . . . . . 32
Deleting manual migration plans . . . . . . . . . . . . . . . . . . . . . . . . . . . . . . . . . . . . . . . . . . . . . . . 33
Auto Migration tab . . . . . . . . . . . . . . . . . . . . . . . . . . . . . . . . . . . . . . . . . . . . . . . . . . . . . . . . . . . 33
Pane contents . . . . . . . . . . . . . . . . . . . . . . . . . . . . . . . . . . . . . . . . . . . . . . . . . . . . . . . . . . . . . 34
Auto Migration plans section . . . . . . . . . . . . . . . . . . . . . . . . . . . . . . . . . . . . . . . . . . . . . . . . 34
Auto Plan parameter section . . . . . . . . . . . . . . . . . . . . . . . . . . . . . . . . . . . . . . . . . . . . . . . . 35
Setting auto migration parameters . . . . . . . . . . . . . . . . . . . . . . . . . . . . . . . . . . . . . . . . . . . . . . 35
Deleting auto migration plans. . . . . . . . . . . . . . . . . . . . . . . . . . . . . . . . . . . . . . . . . . . . . . . . . . 36
Remaking auto migration plans . . . . . . . . . . . . . . . . . . . . . . . . . . . . . . . . . . . . . . . . . . . . . . . . 36
Attribute tab . . . . . . . . . . . . . . . . . . . . . . . . . . . . . . . . . . . . . . . . . . . . . . . . . . . . . . . . . . . . . . . . 36
Pane contents . . . . . . . . . . . . . . . . . . . . . . . . . . . . . . . . . . . . . . . . . . . . . . . . . . . . . . . . . . . . . 36
Reserving target volumes . . . . . . . . . . . . . . . . . . . . . . . . . . . . . . . . . . . . . . . . . . . . . . . . . . . . . 38
Setting (fixing) parity groups . . . . . . . . . . . . . . . . . . . . . . . . . . . . . . . . . . . . . . . . . . . . . . . . . . 38
Releasing (unfixing) parity groups . . . . . . . . . . . . . . . . . . . . . . . . . . . . . . . . . . . . . . . . . . . . . . . 39
Changing maximum disk usage rates for HDD classes. . . . . . . . . . . . . . . . . . . . . . . . . . . . . . . . . 39
History tab . . . . . . . . . . . . . . . . . . . . . . . . . . . . . . . . . . . . . . . . . . . . . . . . . . . . . . . . . . . . . . . . . 40
Pane contents . . . . . . . . . . . . . . . . . . . . . . . . . . . . . . . . . . . . . . . . . . . . . . . . . . . . . . . . . . . . . 40
Viewing migration history logs . . . . . . . . . . . . . . . . . . . . . . . . . . . . . . . . . . . . . . . . . . . . . . . . . 41
Troubleshooting Auto LUN XP. . . . . . . . . . . . . . . . . . . . . . . . . . . . . . . . . . . . . . . . . . . . . . . . . . . . . . . 44
Using RAID Manager for manual Auto LUN XP migrations . . . . . . . . . . . . . . . . . . . . . . . . . . . . . . . . . . . 44
2 Auto LUN/Performance Control Base Monitor. . . . . . . . . . . . . . . . . . . . . . . . . . . . . . . 49
Auto LUN XP statistics . . . . . . . . . . . . . . . . . . . . . . . . . . . . . . . . . . . . . . . . . . . . . . . . . . . . . . . . . . . . 49
Auto LUN Monitoring Options pane. . . . . . . . . . . . . . . . . . . . . . . . . . . . . . . . . . . . . . . . . . . . . . . . 50
XP12000/XP10000 disk arrays . . . . . . . . . . . . . . . . . . . . . . . . . . . . . . . . . . . . . . . . . . . . . . . . 51
Usage statistics. . . . . . . . . . . . . . . . . . . . . . . . . . . . . . . . . . . . . . . . . . . . . . . . . . . . . . . . . . . . . . . . . 51
Collecting usage statistics about disk array resources. . . . . . . . . . . . . . . . . . . . . . . . . . . . . . . . . . . . 51
Viewing parity group usage statistics . . . . . . . . . . . . . . . . . . . . . . . . . . . . . . . . . . . . . . . . . . . . . . . 52
Viewing logical volume usage statistics . . . . . . . . . . . . . . . . . . . . . . . . . . . . . . . . . . . . . . . . . . . . . 52
Viewing channel adapter (CHA) usage statistics . . . . . . . . . . . . . . . . . . . . . . . . . . . . . . . . . . . . . . . 53
Viewing channel processor (CHP) usage statistics . . . . . . . . . . . . . . . . . . . . . . . . . . . . . . . . . . . . . . 54
Viewing disk adapter (DKA) usage statistics . . . . . . . . . . . . . . . . . . . . . . . . . . . . . . . . . . . . . . . . . . 54
Viewing disk processor (DKP) usage statistics . . . . . . . . . . . . . . . . . . . . . . . . . . . . . . . . . . . . . . . . . 55
Viewing data recovery and reconstruction processor (DRR) usage statistics . . . . . . . . . . . . . . . . . . . . . 55
Viewing write pending rates . . . . . . . . . . . . . . . . . . . . . . . . . . . . . . . . . . . . . . . . . . . . . . . . . . . . . 56
Viewing access path usage statistics . . . . . . . . . . . . . . . . . . . . . . . . . . . . . . . . . . . . . . . . . . . . . . . 56
Workload and traffic statistics . . . . . . . . . . . . . . . . . . . . . . . . . . . . . . . . . . . . . . . . . . . . . . . . . . . . . . 57
Collecting workload and traffic statistics about disk drives, ports, and LU paths. . . . . . . . . . . . . . . . . . 57
Viewing disk drive workload statistics . . . . . . . . . . . . . . . . . . . . . . . . . . . . . . . . . . . . . . . . . . . . . . 58
Viewing disk array port traffic statistics. . . . . . . . . . . . . . . . . . . . . . . . . . . . . . . . . . . . . . . . . . . . . . 59
Viewing HBA/port traffic statistics . . . . . . . . . . . . . . . . . . . . . . . . . . . . . . . . . . . . . . . . . . . . . . . . . 60
Index . . . . . . . . . . . . . . . . . . . . . . . . . . . . . . . . . . . . . . . . . . . . . . . . . . . . . . . . . . . . . 63
Figures
1 Data Flow during an Auto LUN XP Operation . . . . . . . . . . . . . . . . . . . . . . . . . . . . . . . . . . . . . . . . 12
2 Data Flow after an Auto LUN XP operation . . . . . . . . . . . . . . . . . . . . . . . . . . . . . . . . . . . . . . . . . . 13
3 Auto migration function example 1 . . . . . . . . . . . . . . . . . . . . . . . . . . . . . . . . . . . . . . . . . . . . . . . 15
4 Auto migration function example 2 . . . . . . . . . . . . . . . . . . . . . . . . . . . . . . . . . . . . . . . . . . . . . . . 15
5 Auto LUN pane . . . . . . . . . . . . . . . . . . . . . . . . . . . . . . . . . . . . . . . . . . . . . . . . . . . . . . . . . . . . . 24
6 WWN, Port-LUN, LDEV, and Physical tabs . . . . . . . . . . . . . . . . . . . . . . . . . . . . . . . . . . . . . . . . . . 27
7 Manual Migration tab . . . . . . . . . . . . . . . . . . . . . . . . . . . . . . . . . . . . . . . . . . . . . . . . . . . . . . . . 31
8 Auto Migration tab . . . . . . . . . . . . . . . . . . . . . . . . . . . . . . . . . . . . . . . . . . . . . . . . . . . . . . . . . . 34
9 Attribute pane . . . . . . . . . . . . . . . . . . . . . . . . . . . . . . . . . . . . . . . . . . . . . . . . . . . . . . . . . . . . . . 36
10 Class table boxes . . . . . . . . . . . . . . . . . . . . . . . . . . . . . . . . . . . . . . . . . . . . . . . . . . . . . . . . . . . 37
4
Page 5

11 Parity group table boxes. . . . . . . . . . . . . . . . . . . . . . . . . . . . . . . . . . . . . . . . . . . . . . . . . . . . . . . 37
12 Attribute tab tree . . . . . . . . . . . . . . . . . . . . . . . . . . . . . . . . . . . . . . . . . . . . . . . . . . . . . . . . . . . . 39
13 History tab . . . . . . . . . . . . . . . . . . . . . . . . . . . . . . . . . . . . . . . . . . . . . . . . . . . . . . . . . . . . . . . . 40
14 Pair status transitions during Auto LUN XP migrations using RAID Manager. . . . . . . . . . . . . . . . . . . . 45
15 Auto LUN Monitoring Options pane. . . . . . . . . . . . . . . . . . . . . . . . . . . . . . . . . . . . . . . . . . . . . . . 51
16 Parity group usage statistics . . . . . . . . . . . . . . . . . . . . . . . . . . . . . . . . . . . . . . . . . . . . . . . . . . . . 52
17 Logical volume usage statistics. . . . . . . . . . . . . . . . . . . . . . . . . . . . . . . . . . . . . . . . . . . . . . . . . . . 52
18 CHA usage statistics. . . . . . . . . . . . . . . . . . . . . . . . . . . . . . . . . . . . . . . . . . . . . . . . . . . . . . . . . . 54
19 CHP usage statistics . . . . . . . . . . . . . . . . . . . . . . . . . . . . . . . . . . . . . . . . . . . . . . . . . . . . . . . . . . 54
20 DKA usage statistics . . . . . . . . . . . . . . . . . . . . . . . . . . . . . . . . . . . . . . . . . . . . . . . . . . . . . . . . . . 55
21 DKP usage statistics . . . . . . . . . . . . . . . . . . . . . . . . . . . . . . . . . . . . . . . . . . . . . . . . . . . . . . . . . . 55
22 DRR usage statistics . . . . . . . . . . . . . . . . . . . . . . . . . . . . . . . . . . . . . . . . . . . . . . . . . . . . . . . . . . 56
23 Write pending rates . . . . . . . . . . . . . . . . . . . . . . . . . . . . . . . . . . . . . . . . . . . . . . . . . . . . . . . . . . 56
24 Usage statistics about paths between adapters and the cache switch . . . . . . . . . . . . . . . . . . . . . . . . 57
25 Usage statistics about paths between adapters and shared memory. . . . . . . . . . . . . . . . . . . . . . . . . 57
26 Usage statistics about paths between cache switches and cache memory . . . . . . . . . . . . . . . . . . . . . 57
27 Workload statistics for all parity groups . . . . . . . . . . . . . . . . . . . . . . . . . . . . . . . . . . . . . . . . . . . . 58
28 Workload statistics for a specific parity group . . . . . . . . . . . . . . . . . . . . . . . . . . . . . . . . . . . . . . . . 58
29 Workload statistics for logical volumes in a parity group . . . . . . . . . . . . . . . . . . . . . . . . . . . . . . . . 58
30 Traffic statistics about ports in a disk array . . . . . . . . . . . . . . . . . . . . . . . . . . . . . . . . . . . . . . . . . . 59
31 Traffic statistics about host ports to which a disk array port is connected. . . . . . . . . . . . . . . . . . . . . . 59
32 Traffic statistics about host ports in a host group . . . . . . . . . . . . . . . . . . . . . . . . . . . . . . . . . . . . . . 60
33 Traffic statistics about LU paths . . . . . . . . . . . . . . . . . . . . . . . . . . . . . . . . . . . . . . . . . . . . . . . . . . 60
34 Traffic statistics for host bus adapters . . . . . . . . . . . . . . . . . . . . . . . . . . . . . . . . . . . . . . . . . . . . . . 61
35 Traffic statistics for each PFC group . . . . . . . . . . . . . . . . . . . . . . . . . . . . . . . . . . . . . . . . . . . . . . . 61
36 Traffic statistics for each port connected to a specified HBA . . . . . . . . . . . . . . . . . . . . . . . . . . . . . . 61
Tables
1 Document conventions . . . . . . . . . . . . . . . . . . . . . . . . . . . . . . . . . . . . . . . . . . . . . . . . . . . . . . . . . . 8
2 Movability of volumes in pairs consisting of CV and normal values . . . . . . . . . . . . . . . . . . . . . . . . . . 16
3 Non-cascaded volumes that can be used as source volumes . . . . . . . . . . . . . . . . . . . . . . . . . . . . . . . 18
4 Cascaded volumes that can be used as source volumes . . . . . . . . . . . . . . . . . . . . . . . . . . . . . . . . . . 18
5 Control cylinders by emulation type . . . . . . . . . . . . . . . . . . . . . . . . . . . . . . . . . . . . . . . . . . . . . . . . 20
6 Total number of differential tables per migration plan . . . . . . . . . . . . . . . . . . . . . . . . . . . . . . . . . . . . 21
7 Control cylinders by emulation type . . . . . . . . . . . . . . . . . . . . . . . . . . . . . . . . . . . . . . . . . . . . . . . . 21
8 The estimated delay in the copying speed. . . . . . . . . . . . . . . . . . . . . . . . . . . . . . . . . . . . . . . . . . . .23
9 Graph contents based on list selection (Port-LUN tab) . . . . . . . . . . . . . . . . . . . . . . . . . . . . . . . . . . . . 26
10 Auto LUN pane, Port-LUN tab icons . . . . . . . . . . . . . . . . . . . . . . . . . . . . . . . . . . . . . . . . . . . . . . . . 28
11 Auto LUN pane, Physical tab icons . . . . . . . . . . . . . . . . . . . . . . . . . . . . . . . . . . . . . . . . . . . . . . . . 29
12 Migration log messages . . . . . . . . . . . . . . . . . . . . . . . . . . . . . . . . . . . . . . . . . . . . . . . . . . . . . . . . 44
13 Errors during Auto LUN XP migrations or migration cancellations using RAID Manager . . . . . . . . . . . . 46
Auto LUN XP user guide for the XP12000/XP10000 5
Page 6

6
Page 7

About this guide
This guide provides information about the following:
•”Auto LUN XP for the XP12000/XP10000”on page 11
•”Auto LUN XP features” on page 11
•”Auto LUN XP tasks” on page 11
•”Reserve volumes” on page 12
•”Volume migration” on page 12
•”Estimating usage rates” on page 13
•”Automatic migration” on page 14
•”Manual migration” on page 16
•”Requirements and restrictions” on page 16
•”Starting Auto LUN XP” on page 24
•”Creating and executing migration plans” on page 30
•”Troubleshooting Auto LUN XP” on page 44
•”Using RAID Manager for manual Auto LUN XP migrations” on page 44
•”Auto LUN/Performance Control Base Monitor”on page 49
•”Auto LUN XP statistics” on page 49
•”Usage statistics” on page 51
•”Workload and traffic statistics” on page 57
Supported storage platforms and firmware
In this guide, the term array refers to the following storage platforms:
• HP StorageWorks XP12000 Disk Array
• HP StorageWorks XP10000 Disk Array
For information about required firmware versions, see the HP StorageWorks XP Remote Web Console user
guide for XP12000/XP10000.
Intended audience
This guide is intended for customers and HP-authorized service providers with knowledge of the following:
• Disk array hardware and software
• Data processing and RAID storage subsystems and their basic functions
Prerequisites
Prerequisites for using this product include:
• Installation of the HP StorageWorks disk array(s)
• Installation of the license key for this product
Related documentation
In addition to this guide, please refer to other documents for this product:
• HP StorageWorks Command View XP user guide for XP Disk Arrays
• HP StorageWorks XP Remote Web Console user guide for XP12000/XP10000
• HP StorageWorks Continuous Access XP Journal user guide
• HP StorageWorks Performance Control XP user guide
• HP StorageWorks XP Disk/Cache Partition user guide
Auto LUN XP user guide for the XP12000/XP10000 7
Page 8
•
Hitachi True Copy for z/OS® for the XP128/XP1024/XP10000/XP1200
•
HP StorageWorks RAID Manager XP user guide
You can find these documents at http://www.hp.com/support/
Document conventions and symbols
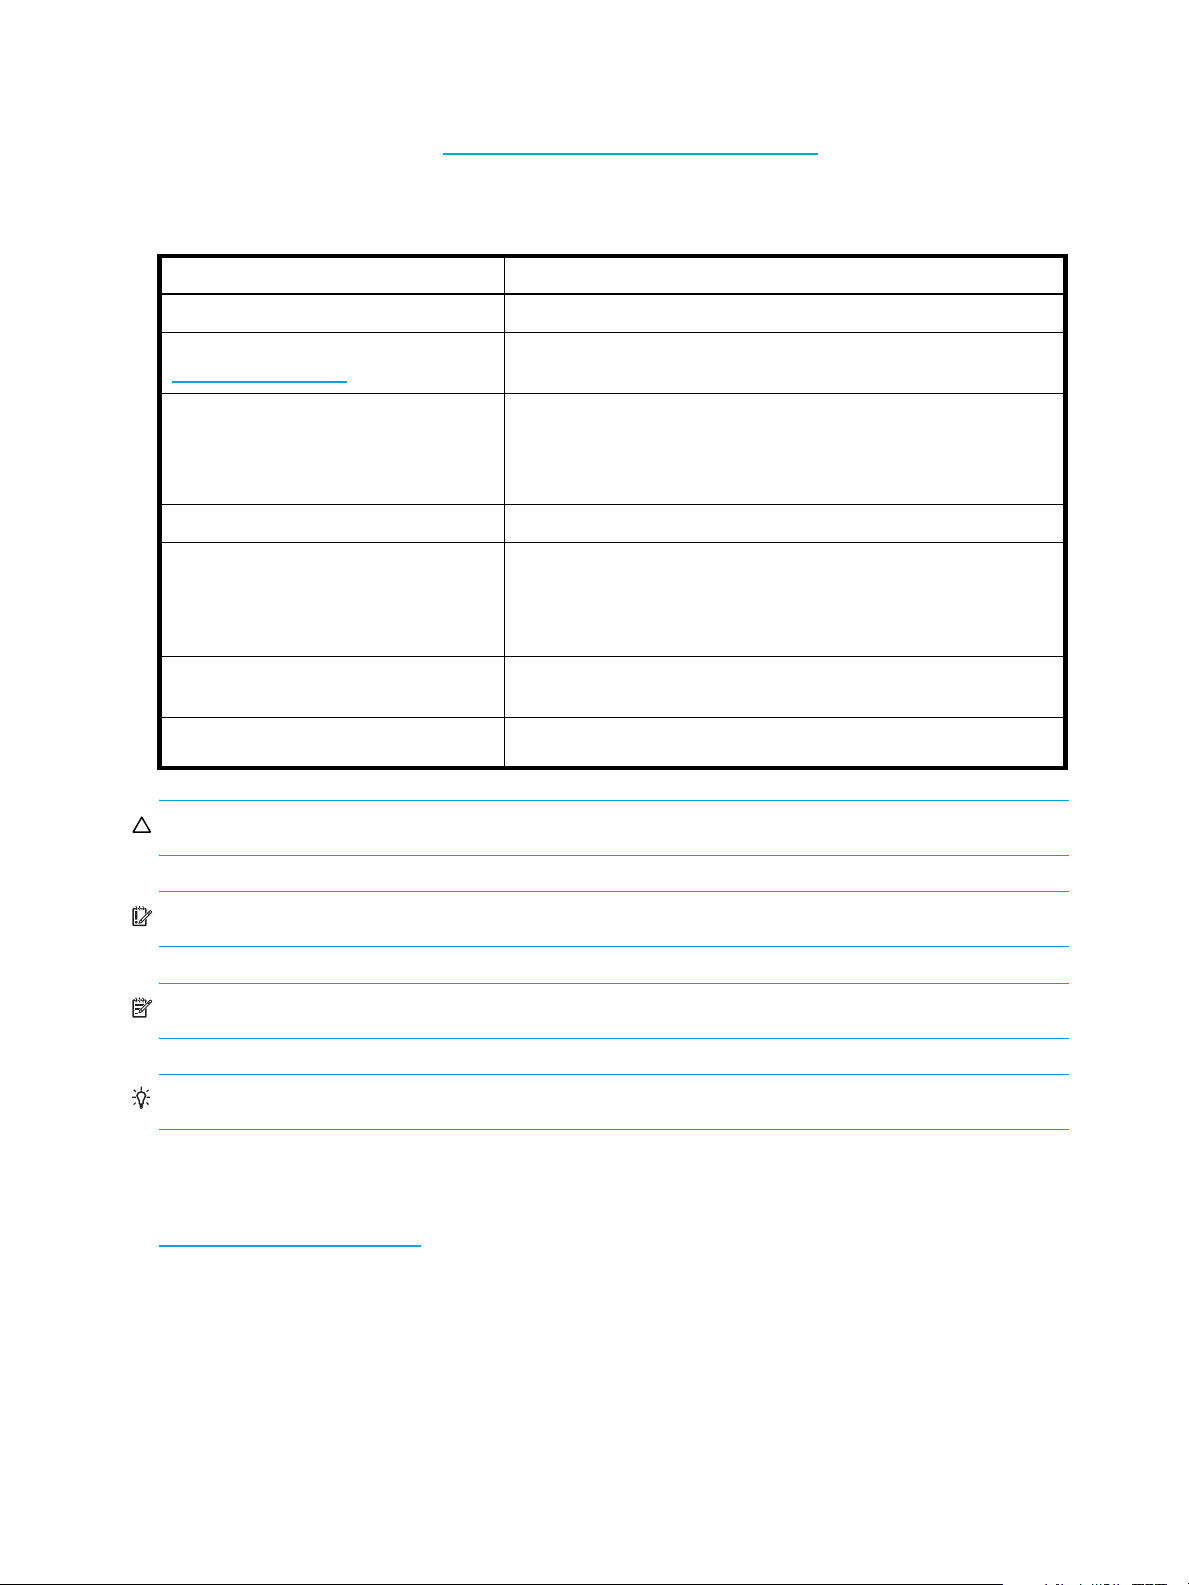
Table 1 Document conventions
Convention Element
Blue text: Table 1
Blue, underlined text:
(http://www.hp.com)
Bold text
Italic text
Monospace text
Monospace, italic text
Cross-reference links and e-mail addresses
Web site addresses
• Keys that are pressed
• Text typed into a GUI element, such as a box
• GUI elements that are clicked or selected, such as menu and list
Text emphasis
• File and directory names
• System output
• Code
• Commands, their arguments, and argument values
• Code variables
• Command variables
rwc/manuals.
items, buttons, and check boxes
Monospace, bold text
CAUTION: Indicates that failure to follow directions could result in damage to equipment or data.
IMPORTANT: Provides clarifying information or specific instructions.
NOTE: Provides additional information.
TIP: Provides helpful hints and shortcuts.
HP technical support
Telephone numbers for worldwide technical support are listed on the HP support web site:
http://www.hp.com/support/
Collect the following information before calling:
• Technical support registration number (if applicable)
• Product serial numbers
• Product model names and numbers
• Applicable error messages
• Operating system type and revision level
• Detailed, specific questions
Emphasized monospace text
.
8
Page 9

For continuous quality improvement, calls may be recorded or monitored.
Subscription service
HP strongly recommends that customers register online using the Subscriber's choice web site:
http://www.hp.com/go/e-updates
Subscribing to this service provides you with e-mail updates on the latest product enhancements, newest
driver versions, and firmware documentation updates as well as instant access to numerous other product
resources.
After subscribing, locate your products by selecting Business support and then Storage under Product
Category.
HP web sites
For additional information, see the following HP web sites:
.
• http://www.hp.com
• http://www.hp.com/go/storage
• http://www.hp.com/service_locator
• http://www.hp.com/support/manuals
• http://www.hp.com/support/downloads
• http://www.hp.com/support/rwc/manuals
Documentation feedback
HP welcomes your feedback.
To make comments and suggestions about product documentation, please send a message to
storagedocs.feedback@hp.com. All submissions become the property of HP.
Auto LUN XP user guide for the XP12000/XP10000 9
Page 10

10
Page 11

1 Auto LUN XP for the XP12000/XP10000
Auto LUN XP monitors resources in disk arrays and hosts connected to disk arrays. Auto LUN XP works with
open system and mainframe volumes. You can analyze the information Auto LUN XP provides to optimize
data storage and retrieval on disk arrays, resolve activity bottlenecks, and optimize volume allocation.
Auto LUN XP features
Auto LUN XP provides the following features:
• When a migration plan (set of detailed user-specified parameters) is in place, Auto LUN XP
automatically migrates logical volumes in disk arrays.
• Auto LUN XP operations are completely non-disruptive. Data being migrated remains online to all hosts
for read and write I/O operations throughout the volume migration process.
• Auto LUN XP supports manual volume migration operations and estimates performance improvements
prior to migration.
Auto LUN XP begins by obtaining usage statistics about physical hard disk drives, logical volumes,
processors, and other resources in disk arrays. Then, using manual or automatic migration, Auto LUN XP
balances the workload among hard disk drives, logical volumes, and processors to improve system
performance.
Use Performance Control XP to ensure that I/O operations requiring high performance receive higher
priority than I/O operations from other, lower-priority hosts. You can set the priority of disk arrays, monitor
I/O and transfer rates, and limit performance of less-critical arrays when necessary to maintain
performance of high-priority arrays.
NOTE: Partition-level users in the StorageAdmins group cannot use Auto LUN XP, but users with full array
access can use Auto LUN XP.
For users in the StorageAdmins group, the functions you can use are limited. For more information about
these limitations, see the HP StorageWorks Command View XP user guide for XP Disk Arrays or the
HP StorageWorks XP Remote Web Console user guide for XP12000/XP10000.
Auto LUN XP tasks
• Load balance disk array resources to improve performance. Balancing resource usage can significantly
improve disk array performance. Use Auto LUN XP data to optimize several areas of performance,
including front-end and back-end processor usage and allocation of logical volumes to physical disk
drives and RAID level.
• Optimize disk drive access patterns. Auto LUN XP collects and analyzes information about disk drive
access patterns and can migrate volumes to optimize host access to data. For example, RAID-1
technology might provide better performance than RAID-5 under certain conditions, and one disk drive
type might provide better performance than another for certain types of access. Auto LUN XP fine-tunes
logical volume allocation.
• Analyze disk array usage. Auto LUN XP displays performance data graphically to highlight peaks and
trends. Use the graph to identify activity bottlenecks.
• Better utilize RAID levels and HDD types. The XP12000/XP10000 supports both RAID-1 and RAID-5
technologies and a mixture of RAID-1 and RAID-5 parity groups. The XP12000/XP10000 also supports
several types of hard disk drives (HDDs) and allows a mixture of HDD types within each disk array
domain to provide maximum flexibility in configuration. Auto LUN XP takes into account RAID level and
physical HDD performance of each parity group, enabling reallocation of logical volumes and
optimization with respect to both RAID level and HDD type. The proper combination of RAID level and
HDD type for logical volumes can significantly improve disk array performance.
Auto LUN XP user guide for the XP12000/XP10000 11
Page 12
Reserve volumes
The reserve volume function reserves target volumes for automatic and manual migration operations. After
you reserve a number of target volumes, Auto LUN XP maintains this number of reserved volumes by
swapping the reserve attribute after each migration operation (following the migration operation, the
original source volume becomes a reserved volume).
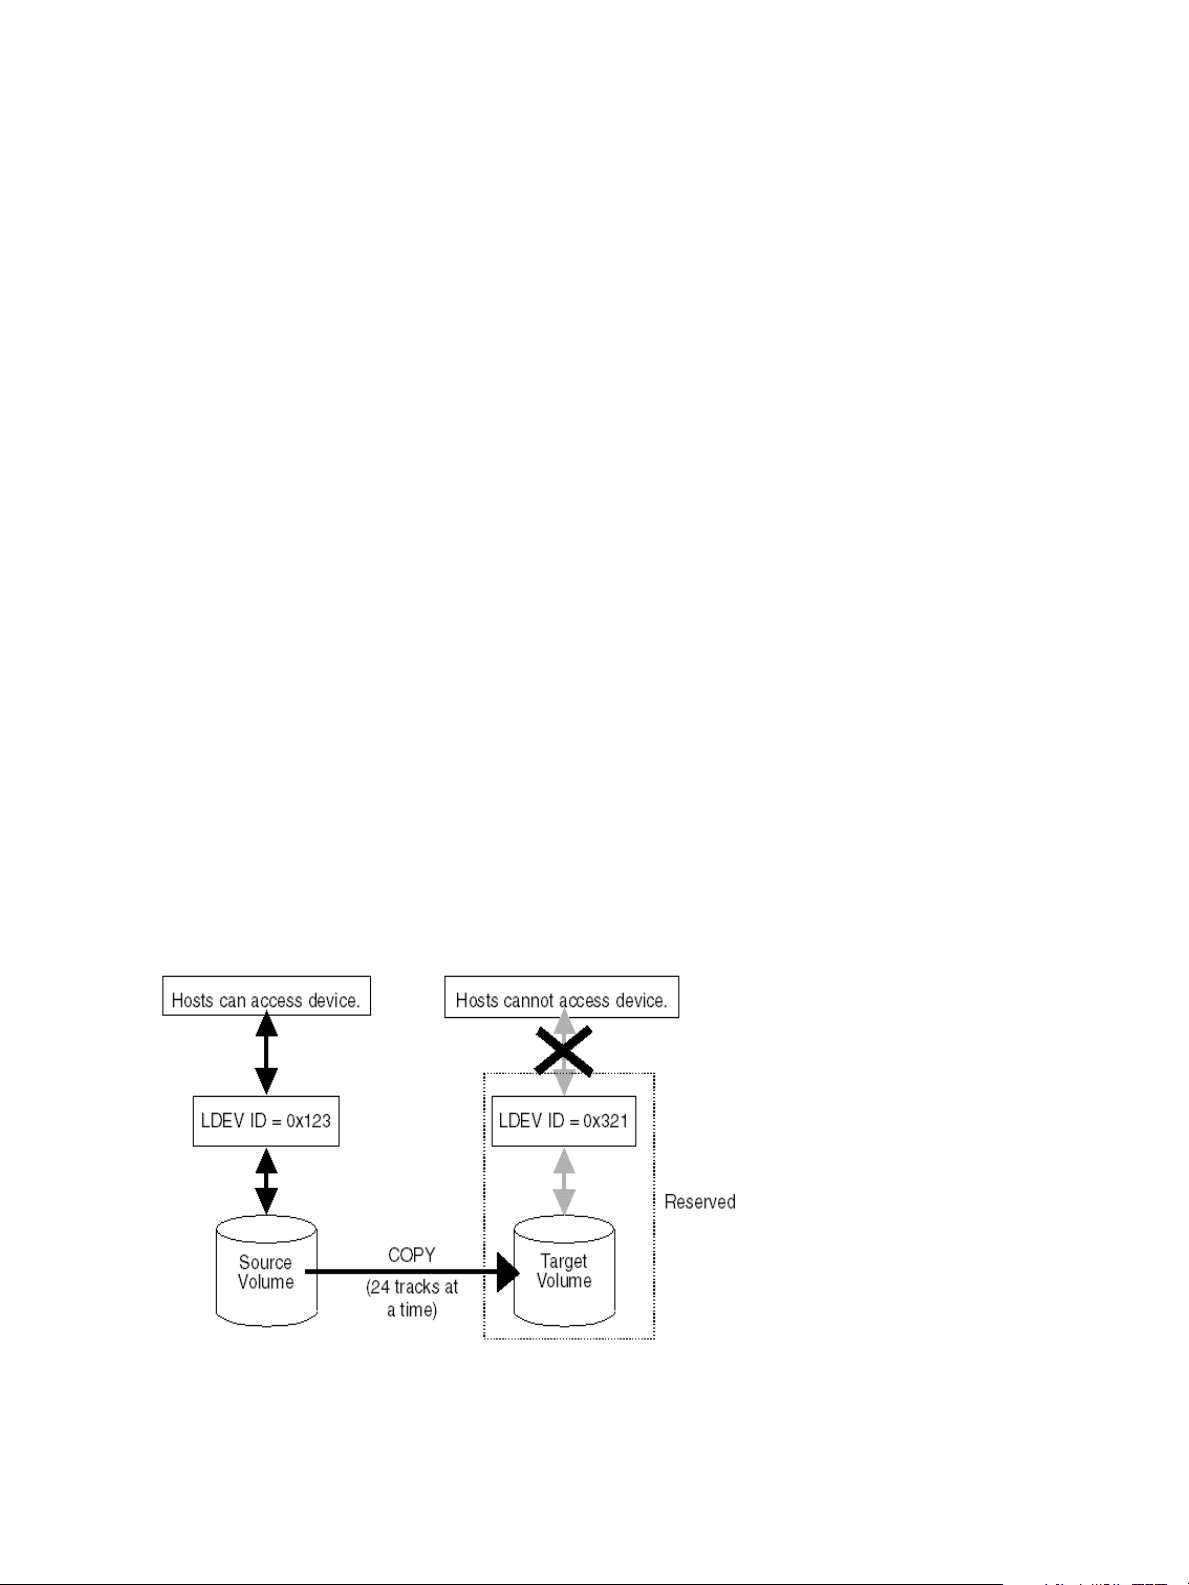
Volume migration
Auto LUN XP volume migration operations consist of two steps:
• Copy the data on the Auto LUN XP source volume to the Auto LUN XP target volume
• Transfer host access to the target volume to complete the migration
The Auto LUN XP source volume can be online to hosts during migration. The target volume is reserved
prior to migration to prevent host access during migration. The source and target volumes can be anywhere
in the disk array.
The Auto LUN XP copy operation copies the entire contents of the source volume to the target volume. If
write I/Os update the source volume during the copy operation, the XP12000/XP10000 uses a cylinder
map to track updates and performs additional copy operations after the initial copy is complete to
duplicate the updates at the target volume.
When volumes are fully synchronized (no differential data on source volume), the XP12000/XP10000
completes the migration by swapping the reserve attribute (target becomes normal and source becomes
reserved) and redirecting host access to the target volume. Auto LUN XP performs all migration operations
sequentially (one volume migration at a time).
Typical copy times for open system volumes (with no other I/O activity) are:
• OPEN-3: 1.5 minutes
• OPEN-8/9: 4.5 minutes
• OPEN-E: 9 minutes
• OPEN-V: variable
For automatic and manual migration operations, Auto LUN XP checks the current write pending rate. If the
write pending rate is higher than 60%, Auto LUN XP cancels the migration. For auto migration, Auto LUN
XP also checks current disk usage of source volumes and source and target parity groups. If current disk
usage is higher than the user-specified maximum for auto migration, Auto LUN XP cancels the migration.
Figure 1 Data Flow during an Auto LUN XP Operation
12 Auto LUN XP for the XP12000/XP10000
Page 13
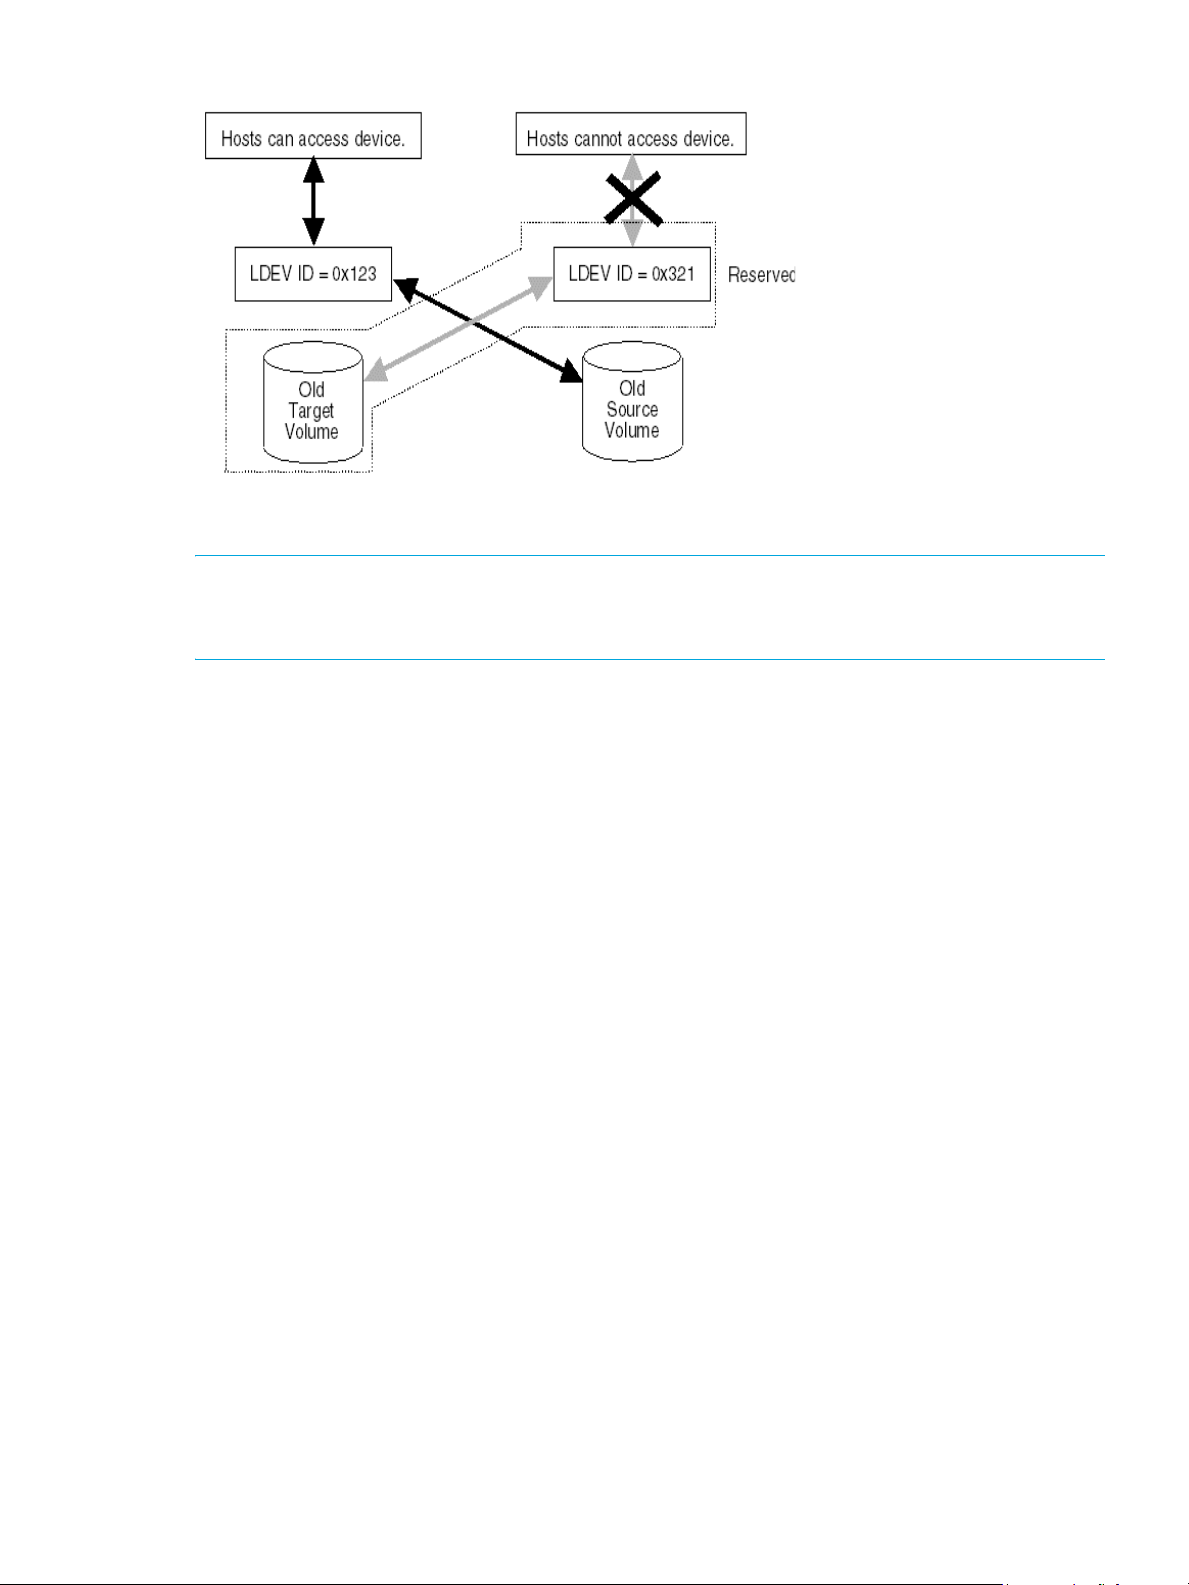
Figure 2 Data Flow after an Auto LUN XP operation
NOTE: Immediately after a source volume and a target volume replace each other, RAID level before the
replacement might be displayed or an internal error might occur in the disk array. In this case, select
Refresh to update the display.
Estimating usage rates
The estimate function calculates expected usage of source and target parity groups after a proposed
volume migration. The estimate function uses subsystem usage data collected by the monitor function, HDD
performance characteristics, and RAID level to estimate expected usage rates. The automatic and manual
migration functions use these estimated values to verify proposed migrations.
For each proposed migration operation, Auto LUN XP automatically estimates expected usage rates for
source and target parity groups. The estimate function calculates expected results of a proposed volume
migration based on XP12000/XP10000 monitor data collected during the user-specified monitor data
term. The estimate function considers RAID level and HDD type when estimating expected usage rates
(RAID-1 and RAID-5 have different access characteristics).
The estimate function is a critical component of the auto migration function. The estimate function calculates
expected parity group usage for source and target parity groups, and the auto migration function uses
these estimates to verify proposed migrations. If any condition prevents Auto LUN XP from estimating an
expected usage rate (for example, invalid monitor data), the auto migration function will not schedule the
migration operation.
For manual migration operations, when you select the source volume, Auto LUN XP displays expected
usage rates for the source parity group, so you can see the predicted effect of migrating the selected
volume out of its group. When you select the target volume, Auto LUN XP displays expected usage rates for
the target parity group, so you can see the predicted effect of adding the selected source volume to the
selected parity group.
Auto LUN XP does not estimate processor or access path usage. You can use Auto LUN XP migration
operations to improve DKP and DRR usage, but cannot use them to address CHP or access path usage.
Perform Auto LUN XP migration only when you expect a large improvement in disk array performance.
Auto LUN XP migration might not provide significant improvement if parity group or volume usage varies
only slightly or if overall DKP or DRR usage is relatively high. Also keep in mind that disk array tuning
operations might improve performance in one area while decreasing performance in another. For
example, suppose parity groups A and B have average usage values of 20% and 90%, respectively. Auto
LUN XP estimates that if one logical volume is migrated from parity group B to parity group A, the usage
values will become 55% and 55%. If you perform this migration operation, I/O response time for parity
Auto LUN XP user guide for the XP12000/XP10000 13
Page 14

group B will probably decrease and I/O response time for parity group A might increase, while the overall
throughput might increase or decrease.
From an open-system host, you can also use RAID Manager command to perform manual volume
migration. To use RAID Manager to perform Auto LUN XP migration, install Auto LUN XP on the
XP12000/XP10000. For more information, see ”Using RAID Manager for manual Auto LUN XP
migrations” on page 44.
Automatic migration
Auto migration is the primary tuning method for disk arrays. Auto migration analyzes data and executes
migration plans automatically based on user-specified parameters. Use Auto LUN XP to schedule auto
migration operations, select data to be analyzed, and specify maximum time and performance impact of
auto migration operations. Auto LUN XP displays a detailed log of auto migration activities.
Auto migration operations are based on the following major parameters:
• Hierarchy of parity groups. Auto LUN XP arranges parity groups in the XP12000/XP10000 in a
hierarchy based on HDD type, and assigns each parity group to a class based on performance of its
HDD type. Classes are ordered from highest performance drive (class A) to lowest performance drive
(class B, C, or higher depending on number of HDD types available). The auto migration function uses
this hierarchy to identify target volumes for auto migration operations.
The auto migration function can also specify “fixed” parity groups that are excluded from auto
migration operations.
• Maximum disk usage. The auto migration function specifies the maximum disk usage rate for each
HDD class in the XP12000/XP10000, and uses these limits to identify source volumes for auto
migration operations.
You must identify and specify disk usage limits for your environment. When you use the same maximum
disk usage rate for all HDD classes, HDD performance is the only factor used in determining auto
migration plans. When you specify different usage limits for HDD classes, you can bias the auto
migration function to favor (or avoid) certain HDD types. Migrating high-usage volumes to higher HDD
classes should significantly improve host access to volumes, which can also have a large effect on disk
array performance.
The auto migration function also specifies the maximum disk usage rate during auto migration
operations, so you can control the impact of Auto LUN XP copy operations on disk array performance.
If source or target parity group usage exceeds the specified limit during migration, the auto migration
operation is canceled.
Do not perform manual migration operations while the auto migration function is active. Always turn off the
auto migration function and cancel any existing auto migration plan before performing manual migration
operations.
Storage management by maximum disk usage
Use the auto migration function to specify maximum usage rate for each HDD class in an
XP12000/XP10000. When a parity group exceeds this limit, the auto migration function makes a plan to
migrate one or more volumes in this parity group to a parity group in a higher HDD class or to a parity
group in the same HDD class with lower usage.
This storage tuning method addresses and can eliminate disk drive activity bottlenecks. Auto LUN XP uses
its estimated usage rates to verify each proposed auto migration, and will not perform a migration
operation that might result in a target parity group exceeding the user-specified maximum disk usage rate.
The auto migration function identifies parity groups that exceed the user-specified usage limit, and selects
high-usage volumes as source volumes to be migrated to parity groups in higher HDD classes or to other
parity groups in the same HDD class with lower usage.
Keep reserved volumes in high HDD classes
When parity groups in the highest HDD classes start to run out of reserved (empty) volumes, Auto LUN XP
maintains available reserve volumes by automatically migrating low-usage volumes from higher HDD class
groups to lower HDD class groups.
14 Auto LUN XP for the XP12000/XP10000
Page 15

The auto migration function can move a high-usage volume to a higher HDD class group, forcing a
low-usage volume out of that HDD class group. To do so, the auto migration function requires a minimum of
5% difference in estimated disk usage between the two volumes. If the difference is less than 5%, this
migration is considered ineffective and the volume is not moved.
Figure 3 Auto migration function example 1
The auto migration function can also move a volume from one parity group to another group of the same
HDD class, forcing another volume out of the destination parity group. To do so, the auto migration
function requires a minimum of 20% difference in estimated disk usage between the two volumes. If the
difference is less than 20%, this migration is considered ineffective and the volume is not moved.
Figure 4 Auto migration function example 2
Auto LUN XP user guide for the XP12000/XP10000 15
Page 16

Auto migration sequence of events
The following are the typical steps to set up an auto migration plan:
1. Analyze monitor data. You specify the monitor data term to be analyzed.
2. Make auto migration plan. You specify the auto migration plan’s parameters.
3. Perform auto migration plan. You specify when the auto migration plan is executed.
4. Analyze monitor data to confirm tuning results.
Manual migration
Use manual migration to select and migrate logical volumes under direct, manual control. The manual
migration function displays estimated results of proposed migration operations, which you can use to
determine expected performance improvements prior to the actual migration.
While auto migration operations are based on disk usage and hierarchy of parity groups, you can use
manual migration operations to address back-end processor usage (DKPs and DRRs) and volume and
parity group usage. If monitoring shows high or unbalanced processor usage, use manual migration
operations to tune the processor performance of the XP12000/XP10000.
Requirements and restrictions
Selection of CU group
When you select CU group CU00-3F, the Auto LUN XP buttion is available. With all other CU group
selections, the button is deactivated (grayed out).
Logical volumes
Source and target volumes must be in the same XP12000/XP10000. Also, a combination of source and
target volumes should satisfy the following conditions:
• The source and target volumes have the same emulation type and capacity.
• If the emulation type is not OPEN-V, the source and target volumes are customized volumes (CVs), or
the volumes are normal volumes.
• If you use LUN Security XP Extension with Auto LUN XP, volume management areas (VMA) are set on
the source and target volumes, or VMAs are not set on both volumes. You cannot set VMA on a volume
that is already reserved by Auto LUN XP. To set VMA on a volume, perform the VMA setting first, and
then reserve that volume.
• The CU:LDEV numbers of volumes take the value between 00:00 and 3F:FF.
NOTE: For users in the StorageAdmins group, the functions you can use are limited. For more information
about these limitations, see the HP StorageWorks Command View XP user guide for XP Disk Arrays or the
HP StorageWorks XP Remote Web Console user guide for XP12000/XP10000.
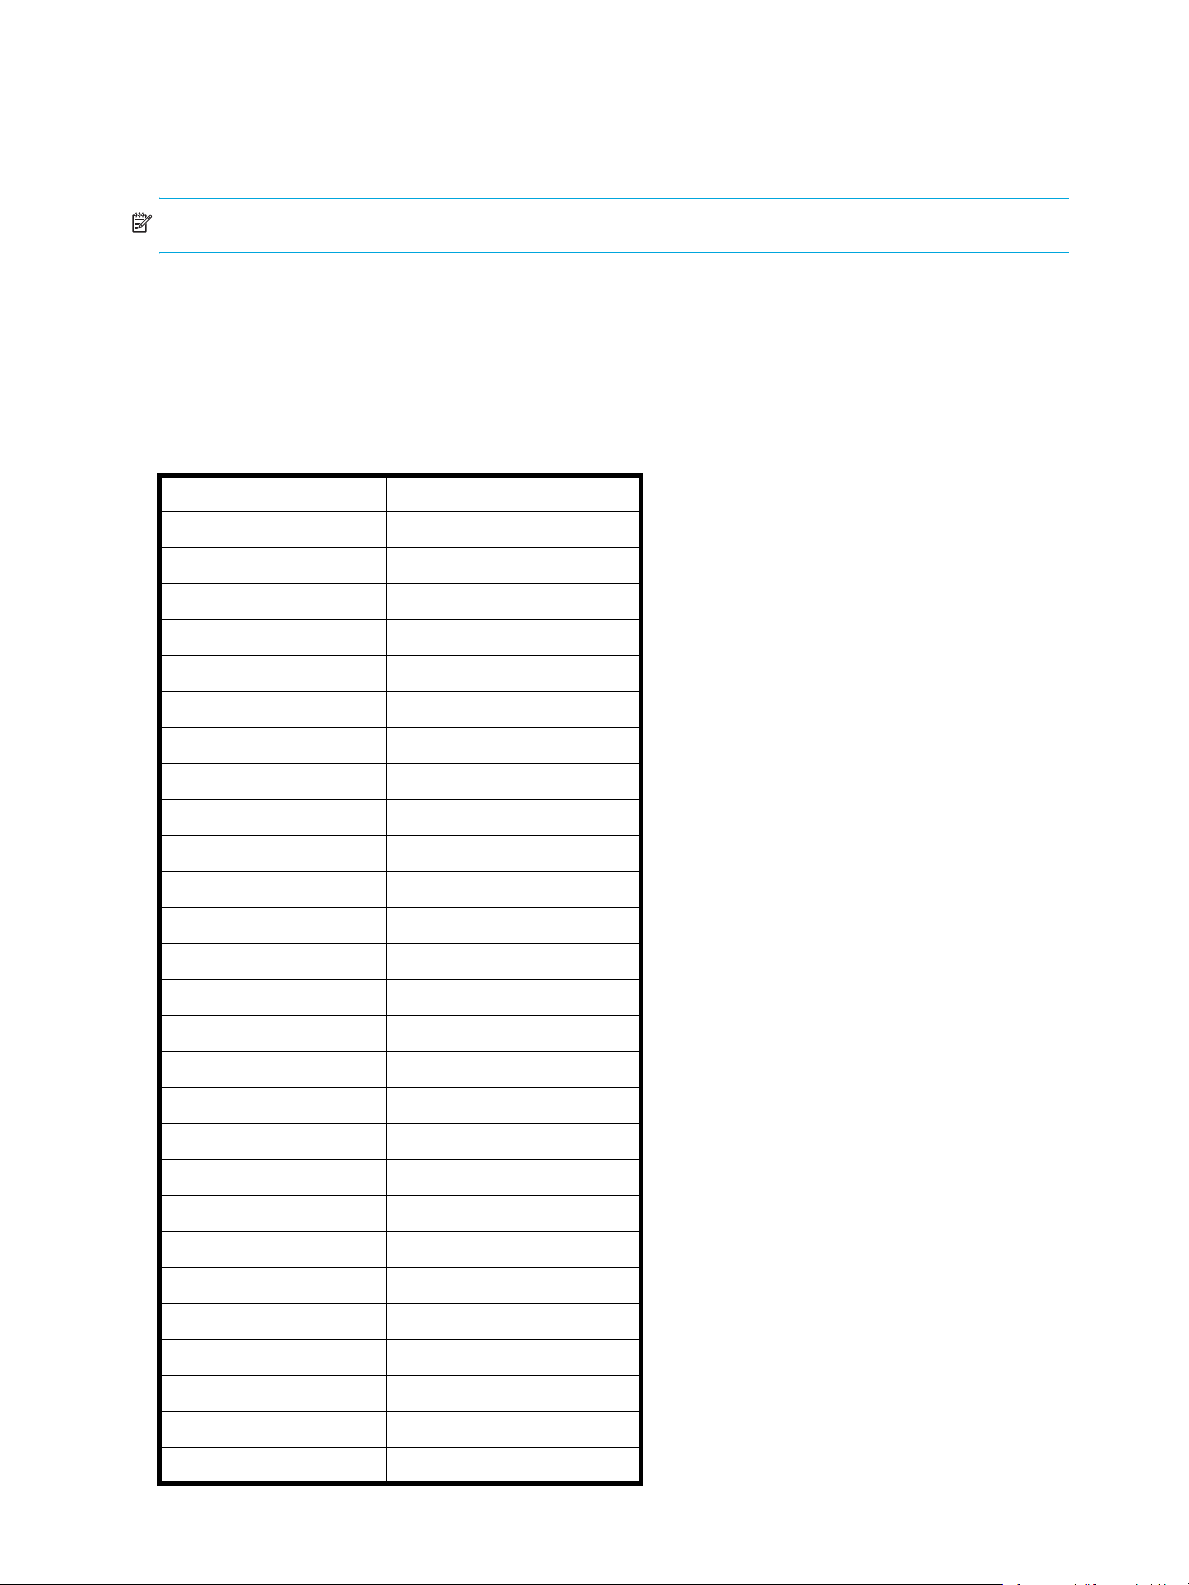
Whether you can or cannot perform volume migration with a pair consisting of CVs and normal volumes
depends on the volumes’ emulation type. For details, see Table 2.
Table 2 Movability of volumes in pairs consisting of CV and normal values
Source volume Target volume
Normal volume
(not OPEN-V)
Normal volume
(not OPEN-V)
Normal volume
(OPEN-V without
VMA setting)
16 Auto LUN XP for the XP12000/XP10000
Movable Not movable Not movable Not movable Not movable Not movable
Not movable Movable Not movable Not movable Movable Not movable
Normal volume
(OPEN-V without
VMA setting)
Normal volume
(OPEN-V with
VMA setting)
CV
(not OPEN-V)CV(OPEN-V without
VMA setting)
CV
(OPEN-V with
VMA setting)
Page 17

Table 2 Movability of volumes in pairs consisting of CV and normal values (continued)
Source volume Target volume
Normal volume
(OPEN-V with
VMA setting)
CV
(not OPEN_V)
CV
(OPEN-V without
VMA setting)
CV
(OPEN-V with
VMA setting)
You cannot make pairs of the volumes.
Specify the logical volumes satisfying the conditions described in Table 2 as the source and target
volumes. The source and target volumes must be specified by LDEV ID.
Source volumes
The following describes whether volumes can be used as source volumes:
• Volumes set as command devices (reserved for use by hosts) cannot be used as source volumes.
• Volumes in an abnormal or inaccessible condition (for example, fenced) cannot be used as source
volumes.
• Volumes with Cache LUN data stored in cache cannot be used as source volumes.
• iSCSI volumes (volumes to which paths are defined from iSCSI ports) cannot be used as source
volumes.
• Volumes that HP StorageWorks Continuous Access XP Journal or Universal Replicator for z/OS® uses
as a data or journal volume cannot be used as source volumes.
• Volumes reserved by a migration program other than Auto LUN XP cannot be used as source volumes.
• Volumes on which the RAID Manager is performing volume migration operations.
• Volumes that form a Snapshot XP pair cannot be used as source volumes.
• Volumes used by Continous Access XP Journal or Universal Replicator for z/OS® as a journal volume.
• Volumes used by the IBM 3990 Concurrent Copy (CC) host software function.
• Virtual and pool volumes cannot be used as source volumes.
• Inaccessible volumes, or volumes in an abnormal state cannot be used as source volumes (for example,
pinned track or fenced volumes).
• Volumes being shredded.
• Universal Replicator for z/OS®: If the status of a Universal Replicator for z/OS® volume is Pending
duplex or Duplex, the volume cannot be used as a source volume. Note that if you specify a Universal
Replicator for z/OS® volume as a source volume, you cannot specify an external volume as the target
volume.
• Continuous Access XP Journal. If the status of a HP StorageWorks Continuous Access XP Journal volume
is PSUS, PSUE, or SMPL, the volume can be used as a source volume. If not, the volume cannot be used
as a source volume. When a Continuous Access XP Journal pair is deleted from the MCU, the status of
both volumes changes to SMPL, and both volumes can be used as source volumes. When a Continuous
Access XP pair is deleted from the RCU, the status of the P-VOL changes to PSUS, the status of the S-VOL
changes to SMPL, and both volumes can be used as source volumes.If the status of a Continuous
Access XP Journal volume is COPY or PAIR, the volume cannot be used as a source volume. Note that
if you specify a Continuous Access XP Journal volume as a source volume, you cannot specify an
external volume as the target volume.
• Business Copy. Using a BC volume as a source volume depends on the status and cascade
configuration of the volume. If the status of a BC volume is not split-pending COPY(SP) or PSUS(SP), the
Not movable Not movable Movable Not movable Not movable Not movable
Not movable Not movable Not movable Movable Not movable Not movable
Not movable Movable Not movable Not movable Movable Not movable
Not movable Not movable Movable Not movable Not movable Movable
Auto LUN XP user guide for the XP12000/XP10000 17
Page 18

volume can be used as a source volume. If the status is COPY(SP) or PSUS(SP), the volume cannot be
used as a source volume. This applies to cascaded and non-cascaded volumes.
Table 3 shows which non-cascaded volumes can be used as source volumes.
Table 3 Non-cascaded volumes that can be used as source volumes
Pair configuration Use P-VOL as source volume Use S-VOLs as source volumes
Ratio of P-VOL to S-VOLs is 1:1 Yes Yes
Ratio of P-VOL to S-VOLs is 1:2 Yes Yes
Ratio of P-VOL to S-VOLs is 1:3 No Yes
Table 4 shows which cascaded volumes can be used as source volumes.
Table 4 Cascaded volumes that can be used as source volumes
Pair Configuration Use P-VOL as source volume Use S-VOLs as source volumes
L1 pair, ratio of P-VOL to S-VOLs is 1:1 Yes Yes
L1 pair, ratio of P-VOL to S-VOLs is 1:2 Yes Yes
L1 pair, ratio of P-VOL to S-VOLs is 1:3 No Yes
L2 pair, ratio of P-VOL to S-VOLs is 1:1 Yes No
L2 pair, ratio of P-VOL to S-VOLs is 1:2 No No
If any of the following operations are performed on an Auto LUN XP source volume during migration, the
Auto LUN XP volume migration process stops:
• Continuous Access XP operations that change the volume status to something other than PSUS, PSUE, or
SMPL
• BC operations that change the volume status to COPY(SP) or PSUS(SP)
• Continuous Access XP Journal operations
• Continuous Access XP Journal or Universal Replicator for z/OS® operation that changes the volume
status to COPY.
LUSE source volumes
To specify a LUSE source volume for migration, specify individual LDEVs within the LUSE volume (for
example, LDEVs with high usage). Auto LUN XP migrates only specified LDEVs. If needed, specify all LDEVs
of the LUSE volume to relocate the entire LUSE volume. In this case, ensure that the required reserved target
LDEVs are available.
Target volumes
Target volumes must be reserved prior to migration. Hosts cannot access reserved volumes. The following
volumes cannot be reserved:
• Logical Unit Size Expansion (LUSE) volumes
• Volumes set as command devices
• Volumes assigned to BC or Continuous Access XP pairs
• Volumes reserved for BC operations
• Volumes with Cache LUN data stored in cache
• iSCSI volumes (for example, volumes to which paths are defined from iSCSI ports)
• Volumes in abnormal or inaccessible conditions (for example, fenced)
• Volumes Continuous Access XP Journal uses
• Volumes specified with the Read Only or Protect attribute
• Volumes that Volume Security disabled for use as secondary volumes
• Volumes that LUN Security XP Extension specified as Read Only or Protect or disabled for use as
secondary volumes
18 Auto LUN XP for the XP12000/XP10000
Page 19

• Volumes reserved by a migration program other than Auto LUN XP
• Volumes on which the RAID Manager is performing volume migration operations.
• Volumes that form a Snapshot XP pair.
• Virtual and pool volumes.
Number of volumes
In manual migrations, the number of migration plans that can be executed concurrently might be restricted,
depending on use of other Command View XP or XP Remote Web Console programs and emulation types
and sizes of migrated volumes. Therefore, the number of migration plans that can be executed concurrently
is not constant.
A maximum of 36 Auto LUN XP copy operations can be requested at the same time. Auto LUN XP performs
migration operations sequentially (one volume at a time).
The maximum number of Auto LUN XP copy operations plus BC pairs is 1024.
Calculating the number of Auto LUN XP concurrent migration plans
When a migration plan is created, differential tables are used. Differential tables are disk array resources
that are shared by Flex Copy XP, Business Copy XP, ShadowImage for z/OS
Mirroring, Hitachi FlashCopy Mirroring Version2, Snapshot XP, and Auto LUN XP. The maximum number of
differential tables that Auto LUN XP can use is the number of total differential tables in the disk array minus
the number used by other applications.
When using Auto LUN XP for manual volume migration, the number of migration plans that can be
executed concurrently depends on the following:
• How much shared memory is available for differential tables. The number of differential tables
available in one disk array is determined by whether additional shared memory for differential tables is
installed.
• You can use 13,652 differential tables if no additional shared memory for differential tables is
installed.
• You can use 30,718 differential tables if additional shared memory for differential tables is installed.
NOTE: Contact your HP account support representative for more information about adding additional
shared memory.
• The emulation type and capacity of each volume to be migrated:
The number of differential tables needed to migrate one volume differs depending on the emulation
type and size of the volume. For the number of differential tables needed for migrating a mainframe
volume, see page 19. For the number of differential tables needed for migrating an open-system
volume, see page 21.
®
, Hitachi FlashCopy
You can estimate the maximum number of migration plans that can be executed concurrently by applying
the previously described conditions to the following equation: , where:
• Σ(α) is the total number of differential tables needed to migrate all volumes.
• (β) is the number of available differential tables.
For example, if you want to create 20 migration plans of OPEN-3 volumes (volume size = 2,403,360 KB),
calculate the number of required differential tables (page 21) and enter this number in the equation:
120
×()20=[]13,652 or 30,718≤
Since this equation is true, you can create 20 migration plans of OPEN-3 volumes.
.
Σα() β()=
Calculating differential tables for mainframe volume migration
When you migrate mainframe volumes, use the following equation to calculate the total number of
required differential tables per migration plan:
XY+()15× Z÷ Total number of differential tables per migration plan=
Auto LUN XP user guide for the XP12000/XP10000 19
, where:
Page 20
• X: The number of cylinders in the volume to be migrated. If the volume is a CVS volume, use the number
of cylinders in the custom volume instead of the default value for the emulation type.
• Y: The number of control cylinders (See Table 5).
• Z: The number of slots that can be managed by a differential table: .
1916 32×
NOTE: Round the result of the calculation up to the nearest whole number.
For example, if a volume has the emulation type 3390-3, and 3339 cylinders, calculate the total number of
differential tables with the following equation: .
3339 6+()15 1916 32×()÷× 0.81836=
When you round 0.81836 up to the nearest whole number, it becomes 1. Therefore, the total number of
differential tables for one migration plan is 1 when emulation type is 3390-3.
The following table shows the number of the control cylinders according to the emulation type.
Table 5 Control cylinders by emulation type
Emulation type Number of control cylinders
3380-3 7
3380-3A 7
3380-3B 7
3380-3C 7
3380-F 22
3380-K 7
3380-KA 7
3380-KB 7
3380-KC 7
3390-3 6
3390-3A 6
3390-3B 6
3390-3C 6
3390-3R 6
3390-9 25
3390-9A 25
3390-9B 25
3390-9C 25
3390-L 23
3390-LA 23
3390-LB 23
3390-M 53
3390-MA 53
3390-MB 53
3390-MC 53
3390-LC 23
NF80-F 22
20 Auto LUN XP for the XP12000/XP10000
Page 21

Table 5 Control cylinders by emulation type (continued)
NF80-K 7
NF80-KA 7
NF80-KB 7
NF80-KC 7
Calculating differential tables for open-system volume migration
When you migrate open-system volumes, use the information in Table 6 to calculate the total number of
required differential tables per migration plan.
Table 6 Total number of differential tables per migration plan
Emulation type Equation
OPEN-3 Total number of differential tables per migration plan =
OPEN-8
OPEN-9
OPEN-E
OPEN-L
OPEN-V Total number of differential tables per migration plan =
1. If the selected volume is a CVS (custom volume size) volume, use the capacity of the custom volume instead of the default volume
capacity for the emulation type. Since the OPEN-L emulation type does not support custom volume operations, you must use the
default volume capacity of OPEN-L for X.
2. 1 KB equals 1024 bytes.
(X): Capacity of the volume to be migrated (KB)
(Y): Number of control cylinders associated with the emulation type (see Table 7)
(Z): Number of slots that can be managed by a differential table
NOTE: Round the result of the calculation up to the nearest whole number.
For example, if the volume’s emulation type is OPEN-3, and it is not a custom volume, the
volume capacity (X) is the default volume size, 2,403,360 KB, and the total number of
differential tables is calculated as follows:
2,403,360 48÷()815×()+[]1,916 32×()÷ 0.81860=
When you round to the nearest whole number, the result is 1. Therefore, the total number of
differential tables for one migration plan is 1 when the emulation type is OPEN-3.
(X): Capacity of the volume to be migrated (KB)
(Z): Number of slots that can be managed by a differential table
NOTE: Round the result of the calculation up to the nearest whole number.
For example, if the volume capacity (X) is the maximum OPEN-V volume capacity of
3,019,898,880 KB, the total number of differential tables is calculated as follows:
3,019,898,880 256÷()1,916 32×()÷ 192.40084=
When you round up to the nearest whole number, the result is 193. Therefore, the total number
of differential tables for migration plan is 193 when the emulation type is OPEN-V.
X 48÷()Y15×()+[]Z÷
1, 2
1,916 32×()
X 256÷()Z()÷
2
1,916 32×()
The following table shows the number of control cylinders according to the emulation type.
Table 7 Control cylinders by emulation type
Emulation type Number of control cylinders
OPEN-3 8 (5,760KB)
OPEN-8 27 (19,440KB)
OPEN-9
OPEN-E 19 (13,680KB)
Auto LUN XP user guide for the XP12000/XP10000 21
Page 22
Table 7 Control cylinders by emulation type (continued)
OPEN-L 7 (5,040KB)
OPEN-V 0 (0KB)
Auto migration planning
Auto LUN XP will not plan an auto migration when:
• There is no reserve volume with the same emulation type and capacity as the source volume in the
same or next higher/lower HDD class (auto migration is performed only between consecutive classes or
within the same class)
• Auto LUN XP cannot estimate the usage rate for the target parity group because of some condition (for
example, invalid monitor data)
• The estimated usage of the target parity group or volume is over the user-specified maximum disk usage
value for that HDD class
• The estimated performance improvement is not large enough
Auto migration execution
Auto LUN XP will not execute an auto migration operation when:
• The current usage (last 15 minutes) of the source or target parity group or volume is over the maximum
disk usage rate for auto migration
• The current write pending rate for the disk array is 60% or higher
Manual migration execution
Auto LUN XP will execute a manual migration operation when the current write pending rate for the disk
array is 60% or higher.
Copy Threshold option
If Auto LUN XP performs migration operations when the disk array workload is heavy, host server I/O
performance might be degraded. To minimize this performance degradation, enable Copy Threshold,
which temporarily stops Auto LUN XP operations when the disk array has a heavy workload. Copy
operations that are stopped by the Copy Threshold option resume when the disk array workload is lighter.
CAUTION: A volume migration operation might fail if hosts frequently update the volumes being
migrated. If you enable Copy Threshold, Auto LUN XP temporarily stops copy processing when the disk
array is overloaded, which increases the possibility of a failed volume migration operation. Using the
Copy Threshold operation is not recommended when hosts frequently update the volumes being migrated.
IMPORTANT: Contact your HP support account representative for more information about the Copy
Threshold option.
In addition to Auto LUN XP operations, Copy Threshold temporarily stops copy operations for the following
applications when the disk array workload is heavy:
• Business Copy XP
• ShadowImage for z/OS
• Hitachi FlashCopy Mirroring
• Hitachi FlashCopy Mirroring Version 2
• Snapshot XP
• Flex Copy XP
22 Auto LUN XP for the XP12000/XP10000
Page 23

Progress value
If a volumes with heavy and light workloads are migrated together, the migration might not complete (even
though the progress value indicates 100%). If this happens perform one of the following tasks.
• Reduce the workloads between hosts and the disk array and complete the migration.
• Stop the migration for the volume with heavy workloads, migrate the other volume, and then retry the
migration which has been stopped.
Effects on other XP products
When the workloads for update I/Os between hosts and the disk array are heavy, longer time will be
required to complete the volume migration because the copy of differential data is repeatedly executed.
Longer copying times may be required for other XP products when this copy of differential data is
executed. These XP products include: Auto LUN XP, Business Copy XP, ShadowImage for z/OS®,
Compatible Mirroring for IBM® FlashCopy®, and Flex Copy XP.
See Figure 8 for the amount of affected copying time. The copying time of other XP products depends on
the number of pairs set to the XP product, however, the copying time may be increased up to twice.
Table 8 The estimated delay in the copying speed
Capacity of Migrated Volume (MB) Estimated delay in the copying
speed (in minutes)
0 - 1,000 4
1,001 - 5,000 18
5,001 - 10,000 37
10,001 - 50,000 186
50, 001 - 100,000 372
100,001 - 500,000 1860
500,001 - 1,000,000 3720
1,000,001 - 2,150,400 9667
The above estimates are calculated based on the assumption that the
workload for update I/Os for the migrated volume is 50 IOPS for one volume.
Maintenance
Do not perform Auto LUN XP migration operations during disk array maintenance activities (for example,
cache or drive installation, replacement, de-installation, or replacement of the microprogram).
Auto migration parameters
Auto migration parameters are initialized when the disk array configuration is changed (for example, when
new drives or LDEVs are installed). Parameters include disk usage limit and migration time. After a change
is made to the subsystem configuration, you must specify auto migration parameters again.
Powering off disk arrays
To turn the power off at the disk array, ensure that volume migration is finished. If migration is not finished,
HP strongly recommends that you do not turn off the power until the migration is finished.
If you turn the power off while migration is in progress, data migration stops and some of the data are not
migrated. If you turn the power on later, Auto LUN XP resumes data migration. If data remains in shared
memory, which is volatile memory, Auto LUN XP attempts to copy only data that have not been migrated to
the migration destination. However, if data is lost from shared memory, Auto LUN XP attempts to copy all
data to the migration destination; therefore, the copy operation takes more time. Auto LUN XP attempts to
Auto LUN XP user guide for the XP12000/XP10000 23
Page 24
copy data that have not been migrated and data that have already been copied to the migration
destination.
To power off the disk array, obtain the monitoring results first. If you do not, the Physical tab will not display
some monitoring results. For example, if 4:00 a.m. and p.m. is specified in the Gathering Time option in
the Auto LUN XP Monitoring Options pane and you turn off the power to the disk array at 5:00 p.m., the
Physical tab will not display the monitoring results from 4:00 p.m. to 5:00 p.m.
Starting Auto LUN XP
1. Log in to Command View XP or XP Remote Web Console. For more information, see the
HP StorageWorks Command View XP user guide for XP Disk Arrays or the HP StorageWorks XP Remote
Web Console user guide for XP12000/XP10000.
2. Ensure that you are in Modify mode. For more information, see the HP StorageWorks Command View
XP user guide for XP Disk Arrays or the HP StorageWorks XP Remote Web Console user guide for
XP12000/XP10000.
3. Click Auto LUN / Perf Control Base Monitor / PFC in the left pane. The Auto LUN pane appears.
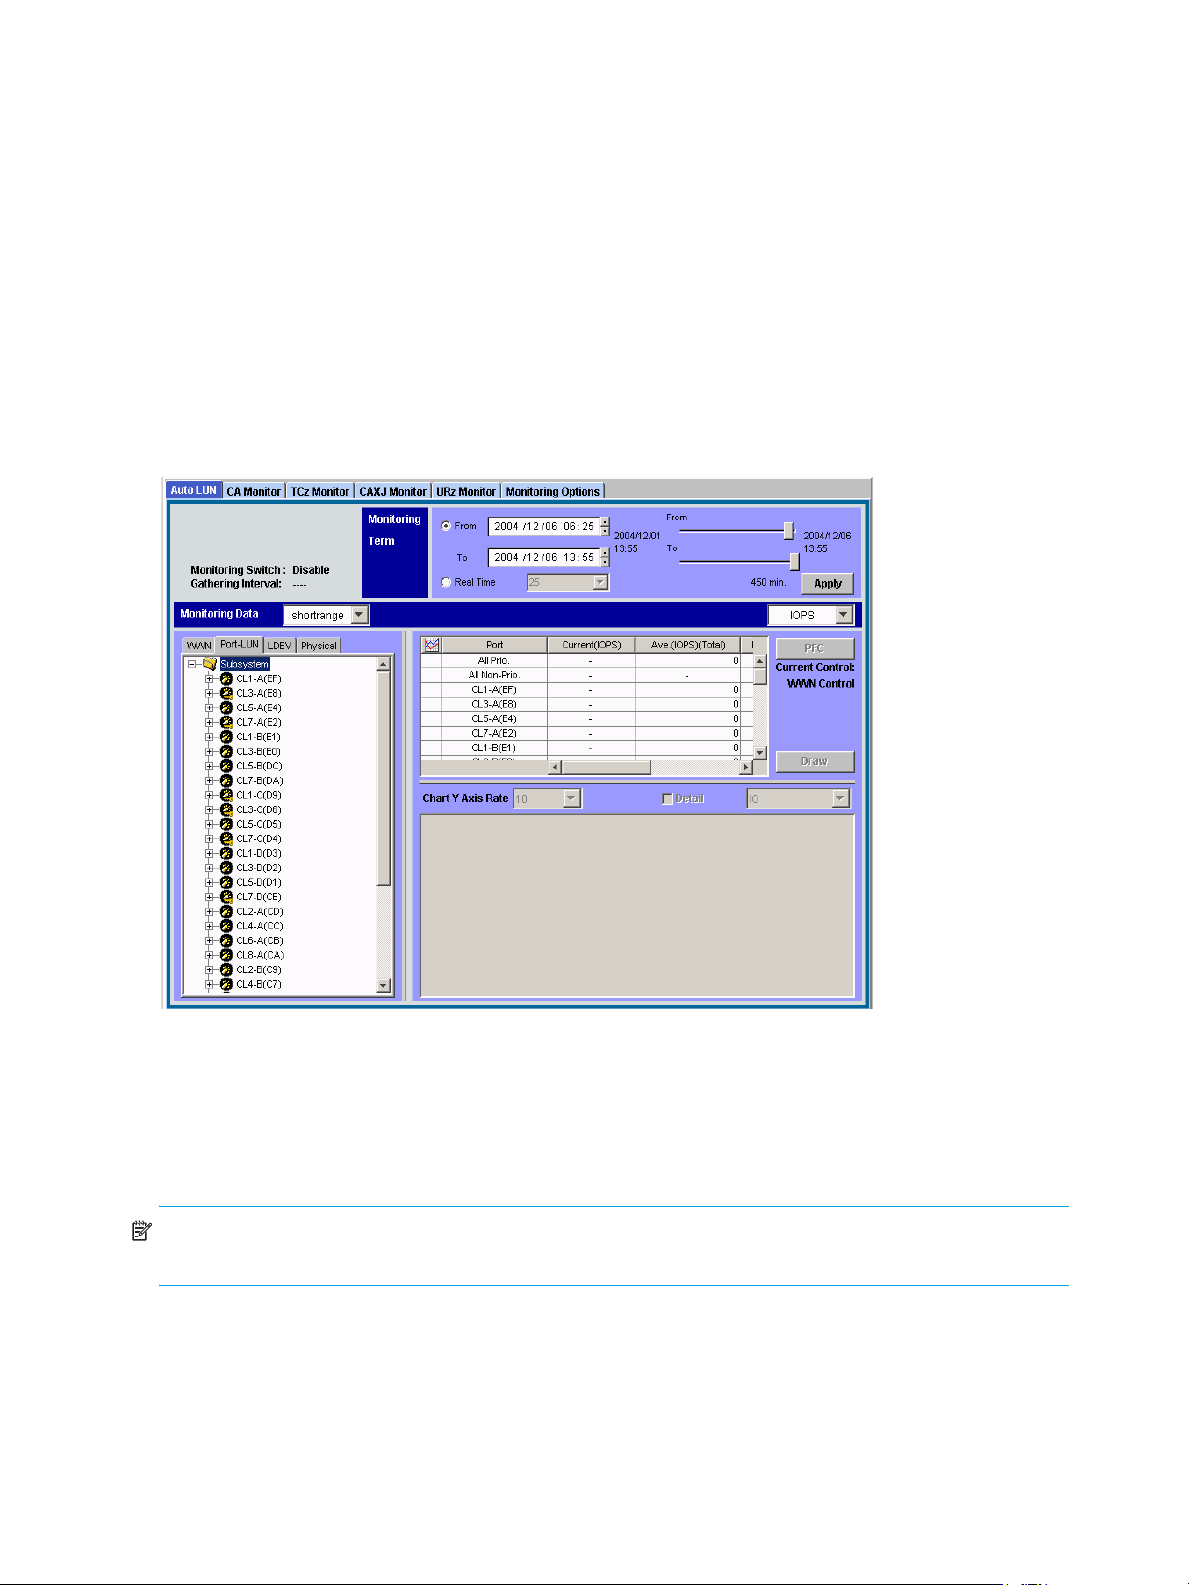
Figure 5 Auto LUN pane
4. Click Monitoring Options. The Monitoring Options pane appears.
Auto LUN pane
The Auto LUN pane is the performance management pane. It displays usage rates for parity groups,
logical volumes, channel processors, disk processors, and so forth. The pane has several sections.
NOTE: If a hyphen appears in monitoring data columns on the Auto LUN pane, statistics cannot be
collected for that item.
Tabs and selection trees
When you click one of the tabs (WWN, Port-LUN, LDEV, or Physical) in the lower-left portion of the pane,
the pane displays different trees of items you can click.
The top left of the pane shows the status of the Short range Monitor and Long range Monitor. For
information about these monitors, see ”Auto LUN Monitoring Options pane” on page 50.
24 Auto LUN XP for the XP12000/XP10000
Page 25

Monitoring term section
Use this section to specify the monitoring period. This setting affects all Auto LUN XP monitoring panes.
Use the From box and slide bar to specify the starting date for the monitoring period. Use the To box and
slide bar to specify the ending date for the monitoring period.
Click Real Time to display workload statistics in real time. Use the list to specify the data range to be
displayed in the graph. This check box appears dimmed when the Physical or LDEV tab is active. If the
service processor is overloaded, extra time might be required for gathering monitoring results, and a
portion of the results will not be displayed.
The Apply button applies the monitoring period settings to the disk array.
Monitoring data section
This section includes the following:
• A list on the left to specify the units in which usage are displayed (MB/s, IOPS, and so forth).
• The CAXJ Monitor pane displays information about Continuous Access XP Journal’s continuous access
operation. This information is also displayed in the Usage Monitor pane. For more information, see the
HP StorageWorks Continuous Access XP Journal user guide.
• The URz Monitor pane displays information about the Universal Replicator for z/OS’s continuous
access operation. This information is also displayed in the Usage Monitor pane. For more information,
see the Hitachi True Copy for z/OS for the XP128/XP1024/XP10000/XP1200.
NOTE: If any continuous access function is not installed in your environment, the corresponding
tab for that function is inactive and you cannot display that pane.
• A list on the right to specify the type of monitoring required: long range or short range. Long range
Table section
This section displays the following:
• Statistics about traffic between host bus adapters (HBAs) in the hosts and ports on the disk array, if the
• Traffic statistics about WWNs and ports if the Port-LUN tab is active.
• Workload statistics about logical volumes if the LDEV tab is active.
• Statistics about parity group usage, processor usage, and so forth if the Physical tab is active.
• The Plan button is displayed when the Physical tab is active. Clicking this button displays Plan pane
• The Draw button draws a graph in the pane’s graph section. The graph charts the statistics displayed in
• The PFC button is displayed when the WWN or Port tab is active. Clicking this button displays the
• The Current Control status is displayed when the WWN or Port tab is active. It displays the status of
monitoring is available only when the Physical tab is active.
WWN tab is active.
containing the Manual Migration, Auto Migration, Attribute, and History tabs.
the table section.
Performance Control pane. For details, see HP StorageWorks Performance Control XP user guide.
Performance Control:
• Port Control: System performance is controlled by the upper limits and threshold specified in the Port
tab of the Performance Control pane
• WWN Control: System performance is controlled by the upper limits and threshold specified in the
WWN tab of the Performance Control pane
• No Control: System performance is not controlled by Performance Control
For further information, see HP StorageWorks Performance Control XP user guide.
Graph section
The graph shows statistics displayed in the table. The vertical axis shows usage values. The horizontal axis
shows date or time.
Auto LUN XP user guide for the XP12000/XP10000 25
Page 26

Use the Chart Y Axis Rate list to select the highest value of the Y-axis (the vertical axis). This list is not
displayed when the Plan button is active.
If you click the Detail check box, the graph displays detailed statistics. This check box is displayed when
the Port-LUN or LDEV tab is active. The contents of the graph depend on the item selected in the list to the
right of the table, as shown in the following table.
Table 9 Graph contents based on list selection (Port-LUN tab)
Selection in list Graph contents
I/O Rate (number of I/Os per second) • Statistics in sequential access mode
Read (number of read accesses per second)
Write (number of write accesses per second)
Read Hit (read hit ratio)
Write Hit (write hit ratio)
1
1
• Statistics in random access mode
• Statistics in CFW (cache fast write) mode
• If the read hit ratio or write hit ratio is high, random
access mode is used for transferring data instead of
sequential access mode. For example, random
access mode might be used for transferring data to
disk areas where Cache LUN XP is applied.
Back Transfer (backend transfer: number of I/Os
between the cache memory and disk drives)
Trans. Rate (number of data transfers) The graph does not display detailed information.
1. Available only when I/O rates are displayed.
• Number of data transfers from the cache memory to
disk drives
• Number of data transfers from disk drives to cache
memory in sequential access mode
• Number of data transfers from disk drives to cache
memory in random access mode
26 Auto LUN XP for the XP12000/XP10000
Page 27

WWN, Port-LUN, LDEV, and Physical tabs
Figure 6 WWN, Port-LUN, LDEV, and Physical tabs
Click one of the tabs (WWN, Port-LUN, LDEV, or Physical) in the lower-left portion of the pane to view data
about ports, LDEVs, or physical components.
When you click a tab, the selection tree in the lower-left portion of the pane changes. You can then click
entities to display information in the table and graph sections of the pane.
If I/O workloads between hosts and the disk array become heavy, the disk array gives higher priority to
I/O processing than monitoring processing; therefore, some monitoring data might be missing. If
monitoring data are frequently missing, use the Gathering Interval option in the Monitoring Options pane
to increase the collection interval.
WWN tab
This tab displays the Subsystem folder and PFC groups, which are groups of multiple WWNs.
Double-clicking a PFC group ( ) displays host bus adapters ( ) in the PFC group. Double-clicking Not
Grouped in the tree shows host bus adapters (WWNs) that do not belong to any PFC group.
To start monitoring traffic between host bus adapters and disk array ports, you must specify settings before
starting monitoring.
If the SVP is overloaded, more time than the gathering interval allots might be required for updating the
displayed monitoring data. In this case, some portion of monitoring data does not appear in the pane. For
example, if the gathering interval is 1 minute, and the display in the pane is updated at 9 minutes and the
next update occurs at 9:02, the pane (including the graph) does not display monitoring results for the
period of 9:00 to 9:01. This situation occurs when you use a Command View XP or XP Remote Web
Console system, and when the SVP is used to perform maintenance operations for the disk controller.
Auto LUN XP user guide for the XP12000/XP10000 27
Page 28

After replacing the micro program, monitoring data is not stored until a service technician releases the SVP
from Modify mode.
NOTE: If a host bus adapter’s WWN is displayed in red in the tree, the host bus adapter is connected to
two or more ports, but Performance Control does not control traffic between the HBA and some ports. For
information about controlling the traffic between the HBA and all connected ports, see HP StorageWorks
Performance Control XP user guide.
Port -LUN tab
This tab displays ports. The tree view displays the following icons.
Table 10 Auto LUN pane, Port-LUN tab icons
Icon Status
Short-wave Fibre Channel port in standard mode with LUN security.
If the port name is followed by its fibre address, the port is a Fibre Channel port. For example, CL1-A(EF)
indicates the CL1-A port is a Fibre Channel port.
Short-wave Fibre Channel port in standard mode without LUN security.
Short-wave Fibre Channel port in high-speed or high-speed (2 port) mode with LUN security.
LDEV tab
Short-wave Fibre Channel port in high-speed or high-speed (2 port) mode without LUN security.
Long-wave Fibre Channel port in standard mode with LUN security.
Long-wave Fibre Channel port in standard mode without LUN security.
Long-wave Fibre Channel port in high-speed or high-speed (2 port) mode with LUN security.
Long-wave Fibre Channel port in high-speed or high-speed (2 port) mode without LUN security.
NOTE: High-speed (2 port) mode is available only if the XP disk array has firmware version 21.06.22 or
later installed.
NOTE: Auto LUN/Performance Control Base Monitor obtains statistics about traffic only on ports
connected to open-system host groups. Statistics for ports connected to mainframe host groups cannot be
obtained.
This tab displays parity groups. Box folders appear below the Subsystem folder. The number at the end of
a Box folder name indicates the number at the beginning of the parity group ID. For example, if you
double-click the Box 1 folder, the tree view displays a list of parity groups that have IDs beginning with 1
(such as 1-1 and 1-2).
If you double-click a parity group, the logical volumes in the parity group appear in the table. If a parity
group ID starts with the letter E, the logical volumes in the parity group are external LUs.
The parity group icon ( ) represents a single parity group or two or more connected parity groups. If two
or more parity groups are connected, logical volumes can be striped across two or more drives. Therefore,
connected parity groups provide faster access (particularly faster sequential access) to data.
28 Auto LUN XP for the XP12000/XP10000
Page 29

If the parity group icon represents a single parity group 1-3, the text 1-3 is displayed on the right of the
CHA-1E (Fibre 16 P
)*
icon. If the parity group icon represents two or more connected parity groups, all connected parity groups
are displayed to the right of the icon. For example, if parity group 1-3 is connected with parity group 1-4,
the text 1-3[1-4] is displayed on the right of the parity group icon. All parity groups connected with 1-3 are
enclosed by square brackets.
When the Business Copy or SI390 quick restore operation is being performed, a Control View pane might
display old information (status prior to the quick restore operation) on logical volume (LDEV) configurations.
In this case, wait until the quick restore operation completes, and click Refresh ( ) to update the
Command View XP or XP Remote Web Console window.
Physical tab
This tab displays parity groups, CHAs, DKAs, and other related items. The tree view displays the following
icons.
Table 11 Auto LUN pane, Physical tab icons
Icon Description
Parit y g roup.
CHA-1G (Mfibre 4Port)*
ort
CHA-1E (Fibre 16Port)*
FICON channel adapter.
Short-wave Fibre Channel adapter in standard mode.
This port icon indicates
either of the following:
• a Fibre Channel port in Standard mode. LUN security is not applied to
this port.
• an iSCSI port to which LUN security is not applied
NOTE: Note: An iSCSI port is not supported in the present version of
Command View XP.
This port icon indicates either of the following:
• a Fibre Channel port in Standard mode. LUN security is applied to this
port.
• an iSCSI port to which LUN security is applied (Note: An iSCSI port is not
supported in the present version of TagmaStore™ USP)
If the port name is followed by its fibre address, the port is a Fibre Channel port. If
the port name is followed by two hyphens, the port is an iSCSI port. For example,
CL1-A(EF) indicates that the CL1-A port is a Fibre Channel port, and CL1-A(--)
indicates that the CL1-A port is an iSCSI port.
CHA-1E (Fibre 16Port)*
NOTE: An iSCSI port is not supported in the present version of Command
View XP.
NOTE: For detailed information about LUN security, please refer to LUN
Manager User's Guide.
Short-wave Fibre Channel adapter in high-speed or high-speed (2 port) mode.
Auto LUN XP user guide for the XP12000/XP10000 29
Page 30

Table 11 Auto LUN pane, Physical tab icons (continued)
Icon Description
CHA-1E (Fibre 16Port)*
CHA-1E (Fibre 16Port)*
CHA-1E (Fibre 16Port)*
CHA-2U (iSCSI 4Port)*
CHA-1F (NAS 4Port)*
* The channel adapter number and number of ports that displayed on the right side of the icon are examples.
a Fibre Channel port in High Speed mode. LUN security is applied to this port.
a Fibre Channel adapter in Initiator/External MIX mode
a Fibre Channel port in Initiator/External MIX mode. LUN security is applied to this
port
Long-wave Fibre Channel adapter in standard mode.
Channel adapter for use in an iSCSI environment
Long-wave Fibre Channel adapter in high-speed or high-speed (2 port) mode.
Channel adapter for use in a NAS environment
Disk processor (DKP).
Data recovery and reconstruction processor (DRR).
Access path.
NOTE: High-speed (2 port) mode is available only if the XP disk array has firmware version 21.06.22 or
later installed.
In short range, if I/O workloads between hosts and the disk array become heavy, the disk array gives
higher priority to I/O processing than monitoring processing; therefore, some monitoring data might be
missing. If monitoring data is missing frequently, use the Gathering Interval option in the Monitoring
Options pane to increase the collection interval.
NOTE: Short-range monitoring data and long-range monitoring data may have some margin of error.
Creating and executing migration plans
Before you use Auto LUN XP, you must first reserve logical volumes for migration destinations. See
”Reserving target volumes” on page 38.
1. In the Auto LUN pane, click Physical.
2. Click Plan. The Plan - Manual Migration tab appears.
There are four tabs: Manual Migration, Auto Migration, Attribute, and History. Click the tabs to access that
pane. By default, the Manual Migration tab appears.
30 Auto LUN XP for the XP12000/XP10000
Page 31

Manual Migration tab
Use this tab to create and execute migration plans for manually migrating volumes.
Figure 7 Manual Migration tab
Pane contents
This pane contains the following items:
• Monitoring Term: Displays the monitoring period specified in the Auto LUN pane, analyzes disk usage
information collected by Auto LUN XP during the monitoring period, and calculates estimated usage
rates of the source and target parity groups after a proposed volume migration.
• Gathering Time: Displays the time specified in the Auto LUN XP Monitoring Options pane. The disk
array collects usage statistics about resources (such as hard disk drives) at the specified gathering time.
Auto LUN XP uses collected usage statistics to estimate usage rates of parity groups after a proposed
volume migration.
• Source LDEV section: Specifies the source volume (logical volume you want to migrate). On the right are
the current usage rate for the parity group to which the source volume belongs and estimated usage
rate for the parity group after a proposed volume migration.
• Target (Reserved) LDEV section: Specifies the target volume (where you want to migrate the source
volume). On the right are the current usage rate for the parity group to which the target volume belongs
and estimated usage rate for the parity group after a proposed volume migration.
Tree view
This view lists parity groups in the disk array. Double-clicking a parity group icon displays the logical
volumes in that parity group.
Table view
• Plan columns:
• Stat: Displays an error code if an error occurs during execution of a migration plan. To view
detailed information about an error, select and right-click the error code, and click Details.
• DEL: Displays the character D if you delete a migration plan that is waiting for execution. Migration
plans indicated by D are deleted when you click Apply.
• %: Displays the progress of the manual migration.
Auto LUN XP user guide for the XP12000/XP10000 31
Page 32

• Source LDEV columns:
• LDEV: Logical volume ID
• Emulation: Emulation type of the logical volume
• Capacity: Capacity of the logical volume
• RAID: RAID type
• PG: Parity group ID (frame and group number)
• HDD: Type of hard disk drive
• CLPR: The numbers and names of CLPRs corresponding to each parity group to which the logical
volume belongs
• Target LDEV columns:
• LDEV: Logical volume ID
• RAID: RAID type
• PG: Parity group ID (frame and group number)
• HDD: Type of hard disk drive
Buttons
• Set: Adds a new manual migration plan consisting of the logical volume in SourceLDEV and the logical
volume in TargetLDEV. Each row in the table indicates a migration plan.
• Delete: Deletes the migration plan. If you select a migration plan in black (migration plan waiting for
execution or being executed) and click Delete, the DEL column displays the character D. The selected
migration plan will not be deleted until you click Apply.
• Refresh: Updates information in the tab after applying a manual migration plan (after clicking the
Apply button).
• Apply: Applies manual migration plans in the table to the disk array.
• Source LDEV addition: The
• Target LDEV addition: The
• Reset: Cancels execution of the manual migration plan.
• Close: Closes this pane.
→ button below the Source LDEV section.
→ button below the Target (Reserved) LDEV section.
Migrating volumes manually
To migrate volumes manually, you must create migration plans. A migration plan is a pair of
volumes—source volume and corresponding target (destination) volume. To migrate more than one logical
volume, you must create multiple migration plans.See also ”Calculating the number of Auto LUN XP
concurrent migration plans”
NOTE: For manual migrations, you can specify logical volumes in a fixed parity group as source or target
volumes.
CAUTION: Do not perform manual migrations while the Auto Migration function is active. Doing so
cancels all existing auto migration plans. Use the following procedure to turn off Auto Migration and
cancel any auto migration plans before doing a manual migration.
1. In the Auto LUN pane, click Physical.
2. Click Plan. The Manual Migration tab appears.
3. Before migrating logical volumes manually, click Auto Migration to turn off Auto Migration.
4. In Auto Migration Plans, click Delete All to remove all auto migration plans.
5. In Auto Migration Function, click OFF, and click Set.
6. Click Manual Migration.
32 Auto LUN XP for the XP12000/XP10000
Page 33

7. In the tree, double-click a parity or external volume group. A list of logical volumes in that group
appears. Logical volumes that can be migrated are indicated by the icon.
8. From a volume with the icon, click the source volume (logical volume to migrate), and click the S
button. The selected volume is defined as the source volume.
9. In the tree, double-click the parity group to which you want to migrate the source volume. A list of
logical volumes in that parity group appears. Click the target (destination) volume. You can click only
volumes with a green pin icon or an icon framed by a blue line.
10. From the logical volumes indicated by a blue icon with a left-pointing arrow, select the logical volume
to define as the target volume, and click the T button below the Target (Reserved) LDEV section.
Auto LUN XP calculates estimated usage rates of the source and target parity group. Estimated results
are displayed on the right of the Source LDEV and Target (Reserved) LDEV text box and in the graph.
11 . Check the estimated results in Source LDEV, Target (Reserved) LDEV, and the graph. If you think you can
achieve the necessary disk performance, go to the next step. If not, change the source or target volume.
12 . Click Set.
A new migration plan, consisting of the specified source and target volumes, is added to the table. The
new migration plan is shown in blue.
To migrate more than one volume manually, repeat the steps to add migration plans.
13 . Click Apply.
Migration plans are applied to the disk array and wait for execution. Auto LUN XP performs multiple
migration plans concurrently. The font color of the migration plans changes from blue to black.
When a logical volume starts migration, the % column displays the migration’s progress. When
migration is complete, the volume’s migration plan disappears.
If an error occurs during migration, an error code appears.
Deleting manual migration plans
To delete a migration plan, click a migration plan, and click Delete.
You cannot use the Delete button to delete migration plans executed by programs other than Auto LUN XP.
If you select a migration plan in black (migration plan waiting for execution or being executed) and click
Delete, the character D is displayed in the DEL column. The migration plan will not be deleted until you
click Apply.
CAUTION: If you delete a migration plan that is being executed, the integrity of data on the target volume
cannot be guaranteed.
When an error condition exists on the disk array, resource usage can increase or become unbalanced. Do
not use the usage statistics collected during an error condition as the basis for planning migration
operations.
Auto Migration tab
Use this tab to make settings for automating volume migrations.
Auto LUN XP user guide for the XP12000/XP10000 33
Page 34

NOTE: Auto migration cannot use external volumes or volumes reserved by another program.
Figure 8 Auto Migration tab
Pane contents
This pane contains the following items:
• Monitoring Term: Displays the monitoring period specified in the Auto LUN pane, analyzes disk usage
information collected by Auto LUN XP during the monitoring period, and calculates estimated usage
rates of the source and target parity groups after a proposed volume migration.
• Gathering Time: Displays the time specified in the Auto LUN XP Monitoring Options pane. The disk
array collects usage statistics about resources (such as hard disk drives) at the specified gathering time.
Auto LUN XP uses collected usage statistics to estimate usage rates of parity groups after a proposed
volume migration.
Auto Migration plans section
• Auto Migration Function: If Auto Migration Function is ON, auto migrations take place at the next
migration time
• Migration Status: Progress of auto migration plans
• Not planned yet: Has not yet created auto migration plans
• Not performed yet: Has created auto migration plans, but has not executed them
• Failed to make plan: Failed to create auto migration plans
• Under migration: Is executing an auto migration plan
• Last migration has canceled (Please see log file): Has canceled the plan
• Migration successfully ended. Plan has done: Successfully executed the migration plans
• Plan Creation Time: When auto migration plans were created
• Next Migration Time: When the next auto migrations will be performed
• Make New Plan button: Discards existing auto migration plans and creates new auto migration plans
• Delete button: Deletes the selected auto migration plan
• Delete All button: Deletes all auto migration plans
34 Auto LUN XP for the XP12000/XP10000
Page 35

Auto Plan parameter section
• Auto Migration Function: If you click ON, logical volumes are automatically migrated. If you click OFF,
they are not.
• Sampling Term: The auto migration function analyzes resource usage within the S
creates auto migration plans based on that analysis. Use Sampling Term to narrow resource usage
statistics to be analyzed.
• Date and Time: Specifies a date/time frequency for analyzing resource usage.
• Number of Sampling Points: Click All sampling points or X highest sampling points. With X highest
sampling points, Auto LUN XP uses the Xth highest average usage rate during the sampling period to
determine disk usage. Use the list to specify the value of X.
• Migration Time: Specifies the time when auto migration starts
• Auto Migration Condition: Specifies the following auto migration conditions:
• Max. migration duration: Time limit (10-120 minutes) for an auto migration plan. If the migration is
not completed within this limit, remaining migration operations are performed at the next scheduled
execution time.
• Max. disk utilization: Disk usage limit (10-100%) during auto migration. If the most recent usage for
any source or target parity group is over this limit when auto migration starts, Auto LUN XP cancels
the auto migration plan and retries the plan at the next execution time.
• Max. number of vols for migration: The maximum number of volumes (1-40) that can be migrated
during one auto migration plan.
• Default button: Sets parameters to their default values and applies them to the disk array.
• Set button: Applies parameters to the disk array.
• Reset button: Restores parameters to the value before the change.
• Close button: Closes this pane.
AMPLING TERM and
Setting auto migration parameters
1. In the Auto LUN pane, click Physical.
2. Click Plan. The Manual Migration tab appears.
3. Click Auto Migration. The Auto Migration tab appears.
4. In the Date and Time boxes in Sampling Term, specify a period to analyze resource usage statistics.
Ensure that the data term and auto migration execution time are separated by at least one hour. For
example, if the sampling term is from 10:00 to 14:00, auto migration should not be performed
between 09:00 and 15:00.
5. In Number of Sampling Points, click All sampling points or X highest sampling points, and click the
value of X in the list.
6. In Migration Time, specify when to start auto migration operations. The following scheduling restrictions
apply to Migration Time:
• Must be at least 15 minutes plus the specified maximum migration duration earlier than disk array
auto-reboot or data gathering.
• Must be at least 30 minutes later than disk array auto-reboot or data gathering.
• Must be at least 15 minutes plus the specified maximum migration duration earlier than the specified
Data Term start time.
• Must be at least 60 minutes later than the specified Data Term end time.
7. If necessary, set the auto migration parameters as follows:
• Max. migration duration: Set a time limit for auto migrations. If auto migration is not completed
within this limit, Auto LUN XP cancels operations.
• Max. disk utilization: Set a disk usage limit.
• Max. number of vols for migration: Specify the maximum number of volumes that can be auto
migrated at the same time.
8. In Auto Migration Function, click ON.
9. Click Set.
Auto LUN XP user guide for the XP12000/XP10000 35
Page 36

10. Click Close.
Deleting auto migration plans
• To delete all auto migration plans, click Delete All.
• To delete one auto migration plan, click the plan in the table, and click Delete.
Remaking auto migration plans
If auto migration operations do not produce enough improvements in disk access performance, discard the
current migration plans and create new auto migration plans.
1. In the Auto LUN pane, click Physical.
2. Click Plan. The Manual Migration tab appears.
3. Click Auto Migration. The Auto Migration tab appears.
4. In the Auto Migration tab, change the limit on the disk usage rate for HDD classes.
5. Make any other changes in the Auto Plan Parameters section of the pane.
6. Click Make New Plan. The existing auto migration plans are deleted and new auto migration plans are
created.
7. Click Close.
Attribute tab
Use this tab to find out which parity group belongs to which HDD class. The tab also displays information
about parity groups, such as parity group usage, logical volume capacity, and RAID type.
Figure 9 Attribute pane
Pane contents
This pane contains the following items:
• Monitoring Term: Displays the monitoring period specified in the Auto LUN pane, analyzes disk usage
information collected by Auto LUN XP during the monitoring period, and calculates estimated usage
rates of the source and target parity groups after a proposed volume migration.
• Gathering Time: Displays the time specified in the Auto LUN XP Monitoring Options pane. The disk
array collects usage statistics about resources (such as hard disk drives) at the specified gathering time.
36 Auto LUN XP for the XP12000/XP10000
Page 37

Auto LUN XP uses collected usage statistics to estimate usage rates of parity groups after a proposed
volume migration.
• Attribute tree: Lists HDD classes. When you double-click an HDD class icon, a list of parity groups in
that HDD class appears.
• Apply button: Applies settings in the Attribute tab to the disk array.
• Reset button: Discards changes in the Attribute tab and restores the original settings.
• Close button: Closes this pane.
• Class table boxes: When you click a class in the Attribute tree, the table displays information about
parity groups in that class.
Figure 10 Class table boxes
• PG: Parity group ID.
• HDD: Type of hard disk drive.
• Ave.: Average usage rate for the parity group. If an exclamation mark (!) appears, the reported
usage rate might be inaccurate because the configuration has changed (for example, volumes have
been moved by a migration plan or changed by VSC).
• Max.: Maximum usage rate for the parity group. If an exclamation mark (!) appears, the reported
usage rate might be inaccurate.
• Total: Total number of logical volumes in the parity group.
• CLPR: The number and name of the CLPR that corresponds to the parity group to which the logical
volume belongs, in the format CLPR number:CLPRname. For more information, see the
HP StorageWorks XP Disk/Cache Partition user guide.
• Parity group table boxes: When you click a parity group, the table displays information about logical
volumes in that parity group.
Figure 11 Parity group table boxes
• Icons: A reserved volume ( ), which can be used as a migration destination; a normal volume
( ), which cannot be used as a migration destination; free space ( ); and so forth.
• LDEV: Logical volume ID.
• Emulation: Emulation type of logical volume.
• Capacity: Capacity of logical volume.
• Ave.: Average usage rate for logical volume. If an exclamation mark (!) appears, the reported
usage rate might be inaccurate.
• Max.: Maximum usage rate for logical volume. If an exclamation mark (!) appears, the reported
usage rate might be inaccurate.
Auto LUN XP user guide for the XP12000/XP10000 37
Page 38

• CLPR: Number and name of the CLPR that corresponds to the parity group to which the logical
volume belongs, in the format CLPR number:CLPRname. For more information about CLPRs, see the
HP StorageWorks XP Disk/Cache Partition user guide.
• Owner: Program that reserved the volume. If Auto LUN XP reserved this volume, USP is displayed. If
another program reserved this volume, Other[XX] is displayed, where [XX] is the program ID. If this
volume is not reserved and is a normal volume, a hyphen (-) is displayed.
Reserving target volumes
To migrate volumes, you must reserve logical volumes as migration destinations (targets) regardless of the
migration method (manual or automatic). Migration will not take place if no logical volume is reserved.
NOTE: The term reserved volume refers to a volume that is reserved for use as a migration destination.
Reserved volumes are denoted by blue icons. The term normal volume sometime refers to a volume that
is not reserved as a migration destination.
1. In the Auto LUN pane, click Physical.
2. Click Plan. The Manual Migration tab appears.
3. Click Attribute. The Attribute tab appears.
4. In the Attribute tree, locate a logical volume to use as a migration destination. First click an HDD class
to display a list of parity groups in that class. Next, click a parity group to display a list of logical
volumes in that group.
5. In the table on the right, locate logical volumes preceded by the or icons. From those logical
volumes, choose the logical volume, and right-click.
6. Click Reserved LDEV. The icon changes to .
7. Click Apply. The settings in the pane are applied to the disk array. The specified logical volume is
reserved as a migration destination.
If you right-click a logical volume preceded by the icon (reserved volume) and click Normal LDEV, the
icon changes to , and you cannot use the volume as a migration destination. This procedure does not
work when the logical volume is preceded by the green Reserved icon, which indicates another program
reserved the volume.
Setting (fixing) parity groups
The auto migration function excludes fixed parity groups. However, volumes in a fixed parity group can be
used for manual migration operations.
1. In the Auto LUN pane, click Physical.
2. Click Plan. The Manual Migration tab appears.
3. Click Attribute. The Attribute tab appears.
4. In the tree, double-click an HDD class folder.
The table on the right displays a list of parity groups in the HDD class. An icon indicates parity groups
that can include source or target volumes. A different icon indicates fixed parity groups, which cannot
include source nor target volumes.
38 Auto LUN XP for the XP12000/XP10000
Page 39

5. Right-click the parity group you want to fix.
Figure 12 Attribute tab tree
6. Click Fixed PG. The parity group becomes fixed and is marked with an icon.
7. Click Apply.
Releasing (unfixing) parity groups
To move logical volumes in a fixed parity group to another parity group, change the fixed parity group to
a normal parity group. To do this, go to the Attribute tab, right-click the fixed parity group, and click
Normal PG.
Changing maximum disk usage rates for HDD classes
Each HDD class has a default disk usage rate. This limit affects auto migration behavior. You can change
the limit on disk usage rate.
1. In the Auto LUN pane, click Physical.
2. Click Plan. The Manual Migration tab appears.
3. Click Attribute. The Attribute tab appears.
4. In the Attribute tree, right-click an HDD class folder, and click Change Class Threshold. The Change
Threshold pane appears.
5. Click the value you want to use as the limit.
6. Click OK. In the Attribute tree, the selected value is displayed to the right of the specified class.
7. Click Apply. The new limit is applied to the disk array.
Auto LUN XP user guide for the XP12000/XP10000 39
Page 40

History tab
Use this tab to display information about automatic and manual migration operations that occurred in the
past. You can find out when migration operations took place and whether they finished successfully.
Figure 13 History tab
Pane contents
This pane contains the following items:
• Monitoring Term: Displays the monitoring period specified in the Auto LUN pane, analyzes disk usage
information collected by Auto LUN XP during the monitoring period, and calculates estimated usage
rates of the source and target parity groups after a proposed volume migration.
• Gathering Time: Displays the time specified in the Auto LUN XP Monitoring Options pane. The disk
array collects usage statistics about resources (such as hard disk drives) at the specified gathering time.
Auto LUN XP uses the collected usage statistics to estimate usage rates of parity groups after a
proposed volume migration.
• Auto Migration History: Displays log information, showing the creation and execution of auto migration
plans. The Erase button erases the information.
• Migration History: Displays a log of volume migration events and a log or migration plan executed by
programs other than Auto LUN XP. The table displays the following information:
• Date: Event date
• Time: Event time
• Action: Description of migration operation or event
• Source[Parity PR.]: Source volume and parity group
• Destination: Target volume and parity group
• Owner: Program that reserved the volume. If Auto LUN XP reserved this volume, USP is displayed. If
• Refresh button: Updates information in the History tab.
• Close button: Closes this pane.
another program reserved this volume, Other[XX] is displayed, where [XX] is the program ID.
40 Auto LUN XP for the XP12000/XP10000
Page 41

Viewing migration history logs
The History tab displays logs of automatic and manual migration operations.
1. In the Auto LUN pane, click Physical.
2. Click Plan. The Manual Migration tab appears.
3. Click the History tab. The History tab appears.
To view logs of auto operations, look at Auto Migration History.
To view logs of manual migration operations, look at Migration History.
The migration logs may display the following messages.
Normal end of migration:
Migration Complete (CU:LDEV->CU:LDEV) Start:yyyy/mm/dd hh:min:sec -> End:yyyy/mm/dd
hh:min:sec
(a) (b) (c) (d)
(a) Source volume
(b) Target volume
(c) Copy start time
(d) Copy end time
Migration was canceled (over the limit duration):
Migration Canceled (CU:LDEV->CU:LDEV) Start:yyyy/mm/dd hh:min:sec -> End:yyyy/mm/dd
hh:min:sec
(a) (b) (c) (d)
(a) Source volume
(b) Target volume
(c) Copy start time
(d) Copy end time
Migration was canceled (invalid parity group):
Migration Canceled (CU:LDEV (X-X)->CU:LDEV (X-X)) yyyy/mm/dd hh:min:sec (Invalid Parity
Group)
(a) (b) (c) (d) (e)
(a) Source volume
(b) Parity group of the source volume
(c) Target volume
(d) Parity group of the target volume
(e) Canceled time
Auto LUN XP user guide for the XP12000/XP10000 41
Page 42

Migration was stopped (other reason):
Migration Stopped (CU:LDEV->CU:LDEV) yyyy/mm/dd hh:min:sec (XXXXXXXXXXXX)
(a) (b) (c) (d)
(a) Source volume
(b) Target volume
(c) Canceled time
(d) Reason for cancellation:
• No reserve volume. No reserved volume is set. Please make another plan.
•
Reserve volume emulation is different. The reserved volume's emulation type is
different.
•
Utilization check. The usage rate is over the limit, or there is no monitor data.
•
Migration failed. Error code: XXXX. The migration operation failed.
•
Reserve volume size is different. Reserve volume size is different.
•
Reserve volume emulation is not supported. The emulation type of reserved volume is
not supported.
•
Utilization check failed. The check of the usage rate finished abnormally.
•
Reserve volume check failed. The check of the reserved volume finished abnormally.
Migration plan was deleted (because the previous plan had been deleted):
Migration Plan deleted (CU:LDEV->CU:LDEV) yyyy/mm/dd hh:min:sec (Pre-Plan is deleted)
(a) Source volume
(b) Target volume
(c) Canceled time
(a) (b) (c)
Started making an auto migration plan:
yyyy/mm/dd hh:min : MakePlan function starts
(a)
(a) Start time
Finished making an auto migration plan:
yyyy/mm/dd hh:min : MakePlan function finishes
(a)
(a) End time
Output the auto migration plans:
X plans are output
(a)
(a) Number of plans
Contents of auto migration plan:
PlanXXX: Src LDEV CU:LDEV in Grp X-X, Dst LDEV CU:LDEV in Grp X-X
(a) (b) (c) (d) (e)
(a) Plan number
(b) Source volume
(c) Parity group of the source volume
(d) Target volume
(e) Parity group of the target volume
42 Auto LUN XP for the XP12000/XP10000
Page 43

Failed making an auto migration plan:
yyyy/mm/dd hh:min : MakePlan is terminated by error: XXXXXXXXXX
(a) (b)
(a) End time
(b) Reason for failure:
• Cannot make proper migration plan: The program could not make a proper migration plan.
Check the number of the reserved volumes and their locations. Check the maximum disk
usage and change if necessary.
•
Failed to get XXXXXXXXXX (information or data: The program failed to get the
information or data to make a plan. In the case of information, make the initial value
again by selecting [Initialize]. In the case of data, check the status of gathered
data and get them again.
•
Failed to write to XXXXXXXXXX (information or data): The program failed to write the
information to make a plan.
•
Invalid XXXXXXXXXX (information or data): The required information/data could not be
used because the information was invalid. In the case of information, make the initial
value again by selecting [Initialize]. In the case of data, check the status of
gathered data and get them again.
•
Memory allocation error: The program failed to allocate the memory to make the plan.
•
"C:\dkc200\others\Auto LUNatm.ini does not exist.": Auto LUN failed to make plans
because the Auto LUN atm.ini file did not exist. Click the [Initialize] button before
making plans again.
Log entry that the auto migration plan could not be made:
Cannot make plan: Class X Grp X-X
(a) (b)
(a) Class
(b) Parity group
Some monitor data samples were invalidated:
Grp X-X: X samples are invalidated because of migration.
New volumes have been installed:
New entries are added for following LDEVs: CU:LDEV, CU:LDEV, ...
Invalid data:
Too many invalid data: invalidated all data
Volume utilization check failed:
Utilization check failed
Check volume usage failed because the necessary data could not be obtained. Please get
the data again.
Volume reserve attribute check failed:
Reserve volume check failed
Check volume reserve attribute failed because the necessary data could not be obtained.
Please get the data again.
Auto LUN XP user guide for the XP12000/XP10000 43
Page 44

The migration logs may display the following messages:
Table 12 Migration log messages
Message Meaning
Migration Start Migration operation started
Migration Complete Migration operation completed successfully
Migration Cancel User canceled the migration operation
Migration Failed Migration operation failed
Migration Give Up Migration operation was canceled by Auto LUN XP (for example, volume usage rate
exceeded specified maximum)
Migration Canceled
by Controller
Migration Canceled
by Controller
(Business Copy XP)
Migration Canceled
by Controller (CA
(*1))
Migration Canceled
by Controller (Data
Migration (*2))
Migration Canceled
by Controller (CA
(*3))
Migration Canceled
by Controller
(XRC(*4))
Migration Canceled
by Controller
(CC(*5))
*1 : It indicates Continous Access XP or Continous Access XP Journal.
*2 : It indicates Hitachi Online Data Migration.
*3 : It indicates Continous Access XP or Continous Access XP Journal.
*4 : It indicates Compatible Replication for IBM® XRC, which is abbreviated as XRC
Replication.
*5 : It indicates IBM 3990 Concurrent Copy.
The migration operation was canceled by Auto LUN XP (e.g., volume usage rate
exceeded specified maximum).
Because each XP product started processing, the migration operation was
canceled by Auto LUN XP.
Troubleshooting Auto LUN XP
Auto LUN XP displays error messages on the Command View XP or XP Remote Web Console GUI when
error conditions occur during Auto LUN XP operations.
If you need to contact your HP account support representative, provide as much information about the
problem as possible, including the error codes.
Using RAID Manager for manual Auto LUN XP migrations
Use RAID Manager to perform manual Auto LUN XP migrations from an open-system host when Auto LUN
XP is installed on the XP12000/XP10000. See the HP StorageWorks RAID Manager XP user guide for
more information.
44 Auto LUN XP for the XP12000/XP10000
Page 45

The following is an example of the procedure for using RAID Manager commands to perform manual Auto
LUN XP migrations. In this example, group1 is the group name in the RAID Manager configuration file,
and pair1 is the name of the volume pair that is a target of the operation.
1. Start RAID Manager.
2. Type the following command for an SMPL pair to begin the Auto LUN XP migration:
paircreate -g group1 -d pair1 -m cc -vl
When Auto LUN XP migration starts, the status of the pair changes to COPY.
3. Type the following command to check the pair’s status:
pairdisplay -g group1 -d pair1 -fcex
When the Auto LUN XP migration completes, the pair’s status becomes PSUS. If the Auto LUN XP
migration fails, the pair’s status becomes PSUE.
4. When the pair’s status becomes PSUS or PSUE, use the following command to return the pair status to
SMPL:
pairsplit -s -g group1 -d pair1
NOTE: If the migration fails (the pair’s status becomes PSUE), repeat step 2 and step 3. If the pair’s status
still becomes PSUE, contact your HP account support representative.
The status transition chart of a pair when the volume migration is performed by using RAID Manager is
shown in Figure 14. You can view the status shown in this chart by typing pairdisplay in RAID
Manager.
Figure 14 Pair status transitions during Auto LUN XP migrations using RAID Manager
When you perform Auto LUN XP migrations using RAID Manager, the following restrictions apply:
• An Auto LUN XP reserved volume cannot be used.
• A migration plan being executed by Auto LUN XP cannot be canceled from RAID Manager.
• A migration plan created by Auto LUN XP cannot be displayed using RAID Manager.
• Before checking RAID Manager settings in a Command View XP or XP Remote Web Console pane,
click All Refresh.
• Migration cannot be performed when either of the specified volumes is a LUSE volume.
Auto LUN XP user guide for the XP12000/XP10000 45
Page 46

• When you try Auto LUN XP migrations or migration cancellations using RAID Manager, EX_CMDRJE
might appear and the command might be refused, depending on the condition in the disk controller.
Table 13 shows error codes, causes, and solutions for this case.
Table 13 Errors during Auto LUN XP migrations or migration cancellations using RAID Manager
Error code Cause Solution
2051 Migration target volume is being used with LUN
Security XP Extension.
2055 Migration target volume is being used with
Continuous Access XP Journal.
2056 Migration source volume is being used with
Continuous Access XP Journal.
2057 VMA setting is different between the migration
target and source volumes.
2058 Migration target and source volumes belong to
the same parity group.
2301 Auto LUN XP is not installed on the
XP12000/XP10000.
2306 LBA size does not match between the migration
target and source volumes.
2309 Maximum number of pairs that can be set in the
disk array is exceeded.
2311 Auto LUN XP already reserved the migration
target volume.
2312 Migration source volume is online with the host. Take the migration source volume off-line from the
Release the volume from LUN Security XP
Extension, and perform the volume migration.
Release the volume from Continuous Access XP
Journal, and perform the volume migration.
Release the volume from Continuous Access XP
Journal, and perform the volume migration.
Volume migration cannot be executed. Check the
configuration definition file.
Volume migration cannot be executed. Check the
configuration definition file.
Install Auto LUN XP, and perform the volume
migration.
Volume migration cannot be executed. Check the
configuration definition file.
Reduce the number of pairs set in the disk array,
and perform the volume migration (see
”Calculating the number of Auto LUN XP
concurrent migration plans”).
Cancel the Auto LUN XP reservation, and perform
the volume migration.
host, and perform the volume migration.
232F Migration source volume is already specified as
an Auto LUN XP target volume.
2331 Consider the following causes:
• Auto LUN XP already reserved the migration
source volume.
• Number of slots in the migration target and
source volumes does not match.
2332 You cannot add pair settings any more to the
migration source volume.
2333 Volume specified by the migration cancellation is
not a migration source volume.
2336 Emulation type of the migration target and source
volumes does not match.
2337 Migration source volume is a Business Copy XP
leaf volume.
233B Migration target volume is a Business Copy XP
primary volume.
233C Migration target volume is a Business Copy XP
secondary volume.
Release the volume from Auto LUN XP, and
perform the volume migration.
Do the following:
1. Cancel the Auto LUN XP reservation, and
perform the volume migration.
2. Volume migration cannot be executed. Check
the configuration definition file.
Reduce the number of pair settings of the
specified volume, and perform the migration (see
”Calculating the number of Auto LUN XP
concurrent migration plans”).
RAID Manager is trying to perform the migration
cancellation for a pair that is not migrating.
Check the configuration definition file.
Volume migration cannot be executed. Check the
configuration definition file.
Release the Business Copy XP pair, and perform
the volume migration.
Release the Business Copy XP pair, and perform
the volume migration.
Release the Business Copy XP pair, and perform
the volume migration.
46 Auto LUN XP for the XP12000/XP10000
Page 47

Table 13 Errors during Auto LUN XP migrations or migration cancellations using RAID Manager
Error code Cause Solution
2342 Migration target volume is already specified as
an Auto LUN XP target volume.
2344 Volume specified by the migration cancellation is
not a migration target volume.
2346 Migration target volume is a Continuous Access
XP primary volume.
2347 Migration target volume is a Continuous Access
XP secondary volume.
234B Migration target volume is already specified as
an Auto LUN XP source volume.
2355 Volume Management setting in the migration
target and source volumes is different.
2356 Migration target volume is being used with Flex
Copy XP.
2362 Migration source volume is an XRC primary
volume.
2363 Migration target volume is an XRC primary
volume.
2366 Migration target volume is a Concurrent Copy
primary volume.
Release the Auto LUN XP volume, and perform the
volume migration.
RAID Manager is trying to perform the migration
cancellation for a pair that is not migrating.
Check the configuration definition file.
Release the Continuous Access XP pair, and
perform the volume migration.
Release the Continuous Access XP pair, and
perform the volume migration.
Release the volume from Auto LUN XP, and
perform the volume migration.
Volume migration cannot be executed. Check the
configuration definition file.
Release the Flex Copy XP pair, and perform the
volume migration.
Release the XRC pair, and perform the volume
migration.
Release the XRC pair, and perform the volume
migration.
Release the Concurrent Copy pair, and perform
the volume migration.
2368 Migration source volume is a Continuous Access
XP primary volume that is not in the SUSPEND
status.
236B Migration source volume is a Business Copy XP
volume that is in the SP-PEND status.
2372 Migration source volume is being formatted. Perform the volume migration after formatting is
2373 Migration source volume is a command device. Volume migration cannot be executed. Check the
237C Migration source volume is an external volume
specified as a Continuous Access XP primary
volume.
237E Specified pair is being used with Flex Copy XP. Release the Flex Copy XP pair, and perform the
2382 Migration target volume is being formatted. Perform the volume migration after formatting
2383 Migration target volume is a command device. Volume migration cannot be executed. Check the
2389 Cache LUN XP is set on the migration source
volume.
238A Cache LUN XP is set on the migration target
volume.
Put the Continuous Access XP pair in the
SUSPEND status or release the Continuous Access
XP pair, and perform the volume migration.
Perform the volume migration after the Business
Copy XP pair is changed to the SPLIT status.
completed.
configuration definition file.
Release the Continuous Access XP pair, and
perform the volume migration.
volume migration.
completes.
configuration definition file.
Release the Cache LUN XP setting, and perform
the volume migration.
Release the Cache LUN XP setting, and perform
the volume migration.
238B Migration source and target volumes are
specified as LUSE volumes.
Volume migration cannot be executed. Check the
configuration definition file.
Auto LUN XP user guide for the XP12000/XP10000 47
Page 48

Table 13 Errors during Auto LUN XP migrations or migration cancellations using RAID Manager
Error code Cause Solution
238C Migration target volume is a Business Copy XP
reserved volume.
239D Migration target volume is an ENAS system
volume.
Cancel the Business Copy XP reservation, and
perform the volume migration.
Volume migration cannot be executed. Check the
configuration definition file.
48 Auto LUN XP for the XP12000/XP10000
Page 49

2 Auto LUN/Performance Control Base Monitor
Auto LUN XP statistics
Disk arrays automatically collect statistics twice a day (in the morning and afternoon). Auto LUN XP
monitors disk arrays and obtains usage statistics about resources such as front-end and back-end
processors, hard disk drives, and logical volumes every 15 minutes.
Auto LUN XP displays statistics collected for the last three months. Statistics over three months old are
discarded.
You can specify a time period and view a graph illustrating how usage rates change within that time
period. You can also view average and maximum usage rates.
You can analyze information displayed on the pane and identify overloaded resources. If necessary, take
load-balancing measures to improve system performance.
Auto LUN XP displays the following types of information:
• Usage statistics about parity groups. If data shows overall high parity group usage, consider installing
additional HDDs and using Auto LUN XP to migrate high-usage volumes to the new parity groups. If
monitor data shows unbalanced parity group usage, use Auto LUN XP to migrate volumes from
high-usage parity groups to low-usage parity groups.
• Usage statistics about logical volumes. Auto LUN XP displays average and maximum usage, including
sequential and random access, for each LDEV in a parity group. Logical volume usage is the time in
use (sequential and random access) of the physical drives of each LDEV, averaged by number of
physical drives in the parity group.
If data shows overall high logical volume usage, consider installing additional hardware (for example,
HDDs, DKAs, or cache). If monitor data shows unbalanced volume usage, use Auto LUN XP to migrate
high-usage volumes to higher HDD classes and/or lower-usage parity groups. You can also use logical
volume usage data to analyze access characteristics of volumes and determine appropriate RAID level
and/or HDD type for the volumes.
• Usage statistics about channel adapters and channel processors. Channel adapters (CHAs) process
host commands and control data transfer between hosts and cache. A channel adapter contains
multiple channel processors (CHPs), which process host commands and control data transfer.
If data shows overall high CHA usage, consider installing additional CHAs. If data shows unbalanced
CHP usage, consider moving some devices defined on overloaded ports to ports with lower-usage
CHPs to balance front-end usage.
• Usage statistics about disk adapters and disk processors. Disk adapters (DKAs) control data transfer
between cache and disk devices. A disk adapter contains multiple disk processors (DKPs), which
control data transfer.
If data shows overall high DKP usage, consider installing additional HDDs and/or DKAs and using
Auto LUN XP to migrate high-write-usage volumes (especially sequential writes) to the new parity
groups. If data shows unbalanced DKP usage, use Auto LUN XP to migrate logical volumes from
high-usage parity groups to low-usage parity groups.
Auto LUN XP cannot estimate DKP usage. Use Auto LUN XP migration only for obvious cases of high or
unbalanced DKP usage. Auto LUN XP migration might not improve performance if DKP usage values
vary only slightly or if overall DRR usage values are relatively high.
• Usage statistics about data recovery and reconstruction processors. Data recovery and reconstruction
processors (DRRs) are microprocessors located on DKAs that generate parity data for RAID-5 parity
groups. DRRs use “old data + new data + old parity” to generate new parity.
If data shows overall high DRR usage, this might indicate a high write penalty. Consult your
HP representative about high write penalty conditions. If data shows unbalanced DRR usage, consider
using Auto LUN XP to relocate volumes to balance DRR usage within the disk array.
• Write pending rate. The write pending rate indicates the ratio of write-pending data to cache memory
capacity. The Auto LUN pane displays average and maximum write pending rates for the specified time
Auto LUN XP user guide for the XP12000/XP10000 49
Page 50

period. The pane also displays a graph indicating how the write pending rate changed within that
period.
• Usage statistics about access paths. An access path is a path through which data and commands are
transferred within a disk array.
In a disk array, channel adapters control data transfer between hosts and cache memory. Disk
adapters control data transfer between cache memory and disk drives. Data transfer does not occur
between channel adapters and disk adapters. Data is transferred via the cache switch (CSW) to cache
memory.
When hosts issue commands, they are transferred via channel adapters to shared memory (SM). Disk
adapters check the contents of shared memory.
Auto LUN XP monitors and displays usage rates for the following access paths:
• Between channel adapters and the cache switch
• Between disk adapters and the cache switch
• Between the cache switch and cache memory
• Between channel adapters and shared memory
• Between disk adapters and shared memory
• Statistics about logical devices. You can check whether I/O operations converge on particular logical
volumes or how much data is read from logical volumes into cache memory.
Auto LUN XP displays the following information:
• Number of read and write requests made to logical devices (or parity groups)
• Number of data transfers occurring between logical devices (or parity groups) and cache memory
• Size of data transferred to logical devices (or parity groups)
• Read hit rate
• Write hit rate
For read I/Os, when requested data is already in cache, the operation is a read hit. For example, if ten
read requests were made from hosts to devices during a time period, and the read data was already in
cache memory for three of the ten requests, the read hit rate for that time period is 30 percent. Higher
read hit rates imply higher processing speed because fewer data transfers are made between devices
and cache memory.
For write I/Os, when requested data is already in cache, the operation is a write hit. For example, if
ten write requests were made from hosts to devices during a time period, and the write data was
already in cache memory for three of the ten requests, the write hit rate for that time period is
30 percent. Higher write hit rates imply higher processing speed because fewer data transfers are
made between devices and cache memory.
• Statistics about port traffic. Auto LUN XP monitors host ports and disk array ports to obtain statistics
about I/O and transfer rates. If you analyze these rates, you can determine which host issues the most
I/O requests and which host transfers the most data.
• Statistics about LU path traffic. Auto LUN XP monitors LU paths to obtain statistics about I/O and
transfer rates. If you analyze these rates, you can determine which LU paths are used to make many of
the I/O requests to disks and which LU paths are used to transfer much of the data to disks.
Auto LUN Monitoring Options pane
Use this pane to set the gathering time for monitoring.
NOTE: When statistics are collected, a heavy workload is likely to be placed on servers. This might slow
down client processing.
The pane contents vary according to your disk array.
50 Auto LUN/Performance Control Base Monitor
Page 51

NOTE: Settings in the Monitor Options pane work with settings for Continuous Access XP and Continuous
Access XP Journal. Therefore, changes you make to one pane affect the settings in the other panes.
XP12000/XP10000 disk arrays
NOTE: To begin monitoring the disk array, Command View XP or XP Remote Web Console must be in
Modify mode. A yellow background color signals Modify mode. A gray background color signifies View
mode. You cannot change in the Monitoring Options pane in View mode.
To change settings, when the background color of the lock icon is blue, click the lock icon. If the
background of the lock icon is red, wait a few minutes and try again.
XP12000/XP10000 arrays display the following pane:
Figure 15 Auto LUN Monitoring Options pane
This pane contains the following items:
• Current Status: Specifies whether the disk array is monitored. Click Enable to start monitoring. Click
Disable to stop monitoring. The default is Disable.
• Gathering Interval: If Current Status is Enable, specifies the collection interval during which statistics are
collected, in minutes. For example, if you enter 2, statistics are gathered every two minutes. The default
is 1 minute. The interval in long range is fixed at 15 minutes.
Usage statistics
Collecting usage statistics about disk array resources
To obtain usage statistics about a disk array’s resources, complete the following instructions to start
monitoring the disk array.
1. In the Auto LUN pane, click Monitoring Options. The Monitoring Options pane appears.
2. Click Enable for the Current Status option.
3. Use the Gathering Interval box to specify the collection interval during which the disk array collects
statistics. The interval in long range is fixed at 15 minutes.
4. Click Apply. Auto LUN XP starts monitoring the disk array.
To stop monitoring the disk array, complete the following instructions. If you stop monitoring, Auto LUN XP
stops collecting statistics.
1. In the Auto LUN pane, click Monitoring Options. The Monitoring Options pane appears.
2. Click Disable for the Current Status option.
3. Click Apply.
Auto LUN XP user guide for the XP12000/XP10000 51
Page 52

Viewing parity group usage statistics
Auto LUN XP monitors parity groups, and displays average and maximum usage rates for the specified
period. Auto LUN XP also displays a graph illustrating changes in parity group usage within that period.
1. In the Auto LUN pane, click Physical, and click the Parity Group folder. The table displays usage
statistics about the parity group.
Figure 16 Parity group usage statistics
NOTE: If an exclamation mark (!) appears before a usage rate, that parity group usage rate might
be inaccurate because the configuration has changed (for example, volumes have been moved by
a migration plan or changed by VSC).
2. To display a graph illustrating changes in usage rates, click the parity groups in the table, and click
Draw.
The table displays the following items:
• Graph column: The check mark icon indicates the graph is currently illustrating data for that item.
• PG: Parity group ID.
• RAID: RAID level (RAID-5 or RAID-1).
• Drive Type: Hard disk drive type.
• Usage: The Ave. (Total) column displays the average usage rate in the specified period. The Max.
column displays the maximum usage rate in the specified period.
• CLPR: The number and name of the CLPR that corresponds to the parity group. For more information
about CLPRs, see the HP StorageWorks XP Disk/Cache Partition user guide.
Viewing logical volume usage statistics
1. In the Auto LUN pane, click Physical, and double-click the Parity Group folder. The folder opens. A list
of parity groups appears below the folder.
2. Click the parity group. The table displays usage statistics about logical volumes in the specified parity
group.
NOTE: To view the ratio of Business Copy XP and ShadowImage for z/OS processing to all
processing in the physical drive, select Short Range.
Figure 17 Logical volume usage statistics
52 Auto LUN/Performance Control Base Monitor
Page 53

NOTE: If an exclamation mark (!) appears before a usage rate, that parity group usage rate might
be inaccurate because the configuration has changed (for example, volumes have been moved by
a migration plan or changed by VSC).
3. To display a graph illustrating changes in usage rates for parity groups, click the parity groups in the
table, and click Draw.
The table displays the following items:
• Graph column: The check mark icon indicates the graph is currently illustrating data for that item.
• LDEV: Logical volumes (LDEVs). The number on the left of the colon is the CU image number. The
number on the right of the colon is the LDEV number.
• Emulation: Device emulation type.
• Usage: The Ave. column displays the average usage rate in the specified period. The Max. column
displays the maximum usage rate in the specified period.
• Read Rate: The Rnd. column indicates the random read rate, which is the ratio of random read requests
to read and write requests. The Seq. column indicates the sequential read rate, which is the ratio of
sequential read requests to read and write requests.
• Write Rate: The Rnd. column indicates the random write rate, which is the ratio of random write
requests to read and write requests. The Seq. column indicates the sequential write rate, which is the
ratio of sequential write requests to read and write requests.
• Parity Gr. Use[Exp](%): Expected (estimated) average and maximum usage rates of the parity group, if
the volume was migrated out of the group (or de-installed). The Ave. (Total) column indicates an
estimated change in average usage rate. The Max. column indicates an estimated change in maximum
usage rate. For example, if the Ave. (Total) box for volume 0:01 displays 20 -> 18, average usage rate
of the parity group to which the volume belongs is 20 percent. If the volume was migrated out of the
parity group, average usage rate of that group is expected to drop to 18 percent.
• Business Copy: (Displayed only when you select Short Range as the storing period of statistics.) For
each logical volume, the percentage of processing of the following programs to all processing of the
physical drives:
• ShadowImage for z/OS
•Business Copy XP
•Flex Copy XP
• Hitachi® FlashCopy® Mirroring
• Hitachi® FlashCopy® Mirroring Version 2
•Auto LUN XP
• Snapshot XP
This value is found by dividing access time to physical drives by the following programs by all the
access time to physical drives. The Ave. (Total) column indicates the average percentage of processing
in the specified period for the programs listed above. The Max. column indicates the maximum
percentage of processing of the programs listed above in the specified period. For more information,
see the programs’ documentation.
• CLPR: The number and name of the CLPR that corresponds to the parity group to which the logical
volume belongs, in the format CLPR number:CLPR name. For more information about CLPRs, see the
HP StorageWorks XP Disk/Cache Partition user guide.
Viewing channel adapter (CHA) usage statistics
Auto LUN XP monitors channel adapters, and displays average and maximum usage rates in the specified
period.
Auto LUN XP user guide for the XP12000/XP10000 53
Page 54

1. In the Auto LUN pane, click Physical, and click the CHA folder. The table displays usage statistics about
channel adapters (CHAs).
Figure 18 CHA usage statistics
2. To display a graph illustrating changes in usage rates for channel adapters, click the channel adapters
in the table, and click Draw.
The table displays the following items:
• Graph column: The check mark icon indicates the graph is currently illustrating data for that item.
• ID: Channel processor ID numbers.
• Usage: The Ave. (Total) column displays the average usage rate in the specified period. The Max.
column displays the maximum usage rate in the specified period.
Viewing channel processor (CHP) usage statistics
Auto LUN XP monitors channel processors in each channel adapter, and displays average and maximum
usage rates in the specified period.
1. In the Auto LUN pane, click Physical, and double-click the CHA folder. A list of channel adapters
appears below the CHA folder.
2. Click a channel adapter. The table displays usage statistics about channel processors in the selected
channel adapter.
Figure 19 CHP usage statistics
3. To display a graph illustrating changes in usage rates for channel processors, click the channel
processors in the table, and click Draw.
The table displays the following items:
• Graph column: The check mark icon indicates the graph is currently illustrating data for that item.
• ID: Channel processor ID numbers.
• Usage: The Ave. (Total) column displays the average usage rate in the specified period. The Max.
column displays the maximum usage rate in the specified period.
Viewing disk adapter (DKA) usage statistics
Auto LUN XP monitors disk adapters, and displays average and maximum usage rates in the specified
period. If you click the ACP folder, the table displays a list of disk adapters and indicates whether each
disk adapter is located in Cluster-1 or Cluster-2.
54 Auto LUN/Performance Control Base Monitor
Page 55

In the Auto LUN pane, click Physical, and click the ACP folder. The table displays a list of disk adapters.
Figure 20 DKA usage statistics
The table displays the following items:
• Adapter: Disk adapter ID numbers.
• Cluster-1: If the Cluster-1 column displays 0 and the Cluster-2 column displays a hyphen, the disk
adapter is located in Cluster-1.
• Cluster-2: If the Cluster-2 column displays 0 and the Cluster-1 column displays a hyphen, the disk
adapter is located in Cluster-2.
Viewing disk processor (DKP) usage statistics
Auto LUN XP monitors disk processors, and displays average and maximum usage rates in the specified
period.
1. In the Auto LUN pane, click Physical, and double-click the ACP folder. A list of disk processors appears
below the ACP folder.
2. Click the DKP. The table displays usage statistics about disk processors in the disk adapter.
Figure 21 DKP usage statistics
3. To display a graph illustrating changes in usage rates for disk processors, click the disk processors in
the table, and click Draw.
The table displays the following items:
• Graph column: The check mark icon indicates the graph is currently illustrating data for that item.
• ID: Disk processor ID numbers.
• Usage: The Ave. (Total) column displays the average usage rate in the specified period. The Max.
column displays the maximum usage rate in the specified period.
Viewing data recovery and reconstruction processor (DRR) usage statistics
Auto LUN XP monitors data recovery and reconstruction processors (DRRs), and displays average and
maximum usage rates in the specified period.
1. In the Auto LUN pane, click Physical, and double-click the ACP folder. A list of DDRs appears below the
ACP folder.
Auto LUN XP user guide for the XP12000/XP10000 55
Page 56

2. Click the DRR below the disk adapter. The table displays usage statistics about DRRs in the disk
adapter.
Figure 22 DRR usage statistics
3. To display a graph illustrating changes in usage rate for DRRs, click the DRRs in the table, and click
Draw.
The table displays the following items:
• Graph column: The check mark icon indicates the graph is currently illustrating data for that item.
• ID: DDR ID numbers.
• Usage: The Ave. (Total) column displays the average usage rate in the specified period. The Max.
column displays the maximum usage rate in the specified period.
Viewing write pending rates
Auto LUN XP displays write pending rates. The write pending rate indicates the ratio of write-pending data
to cache memory capacity. Auto LUN XP displays average and maximum write pending rates in the
specified period.
1. In the Auto LUN pane, click Physical, and click the Cache folder.
Figure 23 Write pending rates
2. To display a graph illustrating changes in the write pending rate, click the write pending rate in the
table, and click Draw.
The table displays the following items:
• Graph column: The check mark icon indicates the graph is currently illustrating data for that item.
• CLPR: The number and name of the CLPR that corresponds to the parity group to which the logical
volume belongs, in the format CLPR number:CLPR name. For more information about CLPRs, see the
HP StorageWorks XP Disk/Cache Partition user guide.
• Write Pending (%): The Ave. column displays the average write pending rate for the specified period.
The Moment Max. column displays the maximum write pending rate for the specified period.
Viewing access path usage statistics
Channel adapters (CHAs) and disk adapters (DKAs) transfer data to the cache switch (CSW) and shared
memory (SM) when I/O requests are issued from hosts to the disk array. Also, the cache switch transfers
data to cache memory.
Auto LUN XP monitors these data transfer paths, and displays average and maximum usage rates for the
paths in a specified period.
1. In the Auto LUN pane, click Physical, and double-click the Access Path Usage folder.
56 Auto LUN/Performance Control Base Monitor
Page 57

2. Do any of the following:
• To check usage statistics about paths between adapters (CHAs and DKAs) and the cache switch,
click Adapter-CSW below the Access Path Usage folder.
Figure 24 Usage statistics about paths between adapters and the cache switch
• To check usage statistics about paths between adapters (CHAs and DKAs) and shared memory,
click Adapter-SM below the Access Path Usage folder.
Figure 25 Usage statistics about paths between adapters and shared memory
• To check usage statistics about paths between cache switches and cache memory, click CSW-Cache
below the Access Path Usage folder.
Figure 26 Usage statistics about paths between cache switches and cache memory
3. To display a graph illustrating changes in usage statistics about paths, click the paths in the table, and
click Draw.
The table displays the following items:
• Graph column: The check mark icon indicates the graph is currently illustrating data for that item.
• Usage(%): The Ave. (Total) column displays the average path usage rate in the specified period. The
Max. column displays the maximum path usage rate in the specified period.
Workload and traffic statistics
Collecting workload and traffic statistics about disk drives, ports, and LU paths
To obtain usage statistics about workloads, port traffic, LU path traffic, and traffic between host bus
adapters and ports, complete the following instructions to start monitoring the disk array:
1. In the Auto LUN pane, click Monitoring Options. The Monitoring Options pane appears.
2. Click Enable for the Current Status option.
3. Use the Gathering Interval box to specify the collection interval during which the disk array collects
statistics. The interval in long range is fixed at 15 minutes.
Auto LUN XP user guide for the XP12000/XP10000 57
Page 58

4. Click Apply. Auto LUN XP starts monitoring the disk array.
To stop monitoring the disk array, complete the following instructions. If you stop monitoring, Auto LUN XP
stops collecting statistics.
1. In the Auto LUN pane, click Monitoring Options. The Monitoring Options pane appears.
2. Click Disable for the Current Status option.
3. Click Apply.
Viewing disk drive workload statistics
Use the LDEV tab of the Auto LUN pane to check workloads on physical disk drives (parity groups) or
logical volumes. The pane displays the following information:
• Number of I/O requests issued to parity groups and logical volumes
• Amount of data transferred to parity groups and logical volumes
• Read hit rate
• Write hit rate
• Number of data transfers between parity groups (or logical volumes) and cache memory
1. In the Auto LUN pane, click LDEV. The LDEV tree displays a list of parity groups.
2. In the list on the right, click IOPS to specify I/Os per second, or click MB/s to specify megabytes
transferred per second.
3. In the LDEV tree, do one of the following:
• To check workload statistics for all parity groups, click the folder containing the parity groups.
Figure 27 Workload statistics for all parity groups
• To check workload statistics for certain parity groups, click a Box folder. For example, if you click
the Box 1 folder, the table displays only parity groups that have IDs beginning with 1-.
Figure 28 Workload statistics for a specific parity group
• To check workload statistics for logical volumes in a parity group, click the parity group.
Figure 29 Workload statistics for logical volumes in a parity group
4. To display a graph, click the parity groups or logical volumes, use the list on the lower-right side of the
table to select the type of information you want to view, and click Draw. A graph displays below the
table. The horizontal axis indicates the time.
5. To view detailed information in the graph, click the Detail check box on the lower-right side of the table,
and click Draw. The graph contents change. If you specify more than one parity group or logical
volume, you cannot click the Detail check box to view detailed information.
If the graph does not display changes in workload statistics, change the value in the Chart Y Axis Rate
list. For example, if the largest value in the table is 200 and the value in Chart Y Axis Rate is 100,
select a value larger than 200 from Chart Y Axis Rate.
58 Auto LUN/Performance Control Base Monitor
Page 59

The table displays the following:
• Graph column: The check mark icon indicates the graph is currently illustrating data for that item.
• Group: Parity group ID. If the ID starts with the letter E, logical volumes in the parity group are external
LUs.
• LDEV: Logical volume ID. If the ID ends with the symbol #, logical volume is an external LU.
• Type: Emulation type.
• IO Rate (IOPS): Number of I/O requests to the parity group (or logical volume) per second. This column
is displayed when IOPS is selected in the list on the upper-right side of the table.
• Read (IOPS): Number of read accesses to the parity group (or logical volume) per second. This column
is displayed when IOPS is selected in the list on the upper-right side of the table.
• Write (IOPS): Number of write accesses to the parity group (or logical volume) per second. This column
is displayed when IOPS is selected in the list on the upper-right side of the table.
• Trans.(MB/s): Size (in megabytes) of data transferred to the parity group (or logical volume) per
second. This column is displayed when MB/s is selected in the list on the upper-right side of the table.
• Read Hit(%): Read hit rate.
• Write Hit(%): Write hit rate.
• Back Trans.(count/sec): Number of data transfers between parity group (or logical volume) and cache
memory.
• Response Time (ms): Time (in microseconds) for replying from an external volume group when I/O
accesses are made from the disk array to the external volume group. Average response time in the
period specified for Monitoring Term is displayed.
• CLPR: The number and name of the CLPR that corresponds to the parity group to which the logical
volume belongs, in the format CLPR number:CLPRname. For more information, see the
HP StorageWorks XP Disk/Cache Partition user guide.
Viewing disk array port traffic statistics
1. In the Auto LUN pane, click Port-LUN, and click the Subsystem folder in the tree. The Port-LUN tree lists
ports on the disk array. When you double-click a port, a list of host groups for the port appears. When
you double-click a host group, the LUN icon appears.
2. To check the number of I/Os, click IOPS in the list on the right side of the pane. To check the amount of
data transferred, click MB/s. To view IOPS or amount of data in real time, select the Real Time option,
specify the number of collections to display, and click Apply.
3. In the Port-LUN tree, do one of the following:
• To view traffic statistics about ports in the disk array, click the root.
Figure 30 Traffic statistics about ports in a disk array
• To view traffic statistics about host ports to which a disk array port is connected, click the disk array
port.
Figure 31 Traffic statistics about host ports to which a disk array port is connected
Auto LUN XP user guide for the XP12000/XP10000 59
Page 60

• To view traffic statistics about host ports in a host group, click the host group.
Figure 32 Traffic statistics about host ports in a host group
• To view traffic statistics about LU paths, click the LUN icon.
Figure 33 Traffic statistics about LU paths
4. To find out how traffic has changed, click the ports, WWNs, or LUNs, and click Draw. A graph
appears below the table.
5. To view more detailed information in the graph, click the Detail check box on the lower-right side of the
table, and click Draw. The graph contents change.
The table displays the following:
• Graph column: The check mark icon indicates the graph is currently illustrating data for that item.
• Port: Ports on the disk array.
• WWN: WWNs of the host bus adapters.
• LUN: LUNs (logical unit numbers).
• PFC Name: PFC names of host bus adapters.
• Nickname: Nickname for host bus adapters. LUN Manager allows you to assign a nickname to each
host bus adapter so you can easily identify each host bus adapter in the LUN Manager panes.
• CU:LDEV: Logical volume IDs. The number on the left of the colon is the CU image number. The number
on the right of the colon is the LDEV number. If a logical volume ID ends with the symbol #, the logical
volume is an external LU.
• Emulation: Emulation types.
• Paths: Number of LU paths.
• Current: Current I/O rate.
• Ave.: Average I/O rate for the specified period.
• Max.: Maximum I/O rate for the specified period.
• Response Time (ms): Time (in microseconds) for replying from an external volume group when I/O
accesses are made from disk array to external volume group. Average response time in the period
specified for Monitoring Term is displayed.
If you select a port in the list, click Draw, and select the Detail check box, a detailed graph of the port
I/O rate is drawn. The Peak value means the top of the Max. line in this graph.
• Attribute: Priority of each port. Prio. indicates a prioritized port. Non-Prio. indicates a non-prioritized
port. When calculating I/O rates to be displayed in the All Prio. row, Auto LUN XP uses I/O rates of
other prioritized ports.
Viewing HBA/port traffic statistics
If Performance Control XP is enabled, Auto LUN XP monitors paths between host bus adapters (HBAs) in
host servers and ports on disk arrays. You can view both I/O and transfer rates between HBAs and ports.
1. In the Auto LUN pane, click WWN.
The tree view displays a list of PFC groups ( ). The Not Grouped item appears below the PFC
groups.
• If you double-click a PFC group, host bus adapters ( ) in the PFC group are displayed.
60 Auto LUN/Performance Control Base Monitor
Page 61

• If you double-click Not Grouped, host bus adapters ( ) that do not belong to any PFC group are
displayed.
2. In the list on the right side of the pane, do either of the following:
•To view I/O rates, select IOPS.
• To view transfer rates, select 100KB/s (MB/s [XP 12000]).
3. In the tree view, do one of the following:
• To view traffic statistics for host bus adapters in a PFC group, click the PFC group.
Figure 34 Traffic statistics for host bus adapters
• To view traffic statistics for host bus adapters that do not belong to any PFC group, click Not
Grouped (see Figure 34).
• To view the I/O or transfer rates at each PFC group, click the Subsystem folder.
Figure 35 Traffic statistics for each PFC group
• To view traffic statistics for each port connected to a given host bus adapter, click the HBA.
Figure 36 Traffic statistics for each port connected to a specified HBA
4. To find out how traffic has changed, in the table, click the PFC groups or WWNs, and click Draw. A
graph appears below the table.
NOTE: If a host bus adapter’s WWN is displayed in red in the tree view, the host bus adapter is
connected to two or more ports, but Performance Control XP does not control traffic between the
HBA and some ports. When many-to-many connections are established between HBAs and ports,
monitor all traffic between HBAs and ports. For information about controlling traffic between the
HBA and connected ports, see HP StorageWorks Performance Control XP user guide.
5. To view more detailed information in the graph, click the Detail check box on the lower-right side of the
table, and click Draw. The graph contents change.
The table displays the following:
• Graph column: The check mark icon indicates the graph is currently illustrating data for that item.
• Group: PFC groups.
• PFC Name: PFC names of host bus adapters.
• Port: Ports on the disk array.
• Current: Current I/O or transfer rate.
• Ave.: Average I/O or transfer rate for the specified period.
• Max.: Maximum I/O or transfer rate for the specified period.
• Response Time: Time between when the DKC receives the read/write command and when the DKC
responds to the command. The value is average response time over one minute.
• Attribute: Priority of each host bus adapter. Prio. indicates a high-priority HBA (prioritized WWN).
Non-Prio. indicates a low-priority HBA (non-prioritized WWN). When calculating I/O rates displayed
in the All Prio. row, Auto LUN XP uses I/O rates of other prioritized ports.
Auto LUN XP user guide for the XP12000/XP10000 61
Page 62

62 Auto LUN/Performance Control Base Monitor
Page 63

Index
A
access path usage statistics 50, 56
Attribute tab
audience, documentation
Auto LUN pane
auto migration
execution
history
parameters
planning
powering off disk arrays
reserving target volumes
settings
36
7
24
22
40
14
22
23
38
33
C
calculating migration plans 19
cascaded volumes
channel adapters (CHAs) usage statistics
channel processors (CHPs) usage statistics
CHAs (channel adapters) usage statistics
CHPs (channel processors) usage statistics
conventions, document
customer support
18
49, 53
49, 54
49, 53
49, 54
8
8
D
data recovery and reconstruction processors (DRRs)
usage statistics
differential tables - calculating migration plans
disk adapters (DKAs) usage statistics
disk arrays
powering off
resource statistics
disk processors (DKPs) usage statistics
disk usage
auto migration
maximum
disk usage, auto migration
DKAs (disk adapters) usage statistics
DKPs (disk processors) usage statistics
document conventions
documentation, related
DRRs usage statistics
13, 49, 55
19
49, 54
23
51
13, 49, 55
14
39
14
49, 54
13, 49, 55
8
7
13, 49, 55
E
error messages
Auto LUN XP
RAID Manager
estimating usage rates
44
46
13
F
features 11
fixing parity groups
38
G
Graph section 25
H
hard disk drives (HDDs)
Attribute tab
disk usage
maximum
disk usage, maximum
estimating usage
optimizing performance
reserved volumes
HBAs (host bus adapters) traffic statistics
HDDs
Attribute tab
auto migration
disk usage, maximum
estimating usage
optimizing performance
reserved volumes
help
HP technical support
History tab, migrations
host bus adapters (HBAs) traffic statistics
HP
storage web site
Subscriber’s choice web site
technical support
36
14
39
13
11
14
36
14
14, 39
13
11
14
8
40
9
9
8
L
LDEV tab 27, 28
LDEVs source volumes
logical volumes
requirements
usage statistics
workload statistics
logs, migration
LU path traffic statistics
LUSE source volumes
18
16
49, 50, 52
58
41
50, 57
18
M
manual migration
about
16
execution
fixing parity groups
history
RAID manager, using
settings
migration
auto
estimating usage rates
fixing parity groups
history tab
22
38
40
44
31
14, 22, 33
13
38
40
60
60
Auto LUN XP user guide for the XP12000/XP10000 63
Page 64

logs 41
manual
operations
plans
powering off disk arrays
RAID Manager, using
releasing parity groups
target volumes
Monitoring Data section
Monitoring Options pane
Monitoring Term section
16, 22, 31
12
30
44
38
25
50
25
N
non-cascaded volumes 18
O
optimizing performance 11
23
39
access path usage
channel adapters (CHAs)
channel processors (CHPs)
data recovery and reconstruction processors (DRRs)
55
disk adapters (DKAs)
disk array resources
disk processors (DKPs)
HBA/port traffic
logical volume usage
Monitoring Options pane
parity group usage
port traffic
traffic
types of
workload
Subscriber’s choice, HP
59, 60
57
49
58
56
53
54
54
51
55
60
52
50
52
9
P
parity groups
Attribute tab
auto migration
fixing
LDEV tab
releasing
statistics
usage rate, estimating
usage statistics
workload statistics
Physical tab
plans, migration
accessing
auto
33
manual
Port-LUN tab
ports, traffic statistics
about
disk arrays
HBAs
monitoring
powering off disk arrays
prerequisites
36
14
38
28
39
49
13
52
58
27, 29
30
31
27, 28
50
59
60
57
23
7
R
RAID Manager, using for manual migration 44
RAID parity groups, optimizing performance
releasing parity groups
reserve volumes
HDD classes
maintaining
selecting
reserving target volumes
restrictions
14
12
38
16
39
38
11, 13
T
Table section 25
target volumes
tasks
11
technical support, HP
traffic statistics
troubleshooting
Auto LUN XP
RAID Manager
18, 38
8
50, 57
44
46
U
usage statistics
access path
channel adapters (CHAs)
channel processors (CHPs)
data recovery and reconstruction processors (DRRs)
55
disk adapters (DKAs)
disk processors (DKPs)
logical volumes
parity groups
56
53
54
54
55
52
52
W
web sites
HP documentation
HP storage
HP Subscriber’s choice
workload statistics
write-pending data
WWN tab
9
27
8
9
58
50, 56
S
source volumes 16, 17
starting Auto LUN XP
statistics
64
24
Page 65

Figures
1 Data Flow during an Auto LUN XP Operation . . . . . . . . . . . . . . . . . . . . . . . . . . . . . . . . . . . . . . . . 12
2 Data Flow after an Auto LUN XP operation . . . . . . . . . . . . . . . . . . . . . . . . . . . . . . . . . . . . . . . . . . 13
3 Auto migration function example 1 . . . . . . . . . . . . . . . . . . . . . . . . . . . . . . . . . . . . . . . . . . . . . . . 15
4 Auto migration function example 2 . . . . . . . . . . . . . . . . . . . . . . . . . . . . . . . . . . . . . . . . . . . . . . . 15
5 Auto LUN pane . . . . . . . . . . . . . . . . . . . . . . . . . . . . . . . . . . . . . . . . . . . . . . . . . . . . . . . . . . . . . 24
6 WWN, Port-LUN, LDEV, and Physical tabs . . . . . . . . . . . . . . . . . . . . . . . . . . . . . . . . . . . . . . . . . . 27
7 Manual Migration tab . . . . . . . . . . . . . . . . . . . . . . . . . . . . . . . . . . . . . . . . . . . . . . . . . . . . . . . . 31
8 Auto Migration tab . . . . . . . . . . . . . . . . . . . . . . . . . . . . . . . . . . . . . . . . . . . . . . . . . . . . . . . . . . 34
9 Attribute pane . . . . . . . . . . . . . . . . . . . . . . . . . . . . . . . . . . . . . . . . . . . . . . . . . . . . . . . . . . . . . . 36
10 Class table boxes . . . . . . . . . . . . . . . . . . . . . . . . . . . . . . . . . . . . . . . . . . . . . . . . . . . . . . . . . . . 37
11 Parity group table boxes. . . . . . . . . . . . . . . . . . . . . . . . . . . . . . . . . . . . . . . . . . . . . . . . . . . . . . . 37
12 Attribute tab tree . . . . . . . . . . . . . . . . . . . . . . . . . . . . . . . . . . . . . . . . . . . . . . . . . . . . . . . . . . . . 39
13 History tab . . . . . . . . . . . . . . . . . . . . . . . . . . . . . . . . . . . . . . . . . . . . . . . . . . . . . . . . . . . . . . . . 40
14 Pair status transitions during Auto LUN XP migrations using RAID Manager. . . . . . . . . . . . . . . . . . . . 45
15 Auto LUN Monitoring Options pane. . . . . . . . . . . . . . . . . . . . . . . . . . . . . . . . . . . . . . . . . . . . . . . 51
16 Parity group usage statistics . . . . . . . . . . . . . . . . . . . . . . . . . . . . . . . . . . . . . . . . . . . . . . . . . . . . 52
17 Logical volume usage statistics. . . . . . . . . . . . . . . . . . . . . . . . . . . . . . . . . . . . . . . . . . . . . . . . . . . 52
18 CHA usage statistics. . . . . . . . . . . . . . . . . . . . . . . . . . . . . . . . . . . . . . . . . . . . . . . . . . . . . . . . . . 54
19 CHP usage statistics . . . . . . . . . . . . . . . . . . . . . . . . . . . . . . . . . . . . . . . . . . . . . . . . . . . . . . . . . . 54
20 DKA usage statistics . . . . . . . . . . . . . . . . . . . . . . . . . . . . . . . . . . . . . . . . . . . . . . . . . . . . . . . . . . 55
21 DKP usage statistics . . . . . . . . . . . . . . . . . . . . . . . . . . . . . . . . . . . . . . . . . . . . . . . . . . . . . . . . . . 55
22 DRR usage statistics . . . . . . . . . . . . . . . . . . . . . . . . . . . . . . . . . . . . . . . . . . . . . . . . . . . . . . . . . . 56
23 Write pending rates . . . . . . . . . . . . . . . . . . . . . . . . . . . . . . . . . . . . . . . . . . . . . . . . . . . . . . . . . . 56
24 Usage statistics about paths between adapters and the cache switch . . . . . . . . . . . . . . . . . . . . . . . . 57
25 Usage statistics about paths between adapters and shared memory. . . . . . . . . . . . . . . . . . . . . . . . . 57
26 Usage statistics about paths between cache switches and cache memory . . . . . . . . . . . . . . . . . . . . . 57
27 Workload statistics for all parity groups . . . . . . . . . . . . . . . . . . . . . . . . . . . . . . . . . . . . . . . . . . . . 58
28 Workload statistics for a specific parity group . . . . . . . . . . . . . . . . . . . . . . . . . . . . . . . . . . . . . . . . 58
29 Workload statistics for logical volumes in a parity group . . . . . . . . . . . . . . . . . . . . . . . . . . . . . . . . 58
30 Traffic statistics about ports in a disk array . . . . . . . . . . . . . . . . . . . . . . . . . . . . . . . . . . . . . . . . . . 59
31 Traffic statistics about host ports to which a disk array port is connected. . . . . . . . . . . . . . . . . . . . . . 59
32 Traffic statistics about host ports in a host group . . . . . . . . . . . . . . . . . . . . . . . . . . . . . . . . . . . . . . 60
33 Traffic statistics about LU paths . . . . . . . . . . . . . . . . . . . . . . . . . . . . . . . . . . . . . . . . . . . . . . . . . . 60
34 Traffic statistics for host bus adapters . . . . . . . . . . . . . . . . . . . . . . . . . . . . . . . . . . . . . . . . . . . . . . 61
35 Traffic statistics for each PFC group . . . . . . . . . . . . . . . . . . . . . . . . . . . . . . . . . . . . . . . . . . . . . . . 61
36 Traffic statistics for each port connected to a specified HBA . . . . . . . . . . . . . . . . . . . . . . . . . . . . . . 61
Page 66

Page 67

Tables
1 Document conventions . . . . . . . . . . . . . . . . . . . . . . . . . . . . . . . . . . . . . . . . . . . . . . . . . . . . . . . . . . 8
2 Movability of volumes in pairs consisting of CV and normal values . . . . . . . . . . . . . . . . . . . . . . . . . . 16
3 Non-cascaded volumes that can be used as source volumes . . . . . . . . . . . . . . . . . . . . . . . . . . . . . . . 18
4 Cascaded volumes that can be used as source volumes . . . . . . . . . . . . . . . . . . . . . . . . . . . . . . . . . . 18
5 Control cylinders by emulation type . . . . . . . . . . . . . . . . . . . . . . . . . . . . . . . . . . . . . . . . . . . . . . . . 20
6 Total number of differential tables per migration plan . . . . . . . . . . . . . . . . . . . . . . . . . . . . . . . . . . . . 21
7 Control cylinders by emulation type . . . . . . . . . . . . . . . . . . . . . . . . . . . . . . . . . . . . . . . . . . . . . . . . 21
8 The estimated delay in the copying speed. . . . . . . . . . . . . . . . . . . . . . . . . . . . . . . . . . . . . . . . . . . .23
9 Graph contents based on list selection (Port-LUN tab) . . . . . . . . . . . . . . . . . . . . . . . . . . . . . . . . . . . . 26
10 Auto LUN pane, Port-LUN tab icons . . . . . . . . . . . . . . . . . . . . . . . . . . . . . . . . . . . . . . . . . . . . . . . . 28
11 Auto LUN pane, Physical tab icons . . . . . . . . . . . . . . . . . . . . . . . . . . . . . . . . . . . . . . . . . . . . . . . . 29
12 Migration log messages . . . . . . . . . . . . . . . . . . . . . . . . . . . . . . . . . . . . . . . . . . . . . . . . . . . . . . . . 44
13 Errors during Auto LUN XP migrations or migration cancellations using RAID Manager . . . . . . . . . . . . 46
Page 68

 Loading...