

HP Workstation xw4100, Workstation xw4200, Workstation xw6000, Workstation xw8000, Workstation Xw6200 SATA Hard Drive Installation Guide
...
345524-B21.book 1 ページ 2003年8月22日 金曜日 午後4時6分
SATA Hard Drive
Installation Guide
SATAハー ド デ ィ スク ドライブ
インストール ガイ ド
Document Part Number: 345524-B21
August 2003
This document provides instructions on installing a serial
advanced technology attachment (SATA) hard drive into your
computer.
このマニュアルでは、コンピュータに Serial ATA(SATA)ハードディ
スク ドライブを取り付ける方法について説明します。
345524-B21.book 2 ページ 2003年8月22日 金曜日 午後4時6分
345524-B21.book 1 ページ 2003年8月22日 金曜日 午後4時6分
Preparing for Installation
Although HP computers are designed for easy access to the
upgradeable areas, it is strongly recommended that only an HP
1
authorized dealer, reseller, or service provider install accessories.
HP authorized dealers, resellers, and service providers are
company trained in the installation of accessories and can ensure
that the accessory is installed and functioning properly.
If you decide to install the hard drive accessory yourself, you will
need a Torx T-15 screwdriver.
For additional information on SATA
technology, consult the white paper
“Implementation of Serial ATA on HP
Business Desktops” available at
http://www.hp.com/support.
345524-B21.book 2 ページ 2003年8月22日 金曜日 午後4時6分
Preparing for Installation
Disassembling the Computer
Ä
1. Turn off the computer and any external devices.
2. Disconnect the AC power cord and any external devices.
3. Unlock the external chassis keylock (if applicable).
4. If necessary, loosen the screws on the computer to remove
the access panel or computer cover.
5. Remove the access panel or computer cover and front bezel.
Refer to the documentation that came with your computer
for model specific instructions on accessing the inside of the
computer.
CAUTION: Ensure that the power to the computer is off
and the AC power cord disconnected to avoid electrical
shock or damage to the computer.
1–2 SATA Hard Drive Installation Guide
HP accessories are for use in HP computer
products. They have been extensively tested for
reliability and are manufactured to high quality
standards. HP warrants only those accessories that
are manufactured or sold by HP.
345524-B21.book 1 ページ 2003年8月22日 金曜日 午後4時6分
Installing a Hard Drive
2
This chapter covers:
Q Installing an additional hard drive.
If you are installing a SATA hard drive on an
hp workstation xw series, please refer to
www.hp.com/go/bizsupport for
workstation-specific installation information.
This information may be in the form of a SATA
whitepaper and/or embedded in the service
and technical reference guide
(www.hp.com/support/workstation_manuals)
for your specific workstation.
Q Replacing an existing hard drive.

345524-B21.book 2 ページ 2003年8月22日 金曜日 午後4時6分
Installing a Hard Drive
Å
Ä
It is strongly recommended that only an HP
authorized dealer, reseller, or service
provider replace your primary hard drive.
WARNING: To reduce the risk of personal
injury from hot surfaces, allow the internal
system components to cool before touching.
CAUTION: Ensure that the power to the computer
is off. Disconnect the AC power cord to avoid
electrical damage to the computer. Electrostatic
discharge (ESD) can damage electronic
components. Be sure you are properly grounded
before beginning this procedure. Refer to
Appendix A, “Electrostatic Discharge,” for more
information.
2–2 SATA Hard Drive Installation Guide
Refer to the documentation that came with your
computer for detailed instructions on installing an
optional drive.
345524-B21.book 3 ページ 2003年8月22日 金曜日 午後4時6分
Installing a Hard Drive
Installing an Additional Hard
Drive
1. If your system uses guide screws to hold the drives in the
bay, install the screws on the hard drive. These guide screws
are stored behind the front bezel.
SATA Hard Drive Installation Guide 2–3
345524-B21.book 4 ページ 2003年8月22日 金曜日 午後4時6分
Installing a Hard Drive
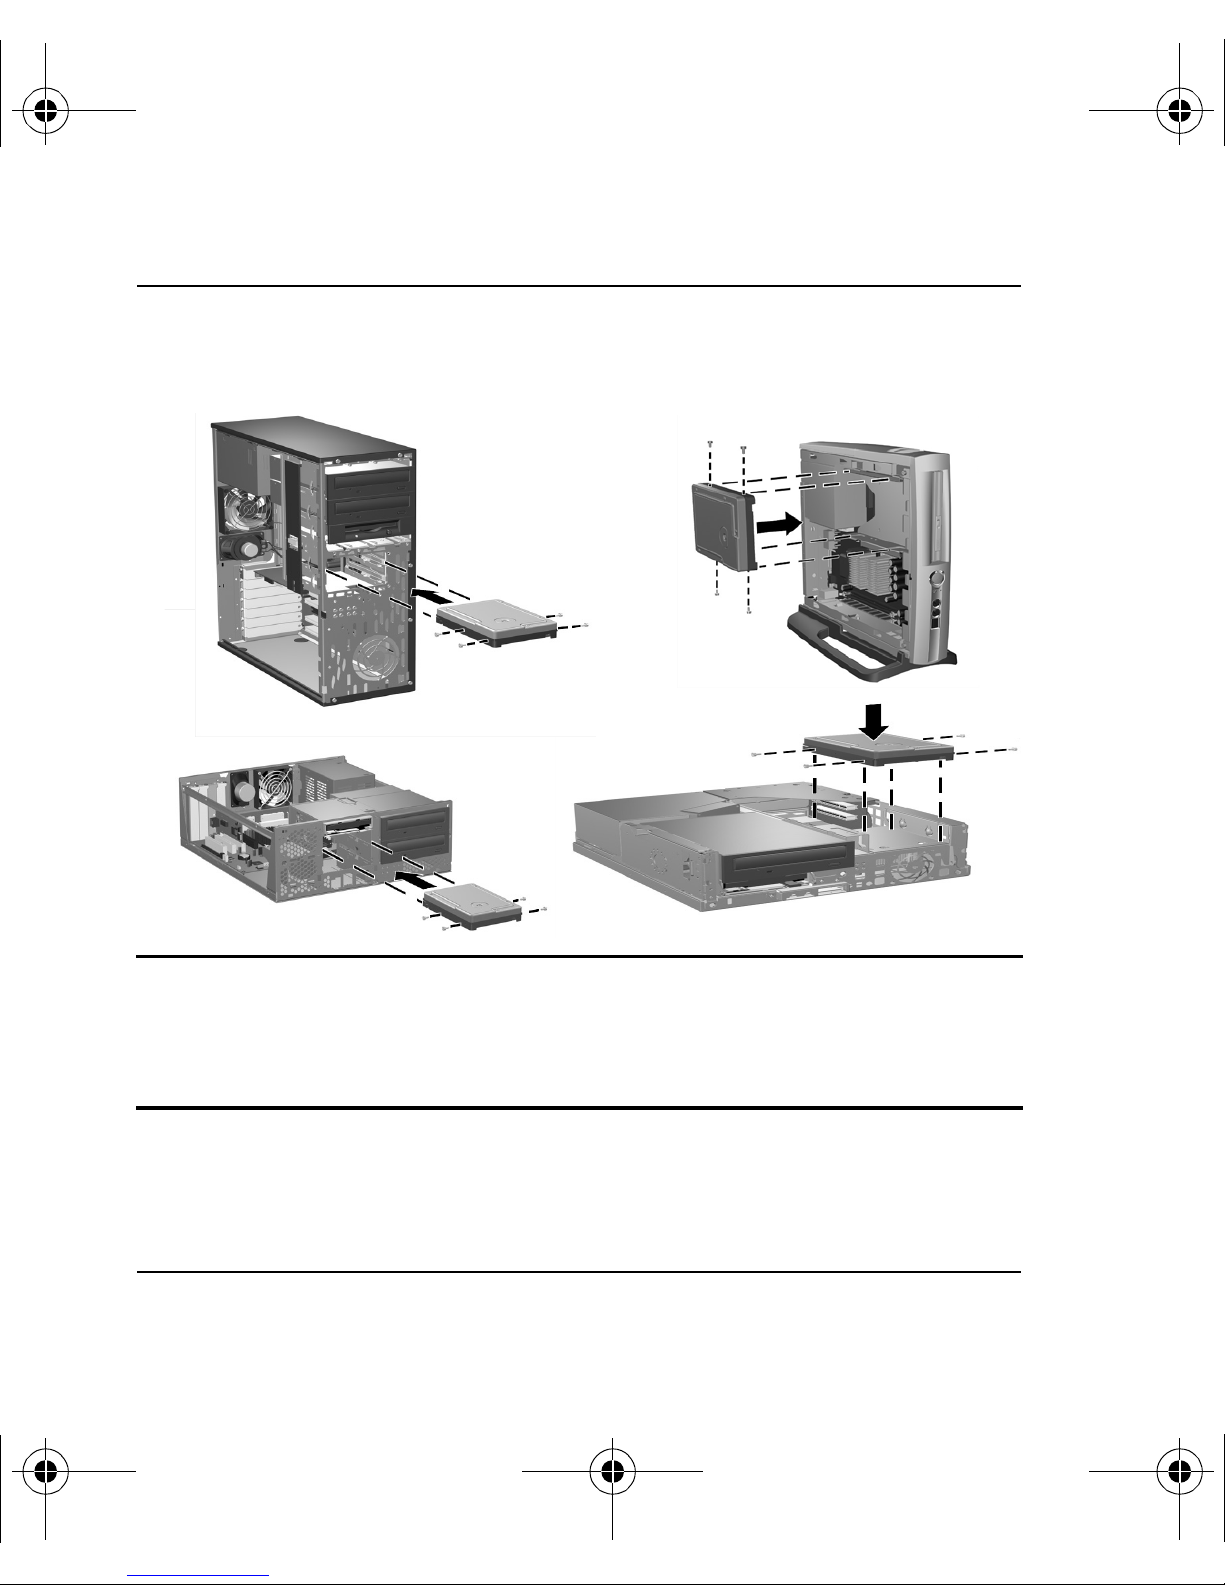
2. Install the hard drive assembly by sliding it into the drive
bay as shown in the illustration below.
For comprehensive instructions on installing an
additional hard drive, refer to the documentation
that came with your computer.
2–4 SATA Hard Drive Installation Guide
345524-B21.book 5 ページ 2003年8月22日 金曜日 午後4時6分
Installing a Hard Drive
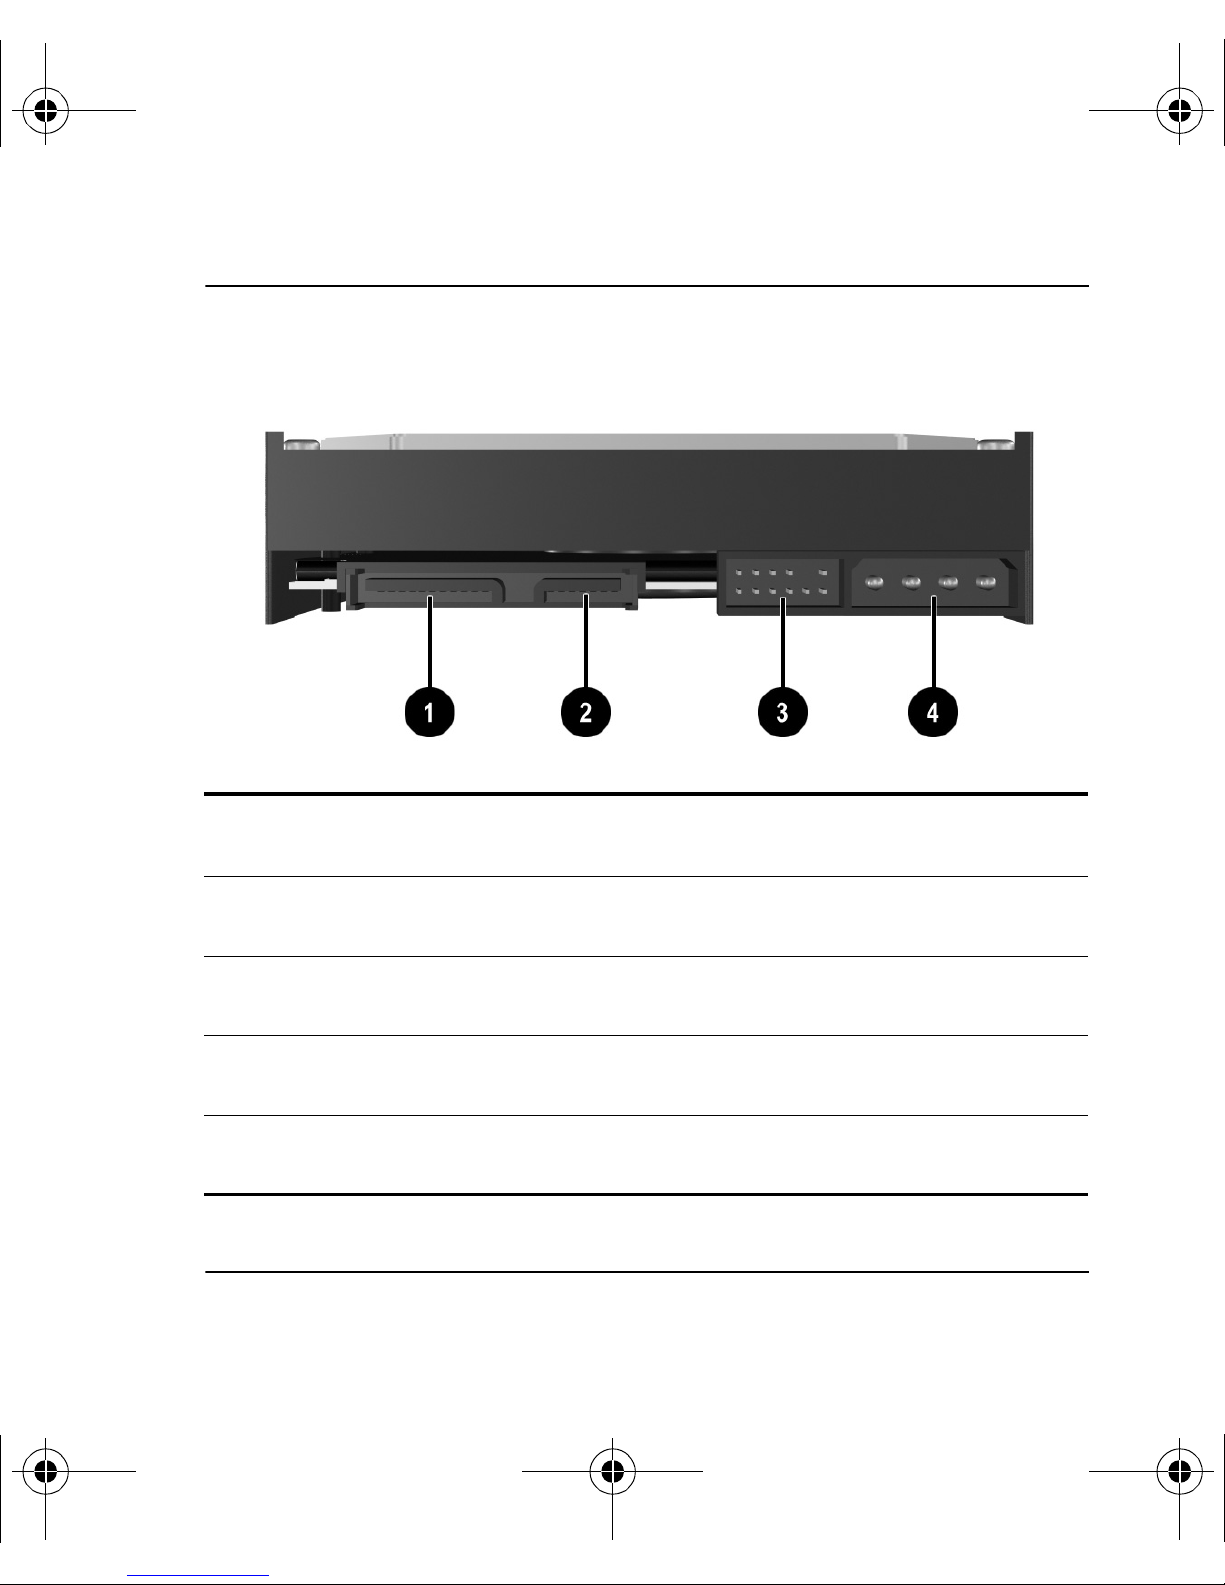
3. Locate the appropriate connectors, identified in the
following illustration, on the back of the SATA hard drive.
Hard Drive Connectors
1 SATA power connector
2 SATA data connector
3 Debugging connector
4 Legacy power connector (not present on all models)
SATA Hard Drive Installation Guide 2–5

345524-B21.book 6 ページ 2003年8月22日 金曜日 午後4時6分
Installing a Hard Drive
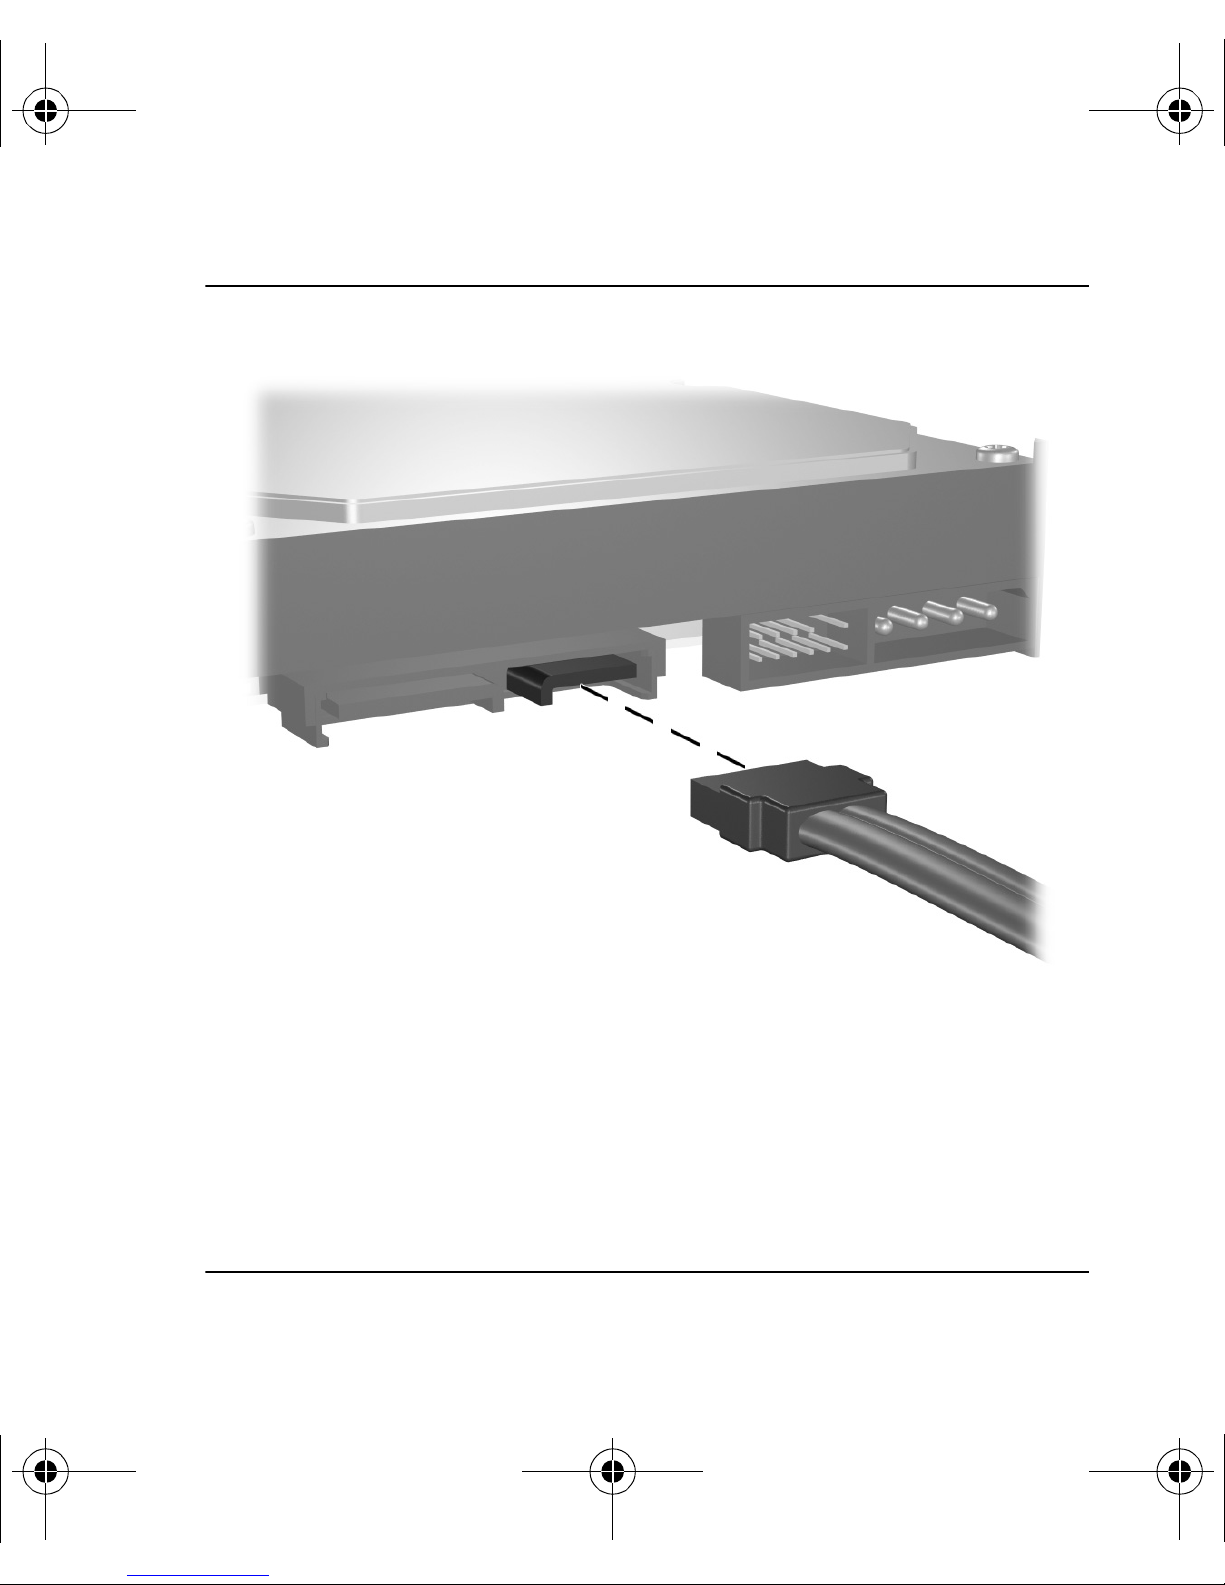
4. Connect the data cable to the SATA data connector on the
new drive as shown in the following illustration.
Ä
Five data cables are provided in the kit. Refer
to the “SATA Hard Drive Cables” card
included in the kit to determine which cable
is required for your system board.
CAUTION: The data cable end is keyed to
ensure proper alignment. To avoid damage
to the cable header pins, check the
header/connector alignment and push
gently when connecting the data cable
header to the SATA connector on the drive
and system board.
2–6 SATA Hard Drive Installation Guide
345524-B21.book 7 ページ 2003年8月22日 金曜日 午後4時6分
Installing a Hard Drive
SATA Hard Drive Installation Guide 2–7
345524-B21.book 8 ページ 2003年8月22日 金曜日 午後4時6分
Installing a Hard Drive
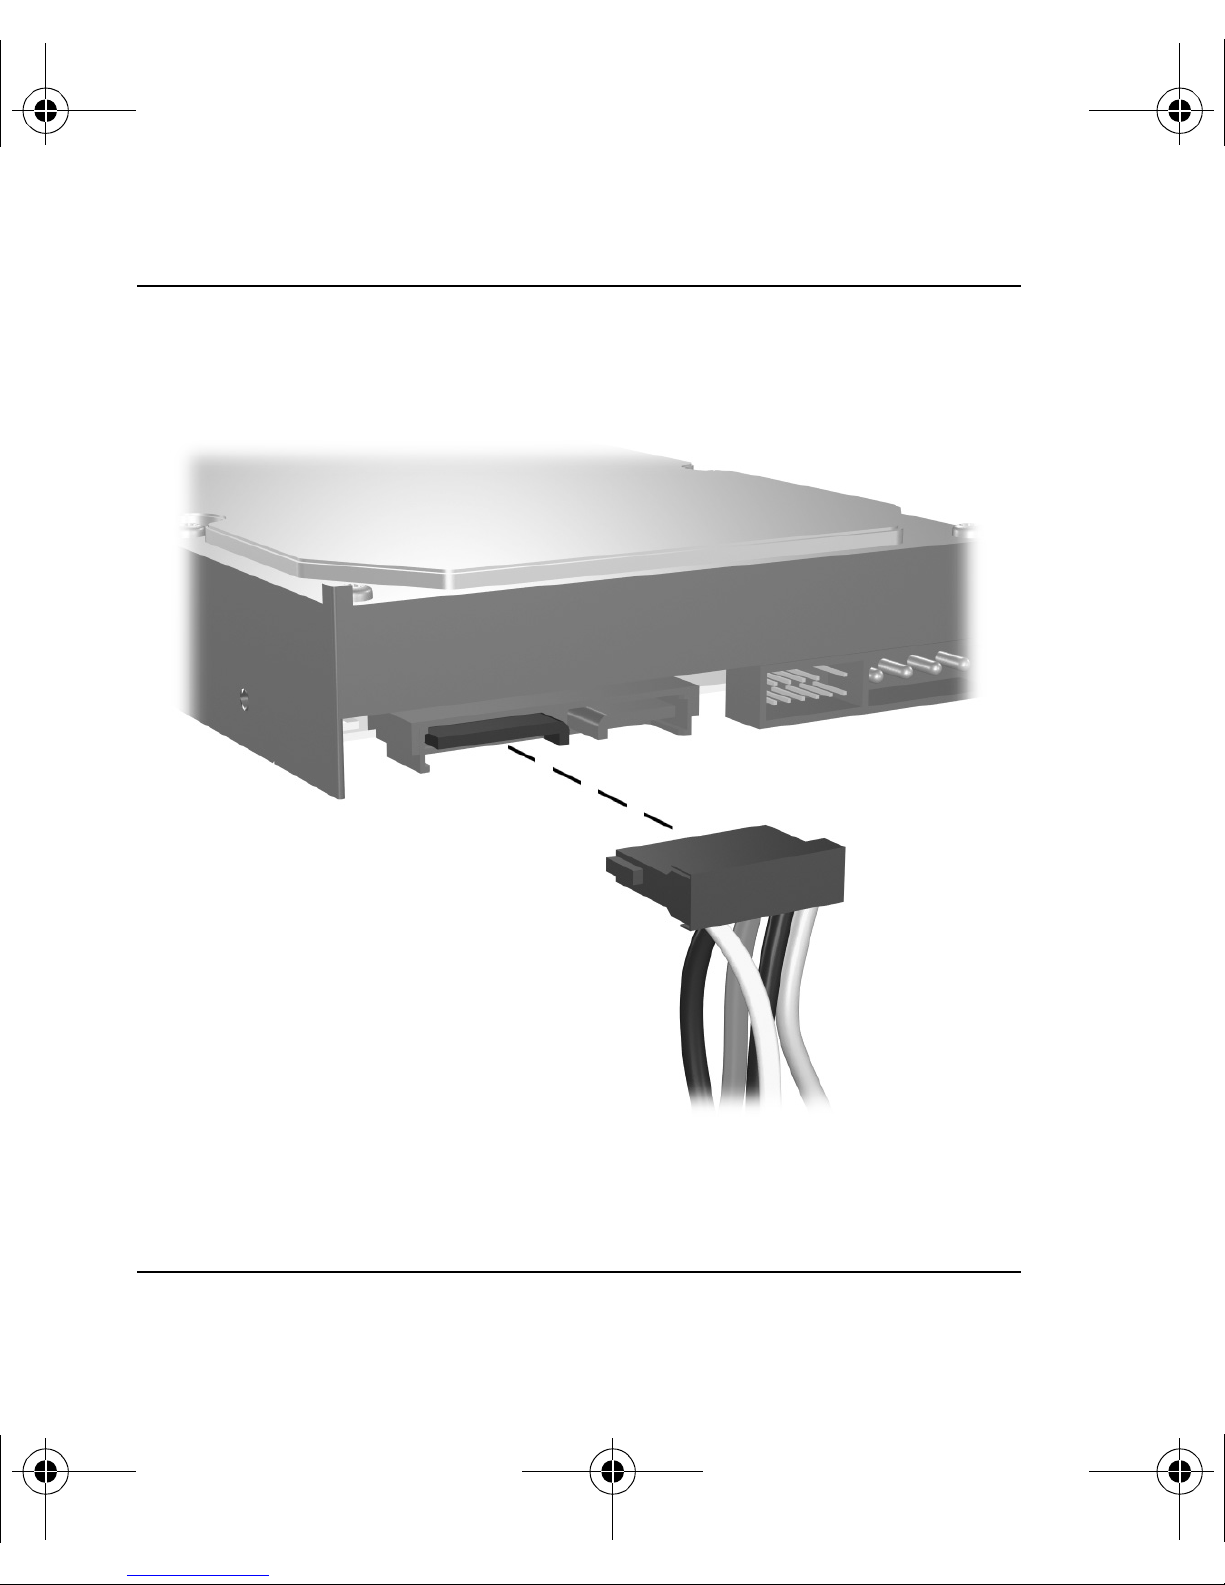
5. Connect the power cable to the SATA power connector as
shown in the illustration below.
2–8 SATA Hard Drive Installation Guide
345524-B21.book 9 ページ 2003年8月22日 金曜日 午後4時6分
Installing a Hard Drive
Ä
CAUTION: For SATA hard drives use the
SATA or legacy power connector. Do not
plug in both.
6. Connect the opposite end of the SATA data cable to the
system board as shown in the following illustration. Because
system boards vary, your system board may contain up to
two vertical SATA connectors 1 or up to two horizontal
SATA connectors 2. Horizontal SATA connectors require a
data cable with a 90 degree angled header.
SATA Hard Drive Installation Guide 2–9

345524-B21.book 10 ページ 2003年8月22日 金曜日 午後4時6分
Installing a Hard Drive
2–10 SATA Hard Drive Installation Guide

345524-B21.book 11 ページ 2003年8月22日 金曜日 午後4時6分
Installing a Hard Drive
Ä
CAUTION: If your system has only one
SATA hard drive, you must connect the hard
drive to the connector labeled SATA 0 first to
avoid any hard drive performance problems.
Replacing an Existing Hard Drive
Ä
CAUTION: Prior to replacing an existing
hard drive, be sure to back up your data. If
your computer supports only one hard drive,
you must use a second system with third-party
software to copy the data to the new hard
drive.
SATA Hard Drive Installation Guide 2–11
345524-B21.book 12 ページ 2003年8月22日 金曜日 午後4時6分
Installing a Hard Drive
HP strongly recommends that only an HP
authorized dealer, reseller, or service
provider replace your primary hard drive.
However, if you choose to perform a
self-install, follow the steps in the previous
section, “Installing an Additional Hard
Drive.” You may also refer to the technical or
service-related documentation applicable to
your computer for more comprehensive
instructions.
2–12 SATA Hard Drive Installation Guide

345524-B21.book 13 ページ 2003年8月22日 金曜日 午後4時6分
Installing a Hard Drive
Reassembling the Computer
1. Replace the front bezel.
2. Replace the computer cover or access panel and tighten the
screws. (if applicable)
3. Lock the external chassis keylock (if applicable).
4. Reconnect any external devices to the computer.
5. Plug the AC power cord into the computer, then into a
grounded AC outlet.
Å
SATA Hard Drive Installation Guide 2–13
WARNING: This equipment is designed for
connection to a grounded (earthed) outlet.
The ground type plug is an important safety
feature. To avoid the risk of electric shock or
damage to your equipment, do not disable
this feature.
If you need additional assistance, refer to the
documentation that came with your computer for
product-specific information about reassembling
the computer.
 Loading...