

Page 1

322496-001.book Page i Tuesday, March 4, 2003 3:21 PM
getting started guide
Linux-based workstations
hp workstation xw5000
hp workstation xw8000
Document Part Number: 322496-001
April 2003
Use this guide as a reference when setting up your new Linux®-based
workstation. For more information about your workstation, re view the
other documentation that came with your system and visit HP’s Web
site at
www.hp.com/go/workstationsupport.
Page 2

322496-001.book Page ii Tuesday, March 4, 2003 3:21 PM
© 2003 Hewlett-Packard Company
HP, Hewlett-Packard, and the HP logo are registered trademarks of
Hewlett-Packard Company.
Red Hat is a registered trademark of Red Hat, Inc.
Linux is a registered trademark of Linus Torvalds.
Intel, Pentium, Intel Inside, and Celeron are trademarks of Intel Corporation in
the U.S. and other countries.
Adobe, Acrobat, and Acrobat Reader are trademarks or registered trademarks of
Adobe Systems Incorporated.
All other product names mentioned herein may be trademarks of their respective
companies.
Hewlett-Packard Company shall not be liable for technical or editorial errors
or omissions contained herein or for incidental or consequential damages in
connection with the furnishing, performance, or use of this material. The
information in this document is provided “as is” without warranty of any kind,
including, but not limited to, the implied warranties of merchantability and
fitness for a particular purpose, and is subject to change without notice. The
warranties for HP products are set forth in the express limited warranty
statements accompanying such products. Nothing herein should be construed
as constituting an additional warranty.
Å
Ä
This document contains proprietary information that is protected by copyright.
No part of this document may be photocopied, reproduced, or translated to
another language without the prior written consent of Hewlett-Packard
Company.
WARNING: Text set off in this manner indicates that failure to follow
directions could result in bodily harm or loss of life.
CAUTION: Text set off in this manner indicates that failure to follow
directions could result in damage to equipment or loss of information.
getting started guide
Linux-based workstations
hp workstation xw5000
hp workstation xw8000
First Edition (April 2003)
Document Part Number: 322496-001
Page 3

322496-001.book Page iii Tuesday, March 4, 2003 3:21 PM
1 setting up and using your workstation
setting up your workstation. . . . . . . . . . . . . . . . . . . . . . . . . . . . . . . . . . . . . . . . . . . . . . 1–1
prepare your workspace . . . . . . . . . . . . . . . . . . . . . . . . . . . . . . . . . . . . . . . . . . . . . 1–1
install your graphics card . . . . . . . . . . . . . . . . . . . . . . . . . . . . . . . . . . . . . . . . . . . . 1–2
connect the components . . . . . . . . . . . . . . . . . . . . . . . . . . . . . . . . . . . . . . . . . . . . . 1–2
connect to a Local Area Network (LAN) . . . . . . . . . . . . . . . . . . . . . . . . . . . . . . . . 1–6
connect the power cords . . . . . . . . . . . . . . . . . . . . . . . . . . . . . . . . . . . . . . . . . . . . . 1–6
starting and shutting down your workstation . . . . . . . . . . . . . . . . . . . . . . . . . . . . . . . . 1–7
starting your workstation for the first time. . . . . . . . . . . . . . . . . . . . . . . . . . . . . . . 1–7
initializing your software . . . . . . . . . . . . . . . . . . . . . . . . . . . . . . . . . . . . . . . . . . . . 1–7
workstation start-up . . . . . . . . . . . . . . . . . . . . . . . . . . . . . . . . . . . . . . . . . . . . . . . . 1–8
shutting down your workstation . . . . . . . . . . . . . . . . . . . . . . . . . . . . . . . . . . . . . . . 1–9
using your workstation . . . . . . . . . . . . . . . . . . . . . . . . . . . . . . . . . . . . . . . . . . . . . . . . 1–10
understanding the control panel . . . . . . . . . . . . . . . . . . . . . . . . . . . . . . . . . . . . . . 1–10
setting hardware passwords in the hp setup program . . . . . . . . . . . . . . . . . . . . . . . . . 1–11
to set a password. . . . . . . . . . . . . . . . . . . . . . . . . . . . . . . . . . . . . . . . . . . . . . . . . . 1–11
if you forget your user password . . . . . . . . . . . . . . . . . . . . . . . . . . . . . . . . . . . . . 1–12
configuring your workstation . . . . . . . . . . . . . . . . . . . . . . . . . . . . . . . . . . . . . . . . . . . 1–12
starting the hp setup program . . . . . . . . . . . . . . . . . . . . . . . . . . . . . . . . . . . . . . . . 1–12
setup program menus . . . . . . . . . . . . . . . . . . . . . . . . . . . . . . . . . . . . . . . . . . . . . . 1–13
viewing your workstation configuration . . . . . . . . . . . . . . . . . . . . . . . . . . . . . . . . . . . 1–15
loading software applications for your optical drive. . . . . . . . . . . . . . . . . . . . . . . . . . 1–15
configuring your video card and monitor . . . . . . . . . . . . . . . . . . . . . . . . . . . . . . . . . . 1–16
using power management . . . . . . . . . . . . . . . . . . . . . . . . . . . . . . . . . . . . . . . . . . . . . . 1–16
software and driver availability. . . . . . . . . . . . . . . . . . . . . . . . . . . . . . . . . . . . . . . . . . 1–16
recycling your workstation . . . . . . . . . . . . . . . . . . . . . . . . . . . . . . . . . . . . . . . . . . . . . 1–16
contents
getting started guide iii
Page 4

322496-001.book Page iv Tuesday, March 4, 2003 3:21 PM
contents
2 Linux system setup and recovery
configuring your Linux workstation . . . . . . . . . . . . . . . . . . . . . . . . . . . . . . . . . . . . . . . 2–1
setting the root password (required) . . . . . . . . . . . . . . . . . . . . . . . . . . . . . . . . . . . . 2–3
changing boot/network parameters. . . . . . . . . . . . . . . . . . . . . . . . . . . . . . . . . . . . . 2–4
graphics parameters . . . . . . . . . . . . . . . . . . . . . . . . . . . . . . . . . . . . . . . . . . . . . . . . 2–6
DNS parameters configuration . . . . . . . . . . . . . . . . . . . . . . . . . . . . . . . . . . . . . . . . 2–7
system time, timezone, date parameters . . . . . . . . . . . . . . . . . . . . . . . . . . . . . . . . . 2–8
setting the keyboard language. . . . . . . . . . . . . . . . . . . . . . . . . . . . . . . . . . . . . . . . . 2–9
summary . . . . . . . . . . . . . . . . . . . . . . . . . . . . . . . . . . . . . . . . . . . . . . . . . . . . . . . . 2–10
recovering your Linux system. . . . . . . . . . . . . . . . . . . . . . . . . . . . . . . . . . . . . . . . . . . 2–11
the Linux Rescue Mode . . . . . . . . . . . . . . . . . . . . . . . . . . . . . . . . . . . . . . . . . . . . 2–11
booting single user mode directly. . . . . . . . . . . . . . . . . . . . . . . . . . . . . . . . . . . . . 2–14
3 troubleshooting
solving common problems . . . . . . . . . . . . . . . . . . . . . . . . . . . . . . . . . . . . . . . . . . . . . . 3–1
workstation does not start properly. . . . . . . . . . . . . . . . . . . . . . . . . . . . . . . . . . . . . 3–2
hardware problems . . . . . . . . . . . . . . . . . . . . . . . . . . . . . . . . . . . . . . . . . . . . . . . . . 3–4
issues with BIOS passwords. . . . . . . . . . . . . . . . . . . . . . . . . . . . . . . . . . . . . . . . . . 3–9
understanding the E-buzzer beep codes . . . . . . . . . . . . . . . . . . . . . . . . . . . . . . . . 3–11
restoring your OS and software from CD . . . . . . . . . . . . . . . . . . . . . . . . . . . . . . . . . . 3–12
index
iv getting started guide
Page 5

322496-001.book Page 1 Tuesday, March 4, 2003 3:21 PM
setting up and using your workstation
setting up your workstation
WARNING: If you have any doubt that you can lift the workstation and
Å
monitor safely, do not move them without help.
1
prepare your workspace
1. Unpack all components.
2. Place your monitor on a sturdy desk with easily accessible power
outlets and enough space for the keyboard, mouse, and any other
accessories.
3. Position the workstation on a sturdy desk or the floor with the
front and rear connectors easily accessible. The workstation must
be close enough to the peripherals so that the cables can be
connected.
installation tools
No tools are required for basic setup.
getting started guide 1–1
Page 6

322496-001.book Page 2 Tuesday, March 4, 2003 3:21 PM
setting up and using your workstation
install your graphics card
Your HP workstation is available with a range of graphics cards. For
a complete and current list of supported cards, see:
http://www.hp.com/workstations/ia32/options/graphicscontrollers.
html
Some video cards are pre-installed in the system, whereas others are
packaged separately and shipped with the system.
If your workstation did not ship with a pre-installed graphics card,
you must install the card and load the drivers. Refer to the
documentation included with your graphics card for instructions.
connect the components
Before you connect any cords or cables to your workstation, read
“Important Safety Warnings”.
The hp workstations xw5000 and xw8000 have front- and rear-panel
connectors. The cable connectors are color-matched to their
corresponding ports. The connectors are shaped to go in one way
only.
1–2 getting started guide
Page 7
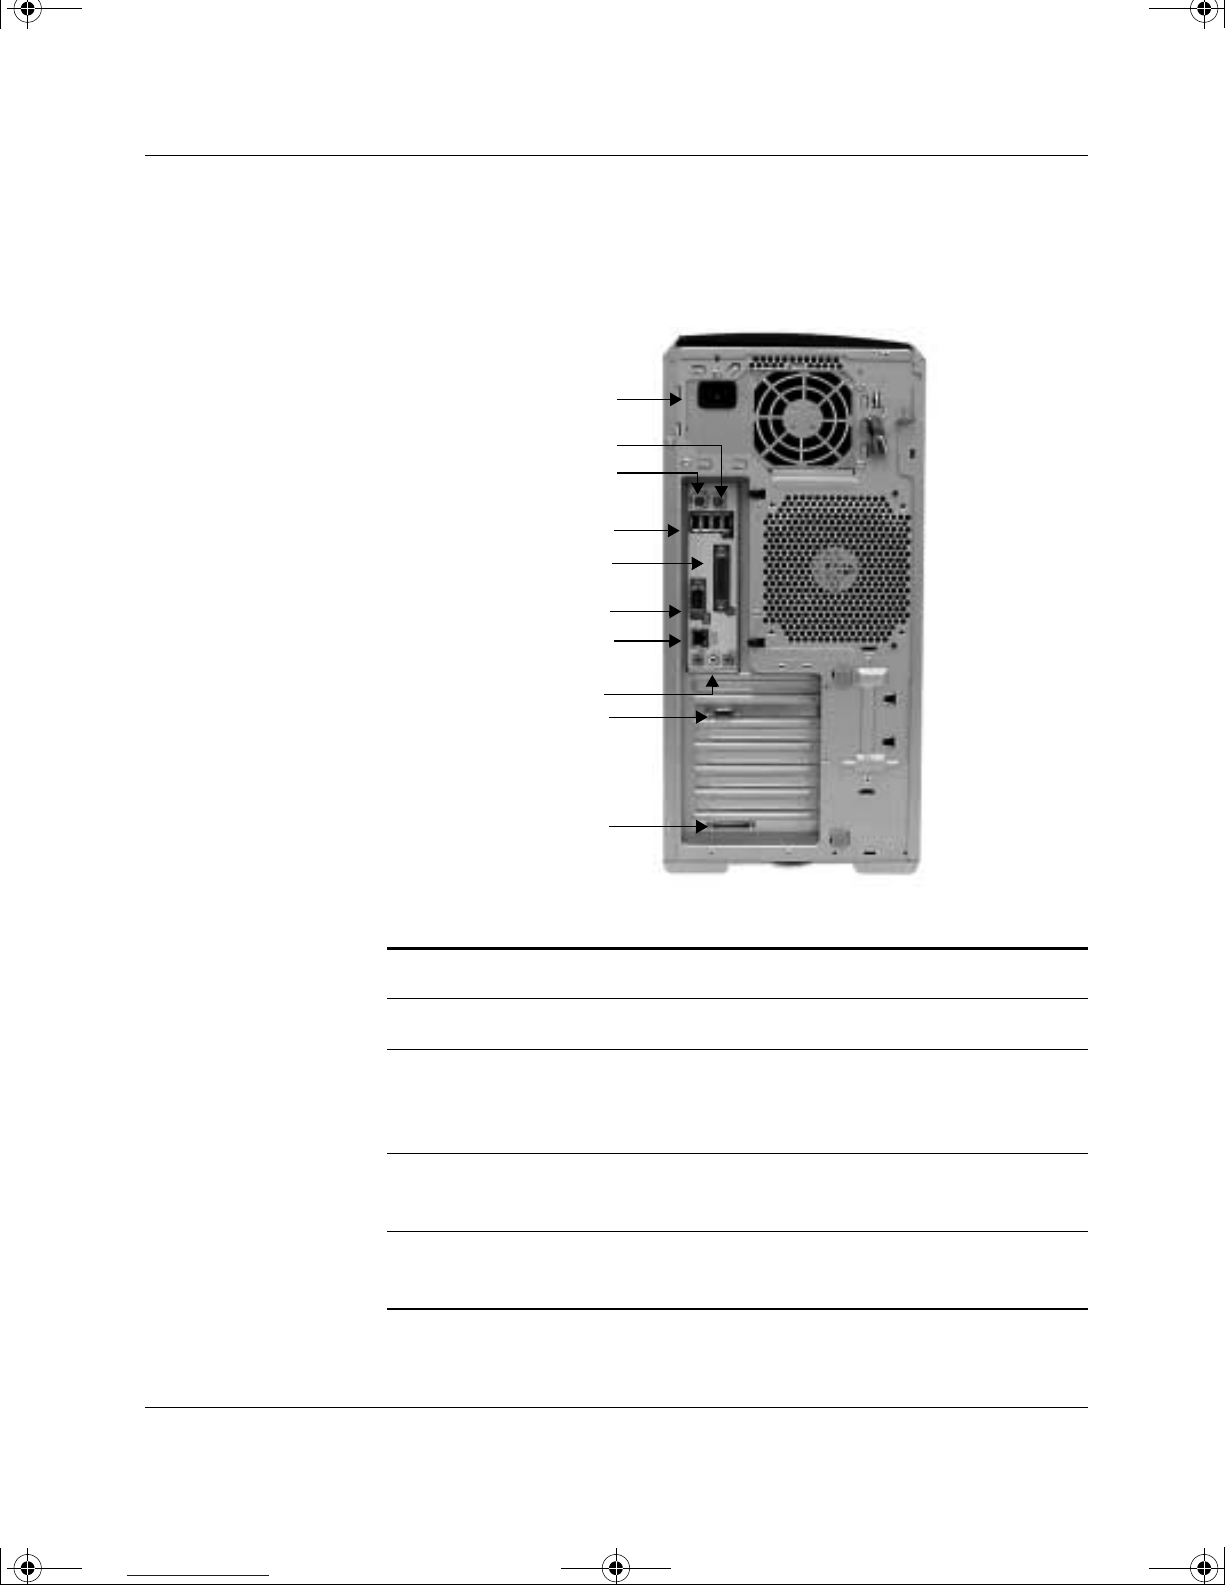
322496-001.book Page 3 Tuesday, March 4, 2003 3:21 PM
hp workstation xw5000 rear panel connectors
The following illustration shows the hp workstation xw5000 rear
panel connectors.
setting up and using your workstation
1
2
3
4
5
6
7
8
9
10
hp workstation xw5000 rear panel connectors
1 Power 6 Serial (teal)
2 PS2 Mouse (green) 7 LAN (orange)
3 PS2 Keyboard (purple) 8 Audio (Microphone — pink,
Line Out — lime,
Line In — light blue)
4 USB (black) 9 Monitor (connection on
graphics card)
5 Parallel (burgundy) 10 SCSI Card (optional) (requires
getting started guide 1–3
optional SCSI adapter card)
Page 8
322496-001.book Page 4 Tuesday, March 4, 2003 3:21 PM
setting up and using your workstation
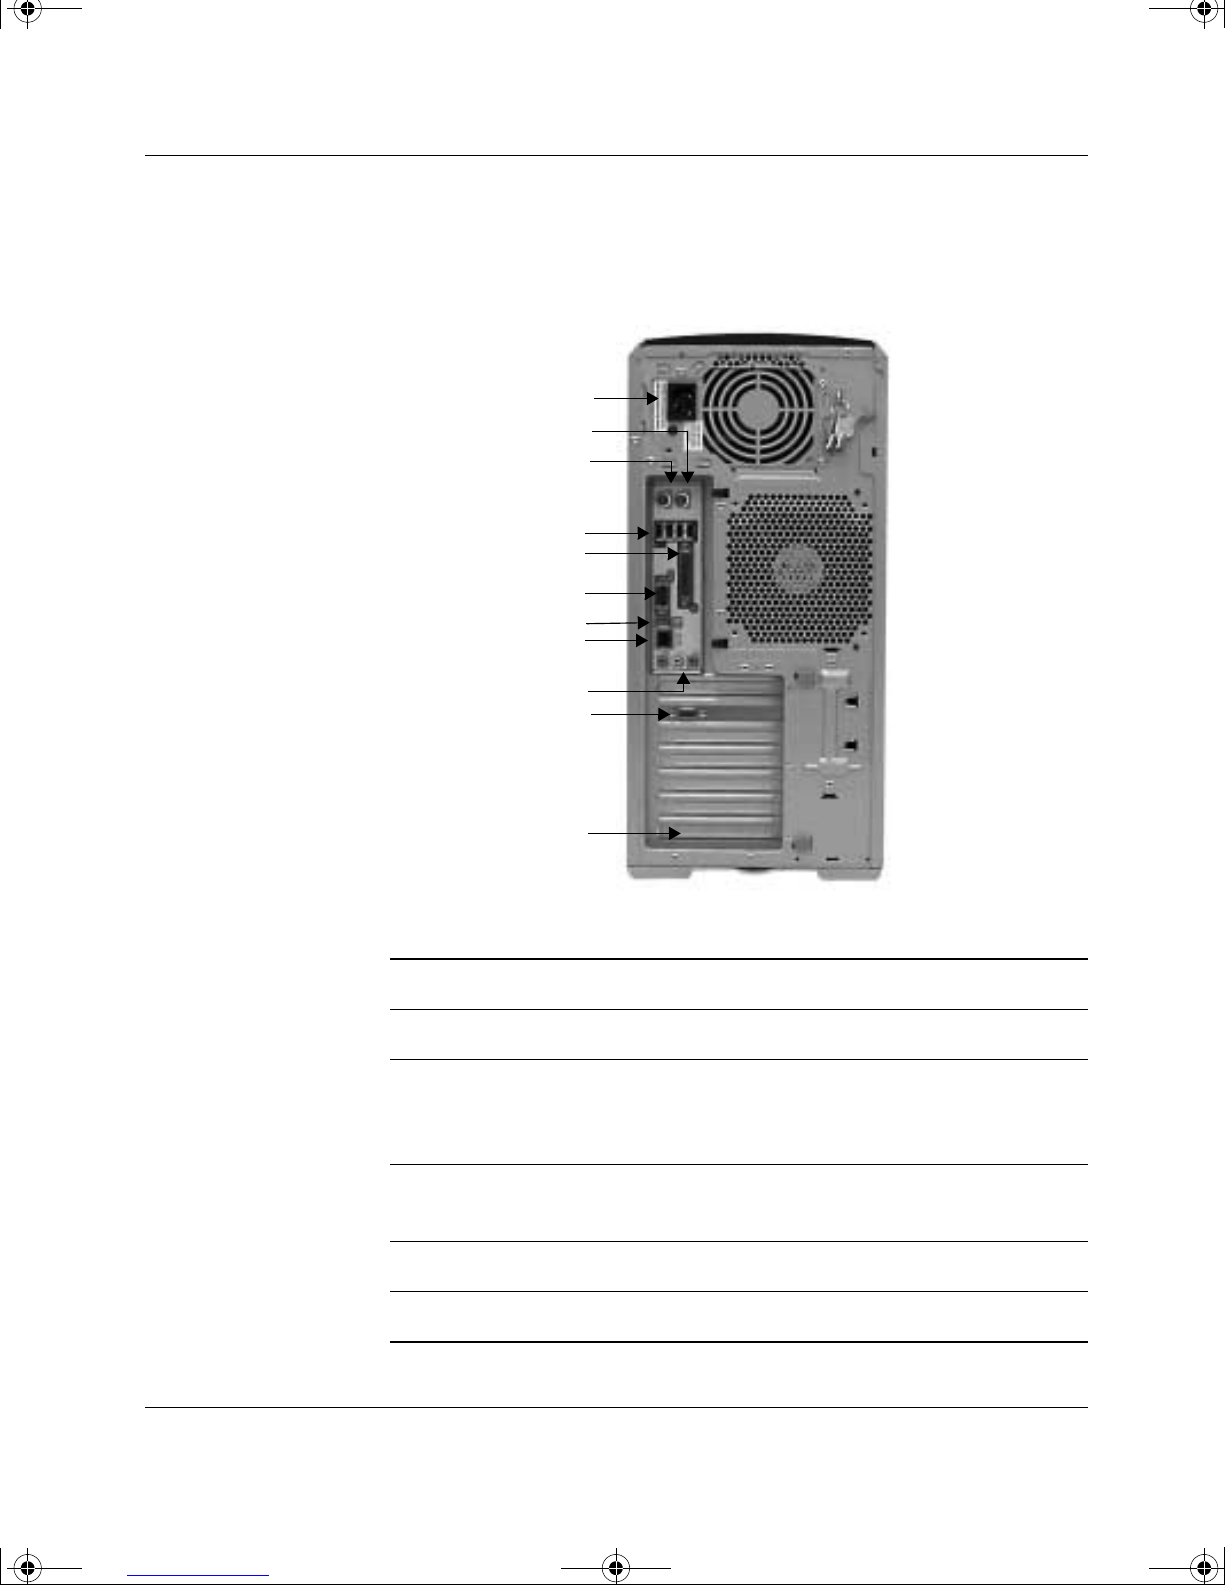
hp workstation xw8000 rear panel connectors
The following illustration shows the hp workstation xw8000 rear
panel connectors.
1
2
3
4
5
6
7
8
9
10
11
hp workstation xw8000 rear panel connectors
1 Power 7 IEEE-1394 (gray)
2 PS2 Mouse (green) 8 LAN (orange)
3 PS2 Keyboard (purple) 9 Audio (Microphone — pink,
Line Out — lime,
Line In — light blue)
4 USB (black) 10 Monitor (connection on
graphics card)
5 Parallel (burgundy) 11 SCSI Card (optional)
6 Serial (teal)
1–4 getting started guide
Page 9

322496-001.book Page 5 Tuesday, March 4, 2003 3:21 PM
front panel connectors
The front panel of the workstations include these connectors:
■ dual USB
■ audio line out (speakers or headphones)
■ microphone
■ IEEE-1394 (optional on xw5000)
NOTE: The IEEE-1394 connector comes is an optional feature on
the hp workstation xw5000. If you did not order this feature, the
connector comes covered with a removable plug. Flip down the front
panel cover to access the front panel connectors. You can remov e this
cover for easier access to the connectors.
setting up and using your workstation
2
1
1 IEEE-1394 (optional for
xw5000)
2 USB 4 Audio Line Out
3 Microphone
3
4
Connect the components:
1. Connect the display cable to the monitor and graphics card
connectors. Lightly tighten the attachment screws.
NOTE: Depending on the graphics card you ordered and whether
your monitor is analog or digital, you may also need to connect a
dongle to convert between digital and analog signals.
2. Connect the mouse and keyboard to the rear panel of the system.
getting started guide 1–5
Page 10

322496-001.book Page 6 Tuesday, March 4, 2003 3:21 PM
setting up and using your workstation
3. If you have a printer and it has a:
4. Connect any USB accessories to the front- or rear-panel USB
5. If you have a microphone, headphones or amplified speakers,
❏ parallel port connector, connect your printer cable to the
parallel port and tighten the attachment screws.
❏ USB connector, connect your printer cable to a USB
connector on the rear of the system.
Connect any serial devices to the serial port.
connectors.
connect them to the audio ports on the front or rear panel of the
system.
NOTE: The internal speaker is deacti vated after you connect speak ers
or headphones to the front or rear-panel line out jack.
connect to a Local Area Network (LAN)
The hp workstation xw5000 includes a 10BT/100TX LAN
auto-sensing interface adapter supporting both 10Mbps and 100Mbps
operation. The hp workstation xw8000 uses a 10/100/1000 Mb
Ethernet adapter supporting 10Mbps, 100Mbps, and 1000Mbps.
Connect the network cable to the LAN connector on the rear panel of
the system.
connect the power cords
WARNING: For your safety, always connect equipment to a grounded
Å
wall outlet. Always use the power cord provided with the equipment with
a properly grounded outlet. To disconnect the workstation from power,
you must remove the power cord from the power outlet. Therefore, the
equipment must be located near and easily accessible power outlet.
1. Connect the power cords to the rear of the monitor and the
2. Connect both power cords to grounded outlets.
1–6 getting started guide
workstation.
Page 11

322496-001.book Page 7 Tuesday, March 4, 2003 3:21 PM
starting and shutting down your workstation
starting your workstation for the first time
Your Linux® workstation has pre-installed Red Hat® Linux and HP
software. It is initialized the first time you start the workstation. The
software initialization process takes a few minutes. The first time
the workstation is booted, the Linux Setup Tool utility displays.
The Linux Setup Tool allows you to enter your password, network,
graphics, time, and keyboard settings for your workstation.
initializing your software
setting up and using your workstation
Ä
Ä
CAUTION: It is important not to interrupt the boot process. Doing so may
cause the boot to abort or leave the workstation in an unusable state.
To initialize your software:
1. Turn on the monitor and an y peripherals you have attached to the
system.
CAUTION: Some peripherals specifically state that you should not attach
the device until the drivers are installed. Refer to the documentation for
your peripherals for additional information.
2. Press the power button on the front panel of the workstation.
When you start your workstation:
❏ The Power-On-Self-Test (POST) runs while the workstation
logo is displayed. T o vie w the details of this test, press Esc. If
an error occurs in the POST, the error is displayed
automatically.
❏ The system initializes the software automatically after POST
is complete.
3. If prompted, enter the password you set up in the Linux Setup
getting started guide 1–7
Tool.
Page 12

322496-001.book Page 8 Tuesday, March 4, 2003 3:21 PM
setting up and using your workstation
workstation start-up
The following features are available during startup:
■ Instant Boot Menu
■ Keys During POST and Setup
instant boot menu
The Instant Boot Menu allows you to choose a boot device without
running the Setup program and rebooting the system. The choice is
valid for this boot only; setup preferences are not modified.
To select a boot option, press F8 when the HP splash screen is
displayed.
This screen lists only allowed boot devices. For example, if the
administrator has disabled the “boot from floppy” option in Setup
program, the floppy drive will not be listed in the Instant Boot Menu.
keys during POST and setup
The POST Welcome screen (HP logo) displays the following choices:
■ Esc — Summary. If you press Esc during POST, the BIOS
displays a summary of the configuration information before
loading the OS.
■ F2 — Setup
■ F8 — Boot Order
■ F12 — Forced Network Boot
In case of a warning or error, the following options are also available:
■ F1 — Continue
■ Enter — View Errors
1–8 getting started guide
Page 13

322496-001.book Page 9 Tuesday, March 4, 2003 3:21 PM
shutting down your workstation
CAUTION: Turning off your system without using the following
Ä
instructions may result in a loss of data or a damaged file system.
To shut down your workstation:
1. Exit all applications.
2. Shut down the workstation using the operating system’s
3. Press the On/Off button on the control panel.
4. Select one of the options and click OK.
setting up and using your workstation
Shutdown command.
getting started guide 1–9
Page 14

322496-001.book Page 10 Tuesday, March 4, 2003 3:21 PM
setting up and using your workstation
using your workstation
understanding the control panel
The hardware control panel located on the front of the workstation is
identical for both the hp workstation xw5000 and xw8000.
1
2
3
4
xw5000 and xw8000 front panel components
1 Optical Drive Bays 4 Power Button
2 Floppy Drive 5 Hard Disk Activity LED
3Power LED 6Reset Button
5
6
Power On/Off button. Press this button to start the workstation. You
can also wake the workstation from Hibernate or Standby mode by
pressing this button for less than four seconds. To turn the workstation
off, press this button for more than four seconds (see “Shutting Do wn
Your Workstation”).
1–10 getting started guide
Page 15

322496-001.book Page 11 Tuesday, March 4, 2003 3:21 PM
Powe r LED. These LEDs indicates system status:
■ Solid green — system is on.
■ Solid yellow — workstation is in Standby or Hibernate mode.
■ Flashing yellow, flashing red, or solid red — system error.
Reset button. Press this button to re-initialize all the hardware
without cycling power to the system (soft boot). Avoid general use of
this button because file damage may occur. Always use the OS Shut
Down command before resetting the machine.
Hard Disk Activity LED. Flickers when your hard disk is being
accessed.
setting up and using your workstation
setting hardware passwords in the hp setup
program
You can set hardware passwords to provide different levels of
protection for your workstation: the Administrator password and
the User password. You set the passwords using the Security menu
in the Setup program.
The administrator can access and change all settings in the Setup
program, while the User can only access and modify certain items in
the Main menu.
to set a password
1. Start the Setup program.
2. Select the Security menu.
3. Select the Administrator or User Password submneu.
4. Select the Set Administrator or User Password setup item. You
must enter your password twice.
5. To save your changes and exit the Setup program, press Esc or
select Exit Menu, then select Exit Saving Changes.
To remove the password, follow the same procedure to set a
password. You will be asked to enter the existing password first.
Then, for the new password leave the password field blank and press
Enter. To confirm your choice, press Enter a second time.
getting started guide 1–11
Page 16

322496-001.book Page 12 Tuesday, March 4, 2003 3:21 PM
setting up and using your workstation
if you forget your user password
1. Turn off the workstation.
2. Re-start the workstation. If you are prompted for a password,
enter the Administration password.
3. When Press F2 to Enter Setup displays, press the F2 key.
4. Enter the Administrator password to access the Setup program.
5. Go into the Security menu.
6. Go to the Set User Password field and set a new User password.
This replaces the old password.
7. Press Esc or select Exit Menu to save the new password and exit
Setup.
configuring your workstation
Use the HP Setup program to configure your workstation. With this
program you can:
■ set up BIOS-Access Administrator and User passwords
■ change the system boot order
■ solve configuration problems.
CAUTION: It is recommended that you take note of any changes to the
Ä
starting the hp setup program
system setup before making any changes.
1. Turn on the display and then the w orkstation. If the workstation is
already turned on, save your data and exit all programs, then
restart the workstation.
2. Press F2 while F2 Setup is displayed at the bottom of the screen.
NOTE: If you fail to press F2 in time and the start-up process
continues, you will need to restart your workstation and go through
the POST again so you can press F2.
1–12 getting started guide
Page 17

322496-001.book Page 13 Tuesday, March 4, 2003 3:21 PM
setup program menus
The opening screen of the workstation setup program is displayed.
The following display:
■ The Main Menu presents a list of fields, for example, the installed
BIOS version or Date and Time.
■ A band along the top of the screen offers a list of menus. Select a
menu by using either the left or right arrow keys.
■ A band along the bottom of the screen gives instructions for using
the keyboard-driven menus.
main menu
setting up and using your workstation
advanced menu
The Main Menu presents a list of fields, including:
■ The installed BIOS version
■ Reset Configuration Data
■ System Time
■ System Date
■ Key Click
■ Key Auto-Repeat Speed
■ Delay Before Auto-Repeat
■ NumLock at Power-on
By default, “Reset Configuration Data” is set to No. Select Yes to
clear the system configuration data and return to the default settings.
The Advanced Menu offers a list of sub-menus allowing you to view
or configure:
■ processor speed
■ advanced features of the chip set
■ PCI cards
getting started guide 1–13
Page 18

322496-001.book Page 14 Tuesday, March 4, 2003 3:21 PM
setting up and using your workstation
■ the Advanced Graphics Port video card
■ settings for the integrated:
❏ floppy disk drive controller
❏ IDE controller and for attached IDE devices
❏ SCSI controller (optional)
❏ 10/100BT network interface
❏ serial and parallel ports
❏ audio controller
security menu
boot menu
power menu
The Security menu lets you:
■ change or set the System Administrator Password, User
Password, or Power-on Password (see “Setting Passwords”)
■ prevent unauthorized startup from the floppy, optical drives, and
IDE drives
■ prevent unauthorized use of the floppy drive
■ prevent a Plug-and-Play OS from changing the BIOS
configuration settings
■ prevent unauthorized changes to the boot sector
The Boot menu allows you to select the order of the devices from
which you want the BIOS to attempt to boot the operating system.
The QuickBoot mode option allows the system to skip certain tests
while booting. This decreases the time needed to boot the system.
The Power menu lets you enable remote power-on. You can also set
the mode of operation if an AC power loss occurs.
1–14 getting started guide
Page 19

322496-001.book Page 15 Tuesday, March 4, 2003 3:21 PM
viewing your workstation configuration
The Summary Screen gives you a summary of the current
configuration of your workstation (for example: BIOS version, CPU
speed, memory module size, and installed mass storage devices).
You should check the configuration of your workstation when you
first use it and each time after you install, remove, or upgrade
accessories. To check the configuration:
1. Turn on the display and then the workstation. If the workstation
is already turned on, save your data and exit all programs,
then restart the workstation. Consult your operating system
documentation for any special instructions concerning turning
off and restarting your workstation.
setting up and using your workstation
2. When the start-up logo appears on your display, press Esc. This
takes you to the Summary Screen. (To go immediately into the
Setup program, and bypass the Summary Screen, press F2 instead
of Esc.) The Summary Screen is displayed for only a short time.
Press the Pause/Break key on the keyboard to retain the
Summary Screen until another key is pressed.
loading software applications for your optical
drive
The Linux-based hp workstations xw5000 and xw8000 are available
with different optical drives. Each requires different software or
drivers to operate properly. Only the CD-ROM comes with
pre-installed drivers. To locate the drivers for other types of drives
(CD-RW, DVD-ROM, DVD+RW), visit
latest Linux software applications available.
NOTE: No drivers are required for read-only access to these drives.
NOTE: You cannot install a CD-RW and a DVD+RW in the same
system.
www.redhat.com for the
getting started guide 1–15
Page 20

322496-001.book Page 16 Tuesday, March 4, 2003 3:21 PM
setting up and using your workstation
configuring your video card and monitor
All video cards that ship with your workstation support multiple
refresh rates, resolutions, and color depths.
For additional information, see the documentation that shipped with
your card.
using power management
Power management enables you to reduce the overall workstation
power consumption by slo wing down the workstation’s activity when
it is idle.
Operating systems differ in their power management capabilities.
Refer to your operating system documentation for more information.
software and driver availability
In the “Software and Drivers” section of the HP support site
www.hp.com/go/workstationsupport, you can download the latest
drivers and BIOS for your workstation.
You can also register to obtain information on new driver availability
automatically.
Contact your dealer for an up-to-date list of supported devices or
check the HP website:
www.hp.com/go/workstationsupport.
recycling your workstation
HP has a strong commitment towards environmental conservation.
Your workstation has been designed to respect the environment as
much as possible.
HP can take an old workstation back for recycling when it reaches
the end of its useful life through the product take-back program.
Collected equipment is sent to one of HP’s recycling facilities. As
many parts as possible are reused and the rest are recycled. Special
care is taken with batteries and other potentially toxic substances.
For details about HP’s product take-back program, contact your
dealer or your nearest HP Sales Office.
1–16 getting started guide
Page 21

322496-001.book Page 1 Tuesday, March 4, 2003 3:21 PM
Linux system setup and recovery
configuring your Linux workstation
Make sure there are no disks in the 3.5-inch floppy drive or the
CD-ROM drive, then turn on the power switch. As the workstation
boots, it describes what is happening with messages on the screen.
You do not need to respond to any messages you see. The start-up
process is completely automatic.
2
The setparms utility is run the first time the workstation is booted.
It allows you to set up important functionality of your workstation
before you login. These areas of functionality are: networking, the
Xserver, timezone, system time, root password, and keyboard
language. These areas will be discussed in more detail below.
setparms is written so that you can go back to a function as many
times as you need to and change it before you exit.
getting started guide 2–1
Page 22

322496-001.book Page 2 Tuesday, March 4, 2003 3:21 PM
Linux system setup and recovery
After a few minutes, the start-up process ends and the Linux Setup
Tool window , shown below, appears. You can choose from the tabs at
the top of the screen to select the various areas of functionality.
2–2 getting started guide
Page 23

322496-001.book Page 3 Tuesday, March 4, 2003 3:21 PM
setting the root password (required)
Before you exit, you must set your own root password. setparms
enforces this. Click on the Passwords tab at the top of the Setup Tool
window. This brings up the window shown below.
Linux system setup and recovery
To set the password:
1. Choose a password, according to the directions in the window,
and type it in the Enter Root Password box. Asterisks appear in
the box, instead of what you type.
2. Type your password again in the Enter password again box.
3. Click Save & Exit.
getting started guide 2–3
Page 24

322496-001.book Page 4 Tuesday, March 4, 2003 3:21 PM
Linux system setup and recovery
changing boot/network parameters
Choose the Network tab and the following window displays.
There are three kinds of booting protocols that setparms can set up for
you: Static, DHCP, and BOOTP. Choose the appropriate protocol
based on the following descriptions:
static boot protocol
If you choose Static booting, you will have to set several networking
parameters. Some of these are described below.
You will also need to provide an IP address for your workstation, a
hostname, the IP address of the network gateway for your system, the
netmask (255.255.248.0 for example), and a network domain name
(for example, company_name.com).
Set up your DNS Configuration. Refer to the section “DNS
Parameters Configuration” in this chapter for an example of the
screen interface and instructions.
2–4 getting started guide
Page 25

322496-001.book Page 5 Tuesday, March 4, 2003 3:21 PM
Files that are modified with these network changes are:
■ /etc/resolv.conf
■ /etc/sysconfig/network
■ /etc/sysconfig/network-scripts/ifcfg-eth0
DHCP boot protocol
If you choose DHCP booting, your IP address, hostname, gateway,
netmask, domain name, and DNS server information are all set up
for you at boot time. It should also set up your NIS information.
Howev er , the current DHCP client-side implementation from Red Hat
does not request this from the server, so you will have to set that up
yourself if you use it. See the “DNS Parameters Configuration”
section in this chapter.
Linux system setup and recovery
The file /etc/sysconfig/network-scripts/ifcfg-eth0 is modified when
you select DHCP.
BOOTP boot protocol
BOOTP is a subset of DHCP and will not be fully described here. It
gets your IP address, hostname, gateway and netmask, but does not
set up your DNS server information or NIS authentication, so you
will have to do that yourself.
The file /etc/sysconfig/network-scripts/ifcfg-eth0 is modified when
you select BOOTP.
Choose the Boot Protocol that is appropriate for your system. If you
do not know which protocol to choose, ask your system administrator .
The following instructions assume you are using the Static protocol.
getting started guide 2–5
Page 26

322496-001.book Page 6 Tuesday, March 4, 2003 3:21 PM
Linux system setup and recovery
graphics parameters
To set Monitor and Video parameters, use the Graphics tab at the top
of the Setup Tool window. The window (see below) allows you to
choose monitor manufacturer/type, video modes and which Default
Window Manager to use.
Follow the directions on the screen and click Save & Exit to save the
changes.
NOTE: If you do not see your monitor listed, use the default
selections that display when this program is opened.
2–6 getting started guide
Page 27

322496-001.book Page 7 Tuesday, March 4, 2003 3:21 PM
DNS parameters configuration
In the Network tab, select the DNS Servers tab to configure you DNS
connections.
Linux system setup and recovery
The window contains two other sections: DNS Servers (IP Address)
and DNS Search Domains. To set the DNS parameters:
1. Type the network Domain Name Server address in the Server
field.
2. Click the Add button below the Server field to place this address
in the larger window. If there is more than one domain name
server, you may k eep adding addresses until you hav e added them
all. The first one will be your primary DNS.
3. Type the domain name in the Domain Name field.
4. Click Save & Exit.
getting started guide 2–7
Page 28

322496-001.book Page 8 Tuesday, March 4, 2003 3:21 PM
Linux system setup and recovery
system time, timezone, date parameters
The “Time/Timezone” tab at the top of the Setup Tool screen will
display the window shown below which is used for setting your
system time and date. To enter the current time, day, month, and year:
1. Type the current time using the 24-hour clock in the Time field.
2. Type the current day of the month in the Day field.
3. Pull down the Month menu to select the current month.
4. Type the year in the Year field.
time zone
To set the time zone:
1. Click the Geographical Location button at the top of the window
2. Use the scroll bar to show your city/time zone, then click on it.
3. Click Save to use these selections and close this window.
2–8 getting started guide
to select your location, if it is not “U.S.”
Page 29

322496-001.book Page 9 Tuesday, March 4, 2003 3:21 PM
This step creates a symbolic link from /etc/localtime to
/usr/share/zoneinfo/<timezone>.
Selecting the “Set time on Save” option causes setparms to set and
save the system clock and the hardware clock with the time and date
specified in the T ime and Date fields. If you do not select that option,
they will remain set to their current value.
setting the keyboard language
The Keyboarding Mapping functionality currently supports five
keyboard languages: U.S., U.K., French, German, and Spanish.
U.S. is the default.
Linux system setup and recovery
As soon as you click Set Now in this window, the keyboard language
is set and the keyboard is re- mapped, but only for the time you are in
setparms. The change is saved only if you click the Save button
when you leave setparms, otherwise the change is discarded (that
is, the previous keyboard mapping is kept).
This step modifies the files:
■ /etc/sysconfig/keyboard
■ /etc/sysconfig/i18n
getting started guide 2–9
Page 30

322496-001.book Page 10 Tuesday, March 4, 2003 3:21 PM
Linux system setup and recovery
summary
This completes the miscellaneous parameters you can set from the
Linux Setup Tool window. If you want to erase the changes you have
made and keep the current configuration settings, click the Reset
Configuration button.
The Show Summary window, shown below, contains all the
information you entered. To change any choices, click OK to close
the Show Summary window, and click the appropriate parameter box
in the Linux Setup Tool window.
Click OK to close this window.
If you are satisfied with all the information you hav e entered, click
Save at the bottom of the Linux Setup Tool window to save this
configuration.
NOTE: The system will not let you exit until you have set the root
password.
2–10 getting started guide
Page 31

322496-001.book Page 11 Tuesday, March 4, 2003 3:21 PM
recovering your Linux system
This section provides information on how to recover your Linux
system should it be required.
the Linux Rescue Mode
The Linux Rescue Mode is a Linux environment that lets you access
files on your Linux workstation when you cannot actually run Linux.
You may be unable to run Linux because it will not boot or you have
had a hardware or software failure.
Linux may not boot if you have installed another operating system.
Some operating systems assume that you have no other operating
systems on your computer. When such an operating system is
installed, it overwrites the Master Boot Record that contained the
Linux GRUB bootloader. If this happens, Linux will not boot.
Linux system setup and recovery
Any computer can experience a hardware or software f ailure for many
reasons. With the Linux workstation, it might happen because of
problems with a hard drive or because LILO was not run after
building a new kernel.
Rescue Mode can give you access to the system so you can try to
solve the problem or, at least, make copies of important files.
getting started guide 2–11
Page 32

322496-001.book Page 12 Tuesday, March 4, 2003 3:21 PM
Linux system setup and recovery
booting your system in Rescue Mode
To boot your system in Rescue Mode, enter the following parameter
at the installation boot prompt:
boot: linux rescue
You can get to the installation boot prompt in one of these ways:
1. By booting your system from the diskette or CD-ROM that came
with your Red Hat Linux boxed set.
2. By booting from a network or PCMCIA boot diskette. These
methods assume your network connection is working and require
you to identify the network host and transfer type.
Once you have your system in Rescue Mode, a prompt appears:
bash#
From this prompt, you can use the following commands:
table 2-1. Linux commands
anaconda gzip mke2fs.ext2 ps
badblocks head mknod python
bash hwclock mkraid python
cat ifconfig mkswap raidstart
chatter init mlabel raidstop
chmod insmod mmd rcp
chroot less mmount rlogin
clock ln mmove rm
collage loader modprobe rmmod
cp ls mount route
cpio lsattr mpartition rpm
dd lsmod mrd rsh
2–12 getting started guide
Page 33

322496-001.book Page 13 Tuesday, March 4, 2003 3:21 PM
table 2-1. Linux commands (Continued)
ddcprove mattrib mread sed
depmode mbadblockes mren sh
df mcd mshowfat sync
e2fsck mcopy mt tac
fdisk mdel mtools tail
fsck mdeltree mtype tar
fsck.ext2 mdir mv touch
Linux system setup and recovery
ftp mdu mzip traceroute
genhdlist mformat open umount
gnome-pty-helper minfo pico uncpio
grep mkdir ping uniq
gunzip mke2fs probe zcat
NOTE: The man command is not available in Rescue Mode. Make
sure you know how to use all the above commands before you use
Rescue Mode.
If your root filesystem is undamaged, you can mount it and then run
any standard Linux utility. For example, suppose your root filesystem
is in /dev/hda5. Here is how to mount this partition:
mount -t ext2 /dev/hda5 /foo
Where /foo is a directory that you have created.
Now you can run chroot, fsck, man, and other utilities. At
this point, you are running Linux in single-user mode.
If you do not know the names of your Linux partitions, you can guess;
mounting non-existent partitions will do no harm.
getting started guide 2–13
Page 34

322496-001.book Page 14 Tuesday, March 4, 2003 3:21 PM
Linux system setup and recovery
booting single user mode directly
You may be able to boot single-user mode directly. If your system
boots, but does not allow you to login when it has completed booting,
try rebooting and specifying one of these options at the LILO boot
prompt:
LILO boot: linux single
LILO boot: linux emergency
In single-user mode, you computer boots to runlevel 1. Your local
filesystems will be mounted but your network will not be activated.
You get a usable system maintenance shell.
In emergency mode, you are booted into the most minimal
environment possible. The root filesystem will be mounted read-only
and almost nothing will be set up. The main advantage of this over
Linux single user is that your init files are not loaded. If init is
corrupted or not working, you can still mount filesystems to recover
data that could be lost during a re-installation.
2–14 getting started guide
Page 35

322496-001.book Page 1 Tuesday, March 4, 2003 3:21 PM
This chapter contains basic information to help you get your
workstation up and running in the unlikely event that you experience
a problem.
solving common problems
3
troubleshooting
This section contains information for diagnosing and solving
common problems on the hp workstation xw5000 and xw8000.
■ Your Workstation Does Not Start Properly
■ You Find a Hardware Problem
❏ Your System Does Not Start Properly
❏ Keyboard and Mouse Problems
❏ Video Problems
❏ Optical Drive Problems
❏ Audio Problems
■ You Forgot Your Password
■ Understanding the E-buzzer Beep Code
For more detailed help, refer to the hp workstation xw5000
and xw8000 Technical Reference Guides at
http://www.hp.com/go/workstationsupport.
getting started guide 3–1
Page 36

322496-001.book Page 2 Tuesday, March 4, 2003 3:21 PM
troubleshooting
workstation does not start properly
The following table will assist you in resolving issues when your
workstation does not start properly.
table 3-1. system does not start properly
the system doesn’t power on.
Make sure... How
The system’s power cord is properly
connected.
Connect the power cord to a working power
outlet and to the rear of the system.
there is a POST error.
The POST can detect errors and changes to the configuration. In either case, a code and short
description is displayed.
Make sure... How
You read the message and select the
appropriate action.
•Press F1 to ignore the message and
continue.
•Press F2 to run the Setup program and
correct a system configuration error.
•Press Enter to see details about the
message. After viewing these details, you
are returned to the original POST display
screen.
Note: A list of POST errors with suggested
solutions is included in the hp workstation
xw5000 and xw8000 Technical Reference
Guides at:
http://www.hp.com/go/workstationsupport
3–2 getting started guide
Page 37

322496-001.book Page 3 Tuesday, March 4, 2003 3:21 PM
there are one or more beeps and the system does not boot.
When your workstation starts, the system tests your hardware for possible problems. If a critical
problem is detected, the system emits audible beeps.
Make sure... How
troubleshooting
You count the beeps to determine the error
and suggested solutions.
See the “Understanding the E-buzzer beep
code” section for more information.
the display is blank.
Make sure... How
Both the workstation and monitor power cords
are firmly connected and plugged in.
Connect the power cords to a working power
outlet and to the rear of the workstation and
the monitor.
The outlet power is functioning. Turn on any light switches, power strips, or
surge protectors connected to the outlet.
The workstation and monitor are turned on.
(The power light should be illuminated.)
Turn on the workstation and monitor using the
power button. Make sure that any power strips
are turned on.
getting started guide 3–3
Page 38

322496-001.book Page 4 Tuesday, March 4, 2003 3:21 PM
troubleshooting
hardware problems
The following table will assist you in resolving issues when your
workstation has a hardware problem.
table 3-2. keyboard and mouse problems
the keyboard doesn’t work.
Make sure... How
The keyboard cable is correctly connected. Ensure that the keyboard is connected to the
keyboard connector on the rear panel of the
workstation.
The keyboard is free of debris. Check all keys are the same height, and none
are stuck in the down position.
The keyboard itself is not defective. Either replace the keyboard with a known
working unit or try the keyboard with another
system.
the mouse doesn’t work.
Make sure... How
The mouse cable is correctly connected. Ensure that the mouse is connected to the
mouse connector rather than the keyboard
connector on the rear panel of your
workstation.
The mouse is clean. Clean the mouse ball as shown below.
The mouse itself is not defective. Replace the mouse with a unit that is known to
3–4 getting started guide
work or try the mouse with another system.
Page 39

322496-001.book Page 5 Tuesday, March 4, 2003 3:21 PM
table 3-3. video problems
the system’s power indicator light works, but the monitor remains blank.
Make sure... How
The monitor is switched ON (LED is on). Refer to the monitor manual for an explanation
troubleshooting
of the LED signals.
The monitor’s power cord is correctly
connected.
Ensure that the power cord is plugged into a
working grounded power outlet and into the
monitor.
The graphics card is installed and the monitor
(video) cable is correctly connected.
Ensure the video cable is properly connected
to both the system and the monitor. Ensure that
the cable is connected to the graphics card’s
connector.
The monitor’s brightness and contrast settings
are correctly set.
Check the settings using the monitor’s OSD
(on-screen display) or using controls on the
front of the monitor.
the display works properly during the POST, but goes blank when the OS
starts.
Make sure... How
The OS display settings are compatible with
your monitor.
Refer to your OS and monitor documentation
for more information. Also, refer to the
“changing boot/network parameters” section
in chapter 2 for additional information.
getting started guide 3–5
Page 40

322496-001.book Page 6 Tuesday, March 4, 2003 3:21 PM
troubleshooting
table 3-4. optical drive problems
the workstation does not boot from CD-ROM or DVD drive.
Make sure... How
The CD or DVD boot is enabled through the
Computer Setup utility.
Run the Setup program and enable booting to
removable media and verify boot order
settings.
A bootable CD is in the optical drive. Insert a bootable CD in the drive.
CD or DVD devices are not detected or driver is not loaded.
Make sure... How
The drive is connected and configured
properly.
Refer to the
Technical Reference Guides
http://www.hp.com/go/workstationsupport
hp workstation xw5000 and xw8000
at
movie will not play in the DVD drive.
Make sure... How
The decoder software is installed properly. Install decoder software. See the “Loading
Software Applications for Your Optical Drive”
section in this guide for additional information.
you can’t eject a CD.
Make sure... How
The disc is properly seated in the drive. Turn off computer and insert a thin metal rod
3–6 getting started guide
into the emergency eject hole and push firmly.
Slowly pull the tray out from the drive until the
tray is fully extended, then remove the CD.
Page 41

322496-001.book Page 7 Tuesday, March 4, 2003 3:21 PM
the optical drive cannot read a disc or takes too long to start.
DVD drives take longer to start because they must determine the type of media played, such as
audio or video. Wait at least 30 seconds to let the DVD drive determine the type of media
being played. If the CD still does not start, read the other solutions listed for this topic.
Make sure... How
The disc has been inserted right-side up. Re-insert the CD with the label facing up.
The disc is clean and has not been scratched. Clean CD or DVD with a cleaning kit,
The OS detects the optical drive. 1. Use your OS to remove or uninstall the
troubleshooting
available from most computer stores.
device in question.
2. Restart your computer.
you can’t record to a CD.
Make sure... How
You have the correct type of media. Verify that you are using the correct media for
the drive.
Try a different brand of media. Quality varies
widely among manufacturers.
You are recording at the correct speed. Try using a slower speed when recording
audio CDs.
getting started guide 3–7
Page 42

322496-001.book Page 8 Tuesday, March 4, 2003 3:21 PM
troubleshooting
table 3-5. audio problems
the system has no sound.
Make sure... How
Software volume control is not turned down or
muted.
The speaker or optical drive volume control is
not turned down.
External speakers are plugged into the correct
audio port.
The optical drive audio cable is properly
connected.
Headphones or speakers connected to the line
out connector are not muting the internal
speaker.
Open up the Speaker/Sound program and set
the volume. If the volume is muted, clear any
mute check boxes.
If your speakers or optical drive have volume
control knobs, turn the knob to increase the
volume.
Plug external speakers into the correct port on
the front- or rear-panel of the system. See the
“Connect the Components” section in this
guide for more information.
Connect the audio cable between the CD or
DVD-ROM drive and the system board. See
the hp workstation xw5000 and xw8000
Technical Reference Guides at
http://www.hp.com/go/workstationsupport
Turn on and use headphones or external
speakers, if connected, or disconnect
headphones or external speakers.
The workstation is not in Standby mode. Press the power button to resume from Standby
mode.
3–8 getting started guide
Page 43

322496-001.book Page 9 Tuesday, March 4, 2003 3:21 PM
noise or no sound comes out of the speakers or headphones.
Make sure... How
troubleshooting
The workstation is detecting the correct
speaker/headphone type and
analog-to-digital auto-sense is engaged.
issues with BIOS passwords
If you forget the BIOS passwords for the workstation, you must clear
them before you can set new passwords.
clearing the BIOS user password
• If you are using digital speakers that have
a stereo jack and want the system to
auto-switch to digital, use a stereo-to-mono
adapter to properly engage the auto-sense
feature.
• If a stereo-to-mono adapter is not
available, use your OS to access the
multimedia device properties and manually
switch the audio signal from analog to
digital.
• If the headphones have a mono jack, use
your OS to access the multimedia device
properties and manually switch the system
to analog out.
If you forgot your User password and remember the Administrator
password, you can clear the User password through the Setup Menu.
To clear the User password:
1. Start the Setup Program
2. Enter the Administrator password when prompted.
3. Select Security Menu > Clear all Passwords.
4. Enter and confirm a new User password if needed.
5. Press Esc to leave the Security Menu.
6. Select Exit > Exit Saving Changes to save your changes.
getting started guide 3–9
Page 44

322496-001.book Page 10 Tuesday, March 4, 2003 3:21 PM
troubleshooting
clearing the BIOS administrator password
To clear the Administrator password:
1. Turn off the workstation and remove the left side panel (see the
hp workstation xw5000 and xw8000 Technical Reference Guides
for additional information).
2. Set switch 1 on the system board switch block to On (see the label
on the inside of the left side panel for switch location).
3. Replace the workstation cover.
4. Turn on the workstation and press Esc when prompted to see the
summary page.
5. When a message appears indicating that the passwords have been
cleared, turn off the workstation and remove the cover.
6. Set switch 1 on the system board block back to Off.
7. Replace the side panel.
8. If you want to set new passwords, follo w the instructions gi v en in
the “setting hardware passwords in the hp setup program” section
in Chapter 1.
3–10 getting started guide
Page 45

322496-001.book Page 11 Tuesday, March 4, 2003 3:21 PM
understanding the E-buzzer beep codes
When your workstation starts, the system tests your hardware for
possible problems. If a problem is detected, the e-buzzer will emit
audible beeps and an encoded error signal that can be sent through a
telephone line to an authorized Help desk or HP Support. This signal
can be decoded by Help desk equipment to extract the workstation
model, serial number, and details about an y faults. To send this signal
to HP Support, hold your telephone next to the speaker on the system
front bezel when the system is booting.
table 3-6. E-buzzer beep codes
No. beeps component error solution
troubleshooting
1 Processor Processor
absent, not
correctly
connected.
2 Power Supply Power supply
is in protected
mode.
3MemoryNo memory,
bad memory
modules, or
incompatible
memory
module.
Contact HP Customer Care.
Contact HP Customer Care.
1. Remove any newly installed
RAM and reseat it. Ensure
that memory is loaded in the
correct order.
2. If the problem persists,
contact HP Customer Care or
replace the system RAM.
See the help section is this guide
or the hp workstation xw5000
and xw8000 Technical
Reference Guides at
http://www.hp.com/
go/workstationsupport
getting started guide 3–11
Page 46

322496-001.book Page 12 Tuesday, March 4, 2003 3:21 PM
troubleshooting
No. beeps component error solution
4 Video Card Graphics
card failure.
5 PCI Card PCI card
initialization
problem.
6BIOS Corrupted
BIOS.
1. Remove the graphics card
2. If the problem persists,
1. Remove PCI cards until you
2. Reseat the offending PCI
3. If the problem persists,
Perform a BIOS Boot Block
Recovery. See the hp workstation
xw5000 and xw8000 Technical
Reference Guides at
http://www.hp.com/
go/workstationsupport
and reseat it.
remove the graphics card and
replace it with a good card.
find the one causing the
failure.
card.
replace the defective PCI
card.
7 System Board Defective
motherboard.
Contact HP Customer Care.
restoring your OS and software from CD
Restore the original OS and factory-installed software by using the
CDs provided with your workstation. Carefully read and follow the
instructions that came with the CDs. For questions about problems
with these CDs, contact HP Customer Care.
WARNING: The operations you perform using the recover CDs
Å
3–12 getting started guide
permanently erase the contents of your hard disk. Always back up your
data and personal files before using the recovery CDs.
Page 47

322496-001.book Page 1 Tuesday, March 4, 2003 3:21 PM
index
B
beep codes 3–11
3–12
BIOS
boot
BOOTP protocol
1–8
menu
parameters
static protocol
2–4
C
components
connecting
xw5000 rear panel
xw8000 rear panel
connecting
keyboard
LAN
mouse
power cords
connectors
front panel
xw5000 rear panel
xw8000 rear panel
control panel
1–2
1–5
1–6
1–5
1–5
1–10
2–4
1–6
2–5
1–3
1–4
1–3
1–4
drivers
availability 1–16
optical drives
G
graphics
configuring
parameters
troubleshooting
graphics card
H
hp setup
advanced menu
boot menu
main menu
menus
power menu
security menu
starting
1–13
1–12
I
installing
graphics card
software
1–15
1–15
1–16
2–6
3–5
3–12
1–13
1–14
1–13
1–14
1–14
1–2
D
DNS parameters 2–7
getting started guide index–1
K
keyboard
troubleshooting
xw5000 connector
xw8000 connector
3–4
1–3
1–4
Page 48

322496-001.book Page 2 Tuesday, March 4, 2003 3:21 PM
index
L
language, setting 2–9
Linux
commands
Rescue mode
single user mode
system recovery
Linux Setup Tool
2–12
2–11
2–14
2–11
2–2
M
memory 3–11
motherboard
mouse
troubleshooting
xw5000 connector
xw8000 connector
3–12
3–4
1–3
1–4
N
network parameters 2–4
P
parameters
2–4
boot
2–8
date
2–7
DNS
graphics
network
system time
timezone
passwords
BIOS
clearing
setting root
PCI card
POST
power management
power supply
2–6
2–4
2–8
2–8
3–9
3–9
2–3
3–12
1–8
1–16
3–11
R
Rescue mode 2–11
S
setting passwords 1–11
setting up the workstation
single user mode
software
availability
hp setup
initializing
1–7
Linux
loading for optical drives
recovery
restoring
setting passwords
system board
2–14
1–16
1–12
1–9
2–11
3–12
1–11
3–12
T
troubleshooting
audio problems
common problems
hardware problems
keyboard problems
mouse problems
optical drive problems
passwords
video problems
workstation not starting
3–8
3–1
3–4
3–4
3–4
3–9
3–5
V
video card 3–12
W
workstation
configuring
recycling
setting up
shutting down
starting
1–10
using
viewing configuration
1–12, 2–1
1–16
1–1
1–9
1–7
1–1
1–15
3–6
3–2
1–15
index–2 getting started guide
 Loading...