

Page 1

Veritas Storage Foundation™ and High
Availability Solutions 5.0.1 Getting
Started Guide
HP-UX 11i v3
HP Part Number: 5900-0081
Published: August 2010
Edition: 1.0
Page 2

© Copyright 2010 Hewlett-Packard Development Company, L.P.
Confidential computer software. Valid license from HP required for possession, use or copying. Consistent with FAR 12.211 and
12.212, Commercial Computer Software, Computer Software Documentation and Technical Data for Commercial Items are
licensed to the U.S. Government under vendor’s standard commercial license.
The information contained herein is subject to change without notice. The only warranties for HP products and services are set
forth in the express warranty statements accompanying such products and services. Nothing herein should be construed as
constituting an additional warranty. HP shall not be liable for technical or editorial errors or omissions contained herein.
UNIX is a registered trademark of The Open Group.
Veritasisaregisteredtrademark of Symantec Corporation. Copyright © 2009 Symantec Corporation. All rights reserved. Symantec,
the Symantec Logo, Veritas, and Veritas Storage Foundation are trademarks or registered trademarks of Symantec Corporation
or its affiliates in the U.S. and other countries. Other names may be trademarks of their respective owners.
Java is a registered trademark of Sun Microsystems, Inc.
Intel and Itanium are registered trademarks of Intel Corporation or its subsidiaries in the United States or other countries.
Page 3

Contents
Technical Support ... . . ...... . ..... . . . ...... . . ...... . ..... . . . ...... . . ...... . ....... . ...... . . ...... . . ...... . ...... 4
Chapter 1 Product overview ... . . ...... . ...... . . ...... . . ...... . ...... . . ...... . . ...... . ....... . 9
About Veritas Storage Foundation and High Availability
products ..... . . ...... . . ...... . ....... . ...... . . ...... . . ...... . ...... . . ...... . . ...... . .... 9
Component software ... . . ...... . ...... . . ...... . . ...... . ..... . . . ...... . . ...... . ....... . .... 9
Symantec Product Authentication Service ... . . . ...... . . ...... . ..... . . . ...... . 9
Storage Foundation Management Server .. . ...... . . ...... . . ...... . ...... . . .. 10
Veritas Storage Foundation ... . . ...... . . ...... . ...... . . ...... . . ...... . ..... . . . ...... . . . 10
About this product ... . ...... . . ...... . . ...... . ..... . . . ...... . . ...... . ..... . . . ...... . 10
Veritas Storage Foundation for Oracle .... . . ...... . ...... . . ...... . . ...... . ..... . . . . 11
About Veritas Storage Foundation for Oracle® ... . . ...... . ...... . . ...... . . . 11
Storage Foundation Cluster File System .. . ...... . . ...... . . ...... . ...... . . ...... . . . 12
About Veritas Storage Foundation Cluster File System ..... . . ...... . . ... 12
Storage Foundation for Oracle RAC ... . . ...... . . ...... . ..... . . . ...... . . ...... . ...... 12
About Veritas Storage Foundation for Oracle® RAC ...... . ..... . . . ...... . 12
Chapter 2 How the discs are organized . . ..... . . . ...... . . ...... . ....... . ...... . . .... 15
Contents of the software discs in the media kit ..... . . ...... . ..... . . . ...... . . ... 15
Contents of the product disc . ...... . . ...... . ..... . . . ...... . . ...... . ..... . . . ...... 15
Disc directory structure .... . . ...... . . ...... . ...... . . ...... . . ...... . ..... . . . ...... . . .... 16
Chapter 3 Installation overview . . . ...... . ...... . . ...... . . ...... . ....... . ...... . . ...... . . . 17
Documentation references, before you install .. . ....... . ...... . . ...... . . ...... . .. 17
Performing preinstallation checks and configuration ... . . ...... . ...... . . ..... 17
Configuring secure shell (ssh) or remote shell before installing
products . ...... . . ...... . ...... . . ...... . . ...... . ...... . . ...... . . ...... . ....... . ...... . . 18
Configuring and enabling ssh ....... . ...... . . ...... . . ...... . ...... . . ...... . . ... 19
Enabling remsh ...... . . ...... . . ...... . ...... . . ...... . . ...... . ..... . . . ...... . . ...... . 23
Mounting a software disc ..... . . ...... . ....... . ...... . . ...... . . ...... . ...... . . ...... . . . 24
Downloading the Storage Foundation and High Availability software
... . . ...... . ...... . . ...... . . ...... . ..... . . . ...... . . ...... . ....... . ...... . . ...... . . ...... . .. 24
Copying and unzipping the downloaded release . . ....... . ...... . . ...... . . ...... 25
Page 4

Contents8
Chapter 4 Where to find more information ..... . ...... . . ...... . . ...... . ...... . . . 27
Documentation .... . ...... . . ...... . . ...... . ..... . . . ...... . . ...... . ..... . . . ...... . . ...... . .. 27
Service and support . . ...... . . ...... . ...... . . ...... . . ...... . ..... . . . ...... . . ...... . ....... 27
Page 5

Product overview
This chapter includes the following topics:
■ About Veritas Storage Foundation and High Availability products
■ Component software
■ Veritas Storage Foundation
■ Veritas Storage Foundation for Oracle
■ Storage Foundation Cluster File System
■ Storage Foundation for Oracle RAC
Chapter
1
About Veritas Storage Foundation and High
Availability products
The following sections describe the products and component software available
in this Veritas Storage Foundation and High Availability Solutions release.
Component software
The following component software are available in this Veritas Storage Foundation
and High Availability Solutions release.
Symantec Product Authentication Service
The Symantec Product Authentication Service is a common Symantec feature.
This feature validates the identities that are based on existing network operating
system domains (such as NIS and NT) or private domains. The authentication
Page 6

Product overview
10
Veritas Storage Foundation
service protects communication channels among Symantec application clients
and services through message integrity and confidentiality services.
Before you install the authentication service, read the Storage Foundation and
High Availability Solutions appendix in the Symantec Product Authentication
Service Installation Guide.
This document is located at the following directory in the release media.
authentication_service/docs/vxat_install.pdf
Before you select this method of setting up the authentication service, also read
the product installation guide and release notes.
Storage Foundation Management Server
Storage Foundation Management Server (SF Management Server) provides a
centralized management console for Veritas Storage Foundation products. You
can use SF Management Server to monitor, visualize, and manage storage resources
and generate reports about those resources. SF Management Server is not available
on the Storage Foundation and High Availability Solutions release and must be
obtained separately. For information on ordering SF Management Server, visit
the following URL:
www.symantec.com/enterprise/sfms
Veritas Storage Foundation
Before you install this product, complete the following tasks:
■ Read the product release notes.
■ Review the preliminary information.
■ Follow the instructions in the Storage Foundation Installation Guide.
These documents are located at the following directories in the release media.
storage_foundation/docs/sf_notes.pdf
storage_foundation/docs/sf_install.pdf
About this product
Veritas Storage Foundation by Symantec includes Veritas File System by Symantec
(VxFS) and Veritas Volume Manager by Symantec (VxVM) with various feature
levels.
Page 7

Veritas Storage Foundation for Oracle
Veritas File System is a high performance journaling file system that provides
easy management and quick-recovery for applications. Veritas File System delivers
scalable performance, continuous availability, increased I/O throughput, and
structural integrity.
Veritas Volume Manager removes the physical limitations of disk storage. You
can configure, share, manage, and optimize storage I/O performance online
without interrupting data availability. Veritas Volume Manager also provides
easy-to-use, online storage management tools to reduce downtime.
VxFS and VxVM are included in all Veritas Storage Foundation products. If you
have purchased a Veritas Storage Foundation product, VxFS and VxVM are
installed and updated as part of that product. Do not install or update them as
individual components.
Veritas Storage Foundation has the following products:
■ Storage Foundation Standard
■ Storage Foundation Enterprise
The Veritas products table lists the optionally licensed features available with
each Storage Foundation version.
11Product overview
Veritas Storage Foundation for Oracle
Before you install this product, complete the following tasks:
■ Read the product release notes.
■ Review the preliminary information.
■ Follow the instructions in the Storage Foundation Installation Guide.
These documents are located at the following directories in the release media.
storage_foundation/docs/sf_notes.pdf
storage_foundation/docs/sf_install.pdf
About Veritas Storage Foundation for Oracle®
Veritas Storage Foundation for Oracle® by Symantec is an integrated set of system
software enhancements and configuration guidelines. The enhancements and
guidelines help Oracle database administrators configure a database system with
high performance, availability, manageability, and reliability.
Page 8

Product overview
12
Storage Foundation Cluster File System
Storage Foundation Cluster File System
Before you install this product, complete the following tasks:
■ Read the product release notes.
■ Review the preliminary information.
■ Follow the instructions in the Storage Foundation Installation Guide.
These documents are located at the following directories in the release media.
storage_foundation/docs/sf_notes.pdf
storage_foundation_cluster_file_system/docs/sfcfs_install.pdf
About Veritas Storage Foundation Cluster File System
Veritas Storage Foundation Cluster File System by Symantec extends Veritas File
System and Veritas Volume Manager to support shared data in a storage area
network (SAN) environment. Using Storage Foundation Cluster File System,
multiple servers can concurrently access shared storage and files transparently
to applications.
Storage Foundation Cluster File System HA adds the failover functionality. This
functionality can protect everything from a single critical database instance to
very large multiple-application clusters in networked environments. Veritas
Storage Foundation Cluster File System also provides increased automation and
intelligent management of availability and performance.
Storage Foundation for Oracle RAC
Before you install this product, review the preliminary information.
Before you start the installation, read the component product release notes and
installation guide.
These documents are located at the following directories in the release media.
storage_foundation_for_oracle_rac/docs/sfrac_notes.pdf
storage_foundation/docs/sf_notes.pdf
storage_foundation_for_oracle_rac/docs/sfrac_install.pdf
About Veritas Storage Foundation for Oracle® RAC
Veritas Storage Foundation for Oracle® RAC is an integrated suite of Veritas
storage management and high-availability software. The software is engineered
to improve performance, availability, and manageability of Real Application
Page 9

Storage Foundation for Oracle RAC
Cluster (RAC) environments. Certified by Oracle Corporation, Veritas Storage
Foundation for Oracle RAC delivers a flexible solution that makes it easy to deploy
and manage RAC.
13Product overview
Page 10

Product overview
14
Storage Foundation for Oracle RAC
Page 11

Chapter
How the discs are organized
This chapter includes the following topics:
■ Contents of the software discs in the media kit
■ Disc directory structure
Contents of the software discs in the media kit
The Veritas Storage Foundation and High Availability Solutions media kit includes
multiple software media. The contents of each software media is shown on the
media label.
Find the location of the Getting Started Guide and Release Notes for each product
in the corresponding product sections. Read the Getting Started Guide and Release
Notes for your product before you begin the installation procedure.
You can install only those Symantec software products for which you have
purchased a license. Other products are included on the enclosed software media,
but are not available.
2
Contents of the product disc
The following products are on the product disc:
■ Veritas File System
■ Veritas Volume Manager
■ Veritas Storage Foundation
■ Symantec Product Authentication Service
Page 12
How the discs are organized
16
Disc directory structure
Disc directory structure
Table 2-1 lists the directory and contents of the Veritas Storage Foundation and
High Availability Solutions disc.
Table 2-1
authentication_service
getting_started.pdf
storage_foundation
storage_foundation
_cluster_file_system
Storage Foundation and High Availability Solutions disc directories
ContentsDirectory name or file name
The third-party legal notices documentation3rdpartyattributions.pdf
Symantec Authentication Services scripts and
documentation
Veritas product packagesdepot
Veritas File System scriptsfile_system
The Veritas Storage Foundation and High Availability
Solutions Getting Started Guide
Perl language binaries and library functionsperl
The readme end user license agreement documentationREADME_EULA
The Veritas Storage Foundation readme first filereadme_first.txt
Veritas Storage Foundation, Veritas File System, and
Veritas Volume Manager packages, scripts, and
documentation
Veritas Storage Foundation, Veritas File System, and
Veritas Volume Manager packages, scripts, and
documentation
storage_foundation_
for_oracle
storage_foundation
_for_oracle_rac
Veritas Storage Foundation for Oracle packages, scripts,
and documentation
Veritas Storage Foundation for Oracle RAC tools, scripts,
and documentation.
Veritas Volume Manager packages and scriptsvolume_manager
Page 13

Chapter
Installation overview
This chapter includes the following topics:
■ Documentation references, before you install
■ Performing preinstallation checks and configuration
■ Configuring secure shell (ssh) or remote shell before installing products
■ Mounting a software disc
■ Downloading the Storage Foundation and High Availability software
■ Copying and unzipping the downloaded release
3
Documentation references, before you install
Before you install this product, become familiar with the following documentation:
■ Review the product release notes and getting started guide
■ Review the preliminary information
■ Read the instructions in the Storage Foundation Installation Guide
Performing preinstallation checks and configuration
This installation guide is designed for system administrators who already have a
knowledge of basic UNIX system and network administration. Basic knowledge
includes commands such as tar, mkdir, and simple shell scripting. Also required
is basic familiarity with the specific platform and the operating system where
Storage Foundation is installed.
If you already have an earlier version of any of the Veritas products installed,
refer to the upgrade procedures.
Page 14

Installation overview
18
Configuring secure shell (ssh) or remote shell before installing products
Only users with superuser (root) privileges can install, upgrade, and initialize
Veritas Storage Foundation.
Review the preinstallation requirements and system requirements. Install the
operating system before installing the Veritas software.
The product documentation is available at the following location:
http://www.symantec.com/business/support/index.jsp
Use the swinstall command to install the products.
To install the bundle, enter the following command:
# swinstall -x autoreboot=true -s <source depot location> <bundle name>
If patches to the HP-UX operating system are required, the patches must be applied
prior to installing the Veritas products. Patches may be required to resolve HP-UX
kernel, product performance, or other issues. Patches may be required for Veritas,
HP-UX, or Oracle software.
The system must be in a quiescent state before adding patches.
See the product Release Notes for last minute information on recommended
patches.
You must obtain new licenses to use all of the features in the Veritas Storage
Foundation software. Any Veritas licenses for the previous releases that are
currently installed allow you to use only a limited subset of these features.
For remote installation, or installation on multiple systems, set up remsh or ssh.
See “Configuring secure shell (ssh) or remote shell before installing products ”
on page 18.
Mount the Veritas software disc, or download and uncompress the Storage
Foundation software.
See “Mounting a software disc ” on page 24.
See “Downloading the Storage Foundation and High Availability software ”
on page 24.
Configuring secure shell (ssh) or remote shell before
installing products
You must establish communication between the nodes to install the Veritas
software from a remote system, or install and configure a cluster. The node from
which the installation utility is run must have permissions to run remsh (remote
Page 15

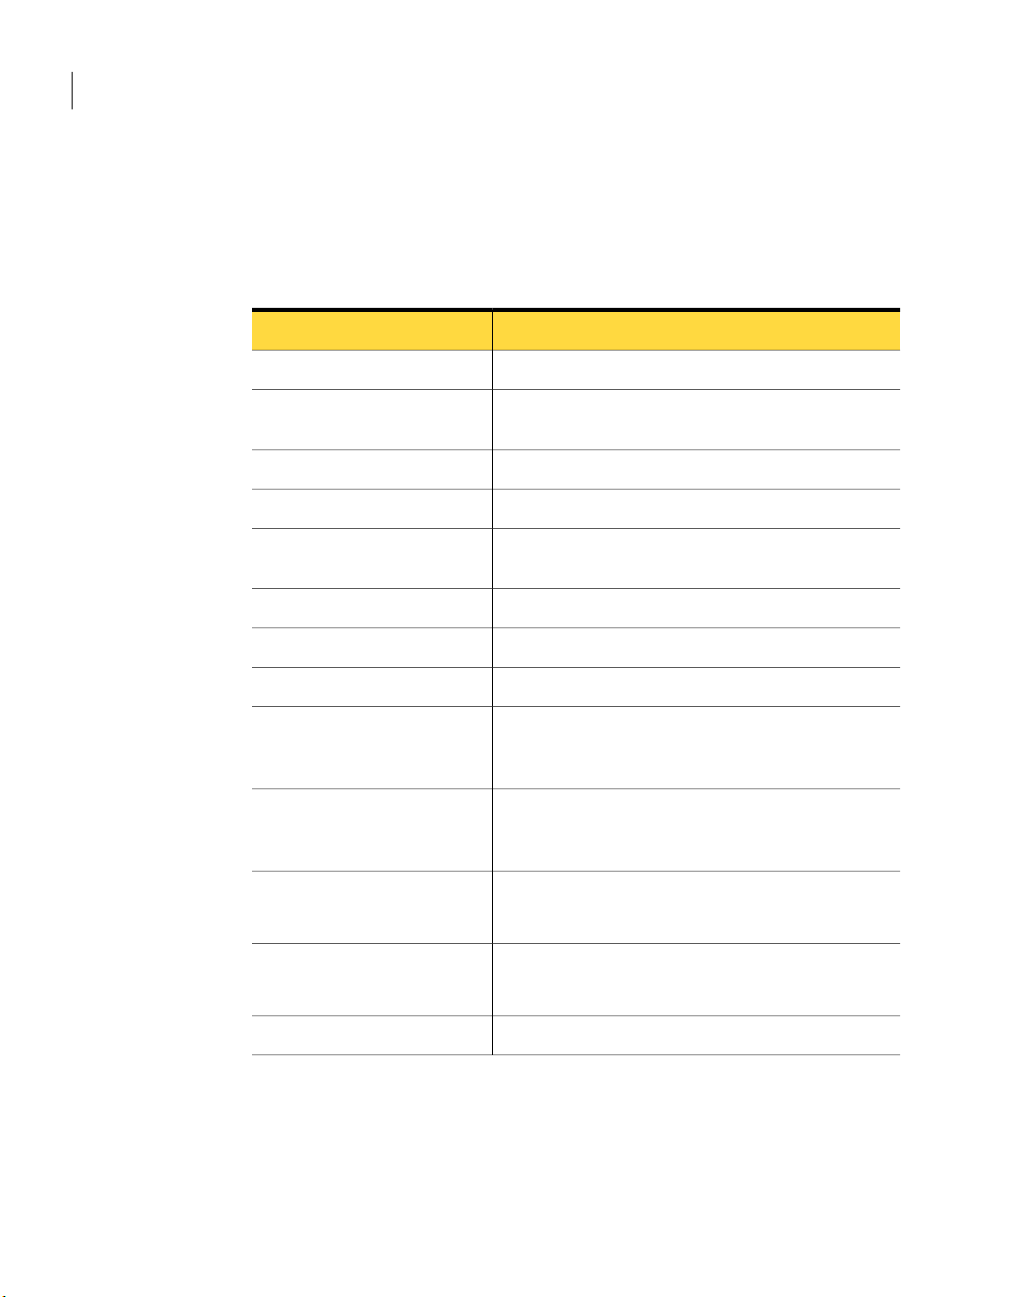
Source System: system1
Target System: system2
Private
Key
Public
Key
authorized_keys
file
Configuring secure shell (ssh) or remote shell before installing products
shell) or ssh (secure shell) utilities. These utilities must run as root on all cluster
nodes or remote systems.
You can install products to remote systems using either secure shell (ssh) or
remote shell (remsh).Using ssh is the default, and is recommended, to configure
a secure shell environment before you install any Veritas product.
This section contains an example on how to set up the ssh password free
communication. The example sets up ssh between a source system (system1)
that contains the installation directories, and a target system (system2). This
procedure also applies to multiple target systems.
Configuring and enabling ssh
The ssh program enables you to log in and execute commands on a remote system.
ssh enables encrypted communication and an authentication process between
two untrusted hosts over an insecure network.
In this procedure, you must first create a DSA key pair. From the key pair, you
must append the public key from the source system to the authorized_keys file
on the target system or systems.
Figure 3-1 illustrates this procedure.
19Installation overview
Figure 3-1
Creating the DSA key pair and appending it to target systems
Read the ssh documentation and online manual pages before enabling ssh. For
information related to issues regarding ssh configuration contact your operating
system support provider.
Visit the OpenSSH website that is located at: http://openssh.org to access online
manuals and other resources.
Page 16

Installation overview
20
Configuring secure shell (ssh) or remote shell before installing products
To create the DSA key pair
On the source system (system1), log in as root, and navigate to the root
1
directory.
system1 # cd /
To generate a DSA key pair on the source system, type the following command:
2
system1 # ssh-keygen -t dsa
System output similar to the following is displayed:
Generating public/private dsa key pair.
Enter file in which to save the key (//.ssh/id_dsa):
Press Enter to accept the default location: /.ssh/id_dsa.
3
When the program asks you to enter the passphrase, press the Enter key
4
twice.
Enter passphrase (empty for no passphrase):
Do not enter a passphrase. Press Enter.
Enter same passphrase again:
Press Enter again.
Make sure the /.ssh directory is on all the target installation systems (system2
5
in this example). If that directory is not present, create it on all the target
systems and set the write permission to root only:
system2 # mkdir /.ssh
Change the permissions of this directory, to secure it.
system2 # chmod go-w /.ssh
Page 17

Configuring secure shell (ssh) or remote shell before installing products
To append the public key from the source system to the authorized_keys file on
the target system, using secure file transfer
Make sure the Secure File Transfer Program (SFTP) is enabled on all the target
1
installation systems (system2 in this example).
To enable SFTP, the /opt/ssh/etc/sshd_config file must contain the
following two lines:
PermitRootLogin yes
Subsystem sftp /opt/ssh/libexec/sftp-server
If the lines are not there, add them and restart ssh:
2
system1 # /sbin/init.d/secsh start
From the source system (system1), move the public key to a temporary file
3
on the target system (system2).
Use the secure file transfer program.
In this example, the file name id_dsa.pub in the root directory is the name
of the temporary file for the public key.
Use the following command for secure file transfer:
21Installation overview
system1 # sftp system2
If the secure file transfer is set up for the first time on this system, output
similar to the following lines is displayed:
Connecting to system2 ...
The authenticity of host 'system2 (10.182.00.00)'
can't be established. DSA key fingerprint is
fb:6f:9f:61:91:9d:44:6b:87:86:ef:68:a6:fd:88:7d.
Are you sure you want to continue connecting (yes/no)?
Enter yes.
4
Output similar to the following is displayed:
Warning: Permanently added 'system2,10.182.00.00'
(DSA) to the list of known hosts.
root@system2 password:
Enter the root password of system2.
5
Page 18

Installation overview
22
Configuring secure shell (ssh) or remote shell before installing products
At the sftp prompt, enter the following command:
6
sftp> put /.ssh/id_dsa.pub
The following output is displayed:
Uploading /.ssh/id_dsa.pub to /id_dsa.pub
To quit the SFTP session, enter the following command:
7
sftp> quit
To begin the ssh session on the target system (system2 in this example), enter
8
the following command on system1:
system1 # ssh system2
Enter the root password of system2 at the prompt:
password:
After you log in to system2, enter the following command to append the
9
id_dsa.pub file to the authorized_keys file:
system2 # cat /id_dsa.pub >> /.ssh/authorized_keys
After the id_dsa.pub public key file is copied to the target system (system2),
10
and added to the authorized keys file, delete it. To delete the id_dsa.pub
public key file, enter the following command on system2:
system2 # rm /id_dsa.pub
To log out of the ssh session, enter the following command:
11
system2 # exit
Page 19

Configuring secure shell (ssh) or remote shell before installing products
When you install from a source system that is also an installation target, also
12
add the local system id_dsa.pub key to the local authorized_keys file. The
installation can fail if the installation source system is not authenticated.
To add the local system id_dsa.pub key to the local authorized_keys file,
enter the following command:
system1 # cat /.ssh/id_dsa.pub >> /.ssh/authorized_keys
Run the following commands on the source installation system. If your ssh
13
session has expired or terminated, you can also run these commands to renew
the session. These commands bring the private key into the shell environment
and make the key globally available to the root user:
system1 # exec /usr/bin/ssh-agent $SHELL
system1 # ssh-add
Identity added: //.ssh/id_dsa
This shell-specific step is valid only while the shell is active. You must execute
the procedure again if you close the shell during the session.
To verify that you can connect to a target system
23Installation overview
Enabling remsh
On the source system (system1), enter the following command:
1
system1 # ssh -l root system2 uname -a
where system2 is the name of the target system.
The command should execute from the source system (system1) to the target
2
system (system2) without the system requesting a passphrase or password.
Repeat this procedure for each target system.
3
Remote shell functionality is enabled automatically after installing HP-UX.
Typically, the only requirement to enable remote installations is to modify the
.rhosts file. A separate .rhosts file is in the $HOME directory of each user. You
must modify this file for each user who remotely accesses the system using remsh.
Each line of the .rhosts file must contain a fully qualified domain name or IP
address for each remote system that has access to the local system. For example,
if the root user must remotely access system1 from system2, add an entry for
system2.companyname.com to the /.rhosts file on system1.
# echo "system2.companyname.com" >> $HOME/.rhosts
Page 20

Installation overview
24
Mounting a software disc
After you complete an installation procedure, delete the .rhosts file from each
user’s $HOME directory to ensure security:
# rm -f $HOME/.rhosts
For more information on configuring the remote shell, see the operating system
documentation and the remsh(1M) manual page .
Mounting a software disc
Veritas software is provided on a disc.
To mount the software disc
Place the Veritas software disc into a DVD drive connected to your system
1
and log in as superuser.
Determine the block device file for the DVD drive:
2
# ioscan -fnC disk
Make a note of the device file as it applies to your system.
Create a directory in which to mount the software disc and mount the disc
3
using the appropriate drive name. For example:
# mkdir -p /mnt/dvdrom
# /usr/sbin/mount -F cdfs /dev/dsk/c3t2d0 /mnt/dvdrom
Verify that the disc is mounted:
4
# mount
Change to the appropriate directory and product subdirectory to view the
5
product release notes and installation guides, to install the products.
Downloading the Storage Foundation and High
Availability software
One method of obtaining the Storage Foundation and High Availability software
is to download it to your local system from the Symantec Web site.
If you download a standalone Veritas product, use the swinstall command to
install the product.
Page 21

Copying and unzipping the downloaded release
To download the software
Verify that you have enough space on your filesystem to store the downloaded
1
software.
If you plan to install the software on the same system, ensure that you also
have enough space for the installed software.
To see the space available, you can use the df command with the name of the
2
local file system where you intend to download the software.
# df -b filesystem
Caution: When you select a location to download files, do not select a directory
that contains Veritas products from a previous release or from the
maintenance pack. You must download the Veritas 5.0 software and the
Veritas software in separate directories.
Download the software, specifying the file system with sufficient space for
3
the file.
25Installation overview
Copying and unzipping the downloaded release
Before you can install the latest version of the product, you must unzip the
downloaded file, and extract the contents from the downloaded file.
To unzip the release
Create a new directory on a file system with sufficient space to store the
1
installation software after the files are uncompressed. Let parent_directory
be the name of the new directory to store the files for this release.
This directory must be clean, with no files present from previous installations
or versions of any products.
# mkdir /parent_directory/install
Copy the compressed files from your download area to the installation
2
directory, as required. This copy might be necessary if the area into which
releases are downloaded is not on the system or is used for installations.
Go to the installation directory and unzip the compressed files.
3
# cd /parent_directory/install
# gunzip *.gz
Page 22

Installation overview
26
Copying and unzipping the downloaded release
To untar the downloaded file
Untar the downloaded file to your new installation directory.
◆
# cd /parent_directory/install
# tar xf filename1.tar
# tar xf filename2.tar
# tar xf filename3.tar
.
.
Page 23

Chapter
Where to find more
information
This chapter includes the following topics:
■ Documentation
■ Service and support
Documentation
4
You can access product documentation in the following ways:
■ Veritas documents are in Adobe Portable Document Format (PDF) on the
product discs or downloaded software.
■ The product documentation is available on the Web at the following URL:
http://www.symantec.com/business/support/index.jsp
Service and support
To access the self-service knowledge base, go to the following URL:
http://entsupport.symantec.com
Page 24

Where to find more information
28
Service and support
 Loading...