

Page 1
HP Vectra VL
series 8
User’s Guide
Page 2

Notice
The information contained in this document is subject to change
without notice.
Hewlett-Packard makes no warranty of any kind with regard to this
material, including, but not limited to, the implied warranties of
merchantability and fitness for a particular purpose. Hewlett-Packard
shall not be liable for errors contained herein or for incidental or
consequential damages in connection with the furnishing, performance,
or use of this material.
This document contains proprietary information that is protected by
copyright. All rights are reserved. No part of this document may be
photocopied, reproduced, or translated to another language without the
prior written consent of Hewlett-Packard Company.
TM
Adobe
and AcrobatTM are trademarks of Adobe Systems Incorporated.
Microsoft
®, MS®
, MS-DOS
®, Windows®, and Windows NT®
U.S. registered trademarks of Microsoft Corporation.
Pentium
is a U.S. registered trademark of Intel Corporation.
®
Hewlett-Packard France
Commercial Desktop Computing Division
38053 Grenoble Cedex 9
France
1998 Hewlett-Packard Company
are
Page 3

User’s Guide
PN: D5908-90001
Page 4

Who this Manual is For
This manual is for anyone who wants to:
Set up the PC for the first time
•
Troubleshoot problems on the PC
•
Find out where to get more information and support.
•
Important Ergonomic Information
It is strongly recommended that you read the ergonomic information
before using your PC. For Windows NT 4.0 and Windows 95 users, click
the
Start
Comfortably
button then click
.
Programs ➪ HP Info ➪ Working
WARNING
Important Safety Information
If you have any doubt that you can lift the PC or display safely, do not
try to move it without help.
For your safety, always connect the equipment to a grounded wall
outlet. Always use a power cord with a properly grounded plug, such
as the one provided with this equipment, or one in compliance with
your national regulations. This PC is disconnected from the power by
removing the power cord from the power outlet. This means the PC
must be located close to a power outlet that is easily accessible.
For your safety, never remove the PC’s cover without first removing
the power cord from the power outlet, and any connection to a
telecommunications network. Always replace the cover on the PC
before switching it on again.
To avoid electric shock, do not open the power supply.
This HP PC is a class 1 laser product. Do not attempt to make any
adjustment of the laser units.
ii English
Page 5

Contents
1 Setting Up and Using Your PC
Unpacking Your PC . . . . . . . . . . . . . . . . . . . . . . . . . . . . . . . . . . . . . . . . . 2
Connecting the Mouse, Keyboard, Display and Printer . . . . . . . . . . . 3
Connecting to a Network (Some Models Only). . . . . . . . . . . . . . . . . . 4
Connecting Multimedia Accessories
(Some Models Only) . . . . . . . . . . . . . . . . . . . . . . . . . . . . . . . . . . . . . . . . 5
Connecting the Power Cords . . . . . . . . . . . . . . . . . . . . . . . . . . . . . . . . . 8
Your PC’s Hardware Control Panel . . . . . . . . . . . . . . . . . . . . . . . . . . . 10
Using Your HP Enhanced Keyboard . . . . . . . . . . . . . . . . . . . . . . . . . . 11
Using Your HP Enhanced Mouse. . . . . . . . . . . . . . . . . . . . . . . . . . . . . 12
Starting and Stopping Your PC. . . . . . . . . . . . . . . . . . . . . . . . . . . . . . . 13
Starting the PC for the First Time . . . . . . . . . . . . . . . . . . . . . . . . . . . . . . 13
Initializing Your Software . . . . . . . . . . . . . . . . . . . . . . . . . . . . . . . . . . . . . .13
After Your PC Has Restarted . . . . . . . . . . . . . . . . . . . . . . . . . . . . . . . . . . .14
Changing the Operating System . . . . . . . . . . . . . . . . . . . . . . . . . . . . . . . . 14
Starting Your PC. . . . . . . . . . . . . . . . . . . . . . . . . . . . . . . . . . . . . . . . . . . . . 15
Stopping Your PC. . . . . . . . . . . . . . . . . . . . . . . . . . . . . . . . . . . . . . . . . . . . 16
Using Power Management . . . . . . . . . . . . . . . . . . . . . . . . . . . . . . . . . . 17
Using Security Features . . . . . . . . . . . . . . . . . . . . . . . . . . . . . . . . . . . . 17
Additional Information and Help. . . . . . . . . . . . . . . . . . . . . . . . . . . . . 18
On Your PC’s Hard Disk Drive . . . . . . . . . . . . . . . . . . . . . . . . . . . . . . . . . . 18
On the HP Web Site . . . . . . . . . . . . . . . . . . . . . . . . . . . . . . . . . . . . . . . . . . 18
English iii
Page 6

The Downloadable Documentation Kit (MIS Kit) . . . . . . . . . . . . . . . . . . 18
The Upgrade and Maintenance Guide . . . . . . . . . . . . . . . . . . . . . . . . . . . 19
Downloading The Upgrade and Maintenance Guide . . . . . . . . . . . . . . . . 20
2 How to Install Accessories In Your PC
Accessories You Can Install . . . . . . . . . . . . . . . . . . . . . . . . . . . . . . . . 22
Removing and Replacing the Cover. . . . . . . . . . . . . . . . . . . . . . . . . . 23
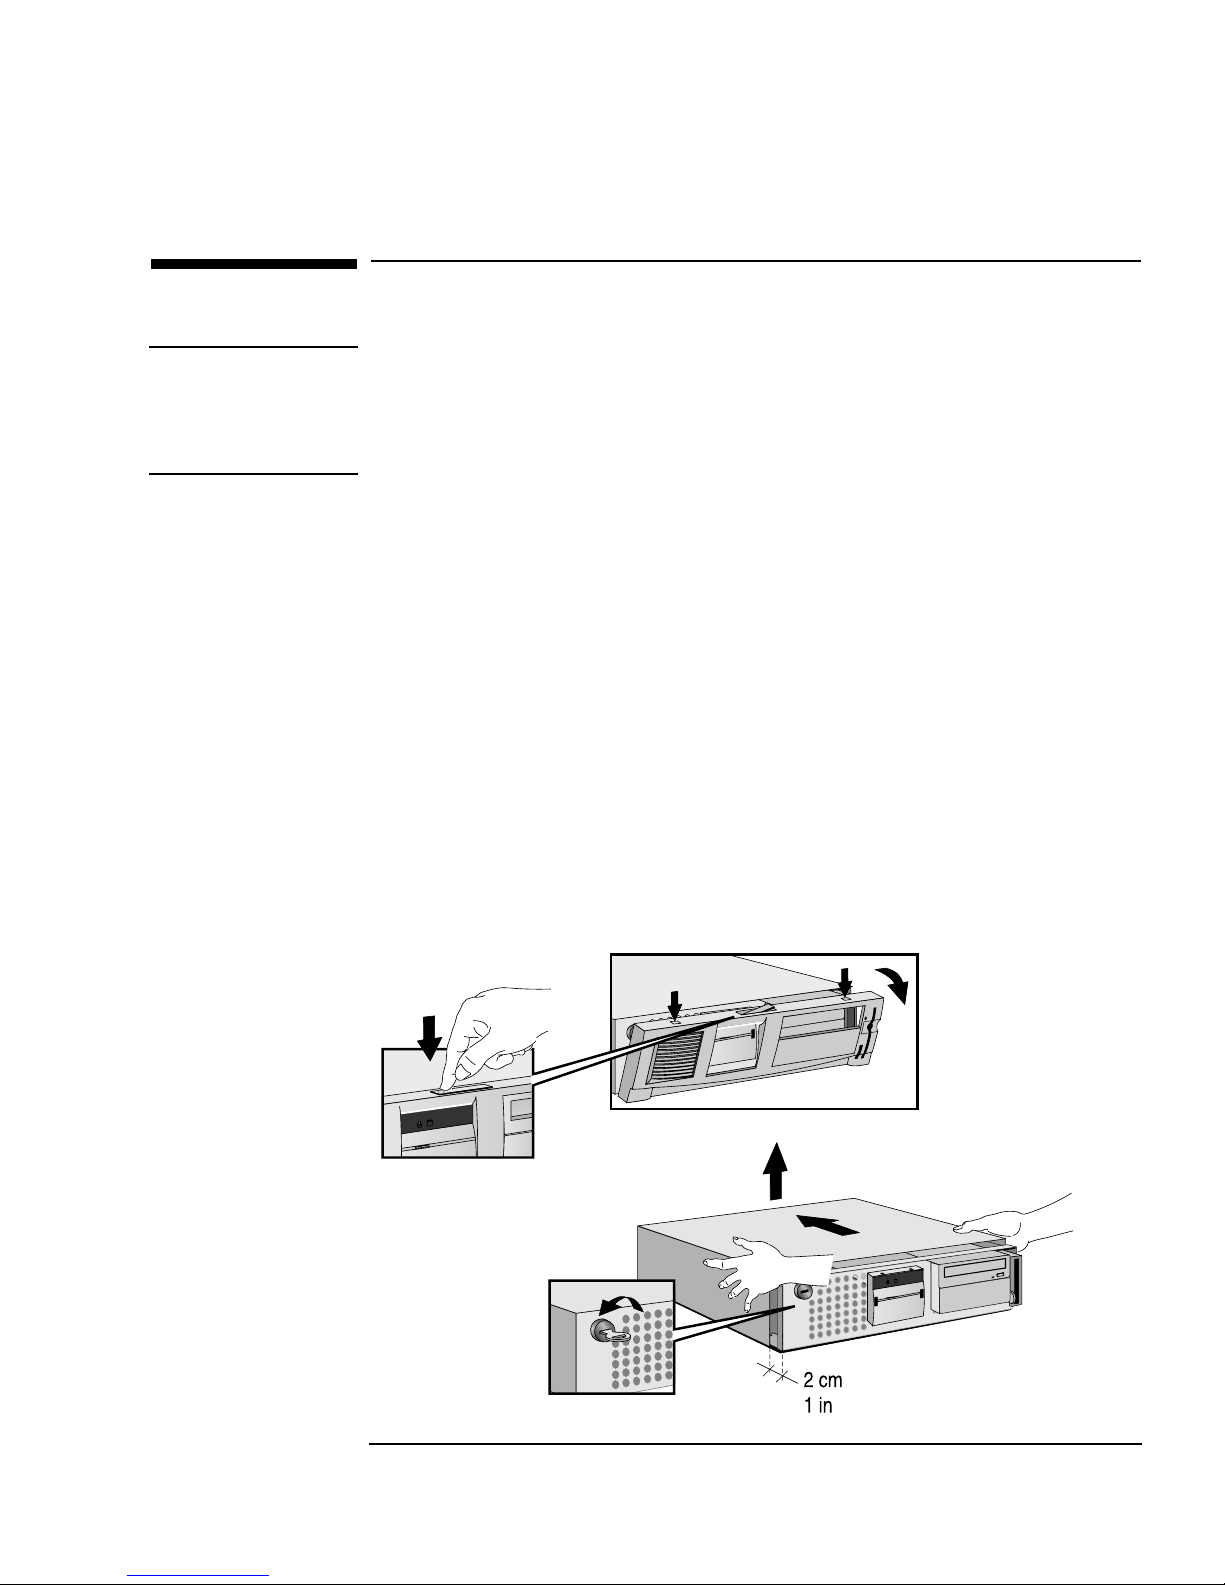
Removing the Cover . . . . . . . . . . . . . . . . . . . . . . . . . . . . . . . . . . . . . . . . . 23
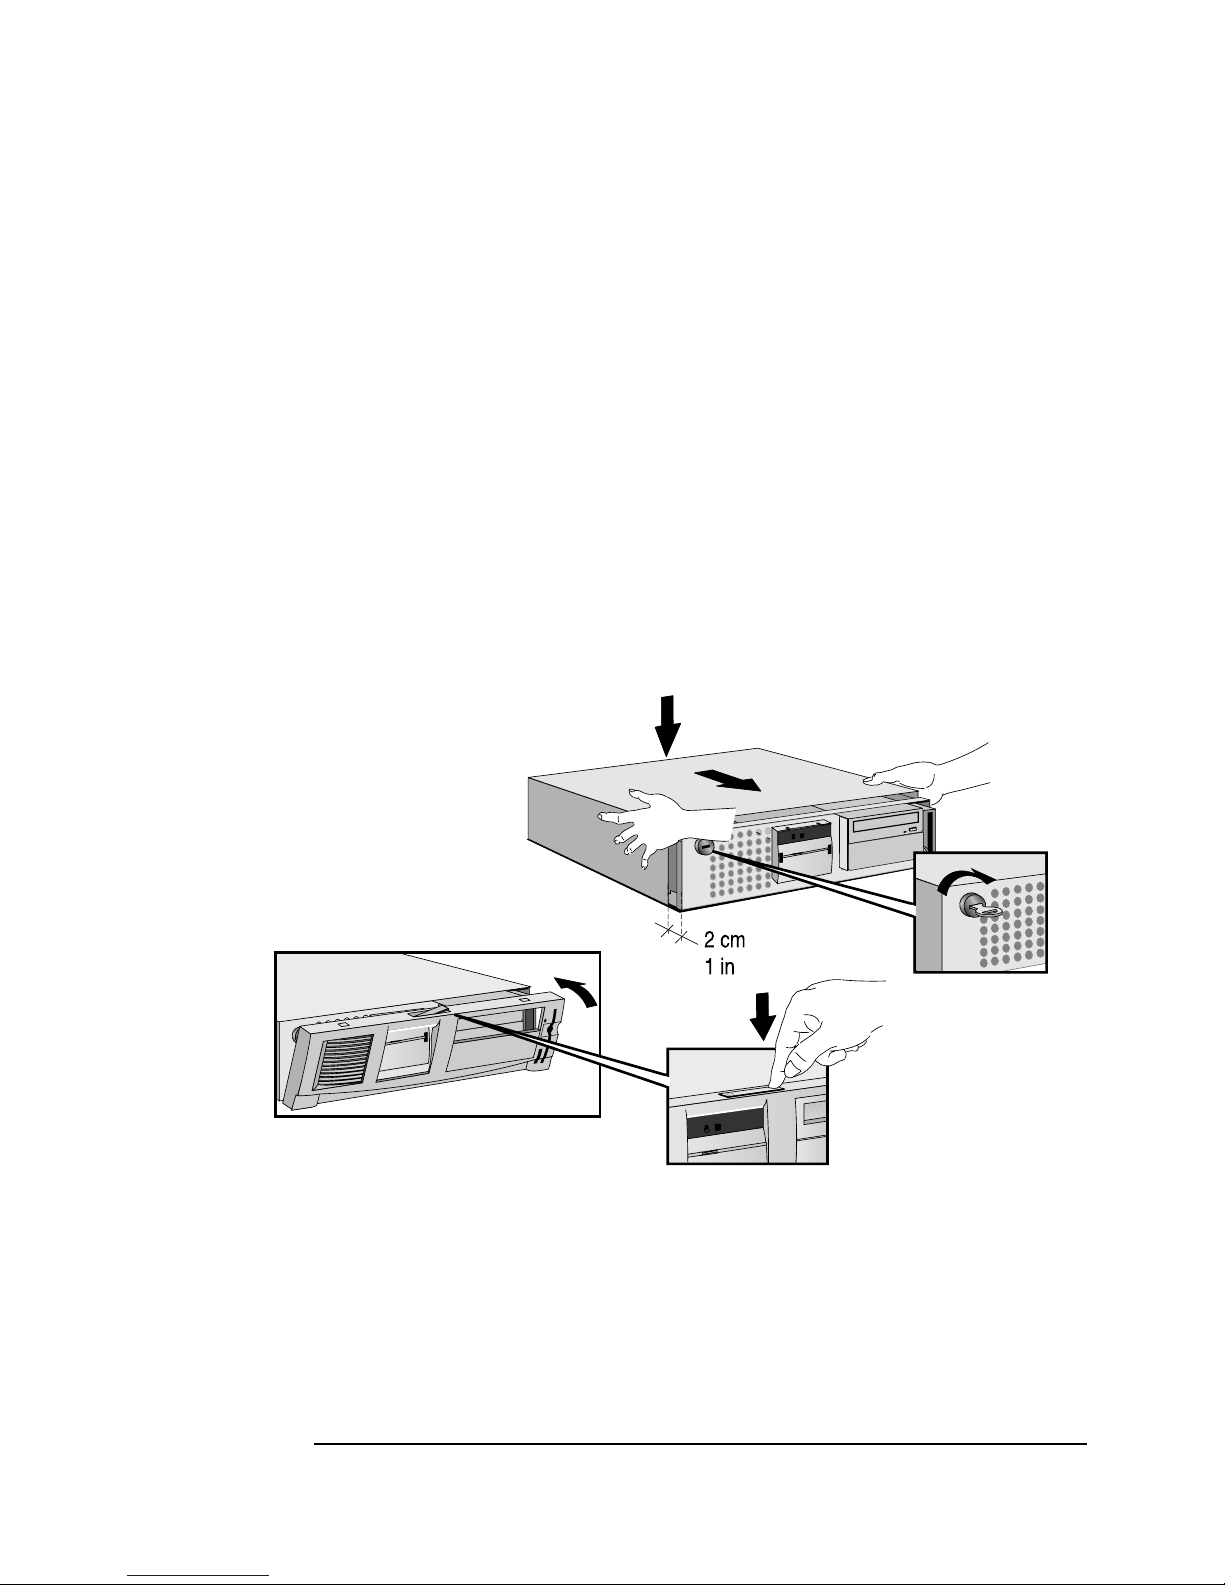
Replacing the Cover after Installing Accessories . . . . . . . . . . . . . . . . . . 24
Moving and Replacing the Power Supply . . . . . . . . . . . . . . . . . . . . . 25
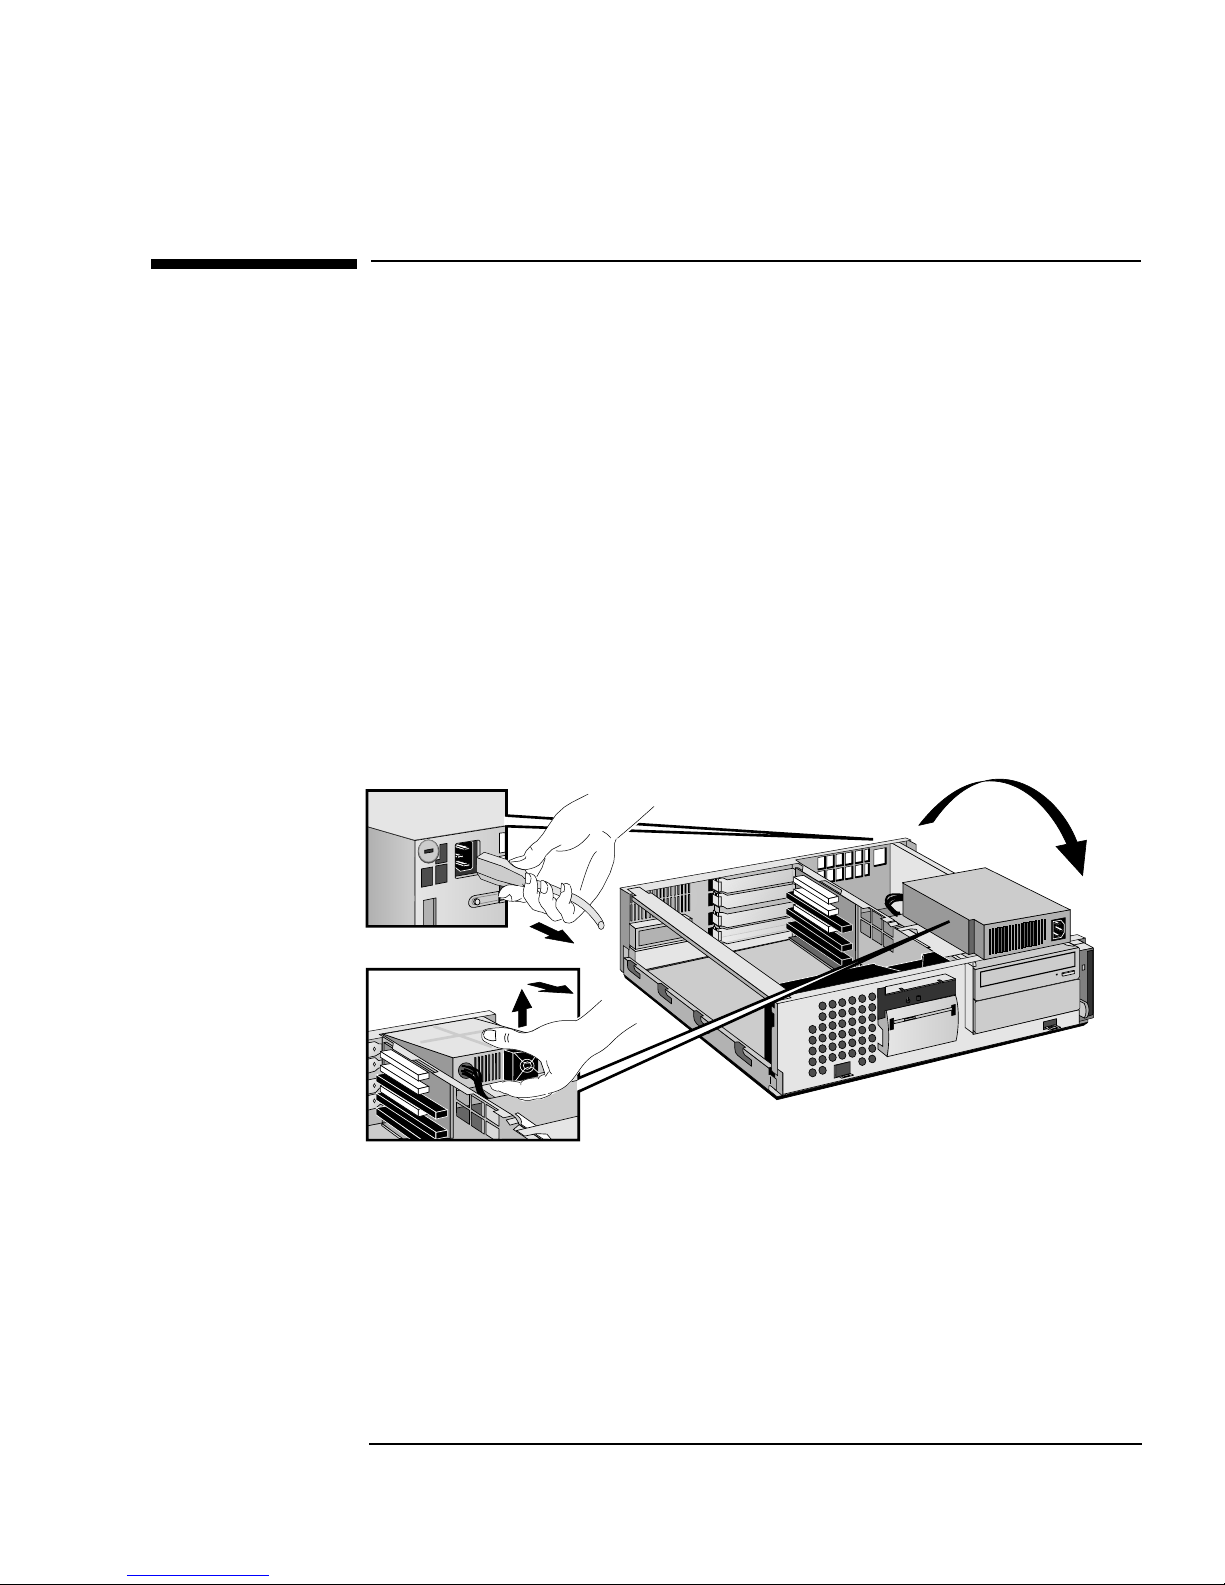
Moving the Power Supply . . . . . . . . . . . . . . . . . . . . . . . . . . . . . . . . . . . . . 25
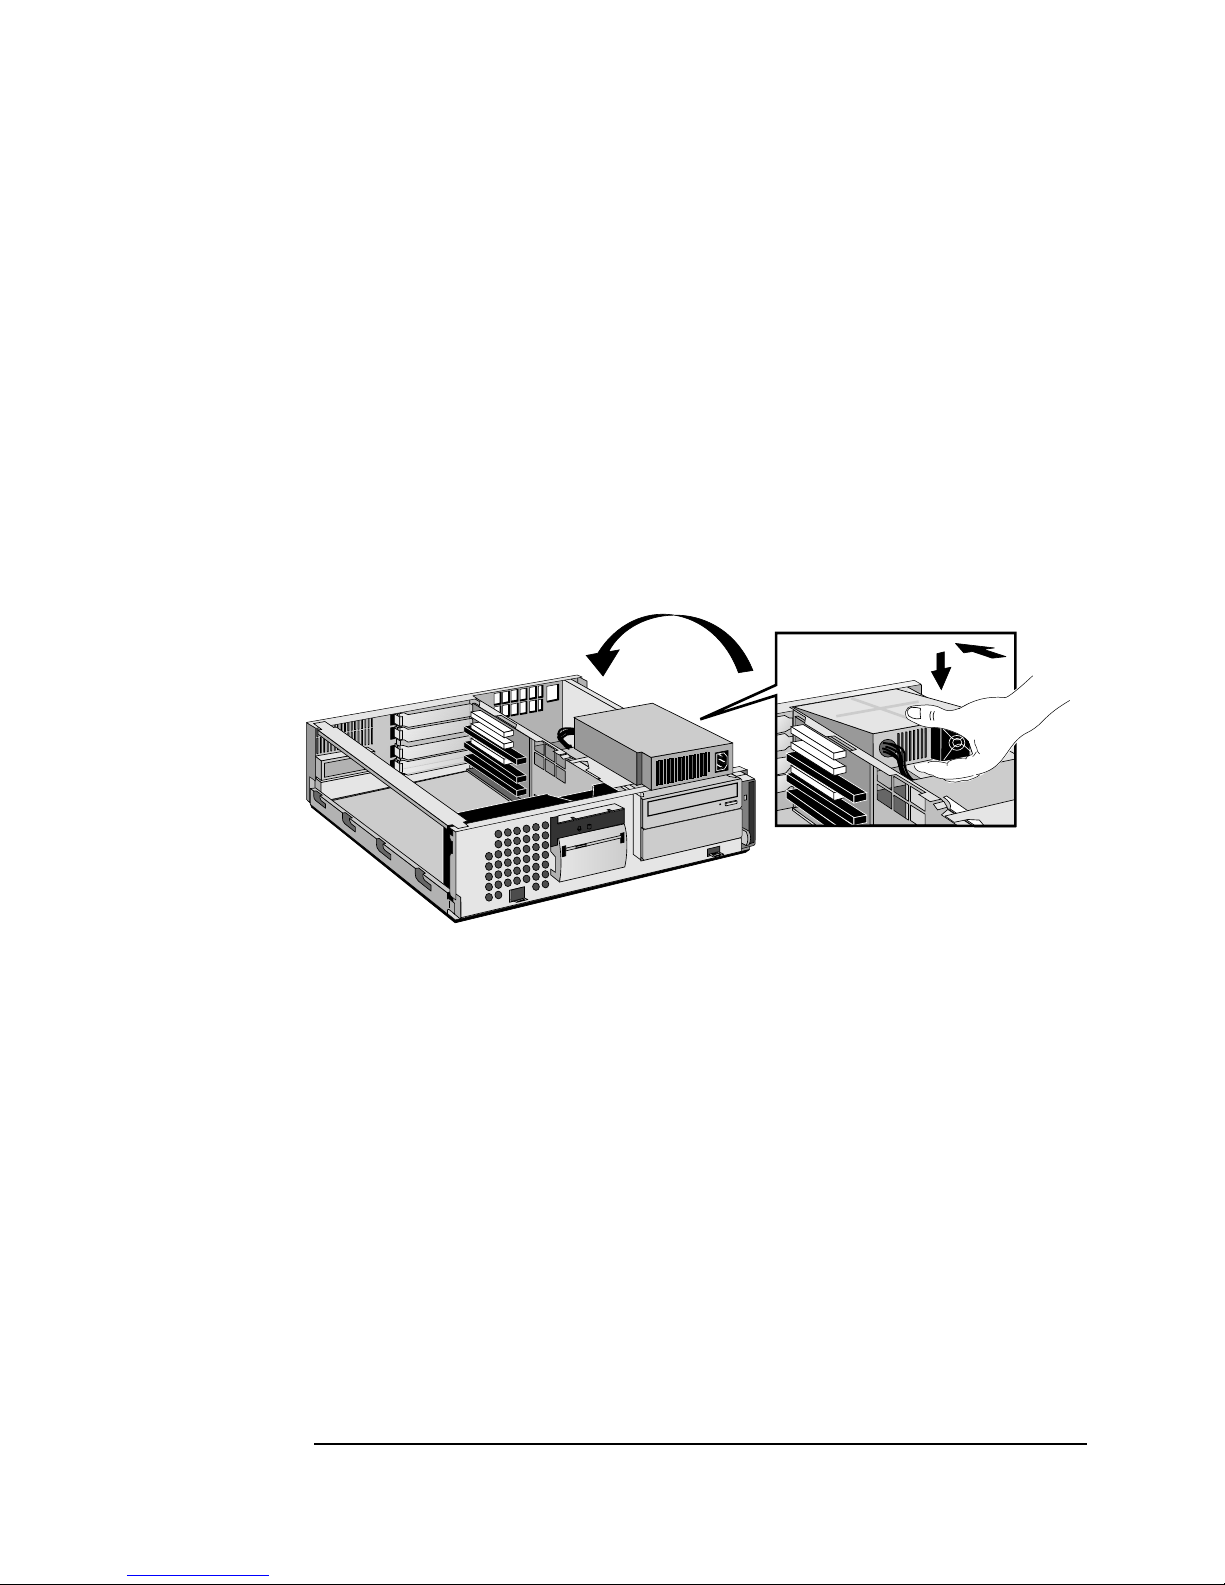
Replacing the Power Supply. . . . . . . . . . . . . . . . . . . . . . . . . . . . . . . . . . . 26
Installing Memory. . . . . . . . . . . . . . . . . . . . . . . . . . . . . . . . . . . . . . . . . 27
Installing Main Memory. . . . . . . . . . . . . . . . . . . . . . . . . . . . . . . . . . . . . . . 27
Installing Mass Storage Devices . . . . . . . . . . . . . . . . . . . . . . . . . . . . . 29
Connecting Devices. . . . . . . . . . . . . . . . . . . . . . . . . . . . . . . . . . . . . . . . . . 29
Installing Accessory Boards . . . . . . . . . . . . . . . . . . . . . . . . . . . . . . . . 32
PCI Slot Numbers Used in the PC’s Setup Program . . . . . . . . . . . . . . . . 32
Installing the Board . . . . . . . . . . . . . . . . . . . . . . . . . . . . . . . . . . . . . . . . . . 33
Configuring Accessory Boards with Plug and Play . . . . . . . . . . . . . . . . . 33
Configuring non-Plug and Play ISA Accessory Boards . . . . . . . . . . . . . . 34
iv English
Page 7

3 Troubleshooting Your PC
HP DiagTools Hardware Diagnostics Utility . . . . . . . . . . . . . . . . . . . 36
If Your PC Does Not Start Properly. . . . . . . . . . . . . . . . . . . . . . . . . . . 38
If Your PC Has a Hardware Problem. . . . . . . . . . . . . . . . . . . . . . . . . . 39
Display Does Not Work Properly. . . . . . . . . . . . . . . . . . . . . . . . . . . . . . . . 39
If Nothing is Displayed on the Screen . . . . . . . . . . . . . . . . . . . . . . . . . . . .39
Other Display Problems . . . . . . . . . . . . . . . . . . . . . . . . . . . . . . . . . . . . . . .39
If Your Keyboard Does Not Work . . . . . . . . . . . . . . . . . . . . . . . . . . . . . . . 40
If Your Mouse Does Not Work . . . . . . . . . . . . . . . . . . . . . . . . . . . . . . . . . . 40
HP Setup Program . . . . . . . . . . . . . . . . . . . . . . . . . . . . . . . . . . . . . . . . . 41
Hewlett-Packard Support and Information Services . . . . . . . . . . . . 42
Regulatory Information . . . . . . . . . . . . . . . . . . . . . . . . . . . . . . 46
HP General Hardware Warranty . . . . . . . . . . . . . . . . . . . . . . . 49
HP Software Product License Agreement and
Software Product Limited Warranty. . . . . . . . . . . . . . . . . . . . 51
Physical Characteristics . . . . . . . . . . . . . . . . . . . . . . . . . . . . . . . . . . . . . . . 53
Power Consumption. . . . . . . . . . . . . . . . . . . . . . . . . . . . . . . . . . . . . . . . . . 53
Acoustic Noise Emission . . . . . . . . . . . . . . . . . . . . . . . . . . . . . . . . . . . . . . 53
English v
Page 8

vi English
Page 9

1
Setting Up and Using Your PC
Page 10
1 Setting Up and Using Your PC
Unpacking Your PC
Unpacking Your PC
WARNING
If you have any doubt that you can lift the PC or display safely, do not
try to move it without help.
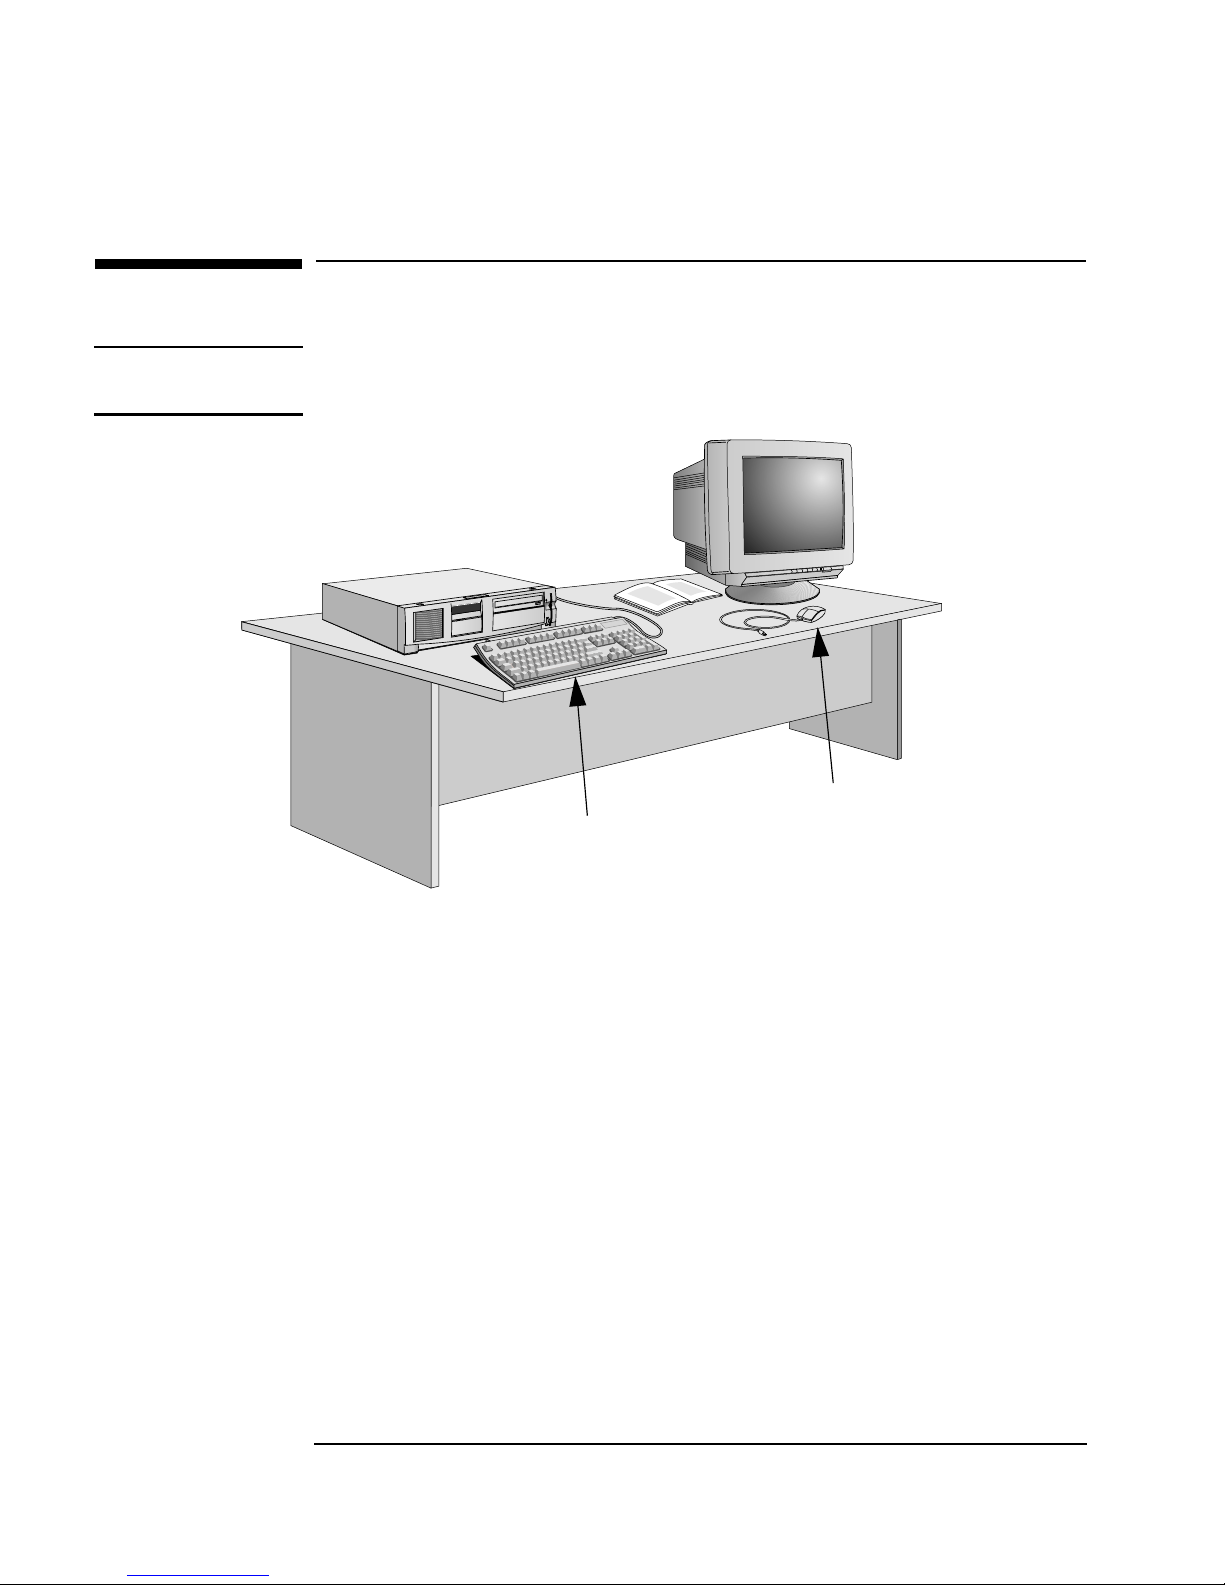
Typical Display
Computer
Mouse
Keyboard
Unpack all the components.
1
Operating System
Installation Tools
Place the PC on a sturdy desk near to easily accessible power outlets,
2
with enough space for the keyboard, mouse, and any other
accessories. You can either place the PC horizontally (flat on the
desk) or vertically (on its side), with the floppy drive at the top.
Position the PC so that its rear connectors are easily accessible.
3
Refer to the display’s manual for information about the display.
4
Your PC’s operating system is preloaded on your PC’s hard disk drive
and is set up when you start your PC for the first time.
No tools are required to set up your PC. However, if you plan to install a
disk drive, you may need a screwdriver. For further information about
installing accessories, refer to chapter 2, How to Install Accessories In
Your PC.
2 English
Page 11
1 Setting Up and Using Your PC
Connecting the Mouse, Keyboard, Display and Printer
Connecting the Mouse, Keyboard, Display and Printer
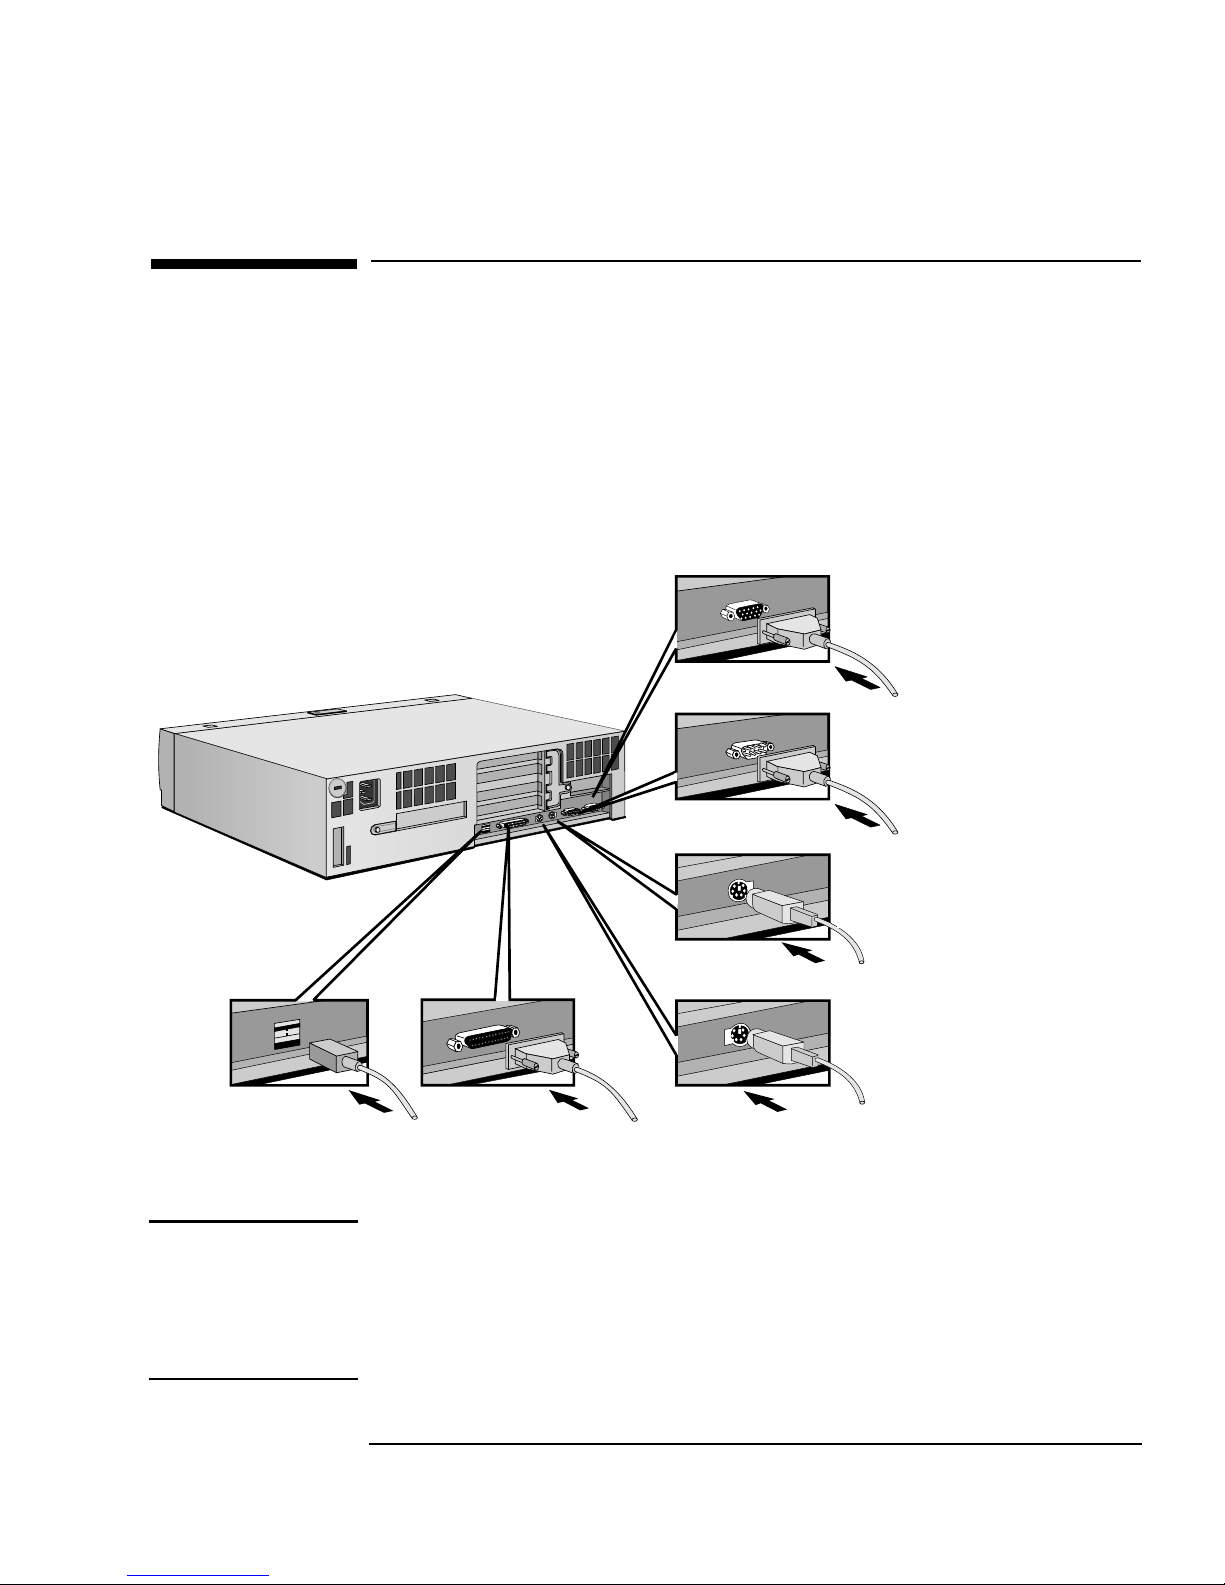
Connect the mouse, keyboard and display to the back of the computer.
The connectors are shaped to go in one way only.
Connect the printer cable to the back of the computer and tighten the
attachment screws. Use the connector labeled:
Parallel (25-pin parallel connector) for a parallel printer
•
Serial (9-pin serial connector) for a serial printer.
•
Display
Serial Connector
Keyboard
(To connect an HP enhanced
keyboard, refer to page 5.)
Mouse
Parallel Connector(USB—see note)
NOTE The Universal Serial Bus (USB) connectors can be used for USB
accessories. Most USB accessories are automatically configured as soon
as they are physically attached to the PC.
USB is not supported by all operating systems, although it is supported
by the latest version of Windows 95 (preloaded on some models).
English 3
Page 12
1 Setting Up and Using Your PC
Connecting to a Network (Some Models Only)
Connecting to a Network (Some Models Only)
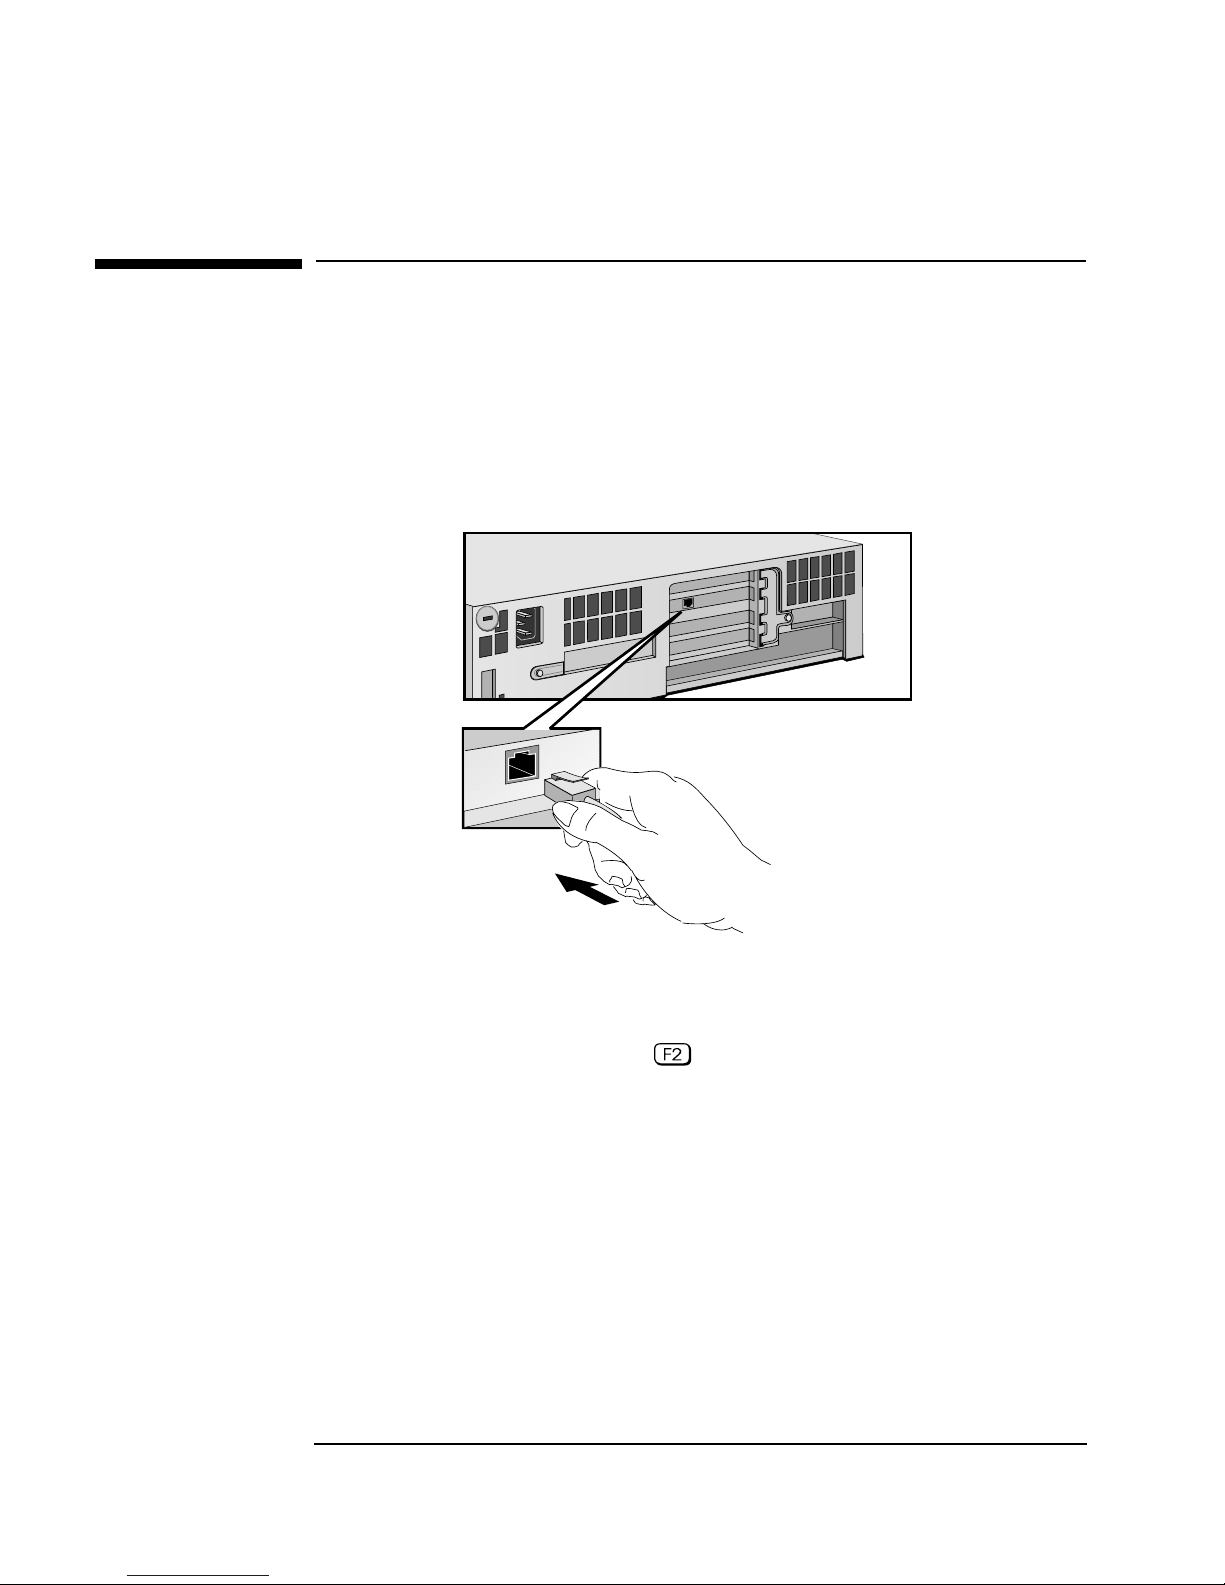
Let your Network Administrator know you are connecting your PC to
the network.
Connect the network cable to the RJ-45 UTP (Unshielded Twisted
Pair) LAN connector.
10/100BT
Connector
Once you have connected the network cable to your PC, you must
enable your network connection in the PC’s Setup program. (To enter
the PC’s Setup program, press during start-up.)
4 English
Page 13
1 Setting Up and Using Your PC
Connecting Multimedia Accessories (Some Models Only)
Connecting Multimedia Accessories
(Some Models Only)
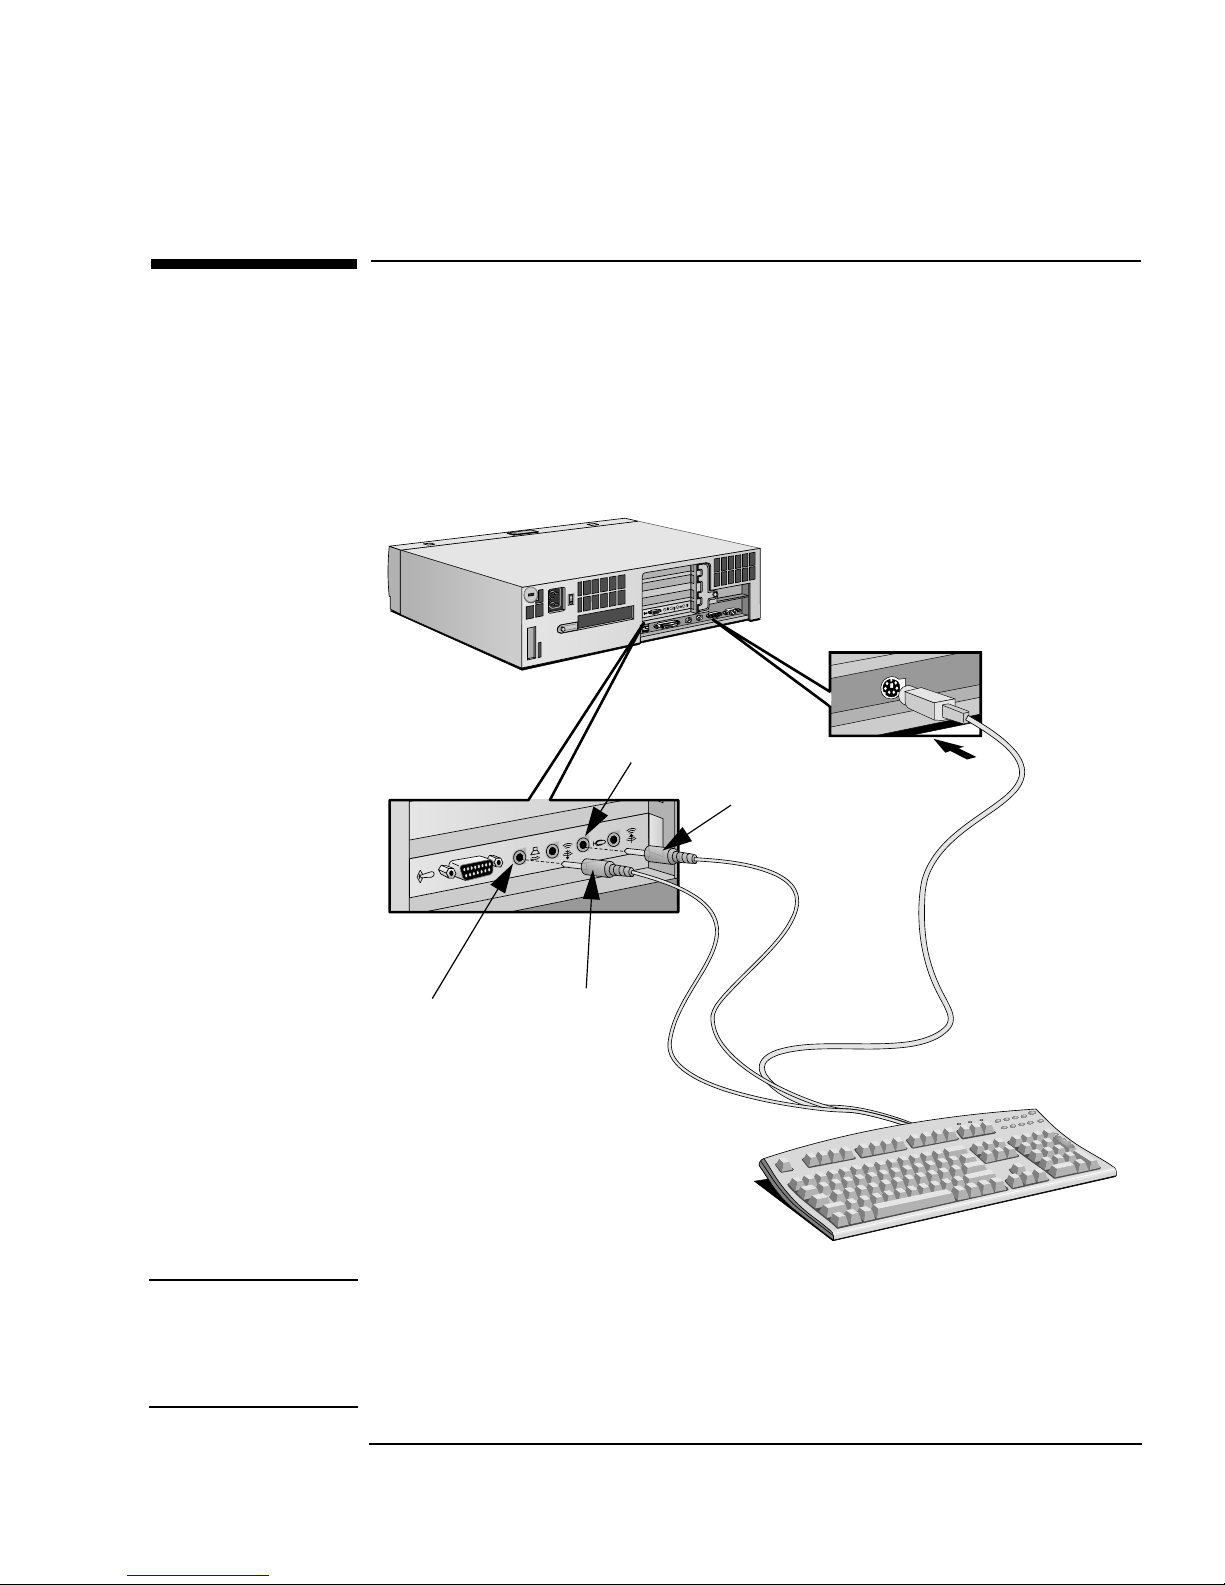
If your PC has multimedia capabilities, it will have an HP enhanced
keyboard and a multimedia rear panel.
Connect the HP enhanced keyboard to the PC.
1
Standard keyboard
connector
Red microphone
socket
Red jack
Black speaker
socket
Black jack
NOTE When you connect the black keyboard jack to the rear of the PC, the
PC’s internal speaker is deactivated. You can then connect headphones
or speakers to the rear of the keyboard to have sound (go to the next
step).
English 5
Page 14
1 Setting Up and Using Your PC
Connecting Multimedia Accessories (Some Models Only)
WARNING
To avoid discomfort from unexpected noise, always turn the volume
down before connecting headphones or speakers.
Listening to loud sounds for prolonged periods may permanently
damage your hearing. Before putting on headphones, place them
around your neck and turn the volume down. When you put on the
headphones, slowly increase the volume until you find a comfortable
listening level, and leave the volume control in that position.
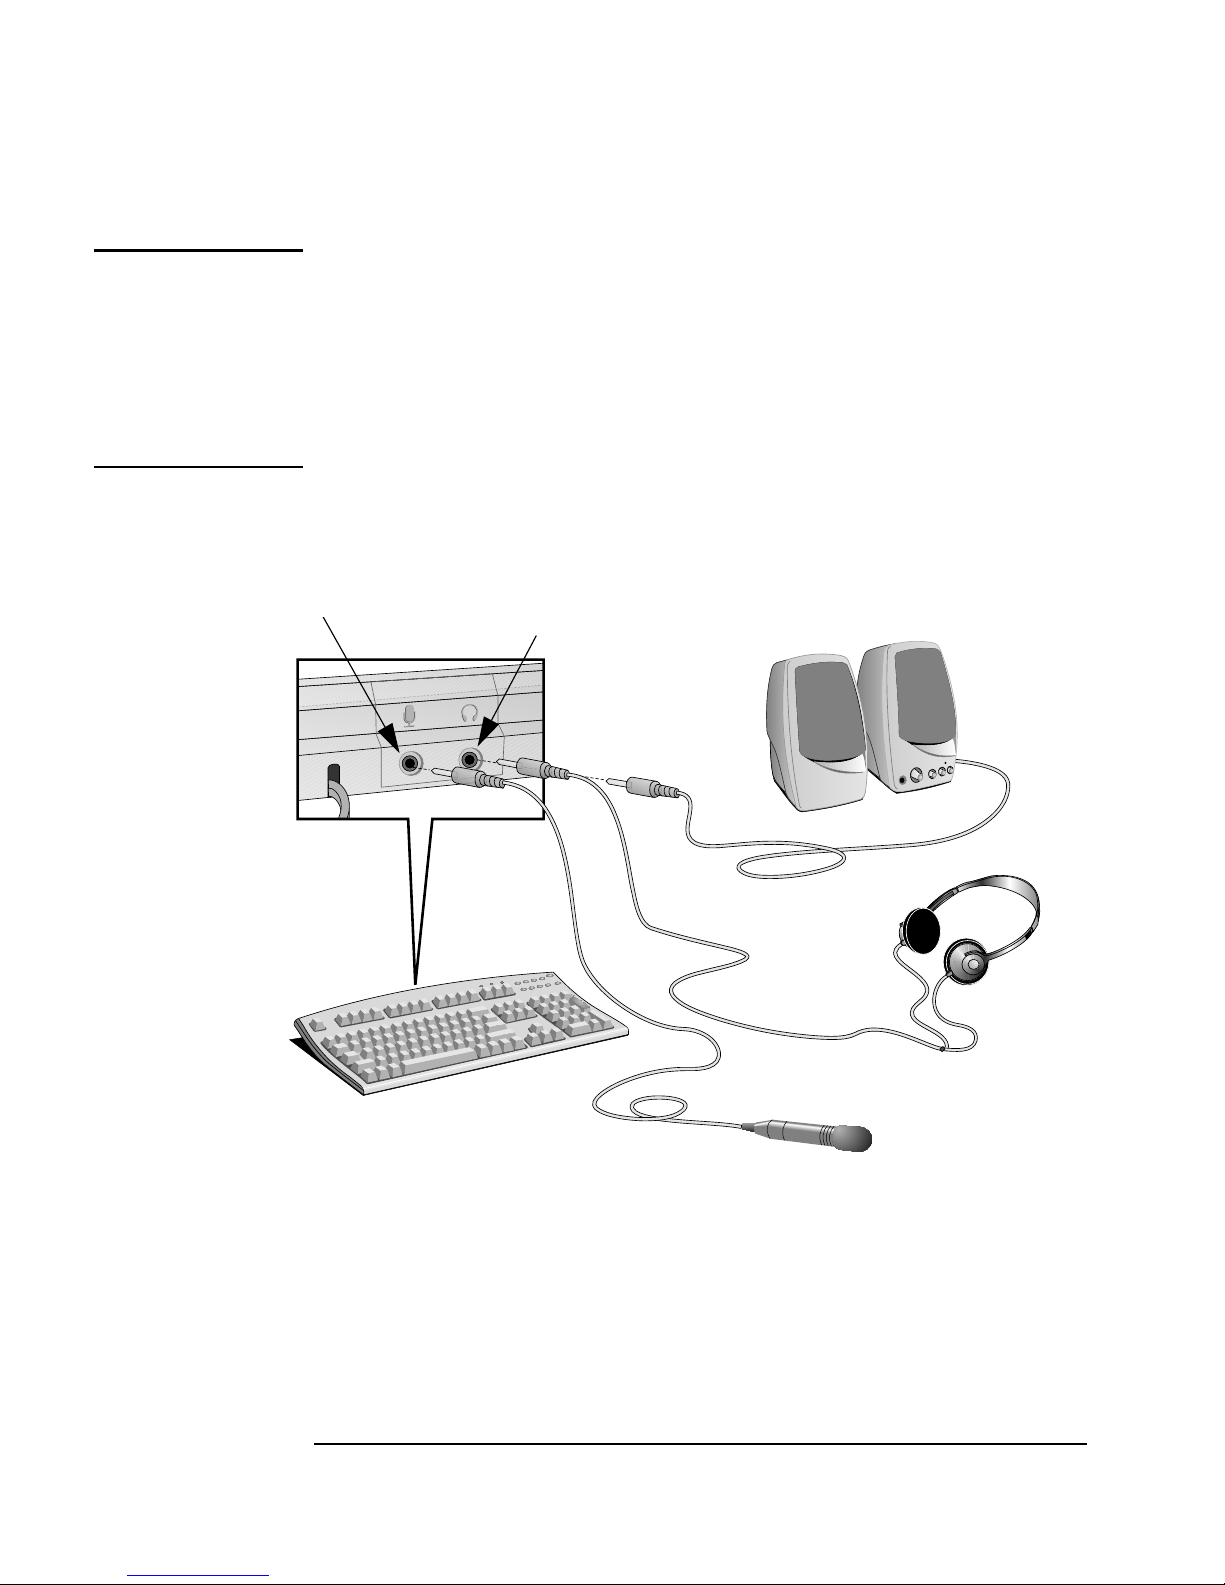
2 Connect the microphone and headphones/speakers to the keyboard.
Keyboard
microphone socket
Keyboard
headphones/speaker
socket
The speakers and microphone shown here are not supplied with
your PC.
6 English
Page 15
1 Setting Up and Using Your PC
Connecting Multimedia Accessories (Some Models Only)
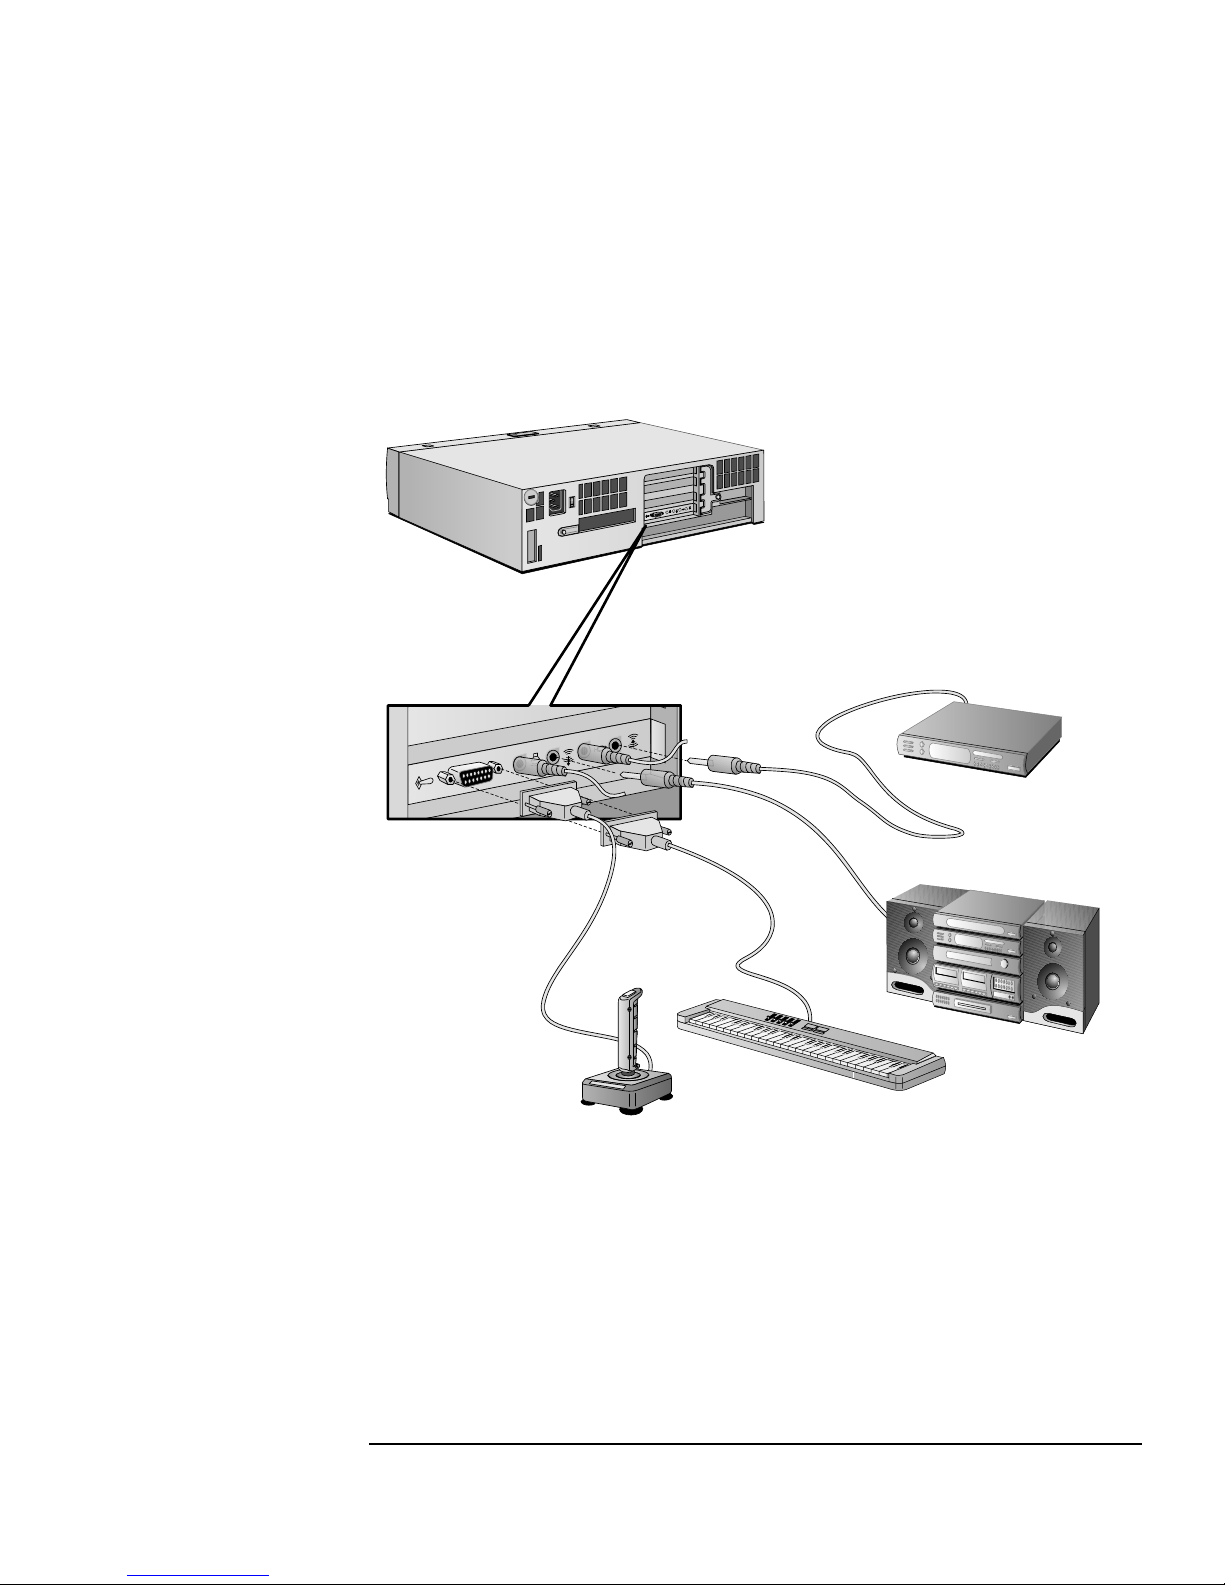
3 Connect any remaining audio accessories, such as a joystick or hi-fi
equipment, to the multimedia rear panel.
The audio accessories shown here (joystick, musical instrument,
and hifi equipment) are not supplied with your PC.
English 7
Page 16
1 Setting Up and Using Your PC
Connecting the Power Cords
Connecting the Power Cords
WARNING
For your safety, always connect the equipment to a grounded wall
outlet. Always use a power cable with a properly grounded plug such
as the one provided with this equipment or in compliance with your
national regulations. This PC is disconnected from the power by
removing the power cord from the power outlet. This means the PC
must be located close to a power outlet that is easily accessible.
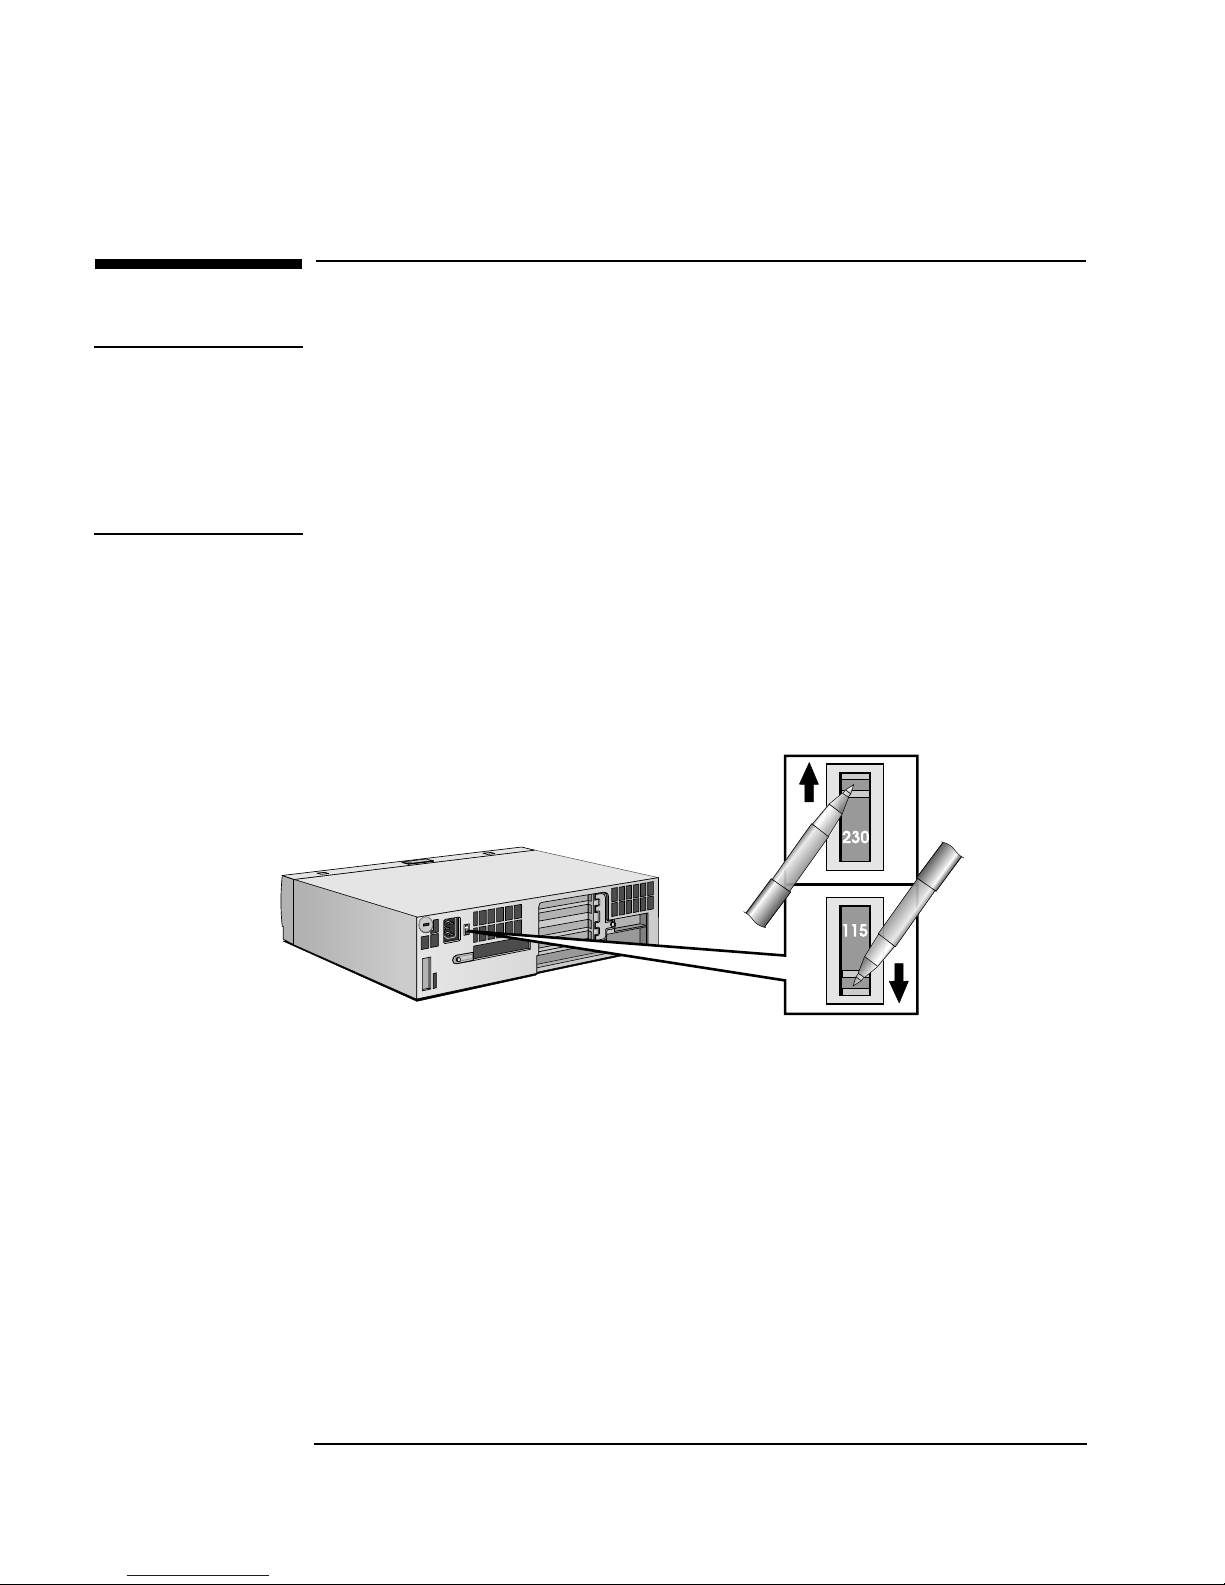
Some models have a voltage selection switch, as shown in the
1
diagram below.
Voltage
Selection
Switch
If your PC does not have a voltage selection switch, go directly to
step 2.
If your PC does have a voltage selection switch:
Remove the warning label covering the computer’s power
a
connector.
Ensure that the voltage setting is correct for your country.
b
(The voltage is set during manufacture and should be already
correct.)
8 English
Page 17
1 Setting Up and Using Your PC
Connecting the Power Cords
WARNING
If your PC has a voltage selection switch, ensure that the voltage
setting is correct for your country before connecting the power supply
cord. (To know if your PC has a voltage selection switch, refer to the
previous page.)
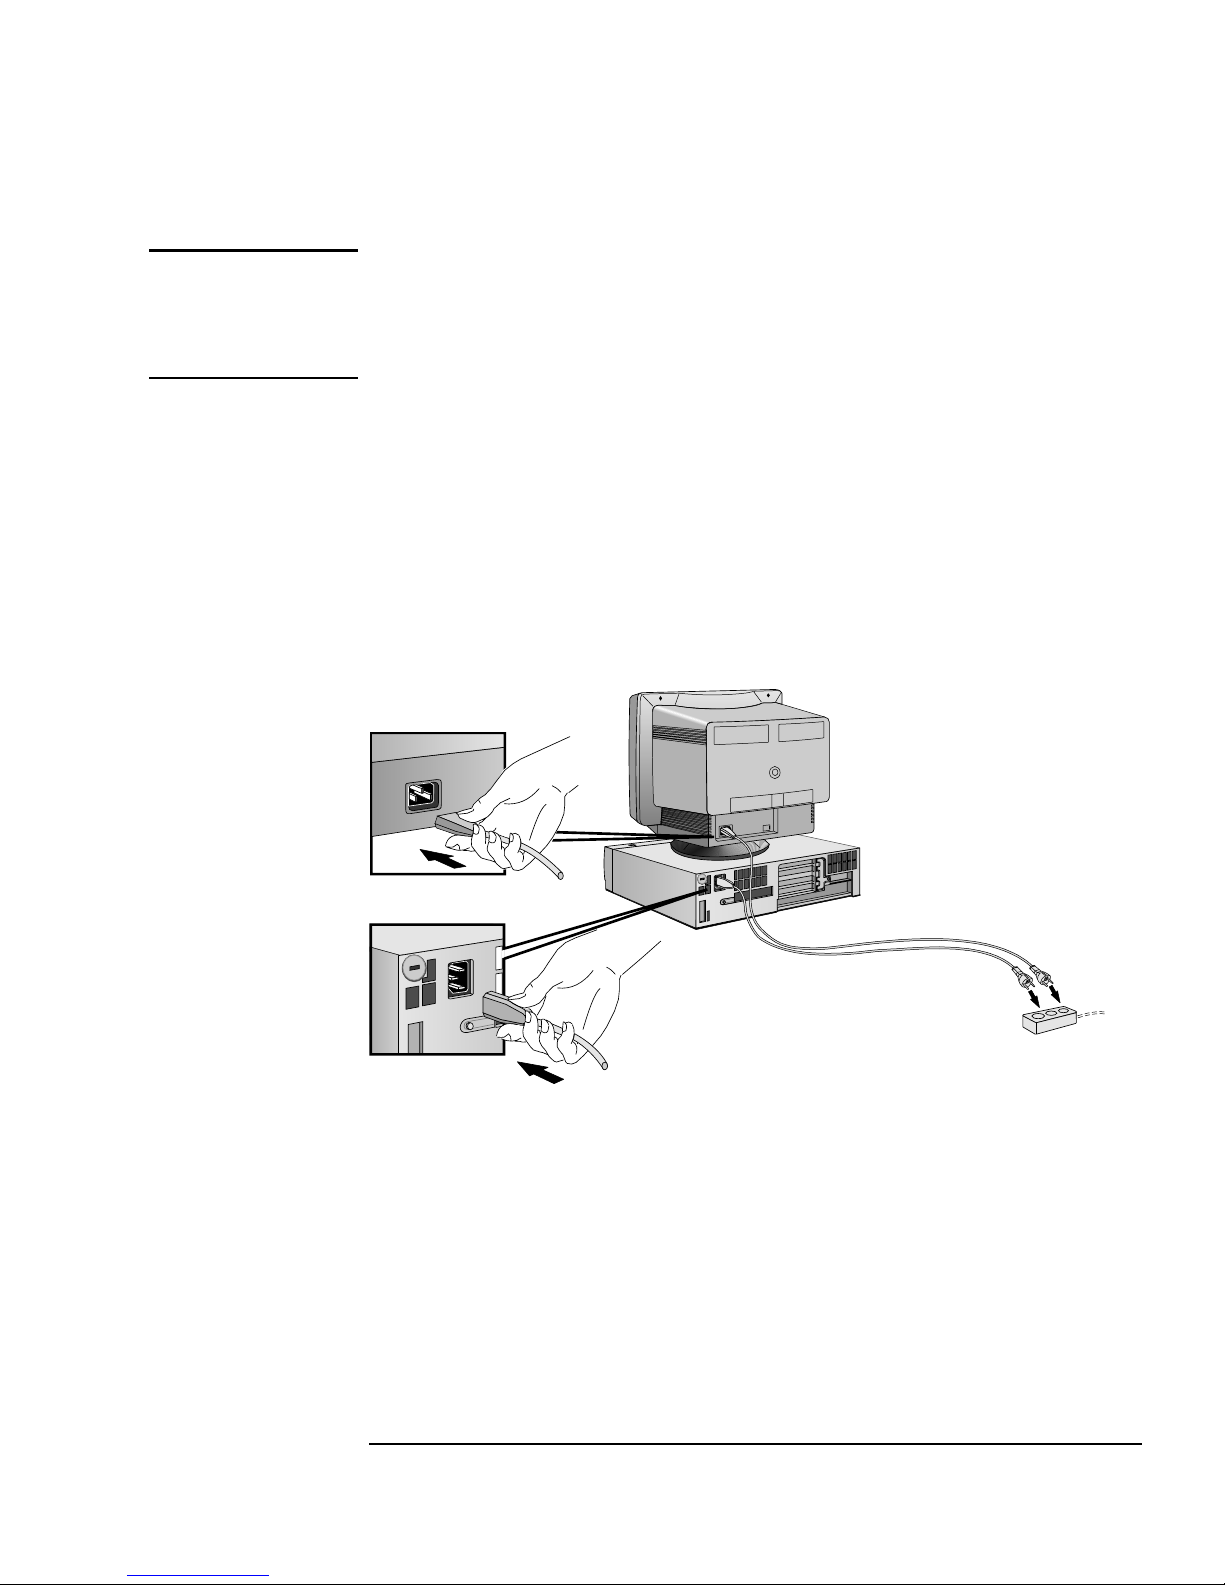
2 Connect the power cords to the display and the computer. (The
connectors are shaped to go in one way only.)
3 Connect the display’s power cord and the computer’s power cord to
a grounded outlet.
Display
Power Cord
Computer
Power Cord
Grounded Outlet
English 9
Page 18

1 Setting Up and Using Your PC
Your PC’s Hardware Control Panel
Your PC’s Hardware Control Panel
Your PC’s hardware control panel is on the front of your PC.
Hard Disk Activity Light
Power on Status Light
(Flashes in Sleep Mode)
Keyboard Lock Status Light
Power On/Off Button
Power On/Off Button
Hard Disk Activity Light
Press this button to turn your PC’s power on and off.
This light glows/flickers when your hard disk drive is being accessed.
The hard disk activity light will also work if you install a second IDE hard
disk drive (supplied by HP). However, if you replace this drive with a
SCSI hard disk drive, the hard disk activity light is not used.
10 English
Page 19
1 Setting Up and Using Your PC
Using Your HP Enhanced Keyboard
Using Your HP Enhanced Keyboard
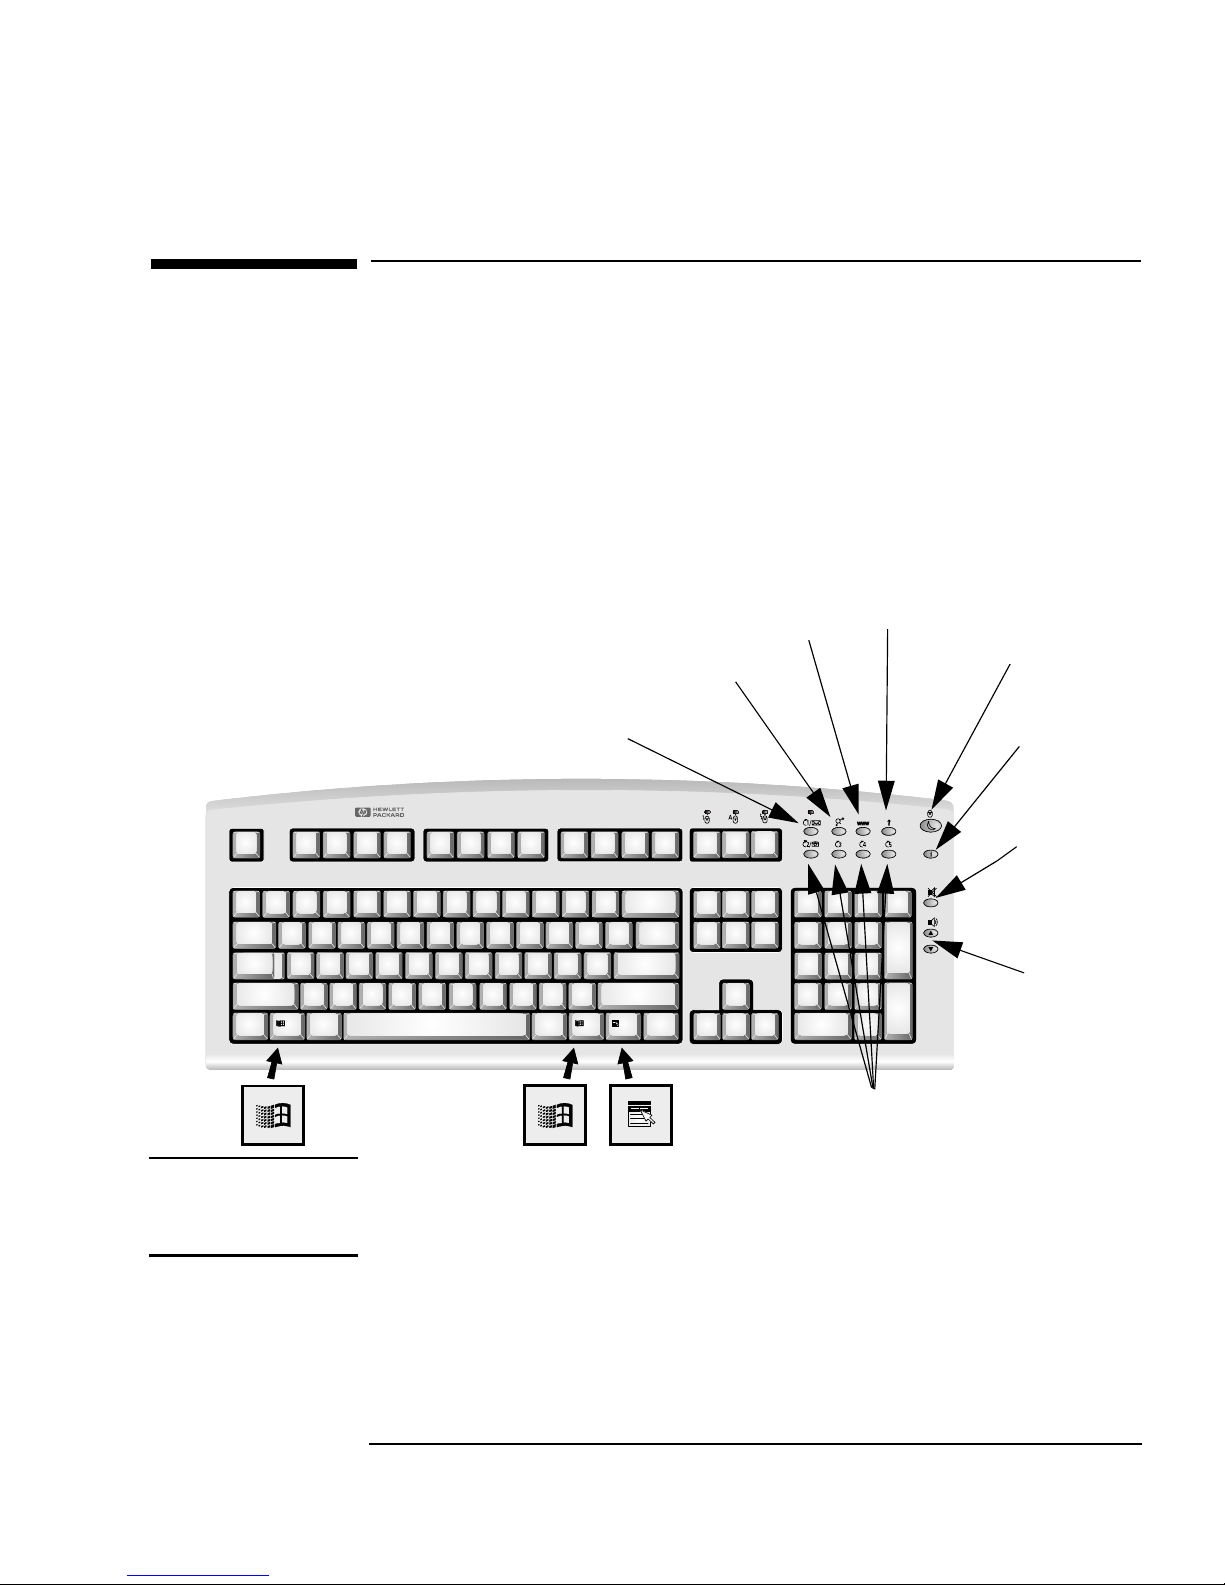
The HP enhanced keyboard has QuickLaunch keys you can use to:
Mute or adjust the volume of the audio system
•
Perform one-touch shortcuts to start applications, open files, or
•
access Web sites
Launch the Internet browser supplied with your system
•
Display and configure the actions assigned to keys
•
Lock or suspend your PC
•
Access HP TopTools and customer information.
•
Internet key
HP TopTools
Shortcut key
Menu key
Lock/Suspend key
HP Customer
Information
Mute key
Volume
control
keys
Shortcut keys
NOTE The HP enhanced keyboard requires the correct driver. This driver is
provided with all Windows NT 4.0 and Windows 95 preloaded systems.
The driver is only available for Windows NT 4.0 and Windows 95.
Menu Key
Press the “?“ Menu key to display the QuickLaunch keys of the HP
enhanced keyboard on your screen. Click any of the keys on the screen
to display the action assigned to that key, or to change the action
assigned to the key.
English 11
Page 20
1 Setting Up and Using Your PC
Using Your HP Enhanced Mouse
Using Your HP Enhanced Mouse
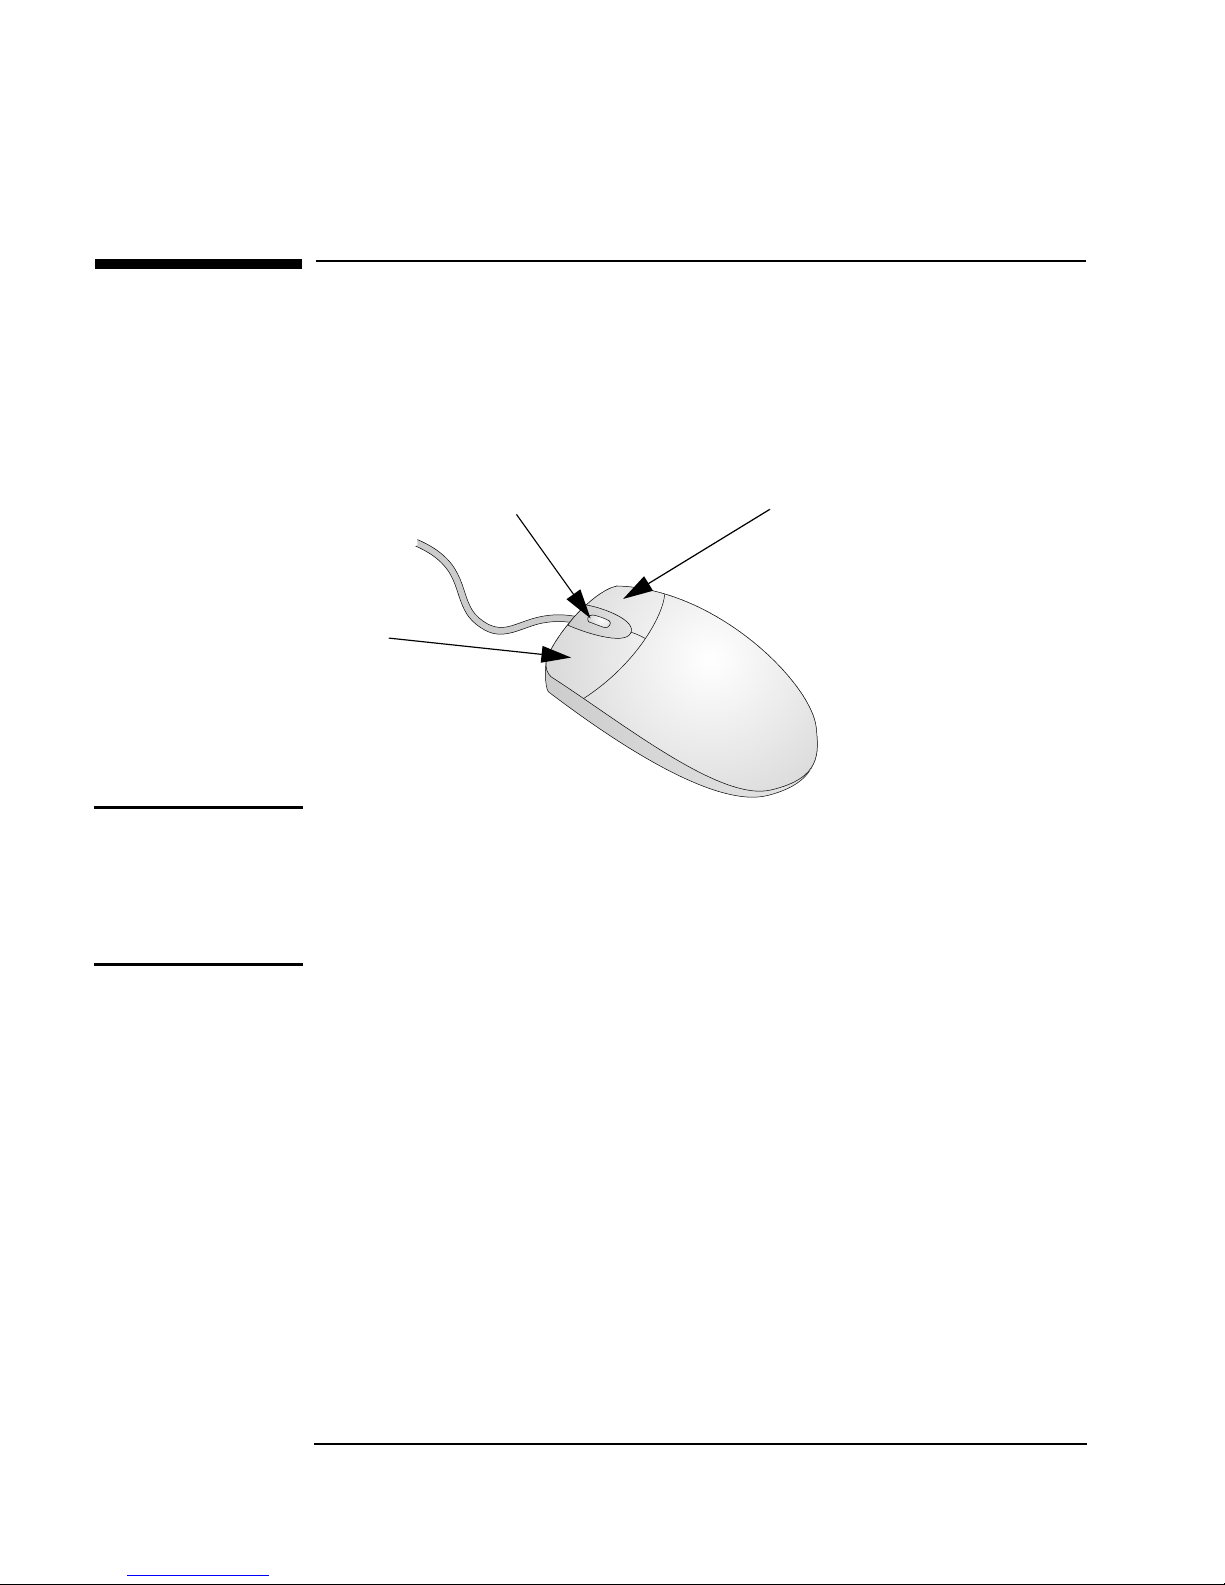
The HP enhanced mouse has two buttons and a combination
button/wheel for powerful, dynamic control of clicking, scrolling and
zooming in Windows 95 and Windows NT applications.
Click/Select Button
Third Button and
Scroll/Zoom Wheel
Context Menu/Alternate
Select Button
NOTE The scroll function works only in Windows NT and Windows 95
applications that support scrolling. The zoom function works only in
Microsoft Office 97 compatible applications that support zoom.
To use the scroll or zoom function, you must ensure that the mouse is
configured to use these functions.
Scrolling
In a Windows application, push the mouse wheel forwards to scroll
down and backwards to scroll up.
Zooming
In a Microsoft Office 97 compatible application, hold the
Ctrl
key down
and then push the mouse wheel forwards to zoom in (enlarge), and
backwards to zoom out (reduce).
Configuring the Mouse
Using the mouse setup, you can reassign each mouse button and the
combination button/wheel to a different function. Also, you can change
the scroll function so that it works in a different way.
To change the mouse setup or to see the available scroll options, click
the
Start
Mouse
button, select
Settings ➪ Control Panel
, and then finally click the
Buttons
tab.
, double-click
12 English
Page 21

1 Setting Up and Using Your PC
Starting and Stopping Your PC
Starting and Stopping Your PC
NOTE If you are not starting your PC for the first time, go directly to "Starting
Your PC", on page 15.
Starting the PC for the First Time
If your PC has preinstalled software, it is initialized the first time you
start the PC. The software initialization process takes a few minutes.
This process sets up the software in your language and sets up your
software to use the hardware installed in your computer (you can
change the settings after the software has been initialized).
Initializing Your Software
NOTE Do NOT switch OFF the PC while the software is being initialized—this
could cause unexpected results.
To initialize your software:
Turn on the display first, and then the PC.
1
When the PC is switched on, the Vectra Logo is displayed. The PC
performs a Power-On-Self-Test (POST). Press if you want to
view the POST details in the HP Summary Screen.
If an error is detected during the Power-On-Self-Test, the PC will
automatically display the error. You may be prompted to press
to start the Setup program to correct the error.
The software initialization routine starts. It displays the software
2
license agreement, and gives you an opportunity to read Working in
Comfort (ergonomic advice for computer users). The initialization
routine then asks questions about the PC. For example, it will ask the
name of the person who will use the PC and your company name. (If
necessary, the name of the user can be modified later.)
While the initialization program is running, you can complete the
3
reply card provided with your PC.
English 13
Page 22

1 Setting Up and Using Your PC
Starting and Stopping Your PC
4 After the initialization routine has finished, click on OK and the PC
will restart.
After Your PC Has Restarted
Set the keyboard to a comfortable position.
❒
Adjust the display screen’s brightness and contrast to suit your
❒
needs. If the picture does not fill the screen or is not centered, adjust
it using the controls on the display. Refer to the display’s manual for
details.
Changing the Operating System
If you change the operating system used by your PC, ensure that the
PnP Operating System
you are using the preinstalled operating system, this field should
already be correctly set.
field in the Setup program is correctly set. If
If you are using a Plug and Play operating system such as Windows 95,
set the
PnP Operating System
program to
Yes
field in the
.
menu of the Setup
Main
For non-Plug and Play operating systems, such as Windows NT 4.0, set
this field to No. To check if your operating system is Plug and Play, refer
to the operating system documentation. (To enter the PC’s Setup
program, press during start-up.)
14 English
Page 23

1 Setting Up and Using Your PC
Starting and Stopping Your PC
Starting Your PC
Before you start your PC, first switch on the display.
1
Start your PC in one of these ways:
2
Press the power button on the front panel.
•
Press the keyboard space bar.
•
The keyboard power-on feature will work only if it is enabled in
the Setup program (press during start-up to enter the Setup
program) and the system board switch 8 is CLOSED. (For more
information about the system switches, refer to the Upgrade and
Maintenance Guide. This guide can be downloaded from HP’s
web site, at
http://www.hp.com/go/vectrasupport/
When you switch on the computer, it carries out the Power-On-SelfTest (POST) while the Vectra logo is displayed. If you wish to view
the POST details, press to get the HP Summary Screen. If there
is an error in the POST, the error will automatically be displayed.
For more details, refer to the Upgrade and Maintenance Guide.
(This guide can be downloaded from HP’s web site at
http://www.hp.com/go/vectrasupport/
.)
.)
If you have set a password in the PC’s Setup program, the password
3
prompt displays after the POST has completed. If the Password
prompt is displayed, type your password and press to be
able to use the PC.
You have three attempts at entering the correct password. If all
three attempts are incorrect, you will have to restart the PC before
being able to try again.
English 15
Page 24

1 Setting Up and Using Your PC
Starting and Stopping Your PC
Stopping Your PC
To stop the PC, make sure that you have exited all programs and the
operating system (if necessary), and then press the power button on
the control panel.
Stopping Your PC in
Windows NT 4.0 or
Windows 95
With some operating systems, such as Windows 95 or Windows NT 4.0,
the PC will automatically switch off when you shut down the operating
system.
Refer to the operating system manual for details on how to shut down
or exit the operating system.
16 English
Page 25

1 Setting Up and Using Your PC
Using Power Management
Using Power Management
Power management enables you to reduce the PC’s overall power
consumption by slowing down the PC’s activity when it is idle.
HP Setup Program
Operating System
Power Management
Software Passwords:
NT Lock and HP Lock
You can configure power management in the HP Setup program. Refer
to “Power Menu Items" in the HP Setup program. (To enter the PC’s
Setup program, press during start-up.)
Operating systems such as Windows NT 4.0 and Windows 95 differ in
their power management capabilities. Refer to your operating system
documentation for more information.
Using Security Features
Your PC’s security features enable you to protect your PC from
unauthorized use by using passwords.
NT Lock, the HP utility preloaded with Windows NT 4.0, and HP Lock,
the HP utility preloaded with Windows 95, allow you to set and use
passwords. For more information, consult the online help by clicking the
Start
Help
button and then clicking
.
Programs ➪ HP Lock ➪ Online
BIOS Passwords:
HP Setup Program
Operating System
Passwords
You can also configure the security features in the HP Setup program.
Refer to “Security" in the HP Setup program. (To enter the PC’s Setup
program, press during start-up.)
Operating systems such as Windows NT and Windows 95 have a
password facility. Refer to your operating system documentation for
more information.
English 17
Page 26

1 Setting Up and Using Your PC
Additional Information and Help
Additional Information and Help
On Your PC’s Hard Disk Drive
Additional information about your PC is preloaded on your PC’s hard
disk drive. This information includes:
Getting Information —where to get information about your PC,
•
including links to useful HP web site pages.
For Windows NT 4.0 and Windows 95 users, you can access this
page by clicking the
HP Info ➪ HP Vectra VL
Working in Comfort—guidance on ergonomic issues.
•
Start
button and then clicking
.
Programs
➪
For Windows NT 4.0 and Windows 95 users, you can access this
information by clicking the
Programs
Using Sound—describes how to get the most out of your sound
•
➪
HP Info ➪ Working Comfortably
Start
button and then clicking
.
system (some models only).
For Windows NT 4.0 and Windows 95 users, you can access this
information by clicking the
Programs
➪
HP Info ➪ Using Sound On Your PC
Start
button and then clicking
.
On the HP Web Site
The HP web site contains a wide range of information, including
downloadable documentation and service and support options.
The Downloadable Documentation Kit (MIS Kit)
HP’s web site allows you to download documentation for your PC. This
documentation is contained in a kit called the MIS kit. This kit contains
technical documents intended for MIS (Management Information
Services) management.
The documents provided are in Adobe Acrobat (PDF) format.
18 English
Page 27

1 Setting Up and Using Your PC
Additional Information and Help
The MIS Kit for your PC is available free of charge on the HP web site
(
http://www.hp.com/go/vectrasupport/
).
The MIS kit for your PC includes:
Using Sound—describes how to get the most out of your sound
•
system, including configuration and troubleshooting information
(also available on the hard disk drive of multimedia models).
Upgrade and Maintenance Guide —describes in detail how to
•
install accessories. It also has detailed troubleshooting information.
This manual is described in detail in the next section.
Familiarization Guide—PC training information for support and
•
maintenance personnel.
Network Administrator’s Guide—network driver installation
•
information for network administrators.
Service Handbook Chapters—information on upgrade and
•
replacement parts, including HP part numbers.
The Upgrade and Maintenance Guide
The Upgrade and Maintenance Guide is a downloadable document
in Acrobat (PDF) format. It contains detailed information about:
Installing accessories, including:
•
Installing a hard disk drive in an internal shelf
•
Installing a Zip drive, CD-ROM drive, or tape drive
•
Installing an accessory board
•
Installing a security cable
•
Replacing the system board battery
•
Installing an external battery.
•
Troubleshooting your PC.
•
Technical information about your PC, including:
•
System board switches
•
IRQs, DMAs, and I/O addresses used by your PC.
•
English 19
Page 28

1 Setting Up and Using Your PC
Additional Information and Help
The installation and troubleshooting information in the Upgrade and
Maintenance Guide is more detailed than the information provided in
this manual. HP recommends you download and print the Upgrade
and Maintenance Guide before installing any accessories in your PC.
NOTE To view and print the Upgrade and Maintenance Guide you must
have Adobe’s Acrobat Reader on your PC. The Acrobat Reader comes
preloaded on all Windows 95 and Windows NT 4.0 systems. You can also
download the Acrobat Reader free of charge from Adobe’s web site.
Downloading The Upgrade and Maintenance Guide
To download the guide, connect to the HP Vectra Support site at
www.hp.com/go/vectrasupport
.
20 English
Page 29

2
How to Install Accessories In Your PC
This chapter provides summary information about installing
accessories in your PC. For more detailed information, refer to the
Upgrade and Maintenance Guide, available on HP’s web site at
http://www.hp.com/go/vectrasupport/
.
Page 30
2 How to Install Accessories In Your PC
Accessories You Can Install
Accessories You Can Install
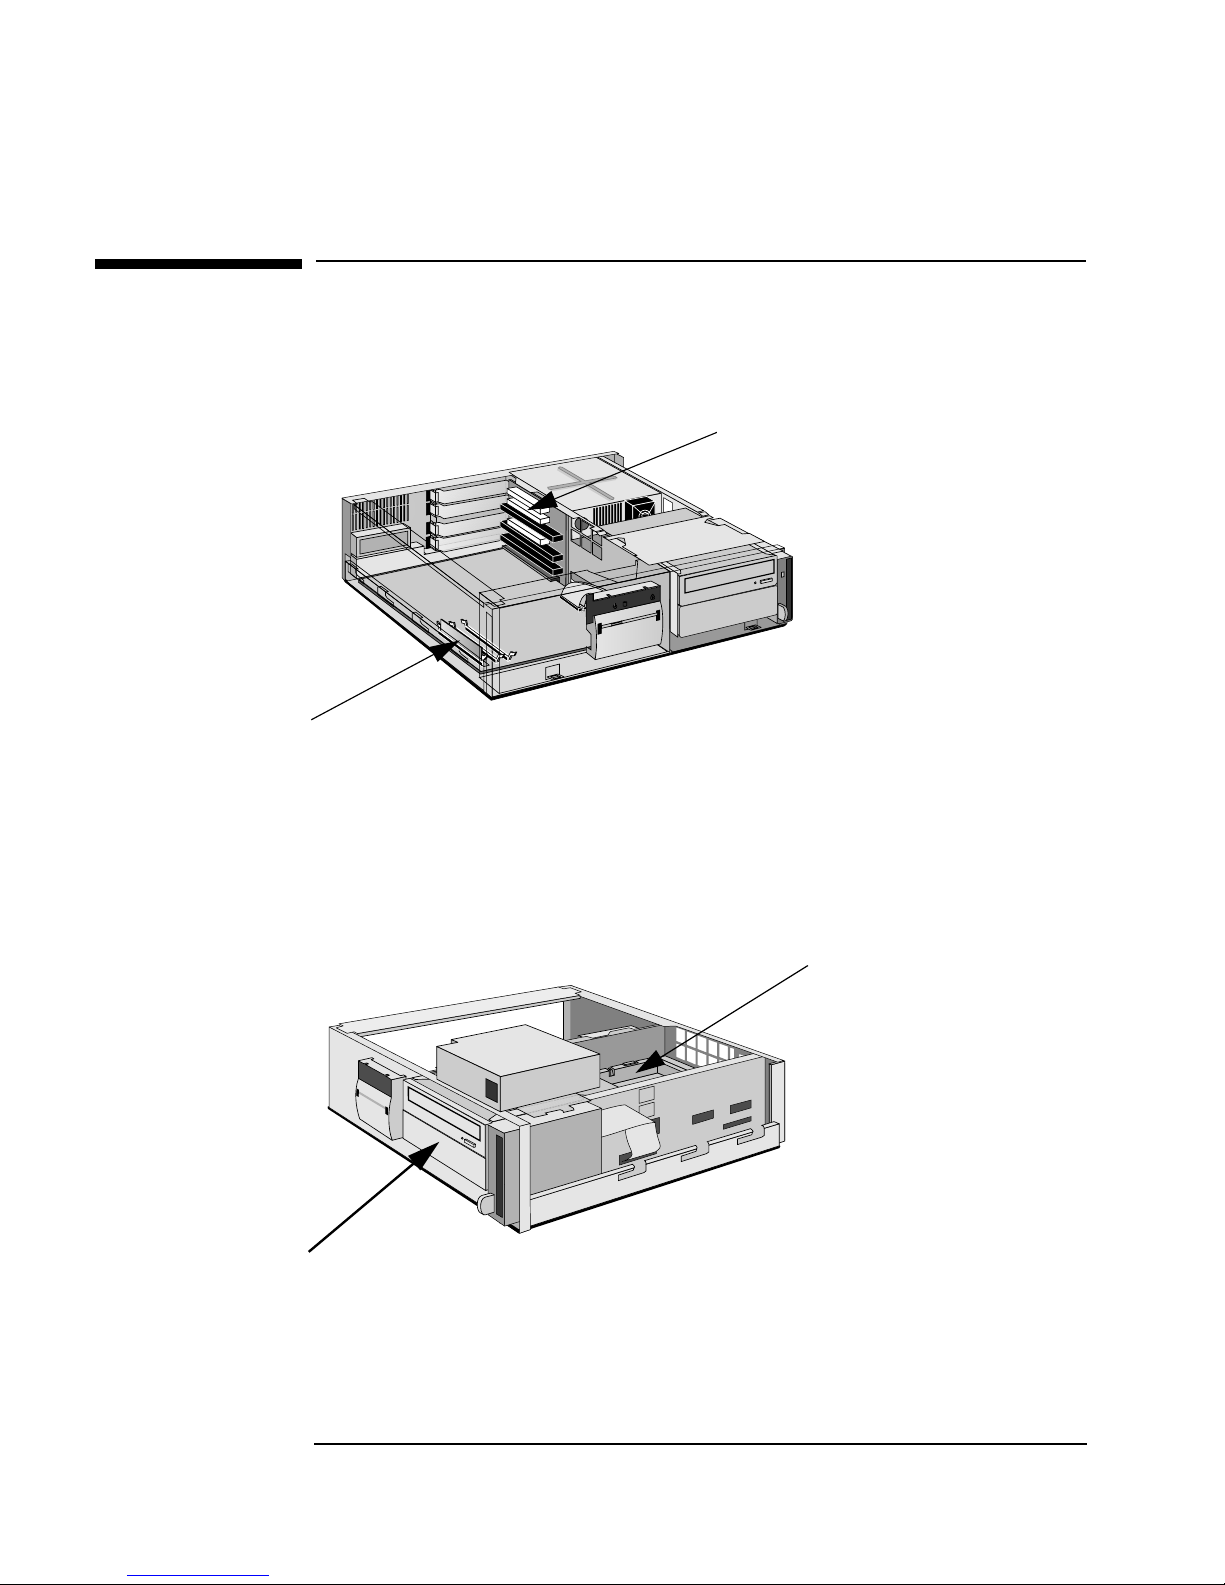
Up to Four Accessory Boards
(Some slots may come with
pre-installed boards)
Main Memory Modules:
(100 MHz SDRAM only)
32 MB kit SDRAM
64 MB kit SDRAM
128 MB kit SDRAM
256 MB kit SDRAM
One or Two Free Front-Access Device Shelves
Zip Drive
Tape Drive
CD-ROM Drive (already installed on some models)
This space can be used:
•
For a Supplementary Hard Disk
Drive, or
•
For a PCI Accessory Board
22 English
Page 31
2 How to Install Accessories In Your PC
Removing and Replacing the Cover
Removing and Replacing the Cover
WARNING
For your safety, never remove the PC’s cover without first removing
the power cord from the power outlet, and any connection to a
telecommunication network. Always replace the cover before
switching the PC on again.
Removing the Cover
Switch off the display and the PC.
1
Disconnect the power cords from the power outlets, the PC, and the
2
display. Disconnect any connection to a telecommunication
network.
Press the central latch down to unlock the front panel.
3
Remove the front panel by pressing the two tabs down, pivoting the
4
front panel downward, and lifting it off.
If necessary, unlock the cover using the key provided with the PC.
5
Placing your hands on the sides of the cover, push the cover forward
6
by about 2 cm (about 1 inch) and lift it off.
English 23
Page 32
2 How to Install Accessories In Your PC
Removing and Replacing the Cover
Replacing the Cover after Installing Accessories
Check that you have installed all your accessories.
1
Make sure that all internal cables are properly connected and safely
2
routed so they will not be entangled when you replace the cover.
Ensure that the cover lock is unlocked.
3
Lower the cover onto the computer (aligning the front of the cover
4
with the inner front edge of the computer frame), and firmly slide it
forwards into position.
If required, lock the cover using the key.
5
Replace the front panel by first inserting the two lower hinges then
6
pivoting it upwards into place. The two tabs will click into place.
Close the central latch on top of the front panel.
7
Reconnect all cables and power cords.
8
24 English
Page 33
2 How to Install Accessories In Your PC
Moving and Replacing the Power Supply
Moving and Replacing the Power Supply
You must move the power supply to access the rear drive shelves and
the additional accessory board slot. Removing the power supply also
improves access to the drive connectors and cables.
Moving the Power Supply
Disconnect the computer’s power supply cord and any connection to
1
a telecommunication network. Remove the computer’s cover.
Lift the front of the power supply to free the two side catches, then
2
slide it horizontally out. Lift the power supply clear and place it
upside down on the front drive unit.
English 25
Page 34
2 How to Install Accessories In Your PC
Moving and Replacing the Power Supply
Replacing the Power Supply
Before replacing the power supply, ensure that all new drives have
1
been correctly installed and that all data and power cords are
properly connected and correctly routed.
Lift the front of the power supply (the fan end) and slide it into the
2
rear of the PC. Ensure that the hinge on the back of the power supply
engages the notch on the chassis. Then lower the front of the power
supply so that the catch on either side slides into place.
Always replace the PC’s cover before connecting the power cord.
3
26 English
Page 35
2 How to Install Accessories In Your PC
Installing Memory
CAUTION Static electricity can damage electronic components.
Turn all equipment OFF. Don’t let your clothes touch the accessory.
To equalize the static electricity, rest the accessory bag on top of the PC
while you are removing the accessory from the bag. Handle the
accessory as little as possible and with care.
Installing Main Memory
Your PC is supplied with main memory. If you need more main memory
to run your application software, you can install up to a total of
768 MB (three 256 MB modules).
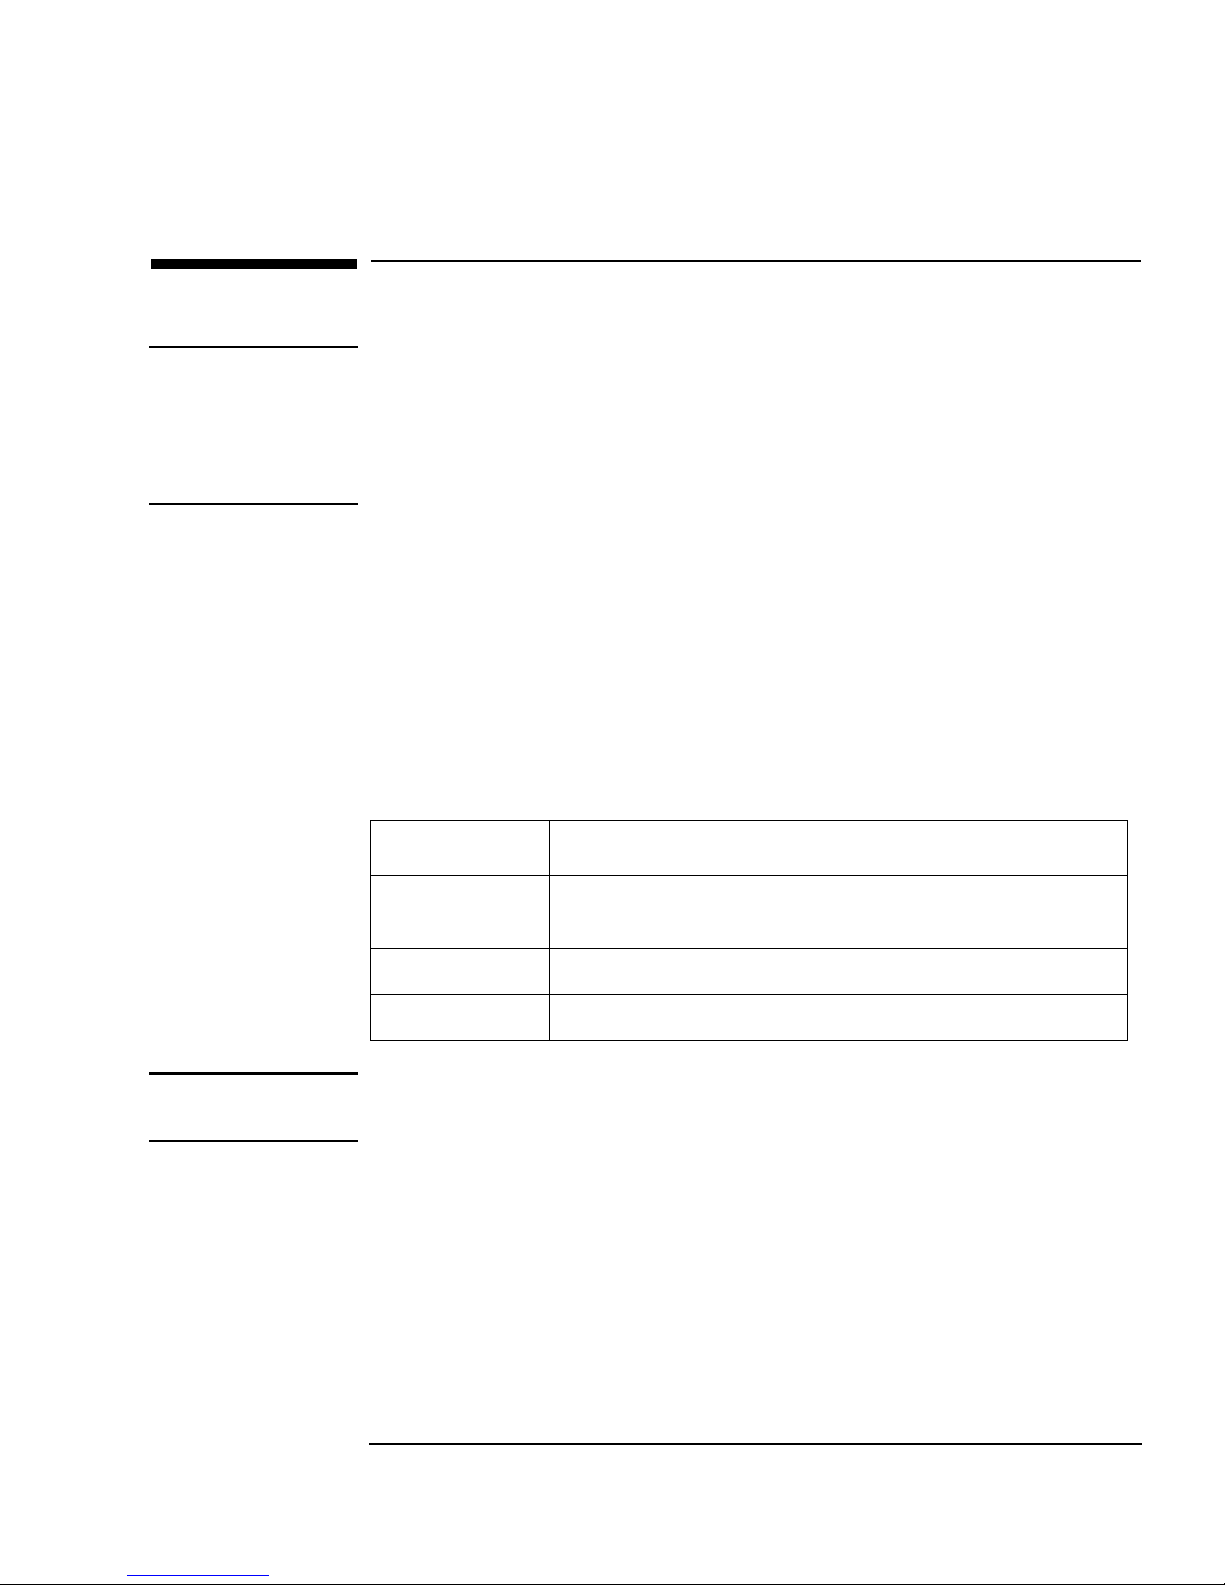
Main memory is available in modules of 32 MB, 64 MB, 128 MB, or
256 MB. There are three memory “banks”. Each bank can
accommodate a memory module.
Installing Memory
Bank Memory Modules You can Install
Outside
(closest to edge)
Middle Any 32 MB, 64 MB, 128 MB, or 256 MB 100 MHz SDRAM module
Inside Any 32 MB, 64 MB, 128 MB, or 256 MB 100 MHz SDRAM module
Any 32 MB, 64 MB, 128 MB, or 256 MB 100 MHz SDRAM module
Usually comes preloaded with a 32 MB or a 64 MB module
NOTE Memory must be installed first in the outside bank, then in the middle
bank, and lastly in the inside bank.
English 27
Page 36
2 How to Install Accessories In Your PC
Installing Memory
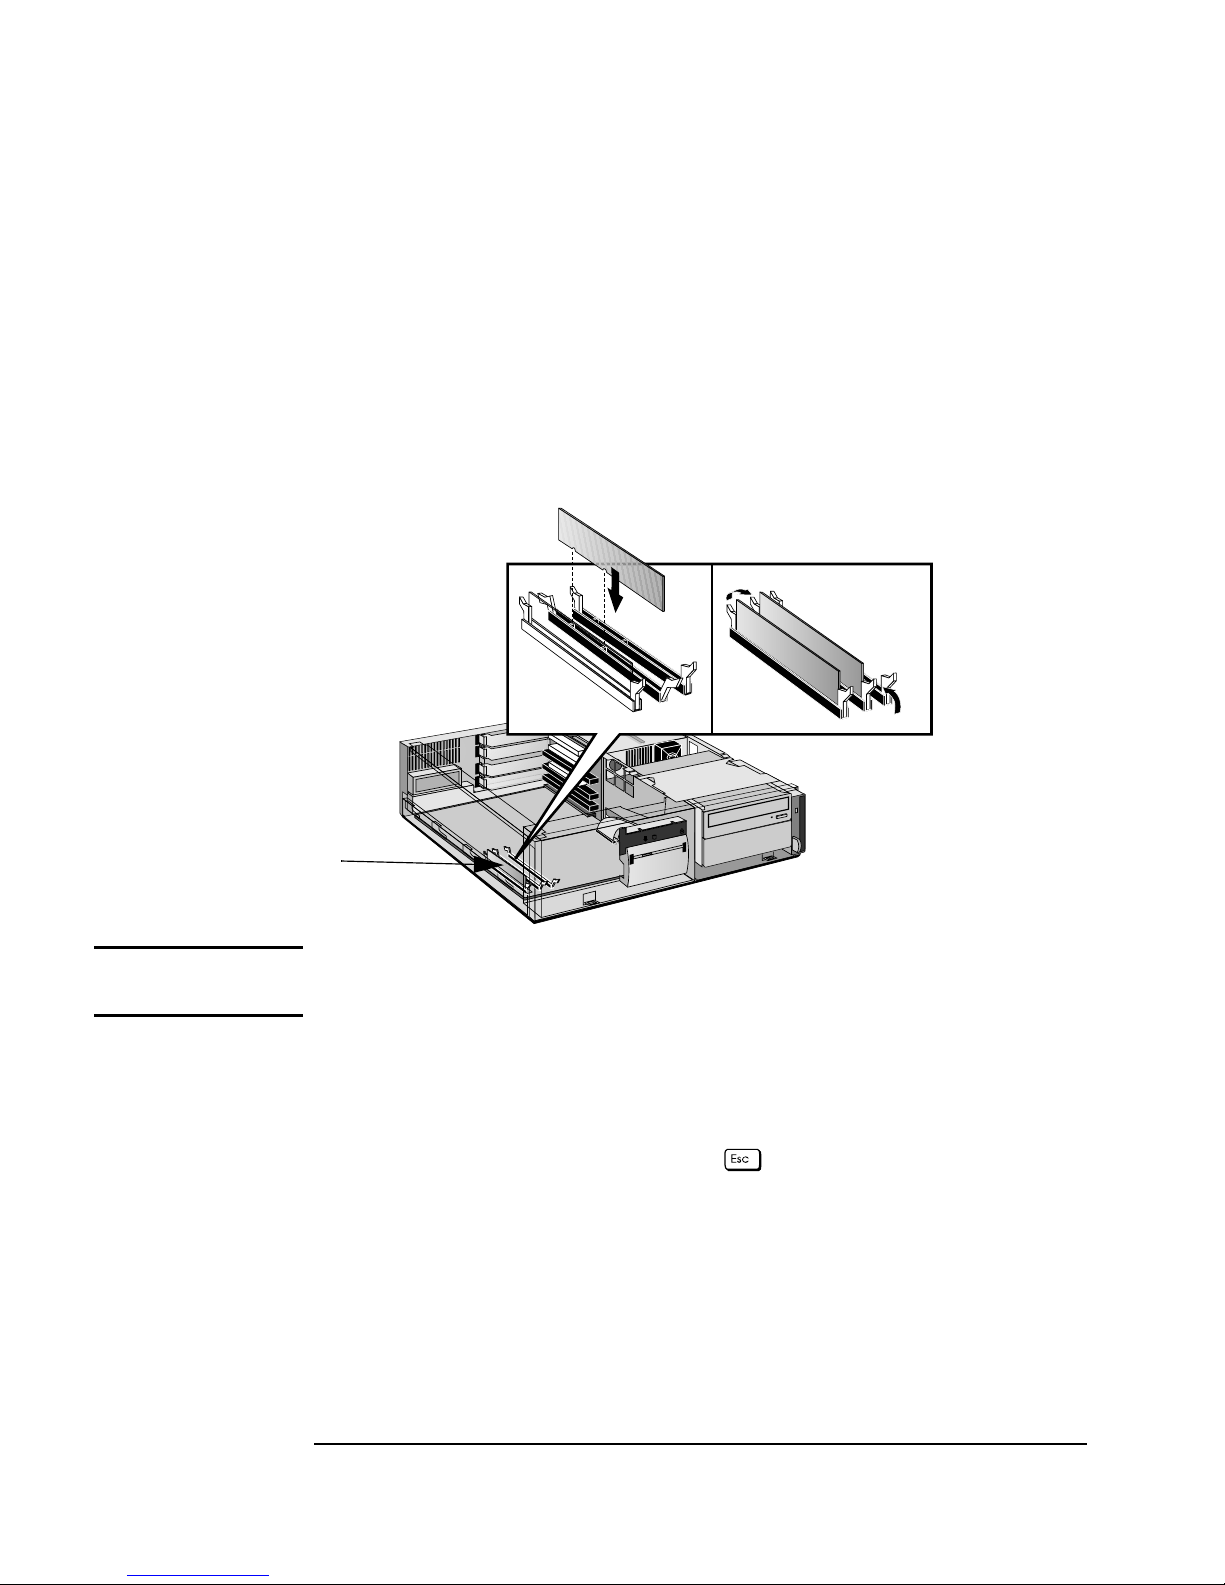
To install a main memory module:
1 Disconnect the computer’s power supply cord and any connection to
a telecommunication network.
2 Remove the computer’s cover.
3 Align the memory module’s connector with the slot’s socket. Slide
the memory module into the slot at 90° to the system board.
Outside Bank
NOTE If you need to remove a main memory module, release the retaining
clips and pull the module forward and out of the socket.
4 Install any other accessories before replacing the cover. Reconnect
all cables and power cords.
5 Check the HP Summary Screen to verify the new configuration (To
see the HP Summary screen, press when the Vectra logo appears
during start-up.)
28 English
Page 37
2 How to Install Accessories In Your PC
Installing Mass Storage Devices
Installing Mass Storage Devices
This section describes the data connectors that you can use when you
install an extra IDE mass storage device. For detailed installation
instructions, refer to the Upgrade and Maintenance Guide, available
on HP’s web site at
http://www.hp.com/go/vectrasupport/
You can install extra IDE mass storage devices such as a supplementary
hard disk drive, a Zip drive, a CD-ROM drive, and a tape drive. Up to
two hard disk drives can be installed in your PC.
NOTE You can install a non-IDE hard disk drive or CD-ROM device, but it will
need an accessory board, cable and driver software (usually supplied
with the device). Contact the product vendor for further information.
.
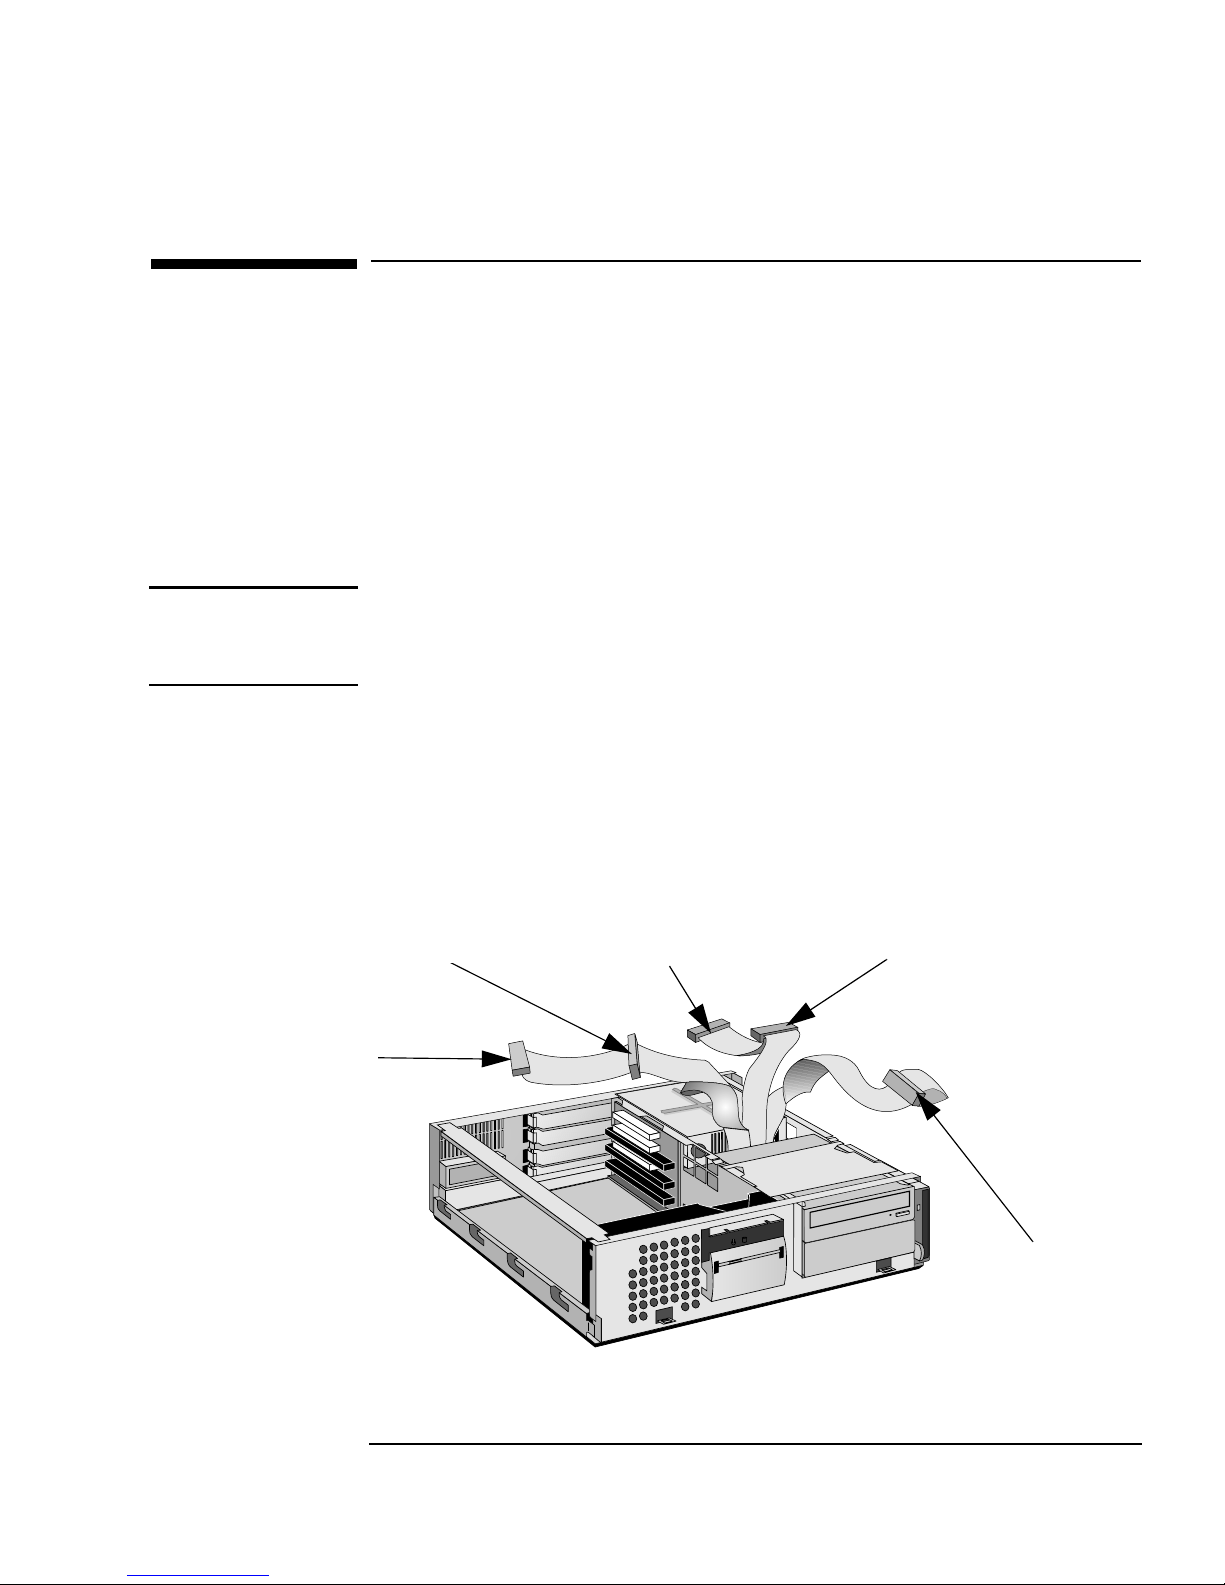
Ultra ATA IDE HDD cable
Slave (middle) connector
Ultra ATA IDE HDD cable
Master (end) connector
Connecting Devices
If you add a Zip drive, hard disk drive, CD-ROM drive, or tape drive,
you need to connect it to power and data cables. The data cables
available in your PC are shown below:
IDE CD-ROM cable
Master (end) connector
IDE CD-ROM cable
Slave (middle) connector
Floppy drive data
cable (non-IDE)
English 29
Page 38

2 How to Install Accessories In Your PC
Installing Mass Storage Devices
Which Data Connectors
to Use
There are three data cables inside your PC. Two of these are for IDE
devices.
An Enhanced Ultra ATA IDE (Integrated Drive Electronics) hard
•
disk drive cable. This supports up to two IDE hard disk drives, one of
which is already connected. This cable is labeled “HDD”.
For optimum performance, use this cable to connect IDE hard disk
drives that are Ultra ATA compatible.
A second Enhanced IDE drive cable that supports up to two IDE
•
devices. If you install a CD-ROM drive or a Zip drive, connect it to
this cable. This cable is labeled “CD-ROM”.
The third cable is non-IDE and has one connector for a floppy drive.
•
Up to four IDE devices can be connected to the system board using the
IDE data cables. (Refer to the storage device’s manual to check
whether you need to set jumpers, or if there are any special installation
procedures.)
30 English
Page 39
2 How to Install Accessories In Your PC
Installing Mass Storage Devices
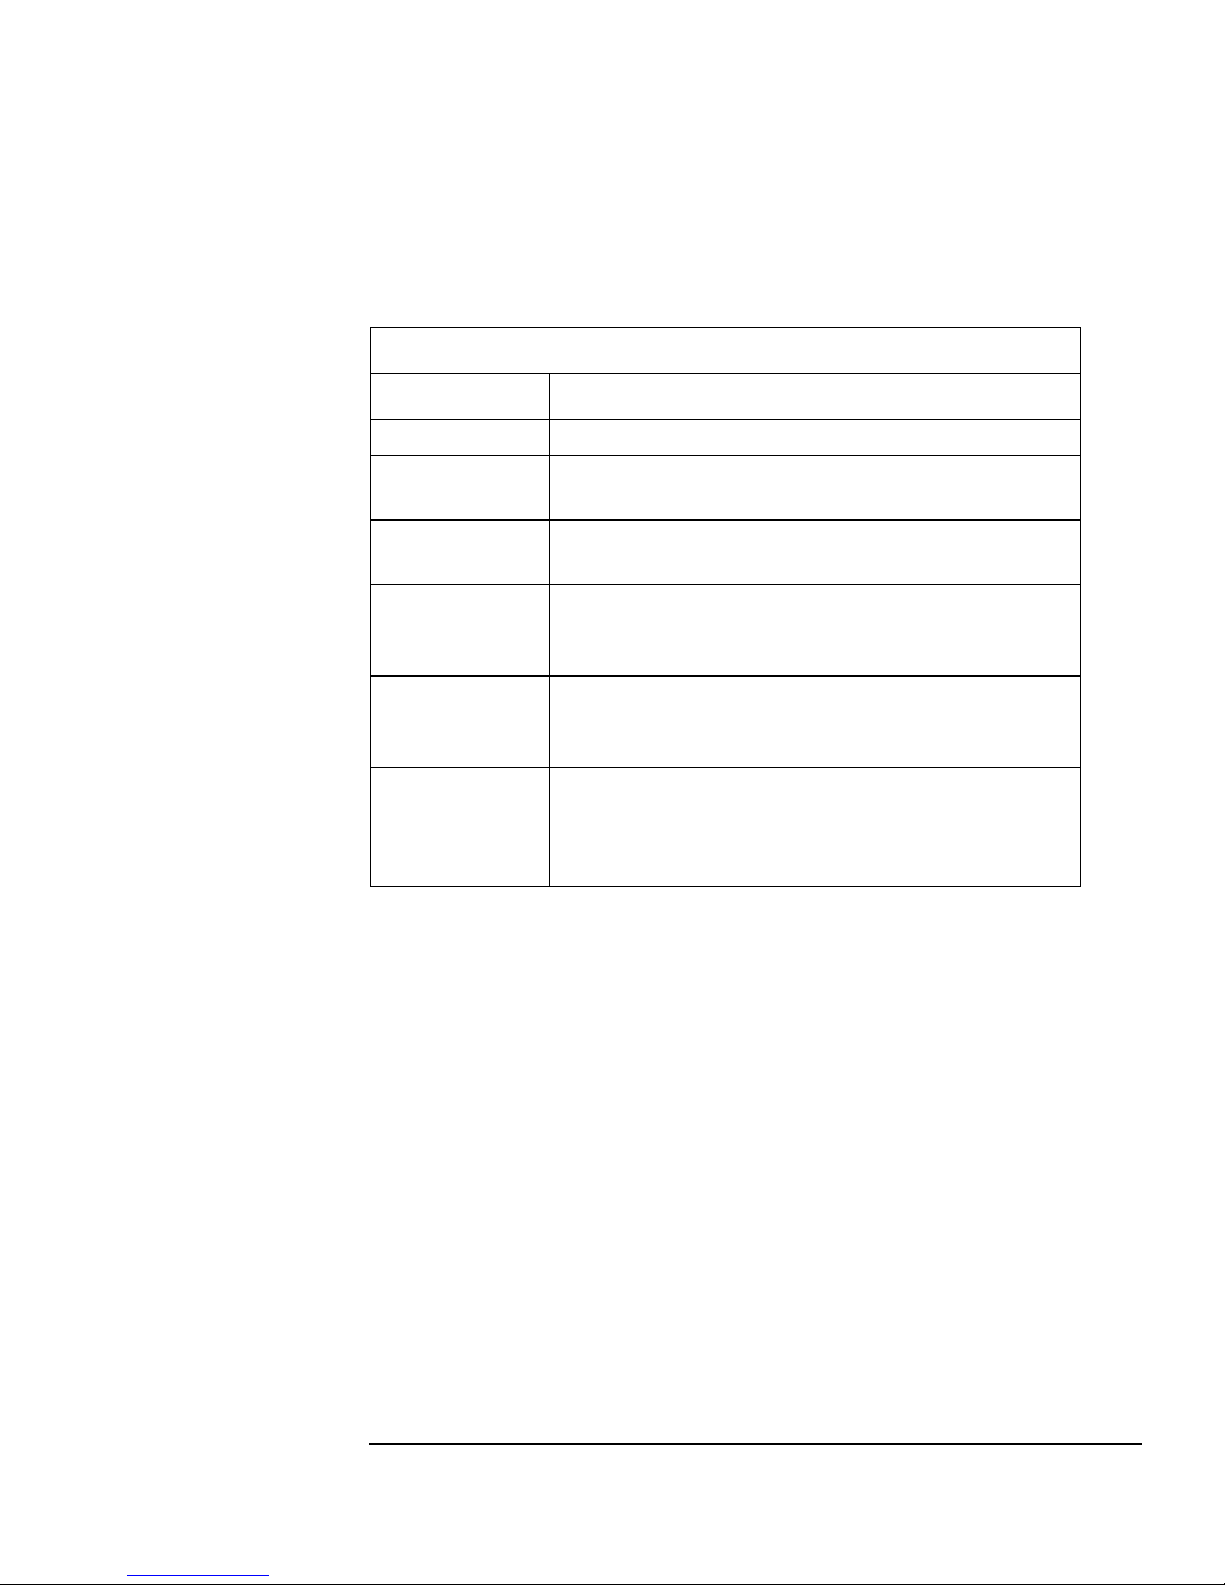
The following table explains which IDE data connectors you should use
when you install additional devices.
Examples of multiple IDE drive combinations
Configuration Connections to data cables
1 Hard disk drive 1. Bootable hard disk drive: Master connector, HDD Cable
2 Hard disk drives 1. Bootable hard disk drive:
2. Second hard disk drive:
1 Hard disk drive
1 CD-ROM drive
2 Hard disk drives
1 CD-ROM drive
1. Bootable hard disk drive:
2. CD-ROM drive:
1. Bootable hard disk drive:
2. Second hard disk drive:
3. CD-ROM drive:
1 Hard disk drive
1 CD-ROM drive
1 Zip drive
2 Hard disk drives
1 CD-ROM drive
1 Zip drive
1. Bootable hard disk drive:
2. CD-ROM drive:
3. Zip drive:
1. Bootable hard disk drive:
2. Second hard disk drive:
3. CD-ROM drive:
4. Zip drive:
Master connector, HDD Cable
Slave connector, HDD Cable
Master connector, HDD Cable
Master connector, CD-ROM Cable
Master connector, HDD Cable
Slave connector, HDD Cable
Master Connector, CD-ROM Cable
Master connector, HDD Cable
Master connector, CD-ROM Cable
Slave connector, CD-ROM Cable
Master connector, HDD Cable
Slave connector, HDD Cable
Master connector, CD-ROM Cable
Slave connector, CD-ROM Cable
English 31
Page 40

2 How to Install Accessories In Your PC
Installing Accessory Boards
Installing Accessory Boards
CAUTION Static electricity can damage electronic components. Turn all
equipment off. Don’t let your clothes touch the accessory. To equalize
the static electricity, rest the accessory bag on top of the computer
while you are removing the accessory from the bag. Handle the
accessory as little as possible and with care.
The PC has four main accessory board slots and one supplementary
slot. These five slots are marked “1” to “5” on the rear of the PC cover.
Slot 1 (the top slot) can be used for a full-length 32-bit PCI board.
•
Slot 2 can be used for either a full-length 32-bit PCI or a full-length
•
16-bit ISA board.
Slot 3 can be used either for a full-length 32-bit PCI or a full-length
•
16-bit ISA board.
Slot 4 (the bottom slot) can be used for a half-length 16-bit ISA
•
board.
Slot 5 is a supplementary slot. It is under the power supply and can
•
be used for half-length 32-bit PCI boards. Alternatively, this space
can be used for a hard disk drive.
PCI Slot Numbers Used in the PC’s Setup Program
Your PC uses logical slot numbers in the Setup program. You only need
to know these PCI slot numbers if you want to change the PCI slot
configuration in the Setup program. (To enter the PC’s Setup program,
press during start-up.)
PCI Slot #1 is the top PCI slot. This corresponds to physical Slot “1”
•
marked on the PC’s rear cover.
PCI Slot #2 is the second PCI slot from the top. It corresponds to
•
physical Slot “2” marked on the PC’s rear cover.
PCI Slot #3 is the bottom PCI slot. It corresponds to physical Slot “3”
•
marked on the PC’s rear cover.
PCI Slot #4 is the supplementary PCI slot under the power supply. It
•
corresponds to physical Slot “5” marked on the PC’s rear cover.
32 English
Page 41

2 How to Install Accessories In Your PC
Installing Accessory Boards
Installing the Board
For instructions on installing an accessory board, refer to the Upgrade
and Maintenance Guide, available on HP’s web site at
http://www.hp.com/go/vectrasupport/
.
Configuring Accessory Boards with Plug and Play
Plug and Play is an industry standard for automatically configuring
your PC's hardware resources and the accessory boards installed in it.
Your PC has configurable support for Plug and Play in the BIOS.
All PCI accessory boards are Plug and Play, although not all ISA boards
are. Check the accessory board’s documentation if you are unsure.
When you start your PC after installing an accessory board, the Plug
and Play BIOS automatically detects which hardware resources (IRQs,
DMAs, memory ranges, and I/O addresses) are used by PC components
(such as the keyboard, the communications ports, network adapters,
and accessory boards).
Windows 95
Windows NT 4.0
NOTE FOR
WINDOWS NT 4.0
Operating systems that support Plug and Play, such as Windows 95, will
automatically detect a newly installed Plug and Play accessory board
and install the driver for this device, if the driver is available.
For operating systems that do not support Plug and Play, such as
Windows NT 4.0, refer to the operating system documentation for
information about installing accessory boards.
In Windows NT 4.0, click the
Start
button then click
Help
. You can
use the contents or index to find information about installing devices.
Windows NT 4.0 helps you through the installation of devices such as
modems and sound boards.
After installing a new device in Windows NT 4.0, you must reinstall the Microsoft Service Pack to update the operating
system for your PC.
To do this, click the
Windows NT Update
Start
.
button then look in
Programs ➪
English 33
Page 42

2 How to Install Accessories In Your PC
Installing Accessory Boards
Configuring non-Plug and Play ISA Accessory Boards
If you install an ISA accessory board that is not Plug and Play, you will
need to configure the board before your PC can use it. For instructions
about configuring the board, refer to the documentation that came
with the board.
For guidelines on available IRQs and I/O addresses in your PC, refer to
the Upgrade and Maintenance Guide, available on HP’s web site at
http://www.hp.com/go/vectrasupport/
such as Windows 95, can display the IRQs and I/O addresses currently
used by your PC. Refer to the operating system documentation for
more information.
Refer to the documentation supplied with the operating system for
details on your operating system’s capabilities and restrictions
concerning non-Plug and Play accessory boards.
. Some operating systems,
Resetting the PC’s
Configuration Data
If your PC is having difficulties recognizing the ISA board, try resetting
the PC’s data configuration. This will clear any old configuration data
that is no longer used. To do this, enter the PC’s Setup program, set the
Reset Configuration Data
parameter to
, and restart the PC.
Yes
34 English
Page 43

3
Troubleshooting Your PC
This chapter provides summary information that can help you solve
problems you may encounter when using your PC. For more detailed
information, refer to the Upgrade and Maintenance Guide, available
on HP’s web site at
http://www.hp.com/go/vectrasupport/
.
Page 44

3 Troubleshooting Your PC
HP DiagTools Hardware Diagnostics Utility
HP DiagTools Hardware Diagnostics Utility
DiagTools, the Vectra Hardware Diagnostics utility, helps you diagnose
hardware-related problems on HP Vectra PCs and PC Workstations.
It is a series of tools designed to help you to:
Check the configuration of your system and verify that it is
•
functioning correctly.
Diagnose hardware-related problems.
•
Provide precise information to HP-dedicated Support Agents so that
•
they can solve any problems quickly and effectively.
Vectra PC users must first install the latest version of this utility and
then ensure it is ready for use.
Where to Get the
DiagTools Utility
For more information about how and where to install this utility, refer
to the Vectra Hardware Diagnostics User's Guide, available on the
HP web site in PDF (Adobe Acrobat) format.
It is important that you use the latest version of this utility to diagnose
hardware-related problems. If you do not, HP-dedicated Support
Agents may request that you do so before offering support.
The latest version of this utility can be obtained from HP Electronic
Information Services, available 24 hours per day, 7 days per week.
To access these services connect to the HP World Wide Web Site at
http://www.hp.com./go/vectrasupport/
.
36 English
Page 45

3 Troubleshooting Your PC
HP DiagTools Hardware Diagnostics Utility
Starting the
Diagnostics Utility
Basic System Tests
Advanced System
Tests
To start DiagTools:
1 Insert the DiagTools diskette into the floppy drive.
2 Quit all applications, shut down the operating system and restart
your PC. On restarting, this utility will run automatically, displaying
the Welcome screen.
3 Press F2 to continue and follow the instructions on-screen to carry
out the diagnostic tests.
This utility will automatically detect the complete hardware
configuration of your system before any tests can be performed.
To verify the correct operation of your system's hardware, you will need
to carry out the Basic System Tests.
To perform more in-depth testing of your system’s individual
components, you can use the Advanced System Tests.
NOTE The advanced system tests are suitable for intermediate and advanced
users only.
Support Ticket
To produce a complete record of your system’s configuration and test
results, you will need to create a Support Ticket. This can then be sent,
via email or fax, to your local or HP-dedicated Support Agent.
For more information on how to use this utility, refer to the Vectra
Hardware Diagnostics User's Guide, available on the HP World Wide
Web Site, at
http://www.hp.com./go/vectrasupport/
.
English 37
Page 46

3 Troubleshooting Your PC
If Your PC Does Not Start Properly
If Your PC Does Not Start Properly
If your display is blank and there are no error messages when you turn
on your PC, follow this procedure:
Check that the computer and display are turned on. (The power light
1
should be illuminated.)
Check the display’s contrast and brightness settings.
2
Make sure that all cables and power cords are firmly plugged in.
3
Make sure the power outlet is working.
4
If the problem continues, contact the people in your organization who
support and maintain the PCs on your network.
38 English
Page 47

3 Troubleshooting Your PC
If Your PC Has a Hardware Problem
If Your PC Has a Hardware Problem
This section describes what to do if you have problems with your
display, keyboard, or mouse.
WARNING
Be sure to disconnect the power cord and any telecommunication
cables from your computer before you remove the cover to check the
cable connections or jumper settings.
To avoid electric shock and harm to your eyes by laser light, do not
open the CD-ROM drive enclosure. The CD-ROM drive should be
serviced by service personnel only. Refer to the label on the CD-ROM
for power requirements and wavelength. This PC is a class 1 laser
product. Do not attempt to make any adjustment of the laser unit.
Display Does Not Work Properly
If Nothing is Displayed on the Screen
If nothing is displayed on the screen, but the PC starts and the
keyboard and other peripheral devices seem to operate properly:
Ensure that you have entered the correct password, if one is
1
required to use this PC.
Check that the display’s brightness and contrast controls are
2
properly set.
Ensure that the display video cable is correctly connected.
3
Make sure that the display is plugged in and switched ON.
4
Switch off the display, and unplug it from the power outlet.
5
Disconnect the video cable and examine the video cable connector
pins. If the pins are bent, carefully straighten them.
Other Display Problems
If the display image is not aligned with the screen, use the display’s
controls to center the image (refer to the display manual for
instructions). Check your display manual to find out which refresh rate
is required. Use your operating system’s display control panel to select
the correct refresh rate.
English 39
Page 48
3 Troubleshooting Your PC
If Your PC Has a Hardware Problem
If Your Keyboard Does Not Work
Ensure that the keyboard is correctly connected to the keyboard
1
connector (and not the mouse connector) of the PC.
Ensure that no keys are stuck on the keyboard. If a key is stuck,
2
release it by gently manipulating it with your finger.
If you turn on your PC, the operating system boots, and the keyboard
3
is correctly connected but does not work, the power-on password
may be set to “keyboard locked”. You will need to enter a password
to unlock the keyboard (and mouse).
Ensure that no liquids have been spilled on the keyboard. If this is
4
the case, get your keyboard repaired or replace it.
If you are using the QuickLaunch keys of HP’s enhanced keyboard,
5
ensure that you are using the correct driver. This driver is provided
with all Windows NT 4.0 and Windows 95 preloaded systems and is
only available for Windows NT 4.0 and Windows 95.
If Your Mouse Does Not Work
Ensure that the mouse is correctly connected to the the mouse
1
connector (and not the keyboard connector) of the PC.
Ensure that the mouse driver supplied with the preloaded software
2
is correctly installed. If you are using HP’s enhanced mouse, ensure
that you are using the correct driver. This driver is provided with all
Windows NT 4.0 and Windows 95 preloaded systems.
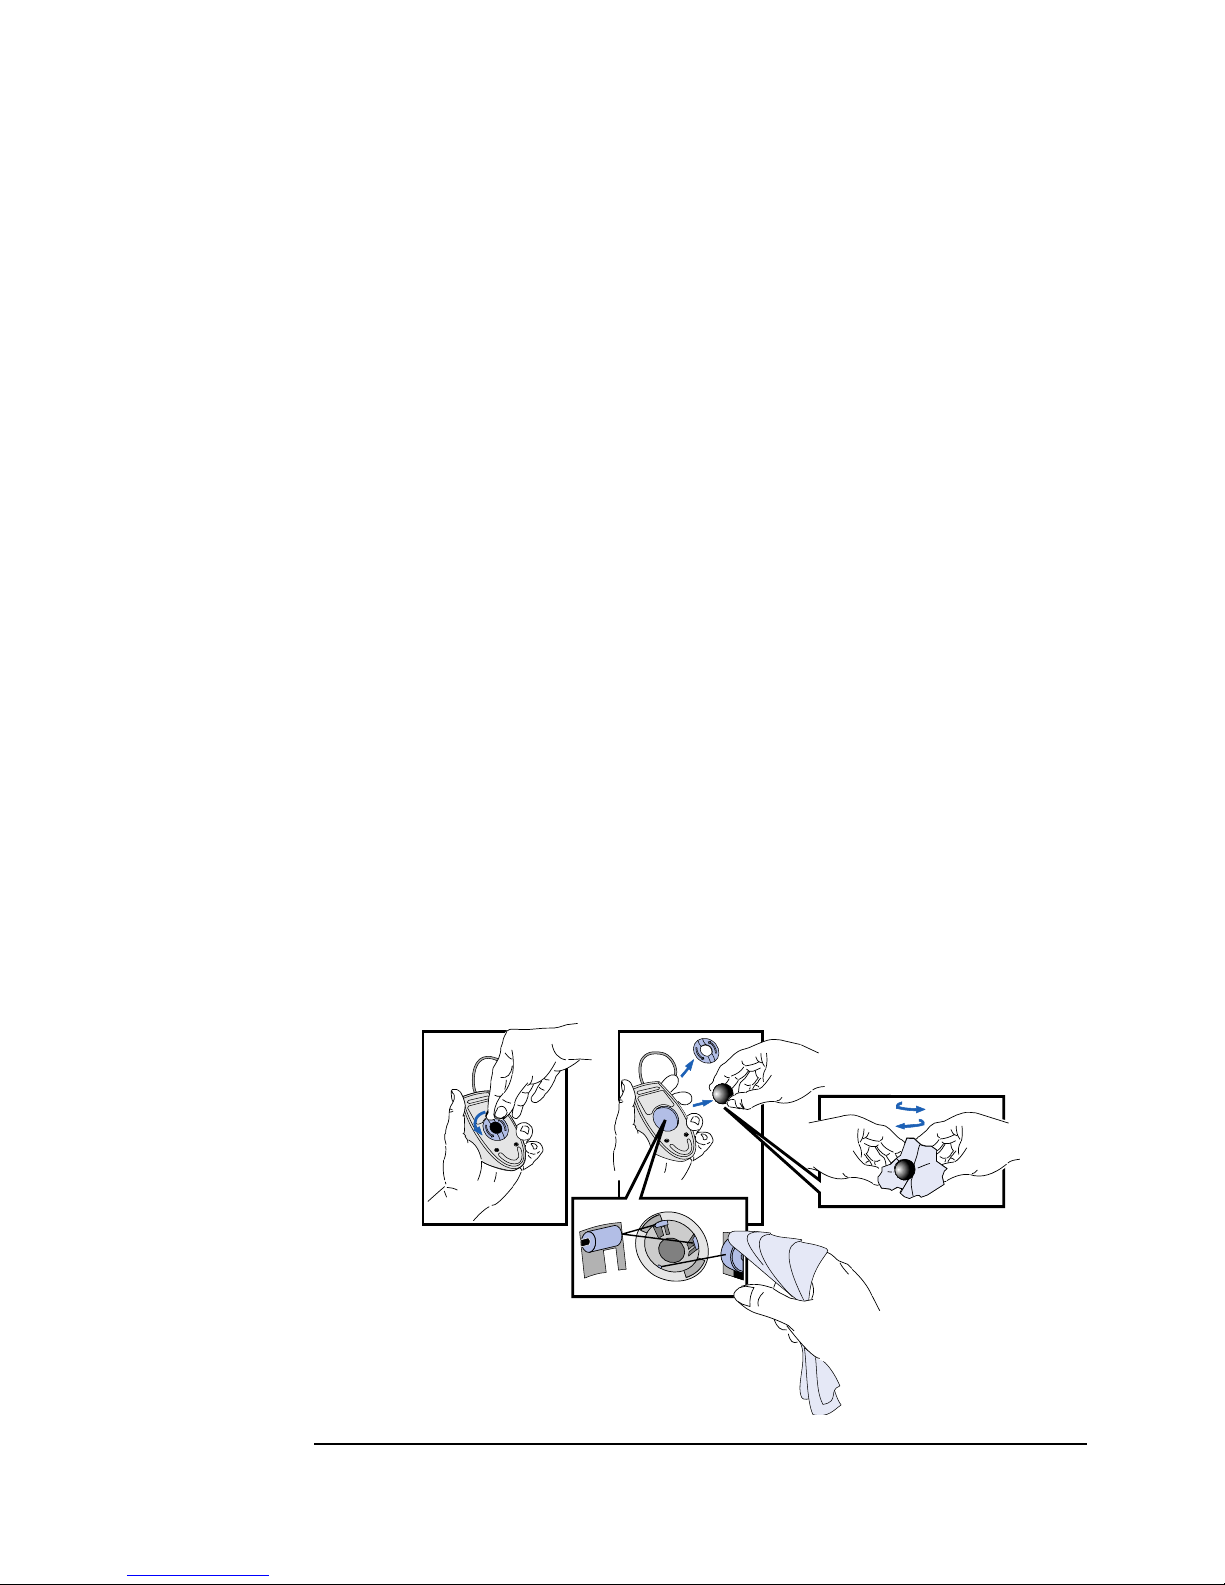
Clean the mouse ball and rollers as shown in the figure below (use a
3
non-residual contact cleaner).
Cleaning the mouse ball
Cleaning the mouse rollers
40 English
Page 49

3 Troubleshooting Your PC
HP Setup Program
Follow these instructions to verify or to change your PC’s
configuration:
HP Setup Program
First, Turn On or Restart
Your PC
To Go to the HP
Summary Screen
To Go to the
Setup
Program
If your PC is off, turn on the display and then the PC.
If the PC is already turned on, save your data, exit all programs and
restart your PC. For Windows NT 4.0 or Windows 95, use the Shut
➪
Down
This command will automatically exit the operating system and restart
the PC. For operating systems such as Windows NT 3.51, you must exit
the operating system and then manually switch off and then on the PC,
using the power on/off button.
While the Vectra logo appears on your display, press . This will take
you to the HP Summary Screen. The Summary Screen will appear for
only a short time. To retain the screen indefinitely (until you decide to
leave it), press .
The summary screen shows the basic configuration of your PC, such as
the amount of main memory.
To go immediately into the Setup program while the Vectra logo
appears on your display (and bypass the Summary Screen), press
instead of .
Restart your computer command in the
Start
menu.
The Setup program allows you to view and change the configuration of
your PC, such as the passwords and standby (power saving) mode.
To Go to the Boot Menu
To go to the Boot Menu while the Vectra logo appears on your display,
press .
The Boot Menu shows the order of devices which the PC attempts to
start from (floppy drive, CD-ROM drive, hard disk drive, and network).
From this menu you can also enter the Setup program to change the
boot order.
English 41
Page 50

3 Troubleshooting Your PC
Hewlett-Packard Support and Information Services
Hewlett-Packard Support and Information Services
Hewlett-Packard computers are engineered for quality and reliability to
give you many years of trouble-free service. To ensure that your
computer system maintains its reliability and to keep you up to date
with the latest developments, HP and a worldwide network of trained
and authorized resellers provide comprehensive service and support.
To learn more about HP service and support, please refer to the
support web site:
http://www.hp.com/go/vectrasupport/
.
42 English
Page 51

Index
A
accessories
installing, 21
accessory boards
configuring with non-Plug & Play, 34
configuring with Plug & Play, 33
installing, 32
installing, detailed, 19
accoustic noise, 53
audio
connectors, 6
controls, 11
B
battery
installing external, 19
replacing system board, 19
C
cables
keyboard, 3
CD-ROM drive
installing, 19
connecting
display, 3
enhanced keyboard, 5
IDE drives, 29
keyboard, 3
mouse, 3
network, 4
power cords, 8
printer, 3
connectors
audio, 6
headphones, 6
microphone, 6
MIDI, 7
control panel
using, 10
cover
removing, 23
replacing, 24
D
diagnostics
harware, 36
DiagTools, 36
display
brightness, 14
connecting, 3
contrast, 14
problems with, 39
DMAs
used by your PC, 19
documentation
downloadable from Web, 18
E
enhanced keyboard
connecting, 5
H
hard disk drive
activity light, 10
installing, 19
headphones
connector, 6
help
online, 18
HP Lock, 17
HP Setup program, 41
HP Summary screen, 41
HP Support & Information Services, 42
HP Web site, 18
I
I/O addresses
used by your PC, 19
IDE cables, 29
IDE drives, 29
connecting, 29
information
finding additional, 18
HP services, 42
initializing
software, 13
installing
accessories, 21
accessories, types, 22
accessory boards, 32
accessory boards, detailed, 19
CD-ROM drive, 19
external battery, 19
hard disk drive, 19
mass storage devices, 29
memory, 27
security cable, 19
tape drive, 19
tools required, 2
Zip drive, 19
IRQs
used by your PC, 19
K
keyboard
connecting, 3
connecting enhanced, 5
lock status light, 10
problems with, 40
using, 11
L
LAN connection, 4
line in
connector, 7
line out
connector, 7
M
mass storage devices
installing, 29
memory
installing, 27
installing, how to, 28
menu key, 11
microphone
connector, 6
MIDI
connector, 7
MIS kit
description, 18
mouse
connecting, 3
problems with, 40
scrolling, 12
setup, 12
using, 12
mute key, 11
N
network
connecting to, 4
NT Lock, 17
43
Page 52

Index
O
on/off button, 10
online information, 18
P
PC
starting, 15
starting and stopping, 13
starting for the first time, 13
stopping, 16
unpacking, 2
PCI slot numbers, 32
physical characteristics, 53
Plug & Play
configuring accessory boards, 33
power consumption, 53
power cords
connecting, 8
power management
using, 17
power on status light, 10
power supply, 25
removing, 25
replacing, 26
Power-On Self-Test
screen, 13
printer
connecting, 3
R
removing the cover, 23
replacing
system board battery, 19
replacing the cover, 24
Reset Configuration Data
parameter in Setup, 34
S
scrolling
using mouse, 12
security cable
installing, 19
security features
using, 17
Setup program, 41
software
initializing, 13
license agreement, 13
starting
and stopping PC, 13
PC, 15
PC for the first time, 13
stopping
PC, 16
Summary screen, 41
support
HP, 42
system board switches, 19
T
tape drive
installing, 19
technical information, 19
tools required for installation, 2
troubleshooting
basic, 35
more detailed info, 19
U
unpacking the PC, 2
Upgrade and Maintenance Guide
description, 19
downloading, 20
using
control panel, 10
enhanced keyboard, 11
enhanced mouse, 12
keyboard, 11
mouse, 12
power management, 17
security features, 17
V
voltage selection, 8
volume control, 11
W
Web site
HP, 18
Z
Zip drive
installing, 19
44
Page 53

Regulatory Information and Warranty
Page 54
Regulatory Information
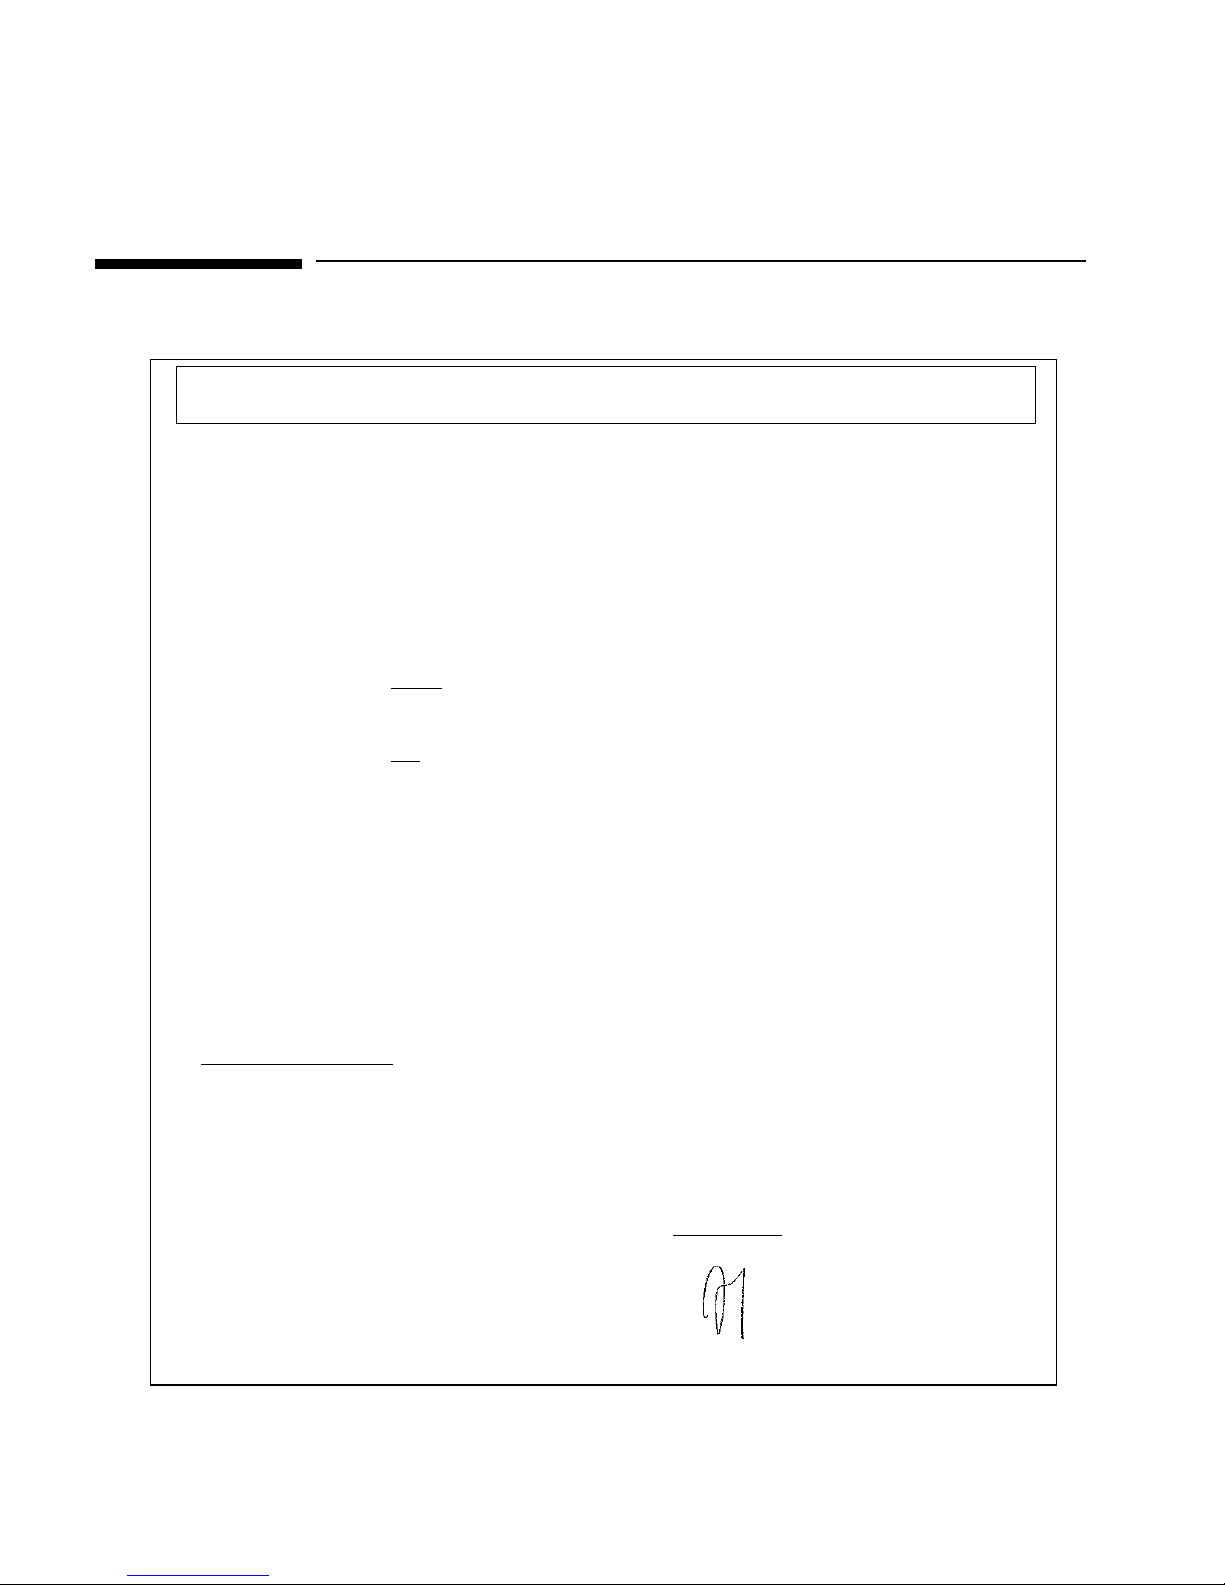
DECLARATION OF CONFORMITY
According to ISO/IEC Guide 22 and EN 45014
Manufacturer’s Name: HEWLETT-PACKARD
Manufacturer’s Address: 5 Avenue Raymond Chanas
38053 Grenoble Cedex 09
FRANCE
Declares that the product: Product Name: Personal Computer
Model Number: HP VECTRA VL 6/XXX series 8
Models DT and MT
Conforms to the following Product Specifications:
SAFETY
International: IEC 950:1991 +A1 +A2 +A3+A4
Europe: EN 60950:1992 +A1 +A2 +A3
EMC
Supplementary information:
CE-marking accordingly: The EMC directive 89/336/EEC amended by the directive 93/68/EEC. The Low Voltage Directive 73/23/EEC.
1)
The product was tested in a typical configuration with Hewlett-Packard Personal Computer Systems.
2)
This Device complies with Part 15 of the FCC Rules. Operation is subject to the following two conditions: (1) this device may not
cause harmful interference, and (2) this device must accept any interference received, including interference that may cause undesired
operation.
Grenoble Jean-Marc JULIA
March 1998 Quality Manager
For Compliance Information ONLY, contact:
USA Contact:
Hewlett-Packard Company, Corporate Product Regulations Manager,
3000 Hanover Street, Palo Alto, CA 94304. (Phone: (415) 857-1501)
The product herewith complies with the requirements of the following Directives and carries the
CISPR 22:1993+A1 / EN 55022:1994 Class B
EN 50082-1:1992
IEC 801-2:1992 / prEN 55024-2:1992 - 4kV CD, 8kV AD
IEC 801-3:1984 / prEN 55024-3:1991 - 3V/m
IEC 801-4:1988 / prEN 55024-4:1992 - 0.5 kV Signal Lines,
IEC 555-2:1982+A1:1985 / EN60555-2:1987
IEC 1000-3-3:1994 / EN61000-3-3:1995
FCC Title 47 CFR, Part 15 Class B
AS / NZ 3548:1992
2)
1)
1 kV Power Lines
/ ICES-003, Issue 2 / VCCI-2 1)
français46 français
Page 55

FCC (for USA only)
Federal Communications Commission Radio Frequency Interference Statement
Warning:
This equipment has been tested and found to comply with the limits for a Class B digital device, pursuant to Part
15 of the FCC Rules. These limits are designed to provide reasonable protection against harmful interference in
a residential installation. This equipment generates and uses, and can radiate radio frequency energy and, if not
installed and used in accordance with the instructions, may cause harmful interference to radio
communications. However, there is no guarantee that interference will not occur in a particular installation. If
this equipment does cause harmful interference to radio or television reception, which can be determined by
turning the equipment off and on, the user is encouraged to correct the interference by one or more of the
following measures:
• reorient or relocate the receiving antenna
• increase the separation between the equipment and the receiver
• connect the equipment into an outlet on a circuit different from that to which the receiver is connected
• consult the dealer or an experienced radio/TV technician for help.
Hewlett-Packard’s FCC Compliance Tests were conducted with HP-supported peripheral devices and HP
shielded cables, such as those you receive with your system. Changes or modifications not expressly approved
by Hewlett-Packard could void the user’s authority to operate the equipment.
Notice for Canada
This Class B digital apparatus meets all requirements of the Canadian Interference-Causing Equipment
Regulations.
Cet appareil numérique de la Class B respecte toutes les exigences du Règlement sur le matériel brouilleur du
Canada.
Safety Warning for the USA and Canada
If the power cord is not supplied with the computer, select the proper power cord according to your local
national electric code.
USA
: use a UL listed type SVT detachable power cord.
Canada
: use a CSA certified detachable power cord.
For your safety, never remove the PC’s cover without first removing the power cord and any connection to a
telecommunication network. Always replace the cover before switching on again.
Si le cordon secteur n’est pas livré avec votre ordinateur, utiliser un cordon secteur en accord avec votre code
electrique national.
USA
: utiliser un cordon secteur “UL listed”‚ de type SVT.
Canada
: utiliser un cordon secteur certifié CSA.
Pour votre sécurité, ne jamais retirer le capot de l’ordinateur sans avoir préalablement débranché le cordon
secteur et toute connection à un réseau de télecommunication. N’oubliez pas de replacer le capot avant de
rebrancher le cordon secteur.
Changing a battery
There is a danger of explosion if the battery is incorrectly installed. For your safety, never attempt to recharge,
disassemble or burn the old battery. Replace the battery only with the same or equivalent type recommended by
the manufacturer. The battery in this PC is a lithium battery which does not contain heavy metals, nevertheless,
in order to protect the environment, do not dispose of batteries in household waste. Please return used batteries
to the shop from which you bought them, to the dealer from whom you purchased the PC, or to Hewlett
Packard, so that they can either be recycled or disposed of in an environmentally sound way. Returned used
batteries will be accepted free of charge.
Changement de la pile
Il y a danger d’explosion lorsque la pile n’est pas installeé correctement. Pour votre sécurité, ne jamais essayer
de recharger, de démonter ou de brûler l’ancienne pile. Remplacer uniquement avec une pile du même type ou
d’un type équivalent recommandé par HP. La pile de cet ordinateur est une pile au lithium qui ne contient pas de
métaux lourds, néanmoins, afin de protéger l’environnement, il ne faut pas la jeter dans les ordures ménagères
mais la rendre au magasin ou vous l’avez achetée, ou revendeur où vous avez achetéz l’ordinateur, ou à Hewlett
Packard, pour qu’elle soit recyclée, ou stockée de manière qui ne nuit pas à l’environnement. Les piles usées
seront acceptées gratuitement.
Notice for the Netherlands
NL
Bij dit apparaat zijn batterijen geleverd. Wanneer deze leeg zijn, moet U ze niet weggooien maar inleveren als
KCA.
français
français 47
Page 56
Notice for the United Kingdom
The HP Vectra PC is approved under approval number NS/G/1234/J/100003 for indirect connection to Public
Telecommunication Systems within the United Kingdom.
Hinweis für Deutschland: Geräuschemission
Lärmangabe nach Maschinenlärmverordnung - 3 GSGV (Deutschland):
LpA < 70 dB am Arbeitsplatz bei normalem Betrieb nach DIN 45635 T.19
(under normal use in the workplace, as per ISO 7779).
Warnung
Wenn die Batterie nicht korrekt eingebaut wird, besteht Explosionsgefahr. Zu ihrer eigenen Sicherheit sollten
Sie nicht versuchen, die Batterie wiederaufzuladen, zu zerlegen oder die alte Batterie zu verbrennen. Tauschen
Sie die Batterie nur gegen den gleichen oder ähnlichen Typ aus, der vom Hersteller empfohlen wird. Bei der in
diesem PC intergrierten Batterie handelts sich um eine Lithium-Batterie, die keine Schwermetalle enthält.
Batterien und Akkumulatoren gehören nicht in den Hausmüll. Sie verden vom Hersteller, Händler oder deren
Beauftragten kostenlos zurückgenommen, um sie einer Verwertung bzw. Entsorgung zuzuführen.
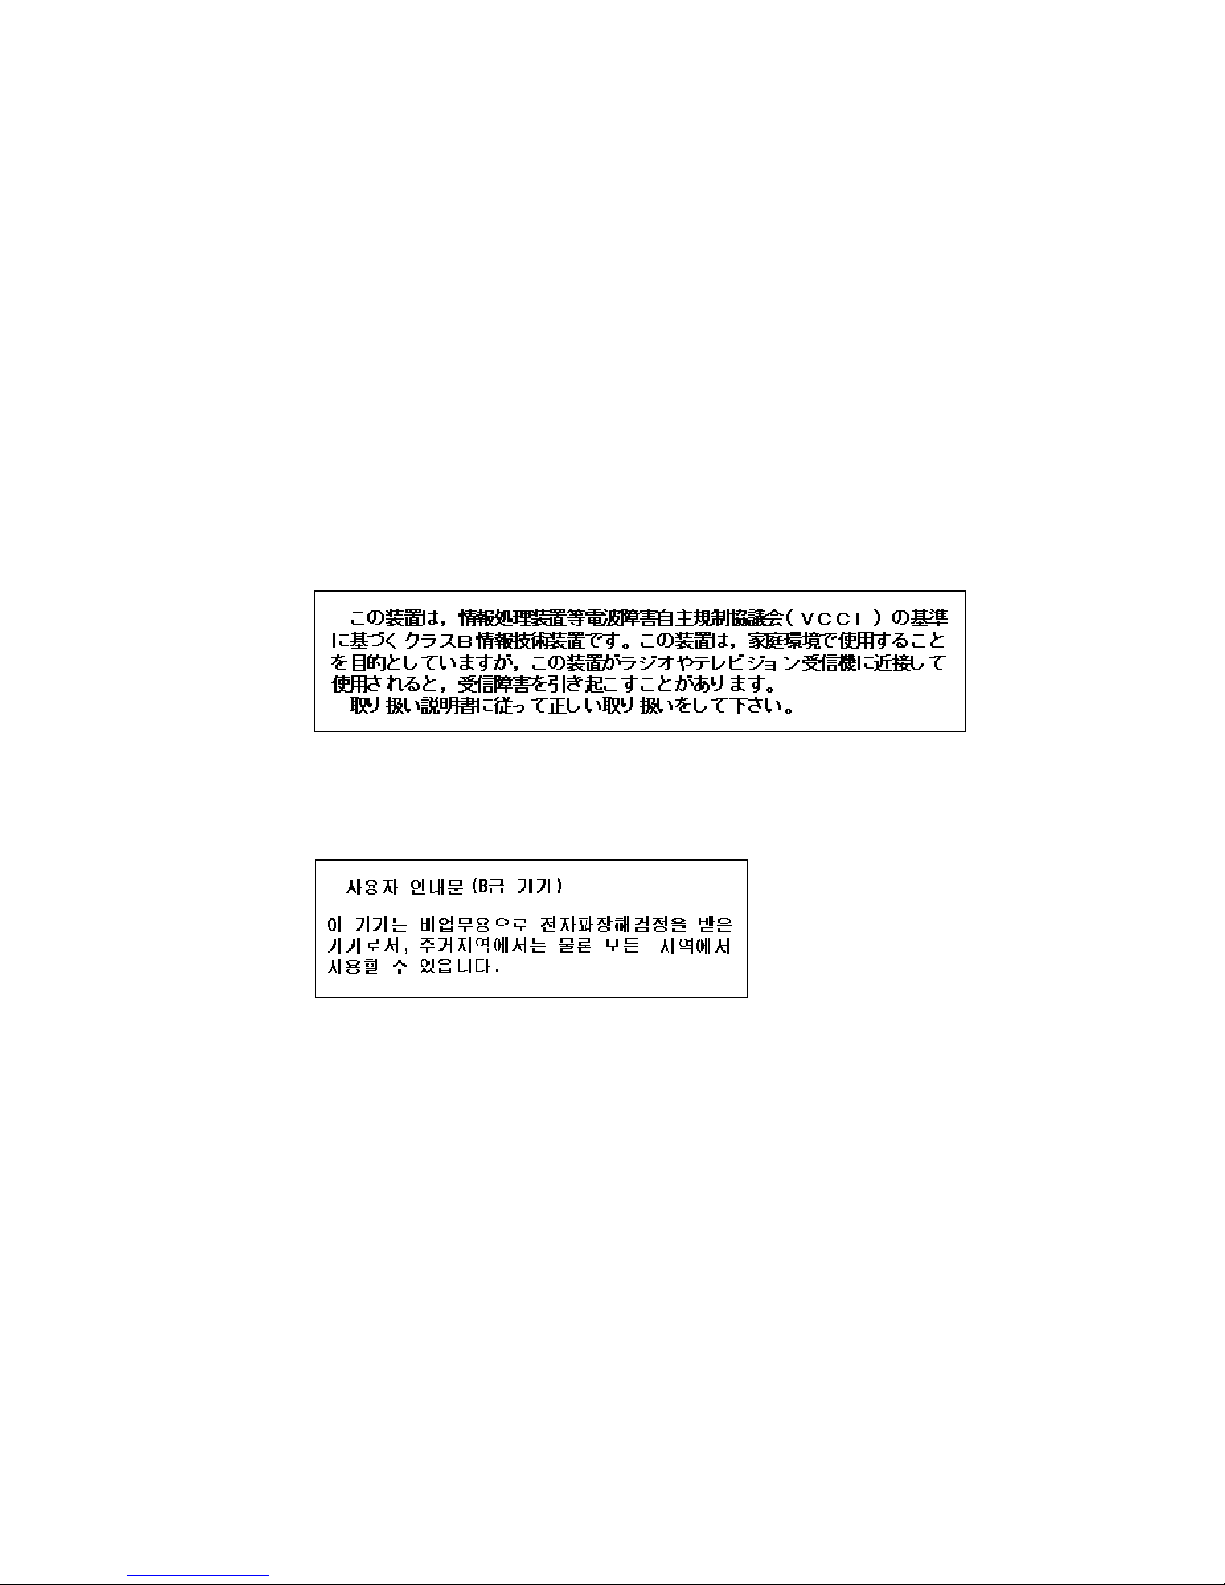
Notice for Japan
This equipment is in the Class B category information technology equipment based on the rules of the Voluntary
Control Council For Interference by Information Technology Equipment (VCCI). Although aimed for residential
area operation, radio interference may be caused when used near a radio or TV receiver. Read the instructions
for correct operation.
Notice for Korea
Recycling Your PC
HP has a strong commitment toward the environment. Your HP Personal Computer has been designed to
respect the environment as much as possible.
HP can also take your old PC back for recycling when it reaches the end of its useful life.
HP has a product take-back program in several countries. The collected equipment is sent to one of HP’s
recycling facilities in Europe or the USA. As many parts as possible are reused. The remainder is recycled.
Special care is taken for batteries and other potentially toxic substances, which are reduced into non-harmful
components through a special chemical process.
If you require more details about HP’s product take-back program, contact your dealer or your nearest HP Sales
Office.
français48 français
Page 57

HP General Hardware Warranty
General
This HP General Hardware Warranty statement gives you, the customer, express warranty rights from HP, the
Manufacturer. Please refer to the HP Vectra Warranty Card included with your product for your
warranty entitlements. In addition, you may also have other legal rights under applicable local law or special
written agreement with HP.
specific
FOR CONSUMER TRANSACTIONS IN AUSTRALIA AND NEW ZEALAND, THE WARRANTY
TERMS CONTAINED IN THIS STATEMENT, EXCEPT TO THE EXTENT LAWFULLY
PERMITTED, DO NOT EXCLUDE, RESTRICT, OR MODIFY BUT ARE IN ADDITION TO THE
MANDATORY STATUTORY RIGHTS APPLICABLE TO THE SALE OF THIS PRODUCT TO YOU.
Warranty Repair or Replacement
HP Hardware
For the specific warranty period described in the HP Vectra Warranty Card included with your product, HP
warrants that your HP Hardware, Accessory or Supply will be free from defects in materials and workmanship.
Except as indicated above, however, HP does not warrant that any HP Hardware, Accessory or Supply will
operate uninterrupted or error-free.
If, during the product warranty period, HP is unable, within a reasonable time, to repair your product to a
condition as warranted, you will be entitled to a refund (in the amount of the product purchase price) upon
prompt return of the product to your authorized HP dealer or other HP designate. Unless otherwise stated or
agreed upon in writing with HP, all hardware components must be returned for refund with the entire system
process unit.
The system processor unit, keyboard, mouse, and Hewlett-Packard accessories inside the system processor unit
-- such as video adapters, mass storage devices, and interface controllers -- are covered by this warranty.
HP products external to the system processor unit -- such as external storage subsystems, displays, printers, and
other peripherals -- are covered by the applicable warranties for those products.
HP software is covered by the HP Software Product Limited Warranty located in your HP product manual.
HP does NOT provide support for this product configured as a network server
NetServers for your network server requirements.
Unless otherwise stated, and to the extent permitted by local law, hardware products may contain
remanufactured parts (equivalent to new in performance) or parts which may have been subject to prior
incidental use. HP may repair or replace hardware products (i) with products which are equivalent in
performance to the products being repaired or replaced but which may have been subject to prior use, or (ii)
with products which may contain remanufactured parts equivalent to new in performance or parts which may
have been subject to prior incidental use.
Non-HP Hardware
Pre-installed
have different warranty conditions than those of the HP product in which they are installed.
All
non-HP
subsystems, displays, printers, and other peripherals -- are covered by the applicable vendor warranties for
those products.
non-HP
products or peripherals external to the system processor unit -- such as external storage
hardware and
components installed after the purchase of your HP product may
non-HP
. We recommend HP
Proof of Purchase and Warranty Period
In order to receive service or support for your hardware product for the warranty period specified in the HP
Vectra Warranty Card included with your product, proof of the original purchase date of the product may be
required in order to establish the warranty period starting date for your product. If proof of purchase is not
available, the manufacturer’s date (located on the product) becomes the beginning of the warranty period.
Exclusions
Warranty does not apply to defects resulting from: (a) improper or inadequate maintenance or calibration; (b)
software, interfacing, parts or supplies not supplied by HP; (c) unauthorized repair, maintenance, modification
or misuse; (d) operation outside of the published operating specifications for the product; (e) improper site
preparation or maintenance; or (f) such other exclusions as may be expressly set forth in this Warranty
Statement.
français
français 49
Page 58

Limitation of Implied Warranties
TO THE EXTENT ALLOWED BY APPLICABLE LOCAL LAW, ANY IMPLIED WARRANTY BY THE
MANUFACTURER OF MERCHANTABILITY FOR FITNESS FOR A PARTICULAR PURPOSE OR OTHER
IMPLIED WARRANTIES ARE HEREBY LIMITED TO THE DURATION OF THE EXPRESS WARRANTY SET
FORTH ABOVE.
Exclusive Remedy
TO THE EXTENT ALLOWED BY APPLICABLE LOCAL LAW, THE REMEDIES IN THIS WARRANTY
STATEMENT ARE YOUR SOLE AND EXCLUSIVE REMEDIES. EXCEPT AS INDICATED ABOVE, IN NO
EVENT WILL HP BE LIABLE FOR LOSS OF DATA OR FOR DIRECT, SPECIAL, INCIDENTAL,
CONSEQUENTIAL (INCLUDING LOST PROFIT) OR OTHER DAMAGE, WHETHER BASED IN CONTRACT,
TORT OR OTHERWISE.
(Rev. 16/03/98)
français50 français
Page 59

HP Software Product License Agreement and Software Product Limited Warranty
Your HP Vectra PC contains preinstalled software programs. Please read the Software License Agreement before
proceeding.
CAREFULLY READ THIS LICENSE AGREEMENT AND LIMITED WARRANTY STATEMENT BEFORE
PROCEEDING TO OPERATE THIS EQUIPMENT. RIGHTS IN THE SOFTWARE ARE OFFERED ONLY ON THE
CONDITION THAT THE CUSTOMER AGREES TO ALL TERMS AND CONDITIONS OF THE LICENSE
AGREEMENT. PROCEEDING TO OPERATE THE EQUIPMENT INDICATES YOUR ACCEPTANCE OF THESE
TERMS AND CONDITIONS. IF YOU DO NOT AGREE WITH THE TERMS OF THE LICENSE AGREEMENT,
YOU MUST NOW EITHER REMOVE THE SOFTWARE FROM YOUR HARD DISK DRIVE AND DESTROY THE
MASTER DISKETTES, OR RETURN THE COMPLETE COMPUTER AND SOFTWARE FOR A FULL REFUND.
PROCEEDING WITH CONFIGURATION SIGNIFIES YOUR ACCEPTANCE OF THE LICENSE TERMS.
HP Software Product License Agreement
UNLESS OTHERWISE STATED BELOW, THIS HP SOFTWARE PRODUCT LICENSE AGREEMENT SHALL
GOVERN THE USE OF ALL SOFTWARE THAT IS PROVIDED TO YOU, THE CUSTOMER, AS PART OF THE
HP COMPUTER PRODUCT. IT SHALL SUPERSEDE ANY NON-HP SOFTWARE LICENSE TERMS THAT MAY
BE FOUND ONLINE, OR IN ANY DOCUMENTATION OR OTHER MATERIALS CONTAINED IN THE
COMPUTER PRODUCT PACKAGING.
Note: Operating System Software by Microsoft is licensed to you under the Microsoft End User License
Agreement (EULA) contained in the Microsoft documentation.
The following License Terms govern the use of the software:
USE
. Customer may use the software on any one computer. Customer may not network the software or otherwise use it
on more than one computer. Customer may not reverse assemble or decompile the software unless authorized by law.
COPIES AND ADAPTATIONS
or (b) when copying or adaptation is an essential step in the use of the software with a computer so long as the copies and
adaptations are used in no other manner.
OWNERSHIP
of the physical media. Customer acknowledges and agrees that the software is copyrighted and protected under the
copyright laws. Customer acknowledges and agrees that the software may have been developed by a third party software
supplier named in the copyright notices included with the software, who shall be authorized to hold the Customer
responsible for any copyright infringement or violation of this Agreement.
PRODUCT RECOVERY CD-ROM
recovery CD-R OM an d/or support utility softw are may o nly be used fo r restorin g the hard disk o f the HP computer with
which the product recovery CD-ROM was originally provided.(ii) The use of any operating system software by
Microsoft contained in any such product recovery CD-ROM shall be governed by the Microsoft End User License
Agreement (EULA).
TRANSFER OF RIGHTS IN SOFTWARE
part of the transfer of all rights and only if Customer obtains the prior agreement of the third party to be bound by the
terms of this License Agreement. Upon such a tran sfer , Cu stomer agrees that his/her righ ts in the softw are are terminated
and that he/she will either destroy his/her copies and adaptations or deliver them to the third party.
SUBLICENSING AND DISTRIBUTION
adaptations of the software to the pub lic in p h ysical media or by telecommunication without the pr io r written co nsen t of
Hewlett-Packard.
TERMINATION.
provided Hewlett-Packard has requested Custom er to cure the f ailu re and Customer has f ailed to do so within th irty (30)
days of such notice.
UPDATES AND UPGRADES
which may be available from Hewlett-Packard under a separate support agreement.
EXPORT CLAUSE
the U.S. Export Administration regulations or other applicable regulation.
U.S. GOVERNMENT RESTRICTED RIGHTS
to restrictions as set forth in subparagraph (c)(1)(ii) of the Rights in Technical Data and Computer Software clause in
DFARS 252.227-7013. Hewlett-Packard Company, 3000 Hanover Street, Palo Alto, CA 94304 U.S.A. Rights for nonDOD U.S. Government Departments and Agencies are as set forth in FAR 52.227-19(c)(1,2).
Customer agrees that he/she does not have any title or ownership of the software, other than ownership
.
Hewlett-Packard may terminate this software license for failure to comply with any of these terms
Customer agrees not to export or re-export the software or any copy or adaptation in violation of
.
Customer may make copies or adaptations of the software (a) for archival purposes
.
. If your computer was shipped with a product recov ery CD-ROM: (i) The product
Customer may transfer rights in the software to a third party only as
.
Customer may not lease, sublicense the software or distribute copies or
.
. Customer agrees that the software does not include updates and upgrades
Use, duplication, or disclosure by the U.S. Government is subject
.
français
français 51
Page 60

HP Software Product Limited Warranty
THIS HP SOFTWARE PRODUCT LIMITED WARRANTY SHALL COVER ALL SOFTWARE THAT IS PROVIDED
TO YOU, THE CUSTOMER, AS PART OF THE HP COMPUTER PRODUCT, INCLUDING ANY OPERATING
SYSTEM SOFTWARE. IT SHALL SUPERSEDE ANY NON-HP WARRANTY TERMS THAT MAY BE FOUND
ONLINE, OR IN ANY DOCUMENTATION OR OTHER MATERIALS CONTAINED IN THE COMPUTER
PRODUCT PACKAGING.
Ninety-Day Limited Software Warranty
purchase that the software product will execute its programming instructions when all files are properly installed. HP
does not warrant that the software will be uninterrupted or error free. In the event that this software product fails to
execute its programming instructions during the warranty period, HP will provide the Customer with non-defective
software along with re-installation instructions or assistance.
HP Software
For the applicable Warranty specified in the HP Warranty Card included with your product, HP warrants preloaded HP
software against defects in material and workmanship that may result in the failure of HP software to execute when the
HP product and HP software are used properly. Except as expressly provided above, HP does not warrant that any HP
software will operate uninterrupted or error-free.
If HP receives notice of a defect in an HP software product during the software product’s warranty period, HP will, at its
option and according to the specified warranty:
1. assist in the re-installation of non-defective software OR
2. provide the end-user customer with non-defective software along with written re-installation instructions.
Reloading of the bundled, preloaded HP or non-HP software by HP or any of its designates is not covered
by the HP warranty.
Should HP be unable to replace the software within a reasonable amount of time, the Customer’s alternate
remedy shall be a refund of the purchase price upon return of the product and all copies. Unless otherwise
stated or agreed upon in writing with HP, bundled or pre-installed software may not be returned for
separate from the return of the entire bundled or pre-installed system.
Non-HP Software
All pre-installed and bundled Non-HP software is warranted by the software vendor and is not warranted by HP.
Removable Media (If supplied)
recorded to be free from defects in materials and workmanship under normal use for a period of NINETY (90) DAYS
from the date of purchase. In the event the media proves to be defective during the warranty period, Customer’s remedy
shall be to return the media to HP for replacement. Should HP be unable to replace the media within a reasonable amount
of time, Customer’s alternate remedy shall be a refund of the purchase price upon return of the product and destruction of
all other non removable media copies of the software product.
Notice of Warranty Claims
days after the expiration of the warranty period.
Limitation of Warranty
Any implied warranty of merchantability or fitness for a particular purpose is limited to the 90-day duration of this
written warranty. Some states or provinces do not allow limitations on how long an implied warranty lasts, so the above
limitation or exclusion may not apply to you. This warranty gives specific legal rights, and you may also have other
rights which vary from state to state, or province to province.
Limitation of Liability and Remedies
EXCLUSIVE REMEDIES. IN NO EVENT SHALL HP BE LIABLE FOR ANY DIRECT, INDIRECT, SPECIAL,
INCIDENTAL OR CONSEQUENTIAL DAMAGES (INCLUDING LOST PROFIT) WHETHER BASED ON
WARRANTY, CONTRACT, TORT OR ANY OTHER LEGAL THEORY. Some states or provinces do not allow the
exclusion or limitation of incidental or consequential damages, so the above limitation or exclusion may not apply to
you.
Obtaining Warranty Service
indicated in the owner’s manual or service booklet.
FOR CONSUMER TRANSACTIONS IN AUSTRALIA AND NEW ZEALAND: THE WA RRANTY TERMS
CONT AINED IN THIS STA TEMENT, EXCEPT TO THE EXTENT LAWFULLY PERMITTED, DO NOT EXCLUDE,
RESTRICT, OR MODIFY BUT ARE IN ADDITION TO THE MANDATORY STATUTORY RIGHTS APPLICABLE
TO THE SALE OF THIS PRODUCT TO YOU.
(Rev. 16/03/98)
HP makes no other express warranty, whether written or oral with respect to this product.
.
HP warrants the removable media, if supplied, upon which this product is
.
Customer must notify HP in writing of any warranty claim not later than thirty (30)
.
Warranty service may be obtained from the nearest HP sales office or other location
.
HP warrants for a period of NINETY (90) DAYS from the date of the
.
refund
THE REMEDIES PRO VIDED ABO VE ARE CUST OMER’S SOLE AND
.
français52 français
PN: D5908-90001
Page 61
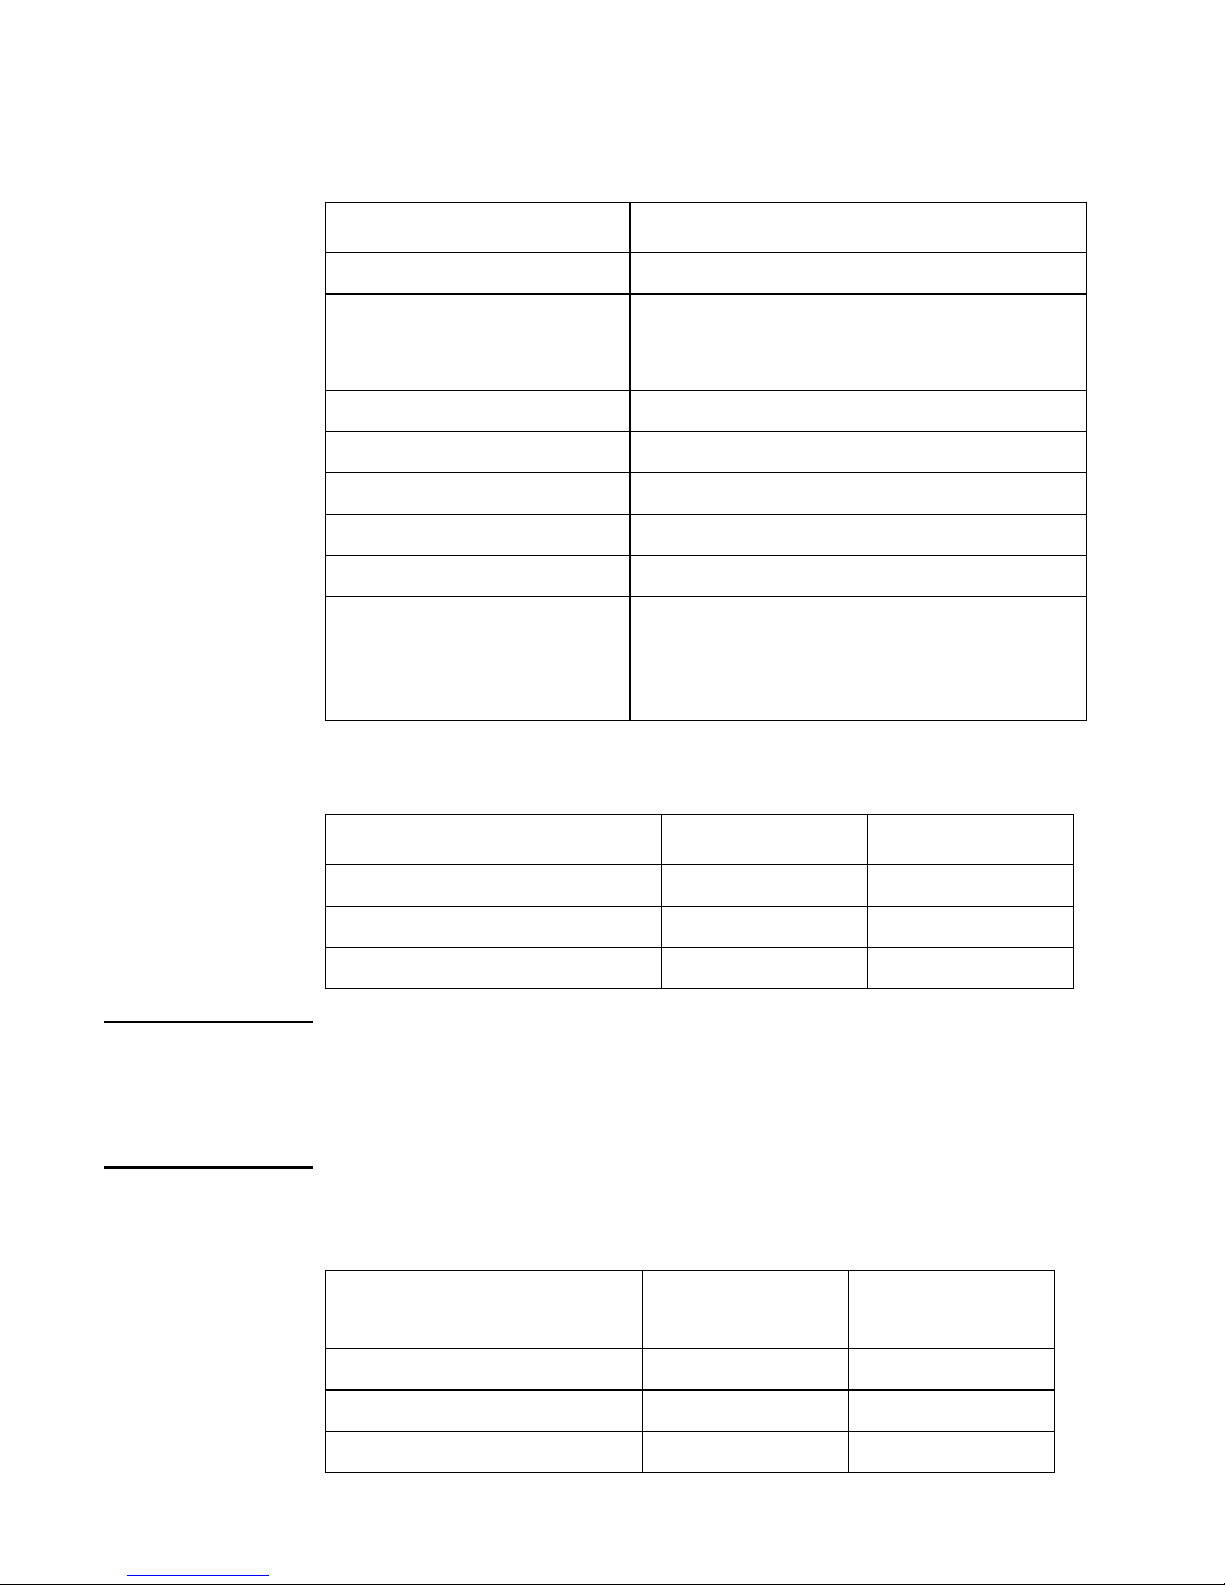
Physical Characteristics
Characteristic Description
Weight (excl. display and keyboard) 9 kg (20 pounds)
Dimensions Width: 43.5 cm (17.1 inches)
Height: 13.2 cm (5.2 inches)
Depth: 44.6 cm (17.5 inches)
2
Footprint 0.194 m
Storage temperature –40 ºC to 70ºC (–40 ºF to 158 ºF)
Storage humidity 8% to 80% (relative), non-condensing at 40ºC (104 ºF)
Operating temperature 10 ºC to 40ºC (50 ºF to 104 ºF)
Operating humidity 15% to 80% (relative)
Power supply Input voltage: 100 – 127 V, 200 – 240V ac
(some models have voltage selection switch)
Input frequency: 50/60 Hz
Maximum output power: 120W continuous
(2.08 ft2)
NOTE
Power Consumption
Power Consumption (Windows NT 4.0) 115V / 60Hz 230V / 50Hz
Operating without input/output
Standby
Off
<
33 W
<
28.5 W
<
3.5 W
<
33 W
<
28.5 W
<
3.5 W
When the PC is turned off with the power button on the front panel, the power
consumption falls below 5 Watts, but is not zero. The special on/off method used by this
PC considerably extends the lifetime of the power supply. To reach zero power
consumption in “off” mode, either unplug the PC from the power outlet or use a power
block with a switch.
Acoustic Noise Emission
Acoustic Noise Emission
(Measured according to ISO 7779)
Sound Power Sound Pressure
Operating LwA <39 dB LpA <35 dB
Operating with HDD access LwA <39 dB LpA <35 dB
Operating with FDD access LwA <42 dB LpA <38 dB
Page 62
PC Documentation Roadmap
If you want to ...
Setup
Set up your computer
Learn how to use your
operating system
Learn how to upgrade your
computer by installing
accessories
This manual
Setting Up and Using Your PC
Reference
Operating System Online Help
Start ☞ Help ☞Contents in
Windows 95 and Windows NT 4.0
Operating System
User’s Guide
This manual
How to Install Accessories In Your PC
(Summary information only)
Upgrade and Maintenance Guide
for this PC
http://www.hp.com/go/vectrasupport/
Find out about the
different support options
available, and how to
troubleshoot your
computer
Paper not bleached with chlorine
50%
Troubleshooting and Support
This manual
Troubleshooting Your PC
(Summary information only)
HP Documentation (MIS) Kit for
this PC
http://www.hp.com/go/vectrasupport/
Provides training, support, and technical
information for this product
Part Number
Printed
D5908-90001
04/98 in EU
 Loading...