

Page 1

升級與維護手冊
Upgrading and Servicing Guide
Page 2

Page 3

升級與維護手冊
Page 4

著作權資訊
Hewlett-Packard 產品和服務的唯一擔保列於隨產品和服務所附的明示保證聲明中。 本文件的任何部分都不可構成任何額外的擔保。
HP 不負責本文件在技術上或編輯上的錯誤或疏失。
對於在非 HP 提供的設備上使用其軟體的情況,HP 概不負責。
本文件包含的專屬資訊受到著作權法的保護。 未經 HP 事先書面許可,不得影印、複製本文件之任何部份,或將其翻譯成其他語言。
Hewlett-Packard Company
P.O. Box 4010
Cupertino, CA 95015-4010
USA
Copyright © 2008 Hewlett-Packard Development Company, L.P.
可能授權使用一或二個美國專利號碼 4,930,158 與 4,930,160,使用期限為 2008 年 8 月 28 日。
Microsoft 和 Windows 為 Microsoft Corporation 的美國註冊商標。 Windows Vista 是 Microsoft Corporation 在美國和 / 或其他
國家 / 地區的註冊商標或商標。
HP 支持您合法使用科技,但不認可或鼓勵在違反著作權法的情況下使用我方產品。 本文件所包含之資訊可隨時更改,恕不另行
通知。
Page 5

目錄
升級步驟開始...............................................................................................................................1
安全資訊 .................................................................................................................................2
找到組件的正確位置................................................................................................................. 2
拆開電腦 .................................................................................................................................3
拆卸與更換記憶體模組..................................................................................................................7
拆卸記憶體模組....................................................................................................................... 8
裝回記憶體模組..................................................................................................................... 10
拆卸與更換硬碟..........................................................................................................................14
拆卸硬碟 ...............................................................................................................................14
更換硬碟機 ........................................................................................................................... 17
目錄 iii
Page 6

iv 升級與維護手冊
Page 7
升級與維護手冊
此手冊提供的指示將引導您更換或升級您的 HP TouchSmart PC 的記憶體與硬碟。
升級步驟開始
請您參閱產品規格了解系統升級可能性的資訊,再決定是否為電腦升級或進行維護。 請到
http://www.hp.com/support 參閱產品資訊。
在嘗試升級或維護 HP TouchSmart PC 之前,請閱讀下列事項。
! 這些程序是假設您已熟悉與個人電腦相關的一般術語,熟悉使用和修改電子設備的安全操作並確實遵
守這些法規。
! 請記錄並妥善保存電腦的型號和序號、所有安裝選項,以及關於電腦的其他資訊。 這麼一來需要時就
可以隨時查閱這些資訊,而不需再打開電腦查看。
! 建議您在處理電腦時,戴上防靜電腕帶並站立在導電泡棉墊上。
! 拆開與裝回 HP TouchSmart PC 時,Hewlett-Packard 建議您使用尖端帶有磁性的螺絲起子,以更簡易
地拆卸與鎖回螺絲。
警告: 拆卸記憶體外蓋或背板時,請務必中斷 HP TouchSmart PC 與電源的連接。 若沒有執行這些動作就拆開
HP TouchSmart PC 或進行任何程序,可能會導致人身傷害或裝備的損壞。
升級與維護手冊 1
Page 8
安全資訊
本產品尚未進行 「IT」電源系統 (按照 IEC 60950 標準,不直接接地的交流電配電系統)連接的評估。
警告: 在安裝及將系統接上電源系統之前,請先參閱 《有限保固、支援及系統復原手冊》中的 〈其他安全資
訊〉一節。
警告: 請避免碰觸電腦內部銳利的邊緣。
警告: 請謹慎搬移您的電腦。 電腦非常重。
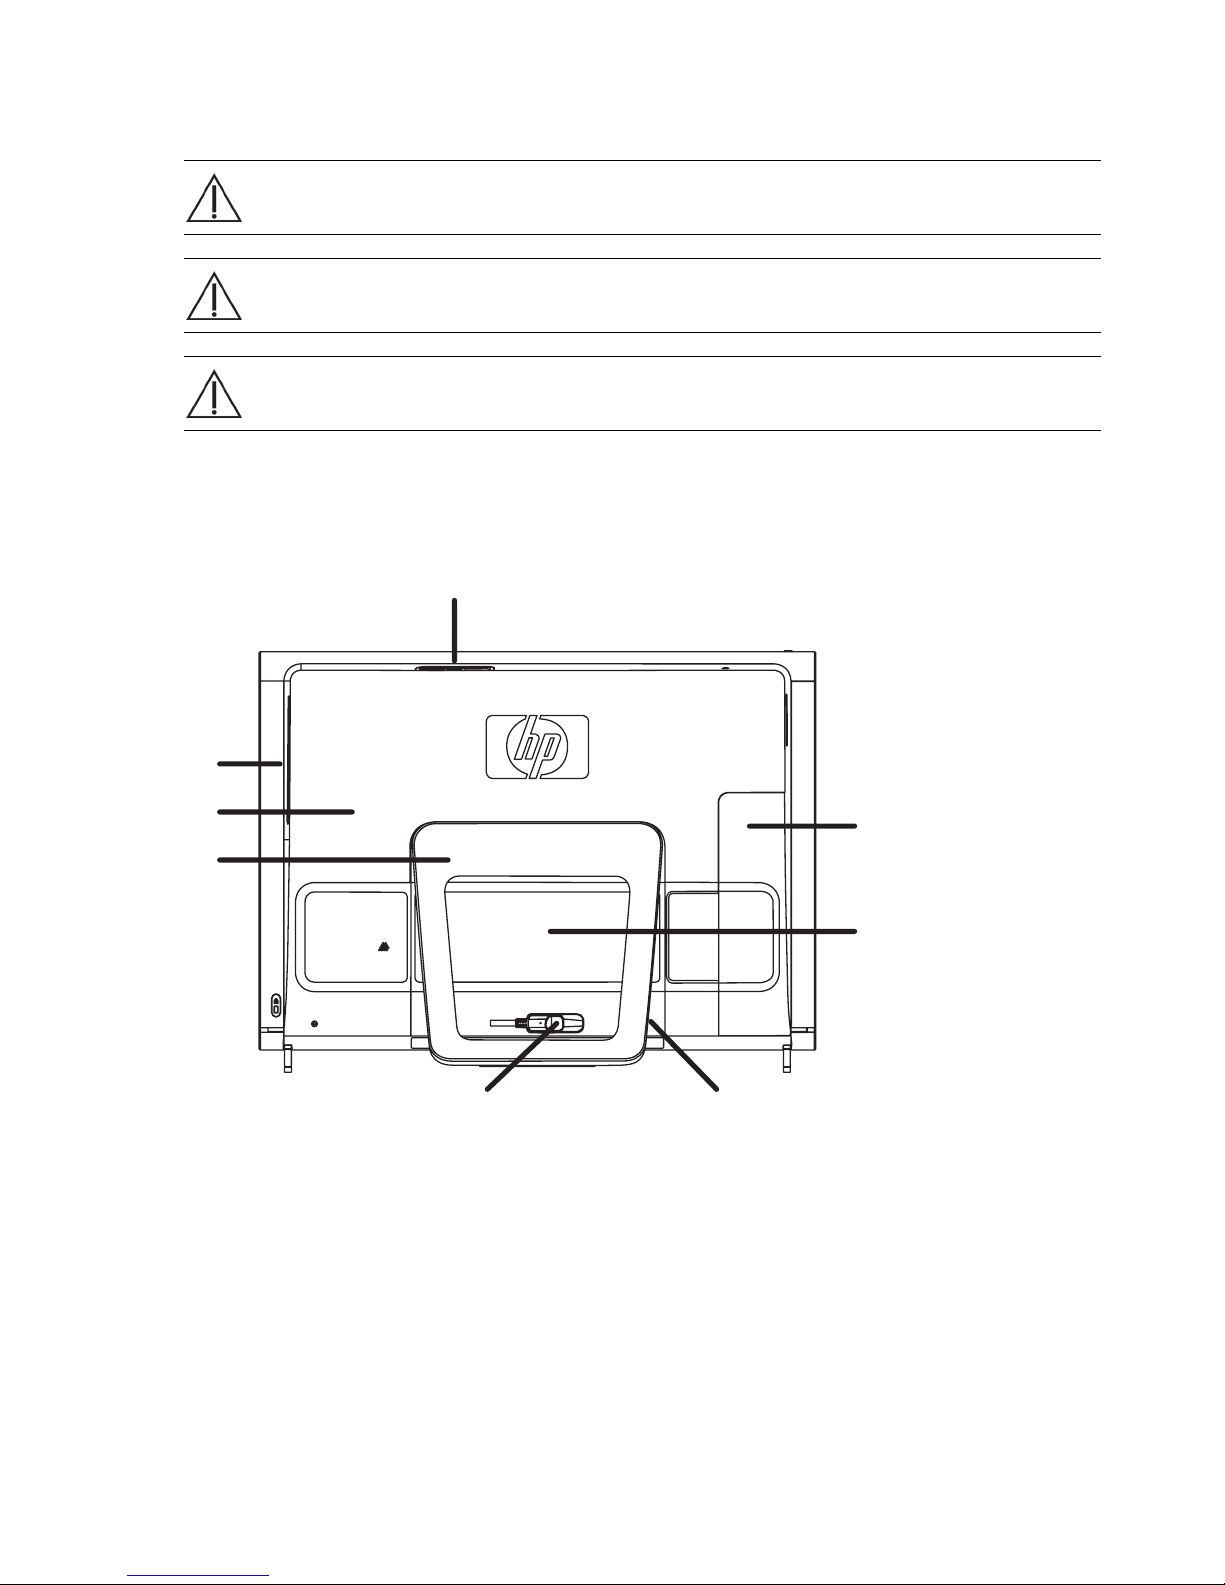
找到組件的正確位置
請參閱下列圖示找出 HP TouchSmart PC 的組件。
A
B
C
H
D
G
EF
A:Pocket Media Drive 托槽 D:電腦支架 G:硬碟 / 記憶體外蓋
B:光碟機插槽 E:電源變壓器接頭 H:接頭外蓋
C:背板 F:無線鍵盤和滑鼠接收器
2 升級與維護手冊
Page 9
拆開電腦
為了避免人身傷害及設備損壞,在拆開 HP TouchSmart PC 之前,請務必依照順序完成下列步驟。
1 移除所有連接在 HP TouchSmart PC 的外接式裝置 (CD、DVD、記憶卡、USB 裝置、Pocket Media
Drive 以及外接式硬碟機)。
警告事項: 靜電會損壞 HP TouchSmart PC 或選購設備的電子組件。 請碰觸一下接地金屬物體,確保您已釋放出
靜電。
™
2 點選 Windows Vista [ 開始 ] 按鈕
警告: 為了降低電擊或觸及過熱表面等人身傷害的風險,請務必從牆上電源插座拔下電源線,並讓內部系統組
件先冷卻一下再觸碰。
3 系統完全關閉後,自 HP TouchSmart PC 的背部中斷電源變壓器 (A) 的連接。
,然後點選 [ 關機 ]。
A
升級與維護手冊 3
Page 10

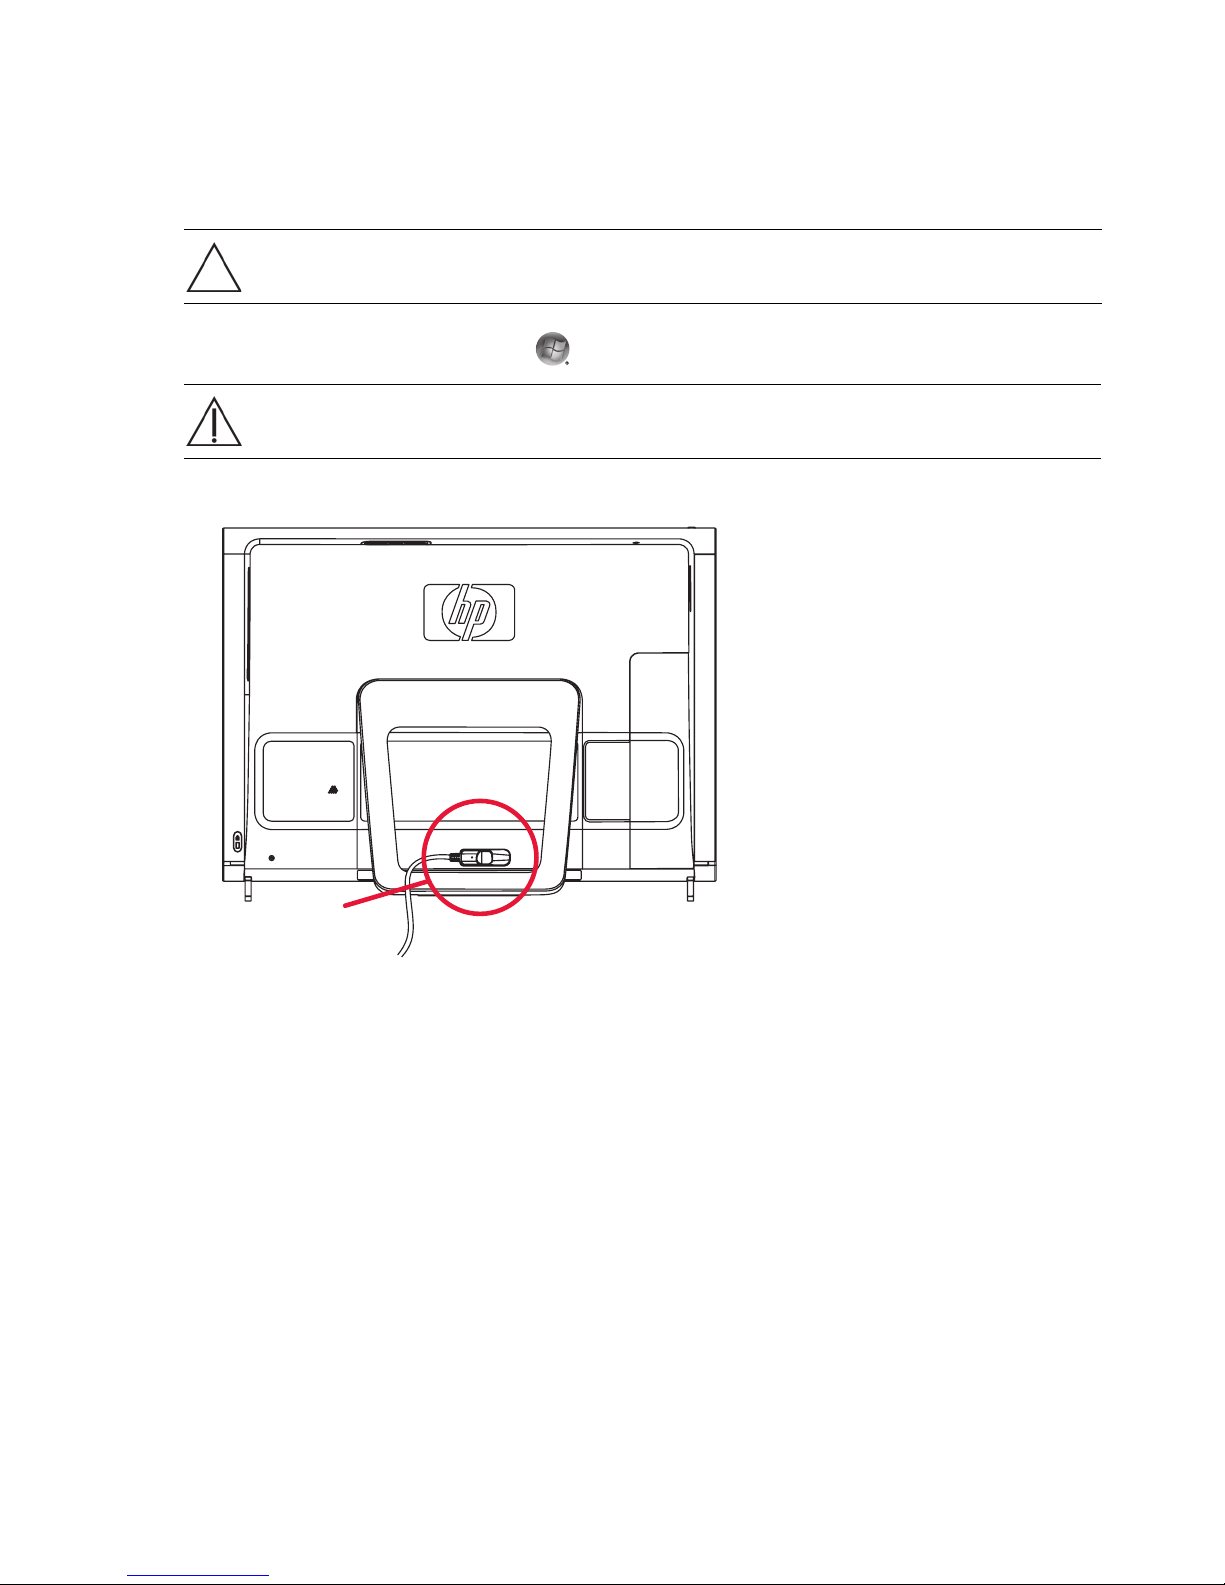
4 用您的手指伸進外蓋 (A) 左下角的間隔,然後輕拉拆卸接頭外蓋。
A
5 拔除所有連接在 HP TouchSmart PC 背部的連接線。
6 將電腦面朝下放置在柔軟、平坦的表面。 為了保護觸控螢幕面板避免刮傷或其他損壞,HP 建議您在
電腦下鋪一條毯子、毛巾或其他軟布。
4 升級與維護手冊
Page 11
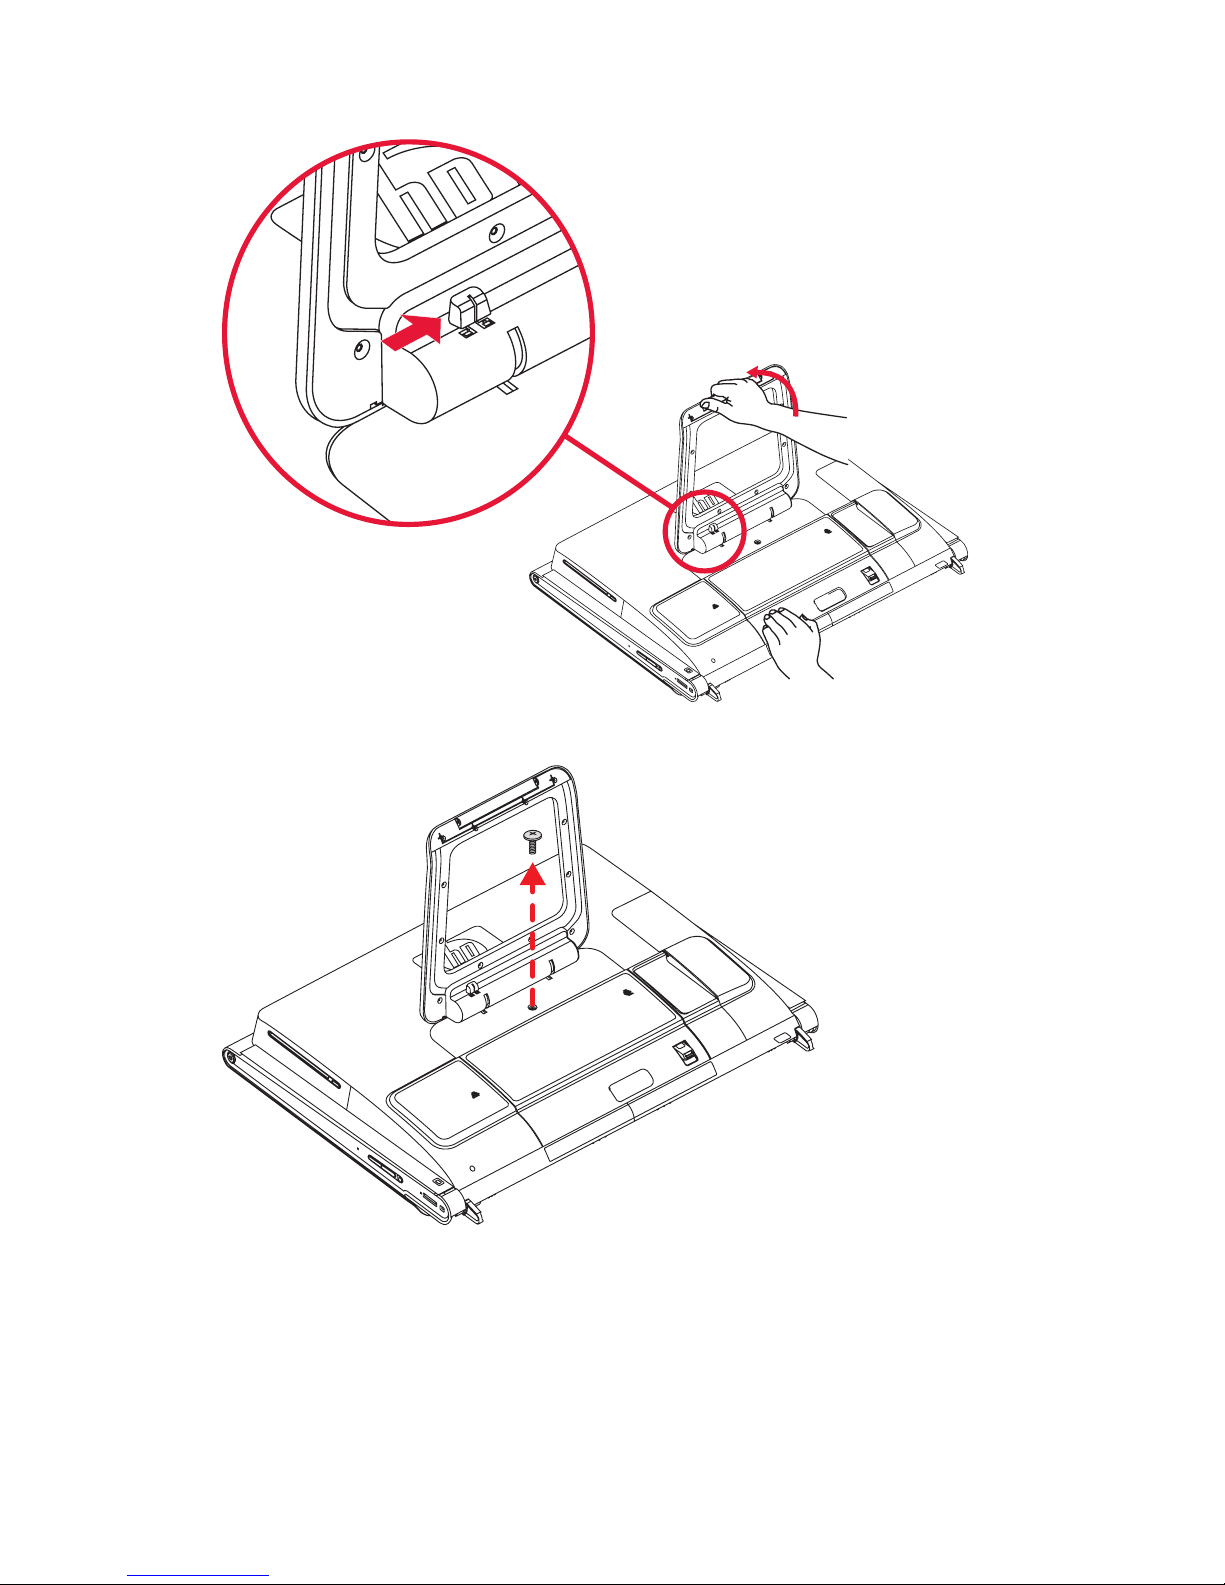
7 稍微施壓拉起電腦支架直到與電腦成為大約 90 度 (A) 角的筆直位置,然後將閂鎖往右移動直到鎖定
位置 (B)。
B
A
8 拆卸將硬碟機 / 記憶體外蓋固定在電腦背部的螺絲。
升級與維護手冊 5
Page 12
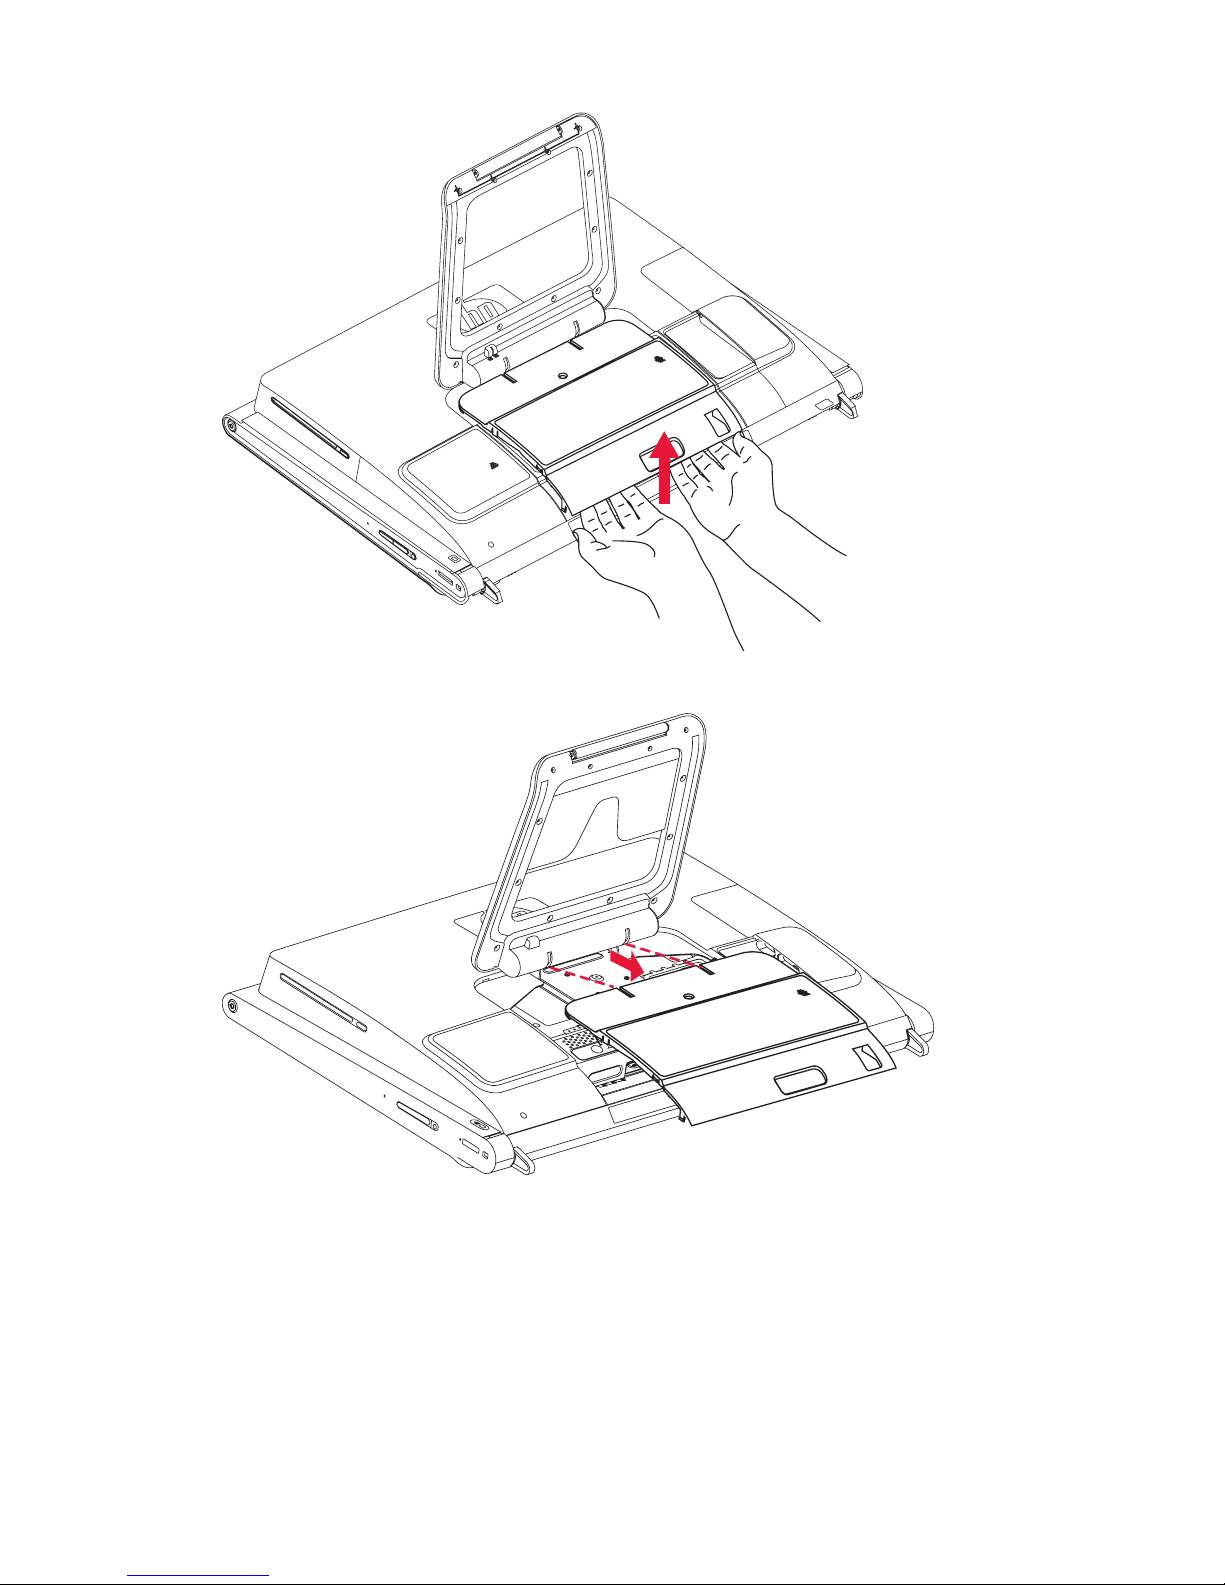
9 將手指伸進外蓋下,然後稍微施力拉開外蓋鬆開卡榫。
10 將外蓋朝自己的方向推動以拆卸外蓋,然後放在一旁。
若要更換記憶體模組,請參閱第 7 頁的 「拆卸與更換記憶體模組」。
若要更換硬碟機,請參閱第 14 頁的 「拆卸與更換硬碟」。
6 升級與維護手冊
Page 13

拆卸與更換記憶體模組
您的 HP TouchSmart PC 中有隨機存取記憶體 (RAM),可以暫時儲存電腦上的資料和指令。
HP TouchSmart PC 隨附一或兩組記憶體模組供您更換。
開始之前
請留意下列要求再進行拆卸與更換記憶體模組。
主機板含有 SO-DIMM (小型雙插入式記憶體模組)專用的插槽。 下列圖示中圓圈位置即為記憶體模組配
對凹槽。
若要判定您 HP TouchSmart PC 使用的記憶體模組之類型和速度,以及取得特定記憶體模組的資訊和規
格,請到:www.hp.com/support。
警告事項: 使用錯誤的記憶體模組類型可能會使電腦受損。
升級與維護手冊 7
Page 14
拆卸記憶體模組
1 請先按照第 1 頁的 「升級步驟開始」所述的程序,再開始進行此程序。
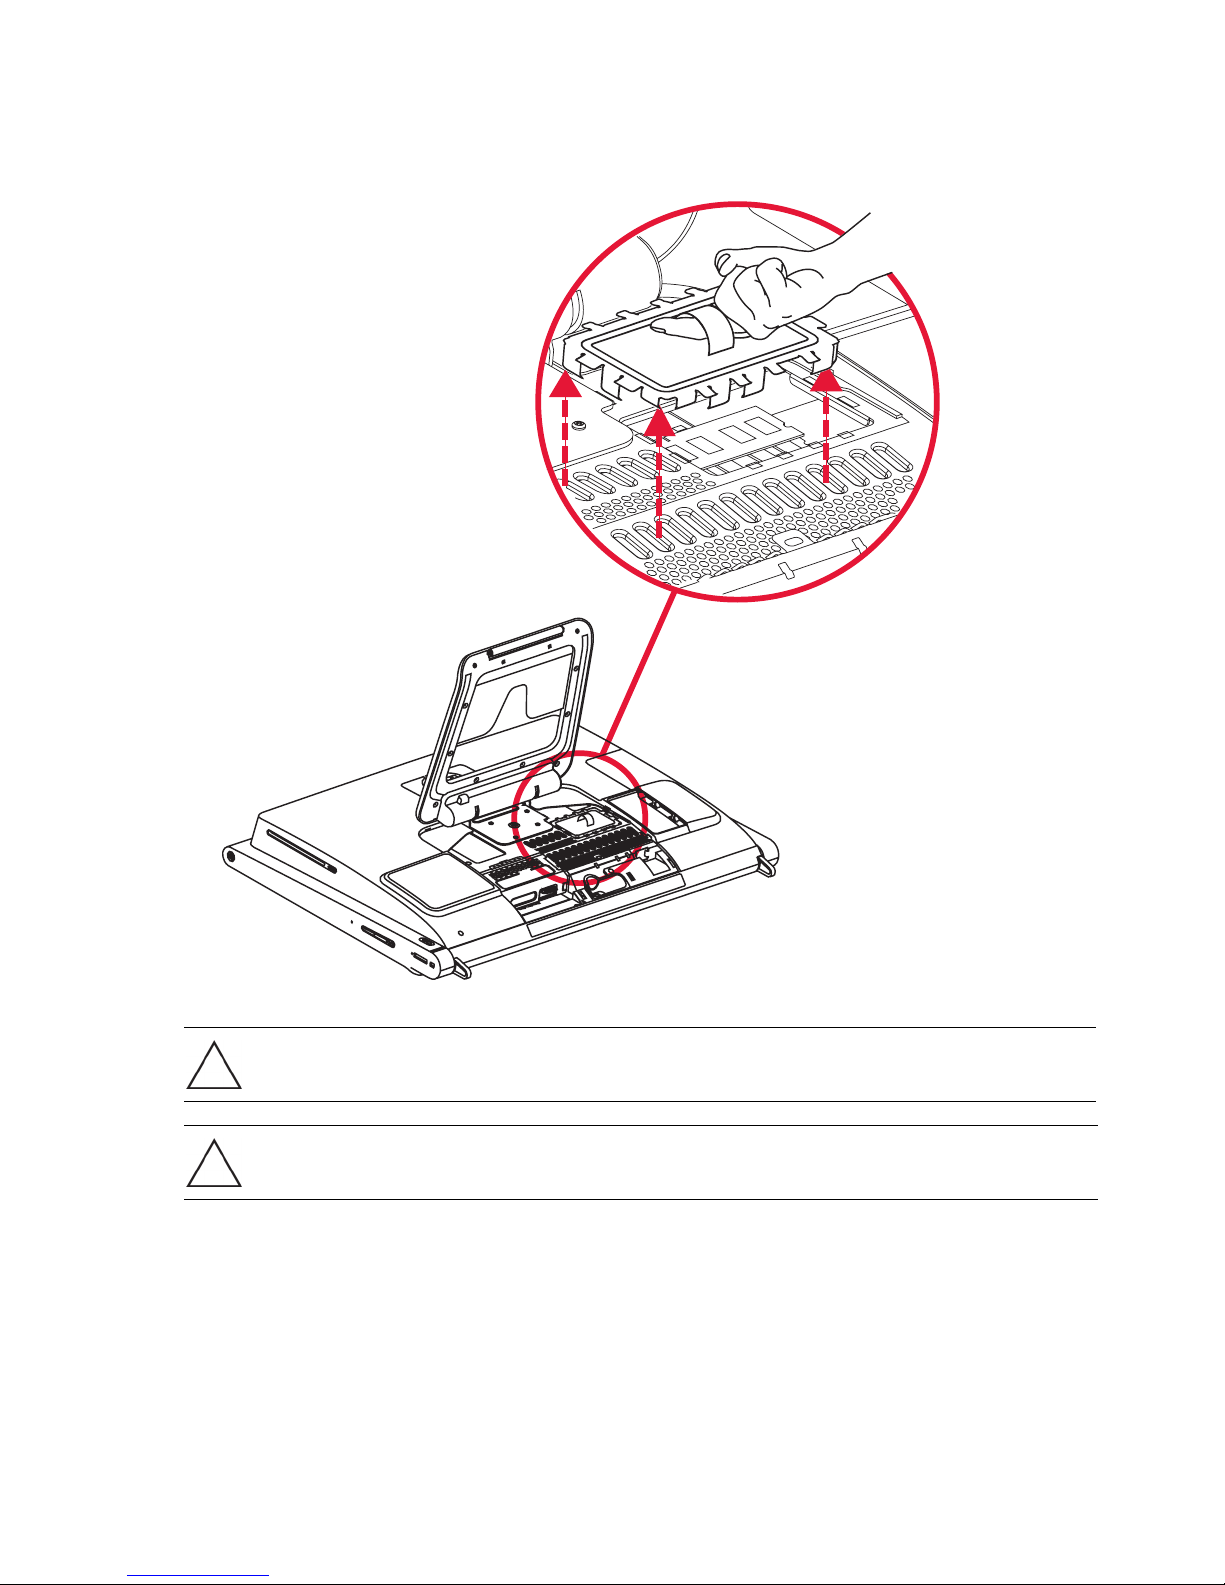
2 找到記憶體模組 EMI 防護罩 (A),將一根手指穿進防護罩拉環以便把整片防護罩拿起來 (B)。
B
A
警告事項: 處理記憶體模組時,請小心不要碰到任何接點。 碰觸接點可能會損壞模組。
警告事項: 請勿將記憶體模組從插槽中拔出。 請使用固定夾閂鎖移除模組。
8 升級與維護手冊
Page 15
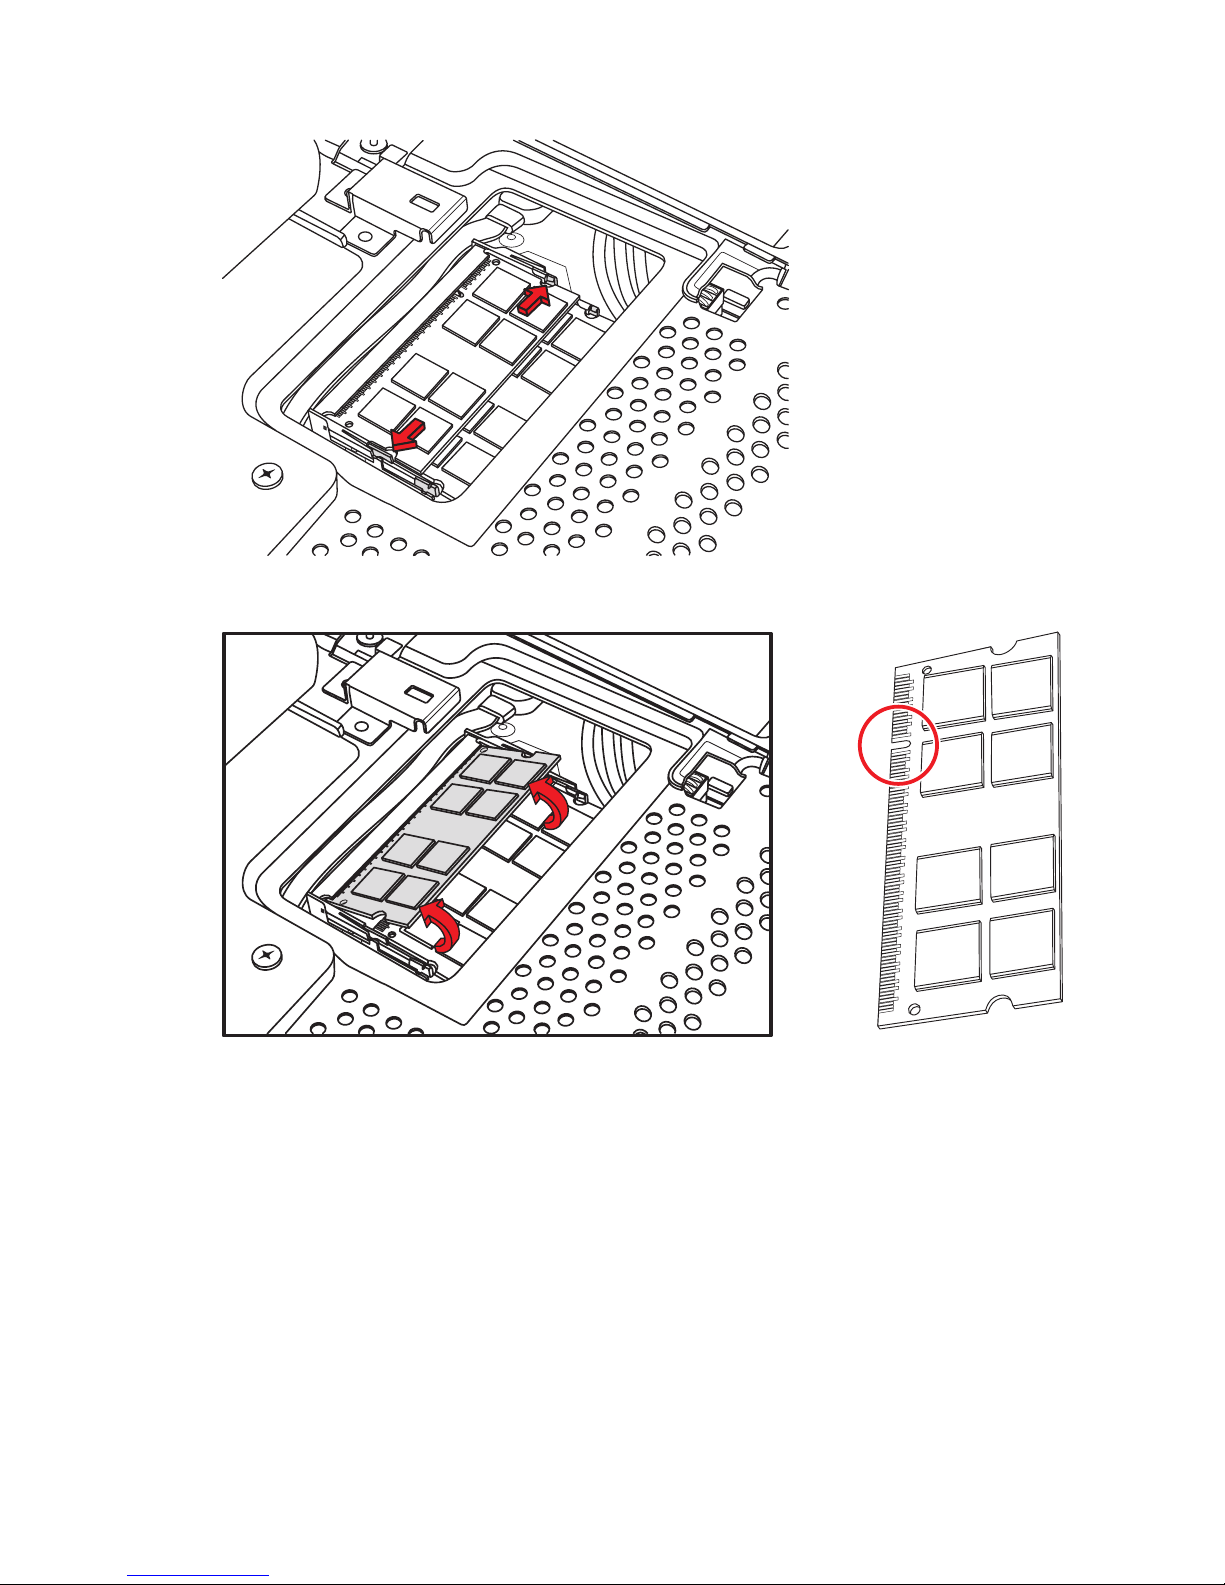
3 將固定夾的兩個閂鎖從記憶體模組往外扳開。 一次推一個可能比較不費力。 記憶體模組會以某個角度
彈起。 兩個記憶體模組都可使用相同程序進行拆卸。
4 從記憶體插槽中拿起記憶體模組。 請記住配對凹槽在接頭邊緣的位置。
5 將記憶體模組存放在防靜電包裝袋中。
升級與維護手冊 9
Page 16
裝回記憶體模組
您升級 HP TouchSmart PC 所使用的記憶體,必須和電腦原廠安裝的記憶體類型、速度相同。 兩個記憶體
模組的容量必須相同,才能達到最佳效能。 兩個記憶體模組都可使用下列的相同程序進行安裝。
警告事項: 處理記憶體模組時,請小心不要碰到任何接點。 碰觸接點可能會損壞模組。
1 拆卸記憶體模組。 請參閱第 8 頁的 「拆卸記憶體模組」。
2 將新的記憶體模組與插槽對齊,接頭邊緣的配對凹槽才會與您剛才拆卸的模組位於相同位置。
注意事項:插槽是有配對的。 如果模組凹槽與插槽無法吻合,請將記憶體模組翻面。
10 升級與維護手冊
Page 17
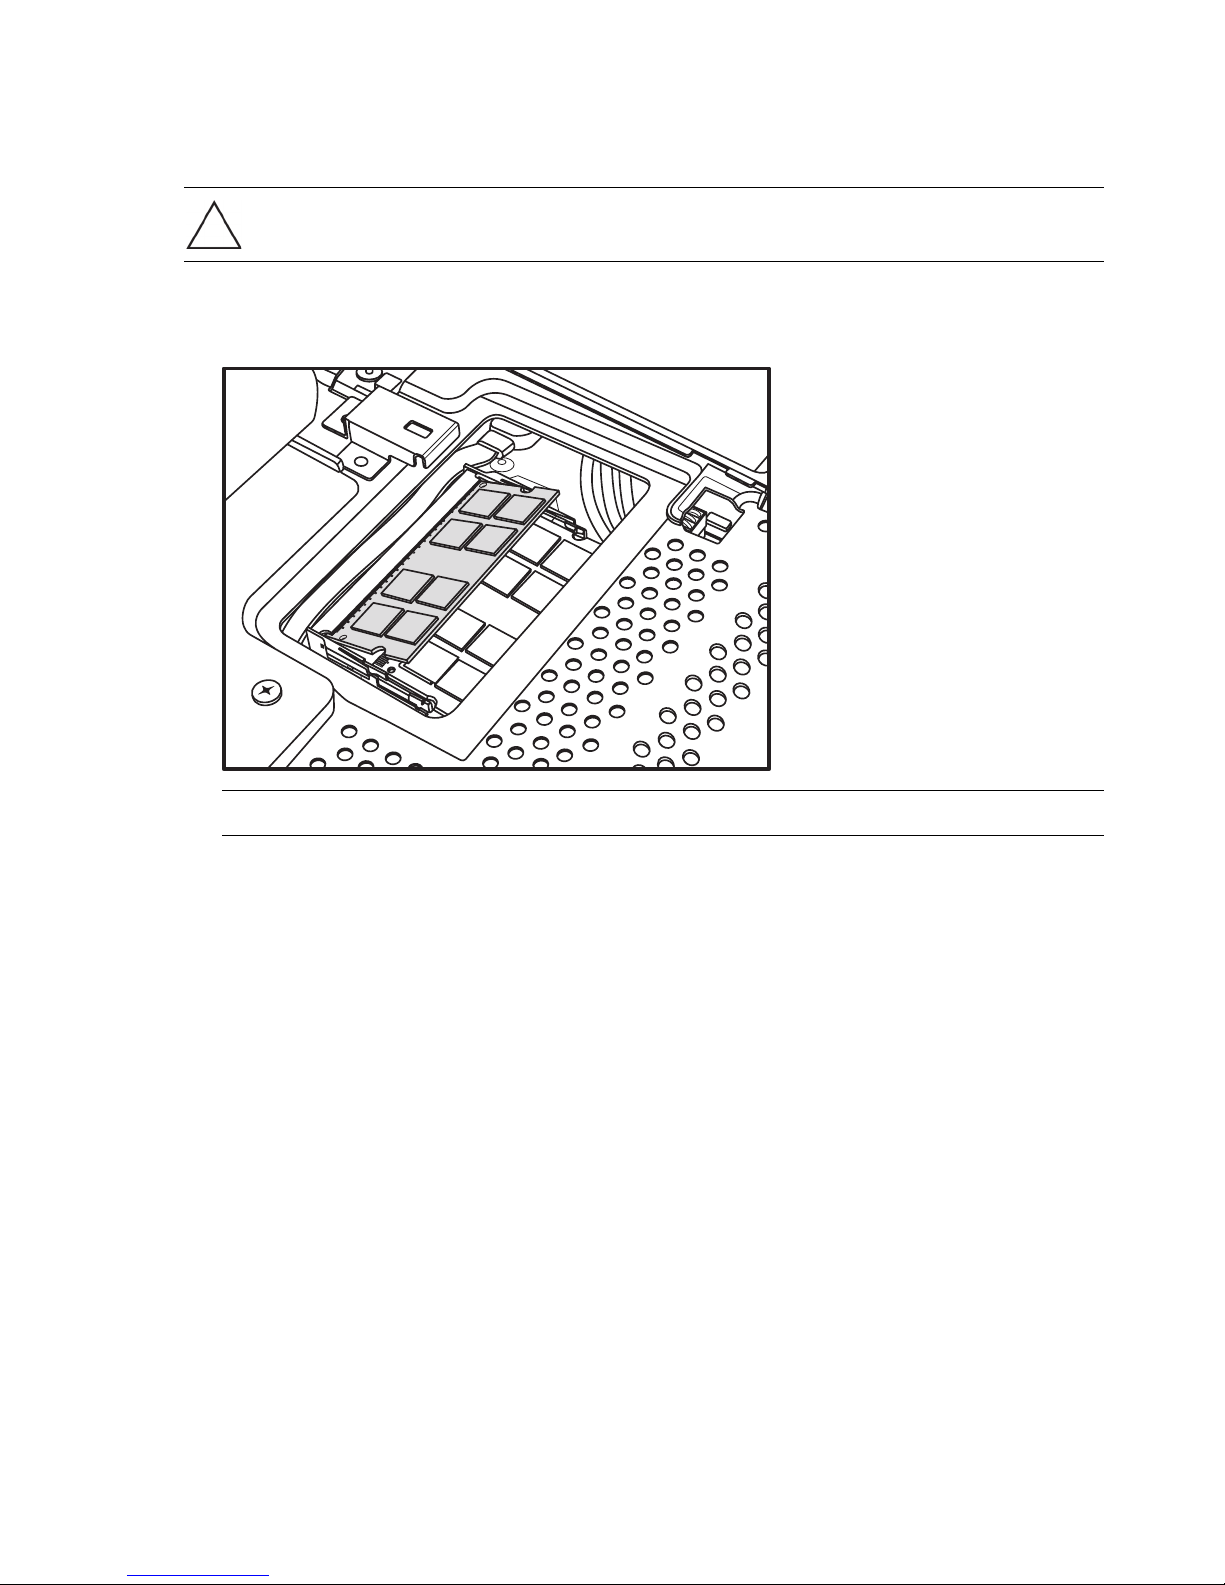
3 將記憶體模組推進記憶體凹槽的底部,直到金色邊緣幾乎完全沒入凹槽裡,然後再壓下記憶體模組外
A
緣讓固定夾卡入鎖定位置。
警告事項: 記憶體模組必須完全插入凹槽才能卡入鎖定位置,否則無法正常運作。 在下列圖示中,記憶體模組
的安裝方式不正確 (A),因為仍可看見金色邊緣。
升級與維護手冊 11
Page 18

4 裝回記憶體模組 EMI 防護罩。
5 將硬碟機 / 記憶體外蓋放到原來的位置上,並推動外蓋讓插槽與電腦支架下的溝槽吻合。
外蓋會 「卡」一聲地卡入定位,這表示側邊卡榫卡進了電腦溝槽。 如果裝回外蓋的方式正確無誤,
外蓋會與大片的背板齊平。
12 升級與維護手冊
Page 19

6 裝回將硬碟架固定到機殼的螺絲。
注意事項:如果更換或新增記憶體模組後,螢幕顯示為空白,表示記憶體安裝方式或類型錯誤。 請拆卸
並重新安裝記憶體模組。
您已經成功地完成這項程序!
現在,請將電腦直立放置在平坦表面上,支架則置於安全與開放的位置。
重新連接電源線與周邊裝置。
升級與維護手冊 13
Page 20

拆卸與更換硬碟
您可以更換或升級硬碟。
本電腦的硬碟為序列 ATA (進階附接技術規格)硬碟,並使用窄型資料傳輸線。
警告事項: 請將您硬碟上的個人檔案備份至某外接式的儲存裝置 (如 DVD),然後再拆卸硬碟。 否則資料可能
會遺失。 在更換硬碟後,您必須使用復原光碟執行 「系統復原」以載入原廠安裝的檔案。 如需更多關於復原程序
的資訊,請參閱 HP TouchSmart PC 隨附的 《有限保固、支援及系統復原手冊》。
拆卸硬碟
1 完成準備為 HP TouchSmart PC 升級的程序。 請參閱第 1 頁的 「升級步驟開始」。
警告: 為了降低電擊或觸及過熱表面等人身傷害的風險,請務必從牆上電源插座拔下電源線,並讓內部系統組件
先冷卻一下再觸碰。
2 找到硬碟機 EMI 防護罩 (A) 的位置,然後使用防護罩拉環將防護罩拿離電腦 (B)。
A
B
14 升級與維護手冊
Page 21

3 這時硬碟機仍然位於電腦裡,請按下電源線與資料傳輸線的閂鎖中斷連接線與硬碟機的連結。
4 拆卸連接線左側的運送螺絲。
5 拉起硬碟機卡榫 (A),然後將硬碟抽出托槽 (B)。
A
B
升級與維護手冊 15
Page 22

6 拿一支十字螺絲起子 (建議使用尖端帶有磁性的螺絲起子)拆卸將硬碟機固定在硬碟架上的四顆螺
絲,然後將硬碟推出硬碟架。
您手中的硬碟架可能與圖中的硬碟架有些許差異。
7 將硬碟機存放在防靜電包裝袋中。
16 升級與維護手冊
Page 23

更換硬碟機
1 如有需要,請拆卸硬碟機。 請參閱第 14 頁的 「拆卸硬碟」。
警告事項: 請小心拿取硬碟機。 請勿敲打或搖晃硬碟。 硬碟機很容易因此損害。
2 將硬碟機推進硬碟架,然後裝回四顆螺絲。
您手中的硬碟架可能與圖中的硬碟架有些許差異。
升級與維護手冊 17
Page 24

3 將硬碟架推進托架,聽到 「卡」一聲後才表示已經結合。
4 將電源線和資料傳輸線接到硬碟機上。
18 升級與維護手冊
Page 25

5 裝回將硬碟架固定到電腦的運送螺絲。
升級與維護手冊 19
Page 26

6 裝回硬碟機 EMI 防護罩,稍微施力按下防護罩讓卡榫結合。
20 升級與維護手冊
Page 27

7 將硬碟機 / 記憶體外蓋放到原來的位置上,並推動外蓋讓插槽與電腦支架下的溝槽吻合。
外蓋會 「卡」一聲地卡入定位,這表示側邊卡榫卡進了電腦。 如果裝回外蓋的方式正確無誤,外蓋
會與大片的背板齊平。
8 裝回將硬碟架固定到機殼的螺絲。
升級與維護手冊 21
Page 28

您已經成功地完成這項程序!
現在,請將電腦直立放置在平坦表面上,支架則置於安全與開放的位置。
重新連接電源線與周邊裝置。
22 升級與維護手冊
Page 29

Upgrading and Servicing Guide
Page 30

Copyright Information
The only warranties for Hewlett-Packard products and services are set forth in the express statements accompanying such products and
services. Nothing herein should be construed as constituting an additional warranty. HP shall not be liable for technical or editorial
errors or omissions contained herein.
HP assumes no responsibility for the use or reliability of its software on equipment that is not furnished by HP.
This document contains proprietary information that is protected by copyright. No part of this document may be photocopied,
reproduced, or translated to another language without the prior written consent of HP.
Hewlett-Packard Company
P.O. Box 4010
Cupertino, CA 95015-4010
USA
Copyright © 2008 Hewlett-Packard Development Company, L.P.
May be licensed in the United States by one or both of U.S. Patents Nos. 4,930,158 and 4,930,160 until August 28, 2008.
Microsoft and Windows are U.S. registered trademarks of Microsoft Corporation. The Windows Vista is either a registered trademark
or trademark of Microsoft Corporation in the United States and/or other countries/regions.
HP supports lawful use of technology and does not endorse or encourage the use of our products for purposes other than those
permitted by copyright law. The information in this document is subject to change without notice.
Page 31

Table of Contents
Start Here.....................................................................................................................................1
Safety Information ....................................................................................................................2
Locating Components................................................................................................................2
Opening the Computer .............................................................................................................3
Removing and Replacing a Memory Module ....................................................................................7
Removing a Memory Module .....................................................................................................8
Replacing a Memory Module...................................................................................................10
Removing and Replacing the Hard Disk Drive .................................................................................14
Removing the Hard Disk Drive ................................................................................................. 14
Replacing a Hard Disk Drive....................................................................................................17
Table of Contents iii
Page 32

iv Upgrading and Servicing Guide
Page 33

Upgrading and Servicing Guide
This guide provides instructions for replacing or upgrading the memory and the hard disk drive in your
HP TouchSmart PC.
Start Here
Before you decide to upgrade or service the computer, refer to the product specifications for system
upgradability information. Go to http://www.hp.com/support for product information.
Read the following items before attempting to upgrade or service the HP TouchSmart PC.
! These procedures assume familiarity with the general terminology associated with personal computers,
and with the safety practices and regulatory compliance required for using and modifying electronic
equipment.
! Write down and save the computer model and serial numbers, all installed options, and other
information about the computer. It is easier to consult this information than to open and examine the
computer.
! It is recommended that you use an antistatic wrist strap and stand on a conductive foam pad when
working on the computer.
! Hewlett-Packard recommends that you use a magnetic-tipped screwdriver when opening and closing
the HP TouchSmart PC, to make it easier to remove and install the screws.
WARNING: Always disconnect the HP TouchSmart PC from the power source before removing
the memory cover or the back cover. Failure to do so before you open the HP TouchSmart PC
or perform any procedures can result in personal injury or equipment damage.
Upgrading and Servicing Guide 1
Page 34

Safety Information
This product has not been evaluated for connection to an “IT” power system (an AC distribution system with
no direct connection to the earth, according to IEC 60950).
WARNING: Please read “Additional Safety Information” in the Limited Warranty, Support, and
System Recovery Guide before installing and connecting your system to the electrical power
system.
WARNING: Avoid touching sharp edges inside the computer.
WARNING: Take care when lifting or moving your computer. The computer is heavy.
Locating Components
Refer to the following illustration to locate components of the HP TouchSmart PC.
A
B
C
H
D
G
EF
A: Pocket media drive bay D: Computer stand G: Hard drive/memory cover
B: Optical disc drive slot E: Power adapter connector H: Connector cover
C: Back cover F: Wireless keyboard and mouse
receiver
2 Upgrading and Servicing Guide
Page 35

Opening the Computer
To avoid injury and equipment damage, always complete the following steps in order, when opening the
HP TouchSmart PC.
1 Remove all media and external devices (CDs, DVDs, memory cards, USB devices, pocket media drive,
and external hard disk drives) from the HP TouchSmart PC.
CAUTION: Static electricity can damage the electronic components of the HP TouchSmart PC or
optional equipment. Ensure that you are discharged of static electricity by briefly touching a
grounded metal object.
2 Tap th e Windows Vista start button
WARNING: To reduce the risk of personal injury from electrical shock or hot surfaces,
disconnect the power cord from the wall outlet, and allow the internal system components to
cool before touching them.
™
, and then tap Shut Down.
3 After the system has completely shut down, disconnect the power adapter (A) from the back of the
HP TouchSmart PC.
A
Upgrading and Servicing Guide 3
Page 36

4 Remove the connector cover by inserting your finger under the gap on the bottom-left side of the
cover (A), and then pulling gently.
A
5 Disconnect all other attached cables from the back of the HP TouchSmart PC.
6 Place the computer face-down on a soft flat surface. HP recommends that you set down a blanket,
towel, or other soft cloth to protect the touch screen surface from scratches or other damage.
4 Upgrading and Servicing Guide
Page 37

7 Apply additional pressure to lift the computer stand as far as it will go to an upright position, about
90 degrees (A) from the computer, and then move the latch to the right until it is in the locked
position (B).
B
A
8 Remove the screw that secures the hard disk drive/memory cover to the back of the computer.
Upgrading and Servicing Guide 5
Page 38

9 Insert your fingertips just under the cover, and then pull up firmly to release the tabs.
10 Slide the cover out toward you to remove it, and then set it aside.
To replace a memory module, see “Removing and Replacing a Memory
Module” on page 7.
To replace a hard disk drive, see “Removing and Replacing the Hard Disk
Drive” on page 14.
6 Upgrading and Servicing Guide
Page 39

Removing and Replacing a Memory Module
Your HP TouchSmart PC comes with random access memory (RAM), which temporarily stores data and
instructions on your computer. The HP TouchSmart PC ships with one or two memory modules that you can
replace.
Before you begin
Observe the following requirements before removing and replacing the memory module.
The motherboard contains sockets for SO-DIMMs (small outline dual in-line memory modules). A memory
module with the key slot circled is shown in the following illustration.
To determine which type and speed of memory module your HP TouchSmart PC uses, and for specific
memory module information and specifications, go to www.hp.com/support
CAUTION: Using the wrong type of memory module could damage the computer.
Upgrading and Servicing Guide 7
Page 40

Removing a Memory Module
1 Before you begin this procedure, follow the procedures in “Start Here” on page 1.
2 Locate the memory module EMI shield (A), hook a finger through the shield loop, and then lift it up and
out of the way (B).
B
A
CAUTION: When handling a memory module, be careful not to touch any of the contacts.
Doing so may damage the module.
CAUTION: Do not pull the memory module out of the socket. Use the latches of the retaining
clips to remove the module.
8 Upgrading and Servicing Guide
Page 41

3 Push the two latches of the retaining clips away from the memory module. It may be easier to push one
latch at a time. The memory module pops up at an angle. Both memory modules can be removed by
using the same procedure.
4 Lift the memory module from the memory socket. Note the key slot on the connector edge.
5 Store the memory module in antistatic packaging.
Upgrading and Servicing Guide 9
Page 42

Replacing a Memory Module
Upgrade the memory in your HP TouchSmart PC with memory of the same type and speed as the memory
originally installed. The capacity for both memory modules must match for optimal performance. Both
memory modules can be installed by using the same procedure listed below.
CAUTION: When handling a memory module, be careful not to touch any of the contacts.
Doing so may damage the module.
1 Remove the memory module. See “Removing a Memory Module” on page 8.
2 Align the new memory module with the socket, so that the key slot on the connector edge is the same
as the module that you removed.
NOTE: The sockets are keyed. If the module slot does not match the socket, turn the memory
module over.
10 Upgrading and Servicing Guide
Page 43

3 Slide the memory module all the way into the memory slot, until the gold edge is almost completely
A
hidden in the slot, and then push down the outer edge of the memory module until the retaining clips
snap into place.
CAUTION: The memory module must be inserted all the way into the slot before it is snapped
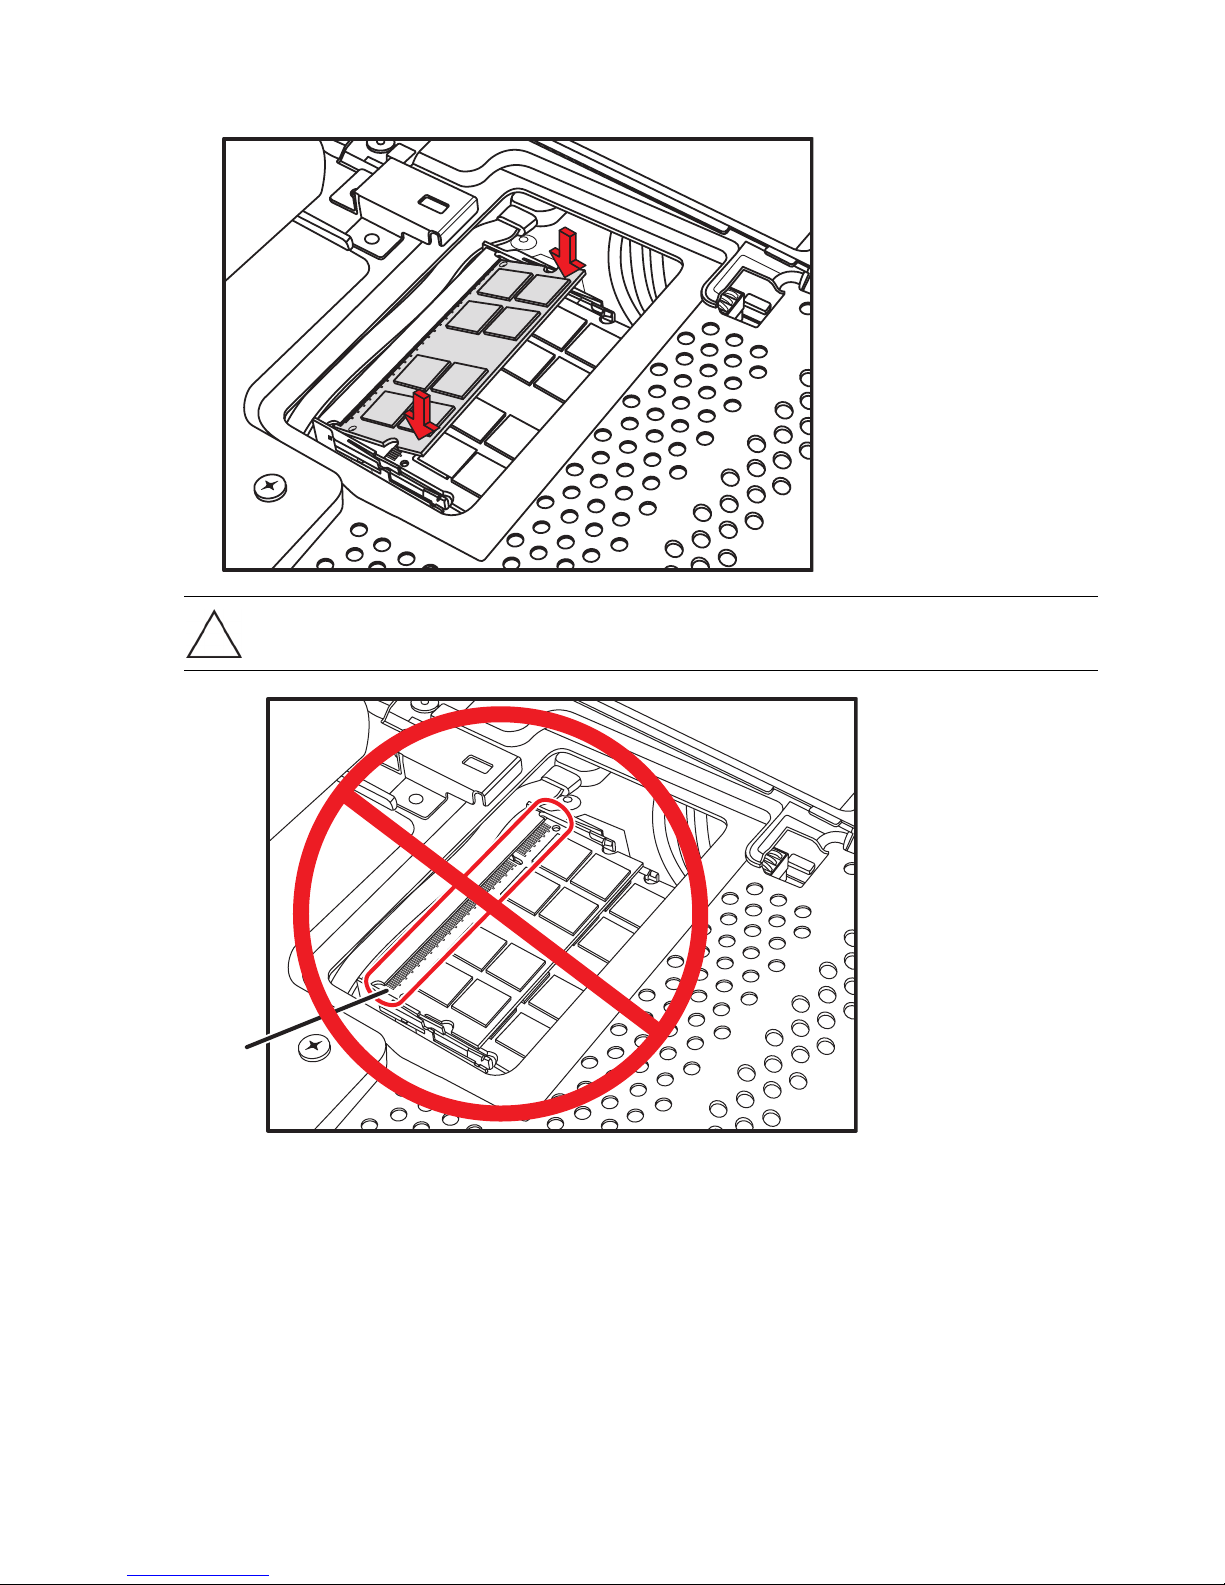
down into place; otherwise it will not work properly. In the following illustration, a memory
module is installed incorrectly (A), with the gold edge showing.
Upgrading and Servicing Guide 11
Page 44

4 Replace the memory module EMI shield.
5 Replace the hard disk drive/memory cover by lowering it into place, and sliding it so the slots on the
cover fit into the grooves under the computer stand.
The cover snaps into place with a click as the side tabs engage with the grooves in the computer.
When the cover is replaced properly, it will be flush with the larger back cover.
12 Upgrading and Servicing Guide
Page 45

6 Replace the screw that secures the hard disk drive cage to the chassis.
NOTE: If a blank screen is displayed after you replace or add a memory module, the memory is installed
incorrectly, or it is the wrong type of memory. Remove and reinstall the memory module.
You have completed this procedure successfully!
Now, place the computer upright on a flat surface with the stand in a safe and open position.
10° min.
40°max
Reconnect power cables and peripherals.
Upgrading and Servicing Guide 13
Page 46

Removing and Replacing the Hard Disk Drive
You can replace or upgrade the hard disk drive.
The hard disk drive is a Serial ATA (advanced technology attachment) drive, which uses a narrow
data cable.
CAUTION: Before removing the hard disk drive, back up any personal files on the hard disk
drive to an external storage device, such as a DVD. Failure to do so may result in data loss.
After replacing the hard disk drive, you need to run System Recovery using recovery discs
to load the factory-installed files. For details about the recovery procedure, refer to the
Limited Warranty, Support, and System Recovery Guide included with your HP TouchSmart PC.
Removing the Hard Disk Drive
1 Complete the procedures to prepare the HP TouchSmart PC. See “Start Here” on page 1.
WARNING: To reduce the risk of personal injury from electrical shock or hot surfaces,
disconnect the power cord from the wall outlet, and allow the internal system components to
cool before touching them.
2 Locate the hard disk drive EMI shield (A), and then lift the shield up and out of the way (B), using the
shield loop.
A
B
14 Upgrading and Servicing Guide
Page 47

3 While the hard disk drive is still in the computer, disconnect the power and data cables on the hard
disk drive, by pressing down the latches and then removing them from the drive.
4 Remove the shipping screw just to the left of the cables.
5 Pull up on the hard disk drive tab (A), and then pull the drive from its bay (B).
B
A
Upgrading and Servicing Guide 15
Page 48

6 With a Phillips screwdriver (magnetic-tipped recommended), remove the four screws that secure the
hard disk drive to the cage, and then slide the hard disk drive out of the cage.
Your hard disk drive cage may look slightly different from the illustration.
7 Place the hard disk drive in an anti-static bag.
16 Upgrading and Servicing Guide
Page 49

Replacing a Hard Disk Drive
1 If necessary, remove the hard disk drive. See “Removing the Hard Disk Drive” on page 14.
CAUTION: Take care when handling a hard disk drive. Do not bang or shake it. It can be easily
damaged.
2 Slide the hard disk drive into the cage and then replace the four screws.
Your hard disk drive cage might look different from the illustration.
Upgrading and Servicing Guide 17
Page 50

3 Slide the hard disk drive cage into the bay until you hear the click indicating it is engaged.
4 Connect the power and data cables to the hard disk drive.
18 Upgrading and Servicing Guide
Page 51

5 Replace the shipping screw that holds the hard disk drive cage to the computer.
Upgrading and Servicing Guide 19
Page 52

6 Replace the hard drive EMI shield, pressing it firmly into place so the tabs engage.
20 Upgrading and Servicing Guide
Page 53

7 Replace the hard disk drive/memory cover by lowering it into place, and sliding it so the slots on the
cover fit into the grooves under the computer stand.
The cover snaps into place with a click as the side tabs engage in the computer. When the cover is
replaced properly, it will be flush with the larger back cover.
8 Replace the screw that secures the hard disk drive cage to the chassis.
Upgrading and Servicing Guide 21
Page 54

You have completed this procedure successfully!
Now, place the computer upright on a flat surface with the stand in a safe and open position.
Reconnect power cables and peripherals.
10° min.
40°max
22 Upgrading and Servicing Guide
Page 55

Page 56

Copyright © 2008 Hewlett-Packard Development Company, L.P.
手冊中所包含之資訊可隨時更改,恕不另行通知。
The information contained herein is subject to change without notice.
Printed in xxxxx
 Loading...