

Page 1

HP TouchSmart PC
User Guide
Copyright Information
The only warranties for Hewlett-Packard products and services are set forth in the express statements accompanying such
products and services. Nothing herein should be construed as constituting an additional warranty. HP shall not be liable for
technical or editorial errors or omissions contained herein.
HP assumes no responsibility for the use or reliability of its software on equipment that is not furnished by HP.
This document contains proprietary information that is protected by copyright. No part of this document may be photocopied,
reproduced, or translated to another language without the prior written consent of HP.
Hewlett-Packard Company
P.O. Box 4010
Cupertino, CA 95015-4010
USA
Copyright © 2007 Hewlett-Packard Development Company, L.P.
May be licensed in the United States by one or both of U.S. Patents Nos. 4,930,158 and 4,930,160 until August 28, 2008.
Microsoft and Windows Vista are U.S. registered trademarks of Microsoft Corporation. The Windows logo and Windows
Vista are trademarks or registered trademarks of Microsoft Corporation in the United States and/or other countries/regions.
HP supports lawful use of technology and does not endorse or encourage the use of our products for purposes other than
those permitted by copyright law. The information in this document is subject to change without notice.
HP TouchSmart PC Documentation
Your HP TouchSmart PC includes several guides to help you perform various tasks.
Printed information Guide found on your computer hard disk drive
HP TouchSmart PC User Guide Getting Started guide
Limited Warranty and Support guide
Troubleshooting and Maintenance Guide
HP TouchSmart PC User Guide provides information about setting up and using all the features of your
HP TouchSmart PC. You will also find information about various software such as Windows Media Center,
HP SmartCenter, HP PhotoSmart Touch, HP SmartCalendar, and more.
Getting Started provides information about using your HP computer, the Microsoft
operating system, the Windows Media Center, and some of the hardware and the software programs included
with the computer. Onscreen guides are available in the User Guides folder on your computer. Click the
Windows Start Button
Started.
Limited Warranty and Support guide provides information about your computer warranty and how to
obtain support.
Troubleshooting and Maintenance Guide provides information about tasks you can perform to
ensure the trouble-free operation of your computer and to ease the recovery of important information on your
computer should problems arise in the future. It also contains a series of tables that describe solutions you can try
to resolve problems that may occur when you install and use your computer.
For more detailed information about where you will find specific information in each of these guides, refer
to Locating Information about Your Computer in this guide.
®
on the taskbar, click All Programs, User Guides, and then click Getting
®
Windows Vista™
HP Touchsmart PC User Guide i
Page 2

Accessing Software and Performing Other PC Tasks
You can access your software and perform various tasks on your HP TouchSmart PC using the touch screen,
keyboard, mouse, stylus, or remote control. Some tasks are better suited to the touch screen, such as using
the HP SmartCenter programs, browsing the Internet, or accessing your favorite programs. Some activities,
such as typing search text, are better suited for the keyboard.
You always have the flexibility to use various ways to navigate your PC, create messages, and access your
music, TV programs, and photos.
NOTE: All software that you purchase and install separately is accessible with the touch screen, but some
programs are easier to use with a stylus, keyboard, or mouse.
Accessing Software and Performing Other PC Tasks
Software and other
PC activities
HP SmartCenter Best Good Yes
HP SmartCalendar Best Good No
HP Photosmart Touch Best Good No
Windows Media Center Better Good Best
Software included with the PC Good Best No
Software you install Good Best No
Internet access Good Best No
Windows Vista operating
system
Desktop navigation Better Best No
Turn the PC on or put it in
Standby mode
Tou ch scree n
Finger/Stylus
Good Best No
On only Best Best
Keyboard/mouse Remote control
ii HP Touchsmart PC User Guide
Page 3

Table of Contents
Setting Up the HP TouchSmart PC .................................................................................1
HP TouchSmart PC Cables.........................................................................................................7
Setting Up the HP TouchSmart PC....................................................................................................7
Using surge protection ..............................................................................................................7
Connecting the power cord .......................................................................................................7
Setting up the wireless keyboard and mouse................................................................................8
Turning on the HP TouchSmart PC ..............................................................................................8
Using the Wireless Keyboard or Mouse ...........................................................................................9
Using the wireless keyboard ......................................................................................................9
Using the wireless mouse.........................................................................................................11
Replacing batteries in the keyboard or mouse............................................................................ 11
Manually sync the wireless keyboard or mouse.......................................................................... 12
Connecting the TV Signal Source to the PC.....................................................................................13
Connecting the IR emitter.........................................................................................................14
Connecting an HP Photo Printer ....................................................................................................15
Connecting a printer...............................................................................................................15
Setting Up the Remote Control ......................................................................................................16
Using a Wireless Network and Bluetooth Devices ...........................................................................17
Setting up a wireless local area network ...................................................................................17
Using Bluetooth devices ........................................................................................................
Connecting to the Internet.............................................................................................................18
Setting up a network and the HP TouchSmart PC........................................................................19
..17
Using the HP TouchSmart PC.......................................................................................21
Using the HP TouchSmart PC Screen.............................................................................................. 21
Selecting items with your touch screen ......................................................................................21
Optimizing the screen for touch or the mouse ............................................................................21
About touch screen technology ................................................................................................22
Cleaning the HP TouchSmart PC Screen ....................................................................................23
Using the stylus ......................................................................................................................23
Using the Built-in Web Camera and Microphone ............................................................................24
Having a video chat or making conference calls ........................................................................24
Table of Contents iii
Page 4

Using the HP TouchSmart PC Software...........................................................................................24
What is HP SmartCenter?........................................................................................................24
Navigating in HP SmartCenter .................................................................................................26
Opening HP SmartCenter........................................................................................................ 26
Using the remote control with HP SmartCenter ...........................................................................26
Changing the weather location ................................................................................................ 27
Changing the HP SmartCenter clock settings..............................................................................28
Using HP SmartCalendar.........................................................................................................29
Moving notes to your calendar.................................................................................................33
Using HP Photosmart Touch ..........................................................................................................34
Opening HP Photosmart Touch................................................................................................. 34
Transferring your photos to the PC............................................................................................34
Working with digital images....................................................................................................34
HP Photosmart Touch shortcuts ................................................................................................35
Adding pictures to your HP Photosmart Touch library ..................................................................35
Searching for pictures with HP Photosmart Touch........................................................................ 36
Selecting pictures in HP Photosmart Touch ................................................................................. 36
Editing pictures in HP Photosmart Touch .................................................................................... 36
Printing pictures in HP Photosmart Touch ...................................................................................37
Other HP SmartCenter Features..................................................................................................
...38
Personalizing your HP SmartCenter page ..................................................................................38
Changing what you can launch from HP SmartCenter.................................................................39
Using the touch screen to access Windows Media Center ................................................................41
Using Tablet PC software to enter text with the touch screen ........................................................43
Using Windows Journal software to create hand-written notes and drawings .................................43
Upgrading the HP TouchSmart PC ...............................................................................45
Safety Information .......................................................................................................................45
Opening and Closing the HP TouchSmart PC..................................................................................45
Preparing the HP TouchSmart PC..............................................................................................45
Before opening the HP TouchSmart PC......................................................................................46
After closing the HP TouchSmart PC..........................................................................................46
Removing the rear cover .........................................................................................................47
Replacing the rear cover .........................................................................................................48
Removing the vertical cover .....................................................................................................48
Replacing the vertical cover..................................................................................................... 49
Adding Memory..........................................................................................................................49
Removing a memory module.................................................................................................... 49
Installing a memory module .....................................................................................................50
Removing and Replacing the Hard Disk Drive .................................................................................51
Removing the hard disk drive...................................................................................................51
Replacing the hard disk drive...................................................................................................52
Locating Information About Your Computer ................................................................53
Index .........................................................................................................................54
iv HP TouchSmart PC User Guide
Page 5
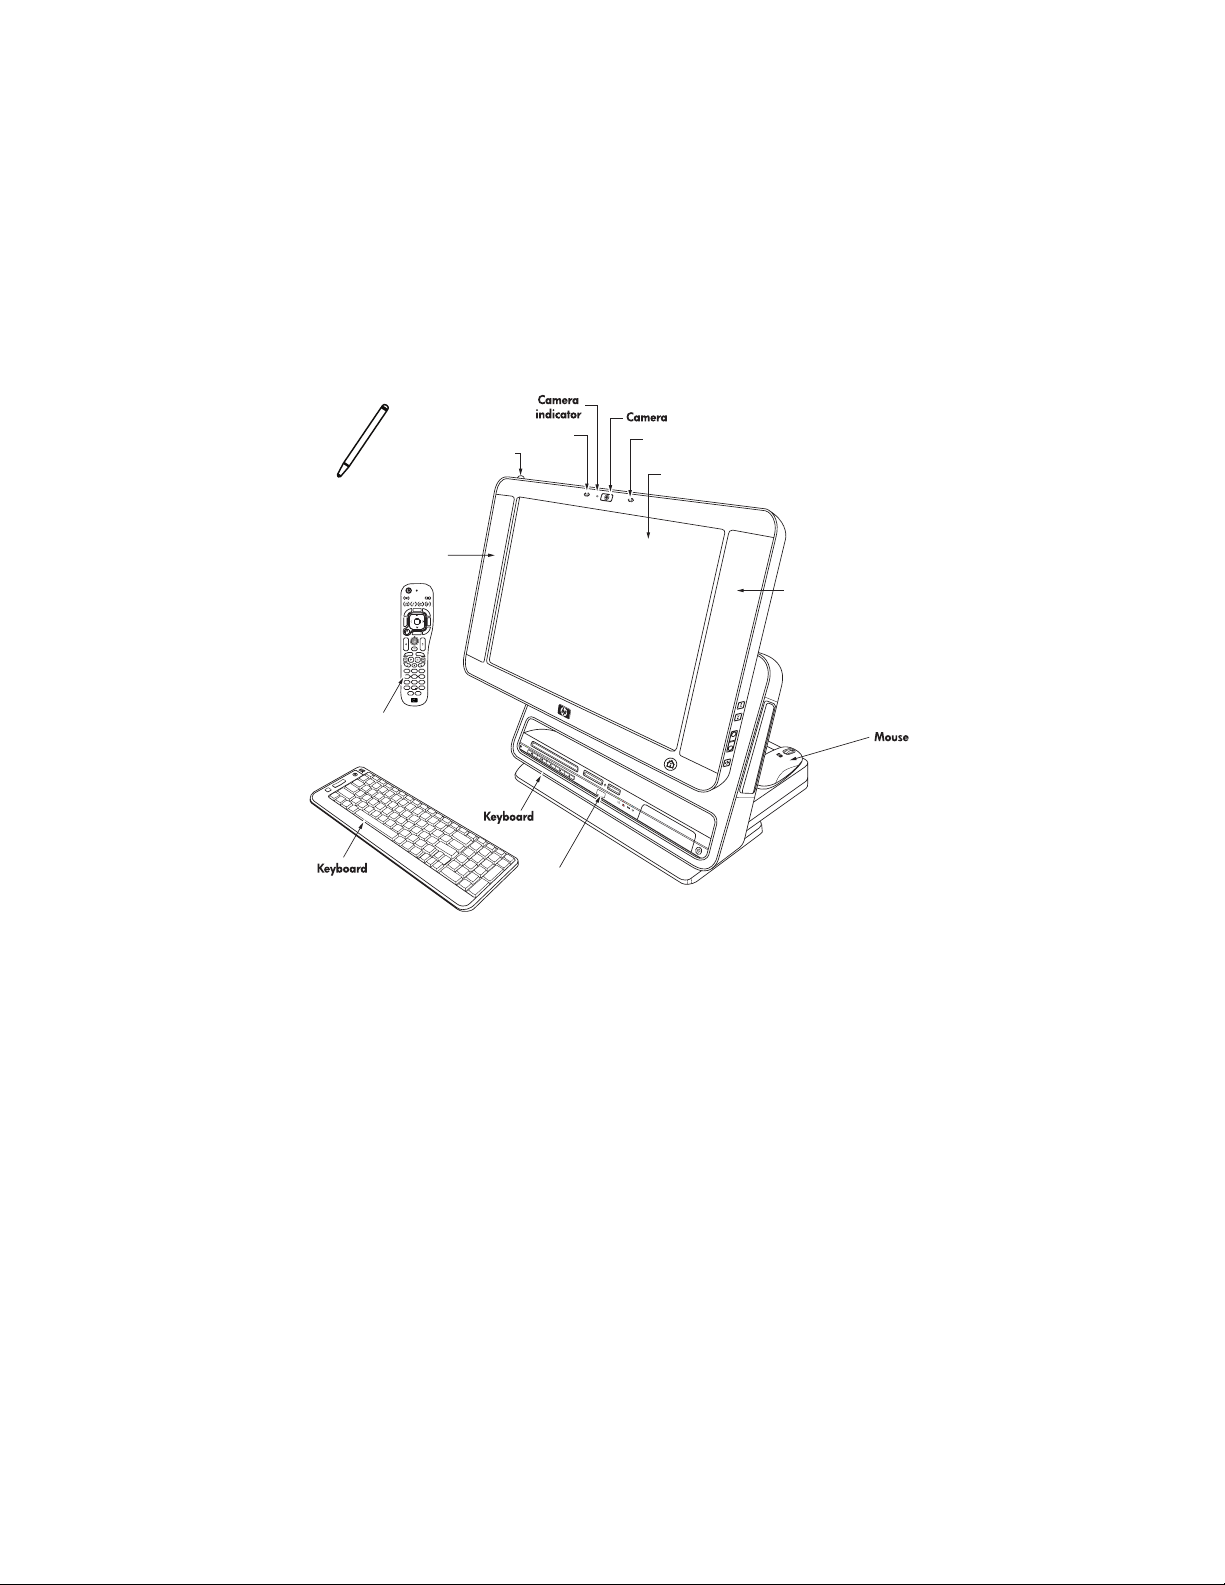
Setting Up the HP TouchSmart PC
This section provides figures you can use to locate the HP TouchSmart PC hardware, and information about
setting up the HP TouchSmart PC and making connections.
Stylus and Stylus storage
Microphone
Microphone
Touch-enabled screen
Speaker
On/Off
Visualization Print
Picture
VideoRadio Music
Guide
V
L
T
i
v
d
e
e
T
d
V
r
o
c
e
R
OK
Asspect
DVD menu
w
o
h
S
e
d
i
back
l
S
More Info
Volume
Channel
Ch+
+
Mute
_
Ch-
Eject
Record
abc
def
3
1
2
ghi
jkl mno
6
4
5
pqrs tuv
wxyz
8 9
7
#
0
*
Enter
Clear
Remote control
Speaker
+
-
(Stored)
(Stored)
Remote control
sensor window
Adjustable19-inch touch-enabled widescreen — move it up and down and tilt it back and forth at
the angle that is comfortable to you.
Built-in microphone array — use them individually, or use them with the Web camera.
Built-in Web camera and indicator — use the camera individually or use with the microphone array
to have video chats or make video conference calls over the Internet using your favorite chat software that
supports video.
High-performance built-in 2.0 speakers — use them for a powerful media experience when
watching Live TV, listening to music, or watching your home videos and DVD discs.
Wireless keyboard and mouse — keyboard fits into a convenient hideaway storage bay under the
display and mouse sits behind the display when you are not using it. To conserve battery power, move the
switch on the bottom of the mouse to the Off position before storing the mouse. You can use the keyboard
to type messages, turn on the PC, and navigate your PC software.
Remote control — point it at the remote control sensor window, and navigate all of your
Windows Media Center options, such as watching and recording your favorite TV shows, playing a
slideshow of your vacation photos, or playing your music playlists. See “Setting Up the Remote Control.”
Stylus and Stylus storage — use it as a pointer device to more precisely control the touch screen
navigation. Press down on the stylus to lock it in place and press it again to release it from its holder.
Setting Up the HP TouchSmart PC 1
Page 6
DVD drive
SmartCenter
Activity LED Indicators
Previous Track
Play/Pause
Next Track
Audio/Video
Connectors
On/Standby
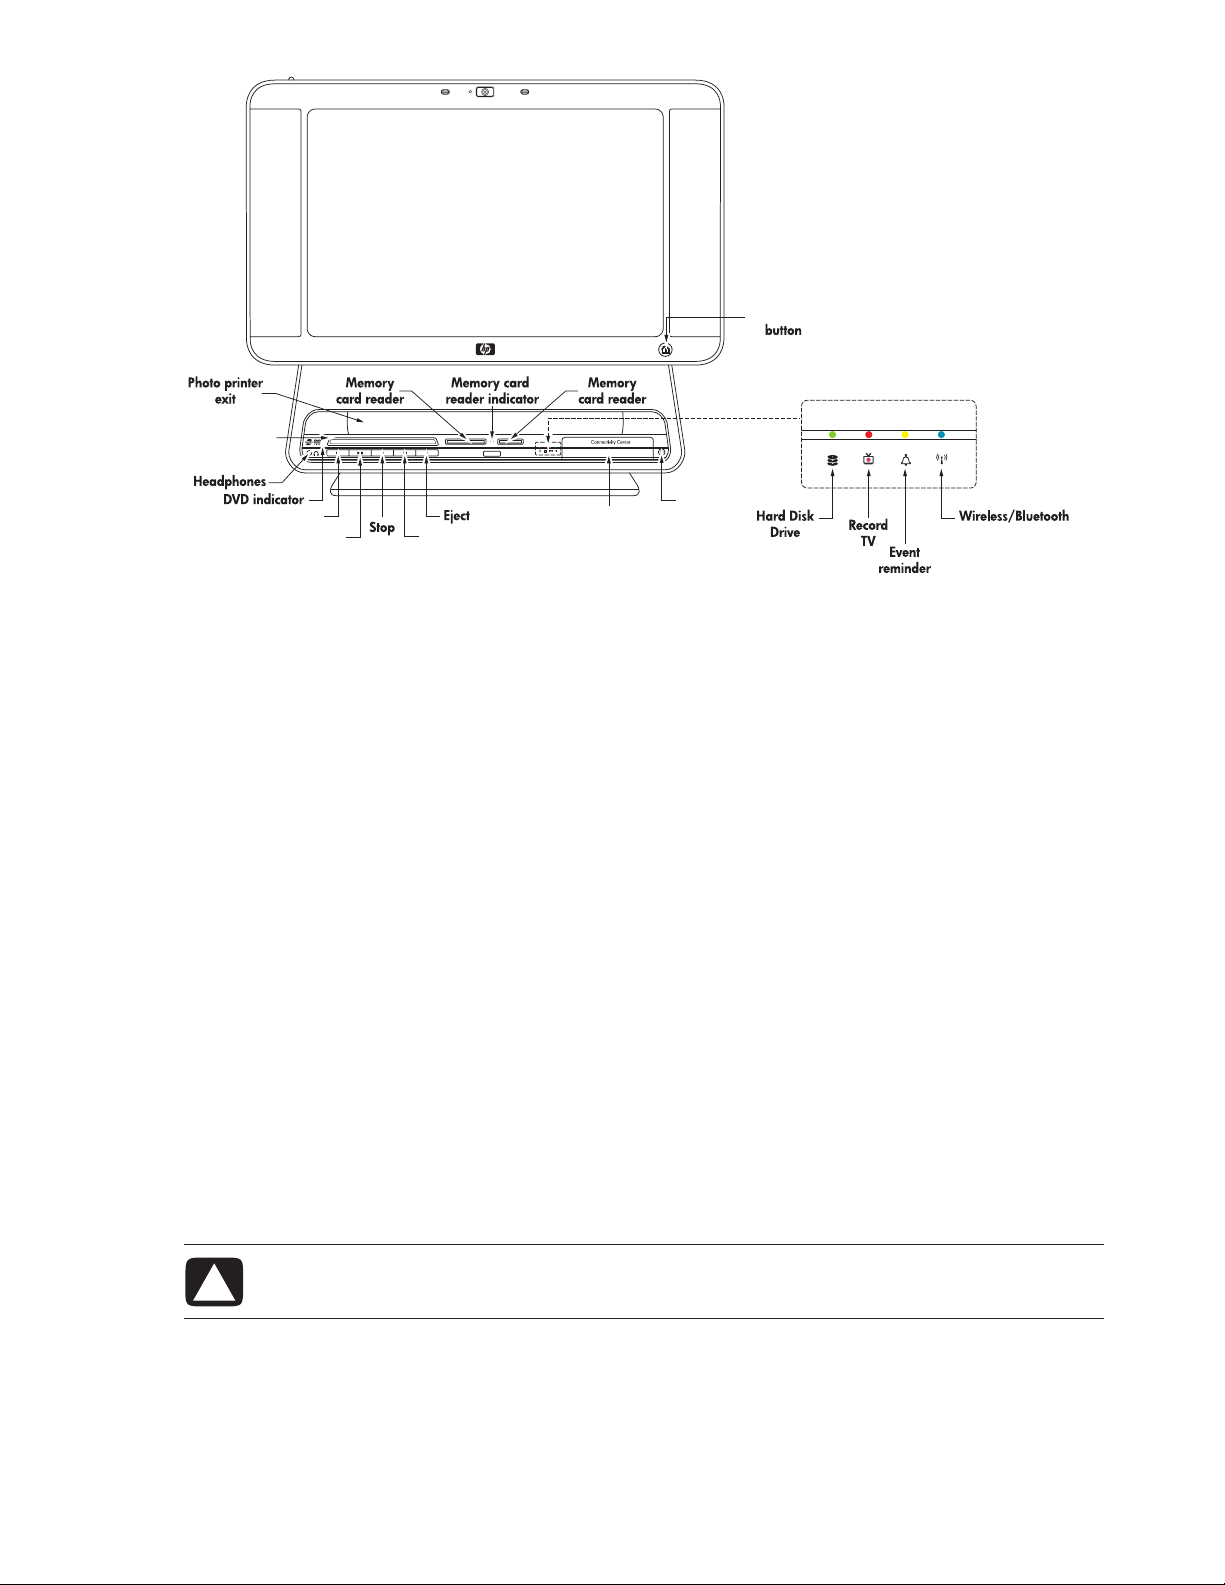
Built-in wireless LAN — use it to connect to a wireless home network that connects all the PCs in your
home or office. See “Setting up a wireless local area network.”
Bluetooth — connect to all kinds of wireless devices such as printers, cameras, headsets, cell phones,
audio headphones, and more.
HP SmartCenter button — press it to turn your HP TouchSmart PC on and launch your HP SmartCenter
software, or if PC is already turned on, press it to launch HP SmartCenter.
On/Standby button — press to easily turn on your HP TouchSmart PC, or put it in Standby
(sleep) mode.
Media card reader — an 8-in-1 two-slot memory card reader where you can easily insert various photo
memory cards to quickly transfer your digital photos to the PC.
Left slot accepts CompactFlash I and II, and MicroDrive.
Right slot accepts SD, MMC, MS, MS-PRO, and xD.
Memory card reader indicator — light to show current activity for the memory card reader.
Activity LED indicator lights — light to show current activity for the hard disk drive, TV recording, the
HP SmartCalendar event reminder, and wireless/Bluetooth devices.
Media control buttons — press Previous Track, Play/Pause, Stop, Next Track, or Eject to play and
control your music CDs and DVD movies.
DVD drive, an optical DVD+/-RW drive with LightScribe — insert CDs and DVDs to play and burn
120 mm double-layer and 80 mm round discs, or create your own disc labels using the LightScribe
technology. The DVD indicator lights to show disc activity. See the Troubleshooting and Maintenance
Guide for information on how to access the DVD drive ejector hole.
CAUTION: Business card and other form factor discs are not supported. Inserting these discs
may prevent the drive from opening and can cause mechanical problems.
Headphone connector — connect your headphones (sold separately).
Photo printer exit — slot for the photo to exit when an HP photo printer (sold separately) is placed on
the HP Printer dock on the back of the HP TouchSmart PC.
2 HP TouchSmart PC User Guide
Page 7
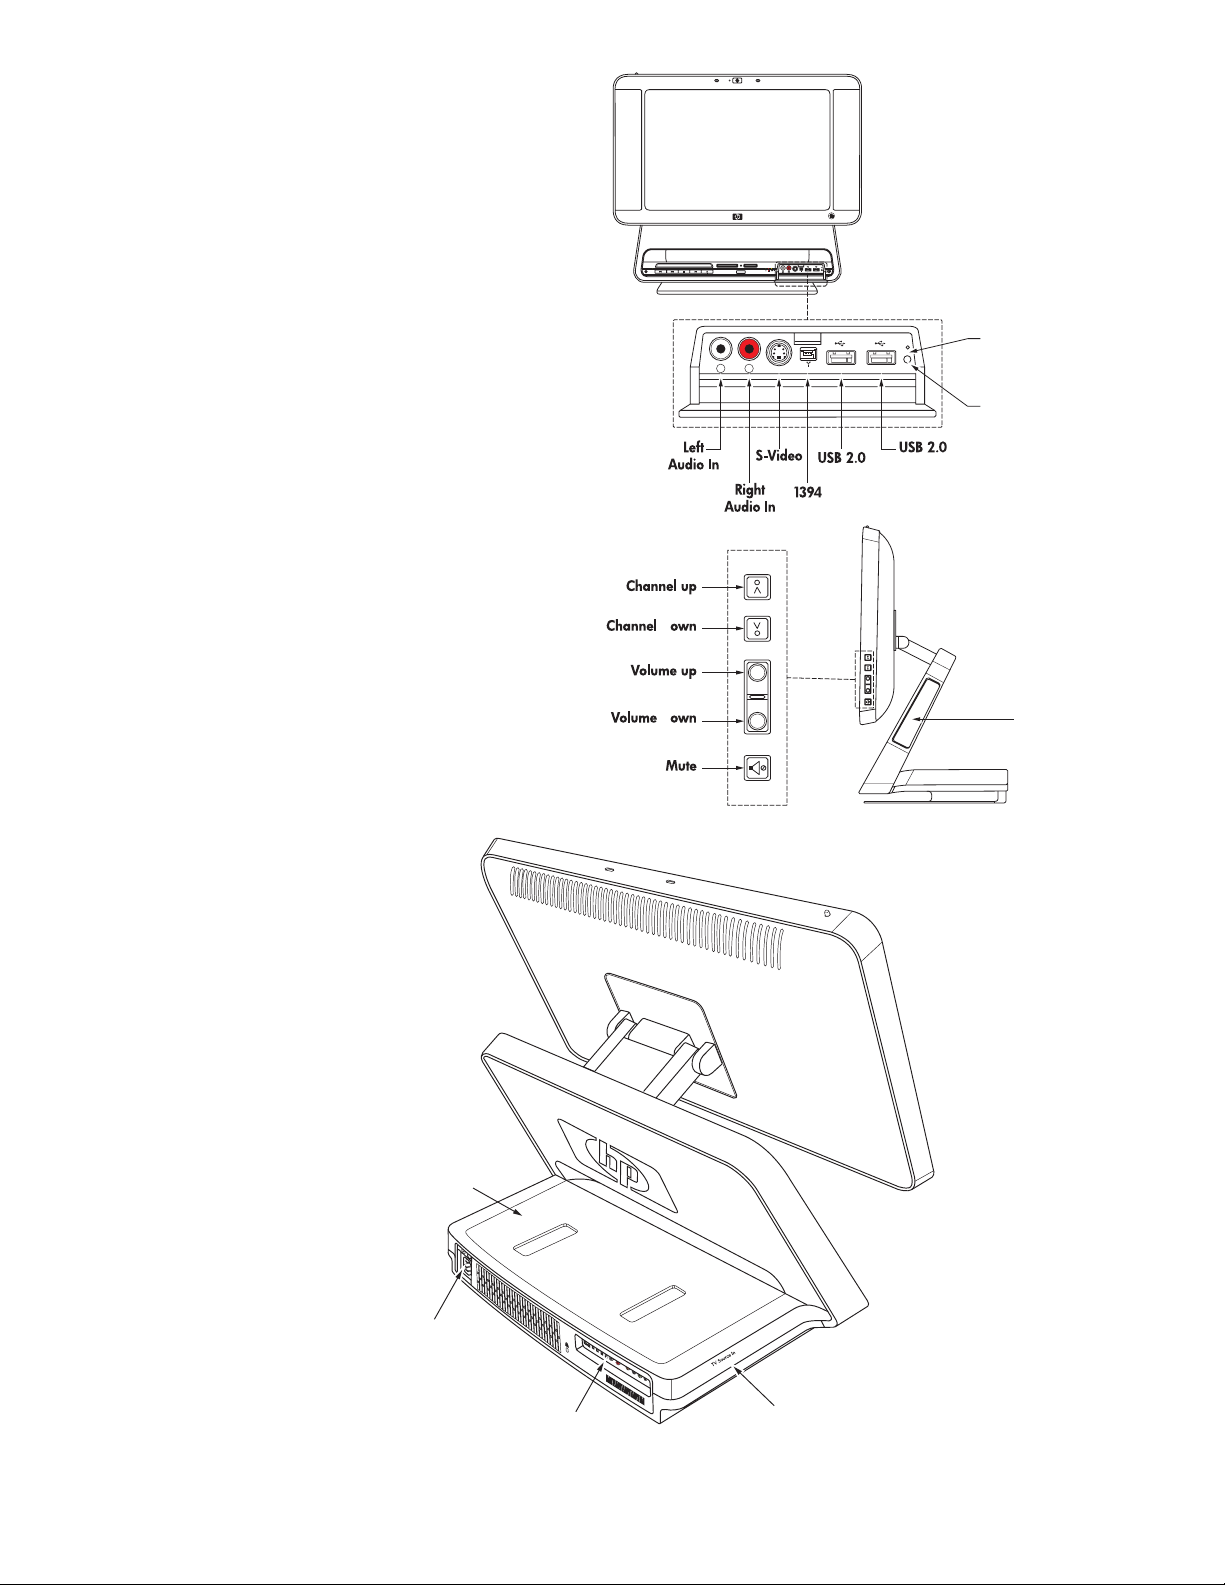
Audio/video connectors — connect audio
or video devices using these connectors. Also
has manual keyboard and mouse connect
button and indicator.
Channel, volume, and mute controls —
quickly change channels while watching live
TV in Media Center and adjust the sound level
for all your PC experiences.
L
R
USB 2.0USB 2.01394
S-Video
Keyboard/Mouse
L
R
1394
S-Video
USB 2.0USB 2.0
Connect light
Keyboard/Mouse
Connect button
d
HP printer dock
+
d
-
+
-
HP Pocket
Media Drive Bay
Rear connectors
Rear connectors
TV signal input
connectors
Setting Up the HP TouchSmart PC 3
Page 8
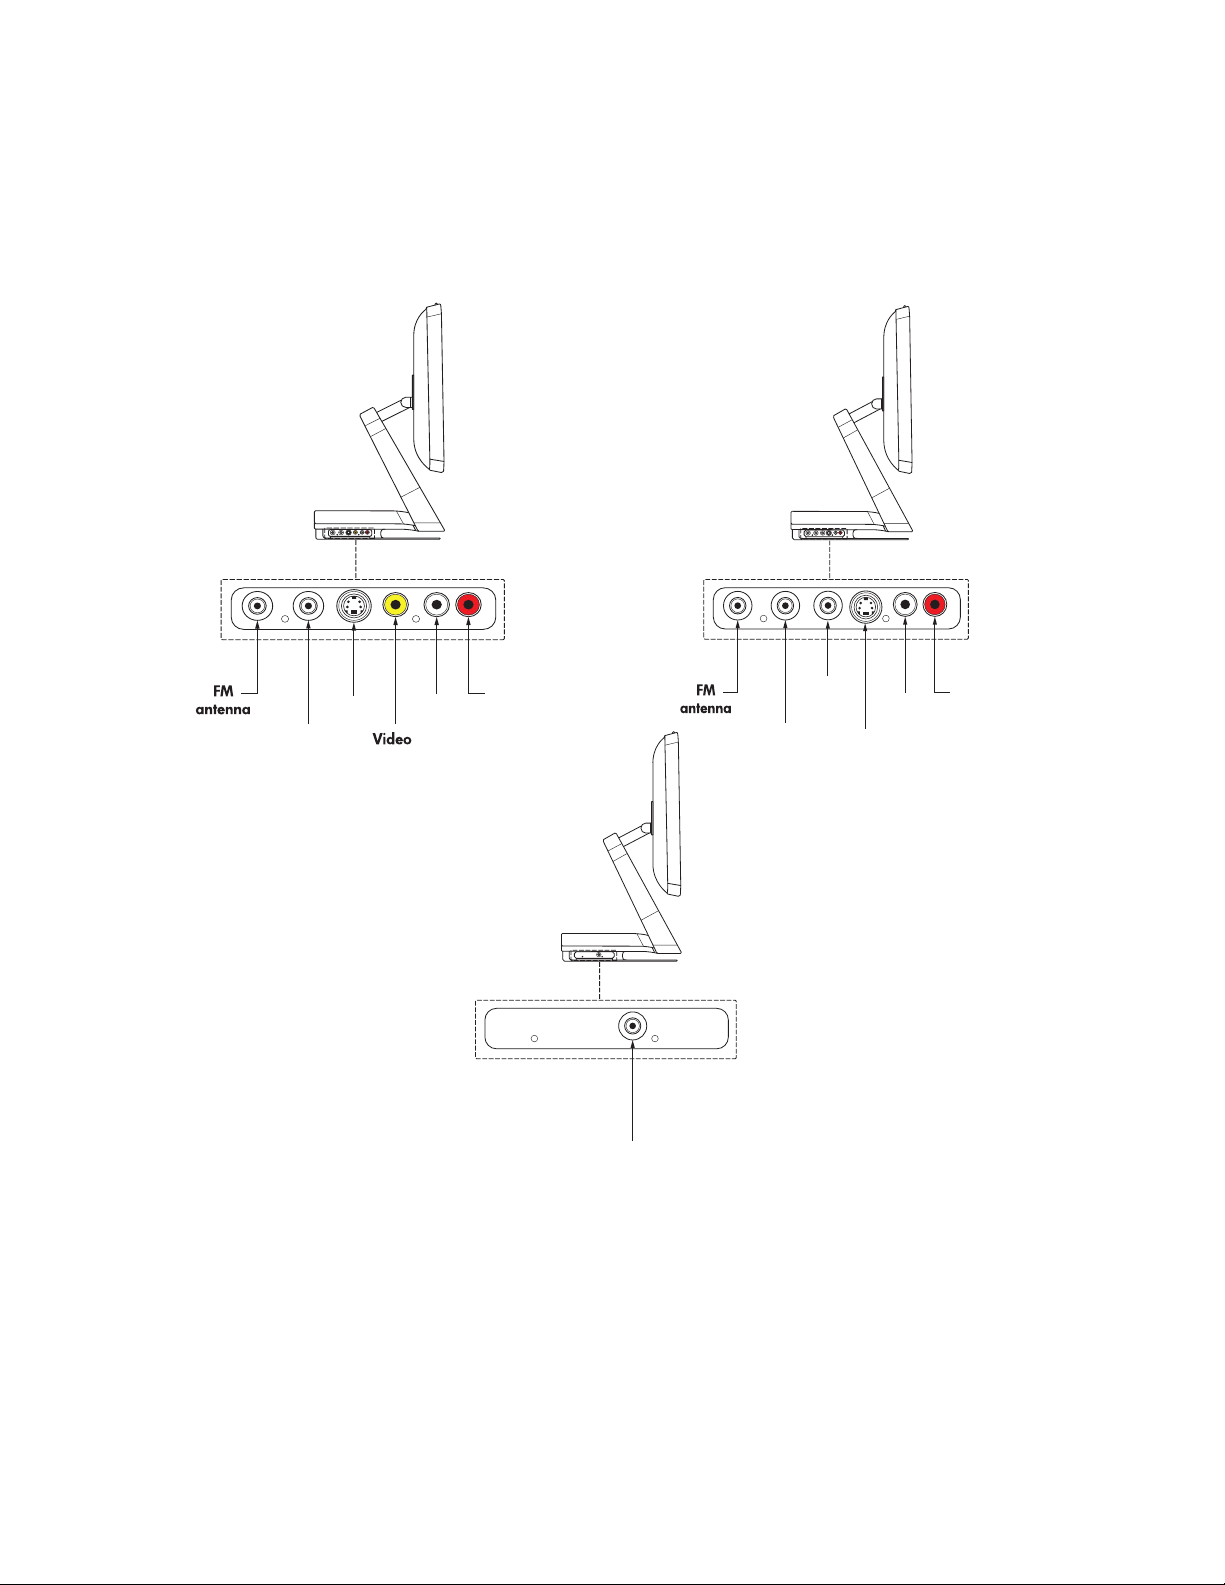
TV signal input connectors — input connectors on the left side of the HP TouchSmart PC are for the TV
input signal. All models have a coaxial TV In connector. Some models also have an HDTV/ATSC
connector. Some models also have S-video or video (composite) connectors and left Audio In and right
Audio In connectors in this area. Some models have a coaxial FM antenna connector in this area.
For more information about setting up your TV signal, see “Connecting the TV Signal Source to the PC” on
page 13.
Shown below are three different TV tuner connectors your HP TouchSmart PC may include.
S-Video
TV In
Cable/
antenna
Audio In
Composite
Left
Right
Audio In
TV In
Cable/
antenna
TV In
Cable/
antenna
HDTV/
ATSC
S-Video
Left
Audio In
Right
Audio In
4 HP TouchSmart PC User Guide
Page 9
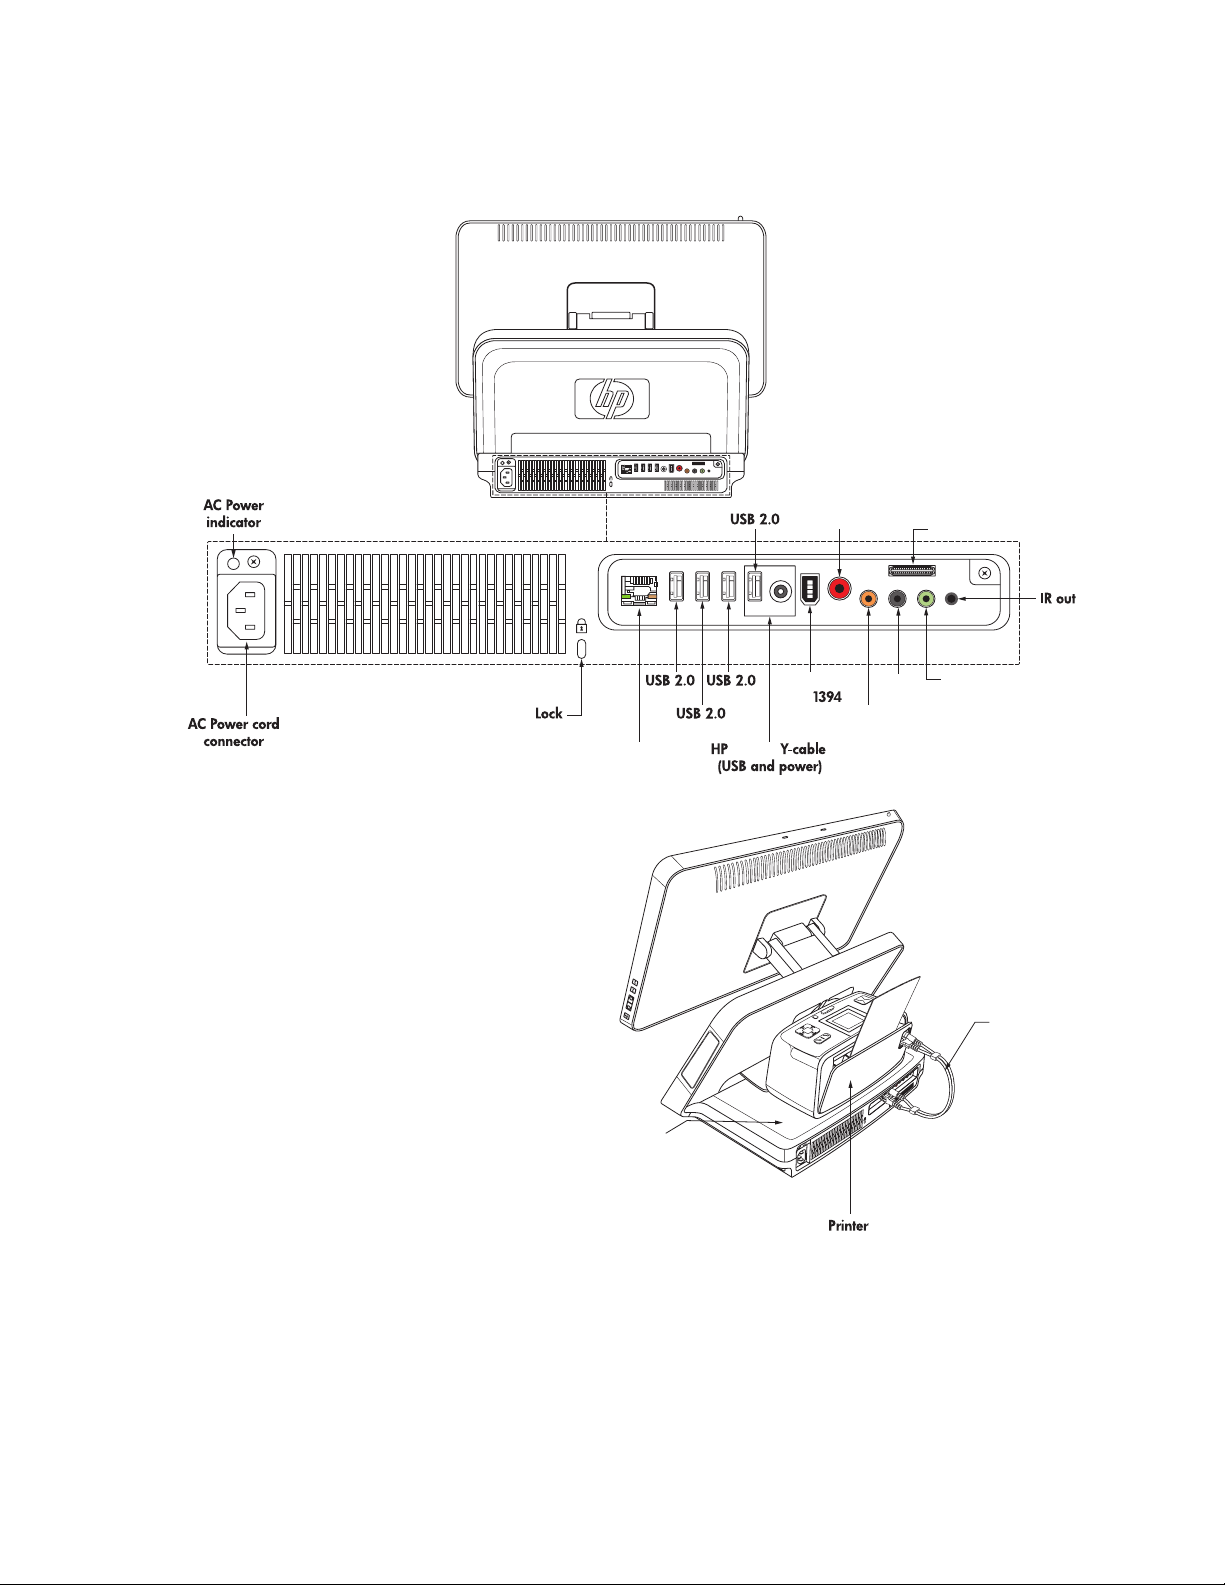
Rear connectors — Connectors for AC power cord (with a green indicator light), a Kensington lock slot,
LAN (for a wired Ethernet connection), four USB 2.0, HP printer Y-cable connectors (USB and power
output), FireWire
®
(IEEE 1394) (6-pin), digital audio out (SPDIF), subwoofer/center, left and right surround,
and left and right front are each 3.5 mm dual-channel analog audio out connectors, IR (infrared emitter)
out, and a mini-VGA out connector.
Digital audio
out (SPDIF)
Mini-VGA Out
HP Printer dock — place one of select
models of HP Photo printers (sold separately)
on the printer dock on the back of the
HP TouchSmart PC to save counter space.
You can also connect the HP printer without
using a separate power cable by using the
HP printer Y-cable. See “Connecting an
HP Photo Printer.”
10/100/1000 GB
LAN (Ethernet)
+
-
HP printer dock
printer
FireWire
(IEEE
HP P
hotosmart
OK
A617
)
Center/
Subwoofer
Pr
int
X
C
orrect
Selec
-
t
+
Zoom
Photo
Fix
Layo
ut
Men
u
L - R
Surround
L - R
Front
HP printer Y-cable
Setting Up the HP TouchSmart PC 5
Page 10
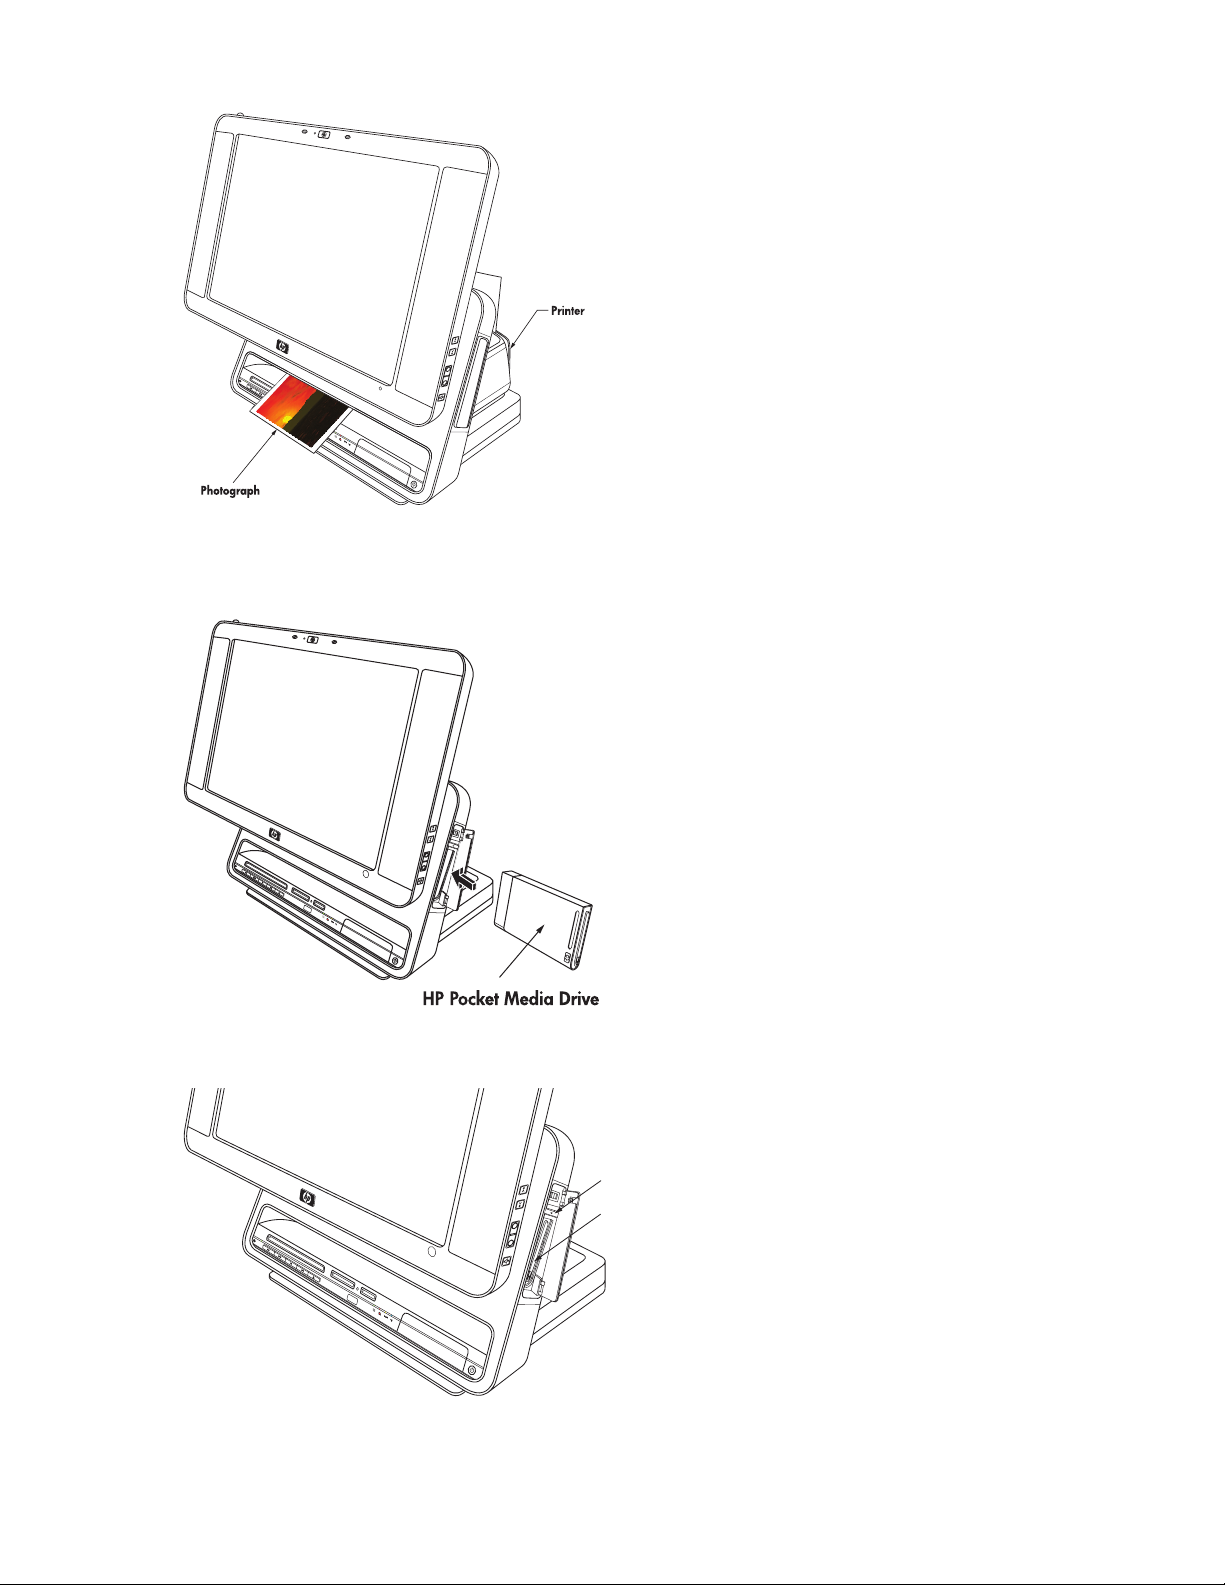
Photo printer exit — the print exits out of the front of the HP TouchSmart PC at the photo printer exit.
+
-
HP Pocket Media Drive Bay — press the top of the drive bay cover to open it. Insert a portable
HP Pocket Media Drive, which is a hard disk drive that you purchase separately. You can use it to store
and transfer all of your important media files.
+
-
You can safely remove the drive when the activity light on the drive is not blinking. Press the Eject button to
pop out and then remove the drive.
Press to eject PMD
PMD bay
ve
+
ri
ket Media D
-
oc
HP P
For specific steps to disconnect and remove the drive, see “Disconnecting the Drive” in the “Using the
HP Personal Media Drive and the HP Pocket Media Drive” chapter of the Getting Started guide.
6 HP TouchSmart PC User Guide
Page 11

HP TouchSmart PC Cables
For more information about cables, refer to the printed cable flyer that came with your HP TouchSmart PC.
Power cable to connect the PC to the power source.
Ethernet (RJ-45) cable (sold separately) to optionally connect the PC to a wired
LAN (Ethernet) port.
VGA adapter cable connects from the VGA Out connector to a standard 15-pin VGA connector on
a TV or a monitor.
HP printer Y-cable (Type B USB) with power to connect HP Photosmart A510 and A610 Series
printer models without using a separate power cable.
IR (infrared) emitter cable to connect the HP TouchSmart PC (at the IR Out connector) to operate
the remote sensor on a set-top box.
Setting Up the HP TouchSmart PC
Setting up the HP TouchSmart PC is simple; just place it and connect the power cord. Then, pull the battery
tabs on the wireless keyboard and mouse, turn on the mouse, and then turn on the PC, and you are ready
to begin using you HP TouchSmart PC.
You c an a ls o:
Connect to the Internet using wireless or wired (optional) connection. See “Connecting to the Internet.”
Insert the batteries in the remote control. See “Setting up the remote control to use with Windows
Media Center.”
Make other connections, such as TV input signal. See “Connecting the TV Signal Source to the PC.”
Connect a printer. See “Connecting a printer.”
WARNING: Please read “Additional Safety Information” in the Limited Warranty and Support
Guide before installing and connecting your HP TouchSmart PC to the electrical power system.
Read the topics in this section to learn more about setting up your HP TouchSmart PC. Look in the
HP TouchSmart PC box for printed details or updates regarding your HP TouchSmart PC.
Using surge protection
Help protect your HP TouchSmart PC and accessories by connecting all power cords for your
HP TouchSmart PC and peripheral devices (such as a monitor, printer, or scanner) to a surge protection
device such as a power strip with surge protection or an uninterruptible power supply (UPS). Many surge
protection devices have surge protection inputs and outputs for modem or telephone lines. Telephone lines
are a common path for lightning spikes to get into your system. Some surge protection devices have surge
protection for television cable connections as well. Use those if your HP TouchSmart PC has a television
tuner installed.
Not all power strips provide surge protection; the power strip must be specifically labeled as having this
capability. Use a power strip whose manufacturer offers a damage replacement policy that replaces your
equipment if surge protection fails.
Connecting the power cord
Connect the power cord to the AC power cord connector on the back of the HP TouchSmart PC, and then
plug the other end into a surge protection device or the wall outlet. The AC power indicator turns green
when the cord is connected to a power source.
Setting Up the HP TouchSmart PC 7
Page 12
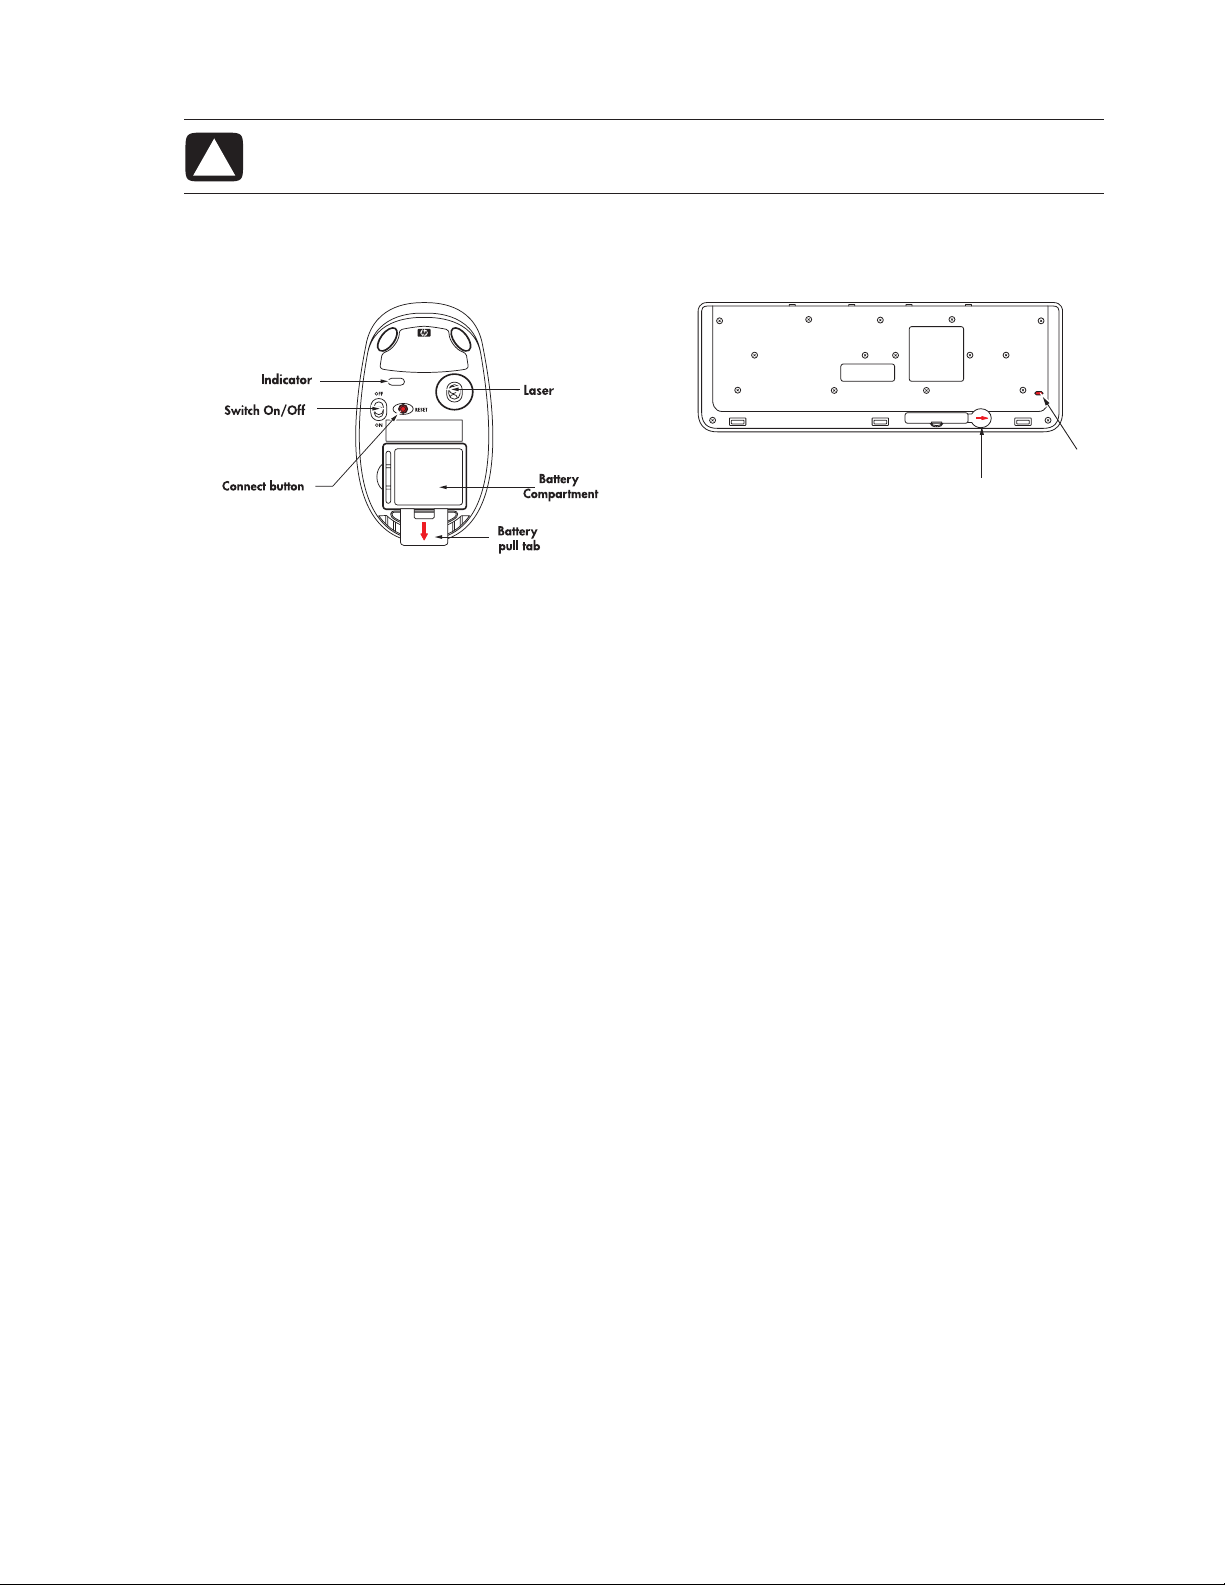
Setting up the wireless keyboard and mouse
CAUTION: You must follow the steps in the order listed to enable your keyboard and mouse to
work with your HP TouchSmart PC.
To set up the wireless keyboard and mouse:
1 Engage the batteries by pulling out the battery tabs from the bottom of the mouse and the keyboard.
Connect
Battery
pull tab
2 For the mouse only, move the switch on the bottom of the mouse to the On position.
3 Place the mouse and the keyboard on the same surface as the HP TouchSmart PC and within 12 inches
(30 centimeters) of it.
button
4 When the HP TouchSmart PC is turned on, the keyboard and mouse automatically syncs.
5 If the mouse or the keyboard does not work properly, you may have to manually sync them or replace
the batteries. See “Manually sync the wireless keyboard or mouse” or “Replacing batteries in the
keyboard or mouse.”
Turning on the HP TouchSmart PC
Press the On/Standby button on the front of the HP TouchSmart PC to easily turn on your
HP TouchSmart PC. It takes about 20 minutes to complete the initial setup by following the onscreen
instructions.
You are ready to begin using you HP TouchSmart PC.
For more information, see “Turning On Your HP TouchSmart PC for the First Time” in the Getting Started
guide.
You can also turn the HP TouchSmart PC on or in Standby mode by pressing the On/Standby button on
keyboard or the remote control.
8 HP TouchSmart PC User Guide
Page 13
Using the Wireless Keyboard or Mouse
You can use the keyboard within approximately 9.8 feet (3 meters) and the mouse within approximately
9.8 feet (3 meters) of the HP TouchSmart PC.
Using the wireless keyboard
This section describes some information about the wireless keyboard. For more information about
keyboards, refer to “Using the Keyboard” in the Getting Started guide.
Your keyboard is either a US version or a UK version.
Keyboards
US Keyboard is shown. UK key differences are shown above the keyboard.
£
2
$
3
4
On
Display
Off
÷
@
þ
#
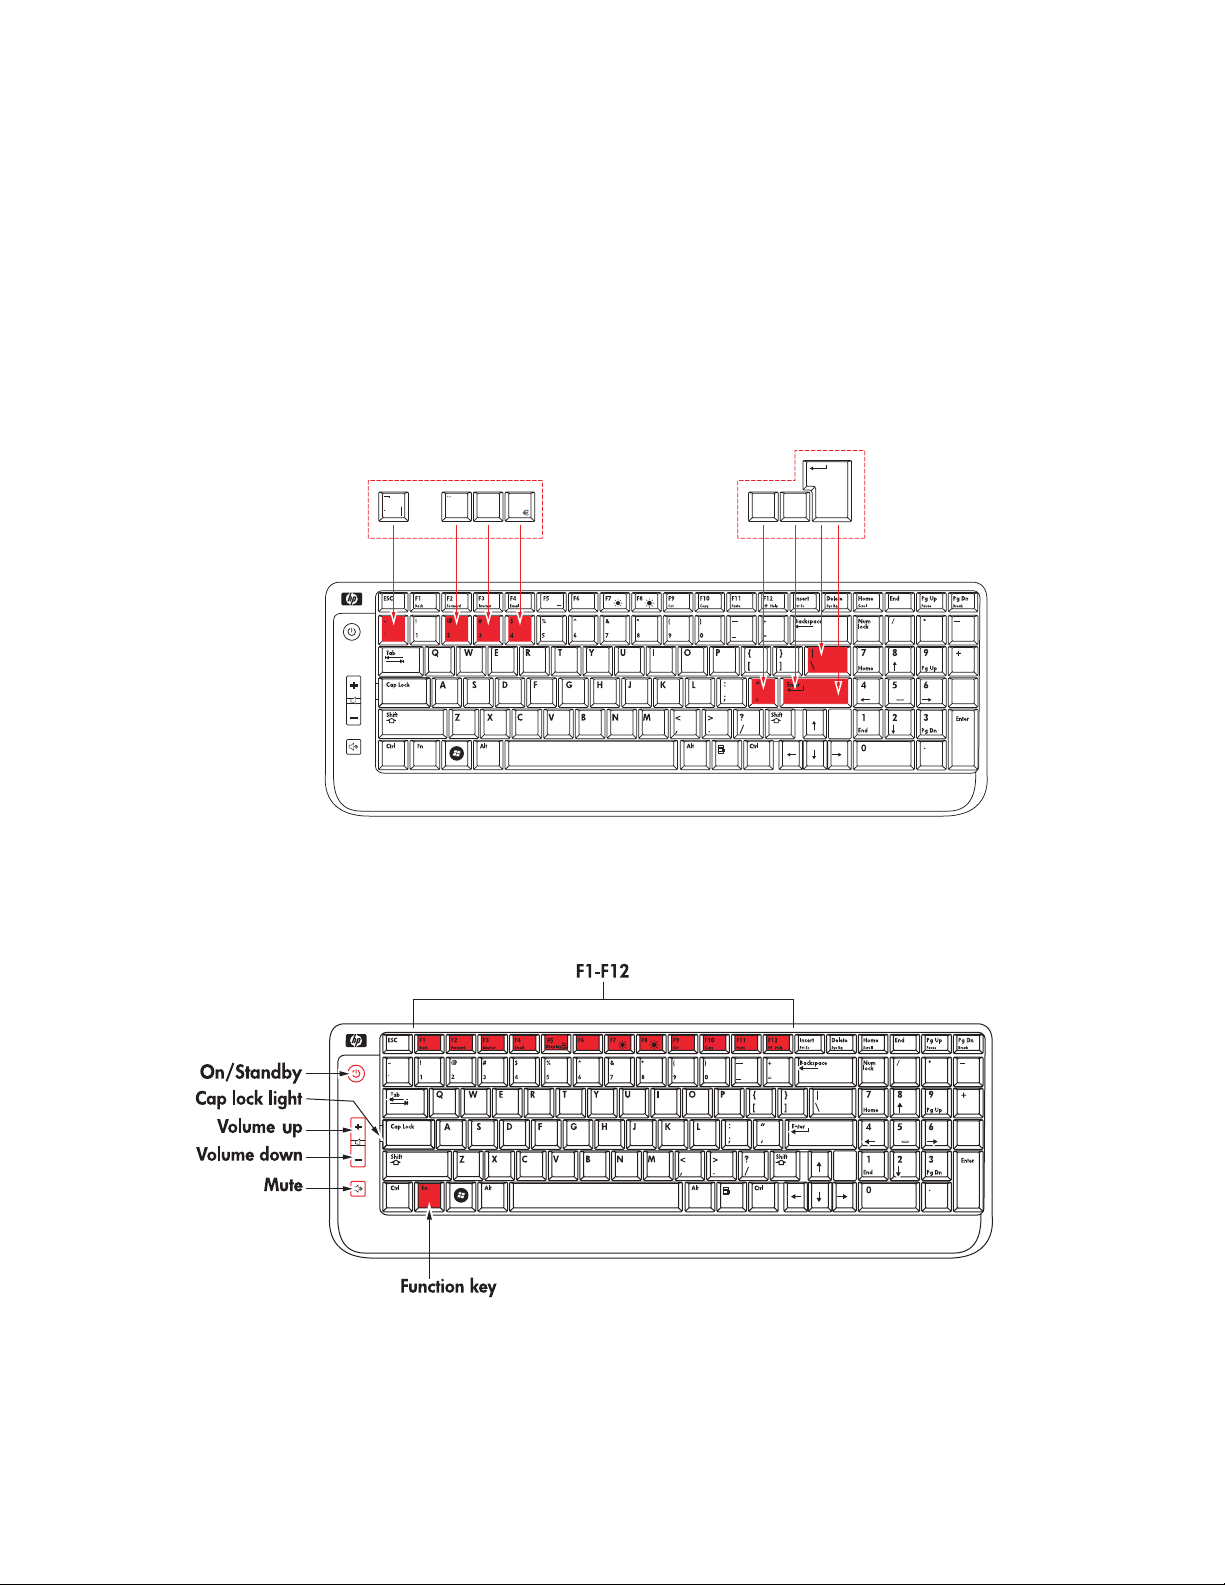
Special keyboard buttons
The wireless keyboard has some special buttons and keys. The Caps Lock key is used to lock the keyboard
to capital letters. When the Caps Lock is on, the Caps Lock light flashes briefly each time a key is pressed.
You can customize some of the special buttons on the keyboard to open different programs or files, or to
go to favorite Web sites. For more information, see “Customizing the keyboard buttons” in the
Getting Started guide.
Setting Up the HP TouchSmart PC 9
Page 14
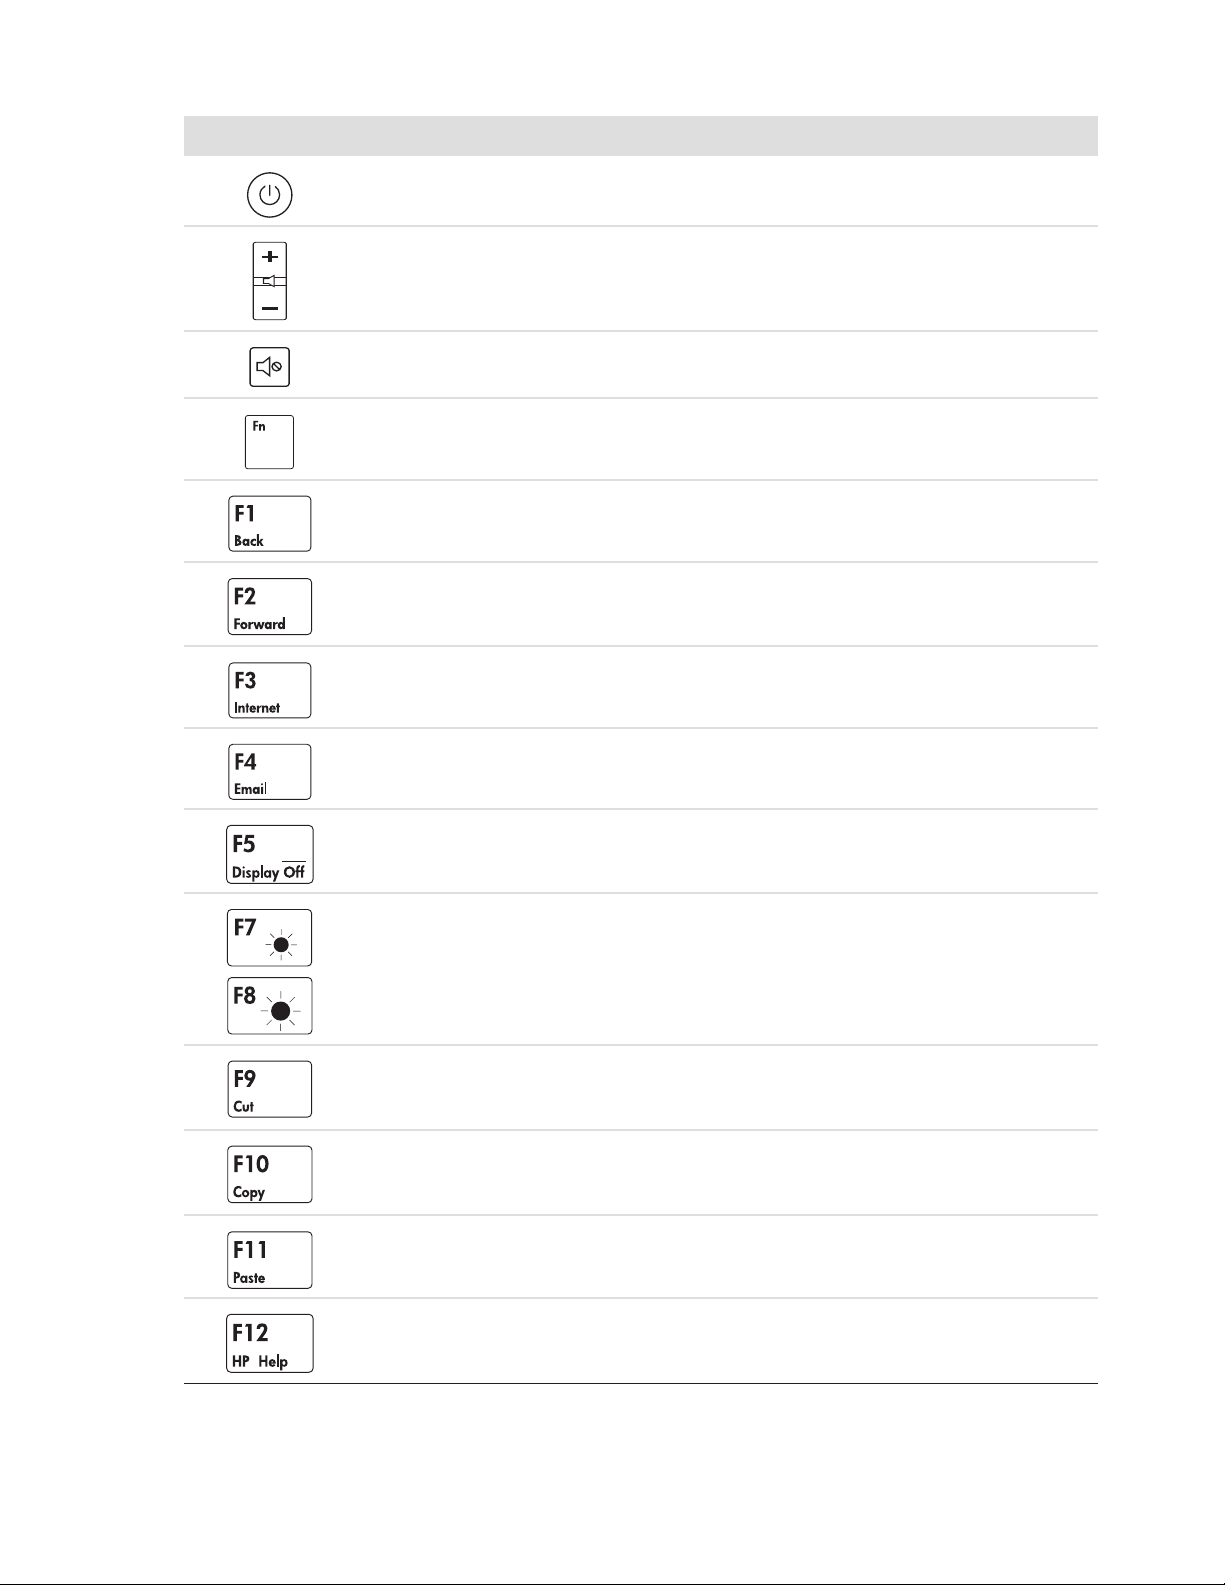
Special Keyboard Buttons
n
Button or key Description
On/Standby turns the HP TouchSmart PC on or puts the HP TouchSmart PC into
standby or sleep mode.
Volume U p and Vo lume Down adjust the speaker sound level.
Mute turns the sound off or on.
The Function (Fn) key acts as a shift-down key for the Function keys; press Fn with
a Function key (F1 through F12) to select the lower feature of the key.
The Back key (press Fn+F1) moves back one window or Web page.
The Forward key (press Fn+F2) moves forward one window or Web page.
The Internet key (press Fn+F3) opens your Internet browser. Can be configured to
open any Web site or software program.
The E-mail key (press Fn+F4) opens the e-mail program. Can be configured to
open any Web site or software program.
The Display On/Off (press Fn+F5) turns off the display. Press the Display On/Off
O
(press Fn+F5) again to turn the display back on.
The Brightness Down (press Fn+F7) and Brightness Up (press Fn+F8) adjust
the screen brightness.
The Cut key (press Fn+F9) removes the selected item and creates a copy that can
be pasted.
The Copy key (press Fn+F10) copies the selected item.
The Paste key (press Fn+F11) pastes the selected item.
10 HP TouchSmart PC User Guide
The HP Help key (press Fn+F12) opens Help and Support.
Page 15

Using the wireless mouse
The cursor on the screen moves when you move the mouse. The wireless mouse operates with a Class 1
laser beam, which you cannot see. The mouse indicator light on the bottom of the mouse blinks when you
turn it upside down to show that the batteries and the laser are working, and that the laser is off to protect
you. Do not store the mouse upside down.
To use the mouse, move the switch on the bottom of the mouse to the On position. Use the mouse on most
surfaces.
To conserve battery power, when not in use, move the switch on the bottom of the mouse to the Off position
before storing the mouse.
For more information about the mouse, refer to “Using the Mouse” in the Getting Started guide.
Replacing batteries in the keyboard or mouse
Review these tips:
When the unit does not operate properly, replace the batteries in the keyboard or mouse.
Do not mix different types of batteries together. For example, do not mix rechargeable and
non-rechargable, alkaline and carbon-zinc (Ni-Cd), or old batteries with fresh ones.
Be sure to place the batteries in the correct position (+ on the battery matching the + in the battery
compartment). Reversed batteries may cause damage to the device.
When not using the mouse or keyboard for a couple weeks or more, remove the batteries to prevent
damage or injury from possible battery leakage.
Do not try to recharge batteries that are not intended to be recharged; they can overheat and rupture.
Follow the battery manufacturer’s directions for the batteries you are using.
Always remove batteries as soon as they become weak. Weak batteries can leak and severely
damage the unit. The battery life depends on how much the unit is used.
Do not take apart the batteries, heat them, or throw them into a fire.
To replace the batteries:
1 For the mouse only, move the switch on the bottom of the mouse to the Off position.
2 Remove the battery cover from the bottom of the keyboard or mouse.
3 Remove the batteries.
4 Insert new batteries, matching the orientation shown on the housing. Use four AAA batteries for the
keyboard, and two AA batteries for the mouse.
5 Replace the battery cover.
6 For the mouse only, move the switch on the bottom of the mouse to the On position.
7 Place each unit on the same surface as the HP TouchSmart PC and within 39 inches (1 meter) of it.
8 With the HP TouchSmart PC turned on, the keyboard/mouse connect indicator on the front of the
HP TouchSmart PC lights when the keyboard and mouse are synced (recognized). The unit should be
automatically recognized in about 5 seconds. Press a key on the keyboard or move the mouse to
check operation.
NOTE: The keyboard and mouse do not lose sync during a battery charge.
If either unit does not work properly, you may have to manually sync them. See “Manually sync the wireless
keyboard or mouse.”
Setting Up the HP TouchSmart PC 11
Page 16

Manually sync the wireless keyboard or mouse
Use these steps to manually sync the keyboard or mouse with the HP TouchSmart PC when either unit does
not work properly after replacing the batteries.
1 For the mouse only, move the switch on the bottom of the mouse to the On position.
2 Place the keyboard or mouse on the same surface and within close proximity (12 inches or
30.5 centimeters) as the HP TouchSmart PC.
3 Using a ball point pen, press and hold the keyboard/mouse Connect button on the front of the
HP TouchSmart PC until the indicator light blinks. You have 60 seconds to complete step 4 or 6.
4 For the keyboard, press the Connect button on the bottom until the Caps lock indicator light (located
on top next to the Caps lock key) starts blinking. The sync should occur within 5 seconds.
5 Repeat step 3 to begin the syncing of the mouse.
6 On the bottom of the mouse, press the Connect button until the indicator light starts blinking. The
syncing should occur within 5 seconds.
7 If the keyboard or mouse does not operate properly, repeat steps 1 through 6.
NOTE: After pressing the Connect button on the system, press only the Connect button on the keyboard or
the mouse. Pressing another key may cause the sync to take longer or to time out. If the receiver times out,
you must press the system Connect button until the LED blinks, and then press the keyboard or the mouse
Connect button until the LEDs blink.
12 HP TouchSmart PC User Guide
Page 17
Connecting the TV Signal Source to the PC
NOTE: The number and type of cables required to connect your HP TouchSmart PC may vary by model.
You may need to purchase extra cables separately. Your HP TouchSmart PC may not include all the cables
you need for your computer setup, and the cables included may vary by model.
Use these steps to connect the TV signal source, the FM signal antenna, or video and audio from a set-top
box or DVD player. Some HP TouchSmart PC models have only the TV connector.
Shown below are three different TV tuner connectors your HP TouchSmart PC may include:
TV/In Cable antenna connector only
If your TV tuner looks like this, follow this procedure:
1 Connect the coaxial cable from your TV antenna or TV cable provider to
the TV In connector on the left side of the HP TouchSmart PC.
Or
Plug an S-V/Cable antenna video cable into the S-Video connector in the
front Connectivity Center of the HP TouchSmart PC. Plug the other end of
the cable into your set-top box or other device that is providing the signal
source for the TV.
2 If you are using the S-Video connector, plug audio cables from your set-
top box into the audio left and right connectors in the front Connectivity
Center of the HP TouchSmart PC.
3 If you are using the set-top box, connect the IR emitter cable. See
“Connecting the IR emitter.”
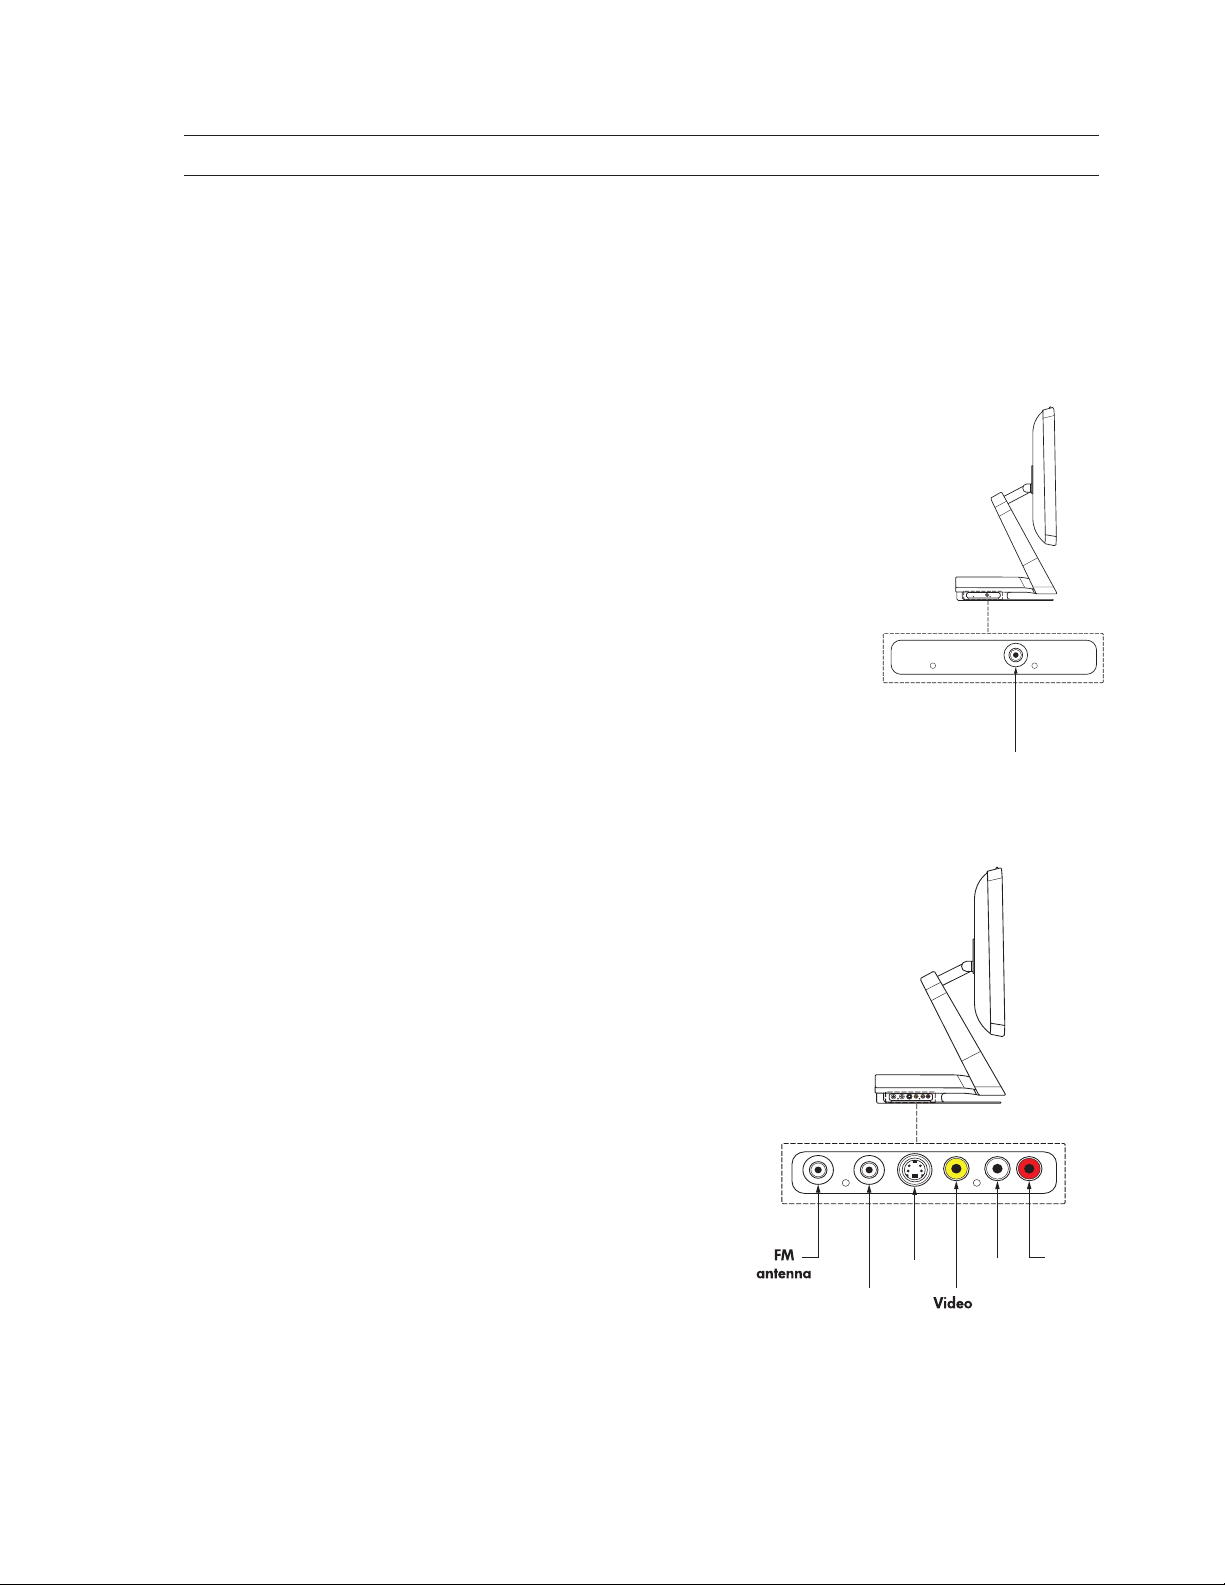
FM antenna, TV In, S-Video, Video Composite, left
and right audio connectors
If your TV tuner looks like this, use the following procedure:
1 Connect the coaxial cable from your TV antenna or TV
cable provider to the TV In/Cable/Ant connector on the
left side of the HP TouchSmart PC.
Or
Plug a cable into the S-Video or Video (composite)
connector on the left side of the HP TouchSmart PC; use an
S-Video cable or composite video cable. Plug the other
end of the cable into your set-top box or other device that
is providing the signal source for the TV.
2 If you are using the S-Video or video connector, plug audio
cables from your set-top box into the audio left and right
connectors on the left side of the HP TouchSmart PC.
3 Push the coaxial cable from your FM antenna or signal
provider onto the FM connector on the left side of the
HP TouchSmart PC.
4 If you are using the set-top box, connect the IR emitter
cable. See “Connecting the IR emitter.”
S-Video
TV In
Cable/
antenna
Audio In
Composite
Left
TV In
Cable/
antenna
Right
Audio In
Setting Up the HP TouchSmart PC 13
Page 18
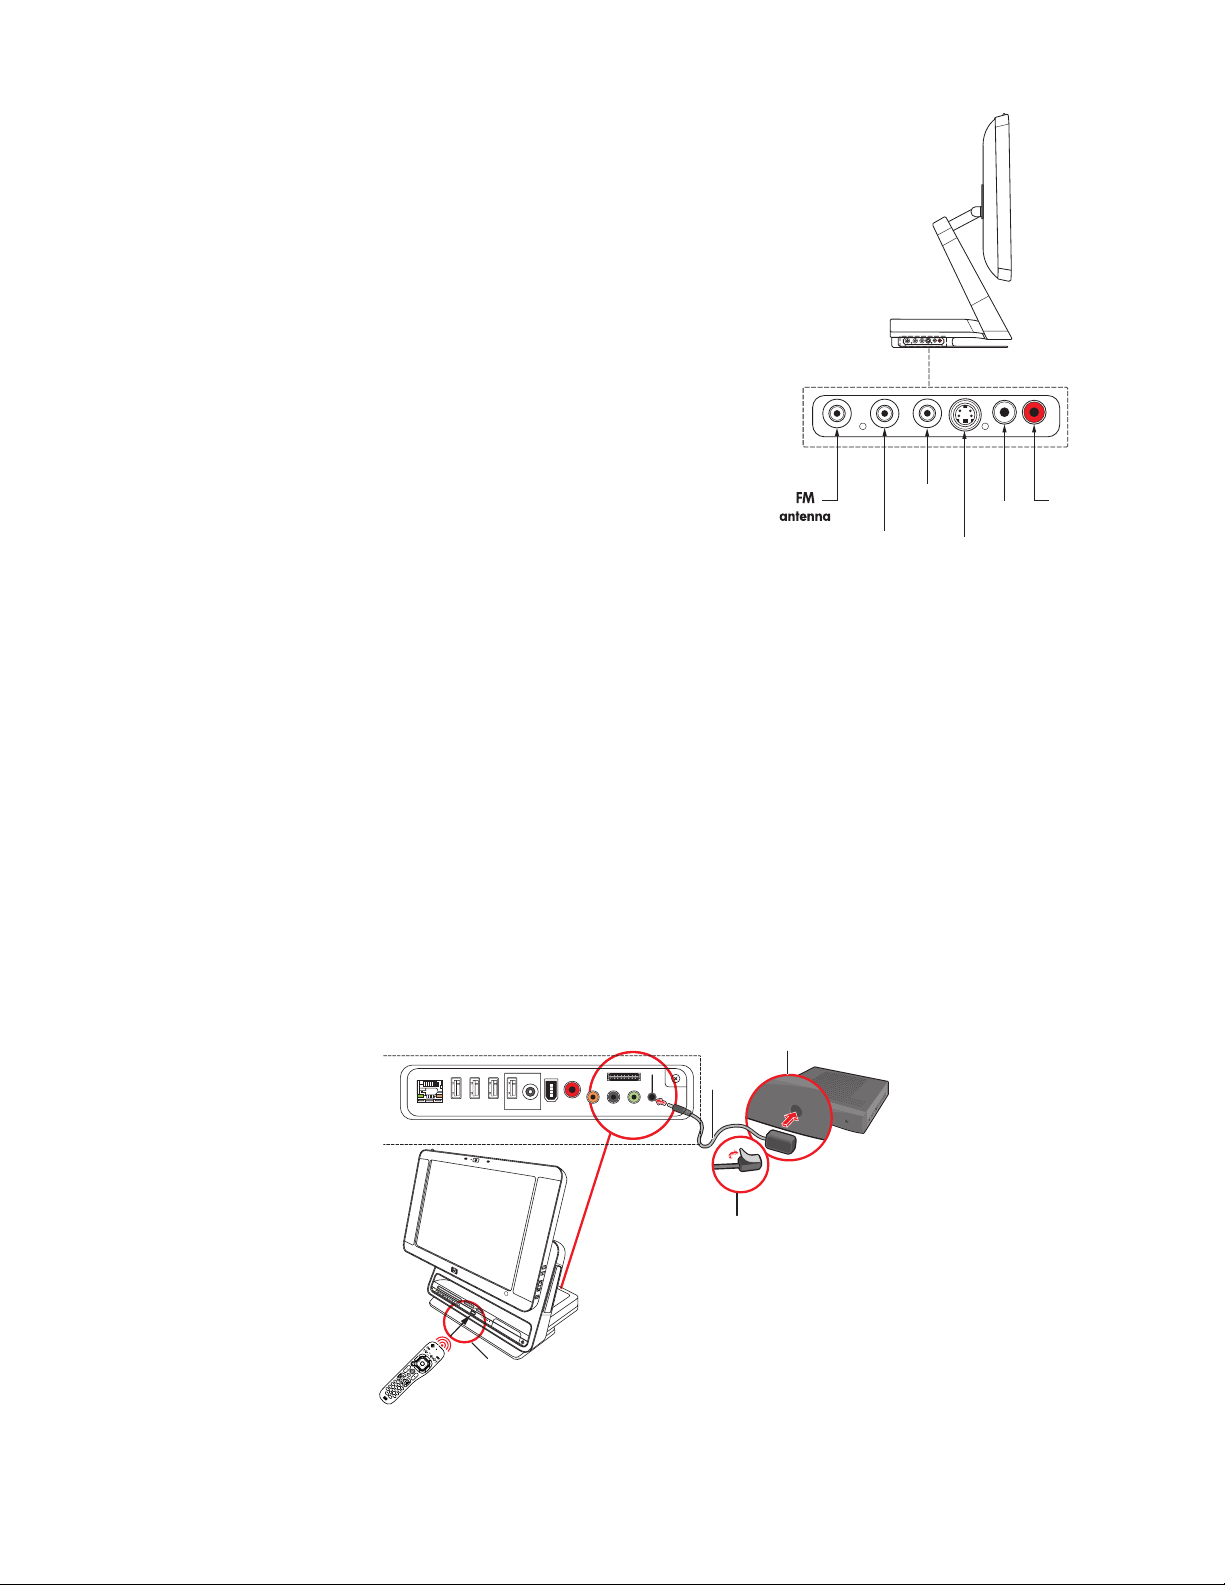
FM antenna, TV In, HDTV/ATSC, S-Video, left and right audio connectors
If your TV tuner looks like this, use the following procedure:
1 Connect the coaxial cable from your TV antenna or TV cable
provider to the Cable/Ant connector on the left side of the
HP TouchSmart PC.
Or
Plug a cable into the S-Video or video (composite) connector
on the left side of the HP TouchSmart PC; use an S-Video
cable or composite video cable. Plug the other end of the
cable into your set-top box or other device that is providing
the signal source for the TV.
2 If you are using the S-Video or video connector, plug audio
cables from your set-top box into the audio left and right
connectors on the left side of the HP TouchSmart PC.
3 Push the coaxial cable from your FM antenna or signal
provider onto the FM connector on the left side of the
HP TouchSmart PC.
4 If you are using the set-top box, connect the IR emitter cable.
TV In
Cable/
antenna
HDTV/
ATSC
Left
Audio In
S-Video
Right
Audio In
See “Connecting the IR emitter.”
Connecting the IR emitter
The remote infrared emitter cable is a small device that connects to the HP TouchSmart PC at the IR Out
connector and covers the remote sensor on a set-top box. It enables the remote control that came with your
HP TouchSmart PC and the Windows Media Center program to operate the set-top box.
1 If you have a cable TV set-top box, a satellite set-top box, or another set-top box that controls
your TV signal, connect the IR emitter cable (A) to IR Out connector (D) on the back of the
HP TouchSmart PC.
2 Remove the paper from the backing tape on the end of the cable (B), and then press the end of the
cable over the remote infrared (IR) sensor (receiver) window on the set-top box (C). To locate the
remote infrared sensor window, shine a flashlight through the plastic on the front of the set-top box.
3 In the Windows Media Center, select the channel using the screen, the display channel buttons, or the
remote control channel buttons. When using the remote control, point the remote control at the
HP TouchSmart PC front (E), not at the set-top box.
C
D
A
14 HP TouchSmart PC User Guide
B
+
-
On/Off
Visuali
z
ation Print
R
adio
Music
P
e
d
d
r
icture
o
T
c
V
e
R
Guide
Vide
o
DVD menu
L
i
v
e
OK
back
T
V
Volume
+
More Info
Asspect
_
Channel
S
w
l
i
o
d
h
e
S
Mute
Recor
Ch+
d
Ch-
Eject
1
4
ghi
2
abc
7
pqrs tuv
5
3
jkl
def
#
8 9
6
mno
0
Clear
wxyz
*
Enter
E
Page 19
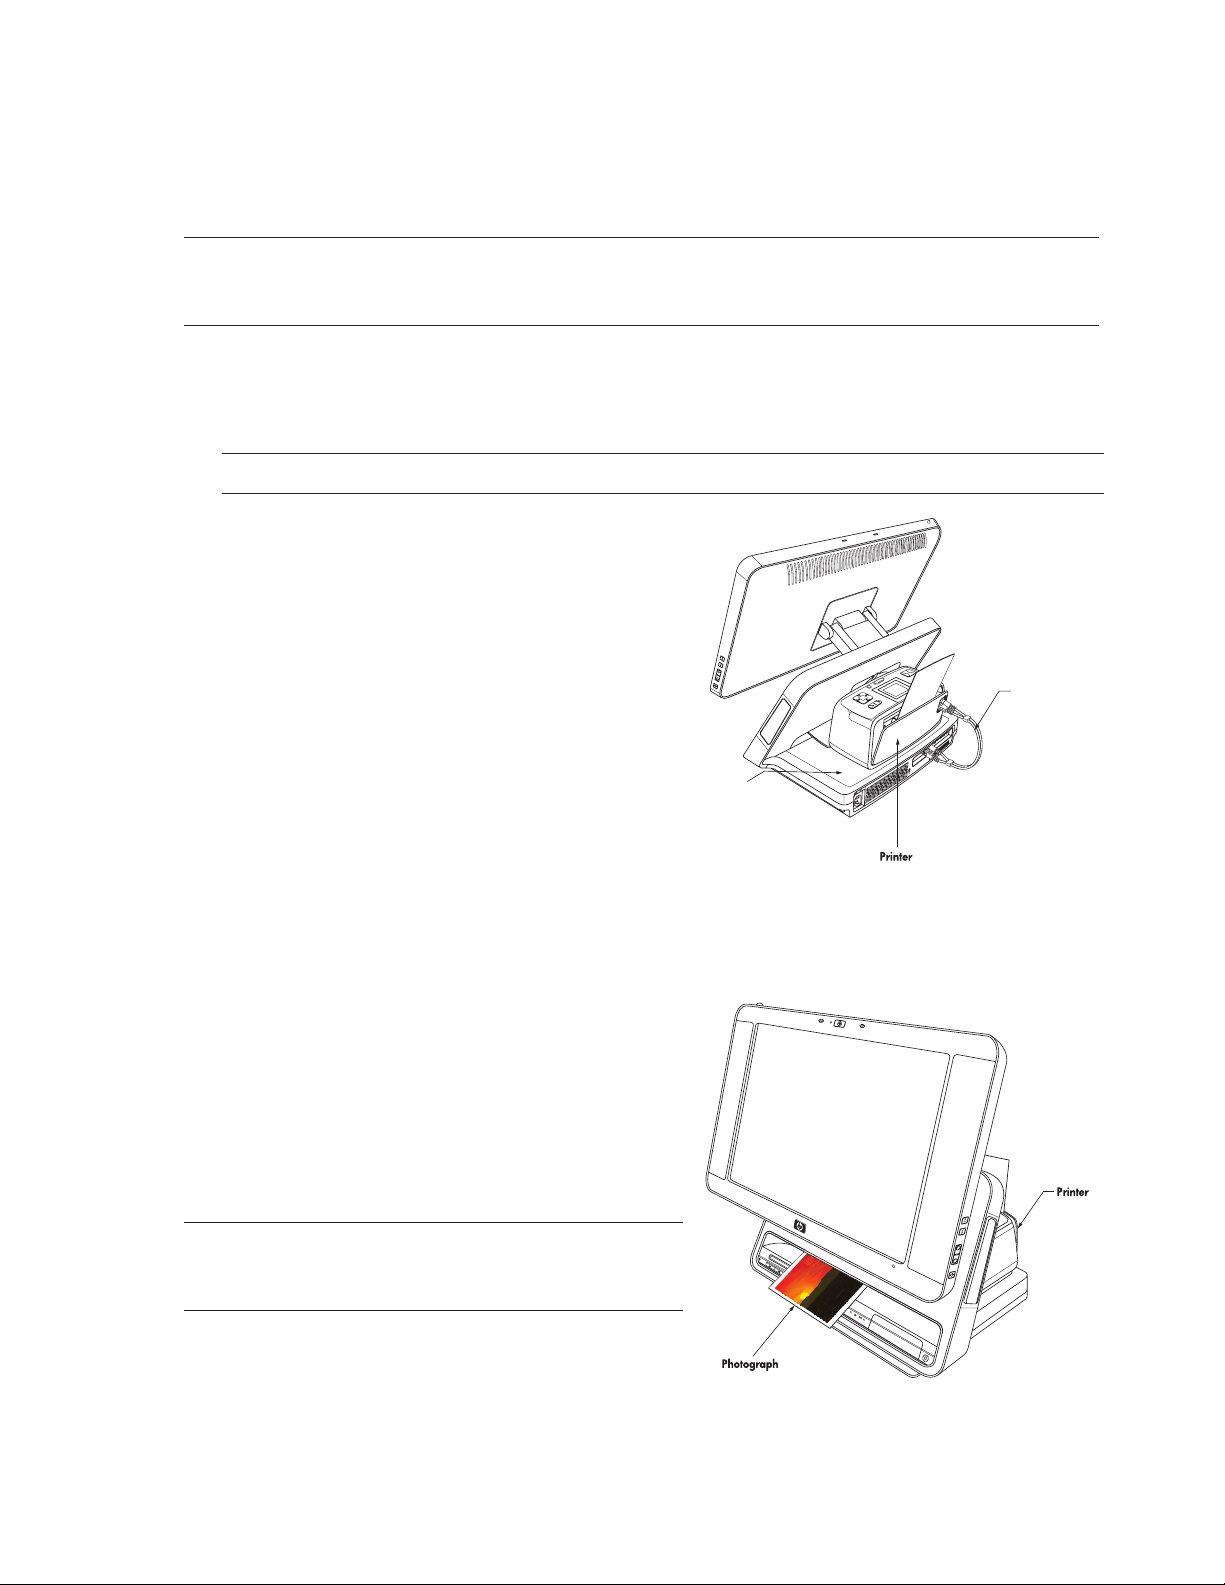
Connecting an HP Photo Printer
Some HP photo printer models (A510 Series and A610 Series sold separately) can be placed on the
printer dock on the back of the HP TouchSmart PC to provide a photo kiosk experience at home and save
counter space at the same time. You can power the HP printer without using a separate power cable by
connecting the printer to your HP TouchSmart PC using the included HP printer Y-cable.
NOTE: If using the HP printer (USB and power) Y-cable to connect the HP printer to the HP TouchSmart PC,
when the HP TouchSmart PC goes into sleep mode, the printer batteries do not charge and printing may
be terminated. The HP TouchSmart PC must remain operational while printing completes.
Connecting a printer
1 Connect cabling to the printer:
NOTE: Printer installation procedure varies based on manufacturer. Follow manufacturer instructions.
Open the paper output tray of an HP Photosmart
A510 or A610 Series printer (sold separately)
and place it on the back of the HP TouchSmart
PC. Connect the HP printer (USB and power)
Y-cable to the printer AC power cord connector
and USB connector.
Or
Connect the power cord and USB cable to the
printer. Plug the power cord into a power
source.
2 Connect cabling to the HP TouchSmart PC:
+
-
HP printer dock
Photo Fix
Layo
ut
Men
u
Pr
int
X
C
orr
HP P
ect
hotosmart
OK
A617
Select
-
+
Zoom
HP printer Y-cable
Connect the other end of the HP printer Y-cable
to the paired USB connector and HP printer
power connector on the back of the
HP TouchSmart PC.
Or
Connect the USB cable to the back of the HP TouchSmart PC.
3 Turn on the printer.
4 To print a photo, open the back of the photo printer
and insert photo paper.
5 Print the photo. The photo ejects out of the printer
and through the front of the HP TouchSmart PC. For
information about using the printer, refer to “Using a
Printer” in the “Managing Files” chapter of the
Getting Started guide.
NOTE: If your photo doesn’t print, make sure the paper
output tray and the back of the printer are open for the
paper to eject properly.
+
-
Setting Up the HP TouchSmart PC 15
Page 20
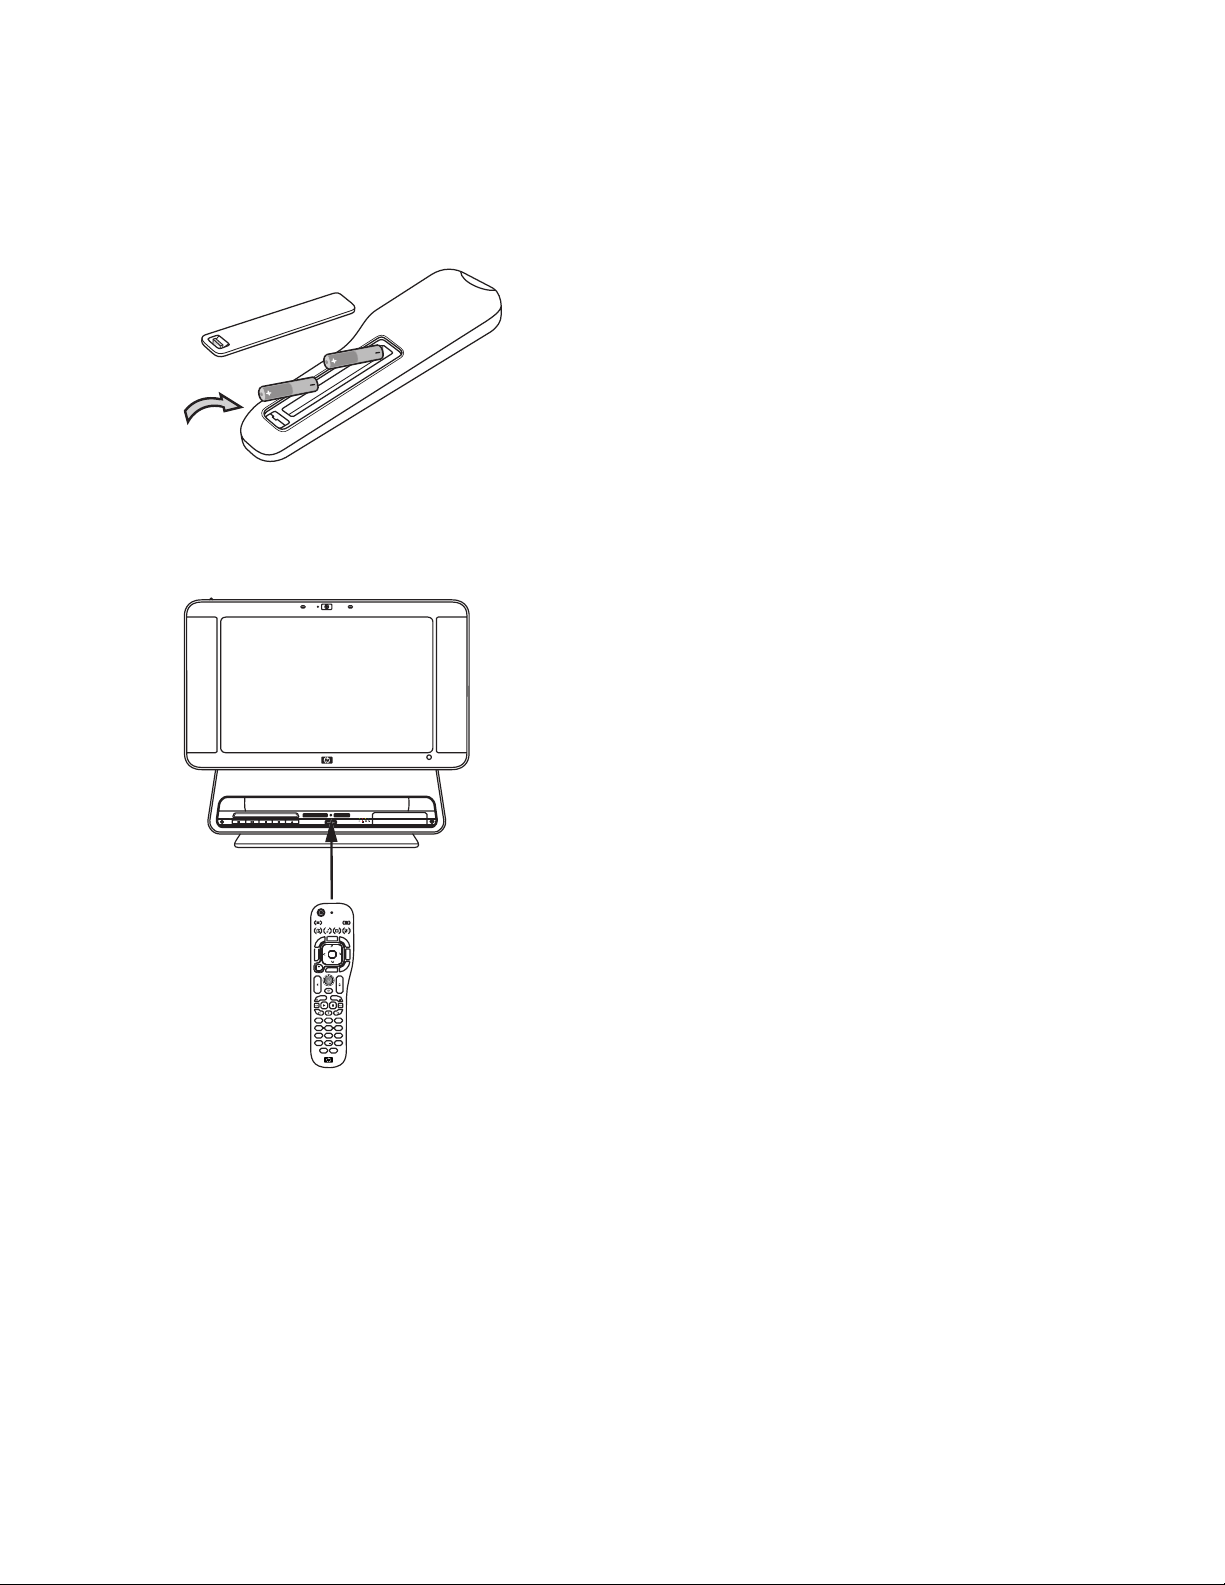
Setting Up the Remote Control
Setting up the remote control to use with Windows Media Center
Remove the back cover of the remote control and insert two AA batteries in the remote control. Make sure
the batteries are inserted in the correct direction with the + and – symbols on the batteries matching the
ones on the remote control.
Using the remote control
Point the remote control at the remote control sensor at the front of the HP TouchSmart PC, and press a
button.
On/Off
Visualization Print
Picture
VideoRadio Music
Guide
V
L
T
i
v
d
e
e
T
d
V
r
o
c
e
R
OK
Asspect
DVD menu
w
o
h
S
e
d
i
back
l
S
More Info
Volume
Channel
Ch+
+
Mute
_
Ch-
Eject
Record
abc
def
3
1
2
ghi
jkl mno
6
4
5
pqrs tuv
wxyz
8 9
7
#
0
*
Enter
Clear
Pressing the On/Standby button turns the HP TouchSmart PC on or puts it in Standby (sleep) mode.
For more information about the remote control, refer to “Using the Windows Media Center Remote
Control” in the Getting Started guide.
16 HP TouchSmart PC User Guide
Page 21

Using a Wireless Network and Bluetooth Devices
Your HP TouchSmart PC is designed to support a wireless local area network (LAN) and wireless
connections with other Bluetooth devices.
Setting up a wireless local area network
Your home LAN may consist of a wired or a wireless network that you can use to connect your
HP TouchSmart PC to other devices on the network, including other computers. The network components
may include a hub or a switch, which can connect multiple devices to the network, or a router, which can
connect computers or a broadband Internet connection to the network. This network connection also
enables you to share data, and printers or other devices among your computers. The network connection to
the Internet is usually through a broadband (DSL or cable) modem, which may require a separate
subscription.
For more information, see “Connecting to the Internet.”
Using Bluetooth devices
Bluetooth devices create a personal area network (PAN) to connect other Bluetooth devices such as
computers, phones, printers, headsets, speakers, and cameras. In a PAN, each device communicates
directly with the other devices, and the devices must be relatively close together.
Setting Up the HP TouchSmart PC 17
Page 22

Connecting to the Internet
For Internet connectivity (optional), use wireless LAN, or connect an Ethernet cable for a wired LAN
connection:
For a wireless LAN, the HP TouchSmart PC includes a built-in wireless LAN, which you can use to
access your wireless home network. The HP TouchSmart PC is also Bluetooth enabled, so you can
connect all kinds of wireless devices. See “Using Bluetooth devices.”
For a wired LAN, connect an Ethernet cable (sold separately) to the Ethernet connector on the back
of the HP TouchSmart PC, and then connect the other end to the network router or cable modem.
NOTE: Broadband modem and router installation procedures vary based on manufacturer. Follow
manufacturer instructions.
To set up your Internet connection, the following items are needed:
Broadband modem (DSL or cable) with high-speed Internet service purchased from your Internet
service provider (ISP)
Wireless or wired router (sold separately)
Computer connection: wired or wireless
Wired uses Ethernet cable (sold separately) from computer to network router or cable modem.
Wireless uses the computer built-in antenna.
c
+
c
-
18 HP TouchSmart PC User Guide
Page 23

Setting up a network and the HP TouchSmart PC
First time wireless network installation requires that you:
1 Purchase high-speed Internet service.
2 Purchase and install a wireless router.
3 Configure the HP TouchSmart PC to connect to the wireless network.
4 Add your wired computer or devices to the network (optional).
Purchase high-speed Internet service
If you already have high-speed Internet service (DSL or cable), skip to “Purchase and install a wireless
router.”
If you do not have high-speed service, proceed with the steps below.
1 Contact a local ISP to purchase high-speed Internet service and a DSL or cable modem. The ISP will
help set up the modem, install an data cable to connect the modem to the service, and test the service.
If the ISP provides a single device that acts as both a modem and a wireless router, you can proceed
to “Purchase and install a wireless router.”
2 Your ISP will give you a user ID and password to access the Internet through its service. Record this
information.
NOTE: HP recommends that you protect your HP TouchSmart PC from Internet viruses by installing a
firewall and using anti-virus software that is updated regularly. For more information about using security
software, go to Help and Support. Click Start on the taskbar, click Help and Support. Type Firewall or
Anti-virus software into the search box and press the Enter key.
Purchase and install a wireless router
Read through these steps before you install the wireless router using the router manufacturer’s instructions
and your computer. If you need technical assistance during the router installation, contact the router
manufacturer.
1 Many wireless routers are shipped with a default network name (SSID) and security disabled. The
router manufacturer’s software allows you to change the SSID and enable security to protect the
privacy of your wireless network. If you change the default SSID or enable security during the router
setup, record the information. You need this information when you configure your computer and any
other existing computers to access the router.
2 The most common security levels are WPA-Personal and WEP. Some router manufacturers amy provide
additional security levels. If you enable router security, record the password and security key. The
password may be called an encryption key, passphrase, or pre-shared key.
3 Locate and use the wireless router manufacturer’s instructions to install the wireless router. After you
complete the router installation, return to these steps.
4 Test your wireless router setup by opening the Web browser and accessing any Web site. Do not
continue until you have successfully accessed a Web site.
Setting Up the HP TouchSmart PC 19
Page 24

Configuring the HP TouchSmart PC to connect to the wireless network
1 Turn on your HP TouchSmart PC.
2 To connect your HP TouchSmart PC to the wireless network:
Right-click the network icon in the system tray, and then select Connect to a network. When
the window opens, select the network and click Connect.
Or
Right-click the network icon in the system tray, and then select Network and Sharing Center.
When the window opens, select Setup a wireless router or access point, and then follow
the onscreen instructions.
3 Test the wireless network by opening your Web browser and accessing any Web site.
Adding your wired HP TouchSmart PC to the network (optional)
This optional procedure applies to only those HP TouchSmart PCs that are already configured to access the
Internet.
1 Disconnect power from the broadband modem and the wireless router, and then shut down your
HP TouchSmart PC and the computers you want to add to your network.
2 For each wired computer, connect one end of an Ethernet cable to the LAN connector on the computer,
and then connect the other end of the cable to any available Ethernet connector on the wireless router.
3 Reconnect power to the modem and wait until the modem has completed its startup cycle. Reconnect
power to the wireless router. Then, turn on the wired computers and your HP TouchSmart PC.
4 Test the network connection for each wired computer by opening the Web browser and accessing any
Web s i te.
20 HP TouchSmart PC User Guide
Page 25

Using the HP TouchSmart PC
Using the HP TouchSmart PC Screen
The angle and height of HP TouchSmart screen is easily adjustable
by each person using it. You can move it up and down and tilt it
back and forth to the angle that is comfortable for each person.
Selecting items with your touch screen
To select items on your touch screen you can:
Press once just like a single mouse click.
Tap twice quickly like a double mouse click.
Open a secondary menu as you would do when you perform a
right mouse click, by pressing and holding until the menu
appears and then moving your finger to select the menu item.
When you release your finger, the item is selected.
+
-
Optimizing the screen for touch or the mouse
When the screen is optimized for touch, icons, scroll bars, and some
fonts are enlarged for easy selection, and a desktop icon is opened with
a single-click. When the screen is optimized for the mouse, icons, scroll
bars and fonts are smaller and a desktop icon is opened with a
double-click.
To optimize your screen for touch or mouse:
1 Press or click the Windows Start Button on the taskbar.
2 Press All Programs.
3 Scroll down the Start menu, if needed, and then press HP.
4 Press HP TouchSmart Programs.
5 Select Optimize for Mouse or Optimize for Touch.
Using the HP TouchSmart PC 21
Page 26

About touch screen technology
Conventional touch screens, such as in airport check-in terminals or cash registers in a restaurant use a
touch overlay sensor material which requires a physical press to register the touch. This type of touch
screen has a limited in-use life. Such an overlay also impairs the image quality.
In contrast, the HP TouchSmart PC touch screen uses a sensitive optical technology which registers a touch
just before the finger or stylus actually touches the surface. This optical touch technology does not have an
overlay and is designed to have a longer in-use life.
NOTE: Any moving object, such as an insect, that makes contact with the touch screen, may register as a
valid touch.
Because this optical technology is sensitive, HP recommends that you handle your touch screen with care.
Please review the following cautions:
CAUTION: Because you HP TouchSmart touch screen uses a sensitive optical technology, do not
apply pressure on the front of the display or around the screen borders to avoid damaging
the touch screen.
CAUTION: Keep the screen clean from foreign objects to achieve the best touch sensitivity.
Avoid excessive dust accumulation on all sides of the border of the screen. See “Cleaning the
HP TouchSmart PC Screen” on page 23.
CAUTION: Like any other home electronic products, please keep the HP TouchSmart PC away
from liquids or a harsh environment that contains excessive dust, heat, or humidity.
22 HP TouchSmart PC User Guide
Page 27

Cleaning the HP TouchSmart PC Screen
For optimal touch performance, the HP TouchSmart PC screen requires periodic cleaning to remove any
particles on the sides and surface of the screen. The touch screen has a protective glass surface that can be
cleaned by using a soft cloth or paper towel dampened with a typical household glass cleaner.
To clean the touch screen:
1 Disable the touch screen by turning off the PC and disconnecting the power cord from the wall.
2 Spray a small amount of a mild glass cleaner onto a lint-free soft cloth.
3 Wipe the surface and each side of the display to remove any dirt, fingerprints, or other debris that
could hinder the touch recognition of the screen.
CAUTION: Do not spray or place the cleaner directly on the screen; spray the cleaner into the
cloth and then wipe the sides and surface of the touch screen. Also, avoid wiping in the top
corners where the optics are located.
Do not use an abrasive cleaner or cloth when cleaning the sides or the surface of the screen as
this could cause damage to the touch screen.
.
Using the stylus
You can use the stylus as a pointer device, like
your finger or a mouse click to more precisely
control the touch screen navigation. You can
also use it as a writing device when creating
notes in the HP SmartCalendar.
Stylus holder
Using the HP TouchSmart PC 23
Page 28

Using the Built-in Web Camera and Microphone
Your HP TouchSmart PC comes with a built-in Web camera
and array microphone located at the top and corners of
your display. You can use them to have video chats or make
conference calls over the Internet.
Web camera and microphones
Having a video chat or making conference calls
In order to set up a video chat, you must have a connection
to the Internet, an Internet Service Provider (ISP), and a
software that enables you to make video calls over the
Internet. Just like instant messengers, you can use this kind
of software to chat with one or more people at a time. You
can bookmark the chat contact or group and find it later
which is convenient for regular chats with family or business
contacts.
To set up a video chat:
1 Download an Internet messenger or video phone call software program. Make sure the person you are
calling has compatible video calling software.
2 Enable your Web camera as the default video input. This is usually done through the video setup in the
software program tools menu.
Microphone
Camera
activity
Camera
Microphone
NOTE: This software may require a separate subscription.
3 Send your video call by following the instructions of the video calling software program.
Using the HP TouchSmart PC Software
What is HP SmartCenter?
HP SmartCenter is a launch page you can personalize for quick access to information and links to your
favorite programs, Web sites, and other PC utilities. From the HP SmartCenter page, you can quickly
access information on the Internet, view your photos, or check the weather anywhere in the country with
just a few touches. For more information about HP SmartCenter, see “Navigating in HP SmartCenter” on
page 26.
24 HP TouchSmart PC User Guide
Page 29

Listed below are some of the things you can do to simplify your HP TouchSmart PC experience using
HP SmartCenter.
A
J
Q
P
O
N
B C
J H
M
L
K I
D
E
F
G
NOTE: If you have trouble opening a shortcut, close the HP SmartCenter window and open it again by
pressing the Windows Start Button on the taskbar, pressing All Programs, HP, HP TouchSmart
Programs, and then HP SmartCenter.
A Quickly open your HP SmartCalendar program where you can create notes for family members,
schedule events, and set up reminders.
B Quickly access your HP Photosmart Touch program, where you can quickly view, edit, and print your
digital photos.
C Get the latest weather forecast for your area. Currently, this feature is available only in the United
States, not in Canada or the United Kingdom.
D Close, minimize, and maximize your HP SmartCenter window.
E Add a link to a software program or a Web site.
F Use your media transport controls to control your digital media such as viewing photo slideshows,
pausing live TV, and watching your home videos.
G Launch the game Solitaire. Shortcuts to other games can be accessed by using the Personalize tool.
See “Other HP SmartCenter Features” on page 38.
H Open a help file that contains information about using your HP SmartCenter software.
I Access HP Advisor, where you can find shortcut links and tools; find PC storage and HP warranty
information, get HP software and driver updates, get important messages from HP, and access PC
Health and Security and PC Help & Tools. HP Advisor is available in North America only.
J Open Windows Media Center to access your recorded TV programs, music, photos, videos and more.
K Launch Internet Explorer so you can access information on the Internet.
L Go to the Windows Vista Desktop.
M Display the time and location of up to three different places of your choice.
N Personalize your HP SmartCenter page and change certain display settings.
O Launch Windows Media Center so you can browse your music collection and play your favorite
tracks.
P Switch to live TV in Windows Media Center when your PC is connected to a TV signal and you have
set up Windows Media Center to access your TV signal.
Q Use the Back button to move back to a previous window.
Using the HP TouchSmart PC 25
Page 30

Navigating in HP SmartCenter
You can use touch, the wireless keyboard and mouse, or your remote control to select and deselect items in
HP SmartCenter.
You can press Back to HP SmartCenter when you want to go back to the main HP SmartCenter
window.
Opening HP SmartCenter
To open your HP SmartCenter:
HP SmartCenter
button
1 Press the HP SmartCenter button on the lower-right side of the HP TouchSmart PC display.
Or
1 Press or click the Windows Start Button on the taskbar.
2 Press or click All Programs.
3 Scroll down the Start menu, and then press or click HP.
4 Press or click HP TouchSmart Programs.
5 Press or click HP SmartCenter.
Using the remote control with HP SmartCenter
26 HP TouchSmart PC User Guide
Page 31

You can use the remote control on the main page of HP SmartCenter. Use the arrow keys to highlight a
shortcut, and then use the OK key to activate the highlighted shortcut. The selected item appears with a box
around it.
Changing the weather location
Your HP TouchSmart PC has a link to a two-day weather forecast for any area in the United States. Your
model has Cupertino, California’s weather displayed as a default. To change it to your location:
1 Open the HP SmartCenter page.
2 Press the weather icon.
3 Press Change Zip Code.
4 Use your keyboard or press the touch keyboard to enter your zip code.
5 Select Fahrenheit or Celsius.
6 Press OK.
7 Press Back to HP SmartCenter when you are finished.
Using the HP TouchSmart PC 27
Page 32

Changing the HP SmartCenter clock settings
To change it to your time zone:
1 Open the HP SmartCenter page.
2 Press the analog or digital Clock icon.
3 Press Change Name and Time Zone under the first clock or
press the clock.
4 Under Clock Name, touch the word Time, and then move your finger over it to highlight the word.
When selected, type in a new name such as San Francisco Time or Uncle Billy.
5 Select your time zone by touching an item in the list. You can view more time zones by using the scroll
bar. When finished, touch OK.
6 To enable the other two time zones, place a check in the Enable check box.
28 HP TouchSmart PC User Guide
Page 33

7 Press Change Name and Time Zone under the clock you want to add or touch the clock.
8 Under Clock Name, touch the word Time, and then move your finger over it to highlight the word.
When selected, type in a new name such as Hong Kong Time or Mike in Idaho.
9 Select your time zone by touching an item in the list. You can view more time zones by using the scroll
bar. When finished, touch OK
10 Press the Back to HP SmartCenter icon when you are finished.
11 To view the two other time zones, press the Time icon from the main HP Smart Center page.
NOTE: Only one time can appear on the main HP SmartCenter page unless you move the Clock icon into
the top row when you personalize your HP SmartCenter page. Refer to “Changing what you can launch
from HP SmartCenter” on page 39.
Using HP SmartCalendar
HP SmartCalendar is a shared calendar and message
center where you can manage your family’s schedule.
With HP SmartCalendar you can schedule family
events and stay in touch with voice and text messages
that you can create using touch, the stylus, the
keyboard, or your voice.
You can create notes for specific events and set up
reminders that the HP TouchSmart PC can display using
the yellow indicator on the front of the PC.
Opening HP SmartCalendar
To open your HP SmartCenter:
1 Press the HP SmartCenter button on the lower-right side of the HP TouchSmart PC display.
Or
Press or click the Windows Start Button on the taskbar.
2 Press or click All Programs.
3 Scroll down in the Start menu, and then press or click HP.
4 Press or click HP TouchSmart Programs.
5 Press or click HP SmartCenter.
6 Press the HP SmartCalendar icon.
Using the HP TouchSmart PC 29
Page 34

Viewing your calendar
When you open your HP SmartCalendar home page, your calendar appears on the right side of the
screen, and the bulletin board for your notes appears on the left side. To open the calendar up to full view,
just press the arrow on the left side of the calendar. To close the calendar and show the bulletin board,
press the arrow on the left side of the calendar.
Bulletin board and calendar view Calendar view
When your calendar is in full-screen mode, you can choose other views by pressing the icons in the
calendar toolbar shown below. You can view it as one month, one year, one week, or one day. You can
also use the arrows on the calendar window to scroll up or down one week at a time or 4 weeks at a time.
One year One month One week One day
Scheduling an event
Windows login accounts (Administrator, Guest) are separate from your HP SmartCalendar accounts. You
must set these accounts up separately, and you can do so with family group accounts or individual
accounts.
Events are displayed up on the main HP SmartCenter page if the calendar icon is located in the top row.
The main HP SmartCenter page displays up to three appointments. It updates periodically by removing
past events and listing upcoming appointments for that day. HP SmartCalendar shows the appointment
start times and the description of the event when displayed on the main page.
30 HP TouchSmart PC User Guide
Page 35

To schedule an event on your calendar:
1 Open HP SmartCalendar.
2 Press Schedule Event.
3 Touch the text box next to What to type in an event or press the drop-down arrow to select an event.
Use the touch keyboard or your physical keyboard to type in an event.
4 Touch the text box next to Where, and type in where your event takes place.
5 Press the drop-down arrows next to your start and end dates and the start and end times to enter this
information for your date and time of your event.
6 Touch the text box next to Description to add more information about your event.
7 If this is a reoccurring event, use the drop-down arrow under Repeat, and select Daily, Weekly,
Monthly, or Yearl y.
8 If you want to set a reminder to alert you before the event, use the drop-down arrow under Reminder
and select 15 minutes before, 1 hour before, 1 day before, or 1 week before.
9 Under Assign To, use the drop-down arrow to assign the event to one or more members of the family.
NOTE: Each member or group must have a user account set up in HP SmartCalendar in order to
show up in this list.
10 Press Done after you have entered all of your event information. Your event appears as a white dot on
your calendar. To view it, just touch the date, and then touch the event.
11 To print a date, just touch the date and then press the Print button on the screen and follow onscreen
instructions.
Using the HP TouchSmart PC 31
Page 36

Adding user accounts in HP SmartCalendar
You can set up user accounts in HP SmartCalendar so that each person can have access to personal notes
that others assign to you.
To add user accounts in HP SmartCalendar:
1 Open HP SmartCalendar window.
2 Press the add user icon on the toolbar.
3 Press Manage Users.
4 Press Add User, Edit User, or Delete User.
5 If you selected Add User, type the name, select an icon, or press Browse to find your icon.
6 Press Save.
7 Press Close.
Deleting an event
To delete an event from your HP SmartCalendar, touch the date, touch the event, and then press the
Delete button on the screen.
Creating text notes with the touch screen, stylus, or keyboard
1 Open HP SmartCalendar.
2 Press Write Note.
3 Select a paper color.
4 Press the drop-down arrow next to Assign note and select a user, and then press Done.
5 Select a tool to enter your text and graphics:
Select the Pen icon to use your finger or the stylus.
Select the ABC icon to use your keyboard.
Use the Eraser tool to erase a hand-written message and start over.
6 Enter your text using the tool you selected. You can create a note using
different tools.
7 Press Done when you are finished. Your note appears on your bulletin board next to your calendar.
32 HP TouchSmart PC User Guide
Page 37

Creating voice messages
1 Open HP SmartCalendar.
2 Press Record Note at the bottom of the screen.
3 Press the Record button to record a short message (120 seconds
maximum).
4 Press the Stop button to stop recording your message.
5 Press the Play button to listen to your message.
6 Press Done when you are finished. Your voice note appears with a
speaker next to your calendar. Voice notes can be played back by
touching the note, selecting the microphone icon, and then pressing the
Play button.
NOTE: If you move a copy of a voice note to your HP SmartCalendar, you cannot listen to the message
from the calendar view. You can only play voice notes from the bulletin board.
Moving notes to your calendar
When you create a note you can copy it to a specific date on the calendar by dragging the note to a date.
It then appears as a Reminder on the date you selected. To view the note, press the date, and then press
the reminder.
NOTE: Once you move a copy of your notes to the calendar, you cannot edit them. You must edit notes
from the bulletin board and then drag a copy of the new note to the calendar date.
Editing notes
When your notes appear next to the calendar, you edit them. Just press them to open them in the create a
note window.
Once you move your notes to the calendar, they can no longer be edited.
Deleting text and voice notes
1 Open HP SmartCalendar.
2 Press the note you want to delete and drag it to the wastebasket
icon in the HP SmartCalendar page.
Using the HP TouchSmart PC 33
Page 38

Using HP Photosmart Touch
With HP Photosmart Touch you can upload, view,
edit, and print your digital memories with the
touch of a finger. The easy-to-use touch display
lets you view and print photos as easily as using a
photo kiosk.
You can use the accessible card readers on the
front of the HP TouchSmart PC to easily upload
photos from your digital camera. You can also
add an HP photo printer (A510 Series and
A610 Series) where your photos print out right
under the display.
Opening HP Photosmart Touch
To open your HP Photosmart Touch:
1 Open the HP SmartCenter page.
2 Press the HP Photosmart Touch icon.
Transferring your photos to the PC
You can transfer digital images and videos to the HP TouchSmart PC by using various methods.
HP Photosmart Touch can import photos that are located in any device that is listed as Volume drive in
Computer or Device Manager. If your device is not listed as a Volume drive, you must move your photos to
a folder on your computer for HP Photosmart Touch to be able to find, display, edit, and print them.
To transfer photos to your PC:
1 Insert a memory card into the memory card reader.
a Connect a digital camera or digital video camera to the HP TouchSmart PC with the transfer cable
that came with the device. (Select models have a digital camera docking bay.)
Or
b Insert a photo CD or DVD disc into the DVD drive.
2 Move your pictures to a PC folder, such as Pictures, or to your desktop.
Working with digital images
You can connect a digital image source, such as a digital photo or video camera, directly to the
HP TouchSmart PC or through a docking station. Most digital picture files you copy or download from the
device appear in the Pictures folder.
NOTE: When transferring pictures from a digital photo camera to the HP TouchSmart PC in HP Photosmart
Touch, set the camera’s USB setting to disk drive instead of digital camera.
Windows Vista detects your external device and displays a message asking if you want to view your
images.
You can copy digital picture files from the memory cards used by digital cameras and other digital imaging
devices by using the memory card reader (select models only).
34 HP TouchSmart PC User Guide
Page 39

HP Photosmart Touch shortcuts
Select the shortcut icons on the HP Photosmart window to perform the following tasks.
HP Photosmart Touch Main Window
Button or
Toolbar
Function
Refresh the HP TouchSmart PC for any new photos that were added to your
hard disk drive.
Import your pictures from a camera, a memory card, or from a folder on your
hard disk drive.
Print your photos, photo packages, and index sheets using the images you
select.
Return to the main HP SmartCenter window.
Enlarge or reduce the viewing size of your photos.
Adding pictures to your HP Photosmart Touch library
The first time you open the HP Photosmart Touch program, a message appears asking if you want to create
a library by finding images on your HP TouchSmart PC.
1 Open HP Photosmart Touch.
2 Connect your photo device or insert your media. Insert a memory card, external hard disk drive, CD,
DVD, or digital camera.
3 Press the Import photos icon.
4 Press From Folder, and browse to where your photos are located.
5 Select a folder to import, and place a check mark next to folder you want to import.
6 Press OK.
7 Press the Refresh icon to update your HP Photosmart Touch library with any new photos that
have been added to your hard disk drive.
Using the HP TouchSmart PC 35
Page 40

Searching for pictures with HP Photosmart Touch
You can search for pictures by date or tag in HP Photosmart Touch based on the date assigned by the
camera when the picture was taken or the date the picture was scanned.
1 Open HP Photosmart Touch.
2 Press Date. Select the date of your picture. Use the scroll bar on the right to view all of the photos, if
necessary.
Or
Press Folder. Select a folder, and then select the photos you want to view.
3 Use the scroll bar to find your pictures which are listed by the date they were added to your hard disk
drive.
4 Press the Refresh icon to update your HP Photosmart Touch library with any new photos that
have been added to your hard disk drive.
Selecting pictures in HP Photosmart Touch
You can view all of your images, individual albums, or pictures selected from a search.
1 Open HP Photosmart Touch.
2 Navigate to the group of pictures you want to view.
3 Touch the circle on the left side of the thumbnail image to select it for printing. A check mark appears
when the photo is selected.
Editing pictures in HP Photosmart Touch
You can make changes to your pictures in HP Photosmart Touch. Some of the editing features include
removing red-eye, cropping, and rotating images.
1 Open HP Photosmart Touch.
2 Click anywhere on a photo (except on the circle on the left) to select it. When you select a photo, the
HP Photosmart Touch editing window opens.
36 HP TouchSmart PC User Guide
Page 41

3 Select the editing option, such as Crop.
4 Select your cropping option of Landscape, Portrait, or Custom, press and drag the cropping
arrows until you have the cropped image you want, and then select Apply.
5 Press Done.
NOTE: You may need to refresh the window to view your edited picture in your HP Photosmart Touch
folders.
Printing pictures in HP Photosmart Touch
You need to connect your printer and install any printer software before you can print from
HP Photosmart Touch.
1 Open HP Photosmart Touch.
2 Select the photo you want to print by clicking the bottom-left corner. A check mark is displayed when a
photo is selected.
3 Press the Print icon at the bottom of the window.
Using the HP TouchSmart PC 37
Page 42

4 Select your print options, and then press Print.
5 Follow any onscreen printing instructions.
Other HP SmartCenter Features
Personalizing your HP SmartCenter page
To change the look of your HP SmartCenter page:
1 Open the HP SmartCenter page.
2 Press or click the Personalize icon.
3 Select the Appearance tab.
4 Select your HP SmartCenter page settings:
Under Opening Screen Animation, select Show or Hide.
Under Button Annimation, check or uncheck Ripple or Bounce.
Under Optimize Windows for Touch, select Touch Optimized or Mouse Optimized.
Under Theme Color, select a color.
5 Press the Back to HP SmartCenter icon when you are finished.
38 HP TouchSmart PC User Guide
Page 43

Changing what you can launch from HP SmartCenter
1 Open the HP SmartCenter page.
2 Press or click the Personalize icon.
3 Select the Arrange Programs tab.
4 Click and drag the shortcut icon you want to move over another shortcut icon. When you let go, the
shortcuts change position on your HP SmartCenter page.
5 Press Back to HP SmartCenter when you are finished.
Adding or removing a Web shortcut on the HP SmartCenter page
1 Open the HP SmartCenter page.
2 Press or click the Personalize icon.
3 Select the Select Programs tab.
4 Select the shortcuts you want to appear by placing or removing the check mark next to each item
listed. Use the scroll bar on the right side of the screen to view all of the shortcut items.
NOTE: Up to twelve and a minimum of three shortcut icons appear on the HP SmartCenter page at
one time.
Using the HP TouchSmart PC 39
Page 44

5 To create a new shortcut, place a check mark next to Create a shortcut for your favorite program or
web site, and then press Create Shortcut Change on the right side of the screen.
6 Select Web Page.
7 In the address field, press the touch keyboard icon to enter the Web address by touch, or you can use
your physical keyboard to enter the address.
8 Enter your shortcut name.
9 Select an icon for your Web page shortcut.
10 Press OK.
11 Press Back to HP SmartCenter when you are finished.
Adding or removing a program shortcut on the HP SmartCenter page
1 Open the HP SmartCenter page.
2 Press or click the Personalize icon.
3 Press the Select Programs tab.
4 Select the shortcuts you want to appear or remove by placing or removing the check mark next to each
item listed.
NOTE: You can have up to twelve and a minimum of three shortcut icons at one time.
5 To create a new shortcuts, press Create Shortcut Change.
6 Press Program.
7 Press Browse to locate a program you want to create a shortcut for, select it, and then press OK.
8 Press Back to HP SmartCenter when you are finished.
40 HP TouchSmart PC User Guide
Page 45

Using the touch screen to access Windows Media Center
You can enjoy your favorite music, TV programs, slideshows, and movies by using Windows Media
Center. All of the menus in Windows Media Center are accessible through touch as well as your remote
control, keyboard, and mouse. It is your choice.
To open Windows Media Center from the Start menu just press the Windows Start Button on the
taskbar, and then press Windows Media Center.
To open Windows Media Center from the HP SmartCenter just open HP SmartCenter and press
the Windows Media Center icon.
To open HP SmartCenter:
1 Press the Windows Start Button on the taskbar.
2 Press All Programs.
3 Scroll down the Start menu, and then press HP.
4 Press HP TouchSmart Programs.
5 Press HP SmartCenter.
For more information about using Windows Media Center, refer to the Getting Started guide.
Some of the things you can do in Windows Media Center are:
Use the included remote control or touch screen to quickly and easily access your music, TV programs,
movies, and radio.
Watch TV programs and movies.
Browse and listen to your music collection.
Play DVDs and videos.
Listen to FM and Internet radio.
Create music CDs and DVDs of your recorded TV programs.
Opening HP SmartCenter from Windows Media Center
1 Click the Windows Start Button on the taskbar.
2 Click Windows Media Center.
3 From the Windows Media Center menu, scroll to HP TouchSmart Programs, and then select
HP SmartCenter, HP SmartCalendar, or HP Photosmart Touch.
Using the HP TouchSmart PC 41
Page 46

Access PC updates, PC health and security information, and more with
HP Advisor
HP Advisor is available in North America only.
1 Press or click the Windows Start Button on the taskbar.
2 Click HP Total Care Advisor.
Or
Press or click All Programs, scroll down the Start menu, and then press or click HP. Press or click
HP TouchSmart Programs. Press or click HP SmartCenter.
3 Click the HP Advisor icon.
4 From here you can:
View security information such as Windows Auto Update and Virus Protection.
Get PC updates.
Connect to the Internet and view Internet Service Provider offers.
View HP warranty information.
View connected printers and add a printer.
Launch Microsoft Backup Tool.
Access PC health and security information.
Access PC help tools.
Access PC Action Center, where you can get critical PC alerts, tips, and tricks regarding keeping
your PC in good working order.
42 HP TouchSmart PC User Guide
Page 47

Using Tablet PC software to enter text with the touch screen
Use Microsoft Tablet PC to enter text in any software program or Internet text field without using the
keyboard. You can use the stylus or your touch to enter text on the touch screen by using the onscreen
keyboard. Use the writing pad or the character pad to convert your handwriting into typed text, or use the
onscreen keyboard to enter characters.
To open the Tablet PC Input Panel:
1 Press the Windows Start Button on the taskbar.
2 Press All Programs, Accessories, Tablet PC, and then Tablet PC Input Panel.
3 To move or dock the window to the side of your screen, just press the close button.
4 To move it back to the middle of the desktop, just touch and press it.
5 Use your stylus or your touch to write a note. You can also use the tools in the Windows toolbar to
customize your note
Using Windows Journal software to create hand-written notes and drawings
Use Windows Journal to write or draw using your stylus on the touch screen. You can save your
handwriting in a note, convert the writing to type-written text, or just leave your handwriting or drawing as
ink in a note. You can also insert pictures into your notes.
To open the Windows Journal:
1 Press the Windows Start Button on the taskbar.
2 Press All Programs, Accessories, Tablet PC, and then Windows Journal.
3 Use your stylus or your touch to write a note or draw a picture. You can also use the tools in the
Windows Journal toolbar to customize your note.
4 To save your note, press the File menu and press Save.
Using the HP TouchSmart PC 43
Page 48

44 HP TouchSmart PC User Guide
Page 49

Upgrading the HP TouchSmart PC
Safety Information
This product has not been evaluated for connection to an “IT” power system (an AC distribution system with
no direct connection to the earth, according to IEC 60950).
WARNING: Please read “Additional Safety Information” in the Limited Warranty and Support
Guide before installing and connecting your system to the electrical power system.
Opening and Closing the HP TouchSmart PC
Vertical cover
Rear cover
Preparing the HP TouchSmart PC
Before you upgrade any component in your HP TouchSmart PC, you need to prepare the HP TouchSmart
PC so that you can safely handle it and the components.
Read the following items before attempting to upgrade or service the HP TouchSmart PC.
1 These procedures assume familiarity with the general terminology associated with personal computers
and with the safety practices and regulatory compliance required for using and modifying electronic
equipment.
2 Write down and save the system model and serial numbers, all installed options, and other
information about the system. It’s easier to consult this information than to open and examine the
computer.
Upgrading the HP TouchSmart PC 45
Page 50

3 It is recommended that you use an antistatic wrist strap and a conductive foam pad when working on
the system.
WARNING: Always disconnect the HP TouchSmart PC from the power source before removing
the rear or vertical cover of the HP TouchSmart PC. Failure to do so before you open the
HP TouchSmart PC or do any procedures can result in personal injury or equipment damage.
Before opening the HP TouchSmart PC
To avoid injury and equipment damage, always follow this procedure in this order before opening the
HP TouchSmart PC.
1 Remove any media (CD, DVD, memory cards, USB devices, external hard disk drives) from the
HP TouchSmart PC.
2 Click the Windows Start Button, and then click Shut Down.
CAUTION: To reduce the risk of personal injury from electrical shock or hot surfaces,
disconnect the power cord from the wall outlet, and allow the internal system components to
cool before touching.
3 Disconnect the power cord from the electrical outlet and then from the HP TouchSmart PC.
4 Disconnect all other attached cables from the rear of the HP TouchSmart PC.
5 Disconnect all external devices.
CAUTION: Static electricity can damage the electronic components of the HP TouchSmart PC or
optional equipment. Ensure that you are discharged of static electricity by briefly touching a
grounded metal object.
After closing the HP TouchSmart PC
To avoid injury and equipment damage, always follow this procedure in this order after closing the
HP TouchSmart PC.
1 Reconnect the power cord.
WARNING: To reduce the risk of electrical shock, fire, or damage to the equipment, do not
plug telecommunications or telephone connectors into the network interface card (NIC)
(labeled as LAN).
2 Reconnect all other cables.
3 Reconnect external devices.
4 Turn on the HP TouchSmart PC and all peripherals such as the monitor.
46 HP TouchSmart PC User Guide
Page 51

Removing the rear cover
This procedure is necessary when removing and upgrading memory.
1 See “Opening and Closing the HP TouchSmart PC” on page 45.
2 Remove the two screws that secure the rear cover to the HP TouchSmart PC chassis. Keep the screws
for later.
+
-
3 Pull the rear cover back about 1/2 in (1.27 cm) (A). If necessary, gently push down on the cover while
pulling back.
4 Lift the rear cover and remove from the chassis (B).
WARN ING: Bewa r e of shar p edges inside the chassis.
Upgrading the HP TouchSmart PC 47
Page 52

Replacing the rear cover
1 Place the rear cover in the proper position on the chassis and about 1/2 in (1.27 cm) back from the
vertical cover.
2 Slide the rear cover toward the front of the chassis until the rear of the cover is flush with the rear I/O
area of the chassis.
3 Ensure that the holes for the screws align with the holes in the chassis, and then replace the two
screws.
Removing the vertical cover
This procedure is necessary when removing or replacing the hard disk drive.
1 See “Opening and Closing the HP TouchSmart PC” on page 45.
CAUTION: To reduce the risk of personal injury from electrical shock or hot surfaces, disconnect
the power cord from the wall outlet, and allow the internal system components to cool before
touching.
2 If necessary, raise the display (monitor) until the pocket behind the monitor is accessible.
3 While holding the back of the vertical cover, push and hold down the lever on the front of the vertical
cover. This lever is located in a pocket behind the display (monitor) portion of the HP TouchSmart PC.
Lever
4 While holding down the lever, pull the vertical cover up and remove from the chassis.
48 HP TouchSmart PC User Guide
Page 53

Replacing the vertical cover
1 Align and insert the hooks on the vertical cover into the holes on the back of the chassis.
2 Reach behind the display, and hold down the lever on the vertical cover while sliding the vertical cover
down and into place on the back of the vertical chassis.
Adding Memory
Your HP TouchSmart PC comes with random access memory (RAM), which temporarily stores data and
instructions on your HP TouchSmart PC. The HP TouchSmart PC ships with two memory modules, but you
can replace the existing memory modules with higher-capacity ones.
The motherboard contains sockets for SO-DIMMs (small outline dual in-line memory modules).
To determine which type and speed of memory module your HP TouchSmart PC uses, and for specific
memory module information and specifications, go the Web site listed in your Limited Warranty and
Support Guide, and click the Support link.
WARNING: Using the wrong type of memory module could damage the system.
Removing a memory module
1 Complete the procedures to prepare the HP TouchSmart PC and to remove the rear cover. See
“Opening and Closing the HP TouchSmart PC” on page 45.
2 Remove the cable from the DVD drive.
DVD drive
Tab
3 Lift the tab at the left side of the DVD drive and slide the drive straight back.
DVD drive cable
4 Move the DVD drive cable away from the memory module beneath it.
CAUTION: When handling a memory module, be careful not to touch any of the contacts.
Doing so may damage the module.
Upgrading the HP TouchSmart PC 49
Page 54

WARNING: Do not pull the memory module out of the socket. Use the latches of the retaining
clips to remove the module.
5 Push the two latches of the retaining clips away from the memory module. The memory module pops
up at an angle.
Latches
Latches
Memory module
6 Lift the memory module from the memory socket. Note the location of the key slot on the
connector edge.
Installing a memory module
Upgrade the memory in your HP TouchSmart PC with memory of the same type and speed as the memory
originally installed in your HP TouchSmart PC. The two memory modules must be identical in type, speed,
and capacity.
CAUTION: When handling a memory module, be careful not to touch any of the contacts.
Doing so may damage the module.
1 With the DVD cable moved out of the way, align the memory module with the socket, so the key slot on
the connector edge is same as the module removed.
NOTE: The sockets are keyed. If the module slot does not match the socket, turn the memory
module over.
2 Slide the memory module into the socket at the same angle it was removed.
3 Push the outer edge of the memory module down until the retaining clip latches catch.
4 Move the DVD cable out of the way and insert the DVD drive. Slide the drive in until the tab catches.
5 Reconnect the DVD drive cable.
6 Complete the procedures to replace the rear cover, and close the HP TouchSmart PC. See “Opening
and Closing the HP TouchSmart PC” on page 45.
NOTE: If a blank screen is displayed after replacing or adding a memory module, the memory is
installed incorrectly or it is the wrong type of memory. Remove and reinstall the memory module.
50 HP TouchSmart PC User Guide
Page 55

Removing and Replacing the Hard Disk Drive
You can replace or upgrade the hard disk drive.
The hard disk drive is a Serial ATA (advanced technology attachment) drive, which uses a narrow
data cable.
CAUTION: Back up your personal files on the hard disk drive to an external storage
device, such as a CD, before removing the hard disk drive. Failure to do so may result in
data loss. After replacing the hard disk drive, you need to run System Recovery using
recovery discs to load the factory-installed files. See the user documentation that came
with your HP TouchSmart PC for details about the recovery procedure.
Removing the hard disk drive
1 Complete the procedures to prepare the HP TouchSmart PC to remove the vertical cover. See
“Opening and Closing the HP TouchSmart PC” on page 45.
2 Loosen the two bottom screws on the hard disk drive cage three turns.
Screw (remove)Screw (remove)
Powe r
cable
Data
cable
Screw (loosen 3 turns)
Screw (loosen 3 turns)
3 Remove the two top screws from the hard disk drive cage.
4 Lift the cage up off the two bottom screws and out of the chassis.
5 Disconnect the power and data cables from the back of the drive. Squeeze the latch on the SATA
connector to remove the data cable.
6 Remove the four screws from the cage, and lift the sides of the hard disk drive from the cage.
Screws
Upgrading the HP TouchSmart PC 51
Page 56

Replacing the hard disk drive
1 Complete the procedures to remove the hard disk drive, if necessary. See “Removing the hard disk
drive” on page 51.
2 Place the hard disk drive into the cage and insert the four screws.
Screws
3 Connect the power and data cables to the hard disk drive.
4 Place the hard disk drive cage over the two bottom screws and into the chassis.
Screw (insert)Screw (insert)
Powe r
cable
Data
cable
Screw (tighten)
Screw (tighten)
5 Insert the two top screws and tighten the two bottom screws.
6 Complete the procedures to replace the vertical cover and close the HP TouchSmart PC. See “Opening
and Closing the HP TouchSmart PC” on page 45.
52 HP TouchSmart PC User Guide
Page 57

Locating Information About Your Computer
This section is an index to information about your
computer. The information is located in this guide and
other guides that have been included with your
computer.
HP TouchSmart PC User Guide (this guide), a
printed guide with specific information about the
HP TouchSmart PC product. References are listed
as black page numbers UG-#.
Getting Started guide, included on your
computer is an onscreen guide, provides
information about using your HP computer, the
Microsoft Windows Vista operating system, the
Windows Media Center, and some of the
hardware and the software programs included
with the computer. References are coded as
green page numbers: GS-#.
Limited Warranty and Support guide, a
printed guide, provides information about your
computer warranty and how to obtain support.
References are listed as blue page
numbers: WS-#.
Troubleshooting and Maintenance Guide,
a printed guide, provides information about tasks
you can perform to ensure the trouble-free
operation of your computer and to ease the
recovery of important information on your
computer should problems arise in the future. It
also contains a series of tables that describe
solutions you can try to resolve problems that may
occur when you install and use your computer.
References are listed as red page numbers: TM-#.
Viewing the Getting Started guide, or
more information
The Getting Started guide is an onscreen guide.
Onscreen guides are available in the User Guides
folder on your computer.
1 Click the Windows Start Button
on the taskbar.
2 Click All Programs.
3 Click User Guides.
4 Click the guide name, such as Getting Started,
to view the guide.
Finding more information on the Web
You can find copies of your guides and information for
your computer by using the Internet to access the
Support Web site.
1 Go to http://www.hp.com/support in your
Web browser.
2 Select your country/region and language.
3 Click Support and Drivers.
4 Click See support and troubleshooting
information, enter the model number of your
computer, and then click Search .
5 Click Manuals.
6 Locate the manual you want, and then do one of
the following:
TM
How to locate information
Locate information by looking in the entries under the
main task or subject.
For example, to locate a figure showing where the
DVD slot is on the computer, look under D for the term
DVD, then look for a listing from the User Guide such
as drive slot,
UG-3.
Click the title to display the file in Adobe
Acrobat Reader (which you can download
from the Manuals page if it is not currently
installed on your computer).
Right-click the title, click Save Target As,
specify a location on your computer where
you want to save the file, rename the file
(retaining the .pdf extension), and then
click Save.
NOTE: Only Getting Started guide references are
included in the index at this time.
Locating Information About Your Computer 53
Page 58

A
activity lights UG- 2
adding
CD tracks to the music library GS- 92
music files to the music library
from the hard disk drive GS- 91
antivirus, installing program
Audio Troubleshooting, TM- 8
autoscroll
GS- 28
GS- 16
B
batteries UG- 16
installing in remote control 35
keyboard and mouse UGremote control UG- 16
type for remote control GS-35
bay
HP Pocket Media Drive UG-
Bluetooth devices UG- 17
burning
audio and data disc GS-120–GS-125
CDs, DVDs GS-119–GS-123
button
computer on/standby UGHP SmartCenter UG- 2
buttons
channel, volume, and mute UGDVD control UG- 2
media control or playback GS-24
Off, See turning off PC GS-10
remote control GS-32
buttons, keyboard
customizing GS-25
11
6
2
3
C
calendar
using HP SmartCalendar UGviewing UG- 30
camera
using built-in Web camera UGWeb camera with indicator UG- 1
card reader, memory GS-61
carpal tunnel syndrome GS-5
CD and DVD Drive Troubleshooting, TM- 9–10
CDs
creating a music CD in Music GS-101, GS-102
erasing rewritable GS-120
playing in Music GS-96, GS-98
change the speed of the cursor GS-29
channel buttons UG-
3
29
24
cleaning UG- 23
computer
connecting the IR emitter UGturning on UG- 8
Computer Playback GS-149
connecting
FM antenna UGheadphones UG- 2
printer UG- 15
remote IR emitter cable UG- 14
to the Internet UG- 18
TV signal UG- 13
connectors UG- 5
audio/video UG- 3
country/region codes GS-111
cursor speed GS-29
customizing keyboard buttons GS-25
13
14
D
Declaration of Conformity, WS- 9
desktop
switching from Media Center
digital camera, using HP Photosmart Touch UG- 34
digital images GS-129
working with UG- 34
digital picture GS-61, GS-129
digital video
camera capture
using HP Photosmart Touch UG- 34
discs
drive compatibility
erasing rewritable GS-120
features and compatibility GS-58
Disk Cleanup, TM- 2
Disk Defragmenter, TM- 3
Display (monitor) Troubleshooting, TM- 11
dock
printer UG-
documentation, onscreen GS-1
Drivers, update, TM- 22
DV camera capture
DVD
drive slot UGindicator light UG- 2
DVD movies
changing
audio settings
language GS-113
playing
in Media Center
DVD Play, features GS-46
GS-142
GS-57
5
GS-142
2
GS-116
GS-112
GS-80
54 HP TouchSmart PC User Guide
Page 59

E
End-User License Agreement, WS- 6–8
erasing rewritable discs
error messages
Channel information is currently not available
common recording errors GS-173
Download Incomplete GS-159
Image cannot be displayed GS-133
Low Disk Space GS-168, GS-170
No data available GS-159
Search is unavailable because there is no guide
information
The current lineup and/or location selected for the guide
is not supported
The guide information is either missing or
corrupt
GS-159
errors
reducing recording speed
Ethernet UG- 18
event
deleting an event from HP SmartCalendar UG-
scheduling in HP SmartCalendar UG- 30
GS-120
GS-159
GS-159
GS-159
GS-121
32
F
file type
music
GS-93, GS-140
picture GS-133, GS-139
video GS-137, GS-139
FireWire (IEEE 1394) GS-142, GS-143
FM Radio GS-104
FM Antenna In GS-106
FM Tuner In GS-104
Preset Radio Stations GS-106, GS-107, GS-108
Radio Online GS-109
radio tuner input GS-104
TV Signal GS-105
FM radio, see radio
G
games
finding UG-
Guide, see Television Program Guide
25
H
Hard Disk Drive Troubleshooting, TM- 12
Hard Disk Drive upgrade UG-
Hardware Installation Troubleshooting, TM- 12–13
Hardware Limited Warranty, WS- 2–6
headphones UG-
Help and Support GS-2
HP Advisor
access PC updates, security information UG-
accessing UG- 25
features UG- 42
2
51
42
HP Media Drive
inserting a drive
HP Personal Media Drive GS-67
activity and power lights GS-68
automatic on and off feature GS-68
disconnecting the drive GS-72
location and drive letter GS-70
HP Photosmart Essential GS-46
HP Photosmart Touch
creating your picture library UGopening UG- 34
using UG- 25, 34, 35
HP Pocket Media Drive GS-67
bay UG- 6
using UG- 6
HP printer Y-cable UG- 5
HP SmartCalendar
adding user accounts UGcreating voice notes UG- 33
deleting an event UG- 32
using UG- 25, 29
HP SmartCenter
accessing the two-day weather forecast UGadding or removing Web site shortcut UG- 39
changing location of shortcuts UG- 39
changing time setting UG- 28
customizing UG- 38
getting help UG- 25
opening UG- 26, 29, 41
scheduling an event UG- 30
what is, using UG- 24
HP SmartCenter button UG- 2
using to open HP SmartCenter UG- 26
HP Total Care Advisor GS-17
HP TouchSmart PC screen
cleaning UG-
GS-68
35
32
23
I
indicators
activity lights UG-
Internet
access UGconnecting UG- 18
Internet Access Troubleshooting, TM- 14–15
Internet security
IR emitter
connecting UG-
2
25
GS-7, GS-8, GS-103
14
27
Locating Information About Your Computer 55
Page 60

K
Kensington lock slot UG- 5
keyboard
customizing buttons
keys UG- 9
replace batteries UG- 11
setting up UG- 8
shortcuts GS-25
special buttons UG- 9
types of buttons GS-19
UK keyboard differences UG- 9
using UG- 9, GS-19
Keyboard and Mouse Troubleshooting, TM- 16–17
GS-25
L
LAN UG- 17, 18
local area network (LAN) UG- 17
lock
Kensington UG-
5
M
magicSpot GS-145
manual sync, keyboard and mouse UG- 12
Media Center
menu bars
navigating GS-80
opening with remote control GS-34
playing DVDs GS-112
resizing window GS-80
using with another program open GS-80
what you can do
in Music
in Radio GS-104
media control buttons UG- 2
memory card, formatting GS-65
memory card reader UG- 34, GS- 129
card types UG- 2, GS-61
in-use light GS-65
troubleshooting GS-66
using GS-61
memory, upgrade UG- 49
microphone
using UGmicrophone array UG- 1
mouse
autoscroll
cursor speed GS-29
panning GS-28
replace batteries UG- 11
setting up UG- 8
storing UG- 1
switching button functions GS-29
using UG- 11
GS-80
GS-89
24
GS-28
Music GS-89
browse, listen UG- 25
copying music to CD GS-101, GS-102
creating a queue list GS-97
deleting music from the Music library GS-93
finding and playing an album GS-98
playing a song GS-96
playing an album GS-96, GS-98
playing music GS-94
playing with Windows Media Player
GS-111, GS-116
supported file types GS-93
music library
adding CD tracks
creating GS-91
mute button UG- 3, GS-24
muvee autoProducer
adding a title and credits
adding music GS-141
adding pictures GS-141, GS-144
adding video GS-141, GS-143
allowing music to repeat GS-146
allowing video and pictures to repeat GS-146
basic steps to create a movie GS-139
changing settings GS-146
copying a movie to disc GS-150
features GS-47
getting started GS-141
getting video from a camera GS-141
making a movie GS-147
previewing a movie GS-148
rotating images clockwise GS-145
selecting style GS-145
setting the duration of video GS-146
upgrading GS-151
using the magicMoments feature GS-144
GS-92
GS-141
N
network
wireless UG-
Norton Internet Security
configuring
registering GS-44
note
deleting notes in HP SmartCalendar UGediting in HP SmartCalendar UG- 33
moving notes to calendar UG- 33
2
GS-44
O
Off button, See turning off PC GS-10
On/Standby button UG- 2
Operating Specifications, WS- 10
optical drive quick reference
optimizing for touch or mouse UG- 21
Optimization setting GS-76, GS-87
GS-59
33
56 HP TouchSmart PC User Guide
Page 61

P
panning with the mouse GS-28
passwords
creating
PC
connecting the IR emitter UG-
Help & Tools GS-2
turning off GS-10
Performance Troubleshooting, TM- 18–19
photos
transferring to PC UGphoto slot UG- 2
pictures GS-129
copying pictures to CD GS-136
editing GS-133
editing in HP Photosmart Touch UG- 36
image not displayed GS-133
printing UG- 37, GS-133
rotating GS-135
selecting in HP Photosmart Touch UG- 36
types of files it can display GS-133
viewing a slide show with music GS-132
Pictures and Videos GS-129
pictures, turning captions on or off GS-131
pictures, viewing GS-131
pictures, viewing pictures as a slide show GS-132
playing
digital music files
digital videos GS-137
DVDs in Media Center GS-112
music CDs in Media Center GS-94
songs in Music GS-96
playing music CDs GS-110, GS-117
playing songs
Buy Music option
Visualize option GS-98
playlist
creating in Music
pointer device
using the stylus UGpower
surge protection UGpower cord
connecting UG-
Power Troubleshooting, TM- 17–18
printer
connecting UGprinter dock UG- 5
Program Guide, see Television Program Guide
GS-15
14
34
GS-94
GS-98
GS-100
23
7
7
15
Q
queue list
creating in Music
GS-97
R
radio
connecting antenna to PC
getting reception GS-104
organizing radio station presets GS-107
Radio window GS-104
organizing pre-set radio stations GS-107
playing FM stations GS-104
playing radio in Media Center GS-104
recording radio programs GS-107
RAM, see Memory UG- 49
RealPlayer, features GS-46
Recommended Maintenance Schedule, TM- 5–6
recorded TV
recording
options
radio programs GS-107
TV programs GS-164
recording TV
standby mode
recording TV programs
manually
single program or series, canceling GS-164
when two are scheduled for the same time GS-165
recording TV shows
making sure a program is being recorded
using the guide GS-165
Recovery Discs, Creating, TM- 25–26
Regulatory and Safety Information, WS- 10–13
remote control
buttons
On/Standby (sleep) button UG- 16
range GS-34
type of battery to use GS-35
sensor UG- 16
sensor window UG- 1
using GS-34
using with HP SmartCenter UG- 26
using in TV + Movies GS-156
remote control UG- 1, 16
remote sensor GS-35
using GS-34
repetitive strain injury (RSI),
see Safety & Comfort Guide GS-5
Return to HP SmartCenter button
using UG-
rewritable discs, erasing GS-120
router installation UG- 18
Roxio Creator
erasing discs
GS-172
GS-165
how to stop recording GS-164
GS-82
GS-166
GS-32
26
GS-120
GS-104
GS-164
Locating Information About Your Computer 57
Page 62

S
Safety & Comfort Guide GS-5
safety warnings GS-5
screen UG- 1
scrolling with the mouse GS-28
search
pictures in HP Photosmart Touch UG-
searching for programs GS-163
setting up
keyboard and mouse UG-
settings
for sound
general GS-86
Internet connections GS-86
remote control and remote sensor GS-35
set-top box
IR emitter cable for UG-
Shared Video folder GS-136
shortcuts
keyboard
shutting down PC GS-10
sleep mode button GS-22
slide show
displaying information about pictures
viewing pictures GS-132
viewing with music GS-132
Software and Driver Reinstallation, TM- 24
software programs
DVDPlay
Windows Movie Maker GS-48
sorting TV programs
by category
by date GS-172
by name GS-172
speakers UG- 1
Start menu
Media Center
stylus UG- 1
using UG- 23
Support
messages
Support Information, WS- 14–15
Support Phone Numbers, WS- 14
surge protection UG-
SVCD GS-150
switching mouse button functions GS-29
sync
keyboard and mouse, manually UG-
System Recovery, TM- 25–29
System Restore, TM- 23
GS-86
GS-25
GS-46
GS-172
GS-78
GS-2
7
8
14
36
GS-132
12
T
Tablet PC
using to enter text with the touch screen UG-
Television Program Guide
no data available
recording TV programs GS-165
searching for TV programs GS-163
setting up a download method GS-160
using the More information button GS-159
viewing GS-159
touch screen UG- 21, 23
creating notes in HP TouchSmart Calendar UG- 32
selecting UG- 21
using Tablet PC software UG- 43
using Windows Journal UG- 43
touch screen UG- 1
troubleshooting
remote sensor
turning off PC GS-10
turning on the computer UG- 8
TV
adding missing channels to the guide
advanced recording options GS-165
editing channels in the guide GS-162
input connectors UG- 4
manually downloading the guide GS-160, GS-161
playback, time shifting GS-156
playing recorded TV programs GS-172, GS-173
recording icons GS-164
recording TV from the guide GS-165
recording TV manually GS-166
recording TV programs GS-164
removing channels from the guide GS-162
searching for TV programs GS-163
searching for TV programs by category GS-164
sorting programs GS-172
Television Program Guide errors GS-159
time shifting GS-156
using digital video recorder while watching GS-156
using the remote control GS-156
watching GS-154
watching TV programs GS-155
TV + Movies GS-153
tweak muvee GS-148
GS-159
GS-35
43
GS-162
U
update, Windows Vista GS-14
updates from Compaq Connections, using GS-2
updates from HP Connections, using GS-2
updating, system GS-14
upgrade UG- 45
user accounts
adding in HP SmartCalendar UG-
creating GS-15
32
58 HP TouchSmart PC User Guide
Page 63

V
VCD GS-150
playing with Windows Media Player GS-117
video capture
live
GS-142
recorded video GS-142
video chat
setting up UG-
video editing
getting started with muvee autoProducer
video movies
transferring
transferring and recording GS-138
Video Troubleshooting, TM- 11
GS-136
videos
creating a CD or DVD GS-138
playing GS-136
playing digital videos GS-137
transferring videos GS-138
visualization settings GS-95
voice messages
creating UG-
volume
controls
volume buttons UG- 3
24
GS-141
GS-138
33
GS-24
W
weather
changing location of the two-day forecast UG-
checking local weather in HP SmartCenter UG- 27
weather forecast
accessing UGWeb camera
using UG-
25
24
27
Web camera and indicator UG- 1
Web Streaming GS-149
Windows Journal
using UG-
Windows Media Center
opening UG-
play videos GS-136
playing videos GS-136
using the touch screen to access UG- 41
viewing your pictures GS-131
watch live TV UG- 25
what you can do
Windows Media Player
play DVDs
play music CDs GS-111
playing video CDs GS-117
setting as default player GS-93
types of files GS-93
Windows Movie Maker, features GS-48
Windows Vista update GS-14
wired network UG- 18
wireless network UG- 2, UG- 19
working in comfort GS-5
43
25
in TV + Movies
GS-116
GS-153
Y
Y-cable, HP printer UG- 5, UG- 15
59 HP TouchSmart PC User Guide
Page 64

Part number: 5991-7301
 Loading...