

Page 1
Upgrading and Servicing Guide
Manuel de mise à niveau et d'entretien
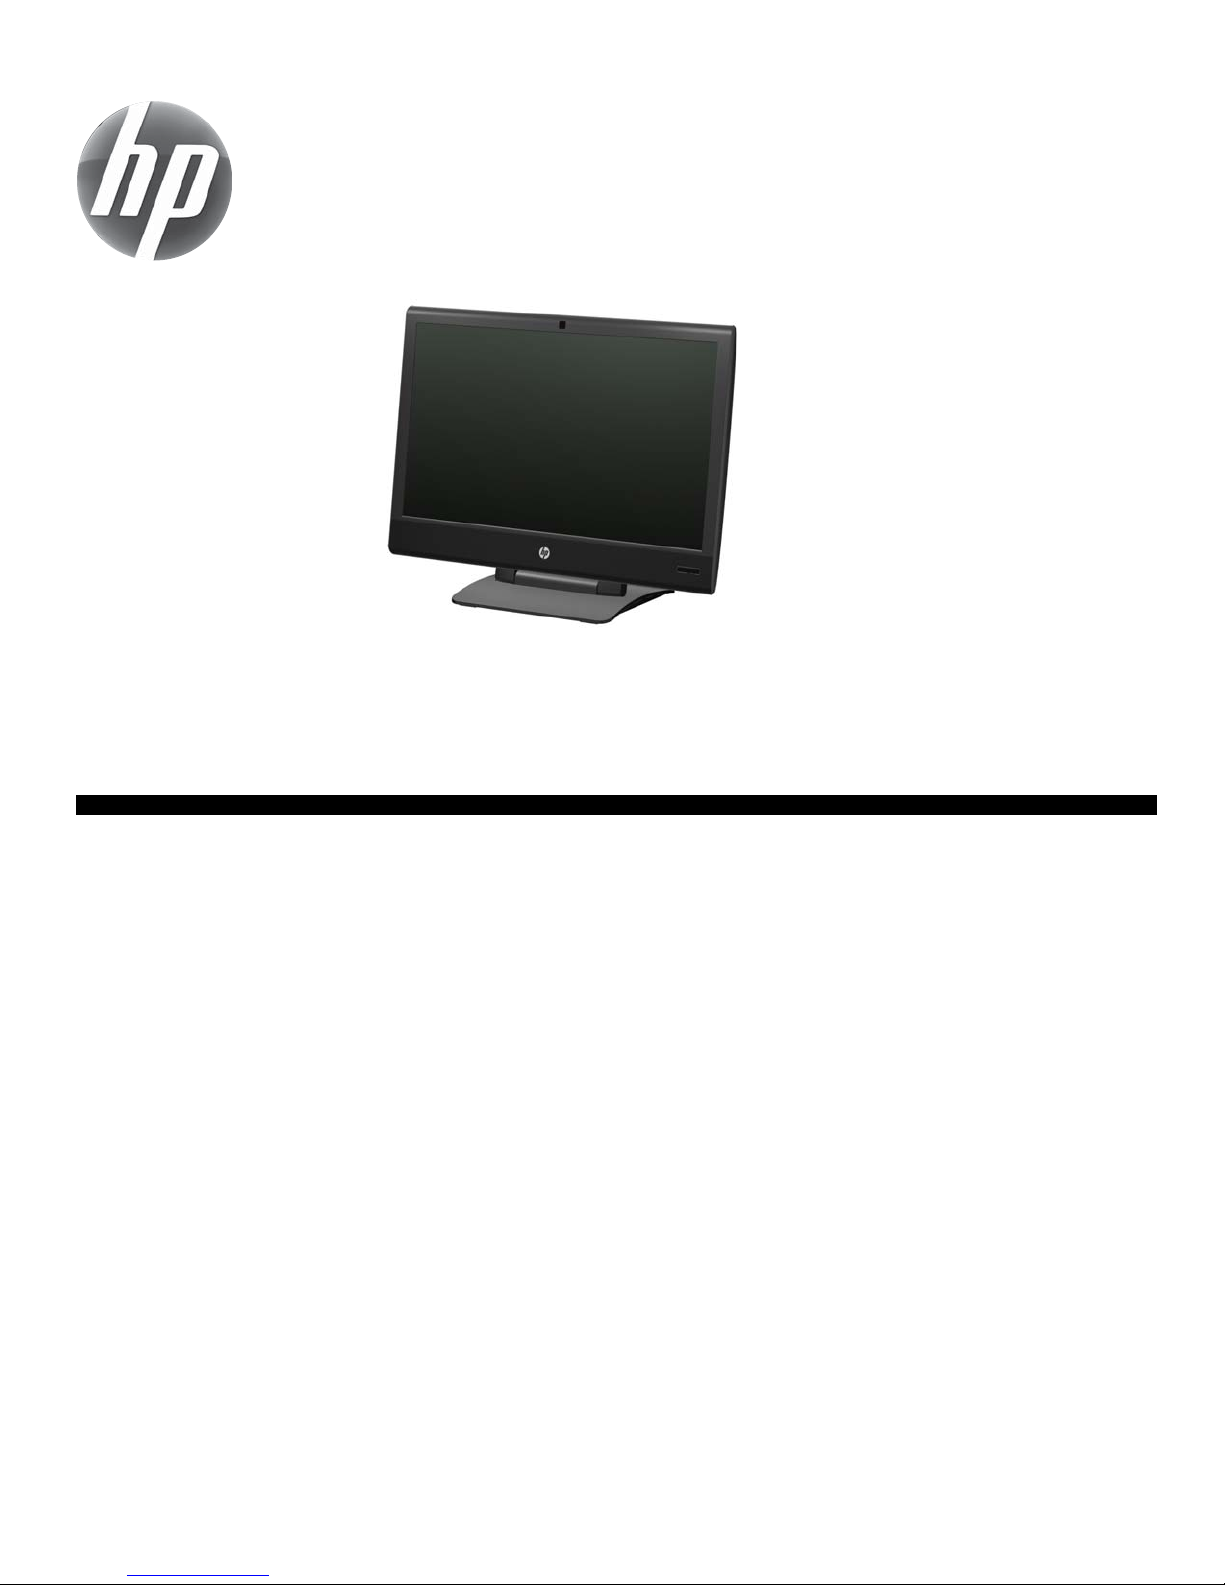
HP TouchSmart
Computer features may vary by model
Les fonctions de l’ordinateur peuvent varier selon le modèle.
Removing and replacing a CD/DVD drive ............... 2
Tools Needed .............................................................. 2
Removing the CD/DVD drive ......................................... 2
Installing a new CD/DVD drive ...................................... 6
Removing and replacing a hard disk drive ........... 12
Tools needed ............................................................. 12
Removing the hard disk drive ....................................... 12
Replacing the hard disk drive ....................................... 16
Upgrading or replacing memory ......................... 22
Tools Needed ............................................................ 22
Memory Compatibility................................................. 22
Removing the memory ................................................. 23
Installing a new memory card ...................................... 26
Troubleshooting.......................................................... 29
610
PC
Retrait et remplacement d’un lecteur de CD/DVD .... 2
Outils nécessaires......................................................... 2
Retrait du lecteur de CD/DVD ........................................ 2
Installation d’un nouveau lecteur de CD/DVD .................. 6
Retrait et remplacement d’un disque dur ..............12
Outils nécessaires....................................................... 12
Retrait du disque dur................................................... 12
Installation d’un nouveau disque dur ............................. 16
Augmentation ou remplacement de la mémoire ... 22
Outils nécessaires....................................................... 22
Compatibilité de la mémoire ........................................ 22
Retrait de la mémoire .................................................. 23
Installation d’un nouveau module mémoire..................... 26
Dépannage................................................................ 29
Page 2

ii 647642-DN1
Page 3
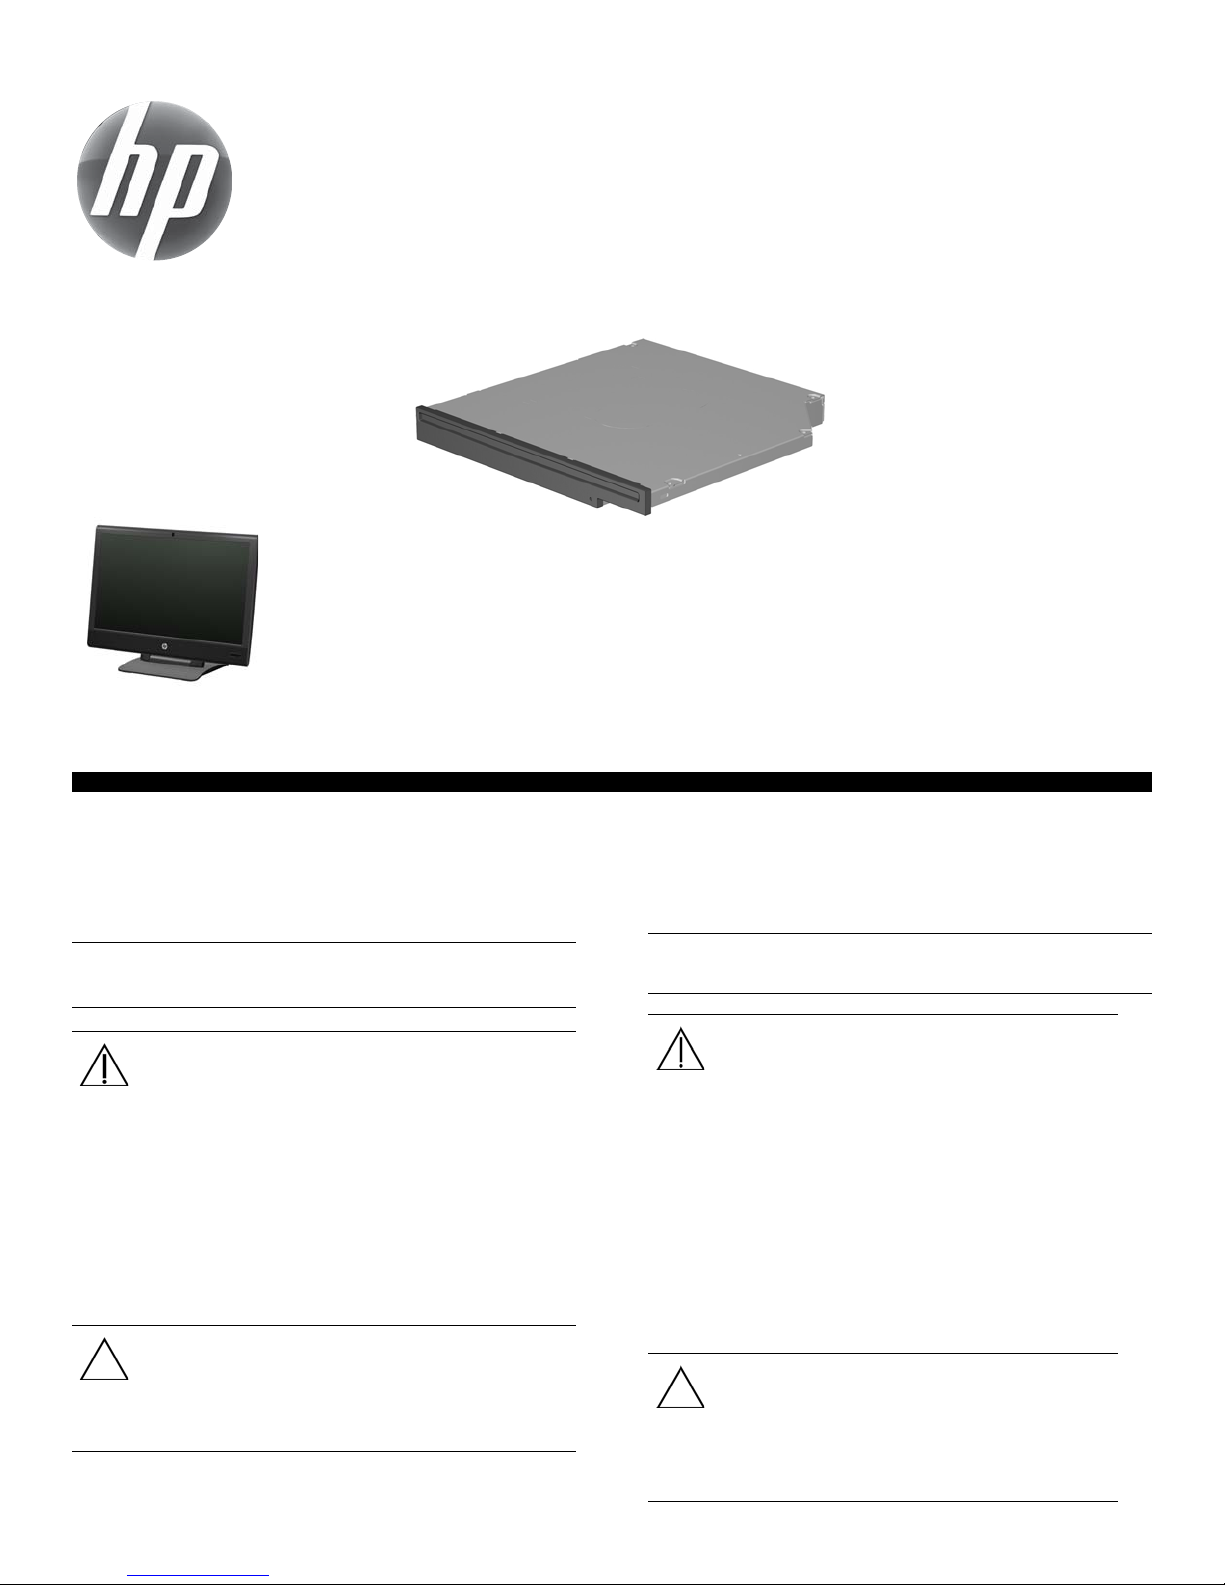
Removing and Replacing a CD/DVD Drive
Retrait et remplacement d’un lecteur de CD/DVD
HP TouchSmart
610
PC
Les fonctions de l’ordinateur peuvent varier selon le modèle.
Computer features may vary by model.
Before you begin
Observe the following requirements before removing and
replacing the CD/DVD drive.
IMPORTANT: A CD/DVD drive is extremely sensitive to
shock impact. Do not bang or drop it.
WARNING:
Never open the cover with the power
applied. You might damage your
computer or be injured by the spinning
fan blades.
Avoid touching sharp edges inside the
computer.
Keep your hands away from the moving
fan.
Keep fingers and tools clear of the fan
when the power is applied.
CAUTION: Static electricity can damage the
electronic components inside the computer. Discharge
static electricity by touching the metal cage of the
computer before touching any internal parts or
electronic components.
Avant de commencer
Respectez les conditions requises suivantes avant de retirer et de
remplacer le lecteur de CD/DVD.
IMPORTANT : Un lecteur de CD/DVD est extrêmement sensible
aux chocs. Ne le laissez pas tomber et ne le heurtez pas.
AVERTISSEMENT :
N’ouvrez jamais le capot lorsque le
cordon d’alimentation est branché ou
lorsque l’ordinateur est sous tension.
Vous pourriez endommager votre
ordinateur.
Évitez de toucher les bords tranchants
à l’intérieur du châssis.
Gardez vos mains à l’écart du
ventilateur en mouvement.
N’approchez pas vos doigts ou des
outils du ventilateur lorsque
l’ordinateur est alimenté.
ATTENTION : L’électricité statique peut
endommager les composants électroniques à
l’intérieur de l’ordinateur. Déchargez l’électricité
statique en touchant la cage métallique de
l’ordinateur avant de toucher tout composant
interne ou tout composant électronique.
Page 4
Removing and replacing a CD/DVD drive
Retrait et remplacement d’un lecteur de CD/DVD
10 - 15 m in u te s
10 à 15 minutes
Tools Needed
Flathead/Torx screwdriver #15
Phillips screwdriver #1
Small screws are easily lost. Remove screws over a surface
that allows you to retrieve them if they fall.
Outils nécessaires
Tournevis plat/Torx #15
Tournevis cruciforme de précision #1
Les petites vis peuvent facilement être perdues. Retirez les
vis sur une surface qui vous permettra de les récupérer si
elles tombent.
Removing the CD/DVD drive
Retrait du lecteur de CD/DVD
1 Remove items such as CDs, DVDs, and USB storage
devices from the computer.
Retirez les éléments tels que des CD, DVD et
périphériques de stockage USB de l’ordinateur.
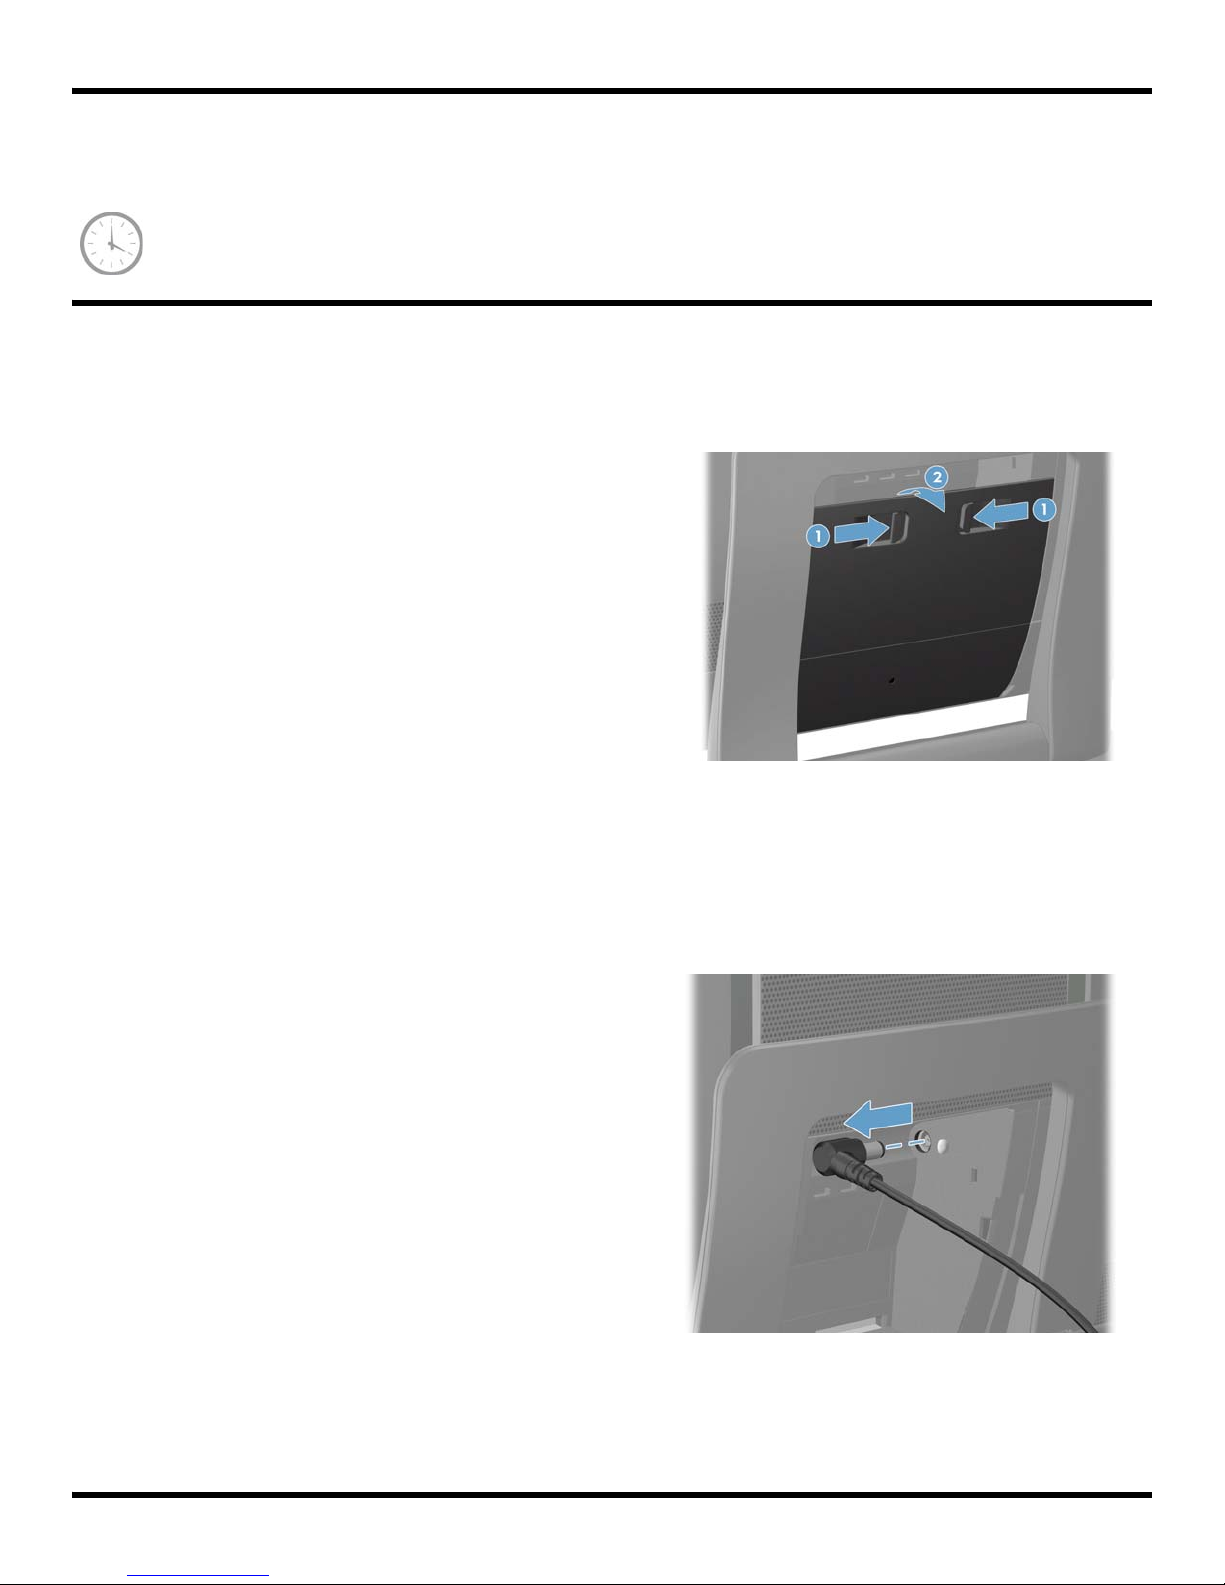
3 Open the rear port access door by squeezing the two
tabs at the back of the computer (1) and then pulling
the door open (2).
Appuyez sur les deux languettes afin d’ouvrir le volet
d’accès aux ports arrière de l’ordinateur (1) en le tirant
vers vous (2).
4 Unplug the computer by disconnecting the power cord
from the back of the computer.
2 Close all open programs and shut down your
operating system.
Fermez tous les programmes ouverts et arrêtez votre
système d’exploitation.
2 647642-DN1
Débranchez l’ordinateur en déconnectant le cordon
d’alimentation à l’arrière de l’ordinateur.
Page 5
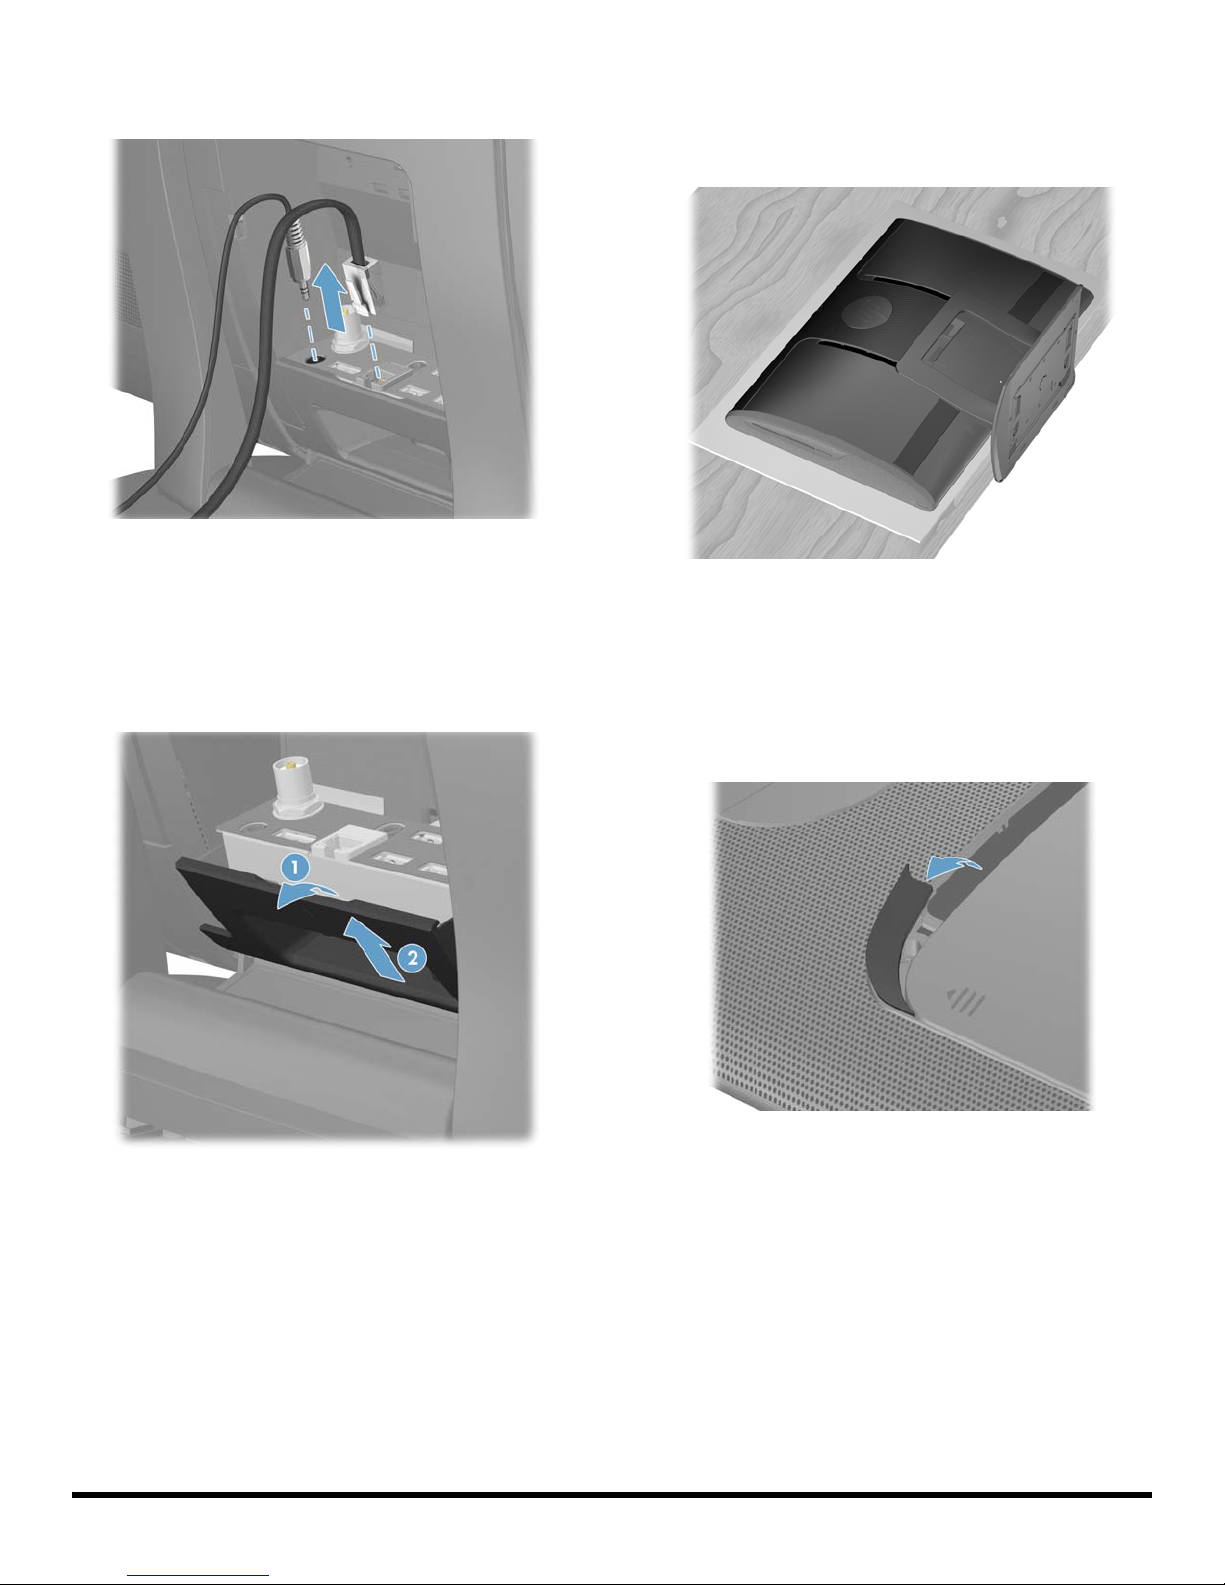
5 Unplug all attached cables from the back of the
computer.
Débranchez tous les câbles fixés à l’arrière de
l’ordinateur.
6 Remove the small center panel below the rear ports by
pulling out the top of the panel (1) then lifting the
panel off the computer (2).
7 Lay the computer down on a flat surface, covered with
a soft cloth to protect the screen from scratches or
other damage. Make sure the stand extends beyond
the edge of the flat surface.
Posez l’ordinateur sur une surface plane recouverte
d’un chiffon doux afin de protéger l’écran contre les
éraflures ou autres dommages. Assurez-vous que le
socle dépasse du bord de la surface plane.
8 Remove the screw cover from the drive door by lifting it
up and away from the computer.
Retirez le petit panneau central situé sous les ports
arrière en tirant le bord supérieur du panneau (1), puis
en le soulevant hors de l’ordinateur (2).
647642-DN1 3
Enlevez le cache-vis du volet du lecteur en le soulevant
pour le détacher de l’ordinateur.
Page 6
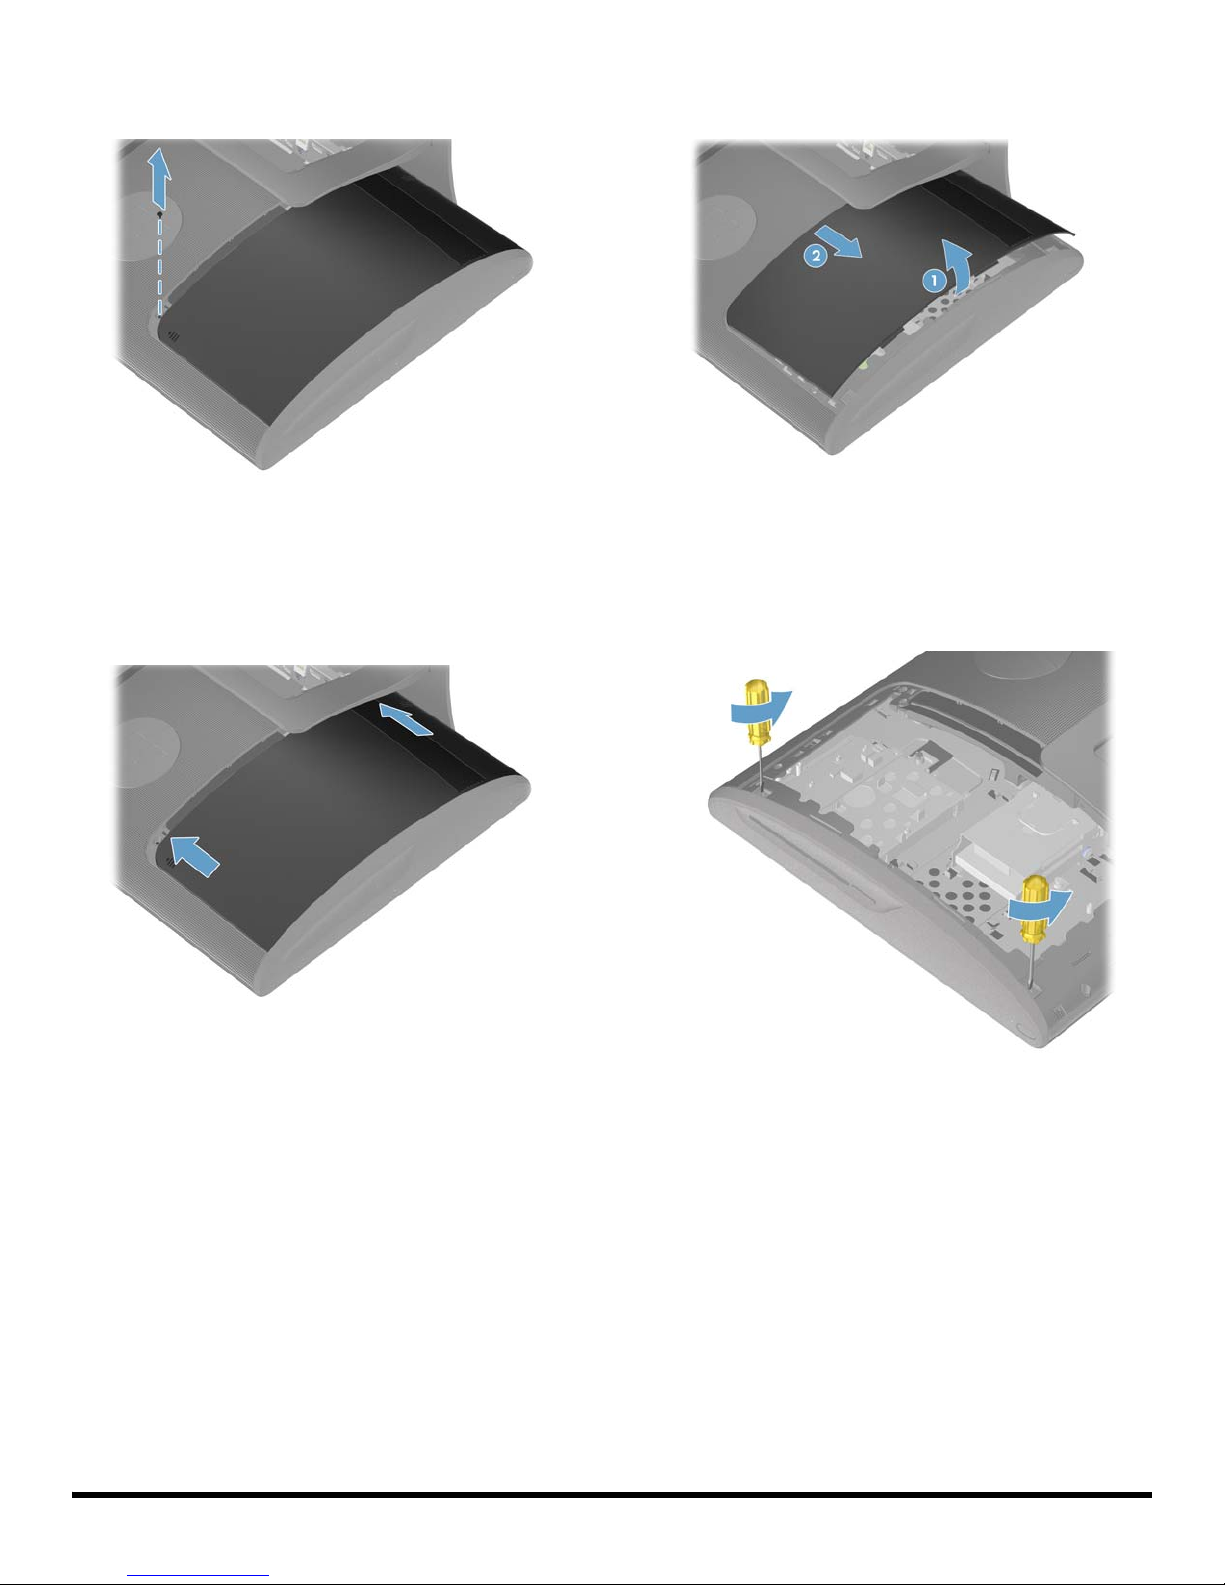
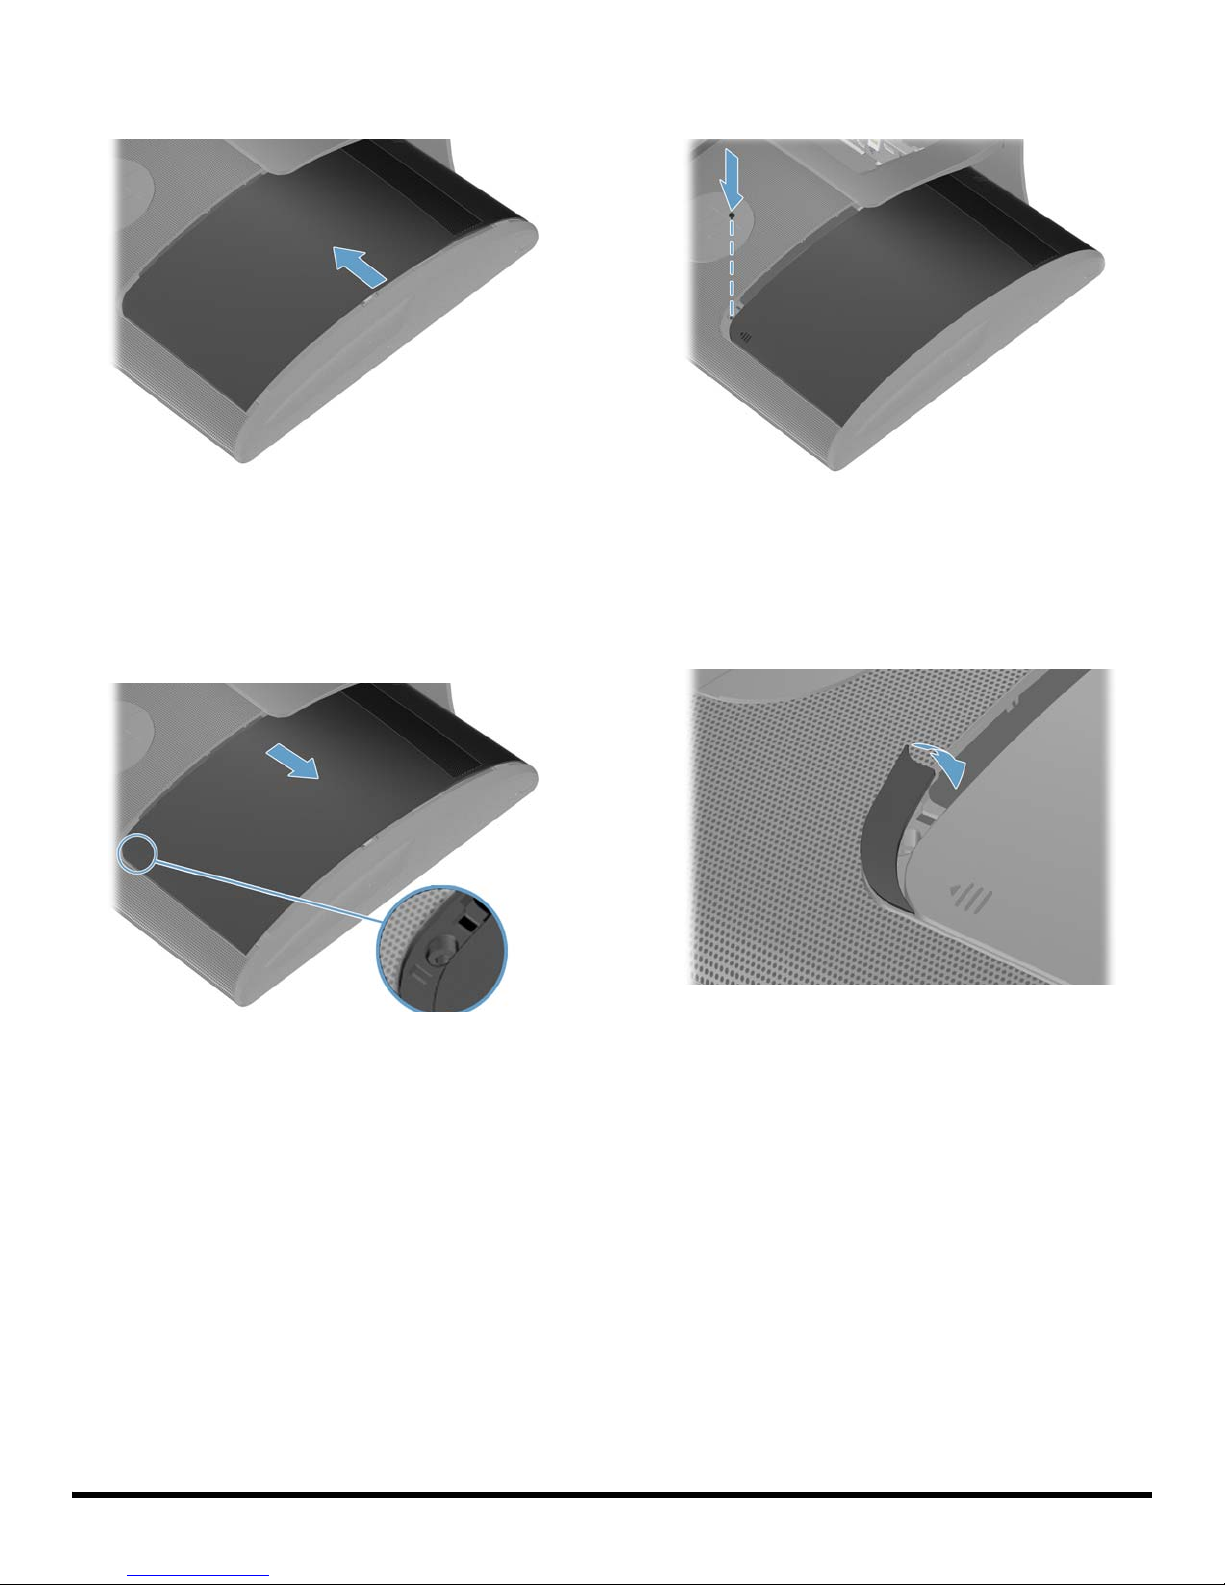
9 Remove the screw at the top of the drive door using a
flathead or Torx screwdriver.
11 Lift (1) and remove (2) the drive door from the back of
the computer.
Enlevez la vis située sur le haut du volet du lecteur à
l’aide d’un tournevis à bout plat ou Torx.
10 Slide the drive door toward the center of the computer
until it stops (approximately 5 cm or 1/5 inch).
Faites glisser le volet du lecteur vers le centre de
l’ordinateur jusqu’à ce qu’il s’arrête (environ 5 cm ou
1/5 de pouce).
Soulevez (1) et enlevez (2) le volet du lecteur de
l’arrière de l’ordinateur.
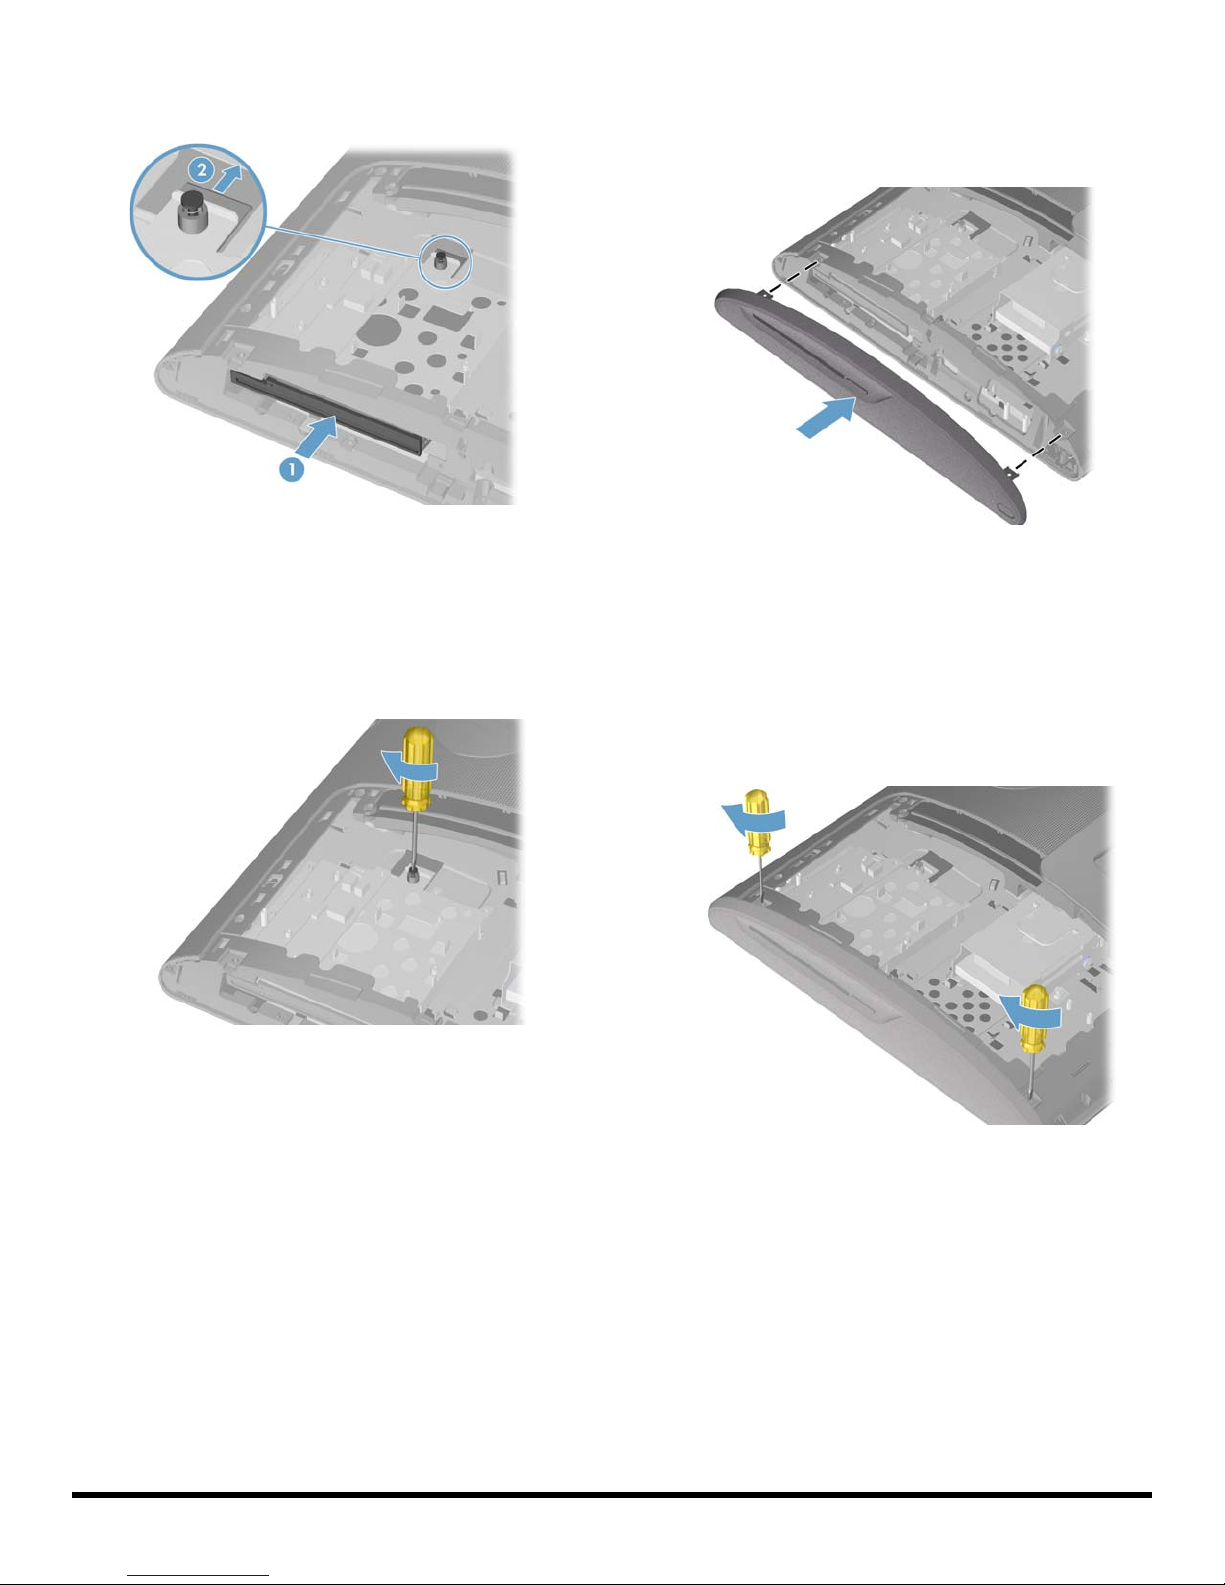
12 Remove the two screws that attach the side panel to
the computer.
Retirez les deux vis qui fixent le panneau latéral sur
l’ordinateur.
4 647642-DN1
Page 7
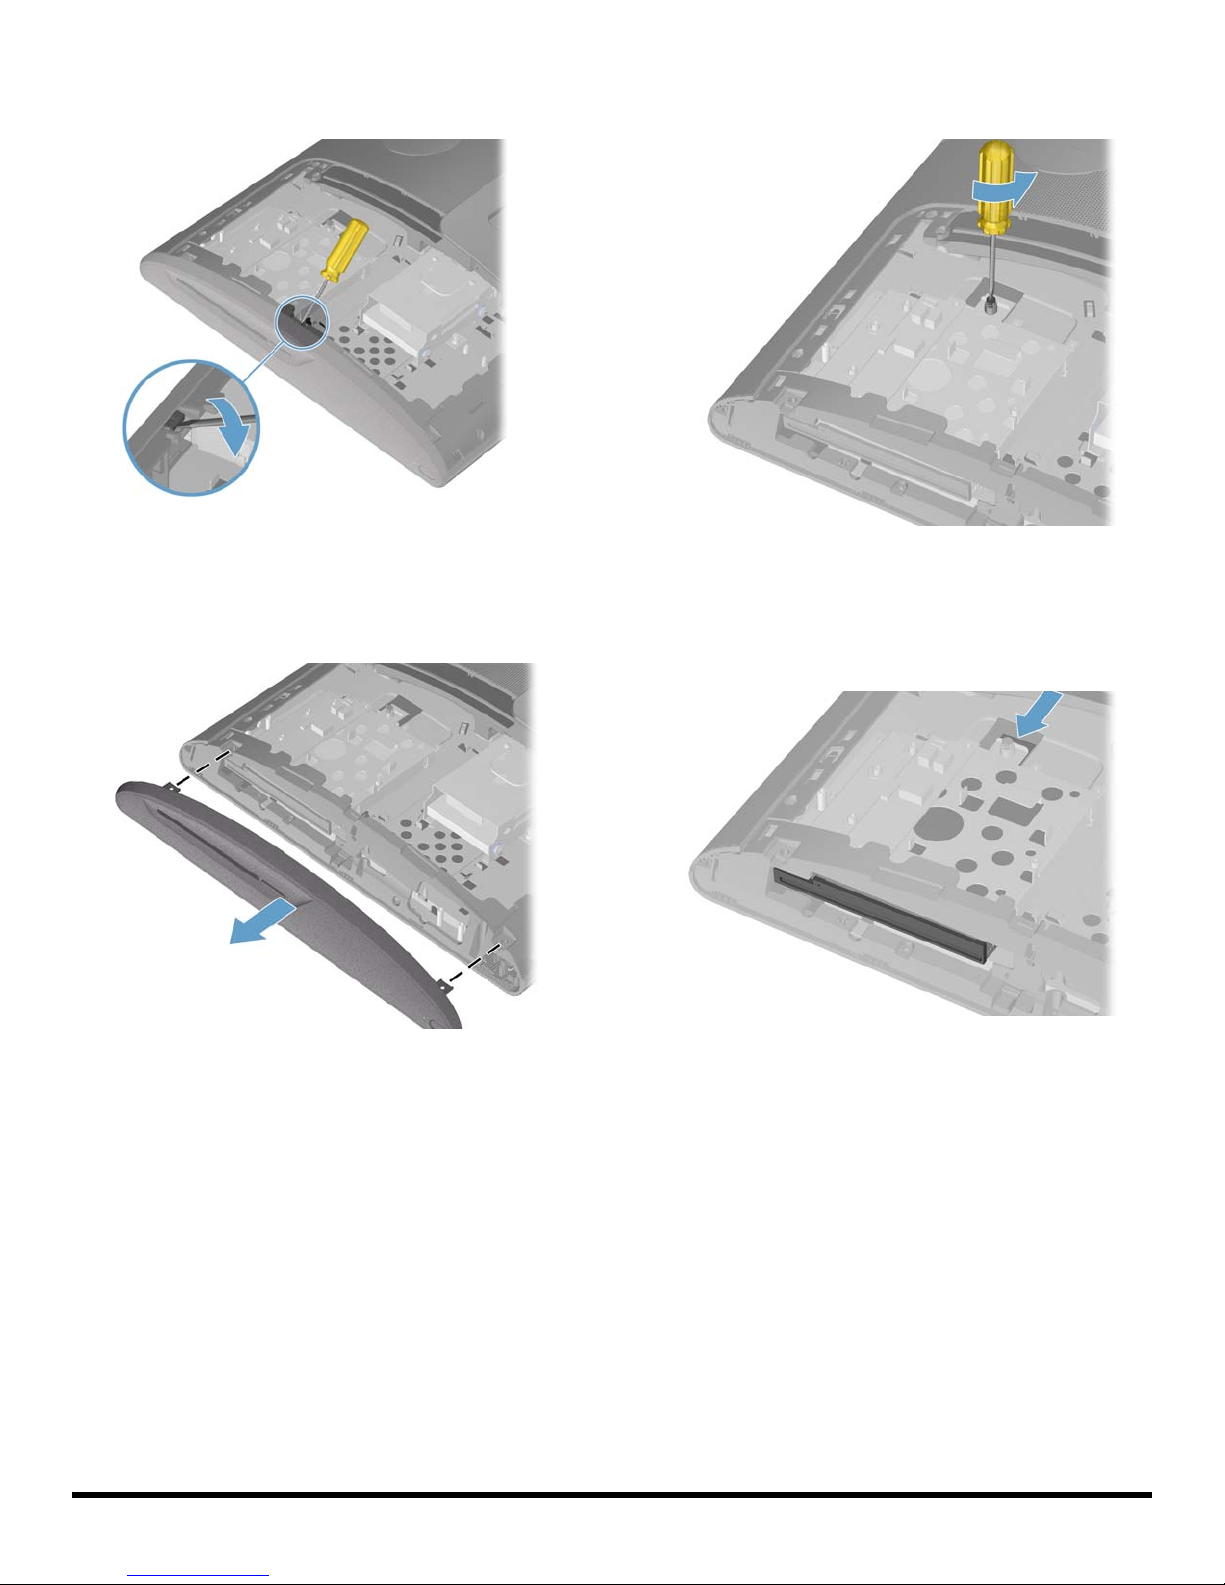
13 Insert a flathead screwdriver into the tab of the side
panel to release it from the computer.
Insérez un tournevis à bout plat dans la languette du
panneau latéral pour le détacher de l’ordinateur.
14 Remove the side panel from the computer.
15 Loosen the captive screw on the top of the CD-DVD
drive.
Desserrez la vis captive située en haut du lecteur de
CD-DVD.
16 Push the CD-DVD drive out of the computer.
Retirez le panneau latéral de l’ordinateur.
647642-DN1 5
Extrayez le lecteur de CD-DVD de l’ordinateur.
Page 8
17 Remove the CD-DVD drive from the computer.
Installing a new CD/DVD drive
Installation d’un nouveau lecteur
de CD/DVD
NOTE: The replacement CD/DVD drive may not look
exactly the same as the original drive due to different
manufacturers or models. Hewlett-Packard always provides
quality parts that meet or exceed your original computer
specifications.
REMARQUE : Le lecteur de CD/DVD de remplacement
peut ne pas ressembler exactement au lecteur d’origine en
raison de différences entre modèles ou fabricants.
Hewlett-Packard fournit toujours des pièces de qualité
conformes ou supérieures aux caractéristiques techniques
de votre ordinateur d’origine.
Retirez le lecteur de CD-DVD de l’ordinateur.
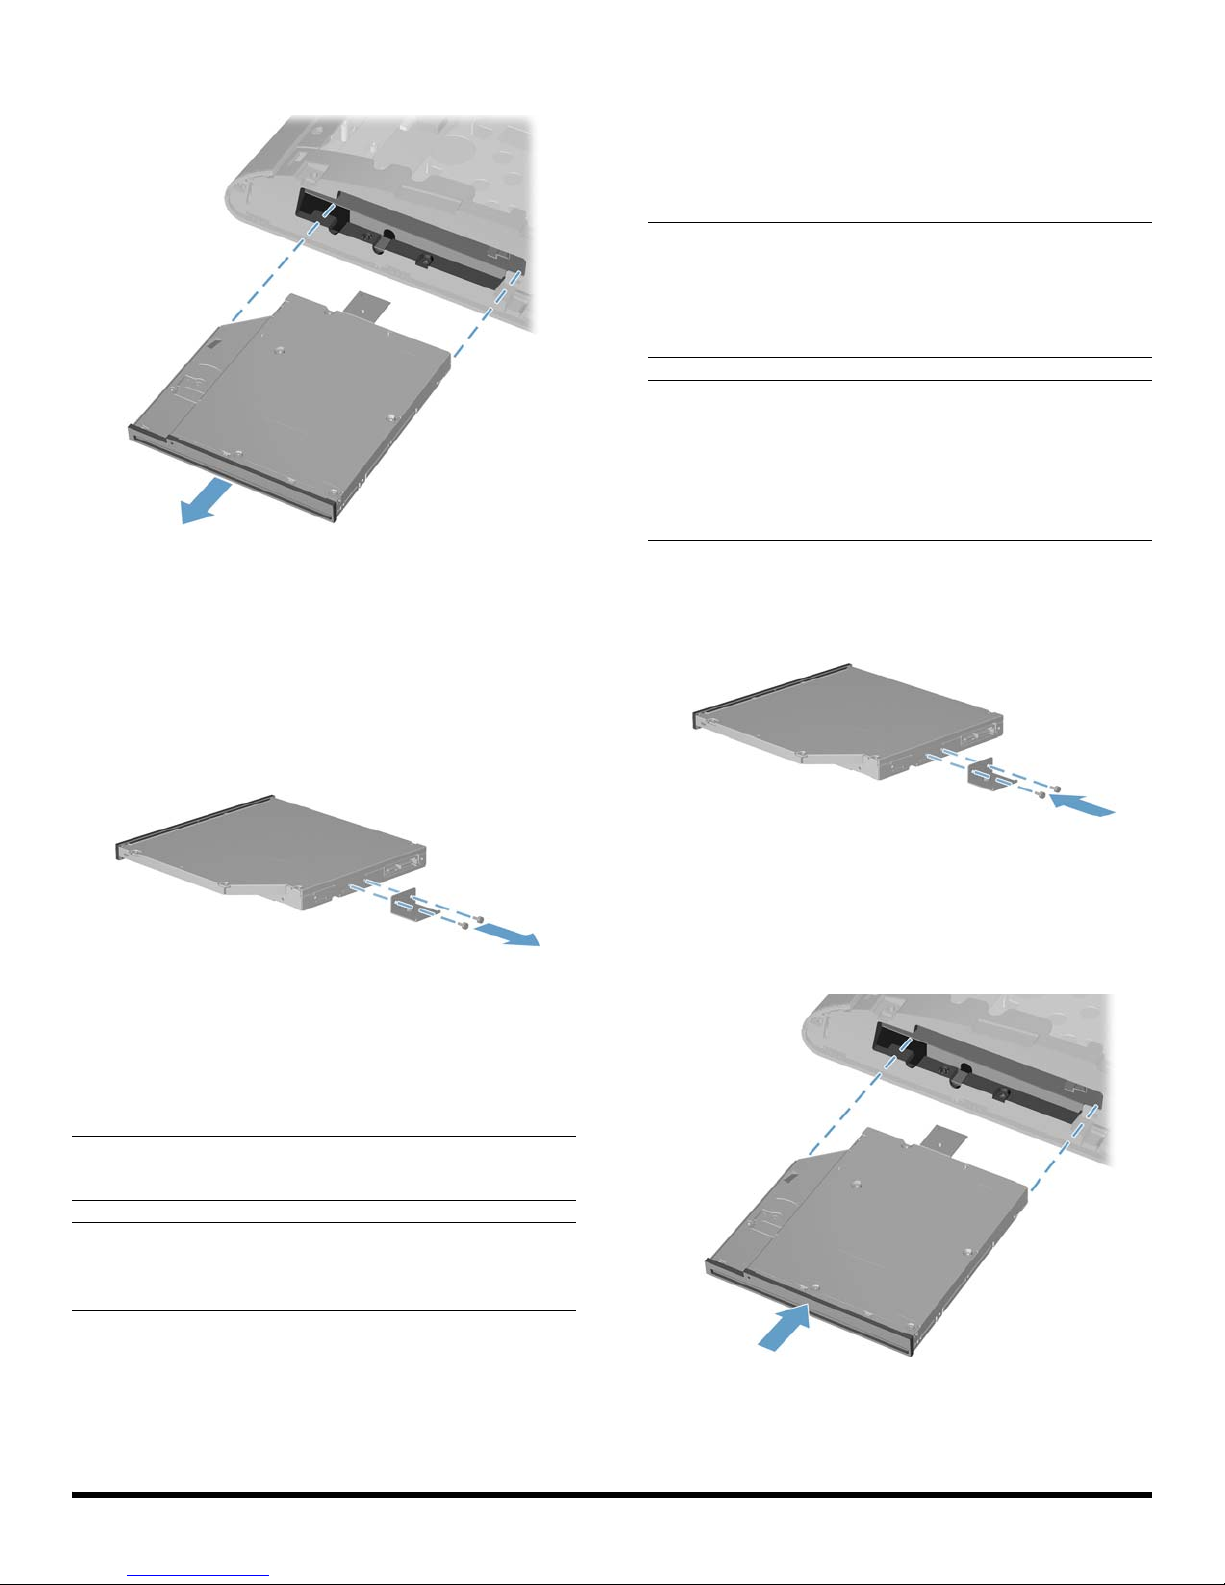
18 Remove the bracket on the back of the CD/DVD tray
by removing the two screws with a Phillips screwdriver.
Save the bracket and the two screws.
Retirez l’équerre située au dos du plateau CD/DVD en
desserrant les deux vis à l’aide d’un tournevis
cruciforme. Mettez l’équerre et les deux vis de côté.
1 Install the screws that secure the bracket to the back of
the CD/DVD drive with a Phillips screwdriver.
Serrez les vis qui fixent l’équerre au dos du lecteur de
CD/DVD à l’aide d’un tournevis cruciforme.
2 Insert the CD-DVD drive into the slot on the computer.
NOTE: Do not lose the CD/DVD bracket and screws. You
will fasten the CD/DVD bracket to the new CD/DVD drive.
REMARQUE : Ne perdez ni l’équerre du plateau CD/DVD
ni les vis. Vous devrez fixer l’équerre du plateau CD/DVD
au nouveau lecteur de CD/DVD.
6 647642-DN1
Insérez le lecteur de CD-DVD dans la fente de
l’ordinateur prévue à cet effet.
Page 9
3 Push the CD-DVD drive (1) into the computer until the
hole in the bracket aligns with the captive screw (2).
5 Reinstall the side panel on the side of the computer,
aligning the screw holes on the panel with the screw
holes on the computer. Press firmly on the center of the
side panel until it snaps into place.
Poussez le lecteur de CD-DVD (1) dans l’ordinateur
jusqu’à ce que le trou de l’équerre soit dans
l’alignement de la vis captive (2).
4 Tighten the captive screw on the top of the CD-DVD
drive.
Serrez la vis captive située en haut du lecteur de
CD-DVD.
Remettez le panneau latéral sur le côté de
l’ordinateur, en alignant les trous de vis du panneau
sur les trous de vis de l’ordinateur. Appuyez
fermement sur le centre du panneau latéral jusqu’à ce
qu’il s’enclenche.
6 Install the two screws that secure the side panel to the
computer.
647642-DN1 7
Serrez les deux vis qui fixent le panneau latéral sur
l’ordinateur.
Page 10
7 Reinstall the drive door by sliding it toward the center
of the computer.
9 Install the screw securing the door to the back of the
computer.
Remettez le volet du lecteur en place en le faisant
glisser vers le centre de l’ordinateur.
8 Slide the drive door to the edge of the computer
making sure to align the screw hole in the drive door
to the screw hole on the computer.
Faites glisser le volet du lecteur vers le bord de
l’ordinateur en vous assurant que le trou de vis du
volet du disque est bien aligné sur le trou de vis de
l’ordinateur.
Serrez la vis qui fixe le volet à l’arrière de l’ordinateur.
10 Press the top edge of the screw cover on to the drive
door and then press down on the bottom edge of the
screw cover until it snaps into place.
Pressez le bord supérieur du cache-vis sur le volet du
lecteur, puis appuyez sur le bord inférieur du cache-vis
jusqu’à ce qu’il s’enclenche.
8 647642-DN1
Page 11

11 Place the computer in an upright position.
13 Reconnect all the cables at the back of the computer.
Rebranchez tous les câbles à l’arrière de l’ordinateur.
Mettez l’ordinateur en position verticale.
12 Replace the back cover on the computer.
Remettez le capot arrière sur l’ordinateur.
14 Plug the power cord into the back of the computer.
Branchez le cordon d’alimentation à l’arrière de
l’ordinateur.
15 Close the rear port access door at the back of the
computer.
647642-DN1 9
Fermez le volet d’accès aux ports arrière de
l’ordinateur.
Page 12

16 Press the power button to turn on the computer.
TÂCHE COMPLÉTÉE
TASK COMPLETED
Appuyez sur le bouton Marche/Arrêt pour allumer
l’ordinateur.
10 647642-DN1
Page 13

Removing and Replacing a Hard Disk Drive
Retrait et remplacement d’un disque dur
HP TouchSmart
610
Les fonctions de l’ordinateur peuvent varier selon le modèle.
Computer features may vary by model.
Before you begin
Observe the following requirements before removing and
replacing the hard disk drive.
IMPORTANT: A hard disk drive is extremely sensitive to shock
impact. Do not bang or drop it. Do not touch the circuit board.
Static electricity can damage the drive.
WARNING:
Never open the cover with the power
cord attached or power applied. You
might damage your computer or be
injured by the spinning fan blades.
Avoid touching sharp edges inside the
computer.
Keep your hands away from the moving
fan.
Keep fingers and tools clear of the fan
when the power is applied.
CAUTION: Static electricity can damage the
electronic components inside the computer. Discharge
static electricity by touching the metal cage of the
computer before touching any internal parts or
electronic components.
Avant de commencer
Respectez les conditions requises suivantes avant de retirer et de
remplacer le disque dur.
IMPORTANT : Un disque dur est extrêmement sensible aux
chocs. Ne le laissez pas tomber et ne le heurtez pas. Ne touchez
pas la carte de circuit intégré. L’électricité statique peut
endommager le disque.
AVERTISSEMENT :
N’ouvrez jamais le capot lorsque le
cordon d’alimentation est branché ou
lorsque l’ordinateur est sous tension.
Vous pourriez endommager votre
ordinateur.
Évitez de toucher les bords tranchants à
l’intérieur du châssis.
Gardez vos mains à l’écart du ventilateur
en mouvement.
N’approchez pas vos doigts ou des outils
du ventilateur lorsque l’ordinateur est
alimenté.
ATTENTION : L’électricité statique peut endommager
les composants électroniques à l’intérieur de
l’ordinateur. Déchargez l’électricité statique en
touchant la cage métallique de l’ordinateur avant de
toucher tout composant interne ou tout composant
électronique.
Page 14

Removing and replacing a hard disk drive
Retrait et remplacement d’un disque dur
15-20 minutes
15 à 2 0 m i n utes
Tools needed
Flathead/Torx screwdriver #15
Small screws are easily lost. Remove screws over a surface
that allows you to retrieve them if they fall.
Outils nécessaires
Tournevis plat/Torx #15
Les petites vis peuvent facilement être perdues. Retirez les
vis sur une surface qui vous permettra de les récupérer si
elles tombent.
Removing the hard disk drive
Retrait du disque dur
1 Remove items such as CDs, DVDs, and USB storage
devices from the computer.
Retirez les éléments tels que des CD, DVD et
périphériques de stockage USB de l’ordinateur.
2 Close all open programs and shut down your
operating system.
Fermez tous les programmes ouverts et arrêtez votre
système d’exploitation.
3 Open the rear port access door by squeezing the two
tabs at the back of the computer (1) and then pulling
the door open (2).
12 647642-DN1
Appuyez sur les deux languettes afin d’ouvrir le volet
d’accès aux ports arrière de l’ordinateur (1) en le tirant
vers vous (2).
Page 15

4 Unplug the computer by disconnecting the power cord
from the back of the computer.
Débranchez l’ordinateur en déconnectant le cordon
d’alimentation à l’arrière de l’ordinateur.
5 Unplug all attached cables from the back and side of
the computer.
6 Remove the small center panel below the rear ports by
pulling out the top of the panel (1) then lifting the
panel off the computer (2).
Retirez le petit panneau central situé sous les ports
arrière en tirant le bord supérieur du panneau (1), puis
en le soulevant hors de l’ordinateur (2).
7 Lay the computer down on a flat surface, covered with
a soft cloth to protect the screen from scratches or
other damage. Make sure the stand extends beyond
the edge of the flat surface.
Débranchez tous les câbles branchés à l’arrière et sur
le côté de l’ordinateur.
647642-DN1 13
Posez l’ordinateur sur une surface plane recouverte
d’un chiffon doux afin de protéger l’écran contre les
éraflures ou autres dommages. Assurez-vous que le
socle dépasse du bord de la surface plane.
Page 16

8 Remove the screw cover from the drive door by lifting it
up and away from the computer.
10 Slide the drive door toward the center of the computer
until it stops (approximately 5 cm or 1/5 inch).
Enlevez le cache-vis du volet du disque en le soulevant
pour le détacher de l’ordinateur.
9 Remove the screw at the top of the drive door using a
flathead or Torx screwdriver.
Enlevez la vis située sur le haut du volet du disque à
l’aide d’un tournevis à bout plat ou Torx.
Faites glisser le volet du disque vers le centre de
l’ordinateur jusqu’à ce qu’il s’arrête (environ 5 cm ou
1/5 de pouce).
11 Lift (1) and remove (2) the drive door from the back of
the computer.
Soulevez (1) et enlevez (2) le volet du disque de
l’arrière de l’ordinateur.
14 647642-DN1
Page 17

12 Loosen the captive screw on the side of the hard drive
cage that secures the cage to the computer using a
flathead or Torx screwdriver.
Desserrez la vis captive située sur le côté du
compartiment du disque dur et qui fixe le
compartiment du disque dur à l’ordinateur à l’aide
d’un tournevis à bout plat ou Torx.
14 To remove the hard drive from the hard drive cage,
remove the four screws on the sides of the cage that
secure the drive to the cage (1), using a flathead or
Torx screwdriver. Slide the drive out of the cage (2).
Pour retirer le disque dur de son compartiment, enlevez
les quatre vis situées sur les côtés du compartiment qui
fixent le disque dur au compartiment (1) à l’aide d’un
tournevis à bout plat ou Torx. Faites glisser le disque
hors de son compartiment (2).
13 Grasp the handle on top of the hard drive cage and
slide the cage toward the outer edge of the computer,
then lift the cage out of the computer.
Saisissez la poignée en haut du compartiment du
disque dur et faites glisser le compartiment vers le
bord extérieur de l’ordinateur, puis retirez le
compartiment de l’ordinateur.
647642-DN1 15
Page 18

Replacing the hard disk drive
Installation d’un nouveau disque
dur
NOTE: The replacement hard-disk drive may not look
exactly the same as the original drive due to different
manufacturers or models. Hewlett-Packard always provides
quality parts that meet or exceed your original computer
specifications.
REMARQUE : Le disque dur de remplacement peut ne
pas ressembler exactement au disque dur d’origine en
raison de différences entre modèles ou fabricants.
Hewlett-Packard fournit toujours des pièces de qualité
conformes ou supérieures aux caractéristiques techniques
de votre ordinateur d’origine.
2 Install the four screws that secure the drive to the cage.
Mettez en place les quatre vis qui fixent le disque au
compartiment.
1 Slide the new hard drive into the hard drive cage
making sure that the connectors on the hard drive are
on the same end of the cage as the handle.
Faites glisser le nouveau disque dur dans le
compartiment prévu à cet effet, en vous assurant que
les connecteurs du disque dur sont du même côté du
compartiment que la poignée.
NOTE: The four screws that secure the hard disk drive to
the hard-disk drive cage may have had rubber grommets.
These grommets can fall off when you remove the hard
drive from the hard-drive cage. Replacement grommets
might be included with the new hard drive. If so, place a
new grommet over each hole before fastening the screw.
REMARQUE : Les quatre vis qui fixent le disque dur à son
compartiment peuvent avoir été dotées d'œillets en
caoutchouc. Ces œillets peuvent tomber lorsque vous
enlevez le disque dur de son compartiment. Il est possible
que des œillets de remplacement aient été fournis avec le
disque dur neuf. Dans ce cas, placez un nouvel œillet sur
chaque trou avant de serrer la vis.
16 647642-DN1
Page 19

3 Set the hard drive cage down into the bay, aligning
the tabs on the bottom of the cage with the tabs on the
chassis. Slide the drive back toward the center of the
computer until it stops, ensuring that the connector on
the end of the drive is properly seated.
Déposez le compartiment du disque dur dans la baie
en alignant les languettes situées sur le bas du
compartiment sur ceux du châssis. Faites à nouveau
glisser le disque vers le centre de l’ordinateur jusqu’à
ce qu’il s’arrête, en vous assurant que le connecteur
situé à l’extrémité du disque est bien enclenché.
5 Reinstall the drive door by sliding it toward the center
of the computer.
Remettez le volet du disque en place en le faisant
glisser vers le centre de l’ordinateur.
6 Slide the drive door to the edge of the computer
making sure to align the screw hole in the drive door
to the screw hole on the computer.
4 Tighten the captive screw with a flathead or Torx
screwdriver, to secure the hard drive cage in place.
Serrez la vis captive à l’aide d’un tournevis à bout plat
ou Torx, afin de garantir que le disque dur soit bien en
place.
Faites glisser le volet du disque vers le bord de
l’ordinateur en vous assurant que le trou de vis du
volet du disque est bien aligné sur le trou de vis de
l’ordinateur.
647642-DN1 17
Page 20

7 Install the screw securing the door to the back of the
computer.
Serrez la vis qui fixe le volet au dos de l’ordinateur en
place.
8 Press the top edge of the screw cover on to the drive
door and then press down on the bottom edge of the
screw cover until it snaps into place.
9 Place the computer in an upright position.
Mettez l’ordinateur en position verticale.
10 Replace the back cover on the computer.
Pressez le bord supérieur du cache-vis sur le volet
du disque, puis appuyez sur le bord inférieur du
cache-vis jusqu’à ce qu’il s’enclenche.
18 647642-DN1
Remettez le capot arrière sur l’ordinateur.
Page 21

11 Reconnect all the cables at the back of the computer.
13 Close the rear port access door at the back of the
computer.
Rebranchez tous les câbles à l’arrière de l’ordinateur.
12 Plug the power cord into the back of the computer.
Branchez le cordon d’alimentation à l’arrière de
l’ordinateur.
Fermez le volet d’accès aux ports arrière de
l’ordinateur.
14 Press the power button to turn on the computer.
Appuyez sur le bouton d’alimentation pour démarrer
l’ordinateur.
647642-DN1 19
Page 22

NOTE: If your hard-disk drive was shipped without an
TÂCHE COMPLÉTÉE
TASK COMPLETED
operating system installed, you will need to use your system
recovery discs to install the operating system on the new
hard disk drive.
To install the operating system, refer to the instructions
included with your system recovery discs. You can also
order recovery disks from the HP Web site:
http://www.hp.com/support
After the operating system has been installed, you will
need to reinstall any applications and restore any data you
backed up.
REMARQUE : Si votre disque dur a été livré sans qu’un
système d’exploitation y soit installé, vous devrez utiliser
vos disques de restauration de système pour installer le
système d’exploitation sur le nouveau disque dur.
Pour installer le système d’exploitation, suivez les
instructions jointes à vos disques de restauration de
système. Vous pouvez également commander des disques
de restauration sur le site Web HP suivant :
http://www.hp.com/support
Après avoir installé le système d’exploitation, il vous faudra
réinstaller toutes les applications et restaurer toutes les
données que vous avez sauvegardées.
20 647642-DN1
Page 23

Upgrading or Replacing Memory
Augmentation ou remplacement de la mémoire
HP TouchSmart
610
Les fonctions de l’ordinateur peuvent varier selon le modèle.
Computer features may vary by model.
Before you begin
Observe the following requirements before removing and
replacing memory.
IMPORTANT: A memory card is extremely sensitive to shock
impact. Do not bang or drop it. Static electricity can damage the
card.
WARNING:
Never open the cover with the power
cord attached or power applied. You
might damage your computer or be
injured by the spinning fan blades.
Avoid touching sharp edges inside the
computer.
CAUTION: Static electricity can damage the
electronic components inside the computer. Discharge
static electricity by touching the metal cage of the
computer before touching any internal parts or
electronic components.
Avant de commencer
Respectez les conditions requises suivantes avant de retirer et de
remplacer la carte mémoire.
IMPORTANT : Une carte mémoire est extrêmement sensible aux
chocs. Ne la laissez pas tomber et ne la heurtez pas. L’électricité
statique peut endommager la carte.
AVERTISSEMENT :
N’ouvrez jamais le capot lorsque le
cordon d’alimentation est branché ou
lorsque l’ordinateur est sous tension.
You might damage your computer or
be injured by the spinning fan
blades.
Évitez de toucher les bords tranchants
à l’intérieur du châssis.
ATTENTION : L’électricité statique peut
endommager les composants électroniques à
l’intérieur de l’ordinateur. Déchargez l’électricité
statique en touchant la cage métallique de
l’ordinateur avant de toucher tout composant
interne ou tout composant électronique.
Page 24

Upgrading or replacing memory
Augmentation ou remplacement de la mémoire
10 - 15 minutes
10 à 15 mi nute s
Tools Needed
Flathead/Torx screwdriver #15
Small screws are easily lost. Remove screws over a surface
that allows you to retrieve them if they fall.
Memory Compatibility
Verify that the memory installed is compatible with this
computer. SO-DIMMs are small outline dual inline memory
modules. They are smaller and thinner than most other
DIMMs, so that they take less space in the case.
SO-DIMM modules must meet the following requirements:
204-pin DDR3-DIMM
PC3-10600 (1333 MHz) DDR3-SDRAM
Unbuffered, non-ECC (64-bit) DIMMs
1.5 V memory only
16.0 GB maximum installable memory using 4GB
Modules. Actual available memory that can be used in
Windows will be less.
Because the memory uses dual channels, you should use
the same DIMM type for both sockets
NOTE: The actual memory transfer speed can vary based
on the CPU used in your computer.
.
Outils nécessaires
Tournevis plat/Torx #15
Les petites vis peuvent facilement être perdues. Retirez les
vis sur une surface qui vous permettra de les récupérer si
elles tombent.
Compatibilité de la mémoire
Vérifiez que la mémoire installée est compatible avec cet
ordinateur. Les mémoires SO-DIMM sont des modules de
mémoire de petit format à double rangée de connexions.
Ceux-ci sont plus petits et plus fins que les autres modules
DIMM, pour prendre moins de place dans le boîtier.
Les modules SO-DIMM doivent remplir les conditions
suivantes :
204-pin DDR3-DIMM
PC3-10600 (1333 MHz) DDR3-SDRAM
DIMM sans mémoire tampon, sans code correcteur
d’erreur (64 bits)
Mémoire 1,5 V seulement
16,0 Go maximum de mémoire installable utilisant des
modules de 4 Go. La mémoire réellement disponible
pouvant être installée sous Windows sera inférieure.
Comme la mémoire utilise deux canaux, vous devez utiliser
le même type de DIMM pour les deux supports.
22 647642-DN1
REMARQUE : La vitesse de transfert de mémoire réelle
peut varier en fonction du processeur utilisé dans votre
ordinateur.
Page 25

Removing the memory
Retrait de la mémoire
1 Remove items such as CDs, DVDs, and USB storage
devices from the computer.
Retirez les éléments tels que des CD, DVD et
périphériques de stockage USB de l’ordinateur.
2 Close all open programs and shut down your
operating system.
Fermez tous les programmes ouverts et arrêtez votre
système d’exploitation.
3 Open the rear port access door by squeezing the two
tabs at the back of the computer (1) and then pulling
the door open (2).
4 Unplug the computer by disconnecting the power cord
from the back of the computer.
Débranchez l’ordinateur en déconnectant le cordon
d’alimentation à l’arrière de l’ordinateur.
Appuyez sur les deux languettes afin d’ouvrir le volet
d’accès aux ports arrière de l’ordinateur (1) en le tirant
vers vous (2).
5 Unplug all attached cables from the back and side of
the computer.
Débranchez tous les câbles branchés à l’arrière et sur
le côté de l’ordinateur.
647642-DN1 23
Page 26

6 Remove the small center panel below the rear ports by
pulling out the top of the panel (1) then lifting the
panel off the computer (2).
Retirez le petit panneau central situé sous les ports
arrière en tirant le bord supérieur du panneau (1), puis
en le soulevant hors de l’ordinateur (2).
7 Lay the computer down on a flat surface, covered with
a soft cloth to protect the screen from scratches or
other damage. Make sure the stand extends beyond
the edge of the flat surface.
8 Remove the screw cover from the memory access
panel by lifting it up and away from the computer.
Enlevez le cache-vis du volet du panneau d’accès à la
mémoire mémoire en le soulevant pour le détacher de
l’ordinateur.
9 Remove the screw at the top of the memory access
panel using a flathead or Torx screwdriver.
Posez l’ordinateur sur une surface plane recouverte
d’un chiffon doux afin de protéger l’écran contre les
éraflures ou autres dommages. Assurez-vous que le
socle dépasse du bord de la surface plane.
24 647642-DN1
Enlevez la vis située sur le haut du panneau d’accès à
la mémoire à l’aide d’un tournevis à bout plat ou Torx.
Page 27

10 Slide the memory access panel toward the center of
the computer until it stops (approximately 5 cm or
1/5 inch).
Faites glisser le panneau d’accès à la mémoire vers le
centre de l’ordinateur jusqu’à ce qu’il s’arrête (environ
5 cm ou 1/5 de pouce).
11 Lift up the outside edge of the panel approximately
2.5 cm (1 inch) (1) and slide the panel toward the
outside edge of the computer (2) to remove it.
IMPORTANT: If you are removing both cards on one
side, you must remove the upper one before removing the
lower one. Remove 1 before 3. Remove 4 before 2.
IMPORTANT : Si vous retirez les deux cartes d’un côté,
vous devez retirer d’abord la carte supérieure, puis la
carte inférieure. Enlevez la carte 1 avant la 3. Enlevez la
carte 4 avant la 2.
12 Use your fingers to press outwards on the retaining
clips at the left and right sides of the top memory
card (1) to release it. Holding the memory card by its
edges, remove it from the compartment (2).
Soulevez le bord extérieur du panneau d’environ
2,5 cm (1 pouce) (1), puis faites-le glisser vers le bord
extérieur de l’ordinateur (2) pour le retirer.
647642-DN1 25
Utilisez vos doigts pour écarter les clips de fixation
situés sur les côtés gauche et droit de la carte mémoire
supérieure (1) pour la libérer. En tenant la carte
mémoire par les bords, retirez-la du compartiment (2).
13 If you need to remove additional memory cards,
repeat step 12.
Si vous devez retirer une autre carte mémoire, répétez
l’étape 12.
Page 28

Installing a new memory card
Installation d’un nouveau module
mémoire
NOTE: The replacement memory card may not look
exactly the same as the original card due to different
manufacturers or models. Hewlett-Packard always provides
quality parts that meet or exceed your original computer
specifications.
REMARQUE : Le module mémoire de remplacement peut
ne pas ressembler exactement au module d’origine en
raison de différences entre modèles ou fabricants.
Hewlett-Packard fournit toujours des pièces de qualité
conformes ou supérieures aux caractéristiques techniques
de votre ordinateur d’origine.
IMPORTANT: If you are replacing more than one card,
you must replace cards into the two black slots first and
then into the two white slots.
IMPORTANT : Si vous voulez remplacer plus d’une carte,
vous devez commencer par remettre des cartes dans les
deux logements noirs, puis dans les deux logements
blancs.
2 If using two memory cards, they will go into the black
slots in the order shown. The first memory card goes
into a black slot (1), the second memory card goes
into a black slot (2).
Si vous utilisez deux cartes mémoire, elles devront être
insérées dans les logements noirs dans l’ordre
indiqué. La première carte mémoire est insérée dans
un logement noir (1), la deuxime carte mémoire est
également insérée dans un logement noir (2).
1 Orient the new memory card so that the notch on the
edge of the card faces forward and is on the right.
Orientez la nouvelle carte mémoire de manière que
l’encoche sur le bord de la carte soit dirigée vers
l’avant et se trouve à droite.
26 647642-DN1
Page 29

3 Holding the card by its edges, slide it all the way into
the slot (1). Make sure the card is pressed all the way
into the socket and then gently push down on the card
to snap it into place (2).
En tenant la carte par les bords, faites-la glisser
jusqu’au fond du logement (1). Assurez-vous que la
carte est entièrement insérée dans le support, puis
appuyez doucement sur la carte pour qu’elle
s’enclenche (2).
5 Reinstall the memory access panel by sliding it in
toward the center of the computer.
Remettez le panneau d’accès à la mémoire en place
en le faisant glisser vers le centre de l’ordinateur.
6 Slide the memory access panel toward the edge of the
computer, aligning the screw hole on the panel with
the screw hole on the computer.
4 If you are replacing more than one memory card,
repeat step 3 with each card.
Si vous remplacez plus d’une carte mémoire, répétez
l’étape 3 pour chaque carte.
Faites glisser le panneau d’accès à la mémoire vers le
bord de l’ordinateur, en alignant le trou de vis du
panneau sur le trou de vis de l’ordinateur.
647642-DN1 27
Page 30

7 Install the screw securing the memory access panel to
the back of the computer.
Serrez la vis qui fixe le panneau d’accès à la mémoire
au dos de l’ordinateur.
8 Press the top edge of the screw cover on to the
memory access panel and then press down on the
bottom edge of the screw cover until it snaps into
place.
9 Place the computer in an upright position.
Mettez l’ordinateur en position verticale.
10 Replace the back cover on the computer.
Remettez le capot arrière sur l’ordinateur.
11 Reconnect all the cables at the back of the computer.
Pressez le bord supérieur du cache-vis sur le panneau
d’accès à la mémoire, puis appuyez sur le bord
inférieur du cache-vis jusqu’à ce qu’il s’enclenche.
Rebranchez tous les câbles à l’arrière de l’ordinateur.
28 647642-DN1
Page 31

12 Plug the power cord into the back of the computer.
14 Press the power button to turn on the computer.
Branchez le cordon d’alimentation à l’arrière de
l’ordinateur.
13 Close the rear port access door at the back of the
computer.
Fermez le volet d’accès aux ports arrière de
l’ordinateur.
Appuyez sur le bouton Marche/Arrêt pour allumer
l’ordinateur.
TASK COMPLETED
TÂCHE COMPLÉTÉE
Troubleshooting
If the computer displays a memory error after you have
turned it back on, turn the computer off and unplug the
power cord, then open up the memory compartment and
make sure the memory card is firmly seated. To install it
correctly, make sure it is inserted all the way into the slot,
and then push down on it to snap it into place.
Copyright © 2011 Hewlett-Packard Development Company, L.P.
The information contained herein is subject to change without notice.
Version: 1.0
Printed in Canda
Dépannage
Si l’ordinateur affiche une erreur mémoire lorsque vous le
rallumez, eteignez l’ordinateur et débranchez le cordon
d’alimentation, puis ouvrez le compartiment de la mémoire
et vérifiez que la carte mémoire est insérée fermement.
Pour l’installer correctement, vérifiez qu’elle est insérée à
fond dans le compartiment puis appuyez vers le bas pour
qu’elle s’enclenche.
Copyright © 2011 Hewlett-Packard Development Company, L.P.
Les informations contenues dans le présent document sont
susceptibles d’être modifiées sans préavis.
Version : 1.0
Imprimé au Canada
 Loading...