

Page 1

User Guide
Page 2

Copyright Information
The only warranties for Hewlett-Packard products and services are set forth in the express statements accompanying such products and
services. Nothing herein should be construed as constituting an additional warranty. HP shall not be liable for technical or editorial
errors or omissions contained herein.
HP assumes no responsibility for the use or reliability of its software on equipment that is not furnished by HP.
This document contains proprietary information that is protected by copyright. No part of this document may be photocopied,
reproduced, or translated to another language without the prior written consent of HP.
Hewlett-Packard Company
P.O. Box 4010
Cupertino, CA 95015-4010
USA
© Copyright 2009 Hewlett-Packard Development Company, L.P.
This product incorporates copyright protection technology that is protected by U.S. patents and other intellectual property rights. Use of
this copyright protection technology must be authorized by Macrovision, and is intended for home and other limited viewing uses only
unless otherwise authorized by Macrovision. Reverse engineering or disassembly is prohibited.
Microsoft, the Windows logo, and Windows are trademarks or registered trademarks of the Microsoft group of companies in the
United States and/or other countries/regions.
Wi-Fi CERTIFIED 802.1n based on Draft 2.0
Draft 2.0 refers to the version of the not-yet-ratified IEEE 802.11n standard used in Wi-Fi Alliance testing as of June 2007.
The specifications of the 802.11n WLAN (wireless local area network) are draft specifications and not final. If the final specifications
differ from the draft specifications, it may affect the ability of this device to communicate with other 802.11n WLAN devices.
HP supports lawful use of technology and does not endorse or encourage the use of our products for purposes other than those
permitted by copyright law. The information in this document is subject to change without notice.
Page 3

Table of Contents
Finding HP TouchSmart PC Information ........................................................................................... vi
Welcome......................................................................................................................1
Features.......................................................................................................................................1
Cables and accessories.............................................................................................................2
Front and right side of the HP TouchSmart PC ..............................................................................4
Lower-left side of the HP TouchSmart PC......................................................................................6
Connector cover.......................................................................................................................7
Back of the HP TouchSmart PC...................................................................................................7
Activity LED indicator lights........................................................................................................9
Connecting the Power Source .......................................................................................................10
Cable Management.....................................................................................................................10
Computer Stand..........................................................................................................................12
Computer Orientation..................................................................................................................12
Computer Swivel.........................................................................................................................13
Wireless Keyboard and Mouse.....................................................................................................13
Synchronizing the wireless keyboard or mouse ..........................................................................13
Ambient Light..............................................................................................................................14
Adding Hardware and Software...................................................................................................14
Determining Whether Your System Is 64-bit or 32-bit ..................................................................15
Optical Disc Drive.......................................................................................................................15
Connecting to the Internet.............................................................................................................15
Wireless home network...........................................................................................................15
Wired home network..............................................................................................................16
Bluetooth Devices........................................................................................................................17
TV Tuner and Windows Media Center...........................................................................................18
Watching and recording TV programs......................................................................................18
Connecting the TV signal source to the computer........................................................................18
Using a set-top box with Windows Media Center (optional step)..................................................20
Windows Media Center setup wizard.......................................................................................21
Connecting a Game Console........................................................................................................22
Using the remote control in gaming mode .................................................................................23
Returning to PC mode from gaming mode .................................................................................23
Gaming mode troubleshooting.................................................................................................23
Table of Contents iii
Page 4

Sound Options............................................................................................................................24
Connecting analog speakers ...................................................................................................25
Connecting and enabling digital speakers or an audio receiver ...................................................25
Speaker volume .....................................................................................................................26
Configuring sound for Windows Media Center..........................................................................26
Headphones..........................................................................................................................26
Microphones .........................................................................................................................27
Headsets...............................................................................................................................27
MP3 players ..........................................................................................................................27
Connecting a Printer....................................................................................................................27
Connecting a printer with a parallel port...................................................................................27
Power Settings ............................................................................................................................27
Adjusting Screen Display .............................................................................................................28
Adjusting Monitor Settings with the Onscreen Display......................................................................28
Installing a Security Lock ..............................................................................................................29
Cleaning the HP TouchSmart PC Screen.........................................................................................30
Using the HP TouchSmart with Safety and Comfort ..........................................................................30
Recycling Your Old Computer Hardware .......................................................................................31
Software Overview....................................................................................................33
What Is HP TouchSmart Software? ................................................................................................33
Navigating HP TouchSmart ..........................................................................................................33
Touch Techniques Outside HP TouchSmart Software ........................................................................35
HP TouchSmart Tiles ....................................................................................................................35
Creating new tiles ..................................................................................................................36
Adding a tile for a favorite Web site ........................................................................................36
Viewing hidden tiles ...............................................................................................................36
Hiding tiles............................................................................................................................36
Deleting tiles..........................................................................................................................37
Changing tile icons or color.....................................................................................................37
HP TouchSmart Tutorials...............................................................................................................37
HP TouchSmart Browser ...............................................................................................................37
RSS Feeds ..................................................................................................................................37
HP TouchSmart Photo...................................................................................................................38
Photo library..........................................................................................................................38
Slideshows ............................................................................................................................39
Hiding photos........................................................................................................................39
Creating (burning) a CD or DVD of photos ................................................................................39
HP TouchSmart Canvas................................................................................................................40
HP TouchSmart Music ..................................................................................................................40
Moving music files into HP TouchSmart Music ............................................................................40
Moving songs from iTunes into HP TouchSmart Music .................................................................41
Album art..............................................................................................................................41
Creating and editing playlists ..................................................................................................42
Deleting songs .......................................................................................................................42
Music Store ...........................................................................................................................42
Creating (burning) a CD or DVD of music or photos ...................................................................42
iv User Guide (Features may vary by model)
Page 5

HP TouchSmart Video ..................................................................................................................43
Webcam and microphone.......................................................................................................44
Capturing webcam video and snapshots...................................................................................44
Making a video .....................................................................................................................44
Video playlists .......................................................................................................................45
Transferring videos to the computer ..........................................................................................45
Uploading videos to YouTube ..................................................................................................45
Recording home movies ..........................................................................................................46
Video chats and conference calls .............................................................................................46
HP TouchSmartMovieThemes ...................................................................................................46
HP TouchSmart Calendar .............................................................................................................47
HP TouchSmart Notes ..................................................................................................................47
Handwritten or typed notes......................................................................................................47
Voice notes............................................................................................................................47
Deleting notes........................................................................................................................47
HP TouchSmart Weather..............................................................................................................48
HP TouchSmart Clock ..................................................................................................................48
HP TouchSmart Recipe Box...........................................................................................................48
HP TouchSmart Twitter .................................................................................................................49
HP TouchSmart Netflix .................................................................................................................49
Live TV.......................................................................................................................................49
HP TouchSmartLink ......................................................................................................................49
Updating Software ......................................................................................................................49
Software Quick Reference Table ...................................................................................................50
Remote Control ..........................................................................................................53
Using the Remote Control ............................................................................................................53
Software Troubleshooting and System Recovery.........................................................57
Software Troubleshooting.............................................................................................................57
Software repair overview ........................................................................................................57
Updating drivers ....................................................................................................................57
Microsoft System Restore.........................................................................................................58
Software program and hardware driver reinstallation .................................................................58
Creating data backup discs.....................................................................................................59
Creating system recovery discs ................................................................................................59
System Recovery .........................................................................................................................59
Creating recovery discs...........................................................................................................60
System recovery options..........................................................................................................60
Additional Troubleshooting...........................................................................................................62
Index.........................................................................................................................65
Table of Contents v
Page 6

Finding HP TouchSmart PC Information
Type of information Where to find
Set up your HP TouchSmart PC. Setup poster
How-to videos about using HP TouchSmart
features.
Hardware features.
Connect to the Internet.
HP TouchSmart and other software.
Connect a television signal.
Recover factory settings.
Learn how to use the Microsoft
®
Windows® 7
operating system.
Troubleshoot the most common computer
hardware and software issues.
Find electronic user guides and specifications
for your computer model.
Order parts and find additional
troubleshooting help.
Upgrade or replace components of your
computer.
On the HP TouchSmart home page, tap the
Tutorials tile to open it, and then tap a tutorial
to view it. Or, visit
www.hp.com/supportvideos (English only)
User Guide (this guide)
Help and Support
Tap the Win dows Start button
®
, and then tap
Help and Support.
HP Support Web site:
www.hp.com/support
Tap the Start button, tap Help and Support,
and then tap the Online Help icon.
Upgrading and Servicing Guide
Tap the Start button, tap Help and Support,
and then tap the User Guides icon.
Find computer warranty information.
Get technical support.
Get up-to-date information and help from the
Windows community.
Learn how to make your computer adaptable to
wall mounting.
If the guide is not there, visit
www.hp.com/support
Limited Warranty and Support Guide
www.hp.com/support/consumer-forum
Preparing Your Computer for Wall-Mounting
guide. If the guide is not there, visit
www.hp.com/support
vi User Guide (Features may vary by model)
Page 7

Features
Welcome
The HP TouchSmart PC is a touch-enabled high-performance computer built into a high-definition* 58.4-cm
diagonal widescreen display.
DVD and Blu-ray player and burner, Bluetooth capability, ambient lighting, USB ports, a media card
reader, a BrightView display, Wireless 802.11n networking, and high-quality speakers.
The interactive screen makes wall mounting a good choice for the HP TouchSmart PC. The hardware to
adapt the computer for wall mounting (not the actual wall mount) is included in select models and can be
purchased.
Using your fingertips, you can listen to music, edit digital photos, or watch home videos.
***
**
The slim computer offers features such as an adjustable webcam, a CD/
* High-definition (HD) content is required to view HD images.
** Features vary by model. Your computer may not exactly match the illustrations and descriptions in this guide.
*** VESA mount adapter availability varies by country/region. Separate wall-mounting hardware is required that
attaches to the VESA mount adapter.
Welcom e 1
Page 8
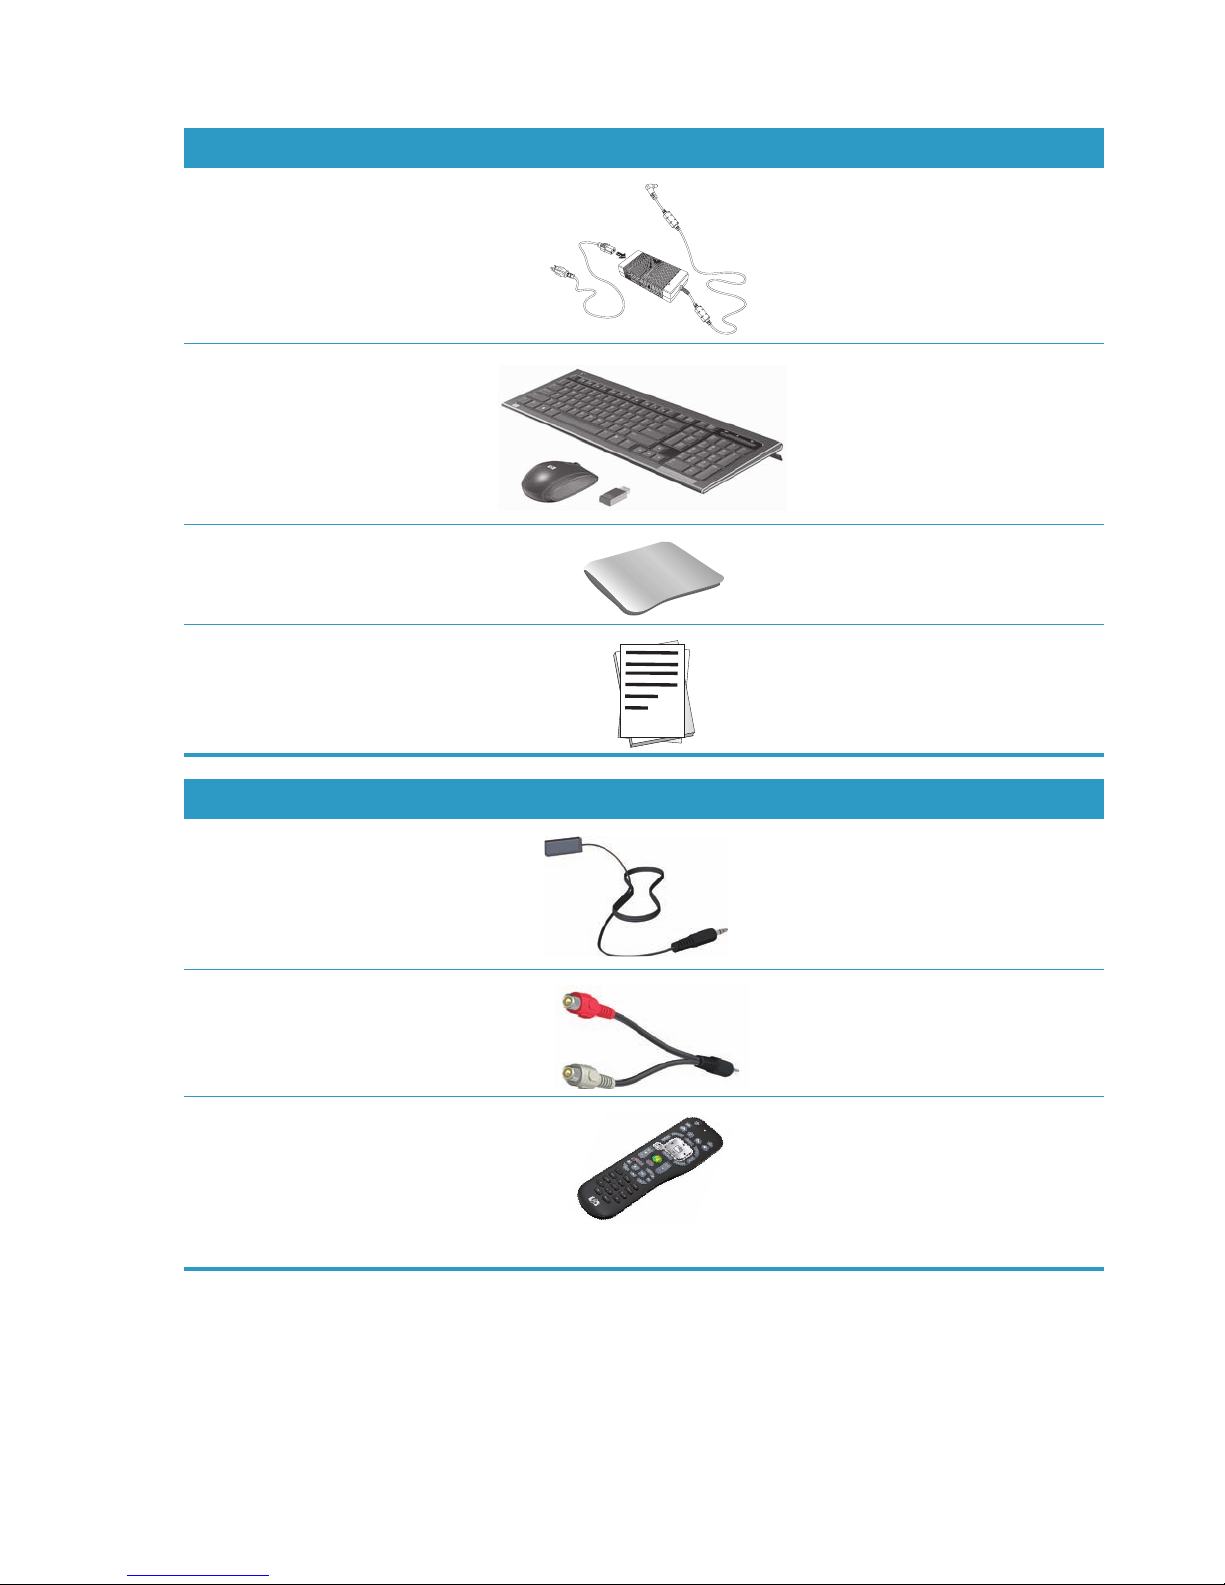
Cables and accessories
What’s in the box
Power cable (two pieces) Use to connect computer to
power source.
Wireless keyboard and mouse
(batteries installed), and receiver
Use to control some software and
functions instead of using touch.
Cleaning cloth Use to clean the touch screen.
Setup poster and documentation Use to set up your computer and
navigate its features.
Computers with TV Tuners
Infrared (IR) emitter cable Use to control a set-top box
(cable or satellite TV) with a
remote control.
Y-audio composite cable Use with S-Video to combine
Remote control Use with Windows Media
2 User Guide (Features may vary by model)
audio left and right channels.
Center, some features of the
touch screen, and the game
console.
Also included in select models
without TV tuners.
Page 9
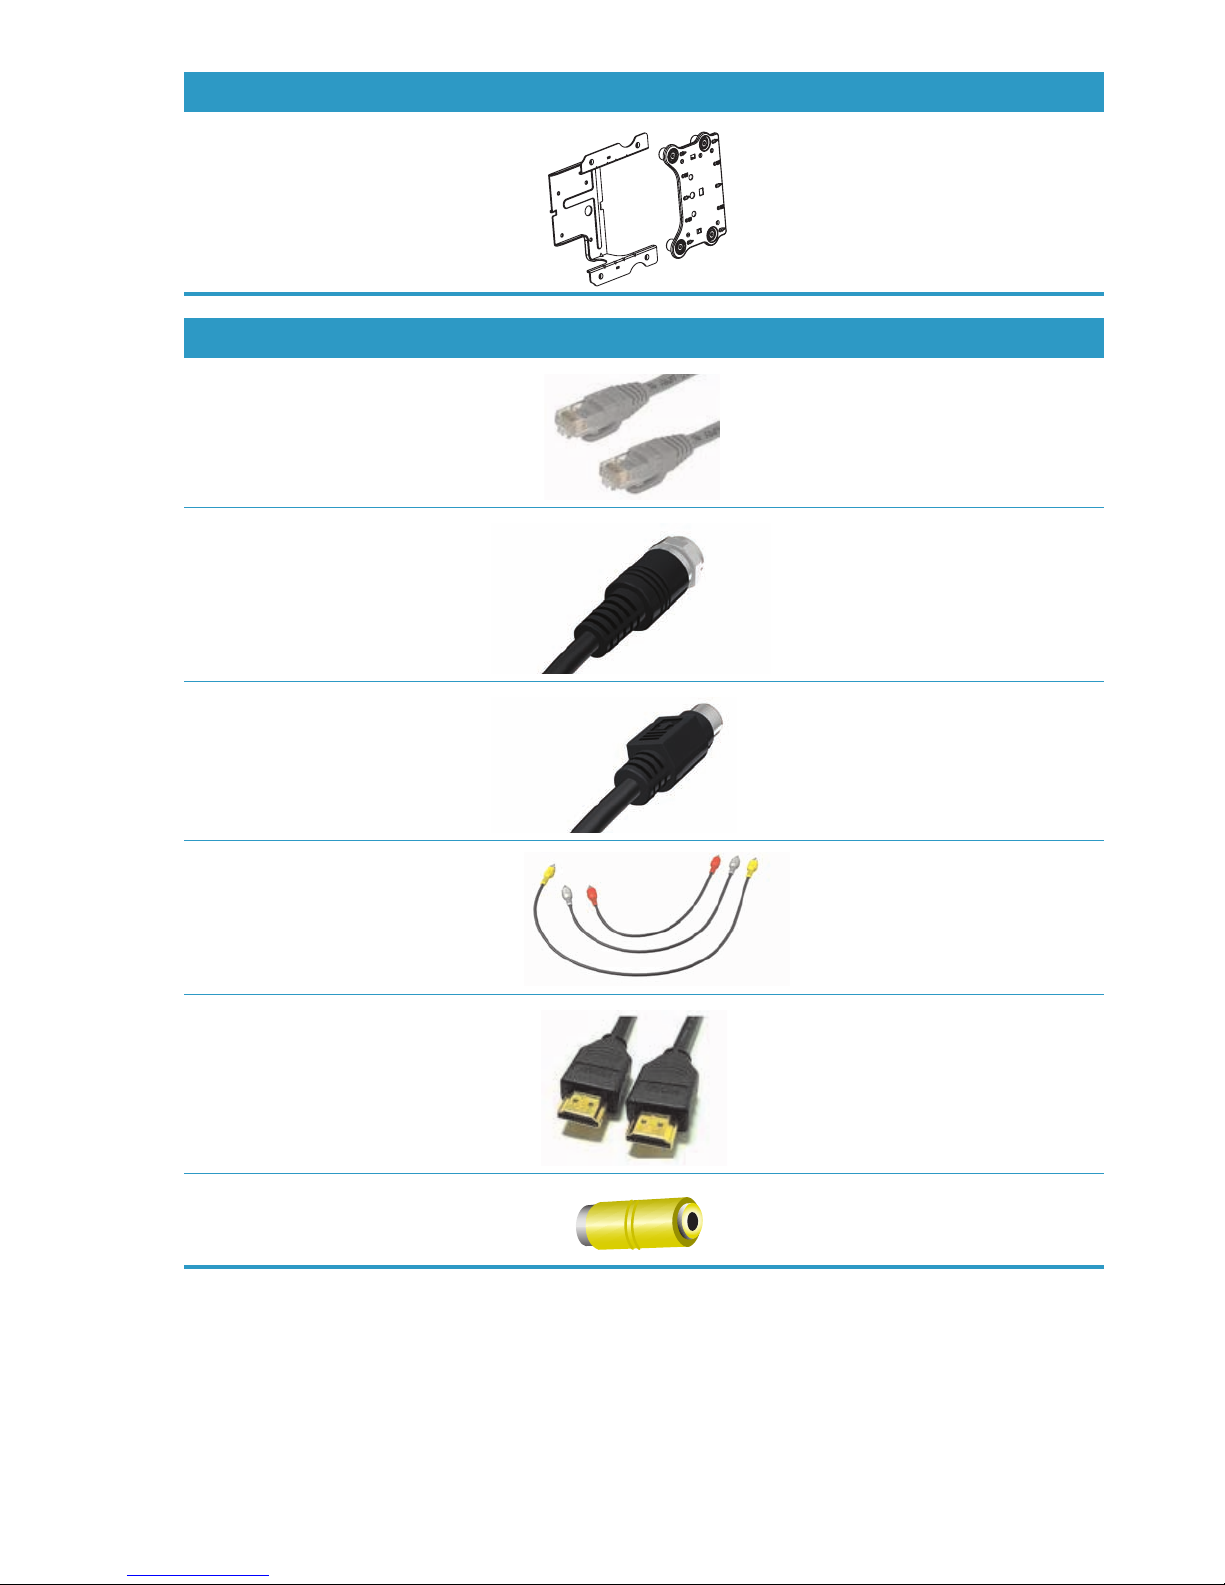
Computers with wall-mounting option
VESA plate adapter assembly Mounted on the back of the
computer, this system adapts
your computer for separate wallmounting hardware (not
included).
Cables and adapters not included, but may be required
Ethernet (LAN) cable For a wired network.
Coaxial cable For an Internet connection with a
cable modem, or to connect the
TV signal source to the computer.
Connector type may vary.
S-Video cable For connecting the TV signal
source to the computer from a
set-top box.
Audio/video composite cable For connecting game console
and TV signal source from a
set-top box.
HDMI cable For use with an HDMI-supported
game console or TV set-top box.
TV tuner (composite video to
S-Video) adapter
For connecting TV signal source
to the computer from a
set-top box.
Welcom e 3
Page 10
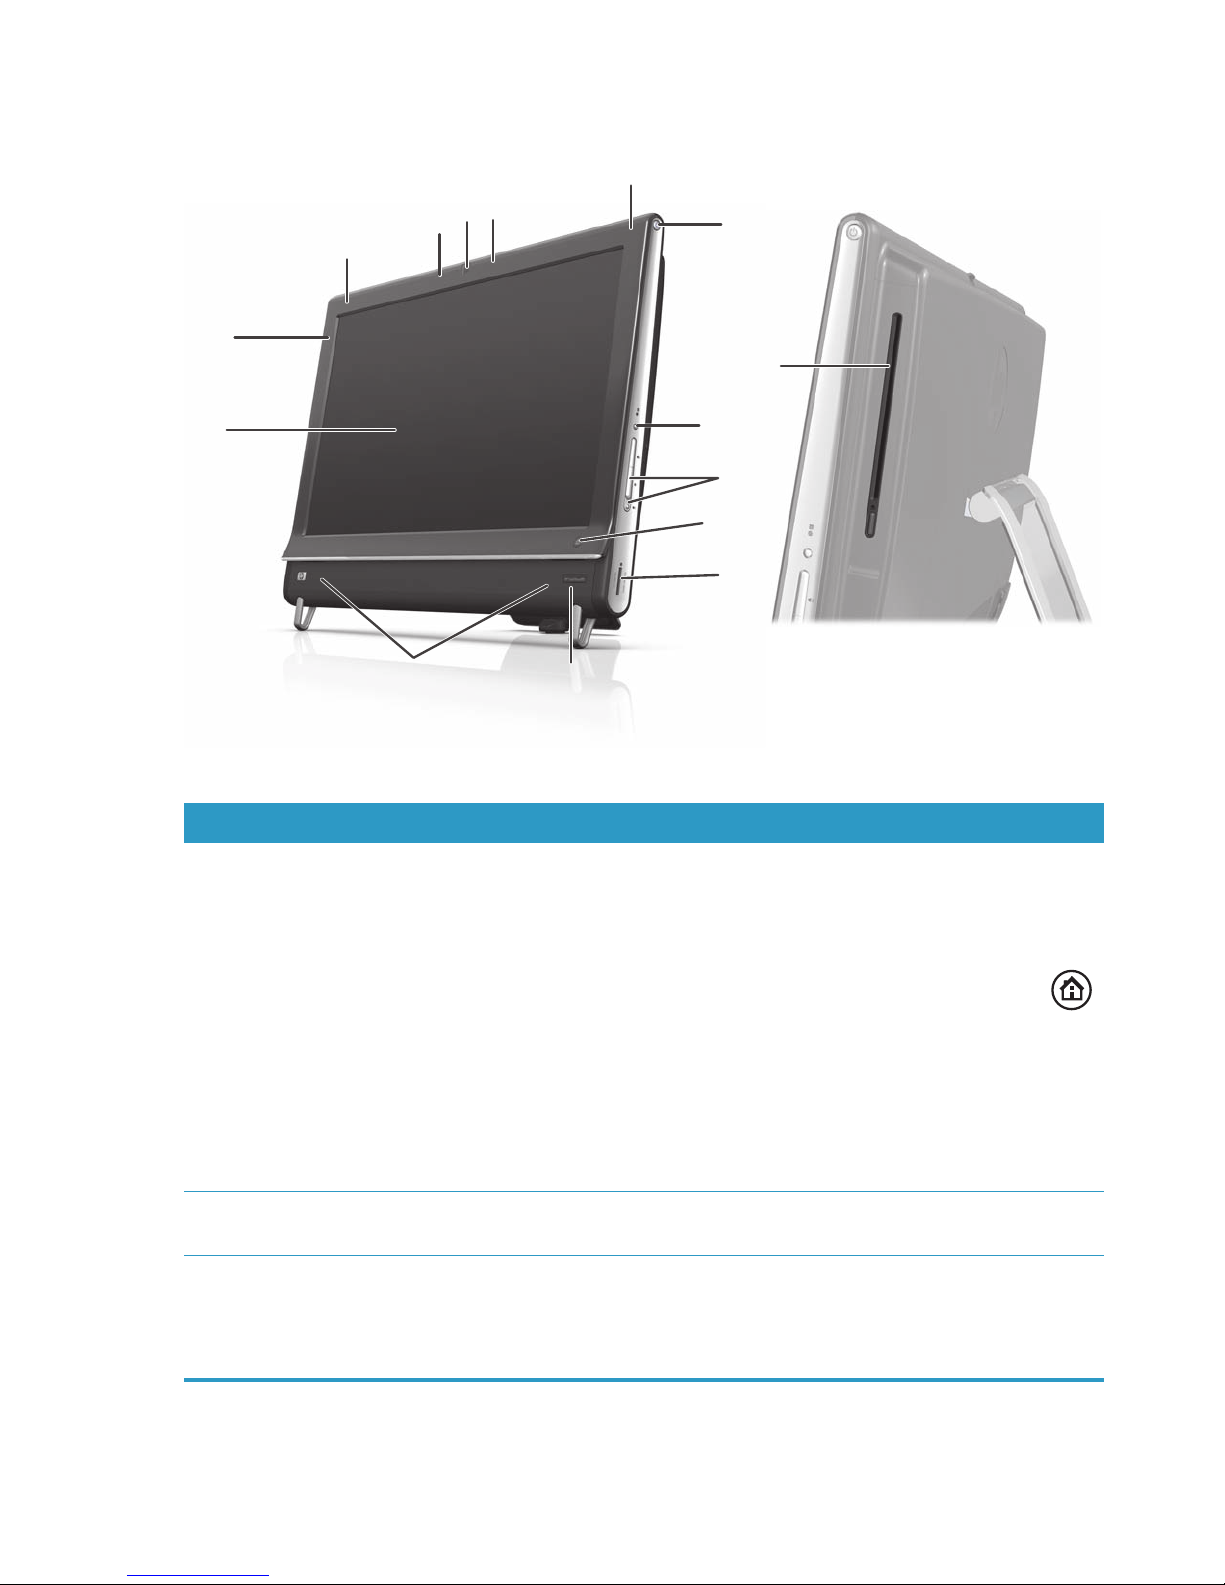
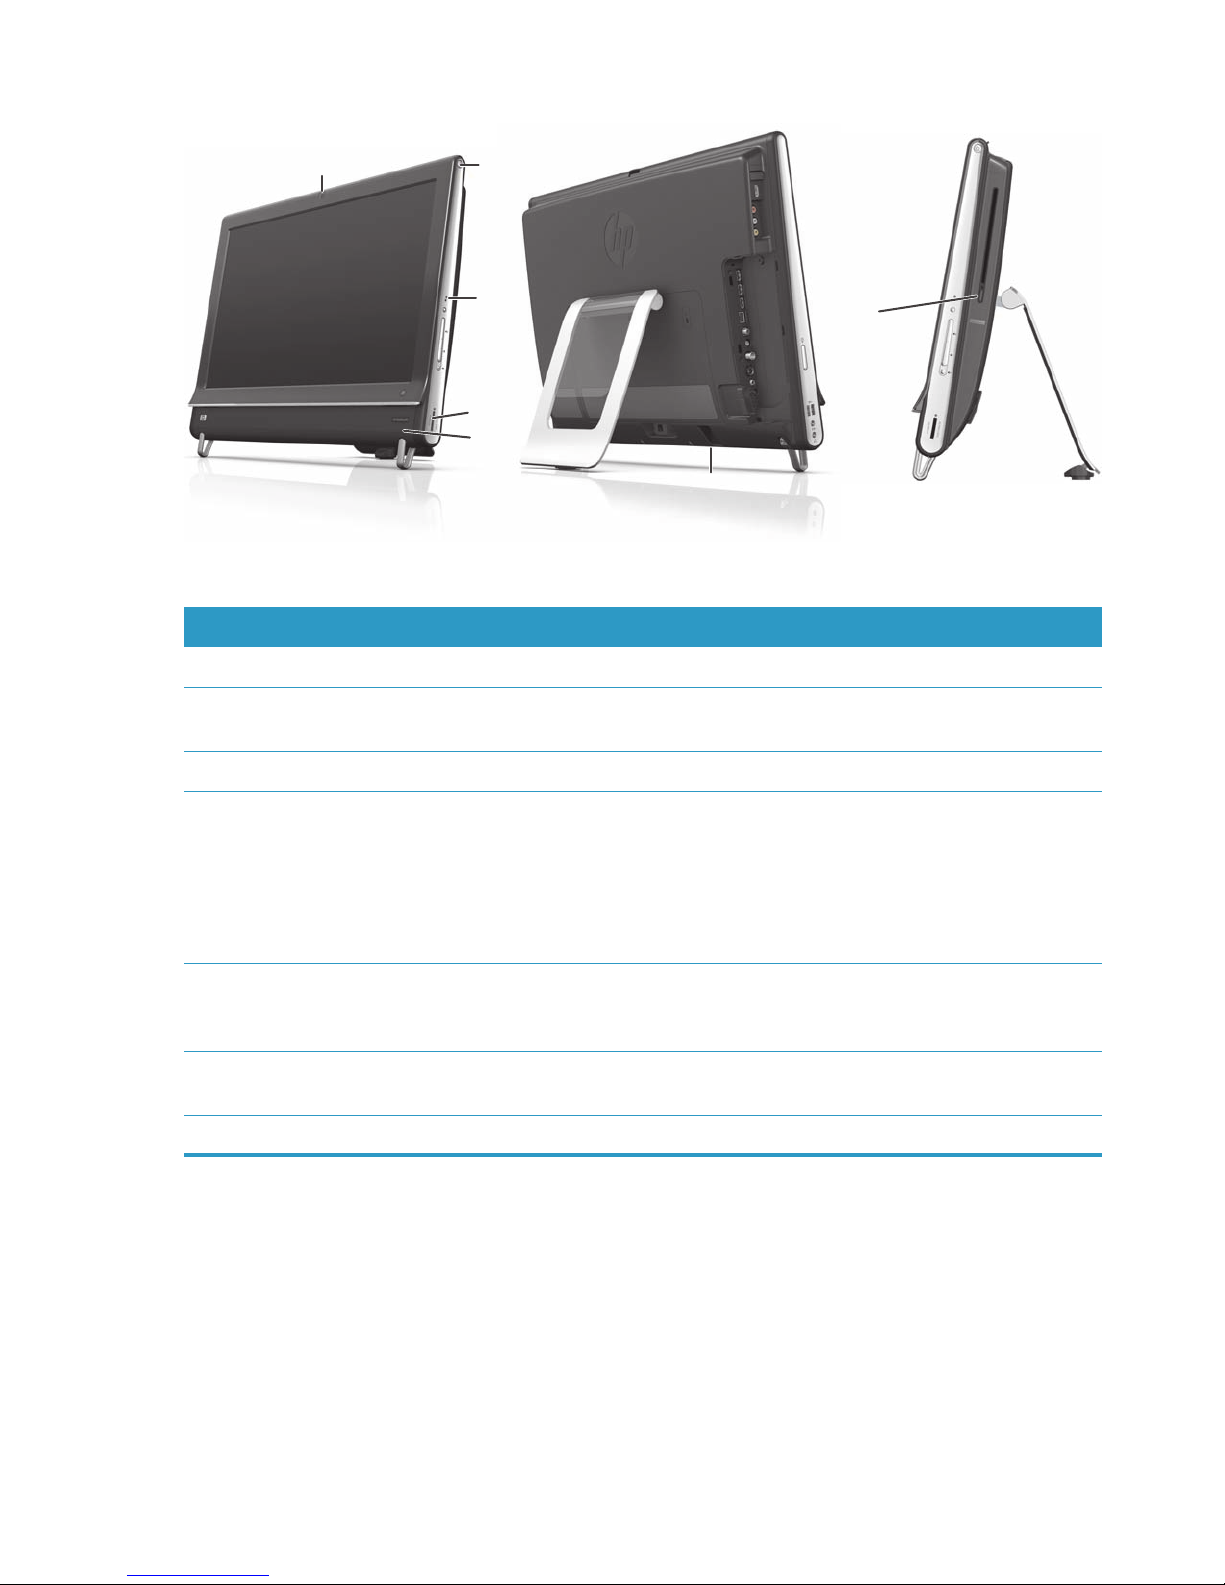
Front and right side of the HP TouchSmart PC
Features and configurations vary by model
C
E
D
D
C
B
F
M
A
L
Item Description
A LCD display
optimized for touch
G
H
I
J
K
State-of-the-art 58.4-cm diagonal widescreen high-definition display with
HP BrightView technology.* HP BrightView technology improves the
contrast and clarity of your display. In addition, it boasts a high
resolution of 1920 x 1080 and a fast response time of 5 ms.**
The display is optimized for an elegant touch experience. Your
fingertip is all you need to interact with the HP TouchSmart. The
durable glass panel is sturdy and delightfully responsive.
Experience the ease of managing your digital life by touch with the
HP TouchSmart software.
B Bluetooth
(select models only)
C Built-in wireless LAN
(select models only)
4 User Guide (Features may vary by model)
* High definition (HD) content is required to view HD images. Most current DVDs do
not provide HD images.
**All specifications represent the typical specifications provided by Hewlett-Packard’s
component manufacturers; actual performance may vary either higher or lower.
Use Bluetooth to connect to Bluetooth-enabled devices. The diagram
shows the internal location of Bluetooth (not visible externally).
Use the built-in wireless LAN to connect to the Internet through your
existing wireless network. The diagram shows the internal location of the
wireless LAN (top left and right, not visible externally).
The wireless LAN supports IEEE 802.11 b/g/n.
Page 11

Item Description (continued)
D Microphone array Use the built-in digital microphones to record sound for your webcam
videos, and to use instant messenger or chat software to have video
chats online. The microphone is designed to provide a cleaner sound by
filtering out ambient noise in your environment. It is designed to record
from a distance of up to one-half meter away from the computer.
E Webcam Create videos and snapshots that you can view, send by e-mail, and
upload to video sharing sites. Use the built-in webcam and microphone
array to have video chats with friends and family.*
To adjust the viewing angle of the webcam shot, tilt the screen, or use the
adjust lever immediately behind the webcam. You can also choose how
tightly you want to crop the view of the camera, creating a close-up view
of your face or including more of the background.
*Internet access required.
F Power/Sleep button Press the Power/Sleep button to turn on your HP TouchSmart PC, or to
put it into Sleep mode.
To turn off your computer, tap the Start button, and then select Shut
Down. Or tap the arrow next to the Shut Down button to switch users,
log off, lock, restart, or sleep.
G Display menu button
(game console models
Press this button to open an onscreen display (OSD) where you can make
adjustments to the screen, such as brightness and contrast.
only)
H Volume and mute
Adjust the sound level up or down, or mute the sound.
controls
I HP TouchSmart button Turn your HP TouchSmart PC on and open your HP TouchSmart software.
Or, if the computer is already turned on, press the button to open the
HP TouchSmart software for quick access to your music, photos, videos,
or the Web. The HP TouchSmart button cannot turn the computer off.
J Memory card reader Use the built-in memory card reader to easily access photos and other
files directly from a memory card.
Supported formats include Extreme Digital (xD), Secure Digital (SD),
Secure Digital High-Capacity (SDHC), MultiMediaCard (MMC),
Memory Stick (MS), and Memory Stick Pro (MS-Pro) memory cards.
Your memory card reader also supports adapters for the following
memory cards: Mini SD, RS-MMC, Micro SD, MS-Duo, and MS Pro Duo.
K IR receiver window
(select models only)
Infrared (IR) receiver window, located on the lower-right side of the
computer. Allows for use with a remote control.
L Internal speakers Use the built-in, high-quality stereo speakers for a powerful media
experience when listening to music, or when watching your home videos
and DVDs.
Welcome 5
Page 12

Item Description (continued)
M Slot-loading
CD/DVD drive
(located on back
side panel)
Watch your favorite DVD or Blu-ray disc (select models only), or listen to
your CD collection. Burn CDs, DVDs, and Blu-ray discs.*
Read and write DVD-RAM, CD-R/RW, and DVD+/-R/RW.
Read and play CD-ROM, DVD-ROM, CD Audio, DVD+/-R dual layer
(DL), DVD-Video, and Video CD.
* HP supports the lawful use of technology and does not endorse or encourage the
use of our products for purposes other than those permitted by copyright law.
Lower-left side of the HP TouchSmart PC
Features and configurations vary by model
A
B
C
D
Connector Function
A Ambient Light
button
(select models
only)
B USB 2.0 Connect USB devices (USB 2.0) such as printers, external hard disk drives,
C Audio Line In Connect MP3 players or other audio players. This connector is not for
D Headphones Connect headphones to the port to listen to music without disturbing
The HP TouchSmart Ambient Light casts a glow from the computer base.
Ambient Light is turned off by default. Turn on Ambient Light by pressing the
Ambient Light button. Tap it again to make it brighter, and again for brighter
still.
digital cameras, and MP3 players.
headphones or a microphone.
anyone.
6 User Guide (Features may vary by model)
Page 13
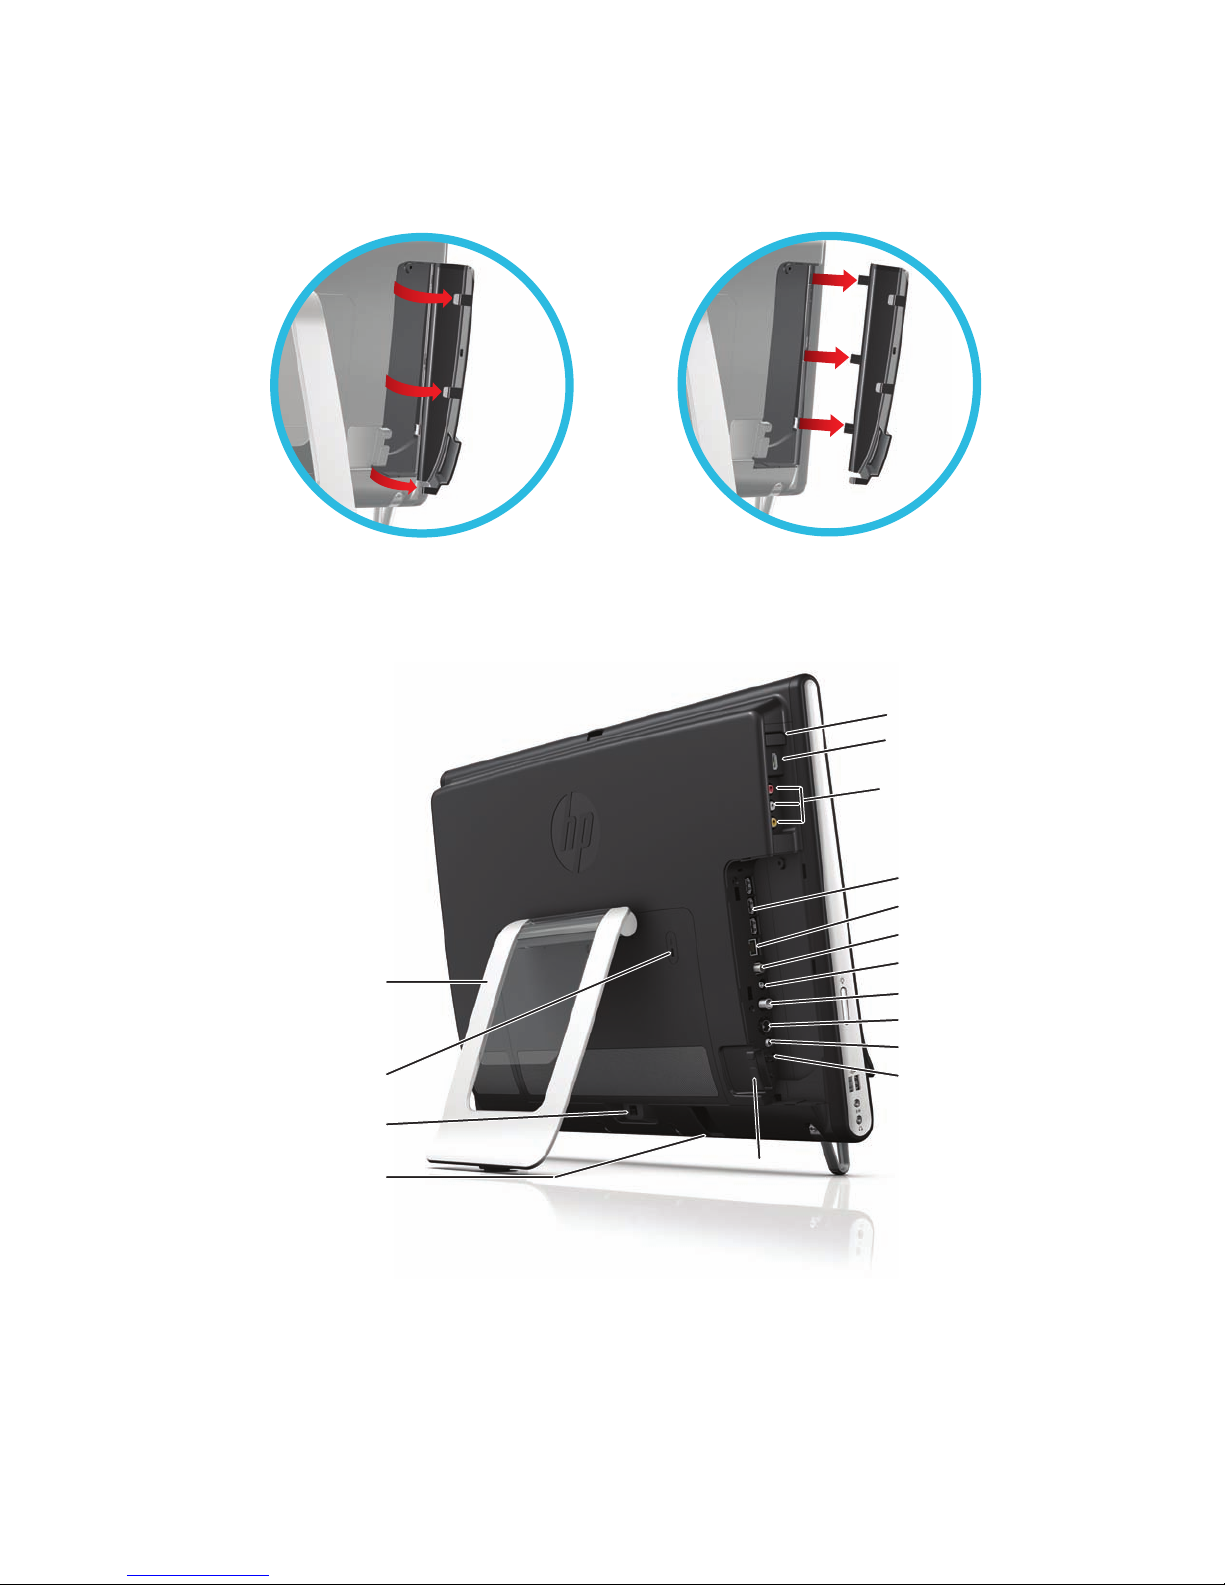
Connector cover
To remove the connector cover on the back of the computer, insert your finger under the gap on the
bottom-left side of the cover (A), and pull straight out (B). Replace the connector cover by aligning the
hooks on the right edge of the cover with the slots on the computer, and then pressing it until it snaps
into place.
AB
Back of the HP TouchSmart PC
Features and configurations vary by model
M
N
O
A
B
C
D
E
F
L
P
G
H
I
J
K
Welcom e 7
Page 14

Connector Function
A A/V source button
(game console
models only)
B HDMI port
(game console
This button is at the top of the game console ports. Press it to choose
between HDMI as your source or composite audio/video as your source
(whichever ports you connected to).
If your game console (or TV set-top box) is HDMI-compatible, connect to
this port.
models only)
C Composite audio/
video ports
If your game console (or TV set-top box) has composite audio/video
connections, connect to these ports.
(game console
models only)
D USB 2.0 ports (3) Connect USB devices (USB 2.0) such as printers, external hard disk
drives, digital cameras, and MP3 players.
E Gigabit
Connect to the Internet through your wired network.
Ethernet LAN
(10/100/1G)
F Digital audio port
(SPDIF Out)
Connect to your home theater system or your surround sound digital
speakers. Supports 3.1, 4.1, and 5.1 speakers.
G Audio Line Out Connect external 2.0 and 2.1 powered speakers.
H TV In
(TV tuner models
Connect your TV signal source to watch, record, and pause live TV. This is
an F-type coaxial TV input signal connector.
only)
I S-Video In
(TV tuner models
Capture analog video from a video camera, or connect to a set-top box
for TV input.
only)
J Stereo Audio In (TV
tuner models only)
K IR emitter (blaster)
(select models only)
Connect audio for A/V input from a set-top box, digital video camera, or
other video device.
Adhere to your TV set-top box IR receiver area to receive the remote
control signal while watching and recording TV programs. This is not
required if you do not use a set-top box. A remote control is included with
select models only.
L Computer stand Slide the stand for stability and best viewing angle. The stand supports an
adjustable tilt angle between 5 degrees and 40 degrees from the vertical.
M Security lock slot Insert a security lock (sold separately), which enables you to secure your
computer from theft and unwanted changes.
N Power connector Plug the power adapter into the computer.
O Wireless keyboard
Preinstalled receiver for using a wireless keyboard and mouse.
and mouse receiver
P Cable clip Route your cables through the clip, close the connector cover, and then
route the cables through the notch in the computer stand.
8 User Guide (Features may vary by model)
Page 15
Activity LED indicator lights
A
B
C
D
E
F
G
The following are the activity indicator light-emitting diodes (LEDs) on your HP TouchSmart PC:
LED What it Does
A Webcam Indicates webcam activity.
B Power Indicates the power state: blue indicates power on, and amber
indicates Sleep mode.
C Hard disk drive Indicates hard disk drive activity.
D Memory card reader Indicates memory card reader activity. When the LED is flashing, do
not remove your memory card.
When the LED is off, no card is inserted. A solid LED indicates that a
card is inserted with no read or write capacity. A flashing LED
indicates that there is memory card activity, and that a card has
read/write capacity.
E Remote control IR receiver
(select models only)
Indicates that your computer is working with your remote control to
navigate windows, record TV shows, and perform other activities in
Windows Media Center.
F Wireless keyboard and
mouse receiver
Indicates wireless signals received from the wireless keyboard and
mouse. The LED is visible from the back of the computer.
G Optical disc drive Indicates optical disc drive is in use.
Welcom e 9
Page 16
Connecting the Power Source
Plug the power cord into the AC adapter (external power supply), and the AC adapter cord into the back
of the computer. Route the power cord through the notch in the computer stand, and then plug the power
cord into an AC power source through a surge protector/uninterruptible power supply (UPS).
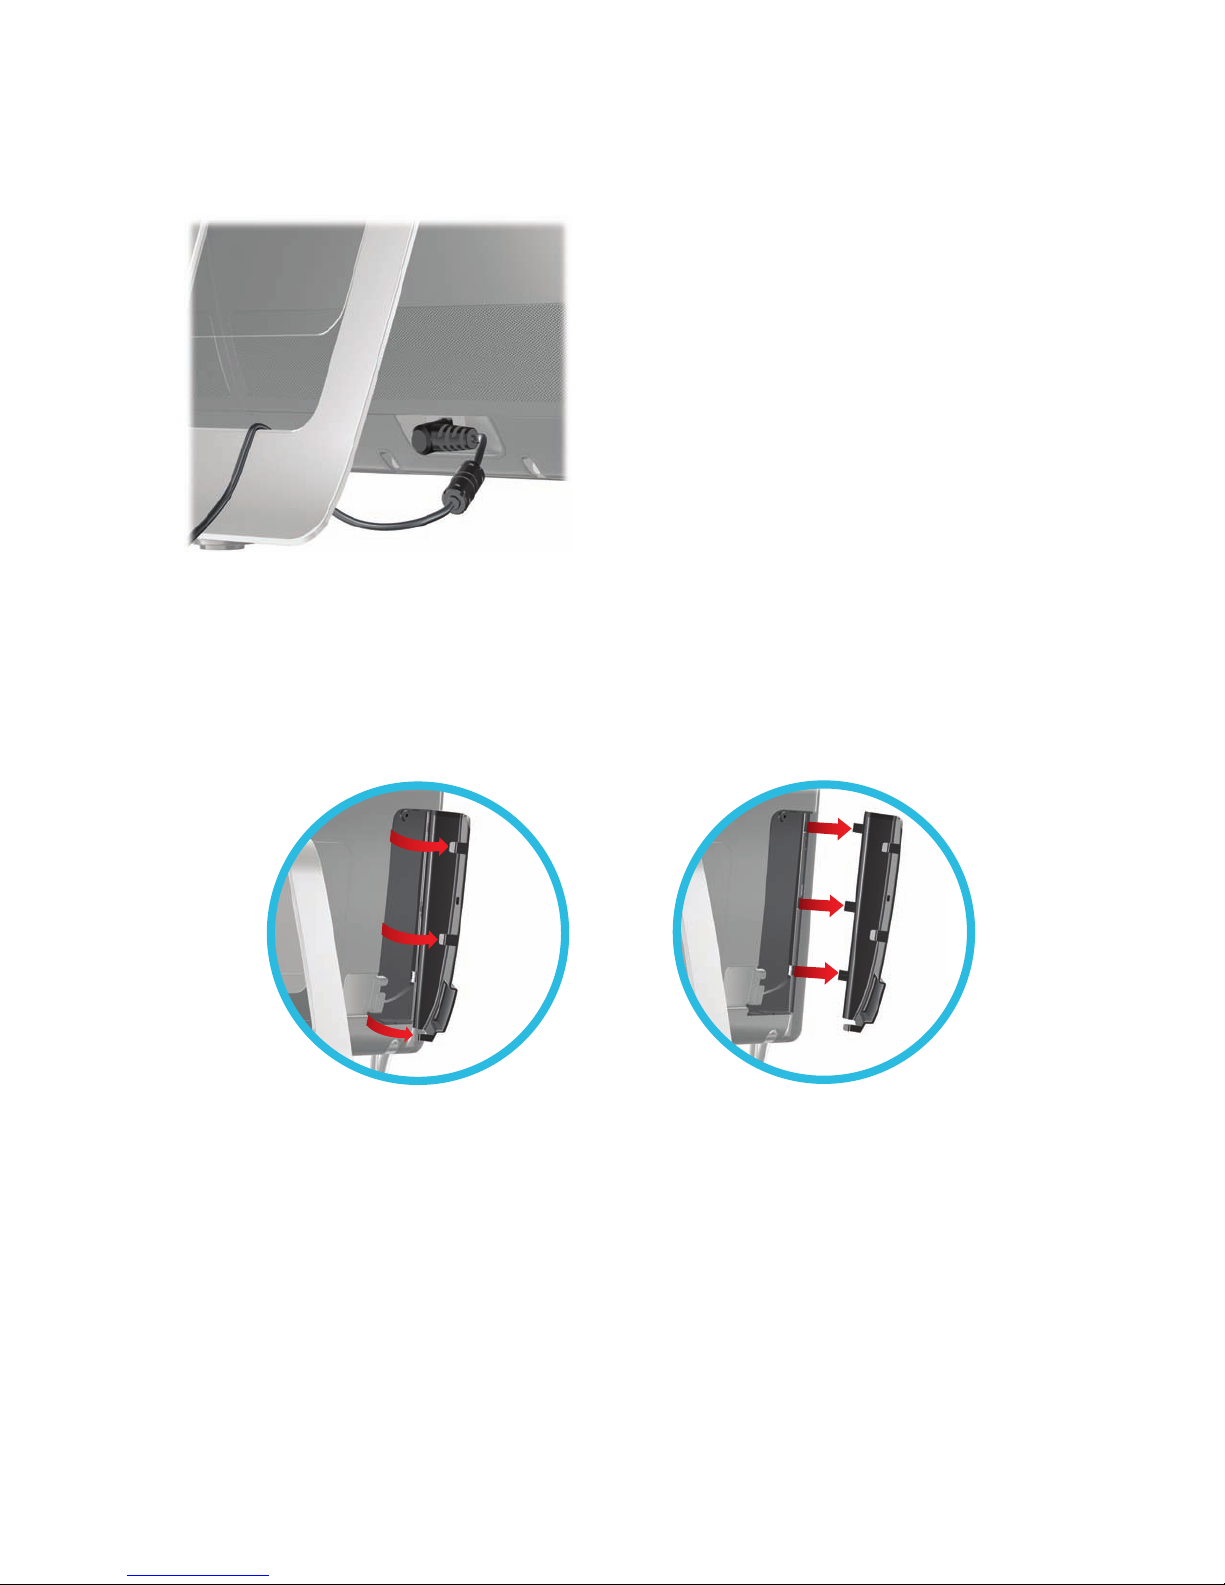
Cable Management
The HP TouchSmart PC includes a cable-management feature located behind the back connector cover. To
use the cable-management feature:
1 Remove the connector cover on the back of the computer by inserting your finger under the gap on the
bottom-left side of the cover (A), and then pulling straight out gently (B).
AB
10 User Guide (Features may vary by model)
Page 17
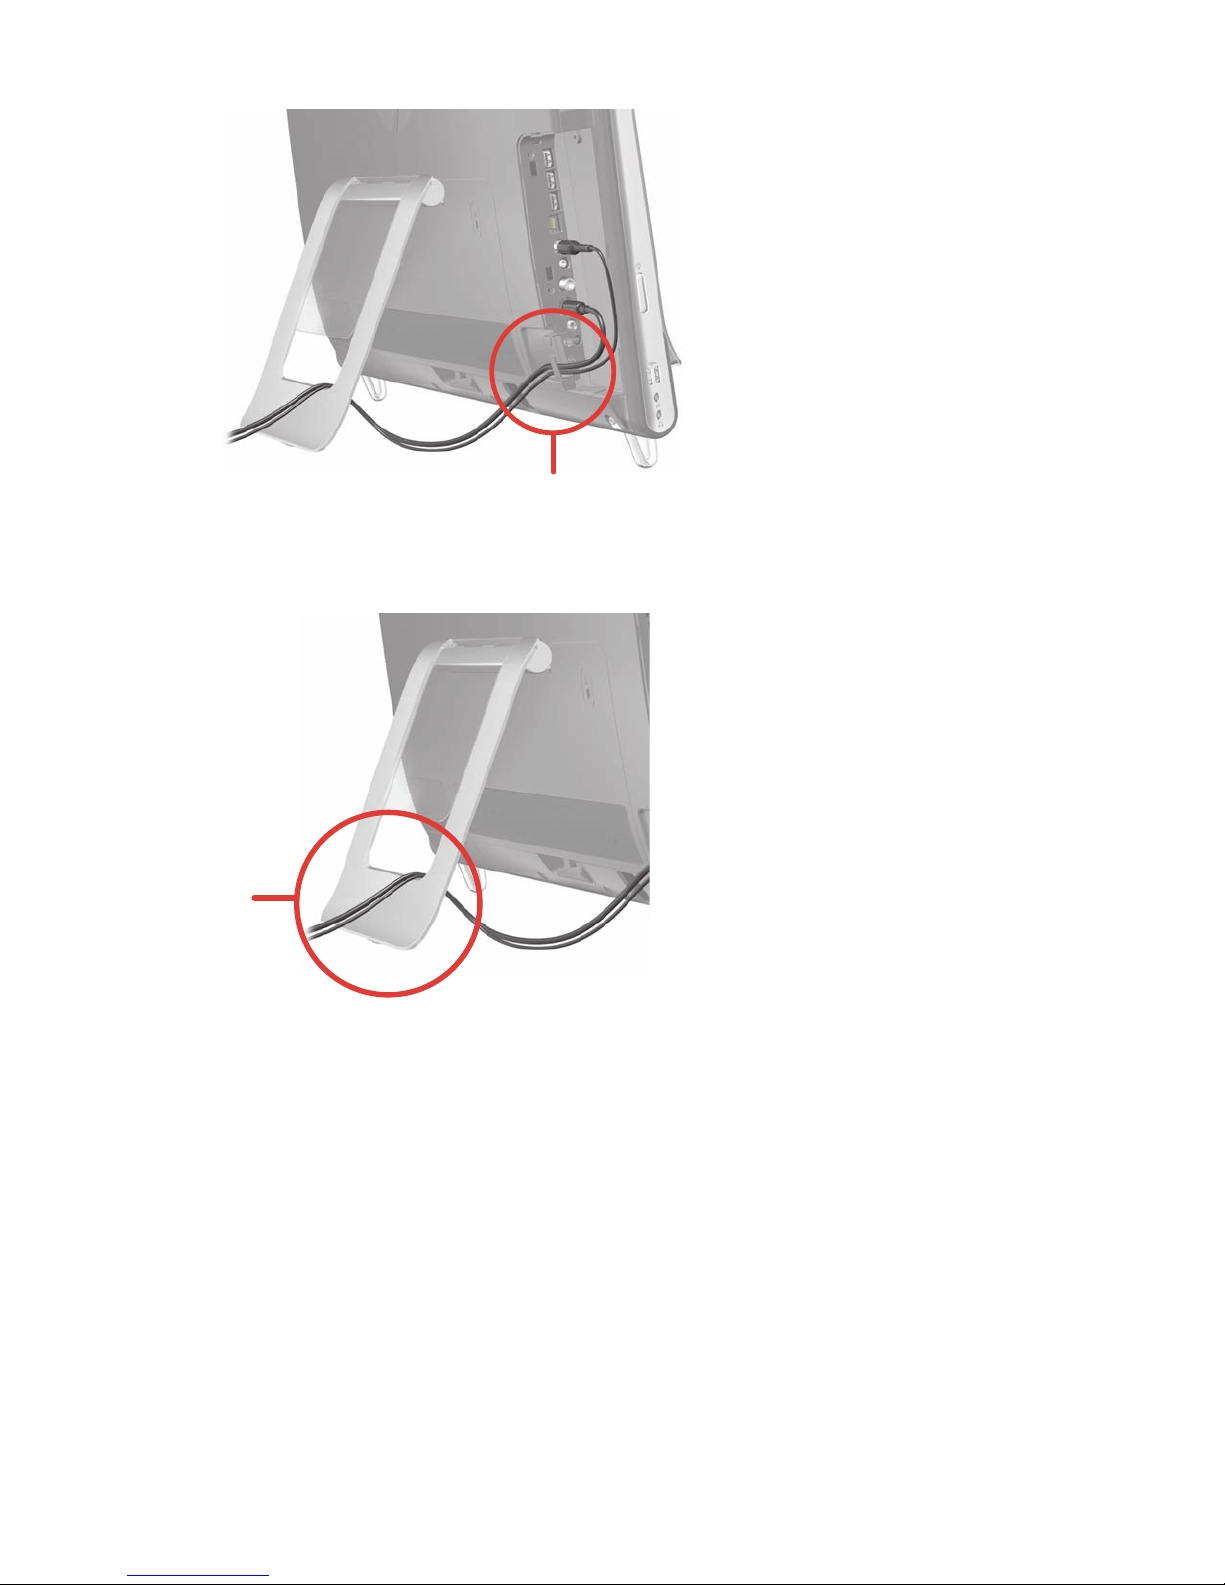
2 Route your cables through the cable routing clip (C), and out from the back of the computer.
C
3 Replace the connector cover by aligning the hooks on the right edge of the cover with the slots on the
computer, and then pressing it until it snaps into place. Then, route the cables through the open area
between the plastic plate and the bottom of the stand (D).
D
Welcom e 11
Page 18
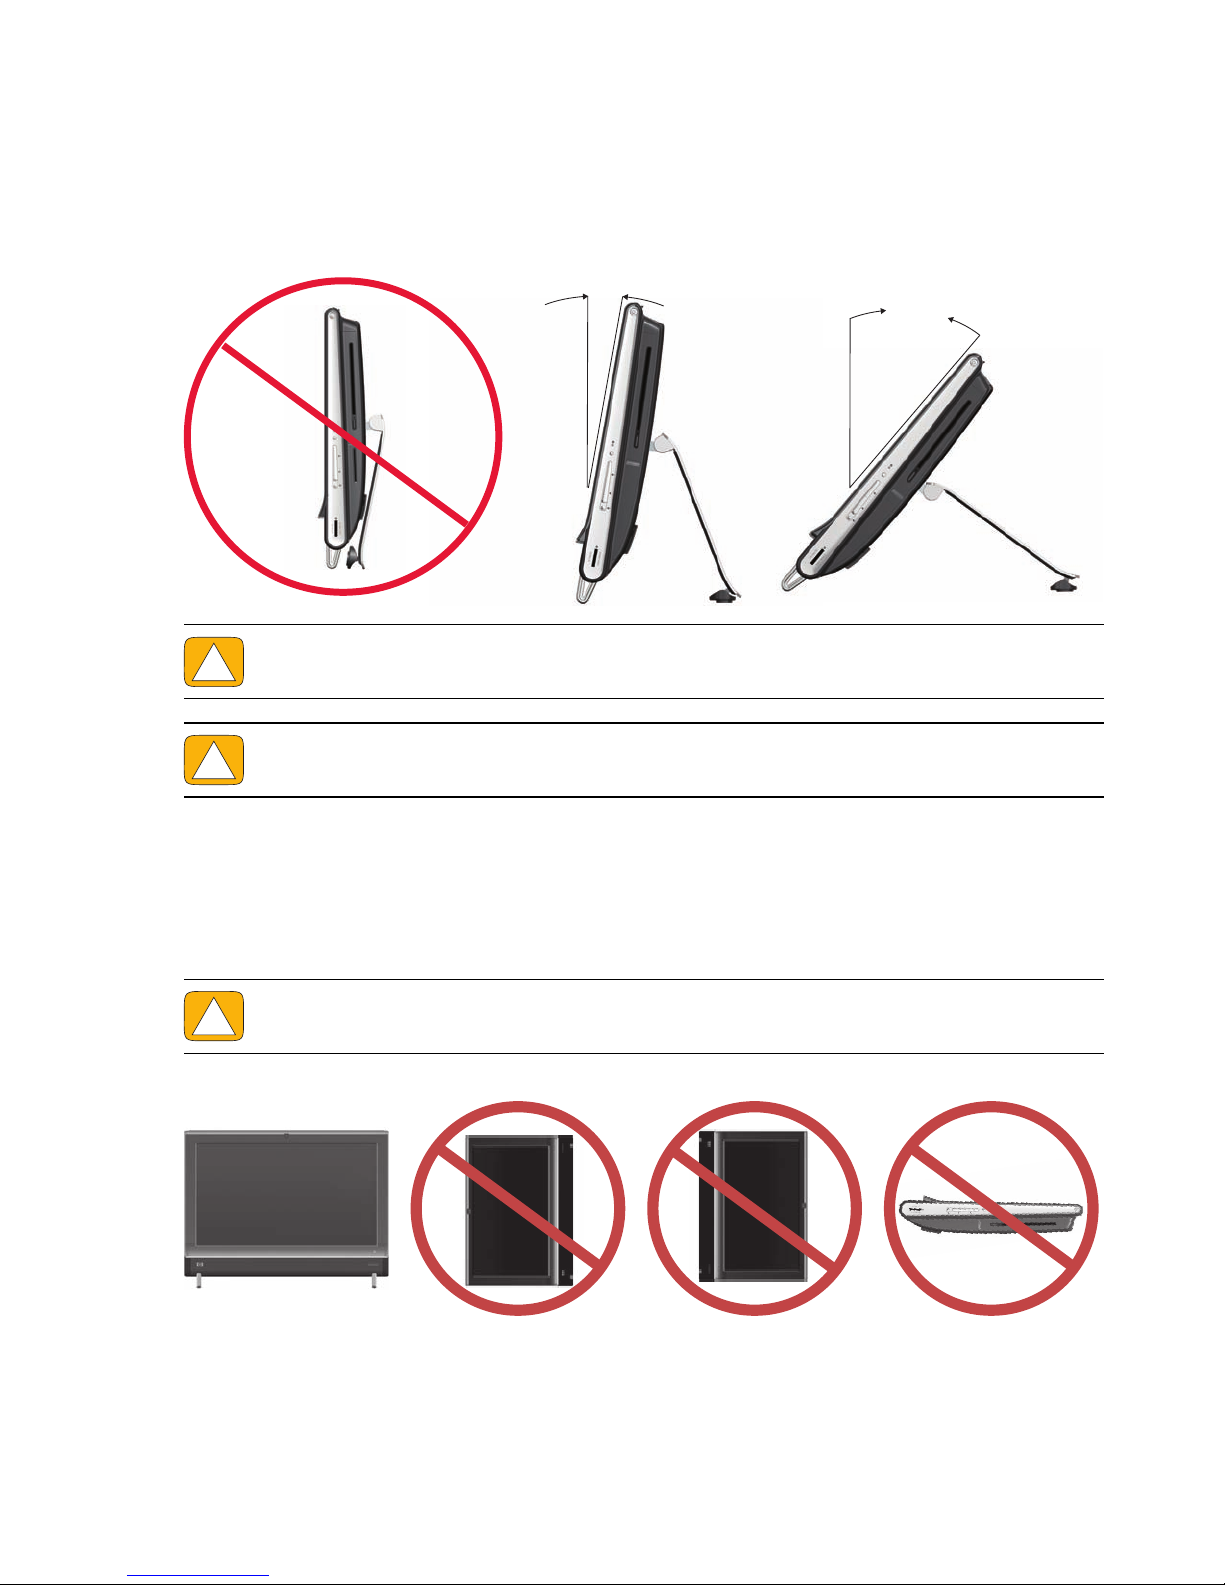
Computer Stand
The HP TouchSmart PC is shipped with the computer stand secured against the back of the computer. To
assure that the computer is in a stable position on your desktop, pull the computer stand open until it snaps
into place. Then, if you want to change the angle of the HP TouchSmart PC, hold each side of the
computer, and tilt it (the monitor moves forward; the stand stays in place) to an angle of between
5 degrees and 40 degrees from the vertical.
CAUTION: Make sure the angle of the computer is at least 5 degrees from the vertical;
otherwise the computer will be unstable and could fall over.
5° min.
40°
max
CAUTION: The computer stand stays in place as you increase the angle; the computer moves
forward. Take care that the computer screen does not move off the table.
Computer Orientation
Your HP TouchSmart PC is designed to be operated in a landscape orientation (A). When wall-mounted,
the PC should remain with the display in landscape orientation, not portrait (B), or laid horizontal (C).
CAUTION: Placing your PC in portrait orientation (B) or horizontal orientation (C) may result in
damage to the hardware components.
AB B C
12 User Guide (Features may vary by model)
Page 19
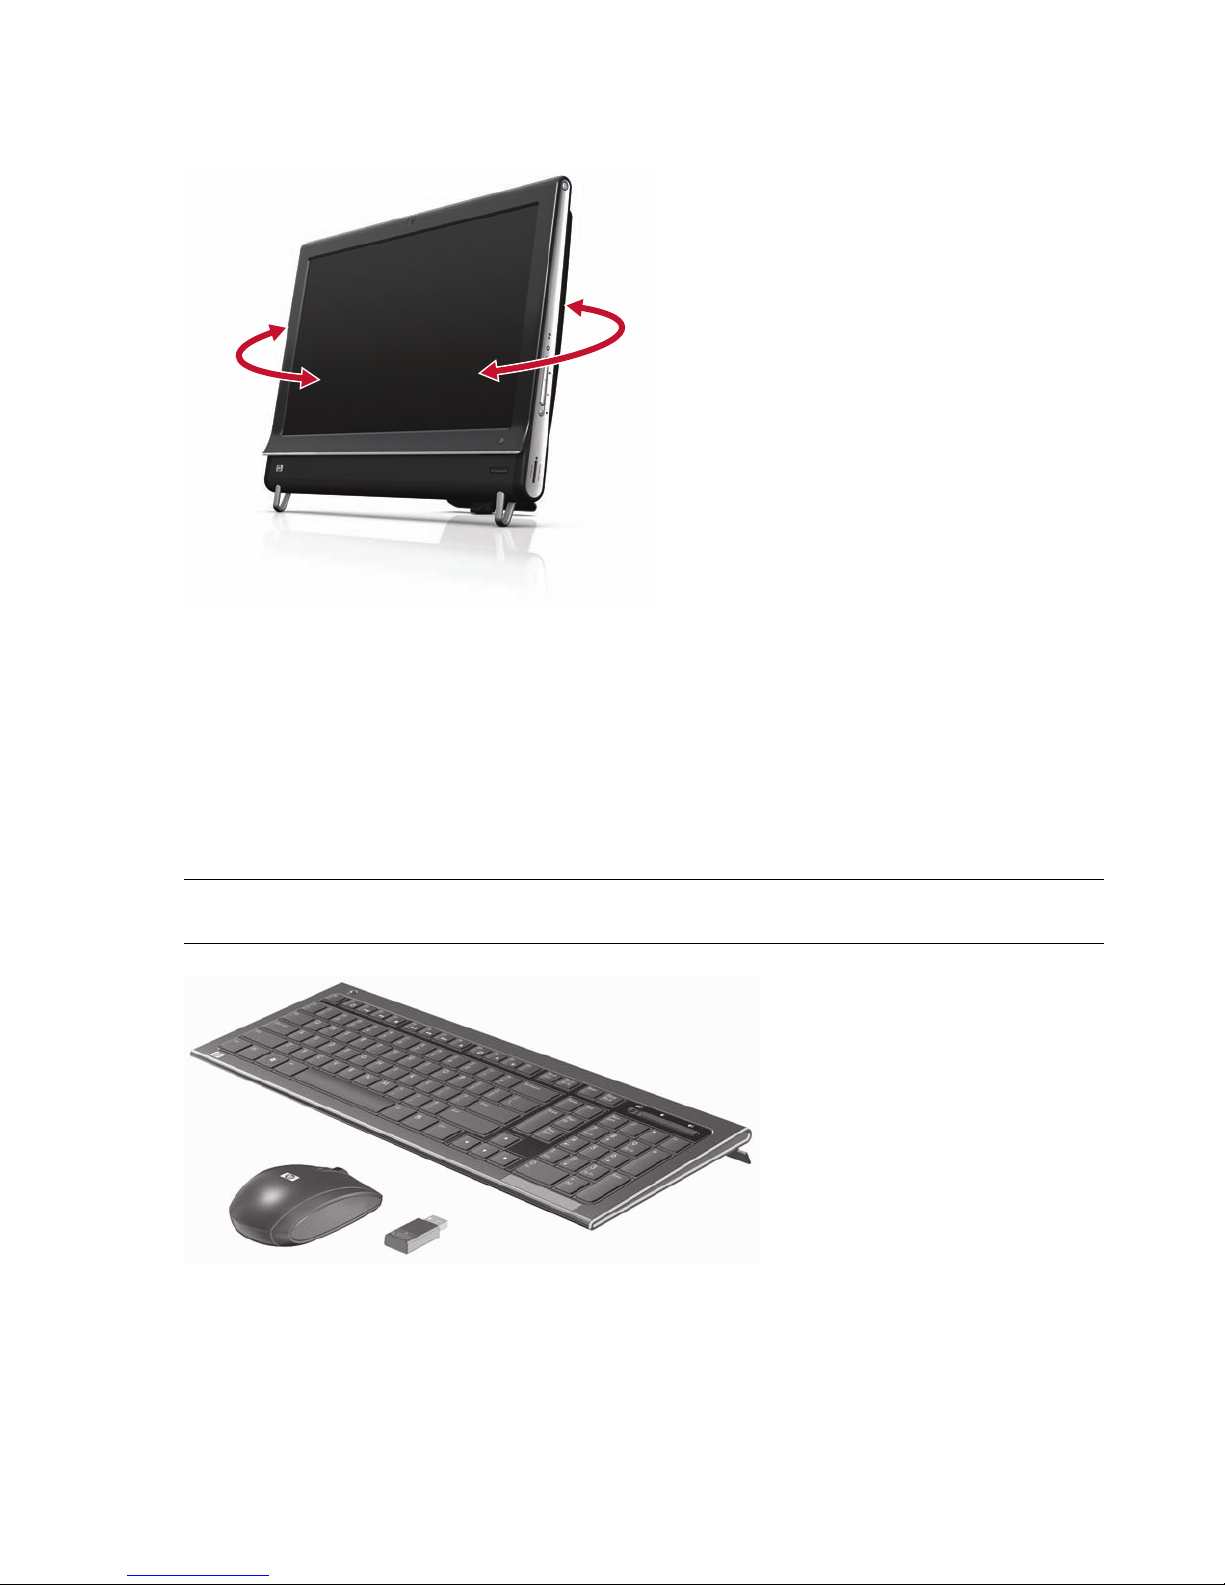
Computer Swivel
The computer allows a usable range of motion with the swivel feature.
Wireless Keyboard and Mouse
Your wireless keyboard and mouse are easy to set up. Just remove the battery tabs on both the keyboard
and the mouse. Also, make sure the Power switch on the bottom of the mouse is in the On position (the
keyboard does not have a Power switch). Then, turn on the computer. If you have trouble using the
keyboard and mouse, manually synchronize them as explained in the next procedure.
The keyboard is designed to fit under your computer when not in use. Your product may vary from the one
shown here. The wireless receiver shown here is preinstalled in the computer.
IMPORTANT: For better mouse battery life and performance, avoid using your mouse on a dark or
high-gloss surface, and turn mouse power off when not in use.
Synchronizing the wireless keyboard or mouse
The wireless keyboard and mouse are pre-synchronized, for your convenience, to work with your
HP TouchSmart PC. The keyboard and mouse should work immediately after you first pull the battery tabs
to activate the preinstalled batteries, and then turn on the mouse (B).
Welcom e 13
Page 20
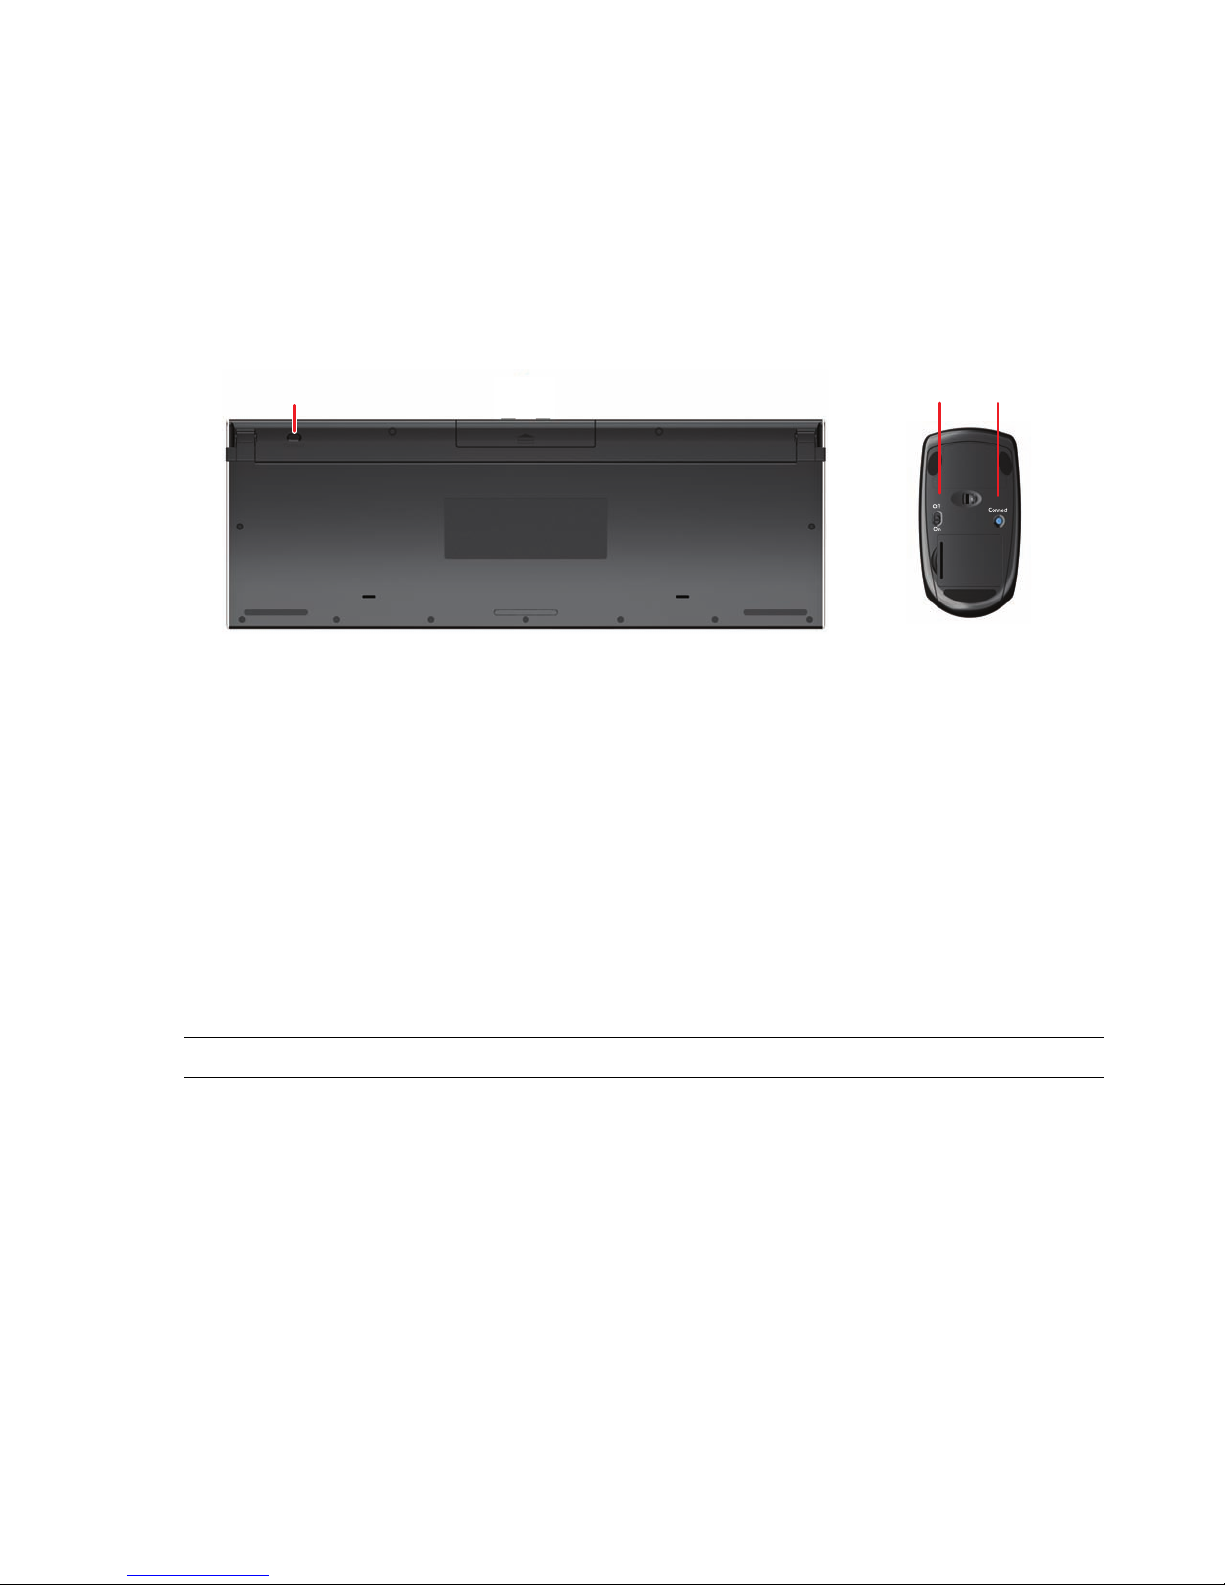
You may need to manually synchronize the wireless keyboard or mouse if they are not functioning.
To synchronize them:
Make sure the keyboard and mouse are next to the HP TouchSmart PC, within 30 cm and away from
interference from other devices.
Keyboard: Press the Connect button on the bottom of the keyboard (A) for five seconds. The blue
activity LED from the wireless receiver illuminates when the synchronization command has been
received and turns off when synchronization is complete.
Mouse: Press the Connect button on the bottom of the mouse (C) for five seconds. The blue activity
LED from the wireless receiver illuminates when the synchronization command has been received and
turns off when synchronization is complete.
B
A
C
If this does not work, remove and then re-insert the wireless keyboard and mouse receiver from the back of
the computer and then synchronize the keyboard and mouse again.
Ambient Light
Select models only
The HP TouchSmart Ambient Light casts a cool white glow from the base of the computer (in select models
you can change its color). By default, the Ambient Light is turned off when you turn on the computer.
To control the Ambient Light:
Press the Ambient Light button on the left side of the computer to turn the Ambient Light on.
Continue pressing the button to cycle through low intensity, medium intensity, high intensity, off,
and on.
NOTE: The Ambient Light will dim when the computer goes into Sleep mode.
To change the color or intensity of Ambient Light (select models only):
1 Tap the Start button, tap All Programs, navigate to HP applications, and find the Light feature.
2 Tap the co lor you wa nt.
3 Change the intensity of light either by tapping toward the top or toward the bottom of the color
spectrum, or by pressing the Ambient Light button on the computer.
Adding Hardware and Software
HP TouchSmart PCs may not be compatible with all of the software you install or all of the hardware you
add. Make sure your hardware and software are compatible with the operating system.
14 User Guide (Features may vary by model)
Page 21
Determining Whether Your System Is 64-bit or 32-bit
A
1 Tap the Start button, and then tap Help and Support.
2 Tap Troubleshooting Tools, and then tap System Information.
3 Tap Touch here to open System Information.
4 After the System Information displays, view Operating System, Name. It will appear as either
(64-bit) or (32-bit).
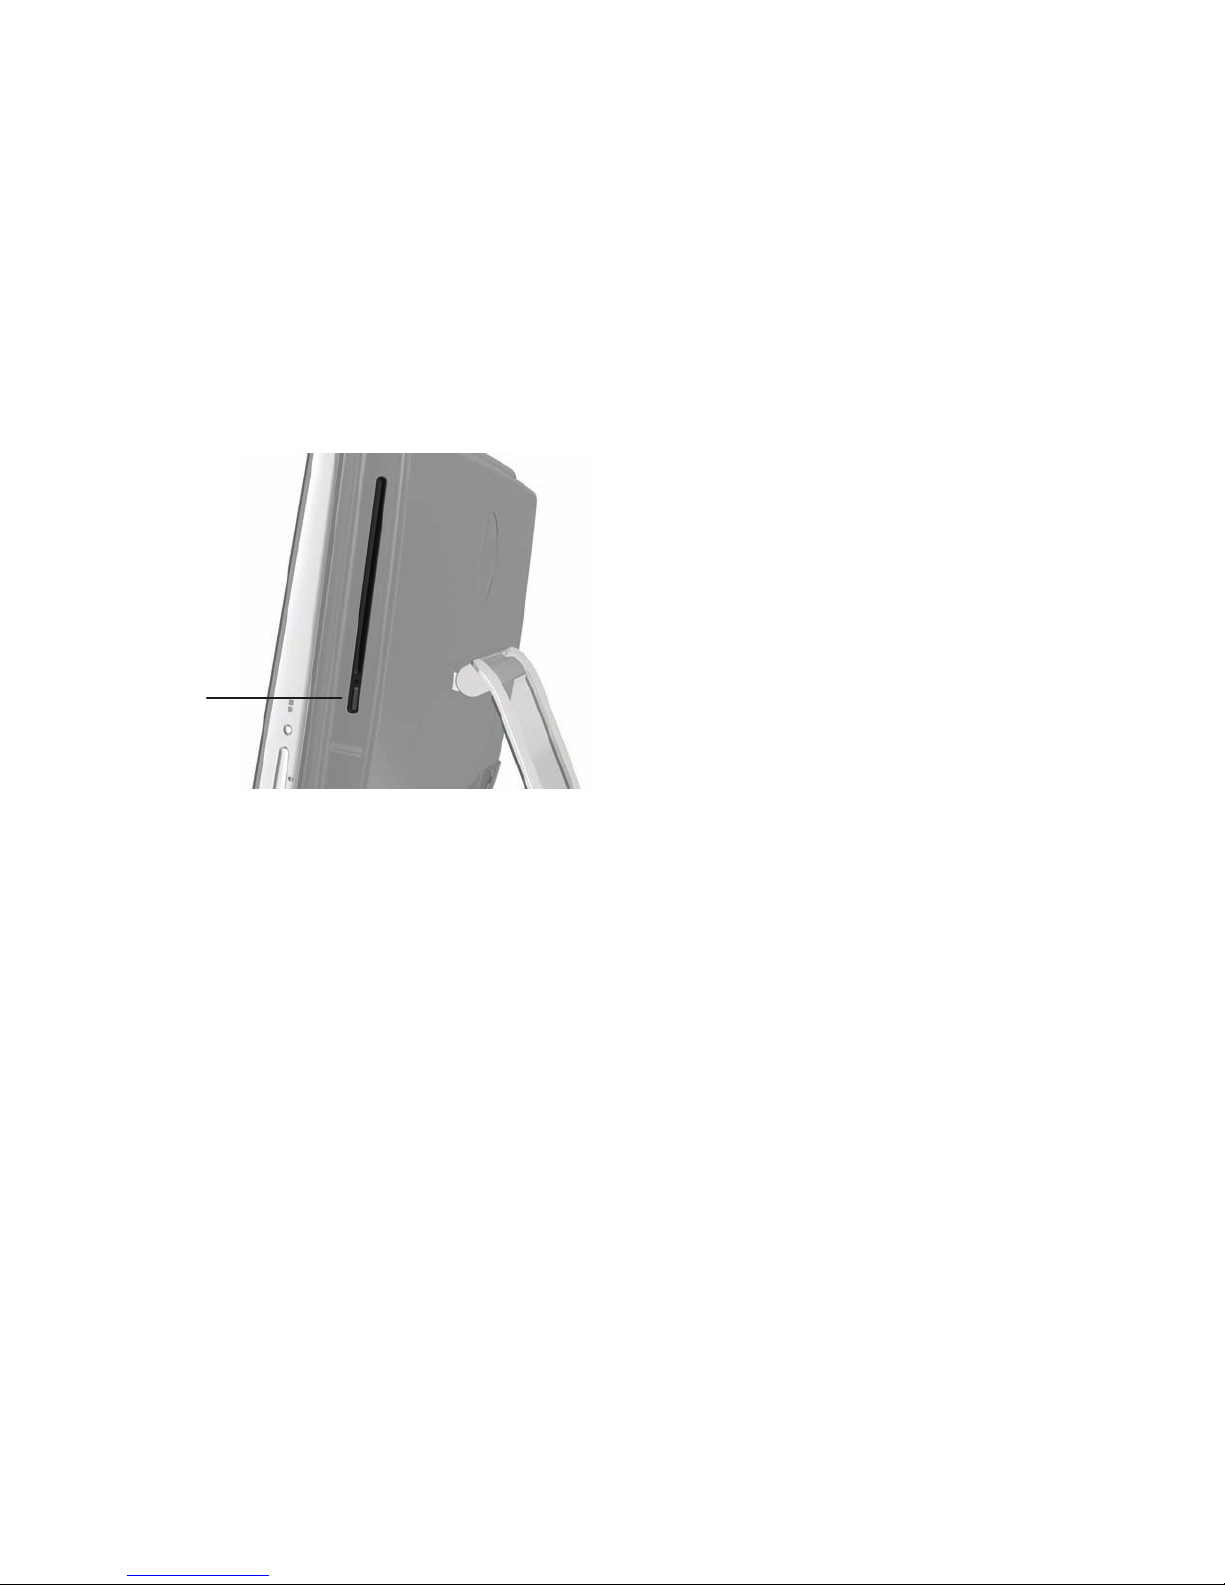
Optical Disc Drive
Use your CD/DVD drive to play and record CDs and DVDs, and Blu-ray discs (select models only). The
slim-slot CD/DVD drive does not have a disc tray. To insert a disc, turn the data side toward the back of the
computer (label side forward) and slide the disc into the drive slot.
To eject a disc, make sure the power is turned on and then press the Eject button (A) on the side of the disc
drive. You can also tap the Start button, tap Computer, press and hold (or with the mouse, right-click) the
CD drive, and then tap Eject.
If the disc gets stuck, refer to the Limited Warranty and Support Guide for the telephone number to contact
HP Support.
Connecting to the Internet
Your HP TouchSmart PC is designed to support a wireless (select models only) or wired LAN that connects
your computer to other devices, such as printers and other PCs. The network connection to the Internet is
usually through a broadband modem (digital subscriber line [DSL] or cable), which requires a separate
subscription.
For a wireless LAN, the HP TouchSmart PC includes a built-in wireless LAN antenna, which you
can use to access your wireless home network.
For a wired LAN, connect an Ethernet cable (sold separately) to the Ethernet connector on the back
of the computer, and then connect the other end to the network router or broadband modem.
Wireless home network
Wireless access point and Internet service are required and not included. Availability of public wireless
access points may be limited.
First-time wireless network installation requires that you:
Welcom e 15
Page 22
1 Purchase high-speed Internet service from an Internet service provider (ISP).
2 Purchase a broadband modem (DSL or cable). This may be provided by the ISP.
3 Purchase and install a wireless router (sold separately), if one is required.
NOTE: Broadband modem and router installation procedures vary, depending on the manufacturer.
Follow the manufacturer’s instructions.
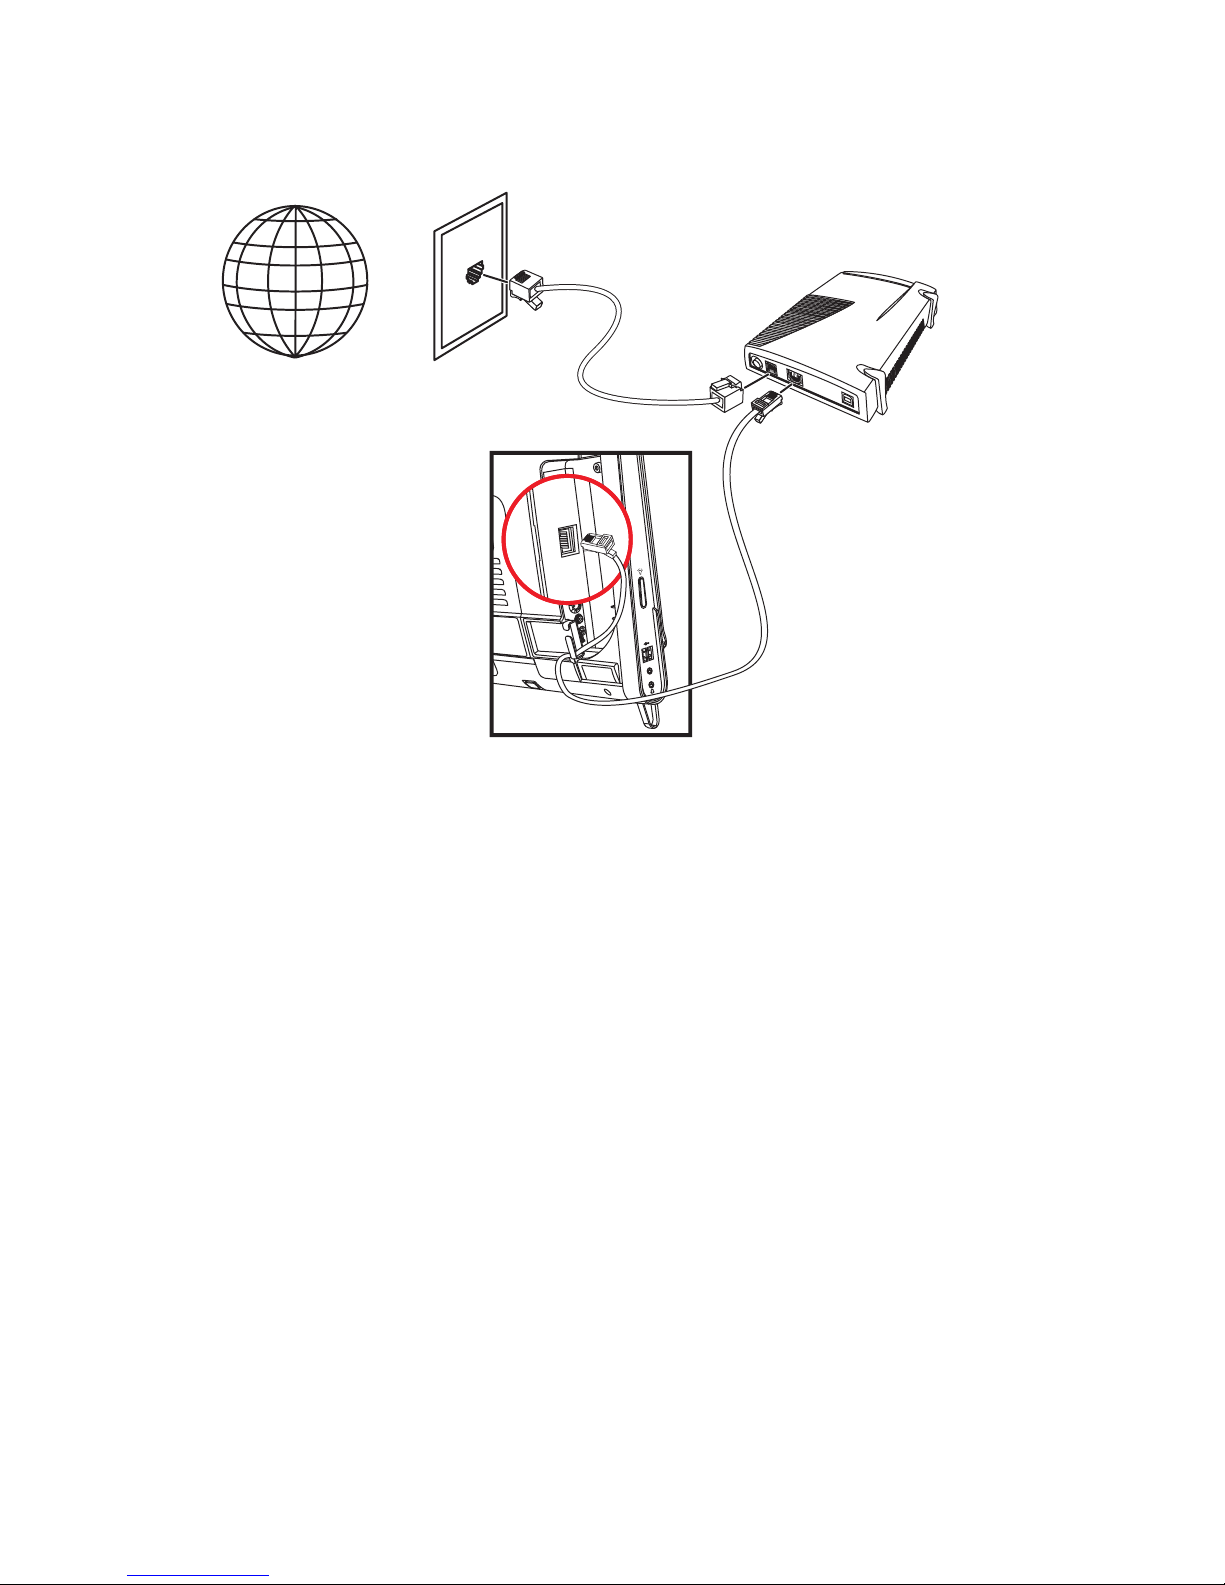
4 Connect your computer to the network.
NOTE: A DSL wall connection is shown here. If you have a cable modem, the modem will be
connected to the wall using a coaxial cable.
CBA
5 Configure the HP TouchSmart PC to connect to the wireless network.
a Turn on your HP TouchSmart PC.
b Connect your HP TouchSmart PC to the wireless network:
Right-click the Network icon on the taskbar, and then select Open Network and
Sharing Center. Click Connect to a network. When the window opens, select the
network, and then click Connect.
Or
Right-click the Network icon on the taskbar, and then select Network and Sharing
Center. When the window opens, select Set up a new connection or network,
and then follow the onscreen instructions.
c Test the wireless network by opening your Web browser and accessing any Web site.
6 Add wireless devices to the network (optional).
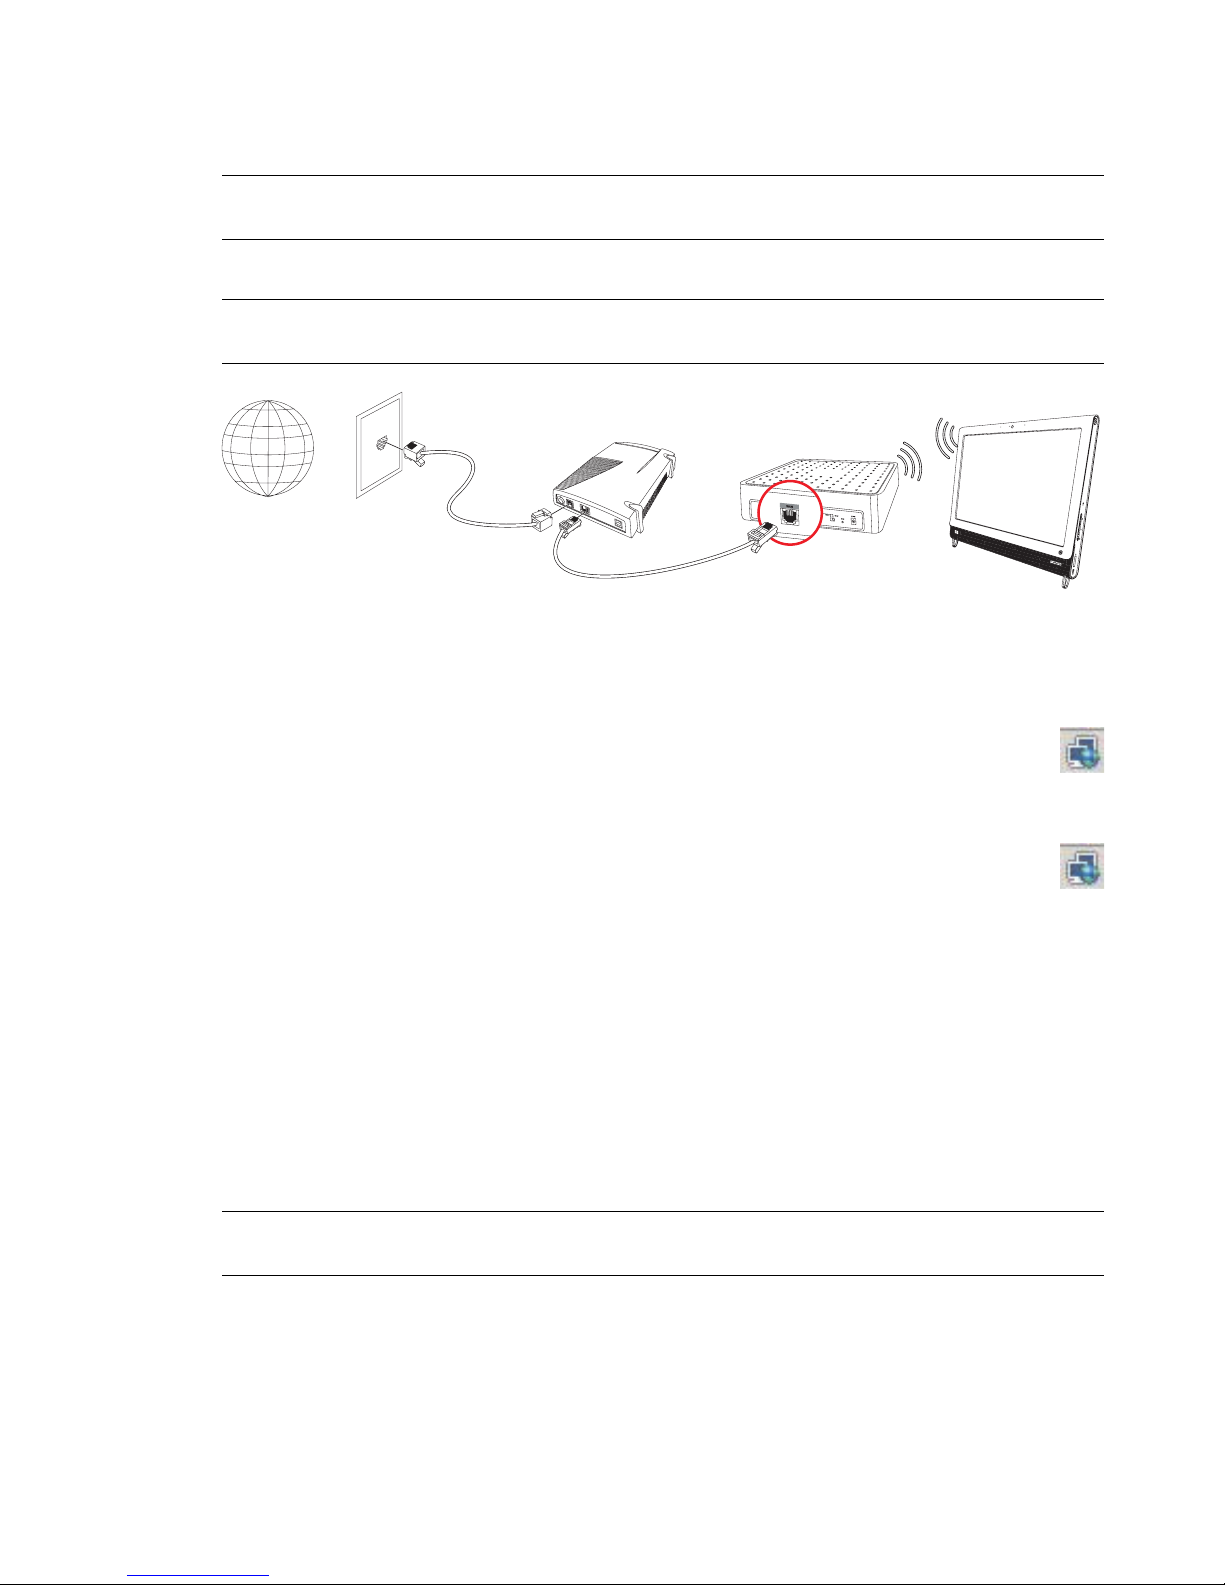
Wired home network
First-time wired network installation requires that you:
1 Purchase high-speed Internet service from an Internet service provider (ISP).
2 Purchase a broadband modem (DSL or cable). This may be provided by the ISP.
3 Purchase and install a wired router (sold separately), if one is required.
NOTE: Broadband modem and router installation procedures vary, depending on the manufacturer.
Follow the manufacturer’s instructions.
4 Connect the DSL cable (shown) or coaxial cable (not shown) from the wall to the modem.
5 Connect the modem to the computer Ethernet port with an Ethernet cable. If you want to connect
multiple devices to the network, connect a router or hub (not shown) to the modem with an Ethernet
cable, and then connect the computer to the router with an Ethernet cable.
16 User Guide (Features may vary by model)
Page 23
If you have a wired network in your home with Ethernet connectors in the wall, connect directly from
your computer Ethernet port to the Ethernet wall connector with an Ethernet cable.
The Ethernet port on the HP TouchSmart PC is located on the back of the computer, behind the
connector cover.
6 Add other computers or devices to your wired network:
a Disconnect power from the broadband modem and the router, and then shut down your
HP TouchSmart PC and the computers you want to add to your network.
b For each wired computer, connect one end of an Ethernet cable to the LAN connector on the
computer, and then connect the other end of the cable to any available Ethernet connector on
the router.
c Reconnect power to the modem, and wait until the modem has completed its startup cycle.
Reconnect power to the router. Then, turn on the wired computers and your HP TouchSmart PC.
d Test the network connection for each wired computer by opening your Web browser and
accessing any Web site.
Bluetooth Devices
Select models only
Some models of the HP TouchSmart PC are Bluetooth-enabled, so that you can connect all kinds of
Bluetooth-enabled wireless devices. Bluetooth devices create a personal area network (PAN), which
connects other Bluetooth devices, such as computers, phones, printers, headsets, speakers, and cameras.
In a PAN, each device communicates directly with the other devices; the devices must be relatively close
together.
To enable a Bluetooth device:
1 Refer to your Bluetooth device’s instructions to make it “discoverable” (it sends out a radio signal).
2 Click the Start button, Control Panel, and then click Hardware and Sound. Find your Bluetooth
device and follow onscreen instructions.
Welcom e 17
Page 24

3 If your Bluetooth device is a printer, tap the Start button, then Control Panel, and then tap
Hardware and Sound. Tap Printers. Tap Add a printer.
TV Tuner and Windows Media Center
Select models only
Watch and record your favorite TV programs by using Windows Media Center. Menus and features in
Windows Media Center are accessible through touch, remote control, keyboard, and mouse. TV tuners
and remote controls are included in select models only.
Watching and recording TV programs
To watch and record TV programs on your HP TouchSmart PC:
1 Connect the TV signal source to the TV tuner on the computer. See “Connecting the TV signal source to
the computer” on page 18.
2 Set up your computer for use with a set-top box (optional). See “Using a set-top box with Windows
Media Center (optional step)” on page 20.
3 Complete the Windows Media Center setup wizard to configure your TV tuner and your program
guide. See “Windows Media Center setup wizard” on page 21.
4 Point the remote control at the IR receiver on the lower-right side of the HP TouchSmart PC to start
Windows Media Center, and use this program to watch and record TV shows. For more information
about setting up and using Windows Media Center, go to: www.microsoft.com, or tap the Start
button, tap Windows Media Center, tap Tasks, and then tap learn more. This takes you to
www.windowsmediacenter.com
Connecting the TV signal source to the computer
Select models only
WARNING: Please read “Additional Safety Information” in the Limited Warranty and Support
Guide before installing and connecting your HP TouchSmart PC to the electrical power system.
To connect a TV signal to the computer, your computer needs a TV tuner, which is included with select
models only. You also may need to purchase some cables separately.
NOTE: Availability of signals is limited by the strength and accessibility of the originating TV signal,
location and other factors. Performance issues may arise, and do not constitute defects in the product.
WARNING: Norway and Sweden only: Cable grounding notice for products with a TVB tuner.
Your TV tuner requires that you use a TV tuner isolator (adapter) (purchased separately) with
your computer to connect a coaxial cable to the TV signal source. Using the TV tuner adapter
helps prevent personal injury and computer damage from surges on the coaxial line.
18 User Guide (Features may vary by model)
Page 25

Connect the coaxial cable from your TV antenna or TV cable provider to the TV In connector (A) located on
A
the back of the computer behind the connector cover. See “Back of the HP TouchSmart PC” on page 7.
Welcom e 19
Page 26
Using a set-top box with Windows Media Center
A
(optional step)
Sold separately
Refer to your set-top box documentation for more details.
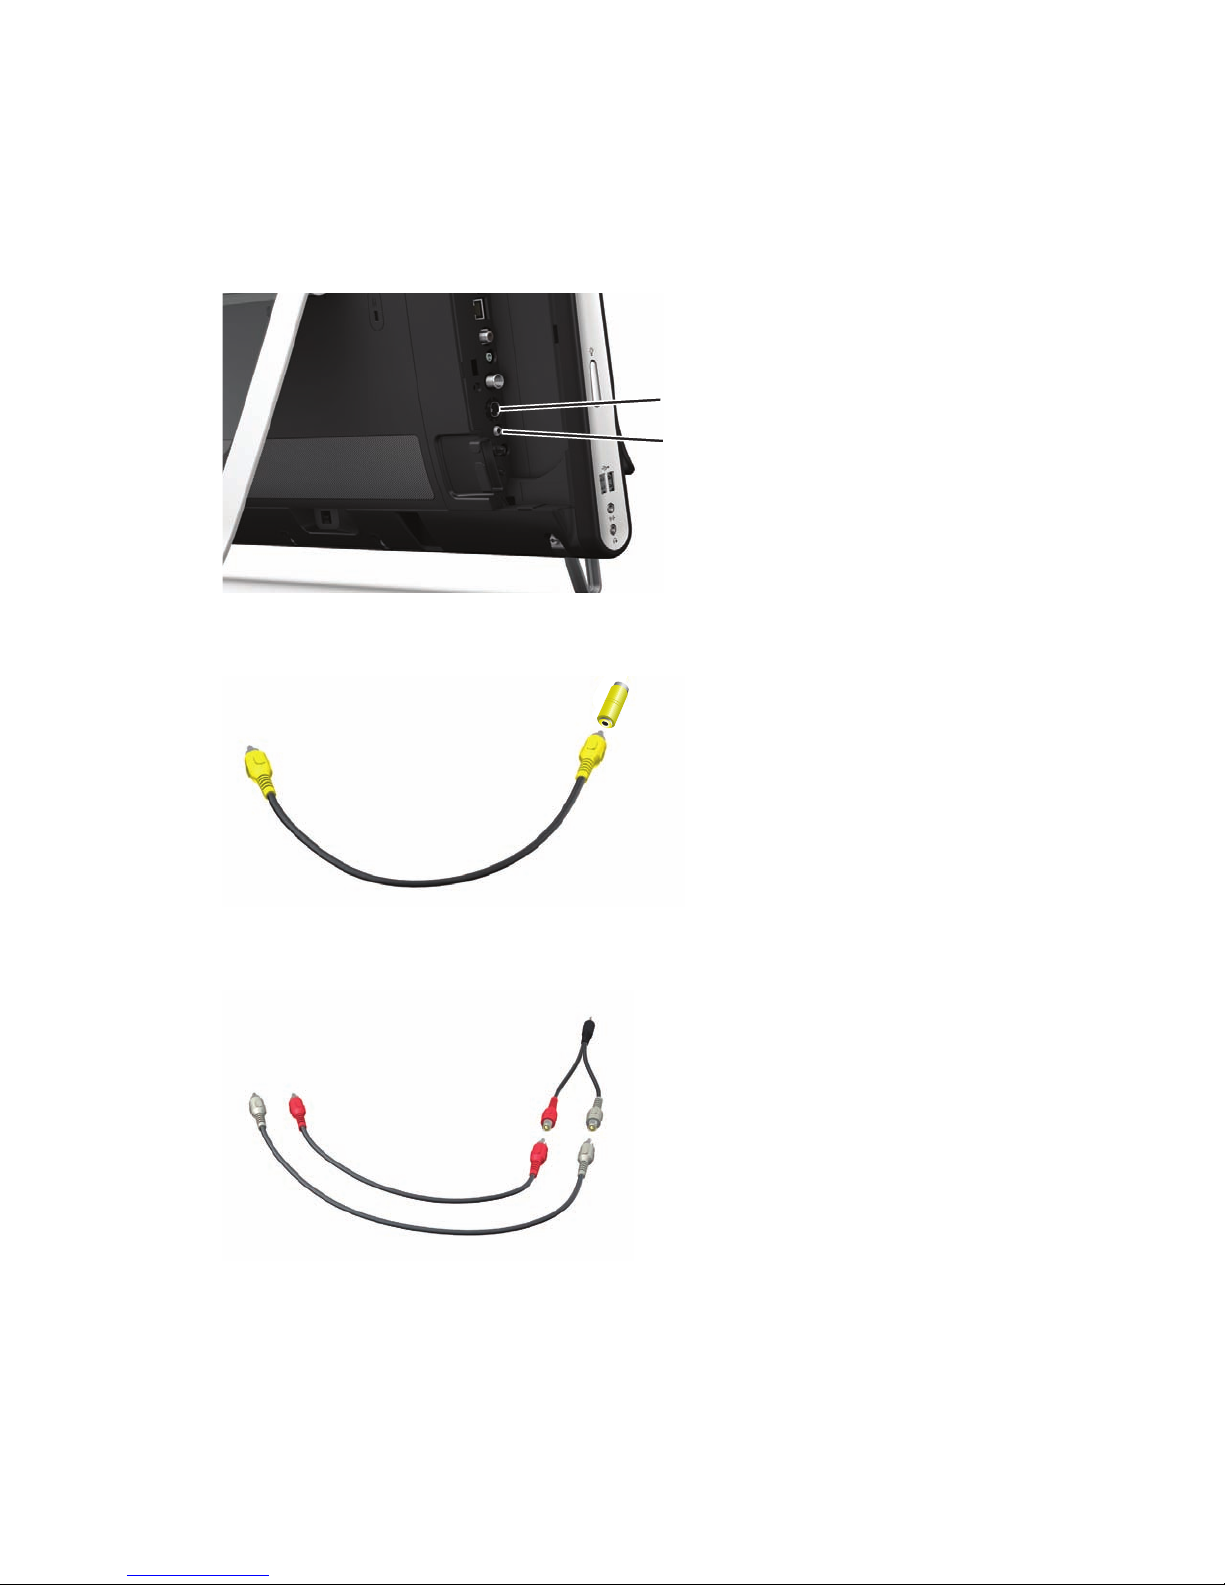
1 Connect an S-Video cable to the S-Video In connector (A), located on the back of the computer behind
the connector cover. Connect the other end of the cable to your set-top box.
B
You may need a composite video to S-Video adapter (sold separately) to connect the set-top box Video
Out to the S-Video In connector (A).
.
2 For S-Video, connect audio cable from your set-top box to the Audio Line In connector (B) on the back
of the computer. Use a Y cable to combine RCA left and right channels (white and red).
Setting up for computer to communicate with a set-top box
(optional step)
You need to configure the computer connections so it can communicate with your set-top box.
Connect an IR emitter (blaster) cable to the computer and your set-top box to use the remote control
properly.
20 User Guide (Features may vary by model)
Page 27
The IR emitter cable is a remote control sensing device that connects to the computer and covers the remote
sensor on a set-top box. When you are selecting TV channels in Windows Media Center, it enables the
remote control to work with your set-top box.
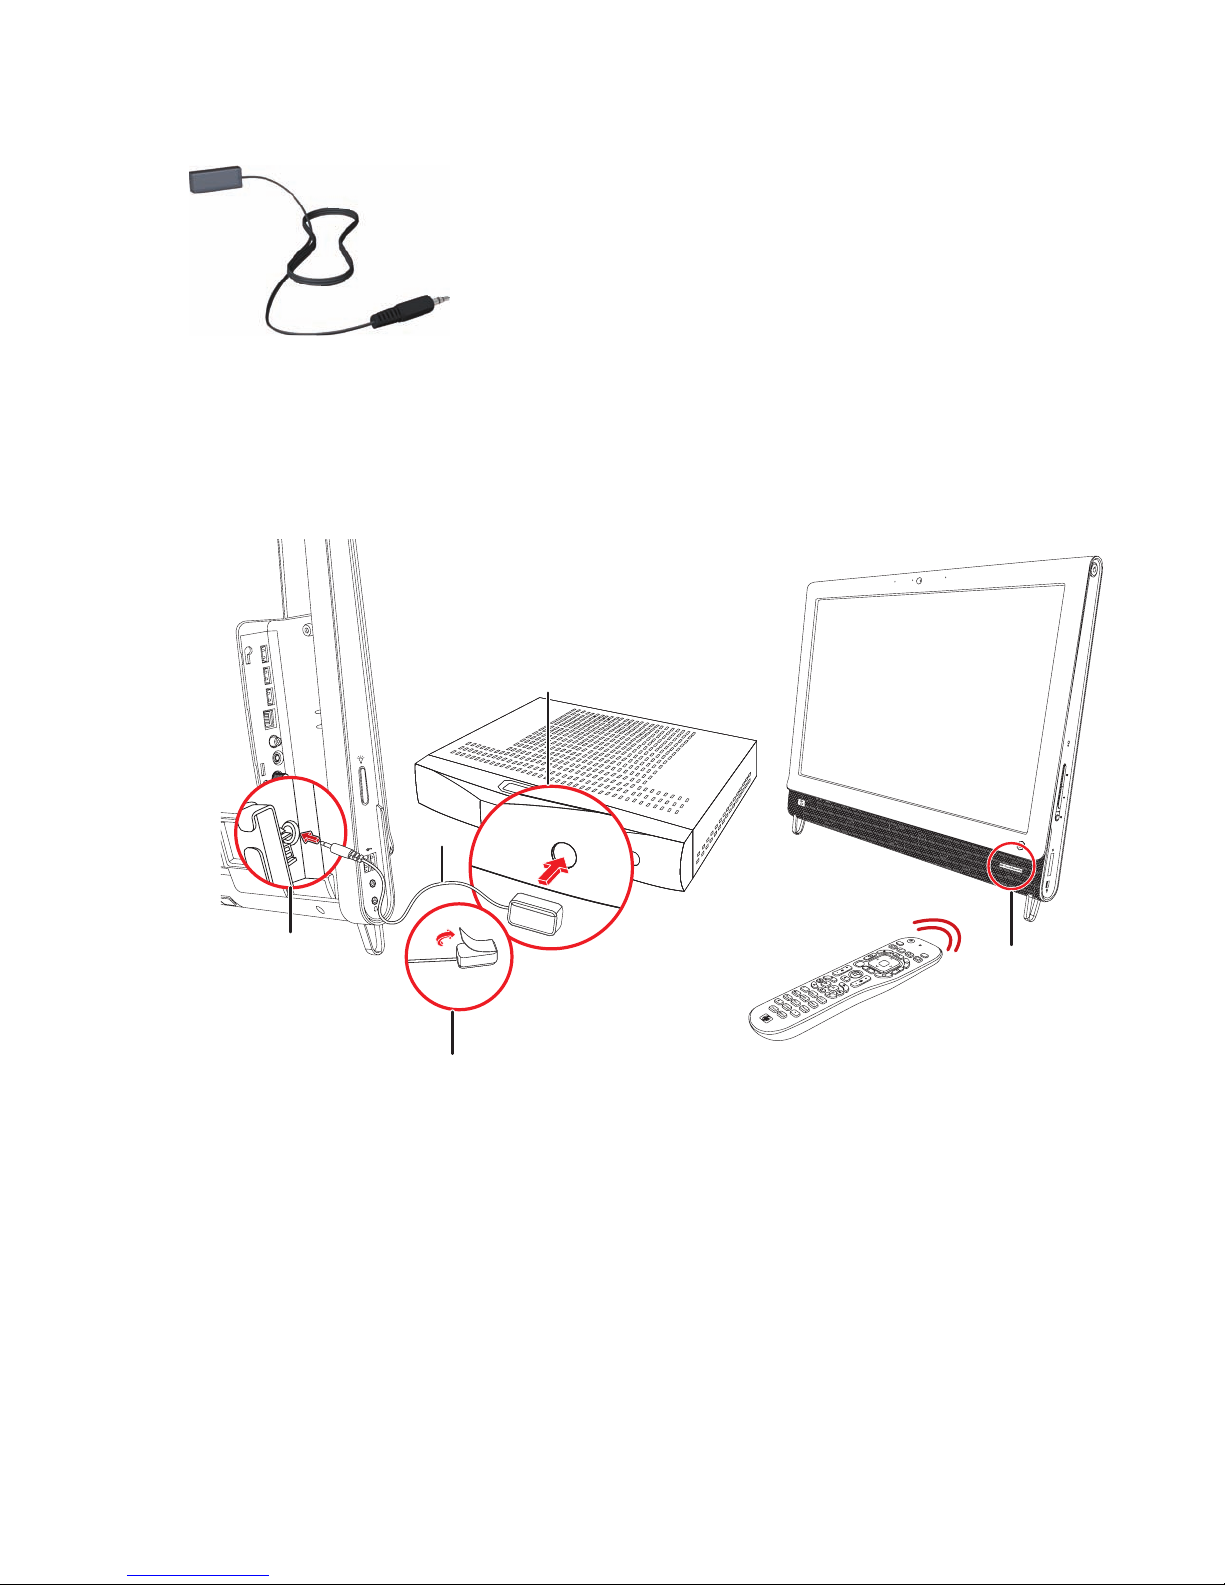
1 Connect the IR emitter cable (A) to the IR Out connector (D) on the back of the computer.
2 Remove the paper from the backing tape on the end of the cable (B), and then press the end of the
cable over the remote IR sensor (receiver) window on the set-top box (C). To locate the remote infrared
sensor window, shine a flashlight through the plastic on the front of the set-top box.
3 When you use the remote control, point it at the front of the HP TouchSmart PC (E), not at the
set-top box.
C
A
D
E
B
Windows Media Center setup wizard
Select models only
1 Tap the Start button, tap All Programs, and then tap Windows Media Center.
2 Follow the onscreen instructions to set up your TV tuner and Windows Media Center TV program
guide.
For more information about setting up and using Windows Media Center, go to: www.microsoft.com,
or tap the Start button, tap Windows Media Center, tap Tasks, and then tap learn more.
Welcom e 21
Page 28
Connecting a Game Console
A
Select models only
Some computer models allow you to use your system as a high-resolution monitor for gaming. The game
console ports are located on the top-left side of the computer.
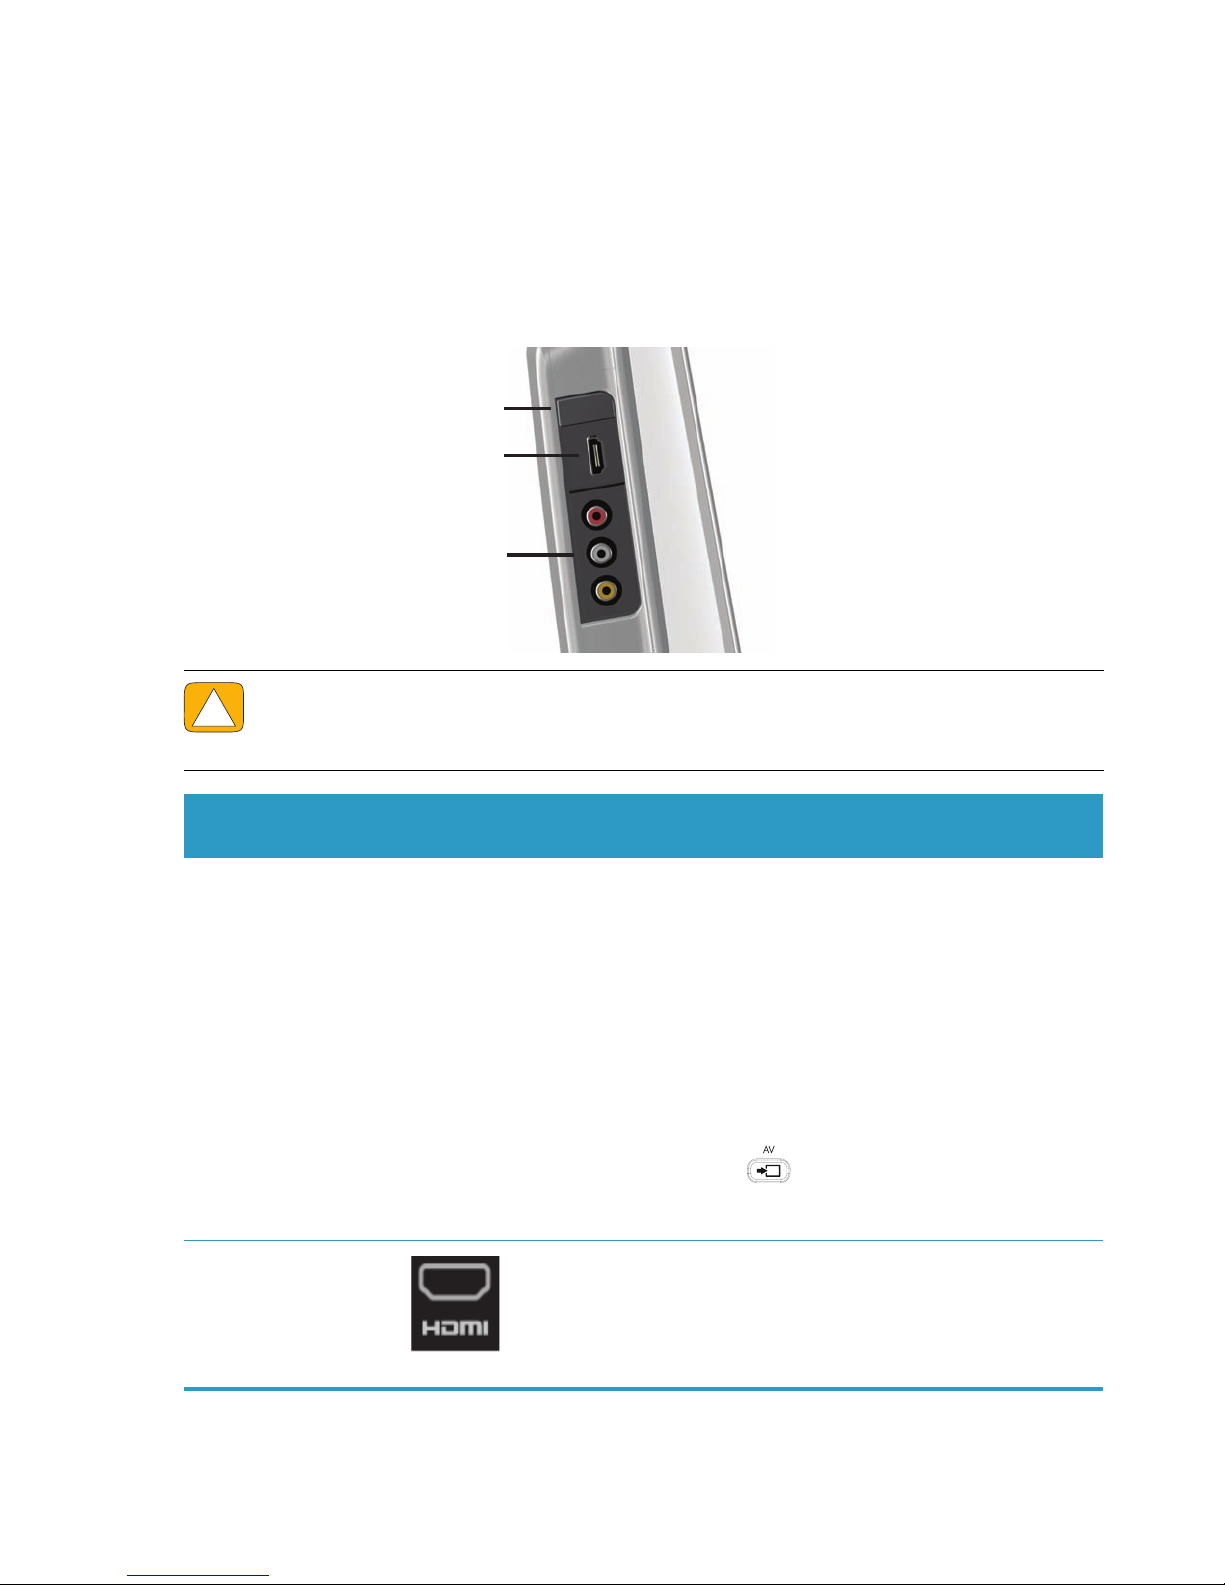
The game box connects to the game console ports. Connect cables to the HDMI port (B) or to the
composite audio/video ports (C), and then use the A/V source button (A) to enable an onscreen display
where you toggle (by pressing multiple times) to HDMI or composite mode, or to PC mode.
When connected to the game console ports, your system is display mode; there is no recording capability.
.
B
C
CAUTION: When the system is in display mode, the computer is still running in the
background. The keyboard, mouse, and touch screen function are active and still control the
computer. It is recommended you save and close all files before connecting to the game
console ports.
Onscreen
Item
A A/V source
button
display
Description
This button enables an onscreen display, where you toggle
through three sources:
PC mode — Default mode. Not for gaming.
HDMI mode — Display mode for playing video games
or viewing TV.
Composite mode — Display mode for playing video
games or viewing TV.
NOTE: If your game console is not connected, or if it is not
powered on, the source automatically defaults to PC mode.
The A/V source button on your remote control works the
same as the A/V source button on the upper left of the
computer.
B HDMI port Connect from the game console or set-top box to this port.
Ensure the devices are powered on.
22 User Guide (Features may vary by model)
After you connect the console to the HDMI port, press the A/V
source button to toggle to HDMI (the menu appears on your
monitor).
Page 29

Item
Onscreen
display
Description (continued)
C Composite
audio/video
ports
Connect from the game console or set-top box to these ports.
Ensure the devices are powered on.
After you connect the console to the composite ports, press the
A/V source button to toggle to Composite Audio/Video
(the menu appears on your monitor).
Using the remote control in gaming mode
Use the A/V source button on your remote control to toggle through source modes: PC mode, HDMI
mode, and composite mode. This button has the same function as the Source toggle button on the top left of
the computer. If used while you are in gaming mode, the following buttons still affect PC mode:
A/V — Switches source (PC, HDMI, composite)
Volume — Affects the volume of the PC as well when changed in gaming mode
Mute — Mutes sound in games and on PC
Media Center — Automatically switches back to PC and opens Media Center
Power — Returns the system to PC mode, from where you can then place the system into Sleep mode
or shut it down.
Returning to PC mode from gaming mode
To return to PC mode from gaming mode:
Press the Ctl, Alt, Del buttons simultaneously on the keyboard
Press the Sleep button on the keyboard or remote
Press the Power/Sleep button on the computer
Press the Media Center (Start) button on the remote
Press the TouchSmart button on the computer
Gaming mode troubleshooting
Issue Solution
When I connect my device to the
game console ports, the computer
keeps going back to PC mode.
Ensure the device and the computer are on.
Ensure the source you want has a check mark next to it in the
onscreen menu (either HDMI or composite audio/video).
After you successfully select the source, you should see an
onscreen display similar to this:
Welcom e 23
Page 30

Issue Solution (continued)
Audio drops when I play a video
game.
The system is on Mute. Press the Volume + or Volume – button
on the side of the computer to get out of Mute state.
Ensure the correct audio source is selected. If an HDMI-
compatible device is connected, press the A/V source button
to enable the onscreen display, then press the A/V source
button until HDMI is selected. If composite audio/video is
connected, use the button to select composite.
Open the Audio Settings menu from within the gaming
application to ensure the correct audio format output is
selected.
Choose Digital Stereo, or PCM Audio. (HP TouchSmart PC
does not support AC3, DTS, or Dolby Digital 5.1.)
If you see the following audio warning onscreen it means one
of two errors:
a The A/V source mode is HDMI, but the audio output is
Dolby Digital or DTS.
I connected my external speakers,
and my audio is muted.
Sound Options
Your HP TouchSmart PC supports the following speaker options:
Built-in analog stereo speakers
Analog 2.0 or 2.1 powered speakers
Digital 3.1, 4.1, or 5.1 powered speakers
Audio receiver
Headphones
NOTES:
The HP TouchSmart PC supports powered speaker systems only. Powered speakers require a separate
power supply.
When the Audio Line In connector is being used, the following are affected: the output to the internal
speakers, the Audio Line Out connector, and the headphones connector. For example, if you are
playing sound through your internal speakers and then you connect an MP3 device through your
Audio Line In connector, you will hear both sounds.
b The A/V source mode is HDMI, and no audio is being
detected.
When an Audio Line Out connector (such as headphones or
external speakers) is connected, the internal speakers are muted.
Ensure the volume on the external speakers is turned up.
By default, the internal speakers are on, and the digital speakers are off.
24 User Guide (Features may vary by model)
Page 31

Connecting analog speakers
For 2.0 powered speakers, connect the speaker cable to the Audio Line Out connector on the back of the
computer behind the connector cover.
For 2.1 powered speakers, connect the Audio Line Out connector on the back of the computer behind the
connector cover to the subwoofer, and then connect the left and right speakers to the subwoofer. Turn on
the computer and then the speaker system. If necessary, refer to the documentation that came with your
speakers.
NOTE: When an Audio Line Out connector (such as headphones or external speakers) is connected, the
internal speakers are muted.
Connecting and enabling digital speakers or an audio
receiver
Connect 3.1, 4.1, or 5.1 digital speakers or an audio receiver to the SPDIF out (orange) connector on the
back of the computer behind the connector cover, and then use the following procedure to enable the
speakers or audio receiver. If necessary, refer to the instructions that came with your speakers or audio
receiver.
NOTE: When SPDIF is connected:
You can switch to the internal speakers without unplugging the SPDIF device.
The Volume + and Volume – and Mute buttons do not control the SPDIF device. Control SPDIF device
volume with its own controls.
To enable digital speakers or an audio receiver, use the Realtek HD Audio Manager software that came
with the computer.
1 Tap the Realtek HD Audio Manager icon on the taskbar.
2 Tap the Volume button.
3 In the SPDIF area, select the Default button.
4 Configure the sound to your preferences by using the Realtek advanced buttons.
NOTE: To switch back to the internal speakers after the digital speakers are enabled, select the Default
button in the Internal Speakers area. Simply turning off the external speakers does not enable the internal
speakers; the internal speaker setting must be selected.
Welcom e 25
Page 32

Speaker volume
Use the Volume buttons on the right side of the computer.
Use the Microsoft Volume icon on the taskbar:
a Press and hold (or with the mouse, right-click) the Volume icon, and then select Open
Volume Mixer. The Volume Mixer window opens.
b To adjust the volume for HP TouchSmart programs (Notes, Music, and Video), be sure to adjust
both the speaker volume, and the HP TouchSmart program volume. Scroll to the right in the
Applications area to see all choices.
c When you are satisfied with the sound level, tap the Close button (the X in the upper-right corner)
to close this window.
If you have digital speakers, you can also use Realtek HD Audio Manager to adjust the volume and
perform sound balance testing:
a Tap the Realtek icon on the taskbar.
b Adjust the slider that corresponds with the speaker setup your system uses.
NOTE: You also adjust the volume for the built-in microphone array in this window.
Configuring sound for Windows Media Center
After you have installed, connected, and configured the speakers, configure audio output for Windows
Media Center:
1 Tap the Start button.
2 Tap Windows Media Center.
3 Follow directions to setting up sound, and tap Finish when done.
Headphones
Use your headphones by connecting them to the headphones connector on the left side of the computer.
When the headphones connector is being used, the internal speakers and Line Out are muted.
26 User Guide (Features may vary by model)
Page 33

Microphones
Your HP TouchSmart PC comes with built-in microphones near the webcam on the front of the computer. The
array is designed to filter out ambient noise in your environment to provide a cleaner sound.
You can use the microphone from a distance of up to one-half meter from the HP TouchSmart PC.
To adju st the vo lume:
1 Tap the Realtek HD Audio Manager icon on the taskbar.
2 Adjust the slider.
Headsets
Bluetooth or USB-connected headsets can be used with your system.
NOTE: You cannot use a headset with two connectors.
MP3 players
You can connect a media player, such as an MP3 player, to the Line In connector on the left side of the
computer and play it through the internal speakers or added external speakers.
Connecting a Printer
You can connect a printer by using the USB connectors on the sides or back of the HP TouchSmart PC, or
you can use a wireless printer.
NOTE: The HP TouchSmart PC does not support printers that require a parallel printer connector.
Connecting a printer with a parallel port
HP TouchSmart supports USB and wireless printer connections. If your printer has a parallel port, you must
buy a USB parallel port adapter.
Also, you will need to download a printer driver that works with Windows 7. To verify your operating
system and compatibility, go to www.hp.com/support
Power Settings
Basic power settings help conserve energy. For example, you can set your computer to go to sleep or go
into hibernation after a specified period of inactivity.
If the computer is in Sleep mode, it “wakes up,” or re-loads faster than when in Hibernate mode, but
your data is less safe. If, for example, a power outage occurs in Sleep mode, unsaved data would be lost.
Hibernate mode (select models only) puts the computer into a deeper sleep, with more energy savings.
In Hibernate mode, all peripheral power shuts down and all data is saved to your hard drive. Upon
awakening, the data is restored to where you were in the last session. This process takes a little longer than
awakening from Sleep mode (but less time than if you had shut down), and is considered a safer state
for data.
Welcom e 27
Page 34

You can put the computer into Sleep mode several ways. Press the Power/Sleep button on the top right of
the computer, press the Sleep button on remote control, or press the Sleep button on the upper left of your
keyboard.
Or
Tap the Start button, tap the Arrow button next to the Shut Down button, and then select Sleep or
Hibernate.
To change power settings:
1 Tap the Start button, and then tap Control Panel.
2 Tap Hardware and Sound.
3 Tap Power Options.
4 Choose a power option.
Power options include settings that determine when the computer sleeps or hibernates, and the ratio
you want of overall energy savings versus performance.
Turning off the monitor for power savings
If you are leaving for some time but want to keep the computer running, you can turn off the monitor for
further power savings.
Press the Function (Fn) key, and simultaneously press the F9 key to turn off the monitor. The computer
continues to run.
Press Fn + F9 again to turn the monitor on again.
Adjusting Screen Display
Adjust screen display features using the Control Panel:
1 To make adjustments to your screen, tap the Start button, tap Control Panel, and then tap
Appearance and Personalization.
2 Choose an option to change the look of your desktop.
You can choose to change the desktop background or the screen saver. There is an option to turn high
contrast on or off, and various options to accommodate low vision, and more.
To change the screen brightness using the keyboard:
Press the Fn key on the keyboard, and simultaneously press the F10 key to reduce screen brightness.
Press the Fn key, and simultaneously press the F11 key to increase brightness.
To turn off the monitor from the keyboard:
Press the Fn key, and simultaneously press the F9 key to turn off the monitor if you are leaving for some
time. The computer continues to run; this is a power-saving feature.
Press Fn + F9 again to turn the monitor on again.
Adjusting Monitor Settings with the
Onscreen Display
Game console models only
HP TouchSmart PCs with the game console option include an onscreen display (OSD) button on the right
side of the computer, just above the volume buttons. See “Front and right side of the HP TouchSmart PC” on
page 4 for the location.
28 User Guide (Features may vary by model)
Page 35

1 Press the display menu button on the right side of the computer.
The onscreen display opens, where you can adjust screen brightness, contrast, and aspect. You can
also customize how text, video, and the game controller is handled. The Reset function returns all
controls back to default.
2 Press the Volume + button (just below the OSD menu on the right side of the computer), to move up the
menu, or press Volume – to move down the menu.
3 After you select which feature you want to customize, press the Mute button (which functions as the
Select button when the OSD menu is open).
4 When you are finished, use the Volume buttons to move to the Exit field , and press the
Mute button to select it.
The OSD menu closes.
Installing a Security Lock
A security lock (sold separately) enables you to secure your computer from theft and unwanted changes.
A security lock is a key lock device that has a wire cable attached. You attach one end of the cable to your
desk (or other stationary object) and the other to this security slot on the computer. Secure the security lock
with the key.
Welcom e 29
Page 36

Cleaning the HP TouchSmart PC Screen
Before cleaning the touch screen, you must disable it by turning off the computer. If the computer is not
turned off, the touch screen is enabled, and you could lose data while cleaning it.
For optimal touch performance, the HP TouchSmart PC screen requires periodic cleaning to remove any
particles on the sides and surface of the screen. The touch screen has a glass surface that can be cleaned
by using the cleaning cloth that came with your HP TouchSmart PC. You can also use a soft cloth or paper
towel dampened with a typical household glass cleaner to clean the touch screen.
To achieve the best touch sensitivity, keep the screen clean from foreign objects. Avoid excessive dust
accumulation on all sides and edges of the screen.
To clean the touch screen:
1 Turn off the computer. Tap the Start button, and then tap Shut Down.
2 Disconnect the power cord from the wall.
3 Spray a small amount of a mild glass cleaner onto the cleaning cloth that came with your
HP TouchSmart PC. You can also use a soft cloth or paper towel dampened with a typical household
glass cleaner to clean the touch screen.
4 Wipe the surface and each side of the touch screen to remove any dirt, fingerprints, or other debris
that could hinder the touch recognition of the screen.
CAUTION: Do not spray or place the cleaner directly on the screen; spray the cleaner into the
cloth, and then wipe the sides and surface of the touch screen.
Do not use an abrasive cleaner or cloth when cleaning the sides or the surface of the screen,
because this could cause damage to the touch screen.
.
Using the HP TouchSmart with Safety and Comfort
Before you begin using the computer, arrange the computer and your work area to maintain your comfort
and productivity. Refer to the Safety & Comfort Guide for important ergonomic information:
Visit www.hp.com/ergo on the Web.
WARNING: To reduce the risk of serious injury, read the Safety & Comfort Guide. It describes
proper workstation setup, posture, and health and work habits for computer users. It also
provides important electrical and mechanical safety information.
Locate the TouchSmart monitor in the room to minimize glare from the screen. You can also reduce glare by
tilting the monitor.
The TouchSmart screen can be used as an input device; therefore, the monitor should be placed so that
your shoulders and neck are comfortable.
The monitor may need to be moved close to your body to keep your shoulders relaxed while you are
touching the screen. Keep your shoulders low and your upper arm close to your body when you touch the
screen. The more the screen is used for input, the more important this is. One way to move the monitor
closer to you is by placing the keyboard under the monitor.
You can position the monitor in a variety of ways to provide a balance between relaxing your shoulders
and keeping your head balanced comfortably over your neck. If you feel discomfort in your shoulders, try
moving the monitor closer to your body or lowering the height of the monitor by lowering the work surface.
If you feel discomfort in your upper back muscles and neck, try increasing the height of the monitor by
increasing the work surface height.
30 User Guide (Features may vary by model)
Page 37

The graphic here shows correct body and monitoring positioning.
The graphic here shows incorrect usage.
Recycling Your Old Computer Hardware
Disposing of electronic waste responsibly has been an HP priority for more than 20 years. If this computer
is a replacement for an older PC you no longer need, go to www.hp.com/go/recycle to find out how
HP can help you dispose of your old computer with minimum impact on the planet.
The recycling option is not available in all countries/regions.
Welcom e 31
Page 38

32 User Guide (Features may vary by model)
Page 39

Software Overview
What Is HP TouchSmart Software?
The HP TouchSmart software suite comes preinstalled on your new computer. HP TouchSmart is designed to
maximize the touch features on your new computer. You can personalize HP TouchSmart for quick access
to your favorite online programs, the Web, and RSS feeds. From the HP TouchSmart homepage, quickly
view your photos, watch videos, play music, or search the Internet with a few taps.
View the TouchSmart tutorials at www.hp.com/supportvideos (English only); just a few minutes will
help you navigate through all the software features.
Opening HP TouchSmart from the Windows desktop
When you first turn on your computer, the Windows 7 desktop opens. To open the touch-friendly
HP TouchSmart software, press the HP TouchSmart button on the lower-right side of the computer,
Or
Double-tap the HP TouchSmart shortcut icon on the desktop.
Navigating HP TouchSmart
Use touch or the wireless keyboard and mouse to select and deselect items in HP TouchSmart. Within
HP TouchSmart, additional ways to access and navigate programs are shown here.
Action Description
Go to HP TouchSmart
homepage
Close or minimize
HP TouchSmart
Go back to a previous
window
Personalize your
HP TouchSmart homepage
Control music (Play,
Pause, Skip or Back)
Go to the Windows
desktop
Tap the House icon to go to the
HP TouchSmart homepage.
Tap the Close button on the
HP TouchSmart homepage.
Tap the Back Arrow button.
Tap the Personalize button on the
HP TouchSmart homepage.
Tap the music controls at the top right of
the window.
Tap the Windows 7 icon in the
upper-left corner to minimize
HP TouchSmart and go to the Microsoft
Windows desktop.
Software Overview 33
Page 40

Action Description (continued)
Scroll browsing To quickly scroll left and right, or up
and down, you can touch and drag
your finger across the screen in the
direction you want to scroll.
There must be enough items for scrolling
to work.
Tile View browsing Drag your finger across the tiles to
browse through them, and then tap a
tile to open it.
There must be enough items for scrolling
to work.
Fan View browsing Browse your photo, music, and video
collections by using the Fan View. From
the HP TouchSmart media views, tap the
Fan icon in the bottom-right corner,
drag the fan left or right, and then tap
an item to open it.
Move an HP TouchSmart
tile to a new location
Drag and drop songs to
create a playlist
Resize a note or a photo
(including in Canvas)
using two fingers
Use Windows Input Panel
(onscreen keyboard)
Press and drag a tile down from the top
row, or up from the bottom row, and
then left or right, to move it to a new
location in the HP TouchSmart window.
Press and then drag an item first up or
down at a right angle and then over to
the playlist area. You know when the
item is selected when a disc icon
appears.
Touch two fingers at the same time on
the tiles, and move the fingers apart to
make a tile larger.
Move the two fingers together to make
a tile or photo smaller.
Tap inside a text box and the onscreen
keyboard appears. If a pencil and pad
icon appears, tap the icon. Then use the
onscreen keyboard to enter text.
CAUTION: Because the HP TouchSmart touch screen uses a sensitive touch technology, to avoid
damaging the touch screen, do not apply pressure on the front of the display bezel or around
the screen borders.
34 User Guide (Features may vary by model)
Page 41

CAUTION: To achieve the best touch sensitivity, keep the screen clean from foreign objects.
Avoid excessive dust accumulation on all sides of the screen.
CAUTION: Like any other home electronic product, keep the HP TouchSmart PC away from
liquids or a harsh environment that contains excessive dust, heat, or humidity.
Touch Techniques Outside HP TouchSmart Software
To use software and navigate the Windows desktop, you can use the touch screen, keyboard, mouse, or
remote control (included with select models only).
Some tasks, such as HP TouchSmart programs, browsing the Internet, or accessing your favorite programs,
are better suited to the touch screen. Others are better suited to the keyboard. When you use the Windows
Media Center program to watch and record TV programs, the remote control is the best choice. When
playing video games, use the remote control; the touch screen, keyboard, and mouse are disabled.
NOTE: Software that you purchase and install separately is accessible by the touch screen, but some
programs may be easier to use with a keyboard or mouse.
Tablet input panel (onscreen keyboard)
Use the tablet input panel (onscreen keyboard) to enter text using touch. It can also recognize your
handwriting and convert it to typewritten text.
Access an input panel by tapping inside an input dialog, and then tapping the keypad icon to open the
handwriting, touch, and text input tool. If you do not see the input panel or if you want to adjust your touch
settings, tap the Start button, tap Control Panel, tap Mobile PC, and then tap Pen and Input
Devices. Select the setting to enable the Input Panel.
You can also ta p the Start button, tap All Programs, tap Accessories, and find the input panel.
NOTE: Handwriting recognition is not available in all languages. If your language is not available, you
can use the onscreen keyboard to enter text.
HP TouchSmart Tiles
When you open HP TouchSmart software, you see a row of large tiles and a row of small tiles below that.
Tiles are shortcuts to software programs, features in HP TouchSmart, or links to Web sites. Use the large tile
area for programs you use often, and use the small tiles for the rest of your program shortcuts.
Move these tiles around with your finger by dragging a tile up and out of a row and dropping it to a new
location. The tile appears as a transparent image as it moves. You can move the large tiles down to the
small tile area or the small tiles up to the large tile area.
Except for the Music tile, applications close as they are dragged to the lower tile row. You can play and
control music always with the music icons showing on the top right of the screen.
Software Overview 35
Page 42

Creating new tiles
1 Open the HP TouchSmart homepage by clicking the HP TouchSmart icon.
2 Tap the Personalize button.
3 Select Create a new tile.
4 Select HP TouchSmart Program, tap Windows Program or Websites, and then tap Next.
5 Select Choose from a list to show a list of all software programs in your Programs folder.
6 Select the software to add and then tap OK.
7 In the Tile Name box enter a name for the tile. Usually, the program name automatically appears.
8 Place a check mark in the Icon check box to display the program icon in the tile, and then tap OK.
Your program shortcut appears as a small tile on the bottom of the HP TouchSmart homepage.
9 Tap OK to return to the HP TouchSmart homepage.
Adding a tile for a favorite Web site
To make your touch views more efficient, add some often-visited Web sites to either the large tile or the
lower small tile area. You can also add RSS feeds after you subscribe to them from a Web site.
1 Open HP TouchSmart, and tap the Personalize button.
2 Select Create a New Tile.
3 Select Websites, and then tap Next.
4 Type in the URL for the Web site of your choice, starting with www or the equivalent (for example,
www.hp.com/go/touchsmart). Or select Choose from a list to select a Web site from the list of
Internet Explorer favorites.
5 The option to check the box to display the Web icon may be grayed out if one is not available. You
can choose an icon from those displayed below the check box instead. Otherwise, it will display a
sample Web page. Your Web site link appears as a small globe in the small tile area on the bottom of
the HP TouchSmart homepage.
6 Tap OK to return to the HP TouchSmart homepage.
Your Web site link will display in the HP TouchSmart Browser.
Viewing hidden tiles
To view a hidden tile:
1 From the HP TouchSmart homepage, tap the Personalize button.
2 In the list of tiles, tap a tile that is disabled.
3 Tap Show in the Visibility field.
4 Tap Done to save your changes and return to the HP TouchSmart homepage.
The tile you enabled is now visible.
Hiding tiles
To temporarily hide a tile:
1 From the HP TouchSmart homepage, tap the Personalize button.
2 In the list of tiles, tap a tile that is enabled.
36 User Guide (Features may vary by model)
Page 43

3 Tap Hide tile in HP TouchSmart in the Visibility field.
4 Tap Done to save your changes and return to the HP TouchSmart homepage.
The tile you disabled is now hidden from view.
Deleting tiles
1 From the HP TouchSmart homepage, tap the Personalize button.
2 Select Delete, and then tap Yes.
3 Tap Done.
Only the shortcut is deleted from the Tile View. The program itself is not deleted.
Changing tile icons or color
1 From the HP TouchSmart homepage, tap the Personalize button.
2 To choose a tile color, or to change a tile icon, tap the Change button and choose an icon.
3 Tap Done.
HP TouchSmart Tutorials
Tap this tile to watch new HP TouchSmart tutorials. Get the basics, or browse through the menu to find a
subject you want to learn more about.
HP TouchSmart Browser
Not available in all countries/regions
HP TouchSmart Browser is a simple viewer for displaying live content in your HP TouchSmart homepage. Its
interface is different from the Internet Explorer
monitor your favorite Web sites as they change content throughout the day.
The HP TouchSmart Browser supports only standard HTML pages. It does not support other display formats,
such as RSS feeds. To view RSS feeds, use the HP TouchSmart RSS feed tile.
If you are doing heavy Web surfing, and using sites with a lot of pop-ups, or downloading files
with secondary dialog boxes, use Internet Explorer or another standard browser. Internet
connection is required.
RSS Feeds
Not available in all countries/regions
RSS is a more efficient way of getting information from Web sites and blogs. Instead of searching for
updated news and information, you receive updates in the form of a live feed, called an RSS (really simple
syndication) feed. Some RSS feeds distribute other types of digital content, including pictures, audio files,
videos, or updates, to view when you choose.
HP TouchSmart includes an RSS Feed Reader where you view feeds from Web sites. You can add an RSS
Feed tile by adding a new tile and choosing RSS Feed.
®
interface, and can be more useful. Use it in a large tile to
To subscribe to an RSS feed in Internet Explorer:
1 Tap the Start button, and then tap Internet Explorer.
Software Overview 37
Page 44

2 Tap the Feeds button to discover feeds on the Web page. Often this is an orange icon.
3 Tap a feed.
4 Tap the Subscribe to this Feed button .
5 Type a name for the feed, and then select the folder where you want to create the feed.
6 Tap Subscribe.
7 Open HP TouchSmart, and tap the RSS feeds tile to view your RSS feeds.
You might have to add a tile and choose RSS Feed if you do not already have an RSS tile.
8 Tap the feed title to display it in the RSS reader window. If you tap the arrow button on the feed
window, it opens in Internet Explorer outside of HP TouchSmart. When you close the feed, the
HP TouchSmart RSS feed window opens.
Keep in mind that RSS feeds take up resources. If you are performing a task and you find you are getting a
slower response from the computer, you might try turning off the RSS feeds.
HP TouchSmart Photo
View and edit your photos, create slideshows, and print photos with HP TouchSmart Photo. If you have an
Internet connection and a Snapfish account, you can upload your photos to share with others. The Upload
button in TouchSmart Photo links to the Snapfish Web site. (Snapfish is not available in some countries/
regions.)
Use two fingers to resize a photo. Touch two fingers at the same time on the photo, and move the fingers
apart to make a tile larger.
Move the two fingers together to make a tile or photo smaller.
To rotate a photo, enlarge it by placing your thumb and forefinger at the center of the photo, and use a
spreading motion. Tap the rotate arrow at the bottom of the photo. You can also use the Rotate button on
the right pane. When you make a slideshow of your photos, rotate your photos so each photo appears in
its correct orientation.
From HP TouchSmart, you can access photos stored anywhere on your hard drive.
HP TouchSmart Photo supports the .jpg file format.
Photo library
You can view any photos you have on your hard drive with HP TouchSmart Photos. To get photos from your
camera:
1 Remove the memory card from your camera, and insert it into the memory card reader on the
lower-right side of the computer. (Alternatively, use the USB cable that came with the camera, and
connect the cable to the camera and then to a USB port in the computer.)
The HP TouchSmart view minimizes automatically and a Microsoft dialog appears.
2 Tap Open folder to view files.
3 Tap the Start button.
4 Tap Pictures.
5 Use an existing folder, or create a new folder, and then with your fingertip, drag and drop the pictures
you want into the folder.
6 Return to the HP TouchSmart view by tapping the house icon in the taskbar.
7 Open the Photos tile.
38 User Guide (Features may vary by model)
Page 45

8 Tap Folders in the top menu, and select the folder where you dropped your photos into.
9 View your photos.
To preview your photos from your camera memory card directly from the HP TouchSmart homepage (but
not download them):
1 Tap the back arrow in the upper-left corner of the HP TouchSmart window.
2 Tap Removable Disc.
3 View your photos directly from the memory card.
Slideshows
Be sure you name your slideshow and then tap Save, or the slide show will not be saved. To make a
slideshow:
1 From the HP TouchSmart homepage, tap the Photo tile.
2 Choose the source location for your slideshow: Dates, Folders, All Photos, or Removable
Drive.
3 If you want specific photos in your slideshow, create a folder that contains those photos only.
4 Tap the Play Slideshow button in the lower menu.
As you watch the slideshow, onscreen controls disappear. Tap the screen to make them reappear.
5 Adjust slideshow settings by tapping the Settings button, and selecting your settings.
Examples of HP TouchSmart Photo settings include a feature that fades or moves the photo while
transitioning to the next photo, and timing between photos (the default is 5 seconds).
6 Enter a name of the slideshow in the text box.
7 Tap Save.
Hiding photos
You can hide some of your photos so they do not show up in HP TouchSmart Photo.
1 From your Windows desktop, browse to the photo or folder you do not want to show in the Photos tile
in HP TouchSmart Photo.
2 Right-click the photo, and click Properties.
3 Click the General tab, and Attributes, click Hidden.
You can still see hidden folders in Windows if you want, by following this procedure:
1 Click the Start button.
2 Click Control Panel, and then click Appearance and Personalization.
3 Click Folder Options.
4 Click the View tab.
5 Under Advanced settings, click Show hidden files and folders, and then click OK.
Creating (burning) a CD or DVD of photos
See “Creating (burning) a CD or DVD of music or photos” on page 42.
Software Overview 39
Page 46

HP TouchSmart Canvas
The Canvas tile is a virtual interactive collage. Open the Canvas tile and create collages of photographs.
Share collages with family, make a poster, or use a collage as your computer desktop background. At the
lower part of the tile, tap one of the folders of pictures. Tap the fly-out menu that comes up, and drag the
picture you want onto the canvas to add it to the collage. Use a two-finger touch to rotate the picture or
resize it.
Tap a free area on the canvas, and draw a circle around several photos. Then, use the tag feature to tag
the photos. This is an efficient method of tagging a variety of photos at once.
Tap the top color bar to open a screen to manipulate photos. After you create a collage, be sure to save it.
HP TouchSmart Music
HP TouchSmart Music lets you organize and play your music easily. Browse your music collection by
album, artist, genre, song, or playlist. You can also play CDs, view song titles and album art, and create
editable playlists.
Unlike other HP TouchSmart tiles, if you have music playing and drag the music tile to the lower tile row,
your music still plays, and control buttons are still visible.
HP TouchSmart accesses your music from the Music folder on your hard drive (you can access this folder by
tapping the Start button, and then Music). If you have downloaded iTunes and have an iTunes account
(not included), the iTunes folder resides in this Music folder also.
Using the Settings button, choose to access your music from either your Music folder on your hard drive,
or from your iTunes folder. You cannot view both libraries at once. The iTunes choice is disabled if you have
not downloaded iTunes.
HP TouchSmart Music supports the following music file formats: .mp3, .wma, .wav, .aac, .m4p, and .m4a.
NOTE: You must install iTunes (not included) and create an account to enable HP TouchSmart to support
.m4p and .m4a file formats.
Moving music files into HP TouchSmart Music
First, put music files on your hard drive in your Music folder:
1 Click the Start button, and click Music.
2 Navigate to the library where you want your music stored—either the Music folder or the iTunes
folder within the Music folder—and open the library.
3 Put music into the Music folder, or the iTunes folder within the Music folder, in several ways:
Buy or download free music from the Internet.
Transfer music from CDs you own (drag and drop, or cut and paste).
Transfer music from an existing library on another computer (by transferring with an external USB
drive, connecting the USB drive to the computer, and then dragging and dropping the files into the
Music folder).
40 User Guide (Features may vary by model)
Page 47

Next, choose from where HP TouchSmart Music will show music files:
4 From the HP TouchSmart homepage, tap Music.
5 Tap Settings, and then tap either Use HP TouchSmart Media library (which is the Music folder
on your hard drive) or Use my iTunes library.
iTunes does not come preinstalled. To use iTunes, you have to have access to the Internet, and
download and set up an account with iTunes.
You can see all files from the music folder you chose in HP TouchSmart Music.
Moving songs from iTunes into HP TouchSmart Music
HP TouchSmart can play music from only one music library at a time. HP TouchSmart Media Library is the
default library. To access songs from iTunes (not preinstalled, downloaded separately) and add them to
your music library:
1 Download iTunes to your hard drive from www.apple.com/downloads (Internet access
required).
2 Set up an iTunes account.
3 Open the TouchSmart Music window by tapping the Music tile.
4 Tap Settings, and select Use my iTunes library.
5 Tap Save.
Album art
Sometimes album art or other album information does not transfer during the music transfer process. In this
case, you can find the missing album information. You need the Internet for this procedure.
To find album art when it is missing:
1 From the Windows desktop, tap (or click) the Start button, tap Windows Media library or
iTunes.
The albums appear in the library.
2 Search for the album that does not have artwork.
3 Place your cursor over the blank CD icon (the album with no cover art) and right-click.
4 In the pull-down menu, click Find Album Info.
The application goes to the Internet to find the album.
5 Press Finish when the album is identified, and wait while the album information is downloaded (cover
art, date of production, and more).
You can also create your own art:
1 Find a piece of art on the Internet and download it to your hard drive.
You might find the artwork of the original CD cover, and choose that.
2 Open your Music folder and find the album that does not have artwork.
3 Drag and drop, or cut and paste, the art to the blank CD icon in your Music folder.
To find album art for music stored in the iTunes library:
1 Navigate to the iTunes store and sign in.
2 From the Advanced menu, select Get Album Artwork and follow the directions.
Software Overview 41
Page 48

Creating and editing playlists
Create a playlist by simply dragging songs to the Playlist window.
1 Open HP TouchSmart, and select the Music tile.
2 Select Album, and then select an album that contains the songs you want to add.
3 You can drag an entire album into the playlist on the right. Or, tap on the album to open it, and then
drag individual songs into the playlist.
4 To quickly add several selections, tap Add to List. Green circles with a + (plus sign) appear next to
each song in song list view, and next to each album in album tile view.
5 Tap the + (plus sign) next to a song to add it to the playlist. Repeat until the playlist is complete.
6 To rearrange songs in the playlist, drag the song out of the list, and drop it into a different position.
7 To delete a song from the playlist, touch and drag it to the Trash icon.
8 Tap Save as Playlist.
9 Name the playlist.
10 Tap Save.
Your playlist opens. You can close it, delete it, or edit it.
IMPORTANT: Be sure you save your playlist if you want to keep it.
11 After you create a playlist and save it, you can clear the playlist window by tapping Clear All.
NOTE: 500 songs can be added to a playlist. If you try to add more than 500, a message appears:
Maximum number of songs in Playlist. Delete one or more items in Playlist before adding new songs. You
can either delete songs, or start another playlist.
Deleting songs
To delete a song from your music library, navigate to your hard drive (from the Windows desktop), open
the Music folder where you added your music, and delete it from there.
Music Store
Not available in all countries/regions. Internet connection required.
The Music Store option within the Music tile gives you free access to millions of songs. If you do not have a
subscription to Rhapsody, you can still hear 30 seconds of any song in its catalogs. With a (free)
subscription to Rhapsody (select locations only), you search for music by What’s New, Genres, Channel
Guide (radio stations), Playlists, or your own custom playlists. You can also access playlists from people
within the music community, editors, and celebrities. You can also find out more about any artist you are
listening to.
Creating (burning) a CD or DVD of music or photos
To record, or burn*, a CD of your songs, you must use a CD recording program, such as CyberLink
Power2Go or Windows Media Player, which you access through your Windows desktop.
* HP supports the lawful use of technology and does not endorse or encourage the use of our products for purposes other
than those permitted by copyright law.
42 User Guide (Features may vary by model)
Page 49

To create CDs and DVDs of your music or photos using CyberLink software:
1 Tap the Start button, tap All Programs, and then tap CyberLink DVD Suite Deluxe.
2 Select the type of media you are using.
3 Under Select Source, navigate to your music or photos folder (wherever you store your music or photos
on your hard drive).
4 Add music or photos by selecting each file, and clicking the red plus/add (+) icon to add the file.
The file is added to the lower pane.
5 After you add at least one file to the lower pane to record on your CD or DVD, the Burn a Disc icon
is enabled at the top icon bar. Tap that icon when you have added all the files you want to record.
6 In the dialog that opens, choose the media settings you want, and select Burn.
A message appears if you have not inserted a writable disc, telling you to do so now.
7 Insert a CD or DVD.
The burning process starts.
HP TouchSmart Video
With HP TouchSmart Video, make your own videos using the built-in webcam, play the videos, and then
upload them to YouTube (not available in some countries/regions). YouTube requires an Internet
connection.
HP TouchSmart Video also allows you to play videos from your own video camera, and upload them to
YouTube or burn them onto a CD or DVD to share. You can access videos stored anywhere on your hard
drive.
HP TouchSmart Video supports the following video file formats: .mpg, .mpeg, .dvr-ms, .wmv, .asf, and .avi.
Software Overview 43
Page 50

Webcam and microphone
A built-in webcam and microphone array are located at the top of your computer. Use them to capture
videos and have video chats and conference calls using instant messaging software (download the instant
messaging software of your choice; it is not included with HP TouchSmart).
The webcam (A) and microphones (B) are at the top center of the computer. To adjust the viewing angle of
the webcam shot, tilt the screen, or use the webcam adjustment lever (C) just behind the webcam. For
optimal sound recording, you should be within one-half meter from the HP TouchSmart computer.
B
C
A
B
Capturing webcam video and snapshots
Use HP TouchSmart to record video and take snapshots. Use the YouTube button to upload videos.
NOTE: The YouTube Web site is not available in all countries/regions. YouTube requires Internet
connection, and you must set up an account.
Outside HP TouchSmart software, you can also use CyberLink YouCam software (select models only) to
capture webcam video and snapshots. CyberLink YouCam allows you to add special effects to your videos,
e-mail videos to your friends, and upload your videos to YouTube.
To use CyberLink YouCam:
Tap the Start button, tap All Programs, tap CyberLink YouCam, tap CyberLink YouCam; then tap
Tutorials, or tap the Help icon (?) to access the Help menu.
Making a video
1 To access the webcam, tap the Video tile to start.
2 At the bottom of the window, tap the Webcam button.
3 A viewing box opens on the screen and displays what the webcam sees; tilt the screen or move
yourself to get a better view.
4 If you need time to set up, tap the 3 Second Delay check box. Tap it again if you want to turn off the
feature.
44 User Guide (Features may vary by model)
Page 51

5 Tap Record.
6 When the video is finished, tap Stop Recording. To review the video, tap the Play video.
7 On the right side of the screen, tap Keep or Discard to keep or discard the video.
8 If you tapped Keep, tap Cancel to exit the webcam feature.
9 Find your new video.
The file name reflects the date and time of recording.
10 You can rename the file either in Windows 7 or in HP TouchSmart Video.
Video playlists
You can organize your videos by creating video playlists, much like you might with music.
NOTE: You must save your playlist if you want to keep it. Name it first, and then the Save button is
enabled, according to this procedure.
1 From the HP TouchSmart homepage, tap the Video tile.
2 At the bottom of the screen, tap Create Playlists.
3 Open a video folder that contains videos you want to select to add to the playlist.
4 Drag and drop each video you want into the Create Playlist pane, or tap on the green plus sign at
the top of each video to add it.
5 If you want to select videos from multiple folders, tap the return arrow and select another folder.
6 When you are done, tap the text field toward the bottom of the playlist pane to enable it.
7 Type a playlist name.
8 Tap Save.
Transferring videos to the computer
1 Connect your camcorder to the computer by using a USB connector, and follow the onscreen
instructions to transfer videos to your hard drive.
Or
Download videos from the Internet.
2 After you add your videos to the computer, view them in HP TouchSmart Video.
HP TouchSmart Video can play videos stored anywhere on your hard drive.
Uploading videos to YouTube
The YouTube Web site is not available in all countries/regions.
You must create an account with YouTube before you can upload your videos to YouTube (select models
only). You can set up an account with YouTube from HP TouchSmart Video.
1 Open HP TouchSmart, and select the Video tile.
2 Select Dates or Folders.
3 Tap the video you want to upload to YouTube.
4 Tap Upload to YouTube.
Software Overview 45
Page 52

5 Follow the onscreen instructions to create a YouTube account, or you can enter your name and
password if you have an existing YouTube account.
6 Follow the onscreen instructions to name your video and complete the process of uploading your video
to YouTube.
Videos uploaded to YouTube are limited to 10 minutes length.
The webcam resolution is VGA 640 x 480.
Recording home movies
You can use the CyberLink DVD Suite to record videos to disc. Tap the Start button, All Programs,
CyberLink DVD Suite, select the Video icon to start the recording program, tap the Help menu, and
then tap Help.
Video chats and conference calls
To set up a video chat, you must have a connection to the Internet, an ISP, and software that enables you to
make video calls over the Internet. As with chat or instant messenger software, you can use this kind of
software to chat with one or more people at a time. The software may require a separate subscription, and
may not be included with HP TouchSmart.
Before you can set up a video chat:
1 Download and set up an account with an Internet messenger or video phone call program (or set up
an account with Windows Live Messenger—MSN Hotmail, MSN Messenger, or Passport will work—
which is included in select models of HP TouchSmart). The person you are calling must have the same
video calling software.
2 Open your video phone calling program (for example Windows Live Messenger).
3 Find the Audio and Video setup, which is usually in the Tools menu (in Windows Live Messenger,
find the Tools menu by clicking Show menu. The Show menu button is in the upper-right corner of the
window, and is a small down-arrow icon.).
4 Click Next when prompted, and if you do not have external speakers, choose Realtek Integrated
speakers.
5 Set your volume, and click Next.
6 Select your microphone; if you do not have an external microphone, choose Realtek Integrated
microphone, and click Next.
7 Choose HP Webcam as your video, and follow the rest of the instructions.
8 Click Finish.
9 Open the client and follow the directions to start a video chat.
HP TouchSmartMovieThemes
With the MovieThemes option on the Video tile, you can make your movies have the same look and feel of
some of your favorite films. Tap the tile to open it, and view your options, such as a classic black and white
look, or a science fiction look and feel.
46 User Guide (Features may vary by model)
Page 53

HP TouchSmart Calendar
HP TouchSmart Calendar is a calendar where you manage your (and your family’s) schedule. You can
view and print scheduled events.
In the Calendar tile, you can import or export events to store in an industry-standard calendar file format
(an .ics file) stored in a location you choose on your hard drive.
HP TouchSmart Notes
With HP TouchSmart Notes, you can create text notes and voice notes using touch, the keyboard, a video,
photos, or by recording your own voice. This is a fun way to make notes to yourself or others who use the
computer.
Handwritten or typed notes
Written notes can be typed or handwritten by touch. Use this feature like you would use sticky notes to your
family or yourself.
1 Open HP TouchSmart, and select the Notes tile.
2 Select the Notepad icon at the bottom of the window.
3 Select a paper color by selecting the Paper icon on the left, and then select a font color by selecting
one of the pen colors on the right.
4 Select a tool to enter your text and graphics:
Select the Pen icon to use your finger.
Select the ABC icon to use your keyboard, and then press the drop-down arrow to select a font.
Select the Eraser tool to erase a handwritten message and start over.
5 Enter your text by using the tool you selected. You can use more than one tool to create each note. For
example, you can type a message and then draw something on the same note.
6 When you are finished, tap Done. Your note appears on the Notes bulletin board.
Voice notes
1 Open HP TouchSmart, and select the Notes tile.
2 Select the Microphone icon at the bottom of the screen.
3 Tap the Record button to record a short message.
4 Tap the Stop button to stop recording your message.
5 Tap the Play button to review your message.
6 Tap Keep or Cancel. Tap Done to save the voice note.
Deleting notes
To delete a note:
1 Open HP TouchSmart, and select the Notes tile.
2 Press and drag the note to delete into the Recycle Bin in the bottom-right corner of the window.
Software Overview 47
Page 54

3 Tap the Recycle Bin icon to open it, tap to select the items you want to delete, and then tap the
Delete Selected button.
4 Tap Done.
To restore a note (you can do this only if you have not deleted the file from the Recycle Bin):
1 Open the Recycle Bin.
2 Select the note you want to restore (by tapping it).
3 Tap the Restore Selected button.
HP TouchSmart Weather
Not available in all countries/regions
Through the Settings button, you can set up a tile to give a two-day forecast for any city or zip code.
1 From the HP TouchSmart homepage, select the Weather tile.
2 Tap the Settings button.
3 Tap in the Set Location box, and then use your keyboard or the onscreen keyboard to enter a city,
state, ZIP, or postal code.
4 Tap the Search button. Choose the city to display in the Select Your City box.
5 Select Fahrenheit or Celsius.
6 Tap OK to confirm the settings.
Tap the House icon to return to the HP TouchSmart homepage.
HP TouchSmart Clock
Personalize your TouchSmart clock to show the time for one, two, or three different time zones.
HP TouchSmart Recipe Box
Not available in all countries/regions. Internet connection required.
The Recipe Box tile is an interactive way to have your computer dictate recipe ingredients and procedures
while you cook. As you do the preparation and cooking, the computer talks you through it. If you need
more time, you tell it to stop, and then when you are ready, it continues from where it left off.
The computer needs to be fairly close to the kitchen for the interactive feature to work well. Alternatively, a
Bluetooth connection allows interaction from a much greater distance. To enable a Bluetooth connection,
tap Settings and tap Next through the Bluetooth wizard to set up your headset. When you connect the
next time, you automatically connect to the previous Bluetooth headset selected. You can also do a quick
search for other Bluetooth devices.
First, choose a category, such as Desserts, Meals, Seafood, or Starters. You can add other
categories and choose an icon to attach to that category, and then you can edit it later. Choose the dish
you want to make.
Tap the information guide to enable voice commands. The information guide recites all ingredients and
then the procedures. You do not need to refer to a recipe; you get it all by the HP TouchSmart voice
instruction. The instructions stop after each line, so you can complete the procedure at your own pace.
When you say the command to Start, the guide gives you the recipe, but stops after each line until you say
Continue.
48 User Guide (Features may vary by model)
Page 55

You can ask the guide to Repeat, and the guide repeats from the last line. You can also choose to have the
guide read the entire recipe.
You can also add recipes manually, or copy and paste them. Or browse for a recipe on the Internet from a
selected list of online recipes.
If you are the kind of cook who edits your recipes, you can also edit recipes and then save them for your
archives.
HP TouchSmart Twitter
Not available in all countries/regions
Twitter requires an Internet connection and a Twitter account. Join the twittering crowd with the HP, touchfriendly version of Twitter. Send short text messages to your friends and followers. Find out what they’re
talking about.
In the Search field, you can enter a current or favorite movie, a news event, or a question, such as how to
train for a marathon, and you can see comments and opinions from the entire Twitter community—outside
your own Twitter friends and family.
Click Settings to configure your account details such as how to receive notices, and how to customize
your account’s design.
HP TouchSmart Netflix
Not available in all countries/regions
An Internet connection and a Netflix account is required. With Netflix you can instantly watch movies
(even some new releases) and TV episodes streamed from Netflix to your computer. Tap the tile to open it
and follow the directions.
Live TV
Select models only. TV tuner required.
With Live TV you can watch local TV and cable content. The tile contains an electronic programming guide
so you can easily find TV programs. Use the digital video recorder (DVR) function to record your favorite
*
shows.
HP TouchSmartLink
With TouchSmartLink software you can transfer photos and contacts from your mobile phone to your
HP TouchSmart PC using Bluetooth wireless technology that comes with the mobile phone.
HP TouchSmartLink works with mobile phones that support the FTP/Obex file transfer protocol. All
Windows Mobile OS phones should work with HP TouchSmartLink.
Updating Software
Check www.hp.com/go/touchsmart for updated software and new software features.
* Availability of signals limited by the strength and accessibility of the originating TV signal, location and other
factors. Performance issues may arise, and do not constitute defects in the product.
Software Overview 49
Page 56

Software Quick Reference Table
In addition to the HP TouchSmart software suite, you may have the following programs installed. Some of
the software listed in the following table is included with select models only. This is not a complete list of all
the software included with your computer.
To open any of these programs, tap the Start button, All Programs, select the program folder (for
example, DVD Play), and then tap the program name to open the software.
With this program: You can :
DVD Play
CyberLink DVD Suite
CyberLink Power2Go
CyberLink YouCam
Play DVD movies, video CDs (VCDs), and Blu-ray discs.
Use the Zoom and Pan features.
Create viewing bookmarks.
Includes various programs, such as: Power2Go, YouCam (select models
only), LabelPrint, and PowerDirector. See the programs listed in this table
for more details about the program features.
Record data and music files.
Record a copy of an existing music or data CD for use on your computer.
Create customized music CDs from CDs in your collection, or from .wav,
.mp3, or .wma files. You can play these CDs on your home or car stereo.
Copy and share data files.
Create archive CDs or DVDs from files on your computer.
Copy video files.
Verify that the disc has been created without errors.
Capture and edit webcam video and snapshots.
Upload your videos to YouTube. (The YouTube Web site is not available in
all countries/regions).
Start a video chat.
Send your videos to friends and family.
CyberLink LabelPrint
Print labels to attach directly to a disc.
Create song title inserts for your CD cases.
50 User Guide (Features may vary by model)
Page 57

With this program: You can: (continued)
CyberLink
PowerDirector
HP Advisor
Record movie files to create VCDs and DVDs that you can play on some
DVD players.
Copy and share video files.
Capture video files.
Edit video files.
Quickly organize the Web links you want to keep available to you on your
desktop.
Comparison-shop by using the convenient shopping search engine.
Get HP software and driver updates.
Get important messages from HP.
Access PC Health and Security and PC Help tools.
Software Overview 51
Page 58

52 User Guide (Features may vary by model)
Page 59

Using the Remote Control
Select models only
Remote Control
The remote control works with Windows Media Center and other software. This remote control helps you
navigate around and control the computer, just as a TV remote control helps you navigate cable TV options
or control the playback of a movie in a DVD player.
Remote Control 53
Page 60

Remote control buttons
1 On/Off — Puts the computer into and out
of a power-reduced Sleep mode. It does not
turn the computer off.
If the computer is in game console mode,
pressing this button returns you to PC mode.
Press the button again to put the computer to
sleep.
2 Visualization — Displays visual imagery
synchronized to the sound of the music
tracks.
3 Music — (Windows Media Center only)
Opens the Music Library window in
Windows Media Center.
4 Radio — (Windows Media Center only)
Opens the FM Radio window in Windows
Media Center.
5 Guide — (Windows Media Center only)
Opens the Television Program Guide.
6 Recorded TV — (Windows Media Center
only) Opens the recorded TV window where
recorded TV programs are displayed.
7 Arrows — Move the cursor to navigate
and select actions.
8 DVD menu — Opens the Play DVD
window in Windows Media Center or opens
the main menu of a DVD movie, if available.
9 Back — Returns to the previous window.
10 More Info — Displays available
information about a selected media file and
displays other menus.
11 Start — Opens Windows Media Center
main menu.
If you are in game console mode, pressing
this button takes you to PC mode and opens
Media Center.
12 Volume — Increases (+) or decreases (–)
volume. When in game console mode,
affects the volume of the PC as well.
13 Mute — Turns computer sound off. The
word Mute displays onscreen when Mute is
turned on. If this button is pressed when the
system is in game console mode, the
computer sound is muted (with no display
onscreen).
14 Record — Records a selected television program and stores it on the hard disk drive.
15 Play — Plays the selected media.
16 Rewind — Moves the media backward at three speeds.
54 User Guide (Features may vary by model)
Page 61

17 Skip Backward — Moves media backward 7 seconds or to the beginning of a music track or a
DVD chapter.
18 0 through 9, *,
., # — Enters text and numbers into a search or text box. Pressing a number button
repeatedly toggles through the characters on that button. Press Enter to select a character.
19 Clear — Deletes the last character entered.
20 LED — Activity indicator light. The LED tells you that the remote control is emitting a signal when you
press a button.
21 A/V source button — (Game console models only) Toggles through three sources: PC, HDMI, and
composite video when the system is connected to the upper-left display-only ports.
22 Picture — (Windows Media Center only) Opens the Pictures Library window.
23 Video — (Windows Media Center only) Opens the Videos Library window.
24 Live TV — (Windows Media Center only) Displays the full-screen view of live TV. Moves a TV
program forward to the end of the pause buffer and resumes playing live TV.
25 OK — Selects the desired action or window option and acts as the Enter key.
26 Aspect — Changes the aspect ratio of the display. Zooms in on the picture three times, and then
returns to the full-screen aspect ratio.
27 Slide Show — (Windows Media Center only) Plays a slide show of all the pictures on the hard disk
drive.
28 Ch+ and Ch– — Changes the TV channels or moves pages up and down, depending on available
options. Moves to the next DVD chapter.
29 Eject — Ejects a CD or DVD.
30 Pause — Pauses audio and video tracks and live or recorded TV programs.
31 Fast Forward — Moves the media forward at three speeds.
32 Skip Forward — Moves the media forward 30 seconds in videos and live TV, one music track, or
one DVD chapter.
33 Stop — Stops the media currently playing.
34 Enter — Selects the desired action, menu, or window option.
Remote Control 55
Page 62

56 User Guide (Features may vary by model)
Page 63

Software Troubleshooting and
Software Troubleshooting
Your computer uses the operating system and installed software programs during normal operation. If
your computer works improperly or stops because of the software, you may be able to repair it.
Some software repairs are as simple as restarting your computer, and others require performing a system
recovery from files on your hard disk drive.
Software repair overview
The most efficient way to repair software problems is simply to restart the computer or turn the computer off
completely and then power it back up again. If this does not work, then explore the following methods for
fixing your computer if you are experiencing software problems:
Updating drivers (see the following section, “Updating drivers”).
Microsoft System Restore (see “Microsoft System Restore” on page 58) — Restores your computer
configuration to a configuration that was in use before the current software problem existed.
System Recovery
Software program and hardware driver reinstallation (See “Software program and hardware driver
reinstallation” on page 58) — Allows reinstallation of the factory-installed software or hardware driver
by using the Recovery Manager program.
System recovery — Erases and reformats the hard disk drive, deleting all data files you have created,
and then reinstalls the operating system, programs, and drivers.
Updating drivers
A driver is a software program that enables your computer to communicate with an attached device, such
as a printer, hard disk drive, mouse, or keyboard.
Complete the following procedure to update a driver, or to revert to an earlier version of the driver if the
new one does not solve your problem:
1 Click the Start button.
2 Type Device Manager into the Start Search box, and then click Device Manager to open the Device
Manager window.
3 Click the plus sign (+) to expand the type of device you want to update or rollback. (For example,
DVD/CD-ROM drives).
4 Double-click the specific item (for example, HP DVD Writer 640b).
5 Click the Driver tab.
6 To update a driver, click Update Driver, and then follow the onscreen instructions.
Or
To revert to an earlier version of a driver, click Rollback Driver, and then follow the onscreen
instructions.
Software Troubleshooting and System Recovery 57
Page 64

Microsoft System Restore
Microsoft Windows 7 includes a feature that enables you to restore your computer configuration to a
configuration that was in use before the current software problem existed. The feature does this by creating
a restore point where it records the computer settings at that time and date.
When a new program is installed, the operating system automatically creates a restore point before it adds
the new software. You can also set restore points manually.
If you experience a problem that you think may be due to software on your computer, use System Restore
to return the computer to a previous restore point.
NOTE: Always use this System Restore procedure before you use the system recovery program.
To start a System Restore:
1 Close all open programs.
2 Click the Start button, right-click Computer, and then click Properties.
3 Choose System protection, System Restore, and then click Next.
4 Follow the onscreen instructions.
To manually add restore points:
1 Close all open programs.
2 Click the Start button, right-click Computer, and then click Properties.
3 Click System protection.
4 Under Protection Settings, select the disk for which you want to create a restore point.
5 Click Create.
6 Follow the onscreen instructions.
For more information about software restore points:
1 Click the Start button, and then click Help and Support.
2 Type system restore in the Search Help box, and then press Enter.
Software program and hardware driver reinstallation
If an individual factory-installed software program or hardware driver is damaged, you can reinstall it by
using the Recovery Manager program (select models only).
NOTE: Do not use the Recovery Manager program to reinstall software programs that came on CDs or
DVDs included in the computer box. Reinstall these programs directly from the CDs or DVDs.
Before you uninstall a program, be sure you have a way to reinstall it. Check that it is still available from
where you initially installed it (for example, discs or the Internet). Or check that the program is in the list of
programs you can reinstall from the Recovery Manager.
To check the list of installable programs in the Recovery Manager:
1 Click the Start button, All Programs, Recovery Manager, and then click Recovery
Manager. If prompted, click Yes to allow the program to continue.
2 Under I need help immediately, click Software Program Reinstallation.
3 Click Next at the Welcome screen.
A list of programs opens. Check whether your program is there.
58 User Guide (Features may vary by model)
Page 65

To uninstall a program:
1 Close all software programs and folders.
2 Uninstall the damaged program:
a Click the Start button, and then click Control Panel.
b Under Programs, click Uninstall a program.
c Select the program you want to remove, and then click Uninstall.
d Click Yes if you want to continue with the uninstall process.
To reinstall a program using the Recovery Manager:
1 Click the Start button, click All Programs, click Recovery Manager, and then click Recovery
Manager.
2 Click Software Program Reinstallation.
3 Click Next at the Welcome screen.
4 Choose the program you want to install, click Next, and follow the onscreen instructions.
5 When you have finished reinstalling, restart the computer.
NOTE: Do not skip this last step. You must restart the computer after recovering software programs or
hardware drivers.
Creating data backup discs
Use CD or DVD recording (or burning) software that is installed on your computer to create backup discs of
important information, including personal files, e-mail messages, and Web site bookmarks. You can also
move data to an external hard disk drive.
When writing data to a backup disc, use software that includes write verification functionality. This feature
compares the data on your hard disk drive with the data copied to the disc to ensure it is an exact copy.
Depending on your disc recording software, you may need to manually enable this feature (refer to the
software documentation).
If you encounter recording issues, try alternate media (different types or brands). Also, use the Windows
Explorer tool to view your files and verify content was copied over. To open Windows Explorer, right-click
the Start button, and then click Explore.
Creating system recovery discs
This is a one-time procedure that you should perform while your computer is working properly. If you
encounter problems with your computer later, you can restore it to its original factory settings by using the
system recovery discs that you created. Refer to “Creating recovery discs” on page 60 for details.
System Recovery
System recovery completely erases and reformats the hard disk drive, deleting all data files you have
created. System recovery reinstalls the operating system, programs, and drivers. However, you must
reinstall any software that was not installed on the computer at the factory. This includes software that came
on CDs included in the computer accessory box, and software programs you installed after purchase.
Software Troubleshooting and System Recovery 59
Page 66

You must choose one of the following methods to perform a system recovery:
Recovery Image — Run the system recovery from a recovery image stored on your hard disk drive.
The recovery image is a file that contains a copy of the original factory-shipped software. To perform a
system recovery from a recovery image, see “System recovery from the Windows 7 Start menu” on
page 61.
NOTE: The recovery image uses a portion of the hard disk drive that cannot be used for data storage.
Recovery Discs — Run the system recovery from a set of recovery discs that you create from files
stored on your hard disk drive. To create recovery discs, see the next section.
Creating recovery discs
Complete the procedure described in this section to create a set of recovery discs from the recovery image
stored on your hard disk drive. This image contains the operating system and software program files that
were originally installed on your computer at the factory.
You can create only one set of recovery discs for your computer. Furthermore, the recovery discs you create
can be used only with your computer.
Choosing recovery discs
To create recovery discs, your computer must have a DVD writer.
Use DVD+R or DVD-R blank media to create your system recovery discs.
You cannot use DVD+RW, DVD-RW, DVD+RW DL, DVD-RW DL, DVD+R DL, DVD-R DL, or CD discs to
create recovery discs.
Use high-quality discs to create your set of recovery discs. The verification standard for the recovery disc
creation process is very high. You may see error messages such as Recording failure when writing disc or
Error detected during disc verification.
Your discs may be rejected if they are not defect-free. You will be prompted to insert a new blank disc to try
again. It is normal that some of your discs may be rejected.
The number of discs in the recovery disc set depends on your computer model (typically 1–3 DVD discs).
The Recovery Disc Creator program tells you the specific number of blank discs needed to make the set.
The process takes some time to verify that the information written on the disc is correct. You can quit the
process at any time. The next time you run the program, it resumes where it left off.
To create recovery discs
1 Close all open programs.
2 Tap the Start button, All Programs, Recovery Manager, and then tap Recovery Disc
Creation. If prompted, tap Yes to allow the program to continue.
3 Follow the onscreen instructions. Label each disc as you make it (for example, Recovery 1,
Recovery 2).
4 Store the recovery discs in a safe place.
System recovery options
You should attempt a system recovery in the following order:
1 Through the hard disk drive, from the Windows 7 Start menu.
2 Through the hard disk drive, by pressing the F11 key on the keyboard during system startup.
60 User Guide (Features may vary by model)
Page 67

3 Through recovery discs that you create.
4 Through recovery discs purchased from HP Support. To purchase recovery discs, go to
www.hp.com/support and visit the Software & Driver downloads page for your computer model.
System recovery from the Windows 7 Start menu
If the computer is working, and Windows 7 is responding, use these steps to perform a system recovery.
NOTE: System recovery deletes all data and programs you created or installed after purchase. Therefore,
ensure you have backed up, to a removable disc, any data you want to keep.
1 Turn off the computer.
2 Disconnect all peripheral devices from the computer, except the keyboard and mouse.
3 Turn on the computer.
4 Tap the Start button, All Programs, Recovery Manager, and then tap Recovery Manager.
If prompted, tap Yes to allow the program to continue.
5 Under I need help immediately, tap System Recovery.
6 Tap Yes, and then tap Next.
Your computer restarts.
NOTE: If your system does not detect a recovery partition, it will prompt you to insert a recovery disc.
Insert the disc and proceed to Step 7 in the section “Starting system recovery from user-created
recovery discs” on page 62.
7 Under I need help immediately, tap System Recovery.
8 If you are prompted to back up your files, and you have not done so, select Back up your files
first (recommended) button, and then tap Next. Otherwise, select Recover without backing
up your files button, and then tap Next.
System recovery begins. After system recovery is complete, tap Finish to restart the computer.
9 Complete the registration process, and wait until you see the desktop.
10 Turn off the computer, reconnect all peripheral devices, and turn the computer back on.
System recovery at system startup
If Windows 7 is not responding, but the computer is working, use these steps to perform a system recovery:
NOTE: System recovery deletes all data and programs you created or installed after purchase. Therefore,
ensure you back up, to a removable disc, any data you want to keep.
1 Turn off the computer. If necessary, press and hold the On button until the computer turns off.
2 Disconnect all peripheral devices from the computer, except the keyboard and mouse.
3 Press the On button to turn on the computer.
4 As soon as you see the initial company logo screen appear, repeatedly press the F11 key on your
keyboard until the Windows is Loading Files message appears on the screen.
5 Under I need help immediately, tap System Recovery.
6 If you are prompted to back up your files, and you have not done so, select Back up your files
first (recommended) button, and then tap Next. Otherwise, select Recover without backing
up your files button, and then tap Next.
System recovery begins. After system recovery is complete, tap Finish to restart the computer.
Software Troubleshooting and System Recovery 61
Page 68

7 Complete the registration process, and wait until you see the desktop.
8 Turn off the computer, reconnect all peripheral devices, and turn the computer back on.
Starting system recovery from user-created recovery discs
This section contains the procedure for performing a system recovery from the recovery discs you created
as described in “Creating recovery discs” on page 60.
NOTE: System recovery deletes all data and programs you created or installed after purchase. Therefore,
ensure you back up, onto a removable disc, any data you want to keep.
To perform a system recovery using recovery discs:
1 If the computer is working, create a backup DVD containing all the data files you want to save. When
you are done, remove the backup disc from the drive tray.
CAUTION: All data on the hard disk drive will be deleted. You will lose data if it is not
backed up.
2 Disconnect all peripheral devices from the computer, except the keyboard and mouse.
3 Insert recovery disc #1 into the DVD drive tray, and close the tray.
4 If the computer works, click the Start button, click the Arrow button next to Shut Down, and then
click Shut Down.
Or
If the computer is not responding, press and hold the On button for approximately 5 seconds, or until
the computer turns off.
5 Disconnect all peripheral devices from the computer, except the monitor, keyboard, and mouse.
6 Press the On button to turn on the computer.
If you are prompted to choose between running System Recovery from disc or from hard drive, select
Run program from disc, and then click Next.
7 Under I need help immediately, click Factory Reset.
8 If you are prompted to back up your files, and you have not done so, select Back up your files
first (recommended) button, and then click Next. Otherwise, select Recover without backing
up your files button, and then click Next.
9 If you are prompted to insert the next recovery disc, do so.
10 When the Recovery Manager is finished, remove all recovery discs from the system.
11 Click Finish to restart the computer.
Additional Troubleshooting
For additional troubleshooting solutions, refer to the following:
HP Support Assistant
HP Support Assistant helps you maintain your PC performance and resolve problems faster with
automated updates, onboard diagnostics, and guided assistance.
To open HP Support Assistant, tap the Start button, All Programs, HP, and then tap HP Support
Assistant.
Windows 7 Troubleshooting Tools
62 User Guide (Features may vary by model)
Page 69

Windows 7 provides troubleshooting tools that can automatically troubleshoot and fix common computer
problems. To access the Windows 7 Troubleshooting Tools:
1 Tap the Start button, and then tap Control Panel.
2 Tap System and Security.
3 Under Action Center, tap Find and fix problems (troubleshooting).
Software Troubleshooting and System Recovery 63
Page 70

64 User Guide (Features may vary by model)
Page 71

Index
Numerics
32-bit system 15
64-bit system 15
A
A/V source button 22, 23
AC adapter 10
adapter, composite video-to-S-Video 20
album art 41
Ambient Light
adjusting
button 6
Ambient Light feature 14
audio
Line In connector
Line Out connector 8
troubleshooting 24
Windows Media Center 26
14
6
B
backup 59
backup discs, creating 59
Bluetooth
antenna features
using 17
Blu-ray drive location 6
brightness, screen 28
Browser tile 37
button
A/V source
Ambient Light 6
computer Power/Sleep 5
HP TouchSmart 5
4
22, 23
C
cable
management
router clip 8
routing clip 11
Calendar tile 47
camera
distance from
position 44
Canvas tile 40
carpal tunnel syndrome 30
10
44
CD
burning
drive location 6
using the CD/DVD drive 15
cleaning the monitor 30
Clock tile 48
coaxial cable 16
composite
audio/visual ports
mode 22
video adapter 20
computer
connecting the IR emitter
light 14
recycling old hardware 31
stand 8
stand, adjusting the angle 12
conference calls 46
connecting
game console
Internet 15
powered speakers 25
printer 27
speakers 25
to network 15
TV 18
TV signal 18
contrast, screen 29
CyberLink
DVD Suite
LabelPrint 50
Power2Go 50
PowerDirector 51
YouCam 50
42
23
22
50
D
deleting tiles 37
digital audio connector 8
driver reinstalling 58
drivers, update 57
DSL 16
connection 16
DVD drive location 6
DVD Play 50
E
ergonomic safety 30
21
Index 65
Page 72

G
game console 22
input ports 8, 22
troubleshooting 23
H
hard disk drive, LED 9
hardware
recycling
upgrades 14
HDMI
mode
port 22
headphones
port
using 26
headsets 27
Hibernate mode 27
how-to videos vi
HP Advisor 51
HP TouchSmart
cleaning the touch screen
finding information vi
navigating 33
opening 33
start button 5
updating the computer software 49
using the software 33
what is it 33
31
22
6
30
I
Internet connection 15
IR emitter
cable connecting to a set-top box
cable, connecting 21
port 8
IR receiver, remote control 5
iTunes 41
K
Kensington security lock 29
keyboard and mouse
about
13
receiver LED 9
receiver location 8
troubleshooting 14
L
LAN (local area network) 15
antenna features 4
connecting to the Internet 8
light, ambient 14
local area network (LAN) 15
lock, security 8, 29
21
M
memory card reader
card types
features 5
LED 9
microphones
adjusting volume
position 44
range 27
monitor
brightness
cleaning 30
contrast 29
resolution 4
size 1
mouse and keyboard
about
receiver location 8
troubleshooting 14
MovieThemes tile 46
MP3 players 27
Music Store 42
Music tile 40
album art 41
deleting songs 42
file formats 40
moving files to library 40
playlists 42
5
27
28
13
N
NetFlix tile 49
network
wired
8, 16
wireless 4, 15
Notes tile 47
deleting a note 47
voice notes 47
O
onscreen keyboard 35
optical drive
LED
9
location 6
OSD
button
5
P
Photo tile 38
hiding photos 39
slideshows 39
playlists
creating
video 45
power adapter connector 8
power cord, connecting 10
power settings 27
Power, LED 9
42
66 User Guide (Features may vary by model)
Page 73

Power/Sleep button 5
powered speakers, connecting 25
printers
connecting
parallel ports 27
27
R
Realtek HD Audio Manager
connecting speakers
microphone volume 27
receiver, wireless keyboard and mouse 9
Recipe Box tile 48
recovery discs
choosing
creating 60
Recovery Manager 58
recycling computer hardware 31
reinstall a software program 58
remote control
IR receiver LED
using with HP TouchSmart 53
with game console 23
repairing software 57
repetitive strain injury (RSI), see Safety & Comfort Guide
resolution, monitor
restoring your computer configuration 58
Rhapsody 42
router installation 16
RSS Feeds tile 37
60
25
9
4
S
Safety & Comfort Guide 30
safety warnings 30
screen
brightness
cleaning 30
contrast 29
security lock slot 8, 29
set-top box
connecting to computer
remote emitter cable for 21
with Windows Media Center 20
Sleep mode 27
slideshows, making 39
software
reinstalling
repairing 57
updating 49
software programs
DVD Play
songs, deleting 42
speakers 5
adjusting volume 26
connecting digital or audio receiver 25
features 5
Stereo Audio In connector 8
support information vi
support tutorials vi, 37
S-Video adapter 3, 20
28
21
58
50
S-Video cable 3, 20
S-Video In connector 8
Swivel
computer
synchronizing keyboard or mouse 14
system recovery 59
System Restore 58
system recovery discs, making 59
System Restore 58
13
T
tiles 35
adding a Web link 36
adding new 36
changing icon or color 37
deleting 37
hiding 36
viewing hidden 36
touch screen
accessing and navigating
cleaning 30
features 4
TouchSmartLink tile 49
tutorials vi, 37
Tutorials tile 37
TV
connecting
tuner 18
TV In connector 8
Twitter tile 49
18
35
U
updating
drivers
57
upgrading
hardware
upgrading hardware 14
USB
connection
devices 6
14
8
V
video
playlists
recording 44
setting up a video chat 46
webcam 44
YouTube 45
Video tile 43
volume
controls
Volume Mixer 26
45
5
Index 67
Page 74

W
Weather tile 48
webcam
capturing video and snapshots
features 5
LED 9
position 44
using with the microphone 44
viewing angle 5, 44
Windows Media Center
configuring sound
setup wizard 21
using the remote control 53
watching and recording TV 18
wired home network 16
LAN connection 8
setting up 16
wireless home network 15
LAN connection 4
setting up 15
wireless keyboard and mouse 13
receiver location 8
working in comfort 30
26
Y
YouTube 45
44
68 User Guide (Features may vary by model)
Page 75

Manuel de l’utilisateur
Page 76

Copyright
Les garanties des produits et services Hewlett-Packard sont exclusivement présentées dans les déclarations expresses accompagnant
lesdits produits et services. Aucun élément du présent document ne saurait être considéré comme une garantie supplémentaire.
La société HP ne saurait être tenue responsable des erreurs ou omissions de nature technique ou rédactionnelle qui pourraient subsister
dans le présent document.
La société HP n’assume aucune responsabilité quant à l’utilisation ou à la fiabilité de ses logiciels sur un matériel non fourni par HP.
Le présent document contient des informations exclusives protégées par copyright. Aucune partie du présent document ne saurait être
photocopiée, reproduite ou traduite dans une autre langue sans l’autorisation écrite préalable de HP.
Hewlett-Packard Company
P.O. Box 4010
Cupertino, CA 95015-4010
USA
© Copyright 2009 Hewlett-Packard Development Company, L.P.
Ce produit intègre une technologie de protection des droits d’auteur qui est protégée par des brevets américains et par d’autres droits
à la propriété intellectuelle. L'utilisation de cette technologie de protection des droits d’auteur doit être autorisée par Macrovision et est
destinée à l’usage des particuliers ou d’autres utilisations de visualisation limitée dans l’absence d'autre autorisation de Macrovision.
La rétroingénierie ou le désassemblage du produit sont interdits.
Microsoft, le logo Windows et Windows sont des marques de commerce ou des marques déposées du groupe de sociétés Microsoft
aux États-Unis et/ou dans d’autres pays/régions.
802.1n CERTIFIÉ Wi-Fi basé sur le projet 2.0
Le projet 2.0 se rapporte à la version de la norme 802.11n de l’IEEE non encore ratifiée utilisée dans les tests de l’alliance Wi-Fi de
juin 2007.
Les caractéristiques du réseau sans fil (WLAN) 802.11n sont provisoires et non définitives. Si les caractéristiques définitives diffèrent
des caractéristiques provisoires, la capacité de ce périphérique à communiquer avec d’autres périphériques WLAN 802.11n peut
être affectée.
En faveur d’une utilisation licite des technologies, HP ne saurait appuyer ni encourager l’utilisation de produits à d’autres fins que
celles autorisées par la loi sur les droits d’auteur. Les informations contenues dans le présent document peuvent faire l’objet de
modifications sans préavis.
Page 77

Table des matières
Recherche d’informations sur l’ordinateur HP TouchSmart.................................................................. vi
Bienvenue....................................................................................................................1
Caractéristiques ............................................................................................................................ 1
Câbles et accessoires................................................................................................................2
Avant et côté droit de l’ordinateur HP TouchSmart PC...................................................................4
Côté gauche de l’ordinateur HP TouchSmart ................................................................................6
Capot du connecteur ................................................................................................................ 7
Arrière de l’ordinateur HP TouchSmart ........................................................................................7
Témoins lumineux d’activité .......................................................................................................9
Branchement à la source d’alimentation .........................................................................................10
Gestion des câbles ......................................................................................................................10
Socle de l'ordinateur ...................................................................................................................12
Orientation de l’ordinateur ...........................................................................................................12
Orientation latérale de l’ordinateur................................................................................................ 13
Clavier et souris sans fil ...............................................................................................................13
Synchronisation du clavier et de la souris sans fil .......................................................................13
Lumière ambiante........................................................................................................................14
Ajout de matériel et de logiciels ....................................................................................................14
Pour déterminer si vous avez un système 64 ou 32 bits...............................................................15
Lecteur de disque optique.............................................................................................................15
Connexion à Internet ...................................................................................................................15
Réseau domestique sans fil ......................................................................................................15
Réseau domestique câblé ........................................................................................................16
Périphériques Bluetooth................................................................................................................ 17
Carte TV et Windows Media Center..............................................................................................18
Regarder et enregistrer des émissions télévisées .........................................................................18
Connexion de la source de signal TV à l’ordinateur....................................................................18
Utilisation d’un boîtier décodeur avec Windows (étape en option) ...............................................20
Assistant de configuration Windows Media Center ....................................................................21
Branchement d’une console de jeu ................................................................................................22
Utilisation de la télécommande en mode jeu ..............................................................................23
Retour au mode ordinateur à partir du mode jeu ........................................................................23
Dépannage du mode jeu.........................................................................................................23
Table des matières iii
Page 78

Options de son ...........................................................................................................................24
Branchement de haut-parleurs analogiques................................................................................25
Branchement et activation de haut-parleurs numériques
ou d’un récepteur audio..........................................................................................................25
Volume des haut-parleurs ........................................................................................................26
Configuration du son pour Windows Media Center....................................................................26
Casque d’écoute ....................................................................................................................26
Microphones .........................................................................................................................27
Casque d’écoute ....................................................................................................................27
Lecteurs MP3 .........................................................................................................................27
Branchement d’une imprimante.....................................................................................................27
Branchement d’une imprimante avec un port parallèle ................................................................27
Paramètres d’alimentation ............................................................................................................ 27
Réglage de l’affichage de l’écran.................................................................................................. 28
Réglage des paramètres du moniteur avec l’affichage à l’écran........................................................28
Installation d’un verrou de sécurité ................................................................................................29
Nettoyage de l’écran de l’ordinateur HP TouchSmart....................................................................... 30
Utilisation de l’ordinateur HP TouchSmart avec sécurité et ergonomie ................................................30
Recyclage du vieux matériel informatique.......................................................................................31
Vue d’ensemble du logiciel.........................................................................................33
Définition du logiciel HP TouchSmart .............................................................................................33
Navigation dans HP TouchSmart...................................................................................................33
Techniques de toucher en dehors du logiciel HP TouchSmart ............................................................35
Modules HP TouchSmart ..............................................................................................................35
Création de modules ..............................................................................................................36
Ajout d’un module pour un site Web favori ...............................................................................36
Affichage des modules cachés .................................................................................................36
Masquer les modules ..............................................................................................................36
Suppression des modules ........................................................................................................ 37
Changement des icônes ou de la couleur des modules................................................................37
Didacticiels HP TouchSmart .......................................................................................................... 37
Navigateur HP TouchSmart ..........................................................................................................37
Flux RSS.....................................................................................................................................37
HP TouchSmart Photo...................................................................................................................38
Bibliothèque de photos ...........................................................................................................38
Diaporamas ..........................................................................................................................39
Masquer des photos ...............................................................................................................39
Création (gravure) d’un CD ou d’un DVD contenant
vos photos.............................................................................................................................39
Tableau HP TouchSmart ...............................................................................................................40
HP TouchSmart Musique ..............................................................................................................40
Déplacement de fichiers musicaux dans
HP TouchSmart Music .............................................................................................................40
Déplacement de titres depuis iTunes dans HP TouchSmart Music ..................................................41
Couverture ............................................................................................................................41
Création et modification de listes de lecture...............................................................................42
Suppression de titres...............................................................................................................42
Magasin de musique ..............................................................................................................42
Création (gravure) d’un CD ou d’un DVD contenant de la musique ou des photos .......................... 42
iv Manuel de l’utilisateur (les fonctions peuvent varier selon le modèle)
Page 79

HP TouchSmart Vidéo ..................................................................................................................43
Webcam et microphone..........................................................................................................44
Capture de vidéos et d’instantanés avec la webcam...................................................................44
Création d’une vidéo ..............................................................................................................44
Listes de lecture vidéo .............................................................................................................45
Transfert de vidéos sur l’ordinateur ...........................................................................................45
Chargement de vidéos sur YouTube..........................................................................................45
Enregistrement de films à domicile............................................................................................46
Conversations vidéo et visioconférences....................................................................................46
Thèmes de films HP TouchSmart ...............................................................................................46
Calendrier HP TouchSmart ...........................................................................................................47
HP TouchSmart Notes ..................................................................................................................47
Notes manuscrites ou tapées ...................................................................................................47
Notes vocales ........................................................................................................................47
Suppression de notes..............................................................................................................47
HP TouchSmart Météo .................................................................................................................48
HP TouchSmart Horloge ...............................................................................................................48
Boîte de recettes HP TouchSmart ...................................................................................................48
HP TouchSmart Twitter .................................................................................................................49
HP TouchSmart Netflix .................................................................................................................49
TV en direct................................................................................................................................49
HP TouchSmart Link .....................................................................................................................49
Mises à jour du logiciel................................................................................................................49
Tableau de référence rapide concernant les logiciels .......................................................................50
Télécommande...........................................................................................................53
Utilisation de la télécommande ....................................................................................................53
Dépannage logiciel et récupération du système ..........................................................57
Dépannage logiciel .....................................................................................................................57
Vue d’ensemble des réparations logicielles................................................................................57
Mise à jour de pilotes .............................................................................................................57
Restauration du système Microsoft ............................................................................................58
Réinstallation des logiciels et des pilotes....................................................................................58
Création de disques de sauvegarde des données .......................................................................59
Création de disques de récupération système ............................................................................59
Récupération système ..................................................................................................................59
Création de disques de récupération ........................................................................................60
Options de récupération système..............................................................................................60
Dépannage supplémentaire.......................................................................................................... 63
Index .........................................................................................................................65
Table des matières v
Page 80

Recherche d’informations sur l’ordinateur
HP TouchSmart
Type d’informations Où trouver
■ Configurez l’ordinateur HP TouchSmart. Affiche d’installation
■ Vidéos de démonstration de l’utilisation des
fonctions de l’ordinateur HP TouchSmart.
■ Caractéristiques matérielles.
■ Connecter à Internet.
■ HP TouchSmart et d’autres logiciels.
■ Connecter un signal de télévision.
■ Restaurer les paramètres d’usine.
■ Apprenez à utiliser le système d’exploitation
Microsoft
■ Dépannez les problèmes matériels et logiciels
®
Windows® 7.
les plus courants sur votre ordinateur.
■ Recherchez les manuels de l’utilisateur
électroniques et les caractéristiques de votre
modèle d’ordinateur.
■ Commandez des pièces et recherchez une
aide supplémentaire pour le dépannage.
Sur la page d’accueil du HP TouchSmart,
appuyez sur le module Didacticiels pour
l’ouvrir, puis appuyez sur un didacticiel pour le
regarder. Vous pouvez également visiter la page
www.hp.com/supportvideos (en anglais
uniquement)
Manuel de l’utilisateur (ce guide)
Aide et support
®
Touchez le bouton Démarrer de Windows
,
puis touchez Aide et support.
Site Web de l’assistance HP :
www.hp.com/support
Touchez le bouton Démarrer, puis touchez
Aide et support, puis appuyez sur l’icône
Aide en ligne.
■ Mettez à niveau ou remplacez des composants
de votre ordinateur.
■ Recherchez des informations sur la garantie de
votre ordinateur.
■ Recevez une assistance technique
■ Recevez des informations à jour et de l’aide de
la part de la communauté Windows.
■ Découvrez comment adapter votre ordinateur
pour un montage mural.
Guide de mise à niveau et d’entretien courant
Touchez le bouton Démarrer, puis touchez
Aide et support, puis appuyez sur l’icône
Manuels de l’utilisateur.
Si le guide ne se trouve pas là, allez sur la page
www.hp.com/support
Guide de garantie limitée et de support
www.hp.com/support/consumer-forum
Guide de Préparation de votre ordinateur pour
un montage mural. Si le guide ne se trouve pas
là, allez sur la page www.hp.com/support
vi Manuel de l’utilisateur (les fonctions peuvent varier selon le modèle)
Page 81

Caractéristiques
Bienvenue
Le HP TouchSmart est un ordinateur tactile haute performance intégré dans un magnifique écran large
haute définition de
qu’une webcam réglable, un lecteur et graveur de CD/DVD et de disques Blu-ray, la fonctionnalité
Bluetooth, l’éclairage ambiant, des ports USB, un lecteur de carte mémoire, un écran BrightView, la mise
en réseau sans fil selon la norme 802.11n et des haut-parleurs de haute qualité.
Grâce à l’écran interactif, il est judicieux de fixer l’ordinateur HP TouchSmart sur un mur. Le matériel pour
adapter l’ordinateur au montage mural (mais pas le montage lui-même) est fourni avec certains modèles et
peut être acheté.
D’un simple effleurement du bout des doigts, vous pouvez écouter de la musique, modifier vos photos
numériques ou regarder votre vidéo favorite.
*
58,4 cm (23-po.) de diagonale.** Cet ordinateur mince propose des fonctions telles
***
* Un contenu haute définition (HD) est requis pour visualiser des images en haute définition.
** Les caractéristiques peuvent varier selon les modèles. Il est possible que votre ordinateur ne corresponde pas
exactement aux illustrations et aux descriptions contenues dans le présent guide.
*** La disponibilité de l’adaptateur VESA varie selon les pays et les régions. Un matériel séparé pour le montage mural,
qui se fixe sur l’adaptateur VESA est nécessaire.
Bienvenue 1
Page 82

Câbles et accessoires
Que contient la boîte
Câble d’alimentation
(deux éléments)
Utilisez-le pour brancher
l’ordinateur à la source
d’alimentation.
Clavier et souris (piles installées)
et récepteur sans fil
Utilisez-les pour contrôler
certains logiciels et fonctions au
lieu de le faire par effleurement.
Chiffon de nettoyage Utilisez-le pour nettoyer l’écran
tactile.
Affiche d’installation et
documentation
Utilisez-la pour configurer votre
ordinateur et naviguer dans ses
fonctions.
Ordinateurs équipés
d’une carte TV
Câble de l’émetteur
infrarouge (IR)
Utilisez-le pour commander un
boîtier décodeur (câble ou TV
par satellite) avec une
télécommande.
Câble composite audio en Y Utilisez-le avec un câble S-Vidéo
pour combiner les canaux audio
gauche et droit.
Télécommande Utilisez-la avec Windows Media
Center, certaines fonctions de
l’écran tactile et la console
de jeu.
Également fournie avec certains
modèles sans carte TV.
2 Manuel de l’utilisateur (les fonctions peuvent varier selon le modèle)
Page 83

Ordinateurs avec option de montage mural
Adaptateur plaque VESA Fixé à l’arrière de l’ordinateur,
ce système adapte votre
ordinateur à un système de
montage mural (non fourni).
Câbles et adaptateurs non fournis, mais qui peuvent être nécessaires
Câble Ethernet (LAN) Pour un réseau câblé.
Câble coaxial Pour une connexion Internet avec
un modem câblé, ou pour
connecter la source de signal TV
à l’ordinateur.
Le type de connecteur peut varier.
Câble S-Vidéo Pour la connexion de la source de
signal TV sur l’ordinateur à partir
d’un boîtier décodeur.
Câble composite audio/vidéo Pour la connexion d’une console
de jeu et de la source de signal
TV à partir d’un boîtier décodeur.
Câble HDMI À utiliser avec une console de jeu
prenant en charge l’interface
HDMI ou un boîtier décodeur TV.
Adaptateur pour carte TV
(vidéo composite vers S-Vidéo)
Pour la connexion de la source de
signal TV sur l’ordinateur à partir
d’un boîtier décodeur.
Bienvenue 3
Page 84

Avant et côté droit de l’ordinateur HP TouchSmart PC
Les fonctionnalités et les configurations varient en fonction du modèle.
C
E
D
D
C
B
F
M
A
L
Composant Description
A Affichage LCD
optimisé pour la
technologie tactile
G
H
I
J
K
Écran haute définition ultramoderne de 58,4 cm (23-po.) de diagonale
équipé de la technologie HP BrightView.* La technologie HP BrightView
améliore le contraste et la clarté de votre écran. Il bénéficie, par ailleurs,
d’une haute résolution de 1 920 x 1 080 et d’un temps de réponse
rapide de 5 ms.**
L’affichage est optimisé pour une expérience tactile d’exception.
L’interaction avec le HP TouchSmart s’effectue d’un simple toucher
du bout des doigts. Robuste, le panneau de verre durable est
parfaitement réceptif. Simplifiez la gestion de votre vie numérique
grâce à la technologie tactile du logiciel HP TouchSmart.
* Un contenu haute définition (HD) est requis pour visualiser des images en haute
définition. La plupart des DVD actuels ne proposent pas d’images HD.
**Toutes les indications de performance représentent le niveau type atteint par les
fabricants de composants pour Hewlett Packard ; les performances constatées
peuvent varier par rapport à ce niveau.
B Bluetooth
(certains modèles
uniquement)
C LAN sans fil intégré
(certains modèles
uniquement)
4 Manuel de l’utilisateur (les fonctions peuvent varier selon le modèle)
Utilisez Bluetooth pour assurer la communication avec les appareils
équipés de Bluetooth. Le diagramme montre l’emplacement interne de
Bluetooth (invisible de l’extérieur).
Utilisez le réseau local intégré pour vous connecter à Internet via votre
réseau sans fil existant. Le diagramme montre l’emplacement interne du
réseau local sans fil (en haut à gauche et à droite ; invisible de
l’extérieur).
Le réseau local sans fil prend en charge la norme IEEE 802.11 b/g/n.
Page 85

Composant Description (suite)
D Microphone Enregistrez le son de vos vidéos au moyen des microphones numériques
intégrés, et menez des conversations en temps réel par le biais de la
messagerie instantanée ou du logiciel de conversation en ligne. Le
microphone est conçu pour éliminer par filtrage le bruit ambiant de votre
environnement et fournir ainsi une trame sonore pure. Il est capable
d’enregistrer des sons jusqu’à 50 cm (2 pieds) de distance de
l’ordinateur.
E Webcam Créez des vidéos et des instantanés que vous pouvez ensuite visualiser,
envoyer par courrier électronique et télécharger sur des sites de partage
vidéo. Menez une conversation vidéo avec vos amis et votre famille au
moyen de la webcam et du microphone.*
Pour ajuster l’angle d’affichage de prise de vue de la webcam, inclinez
l’écran ou réglez le levier qui se trouve immédiatement derrière la
webcam. Vous pouvez également choisir le degré de cadrage de la vue
de la caméra, ce qui crée une vue rapprochée de votre visage ou inclut
un peu plus l’arrière-plan.
* Accès Internet requis.
F Bouton de mise en
marche/veille
G Bouton du menu
Affichage
(modèles console
de jeu uniquement)
H Réglage du volume et
désactivation du son
I Bouton
HP TouchSmart
J Lecteur de carte
mémoire
Appuyez sur le bouton de mise en marche/veille pour allumer
l’ordinateur HP TouchSmart ou le mettre en veille.
Pour éteindre l’ordinateur, touchez le bouton Démarrer, puis
sélectionnez Arrêter. Vous pouvez également appuyer sur la flèche
située à côté du bouton Arrêter pour changer d’utilisateurs, fermer votre
session, verrouiller, redémarrer ou mettre en veille.
Appuyez sur ce bouton pour ouvrir un affichage à l’écran (OSD) où vous
pouvez effectuer des réglages de l’écran comme la luminosité et le
contraste.
Baissez ou augmentez le volume, ou bien désactivez le son.
Allumez l’ordinateur HP TouchSmart et lancez le logiciel HP TouchSmart.
Ou, si l’ordinateur est déjà allumé, appuyez sur le bouton pour lancer le
logiciel HP TouchSmart et accéder rapidement à votre musique, vos
photos, vos vidéos ou au Web. Le bouton HP TouchSmart ne permet pas
d’éteindre l’ordinateur.
Accédez rapidement aux photos et autres fichiers directement à partir
d’une carte mémoire que vous aurez introduite dans le lecteur.
Formats des cartes mémoire pris en charge : Extreme Digital (xD), Secure
Digital (SD), Secure Digital High-Capacity (SDHC), MultiMediaCard
(MMC), Memory Stick (MS) et Memory Stick Pro (MS-Pro).
Le lecteur de carte mémoire prend également en charge les adaptateurs
pour les cartes mémoire suivantes : Mini SD, RS-MMC, Micro SD,
MS-Duo et MS Pro Duo.
K Récepteur à
infrarouge (certains
modèles uniquement)
L Haut-parleurs internes Écoutez la plus belle musique ou regardez vos vidéos et DVD, et
Fenêtre du récepteur infrarouge située dans le coin inférieur droit de
l’ordinateur. Permet l’utilisation avec une télécommande.
bénéficiez du potentiel multimédia grâce aux haut-parleurs stéréo de
haute qualité intégrés.
Bienvenue 5
Page 86

Composant Description (suite)
M Lecteur CD/DVD à
chargement par fente
(situé sur le panneau
latéral arrière)
Regardez vos DVD ou vos disques Blu-Ray (certains modèles uniquement)
favoris, ou écoutez vos CD. Gravez des CD, des DVD et des disques
Blu-Ray.*
Possibilité de lecture et d’écriture sur des disques aux formats DVD-RAM,
CD-R/RW et DVD+/-R/RW.
Possibilité de lecture de CD-ROM, de DVD-ROM, de CD audio, de
DVD+/-R double couche (DL), de DVD-vidéo et de CD vidéo.
* HP est en faveur d’une utilisation licite des technologies et n’appuie pas ni
n’encourage l’utilisation de produits à d’autres fins que celles autorisées par
la loi sur les droits d’auteur.
Côté gauche de l’ordinateur HP TouchSmart
Les fonctionnalités et les configurations varient en fonction du modèle.
A
B
C
D
Connecteur Fonction
A Bouton de lumière
ambiante (certains
modèles
uniquement)
B USB 2.0 Connectez vos périphériques USB (USB 2.0), comme par exemple des
C Entrée audio Connectez des lecteurs MP3 ou tout autre lecteur audio. Ce connecteur n’est
D Casque d’écoute Branchez un casque d’écoute sur le port pour écouter de la musique sans
La lumière ambiante de l’ordinateur HP TouchSmart diffuse une lueur depuis
la base de l’ordinateur. Par défaut, la lumière ambiante est éteinte. Allumez
la lumière ambiante et appuyant sur le bouton Lumière ambiante. Appuyez
de nouveau dessus pour le rendre plus brillant, et encore une fois pour
augmenter la brillance.
imprimantes, des disques durs externes, des appareils photo numériques et
des lecteurs MP3.
pas prévu pour les casques ou un microphone.
déranger votre entourage.
6 Manuel de l’utilisateur (les fonctions peuvent varier selon le modèle)
Page 87

Capot du connecteur
Pour retirer le capot de protection des connecteurs à l’arrière de l’ordinateur, insérez un doigt dans
l’espace en bas à gauche du capot (A) et tirez doucement (B). Remettez le capot en alignant les ergots
qui figurent sur le bord droit sur les fentes de l’ordinateur, puis en appuyant jusqu’à leur enclenchement.
AB
Arrière de l’ordinateur HP TouchSmart
Les fonctionnalités et les configurations varient en fonction du modèle.
M
N
O
A
B
C
D
E
F
L
P
G
H
I
J
K
Bienvenue 7
Page 88

Connecteur Fonction
A Bouton source
source
(modèles console de
Ce bouton se trouve au des ports de la console de jeu. Appuyez dessus
pour choisir la source : HDMI ou composite audio/vidéo, en fonction des
ports auxquels vous êtes connecté.
jeu uniquement)
B Port HDMI
(modèles console de
Si votre console de jeu (ou votre boîtier décodeur TV) est compatible avec
l’interface HDMI, connectez-la sur ce port.
jeu uniquement)
C Ports audio/vidéo
composites
Si votre console de jeu (ou votre boîtier décodeur TV) est équipée de
connexion audio/vidéo composite, connectez-la sur ces ports.
(modèles console de
jeu uniquement)
D Ports USB 2.0 (3) Connectez vos périphériques USB (USB 2.0), comme par exemple des
imprimantes, des disques durs externes, des appareils photo numériques et
des lecteurs MP3.
E Réseau local
Connectez-vous à Internet via votre réseau câblé.
Gigabit Ethernet
(10/100/1G)
F Port audio
numérique
Branchez-le à votre matériel de home cinéma ou à vos haut-parleurs
satellites. Prend en charge les haut-parleurs 3.1, 4.1 et 5.1.
(sortie SPDIF)
G Sortie audio Branchez des haut-parleurs 2.0 et 2.1 externes alimentés.
H Connecteur
d’entrée TV
(certains modèles
Branchez votre source de signal TV pour regarder, enregistrer et
interrompre momentanément une émission télévisée en direct. Il s’agit d’un
connecteur de signal d’entrée TV coaxial de type F.
uniquement)
I Connecteur d’entrée
S-vidéo
Capturez une séquence vidéo analogique à partir d’une caméra vidéo, ou
branchez-le à l’entrée TV d’un boîtier décodeur.
(modèles avec
cartes TV
uniquement)
J Entrée audio stéréo
(modèles avec
Branchez un système audio à l’entrée A/V d’un boîtier décodeur, une
caméra numérique ou tout autre appareil vidéo.
cartes TV
uniquement)
K Émetteur à
infrarouge
(télécapteur)
(certains modèles
uniquement)
Fixez-le à la zone du récepteur infrarouge de votre boîtier décodeur TV
afin de recevoir le signal de la télécommande pendant que vous regardez
et enregistrez des émissions télévisées. Il est inutile si vous n’utilisez pas de
boîtier décodeur. La télécommande est livrée avec certains modèles
uniquement.
L Socle de l’ordinateur Socle à coulisser pour assurer la stabilité de l’appareil et adapter l’angle
de vue. Vous pouvez régler l’inclinaison du socle entre 5 et 40 degrés par
rapport à la verticale.
M Prise pour verrou
de sécurité
N Connecteur
Insérez un verrou de sécurité (vendu séparément), qui permet de protéger
votre ordinateur contre le vol et toute modification non voulue.
Branchez l’adaptateur d’alimentation à l’ordinateur.
d’alimentation
O
Récepteur du clavier
Récepteur préinstallé, utile si vous utilisez un clavier et une souris sans fil.
et de la souris
sans fil
P Attache-câble Acheminez vos câbles dans le collier, fermez le capot des connecteurs,
puis guidez les câbles au travers de l’ouverture dans le socle de
l’ordinateur.
8 Manuel de l’utilisateur (les fonctions peuvent varier selon le modèle)
Page 89

Témoins lumineux d’activité
A
B
C
D
E
F
G
Les voyants ci-dessous sont des diodes électroluminescentes (DEL) qui témoignent d’une activité sur
l’ordinateur HP TouchSmart :
Témoin Rôle
A Webcam Indique l’activité de la webcam.
B Alimentation Indique l’état de l’alimentation : bleu quand l’ordinateur est allumé,
et orange quand il est en veille.
C Disque dur Indique l’activité du disque dur.
D Lecteur de carte mémoire Indique l’activité du lecteur de la carte mémoire. Quand le témoin
clignote, prenez soin de ne pas retirer la carte mémoire.
Si le témoin est éteint, le lecteur ne contient aucune carte. Un témoin
allumé en continu indique l’incapacité de lecture ou d’écriture de la
carte introduite. Un témoin qui clignote signifie que la carte mémoire
est active et qu’elle bénéficie d’une capacité de lecture/écriture.
E Récepteur infrarouge à
télécommande
(certains modèles
uniquement)
F Récepteur du clavier et de
la souris sans fil
Indique que l’ordinateur fonctionne avec une télécommande que
vous utilisez pour naviguer dans Windows, enregistrer des
émissions télévisées et exécuter d’autres fonctions au sein de
Windows Media Center.
Indique que des signaux sont reçus du clavier et de la souris sans fil.
Le témoin est visible depuis l’arrière de l’ordinateur.
G Lecteur de disque optique Indique que le lecteur de disque optique est en cours d’utilisation.
Bienvenue 9
Page 90

Branchement à la source d’alimentation
Branchez le cordon d’alimentation dans l’adaptateur secteur (alimentation externe) et le cordon de
l’adaptateur secteur à l’arrière de l’ordinateur. Guidez le cordon d’alimentation au travers de l’ouverture
dans le support de l’ordinateur, puis raccordez-le à une source d’alimentation secteur via un
parasurtenseur/onduleur UPS (alimentation sans interruption).
Gestion des câbles
L’ordinateur HP TouchSmart bénéficie d’une fonction de gestion des câbles située derrière le capot des
connecteurs à l’arrière de l’appareil. Pour utiliser la fonction de gestion des câbles.
1 Retirez le capot de protection des connecteurs à l’arrière de l’ordinateur en insérant un doigt dans
l’espace en bas à gauche du capot (A) et en tirant doucement (B).
AB
10 Manuel de l’utilisateur (les fonctions peuvent varier selon le modèle)
Page 91

2 Guidez vos câbles au travers du collier d’acheminement (C), et faites-les sortir de l’arrière de
l’ordinateur.
C
3 Remettez le capot en alignant les ergots qui figurent sur le bord droit sur les fentes de l’ordinateur, puis
en appuyant jusqu’à leur enclenchement. Acheminez ensuite les câbles à travers la zone ouverte entre
la plaque en plastique et le bas du socle (D).
D
Bienvenue 11
Page 92

Socle de l'ordinateur
L’ordinateur HP TouchSmart est livré avec son socle fixé contre sa face arrière. Pour garantir l’aplomb de
l’ordinateur sur votre bureau, écartez le socle en tirant jusqu’à son enclenchement. Ensuite, si vous voulez
modifier l’angle du HP TouchSmart, empoignez l’ordinateur de chaque côté, et faites-le basculer (le
moniteur se déplace vers l’avant, le socle reste en place) vers l’arrière à un angle entre 5 et 40 degrés par
rapport à la verticale.
ATTENTION : Assurez-vous que l’angle d’inclinaison de l’ordinateur est d’au moins 5 degrés
par rapport à la verticale pour éviter tout déséquilibre et une éventuelle chute.
5° min.
40°
max
ATTENTION : Le socle de l’ordinateur reste en place lorsque vous augmentez l’angle ;
l’ordinateur se déplace vers l’avant. Prenez garde à ce que l’écran de l’ordinateur ne dépasse
pas de la table.
Orientation de l’ordinateur
L’ordinateur HP TouchSmart PC est conçu pour être utilisé selon une orientation paysage (A). Lorsqu’il est
fixé sur un mur, l’ordinateur doit garder l’écran dans cette orientation paysage et ne pas être orienté en
portrait (B), ou reposer horizontalement (C).
ATTENTION : Si vous disposez l’ordinateur avec une orientation portrait (B) ou horizontale (C),
vous risquez d’endommager les composants matériels.
AB B C
12 Manuel de l’utilisateur (les fonctions peuvent varier selon le modèle)
Page 93

Orientation latérale de l’ordinateur
La fonction d’orientation latérale de l’ordinateur offre une plage de mouvement utilisable.
Clavier et souris sans fil
La configuration de votre clavier et votre souris sans fil est très simple. Retirez simplement les languettes des
piles du clavier et de la souris. Vérifiez par ailleurs que l’interrupteur sous la souris est allumé (le clavier
n’est doté d’aucun interrupteur). Ensuite, allumez l’ordinateur. Si l’usage du clavier et de la souris vous
pose des problèmes, synchronisez-les manuellement en vous conformant à la procédure suivante.
Le clavier est conçu pour s’adapter sous l’ordinateur lorsque vous ne vous en servez pas. Il est possible que
votre produit diffère de celui représenté ici. Le récepteur sans fil montré ici est préinstallé dans l’ordinateur.
IMPORTANT : Pour optimiser la durée de vie des piles, évitez d’utiliser la souris sur une surface sombre
ou très brillante, et éteignez la souris lorsque vous ne l’utilisez pas.
Synchronisation du clavier et de la souris sans fil
Pour vous faciliter la tâche, le clavier et la souris sans fil sont présynchronisés pour fonctionner avec
l’ordinateur HP TouchSmart. Le clavier et la souris doivent fonctionner immédiatement dès que vous retirez
les languettes des piles afin d’activer les piles préinstallées ; allumez ensuite la souris (B).
Bienvenue 13
Page 94

En cas de dysfonctionnement, une synchronisation manuelle du clavier et de la souris peut être nécessaire.
Pour les synchroniser :
■ Assurez-vous que le clavier et la souris sont à proximité de l’ordinateur HP TouchSmart, à savoir à
moins de 1 pied (30 cm), et qu’aucun autre périphérique ne crée une interférence.
■ Clavier : Appuyez sur le bouton Connecter sous le clavier (A) pendant cinq secondes. Le témoin
d’activité bleu du récepteur sans fil s’allume lorsque la commande de synchronisation a été reçue et
s’éteint lorsque la synchronisation est terminée.
■ Souris : Appuyez sur le bouton Connecter sous la souris (C) pendant cinq secondes. Le témoin
d’activité bleu du récepteur sans fil s’allume lorsque la commande de synchronisation a été reçue et
s’éteint lorsque la synchronisation est terminée.
B
A
Si le dysfonctionnement persiste, retirez puis réintroduisez le récepteur du clavier et de la souris à l’arrière
de l’ordinateur, puis effectuez à nouveau la synchronisation.
C
Lumière ambiante
Certains modèles uniquement
La lumière ambiante de l’ordinateur HP TouchSmart diffuse une lueur d’un blanc cru depuis la base de
l’ordinateur (sur certains modèles, vous pouvez changer la couleur). Par défaut, la lumière ambiante est
éteinte au moment où vous allumez l’ordinateur.
Pour régler la lumière ambiante :
■ Appuyez sur le bouton de réglage de la lumière ambiante, situé sur le côté gauche de l’appareil, pour
allumer la lumière ambiante.
■ Continuez d’appuyer sur le bouton pour faire se succéder en alternance la faible intensité, l’intensité
moyenne, la haute intensité, la désactivation et l’activation.
REMARQUE : La lumière ambiante s’affaiblit lorsque l’ordinateur passe en mode veille.
Pour changer la couleur ou l’intensité de la lumière ambiante (certains modèles uniquement) :
1 Touchez le bouton Démarrer, Tous les programmes, allez dans Applications HP et
recherchez la fonction Lumière.
2 Touchez la couleur désirée.
3 Modifiez l’intensité de la lumière en touchant le haut ou le bas du spectre coloré, ou en appuyant sur
le bouton de lumière ambiante sur l’ordinateur.
Ajout de matériel et de logiciels
L’ordinateur HP TouchSmart peut ne pas être compatible avec tous les logiciels que vous installez ou tous
les matériels que vous ajoutez. Assurez-vous que votre matériel et vos logiciels sont compatibles avec le
système d’exploitation.
14 Manuel de l’utilisateur (les fonctions peuvent varier selon le modèle)
Page 95

Pour déterminer si vous avez un système 64 ou 32 bits
1 Touchez le bouton Démarrer, puis touchez Aide et support.
2 Appuyez sur Outil de dépannage, puis sur Informations système.
3 Appuyer sur Appuyer ici pour ouvrir Information système.
4 Lorsque l’écran Information System s’affiche, vous pouvez voir le système d’exploitation et son
nom. Il apparaît sous la forme (64 bits) ou (32 bits).
Lecteur de disque optique
Utilisez votre lecteur de disque CD/DVD pour lire ou enregistrer des CD et des DVD, ainsi que des disques
Blu-Ray (certains modèles uniquement). Le lecteur de CD/DVD n’est pas un tiroir, mais une fine fente.
Introduisez le disque avec le côté où figurent les données orienté vers l’arrière de l’ordinateur (l’étiquette se
trouvant devant).
A
Pour éjecter un disque, assurez-vous que l’appareil est allumé, puis appuyez sur le bouton Éjection (A) sur
le côté du lecteur. Vous pouvez aussi appuyer sur le bouton Démarrer, appuyer sur Ordinateur, puis
appuyer en maintenant le doigt enfoncé (ou avec la souris, cliquer avec le bouton droit) sur le lecteur CD,
et enfin appuyer sur Éjecter.
Si le disque se coince, reportez-vous au Guide de garantie limitée et de support pour obtenir le numéro de
téléphone où contacter le service d’assistance technique HP.
Connexion à Internet
L’ordinateur HP TouchSmart est conçu pour prendre en charge un réseau local sans fil (certains modèles
uniquement) ou câblé capable d’établir la communication avec d’autres périphériques, comme par
exemple des imprimantes et d’autres ordinateurs. La connexion réseau à Internet se fait d’ordinaire par le
biais d’un modem à large bande (DSL ou câble), qui nécessite un abonnement distinct.
■ Pour un réseau local sans fil, l’ordinateur HP TouchSmart comporte une antenne de réseau local
sans fil intégrée, que vous pouvez utiliser pour accéder à votre réseau domestique sans fil.
■ Pour un réseau local câblé, branchez un câble Ethernet (vendu séparément) au connecteur
Ethernet à l’arrière de l’ordinateur, puis raccordez l’autre extrémité au routeur ou au modem à
large bande.
Réseau domestique sans fil
Le point d’accès sans fil et le service Internet sont requis et ne sont pas fournis. La disponibilité des points
d’accès sans fil peut être limitée.
Bienvenue 15
Page 96

Si vous installez un réseau sans fil pour la première fois, vous devez vous acquitter des tâches suivantes :
1 Souscrivez à un service d’accès Internet haut débit auprès d’un fournisseur d’accès Internet (FAI).
2 Procurez-vous un modem à large bande (DSL ou câble). Celui-ci est généralement fourni par le FAI.
3 Achetez et installez un routeur sans fil (vendu séparément), le cas échéant.
REMARQUE : Les procédures d’installation du modem à large bande et du routeur varient en
fonction du fabricant. Conformez-vous aux instructions du fabricant.
4 Connectez l’ordinateur au réseau.
REMARQUE : L’illustration concerne une connexion DSL murale. Si vous disposez d’un modem câblé,
le modem sera raccordé au mur par le biais d’un câble coaxial.
CBA
5 Configurez l’ordinateur HP TouchSmart en vue de la connexion avec le réseau sans fil.
a Allumez l’ordinateur HP TouchSmart.
b Connectez l’ordinateur HP TouchSmart au réseau sans fil :
■ Cliquez avec le bouton droit sur l’icône Réseau dans la barre des tâches, puis
sélectionnez Ouvrir le centre réseau et partage. Cliquez sur Connecter à un
réseau
Ou
■ Cliquez avec le bouton droit sur l’icône Réseau dans la barre des tâches, puis
sélectionnez Centre réseau et partage. Quand la fenêtre apparaît, sélectionnez
Configurer une nouvelle connexion ou un réseau, puis suivez les instructions
qui s’affichent à l’écran.
c Testez le réseau sans fil ; pour cela, ouvrez votre navigateur Web et accédez à un site Web.
6 Ajoutez des périphériques sans fil au réseau (facultatif).
. Quand la fenêtre apparaît, choisissez le réseau, puis cliquez sur
Connexion
.
Réseau domestique câblé
Si vous installez un réseau câblé pour la première fois, vous devez vous acquitter des tâches suivantes :
1 Souscrivez à un service d’accès Internet haut débit auprès d’un fournisseur d’accès Internet (FAI).
2 Procurez-vous un modem à large bande (DSL ou câble). Celui-ci est généralement fourni par le FAI.
3 Achetez et installez un routeur câblé (vendu séparément), le cas échéant.
REMARQUE : Les procédures d’installation du modem à large bande et du routeur varient en
fonction du fabricant. Conformez-vous aux instructions du fabricant.
4 Connectez le câble DSL (illustré) ou le câble coaxial (non illustré) du mur au modem.
5 Branchez le modem au port Ethernet de l’ordinateur au moyen d’un câble Ethernet. Si vous voulez
raccorder plusieurs périphériques au réseau, connectez un routeur ou un concentrateur (non illustré) au
modem au moyen d’un câble Ethernet, puis raccordez l’ordinateur au routeur via un câble Ethernet.
16 Manuel de l’utilisateur (les fonctions peuvent varier selon le modèle)
Page 97

Si vous possédez un réseau câblé à domicile avec des connecteurs Ethernet sur mur, raccordez
directement un câble Ethernet du port Ethernet de l’ordinateur au connecteur Ethernet mural.
Le port Ethernet de l’ordinateur HP TouchSmart est situé à l’arrière de l’appareil, derrière le capot des
connecteurs.
6 Ajoutez d’autres ordinateurs ou périphériques au réseau câblé :
a Débranchez le modem à large bande et le routeur de l’alimentation, puis éteignez l’ordinateur
HP TouchSmart et les PC que vous voulez ajouter au réseau.
b Pour chaque ordinateur câblé, raccordez une extrémité d’un câble Ethernet au connecteur de
réseau local de l’ordinateur, puis raccordez l’autre extrémité du câble à un quelconque connecteur
Ethernet disponible sur le routeur.
c Rebranchez le modem, et patientez jusqu’au terme de son cycle de démarrage. Rebranchez le
routeur. Ensuite, allumez les ordinateurs câblés et l’ordinateur HP TouchSmart.
d Testez la connexion réseau pour chacun des ordinateurs câblés ; pour cela, ouvrez votre
navigateur Web et accédez à un site Web.
Périphériques Bluetooth
Certains modèles uniquement
Certains modèles d’ordinateur HP TouchSmart sont équipés de la technologie Bluetooth qui permet la
communication entre différents périphériques Bluetooth. Les périphériques Bluetooth créent un réseau
personnel (PAN) qui assure la connexion d’autres périphériques dotés de la technologie Bluetooth, tels que
des ordinateurs, téléphones, imprimantes, casques d
Sur un réseau personnel, les périphériques situés relativement proches les uns des autres communiquent
chacun directement avec les autres.
Pour activer un périphérique Bluetooth :
1 Reportez-vous aux instructions du périphérique Bluetooth pour des détails sur la façon dont il peut être
découvert (il envoie un signal radio).
2 Cliquez sur le bouton Démarrer, sur Panneau de configuration, puis sur Matériel et audio.
Recherchez votre téléphérique Bluetooth et suivez les instructions affichées à l’écran.
3 Si le périphérique Bluetooth est une imprimante, appuyez sur le bouton Démarrer, sur Panneau de
configuration, puis sur Matériel et audio. Appuyez sur Imprimantes. Appuyez sur Ajouter
une imprimante.
’écoute, haut-parleurs, caméras et appareils photo.
Bienvenue 17
Page 98

Carte TV et Windows Media Center
Certains modèles uniquement
Regardez et enregistrez vos émissions télévisées favorites en utilisant Windows Media Center. Les menus
et les fonctions de Windows Media Center sont accessibles par simple effleurement, mais vous pouvez
également vous servir de la télécommande, du clavier et de la souris. La carte TV et la télécommande sont
fournies avec certains modèles uniquement.
Regarder et enregistrer des émissions télévisées
Pour regarder et enregistrer des émissions télévisées sur l’ordinateur HP TouchSmart :
1 Connectez la source de signal TV à la carte TV de l’ordinateur. Voir Connexion de la source de signal
TV à l’ordinateur, page 18.
2 Configurez l’ordinateur en vue d’un usage d’un boîtier décodeur (en option). Voir Utilisation d’un
boîtier décodeur avec Windows (étape en option), page 20.
3 Procédez aux tâches de l’assistant de configuration de Windows Media Center afin de configurer la
carte TV et le guide des programmes. Voir Assistant de configuration Windows Media Center,
page 21.
4 Pointez la télécommande vers le récepteur infrarouge en bas à droite de l’ordinateur HP TouchSmart
pour lancer Windows Media Center et utilisez ce programme pour regarder et enregistrer des
émissions télévisées. Pour plus d’informations sur la configuration et l’utilisation de Windows Media
Center, rendez-vous sur : www.microsoft.com, ou appuyez sur le bouton Démarrer, sur
Windows Media Center, sur Tâches, puis sur En savoir plus. Cela vous amène sur le site
www.windowsmediacenter.com
Connexion de la source de signal TV à l’ordinateur
Certains modèles uniquement
ATTENTION : Reportez-vous à la section Informations de sécurité supplémentaires du Guide de
garantie limitée et de support avant d’installer et de connecter l’ordinateur HP TouchSmart à
Si vous souhaitez connecter une source de signal TV à l’ordinateur, celui-ci doit être équipé d’une carte TV,
livrée avec certaines modèles seulement. Il est également possible que vous ayez besoin d’acheter des
câbles séparément.
REMARQUE : La disponibilité des signaux est limitée par la force et l’accessibilité du signal TV d’origine,
de son emplacement ainsi que d’autres facteurs. Les problèmes de performance qui peuvent surgir ne
constituent pas des défauts du produit.
l’alimentation secteur.
ATTENTION : (Norvège et Suisse uniquement) Avis de mise à la terre des câbles pour les
produits équipés d’un syntoniseur TVB.
Pour utiliser la carte TV, vous devez immanquablement utiliser un sectionneur (adaptateur
vendu séparément) avec l’ordinateur pour brancher un câble coaxial à la source de signal TV.
Le recours à l’adaptateur pour carte TV permet d’éviter les blessures personnelles et la
détérioration du matériel en cas de surtension sur la ligne coaxiale.
18 Manuel de l’utilisateur (les fonctions peuvent varier selon le modèle)
Page 99

Branchez le câble coaxial de l’antenne TV ou le câble TV fourni au connecteur d’entrée TV (A) situé à
l’arrière de l’ordinateur, derrière le capot des connecteurs. Consultez Arrière de l’ordinateur
HP TouchSmart page 7.
A
Bienvenue 19
Page 100

Utilisation d’un boîtier décodeur avec Windows
(étape en option)
Vendu séparément
Reportez-vous à la documentation de votre boîtier décodeur pour plus d’informations.
1 Branchez un câble S-vidéo au connecteur d’entrée S-vidéo (A) situé à l’arrière de l’ordinateur, derrière
le capot des connecteurs. Raccordez l’autre extrémité du câble au boîtier décodeur.
A
B
Vous aurez peut-être besoin d’un adaptateur S-vidéo (vendu séparément) pour connecter la sortie
vidéo du boîtier décodeur au connecteur d’entrée S-vidéo (A).
.
2 Si vous utilisez une connexion S-vidéo, branchez le câble audio du boîtier décodeur au connecteur
d’entrée audio (B) à l’arrière de l’ordinateur. Utilisez un câble en Y pour combiner les canaux RCA
gauche et droit (blanc et rouge).
Configuration pour que l’ordinateur communique avec un boîtier
décodeur (étape en option)
Vous devez configurer les connexions de l’ordinateur pour qu’il puisse communiquer avec votre boîtier
décodeur.
Connectez un câble d’émetteur à infrarouge (télécapteur) à l’ordinateur et à votre boîtier décodeur pour
utiliser correctement la télécommande.
20 Manuel de l’utilisateur (les fonctions peuvent varier selon le modèle)
 Loading...