

Page 1

HP SureStore E SAN Manager
LUN Management
Solaris Installation Guide
H
Edition 0900
Printed in U.S.A.
Page 2

Notice
Restricted Rights Legend
© Hewlett-Packard Company, 1999, 2000. All rights
reserved.
Hewlett-Packard Company makes no warranty of
any kind with regard to this material, including, but
not limited to, the implied warranties of merchantability and fitness for a particular purpose. HewlettPackard shall not be liable for errors contained
herein or for incidental or consequential damages in
connection with the furnishing, performance, or use
of this material.
This document contains proprietary information,
which is protected by copyright. No part of this
document may be photocopied, reproduced, or
translated into another language without the prior
written consent of Hewlett-Packard. The information contained in this document is subject to change
without notice.
Use, duplication, or disclosure by government is
subject to restrictions as set forth in subdivision (c)
(1) (ii) of the Rights in Technical Data and Computer
Software Clause at DFARS 252.227.7013.
Warranty
If you have any questions about the warranty for
this product, contact your dealer or local HewlettPackard sales representative.
1999, 2000 Hewlett-Packard Company. All rights
reserved.
SureStore E is a trademark of Hewlett-Packard
Company.
Adobe and Acrobat are trademarks (which may be
registered in some jurisdictions) of Adobe Systems
Incorporated.
QLogic is a registered trademark of QLogic
Corporation.
Sun, Solaris, and Solstice DiskSuite are trademarks
of Sun Microsystems, Inc.
All SPARC trademarks are used under license and
are trademarks or registered trademarks of SPARC
International, Inc., in the United States and other
countries. Products bearing SPARC trademarks are
based upon an architecture developed by Sun
Microsystems, Inc.
UNIX is a registered trademark in the United States
and other countries, licensed exclusively through
X/Open Company Limited.
VERITAS and VxFS are registered trademarks of
VERITAS Software Corporation in the United States
and other countries.
VERITAS Volume Manager and VERITAS File
System are trademarks of VERITAS Software
Corporation.
Windows is either a registered trademark or
trademark of Microsoft Corporation in the United
States and/or other countries.
2
Page 3

Format Conventions
Denotes
Caution
Note
this font
this font
this font
this font
A condition or situation that
could damage or destroy the
product or the user’s work
Significant concepts or operating
instructions
Text to be typed verbatim: all
commands, path names, file
names, and directory names
Buttons and tabs to click; for
example, the
Text displayed on the screen
A submenu; for example,
Database Scan For Devices
means to select the Scan For
Devices option in the Database
menu.
Variables within Solaris
commands
Variables in Solaris commands
that are shown in on-screen text
examples
Save
button.
3
Page 4

Preface
This installation guide explains how to install, use, and troubleshoot HP SureStore E SAN Manager
LUN Management (SAN Manager LM) software on Sun Solaris nodes.
This guide is a supplement to the
Administrator’s Guide
include Sun Solaris nodes.
This guide assumes that you have a working knowledge of the Solaris Operating System and its
conventions. For more information about Solaris, see your Solaris documentation.
and is intended for SAN Administrators with SAN Manager networks that
HP SureStore E SAN Manager LUN Management
4
Page 5

CONTENTS
Contents
1 Installation
System Requirements . . . . . . . . . . . . . . . . . . . . . . . . . . . . . . . . . . . . . . . . . . . . . . . . . . . . 8
SAN Manager LM Packages . . . . . . . . . . . . . . . . . . . . . . . . . . . . . . . . . . . . . . . . . . . . . . . 9
SAN Manager LM Components . . . . . . . . . . . . . . . . . . . . . . . . . . . . . . . . . . . . . . . . . . .10
Pre-Installation . . . . . . . . . . . . . . . . . . . . . . . . . . . . . . . . . . . . . . . . . . . . . . . . . . . . . . . .11
On Solaris 7 Stations Only: Remove the QLogic HBA Driver . . . . . . . . . . . . . . . 11
Remove the OEM QLogic HBA Driver . . . . . . . . . . . . . . . . . . . . . . . . . . . . . . . . . .11
Install a Fibre Channel HBA Card Into Each Computer . . . . . . . . . . . . . . . . . . .12
Pre-Installation Checklist. . . . . . . . . . . . . . . . . . . . . . . . . . . . . . . . . . . . . . . . . . . . .12
Installing SAN Manager LM . . . . . . . . . . . . . . . . . . . . . . . . . . . . . . . . . . . . . . . . . . . . . .14
Configuration. . . . . . . . . . . . . . . . . . . . . . . . . . . . . . . . . . . . . . . . . . . . . . . . . . . . . . . . . .16
Adding a Node to the Database Automatically . . . . . . . . . . . . . . . . . . . . . . . . . . . 16
Adding a Node to the Database Manually . . . . . . . . . . . . . . . . . . . . . . . . . . . . . . . 16
. . . . . . . . . . . . . . . . . . . . . . . . . . . . . . . . . . . . . . . . . . . . . . . . . . . . . . . . . . .7
2 Storage Management
Supported Partition Map Formats . . . . . . . . . . . . . . . . . . . . . . . . . . . . . . . . . . . . . . . .20
Unknown/Raw . . . . . . . . . . . . . . . . . . . . . . . . . . . . . . . . . . . . . . . . . . . . . . . . . . . . . .20
NTFS/FAT. . . . . . . . . . . . . . . . . . . . . . . . . . . . . . . . . . . . . . . . . . . . . . . . . . . . . . . . . . 20
UPM Format. . . . . . . . . . . . . . . . . . . . . . . . . . . . . . . . . . . . . . . . . . . . . . . . . . . . . . . . 20
Preparing a Fibre Channel Disk for use with SAN Manager LM. . . . . . . . . . . . . . . .21
Slice Name Conventions. . . . . . . . . . . . . . . . . . . . . . . . . . . . . . . . . . . . . . . . . . . . . . 21
Disk Setup Issues . . . . . . . . . . . . . . . . . . . . . . . . . . . . . . . . . . . . . . . . . . . . . . . . . . .22
Partitioning a SAN Manager LM Disk for use with Solaris . . . . . . . . . . . . . . . . .22
Creating a UFS File System . . . . . . . . . . . . . . . . . . . . . . . . . . . . . . . . . . . . . . . . . . . . . .26
. . . . . . . . . . . . . . . . . . . . . . . . . . . . . . . . . . . . . . . . . . . .19
5
Page 6

Mounting UFS File Systems . . . . . . . . . . . . . . . . . . . . . . . . . . . . . . . . . . . . . . . . . . . . . 28
Mounting File Systems Automatically . . . . . . . . . . . . . . . . . . . . . . . . . . . . . . . . . . . . . 29
Using the vfstab File . . . . . . . . . . . . . . . . . . . . . . . . . . . . . . . . . . . . . . . . . . . . . . . . . 30
3 SAN Manager LM Utilities
SAN Manager LM Utilities . . . . . . . . . . . . . . . . . . . . . . . . . . . . . . . . . . . . . . . . . . . . . . . 32
get_wwn . . . . . . . . . . . . . . . . . . . . . . . . . . . . . . . . . . . . . . . . . . . . . . . . . . . . . . . . . . . . . . 33
get_loop_state . . . . . . . . . . . . . . . . . . . . . . . . . . . . . . . . . . . . . . . . . . . . . . . . . . . . . . . . .34
4 Troubleshooting
No SAN Devices are Available on a Solaris Node. . . . . . . . . . . . . . . . . . . . . . . . . . . . 36
Error During Mounting: “Not a block device”. . . . . . . . . . . . . . . . . . . . . . . . . . . . . . . 37
A Fibre Channel Tape Library, CD-R Drive, or Other Device is not Showing Up . 38
A Solaris Node is not Discovered by a SAN Manager LM Administration Node . . 39
A Device Cannot be Disabled from a Solaris Node . . . . . . . . . . . . . . . . . . . . . . . . . . 40
Index
. . . . . . . . . . . . . . . . . . . . . . . . . . . . . . . . . . . . . . . . . . . . . . . . . . . . . . . . . . . . . . . . . 41
. . . . . . . . . . . . . . . . . . . . . . . . . . . . . . . . . . . . . . . . . . . . . . . . . . 35
. . . . . . . . . . . . . . . . . . . . . . . . . . . . . . . . . . . . . . . 31
6
Page 7

1 INSTALLATION
System Requirements
SAN Manager LM Packages
SAN Manager LM Components
Pre-Installation
Installing SAN Manager LM
Configuration
Installation
7
Page 8

System Requirements
All SAN Manager LM Solaris nodes must meet the following system requirements:
•
Solaris Workstation or Server 2.6 or 7
Note
•
PCI bus-equipped computer, with one free bus mastering slot
•
Any UltraSPARC workstation or server
64 megabytes of RAM
•
Available disk space per file system: root (/): 500k and /opt: 500k
•
Network adapter
•
•
Network protocol: TCP/IP
•
A Windows NT computer with SAN Manager LM installed and configured, which is on
the same network as the Solaris node
Note
SAN Manager LM works with Solaris 7 in 32-bit mode only. Solaris 7 in 64-bit
mode is not supported.
See the
requirements.
SAN Manager LM Administrator’s Guide
for Windows NT system
8
System Requirements
Page 9

SAN Manager LM Packages
The SAN Manager LM installer includes the following packages:
•
TRSANfcd: The SAN Manager LM software
•
TRSANdoc: Adobe Acrobat PDF versions of the
Installation Guide
and the
SAN Manager LM for Solaris Release Notes
SAN Manager LM for Solaris
Installation
Note
To view the electronic versions of the SAN Manager LM documentation, you
must have Adobe Acrobat Reader installed. The Acrobat installer is available on
the SAN Manager LM CD-ROM. For instructions on installing Acrobat Reader,
see the
/cdrom/sanman/adobe/SSOLRS.install/INSTGUID.TXT
file.
SAN Manager LM Packages
9
Page 10
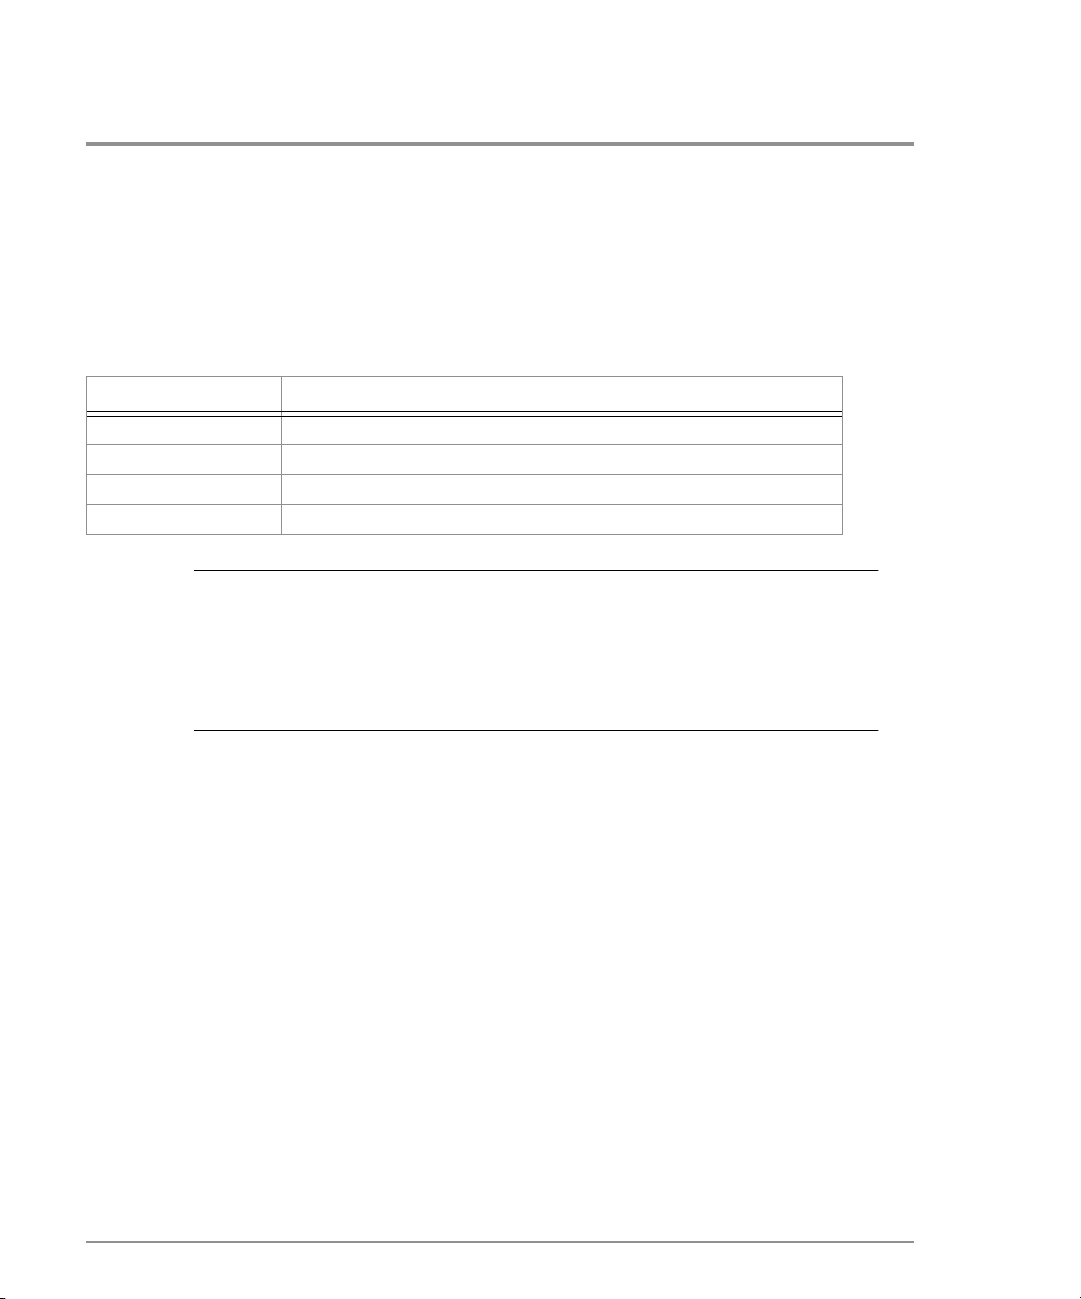
SAN Manager LM Components
Table 1
File name Description
sd_fcst Fibre Channel SCSI-Target driver with SAN Manager LM support
tfc Qlogic Host Bus Adapter (HBA) driver
TRSANManService SAN Manager LM Service
S99TRService Starts the SAN Manager LM Service at boot time
Note
SAN Manager LM Solaris Components
Unless you choose a custom location, the SAN Manager LM application,
service, and utilities are installed into the
/opt/TRSANfcd/bin
directory. The
default install location for the SAN Manager LM documentation is
/opt/TRSANfcd/doc
/kernel/drv
directory, and the S99TRService is copied to the
. The SAN Manager LM drivers are installed into the
/etc/rc2.d
directory.
10
SAN Manager LM Components
Page 11

Pre-Installation
If you are installing SAN Manager LM on a node that is running Solaris 7, read the QLogic
HBA driver section below. Otherwise, skip to the HBA installation section on page 12.
On Solaris 7 Stations Only: Remove the QLogic HBA Driver
Solaris 7 is packaged with an OEM software package that includes a QLogic HBA driver. If
the OEM software package is installed, you must remove the OEM QLogic driver before
installing SAN Manager LM. If you connect a Solaris machine to the Fibre Channel network
while running the OEM QLogic driver, all of the devices on the SAN will be added to
/dev/rdsk
LM with its QLogic driver, only assigned devices are listed in
and
/dev/dsk
. This can cause confusion, because when you run SAN Manager
/dev/rdsk
and
/dev/dsk
.
Installation
Note
To check for the OEM QLogic HBA driver, look for a file named
/kernel/drv
directory.
ifp
in the
Remove the OEM QLogic HBA Driver
1. Log in as superuser.
2. Enter
3. Once the QLogic driver is removed, continue with the HBA installation procedure on
Note
rem_drv ifp
page 12.
to remove the QLogic driver.
If you decide to remove this node from the SAN at a later time, enter the
following command to restore the Solaris 7 QLogic driver:
add_drv -m″* 0666 root root″ -i′″pci1077,2100″′ ifp
Pre-Installation
11
Page 12

Install a Fibre Channel HBA Card Into Each Computer
1. Verify that the computer functions properly before installing the HBA.
2. Shut down the computer.
3. Install the HBA. For instructions, see your HBA installation guide.
4. Cable each computer to the hub or switch.
5. Power up the computer.
Caution
For Solaris 7 nodes, remember to start up the computer in 32-bit mode. SAN
Manager LM cannot be installed on a Solaris 7 node that is running in 64-bit
mode. To start up in 32-bit mode, enter the command
process, then enter the following command:
boot kernel/unix -r
stop a
to halt the boot
Pre-Installation Checklist
1. Does the computer meet SAN Manager LM’s system requirements?
2. Is the HBA installed?
3. Is the computer attached to a SAN?
4. Is the LAN up, running, and configured so it supports the LAN IP addressing scheme?
– Will the IP address on the Solaris node work with the IP addressing scheme on the
Windows NT node(s)?
– Is the Hosts file on the Windows NT administration node updated with the Sun
node’s IP address? This is only necessary if Samba is not installed on the Sun node
or DNS Services is not configured.
– Is the
/etc/hosts
support the LAN IP addressing setup?
file on the Sun node updated with the correct IP address that will
5. Is SAN Manager LM installed and configured on at least one Windows NT node
(preferably a Windows NT primary domain controller machine) on the SAN?
12
Pre-Installation
Page 13

6. Is SAN Manager LM licensed for Sun Solaris nodes? Run SAN Manager LM on a
Windows NT node to check your licensing information. For more information about
licensing, see the
Guide
.
HP SureStore E SAN Manager LUN Management Administrator’s
7. Is the Fibre Channel network hardware (hubs, switch, etc.) powered up?
8. Are the optical/copper Fibre Channel cables properly connected to the HBAs, hubs or
switches, and storage disk array enclosures?
Have the following available:
•
The SAN Manager LM installation CD-ROM
SAN Manager LM for Solaris Release Notes
•
Fibre Channel hardware manuals
•
Installation
Pre-Installation
13
Page 14

Installing SAN Manager LM
1. For Solaris 7 nodes only: Start up the node in 32-bit mode.
2. Log in as superuser.
3. Insert the SAN Manager LM CD-ROM in the CD drive.
By default, the CD-ROM mounts to the
/cdrom/sanman
directory.
If the CD does not mount automatically, enter the following command:
Note
mount -F hsfs -o ro /vol/dev/dsk/c0t2d0 /cdrom/sanman
Mount points may vary depending on your system configuration. In this
example, the CD drive is on controller 0, and c0t2d0 is the default CD-ROM
address.
4. Enter
pkgadd -d /cdrom/sanman
to add packages from the SAN Manager LM CD-
ROM.
A message similar to the following is displayed:
The following packages are available:
1 TRSANfcd Hewlett-Packard SAN Manager install set
(sparc) version 1.0.0
2 TRSANdoc SAN Manager documentation
(sparc) version 1.0.0
Select package(s) you wish to process (or 'all' to process all packages). (default: all) [?,??,q]:
5. To install the SAN Manager LM software and documentation, press
Return
. If you do
not want to install both packages, enter the number of the SAN Manager LM package to
install, and press
Return
.
6. When prompted to confirm the installation, enter y and press
14
Installing SAN Manager LM
Return
.
Page 15

When the SAN Manager LM software package has been added, the Console displays the
following information as it loads the SAN Manager LM QLogic driver and Target driver:
Hewlett-Packard TFC Driver
Copyright 1999 Hewlett-Packard Company
Sparc Qlogic Driver version 1.0.0 (08:32:13, Nov 1 1999)
TFC: Attaching pci1077,2100 instance 1
HP Sparc Fibre Target Driver version 1.0 Build 62 (10:10:18, Apr 27
2000)
TFC Driver: loop 0 up
The installation is now complete. You do not need to reboot after installing SAN Manager
LM on a Solaris node.
Installation
Installing SAN Manager LM
15
Page 16

Configuration
After SAN Manager LM is installed on a Sun Solaris node, the node must be added to the
SAN Manager LM database. This is done through the SAN Manager LM administration
application, which must be run on a Windows NT node, preferably one that is configured as
a primary domain controller.
Adding a Node to the Database Automatically
If the Solaris node is running an application that includes NetBIOS support (Samba, for
example), the Solaris node will be discovered and added to the SAN database when the
SAN Manager LM administration application is started on a Windows NT node. Starting the
application automatically initiates a scan for all nodes and devices found on the SAN. If a
node is not added automatically, follow the procedure for adding nodes manually, see the
following section.
Note When adding Sun nodes to the database, be sure to run SAN Manager LM on a
Windows NT node that has an updated Hosts file. For more information, see the
Pre-Installation Checklist on page 12.
Adding a Node to the Database Manually
1. Obtain the node’s host name or IP address.
– To get the host name of a Solaris node, enter the command: uname -n
– To get the IP address of a Solaris node, enter the command: ifconfig -a
2. On a SAN Manager LM Windows NT node, run the SAN Manager LM application.
3. Select Database Add Node.
16
Configuration
Page 17

The Add Node dialog box appears.
4. Select Node Name or IP Address.
5. Enter the host name or IP Address and click the Add Node button.
6. Add more nodes or click Close to close the Add Node dialog box.
7. Verify that the host name of the Solaris node is displayed in the main window of the SAN
Manager Windows NT administration application.
You are now ready to set up storage devices for use with SAN Manager LM.
Installation
Configuration 17
Page 18

18 Configuration
Page 19

2 STORAGE MANAGEMENT
Supported Partition Map Formats
Preparing a Fibre Channel Disk for use with SAN Manager LM
Creating a UFS File System
Mounting UFS File Systems
Mounting File Systems Automatically
Storage Management
19
Page 20

Supported Partition Map Formats
Using the SAN Manager LM application on a Windows NT node, you can assign the
following types of LUNs (devices) to Solaris nodes: Unknown/Raw, NTFS/FAT, and UPM
format. If you intend to use these types of LUNs in a Solaris environment, the necessary
Solaris file systems (UFS or VxFS) must be created.
Unknown/Raw
Unknown/raw disks are displayed with device names in /dev/rdsk and /dev/dsk on Solaris
nodes. These device names are used to build UFS or VxFS (Veritas) file systems using the
Solaris Format utility.
NTFS/FAT
NTFS/FAT disks are displayed as usable devices on Solaris nodes.
Caution To use an NTFS/FAT device on a Solaris node, you must format it with a UFS
or VxFS file system, which will erase Microsoft s FAT/NTFS file system and all
data on the disk prior to Solaris formatting.
UPM Format
There are three types of UPM partitions that exhibit the following behavior when UPM
devices are assigned to Solaris nodes:
• Database: Used in the SAN Manager LM database mirror set. Database partitions are not
accessible to Solaris nodes.
• Free space: Unused space on a UPM disk is called free space. Free space partitions are
not accessible to Solaris nodes.
• File system: This UPM partition is designated for use as a file system partition. UPM file
system partitions are displayed as Virtual LUNs on Solaris nodes. A Virtual LUN is really
a single UPM partition on a disk, but Solaris views it as a usable device that can be
partitioned and used for up to seven UFS file systems.
20 Supported Partition Map Formats
Page 21

Preparing a Fibre Channel Disk for use with SAN Manager LM
1. On a Windows NT SAN Manager LM node, run the administration application and assign
the desired devices to the Solaris node.
2. To verify that the assigned SAN Manager LM disks are available, enter ls /dev/rdsk to
list the available disk devices on the Solaris node.
The Solaris node creates eight slices (partitions) for every accessible device. The slice
names are listed as numbers 0 through 7, with slice number 2 representing the entire
device. For non-UPM devices, the node creates a single device (LUN) name with eight
slices. In contrast, when you assign a UPM device to a Solaris node, a separate device
name with eight slices is listed for each UPM partition on the device. This is called a
virtual LUN, because it is really a UPM partition on a disk, but Solaris views it as a
separate device.
Slice Name Conventions
The slice name c1t127d49s0 includes the following components:
• c1 refers to the controller the storage device is connected to.
Storage Management
• t127 refers to the target number for the LUN.
Note Target numbers under 127 represent targets that are on hubs, and target
numbers over 127 indicate targets that are on switches. If a slice has target
number 127, the device is partitioned with SAN Manager LM’s UPM format.
• d49 is the logical unit number of the device.
• s0 is the slice (partition) number of the device.
Your SAN storage is now ready to be formatted.
Preparing a Fibre Channel Disk for use with SAN Manager LM 21
Page 22

Disk Setup Issues
• When selecting disks to partition, be careful not to select your internal disk.
• To support third-party failover software products on dual controller single loop SANs,
SAN Manager devices are listed twice as available disks when you run the Format utility.
If you are using a dual controller single loop SAN, be careful to partition, create a file
system, and mount only one instance of each SAN disk. For example, if c1 and c2 are
the Fibre Channel controllers, then c1t17d0 and c2t17d0 refer to the same disk. If you
partition, mount, or create file systems on both instances of a disk, data corruption will
occur.
Partitioning a SAN Manager LM Disk for use with Solaris
1. Run the Format utility.
A list of available devices appears with a prompt to specify a disk. The following
example is sample output from a one controller, one loop SAN configuration:
AVAILABLE DISK SELECTIONS:
0. c0t0d0 <Seagate Medalist 34342A cyl 8892 alt 2 hd 15 sec 63>
/pci@1f,0/pci@1,1/ide@3/dad@0,0
1. c1t17d0 <SEAGATE-ST118202CLAR18-3525 cyl 6919 alt 2 hd 24 sec 214>
/pci@1f,0/pci@1/scsi@1/sd_fcst@11,0
2. c1t127d20 <TR-UPM-4c72e14-1.00 cyl 54193 alt 2 hd 4 sec 640>
/pci@1f,0/pci@1/scsi@1/sd_fcst@7f,14
3. c1t127d35 <TR-UPM-83c7723-1.00 cyl 6919 alt 2 hd 24 sec 214>
/pci@1f,0/pci@1/scsi@1/sd_fcst@7f,23
4. c1t127d135 <TR-UPM-48e90487-1.00 cyl 6919 alt 2 hd 24 sec 214>
/pci@1f,0/pci@1/scsi@1/sd_fcst@7f,87
5. c1t127d189 <TR-UPM-10a46fbd-1.00 cyl 6919 alt 2 hd 24 sec 214>
/pci@1f,0/pci@1/scsi@1/sd_fcst@7f,bd
6. c1t127d250 <TR-UPM-5b3833fa-1.00 cyl 65441 alt 2 hd 1 sec 530>
/pci@1f,0/pci@1/scsi@1/sd_fcst@7f,fa
Specify disk (enter its number):
22 Preparing a Fibre Channel Disk for use with SAN Manager LM
Page 23

2. Enter the disk number and press Return.
If there is no valid partition table, the Format utility prompts you to label the disk:
Disk not labeled. Label it now? n
3. If you want to label the disk with the default partition table, enter y and press Return.
If you want to set up the partition label manually, enter n and press Return.
4. At the format prompt, enter p to select (define) a partition table, and press Return.
5. At the partition prompt, type p and press Return to display the current partition table:
partition> p
Current partition table (default):
Total disk cylinders available: 54193 + 2 (reserved cylinders)
Part Tag Flag Cylinders Size Blocks
0 root wm 0 - 102 128.75MB (103/0/0) 263680
1 swap wu 103 - 205 128.75MB (103/0/0) 263680
2 backup wu 0 - 54192 66.15GB (54193/0/0) 138734080
3 unassigned wm 0 0 (0/0/0) 0
4 unassigned wm 0 0 (0/0/0) 0
5 unassigned wm 0 0 (0/0/0) 0
6 usr wm 206 - 54192 65.90GB (53987/0/0) 138206720
7 unassigned wm 0 0 (0/0/0) 0
partition>
Storage Management
If you used the default partition table in Step 3, slices 0, 1, and 6 are created. Slice 2
represents the entire disk.
6. At the partition prompt, enter the partition number that you want to change, and press
Return.
Preparing a Fibre Channel Disk for use with SAN Manager LM 23
Page 24

The partition information is displayed along with the enter partition ID tag prompt:
partition> 0
Part Tag Flag Cylinders Size Blocks
0 root wm 0 - 51 130.41MB (52/0/0) 267072
Enter partition id tag[root]:
7. Assign a partition id tag, or press Return to accept the default value.
8. When prompted with Enter partition permission flags[wm]:, press Return to
accept the default setting.
9. When prompted with Enter new starting cyl, enter the starting cylinder number.
Caution Do not enter a cylinder number that overlaps another partition. The exception
to this rule is slice 2, which always represents the entire disk.
10. When prompted with Enter partition size, enter the size of the desired partition in
blocks (b), cylinders (c), megabytes (mb), or gigabytes (gb), and press Return.
11. Repeat steps 6 through 10 for subsequent partitions.
12. If extra partitions are defined in the partition table, delete them by using the following
settings:
Enter partition id tag[swap]:
Enter partition permission flags[wu]:
Enter new starting cyl[103]: 0
Enter partition size[263680b, 103c, 128.75mb, 0.13gb]: 0
Caution Do not delete the information listed under slice 2.
To view the partition table, enter p at the partition prompt, and press Return. Note the
slice numbers that were used. This information, along with the disk name, will be
needed in the section Creating a UFS File System on page 26.
13. At the partition prompt, enter label and press Return.
24 Preparing a Fibre Channel Disk for use with SAN Manager LM
Page 25

14. At the Ready to label disk, continue? prompt, enter y and press Return.
At this point, the new partition table is written to the disk. If you view this disk’s Device
Information in the SAN Manager LM administration application on a SAN Manager LM
Windows NT node, the device will be listed with a Sun partition map.
15. At the partition prompt, enter q and press Return.
16. To partition another disk, choose disk from the format menu, press Return, and repeat
steps 2 through 15, above.
17. When all disks are partitioned, exit the Format menu.
Storage Management
Preparing a Fibre Channel Disk for use with SAN Manager LM 25
Page 26

Creating a UFS File System
Now that your disks are partitioned, create a UFS file system on each partition.
1. At the # prompt, enter ls /dev/rdsk/c1* and press Return.
In this example, c1 is the Fibre Channel controller. Solaris lists all of the enabled
physical and virtual LUNs on the Fibre Channel controller. For each device, all 8 slices
are listed, regardless of whether they contain partitions.
# ls /dev/rdsk/c1*
/dev/rdsk/c1t127d135s0 /dev/rdsk/c1t127d20s0 /dev/rdsk/c1t127d35s0
/dev/rdsk/c1t127d135s1 /dev/rdsk/c1t127d20s1 /dev/rdsk/c1t127d35s1
/dev/rdsk/c1t127d135s2 /dev/rdsk/c1t127d20s2 /dev/rdsk/c1t127d35s2
/dev/rdsk/c1t127d135s3 /dev/rdsk/c1t127d20s3 /dev/rdsk/c1t127d35s3
/dev/rdsk/c1t127d135s4 /dev/rdsk/c1t127d20s4 /dev/rdsk/c1t127d35s4
/dev/rdsk/c1t127d135s5 /dev/rdsk/c1t127d20s5 /dev/rdsk/c1t127d35s5
/dev/rdsk/c1t127d135s6 /dev/rdsk/c1t127d20s6 /dev/rdsk/c1t127d35s6
/dev/rdsk/c1t127d135s7 /dev/rdsk/c1t127d20s7 /dev/rdsk/c1t127d35s7
/dev/rdsk/c1t127d189s0 /dev/rdsk/c1t127d250s0 /dev/rdsk/c1t17d0s0
/dev/rdsk/c1t127d189s1 /dev/rdsk/c1t127d250s1 /dev/rdsk/c1t17d0s1
/dev/rdsk/c1t127d189s2 /dev/rdsk/c1t127d250s2 /dev/rdsk/c1t17d0s2
/dev/rdsk/c1t127d189s3 /dev/rdsk/c1t127d250s3 /dev/rdsk/c1t17d0s3
/dev/rdsk/c1t127d189s4 /dev/rdsk/c1t127d250s4 /dev/rdsk/c1t17d0s4
/dev/rdsk/c1t127d189s5 /dev/rdsk/c1t127d250s5 /dev/rdsk/c1t17d0s5
/dev/rdsk/c1t127d189s6 /dev/rdsk/c1t127d250s6 /dev/rdsk/c1t17d0s6
/dev/rdsk/c1t127d189s7 /dev/rdsk/c1t127d250s7 /dev/rdsk/c1t17d0s7
26 Creating a UFS File System
Page 27

2. At the # prompt, enter newfs options /dev/rdsk/slice_name, and press Return to
create a UFS file system on the partition.
Solaris prompts you to confirm the request:
newfs: construct a new file system /dev/rdsk/slice_name: (y/n)?
3. Enter y and press Return.
4. Repeat steps 1 through 3 to create UFS file systems on additional partitions.
Note To make a VERITAS File System (VxFS), enter the following command:
# mkfs -F vxfs /dev/rdsk/device partition_size
Storage Management
Creating a UFS File System 27
Page 28

Mounting UFS File Systems
1. Create a mount point by entering the following command: mkdir /mount_point,
where mount_point is any user-defined name.
Note To streamline your SAN administration procedures, you may want to create a
directory, and then create mount points for each Fibre Channel file system
within that directory, for example:
# mkdir /SAN
# mkdir /SAN/fibre1
2. Enter mount /dev/dsk/slice_name /mount_point to mount a file system, for
example: # mount /dev/dsk/c1t17d0s0 /SAN/fibre1
3. To view the mounted file systems, enter ls /mount_point.
Note To mount a VERITAS File System (VxFS) enter the following command:
mount -F vxfs -o delaylog /dev/dsk/device /mount_point
28 Mounting UFS File Systems
Page 29

Mounting File Systems Automatically
To mount file systems automatically at startup, add them to the /etc/vfstab file. For
example, to add slice c1t17d0s0, enter it into the vfstab file.
• Device to mount: /dev/dsk/c1t17d0s0
• Device to fsck: /dev/rdsk/c1t17d0s0
• Mount point: /SAN/fibre1
• fstype: UFS
• fsck pass: 1
The following example shows a vfstab file:
#device device mount FS fsck mount mount
#to mount to fsck point type pass at boot options
#
#/dev/dsk/c1d0s2 /dev/rdsk/c1d0s2 /usr ufs 1 yes fd - /dev/fd fd - no /proc - /proc proc - no /dev/dsk/c0t0d0s4 - - swap - no /dev/dsk/c0t0d0s0 /dev/rdsk/c0t0d0s0 / ufs 1 no /dev/dsk/c0t0d0s6 /dev/rdsk/c0t0d0s6 /usr ufs 1 no /dev/dsk/c0t0d0s3 /dev/rdsk/c0t0d0s3 /var ufs 1 no /dev/dsk/c0t0d0s7 /dev/rdsk/c0t0d0s7 /export/home ufs 2 yes /dev/dsk/c0t0d0s5 /dev/rdsk/c0t0d0s5 /opt ufs 2 yes /dev/dsk/c0t0d0s1 /dev/rdsk/c0t0d0s1 /usr/openwin ufs 2 yes swap - /tmp tmpfs - yes -
# SAN Manager Devices
/dev/dsk/c1t17d0s0 /dev/rdsk/c1t17d0s0 /SAN/fibre1 ufs 1 yes -
Storage Management
Mounting File Systems Automatically 29
Page 30

Using the vfstab File
If you unassign a device that is listed in the vfstab file and then reboot the system, the
vfstab file will report errors and cause the system boot process to terminate at single-user
mode:
/dev/rdsk/device_name: I/O error can’t open /dev/rdsk/device_name
/dev/rdsk/device_name: CAN’T CHECK FILE SYSTEM
/dev/rdsk/device_name: UNEXPECTED INCONSISTENCY; RUN fsck MANUALLY
WARNING—Unable to repair one or more of the following filesystem(s):
SAN devices will be listed here
Run fsck manually (fsck filesystem...).
Exit the shell when done to continue the boot process
1. To continue startup, press Control + D.
2. Log in to the Solaris node.
3. On a Windows NT administration node, reassign the missing device(s).
4. On the Solaris node, enter the command mount -a to mount all devices listed in the
vfstab file.
30 Mounting File Systems Automatically
Page 31

3 SAN MANAGER LM UTILITIES
SAN Manager LM Utilities
get_wwn
get_loop_state
SAN Manager LM
Utilities
31
Page 32

SAN Manager LM Utilities
SAN Manager LM for Solaris includes two utilities:
• get_wwn
• get_loop_state
32 SAN Manager LM Utilities
Page 33

get_wwn
The get_wwn utility lists all discovered devices and their worldwide names. The utility is
found in the /opt/TRSANfcd/bin directory. For example, with two controllers on the same
loop, seeing the same storage, a result similar to the following appears:
apollo# get_wwn
loop0
target 1 lun 0 wwn 0x2000002037119126
target 2 lun 0 wwn 0x200000203711534c
target 3 lun 0 wwn 0x2000002037114102
target 4 lun 0 wwn 0x20000020371140ff
target 5 lun 0 wwn 0x20000020371119a8
target 6 lun 0 wwn 0x2000002037119ba1
target 7 lun 0 wwn 0x2000002037116035
target 8 lun 0 wwn 0x2000002037116008
loop1
target 1 lun 0 wwn 0x2000002037119126
target 2 lun 0 wwn 0x200000203711534c
target 3 lun 0 wwn 0x2000002037114102
target 4 lun 0 wwn 0x20000020371140ff
target 5 lun 0 wwn 0x20000020371119a8
target 6 lun 0 wwn 0x2000002037119ba1
target 7 lun 0 wwn 0x2000002037116035
target 8 lun 0 wwn 0x2000002037116008
Note The get_wwn utility provides information from memory rather than doing an
active scan of the loop. During a system reboot, get_wwn is updated to reflect
the current SAN world wide name topology.
get_wwn 33
SAN Manager LM
Utilities
Page 34

get_loop_state
The get_loop_state utility checks to see that the Fibre Channel disks are available, and
reports on the status of the loop:
apollo:# get_loop_state
loop0 is up
loop1 is up
34 get_loop_state
Page 35

4 TROUBLESHOOTING
No SAN Devices are Available on a Solaris Node
Error During Mounting: “Not a block device”
A Fibre Channel Tape Library, CD-R Drive, or Other Device is not Showing Up
A Solaris Node is not Discovered by a SAN Manager LM Administration Node
A Device Cannot be Disabled from a Solaris Node
35
Troubleshooting
Page 36

No SAN Devices are Available on a Solaris Node
If no SAN devices are listed on a Solaris node, find the cause below that best describes the
situation, then attempt the solution.
Symptom Cause/Solution
Assigned SAN
devices are not
available on a
Solaris node.
The host bus adapter (HBA) or drivers are not installed. Install the HBA or
drivers.
SAN-attached storage or other network hardware is powered off. Power
on the drives or network hardware.
Network cables are not connected properly. Verify all cable connections.
There is a failure within the Fibre Channel loop. Power down the Fibre
Channel hardware, then power up the hardware to reset the Fibre Channel
loop.
Note Power up the storage devices first, then the hubs/switches
followed by the SAN Manager LM Windows NT administration
node, and then all other nodes.
The Solaris node cannot access the SAN database because its Fibre
Channel cable is not connected to the loop where the SAN database is
located. This problem is most likely to occur in a dual loop configuration in
which the SAN database is accessible on one loop but not the other. Make
sure the Solaris node is attached to the correct loop.
The Fibre Channel card has become unseated in the computer. Shut
down the computer, remove and reseat the card.
The Fibre Channel card, hub, switch, or storage controller is bad. Run
device and vendor specific diagnostics and replace any bad components.
36 No SAN Devices are Available on a Solaris Node
Page 37

Error During Mounting: “Not a block device”
Symptom Cause/Solution
When mounting a
device, you get the
following error
message:
mount: /dev/rdsk/
slice_name not a
block device
There was an error in the mount command. This error occurs when
you try to mount a disk by using the raw device name rather than
the correct block device name. Enter the correct command:
mount /dev/dsk/slice_name /mount_point
Note Always create UFS/VxFS file systems on raw device
names and mount file systems on block device names, for
example:
Raw device name:
Block device name: /dev/dsk/device
/dev/rdsk/device
Error During Mounting: “Not a block device” 37
Troubleshooting
Page 38

A Fibre Channel Tape Library, CD-R Drive, or Other Device is not Showing Up
Symptom Cause/Solution
A Fibre Channel device is
not showing up on a SAN
Manager LM Solaris node.
SAN Manager uses an alternate SCSI disk driver, which allows
SAN Manager to co-exist with the standard SCSI disk driver that
controls things like internal SCSI buses. SAN Manager LM for
Solaris has a separate driver class for the Qlogic host bus
adapter driver: tran_scsi instead of scsi.
If the driver.conf file for the tape, CD-R, or other type of Fibre
Channel device has the following line in it:
name="my_driver" class="scsi"
change that line or add another line that reads:
name="my_driver" class="tran_scsi"
38 A Fibre Channel Tape Library, CD-R Drive, or Other Device is not Showing Up
Page 39

A Solaris Node is not Discovered by a SAN Manager LM Administration Node
When adding Solaris nodes to the SAN, the following errors may occur:
• After adding a Solaris node to the SAN, it is not listed in the nodes pane of the SAN
Manager administration application on a Windows NT node.
• When using the Add Node command, the SAN Manager LM application reports that it
“cannot resolve IP address to host name” or “cannot ping SAN Manager LM on the
node.”
Symptom Cause/Solution
A Solaris node cannot
be successfully added
to the SAN database.
There is an IP connectivity problem. To verify IP connectivity
between the nodes, ping both nodes.
Enter the following command to ping the Solaris node from the
Windows NT node:
c: ping -t ip_address
To ping a Windows NT node from a Solaris node, enter the following
command:
ping -s ip_address
The host file on either the Windows NT or Solaris node has not
been updated properly. On a Solaris node that is not running Samba
and does not have DNS Services configured, verify that the
file is updated correctly with the host name and IP addresses of all
nodes on the SAN. On Windows NT nodes, verify that the
/etc/hosts
winnt\system32\drivers\etc\Hosts file has been updated.
The SAN Manager LM service may not be running on the Solaris
node. Enter the following command to verify that the service is running:
# ps -ef | grep Service.
There is a connectivity problem between the Solaris node and the
SAN database. Run the get_wwn utility to see if any devices are
attached.
Troubleshooting
A Solaris Node is not Discovered by a SAN Manager LM Administration Node 39
Page 40

A Device Cannot be Disabled from a Solaris Node
Symptom Cause/Solution
When unassigning a
device from a Solaris
node, the Windows
NT administration
node displays a
Disable Device
error
Failed
message.
The device contains a mounted file system that is in use. Stop
any processes that are using the file system, unmount the device,
then unassign the device with the SAN Manager administration
application.
The device is configured to be used with third-party storage
management software, such as Solstice DiskSuite or VERITAS
Volume Manager. SAN Manager has no way of telling a thirdparty storage management application that a particular device
needs to be removed from its configuration. Before unassigning
device(s) in SAN Manager, manually remove them from the control
of third-party storage management software.
The device is in use by an application that accesses it directly.
SAN Manager has no way of knowing what program is using
the disk in question, or how to make it stop without interrupting
what may be a critical process. Before unassigning this type of
device, shut down the program that is using it and unmount the
device.
40 A Device Cannot be Disabled from a Solaris Node
Page 41

INDEX
Index
C
Cautions
Do not delete slice 2 information 24
Do not enter overlapping cylinder
numbers 24
reformatting NTFS devices 20
Starting Solaris 7 nodes in 32-bit mode 12
components, SAN Manager LM 10
H
HBA
installing 12
I
installation
32-bit mode, requirement for Solaris 7 14
default install location 10
pre-installation 12
procedure 14
system requirements 8
M
mount point
creating a mount point 28
mounting file systems 28
automatically with the vfstab file 29
VERITAS 28
N
Notes
Adding Sun nodes to the database 16
default installation location 10
get_wwn, updated at startup only 33
Making a VERITAS file system 27
mount points 14
mounting VERITAS file systems 28
online documentation 9
restoring the OEM QLogic driver 11
Solaris 7 compatibility 8
target numbers and their meanings 21
P
partitioning
defining a partition table 23
deleting extra partitions 24
labeling the disk 23
slice 2 23
pre-installation 12
checklist 12
Solaris 7 issues 11
S
SAN Manager disks
verifying availability 21
SAN Manager LM
components 10
default install location 10
packages 9, 14
pre-installation 12
preparing the FC disks 21
system requirements 8
41
Page 42

SAN Manager LM disks
creating file systems 26
mounting file systems 28
slice names
conventions 21
slices
defined 21
naming convention 21
Solaris 7
32-bit mode, requirement 12
pre-installation issues 11
Solaris nodes
getting the hostname 16
getting the IP address 16
Sun workstations
adding to the SAN 11
Supported partition map formats
NTFS 20
unknown/raw 20
UPM 20
supported partition map formats
NTFS 20
unknown/raw 20
UPM 20
system requirements 8
T
Tips
Creating a directory for mount points 28
Locating the OEM QLogic driver 11
troubleshooting
"not a block device" error 37
a device cannot be disabled from a Solaris
node 40
assigned devices unavailable on a Solaris
node 36
SAN Manager LM on Windows NT cannot
discover a Solaris node 39
U
UPM partition types
database partition 20
file system 20
free space 20
V
VERITAS File System (VxFS)
creating 27
mounting 28
vfstab file
unassigning devices, warning 30
updating 29
virtual LUN
definition 20
42 Index
Page 43

Reader Comment Sheet
Hewlett-Packard [SAN Manager LM for Solaris Installation Guide]
We welcome your evaluation of this manual. Your comments and suggestions will help us improve our
publications. Remove this page and mail or fax it to (916) 785-2299.
Agree Disagree N/A
The manual is well organized.
The information is technically accurate.
Information is easy to find.
Step-by-step procedures are easy to perform.
There are enough examples and pictures.
The examples and pictures are useful.
Comments ______________________________________________________________________________
______________________________________________________________________________________
______________________________________________________________________________________
______________________________________________________________________________________
Name: Phone:
Title: fax:
Company: E-mail:
Address: ZIP:
City & State: Country:
___ Check here if you would like a reply.
Hewlett-Packard has the right to use submitted suggestions without obligation, with all such ideas becoming the property of Hewlett-Packard.
HPSO/SSMO Information Engineering J6112-96010 E0900
Page 44

%86,1(665(3/<0$,/
),567&/$660$,/ 3(50,712 526(9,//(&$
3267$*(:,//%(3$,'%<$''5(66((
$WWHQWLRQ,QIRUPDWLRQ(QJLQHHULQJ06
+HZOHWW3DFNDUG&RPSDQ\
6RIWZDUHDQG6$10DQDJHPHQW2SHUDWLRQ
)RRWKLOOV%RXOHYDUG
5RVHYLOOH&$
99
123267$*(
1(&(66$5<
,)0$,/('
,17+(
81,7('67$7(6
Fold Here
Tape Please Do Not Staple Tape
Page 45

Page 46

&RS\ULJKW
+HZOHWW3DFNDUG&RPSDQ\
3ULQWHGLQ86$
-
)RU,QWHUQDO8VH2QO\
 Loading...