

Page 1

HP SureStore
NetStorage
6000
User’s Guide
Page 2

© 2000 - 2001 Hewlett-Packard Company.
The information contained in this document is subject to change without notice.
This document contains proprietary information which is protected by copyright. All rights are
reserved. No part of this document may be photocopied, reproduced or translated to another
language without the prior written consent of Hewlett-Packard Company.
Hewlett-Packard shall not be liable for errors contained herein or for incidental or consequential
damages (including lost profits) in connection with the furnishing, performance, or use of this
material whether based on warranty, contract, or other legal theory.
Part Number C4475-90102
Page 3

Table of Contents
Chapter 1: Overview
Network Attached Storage . . . . . . . . . . . . . . . . . . . . . . . . . . . . . 1-1
Getting Started. . . . . . . . . . . . . . . . . . . . . . . . . . . . . . . . . . . . . . . 1-1
HP NetStorage 6000 Hardware. . . . . . . . . . . . . . . . . . . . . . . . . . . 1-3
The HP NetStorage 6000 Web Interface. . . . . . . . . . . . . . . . . . . . 1-9
Integrating with Network Management Applications. . . . . . . . . . 1-11
Backing up the HP NetStorage 6000. . . . . . . . . . . . . . . . . . . . . . . 1-12
Locating Information . . . . . . . . . . . . . . . . . . . . . . . . . . . . . . . . . 1-13
Using Help While You Work . . . . . . . . . . . . . . . . . . . . . . . . . . . . 1-14
Printing Documents. . . . . . . . . . . . . . . . . . . . . . . . . . . . . . . . . . . 1-14
Chapter 2: The Identity Tab
Chapter 3: Configuring Your System and Network
The Configuration Tab . . . . . . . . . . . . . . . . . . . . . . . . . . . . . . . . 3-1
Network Settings. . . . . . . . . . . . . . . . . . . . . . . . . . . . . . . . . . . . . 3-2
Alert Settings. . . . . . . . . . . . . . . . . . . . . . . . . . . . . . . . . . . . . . . . 3-7
System Settings. . . . . . . . . . . . . . . . . . . . . . . . . . . . . . . . . . . . . . 3-10
User Mapping . . . . . . . . . . . . . . . . . . . . . . . . . . . . . . . . . . . . . . . 3-14
Shutting Down and Restarting . . . . . . . . . . . . . . . . . . . . . . . . . . . 3-21
Français
Chapter 4: Managing Storage
The Storage Tab . . . . . . . . . . . . . . . . . . . . . . . . . . . . . . . . . . . . . 4-1
Managing Physical and Logical Drives . . . . . . . . . . . . . . . . . . . . 4-2
Managing File Volumes and Directories. . . . . . . . . . . . . . . . . . . . 4-8
Allowing Access to Data. . . . . . . . . . . . . . . . . . . . . . . . . . . . . . . 4-14
Table of C ontents-1
Page 4

Chapter 5: Backing Up and Restoring Files
The Backup and Restore Tab . . . . . . . . . . . . . . . . . . . . . . . . . . . . 5-1
Using the HP SureStore 818 or 1/9 DLT Autoloader . . . . . . . . . . 5-1
Local and Remote Backups. . . . . . . . . . . . . . . . . . . . . . . . . . . . . 5-4
Disk Checkpoints . . . . . . . . . . . . . . . . . . . . . . . . . . . . . . . . . . . . 5-7
Checking the Current Tape Drive Status. . . . . . . . . . . . . . . . . . . . 5-11
Backing Up . . . . . . . . . . . . . . . . . . . . . . . . . . . . . . . . . . . . . . . . . 5-14
Restoring Volumes, Files, and Directories . . . . . . . . . . . . . . . . . . 5-18
Checking Settings and Features . . . . . . . . . . . . . . . . . . . . . . . . . . 5-21
Chapter 6: Monitoring the System
The Status Tab. . . . . . . . . . . . . . . . . . . . . . . . . . . . . . . . . . . . . . . 6-1
Monitoring Hardware Information . . . . . . . . . . . . . . . . . . . . . . . . 6-1
Viewing System Activity . . . . . . . . . . . . . . . . . . . . . . . . . . . . . . 6-6
Chapter 7: Reporting
The Report Tab . . . . . . . . . . . . . . . . . . . . . . . . . . . . . . . . . . . . . . 7-1
Chapter 8: Securing Data
About HP NetStorage 6000 Security . . . . . . . . . . . . . . . . . . . . . . 8-1
HP NetStorage 6000 Security in a UNIX-only Envir onment . . . . 8-1
HP NetStorage 6000 Security in an NT-only Environment . . . . . 8-4
Security Mapping in a Heterogeneous Environment . . . . . . . . . . 8-9
UNIX Files Accessed by NT Clients . . . . . . . . . . . . . . . . . . . . . . 8-10
NT Files Accessed by UNIX Clients . . . . . . . . . . . . . . . . . . . . . . 8-11
Mapping NT and UNIX Users . . . . . . . . . . . . . . . . . . . . . . . . . . . 8-12
Modifying Map Files. . . . . . . . . . . . . . . . . . . . . . . . . . . . . . . . . . 8-13
Chapter 9: Contacting Support and Upgrading
Table of Contents-2
The Support Tab . . . . . . . . . . . . . . . . . . . . . . . . . . . . . . . . . . . . . 9-1
Upgrading the HP NetStorage 6000 . . . . . . . . . . . . . . . . . . . . . . . 9-3
Page 5

Chapter 10: Integrating with Management Applications
Management Applications Overview . . . . . . . . . . . . . . . . . . . . . . 10-1
HP Top Tools Integration . . . . . . . . . . . . . . . . . . . . . . . . . . . . . . 10-3
HP OpenView Network Node Manager Integration. . . . . . . . . . . 10-4
CA Unicenter TNG Framework Integration. . . . . . . . . . . . . . . . . 10-7
ManageX Integration . . . . . . . . . . . . . . . . . . . . . . . . . . . . . . . . . 10-10
Chapter 11: Integrating with Remote Backup Applications
Remote Backup Applications Overview. . . . . . . . . . . . . . . . . . . . 11-1
Using ARCserveIT . . . . . . . . . . . . . . . . . . . . . . . . . . . . . . . . . . . 11-2
Using Backup Exec. . . . . . . . . . . . . . . . . . . . . . . . . . . . . . . . . . . 11-4
Using HP OpenView OmniBack II. . . . . . . . . . . . . . . . . . . . . . . . 11-5
Appendix A: Legal Information
Statements. . . . . . . . . . . . . . . . . . . . . . . . . . . . . . . . . . . . . . . . . . A-1
Software License Agreement . . . . . . . . . . . . . . . . . . . . . . . . . . . . A-2
Appendix B: NetStorage 6000 Warranty Information
Planning for Support. . . . . . . . . . . . . . . . . . . . . . . . . . . . . . . . . . B-1
Obtaining Warranty Support . . . . . . . . . . . . . . . . . . . . . . . . . . . . B-3
Obtaining Out-of-Warranty Support. . . . . . . . . . . . . . . . . . . . . . . B-5
Hewlett-Packard Limited Warranty Statement. . . . . . . . . . . . . . . B-6
Appendix C: System Specifications
Central Processing Unit (CPU). . . . . . . . . . . . . . . . . . . . . . . . . . . C-1
Uninterruptible Power Supply (UPS). . . . . . . . . . . . . . . . . . . . . . C-2
Hardware Specifications. . . . . . . . . . . . . . . . . . . . . . . . . . . . . . . C-3
Features. . . . . . . . . . . . . . . . . . . . . . . . . . . . . . . . . . . . . . . . . . . . C-5
Upgrade Options. . . . . . . . . . . . . . . . . . . . . . . . . . . . . . . . . . . . . C-6
Security and Safety. . . . . . . . . . . . . . . . . . . . . . . . . . . . . . . . . . . C-6
Regulatory Compliance . . . . . . . . . . . . . . . . . . . . . . . . . . . . . . . C-7
Environmental Specifications. . . . . . . . . . . . . . . . . . . . . . . . . . . . C-8
Power Specifications. . . . . . . . . . . . . . . . . . . . . . . . . . . . . . . . . . C-10
Replacements and Upgrades . . . . . . . . . . . . . . . . . . . . . . . . . . . . C-11
Table of Contents-3
Page 6

Appendix D: Telnet Information
Appendix E: Troubleshooting and Error Codes
General Issues . . . . . . . . . . . . . . . . . . . . . . . . . . . . . . . . . . . . . . . E-1
Browser Issues . . . . . . . . . . . . . . . . . . . . . . . . . . . . . . . . . . . . . . E-4
Determining Component Failure. . . . . . . . . . . . . . . . . . . . . . . . . . E-6
UPS Troubleshooting . . . . . . . . . . . . . . . . . . . . . . . . . . . . . . . . . E-8
Hardware Error Codes. . . . . . . . . . . . . . . . . . . . . . . . . . . . . . . . . E-10
Glossary
Table of Contents-4
Page 7

Table of Contents-5
Page 8

Overview
Network Attached Storage
Network Attached Storage
The HP NetStorage 6000 is a network attached storage (NAS) device used
to store data on your network. NAS devices provide a simpler, more
reliable, and cost-effective way to add storage to your network.
The HP NetStorage 6000:
n Requires minimal setup and is easily ma intained
n Does not impact the productivity of existing general-purpose server
operations
Chapter 1
Overview
n Frees up the general-purpose server so that applications operate more
efficiently
n Contains SCSI hard drives in a pre-configured RAID 5 array
n Provides SNMP notification of critical events
n Provides SMTP/E-mail for critical evens
Getting Started
Before proceeding, make sure that you have installed and configured the
HP NetStorage 6000 device by entering the IP, gateway, subnet, and
broadcast addresses via the front panel of the HP NetStorage 6000. For
more information, refer to Installing the HP Ne tStorage 6000.
Once the front panel information has been entered, you must use the
HP NetStorage web interface to finish configuring your device:
1 Open the HP NetStorage web interface. (Once the web interface is open,
you can access help online.) See “The HP NetStorage 6000 Web
Interface” on page 1-9.
1-1
Page 9

Overview
Getting Started
2 Go directly to the Configuration Tab and manually enter:
• System name, see “DNS Settings” on page 3-3
• Administrat ive password, se e “Administrative Password Settings” on
page 3-12
• DNS domain name, see “DNS Settings” on page 3-3
• Primary and secondary DNS server IP addresses, see “DNS Settings”
on page 3-3
• NIC parameters, see “TCP/IP Settings” on page 3-2
• Address for event log data, see “System Log” on page 3-9
• UNIX settings, see “UNIX Settings” on page 3-4
• WINS settings, see “Windows Settings” on page 3-6
• SMTP server information, see “SMTP/Email” on page 3-7
• SNMP settings/Traps, see “SNMP/Network Management Settings”
on page 3-8
• Contact and asset information, see “Informational Settings” on
page 3-10
• System time and date, see “Date and Time Settings” on page 3-11
• User mapping information, see “Mapp i ng Strategy” on page 3-14
3 Go to the Storage Tab and manually:
• Group your physical drives into logical drives (RAID sets) if
required, see “Create a Logical Drive” on page 4-4
• Create volumes for data storag e, see “Create a New File Volume” on
page 4-9
• Create directories and sub-directories beneath your volumes, see
“Create a Directory” on page 4-12
• Make volumes or directories available to users by sharing or
exporting them, see “Create or Edit Windows Shares” on page 4-14
1-2
Page 10
Overview
HP NetStorage 6000 Hardware
HP NetStorage 6000 Hardware
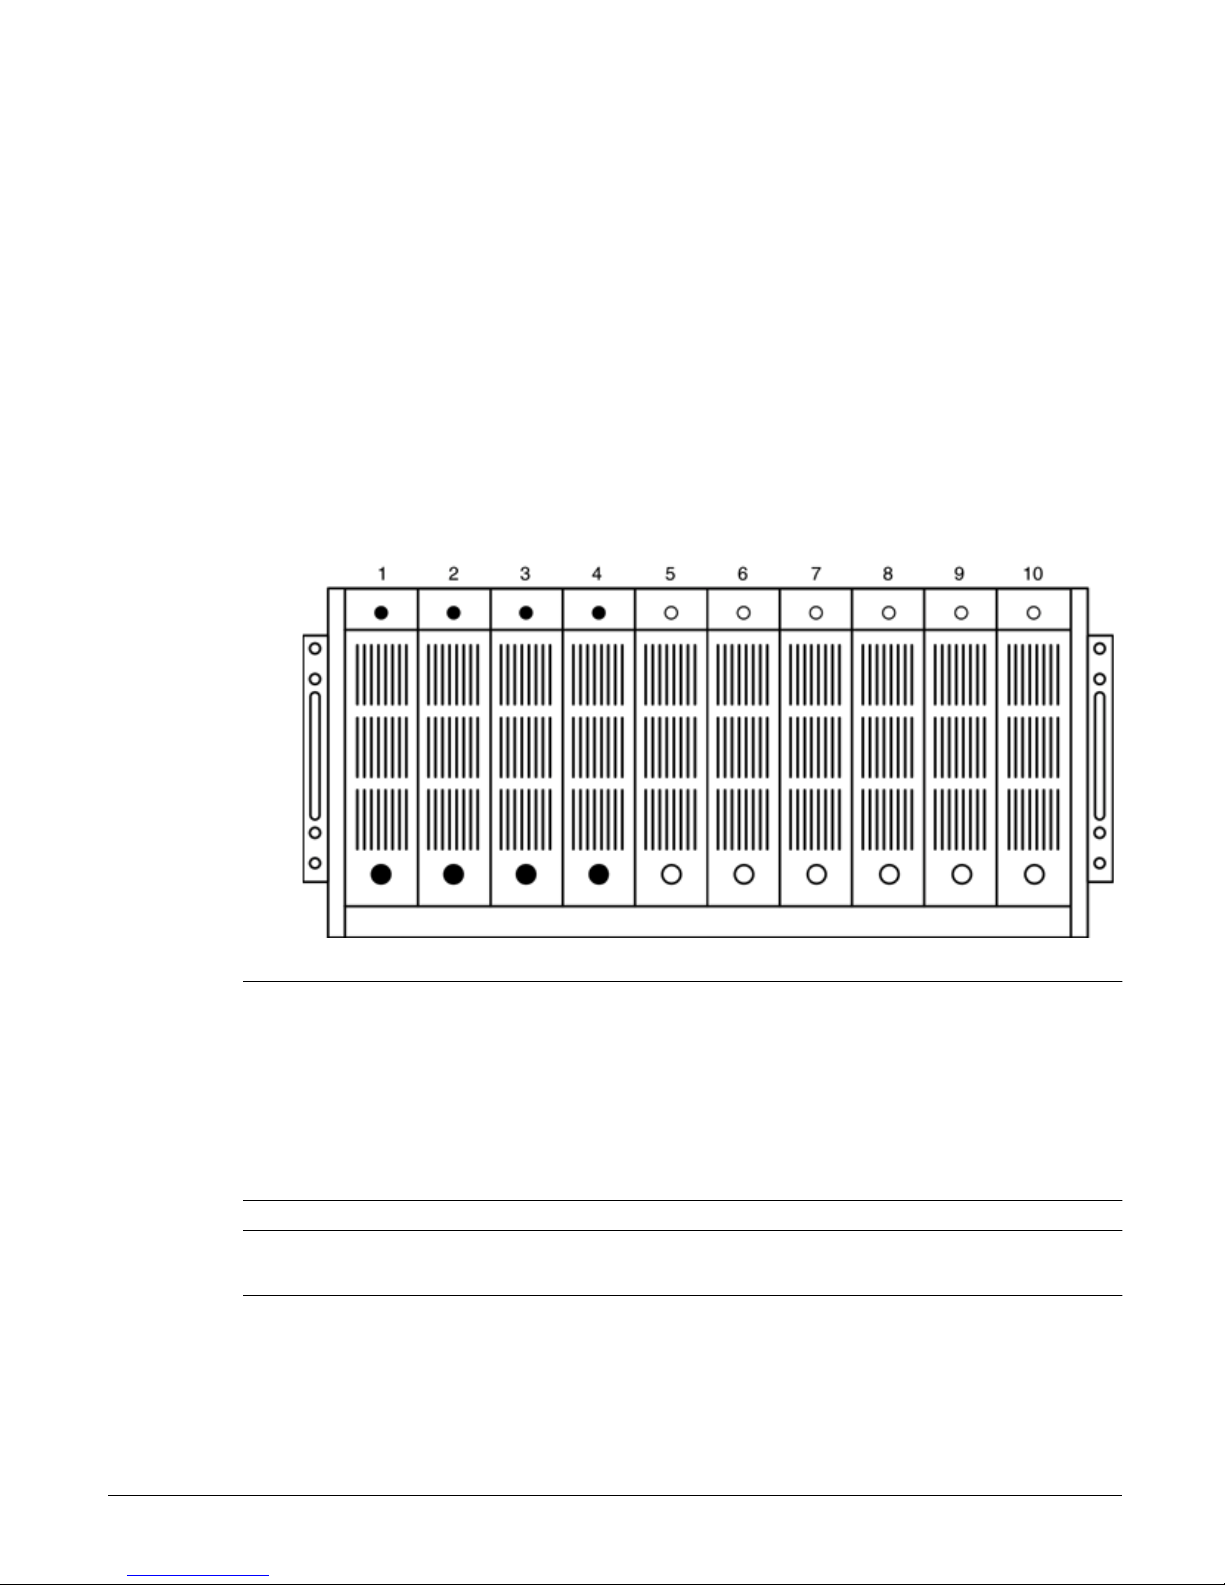
Physical Drives
The HP NetStorage 6000 contains between four and ten physical hard
drives, depending on your company’s storage needs. Each physical drive
can have up to 73GB of storage capacity.
Figure 1.1 Physical Drives
Note Use only HP Hard Drives approved for your NetStorage 6000. For an up-
to-date list of approved hard disk drives, please visit our web site at
www.hp.com/suppo rt/ns6000. Drives on t he approved list have custom
firmware for use in your NetStorage 6000. Do not attempt to install any
hard disk drives other than the approved drives listed at this web site as
doing so may r esult in system failure o r loss of data. Using non-supported
hard drives may also void your warranty.
Note All drives in the HP NetStorage 6000 must have the same capacity. Any
other configuration is not supported.
1-3
Page 11
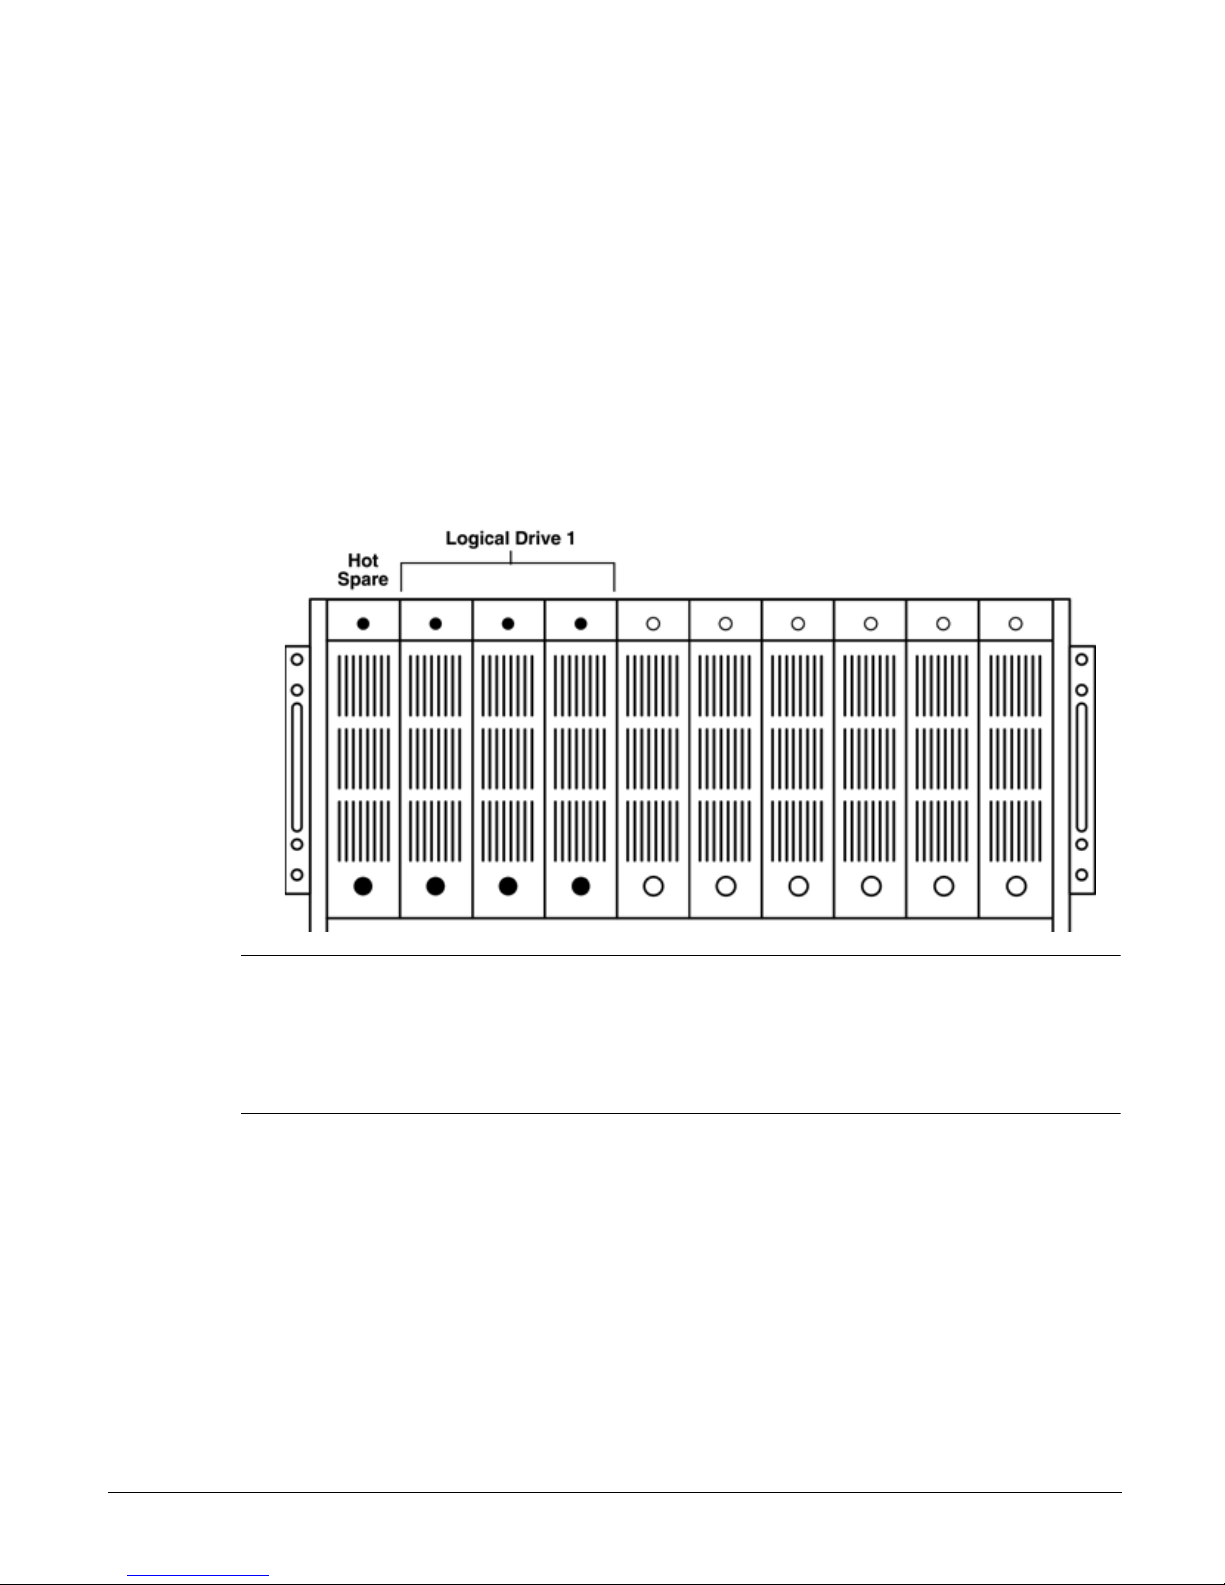
Logical Drives
Figure 1.2 Logical Drives
Overview
HP NetStorage 6000 Hardware
Physical drives are grouped together to form one or more logical drives,
which are also known as RAID sets. Physical drives are also used
individually as hot spares. Logical drives and hot spares are configured at
the factory. The illustration in figure 1.2 shows a typical configuration.
Note The HP NetStorage 6000 supports only RAID level 5 for the creation of
logical drives. Because RAID level 5 requires a minimum of 3 physical
drives for a RAID set, the HP NetStorage 6000 requires at least 3 drives to
be grouped together to create a logical drive, though you can create a
logical drive that uses as many as eight physical drives.
1-4
Page 12
Overview
HP NetStorage 6000 Hardware
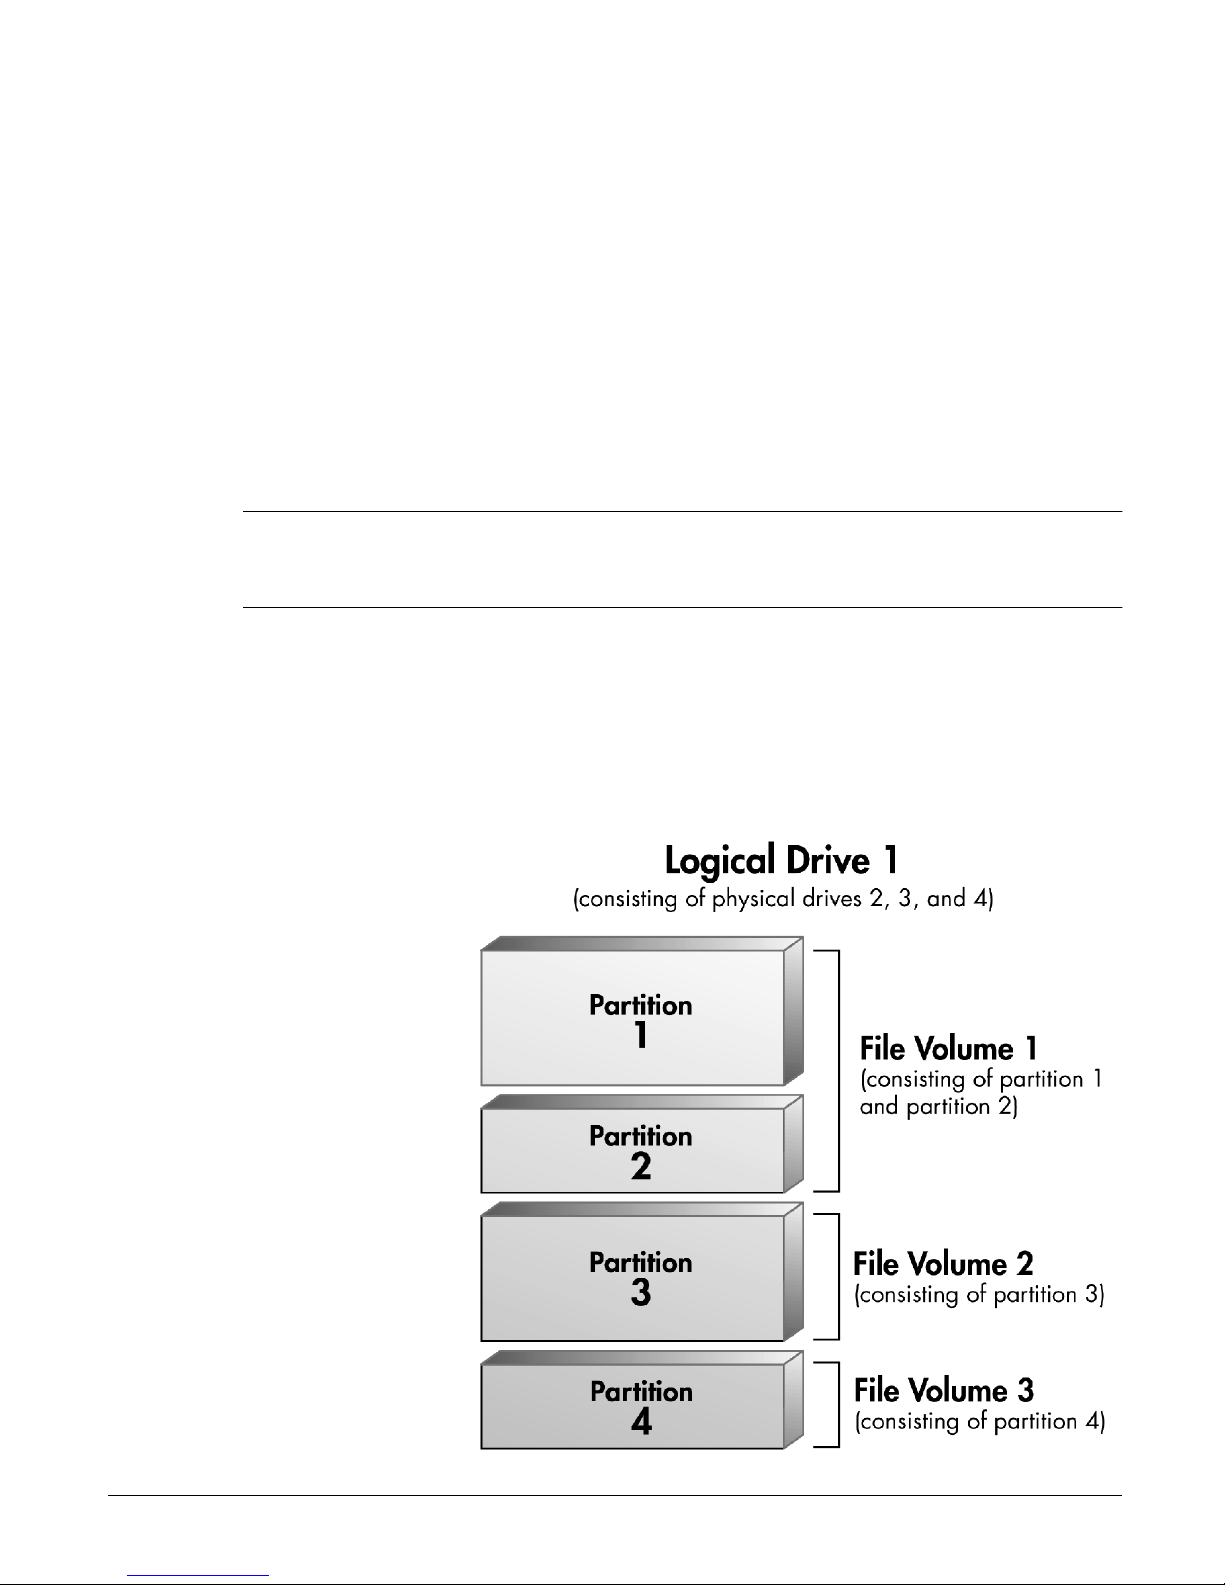
Partitions and File Volumes
Logical drives are further broken down into as many as four partitions with
each partition consisting of 256GB of drive space or less. Once you have
partitioned your logical drive, you can create file volumes for storing your
data.
File volumes are the basic unit of logical storage for a file system on the HP
NetStorage 6000. When you create a file volume, it uses one partition on
one logical drive. Because you are limited to four part itions, the maximum
number of file volumes that can be created on a logical drive is four.
Note The HP NetStorage 6000 has a limit of 256GB (262144 MB) per partition.
The user interface does not warn you of this limitation. If you attempt to
create a partition greater than 256GB, the operation fails.
Initially, each partition is assigned to a file volume. However, file volumes
can expand to span several partitions if extra storage space becomes
necessary.
Figure 1.3 File Volume and Partition Example
1-5
Page 13

The illustration in figure 1.3 on page 1-5 shows a logical drive that consists
of three physical drives. Thi s logical driv e has been broken down into fou r
partitions (the maximum number). Typically , you create partitions such that
each one becomes a file volu me. Ho wever, at some point yo u m ay r e quire
more storage space for a file volume.
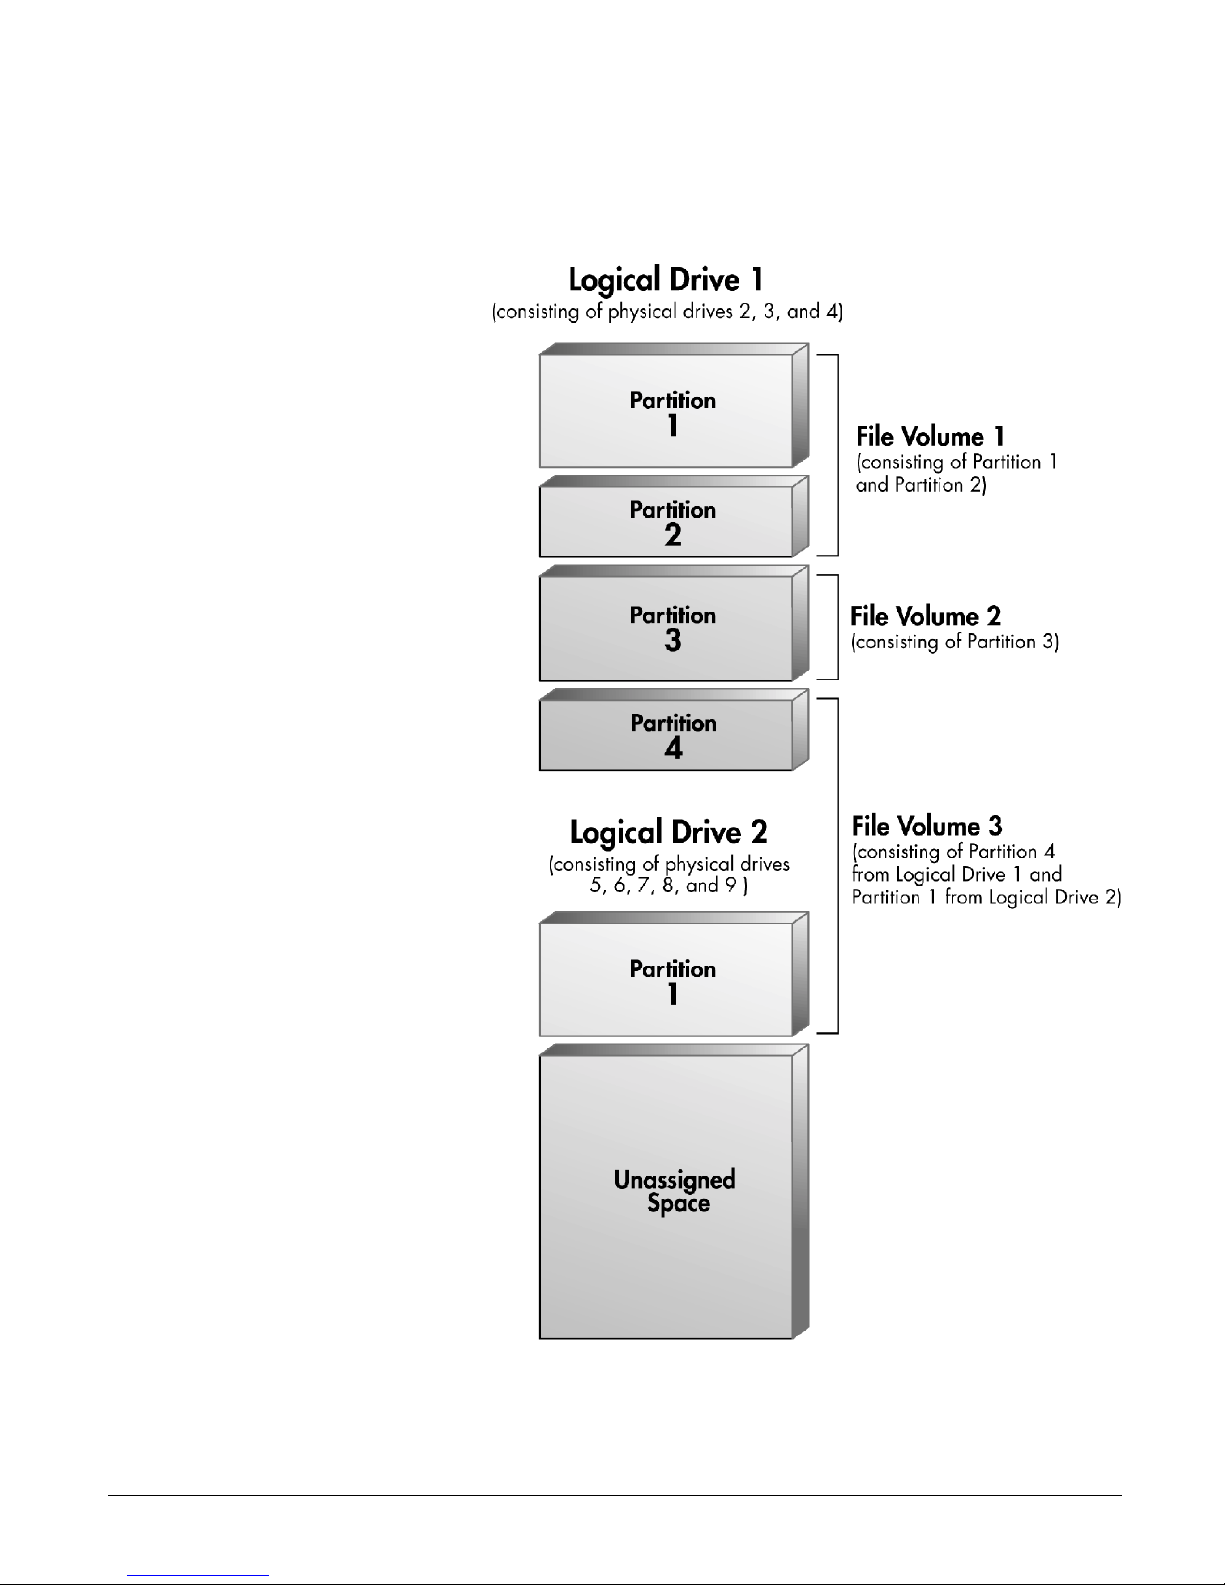
Increasing Storage Capacity
An important aspect of managing fi le volumes i s the concept of expanding
volumes. If, at a later date, a file volume becomes full of data, you can
expand the file volume, thus alleviating the lack of space on the volume.
Just like creating new file volumes, expanding file volumes need storage
space from a logical drive, and a free partition. However, this free space
and free partition do not have to be on the same logical drive as the file
volume that is being expanded. Thus, it is possible to create file volumes
that span across logical drives. This gives you the option of expanding
existing volumes by installing another logical drive on the system.
Overview
HP NetStorage 6000 Hardware
The example shown in figure 1.4 on page 1-7 expands on the previous
example by adding a new logical drive consisting of five newly added
physical drives. This logical drive has had one partition defined. File
volume 3 has then been expanded to include this newly available space.
1-6
Page 14
Overview
HP NetStorage 6000 Hardware
Figure 1 .4 Expanding File Volumes
1-7
Page 15
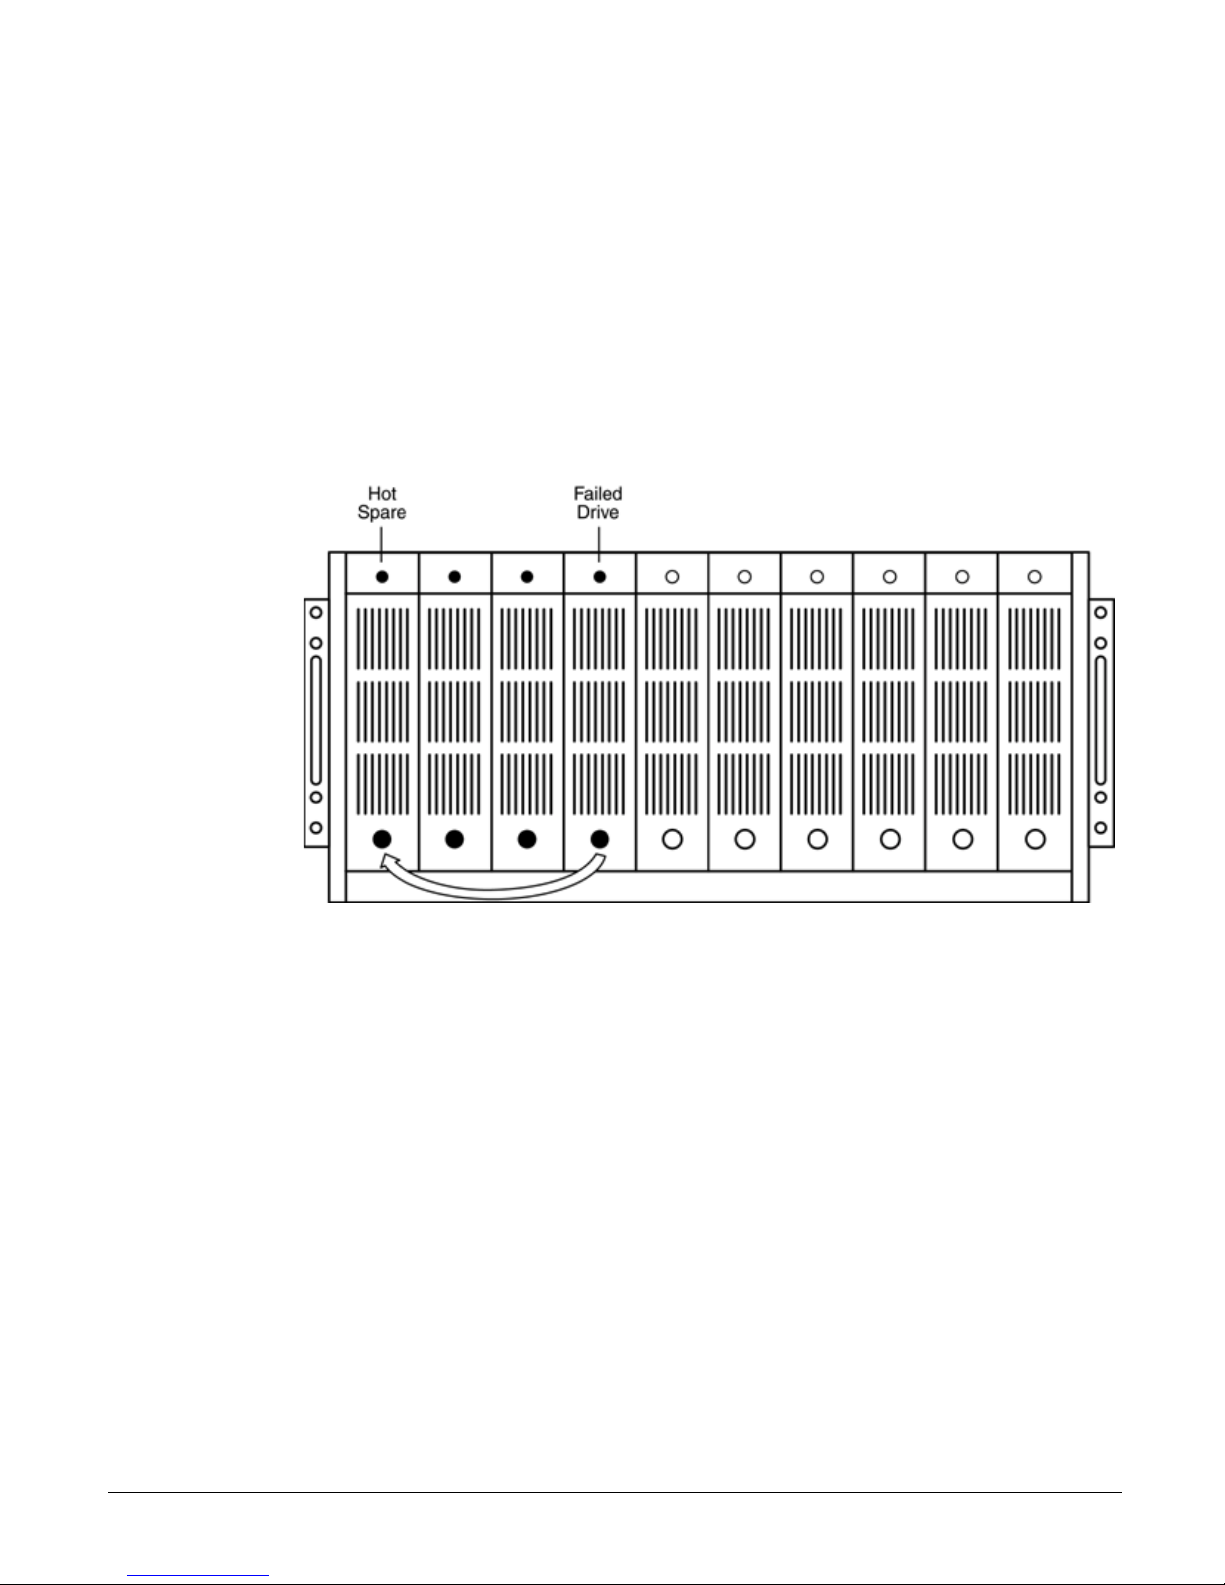
Hot Spare Driv es
Hot spare drives are reserved drives that are used only when a physical
drive that is part of a logical drive fails. When this happens, the system
automatically selects the first available hot spare drive to tak e the p lace of
the failed drive as shown in figure 1.5. The logical drive is rebuilt using the
hot spare, and the hot spare drive becomes a member of the logical drive.
Figure 1.5 Hot Spare Drive
Overview
HP NetStorage 6000 Hardware
It is important to note that a hot spare must have the same or larger capacity
of the physical drive it is to replace. The system will not select a hot spare
to replace a failed drive if the capacity of the hot spar e is less than the drive
it is to replace.
Once a hot spare is used to repair a logical drive, its assignment changes
from Hot Spare to Online. If you replace the failed drive, it automatically
receives an assignment of Unassigned. You must manually assign the new
drive to Hot Spare if the new drive is to serve as a hot spare.
Redundant Power Supply Modules
A redundant power supply module is installed in the back of the HP
NetStorage 60 00. Three pow er-sup ply modu les are active but o nly two are
necessary to power a fully loaded unit. If a power supply module fails, the
redundant supply provides power to the unit.
1-8
Page 16

Overview
The HP NetStorage 6000 Web Interface
Redundant Power Supply Cords
The HP NetStorage 6000 lets you attach more than one power source into
the back of the unit. This redundancy protects against a power failure. The
primary power cord needs to be connected when power is turned on.
The HP NetStorage 6000 Web Interface
The HP NetStorage 6000 is managed via a web browser as shown in
figure 1.6 on page 1-10 (Internet Explorer 5.0 or later or Netscape 4.61 or
later). To access the web interface, enter the IP address of the HP
NetStorage 6000 in the address field of your browser.
Note The first time you open this interface, a security warning appears. The
NetStorage web interface uses Java and Javascript components to properly
display system information. Your browser detects that such programs are
running and asks for your permission to accept these software
components. You must accept content from or grant privileges to HewlettPackard Company. To prevent further security warnings from appearing,
check the box at the bottom of the window to always trust content from
Hewlett-Packard Company.
1-9
Page 17

Figure 1.6 HP NetStorage 6000 Web Interface
Overview
The HP NetStorage 6000 Web Interface
The web interface’s six tabs are :
n Identity Tab — V iew general sys tem information. See Chapter 2, “The
Identity Tab.”
n Status Tab — View system activity and monitor hardware information.
See Chapter 6, “Monitoring the System.”
n St orage Tab — Create and delete file volumes and directories; create
shares and mount points; modify permissio ns; view file volume
information; view physical drive specifications. See Chapter 4,
“Managing Storage.”
n Configuration Tab — Initialize, view, and modify network, alert, and
system settings for your device. See Chapter 3, “Configuring Your
System and Network.”
n Backup/Restore T ab — C heck the current tape drive status; create disk
checkpoints; schedule a backup; restore volumes, files, and directories;
check settings and features. See Chapter 5, “Backing Up and Restori ng
Files.”
n Support Tab — Request information about the HP NetStorage 6000,
and register and upgrade your operating system. See Chapter 9,
“Contacting Support and Upgrading.”
n Reports Tab — Provides information on hardware and software, file
system configuration, NIC configuration, and environmental status to
up to three email addresses.
1-10
Page 18

Overview
Integrating with Network Mana gement Applications
Integrating with Network Management Applications
Network management applications let you view and manage devices on
your network. The HP NetStorage 6000 works with the following
management applications:
n HP TopTools versions 4.5 and 5.0
n HP OpenView Network Node Manager version 6.0
n Computer Associates Unicenter TNG Framework version 2.2
n HP OpenView ManageX version 4.21
The integration lets each network management application:
n Identify the HP NetStorage 6000 when it is attached to the network
n Display the HP NetStorage 6000 icon in the platform’s network
topology map
n Launch the HP NetStorage 6000 web-based user interface from a pop-
up menu
n Receive and process event notifications from the HP NetStorage 6000
For more information, see Chapter 10, “Integrating with Management
Applications.”
1-11
Page 19

Backing up the HP NetStorage 6000
Backing up the HP NetStorage 6000
Local Backup
Y ou can us e the backup application in the NetStorage web inter face plus an
optional HP SureStore DLT Autoloader 818 or 1/9 to perform a local
backup. In a local backup session the data is transferred to the locally
attached Autoloader using a tape format that is unique to the HP NetStorage
6000. The data transfer does not interfere with your LAN traffic.
Remote Backup
You can use third-party backup applications on any computer on the
network with a tape drive attached to perform a remote backup. When you
run a remote backup, data from the HP NetS torag e 6000 transf ers over the
network to the remote server running the backup application, and then to
the server-attached tape device.
Overview
T ape backup is intended to replace the data of an entire drive. It is possible
to restore individual files, but only if you know the exact location of a file.
For a list of remote backup applications the HP NetStorage 6000 integrates
with, see Chapter 11, “Integrating with Remote Backup Applications.”
1-12
Page 20

Overview
Locating Information
Locating Information
The online User’s Guide works with HP T opTools version 5.0. If y ou do not
have TopTools on your system, you can use a web browser to view the
user’s guide (Internet Explorer 5.0 or later or Netscape 4.61 or later). The
context-sensitive, online User’s Guide is pre-loaded on your HP NetStorage
6000.
The guide is organized into main level and sub-level topics.
The left-hand tabs in this help system are:
n Contents — The Contents tab di splays folders a nd pages that represent
the categories of information in the online user's guide. When you click
a closed folder, it opens to display its content (subfolders and pages).
When you click an open folder, it closes. When you click pages, you
select topics to view in the right-hand pane.
n Index — The Index tab displays a list of keywords and keyword
phrases. These terms are associated with topics in the help system. To
open a topic in the right-hand pane associated with a keyword, doubleclick the keyword.
A PDF version of the user's guide is also located on the HP NetStorage
6000 CD.
Note Viewing the PDF-format HP SureStore NetStorage 6000 User’s Guide
requires Adobe Acrobat Reader.
To view this vers ion:
1 Insert the HP NetStorage 6000 CD into your CD-ROM drive.
2 Open a Windows Explorer window.
3 Click on your CD-ROM drive and locate the directory /Doc.
4 Double-click on the file UserGuid.pdf to view it.
1-13
Page 21

Using Help While You Work
You can obtain information abou t the tabs in the NetStorage web inter face
by using context-sensitive help.
1 Click the help icon in the upper right corner of the web interface
window. A help window displays the topic pertainin g to the screen you
are viewing.
2 Review the information, then close the window, or leave help running
in the background by minimizing the screen.
When viewing help, you can maximize the window or resize it with the
buttons in the upper-right corner.
Note Clicking the help icon in the upper right corner does not automatically
bring the on-line help browser window to the top; it may be hidden by
another window. You must raise the window manually by clicking in the
window , clicking the title bar of the window, or selecting it from a task list
Overview
Using Help While You Work
Printing Documents
While using the online user’s guide, you can print topics and information
directly from the viewer . The available print op tions are determined by the
version of TopTools or your browser.
Select File > Print and click the option s you want for the screen( s) you are
printing.
1-14
Page 22

The Identity Ta b
Chapter 2
The Identity Tab
The Identity tab displays the following general system information:
n Name—The system or host name for your HP NetStorage 6000
n Description—HP NetStorage 6000
n Manufacturer—Hewlett-Packard Company
n Product Name—The product number corresponding to the original
configuration of the HP NetStorage 6000
n Location—The physical location of the HP NetStorage 6000
n Contact Name—The person to be notified in case of trouble or
questions about the HP NetStorage 6000 (usually the system
administrator)
n Contact Phone—Usually the phone number of the contact name
n Serial #—The factory-set serial number of the unit
n Asset #—A user-assigned number to track company assets
n Net Address—The IP network address of the Network Interface Card
(NIC) in port 1 (although the HP NetStorage 6000 supports multiple
ports, only the first one is displayed)
n MAC Address—The unique Machine Address Code for the NIC in
port 1
n OS Version—The current version of the operating system running on
the HP NetStorage 6000
n Up Time—The cumulative up-time of the HP NetStorage 6000 since
the last reboot
You can change the Name, Location, Contact Name, Contact Phone and
Asset # using the NetStorage 6000 web interface. See“Informational
Settings” on page 3-10 for more information.
2-1
Page 23

The Identity Tab
2-2
Page 24

Configuring Your System and Network
The Configuration Tab
Configuring Your System and Network
The Configuration Tab
When you initially set up your HP NetStorage 6000, you must:
n Enter your TCP/IP settings.
n Configure your Network Interface Card parameters.
n Set up your UNIX and/or Windows environments.
If your network configuration changes, you need to alter these settings.
The Configuration tab lets you access:
Chapter 3
n Network settings — TCP/IP, Windows and UNIX settings that allow
the NetStorage 6000 to connect with your network and work in
Windows, UNIX or both opera t ing systems.
n Alert settings — Optional settings you can enter if you want to receive
e-mail or server notification in case of a hardware failure or system
alerts. You also can specify a remote server to which you can red irect a
copy of the event log.
n System settings — Optional informational settings. Y ou can specify the
date and time as well as password-protect the administration of your
NetStorage web interface.
n User mapping — Configuration and management tools for operating
the HP NetStorage 6000 in a heterogeneous environment with userlevel security for NT clients.
n Shutdown/Restart — Y o u can shut down or restart the HP NetStor age
device from the Configuration tab.
3-1
Page 25

Network Settings
TCP/IP Settings
The HP NetStorage 6000 has two Network I nterface C ard (NIC) slo ts and
supports the following NICs:
n Single-port 10/10 0 Base-T
n Dual-port 10/100 Base-T
n Gigabit 1000 Base SX
This support gives t he system between one and fou r NIC por ts. When you
initially set up your HP NetStorage 6000, you need to configure your IP
address for the NIC using the front panel display. If you have Dynamic
Host Configurati on Protocol (DHCP) o n your system and i t is enabled, NIC
configuration occurs automatically.
Configuring Your System and Network
Network Settings
If you add a new card or change your IP address, you need to reconfigure
the NIC parameters by filling in each of the individual fields on the TCP/
IP Settings screen.
To set the NIC parameters:
1 Select one of the following two options:
• Obtain an IP address from the DHCP Server sets the parameters
automatically if DHCP is enabled. Because the parameters are under
DHCP control, you can not enter or change the IP Addr ess or subnet
mask. If you disable DHCP and then later decide to enable it, you will
need to restart your device.
• Depending on your co nfiguration, the DHCP server provides any o r
all of the following parameters: System Name, Gateway IP Address,
DNS Domain Name, NIS parameters, and Windows parameters. You
must manually conf igure any parameter that DHCP does not s et. You
need to reboot your system to configure the DHCP parameters.
2 Specify an IP Address lets you enter the IP Address and subnet mas k.
The text fields show the current value which can be changed by entering
a static IP Address and/or subnet mask. (If you do not have opti onal NIC
ports, Not Installed displays beneath the NIC port fields.)
3-2
Page 26

Configuring Your System and Network
Network Settings
3 Click Apply. A dialog box informs you that:
• You are about to change the system’s NIC parameters. Yo u (and other
users) will lose the connection to the device while the changes take
place.
• The NetStorage web interface in the current browser cache becomes
invalid. You should close the browser and reconnect to the system
using the new NIC parameter s .
• Any invalid entries in the NIC parameters may result in an inability
to access the NetStorage web interface.
4 Click OK. You do not need to restart the system.
NIC parameter fields are provided for up to three optional NIC ports. They
behave identically to the fields for the primary NIC.
DNS Settings
To define the DNS settings:
1 Using the NetStorage web interface, click the Configuration tab, then
select Network Settings > DNS Settings.
2 Enter the:
• System Name (Host or Computer Name)
• DNS Domain Name (Name of the domain on which the HP
NetStorage 6000 device resides such as, alpha.corp.com)
• Primary and Secondary DNS server IP addresses
3 Click Apply. You do not need to restart the system.
3-3
Page 27

UNIX Settings
During initial setup, you must specify how to mana ge and maintain the
Hosts and Trusted Hosts files. Hosts file management lets you map a
machine name to its IP address. Trusted Hosts file management lets you
configure hosts on your network so that they have a trusted relationship
with the HP NetStorage 6000. A trusted relationship lets the host perform
administrativ e fun ct io ns, such as file changes and remot e net wor k backup
(on the HP NetStorage 6000).
To add a Hosts file:
1 Using the NetStorage web interface, click the Configuration tab, then
select Network Settings > UNIX Settings.
2 Click Add next to the Hosts F ile Management field. The Add Host
File Entry screen appears.
Configuring Your System and Network
Network Settings
3 Enter a Host Name and a Host IP Addre ss.
4 If you are adding:
• multiple hosts, you need to click Apply after each addition, then click
OK when you finish.
• only one host, you can simply click OK.
To modify or delete an existing Hosts file:
1 Using the NetStorage web interface, click the Configuration tab, then
select Network Settings > UNIX Settings.
2 Select a host from the Hosts drop-down list.
3 Click either:
• Edit. Modify the Host Name and Host IP Address, then click
Apply.
• Remove. Click OK to confirm your selection.
3-4
Page 28

Configuring Your System and Network
Network Settings
To set up a Trusted Host, you must first specify it in the Hosts file:
Note Making a host trusted may compromise network security and should only
be done for administrative purposes.
1 Using the NetStorage web interface, click the Configuration tab, then
select Network Se ttings > UNIX Se ttings.
2 Click Add next to the Trusted Hosts File Management field. The Add
Trusted Host Entry screen appears.
3 Enter the host name.
4 If you are adding:
• multiple trusted hosts, you need to click Apply after each addition,
then click OK when you fi nish.
• only one trusted host, you can simply click OK.
To change or delete an existing trusted host :
1 Using the NetStorage web interface, click the Configuration tab, then
select Network Se ttings > UNIX Se ttings.
2 Select a host from the Hosts drop-down list.
3 Click either:
• Edit. Modify the Trusted Host Name, then click Apply.
• Remove. Click OK to confirm your selection.
3-5
Page 29

Windows Settings
If you support Windows users, you must specify the Windows settings
during initial setup.
To specify the Windows settings:
1 Using the NetStorage web interface, click the Configuration tab, then
select Network Settings > Windows Settings.
2 Enter the:
• Primary and Secondary WINS IP Addresses
• Network Neighborhood System Comment (optional)
3 Click either User Level Security or Share Level Security for the
security mode. See “User-Level Security” on page 8-6 or “Share-Level
Security” on page 8-5 for more information.
Configuring Your System and Network
Network Settings
a If you select User Level Security, enter the:
— Domai n Name
— Domai n Log in Name (the login name spec ified must have
sufficient permission to allow machines to be added to the
domain)
— Domai n P a ssword
b If you select Share Level Security, enter the name of the
Workgroup where the HP NetStorage 6000 is a member.
4 Click Apply. You do not need to restart the system u nless you changed
your security mode.
3-6
Page 30

Configuring Your System and Network
Alert Settings
Alert Settings
SMTP/Email
The HP NetStorage 6000 lets you automatically notify individuals via email if there is a hardware failure or a critical system alert.
To set up automatic notification:
1 Using the NetStorage web interface, click the Configuration tab, then
select Alert Settings > SMTP/emai l.
2 Enter the name of the e-mail server. The e-mail server must be an IP
address or a fully qualified name (such as, alpha.corp.com).
Note If you change the e-mail server , it automatically changes the e-mail server
specified in the Reports tab. See “The Report Tab” on page 7-1.
3 Enter the e-mail addresses of as many as four individuals. You must
specify an e-mail server if one or more e-mail recipients are defined.
4 Click either:
• Send Test email to send a test message to the recipients and save
your settings.
• Apply to only save your settings.
Note The information on this screen is optional. Blank fields do not affect the
functionality of the device. In the event of a hardware failure or system
alert, messages are sent through the network management tool or they are
logged in the event log. See “View Event Log” on page 6-3.
3-7
Page 31

Configuring Your System and Network
SNMP/Network Management Settings
If you are using a Simple Network Management Protocol (SNMP) tool,
you can define the names of the serv ers to receiv e notification in cas e of a
failure.
To define the servers to receive notification:
1 Using the NetStorage web interface, click the Configuration tab, then
select Alert Settings > SNMP/Network Management.
By default, the Community String field is set to public and the Trap
Destination fields are blank.
2 In the Trap Destination fields, enter the IP addresses or names of the
servers you want the system to no tify (up to five).
3 Enter a value in the Volume Capacity Threshold field to receive a
warning message if your volume gets to a certain capacity. By default,
the field is set to 95 percent
Alert Settings
4 Click either:
• Send SNMP Test Trap to send a cold boot test trap to the destination
addresses and save your changes.
• Apply to only save your settings.
Note The information on this screen is optional. Blank fields do not affect the
functionality of the device.
3-8
Page 32

Configuring Your System and Network
Alert Settings
System Log
You can define a remote server to which you can redirect a copy of the
event log. For more information, see “View Event Log” on page 6-3. The
Syslog function lets you manage a central location for the event log instead
of working with dif ferent interfaces or systems. The Syslog function allows
the event log to be redirected to systems with a Syslog daemon.
Note Red Hat Linux 6.1 requires that you set the -r option in the syslog daemon
to enable the device to receive messages from the network. This action,
along with defining the remote server on the SYSLOG page, allows the
HP NetStorage 6000 event log messages to appear in the Red Hat Linux
6.1 system log file.
To define a remote server to receive a copy of the event log:
1 Using the NetStorage web interface, click the Configuration tab, then
select Alert Settings > Syslog.
2 Enter the name or IP address of a remote server to redirect the event log
to. (If the field blank, this feature is disabled.)
3 Click Apply.
Note System log information is optional. A blank field does not affect the
functionality of the device.
3-9
Page 33

System Settings
Informational Settings
The Informational Settings appear on the Identity screen of the
NetStorage web interface. Network management tools may also function
according to the contents of these fields.
To change the informational settings:
1 Using the NetStorage web interface, click the Configuration tab, then
select System Settings > Informational Settings.
2 Enter the:
• Name of the person primarily responsible for the HP NetStorage
6000 in the Contact Name field.
Configuring Your System and Network
System Settings
• Phone number of the person primarily responsible for the HP
NetStorage 6000 in the Contact Phone Number field.
• Description of t he physical location of the HP NetStorage 6000 in th e
System Location field.
• Number that your company might use to identify and track the HP
NetStorage 6000 in the Asset Number field.
3 Click Apply.
Note Blank fields do not affect the functionality of the device. However,
entering your system location lets you easily determine which device has
issued an alert when you receive notification of an error. (The e-mail
message contains the system name.) If you provide your system location
information, you can easily troubleshoot or repair the problem.
3-10
Page 34

Configuring Your System and Network
System Settings
Date and Time Settings
Although not required, you should set the date and time on the HP
NetStorage 6000. The system uses the information on this screen to keep
track of the date and time for operations such as:
n Backup
n Time stamps for file generation and modification
n Log file reports
Failure to set the proper date and time may lead to confusing behavior or
misleading time stamping of files and log messages.
To set the date and time:
1 Using the NetStorage web interface, click the Configuration tab, then
select System Settings > Dat e and Time.
2 Enter the:
• current date using the format mm/dd/yyyy.
• current time using military format hh:mm.
3 Select a Time Zone for your area from the pull-down menu.
4 If desired, check Automatically Adjust Clock for Daylight Savings
Changes.
5 Click Apply.
3-11
Page 35

Configuring Your System and Network
System Settings
Administrative Password Settings
You can set a password for the HP NetStorage 6000. This prevents
unauthorized access to the storage device’s web interface. The HP
NetStorage 6000 ships without password protection, and the fields are
initially blank.
Note If you set a password fo r t he HP Net Storage 6000, protect it as you would
any other password. If you forget or lose this password, you will not be
able to access your device. Call HP Support for assistance. See “HP
NetStorage 6000 Service and Support” on page 9-1.
If you specify a passwor d, you must kn ow the password t o view or modif y
the information in the other tabs. You can not access the NetStorage web
interface without the password.
To initially specify a password:
1 Using the NetStorage web interface, click the Configuration tab, then
select System Settings > Administrative Password.
2 Leave the Old Password field blank. Enter a password in the New
Password field. Use any combination of letters and numbers, and
uppercase and lowercase characters.
3 Confirm your password by typing it again in the Confirm New
Password field.
4 Click Apply.
5 A dialog box informs you that your password is set. Click OK.
Note If you did not correctl y conf ir m you r pas swo rd, a di alog box prompts you
to re-enter your password
3-12
Page 36

Configuring Your System and Network
System Settings
To change your password:
1 Using the NetStorage web interface, click the Configuration tab, then
select Systems Se ttings > Administrative Password.
2 Enter your password in the Old Password field.
3 Enter a new password in the New Password field. You can use any
combination of letters and numbers, and uppercase and lowercase
characters.
4 Confirm your password by typing it again in the Confirm New
Password field.
5 Click Apply.
6 A dialog box informs you that your new password is set. Click OK.
To remove a password:
1 Using the NetStorage web interface, click the Configuration tab, then
select Systems Se ttings > Administrative Password.
2 Enter your password in the Old Password field.
3 Leave the New Password and Confirm New Password fields blank.
4 Click Apply.
5 A dialog box informs you that your new password is set. Click OK.
Note A dialog box prompts you to re-enter your password if you did not type
your old password, you typed an incorr ect pass word in the Old Password
field, or you did not correctly confirm your password.
3-13
Page 37

Configuring Your System and Network
Hardware Settings
The HP NetStorage 6000 may be attached to an uninterruptible power
supply (UPS).
To enable or disable HP NetStorage 6000 support for the UPS:
1 Using the NetStorage web interface, click the Configuration tab, then
select System Settings > Hardware Settings.
2 Check External power supply (UPS) attached if you are going to
attach a UPS to the HP NetStorage 6000. Clear this setting if you are
going to use the HP NetStorage 6000 without a UPS.
3 Click Apply. In order for the changes to take effect, you need to restart
your system.
Note For a list of supported UPS devices, see Appendix , “System
Specifications.”
User Mapping
User Mapping
Mapping Strategy
The HP NetStorage 6000 server is a general purpose file server with
capabilities to serve files to Windows clients and UNIX/Linux clients using
the native file serving protocol of each client. In order to allow clients to
access the same files, with the same acce ss privileges, it is necessary to map
the equivalency of the UNIX and Windows accounts. The m apping occurs
on both a user and Windows primary group level. In order to create this
mapping or association, it is necessary to specify an overall strategy and
then manage the mapping files as needed.
For more information, see “Mapping NT and UNIX Users” on page 8-12.
3-14
Page 38

Configuring Your System and Network
User Mapping
To select a mapping strategy:
1 Using the NetStorage web interface, click the Configuration tab, then
select User Mapping > Mapping Strategy.
2 Select a User Mapping strategy. The possible choices are:
• No Mapping — N o automatic mapping between UNIX NIS
accounts and Windows accounts occurs. Any mapping between
accounts must be done by editing the user map file for each account.
• User Name Mapping — If the Windows and UNIX us ernames from
the NIS files are identical, then a mapping association is
automatically created in the user map file.
• Full Name Mapping — If the Windows full name field and the
UNIX comment field in the NIS file, are identical then a mapping
association is automatically created in the user map file.
3 Select a Group Mapping strategy. The possible choices are:
• No Mapping — No automatic mapping between a UNIX NIS group
file and Windows primary group account occurs. Any mapping
between group accounts must be done by editing the group map file
for each account.
• Group Name Mapping — If the primary Windows group account
and the UNIX NIS group accoun t names are identical then a mapping
association is automatically created in the group map file.
4 Click Apply when you are satisfied with your mapping choices.
3-15
Page 39

Configuring Your System and Network
User Mapping
NIS User Accounts
Note The HP NetStorage 6000 supports NIS service, but not NIS+ service.
The HP NetStorage 6000 allows you read-only access to portions of the
user NIS file generated by the Network Information Service (NIS) when
NIS is enabled. This inf ormation is prov ided for assis tance if you find that
you need to make modifications to the user map file. The user map file
associates an NT or Windows user with a UNIX user account. NT or
Windows client information is automatically captured by the NetStorage
6000. Depending upon the user mapping strategy that you have selected,
you may find that you wish to create an association between a specific
Windo ws or NT client and a UNIX accoun t. In order to make this cust om
association you need the UNIX user n ame and UID. Y ou can scroll through
the user NIS file to find the UNIX account name and UID that are needed
to complete the custom mapping.
Once you have identified the UNIX user name and UID value, you can
modify the user map file using the NetStorage web interface. Fill in the
appropriate fields with the UNIX user account information.
For more information, see “Mapping Strategy” on page 3-14 and
“Modifying the User Map File” on page 3-19.
Note In order to see the user NIS file, the NIS service must first be enabled.
To enable or disable NIS (disabled is the default) for User Accounts:
1 Using the NetStorage web interface, click the Configuration tab, then
select User Mapping > NIS User Accounts.
2 Click on NIS Service.
3 Check or clear Enable NIS. If you are enabling NIS, enter the:
• master serv er ’s IP address in the NIS Server field.
• appropriate NIS domain name in the NIS Domain field.
4 Click Apply. You do not need to restart the system.
The NIS files are automatically updated every 5 minutes when the NIS
service is enabled. If the service is disabled , y ou see either stale d ata or an
informational message indicating that the file is empty.
Note The NIS service can be enabled from either the NIS User Accoun t page or
the NIS Group Account page.
3-16
Page 40

Configuring Your System and Network
User Mapping
NIS Group Accounts
Note The HP NetStorage 6000 supports NIS service, but not NIS+ service.
The HP NetStorage 6000 allows you read-only access to portions of the
user NIS file generated by the Network Information Service (NIS) when
NIS is enabled. This inform ation is provi ded fo r assis tance if you fin d that
you need to make modifications to the group ma p file. The gro up map file
associates an NT or Windows primary group with a UNIX group acco unt.
NT or Windows primary group account information is automatically
captured by the NetStorage 6000. Depending upon the group mapping
strategy that you have selected, you may find that you wish to create an
association between a specific W indows or NT client and a UNIX account.
In order to make this custom association, you need the group name and
GID. You can scroll through the group NIS file and find the UNIX group
name and GID that are needed to complete the custom mapping.
Once you have identified the UNIX group name and GID value, you can
modify the group map file using the NetStorage web interface. Fill in the
appropriate fields with the UNIX group account information.
For more information, see “Mapping S t rat egy” on page 3-14 and
“Modifyi ng the Group Map File ” on page 3-20.
Note In order to see the group NIS file, the NIS service must first be enabled.
To enable or disable NIS (disabled is the default) for Group Accounts:
1 Using the NetStorage web interface, click the Configuration tab, then
select User Mapping > NIS Group Accounts.
2 Click on NIS Service.
3 Check or clear Enable NIS. If you are enabling NIS, enter the:
• master server’s IP address in the NIS Server field.
• appropriate NIS domain name in the NIS Domain field.
4 Click Apply. You do not need to restart the system.
The NIS files are automatically updated every 5 minutes when the NIS
service is enabled. If the service is d i sabled, y ou s ee either st ale data or an
informational message indicating that the file is empty.
Note The NIS service can be enabled from either the NIS User Account pag e or
the NIS Group Account page.
3-17
Page 41

Configuring Your System and Network
User Mapping
NIS Service
Note The HP NetStorage 6000 supports NIS service, but not NIS+ service.
The HP NetStorage 6000 allows you read-only, online access to the user
NIS file generated by the Network Information Services (NIS) service. In
order to see this file the NIS service must first be enabled.
To enable or disable NIS (disabled is the default) for User Accounts:
1 Using the NetStorage web interface, click the Configuration tab, then
select User Mapping > NIS User Accounts or User Mapping > NIS
Group Accounts.
2 Click on NIS Service.
3 Check or clear Enable NIS. If you are enabling NIS, enter the:
• master serv er ’s IP address in the NIS Server field.
• appropriate NIS domain name in the NIS Domain field.
4 Click Apply. You do not need to restart the system.
The NIS files are automatically updated every 5 minutes when the NIS
service is enabled. If the service is disabled you see either stale data or an
informational message indicating that the file is empty.
3-18
Page 42

Configuring Your System and Network
User Mapping
Modifying the User Map File
The user map file contains an entry for each unique Windows client that
attaches to the HP NetStorage 6000 while the device is configured to use
user-level security. The format of the file entry is:
<UNIX username>:<UID>:<NT username>:<NT domain>:<NT RID>
The UID value that is assigned to the Windo ws client is one number larger
than the largest UID value in the users map or users NIS file starting with
number 65537. The default UNIX username i s the UID value pref ixed with
a lower case u.
When a new Windows client attaches to the HP NetStorage 6000 this file
is consulted along with the mapping strategy that you have selected. For
example, if you have selected User Name mapping, when a UNIX client
attaches with the an identical UNIX and Windows username the UNIX
client information is used instead of the default information discussed
above.
By reviewing the user map file you s ee that the UNIX usernames, UIDs and
Window client information is associated with the file security for each
protocol.
To add or modify an entry in the user map file:
1 Using the NetStorage web interface, click the Configuration tab, then
select User Mapping > User Map File. The current user map file is
displayed.
2 Click Modify Map. The UNIX Logon Name and UNIX UID values are
displayed and can be edited. The Windows Logon Name, Windows
Domain, and Windows RID values are displayed f or in for mat iona l
purposes only and cannot be edited.
3 Once you have completed your modifications, click Apply to return to
the User Map File page. You do not need to restart the system.
To delete an existing map file entry:
1 Using the NetStorage web interface, click the Configuration tab, then
select User Mapping > User Map File. The current user map file is
displayed.
2 Click Delete Map. You receive co nfirm atio n that the s elected us er h as
been deleted.
3-19
Page 43

Modifying the Group Map File
The group map file contains an entry for each unique Windows primary
group that is associated with the Wind ows users that access the NetStorage
6000 when it is configured to use user-level security. The format for the
group map file is:
<UNIX groupname>:<GID>:<NT groupname>:<NT
domain>:<NT RID>
The GID value that is assigned to the Windows clients’ primary group is
one number larger than the largest group map or group NIS file starting
with number 65537. The default UNIX groupname is the GID value
prefixed with a lower case u.
When a Windows client attaches to the NetStorage 6000 for the first time
this group map file is consult ed along with the group mappin g strategy that
has been selected. For example, if you have selected group mapping by
name, when a UNIX client attaches with an iden tical UNIX and Windows
group name, the UNIX group information is used instead of the default
group information discussed above.
Configuring Your System and Network
User Mapping
To modify an entry in the group map file:
1 Using the NetStorage web interface, click the Configuration tab, then
select User Mapping > Group Map File. The current group map file is
displayed.
2 Click Modify Map. The UNI X gro up name an d U NIX GI D val ues ar e
displayed and can be edited. The Windows Group Name, Windows
Domain, and Windows RID values are displayed for informational
purposes only and cannot be changed.
3 Once you have completed your modi ficat i on s, click Apply to return to
the User Map File page. You do not need to restart the system.
To delete an existing map file entry:
1 Using the NetStorage web interface, click the Configuration tab, then
select User Mapping > Group Map File. The current group map file is
displayed.
2 Click Delete Map. You receive confirmation that the selected group has
been deleted.
3-20
Page 44

Configuring Your System and Network
Shutting Down and Rest arti ng
Shutting Down and Restarting
Shutting Down the HP NetStorage 6000
Shut down the device if you:
n move the device to a new location
n anticipate a power outage in your building and you do not have an
uninterruptible power supply for the device
To shut down the device:
1 Using the NetStorage web interface, click the Configuration tab, then
select Shutdown/Restart.
2 Click the Shutdown button. A dialog box informs you that:
• You and any other connected users will lose the connection to the
device.
• The NetStorage web interface in the current browser cache becomes
invalid. The browser closes and you must re-connect to the system
after it reboots.
3 Click OK.
4 When the LCD display on the unit is blank, turn off the device by
pushing the power switch in the back.
3-21
Page 45

Configuring Your System and Network
Restarting the HP NetStorage 6000
Restart the device if you:
n Download a new version of the NetStorage web interface as described
in “Upgrading From the Web” on page 9-4.
n Install a new operating system
n Change your security mode as described in “Windows Settings” on
page 3-6.
n Enable DHCP as described in “TCP/IP Settings” on page 3-2.
To restart the device:
1 Using the NetStorage web interface, click the Configuration tab, then
select Shutdown/Restart.
2 Click the Restart button. A dialog box informs you that:
Shutting Down and Restarting
• You and any other connected users will lose the connection to the
device.
• The NetStorage web interface in the current browser cache becomes
invalid. The browser closes and you must re-connect to the system
after it reboots.
3 Click OK.
3-22
Page 46

Managing Storage
The Storage Tab
The Storage Tab
The storage tab in the HP NetStorage 6000 lets you:
n View file volumes and share information
n Manage file volumes (create, expand, rename, and delete)
n Manage directories in file volumes (create, rename, and delete)
n Manage Windows shares in directories (create or edit)
n Manage mount points (UNIX only)
Chapter 4
Managing Storage
n View physical drive information
n View logical drive information
n Manage logical drives (create, delete, and rebuild)
n Assign hot spare drives
4-1
Page 47

Managing Physical and Logical Drives
Managing Physical and Logical Drives
View Physical Drive Information
The HP NetStorage 6000 contains ten drive bays to host as many as ten
physical disk drives. Physical drives are used in grou ps of three to eight to
create RAID sets (logical drives). Physical drives are also used individually
as hot spares. A drive assigned as a hot spare automatically repairs a RAID
set when one of the drives in the set becomes damaged or is removed.
To examine and manage physical drives:
Using the NetStorage web interface, click the Storage tab, then select
Physical Drives.
A table displays the following drive information.
Managing Storage
n Slot assignment of each drive
n Vendor or manufacturer of the drives
n Product drive name
n Revision level of the drive
n Serial number of the drive
n Drive capacity in Megabytes
n Mapping of the Logical Drive associated with the physical drive
The table also shows the current status of each drive:
n Empty
n Rebuilding
n Online
n Unassigned
n Hot Spare
n Dead
Note The Actions button in the upper left corner lets you create logical drives
and assign hot spares.
4-2
Page 48

Managing Storage
Managing Physical and Logical Drives
View Logical Drive Information
Logical drives on the HP NetStorage 6000 are roughly equivalent to what
is commonly referred to as a RAID set. You may partition the storage space
on logical drives to create up to four file volumes. You may want to view
logical drive information to see how much free space is available in the
individual partitions, an d where you might want to save your data.
To manage and view logical drive information:
Using the NetStorage web interface, click the Storage tab, then sel ect
Logical Drives.
A table displays partition information for each logical drive in the system.
To the left of the table, the following drive information display s:
n Drive name
n Drive capacity
n RAID level
n Drive status
The table contains partition information for the logical drive. Each logical
drive contains a maximum of four partitions. Partitions are allocated to
create file volumes. The table displays the current allocation of partitions
to the file volumes on the system, and contains the following information:
n Partition number (1 through 4)
n File volume name
n Raw capacity (unformatted capacity dedicated to the file volume)
n Percent of total space used by the partition
Partitions that are available for the creation of new file volumes display
<FREE SPACE> in the File Volume Na me column, and show the
maximum available free space in the Raw Capacity column.
Note The Actions button in the upper left corner lets you create, rename,
expand, and delete file volumes.
4-3
Page 49

Create a Logical Drive
You create logical drives by g rou ping a set of ph ys ical drives into a sing le
RAID set. Currently, the HP NetStorage 6000 supports only RAID level 5
for the creation of logical drives. Because RAID level 5 requires a
minimum of three physical drives for a RAID set, the HP NetStorage 6000
requires at least three drives to be grouped together to create a logical drive.
To create a new logical drive:
1 Using the NetStorage web interface, click the Storage tab, then select
Physical Drives.
2 Click Actions, then select Create Logical Drive. All of the physical
drives in the system are displayed. Each drive is represented by a
graphic of a drive bay:
• Drive bays containing unassigned drives are selectable.
Managing Storage
Managing Physical and Logical Drives
• Drive bays that are empty, or that contain assigned drives are not
selectable.
3 Click on the graphics of the drives that are to be used to make the new
logical drive.
4 Click OK.
A status message is displayed along wit h a progress bar and a Close butt on.
You do not need to monitor the creation process, and you may return to the
Physical Drives screen at any time by pressing the Close button. T o return
to the progress screen, select Actions > View Create Status.
The drive is prepared in three stages:
1 The command is issued to the RAID controller.
2 The RAID controller activates the new logical drive.
3 The logical drive is initialized.
The first two steps execute quickly and are typically completed within a
minute. After these two steps are complete, the new Logical Drive is ready
to use. At this point, you may create volumes and place data on those
volumes. You do not need to wait for the third step to run to completion.
4-4
Page 50

Managing Storage
Managing Physical and Logical Drives
Drive Initialization, the third and final step of Logical Drive creation, takes
place in the background and may be time-con suming. This pr ocess shou ld
run to completion before the system is re-boo ted or powered down. In o rder
for the system to track the process, other RAID-related operations, s uch as
Hot Spare assignment, are not allowed until this process is co mplete.
Note A logical drive may contain a maximum of eight physical drives.
Delete a Logical Drive
When you delete a logical drive, the physical drives it used are set to the
unassigned state. I t is important to note t hough, that you can on ly delete the
last logical drive in the list. For example, if two logical drives exist on the
system, in order to delete the first logical drive, you must first delete the
second logical drive.
To delete a logical drive:
1 Using the NetStorage web interface, click the Storage tab, then select
Physical Drives.
2 Click Actions, then select Delete Logical Drive.
3 The logical drive available for deletion displays.
4 If it is the drive you want to delete, click Yes. Otherwise, click No.
5 If you click Yes, a second page appears to confirm your selection.
Caution: Verify that this is the drive you want to delete. Deletin g a
logical drive destroys all the data on that logical drive, and the
procedure cannot be reversed.
6 Enter Yes.
7 Click OK.
Note While the HP NetStorage 6000 deletes a drive, the LEDs flash and the
user interface freezes. Do not perform any tasks with the keyboard or
mouse while this activity takes place.
4-5
Page 51

Managing Storage
Managing Physical and Logical Drives
Rebuild a Logical Drive (RAID set)
If a physical drive in a logical drive fails and a ho t spare is not available to
automatically replace it, the logical drive goes into a critical state. In this
state, the logical drive does not protect the data with redundancy. All data
on the logical drive is lost if another drive fails.
Note If you replace a failed drive with a new drive, you must use the same slot
that the failed drive used.
To recover the logical drive from critical state, replace the failed hard
drive wit h a new one an d rebuild the logical drive:
1 Replace the failed drive. (Follow the instructions that come with the
drive.)
2 Using the NetStorage web interface, click the Storage tab, then select
Physical Drives.
3 Verify that the drive is recognized by the system. Click Actions, then
select Refresh to update the table. If the drive is not recognized (as
unassigned), reboot the system.
4 Once the drive is recognized and is in an unassigned state, click
Actions, then select Rebuild Logical Drive.
5 You are prompted to select a log ical drive to rebuild. Normally, there is
only one drive to select. Select the desired logical drive to rebuild.
6 Click OK.
The rebuilding proces s may t ake o ne or more hours. To monitor the status
of the drive on the Physical Drives page, click Actions, then select
Refresh to update the table. When the drive is rebuilt, its status changes
from Rebuilding to Online.
4-6
Page 52

Managing Storage
Managing Physical and Logical Drives
Assign a Hot Spare
The HP NetStorag e 6000 le ts you ass ign phys ical dri ves to fu nction a s hot
spares. Hot spare drives are reserved drives that are used only when a
physical drive that is part of a logical drive fails. When this happens, the
system automatically selects the first available hot spare drive to take the
place of the failed drive. The logical drive is rebuilt using the hot spare, and
the hot spare drive becomes a member of the logical drive.
Once a hot spare is used to repair a logical drive, its assignment changes
from Hot Spare to Online. If you replace the failed drive, it automatically
receives an assignment of Unassigned. You must manually assign the new
drive to Hot Spare if the new drive is to serve as a hot spare.
Most systems only use one physical dr ive to serve as a hot sp are. However,
there is no restriction on the number of hot spares in the system, though
every additional hot spare uses another physical drive and lessens storage
capacity. Any and all drives may serve as hot spares. There is no
requirement to have a hot spare on the system at all.
To assign a hot spare:
1 Click the Storage tab, then select Physical Drives.
2 Click Actions, then select Assign Hot Spares.
3 A picture representing all of the physical drives in the system appears.
Each drive is represented by a graphic of a drive bay. Drive bays
containing unassigned drives or hot spare drives are selectable. All other
drive bays are not selectable.
4 Select the drives to be used as hot spares by clicking on them.
5 Click OK.
Note Refer to the HP support web page for more information on upgrading
storage capacity or replacing a failed hard drive.
4-7
Page 53

Managing File Volumes and Directories
Managing File Volumes and Directories
View File Volume Information
File Volumes are the basic unit of logical storage for a file system on the
HP NetStorage 6000 . The volume contains a director y hierarchy that stores
files within the directories of that hierarchy. You can manage directories
and files f rom a remot e UNIX or Windows system usin g Explorer on
Microsoft Windows, or by mounting the file volume from a UNIX shell.
The HP NetS torage 6000 also offers a si mple browsing t ool that allows y ou
to examine the hierarchy of each file volume on the system, and to perform
basic management f unctions.
To view file volume information:
1 Using the NetStorage web interface, click the Storage tab, then select
File Volumes. A tree list appears on the left. On the right, a file volume
summary screen appears. This summary screen displays the following
general information for each volume on the system:
Managing Storage
• File volume name
• Total capacity in MB
• Free space in MB
• Free space in percent
• Used space
2 Navigate the tree list to display more detailed information for each file
volume, and each subdirectory within the file volume. The root of the
tree is an image of a computer, and is called Summary. Select this to
display the summary page.
File volumes are displayed in the second level of the tree hierarchy.
Select a file volume to display a page that contains the following
information:
• File volume name
• Total capacity in MB
• Used space in MB
• Used space in percent
• Unused space in MB
• Unused space in percent
• Windows share status of the volume root, and lets you change the
share status. You can use the Actions button to manage directories.
4-8
Page 54

Managing Storage
Managing File Volumes and Directories
3 To view subdirectory information, select a sub directory (design ated by
a file folder graphic). The following information displays:
• Name of subdirectory
• Absolute path from the root
• Windows share status
Create a New File Volume
You create file volumes by allocating space from a logical drive. Logical
drives on the HP NetStorage 6000 are divided into a maximum of four
partitions. Whenever you create a file volume, it uses one partition on one
logical drive.
To create a new file volume:
1 Using the NetStorage web interface, click the Storage tab, then select
Logical Drives.
2 Click Actions, then select Create File Volume.
3 Enter a new file volume name in the space provided.
4 Select a partition to use from the pull down menu.
5 Enter desired file volume size (MB) in the space provided.
6 Click OK.
A progress bar displays while the new volume is formatted.
4-9
Page 55

Expand a File Volume
To expand a file volume, there must be free storage space and a free
partition on a logical drive. This free space and free partition do not need
to be on the same logical drive as the file volume to be expa nded—you can
create file volumes that span across logical drives. This gives you the
option of expan ding existing vol umes by installi ng another logical drive on
the system .
To expand an existing file volume:
1 Using the NetStorage web interface, click the Storage tab, then select
Logical Drives.
2 Click Actions, then select Expand File Volume.
3 Select the volume to be expanded.
4 Select a partition to use from the pull down menu.
Managing Storage
Managing File Volumes and Directories
5 Enter desired file volume size in the space provided.
6 Click OK.
A progress bar displays while the file volume is expanded.
Rename a File Volume
To rename a file volume:
1 Using the NetStorage web interface, click the Storage tab, then select
Logical Drives.
2 Click Actions, then select Rename File Volume.
3 Select the volume you want to rename.
4 Enter a new name in the text field.
5 Click OK.
Note You can not rename file volumes that have been expanded.
4-10
Page 56

Managing Storage
Managing File Volumes and Directories
Delete a File Volume
When you delete a file volume, the space it used is reclaimed by the logical
drive. However, if you delete a file volume that uses a partition number
lower than a partition currently in use by another file volume, the freed
space is not combined with the other free space on the logical drive.
For example, if partition 1 is deleted, and partition 2 contains a file volume,
then the space freed up by partition 1 must remain as the fixed space of that
partition. Partition 1 can still be used for a file volume, but the volume must
allocate no more space than the volume that was deleted.
This restriction does not apply to deleted file volumes that are located in
partitions adjacent to the remaining free space on the logical drive.
Caution Deleting a file volume destroys all the data on that vo lume. The p rocedure
cannot be reversed.
To delete a file volume:
1 Using the NetStorage web interface, click the Storage tab, then select
Logical Drives.
2 Click Actions, then select Delete File Volume.
3 Select the volume you want to delete.
4 Click OK.
5 Enter Yes when asked to confirm your selection.
6 Click OK.
4-11
Page 57

Managing Storage
Managing File Volumes and Directories
Create a Directory
You can create subdirectories under the root level of the file volume, or
under any directory in the hierarchy. Subdirectories let you organize your
data into easily accessible folders.
To create a directory:
1 Using the NetStorage web interface, click the Storage tab, then select
File Volumes.
2 Navigate the tree list to highlight the desired file volume or directory.
3 Click Actions, then select Create Directory.
4 Enter the directory name in the text field.
5 Click OK. The new directory is created immediately.
Note Before a network user can see this directory, you must either share it or
create a mount point. For more information, see “Create or Edit Windows
Shares” on page 4-14.
Rename a Directory
To rename a directory:
1 Using the NetStorage web interface, click the Storage tab, then select
File Volumes.
2 Navigate the tree list to highlight the desired directory.
3 Click Actions, then select Rename.
4 Enter a new name in the text field.
5 Click OK.
4-12
Page 58

Managing Storage
Managing File Volumes and Directories
Delete a Directory
Y ou can d elete directories to free up disk space or to remove unwanted data
on the HP NetStorage 6000.
Caution Deleting a directory destroys all the data in that directory and all of its
subdirectories. The procedure cannot be reversed.
To delete a directory:
1 Using the NetStorage web interface, click the Storage tab, then select
File Volumes.
2 Navigate the tree list to the desired directory item and select it.
3 Click Actions, then select Delete.
4 When prompted, confirm your selection.
4-13
Page 59

Allowing Access to Data
Create or Edit Windows Shares
Shares are permissions that let you control Microsoft Windows users’
access to data. You can create shares in any directory within a file vo lume,
including the root. Once a share is created, u sers may attach to the share via
the network neighborhood in Windows and store and retrieve files and
directories.
Security for network shares is handled in one of two ways:
n Secure share level security is the simplest security method available.
Access to the share may be restricted on a share by share basis. The
administrator can set Read Only passwords and Read/Write passwords
for each share on the system. Users wishing to gain access to a share are
asked to supply the correct password. Only users with the correct
password are given access to the share. Passwords are encrypted for
transmission over the network lines.
Managing Storage
Allowing Access to Data
n User level security is more advanced and offers more flexibility for
both the administrator and the user:
• Users are authenticated via the NT domain controller using pass
through authentication.
• Users accessing the resources of the system must be logged onto an
NT domain and must have specific rights to access the given
resource. The resource is not only the share, but the directories and
files within the share as well.
• Administrators and users m ay restrict access to any file, directory or
groups of files and directories to any user or group of users in the
domain.
To create or edit shares in Windows:
1 Using the NetStorage web interface, click the Storage tab, then select
File Volumes.
2 Select the item to be shared in the tree list (the file volume root or a
subdirectory).
3 In the Windows Networking box, select Share As.
4 A default name appears in the Share Name field. You can change this
name to any name desired.
4-14
Page 60

Managing Storage
Allowing Access to Data
Note Windows shares are indicated in the tree list with a graphic of a hand
Edit Host Access
5 Enter a Comment (optional).
6 Enter a password in the R/O and R/W fiel ds. (These appear only if you
are using Share Level Security. See “Share-Level Security” on
page 8-5.)
7 Click Apply.
holding the shared object.
The HP NetStorage 6000 automatically generates a UNIX mount point at
the root of the file volume when you create the volume. Mount points allow
access to the system via the NFS protocol. By default, the mount point
allows no access from any UNIX host when the volume is created. You
must specifically grant access before UNIX host systems can mount the
volume. Host access rights to resour ces via the NFS pr otocol are man aged
through the approve file.
The /etc/approve File
In traditional UNIX implementations, the exports file is used to restrict
host access to the defined mount points. On the HP NetStorage 6000, this
function is handled by the /etc/approve file. The administrator may
edit this file:
n Directly from a text editor via an NFS (UNIX) mount or a Windows
share. The file is named approve, and is located in the /etc directory
in the first file volume created on the system. The /etc director y is an
administrative file directory. The files may be edited (with the correct
permissions), but they cannot be deleted.
n From the HP NetStorage web interface, as explained in this section.
Entries in the approve file have four fields:
4-15
Page 61

Managing Storage
Allowing Access to Data
Field Restrictions
class
specifier
host pattern
rights
This field specifies the class of object to protect. In all
cases, the object is files.
This field specifies the resources on the NetS to rage 6 000
server to protect. For example, /engineer ing, applies to all
files and directories in the /engineering file system.
This field has the name of a host or group of hosts that
have access rights. Host names must be resolvable
through the local /etc/hosts file, the NIS hosts file,
or through DNS. Groups of hosts are specified in the /
etc/hostgrps file. If the host pattern is the name of a
group, then it must be preceded by the @ symbol. The
wildcard character ( * ) may be used to specify all hosts.
Note that the @general group is a pre-defined group
that specifies all hosts.
This field specifies the access limits to apply. The entry
in this field can be:
access=rw Allow read and write access to the resources
access=ro Allow read only access to the resources
access=none Deny all access to the resource
The fields must be separated by one or more spaces or tabs. If a specifier
contains space characters (such as a directory name that contains spaces),
then the entire specifier must be enclosed in double quotes.
Whenever a host attempts to mount a vo lume, the appr ove f i le is searched
to determine the appropriate access to grant the host. The file is searched
sequentially from top to bo ttom. When a matc h is found t o the host pa ttern
and the volume specifier, then the associated access rights are applied. All
entries in the file after the matched entry are ignored. Therefore, it is
important to order the entries in the file so that the more specific entries are
listed first, and the more general entries are listed last.
4-16
Page 62

Managing Storage
Allowing Access to Data
Here is a list of sample entries in the host access file:
#class specifier host pattern rights
files /acct/usr it0 access=rw
files /acct/usr @guest access=ro
files /acct/etc it1 access=rw
files /acct/etc it2 access=rw
files /acct @general access=none
These five entries define the access to the /acct volume. In particular , the
first two entries define access to the /acct/usr directory. Read only
access is granted to the guest group (defined in the /etc/hostgrps
file). The next two entries allow read/write access to the machines it1 and
it2 to all files and directories in the /acct/etc directory . The last entry
is a catch-all, indicating that all other hosts have no access to the /acct
volume.
The following list demonstrates the use of wildcards and DNS domains:
#class specifier host pattern rights
files /engineering *.eng.nas.hp.com access=rw
files /engineering *.test.nas.hp.com access=ro
files /engineering @general access=none
files / @general access=none
The first three entries define the access allowed to the /engineering
volume. The wildcard (*) character was u sed to specify all the machines in
a DNS domain. The last two lines in the examples are catch-alls, indicating
that all other hosts have no access to the /engineering volume or any
other volume. These entries are optional since acces s is always denied if it
is not specifically granted.
To view and edit the host access file using the NetStorage web interface:
1 Using the NetStorage web interface, click the Storage tab, then select
Host Access.
2 Modify the file as you would in any text editor.
3 Click Save Changes when you are done editing.
Note If there is no entry in the approve file to define access to a volume, then
access is denied to all ho sts . T he r oot us er, mounting from a Trusted Host,
always has full read/write access to all volumes, regardless of the access
rights specified in the approve file.
4-17
Page 63

Managing Storage
Allowing Access to Data
The /etc/hostgrps File
In most cases, you want to specify a gr oup of co mpu t ers when iden tifying
Host Access to the NetStorage 6000. In many of these situations, the
wildcard character (*) serves this pu rpose. However, in some cases it is not
sufficient. You can get around this problem by simply generating a Host
Access entry for each computer, or you can define a group of host
computers that may then be referenced by name (preceded by the @
symbol). A group of host computers may be defined by creating an entry
in the /etc/hostgrps file. The file must be edited manually, using a
text editor via the N FS protocol, or the CIFS protoc ol (assuming that you
have the proper ri ghts).
Groups may be created by ad ding an entry into the /etc/hostgrps file.
Each entry starts with the name of the group, followed by a sequence of
host names to associate with the group . Every name is delimited by a space
character. For example:
# Hostgrps file (group hosts under a name for access control)
general *
mygroup eng6284.stor.hp.com eng6a2c.stor.hp.com
eng8106.stor.hp.co
mygroup 10.58.159.245 hpcust6da6
Note The host names may appear as fully qualified domain names, IP
addresses, or host names as they app ear in DNS or a hos ts file. Entries for
a group may span more than one line by entering the group name again at
the beginning of the next line.
The host names must be resolvable through the hosts file, the NIS hosts
file, or DNS.
4-18
Page 64

Backing Up and Restoring Files
The Backup and Restore Tab
Backing Up and Restoring Files
The Backup and Restore Tab
The Backup and Restore tab lets you:
n Create disk checkpoints
n Modify checkpoint schedules
n Manage disk checkpoints
n View the tape backup job status
n View the tape restore job status
n View the tape magazine
n View the tape log
n Create and execute backup jobs
n Choose your backup options
n Back up checkpoints
n Restore volumes
n Restore files and directories
n Check your tape settings
Chapter 5
Note Labeling your tapes and keepin g track of schedules is a crucial compon ent
in the backup and restore process.
Using the HP SureStore 818 or 1/9 DLT Autoloader
HP designs the HP NetStorage 6000 to work with the HP SureStore 818
(part number C6284NB) or Autoloader 1/9 (part number C7146NB) DLT
backup devices. See the installation poster for directions on attaching the
Autoloader to the HP NetStorage 6000.
Contact your local HP Authorized Reseller for information about ordering
either the 818 or 1/9 HP SureStore DLT Autoloader. If you already own
either Autoloader, purchase a SCSI cable (part number D6020A) to
connect your Autoloader to the HP NetSt o rage 60 00. If yo u do not hav e a
reseller , l o g on t o t he HP we b si te www.hp.com
.
5-1
Page 65

Backing Up and Restoring Files
Using the HP SureStore 818 or 1/9 DLT Autoloader
You should refer to your User’ s Guide th at came with your Autoloader for
information about setup and maintenance. The information in this chapter
is for the Autoloader 818. If you have the 1/9 Autoloader and you are
unable to find your user documentation, refer to the HP web site.
The 818 Autolo ader has eight slots: Slots 1-6 are in the front of the unit an d
Slots 7 and 8 are inside.
Note The Autoloader cannot detect the difference between a cleanin g tape and a
tape cartridge, so use caution when loading tapes into the magazine.
Loading Tapes into the Magazine
With the tape’s writeprotect switch fa cing
out and the smooth
edge facing the top of
the magazine, ins ert
the tape until it clicks . A
metal tab releases to
lock the tape into place.
When you load tapes to perform a backup, the Autoloader does not care
about previous tape contents; it treats every tape in the magazine as
blank. Be sure to sequentially label your tapes after a backup.
If you are rest orin g a s pec if ic file or your entire syste m, y ou must lo ad th e
tapes in the correct order into the magazine.
5-2
Page 66

Backing Up and Restoring Files
Using the HP SureStore 818 or 1/9 DLT Autoloader
Loading Tapes into the Internal Slots
To load internal tapes, remove
the magazine from the
Autoloader. With the ta pe’s writeprotect switch facing out of the
Autoloader and t he smooth edge
facing the top of the slot, insert
the tape until it clicks into place.
Loading the Magazine into the Autoloader
With the handle fac ing out of
the Autoloader, insert the
magazine into the
Autoloader. Slide the
magazine in until it clicks
into place. Slide the handl e
all the way t o the left to st ore
the magazine.
5-3
Page 67

Cleaning the Autoloader Tape Drive
The drive mechanism should only be cleaned if CLEAN DRIVE displays
on the front panel. For directions on how to clean your tape drive, see the
HP SureStore DLT Autoloader User’s Guide.
Ordering Tapes
You can order a full range of supplies through a Hewlett-Packard
authorized dealer, an HP sales office, or HP Direct. To contact HP Di rect,
call 1-800-227-8164. See the list below for product names and part
numbers.
n Data cartridge (C5141-85701)
n Cleaning cartridge (C5142-85700)
Backing Up and Restoring Files
Local and Remote Backups
Local and Remote Backups
Backup Overview
Although the HP NetStorage 6000 provides RAID 5 hardware protection
for your data, a backup strategy can prevent data loss in cases of inadvertent
deletion or system disasters such as theft and fire. Using features built-in to
your HP NetStorage 6000, a backup strategy can provide:
n Daily checkpoints for rapid recovery of individual files or directories,
plus. See “Creating Checkp oints” on page 5-9.
n Full backups on a weekly schedule for long-term storage and disaster
recovery. See “Creating and Executing Backup Jobs” on page 5-14.
To perform backups, y ou need t o att ach ei ther an 8 18 or 1/9 HP SureSt ore
DL T Autoloader to your HP NetStorage 6000 (see the installation poster for
instructions). You can set up the tape device to perform two types of
backups:
n A local backup: Use the backup application in the NetStorage web
interface plus an optional 818 or 1/9 HP SureStore DL T Autoloader . See
“Performing a Local Backup” on page 5-5.
n A remote backup: Use one of several popular network remote backup
applications on a networked computer. See “Performing a Remote
Backup” on page 5-6.
5-4
Page 68

Backing Up and Restoring Files
Local and Remote Backups
Note You do not need to format tapes for a backup. However, before you load
tapes in the Autoloader, make sure they are not write-protected.
The length of time required to perform a backu p depends on the si ze of the
volume and the local area network (LAN). As a general rule:
n For a local backup, the Autoloader backs up 25 gigabytes per hour.
n For a remote backup on a 10Base-T network, the Autoloader backs up
3 gigabytes per hour.
n For a remote backup on a 100Base-T network , the Autoloader back s up
10 gigabytes per hour.
During a backup, the Autoloader’s control panel disp l a ys Writing and
the green activity light flashes.
Performing a Local Backup
Use the backup application in the NetStorage web interface plus an
optional 818 or 1/9 HP SureStore DLT Autoloader to perform a local
backup. See the installation poster for directions on attaching the
Autoloader to the HP NetStorage 6000 and see “Using the HP SureStore
818 or 1/9 DLT Autoloader” on page 5-1 for information on using the
Autoloader.
Note You can only access Tape Status, T ape Backup, Tape Restore, and Tape
Settings in the Backup/Restore tab after you attach an Autoloader to
your HP NetStorage 6000
In a local backup session, a special checkpo int of yo ur data is first created
on disk, then the data is transferred to the locally attached Autoloader. The
checkpoint uses only a small amount of disk space and the data transfer
does not interfere with your LAN traffic.
To run a local backup:
1 From your workstation , open a we b browser an d enter the IP ad dress of
the HP NetStorage 6000.
2 Click the Backup/Restore tab, then select Tape Backup (see “Creating
and Executing Backup Jobs” on page 5-14 for more information).
The local backup feature provides simple scheduling capability and can be
configured to back up individual files or combinations of volumes.
5-5
Page 69

Performing a Local Restore
From a local backup tape, a restore operation can select an individual
volume, directory , or file. Make su re you carefully label and date your local
backup tapes because a database of local backup operations is not
maintained.
To run a local restore:
1 From your workst ation, open a web browser and enter the IP address of
the HP NetStorage 6000.
2 Select the Backup/Restore tab, then click Tape Restore (see
“Restoring Volu mes” on page 5-18 or “Restoring Files and Directories”
on page 5-20 for more information).
Performing a Remote Backup
Backing Up and Restoring Files
Local and Remote Backups
Use third-party backu p app l ica tio ns on an y co mput er on t h e net work w ith
a tape drive attached to perform a remote backup.
When you run a remote backup, data from the HP NetStorage 6000
transfers over the network to the remote server running the backup
application, and then to the server-attached tape device. The remote backup
application cannot control the Autoloader connected to the HP NetStorage
6000.
If the backup application is running under NT, the restore operation
recovers both the NT and UNIX security settings for each file. If the backup
application is running under UNIX, the restored NT files revert to the
default user security setting, while UNIX files retain their full security
settings.
See “Remote Backup Applications Overview” on page 11-1 for a list of
remote backup applications the HP NetStorage 6000 integrates with.
5-6
Page 70

Backing Up and Restoring Files
Disk Checkpoints
Disk Checkpoints
What Are Disk Checkpoints?
You can use the disk checkpoint feature to create a read-only virtual copy
of your volume. This copy does not consume the equivalent disk space that
an actual copy consumes. Because they are not real copies, checkpoints
appear as a collection of directories in a virtual volume. This volume has
the same name as the original volume but with a .chkpnt extension. Y ou
can retrieve data from the checkpoint by browsing to the data you need and
copying it to the desired location. Y ou can also back up checkpoints to tape.
For more information, see “Backing Up Checkpoints” on page 5-17.
You can create checkpoints manually (by checking Immediate) or have
them created automatically at scheduled times by checking the appropriate
boxes. The following table lists the checkpoints you can schedule and their
deletion dates.
Checkpoint Creation Time Deletion
Immediate Now Delete manually
Weekly Every Sunday at 1 am Automatically deletes
in 14 days
Nightly Every weekday at 1 am Automatically deletes
in 7 days
Daily Every weekday at 1 pm Automatically deletes
in 3 days
Every three hours Every weekday from 9 am
to 6 pm
Automatically deletes
in 6 hours
You name immediate checkpoints. The system names scheduled
checkpoints based on the creation date and time and their deletion date.
For example, if you created a three-hour scheduled che ckpoint on Januar y
19, 2000 at 9 am, the system names that checkpoint 20000119-
090001,6h. The date of this checkpoint is year 2000, mon th 01, day 19,
and the time you created it was 09 am, 00 min, 01 seconds. The checkpoint
deletes in 6 hours.
If you do not want the system to delete the checkpoint on its deletion time,
rename the checkpoint (see “Renaming or Deleting Checkpoints” on
page 5-1 0). The name of the checkpoint is also the name of its directory o n
the virtual volume.
5-7
Page 71

Backing Up and Restoring Files
Disk Checkpoints
Note When checkpoints are created, they do not use much disk space. As you
make changes to the disk volume, checkpoints use increasing amounts of
space. Checkpoints may be deleted automatically if the system begins to
run out of disk space. To save disk space, delete old checkpoints
periodically.
Checkpoints appear as a directory in the virtual volume. For example, if
you have two checkpoints for volume X (one you created named ABC and
a scheduled checkpoint named 20000119-090001,6h), you would
find the following on the virtual volume:
/X.chkpnt/ABC (your checkpoint)
/X.chkpnt/20000119-090001,6h (scheduled checkpoint)
Checkpoints have benefits and limitations.
Benefits Limitations
• Fast, accurate, and conven ient file
archive.
• Quick and easy archive retrieval.
• Uses minimal disk space initially.
• Depends on the disk not failing.
• Uses increasing amounts of
storage over time.
5-8
Page 72

Backing Up and Restoring Files
Disk Checkpoints
Creating Checkpoints
To create a new checkpoint:
1 Using the NetStorage web interface, click the Backup/Restore tab, then
select Disk Checkpoints > Create/Schedule New Checkpoints.
2 Select a volume from the drop-down list.
To create a checkpoint now:
1 Click the box next to Immediate.
2 Type a name for the checkpoint.
3 Click Save Settings and respond to the confirmation dialog box. The
checkpoint is saved to the volume.
To schedule automatic creation of checkpoints:
1 Click the box or boxes next to all desired schedules.
2 Click Save Settings, then click OK to save your changes.
Note You name the immediate checkpoints. The system names the scheduled
checkpoints based on the creation date and time and their deletion date.
Modifying Checkpoint Schedules
To modify the checkpoint schedule:
1 Using the NetStorage web interface, click the Backup/Restore tab, then
select Disk Checkpoints > Create/Schedule New Checkpoints.
2 From the drop-dow n list, select the volume whose schedule you w ant to
modify.
3 Click the box or boxes to change the schedule of the checkpoint(s).
Note You can select any schedule you desire (for example, one, several, or all
the scheduled settings).
4 Click Save Settings. A dialog box asks you if you want to save your
changes. Click OK.
5-9
Page 73

Backing Up and Restoring Files
Managing Checkpoints
Note To save disk space, delete old checkpoints periodically.
To access the data in a checkpoint:
1 Using the NetStorage web interface, click the Backup/Restore tab, then
select Disk Checkpoints > Mana ge Existing Checkpoints.
2 Select a volume from the drop-down list.
3 Choose a checkpoint to retrieve the checkpoint name and directory.
4 Locate the directory where the checkpoint resides and give yourself
permission to access the directory.
Renaming or Deleting Checkpoints
Disk Checkpoints
Checkpoints that are created at a sched uled time are automatically deleted
based on their creation date. The system parses the filename to determine
when to delete the checkpoint. If you do not want the system to delete the
checkpoint on its deletion date, rename the checkpoint.
To rename or delete a checkpoint:
Note Renamed checkpoints may still be deleted if the file sy stem starts to run
out of disk space.
1 Using the NetStorage web interface, click the Backup/Restore tab, then
select Disk Checkpoints > Mana ge Existing Checkpoints.
2 Select a volume from the drop-down list.
3 Choose the checkpoint you want to rename or delete.
4 Check either:
• Rename checkpoint, enter a new name, then click Apply.
• Delete Checkpoint, and respond to the confirmation dialog box.
5-10
Page 74

Backing Up and Restoring Files
Checking the Current Tape Drive Status
Checking the Current Tape Drive Status
Tape Backup Job Status
The Tape Backup Job Status screen displays the st atus of your cu rrent or
last backup job.
To view this screen using the NetStorage web interface:
1 Click the Backup/Restore tab.
2 Select Tape Status > Backup J ob Status.
The fields are:
Field Description
Device Status Ready, Backup Running, Restore Running,
Testing a Tape, or Unknown.
Job Name Name you have given the backup job.
Job Status In progress or complete.
Errors Number of errors that occurred during the job. To
view the error log for this tape, click Ta pe Log .
Job Start Time Date and time the job began.
Job End Time Date and time the job finished.
Job Length in
Minutes
Files Processed Number of files processed.
Bytes Processed Number of bytes processed.
Tapes Used Number of tapes the job required.
Note Make sure you view the tape log when the job completes to determine
Time it took to complete the job.
which tapes were written to. This procedure is the only way to know
which tapes were used. Remove those tapes from the Autoloader and label
them. For more information, see “Tape Log” on page 5 -14 .
The screen refreshes every 10 seconds.
5-11
Page 75

Tape Restore Job Status
The Tape Restore Job Status s creen displays the status of you r current or
last restore job.
To view this screen using the NetStorage web interface:
1 Click the Backup/Restore tab.
2 Select Tape Status > Restore Job Status.
The fields are:
Field Description
Device Status Ready, Backup Running, Restore Running,
Testing a Tape, or Unknown.
Job Statu s In progress or complete.
Backing Up and Restoring Files
Checking the Current Tape Drive Status
Errors Number of errors that occurred during the job. To
view the error log for this tape, click Tape Log.
Job Start T im e Date and time the job began.
Job End Time Date and time the job finished.
Job Length in
Minutes
Files Processed Number of files processed.
Bytes Processed Number of bytes processed.
Tapes Used Number of tapes the job required.
Time it took to complete the job.
The screen refreshes every 10 seconds.
5-12
Page 76

Backing Up and Restoring Files
Checking the Current Tape Drive Status
Tape Magazine
The View Tape Ma gazine screen displays information about the tape
device attached to your HP NetStorage 6000. You can not retrieve
information on a tape if:
n the device is busy
n you do not have a tape device attached
n an error has occurred on your system
Before performing a backup or a restore, make sure you:
n (Restore only) Write-protect all restore tapes before loading them into
the magazine. Slide the write-protect switch until it clicks and an orange
tab appears.
n V erify information about the tapes you loaded in the slots by clicking on
the tape icon below the tape’s slot number.
n Test the slot contai ni ng the fi rs t t ape of the set from which you wan t to
restore.
Note Loading and reading a tape takes at least three minutes.
To obtain information about a tape:
1 Using the NetStorage web interface, click the Backup/Restore tab, then
select Tape Status > Tape Magazine.
2 To read the tape information, click on a tape icon below the tape’s slot
number. If a backup, restore or other activity is taking place, the tape
icons are inaccessible.
3 A dialog box informs you that the device is testing the slot you selected.
Click OK.
4 The following information about the tape appears on the screen if the
tape contains a backup:
• slot number being tested
• job on the tape
• serial number of the tape
• order of the tape within the job
• type of backup performed (if you are testing the first tape of a job)
• date and time you created the tape
• volumes on the tape (if you are testing the first tape of a job)
5 Review the information on the screen. If you want , you can test another
slot.
5-13
Page 77

Tape Log
Backing Up and Restoring Files
Backing Up
The tape log tells you which tapes were written to during a backup, as well
as the date, time, and description of events that occurred.
To display the tape log for your tape drive:
1 Using the NetStorage web interface, click on the Backup/Restore tab,
then select Tape Status > Tape Log.
2 A screen displays the events on the backup tape. If a backup is in
progress, click Bottom to see the most recent information in the tape
log.
You can get mo re informat ion fro m the tape log b y clicking on th e buttons
labeled Top, PgUp, PgDn, and Bottom.
Backing Up
Creating and Executing Backup Jobs
Note You may need to maximize your browser window to see the entire Tape
You can only back up volumes to your backup device, not individual files
or directories. You can store only one backup job on a tape, regardless of
how much data you are back ing up. T he backup tape do es not allow y ou to
access directory information.
Y ou do no t need to format tapes fo r a backup. However , before you perform
a backup, make sure:
n your tapes are not write-protected
n you have enough tapes for the backup
n you loaded the tapes in the correct order
Backup screen.
To create a new backup job:
1 Using the NetStorage web interface, click the Backup/Restore tab, then
select Tape Backup.
2 Click Create a new job and enter a name for the job.
3 Select the volume(s) you want to back up.
5-14
Page 78

Backing Up and Restoring Files
Backing Up
4 Select a backup type. Click
• Full Backup to back up all the files in the selected volume(s).
• Differential Backup to back up only those files that have changed
since the last full backup.
5 If you want to schedu le the job , select t he days yo u want to run the job.
On the Tape Settings screen (see “Tape Settings” on page 5-21), you
can change the scheduled start time. You can schedule only one job p er
day; however, several jobs can be configured to back up the same
volume(s).
Note If you exit this screen without sav ing yo ur changes, the modifi cations you
made will be lost.
You can now:
n Save the job by clicking Save.
n Delete the job by clicking Delete.
n Modify the backup job.
n Run the backup job now.
For more information, see “Choosing Backup Options.”
Choosing Backup Options
Note You may need to maximize your browser window to see the entire Tape
Backup screen.
To run a backup job now:
1 Insert a tape or tapes into your Autoloader (make sure they are no t write-
protected). To verify tha t you loaded the tap es in the correct order, view
the tape magazine (see “Tape Magazine” on page 5-13).
2 Using the NetStorage web interface, click the Backup/Restore tab, then
select Tape Backup.
3 Select an existing job from the drop-down list.
4 Select either Run now, observe Tape Protection to prevent tapes with
recent data on them from being overwritten or Run now, ignore Tape
Protection to disregard that setting.
5-15
Page 79

5 Click Run Job Now. If you changed the backup schedule, a dialog box
informs you that the job will be saved before the backup occurs. If you
start a job using Run Job Now and a job i s scheduled t o run while you r
backup or restore is still in progress, the schedule job will not run. Click
OK or Cancel.
6 The Tape Backup Job Status screen appears and displays the:
• Device Status
• Job Name
• Job Start Time
• Running Time
• Files and Bytes Processed
• Number of Tapes Accessed
• Bytes on Last Tape
Note You can also cancel the backup job.
Backing Up and Restoring Files
Backing Up
7 When the job completes, view the tape log (see “Tape Log” on
page 5-14) to determine which tapes were written to. This procedure is
the only way to kn ow which t apes were used (protected tapes may have
been skipped). Remove those tapes from the Autoloader and label them.
To modify an existing backup job:
1 Using the NetStorage web interface, click the Backup/Restore tab, then
select Tape Backup.
2 Select an existing job from the drop-down list.
3 Modify the settings for the job.
4 Click Save.
To cancel a backup:
1 While a backup is in progress, click Abort Running Job.
2 Remove from the magazi ne any ta pes that contai n data yo u do not w ant
to overwrite.
Note If you want to back up the same data from the canceled backup job,
rename the checkpoint backup.failed to backup.
5-16
Page 80

Backing Up and Restoring Files
Backing Up
To delete a j ob:
1 Click the Backup/Restore tab, then select Tape Back u p.
2 Select an existing job from the drop-down list.
3 Click Delete.
Backing Up Checkpoints
When a tape backup begins, it creates a checkpoint named backup. The
information in the checkpoint backup is backed up to tape. If a checkpoint
named backup already exists, that checkpoint is backed up instead.
Keep in mind:
n If the disk you are backing up is almost full, the attempt to create a
backup checkpoint fails.
n If the backup completes successfully , the backup checkpoint is
deleted.
n If the backup fails, the backup checkpoint is renamed
backup.failed and is not deleted.
Note To control when data is frozen before being written to tape, you can
rename any checkpoint (incl uding backup.failed) to backup. Keep in
mind that the renamed checkpoint is deleted when the backup completes.
5-17
Page 81

Backing Up and Restoring Files
Restoring Volumes, Files, and Directories
Restoring Volumes, Files, and Directories
Restoring Overview
T o res tor e a volume, file, or d irectory, you need to know which tape(s) the
volume, file, or directory resides on and which tape drive slots the tape is
loaded in. (Remember to always label your tapes.) In restoring files and
directories, you must also know the full path of the file/directory that you
are retrieving, starting with the volume name.
Caution If you start a restore and have a backup scheduled to occur after your
restore finishes, the restore tape in the drive may be overwritten by the
backup. To prevent this, remove the tape before the backup begins or
write-protect the tape by sliding the write-protect switch until it clicks and
an orange tab appears
The following information is retrieved from tapes that contain data:
n slot number being tested
n job on the tape
n position within the job
n date and time you last wrote data to the tape
If you are testing the first tape of the backup set, the following additio nal
information is retrieved:
n a list of volumes on the tape
n type of backup on the tape (differential or full)
The first tape of a backup set must be selected to begin a restore.
Note If you changed the job since the backup, current inf ormation abou t the job
may not reflect what is on the tape.
Restoring Volumes
Before you begin a whole-volume restore on disk:
n You might want to clear the volumes of current data because you will
overwrite entire volumes.
n Make sure you restore from the full backup before restoring from a
differential backup.
5-18
Page 82

Backing Up and Restoring Files
Restoring Volumes, Files, and Directorie s
To restore a v olume:
1 Insert the tapes containing the volume you want to restore in the
Autoloader. Make sure you write-protect the tapes and load them in the
correct order.
2 Using the NetStorage web interface, click the Backup/Restore tab, then
select Tape Restore.
3 To read the tape information, click on a tape icon below the tape’s slot
number. The following information about the tape appears on the screen
for tapes that contain a backup:
• slot number being tested
• job on the tape
• serial number of the tape
• order of the tape within the job
• type of backup performed (if it is the first tape of the backup)
• date and time you last wrote data to the tape
• volumes on the tape (if it is the first tape of the backup)
Note Loading and reading a tape takes at least three minutes.
4 Click Restore Whole Volumes.
5 A screen appears, listing the volumes on the tape. Select the volumes
you want to restore.
6 Click Start Restore. A dialog box warning may inform you that if a
backup is scheduled after you run a restore, the backup may overwrite
your restore tapes. You should also write-protect your tapes or use the
tape protection features on th e Settings screen (see “Tape Setti ngs ” on
page 5-21). Click OK or Cancel.
7 The D rive and Job Statu s screen displays the status of the restore. The
screen refreshes every 10 seconds. To cancel the restore, click Abort
Running Job.
8 When the restore is complete, view the tape log.
Note If the restore fails, make sure you view the tape log to determine what
went wrong. For more information, see “Tape Log” on page 5-14.
5-19
Page 83

Restoring Files and Directories
To restore a file or directory:
1 Insert the tapes you want to restore from in the Autoloader. Make sure
you write-protect the tapes and load them in the correct order.
2 Using the NetStorage web interface, click the Backup/Restore tab, then
select Tape Restore.
3 To read the tape information, click on a tape icon below the tape’s slot
number. The following information about the tape app ears on the screen
for tapes that contain a backup:
• slot number being tested
• job on the tape
• serial number of the tape
Backing Up and Restoring Files
Restoring Volumes, Files, and Directories
• order of the tape within the job
• type of backup performed (if it is the first tape of the backup)
• date and time you last wrote data to the tape
• volumes on the tape (if it is the first tape of the backup)
Note Loading and reading a tape takes at least three minutes.
4 Click Restore Single File/Directory.
5 A screen prompts you for the full path of the file(s) or directories you
wish to restore. Make sure you use correct spelling and capitalization.
Use forward slashes (/) between directories.
6 Select either:
• Restore to original location
• Restore to directory on NetStorage 6000. You must enter the
destination path on the disk.
7 Click Start Restore. A dialog box warning may inform you that if a
backup is scheduled after you run a restore, the backup may overwrite
your restore tapes. You should write-protect your tapes or use the tape
protection features on the Settings screen (see “Tape Settings” on
page 5-21). Click OK or Cancel.
8 Before beginning a restore, the HP NetStorage 6000 searches the tape
for the files. The Drive and Job Status screen displays the status of the
restore. Check this screen periodically to see if the scan is successful.
5-20
Page 84

Backing Up and Restoring Files
Checking Settings and Features
The screen refreshes every 10 seconds. Even if you’re restoring only a
single file, the restore process might need to read through much of the
backup set. To cancel the restore, click Abort Running Job.
9 When the restore is complete, view the tape log.
Note If the restore fails, make sure you view the tape log to determine what
went wrong. For more information, see “Tape Log” on page 5-14.
Checking Settings and Features
Tape Settings
The Settings and Feature s screen lets you:
n Change the start time for scheduled jobs.
n Change the number of days tapes are protected after backup.
n Tell the device which slot contains a cleaning tape.
Changing the Backup Schedule
Note Scheduled jobs can have only one start time.
To change the scheduled start time for all backup jobs:
1 Using the NetStorage web interface, click the Backup/Restore tab, then
select Tape Settings.
2 Select the Start time for scheduled jobs field and enter a new start time
using military format.
3 Click Submit. A dialog box informs you that you have changed the time
for scheduled jobs. Click OK.
5-21
Page 85

Backing Up and Restoring Files
Checking Settings and Features
Changing the Tape Protection Window
The tape protection window is a logical write-protection mechanism that
the server enforces. The window requires that you set the correct date and
time on the server . You accomplish physical tape-protection with the writeprotect tab on the tape cartridge. The tape protection window attempts to
prevent accidental overwrite of tapes that are not physically writeprotected.
The Autoloader tests each tape’s protection setting before writing data to it.
The default tape protection window is 7 days. For example, if a tape
contains 5-day-old dat a and tape protect ion is 7 days , the Autoloader s kips
that tape and tests the next one. The Autoloader also skips write-protected
tapes and cleaning tapes.
To change the protection setting for tapes:
1 Using the NetStorage web interface, click the Backup/Restore tab, then
select Tape Settings.
2 Select the Backup tapes are protected from overwrite for field and
enter a new value.
3 Click Submit. A dialog box informs you that you have changed the
number of days your tapes are protected. Click OK.
Skipping the Cleaning Tape
You can specify which slot contains a cleaning tape by skipping that slot
during a backup or restore.
1 Using the NetStorage web interface, click the Backup/Restore tab, then
select Tape Settings.
2 Click either:
• Use all tape magazine slots for backup and restore.
• Slot (specify slot) contains a cleaning tape and will not be used for
backup or restore.
3 Click Submit.
5-22
Page 86

Monitoring the System
The Status Tab
The Status Tab
The Status tab lets you:
n View status summary
n V i ew event log
n V iew environmen tal parameters (t emperature, vol tages and coo ling fan
operation)
n View CPU utilization (both current and peak CPU valu es)
Chapter 6
Monitoring the System
n View network transmiss ion information (summary information on all
Network Interface Cards in the system)
n View client activity on the network
Monitoring Hardware Information
Status Summary
Hardware status summary lets you view environmental and activity status.
If an environmental item is running:
n out of specification, it is noted in the comment field and a hyperlink lets
you access the corresponding page.
n within specification, a green light and an ok message are displayed.
To view hardware status summary:
Using the NetStorage web interface, click the Status tab, then select
Summary.
The following information displays:
n Temperature problems link to Environmental Monitoring > Air
Temperature.
n Power supplies. The five system voltages scanned and verified.
6-1
Page 87

Monitoring Hardware Information
n Power modules. Informational messages about the power supply
module status. If there are an y error conditions, they are reported in the
event log and any device notification systems that have been enabled.
n Cooling fans (on or off). Problems li nk t o Environmental Monitoring
> Cooling Fans.
n Network Transmissi on - NIC Port 1. The cumulative amount of packe ts
in and out for the first or primary port since the machine was last reset
or reboo t ed.
n Client Activity. Current number of clients attached to the HP
NetStorage 6000.
Note The following symbols are used in the table:
— OK
— an item is critical
— the status information could not be obtained
— informational status only
Monitoring the System
6-2
Page 88

Monitoring the System
Monitoring Hardware Information
View Event Log
You can view system messages two ways:
n View Err ors Only displays only the err or messages that have occurred
in the system.
n View All Messages displays all messages that have occurred in the
system. Refresh updates the view with the most recent event logging
information.
To view the event log:
1 Using the NetStorage web interface, click the Status tab, then select
Event Log. The following event information displays:
• Date - mm/dd format
• Time - 24 hour clock
• Severity - (I = informational messages, E = error messages)
• Description of event or error
2 Click:
• View Errors Only to view error messages only.
• View All Messages to return to the event log.
3 Click Refresh to update the log files.
You can use your browser’s print command to print a copy of the log.
Note You can send a copy of the event log to a remote server. For more
information, see “System Log” on page -9. Otherwise, the event log
contains a fixed number of entries with the oldest item dropping off the
log page. When the system is shutdown or rebooted the event log
information is reset.
6-3
Page 89

View Environmental Parameters
You can view hardware status graphically and numerically. The
information is updated every 60 seconds. The following environmental
systems are monitored and required for normal operation of the HP
NetStorage 6000: temperature, power supply voltages, and cooling fans.
See “Hardware Specifications” on page C-3 for more information.
To view environmental parameters:
1 Using the NetStorage web interface, click the Status tab, then select
Environmental Monitoring.
2 Click on any of the three environmental systems to view its status.
• Air Temperature: Two temperature gauges indicate the current air
temperature in the HP NetStorage 6000 box. The temperature is
displayed in degrees Celsius.
A temperature error or f ailure is indicated in the status summary table
if the temperature rises 15° C above the maximum ambient operating
temperature of 40° C for more than 15 seconds.
Monitoring the System
Monitoring Hardware Information
• System Voltages: The HP NetStorage 6000 has f ive system volt ages
that are monitored and maintained with three power supply modules
(one is redunda nt). Fi ve gauges d isplay the current s ystem volt age of
each. If any voltage fluctuates by mor e than +/- 10% fo r more than 2
seconds it will be detected as an error and the appropriate notification
and event log messages are sent.
• Cooling Fans: Cooling fans maintain the necessary ambient
temperature for maximum performance. The status of each fan is
shown either as a:
— black, spinning fan: fan is working normally
— red fan: fan has failed.
Note The RPM's of each fan are disp layed b eneath. Fans normally operate at or
above 3750 RPM. A no tification i s posted on the statu s summary page and
the event log if a fan has stopped or is not spinning at a high enough rate.
Caution You must operate the HP NetStorage 6000 with the cover on. Otherwise,
the fans will not cool the unit properly and it may overheat.
6-4
Page 90

Monitoring the System
Monitoring Hardware Information
View CPU Utilization
CPU utilization lets you view the current load on the CPU of the HP
NetStorage 6000. The information updates every 60 seconds. Y ou can view
the current load on the processor or the peak usage (the maximum load
within the last five minutes).
To view the CPU Utilization:
Using the NetStorage web interface, click the Status tab, then select CPU
Utilization. A CPU Usage chart appears displaying the current usage and
the peak usage for the last five minutes.
6-5
Page 91

Viewing System Activity
View Network Transmission Information
You can view network transmission information to see how much data is
flowing across the network NIC ports in the HP NetStorage 6000. This
information is used to determine if your network is running as efficiently
as possible. If one of the NIC ports has too much traffic, you may want to
move clients to another available NIC port. You can also view errors and
collisions to spot potential hardware problems. The table is updated ever y
five seconds.
To view network transmission information:
Using the NetStorage web interface, click the Status tab, then select
Network Transmission. The following network transmission information
displays:
Monitoring the System
Viewing S ystem Activity
n NIC name (Network Interface Card): This is autom atically assigned by
the HP NetStorage 6000.
n Network address (the network IP address): This is either assigned by the
user or assigned using DHCP. If the port has not been configured, t hen
<Not Configured> is displayed.
n Packets in: the cumulative total for this port
n Packets out: the cumulative total for this port
n Errors
n Collisions
Note This information is displayed separately for each NIC port even if you
have taken advantage of port aggregation. When the HP NetStorage 6000
is reset or restarted, all of the numbers reset to zero.
6-6
Page 92

Monitoring the System
Viewing System Activ ity
View Client Activity
You can view client activ ity to see how man y clients are curr ently attached
to the HP NetStorage 6000 and the activity of the 20 most active clients.
The most active client is listed at the top. The activity is defined as the total
number of packets in and out for each client in the previous ten seconds.
The client activity page updates every five seconds.
To view client activity:
1 Using the NetStorage web interface, click the Status tab, then select
Client Activity.
2 The following information displays:
• Client name - either an IP address or the system name
• Total activity (packets in and out)
Note The client’s fully qualified name or their IP address displays depending
upon the system’s DNS configuration in settings.
6-7
Page 93

Monitoring the System
Viewing S ystem Activity
6-8
Page 94

Reporting
The Report Tab
The Report Tab
From the R eport Tab you can send an HP NetStorage 6000 system
information report to up to three e-mail addresses. This report provides
information on hardware and software, file system configuration, NIC
configuration, and environmental status. This repo rt is helpful for checking
configuration information as well as software and firmware versions.
Several attachments are sent along with this report such as the event log,
the group and users map files, the group.nis file, the password.nis
file, the /etc/hosts file, and the /etc/approve file.
Chapter 7
Reporting
To send a copy of this file and its attachments via e-mail:
1 Using the NetStorage web interface, click the Reports tab.
2 Enter the name of the e-mail server. The e-mail server must be an IP
address or a fully qualified name (such as, alpha.corp.com).
Note If you change the e-mail server , it automatically changes the e-mail server
specified on the SMTP/Email page. See “SMTP/Email” on page 3-7.
3 Enter the e-mail addresses of as many as three individuals. You must
specify an e-mail server if one or more e-mail recipients are defined.
4 Click either:
• Send System Report Email to send a report to the recipients and
save your settings.
• Apply to save your settings without sending a report.
7-1
Page 95

Reporting
The Report Tab
7-2
Page 96

Securing Data
About HP NetStorage 6000 Security
Securing Data
About HP NetS torage 6000 Security
This section explains the details of security as it applies to the user data
stored on the HP Ne tStorage 6000. The NetStorage 6000 utilizes most of
the security features found on Microsoft Windows, as well as all of the
security features found on UNIX platforms. It is not the intent of this
section to review the specifics of thos e s ecurity arch itectures. In stead, th is
section highlights the special features and differences that distinguish the
security on the HP NetStorage 6000 from the security on traditional
Windows or UNIX file servers.
Chapter 8
Since the HP NetS torage 600 0 is design ed to serve fi les over both NFS and
CIFS/SMB protocols, it is necessary to establish a mapping of the security
architectures from one platform to the other. “Mapping NT and UNIX
Users” on page 8-12 explains how that mapping is accomplished.
HP NetStorage 6000 Security in a UNIX-only Environment
The NetStorage 6000 utilizes an internal file system that is native to UNIX
environments. As such, it has UNIX security mechanisms bu ilt-in that are
leveraged when serving files over the NFS protocol. All resources stored
on the file system contain the security metadata commonly found in UNIX
systems.
The NetStorage 6000 does not support the concept of the /etc/exports
file for managing mount points. Instead, the server au tomatically creates a
single mount point at the root of all volumes created on the system. Since
the server is specifically designed to share files, the exporting of mount
points has been automated.
The root directory of the mount points on the NetStorage 6000 is given
special permissions to facilitate appropriate access to users. The owner and
group of this directory are root (UID = 0, GID = 0), and the permissions are
read, write, and execute to owner, group and other (rwxrwxrwx). One
8-1
Page 97

consequence of this setting is that all users can delete any file in the root of
the mount point. Therefore, administrato rs are encouraged to avoid storing
files in the root of the mount point.
The group assignment to files created in a file volume on UNIX can be
performed in a variet y o f ways . On t he Net Storage 6000, when a new fil e
is created, the group assignment is inherited from the directory where the
file is created. For example, if the group owner for directory /acct/usr
is accountants (GID = 501), then all files created in that directory will be
assigned a group owner of accountants (GID = 501).
T r usted Hosts
All UNIX clients that mount to file systems on the NetStorage 6000 use the
UID and GID of their account when accessing files. A special case is the
root user (UID = 0). In UNIX, the root user is a Super User , with full access
to all files and directories in the file system. Due to the extensive rights
provided to the root user, and the extensive damage that can be done by a
malicious root user, the NetStorage 6000 does not trust them by default.
Clients that attach with root privilege are given access as user nobody
(UID = 60001), with no special rights or privileges.
Securing Data
HP NetStorage 6000 Security in a UNIX-only Environment
The administrator can override this default behavior by declaring a
particular client to be a Trusted Host. A root user mounting a NetStorage
6000 file system from a cli ent th at is a Trusted Host is given root pri vilege
(UID = 0) to the file system. This feature allows administration of the file
system by a root user, while at the same time, protecting the file system
from other root users that should not have privileged access to the
NetStorage 6000 file systems.
The administrator may declare Trusted Hosts using the web based
administration tool, or the telnet administration tool of the NetStorage
6000.
8-2
Page 98

Securing Data
HP NetStorage 6000 Security in a UNIX-only Environment
The /etc Directory
It is necessary to maintain a number of system files on the NetS torage 6000
in an accessible place for administrative purposes. Some of the more
common files found in this directory are:
Filename Description
hosts Resolves host names
hostgrps Defines groups of host computer s
approve Restricts host access
users.map Maps Windows user accounts to UNIX user accounts
group.map Maps Windows group accounts to UNIX group accounts
All of these files are stored in the /etc directory on the first volume
created on the system. The files in the /etc directory are for system
management purposes an d can not be deleted. If the volume that st or es t h e
/etc directory is ever deleted, then the system moves the cont ents of this
directory to another available volume.
Most of the files in the /etc directory may be edited through the web
based user interface, or the telnet interface of the HP NetStorage 6000. In
some cases, it is necessary to edit these files directly using a text editor. By
default, all files in the /etc directory are owned by the root user , and may
only be edited by the root user. Therefore, the only way to edit these files
directly (using a text editor) is to mount the file system as the root user from
a Trusted Host. See “Trusted Hosts” on page 8-2.
The /etc/approve File
Since the NetStorage 6000 does not support the /etc/exports file,
support has been added for a file named /etc/approve. This file can
be used to restrict NFS access to particular clients on the network.
In order to restrict individual clients and groups of clients to specific
resources on the NetStorage server, the /etc/approve file must be
edited. The file may be edited manually, or from the web based user
interface, under the Host Access section of the Storage tab. Entries in the
/etc/approve file have four fields. These fields are defined as follows:
8-3
Page 99

Securing Data
HP NetStorage 6000 Security in an NT-only Environment
Field Description
class This field specifies the class of object to protect. In all cases
the object is files.
specifier This field specifies the resources on the NetStorage 6000
server to protect. For example, /engineering, ap pl ies to a ll
files and directories in t he /engineering file system.
host
pattern
rights This field specifies the acc es s li mi t s to apply . Th e ent ry in this
This field has the name of a host or group of hosts that have
access rights. Host names must be resolvable through the
local /etc/hosts file, the NIS hosts file, or through DNS.
Groups of hosts are specified in the /etc/hostgrps file. If
the host pattern is the name of a group, then it must be
preceded by the @ symbol. The wildcard character ( * ) may
be used to specify all hosts.
field can be one of the following:
• access=rw allows read and write access to the resources
• access=ro allows read only access to the resources
• access=none denies all access to the resource
Additional information about the format of this file, as well as detailed
examples may be found in “Edit Host Access” on page 4-15.
The file is searched sequentially for a match. Once an entry is found that
matches the host and the resource to restrict, all other entries are ignored.
HP NetStorage 6000 Security in an NT-only Environment
On Microsoft W indows, the protocol used to transfer files over t he network
between a server and a client is known as Server Message Block (SMB), or
Common Internet File System (CIFS). Many variations of the protocol
exist which reflect the myriad flavors of W indows on the Market; W indows
95/98, Windows NT, and Windows 2000.
Given all these variations, there are two distinct mechanisms used in CIFS
to provide security for resources . They are known as Shar e-Level Security
and User-Level Security. The HP NetStor age 60 00 supports both o f these
security modes. The next two sections briefly explain the architecture of
these security modes, and highlight any special considerations that should
be noted for the HP NetStorage 6000.
8-4
Page 100

Securing Data
HP NetStorage 6000 Security in an NT-only Environment
Share-Level Security
Share-level security is the simplest CIFS security mode to use, but offers
the least security. In this mode, each share is protected by a password.
When the server administrator defines a new share, a password is specified
to protect the share from unauthorized access. When a user first accesses
the share they are prompted for the password. Once the password is entered
and verified, then the user has full access to all files on the share. ShareLevel security is the default security mode for Windows for Workgroups
and Windows 95.
Share-Level security may be implemented to allow both Read /Write
access, as well as Read Only access to shares. Each share may be protected
by a Read/Write pass word and a Read Only password. The access allowed
on the share (Read/W rite or Read Only) is dictated by the password entered
by the user.
By default, the NetStorage 6000 accepts encrypted passwords for
verification. In these cases, Windows NT (also known as NT LM 0.12)
password encryption is used. The NetStorage 6000 also accepts plaintext
passwords from older clients, for backward compatibility.
Since the native file system on the NetStorage 6000 is UNIX based, all files
must have a UID and GID associated with them. However, since ShareLevel security does not support the concept o f users or groups, a si ngle UID
and GID is assigned to each share, such that all files created in the share
from Windows clients are assigned the UID and GID of the share. When
shares are managed through the web based administration tool, shares are
automatically assigned a UID and GID of zero (UID = 0, GID = 0). For
administrators with special needs, the default UID and GID o f zero may be
changed for a given share. The telnet interface of the NetStorage 6000
allows the user to specify the UID and the GID to be used for a particular
share. In this case, ALL directories and files created in the share are
assigned the UID and GID specified by the administrator.
Since Share-Level security allows the user fu ll access to all files regardless
of the UNIX permission settings, it is up to the administrator to ensure that
the Windows shares are created in s uch places so as not to expose sensitive
system files, or the resources of other UNIX users.
8-5
 Loading...