

Page 1

1
HP NAS VA
User’s Guide
October 16, 2001
Page 2

2
Table of Contents
TABLE OF CONTENTS ..................................................................................................2
LEGAL INFORMATION.................................................................................................7
Acknowledgments..............................................................................................................................................7
Software License Agreement .................................................................................................................................7
Environmental and Regulatory Compliance ......................................................................................................9
HP NAS VA Warranty Information ....................................................................................10
Planning for Support........................................................................................................................................10
Obtaining Out-of-Warranty Support ................................................................................................................10
Hewlett-Packard Limited Warranty Statement................................................................................................11
HP NAS VA ......................................................................................................................13
Overview ..........................................................................................................................................................13
Storage Overview .............................................................................................................................................13
Physical Storage...........................................................................................................................................13
Disk Drives..............................................................................................................................................13
Virtual Array ...........................................................................................................................................14
Active Spare............................................................................................................................................14
Logical Storage ............................................................................................................................................14
Logical Unit Number...............................................................................................................................14
Volume Groups.......................................................................................................................................14
Logical Volumes .....................................................................................................................................14
Snapshots.................................................................................................................................................15
Planning Your Storage .....................................................................................................................................15
Planning LUNs and Volume Groups...........................................................................................................15
Planning Snapshots......................................................................................................................................15
USING THE HP NAS VA...............................................................................................17
Getting Started - Part 1.....................................................................................................................................17
Recommendation.........................................................................................................................................17
Understanding NAS VA Storage Terminology ...........................................................................................17
NAS VA Storage Configuration Tools........................................................................................................18
Command View NAS GUI Command Line ............................................................................................18
Command View NAS (under the Storage Tab).....................................................................................18
Command Line........................................................................................................................................18
Items to be aware of:....................................................................................................................................19
Volume Group Creation..........................................................................................................................19
LUN Creation..........................................................................................................................................19
Adding Storage to an Existing Volume Group, Expanding the Size of an Existing Volume Group ......19
Getting Started - Part 2.....................................................................................................................................19
set_parms initial Command.........................................................................................................................20
Using the NAS Web Interface..........................................................................................................................21
Using Online Help............................................................................................................................................22
Page 3

3
Using Help While You Work...........................................................................................................................22
Printing Help Information................................................................................................................................23
HP NAS WEB INTERFACE..........................................................................................24
Identifying the HP NAS VA...............................................................................................24
The Identity Tab...............................................................................................................................................24
Configuring Your System and Network .............................................................................. 25
The Configuration Tab.....................................................................................................................................25
Shutting Down and Restarting the HP NAS Server.........................................................................................25
Shutting Down the NAS Server...................................................................................................................25
Restarting the NAS Server...........................................................................................................................26
System Properties ..................................................................................................................................................27
System Hostname.............................................................................................................................................27
Administrative Password Settings....................................................................................................................27
Date and Time Settings ....................................................................................................................................28
Setting a Time Zone.....................................................................................................................................28
Contact Information.........................................................................................................................................28
Networking Settings..............................................................................................................................................30
TCP/IP Settings ....................................................................................................................................................30
IP Addresses.....................................................................................................................................................30
Domain Name Service (DNS) ..........................................................................................................................31
DNS Initial Setup.........................................................................................................................................31
Editing DNS Information ............................................................................................................................31
NIS Settings......................................................................................................................................................32
NIS Requirements........................................................................................................................................32
Enabling and Disabling NIS........................................................................................................................32
nsswitch.conf File Modification..............................................................................................................32
NFS Settings .........................................................................................................................................................34
NFS Settings.....................................................................................................................................................34
CIFS Settings ........................................................................................................................................................35
CIFS Settings (Samba).....................................................................................................................................35
WINS Addresses..........................................................................................................................................35
Managing Storage .............................................................................................................36
The Storage Tab ...............................................................................................................................................36
Quick Setup.............................................................................................................................................................37
RAID Device Setup..........................................................................................................................................37
Initial Setup and Configuration ...................................................................................................................37
Action Menu Picks......................................................................................................................................37
Physical Drive Quick Setup .............................................................................................................................38
Advanced Setup.....................................................................................................................................................39
Local Storage ........................................................................................................................................................39
Advanced Setup of Physical Devices...............................................................................................................39
Action menu picks.......................................................................................................................................39
Managing Logical Volumes and Volume Groups............................................................................................40
Logical Volumes..........................................................................................................................................40
Action menu picks...................................................................................................................................40
Volume Groups............................................................................................................................................41
Page 4

4
Action menu picks...................................................................................................................................41
Managing Local File Systems..........................................................................................................................41
Action menu picks.......................................................................................................................................41
Command View SDM (Storage Device Manager)...............................................................................................42
Connecting to Command View SDM ..............................................................................................................42
Using the Command View Storage Device Manager (SDM)..........................................................................42
Sun Microsystems Java Plug-in Version 1.3.1............................................................................................42
Modifying the .java.policy File...............................................................................................................43
Command View SDM Certificate ...............................................................................................................43
Managing Arrays and LUNS ...............................................................................................................................45
Storage Array Summary...................................................................................................................................45
Scanning for a New Array................................................................................................................................45
Naming or Renaming an Array ........................................................................................................................46
Advanced Array Management..........................................................................................................................46
LUN Management............................................................................................................................................46
Managing Volume Groups...................................................................................................................................47
Viewing Volume Groups..................................................................................................................................47
Creating a Volume Group ................................................................................................................................47
Editing a Volume Group ..................................................................................................................................47
Deleting a Volume Group ................................................................................................................................47
Managing Logical Volumes .................................................................................................................................49
Viewing Logical Volume Information.............................................................................................................49
Creating a New Logical Volume......................................................................................................................49
Editing a Logical Volume ................................................................................................................................50
Deleting a Logical Volume ..............................................................................................................................50
Allowing Access to Data......................................................................................................................................51
Granting Users Access to Data.........................................................................................................................51
Creating and Editing Shares and Exports.........................................................................................................51
Verifying the HP NAS VA is Accessible to Users..........................................................................................52
Windows......................................................................................................................................................52
UNIX ...........................................................................................................................................................52
Monitoring the System.......................................................................................................53
The Status Tab..................................................................................................................................................53
System Status ..........................................................................................................................................................54
Viewing the System Log..................................................................................................................................54
Performance Statistics ..........................................................................................................................................55
Viewing System Utilization .............................................................................................................................55
Viewing Network Activity...............................................................................................................................55
Viewing NFS Activity......................................................................................................................................55
Viewing Top Output.........................................................................................................................................56
System Software...................................................................................................................................................57
Viewing the Software Patch List......................................................................................................................57
Contacting Support ............................................................................................................ 58
The Support Tab...............................................................................................................................................58
Support.....................................................................................................................................................................59
Viewing Local Support Documentation...........................................................................................................59
Web Documentation.............................................................................................................................................60
Page 5

5
Viewing HP Support Documentation on the Web...........................................................................................60
HP NAS VA Service and Support....................................................................................................................60
HP NAS VA Support Web Site...................................................................................................................60
Contacting Customer Support by Phone......................................................................................................60
SECURITY.......................................................................................................................61
About HP NAS VA Security............................................................................................................................61
HP NAS VA Security in a UNIX-only Environment.......................................................................................61
UNIX File Security......................................................................................................................................61
HP NAS VA Security in an NT-only Environment.........................................................................................62
Share-Level Security...................................................................................................................................62
User Level (Domain) Security.....................................................................................................................62
Permissions..................................................................................................................................................63
Sharing Files Across Multiple Platforms.........................................................................................................63
Accessing Files Created by UNIX Clients..................................................................................................63
Accessing Files Created by NT Clients.......................................................................................................65
CIFS file locking ..............................................................................................................................................65
Virus Prevention and Detection .......................................................................................................................66
BACKUP...........................................................................................................................68
Backup Overview.............................................................................................................................................68
HIGH AVAILABILITY..................................................................................................69
Clustering Overview.........................................................................................................................................69
OTHER FEATURES.......................................................................................................70
Using Snapshots...............................................................................................................................................70
NAS Windows 2000 Overview........................................................................................................................70
Overview......................................................................................................................................................70
Domain Mode Effect Upon Feature Set ......................................................................................................71
Groups..........................................................................................................................................................72
Other Features..............................................................................................................................................72
Resizing of File Systems and Volumes............................................................................................................73
The fsadm Command..................................................................................................................................73
The vxresize Command ..............................................................................................................................73
Managing User Quotas.....................................................................................................................................73
SNMP...............................................................................................................................................................74
SNMP Daemon............................................................................................................................................74
Traps ............................................................................................................................................................74
Turning SNMP Functionality On or Off.....................................................................................................74
VIRTUAL ARRAY..........................................................................................................75
Virtual Array ....................................................................................................................................................75
Figure 1: Host visibility of storage pool.....................................................................................................75
RAID Levels................................................................................................................................................75
RAID 1+0................................................................................................................................................75
Figure 2: RAID 1+0........................................................................................................................................76
RAID 5DP...............................................................................................................................................76
Page 6

6
Figure 3: RAID 5DP........................................................................................................................................77
RAID 1+0 and RAID 5DP Combined (AutoRAID)...............................................................................77
TROUBLESHOOTING..................................................................................................78
General Issues...................................................................................................................................................78
Browser Issues..................................................................................................................................................80
Release Notes ...................................................................................................................................................81
Browser Issues.............................................................................................................................................81
Known Problems .........................................................................................................................................82
HP NAS VA User's Guide (Print Version)..................................................................................................82
GLOSSARY......................................................................................................................83
Glossary............................................................................................................................................................83
A..................................................................................................................................................................83
B...................................................................................................................................................................83
C...................................................................................................................................................................84
D..................................................................................................................................................................84
E...................................................................................................................................................................85
G..................................................................................................................................................................85
H..................................................................................................................................................................85
I....................................................................................................................................................................86
L...................................................................................................................................................................86
M..................................................................................................................................................................86
N..................................................................................................................................................................86
P ...................................................................................................................................................................87
R...................................................................................................................................................................87
S ...................................................................................................................................................................88
T...................................................................................................................................................................89
U..................................................................................................................................................................89
V..................................................................................................................................................................89
W..................................................................................................................................................................90
INDEX...............................................................................................................................91
Page 7

7
Legal Information
Acknowledgments
Outline Java Applet licensed from Byte-Sized Computing (http://www.Byte-Sized.com).
Software License Agreement
IMPORTANT - READ CAREFULLY BEFORE USING THIS PRODUCT. THIS AGREEMENT
APPLIES ONLY TO HEWLETT-PACKARD PROPRIETARY SOFTWARE AND THIRD PARTY
SOFTWARE NOT SPECIFICALLY IDENITIFIED AS BEING LICENSED UNDER A SEPARATE
AGREEMENT. SOME LICENSE AGREEMENTS FOR THIRD PARTY SOFTWARE MAY BE
PROVIDED IN THE SOFTWARE ITSELF.
PROCEEDING AND USING THIS PRODUCT INDICATES YOUR ACCEPTANCE OF THESE
TERMS AND CONDITIONS AND IS A REPRESENTATION BY YOU THAT YOU HAVE THE
AUTHORITY TO ACCEPT THEM. IF YOU DO NOT AGREE WITH THESE TERMS AND
CONDITIONS, YOU SHOULD PROMPTLY RETURN THE UNUSED PRODUCT AND YOUR
MONEY WILL BE REFUNDED.
This End-User License Agreement ("Agreement") is a binding legal agreement between you
(either an individual or a legal entity) and Hewlett-Packard. By using this Hewlett-Packard
software (the "Software") product, you agr ee to be bound by the terms of this Agreement. (The
term Software includes the computer software, the associated media, any printed materials, and
any "on-line" or electronic documentation.) If you do not agree to the terms of this Agreement,
Hewlett-Packard is unwilling to license the Software to you. In such event, you may not install,
use or copy the Software, and you should promptly return the unused product(s) for a refund.
The Software is protected by copyright laws and international copyright treaties, as well as other
intellectual property laws and treaties. The Software is licensed to you, not sold. Hewlett-Packard
retains all right and title to the Software and related documentation.
1. GRANT OF LICENSE: This Agreement grants you the following rights:
o Software: You may install and use one copy of the Software on one server computer.
o Back-Up Copy: You may make one (1) back-up copy of the Software. You may use the
back-up copy solely for archival purposes. You must clearly label any such copy with
Hewlett-Packard's copyright notice and any other proprietary legends which appear on
the original copy. The archival copy must be kept in your possession and are the property
of Hewlett-Packard.
2. DESCRIPTION OF OTHER RIGHTS AND LIMITATIONS
o Limitations on Copying and Distribution: Except as provided in section 1 above, you may
not copy, transmit, or distribute the Software, except and only to the extent that such
activity is expressly permitted by applicable law despite this limitation.
o Limitations on Reverse Engineering and Modification: You may not reverse compile,
reverse engineer, decompile, disassemble, convert to a humanly comprehensible form,
modify or create works derivative of the Software. You may not disguise, obfuscate the
Software in order to use it elsewhere. If the Software is serialized, you may not modify or
disable the neither serial number features nor copy protection mechanisms contained in
the Software.
o Separation of Components: This Software is licensed as a single product. Its components
may not be separated for use on more than one computer.
o Sublicense, Rental and Third Party Use: You may not sublicense, rent, timeshare, loan or
Page 8

8
lease the Software, or directly or indirectly permit a third party to use or copy the
Software.
o Software Transfer: You may permanently transfer your rights under this Agreement,
provided you (i) retain no copies; (ii) transfer all of the Software (including all
components, the media, all printed materials, any upgrades, and this Agreement); and
(iii) provide Hewlett-Packard with written notice of the transfer within ten (10) days. Any
other assignment by you of this agreement shall be void. If the Software is an upgrade,
any transfer must include all prior versions of the Software.
o Export: You may not export the Software without prior written approval from Hewlett-
Packard. If the Software was purchased in the United States of America, you agree to
comply with all applicable United States laws and regulations pertaining to export
controls. If the Software was purchased outside the U.S., you may not re-export the
Software except as permitted by the laws of the United States and the laws of the
jurisdiction in which you purchased the software.
o Termination: Without prejudice to any other rights, Hewlett-Packard may terminate this
Agreement if you fail to comply with the terms and conditions set forth in this Agreement.
In such event, you must return all copies of the Software and all of its components and
documentation to Hewlett-Packard or certify that you have destroyed all such copies.
3. COPYRIGHT: All title and copyrights in and to the Software (including, but not limited to, any
images, photographs, animations, video, audio, music, text, incorporated in the Software, the
accompanying printed materials, and any copies of the Software) are owned by Hewlett-Packard
or its suppliers or licensors. You may not copy the printed materials accompanying the Software.
4. U.S. GOVERNMENT RESTRICTED RIGHTS: The Software and documentation have been
developed entirely at private ex pense and are provided as "Commercial Computer Software" or
"restricted computer software". Use, duplication or disclosure by the U.S. Government or a U.S.
Government subcontractor is subject to the restrictions set forth in subparagraph (c) (I) (ii) of the
Rights in Technical Data and Computer Software clauses in DFARS 252.227-7013 or as set forth
in subparagraph ( c) (1) and (2) of the Commercial Computer Software -Restricted Rights clauses
at FAR 52.227-19, as applicable. The Contractor is Hewlett-Packard Company, 3000 Hanover
Street, Palo Alto, California 94304.
5. LIMITED WARRANTY: Hewlett-Packard warrants that the Software will perform substantially in
accordance with the applicable Hewlett-Packard published documentation prevailing at the time
of shipment for a period of ninety (90) days from the date of receipt. Hewlett-Packard warrants
that any media accompanying the Software will be free from defects in materials and
workmanship under normal use and service for a period of ninety (90) days from the date of
receipt. Any implied warranties on the Software and media are limited to ninety (90) days. Some
states or jurisdictions do not allow limitations on the duration of an implied warranty, so the above
limitation may not apply to you.
6. CUSTOMER REMEDIES: Hewlett-Packard's entire liability and your exclusive remedy shall be,
at Hewlett-Packard's option, either (a) return of the price paid, or (b) repair or replacement of the
Software that does not meet the limited warranty in section 5 above and which is returned to
Hewlett-Packard with a copy of your receipt. Any replacement Software will be warranted for the
remainder of the original warranty period or thirty (30) days, whichever is longer.
7. NO OTHER WARRANTIES: YOU ACKNOWLEDGE AND AGREE THAT THE US E OF THE
SOFTWARE IS AT YOUR OWN RISK. TO THE MAXIMUM EXTENT PERMITTED BY
APPLICABLE LAW, HEWLETT-PACKARD AND ITS SUPPLIERS AND LICENSORS DISCLAIM
ALL OTHER WARRANTIES, EITHER EXPRESS OR IMPLIED, INCLUDING, BUT NOT LIMITED
TO, IMPLIED WARRANTIES OF NON-INFRINGEMENT, MERCHANTABILITY AND FITNESS
FOR A PARTICULAR PURPOSE. HEWLETT-PACKARD DOES NOT WARRANT THAT THE
FUNCTIONS CONTAINED IN THE SOFTWARE WILL MEET YOUR REQUIREMENTS, OR
THAT THE OPERATION OF THE SOFTWARE WILL BE UNINTERRUPTED OR ERROR -FREE,
OR THAT DEFECTS IN THE SOFTWARE AND RELATED DOCUMENTATION WILL BE
CORRECTED, FURTHERMORE, HEWLETT-PACKARD DOES NOT WARRANT OR MAKE
ANY REPRESENTATIONS REGARDING THE USE OF THE RESULTS OF THE USE OF THE
Page 9

9
SOFTWARE OR RELATED DOCUMENTATION IN TERMS OF THEIR CORRECTNESS,
ACCURACY, RELIABILITY, OR OTHERWISE. NO ORAL OR WRITTEN INFORMATION OR
ADVICE GIVEN BY HEWLETT-PACKARD OR A HEWLETT-PACKARD AUTHORIZED
REPRESENTATIVE SHALL CREATE A WARRANTY OR IN ANY WAY INCREASE THE SCOPE
OF THIS WARRANTY. EXCEPT AS OTHERWISE PROVIDED IN THIS AGREEMENT, SHOULD
THE HEWLETT-PACKARD SOFTWARE PROVE DEFECTIVE, YOU (AND NOT HEWLETTPACKARD OR A HEWLETT-PACKARD AUTHORIZED REPRESENTATIVE) ASSUME THE
ENTIRE COST OF ALL NECESSARY SERVICING, REPAIR OR CORRECTION. THIS LIMITED
WARRANTY GIVES YOU SPECIFIC LEGAL RIGHTS. YOU MAY HAVE OTHERS WHICH
VARY FROM STATE OR JURISDICTION TO STATE OR JURISDICTION.
8. NO LIABILITY FOR CONSEQUENTIAL DAMAGES: TO THE MAXIMUM EXTENT
PERMITTED BY LAW, IN NO EVENT SHALL HEWLETT-PACKARD OR ITS SUPPLIERS OR
LICENSORS BE LIABLE FOR ANY DAMAGES WHATSOEVER (INCLUDING, WITHOUT
LIMITATION, SPECIAL, INCIDENTAL, CONSEQUENTIAL, OR INDIRECT DAMAGES FOR
PERSONAL INJURY, LOSS OF BUSINESS PROFITS, BUSINESS INTERRUPTION, LOSS OF
BUSINESS INFORMATION, OR ANY OTHER LOSS) ARISING OUT OF THE USE OR
INABILITY TO USE THE SOFTWARE, EVEN IF HEWLETT-PACKARD HAS BEEN ADVISED
OF THE POSSIBILITY OF SUCH DAMAGES. IN ANY CASE, HEWLETT-PACKARD'S ENTIRE
LIABILITY UNDER ANY PROVISION OF THIS AGREEMENT SHALL BE LIMITED TO THE
PRICE PAID FOR THE SOFTWARE. BECAUSE SOME STATES OR JURISDICTIONS DO NOT
ALLOW THE EXCLUSION OR LIMITATION OF LIABILITY FOR CONSEQUENTIAL OR
INCIDENTAL DAMAGES, THE ABOVE LIMITATION MAY NOT APPLY TO YOU.
9. INDEMNITY: You agree to indemnify and hold Hewlett-Packard and its suppliers and licensors
harmless from and against any and all claims of any kind (along with attorney's fees and litigation
costs), including but not limited to, personal injury or property damage arising out of, resulting
from, or in connection with results you have obtained through your negligent use or misuse of the
Software.
10. GOVERNING LAW: This Agreement is governed by and construed in accordance with the
laws of the State of California, U.S.A as applied to agreements entered into and wholly performed
within California between California residents. This Agreement shall not be governed by the 1980
U.N. Convention on Contracts for the International Sale of Goods.
11. COMPLETE AGREEMENT: This Agreement is the entire agreement between Hewlett-
Packard and you with respect to the Software. THE ACCEPTANCE OF ANY PURCHASE
ORDER PLACED BY YOU IS MADE CONDITIONAL ON YOUR AGREEMENT TO THE TERMS
SET FORTH IN THIS AGREEMENT, AND HEWLETT-PACKARD AGREES TO FURNISH THE
SOFTWARE ONLY UPON THESE TERMS AND NOT UPON THOSE IN YOUR PURCHASE
ORDER. This Agreement replaces all prior understandings and agreements, whether written or
oral. This agreement may not be modified unless Hewlett-Packard and you both assent in writing.
SEVERABILITY: If for any reason a court of competent jurisdiction finds any provision or part of
any provision of this Agreement unenforceable, that part or provision shall be enforced to the
maximum extent permitted by law so as to effect the intent of the parties, and the remainder of
the agreement shall continue in full force and effect.
Environmental and Regulatory Compliance
For details about environmental and regulatory compliance, refer to the documentation for each
HP NAS VA component.
Page 10

10
HP NAS VA Warranty Information
Planning for Support
Step 1 - Retain your Proof-of-Purchase
Support of your HP NAS VA solution is based on length of ownership. Please retain your original
proof-of-purchase (sales receipts). You may need this information should you have to contact HP
for post sales support. If you do not have a copy of your proof-of-purchase, please contact your
internal purchasing department.
Step 2 - Record Product and Serial Numbers
Please record the product number and product serial number for each major component in your
system and retain a copy of the information in a safe place. This helps us help you.
Step 3 - Register Your Product
If you did not register your product during the Setup & Installation process, it's not too late!
Registering your product is easy, only takes a few minutes, and brings you ma ny benefits,
including:
o The ability to customize your Proactive Notification Profile, specifying the kind of product
or Service & Support updates you want HP to automatically send you in relation to this
product.
o Receive personalized and more expedient tec hnical web & telephone support customized
to your product and its operating environment.
o Access to driver & OS upgrades.
o Opportunity to participate in on-line Forums.
o Access to white papers & technical documents.
o Access to Troubleshooting Trees that help you diagnose and resolve your own support
issues.
o E-mail access to HP Support Engineers
Step 4 - Warranty Upgrades (optional)
HP offers a variety of SupportPack products that provide you the opportunity to upgrade your
standard warranty. Please contact your HP Authorized Reseller or the HP Customer Support
Business Center at 1-800-743-8305 for information on upgrading your warranty.
Obtaining Out -of-Warranty Support
Step 1 - Diagnose the Problem
If you encounter difficulty with your HP NAS VA product, refer to the Monitoring and
Troubleshooting chapters of this User's Guide to troubleshoot or identify the failing component in
your product.
If you are unable to resolve your issue, log onto the HP Customer Care Web Site at
http://www.hp.com/support/nasva for additional troubleshooting assistance. This site is frequently
updated with the latest troubleshooting tools, technical specifications, driver and OS upgrades specific to your HP NAS VA.
Note: Access to some content may be limited to registered customers only. Refer to Step 3 of
Planning for Support for information on registering your product.
Page 11
11
Step 2 - Placing Part Orders
any hard disk drives other than the approved drives listed at this web site
To order service parts after your warranty has expired, please contact the appropriate HP
Customer Care Parts Ordering center in your region, during the hours specified below.
Region Telephone Number Hours of Operation
Canada 800-387-3154 or
905-206-4747
United States 800-227-8164 M-F, 6am -5pm PT
M-F, 8:30am-5pm ET
Hewlett-Packard Limited Warranty Statement
1. HP warrants to you, the end -user customer, that HP hardware will be free from defects in
materials and workmanship for a period of ONE (1) YEAR from date of purchase. If HP
receives notice of such defects during the warranty period, HP will, at its option, either
repair or replace product components that prove to be defective. Replacement
components may be either new or equivalent in performance to new.
o Repair or replacement will be performed by HP, Reseller or qualified third party, at
HPs option, "on -site" at your premises or by use of the Customer Replaceable Part
process The following table outlines HPs response time goals based on distance.
Response times are not guaranteed.
Zone Distance from HP Office Response Time
1-3 160 km (100 mi) Next Business Day
4-5 320 km (200 mi) Second Business Day
6 480 km (300 mi) To be negotiated
Not designated Over 480 km (300 mi) To be negotiated
On-site servi ce is restricted or unavailable in certain locations. In HP-Excluded
Travel Areas -areas where geographical obstacles, undeveloped roads, or
unsuitable public transportation prohibit routine travel-service is provided on a
negotiated basis at extra charge. To find out if you are in a geographically restricted
service area, contact the HP Customer Support Business Center at 1-800-743-8305
HP SupportPacks and other enhanced services may follow different guidelines.
Please contact your HP Authorized Reseller or the HP Customer Support Business
Center at 1-800-743-8305 for information warranty upgrades and response times.
2. Replacement components assume either the remaining warranty of the components
they replace or 90 days, whichever is greater. When service invol ves the exchange of
a product or a component, all removed components, in their entirety, become the
property of HP and must be returned to HP after the replacement has been installed.
The replacement component becomes your property and you may be billed fo r
components not returned to HP.
Caution:
Use only HP Hard Drives approved for your HP NAS VA. For an up-todate list of approved hard disk drives, please visit our web site at
http://www.hp.com/support/nasva. Drives on the approved list have
custom firm ware for use in your HP NAS VA. Do not attempt to install
as doing so may result in system failure or loss of data. Using nonsupported hard drives may also void your warranty.
Page 12

12
2. This Limited Warranty does not apply to defects resulting from (a) improper or inadequate
maintenance or calibration, (b) software, interfacing, parts, or supplies not supplied by
HP, (c) unauthorized modification or misuse, (d) operation outside of the published
environmental specifications for the product, (e) acts of God, or (f) improper site
preparation or maintenance.
3. HP does not warrant that the operation of HP products will be uninterrupted or error free.
If HP is unable, within a reasonable time, to repair or replace a product, confirmed by HP
to be defective due to reasons other than those described in #2 above, to a condition as
warranted, you will be entitled to a refund of the purchase price upon prompt return of the
product.
4. TO THE EXTENT ALLOW ED BY LOCAL LAW, THE ABOVE WARRANTIES ARE
EXCLUSIVE AND NO OTHER WARRANTY OR CONDITION, WHETHER WRITTEN OR
ORAL, IS EXPRESSED OR IMPLIED AND HP SPECIFICALLY DISCLAIMS ANY
IMPLIED WARRANTIES OR CONDITIONS, OF MERCHANTABILITY, SATISFACTORY
QUALITY, AND FITNE SS FOR A PARTICULAR PURPOSE. Some countries, states, or
provinces do not allow limitations on the duration of an implied warranty so the above
limitation or exclusion might not apply to you. This Limited Warranty gives you specific
legal rights and you might also have the rights that vary form country to country, state to
state, or province to province.
5. HP will be liable for damage to tangible property per incident up to the greater of
$300,000 or the actual amount paid for the product that is the subject of the claim.
6. TO THE EXTENT ALLOWED BY LOCAL LAW, THE REMEDIES IN THIS LIMITED
WARRANTY STATEMENT ARE YOUR SOLE AND EXCLUSIVE REMEDIES. EXCEPT
AS INDICATED ABOVE, IN NO EVENT WILL HP BE LIABLE FOR LOSS OF DATA OR
FOR DIRECT, SPECIAL, INCIDENTAL, CONSEQUENTIAL (INCLUDING LOST PROFIT
OR DATA), OR OTHER DAMAGE, WHETHER BASED IN CONTRACT, TORT OR
OTHERWISE. Some countries, states, or provinces do not allow the exclusion or
limitation of incidental or consequential damages, so the above limitation or exclusion
may not apply to you.
THE WARRANTY TERMS CONTAINED IN THIS STATEMENT, EXCEPT TO THE
EXTENT LAWFULLY PERMITTED, DO NOT EXCLUDE, RESTRICT, OR MODIFY, AND
ARE IN ADDITION TO THE MANDATORY STATUTORY RIGHTS APPLICABLE IN YOUR
JURISDICTION TO THE SALE OF THIS PROD UCT TO YOU.
Page 13

13
HP NAS VA
Overview
The HP Surestore Network Attached Storage (NAS) VA solution stores data on your network.
NAS solutions provide a simpler, more reliabl e, and cost-effective way to add storage to your
network.
The HP NAS VA solution consists of:
o A file server
o One or more storage arrays
o Tape library (optional)
o A rack
The HP NAS VA solution offers the following features:
o An operating system optimized for storage and file serving.
o The NAS web interface for device management.
o Context-sensitive .
o The ability to attach a storage array to your HP NAS VA server and manage that array
using the Command View SDM web interface.
o Supports the following through HP -UX:
o SNMP notification of critical events
o Remote system log (syslog) capabilities
o Snapshots for quick retrieval of data that is inadvertently lost or deleted
o User Quota
o Virus protection software
o Tape backup
Storage Overview
The storage space on your HP NAS VA is made up of physical and logical storage. Physical
storage refers to the hardware you use for data storage. The physical storage components on the
HP NAS VA include:
o Disk drives
o RAID levels
o Active spare
Logical storage is created by software that lets you combine disk space from multiple physical
disks into a logical volume. A logical volume is a disk partition that can be comprised of physical
storage on multiple devices. The logical storage components on the HP NAS VA include:
o Logical unit numbers (LUNs)
o Volume groups
o Logical volumes
o Snapshots
Physical Storage
Disk Drives
You can configure the HP NAS VA to contain as many as 105 18GB, 36GB, or 73GB physical
Page 14

14
hard disks, depending on your storage needs. Drive capacities may be mixed. If drive speeds
are mixed, system performance will approximate the lowest speed drive in use.
Virtual Array
Your HP Virtual Array is preconfigured for you at installation by the HP Customer Engineer.
Administrators with a strong working knowledge in HP-UX administration and the Logical Volume
Manager can make changes through the Command View SDM. The term “Virtual Array” refers
to the way the disks within the array are treated as a pool of data storage blocks instead of real
physical disks. Further information on your VA is available in the Virtual Array section of this
manual.
Active Spare
The active spare feature in the storage array offers increased protection against disk failure. An
active spare ensures that the array can restore data redundancy and performance as quickly as
possible following a hard disk failure.
Active spare reserves capacity to perform a rebuild in the event of a disk failure. If you are using
disks of different capacities in your array, active spare reserves enough space to rebuild the
largest disk. As with logical volumes, the capacity reserved for the active spare is distributed
across all the disks in the array; no one physical disk contains the active spare.
Active spare is similar to the dedicated hot spare disks used in some conventional arrays.
However, those arrays let the hot spare remain idle until it is needed. This array uses the active
spare for RAID 1+0 storage until the spare is needed. This provides the added benefit of
enhancing performance while also protecting against disk failure.
Logical Storage
Logical Unit Number
Logical unit numbers (LUNs) prepare the physical disk space for use.
A logical unit number (LUN) is a unique identifier to differentiate between separate devices (each
of which is a logical unit). Each LUN is a unique number that identifies a specific unit of storage.
The number of LUNs supported on your NAS VA is dependent on the array hardware installed in
your solution. The VA 7400 array can support up to 1024 LUNs. The VA 7100 array can support
up to 128 LUNs. Typically, your NAS VA solution will use only a very small number of LUNs.
Volume Groups
Volume groups combine the space from LUNs and make the space accessible to the file system
for creating logical volumes and directories, which can then be made accessible to users.
A volume group is a collection of between 1 and 32 LUNs. A LUN may belong to only one volume
group per system. Each system can contain as many as 255 volume groups. When a LUN is
assigned to a volume group, the volume's physical blocks of storage media are organized into
physical partitions of a size you specify when you create the volume group.
Logical Volumes
A logical volume is a section of disk space that holds computer data. A large volume group can
be divided into several logical volumes or partitions, each of which is treated as a separate disk.
Logical volumes are the basic unit of logical storage for a file system on the HP NAS VA. Logical
volumes can be further subdivided into individual directories.
Page 15

15
Snapshots
A snapshot is a read-only picture of a logical volume at a specific point in time that provides
almost instantaneous access to the previous version of a file.
Planning Your Storage
You need to construct an overall storage architecture showing the amount of total storage
available and how it should be allocated to different groups or functions.
Storage space is spread across volume groups. In these volume groups, you must create logical
volumes to divide your disk space. You can divide each volume group into as many as 256 logical
volumes. Planning storage space allocation prior to creating logical volumes is important.
Although the HP NAS VA allows you to expa nd your logical volumes later, you may want to
reserve extra space during setup to allow for easier expansion.
Planning LUNs and Volume Groups
LUNs can be any size up to 256 GB. Create enough LUNs so you can use all the available
storage in a volume group. Volume groups can be no larger than 2 TB. That is because it is the
maximum file size allowed. If you have more than 2 TB of storage in any array, you will have to
create multiple volume groups for that array. You can create up to 256 volume groups.
Planning Snapshots
Snapshots are an important part of your data-protection plan. A good data-protection plan should
include your backup strategy, storage redundancy provided by either AutoRAID or RAID 1+0, and
snapshots. Snapshots give you nearly instantaneous access to previous versions of a file stored
on your HP NAS VA.
A snapshot is a read-only picture of a logical volume at a specific point in time. When you create
a file, the snapshot of that file is of zero length. However, as you modify the file, the snapshot
tracks changes between the original file and the modified file. If an error occurs and you want to
revert to the previous version, you can use the snapshot data and the unmodified parts of the
original file to quickly and easily construct the file.
Snapshots consume storage space. When you plan your storage, you must consider how
dynamic your data will be. If you have created a logical volume in which the data will change
rapidly, snapshots will consume a large amount of space. At the extreme limit, a file can change
so much from its original incarnation that the snapshot consumes the same amount of space as
the original data. Typically, data does not change so rapidly, and the usage and growth of
snapshot space is relatively slow.
Snapshots are optional. You can add or resize a snapshot at a later time if there is enough free
space available in the logical volume. For information about how to incorporate snapshots into
your data-protection plan, see Using Snapshots.
Page 16

16
Use this table to help you plan your storage system.
the NAS web interface. See the Using the
Using the numbers from step 3 above allocate the space to as many files volumes as you wish (max. 256 in each volume
1. Look up the total available storage space
Total available system storage _____ GB Take the figure from in the Unallocated
Column the Storage Array Summary of
NAS Web Interface section of this manual.
2. Calculate space for creating LUNs
Space for LUNs LUN 1 _____ GB
LUN 2 _____ GB
LUN 3 _____ GB
and so forth
3. Verify total space for creati ng Volume Group(s)
Space available for Volume
Groups
4. Plan space to reserve for Snapshots
Snapshots are associated with a specific logical volume and must be created in the same volume group as that logical
volume. Therefore you must allocate enough space in each volume group to include all logical volumes and snapshots.
Snapshots are optional. You can add or resize a snapshot at a later time if there is enough free space available in the
logical volume.
5. Calculate space to be used in Logical Volumes and Snapshots
If you are using multiple volume groups, you must calculate the total space used i n each. Make a copy of this section for
each volume group.
VG 1 _____ GB
VG 2 _____ GB
VG 3 _____ GB
and so forth
Recommended configuration: Use the full
amount of space available on the array in
1 LUN.
Recommended configuration: Use the full
amount of space available on the array in
1 Volume Group.
group).
Make sure to include enough space for snapshots, it you are using them on a particular logical volume.
Logical Volumes
in Volume Group ___
a) Logical Volume 1 _____ GB _____ GB
b) Logical Volume 2 _____ GB _____ GB
c) Logical Volume 3 _____ GB _____ GB
d) Logical Volume 4 _____ GB _____ GB
e) Logical Volume 5 _____ GB _____ GB
f) Logical Volume 6 _____ GB _____ GB
g) Logical Volume 7 _____ GB _____ GB
h) Logical Volume 8 _____ GB _____ GB
i) Logical Volume 9 _____ GB _____ GB
j) Logical Volume 10 _____ GB _____ GB
k) Logical Volume 11 _____ GB _____ GB
l) Logical Volume 12 _____ GB _____ GB
_____ And so on _____ GB _____ GB
6. Verify total space for Snapshots and Logical Volumes for Each Volume Group
_____ GB Total the lines in section 5. This number
7. Define Shares/Exports
Identify which logical volumes (above) will
File Space Snapshot Win Share/UNIX Export
should be equal to or less than line 1.
be Windows Shares or UNIX Exports.
Page 17

17
Using the HP NAS VA
Getting Started - Part 1
This section is a summary of how to get started with your HP NAS VA Storage system. For more
details please see the following sections of this manual:
o Planning Your Storage
o Getting Started - Part 2
Recommendation
Use Quick Setup if you want up to 256 GB of storage con figured quickly on your VA 7100, 512
GB on your VA 7400. Quick Setup will create a single Volume Group and a single LUN on the
VA 7100, one Volume Group with 2 LUNs on your VA7400. You can then create multiple Logical
Volumes onto that Volume Group with Quick Setup.
Quick Setup should only be used 1 time, thereafter you need to use Advanced Setup for your
storage configurations.
Use Advanced Setup for creating multiple Volume Groups and Logical Volumes, or Volume
Groups and Logical Volumes of differ ent sizes. Use Advanced Setup either from the start, or to
manage your storage after one usage of Quick Setup. Advanced Setup can be used to expand
the size of the Volume Group created with Quick Setup.
Understanding NAS VA Storage Terminology
NAS VA storage progression: LUN (device) > Volume Group > Logical Volume > mount
point/share
LUN (device) – A “device” or LUN is a group of storage (i.e. “blocks”) striped across ALL disks in
the Array (behavior unique to HP’s Auto Raid). An array must have at least one LUN and can
have as many as hundreds of LUNs. HPUX naming conventions refer to LUNs as devices; we
attempt to use LUN throughout this document.
Volume Group (VG) – the next level of grouping storage. VGs are made up of one or more
entire LUNs. By design, it is not possible for a single LUN to be a member of more than one VG.
VGs can contain LUNs from multiple arrays connected to the NAS head via multiple FC-HBAs or
FC hubs or switches. This is usually done to distribute the data load across more disks to
increase performance.
Logical Volume (LV) – a “slice” of the grouped storage (i.e. VG). The LV can be very small or
use all of the space available in a single VG, but it cannot span VGs. CIFS shares (for Microsoft
based OSs) and NFS mount points (for UNIX based OSs) provide access to the available storage
in a LV.
Page 18

18
NAS VA Storage Configuration Tools
Command View NAS GUI Command Line
Command View NAS GUI Command Line
Quick
Setup
Create LUNs
(devices)
Manage LUNs
(devices)
Create VGs X X X X
Manage VGs X X X
Create LVs X X X X
Manage LVs X X X X
Create exports/shares X X
Manage
exports/shares
Command View NAS (under the Storage Tab)
X X X
X X
X
Advanced
Setup
Command
View SDM
SAM Command
View
(console)
LVM
Quick Setup (QS) - is intended to be the shortest path to configure up to 256/512 GB of storage.
QS does not offer the flexibility and breadth of space/performance/redundancy options that the
Advanced Setup (utilizing LUNs creat ed via Command View SDM) does.
The “add storage...” feature of QS provides the ability to create Logical Volumes and related NFS
mount point and/or CIFS share of the size of your choice on a single Volume Group created by
Quick Setup.. QS does not provi de the ability to create a VG utilizing LUNs from multiple arrays.
Advanced Setup (AS) - provides the ability to create up to 256 VGs and up to 255 LVs and
mount points/shares dependent upon the configuration and number of LUNs that exist on the
array(s). AS relies upon having previously created LUNs via QS or, more preferably, via
Command View SDM.
Command View SDM – accessible from “Command View SDM” in the navigation tree of
the Storage tab from the Command View NAS. This tool offers the ability to manage your
storage at the lowest level (LUNs). It provides the ability to create, delete and manage
LUNs and all other Array specific management features. When performance, space or
specific configurations are required, configuration via Command View SDM is required.
Command Line
SAM – VGs, LVs and mountpoints may be created, but NFS exports and CIFS shares can’t be
created in SAM. SAM is subject to a similar limitation as the GUI – LUNs cannot be created via
SAM. SAM is the most intuitive of the command line functions available to you, but can not
provide all the functionality needed.
Command View – a text-based version of Command View SDM. Running CVUI (located in
/opt/sanmgr/commandview/client/sbin) provides a text-based, menu driven interface from the
command line with all of the storage management capabilities of Command View SDM.
LVM commands – pvcreate, vgcreate and others are LVM (Logical Volume Manager)
commands. LVM sits on top of UX and performs just what it’s title says – manages (everything
Page 19

19
up to) Logical Volumes. Please refer to your UX documentation for instructions regarding all of
the various LVM commands, parameters and their correct usage.
Items to be aware of:
Volume Group Creation
o QS is the fastest way to create usable storage for NAS VA. It provides one Volume
Group of up to 256 GB and a single LUN of up to 256 GB for you on VA71000, and one
Volume Group of up to 512 GB with up to 2 LUNs of 256GB each on the VA7400 array.
o QS creates storage based upon the World Wide Name (wwn) of each VA series storage
array. Using QS creates a single VG, named VG(wwn), per attached VA. QS recognizes
ONLY VGs created with the VG(wwn) convention, thus only one VG per array is
recognized by QS. Any VGs created via AS or SAM using the default VG name (e.g.
vg01) will NOT be recognized by QS.
LUN Creation
o Command View NAS (GUI or console) and Command View SDM provide the ability to
add, delete or modify LUNs (devices). The Command View NAS GUI creates LUNs only
when QS is used. Once storage has been configured via QS or AS, LUNs deleted or
modified utilizing either Command View NAS or Command View SDM will destroy all data
within the associated VGs/LVs.
Adding Storage to an Existing Volume Group, Expanding the Size of an Existing Volume
Group
o The Volume group size is defined during QS storage configuration or AS setup. If a VG
is desired to be extended beyond the original size, the data must be moved or copied
elsewhere PRIOR to the VG being reconfigured. Failure to do this could result in loss of
data!
Getting Started - Part 2
To begin using your HP NAS VA, you need to:
o Install your NAS VA through the installation documentation provided.
o The first time the system boots, it will run set_parms initial. This allows you
to set a number of system parameters necessary to be able to manage your system
from the NA S web interface. See the section below on the set_parms command
for further information.
o You may need to add or edit some custom configuration information based on your
particular needs
o Configure your basic network information for your device using the HP NAS VA web
interface Configuration tab.
o From the Configuration tab, navigate the logic tree to the Network Settings section.
o Select IP Addresses. Review the IP Addresses section of this manual under:
HP NAS GUI
Configuring Your System and Network
Networking Settings
TCP/IP Settings
IP Addresses
Page 20

20
o Plan your storage. Review the Planning your Storage section of this manual under:
HP NAS VA
Planning Your Storage
o Set up your storage system.
o The first time your HP NAS VA solution is booted up, it will not recognize that any
storage arrays are attached. To make your solution recognize the attached arrays:
1. Go to the Storage tab.
2. Navigate the logic tree to Quick Setup and select RAID Devices.
3. No RAID devices are listed in the RAID Device Summary. You should see a
message posted that says, "This system has not detected any RAID devices
connected to it. Use the Action button and select "Force Hardware Rescan" to
rescan and detect RAID devices ."
4. Click on the Action button.
5. Select Force Hardware Rescan (slow) to scan for your arrays.
6. From the Action button selection menu, select Initialize and Configure
Storage. This will create LUNs on the array, allowing you to use the storage for
your logical volumes, mount points, and share points.
o Verify that the HP NAS VA is accessible to users by accessing the shares with a
Windows client and mounting the file system from a UNIX client.
After you have setup your HP NAS VA, you can:
o Monitor your system by viewing settings in the Status Tab.
o Enable add-on software suc h as backup agents and anti-virus protection.
set_parms initial Command
On first boot of your system, run the set_parms initial command from a command prompt.
It allows you to setup a variety of system information needed to be able to manage your system
from the NAS web interface.
o The command has a welcome screen asking if you are ready to link to a network. Follow
the on -screen instructions.
o If you continued, the next screen lists the information that you will be required to input
(system hostname, time zone, and IP address) and asks if you want to continue.
o If you accept, you will be asked to enter the system hostname. Qualifications for names
are given on -screen. After entering your hostname, you are asked to confirm your
decision.
o The next screen asks you to select a location from a list. Enter your selection. Next, you
will select a time zone from a list and be asked to confirm your selection. You will then
be shown the current system time in that time zone for your verification. You have the
option of changing or accepting the system clock setting shown.
o Next, you enter the IP address and verify it. On-screen qualifications for the IP address
are given.
o You are asked if you want to set additional parameters: subnet mask and gateway
default address, DNS, and NIS.
o If accepted and If more than one NIC is installed, you will get a message indicating
that this command only sets the default network interface. It also tells you to use
SAM to configure additional NICs.
o The next page asks if you want to set the subnet mask and the the gateway default
address.
o If accepted, you will set the subnet mask and the gateway IP address per the on -screen
instructions. You are asked to verify your entries.
o Next, you are asked if you want to set the local domain name and the DNS server IP
address.
o If yes, you are asked to set the local domain name and the DNS server IP address. You
will be asked to verify your entries.
Page 21

21
o You are then asked if you want to specify NIS.
o If yes, then you will enter the domain name
o Next you set the NIS server name or IP address
o Finally, you are asked to verify the domain name and NIS server name or IP address..
o When done, you will need to reboot your system.
o Upon rebooting, the system will be manageable from the NAS web interface where you
can setup and configure your solution's additional parameters.
Using the NAS Web Interface
The NAS server and storage array are managed via a web browser. Most administrative tasks
are accomplished via this interface.
To access the NAS web interface:
1. Use a computer on the network to open a web browser. On most Windows clients,
Internet Explorer 5.0 or later and Netscape 4.77 or later are supported. On most UNIX
clients, Netscape 4.77 or later is supported; Netscape 6.0 is not supported. For a detailed
list of supported browsers and operating systems, see www.hp.com/support/nasva
2. Type the IP address of the HP NAS VA in the address or locat ion field. The Identity page
will appear similar to the figure below. If you have trouble connecting, try enabling the
browser's option to bypass the proxy server for local addresses.
Page 22

22
3. Click the tabs at the top of the page to perform the following tasks:
o Identity: View general system information
o Status: View overall health of hardware and environmental components on the NAS
head and the overall health of any attached storage array
o Storage: View and manage your storage here. The Quick Setup section allows you
to initially configure up to 1 TB of storage and 1 LUN. The Advanced Setup section
must be used for all subsequent storage configuration. The Advanced Setup
section requires a detailed knowledge of UNIX system administration and the
Logical Volume Manager. Caution: Misuse of the Advanced Setup tools could
result in accidental data loss and the need to reinitialize your NAS VA solution..
For more information, please refer to the following section of this manual:
HP NAS GUI
Managing Storage
Advanced Setup
Local Storage section
or
Command View SDM section
o Configuration: Initialize, view, and modify system, network, and alert settings;
shutdown/restart the system; set up user and group mapping
o Support: Contact service and support for the HP NAS VA; obtain open source code;
run diagnostic tools
When you select any tab other than Identity, a navigation tree appears in the left pane. A plus
sign next to a selection indicates that it contains subentries. To access the subentries, click on
the plus sign to expand the tree or double click on the entry.
Using Online Help
The HP NAS VA solution uses a web browser to view the online help (Supported web browsers
are listed in the Using the NAS Web Interface page of this manual). For a detailed list of
supported browsers and operating systems, see www.hp.com/support/nasva . The contextsensitive, online help is pre -loaded on your HP NAS VA.
The guide is organized into main level and sub -level topics.
The left -hand tabs in this help system are:
o Contents: The Contents tab displays folders and pages that represent the categories of
information in the online user's guide. When you click a closed folder, it opens to display
its content (subfolders and pages). When you click an open folder, it closes. When you
click pages, you select topics to view in the right -hand pane.
o Index: The Index tab displays a list of keywords and keyword phrases. These terms are
associated with topics in the help system. To open a topic in the right -hand pane
associated with a keyword, double -click the keyword.
A printable version (PDF format) of the online help file called the HP NAS VA User's Guide is also
located on the HP NAS VA Support website (www.hp.com/support/nasva).
Note: Viewing the PDF -format HP NAS VA User's Guide requires Adobe Acrobat Reader.
Using Help While You Work
To obtain information about the tabs in the NAS web interface:
Page 23

23
1. Click the ? button for on-line help in the upper right corner of the web interface window. A
separate help window displays the topic pertaining to the screen you are viewing.
2. Review the information and close the window, or leave help running in the background by
minimizing the screen.
When viewing help, you can maximize the window or resize it with the buttons in the upper -right
corner.
Printing Help Information
While using the online help, you can print topics and information directly from the viewer. The
available print options are determined by the version of your browser.
Select File > Print and click the options you want for the screen(s) you are printing.
A printable version (PDF) of the user's guide is also located on the HP NAS VA support site
(www.hp.com/support/nasva).
Page 24

24
HP NAS Web Interface
Identifying the HP NAS VA
The Identity Tab
The Identity tab displays the following general system information:
o *System Hostname —The UNIX hostname for your HP NAS VA system
o Description—HP NAS VA
o Manufacturer—Hewlett-Packard Company
o Product Number—The product number corresponding to the original configuration of the
HP NAS VA
o CPUs—Quantity of CPUs in the NAS server head
o CPU Speed—Clock speed of CPUs in NAS server head
o Memory—Amount of physical memory in NAS head, a portion of which is allocated to file
system cache
o *Location—The physical location of the HP NAS VA (user defined - free format)
o *Contact Name—The person to be notified in case of trouble or questions about the HP
NAS VA (usually the system administrator) (user defined - free format)
o *Contact Phone Number—Usually the phone number of the contact name
o Serial Number—The factory -set serial number of the NAS VA product (user defined -
free format)
o *Asset Number—A number that your company might use to identify and track the HP
NAS VA (user defined - free format)
o Storage Array s/n —The array serial number
o *IP Address—The IP network address of the System Hostname
o MAC Address—The unique Machine Address Code for the NIC in port 1
o OS Version—The current version of the operating system running on the HP NAS VA
o Graphical Interface Version—The current version of the NAS web interface
o Up Time—The cumulative up-time of the HP NAS VA since the last reboot
*You can change these items from the Configuration tab.
+You can change this from the Storag e tab.
Page 25

25
Configuring Your System and Network
The Configuration Tab
You can navigate within the System Configuration tree to set up:
o System Properties: You can specify the system name, administrative password,and
date and time in the administration of your system within the NAS web interface. You
can also specify contact information.
o Networking Settings: These settings allow you to set up your device on several network
protocols. You enter your IP address and Domain Name Service information here. The
HP NAS VA supports Windows and UNIX networking protocols. You can setup access to
your file systems from other computers within the NFS selection. The Samba selection
administers shares for Windows.
You can shut down or restart the device from the Configuration tab.
After you have configured your system to meet your requirements, go to the Storage Tab to
arrange the storage space to fit your needs.
Shutting Down and Restarting the HP NAS Server
The Shutdown/Restart option only applies to the NAS server. If you need to shut down the
storage array, shutdown the NAS server first. Shutdown/Restart lets you:
o Shut down the NAS server remotely.
o Shut down the NAS server and immediately restart (reboot).
o If your HP NAS VA system is a HA (clustered server) model, please refer to your MC
Service Guard users manual for shutting down and restarting your system.
Shutting Down the NAS Server
Shut down the device if you:
o move the device to a new location
o anticipate a power outage in your building and you do not have an uninterruptible power
supply for the device
To shut down the device:
1. Using the NAS web interface, click the Configuration tab, then navigate down the
System Configuration tree and select Shutdown/Restart.
2. Select Shutdown Now , then click Apply. A dialog box informs you that:
o You and any other connected users will lose the connection to the device.
o The NAS web interface in the current br owser cache becomes invalid. You are
prompted to close the browser and you must re-connect to the system after it
reboots.
3. Click OK. The HP NAS server shuts down.
Page 26

26
Restarting the NAS Server
Restart the NAS server if you install a new version of the NAS web interface.
Note: When restarting the NAS server, it is not required that you shutdown/restart the storage
array.
To restart the NAS server:
1. Using the NAS web interface, click the Configuration tab, then navigate down the
System Configuration tree to Shutdown/Restart.
2. Select Shutdown and Restart then click Apply. A dialog box informs you that:
o You and any other connected users will lose the connection to the device.
o The NAS web interface in the current browser cache becomes invalid. The browser
closes and you must re -connect to the system after it reboots.
3. Click OK. The HP NAS server restarts.
Page 27

27
System Properties
System Hostname
The system hos tname uniquely identifies your HP NAS VA server on your network. It is a text
string that contains as many as 15 characters drawn from the alphabet (A -Z), digits (0-9), and
minus sign (-). No distinction is made between upper and lower case. However, the name must
begin with a letter and the last character must not be a minus sign. The name you use appears
on the Identity screen of the web interface and in Network Neighborhood in a Windows
networking environment if it is registered in WINS. If the hostname is not registered in WINS, you
will not be able to display the name in Network Neighborhood.
To define the system name:
1. Using the NAS VA web interface, click the Configuration tab.
2. Navigate down the System Configuration tree to the System Properties section and
select System Name.
3. Enter your system hostname in the System Name field. You can use any combination of
numbers, letters, or dashes for the system hostname for your device. However, the name
must begin with a letter and must not end with a dash.
4. Click Apply.
Administrative Password Settings
You can set a password for the HP NAS server. This prevents unauthorized access to the NAS
web interface. The HP NAS VA ships without password protection, and the fields are initially
blank.
Note: If you set a password for the HP NAS VA, protect it as you would any other password. If
you forget or lose this password, you will not be able to access your device. Call HP
Support for assistance.
If you specify a password, you must know the password to view or modify the information in the
other tabs. You can not access the NAS VA web interface without the password.
To assign, change, or remove an administrative password:
1. Using the NAS VA web interface, click the Configuration tab.
2. Navigate down the System Configuration tree to the System Properties section and
select Administrative Password.
3. In the New Password field:
o If you are assigning a password for the first time or changing your password, enter a
password in this field. Use any combination of printable characters (ASCII codes 32
through 126) with the exception of \, /, |, !, %, ` (back quote), ' (single quote), and ".
o If you are removing the administrative password, leave this field blank.
4. In the Password Confirmation field:
o If you are assigning a password for the first time or changing your password, confirm
the new password by typing it in this field.
o If you are removing the administrative password, leave this field blank.
5. Click Apply.
6. Immediately thereafter, you are asked for a name and password. Enter "Admin" as the
name and use the password you created.
Page 28

28
Alternatively, you can manage your GUI password from the command line with the Apache server
tool htpasswd.
Caution: Removing or not assigning an administrative password is a security risk.
Date and Time Settings
The HP NAS server uses the information on this screen to keep track of the date and time for
operations such as time stamps for file generation and modification. Failure to set the proper date
and time may lead to confusing behavior or misleading time stamping of files and log messages.
To set the system date and time:
1. Using the NAS web interface, click the Configuration tab.
2. Navigate down the System Configuration tree to the System Properties section and
select Date and Time.
3. Enter the:
o current date using the format MM/DD/YYYY.
o current time using military format HH:MM:SS.
4. Click Apply.
Setting a Time Zone
To select a time zone for your NAS VA solution, perform the following steps:
1. From a command prompt, run the set_parms timezone command.
2. You are asked to select a location. Enter the corresponding number to your geographic
location.
3. You are asked to select a time zone. Enter the corresponding number to your selected
time zone.
4. Your selected time zone is displayed. You are asked to confirm the selection.
Contact Information
Some of the Contact Information that you enter appears on the Identity screen of the NAS web
interface. These items are denoted with an *. Network management tools may also function
according to the contents of these fields.
To assign contact information:
1. Using the NAS web interface, click the Configuration tab.
2. Navigate down the System Configuration tree to the System Properties section and
select Contact Information.
3. Enter the:
o name of the person primarily responsible for the HP NAS VA in the *Contact Name
field
o phone number of the person primarily responsible for the HP NAS VA in the
*Contact Phone Number field
o description of the HP NAS VA's physical location in the *Location field.
o number that your company might use to identify and track the HP NAS VA in the
*Asset Number field
Page 29

29
4. Click Apply.
otification of an error. (The email message contains the
*Information appears on the Identity screen.
Note: Blank fields do not affect the functionality of the device. However, entering your system
location (including rack ID and rack position) lets you easily determine which device has
issued an alert when you receive n
system name.) If you provide your system location information, you can easily
troubleshoot or repair the problem.
Page 30

30
Networking Settings
TCP/IP Settings
IP Addresses
The HP NAS server has multiple PCI slots available for Network Interface Cards (NIC). The
number of PCI slots available is dependent on the server you purchased for your system. NICs
can be single-port, dual-port, or quad-port 10/100 cards, or single-port gigabit cards. A list of
currently supported hardware (including NICs) is available on the support web site.
When you initially set up your HP NAS VA, you need to configure the primary NIC. You have two
choices:
?? If you have DHCP enabled, NIC configuration occurs automatically. Depending on your
configuration, the DHCP server provides any or all of the following parameters: IP
Address, Subnet Mask, Gateway Address, Broadcast Address, DNS Domain Name.
?? Connect a laptop to the server management port using a null-modem serial cable, and
use terminal emulation software to log in. Access the text interface to manually configure
the primary NIC (unless you have Dynamic Host Configuration Protocol [DHCP]). You
can use the NAS web interface to configure additional NICs. However, you must fi rst
configure the network settings through the serial port or you will not be able to access the
HP NAS VA through the web-based user interface. See the Getting Started - Part 2
section of this manual for more information.
The following list shows what BOOTP/DHCP vendor options are supported:
o BOOTP_OPTION_NETMASK
o BOOTP_OPTION_GATEWAY
o BOOTP_OPTION_DNS
o BOOTP_OPTION_DOMAIN
o BOOTP_OPTION_BROADCAST
o BOOTP_OPTION_HOSTNAME
o DHCP_OPTION_WINS
o DHCP_OPTION_LOGSRVS
o DHCP_OPTION_LPRSRVS
o DHCP_OPTION_NTPSRVS
o DHCP_OPTION_XFNTSRVS
o DHCP_OPTION_XDMSRVS
To enter the IP addresses for secondary NIC ports:
1. Using the NAS VA web interface, click the Configuration tab.
2. Navigate down the System Configuration tree to Networking Settings > TCP/IP and
select IP Addresses. Your current NIC configuration is displayed.
3. For each available NIC card, choose either Use DHCP or Manually Configure. If you
select Manually Configure , enter the:
o IP Address
o Gateway Address
o Subnet Mask
You may have multiple simultaneous pending changes.
.
4. Click Apply.
Note: Enabling DHCP disables manually configuring addresses.
Page 31

31
Domain Name Service (DNS)
Domain Name Servers convert system names that people can remember (such as
nasva.fc.hp.com) to IP addresses (such as 123.45.67.89) that are used by packet -routing
software.
To enter the DNS information:
1. Using the NAS web interface, click the Configuration tab.
2. Navigate down the System Configuration tree to the Networking Settings > TCP/IP
section and select DNS.
3. If required, enter the DNS Domain Name. The HP NAS VA can belong to only one
domain. You cannot delete a name by entering a blank as a name.
4. Enter up to three DNS Server Addresses, clicking Add after each address. These
should be entered in the appropriate search order. In other words, enter the IP address of
the Primary DNS first followed by the IP address of the secondary DNS and so on until all
of your Domain Name Servers have been identified.
5. Note that the three buttons below the DNS Search Order table apply only to the search
order list. You can select from the following options: Edit, Delete, and Clear List.
6. Click Apply.
DNS Initial Setup
The first time DNS is setup on your HP NAS VA web interface per the instructions above, there is
still one file that needs to be manually changed. Follow the instructions below to complete your
initial DNS setup.
Note: If you are setting up NIS, as well, you may want to review the nsswitch.conf File
Modification instructions in the NIS Settings section of this manual and accomplish both NIS
and DNS initial setup at the same time.
1. Open a telnet session and type: sam A message pops up that describes the sam
command.
2. Hit enter to proceed.
3. From the list displayed, select Networking Communications.
4. From this list, select Name Service Switch. This will edit a file called nsswitch.conf
5. Hit the tab button to get to the File, View, Options, Actions selections at the top of the
screen.
6. Select Actions.
7. From the list displayed, select Choose Name Service Switch.
8. The remaining selections in this command are customer environment specific. Each
customer must decide for themselves the priority they want to apply to DNS as a search
order item. However, if DNS is used, DNS must be listed in the search order for
each item in the Choose Name Service Switch list. Proceed by entering DNS into the
search order for each line item according to your system environment needs.
Editing DNS Information
To edit the DNS information:
o Click the incorrect entry and click Edit Selected to modify it.
o Click the entry and click Delete Selected to remove it.
o Click Clear List to remove all entries.
o Click Apply. Changes will take place after rebooting your system.
Page 32

32
NIS Settings
The HP NAS VA supports Network Information System (NIS). NIS maintains a central database
of names and locations of resources on a network. NIS was formerly known as Yellow Pages.
NIS Requirements
If a master NIS server is to be used as the primary NIS method, the Master NIS server must be
located on the same subnet as the NIS client (your HP NAS VA).
If the Master NIS sever cannot be located on the same subnet as the client, a Slave NIS server
must be configured to work in conjunction with the Master NIS server in order to get proper client
NIS binding.
Please consult the HP-UX systems administrator guides and/or sam help for further information
on proper configuration and setup of a NIS network.
Enabling and Disabling NIS
To enable or disable NIS:
1. Using the NAS web interface, click the Configuration tab.
2. Navigate down the System Configuration tree to the Networking Settings > TCP/IP and
NIS.
3. Check Disable NIS or Enable NIS (Disable NIS is the default).
4. If you are enabling NIS, enter the NIS domain name in the NIS Domain Name field.
5. Click Apply.
6. Changes will take effect after rebooting your system. You can reboot now or after
making the manual changes listed below. You are not done with enabling or disabling
NIS until the nsswitch.conf file has been modified per the instructions below.
nsswitch.conf File Modification
Whenever NIS is enabled or disabled, the nsswitch.conf file must be modified to add to (for
enabling) or remove from (for disabling) NIS in the search order list of the Name Service Switch.
Follow the instructions below to complete enabling or disabling NIS.
Note: If you are setting up DNS, as well, you may want to review the DNS Initial Setup instructions in
the Domain Name Service (DNS) section of this manual and accomplish both NIS and DNS
initial setup at the same time.
1. Open a telnet session and type: sam A message pops up that describes the sam
command.
2. Hit enter to proceed.
3. From the list displayed, select Networking Communications.
4. From this list, select Name Service Switch. This will edit a file called nsswitch.conf
5. Hit the tab button to get to the File, View, Options, Actions selections at the top of the
screen.
6. Select Actions.
7. From the list displayed, select Choose Name Service Switch.
8. The remaining selections in this command are customer environment specific. Each
Page 33

33
customer must decide for themselves the priority they want to apply to NIS as a search
order item. However, if NIS is enabled, NIS must be listed in the search order for
each item in the Choose Name Service Switch list. Proceed by entering NIS into the
search order for each line item ac cording to your system environment needs.
9. If you did not reboot after making the NIS settings in the NAS web interface NIS page,
reboot now for the changes to take effect, or reboot after also making the DNS changes
in the NAS web interface.
Page 34

34
NFS Settings
NFS Settings
Network File System (NFS) settings are optional. NFS is a client/server application that lets a
computer user view and optionally store and update files on a remote computer as though they
were on the user's own computer.
1. Using the NAS web interface, click the Configuration tab.
2. Navigate down the System Configuration tree to the Networking Settings and select
NFS.
3. A table displays a list of exported file systems and their associated access lists.
4. Select a file system from the list.
5. Click the Action button for available choices in managing your NFS settings.
o Refresh - updates your screen
o Add NFS Export
o Edit NFS Export
o Remove NFS Export
o Examples - displays a list of example NFS Access Lists
Note that as you make changes to your NFS settings, the status column will list the change as
pending. You may have multiple simultaneous pending changes. Changes do not take effect
until you click apply.
If desired, you may change the number of Network File System Daemon (NFSD) processes. This
value specifies the number of NFSD proc esses that are created on the NAS device. This value
takes affect immediately; NFS is restarted with the new number of daemons. This setting has a
direct affect on NFS performance.
o A single NFSD process (for example, a value of 1) can support many NFS clients, but
it must provide service in a sequential fashion. This would create performance issues
if more than one NFS client was trying to access the NAS device.
o A large number of NFSD processes could support the same number of NFS clients,
but do so in parallel, thus increasing the performance for the clients. The more NFSD
processes you have, the more system resources are used. Specifying a large value
could also result in poor performance.
You can use a minimum value of 1 and a maximum value of 128. If you are you using your
NAS device primarily as an NFS server, HP recommends that you increase the value of
this setting.
5. Click Apply.
You do not need to restart the system.
Page 35

35
CIFS Settings
CIFS Settings (Samba)
Common Internet File System (CIFS) settings are managed within the Samba web interface. The
Samba software suite is a collection of programs that implements the Server Message Block
(commonly abbreviated as SMB) protocol for UNIX systems. This protocol is also referred to as
the Common Internet File System (CIFS) or LanManager protocol. Among other options,
Windows shares and WINS Addresses can be managed within Samba.
To access Samba:
1. From the NAS VA web interface, select the Configuration tab.
2. Navigate the logic tree, under System Configuration > Networking Settings select
Samba. A username and password are required to enter Samba. Local help for Samba
is available within the Samba selection.
WINS Addresses
Similar to DNS, the Windows Internet Naming Service (WINS) is the Windows NT server method
for associating a computer's host name with its address.
To specify the WINS settings:
1. Using the NAS web interface, click the Configuration tab, navigate down the System
Configuration tree to the Networking Settings and select Samba .
2. Select the Globals button. Scroll down to the WINS Options section.
3. Enter your WINS server IP address in the WINS server field. Local help is available at
this location.
Page 36

36
Managing Storage
The Storage Tab
Please review the following sections before proceeding:
o Storage Overview
o Planning Your Storage
Your HP NAS VA must be completely configured before you attempt to set up your storage using
the Storage tab. For more information on configuring your system, refer to the Getting Started Part 1 and Getting Started - Part 2 sections of this manual, the HP NAS VA Configuration Guide,
and Help for the Configuration tab
The Storage tab is provided to allow you to manage the storage on the HP NAS VA. It is divided
into two main sections:
o Quick Setup - selections include RAID Device Setup and Physical Device Quick Setup
This selection is provided to allow quick initial setup of your storage devices. Arrays are
managed in the RAID Device Setup selection. Hard Drives are managed within the
Physical Drive Setup selection.
o Advanced Setup - the Local Storage section allows you to select Physical Devices,
Logical Vols/Volume Groups, and Mounted File Systems. These pages allow you to
manage attached disk and RAID storage devices at the Logical Vol ume manger level.
The Command View SDM section allows management of externally attached RAID
arrays. .
Caution: Use of the Advanced Setup Tools functions require you to use Command View SDM
to create and manage LUNs. Incorrect use of the Advanced Setup tools can result in data loss.
Page 37

37
Quick Setup
RAID Device Setup
For RAID device setup with a new system, please review the instructions in the Getting Started Part 1 and Getting Started - Part2 sections of this manual.
In the NAS web interface Storage tab > Quick Setup, select RAID Device Setup.
The RAID Device Setup page manages any VA 7100 and/or VA 7400 attached storage. You can
initialize these devices and create Logical Volumes which can be shared with external systems
via NFS or CIFS.
Note: RAID Device Setup is used only for initial setup of your system. Your HP NAS VA solution
will determine the storage capacity and configuration that can be setup through RAID Device
Setup per the following table
Initial Setup and Configuration
The following table tells you the limits of storage capacity and configuration for initial setup using
RAID Device Setup. Once you have completed the initial setup using this tool, you can setup
and configure any remaining storage via the Advanced Setup tools.
Array Model Volume Groups Max Usable
Storage
VA7100 1 256 GB 256 GB 1
VA7400 1 512 GB 256 GB 2
The current storage configuration is listed in a table at the top of the page. Any managed devices
and allocated Volumes are displayed, along with their status and size. Existing Volumes may be
deleted using the table Delete button, and new Volumes may be added using the Add storage
on selected Device Action menu pick.
The NAS GUI treats the array(s) as one large physical disk, represented by the LUN created on
the device at initialization. This disk is then added to a Logical Volume Manager (LVM) Volume
Group (VG), named based on the unique ID of the storage device. Storage created by the user is
allocated from this VG, mounted on the server file system, and exported to exter nal systems via
NFS or SMB.
In depth status and configuration data for the RAID storage device may be obtained from the
Command View SDM Web interface.
Caution: Use of the Advanced Setup Tools functions require you to use Command View SDM
to create and manage LUNs. Incorrect use of the Advanced Setup tools can result in data loss.
Max LUN Size Max Number of
LUNs
Action Menu Picks
A number of storage management functions can be performed from the menu that appears when
the Action button is selected.
Force Hardware Rescan (slow)
o In rare cases the GUI may not recognize externally connected storage devices. If so, a
rescan will do an exhaustive search of the attached hardware and recreate device files
and a default configuration, if necessary. This may take several minutes, and is usually
only needed if adding a new device or if an existing device has been moved or replaced.
Page 38

38
Refresh
o Refreshes the browser page
Details
o Provides a detailed page of information on the selected storage device, describing the
device software, hardware configu ration and version. This can be useful to users
knowledgeable in the detailed inner working of the attached arrays..
Initialize and configure Device
o Prepares the storage device for use with the GUI. Any existing Logical Unit (LUN)
configuration on the device is deleted, and a new LUN is created encompassing the
entire available storage. This new LUN is then added to a LVM Volume Group on the
server.
o The underlying configuration of the storage device is not modified. To manage the
configuration at the lowest level (e.g. RAID levels, hot spares, etc) select the External
Storage Devices tree item, which will bring up the device’s Command View SDM Web
management interface.
Add storage on selected Device
o You may create arbitrary sized Volumes on the storage device which can then be
exported to external systems via NFS or CIFS. This menu item will ask for the size of
Volume you wish to create, and the local CIFS Share name. It will be NFS exported by
default. You may remove existing volumes listed in the Device Sum mary by using the
“Delete” button displayed on the page Device Summary form.
Physical Drive Quick Setup
The Physical Drive Quick Setup page allows you the quickly configure an attached disk drive (not
a RAID storage device) for use. Use this when you want to quickly configure a new physical disk
drive attached to the server.
From the NAS web interface, go to the Storage tab. Under Quick Setup, select Physical Drive
Quick Setup.
The page will list any attached disk drives which are not being used by the system. If there are no
devices available, a dialog box will report the fact.
To manage a device, first select it in the grid. You may then specify:
o a Mount Point in the local file system (e.g. /local/newdisk )
o whether the device should be NFS exported to external UNIX or Linux systems
o a Share Name to be used by CIFS
o whether the devices should be shared to external Windows systems via CIFS
The GUI will create a new file system on the device, mount it on the server file system and
optionally export it via NFS and SMB. All existing data on the device will be lost.
Caution: Creating a new file system on the device will cause all existing data on that device to be
lost!
Once created, more detailed configuration may be performed using the Advanced Setup tree
items within the Storage tab. Choose one of the following Help links to learn more:
o Advanced Setup of Physical Devices
o Managing Logical Volumes and Volume Groups
o Managing Local File Systems
o Connecting to Command View SDM
Page 39

39
Advanced Setup
Local Storage
Advanced Setup of Physical Devices
The Physical Devices page allows you to manage attached disk and RAID storage devices
similar to the Logical Volume Manger level and requires a detailed knowledge of UNIX system
administration and the Logical Volume Manager.
Caution: Use of the Advanced Setup Tools functions requires you to use Command View
SDM to create and manage LUNs. Incorrect use of the Advanced Setup tools can result in
data loss.
From the NAS web interface Storage tab, navigate to Advanced Setup > Local Storage and
select Physical Devices.
The main grid on this page will display all physical storage devices attached to the server, their
connection path, size, and associated Volume Group. Two checkboxes control the presentation
of this display for attached RAID devices.
Show RAID devices
o When checked, RAID storage devices will be displayed in the grid. Normally, the RAID
units should be managed used the Quick Setup ->RAID device setup page. Managing
RAID devices on this page req uires Expert knowledge of system administration and is not
recommended.
Show RAID devices on secondary controllers
o This controls whether the secondary controller paths of RAID devices are displayed. It
has no effect if Show RAID devices is not checked. For expert users only.
To manage a device, select it in the grid and then select an Action menu pick.
RAID devices should not normally be managed on this page. Instead, use the Quick Setup>RAID device setup page.
Consult the HP -UX documentation for Logical Volume Manager help. Briefly, unused disk devices
are normally added to a LVM Volume Group (new or existing) as a physical volume. Logical
Volumes are then created on the physical volume, and file systems then created on the Logical
Volumes. File systems may then be shared with external computer systems via NFS or CIFS.
Action menu picks
Force Hardware Rescan (slow)
o Will cause the server to scan it’s hardware interface for disk and storage devices. This
may take several minutes on large configurations.
Details...
o Will display detailed information on a selected storage device, such as it’s Physical
Volume name, Volume Group name, number of Logical Volumes created on the device,
status, and sizes.
Remove Device from Volume Group...
o Allows the physical volume to be removed from it’s Volume group. All Logical Volumes,
Page 40

40
file systems and data on the device will be lost.
Remove Volume Group and All Associated Devices...
o Removes the selected physical volume and it’s encompassing Volume Group from the
system. All Logical Volumes, file systems and data on the device(s) will be lost.
Add Device to a New Volume Group...
o Adds the selected device to a newly created Volume Group.
Add Device to Existing Volume Group...
o Adds the selected device to a Volume Group. This increases the size of the Volume
Group.
Managing Logical Volumes and Volume Groups
The Logical Volumes / Volume Groups page allows you to manage attached disk and RAID
storage devices similar to the Logical Volume Manger level and requires a detailed knowledge
of UNIX system administration and the Logical Volume Manager.
Caution: Incorrect use of these tools will result in data loss.
From the NAS web interface Storage tab, navigate to Advanced Setup > Local Storage and
select Logical Vols/Volume Groups.
This page displays information on Logical Volumes and Volume Groups. Detailed knowledge of
Logical Volume Manager (LVM) theory is required to interpret and use this page.
Logical Volumes
The top grid on this page displays the Logical Volumes (LVs) configured in LVM. The LV name,
size and mount point are displayed. Menu picks allow you to manage these Logical Volumes.
Action menu picks
Force Hardware Rescan
o Will cause the server to scan it’s hardware interface for attached disk and storage
devices. This may take several minutes on large system configurations.
Details
o Will display detailed information on a selected Logical Volume, such as it’s Logical
Volume name, Volume Group name, status, and sizes.
Mount
o If unmounted, mounts the selected Logical Volume on the server file system.
Unmount
o If mounted, unmounts the selected Logical Volume from the server file system.
Delete Logical Volume
o Deletes the Logical Volume. All data on the Volume will be destroyed.
Extend Logical Volume Size
o Extends the size of the selected Volume. The Free MB in VG grid field will display the
amount of space available in the VG for expansion.
Reduce Logical Volume Size
o Reduces the Volume size. The file system on the Volume will be unmounted, reduced in
size, reformatted and remounted. All data on the Volume will be destroyed.
Page 41

41
Volume Groups
The bottom grid displays the Volume Groups (VGs) configured in LVM. The VG name, size and
mount point are displayed. Menu picks allow you to manage these Logical Volumes.
Action menu picks
Force Hardware Rescan
o Will cause the server to scan it’s hardware interface for attached disk and storage
devices. This may take several minutes on large system configurations.
Details
o Will display detailed information on a selected Volume Group, such as Volume Group
device name, number of Logical Volumes, status, and sizes.
Create a new Logical Volume
o Creates a new Logical Volume on the selected Volume Group. Size and striping policy
will be prompted for during creation.
Managing Local File Systems
This page displays the local mounted file systems on the server. The grid displays the file system
mount point, associated Logical Volume and Volume Groups, and utilization statistics. File
systems may be unmounted using the Action menu picks.
From the NAS web interface Storage tab, navigate to Advanced Setup > Local Storage and
select Mounted File Systems.
This page is intended for users knowledgeable in HP -UX system administration.
Caution: Incorrect use of these tools will result in data loss.
Action menu picks
Refresh
o Refreshes the Browser page
Unmount
o Unmounts the selected file system on the server
Page 42

42
Command View SDM (Storage Device Manager)
Connecting to Command View SDM
When selected, this page will contain the Command View SDM configuration page for the
attached array RAID storage device. This web interface allows detailed configuration of the
attached storage device. Note that in order to access this page, you will need to have
installed appropriate certificates in your browser, as detailed in the Using the Command View
SDM page of this manual.
From the NAS web interface Storage tab, navigate to Advanced Setup > Command View SDM
and select Command View SDM.
Normally, all configuration for your array is performed prior to management of the device by the
GUI.
Caution: After initial configuration and setup of your HP NAS VA, modification or deletion of LUNs
through Command View SDM can result in loss of data.
The Command View SDM Configuration tab allows you to:
o Set the RAID level of the storage device
o Perform Business Copies for backup purposes
o Define hot spares
o And, in general, access all features of the device. Use should be restricted to expert
users.
Also available is a wide range of statistics and status information for assessing the performance
and health of the system.
If you have problems launching the Command View SDM web interface, please refer to the the
Command View SDM documentation available on the HP NAS Web Support page at
www.hp.com/support/nasva.
Using the Command Vi ew Storage Device Manager (SDM)
You can access the Command View SDM from the Storage tab. Navigate the logic tree to the
Advanced Setup > Command View SDM section and select Command View SDM . This opens
the Command View SDM, allowing you to:
o Manage the storage on the arrays
o Monitor the status of the arrays
o Perform array diagnostics
o Download new firmware
Caution: After initial configuration and setup of your HP NAS VA, modification or deletion of LUNs
through Command View SDM can result in loss of data.
To launch the Command View SDM, you must install the Sun Microsystems
version 1.3.1, Standard Edition (if your browser does not automatically connect to it) and the
Command View SDM Certificate.
Sun Microsystems Java Plug-in Version 1.3.1
To use the Command View SDM web interface, you need to have Java Plug -in version 1.3.1
installed in your browser (Internet Explorer 5.0 or later or Netscape 4.74 for HP -UX 10.20 users).
TM
Java Plug -in
Page 43

43
If you use a later version of the plug-in, the Command View SDM will not launch correctly.
Later versions cause problems because the plug-in no longer uses the internet Explorer
certificate database and instead references the internal database maintained by keytool. You can
get further information about this change at http://developer.java.sun.com.
The first time you attempt to launch the Command View SDM, your browser will determine
whether you have the correct version of the Java Plug -in installed.
This plug -in supports Sun Solaris, Windows, and Linux operating systems.
Follow these steps to install the Java Plug-in 1.3.1:
1. Go to the Sun Microsystems web site at http://java.sun.com/products/archive/index.html
2. Select the Java 2 Runtime Environment, Standard Edition, v 1.3.1 hyperlink.
3. Select the appropriate download product and follow the instructions for installation on
your system.
To verify that the correct version of the plug-in is installed on your Windows system, select My
Computer > Control Panel . Add/Remove Programs and review the current software on your
system. if you successfully installed the plug-in, it appears in the installed program list.
If you have already installed the Command View SDM certificate, you should be able to launch
the Command View SDM web interface. If you haven't installed the command View SDM
certificate, follow the directions in that section.
Modifying the .java.policy File
You may find it necessary to modify your .java.policy file if you have other applications which
require a later version of the Java Plug -in. The .java.policy file lets you orverride or tailor the
default Java security policies. If you have the Java run -time environment installed on your
system, you can use a program called policytool to manage your security policy file. This
program typically resides in the Java/bin directory. After you locate and start the program,
configure the .java.policy file as follows:
1. Select Add Policy Entry.
2. Leave the CodeBase field empty.
3. Click Add Permission.
4. Go to the Permissions drop-down list and select All Permission.
5. Click OK, then click Done.
6. Save this modified .java.policy file by selecting File > Save .
7. Exit policytool.
Command View SDM Certificate
In order for Internet Explorer to work correctlyu with the Command View SDM, you must install
the Command View SDM Certificate. Netscape does not use the certificate, so this step is
unnecessary for Netscape users.
1. Double-click the hyperlink on the Advanced Setup > Command View SDM >
Command View SDM . page to download the certificate file HPVA1.crt.
2. Start Internet Explorer 5.0 or later.
3. Select Tools > Internet Options.
4. Select the Content tab, then click Certificates.
5. Click Import.
6. The Certificate Manager Import Wizard opens. Click Next.
7. Enter the path of the HPVA1.crt file, or click Browse to locate it. (you need to set Files
of type to X.509 Certificate [*.cer,* .crt].) Click Open, then click Next.
8. Verify that the Automatically select the certificate store based on the type of
Page 44

44
certificate radio button is selected, then click Next.
9. Complete the Certificate Manager Import Wizard dialog, the click Finish.
10. Click Yes in the confirmation dialog box, then click OK.
The first time you launch the Command View SDM browser, the software asks you to accept the
certificate from Hewlett-Packard. you can choose either to accept the certificate each time you
launch a session or to accept it for all sessions.
To verify the certificate is installed correctly:
1. Start Internet Explorer (version 5.0 or later).
2. Select Tools > Internet Options.
3. Click the Content tab, then click Certificates.
4. Select the Trusted Root Certification Authorities tab.
5. Scroll down the list until you see Hewlett-Packard in the Issued To column. Click View
to view the details of this certificate. It is valid until 12/8/15 and the serial numb er is
3A357244.
Page 45

45
Managing Arrays and LUNS
Storage Array Summary
The Storage Array Summary page displays a table that lists the storage array attached to the HP
NAS VA and information about its storage configuration.
To examine and manage the array:
1. Using the NAS web interface, click the Storage tab.
2. Navigate down the System Storage tree to the Advanced Setup > Command View
SDM section and select Command View SDM. This will open the Command View SDM
web interface.
3. Select the Storage tab, navigate down the System Storage tree to the Storage Array
Management section and select Storage Array Summary.
Caution After initial configuration and setup of your HP NAS VA, modification or deletion of LUNs
through Command View SDM can result in loss of data .
A table displays the following drive information for the array:
Column Description
Array Identifier Name you gave the array (see Naming or Renaming an Array)
or default vendor product number/serial number.
LUN Count The number of LUNs you have on an array (between 1 and 63).
Total Physical Capacity Total physical storage space.
Capacity Allocated to
LUN(s)
Capacity Available for
LUNS(s)
RAID Redundancy Space the system needs for AutoRAID overhead.
Active Spare Capacity Reserved drive space available in case a drive fails.
Unincluded Capacity
State Displays OK or Rebuilding.
You can click on a column heading to sort items in that column. The Actions button in the upper
left corner lets you:
o Scan for a new array
o Name/rename an array
o Launch the array user interface for advanced array management
You can also refresh the items in your display.
Usable space allocated to a Logical Unit Number (LUN).
Space available after you create LUNs.
Drive space that isn't recognized by the HP NAS VA because
drive:
?? belongs to a different array
?? not formatted correctly
This space will not be used until you resolve the issue.
Scanning for a New Array
If you attach a new array, you must scan for the new array to make it accessible. This process
may take a few minutes. Restarting your device also scans for new arrays.
To scan for a new array:
Page 46

46
1. Using the NAS web interface, click the Storage tab.
2. Navigate down the System Storage tree to Quick Setup > RAID Device Setup.
3. Select the Action button.
4. Pick the Action menu selection Force Hardware Rescan (slow).
This will cause the server to scan it’s hardware interface for disk and storage devices. This may
take several minutes on large configurations.
You may wish to review the following: Advanced Setup of Physical Devices
Naming or Renaming an Array
To name or rename an array:
1. Using the NAS web interface, click the Storage tab.
2. Navigate down the System Storage tree to the Advanced Setup > Command View
SDM section and select Command View SDM.. This will open the Command View SDM
web interface. Local help is available within the Command View SDM GUI to complete
the task.
3. Within the Command View SDM, select the Configuration tab.
4. Select Array Settings.
5. Select the array that you want to name.
6. Enter the array name in the Alias Name field.
Advanced Array Management
Advanced array management is available through the Command View SDM web interface and
should only be used by administrators with in-depth knowledge of UNIX Administration
and the Logical Volume Manager.
Caution After initial configuration and setup of your HP NAS VA, modification or deletion of LUNs
through Command View SDM can result in loss of data.
To manage arrays:
1. Using the NAS web interface, click the Storage tab.
2. Navigate down the System Storage tree to the Advanced Setup > Command View
SDM and select Command View SDM.
3. If you select this option, another browser is launched. Make sure you ha ve installed the
Sun Microsystems Java Plug -in 1.3.1 Standard Edition and the HP Command View
Virtual Array Certificate before proceeding.
4. Select the Storage tab of the Command View SDM. Local help is available at this
location to proceed further.
LUN Management
Manually managing LUNs after initial setup is not the preferred method of storage management
for the NAS VA. The Advanced Setup section of the Storage tab allows you to manage your
storage by logical volumes and volume groups. Manage LUNs via Command View SDM. More
information is available under the Advanced Set up topic Managing Logical Volumes and Volume
Groups.
Normally, all configuration for your array is performed prior to management of the device by the
GUI.
Caution After initial configuration and setup of your HP NAS VA, modification or deletion of LUNs
through Command View SDM can result in loss of data.
Page 47

47
Managing Volume Groups
Viewing Volume Groups
A volume group is made up of one or more LUNs.
To view the volume group:
1. Using the SDM web interface, click the Storage tab.
2. Navigate down the System Storage tree under Advanced Setup > Local Storage and
select Logical Vols/Volume Groups.
A table displays the following drive information for every volume group (VG):
o Name of the volume group
o The number of logical volumes in the volume group
o The number of devices
o Space available in the volume group
You can click on a column heading to sort items in that column. The Actions button in the upper
left corner lets you force a hardware rescan to search for other VGs, view details of the selected
volume group, or create a new volume group.
Once you have created a volume group, you are ready to create new logical volumes.
Creating a Volume Group
Creation of new volume groups can be accomplished via the Advanced Setup section of the
Storage tab. Under the Local Storage section, select Logical Vols/Volume Groups. This
page is intended for users knowledgeable in HP-UX system administration and the Logical
Volume Manager.
Caution: Incorrect use of these tools will result in data loss.
A complete management suite is available to manage your logical volumes and volume groups.
More help is available at Managing Logical Volumes and Volume Groups.
Editing a Volume Group
Editing of existing volume groups can be accomplished via the Advanced Setup section of the
Storage tab. Under the Local Storage section, select Logical Vols/Volume Groups. This
page is intended for users knowledgeable in HP-UX system administration and the Logical
Volume Manager.
Caution: Incorrect use of these tools will result in data loss.
A complete management suite is available to manage your logical volumes and volume groups.
More help is available at Managing Logical Volumes and Volume Groups.
Deleting a Volume Group
Before you delete a volume group, you must first delete any logical volumes or snapshots
associated with the volume group.
Deletion of existing volume groups can be accomplished via the Advanced Setup section of the
Page 48

48
Storage tab. Under the Local Storage section, select Logical Vols/Volume Groups. This
page is intended for users knowledgeable in HP-UX system administration and the Logical
Volume Manager.
Caution: Incorrect use of these tools will result in data loss.
A complete management suite is available to manage your logical volumes and volume groups.
More help is available at Managing Logical Volumes and Volume Groups.
Page 49

49
Managing Logical Volumes
Viewing Logical Volume Information
Logical volumes are the basic unit of logical storage for a file system on the HP NAS VA. You
create lo gical volumes by allocating space in a volume group. Therefore, before you can create a
logical volume, you must create a volume group.
A complete management suite is available to manage your logical volumes and volume groups.
More help is available at Ma naging Logical Volumes and Volume Groups.
After you have created logical volumes, you can create shares or mounts under the new logical
volumes to make your data accessible to other computers.
To view summary information on all logical volumes that exist on your HP NAS VA:
1. Using the NAS web interface, click the Storage tab.
2. Navigate down the System Storage tree to the Advanced Setup > Local Storage section and
select Logical Vols/Volume Groups.
A table displays the following information for every logical volume:
o Logical volume name
o Volume group of which the logical volume is a part
o Mount point
You can also edit a logical volume from this location.
You can click on a column heading to sort items in that column. The Actions button in the upper
left corner lets you:
o Force a hardware rescan (slow)
o View detailed information about a selected logical volume
o Mount a selected logical volume
o Unmount a selected logical volume
o Delete a logical volume
o Extend the size of a logical volume
o Reduce the size of a logical volume
Creating a New Logical Volume
Logical volumes are the basic unit of storage for a file system on the HP NAS VA. In order to
create logical volumes, you must already have created one or more volume groups.
To create a new logical volume:
1. Using the NAS web interface, click the Storage tab.
2. Navigate down the System Storage tree to the Advanced Setup >Local Storage and
select Logical Vols/Volume Groups.
3. Scroll down the page to the Volume Groups heading.
4. Select a Volume Group from the table in which to create your new logical volume.
5. Select Actions > Create a New Logical Volume.
6. Enter a new Logical Volume Name.
7. Enter the desired logical volume Capacity.
8. Enter the name of the Mount Point.
You have now created a new volume. You must make this volume available to users before they
can access it.
o For Windows NT users, create a share
Page 50

50
o For UNIX users, create an export.
Editing a Logi cal Volume
To edit the logical volumes that exist on your HP NAS VA:
1. Using the NAS web interface, click the Storage tab.
2. Navigate down the System Stora ge tree to the Advanced Setup > Local Storage section and
select Logical Vols/Volume Groups.
A table displays the following information for every logical volume:
o Logical volume name
o Volume group of which the logical volume is a part
o Mount point
You can click on a column heading to sort items in that column. The Actions button in the upper
left corner lets you:
o Force a hardware rescan (slow)
o View detailed information about a selected logical volume
o Mount a selected logical volume
o Unmount a selected logical volume
o Delete a logical volume
Caution: Deleting a logical volume destroys all the data on that volume. This procedure
cannot be reversed. Therefore, remove all crucial data before you delete the volume.
o Extend the size of a logical volume
o Reduce the size of a logical volume
Please read more about managing logical volumes and volume groups.
Deleting a Logical Volume
When you delete a logical volume, the volume group reclaims the space it used.
Caution: Deleting a logical volume destroys all the data on that volume. This procedure
cannot be reversed. Therefore, remove all crucial data before you delete the
volume.
A complete management suite is available to manage your logical volumes and volume groups.
More help is available at Managing Logical Volumes and Volume Groups.
Page 51

51
Allowing Access to Data
Granting Users Access to Data
Before network users can access the HP NAS VA, you must give them permission. This is a
security concern. Each platform grants permission differently:
o Windows: Shares are permissions that let you control Microsoft Windows users' access
to data. You can create SMB shares for any directory within a file volume, including the
root. Once a share is created, users may attach to the share via the Network
Neighborhood in Windows and store and retrieve files and directories. If you are
operating under share-level security, you can limit access to shares by creating read-only
or read/write passwords. See HP NAS VA Security in an NT-only Environment for more
information.
o UNIX: You create an NFS export so that users can mount that volume/directory on their
systems. However, you must first specify the access mode. If you specify a read -only or
read/write access mode, users can use the mount command to access the volume from
a UNIX workstation. This restriction is only for general access to the system. User-level
restrictions also apply to all of the files and directories on the volume. See HP NAS VA
Security in a UNIX-only Environment for more information.
Creating and Editing Shares and Exports
Shares (Windows) and exports (UNIX) let you control which data clients can access. Host
access allows you to control which client machines are allowed access to the HP NAS VA,
regardless of the user.
To create or edit shares for Windows:
1. Using the NAS web interface, click the Configuration tab.
2. Navigate down the System Configuration tree to the Networking Settings section and
select Samba. A username and password are required to enter Samba which launches
its own GUI. Follow the instructions in the local Samba GUI help.
To create or edit exports for UNIX:
1. Using the NAS web interface, click the Configuration tab.
2. Navigate down the System Configuration tree to the Networking Settings section and
select NFS.
3. A table displays a list of exported file systems and their associated access lists.
4. Select a file system from the list.
5. Click the Action button for available choices in managing your NFS settings.
o Refresh - updates your screen
o Add NFS Export
o Edit NFS Export
o Remove NFS Export
o Examples - presents a list of example NFS Access Lists
More information is available on NFS settings.
Page 52

52
Verifying the HP NAS VA is Accessible t o Users
Windows
To assign (map) a drive letter to a shared network resource:
1. In Network Neighborhood, double-click the computer that has the shared resource.
2. Right-click the shared folder and then click Map Network Drive .
3. To connect under a different user name, type the name in Connect As.
4. If you do not want to connect to the shared directory each time you log on, clear
Reconnect at Logon.
UNIX
Use the mount command to mount an exported network resource:
mount machine:/nfs/<NFS Mount Point Name>
where <NFS Mount Point Name> was the name defined by the administrator when the export
was created.
Page 53

53
Monitoring the System
The Status Tab
This tab allows you to monitor system status. You can navigate within the status tree to view the
following for the NAS VA:
o System Log - Syslog
o Performance Statistics
o System utilization (curre nt values)
o CPU utilization
o Memory utilization
o Run Queue time
o Network activity
o NFS Activity
o Top Output
o System Software
o Patch List
Page 54

54
System Status
Viewing the System Log
The System Log page displays the cont ents of HPUX syslog.
To view the System Log page:
1. Using the NAS web interface, click the Status tab.
2. Navigate the tree structure to the System Status section.
3. Select Syslog.
Page 55

55
Performance Statistics
Viewing System Utilization
System utilization lets you view:
o the current utilization of the CPUs
o the current utilization of your system memory
o Run Queue displays the current number of active processes waiting on scheduling. If
this number is high, you may have users running computing jobs and not just file
serving on the solution. This can adversely affect performance.
o a table displays the amount of memory in the NAS server and the number of CPUs.
To view the System Utilization:
1. Using the NAS web interface, click the Status tab.
2. Navigate down the System Status tree to the Performance Statistics section and select
System Utilization.
Viewing Network Activity
You can view network transmission information to see how much data is flowing across the
network NIC ports in the HP NAS VA. You can use this information to ensure that your network is
running as efficiently as possible. If one of the NIC ports has too much traffic, you may want to
move clients to another available NIC port. You can also view errors to spot potential hardware
problems.
To view network activity:
1. Using the NAS web interface, click the Status tab.
2. Navigate down the System Status tree to the Performance Statistics section and select
Network Activi ty.
3. A table displays the network activity of the:
o NIC Port number
o MAC Address
o IP Address
o Packets Received
o Packets Transmitted
o Transmit Errors
o Receive Errors
You can change the default refresh rate of one minute for the displayed information by choosing a
time interval from the drop-down list, then clicking Refresh Now .
Viewing NFS Activity
To view NFS activity:
1. Using the NAS web interface, click the Status tab.
2. Navigate down the System Status tree to the Performance Statistics section and select
NFS Activity.
3. Output of nfsstat -sm is displayed.
Page 56

56
Viewing Top Output
To view Top output:
1. Using the NAS web interface, click the Status tab.
2. Navigate down the System Status tree to the Performance Statistics section and select
Top.
Page 57

57
System Software
Viewing the Software Patch List
To view the list of currently installed software patches::
1. Using the NAS web interface, click the Status tab.
2. Navigate down the System Status tree to the System Software section and select Patch
List. A list of installed patches is displayed, filtered from the swlist command.
Caution: This HP -UX operating system has been optimized and modified for the HP NAS VA
solution for better file serving performance and manageability. Any patches or
modification to the ope rating system that are not listed on the HP NAS VA support
website will not be supported.
Page 58

58
Contacting Support
The Support Tab
You can navigate within the Support Tab logic tree to:
o View local support documentation
o Gain access to web documentation
o HP technical documentation
o HP support
o HP NAS website
o HP software depot
You can get HP contact information through any of the HP websites under the support tab. Just
click on the link and then click on support.
The HP NAS VA support website is available at www.hp.com/support/nasva
Page 59

59
Support
Viewing Local Support Documentation
You can view local support documentation from the NAS VA web interface Support Tab.
Navigate the support logic tree to Support and select Local Documentation. Any locally stored
support documents are available here. For further information, you can access HP support
documentation on the web.
Page 60

60
Web Documentation
Viewing HP Support Documentation on the Web
There is a variety of HP support documentation available on the web. You can access some of it
through the Support tab under the Web Documentation section.
o HP Docs on the web - provides access to technical documentation for many HP
products.
o HP NAS Online - takes you to the HP NAS web site with up to date information on all
HP NAS products, including the HP NAS VA.
o HP Software Online - links you to the HP Software depot for all HP products.
Contacting HP Support...
HP NAS VA Service and Support
HP NAS VA's electronic services give you a fast, interactive way to access information and help
about setup, configuration, installation, and operation of your product. You can:
o Access the HP NAS VA support web site
o Send an email to customer support
o Phone customer support
HP NAS VA Support Web Site
To access the support web site for your HP NAS VA:
1. In the NAS web interface, click the Support tab.
2. Navigate down the Support tree and select any of the web documentation selections.
3. Once in the site, select Support and make selections based on your needs.
or
1. In a web browser, go to www.hp.com/support/nasva
Contacting Customer Support by Phone
To contact customer support by phone in North America, dial 970-635-1000. If you are calling
from another region, please go to the HP NAS VA Support Web Site at
www.hp.com/support/nasva . Navigate this site to find the contact phone number for your
region.
Page 61

61
Security
About HP NAS VA Security
Two basic ways to ensure the security of the HP NAS VA are:
o control access to the device
o set an administrative password to ensure that only authorized users gain access to
key administrative functions
Access and rights to the data that clients store on the HP NAS VA device can involve security in
the Windows and UNIX environments. The subject of security is beyond the scope of this manual,
but many excellent books are available. This section offers a very abbreviated discussion of key
security elements that you might consider when administering your HP NAS VA, including
administrative password, shares, and exports. Further informaion on security for UNIX-only
environments and security for NT-only environments is available.
HP NAS VA Security in a UNIX-only Environment
UNIX File Security
UNIX uses a reasonably simple approach to data access security. Each workstation performs
user authentication locally. Each user is associated with a 16-bit integer (user ID or UID).
Additionally, each user can be a part of a group that is denoted by another 16 -bit integer (group
ID or GID). A user can be a member of several groups, each with its own unique GID. All objects
contain associated meta-data that includes the UID and GID as well as read/write/execute
permissions for the object. A typical UNIX file permission might look like:
-rwxr-xr-x 1 201 5 611 Nov 11 11:09 testfile
-rwxr-xr-x 1 Wilson Engineering 611 Nov 11 11:09 testfile
In the first line, numbers represent the UID and GID; in the second line, the names associated
with the UID and GID are displayed. In either case, Wilson (UID 201), who is a member of the
Engineering group (GID 5), created a file that has permissions for three different groups. The
permissions are represented by a string of nine characters: three characters for the permissions
of each of the three groups of users. The three groups are the owner (Wilson), the group
(Engineering), and other. In the example above, the owner has specified rwx (read/write/execute)
privileges for himself, r-x (read/execute) privileges for the group, and r-x (read/execute)
privileges for other.
In your network, you might use a Network Information Service (NIS) server to help you maintain
common configuration files such as the password, group, and host files. If your environment uses
a NIS server, you can enable NIS. The HP NAS VA then maintains the same UID and GID
numbers that your UNIX users are currently assigned in a heterogeneous environment.
Note: Whether you disable or enable the use of a NIS server, you are in no way affecting the
security of a homogenous UNIX environment.
An additional form of security called host access is available in the UNIX environment and
controls which client machines are allowed access to the HP NAS VA, regardless of the user. The
allowed clients are specified by a list of IP addresses or hostnames representing those machines.
Host access controls access by machine, not user.
Page 62

62
HP NAS VA Security in an NT-only Environment
The security schema for NT systems is different from that of UNIX, but there are two similarities:
o You can set up the security model to allow user authentication at the share level;
alternatively, you use a security domain, in which authentication is handled by a
Primary Domain Controller (PDC) or Backup Domain Controller (BDC).
o Processes are run with an identity of a user and any groups to which that user
belongs for either that workstation or the domain. Each data object is associated with
meta-data, sometimes called a security descriptor (SD). The security descriptor
contains a list of permissions or denials in the Access Control List (ACL), which
contains an almost limitless number of permutations that can be associated with a
data object.
The HP NAS VA lets you choose between two security models:
o Share-level security
o User-level (Domain) security
Additionally, host access is available in the NT environment to control which client machines are
allowed access to the HP NAS VA, regardless of the user. The allowed clients are specified by a
list of IP addresses or hostnames representing those machines. Host access controls access by
machine, not user.
Share-Level Security
With share-level security, the server explicitly asks for permission (password) every time a user
connects to a share on the HP NAS VA. Thus, any user on the network who knows the name of
the HP NAS VA, the name of the resource (or file), and the password has access to the resource.
When you are using share-level security, you can assign shares a read-only password and/or a
read-write password.
User Level (Domain) Securit y
With user-level security, the client accessing the HP NAS VA passes the credentials of the
logged-on user to the HP NAS VA system transparently. The HP NAS VA in turn queries the
Primary Domain Controller (PDC) or Backup Domain Controller (BDC) to authenticate the user.
Once the user is authenticated, the PDC or BDC returns a Security ID (SID) that the HP NAS VA
uses to check the client's access rights. This token is then used with all subsequent requests
from that client.
The HP NAS VA supports the NT Master Domain model. This allows the HP NAS VA to
participate in a resource domain that is separate from the domain in which users are
authenticated.
Page 63

63
At boot -up time, the HP NAS VA locates the PDC in the specified account domain, as well as the
domain cont roller in the specified resource domain, then logs on to that domain.
Permissions
You can assign the following permissions to an NT resource:
o Read
o Delete
o Write
o Execute
o Change Permissions
o Take Ownership
Additionally, you can group these permissions into standard permissions that consist of one or
more previous permissions. These standard permissions include:
o No Access
o Read
o Change
o Full Control
o Special Access (where individual permissions can be selected, such as Read +
Change Permissions)
Sharing Files Across Multiple Platforms
The HP NAS VA was designed to work well in a heterogeneous environment and support remote
file access protocols for UNIX and NT clients. A major difficulty in sharing data across these
environments is that the file system security models are very different. For example, NT systems
that use user -level security use ACLs to identify both themselves and the permissions for each
data object, whereas UNIX systems use traditional UNIX permissions that define explicit
permissions for the user, group, and other. However, given some care in setting up the security
environment, a reasonable level of access can be provided for cross-environment requests ( i.e.,
a UNIX client requesting a file created by an NT client) without overly compromising the security
set by the creator of the object.
Accessing Files Created by UNIX Clients
When an NT user accesses a UNIX file, the UNIX file permissions are translated into an ACL that
Page 64

64
then determines the permissions to grant. Recall from HP NAS VA Security in a UNIX-only
Environment that permissions are granted to three distinct groups:
o user
o group
o other
If the owner of the UNIX file does not map to a user in the NT domain, then an NT user ID will be
generated in the local UNIX domain. If the owner of the UNIX file is recognized (or mapped) as a
known NT user, then the appropriate information will be exchanged so that the owner has the
same security privileges in NT that he or she had in UNIX. A similar process occurs for the group
identification and permissions. The Other field is mapped to the NT Everyone account.
Page 65

65
This table shows the mapping that takes place between the permissions.
UNIX NT Equivalent
r-- Read
-w- Write, Delete
--x Execute
-wx Write, Delete, Execute
r-x Read, Execute
rw- Read, Write, Delete
rwx Full Access
--- No Access
Note: If share -level security is being used in the Windows environment, then only the share
passwords affect access. The UNIX permissions have no effect.
Accessing Files Created by NT Clients
Directly mapping NT permissions to UNIX permissions causes some difficulty because NT
permissions have a greater level of complexity. UNIX users are unable to use either the chmod or
chown commands to modify the permissions or owners of NT files. The table below shows which
UNIX-to-NT file permissions are mapped.
NT UNIX
R r
W w
X x
D Ignored
P Denied
O Denied
In addition to the permission mappings covered in the previous sections, the following also
applies:
o If no ACLs are specified, then the UNIX permission will be rwxrwxrwx.
o If the ACL is empty, then the UNIX permissions will be ---------.
o If the only access allowed by the ACL grants full control to everyone, then the UNIX
permissions will be rwxrwxrwx.
o In the absence of a group ACL, the owning group will be the user's primary group
and the group permissions are set to the same value as the other permissions.
Additionally, if an NT file grants permission to the everyone group (and does not specifically deny
access to the owner or the group), then the same access is given to the owner and the primary
group. However, UNIX permissions look for explicit permissions for the owner, group, and other.
To allow the same level of access in UNIX as NT, these files will have a permission of r--r--r--.
CIFS file locking
To ensure integrity and security of user data files despite the variable client access methods, file
locking can be enabled at the file system and/or application level.
Page 66

66
The following table summarizes CIFS/9000 file locking:
Mandatory Share Mode (Open Mode) CIFS/9000
Lock Windows Yes
Lock UNIX – no advisory locking Planned Enhancement
Lock UNIX - advisory locking Yes (HP -UX AR 0901)
Lock UNIX/NFS – no advisory locking Planned Enhancement
Lock UNIX/NFS – advisory locking Yes (HP -UX AR 0901)
Lock PC-NFS Yes (HP -UX AR 0901)
Byte Range Locking
Lock Windows Yes
Lock UNIX – no advisory locking Planned Enhancement
Lock UNIX – advisory locking Yes
Lock UNIX/NFS – no advisory locking Planned Enhancement
Lock UNIX/NFS – advisory locking Yes
Lock PC-NFS Yes
Oplocks
Break Oplock for Windows access Yes
Break Oplock for UNIX access – no
advisory
Break Oplock for UNIX access -
advisory
Break Oplock for UNIX/NFS – no
advisory
Break Oplock for UNIX/NFS – advisory Planned Enhancement
Break Oplock for PC-NFS Planned Enhancement
Planned Enhancement
Planned Enhancement
Planned Enhancement
Virus Prevention and Detection
The primary purpose of NAS is file serving. It is very likely files will be accessed by multiple
protocols (CIFS, NFS, HTTP, etc.) of which there will be many users. It is extremely important
that procedures and systems be in place to prevent a potential disaster (corruption, data loss,
system loss, etc.) via infection and that appropriat e recovery schemes are planned in the event of
infection.
Your HP NAS VA utilizes the HP -UX operating system. Because of this, it is often assumed that
there is no need to safeguard against viruses. However, it is very likely that these NAS servers
will be used to host files from applications that have been inundated with viruses and worms.
Today, more than 90% of computer viruses are executable viruses that are usually spread via
electronic mail, and macro viruses that are embedded in files. Of those, Microsoft applications
(Word, Excel, PowerPoint, and Outlook) are by far the most frequent carriers of viruses. Files
generated and used by these applications are commonly used on NAS systems and should be
safeguarded appropriately in any NAS system.
The HP-UX OS has been tested and verified with Sophos Anti-Virus for Unix. Sophos Anti-Virus
offers HP NAS VA customers on-demand and scheduled scanning of the NAS file systems and it
also offers on -access scanning of clients on the network. Using anti-virus software is an excellent
means of preventing against virus infection, however, as mentioned earlier, “procedures and
systems” should be in place. Thus it is also prudent that users and administrators be aware of
practices and procedures that will guard against virus infection.
The anti-virus support for your NAS VA solution provides virus checking, automatic reporting, and
Page 67

67
disinfection for PCs and entire networks.
Sophos Anti -Virus for Unix has two components:
o SWEEP which provides on-demand checking of files on Unix file servers or
workstations. Scheduled scans are also possible using SWEEP and standard Unix
facilities.
o InterCheck which is placed on non-Unix workstations to allow on -access virus
checking.
Features of Sophos Anti-Virus for Unix:
o The engine is upgraded twelve times a year, and virus definitions are released daily
which can be downloaded from the Sophos website (www.sophos.com) or requested
to be sent by fax or email.
o Easily detects polymorphic viruses using Sophos's advanced Virus Description
Language (VDL) and a built in code emulator.
o Detects and disinfects Microsoft Office macro viruses.
o Scans inside encoded and archive files. Infected files can be removed and/or
disinfected.
o Features an `immediate mode' which allows checking on deman d.
o Ensures total security by providing automatic centralised reporting of every virus
incident.
o Offers on-screen help as part of the Sophos CD on which the software is delivered.
o Sophos provides unlimited 24x7 live body tech support for their customers via toll -
free number and/or email at no charge (contact information will be provided at time of
purchase).
Page 68

68
Backup
Backup Overview
Backup of NAS devices has traditionally been difficult and time consuming. Technologies such
as NDMP have been developed to improve this. However, NDMP is still slower and less reliable
than integrating with the native agents that most backup vendors provide. The NAS operating
system used in the NAS VA is based on HP -UX. This allows backup servers and agents to be
run natively on the NAS head. This provides the best performance and compatibility available
today. The NAS VA supports backup via three methods:
1. SCSI/Fibre Channel connection to a tape device. The NAS head provides both an external
SCSI connection and connection via the fibre channel hub or switch to a SCSI or fibre channel
based tape drive or library. Backup can be performed either through local tools such as tar, or by
integrating a Backup application on the NAS head. This backup option offers maximum
performance, however it often requires dedicated tape resources and additional management
overhead. HP OmniBack II and other leading backup software products are supported. If a non
HP backup application is used, the customer is required to support the application unless a
service agreement with Hewlett-Packard is written to cover the solution.
2. Network backup of the NFS/CIFS share(s). This is one of the most common ways to backup
some NAS devices due to the limitations of NDMP. This is accomplished by mounting the NFS or
CIFS share and backing up the mountpoint. This protects the data on the NAS device, however
the configuration on the NAS device is usually not protected. Additionally, if the share is both
NFS and CIFS, file attributes can be lost. This is not a preferred backup method for HP NAS
VA. You should use either method 1 or method 3.
3. Backup through a backup application agent. This option utilizes the agents provided by
backup vendors to protect the system. Unlike the first options, this allows the NAS device to be
integrated into the existing backup scheme as any other server. It also typically provides the
highest reliability and performance. Backup can either be accomplished by backing up across the
IP network, the fibre channel network or to a locally attached tape device. The management
console of the local backup solution handles management of the backup. Typical applications
that support this backup methodology are HP OmniBack II and other leading backup software
products.
Page 69

69
High Availability
Clustering Overview
For mission critical environments, NAS head clustering is a requirement. The NAS VA is an ideal
fit for this environment due to its modular nature. The high performance NAS head used in the
NAS VA can be clustered to provide an extremely dense highly available NAS solution. In
addition to high availability, clustering technologies provide scalable performance. Unlike other
ways to increase performance, clustering provides an almost linear performance curve as more
nodes are added to the cluster.
A high availability system allows file services to continue in spite of a hardware or software
failure. Highly availiable systems protect users from software failures as well as ffrom failure of a
NAS head, disk, or local area network (LAN) component via redundancy.
An MC/ServiceGuard cluster is a networked group of HP approved NAS heads having sufficient
redundancy of software and hardware that a single point of failure will not significantly disrupt
service. Application services (individual HP-UX processes) are grouped together in packages. In
the event of a single service, node, network, or other resource failure, MC/ServiceGuard can
automatically transfer control of the package to another node within the NAS cluster, allowing
service to remain available with minimal interruption.
The NAS web interface provides basic functionality for both single headed and clustered NAS VA
solutions. MC/ServiceGuard provides the clustering and failover specific functionality. Command
line functions will also apply. For more information on managing clustered NAS heads please
refer to your MC/ServiceGuard User's Manual.
Page 70

70
Other Features
Using Snapshots
A snapshot file system is used to duplicate the contents of a file system at a particular point in
time, much like taking a photographic snapshot. Although files may change in the future, you
have captured the contents of the file at the moment the snapshot was created. This snapshot
copy of your data is read only.
A snapshot file system consists of:
o a super block - logistical information about the snapshot
o a bitmap - indicates if block in original file system has changed
o a blockmap - provides address of data block in snapshot that has a copy of the
original file system block
o data blocks - copies of original contents of changed file system blocks
Snapshots are managed from the command line, not from the NAS GUI. You have the tools to
create snapshots within OnlineJFS, which is included in HP -UX 11i.
To create a snapshot, use:
mount [-F vxfs] -o snapof=source[,snapsize=size] destination
snap_mount_point
Next, create a mount point for the snapshot:
# mkdir /snapmount
Then, mount the snapshot:
With VxVM (Veritas Volume Manager) included in OnlineJFS:
# mount -F vxfs -o snapof=/dev/dsk/datadg/uservol
/dev/vx/dsk/datadg/snapvol /snapmount
Without VxVM:
# mount -F vxfs -o snapof=/dev/dsk/c0t6d0s2 /dev/dsk/c0t5d0s2
/snapmount
NAS Windows 2000 Overview
Overview
HP's CIFS/9000 Server product based upon Samba open source. It is supported only on HP -UX
11 and newer releases. It will follow Samba open source updates as follows:
o March 2000 HP -UX Application Release: Samba 2.0.6
o March 2001 HP -UX Application Release: Samba 2.0.7
o September 2001 HP -UX Application Release: Samba 2.0.9 (planned)
HP includes this CIFS/9000 Server product as a default Distributed File System product on all
HP-UX 11 and later releases. There is no charge for CIFS/9000. On HP -UX 11i and later,
CIFS/9000 is included with the base release OS and is instantly ignitable. Your HP NAS VA
uses HP -UX 11i or later. Setup and configuration scripts are included with the product as well as
an Installation and Administration manual.A major feature of CIFS/9000 Server is the availability
of support options for HP Response Center and HP Worldwide Technology Expert Center
Page 71

71
support. This feature, as well as HP product enhancements, gives the customer exceptional
value with CIFS/9000 Server over Samba open source and competitors' Windows int eroperability
products.
CIFS/9000 Server runs on HP's enterprise ready server family, and has the flexibility to run as a
connectivity application for Windows clients to a general-purpose server, or with NFS as a
dedicated file server platform on a NAS single purpose server like you HP NAS VA solution.
Either way, CIFS/9000 and HP -UX on HP enterprise servers have the following advantages:
o Scalable RISC Architecture
o A-Class
o L-Class
o N-Class
o Superdome
o HP-UX Workstations (including J-Class)
o 99.999% Reliability with MC/ServiceGuard
o State-of-the-Art Storage Platforms
o XP48, XP256, XP512
o VA7100, VA7400
o FC10, FC60
o HP Server Flexibility, not limited single purpose
o General Purpose Server
o Dedicated NAS File Server
o No added costs on HP -UX 11
CIFS/9000 Server is based upon NT4.0 technology using the Common Internet File System
protocol (SMB) that is the standard protocol for Windows operating systems on Windows 95,
Windows 98, NT4.0, and Windows 2000. The common deployment architecture for NT4.0
utilizes:
o Master - Resource domain model
o PDCs and BDCs
o Explicit 1-way or 2-way trusts
o global and local groups
o 4.0 authentication protocol
o 4.0 name resolution
In addition, because CIFS/9000 Server resides on the underlying HP -UX operating system, UNIX
security policy is enforced us ing account data that is stored on:
o /etc/passwd
o NIS
o NIS+
o LDAP
Domain Mode Effect Upon Feature Set
The one-way nature of Native Mode configuration requires a clear understanding of the
advantages and disadvantages of Native Mode and Mixed Mode. The followi ng table illustrates
the major differences:
Page 72

72
Feature Mix
Support NT4.0 BDC Yes No
Support Member Server (CIFS/9000) Yes Yes
Global and Local Groups Yes Yes
Domain Local, Universal Groups; Group
Nesting
NTLM Authentication Yes Yes
Kerberos Authentication Yes* Yes*
UPN Logon Name No Yes*
Dial-In Options (Q193897) No Yes
Intellimirror Yes* Yes*
Clients: W95, W98, NT4.0, W2000 Yes Yes
SIDHistory No Yes
*Windows 2000 Pro only
For more Windows 2000 features, see the NAS Windows 2000 document on the support web
page (www.hp.com/support/nasva).
Native
ed
No Yes
Groups
Global and local groups are an integral component of NT4.0, and provide key functionality for the
Master-Resource domain mode that is most common. Windows 2000 adds Domain Local goups,
Universal groups, and Group Nesting.
o Domain Local Groups: Contain members from anywhere in the Windows 2000
forest, trusted Windows 2000 forests, trusted NT4.0 domains, and grant permissions
to any resource in the local domain (NT4.0 local groups grant permissions only on
the computer where they exist).
o Universal Groups: Contain members from anywhere in the Windows 2000 forest or
tursted forests and can be granted permissions in any domain in the forest, or trusted
forests (NT4.0 global groups contain membe rs from the local domain only).
o Group Nesting:
o Universal Groups can contain other Universal Groups and Global Groups from
any domain.
o Global Groups can contain other Global Groups from the same domain.
o Domain Local Groups can contain Universal Groups, Glob al Groups from any
domain, and Domain Local Groups from the local domain.
Native Mode also allows group conversions from one group type to another:
o Between Security and Distribution Groups
o Between Universal Groups and Global Groups
o Between Universal Groups and Domain Local Groups
Other Features
Please see the NAS Windows 2000 documentation on the HP Support website
(www.hp.com/support/nasva) for detailed information on other features available through
CIFS/9000 Server. These include:
Page 73

73
o Intellimirror: provid es the primary benefits related to custom mobile profiles
o User Data Management - Users have access to their data regardless of the
hardware that they logged on to.
o Software Installation and Maintenance - Users have "just in time" application
installations regardless of the hardware that they are logged on to.
o User Settings Management - Users' desktops are available regardless of the
hardware that they are logged on to.
o SIDHistory: A migration tool that is interdependent with other domain migration and
restructuring tools. It is only available in Native Mode. It addresses the issue of
incongruous user accounts and access control entries on access control lists.
o PDC Emulator: Windows 2000 Advanced Directory domains include the designation
of a PDC Emulator or FSMO PDC Emulator. The PDCE is usually resident on the
forest root domain controller in both Mixed Mode and Native Mode domains, but
includes NT4.0 functionality when the domain is in Mixed Mode.
o Further information on Mixed vs. Native Modes, including Dial -In options.
Resizing of File Systems and Volumes
File systems and Volumes can be resized on-line from a console using the fsadm or vxresize
commands without interruption of user access.
The fsadm Command
Syntax for the fsadm command is as follows:
/usr/sbin/fsadm [-b newsize] [-r rawdev] mount_point
To expand or reduce a file system to 2048000 sectors:
# /usr/sbin/fsadm -b 2048000 -r /dev/vx/rdsk/traindg/vola /vola
The vxresize Command
Syntax for the vxresize command is as follows:
/usr/sbin/vxresize [-bsx] [-F vxfs] [-g diskgroup] [-t tasktag]
volume new_length [medianame]
To expa nd or reduce a file system to 4 GB:
# /usr/sbin/vxresize -F vxfs -g datadg mail 4g
Managing User Quotas
User Quotas are used to allocate a specific amount of disk space to a user
o BSD style per-user quotas are supported.
o Hard limits cannot be exceeded.
o Soft limits can be exceeded temporarily.
o Quotas can be turned on at mount time or any later time.
o The root directory must contain the file quotas.
To turn user quotas on after mounting:
vxquotaon mount_point
To turn user quotas on while mounting:
mount -f vxfs -o quota special mount_point
Page 74

74
To turn user quotas off:
vxquotaoff mount_point
SNMP
SNMP Daemon
The SNMP daemon is the Master SNMP Agent and the collection of subagents that would attach
to the Master Agent collectively form a single SNMP Agent. The SNMP Agent accepts SNMP
Get, GetNext and Set requests from an SNMP Manager which cause it to read or write the
Management Information Base (MIB). The MIB objects are instrumented by the sub Agents.
The Master Agent can bind to three kinds of subagents, namely:
o Loosely coupled subagents or separate process subagents which open IPC
communication channels to communicate with the Master Agent
o Shared library subagents which are dynamically linkable libraries
o Remotely coupled subagents which could run on a different processor or operating
system and communicate with the Master Agent using TCP
To configure the agent’s contact, add the contact after the word contact: in the configuration file
/etc/SnmpAgent.d/snmpd.conf or use the –C option.
Snmpdm and only one snmpdm can execute on a particular UDP port.
Traps
The agent also sends information to a manager without an explicit request from the manager.
Such an operation is called a trap. By default, SNMP traps are not sent to any destination. To
configure the agent to send traps to one or more specific destinations, add the trap destinations
to /etc/SnmpAgent.d/snmpd.conf.
Then Master Agent <snmpdm> and the MIB -2 subagent <mib2agt> collaborate to send the
SNMP traps.
Turning SNMP Functionality On or Off
To turn SNMP functionality on or off, perform the following steps:
1. From a telnet prompt, change your directory to /opt/source.
2. Run the appropriate script: snmp.start or snmp.stop
Page 75
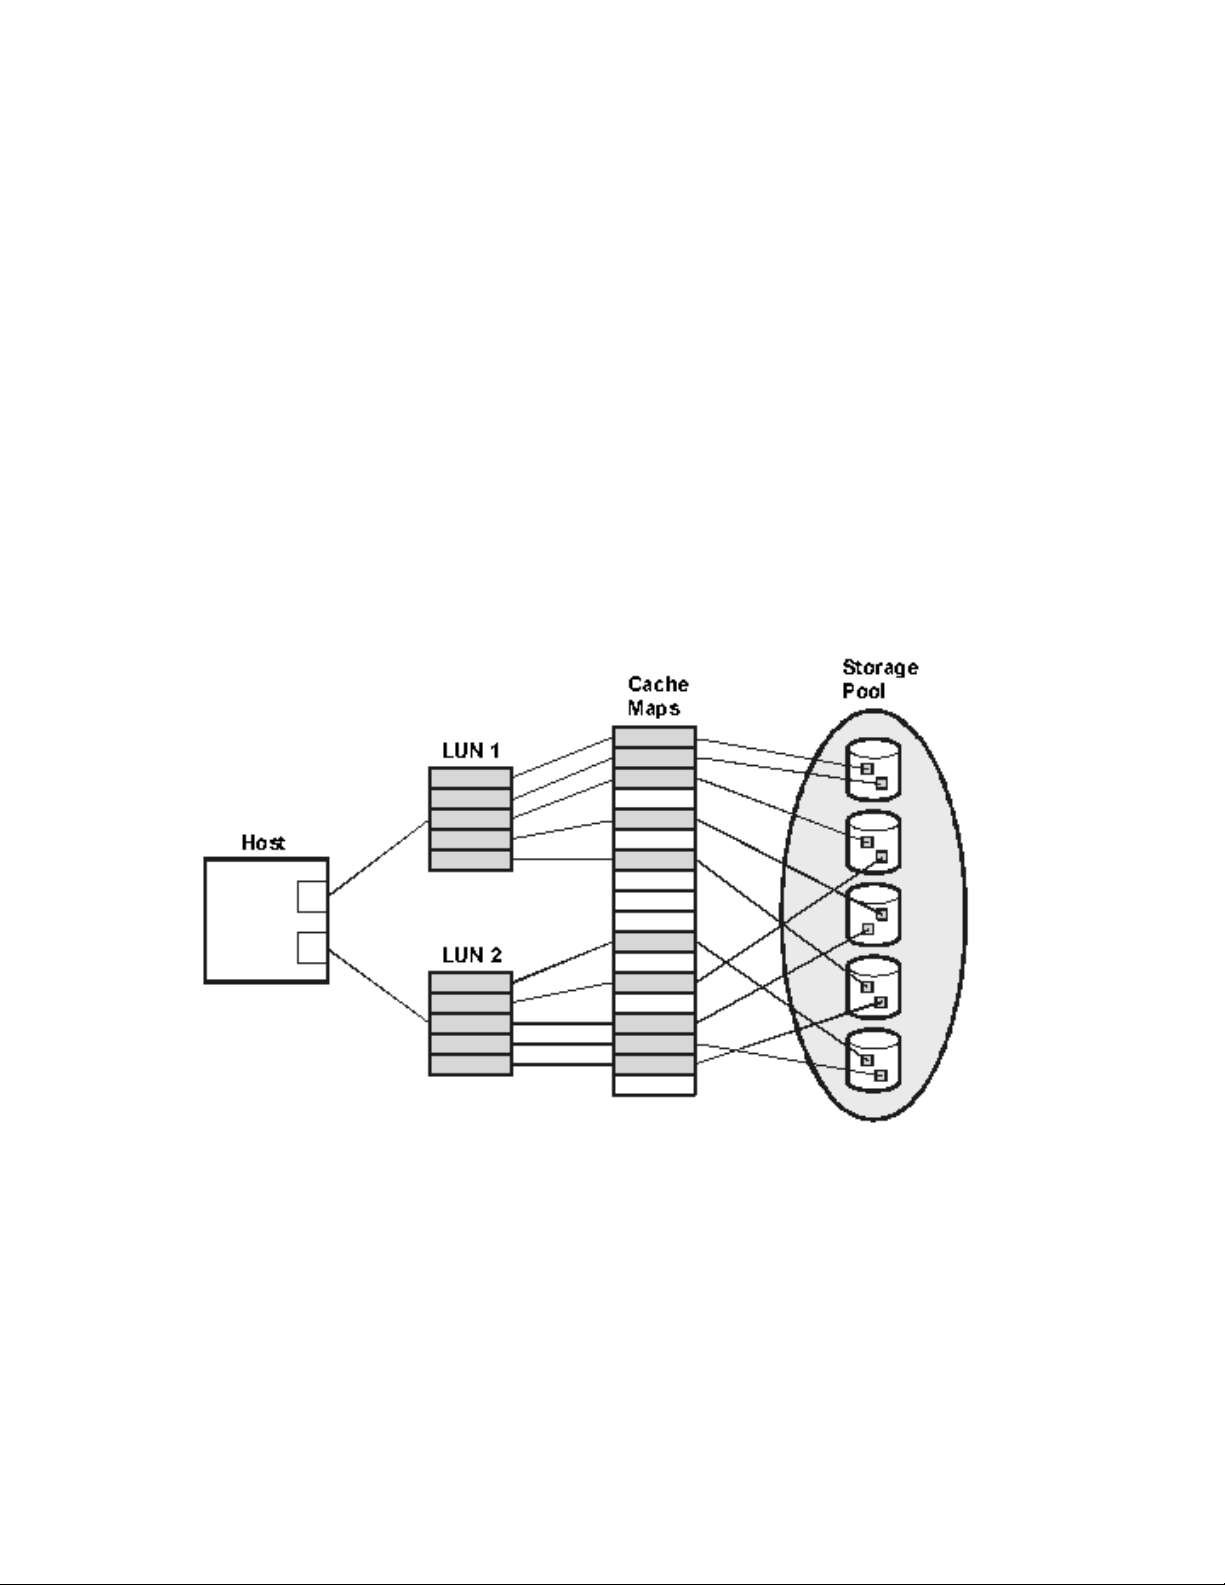
75
Virtual Array
Virtual Array
Your HP Virtual Array is preconfigured for you at installation by the HP Customer Engineer.
Administrators with a strong working knowledge in HP-UX administration and the Logical Volume
Manager can make changes through the Command View SDM. The term “Virtual Array” refers
to the way the disks within the array are treated as a pool of data storage blocks instead of real
physical disks. HP AutoRAID technology uses powerful mapping techniques to present the host
with a logical view of the available storage in the array (see the figure below).
HP AutoRAID uses a combination of RAID 1+0 and RAID 5DP to manage data storage for you
while optimizing your data access time. This is explained further, below.
Because data is spread across all of the disks in the array, logical -to-physical data maps, stored
in array controller cache memory, keep track of where the data is physically located on the disks
in the array. The host has no visibility of the cache data maps; it is simply presented with logical
units (LUNs) for data storage operations.
Figure 1: Host visibility of storage pool
RAID Levels
Redundant Array of Inexpensive Disks (RAID) technology uses different industry -standard
techniques for storing data and maintaining data redundancy. These techniques, called “RAID
levels”, define the method used for distributing data on the disks in a logical unit (LUN). LUNs that
use different RAID levels can be created in the same array. The array covered in this guide
supports the following RAID levels: RAID 1+0 and RAID 5 Double Parity (RAID 5DP).
RAID 1+0
Page 76

76
RAID 1+0 provides data redundancy and good performance. However, the performance is
achieved by using a less efficient technique of storing redundant data called “mirroring.” Mirroring
maintains two sets of the data: a primary set and a backup set, or “mirror”, of the primary set.
Therefore, half of the disk space is consumed by redundant data. The data is also striped across
the disks in the array.
Figure 2 is an example showing the distribution of primary data and mirror data in a RAID 1+0
configuration. The example shows one LUN with 10 stripes, each stripe with two data segments:
n (primary segment) and n’ (“n prime” or “mirror” segment). The following data protection scheme
is demonstrated for RAID 1+0:
o If two non-adjacent disks fail, there is no data loss. Either a primary segment or
its mirror segment is still available.
o If two adjacent disks fail, the data in the entire LUN is lost. In this example, two
segments and their mirrors are lost and cannot be recovered.
Note: Disks A and E are considered as adjacent disks. The segment size is some number (x)
times 520-byte blocks.
Figure 2: RAID 1+0
RAID 5DP
RAID 5DP provides data redundancy and improves cost-efficiency by us ing a more efficient
method of storing redundant data. However, there is a performance penalty for each write
operation. This can impact system performance if your applications frequently update large
amounts of data. RAID 5DP provides high read throughput for small block-size requests (2 KB to
8 KB) by allowing simultaneous read operations from all of the disks in the LUN.
RAID 5DP uses two independent parity algorithms to create two parity values. The second
algorithm provides an additional means to reconstruct data, even if a second disk fails while
another disk is being rebuilt. This “double parity” scheme is referred to as “P + Q Parity.”
During a write operation, the array controller calculates “P” and “Q” parity, then distributes
(stripes) the data and parity information across the disks in the LUN. The process of calculating
and writing parity information affects the write performance of the array.
If a disk fails or becomes inaccessible, the array dynamically reconstructs all user data from the
data and parity information on the remaining disks. If another disk fails, with double parity, it can
also be recovered even while the first disk is being recovered. When a failed disk is replaced, the
array automatically rebuilds the new disk with the data that once resided on the failed disk.
Note: Until a failed disk is replaced (or a rebuild on an active spare is completed), the LUN
operates in a degraded state. The LUN must use data and parity information on the
remaining disks to recreate the contents of the failed disk, thus reducing performance.
Page 77

77 Also, if a third disk in the LUN fails while in a degraded state, parity can no longer be used
and all data in the LUN becomes inaccessible.
Figure 3 is an example showing the distribution of user data and parity data in a RAID 5DP
configuration. The example shows one LUN with five stripes, each stripe with five segments:
three data segments and two parity segments (P n and Q n ). The segments are striped across
the disks in a rotating fashion. The following data protection scheme is demonstrated for RAID
5DP:
o Any one disk can fail without losing data redundancy. If one disk fails, the data
on that disk can be recalculated using either the P or Q parity segment and the data
stored on the remaining good segments in the stripe.
o Any two disks can fail without losing data . If two disks fail simultaneously (B and
C, for example), or if a second disk fails before the first disk is completely rebuilt, the
data from both failed disks can be rebuilt. For example, both segments of missing
data in stripe 1 on disk B and disk C can be recalculated using the P 1 and Q 1 parity
data and the remaining data segment on disk A. Alternatively, if the segment on a
lost disk is either P or Q parity data, then the parity data can be recalculated from the
remaining user data.
Note: Disks A and E are considered as adjacent disks. The segment size is some number (x)
times 520-byte blocks.
Figure 3: RAID 5DP
RAID 1+0 and RAID 5DP Combined (AutoRAID)
Your Virtual Array uses a combination of RAID 1+0 and RAID 5DP (or AutoRAID) to store data.
This means that the same disk within a redundancy group can have one portion of its data
capacity stored in RAID 1+0, while the other portion is stored in RAID 5DP. If one disk fails, the
array first rebuilds the data in RAID 1+0 (the RAID level most exposed to data loss), then rebuilds
the data in RAID 5DP. On the other hand, if two disks fail simultaneously, the array first rebuilds
the data in RAID 5DP, then rebuilds the data in RAID 1+0. Thus, your array optimizes the data
rebuild process, greatly reducing your exposure to data loss.
Your virtual array will survive two simultaneous disk failures within a redundancy group, without
losing data, as long as none of the data segments in the disks are mirrors of each other.
Page 78

78
Troubleshooting
VA does not bring up
, and
subnet mask,
warnings alert you that a drive failure has occurred. When the failed drive
w drive to be the new active
General Issues
Problem Solution
The storage device
does not power on.
On boot up, my NAS
the web interface,
leaving me stuck at a
prompt.
The Windows
environment does
not recognize the HP
NAS VA machine
name.
Make sure the cables are connected correctly and securely. The
primary power cord needs to be connected when power is turned on.
Cycle the power switch off and back on.
From the command line, run set_parms initial. This command
will step you through an initial setup covering hostname, IP Address
time zone in the first section; additional parameters include
gateway IP address, local domain name, DNS server IP address, NIS
domain name and NIS IP address. You will need to reboot after these
settings. You then should be able to manage your system through the
NAS web interface.
If you use names instead of IP addresses to define parameters in the
Configuration tab, you must map your IP address to a machine name.
Make sure:
the addresses of the WINS servers are entered in the Configuration
tab under Networking Settings > Windows Settings > CIFS (Samba)
the Domain Name Server is entered in the Configuration tab under
Networking Settings > TCP/IP Settings > DNS .
these servers are running.
the system name on the HP NAS VA matches the entry on the DNS
server.
The Windows
environment does
not see the HP NAS
VA volumes or
directories.
What happens if a
drive fails?
Make sure the volumes or directories have been shared appropriately.
Click the Storage tab, then select Quick Setup > RAID Device Setup
and view the RAID Device Summary.
Make sure there is no IP address conflict with another computer. Click
the Status tab, then select Syslog and look for IP conflict messages.
If a disk drive is assigned as an active spare, the system automatically
switches to the active spare and rebuilds the data on the failed drive.
During this process, the active spare becomes a member of the RAID
set, and the system continues to serve files without interruption. System
is replaced, you must manually assign the ne
spare. The drive replacement kit provides detailed instructions.
Page 79

79
The HP NAS VA has a serial TTY connection that can be used to access
tion. To use it, connect the TTY port
to another computer using the supplied serial cable. A terminal emulation
Problem Solution
What happens if a
drive fails and there
is no active spare?
How do I
communicate with
the system without a
network connection?
How do I create UNIX
mount points?
I cannot get guest
access to CIFS
shares.
HP recommends that at least one drive be assigned as a global active
spare at all times. If a drive fails and no active spare is present, system
warnings alert you that a drive failure occurred and that the logical drive
(RAID set) is in a critical state. Although the system continues to rebuild
and serve files without interruption, there is a much greater risk of data
loss in this state. The drive replacement kit provides detailed instructions
for installing replacement drives, rebuilding the critical RAID set, and
assigning an active spare.
the system without a network connec
program can then be used to interact with the system's menu-driven
console interface.
The HP NAS VA automatically generates a UNIX mount point at the root
of a logical volume when you create the volume. Thus, there is no need
to manage mount points on a directory by directory basis. Refer to your
UNIX users guide for more information about mount points.
By default HP -UX uses a negative value UID/GID, e.g., nobody = -2.
CIFS/9000 should mask this by creating a user called "smbnull" which
has a positive UID/GID.. If it is not there, you should use a guest user
name "nobo dy" and make sure it has a positive UID/GID. Check for
negative value UID/GID in user accounts in etc/passwd and change
to a positive value.
I am having general
storage setup
problems, e.g., my
array won't initialize.
After adding a
software patch, I am
having trouble with
my system.
Make sure your HP VA7100 and/or VA7400 have firmware HP11 or later
installed.
This HP -UX operating system has been optimized and modified for the
HP NAS VA solution for better file serving performance and
manageability. Any patches or modification to the operating system that
are not listed on the HP NAS VA support website will not be supported.
To see the list of software patches currently on your system, click the
Status tab and navigate the System Status logic tree to System
Software and select Patch List.
Page 80

80
Browser Issues
again. If the unit responds while it is turned off then you have an IP
specified fonts. You may
CLASSPATH environment variable to include the path to the Java jar file.
Problem Solution
The web browser
does not connect to
the unit.
The HP NAS VA is
not responding.
The IP address does
not respond to the
web browser.
The NAS web
interface pages are
not displaying
correctly in Internet
Explorer.
Try disabling the proxy on the web browser, or exclude intranet
addresses.
o Access the system through the Telnet interface to restart it.
o Connect a laptop to the server management port using a null -
modem serial cable, and use terminal emulation software to log in.
o Make sure the network connection is working. Ping the unit (open
a command prompt, then type ping and the unit's IP address)
from another networked computer. If the unit does not respond,
check network connections and topology.
o Make sure there is no IP address conflict with another computer.
The easiest way to determine this is to turn off the unit and ping it
conflict. Alternatively, the Telnet or TTY interface event log
displays an IP conflict message when one exists.
Microsoft's Internet Explorer/Java Virtual Machine may not have been
installed properly. If this is the case, Java applet s will not run properly.
See Microsoft Knowledge Base article Q168806. In particular, pay
attention to where the registry entry
HKEY_LOCAL_MACHINE\SOFTWARE\Microsoft\Code Store
Database\Global Namespace\Java
Packages\com\ms\lang\Path refers to. Copying the correct file to
the file referred to by the registry fixes the problem. The correct file is
generally in the directory referred to by the registry and is about 5 to 6
megabytes in size.
The NAS web
interface in Netscape
is small and
unreadable on my
HP-UX machine.
The NAS web
interface pages are
not displaying on my
HP-UX machine.
1. Change the browser fonts from HP fonts to Sun fonts to improve
the interface appearance. To do this, set the environment
variable MOZILLA_JAVA_FONT_PROPERTIES to
$MOZILLA_HOME/java/classes/sun. If this doesn't help, try
option 2.
2. You need to cha nge your font settings in the browser. Select
Edit > Preferences > Appearance > Fonts and click Use my
default fonts. This overrides document -
also need to increase the font size (select View > Increase
Font).
The README file for Netscape Navigator on UNIX tells you to set the
However, the web interface pages will not display correctly. Set the
CLASSPATH environment variable to exclude the path to the Java jar
file.
Page 81

81
Problem Solution
My new system does
not recognize that
there are arrays
attached.
The first time a newly ignited operating system is brought up, the NAS
web interface does not recognize the attached arrays. Read the Getting
Started - Part 2 section of this manual for information on how to get your
system to recognize the attached arrays.
Release Notes
The following late-breaking information supplements the HP NAS VA User's Guide and online
help. If information in the User's Guide conflicts with information presented here, the information
in this file should be considered correct.
Browser Issues
1. NFS Settings: Creating an NFS export allows access list to be assigned, but not
permissions. By default, the export will be accessible to all users providing 777
permission. To restrict permissions, go to console and use the chmod command. For
help on chmod, type: man chmod
2. CIFS Settings (Samba): If you are using Netscape Navigator as your web browser, you
are likely to have problems using the Samba web interface. The buttons at the top of the
page do not respond properly. A work around for this problem exists:
o Click on the button you wish to select.
o Then right click on the same button. A menu appears.
o Select reload frame.
3. Managing Logical Vols/Volume Groups: When changes are made in the Quick Setup
and Advanced Setup Sections of the Storage tab, the results may not be automatically
updated. To ensure that the latest information is displaying, set your browser to:
o Refresh a page every time it is visited
o Bypass the proxy server for this IP address
4. CIFS Settings (Samba): Internet Explorer problem with using incorrect user name. If you
use the incorrect user name, you will be locked out of Samba. You need to close the
browser and reopen it.
5. NIS Settings: If you run into problems with NIS, be sure to check out the help
documentation for NIS Settings. The browser does not automatically change the
nsswitch file. The help documentation provided describes how to manually edit the
nsswitch file using the sam command. NIS changes made in the NAS web interface
will take effect upon the next reboot. If you are also setting up DNS, be sure to read the
item below, before proceeding. Changes to the nsswitch file using the sam command
can be done concurrently for NIS and DNS initial setup.
6. Domain Name Service (DNS): If you run into problems with DNS, be sure to check out
the help documentation for Domain Name Service (DNS). The browser does not
automatically change the nsswitch file. The help documentation provided describes
how to manually edit the nsswitch file using the sam command. If you are also making
NIS settings, be sure to read the item above before proceeding. Changes to the
nsswitch file using the sam command can be done concurrently for NIS and DNS initial
setup.
Page 82

82
Known Problems
1. Dual homed systems: If you have a problem communicating with your arrays on a dual
homed system, including failure of the armdiscover command, there are several items that
should be investigated:
o Check to make sure the following file exists
/opt/sanmgr/hostagent/config/commIpAddr.txt
This file contains the IP address of the default or onboard NIC (LAN0). If the file
does not exist, you should cre ate it.
o The netconf file can tell you the IP address of LAN0. It is found in the following
directory:
/etc/rc.donfig.d
o Settings in the following files in the /etc directory should also be checked:
hosts - Lists hostname of system with its associated IP ad dress. The first host
entry needs to be the default (LAN0) setting.
resolv.conf - The first nameserver listed needs to be on the same network as
the default (LAN0).
HP NAS VA User's Guide (Print Version)
Page 83

83
Glossary
Glossary
A
Access Control List (ACL)
A list associated with a file that contains information about which users or groups have
permission to access or modify the file.
Active spare
A previously installed physical drive used as a backup in case an assigned drive fails. The
active spare automatically takes over the duties of the failed drive.
Agent
A program that performs a background task for a user and reports to the user when the task is
done or some expected event has taken place. The HP NAS VA uses backup agents to back
up data remot ely.
Aggregation
The combining of multiple similar or related operations into a single one.
Authentication
The process of matching credentials provided by the user against an equivalent entry on the
SAM database. A user's name and password are compared against an authorized list and if
the system detects a match, access is granted to the extent specified in the permission list for
that user.
AutoRAID
AutoRAID implements RAID technology automatically without requiring you to know all the
complexities of det ermining and setting up different RAID modes. AutoRAID is an advanced
array storage technology that provides the best combination of cost, performance, and
availability.
B
Bond channel
A failover mechanism that automatically switches a specific NIC port to a standby network
upon the failure or abnormal termination of the currently active system.
Broadcast address
The address that can be used to send messages to all machines on the subnet. Applying the
subnet mask to the IP address provides the subnet.
Page 84

84
C
CIFS
See Common Internet File System.
Collision
The result of two devices transmitting signals at the same time on the same channel, usually
resulting in a garbled transmission.
Command View Storage Device Manager (SDM)
A web interface for the storage ar ray that allows you to manage the storage on the array,
monitor the status of the arrays, perform array diagnostics, and download new firmware.
NAS
A web interface for the NAS server that allows you to configure, monitor, and upgrade your
system as well as manage the storage, contact support, and run diagnostic tools.
Common Internet File System (CIFS)
A standard way of sharing resources over an IP Network. This standard supercedes SMB.
Community String
The SNMP keyword required for network management tools to retrieve operational or
configuration information from the device.
Credentials
A user's account name and password.
D
Daemon
A program that performs a housekeeping or maintenance utility function without being called
by the user. A daemon sits in the background and is activated only when needed, for
example, to correct an error from which another program cannot recover.
DHCP
See Dynamic Host Configuration Protocol.
Domain (NT)
A group of computers that share a common domain database and security policy.
Domain (TCP/IP)
An alphanumeric representation of an association of computers. (For example, hp.com. com
is a top level domain and hp is a second level domain.
Domain Name Service (DNS) Server
A server that translates domain names (such as hp.com) into IP addresses (such as
15.12.255.67). If you have multiple DNS servers on your network, and one DNS server cannot
translate a domain name, it asks another one, and so on, until the IP address is found.
Dual In-line Memory Module (DIMM)
A module containing one or several random access memory (RAM) chips on a small circuit
board with pins that connect it to the computer motherboard.
Dynamic Host Configuration Protocol (DHCP)
Software that automatically assigns IP addresses to client stations logging onto a TCP/IP
network. It eliminates having to manually assign IP addresses, and it allows a larger group of
machines to share a limited pool of addresses, assuming not all machines are on the network
at the same time. DHCP can assign a new address to each machine at startup (dynamic) or
permanent (static) addresses can be assigned. Newer DHCP servers dynamically update the
DNS servers after making assignments.
Page 85

85
E
Event log
A log of critical or informational events that occurred on the network.
Export
To make a portion of a file system on a remote computer accessible to a local (client)
computer.
G
Gateway
A combination of hardware and software that links two different networks using different
communications protocols so that information can be passed from one to the other. A
gateway both transfers information and converts it to a form compatible with the protocols
used by the receiving network.
Gigabit Interface Converter (GBIC)
A transceiver that converts electric currents (digital highs and lows) to optical signals, and
optical signals to digital electric currents. The GBIC is typically employed in fiber optic and
Ethernet systems as an interface for high -speed networking. The data transfer rate is one
gigabit per second (1 Gbps) or more.
Gateway address
The IP address of a network server or host that functions as a gateway to other networks
through communication lines or other network topologies.
Group Identification (GID)
A number in the UNIX environment that identifies a group of individuals or services to a
computer system.
Group quota
Allows you to restrict the space usage on the HP NAS VA for groups.
H
Host Bus Adapter (HBA)
An HBA is an I/O adapter that sits between the host computer's bus and the Fibre Channel
loop and manages the transfer of in formation between the two channels. In order to minimize
the impact on host processor performance, the host bus adapter performs many low -level
interface functions automatically or with minimal processor involvement.
Hot swapping
A feature that allows equipment to be connected to an active device, such as a computer,
while the device is powered on.
Page 86

86
I
IP address
A unique 32 -bit value that identifies network hosts using TCP/IP. An IP address, or block of
addresses, is assigned upon application to organizat ions responsible for that function. No two
network hosts can be assigned the same IP address. Each address consists of a network
number, optional subnetwork number and host number, written as four numbers separated by
periods. Each number can be 0 to 255.
L
Local Area Network (LAN)
A group of computers and other devices, within a specific location (typically within a building
or floor of a building), connected by a communications link that enables any device to interact
with any other on the network. LANs commonly include microcomputers and shared
resources such as laser printers and storage devices.
Logical drive
A logical grouping of one or more physical drives on a system, commonly referred to as a
RAID set.
Logical Unit Number (LUN)
A logical unit num ber (LUN) is a unique identifier used on a SCSI bus that enables it to
differentiate between up to eight separate devices (each of which is a logical unit). Each LUN
is a unique number that identifies a specific unit of storage, which may be an end user, a file,
or an application program.
Logical Volume
The basic unit of logical storage for a file system on the HP NAS VA.
LUN
See logical unit number.
M
Machine account
All NT workstations and servers on a network must be provided with a machine account in
order to participate in a domain.
Media Access Control (MAC) address
A unique, hardware specific address used to identify a network node.
Metadata
Data that describes data. This includes files names, file properties and security information,
and lists of block addresses at which each file's data is stored.
Mount
To make a portion of a file system on a remote computer accessible to a local (client)
computer. The term is most commonly used with UNIX-based computers.
Page 87

87
N
Network File System (NFS)
An network protocol designed by Sun Microsystems that allows all network users to access
shared files stored on computers of different types. Users can manipulate shared files as if
they were stored locally on the user's own hard disk.
With NFS, computers connected to a network operate as clients while accessing remote files,
and as servers while providing remote users access to local shared files. The NFS standards
are publicly available and widely used.
Network Interface Card (NIC)
An expansion card or other device used to connect a computer to a local area network.
P
Packet
A block of information sent across a network. Packets contain header (which handle
addressing), error correction, checksums, and data.
Permission
The ability of a particular user in a multi -user computer environment to access a particular
resource by means of a user account. Permissions are stored in the system, in a file called a
permissions log. Permissions are checked when a user attempts to access a resource.
Permission bits
Bits that identify the read/write/execute (rwx) privileges for a UNIX file's owner, group, and
anyone else that needs access to the file (other).
Physical drive
A term for the hard drives installed in the HP NAS VA.
Primary Domain Controller (PDC)
A server that has been assigned to become the primary authentication server for the Windows
NT domain. It stores a copy of the Security Accounts Manager (SAM) database and uses this
database to authenticate users.
R
Redundant Array of Independent Disks (RAID)
RAID is a metho d of combining several disk drives into a single logical storage unit. RAID
offers the advantage of fault tolerance by providing real-time data recovery when a disk drive
fails, increasing system uptime and network availability. RAID also increases system
performance when multiple drives work together.
Remote event log
A file located on a UNIX machine containing statistics and error messages.
Page 88

88
S
SCSI
See Small Computer System Interface.
Security Account Manager (SAM) database
A database used to authenticate users.
Server Message Block (SMB) protocol
A network protocol designed and implemented by Microsoft and used by Windows clients to
communicate file access requests to Windows servers. This has been replaced by CIFS.
Share
To make files, directories, or folders accessible to other users over a network.
Share Level Security
Share level security for Windows NT is the simplest security method available. Access to file
volumes or directories (shares) may be restricted on a share by share basis. The
administrator can set read only passwords and read/write passwords for each share on the
system. Users wishing to gain access to a share are asked to supply the correct password.
Only users with the correct password are given access to the share.
Share Name
A name selected by the system administrator as a way of identifying a share. Share names
are usually selected to be easy to remember.
Simple Network Management Protocol (SNMP)
The network management protocol for TCP/IP. In SNMP, agents, which can be hardware as
well as software, monitor the activity in the various devices on the network.
Small Computer System Interface (SCSI)
A SCSI interface is used to connect microcomputers to SCSI peripheral devices, such as
many hard disks and printers, and to other computers and local area networks.
SMB
See Server Message Block.
SMP
See Symmetric Multiprocessing.
Snapshot
A read -only copy of a file volume that contains an image of the volume as it appeared at the
point in time when the copy was taken.
SNMP
See Simple Network Management Protocol.
Subnet Mask
A 32-bit numeric mask that blocks out all but the necessary information. This allows the IP
address to be broken into a component that identifies the subnet on which the device resides
and the ID of the device itself.
Symmetric Multiprocessing (SMP)
A computer architecture in which multiple processors share the same memory, which contains
one copy of the operating system, one copy of any applications that are in use, and one copy
of the data. Because the operating system di vides the workload into tasks and assigns those
tasks to whatever processors are free, SMP can potentially service more transactions within a
fixed amount of time than a single processor system.
System log
A file containing statistical information and error messages.
System Hostname
The system name uniquely identifies your HP NAS VA. It is a text string up to 15 characters
drawn from the alphabet (A -Z), digits (0-9), and minus sign (-). Note that periods are only
Page 89

89
allowed when they serve to delimit component s of "domain style names." No blank or space
characters are permitted as part of a name. No distinction is made between upper and lower
case. However, the name must begin with a letter and the last character must not be a minus
sign or period. The name you use appears on the Identity screen of the user interface and in
Network Neighborhood in a Windows networking environment.
T
TCP/IP
A commonly used networking protocol that allows interconnection of different network
operating systems. TCP/IP stands for Transmission Control Protocol/Internet Protocol.
Telnet
A protocol that provides console services remotely. The Telnet program runs on your
computer and connects your PC to the NAS VA through the network. You can enter
commands through the Telnet program and they are executed as if you were entering them
directly on the server console.
Trap
A type of SNMP message used to signal that an event has occurred.
U
Uninterruptible Power Source (UPS)
A device that is connected between a computer (or other electronic equipment) and a power
source that ensures that electrical flow to the computer is not interrupted because of a
blackout. UPS protects the computer against potentially damaging events such as power
surges and brown-outs.
User Authentication
See Authentication.
User Identification (UID)
A unique number in the UNIX environment that identifies an individual to a computer system.
User Level Security
The HP NAS VA uses a domain controller to authenticate users when they access the device.
Access Control Lists (ACLs) define a user's access rights to a particular object. Users
accessing the resources of the system must be logged onto an NT domain and must have
specific rights to access the given resource. The resource is not only the share, but the
directories and files within the share as well. Administrators and users may restrict access to
any file, directory, or group of files and directories to any user or group of users in the domain.
User quota
Allows you to restrict the space usage on the HP NAS VA for users.
V
Volume group (VG)
An aggregation of one or more LUNs.
Page 90

90
W
Windows Internet Naming Service (WINS)
The Windows NT Server method for associating a computer's host name with its address.
Workgroup
A group of computers on a network that connect to each other using peer relationships.
Top of Page
Page 91

91
Index
A
Access
Granting User.............................................................................................................................................................51
Multi-Platform...........................................................................................................................................................63
Verifying User ............................................................................................................................................................52
Acknowledgments...........................................................................................................................................................7
ACLs ................................................................................................................................................................................63
Active Spare....................................................................................................................................................................13
Active Spare Capacity...................................................................................................................................................45
Add Device
Existing Volume Group............................................................................................................................................39
New Volume Group ..................................................................................................................................................39
Add NFS Export ............................................................................................................................................................. 51
Advanced Array Management.....................................................................................................................................46
Advanced Setup
Array Management....................................................................................................................................................46
Creating a New Logical Volume ............................................................................................................................49
Creating a Volume Group ........................................................................................................................................ 47
Deleting a Volume Group ........................................................................................................................................ 47
Editing a Logical Volume ........................................................................................................................................50
Editing a Volume Group..........................................................................................................................................47
Logical Volumes and Volume Groups..................................................................................................................40
LUN Management.....................................................................................................................................................46
Storage.........................................................................................................................................................................36
Storage Array Summary...........................................................................................................................................45
Viewing Logical Volume Information...................................................................................................................49
Viewing Volume Groups .........................................................................................................................................47
Advanced Setup Tools
Connecting to Command View SDM ....................................................................................................................42
Local File Systems ....................................................................................................................................................41
Misuse.........................................................................................................................................................................21
Physical Devices........................................................................................................................................................39
Storage.........................................................................................................................................................................36
Using Command View SDM...................................................................................................................................42
Armdiscover ................................................................................................................................................................... 80
Array
Renaming....................................................................................................................................................................46
Array Identifier...............................................................................................................................................................45
Asset Number.................................................................................................................................................................28
AutoRAID
Overview.....................................................................................................................................................................74
RAID Redundancy....................................................................................................................................................74
Snapshot Planning.....................................................................................................................................................15
Page 92

92
B
Backup application........................................................................................................................................................67
Backup Overview ..........................................................................................................................................................67
Bitmap..............................................................................................................................................................................69
Blockmap ........................................................................................................................................................................69
Browser Issues................................................................................................................................................................80
Byte Range Locking ...................................................................................................................................................... 64
Byte-Sized Computing....................................................................................................................................................7
C
Certificate Manager Import Wizard............................................................................................................................42
Certificates......................................................................................................................................................................42
Chmod
Multi-platform sharing .............................................................................................................................................63
Release notes..............................................................................................................................................................80
Chown..............................................................................................................................................................................63
CIFS .................................................................................................................................................................................65
CIFS Settings
Release Notes.............................................................................................................................................................80
Samba..........................................................................................................................................................................35
CIFS/9000 ....................................................................................................................................................................... 64
Clustering ........................................................................................................................................................................ 68
Command View SDM
Array Management....................................................................................................................................................46
Array Summary..........................................................................................................................................................45
Connecting..................................................................................................................................................................42
External RAID Devices............................................................................................................................................42
launching.....................................................................................................................................................................42
LUNs ...........................................................................................................................................................................46
Storage.........................................................................................................................................................................36
Using............................................................................................................................................................................42
Command View SDM Certificate ...............................................................................................................................42
Command View Storage Device Manager ................................................................................................................ 42
Common Internet File System.....................................................................................................................................35
Configuration
Administrative Password..........................................................................................................................................27
Contact Information..................................................................................................................................................28
DNS.............................................................................................................................................................................31
IP Addresses...............................................................................................................................................................30
NIS ...............................................................................................................................................................................32
Shutting down and restarting...................................................................................................................................25
System name ..............................................................................................................................................................27
Configuration Tab..........................................................................................................................................................25
Configuring Your System............................................................................................................................................19
Connecting to Command View SDM ........................................................................................................................42
Contact Information ......................................................................................................................................................28
Contact Name .................................................................................................................................................................28
Contact Phone Number.................................................................................................................................................28
Context-sensitive............................................................................................................................................................22
CPU
Information.................................................................................................................................................................24
Status ........................................................................................................................................................................... 53
CPU Utilization ..............................................................................................................................................................55
Creating a New Logical Volume.................................................................................................................................49
Creating a Volume Group............................................................................................................................................47
Page 93

93
Creating LUNs ...............................................................................................................................................................15
Customer Support..........................................................................................................................................................60
Contacting...................................................................................................................................................................60
D
Data-protection...............................................................................................................................................................15
Date and Time Settings.................................................................................................................................................28
Deleting a Logical Volume ..........................................................................................................................................50
Deleting a Volume Group............................................................................................................................................47
Detection of Viruses ...................................................................................................................................................... 65
Device Summary............................................................................................................................................................37
DHCP
Enabling......................................................................................................................................................................30
Disable NIS.....................................................................................................................................................................32
Disk Drives .....................................................................................................................................................................13
DNS..................................................................................................................................................................................31
DNS Server Addresses..................................................................................................................................................31
Documents
Printing ........................................................................................................................................................................ 23
Domain Name Service..................................................................................................................................................31
Double Parity..................................................................................................................................................................74
Dynamic Host Configuration Protocol.......................................................................................................................30
E
Edit
DNS.............................................................................................................................................................................31
Logical Volume .........................................................................................................................................................50
Shares ..........................................................................................................................................................................51
Volume Group............................................................................................................................................................47
Edit NFS Export.............................................................................................................................................................51
Enabling
DHCP..........................................................................................................................................................................30
NIS ...............................................................................................................................................................................32
Exports.............................................................................................................................................................................51
Extend Logical Volume Size .......................................................................................................................................40
External Storage Devices .............................................................................................................................................37
F
Force Hardware Rescan................................................................................................................................................37
Fsadm Command...........................................................................................................................................................72
G
Gateway Address...........................................................................................................................................................30
General Issues.................................................................................................................................................................77
Getting Started
Part 1............................................................................................................................................................................17
Part 2............................................................................................................................................................................19
GID...................................................................................................................................................................................61
Granting Users Access to Data....................................................................................................................................51
H
HA ....................................................................................................................................................................................68
Hard Drives .....................................................................................................................................................................36
Help
Online..........................................................................................................................................................................22
Page 94

94
Samba..........................................................................................................................................................................35
While You Work.......................................................................................................................................................22
Hostname
Security........................................................................................................................................................................61
Setup ............................................................................................................................................................................ 27
HP AutoRAID................................................................................................................................................................74
HP Customer Care Parts Ordering .............................................................................................................................. 10
HP Customer Care Web Site........................................................................................................................................10
HP Customer Support Business Center.....................................................................................................................10
HP NAS Online ..............................................................................................................................................................60
HP NAS VA ...................................................................................................................................................................13
HP NAS VA Security
About...........................................................................................................................................................................61
CIFS File Locking ..................................................................................................................................................... 64
Multi-platform sharing .............................................................................................................................................63
NT-only environment ...............................................................................................................................................62
UNIX-only environment..........................................................................................................................................61
HP NAS VA Support Web Site ................................................................................................................................... 60
HP NAS website............................................................................................................................................................58
HP OmniBack II ............................................................................................................................................................. 67
HP Software Online.......................................................................................................................................................60
HP Support Documentation
Viewing ....................................................................................................................................................................... 60
HP Surestore Network Attached Storage...................................................................................................................13
HP Virtual Array ............................................................................................................................................................ 74
HP websites.....................................................................................................................................................................58
I
Identity.............................................................................................................................................................................28
Identity Tab.....................................................................................................................................................................24
Install
Command View SDM Certificate ..........................................................................................................................42
Sun MicrosystemsTM Java Plug-in .......................................................................................................................42
InterCheck ....................................................................................................................................................................... 65
Internet Explorer............................................................................................................................................................42
IP Addresses
Configuring.................................................................................................................................................................30
Getting Started...........................................................................................................................................................19
J
Java Applet ........................................................................................................................................................................7
Java Plug-in 1.3.1...........................................................................................................................................................42
Java.policy File...............................................................................................................................................................42
L
LAN0...............................................................................................................................................................................80
Local File Systems
Managing .................................................................................................................................................................... 41
Local Storage
Advanced Setup of Physical Devices.....................................................................................................................39
Local File Systems ....................................................................................................................................................41
Logical Volumes and Volume Groups..................................................................................................................40
Storage.........................................................................................................................................................................36
Local Support Documentation.....................................................................................................................................59
Location...........................................................................................................................................................................28
Page 95

95
Lock Files........................................................................................................................................................................64
Logical Storage ..............................................................................................................................................................13
Logical Unit Number
Array ............................................................................................................................................................................ 45
Storage Overview......................................................................................................................................................13
Logical Unit Size ...........................................................................................................................................................46
Logical Vols/Volume Groups......................................................................................................................................40
Logical Volume Information
Viewing ....................................................................................................................................................................... 49
Logical Volume Manager
managing arrays.........................................................................................................................................................46
managing logical volumes and volume groups....................................................................................................40
Logical Volumes
Advanced Setup of Physical Devices.....................................................................................................................39
Deleting ....................................................................................................................................................................... 50
Editing.........................................................................................................................................................................50
Local File Systems ....................................................................................................................................................41
Managing .................................................................................................................................................................... 40
Planning.......................................................................................................................................................................15
Storage.........................................................................................................................................................................36
LUN
Advanced Array Management .................................................................................................................................46
Array Summary..........................................................................................................................................................45
creating ........................................................................................................................................................................ 15
managing.....................................................................................................................................................................46
Planning.......................................................................................................................................................................15
RAID Device Setup...................................................................................................................................................37
Storage Overview......................................................................................................................................................13
Storage planning........................................................................................................................................................15
LV.....................................................................................................................................................................................40
LVM.................................................................................................................................................................................40
M
Machine Address Code.................................................................................................................................................24
Managing
Local File Systems ....................................................................................................................................................41
Logical Volumes and Volume Groups..................................................................................................................40
LUNs ...........................................................................................................................................................................46
Quotas..........................................................................................................................................................................72
Storage.........................................................................................................................................................................21
Mandatory Share Mode................................................................................................................................................64
MC Service Guard
Clustering....................................................................................................................................................................68
Shutting Down and Restarting the HP NAS VA .................................................................................................25
Medianame......................................................................................................................................................................72
Mirroring.........................................................................................................................................................................74
Misuse
Advanced Setup.........................................................................................................................................................21
Mount Point
creating a new logical volume.................................................................................................................................49
Quotas..........................................................................................................................................................................72
Resizing file systems and volumes.........................................................................................................................72
Mounted File Systems...................................................................................................................................................41
Mountpoint......................................................................................................................................................................67
Multi-Platform File Sharing .........................................................................................................................................63
Page 96

96
N
Nameserver ..................................................................................................................................................................... 80
NAS Web Interface .......................................................................................................................................................21
Netconf file .....................................................................................................................................................................80
Netscape Navigator.......................................................................................................................................................79
Network Activity ...........................................................................................................................................................55
Network File System.....................................................................................................................................................34
Network File System Daemon.....................................................................................................................................34
Network Information Service ......................................................................................................................................61
Network Information System.......................................................................................................................................32
Network Interface Cards...............................................................................................................................................30
Networking Settings
CIFS (Samba) .............................................................................................................................................................35
Configuring.................................................................................................................................................................25
DNS.............................................................................................................................................................................31
General Issues ............................................................................................................................................................77
Getting Started...........................................................................................................................................................19
NFS ..............................................................................................................................................................................34
Shares and Exports....................................................................................................................................................51
NFS Access Lists
Exports.........................................................................................................................................................................51
NFS Settings...............................................................................................................................................................34
NFS Activity
Viewing ....................................................................................................................................................................... 55
NFS Export
Add...............................................................................................................................................................................34
Edit...............................................................................................................................................................................34
Remove........................................................................................................................................................................34
NFS Mount Point Name ...............................................................................................................................................52
NFS Settings...................................................................................................................................................................34
Release Notes ............................................................................................................................................................. 80
NFSD...............................................................................................................................................................................34
NIC ................................................................................................................................................................................... 30
NIS....................................................................................................................................................................................32
enabling ....................................................................................................................................................................... 32
Security........................................................................................................................................................................61
NIS Domain Name ........................................................................................................................................................32
NT-only Environment ...................................................................................................................................................62
O
OnlineJFS........................................................................................................................................................................69
Open Mode ......................................................................................................................................................................64
Oplocks............................................................................................................................................................................64
Out-of-Warranty Support .............................................................................................................................................10
Overview
Clustering....................................................................................................................................................................68
HP NAS VA ...............................................................................................................................................................13
P
Packets Transmitted......................................................................................................................................................55
Parity................................................................................................................................................................................74
Password Confirmation.................................................................................................................................................27
Patch List .........................................................................................................................................................................57
PDF-format HP NAS VA User's Guide ..................................................................................................................... 22
Performance Statistics
Page 97

97
Network.......................................................................................................................................................................55
NFS ..............................................................................................................................................................................55
Status ........................................................................................................................................................................... 53
System Utilization.....................................................................................................................................................55
Top Output ..................................................................................................................................................................56
Permissions.....................................................................................................................................................................42
Physical Devices
Advanced Setup.........................................................................................................................................................39
Physical Drive Quick Setup ......................................................................................................................................... 38
Physical Drive Setup ..................................................................................................................................................... 36
Physical Stor age.............................................................................................................................................................13
Placing Part Orders........................................................................................................................................................10
Planning
Getting Started...........................................................................................................................................................19
LUNs ...........................................................................................................................................................................15
Snapshots ....................................................................................................................................................................15
Support........................................................................................................................................................................10
Your Storage...............................................................................................................................................................15
Policytool ........................................................................................................................................................................ 42
Primary Domain Controller..........................................................................................................................................62
Printing Documents.......................................................................................................................................................23
Proof-of-Purchase..........................................................................................................................................................10
Q
Queries
Primary Domain Controller.....................................................................................................................................62
Quick Setup
Physical Drive............................................................................................................................................................38
RAID Device ..............................................................................................................................................................37
Storage.........................................................................................................................................................................36
Quotas .............................................................................................................................................................................. 72
R
RAID
AutoRAID...................................................................................................................................................................74
LUN Management.....................................................................................................................................................46
Physical Drive Quick Setup.....................................................................................................................................38
Storage.........................................................................................................................................................................36
RAID 1+0
Overview.....................................................................................................................................................................74
Planning Snapshots ...................................................................................................................................................13
RAID 1+0 and 5DP Combined....................................................................................................................................74
RAID 5DP.......................................................................................................................................................................74
RAID Device Setup ....................................................................................................................................................... 37
RAID Levels ...................................................................................................................................................................74
Receive Errors ................................................................................................................................................................55
Reduce Logical Volume Size ......................................................................................................................................40
Register Your Product...................................................................................................................................................10
Regulatory Compliance..................................................................................................................................................9
Remove Device..............................................................................................................................................................39
Remove NFS Export .....................................................................................................................................................51
Remove Volume Group ................................................................................................................................................39
Renaming an Array........................................................................................................................................................46
Rescan..............................................................................................................................................................................37
Resizing File Systems and Volumes ..........................................................................................................................72
Page 98

98
Restarting Your NAS Server.......................................................................................................................................25
Run Queue.......................................................................................................................................................................55
S
Samba
CIFS Settings.............................................................................................................................................................35
Configuration.............................................................................................................................................................25
Help..............................................................................................................................................................................35
Release Notes.............................................................................................................................................................80
Shares ..........................................................................................................................................................................51
Scanning for a New Array............................................................................................................................................45
Security
HP NAS VA ...............................................................................................................................................................61
Security ID......................................................................................................................................................................62
Serial Numbers...............................................................................................................................................................10
Serial Number—The.....................................................................................................................................................24
Service .............................................................................................................................................................................10
Settings
Networking.................................................................................................................................................................25
Share-Level Security.....................................................................................................................................................62
Shares
Configuration.............................................................................................................................................................25
Multi-platform Access..............................................................................................................................................63
Windows.....................................................................................................................................................................51
Shutdown/Restart ........................................................................................................................................................... 25
SID....................................................................................................................................................................................62
SMB.................................................................................................................................................................................35
Smbnull............................................................................................................................................................................78
Snapmount......................................................................................................................................................................69
Snapshots
Planning.......................................................................................................................................................................15
Using............................................................................................................................................................................69
Snapsize...........................................................................................................................................................................69
SNMP...............................................................................................................................................................................73
Software Patch List........................................................................................................................................................57
Sophos Anti -Virus.........................................................................................................................................................65
Status
System Utilization.....................................................................................................................................................55
Top Output ..................................................................................................................................................................56
Status Tab ........................................................................................................................................................................53
Storage
Advanced Array Management .................................................................................................................................46
Advanced Setup of Physical Devices.....................................................................................................................39
External RAID Devices............................................................................................................................................42
Logical Volumes and Volume Groups..................................................................................................................40
LUN Management.....................................................................................................................................................46
Overview.....................................................................................................................................................................13
RAID Device Setup...................................................................................................................................................37
Scanning for a New Array .......................................................................................................................................45
Storage Array Management
Array Summary..........................................................................................................................................................45
Planning.......................................................................................................................................................................15
Storage Array Summary ...............................................................................................................................................45
Storage Overview..........................................................................................................................................................13
Storage Tab.....................................................................................................................................................................36
Subnet Mask...................................................................................................................................................................30
Page 99

99
Sun MicrosystemsTM Java Plug-in............................................................................................................................42
Support
HP NAS VA Service and Support..........................................................................................................................60
Local Documentation................................................................................................................................................59
Planning.......................................................................................................................................................................10
Web Documentation.................................................................................................................................................60
Support Tab .....................................................................................................................................................................58
SWEEP............................................................................................................................................................................65
Syslog...............................................................................................................................................................................77
System Hostname
Configuring.................................................................................................................................................................27
Identity.........................................................................................................................................................................24
System Log.....................................................................................................................................................................53
Viewing ....................................................................................................................................................................... 54
System Properties
Administrative Password Settings..........................................................................................................................27
Configuration.............................................................................................................................................................25
Contact Information..................................................................................................................................................28
Date and Time Settings............................................................................................................................................28
System Storage...............................................................................................................................................................49
System Utilization
Viewing ....................................................................................................................................................................... 55
T
TCP/IP
DNS.............................................................................................................................................................................31
IP Addresses...............................................................................................................................................................30
TCP/IP Settings..............................................................................................................................................................19
Telnet...............................................................................................................................................................................79
Time Settings..................................................................................................................................................................28
Time—The ...................................................................................................................................................................... 24
Top Output
Viewing ....................................................................................................................................................................... 56
Total Physical Capacity................................................................................................................................................45
Transmit Errors ..............................................................................................................................................................55
Troubleshooting Trees..................................................................................................................................................10
Trusted Root Certification Authorities.......................................................................................................................42
TTY..................................................................................................................................................................................78
U
UID...................................................................................................................................................................................61
UNIX hostname .............................................................................................................................................................24
UNIX-only Environment ..............................................................................................................................................61
Unmount
Local File Systems ....................................................................................................................................................41
Logical Volumes and Volume Groups..................................................................................................................40
User Access
Granting.......................................................................................................................................................................51
Verifying Accessibility.............................................................................................................................................52
Using Help While You Work ......................................................................................................................................22
Using Online Help .........................................................................................................................................................22
Using Snapshots.............................................................................................................................................................69
Using the Command View Storage Device Manager..............................................................................................42
Page 100

100
V
VDL..................................................................................................................................................................................65
Viewing
HP Support Documentation.....................................................................................................................................60
Local Support Documentation................................................................................................................................59
Logical Volume Information ...................................................................................................................................49
Network Activity.......................................................................................................................................................55
NFS Activity ..............................................................................................................................................................55
Software Patch List ...................................................................................................................................................57
System Log .................................................................................................................................................................54
System Utilization.....................................................................................................................................................55
Top Output ..................................................................................................................................................................56
Virtual Array...................................................................................................................................................................74
Virus Description Language ........................................................................................................................................ 65
Virus Prevention and Detection..................................................................................................................................65
Volume Groups
Advanced Setup of Physical Devices.....................................................................................................................39
Creating ....................................................................................................................................................................... 47
Deleting ....................................................................................................................................................................... 47
Editing.........................................................................................................................................................................47
Local File Systems ....................................................................................................................................................41
Managing .................................................................................................................................................................... 40
Overview.....................................................................................................................................................................13
Planning.......................................................................................................................................................................15
Viewing ....................................................................................................................................................................... 47
Volumes...........................................................................................................................................................................72
Vxresize Command.......................................................................................................................................................72
W
Warranty Upgrades........................................................................................................................................................10
Web Documentation......................................................................................................................................................60
Windows
CIFS Settings.............................................................................................................................................................35
Configuration.............................................................................................................................................................25
shares ...........................................................................................................................................................................51
Windows Internet Naming Service.............................................................................................................................35
Windows Shares.............................................................................................................................................................15
WINS
General Issues ............................................................................................................................................................77
System Name..............................................................................................................................................................27
WINS Addresses............................................................................................................................................................35
WINS Options ................................................................................................................................................................35
 Loading...