

Page 1

HP SureStore
1200mx / 2200mx
Optical Jukebox
User’s Guide
Edition 1
HP Part No. C1104-90021
Printed in: Greeley, CO USA
© Copyright August 2000
Page 2

Notice
This document contains information that is protected by copyright. All rights are
reserved. No part of this document may be photocopied, reproduced, or translated to
another language without the prior written consent of Hewlett-Packard Company.
The information contained in this document is subject to change without notice.
Hewlett-Packard makes no warranty of any kind with regard to this printed material,
including, but not limited to, the implied warranties of merchantability and fitness
for a particular purpose. Hewlett-Packard shall not be liable for errors contained
herein or for incidental or consequential damages in connection with the furnishing,
performance, or use of this material.
© Copyright August 2000
Printing History
New editions of this manual incorporate all material updated since the previous
edition. The manual printing date and part number indicate the current edition. The
printing date changes when a new edition is printed. (Minor corrections and updates
incorporated at reprint do not change this date.)
Part number C1104-90021 Edition 1 August 2000
ii
Page 3

Typographical Conventions
The following typographical conventions are used in this manual:
Emphasis: Denotes important information.
Keycap: Keys on the library.
Computer Output: Information displayed in the display window and screen
menu items that you can select.
WARNING Warnings call attention to a procedure or practice that could result in personal
injury if not correctly performed. Do not proceed until you fully understand an
meet the required conditions.
CAUTION Cautions call attention to an operating procedure or practice that could damage the
product if not correctly performed. Do not proceed until understanding and meeting
these required conditions.
NOTE Notes provide information that can be helpful in understanding the operation of the
product.
iii
Page 4

In This Manual
This user’s guide includes:
Chapter 1 set-up information for this optical jukebox
Chapter 2 information about choosing and using optical disks
Chapter 3 features description, operating instructions, and troubleshooting
information
Appendix A supplies and customer support
Appendix B operating this jukebox on a SCSI bus
Appendix C safety and regulatory information
Glossary of Terms
Index
iv
Page 5

Contents
1. Setting Up the Jukebox
Overview of This Chapter . . . . . . . . . . . . . . . . . . . . . . . . . . . . . . . . . . . . . . . . . . . 1-2
What you need to set up the jukebox . . . . . . . . . . . . . . . . . . . . . . . . . . . . . . . . . 1-2
System Components Needed for Operation of This Jukebox . . . . . . . . . . . . . . . . 1-3
Identifying Right-Side Panel Features . . . . . . . . . . . . . . . . . . . . . . . . . . . . . . . . . . 1-4
Connecting the SCSI Cables to the Jukebox . . . . . . . . . . . . . . . . . . . . . . . . . . . . . 1-7
Choosing Your cabling Configuration . . . . . . . . . . . . . . . . . . . . . . . . . . . . . . . . . . 1-8
Connecting a 4- or 6-Drive Jukebox . . . . . . . . . . . . . . . . . . . . . . . . . . . . . . . . . . . 1-9
Removing the Customer Access Panel. . . . . . . . . . . . . . . . . . . . . . . . . . . . . . . . 1-9
Connecting a 10-Drive Jukebox as the Only Peripheral,
Two Host Adapters, Basic SCSI Addressing . . . . . . . . . . . . . . . . . . . . . . . . . . 1-12
Removing the Customer Access Panel. . . . . . . . . . . . . . . . . . . . . . . . . . . . . . . 1-12
Connecting a 10-Drive Jukebox, One Host Adapter,
Bus 1 and 2 Daisy-Chained, LUN Addressing . . . . . . . . . . . . . . . . . . . . . . . . 1-14
Removing the Customer Access Panel. . . . . . . . . . . . . . . . . . . . . . . . . . . . . . . 1-14
Connecting the Jukebox With Other SCSI Peripherals . . . . . . . . . . . . . . . . . . . . 1-16
Connecting Power . . . . . . . . . . . . . . . . . . . . . . . . . . . . . . . . . . . . . . . . . . . . . . . . 1-17
Configuring Write Verify. . . . . . . . . . . . . . . . . . . . . . . . . . . . . . . . . . . . . . . . . . . 1-18
Installing the Wheel Chocks . . . . . . . . . . . . . . . . . . . . . . . . . . . . . . . . . . . . . . . . 1-19
Moving or Shipping the Jukebox . . . . . . . . . . . . . . . . . . . . . . . . . . . . . . . . . . . . . 1-20
Moving the Jukebox a Short Distance . . . . . . . . . . . . . . . . . . . . . . . . . . . . . . . 1-20
Shipping the Jukebox . . . . . . . . . . . . . . . . . . . . . . . . . . . . . . . . . . . . . . . . . . . . 1-21
2. Using Optical Disks
Overview of This Chapter . . . . . . . . . . . . . . . . . . . . . . . . . . . . . . . . . . . . . . . . . . . 2-2
Using Optical Disks . . . . . . . . . . . . . . . . . . . . . . . . . . . . . . . . . . . . . . . . . . . . . . 2-2
Choosing an Optical Disk Type . . . . . . . . . . . . . . . . . . . . . . . . . . . . . . . . . . . . . . . 2-3
v
Page 6

Contents
Labeling an Optical Disk Cartridge. . . . . . . . . . . . . . . . . . . . . . . . . . . . . . . . . . . . 2-4
Write-Protecting an Optical Disk . . . . . . . . . . . . . . . . . . . . . . . . . . . . . . . . . . . . . 2-5
Caring for Optical Disks . . . . . . . . . . . . . . . . . . . . . . . . . . . . . . . . . . . . . . . . . . . . 2-6
Cleaning Disks. . . . . . . . . . . . . . . . . . . . . . . . . . . . . . . . . . . . . . . . . . . . . . . . . . 2-6
3. Operating the Jukebox
Overview of This Chapter . . . . . . . . . . . . . . . . . . . . . . . . . . . . . . . . . . . . . . . . . . . 3-2
Operating the Control Panel . . . . . . . . . . . . . . . . . . . . . . . . . . . . . . . . . . . . . . . . . 3-3
Using Selection Buttons . . . . . . . . . . . . . . . . . . . . . . . . . . . . . . . . . . . . . . . . . . . . 3-7
Understanding Display Window Messages . . . . . . . . . . . . . . . . . . . . . . . . . . . . . . 3-8
Top Level Menus . . . . . . . . . . . . . . . . . . . . . . . . . . . . . . . . . . . . . . . . . . . . . . . . 3-8
Second Level Menus . . . . . . . . . . . . . . . . . . . . . . . . . . . . . . . . . . . . . . . . . . . . . 3-8
Loading a Disk into the Jukebox . . . . . . . . . . . . . . . . . . . . . . . . . . . . . . . . . . . . . 3-10
Ejecting a Disk From the Jukebox. . . . . . . . . . . . . . . . . . . . . . . . . . . . . . . . . . . . 3-12
Entering the Administration Menu Password . . . . . . . . . . . . . . . . . . . . . . . . . . . 3-13
Changing the Administration Menu Password . . . . . . . . . . . . . . . . . . . . . . . . . . 3-14
Setting the SCSI IDs . . . . . . . . . . . . . . . . . . . . . . . . . . . . . . . . . . . . . . . . . . . . . . 3-15
Setting the LUN Mode. . . . . . . . . . . . . . . . . . . . . . . . . . . . . . . . . . . . . . . . . . . 3-15
Viewing the Current SCSI IDs. . . . . . . . . . . . . . . . . . . . . . . . . . . . . . . . . . . . . 3-16
Changing the Current SCSI IDs. . . . . . . . . . . . . . . . . . . . . . . . . . . . . . . . . . . . 3-17
Setting an Operating Configuration. . . . . . . . . . . . . . . . . . . . . . . . . . . . . . . . . . . 3-20
Retrieving Log History . . . . . . . . . . . . . . . . . . . . . . . . . . . . . . . . . . . . . . . . . . . . 3-23
Running an Internal Test . . . . . . . . . . . . . . . . . . . . . . . . . . . . . . . . . . . . . . . . . . . 3-28
Using Online Repair . . . . . . . . . . . . . . . . . . . . . . . . . . . . . . . . . . . . . . . . . . . . . . 3-34
Troubleshooting. . . . . . . . . . . . . . . . . . . . . . . . . . . . . . . . . . . . . . . . . . . . . . . . . . 3-35
vi
Page 7

Contents
A. Supplies and Customer Support
Overview of This Appendix. . . . . . . . . . . . . . . . . . . . . . . . . . . . . . . . . . . . . . . . . .A-2
Supplies and Accessories. . . . . . . . . . . . . . . . . . . . . . . . . . . . . . . . . . . . . . . . . . . .A-3
Hewlett-Packard Customer Support. . . . . . . . . . . . . . . . . . . . . . . . . . . . . . . . . . . .A-6
Warranty. . . . . . . . . . . . . . . . . . . . . . . . . . . . . . . . . . . . . . . . . . . . . . . . . . . . . . . . .A-7
B. Operating This Jukebox on a SCSI Bus
A Brief Overview of SCSI . . . . . . . . . . . . . . . . . . . . . . . . . . . . . . . . . . . . . . . . . . .B-2
General . . . . . . . . . . . . . . . . . . . . . . . . . . . . . . . . . . . . . . . . . . . . . . . . . . . . . . . .B-2
The SCSI Bus . . . . . . . . . . . . . . . . . . . . . . . . . . . . . . . . . . . . . . . . . . . . . . . . . . .B-2
Initiators and Targets . . . . . . . . . . . . . . . . . . . . . . . . . . . . . . . . . . . . . . . . . . . . .B-2
LUN Addressing. . . . . . . . . . . . . . . . . . . . . . . . . . . . . . . . . . . . . . . . . . . . . . . . .B-3
Transfer Rates on the Bus. . . . . . . . . . . . . . . . . . . . . . . . . . . . . . . . . . . . . . . . . .B-4
Termination . . . . . . . . . . . . . . . . . . . . . . . . . . . . . . . . . . . . . . . . . . . . . . . . . . . .B-4
Single-ended and Differential Interfaces . . . . . . . . . . . . . . . . . . . . . . . . . . . . . .B-5
Connectors . . . . . . . . . . . . . . . . . . . . . . . . . . . . . . . . . . . . . . . . . . . . . . . . . . . . .B-5
The SCSI Bus and This Jukebox . . . . . . . . . . . . . . . . . . . . . . . . . . . . . . . . . . . . . .B-7
Adding Devices to the Bus . . . . . . . . . . . . . . . . . . . . . . . . . . . . . . . . . . . . . . . . .B-8
Default SCSI IDs in the Jukebox When Using Basic SCSI Addressing
and When Using LUN Mode . . . . . . . . . . . . . . . . . . . . . . . . . . . . . . . . . . . . . .B-11
C. Safety and Regulatory Information
Overview of this Appendix . . . . . . . . . . . . . . . . . . . . . . . . . . . . . . . . . . . . . . . . . .C-2
CDRH Regulations (USA Only) . . . . . . . . . . . . . . . . . . . . . . . . . . . . . . . . . . . . . .C-3
EC Radio Frequency Interference Statement (Europe Only). . . . . . . . . . . . . . . . .C-4
United Kingdom Telecommunications Act 1984. . . . . . . . . . . . . . . . . . . . . . . . . .C-5
Declaration of Conformity. . . . . . . . . . . . . . . . . . . . . . . . . . . . . . . . . . . . . . . . . . .C-6
vii
Page 8

Contents
Herstellerbescheinigung . . . . . . . . . . . . . . . . . . . . . . . . . . . . . . . . . . . . . . . . . . . . C-7
English Translation of German Sound Emission Directive . . . . . . . . . . . . . . . C-7
Turvallisuusyhteenveto . . . . . . . . . . . . . . . . . . . . . . . . . . . . . . . . . . . . . . . . . . . . .C-8
Laserturvallisuus . . . . . . . . . . . . . . . . . . . . . . . . . . . . . . . . . . . . . . . . . . . . . . . . C-8
Huolto. . . . . . . . . . . . . . . . . . . . . . . . . . . . . . . . . . . . . . . . . . . . . . . . . . . . . . . . . C-8
English Translation of Finland Regulatory Information . . . . . . . . . . . . . . . . . . . .C-9
Japanese VCCI Statement . . . . . . . . . . . . . . . . . . . . . . . . . . . . . . . . . . . . . . . . . .C-10
Glossary
Index
viii
Page 9

Figures
Figure 1-1 . Right-Side Panel Features — 10-Drive Jukebox Shown . . . . . . . . . . 1-4
Figure 1-2 . Connecting a 4- or 6-Drive Jukebox . . . . . . . . . . . . . . . . . . . . . . . . 1-10
Figure 1-3 . Connecting a 10-Drive Jukebox, Two Host Adapters,
Basic SCSI Addressing . . . . . . . . . . . . . . . . . . . . . . . . . . . . . . . . . . . . . . . . . . 1-13
Figure 1-4 . Connecting a 10-Drive Jukebox, One Host Adapter,
Bus 1 and 2 Daisy-Chained, LUN Addressing . . . . . . . . . . . . . . . . . . . . . . . . 1-15
Figure 1-5 . Installing the Wheel Chocks . . . . . . . . . . . . . . . . . . . . . . . . . . . . . . 1-19
Figure 2-1 . Recommended Placement of Cartridge Labels . . . . . . . . . . . . . . . . . 2-4
Figure 2-2 . Write-Protect Button Location. . . . . . . . . . . . . . . . . . . . . . . . . . . . . . 2-5
Figure 3-1 . The Jukebox Control Panel . . . . . . . . . . . . . . . . . . . . . . . . . . . . . . . . 3-4
Figure 3-2 . Jukebox Display Menu Tree. . . . . . . . . . . . . . . . . . . . . . . . . . . . . . . . 3-6
Figure 3-3 . Loading a Disk . . . . . . . . . . . . . . . . . . . . . . . . . . . . . . . . . . . . . . . . . 3-10
Figure B-1 . Single-ended and Differential Interfaces on This Jukebox . . . . . . . .B-7
Figure B-2 . Four or Six Drives, One Host Adapter, Basic SCSI Addressing. . .B-14
Figure B-3 . 10 Drives, Two Host Adapters, Basic SCSI Addressing . . . . . . . . .B-15
Figure B-4 . Ten Drives, One Host Adapter, LUN Addressing,
Controller/Drives Use Same IDs. . . . . . . . . . . . . . . . . . . . . . . . . . . . . . . . . . .B-16
Figure B-5 . Ten Drives, One Host Adapter, LUN Addressing,
Controller/Drives Use Different IDs. . . . . . . . . . . . . . . . . . . . . . . . . . . . . . . .B-17
ix
Page 10

Figures
x
Page 11

Tables
Table 1-1. Maximum SCSI External Cable Lengths
(Assuming no devices internal to the host computer) . . . . . . . . . . . . . . . . . . . . 1-7
Table 3-1. Configuration Choices . . . . . . . . . . . . . . . . . . . . . . . . . . . . . . . . . . . . 3-21
Table 3-2. Information Logs . . . . . . . . . . . . . . . . . . . . . . . . . . . . . . . . . . . . . . . . 3-23
Table 3-3. Internal Tests . . . . . . . . . . . . . . . . . . . . . . . . . . . . . . . . . . . . . . . . . . . . 3-29
Table 3-4. Troubleshooting . . . . . . . . . . . . . . . . . . . . . . . . . . . . . . . . . . . . . . . . . 3-36
Table A-1. Basic Supplies and Accessories. . . . . . . . . . . . . . . . . . . . . . . . . . . . . .A-3
Table B-1. Default SCSI and LUN Setings in 4- and 6-Drive Jukeboxes . . . . . .B-11
Table B-2. Default SCSI and LUN Settings in the 10-Drive Jukebox . . . . . . . . .B-12
Table B-3. LUN Mapping of a 10-Drive Jukebox if “DRVs BUS 1” ID is
Changed to an ID Different Than the Jukebox Controller
(IDs used are examples). . . . . . . . . . . . . . . . . . . . . . . . . . . . . . . . . . . . . . . . . .B-13
Table B-4. Possible Additional SCSI Addresses Available . . . . . . . . . . . . . . . . .B-18
xi
Page 12

Tables
xii
Page 13

Chapter 1: Setting
up the Disk Drive
Setting Up the
Jukebox
1 Setting Up the Jukebox
Page 14

Setting Up the Jukebox
Overview of This Chapter
Overview of This Chapter
This chapter gives information about the following topics:
• right side panel features
connecting SCSI and power cords
• moving or shipping the jukebox
• connecting SCSI and power cords
What you need to set up the jukebox
Items included with the jukebox:
• power cord
• single-ended and differential SCSI terminators
- one of each included in a 4- or 6-drive jukebox
- two of each included in a 10-drive jukebox
- this guide
Items needed but not included with the jukebox:
• SCSI cable with either a high-density 50-pin (Micro D) or high-density 68-pin
(Micro D) connector depending on whether a single-ended or differential
interface is used
• single-ended or differential SCSI host adapter with at least one available
address. If you have a 10-drive jukebox you may choose to use two adapters.
• application software that supports this type of jukebox
1-2 Chapter 1
Page 15

Setting Up the Jukebox
System Components Needed for Operation of This Jukebox
System Components Needed for Operation of
This Jukebox
This jukebox requires application software to operate it as a single storage device
composed of multiple SCSI devices. Consult with your sales representative to chose
the application software you need.
Standard Configuration
The following list is a hierarchy of the system components needed to operate this
jukebox in a standard configuration.
• Host computer CPU
• Operating system
Chapter 1: Setting
up the Disk Drive
Setting Up the
Jukebox
• Optical jukebox application software
• Jukebox SCSI drivers (may be included in optical jukebox application software
above)
• Jukebox
High-Availability Configuration
The following list is a hierarchy of the system components needed to operate this
jukebox in a high-availability configuration. Consult with your high-availability
vendor for installation and configuration.
• Host computer CPUs (two host computers)
• Operating systems (on two host computers)
• High-availability application software (links both host computers)
• Optical jukebox application software (on both host computers)
• Jukebox SCSI drivers (may be included in optical jukebox application software
above)
• Jukebox
Chapter 1 1-3
Page 16
Setting Up the Jukebox
Identifying Right-Side Panel Features
Identifying Right-Side Panel Features
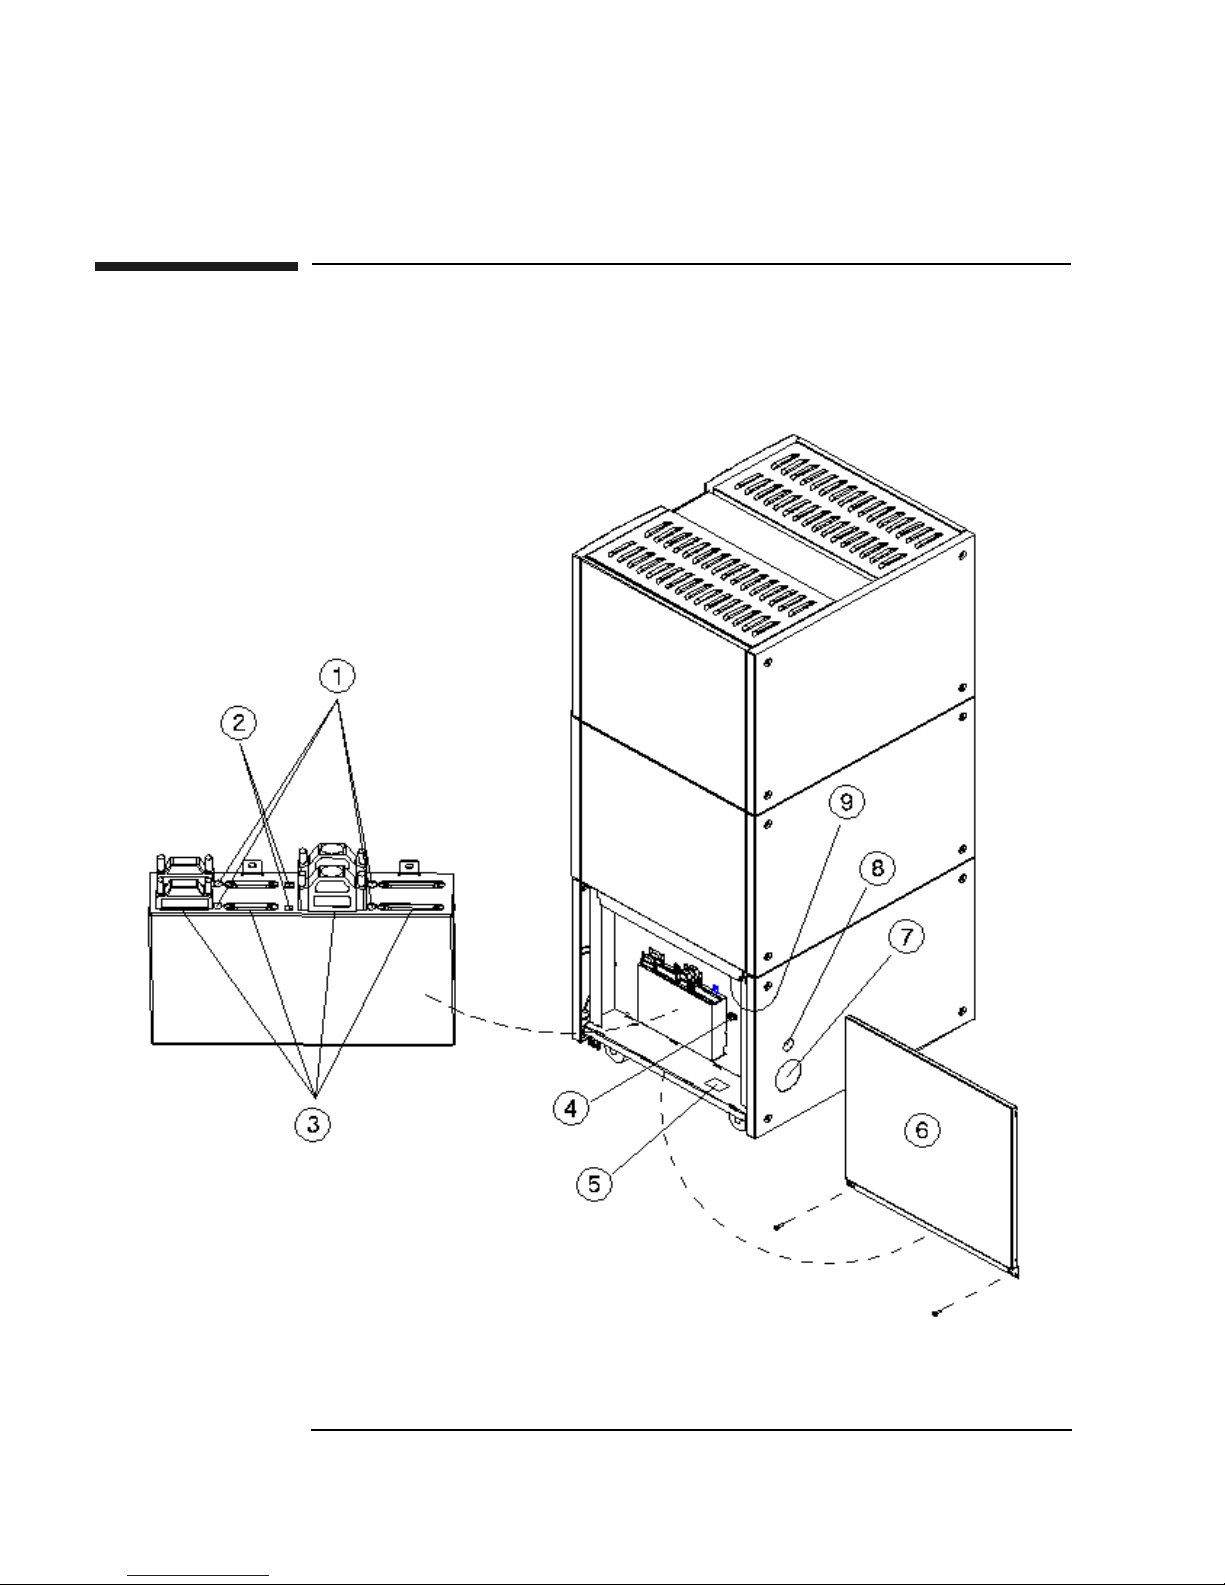
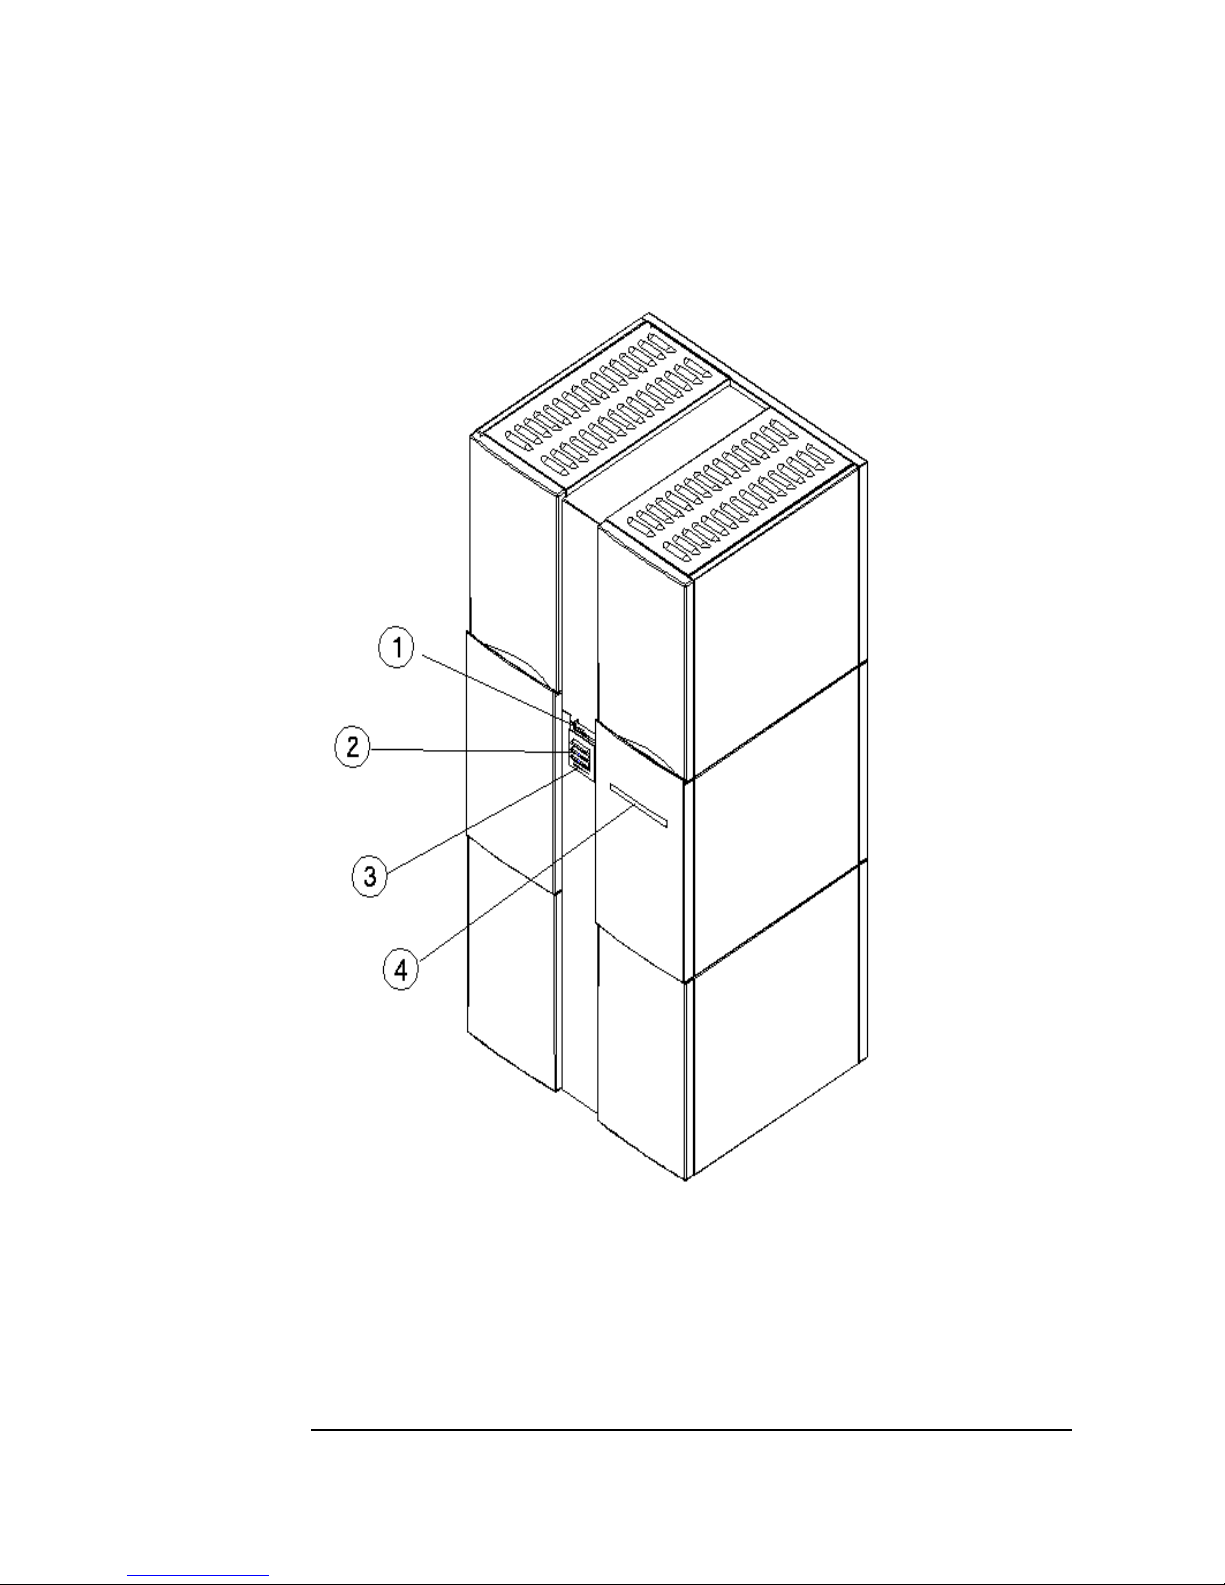
Figure 1-1 Right-Side Panel Features — 10-Drive Jukebox Shown
1-4 Chapter 1
Page 17

Setting Up the Jukebox
Identifying Right-Side Panel Features
The numbers below correspond to the numbers in Figure 1-1 on the previous
page
Chapter 1: Setting
up the Disk Drive
Setting Up the
Jukebox
1 Active bus
indicator
Lit when the SCSI bus is active. There is an indicator
for each single-ended and each differential interface in
the jukebox.
2 SCSI interface
selection switch
Used to select either a single-ended or differential SCSI
interface on the SCSI interface board.
In 4- or 6-drive jukeboxes, there is one interface board.
In 10-drive jukeboxes, there are two interface boards,
designated Bus 1 and Bus 2. The interface selection
switch must be set individually for each board
3 SCSI ports Used for connecting SCSI cables to the interface board.
The interface board has two types of interface;
single-ended and differential. Each type of interface has
two ports
4 Power cord strain
relief clip
Used to route the power cord away from other
connectors and provide strain relief for the power cord
connection.
5 Product serial
number label
Needed for service calls. Write down your jukebox
serial number before you call your service
representative.
6 Access panel and
mounting screws
7 Cable access hole Used to pass SCSI and power cables through to the
8 Power switch The power switch is under the panel but can be operated
9 Power receptacle Receptacle for the jukebox power cord. Located on the
Chapter 1 1-5
Panel that covers the interface and power connection
components. The panel is secured by two screws on the
lower corners. (See the following note.)
Continued on the next page
inside of the jukebox.
through the hole in the panel. Turns power ON and OFF
to the jukebox.
bottom of the power distribution assembly.
Page 18

Setting Up the Jukebox
Identifying Right-Side Panel Features
NOTE Two screws secure the customer access panel to the side of jukebox during shipment
from the factory. These screws are removed during unpacking but should be
replaced after installation is complete. If the jukebox is ever reshipped, these screws
must be in place to properly secure the access panel.
1-6 Chapter 1
Page 19

Setting Up the Jukebox
Connecting the SCSI Cables to the Jukebox
Connecting the SCSI Cables to the Jukebox
In all configurations, the following cabling capabilities apply:
Interface types available Single-ended or differential SCSI, selected by
the interface selection switch on each
interface card
Chapter 1: Setting
up the Disk Drive
Setting Up the
Jukebox
Number of interface cards
available
Number of hosts This jukebox may be used in high availability
The maximum cable length you have available for connection to your host computer
system or other devices depends on which interface type you select. The following
table lists the maximum SCSI bus lengths available to you.
Table 1-1 Maximum SCSI External Cable Lengths (Assuming no devices internal to the
host computer)
Interface Type Maximum External Cable Length
Single-Ended SCSI
(50-pin high-density connector)
Differential SCSI
(68-pin high-density connector)
One card in 4- and 6-drive models,
two cards in 10-drive models
environments. High availability environments
can be complex and are not described in this
guide. Consult with your high-availability
vendor for installation and configuration.
3 meters (9.8 feet)
25 meters (82.0 feet)
NOTE Hewlett-Packard recommends that you use SCSI cables with thumbscrew
connectors. Clip type cables may be used if you first remove the mounted
thumbscrew studs with a flat blade screwdriver. If the thumbscrew studs are not
removed, interference between the cable and the studs may result.
Chapter 1 1-7
Page 20

Setting Up the Jukebox
Choosing Your cabling Configuration
Choosing Your cabling Configuration
Pick the configuration that applies to your plans below. You will be shown the page
for the proper procedures.
See page
Standard Configuration
• The only peripheral on a bus
... and the jukebox has 4 or 6 drives 1-9
... and the jukebox has 10 drives and you are using two
host adapters
... and the jukebox has 10 drives and you are using one
host adapter
• The jukebox will share a bus with other devices 1-16
High Availability configuration
• Consult with your high-availability vendor —
1-12
1-14
1-8 Chapter 1
Page 21

Setting Up the Jukebox
Connecting a 4- or 6-Drive Jukebox
Connecting a 4- or 6-Drive Jukebox
CAUTION Make sure that all peripheral devices connected to the host computer have been
properly shut down. If the host computer is connected to a network, check with the
system administrator before switching off power.
Removing the Customer Access Panel
1. Switch off power to the host computer before you connect the jukebox
NOTE The jukebox ships from the factory with two screws securing the bottom of the
customer access panel to the side of the jukebox. These screws are removed during
the process of unpacking and removing the jukebox from the shipping pallet.
Chapter 1: Setting
up the Disk Drive
Setting Up the
Jukebox
These screws may not have been replaced.
It is a good idea to use the screws to secure the access panel to the jukebox since
they must be in place if the jukebox is ever reshipped.
If you have to replace these screws, they are 6/32 x .437.
2. Remove the customer access panel by pulling on the bottom of the panel and
then lifting it off (see Figure 1-1). (If screws are installed, use a flatblade
screwdriver or T-15 Torx driver.)
Chapter 1 1-9
Page 22
Setting Up the Jukebox
Connecting a 4- or 6-Drive Jukebox
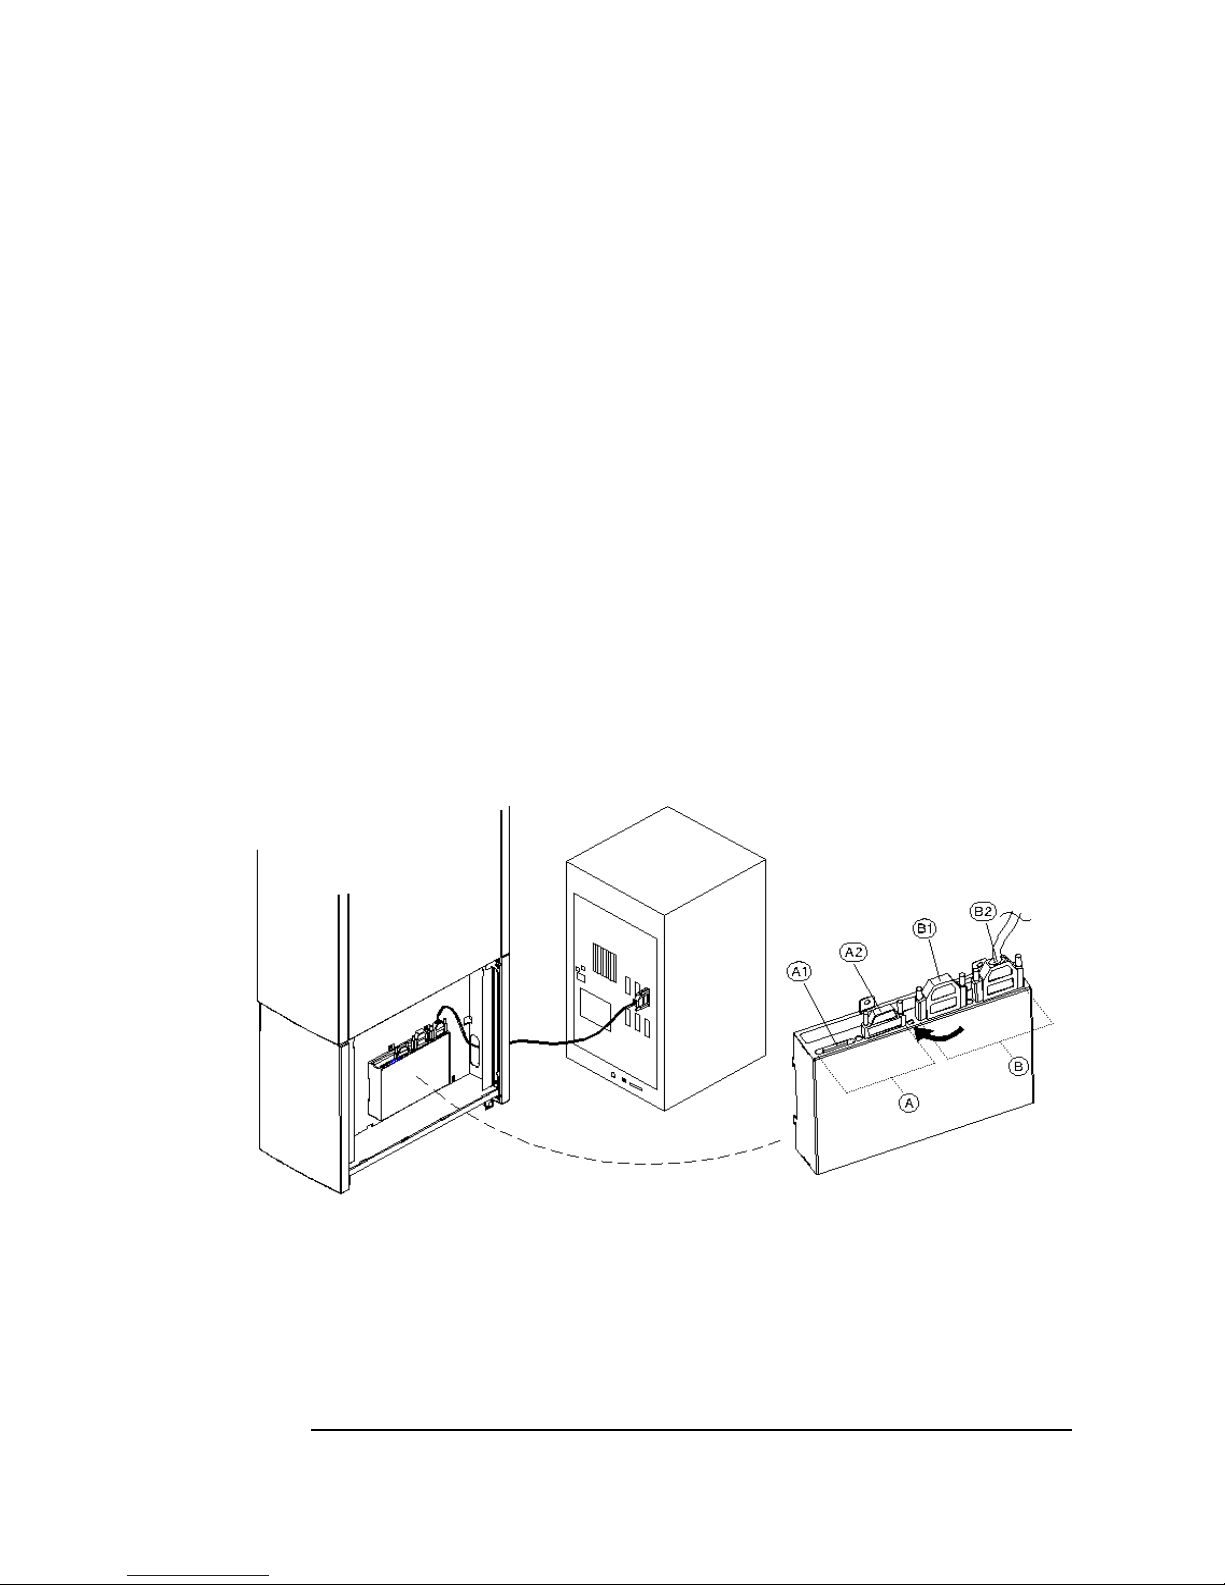
Refer to the following diagram in the next steps.
3. Select single-ended (“A”) or differential (“B”) interface using the SCSI
interface selection switch (see the arrow on the diagram ).
The diagram shows connecting a cable to the differential (“B”) interface.
4. Connect a cable between your host computer and either port of the jukebox
SCSI connectors of your selected interface type (the example diagram shows
using the “B2” port on the differential interface).
Route the cable through the slot at the bottom of the right side (“C”).
5. Plug a SCSI terminator into the unused SCSI port of interface type you chose
(the example diagram shows the terminator at “B1” because “B2” was used for
the cable ).
If you are using the differential interface, use a 68-pin high-density terminator. If
you are using the single-ended interface, use a 50-pin high-density active
terminator.
Figure 1-2 Connecting a 4- or 6-Drive Jukebox
6. Plug a SCSI terminator into one of the SCSI ports on the unused interface.
Only one terminator is necessary on an unused interface.
The example diagram shows the terminator on the single-ended interface
connector “A2” but the terminator could have been placed on “A1”.
Use an active terminator if you are terminating a single-ended interface.
1-10 Chapter 1
Page 23

Setting Up the Jukebox
Connecting a 4- or 6-Drive Jukebox
If you are terminating a differential interface, use a 68-pin high-density
terminator. If you are terminating a single-ended interface, use a 50-pin
high-density active terminator.
7. To continue with the installation, go to “Connecting Power” in this Chapter.
Chapter 1: Setting
up the Disk Drive
Setting Up the
Jukebox
Chapter 1 1-11
Page 24

Setting Up the Jukebox
Connecting a 10-Drive Jukebox as the Only Peripheral, Two Host
Adapters, Basic SCSI Addressing
Connecting a 10-Drive Jukebox as the Only
Peripheral, Two Host Adapters, Basic SCSI
Addressing
CAUTION Make sure that all peripheral devices connected to the host computer have been
properly shut down. If the host computer is connected to a network, check with the
system administrator before switching off power.
Removing the Customer Access Panel
1. Switch off power to the host computer before you connect the jukebox.
NOTE The jukebox ships from the factory with two screws securing the bottom of the
customer access panel to the side of the jukebox. These screws are removed during
the process of unpacking and removing the jukebox from the shipping pallet.
These screws may not have been replaced.
It is a good idea to use the screws to secure the access panel to the jukebox since
they must be in place if the jukebox is ever reshipped.
If you have to replace these screws, they are 6/32 x .437.
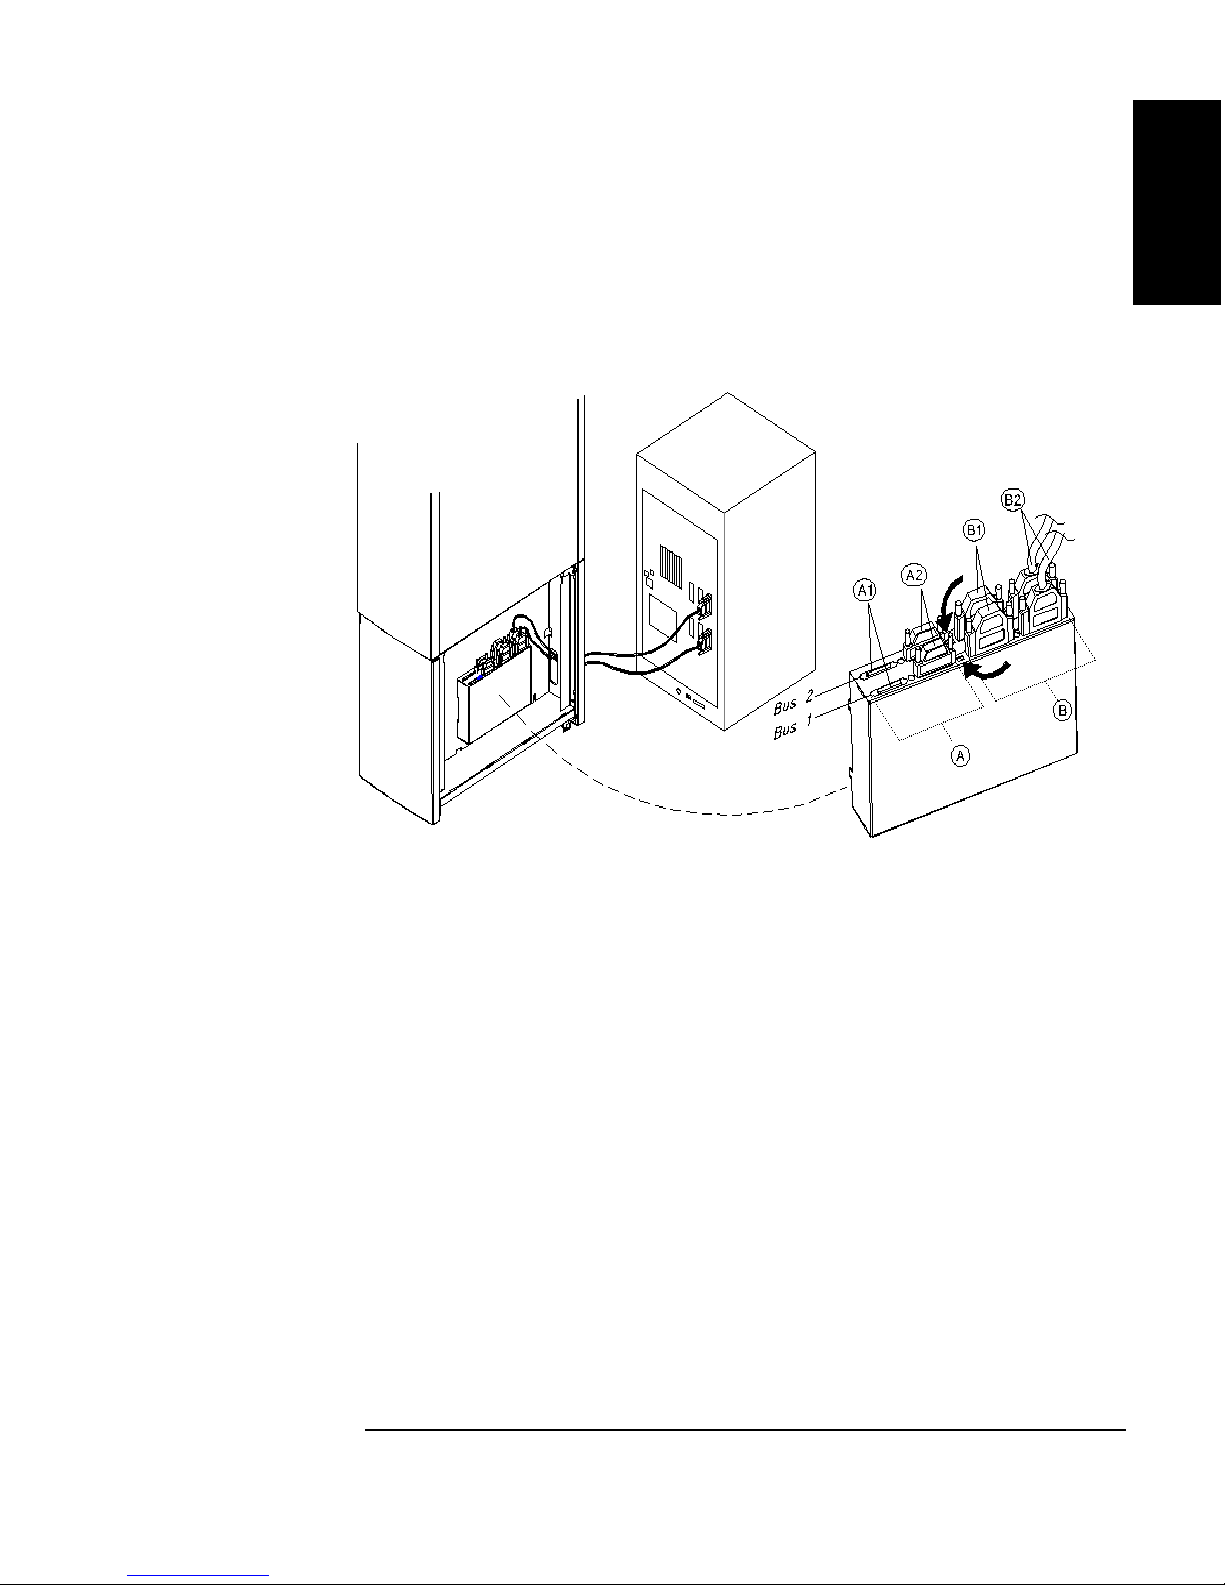
Refer to the following diagram in the next steps.
2. Select single-ended (“A”) or differential (“B”) interface using the SCSI
interface selection switch (see the arrow on the diagram ).
The diagram shows connecting a cable to the differential (“B”) interface.
3. Connect cables between the two host adapters on your host computer and two
SCSI interfaces on the interface module.
You can connect the two cables to two interfaces of the same type of different
types (single-ended or differential). If you use two different types of interface,
check that your jukebox application software supports this.
The diagram shows cable connections to the differential SCSI interface on both
interface cards at “B2.” One cable is connected to Bus 1 and the other cable is
connected to Bus 2.
Route the cables through the slot at the bottom of the right side (C).
1-12 Chapter 1
Page 25
Setting Up the Jukebox
Connecting a 10-Drive Jukebox as the Only Peripheral, Two Host
Adapters, Basic SCSI Addressing
4. Remove the customer access panel by pulling on the bottom of the panel and
then lifting it off (see Figure 1-1). (If screws are installed, use a flatblade
screwdriver or T-15 Torx driver.)
Figure 1-3 Connecting a 10-Drive Jukebox, Two Host Adapters, Basic SCSI Addressing
Chapter 1: Setting
up the Disk Drive
Setting Up the
Jukebox
5. Plug a SCSI terminator into the unused SCSI connector of interface type you
chose (the example diagram shows terminators for the two differential interfaces
placed on the “B1” port for each interface ).
If you are using the differential interface, use a 68-pin high-density terminator. If
you are using the single-ended interface, use a 50-pin high-density terminator.
6. Plug a SCSI terminator into one of SCSI ports on each unused interface (the
example diagram shows the terminators on the single-ended port at “A2” for
both interfaces). The terminators can be placed on either port of the unused
interface.
Use a 50-pin high-density terminator for the single-ended interface or a 68-pin
terminator for the differential interface.
7. To continue with the installation, go to “Connecting Power” in this Chapter.
Chapter 1 1-13
Page 26

Setting Up the Jukebox
Connecting a 10-Drive Jukebox, One Host Adapter, Bus 1 and 2
Daisy-Chained, LUN Addressing
Connecting a 10-Drive Jukebox, One Host
Adapter, Bus 1 and 2 Daisy-Chained, LUN
Addressing
CAUTION Make sure that all peripheral devices connected to the host computer have been
properly shut down. If the host computer is connected to a network, check with the
system administrator before switching off power.
Removing the Customer Access Panel
1. Switch off power to the host computer before you connect the jukebox.
NOTE The jukebox ships from the factory with two screws securing the bottom of the
customer access panel to the side of the jukebox. These screws are removed during
the process of unpacking and removing the jukebox from the shipping pallet.
These screws may not have been replaced.
It is a good idea to use the screws to secure the access panel to the jukebox since
they must be in place if the jukebox is ever reshipped.
If you have to replace these screws, they are 6/32 x .437.
2. Remove the customer access panel by pulling on the bottom of the panel and
then lifting it off (see Figure 1-1). (If screws are installed, use a flatblade
screwdriver or T-15 Torx driver.)
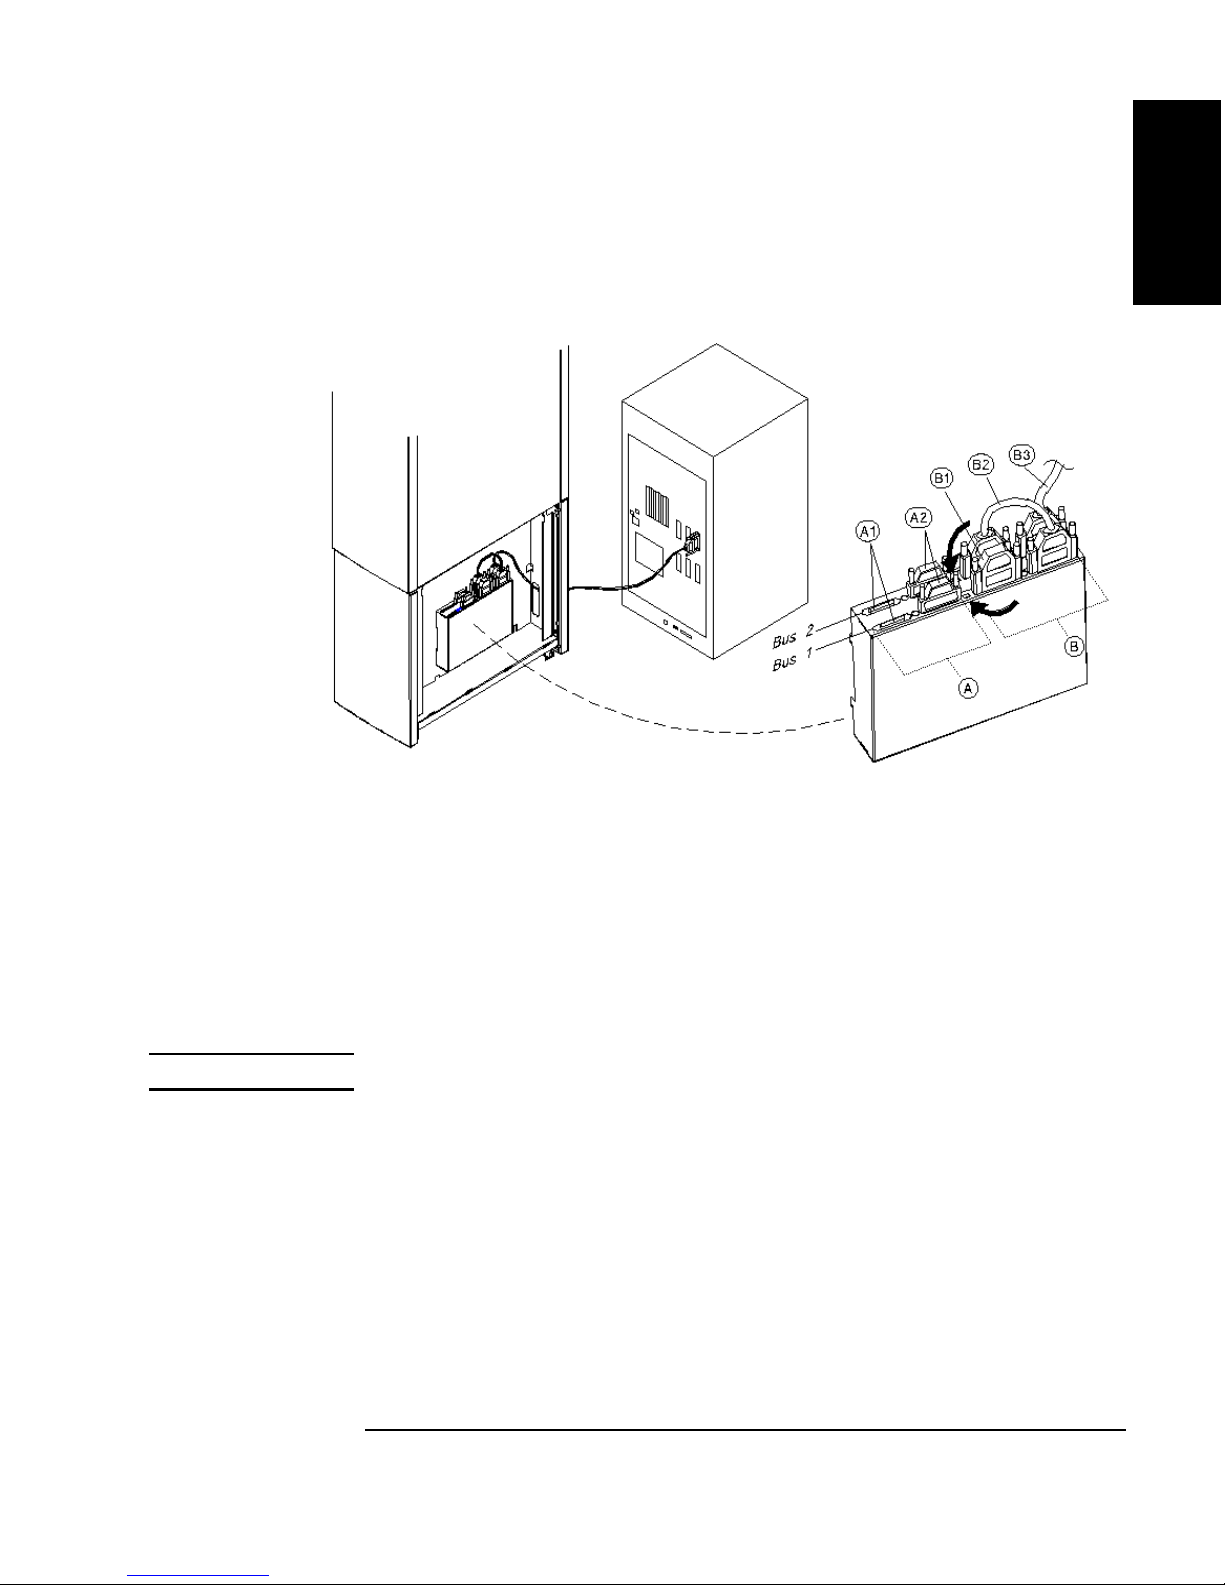
Refer to the following diagram in the notes steps.
3. Select single-ended (“A”) or differential (“B”) interface using the SCSI
interface selection switch (see the arrow on the diagram ).
The diagram shows connecting the host computer cable to a differential interface
port (“B3”). This connection is on the rear interface card so it is Bus 2.
Route the cable through the slot at the bottom of the right side.
4.
Connect a short cable between the interface card you have chosen to the
other Bus (the example diagram shows a cable (“B2”) between the
second Bus 2 port over to a differential port on Bus 1).
1-14 Chapter 1
Page 27
Connecting a 10-Drive Jukebox, One Host Adapter, Bus 1 and 2
Daisy-Chained, LUN Addressing
Figure 1-4 Connecting a 10-Drive Jukebox, One Host Adapter,
Bus 1 and 2 Daisy-Chained, LUN Addressing
Setting Up the Jukebox
Chapter 1: Setting
up the Disk Drive
Setting Up the
Jukebox
5.
Terminate the daisy-chained bus by plugging a terminator into the
unused port of the second interface (the diagram show the terminator in
port “B1”). In this example you would use a 68-pin differential
terminator in “B1.”
A differential interface port uses a 68-pin high-density terminator. A
single-ended interface port uses a 50-pin high-density terminator.
The same cabling can be done using the single-ended ports.
CAUTION Do not daisy-chain between single-ended and differential interfaces.
6.
Plug a SCSI terminator into one of SCSI ports on each unused interface
(the example diagram shows the terminators on the single-ended port at
“A2” for both interfaces). The terminators can be placed on either port of
the unused interface.
Use a 50-pin high-density active terminator for the single-ended interface
or a 68-pin terminator for the differential interface.
7. To continue with the installation, go to “Connecting Power” in this Chapter.
Chapter 1 1-15
Page 28

Setting Up the Jukebox
Connecting the Jukebox With Other SCSI Peripherals
Connecting the Jukebox With Other SCSI
Peripherals
NOTE Operating this jukebox with other peripherals on the same bus is supported, but not
recommended.
In most circumstances, the recommended configuration for this jukebox is as the
only device on a SCSI bus. However, your use of the jukebox may be such that other
devices could be connected to the bus without a loss of performance.
It is possible to connect this jukebox on a bus with additional peripherals in many
different ways (depending on your model):
• a 4- or 6-drive jukebox using basic SCSI addressing or Logical Unit Numbering
(LUN) addressing
• a 10-drive jukebox with one host adapter and with LUN addressing,
daisy-chaining Bus 1 and Bus 2 together or a 10-drive jukebox using two host
adapters, LUN addressing, and using both BUS 1 and Bus 2 interfaces
• a 10-drive jukebox with two host adapters and using LUN addressing
There are many issues that must be considered when connecting other devices on a
bus with this jukebox, including the following:
• how the jukebox is used; archiving, backup, near-line storage. What
performance must be maintained
• how the additional peripheral will be used. How much demand will it place on
the bus
• whether you will be mixing “wide” and “narrow” devices on the bus.
• whether you are using both internal and external segments on your SCSI host
adapter
• whether your bus is single-ended or differential
NOTE Appendix B provides a brief overview of SCSI and the issues you must consider
when placing other peripherals on the same bus with this jukebox.
1-16 Chapter 1
Page 29

Connecting Power
1. Ensure that the power switch on the jukebox is OFF (“5” on Figure 1-1)
NOTE Use the power cord shipped with the jukebox.
2. Route the power cord through the strain relief clip (“4” on Figure 1-1) and close
the clip snugly around the cord.
3. Plug the socket end of the power cord into the power port on bottom of the
power distribution assembly ( “9” on Figure 1-1).
4. Continue to route the power cable down, through the long cable slot at the
bottom of the jukebox right side panel, and out through the cable access hole at
the lower left rear of the jukebox (“7” on Figure 1-1).
Setting Up the Jukebox
Connecting Power
Chapter 1: Setting
up the Disk Drive
Setting Up the
Jukebox
5. Plug the other end of the power cord into a three-hole grounded outlet.
6. Press the power switch ON (“8” on Figure 1-1)
When power is applied, TESTING and NOT READY alternately display. Once
the poweron test completes (approximately 1.5 minutes), READY displays.
NOTE If DEVICE FAILED displays. See “Troubleshooting” in Chapter 3 for
troubleshooting procedures.
7. Refer to Chapter 3, “Operating the Jukebox” for instructions on setting the SCSI
addresses, loading optical disks into the jukebox, setting a password, etc.
NOTE Continue on to “Configuring Write Verify” on the next page.
Chapter 1 1-17
Page 30

Setting Up the Jukebox
Configuring Write Verify
Configuring Write Verify
The write verify configuration ensures that data is written reliably to an optical disk.
The jukebox ships with write verify enabled. Many software applications also
default to this method of writing.
Writing data on a magneto-optical disk requires two passes. The first pass erases the
data in the sector to which data will be written. The second pass writes new data to
that sector.
When write verify is configured to ON, an additional pass is made over the sector.
This third pass verifies that all data is written correctly to the sector. To add to the
reliability of your data, Hewlett-Packard recommends that you maintain the default
ON setting for write verify. Note that when write verify is ON, write operations take
more time.
If you choose to change the write verify configuration to OFF, refer to “Configuring
Operating Configurations” in Chapter 3.
NOTE Continue on to “Installing the Wheel Chocks ” on the next page.
1-18 Chapter 1
Page 31

Setting Up the Jukebox
Installing the Wheel Chocks
Installing the Wheel Chocks
WARNING This jukebox rolls easily and could cause injury or damage if allowed to move
unintentionally.
Four wheel chocks are provided to stabilize the jukebox in position. Install the
wheel chocks after the jukebox is moved to its operating position and all cables
are in place.
Figure 1-5 Installing the Wheel Chocks
Chapter 1: Setting
up the Disk Drive
Setting Up the
Jukebox
1. After all cables and panels are mounted, roll the unit to its final position.
2. Spread the chock apart slightly and slide it around the bottom of the wheel as
shown on the left side of the figure above.
3. Repeat Step 2 for the remaining three wheels.
NOTE This is the last step in the physical installation.
Chapter 1 1-19
Page 32

Setting Up the Jukebox
Moving or Shipping the Jukebox
Moving or Shipping the Jukebox
Refer to the following two sections if you want to move or ship the optical jukebox.
If you want to move the jukebox a short distance, such as to another office or to
another floor in your building, see “Moving the Jukebox a Short Distance.” If you
want to ship the jukebox to another location, see “Shipping the Jukebox.”
Moving the Jukebox a Short Distance
1. If you will be removing the disks from the jukebox, follow your jukebox
application software instructions for unmounting, ejecting, and labeling disks to
ensure that the jukebox can be brought online again easily.
Ensure that there are no disks in the drives.
If you will be manually ejecting disks, refer to “Ejecting an Optical Disk From
the Jukebox” in Chapter 3.
CAUTION Failure to eject a disk from the optical drive prior to moving the jukebox could result
in damage to the optical drive mechanism.
CAUTION Turning off the jukebox in the next step could cause data loss if not done correctly.
Do not turn off power to the jukebox until you are sure the SCSI bus is inactive.
Removing power from a SCSI peripheral when the bus is active can result in data
loss and/or indeterminate bus states. Check your host system manuals for
information about checking the SCSI bus status. If your computer is connected to a
LAN, be sure to check with your system administrator before turning off power to
the jukebox.
2. Switch jukebox power OFF (“8” on Figure 1-1).
3. Remove the right side lower access panel by pulling on the bottom of the panel
and then lifting it off (see “6” Figure 1-1).
If screws are installed on the bottom corners of the panel, use a flatblade
screwdriver or T-15 Torx driver to remove the screws.
4. Remove the power cord and the SCSI cable connections.
5. Loosen the 1/2-inch nut securing the leveler feet and screw the feet up to raise
them away from the floor.
1-20 Chapter 1
Page 33

Setting Up the Jukebox
Moving or Shipping the Jukebox
6. Remove the chocks from the four castor wheels on the bottom of the jukebox
(Figure 1-5).
WARNING Push the jukebox only from the right or left sides (see Figure 1-1). Pushing the
jukebox from either the front or back sides could result in the jukebox tipping
over if a wheel catches on an obstacle.
7. Carefully move the jukebox to its new destination.
8. Set up the jukebox at its new location. Refer to the cabling and addressing
information in the beginning of this chapter if necessary.
9. Lower the leveler feet and tighten the 1/2-inch nut on each foot.
10. Place the wheel chocks around the four caster wheels (Figure 1-5).
11. Bring the jukebox online according to your system’s requirements.
Chapter 1: Setting
up the Disk Drive
Setting Up the
Jukebox
Shipping the Jukebox
1. Follow your jukebox application software instructions for unmounting and
ejecting disks.
Ensure that there are no disks in the drives.
If you will be manually ejecting disks, refer to “Ejecting a Disk From the
Jukebox in Chapter 3.
CAUTION Failure to eject a disk from the optical drive prior to moving the jukebox could result
in damage to the optical drive mechanism.
Failure to remove all disks from the storage slots in the jukebox could result in
damage to the jukebox.
2. Follow your jukebox application’s instructions for labeling the disks according
to what you will be doing with the disks (example: archiving, moving them to
another jukebox, etc.).
CAUTION Turning off the jukebox in the next step could cause data loss if not done correctly.
Do not turn off power to the jukebox until you are sure the SCSI bus is inactive.
Removing power from a SCSI peripheral when the bus is active can result in data
loss and/or indeterminate bus states. Check your host system manuals for
information about checking the SCSI bus status. If your computer is connected to a
LAN, be sure to check with your system administrator before turning off power to
the jukebox.
Chapter 1 1-21
Page 34

Setting Up the Jukebox
Moving or Shipping the Jukebox
3. Switch jukebox power OFF (“8” on Figure 1-1).
4. Remove the right side lower access panel by pulling on the bottom of the panel
and then lifting it off (“6” Figure 1-1).
If screws are installed on the bottom corners of the panel, use a flatblade
screwdriver or T-15 Torx driver to remove the screws.
5. Remove the power cord and the SCSI cable connections.
6. Loosen the 1/2-inch nut securing each leveler foot and screw the four feet up to
raise them away from the floor.
7. Remove the chocks from the four caster wheels on the bottom of the jukebox.
WARNING Push the jukebox only from the right or left sides (see Figure 1-1). Pushing the
jukebox from either the front or back sides could result in the jukebox tipping
over if a wheel catches on an obstacle.
8. Repackage the jukebox in the same way it was received
NOTE Your service representative can provide assistance or advise you on how to best
repackage and ship your jukebox
1-22 Chapter 1
Page 35

Optical Disks
Using
2 Using Optical Disks
Page 36

Using Optical Disks
Overview of This Chapter
Overview of This Chapter
Using Optical Disks
The optical disks that you use with your jukebox are an integral part of the storage
process. This chapter provides information on the following topics:
• choosing an optical disk type
• labeling optical disks
• write-protecting optical disks
• caring for optical disks
IMPORTANT Hewlett-Packard conducts extensive product quality testing to ensure it’s
magneto-optical media is unsurpassed in quality -- far exceeding ISO,
ANSI, and IEC industry standards requirements. In addition, HP conducts
exhaustive media compatibility and interchange testing to ensure maximum
interaction reliability between HP jukebox drives and HP media. Using HP optical
media with HP jukeboxes is the best way to ensure your data’s integrity and
accessibility.
That’s why HP recommends using HP-brand optical media with its jukeboxes.
For additional details and specifications for HP optical media, or to purchase media
online, go to the “Product Information” section at www.hp.com/storagemedia.
2-2 Chapter 2
Page 37

Using Optical Disks
Choosing an Optical Disk Type
Choosing an Optical Disk Type
Two disk types are available for use in the jukebox: rewritable disks and write-once
disks.
To choose which type of disks to use, consider these points:
• Rewritable optical disks--data can be repeatedly written and erased.
• Write-Once optical disks--data can be written only once, and the data cannot be
altered or erased. If you have a need for data security and audit trails, write-once
disks may be a good disk choice.
• Rewritable and write-once disks come in sector sizes from 4,096 bytes/sector
down to 512 bytes/sector (see Table A-1 in Appendix A). The sector size you
choose depends upon what type of operating system you have in your host
computer and which software package you use to manage files stored on the
jukebox.
Optical Disks
Using
NOTE Do not use write-once disks in a computer system that does not support write-once
disks. Check that your jukebox application software supports write-once disks.
Chapter 2 2-3
Page 38

Using Optical Disks
Labeling an Optical Disk Cartridge
Labeling an Optical Disk Cartridge
Make it a practice to label your optical disk cartridges. You are provided adhesive
labels with each disk for this purpose. Here are some suggestions for labeling:
NOTE Your jukebox application software may label your optical disk slot locations
differently. Use your application to check disk locations prior to labeling the disks.
• storage slot location (1, 2, 3, ... )
• date of format or initialization
• disk owner (group, department, etc.)
• storage purpose (backup, old version of operating system, etc.)
HP recommends using end labels as shown in Figure 2-1. End labels reduce the
chance of label material interfering with the cartridge shutter and causing a drive to
jam.
CAUTION Labels used in the vicinity of the shutter may cause the drive to jam if the label is
installed incorrectly or if portions of the label lift off because of wear. If a drive jams
because the label interferes with the shutter, a service call may be necessary.
Figure 2-1 Recommended Placement of Cartridge Labels
2-4 Chapter 2
Page 39
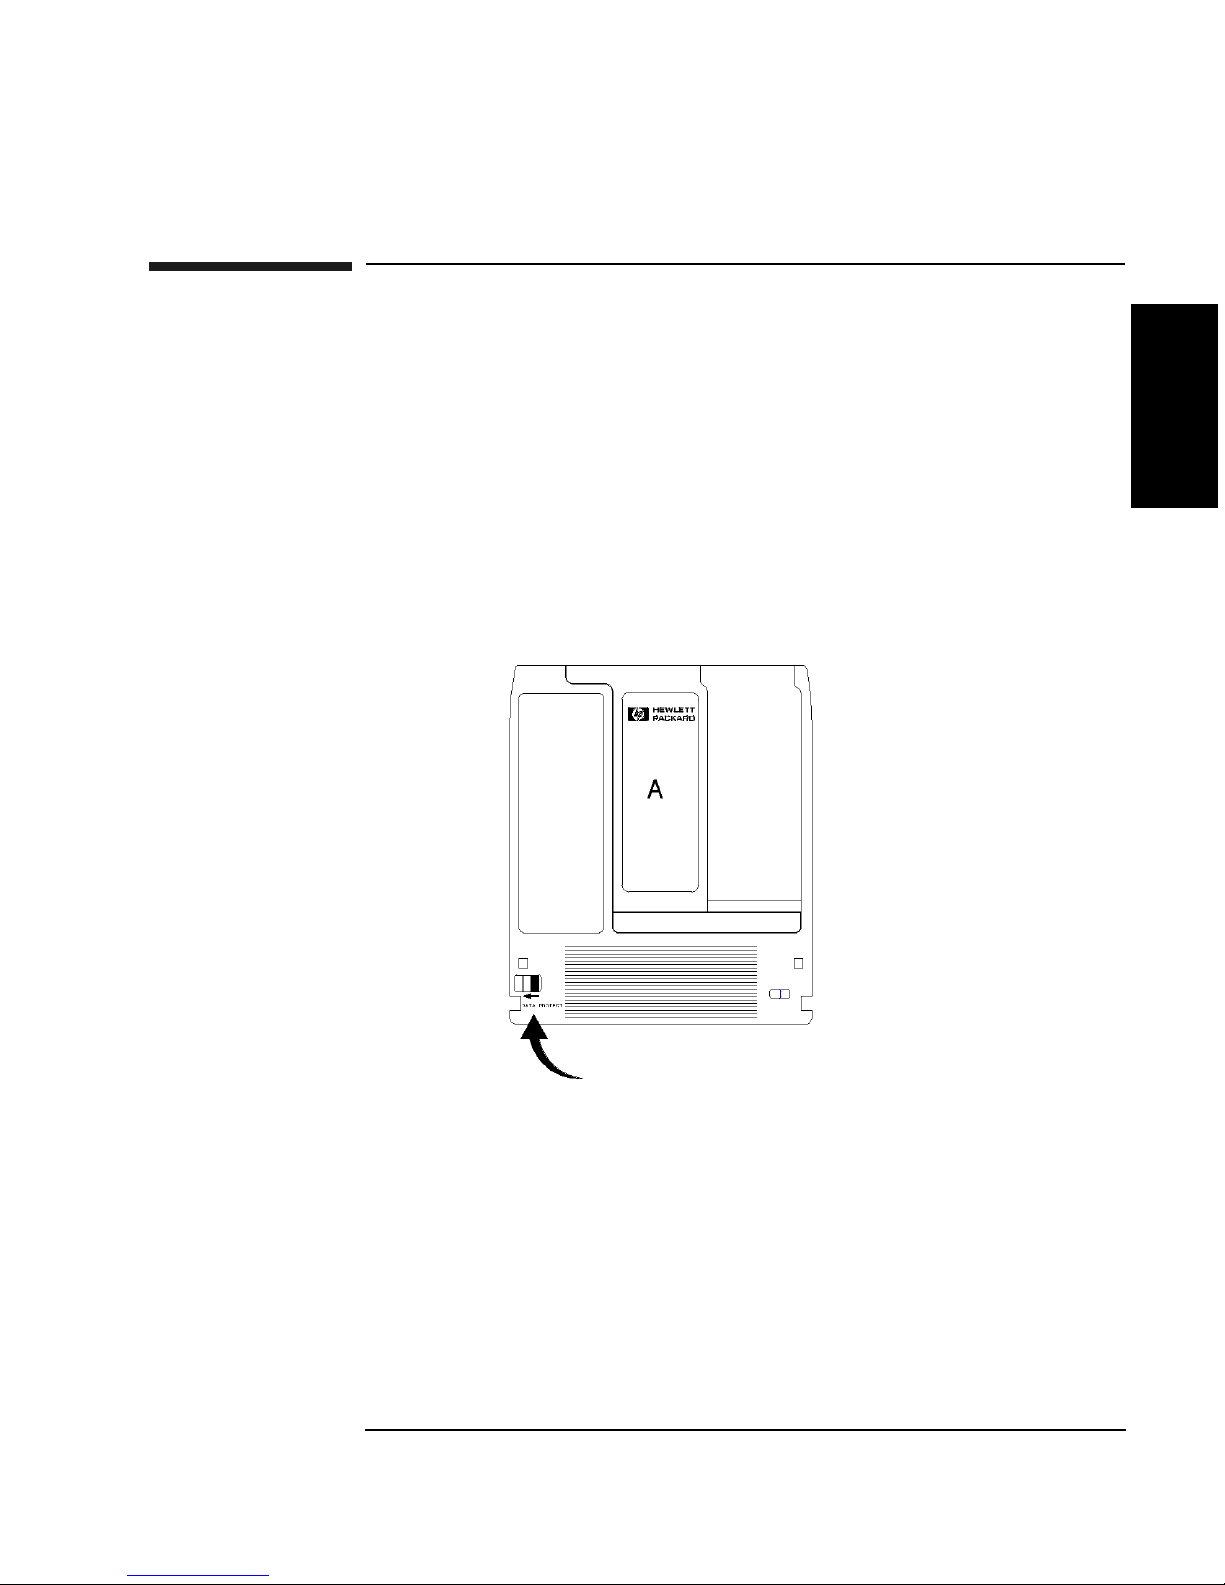
Write-Protecting an Optical Disk
Each side of an optical disk can be write-protected by sliding the write-protect
button in the direction of the arrow on the cartridge (see Figure 2-2).
With rewritable optical disks, write-protecting the disk prevents overwriting
existing files and prevents any additional file being written to the disk.
With write-once optical disks, existing files cannot be altered or erased regardless of
whether or not the write-protect button has been set. However, setting the button to
write-protect prevents writing additional files to the disk.
Figure 2-2 Write-Protect Button Location
Using Optical Disks
Write-Protecting an Optical Disk
Optical Disks
Using
Chapter 2 2-5
Page 40

Using Optical Disks
Caring for Optical Disks
Caring for Optical Disks
Follow these guidelines to ensure that your optical disks remain in good condition:
• Do not expose disks to extreme magnetic fields.
• Do not expose disks to dust particles.
• Do not expose disks to extreme temperatures or extreme humidity.
• Do not drop the disks.
• Do not open a disk's metal shutter and touch the disk surface.
• Do not take disks apart.
• Do not insert disks with loosely-attached labels into the jukebox.
• Remove old disk labels before applying new ones especially if you choose to
place labels on the sides of the cartridge (near the shutter) rather than on the end
of the cartridge.
• Store disks in a clean, safe place when they are not in use.
Cleaning Disks
Normally, an optical disk does not require cleaning when used in a computer room
or clean office environment. If you are in an extremely dusty environment and are
experiencing difficulties reading and/or writing to a particular disk you may want to
clean the disk to see if this corrects the problem.
CAUTION Be very careful when cleaning an optical disk. Abrasive particles dragged across the
disk surface can damage the disk and prevent recovery of some or all of the data on
the disk.
Clean a disk only with a disk cleaning kit. Follow the disk cleaning kit instructions
exactly.
HP-approved disk cleaning kits are listed at www.hp.com/go/optical.
2-6 Chapter 2
Page 41

Operating the
Jukebox
3 Operating the Jukebox
Page 42

Operating the Jukebox
Overview of This Chapter
Overview of This Chapter
This chapter gives information on the following topics:
• operating the control panel
• using the selection buttons
• interpreting messages which appear in the display window
• loading optical disks into the jukebox
• ejecting optical disks from the jukebox
• entering the administration menu password
• changing the administration menu password
• setting SCSI IDs or logical unit numbers (LUNs)
• setting configurations
• retrieving performance information
• running tests (for service use)
• using online repair (for service use only)
• troubleshooting
3-2 Chapter 3
Page 43

Operating the Jukebox
Operating the Control Panel
Operating the Control Panel
The control panel enables manual control of all jukebox operations using six buttons
and an LED display.
The SCSI IDs of the jukebox and its optical drives can be set and changed, disks
may be loaded and ejected, configurations can be monitored and changed,
performance information can be viewed, internal tests can be run, and the jukebox
can be secured from unauthorized use.
The figure and text on the next two pages show the user controls and mailslot. The
rest of the chapter describes all manual procedures available to the operator.
Operating the
Jukebox
Chapter 3 3-3
Page 44
Operating the Jukebox
Operating the Control Panel
Figure 3-1 The Jukebox Control Panel
3-4 Chapter 3
Page 45

Operating the Jukebox
Operating the Control Panel
The numbers below refer to the numbers in Figure 3-1 on the previous page.
1 16-Character
Display
2 Selection
buttons
Displays status information and control panel
information
Pressed to perform the following operations:
LOAD used to load disks into the jukebox mailslot
EJECT used to eject disks from the jukebox mailslot
PREV scrolls the display choice backward by one
NEXT scrolls the display choice forward by one
CANCEL cancels the current operation or choice
ENTER selects the displayed choice
3 Activity light Lit differently to indicate the following:
• Steady Green - power is on
• Flashing Green - an optical drive is being accessed
• Amber - a fault occurred
4 Mailslot Used to load and eject optical disks
Operating the
Jukebox
NOTE Figure 3-2 shows the jukebox menus available using the control panel selection
buttons.
Chapter 3 3-5
Page 46
Operating the Jukebox
Operating the Control Panel
Figure 3-2 Jukebox Display Menu Tree
3-6 Chapter 3
Page 47

Operating the Jukebox
Using Selection Buttons
Using Selection Buttons
Use the LOAD, EJECT, NEXT, PREV, CANCEL, and ENTER buttons to select
tasks you want the jukebox to perform. When you push these buttons, the message
in the display window changes. See the next section for a list of messages.
Each time you push the
NEXT or PREV button, a task choice appears. (If you see an
“*” as part of the message, it indicates there is a menu beneath that choice, which
you can access by pressing the
NEXT or PREV key. Holding the NEXT or PREV or button down scrolls the display
ENTER key. To display additional choices, press the
faster.)
NOTE You can get back to READY at any time by pressing CANCEL. (You may have to
press CANCEL more than once in some cases.)
Operating the
Jukebox
Chapter 3 3-7
Page 48

Operating the Jukebox
Understanding Display Window Messages
Understanding Display Window Messages
The display window shows the operations you may select. Instructions for selecting
or changing choices follows the explanation of the messages.
Top Level Menus
READY The jukebox is ready for operation.
ADMIN * Select to access second-level choices. You must enter a security
code to access these choices.
NOTE A * indicates that there are multiple selections available for that choice currently
displayed. When a choice is flashing, press
display other choices.
ENTER to select it or PREV or NEXT to
Second Level Menus
You must enter a security code before accessing these functions. See “Entering the
Administration Menu Password” later in this chapter. A default password of 000
000 000 is set at the factory. You may want to change this default code to a private
code to prevent unauthorized access to the jukebox. See “Changing the
Administration Menu Password” in this chapter.
TEST * Select to run internal tests (normally, these are run by service).
INFO * Select to retrieve performance information stored in the jukebox
logs.
CONFIG * Select to customize the way the jukebox functions.
SCSI IDs * Select to view and/or change the SCSI IDs and logical unit
numbers (LUNs).
ONLINE
REPAIR * Select to view and change drive settings for online drive
replacement (used by service only)
3-8 Chapter 3
Page 49

Operating the Jukebox
Understanding Display Window Messages
NOTE An “*” indicates there are multiple selections available for the displayed choice.
When a menu selection is flashing, press
PREV or NEXT to display other choices that available in that part of the menu.
ENTER to choose that selection, or press
In Figure 3-2, you can display the selections listed in boxes below the shaded
choices by pressing ENTER when one of the shaded choices displays. Press PREV or
NEXT to scroll through the list. To perform the displayed operation, press ENTER.
Operating the
Jukebox
Chapter 3 3-9
Page 50

Operating the Jukebox
Loading a Disk into the Jukebox
Loading a Disk into the Jukebox
NOTE Label all disks before loading them into the jukebox. (See “Labeling an Optical Disk
Cartridge” in Chapter 2 for instructions.)
Some software packages require that you load and eject disks by using instructions
in the software. If you use a software package to manage files in the jukebox, check
the software documentation before proceeding with these steps.
Start with READY, LOAD * or EJECT * in the display.
1. Press
LOAD on the jukebox control panel. (If none of these messages displays,
CANCEL until READY displays.)
press
Figure 3-3 Loading a Disk
2. When the mailslot opens, insert a disk into the mailslot with Side A of the disk
facing up. The shutter end of the disk goes in the mailslot first.
When the disk is inserted, it is automatically pulled into the mailslot. An
incorrectly inserted disk is rejected, CART IN WRONG displays briefly, and
then LOAD SLOT # displays. (“#” is flashing and is the number of the first
available storage slot in the jukebox.)
3-10 Chapter 3
Page 51

Operating the Jukebox
Loading a Disk into the Jukebox
3. If you want to select the storage slot number that shows in the display, press
LOAD or ENTER. If you want to choose a different storage slot, press NEXT or
PREV until the desired slot number displays, and then press ENTER.
4. LOADING displays as the jukebox moves the disk to the slot. After the disk is
loaded into the selected storage slot, the display returns to LOAD *. You may
now load additional disks by inserting the disks into the mailslot and repeating
step 3 until you are finished loading disks.
5. Press
CANCEL to return to the READY state.
Operating the
Jukebox
Chapter 3 3-11
Page 52

Operating the Jukebox
Ejecting a Disk From the Jukebox
Ejecting a Disk From the Jukebox
NOTE Some software packages require that you load and eject disks by following the
instructions in the software. If you use a software package to manage files in the
jukebox, check the software documentation before proceeding with these steps.
Start with READY, LOAD * or EJECT * in the display.
1. Press
EJECT on the jukebox control panel.
2. EJECT SLOT # displays. (“#” is flashing and the number of the first storage
slot in the jukebox that contains an optical disk.)
3. If you want to select the storage slot number that shows in the display, press
EJECT or ENTER. If you want to choose a different storage slot, press NEXT or
PREV until the desired slot number displays and then press ENTER. (See the note
on the following page.)
EJECTING displays as the jukebox moves the disk to the mailslot. When the
disk is in the mailslot, the display returns to EJECT SLOT #.
4. Remove the disk from the mailslot.
You may now eject additional disks by pressing the
EJECT or ENTER key and
then following steps 2 through 4 until you are finished ejecting disks. When the
last disk is ejected, EMPTY displays briefly before returning to EJECT *.
5. Press
CANCEL to return to the READY state.
3-12 Chapter 3
Page 53

Operating the Jukebox
Entering the Administration Menu Password
Entering the Administration Menu Password
READY > ADMIN * > PSWD 000 000 000
A numeric password is required to access menu choices beneath the ADMIN *
menu of the jukebox (see Figure 3-2). A three-part password of 000-000-000 was set
at the factory. Consider changing the password so that only authorized persons can
access the choices under the ADMIN * menu.
NOTE Don’t forget your password. If you forget it, only your service representative can
reset the security code to the factory setting which enables you to set a new
password.
Follow these steps to enter the password. If you want to change the password, go to
the next section, “Changing the Administration Menu Password.”
Start with READY in the display.
1. Press
2. Press
NEXT until ADMIN * displays.
ENTER. PSWD 000 000 000 displays and the first set of three zeros
flashes.
NOTE If the default password, 000 000 000, is still in effect, accept this password by
pressing
ENTER three times (once for each set of three zeros). TEST * displays
which indicates you are in the menu tree below ADMIN *.
If you have set your own password into the jukebox, continue with Steps 3 to 5
below.
3. Press
NEXT or PREV until the first number of your password displays. Press
ENTER. The middle set of three zeros flashes.
Operating the
Jukebox
4. Press
ENTER. The third set of three zeros flashes.
5. Press
ENTER. TEST * displays.
To access menu choices under the ADMIN * menu press
desired choice displays, and then press
Chapter 3 3-13
NEXT or PREV until the second number of your password displays. Press
NEXT or PREV until the third number of your password displays. Press
NEXT or PREV or until the
ENTER.
Page 54

Operating the Jukebox
Changing the Administration Menu Password
Changing the Administration Menu Password
READY > ADMIN * > PSWD 000 000 000 >CONFIG *
1. Follow the steps on the previous page to enter your password (or the default,
factory-set password 000 000 000).
2. TEST * displays. Press NEXT until CONFIG * displays, and then press ENTER.
3. Press
NEXT or PREV or until NEW PASSWORD displays and then press ENTER.
4. NEW 000 000 000 displays and the first set of three zeros flashes. Press
NEXT or PREV until the new number you wish to assign to the first part of the
password displays and then press
5. Press
NEXT or PREV until the new number you wish to assign to the second part
of the password displays and then press
ENTER. The second set of three zeros flashes.
ENTER. The third set of three zeros
flashes.
6. Press NEXT or PREV until the new number you wish to assign to the third part of
the password displays and then press
7. PASSWORD CHANGED displays. Press
ENTER.
CANCEL three times to return to READY
CAUTION Turning off the jukebox in the next step could cause data loss if not done correctly.
Do not turn off power to the jukebox until you are sure the SCSI bus is inactive.
Removing power from a SCSI device when the bus is active can result in data loss
and/or indeterminate bus states. Check your host system manuals for information
about checking the SCSI bus status. If your computer is connected to a LAN, be sure
to check with your system administrator before turning off power to the jukebox.
8. Turn the jukebox OFF, then ON to save the password to the jukebox flash ROM.
3-14 Chapter 3
Page 55

Operating the Jukebox
Setting the SCSI IDs
Setting the SCSI IDs
NOTE If you are unfamiliar with basic SCSI addressing or LUN addressing, refer to
Appendix B.
First, determine if you are using basic SCSI addressing or logical unit numbering
(LUN). Setting the LUN mode is explained below.
Next, either view the current SCSI IDs or proceed directly to setting IDs. The next
two procedures are “Viewing the Current SCSI IDs” and “Changing the Current
SCSI IDs.”
Tables showing default SCSI IDs for basic SCSI addressing and LUN addressing are
in Appendix B.
Setting the LUN Mode
Operating the
Jukebox
READY > ADMIN * > SCSI ID’S * > CHOOSE LUN MODE *
NOTE If you are unfamiliar with basic SCSI addressing or LUN addressing, refer to
Appendix B.
NOTE Check your host system documentation and jukebox application software
documentation to verify that the use of LUNs is supported.
Start with READY in the display.
1. Press
NEXT until ADMIN * displays and then press ENTER.
2. Enter the administration password.
Instructions for entering this password are in “Entering the Administration
Menu Password” previously in this chapter.
3. Press
4. VIEW ID’S displays. Press
NEXT until SCSI ID’S displays, and then press ENTER.
NEXT until CHOOSE LUN MODE * displays and
then press
ENTER. LUN MODE ON or LUN MODE OFF displays and ON or OFF
is blinking.
5. Press NEXT to change the setting and then press ENTER. WAIT FOR UPDATE
and then TURNED OFF or TURNED ON display briefly. Then SCSI ID’S
displays.
Chapter 3 3-15
Page 56

Operating the Jukebox
Setting the SCSI IDs
You may now view the SCSI ID and LUN numbers using VIEW ID’S, or set a
new SCSI ID number using SET ID’S. (See the following two sections.)
Viewing the Current SCSI IDs
READY > ADMIN * > SCSI ID’S * > VIEW ID’S >
BUS 1*
BUS 2*
NOTE If you are unfamiliar with basic SCSI addressing or LUN addressing, refer to
Appendix B.
Start with READY in the display.
1. Press
NEXT until ADMIN * displays, and then press ENTER.
2. Enter the administration password.
Instructions for entering this password are in “Entering the Administration
Menu Password” previously in this chapter.
3. Press
4. VIEW ID’S displays. Press
5. BUS 1 * displays. If you want to view the IDs on Bus 1, press
NEXT until SCSI ID’S displays, and then press ENTER.
ENTER.
If you want to view the IDs on Bus 2, press
then press
ENTER.
NEXT until BUS 2 * displays and
ENTER.
6. JKBX ID # LUN # or DRV # ID # LUN # displays. (JKBX ID # stands
for the current ID of the jukebox controller, DRV # ID # is the current ID
setting of the displayed drive number, and “LUN #” is the current logical unit
number.)
NEXT or PREV to scroll through the current SCSI IDs and LUNs.
Press
NOTE Tables in Appendix B show the default SCSI IDs and LUNs when LUN mode is
turned on.
7. Press
CANCEL twice to exit VIEW ID’S.
3-16 Chapter 3
Page 57

Operating the Jukebox
Setting the SCSI IDs
Changing the Current SCSI IDs
READY > ADMIN * > SCSI ID’S * > SET ID’S *
NOTE If you are unfamiliar with basic SCSI addressing or LUN addressing, refer to
Appendix B.
Start with READY in the display.
1. Press
NEXT until ADMIN * displays, and then press ENTER.
2. Enter the administration password.
Instructions for entering this password are in “Entering the Administration
Menu Password” previously in this chapter.
3. Press
4. VIEW ID’S displays. Press
NEXT until SCSI ID’S displays, and then press ENTER.
NEXT until SET ID’S displays and then press
ENTER.
BUS 1 * displays. If you want to change the IDs on Bus 1, press
If you want to change the IDs on Bus 2, press
then press
ENTER.
NEXT until BUS 2 * displays and
ENTER.
If you are using basic SCSI addressing (LUN mode OFF):
JKBX ID # LUN # or DRV # ID # LUN # displays. (JKBX ID #
stands for the current ID of the jukebox controller, LUN # is the current logical
unit number, and DRV # ID # is the current ID setting for the displayed drive
number.) When using basic SCSI addressing, the LUN # is always 0.
If you are using LUN addressing (LUN mode ON):
JKBX BUS 1 # or DRVs BUS 1 # displays on Bus 1, or DRVs BUS 2 #
displays on Bus 2. (“#” is the current ID for the jukebox controller and drives
when LUN mode is ON.)
Operating the
Jukebox
5. Press
The # (current ID) begins flashing.
Chapter 3 3-17
NEXT until the setting you wish to change displays, and then press ENTER.
Page 58

Operating the Jukebox
Setting the SCSI IDs
NOTE In the next step you will choose a new ID. Review this note.
This jukebox, by default, assigns ID 6 to the jukebox controller. When in LUN
mode, the jukebox controller ID uses LUN 0 for itself and assigns the drives on
Bus 1 to LUNs 1 to 4 or LUNs 1 to 6 (depending on whether you have four or
six drives on Bus 1 in your model of the jukebox).The result is that there are two
types of devices (controller and drives) at ID 6.
Some host computer systems do not allow you to assign different device types to
the same ID. If your host computer system does not support multiple types at the
same ID and you want to use LUN mode, you must select different IDs for the
jukebox controller (JKBX ID #) and the drives (DRV #).
Tables in Appendix B show jukebox default settings and an example of setting
the jukebox controller and drives to different IDs (one digit apart).
If another device ID is placed between the jukebox controller and the drives,
problems can result. For this reason, the jukebox will not accept IDs for the jukebox
controller and drives that are more than one digit apart. You will receive a
CONFLICT message.
6. Press
NEXT or PREV until the new ID that you want displays and then press
ENTER.
If the jukebox is set to LUN MODE ON, go to Step 8. Only one ID can be
changed and the ID automatically updates when you press ENTER.
7. (If using basic SCSI addressing - LUN mode OFF) Press
displays, and then press
8. UPDATE or WAIT FOR UPDATE and then ID’S SAVED displays briefly.
• If the new settings do not conflict with other SCSI IDs on the bus, SCSI
ID’S displays.
• If the new settings conflict with other IDs on the SCSI bus,
CONFLICT-ABORTED displays briefly and then VIEW ID’S displays.
Any changes entered are lost, and you must repeat steps 3 through 6 to set a
new ID.
NOTE When in LUN mode:
If the new ID you choose results in the IDs for the jukebox controller and the drives
being more than one digit apart, the jukebox displays CONFLICT and rejects the ID.
9. Press
CANCEL until READY displays.
NEXT until UPDATE
ENTER.
3-18 Chapter 3
Page 59

Operating the Jukebox
Setting the SCSI IDs
CAUTION Turning off the jukebox in the next step could cause data loss if not done correctly.
Do not turn off power to the jukebox until you are sure the SCSI bus is inactive.
Removing power from a SCSI device when the bus is active can result in data loss
and/or indeterminate bus states. Check your host system manuals for information
about checking the SCSI bus status. If your computer is connected to a LAN, be sure
to check with your system administrator before turning off power to the jukebox.
10. Turn the jukebox OFF, then ON to save the IDs to the jukebox flash ROM.
Operating the
Jukebox
Chapter 3 3-19
Page 60

Operating the Jukebox
Setting an Operating Configuration
Setting an Operating Configuration
READY > ADMIN * > CONFIG *
You can set configurations to customize the way the jukebox operates.
Start with READY in the display.
1. Press
NEXT until ADMIN * displays.
2. Enter the administration password.
Instructions for entering this password are in “Entering the Administration
Menu Password” previously in this chapter.
3. TEST * displays. Press
4. Press
NEXT or PREV until the name of the configuration you wish to set displays
and then press
ENTER. (Configurations are described on the following pages.)
NEXT until CONFIG * displays, and then press ENTER.
If the configuration has multiple settings, the current setting flashes. Otherwise,
the configuration is set and a confirmation message displays.
5. If the current configuration setting is flashing, press
desired setting displays, and then press
ENTER. OPTION SAVED displays and
NEXT or PREV until the
then the configuration’s name and setting displays.
6. Press CANCEL to return to READY.
CAUTION Turning off the jukebox in the next step could cause data loss if not done correctly.
Do not turn off power to the jukebox until you are sure the SCSI bus is inactive.
Removing power from a SCSI device when the bus is active can result in data loss
and/or indeterminate bus states. Check your host system manuals for information
about checking the SCSI bus status. If your computer is connected to a LAN, be sure
to check with your system administrator before turning off power to the jukebox.
7. Turn the jukebox OFF, then ON to save the configuration to the jukebox flash
ROM.
Configurations are described in the following table.
3-20 Chapter 3
Page 61

Table 3-1 Configuration Choices
Operating the Jukebox
Setting an Operating Configuration
Configuration
Name
RECOVERY
ON/OFF
RESTORE
DEFAULTS
CLEAR
ODOMETERS
DUAL PICKER
ON/OFF
Description
Toggles between ON and OFF. If the configuration is
set to ON, the jukebox attempts to recover from errors;
if the configuration is set to OFF, the jukebox
immediately stops moving if an error condition occurs.
The default configuration is RECOVERY ON, and
recovery should remain ON under normal conditions.
Sets all jukebox configurations to default settings.
Used by service personnel only. Sets all jukebox
odometers to zero.
Toggles between ON and OFF. (The default setting is
DUAL PICKER ON, and dual picker mode should
remain ON under normal conditions.) If the
configuration is set to ON, the jukebox runs with dual
picker (disk transport) addressing ON; if the
configuration is set to OFF, the jukebox runs with dual
picker (disk transport) addressing OFF.
Operating the
Jukebox
STARWARS
ON/OFF
Used by service personnel only. Should be set to ON
during normal operation. Toggles between ON and
OFF. The ON configuration enables the vertical
sensors; the OFF configuration disables the vertical
sensors.
NEW PASSWORD Allows you to change the numerical password required
to access the menu choices under the ADMIN * menu
on the jukebox control panel. These choices include
configurations, tests, and information logs. To change
the security code, see “Changing the Administration
Menu Password” in this chapter.
SCSI LOG
ON/OFF
Used by service personnel only. Should be set to OFF
during normal operation. Toggles between ON and
OFF. Tracks internal SCSI states and saves the
information to a log.
Chapter 3 3-21
Page 62

Operating the Jukebox
Setting an Operating Configuration
Configuration
Name
SECURE MS
ON/OFF
SLTS 230-238
ON/OFF
POWER SECURE
ON/OFF
REP RECOVERED
ON/OFF
Description
Toggles between ON and OFF. The ON configuration
disables loading and ejecting disks. The OFF
configuration enables loading and ejecting disks (the
default state of the jukebox).
Slots 230 to 238 may not be supported by some
jukebox application software. The ON configuration
allows access to these slots. The OFF configuration
prevents access to these slots, making slot 229 the last
available slot.
Toggles between ON and OFF. The ON configuration
retains your selection of the SECURE MS
configuration through power cycling (or power
outage). The OFF configuration allows the jukebox to
return to the default setting of this configuration after a
power cycling (default setting is OFF).
Toggles between ON and OFF. When set to ON,
recovered errors are reported; when set to OFF,
recovered errors are not reported.
CONF40 ON/OFF Used by service personnel only. Changing this
configuration may result in a service call.
WRITE VERIFY
ON/OFF
Toggles between ON and OFF. When set to ON
(default), write verify is forced. When set to OFF, the
drives may write verify or not, depending on how they
are manually configured or how they are configured by
the jukebox application software.
MS DOOR
OPEN/CLOSED
Toggles between OPEN and CLOSED. When set to
OPEN, the mailslot door always remains open; when
set to CLOSED, the mailslot door remains open for ten
seconds after disks are loaded or ejected, automatically
closes when the mailslot is empty, and does not reopen
until you press the
LOAD button.
3-22 Chapter 3
Page 63

Operating the Jukebox
Retrieving Log History
Retrieving Log History
READY > ADMIN * > INFO *
You can display information stored in the jukebox operating logs by using the
INFO * menu.
Start with READY in the display.
1. Press
NEXT until ADMIN * displays.
2. Enter the administration password.
Instructions for entering this password are in “Entering the Administration
Menu Password” in this chapter.
3. TEST * displays. Press
4. Press
NEXT until the name of the log you wish to access displays and then press
ENTER. (A “*” indicates that there are more selections beneath the displayed
choice.)
5. After you are finished viewing log information, press CANCEL to return to
READY.
Information logs are described in the following table.
Table 3-2 Information Logs
Log Name Description
REVISION Jukebox firmware version number.
JUKEBOX * Press
Operating the
Jukebox
NEXT until INFO * displays, and then press ENTER.
ENTER to select the information described in the
next five rows.
product # Product identification string
SN # Serial number of the unit.
FW TYPE ## Code that identifies the type of firmware used in the
DRIVES # Number of drives in the unit.
SLOTS # Number of available storage slots in the unit.
Chapter 3 3-23
unit.
Page 64

Operating the Jukebox
Retrieving Log History
Log Name Description
JKBX ODOMETERS * Press ENTER to select the odometer logs described in
the next five rows.
HOURS Number of operation hours (time the power was on).
Some of the time may be while in power reduction
mode.
MOVES Total moves and move attempts by the disk transport
mechanism.
FLIPS Total disk transport mechanism flips.
XLATES Total disk transport mechanism horizontal moves.
ROTATES Total mailslot rotations.
DRIVE LOADS * Press
ENTER to select the logs under this selection.
DRIVE # Total disk loads for the drive numbered “#.”
DRIVE FW * Press
ENTER to select the logs under this selection.
D# REV x.xx Drive firmware revision code. “D#” is the drive
number and x.xx is the code. Press
NEXT or PREV to
select drive numbers.
DRIVE SN * Press
ENTER to select the logs under this selection.
D# xxxxxxx Serial number of the drive where “#” is the drive
NEXT or PREV to select drive numbers.
HARD ERROR *
number. Press
Log of unrecoverable errors (commands that did
not successfully complete). Returns either
HARD ENTRIES
or ENTRY #. (There may be
multiple hard error numbers.)
Press
ENTER to view the log for the currently
displayed error, or press
NEXT to select the next
error.
(Log entries are described in the rows following
RECOVERY ERROR * in this table.)
NO
3-24 Chapter 3
Page 65

Operating the Jukebox
Retrieving Log History
Log Name Description
SOFT ERROR * Log of recovered errors (commands that complete
successfully). Returns either NO SOFT ENTRIES or
ENTRY #. (There may be multiple soft error
numbers.)
ENTER to view the log for the currently
Press
displayed error, or press
NEXT to select the next error.
(Log entries are described in the rows following
RECOVERY ERROR * in this table.)
RECOVERY ERROR * Log of errors during the most recent move. Returns
either NO ENTRIES or the number of recovery
errors.
ENTER to view the log for the currently
Press
displayed error, or press
NEXT to select the next error.
(Log entries are described in the following rows.
Operating the
Jukebox
*
HARDWARE ERR #
*FRU 1 #
*
FRU 2 #
*
FRU 3 #
Internal diagnostics error number of the cause of the
failure.
Field replaceable unit most likely to be at fault.
Field replaceable unit second most likely to be at
fault.
Field replaceable unit third most likely to be at fault.
Chapter 3 3-25
Page 66

Operating the Jukebox
Retrieving Log History
Log Name Description
MOTION <name> <name> indicates one of the following types of
movements taking place in the jukebox at the time of
the failure:
• EXCHANGE
• MOVE
• POSITION
• INIT ELEM
• REZERO
• ROTATE
• DIAGNOSTIC
• RESTORE
SOURCE # Element number to which the source refers. (This
information is valid for MOVE, EXCHANGE, and
POSITION movements only.)
DESTINATION 1 #Element to which the first destination refers. (This
information is valid for MOVE and EXCHANGE
movements only.)
DESTINATION 2 #Element to which the second destination refers. (This
information is valid for the EXCHANGE movement
only.)
ODOMETER # Move number in which the error occurred.
*
MICROMOVE 1 #
First jukebox micro-move for the original move
command issued prior to the failure.
*
MICROMOVE 2 #
Second jukebox micro-move for the original move
command issued prior to the failure.
*
MICROMOVE 3 #
Third jukebox micro-move for the original move
command issued prior to the failure.
*MICROMOVE 4 #
Fourth jukebox micro-move for the original move
command issued prior to the failure.
3-26 Chapter 3
Page 67

Operating the Jukebox
Retrieving Log History
Log Name Description
*
MICROMOVE 5 #
Fifth jukebox micro-move for the original move
command issued prior to the failure.
*
MICROMOVE 6 #
Sixth jukebox micro-move for the original move
command issued prior to the failure. (This is the last
to be logged.)
*MICROMOVE ER # Micro-move error that occurred.
TOP or BOTTOM
PICKER
Displays either TOP or BOTTOM indicating which
side of the disk transport mechanism was active at the
time of the error.
NORTH or SOUTH
THUMB
Displays either NORTH or SOUTH indicating which
thumb on the transport mechanism was active at the
time of the error.
* Press ENTER to display more information
Operating the
Jukebox
Chapter 3 3-27
Page 68

Operating the Jukebox
Running an Internal Test
Running an Internal Test
READY > ADMIN * >TEST *
The optical jukebox can run self-diagnostic tests. See the Caution note below.
CAUTION Some of the internal diagnostic tests of this jukebox can corrupt your file system if
not properly completed (for example, disks can be placed in unexpected locations).
In almost all cases, these tests should be run only by authorized service personnel.
Service, however, may request that you run specific tests to provide information
before they come to your site. The descriptions of these tests are included in this
manual only for your information.
Instructions for running internal tests are included in this guide to help you run tests
if requested by service. There is a possibility you may run one test as a result of
troubleshooting; this test is “INIT ELEM STATUS.”
Start with READY in the display.
1. Press
NEXT until ADMIN * displays.
2. Enter the administration password.
Instructions for entering this password are in “Entering the Administration
Menu Password” previously in this chapter.
3. TEST * displays. Press
4. Press
NEXT until the name of the test you wish to run displays and then press
ENTER to start the test.
ENTER.
NOTE You m a y p r ess CANCEL at any time to abort a test. A delay may occur while the
current test loop completes.
3-28 Chapter 3
Page 69

Table 3-3 Internal Tests
Tes t N a m e Description
Some of the following tests can corrupt your data if not completed properly.
Those tests are noted with a “Used by service...” alert. Do not run these tests.
If you are in contact with your service representative, you may be requested to
run one or more of the remaining tests as part of the early phases of a diagnostic
procedure. Also, you may receive a control panel message to “RUN ISTAT
TEST” which, the troubleshooting table explains, means to run the INIT
ELEM STATUS test. It is for these two, limited situations that the instructions
for running internal tests is included in this user guide and why the tests are
described.
Operating the Jukebox
Running an Internal Test
Internal Tests are normally for service use only.
Operating the
Jukebox
EXCHANGE
DEMO
Used by service personnel only. Do not run this test if
the jukebox contains disks with file system data on
This test moves randomly-chosen optical disks to
them.
random storage slot locations. This test displays FAIL
if there are no disks in the jukebox or if all storage slots
are full. For best results, the jukebox should contain as
many disks as there are drives, plus two additional
disks. The transport and mailslot must be empty.
INIT MECHANICS Runs the FIND PLUNGE HOME, FIND VERTICAL
HOME, FIND XLATE HOME, and INIT ELEM
STATUS tests. Each test is run one time per test loop.
INIT ELEM
STATUS
Physically scans the entire unit to determine which
storage slots contain disks and if the drives contain
disks.
NOTE: This test appears as “ISTAT TEST” in all
control panel error messages.
Chapter 3 3-29
Page 70

Operating the Jukebox
Running an Internal Test
Tes t N a m e Description
MAGAZINE IO Makes a combination of moves with a PASS/FAIL
result. It moves an optical disk from a randomly-chosen
full slot to a randomly-chosen empty slot with a
random flip. It then moves the disk back to its original
storage slot with its original orientation. This test
displays FAIL if there are no disks in the jukebox or if
all storage slots are full. The drives and mailslot must
be empty.
DRIVE IO Makes a combination of moves with a PASS/FAIL
result. It moves an optical disk from a randomlychosen full slot to a randomly-chosen drive with a
random flip. It then moves the cartridge back to its
original slot with its original orientation. This test
displays FAIL if there are no disks in the jukebox or if
all storage slots are full. The drives and mailslot must
be empty.
MAILSLOT IO Makes a combination of moves with a PASS/FAIL
result. It moves an optical disk from the lowestnumbered full slot to the mailslot with a random flip. It
then moves the cartridge back to its original slot with
its original orientation. This test displays FAIL if there
are no disks in the jukebox or if all storage slots are
full. The drives and mailslot must be empty.
VERTICAL TEST Moves the disk transport mechanism up and down the
full length of the rail. Returns PASS/FAIL. No disks
are required.
TRANSLATE TEST Moves the disk transport mechanism from side to side.
No disks are required.
FLIP TEST Makes a combination of moves with a PASS/FAIL
result. Flips the disk transport mechanism at various
locations. No disks are required.
PICKER TEST Flips the disk transport mechanism and switches active
thumbs. No disks are required
.
3-30 Chapter 3
Page 71

Running an Internal Test
Tes t N a m e Description
Operating the Jukebox
FIND PLUNGE
HOME
FIND VERT HOME Recalibrates the vertical position of the disk transport
FIND XLATE
HOME
VERTICAL
ENCODER
EMPTY DRIVES Used by service personnel only. Do not run this test if
Calibrates the disk transport mechanism, establishes the
mechanism’s orientation, and determines the reference
points in the picker travel path. Assumes that the
mechanics and servo system are functional. No disks
are required.
mechanism and verifies that the vertical path is clear.
No disks are required
Calibrates the reference points for the side-to-side
motion of the disk transport mechanism. No disks are
required
Moves the disk transport mechanism down to the lower
stop, moves it back up a short distance, and then moves
it back down. On the second downward motion the
number of digital pulses is counted and verified.
Returns PASS/FAIL. No disks are required
the jukebox contains disks with file system data on
them
returns them to their home storage slot locations if the
locations are known. If the home storage location is not
known, the jukebox moves the disks into the first
available empty storage slot
.
. Moves disks out of the drive mechanism(s) and
.
.
.
Operating the
Jukebox
EMPTY PICKER Used by service personnel only. Do not run this test if
FILL PICKER Used by service personnel only. Do not run this test if
Chapter 3 3-31
the jukebox contains disks with file system data on
them
. Moves a disk from the disk transport mechanism
to its home storage slot location if that location is
known, otherwise the disk is placed into the first
available empty storage slot
the jukebox contains disks with file system data on
. Moves a disk into the disk transport mechanism
them
from the first storage slot containing a disk. This test
must be run twice to fill both containers in the disk
transport mechanism.
.
Page 72

Operating the Jukebox
Running an Internal Test
Tes t N a m e Description
EXERCISE MECH Runs the VERTICAL TEST, TRANSLATE TEST,
FLIP TEST, MAGAZINE IO, DRIVE IO, and
MAILSLOT IO tests. Each test runs one time per test
loop.
WELLNESS TEST Checks the general capability of the jukebox. Requires
one loaded disk. The drives, transport, and mailslot
must be empty.
EXERCISE MECHANICS. Each test runs one time per
test loop
CLEAR SOFT LOG Sets the soft error log to zero.
Runs INIT MECHANICS and
.
CLEAR HARD
LOG
PLUNGE FULL
SPD
PLUNGE 1/2 SPD
PLUNGE 1/4 SPD
STARWARS The display shows 0 0 0.
Sets the hard error log to zero.
Allows the disk transport mechanics to run at full
speed. This setting should always be used in normal
jukebox operation.
Used by service personnel only.
transport mechanics to run at half speed
Used by service personnel only.
transport mechanics to run at quarter speed.
Each “0" indicates one of the paths that the disk
transport mechanism follows in front of each stack of
optical disks. If the path is clear, a “0” displays; if the
path is blocked (because of an optical disk that is not
inserted fully into its storage slot for example), an “*”
will be displayed. This display is automatically updated
if the status changes.
Allows the disk
.
Allows the disk
3-32 Chapter 3
Page 73

Running an Internal Test
Tes t N a m e Description
Operating the Jukebox
BOTTOM THUMB
Used by service personnel only.
Reports THUMB A,
THUMB B, or NO THUMB. Looks at the top and bottom
thumb sensors and reports whether the thumbs on the
disk transport mechanism are in the forward or back
position. If THUMB A or THUMB B is returned, the
specified thumb is the forward position. If NO THUMB
is returned, both thumbs are in the back position.
TOP THUMB Used by service personnel only.Reports ON or OFF.
Looks at the top thumb sensor which reports whether or
not the thumb that is currently on the top side of the
disk transport mechanism is in the forward position. If
ON is reported the thumb is in the back position; if OFF
is reported the thumb is in the forward position.
TRANSLATE
SENSOR
Reports ON or OFF after looking at the translate
calibration sensor. (Display automatically updates if the
status changes.)
Operating the
Jukebox
Chapter 3 3-33
Page 74

Operating the Jukebox
Using Online Repair
Using Online Repair
The online repair selection allows an authorized service representative to replace a
faulty drive while the jukebox remains online and active. This feature is available
only if enabled by your jukebox application software.
CAUTION Selecting online repair should be done only by an authorized service representative.
This procedure could cause the jukebox optical drives to become inactive.
3-34 Chapter 3
Page 75

Operating the Jukebox
Troubleshooting
Troubleshooting
This section provides steps you can take when problems occur during operation.
If the troubleshooting procedures do not resolve the problem, call your service
provider. If you do not have a service provider, you can locate one by going to
ww.hp.com. Look under “HP Services and Support.”
NOTE If a service call is necessary, gather the following information before calling your
service provider:
• model of your jukebox
• serial number
• brand and model of your host computer
• brand and model of your host computer SCSI adapter
Operating the
Jukebox
• jukebox application software you are using and its version
• any jukebox driver separate from your jukebox application software and the
version of this driver.
Chapter 3 3-35
Page 76

Operating the Jukebox
Troubleshooting
Table 3-4 Troubleshooting
Problem What to do
Jukebox won’t power on. • Ensure that power cord connections are tight.
• Ensure that the power switch is ON (located on
the lower right side of the jukebox rear panel).
• Ensure that the power outlet is operating.
• Replace the power cord with a known good one.
• If steps above are unsuccessful, call your service
representative.
Poweron selftest failed
and DEVICE FAILED
displays
DEVICE FAILED
displays.
Hardware Error #61
(External SCSI cables) is
reported.
Power to the jukebox
failed while a disk was in
the drive and the display
did not return to READY
after the power came back
on.
• Power cycle the jukebox.*
• If the poweron test continues to fail, press
ENTER, write down the displayed error code, and
call your service representative.
• Ensure that only one SCSI device type
(single-ended OR differential) exists on the SCSI
bus.
• Verify that the SCSI interface selection switch is
set correctly (either single-ended or differential).
• Verify that the terminator is the correct type
(single-ended or differential).
• If steps above are unsuccessful, call your service
representative.
• Power cycle the jukebox.*
• If READY does not display (poweron test is
unsuccessful), switch off the power. Do not move
the unit! Moving the unit risks damaging the
optical drive. Call your service representative.
*
Ensure that the SCSI bus is inactive before removing power to the jukebox.
Removing power to a device on an active SCSI bus can cause data loss and/or
problems with the SCSI interface.
3-36 Chapter 3
Page 77

Operating the Jukebox
Troubleshooting
Problem What to do
No display messages. • Ensure that the power cord is connected.
• Ensure that the power switch is ON.
• Power cycle the jukebox.*
• If steps above are unsuccessful, call your service
representative.
Changed the drive ID but
the new ID isn't
Some computers require a restart to recognize new
SCSI IDs.
recognized.
• Ensure the SCSI bus is inactive and restart your
host computer.
Forgot your password. • Enter the default password (000 000 000).
• If the default password is not accepted, call your
service representative.
Disk inserted in the
mailslot but LOAD
ERROR or FAILED
displays.
• Press
CANCEL. Insert the disk in the mailslot
again. See “Loading an Optical Disk into the
Jukebox” in this chapter for the correct disk
loading orientation.
• If the light bar on the front panel is orange, cycle
power to the jukebox.* Try to load the disk again
when READY displays.
• If the disk is in the mailslot correctly and these
error messages repeat, call your service
representative.
Disk inserted in the
mailslot but RESERVED
The SECURE MS configuration is set. Disks cannot
be loaded.
displays
• If appropriate, change this setting. See “Setting
an Operating Configuration” in this chapter. The
current administration password is required.
Operating the
Jukebox
*Ensure that the SCSI bus is inactive before removing power to the jukebox.
Removing power to a device on an active SCSI bus can cause data loss and/or
problems with the SCSI interface.
Chapter 3 3-37
Page 78

Operating the Jukebox
Troubleshooting
Problem What to do
Disk inserted in the
mailslot but MAILSLOT
EMPTY displays
Disk inserted in the
mailslot but DEST NOW
FULL displays
Disk inserted in the
mailslot but TRANSPORT
FULL displays
Disk inserted in the
mailslot but MAILSLOT
SENSOR displays
The mailslot sensors do not detect a disk in the
mailslot.
• Remove and then replace the disk fully into the
mailslot. If the same error reappears, the mailslot
sensors may be defective. Contact your service
representative.
The jukebox moved a disk into the slot you chose
before your load command executed.
• Press
CANCEL, select another slot for the disk,
and then reattempt a load.
The disk transport mechanism already contains a
disk.
• Refer to your host and application documentation
for recovery procedures. If no procedures are
available, call your service representative.
The jukebox mailslot sensors may have failed.
• Remove and then re-insert the disk. If this does
not correct the problem, call your service
representative.
Disk eject attempted but
an EJECT ERROR
message displays.
*Ensure that the SCSI bus is inactive before removing power to the jukebox.
Removing power to a device on an active SCSI bus can cause data loss and/or
problems with the SCSI interface.
3-38 Chapter 3
• Press
CANCEL. Attempt to eject the disk again.
• If the light bar on the front panel is orange, cycle
power to the jukebox* and try to eject the disk
again when READY displays.
• If there is no disk in the mailslot and this error
message repeats, call your service representative.
Page 79

Operating the Jukebox
Problem What to do
Troubleshooting
Disk eject attempted but
RESERVED displays.
Disk eject attempted but
empty and then EJECT *
displays.
Disk eject attempted but
TRANSPORT FULL
displays.
Disk eject attempted but
SOURCE NOW EMPTY
displays.
The jukebox application software reserved the
element for its use or a security configuration was set
to prevent disk ejection.
• If appropriate, change this setting See “Setting an
Operating Configuration” in this chapter. The
current administration password is required.
This is not an error. There are no disks in the
jukebox.
The disk transport mechanism already contains a
disk.
• Refer to your host and application documentation
for recovery procedures. If no procedures are
available, call your service representative.
The application software moved the disk from the
slot you chose before your eject command executed.
Press CANCEL. You may have to wait for the
•
application to replace the disk into the slot
before attempting another eject.
Operating the
Jukebox
Disk eject attempted but
A disk is in the mailslot.
MAILSLOT FULL
displays.
• Remove the disk from the mailslot.
Select EJECT *, select the slot you want the
disk ejected from again, and eject the disk.
You want to stop a test
that is running.
Press
CANCEL. The current test loop continues until
finished, then the test stops.
*Ensure that the SCSI bus is inactive before removing power to the jukebox.
Removing power to a device on an active SCSI bus can cause data loss and/or
problems with the SCSI interface.
Chapter 3 3-39
Page 80

Operating the Jukebox
Troubleshooting
Problem What to do
RUN ISTAT TEST
displays (this initializes
the element status)
• Power cycle the jukebox.*
•
Run the INIT ELEM STATUS test under the
TEST * menu
• If steps above do not result in a READY display,
call your service representative.
Can't write to the disk. • Check the host file system access permissions.
• Eject the disk and check that the write-protect
tab on each side of the disk is in the
write-enabled position.
• Check your application software.
• If steps above are unsuccessful, call your service
representative.
*Ensure that the SCSI bus is inactive before removing power to the jukebox.
Removing power to a device on an active SCSI bus can cause data loss and/or
problems with the SCSI interface.
3-40 Chapter 3
Page 81

A Supplies and Customer Support
Customer Support
Supplies and
Page 82

Supplies and Customer Support
Overview of This Appendix
Overview of This Appendix
This appendix provides information on the following topics:
• supplies and accessories
• shipping screw specifications
• HP customer support
A-2 Appendix A
Page 83

Supplies and Accessories
A full range of computer supplies may be ordered through a Hewlett-Packard
authorized dealer, sales office, or online through the Business Store at
www.bstore.hp.com.
You may also access the “Business Store” web site by selecting “Other
Ways to Buy ” from the main HP shopping site, www.shopping.hp.com.
Authorized dealers and sales offices can be found at www.hp.com under “HP Service
and Support.”
Table A-1 Basic Supplies and Accessories
Item HP Part Number
9.1-and 8.6-Gbyte Optical Disks
Rewritable optical disk (4,096 bytes/sector, 9.1
Gbytes, single disk)
Supplies and Customer Support
Supplies and Accessories
C7983A
Customer Support
Supplies and
Write-once optical disk (4,096 bytes/sector, 9.1
Gbytes, single disk)
Rewritable optical disk (2,048 bytes/sector, 8.6
Gbytes, single disk)
Write-once optical disk (2,048 bytes/sector, 8.6
Gbytes, single disk)
Rewritable optical disk (1,024 bytes/sector, 9.1
Gbytes, single disk)
Rewritable optical disk (512 bytes/sector, 9.1
Gbytes, single disk)
5.2- and 4.7-Gbyte Optical Disks
Rewritable optical disk (2,048 bytes/sector, 5.2
Gbytes, single disk)
Write-once optical disk (2,048 bytes/sector, 5.2
Gbytes, single disk)
C7984A
C7985A
C7986A
C7987A
C7988A
88147J
88146J
Appendix A A-3
Page 84

Supplies and Customer Support
Supplies and Accessories
Item HP Part Number
Rewritable optical disk (1,024 bytes/sector, 4.7
88143J
Gbytes, single disk)
Write-once optical disk (1,024 bytes/sector, 4.7
88145J
Gbytes, single disk)
2.6- and 2.3-Gbyte Optical Disks
Rewritable optical disk (1,024 bytes/sector, 2.6
92280F
Gbytes, single disk)
Write-once optical disk (1,024 bytes/sector, 2.6
92290F
Gbytes, single disk)
Rewritable optical disk (512 bytes/sector, 2.3
92279F
Gbytes, single disk)
Write-once optical disk (512 bytes/sector, 2.3
92289F
Gbytes, single disk)
SCSI Cables
50-Pin Low-Density to 50-Pin High-Density
1.0 m (3.3 ft) clip latch to thumb screw K2296
1.5 m (4.9 ft) clip latch to thumb screw K2297
0.9 m (2.9 ft) thumb screw to thumb screw K2294
1.5 m (4.9 ft) thumb screw to thumb screw K2295
50-Pin High-Density to 50-PinHigh-Density
0.5 m (1.6 ft) thumb screw to thumb screw C2955A
1.0 m (3.3 ft) thumb screw to thumb screw C2908A
1.5 m (4.9 ft) thumb screw to thumb screw C2956A
2.0 m (6.5 ft) thumb screw to thumb screw C2957A
5.0 m (16.5 ft) thumb screw to thumb screw C2958A
A-4 Appendix A
Page 85

Supplies and Customer Support
Supplies and Accessories
Item HP Part Number
68-Pin High-Density to 50-Pin Low-Density
1.0 (3.3 ft) clip latch to thumb screw C2915A
2.0 m (6.5 ft) thumb screw to thumb screw C2906A
5.0 m (16.5 ft) thumb screw to thumb screw C2907A
20.0 m (65.6 ft) thumb screw to thumb screw C2916A
68-Pin High-Density to 68-Pin High-Density
0.9 m (2.9 ft) thumb screw to thumb screw C2911A
2.5m (8.2 ft) thumb screw to thumb screw C2924A
10.0 m (32.8 ft) thumb screw to thumb screw C2925A
20.0 m (65.6 ft) thumb screw to thumb screw C2926A
SCSI Terminators
50-pin active high-density (molded) C2904A
68-pin differential high-density (molded) C2905A
Disk Cleaners
See www.hp.com/go/optical --
Customer Support
Supplies and
Appendix A A-5
Page 86

Supplies and Customer Support
Hewlett-Packard Customer Support
Hewlett-Packard Customer Support
If your jukebox fails and the suggestions in this user’s guide and accompanying
documentation do not solve your problem:
• If you have a service contract with HP, contact your local HP Response Center.
Response Centers are found at www.hp.com under the “HP Services and
Support” tab.
• If you do not have a service contract with HP, contact your nearest HP dealer or
sales office. Dealers and sales offices are found at www.hp.com under the “HP
Services and Support” tab.
NOTE Before calling, please record the following information and have it ready when you
contact your service representative.
- model number of your jukebox
- serial number
- brand and model of your host computer
- brand and model of your host computer SCSI adapter
- jukebox application software you are using and its version
- any jukebox driver you may be using that is separate from your
jukebox application software and the version of this driver
A-6 Appendix A
Page 87

Supplies and Customer Support
Warranty
Warranty
HP PRODUCT DURATION OF WARRANTY
C1104M/P, C1105M/P, C1106M/P, One Year
C1107M/P, C1110M/P
1. HP warrants HP hardware, accessories and supplies against defects in materials
and workmanship for the period specified above. If HP receives notice of such
defects during the warranty period, HP will, at its option, either repair or replace
products which prove to be defective. Replacement products may be either new or
like-new.
2. HP warrants that HP software will not fail to execute its programming
instructions, for the period specified above, due to defects in material and
workmanship when properly installed and used. If HP receives notice of such
defects during the warranty period, HP will replace software media which does not
execute its programming instructions due to such defects.
3. HP does not warrant that the operation of HP products will be uninterrupted or
error free. If HP is unable, within a reasonable time, to repair or replace any product
to a condition as warranted, customer will be entitled to a refund of the purchase
price upon prompt return of the product.
Customer Support
Supplies and
4. HP products may contain remanufactured parts equivalent to new in performance
or may have been subject to incidental use.
5. The warranty period begins on the date of delivery or on the date of installation if
installed by HP. If customer schedules or delays HP installation more than 30 days
after delivery, warranty begins on the 31st day from delivery.
6. Warranty does not apply to defects resulting from (a) improper or inadequate
maintenance or calibration, (b) software, interfacing, parts or supplies not supplied
by HP, (c) unauthorized modification or misuse, (d) operation outside of the
published environmental specifications for the product, or (e) improper site
preparation or maintenance.
7. TO THE EXTENT ALLOWED BY LOCAL LAW, THE ABOVE
WARRANTIES ARE EXCLUSIVE AND NO OTHER WARRANTY OR
CONDITION, WHETHER WRITTEN OR ORAL, IS EXPRESSED OR IMPLIED
AND HP SPECIFICALLY DISCLAIMS ANY IMPLIED WARRANTIES OR
CONDITIONS OF MERCHANTABILITY, SATISFACTORY QUALITY, AND
FITNESS FOR A PARTICULAR PURPOSE.
Appendix A A-7
Page 88

Supplies and Customer Support
Warranty
8. HP will be liable for damage to tangible property per incident up to the greater of
$300,000 or the actual amount paid for the product that is the subject of the claim,
and for damages for bodily injury or death, to the extent that all such damages are
determined by a court of competent jurisdiction to have been directly caused by a
defective HP product.
9. TO THE EXTENT ALLOWED BY LOCAL LAW, THE REMEDIES IN THIS
WARRANTY STATEMENT ARE CUSTOMER’S SOLE AND EXCLUSIVE
REMEDIES. EXCEPT AS INDICATED ABOVE, IN NO EVENT WILL HP OR
ITS SUPPLIERS BE LIABLE FOR LOSS OF DATA OR FOR DIRECT,
SPECIAL, INCIDENTAL, CONSEQUENTIAL (INCLUDING LOST PROFIT OR
DATA), OR OTHER DAMAGE, WHETHER BASED IN CONTRACT, TORT,
OR OTHERWISE.
A-8 Appendix A
Page 89

B Operating This Jukebox on a SCSI Bus
Operation on a
SCSI Bus
Page 90

Operating This Jukebox on a SCSI Bus
A Brief Overview of SCSI
A Brief Overview of SCSI
General
The Small Computer System Interface (SCSI), is a contention-based bus that
accommodates different speed devices without impacting the devices with faster
transfer speeds. This specification was defined by the American National Standards
Institute (ANSI) in 1986. The specification defines both the physical medium and
the command set used to transfer information. Later developments are known under
the newer specifications, SCSI-2 and SCSI-3.
The SCSI Bus
The common SCSI buses are 50-pin and 68-pin. The 50-pin bus, which uses eight of
its lines for data transmission, is called a "narrow" bus. The narrow bus can support
eight devices. The 68-pin bus, which uses 16 lines for data transmission is called a
"wide" bus. The wide bus can support 16 devices.
Initiators and Targets
SCSI devices on the bus are either “initiators” or “targets.” An initiator (usually the
host computer) originates a transaction and the target (usually a peripheral device)
fulfills the request.
Initiators and targets identify themselves on the bus by a SCSI ID. The ID is
designated by the user and is set electronically or manually depending on the device.
In addition to identifying a device on the bus, the ID also determines the priority of
the device during contention among the devices for use of the bus.
The narrow SCSI bus, with its eight data lines, can communicate with eight devices
that have IDs from 0 to 7. The wide SCSI bus, with its 16 data lines, can
communicate with 16 devices that have addresses from 0 to 15. The host adapter,
which links the host computer to the SCSI bus, is also a SCSI device (initiator), and
is usually assigned an ID of 7.
Priority of IDs ascends from lowest to highest but this ascending priority, however,
is in blocks of eight IDs, and the block from 8 to 15 is actually defined to be at a
lower priority than ID 0, the lowest address on the "narrow" portion of the bus. This
is done so that if a narrow device is placed on a wide bus, the wide devices, which
can "see" the lower addresses, will always defer to the lower addresses when they
contend for the bus. Otherwise, a narrow device, which cannot "see" any device at
B-2 Appendix B
Page 91

Operating This Jukebox on a SCSI Bus
A Brief Overview of SCSI
an ID greater than 7, would always assume it won the contention and would attempt
to talk, perhaps at the same time as a device with an ID above 7 that was contending
for the bus. The following diagram shows the priority scale of IDs when the priority
of the two blocks of eight are reversed.
Priority
8 9 10 11 12 13 14 15 0 1 2 3 4 5 6 7
Narrow
Addresses
Wide Address Range
The diagram below shows the linear addressing of a simple, narrow bus with the
host adapter set at a SCSI ID of 7. The device ID does not determine where the
device is physically placed on the bus.
LUN Addressing
SCSI IDs are the top-level method of addressing devices on the bus. Another
method of addressing is also available; logical unit numbering (LUN). This method
enables a complex device, such as a jukebox, to group its internal SCSI devices to a
single SCSI ID.
The complex device is identified by a SCSI ID, but this complex device assigns
logical unit numbers (LUNs) to each device within it. Up to eight LUNs may be
assigned under a single SCSI ID. The LUNs that can be assigned are from 0 to 7
(LUN 0 is usually retained by the complex device).
Appendix B B-3
Operation on a
SCSI Bus
Page 92

Operating This Jukebox on a SCSI Bus
A Brief Overview of SCSI
To use this form of addressing, however, the jukebox application software, the SCSI
bus drivers and the host adapter firmware all have to support this mode of
addressing. The following diagram shows LUNs assigned to devices within the
device at ID 6.
Transfer Rates on the Bus
Initially, the SCSI specification defined a 5 MB/s synchronous data transfer rate on
the narrow bus. SCSI now also defines "Fast" which is 10 MB/s on a narrow bus and
20 MB/s on a wide bus. Another definition is "Ultra," also known as "Fast-20"
which is 20 MB/s transfer rate on a narrow bus and 40 MB/s on a wide bus.
Termination
To keep signals on the SCSI bus from being reflected, “terminators” must be placed
at each end of the physical bus. These terminators may be either active or passive.
Passive termination is a resistor network. Active termination uses a voltage regulator
(the active component) to regulate the power of the resistor network to provide more
stable termination. Active termination is always preferred over passive termination.
Depending on your SCSI device, termination is supplied by a using a physical
connector, by flipping a dipswitch, or by selecting the termination setting in
software.
Termination is always at both physical ends of the bus.
B-4 Appendix B
Page 93

Operating This Jukebox on a SCSI Bus
A Brief Overview of SCSI
Single-ended and Differential Interfaces
The SCSI bus is electrically implemented in two ways: single-ended and
differential. These terms come from the way the signals are asserted on the bus.
Single-ended buses use a 5-volt signal that is referenced to ground. This method
makes the bus somewhat susceptible to noise and loss of signal quality over
distance. The maximum allowable length of a single-ended SCSI bus was initially 6
meters (19.7 feet). Fast SCSI required the maximum length of the bus to be reduced
to 3 meters (9.8 feet).
The differential bus uses two lines for each signal and measures the voltage
difference between the two signals. Differential retains more signal quality than
single-ended and is not as sensitive to noise, allowing for a longer cable length. The
maximum allowable length of a differential bus is 25 meters (82 feet) for all types
buses (narrow, wide, fast, Fast-20).
Connectors
Narrow devices (50-pin) use the following connectors:
• 50-pin low-density clip Centronics-type (external)
This is a large connector that is similar to a printer cable. This type of connector
is gradually being replaced by the Micro D connector, described below.
• 50-pin high density Micro D (using thumbscrews or small clips) (external)
Operation on a
SCSI Bus
Appendix B B-5
Page 94

Operating This Jukebox on a SCSI Bus
A Brief Overview of SCSI
• This connector is similar to a D-type connector, but smaller and with smaller pin
holes placed closer together.
• 50-pin low-density ribbon (usually internal to the host)
Wide devices (68- pin) use the following connectors:
• 68-pin high density Micro D connector (external)
This connector is similar to a D-type connector, but longer and slimmer and with
smaller pin holes placed closer together. This connector is becoming the most
common.
• 68-pin high density ribbon (usually internal to the host)
B-6 Appendix B
Page 95
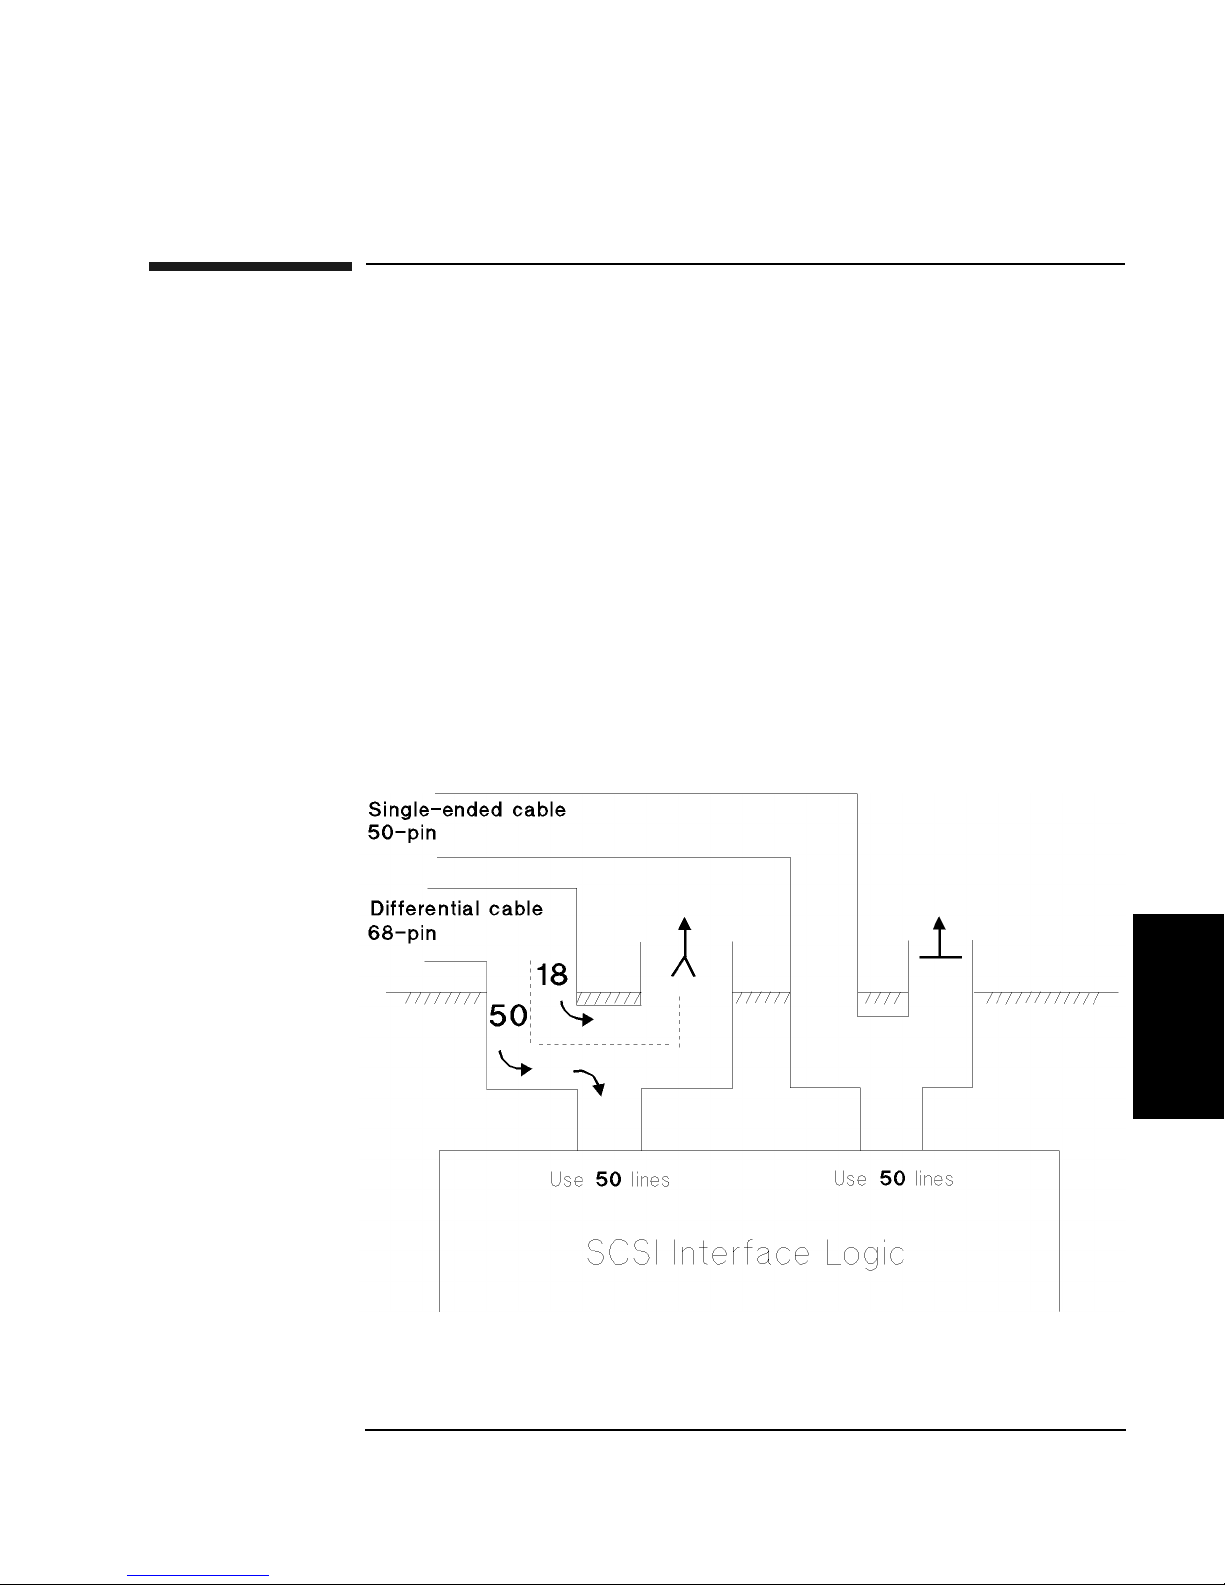
Operating This Jukebox on a SCSI Bus
The SCSI Bus and This Jukebox
The SCSI Bus and This Jukebox
This jukebox is a “fast and narrow” SCSI device with the capability to connect to
either a narrow single-ended bus or a wide differential bus.
In the diagram below, note that the single-ended (50-line) bus is brought directly
onto the jukebox internal narrow bus. The differential interface accepts a wide bus
in its 68-pin connector, but only uses the 50 data and control lines that comprise the
"narrow" portion of the bus. The other 18 lines that provide the upper IDs and data
of the wide bus are ignored. Note that all lines of the wide bus pass through the two
68-pin differential connectors. The wide bus is maintained as a wide bus.
The single-ended connectors are 50-pin and can accept only a narrow bus. The
differential ports use 68-pin connectors and can accept (and pass through) a wide
bus.
Figure B-1 Single-ended and Differential Interfaces on This Jukebox
Appendix B B-7
Operation on a
SCSI Bus
Page 96

Operating This Jukebox on a SCSI Bus
The SCSI Bus and This Jukebox
Adding Devices to the Bus
When considering adding other devices to the jukebox bus, you should consider the
following:
• Will adding a device onto a bus with this jukebox interfere or degrade the
performance of the jukebox or the device that is added?
• If the decision is made to add other devices to the jukebox bus, what SCSI
requirements must be observed to make sure the bus will work?
Before addressing some questions involved in deciding whether to place another
device on the jukebox bus, we can say that, as a general rule, HP recommends that
this jukebox be the only device on a bus. The recommendation is the same whether
the bus is single-ended or differential. One reason for the recommendation is that
interactions on a SCSI bus can be complicated. The more devices on the bus, the
more chance for problems. Another reason is that this jukebox, when fully utilized,
is capable of using up the full bandwidth of the bus. Performance of one or all of the
devices on the bus can be affected.
Consider the quantity of data that the bus will have to carry, the frequency of data
transfer, and the priority of this data transfer in your business. If you are using the
jukebox as a backup or archive device, the demands on the jukebox will be different
than if the jukebox is used for near-online storage where requests for data are more
random in both frequency and amount. If you expect to be using the jukebox at the
same time as the other device, or devices, you should expect to experience a drop in
performance.
Mixing Wide and Narrow Devices
As a preliminary note to this discussion, HP highly recommends that you do NOT
mix wide and narrow buses.
Connecting devices of the same bus width, such as all narrow (50-pin) is a simple
process of daisy-chaining the devices, and terminating both ends of the bus.
However, mixing narrow and wide devices invites problems.
This method should only be implemented by an experienced systems integrator who
is highly knowledgeable about SCSI. Since the wide (68-pin) buses need more data
lines on the bus for their data transfer, it's necessary that the cables connecting the
devices are 68 pin. The data would be lost if the devices were set up as depicted in
the figure below.
B-8 Appendix B
Page 97
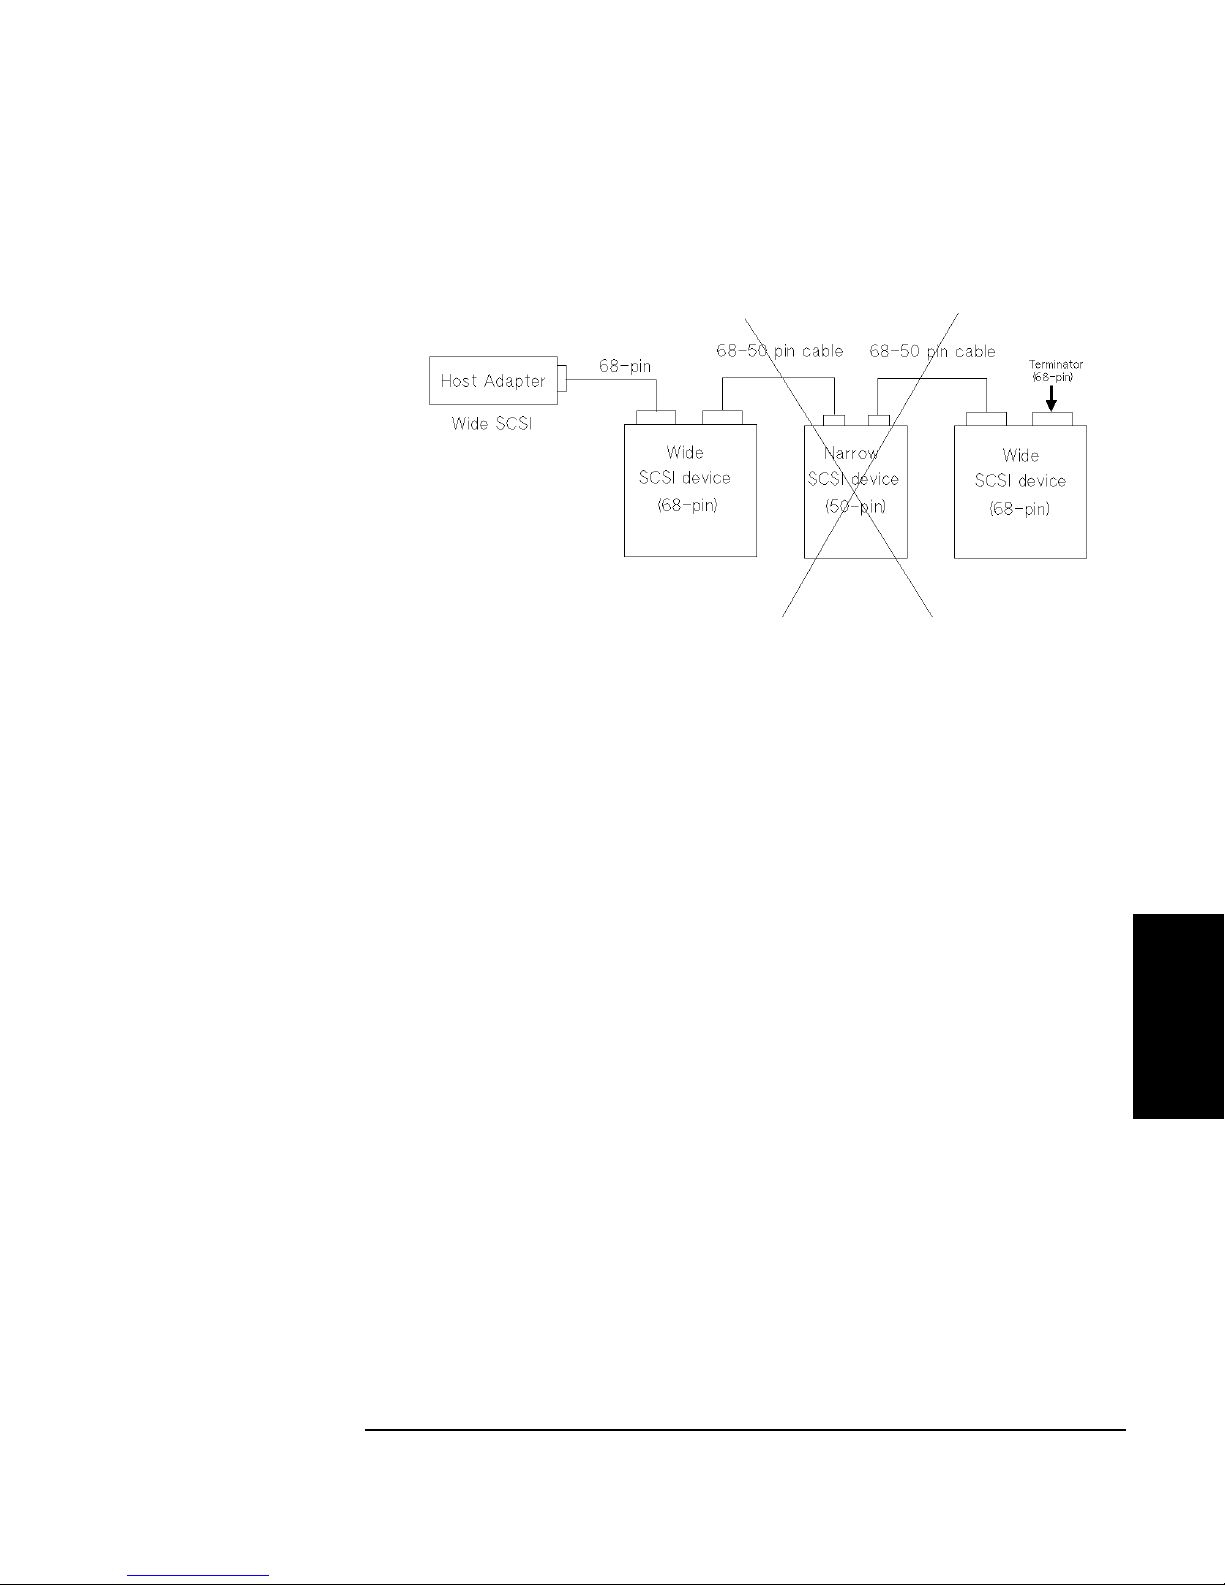
Operating This Jukebox on a SCSI Bus
The SCSI Bus and This Jukebox
Because a narrow device only has a 50-pin connector, it will not transmit the eight
extra bits of data needed for the wide device on the end of the bus. Using only 50
lines also prevents the narrow device from passing along the IDs of devices at 8 or
above.
The lower eight data lines transfer commands and messages, allowing all devices,
regardless of size, to co-exist on the bus. However, data transfers and device
addressing occur on the higher bits. Since a narrow device can’t "see" the upper 8
data bits, that translates to it not being able to "see" wide devices with a SCSI ID
above 8. Remember the host adapter is a device, so if you’re mixing wide and
narrow devices on the bus, your host adapter must be at an ID that all devices can
address.
If mixing narrow and wide devices is unavoidable, use the configuration described
below:
Operation on a
SCSI Bus
Appendix B B-9
Page 98

Operating This Jukebox on a SCSI Bus
The SCSI Bus and This Jukebox
It is very important that the 68-pin to 50-pin cable is properly configured to assure
that the eighteen truncated lines are properly terminated.
Cable Lengths
Observe SCSI cable maximum lengths;
- 3 meters (9.8 feet) for the single-ended bus (remember, this is a fast device)
- 25 meters (82 feet) for the differential bus.
Termination
• Refer to the documentation that comes with your particular adapter to see how to
apply termination.
• Use active terminators to reduce noise sensitivity.
• Never terminate the bus at any place except the physical ends. Terminating the
bus in the middle will probably cause the bus to become inoperable or operate in
a state that could cause data loss.
• If devices are on both sides of the host computer adapter (such as hard drives
internal to the host computer and a jukebox external to the host computer) make
sure that there is no termination on the host computer adapter. Termination must
be only on the device inside the computer that is farthest from the host adapter
and the physical device inside the computer, and the last physical device external
to the computer.
General
• Do not connect a single-ended bus to a differential bus. Damage can occur.
B-10 Appendix B
Page 99

Operating This Jukebox on a SCSI Bus
Default SCSI IDs in the Jukebox When Using Basic SCSI Addressing
and When Using LUN Mode
Default SCSI IDs in the Jukebox When Using
Basic SCSI Addressing and When Using LUN
Mode
Table B-1 Default SCSI and LUN Setings in 4- and 6-Drive Jukeboxes
LUN Mode OFF LUN Mode ON
BUS 1
ID LUN ID LUN
JKBX ID 6 0 6 0
DRV 1 ID 5 0 6 1
DRV 2 ID 4 0 6 2
DRV 3 ID 3 0 6 3
DRV 4 ID 2 0 6 4
DRV 5 ID* 1* 0* 6* 5*
DRV 6 ID* 0* 0* 6* 6*
* if installed
Operation on a
SCSI Bus
Appendix B B-11
Page 100

Operating This Jukebox on a SCSI Bus
Default SCSI IDs in the Jukebox When Using Basic SCSI Addressing
and When Using LUN Mode
Table B-2 Default SCSI and LUN Settings in the 10-Drive Jukebox
LUN Mode OFF LUN Mode ON
BUS 1
ID LUN ID LUN
JKBX ID 6 0 6 0
DRV 1 ID 5 0 6 1
DRV 2 ID 4 0 6 2
DRV 3 ID 3 0 6 3
DRV 4 ID 2 0 6 4
BUS 2 LUN Mode OFF LUN Mode ON
ID LUN ID LUN
DRV 5ID 5 0 5 0
DRV 6 ID 4 0 5 1
DRV 7 ID 3 0 5 2
DRV 8 ID 2 0 5 3
DRV 9 ID 1 0 5 4
DRV 10 ID 0 0 5 5
B-12 Appendix B
 Loading...