

Page 1

HP StorageWorks
D2D Backup System
nl
HP D2D2503
User Guide
Part number: EH990-90905
Third edition: December 2008
Page 2

Legal and notice information
© Copyright 2008 H ewlett-Packard Development Company, L.P.
Confidential computer software. Valid license from HP required for possession, use or copying. Consistent with FAR 12.211 and
12.212, Commercial Computer Software, Computer Software Documentation, and Technical Data for Commercial Items are
licensed to the U.S. Government under vendor’s standard commercial license.
The information contained herein is subject to change without notice. The only warranties for HP products and services are set forth
in the express warranty statements accompanying such products and services. Nothing herein should be construed as constituting
an additional warranty. HP shall not be liable for technical or editorial errors or omissions contained herein.
Linear Tape-Open, LTO, LTO Logo, Ultrium and Ultrium Logo are trademarks of Quantum Corp, HP and IBM in the US, other
countries or both.
Patented under one or more of U.S. Patents Nos. 5,003,307; 5,016,009; 5,463,390; 5,506,580; held by Hi/fn, Inc.
Microsoft, Windows, Windows NT, and Windows XP are U.S. registered trademarks of Microsoft Corporation.
Intel and Itanium are trademarks or registered trademarks of Intel Corporation or its subsidiaries in the United States and other
countries.
AMD is a registered trademark of Advanced Micro Devices, Inc.
Page 3

Contents
Aboutthisguide ......................... 13
Intendedaudience..................................... 13
Relateddocumentation................................... 13
Documentconventionsandsymbols ............................. 13
HPtechnicalsupport.................................... 14
Customerselfrepair .................................... 14
Productwarranties..................................... 14
RegisteringyourHPD2DBackupSystem ........................... 14
Subscriptionservice .................................... 15
HPwebsites........................................ 15
Documentationfeedback .................................. 15
1Beforeyoustart......................... 17
Overview......................................... 17
Optionaltapeattach.................................... 18
Softwareandhardwarerequirements............................. 18
Terminology ....................................... 19
Autoloaders...................................... 19
Backupdevicesandslots................................ 19
Deduplication..................................... 19
Emulationtypes .................................... 19
HostsonanEthernetnetwork .............................. 19
iSCSI ........................................ 21
Libraries ....................................... 21
Mailslots(import/exportelements)............................ 21
Physicaltapedrives .................................. 21
RAID......................................... 22
Replication ...................................... 22
TapeAttach...................................... 22
Storagecapacity ..................................... 22
Physicalstorage.................................... 22
Taperotationstrategies................................. 22
Datadeduplication .................................... 23
Technologytypes ................................... 23
DatadeduplicationandtheHPD2D ........................... 23
BenefitsofHPD2Ddeduplication ............................ 23
Deduplicationandcompression ............................. 24
Taperotationexamplewithdatadeduplication....................... 24
Retentionpolicy.................................. 24
Dataparameters.................................. 24
Typicalsavings .................................. 24
2ConnectingandinstallingtheHPD2DBackupSystem ........ 27
Installingtherailkit .................................... 27
Overview....................................... 27
Kitcontents...................................... 27
Importantsafetyinformation............................... 27
Installationguidelines ................................. 27
Mountingtheserver .................................. 28
Connectingthehardware.................................. 32
D2D Backup System HP D2D2503
3
Page 4

Supported Ethernet configurations .............................. 32
Ethernetnetworkconnection............................... 32
IPv4andIPv6networkprotocols........................... 32
Dualnetworkports................................. 32
DHCPandstaticIPaddressing............................ 33
HPD2DonaGigabitEthernetnetwork........................ 33
PoweringontheHPD2D .................................. 34
Software installation, discovery and configuration ....................... 34
InstallationwizardforWindowsusers........................... 35
RunningtheInstallationwizard............................ 35
Recommendedwebbrowsersettings ............................. 37
InternetExplorer7.X .................................. 37
InternetExplorer6.X.................................. 38
MozillaFirefox1.5,Firefox2.XandFirefox3.X ...................... 38
3Attachingaphysicaltapelibraryortapedrive(optional) ....... 39
HardwarerequirementsforTapeAttach............................ 39
Supporteddevices................................... 39
Tapedeviceinstallationoverview............................... 39
Removingthetopcover................................... 40
InstallingtheHBA ..................................... 40
RemovingthePCICage................................. 41
Removingtheslotcover................................. 41
InstallingthePCIeCard................................. 42
ReinstallingthePCICage................................ 42
Replacingthetopcover................................... 43
Connectinganexternalorrackmountstoragedevice ...................... 44
4 Advanced installation ...................... 45
Manualdriverinstallation.................................. 45
HPLTOTapedriver .................................. 45
Mediumchangerdriver................................. 45
UsingDHCPtodiscovertheHPD2DBackupSystem(IPv4only).................. 46
UsingtheDiscoveryEnginetodiscovertheHPD2DBackupSystem(IPv4only) ........... 46
Beaconmode..................................... 47
If the HP D2D Backup System is new and not yet configured ................. 47
If the HP D2D Backup System has been configuredincorrectly ................ 47
Ifthenetworksetuphasbeenchanged .......................... 47
UsingtheconsoletodiscovertheHPD2DBackupSystem(IPv4andIPv6) ............. 47
Toconnectthesystemconsole.............................. 47
iSCSIInitiator....................................... 49
ManualiSCSIinitiatorinstallation ............................ 49
TheiSCSIInitiatorandAuthentication........................... 50
TheMicrosoftiSCSIInitiator............................... 50
Generaltab.................................... 50
Discoverytab................................... 52
Targetstab.................................... 52
PersistentTargetstab................................ 54
BoundVolumes/Devicestab............................. 55
LinuxandUNIXiSCSIinitiators ............................... 55
5LEDs.............................. 57
FrontpanelLEDs...................................... 57
RearpanelLEDs...................................... 57
Beaconmode....................................... 58
6Configuringandusingreplication ................. 59
4
Page 5

Replicationoverview.................................... 59
Howisreplicationinitiated?............................... 59
ReplicationandTapeAttach............................... 59
Preparingforreplication .................................. 60
Replicationconceptsandterminology............................. 60
Replicationelements.................................. 60
FanIn,FanOutandjobconcurrency........................... 61
FanOUT..................................... 61
FanIN...................................... 62
Jobconcurrency.................................. 64
Replicationdeploymentstrategies .............................. 65
ActivetoPassiveexample................................ 65
ActivetoActiveexample ................................ 66
ManytoOneexample................................. 66
ReplicationLicensing.................................... 67
Beforeyoustart .................................... 67
CreatingtheLTU.................................... 68
ApplyingtheLTU ................................... 68
TheReplicationprocess................................... 68
SeedingtheReplicationTargetAppliance......................... 68
Runningthereplicationwizard.............................. 70
RecoveringaSourceAppliance ............................... 74
Reversereplicationusingthewizard ........................... 74
Reverse replication, source lost and mapping deleted . . . . . . . . . . . . . . . . . . . . 77
PromotingaTargetLibraryovertheWANusingSCSI.................... 79
PromotingaTargetLibraryusingcolocation ........................ 81
Recoveryfromphysicalmediadirecttohost ........................ 83
7TheWebManagementInterface.................. 87
WhatistheWebManagementinterface?........................... 87
ToruntheWebManagementInterface............................ 87
Summary(Home) ..................................... 88
Statusicons...................................... 90
Devices (Configuration)................................... 90
Emulationtypesfortapedevices............................. 91
Libraries, slots and storage capacity . . . . . . . . . . . . . . . . . . . . . . . . . . . 91
Userrecommendations............................... 92
Toviewdevicedetails ................................. 92
Toeditdevicedetails.................................. 92
Tocreateanewdevice................................. 92
Todeleteadevice................................... 94
Cartridges (Configuration) ................................. 94
Emptyslots...................................... 96
Todeleteacartridge.................................. 96
Towriteprotectacartridge ............................... 96
Toeditmaximumsize ................................. 96
Tocreateacartridge.................................. 97
Tomoveorunloadcartridges .............................. 97
Network (Configuration) .................................. 97
Network configuration ................................. 98
Toeditnetworksettings............................... 98
Resettingnetworksettingstofactorydefaults........................ 99
Beaconmode..................................... 100
Email Alerts (Configuration)................................. 100
To configureMicrosoftExchangeServer.......................... 101
Disk(Status)........................................ 102
Diskusage...................................... 102
RAID(Status) ....................................... 103
RAIDstatus...................................... 103
Physicaldisks..................................... 103
D2D Backup System HP D2D2503
5
Page 6

iSCSI(Status) ....................................... 104
Log(Status)........................................ 105
Sortingandsearchingthelog.............................. 106
TapeAttachpages..................................... 106
Replicationpages ..................................... 106
Status(Replication)..................................... 107
Mapping Configuration(Replication)............................. 107
Locallibrary ..................................... 108
Thereplicationwizards................................. 109
Appliance(Replication)................................... 110
Toaddatargetappliance ............................... 111
ToeditorremoveaTargetAppliance........................... 111
TargetandSourceApplianceparameters ......................... 111
LocalSettings(Replication) ................................. 112
Configureblackoutwindows............................... 112
Configurereplicationports ............................... 113
Enablebandwidthlimiting ............................... 113
EventHistory(Replication).................................. 113
Sortingandsearchingtheeventhistory.......................... 114
Admin(Settings)...................................... 114
Resettingthepassword................................. 115
Date&Time(Settings) ................................... 115
Shutdown(Settings) .................................... 116
Firmware(Settings)..................................... 117
Support(Settings) ..................................... 118
License(Settings) ..................................... 119
Moreaboutreplicationlicensing............................. 119
Moreaboutcapacityupgradelicensing.......................... 119
Toapplythelicensekey ................................ 119
8 Using Tape Attach . . . . .................... 121
Optionsforarchivingtotape ................................ 121
Anoteaboutterminology................................ 121
Archivingmethods..................................... 122
Cartridgecopy .................................... 122
WhyusetheCopyfunctionality?........................... 122
WhenwouldCopybeused? ............................ 123
Whenisitnecessarytorestorefromacopiedcartridge? ................ 123
DisadvantagesofCopy............................... 123
Cartridgeexport.................................... 123
WhyusetheExportfunctionality? .......................... 124
WhenwouldExportbeused?............................ 124
WhenwouldIrestorefromanexportedcartridge? ................... 125
DisadvantagesofExport .............................. 125
Compression ..................................... 125
Cartridgeimport.................................... 125
Tapespanning .................................... 126
TapeAttachandreplication................................. 126
UsingtheTapeAttachwebpages .............................. 126
Configuration(TapeAttach)............................... 127
Addingtapestoragedevicestothelist ........................ 127
Viewingandeditingtapedevicedetails........................ 127
Viewingcartridgedetails.............................. 128
Obtainingsupport................................. 128
Upgrading tape storage device firmware ....................... 129
Manualjobs(TapeAttach) ............................... 130
ToselectcartridgesontheHPD2Dlibrary....................... 131
Tocopytoattachedtapestoragedevice ....................... 131
Toexporttoattachedtapestoragedevice....................... 133
Toimportfromattachedtapestoragedevice...................... 134
6
Page 7

Scheduledjobs(TapeAttach) .............................. 134
Tocreateascheduledjob.............................. 135
Sortingandsearchingscheduledjobs ........................ 139
Toview,editordeleteexistingschedules ....................... 139
Status(TapeAttach) .................................. 140
Tocancelajob .................................. 140
Ifanerroroccurs ................................. 141
JobHistory(TapeAttach)................................ 141
Sortingandsearchingthejobhistory......................... 142
9Copyusingatapedriveattachedtothehost ............ 143
Requirements ....................................... 143
Tapedrivessupported ................................. 143
Archivefromhosttotapeprocess .............................. 143
Furtherinformation................................... 144
Compression ....................................... 144
10Restoreprocesseswithoutreplication ............... 145
Restorescenarios ..................................... 145
RestoringfromtheHPD2DBackupSystem........................... 146
Restoreanddeduplication.................................. 146
ReconnectingtotheHPD2Dafterhostfailure ......................... 146
11Troubleshooting ........................ 151
Connectingthehardware.................................. 151
Connecting to the HP D2D from the backup application . . . . . . . . . . . . . . . . . . . . . 151
Connectingtothenetwork ................................. 151
Performance ....................................... 152
Network ....................................... 152
WebManagementInterfaceerrorsandwarnings........................ 152
DiskRAIDerrorsandwarnings ............................. 152
Networkwarnings................................... 153
Systemstate...................................... 153
PowerOn/OffProblems .................................. 153
HPD2Dshutsdownautomatically ............................ 153
HPD2Ddoesnotbootupcorrectly............................ 153
HPD2Dbootsupcorrectly,butcannotbeseenonthenetwork................ 154
CannotconnecttoWebManagementInterface ........................ 154
HPD2Disnotvisibleonthenetwork........................... 154
CannotlogintotheWebManagementInterface...................... 154
CannotauthenticateaniSCSIsession............................. 154
IftheHPD2DBackupSystemrunsoutofdiskspace ...................... 154
HP D2D configurationproblems ............................... 154
Icannotseeanewlycreateddevice ........................... 154
I cannot see additional slots from the backup application . . . . . . . . . . . . . . . . . . 155
Replacementofhardware.................................. 155
Eventlogdisplays‘InvalidBIOSAssemblyname’...................... 155
RAIDbatterybackupstatus ............................... 155
IftheRAIDbatteryfails................................. 155
12Harddiskreplacement ..................... 157
RAID5.......................................... 157
HowdoIknowadiskhasfailed? .............................. 157
Ifyouhaveasystemconsole .............................. 159
Ifyouhaveemailalerts................................. 160
TheEventLog..................................... 160
Electrostaticdischargeinformation .............................. 161
D2D Backup System HP D2D2503
7
Page 8

Replacingtheharddisk................................... 161
EmailalertsandLog.................................. 168
Ifyouhaveasystemconsole .............................. 168
Ifseveraldisksfail..................................... 169
Replacingthedisks .................................. 170
InitializingRAID.................................... 171
Createcartridges ................................. 171
Index .............................. 173
8
Page 9

Figures
1
FrontviewoftheHPD2DBackupSystem...................... 17
2
Rear view of the
3
Device configurationwithonehost ........................ 20
4
Device configurationwithmultiplehosts ...................... 21
5
Datastoredafterdeduplication.......................... 23
6
Space saving
7
Attachtherailstotherackcolumns ........................ 29
8
Insert the H
9
CTObracketlocation .............................. 31
10
Secure the
11
Networkandpowerconnectors.......................... 32
12
Connectingtoabusinessserveronthemainnetwork ................ 33
13
Connectingtoadedicatedbackupnetwork..................... 34
14
PoweringontheHPD2DBackupSystem...................... 34
15
Removingthetopcover ............................. 40
16
Removi
17
Removingtheslotcover(lowprofile)........................ 42
18
Insta
ngthePCIcage ............................. 41
lling the PCIe card (in the low profileslot) ................... 42
HPD2DBackupSystem...................... 18
withdeduplication ......................... 25
PD2Dintotherack.......................... 30
HPD2Dtotherack .......................... 31
19
ReinstallingthePCIcage............................. 43
20
SecuringthePCIcage.............................. 43
21
Replacingthetopcover ............................. 44
22
SystemconsoleconnectionsontheHPD2D..................... 48
23
Systemconsolescreen.............................. 48
24
iSCSIInitiatordownloadpage .......................... 49
25
Generaltab(iSCSI)............................... 51
26
CHAPsecret.................................. 51
27
Discoverytab(iSCSI) .............................. 52
28
Addtargetportal................................ 52
29
Targetstab(iSCSI) ............................... 53
30
AdvancedsettingsCHAP ............................ 54
31
PersistentTargetstab(iSCSI) ........................... 55
32
FrontviewoftheHPD2DBackupSystem...................... 57
33
RearpanelLEDs ................................ 58
D2D Backup System HP D2D2503
9
Page 10

34
ReplicationandTapeattach ........................... 60
35
Replicationelements .............................. 61
36
FanOUTexampleforHPD2D400xandD2D41xx ................. 62
37
HPD2D2500FanOUTexample......................... 62
38
HPD2D250xSeriesFanINexample ....................... 63
39
HPD2D400xand41xxSeriesFanINexample................... 64
40
Active to Pa
41
Activetoactivereplicationexample........................ 66
42
Manytoonereplicationexample......................... 67
43
SeedinginitialdatausingTapeAttach....................... 69
44
Replicationcreationprocess ........................... 70
45
Recoverybyrepopulatingareplacementsourceappliance .............. 75
46
Reversereplicationprocess:sourcelost,mappingintact ............... 76
47
Reversereplicationprocess:sourcelost,mappingdeleted............... 78
48
Recov
49
RecoverybyrelocatingtheTargetAppliance .................... 81
50
Recoveryprocess:promotingatargetlibraryusingcolocation............. 82
51
Recoveryprocess:usingphysicaltape....................... 84
52
Createnewtargetappliance........................... 111
53
Cartridgecopy................................. 122
54
55
tridgeexport ................................ 124
Car
Cartridgeimport ................................ 126
ssivereplicationexample ....................... 66
eryprocess:promotingatargetlibraryovertheWAN ............. 80
56
Archivingtotape................................ 144
57
SummarypagewithRAIDstatuswarning...................... 158
58
dentifyingthefaileddisk ............................ 159
I
59
Systemconsoleshowingfaileddisks........................ 160
60
ogshowingdiskfailure............................. 161
L
61
Removingthetopcover ............................. 162
62
Removingthemiddlecover............................ 163
63
Disknumbering ................................ 163
64
Removingtheharddriveassembly......................... 164
65
Removingdiskfromcarrier............................ 164
66
Installingdiskincarrier ............................. 165
67
Fasteningdisktocarrier............................. 165
68
Installingthedisk................................ 166
69
Reinstallingthetopmiddlecover ......................... 166
70
Reinstallingthetopcover ............................ 167
10
Page 11

71
RAIDrebuilding ................................ 168
72
SystemconsoleduringRAIDrebuild........................ 169
73
Statusshowingmultiplediskfailure ........................ 170
74
RAIDshowingtwodiskfailures.......................... 170
75
Devices page a
76
Systemconsoleaftertwodisksarereplaced .................... 171
waitingRAIDinitialization ..................... 170
D2D Backup System HP D2D2503
11
Page 12

Tables
1
2
3
4
5
Documentconventions.............................. 13
Datadeduplicationsavings,example1 ...................... 25
FanIn,FanOutandjobconcurrencyrules ..................... 65
Summarypagelayout.............................. 89
Deviceparameters(tophalfofthepage)...................... 91
6 Device param
7
Cartridge parameters . . . . . . . . . . . . . . . . . . . . . . . . . . . . . . 95
8
Network par
9
Networkportparameters ............................ 99
10
Emailparameters................................ 101
11
Physicaldiskparameters............................. 104
12
Local library parameters . . . . . . . . . . . . . . . . . . . . . . . . . . . . . 108
13
Replicationsourceforlocallibraryparameters ................... 109
14
Slotmappingforlocallibrarytosourcelibraryparameters .............. 109
15
Targetapplianceparameters........................... 111
16
Source
17
Jobscheduleparameters............................. 138
18
Scheduledjobdetails.............................. 139
19
Restorescenarios................................ 145
eters ............................... 92
ameters . . . . . . . . . . . . . . . . . . . . . . . . . . . . . . 99
applianceparameters........................... 112
12
Page 13

About t his guide
This guide provides information about:
• Installing the HP StorageWorks D2D Backup System
• Using the H P StorageWorks D2D Backup System
• Troubleshooting the HP StorageWorks D2D Backup System
Intended audi
This guide is intended for users who install, operate a nd maintain the HP StorageWorks D 2 D Backup
System.
ence
Related documentation
In addition to this guide, the following document provides related information:
• ‘Starthere’posterforanoverviewoftheinstallationinformationinthisguide(availablein
English, French, German and Japanese)
You c an fi nd these documents from the Manuals page of the HP Business Support Center website:
ttp://www.hp.com/support/manuals
h
In the Storage section, click Storage S olutions and then select your product.
ttp://www.hp.com/support/manuals
h
Document conventions and symbols
Table 1 Docu
Convention
Blue text: Table 1
Blue, unde
Bold text
ment conventions
rlined text: h
ttp://www.hp.com website addresses
Element
Cross-reference links and e-mail addresses
• Keys that are pressed
• Text typed into a GUI element, such as a box
• GUI elements that are clicked or selected, such as
menu and list items, buttons, tabs, and check boxes
Italic text Text emphasis
Monosp
Monospace, italic text
Monospace, bold text
ace text
• File and directory names
• System output
• Code
• Commands, their arguments, and argument values
• Code variables
• Command variables
Emphasized monospace text
D2D Backup System HP D2D2503
13
Page 14

WARNING!
Indicates that failure to follow directions could result in bodily harm or death.
CAUTION:
Indicates that failure to follow d irections could result in damage to equipment or data.
IMPORTANT:
Provides clarif
NOTE:
Provides additional information.
ying information or specific instructions.
HP technical support
For worldwide technical suppor t information, see the HP support website:
h
ttp://www.hp
Before contacting HP, collect the following information:
• Product model names and numbers
• Technical supp
• Product serial numbers
• Error messages
• Operating sys
• Detailed questions
.com/support
ort registration number (if applicable)
tem type and revision level
Customer self repair
HP customer self repair (CSR) programs allow you to repair your StorageWorks product. If a CSR
part needs replacing, HP ships the part directly to you so that you can install it at your convenience.
Some parts do not qualify for CSR. Your HP-authorized service provider will determine whether a repair
can be accomplished by CSR.
For more information about CSR, co ntact your local service provider. For North America, see the CSR
website:
ttp://www.hp.com/go/selfrepair
h
Product warranties
For informa
h
tion about HP StorageWorks product warranties, see the warranty information website:
ttp://www
.hp.com/go/storagewarranty
Registering your HP D2D Backup System
Once you have installed and tested your HP D2 D Backup System please take a few minutes to register
your product. You can register via the web (h
14
About this guide
ttp://www.register.hp.com).
Page 15

To ensure your registration is complete, there are a number of questions on the electronic form that are
mandatory. Other questions are o ptional. However, the more you feel able to complete, the bet ter HP
can meet your needs.
Subscription service
HP recommends that you register your product at the Subscriber’s Choice for Business website:
ttp://www.hp.com/go/e-updates
h
After registering, you will receive e-mail notification of product enhancements, new driver versions,
firmware updates, and other product resources.
HP websites
For additional information, see the following HP websites:
ttp://www.hp.com
•h
•http://www.hp.com/go/ebs
•http://www.hp.com/go/connect
•http://www.hp.com/go/storage
•http://www.hp.com/service_locator
•http://www.hp.com/support/manuals
•http://www.hp.com/support/downloads
Documentation feedback
HP welcome
To make comments and suggestions about product documentation, please send a message to
[email protected]. All submissions become the property of HP.
s your feedback.
D2D Backup System HP D2D2503
15
Page 16

16
About this guide
Page 17
1 Before you star t
In this chapter:
• “Overview” on page 17
•
“Optional tape attach”onpage18
•
“Software a nd hardware requirements” on page 18
•
“Terminology” on page 19
• “Storage capacity” on page 22
•
“Data deduplication” on page 23
Overview
The HP Stora
to six tape devices, which can be used to back up host network servers or PCs. Each tape device
is configured as an Ultrium Tape Library or Autoloader. An emulation type is selected during initial
configuration and this determines the maximum number of s lots that may be configured for the device.
The default configuration emulates the HP StorageWorks 1/8 G2 Ultrium Tape Autoloader.
geWorks D2D Backup System is an iSCSI disk-based storage appliance that emulates up
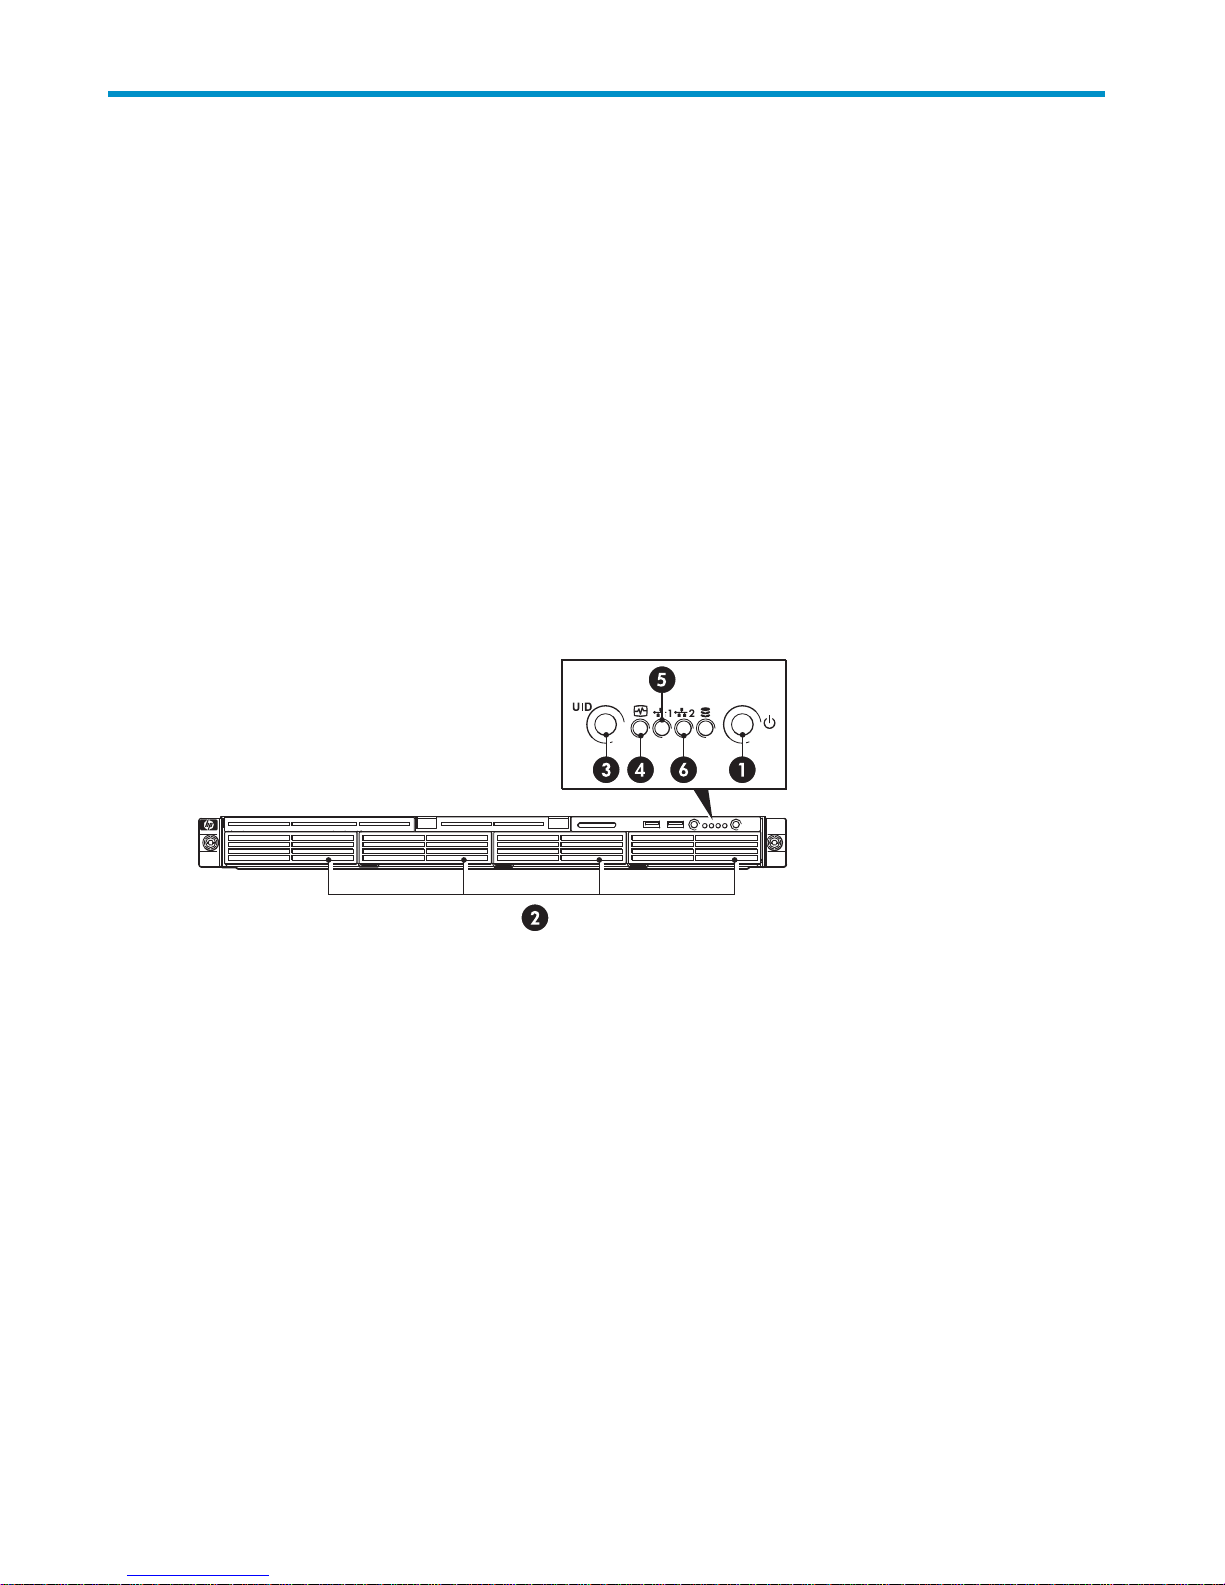
1. Power On button/LED
2. Hard disk drives
3. HP D2D Beacon LED
Figure 1 Front view of the HP D2D Backup System
4. System health LED
5. LAN port 1 LED
6. LAN port 2 LED
D2D Backup System HP D2D2503
17
Page 18
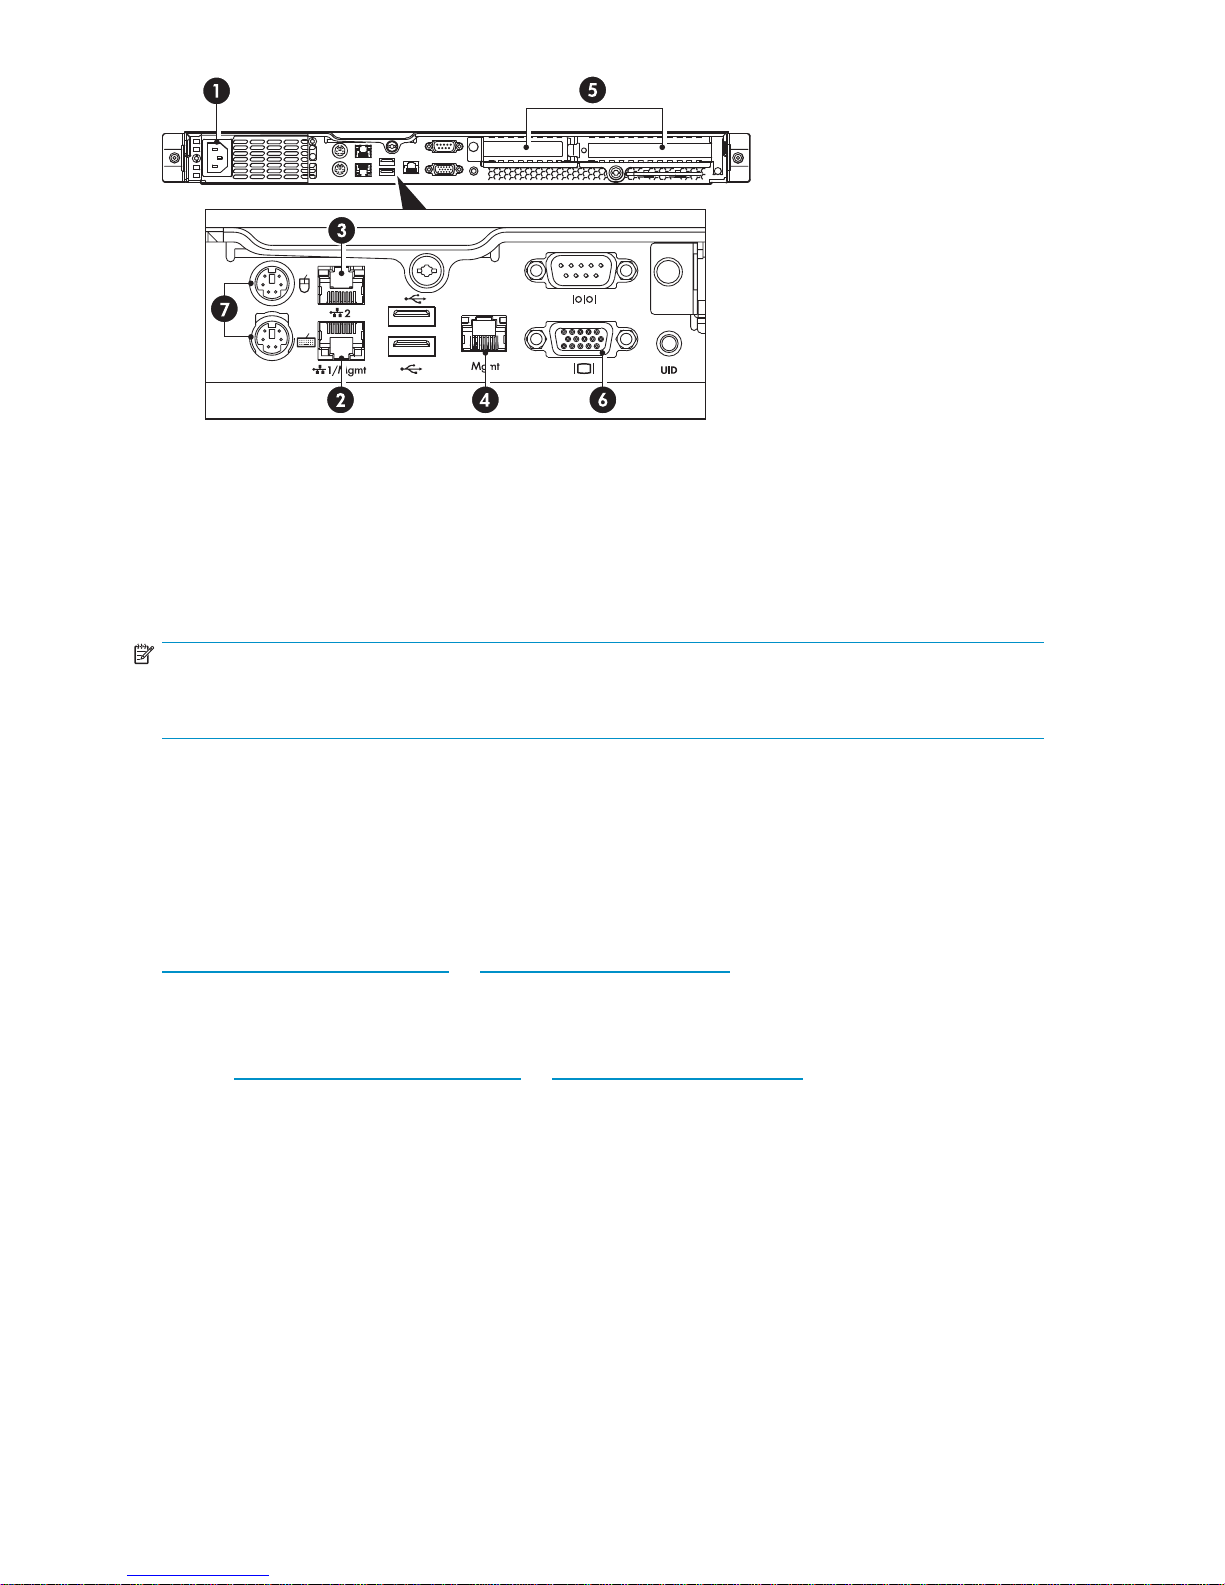
1. Power supply cable socket
5. PCIe slots (one full and one low profile)
2. LAN port 1
3. LAN port 2
4. Management LAN port (Do not connect to this port)
Figure 2 Rear view of the HP D2D Backup System
NOTE:
One full PCIe slot has a SmartArray RAID controller card pre-installed. The other slot is available for
optional T
ape Attach.
6. VGA por t for system console monitor
7. PS/2 ports for system console keyboard and mouse
Optional tape attach
An external or rackmount Ultrium Tape Drive may be attached directly to the H P D2D Backup System,
allowing the user to store backups offsite. Both SAS and SCSI tape drives are supported and require
installation of a host bus adapter (HBA). External tape drives may be half-height or full-height. Rackmount
tape drives are installed in a rackmount enclosure, such as a 1U Rack, 3U Rack or a TapeArray.
To find out which Ultrium Tape Drive models and HBAs are supported, refer to
ttp://www.hp.com/go/connect or http://www.hp.com/go/ebs.
h
Software and hardware requirements
Refer to http://www.hp.com/g o /connect or http://www.hp.com/g o/ebs for the latest connectivity
and compatibility information.
• The HP D2D Backup System should b e connected to a Gigabit Ethernet network. 100 Base-T
Ethernet will limit performance; 10 Base-T Ethernet will severely limit performance.
• For backup and restore you need software that supports tape autoloaders and libraries. This
software resides on the host, not the HP D2D Backup System. The device may be used with the
major backup applications from HP, Symantec, EMC, Computer Associates and others.
18
Before you start
Page 19

Terminology
Autoloaders
An autoloader is a backup device that has a single tape drive and multiple storage slots. (A library has
multiple tape drives, see “Libraries” on page 21.) Each storage slot contains a cartridge that can be
allocated to a specific backup task; for example, one car tridge can hold Monday’s data, another can
hold Tuesday’s data, and so on. In this way, backup applications are able to implement tape rotation
strategies that accommodate differing backup requirements for daily, weekly, monthly, yearly backups.
Backup device
Backup device
the HP D2D Backup System which, as in tape terminology, is referred to as slots or cartridges.
The HP D2D supports the following emulation types: HP 1x8 G2 Autoloader, HP MSL Library (2x24), HP
MSLLibrary(4x24)andD2DBSGenericLibrary(48slots). Thedefaultof1x8G2Autoloaderiscorrect
for many applications. (The number of drives is always restricted to 1, regardless of emulation type.)
See also “Devices (Configuration)”onpage90.
When you configure your HP D2D Backup System with a tape library, the drive emulation type that you
select determines the amount of physical disk space that is made available for each con figured slot.
LTO-2defaultsto200GB,LTO-3defaultsto400GBandLTO-4defaultsto800GB.Thisistheequivalent
of a tape li
spanning
When you c
disk spac
200 GB tape cartridge, which cannot be unloaded. Tape spanning is impossible, so the data to be
backed up must not exceed 200 GB.
Deduplication
Data deduplication compares blocks of data being written to the backup device with data blocks
previously stored on the device. If duplicate data is found, a pointer is established to the original data,
rather than storing the duplicate data sets. This removes, or “deduplicates,” the redundant blocks. See
also “Data deduplication” on page 23.
sandslots
s appear to the host as locally-attached tape devices, but physically, they use disk space on
brary with multiple slots, each containing a 200, 400 or 800 GB cartridge. Both tape
and, more importantly, flexible tape rotation strategies are possible.
onfigure your HP D2D Backup System with a standalone tape drive, 200 GB of physical
e is made available for that tape drive. This is the equivalent of a permanently- mounted
Emulat
ion types
HP D2D products emulate a range of physical Tape Autoloaders or Tape Libraries. Supported emulation
are listed below:
types
• HP 1x8 G2 Autoloader
• HP MSL2024 Library
• HP MSL
• HP D2DBS Library
If it is supported by your backup application, HP D2DBS Library is the preferred emulation type to be
used
D2D device. It is the most flexible emulation type available; however, backup application suppor t varies
by software vendor. See also “Emulation types for tape devices” on page 91.
4048 Library
because it does not emulate any physical library types in existence and is clearly identifiable as a
HostsonanEthernetnetwork
Each emulated backup device is uniquely mapped to an individual h ost; this is the network server or
PC that you wish to back up.
• The backup device appears to the host as a locally-attached tape autoloader or library.
• The backup device is accessed and managed from the backup software running on the host.
D2D Backup System HP D2D2503
19
Page 20
• The backup device is not visible to other devices on the network.
• Multiple servers may not back up to a single b ackup device.
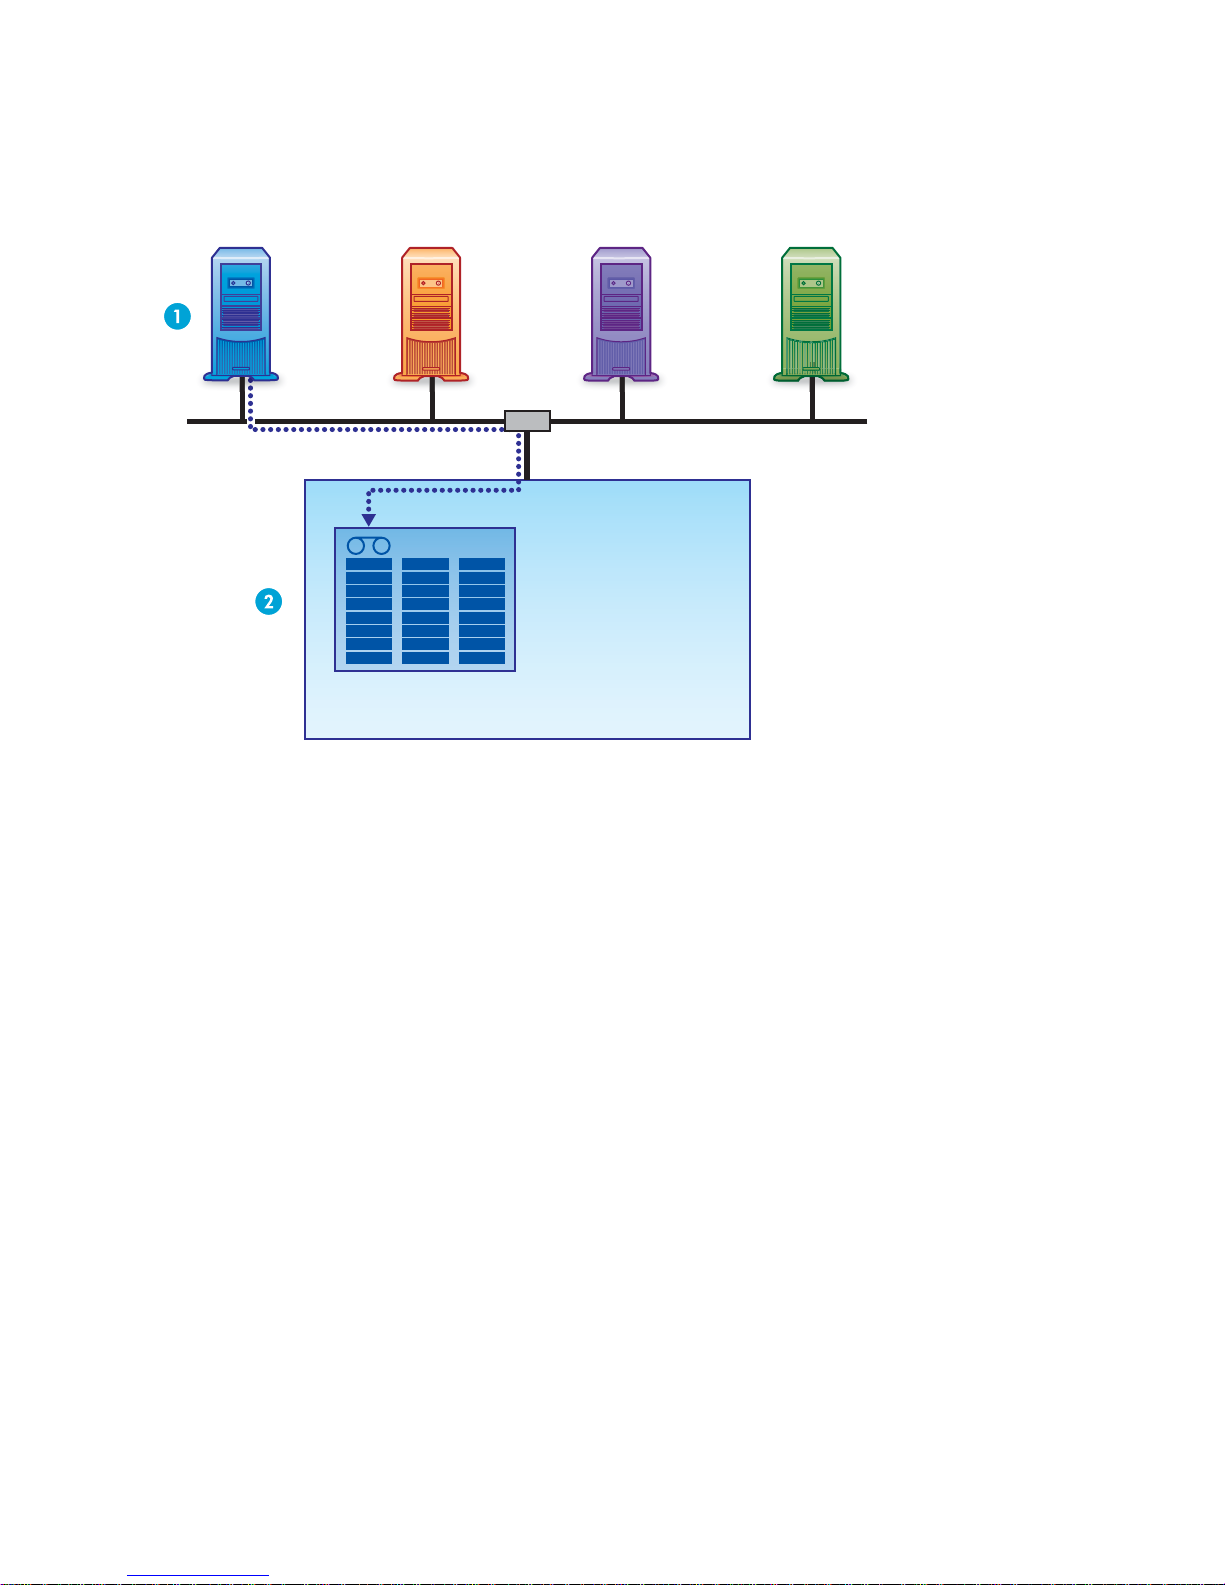
Figure 3 on page 20 shows a configuration with a single host. The Installation wizard has been run
on Host 1. The HP D2D Backup System automatically generates a library for the host. The user may
specify the number of slots during installation.
Host3Host2 Host4/5/6Host1
LAN
Library 1
HP StorageWorks D2D Backup System
Figure 3 Device configuration with one host
• Bydefault,onlyonedeviceisvisibletothehost,thelibrarythathasbeenconfigured for it during
installation. Data from each host goes to its corresponding library.
• Each backup device is visible only to the host for which it has been configured.
• A host may have multiple devices configured for it on the HP D2D Backup System, but this means
fewer hosts may be connected (not illustrated).
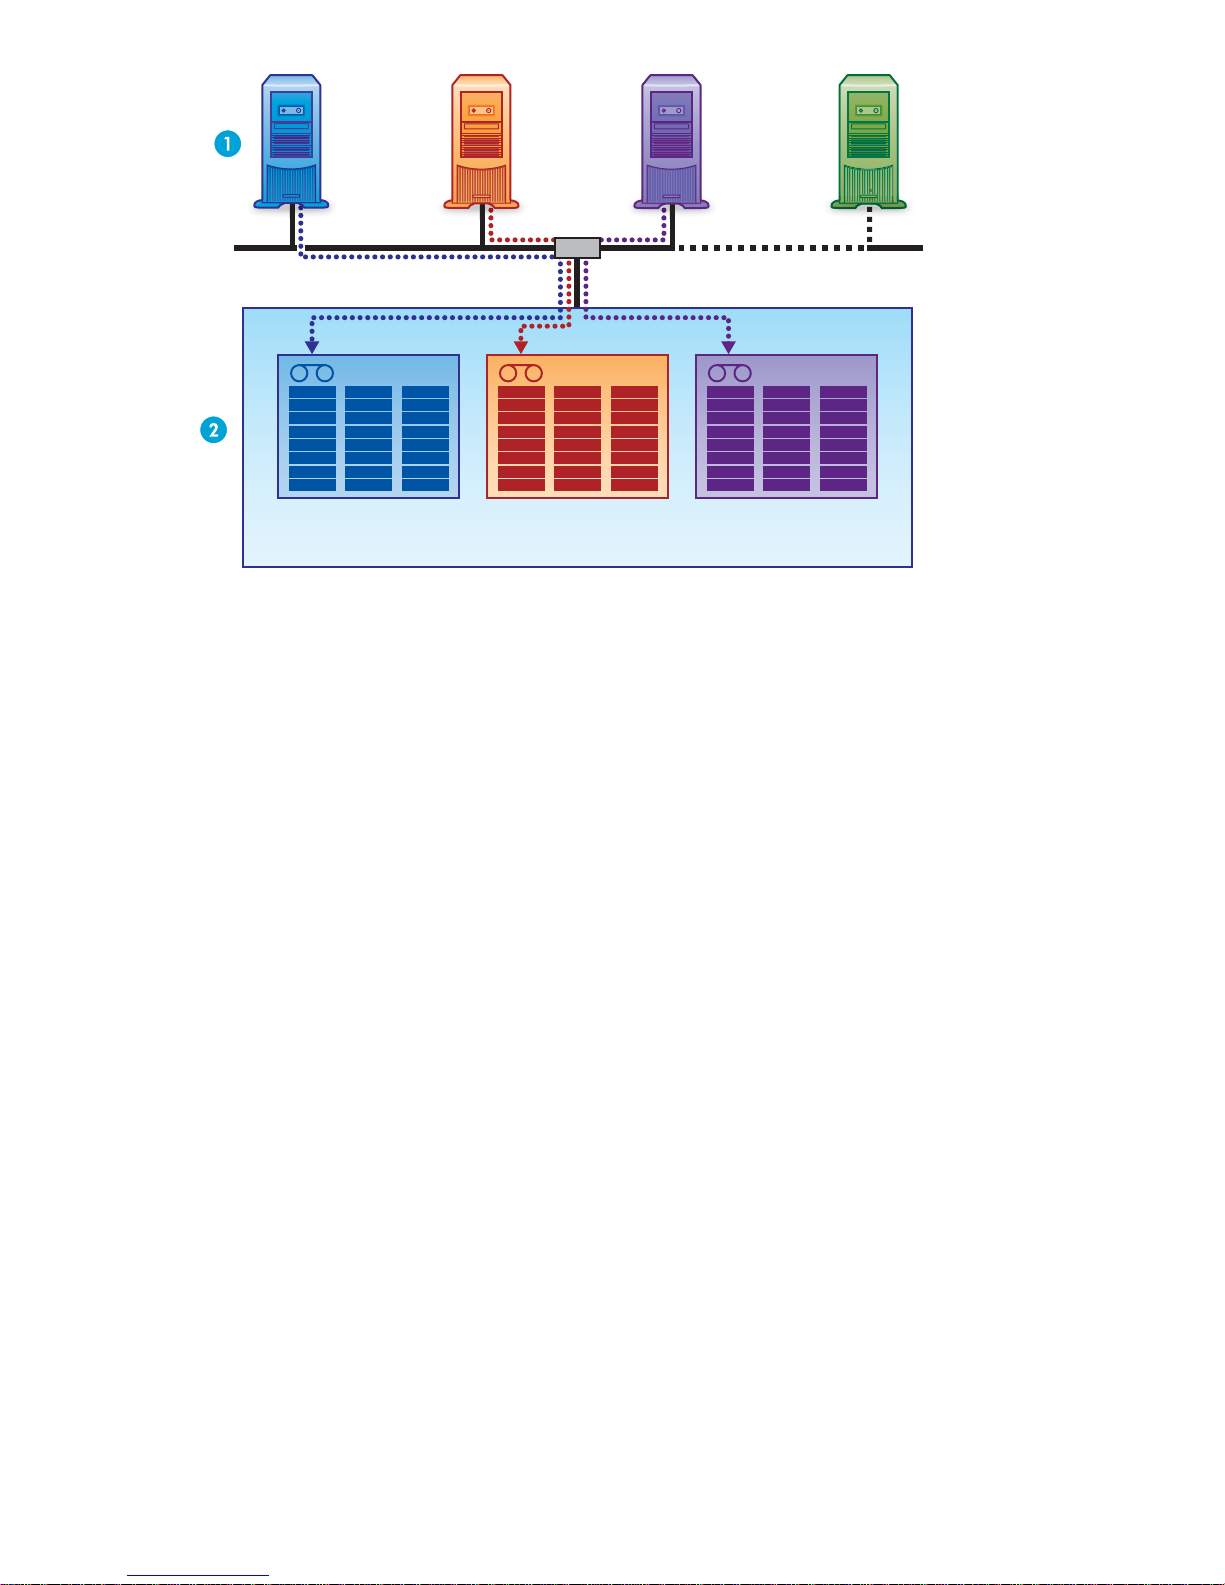
Figure 4 on page 21 shows a con fig uration with three hosts. The HP D2D Backup System can be used
to back up a maximum of six hosts. The Installation wizard automatically generates a library for each
host. The user may specify the number of slots during installation.
20
Before you start
Page 21
iSCSI
Host4 onwardsHost1 Host2 Host3
LAN
Library 1 Library 2 Library 3
HP StorageWorks D2D Backup System
Figure 4 Device configuration with m ultipl e hosts
On an Ethernet network the HP D2D Backup System is configured as an i SCSI device. This
means that the HP D2D Backup System plugs directly into the network, but it presents devices as
directly-attached SCSI autoloaders to host machines. In order to function, it requires an iSCSI initiator.
On Window
“Connecting and installing the HP D2D Backup System” on page 27. For more information about iSCSI,
see “Advanced installation” on page 45. Linux and UNIX users should also refer to the “Linux and UNIX
Configuration Guide” on the HP StorageWorks D2D Backup System CD-ROM for more information.
s systems, this is normally downloaded by the Installation wizard, as described in
Libraries
A tape library is a backup device that has multiple drives and multiple storage slots. Each storage slot
contains a cartridge. The difference between an autoloader and a library is that a library can support
multiple tape drives whereas an autoloader only has one tape drive. This provides considerable storage
capacity and full support for tape rotation strategies. (It may b e necessary to upgrade your backup
application to support libraries.)
Mail slots (import/export elements)
Amail
impo
Back
Expo
slot is a term borrowed from tape terminology to identify a dedicated slot that is used specifically to
rt and export cartridges. They are sometimes called import/export elements by backup applications.
up applications that suppor t this feature move cartridges from the m ail slot when the user runs an
rt job, and look for cartridges in the mail slot when the user runs an Import job.
Physical tape drives
A physical tape drive is a tape drive that is attached to the HP D2D Backup System or the host computer,
so that data can be moved from the HP D2D Backup System and stored offsite. (It should not be confused
withthetapedrivedevicethatisattachedtothelibrarydeviceontheHPD2DBackupSystem(see
“Devices (Configuration)” on page 90.)
D2D Backup System HP D2D2503
21
Page 22

RAID
RAID stands for Redundant Array of Inexpensive (or Independent) Devices, which is a data storage
scheme that divides data among multiple hard drives, increasing data reliability and throughput. The
HP D2D Backup System is a RAID 5 device, which offers the best combination of data p rotection and
capacity. It ha
System continues to operate co rrectly. The failed disk should always b e replaced as soon as possible.
Replication
Replication is a standard term used to describe a way of synchronizing data between hardware in two
physical locations. HP D2 D Replication allows users to replicate data from cartridges on one HP D2D
Backup System to mapped slots on another HP D2D Backup System on a remote site or the same system.
Once con figured (using the simple-to-use wizard), replication occurs automatically, ensuring data is
mirrored from the source to the target HP D2Ds. Deduplication ensures that network trafficisminimized.
See also “Configuring and using replication” on page 59.
Tape Attach
If you attach a supported, physical tape library or tape drive directly to your HP D2D Backup System,
you will be able to copy or export data to the physical tape library or tape drive so that backups can
be stored o
between copy and export is that copied data remains on the HP D2D Backup System; exported data
is removed from it, but can be imported easily when required. These functions are grouped under the
Tape Attach section of the Web Interface. Please see “Using Tape Attach” on page 121 for more
details a
s four hard disks, but if one of the disks fails, no data is lost and the HP D2D Backup
ffsite. This is an impor ta nt requirement for Disaster Recovery strategies. The main difference
bout working with Tape Attach.
Storage capacity
Physical storage
The physical storage capacity of the HP D 2 D Backup System is 3.0 TB (3000 G B ). However, in order to
ensure a high level of data integrity, the disks use RAID 5 protection. This reduces the available capacity
but ensures that, in the event of a single disk failure in the device, there will be no data loss.
Actual storage c apacity is approximately:
• 2.25 TB
Data deduplication is enabled by default for each library device. This eliminates duplicate data from
backups and means that more histories of data can be stored and retained for longer on each library.
See als
You ca n
space
• Review your backup jobs to see if you can reduce the s ize of backup or retention time.
• Use the backup application job settings to overwrite or erase data.
• Expor
Tape rotation strategies
Tape rotation strategies determine when ba ckups are run, the number of cartridges that are required and
how they are reused. The HP D2D Backup System is a very flexible device that can easily be incorporated
into most tape rotation strategies. If your organization does not yet have a tape rotation strategy in place,
see “Tape rotation example with deduplication” on page 24 for example configurations.
for the HP D2D Backup System
o“Data deduplication” on page 23.
not add physical disk space, but you may be able to create some space. Options for creating
, if the disks start to get full, are:
tcartridgestophysicaltape.
22
Before you start
Page 23

Data deduplicat
ion
Data deduplica
previously sto
rather than storing the duplicate data sets. This removes, or “deduplicates,” the redundant blocks. The
key part of this is that the data deduplication is being done at the block level and not at the file level
which reduces the volume of data stored significantly.
Figure 5 Data stored after deduplication
tion compares blocks of data being written to the backup device with data blocks
red on the device. If duplicate data is found, a pointer is established to the original data,
In actual practice, data d eduplication is often used in conjunction with other forms of data reduction such
as conventional data compression to offer the greatest reduction in data volume stored.
Technology types
There are a number of technology types that use different deduplication algorithms. The HP D2D applies
on-the-fly deduplication to chunks of backup data as they are written to the unit. It does not matter which
application was used to create the backup. For further information about deduplication techniques an d
relative benefits, refer to the white papers at h
Data deduplication and the HP D2D
Data deduplication is applied per library device. When you configurethelibrary,itdefaultsto
deduplication enabled. If you disable it, deduplication cannot be selectively applied to any data on the
library device. Compression is also disabled, if deduplication is disabled.
A library is associated with a host server and deduplication allows a greater amount of backup history
to be stored for that host. A larger number of full backups can be achieved, which makes possible a
rotation strategy with a longer retention history. It does not increase the number of host servers that
may be connected. The deduplication factor that has been applied to a library device is calculated
and displayed on the Web Interface. This figure is dynamic, it updates automatically as more data is
written to the library.
Benefits of HP D2D deduplication
The main benefit is that it is possible to store more data and retain data for longer on each cartridge
within a library. The host using the library device has access to a greater depth of historical data
that would otherwise have been archived offline.
Deduplication:
• Provides efficient use of storage capacity by eliminating duplicate data
ttp://www.hp.com.
D2D Backup System HP D2D2503
23
Page 24

• Reduces disk expenditures by reducing storage space required. You can get more backups for each
hostonthesamesizeofstorage(HPD2Ddevice)
• Prolongs disk data retention p eriods
• Reduces the volume of data that must be sent a cross a WAN for remote backups, replication, and
disaster recovery – reducing both risk and operational costs
See “Configuring and using replication” on page 59 for more information about replication.
Deduplication and compression
Compression is applied as part of deduplication. You can expect 1.6:1 compression even on the first
backup where no (or only a sm all amount of) de duplication can occur. If you disable deduplication, see
“Devices (Co
nfiguration)” on page 90, no compression is applied to data on tha t device.
Tape rotation example with data deduplication
The two most significant factors affecting the deduplication ratio for backup are:
• How long do you retain the data?
• How much data changes between backups?
The following example shows projected savings for a 1 TB file server backup.
Retention policy
• 1 week, daily incrementals (5)
• 6 months, weekly fulls (25)
Data parameters
• Data compression rate = 2:1
• Daily change rate = 1% (10% of data in 10% of files)
Typical savings
The following table illustrates a reduction of approximately 11:1 in data stored. In practice, assuming
1.25 TB is available for backup for this library, this means:
• Without data deduplication: only two weeks of data retention is possible before it is necessary to
archive
• With data deduplication: even after six months less than 1.25 TB of disk space has been used.
The following table illustrates h ow this affects the space required to store the data over 25 weeks. The
figures are used to generate the graph shown after the table.
data offline.
24
Before you start
Page 25
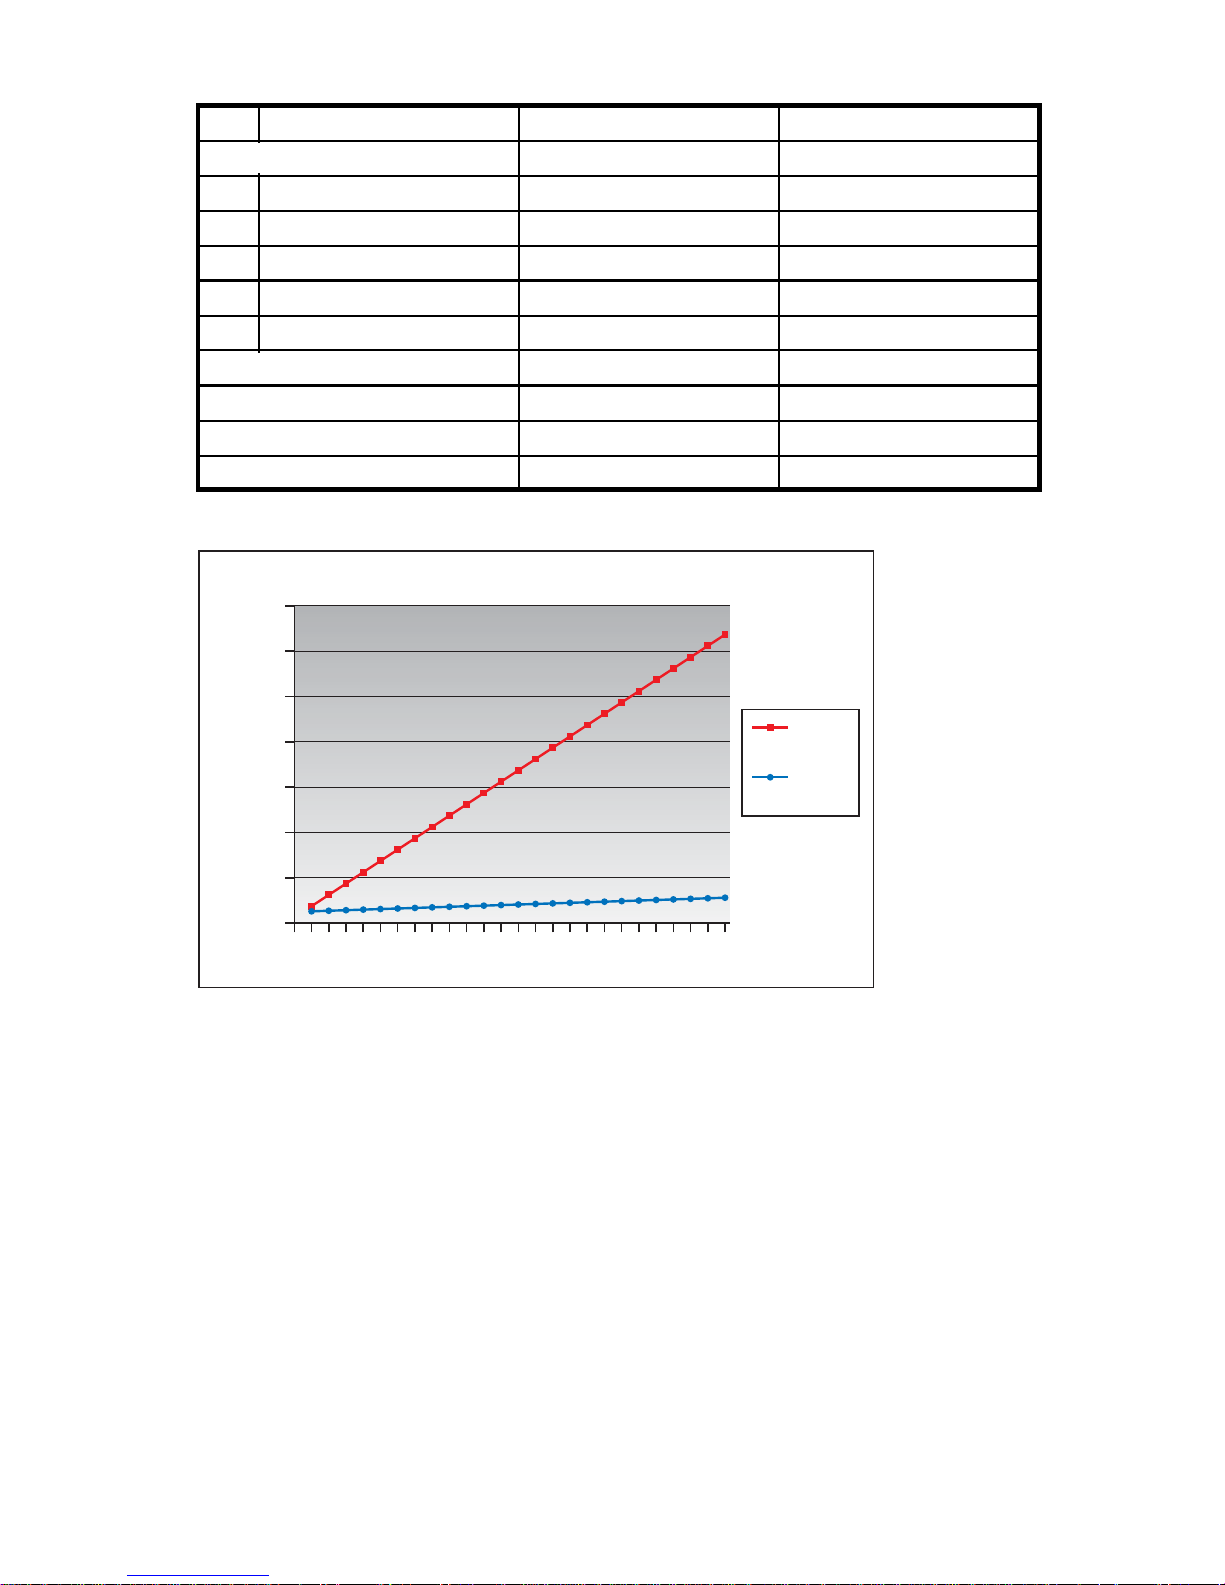
Table 2 Data deduplication savings, example 1
1st daily full backup
1st daily incremental backup
2nd daily incr
3rd daily incremental b ackup
4th dai ly incremental backup
5th dai ly incremental backup
2nd weekly full b ackup
3rd weekly full backup
25th weekly full backup
emental backup
Data stored nor
mally
Data stored wit
500 GB 500 GB
50 GB 5 GB
50 GB 5 GB
50 GB 5 GB
50 GB 5 GB
50 GB 5 GB
500 GB 25 GB
500 GB 25 GB
500 GB 25 GB
hdeduplication
TOTAL 12,750 GB 1,125 GB
Space saving with deduplication
14000
12000
10000
8000
6000
Space in GB
4000
Without
Dedupe
With
Dedupe
2000
0
12345678910111213141516171819202122232425
End of week
Figure 6 Space saving wit h deduplication
D2D Backup System HP D2D2503
25
Page 26

26
Before you start
Page 27

2 Connecting and installing the HP
D2D Backup System
In this chapter:
•
“Installing the rail kit” on page 27
•
“Connecting the hardware”onpage32
•
“Supported network configurations”onpage32
•
“Powering on the HP D2D” on page 34
•
“Software installation, discovery and confi guration” on page 34
•
“Web browser settings” on page 37
Installing the rail kit
Overview
This section contains instructions for installing HP rack rails into square a nd round hole racks for the
HP D2D (1U) and HP D2D (2U) Backup Systems.
Kit conte
nts
• Two rack rails (left and right)
• Mounting
• Two tie wraps
NOTE:
If mounting the HP D2D into threaded hole or telco racks, please see h
purchas
hardware for square and round hole racks
emountinghardware.
Important safety information
See also the Safety Booklet on the HP StorageWorks D2D Backup System CD- ROM.
CAUTION:
Electrostatic discharge (ESD) can damage electronic components. Be sure you are properly grounded
(earthed) before beginning any installation procedure.
Installation guidelines
This installation is to be performed by qualified individuals who have knowledge of the procedures,
precautions, and hazards associated with equipment containing hazardous electrical circuits.
ttp://www.racksolutions.com to
D2D Backup System HP D2D2503
27
Page 28

WARNING!
These rails, when installed, form only a shelf for the server to rest on. The server is not attached to the rail
by any other means. Use extreme caution when pulling the server out from the rack; it can slip and
fall, causing damage to the server or injury. HP is not responsible for any damage or injury caused by
the mishandling of the server.
WARNING!
Ensure that the rack is level and stable before working on the rack. Be sure the leveling jacks (feet) extend
to the floor and that the full weight of the rack rests firmly on the floor.
WARNING!
Ensure that the rack has anti-tip measures in place. Such measu res may include floor-bolting, anti-tip
feet, ballast, or a combination of these as specified by the rack manufacturer and applicable codes.
WARNING!
Ensure that sufficient personnel are on hand to support the product(s) during the installation process. Use
of the appropriate lifting device is recommended as an installation aid.
WARNING!
Always load the rack from the bottom up. Load the heaviest items in the rack first. This makes the rack
bottom-heavy and helps prevent it from becoming unstable.
WARNING!
Do not overload the branch circuit that provides power to the rack. The total rack load should not
exceed 80 percent of the branch circuit rating.
Mounting the server
1. Position left and right rack rails at the desired ’U’ position in the rack.
NOTE:
Therailscanbeadjustedtofittherack.
2. Secure rack rails to the front and back rack columns using screws. Make sure that the shoulders
of the screws fit inside the square or round holes of the rack.
NOTE:
If installing rails into a square hole rack, use larger-sized shoulder screws and pins for mounting. If
installing rails into a round hole rack, use smaller-sized shoulder screws and pins for mounting.
28
Connecting and installing the HP D2D Backup System
Page 29
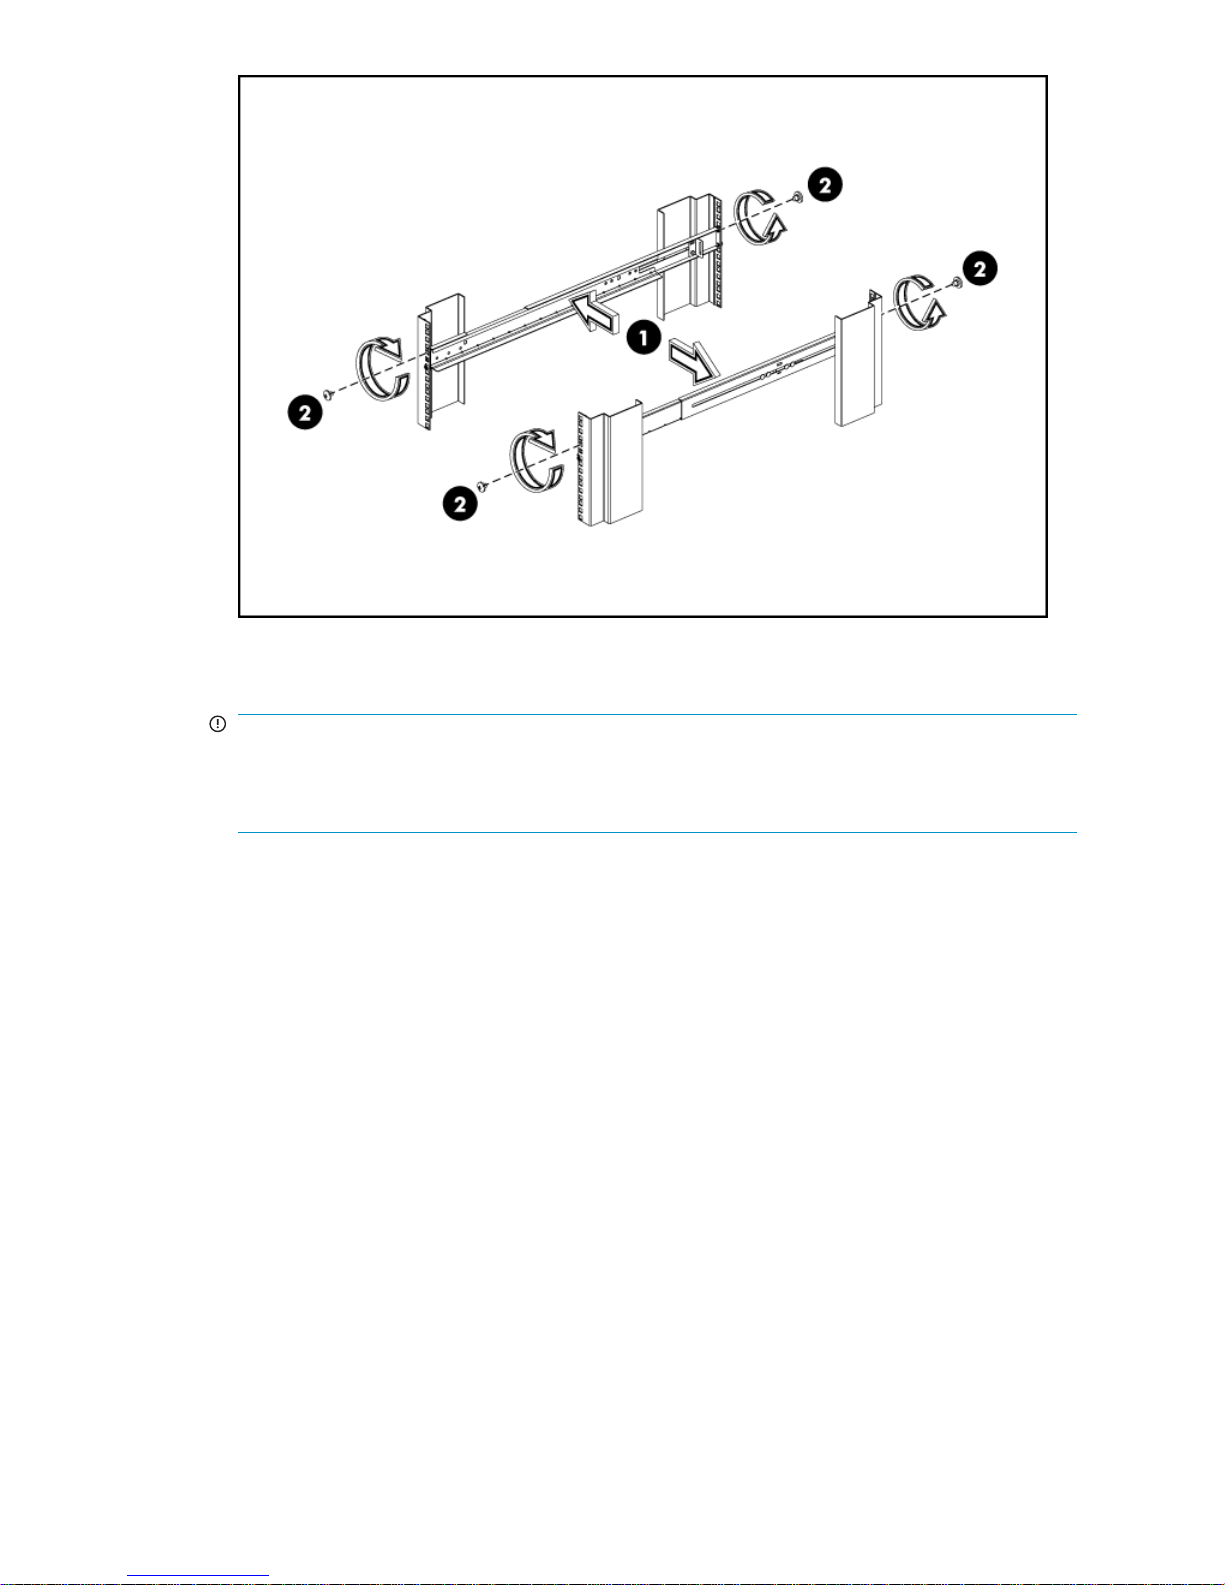
Figure 7 A ttach the rails to the rack columns
3. Slide the HP D2D into position on the rails.
IMPORTANT:
The label on the top of the HP D2D contains useful identity information, such as the MAC address
and default network name. Make a note of this information before you install the HP D2D in the
rack. There is also a p ull-out strip in the front panel with the serial number and port ID.
D2D Backup System HP D2D2503
29
Page 30
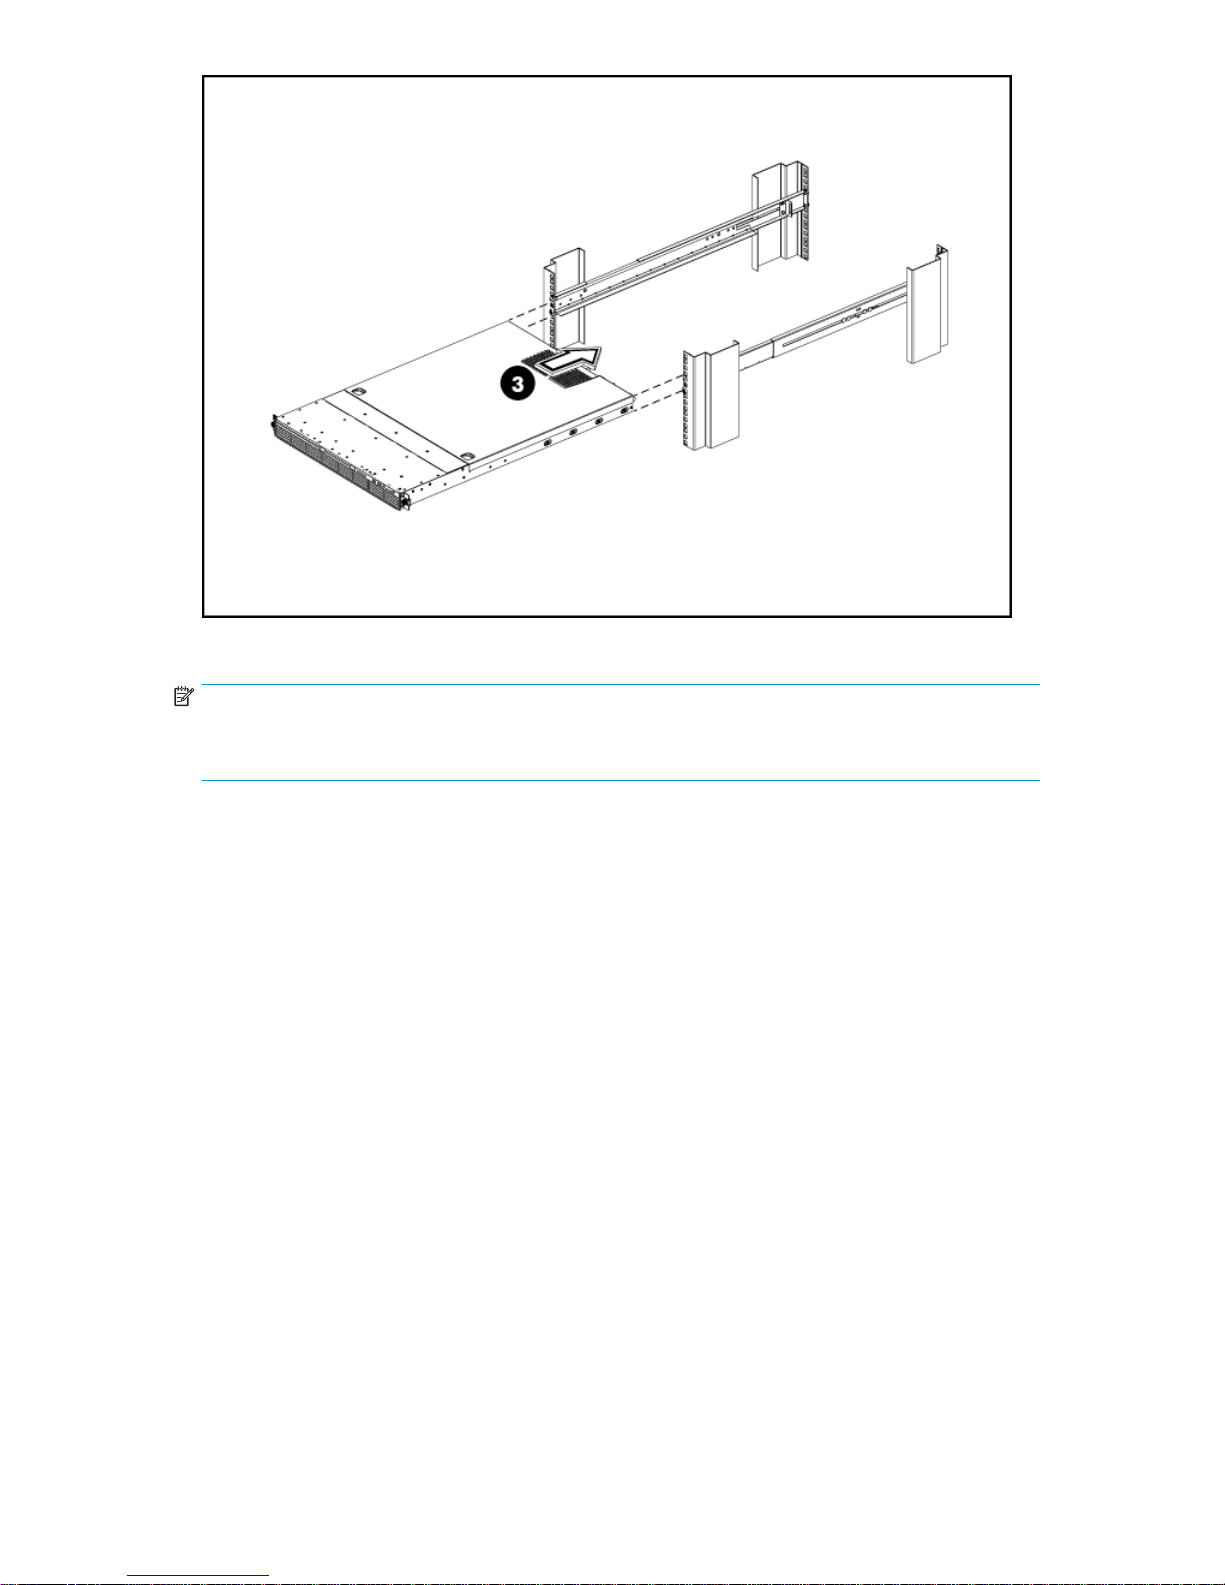
Figure 8 Insert the HP D2D into the rack
NOTE:
The rear ends of the rails have a CTO bracket that must overlap the chassis tab in order to secure the
HP D2D to the rails.
30
Connecting and installing the HP D2D Backup System
Page 31
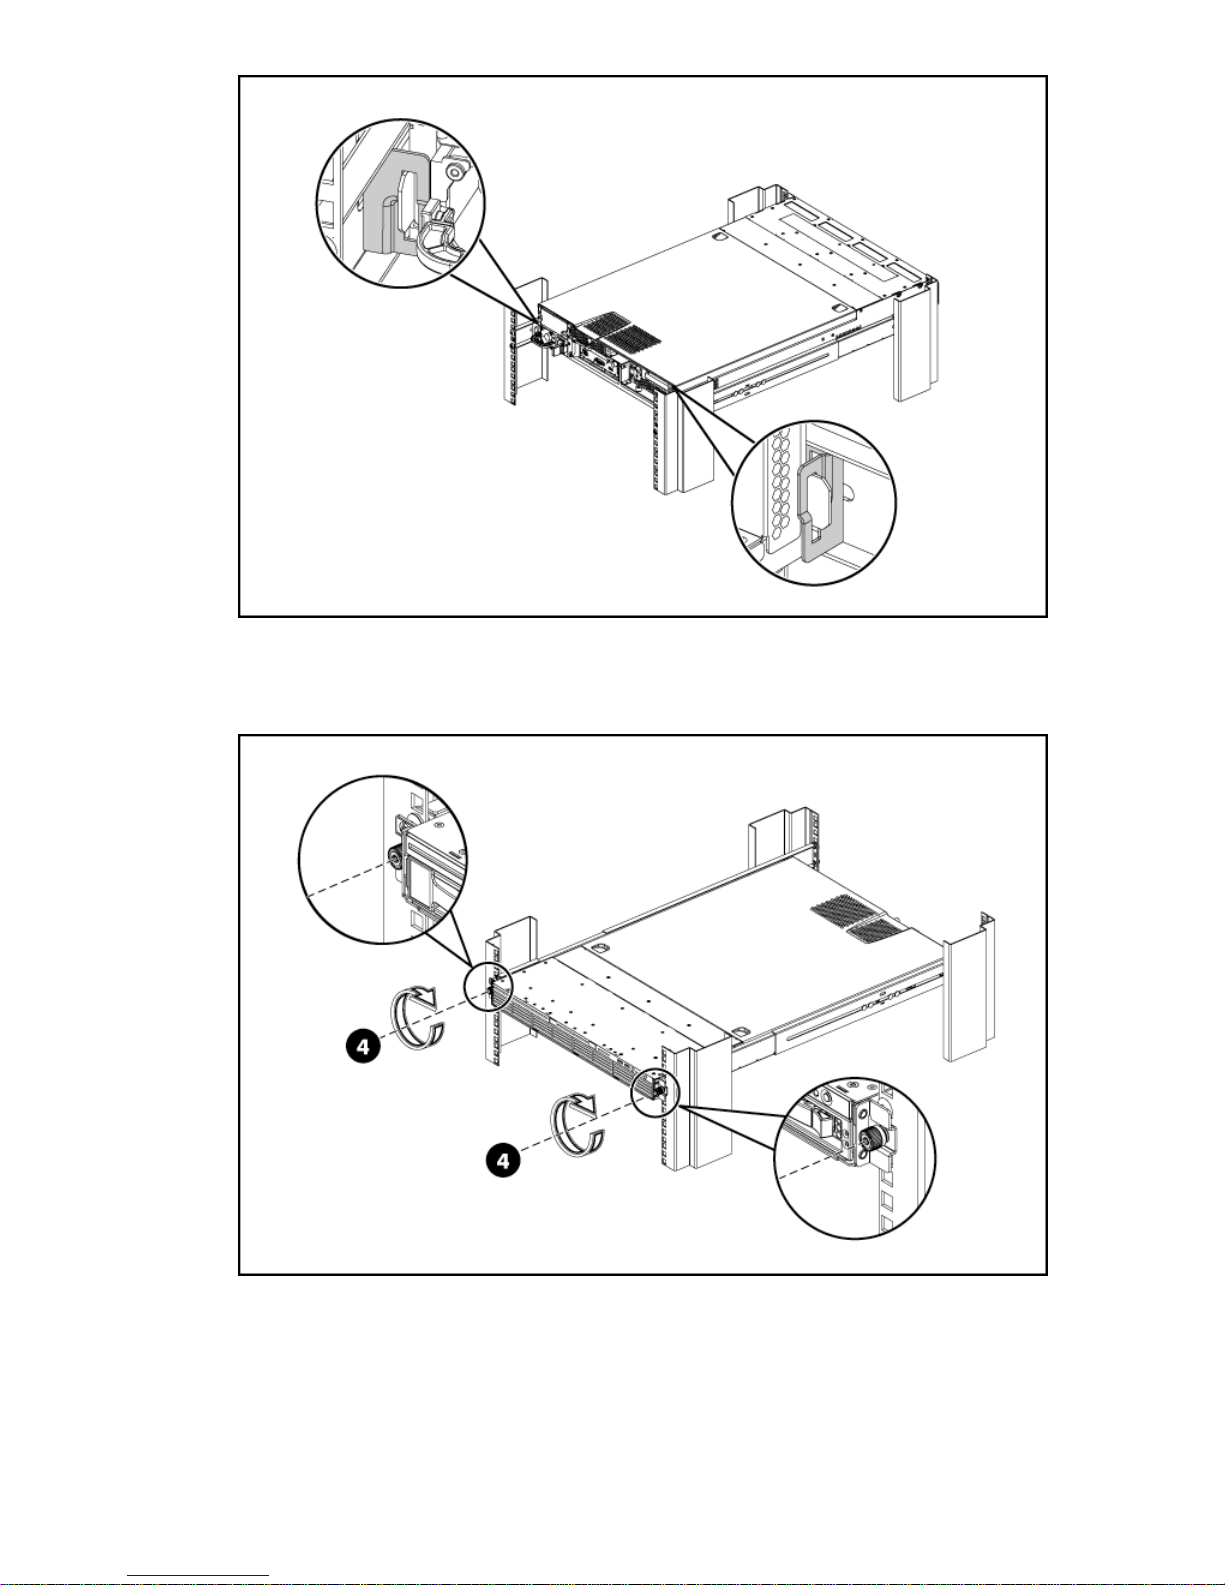
Figure 9 CTO bracket location
4. Secure the HP D2D to the rack rails using thumbscrews on the front bezel.
Figure 10 Secure the HP D2D to the rack
5. Using the holes provided in the rear rack rails, install tie wraps and route external cable as
required.
D2D Backup System HP D2D2503
31
Page 32

Connecting the hardware
1. Power connector
3. LAN port 2 connector
Figure 11 Network and power conn ectors
1. Use the supplied power cord to connect the HP D2D Ba ckup System to the main power supply. This
HP-approved cord is appropriate for your specific geographic region.
For detailed safety information, see the Safety Guide on the HP StorageWorks D2D Backup System
CD-ROM.
2. Use any CAT-5E network cable (also supplied with the product) to connect to a Gigabit network
switch. 100 Base-T Ethernet will lim it performance; 10 Base-T Ethernet will severely lim it performance.
See also “Dual network ports” on page 32.
NOTE:
The Web Management Interface is used to configure devices and it requires an Ethernet connection.
LAN Port 1 (the lower LAN port on the rear of the HP D2D) must always be connected.
NOTE:
The HP D2D also supports direct connection of a monitor and keyboard. Please refer to
“Using the system console to d iscover the HP D2D” on page 47 for more information about this.
2. LAN port 1 connector, must be connected
Supported Ethernet configurations
Ethernet network connection
IPv4 and IPv6 network protocols
The H P D2D supports both IPv4 and IPv6. Setup and configuration will default to IPv4, if the
network is configured to support it. On a n IPv6–only network, it is normally sufficient to enter
the IPv6 MAC Address (found on the label on the top of the unit) when running the Installation
Wizard. However, if this does not work, you can use the system console, as described in
“Using the system console to discover the HP D2D” on page 47.
Dual network ports
The two physical network ports provide three network con figuration modes:
• Single Port Configuration: The HP D2D is connected to one net work only; only one network port
is used
• Dual Port Configuration: The HP D2D is connected to two different networks. Both network ports
are used.
32
(Port 1).
Connecting and installing the HP D2D Backup System
Page 33
• High Availability Dual Port Configuration: Both network ports are used, but the two ports are bound
r
together.
Single port configu ration is the default mod e, but it may easily be changed from the Web Management
Interface. If dual port configuration is required, the networks must be on different sub-nets.
The High Availability mode is the recommended option, because it provides port failover and increased
bandwidth, but both network ports must be connected to the same switch and it must support port bonding.
DHCP and static IP addressing
DHCP network addressing is enabled by default as long as you are connecting the HP D2D as an IPv4
device; this m
connect the H
eans that an IP address and other network settings are assigned automatically when you
P D2D Backup System to an IPv 4 network that has a DHCP server. If preferred, you can use
static IP addressing and assign settings manually during the installation process. If you are connecting to
anIPv6–onlynetwork,itisnormallysufficient to enter the IPv6 MAC Address (found on the label on the
top of the unit) when running the Installation Wizard.
The HP D2D Ba
ckup System should be on the same logical and physical network as the host machine
connecting to it. This is normally the case because, typically, the HP D2D Backup System is connected to
the same Gigabit network switch as the host machines backing up to it.
HPD2DonaGigabitEthernetnetwork
TheHPD2DBackupSystemisconnectedtoaspareportonanexistingGigabitnetworkswitch.
This may be your main network, which is also used to connect a number of different types of devices,
such as PCs, servers, workstations and p rinters, or a dedicated backup network that is used solely
for clients that need to be backed up.
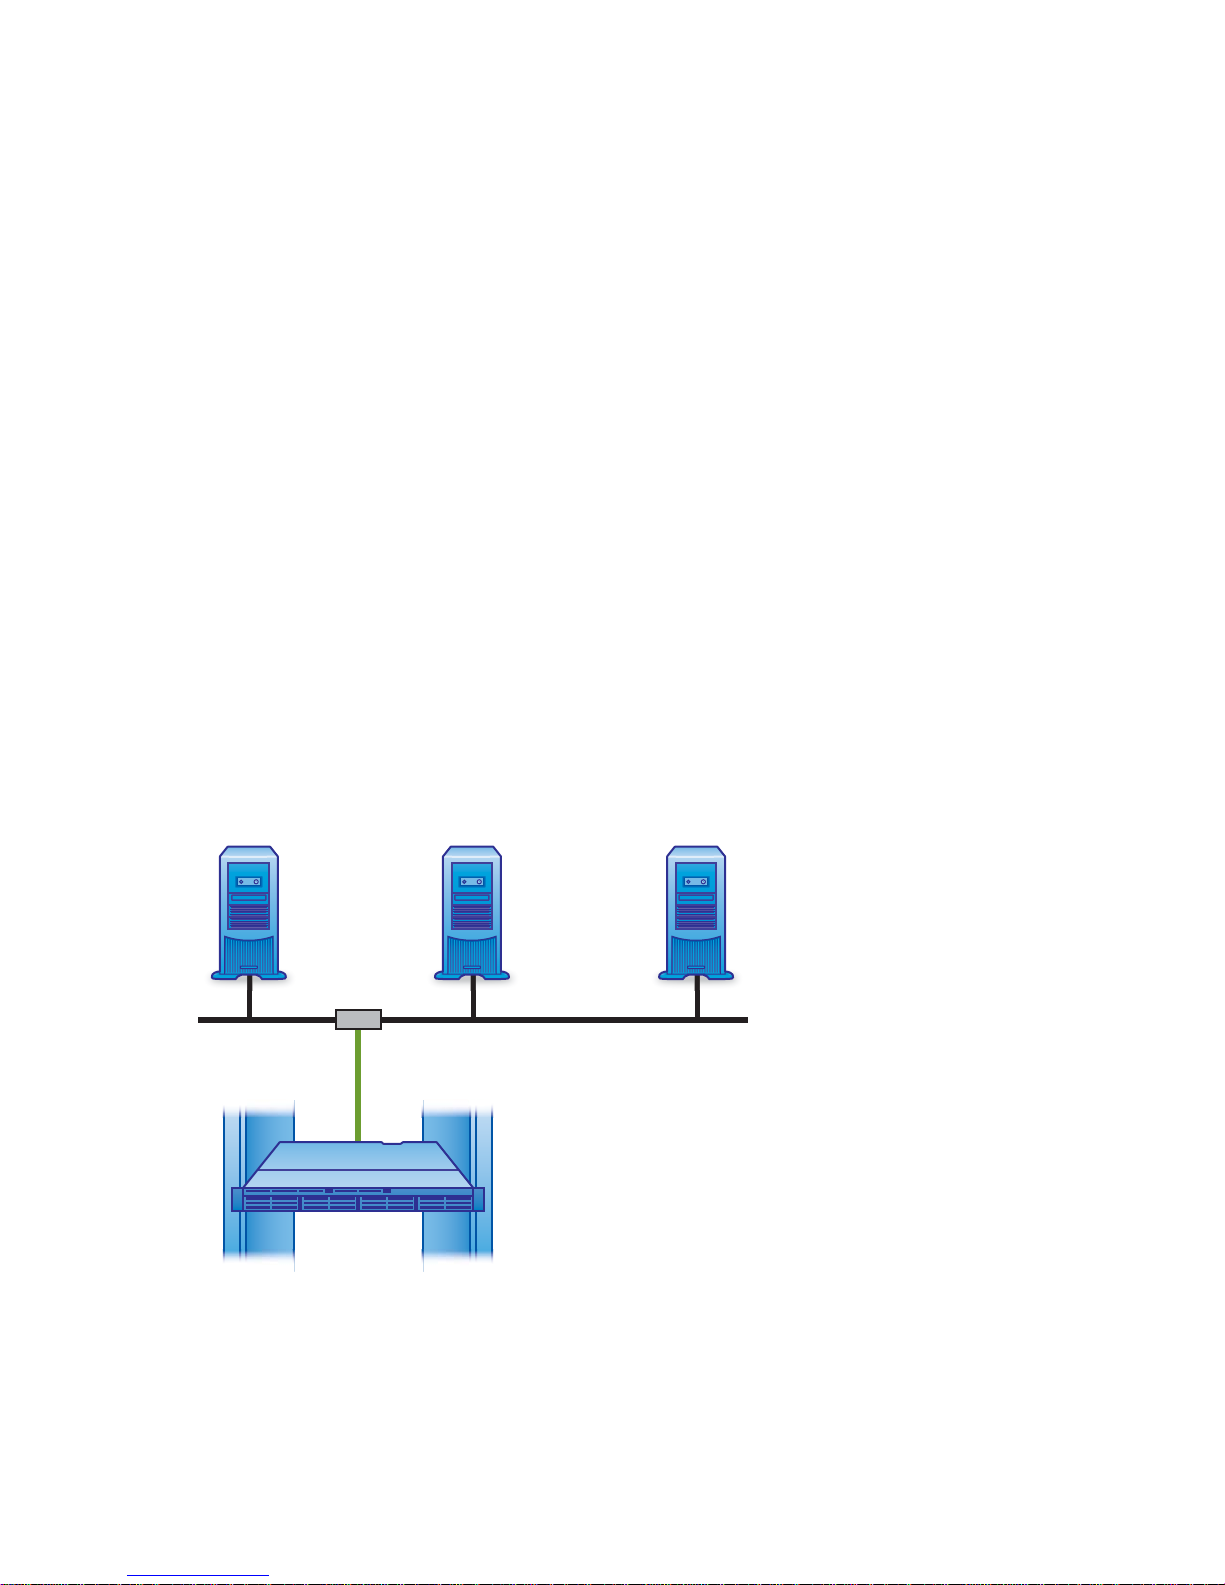
The configuration, illustrated in Figure 12 on page 33, is the simplest and most common configuration,
assuming that Gigabit networking is already in place, and requires no additional hardware. The only
disadvantage to the configuration is that a high volume of traffic may impact network performance during
backup and backups may take longer to complete. However, if backups are scheduled to run outside of
normal business hours, the volume of data trafficisunlikelytobeaproblem.
Server
Supplied cable
Server
Switch
LAN
Serve
HP StorageWorks D2D
Backup System
Figure 12 Conn ecting to a business server on the main network
In some environments, backup data is kept separate from day-to-day office network traffic, as illustrated
in Figure 13 on page 34. There is a separate, dedicated IP network for all hosts that need data to be
backed up.
D2D Backup System HP D2D2503
33
Page 34
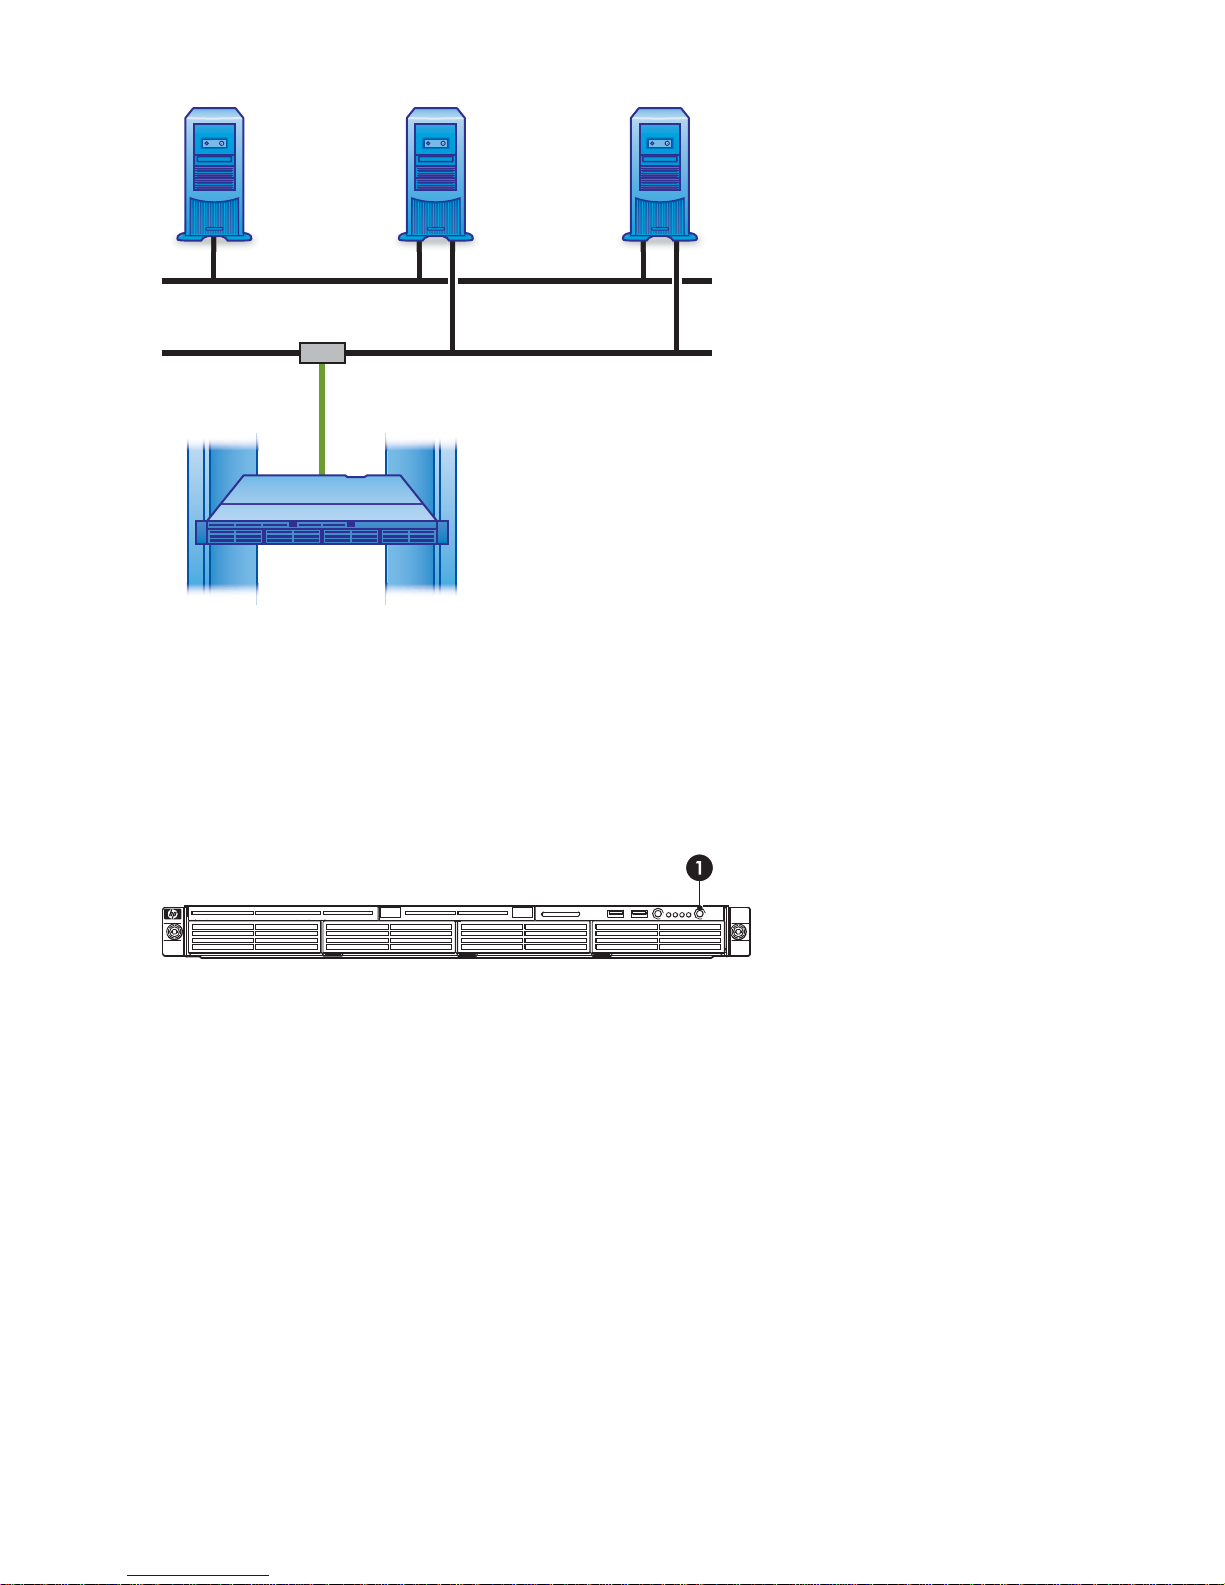
Switch
r
ServerServer
LAN
Serve
Supplied cable
Figure 13 Connecting to a dedicated ba c kup network
P owering on the HP D2D
PressthePoweronbuttononthefrontofyourHPD2DBackupSystem. Thenormalbootsequence
takes app
for appro
roximately 2 minutes. On power up the HP D2D Backup System runs its fans at high speed
ximately 10 seconds before returning to normal speed.
Storage Network
HP StorageWorks D2D
Backup System
Figure 14 Powering on the HP D2D Backup System
1. Power On button
Software installation, discovery and confi guration
There a
• Install all the required drivers
• Discover and configure the HP D2D Backup System on the network
• Creat
UNIX a
“Linu
confi
34
re three stages to installation:
eabaseconfiguration to get started
nd Linux users should download the latest patches for their operating system and refer to the
xandUNIXConfiguration Guide” on the HP StorageWorks D2D Backup System CD-ROM for
guration instructions.
Connecting and installing the HP D2D Backup System
Page 35
Installation wi
For Windows users, the recommended way to set up the HP D2D Backup System network is to run the
Installation wizard from the HP StorageWorks D2D Backup System CD-ROM, particularly if you are
configuring the host for the first time.
The HP D2D Backup System can be used to back up a maximum of six hosts. You should run the
Installation w
software comp
may be a server, workstation or PC.
zard for Windows users
izard on each host that will provide a source of data for backup. The wizard configures the
onents needed to connect from the host and use the HP D2D Backup System. The host
Running the Installation wizard
NOTE:
You must have the necessary administrative rights on the host to run the Installation wizard successfully
and the host should be connected to the Internet in case it is necessary to download the Microsoft
iSCSI Initiator.
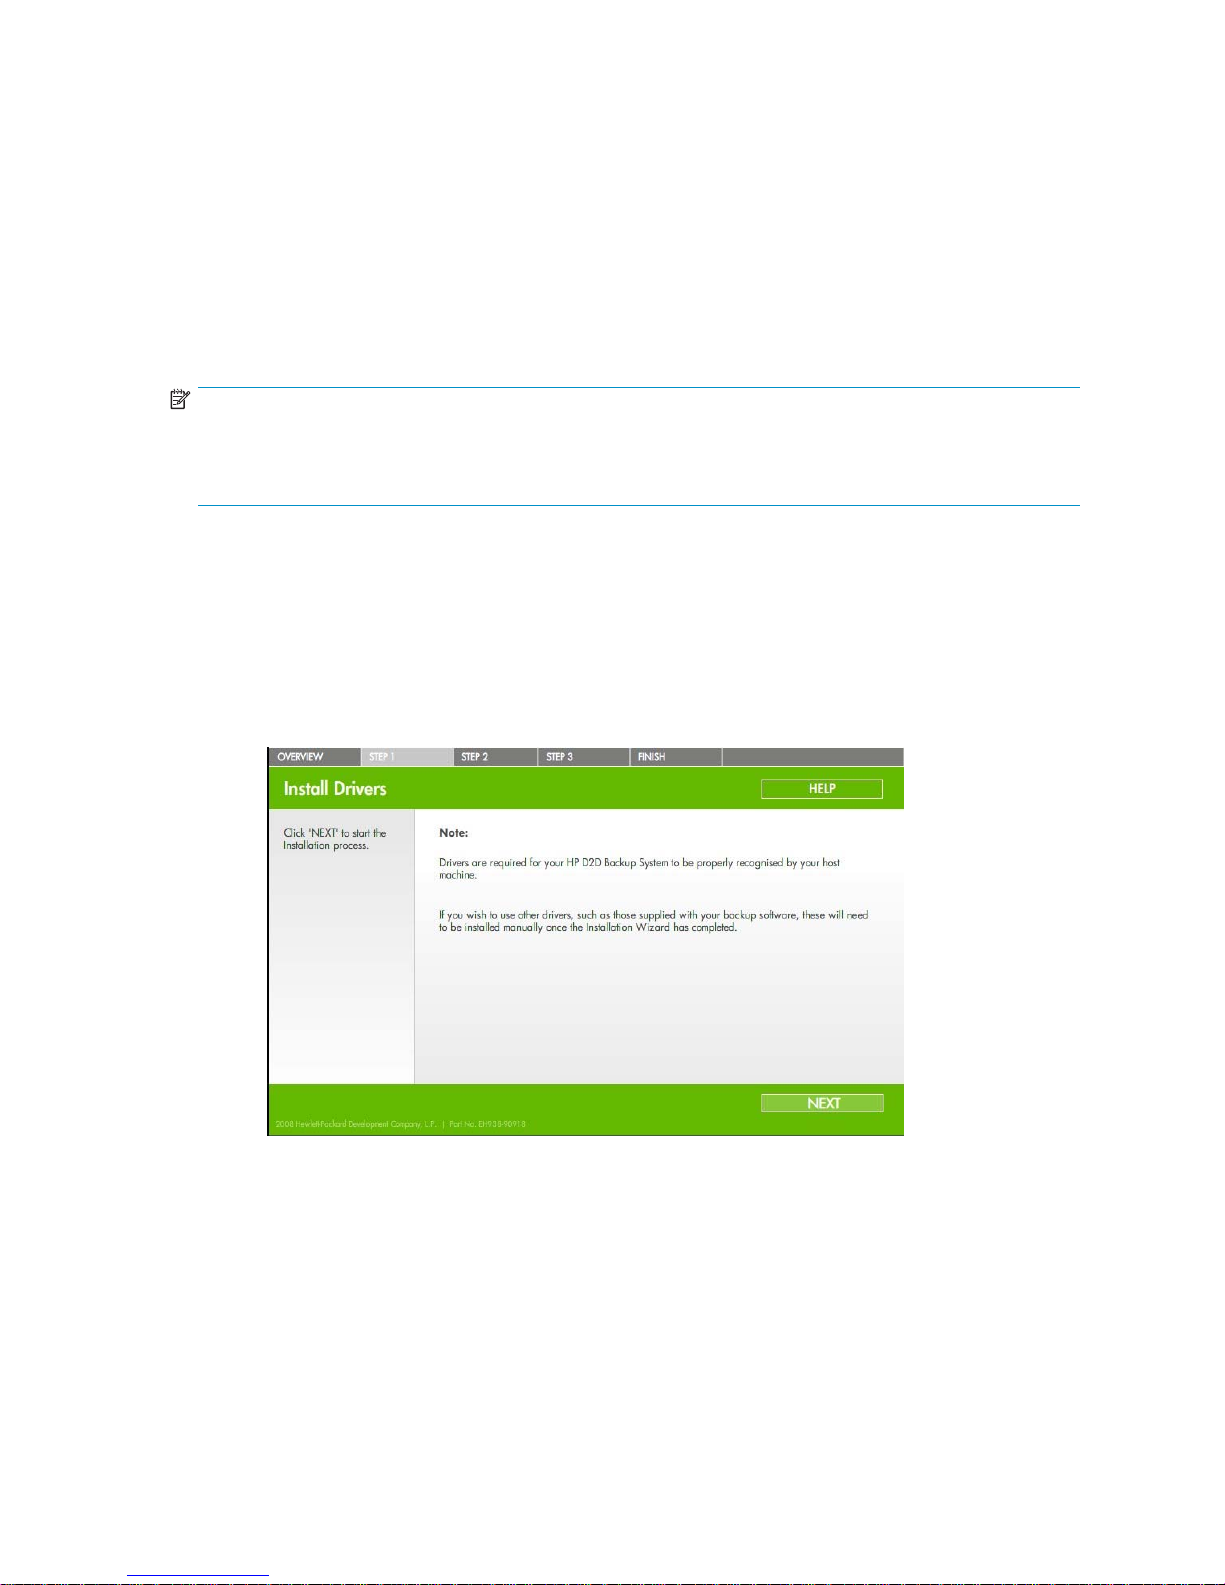
1. Insert the CD-ROM supplied with your HP D2D Backup System into the host machine. It should launch
automatically. If it does not, locate the D2DInstallationWizard.exe file and run it manually.
2. Select Start the wizard and follow the onscreen instructions to step through the installation, normally
by pressing Next.
The Installation wizard will, if possible, configu re all the software components required for setup and
use of the HP D2D Backup System. Use the Wizard help if you need more information.
• Install drivers: These allow your system to recognize the tape medium changer and drive
devices created on the HP D2D Backup System.
• Discover network devices: This allows you to locate your HP D2D Backup System on the
network and configure network settings. If you have multiple devices on your network, a list
is displayed so that you can select the required HP D2D Backup System.
D2D Backup System HP D2D2503
35
Page 36
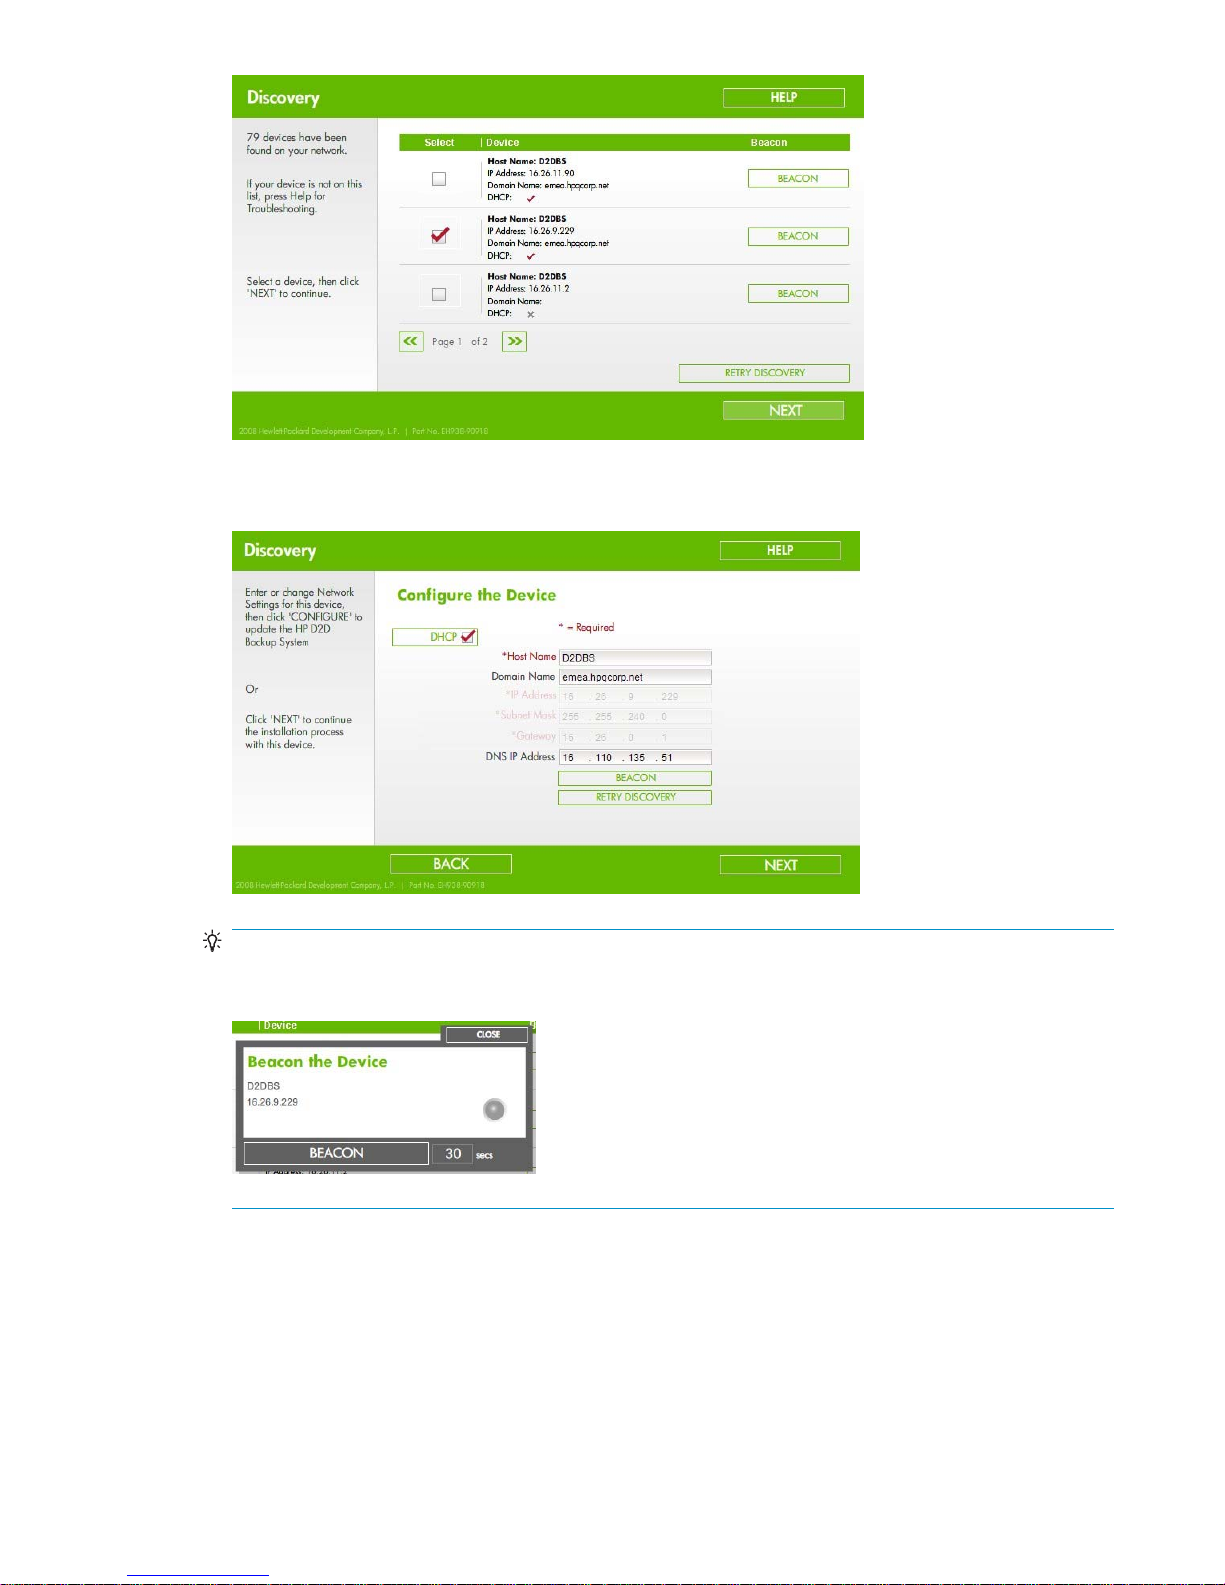
When the configuration page for the device is displayed, DHCP is enabled by default
for IPv4 networks. If you wish to use static IP addressing, disable DHCP and enter the
IP address details.
TIP:
If more than one HP D2D Backup System is being configured at the same time, it may be useful
to physically identify a D2D device. Use Beacon mode to flash the LED on the selected device.
For IPv6–only networks you must enter the MAC address of the HP D2D. You will find
the MAC address on the label on the top of the unit. The wizard translates the MAC
address into a valid IPv6 address for your network. If it is unable to do this, refer to
“Using the system console to discover the HP D2D” on page 47.
• Create desktop shor tcut to the Web Management Interface.
• CreatebaselibrarydeviceontheHPD2D:
If required, this step retrieves and installs the iSCSI initiator, connects this host to the HP D2D
Backup System and configures a library. The second option presented in this dialog is
36
Connecting and installing the HP D2D Backup System
Page 37
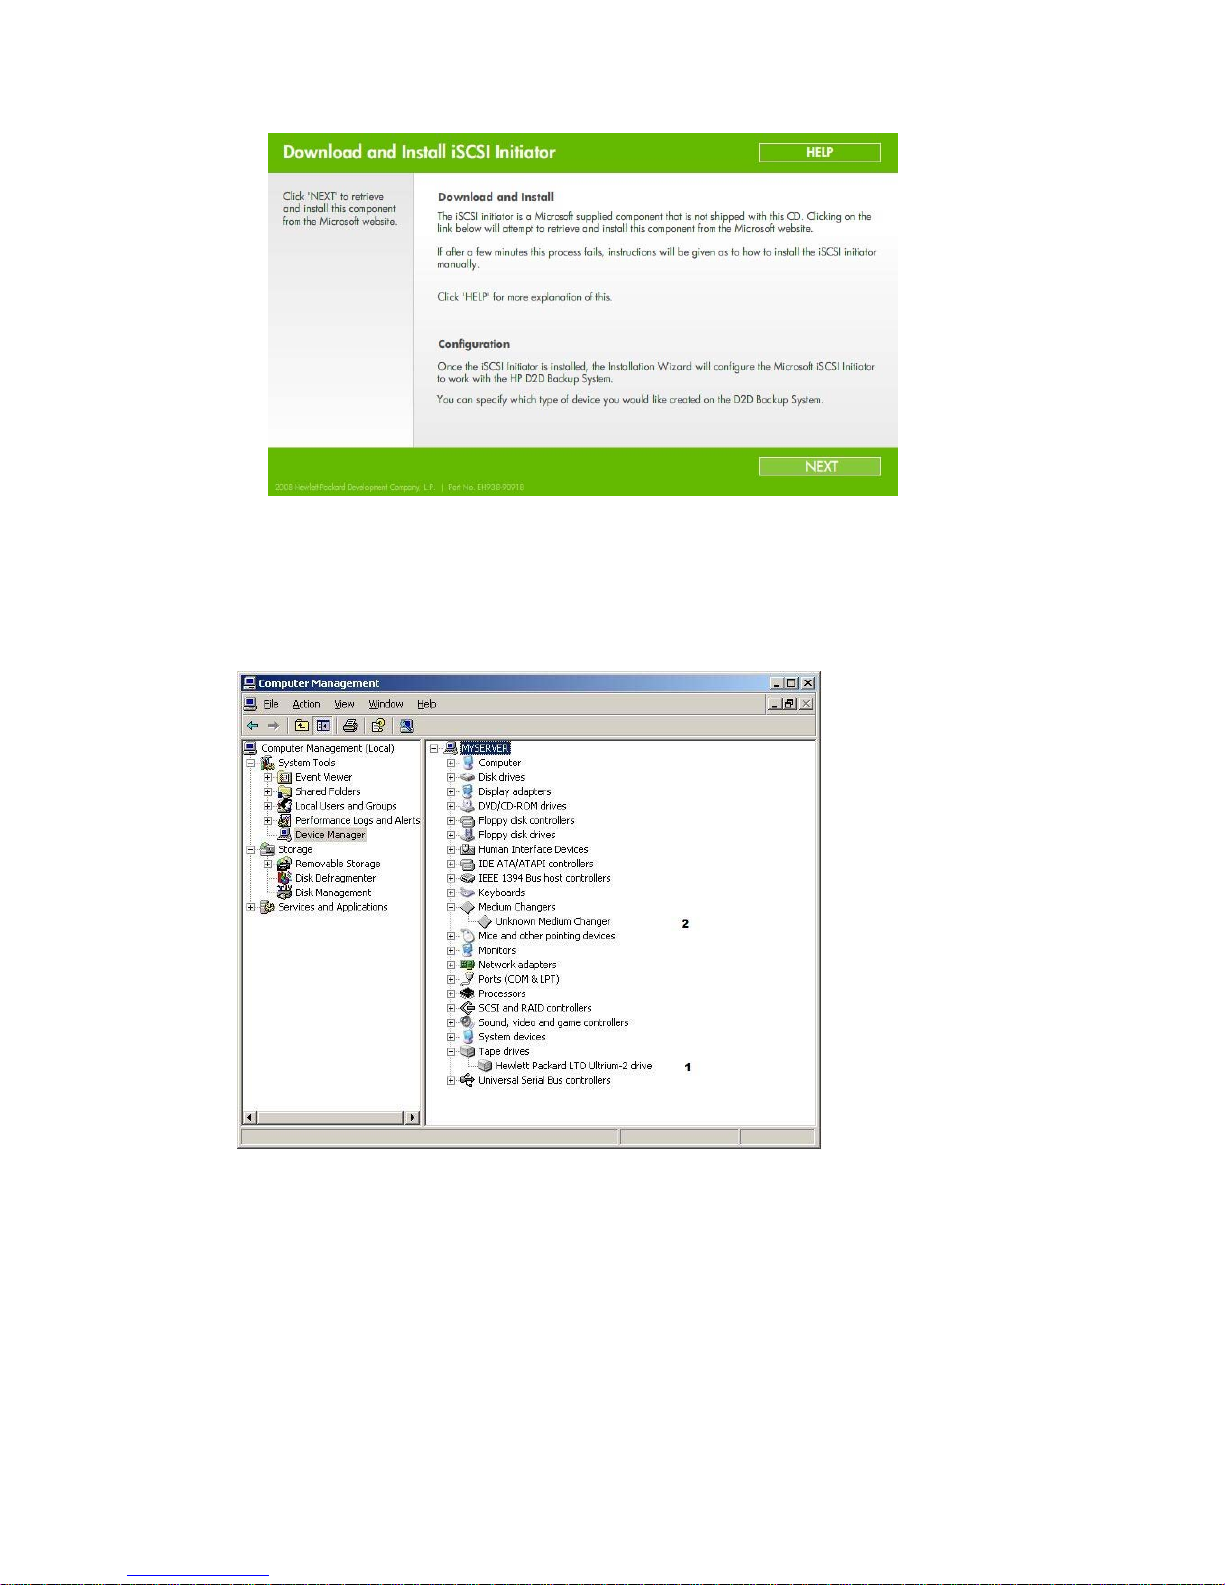
appropriate for most backup applications and is the recommended option. You may edit
the number of slots, if required.
3. Run the Installation wizard on any other hosts that are to be backed up—six is the maximum. On
running the wizard on subsequent hosts, you only need to select the HP D2D Backup System; its
network settings have already been assigned.
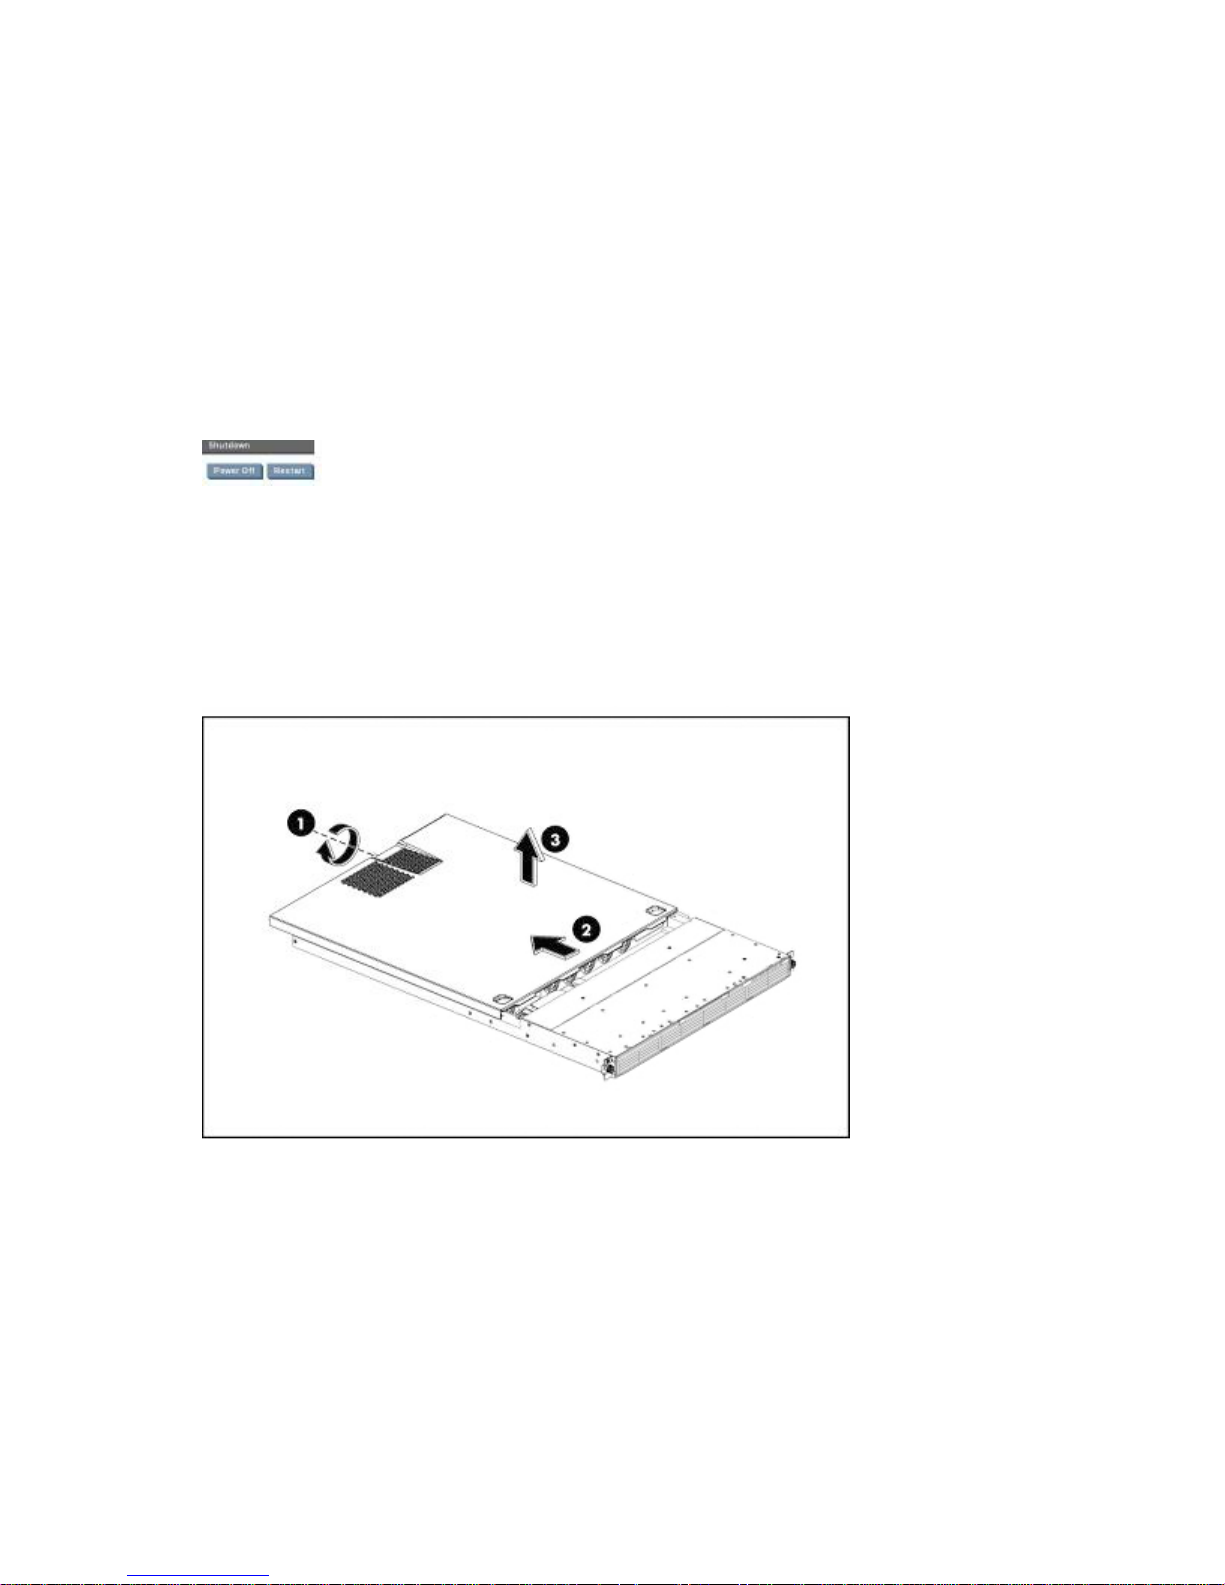
The HP D2D Backup System does not appear as a device under My Computer and it is not mapped
to a drive letter (although it can be seen as a tape drive (1) and medium changer (2)fromDevice
Manager). Use a backup application on the host machine to back up and restore data.
Recommended web browser settings
The web browser used to communicate with the D2D Backup System must have Active Scripting or
JavaScript enabled. If it does not, some of the browser buttons may not be displayed.
Internet Explorer 7.X
1. Click on the Tools button located in the upper right part of the screen (next to the gear icon).
2. Sel
ect Internet Options.
D2D Backup System HP D2D2503
37
Page 38

3. Click on the Security tab.
4. Click on the Custom Level... but ton.
5. Set the option Active scripting to Enable and click OK.
6. Click Yes.
7. Refresh the page.
Internet Expl
orer 6.X
1. Select Tools
2. Select Internet Options.
3. Click on the Security tab.
4. Click on the
5. Scroll down until you see the section labeled Scripting.
6. Under Active scripting select Enable and click OK.
from the top menu.
Custom Level.
Mozilla Firefox 1.5, Firefox 2.X and Firefox 3.X
1. Select Options from the Tools menu.
2. Click on Content.
3. Check the box next to Enable JavaScript.
4. Click OK.
5. Refresh the page.
38
Connecting and installing the HP D2D Backup System
Page 39

3Attachingaphysicaltapelibrary
or tape drive (optional)
In this chapter:
•
“Hardware requirements” on page 39
•
“Tape device installation overview” on page 39
•
“Removing the covers”onpage40
•
“Installing the HBA” on page 40
•
“Replacing the cover” on page 43
• “Connecting an external or rackmount tape device”onpage44
Hardware requirements for Tape Attach
A tape storage d evice may be attached directly to your HP D2D Backup System, allowing you to store
backups offsite.
To use thi
• An HP StorageWorks Ultrium tape storage device, such as a tape library or tape drive. This should be
• Ahostbusadapter,HBA,forthetapedeviceconnection(becausetherearenoembeddedSASor
sfacilityyouneed:
an external device or a 1U or 3U rackmount enclosure for internal devices. The appropriate cables
for the rackmount shelf must be used. Both SAS and SCSI half-height and full-height tape storage
devices
SCSI ports). You must purchase and install the HBA before connecting the tape storage device.
are supported.
NOTE:
altapestoragedevicesattachedtotheHPD2DBackupSystemcanonlybeaccessedbytheHP
Physic
D2D Backup System, using the Tape Attach pages. They do not appear as attached network devices to
the host system.
Supported devices
The following tape storage d evices are supported:
• HP1x8G2Autoloader(1drive,8slots,1mailslot)
• HP MSL 2024 Tape Library (2 drives, 24 slots, 1 mail slot)
• HP MSL 4048 Tape Library (4 drives, 48 slots, 1 mail slot)
• Library-embedded or standalone HP StorageWorks Ultrium Tape Drives (LTO-2, LTO-3 and LTO-4)
Please refer to h
supported host bus adapters and tape storage devices. Please refer to “Using Tape Attach” on page 121
for more information about transferring data to the storage device.
ttp://www.hp.com/go/connect or http://www.hp.com/go/ebs for a list of all
Tape device installation overview
Before connecting a storage device, you must install an HBA. The instructions in this chapter provide the
following information that is specific to the HP D2D Backup System.
D2D Backup System HP D2D2503
39
Page 40
1. If you have already powered up the HP D2D Backup System, power it down and disconnect the
cables before you start; each step is expanded in separate sections af ter the summary below.
2. Remove the top cover from the HP D2D Backup System.
3. Install the HBA.
4. Replace the top cover on the HP D 2D Backup System.
5. Connect an external or rackmount storage device.
Removing the top cover
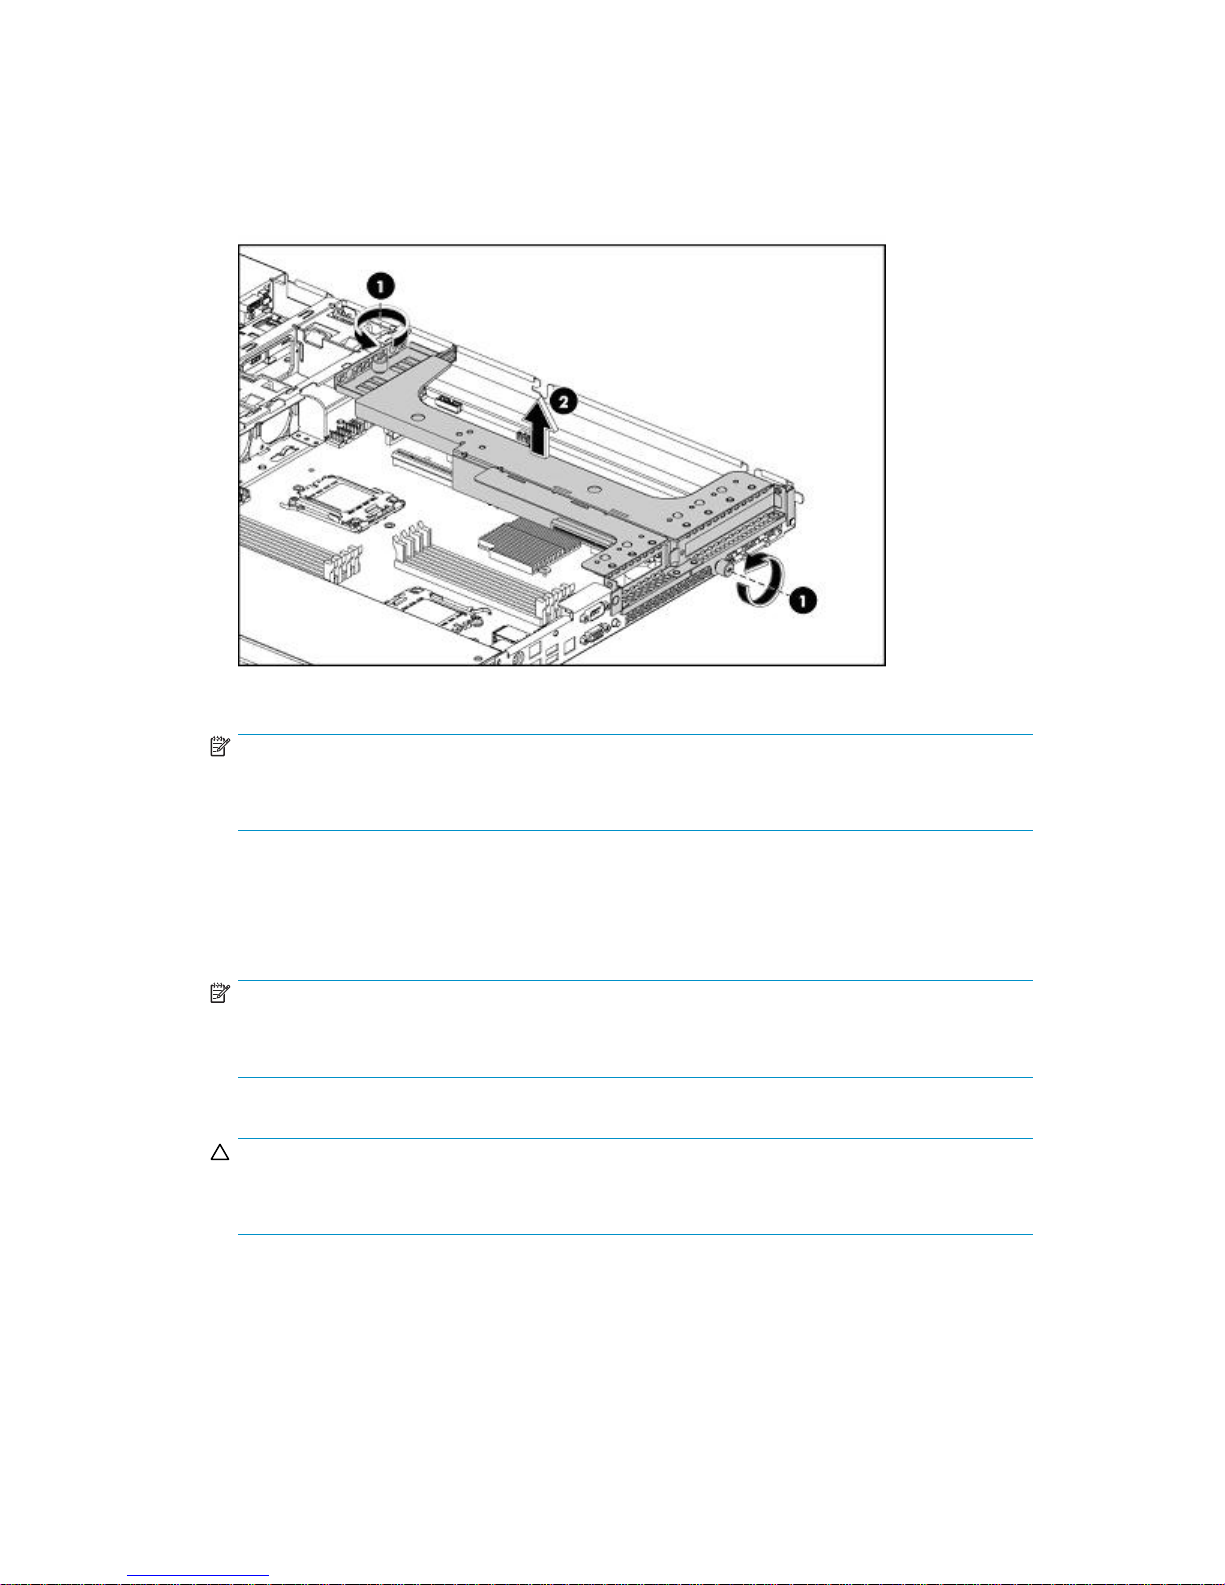
1. If you are ins
already powe
there a re no backup or restore jobs in progress and that no future jobs are scheduled to start whilst
thesystemisshutdown.SelectShutdown on the Web Management interface and click Power Off to
power down the HP D2D Backup System safely.
2. Disconnect the network cable(s) and the power cord(s) from the HP D2D Backup System.
3. You need to remove the top cover before you can remove or replace a server component.
•Loosenth
• Slide the cover (2) approximately 1.25 cm (0.5 in) toward the rear of the unit and then lift the
cover to detach it from the chassis.
•Liftthet
tallingthestoragedeviceaspartoftheinitialinstallation,gotostep3.Ifyouhave
redontheHPD2DBackupSystem,itmustbeshutdownbeforeyoustart.Makesure
e captive screw (1) on the rear p anel with a T-15 screwdriver.
op cover away from the chassis. (3)
Figure 15 Removing the top cover
Installing the HBA
There are two PCI expansion slots on the system board. One supports a full length/full height PCIe card
and this already has a Smart Array RAID controller c ard installed. The other supports a low profile PCIe
slot. This is the slot into which you must install the HBA for Tape Attach. If the HBA that you purchase has
a full-height bracket, you must replace it with a half-height bracket (supplied with the recommended HBA).
40
Attaching a physical tape library or tape drive (optional)
Page 41
Removing the PCI
1. LoosenthetwocaptivescrewsthatsecurethePCIcagetothechassiswithaT-15screwdriver.
2. Lift the PCI cage away from the chassis.
Cage
Figure 16 Removing the PCI cage
NOTE:
The pre-installed RA I D card has a cable connecting it to the system board. It may be easier
to disconnect this cable while you are installing the new HBA.
Removing the slot cover
1. Loosen the screw that secures the slot cover to the chassis. The HBA must be installed in the low
profile slot.
NOTE:
Before installing in the low profile slot ensure that the HBA is fitted with a low profile bracket
(supplied with the recommended HBA, if not already fitted).
2. Remove
CAUTIO
Do not d
must be reinstalled to maintain proper cooling.
the slot cover on the PCI cage.
N:
iscard the slot cover. If the expansion board is removed in the future, the slot cover
D2D Backup System HP D2D2503
41
Page 42
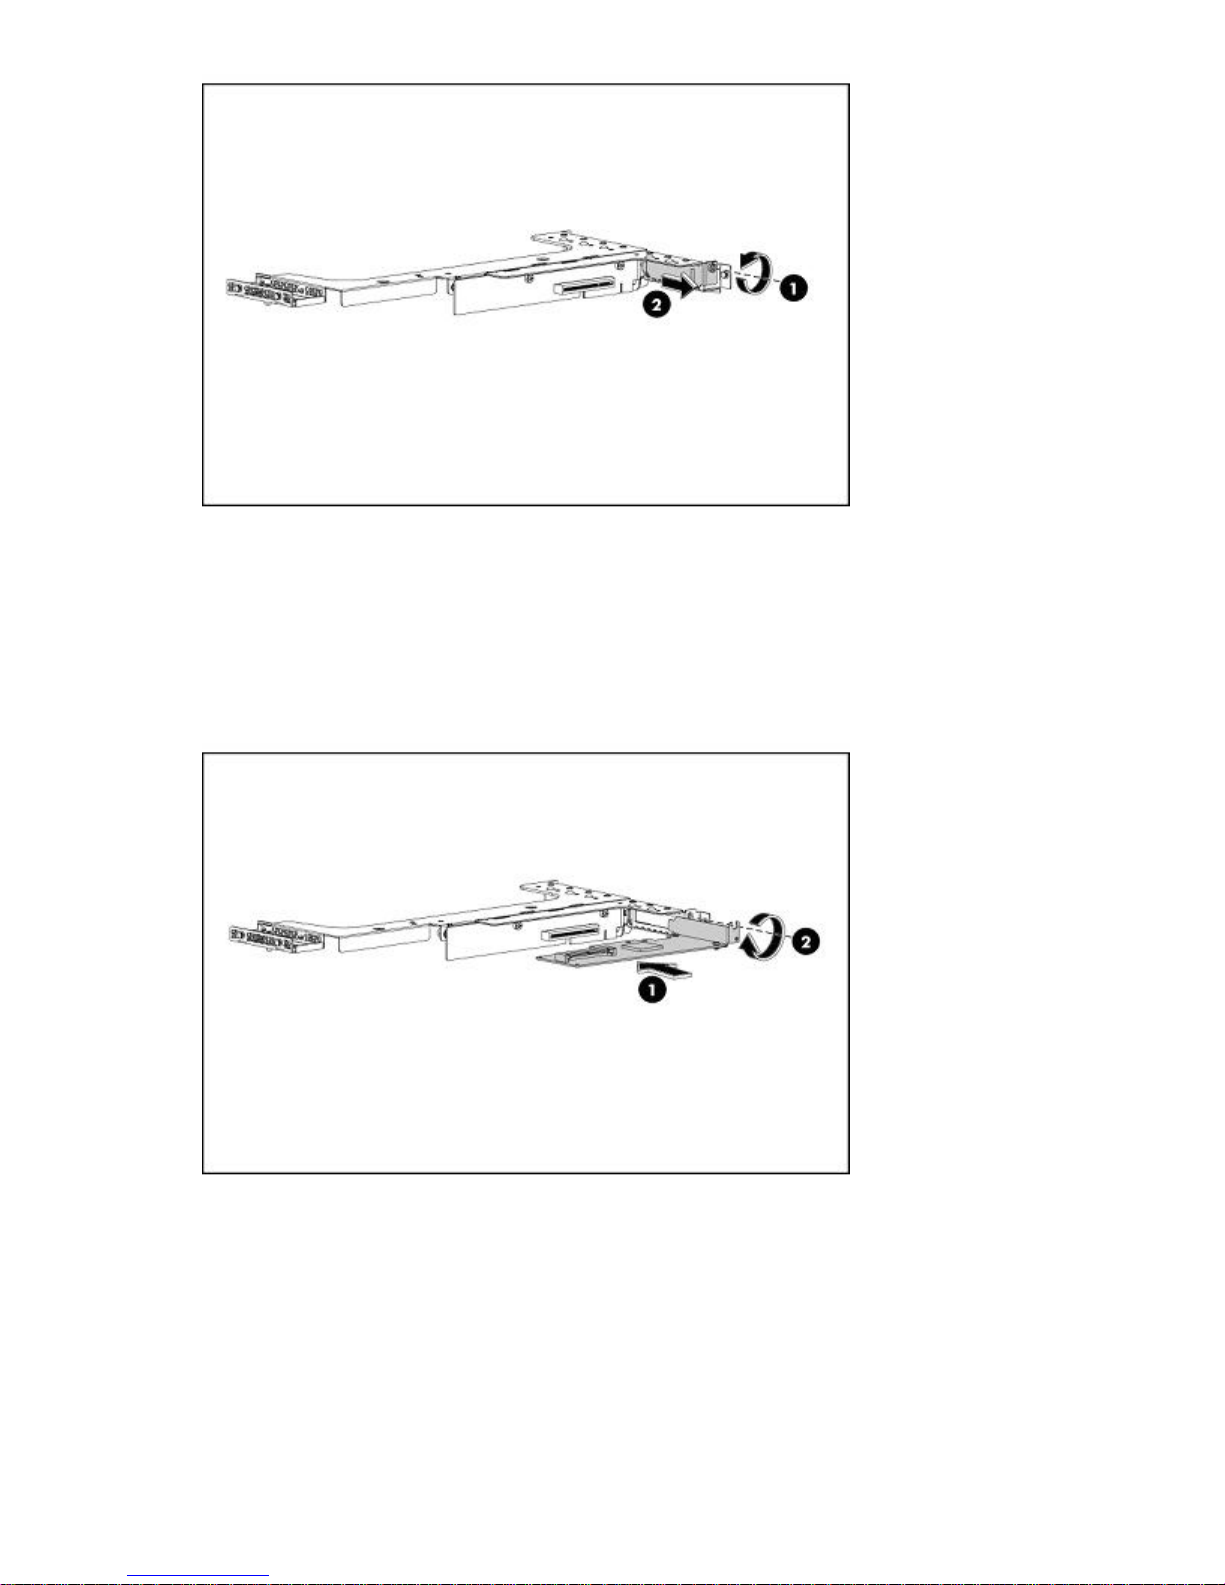
Figure 17 Removing the slot cover (low profile)
InstallingthePCIeCard
1. Slide the
press the board to seat it properly in the slot.
2. Tighten the screw that secures the card to the PCI cage.
Figure 18 Installing the PCIe card (in the low profile slot)
expansion board into the slot, aligning the board with its matching connector. Firmly
Reinstalling the PCI Cage
1. Align the PCI cage to the system board expansion slot, and then press it down to ensure full
connection to the system board.
42
Attaching a physical tape library or tape drive (optional)
Page 43
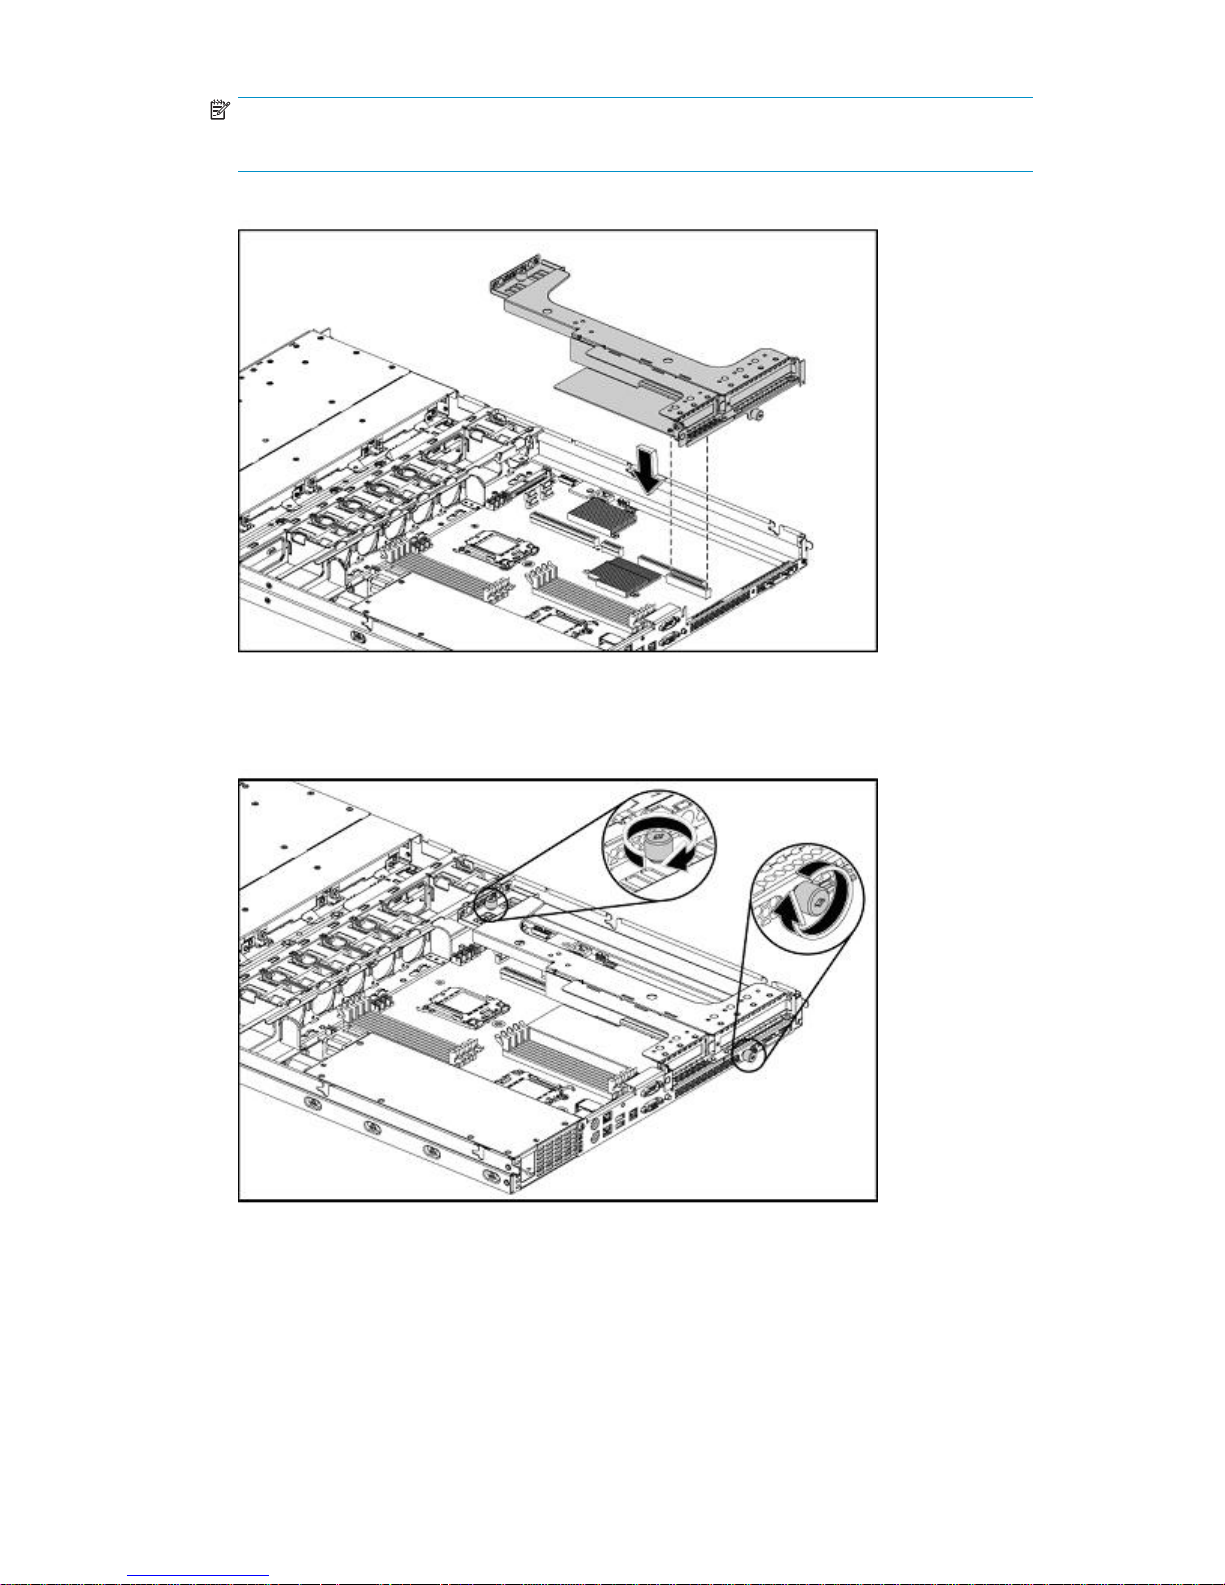
NOTE:
Be sure to reconnect any cables that you disconnected when you removed the PCI cage.
Figure 19 Rei nstalling the PCI cage
2. Tighten the two captive screws to secure the PCI cage to the chassis.
Figure 20 Securing the PCI cage
Replacing the top cover
1. Align the top cover to the chassis and then slide it toward the front p anel to position it into place.
D2D Backup System HP D2D2503
43
Page 44
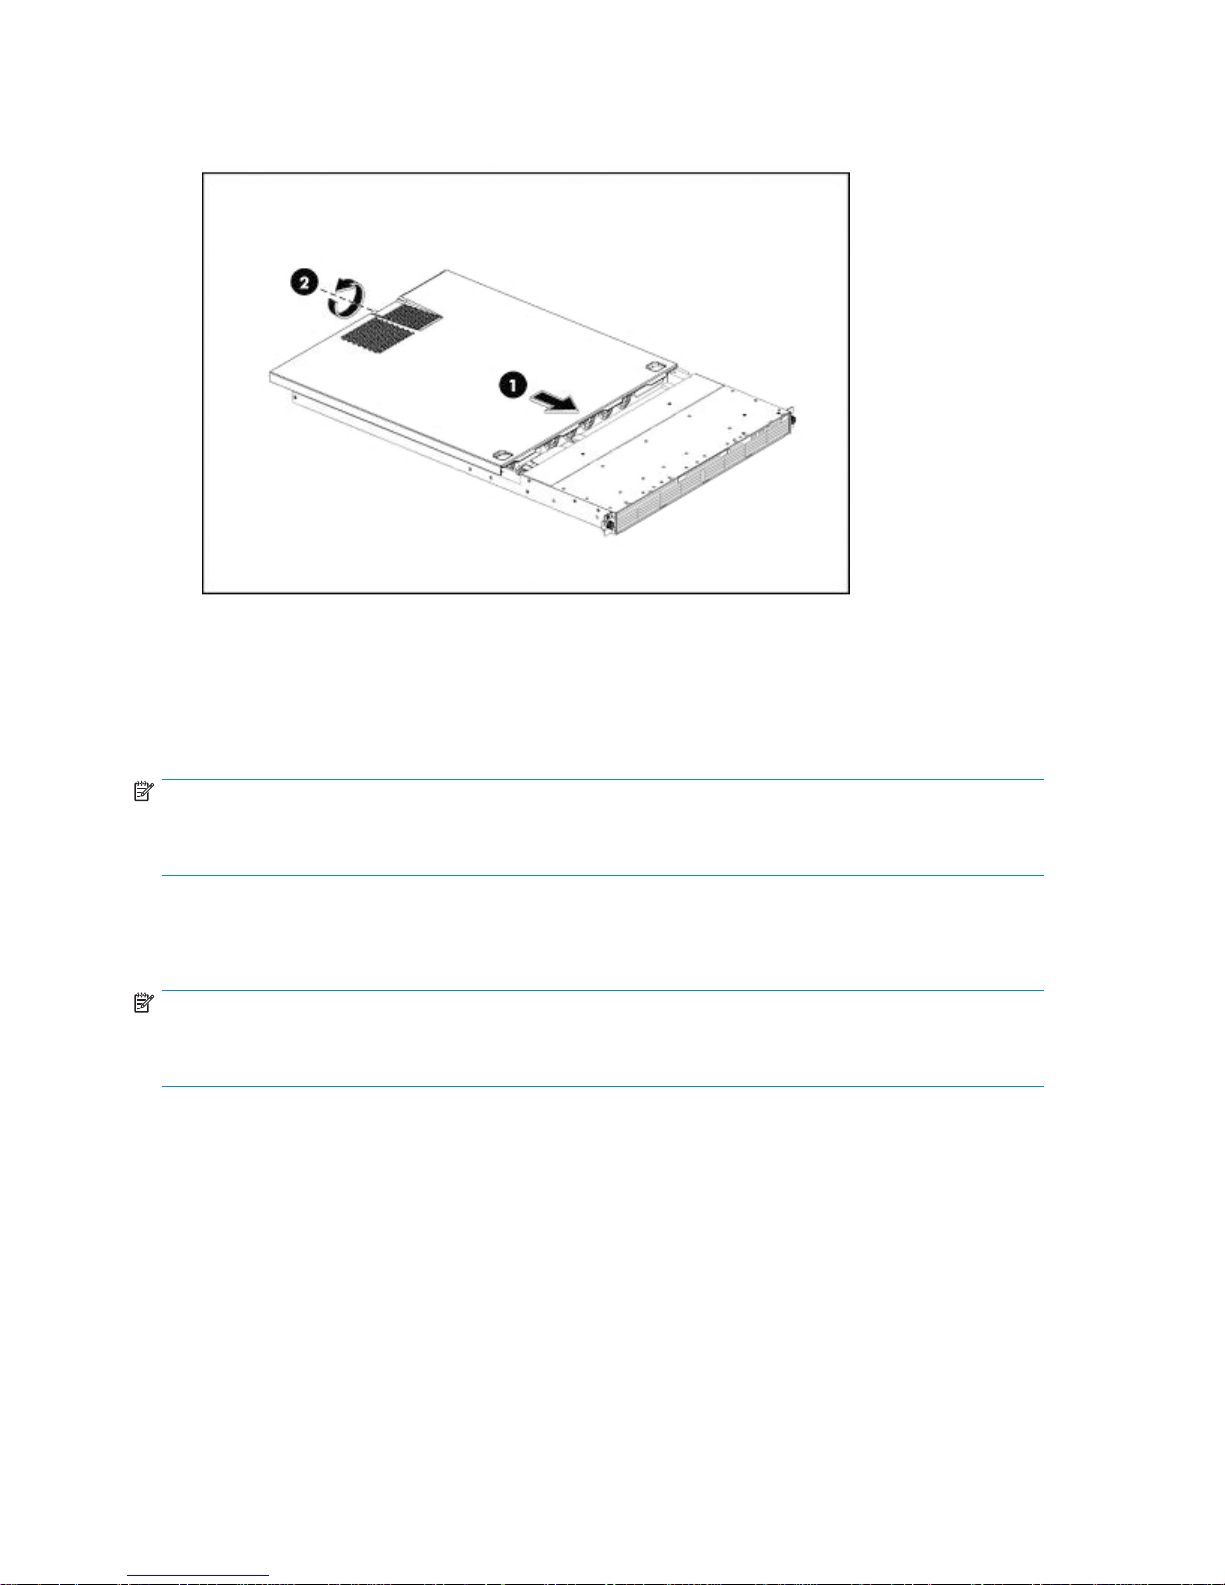
2. Once the cover is attached to the chassis, tighten the captive screw on the rear panel with a T-15
screwdriver.
Figure 21 Replacing the top cover
3. Reconnect the network cable(s) and the power cord(s).
Connecting an external or rackmount storage device
NOTE:
You can only connect an external or rackmount storage device, if you have already installed a
recommen
Connect the external or rackmount storage device, as described in the documentation accompanying
the storage device. Refer to the “User Guide” that is supplied with the storage device for more detailed
information about device usage and LED troubleshooting.
NOTE:
If you are connecting to a 1U or 3U rackmount enclosure for internal storage devices, the appropriate
cables for the rackmount shelf must be used. Please refer to the rack documentation for further details.
ded HBA.
44
Attaching a physical tape library or tape drive (optional)
Page 45

4 Advanced installation
The Installation wizard is the recommended way to install the HP D2D Backup System, but it is possible
to install it manually. You may also need to run phases independently when troubleshooting. This
chapter describes:
•
“Manual driver installation” on page 45
•
“Using DHCP to discover the HP D2D (IPv4 only)” on page 46
•
“Using the Discovery Engine to discover the HP D2D (IPv4 only)” on page 46
•
“Using the system console to discover the HP D2D” on page 47
•
“The Microsoft iSCSI Initiator” on page 50
• “Linux and UNIX iSCSI initiators” on page 55
Manual driver installation
Two drivers are required; an HP LTO Tape driver and a medium changer driver.
NOTE:
Certain ba
changer. For many applications these will be installed automatically during the software installation
process. If the backup software is already installed, you may need to manually update the drivers after
installing the HP D2D Backup System.
ckup applications require you to use their own drivers for both the tape device and medium
HP LTO Tape driver
The HP LTO Tape driver must be installed to allow your system to recognize the Ultrium tape devices
createdbytheHPD2DBackupSystem.
Tape drivers can be installed from the drivers directory on the HP StorageWorks D2D Backup System
CD-ROM, where they are supplied as an installer application and as driver files for manual installation.
Also check the HP website for driver updates at h
Thetapedriveisconfigurable as an LTO-2, LTO-3 or LTO-4 device. This is the default behavior of the tape
drive and there is no need and no way to change it on the HP D2D Backup System. It is important not to
confuse emulation t ype with car tridge size. Emulation type is totally independent from cartridge size. The
HP D2D Backup System allows you to pick whatever cartridge size you like (up to 1.6 TB).
Medium changer driver
No additional medium changer driver is required b ecause Microsoft Windows provides a suitable
generic driver and all backup applications provide their own changer drivers.
ttp://www.hp.com/support.
D2D Backup System HP D2D2503
45
Page 46
Using DHCP to dis
only)
NOTE:
DHCP discovery is only supported if you are installing the HP D2D as an IPv4 iSCSI network device. If
youareinstallingtheunitasanIPv6–onlyiSCSInetworkdevice,DHCPdiscoveryisnotsupported.
If you are connecting the HP D2D Backup System to an IPv4 net work that has a DHCP server, DHCP
addressing is enabled by default. The IP address and other net work settings are assigned automatically
when you connect the HP D2D Backup System to the network. You only need to know the name of the HP
D2D Backup System to complete the installation and create a base library configuration. The name is in
the format D2DBS-<serial number> and can be found on the label on the front of the unit.
Inthewebbrowsertypein:D2DBS-<s erial number>
NOTE:
Depending on network settings, you may need to enter the full domain path.
Once the HP D2D B ackup System has been discovered on the network, you must configure an iSCSI
Initiatoronthehost,sothatthelibrarydevicesontheHPD2Darevisibletothebackupapplication.See
also“The Microsoft iSCSI Initiator” on page 50.
cover the HP D2D Backup System (IPv4
Using the Discovery Engine to discover the HP D2D Backup
System (IPv4 only)
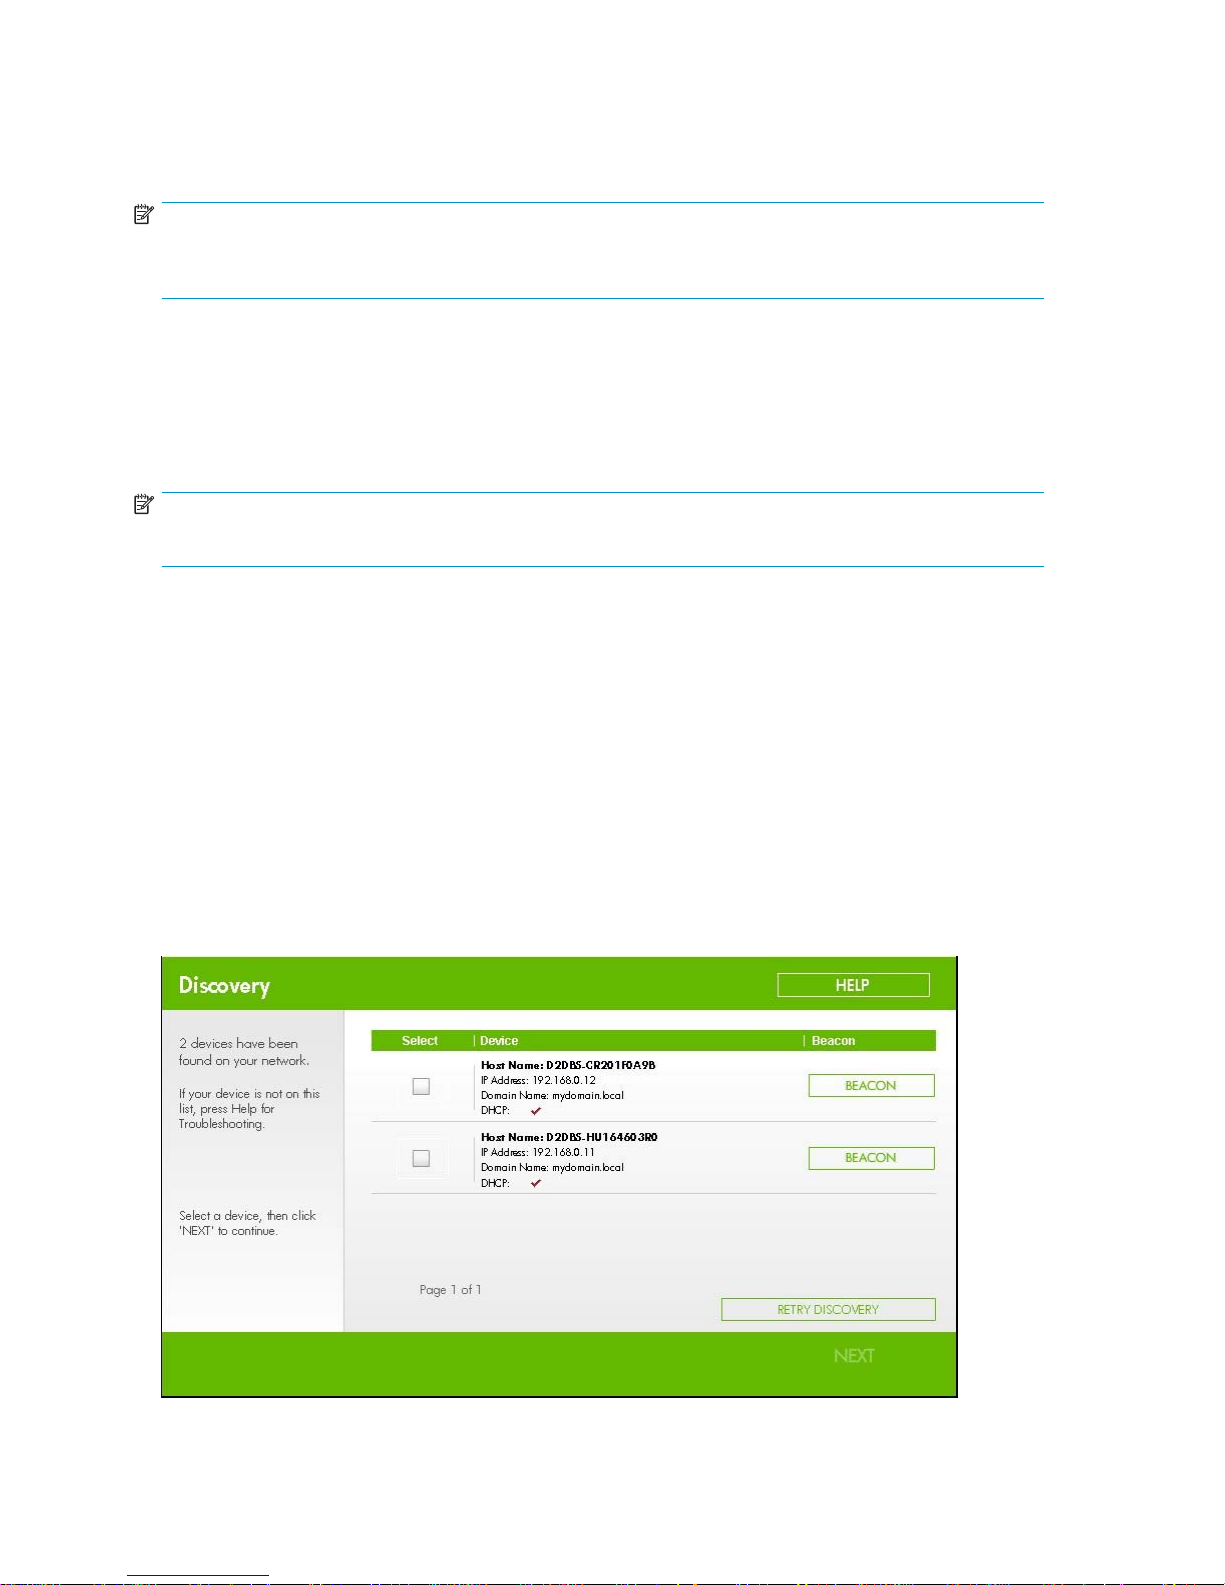
If your network d oes not have a DHCP ser ver, the Discovery Engine allows you to locate the HP
D2D Backup System on your network and assign network settings, such as the IP address. It is the
recommended way to locate and configure the HP D2D Backup System on your network, if you are using
static IP addressing for an IPv4 iSCSI network device. It also allows you to select your required base
configuration and specify the number of slots for a library.
The Discovery Engine can be run as part of the Installation wizard or as a standalone utility from the
HP Storag
eWorks D2D Backup System CD-ROM.
46
Advanced installation
Page 47

Beacon mode
The HP D2D Backup System supports a Beacon LED sequence, which helps a user identify which unit is
being configured, if several a re c onnected to the network. See also “LEDs” on page 57.
If the HP D2D Backup System is new and not yet configured
When installing the HP D2D Backup System for the first time, this step must be completed successfully
before you can connect from your host. Select the appropriate HP D2D Backup System from the list
and make a note of its I P address because you will need this when you con figure the iSCSI Initiator,
see also “Discovery tab”onpage52.
If the HP D2D Backup System has been configured incorrectly
If you cannot connect to the HP D2D Backup System using the Web Management interface, it may
have been configured incorrectly. Run the Discovery Engine to check the IP address of the HP D2D
Backup System and, if necessary, select it again from the list of available HP D2D Backup Systems.
If you still cannot connect to it, check that you have configured the iSCSI Initiator correctly, see also
“Discovery tab” on page 52.
If the network setup has been changed
If the network infrastructure changes, you may need to update the HP D2D Backup System network
settings to allow hosts to continue to connect. Run the Discovery Engine a nd change the network settings
in accordance with your new infrastructure.
You can also use the Web Management Interface to modify these settings directly on the HP D2D Backup
System,aslongasthisisdonebeforetheinfrastructurechangesaremade.
Once the network settings of the HP D2D Backup System have been changed, you must also change the
iSCSI Initiator for each host.
Using the console to discover the HP D2D Backup System
(IPv4 and IPv6)
If you do not use the Installation Wizard or it fails, you can connect the system console directly to the
order to find out the IP address.
unit in
To connect the system console
1. Connect the monitor cable to the VGA port on the rear of the unit.
D2D Backup System HP D2D2503
47
Page 48
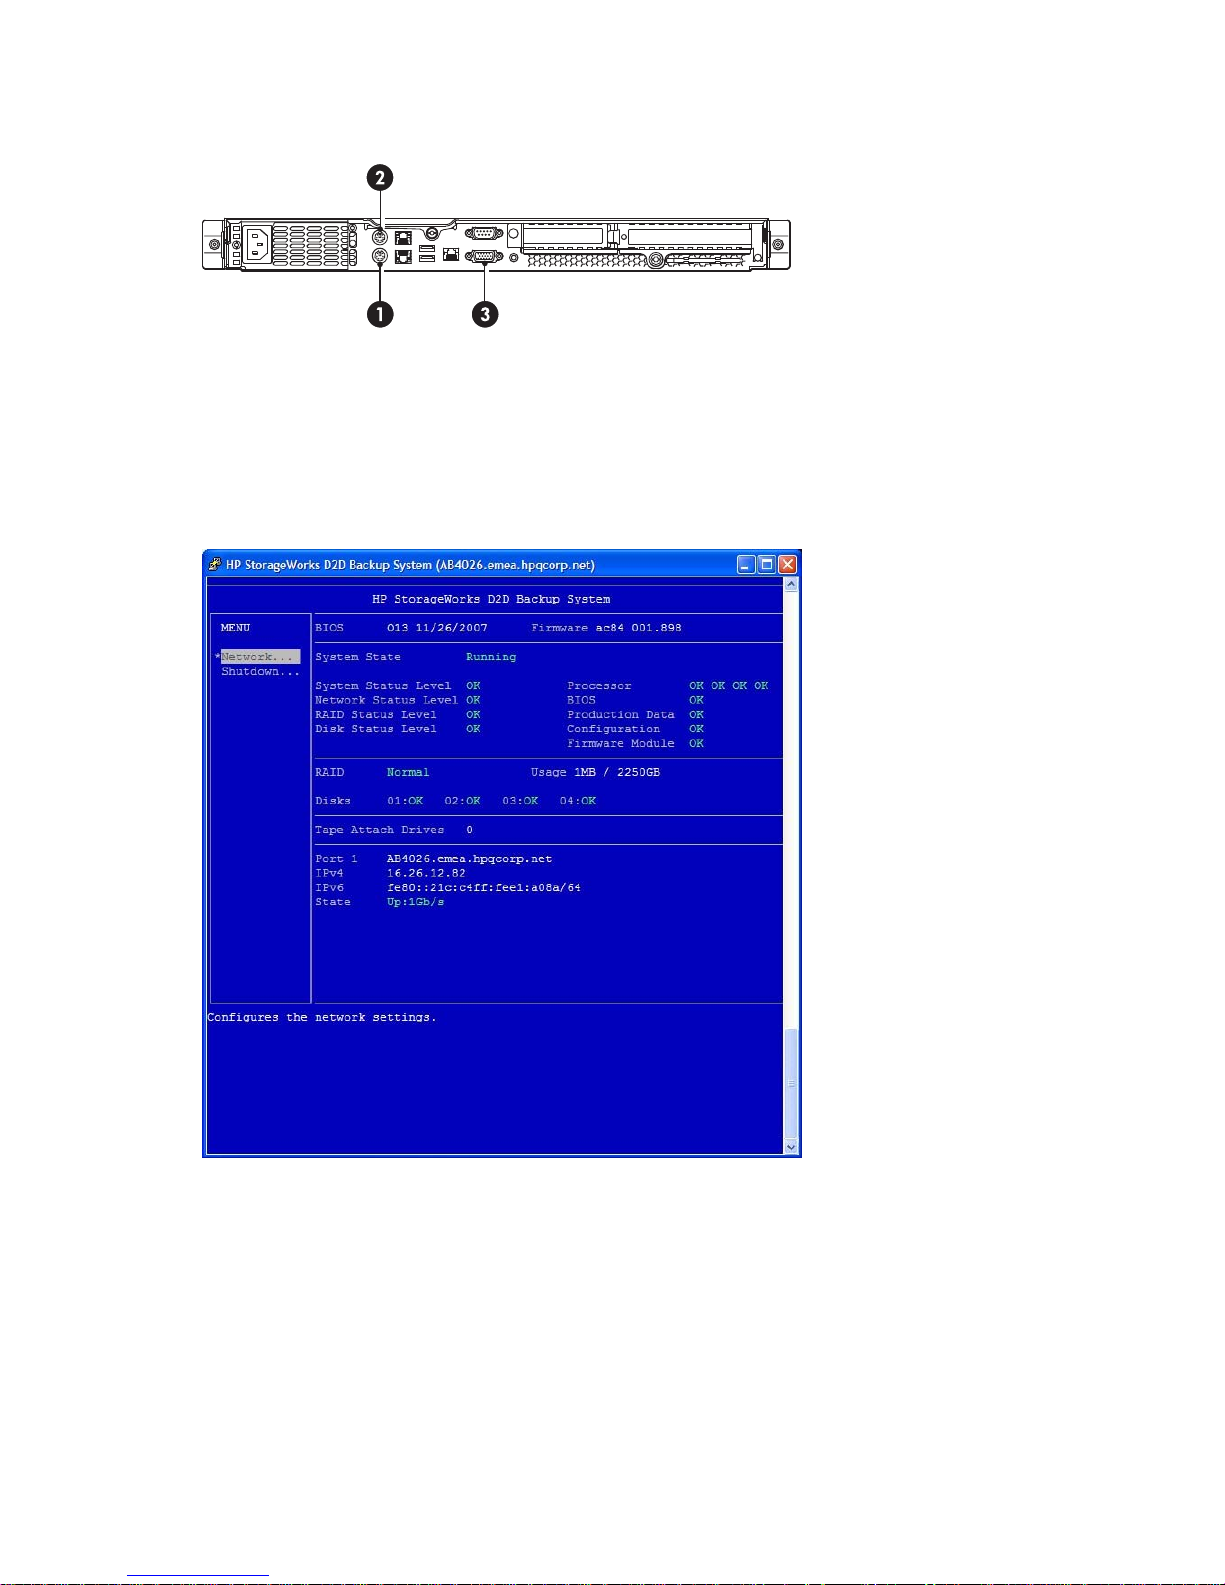
2. Connect the keyboard cable to the PS/2 ports on the rear of the unit. Do not connect anything to
the USB ports.
Figure 22 System console connections on the HP D2D
1 and 2. PS/2 ports for system console keyboard and mouse
3. VGA port for system console monitor
3. Power on the HP D2D and allow it to boot up until the console screen is displayed (see example
below). Select the Network... option from the left-hand Menu.
Figure 23 System console screen
4. Locate the IP address for the port(s) and ma ke a note of it.
5. Use an iSCSI Initiator to enable the host to connect to devices on the HP D2D, see also
“iSCSI Initiator” on page 49. In the web browser on the host machine, type in the IP address of
the HP D 2 D to connect to it.
48
Advanced installation
Page 49
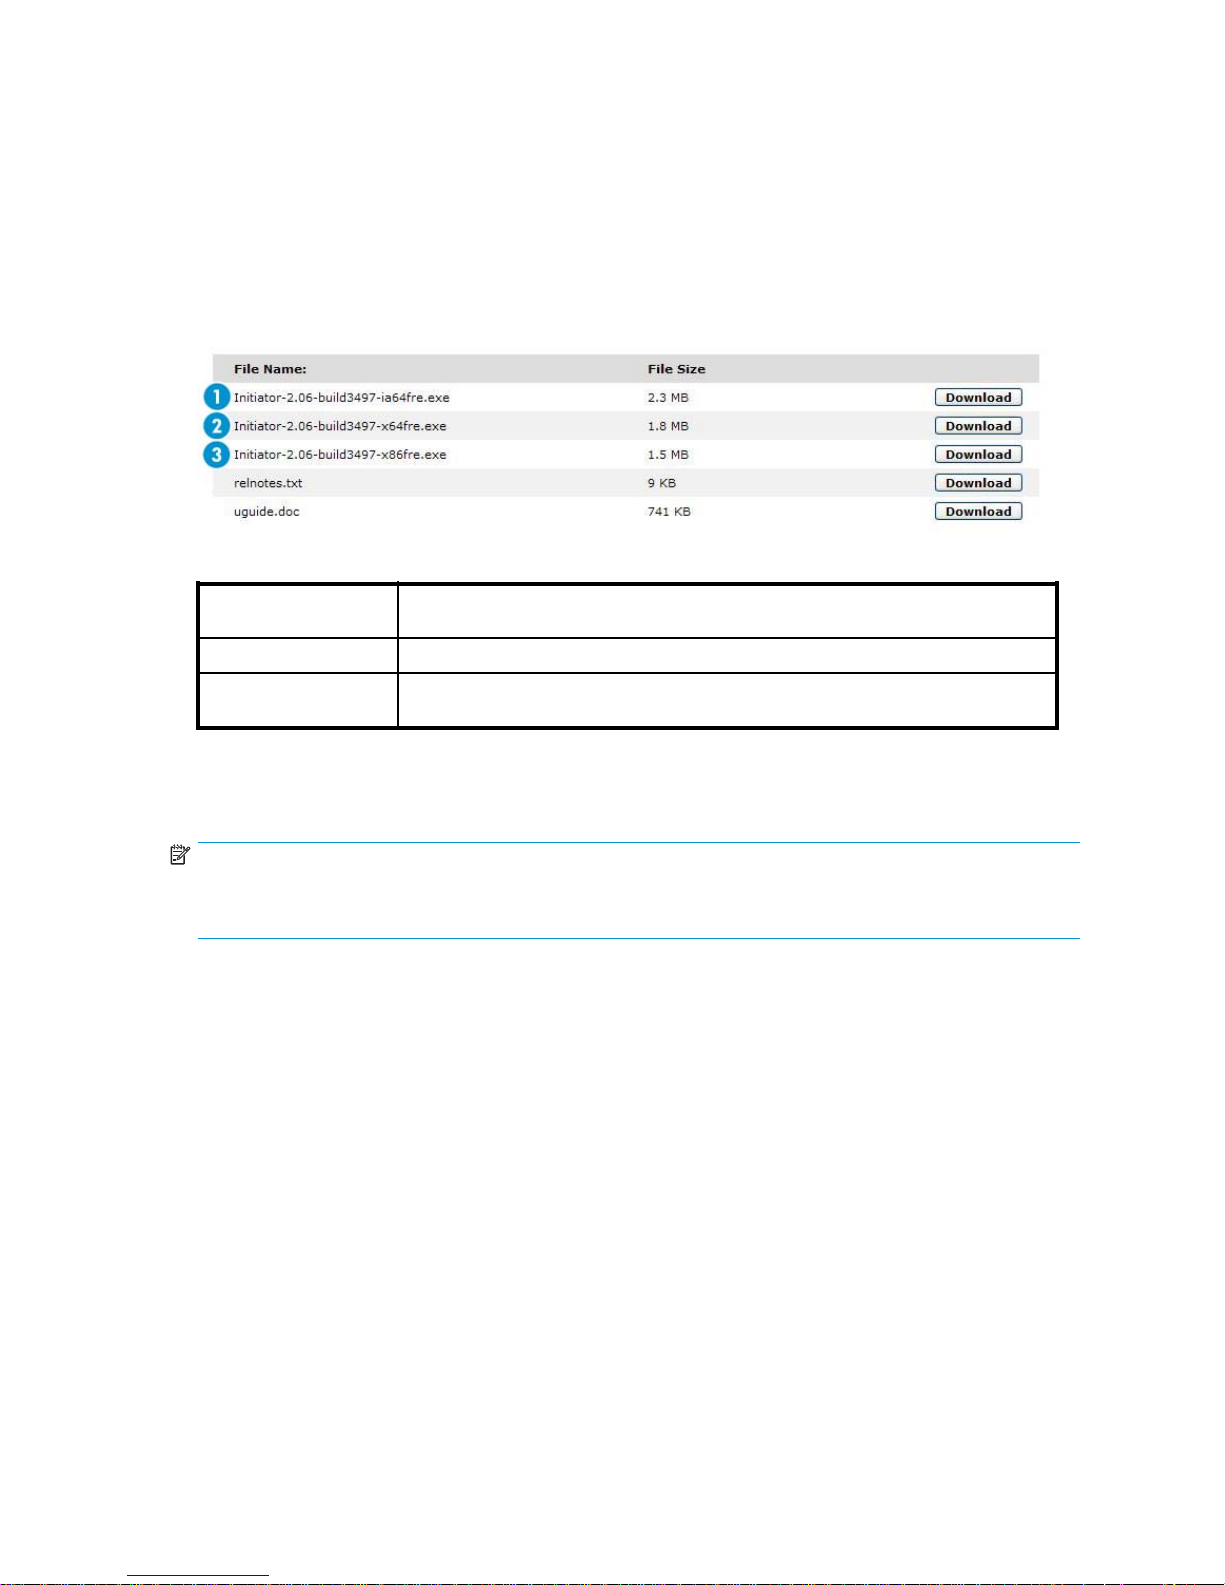
iSCSI Initiator
iSCSI is a protocol for sending SCSI commands via Ethernet. It defines how SCSI packets are translated
to Ethernet packets and connects to the required devices. An iSCSI initiator may be hardware or software
andshouldberu
connect to the l
perform backu
The HP D2D Backup System supports the Microsoft software iSCSI initiator which can b e retrieved
from the Microsoft website.
nning on each host. If the host does not have an iSCSI initiator, it will not be able to
ibrary (or tape drive) confi gured on the HP D2D Backup System and will not be able to
ps.
Figure 24 iSC
1,amd64
2,ia64
3,x86
SI Initiator download page
Use with amd ® 64-bit processors and with Intel ® em64t processors, when
running a 64-bit version of the Windows operating system.
Use with ia-
Use with 32-bit processors or 64-bit processors running 32-bit Windows, such as
Windows XP and Server 2003.
If you download the wrong version, it will not install. The simplest way of ensuring you download the
correct version is to run the Installation wizard from the HP StorageWorks D2D Backup System C D -ROM
because it automatically checks which is the appropriate version for your host.
NOTE:
The Microsoft Vista operating system includes the Microsoft iSCSI Initiator. It can be run from the Control
Panel in Classic M ode.
Manual iSCSI initiator installation
The Installation wizard could fail for the following reasons:
• The host machine does not have an internet connection
• F irewall restrictions prevent this process
• Microsoft has relocated the iSCSI initiator files to a different address on its website.
• Theprocesstimesoutduetoaslowconnection
• The maximum number of drives/libraries have been configured on the HP D2D
64 processors, such as Itanium and HP Integrity.
If the process fails:
1. On a machine that supports an external internet connection, go to the Microsoft website and
search on "iSCSI initiator"
2. Select the result that takes you to the Download page and choose the download that is appropriate
foryourhost.
3. Download the iSCSI initiator and install it on the host, accepting all the default settings.
D2D Backup System HP D2D2503
49
Page 50

The iSCSI Initia
Authentication is not required for the HP D2D, but it is supported for those companies that have a n IT
policy that requires them to use authentication. If this is the case, you will need to configure the necessary
fields on the iSCSI Initiator and also ensure that the corresponding information is supplied in the Web
Management Interface. This enables the Initiator to log into the target device on the HP D2D and the
target device
The authentication method supported on D2D products is CHAP. It relies on a "secret" known only to
the target and initiator. The size of the CHAP secret is between 12 and 16 characters, and must be
entered in exactly the same format in both the Web Management Interface and the iSCSI initiator.
An ’Authentication Failure’ message will occur if the same ’secret’ and ’user name’ information are
not entered into the iSCSI Initiator screen and the Web Management Interface. Further details on
authentication and CHAP can be found within standard iSCSI protocol documentation.
The recomme
1. Create the devices on the Web Management Interface.
2. Set up the Targets in the iSCSI Initiator.
3. Connect to the devices using the CHAP user name and secret that you config ured on the Targets tab.
tor and Authentication
to log into the Initiator.
nded process if you wish to enable authentication is:
The Microsoft iSCSI Initiator
The Microsoft iSCSI initiator contains a number of tabs. This section describes the information that must
be provided in o rder to connect the host to a device on the HP D2D Backup System. It does not provide
a comprehensive description of all the tabs; please download the “User Guide” from the Microsoft
website for more information.
General tab
You do not normally need to make any changes on the General tab. The Initiator Node Name is
generate
d automatically, which guarantees that it will be unique on your network.
50
Advanced installation
Page 51
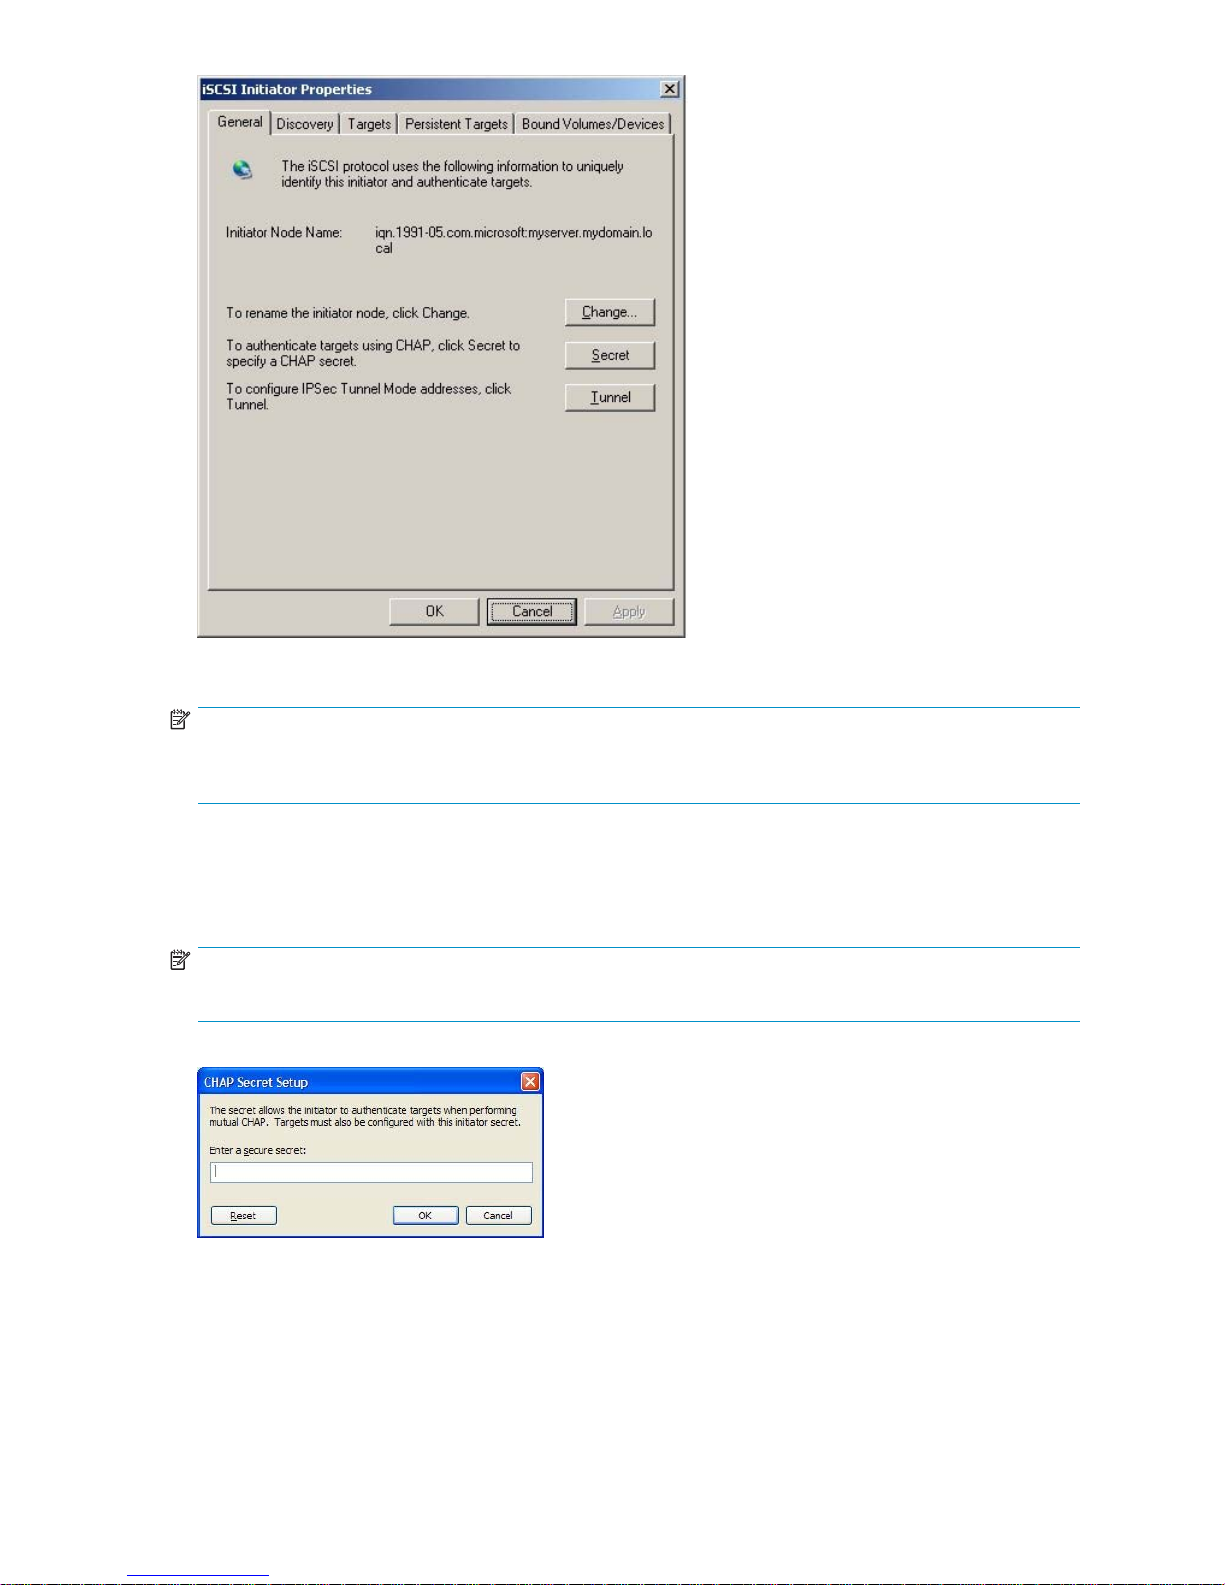
Figure 25 General tab (iSCSI)
NOTE:
When you use the Web Management Interface to create an additional device for your host, you must
provide the iSCSI Initiator Name.ThisistheInitiator Node Name found on the General tab.
Authentication
If you wish to use mutual authentication (where target authentication is also required), click Secret on the
General tab and enter the appropriate string at the prompt.
NOTE:
IPSec Tunnel Mode is not currently supported on HP D2D products.
Figure 26 CHAP secret
The CHAP secret may be between 12 and 16 alphanumeric characters and should be exactly the same
as you enter on the Web Management interface in the Target CHAP Secret field on the Devices
string
page. (See “D evice parameters”onpage92.)
D2D Backup System HP D2D2503
51
Page 52
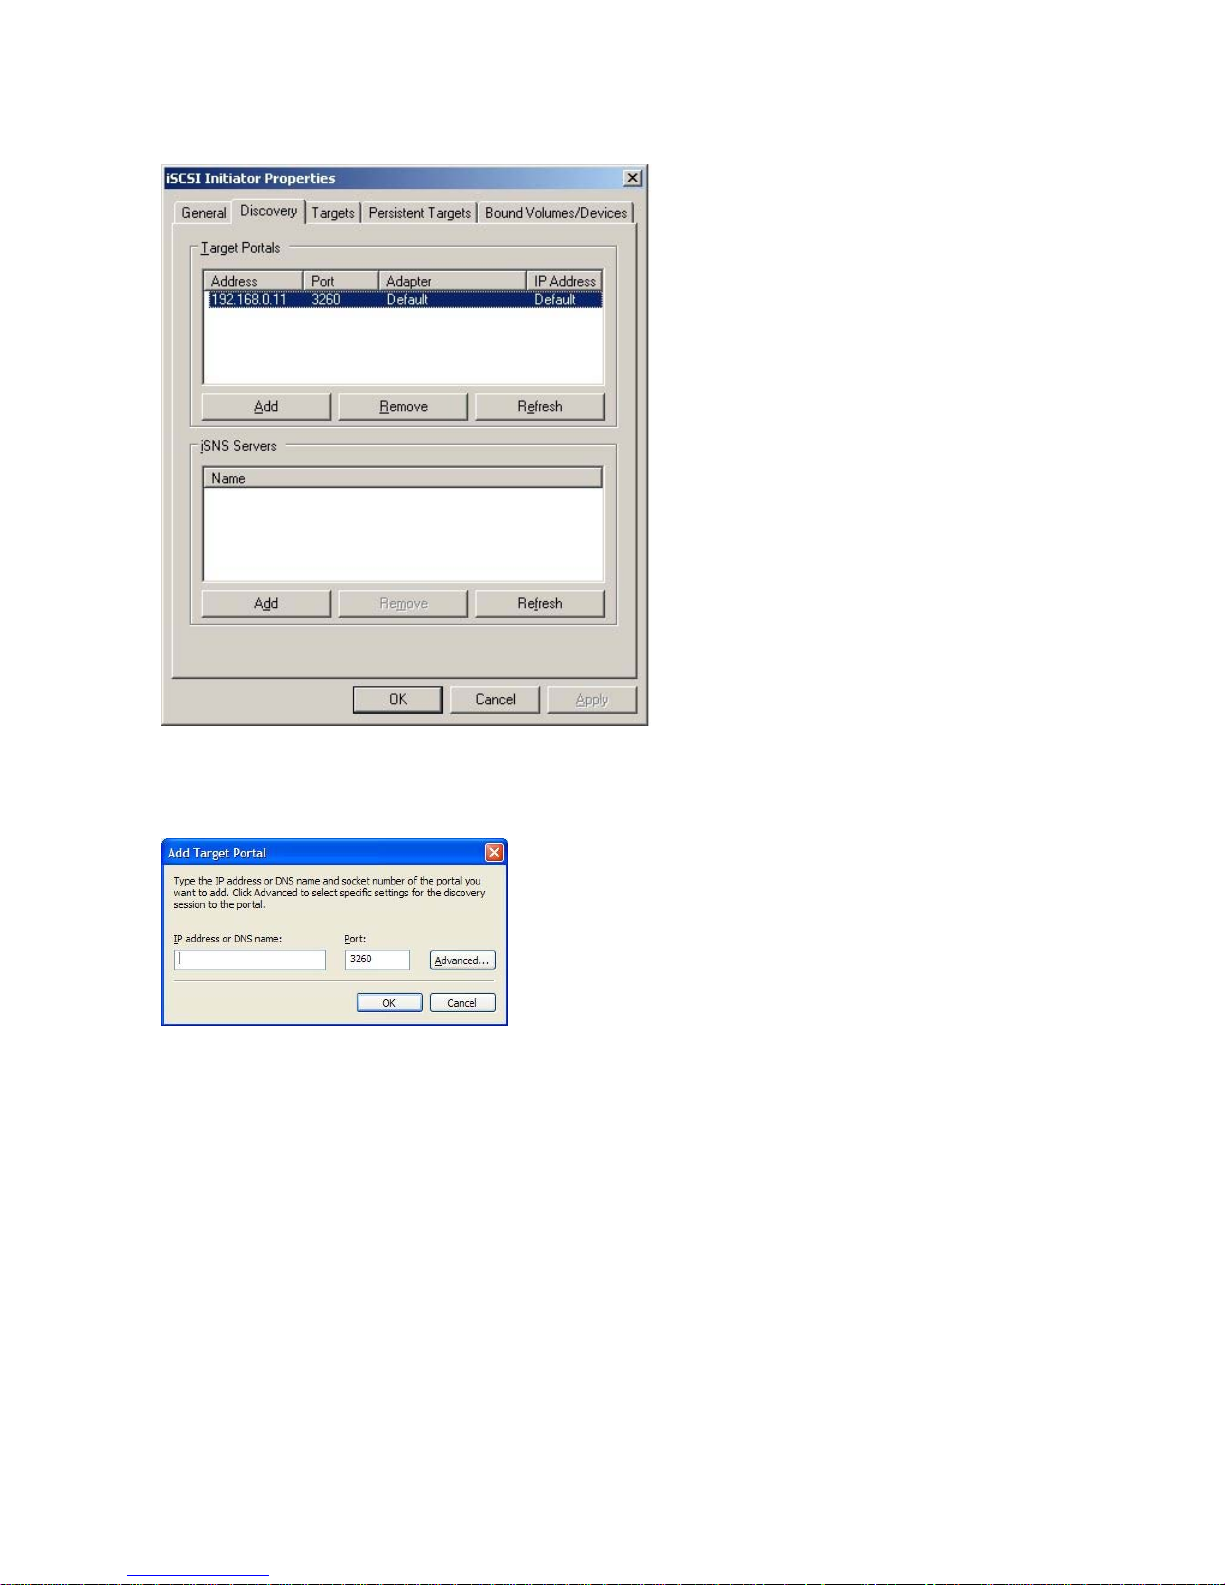
Discovery tab
Figure 27 Discovery tab (iSCSI)
Click Add to enter target portals that will enable discovery of the device.
Figure 28 Add target portal
You must enter the IP address or fully qualified domain name of the HP D2D Backup System (for example,
myhpd2d.mydomain.com)toadditasatargetportalforthehostontheDiscovery tab. Do not change
the Port; it should be 3260.
Targets tab
This tab contains a list of all available devices.
• If this is the first time that the iSCSI Initiator has been configured and th
• If target devices have already been configured for the host in the past, they appear in the list;
When you run the iSCSI Initiator manually, new devices have a status of I
the appropriate targets for your host. Remember that each library ha
not been run, it will automatically create a library with the appropria
(the default is one loader and one tape drive).
no more are created.
satleasttwodevicesandyou
e Installation wizard has
te number of target devices
nactive. You must log on to
52
Advanced installation
Page 53
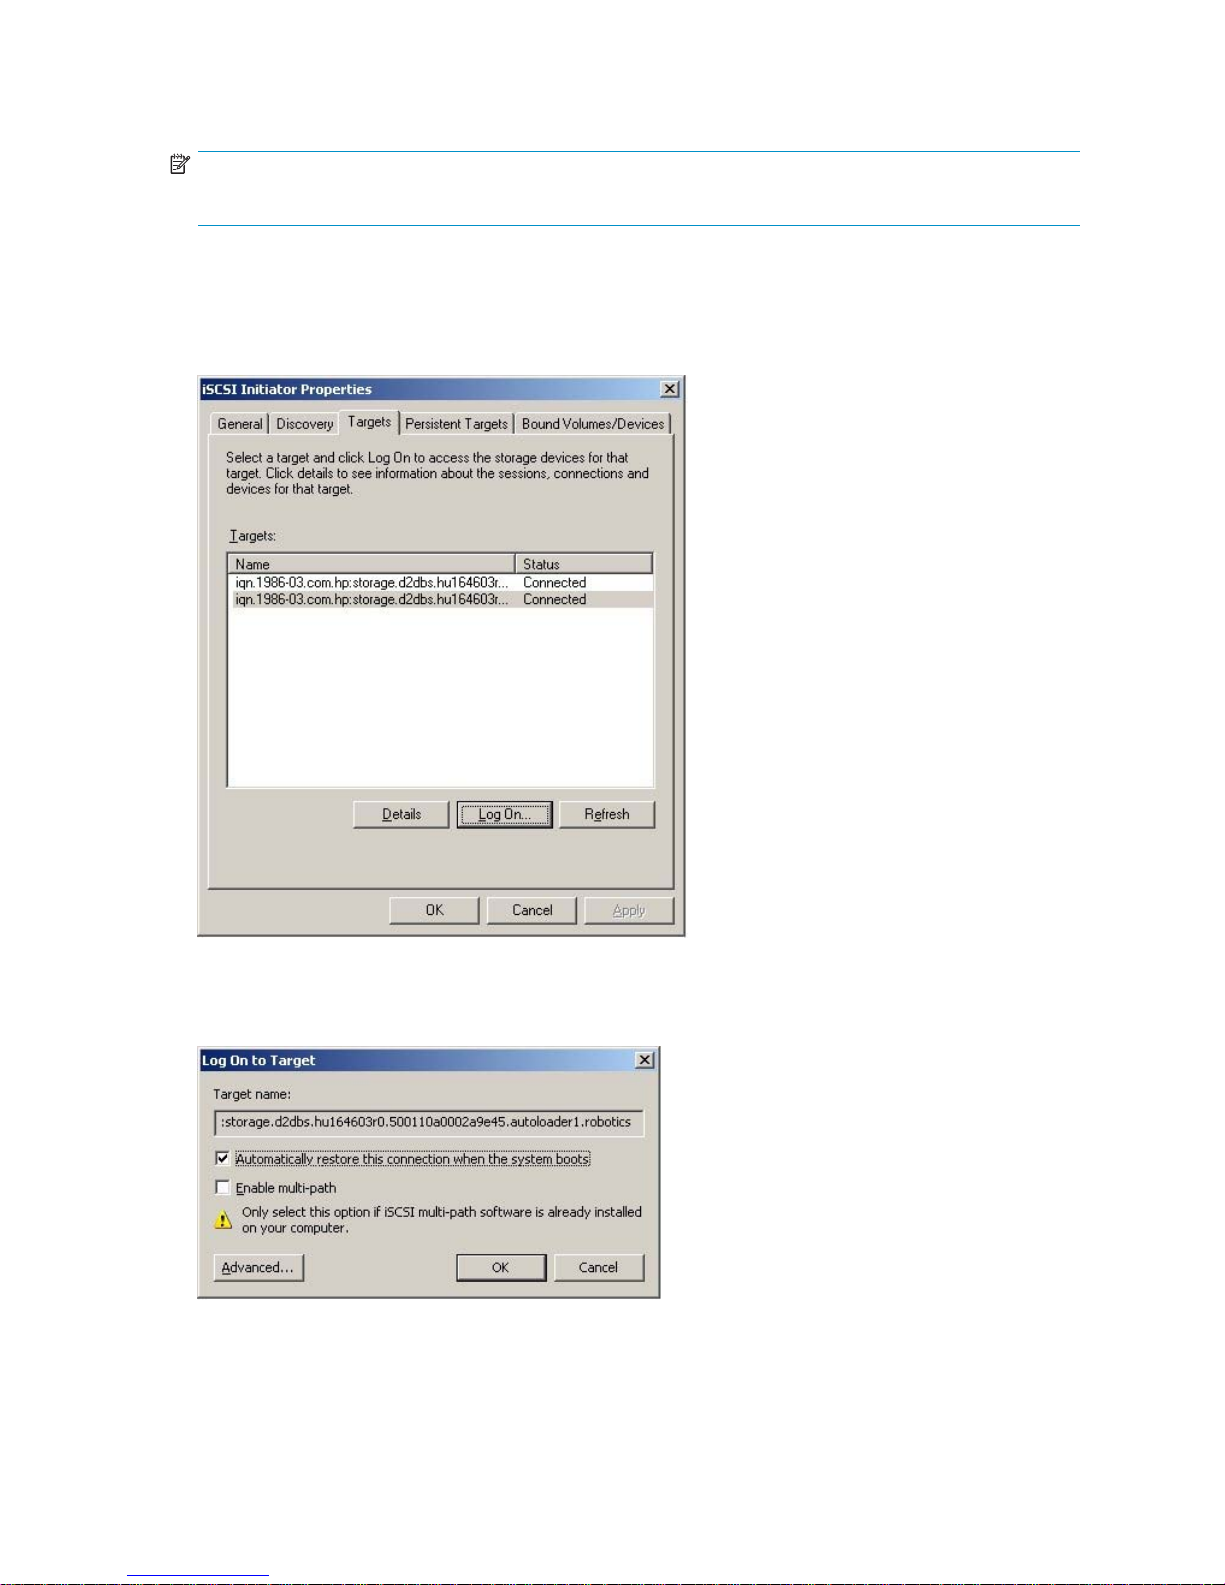
must log onto each one separately. If the emulation t ype you have selected allows more drives, there
will be a target device for each drive.
NOTE:
If you are using mutual CHAP authentication, you set up the details when you log on to the target.
If you are using a dual port configuration, there will be two IP addresses in separate subnets for each
device. The iSCSI initiator will return both IP addresses as possible login addresses. If the default choice
does not work you can select a specific port. High Availability dual ports return a single IP add ress. See
also “Dual network ports” on page 32.
Figure 29 Targets tab (iSCSI)
We recommend that you also select the Automatically restore this connection when the system boots
option in the Log On... dialog.
Authentication
When the Log On to Target prompt is displayed click on Advanced...
D2D Backup System HP D2D2503
53
Page 54
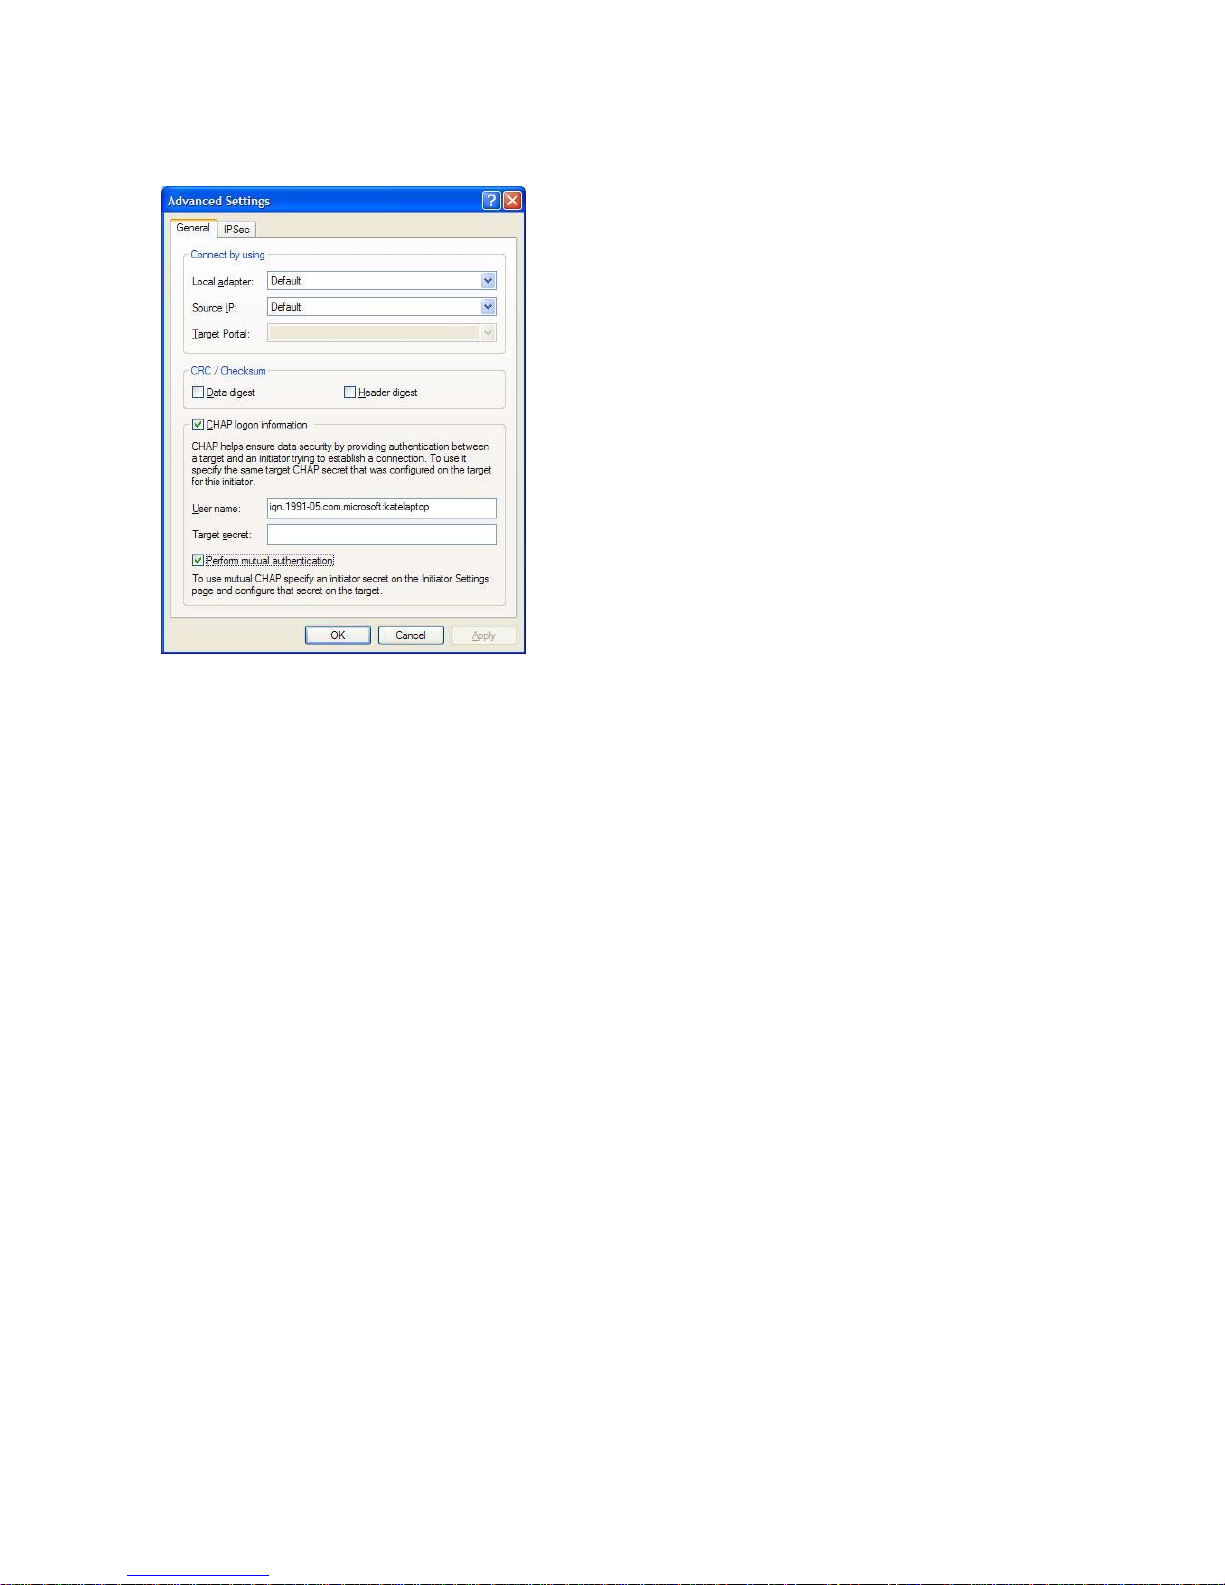
Enable CHAP logon information and enter the secret in the Target Secret box. This should be the same
string as you entered for the Initiator CHAP Secret on the Devices page of the Web Management
Interface. The User Name should match the Initiator CHAP User Name on the Devices page.
Figure 30 Advanced settings CHAP
If you want to use mutual authentication, which means that the target must also log on to the Initiator,
make sure that the Perform mutual authentication box is checked. You must also provide the
Target User Name and Secret on the Devices page in the Web Mana gem ent Interface. See also
“Devices (Configuration)” on page 90.
Persistent Targets tab
The Persistent Targets tab shows the targets that have been configured to restore automatically on reboot.
During initial configuration, it is for information only. However, if you want to stop the host automatically
connect
withou
ing to a device, you must select the device on this tab and Remove it. To disconnect the device
t rebooting, go back to the Targets tab, select the device, click Details and log off.
54
Advanced installation
Page 55
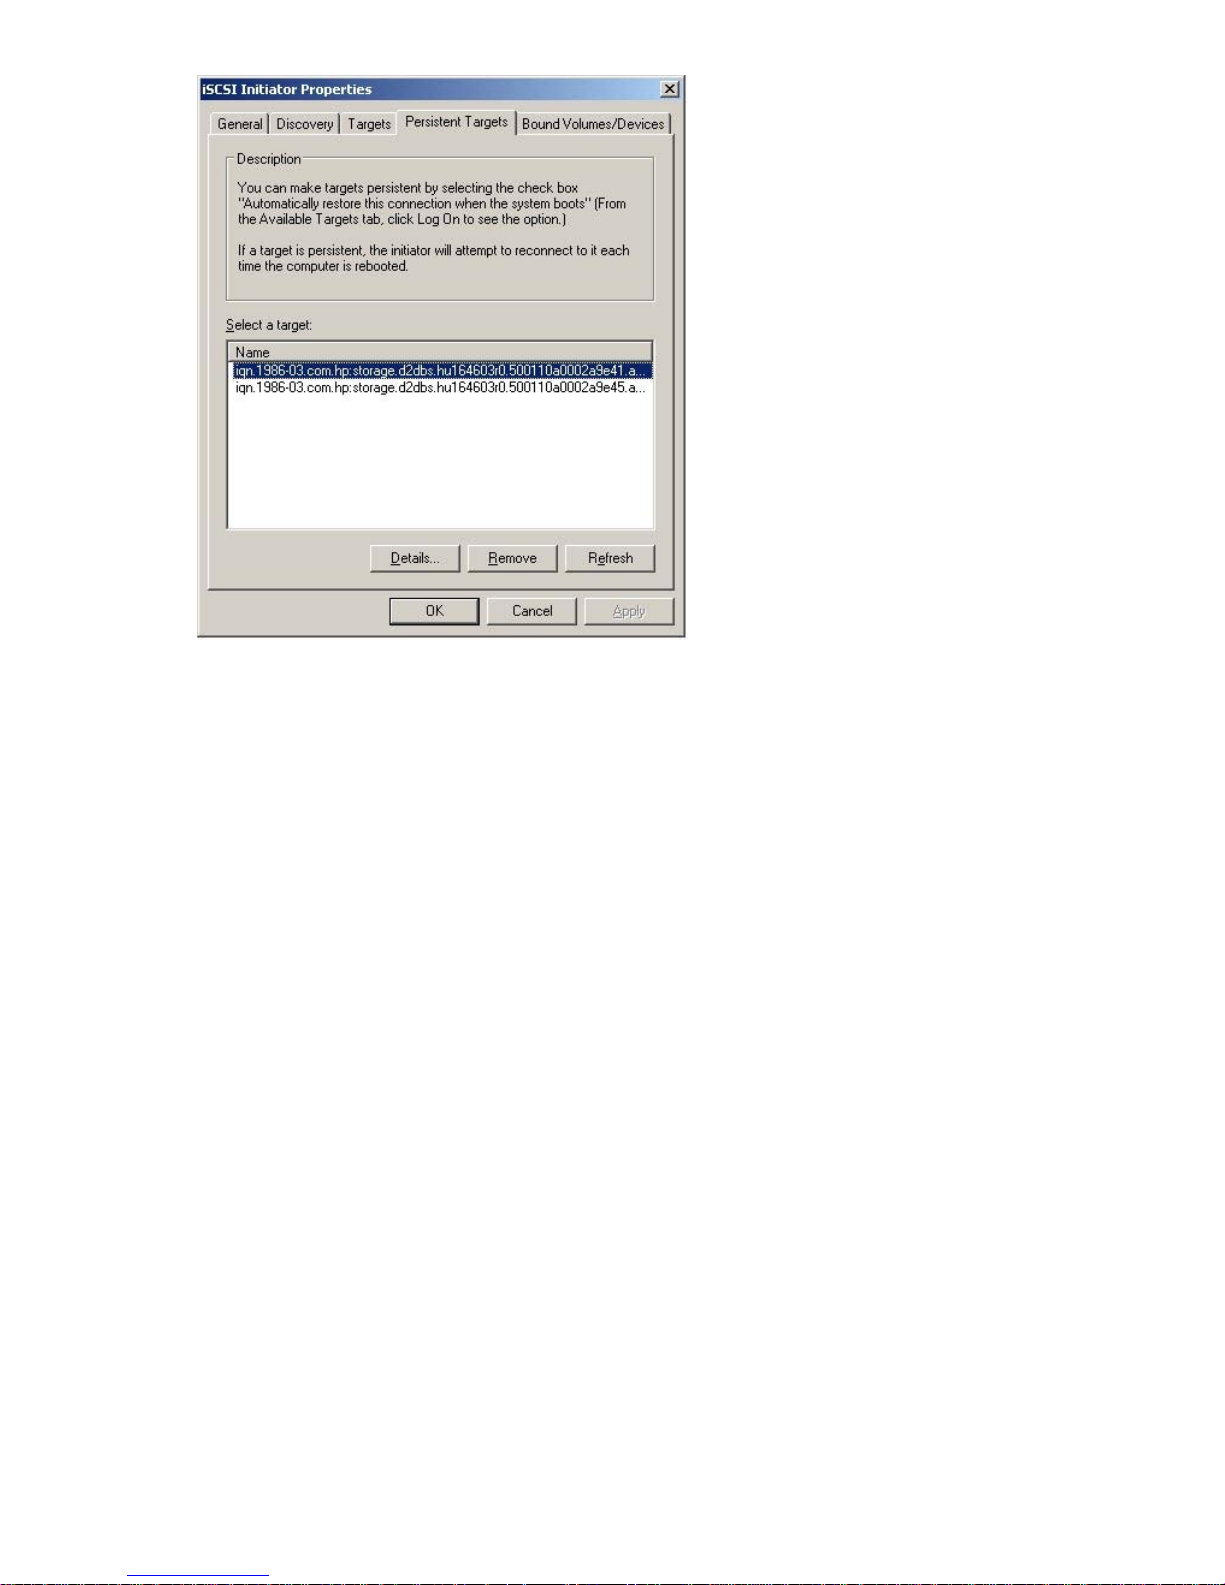
Figure 31 Persistent Targets tab (iSCSI)
Bound Volumes/Devices tab
No configuration is required on the Bound Volumes/Devices tab.
Linux and UNIX iSCSI initiators
An iSCSI initiator is embedded in the operating system. Please refer to the “Linux and UNIX Configuration
Guide” on the HP StorageWorks D2D Backup System CD-ROM for further information. Make sure that
you have downloaded the latest operating system patches before you config ure your system.
D2D Backup System HP D2D2503
55
Page 56

56
Advanced installation
Page 57
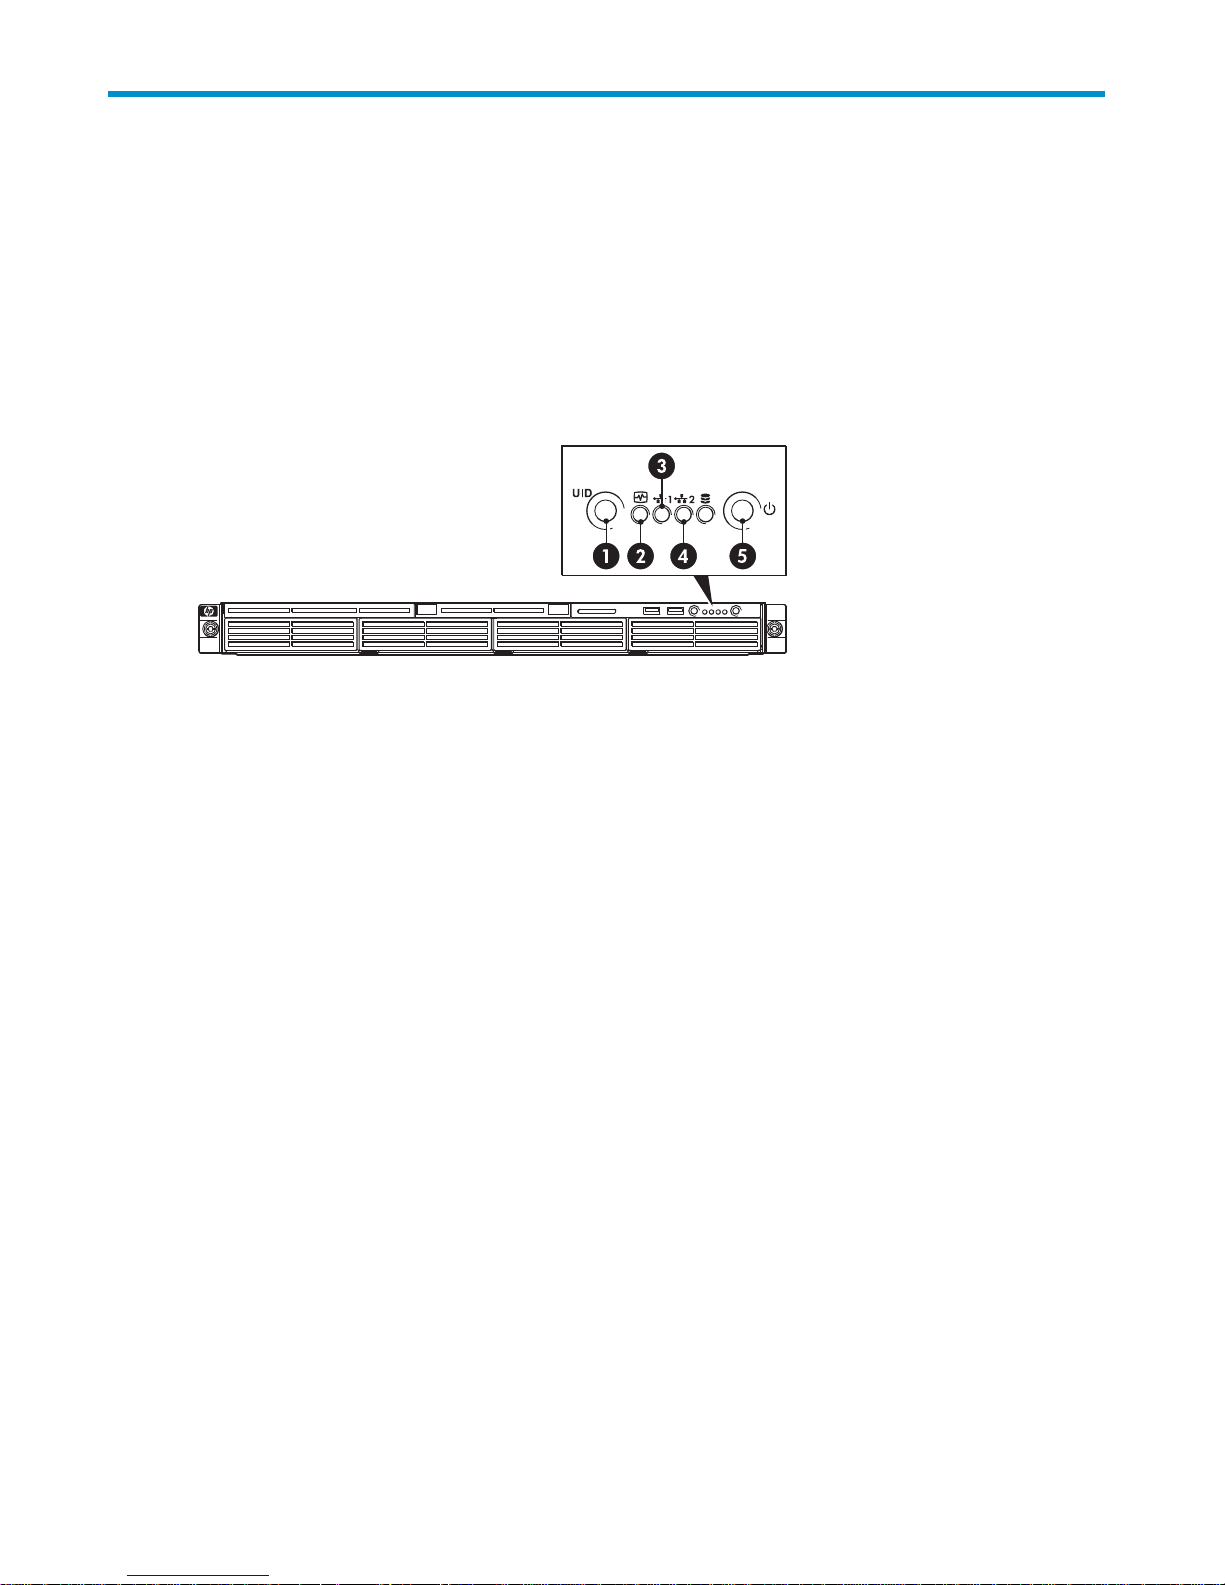
5LEDs
In this chapter:
• “Front panel LEDs” on page 57
• “Rear panel LEDs” on page 57
•
“Beacon mode” on page 58
Front panel LEDs
Figure 32 Fr
1. Power On button/LED
2. HP D2D Beacon LED
3. System H ealth LED
4. and 5. L
ont view of the HP D2D Backup System
AN port LEDS
Rear panel LEDs
The LAN port on the rear p anel has two LED indicators that allow monitoring of network activity.
Steady green: Power connected, device ready to use
nl
Steady amber: Device switched off or in hibernation
with power connected
nl
Off: No pow
Steady blue: identifies the unit
Steady green: Hardware is performing correctly
nl
Flashing red: fault with the power supply, such as
power supply or fan failure
Flashing green: network connection
nl
Off: no network connection or network not configured
er connected
D2D Backup System HP D2D2503
57
Page 58
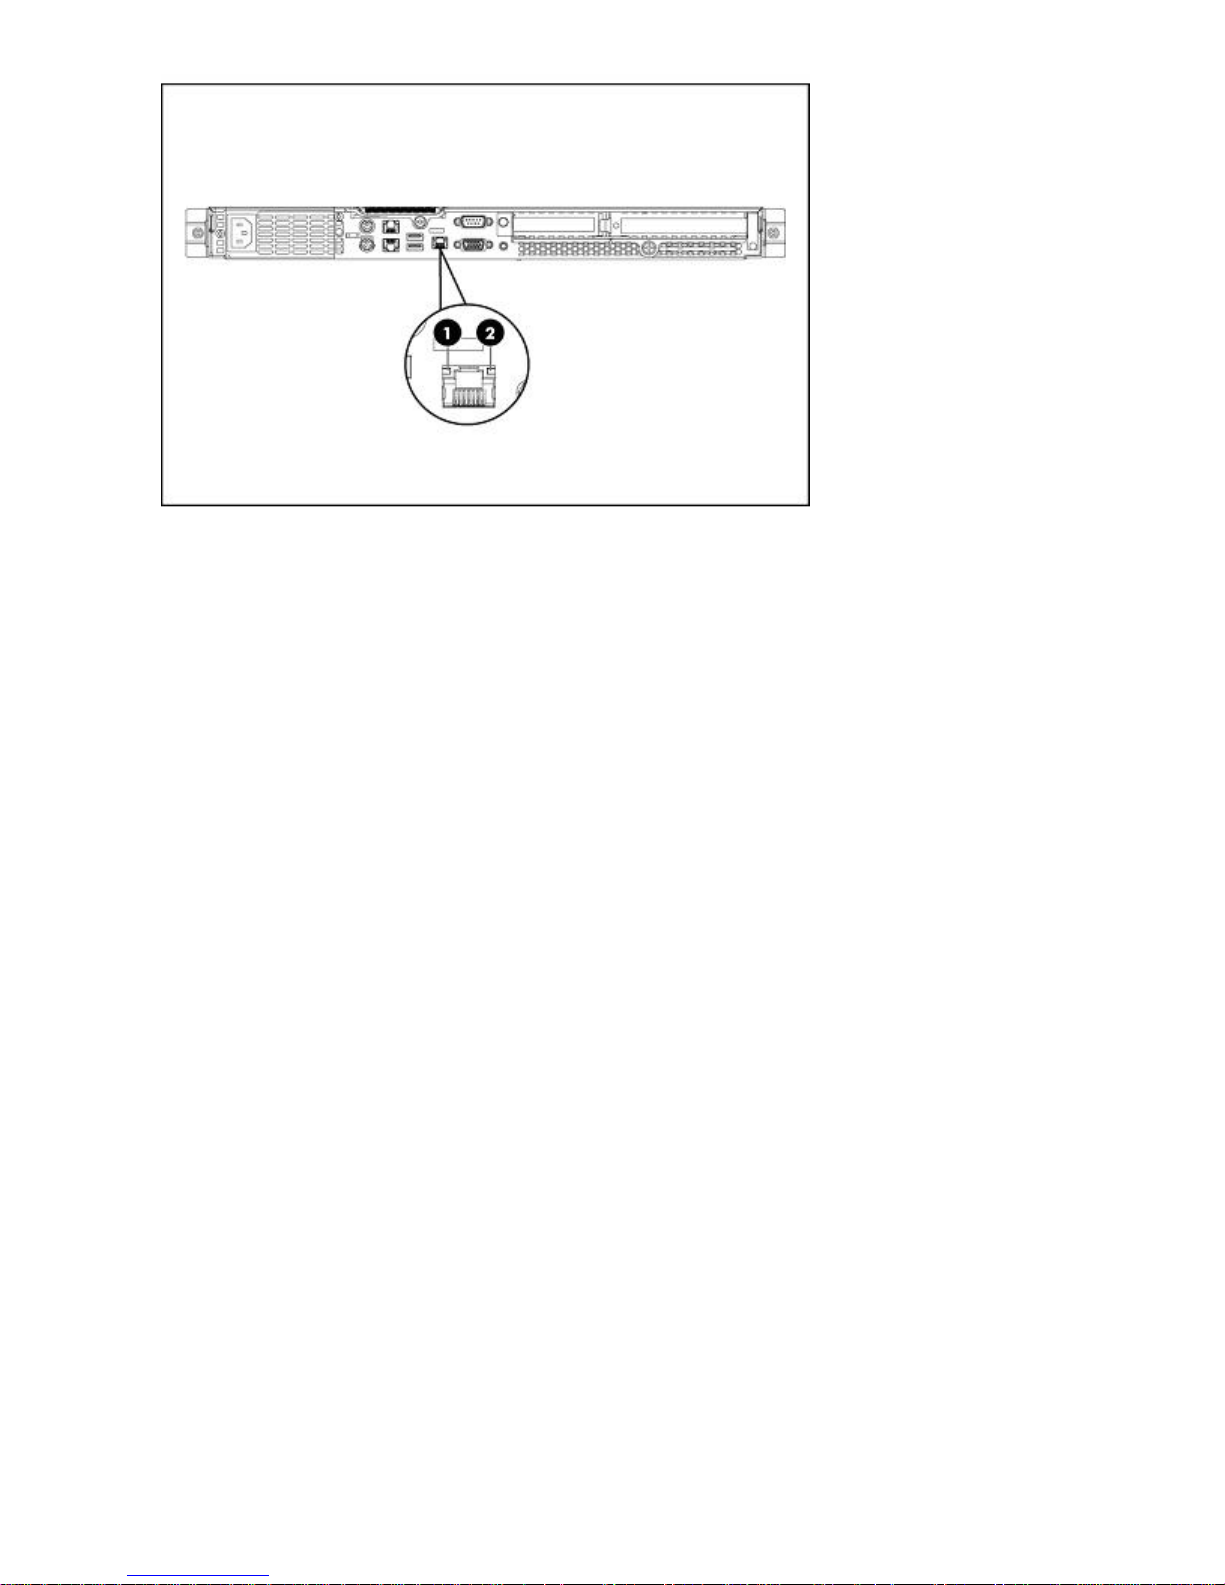
Figure 33 Rear panel LEDs
1. LAN activity status LED indicator Flashing green: Ongoing network data activity.
2. LAN network speed LED indicator Steady green: The LAN connection is using 10
Beacon mo
The HP D2D Backup System suppor ts a Beacon LED sequence, which helps a user identify which unit is
being configured, if several are connected to the network.
Use the Network page of the Web Management Interface to turn Beacon Mode on and off for the HP D2D
Backup System. This turns the Beacon LED on the front and the rear of the HP D2D solid blue. If you do not
switch o
You ca n
ff Beacon Mode, it will continue for 5 minutes. See also “Network (Configuration)”onpage97.
nl
Off: No net
Mbps/100 Mbps link.
nl
Steady amber: The LAN connection is using a GbE
link.
nl
Off: No connection.
work data activity or no connection.
de
also switch Beacon mode on and off by pressing the LED on the front panel.
LEDs
58
Page 59

6Configuring and using replication
NOTE:
When considering replication you are likely to be synchronizing data between different models of HP
D2DBackupSystems.Unliketherestofthisuserguide,theexamplesinthischapterarenotspecifictoa
particular model of HP D2D.
In this chapter:
•
“Replication overview”onpage59
•
“Preparing for replication” on page 60
•
“Replication deployment strategies” on page 65
•
“Seeding the Replication Target Appliance” on page 68
•
“Replication licensing” on page 67
•
“The Replication process” on page 68
•
“Recovering a source appliance” on page 74
Replication overview
Replication is a standard term used to describe a way of synchronizing data between hardware in t wo
physical locations. HP D2D Replication allows car tridges in slots on a library device that has been
configured on one HP D2D B ackup System (the Source Appliance) to be replicated to corresponding
mapped slots on a library device on another HP D2D Backup System (the Target Appliance) at another
location.
Replication is the process of creating an exact match on the target appliance of the specified data from
the source appliance. Data is always mapped at s lot level. It is important to understand that no history is
held; the target appliance always mirrors as soon as p ossible the current state of the data on the source
appliance, which means that it is ready for use if the source library or appliance is unavailable. But it does
not hold archive versions and is not an alternative to conventional ba ckup with multiple restore points.
How is replication initiated?
Once you have set up a replication configuration between Source and Target HP D2D Backup Systems, it
is initiated automatically whenever a cartridge is returned from a drive to a slot that has been configured
for replication. A Configuration Wizard is provided to take you through replication configuration steps.
Replication and Tape Attach
Tape Attach provides very useful additional functionality with replication. Because it is a function of the
Web Management Interface, copy to tape for disaster recovery purposes can occur at the replication
Target Appliance in the Data Center without the need for any involvement from hosts on remote sites. All
scheduling and processing becomes a Back Office task. See also “Using Tape Attach” o n page 121.
D2D Backup System HP D2D2503
59
Page 60
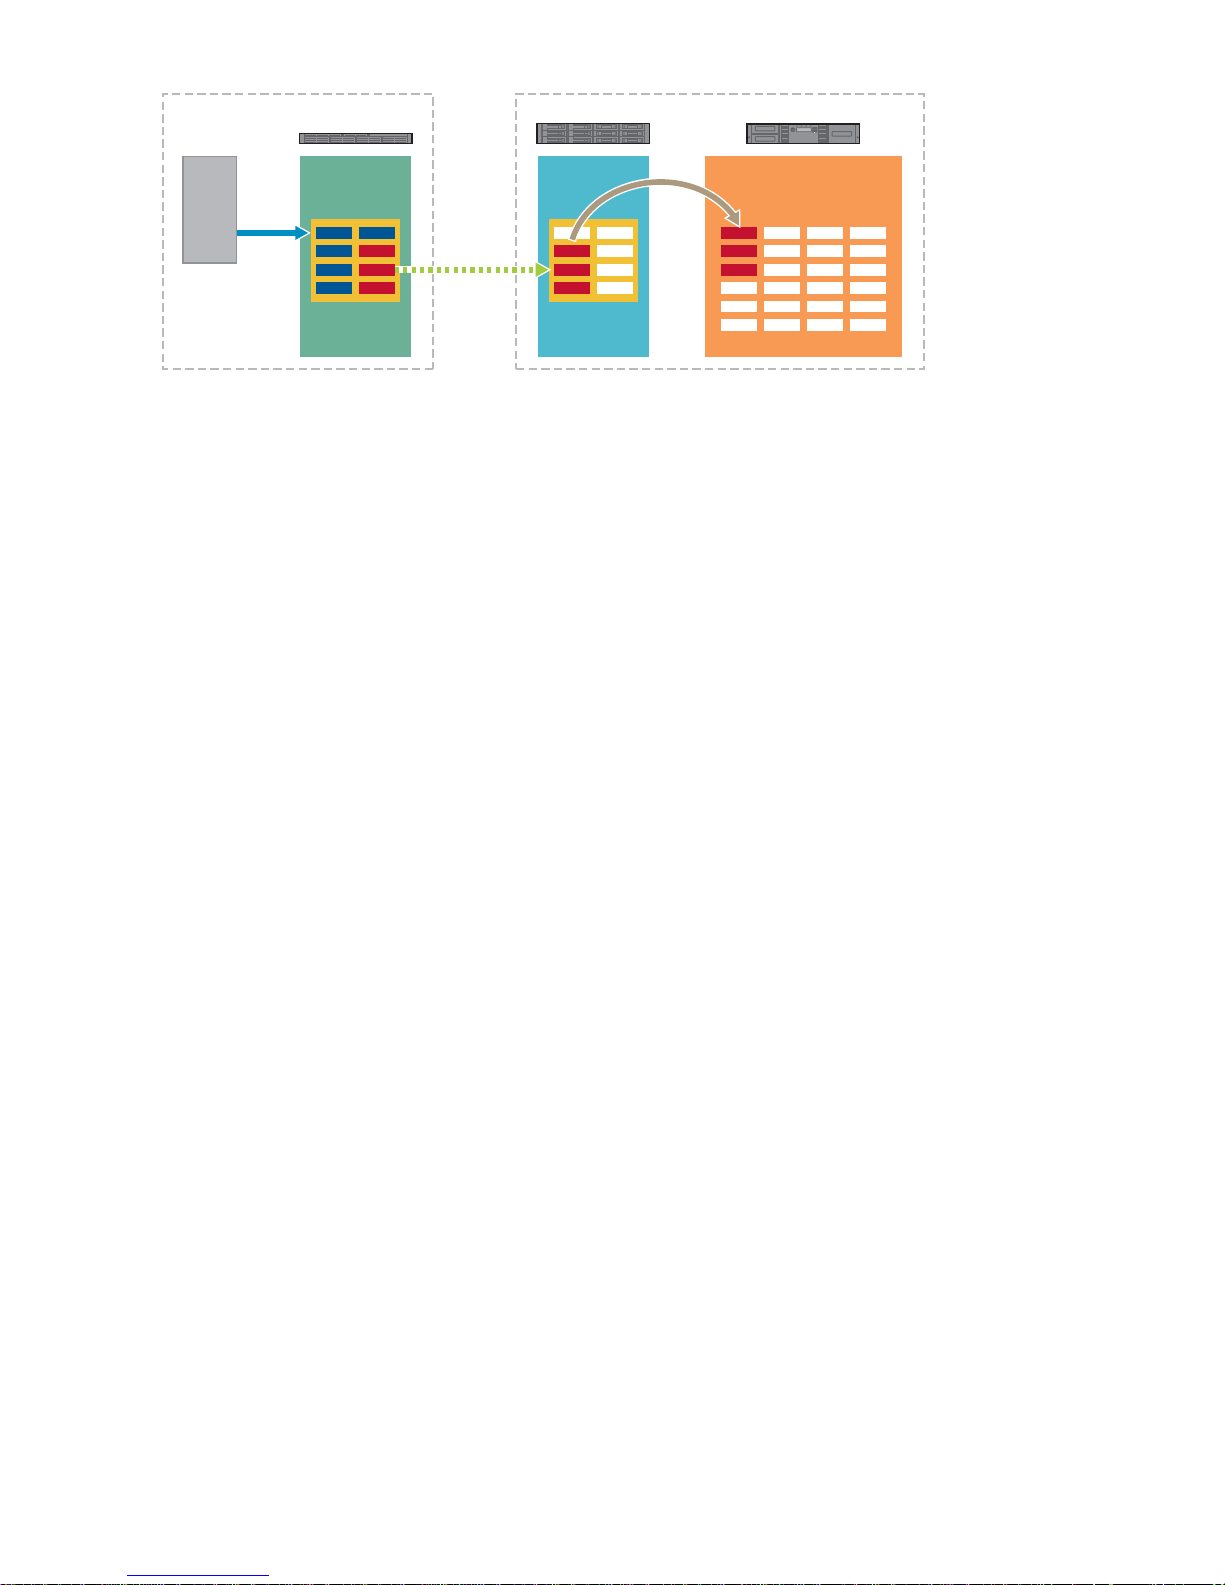
Remote Site Data Center
D2D Appliance
Host
Backup
Replicate
Figure 34 Replication and Tape attach
Similarly, it provides an efficient option for replicating the first instance of data, which contains the full
backup, onto the Target Appliance without placing any load on network bandwidth. (Deduplication
ensures that subsequent replication tasks do not place much load on network bandwidth.) See also
“Seeding the Replication Target Appliance” on page 68.
D2D Appliance Tape Library
Copy
Prepa
ring for replication
There are 5 major considerations:
• Make sure you understand the basic concepts and terminology.
• Decid
• Map your replication workflow and decide how the first backup will be seeded onto the target
• Confi
• Define your Disaster Recovery strategy if the Source Appliance fails.
e which deployment model is appropriate for your organization.
appliance.
gure and monitor replication on the Web Management Interface
Replication concepts and terminology
When confi guring appliances for replication, there are some key concepts and terminology that it
is impor tant to understand.
lication elements
Rep
• Source Appliance: This is the D2D Backup System with the library d evice that is being used for
kup by a host server. The library device contains the slots that need to be replicated.
bac
• Target Appliance: This is the D2D Backup System with the library device that c ontains the
replicated slots; it is an exact match of the library on the source HP D2D Backup System. This
appliance needs a replication license.
n-Replicating Library: This is a library on a D2D Backup System that has not been configured
• No
s a source or target for replication cartridge slots.
a
• Replication-Source Library: This is a library on a D2D Backup System that has been configured
for backups from a host server and has some or all of its slots con figured to be replicated. This
library is visible to the host.
• Replication-Target Library: This is a library on a D2D Backup System that has been configured to
containslotsthatarereplicantsofthoseinasourcelibrary. Thislibraryisnotvisibletothehost.
A single HP D2D Backup System may host both Replication-Source and Replication-Target Libraries
and can, therefore, act simultaneously in both Source and Target Appliance roles. However, the host
server will only be able to access Replication-Source or Non-Replicating Libraries. All actions on
Replication-Target Libraries are controlled from the HP D2D Web Management Interface.
60
Configuring and using replication
Page 61
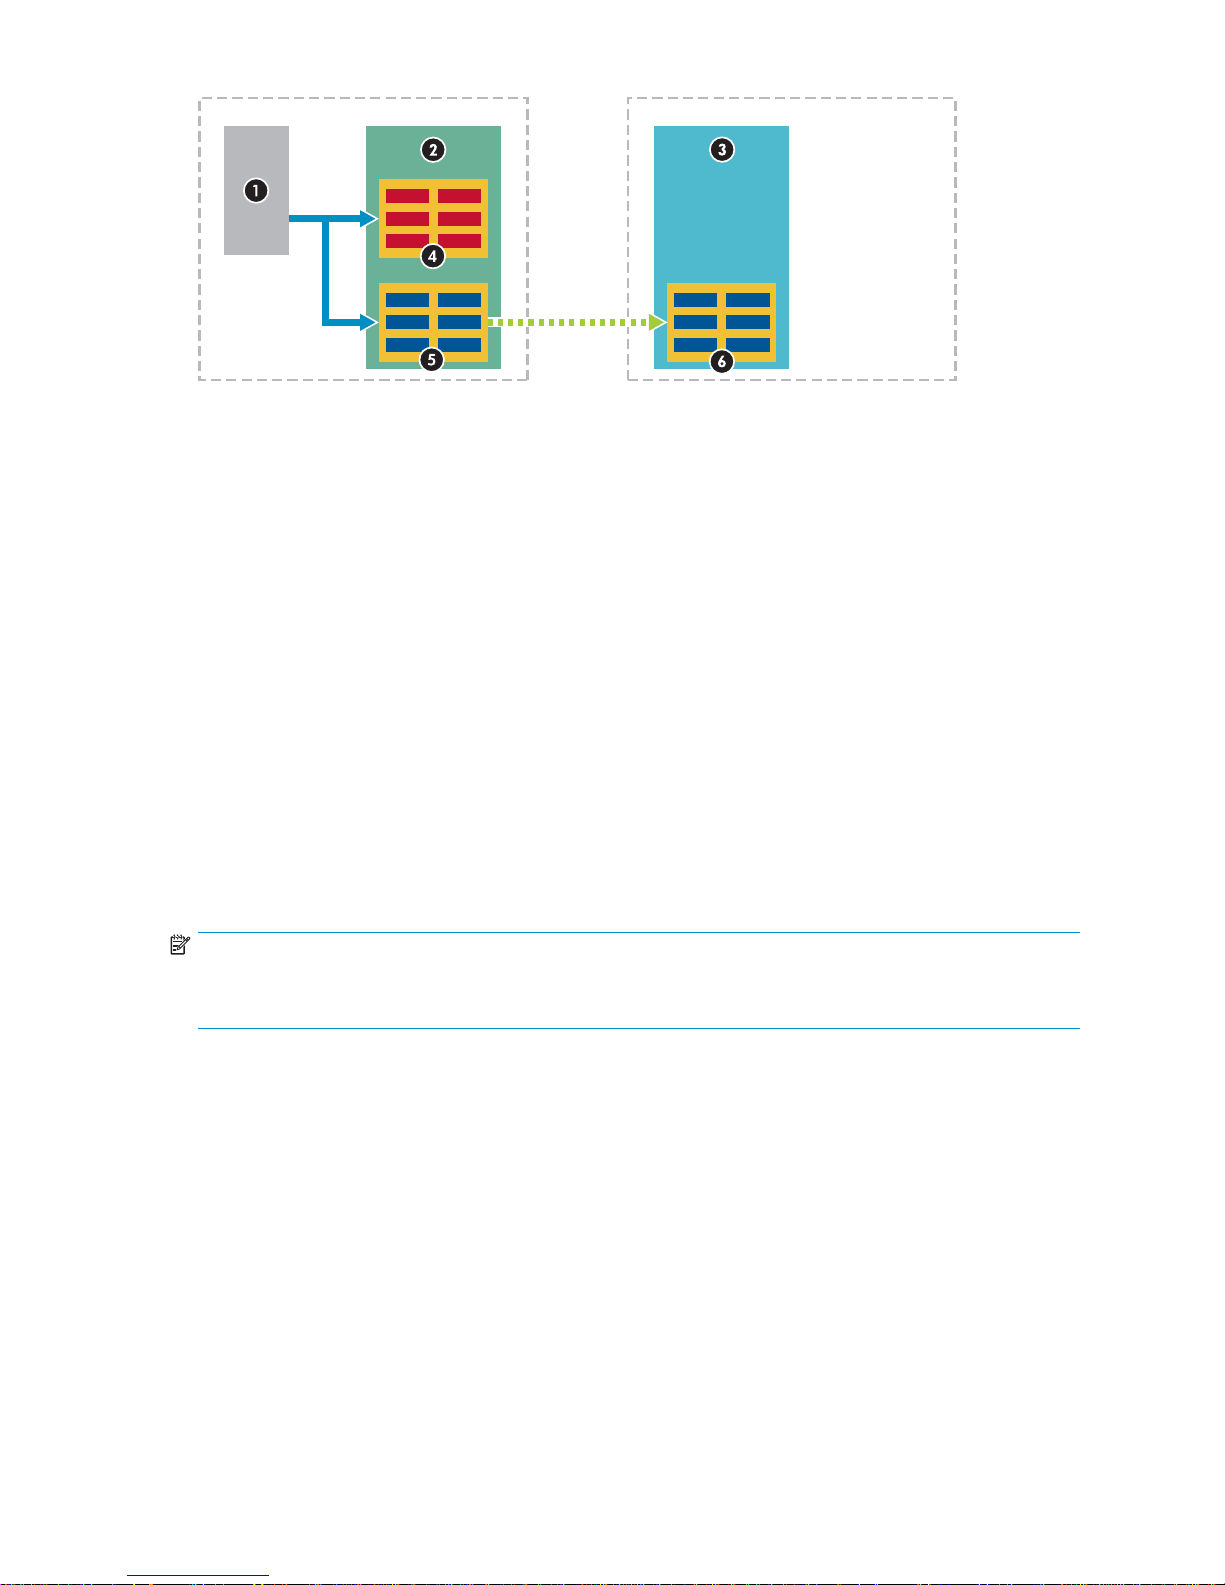
Remote Site Data Center
1. Host backing up
2. Source Appliance 3. Target Appliance
4. Non-Replicating Library
5. Replica
tion Source Library
Figure 35 Replication elements
FanIn,FanOutandjobconcurrency
When configuring replication on complex sites, for example m any Remote Sites into a Data Center, care
must be taken when planning how appliances and libraries will be replicated. The key concepts to
understand are FAN OUT, FAN IN and Concurrency.
Fan OUT
When we talk about FAN OUT, we are c onsidering the number of replication Target Appliances that
are supported from that Source Appliance (the HP D 2 D Backup System that contains the libraries that
you wish
Each library on the Source Appliance m ay be mapped to only one library o n the Target Appliance. You
cannot split slot mappings from one Source Library across several Target Libraries.
NOTE:
Any number of slots within a Replication-Source library may be selected for replication to a Replication-Target
library. This selection is called a slot mapping collection and may be edited after initial mapping creation.
For example: If you have backed up data on the source HP D2D that relates to specificregions,youmay
want to replicate that data to regional data centers.
HP D2D400x and HP D2D41xx Series
Each HP D2D 400x or 4 1xx Series Source Appliance can replicate to up to four Target Appliances.
to replicate).
6. Replica
tion Target Library
D2D Backup System HP D2D2503
61
Page 62
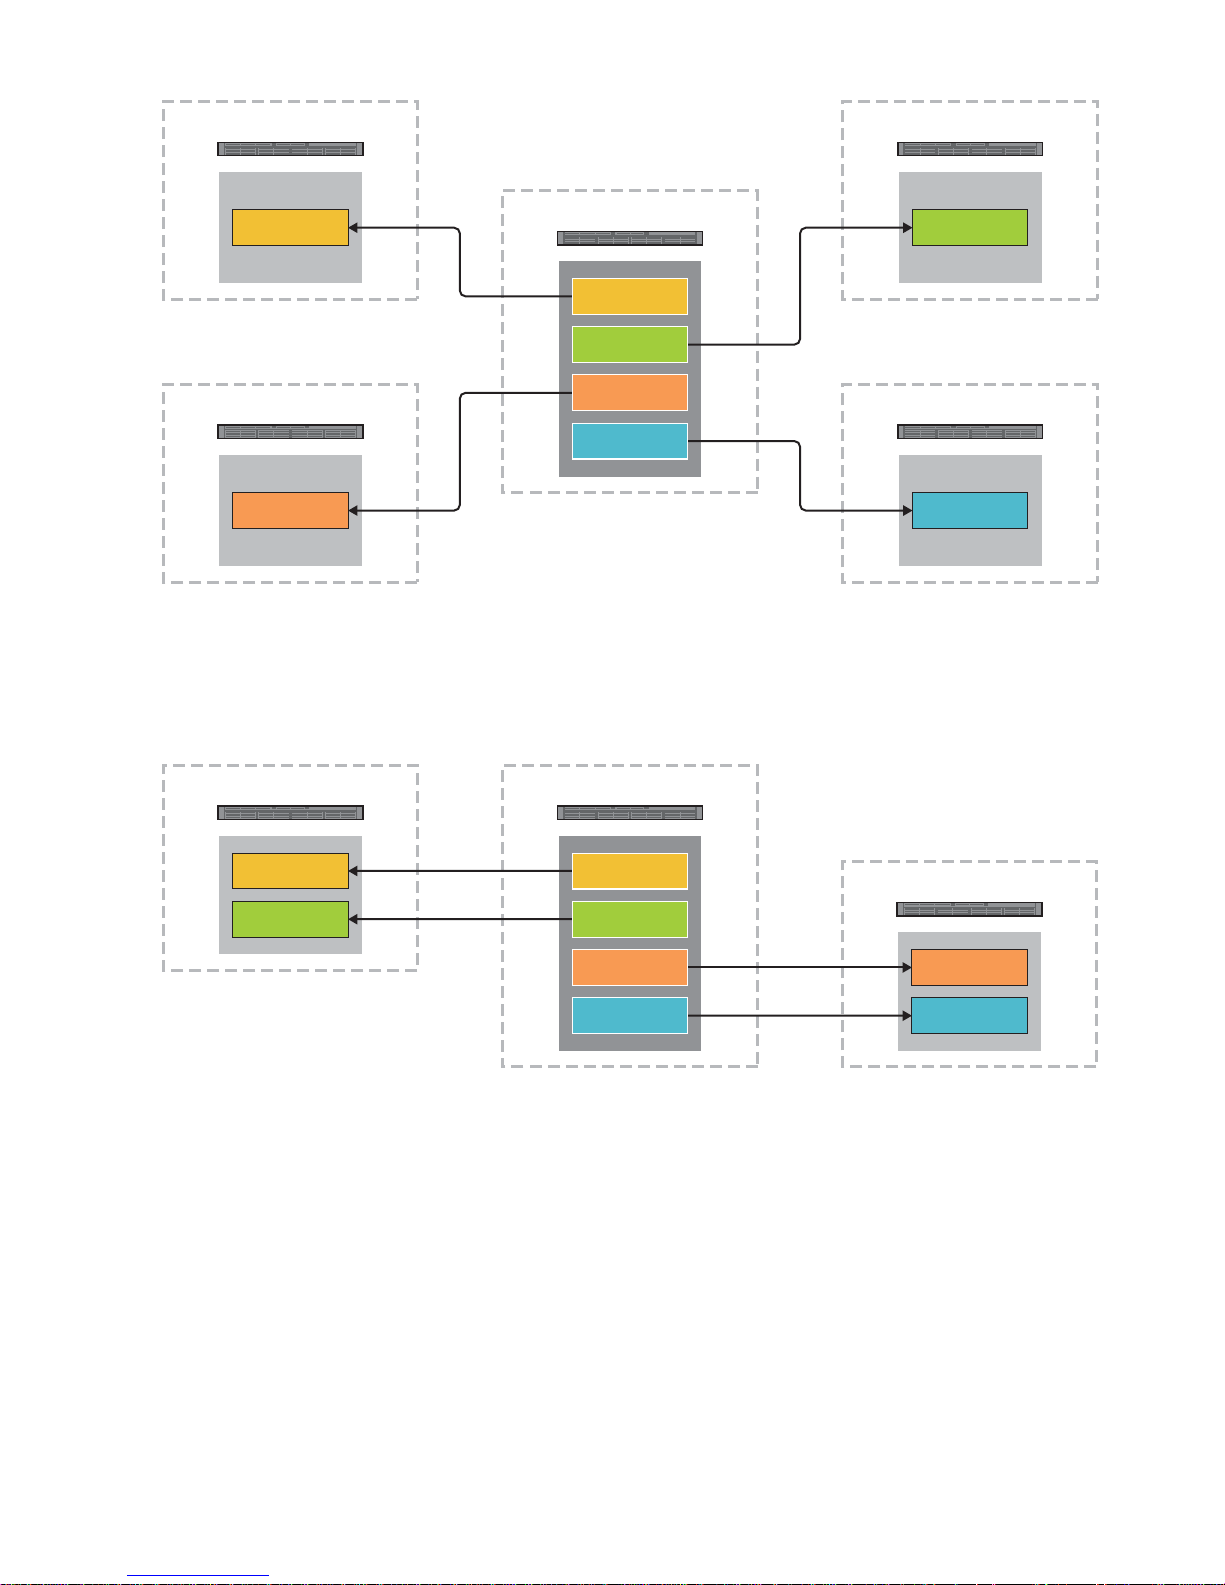
Americas Data Center
Europe Data Center
D2D Appliance
D2D Appliance
Remote Site
Americas
Library
Asia Data Center
D2D Appliance
Asia Library
D2D Appliance
Americas
Americas
Library
Library
Europe Library
Europe Library
Asia Library
Asia Library
Rest of the
Rest of the
World Library
World Library
Europe Library
Other Data Center
D2D Appliance
World Library
Figure 36 Fan OUT example for HP D2D400x and D2D41xx
HP D2 D250x Series
Each HP D2D 250x Series Source Appliance can replicate to up to two Target Appliances.
Rest of the
Fan IN
Americas Data Center
D2D Appliance
Americas
Library
Europe Library
Remote Site
D2D Appliance
Americas
Americas
Library
Library
Europe Library
Europe Library
Asia Library
Asia Library
Rest of the
Rest of the
World Library
World Library
Asia Data Center
D2D Appliance
Asia Library
Rest of the
World Library
Figure 3 7 HP D2D 2500 Fan OUT example
Of course, the above is for illustration only. If your Company policy does not dictate ge ographically
unique data centers, there’s no reason why you could not support all four libraries on a singl e Target
Appliance, as described in the FAN IN section.
When we talk about FAN IN, we are considering the number of replication Source Appliances that are
supported.
HP D2 D250x Series
Each HP D2D 2500 Target Appliance can support up to 6 Source Appliances. Each library on the
Target Appliance must be uniquely mapped to one library on a Source Appliance. For example:
a company has 6 remote sites and a Data Center. Four of the remote sites have one library each
62
Configuring and using replication
Page 63
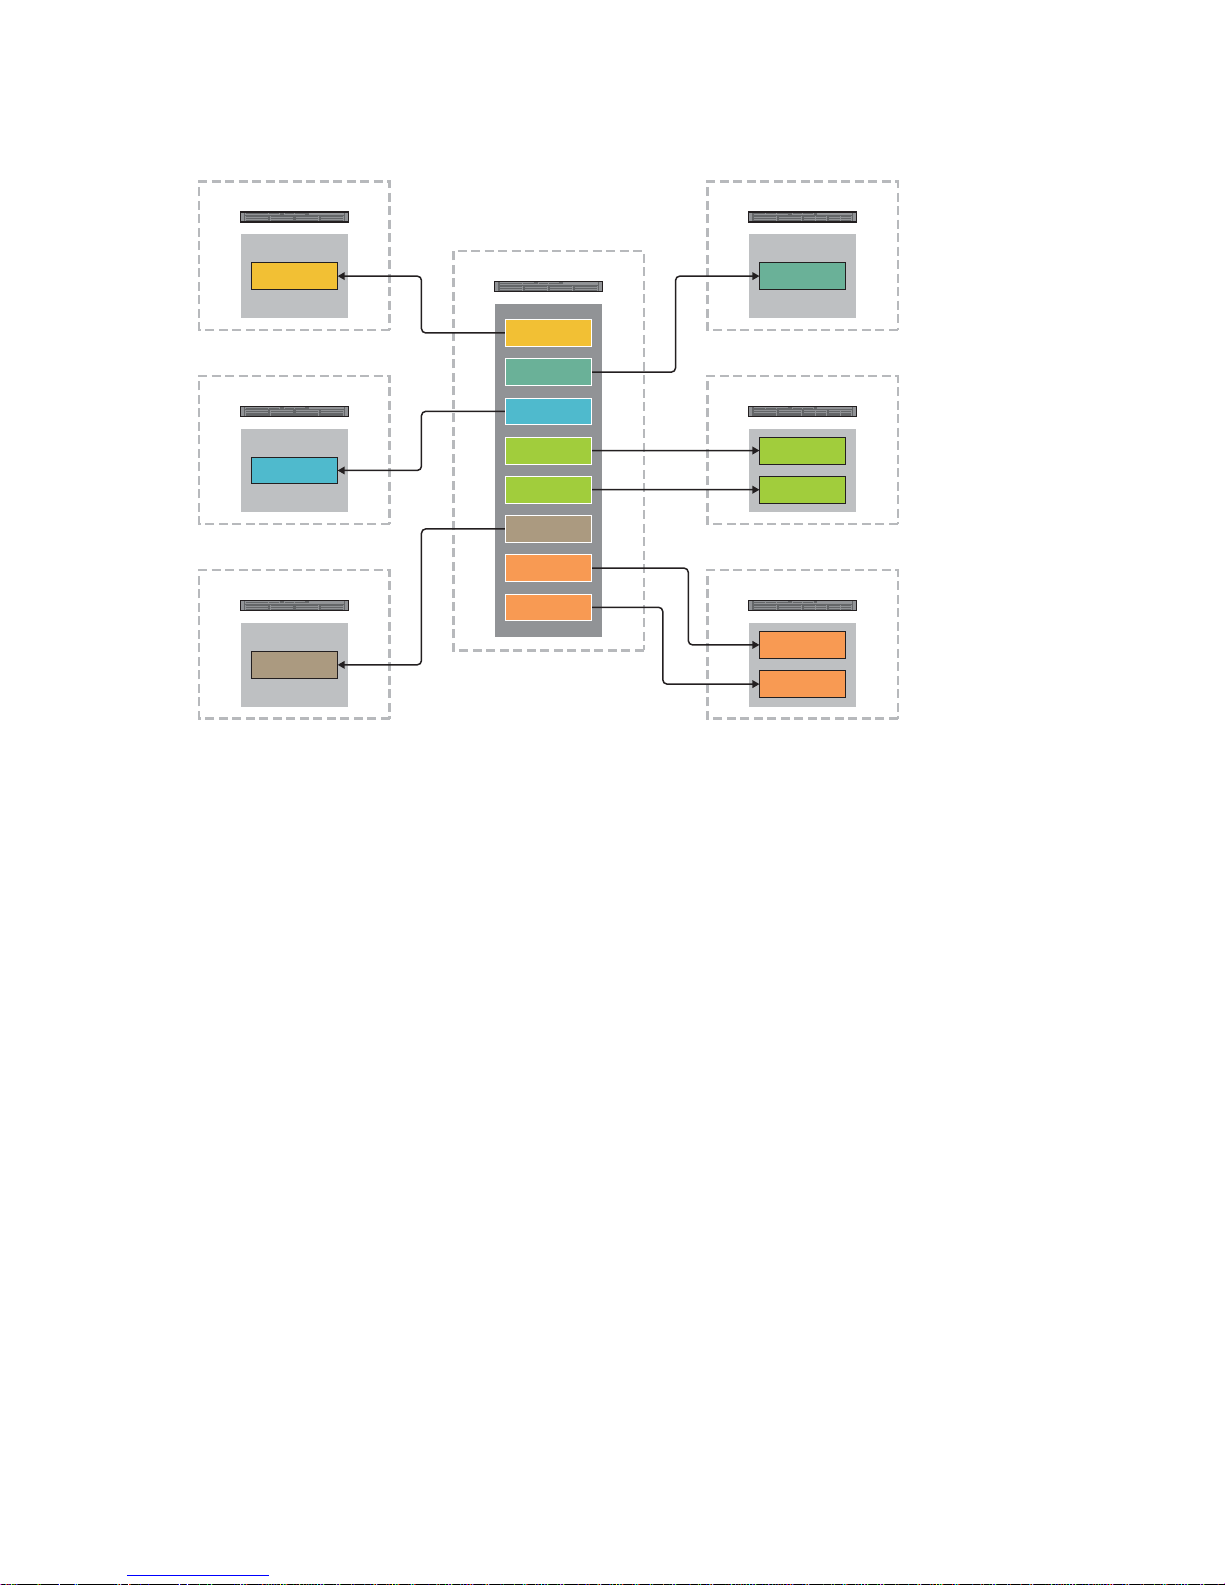
that requires replicating; two have two libraries each. This means that 8 libraries are required on the
Target Appliance in the Data Center.
Remote Site 1
D2D Appliance
Data Center
D2D Appliance
Remote Site 2
D2D Appliance
Remote Site 3
D2D Appliance
Remote Site 4
D2D Appliance
Remote Site 5
D2D Appliance
Remote Site 6
D2D Appliance
Figure 38 HP D2D250x Series Fan IN example
HP D2D400x and 41xx Series
• Each HP D2D400x Source Appliance can support up to 16 Source Appliances. Each library on the
Target Appliance may be mapped to a maximum of 4 libraries on each Source Appliance. In other
words, up to four Source Libraries may be mapped into a single HP D2D 4000 Target Library.
• Each HP D2D41xx Source Appliance can support up to 24 Source Appliances. Each library on the
Target Appliance may be mapped to a maximum of 4 libraries on each Source Appliance. In other
words, up to four Source Libraries may be mapped into a single HP D2D 4100 Target Library.
For example: a research establishment has 5 remote sites, and a total of 10 Source Appliances. The
HP D2D400x or 41xx Series Target Appliance at the Data Center can easily support all 10 Source
Appliances.
• Remote Site 1 and Remote Site 4 each have one D2D Appliance and are running 4 projects. They
have configured a Source Library for each project on their HP D2D. Each set of 4 libraries can be
mapped to a single library on the Target Appliance at the Data Center. The ability to replicate slots
from up to 4 libraries on Source Ap pliances into a single Target Library on a Target Appliance allows
for some additional level of data deduplication across the backed up data; for example, common
operating system files.
• Remote Site 2 has two D2D Appliances, each with two Source Libraries. We can map the slot
mapping collections from those libraries into a single HP D2D 400x Series Target Library. . Source
Appliances 3, 4, 5 and 6 each have one library;
• Remote Site 3 has two D2D Appliances, one with three Source Libraries and the other with one
Source Library. Again, we can map the slot mapping collections from those libraries into a single
HP D2D 400x Series Target Library.
• Remote Site 5 has four D2D Appliances, each with one Source Library. We can map the slot mapping
collections from those libraries into a single HP D2D 400x Series Target Library.
D2D Backup System HP D2D2503
63
Page 64
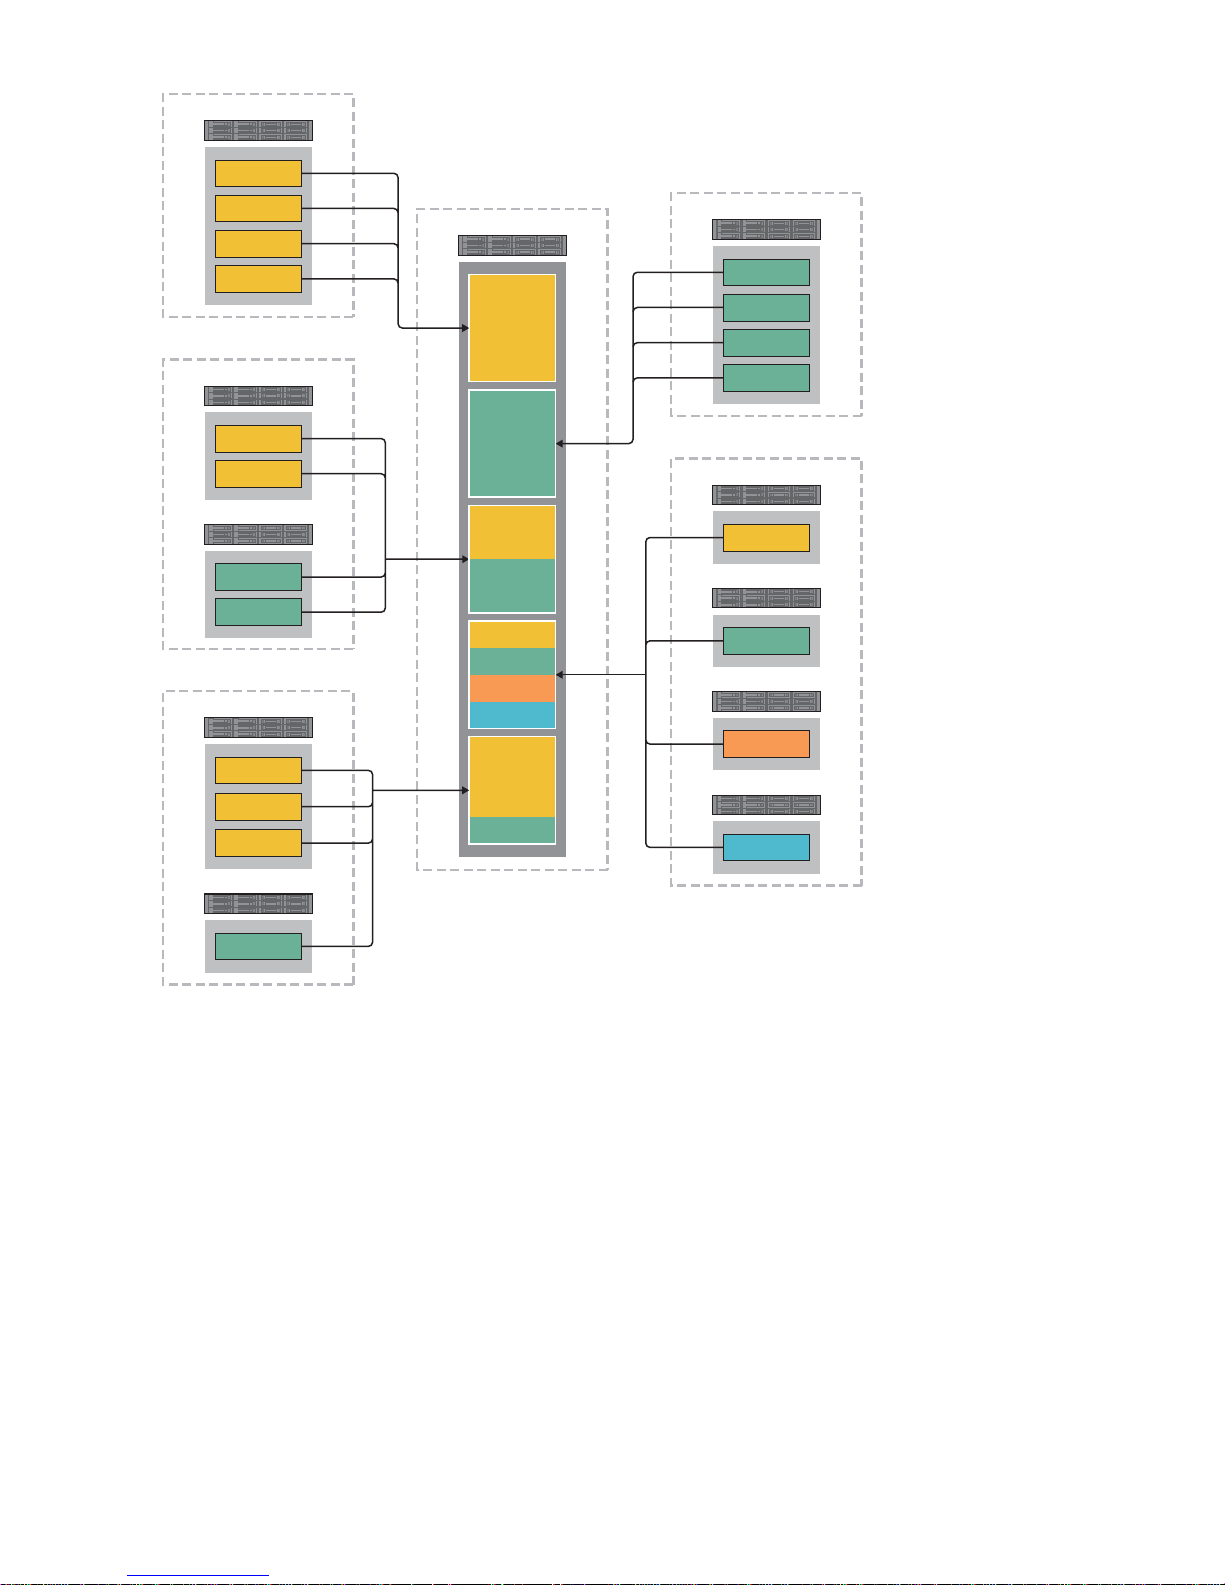
Remote Site 1
D2D Appliance
Remote Site 2
D2D Appliance1
D2D Appliance2
Remote Site 3
D2D Appliance1
Data Center
D2D Appliance
Remote Site 4
D2D Appliance
Remote Site 5
D2D Appliance1
D2D Appliance2
D2D Appliance3
concurrency
Job
D2D Appliance4
D2D Appliance2
Figure 39 HP D2D400x and 41xx Series Fan IN example
Fan IN and slot mapping: You may not want to replicate all the slots in a library. For example, if you
have weekly full backups and daily incremental ba ckups, you may decide to only replicate the slots that
contain the full backups. You make this selection when you configure replication in the Web Management
Interface and it is called a slot mapping. That mapping can only be replicated to a single Target Library,
but that Target Library can hold multiple slot mappings from different Source Libraries, which may also
be from different Source Appliances.
re is no limit on the number of replication jobs that the Target Appliance can handle, but there is a
The
it on the number of jobs that can run concurrently.
lim
• An HP D2D 250x Target Appliance can run three incoming replication jobs concurrently; a Source
Appliance can run one outgoing replication job.
HP D2D 400x Target Appliance can run eight incoming replication jobs concurrently; a Source
• An
pliance can run four outgoing replication jobs.
Ap
64
Configuring and using replication
Page 65

• An HP D2D 41xx Target Appliance can run 16 incoming replication jobs concurrently; a Source
Appliance can run four outgoing replication jobs.
Table 3 Fan In, Fan Out and job concurrency rules
HP D2D 250x HP D2D 400x HP D2D 41xx
Appliance Fan Out
Appliance Fan In
Library Fan Out
Library Fan In
Concurrent target
jobs
Concurrent source
jobs
Maximum
number of Targ
appliances
supported by o
Source appli
Maximum number
of Source
appliances
supported by one
Target appliance
Maximum number
of Target libraries
to which a Source
library may be
mapped
Maximum number
of Source libraries
to which a Target
library may be
mapped
Maximum number
of concurrent
incoming
replication jobs
Maximum number
of concurrent
outgoing replication
jobs
et
ne
ance
2
616
111
1
3816
1
44
24
44
44
Replication deployment strategies
There are many deployment strategies; the following three are perhaps the most typical:
• Active to Passive
ive to Active
• Act
• Many to One
Active to Passive example
In the following example there are two offices, e ach with an HP D2D B ackup System. The HP D2D
Backup System in Office A is being used by the host server for backup and restore and the libraries that
have been configured on it are being replicated to matching libraries on the HP D2D Backup System in
Office B. A replication license is required only for the HP D2D Backup System in Office B. That license
covers all Replication-Target libraries on Appliance B.
D2D Backup System HP D2D2503
65
Page 66
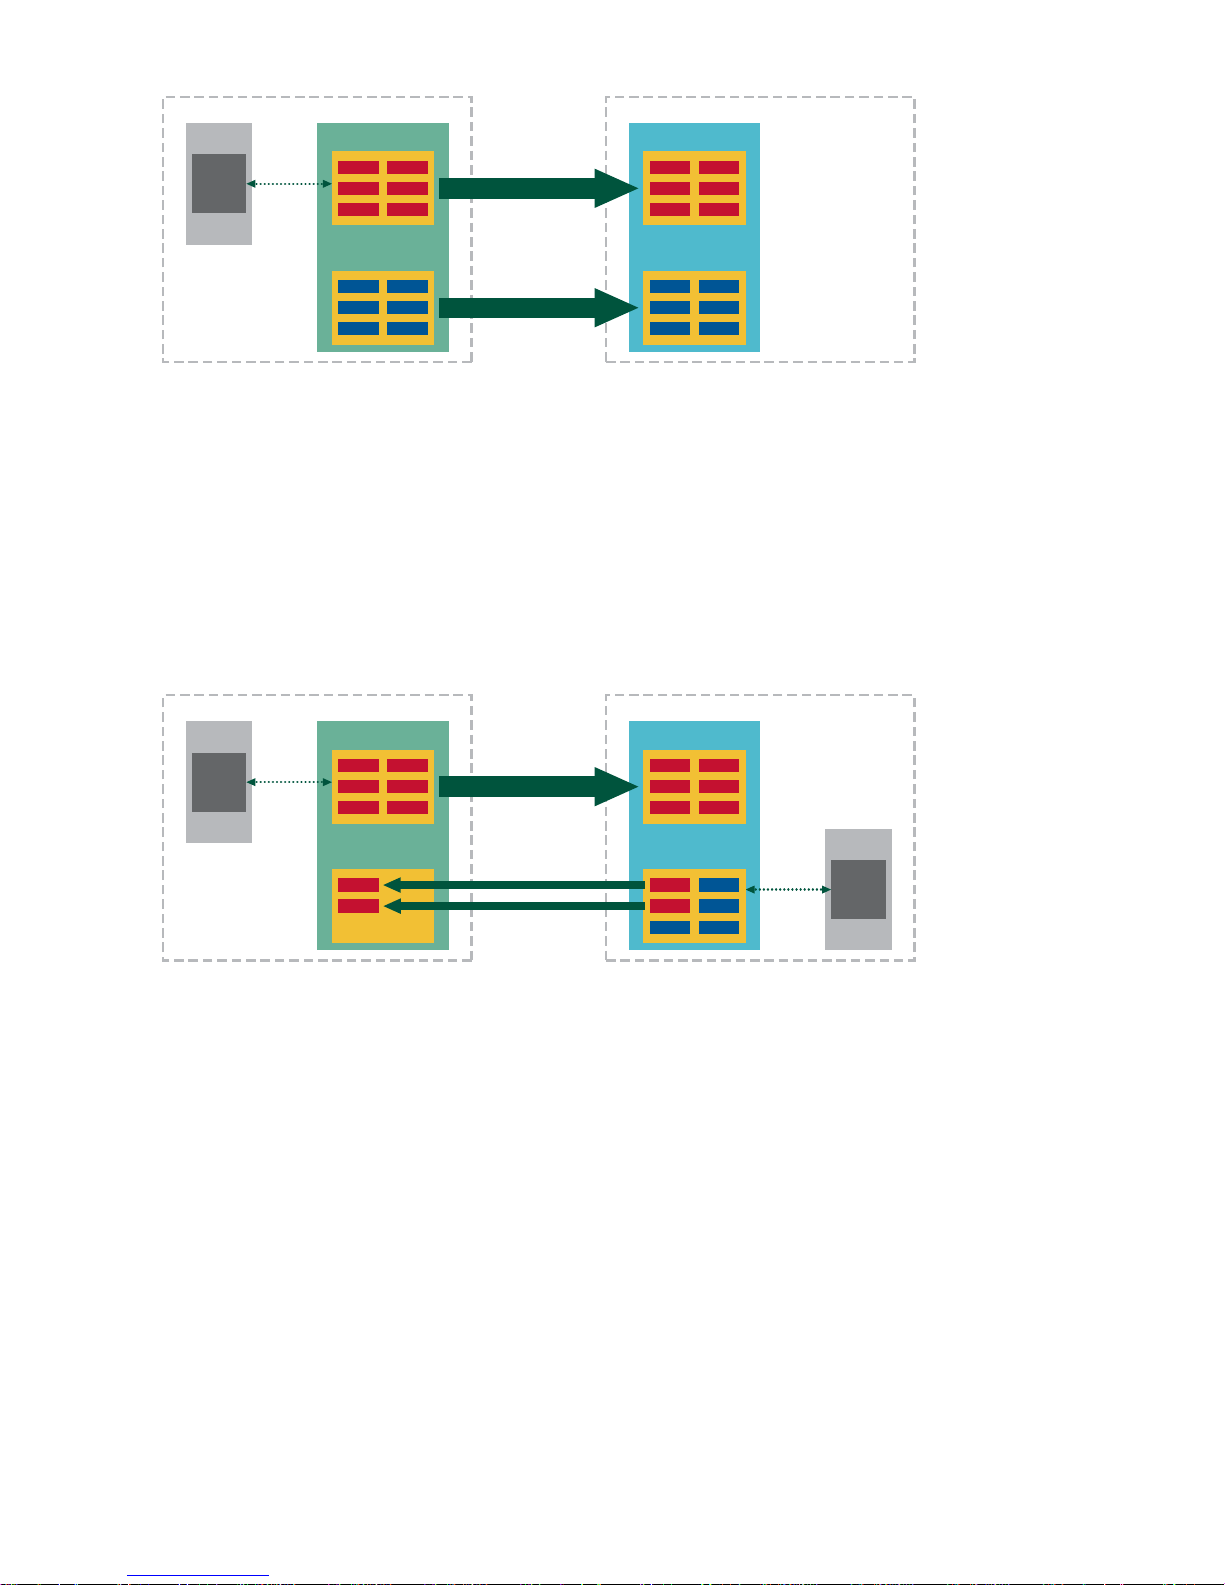
Office A
Host A1
Backup
SW
Backup/
Restore
D2D Appliance A
Library A1
Library A2 Library B2
Figure 40 Active to Passive replication example
Active to Active example
In the following example there are again two offices, e ach with an HP D2D Backup System. The HP
D2D Backup System in Office A is being used by the host server for backup and restore and all of the
cartridges o n the Replication-Source library are being replicated to matching slots on a Replication-Target
library on the HP D2D Backup System in Office B. However, there is also a single host backing up to
six cartridges on another library on the HP D2D Backup System in Office B. Two of those cartridges
are configured to replicate to a Replication-Target library on the HP D2D Backup System in Office A.
A replication license is required for both HP D2D Backup Systems.
Office B
D2D Appliance B
Library B1
Replicate
Replicate
Office A
Host A1
Backup
SW
Backup/
Restore
D2D Appliance A
Figure 41 Active to a ctive repli cation example
Many to One example
In the following example a company has two remote offices and a central data center. There are small
HP D2D Backup Systems in each remote office which host Replication-Source Libraries for backup from
local host machines. In the data center there is a larger D2D Backup System that is used solely to host
Replication-Target Libraries for the remote offices. A replication license is required only for the HP D2D
Backup System in the Data Center. That license covers all Replication-Target libraries.
This is also a good example of slot mapping. Library 2 on the Target Appliance is being used as a
Replication-Target Library by Replication-Source libraries in Of fi ce A and Office B. The Replication-Source
library in Office A is replicating two slots (colored red), while the Replication-Source library in Office B
is replicating five slots (colored red).
Library A1
Library A2
Replicate
Replicate
Office B
D2D Appliance B
Library B1
Library B2
Backup/
Restore
Host B1
Backup
SW
66
Configuring and using replication
Page 67
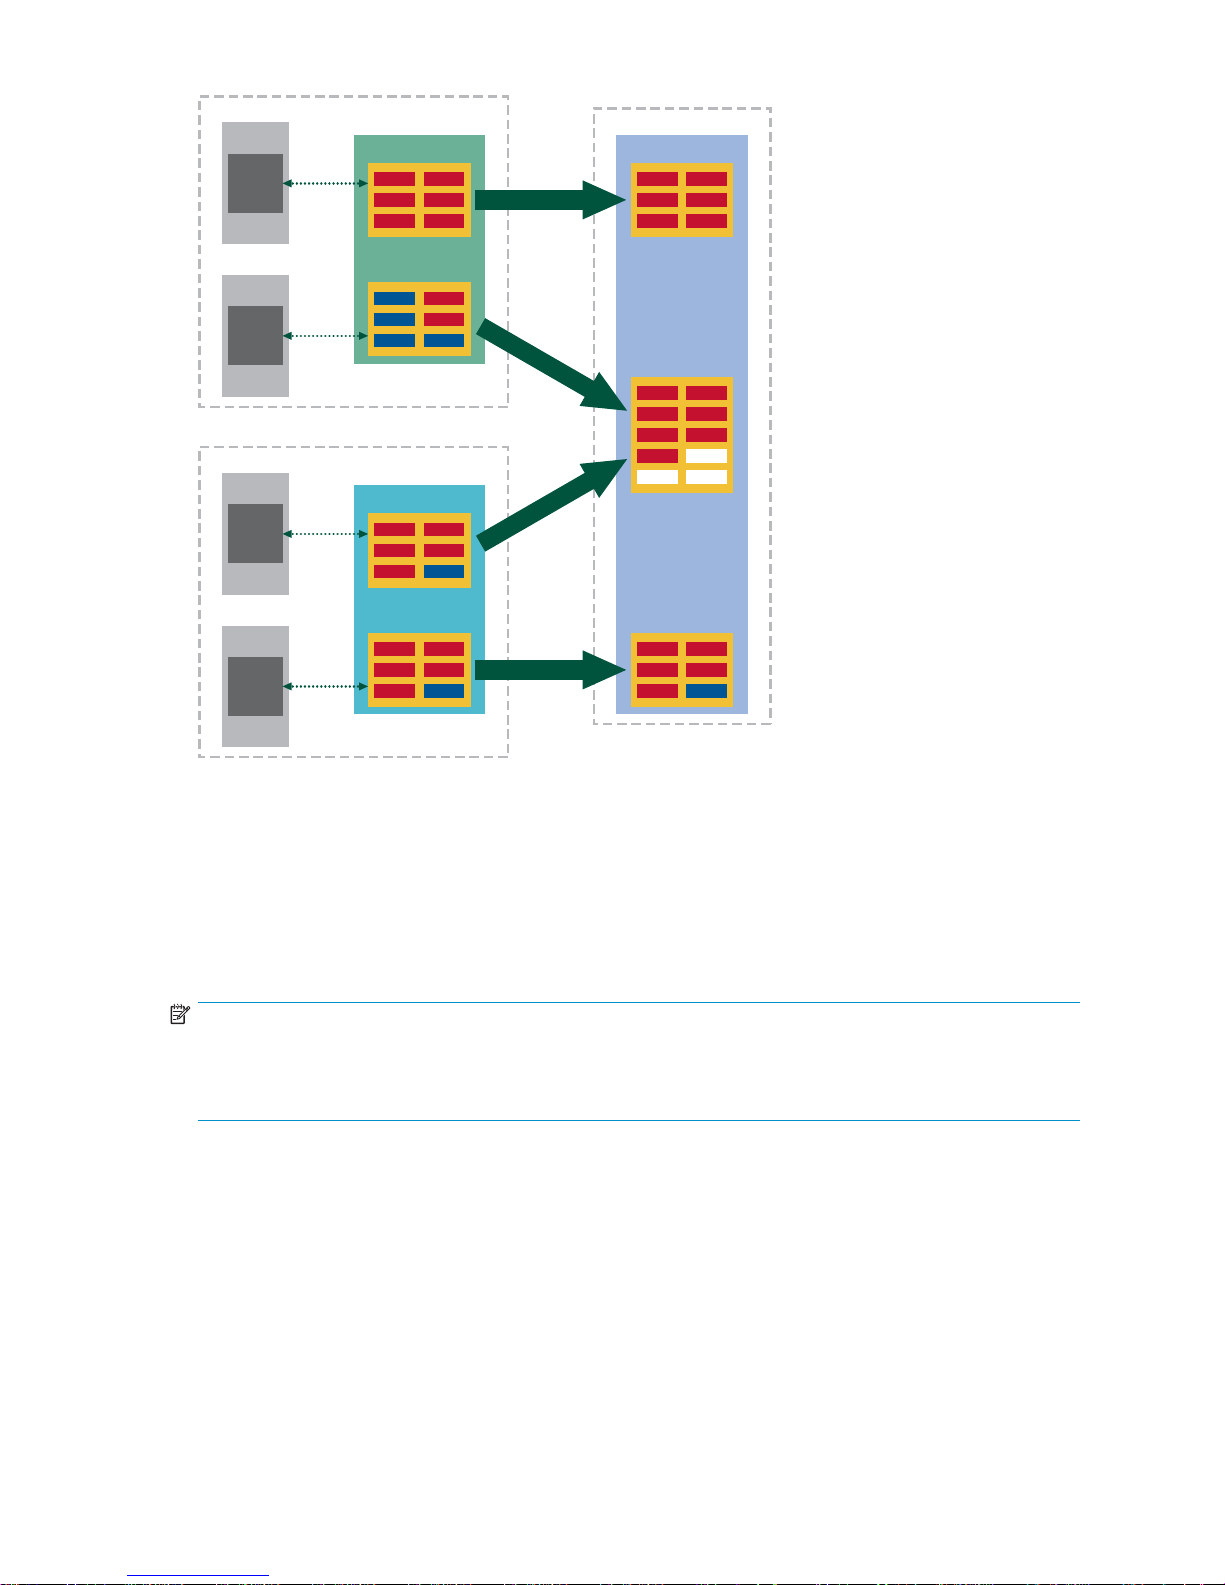
Office A
Host A1
Backup
SW
Backup/
Restore
D2D Appliance A
Library A1
Data Centre D
D2D Appliance D
Library D1
Replicate
Host A2
Backup
Office B
Host B1
Backup
Host B2
Backup
SW
SW
SW
Backup/
Restore
Backup/
Restore
Backup/
Restore
Library A2
D2D Appliance B
Library B1
Library B2
Replicate
Replicate
Replicate
Figure 42 Many to one replication example
Library D2
Library D3
Replication Licensing
The Replication License is a single software license; it is unique to a single HP D2D Backup System and is
required on every appliance that will be used as a Replication Target. If you wish to replicate data to
multiple HP D2D Backup Systems, you require a separate license for each target appliance, appropriate
to the model type, and must repeat the activation process for e ach HP D2D Backup System.
NOTE:
The Replication license can only be used on the model for which it was purchased. For example, the
cationLicenseforaD2D250xseriescanonlybeusedonaD2D250xBackupSystem. Itcannotbeused
Repli
on a D2D4xxx series.
Before you start
To activate your license you must first obtain a p ermanent License To Use (LTU) from the HP Licensing
website and then use the HP D2D’s Web Management Interface to apply the LTU, activate the replication
featureandcompletethelicensingprocess. TheHPLicensingwebsitewillaskyoufor:
• The HP entitlement order number for the HP D 2D Replication license (found on the entitlement
certificate)
• The unique HP D2D Ba ckup System serial numb er (found on the label on the top of the unit)
• Standard registration information, such a s name and contact details
D2D Backup System HP D2D2503
67
Page 68

Online LTU retrieval is the recommended method for license redemption, but there is also a License
Key Request Form that you can submit by post or fax. If you choose to complete this form instead of
redeeming your license from the HP Licensing website, please be sure to include your H P D2D Backup
System serial number on the form.
NOTE:
The LTU is tied uniquely to the serial number of your HP D2D hardware. If your hardware serial number
changes (by swapping out the unit motherboard), the LTU must be transferred to the new hardware via
the HP Licensing website. A new LTU is generated, which must then be applied and activated via the
Web Management Interface on the repaired/replaced system.
Creating the LTU
1. Check that your D2D system firmwareisatthelatestrevisiontoensurethatithasthereplication
feature option on the HP D2D’s Web Management Licensing page. The latest fi rmware is available
from the Software & Driver Downloads pages on h
the D2D Backup System fi rmware as required.
2. Make sure you know both the HP entitlement order number (found in the License kit) and the product
serial number (found on the label on the top of the unit or from the Web Management Interface) .
ttp://www.hp.com. Download and upgrade
3. Go to the HP Licensing website at h
4. This creates a unique LTU (License to Use) as an alpha-numeric string. The option of saving the LTU
as a .DAT file is recommended - this can also be emailed to the registered license owner’s email
address or you can use Cut and Paste to copy it to a temporary file.
ttp://www.webware.hp.com and follow the instructions.
Applying the LTU
1. Log on to the Web Management Interface and select the License web page from Settings.
2. If you have saved the LTU as a .DAT file, click Upload license file and use the Browse option to
locate the file. Click Upload.
Ifyouusedemailoratemporaryfile, cut and paste the string exactly as you obtained it from the HP
Licensing website. and click Enter LTU string.
The Replication process
All Replication status and configuration pages are available from the Replication tab on the Web
Management Interface and are described in Chapter “The Web Management Interface ”onpage87.
This section explains the various stages in the Configu ration process and how you use the Replication
wizard to configure mappings.
Seeding the Replication Target Appliance
Data deduplication must be enabled on a library that is being used for replication. This ensures that
the a m ount of data to be replicated is minimized and the impact on network trafficisnegligible.
However, the benefits of deduplication apply only after the first full backup. The first synchronization of
the cartridges will require significant bandwidth. The same applies in reverse, if you need to recover a
Target c artridge from a Source cartridge. Therefore, there is an advantage to being able to accelerate
the replication of the first full backup. This process is known as seeding.
As part of the deployment strategy, it is important to decide how the first full backup will be seeded.
There are three main options:
• This option does not use seeding, instead we simply allow the first synchronization to take place over
the WAN. If required, you may choose to limit the bandwidth available for the replication job from the
Local Settings on the Web Management Interface, see “Local Settings (Replication)”onpage112.
68
Configuring and using replication
Page 69
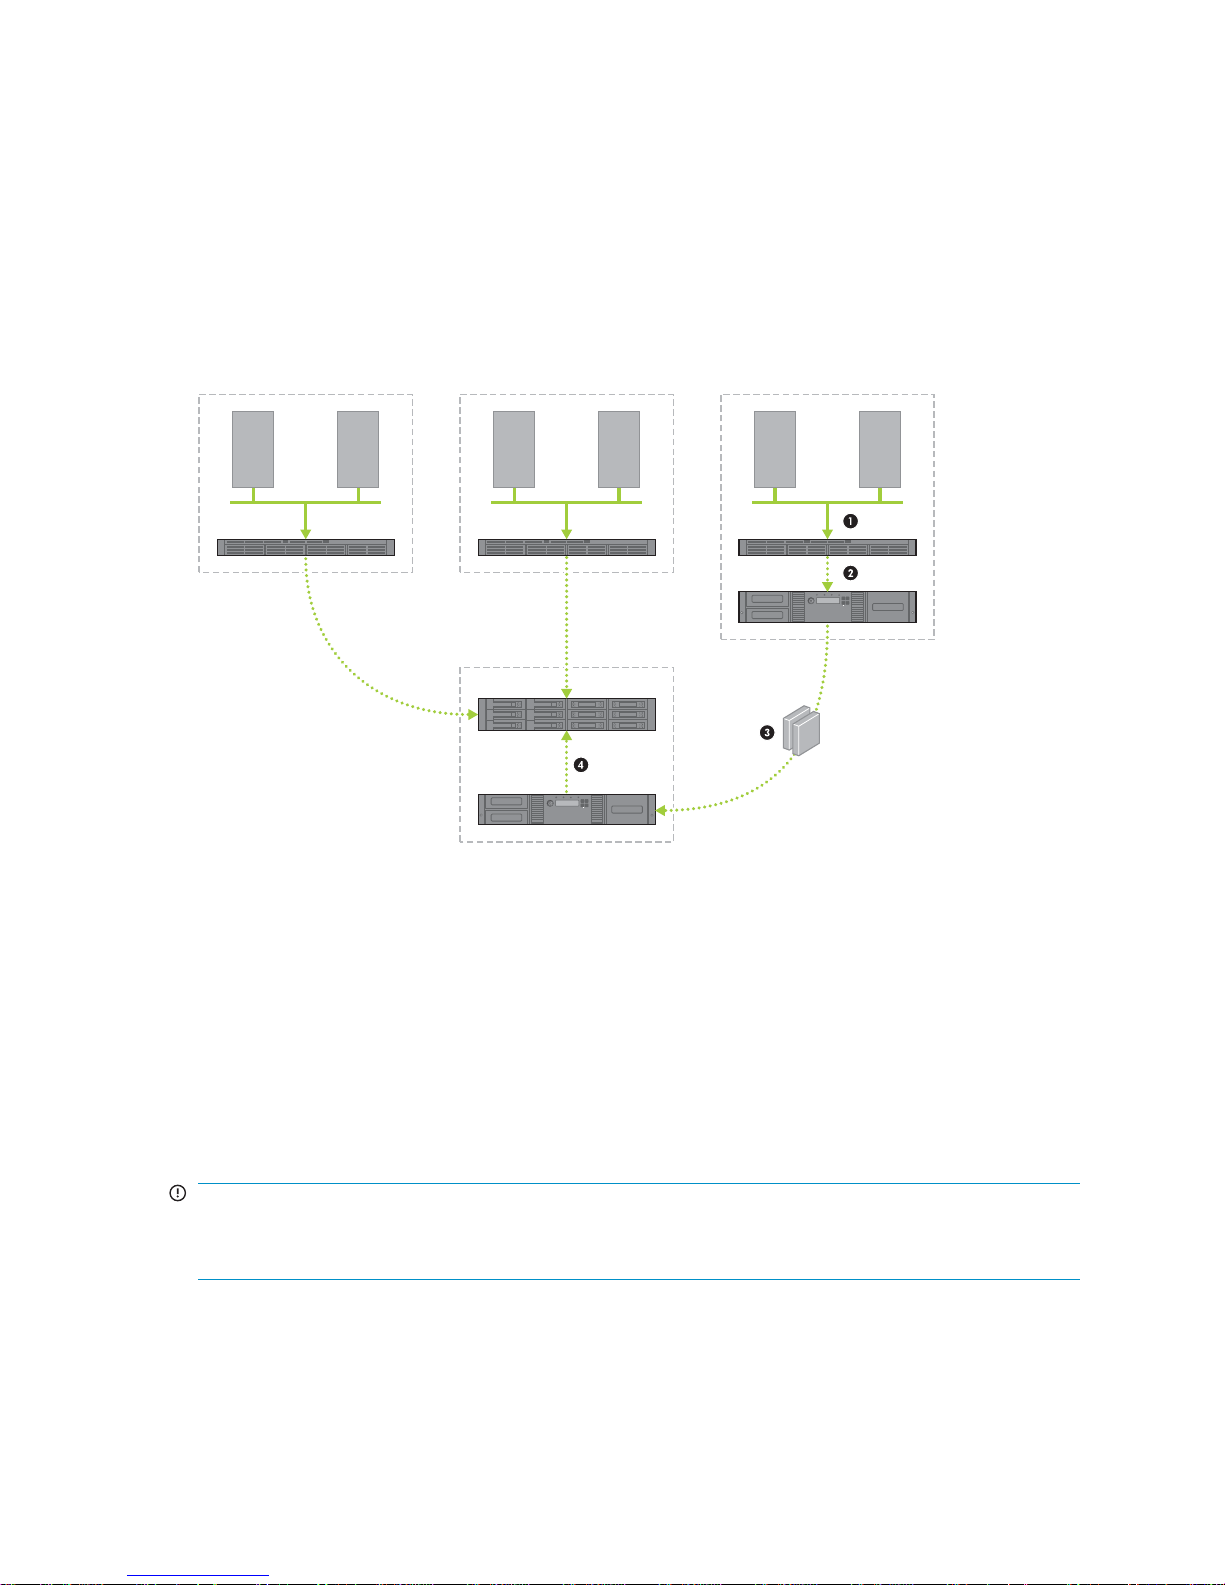
This could take a very long time to complete and may not complete before the next scheduled backup
totheslotbeingreplicated.
• If the Target Appliance is not yet in use, it may be possible to colocate the Source and Target
Appliances on the same site LAN to perform the initial replication locally on a high bandwidth link
and then ship the appliance to the D ata Center.
• If the Target Appliance is already in use, use the Library or Tape Attach Copy functionality to create a
physical car tridge that ca n be shipped to the site of the Target Appliance and imported.
You only need to seed with one full backup. See “Us ing Tape Attach” on page 121 for more
information about using Tape Attach with HP StorageWorks Tape Libraries or Tape Drives. See
“Recovering a source appliance” on page 74 for more information about using seeding with Replication
Recovery.
Remote Site A
Host Host
Remote Site B
Host Host
D2D2500
Data Center
D2D4000
Tape Library
Remote Site C
Host Host
D2D2500D2D2500
Tape Library
Figure 43 Seeding initial data using Tape Attach
1. Host backs up to a Non Replicating library on the Source Appliance.
2. The first full backup is copied to a cartridge on a Tape Library.
3. The physical cartridge is shipped to the Data Center.
4. The firstfullbackupisimportedfromTapeLibraryintoaNon-ReplicatingLibraryontheTarget
Appliance.
5. Once imported create the replication linkage between Source and Target Appliances and configure
slot mappings.
6. Normal replication across the WAN can now take place with only new or changed data needing
to be replicated.
IMPORTANT:
With this option, initial data must be seeded onto a Non-Replicating Library before you use the Web
Management Interface to configure the replication source and target.
D2D Backup System HP D2D2503
69
Page 70
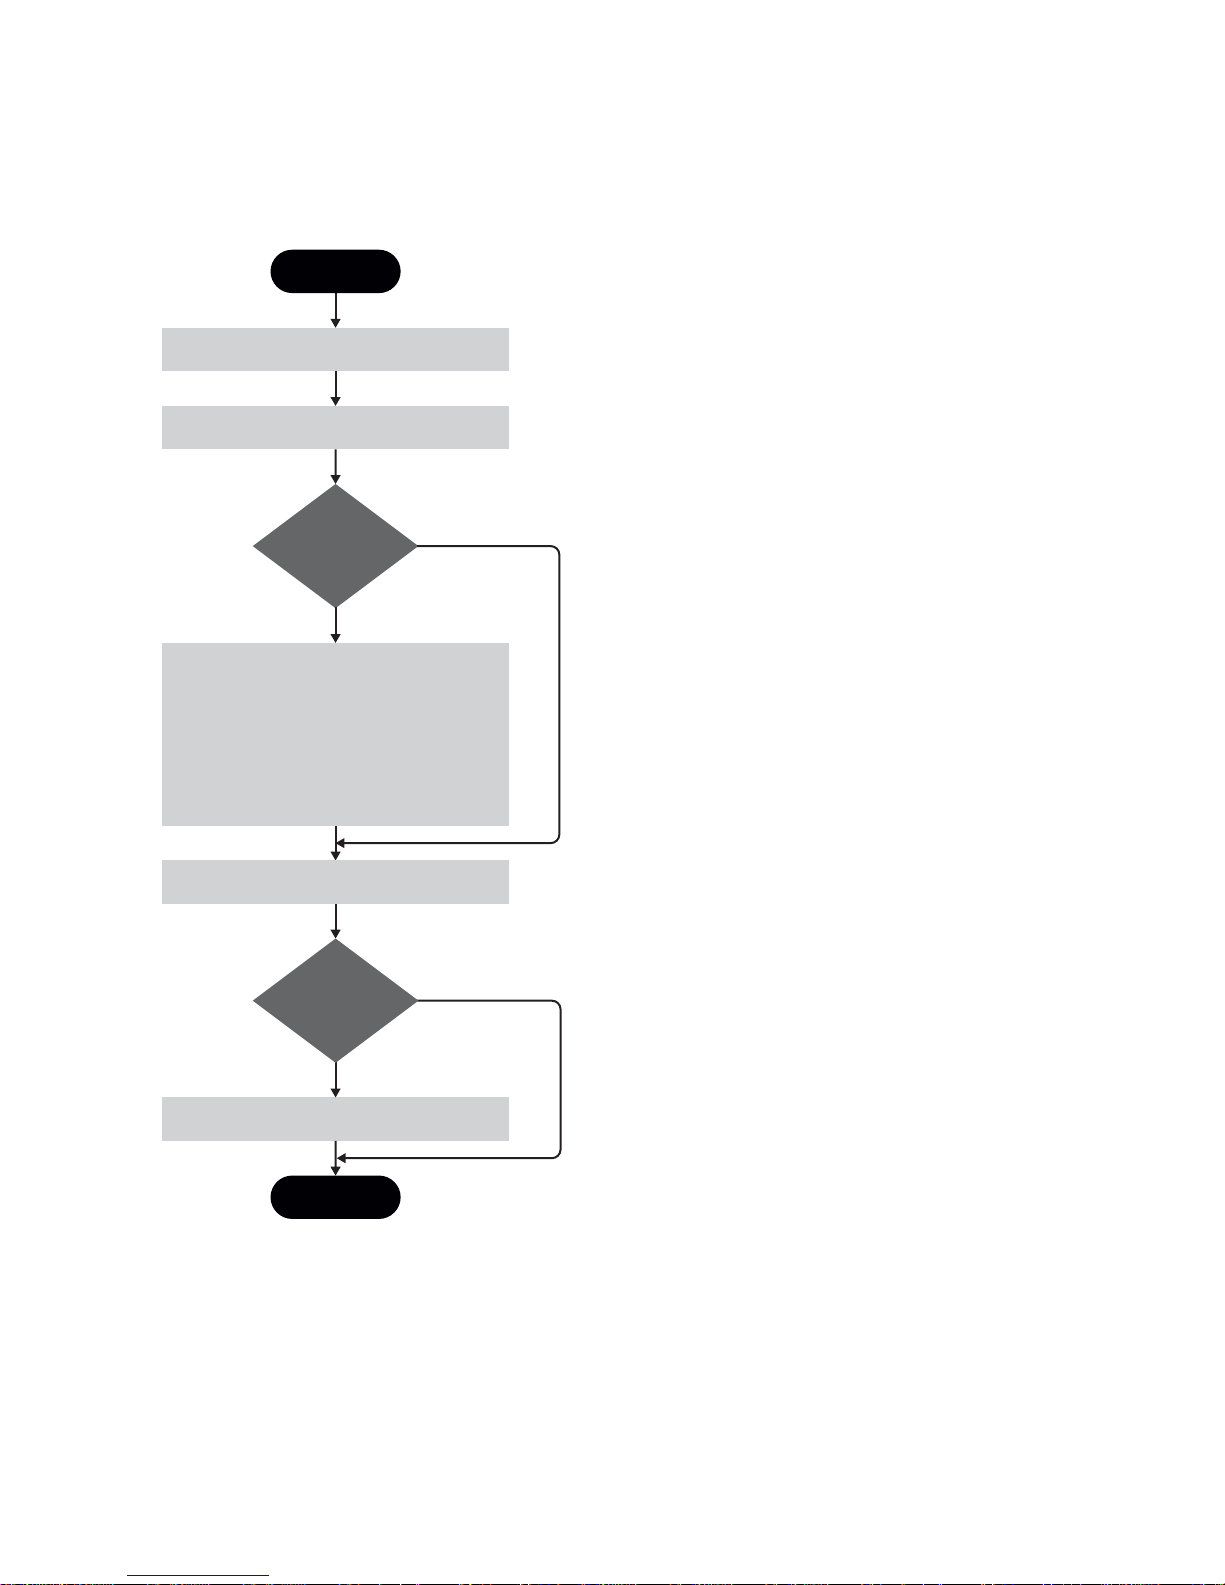
Running the rep
The Replication Wizard is used to create new mappings between Non-Replicating Libraries
(which become Replication Source Libraries) and either existing or new Target Libraries. (See
“Recovering a source appliance” on page 74 for information about the Recovery wizard.)
Create non-replicating Library on source appliance
lication wizard
Start
Create backup rotation scheme and allow first full
backup to run
Use physical
tape media for
seeding?
Yes
On the Mapping Configuration page select the
non-replicating library on the source appliance.
1. Select Start Replication Wizard.
2. Select the target appliance (or create a new one).
3. Select the target library (or create a new one).
4. Edit slot mapping name and map required slots
between source and target.
5. Confirm and finish configuration.
Replication of cartridges will now start.
Was target
co-located with
source?
No
Yes
When cartridges are synchronized, relocate target
appliance to target site.
End
Figure 44 Replication creation process
1. Crea
2. Cre
70
te a Non-Replicating Library on the Source Appliance.
ate a backup rotation scheme and allow the first full backup to run.
Configuring and using replication
No
Page 71
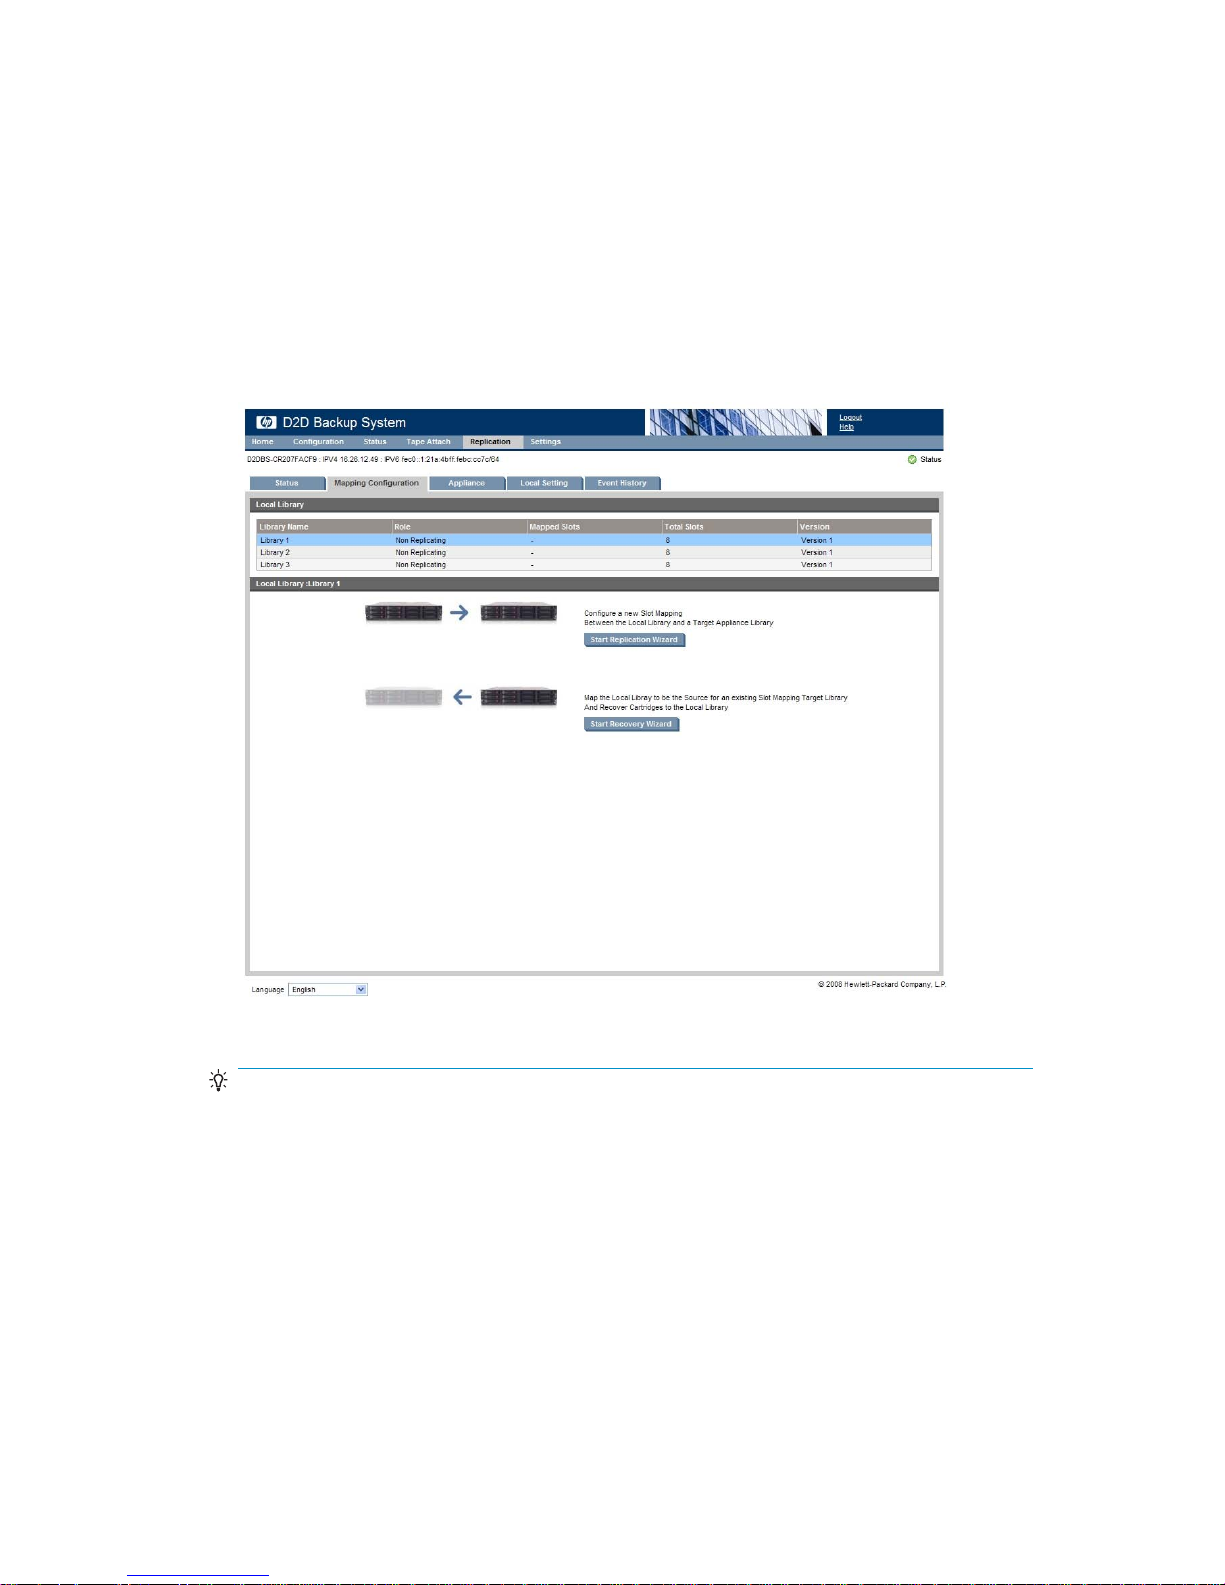
3. Decide how you will seed the first full backup on the Target Appliance. (See also
“Seeding the Replication Target Appliance” on page 68.)
• If you are seeding across the WAN or have been able to colocate the Target Appliance on the
same LAN as the Source Appliance, go to step 4.
• If you are seeding using physical tape media:
1. Use Tape Attach to copy the first full backup to physical media.
2. Transport the physical media to the replication target site.
3. Create a N on-Replicating Library on the Target Appliance.
4. Import the physical media into a slot within the Non-Replicating Library on the Target
Appliance.
4. Go to the Mapping-Configuration page and select a Non-Replicating Library to be converted to a
Replication Source Library.
5. Click Start Replication Wizard. This takes you to the Select Target Appliance step.
TIP:
Click on the show/hide details link to check how many target appliances are
permitted and the number of target appliances that are currently configured. See
“Fan In, Fan Out and job concurrency”onpage61formoreinformationaboutthe
maximum number of appliances that are supported.
D2D Backup System HP D2D2503
71
Page 72
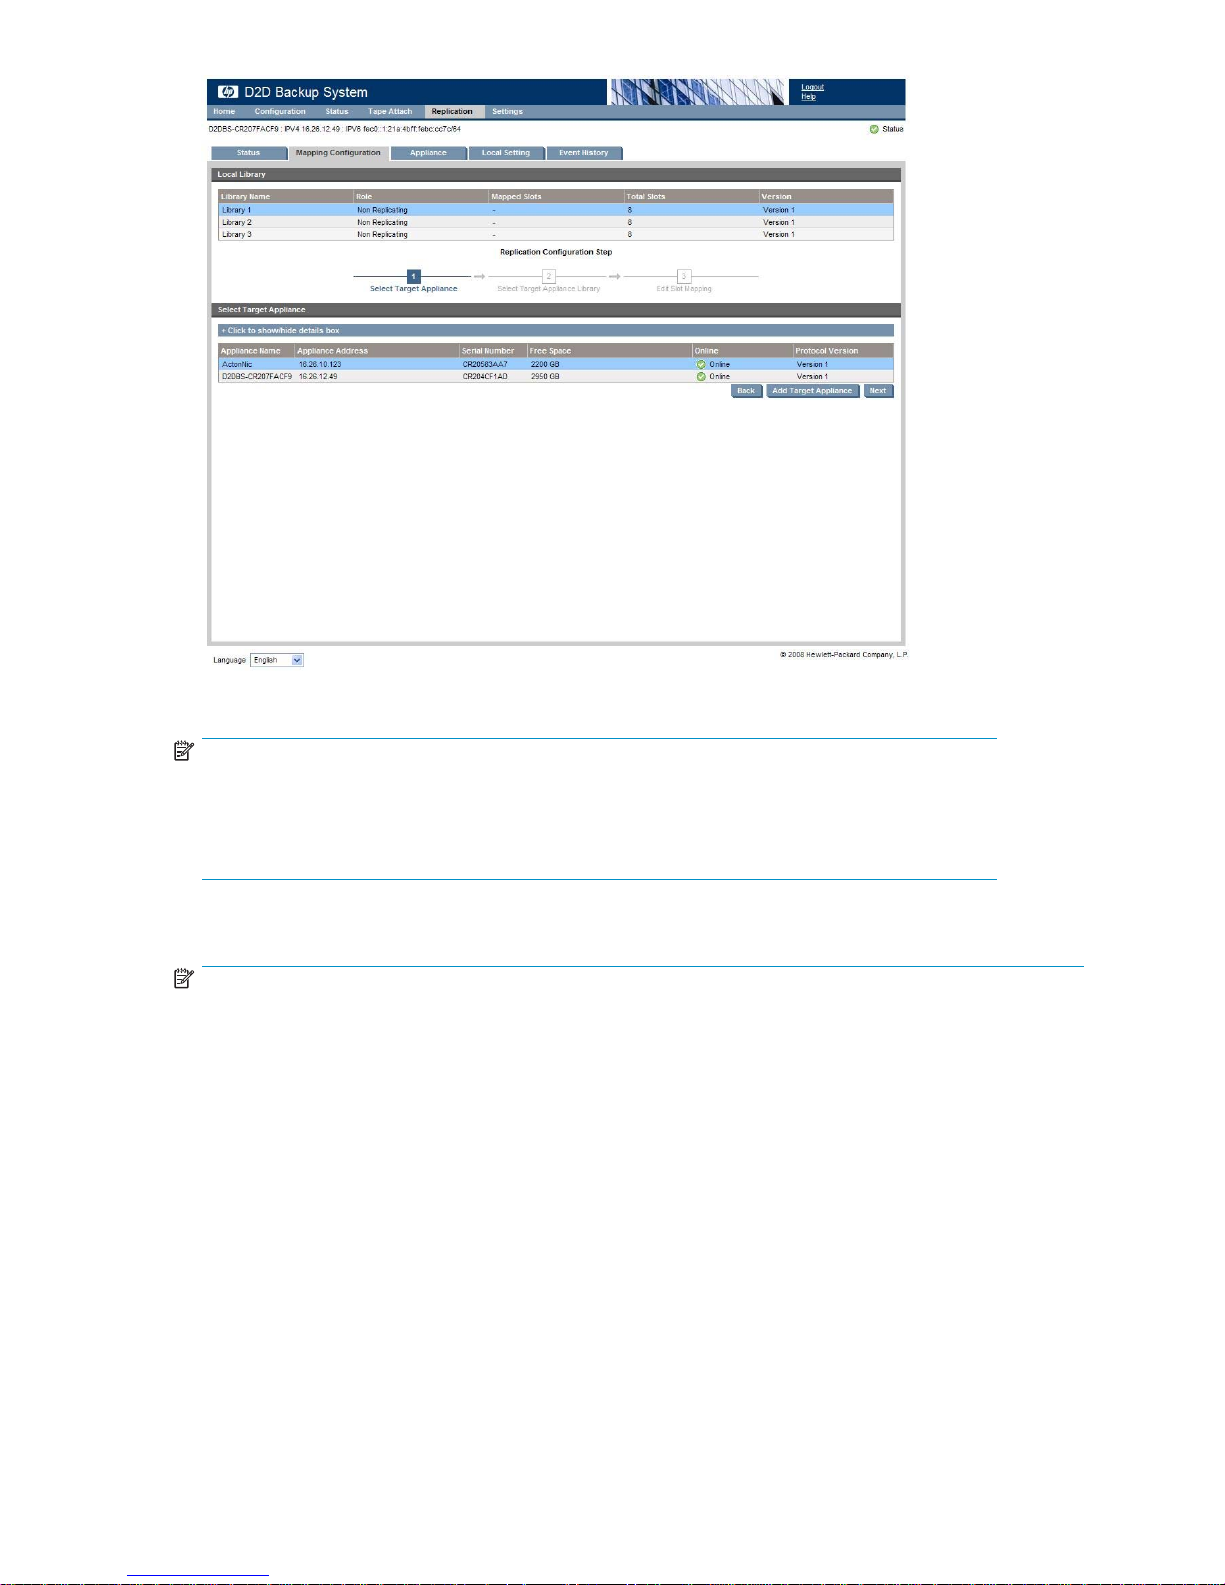
6. Select a T
arget Appliance from the list and click Next.
NOTE:
If you wan
Enter th
for the C
ttoselectanappliancethatisnotyetonthelist,clickAdd Target Appliance.
e Target Appliance IP Address or fully qualified domain name. The default values
ommand and Data Protocol Port Numbers are usually acceptable, but may be
edited if there is a conflict. Click Add Target Appliance.
7. The wizard then moves to the Select Target Library step. Select a library on the target appliance
and click Next.
NOTE:
If you need to create a new library on the target appliance, click Create New Target
Library. Set up the details as you would normally do when creating a new library device, see
“To create a new device” on page 92.
72
Configuring and using replication
Page 73
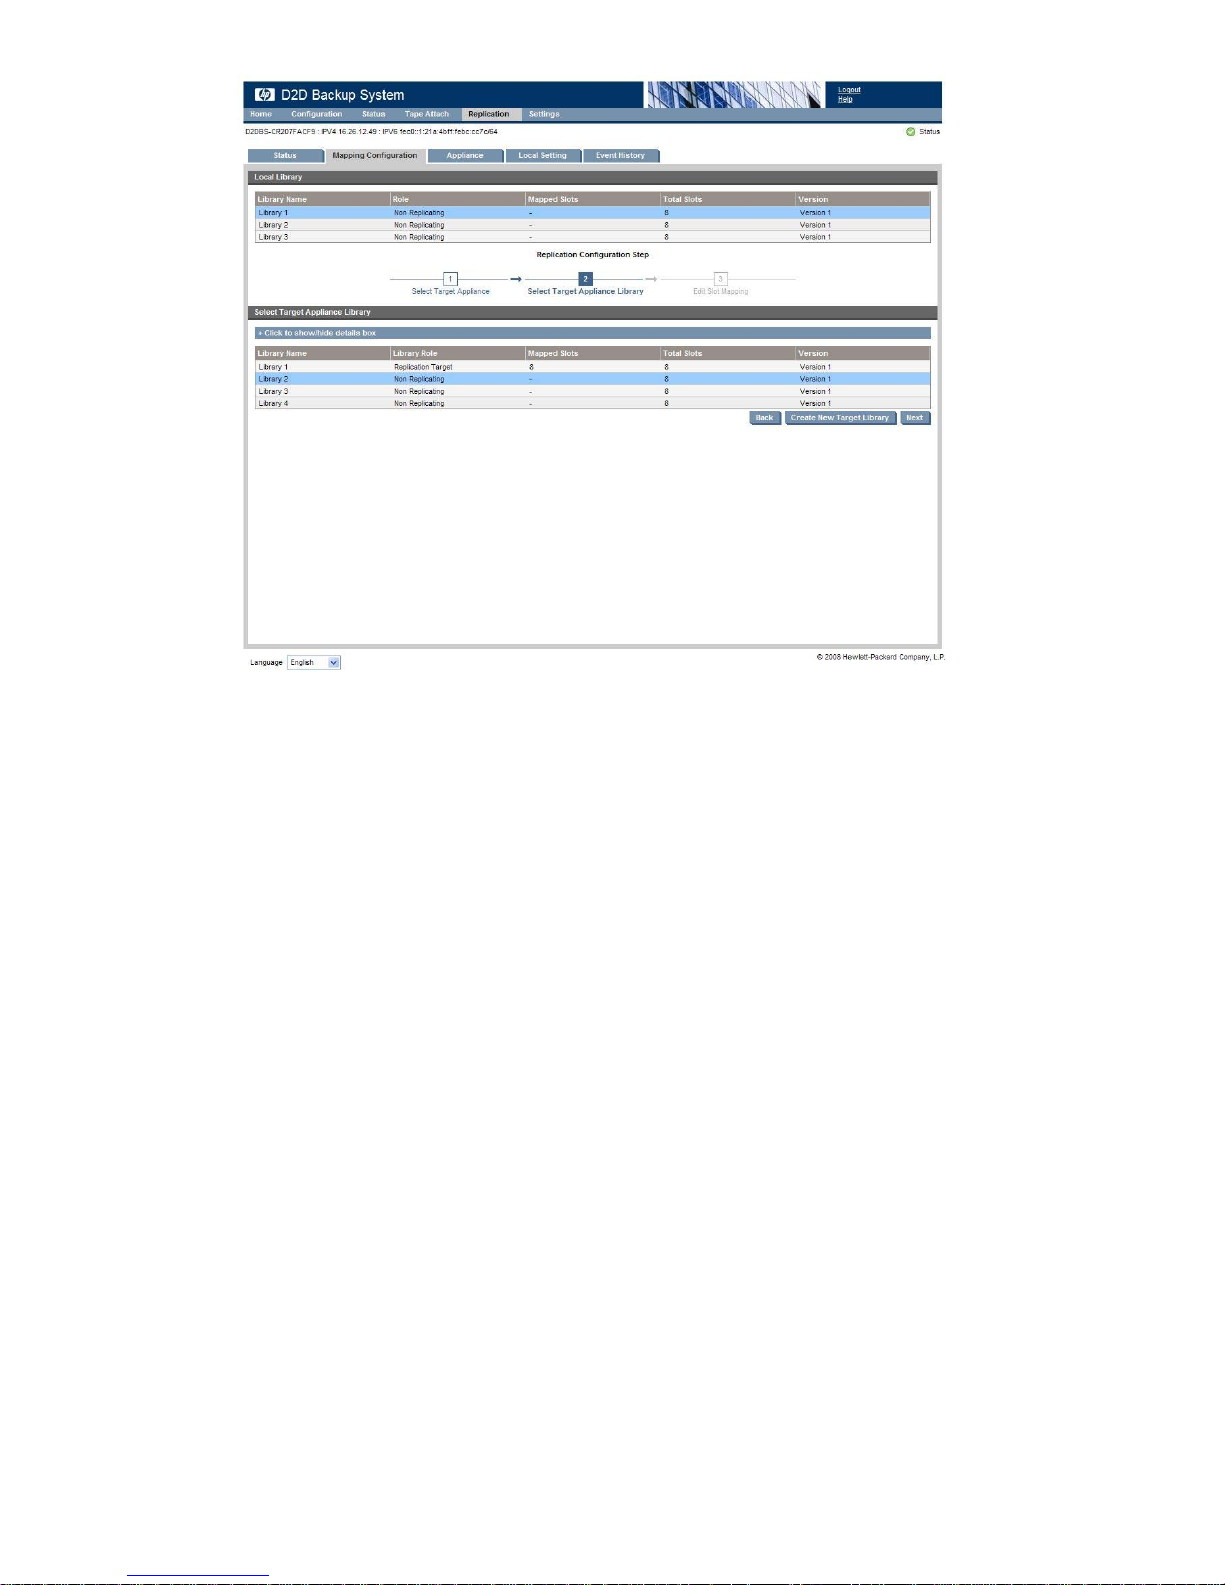
8. This takes you to the Edit S lot Mapping step. Enter a Slot Mapping Name.Theslotnumberand
barcodes of all source car tridges are displayed. A new barcode is generated for them on the target
library. By default, all slots on the Source are selected for mapping and mapped to available slots
on the Target library. If you want to deselect cartridges from this slot mapping configuration, select
Unmapped from the Target Slot Name drop-down menu.
D2D Backup System HP D2D2503
73
Page 74
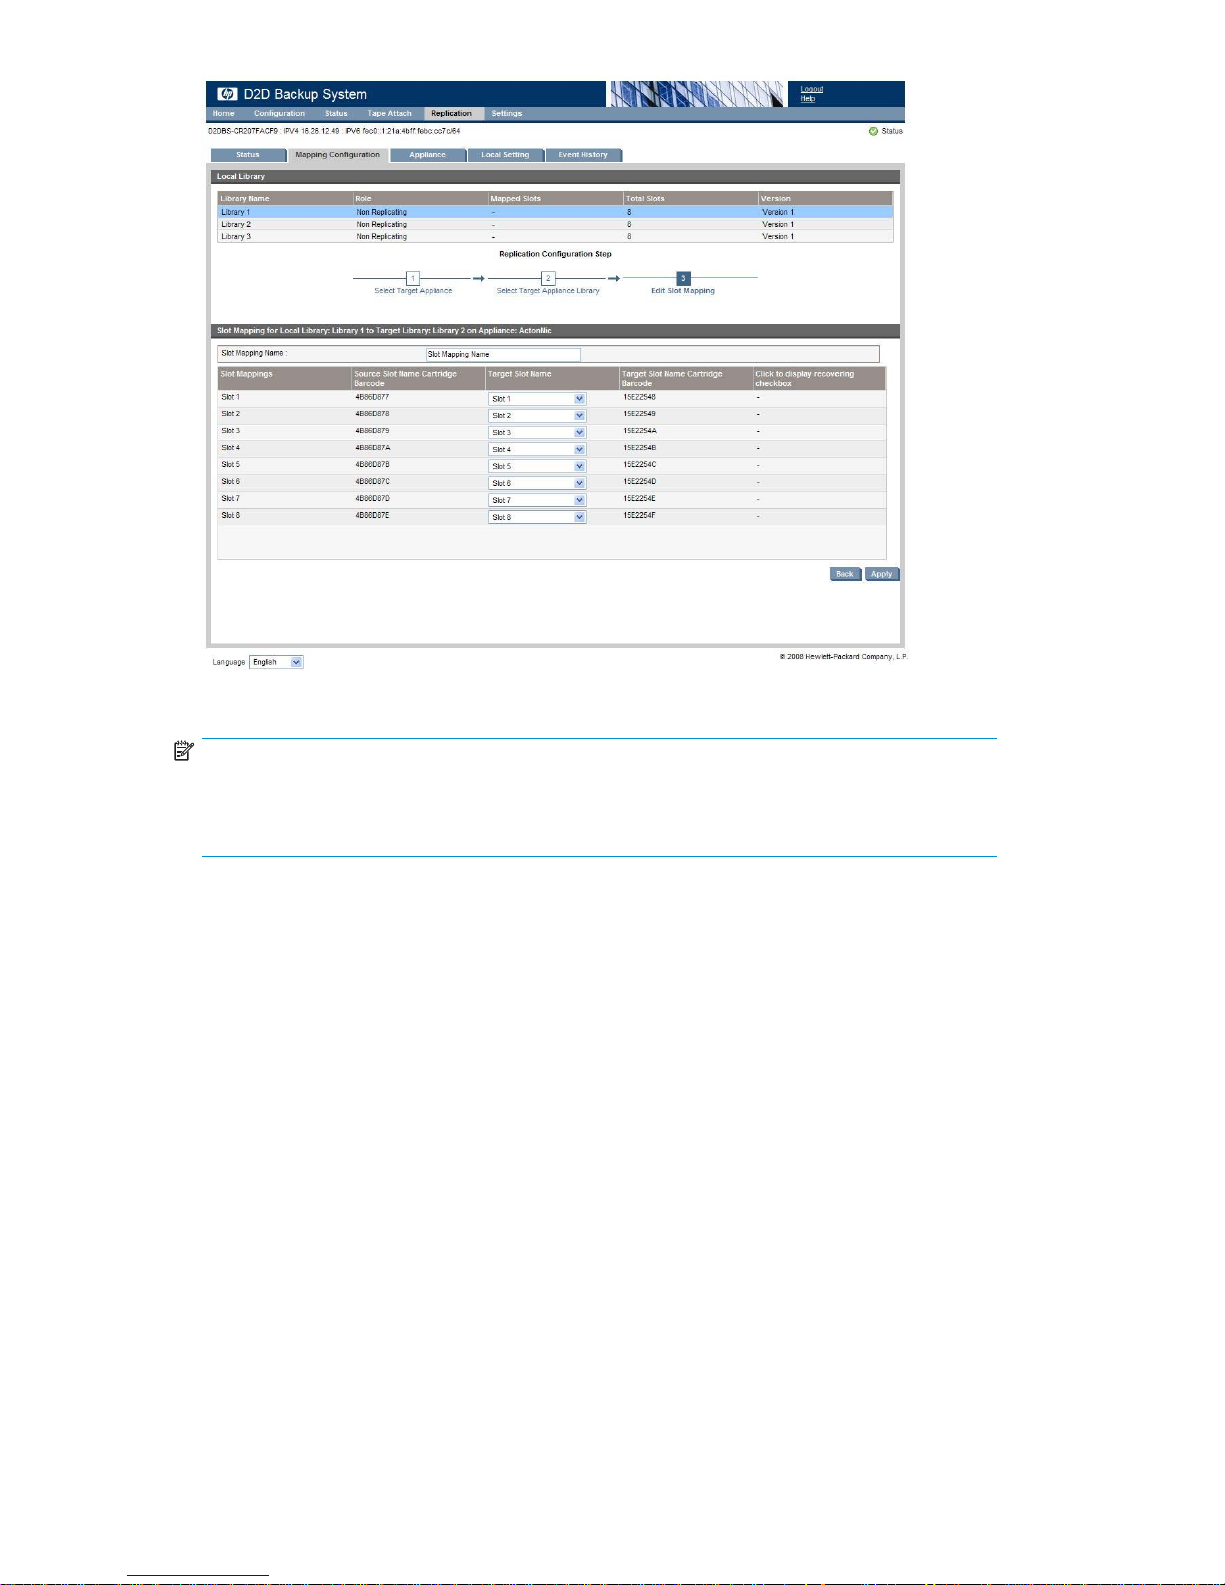
9. Click App
NOTE:
If you wer
Applian
tothetargetsiteassoonasthecartridgesaresynchronized.
ly to create the slot mapping configuration. Replication of cartridges will start immediately.
e able to colocate the Target Appliance on the same LAN as the Source
ce to improve replication performance, remember to relocate the Target Appliance
Recovering a Source Appliance
There are three basic m o dels for recovering data using D2D systems and, within these, there are
sub-models depending on the state from which the user is recovering:
1. Reverse Replication
• When the source device and host servers are lost, but the replication mapping is still present on
the target
• When the source device is lost and the mapping between the source and the target is broken
or removed
2. Target Promotion
• The target is accessed over the WAN using iSCSI
• The target is co-located onto the remote site and connected via iSCSI (LAN) or FC
3. Recovery from physical media directly to host server
Reverse replication using the wizard
74
Configuring and using replication
Page 75
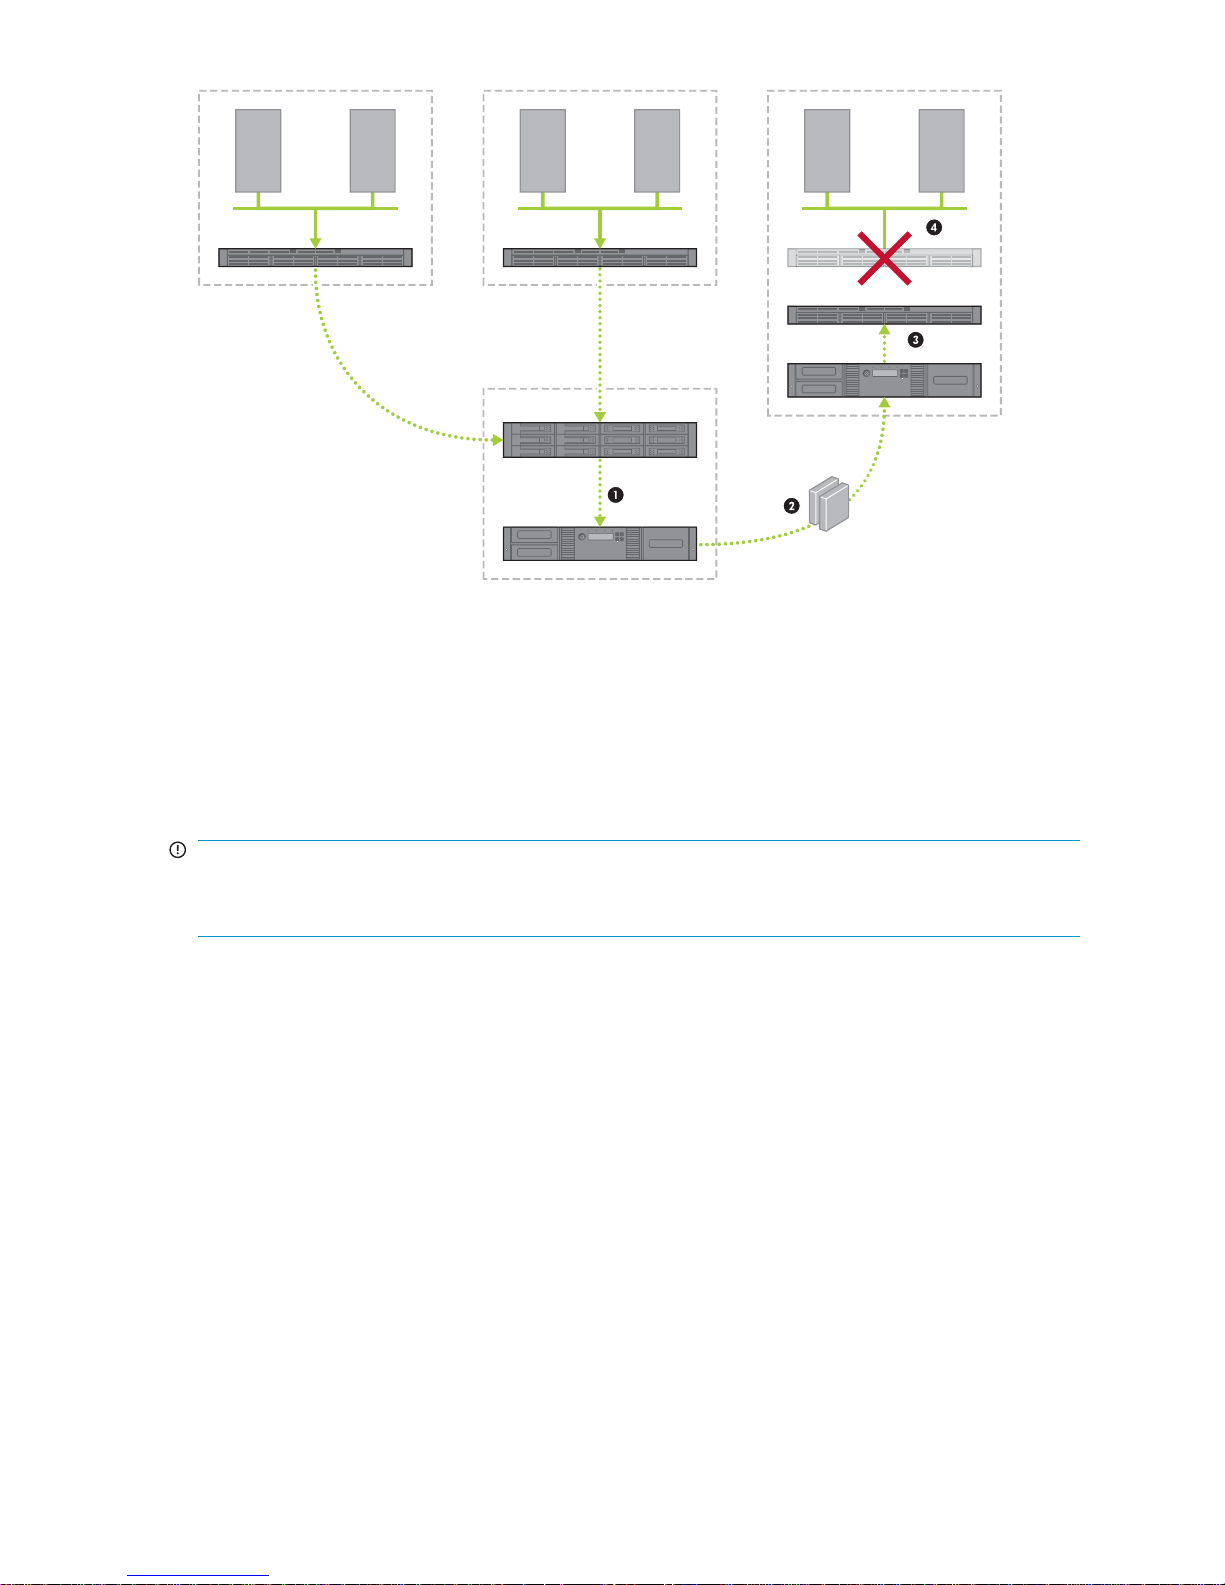
Remote Site A
Remote Site B
Remote Site C
Host Host
D2D2500
Host Host
D2D2500
Data Center
D2D4000
Tape Library
Host Host
D2D2500
Replacement
D2D2500
Tape Library
Figure 45 Recovery by repopulating a replacement source appliance
The source d evice has been lost but the mapping is still in place. This is the standard recovery model, in
which a disaster has occurred in the remote site resulting in the loss of both the host servers and the D2D
system. New hardware has been purchased and installed and the administrator now wants to recover
data to the D2D and then restore to the host server. Before the failure a mapping existed between a
Source Library on the remote site D2D and a Target Library on the D ata Center D2D. After the failure
themappingstillexistsbuttheSourceLibraryismissing.TheTargetLibraryontheDataCenterD2Dis
still in Target Library mode, its mappings have not been removed.
IMPORTANT:
The Recovery wizard, described in this section, is appropriate only for reverse replication when the source
device is lost, but the replication mapping is still present on the target.
D2D Backup System HP D2D2503
75
Page 76
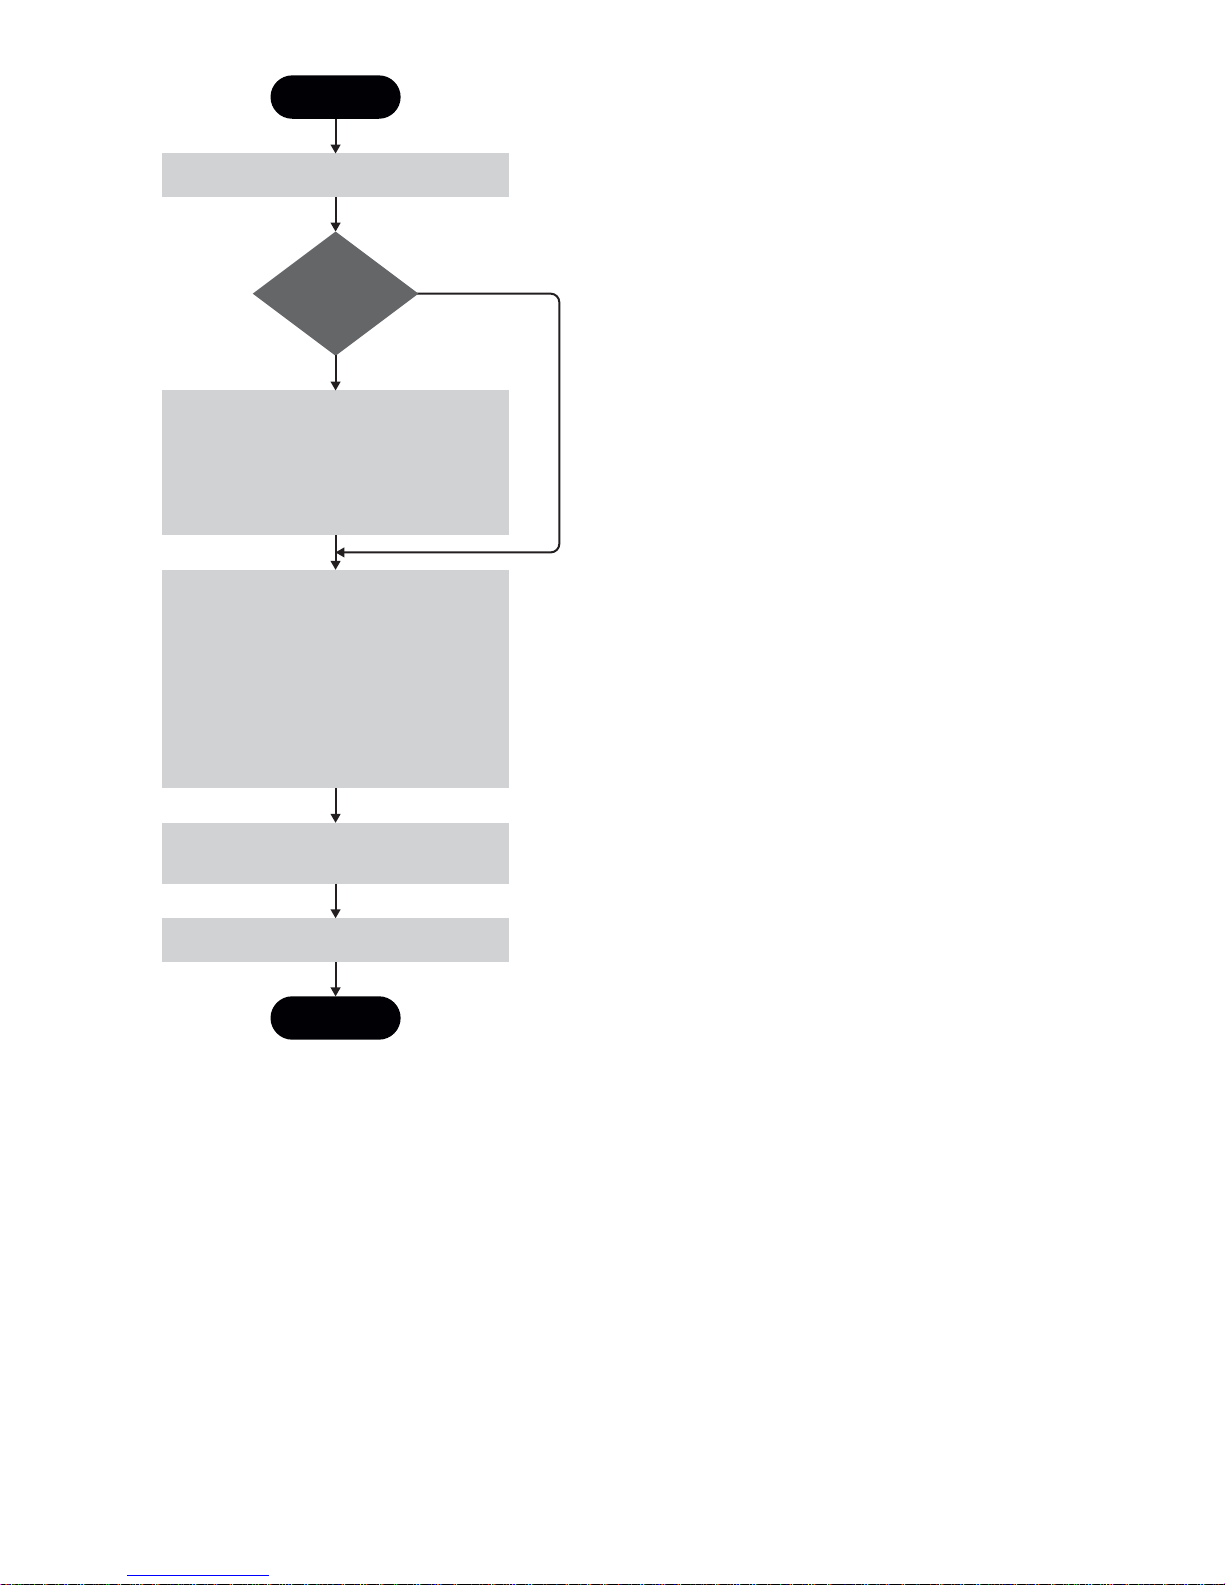
Start
Create non-replicating library on new source appliance.
Use physical
tape media to
'reverse seed'?
Yes
Tape Attach:
1. Use Tape Attach on target appliance to copy last
full backup cartridge to tape.
2. Transport physical tape to replication source site.
3. Use Tape Attach to import physical tape to newly
created library on the source appliance.
On the Mapping Configuration page select the new
non-replicating library on the source appliance.
1. Select Start Recovery Wizard.
2. Add IP address or FQDN of the target appliance
that was used as previous replication target.
3. Select existing target library to use for recovery.
4. Adopt previous configured slot mapping.
5. All cartridges on the target are selected. Unselect
any that are not required for recovery.
6. Select Apply to start reverse replication.
As soon as reverse replication has completed for each
slot use original backup application to recover data to
the host.
New backups to the source device and replication can
now run normally.
No
End
Figure 46 Reverse replication process: source lost, mapping intact
1. Create a new Non-Replicating Library on the Source Appliance (either by running the Installation
wizard or by using the Devices page).
76
Configuring and using replication
Page 77

2. Decide whether you want to use physical tape m ed ia to reverse seed the firstfullrestore. Itis
possible to recover across the WAN, but this may place an unacceptable load on bandwidth or
time availability.
IMPORTANT:
If using reverse seeding, use Tape Attach o n the Target Appliance to copy the last full backup cartridge
to tape and transport the media to the Replication Source site. Import the physical media into the a
slot within a Non-Replicating Library on the Source Appliances (using the Tape Attach pages) before
running the Recovery wizard.
3. Go to the Replication - Mapping Configuration page and select the new non-replicating library.
4. Click Start Recovery Wizard.
5. Add the Target Appliance that was used as the previous replication target using its IP address or
fully qualified domain name.
6. Select the existing Target Library from which slots should be recovered.
7. Adopt the Slot Mapping that had been configured. All slots in the Target Library will be selected by
default, but you may deselect any cartridges that you do not wish to recover to the Source Library.
8. Click Apply to run reverse replication.
9. As soon as reverse replication has completed for each slot, the data may be recovered to the host
using the original backup application.
10. New backups can now run to the Source Appliance and replication will run normally without
further configuration.
Reverse replication, source lost and mapping deleted
This is the non-standard recovery model, in which a disaster has occurred in the remote site resulting in
the loss of both the host servers and the D2D system. New hardware has been purchased and installed
and the admin now wants to recover data to the D2D and then restore to the host server. Before the
failureamappingexistedbetweenaSourceLibraryontheremotesiteD2DandaTargetLibraryonthe
Data Center D2D. After the failure the mapping was also removed on the Target Appliance. The Target
Library on the Data Center D2D is now in a non-replicating state.
IMPORTANT:
In this procedure you will use the Replication wizard on the Source Appliance and not the Recovery wizard.
D2D Backup System HP D2D2503
77
Page 78
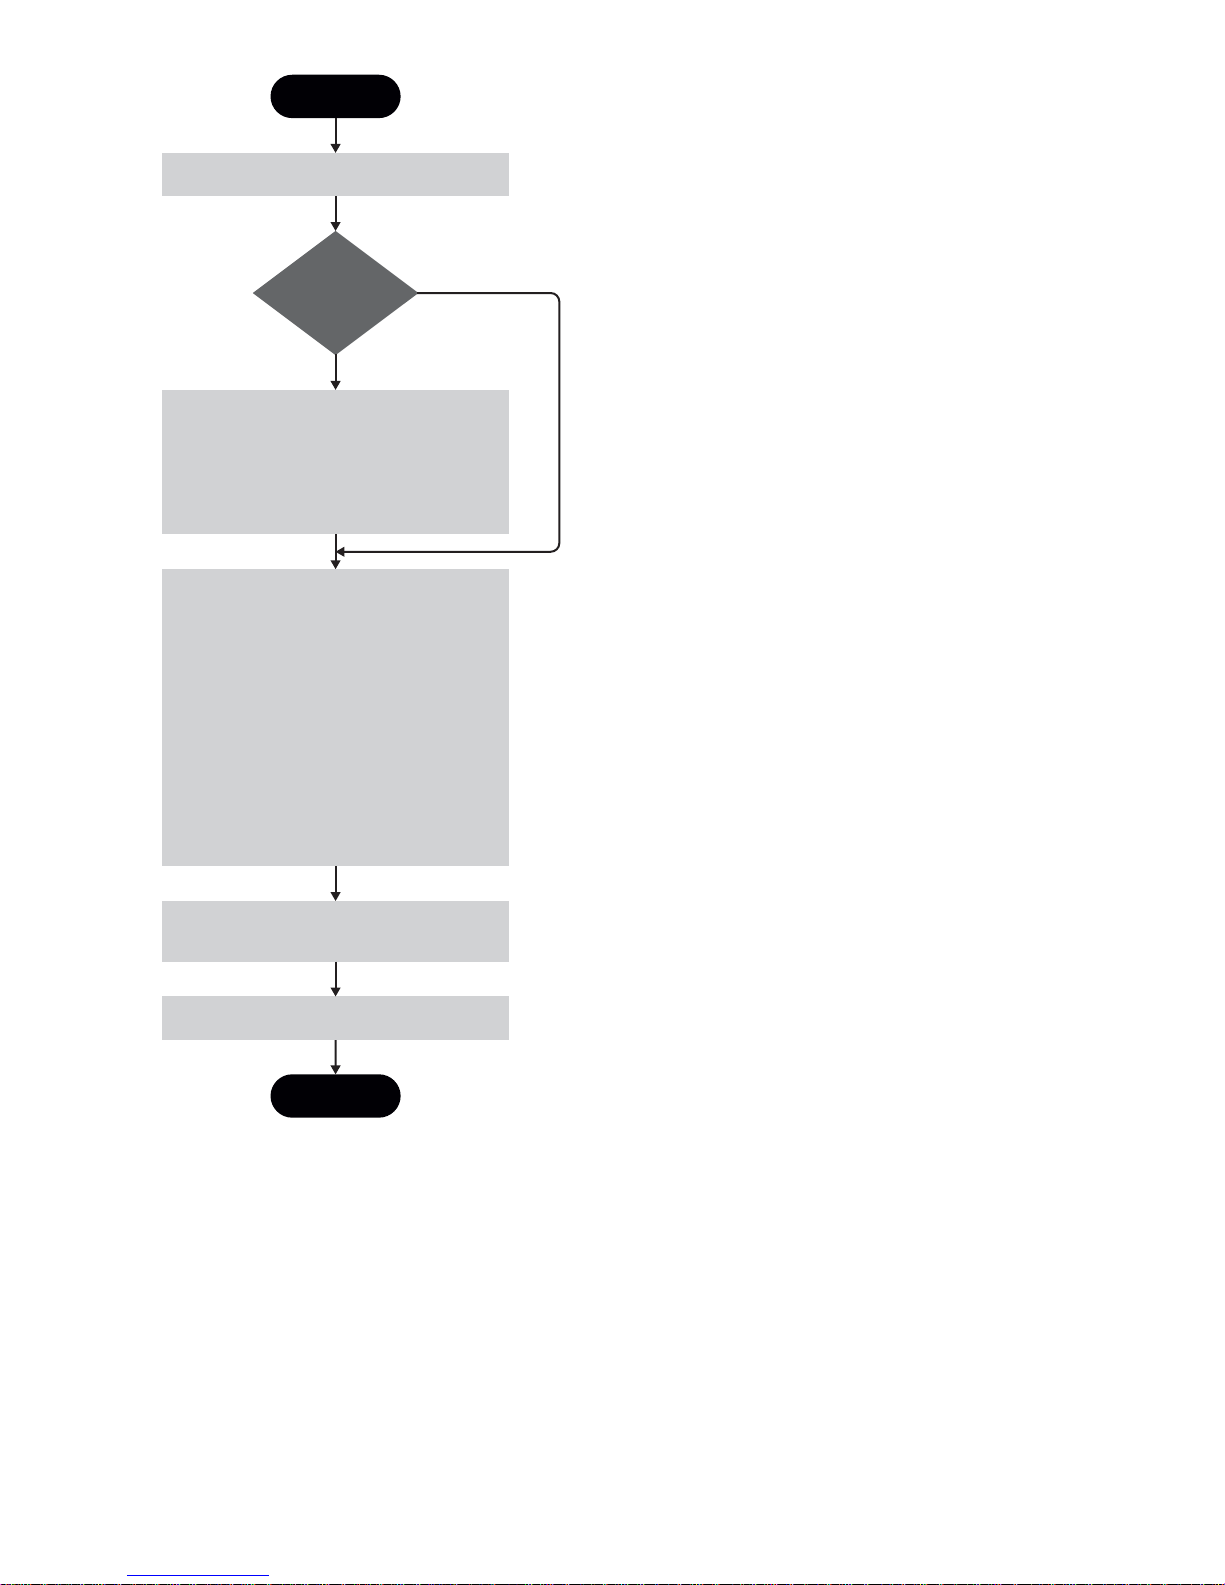
Start
Create non-replicating library on new source appliance.
Use physical
tape media to
'reverse seed'?
Yes
Tape Attach:
1. Use Tape Attach on target appliance to copy last
full backup cartridge to tape.
2. Transport physical tape to replication source site.
3. Use Tape Attach to import physical tape to newly
created library on the source appliance.
On the Mapping Configuration page select the new
non-replicating library on the source appliance.
1. Select Start Replication Wizard. (Do not use the
Recovery Wizard.)
2. Add IP address or FQDN of the target appliance
that was used as previous replication target.
3. Select existing library to use for recovery.
(Its status is now non-replicating, not target.)
4. Remap the slots that were used in the previous
configured slot mapping.
5. Unhide the Recovering checkbox column and
select the cartridges to be recovered. (Any not
selected will not be recovered, but will be used
for subsequent replication overwrite.)
6. Select Apply to start reverse replication.
As soon as reverse replication has completed for each
slot use original backup application to recover data to
the host.
No
New backups to the source device and replication can
now run normally.
End
Figure 47 Reverse replication process: source lost, mapping deleted
1. Create a new Non-Replicating Library on the Source Appliance (either by running the Installation
wizard or by using the Devices page).
78
Configuring and using replication
Page 79

2. Decide whether you want to use physical tape m ed ia to reverse seed the firstfullrestore. Itis
possible to recover across the WAN, but this may place an unacceptable load on bandwidth or
time availability.
IMPORTANT:
If using reverse seeding, use Tape Attach o n the Target Appliance to copy the last full backup cartridge
to tape and transport the media to the Replication Source site. Import the physical media into the a
slot within a Non-Replicating Library on the Source Appliances (using the Tape Attach pages) before
running the Replication wizard.
3. Go to the Replication - Mapping Configuration page and select the new non-replicating library.
4. Click Start Replication Wizard.
5. Add the Target Appliance that was used as the previous replication target using its IP address or
fully qualified domain name.
6. Select the existing library from which slots should be recovered. Because the slot mappings were
deleted, this library is now a Non-Replicating Library (rather than a Target Library).
7. Remap the slots that were previously in the replication mapping.
8. All slots in the Target Library will be selected by default, but you may unhide the Recovering
checkbox column and select the cartridges that should be recovered. Any not selected will not be
recovered but will be mapped for future replication overwrite.
9. Click Apply to run reverse replication.
10. As soon as reverse replication has completed for each slot, the data may be recovered to the host
using the original backup application.
11. New backups can now run to the Source Appliance and replication will run normally without
further configuration.
Promoting a Target Library over the WAN using SCSI
In this recovery model, a disaster has occurred a t the remote site resulting in the loss of both the host
servers and the D2D system. New server hardware has been purchased and installed and the admin
now wants to recover data to the server. The admin however has not installed a new D2D and is going
to recover data directly to the server from the Data Center D2D appliance over the WAN (which will
take a long time).
Before the failure a mapping existed between a Source Library on the remote site D2D and a Target
Library on the Data Center D2D. After the failure the mapping still exists but the Source Library is
missing. The Target Library on the Data Center D2D is still i n Target Library mode, it has not had its
mappings removed.
IMPORTANT:
This recovery method is not suitable if the Target Library also has slot mappings from Source Libraries
on other remote sites.
D2D Backup System HP D2D2503
79
Page 80
Start
On the target appliance in Data Center use
Mapping Configuration page to select target
library on target appliance in Data Center and
remove slot mapping to lost source library.
Was this the only
slot mapping to this
target library?
Yes
The library status changes to non-replicating.
Make sure its port configuration is iSCSI.
On host machine where recovery is to occur,
install iSCSI Initiator and backup application.
Configure iSCSI Initiator Name for new
non-replicating library to match that of the
host system.
Connect to Data Center appliance and library via
iSCSI from host.
Import cartridges into backup application and
recover data to the host over WAN.
When failed D2D is replaced at remote site, use
reverse replication to recover data to it.
No
Is it OK to
remove other
mappings?
No
Yes
This recovery method is not suitable because it will
break other replication mappings.
End
End
Figure 48 Recovery process: promoting a target library over the WAN
1. On the Target Appliance in the Da ta Center, go to the Replication - Mapping Configuration page,
select the Target Library and remove the slot mapping between it and the lost Source Library.
2. As long as there is only one slot mapping to the Target Library, it will become a Non-Replicating
Library.
NOTE:
If there are other mappings, do not remove them if it will break other library replication. Do not
proceed, this method is not suitable.
3. Edit the port configuration of the newly promoted Non-Replicating Library to make it iSCSI.
4. Install the iSCSI initiator on the host machine at the remote site where recovery is to occur and
install the backup application.
5. Configure the iSCSI Initiator Name for the newly promoted Non-Replicating Library to be that of
thehostsystem.
80
Configuring and using replication
Page 81
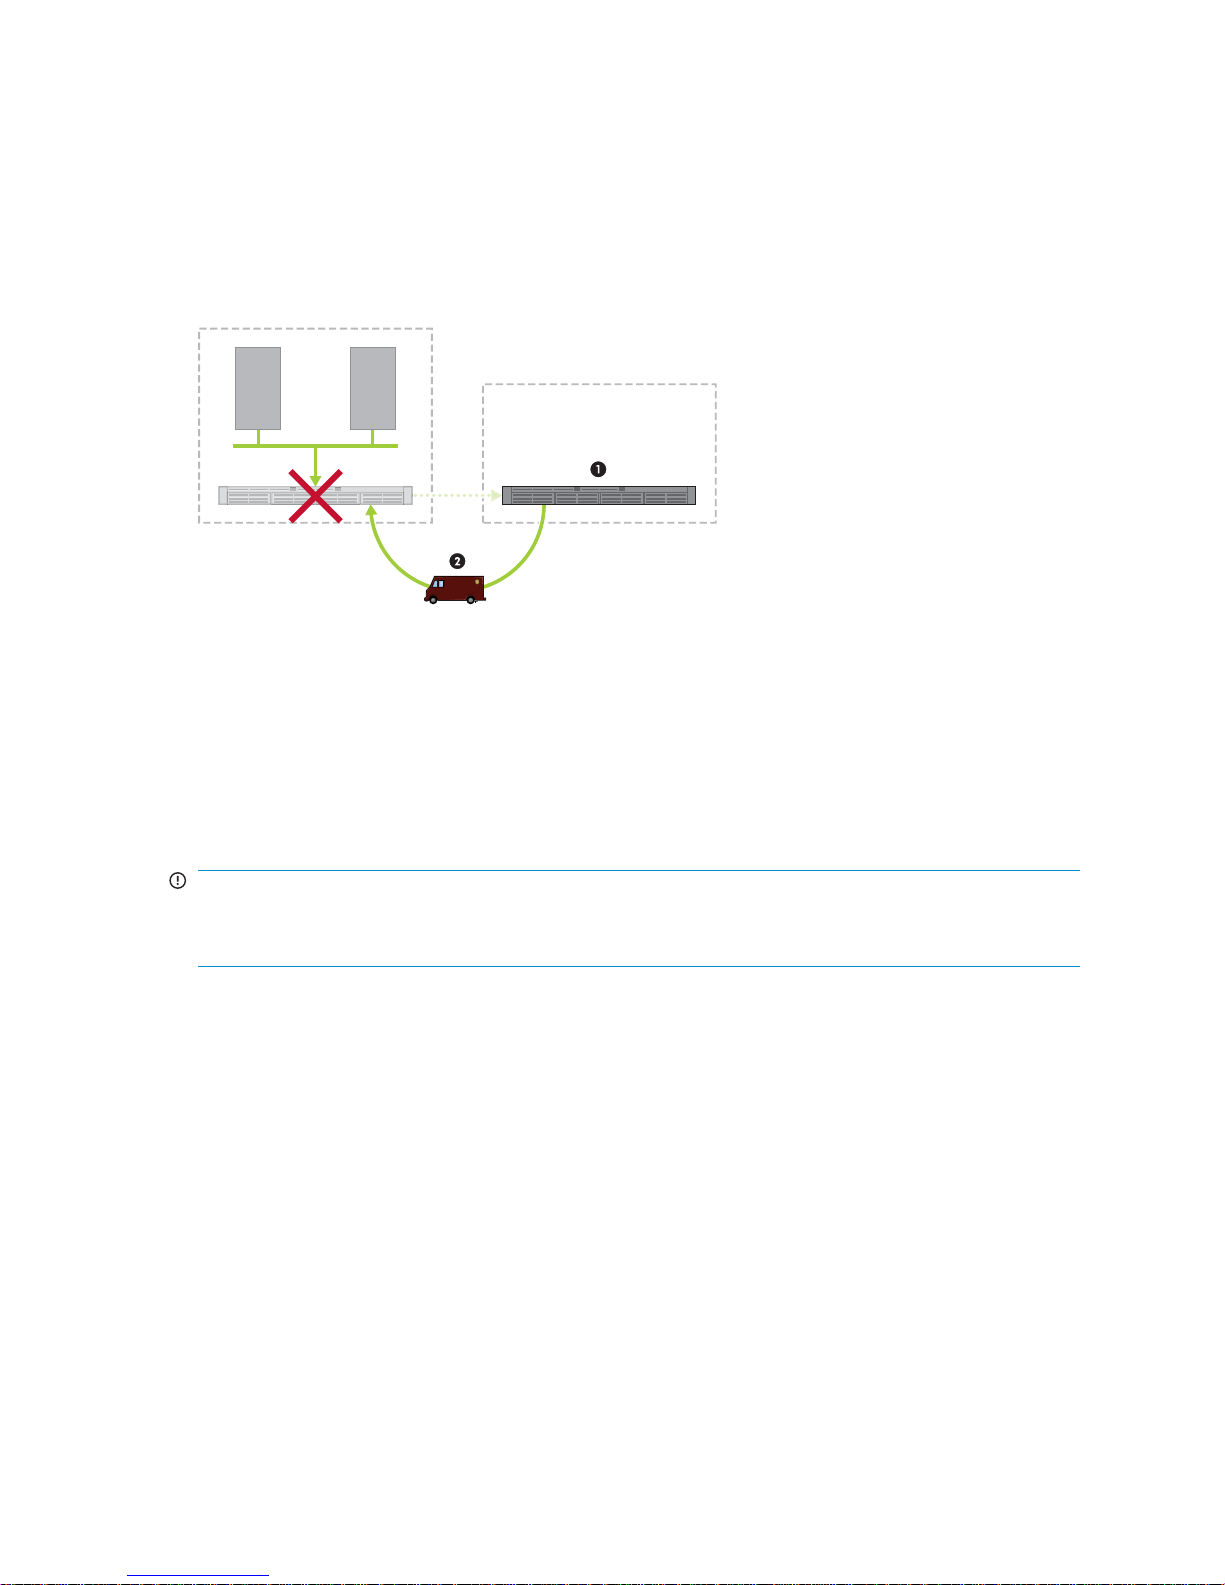
6. Connect to the Data Center appliance and library via iSCSI from the host at the remote site.
7. Import the cartridges into the backup application and recover the data over the WAN.
8. At this point there is no HP D2D Source Appliance at the remote site. If one is installed at
a later date, you can reverse recover the data and configure replication, as described in
“Reverse replication, source lost and map ping deleted”onpage77.
Promoting a Target Library using colocation
Remote Site
Host Host
D2D2500
Data Center
D2D2500
Figure 49 Recovery by relocating the Target Appliance
In this rec
overy model, a disaster has occurred at the remote site resulting in the loss of both the host
servers and the D2D system. New server hardware has been purchased and installed and the admin
now wants to recover data to the server. The admin decides to move the D2D appliance that was in the
Data Cent
er to the remote office (maybe only temporarily) in order to recover the server data.
Before the failure a mapping existed between a Source Library on the remote site D2D and a Target
Library on the Data Centre D2D. After the failure the mapping still exists but the Source Library is missing.
TheTargetLibraryontheDataCentreD2Disstillintargetlibrarymode,ithasnothaditsmappings
removed.
IMPORTANT:
This configuration is possible in only limited situations because it will break any other b ackups or replications
to the Data Center appliance. In a simple Active-Passive scenario, however, this may be a very good model.
D2D Backup System HP D2D2503
81
Page 82
Start
Transport the Data Center D2D to the remote site
iSCSI FC
Make sure the port configuration of the newly
non-replicating library is iSCSI.
and reconfigure networking.
On the Data Center D2D use Mapping
Configuration page to select target library on
the Data Center D2D and remove slot mapping
between it and the source library.
slot mapping to this
The library status changes to non-replicating.
Was this the only
target library?
Yes
Which interface
will hosts use to
connect to D2D?
No
Make sure the port configuration of the newly
non-replicating library is FC.
Is it OK to
remove other
mappings?
Yes
This recovery method is not suitable because it
will break other replication mappings.
No
End
On host machine where recovery is to occur,
install iSCSI Initiator and backup application.
Configure iSCSI Initiator Name for new
non-replicating library to match that of the host
system.
Connect to co-located appliance and library via
iSCSI from host.
Import cartridges into backup application and
recover data to the host over WAN.
When failed D2D is replaced at remote site, use
reverse replication to recover data to it.
Install FC card into server and connect to SAN.
Connect to FC library on co-located appliance.
End
Figure 50 Recovery process: promoting a target library using colocation
1. Transport the appliance from the Data Center to the remote site and reconfigure networking, etc.
82
Configuring and using replication
Page 83

2. On the Target Appliance (now in the remote site), go to the Replication - Mapping Configuration
page, select the Target Library and remove the slot mapping between it and the lost Source Library.
3. As long as there is only one slot mapping to the Target Library, it will become a Non-Replicating
Library.
NOTE:
If there are other mappings, do not remove them if it will break other library replication. Do not
proceed, this method is not suitable.
4. Decide which interface, iSCSI or FC, you will use to connect the library to the host and edit the port
configuration of the newly promoted Non-Replicating Library to make i t iSCSI or FC, as appropriate.
• For an iSCSI connection, install the iSCSI initiator on the host ma chine at the remote site where
recovery is to occur and install the backup application. Configure the iSCSI Initiator Name for
the newly promoted Non-Replicating Library to be that of the host system.
• For a F C connection, connect to the SAN. (If necessary, install a FC card in the server.)
5. Connect to the colocated appliance and library from the host.
6. Import the cartridges into the backup application and recover the data over the WAN.
7. At this point there is no HP D2D Source Appliance at the remote site. If one is installed at
a later date, you can reverse recover the data and configure replication, as described in
“Reverse replication, source lost and map ping deleted”onpage77.
Recovery from physical media direct to host
In this recovery model, a disaster has occurred a t the remote site resulting in the loss of both the host
servers and the D2D system. New server hardware has been purchased and installed and the admin
now wants to recover data to the server. The admin is now going to recover the server data using tape
before purchasing and re-installing a new D2D d evice in the remote office.
The following procedure is the simplest method but only applies if a tape library or tape drive is physically
attached to the Data Center D2D appliance.
D2D Backup System HP D2D2503
83
Page 84
Start
Is physical
tape device attached
to Data Center
D2D?
Yes No
On the appliance in Data Center use Tape Attach
to offload last full backup and any subsequent
incrementals to physical tape.
On the target appliance in Data Center use
Mapping Configuration page to select target library
and remove slot mapping to lost source library.
Was this the
only slot mapping
to this target
library?
Yes
The library status changes to non-replicating.
Make sure its port configuration is iSCSI.
On host machine in Data Center, install iSCSI
Initiator and backup application.
Configure iSCSI Initiator Name for new
non-replicating library to match that of the
host system.
Connect to Data Center appliance and library via
iSCSI from host and copy last full backup and any
subsequent incrementals to physical tape.
No
Is it OK to remove
other mappings?
No
Yes
This recovery method is not suitable because it
will break other replication mappings.
End
Transport the cartridge(s) to the remote office.
Connect a physical tape device to the host server.
Install backup application on the host, then import
and recover data from physical tape.
When failed D2D is replaced at remote site, use
reverse replication to recover data to it.
End
Figure 51 Recovery process: using physical tape
1. Transport the ca rtridges to the remote office.
2. Connect a tape drive or library to the host server.
84
Configuring and using replication
Page 85

3. Install the backup application on the host, then import and recover the data from physical tape.
4. At this point there is no HP D2D Source Appliance at the remote site. If one is installed at
a later date, you can reverse recover the data and configure replication, as described in
“Reverse replication, source lost and map ping deleted”onpage77.
The following procedure may be used if there is a tape library or tape drive attached to the host.
IMPORTANT:
ThisrecoverymethodisnotsuitableiftheTargetLibraryattheDataCenteralsohasslotmappingsfrom
Source Libraries on other remote sites.
1. On the Target Appliance in the Da ta Center, go to the Replication - Mapping Configuration page,
select the Target Library and remove the slot mapping between it and the lost Source Library.
2. As long as there is only one slot mapping to the Target Library, it will become a Non-Replicating
Library.
NOTE:
If there are other mappings, do not remove them if it will break other library replication. Do not
proceed, this method is not suitable.
3. Edittheportconfiguration of the newly promoted Non-Replicating Library to make it iSCSI.
4. Install the
iSCSIinitiatoronthehostmachineattheremotesitewhererecoveryistooccurand
install the backup application.
5. Configure the iSCSI Initiator Name for the newly promoted Non-Replicating Library to be that of
thehostsy
stem.
6. Connect to the Data Center appliance and library via iSCSI from the host at the remote site.
7. Copy the last full backup and any subsequent incrementals to physical tape.
8. Transpor
tthecartridgestotheremoteoffice.
9. Connectatapedriveorlibrarytothehostserver.
10. Install the backup application on the host, then import and recover the data from physical tape.
11. At this p
ointthereisnoHPD2DSourceApplianceattheremotesite. Ifoneisinstalledat
a later date, you can reverse recover the data and configure replication, as described in
“Reverse replication, source lost and map ping deleted”onpage77.
D2D Backup System HP D2D2503
85
Page 86

86
Configuring and using replication
Page 87

7 The Web Manag ement Interface
In this chapter:
•
“Web management interface” on page 87
•
“To run the Web Management Interface” on page 87
•
“Summary (Home)”onpage88
•
“Devices (Configuration)”onpage90
•
“Cartridges (Configuration)” on page 94
•
“Network (Configuration)” on page 97
•
“Email Alerts (Configuration)” on page 100
•
“iSCSI (Status)” on page 104
•
“Log (Status)”onpage105
•
“Status (Replication)” on page 107
•
“Mapping Configuration (Replication)” on page 107
•
“Appliance (Replication)”onpage110
• “Local Settings (Replication)” on page 112
•
“Event History (Replication)” on page 113
•
“Shutdown (Settings)” on page 116
• “Admin (Settings)”onpage114
• “Date and Time (Settings)”onpage115
• “Firmware (Settings)” on page 117
•
“Support (Settings)” on page 118
What i
s the Web Management interface?
The We
• Monitoring the status and health of the HP D2D Backup System and all configured backup devices
• Changing the number of cartridge slots or creating additional libraries, or standalone tape
• Mana
• Creating slot mappings and configuring replication, if required
b Management Interface is the main interface for:
drives, for a host
ging movement of data to and from a physical tape drive attached to the HP D2D (if
one has been installed)
To run the Web Management Interface
There are two ways of logging on:
• FromthehostserverorPC:Use the desktop shortcut created by the Installation wizard.
• From any machine connected to the network: TheHPD2Dusesasecurenetworkconnection.
Enter ht tps:// followed by the IP address or fully qualified domain name (for example,
myhpd2d.mydomain.com) of the HP D2D Backup System into the web browser.
NOTE:
If you use http: in the URL, you are automatically forwarded to the https: secure network connection.
D2D Backup System HP D2D2503
87
Page 88
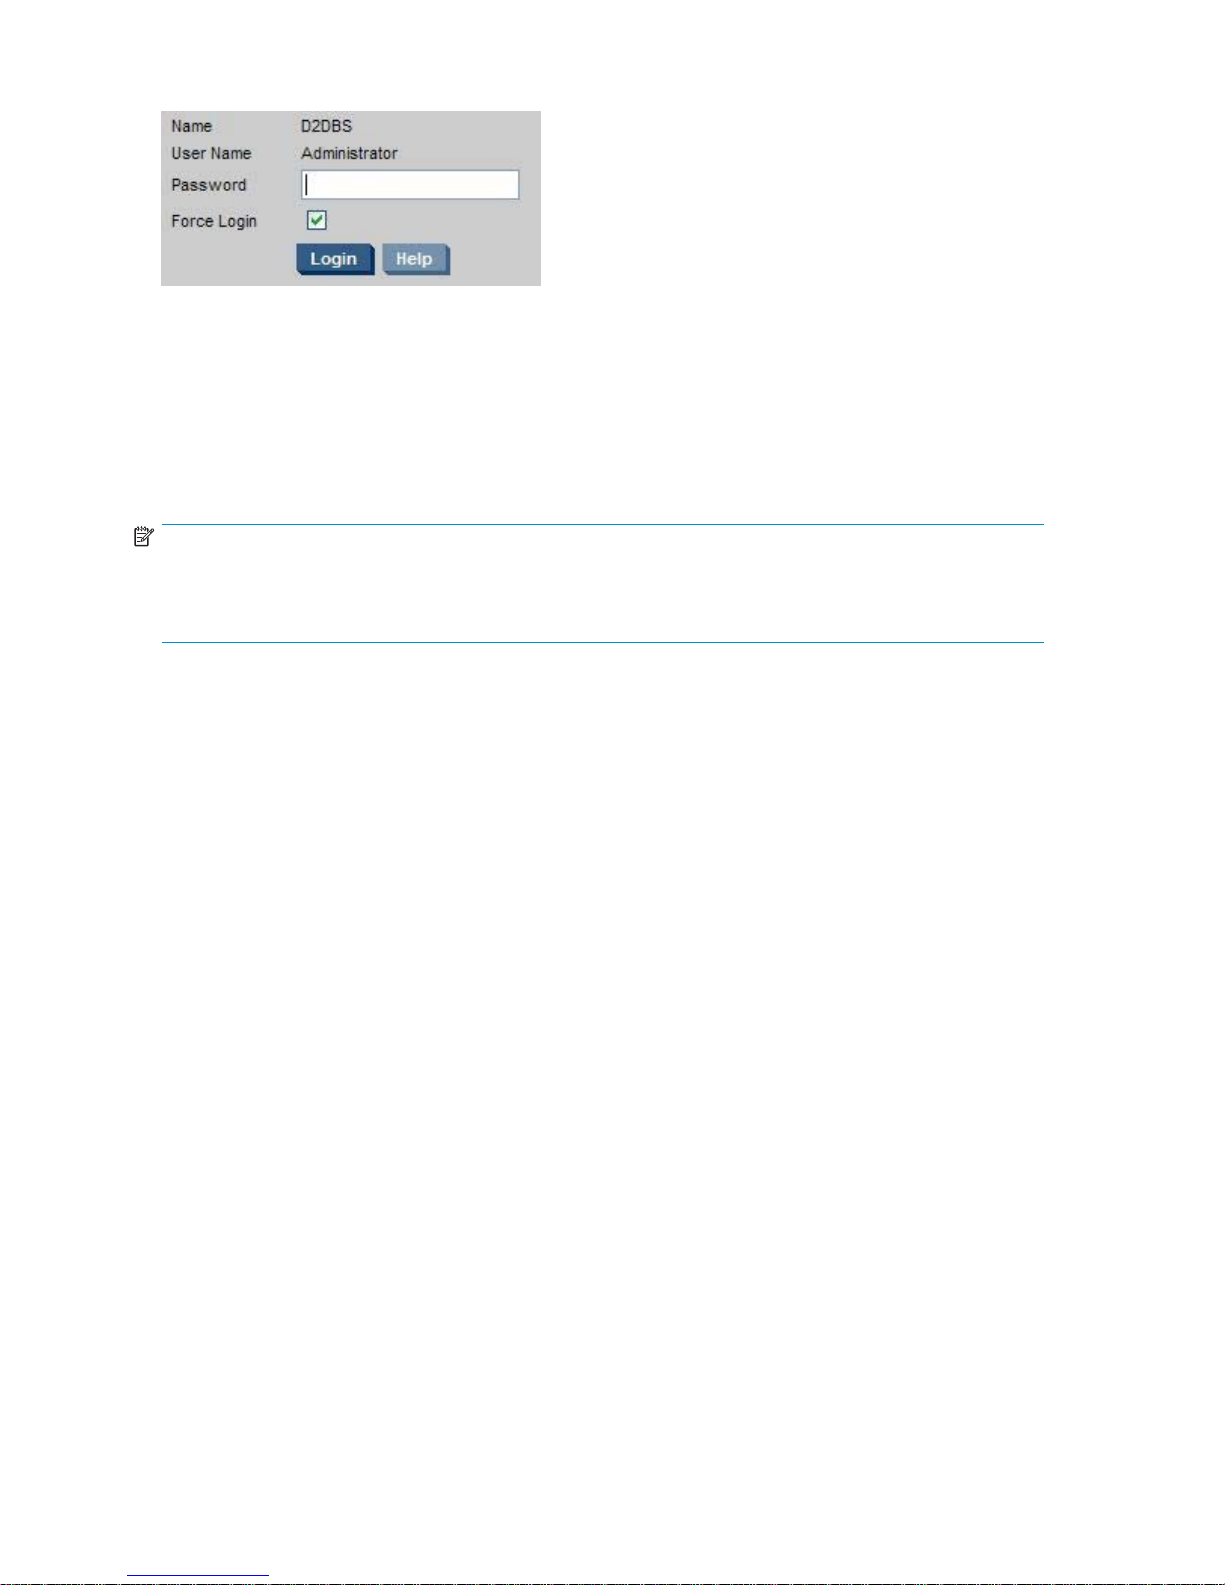
TheWebManagementInterfacedisplaystheLoginprompt:
The Login is Ad
Both names are
menu option, see “Admin (Settings)”onpage114.
Only one active session is suppor ted. You cannot connect to an HP D2D if somebody else is logged into
the Web Management Interface. However, Force Login is enabled by default and this will disconnect
an active session.
After a perio
NOTE:
The web browser used to communicate with the D2D Backup System must have Active Scripting
or JavaScript enabled. If it does not, some of the browser buttons may not be displayed. See
“Web browser settings”onpage37.
ministrator with an initial password of Admin.
case sensitive. The password can subsequently be changed from the Settings/Admin
d of 20 minutes of user inactivity the session will time out and return to the Login screen.
Summary (Home)
Whenever you log in, the Summary pageisdisplayed. ItisalsoaccessedfromHom e in the navigation
bar.
Use this page:
• To display information about your HP D2D Backup System and the backup devices that have
been configured for it.
• To monitor system health and status.
• To display status information about any physical tape drives that are at tached directly to the
D2D Backup System.
88
The Web Managem ent Interface
Page 89
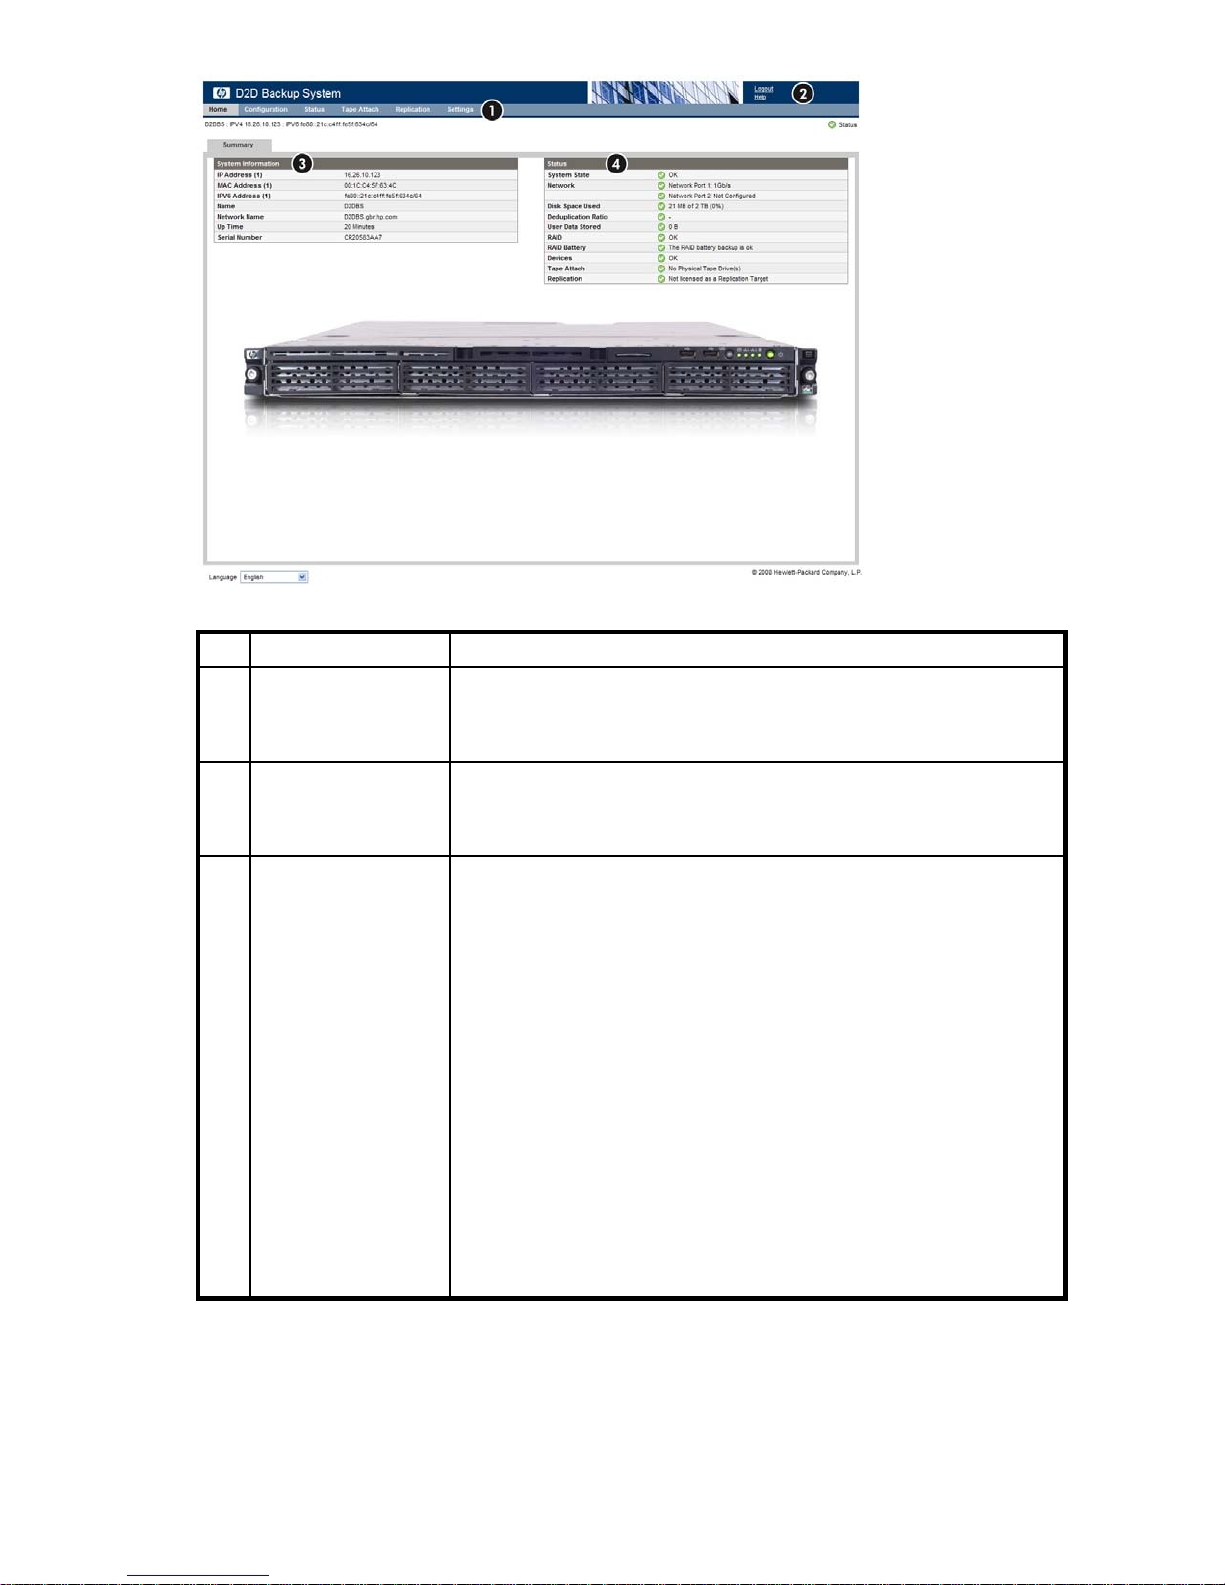
Table4Summarypagelayout
1
Navigation bar Select the appropriate option from the top bar.
2
Help and logout
D2D Backup System
3
information
4
Status details
The Help o
displays
your session on the HP D2D Backup System. If somebody else lo gs in, you
will be automatically logged out.
This section provides the information that identifies your HP D2D Backup
System. It shows the IP Address, Name, Network Name and Serial Number
of the HP D2D Backup System. It also shows how long the HP D2D has
been running.
This section provides details about overall system status and the status of
network and system components. Additional information is provided if the
status is not OK. See also “Status icons”onpage90.
Disk Space Used includes the amount of space that has been allocated
for the number of cartridges created on the unit. Each slot configured
commits3GBofphysicaldiskspace. Deduplication Ratio is updated
whenever data is written to storage.User Data Stored shows how much user
data has been backed up to unit. See also “Libraries, slots and storage
capacity” on page 91.
RAID and RAI D battery are the first place to look to identify any problems
with the RAID status and RAID battery. A failed battery should be replaced
as soon as possib le. See the “HP D2D4100 Series Maintenance and Service
Guide”.
Devices informs the user of the status of the libraries within the HP D2D
Backup System. After a power up or reset, each library is checked and
brought on line. This can take a long time, especially after an unscheduled
power fail, where the message will show ’Starting’.
If a tape drive is connected directly to the HP D2D Backup System, the Tape
Attach status is displayed with a link to job history.
Replication status is shown if you have licensed and enabled this feature.
ption opens the help pages. This is a context sensitive link that
help that is appropriate to the currently selected page.Logout closes
D2D Backup System HP D2D2503
89
Page 90
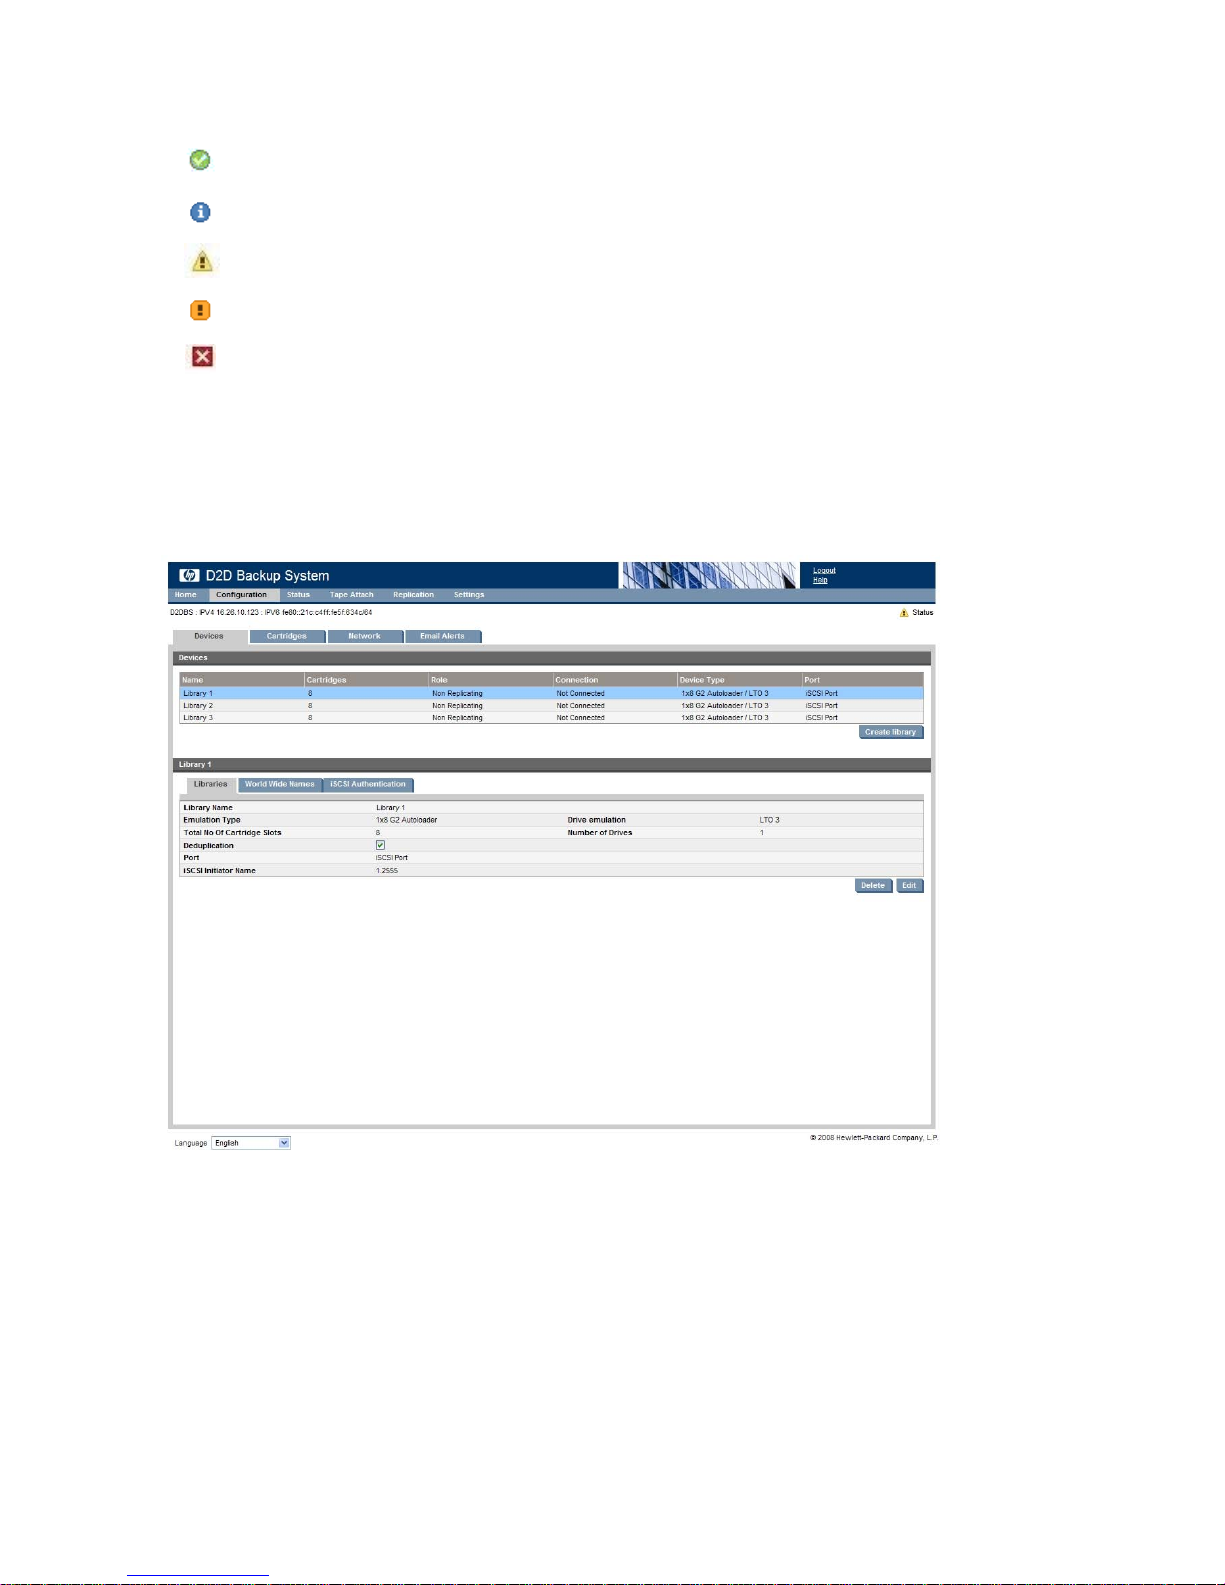
Status icons
Indicates a healthy system or system component. Everything is OK and the system is working
correctly.
Indicates standard information.
Indicates a war
of the device. For example, a disk may have failed.
Indicates a critical state. Something needs attention. Investigate immediately.
Indicates a cri
immediately.
ning state. Something needs attention but it is not critical to the successful operation
tical state. Something is no longer functional, such as a failed disk. Investigate
Devices (Configuration)
If possible, a default library is created automatically when a new host connects to the HP D2D Backup
System. Use this page to view and con figure the default library and to create additional devices, if
required, for the host.
ThetophalfofthepageshowsthealistofdevicesavailableontheHPD2DBackupSystem. Summary
information is provided for each device, as follows:
90
The Web Managem ent Interface
Page 91

Table 5 Device parameters (top half of the page)
Name
Cartridges
Role
Connection
Device Type
Port
Emulation
HP D2D products emulate a range of physical tape devices, these are either Tape Autoloaders or Tape
Librarie
• HP 1x8 G2 Autoloader: This is a single Ultrium tape drive autoloader with a maximum of 24 cartridge
• HP MSL20
• HP MSL4048 Library: This is a tape library device with one embedded Ultrium tape drive and a
• HP D2DBS Library: This is a tape library device with one embedded Ultrium tape drive and 48
This is the name that is used to identify that device (library or autoloader). You may
like to enter a name that identifies the host or backup job with which it is associated.
This is the number of cartridges available on the device, which is determined by the
Emulation Type selected when the device was created.
This is the role of the library, which may be non-replicating, replication source or
replication target.
If a device is shown as not connected, this indicates that the iSCSI Initiator on the
host has not logged on. For more information, see “Targets tab”onpage52.
This is the emulation type used by the backup software. It is selected during
installation or when you create a device.
This identifies the port to which the host is connected for backup and restore. The
number of ports available in the drop-down menu depends upon your network
configuration.
There are two LAN ports on the rear of the HP D2D. LAN port 1 must always be
connected to install the software and run the Web Management Interface. If both
portsareconnected,youwillbeabletochoosewhichonewillbeusedtotransfer
backup data to and from the host in the drop-down menu. If only one por t is
connected, there will be only one LAN port choice (port 1).
types for tape devices
s. Supported emulation types are listed below:
slots. It should be used for simple rotation schemes where a single backup job is to run at a time.
This emulation type is widely supported by backup applications.
24 Library: This is a tape library device with one embedded Ultrium tape drive and a
maximum of 24 cartridge slots. This emulation type is widely supported by backup applications.
maximum
large n
cartridge slots. If it is supported by your backup application, this is the preferred emulation t ype to be
used because it does not emulate any p hysical library types in existence and is, therefore, clearly
ident
application support varies by software vendor.
of 48 cartridge slots. It should be used when implementing rotation schemes that use a
umber of cartridges devices. This emulation type is widely supported by backup applications.
ifiableasaD2Ddevice. Itisthemostflexible emulation type available; however, backup
NOTE:
Symantec prefer their customers to use this emulation type with BackupExec and Netbackup.
Libraries, slots and storage capacity
Each slot configured commits 3 GB of physical disk space, regardless of what value has been configured
for the maximum cartridge size. This ensures that there is always sufficient space to flush buffers and there
is never data in mem o ry that can not be written to ca rtridge. The remainder of the configured maximum
capacity is used only as needed, but the initial 3 GB is permanently committed. Therefore, only configure
the number of slots that you actually require. If you configure a MSL G3 Series (2x24) with 24 cartridges,
you should be aware that you have committed 72 GB of disk space — even when no data is written.
Onlydothis,ifyouaresureallslotswillbeused.
D2D Backup System HP D2D2503
91
Page 92
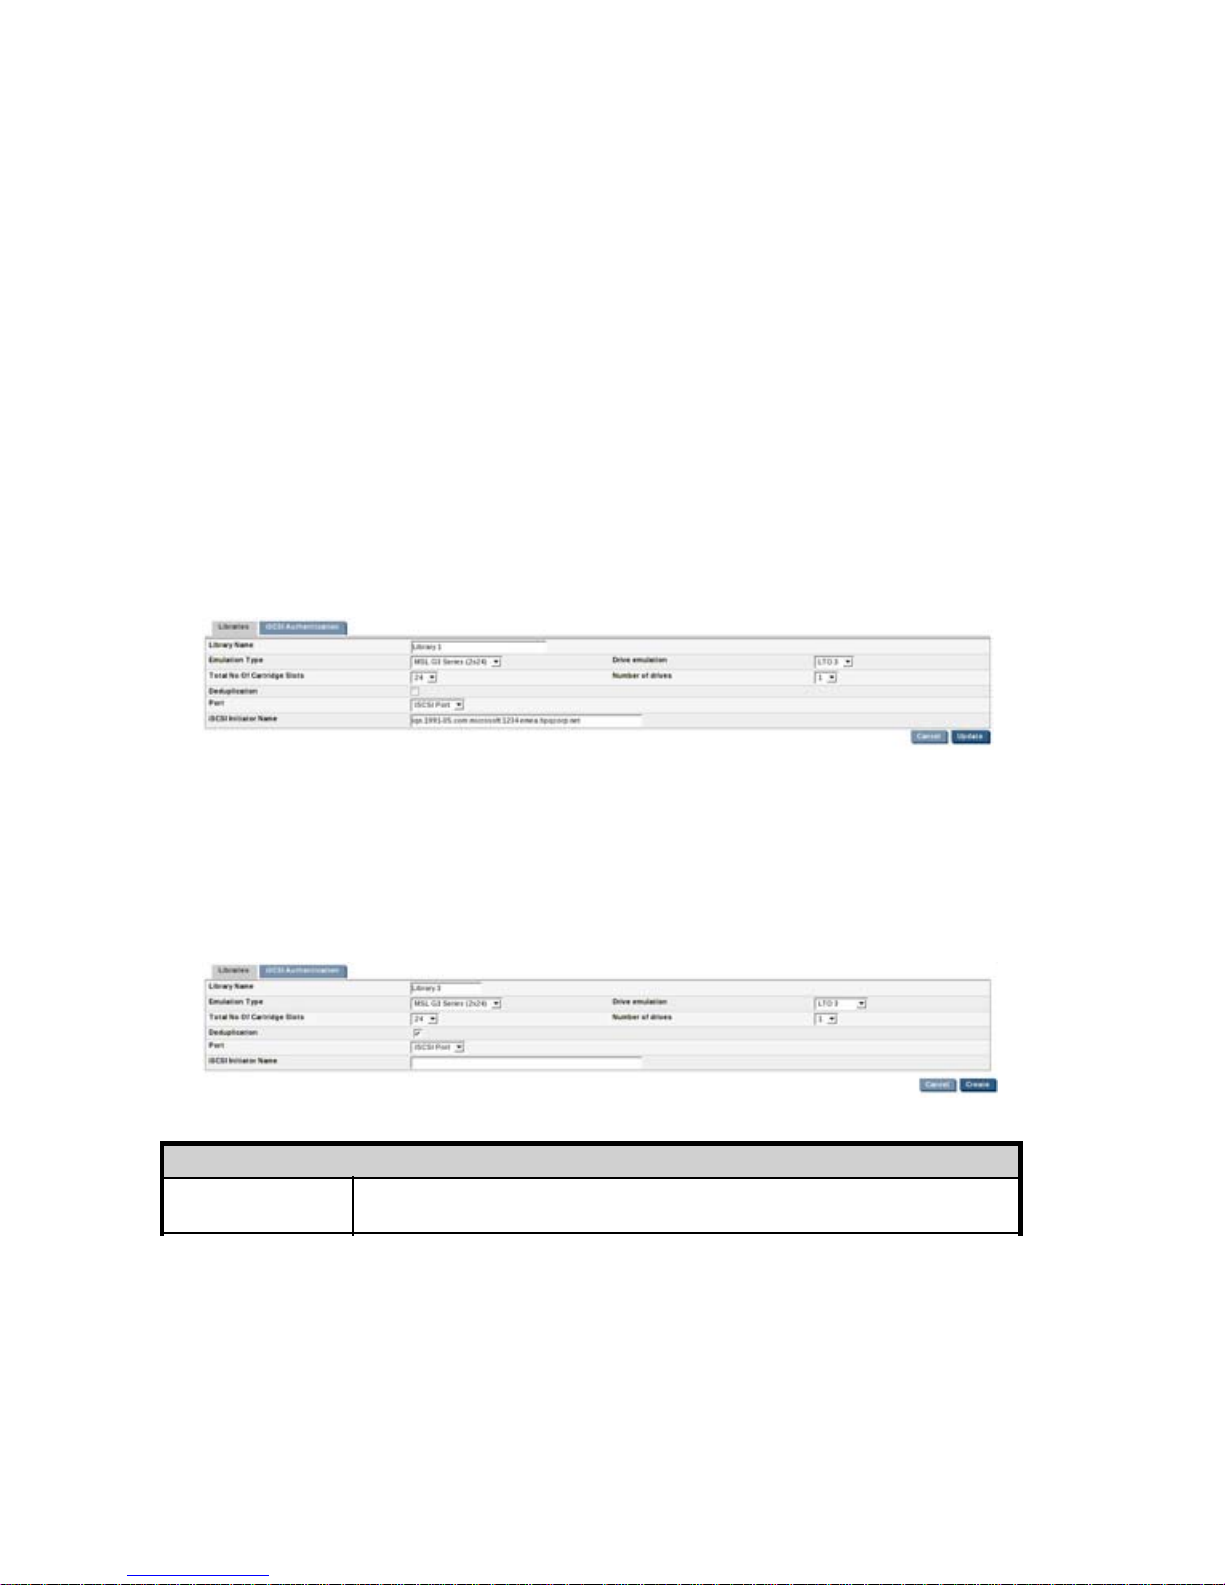
User recommendations
To avoid over-al
• Only configure the libraries that you need
• Only configure the number of car tridges that you are likely to need
You can add cart
from a library w
See “Cartridg
location of disk space and the possibility of running out of disk space for non-user data:
ridges at a later date to expand the system and remove individual blank cartridges
ithout deleting the whole library, but cannot remove cartridges that have been written to.
es (Configuration)” on page 94.
To view device details
Click on a device in the top half of the page to view its details in the bottom half of the page,
where you can also edit and delete details. There are three tabs with device information. See
“Device parameters”onpage92.
To edit device details
1. Select the device in the list to display its details and then click on Edit.
2. Amend details as appropriate and click Update to apply them. The information for the
World Wide N
“Device parameters” on page 92.
ames tab is generated automatically and cannot be changed. See also
To create a new device
1. To create
2. Enter the appropriate details in the Libraries tab and click Create. There is also a tab to enable
and configure iSCSI Authentication, if this is required. Any information you enter on this tab
must match the information that you have configured in the iSCSI Initiator itself. (See also
“Device
Table 6 Device parameters
Libraries tab
Library Name
a new device for the host, click on Create library.
parameters” on page 92 below.)
This is the name that is used to identify that device. You may like to enter a name
that identifies the host or backup job with which it is associated.
92
The Web Managem ent Interface
Page 93

Emulation Type
This is the emulation type used by the backup software. The HP D2D supports the
following emulation types: HP 1x8 G2 Autoloader (1x8), HP MSL Library (2x24),
HP MSL Library (4x24). and HP D2DBS Library (4x48).
Thenumberofembeddeddrivesisalways1,buttheemulationtypedetermines
how many cartridge slots are available. The default of 1x8 G2 Autoloader is
correct for most applications. This is a single U ltrium tape drive autoloader, with a
maximum of 24 cartridge slots. It should be used for simple rotation schemes where
a single backup job is to run at a time. This emulation type is widely supported by
backup applications. Consult your backup application technical support information
for further details.
By selectin
g a drive emulation type, HP LTO–2, 3 or 4, you set only the default
capacity of the cartridges within the library device. (LTO-2 = 200 GB, LTO-3 = 400
Drive Emul
ation
GB, LTO-4 = 8
write to th
00 GB.) It does not affect the ability of the backup application to
edeviceandtapecartridgecapacitiescanbeincreasedatanytime(but
not decreased), as long as the cartridge is blank, regardless of the drive generation
number, see “To edit maximum cartridge size”onpage96.
This is where you define the number of slots that you require for your tape rotation
strategy. The number of slots available depends upon the Emulation Type that you
have selected. Each slot will b e assigned a cartridge whose capacity is appropriate
Total No of Cartridge
Slots:
to the Drive Emulation type.
You can change the maximum size of the cartridge as long as it is blank. This
meansthatyoucanonlychangethevalueimmediatelyafterthedeviceiscreated
and b efore it has been ac cessed by the backup application. See “To edit maximum
cartridge size”onpage96.
Number of drives: Thenumberofdrivesisalways1.
Data deduplication is enabled by default for the library device. If you disable this
Deduplication:
checkbox, you switch off deduplication for all data that is written to the device.
Compression will a lso be di sabled and replication, if licensed.
This identifies the network port on the HP D2D to which the device is connected.
The choices in the drop-down menu depend upon your network configuration. There
Port:
are up to two iSCSI ports (this depends upon your network mode, see “Network
Parameters”onpage99).
See also “Supported network configurations”onpage32.
This is the Initiator Node Name of the host that will back up to this device. It
is provided automatically for the default library that is created when you run the
iSCSI Initiator Name:
Installation wizard on a host for a firsttime.Butyoumustenteritmanuallyifyouare
creating a new device on this page. If you are using the Microsoft iSCSI Initiator, you
can find the name by running the iSCSI Initiator on the host and copying the Initiator
Node Name from the General tab. See “Manual driver installation”onpage45.
World Wide Names tab
Device Name
Device Serial Number
World Wide Node
Name
This is the device name, such as Medium Changer or Drive 1.
This is a u nique serial number for the device. It is generated automatically by the
HP D2D and cannot be edited.
This is provided during manufacturing for all possible devices.
iSCSI Authentication tab
Require initiator to
logon
Initiator CHAP User
Name
Check this box if you require the initiator to logon. You must also provide the
InitiatorCHAPusernameandsecret.
his should be the same CHAP user name that you configure for the target on
T
the iSCSI Initiator. (On the Microsoft iSCSI Initiator, this is the User Name as it is
configured on the Targets tab in the Log On to Target Advanced Settings.)
This should be the same CHAP secret that you confi gure for the target on the iSCSI
Initiator CHAP Secret
Initiator.(OntheMicrosoftiSCSIInitiator,thisistheTargetSecretasitisconfigured
on the Targets tab in the Log On to Target Advanced Settings.)
D2D Backup System HP D2D2503
93
Page 94

Target required to
logon to i nitiator
Target required to
logon to i nitiator
Check this box if you require mutual CHAP authentication, which mea ns that the
target must also log on to the initiator. You must also provide the target CHAP
user name and secret.
Check this box if you require mutual CHAP authentication, which mea ns that the
target must also log on to the initiator. You must also provide the target CHAP
user name and secret. On the iSCSI Initiator you must also make sure that mutual
authentication is enabled. (On the Microsoft iSCSI Initiator, make sure Perform
mutual authentication is checked on the Targets tab in the Log On to Target
Advanced Settings.)
Target CHAP User
Name
Target CHAP Secret
NOTE:
For more information about co nfiguring the Microsoft iSCSI Initiator see
“The Microsoft iSCSI Initiator”onpage50.
To delete a device
Select the required device and then click on Delete in the Details section to delete it. You will be prompted
to confirm that this is what you wish to do.
WARNING!
All data on the device will be deleted. The library’s deduplication store is also deleted. It may take up to
15 minutes to delete all the files and free space on the HP D2D.
Cartridg
es (Configuration)
This may be any meaningful CHAP user name. It does not need to match any
information on the iSCSI Initiator.
ThisshouldbethesameCHAPSecretthatyouconfigure for the target on the iSCSI
Initiator. (On the Microsoft iSCSI Initiator, this is the Secret as it is configured from
the General tab.)
Use this p
page for
94
age to view and configure cartridge settings. The number of slots configured on the Devices
a library determines the number of cartridge rows that are available to edit on this p age.
The Web Managem ent Interface
Page 95
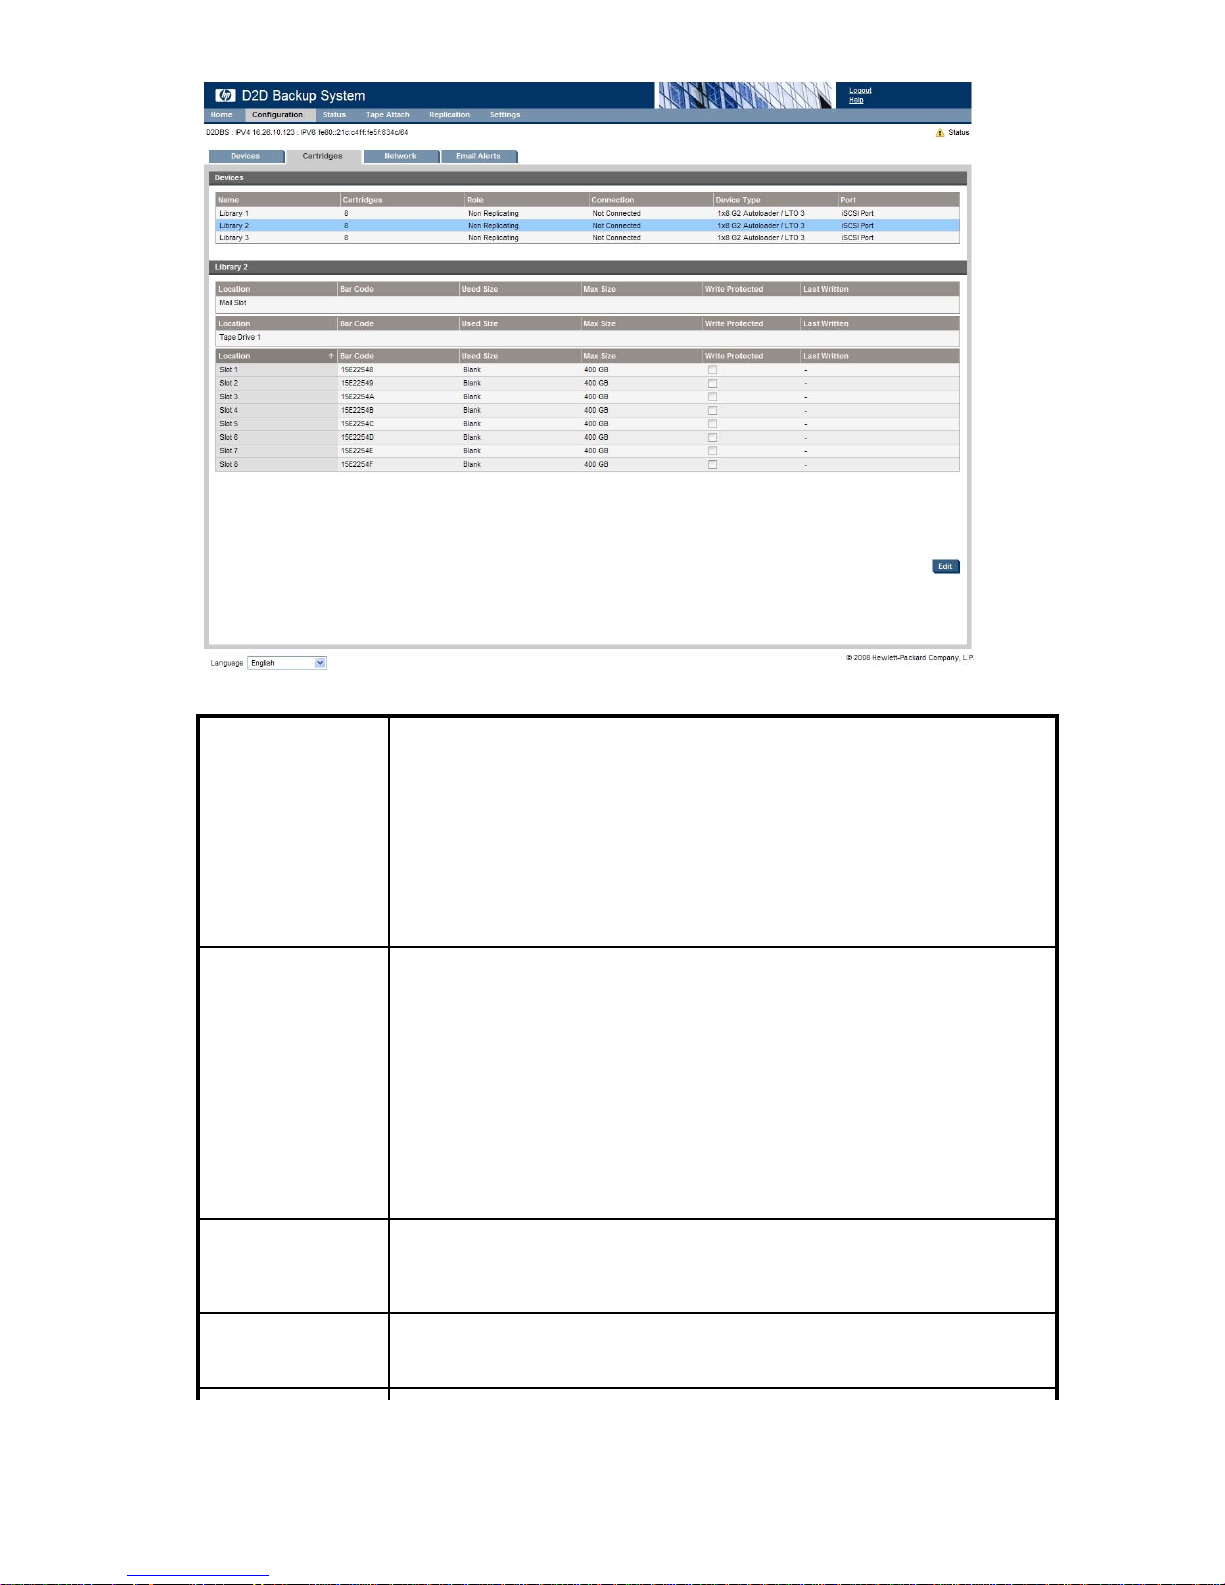
Table 7 Cartridge parameters
The Location column identifies each element of the library that is available to hold a
cartridge. There are three types of element:
• Mail slot: which is a dedicated slot that is used to hold a cartridge that is ready
for exporting to or importing from physical tape. Cartridges are normally moved
Location
Bar Code:
Used Size:
into the mail slot by the backup application on the host machine, but there is
also aMove Cartridge drop-down menu in Edit mode.
• Tape drive: which is populated when there is activity on a cartridge. You can
also move a cartridge into a tape drive by using the Move Cartridge drop-down
menu in Edit mode.
• Slot n: which is one of the standard library slots
A bar code is an 8–digit, alphanumeric, unique identifier for a cartridge within
the HP D2D Backup System. Bar codes are shared with the backup application,
if requested. The backup application may also choose to assign its own internal
tifier to the cartridge but, if it does so, it cannot assign this identifier to the
iden
tridge bar code.
Car
Bar codes are generated automatically but may be edited by the user. If you
choose to edit the bar code:
• It must be unique and must not start with the letters “CLN” or “DG” because
these are reserved designations for cleaning and diagnostic cartridges.
• It should be a minimum of 4 characters. Valid ASCII characters are A-Z, a-z,
0–9, space and hyphen. Anything less than 8 characters will be appended
with space characters.
This shows the actual used capacity in MB or GB. If this is Blank,thecartridge
may be deleted using the delete icon, see below. Non-blank cartridges cannot
be removed so the Remove button will not be shown. Only Blank cartridges can
be removed from the mail slot.
Max Size:
This defaults to the appropriate capacity for the drive emulation type selected on the
Devices tab. This value may be changed if the Used Size is Blank, see below. The
maximum value allowed is 1600 GB.
D2D Backup System HP D2D2503
95
Page 96
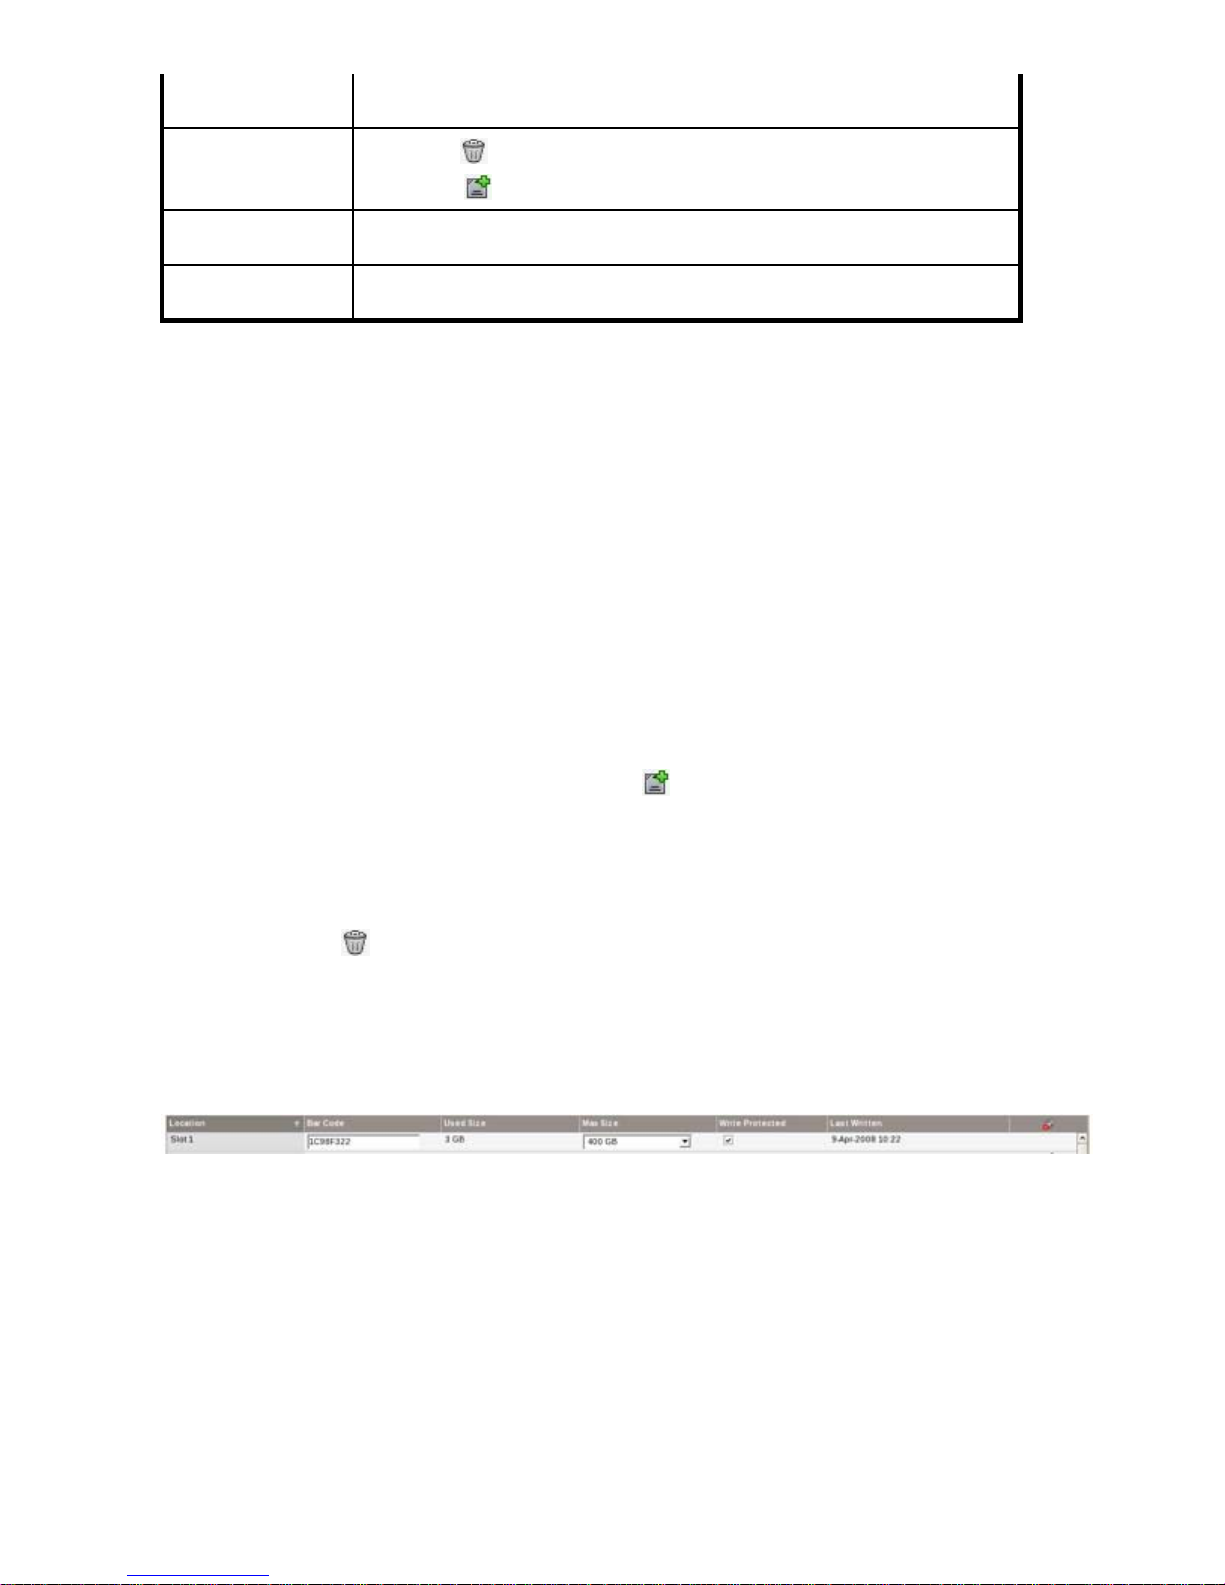
Write Protected:
This is a check box that allows you to enable (checked) and disable (unchecked)
write protection, see below.
Delete or Create icon:
Move Cartridge:
Last Written:
Empty slots
Empty slots are slots that contain no cartridges; all the fields are empty.
• Tape drive row: A library consists of two devices; a tape drive and changer device. This location
• Mail slot row: This location refers to the slot that is used for importing and exporting data.
• Numbered
The (Delete)
The (Create)
This drop-down list is displayed in Edit mode and allows you to move the cartridge
to an empty (blank) slot, mail slot or tape drive.
This tells you
data for copying or exporting.
refers to the tape drive element of the library. It is normally only populated when the backup
applicatio
It is only populated:
• When the bac
• O r when the
has moved data to the mail slot for export.
n on the host is writing to or reading from the library.
kup application on the host moves data into it for export to a tape drive
attached to the HP D2D Backup System. Once the export has been run successfully from the
Web Interface, the slot becomes empty again.
Web Interface is used to import data from a tape drive attached to the HP
D2D.Thebackupapplicationonthehostisusedtomovethedatabackintoanumbered
slot and the mail slot beco m es empty again.
slot row: This slot is empty a fter a Delete operation or after the backup application
icon is displayed in Edit mode and is used to delete a ca rtridge.
icon is displayed next to an empty (blank) slot.
when the cartridge was last written to and is useful when identifying
Once a mai
create a new, blank cartridge. See “To create a cartridge”onpage97.
l slot or numbered slot is empty, a (Create)
To delete a cartridge
If the Used Size of a cartridge is Blank,youwillbeabletoremoveit.
Click on the (Delete)
itbutonlyspacethatisoccupiedbyuniquedatawillbefreedup.
icon in the right-hand column. If the Used Size is not Blank,youcanstillremove
To write protect a cartridge
Click Edit for the appropriate cartridge. Check the Write Protected check box for the cartridge. Your
application will not b e able to write any more data to it.
k Edit for the appropriate slot. Select a value from the drop-down menu and click Update.
To edit
backup
maximum size
The only times you can resize cartridges are when you first create a library or when you add slots and
they are blank. Once the cartridges are made available to the backup application, it formats them ready
for use and they are no longer blank, even if you have not yet written data to them. Similarly, the erase
function on most backup applications does not return the cartridge to a completely blank state.
The Max Size defaults to the appropriate capacity for the drive emulation type selected on the Devices
tab, but if the Used Size is Blank, you can edit this value. The maximum value allowed is 1600 GB.
Clic
icon is available in the far right column to
96
The Web Managem ent Interface
Page 97
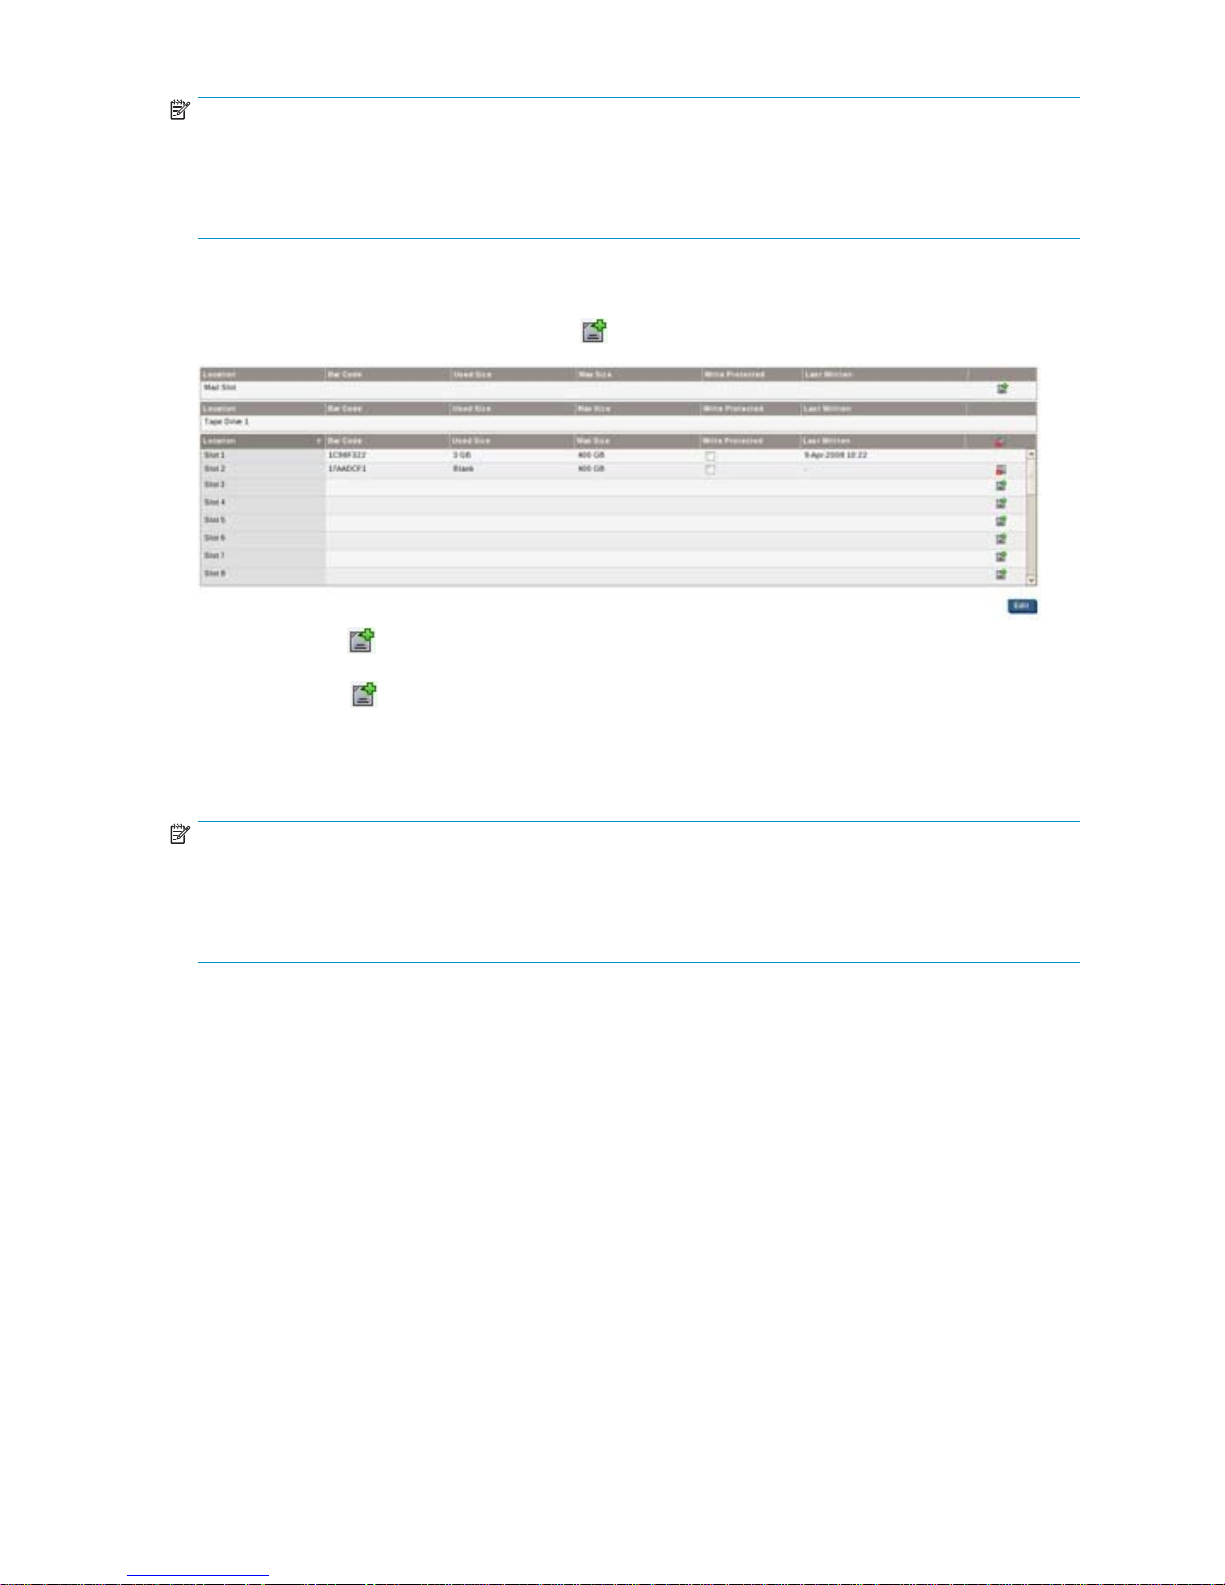
NOTE:
The maximum size indicates the physical disk space available for that slot assuming uncompressed data;
it will only be committed when data is written to it. Changing the maximum space does not a ffect actual
disk usage or save disk space, but may be useful if you know you will be moving data to a physical
tape with a smaller cartridge capacity.
To create a cartridge
Slots that are empty have an extra (Create) icon.
• If you use the icon on an empty slot, the backup application needs to inventory it (add it to its
database or catalog) before it can access it.
• If you use the
blank, new cartridge to an empty cartridge slot, without having to run an inventory. This saves
some processing time.
icon on an empty mail slot, you can use the backup application to move the
You m ay need to restart your services to see the new cartridges.
NOTE:
When you import a cartridge, you need an empty mail slot and an empty cartridge to which the backup
application can move the imp orted data. Therefore, you may wish to leave a slot whose cartridge has
been exported empty, rather than creating a new cartridge. Or to create a slot, edit the Total No Of
Cartridge Slots on the Devices page, see “To edit device details”onpage92.
To move or unload cartridges
The ability to move cartridges is provided, but only to an empty Location (mail slot, tape drive or
numbered slot). The Move Cartridge drop-down menu lists available empty slots. (Empty numbered slots
are created if you delete a cartridge.)
Use the Unload all Cartridges button to return all cartridges to their slots.
The move and unload options are unlikely to b e required very often, but may be useful if the user needs
to re-align their library configuration against their backup application should they become out of synch,
perhaps because the backup application has crashed, or if the backup application does not support
theMoveMediumcommand.
Network (Configuration)
This page is used to view and edit network settings. It is also used to turn Beacon Mode on and off.
D2D Backup System HP D2D2503
97
Page 98
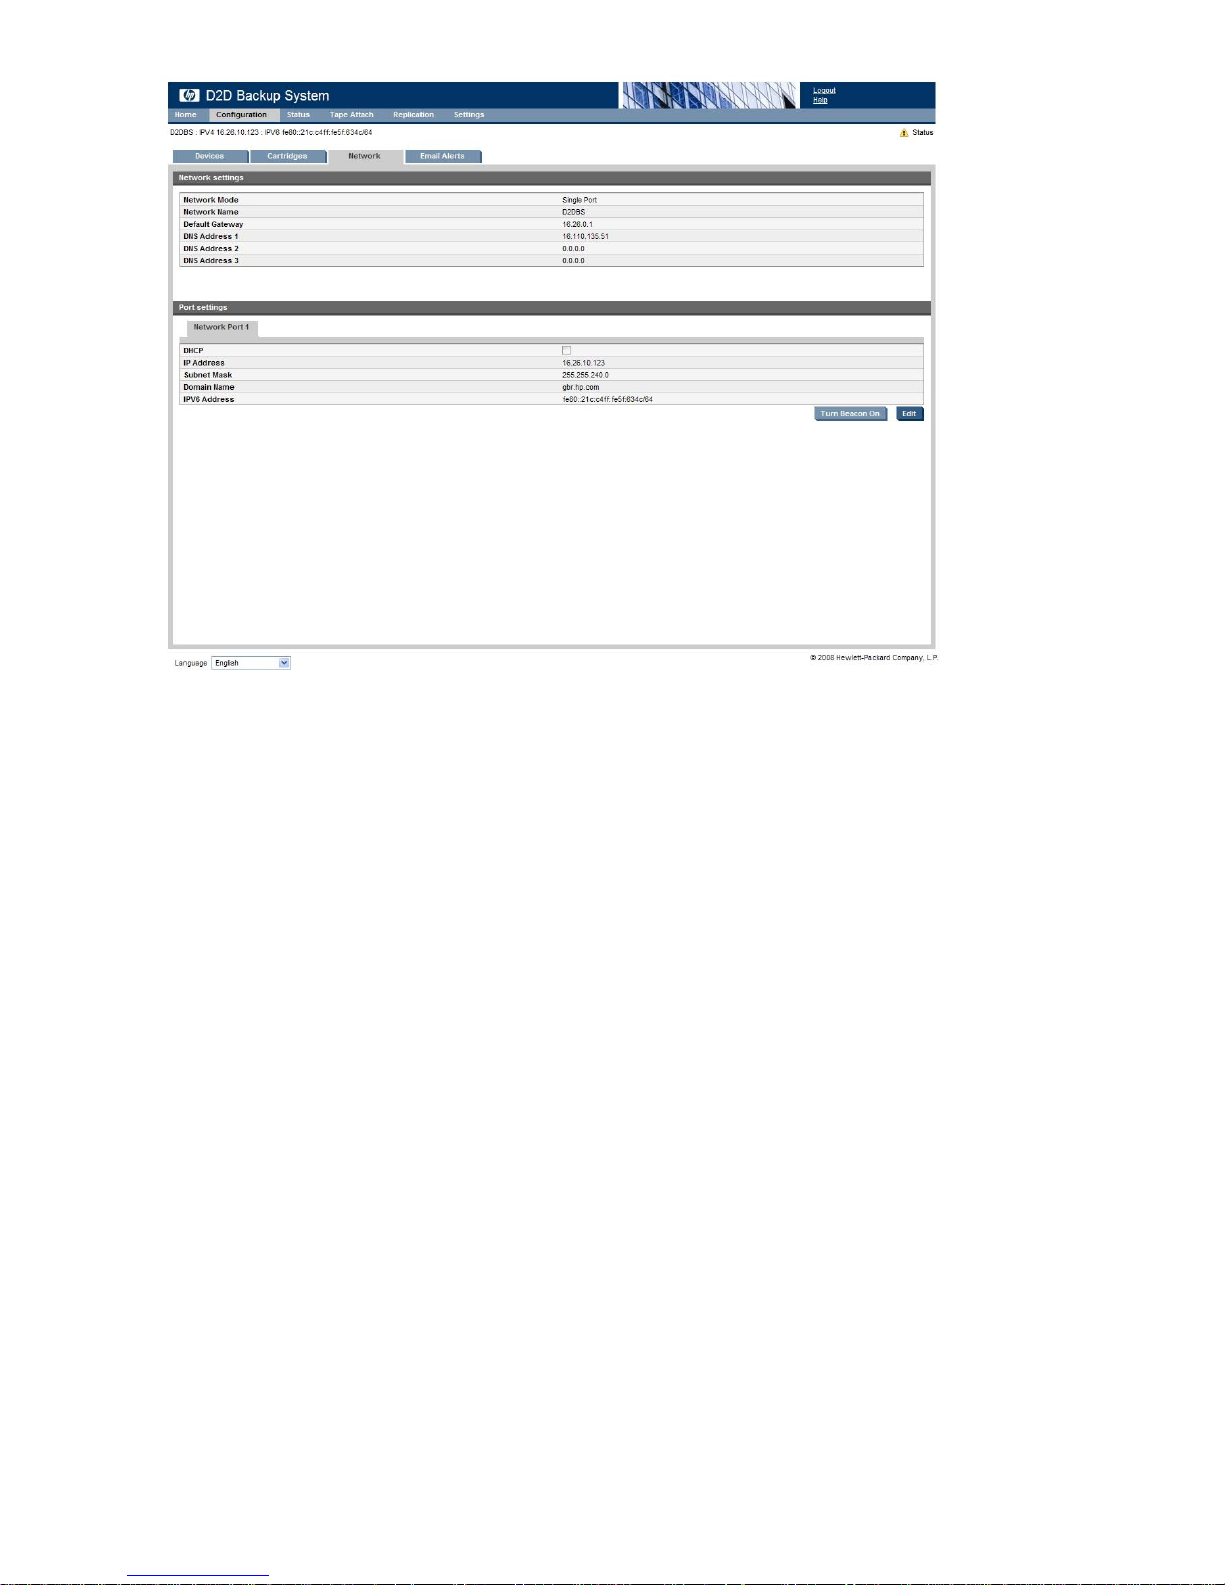
Network configuration
The details in this section reflect the I P settings that were specified during installation. The HP D2D Backup
System supports DHCP for IPv4 networks and this is turned on by default.
You may need to edit the details if there is a c onflict in the IP address, or you move the host to a different
network node. Be aware that any changes you make to the n etwork settings could affect how you
connect again to the HP D2D Backup System. For example, if you change the IP address, you must use
the new address to log in from a web browser.
To edit
network settings
1. Click Edit to make the details editable.
2. Make t
3. You must now reconnect to the HP D2D Backup System using the new set tings.
• If you have changed the IP address, you must use the new address to log in from a web
• You will also need to edit the iSCSI Initiator on all hosts that are connected
98
he required changes and click Update.
ser.
brow
to the HP D2D Backup System, if you change the I P address. See also
“The Microsoft iSCSI Initiator”onpage50.
The Web Managem ent Interface
Page 99

Table 8 Net work parameters
This is where you definethenetworkmode,whichmaybesingleport,dualportor
Network Mode:
high availability dual-port bonding. The selection you make determines the number
of net work port tabs in the lower half of this page and the ports available on the
Devices page. See also “Dual network ports”onpage32.
Network Name:
UseDHCPGateway
Default Gateway:
DNS Server Name
1/2/3:
This is the name of the HP D2D Backup System. You can use the network name,
instead of the IP address, to log on to the Web Management Interface.
This option is available if you have dual ports configured and one port is static
while the other uses DHCP. Check this box to select the DHCP allocated Gateway IP
address for the static port rather than the Default Gateway.
This is the node that connects the HP D2D Backup System to the network that is
servicing the web pages. (Static IP addressing only.)
These are the DNS IP addresses. When using DHCP these may be obtained
automatically. Ask your network administrator to advise what you should enter.
Table 9 Network port parameters
Check or uncheck the box to enable or disable this feature. If DHCP is turned off,
you must manually specify all the network settings for the HP D2D Backup System. If
DHCP:
IP Address:
Subnet Mask:
DHCP is turned on, the majority of the network settings are obtained automatically.
However, even when DHCP is on, the Network Name must be specified. Other
parameters, such as Domain Name and DNS Server Address, become optional.
You can override the automatic settings and enter your own values, if required,
but this is not usually necessary.
This is the IP address for the device. The HP D2D Backup System supports both
dynamic (DHCP) and static IP addressing. The IP Address must be unique on the
network. If you are using static IP addressing, you must also provide the subnet
mask, default gateway and, optionally, domain name.
This d etermines the subnet to which the IP address belongs. (Static IP addressing
only.)
Domain Name:
This is the group of devices on the network to which the HP D2D Backup System
belongs. (Static IP addressing only.)
Resetting network settings to factory defaults
There are some conditions in which a previously configured device may fail to be discovered on a
network and, therefore, may be unreachable if the network parameters are invalid for the network to
which the device is attached. In this c ase, it may be necessary to reset the networking parameters
and device name to factory defaults.
To reset the network settings:
1. Ensure that there are no backup or restore jobs in progress to the device.
2. Press the Power On button on the front of the HP D2D Backup System three times in quick succession
to reset it.
After approximately 5 seconds, the HP D2D Backup System will begin its reboot sequence.
NOTE:
The HP D2D Backup System will be reset to factory networking settings and the Administrator password
will be reset to Admin. No user data will be lost. Network configuration defaults to Single Port
configuration, so you may need to edit the settings on this page.
3. After the reboot, the device will be in D H CP mode and also available for discovery using the
Installation wizard provided on the StorageWorks CD.
D2D Backup System HP D2D2503
99
Page 100
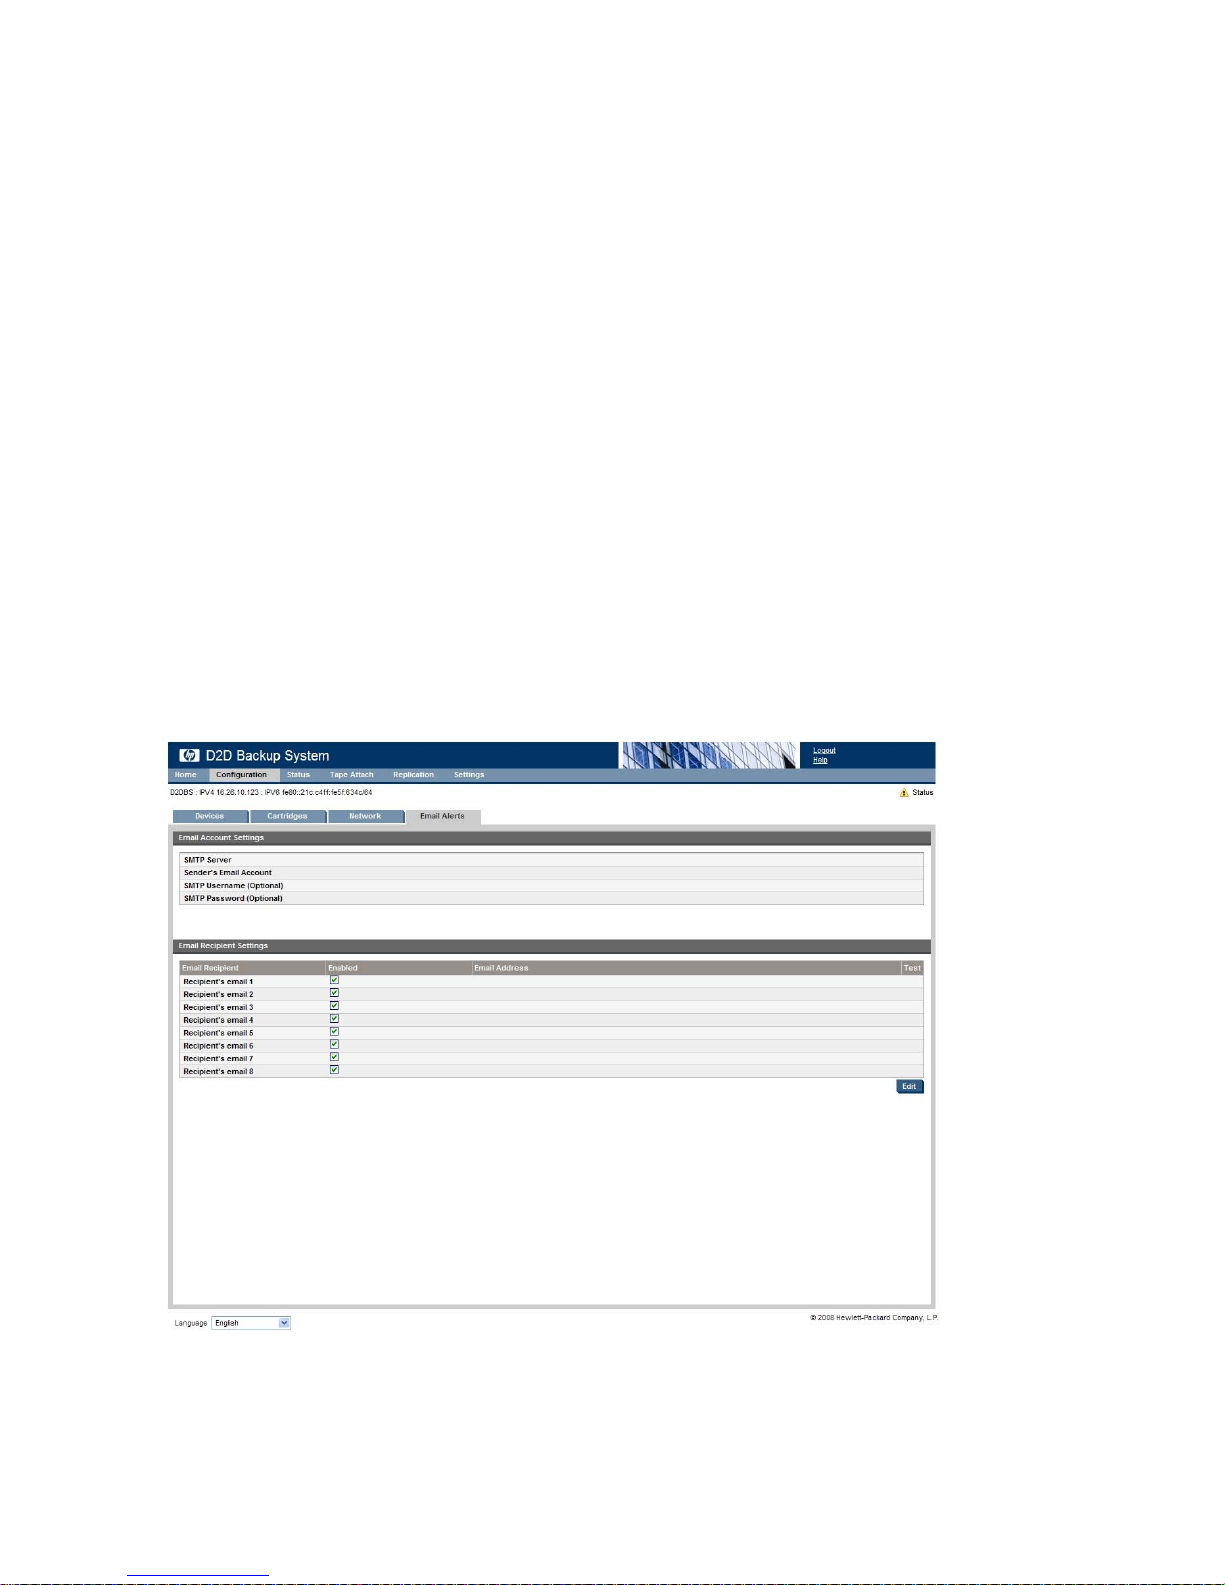
Beacon mode
Beacon mode flashes the LEDs on the HP D2D Backup System. It is useful if you have several H P D2D
Backup Systems on your network and want to confirm which unit is being configured.
• Click Turn Beac
• If you do not switch off Beacon Mode from the Network page, it will continue for 5 minutes.
on On to activate beacon mode.
Email Alerts (Configuration)
This page is used to set up details of the email ser vers that will be used to route messages about the HP
D2D Backup System and to specify up to eight email recipients. Messages are g enerated if a disk fails or
reaches its threshold capacity, if the system reboots, if there are network problems or if there is a critical
hardware failure. Email alerts are also generated for tape attach activities, when there is a separate
tape drive connected to the HP D2D Backup System and the user is importing data from it, copying or
exporting data to it, or scheduling tasks to carry out these activities.
The HP StorageWorks D2D Backup System uses Simple Mail Transfer Protocol (SMTP), which is the
established standard for transferring mail over the internet. Microsoft Exchange has a virtual SMTP
server available which can be used to receive these emails and forward onward if necessary. U NIX
and Linux operating systems have a Sendmail program included. Sendmail uses the SMTP protocol to
receive and, if necessary, forward e-mail messages.
To configure email settings, the HP D2D Backup System must be on the same network as an SMTP
server that it can use.
• Click Edit to make the fields editable. Make changes, as appropriate and click Update.
• Once you have created a recipient’s email address, use the Test button to make sure emails can
be sent successfully.
100
The Web Managem ent Interface
 Loading...