

HP PrecisionScan Pro, SCanJet 6350C, ScanJet 6300C, ScanJet 6300Cse, ScanJet 6300Cxi User Guide
...Page 1

➮
+$%&
HP PrecisionScan Pro
User’s Guide
Using the HP ScanJet scanner
1
A tour of the scanning software
2
Scanning pictures
3
Adjusting images of pictures
4
Scanning text
5
Saving scanned images
6
Scanning transparencies
7
Index
➤
Page 2
Welcome to scanning
with HP PrecisionScan Pro and your
HP ScanJet scanner
The scanning software and your HP ScanJet scanner
let you quickly create excellent electronic images from
pictures and convert text on paper into editable text.
Features
Some of the features of the scanning software are:
Click to select an image in the preview
■
Automatic sensing of output type
■
Automatic sensing of optimal exposure, color, black
■
and white threshold, sharpen level, and resolution
for images of pictures
Drag-and-drop the image to another program or to
■
the desktop
Scale and size the image prior to exporting it to a
■
program or a file
Return to the preview image without rescanning
■
Tools for adjusting exposure, color, black and white
■
threshold, sharpen level, and resolution
Save and re-use scanning settings
■
Use
■
HP PrecisionScan Pro
HP ScanJet scanner on a local area network
scanning software and your
+$%&
Book Contents Index
➮
➮
PrecisionScan Pro
HP
User’s Guide
2
Page 3

Support for your new product
No matter where you are or when
you need it, HP support is there to
help you get the most from your
HP products. Whether it’s making
products easier to use or providing
you with innovative new ways to
tackle your important projects, HP
support helps you become a
confident and creative user. If you
do encounter a problem with your
HP product, don’t worry. HP
support delivers fast, accurate
solutions that won’t rob you of
either your product or your
valuable time.
When you’re ready to get started,
check out HP’s Web site,
http://www.scanjet.hp.com
for great ideas and quick tips on
how to use your HP product in fun
new ways.
© Hewlett-Packard Co., 1999. All Rights
Reserved. Reproduction, adaptation, or
translation without prior written permission
is prohibited, except as allowed under the
copyright laws.
RESTRICTED RIGHTS LEGEND
U.S. Government Restricted Rights. The
Software and any accompanying
documentation have been developed entirely
at private expense. They are delivered and
licensed as “commercial computer software”
as defined in DFARS 252.227-7013 (Oct 1988),
DFARS 252.211-7015 (May 1991) or DFARS
252.227-7014 (Jun 1995), as a “commercial
item” as defined in FAR 2.101(a), or as
“Restricted computer software” as defined in
FAR 52.227-19 (Jun 1987) (or any equivalent
agency regulation or contract clause),
whichever is applicable. You have only those
rights provided for such Software and any
accompanying documentation by the
applicable FAR or DFARS clause or the HP
standard software agreement for the product
involved.
First Edition, 1998
+$%&
Microsoft is a U.S. registered trademark of
Microsoft Corporation.
Windows is a trademark of Microsoft
Corporation.
Acrobat® Reader Copyright © 1987-1997
Adobe Systems Incorporated. All rights
reserved.
Adobe and Acrobat are trademarks of Adobe
Systems Incorporated, which may be
registered in certain jurisdictions.
FlashPix (portions) Copyright © 1996
Book Contents Index
➮
➮
PrecisionScan Pro
HP
User’s Guide
3
Page 4
How to use this online document
➮
+$%&
Go to the book contents, chapter contents, or
index
Click the button in the yellow bar at the bottom of the
■
page when the pointer looks like .
Page forward one page
Press
■
– or –
Click in the yellow bar at the bottom of the page.
■
Enter
or
PgDn
,
Page backward one page
Press
■
– or –
Click in the yellow bar at the bottom of the page.
■
Shift+Enter
➮
or
PgUp
,
Jump to a different part of the document
Click when the pointer looks like .
■
Undo a jump
Click in the toolbar,
■
– or –
Right-click to display the dropdown Acrobat Reader
■
menu, then select
Go Back
.
Re-do a jump
Click in the toolbar,
■
– or –
Right-click to display the dropdown Acrobat Reader
■
menu, then select
Click
Go Forward
Previous page
.
Next page
Book Contents Index
➮
➮
PrecisionScan Pro
HP
User’s Guide
4
Page 5

Contents
+$%&
How to use this online document 4
Using the HP ScanJet scanner 7
1
What can you scan? 8
Place the picture on the scanner 9
Start the scanning software 10
Configure the Scanner buttons 12
A tour of the scanning software 17
2
Scanning software window 18
Context-sensitive pointers 28
Image adjustment tools 30
Output Resolution tool 31
Sharpen Level tool 33
Dimensions tool 34
Exposure Adjustment tool 36
Color Adjustment tool 37
Black & White Threshold tool 38
Invert tool 39
3
4
Book Contents Index
Use Transparency Adapter Tool 40
Online Help 41
Save and re-use adjustment settings 44
Set preferences 47
Scanning pictures 55
Basic steps for scanning pictures 56
Preview scan 57
Create a selection area 58
Zoom scan 63
Return to the preview image (Undo Zoom) 64
Set the output dimensions 65
Choose an output type 69
Adjusting images of pictures 72
Tools for making adjustments 73
Sharpen 75
Adjust exposure 77
Adjust color 87
➮
PrecisionScan Pro
HP
User’s Guide
➮
5
Page 6

Set output resolution 90
Set threshold for black and white bitmaps 92
Set color channel for black and white bitmaps 94
Invert options 96
Scanning text 97
5
Scan and convert a block of text 98
Scan a whole page 101
Saving scanned images 102
6
How you can use the image 103
Print the image 104
Scan to a destination 105
Drag-and-drop to another program 106
Drag-and-drop to the Desktop 107
Copy to the Clipboard 108
Save to a file 109
Scanning transparencies 112
7
The 35mm slide adapter 113
Scan the slide 114
Active Transparency Adapter 115
+$%&
Index 117
Book Contents Index
➮
➮
PrecisionScan Pro
HP
User’s Guide
6
Page 7

+$%&
Using the HP ScanJet
scanner
1
What can you scan?
8
Place the picture on the scanner
9
Start the scanning software
10
Configure the Scanner buttons
12
➮
➮
1
Page 8
What can you scan?
Using the scanning software, you can scan:
color photographs
■
color drawings and line art
■
grayscale drawings
■
black and white photographs
■
black and white drawings and line art
■
pages that have both pictures and text
■
+$%&
How scanning works
During a scan, the scanner light turns on and
moves across the bed. The charge-couple device
(CCD) in the scanner records a digital image of the
light reflected from the original you placed on the
scanner bed. The recorded image is made up of
1200 pixels per inch (ppi) and each pixel can have
a depth of up to 36 bits.
The resulting image can potentially have millions
of colors.
An image is saved for use in another program
when you drag-and-drop it, save it as a file and
insert the file, or copy it, then paste it into an open
document.
1
Using the HP ScanJet
scanner
Book Contents Index
➮
➮
PrecisionScan Pro
HP
User’s Guide
8
Page 9
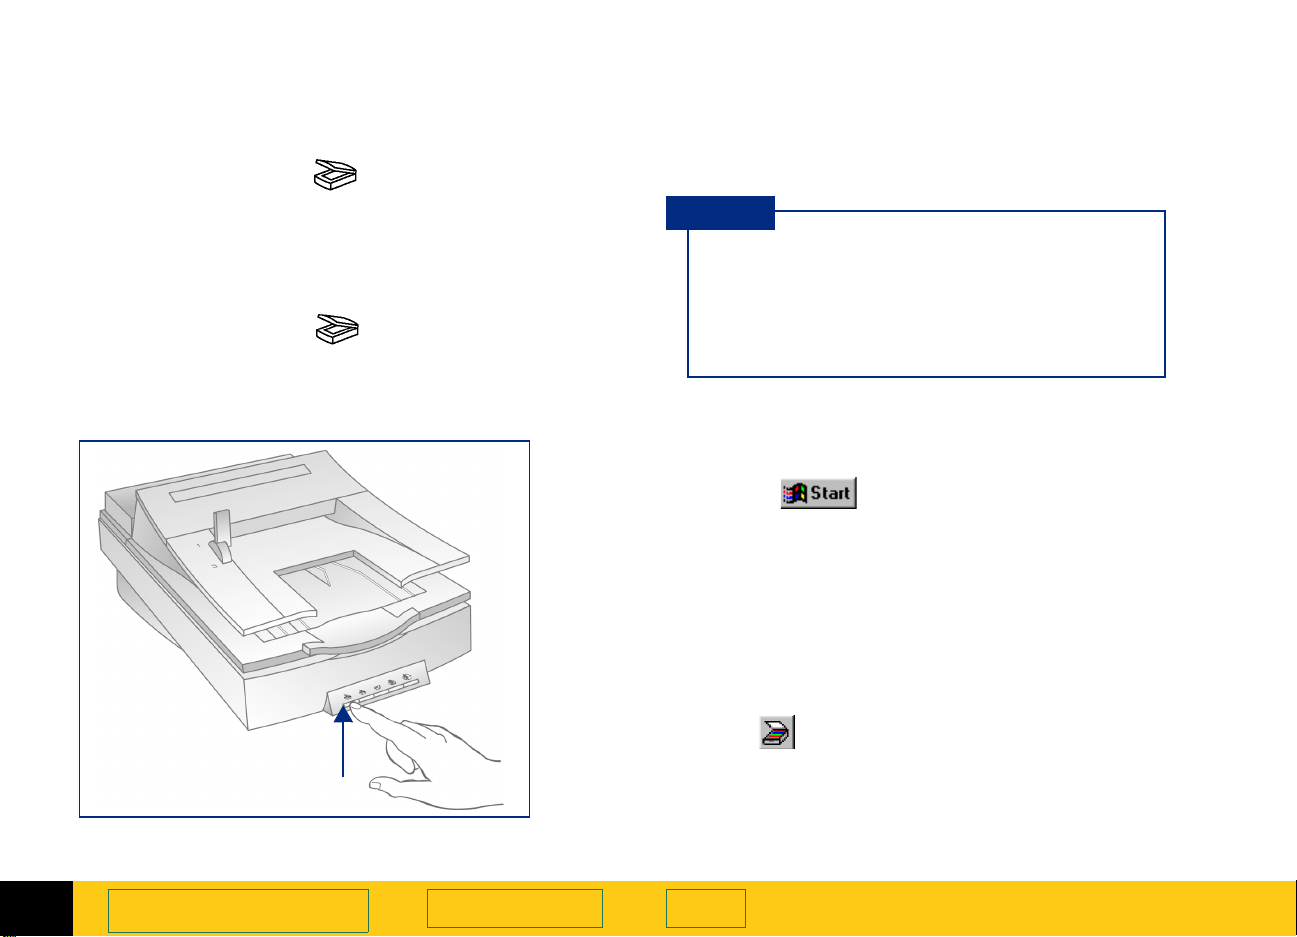
Place the picture on the scanner
+$%&
The picture you want to scan must be placed face down
on the scanner glass.
ADF users
If you are using the
see the online manual HP Automatic Document
Feeder Guide.
Lift the scanner lid
1
and hold it up.
HP Automatic Document Feeder
,
Place the picture
2
face down on the
scanner glass.
TIP
If the picture has straight edges, place the top and
right edges next to the top and right edges of the
scanner bed. This will make the preview image
straight when you scan.
Close the scanner
3
lid.
1
Using the HP ScanJet
scanner
Book Contents Index
➮
➮
PrecisionScan Pro
HP
User’s Guide
9
Page 10
Start the scanning software
+$%&
There are three ways to start the scanning software:
push the
■
use the Windows
■
launch the scanning software from another program
■
using TWAIN (page 11)
button on the scanner
Scan
menu
Start
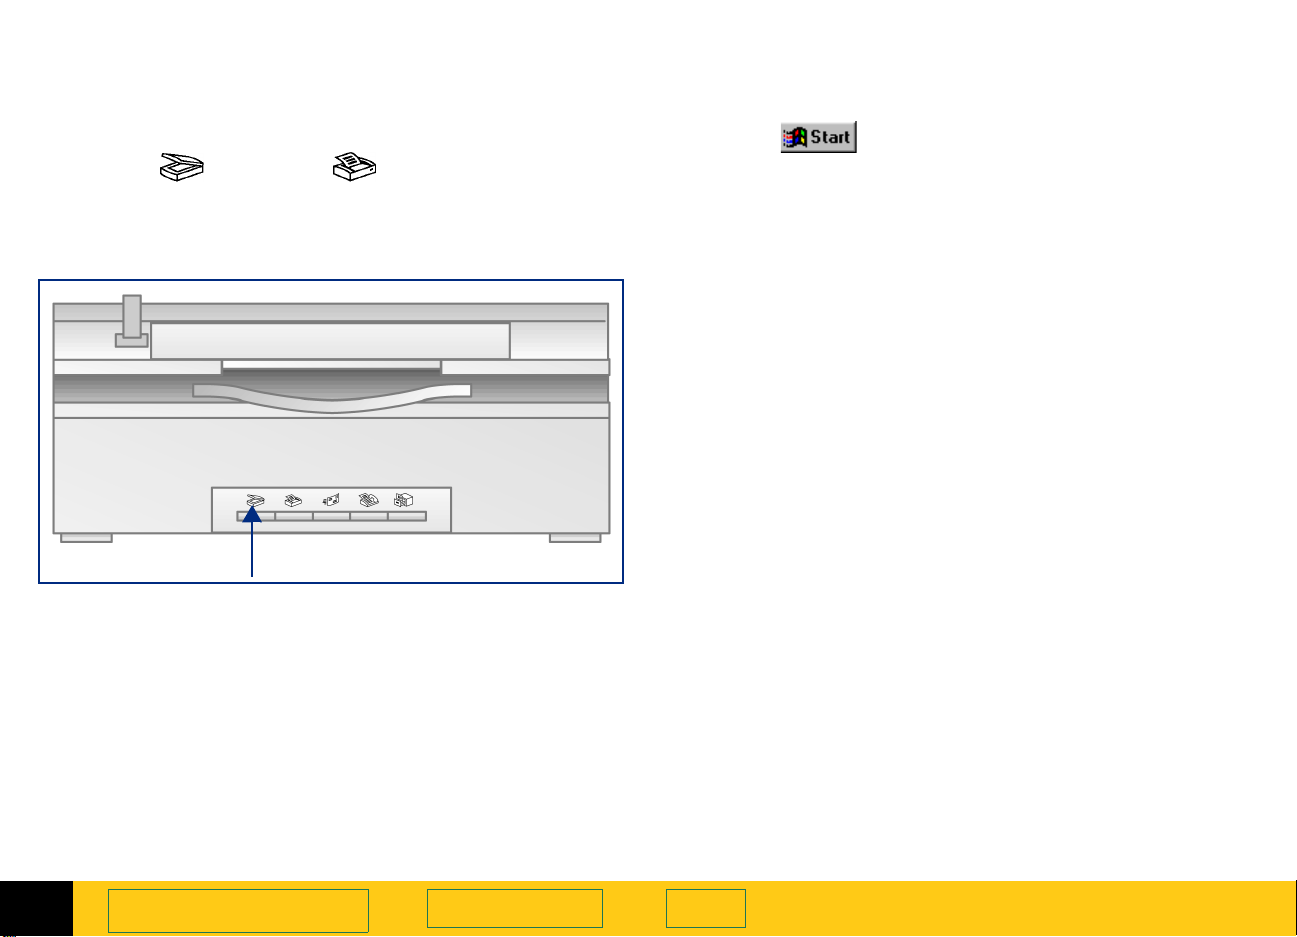
Pushing the button on the scanner
Push the
1
After the scanning software window appears, the
scanner automatically performs a
displays the preview image.
button on the scanner once.
Scan
Preview
button
Scan
scan and
The
scanner.
button is below the lid on the front of the
Scan
TIP
You may need to use the
Manager
HP PrecisionScan Pro
to launch when the
(see page
to configure the
as the default software
).
12
HP ScanJet Button
button to set
Scan
button is pushed
Scan
Using the Windows Start menu
Select , the Windows
1
The Windows
From the
2
HP ScanJet Software:HP PrecisionScan Pro
When the scanning software window appears, the
scanner
scan.
To start a
3
click , the
■
window toolbar, or
from the
■
press
■
Start
does not
Preview
Scan
Ctrl+R
Preview
.
menu appears.
Start
menu, choose
automatically perform a
scan:
button in the scanning software
menu, select
Preview
button.
Start
Programs
, or
, then choose
.
Preview
1
Using the HP ScanJet
scanner
Book Contents Index
➮
➮
PrecisionScan Pro
HP
User’s Guide
10
Page 11
The scanner performs a
the preview image.
Preview
scan and displays
Launching from another program
If you are creating a project such as a greeting card or a
calendar, and want to include a picture from a
photograph, you might be able to scan the photograph
directly into the program you are using. To do this, the
program must have a TWAIN command such as
Acquire
1
2
3
4
, which is probably on one of its main menus.
Open the program in which you will place the
scanned image.
If necessary, select the program’s
command and choose
Select the program’s TWAIN command.
After the scanning software window appears, the
scanner automatically performs a
displays the preview image.
Create a selection area in the preview image, make
necessary adjustments, and select
<application>
occurs and the image is placed in the calling
program.
from the
HP PrecisionScan Pro
menu. The final scan
Scan
Select Source
Preview
Return to
.
scan and
+$%&
What is TWAIN?
TWAIN is an industry-standard communications
protocol for sending instructions to hardware
(such as a scanner) and receiving data back (such
as an image). If you are using a program that
supports TWAIN, you can start
directly from that program.
HP ScanJet scanners and HP scanning software
■
can use TWAIN, but the programs you use to
create projects may not be TWAIN-compatible.
If a program can use TWAIN, it should have a
■
command named
Import
menu.
Selecting one of these commands launches the
■
scanning software selected with the
command.
Editable text cannot be transferred using TWAIN.
■
on one of its main menus, usually the
Acquire, Acquire Image
HP PrecisionScan Pro
, or
Select Source
File
1
Using the HP ScanJet
scanner
Book Contents Index
➮
➮
PrecisionScan Pro
HP
User’s Guide
11
Page 12
Configure the Scanner buttons
+$%&
You can use the
the
Scan
button is set at the factory to automatically launch the
HP PrecisionScan Pro
the factory to automatically lauch the
utility.
HP ScanJet Button Manager
and
Scan
button
buttons. The Scan
Copy
software. The
Copy
to configure
button is set at
HP ScanJet Copy
Select , the Windows
1
The Windows
From the
2
HP ScanJet Software:HP ScanJet
Utilities:HP ScanJet Button Manager
The
Windows 98: From the
double-click
6300C
drop-down list if it is not already selected. Click the
Properties
Select the
3
down list.
Check
4
Make sure the
5
Click OK.
6
The
Start
HP ScanJet Button Manager
Scanners and Cameras.
,
HP SCanJet 6350C
button. Click the
Scan
HP PrecisionScan Pro
HP ScanJet Button Manager
menu appears.
Start
menu, choose
Windows Control Panel
, or
HP ScanJet 6390C
Events
button from the Scanner events drop-
in the list box.
Disable Events
button.
Start
Programs
window appears.
option is not checked.
window closes.
, then choose
.
Select
tab.
,
HP ScanJet
from the
1
Using the HP ScanJet
scanner
Book Contents Index
➮
➮
PrecisionScan Pro
HP
User’s Guide
12
Page 13
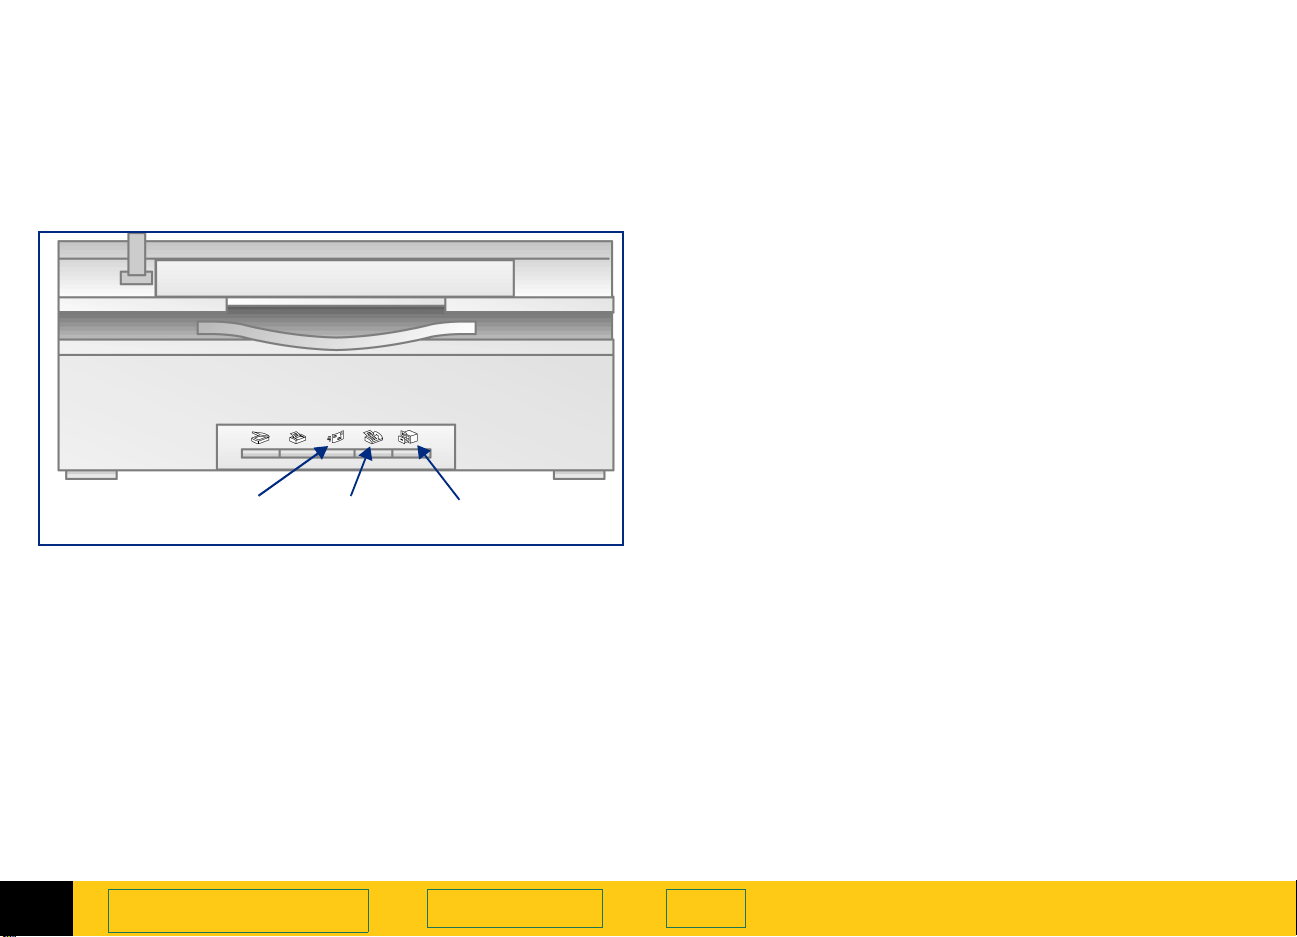
Scanner Buttons
The scanner button settings available to you are
optimized for a specific type of application. They are
designed to be a fast and efficient way to get your scan
to a fax, e-mail program, or a document management
application.
+$%&
1
E-mail
button
Using the HP ScanJet
scanner
Fax
button
Document
Management
Book Contents Index
button
➮
➮
PrecisionScan Pro
HP
User’s Guide
13
Page 14
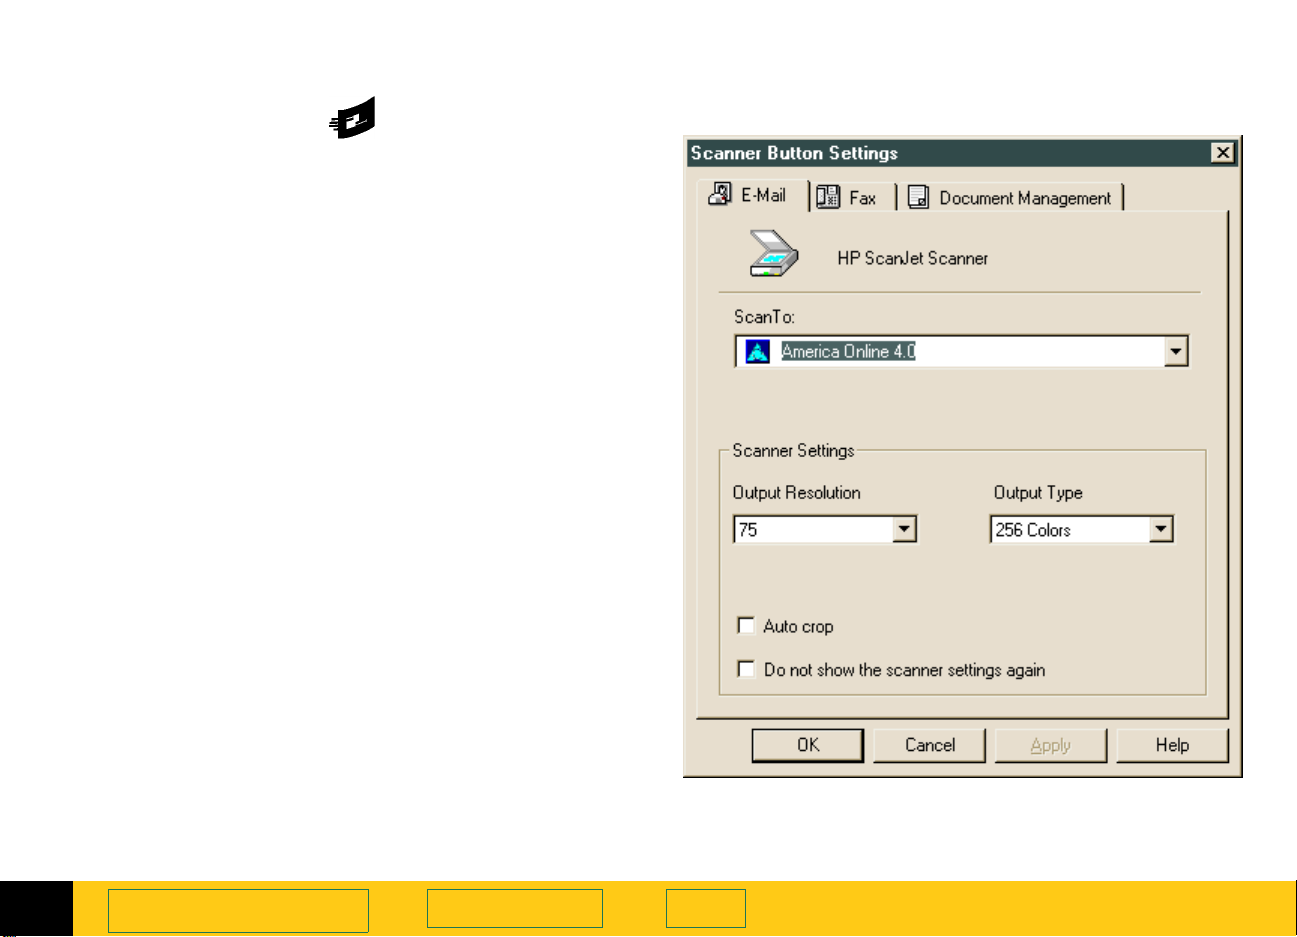
To scan to an e-mail application:
+$%&
Push the
1
The
2
3
4
5
Scanner Button Settings
Select an E-mail application in the
drop-down list. Only supported e-mail applications
installed on your PC appear in the list.
Adjust the
An
•
Output Resolution
smaller file size for an e-mail attachment and look
good on screen.
If
•
Auto crop
the scanner bed will be sent to the e-mail
application. If
scanner bed will be sent as the image.
If you check the
Note:
option, the
again
not appear each time you push the
the scanner. To re-open the
Click
, select the
HP ScanJet Software:HP ScanJet
OK.
Dialog
choose
Utilities:Scanner Button Settings
button on the scanner.
E-mail
dialog appears.
Scan To
Scanner Settings
is checked, only the image placed on
Auto crop
Scanner Button Settings
Start
as necessary.
of 75 dpi will produce a
is unchecked, the entire
Do not show the scanner settings
dialog will
button on
E-Mail
Scanner Button Settings
menu, choose
.
Programs
then
1
Using the HP ScanJet
scanner
Book Contents Index
➮
➮
PrecisionScan Pro
HP
User’s Guide
14
Page 15
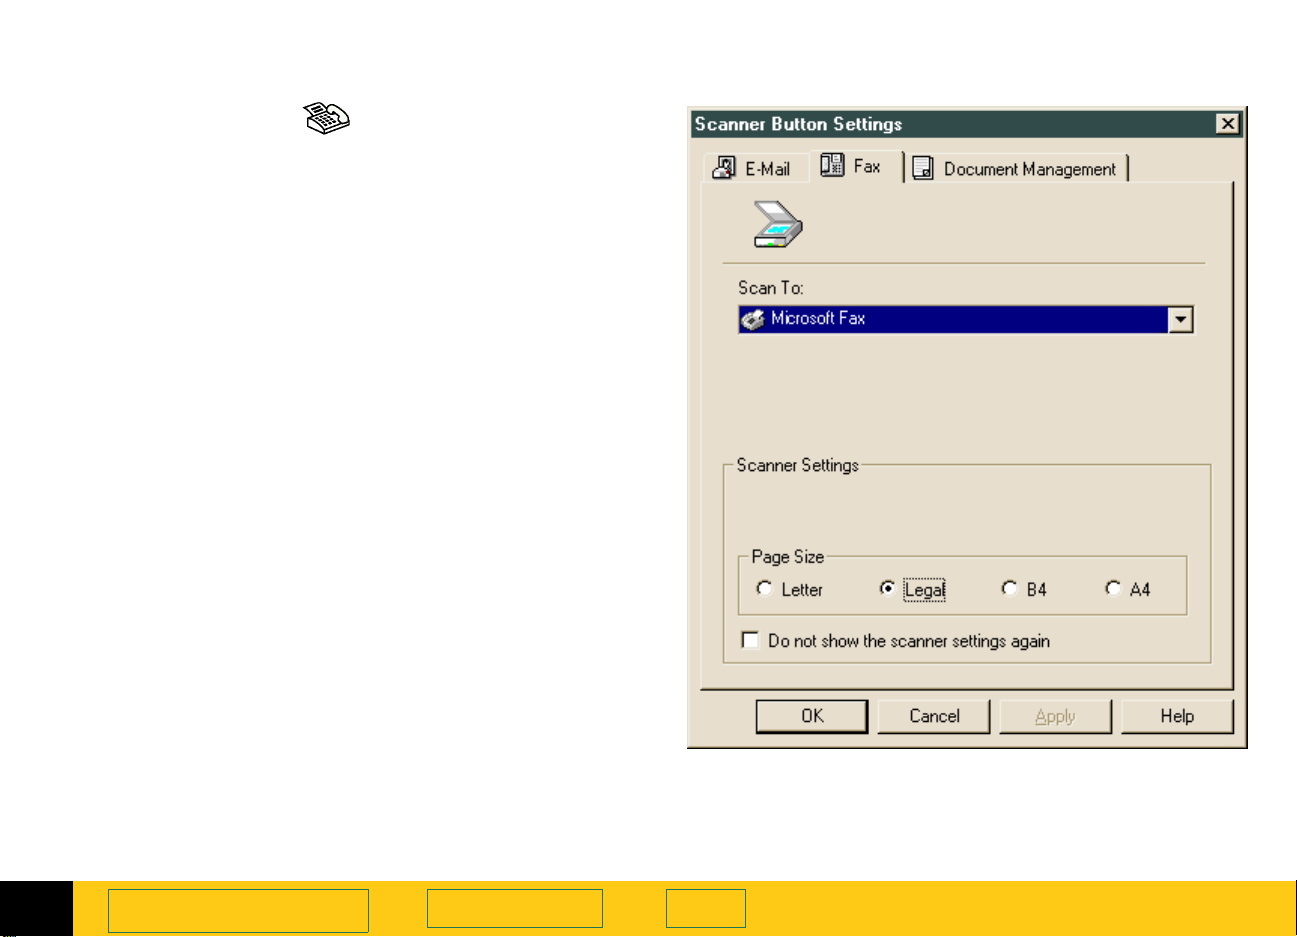
To scan to a fax application:
+$%&
Push the
1
The
2
3
4
5
Scanner Button Settings
Select a Fax application in the
list. Only supported Fax applications installed on
your PC appear in the list.
Adjust the
If you check the
Note:
option, the
again
not appear each time you push the
scanner. To re-open the
Dialog
choose
Utilities:Scanner Button Settings
, select the
Click OK.
button on the scanner.
Fax
dialog appears.
Scan To
Scanner Settings
Scanner Button Settings
Start
HP ScanJet Software:HP ScanJet
as necessary.
Do not show the scanner settings
Fax
Scanner Button Settings
menu, choose
.
Programs
drop-down
dialog will
button on the
then
1
Using the HP ScanJet
scanner
Book Contents Index
➮
➮
PrecisionScan Pro
HP
User’s Guide
15
Page 16
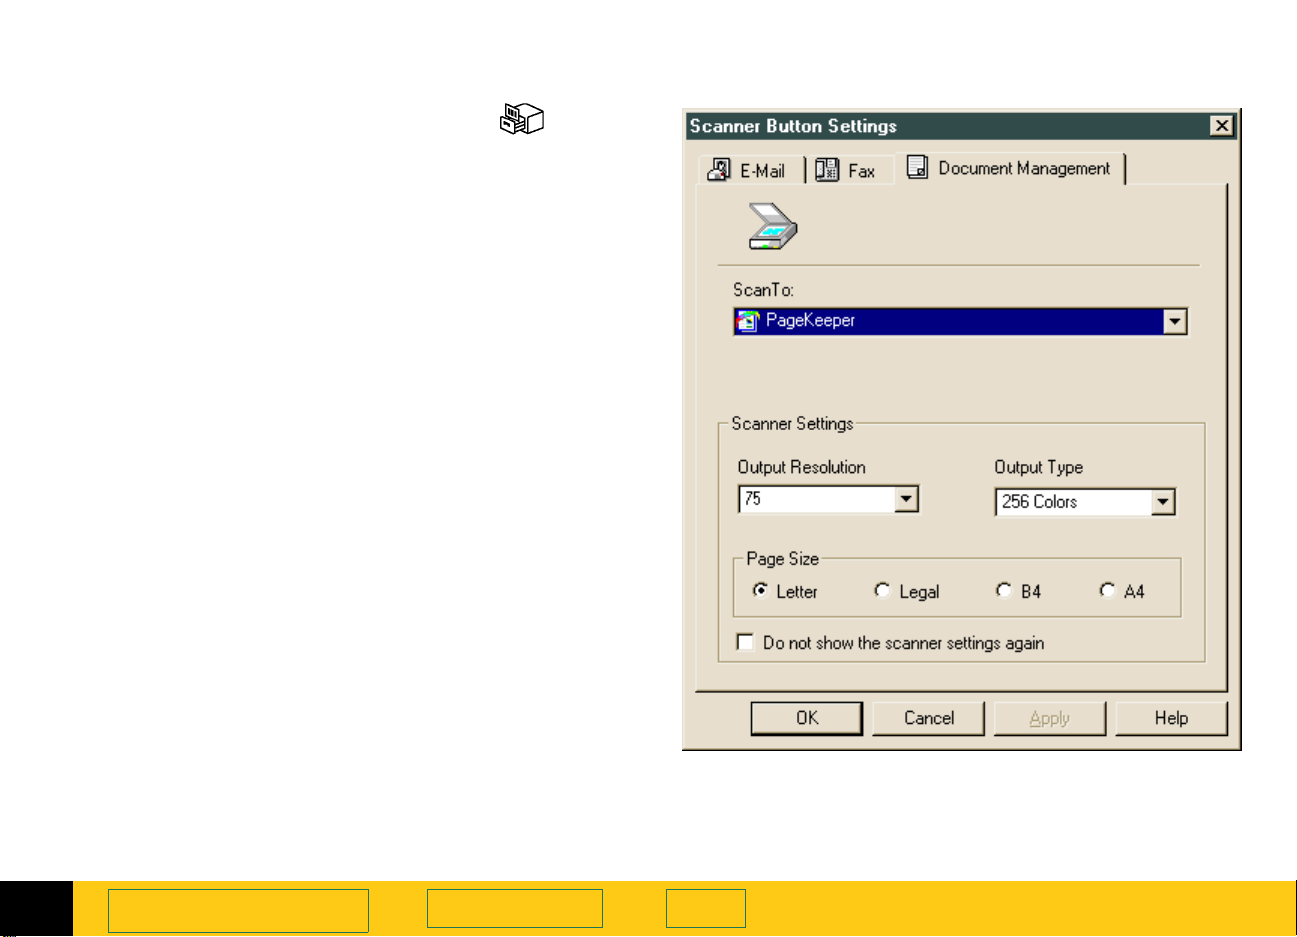
To scan to a document management application:
+$%&
Push the
1
scanner.
The
2
Select a Document Management application from
3
the
document management applications installed on
your PC appear in the list.
Adjust the
4
Note:
again
not appear each time you push the
Management
Scanner Button Settings Dialog
choose
ScanJet Utilities:Scanner Button Settings
Click OK.
5
Document Management
Scanner Button Settings
Scan To
If you check the
option, the
drop-down list. Only supported
Scanner Settings
Do not show the scanner settings
Scanner Button Settings
button on the scanner. To re-open the
Programs
then choose
button on the
dialog box appears.
as necessary.
dialog will
Document
, select the
HP ScanJet Software:HP
Start
.
menu,
1
Using the HP ScanJet
scanner
Book Contents Index
➮
➮
PrecisionScan Pro
HP
User’s Guide
16
Page 17

+$%&
A tour of the scanning
software
2
Scanning software window
18
Context-sensitive pointers
28
Image adjustment tools
30
Output Resolution tool
31
Sharpen Level tool
33
Dimensions tool
34
Exposure Adjustment tool
36
➮
➮
Color Adjustment tool
37
Black & White Threshold tool
38
Invert tool
39
Use Transparency Adapter Tool
40
Online Help
41
Save and re-use adjustment settings
44
Set preferences
47
2
Page 18
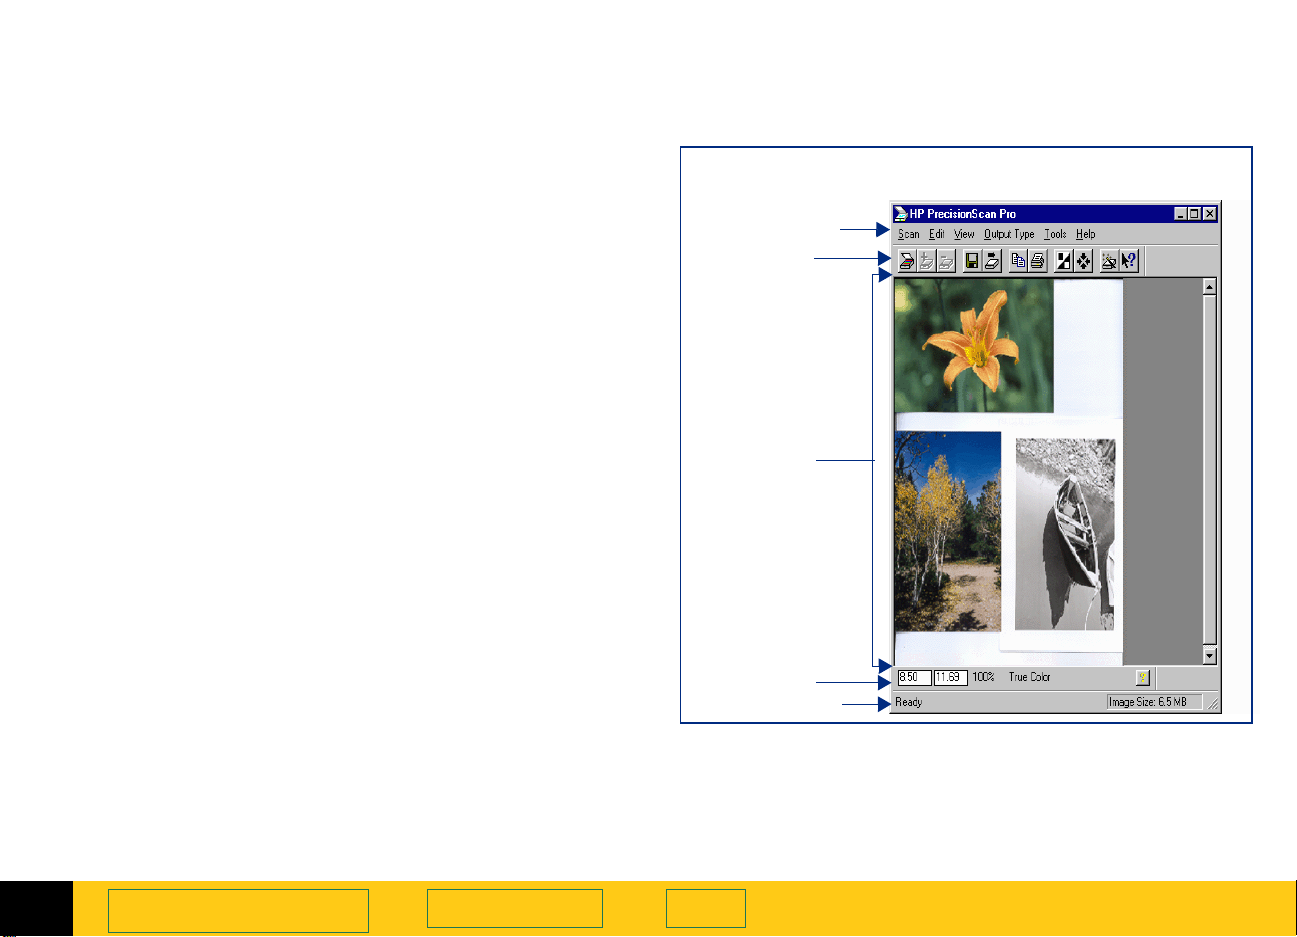
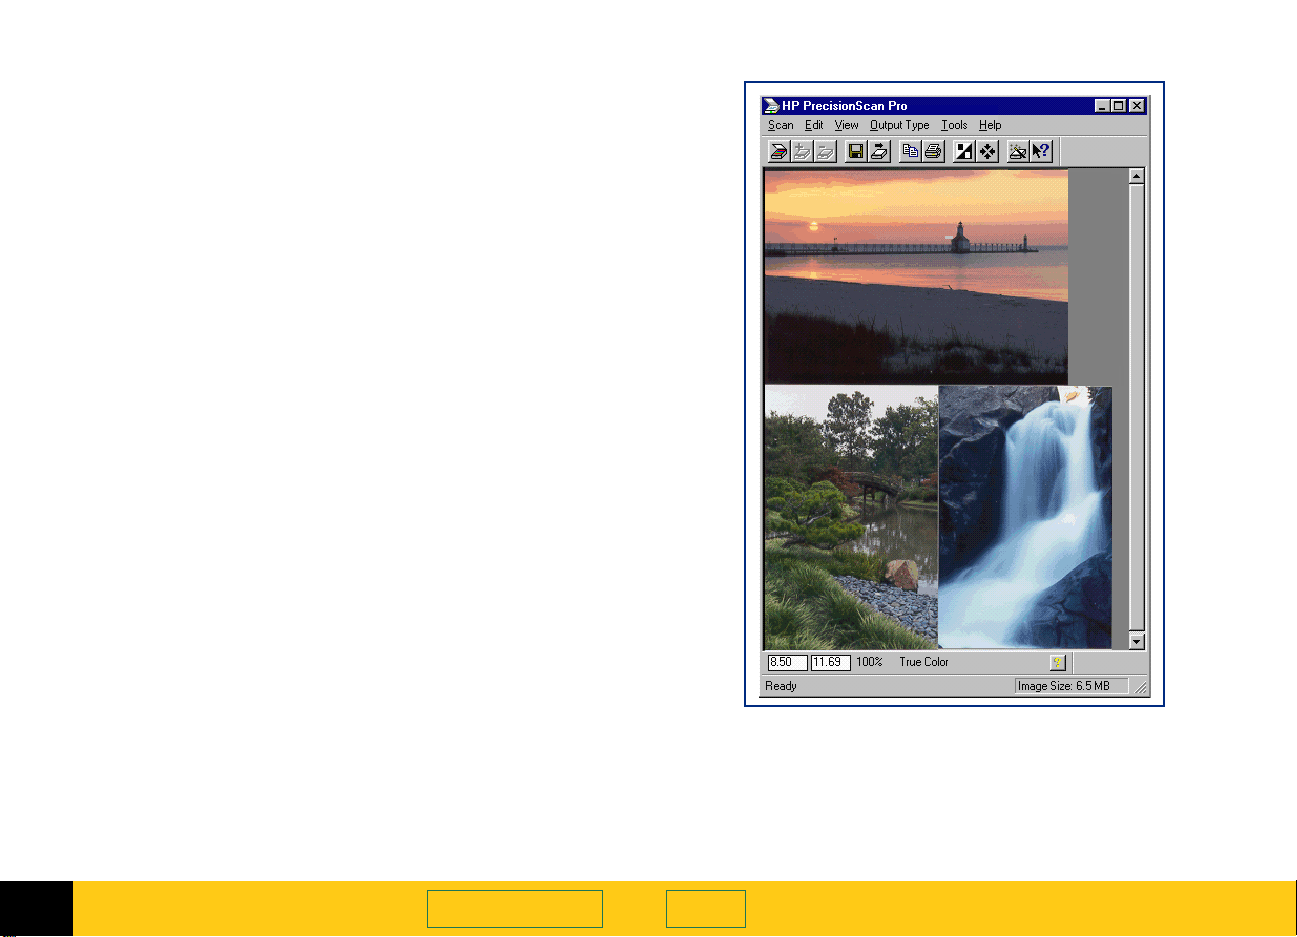
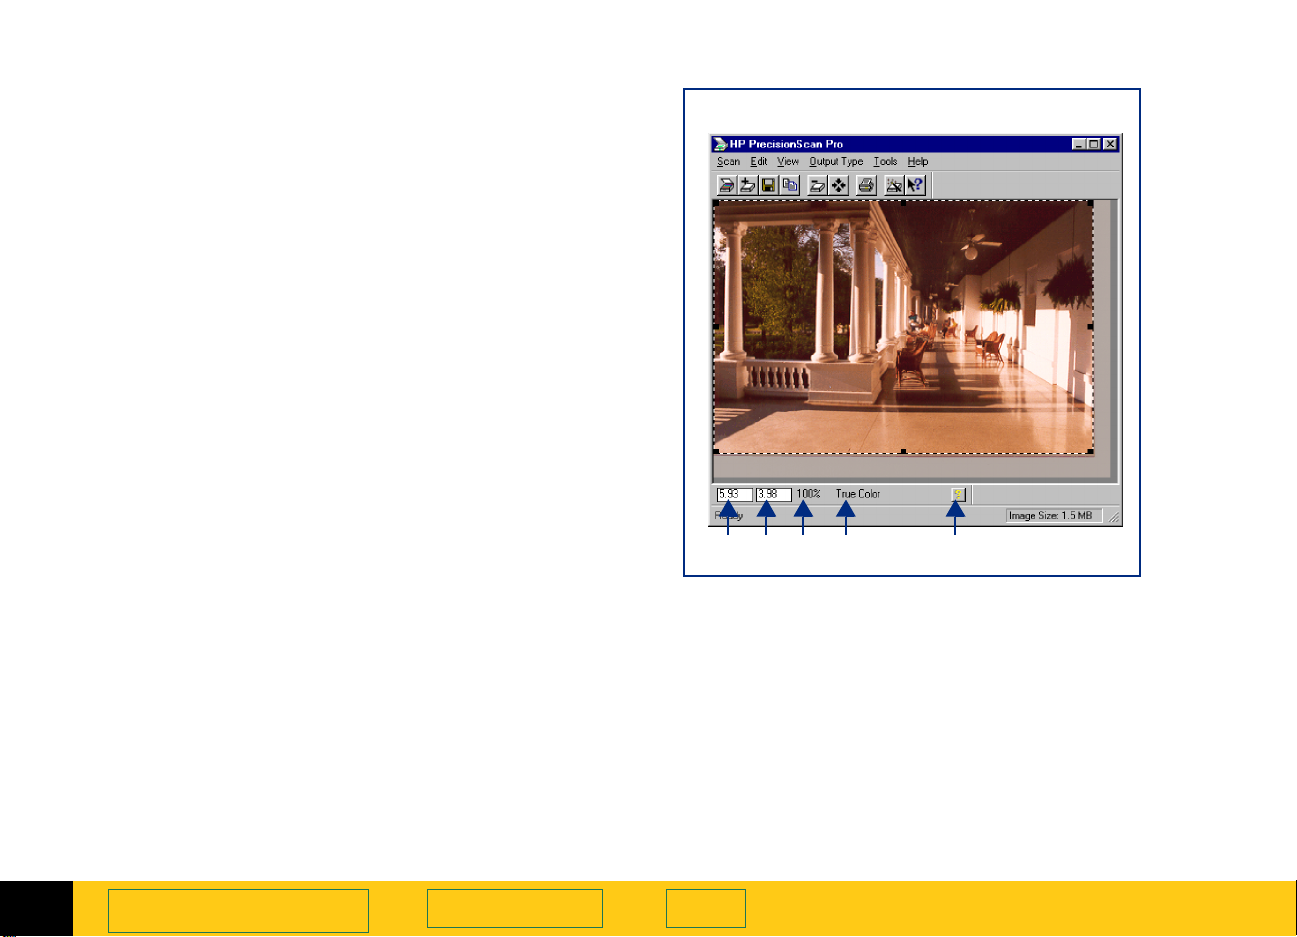
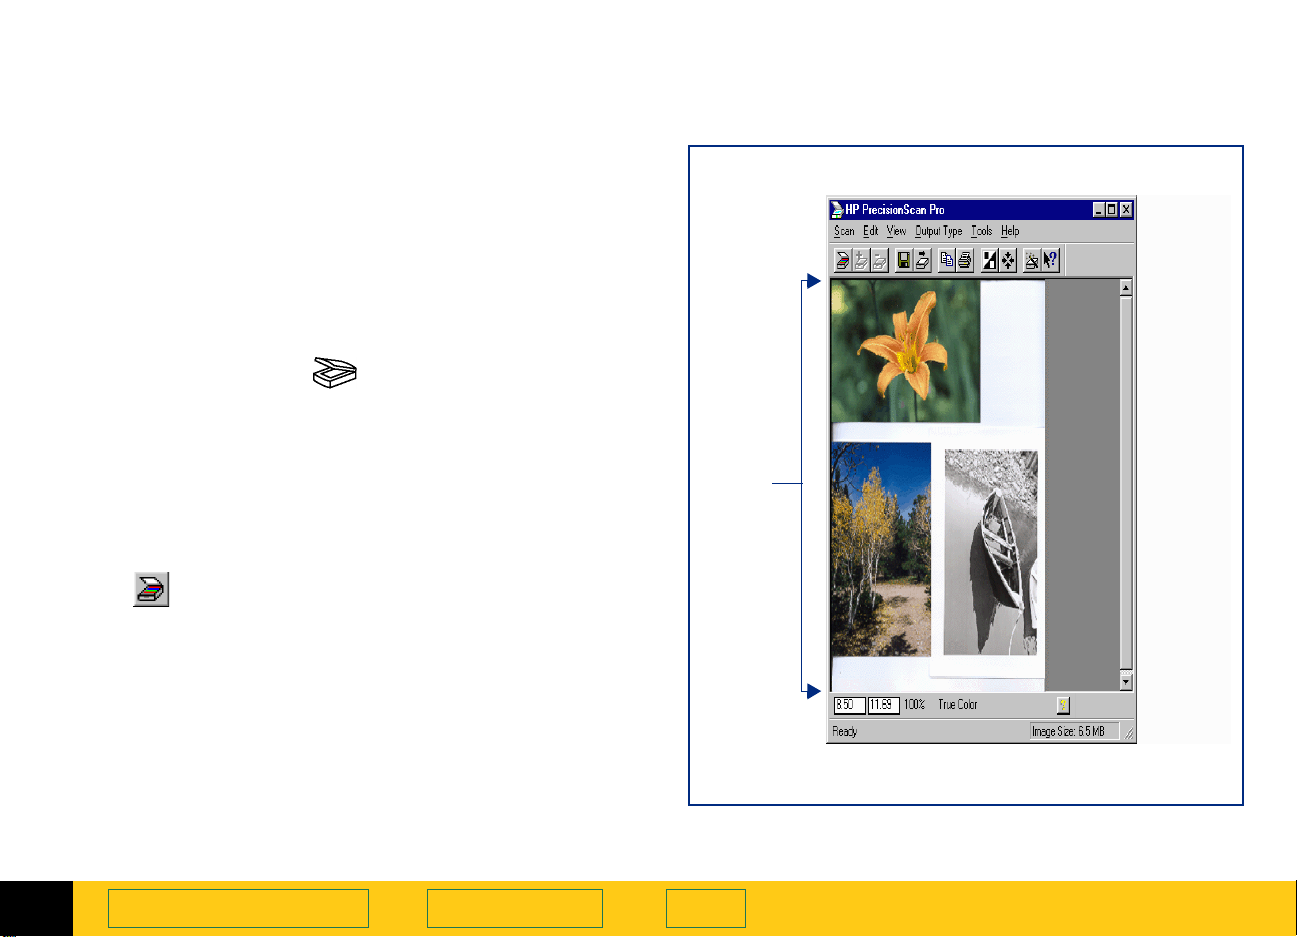
Scanning software window
This chapter describes the scanning software.
Menus —
➊
summarized beginning on page
Toolbar —
➋
commonly used commands (see page24).
Preview area —
➌
preview area of the scanning software window (see
page
Info bar —
➍
image, scale percentage, the
selected, and
Status bar —
➎
size of the selection area (
Image adjustment tools —
tools for making adjustments to the image. These
tools can be placed anywhere on the Windows
desktop (see page
Online Help — Help
online manuals, and videos (see page
The commands in the menus are
.
19
The toolbar has buttons for the most
The scanned image appears in the
).
25
Displays width and height of the output
Output Type
button (see page26).
Help
Displays messages and approximate
Image Size
The scanning software has six
).
30
includes topics, What’s This, more
) (see page27).
41
currently
).
Scanning software window showing a
Menu bar
➊
Toolbar
➋
Preview
➌
area
Preview
+$%&
scan
2
A tour of the scanning
software
Book Contents
Info bar
➍
Status bar
➎
Index
➮
➮
PrecisionScan Pro
HP
User’s Guide
18
Page 19

Menus
All the commands for the scanning software are
available in the menus. Each menu and its commands
are described in the following tables.
S can
+$%&
Preview Ctrl+R
Zoom
Save As... Ctrl+S
Scan To...
Return to <application>
Save Settings...
Load Settings...
Print... Ctrl+P
Print Setup...
Preferences...
Exit
Scans the entire area of the scanner glass at low resolution and displays the
preview image (see page
Scans and enlarges the view of the selection area (see page63).
Displays the
to a file (see page
Displays the
page
105
Scans the selection area and sends the image to the TWAIN-compatible program
that called it (see page
Displays the
page
44
Displays the
(see page
Displays the
the printer (see page
Displays the
Displays the
the scanning software (see page
Closes the scanning software.
Save As
Destination
).
Save Settings
).
Load Settings
).
46
Print
Print Setup
HP PrecisionScan Pro Preferences
dialog box, then scans the selection area and saves the image
).
109
dialog box, then scans the selection area and sends the image to
104
).
57
dialog box for sending a scan to an application (see
).
11
dialog box for saving a set of scanning settings (see
dialog box for loading a set of saved scanning settings
).
dialog box for setting options for printing.
dialog box for setting preferences for
).
47
2
A tour of the scanning
software
Book Contents
Index
➮
➮
PrecisionScan Pro
HP
User’s Guide
19
Page 20
E dit
+$%&
Copy Ctrl+C
Select All Ctrl+A
Clear Selection Esc
V iew
Toolbar
Status Bar
Info Bar
Undo Zoom
When checked, shows the toolbar. When not checked, hides the toolbar (see page24).
When checked, shows the status bar. When not checked, hides the status bar (see page27).
When checked, shows the info bar. When not checked, hides the info bar (see page26).
When viewing a zoomed image, displays the existing preview image so you can create a
different selection area without performing a new
Does a final scan of the selection area and copies it to the Clipboard for pasting into
another program (see page
Draws a selection area that includes the entire area of the scanner glass (see
page
Removes the selection area (page60).
61
).
108
).
Preview
scan (see page64).
2
A tour of the scanning
software
Book Contents
Index
➮
➮
PrecisionScan Pro
HP
User’s Guide
20
Page 21
O utput Type
+$%&
Tr u e C olor
Grayscale
Black & White
B
itmap (raster)
Scalable (vector)
256 Color
W
eb Palette
System Palette
Optimized Palette
Spot Color
Text
Tex t & I mage
Scans the selection in 24-bit color (see page73).
Scans the selection in 8-bit grayscale (see page74).
Scans the selection as a black and white raster image (see page74).
Scans the selection as a black and white vector image that can be resized in another
program without losing image quality (see page
Scans the selection using colors from a standard Web palette (see page69).
Scans the selection using colors from the
more shades of gray and the 16 VGA colors (see page
Scans the selection using colors from a palette that contains pixel colors present in the
original (see page
Finds large areas of similar color and makes it a uniform color in the scanned image (see
page
Scans a text selection and changes the text into unformatted, editable ASCII text (see
page
Scans the selection and saves the text and graphics in RTF, HTML, or PDF format (see
page
71
98
101
).
).
).
70
).
256 Color Web Palette
74
).
output type palette plus
).
71
2
A tour of the scanning
software
Book Contents
Index
➮
➮
PrecisionScan Pro
HP
User’s Guide
21
Page 22
T ools
+$%&
Output Resolution
Sharpen Level
Dimensions
Exposure Adjustment
Color Adjustment
B & W Threshold
Invert
Use Transparency
Adapter
Reset Controls
When checked, shows the
scan of the selection (see pages
When checked, shows the
the image (see pages
When checked, shows the
and height of the selection area, scaling, and setting the width and height of the image
that will be saved, printed, copied, or dragged and dropped (see pages
When checked, shows the
and midtones in the image, and displays pixel distribution, pixel color, and pixel output
levels (see pages
When checked, shows the
color saturation in the image (see pages
When checked, shows the
color channel for an image set to the
pages
When checked, inverts the image (for example, reverses the black and white areas in a
black-and-white image) (see page
When checked, scans the image from the Active Transparency Adapter instead of the
scanner bed (see page
Resets the controls in all tools, except the
values.
38, 92
, and 94).
and 77).
36
Output Resolution
and 90).
31
Sharpen Level
and 75).
33
Dimensions
Exposure Adjustment
Color Adjustment
Black & White Threshold
).
40
tool, which contains fields for setting the width
Black & White Bitmap (raster)
).
39
tool, which sets the resolution for the final
tool, which sets the amount of sharpening for
and 65).
34
tool, which sets highlights, shadows,
tool, which sets color balance (hue) and
and 87).
37
tool, which sets the threshold and the
output type (see
Dimensions
tool, to their optimal (default)
2
A tour of the scanning
software
Book Contents
Index
TIP
Not all tools are active for all output types.
➮
➮
PrecisionScan Pro
HP
User’s Guide
22
Page 23
H elp
+$%&
Contents and Index
HP PrecisionScan Pro Help F1
What’s This Help Shift+F1
HP ScanJet Coach for
General Scanning...
HP ScanJet Coach for
E-mailing Images...
HP ScanJet Coach for
Creating Web Pages...
Show Me
User’s Guide
ADF Guide
About HP PrecisionScan Pro
Ctrl+W
Displays the
Displays
Displays the
on a tool, field, button, or menu item (see page
Explains the general steps to scanning with
(see page
Explains the steps for e-mailing scanned images with
PrecisionScan Pro
Explains the steps for creating web pages with
(see page
Displays movies from the
demonstrate the main features of the scanning software (see
page
Displays the HP ScanJet PrecisionScan Pro User’s Guide in Acrobat
Reader (see page
Displays the HP ScanJet Automatic Document Feeder Guide in
Acrobat Reader (see page
Displays the
HP PrecisionScan Pro Help
42
42
).
42
dialog box for
Help
What’s This Help
).
(see page42).
).
).
43
HP PrecisionScan Pro
pointer for getting Help by clicking
HP PrecisionScan Pro
).
43
Contents, Index
(see page41).
software version number.
, and
).
41
HP PrecisionScan Pro
HP PrecisionScan Pro
CD-ROM that
Find
HP
.
TIP
2
A tour of the scanning
software
Book Contents
Index
Acrobat Reader was automatically installed
during installation.
➮
➮
PrecisionScan Pro
HP
User’s Guide
23
Page 24
Toolbar
Frequently used commands appear as buttons in the
toolbar.
Toolbar Buttons
+$%&
Preview
Zoom
Undo Zoom
Save As
Scan To
Copy
Invert
Reset Controls
Print
HP ScanJet Coach
Help Topics
Scans the entire scanner glass and displays the preview image (see page57).
Scans and enlarges the view of the selection area (see page63).
Displays the existing preview image (see page64).
Scans and saves the selection to a file (see page
Scans to a selected application (see page
Scans and copies the selection to the Clipboard (see page
Reverses the black and white areas in a black and white image (see page39).
Resets the controls in all tools except the
values.
Scans and prints the selection (see page
Displays an interactive introduction to scanning (see page42).
Displays the
button, or menu item.
What’s This Help
pointer for getting
).
105
Dimensions
).
104
).
109
).
108
tool to their optimal (default)
by clicking on a tool, field,
Help
2
A tour of the scanning
software
Book Contents
Index
➮
➮
PrecisionScan Pro
HP
User’s Guide
24
Page 25
Preview area
The preview area in the scanning software window
displays the:
preview image of the entire scanner glass, or
■
zoomed image of the selection area
■
A selection area in
Preview
scan
+$%&
Enlarging the preview area
The size of the preview area determines how big the
image displays.
Enlarge the scanning software window when you want
to increase the magnification of the view of a zoomed
image.
Selection
area
Preview
area
When you
displays in the scanning software window.
Preview
scan, the entire scanner glass area
Enlarged image after a
Zoomed
selection
area
Zoom
scan
2
A tour of the scanning
software
Book Contents
Index
➮
➮
PrecisionScan Pro
HP
User’s Guide
25
Page 26
Info bar
The info bar displays the following information:
the width of the output image
➊
the height of the output image
➋
scale of the output image
➌
➍
➎
the
Output Type
the
Help
button for
currently selected
HP PrecisionScan Pro
+$%&
Scanning software window info bar
2
A tour of the scanning
software
Book Contents
➊➋ ➍
Index
➮
➮
➎➌
PrecisionScan Pro
HP
User’s Guide
26
Page 27
Status bar
The status bar displays the following information:
a message about the action you can take when the
➊
pointer is over some part of the scanning software
window or a tool
the number of KB (kilobytes), MB (megabytes),
➋
GB (gigabytes), or TB (terabytes) in the image
displayed in the selection area (
-ora progress bar for showing when the scanner is
scanning or the scanning software is processing a
command
TIP
Image Size
)
+$%&
Scanning software window status bar
The
Image Size
number of KB, MB, GB, or TB in the image
displayed in the selection area.
This size is only an estimate of the actual size of
the saved file. The file size depends on the format
used to save the file (see page
larger or smaller than the
A tour of the scanning
2
shown in the status bar is the
) and may be
109
Image Size
software
value shown.
Book Contents
➊➋
➮
Index
➮
PrecisionScan Pro
HP
User’s Guide
27
Page 28
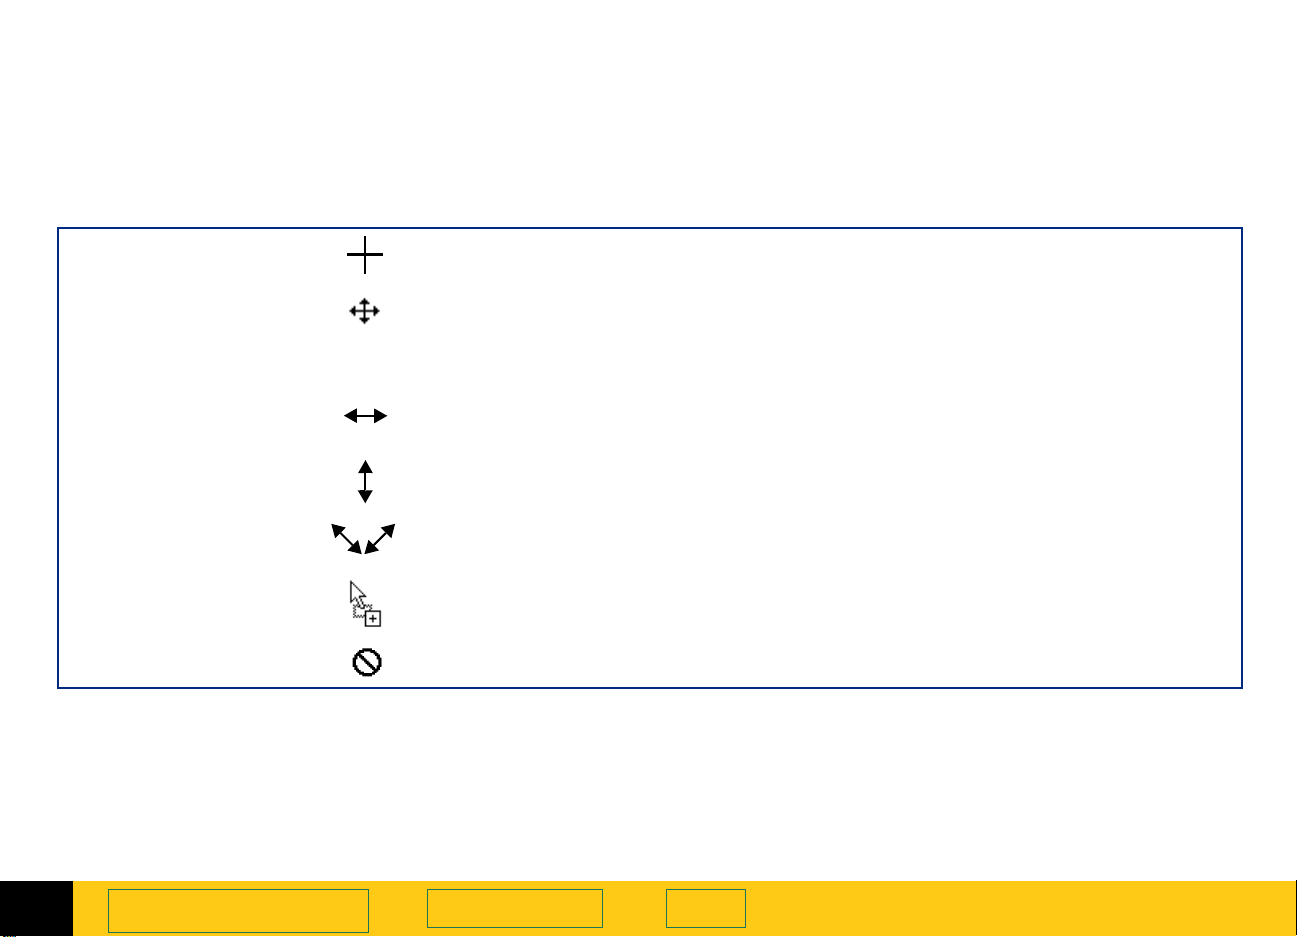
Context-sensitive pointers
The shape of the pointer indicates the type of activity
you can perform in the scanning software.
Selection area pointers
+$%&
New selection area
Move selection area
Resize selection area
horizontally
Resize selection area
vertically
Resize selection area
diagonally
Drop allowed
Drop not allowed
Draw a new selection area.
Move the selection area to a new location in the preview area.
■
Drag the selection area to another program’s open document.
■
When
■
to a folder in the Windows
Drag the mouse from a handle on a side of the selection area to resize the width
of the selection area.
Drag the mouse from a handle on the top or bottom of the selection area to
resize the height of the selection area.
Drag the mouse from a handle on a corner of the selection area to resize both
the height and the width of the selection area.
The program or folder the image has been dragged to accepts this kind of drop.
The program the image has been dragged to does not accept this kind of drop.
key is pressed, drag the selection area to the Windows desktop or
Ctrl
Explorer
.
2
A tour of the scanning
software
Book Contents
Index
➮
➮
PrecisionScan Pro
HP
User’s Guide
28
Page 29
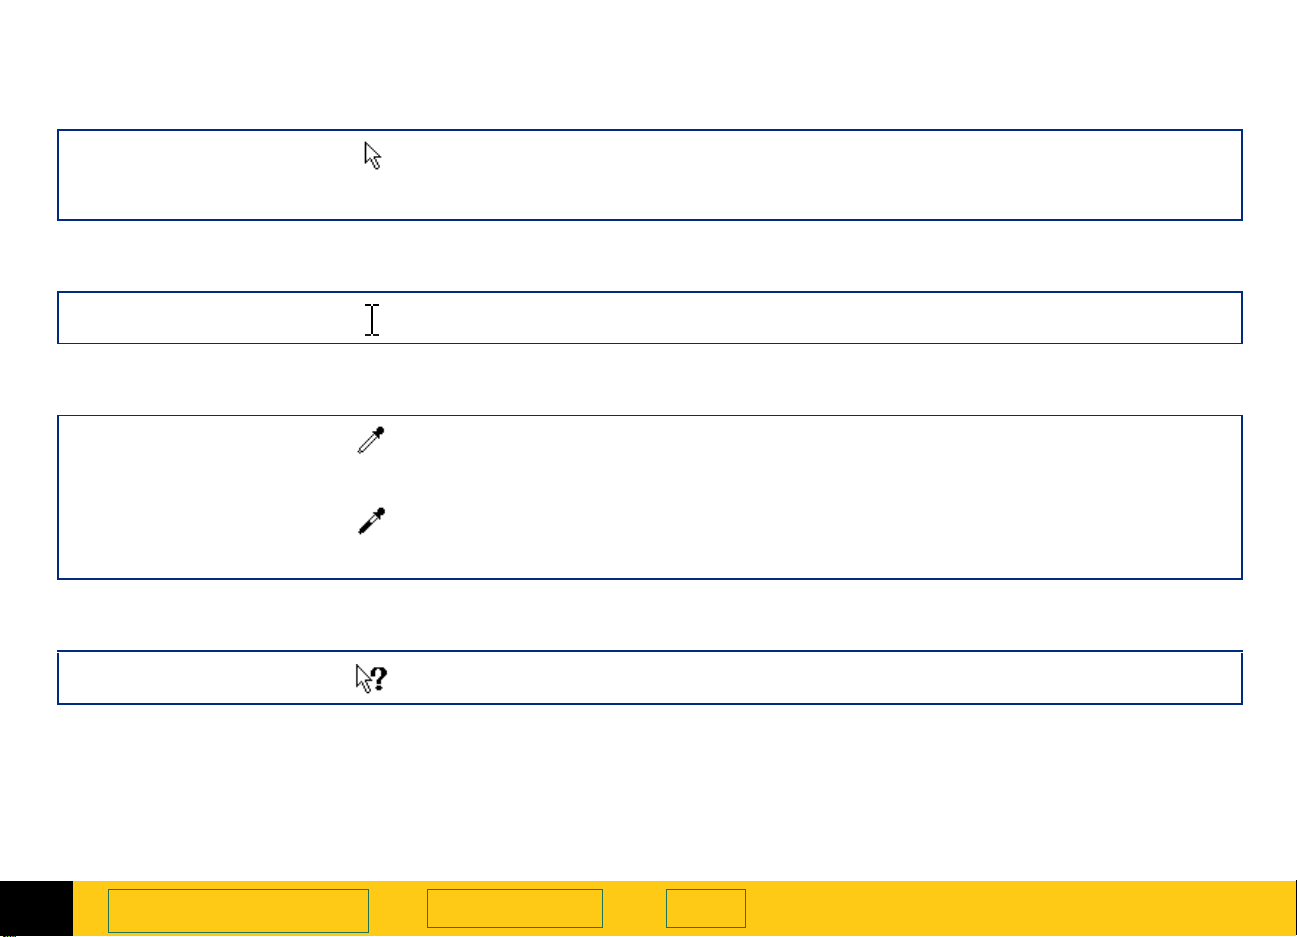
Ready pointer
+$%&
Ready for activity
Typing pointer
Data entry accepted
Pixel value pointers
White eyedropper
Black eyedropper
What’s This Help pointer
What’s This Help
Click a menu item to select a command.
■
Click a list button to select a choice.
■
Click a button to turn it on or off, or to increase or decrease a number.
■
Click, then type a value.
Position this pointer over a light area of the image to see the area’s pixel value in
the RGB meter and in the pixel distribution histogram in the
tool. Click to set the
Position this pointer over a dark area of the image to see the area’s pixel value in
the RGB meter and the pixel distribution histogram in the
tool. Click to set the
Click on a tool, field, button, or menu item for pop-up
Highlights
Shadows
value.
value.
Exposure Adjustment
Exposure Adjustment
on that item.
Help
2
A tour of the scanning
software
Book Contents
Index
➮
➮
PrecisionScan Pro
HP
User’s Guide
29
Page 30

Image adjustment tools
+$%&
Eight tools can be used to make adjustments to the
image in the selection area:
Output Resolution
■
Sharpen Level
■
Dimensions
■
Exposure Adjustment
■
Color Adjustment
■
Black & White Threshold
■
Invert
■
Use Transparency Adapter
■
Each tool has controls you can set for applying to a
final scan. Five of the tools have reset buttons for
applying optimal values to their controls.
tool (see page34)
tool (see page39)
tool (see page31)
tool (see page33)
tool (see page36)
tool (see page37)
tool (see page38)
tool (see page40)
Displaying a tool
From the
■
want to display. A checkmark displays next to the
choice in the
for
Invert
menu, select the name of the tool you
Tools
menu and the tool appears except
Tools
and
Use Transparency Adapter
.
Closing a tool
Click the
■
from the
want to hide. The checkmark disappears and the tool
closes. The tool’s values are still applied to the
image.
button in the tool’s title bar, or
Close
menu, select the name of the tool you
Tools
Docking a tool
Two tools can be docked to the scanning software
window:
Output Resolution
■
Sharpen Level
■
If either of these tools are docked when you close the
scanning software, they will be docked the next time
you start the scanning software.
To dock a tool
Double-click somewhere in the margin of a dockable
■
tool, or drag the tool to the toolbar.
To undock a tool
Double-click somewhere in the margin of the docked
■
tool.
TIP
You can place the tools anywhere on the Windows
desktop.
Position the pointer over the tool’s title bar.
1
Click and drag the tool to a new location.
2
tool
tool
2
A tour of the scanning
software
Book Contents
Index
➮
➮
PrecisionScan Pro
HP
User’s Guide
30
Page 31

Output Resolution tool
+$%&
The
Output Resolution
amount of data for the final scan of an image of a
picture. See
about when to use the
After you have drawn a selection area, use this tool to:
change the resolution setting, if
➊
necessary
reset the resolution setting to
➋
the optimal value for the current
output type
Set output resolution
AutoResolution
When you choose an
software automatically applies the optimal output
resolution to the selection area. For example, output
resolution is automatically set to 200 when the
output type is selected, and set to 300 for the
Color
Black & White Bitmap (raster)
To re-apply
Resolution
AutoResolution
tool.
tool lets you determine the
on page90 for more
Output Resolution
tool.
➊➋
Output Type
, click in the
, the scanning
True
output type.
Output
TIP
You can add commonly-used resolution settings
to the
Resolution
Preferences
Output Resolution
tab of the
dialog box (see page52).
tool’s list box in the
HP PrecisionScan Pro
Custom resolution
When you choose an output type from the
menu, the scanning software automatically applies the
optimal output resolution to the image. You may
override the automatic setting by selecting a different
value from the list box in the
by typing any value between 12 and 999,999 in the field
of the
Output Resolution
tool.
Output Resolution
Images to be displayed on a monitor
Always use 75 as the resolution setting if the image
will be viewed on a monitor, such as in email or on a
Web page.
Output Type
tool or
2
A tour of the scanning
software
Book Contents
Index
➮
➮
PrecisionScan Pro
HP
User’s Guide
31
Page 32
Images to be printed
+$%&
The resolution setting for printing images varies,
depending on the output type applied to the image and
the maximum resolution capability of the printer (see
page
To print images of photographs with the
Color
Output Resolution
To print images of drawings with the
& White Bitmap (raster)
Output Resolution
printer.
).
90
, or
Grayscale
Resolution tool
setting
True Color, 256
output types, set the value in the
tool according to the following table.
300 dpi
printer
100 20 0 300
output types, set the value in the
tool equal to the resolution of the
600 dpi
printer
256 Color
1200 dpi
printer
or
Black
TIP
You can change the resolution settings available in
the
Resolution
(see page
tool’s list box
).
52
TIP
When you change the resolution setting for the
■
image of a picture, you will not see the image
change in the preview area.
You can type any value between 12 and 999,999
■
in the
If you change the resolution setting in the
■
Output Resolution
output type, you can apply
the new output type by clicking .
Output Resolution
tool and then change the
tool.
AutoResolution
for
2
A tour of the scanning
software
Book Contents
Index
➮
➮
PrecisionScan Pro
HP
User’s Guide
32
Page 33

Sharpen Level tool
+$%&
The
Sharpen Level
image of a picture for the final scan. See
page
tool.
When you choose an
picture, the scanning software automatically applies
the optimal sharpen level.
After you have drawn a selection area, use this tool to:
➊
➋
The choices in the
list box are listed in order from
the least amount of sharpening to the most amount of
sharpening:
■
■
■
■
■
for more about how to use the
75
select a sharpen level from
the list box, if necessary
reset the sharpen level
setting to the optimal value
for the current output type
None
Low
Medium
High
Extreme
tool lets you enhance details in the
on
Output Type
Sharpen Level
Sharpen
Sharpen Level
for the image of a
➊➋
TIP
After you select a new sharpen level in the
Sharpen Level
level can be seen in the preview area.
Medium sharpen level Extreme sharpen level
tool, the result of the new sharpen
Grayscale
output type
2
A tour of the scanning
software
Book Contents
Index
➮
➮
PrecisionScan Pro
HP
User’s Guide
33
Page 34
Dimensions tool
+$%&
The
Dimensions
scanned image of a picture so that the image will be
the size you want it when you use the image in another
program or print it. For example, you can save a small
scanned image from a larger original picture.
Original picture 50% Scaled image
tool lets you change the size of the
In the
■
■
■
■
Dimensions
set the dimensions of the selection area
set the units for the selection area and the output
dimensions
scale the image to a percentage of the size of the
original
set the output dimensions of the image for the final
scan
tool, you can:
Scale
2
A tour of the scanning
software
Book Contents
Index
➮
➮
PrecisionScan Pro
HP
User’s Guide
34
Page 35
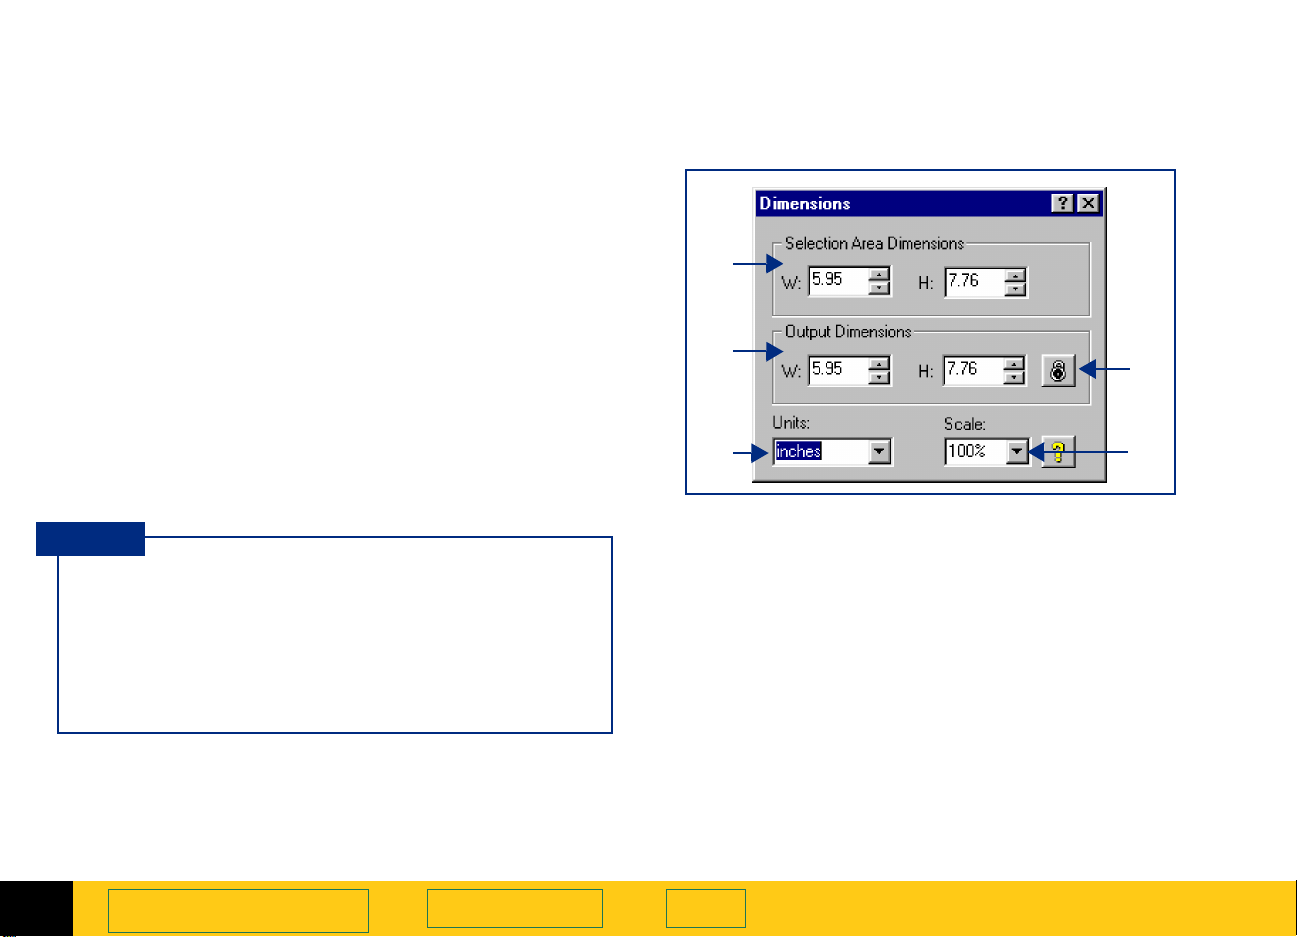
After you have drawn a selection area, use the
Dimensions
adjust the dimensions of the selection area
➊
set values for the width and height of the image to
➋
be included in the final scan
select the units you want to work with
➌
enlarge or reduce output dimensions of the image
➍
for the final scan proportionally by scaling to a
percentage of the original’s size
lock the output dimensions so you can change the
➎
dimensions of the selection area without changing
the output dimensions
tool to:
➊
➋
+$%&
➎
TIP
To preserve image quality when you use it in
another program:
measure the dimensions of the area in which
■
you will place the image, then
2
use the
■
scale or resize the image
Dimensions
A tour of the scanning
software
tool in
HP PrecisionScan Pro
to fit that area.
Book Contents
to
➌
See
Set the output dimensions
about how to use the
➮
Index
➮
HP
on page65 for more
Dimensions
PrecisionScan Pro
tool.
User’s Guide
➍
35
Page 36
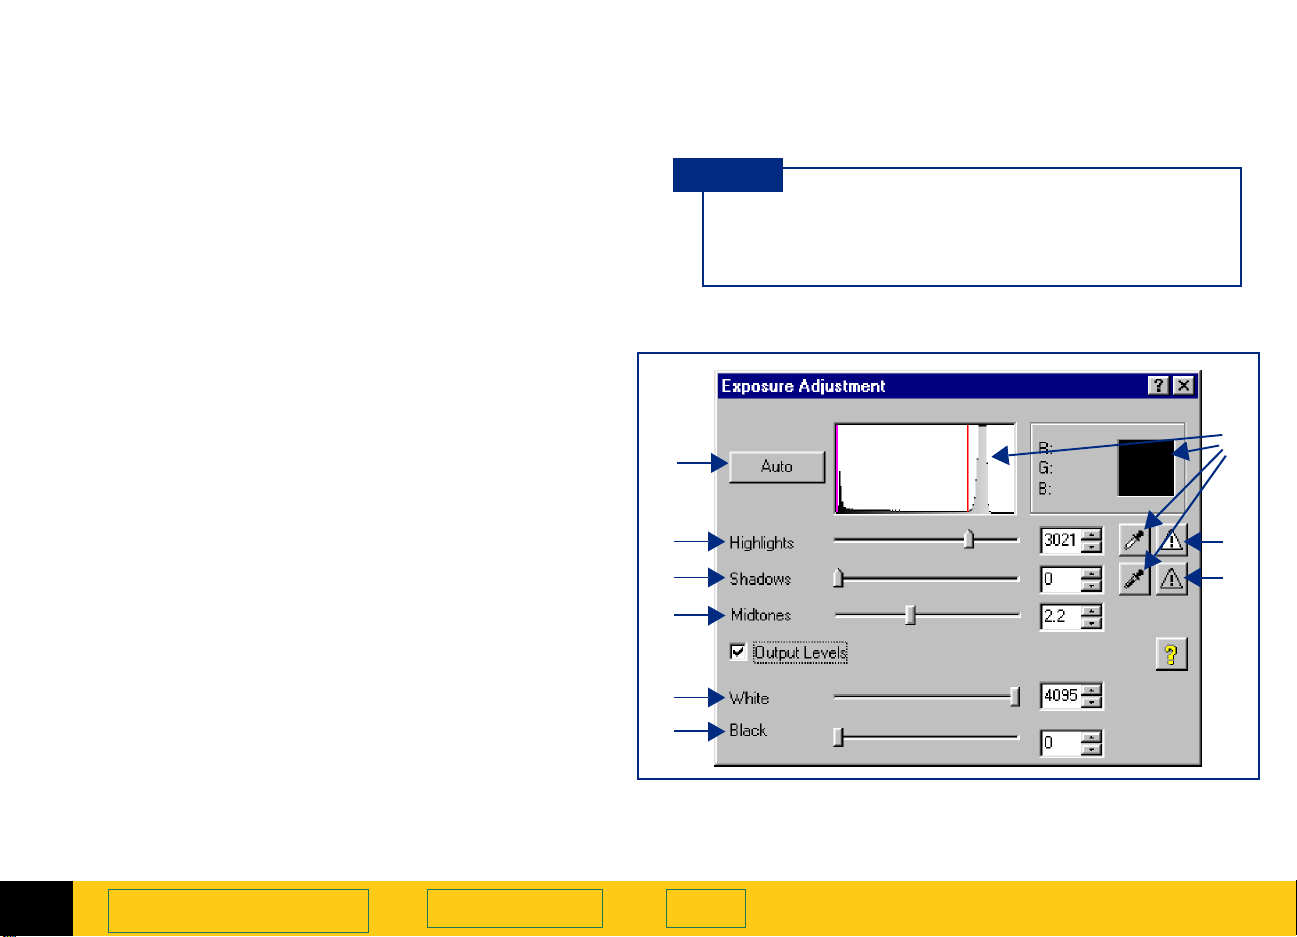
Exposure Adjustment tool
+$%&
The
Exposure Adjustment
adjustments to highlights, shadows, and midtones, or
set the output level of black and white pixels in a color
or grayscale image of a picture. See
page
Adjustment
After you have drawn a selection area, use this tool
to:
➊
➋
➌
➍
➎
➏
➐
➑
➒
for more about how to use the
77
tool.
adjust highlights in the image
adjust shadows in the image
adjust midtones in the image
adjust output level of white pixels
adjust output level of black pixels
view black pixels that will be clipped in the final
scan
view white pixels that will be clipped in the final
scan
view RGB values and pixel distribution for any
light or dark area of the image
reset all the exposure controls to the values
determined by the scanning software
tool lets you make fine
Adjust exposure
Exposure
on
➒
➊
➋
➌
➍
TIP
After you change exposure settings in the
Exposure Adjustment
changes can be seen in the preview area.
tool, the results of the
➑
➏
2
A tour of the scanning
software
Book Contents
➎
Index
➮
➮
PrecisionScan Pro
HP
User’s Guide
36
Page 37
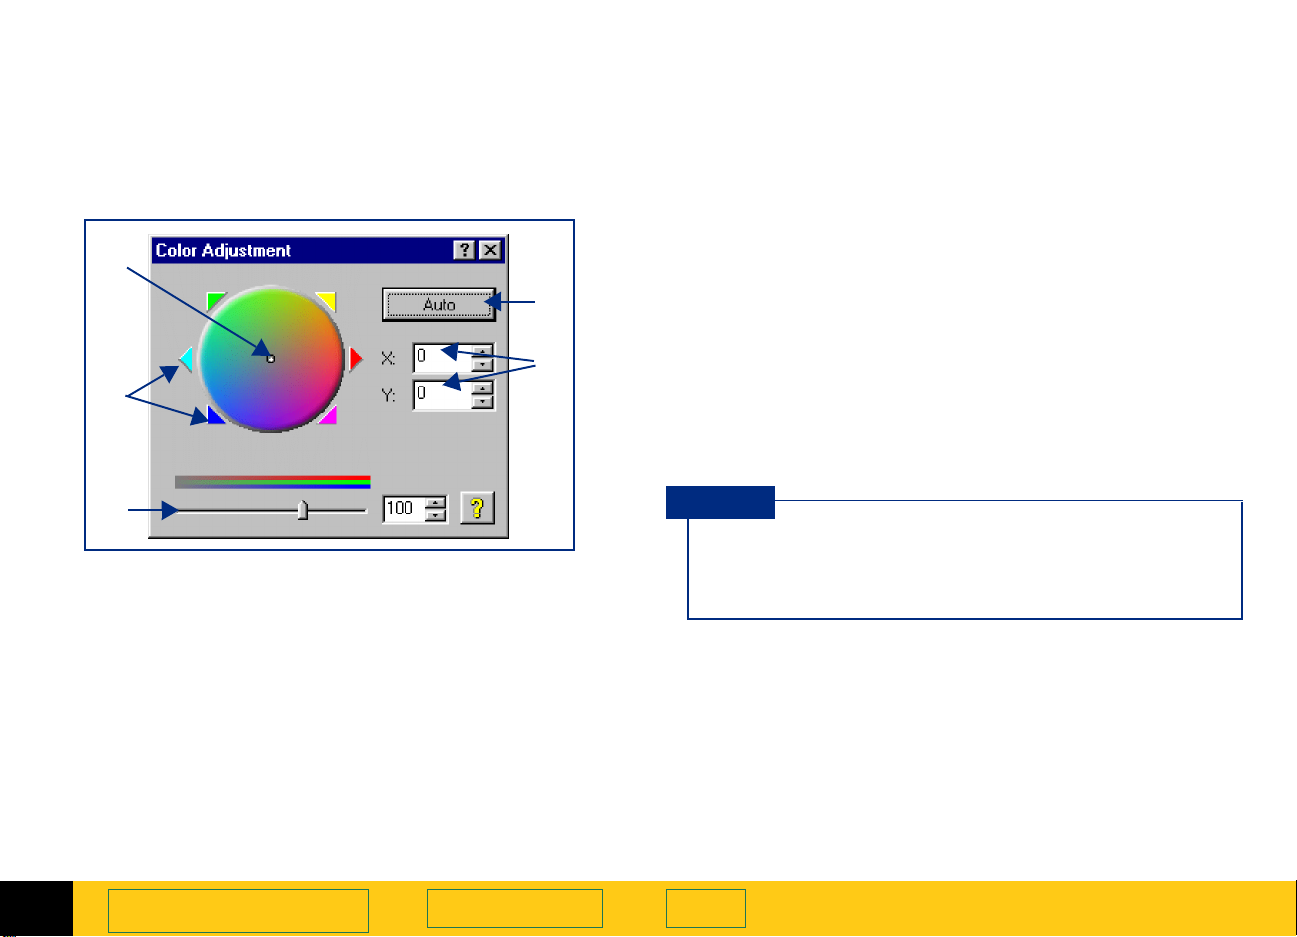
Color Adjustment tool
+$%&
The
Color Adjustment
make colors brighter in a color image.
tool lets you change the hue and
➊
➋
➌
See
Adjust color
the
Color Adjustment
on page87 for more about how to use
tool.
➎
➍
After you have drawn a selection area, use this tool to:
change the hue by dragging the indicator circle in
➊
the
Color Wheel
change the hue by clicking a color’s triangle on the
➋
Color Wheel
set color saturation between 0 and 150; the higher
➌
the saturation value, the brighter the colors
change the hue by typing X and Y values for the
➍
Color Wheel
reset the color controls to the values determined by
➎
the scanning software
TIP
After you change settings in the
tool, the results of the new settings can be seen in
the preview area.
with the mouse
to move the indicator circle
.
Color Adjustment
2
A tour of the scanning
software
Book Contents
Index
➮
➮
PrecisionScan Pro
HP
User’s Guide
37
Page 38

Black & White Threshold tool
+$%&
The
Black & White Threshold
dividing point for black and white pixels in an image
that uses the
All pixels below the threshold will be output as black
and all pixels above the threshold will be output as
white.
After you have drawn a selection area, use this tool to:
view the distribution of black and white pixels in the
➊
selection area
set the black and white threshold (see page92)
➋
set the color channel
➌
set the black and white threshold to the value
➍
determined by the scanning software
Black & White Bitmap (raster)
➊
tool lets you change the
output type.
➍
➋
➌
TIP
After you change settings in the
Threshold
be seen in the preview area.
Black & White Bitmap (raster)
Default
threshold
setting
Low
threshold
setting
tool, the results of the new settings can
Black & White
output type
2
A tour of the scanning
software
Book Contents
Index
➮
➮
PrecisionScan Pro
HP
User’s Guide
38
Page 39

Invert tool
+$%&
The
Invert
image to black and the black areas to white. For color
images, the complementary color is scanned.
You can invert an image if you save to a raster output
types, such as TIFF, GIF, or JPEG. Scans saved as B&W
Vector, Text and Text with Images can not be inverted.
In general, Invert is useful for drawings and spot color
images.
TIP
When you turn on the
image is displayed in the preview area.
tool converts the white areas of an
option, the inverted
Invert
Black & White Bitmap (raster)
Normal
Inverted
output type
2
A tour of the scanning
software
Book Contents
Index
➮
➮
PrecisionScan Pro
HP
User’s Guide
39
Page 40

Use Transparency Adapter Tool
+$%&
The
Use Transparency Adapter
the connected Active Transparency Adapter (XPA),
instead of scanning from the scanner bed.
When
menu, the XPA icon appears in the status bar.
This menu item is available only if the Transparency
Adapter is connected. See
on page
NOTE
Use Transparency Adapter
for more details.
11 5
If the menu item is “dimmed,” shut down HP
PrecisionScan Pro, connect the Active
Transparency Adapter to the back of the scanner,
and re-start HP PrecisionScan Pro.
tool lets you scan from
is checked in the
Active Transparency Adapter
Tools
2
A tour of the scanning
software
Book Contents
Index
➮
➮
PrecisionScan Pro
HP
User’s Guide
40
Page 41

Online Help
+$%&
Quick Help in the scanning software window
A short description, or
move the pointer over of each part of the scanning
software window or a tool, and a longer description
displays in the status bar.
ToolTip
, displays when you
What’s This Help in the scanning software
window
Use
What’s This Help
scanning software window.
To use What’s This Help for the scanning software
window
Click in the toolbar, or the in the title bar of a
1
tool, to change the pointer to .
Click an item in the scanning software window or in a
2
tool.
A popup
You can also press
pointer for the scanning software window.
Help
to learn about any object in the
description appears.
Shift+F1
to display the
What’s This
To use What’s This Help for a tool
Click in the title bar of a tool to change the pointer
1
to .
Click an item in a tool.
2
A popup
description appears.
Help
HP PrecisionScan Pro Help
Use
HP PrecisionScan Pro Help
scanning software and the scanner.
To start Help from the Desktop
Select , the Windows
1
From the
2
HP ScanJet Software:HP Online Help:HP ScanJet Help
The
HP PrecisionScan Pro Help
menu, choose
Start
To start Help from the scanning software window
From the scanning software
■
HP PrecisionScan Pro Help
click in the info bar.
The
HP PrecisionScan Pro Help
to learn about using the
button.
Start
Programs
window appears.
menu, select
Help
or
Contents and Index
window appears.
, then choose
.
, or
2
A tour of the scanning
software
Book Contents
Index
➮
➮
PrecisionScan Pro
HP
User’s Guide
41
Page 42

HP ScanJet Coach
+$%&
Videos
Use the
scanning. Coaches are available for
E-mailing Images
HP ScanJet Coach
and
to learn the steps for
General Scanning
Creating Web Pages
.
To start the HP ScanJet Coach from the Desktop
Select , the Windows
1
From the
2
HP ScanJet Software:HP Online Help:HP ScanJet Coach
The
HP PrecisionScan Pro Help
The
HP ScanJet Coach
menu, choose
Start
appears.
button.
Start
Programs
window appears.
, then choose
To start a HP ScanJet Coach from the scanning
software
Click in the scanning software toolbar, or from
■
the scanning software
Coach for General Scanning
E-Mailing Images
.
Pages
The
HP ScanJet Coach
, or
HP ScanJet Coach for Creating Web
appears.
menu, select
Help
,
HP ScanJet Coach for
HP ScanJet
Several videos of basic scanning concepts can be
,
accessed from the
Insert the
1
drive.
Turn on the computer speakers.
2
HP PrecisionScan Pro
HP PrecisionScan Pro
CD.
CD into the CD-ROM
To start a video from the Desktop
.
Select , the Windows
1
From the
2
HP ScanJet Software:HP Online Help:Show Me Videos
menu, choose
Start
button.
Start
Programs
, then choose
.
To start a video from the Help menu
Start the scanning software.
1
From the
2
menu, choose
Help
Show Me
.
To start a video from online Help
When you see active at the top of a
topic,
Click .
■
Help
2
A tour of the scanning
software
Book Contents
Index
➮
➮
PrecisionScan Pro
HP
User’s Guide
42
Page 43

Online manuals
In addition to this HP PrecisionScan Pro User’s Guide
online manual, you can view the HP ScanJet Automatic
Document Feeder Guide in
describes how to use the HP ScanJet Automatic
Document Feeder.
Adobe Acrobat Reader
To view an online manual from the Desktop
, which
+$%&
Select , the Windows
1
From the
2
HP PrecisionScan Pro:HP Online Help
Adobe Acrobat Reader
manual.
menu, choose
Start
starts and displays the online
button.
Start
Programs
and the manual.
, then choose
To view an online manual from the scanning
software
From the scanning software
■
manual.
Adobe Acrobat Reader
manual.
starts and displays the online
menu, select the
Help
2
A tour of the scanning
software
Book Contents
Index
➮
➮
PrecisionScan Pro
HP
User’s Guide
43
Page 44

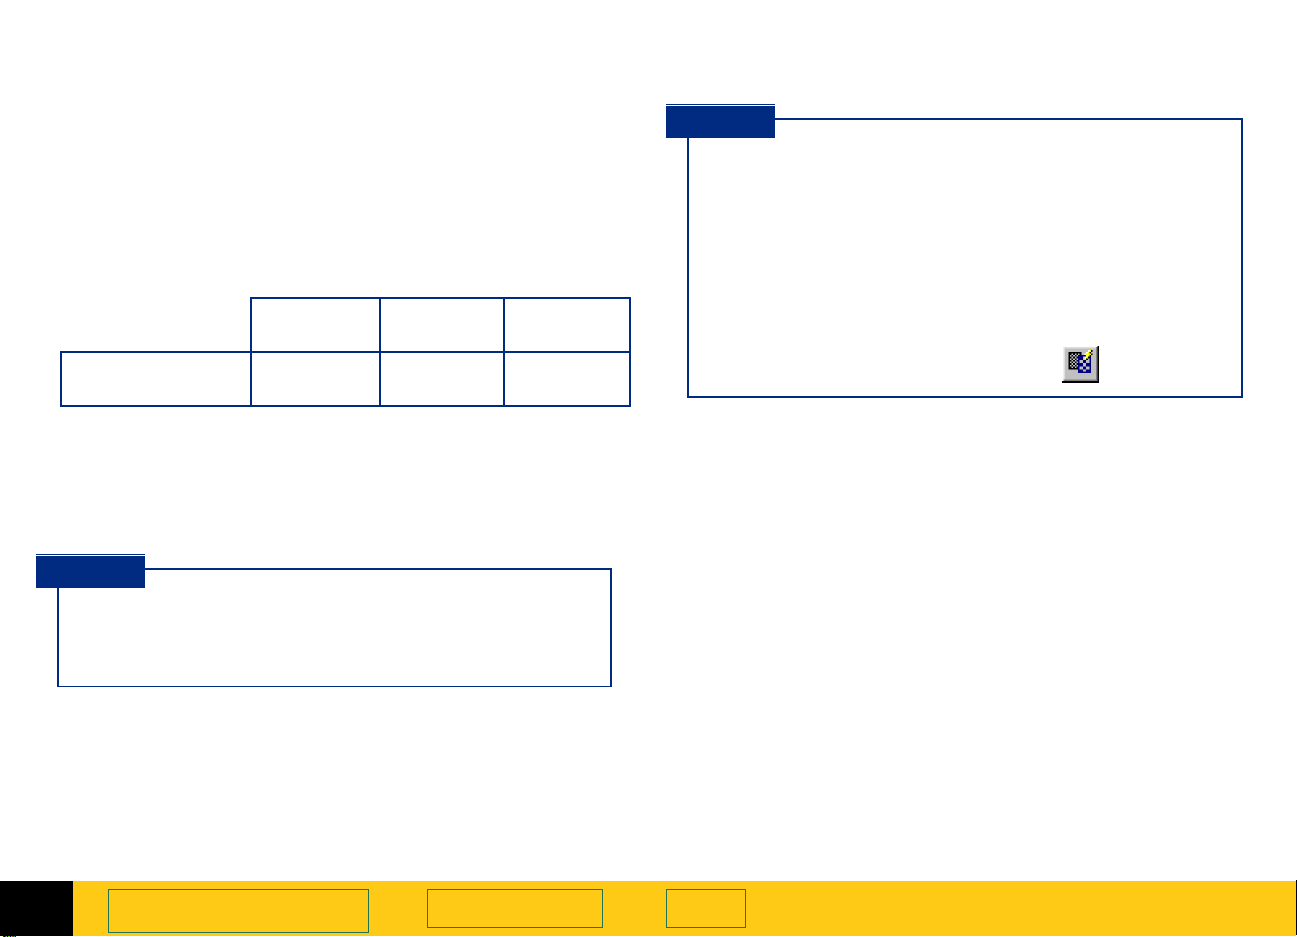
Save and re-use adjustment settings
Save Settings
dialog box
Output Settings
tab
+$%&
You can save the settings you have made to an image
and apply those settings to a another scan during the
current scanning session or after restarting
HP PrecisionScan Pro
you give the set of settings a name.
When you want to use those settings for a different
image, load the settings using the same name
(page
The settings saved are:
Output Type
■
Dimensions
■
Output Resolution
■
Sharpen Level
■
Exposure Adjustment
■
Color Adjustment
■
Black & White Threshold
■
Invert
■
Use Transparency Adapter
■
the selection area, if one existed
■
).
46
tool values (output size and output scale)
. When you save a set of settings,
tool value
tool value
tool values
tool values
tool value
2
A tour of the scanning
software
Book Contents
Index
➮
➮
PrecisionScan Pro
HP
User’s Guide
44
Page 45

Save Settings
Tools Settings
dialog box
tab
+$%&
Saving a set of settings
From the
1
The
Save Settings
Review the settings listed in the
2
the
Tools Settings
If the settings are acceptable for saving, click in the
3
text field of the
name for the settings.
Click
4
Save
The
•
•
Save Settings
The named set of settings is saved for future use
(see page
menu, select
Scan
dialog box appears (see page44).
tabs.
Save Settings
.
).
46
Save Settings...
Output Settings
dialog box, then type a
dialog box closes.
and
2
A tour of the scanning
software
Book Contents
Index
➮
➮
PrecisionScan Pro
HP
User’s Guide
45
Page 46

Loading a set of settings
Any set of scanning settings you have saved with the
Save Settings
currently displayed in the preview area.
dialog box can be applied to the image
Load Settings
Output Settings
dialog box
tab
From the
1
The
Load Settings
From the list box, select the name of the set of
2
settings you want to load.
Review the settings listed in the
3
the
Tools Settings
If the settings are acceptable for loading, click
4
The
•
•
Load Settings
The settings are applied to the image.
menu, select
Scan
dialog box appears.
tabs.
Load Settings...
Output Settings
dialog box closes.
Deleting a set of settings
From the
1
menu, select
Scan
Save Settings...
+$%&
and
.
Load
2
The settings name is selected
A tour of the scanning
software
Book Contents
The
Save Settings
From the list box, select the name of the set of
2
settings you want to delete.
Click
3
The
4
Delete
Delete setting
Click
Yes
The set of settings is deleted from the list of saved
settings.
.
.
dialog box appears.
dialog box appears.
➮
Index
➮
PrecisionScan Pro
HP
User’s Guide
46
Page 47

Set preferences
+$%&
Preferences for the scanner and the scanning software
can be set in the
box.
The
HP PrecisionScan Pro Preferences
several tabs. These tabs are:
Scanner
➊
Selection Area
➋
Resolution
➌
Controls
➍
Text
➎
TIP
To activate a checkbox choice in the
HP PrecisionScan Pro Preferences
Click the checkbox to place a checkmark in it .
■
To activate an option button choice in the
HP PrecisionScan Pro Preferences
Click the option button to place a dot in it .
■
(see page48)
(see page53)
(see page54)
HP PrecisionScan Pro Preferences
dialog box has
(see page50)
(see page52)
dialog box:
dialog box:
dialog
✔
●
Opening the HP PrecisionScan Pro Preferences
dialog box
From the
■
The
appears.
HP PrecisionScan Pro Preferences
➊➋
menu, select
Scan
➌
Preferences...
dialog box
➍
➎
2
A tour of the scanning
software
Book Contents
Index
➮
➮
PrecisionScan Pro
HP
User’s Guide
47
Page 48

Scanner tab
+$%&
The
Scanner
dialog box has checkboxes for enabling:
a
Preview
➊
best quality scaling (page49)
➋
best quality sharpening (page49)
➌
maximum pixel depth (page49)
➍
To change settings:
Select the checkboxes you want to turn on or off.
1
Click
2
Click another tab, or click OK to close the
3
HP PrecisionScan Pro Preferences
tab of the
scan when the scanner’s Scan button
is pushed (page
.
Apply
HP PrecisionScan Pro Preferences
)
49
dialog box.
➊
➋
➌
➍
All the checkbox choices in this tab are turned on
2
A tour of the scanning
software
Book Contents
Index
➮
➮
PrecisionScan Pro
HP
User’s Guide
48
Page 49
Preview scan when scanner button is pushed
+$%&
Maximum Pixel Depth
When this checkbox is checked, each time you push the
Scan button on the scanner the scanner
automatically performs a
can start a
When this checkbox is not checked, pushing the
button on the scanner does not start a
scan. You will need to start a
clicking in the toolbar
■
-orchoosing
Preview
Preview
scan with the Scan button.
from the
Preview
scan. This means you
Preview
Preview
Scan
scan by:
menu
Scan
Best Quality Scaling
When this checkbox is checked, the highest quality
scaling is applied to the final scan.
When this checkbox is not checked, scanning is faster
because normal quality scaling is applied to the final
scan.
Best Quality Sharpening
When this checkbox is checked, the highest quality of
sharpening is applied to the final scan.
When this checkbox is not checked, scanning is faster
because normal quality sharpening is applied to the
final scan.
When this checkbox is checked, the largest pixel bit
depth is applied to the scan to produce the highest
quality image.
When this checkbox is not checked, scanning is faster
for most output types because there is less image data
being processed.
TIP
By default, when
all the checkboxes are checked in the
the
HP PrecisionScan Pro Preferences
HP PrecisionScan Pro
is installed,
Scanner
dialog box.
tab of
2
A tour of the scanning
software
Book Contents
Index
➮
➮
PrecisionScan Pro
HP
User’s Guide
49
Page 50
Selection Area tab
+$%&
The
Selection Area
Preferences
whether the scanning software should automatically:
create a selection area when the mouse is clicked
➊
(page
determine the best
➋
(page
determine the optimal exposure level for the
➌
selection area (page51)
determine the optimal color balance and saturation
➍
for the selection area (page
To change settings:
Select the checkboxes you want to turn on or off.
1
Click
2
Click another tab, or click OK to close the
3
HP PrecisionScan Pro Preferences
dialog box has checkboxes for controlling
)
51
)
51
Apply
.
tab of the
Output Type
HP PrecisionScan Pro
for the selection area
)
51
dialog box.
➊
➋
➌
➍
TIP
By default, when
all the checkboxes are checked in the
tab of the
box.
HP PrecisionScan Pro Preferences
HP PrecisionScan Pro
is installed,
Selection Area
dialog
2
A tour of the scanning
software
Book Contents
Index
➮
➮
PrecisionScan Pro
HP
User’s Guide
50
Page 51
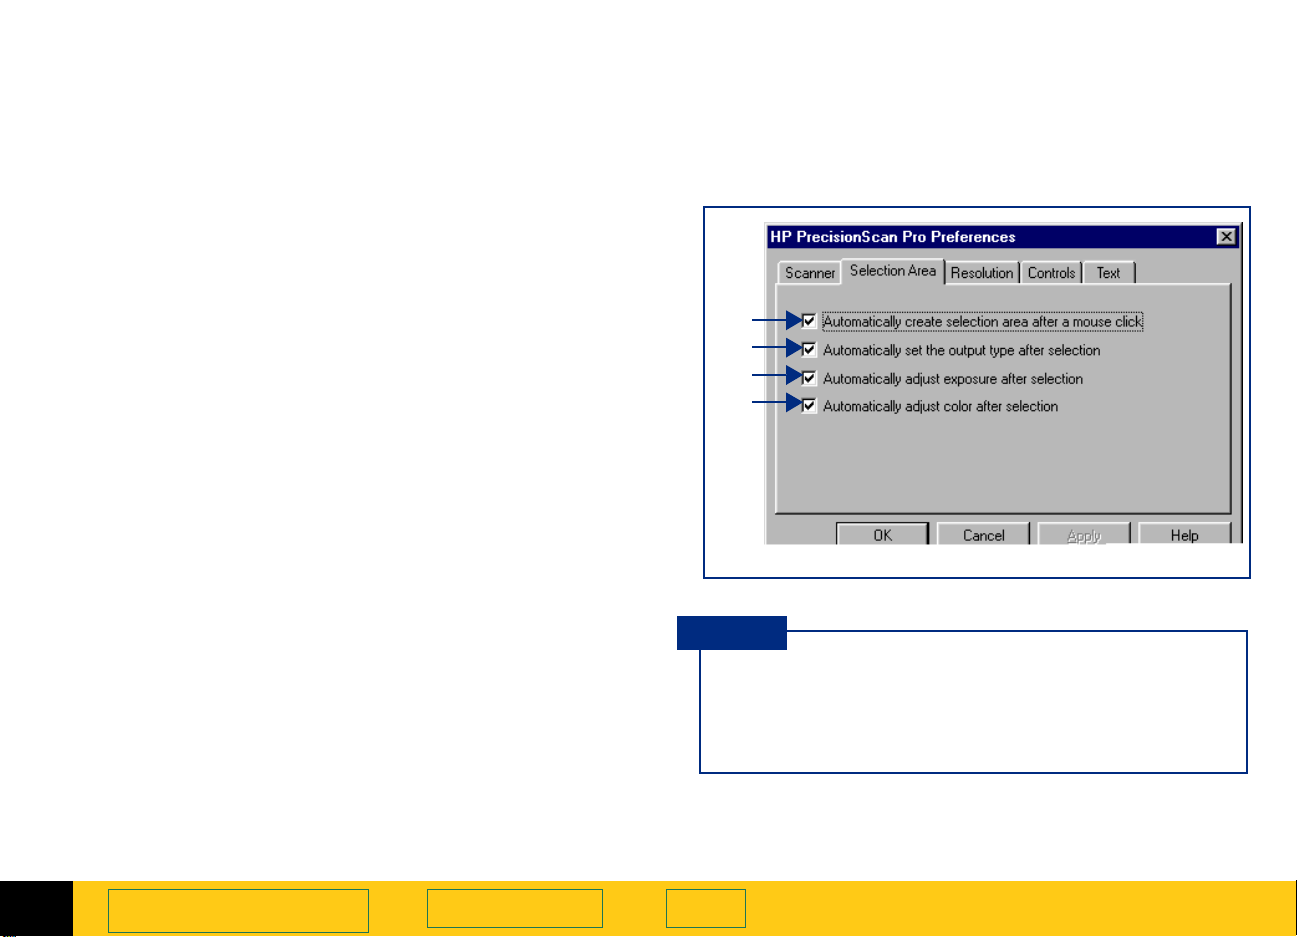
Automatically create selection area after a mouse
click
When this checkbox is checked, the scanning software
automatically creates a selection area when you click
over a part of the image while the pointer looks like
this: .
When this checkbox is not checked:
the scanning software does not automatically create
■
a selection area when you click over a part of the
image
you will need to draw the selection area (see page60)
■
Automatically set the output type after selection
When this checkbox is checked, the scanning software
automatically changes the output type for a new
selection area created by clicking (see page
scanning software determines which output type to
apply based on the contents of the selection area:
True Color
■
enough color
Grayscale
■
mostly grayscale information
Black and White Bitmap (raster)
■
selection area contains mostly black and white
information
Spot Color
■
large areas of similar color.
is applied when the selection area contains
is applied when the selection area contains
is applied if the
is applied when the selection area contains
). The
59
+$%&
When this checkbox is not checked, the scanning
software does not change the current output type when
a new selection area is created. You will need to
manually select the appropriate output type from the
Output Type
area.
Automatically adjust exposure after selection
When this checkbox is checked, each time you create a
new selection area by clicking (see page
scanning software automatically changes the controls
in the
When this checkbox is not checked, the scanning
software does not automatically reset the controls the
Exposure Adjustment
selection area.
Automatically adjust color after selection
When this checkbox is checked, each time you create a
new selection area by clicking (see page
scanning software automatically changes the controls
in the
When this checkbox is not checked, the scanning
software does not automatically reset the controls in
the
Color Adjustment
selection area.
menu when you create a new selection
Exposure Adjustment
tool when you create a new
Color Adjustment
tool when you create a new
tool to the optimal values.
tool to the optimal values.
59
59
), the
), the
2
A tour of the scanning
software
Book Contents
Index
➮
➮
PrecisionScan Pro
HP
User’s Guide
51
Page 52
Resolution tab
+$%&
The
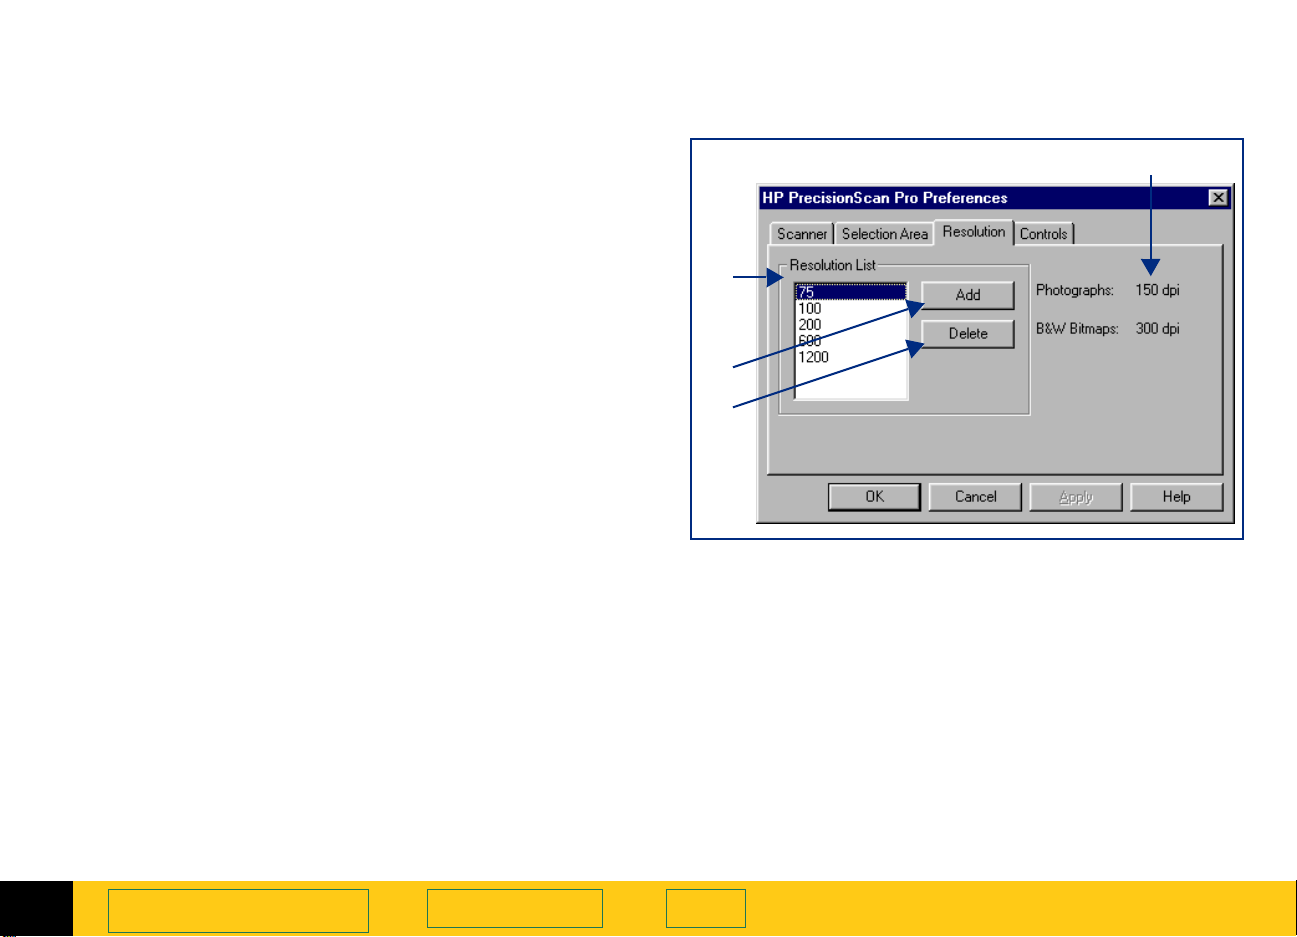
Resolution
Preferences
contained in the
a list of the resolution values currently available in
➊
the
Output Resolution
an
➋
➌
➍
Add
Resolution
a
Delete
Output Resolution
the two resolutions that always remain in the
Resolution
tab of the
dialog box controls the resolution values
Output Resolution
button for adding a resolution to the
tool’s list box
button for deleting a resolution from the
tool’s list box
HP PrecisionScan Pro
tool’s list box. It has:
tool’s list box
tool’s list box
To add a resolution default:
Click
1
In the
2
between 12 and 999,999.
Click OK.
3
Click another tab, or click OK to close the
4
HP PrecisionScan Pro Preferences
.
Add
Default Resolution
dialog box, type a number
dialog box.
Output
Output
➊
➋
➌
To delete a resolution default:
In the
1
to delete.
Click
2
Click another tab, or click OK to close the
3
HP PrecisionScan Pro Preferences
Resolution List
Delete
.
, select the resolution you want
dialog box.
➍
2
A tour of the scanning
software
Book Contents
Index
➮
➮
PrecisionScan Pro
HP
User’s Guide
52
Page 53
Controls tab
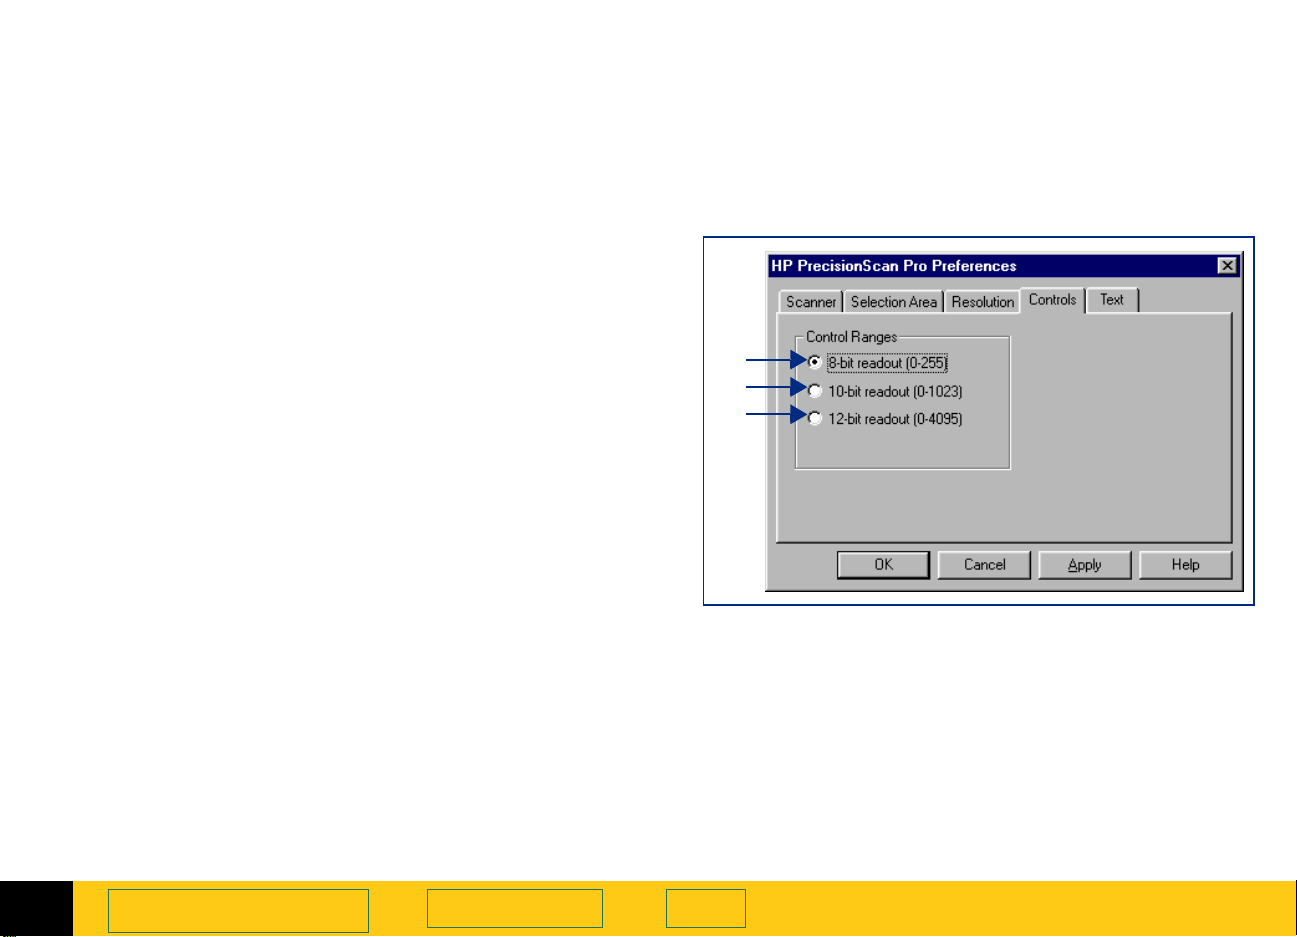
The
Controls
dialog box has option buttons for selecting which
control range readout to use for scanning.
tab of the
HP PrecisionScan Pro Preferences
+$%&
The control range sets the amount of tonal resolution
per color available for correction in the
Adjustment
larger number of bits for the control range results in
greater control of compensation for exposure or
threshold correction.
and
Black & White Threshold
Exposure
tools. Using a
8-bit readout (0-255)
➊
of tonal resolution per color
10-bit readout (0-1023)
➋
bits of tonal resolution per color
12-bit readout (0-4095)
➌
bits of tonal resolution per color
To change settings:
Click the option button to select it.
1
Click
2
Click another tab, or click OK to close the
3
HP PrecisionScan Pro Preferences
Apply
.
— sets the scanner to use 8 bits
— sets the scanner to use 10
— sets the scanner to use 12
dialog box.
➊
➋
➌
2
A tour of the scanning
software
Book Contents
Index
➮
➮
PrecisionScan Pro
HP
User’s Guide
53
Page 54

Text tab
+$%&
The
dialog box allows you to select one of the following for
the RTF output:
Framed text: Puts the text from the page in frames
■
and attempts to recreate the page formatting as
closely as possible to the original.
Flowed text: Eliminates the columns on the page and
■
inserts any images in the text as closely as possible
to where they were in the original.
Text
tab of the
HP PrecisionScan Pro Preferences
2
A tour of the scanning
software
Book Contents
Index
➮
➮
PrecisionScan Pro
HP
User’s Guide
54
Page 55

+$%&
Scanning pictures
3
Basic steps for scanning pictures
56
Preview scan
57
Create a selection area
58
Zoom scan
63
Return to the preview image (Undo Zoom)
64
Set the output dimensions
65
Choose an output type
69
➮
3
➮
Page 56
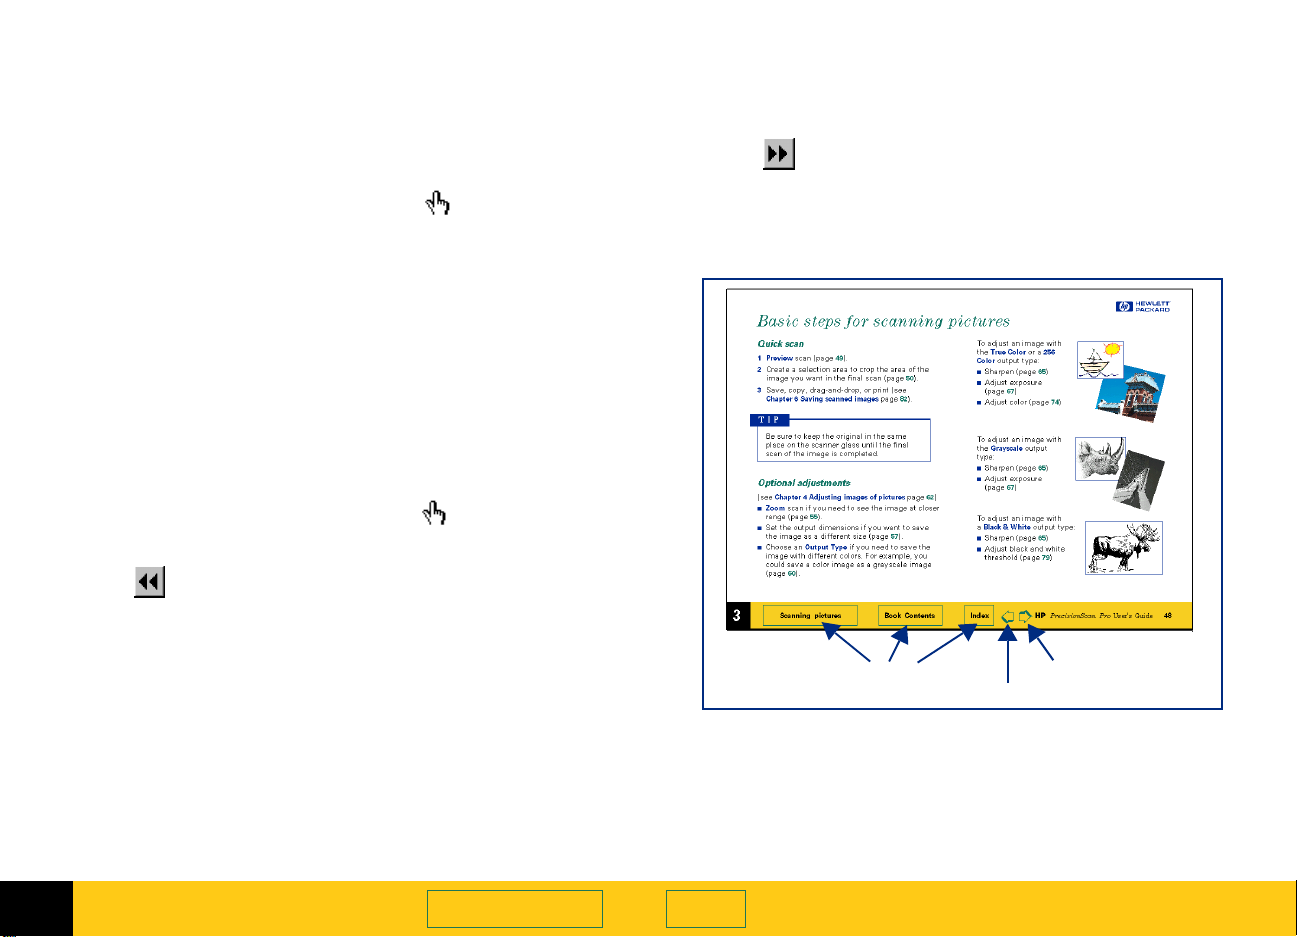
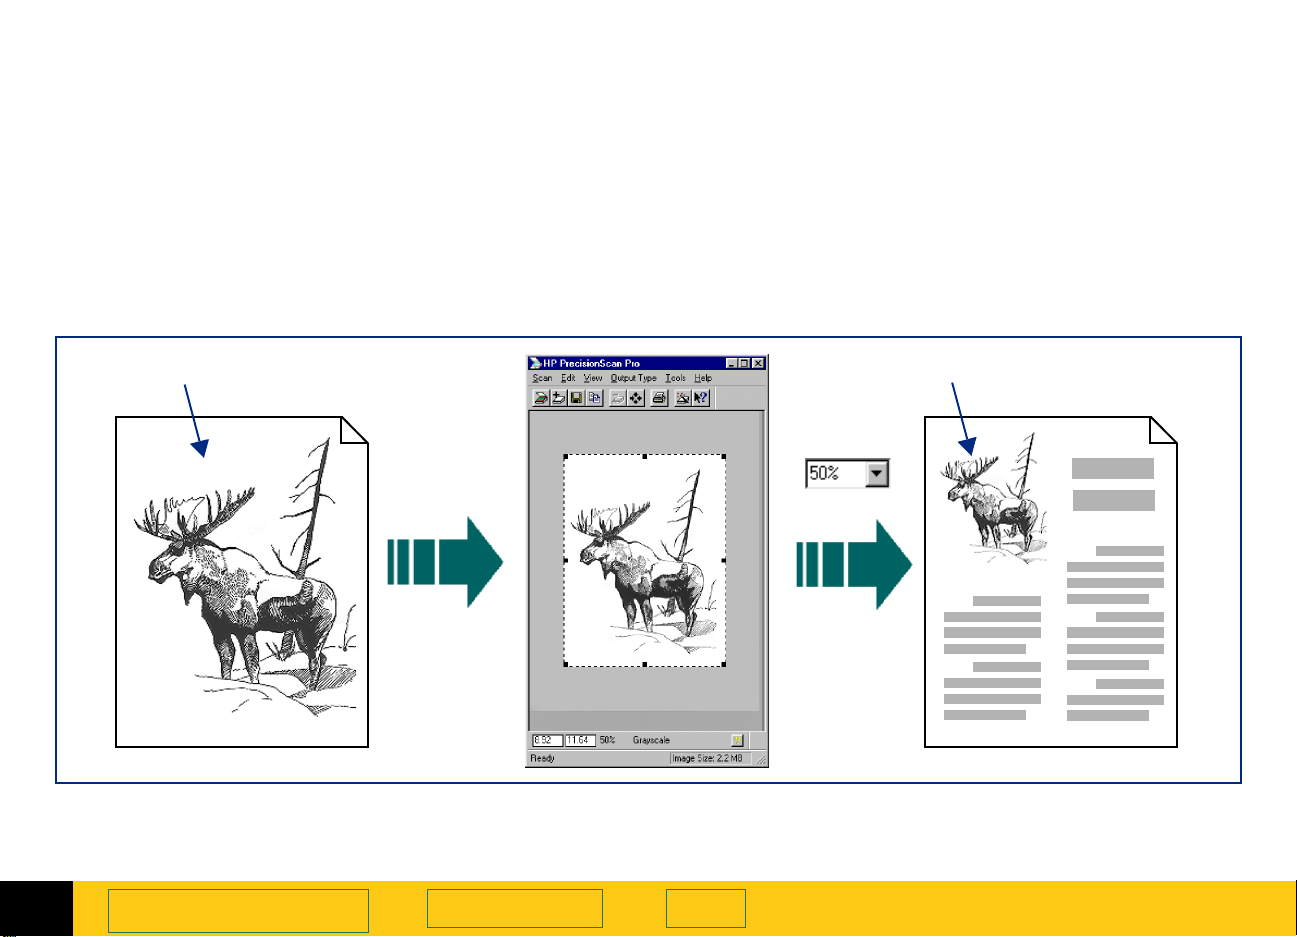
Basic steps for scanning pictures
+$%&
Quick scan
1 Preview
Create a selection area of the part of the image you
2
want in the final scan (page
Scan to a destination, save, copy, drag-and-drop, or
3
print (see
TIP
Be sure to keep the original in the same place on
the scanner glass until the final scan of the image is
completed.
scan (page57).
).
58
Chapter 6 Saving scanned images
page
Optional adjustments
(See
Chapter 4 Adjusting images of pictures
scan to see the image at closer range (page63).
Zoom
■
Set the output dimensions if you want to save the
■
image as a different size (page
Choose an
■
with different colors. For example, you could save a
color image as a grayscale or a 256 color image
(page
Output Type
).
69
if you need to save the image
65
).
page72.)
102
To adjust an image with the
True Color
output type:
Sharpen (page75)
■
Adjust exposure (page77)
■
Adjust color (page87)
).
■
To adjust an image with the
Grayscale
Sharpen (page75)
■
Adjust exposure (page77)
■
To adjust an image with a
Black & White
Sharpen (page75)
■
Adjust black and white
■
threshold (page
channel (page94)
or a
256 Color
output type:
output type:
) or color
92
3
Scanning pictures
Book Contents Index
➮
➮
PrecisionScan Pro
HP
User’s Guide
56
Page 57
Preview scan
+$%&
A
Preview
everything on the scanner glass so you can create a
selection area to work with (see page
will be performed when the image is saved, copied,
printed, or dragged to another program.
scan displays a low-resolution image of
). A final scan
58
Using the Scan button to Preview scan
If the
ScanJet Button Manager
with
HP PrecisionScan Pro
Push the
■
The scanner performs a
preview image appears in the preview area.
For information on configuring the
Manager
, see page12.
button on the scanner once.
Scan
is set to communicate
:
Preview
scan and the
HP ScanJet Button
Using the scanning software to Preview scan
You can
Click , the
■
from the
■
press
■
The scanner performs a
preview image appears in the preview area.
Preview
Ctrl+R
scan from the scanning software:
Preview
menu, select
Scan
.
button in the toolbar, or
Preview
Preview
, or
scan and the
A
Preview
Preview
area
scan displayed in the preview area
3
Scanning pictures
Book Contents Index
➮
➮
PrecisionScan Pro
HP
User’s Guide
57
Page 58

Create a selection area
You must create a selection area to indicate the part of
the image you want to save to a file, copy, print, dragand-drop, or send to a destination.
The area you select will be enclosed by a selection
border, which you can resize later (see page
There are several ways to create a selection area:
click (see page59)
■
draw (see page60)
■
select everything on the scanner glass (see page61)
■
TIP
The selection area determines the part of the image
that is included in the final scan when you save,
copy, print, or drag-and-drop.
If no selection area exists:
you cannot perform drag-and-drop
■
the entire area of the scanner glass will be
■
included when you save, copy, or print
62
).
+$%&
3
Scanning pictures
Book Contents Index
➮
➮
PrecisionScan Pro
HP
User’s Guide
58
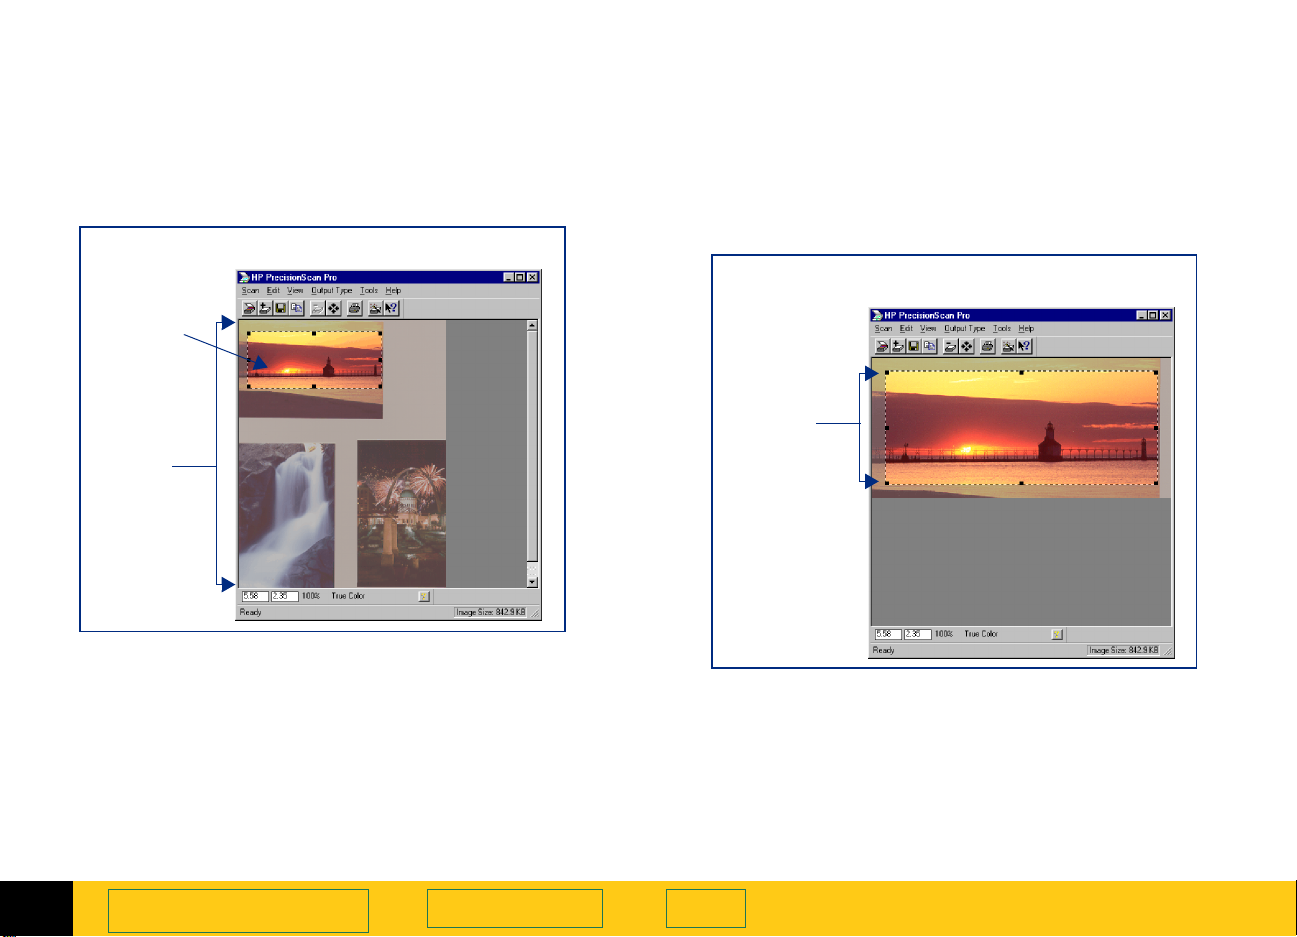
Page 59

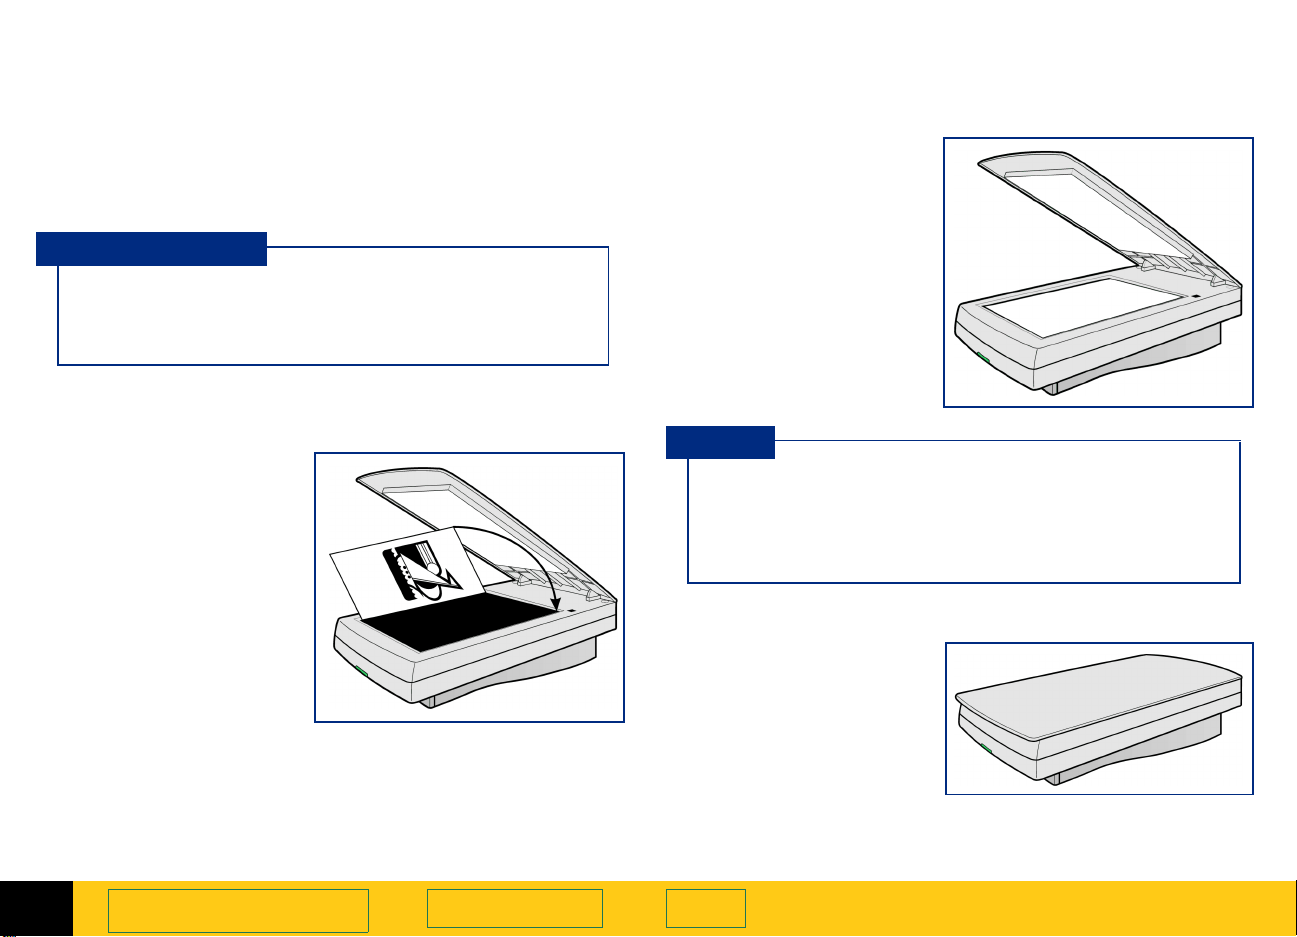
Clicking to create a selection area
Position the pointer near the upper-left corner of
1
the area you want to work with.
Click.
2
A rectangular selection area is created and the parts
of the preview image outside the selection area are
faded to indicate they will not be included in the final
scan.
+$%&
A selection border around the picture
TIP
To enable clicking to create a selection area enable
the Selection Area preference option Automatically
create selection area after a mouse click (see
page
3
).
51
Scanning pictures
Book Contents Index
Selection
area
➮
➮
PrecisionScan Pro
HP
User’s Guide
59
Page 60

Drawing to create a selection area
Position the pointer over one corner of the area
1
you want to select.
Press the mouse button and drag the pointer
2
diagonally to create a selection border.
Release the mouse button.
3
TIP
A dashed border surrounds the selection area.
■
Handles appear on the corners and in the middle
■
of each side of the selection border.
The image inside the selection border remains
■
vivid.
The image outside the selection border appears
■
faded.
Removing the selection area
+$%&
Selection
area
Selection border
3
Scanning pictures
Handles
Book Contents Index
You can delete the selection area so you can create a
different one.
From the
■
press
■
Esc
menu, select
Edit
.
➮
HP
➮
Clear Selection,
PrecisionScan Pro
or
User’s Guide
60
Page 61

Selecting the entire preview area
After a
create a selection area containing the entire preview
area.
■
Preview
From the
– or –
press
A selection border is drawn around the entire
preview area.
Ctrl+A
scan, use the
menu, select
Edit
.
Select All
Select All
command to
Selecting the entire zoomed area
+$%&
A selection border around the entire
After a
a selection area containing the entire zoomed area.
From the
■
– or –
press
A selection border is drawn around the entire
zoomed area.
3
scan, use the
Zoom
menu, select
Edit
Ctrl+A
.
Scanning pictures
Select All
Select All
command to create
Book Contents Index
Preview
area
➮
➮
PrecisionScan Pro
HP
User’s Guide
61
Page 62

Moving the selection area
You can move the selection area to a different location
in the preview area.
Position the pointer inside the selection area.
1
The pointer changes to .
Drag the selection area to its new location.
2
Adjusting the size of selection area
You can change the size of the selection area two ways:
click and drag one of the handles on the selection
■
border (see the picture on page60)
set dimensions for the selection area in the
■
28
tool
).
Dimensions
Use the handles on the border
Position the pointer over the handle on the corner or
1
side of the selection border you need to adjust.
The pointer changes to a bidirectional arrow (see
page
Click on the handle and drag the side of the border to
2
a new location.
Release the mouse button.
3
+$%&
Use the Dimensions tool
You can use the fields in the
area of the
the selection area. (See page
Dimensions
From the
1
The
Click the list button in the
2
units you want to work with.
To set the width of the selection area, type the width
3
value in the
Dimensions
To keep the same aspect ratio for the selection area
4
(keep the
proportional to the new width value), press
-or-
to leave the existing
height value, click in any other field of the
tool.
Dimensions
tool.)
Tools
Dimensions
Width
area.
Selection Area Dimensions
tool to define the exact size of
menu, select
tool appears.
field of the
Selection Area Dimensions
for more about the
34
Dimensions
field and select the
Units
Selection Area
Selection Area Dimensions
.
area height value
Dimensions
Enter
area
,
3
Scanning pictures
Book Contents Index
➮
➮
PrecisionScan Pro
HP
User’s Guide
62
Page 63

Zoom scan
Zoomed selection
scan lets you view the selection area at closer
Zoom
range. Use the
when you adjust it.
Performing a Zoom scan
Create a selection area (page58).
1
To enlarge the view of the selection area:
2
Click , the
•
– or –
from the
•
The scanner scans the selection area and the
selection area fills the preview area.
Scan
command to see the image better
Zoom
button in the toolbar
Zoom
menu, choose
Zoom
+$%&
.
3
Scanning pictures
Book Contents Index
➮
➮
PrecisionScan Pro
HP
User’s Guide
63
Page 64
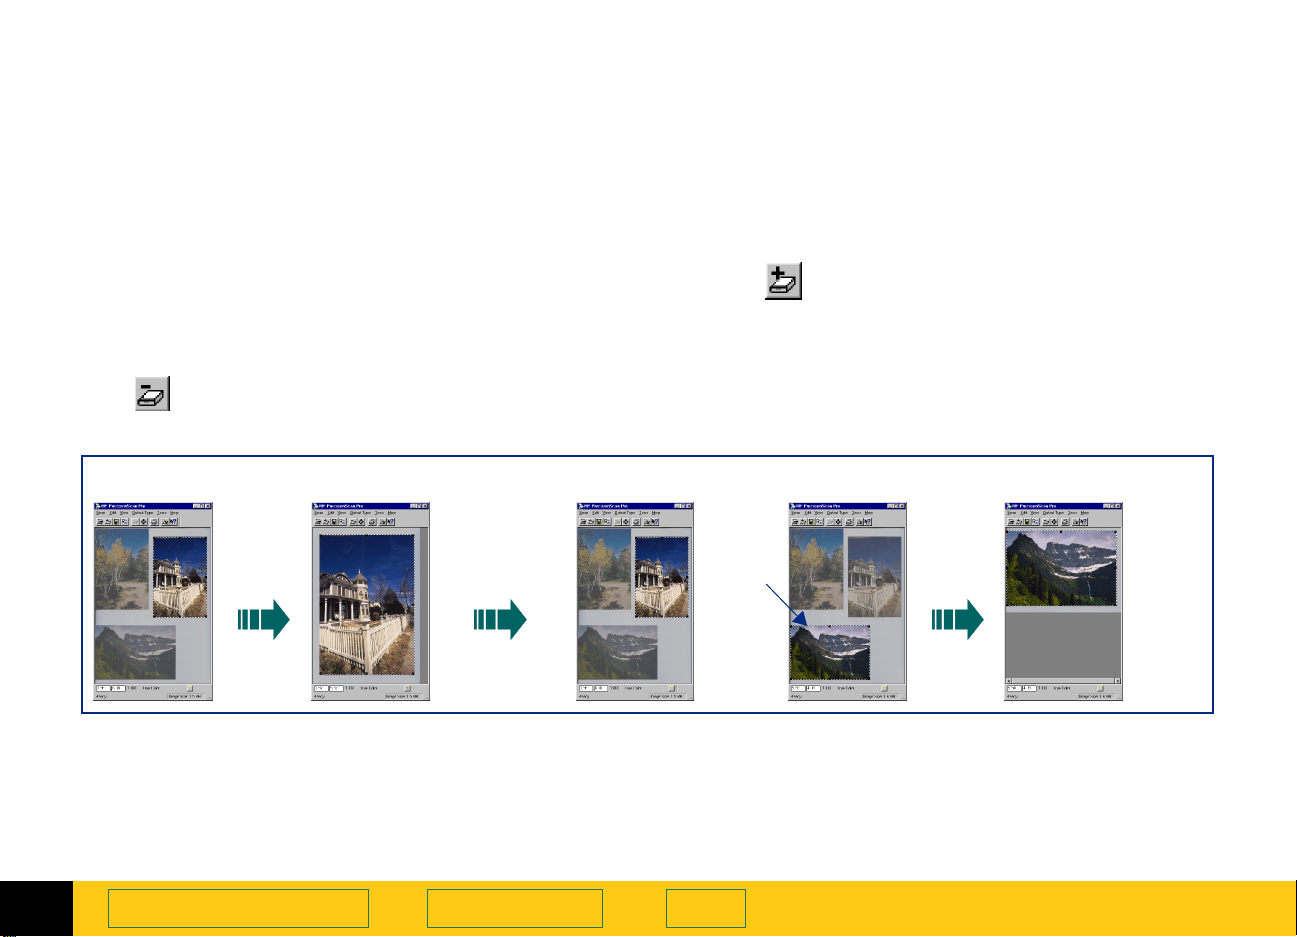
Return to the preview image (Undo Zoom)
+$%&
After you have used the
view of the selection area, you can use the
command to view the preview image without
performing another
when you have several pictures on the scanner glass
and you want to use each one individually.
Preview
command to enlarge the
Zoom
Undo Zoom
scan. This can be useful
Using Undo Zoom
Use the
a different selection area in the preview image.
1
Undo Zoom
Click , the
– or –
Preview image
command when you want to create
Undo Zoom
button in the toolbar,
First zoomed image Preview image Preview image
➊➋➌
Zoom
Undo Zoom Click Zoom
from the
The preview image appears with all settings
preserved.
Select a different area of the preview image.
2
Click , the
3
– or –
from the
The scanner scans the selection area.
The view of the new selection area appears enlarged.
menu, choose
View
Zoom
menu, choose
Scan
Undo Zoom
button in the toolbar,
.
Zoom
Second zoomed image
.
3
Scanning pictures
Book Contents Index
➮
➮
PrecisionScan Pro
HP
User’s Guide
64
Page 65
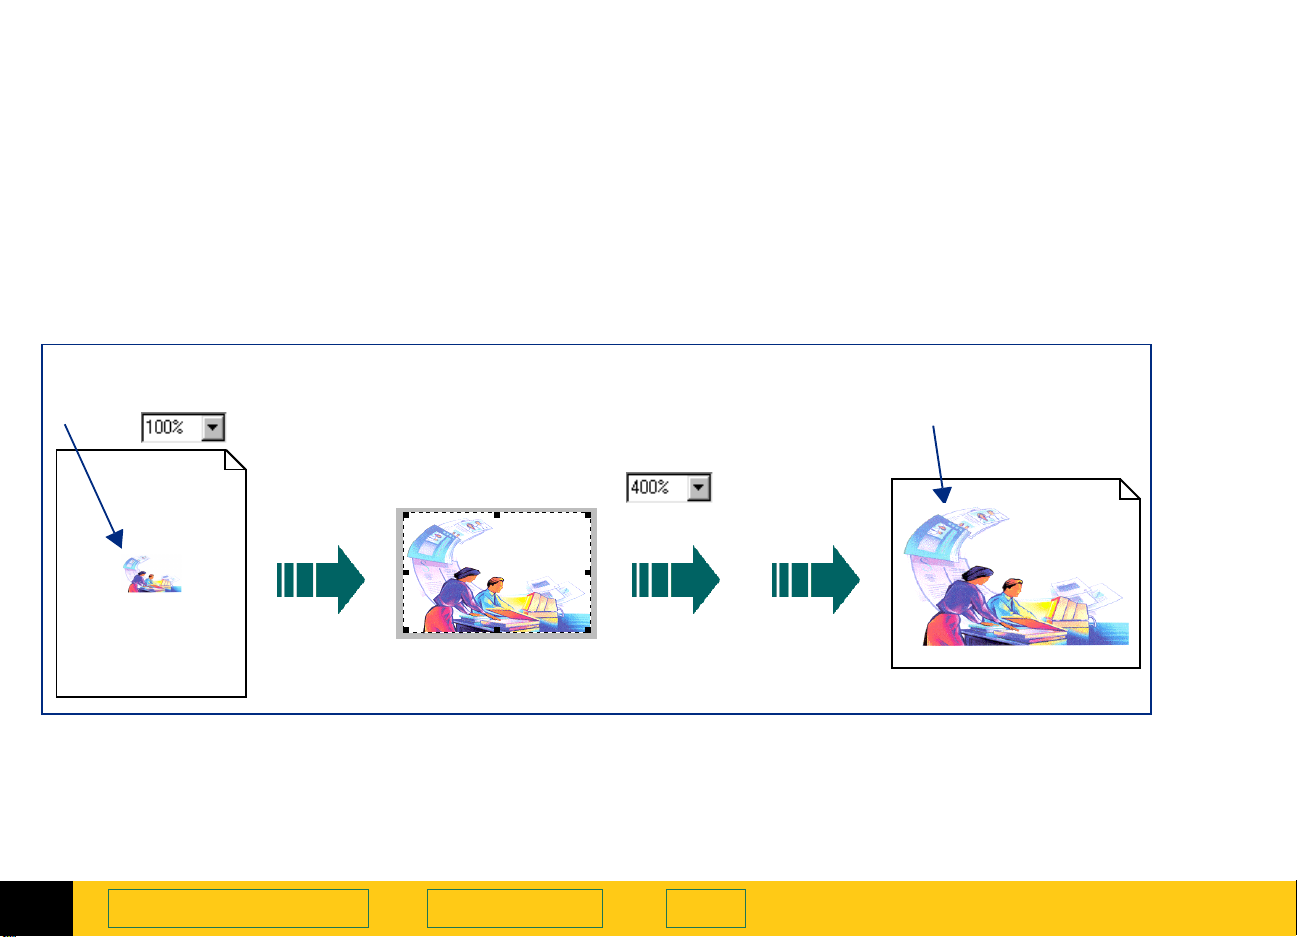
Set the output dimensions
+$%&
To get the best quality image, determine in advance the
physical dimensions you want for the image and set
those dimensions with the
scanning software. For example, if the original is
smaller than the size you need the image to be in
another program, resize it now. Resizing an image in
the destination program can cause the image to
become fuzzy or jagged.
Dimensions
➊➌
Original picture
Scale
Set units
tool in the
➋
Create a selection
area
The usual procedure for setting output dimensions
follows this order:
Choose the units of measurement you want to work
1
with (page
Create a selection area (page58) and adjust the size
2
of the selection area (page
Adjust the output dimensions (page67).
3
Set output
dimensions
by scaling
).
66
Print,
save,
copy, or
drag-anddrop
).
62
400% Scaled image
3
Scanning pictures
Book Contents Index
➮
➮
PrecisionScan Pro
HP
User’s Guide
65
Page 66
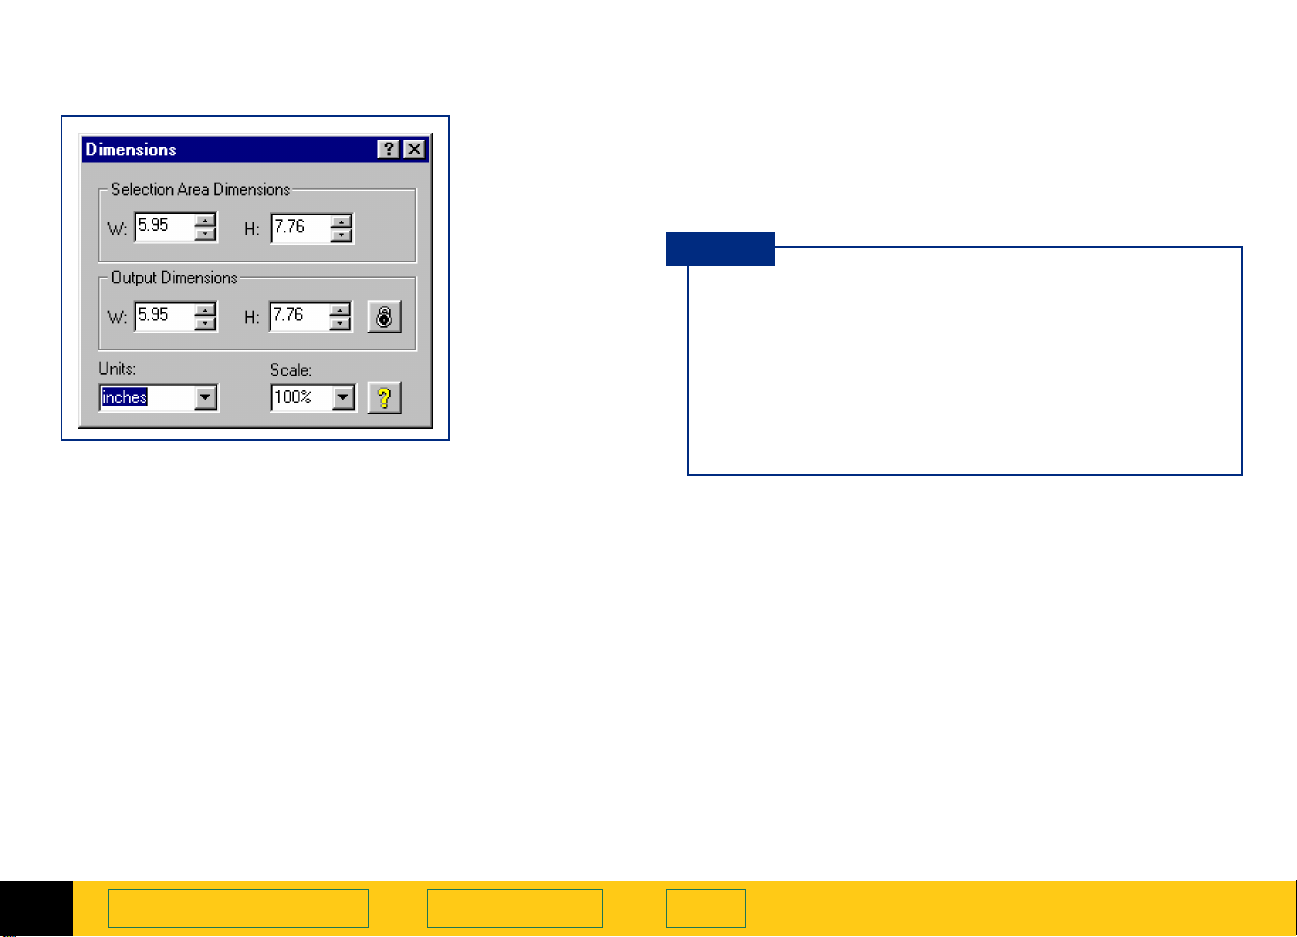
See page34 for more about the
Setting units
Dimensions
tool.
To set units
Create a selection area (page58).
1
Click the list button in the
2
Dimensions
tool and select a unit of measurement.
field of the
Units
TIP
When you change units:
the output width value in both
■
changes
the output height value in both
■
changes
the output width value in the info bar changes
■
the output height value in the info bar changes
■
Width
Height
fields
+$%&
fields
The
measurement for the
Selection Area Dimensions
areas. The units available are:
inches
■
centimeters
■
points
■
pixels
■
3
field in the
Units
Scanning pictures
Dimensions
Width
and
and the
tool sets the units of
Height
fields in the
Output Dimensions
Book Contents Index
➮
➮
PrecisionScan Pro
HP
User’s Guide
66
Page 67
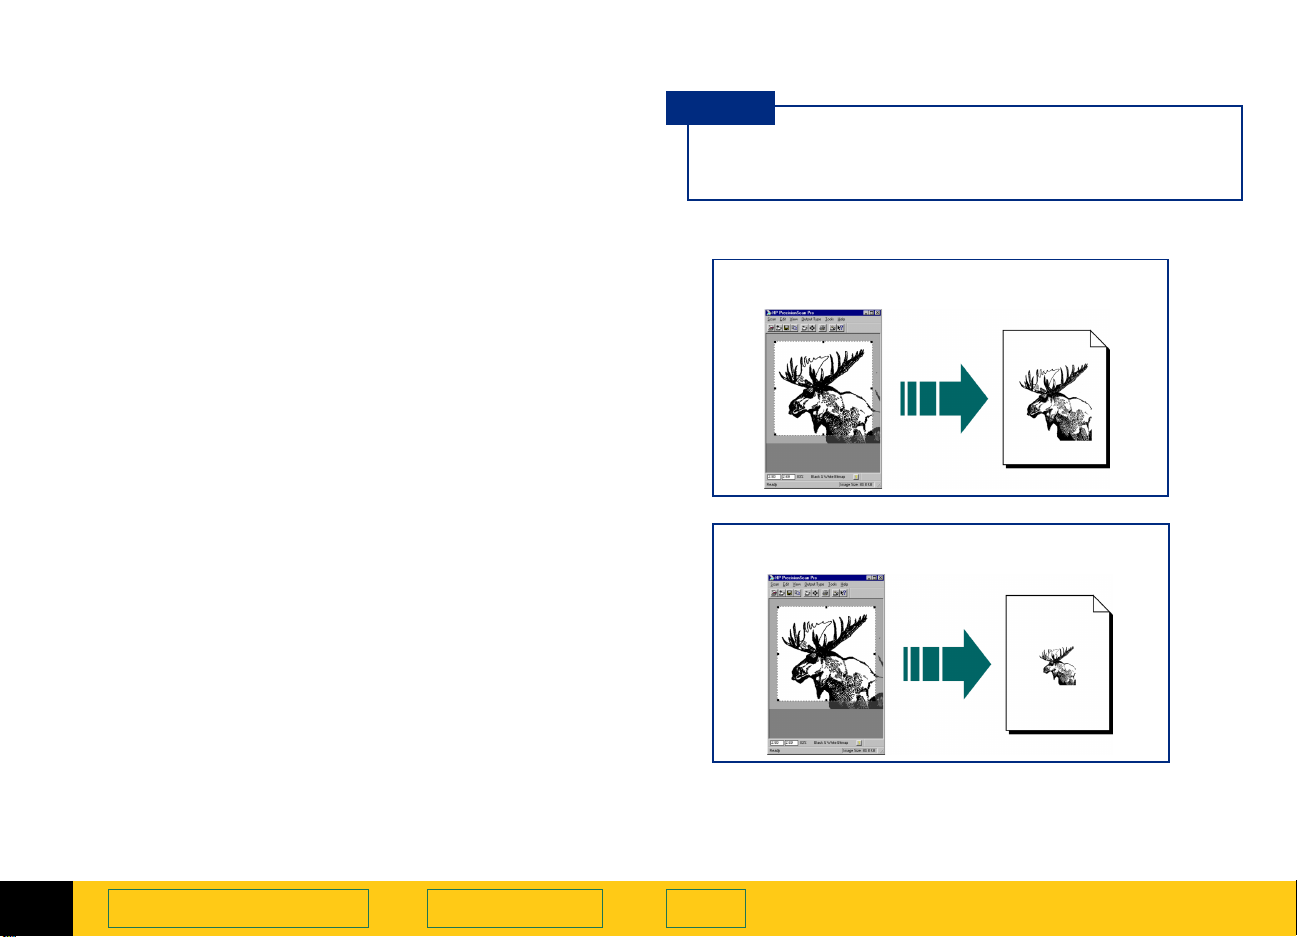
Scaling output as a percentage of the original
The
when you know approximately how big you want the
final image to be.
For example, when you want the image to be half the
size of the original, set the value in the
50%. Or if you want the final image to be twice the size
of the original, set the
Create a selection area (page58).
1
Click the list button in the
2
percentage
-or-
field is useful for setting output dimensions
Scale
Scale
value to 200%.
Scale
field and select a
Scale
value to
TIP
When you change the
the image change in the preview area.
Image output when
Scale
value, you will not see
Scale
is set to 100%
+$%&
type a value in the
The new output width appears in the
the
Output Dimensions
The new output height appears in the
the
Output Dimensions
The new scale percentage appears in the
and in the info bar.
The new image size displays in the
the status bar.
The selection area remains the same.
3
Scanning pictures
field, then press
Scale
area and in the info bar.
area and in the info bar.
.
Enter
field in
Width
Height
Image Size
Book Contents Index
field in
Scale
field
box in
Image output when
➮
PrecisionScan Pro
HP
➮
is set to 50%
Scale
User’s Guide
67
Page 68

Typing values for output width and height
+$%&
Locking values for output dimension
You can type the output dimensions when you know
exactly how big you want the final image to be.
Create a selection area (page58).
1
Click in the
2
of the
width
Press
3
– or –
click in the
and type the value for the height, then press
Enter
•
•
•
•
•
Dimensions
or
Tab
Height
.
The new output width appears in the
the
Output Dimensions
The new output height appears in the
of the
The new scale percentage appears in the
and in the info bar.
The new image size displays in the
in the status bar.
The selection area remains the same.
Output Dimensions
Width
Enter
field of the
tool and type the value for the
,
field of the
Output Dimensions
Output Dimensions
Tab
field of
Width
area and in the info bar.
Height
area and in the info bar.
Image Size
field
Scale
area
area
or
field
box
You can lock the output dimensions you have defined
so you can change the size of the selection area without
changing the output dimensions.
Create a selection area (page58).
1
Set the values for width and height in the
2
Dimensions
Click .
3
Adjust the size of the selection area (see page62).
4
The selection area will be resized proportionally.
The output dimensions remain the same.
area of the
Dimensions
tool.
Output
3
Scanning pictures
Book Contents Index
➮
➮
PrecisionScan Pro
HP
User’s Guide
68
Page 69
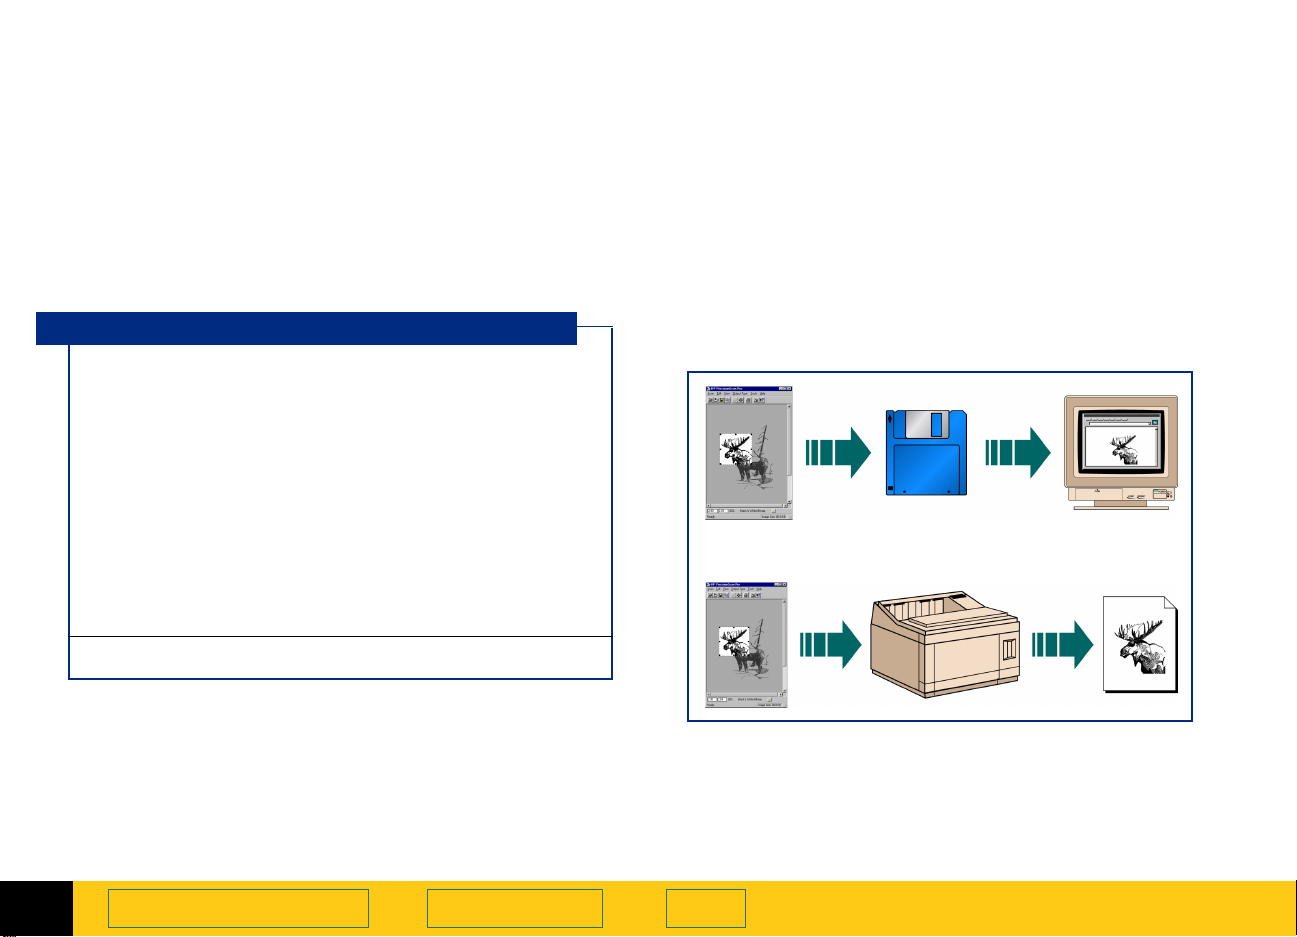
Choose an output type
+$%&
The output type selected in the
determines the bit depth and color palette applied to
the final scan of pictures and drawings, but not for
images that will be converted to text. The table on
page
output type that is appropriate for images of pictures
and drawings.
lists bit depths and color palettes for each
71
Output Type
menu
Output types for pictures
True Color
Grayscale
Black & White
Bitmap (raster),
Scalable (vector)
256 Color
Web Palette
System Palette
Optimized Palette
Spot Color
24-bit, millions of colors
8-bit, 256 shades of gray
1-bit black and white
8-bit, 256 colors
8-bit, 256 colors
However, the output type selected by the scanning
software may not be the most appropriate for the way
you will use the image. For example, when you want to
print the image of a color photograph on a black and
white printer, you may want to set the output type to
Grayscale
Some output types are more suitable for images that
will be displayed on a monitor, others are more
suitable for printing.
.
The scanning software automatically selects an
appropriate output type based on the contents of the
selection area. The current output type setting displays
in the info bar of the scanning software window.
3
Scanning pictures
Book Contents Index
The table on page
output type for various types of originals.
lists results you can get with each
71
➮
➮
PrecisionScan Pro
HP
User’s Guide
69
Page 70

Changing the output type
Create a selection area (page58).
1
From the
2
for the image of the picture you scanned.
Make your output type choice based on:
whether the image will be displayed on a monitor
•
or printed in hardcopy
how many colors you want in the final scan
•
file size
•
After you select an output type from the
menu:
you will see the image change in the preview area
•
the new output type displays in the info bar
•
the new image size displays in the status bar
•
a new sharpening level may appear in the
•
Level
a new value may appear in the
•
tool
Output Type
tool
menu, choose an output type
Output Type
Output Resolution
Sharpen
TIP
For best results with images that will be used on
256-color display monitors, do not use the
Optimized Palette
When an optimized palette is used in an image:
that palette is unique to that image and the
■
unique palette colors are applied to the window
that is displaying the image
colors in other windows that are displayed at the
■
same time will be corrupted, because those other
windows use a standard, system palette
the window displaying the image with the
■
optimized palette will be temporarily rendered
with fewer colors when focus changes to a
different window
output type.
256 Color
+$%&
3
Scanning pictures
Book Contents Index
➮
➮
PrecisionScan Pro
HP
User’s Guide
70
Page 71
Suggestions for choosing output type
+$%&
Type of original
Output Type
True Color
millions of colors (24-bit color)
Grayscale
8-bit (256 shades of gray)
Black & White
1-bit black and
white
(only black
and white)
256 Color
8-bit color
(256 shades of
color)
Bitmap (raster)
Scalable (vector
Web Palette
System Palette
Optimized Palette
Color
photograph
best color image for printing one-color tint image for printing
grayscale image for printing or displaying on a monitor
black and white raster image for printing or displaying on a monitor; not
appropriate for resizing in another program
) scalable black and white vector image for resizing in another program
best color for displaying images on
a Web page
best color for displaying wallpaper,
multiple images, or a presentation
on a monitor
best for selecting the colors closest
to those in the image
Color
drawing
Black and white
photograph
one-color tint image for displaying on
a Web page
one-color tint image for displaying a
presentation on a monitor
Black and white
drawing
3
Spot Color
Scanning pictures
not
recommended
Book Contents Index
eliminates small
variations in a
solid color block
➮
➮
not recommended
PrecisionScan Pro
HP
User’s Guide
71
Page 72

+$%&
Adjusting images of
pictures
4
Tools for making adjustments
73
Sharpen
75
Adjust exposure
77
Adjust color
87
Set output resolution
90
Set threshold for black and white bitmaps
92
Set color channel for black and white bitmaps
94
Invert options
96
➮
➮
4
Page 73

Tools for making adjustments
+$%&
The tools in the scanning software can be used to
adjust the image of a picture before you save, copy,
drag-and-drop, or print the image.
After you have selected an output type (page
cropped the image by creating a selection area
(page
to use are:
), the adjustments you can make and the tools
58
69
) and
Adjustment Tool
sharpening
■
exposure
■
color
■
resolution
■
black and white
■
threshold
invert
■
Sharpen Level
Exposure Adjustment
Color Adjustment
Output Resolution
Black & White Threshold
Invert options
, page
page96,
75
, page
, page
, page
77
87
90
, page
TIP
To get the best scanned image, use the tools in the
scanning software to make adjustments instead of
making adjustments in another program.
92
How output type affects which image
adjustments you can make
The tools available for making adjustments to an
image of a picture depend on the
selected.
Output Type
Adjustments for color output types
An image with the
or a
256 Color
be adjusted for:
sharpening
■
exposure
■
color
■
resolution
■
output type can
True Color
you have
4
Adjusting images of
pictures
Book Contents
Index
➮
➮
PrecisionScan Pro
HP
User’s Guide
73
Page 74

Adjustments for Grayscale output type
An image with the
output type can be adjusted
for:
sharpening
■
exposure
■
resolution
■
Grayscale
+$%&
Adjustments for Black & White Bitmap (raster)
output type
An image with the
White Bitmap (raster)
type can be adjusted for:
sharpening
■
resolution
■
black and white threshold
■
Adjustments for Black & White Scalable (vector)
output type
Black &
output
4
Adjusting images of
pictures
Book Contents
An image with the
White Scalable (vector)
type cannot be adjusted with
any of the tools.
Black &
output
➮
Index
➮
PrecisionScan Pro
HP
User’s Guide
74
Page 75

Sharpen
The right amount of sharpening enhances detail in the
scanned image. Too much or too little sharpening can
accent flaws and emphasize undesirable patterns in
images of photographs, drawings, or line art.
If the original picture is not sharp, or you want to create
a special effect, you can increase or decrease
sharpening with the
level you select will be applied to the final scan.
Sharpen Level
tool. The sharpen
+$%&
TIP
The scanning software automatically selects the
optimal sharpen level for the output type applied
to the image.
See page
4
Medium
Adjusting images of
Grayscale
sharpen level
for more about the
33
pictures
output type
Extreme
sharpen level
Sharpen Level
tool.
Book Contents
Medium
Index
True Color
sharpen level
➮
PrecisionScan Pro
HP
➮
output type
sharpen level
High
User’s Guide
75
Page 76

Changing the sharpen level
From the
1
The
Sharpen Level
Click the list box button, drag to the sharpen level
2
you want, then release the mouse button,
– or –
Click in the sharpen level text field and type the first
letter of a sharpen level.
The new sharpen level is applied.
•
The result of the change to the sharpen level can
•
be seen in the preview area.
The
•
AutoSharpen
becomes active.
Black & White Bitmap (raster)
menu, select
Tools
Sharpen Level
tool appears (see page33).
button in the
Sharpen Level
output type
.
tool
TIP
When you change the sharpen level for the
■
image of a picture, you will see the image
change in the preview area.
If you change the sharpen level in the
■
tool and then change the output type, you
Level
can apply
for the new output type by clicking .
AutoSharpen
Sharpen
Applying the default sharpen level
Click , the
■
tool.
The optimal sharpen level determined by the
•
scanning software is applied to the
tool.
The result of the change to the sharpen level can
•
be seen in the preview area.
AutoSharpen
button in the
Sharpen Level
Sharpen Level
+$%&
4
sharpen level
None
Adjusting images of
pictures
Extreme
sharpen level
Book Contents
Index
➮
➮
PrecisionScan Pro
HP
User’s Guide
76
Page 77

Adjust exposure
+$%&
The scanning software automatically selects the
optimal exposure settings for the output type applied
to the image of a picture. However, if the original
picture needs the brightness or contrast adjusted, you
can use the
Exposure Adjustment
tool to increase or
decrease:
highlights (see page78)
■
shadows (see page79)
■
midtones (gamma) (see page80)
■
clipping of white and black pixels (see page83)
■
output levels for white and black pixels (see page85)
■
The exposure settings you select will be applied to the
final scan.
You can also use the
view the distribution of pixels (see page81)
■
read the RGB values of the pixels in the image (see
■
page
The
).
81
Exposure Adjustment
Exposure Adjustment
tool is active for the color and
tool to:
grayscale output types.
Using the Exposure Adjustment tool
From the
1
The
Exposure Adjustment
Refer to the following sections for using the
2
Adjustment
Changing highlights
■
Changing shadows
■
Changing midtones (brightness)
■
Checking for clipping of pixels
■
Setting pixel output levels
■
menu, select
Tools
tool:
tool appears. (See page36.)
on page
on page
on page
Exposure Adjustment
78
79
on page
on page
80
83
85
Applying the default exposure settings
Click the
■
The optimal exposure settings determined by the
•
scanning software are applied to the
Adjustment
The results of the changes to the exposure settings
•
can be seen in the preview area.
button in the
Auto
tool.
Exposure Adjustment
Exposure
.
Exposure
tool.
4
Adjusting images of
pictures
Book Contents
Index
➮
➮
PrecisionScan Pro
HP
User’s Guide
77
Page 78

Changing highlights
The
Highlights
lets you select the lightest printable value in the image.
This gives coverage to areas that would otherwise
remain the color of the paper. You may change
highlights to:
lighter to bring out details
■
darker to minimize details
■
The range for the number in the
the
Preference Controls
control in the
tab (see page53).
Exposure Adjustment
Highlights
field is set in
tool
+$%&
Bringing out details in light areas
To bring out details in the light areas of the image,
decrease the number in the
Click on the left side of the slider,
■
– or –
type a lower number in the
■
press
– or –
click the DOWN spin button next to the
■
field.
Tab
or
Enter
,
Highlights
Highlights
field:
field, then
Highlights
UP spin button
field
Highlights
control
slider
DOWN spin button
TIP
You can change the amount of tonal resolution
per color available for correction in the
Adjustment
4
tool (see page53).
Adjusting images of
pictures
Book Contents
Exposure
Index
Highlights
➮
➮
set at 215
PrecisionScan Pro
HP
Highlights
User’s Guide
set at 122
78
Page 79

Changing shadows
The
Shadows
lets you select the darkest printable value in the image.
This allows you to bring out detail in areas that would
otherwise become black. You may make dark parts of
images:
lighter to bring out details
■
darker to minimize details
■
The range for the number in the
the
Preference Controls
control in the
tab (see page53).
Exposure Adjustment
Shadows
field is set in
tool
+$%&
Bringing out details in dark areas
To bring out details in the dark areas of the image,
decrease the number in the
Click on the left side of the slider,
■
– or –
type a lower number in the
■
or
Tab
– or –
click the DOWN spin button next to the
■
The result of the change to
the preview area.
Enter
,
Shadows
Shadows
Shadows
field:
field, then press
Shadows
can be seen in
field.
field
Shadows
control
slider
TIP
A
Shadows
generally produces an image with better
shadow detail.
4
value close to or at zero
Adjusting images of
pictures
UP spin button
DOWN spin button
Book Contents
Index
Shadows
➮
➮
set at 10
PrecisionScan Pro
HP
Shadows
User’s Guide
set at 3
79
Page 80
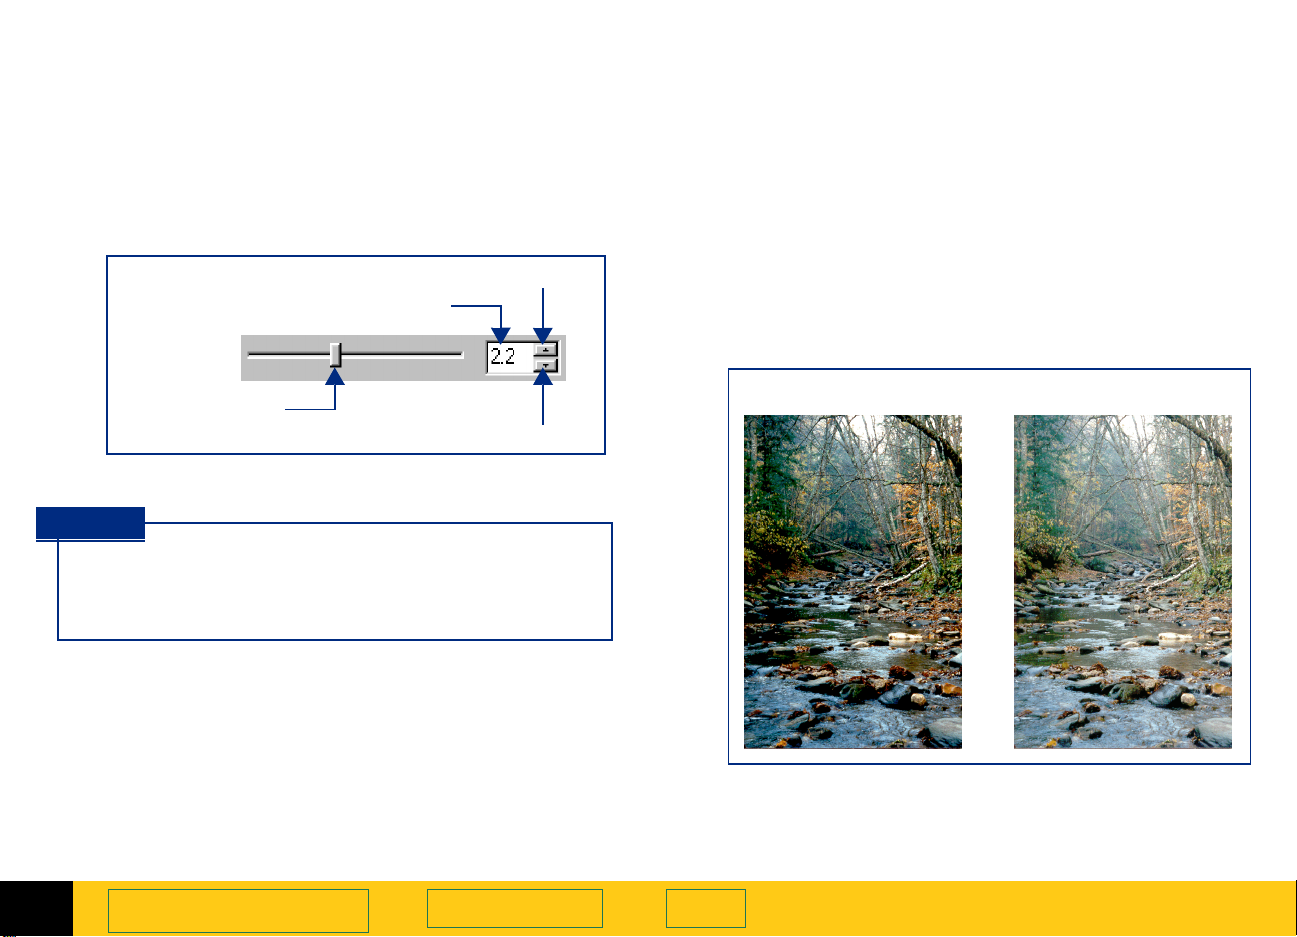
Changing midtones (brightness)
The
Midtones
lets you brighten or darken an image overall by
changing the gamma value.
The range for the number in the
4.0.
Midtones
control
TIP
If you will be sharing the image with others, the
Midtones
brightness of monitors varies.
control in the
slider
value 2.2 is recommended, since the
Exposure Adjustment
Midtones
field
DOWN spin button
field is 1.0 to
UP spin button
tool
+$%&
Brightening the image
To brighten the image overall, increase the number in
the
Midtones
Click on the right side of the slider,
■
– or –
type a higher number in the
■
press
– or –
click the UP spin button next to the
■
The result of the change to
the preview area.
Midtones
Tab
field:
or
Enter
set at 2.2
Midtones
,
Midtones
Midtones
field, then
Midtones
can be seen in
field.
set at 3.0
4
Adjusting images of
pictures
Book Contents
Index
➮
➮
PrecisionScan Pro
HP
User’s Guide
80
Page 81
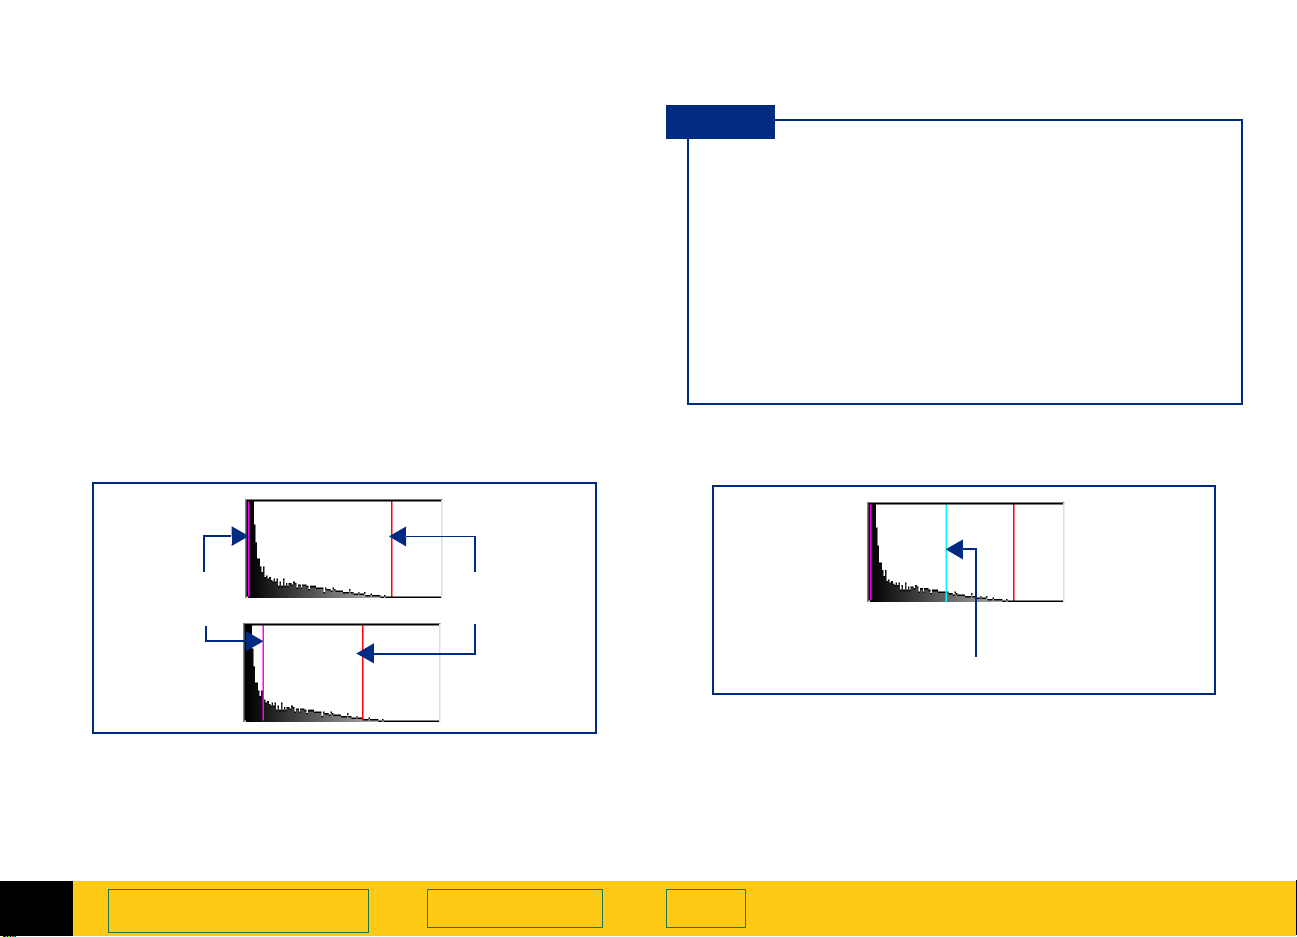
Pixel distribution histogram
+$%&
The histogram in the
graph of the distribution of pixels in the selection area.
The vertical lines in the histogram show the current
settings for
The magenta line in the histogram represents the
➊
current setting for
image.
The red line in the histogram represents the current
➋
setting for
The turquoise line appears in the histogram when
➌
either eyedropper pointer is positioned over the
image. It shows you where the pixels at that place in
the image occur in the histogram.
Shadows
Highlights
Exposure Adjustment
and
Highlights
Shadows
, the lightest areas in the image.
.
, the darkest areas in the
tool is a
TIP
Changing the settings for
■
Shadows
histogram.
Changing the selection area changes the graph
■
in the histogram.
The
■
histogram.
The graph in the histogram represents pixel
■
distribution in the input image, not in the image
that will be output.
➊➋
Shadows Highlights
Highlights
does not change the graph in the
Midtones
setting is not represented in the
➌
Pixels under the eyedropper pointer
and
4
Adjusting images of
pictures
Book Contents
Index
➮
➮
PrecisionScan Pro
HP
User’s Guide
81
Page 82

RGB Meter
You can view the RGB values and pixel color for any
spot in a color or grayscale image with the
the
Exposure Adjustment
RGB values
➊
Pixel color
➋
tool.
RGB Meter
➊ ➋
Using the RGB Meter
Click either eyedropper button in the
1
Adjustment
When you click , the pointer changes to this: .
■
When you click , the pointer changes to this: .
■
tool:
Exposure
in
Move the pointer over the image.
2
The RGB values and pixel color appear in the
•
.
Meter
The turquoise line appears in the histogram.
•
Click the same eyedropper button again.
3
The
•
•
RGB Meter
The pointer returns to normal.
dims.
TIP
Do not click while the eyedropper pointer is over
the image unless you want to change the setting
for
Highlights
or
Shadows
.
+$%&
RGB
4
Adjusting images of
pictures
Book Contents
Index
➮
➮
PrecisionScan Pro
HP
User’s Guide
82
Page 83
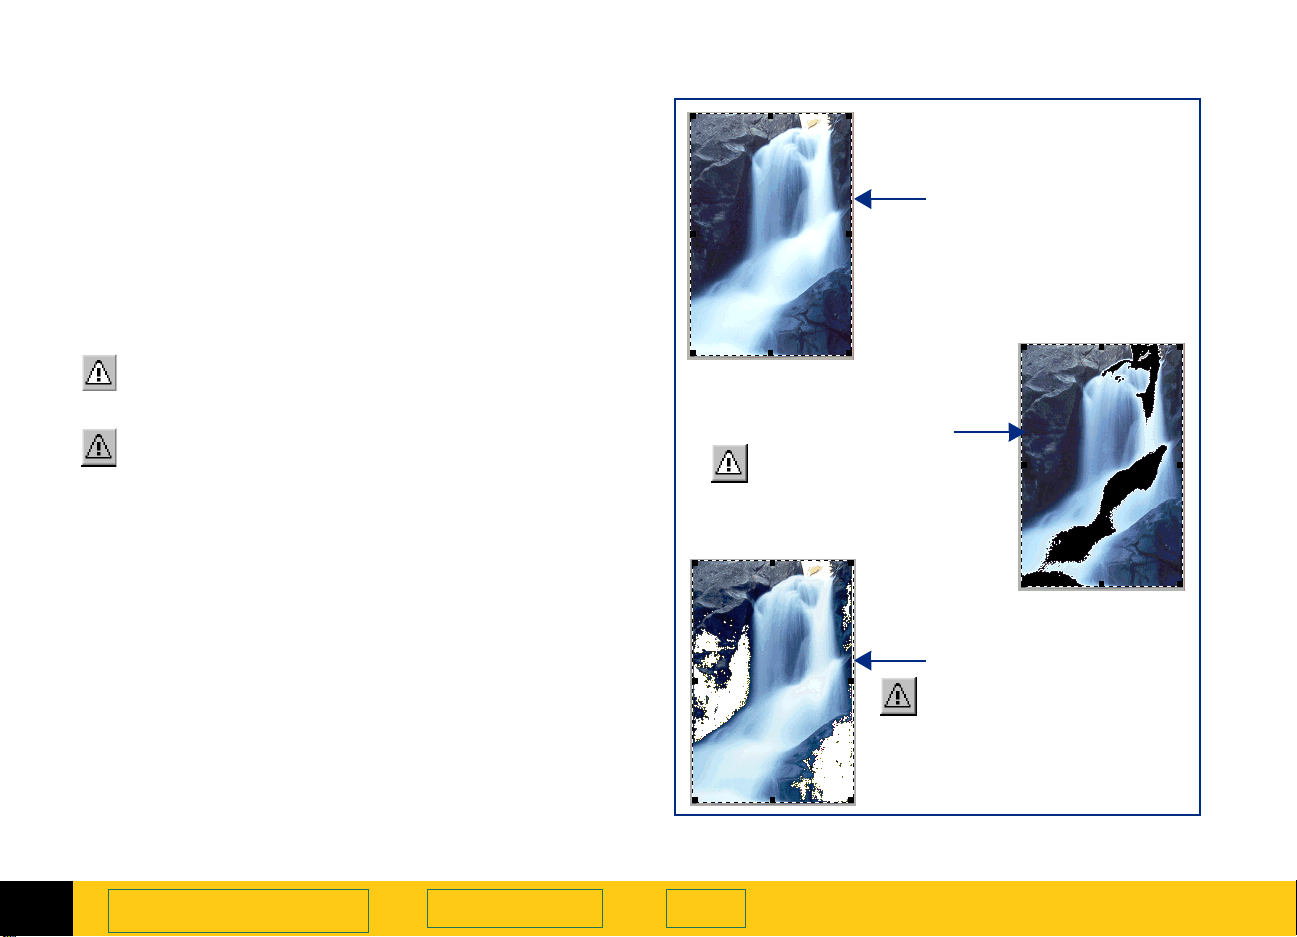
Checking for clipping of pixels
+$%&
The
Exposure Alert
tool warn you of areas of a color or grayscale image
that contain no detail in the lightest and darkest areas
of the image. The lightest area will print as the color of
the paper, with no ink or toner, and therefore no detail.
The darkest areas will print with the blackest color of
ink or toner, saturating the area with the same color of
black with no visible detail.
The
Exposure Alert
tool are:
– for viewing white pixels that will be clipped in
■
the final scan
– for viewing black pixels that will be clipped in
■
the final scan
buttons in the
buttons in the
Exposure Adjustment
Exposure Adjustment
Appearance when
neither
button is on
Appearance when
the white
button, is turned on
Exposure Alert
Appearance when
the black
button, is turned on
Exposure Alert
Exposure Alert
4
Adjusting images of
pictures
Book Contents
Index
➮
➮
PrecisionScan Pro
HP
User’s Guide
83
Page 84

Viewing and removing clipped light areas
+$%&
Viewing and removing clipped dark areas
You can adjust the light or dark areas to add detail back
to them.
Click , the white
1
The light areas in the image that will print as pure
white appear black in the preview area.
In the
2
repeatedly until the clipped pixels disappear from
the image.
The result of the change to
the preview area.
Click , the white
3
The
Highlights
Exposure Alert
Exposure Alert
control, click the UP spin button
Highlights
Exposure Alert
button turns off.
button.
can be seen in
button again.
Click , the black
1
The dark areas in the image that will print as pure
black appear white in the preview area.
In the
2
repeatedly until the clipped pixels disappear from
the image.
The result of the change to
the preview area.
Click , the black
3
The
Shadows
Exposure Alert
Exposure Alert
control, click the DOWN spin button
Exposure Alert
button turns off.
button.
Shadows
button again.
can be seen in
4
Adjusting images of
pictures
Book Contents
Index
➮
➮
PrecisionScan Pro
HP
User’s Guide
84
Page 85
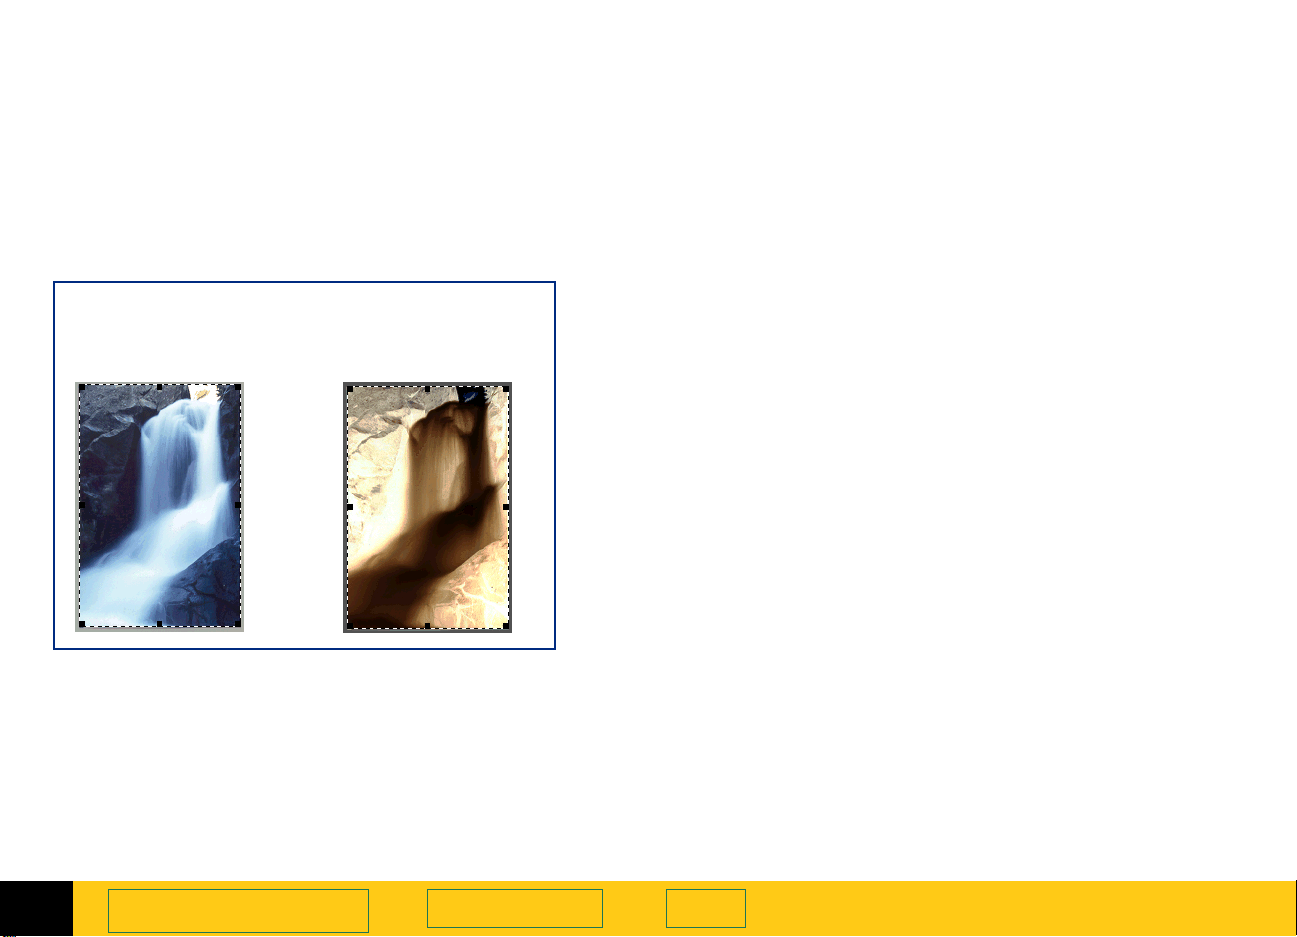
Setting pixel output levels
The
Output Levels
tool lets you create interesting effects for images of
pictures.
When you change the
the
image reverse.
output level value to 255, the colors in the
Black
control in the
output level value to 0 and
White
Exposure Adjustment
+$%&
Changing output levels
Use the
tool to create interesting effects in images of pictures.
The ranges for the numbers in the
fields are set in the
1
Output Levels
Click the
Adjustment
Output Levels
tool to select it.
control in the
Preference Controls
checkbox in the
Exposure Adjustment
White
and
tab (see page53).
Exposure
Black
Appearance with
control = 255
White
control = 0
Black
Appearance with
control = 0
White
control = 255
Black
White
or
and
Tab
Black
field.
The
the
Exposure Adjustment
Click on the one side of a slider,
2
– or –
type a different number in the
then press
– or –
click the UP or the DOWN spin button next to the
White
The result of the changes to
in the preview area.
output levels controls appear in
Black
tool.
or
or
Enter
White
,
Output Levels
Black
can be seen
field,
4
Adjusting images of
pictures
Book Contents
Index
➮
➮
PrecisionScan Pro
HP
User’s Guide
85
Page 86
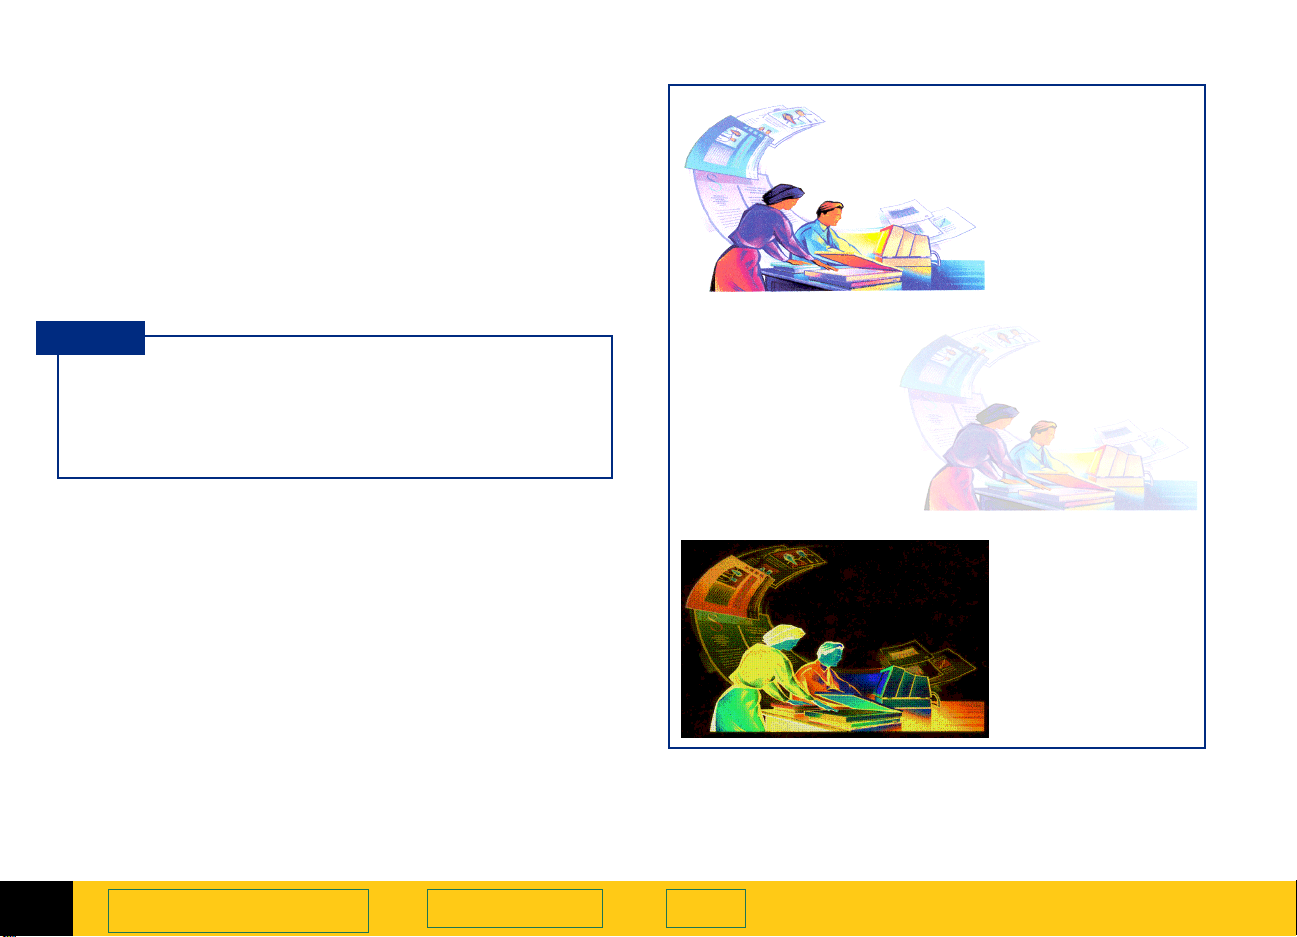
If you want to create an image to use as a backdrop for
dark text on a light background, such as an overhead
transparency, increase the
the image is as faint as you like.
If you want to create an image to use as a backdrop for
light text on a dark background, such as with color
slides, decrease the
image is as faint as you like.
output level value until the
White
output level value until
Black
TIP
Appearance with
control = 255
White
control = 0
Black
+$%&
Click the
tool to change all the exposure settings to the
optimal exposure settings determined by the
scanning software
Adjusting images of
4
button in the
Auto
pictures
Exposure Adjustment
Book Contents
Appearance with
control = 255
White
control = 200
Black
➮
Index
➮
PrecisionScan Pro
HP
Appearance with
control = 0
White
control = 255
Black
User’s Guide
86
Page 87
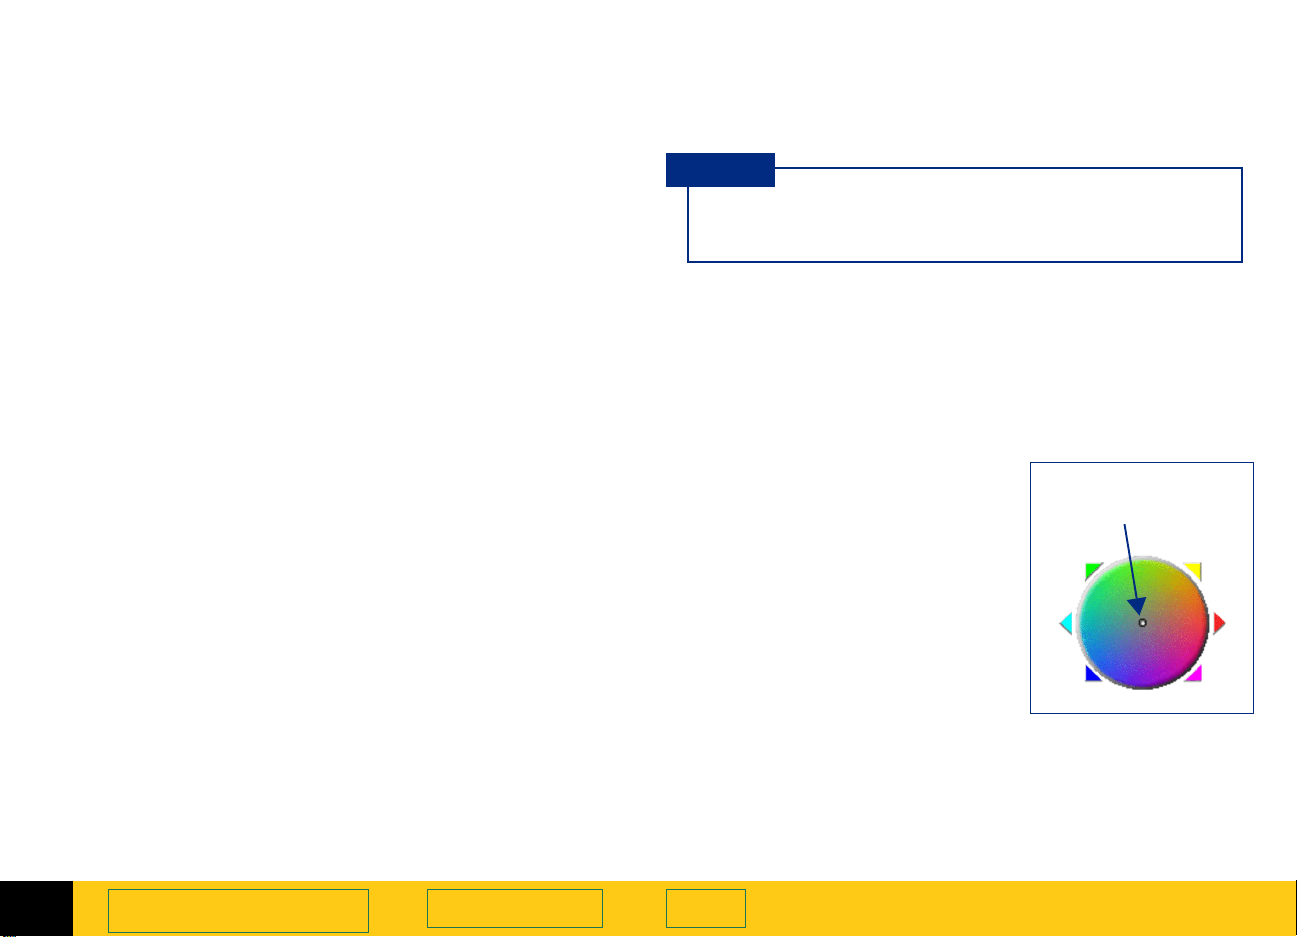
Adjust color
The scanning software automatically selects the
optimal color settings for any color output type applied
to the image. If the overall color in the original picture
is out of balance, or the picture needs more or less
color, you can use the
or decrease:
color balance, or hue (see page87)
■
color saturation (see page88)
■
The
Color Adjustment
types:
True Color
■
256 Color Web Palette
■
256 Color System Palette
■
256 Color Optimized Palette
■
From the
1
The
Change the color balance or saturation as described
2
below.
The color settings you select will be applied to the final
scan.
Tools
Color Adjustment
Color Adjustment
tool is active for these output
menu, select
tool appears (see page37).
Color Adjustment
tool to increase
.
+$%&
TIP
Adjust image color for photographs that are faded
or have too much of one color.
Changing color balance
Use the
change color balance (hue).
Color Wheel
Moving the indicator circle
When the image has too much
of one color, move the
indicator circle toward the
opposite side (opposite color)
on the
■
■
Color Wheel
drag the indicator circle with
the mouse, or
click a color’s triangle
The result of the change to
the hue can be seen in the
preview area.
in the
.
Color Adjustment
Indicator circle in
the
Color Wheel
tool to
4
Adjusting images of
pictures
Book Contents
Index
➮
➮
PrecisionScan Pro
HP
User’s Guide
87
Page 88
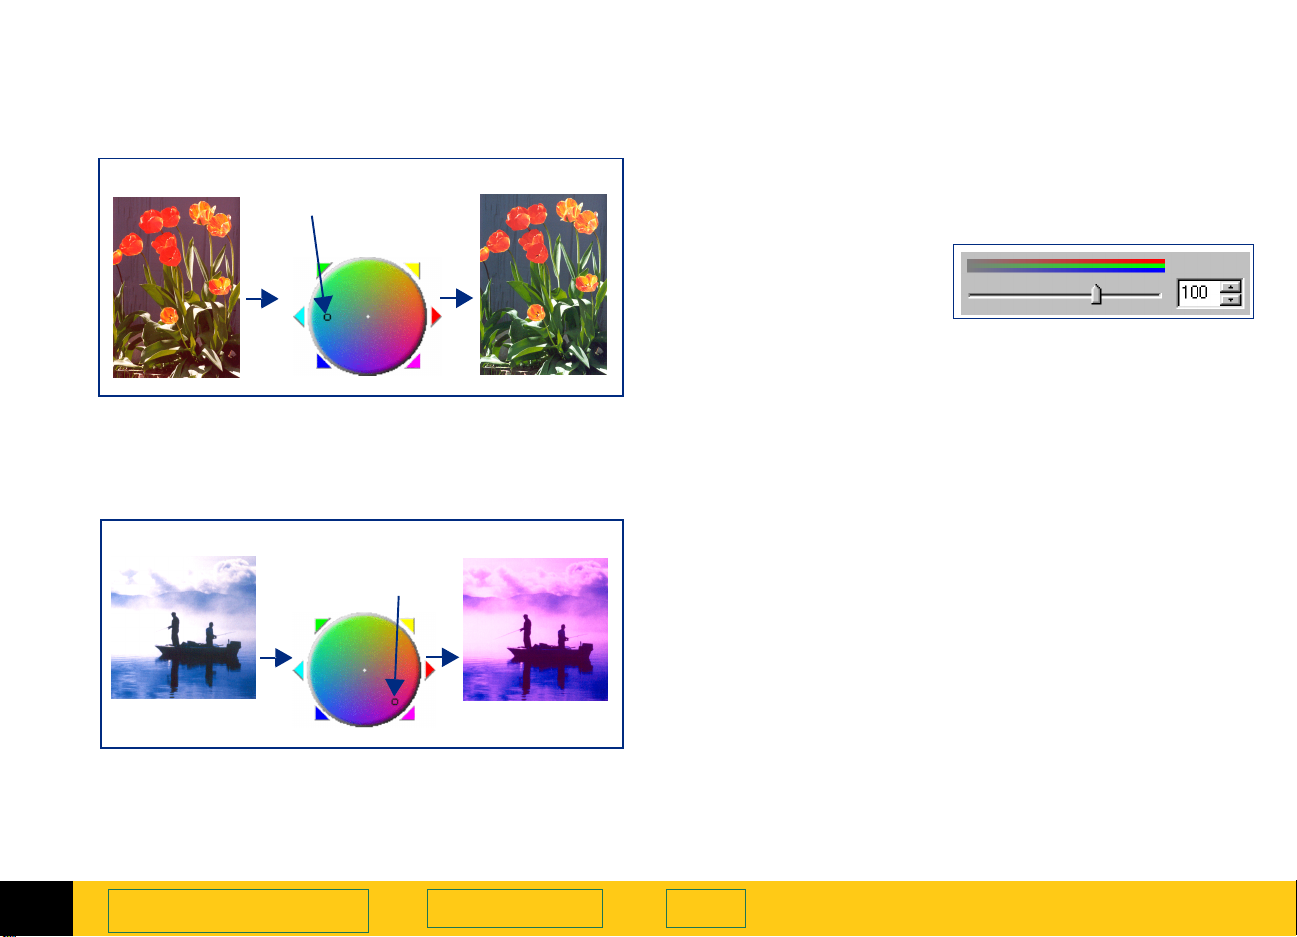
To correct the excess red in the picture below, the
indicator circle can be moved into the cyan area of the
Color Wheel
.
Very red
Less red
moved
indicator circle
+$%&
Changing color saturation
You can adjust the amount of color in the image with
the
Saturation
The higher the number in the
vivid the colors will be in the image. A low number in
the
Saturation
The range for the
number in the
field is 0 to 150.
The result of the change to the saturation value can be
seen in the preview area.
Increasing the amount of color
slider control in the
field gives the image diluted colors.
Saturation
Color Adjustment
Saturation
field, the more
tool.
The hue of an image can be changed to create a
different effect.
4
Original
moved
indicator circle
Adjusting images of
pictures
Special effect
Book Contents
Increase the number in the
colors in the image more vivid:
Click on the right side of the slider,
■
– or –
type a higher number in the
■
press
– or –
click the UP spin button next to the
■
Tab
or
Enter
,
Saturation
Saturation
Decreasing the amount of color
Decrease the number in the
color in the image:
Click on the left side of the slider,
■
– or –
type a lower number in the
■
press
– or –
Tab
or
Enter
,
Saturation
Saturation
➮
Index
➮
PrecisionScan Pro
HP
field to make
field, then
Saturation
field to dilute the
field, then
User’s Guide
field.
88
Page 89

click the DOWN spin button next to the
■
field.
Saturation
set at 100
Saturation
+$%&
Applying the default color settings
Click the
■
The optimal color settings determined by the
•
scanning software are applied to the
Adjustment
The results of the changes to the color settings can
•
be seen in the preview area.
button in the
Auto
tool.
Color Adjustment
Color
tool.
4
Saturation
Adjusting images of
set at 150
pictures
Saturation
set at 75
Book Contents
Index
➮
➮
PrecisionScan Pro
HP
User’s Guide
89
Page 90

Set output resolution
+$%&
To keep file size small, shorten printing time, and use
less memory, use the lowest possible output resolution
setting for an image of a picture.
The output resolution for the image in the selection
area is set in the
The
Output Resolution
Output Resolution
tool is active for these output
tool.
types:
True Color
■
Grayscale
■
256 Color Web Palette
■
256 Color System Palette
■
256 Color Optimized Palette
■
Black & White Bitmap (raster)
■
Spot Color
■
From the
1
The
Output Resolution
appears (see page
Read the following sections
2
menu, select
Tools
31
tool
).
Output Resolution
.
before you change the value for
output resolution in the
Output Resolution
The output resolution setting displayed in the
Resolution
tool will be applied to the final scan.
tool.
Output
Resolution settings for photographs
Follow these guidelines to set output resolution for
color or black and white photographs.
Use 75 as the output resolution setting when:
■
you plan to display the image on a monitor in a
•
Web page
the output type is
•
System Palette
Grayscale
TIP
For Web page images, higher resolution does not
improve image quality, but does increase the
number of bytes required to store the image.
■
■
Use
•
•
Use
•
•
•
as the output resolution setting when:
100
you plan to print the image on a 300 DPI printer
the output type is
Palette
, or
Grayscale
as the output resolution setting when:
200
you plan to print the image on the HP PhotoSmart
printer or a 600 DPI printer
the output type is
Palette
, or
Grayscale
you will not be enlarging the photograph (use a
higher resolution if you scale the image to greater
256 Color Web Palette, 256 Color
,
256 Color Optimized Palette
True Color, 256 Color Optimized
True Color, 256 Color Optimized
, or
4
Adjusting images of
pictures
Book Contents
Index
➮
➮
PrecisionScan Pro
HP
User’s Guide
90
Page 91

than 100% of the original’s size)
■
Use
•
•
•
as the output resolution setting when:
300
you plan to print the image on a 1200 DPI printer
the output type is
Palette
, or
Grayscale
True Color, 256 Color Optimized
you will not be enlarging the photograph (use a
higher resolution if you scale the image to greater
than 100% of the original’s size)
Resolution settings for drawings
Follow these guidelines for setting output resolution
for images of color or black and white drawings.
Use 75 as the output resolution setting when:
■
you plan to display the image on a monitor in a
•
Web page
the output type is
•
System Palette
Grayscale
Use
■
■
300
you plan to print the image on a 300 DPI printer
•
the output type is
•
Grayscale
Use
600
you plan to print the image on the HP PhotoSmart
•
, or
as the output resolution setting when:
, or
as the output resolution setting when:
printer or a 600 DPI printer
the output type is
•
, or
as the output resolution setting when:
■
Use
Grayscale
1200
256 Color Web Palette, 256 Color
,
256 Color Optimized Palette
Black & White Bitmap (raster)
256 Color Optimized Palette
Black & White Bitmap (raster)
256 Color Optimized Palette
Black & White Bitmap (raster)
,
,
,
+$%&
you plan to print the image on a 1200 DPI printer
•
the output type is
•
Grayscale
, or
Black & White Bitmap (raster)
Applying the default resolution
Click , the
■
Resolution
The optimal resolution setting determined by the
•
scanning software is applied to the
Resolution
The result of the change to the resolution setting
•
cannot be seen in the preview area.
TIP
You can change the resolution settings available in
the
Resolution
AutoResolution
tool.
tool.
tool’s list box (see page52).
256 Color Optimized Palette
button in the
Output
Output
,
4
Adjusting images of
pictures
Book Contents
Index
➮
➮
PrecisionScan Pro
HP
User’s Guide
91
Page 92

Set threshold for black and white bitmaps
When you want to save a black and white image from a
color or black and white photograph, you can often
improve the result by changing the threshold for the
division between black and white pixels.
The black and white threshold can be changed with the
Black & White Threshold
Black & White Bitmap (raster)
for more about the
Applying the default threshold
Click the
■
tool.
The optimal black and white threshold setting
•
determined by the scanning software is applied to
the
Black & White Threshold
The result of the change to the threshold setting
•
can be seen in the preview area.
button in the
Auto
tool for an image that has the
output type. (See page38
Black & White Threshold
Black & White Threshold
tool.
tool.)
The
Black & White
Bitmap (raster)
type and a black
and white threshold
of 15 applied
output
Image of a color
photograph with
the
True Color
output type
+$%&
4
Adjusting images of
pictures
Book Contents
Index
➮
➮
PrecisionScan Pro
HP
User’s Guide
92
Page 93

Changing the black and white threshold
To bring out details in an image with the
Bitmap (raster)
Black & White Threshold
Scan a picture.
1
From the
2
The
Black & White Threshold
From the
3
Bitmap (raster)
The image changes to black and white.
Decrease the value in the
4
field:
click on the left side of the slider,
■
– or –
drag the slider to the left,
■
– or –
type a lower number in the
■
field, then press
– or –
click the DOWN spin button next to the
■
Threshold
The result of the change to the black and white
threshold setting can be seen in the preview area.
output type, decrease the number in the
field:
menu, select
Tools
Output Type
.
Tab
field.
menu, select
or
B & W Threshold
tool appears.
Black & White Threshold
Black & White Threshold
,
Enter
Black & White
.
Black & White
Black & White
+$%&
Image with the
output type
Threshold 49
The range for the number in the threshold field is set in
the
Preference Controls
TIP
Try changing the sharpen level to improve the
result when you are changing a color or black and
white photograph to a
image.
Black & White Bitmap (raster)
Threshold 127
(the default for
this image)
tab (see page53).
Black & White Bitmap (raster)
4
Adjusting images of
pictures
Book Contents
Index
➮
➮
PrecisionScan Pro
HP
User’s Guide
93
Page 94

Set color channel for black and white bitmaps
+$%&
When you want to save a black and white bitmap of a
picture that has been printed or photocopied on
colored paper, or want to create a special effect, you
can change the color channel used in the final scan.
Eliminating a color from the image
By changing the color channel setting in the
White Threshold
blue from the image (see page
Scan a picture.
1
From the
2
The
Black & White Threshold
From the
3
Bitmap (raster)
The image changes to black and white.
Decrease the value for the black and white threshold
4
(see page
tool you can eliminate red, green or
).
95
menu, select
Tools
Output Type
.
).
93
menu, select
B & W Threshold
tool appears.
Black & White
TIP
The
does not reset the color channel.
button in the
Auto
Black & White Threshold
Black &
.
tool
Select a color channel from the
5
box in the
To eliminate all the red in colored line art or from a
■
drawing printed on red or pink paper, choose the
channel. The red components of each pixel in the
image will be mapped to white and green and blue
components of each pixel will be mapped to black.
To eliminate all the green in colored line art or from a
■
drawing printed on green paper, choose the
channel. The green components of each pixel in the
image will be mapped to white and red and blue
components of each pixel will be mapped to black.
To eliminate all the blue in colored line art or from a
■
drawing printed on blue paper, choose the
channel. The blue components of each pixel in the
image will be mapped to white and red and green
components of each pixel will be mapped to black.
Black & White Threshold
Scan using channel
tool:
Green
Blue
list
Red
4
Adjusting images of
pictures
Book Contents
Index
➮
➮
PrecisionScan Pro
HP
User’s Guide
94
Page 95

Examples of changing color channels
+$%&
Images of a color drawing changed to the
Bitmap (raster)
color channels and black and white threshold settings
applied in the
Original with
type
Black & White Bitmap (raster)
type applied with
channel and
automatic
threshold (110)
Red
automatic threshold (110)
Green
automatic threshold (110)
output type are shown with different
Black & White Threshold
True Color
color channel and
color channel and
output
output
NTSC Gray
color
Black & White
tool.
color channel and automatic
Blue
threshold (110)
color channel and higher
Blue
threshold (173)
TIP
The
NTSC Gray
box of the
color to gray at a ratio of 30% red, 59% green, and
11% blue.
channel in the
Black & White Threshold
Scan using channel
tool converts
list
4
Adjusting images of
pictures
Book Contents
Index
➮
➮
PrecisionScan Pro
HP
User’s Guide
95
Page 96
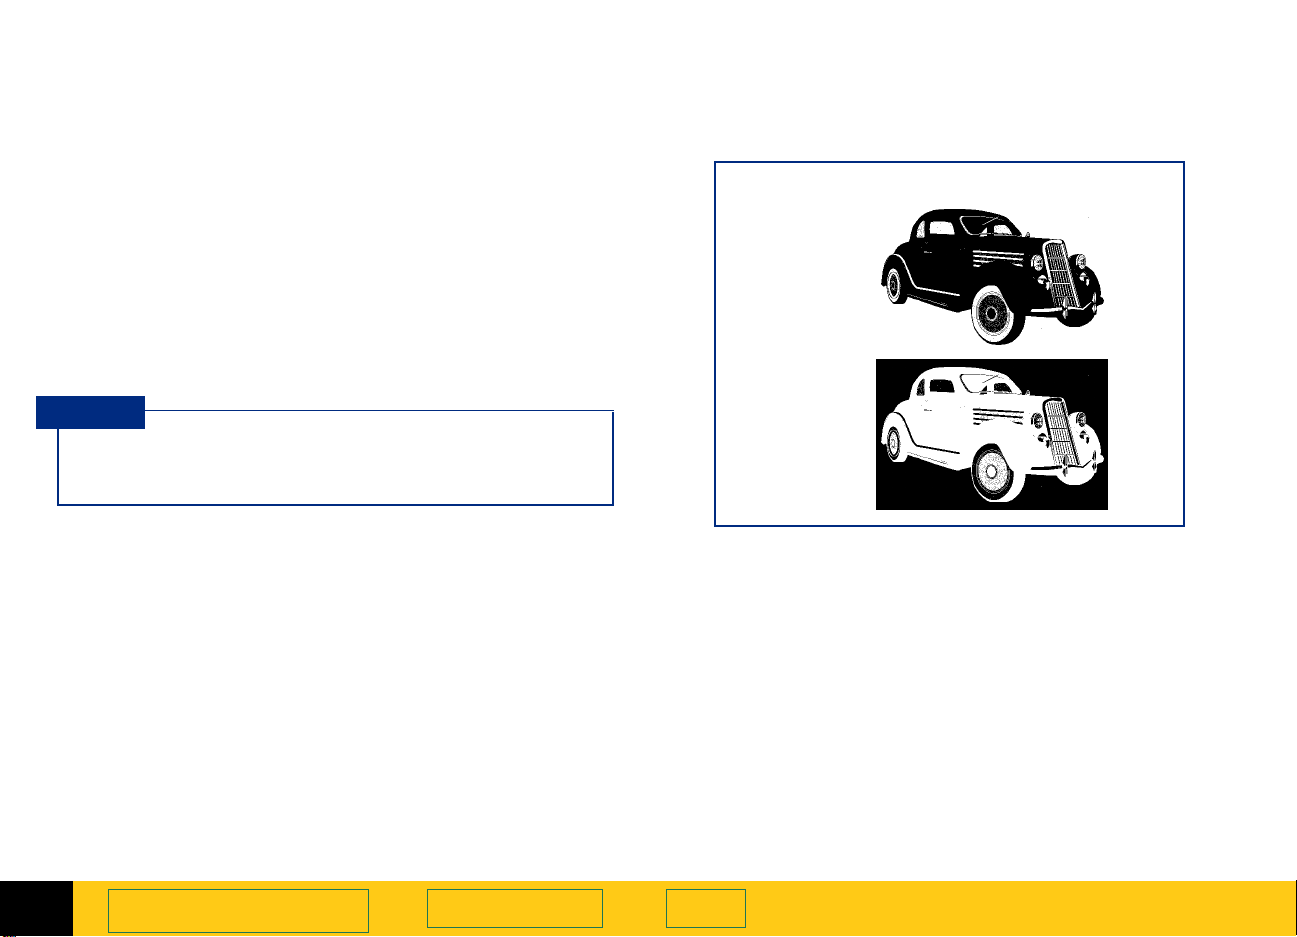
Invert options
+$%&
The
Invert
image. For example, the black and white areas are
reversed in a black-and-white image. A color image will
look like the negative of a color photo.
You can invert an image if you save to a raster output
types, such as TIFF, GIF, or JPEG. Scans saved as B&W
Vector, Text and Text with Images can not be inverted.
This tool is probably most useful for B&W bitmaps and
grayscale images.
TIP
When you turn on the
image is displayed in the preview area.
tool inverts, or reverses, the colors in an
option, the inverted
Invert
Black & White Bitmap (raster)
Normal
Inverted
output type
4
Adjusting images of
pictures
Book Contents
Index
➮
➮
PrecisionScan Pro
HP
User’s Guide
96
Page 97

+$%&
Scanning text
5
Scan and convert a block of text
98
Scan a whole page
101
➮
5
➮
Page 98
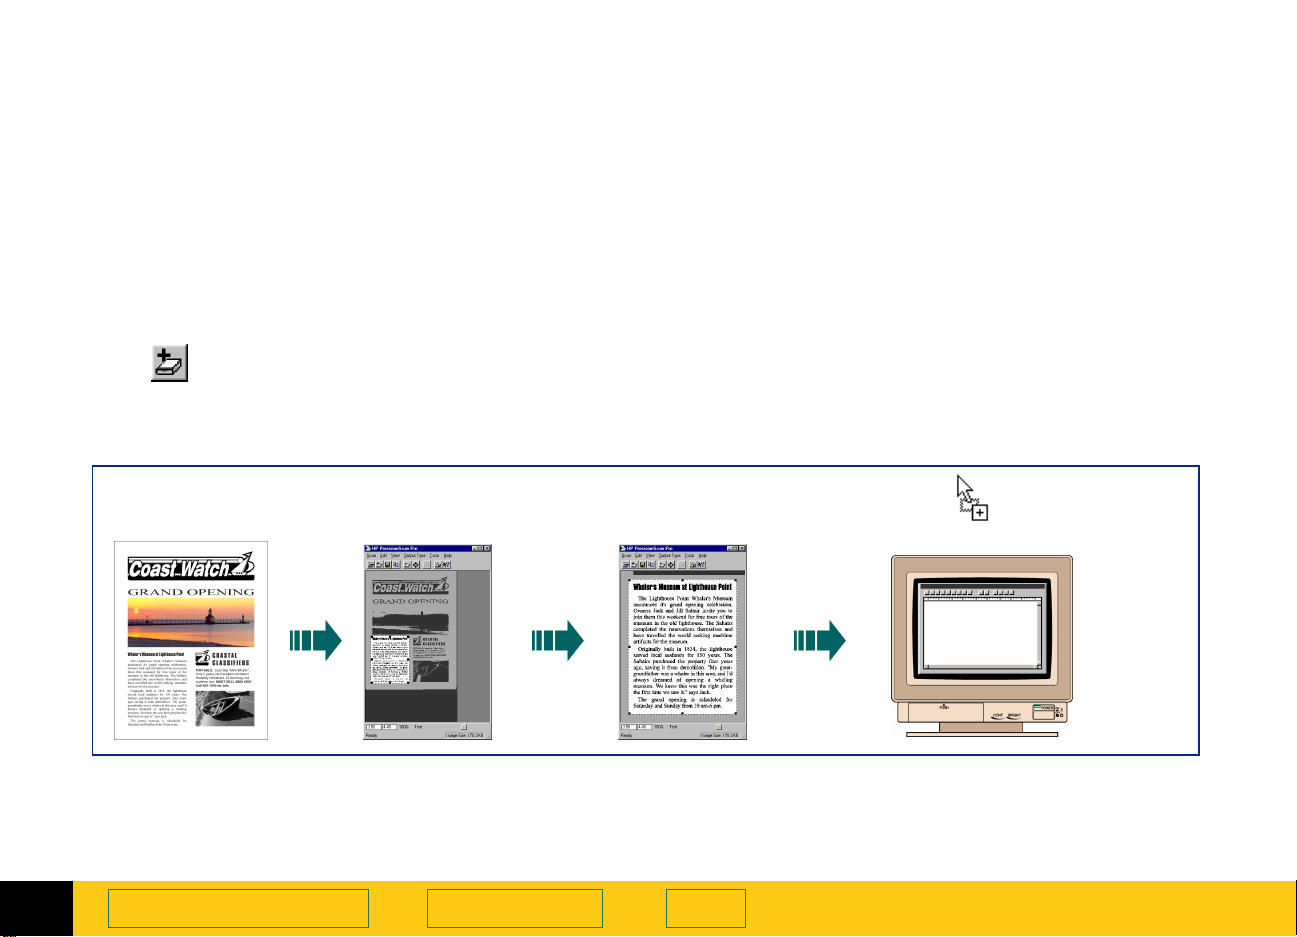
Scan and convert a block of text
+$%&
A block of text can be selected in the preview image for
conversion to editable, unformatted text.
1 Preview
Create a selection area (see page58).
2
From the
3
type.
To enlarge the view of the selection area:
4
•
•
The scanner scans the selection area and the
scan (page57).
Output Type
click , the
from the
Original Zoomed imagePreview image Drag-and-drop
Zoom
Scan
menu, select
button in the toolbar, or
menu, choose
Zoom
with selection area
as the output
Text
.
selection area fills the preview area.
Adjust the selection area to include all the characters
5
you want in the final scan (see page
To begin the final scan and the character conversion:
6
scan to a destination (see page99), or
•
drag-and-drop to another program (see page99),
•
or
• Copy
•Save
to the
to a file (see page
or
Clipboard
Save
to a file.
(see page
).
100
or
Copy
100
62
), or
and
).
Paste
,
5
Scanning text
Book Contents Index
➮
➮
PrecisionScan Pro
HP
User’s Guide
98
Page 99

Selecting Text
Always
■
convert to text, then adjust the position and size
of the selection area to be sure it contains all the
characters you want to convert.
The text in the selection area is displayed at a low
■
resolution and may not appear readable, even
after a
During the final scan when you drag-and-drop,
■
copy, or save the selection area, the text will be
scanned at a higher resolution before it is
converted to editable text.
Zoom
scan a selection area you want to
Zoom
scan.
Scan to a destination
Select this option to scan to:
A blank page in an application (i.e., Microsoft Word)
■
An opened document in an application (this option is
■
not available with all applications)
A document management application
■
A web page creation application
■
A print or fax modem application
■
+$%&
Drag-and-drop to another program
Start the destination program.
1
Open the document and view the page that will
2
receive the image.
In the scanning software window, position the
3
pointer inside the selection area.
The pointer changes to .
Press the left mouse button and drag the image to its
4
position in the open document.
The pointer changes to .
Release the mouse button.
5
A final scan of the image is performed.
The text is converted to editable text and placed in
the open document.
TIP
Be sure to keep the original in the same place on
the scanner glass until the final scan of the image is
completed.
5
Scanning text
Book Contents Index
➮
➮
PrecisionScan Pro
HP
User’s Guide
99
Page 100
Copy to the Clipboard
+$%&
Save to a file
Click , the
1
from the
or press
A final scan of the image is performed.
The text is converted to editable text.
A copy of the text is placed in the
To paste the text in another program’s open
2
document:
Start the destination program.
•
Open the document and view the page that will
•
receive the text.
Position the pointer where you want to place the
•
text, then click.
From the program’s
•
press
The text appears where you pasted it.
menu select
Edit
Ctrl+C
Ctrl+V
button in the toolbar, or
Copy
, or
Copy
.
menu, choose
Edit
.
Clipboard
Paste
Click , the
1
from the
press
The
The only file format choice in the
.
, or
is
In the
2
want to save the text file.
In the
3
Click
4
A final scan of the text is performed.
The text is converted to editable text.
The text is saved to the file.
Ctrl+S
Save As
Text File (.txt)
Save in
File name
Save
Save As...
menu, select
Scan
.
dialog box appears.
.
box, choose the directory where you
box, type a name for the text file.
.
button in the toolbar, or
Save As...
, or
Save as type
list box
5
Scanning text
Book Contents Index
➮
➮
PrecisionScan Pro
HP
User’s Guide
100
 Loading...