

Page 1
Automatic Document Feeder
User’s Guide
HP ScanJet Scanners
Page 2

© Hewlett-Packard Co., 1999
All Rights Reser ve d .
Reproduction, adaptat ion, or
translation without prior
written permission is
prohibited, except as allowed
under copyright laws.
RESTRICTED RIGHTS LEGEND
Use, duplication or discl osur e
is subject to restrictions as set
forth in contract subdivision
(c)(1)(ii) of the Rights in
Technical Data and Computer
Software Clause 52.227FAR14.
Material scanned by this
product may be protected by
governmental laws and other
regulation, such as copyright
laws. The customer is solely
responsible for complying
with all such laws and
regulations.
Publication number
C5195-90000
Second Edition, Septemb er
1999
....................................................................................................................................................................................................................................
Warranty
The information contained in this document is subject to change without
notice.
Hewlett-Packard makes no warranty of any kind with regard to
this material, including, but not limited to, the implied
warranties of merchantab ilit y an d fitn es s for a particul a r
purpose.
Hewlett-Packard shall not be li able for errors contained herein or for
incidental or consequential damages in connection with the furnishing,
performance, or use of this material .
This document contains proprietary information which is protect ed by
copyright. All rights are reser ved. No part of this document may be
photocopied, reproduced, or translated to another language without the
written consent of the Hewlett-Packard Company.
Changes or modification of this equipment not expressly approved by
Hewlett-Packard could void the user’s authority to operate this
equipment. Only use the cables, connectors, power cords and
accessories supplied with this equi pment or expressly approved by
Hewlett-Packard.
FCC Radio Frequency Interference Statement for
Model C5195
Note: This equipment has been te st ed and f ound to comply with the
limits for a Class B digital device, pursuant to Part 15 of the FCC Rules.
These limits are designed to pr ovide reasonable protection again st
harmful interference in a residential installation. This equipment
generates, uses, and can radiate radi o frequency energy and, if not
installed and used in accordance with the instructions, may cause
harmful interference to radio commu nications. However, there is no
guarantee that interference will not occur in a particular install at io n.
If this equipment does cause harmful interference to radio or television
reception, which can be determine d by turning the equipment off and
on, the user is encouraged to try to corre c t the inter f erence by one or
more of the following measures:
• Reorient or relocate the receiving antenna.
• Increase the separation between the equipment and the receiver.
• Connect the equipment into an outlet on a circuit different from that to
which the receiver is connected.
• Consult the dealer or an experienced radio/TV technician for help.
Changes or modification of this equipment not expressly approved by
Hewlett-Packard could void the user’s authority to operate this
equipment. Only use the cables, connectors, power cords and
accessories supplied with this equipmen t or exp ressly approved
byHewlett-Packard.
Page 3

Contents
....................................................................................................................................................................................................................................
Installing the ADF
1
What the ADF Can Do . . . . . . . . . . . . . . . 1-2
Step 1: Unpack the ADF . . . . . . . . . . . . . . 1-3
Step 2: Connect the ADF . . . . . . . . . . . . . . 1-4
Using the ADF
2
Tips for Better Paper Handling . . . . . . . . . . 2-2
Scanning Pages from the ADF . . . . . . . . . . . 2-4
Scanning a Single Page . . . . . . . . . . . . . . . 2-8
Maintaining the ADF
3
Cleaning the ADF . . . . . . . . . . . . . . . . . . 3-2
Replacing the ADF Window . . . . . . . . . . . . 3-4
Removing the ADF . . . . . . . . . . . . . . . . . 3-6
Ordering Parts and Supplies . . . . . . . . . . . . 3-7
Clearing Paper Jams
4
Clearing Paper Jams . . . . . . . . . . . . . . . . 4-2
Supplementary Information
5
ADF Specifications . . . . . . . . . . . . . . . . . 5-5
Regulatory Information . . . . . . . . . . . . . . 5-6
FCC Declaration of Conformity . . . . . . . . . . 5-7
Declaration of Conformity . . . . . . . . . . . . . 5-8
i
Page 4

Installing the ADF
............................................................................................
1
1-2 What the ADF
Can Do
1-3 Step 1: Unpack
the ADF
1-4 Step 2: Connect
the ADF
Page 5
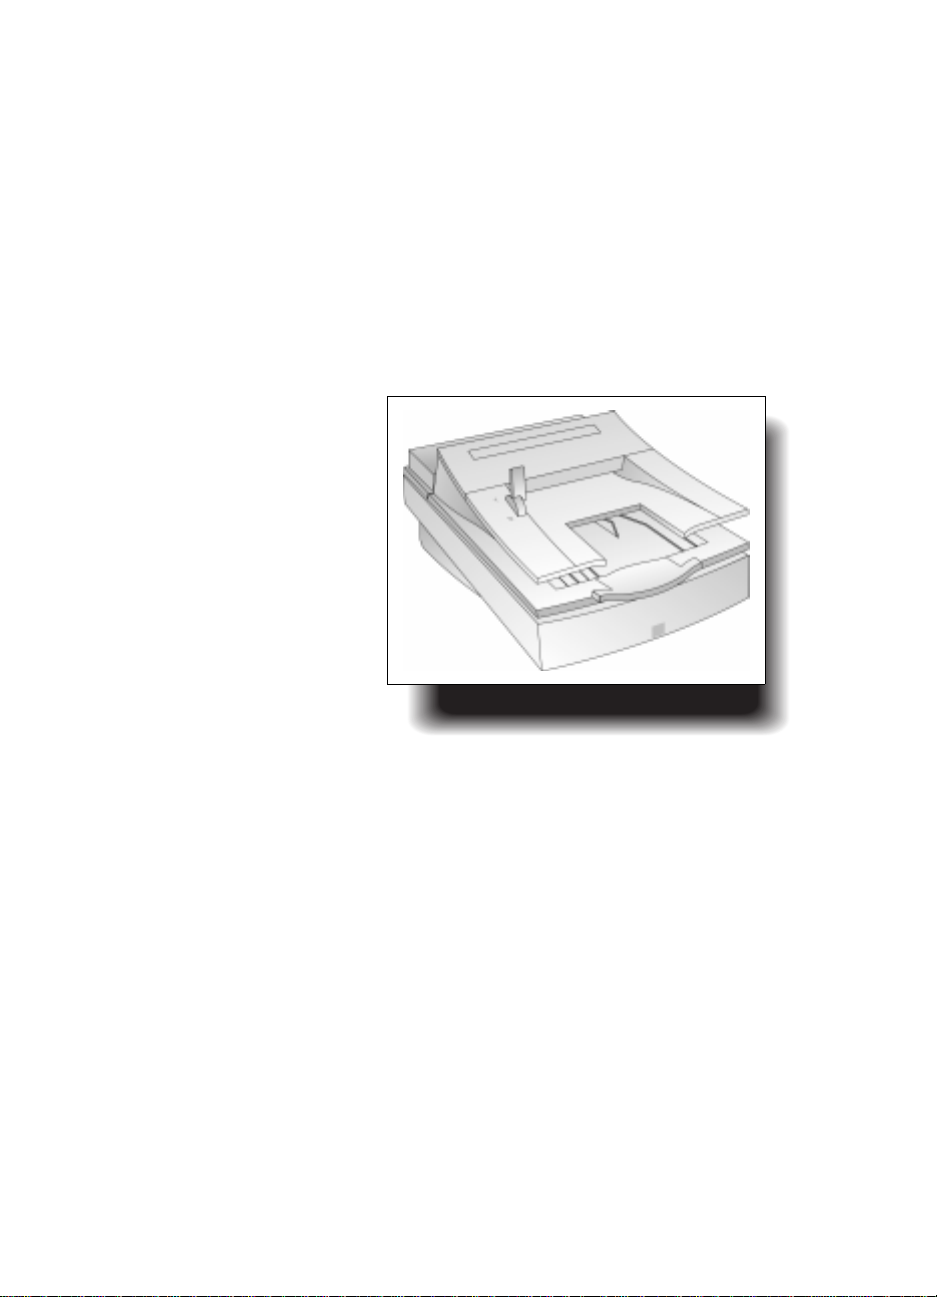
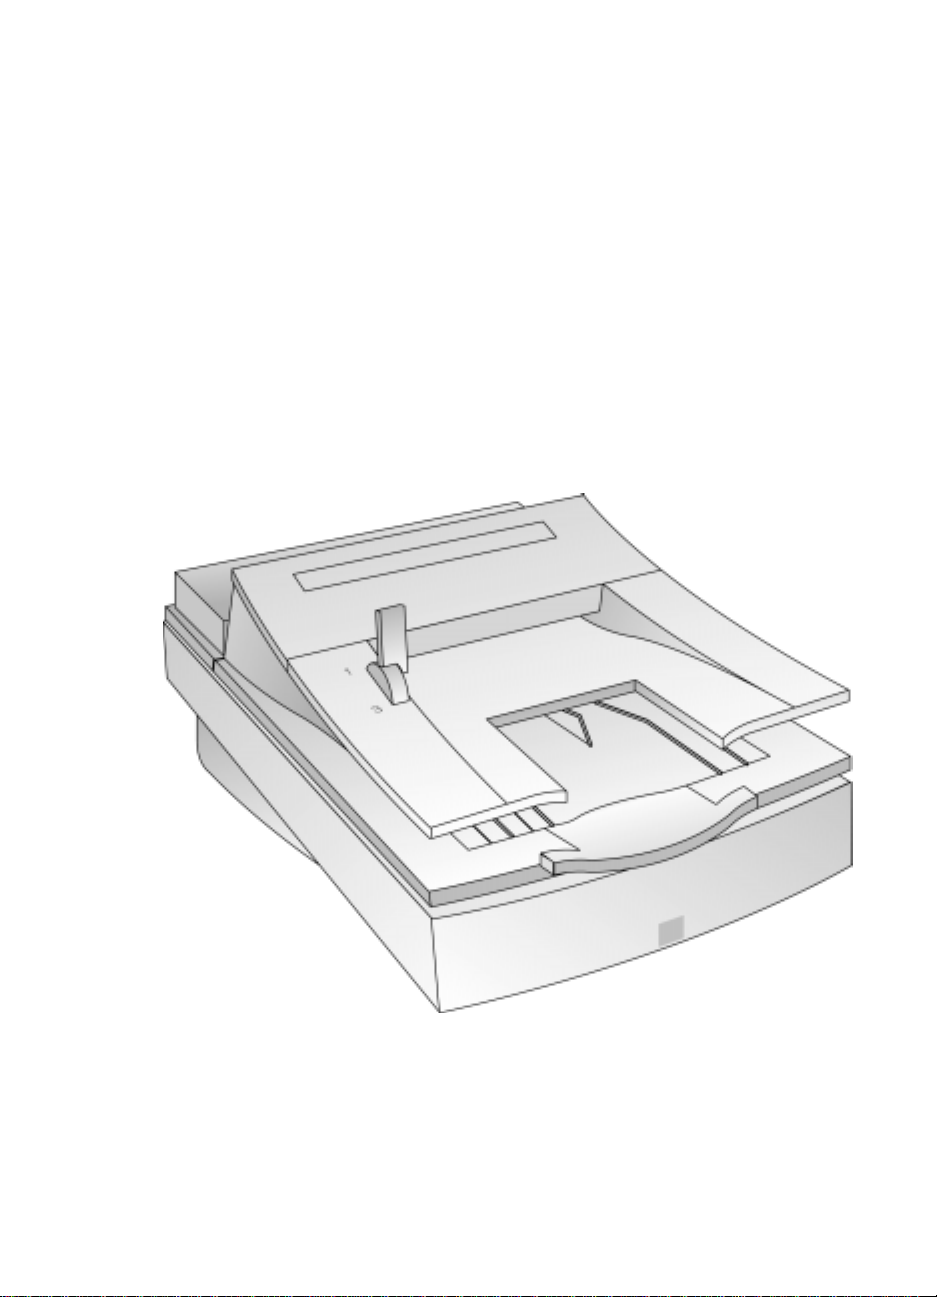
What the ADF Can Do
The Automatic Document Feeder (ADF) is a powerful
addition to your HP ScanJet color scanner. With the
ADF, you can automatically sc an up to 25 pages at a time
(more or less depending on the paper weight). In
addition, you can:
•
Automatically scan and convert multiple pages of text
by using theADF with optical character recognition
(OCR) software. This dramatically reduces the time it
takes to input text for
creating docum ents such
as newslette r s.
•
Automatically scan
multiple pages of images
by using the ADF with
image scanning software.
•
Scan text and images at the
same time by using the
ADF with scanning
software.
•
Electronically store,
retrieve, and send scanned
documents as needed by
using document
ADF on an HP ScanJet Scanner
management software.
....................................................................................................................................................................................................................................
The following sections
explain how to install your ADF.
What the ADF Can Do 1-2
Page 6
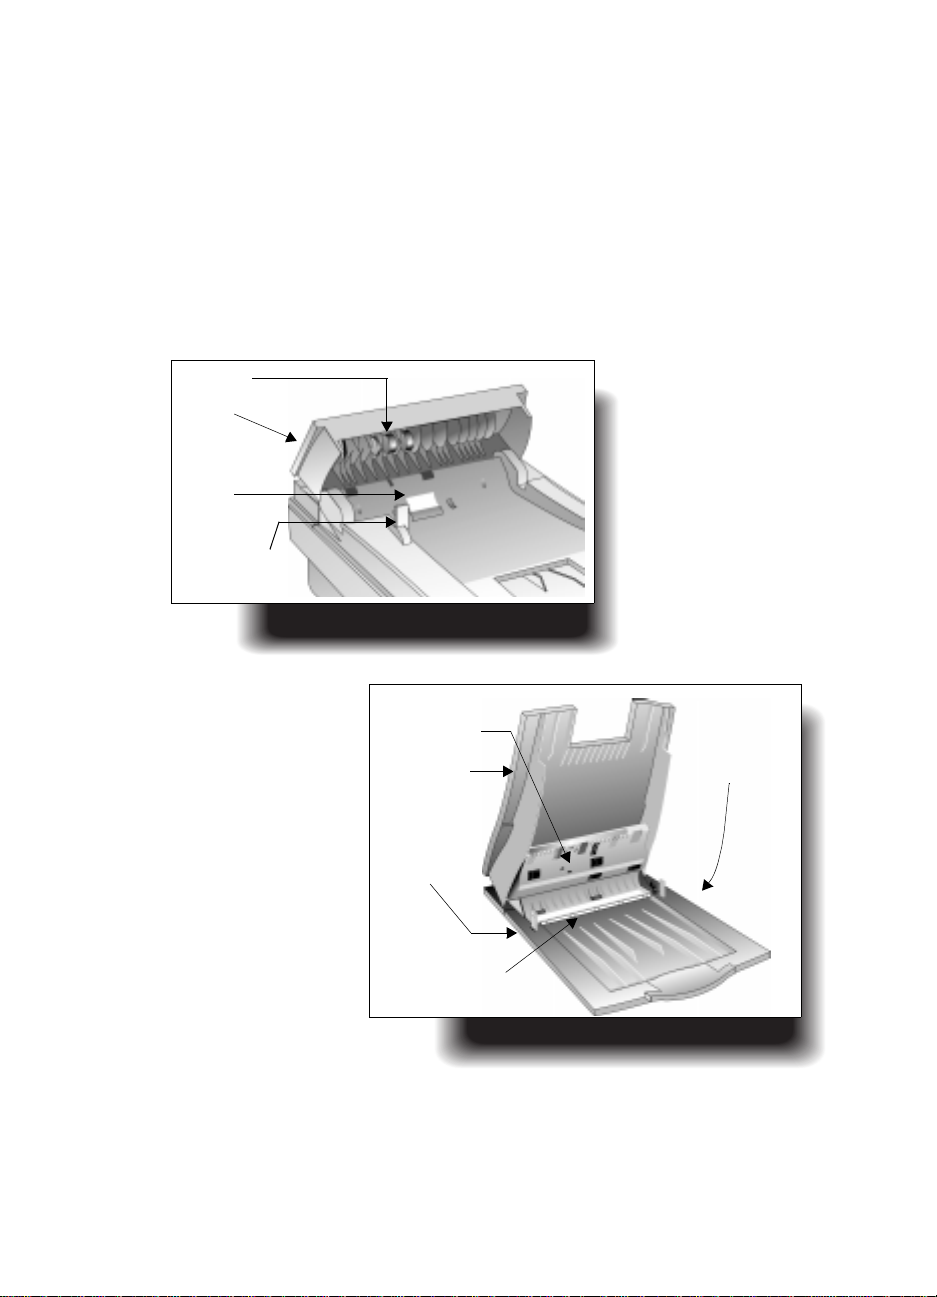
rollers
hatch
separation
pad
paper load
lever
Step 1: Unpack
the ADF
.................... .... ... ........................................................................................................................ .................................................................................
Check for damage whil e un p ack i n g the ADF.
1
If you notice any damage, notify the dealer or mail
order company where you bought the scanner.
Save the box and packing materials in case you need
2
to transport the ADF.
Become familiar with the ADF pa rts shown below:
3
Hatch up
1-3 Step 1: Unpack theADF
flat gray bar
input tray
output tray
user-replaceable
window
mounting posts
(under ADF)
Input tray up
Page 7
Step 2: Connect
the ADF
If your ADF came with your scanner, start at
Note
Step 8 on page1-6.
Turn off the scanner by unplugging the power cor d
1
from the electrical outlet.
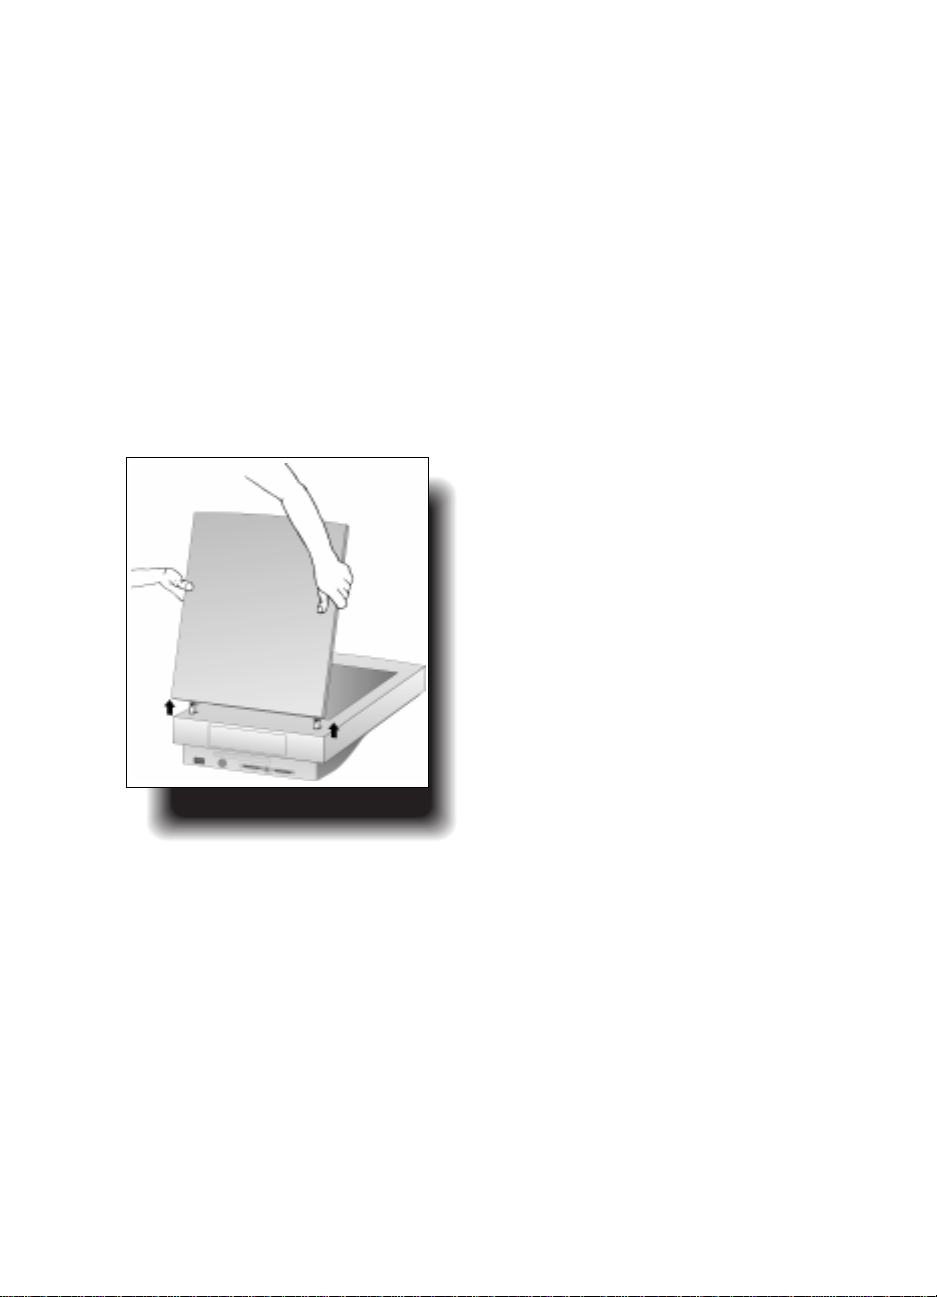
Open the cover.
2
Grasp both sides of the hinged end of the scanner
3
cover and pull straight up until the cover comes off
the scanner. You may need to move the cover from
side to side to pull it off.
far back.
Do not bend the cover too
....................................................................................................................................................................................................................................
Removing the scanner cover
Step 2: Connect t he ADF 1-4
Page 8
Store the cover on a flat, smooth surface in a safe
4
place. You will not need the scanner cover as long as
the ADF is installed.
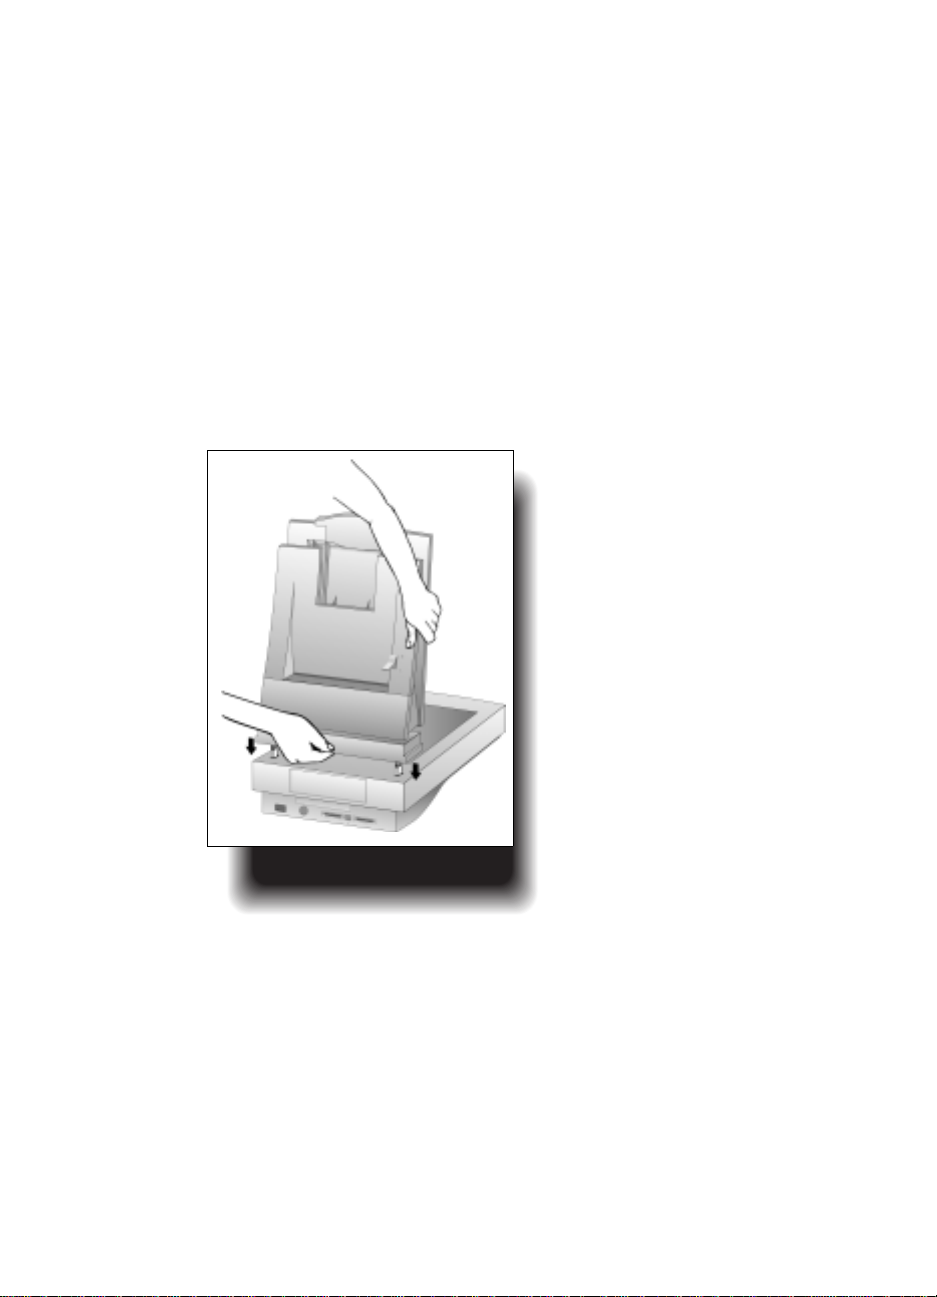
Hold the ADF with the mounting posts perpendicular
5
to the scanner.
Align the mounting posts with the slots at the rear of
6
the scanner body. Ensure both posts are in the same
position.
Lower the ADF until the mounting posts are seated
7
firmly in the scanner.
....................................................................................................................................................................................................................................
Inserting the ADF
mountingposts
Step 2: Connect t he ADF 1-5
Page 9
.................... .... ... .... ........................................................................................................................ .... .........................................................................
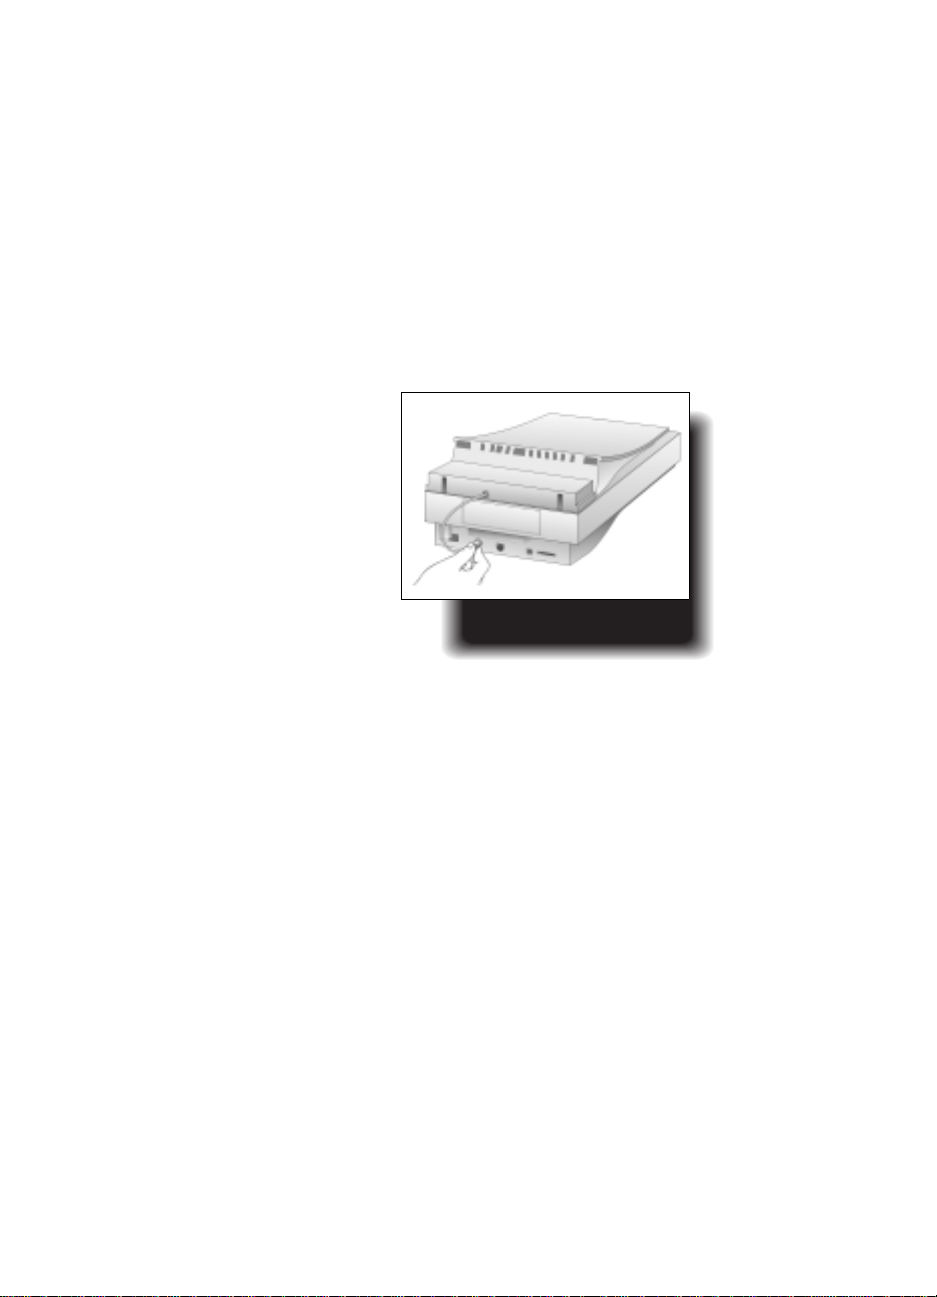
Hold the ADF connector cable so that the arrow on
8
the plug is on top. This helps you align the pins in the
plug with their holes in the socket on the scanner.
Attach the ADF connector cable by pushing it firmly
9
all the way into the round accessory connector so cket
labelled ADF on the back of the scanner.
Y ou may need to tip the scanner/ADF assembly on its
side to connect the cable:
Attaching the ADF
connector cable
Plug the scanner’s power cord into the electric al
10
outlet to turn on the scanner.
1-6 Step 2: Conn ec t t heADF
Never connec t or remove the ADF from the
Note
scanner unless the scanner’s power cord
is unplugged from the electrical outlet.
Page 10

Using the ADF
............................................................................................
2-2 Tips for Better
Paper Handling
2
2-4 Scanning Pages
from the ADF
2-8 Scanning a
Single Page
Page 11

Tips for B etter Paper
Handling
Follow these tips when you scan with your ADF:
•
Remove any paper fro m the scanner glass before
using the ADF.
•
Straighten any curls or wrinkles from your pages
before putting them on the doc ument tray. If this is
not possible, do not scan these pages using the ADF.
Instead, use the scanner glass, or make a photocopy
of the documents and scan
the photocopies.
•
Do not use the ADF to scan
sheets of uncommon paper
or other media, such as:
•
Transparencies
•
Gummed-back paper
•
Magazine pages
•
Lightweight
(“onionskin”) carbons
....................................................................................................................................................................................................................................
ADF on an HP ScanJet
Tips for Better Paper Handling 2-2
Page 12

.................... .... ... ........................................................................................................................ .................................................................................
•
Remove staples, paper clips, and any other materials
from documents.
•
Avoid documents with tears, perforations, or punch
holes.
•
Use the ADF with paper that fits the following
dimensions:
Width Height
Minimum 5.8 inches
14.8 cm
8.3 inches
21.1 cm
Maximum 8.5 inches
•
For paper smaller than the minimum size, use the
21.6 cm
14 inches
35.6 cm
scanner glass instead of the ADF. Paper smaller than
the minimum may cause a paper jam.
•
For paper lighter than 16-lb. bond (60 g/m2) or heavier
than 28-lb. bond (105 g/m
2
), use the scanner glass
instead of the ADF.
2-3 Tips for Better Pape r Han dli ng
Page 13

Scanning Pages from
the ADF
Prior to scanning:
Note
•
Place the paper sta ck with t he pages fa ce up in
reading order on the input tray.
After scanning:
•
The stack is returned in the output tray with
the pages face down in reading order.
Loading Paper into the ADF
Make sure the scanner is plugged into an electrical
1
outlet.
Make sure the scanner’s glass is free of paper.
2
Move the paper load lever to the number 1 position:
3
....................................................................................................................................................................................................................................
Paper load lever
at number 1
Scanning Pages from the ADF 2-4
Page 14

....................................................................................................................................................................................................................................
Put the top end of the paper stack face up on the input
4
tray with the first page to be scanned at the top of the
stack.
Push the paper stack up against the side of the ADF
5
input tray nearest the lever. Slide it into the ADF until
the paper stack does not move any further:
Placing paper in
the input tray
2-5 Scanning Pages from the ADF
Page 15

Move the paper load lever to the number 3 position:
6
Paper load
lever at
number 3
The ADF is now loaded and ready for scanning.
....................................................................................................................................................................................................................................
Scanning Pages from the ADF 2-6
Page 16

If the scan
appears
as vertical
streaks across
the page, make sure
there is no paper on the
scanner glass.
....................................................................................................................................................................................................................................
Scan the Document in the ADF
The ADF works with many software packages that are
compatible with HP ScanJet color scanners. To scan a
document, see the user’s manual of the software
package you are using.
If you insert a small page into the ADF, you may
Note
need to lift the input tray to retrieve the page
after scanning.
The scanner scans pages from the ADF when:
Note
•
The paper is loaded, and
•
The paper load leve r is in position 3.
Otherwise, the scanner performs a flatbed scan
from the scanner glass.
2-7 Scanning Pages from the ADF
Page 17

Scanning a
If the
document on
the scanner
glass is a thin
page, you may need to
place a second sheet of
paper behind the
document to get a better
scanned image.
For best results, cho ose
a different color for the
second page (the
backing sheet).
Single Page
Scanning a Single Page when the
ADF is Installed
Remove any paper from the input tray.
1
Lift the ADF (by lifting from below the output tra y) to
2
expose the scanner glass.
Place the document face down on the scanner in the
3
upper-right corner.
Lower the ADF.
4
Thick documents (up to 20 mm), such as a book,
Note
will fit under the ADF for scannin g on the
scanner glass. For documents t hicker than 20
mm, lift the ADF for scanning.
For large documents, lift the ADF and push back
Note
gently toward the rear of the sca nner. The ADF
will move 20 mm back from its norm al position.
....................................................................................................................................................................................................................................
Scanning a Single P age 2-8
Page 18

Maintaining the ADF
............................................................................................
3-2 Cleaning the ADF
3-4 Replacing the
3
ADF Window
3-6 Removing the ADF
3-7 Ordering Parts
and Supplies
Page 19

Cleaning the ADF
You must clean five parts of the ADF/scanner assembly
to maintain high quality scanning:
•
Scanner glass
•
ADF window
•
Gray bar above the ADF window
•
Rollers
•
Separation pad
To clean th e ADF:
Turn off the scanner by unplugging the power cor d
1
from the electrical outlet.
Wipe the scanner glass (particularly the 2 inches
2
below the ADF user-replaceable window) and the
ADF window with a soft, cle an, lint-free cloth. You
also may dampen the cloth
with water, isopropyl
alcohol, or window clea ner,
if necessary.
Do not use other
Note
cleaning fluids! They
may damage the
ADF window.
Never spray the
cleaning fluid directly
on the ADF.
Check the flat gray bar above
3
the ADF window. The bar
should be gray without black
or other markings. If
necessary, clean the flat
gray bar.
....................................................................................................................................................................................................................................
Cleaning the
ADF window
Cleaning the ADF 3-2
Page 20

.................... .... ... .... ........................................................................................................................ .... .........................................................................
4
5
separation pad
Lift the hatch.
Wipe the ro llers and separation pad with a soft, clean,
lint-free cloth. You may also use isopropyl alcohol, if
necessary.
Separation pad under the hatch
3-3 Cleaning the ADF
Page 21

Replacing the
ADF Window
If the ADF window becomes scratched or uncleanable,
you may need to r eplace it . Order the ADF window from
Hewlett-Packard (see “Ordering Parts and Supplies” on
page 3-7).
To remove the ADF window:
Remove the ADF from the scanner (see “Removing
1
the ADF” on page 3-6).
Lift the input tray of the ADF to expose the
2
ADF window.
Using a small coin, push each of the four Z-shaped
3
hooks until the tab snaps out of position. Push the
long, pointed tab on the end of the window.
Z-shaped
hook
....................................................................................................................................................................................................................................
The ADF window is
free to pull out:
Pushing the Z-shaped hooks
Removing the ADF window
Replacing the ADF Window 3-4
Page 22

....................................................................................................................................................................................................................................
To install the ADF window:
Position the four Z-shaped hooks of the ADF window
1
into the four holes on the bottom of the ADF.
Rotate the ADF window back until it contacts the
2
bottom of the ADF.
Check that the long, pointed tab is on the inside of the
3
ADF .
Beginning the with Z-shaped hook closest to the long,
4
pointed tab, push each of the Z-shaped hooks toward
the back of the ADF.
Verify that the long, pointed tab is on the insid e of
5
the ADF.
3-5 Replacing the ADF Window
Page 23

Removing the ADF
To remove the ADF:
Unplug the scanner’s
1
power cord from the
electrical outlet.
Disconnect the ADF
2
connector cable from the
back of the scanner.
Lift the ADF off the re ar of
3
the scanner. Lift firmly
using your fingers to
separate the rear bracket
from the scanner.
Store the ADF in its
original box for protection.
Replace the scanner cover:
4
Insert the mounting posts into the corresponding
a
slots at the rear of the scanner body.
Lower the scanner cover until the mounting posts
b
are seated fi rmly in the scanner.
Make sure both posts are in the same po sition.
c
....................................................................................................................................................................................................................................
Disconnecting the ADF
connectorcable
Replacing the scanner cover
Removing the ADF 3-6
Page 24

Ordering Parts
and Supplies
.................... .... ... .... ........................................................................................................................ .... .........................................................................
Order parts and supplies f or your hardware, including
cables, additional manuals, and other accessories, from
you local HP dealer.
If your HP dealer cannot supply the parts, call the HP
Support Materials grou p at:
(800) 227-8164
(800) 387-3154
U.S.A.
Canada
3-7 Ordering Parts and Supplies
Page 25

Clearing Paper Jams
............................................................................................
4-2 Clearing Paper
4
Jams
Page 26

Clearing Paper Jams
How you clear a paper jam depends on where the paper
jams in the ADF:
•
If the paper jams “early” in its path through the ADF
and the page is still visible at the top of the ADF:
Open the ADF access hatch.
1
Grasp the paper and pull forward to release.
2
Lifting the access ha tc h
to clear the jam
....................................................................................................................................................................................................................................
You may damage the page if you remove it from
Note
the ADF while the paper load l ever is in the
number 1 position.
DO NOT move the paper lo ad leve r ba ck to
the number 1 position (back) until all pages
have been removed f rom the paper path.
Clearing Paper Jams 4-2
Page 27

....................................................................................................................................................................................................................................
•
If the paper has moved further through the ADF and
cannot be easily pulled after lift ing the access hatch:
Open the hatch.
1
Lift the ADF input tray.
2
Grasp the paper and pul l forward to release.
3
Lifting the input tray
to clear the jam
DO NOT attempt to adjust the ADF
Note
parts that become visible when you lift
the access hatch an d input tray. These
parts are servic eable only by an HP
authorized dealer.
4-3 Clearing Paper Jams
Page 28

Supplementary Information
............................................................................................
5-2 Warranty Terms
5-5 ADF
Specifications
5
5-6 Regulatory
Information
Page 29

Warranty Terms
HEWLETT-PACKARD
LIMITED WARRANTY STATEMENT
HP PRODUCT DURATION OF LIMITED W ARRANTY
HP ScanJet Automatic 1 year
Document Feeder
1. HP warrants to you, the end-user customer, that HP
hardware, accessories and supplies will be free from
defects in materials and workmanship after the date of
purchase, for the period specified above. If HP receives
notice of such def ects during the warranty period, H P
will, at its option, either repair or replace products
which prove to be defective. Replacement products may
be either new or like-new.
2. HP warrants to you that HP software will not fail to
execute its programm ing instructions after the date of
purchase, for the period specified above, due to defects
in material and workmanship when properly installed
and used. If HP receives notice of such defects during
the warranty period, HP will replace software media
which does not execute its programming instructions
due to such defects.
3. HP does not warrant that the operation of HP
products will be uninterrupt ed or error free. If HP is
unable, within a reasonable time, to repair or replace
any product to a condition as warranted, you will be
entitled to a refund of the purchase price upon prompt
return of the product.
....................................................................................................................................................................................................................................
5-2
Page 30

....................................................................................................................................................................................................................................
4. HP products may contain remanufactured parts
equivalent to new in performance or may have been
subject to incidental use .
5. Warranty does not apply to defects resulting from
(a) improper or inadequate maintenance or calibration,
(b) software, interfacing, parts or supplies not supplied
by HP, (c) unauthorized modification or misuse, (d)
operation outside of the published environmental
specifications for the product, or (e ) improper site
preparation or maintenance.
6. HP MAKES NO OTHER EXPRESS WARRANTY OR
CONDITION WHETHER WRITTEN OR ORAL. TO THE
EXTENT ALLOWED BY LOCAL LAW, ANY IMPLIED
WARRANTY OR CONDITION OF MERCHANTABILITY,
SATISFACTORY QUALITY, OR FITNESS FOR A
PARTICULAR PURPOSE IS LIMITED TO THE
DURATION OF THE EXPRESS WARRANTY SET
FORTH ABOVE. Some countries, states or provinces do
not allow limitations on the duration of an implied
warranty, so the above limitation or exc lusion migh t not
apply to you. This warranty gives you specific legal
rights and you might also have other rights that vary
from country to country, state to state, or province to
province.
5-3
Page 31

7. TO THE EXTENT ALLOWED BY LO CAL LAW , THE
REMEDIES IN THIS WARRANTY STATEMENT ARE
YOUR SOLE AND EXCLUSIVE REMEDIES. EXCEPT
AS INDICA TED ABOVE, IN NO EVENT WILL HP OR ITS
SUPPLIERS BE LIABLE FOR LOSS OF DATA OR FOR
DIRECT, SPECIAL, INCIDENTAL, CONSEQUENTIAL
(INCLUDING LOST PROFIT OR DATA), OR OTHER
DAMAGE, WHETHER BASED IN CONTRACT, TORT,
OR OTHERWISE. Some countries, states or provinces
do not allow the exclusion or limitation of incidental or
consequential damages, so the above limitation or
exclusion may not apply to you.
FOR CONSUMER TRANSACTIONS IN AUSTRALIA
AND NEW ZEALAND: THE WARRANTY TERMS
CONTAINED IN THIS STATEMENT, EXCEPT TO THE
EXTENT LA WFULL Y PERMITTED, DO NOT EXCLUDE,
RESTRICT OR MODIFY AND ARE IN ADDITION TO
THE MANDATOR Y ST A TUTORY RIGHTS APPLICABLE
TO THE SALE OF THIS PRODUCT TO YOU.
Hardware repair services
To speak to someone to verify that your ADF needs
repair, please call the HP Customer Support Center. If
your ADF requires repair, the HP Support Agent will
coordinate the process. Please refer to the list of HP
service and support phone numbers supplied with your
scanner. This service is free of charge during the
warranty period of your ADF. Beyond the warranty
period, repairs will be charged on a time and materia ls
basis.
....................................................................................................................................................................................................................................
5-4
Page 32

ADF Specifications
.................... ........................................................................................................................ ........................................................................................
Feature Specifications
Size 11.94 by 19.5 by 3.63 inches (above
Weight 4.3 lbs/1.95 kg
scanner)
(303 by 495 by 92 mm
Paper tray capacity
Maximum paper size 8.5 by 14 inches (216 by 356 mm)
Minimum paper size 8.27 by 5.85 inches (210 by 149 mm)
Maximum paper weight
Minimum paper weight
Power Requirements 24 V dc, 260 mA
25 sheets of 20 lb bond (75 g/m
2
28 lb bond (105 g/m
16 lb bond (60 g/m
)
2
)
2
)
5-5 ADF Specifications
Page 33

Regulatory
Information
German Noise Declaration
The German noi se declara tion is required i n Germany. It
gives noise output figur es for the ADF.
Geräuschemission
LpS < 70 dB
am Arbeitsplatz
normaler Betrieb
nach DIN 45635 T. 19
Die Daten sind die Ergebnisse von Typprüfungen
....................................................................................................................................................................................................................................
Regulatory Information 5-6
Page 34

FCC Declaration of
Conformity
.................... ........................................................................................................................ ........................................................................................
Manufacturer’s Name:
Manufacturer’s Address:
Contact Person:
Telephone:
Product Name:
Model Number(s):
Product Option s :
The manufacturer listed above declares that this product has been
tested and found to comply with the limits for a Class B digital
device, pursuant to Part 15 of FCC rules. Operation is subject to the
following two conditions: (1) This device may not cause harmful
interference, and (2) This device must accept any interference
received, including interference that may cause undesired
operation.
These limits are designed to provide reasonable protection against
harmful interference in a residential installation. This equipment
generates, uses, and can radiate radio frequency energy and, if not
installed and used in accordance with the instruction manual, may
cause harmful interference to radio communications. However,
there is no guarantee that interference will not occur in a particular
installation. If thisequipment does cause harmful interference to
radio or television reception, which can be determined by turning
the equipment off and on, the user is encouraged to try to correct
the interference by one or more of the following measures:
Reorient or relocate the receiving antenna.
•
Increase the separation between the equipment and receiver.
•
Connect the equipment into an outlet on a circuit different from
•
that to which the receiver is connected.
Consult the dealer or an experienced radio/TV technician.
•
Changes or modification of this equipment not expressly approved
by Hewlett-Packard could void the user’s authority to operate this
equipment. Only use the cables, connectors, power cords and
accessories supplied with this equipment or expressly approved by
Hewlett-Packard.
Hewlett-Packard Company
Greeley Hardcopy Division
700 71st Avenue
Greeley, Colorado 80634
USA
GHC Regulatory Manager
970-350-5600
HP ScanJet ADF
C5195 (may contain suffix)
None
Test report on file:
Date:
5-7 FCC Declaration of Conformity
C5195-1
January, 1998
Page 35

Declaration of
Conformity
According to ISO/IEC Guide 22 and EN 45014:
Manufacturer’s Name:
Manufacturer’s Address:
Declares that the product:
Product Name:
Model Number(s):
Product Option s :
Conforms to the following Prod uc t Spe c ific a tions:
Safety:
EMC:
IEC950:1991+A1:1992+A2:1993+A3:1995+A4:1996
EN60950:1992+A1:1992+A2:1993+A3:1995+A4:1997
+A11:1997
EN 60825-1: 1994
CISPR 22: 1993+A1+A2, Class B / EN 55022:
1994+A1,+A2, Class B
EN 50082-1: 1992
IEC 801-2: 1991 / prEN 55024-2: 1992, 4kV CD, 8 kV AD
IEC 801-3: 1984 / prEN 55024-3: 1991, 3 V/m
Hewlett-Packard Company
Greeley Hardcopy Division
700 71st Avenue
Greeley, Colorado 80634
USA
HP ScanJet ADF
C5195 (may contain suffix)
None
....................................................................................................................................................................................................................................
Supplementary Information:
The product herewith complies with the requirements of the Low
Voltage Directive
73/23/EEC and the EMC Directive 89/336/EEC and carries the CEmarking accordingly. LEDs in this product are Class 1 in accordance
to EN60825-1.
Greeley, Colorado, USA, January, 1998
Declaration of Conformity 5-8
Page 36

Glossary
G
access hatch
The cover over the top of the ADF input tray that is
opened to remove jammed paper.
accessory connector socket
The circular socket on th e b ack of th e sca nn er wh er e
the connector cable is inserted.
ADF (automatic document feed er)
A scanner accessory that feeds a paper stack to the
scanner.
ADF window
A clear plastic strip on the bottom of the ADF that
provides access to the scanner opt ics. This window
must be clean and undamaged in order to obtain high
quality scann ed images using the AD F.
connector cable
The cable connecting the ADF to the scanner.
....................................................................................................................................................................................................................................
input tray
The top surfa ce of the ADF where documents are
loaded before being fed in to the scanner.
mounting posts
The hinged posts on the rear of the ADF that are
inserted into the scanner body during installation.
OCR (optical character recognition)
Software that converts scanned text into editable text
that can be inserted into a word processor or desktop
publishing program.
output tray
The tray below the input tray on the ADF that holds
the paper ejected after scanning is complete.
G-1
Page 37

....................................................................................................................................................................................................................................
paper jam
A condition where a sheet of paper is not properly fed,
causing an interruption in AD F ope ration.
paper load lever
The manually operated lever used to load paper into
the ADF input tray.
paper stack
The stack of documents that are placed in the input
tray and are fed by the ADF.
scanner cover
The cover of the scanner that is removed before the
ADF is installed.
scanner glass
The glass surface on top of the scanner where a
document is scanned.
separation pad
Rubber-like pad under the ADF hatch used to separate
pages as they enter the ADF.
G-2
Page 38

Index
A
ADF
cleaning
installing
parts of
regulatory information
removing
specifications
unpacking
ADF window
installing
removing
replacing
3-2
1-4 to 1-6
1-3
5-6
3-6
5-5
1-3
1-3
3-5
3-4
3-4
C
Cleaning, steps for
Connecting the ADF
Connector cable
attaching
disconnecting
1-6
3-2
1-4
3-6
H
Hatch
1-3
I
Input tray
Installing the ADF
1-3
1-4 to 1-6
M
Mounting posts, loading on to
1-5
O
Output tray
1-3
P
Paper
checking
loading
oversized
thick
thin
weight
Paper jams, clearing
Paper load lever
Paper stack
inserting
securing
small size
Parts, ordering
2-2
2-4
2-8
2-8
2-8
2-3
4-2
1-3, 2-4
2-5
2-6
2-7
3-7
S
Scanner cover
replacing
storing
Scanner glass, checking
Scanning
from flatbed
single pages
using ADF
with backing sheet
Software
document manage ment
image processing
OCR
3-6
1-5
2-7
2-8
2-7
2-8
1-2
1-2
2-2
1-2
U
Unpacking the ADF
1-3
Index 1
 Loading...