

Page 1
Q5693A
use
Page 2

Page 3

HP 8-bin Mailbox
User Guide _________________
Page 4

Copyright and License
© 2005 Copyright Hewlett-Packard De velopment Company, L.P.
Reproduction, adaptation or translation without prior written
permission is prohibited, except as allowed under the copyright laws.
The information contained herein is subject to change without notice.
The only warranties for HP products and services are set forth in the
express warranty statements accompanying such products and
services. Nothing herein should be construed as constituting an
additional warranty. HP shall not be liable for technical or editorial
errors or omissions contained herein.
Publication number: Q5693-90905
Edition 2, 4/2005
Trademark Credits
PostScript is a trademark of Adobe Systems Incorporated.
Microsoft, Windows, and Windows NT
are U.S. registered trademarks
of Microsoft Corporation.
Page 5

ENWW iii
Page 6

iv ENWW
Page 7

Contents
1 Product basics
Features . . . . . . . . . . . . . . . . . . . . . . . . . . . . . . . . . . . . . . . . . . . . . . . . . . . . . . . . . . . . . . . . . . . .1
Identifying the MBM parts. . . . . . . . . . . . . . . . . . . . . . . . . . . . . . . . . . . . . . . . . . . . . . . . . . . . . . .2
Interpreting light patterns . . . . . . . . . . . . . . . . . . . . . . . . . . . . . . . . . . . . . . . . . . . . . . . . . . . . . . .3
2 Configuring the MBM for your work environment
Getting started . . . . . . . . . . . . . . . . . . . . . . . . . . . . . . . . . . . . . . . . . . . . . . . . . . . . . . . . . . . . . . .6
Understanding the operation modes. . . . . . . . . . . . . . . . . . . . . . . . . . . . . . . . . . . . . . . . . . . . . . .7
Mailbox. . . . . . . . . . . . . . . . . . . . . . . . . . . . . . . . . . . . . . . . . . . . . . . . . . . . . . . . . . . . . . . . . .7
Stacker . . . . . . . . . . . . . . . . . . . . . . . . . . . . . . . . . . . . . . . . . . . . . . . . . . . . . . . . . . . . . . . . . .7
Job Separator. . . . . . . . . . . . . . . . . . . . . . . . . . . . . . . . . . . . . . . . . . . . . . . . . . . . . . . . . . . . .7
Sorter/Collator . . . . . . . . . . . . . . . . . . . . . . . . . . . . . . . . . . . . . . . . . . . . . . . . . . . . . . . . . . . .7
Setting an operation mode . . . . . . . . . . . . . . . . . . . . . . . . . . . . . . . . . . . . . . . . . . . . . . . . . . . . . .8
HP LaserJet 9040/9050 series printers . . . . . . . . . . . . . . . . . . . . . . . . . . . . . . . . . . . . . . . . .8
HP LaserJet 9040mfp/9050mfp/9500mfp. . . . . . . . . . . . . . . . . . . . . . . . . . . . . . . . . . . . . . . .8
Setting the operation mode in the printer driver to match the control-panel setting. . . . . . . .8
Turning off the designated default output bin for copy jobs . . . . . . . . . . . . . . . . . . . . . . . . . . . .12
HP LaserJet 9040/9050 series printers . . . . . . . . . . . . . . . . . . . . . . . . . . . . . . . . . . . . . . . .12
HP LaserJet 9040mfp/9050mfp/9500mfp. . . . . . . . . . . . . . . . . . . . . . . . . . . . . . . . . . . . . . .12
Assigning a default output bin to a user or a group of users for the Mailbox mode . . . . . . . . . .13
Microsoft Windows . . . . . . . . . . . . . . . . . . . . . . . . . . . . . . . . . . . . . . . . . . . . . . . . . . . . . . . .13
Macintosh. . . . . . . . . . . . . . . . . . . . . . . . . . . . . . . . . . . . . . . . . . . . . . . . . . . . . . . . . . . . . . .14
Sending a print job to an output bin that is different from the default . . . . . . . . . . . . . . . . . . . . .15
Microsoft Windows . . . . . . . . . . . . . . . . . . . . . . . . . . . . . . . . . . . . . . . . . . . . . . . . . . . . . . . .15
Macintosh. . . . . . . . . . . . . . . . . . . . . . . . . . . . . . . . . . . . . . . . . . . . . . . . . . . . . . . . . . . . . . .16
Sending a copy job to an output bin that is different from the default. . . . . . . . . . . . . . . . . . . . .16
3 Problem solving
Resolving common problems . . . . . . . . . . . . . . . . . . . . . . . . . . . . . . . . . . . . . . . . . . . . . . . . . . .18
Interpreting control-panel messages. . . . . . . . . . . . . . . . . . . . . . . . . . . . . . . . . . . . . . . . . . . . . .19
Clearing jams . . . . . . . . . . . . . . . . . . . . . . . . . . . . . . . . . . . . . . . . . . . . . . . . . . . . . . . . . . . . . . .21
Paper-jam locations and parts . . . . . . . . . . . . . . . . . . . . . . . . . . . . . . . . . . . . . . . . . . . . . . .21
Control-panel messages about jams . . . . . . . . . . . . . . . . . . . . . . . . . . . . . . . . . . . . . . . . . .22
Clearing jams in the belt. . . . . . . . . . . . . . . . . . . . . . . . . . . . . . . . . . . . . . . . . . . . . . . . . . . .24
Clearing jams in the entry area . . . . . . . . . . . . . . . . . . . . . . . . . . . . . . . . . . . . . . . . . . . . . .25
Clearing jams in the face-up bin and in the flipper . . . . . . . . . . . . . . . . . . . . . . . . . . . . . . .26
Clearing jams in the delivery head and the face-down bins . . . . . . . . . . . . . . . . . . . . . . . .28
4 Support information
Appendix A Operation modes summary table
Appendix B Specifications
Physical specifications . . . . . . . . . . . . . . . . . . . . . . . . . . . . . . . . . . . . . . . . . . . . . . . . . . . . . . . .33
Space requirements . . . . . . . . . . . . . . . . . . . . . . . . . . . . . . . . . . . . . . . . . . . . . . . . . . . . . . .34
Power requirements and circuit capacity . . . . . . . . . . . . . . . . . . . . . . . . . . . . . . . . . . . . . . .38
Power consumption . . . . . . . . . . . . . . . . . . . . . . . . . . . . . . . . . . . . . . . . . . . . . . . . . . . . . . .38
Operating and storage environment . . . . . . . . . . . . . . . . . . . . . . . . . . . . . . . . . . . . . . . . . .38
Supported media . . . . . . . . . . . . . . . . . . . . . . . . . . . . . . . . . . . . . . . . . . . . . . . . . . . . . . . . . . . .39
ENWW Contents v
Page 8

Appendix C Regulatory information
Declaration of Conformity. . . . . . . . . . . . . . . . . . . . . . . . . . . . . . . . . . . . . . . . . . . . . . . . . . . . . . 41
Canadian DOC Regulations. . . . . . . . . . . . . . . . . . . . . . . . . . . . . . . . . . . . . . . . . . . . . . . . . . . . 42
VCCI Statement (Japan) . . . . . . . . . . . . . . . . . . . . . . . . . . . . . . . . . . . . . . . . . . . . . . . . . . . . . . 42
Korean EMI Statement. . . . . . . . . . . . . . . . . . . . . . . . . . . . . . . . . . . . . . . . . . . . . . . . . . . . . . . . 42
Taiwan . . . . . . . . . . . . . . . . . . . . . . . . . . . . . . . . . . . . . . . . . . . . . . . . . . . . . . . . . . . . . . . . . . . . 42
Index
vi Contents ENWW
Page 9

1
Features
Product basics
The HP 8-bin Mailbox (multibin mailbox [MBM]) makes it easier to share one printer among
several users that might be located in different departments or workgroups within a
network-shared environment. The MBM attaches to a printer or multifunction peripheral (MFP)
and provides multiple output bins that can be assigned to a user or a group of users.
The MBM can be used with any of these HP products:
● HP LaserJet 9040 Series pri nte rs
● HP LaserJet 9050 Series pri nte rs
● HP LaserJet 9050mfp
● HP LaserJet 9040mfp
● HP LaserJet 9500mfp
The MBM has the following features:
● The MBM supports printing or copying output at up to 50 pages per minute (ppm).
● The face-up bin (upper-left bin) can hold up to 125 sheets of 75 grams per square
meter (g/m
● The face-down bins can hold up to 250 sheets of 75 g/m
stacked in order.
● You can use the MBM as a mailbox, stacker, job separator, or sorter/collator.
• Mailbox: The eight face-down bins can be assigned to a user or a group of users. All jobs
that a user or group of users sends are delivered to their assigned bin. This is the default
operation mode.
• Stacker: The MBM can act as a stacker. With the eight face-down bins, it can stack up to
2,000 sheets of 75 g/m
bin. Large jobs might stack up into the next bin.
• Job Separator: Jobs are delivered to the first available (empty) bin (a job can include the
original and its copies), starting from the top bin to the bottom bin.
• Sorter/Collator: Copies of a single job are delivered to consecutive bins.
● In addition to supporting all of the media that the output bins support, the face-up bin also
supports cardstock, envelopes, labels, and transparencies. For more information about
supported media, see
2
) (20-lb bond) paper. Jobs are stacked in reverse order.
2
(20-lb bond) paper each. Jobs are
2
(20-lb bond) paper. Jobs are sent to the lowest available (empty)
“Supported media” on page 39.
ENWW Features 1
Page 10
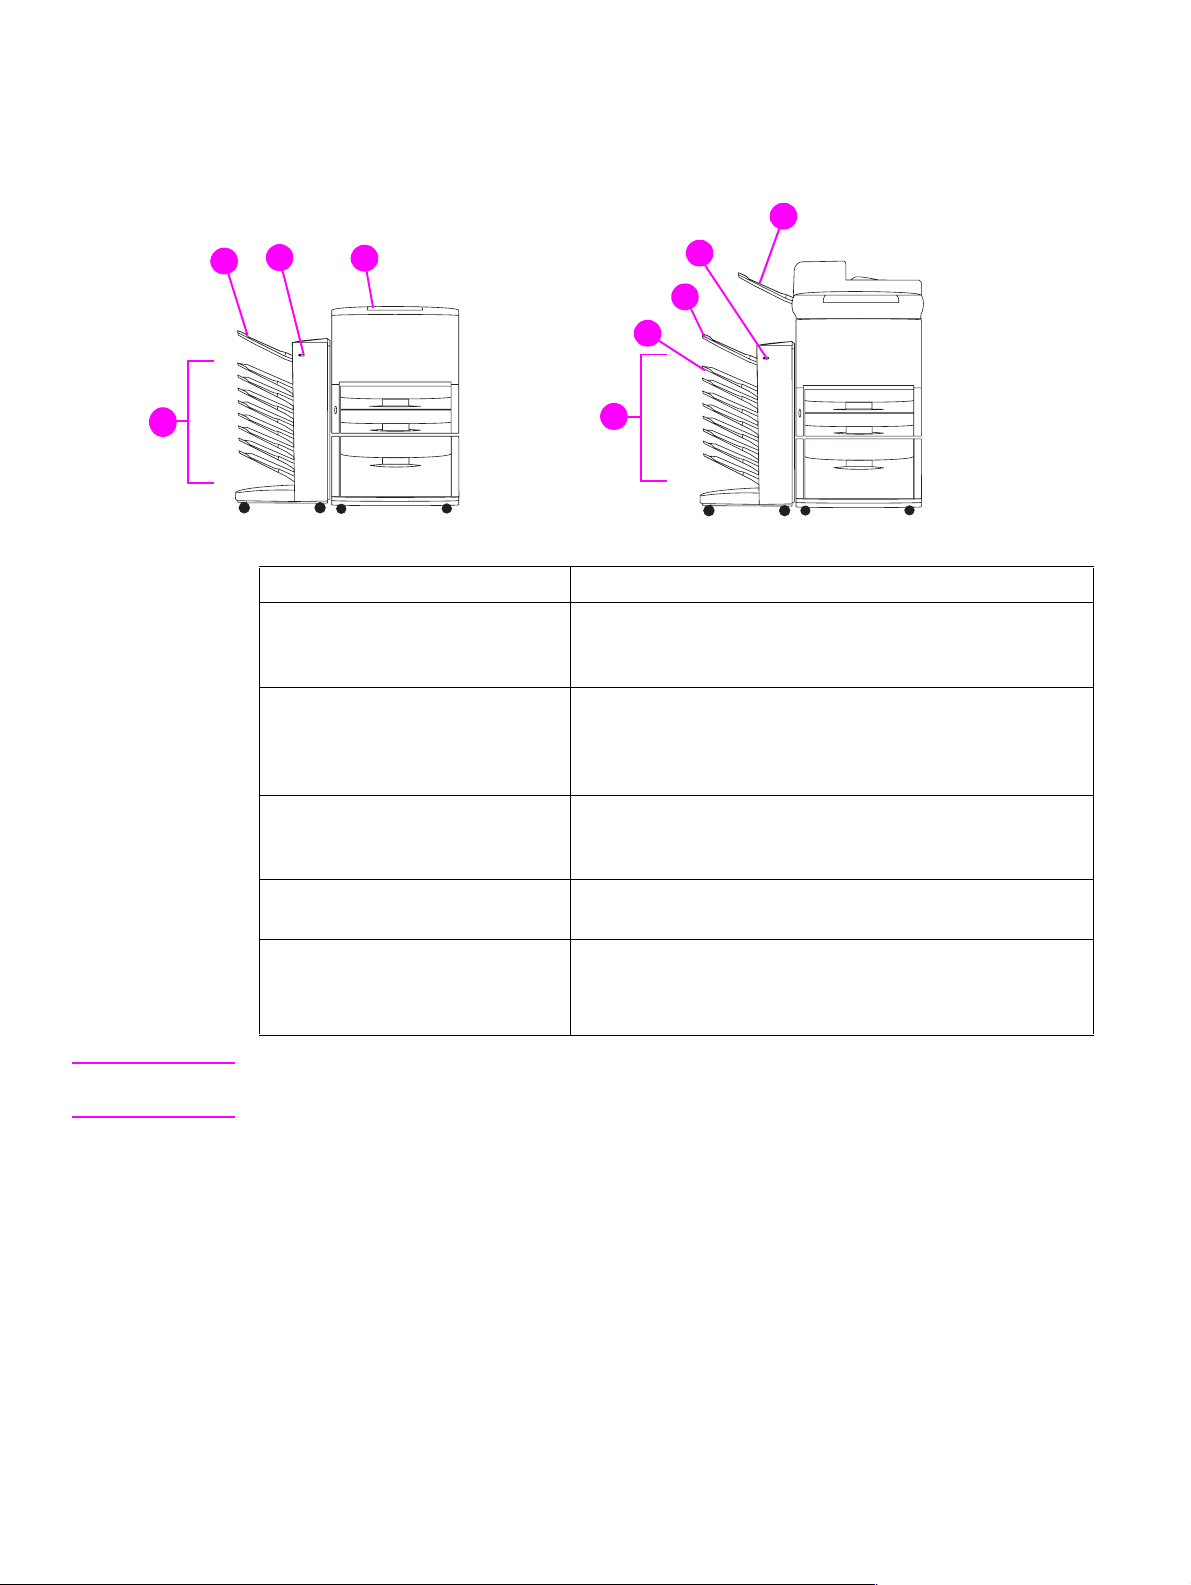
Identifying the MBM parts
HP LaserJet printer HP LaserJet MFP
1
4
1
3
1
1
Part Description
1 Face-down bins 1 through 8 Each of these bins holds up to 250 sheets. In these bins,
1
5
1
5
1
4
1
3
1
2
1
1
the sheets are stacked in the order in which they were
printed.
2 Face-down bin 1 (copy bin) Face-down bin 1 is the default bin for some MFP copy
jobs. When the MFP is in the mailbox mode, or when the
copy-bin option is turned on (enabled) in any of the other
operation modes, the copy jobs are delivered to this bin.
3 Face-up bin (upper-left bin) This bin holds up to 125 sheets. In this bin, the sheets are
stacked in the reverse order from the order in which they
were printed.
4 User LED The user light-emitting diode (LED) indicates the general
status of the MBM.
5 Standard top bin (printer )
ADF (automatic docume nt
feeder) output bin (MFP)
Note For more information about which output bins are designated to received copy and print jobs, see
“Getting started” on page 6.
See the documentation that came with your printer or MFP
for more information about these output bins.
2 1 Product basics ENWW
Page 11
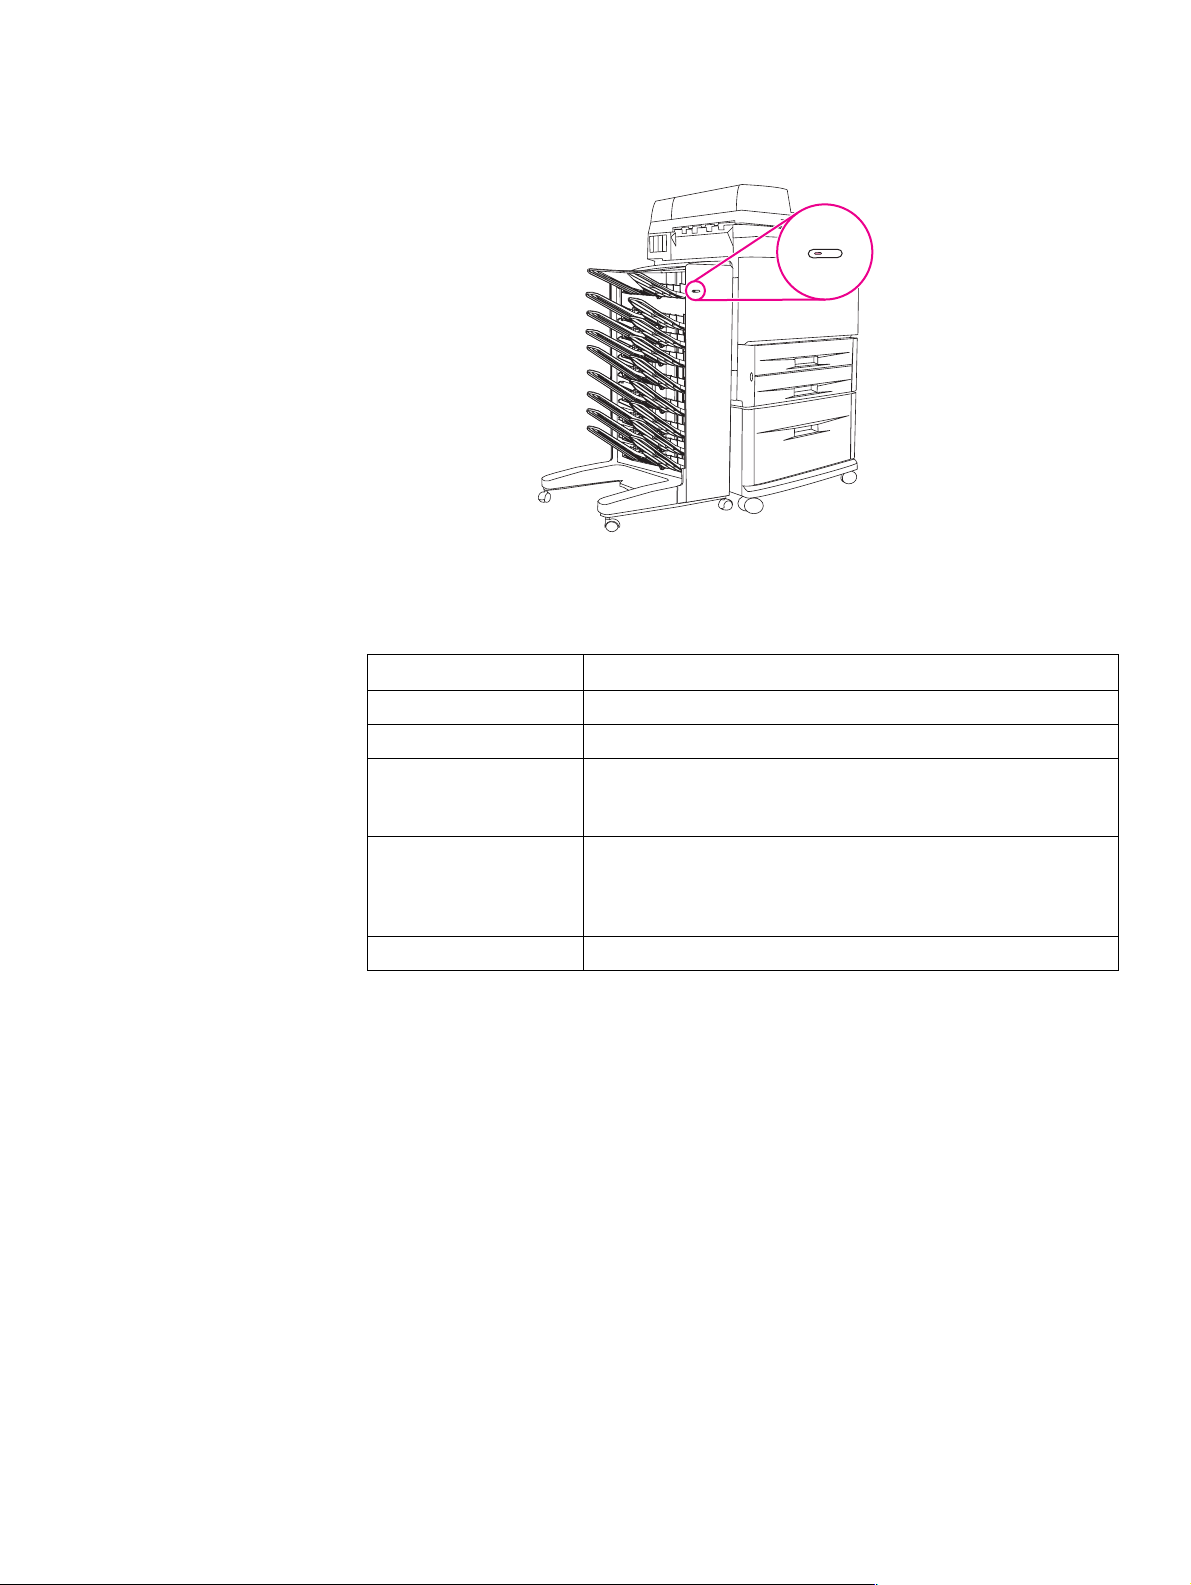
Interpreting light patterns
The user LED, located on the front of the MBM, indicates the status of the MBM. Use the
following table to interpret the device status by reading the user LED.
LED state Indication
Green, solid The MBM is operating normally.
Green, blinking The MBM is in Service mode.
Amber, solid A malfunction has occurred. See the printer or MFP control-panel
display and “Interpreting control-panel messages” on page19 for
more information.
Amber, blinking A jam or another error has occurred. Or, the MBM has been
removed from the printer or MFP. See the printer or MFP
control-panel dis pla y and “Interpreti ng control-pane l messages” on
page 19 for more information.
Off The MBM is off.
ENWW Interpreting light patterns 3
Page 12

4 1 Product basics ENWW
Page 13

Configuring the MBM for your
2
Note The illustrations in this section show the text in English. Depending on the operating system that
work environment
This chapter contains information about the following topics:
● Getting started
● Understanding the operation modes
● Setting an operation mode
● Turning off the designated default output bin for copy jobs
● Assigning a default output bin to a user or a group of users for the Mailbox mode
● Sending a print job to an output bin that is different from the default
● Sending a copy job to an output bin that is different from the default
you are using and what settings you have set, your screens might or might not look like these
illustrations.
ENWW 5
Page 14
Getting started
After the printer driver is installed, you have to configure the MBM in the printer driver and at the
control panel before you can use it.
Whether the MBM is connected to a printer or MFP, an output bin is set to be the first or only bin
to receive copies (the copy bin) or print jobs. See the following table for more information about
which output bins are designated to received copy and print jobs. For more information, see
“Sending a copy job to an output bin that is different from the default” on page 16.
When the MBM
Operational mode Copy bin Default output bin
is connected to
Printer ● Mailbox mode
● Stacker mode
● Job Separator mode
● Sorter/Collator mode
MFP Mailbox mode Not applicable (it
● Stacker mode
● Job Separator mode
● Sorter/Collator mode
● Stacker mode
● Job Separator mode
● Sorter/Collator mode
(The printer does
not produce
copies.)
is alway s enabled
in the Mailbox
mode)
Enabled (default) Face-down bin 1 Face-down bins 2
Disabled Face-down bins 1
Default output bin
for copy jobs
(The printer does not
produce copies.)
Face-down bin 1 Face-down bin 2
through 8
for print jobs
Standard top bin
through 8
Face-down bins 1
through 8
6 2 Configuring the MBM for your work environment ENWW
Page 15

Understanding the operation modes
The MBM has four operation modes.
Note When the MBM is connected to a multifunction peripheral (MFP), the face-down bin 1 is
designated for copy jobs (as the default) and is not available in the printer driver. Each of the
remaining seven output bins is available in the printer driver.
When the operation mode is changed, the printer or MFP restarts
Mailbox
The eight face-down bins (seven face-down bins when the MBM is connected to an MFP) can be
assigned to individual users or a groups of users. All jobs that a user or group of users sends are
delivered to the assigned bin. This is the default operation mode. When the mailbox mode is
selected, each output bin is available as an output destination in the printer driver and at the
control panel.
The face-up bin (upper-left bin) can hold up to 125 sheets and each face-down bin can hold up to
250 sheets. When an assigned output bin is full, the printer or MFP stops printing until the media
in the bin is removed.
Stacker
The MBM can be used as a stacker. Using the eight face-down bins, it can stack up to 2,000
sheets. Jobs are sent to output bins starting with the lowest available empty face-down bin.
When an output bin is full, the current job or a new job is sent into the next available bin until that
bin is full. Large jobs might stack up into the next bin. When the Stacker mode is selected, you
cannot select which bin to send your job to.
When an output bin is full, the job is automatically delivered to the next available bin. When all of
the face-down bins are full, the printer or MFP stops printing and indicates (on the printer or MFP
control-panel display) that the stacker is full. In order for the printer or MFP to continue printing,
you must remove any media from the top face-down bin (bin 1) first and then continue down.
Note Do not remove media from the top face-down bin (bin1) and then attempt to replace it in that bin.
The stack order is disrupted when the media is removed and then replaced.
Job Separator
Jobs are delivered to an available (empty) output bin (a job can include the original and its
copies), starting from the top bin and continuing to the bottom bin. If no bins are empty, a job is
delivered first to the top bin and, if the top bin is full, then to subsequent bins, continuing to the
bottom bin. The bin that the job is sent to is considered the destination bin. When the Job
Separator mode is selected, you cannot select which bin to send your job to.
When the destination bin is full, the printer or MFP stops printing (even if the other bins are not
full). In order for the printer or MFP to continue printing, you must remove the media from the
destination bin.
Sorter/Collator
Each copy of a single print or copy job is delivered to a separate output bin, starting with the top
face-down bin and continuing to the bottom bin. When a copy is delivered to the lowest bin, the
next copy is delivered to the top face-down bin and the delivery process is repeated. When this
mode is selected, you cannot select which bin to send your job to.
ENWW Understanding the operation modes 7
Page 16
If a print or copy job is sent to a bin that is full, the printer or MFP stops printing (even if the other
bins are not full). For the printer or MFP to continue printing, you must remove the media from
the full bin.
Setting an operation mode
After you set the operation mode at the printer or MFP control panel, you need to configure the
printer driver so that it matches the operation mode that you set at the control panel.
HP LaserJet 9040/9050 series printers
1 Use or to scroll to CONFIGURE DEVICE, and then press .
2 Use or to scroll to MBM-8 CONFIG, and then press .
3 Use or to scroll to OPERATION MODE, and then press .
4 Use or to scroll to the operation mode that you want, and then press . The printer
restarts.
5 Continue to “Setting the operation mode in the printer driver to match the control-panel
setting” on page 8.
HP LaserJet 9040mfp/9050mfp/9500mfp
1 Press the MENU button.
2 Scroll to and touch CONFIGURE DEVICE.
3 Scroll to and touch MBM-8 CONFIG.
4 Scroll to and touch OPERATION MODE.
5 Scroll to the operation mode that you want, and then touch OK. An asterisk (*) appears next
to your selection. The MFP restarts.
6 Continue to “Setting the operation mode in the printer driver to match the control-panel
setting” on page 8.
Setting the operation mode in the printer driver to match the control-panel setting
The operation-mode setting in the printer driver needs to match the operation mode that was
selected at the control panel to ensure that print or copy jobs are delivered to the expected
destination bin.
Note The illustrations in this section show the text in English. Depending on the operating system that
you are using and what settings you have set, your screens might or might not look like these
illustrations.
Microsoft® Windows® 2000 and Windows XP
1 Click the Start button, point to Settings, and then click Printers (Windows 2000) or Printers
and Faxes (Windows XP).
2 Right-click the HP product icon, and then click Properties or Printing Preferences.
3 Click the Device Settings tab.
4 Perform one of the following actions:
8 2 Configuring the MBM for your work environment ENWW
Page 17

• For automatic configuration, under Installable Options, click Update Now in the
Automatic Configuration list.
• For manual configuration, under Installable Options, select the appropriate operation
mode in the Accessory Output Bin list.
5 Click OK to save your settings.
ENWW Setting an operation mode 9
Page 18

Windows 98, Windows Me, and Windows NT® 4.0
1 Click the Start button, point to Settings, and then click Printers.
2 Right-click the HP product icon, and then click Properties (Windows 98 and Windows
Millennium Edition [Me]) or Document Defaults (Windows NT 4.0).
3 Perform one of the following actions:
If you are using a Printer Control Language (PCL) printer driver
• For automatic configuration, click the Configure tab, and then click the Update Now
button. For manual configuration, select the appropriate operation mode in the Optional
Paper Destinati ons list.
If you are using a PostScript® (PS) printer driver
•Click the Device Options tab (Windows 98 and Windows Me) or the Device Settings tab
(Windows NT 4.0) tab. Under Installable Options, select the appropriate operation mode
in the Accessory Output Bin list.
4 Click OK to save your settings.
Mac OS X
1 In the Apple menu, click System Pre fere nces.
2 In the System Preferences dialog box, click Print & Fax.
3 Click the Set Up Printers button. Printer List appears.
4 Select the HP product, and then click Show Info on the Printers menu.
5 Select the Installable Options panel.
6 In the Accessory Outpu t Bins list, select HP Multi-Bin Mailbox.
10 2 Configuring the MBM for your work environment ENWW
Page 19

7 In the Mailbox Mode list, select the appropriate operational mode, and then click Apply
Changes.
ENWW Setting an operation mode 11
Page 20

Turning off the designated default output bin for copy jobs
If the MBM is connected to an MFP, the face-down bin 1 is designated for regular copy jobs in
the following operation modes:
● Stacker
● Job Separator
● Sorter/Collator
If the copy bin is turned off, regular copy jobs are sent to face-down bins 1 through 8 for the
Stacker, Job Separator, and Sorter/Collator modes.
Note This option does not apply to the Mailbox mode. When the Mailbox mode is used, the face-down
bin 1 is always used for copy jobs.
HP LaserJet 9040/9050 series printers
1 Use or to scroll to CONFIGURE DEVICE, and then press .
2 Use or to scroll to MBM-8 CONFIG, and then press .
3 Use or to scroll to COPIER BIN, and then press .
4 Use or to scroll to the option to turn the copy bin on or off, and then press .
HP LaserJet 9040mfp/9050mfp/9500mfp
1 Press the MENU button.
2 Scroll to and touch CONFIGURE DEVICE.
3 Scroll to and touch MBM-8 CONFIG.
4 Scroll to and touch COPIER BIN.
5 Scroll to the option to turn the copier bin on or off, and then touch OK.
12 2 Configuring the MBM for your work environment ENWW
Page 21

Assigning a default output bin to a user or a group of users for the Mailbox mode
When the HP 8-bin Mailbox (MBM) is configured as a mailbox, the output bins can be assigned
to users or groups of users. This feature is available in the printer driver.
Note The illustrations in this section show the text in English. Depending on the operating system that
you are using and what settings you have set, your screens might or might not look like these
illustrations.
Microsoft Windows
Windows 2000 and Windows XP
1 At the computer that belongs to the user that you are assigning, click the Start button, point
to Settings, and then click Printers (Microsoft Windows 2000) or Printers and Faxes
(Windows XP).
2 Right-click the HP product icon, and then click Properties or Printing Preferences.
3 On the Output tab, select the appropriate output bin, and then click OK.
4 Repeat steps 1 through 3 for each user.
Windows 98 and Windows Me
1 At the computer that belongs to the user that you are assigning, click the Start button, point
to Settings, and then click Printers.
2 Right-click the HP product icon, and then click Properties.
3 Perform one of the following actions:
If you are using a PCL printer driver
• On the Output tab, select the appropriate output bin, and then click OK.
If you are using a PS printer driver
• Click the Paper tab, click the More Options button. In the More Paper Options dialog
box, select the appropriate output bin from the Output Bin list.
4 Repeat steps 1 through 3 for each user.
ENWW Assigning a default output bin to a user or a group of users for the Mailbox mode 13
Page 22

Windows NT 4.0
1 At the computer that belongs to the user that you are assigning, click the Start button, point
to Settings, and then click Printers.
2 Right-click the HP product icon, and then click Document Defaults.
3 Perform one of the following actions:
If you are using a PCL printer driver
• On the Output tab, select the appropriate output bin, and then click OK.
If you are using a PS printer driver
• Click the Advanced tab. Under Document Options, click Printer Features. Select the
appropriate output bin from the Output Bin list.
4 Repeat steps 1 through 3 for each user.
Macintosh
You can assign a default output bin to a user or a group of users for the Mailbox mode by
creating a preset in the printer driver that specifies the appropriate output bin set.
1 At the computer that belongs to the user that you are assigning, open a document and then
click Print on the File menu.
2 Select the appropriate output bin.
3 In the Presets pop-up menu, click Save As, and then type a name for the preset.
14 2 Configuring the MBM for your work environment ENWW
Page 23

Sending a print job to an output bin that is different from the default
Because you cannot specify a face-down output bin to send your print job to in the Stacker, Job
Separator, and Sorter/Collator modes, the bin option for these modes is Output Bins 1-8 (for
printers) or Output Bins 2-8 (for MFPs). When the MBM is connected to an MFP, output bin 1 is
not available in the printer driver.
Note The illustrations in this section show the text in English. They show screens that appear in the
Mailbox mode. Depending on the operating system that you are using and what settings you have
set, your screens might or might not look like these illustrations.
Microsoft Windows
Windows 2000 and Window XP
1 Open a document, and then click Print on the File menu.
2 Click Setup or Properties. (The options might be different for your program.)
3 Click the Output or Destination tab.
4 In the Bin list, select an output bin, and then click OK.
Windows 98 and Window Me
1 Open a document, and then click Print on the File menu.
2 Click Setup or Properties. (The options might be different for your program.)
3 Perform one of the following actions:
If you are using a PCL printer driver
• On the Output tab, select the appropriate output bin, and then click OK.
If you are using a PS printer driver
• Click the Paper tab, click the More Options button. In the More Paper Options dialog
box, select the appropriate output bin from the Output Bin list. Click OK.
ENWW Sending a print job to an output bin that is different from the default 15
Page 24

Windows NT 4.0
1 Open a document, and then click Print on the File menu.
2 Click Setup or Properties. (The options might be different for your program.)
3 Perform one of the following actions:
If you are using a PCL printer driver
• On the Output tab, select the appropriate output bin, and then click OK.
If you are using a PS printer driver
• Click the Advanced tab. Under Document Options, click Printer Features. Select the
appropriate output bin from the Output Bin list.
Macintosh
1 On the File menu, click Print.
2 Select the Finishing panel.
3 In the Output Destination list, select 8-Bin Mailbox.
4 In the Mailbox Options list, select the appropriate output bin, and then click Print.
Sending a copy job to an output bin that is different from the default
HP LaserJet 9040mfp/905 0mf p/9 500 mf p
1 Touch the copy icon on the control-panel display.
2 Touch COPY SETTINGS, and then touch the Advanced tab.
3 Select the output bin for your copy job.
The output bin options that are available for copy jobs differ depending on the operation mode.
See the following table for more information.
Operational mode Copy bin is enabled Copy bin is disabled
Mailbox mode ● UPPER BIN
● *BIN 1
● BIN 2
● BIN 3
● BIN 4
● BIN 5
● BIN 6
● BIN 7
● BIN 8
● Stacker mode
● Job Separator mode
● Sorter/Collator mode
● UPPER BIN (STRAIGHT
PATH)
● *BIN 1
● BINS 2-8 (CORRECT
ORDER)
Not applicable (the
face-down bin 1 is always
used for copy jobs when the
Mailbox mode is set)
● UPPER BIN (STRAIGHT
PATH)
● *BINs 1-8 (CORRECT
ORDER)
16 2 Configuring the MBM for your work environment ENWW
Page 25

3
Problem solving
This chapter contains information to help you with the following issues:
● Resolving common problems
● Interpreting control-panel messages
● Clearing jams
ENWW 17
Page 26

Resolving common problems
Use the information in the following table to resolve common problems that can occur with the
MBM.
Problem Solution
The MBM does not turn on. ● Make sure that the power cord is firmly plugged into the
The printer or MFP does not recognize
the MBM.
-OR-
The user LED on the MBM is off.
2,000-sheet input tray.
● If you are using the MBM with the HP Color LaserJet 9500mfp,
make sure that the power cord is firmly plugged into the base
of the MFP uni t.
● Make sure that the MBM communications cable is firmly
plugged into the printer or MFP.
● Turn the printer or MFP off, check all of th e ca ble connections,
and then turn the printer or MFP on.
● Check the power cord on the MBM.
● Make sure that the MBM has been configured in the printer
software.
● Make sure that the MBM communications cable is firmly
plugged into the printer or MFP.
● Print a configuration page to see if the MBM is operating
normally.
● If the printer or MFP still does n ot rec og nize the MBM, contact
your authorized HP service provider. See “Support
information” on page 29.
The job went to a different output
location than expected.
Because the face-down bins are full,
the printer or MFP has stopped
printing. But when I remove the paper
from one of the face-down bins, the
printer or MFP does not continue
printing the job.
● Make sure that you are using supported media weights and
sizes. For more information, see “Supported media” on
page 39.
Note Using media that is outside of HP
specifications might cause problems that
could require repai r. This repair is not
covered b y the Hewlett-P ackard warr anty or
service agreements.
● Make sure that the correct output bin is selected in the printer
software. For more information about changing settings in the
printer software, see the user documentation that came with
the printer or MFP.
● Print a configuration page and make sure that the operation
mode in the printer software matches the information on the
configuration page.
Make sure to remove all of the media, starting with the topmost
face-down bin (bin 1) and continuing down. If media is removed
starting from any bin other than bin 1, the MBM ignores it.
Note Do not remove media from the top
face-down bin (bin1) and then attempt to
replace it in that bin. The stack order is
disrupted when the media is removed and
then replaced.
18 3 Problem solving ENWW
Page 27

Problem Solution
The print media jams. ● Make sure that you are using supported media weights and
sizes. For more information, see “Supported media” on
page 39.
Note Using media that is outside of HP
● Check the cables and connectors between the printer and the
MBM.
Repeated jams occur. Repeated jams that occur when print media travels between the
printer or MFP and the MBM might mean that the printer or MFP
and the MBM are set up on an uneven floor.
Level the MBM. See the MBM installation guide for more
information about leveling the MBM.
Interpreting control-panel messages
The following table explain general control-panel messages that pertain to the MBM.
specifications might cause problems that
could require repai r. This repair is not
covered b y the Hewlett-P ackard warr anty or
service agreements.
Note For control-panel messages that pertain to jams that occur when using the MBM, see “Control-
panel messages about jams” on page 22.
Message Description Action
UPPER LEFT BIN FULL
OPTIONAL BIN 1 FULL
OPTIONAL BIN 2 FULL
The face-up bin (upper-left bin) is
full.
One or more of the face-down bins
are full.
Remove all media from the fa ce-up
bin.
Remove all media from the
face-down bins.
OPTIONAL BIN 3 FULL
OPTIONAL BIN 4 FULL
OPTIONAL BIN 5 FULL
OPTIONAL BIN 6 FULL
OPTIONAL BIN 7 FULL
OPTIONAL BIN 8 FULL
OPTIONAL BINS 1-8 FULL
OPTIONAL BINS 2-8 FULL
OUTPUT PAPER PATH OPEN
The MBM is not correct ly attached to
the printer or MFP on the left side.
1. Atta ch the MBM to t he printer or
MFP.
2. Adjust the casters on the
bottom of the MBM to level the
MBM. See the MBM installation
guide for more information
about leveling the MBM.
13.12.XX
JAM IN LEFT ACCESSORY
A jam exists in the MBM. For more information, see “Control-
panel messages about jams” on
page 22.
ENWW Interpreting control-panel messages 19
Page 28

Message Description Action
65.12.60
65.12.61
OUTPUT DEVICE FAILURE
CHECK BINS OF THE OUTPUT
DEVICE
65.12.70
65.12.71
OUTPUT DEVICE CONDITION
A problem exists with the deliveryhead internal mechanism.
A problem exists with the
up-and-down movement of the
delivery head.
1. Move the MBM away from the
printer or MFP.
2. Remove any pieces of media
that might be obstruc ting
movement of the delivery head.
See “Paper-jam locations and
parts” on page 21 for the
location of the delivery head.
3. Reattach the MBM.
4. Wait for the solid green status
light to appear on the user LED
before you continue printing.
1. Move the MBM away from the
printer or MFP.
2. Make sure that all of the output
bins are seated properly.
3. M ake sure that t he blind cov er is
seated correctly. See
“Paper-jam l oca tio ns a nd pa rts”
on page 21 for the location of
the blind cover.
4. Remove any media that might
obstruct the belt movement.
See “Paper-jam locations and
parts” on page 21 for the
location of the belt.
5. Reattach the MBM.
6. Wait for the solid green status
light to appear on the user LED
before you continue printing.
66.12.05
66.12.06
66.12.55
66.12.65
66.12.75
66.12.85
66.12.95
OUTPUT DEVICE FAILURE
An internal malfunction has
occurred.
Turn the printer or MFP off and then
on again. If the prob lem persis ts, call
for service. See “Support
information” on page 29.
20 3 Problem solving ENWW
Page 29

Clearing jams
If the message JAM IN LEFT ACCESSORY appears on the control panel, follow the recommended
action in “Control-panel messages about jams” on page 22.
Note When you clear a jam, be very careful not to tear the media. If even a small piece of media is left
in the MBM, it can cause additional jams.
Paper-jam locations and parts
The following illustration shows the MBM parts that might be involved when jams occur.
1
2
1
1
1
3
1
4
1
5
1
6
1
7
1 Fa ce-down bins
2 Face-up bin
3 Flipper
4 Blind cover
5 Entry area
6 Delivery head
7 Belt
ENWW Clearing jams 21
Page 30

Control-panel messages about jams
The following table explains control-panel messages that pertain to jams that occur when using
the MBM.
Message Description Action
13.12.01
13.12.02
13.12.03
13.12.04
13.12.05
13.12.06
JAM IN LEFT ACCESSORY
13.12.50
JAM IN LEFT ACCESSORY
13.12.51
JAM IN LEFT ACCESSORY
A jam exists in the entry area or the
flipper assemb ly.
Media is present in the belt or the
delivery head.
A paper jam exists in the belt. 1. Move the MBM away from the
1. Move the MBM away from the
printer or MFP.
2. Remove any jammed media
from the output area of the
printer or MFP and from the
entry area or flipper of the MFP.
3. Make sure that you are using
supported media weights and
sizes. For more information,
see “Supported media” on
page 39.
4. Reattach the MBM.
5. Wait for the solid green status
light to appear on the user LED
before you continue printing.
1. Move the MBM away from the
printer or MFP.
2. Remove any media from the
belt.
3. Remove any media from the
delivery head.
4. Make sure that you are using
supported media weights and
sizes. For more information,
see “Supported media” on
page 39.
5. Reattach the MBM.
6. Wait for the solid green status
light to appear on the user LED
before you continue printing.
printer or MFP.
2. Remove any media from the
belt.
3. Make sure that you are using
supported media weights and
sizes. For more information,
see “Supported media” on
page 39.
4. Reattach the MBM.
5. Wait for the solid green status
light to appear on the user LED
before you continue printing.
22 3 Problem solving ENWW
Page 31

Message Description Action
13.12.52
13.12.53
13.12.54
JAM IN LEFT ACCESSORY
A jam exists in the belt or in the
delivery head.
1. Move the MBM away from the
printer or MFP.
2. Remove any media from the
delivery head.
3. Remove any media from the
belt.
4. Make sure that you are using
supported media weights and
sizes. For more information,
see “Supported media” on
page 39
5. Reattach the MBM.
6. Wait for the solid green status
light to appear on the user LED
before you continue printing.
ENWW Clearing jams 23
Page 32

Clearing jams in the belt
1 Move the MBM away from the printer or MFP. To do this, stand on the left side of the MBM
and pull the device straight toward you.
2 Carefully pull the jammed media out of the belt.
CAUTION Be careful to not move the delivery head up or down. Doing so can cause serious damage to the
MBM.
3 Reattach the MBM to the printer or MFP.
24 3 Problem solving ENWW
Page 33

Clearing jams in the entry area
1 Move the MBM away from the printer or MFP. To do this, stand on the left side of the MBM
and pull the device straight toward you.
2 Carefully pull the jammed media from the MBM entry area or from the exit area of the printer
or MFP.
WARNING! Avoid touching the entry area area. It can be hot.
3 Reattach the MBM to the printer or MFP.
ENWW Clearing jams 25
Page 34

Clearing jams in the face-up bin and in the flipper
1 Move the MBM away from the printer or MFP. To do this, stand on the left side of the MBM
and pull the device straight toward you.
2 Remove the face-up bin (upper-left bin).
3 Locate the handle in the flipper area and lift the handle. Remove the jammed media.
WARNING! Avoid touching the flipper area. It can be hot.
4 Reinstall the face-up bin (upper-left bin).
26 3 Problem solving ENWW
Page 35

5 Reattach the MBM to the printer or MFP.
ENWW Clearing jams 27
Page 36

Clearing jams in the delivery head and the face-down bins
1 Move the MBM away from the printer or MFP. To do this, stand on the left side of the MBM
and pull the device straight toward you.
2 Carefully pull the jammed media out from the face-down bin and delivery head.
Note Hewlett-Packard Company recommends removing the jammed media without removing the
face-down bins.
CAUTION Be careful to not move the delivery head up or down. Doing so can cause serious damage to the
MBM.
3 Reattach the MBM to the printer or MFP.
28 3 Problem solving ENWW
Page 37

4
Support information
World Wide Web
Solutions to most issues can be found at www.hp.com. The HP Web site includes frequently
asked questions (FAQ), troubleshooting help, information about maintenance and use, and
manuals for the following products that can be used with the MBM:
● HP LaserJet 9040 Series pri nte rs
● HP LaserJet 9050 Series pri nte rs
● HP LaserJet 9050mfp
● HP LaserJet 9040mfp
● HP LaserJet 9500mfp
Warranty information
See the warranty booklet that came with your printer or MFP for warranty information.
ENWW 29
Page 38

30 4 Support information ENWW
Page 39

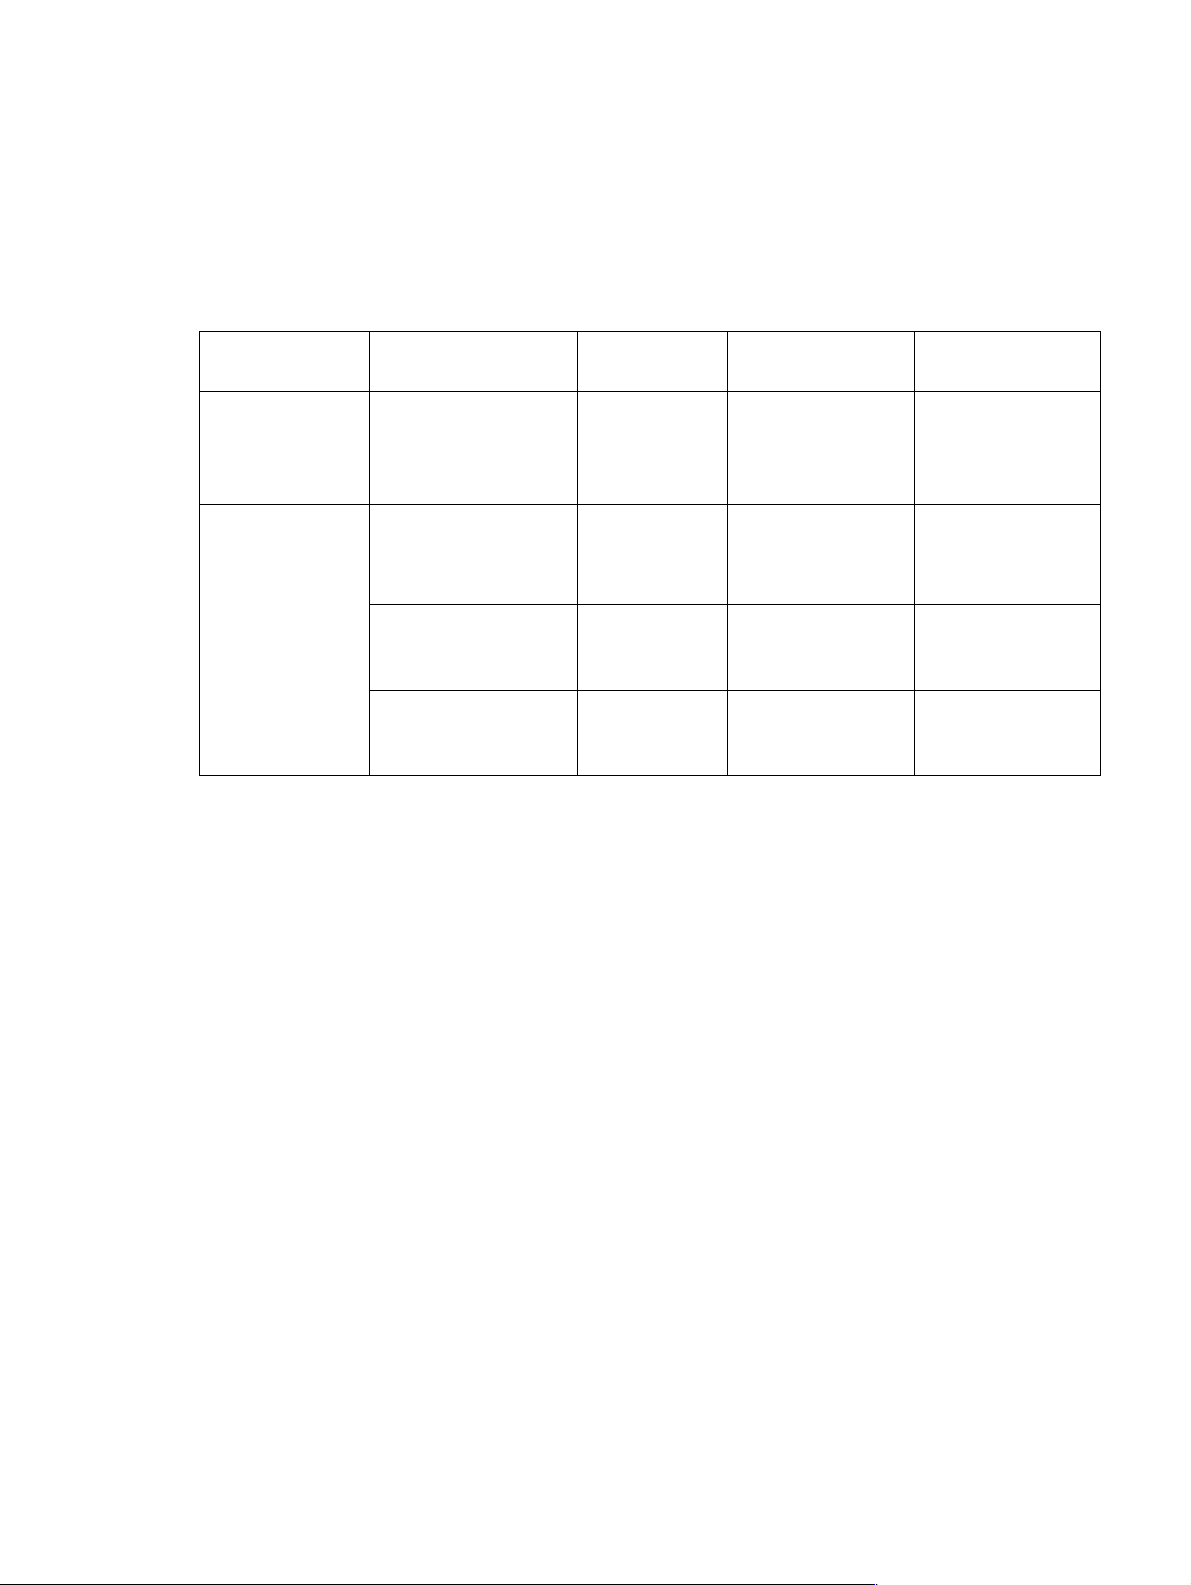
Operation modes summary
A
What the MBM
is connected to
table
Operational mode Copy bin
enabled or
disabled
Printer
● Mailbox mode Not
applicable
(The printer
does not
produce
copies.)
● Stacker mode
● Job Separator mode
● Sorter/Collator mode
Not
applicable
(The printer
does not
produce
copies.)
MFP Mailbox mode The copy
bin is
always
enabled in
the Mailbox
mode
● Stacker mode
● Job Separator mode
● Sorter/Collator mode
● Stacker mode
● Job Separator mode
● Sorter/Collator mode
Enabled
(default)
Disabled
Available output bins The output bin options
at the control panel for
copying
● Standard top bin
● Face-up bin (upper-left
Not applicable
bin)
● Face-down bins 1 through
8
● Standard top bin
● Face-up bin (upper-left
Not applicable
bin)
● Face-down bins 1 through
8 (high paper capacity)
● Face-up bin (upper-left
bin)
● Face-down bins 1 through
8 (high paper capacity)
● Face-up bin (upper-left
bin)
● Face-down bin 1
● Face-down bins 2 through
8 (high paper capacity)
● Face-up bin (upper-left
bin)
● Face-down bins 1 through
8 (high paper capacity)
● UPPER BIN
● *BIN 1
● BIN 2
● BIN 3
● BIN 4
● BIN 5
● BIN 6
● BIN 7
● BIN 8
● UPPER BIN (STR AIGHT
PATH)
● *BIN 1
● BINS 2-8 (CORRECT
ORDER)
● UPPER BIN (STR AIGHT
PATH)
● *BINS 1-8 (COR RECT
ORDER)
The output bin options
in the printer driver for
printing
● Standard Top Bin
● Upper Left Bin
(Straightest Path)
● Output Bin 1
● Output Bin 2
● Output Bin 3
● Output Bin 4
● Output Bin 5
● Output Bin 6
● Output Bin 7
● Output Bin 8
● Standard Top Bin
● Upper Left Bin
(Straightest Path)
● Output Bins 1-8
● Upper Left Bin
(Straightest Path)
● Output Bin 2
● Output Bin 3
● Output Bin 4
● Output Bin 5
● Output Bin 6
● Output Bin 7
● Output Bin 8
● Upper Left Bin
(Straightest Path)
● Output Bins 2-8
● Upper Left Bin
(Straightest Path)
● Output Bins 2-8
ENWW 31
Page 40

32 A Operation modes summary table ENWW
Page 41

Specifications
B
Physical specifications
The following sections outline the physical specifications for the HP 8-bin Mailbox (MBM).
Height Width Depth Weight
970 mm (38.2 inches) 1065 mm (41.9 inches) 480 mm (18.9 inches) 19.2 kgs (51.4 lbs)
480 mm
(18.9 in)
970 mm
(38.2 in)
435 mm
(17.1 in)
630 mm
(24.8 in)
890 mm
(35.0 in)
ENWW Physical specifications 33
Page 42

Space requirements
HP recommends the following setup specifications for using the HP 8-bin Mailbox (MBM) with
your printer or MFP.
● Place the printer or MFP and the MBM on a level surface.
● Allow space around the printer or MFP and the MBM for good ventilation.
● Place the printer or MFP and the MBM in a well-ventilated room.
● Do not expose the printer or MFP and the MBM to direct sunlight or chemicals, including
ammonia-based cleaning solutions.
● Ensure that the printer or MFP and the MBM have an adequate power-supply circuit located
nearby. See the “Power requirements and circuit capacity” on page 38 section of this chap ter
for more information.
● Choose a location for your printer or MFP and the MBM that has a stable temperature and
humidity level. See the “Operating and storage environment” on page 38 section of this
chapter for more information.
34 Appendix B Specifications ENWW
Page 43

Space requirements for the HP 8-bin Mailbox with the
HP LaserJet 9500mfp
480 mm
(18.9 in)
435 mm
(17.1 in)
555 mm
(21.9 in)
635mm
(25 in)
864 mm
(34.0 in)
450 mm
(17.7 in)
415 mm
(16.3 in)
1219 mm
(48 in)
ENWW Physical specifications 35
Page 44

Space requirements for the HP 8-bin Mailbox with the
HP LaserJet 9040mfp and HP LaserJet 9050mfp
480 mm
(18.9 in)
787 mm
(30.9 in)
450 mm
(17.7 in)
435 mm
(17.1 in)
555 mm
(21.9 in)
635 mm
(25 in)
440 mm
(17.3 in)
1219 mm
(48 in)
36 Appendix B Specifications ENWW
Page 45

Space requirements for the HP 8-bin Mailbox with the
HP LaserJet 9040/9050 series printers
480 mm
(18.9 in)
721 mm
(28.3 in)
450 mm
(17.7 in)
435 mm
(17.1 in)
555 mm
(21.9 in)
1118 mm
(43.9 in)
1003 mm
(39.4 in)
ENWW Physical specifications 37
Page 46

Pow e r requirem e nts and circuit capacity
Requirement or capacity 110-volt models 220-volt models
Power requirements 110 to 127 volts (V) (+/- 10%)
50 to 60 hertz (Hz) (+/- 2 Hz)
Minimum recommended circuit
capacity
15.0 amps 6.5 amps
Power consumption
Printer state Specification
Printing 49 watts
Standby 11 watts
Off less than 0.25 watt
Operating and storage environment
Variable Allowable condition
Operating temperature 10° to 32.5° C (50° to 95° F)
220 V (+/- 10%)
50 to 60 Hz (+/- 2 Hz)
-Or220 to 240 V (+/- 10%)
60 Hz (+/- 2 Hz)
Relative humidity 20% to 80%
Storage temperature 0° to 45° C (32° to 113° F)
Storage humidity 20% to 80%
38 Appendix B Specifications ENWW
Page 47

Supported media
Bin Capacity Media size Media type Media weight
Face-down bins 250 sheets of
75 g/m
2
(20 lb
bond)
● Standard sizes:
letter, leg al, ISO A3, ISO A4,
ISO A5, 11 x 17, JIS B4, JIS
B5, 8k, 16k
● Custom sizes:
minimum: 148 x 210 mm
(5.83 x 8.27 inches)
maximum: 297 x 432 mm
(11.69 x 17 inches)
Face-up bin 125 sheets of
75 g/m
2
(20 lb
bond)
● Standard sizes:
letter, legal, executive, ISO
A3, ISO A4, ISOA5, 11 x 17,
JIS B4, JIS B5, jpostD, 8k,
16k
● Custom sizes:
minimum: 98 x 170 mm (3.86
x 6.7 inches )
maximum: 305 x 470 mm (12
x 18.5 inches)
1 - Letterhead with raised lettering or low-temperature inks is not supported.
● plain
● preprinted
● letterhead
● prepunched
● bond
● color
● recycled
● light
● glossy
● heavy
● rough
● heavy glossy
● non-HP
1
heavy glossy
● high-gloss
images
● plain
● preprinted
● letterhead
● prepunched
● bond
● color
● recycled
● light
● glossy
● heavy
● rough
● heavy glossy
● non-HP
1
heavy glossy
● high-gloss
images
● tough paper
● labels
● envelopes
● cardstock
● transparencies
64 to 135 g/m2
(17 to 36-lb bond)
64 to 216 g/m
2
(14 to 58-lb bond)
ENWW Supported media 39
Page 48

40 Appendix B Specifications ENWW
Page 49

C
Regulatory information
Declaration of Conformity
According to ISO/IEC Guide 22 and CEN/CENELEC EN 45014
Manufacturer’s Name: Hewlett-Packard Company
Manufacturer’s Address: Montemorelos 299
Guadalajara Jalisco, 45060
Mexico
Declares, that the product
Product Name: HP 8-bin Mailbox
Model Numbers: Q5693A, Q5710A
Regulatory Model: GUADA-0401-00
Product Options: All
Is in conformity with:
SAFETY: IEC 60950:1999 / EN60950:2000
EMC: CISPR 22:1997 / EN55022:1998 Class A
CISPR 24:1997 / EN 55024:1998
IEC 61000-3-2:2000 / EN61000-3-2:2000
IEC 61000-3-3:1994 +A1 / EN61000-3-3:1995 +A1
FCC Title 47 CFR, Part 15 Class A
Supplementary Information:
The product herewith complies with the requirements of the EMC Directive 89/336/EEC and the Low
Voltage Directive 73/23/EEC, and carries the CE-Marking accordingly.
1) The product was tested in a typical configuration with Hewlett-Packard Personal Computer Systems.
2) This Device complies with Part 15 of the FCC Rules. Operation is subject to the following two
Conditions:
(1) this device may not cause harmful interference, and
(2) this device must accept any interference received, including interference that may cause
undesired operation.
For Regulatory Topics Only:
Australia Contact: Product Regulations Manager, Hewlett-Packard Australia Ltd., 31-41
Joseph Street, Blackburn, Victoria 3130, Australia
European Contact: Your Local Hewlett-Packard Sales and Service Office or Hewlett-Packard
Gmbh, Department HQ-TRE / Standards Europe, Herrenberger Straße
140, D-71034 Böblingen (FAX: +49-7031-14-3143)
USA Contact: Product Regulations Manager, Hewlett-Pac kard Company, PO Box 15, Mail
Stop 160, Boise, Idaho 83707-0015 (Phone: 208-396-6000)
1
/ ICES-003, Issue 4
ENWW Declaration of Conformity 41
Page 50

Canadian DOC Regulations
Complies with Canadian EMC Class A requirements.
<<Conforme à la classe A des normes canadiennes de compatibilité électromagnétiques
CEM.>>
VCCI Statement (Japan)
Korean EMI Statement
Taiwan
42 C Regulatory information ENWW
Page 51

Index
A
ADF output bin 2
B
belt paper jams, clearing 24
bins
capacities 1
copy 12, 16
default settings 6
default, assigning 13
full 18, 19
locating 2
media specifications 39
operation modes 7, 31
selecting 15
troubleshooting selection 18
blinking lights 3
C
Canadian DOC regulations 42
capacities, bins 1
collator mode 7
configuration
copy bin 12, 16
default settings 6
operation modes 7, 8
control panel messages
general 19
paper jams 22
copy bin 12, 16
customer support 29
D
Declaration of Conformity 41
default output bin, assigning 13
default settings 6
delivery head jams, clearing 28
devices supported 1
driver settings
default 6
operation modes 8
E
electrical specifications 38
entry area paper jams, clearing 25
environmental specifications 38
error messages
general 19
paper jams 22
F
face-down bins
capacity 1
copy jobs 12, 16
jams, clearing 28
locating 2
media specifications 39
operation modes 7
face-up bin
capacity 1
jams, clearing 26
locating 2
media specifications 39
operation modes 7
features 1
flashing lights 3
flipper jams, clearing 26
full output bins
control panel messages 19
operation modes 7
troubleshooting 18
J
jams
belt, clearing 24
control panel messages 22
entry area, clearing 25
face-down bins, clearing 28
face-up bin, clearing 26
locations 21
troubleshooting frequent 19
Japanese VCCI statement 42
job separator mode 7
K
Korean EMI statement 42
L
lights
locating 2
status 3
M
mailbox mode 7
media
bin capacities 1
specifications 39
media jams
belt, clearing 24
control panel messages 22
entry area, clearing 25
face-down bins, clearing 28
face-up bin, clearing 26
locations 21
troubleshooting frequent 19
messages
general 19
paper jams 22
mfp products supported 1
modes
default bins 6
setting 8
summary 31
types of 7
ENWW Index 43
Page 52

O
operating environment specifications 34, 38
operation modes
default bins 6
setting 8
summary 31
types of 7
output bins
capacities 1
copy 12, 16
default settings 6
default, assigning 13
full 18, 19
locating 2
media specifications 39
operation modes 31
operations modes 7
selecting 15
troubleshooting selection 18
output paper path open 19
P
pages per minute 1
paper
bin capacities 1
specifications 39
paper jams
belt, clearing 24
control panel messages 22
entry area, clearing 25
face-down bins, clearing 28
face-up bin, clearing 26
locations 21
troubleshooting frequent 19
physical specifications 33
power
specifications 38
troubleshooting 18
printers supported 1
status lights
locating 2
patterns 3
storage specifications 38
support 29
T
Taiwan regulatory statement 42
technical support 29
troubleshooting
bin selection 18
bins, full 18
control panel messages 19
customer support 29
device not recognized 18
jam error messages 22
jam locations 21
jams, belt 24
jams, entry area 25
jams, face-down bins 28
jams, face-up bin 26
jams, frequent 19
lights 3
power 18
U
upper-left bin. See face-up bin
user LED
locating 2
status 3
W
warranty 29
Web site, customer support 29
R
regulatory statements 41
S
selecting an output bin 15
separator mode 7
settings
copy bin 12, 16
default 6
operation modes 7, 8
size specifications
HP 8-bin Mailbox (MBM) 33
media 39
sorter/collator mode 7
space requirements
HP LaserJet 9040/9050 series printers 37
HP LaserJet 9040mfp/9050mfp 36
HP LaserJet 9500mfp 35
setup specifications 34
specifications
features 1
media supported 39
operating environment 38
physical 33
power 38
space requirements 34
speed specifications 1
stacker mode 7
44 Index ENWW
Page 53

Page 54

© 2005 Hewlett-Packard Development Company, L.P.
www.hp.com
 Loading...