

HP ProLiant N40L User Manual
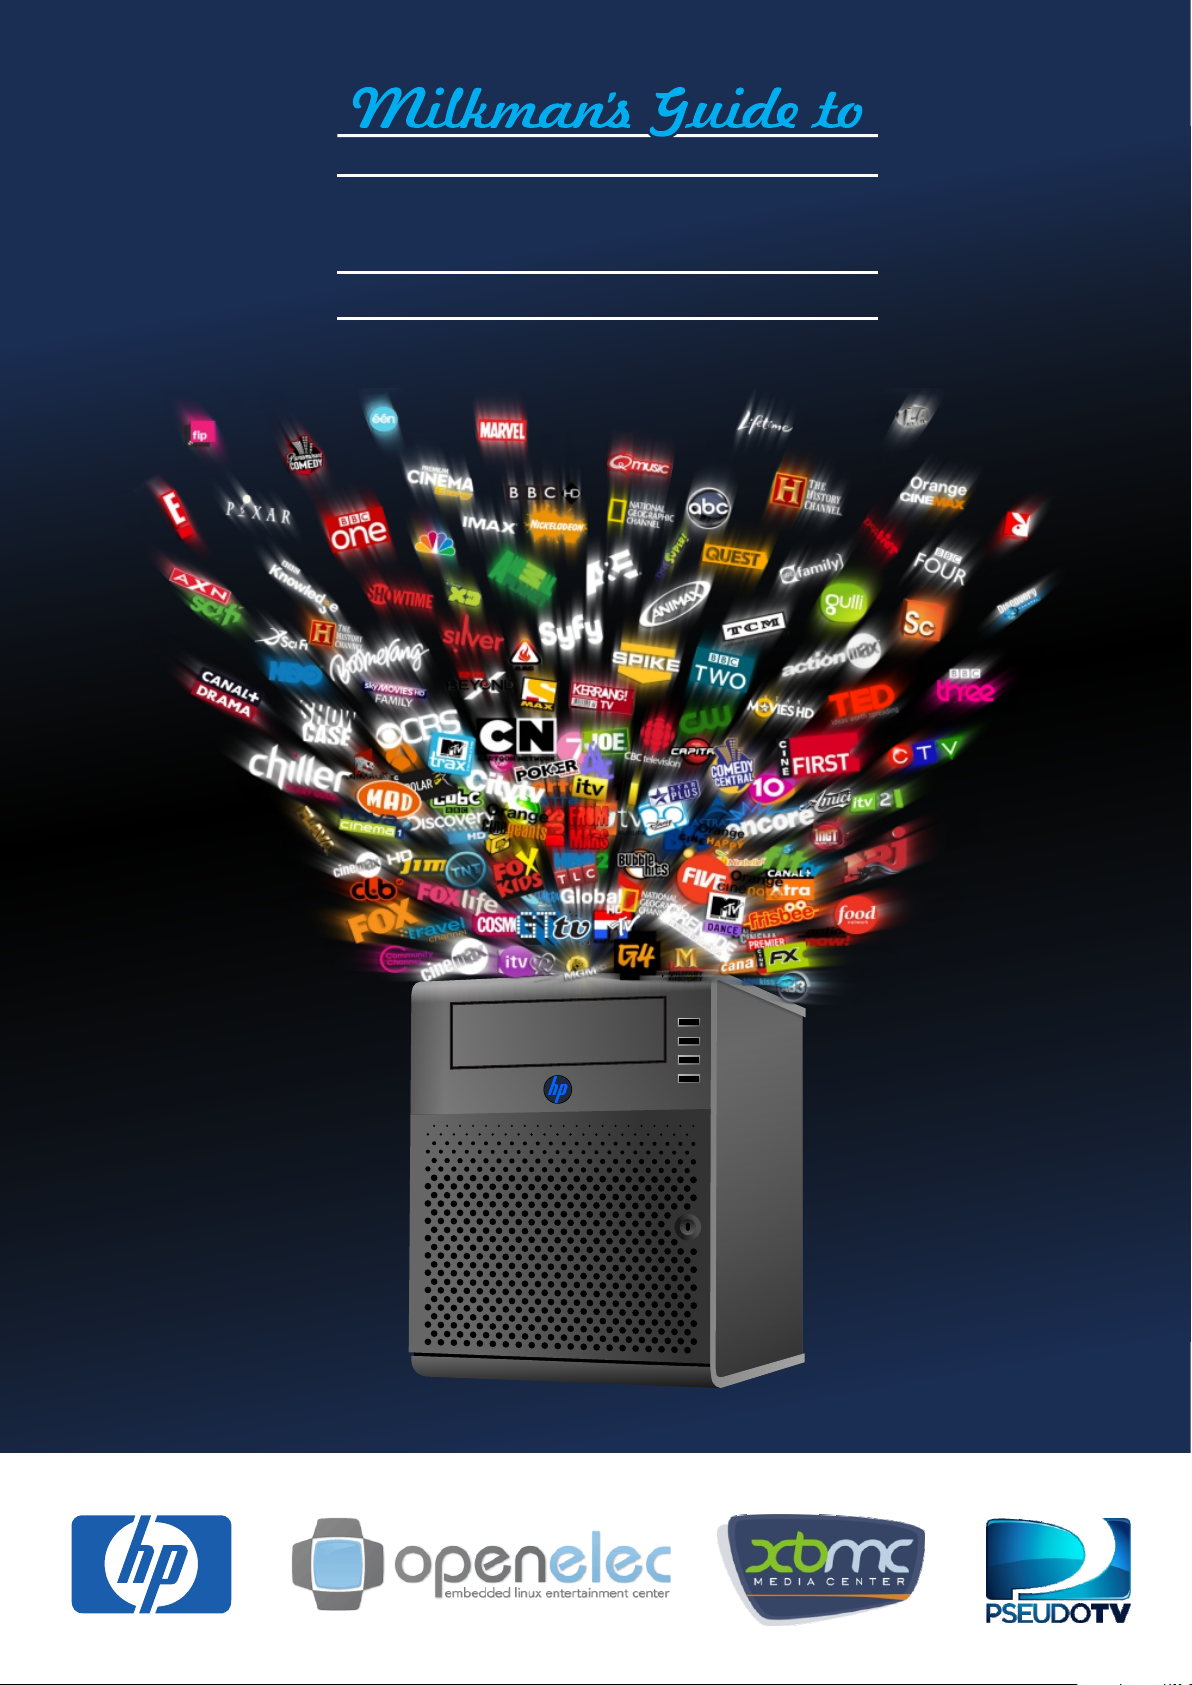
T H E U L T I M A T E
media
s y s t e m
HP ProLiant MicroServer

INTRODUCTION
Hi there,
I am the milkman, and this is my guide.
I have written this guide for all you “regular people” out there who want to join the crowd of
people building home theater Pc’s. HTPC for short.
I’ve made it simple so that anyone can build their very own custom HTPC, that will be 100
times better than any “pre-built” HTPC solution out there.
“Better you say?”
Yes.
This HTPC will be capable of storing around 10 to 15 TB (terrabytes) of media inside the
device itself, up to 30 TB if you use external hard drives as well. That’s a lot of media.
It’s small, too - roughly the size of only 15 stacked DVD cases, and runs very quietly.
It has a gorgeous user interface, and is easy enough for even the wife and kids to use.
Above all, it’s very affordable, and all the software it runs on is 100% free, too.
Your media will also be transformed into a Cable TV experience, where you can make up
your very own channels.
Do you like Sci-Fi? Why not have 5 different Sci-Fi channels?
The possibilities are endless, and the channels you have will be completely up to you.
You can even control the HTPC with your iPhone or Android as the remote!
If you fear you might not be capable of building an HTPC though, read the guide and see
how easy it is. You will be taken step by step along with pictures to help you.
Sincerely,
The Milkman
PS:
If you are happy with this guide, all I ask of you is to send me over some milk.
Actually, keep the milk - it’s good for you.
T H E U L T I M A T E
media
s y s t e m
DISCLAIMER
DISCLAIMER
I will not be held responsible for any bad advice, injury caused by assembling an HTPC or
headaches caused by OpenELEC, XBMC or PseudoTV. I am also not responsible for
copyrighted media and material that you acquire. Only use series, movies and other media
that you legally own. I do not condone piracy in any way.
HOW TO VIEW THIS GUIDE
You can press Ctrl + L to view this guide in Full Screen (Adobe Reader)
This document and font sizes have been designed primarily for reading on an average
sized computer screen, although printing is also an option if you prefer.
Information
ICON LEGEND
Warning!
Good Idea/Tip
T H E U L T I M A T E
media
s y s t e m

INDEX
Technical Specs.......................................................................................................
Quick Overview........................................................................................................
Hardware Checklist..................................................................................................
Creating a USB Key..................................................................................................
Installing OpenELEC................................................................................................
Configuring Samba..................................................................................................
Organizing your media.............................................................................................
Scraping your media................................................................................................
Installing PseudoTV.................................................................................................
Running PseudoTV..................................................................................................
Smart Playlists.........................................................................................................
Adding Channels......................................................................................................
Planning a Channel Setup........................................................................................
Planning Network Channels.....................................................................................
Planning Playlist Channels.......................................................................................
Planning Directory Channels....................................................................................
Organizing Channels...............................................................................................
The Final Result.......................................................................................................
Putting it all Together................................................................................................
PseudoTV Settings..................................................................................................
Final Touches...........................................................................................................
Advanced Channel Rules.........................................................................................
Interleaving, Bumpers & Adverts..............................................................................
Tips..........................................................................................................................
FAQ.........................................................................................................................
Get Sound Working..................................................................................................
Useful Links.............................................................................................................
Final Words..............................................................................................................
Notes.......................................................................................................................
1
2
3
5
8
11
15
16
19
20
21
23
26
27
31
32
34
35
36
37
39
40
42
44
45
46
47
48
49
T H E U L T I M A T E
media
s y s t e m
TECHNICAL SPECS
Product name
Form factor
Processor family
Number of processors
CPU Cores
Maximum memory
Memory slots
Memory type
Expansion slots
USB Ports
Network controller
Drive description
Drive bays
Storage controller
Power supply
Processor cache
: HP ProLiant N40L
: Ultra Micro Tower
: AMD Turion™ II Neo N40L (1.5GHz)
: 1
: 2
: 8 GB (1 x 2 GB included)
: 2 x DIMM slots
: PC3 DDR3
: 1 x half-height, half-length PCIe x16 (Gen 2)
1 x half-height, half-length PCIe x1 (Gen 2)
: 7x USB 2.0 ports. (4 front , 2 rear, 1 internal)
: 1GbE NC107i 1 Port (Gigabit Ethernet)
: (4) LFF SATA
: 4 x 3.5 inch Drives
1 x 5.25 inch DVD / Bluray Drive
: Integrated 4 port SATA RAID
: 150 Watts
: 2 MB L2
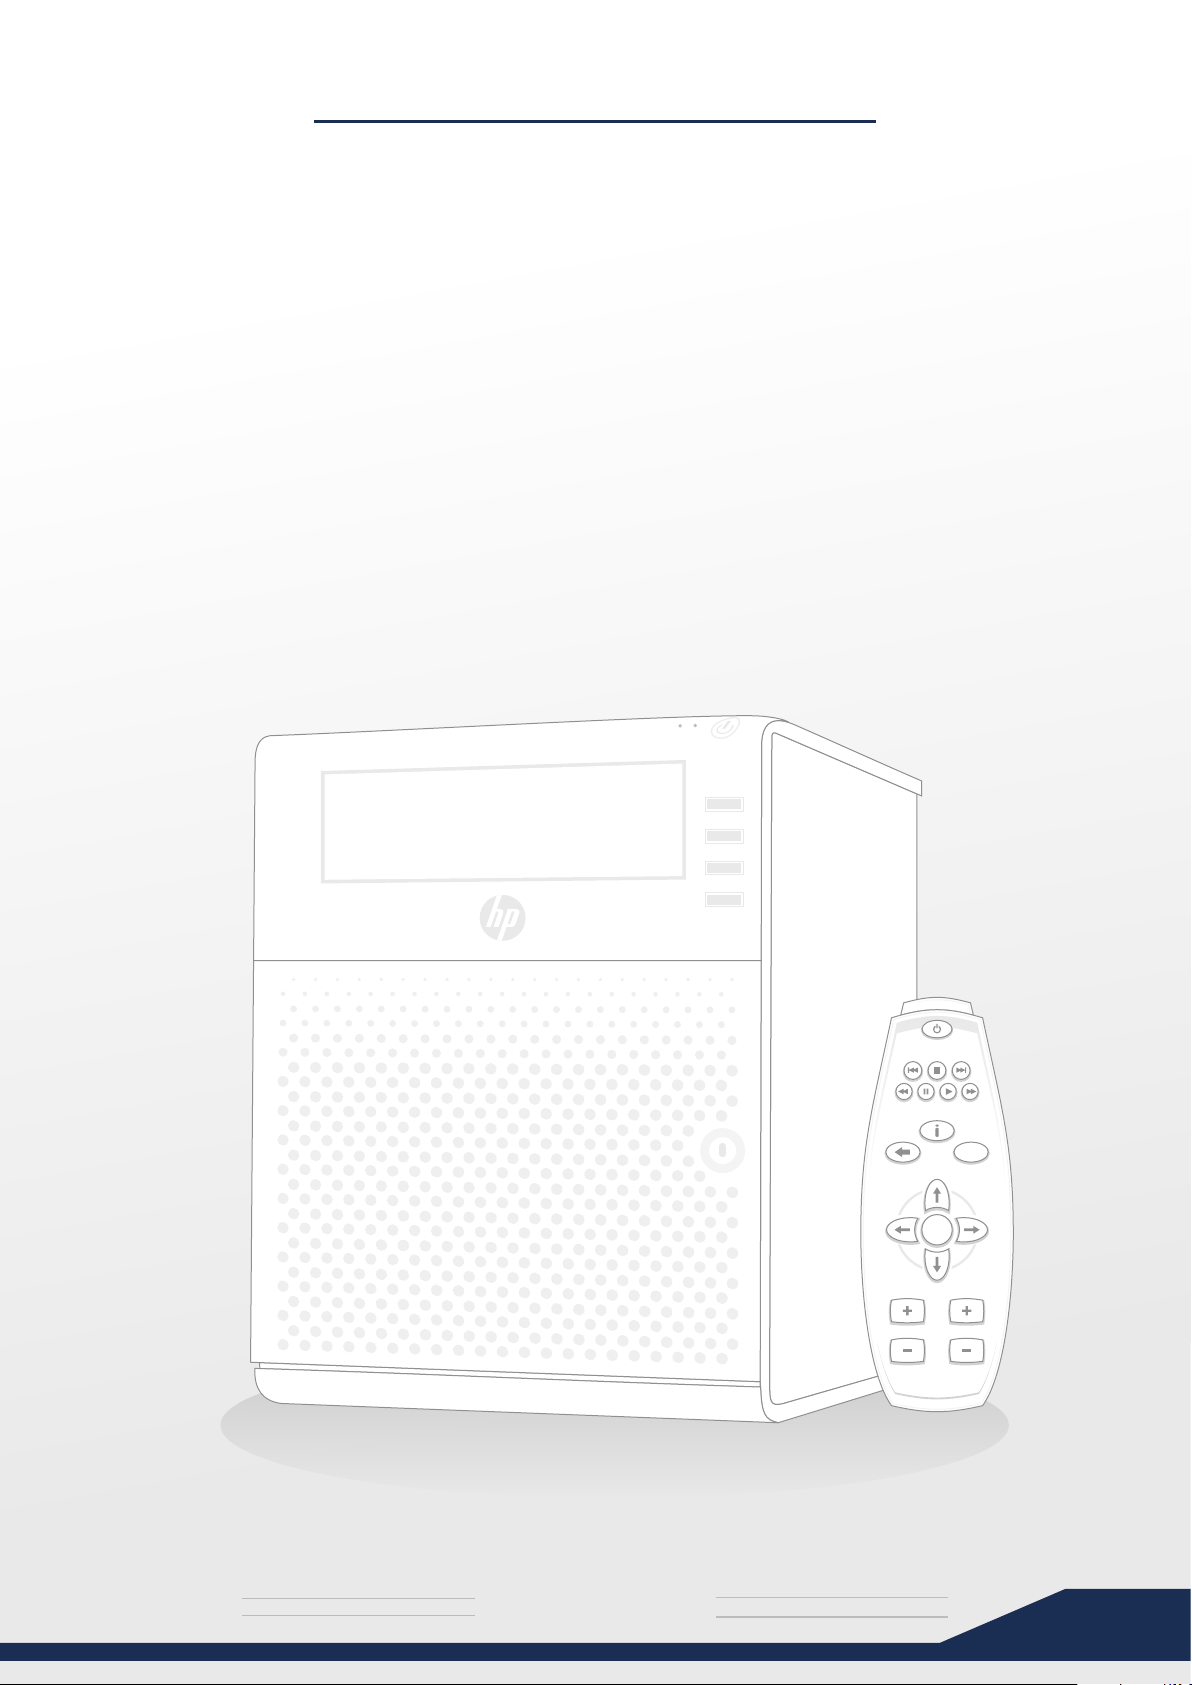
ProLiant MicroServer
HP
EXIT
OK
VOL CH
* Remote not included with HP ProLiant MicroServer
T H E U L T I M A T E
media
s y s t e m
1

QUICK OVERVIEW
HTPC
An HTPC and other convergence devices integrate components of a home theater into a
unit co-located with a home entertainment system. An HTPC system typically has a remote
control and the software interface normally has a 10-foot user interface design so that it can
be comfortably viewed at typical television viewing distances. An HTPC can be purchased
pre-configured with the required hardware and software needed to add video
programming or music to the PC. Enthusiasts can also piece together a system out of
discrete components as part of a software-based HTPC
XBMC
XBMC is an award-winning free and open source (GPL) software media player and
entertainment hub for digital media. XBMC is available for Linux, OSX, and Windows.
Created in 2003 by a group of like minded programmers, XBMC is a non-profit project run
and developed by volunteers located around the world. More than 50 software developers
have contributed to XBMC, and 100-plus translators have worked to expand its reach,
making it available in more than 30 languages.
While XBMC functions very well as a standard media player application for your computer,
it has been designed to be the perfect companion for your HTPC. Supporting an almost
endless range of remote controls, and combined with its beautiful interface and powerful
skinning engine, XBMC feels very natural to use from the couch and is the ideal solution for
your home theater.
OpenELEC
Open Embedded Linux Entertainment Center, or OpenELEC for short, is a small Linux
distribution built from scratch as a platform to turn your computer into a complete XBMC
media center. OpenELEC is designed to make your system boot as fast as possible and
the install is so easy that anyone can turn a blank PC into a media machine in less than 15
minutes.
Pseudo TV
This script for XBMC gives you the ability to define your own TV channels and watch all of
your media just as you would watch normal cable. Use the electronic program guide to see
what's on, or to start watching anything you see.
Setup your own list of channels by configuring the addon and opening the channel
configuration utility. You will be able to select from a variety of built-in channel types, or you
can select a smart playlist that you've made to be a channel.
T H E U L T I M A T E
media
s y s t e m
2
HARDWARE CHECKLIST
DISCLAIMER
First of all, you may buy any hardware you prefer. If you are experienced in any one of
these fields, or have done research on the subject, feel free to use any HTPC, Graphics
card or Remote as you please. Just be sure to blame yourself if money is wasted by
experimenting with other components that aren’t compatible.
HTPC
There are many HTPC’s to choose from, but I personally recommend using the HP
ProLiant MicroServer. It really is a keeper.
Not only is it very silent, but it can house up to 5 Internal Hard Drives. There are also 7 USB
Slots (which can be used for external hard drives) and 2 PCI-Slots.
This guide is specifically written for HP ProLiant MicroServer owners in mind.
Graphics Card
You will need a low budget graphics card to enable the HP ProLiant Microserver to output
sound and HD Video. The HP ProLiant Microserver only supports low profile cards with low
profile brackets. (the steel end containing the DVI-out)
I recommend the Msi N520GT-MD1GD3/LP. It has a fan but I assure you it is quite silent.
The card comes with 3 brackets and handles 1080p video flawlessly.
You might need to switch the bracket to the low profile one that is included in the box.
ATI cards might have driver problems with OpenELEC.
Memory
The HP ProLiant Microserver has 2GB of RAM included, and more can be added.
OpenELEC is extremely lightweight though and additional Memory will not be needed.
Hard Drives
5300 rpm hard drives are completely fine for use in a HTPC.
You may get some faster transfer speeds when moving around data through the network if
your drives are formatted to EXT3 Partitions, however, I prefer to use NTFS myself as they
can be used in a Windows System, while EXT3 cannot.
If you will be watching most of your media from your HTPC, it’s a good idea to copy all the
media to it so you do not have to switch the PC on to be able to watch something.
QUICK TIP
You can also just plug some of your hard drives into the HTPC after the OpenELEC
installation has been completed, and skip the copying process altogether.
Copying files can take a long time, so this is definitely recommended.
T H E U L T I M A T E
media
s y s t e m
3

HARDWARE CHECKLIST
Remote & Receiver
There are many remotes and receivers to choose from, and this is one part that is up to you,
your style, preferred button layout, quality, features and your budget.
Prices range from cheap to very expensive.
Hauppauge receivers and Logitech remotes make a good combo and are recommended.
Try to get a Receiver that is RC6 compatible / certified.
IR: Infra Red – Requires line of sight to the receiver.
RF: Radio Frequency – Requires no line of sight.
WARNING!
Your remote may also be able to switch on your HTPC with the on/off button, but it may
require you to connect the receiver to the HTPC’s Power supply cables directly. Please
check your manual if you are prepared to go this far – Working with Power cables is not
recommended for people who don’t know what they are doing.
If you install a WiFi card into your HTPC, or connect it to a WiFi enabled router, you may be
able to use certain mobile phones to control XBMC (iPhones / Android based phones).
Check your phone’s App Store to download an XBMC compatible remote App.
HDMI Cable
You will need this to pass digital video and sound signals to your TV.
Whether it’s a pure HDMI cable or a DVI-to-HDMI cable, will be up to your graphics card.
The Msi N520GT has a DVI and an HDMI Port on the Low Profile bracket.
Note: Make sure your Plasma/LCD has an HDMI port !
Keyboard
You need a keyboard to install OpenELEC on your HTPC.
You may even use the keyboard from this computer temporarily.
Please note that Gaming keyboards with advanced features might not be compatible with
the initial OpenELEC Setup.
Flash Drive(s)
You need one flash drive to install OpenELEC on the HTPC. You will need a second if you
intend installing and running OpenELEC from a flashdrive as well.
Network Cable
CAT5e should work nicely. make sure it’s long enough to go from the HTPC to your PC.
Once you have ordered, received and assembled your brand new HTPC, it’s time to Install
OpenELEC which comes with XBMC pre-installed. Isn’t that nice of them?
T H E U L T I M A T E
media
s y s t e m
4

CREATING A USB KEY
Preparing the USB flash drive
We will need a “USB Key” - a flash drive / thumbstick / USB Drive to get OpenELEC on to
the HTPC. Any type will do, as long as it is around 256MB or larger.
Please back up all files on the flash drive before continuing.
FORMATTING THE FLASH DRIVE
Format an empty flash drive with the FAT file system
You should be able to do this right in Windows by right-clicking on the drive and
selecting “Format…”
If you are having trouble getting the OpenELEC setup to boot up from your flash
drive, try formatting with “EASEUS Partition Master”, it has many options for
formatting. Some USB flash drives have been known to give problems.
a FAT32 file system might also work with newer OpenELEC releases.
WARNING!
This will wipe all data on that drive – Please make sure you have the correct path of the
flashdrive, and make sure there aren’t any files on it that are important to you.
Download OpenELEC
(FAT16).
Go to and download the latest release of OpenELEC.www.openelec.tv/get-openelec
WHICH BUILD?
For the HP ProLiant MicroServer + Msi N520GT setup, the latest “Generic Build” of
OpenELEC should be the one to go for.
If you are using other HTPC hardware setups, please read the website or forum to
determine which build to use. The “Generic Build” is always the safest option though.
Extract the setup files
Extract the OpenELEC release you have just downloaded to a folder on your hard drive.
The file will be called something like “OpenELEC-Generic.i386-1.0.2.tar.bz2”
You can Use WinRAR to extract this zipfile.
T H E U L T I M A T E
media
s y s t e m
5
CREATING A USB KEY
Create the OpenELEC USB Key
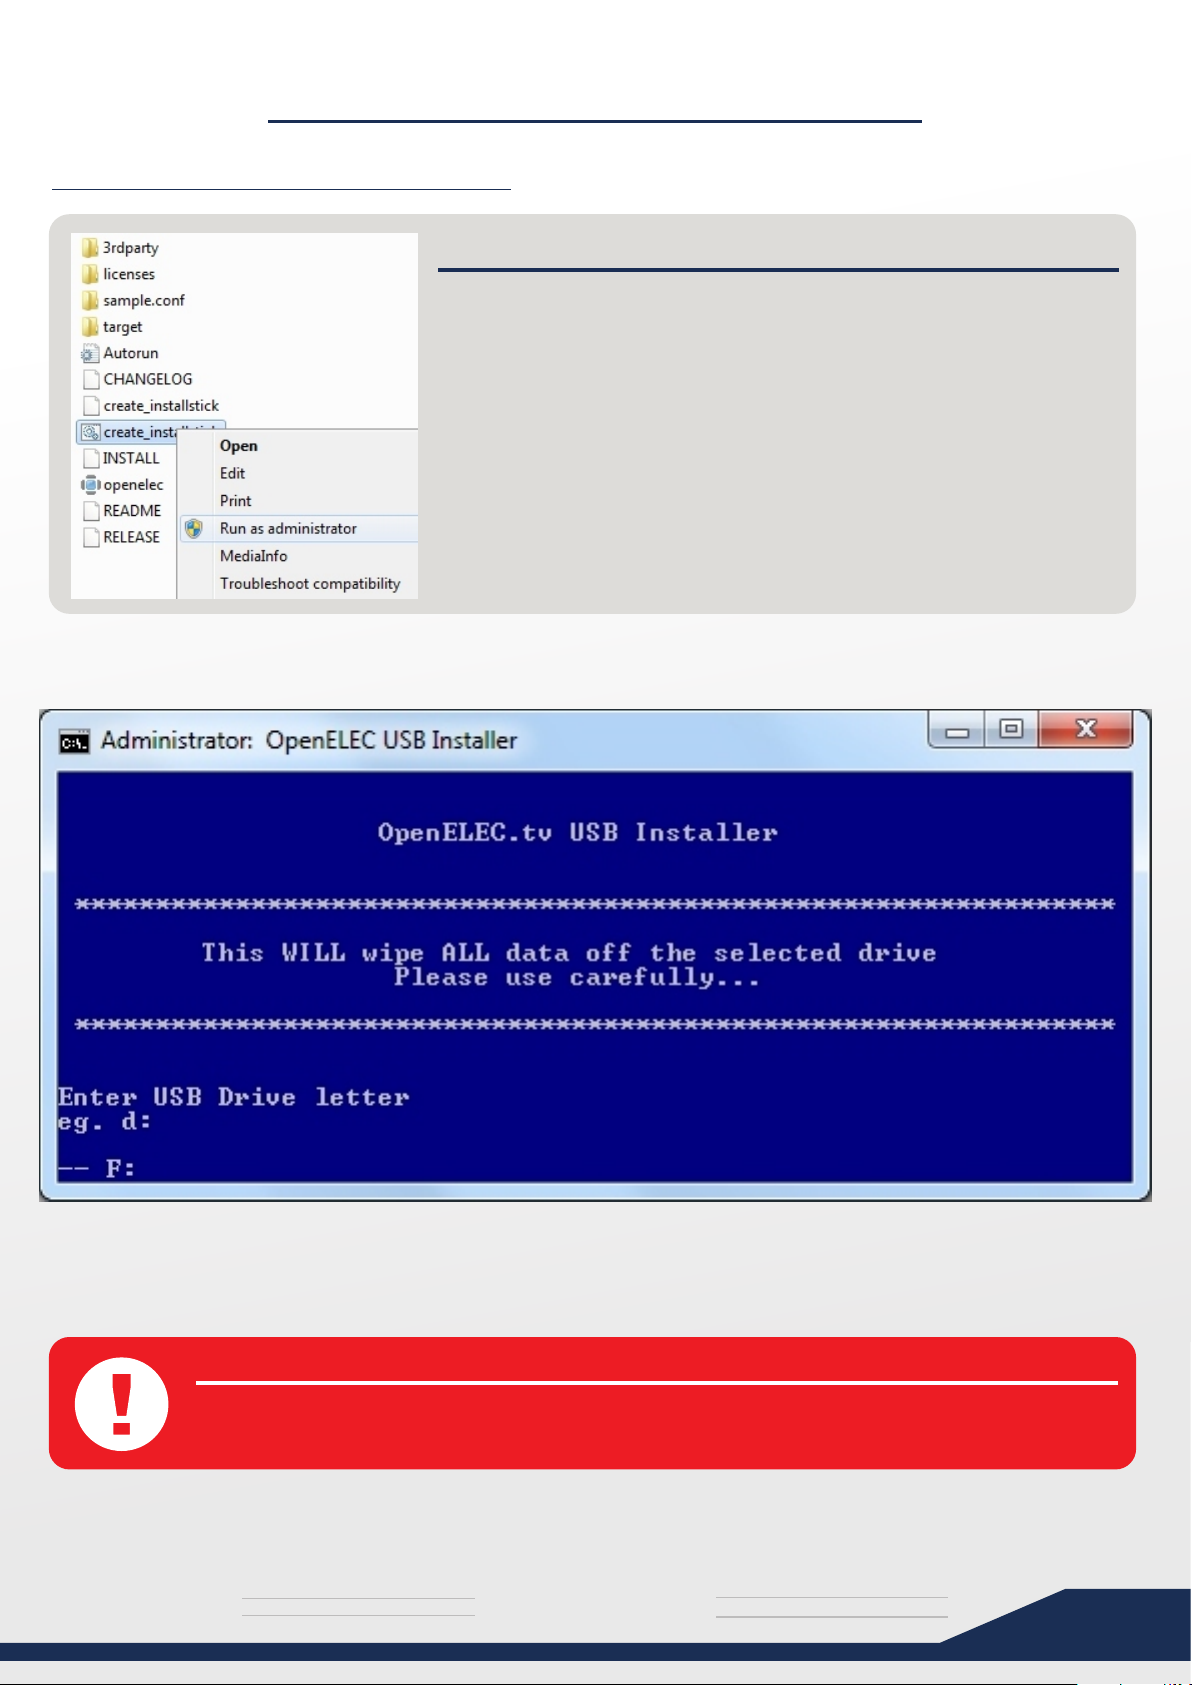
STARTING THE PROCESS
Go to the path where you have just extracted your OpenELEC
USB Installer files.
Right click on the .BAT file called “create_installstick.bat” and
select “Run as administrator”.
The OpenELEC USB Installer should start
Specify your USB Drive by typing it’s drive letter followed by a colon, for example F: or G:
(F: is MY flash drive location, please make sure what the path is on your own computer!
WARNING!
This will wipe all data on the specified drive – Please make sure you have the correct path
of the flashdrive!
T H E U L T I M A T E
media
s y s t e m
6
CREATING A USB KEY
Create the OpenELEC USB Key
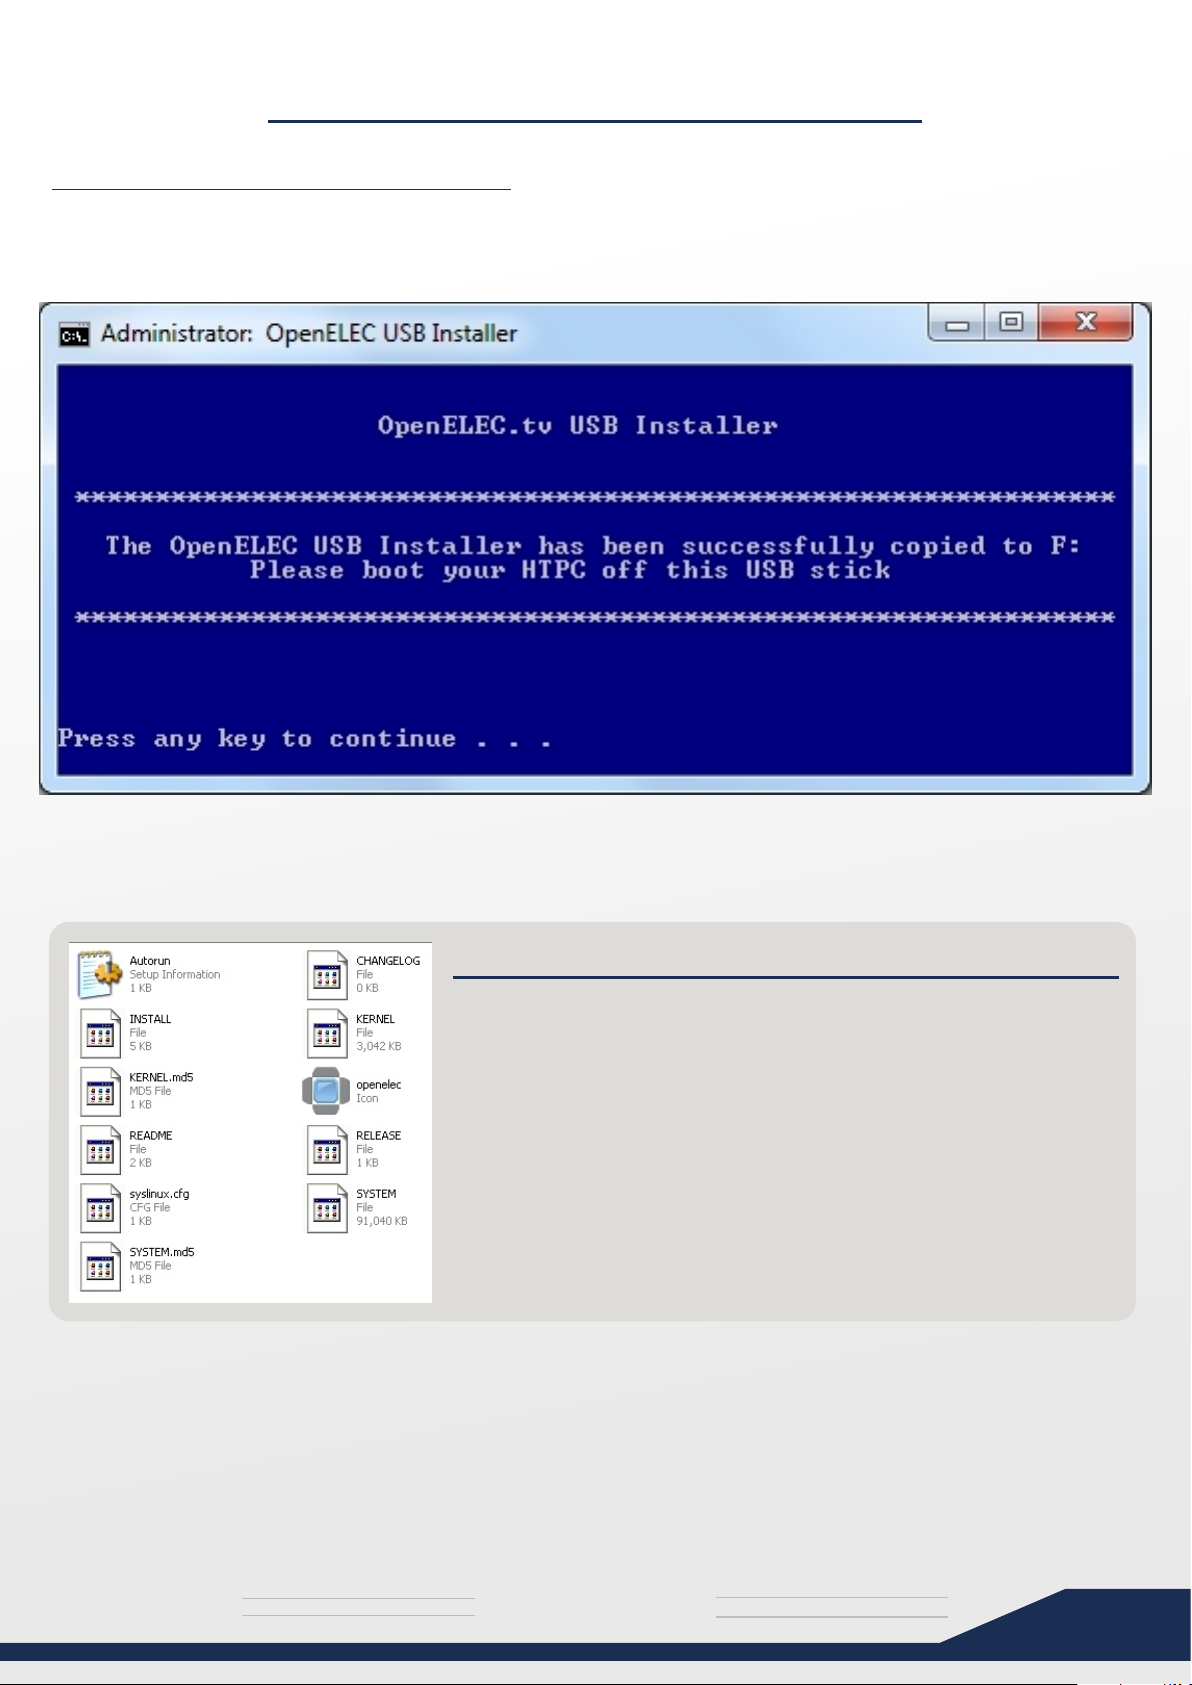
After pressing ENTER it will start creating the OpenELEC USB Key for you, which will be
used to install OpenELEC and XBMC on to your HTPC.
Wow, that was quick!
CHECK THE USB
Let’s just have a quick look on the flash drive to see if all the files
have been created for us.
It should be fine though...
You should have the following files:
Autorun.ini, CHANGELOG, INSTALL, KERNEL, KERNEL.md5,
openelec, README, RELEASE, syslinus.cfg, SYSTEM and
SYSTEM.md5
Now everything should be ready, and we can move on to the HTPC itself. Yay!
T H E U L T I M A T E
media
s y s t e m
7
INSTALLING OPENELEC
Installing OpenELEC on your HTPC
LET’S DO THIS!
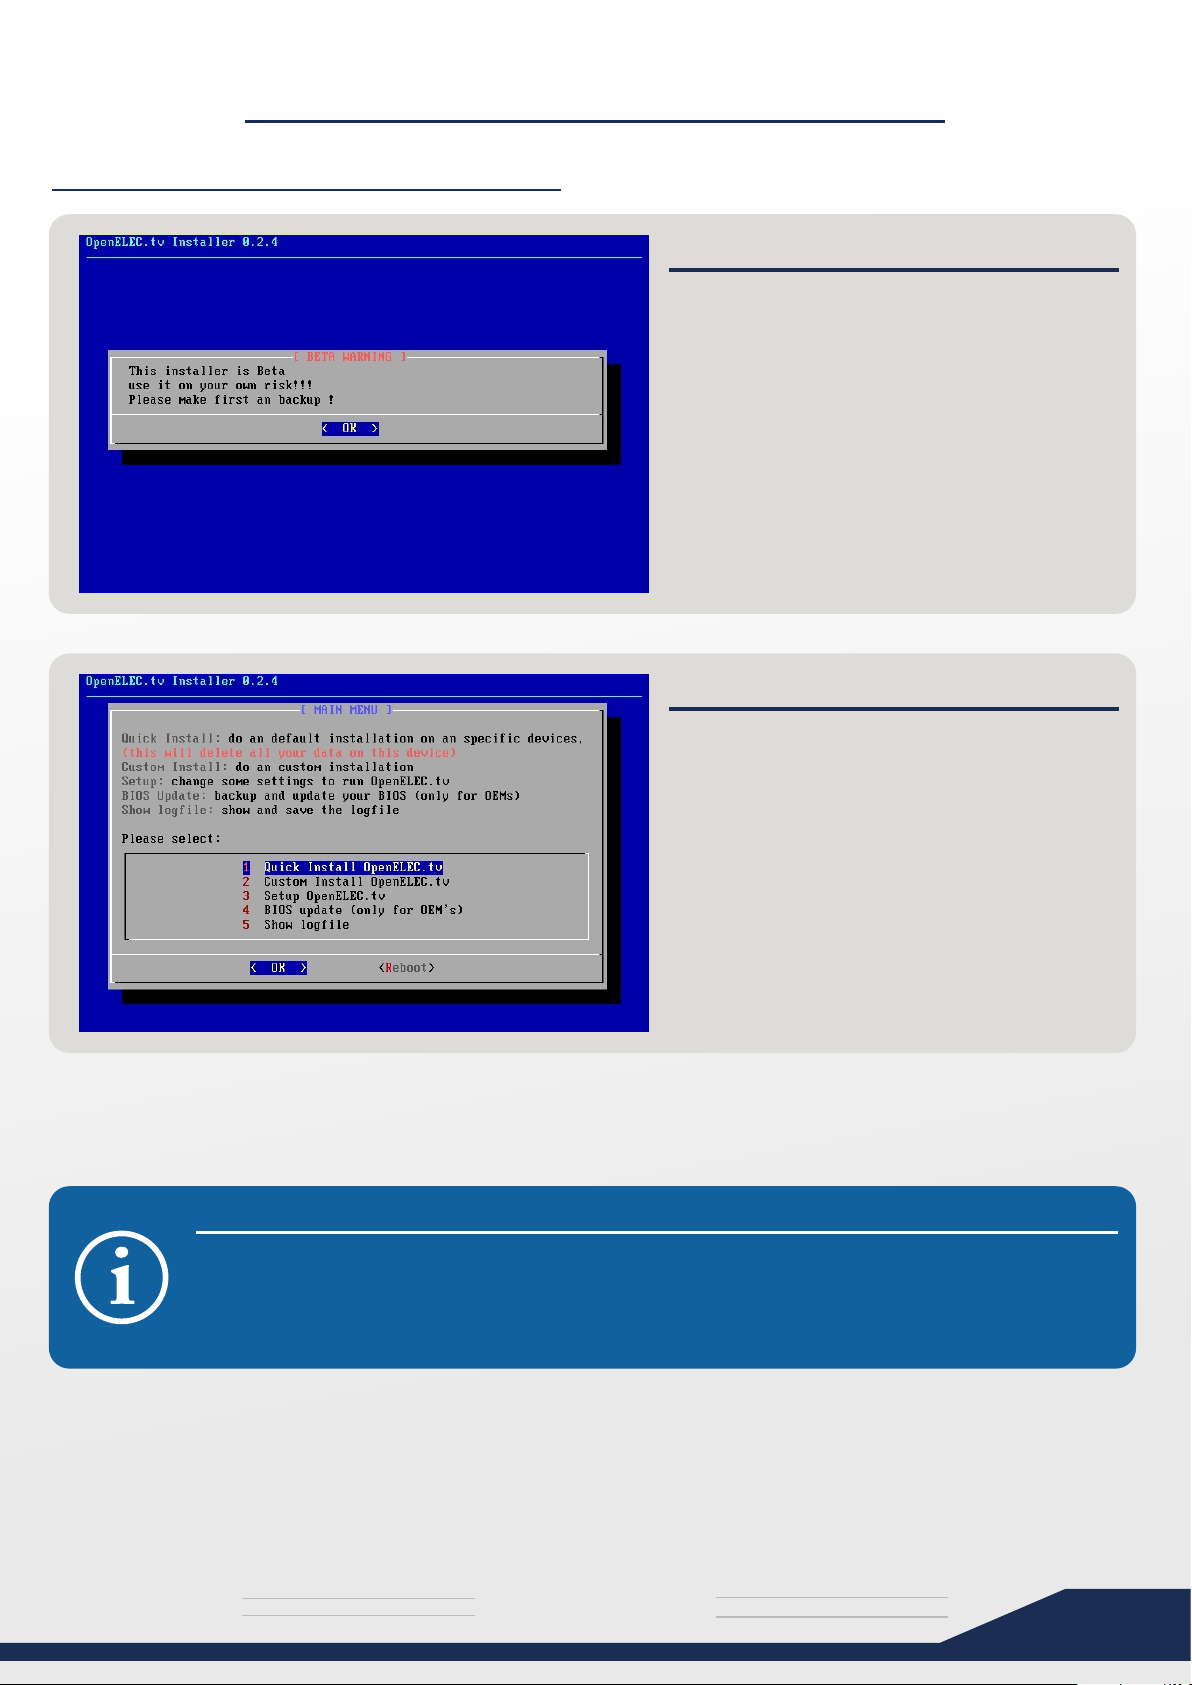
- Insert the flash drive drive into your HTPC
- Turn on your HTPC
- it should boot into the OpenELEC Setup
Press OK if you receive a “Beta Warning”
message.
Future versions of OpenELEC might not
have this warning.
QUICK INSTALL
After the Beta Warning, you should see a
Menu with 5 options.
Press Enter on the first option titled “Quick
install of OpenELEC“ to begin.
At this moment in time, none of the other
options work yet, as this is the Beta.
XBMC will function perfectly once installed
though, don’t worry.
KEYBOARD NOT WORKING?
If the keyboard doesn’t work, you will have to get your hands on another model.
Try the most “basic” keyboard you can find, without all the advanced Gamer Keyboard
features and buttons that they come with these days.
T H E U L T I M A T E
media
s y s t e m
8
INSTALLING OPENELEC
Installing OpenELEC on your HTPC
INSTALLING TO A USB DRIVE YOU SAY?
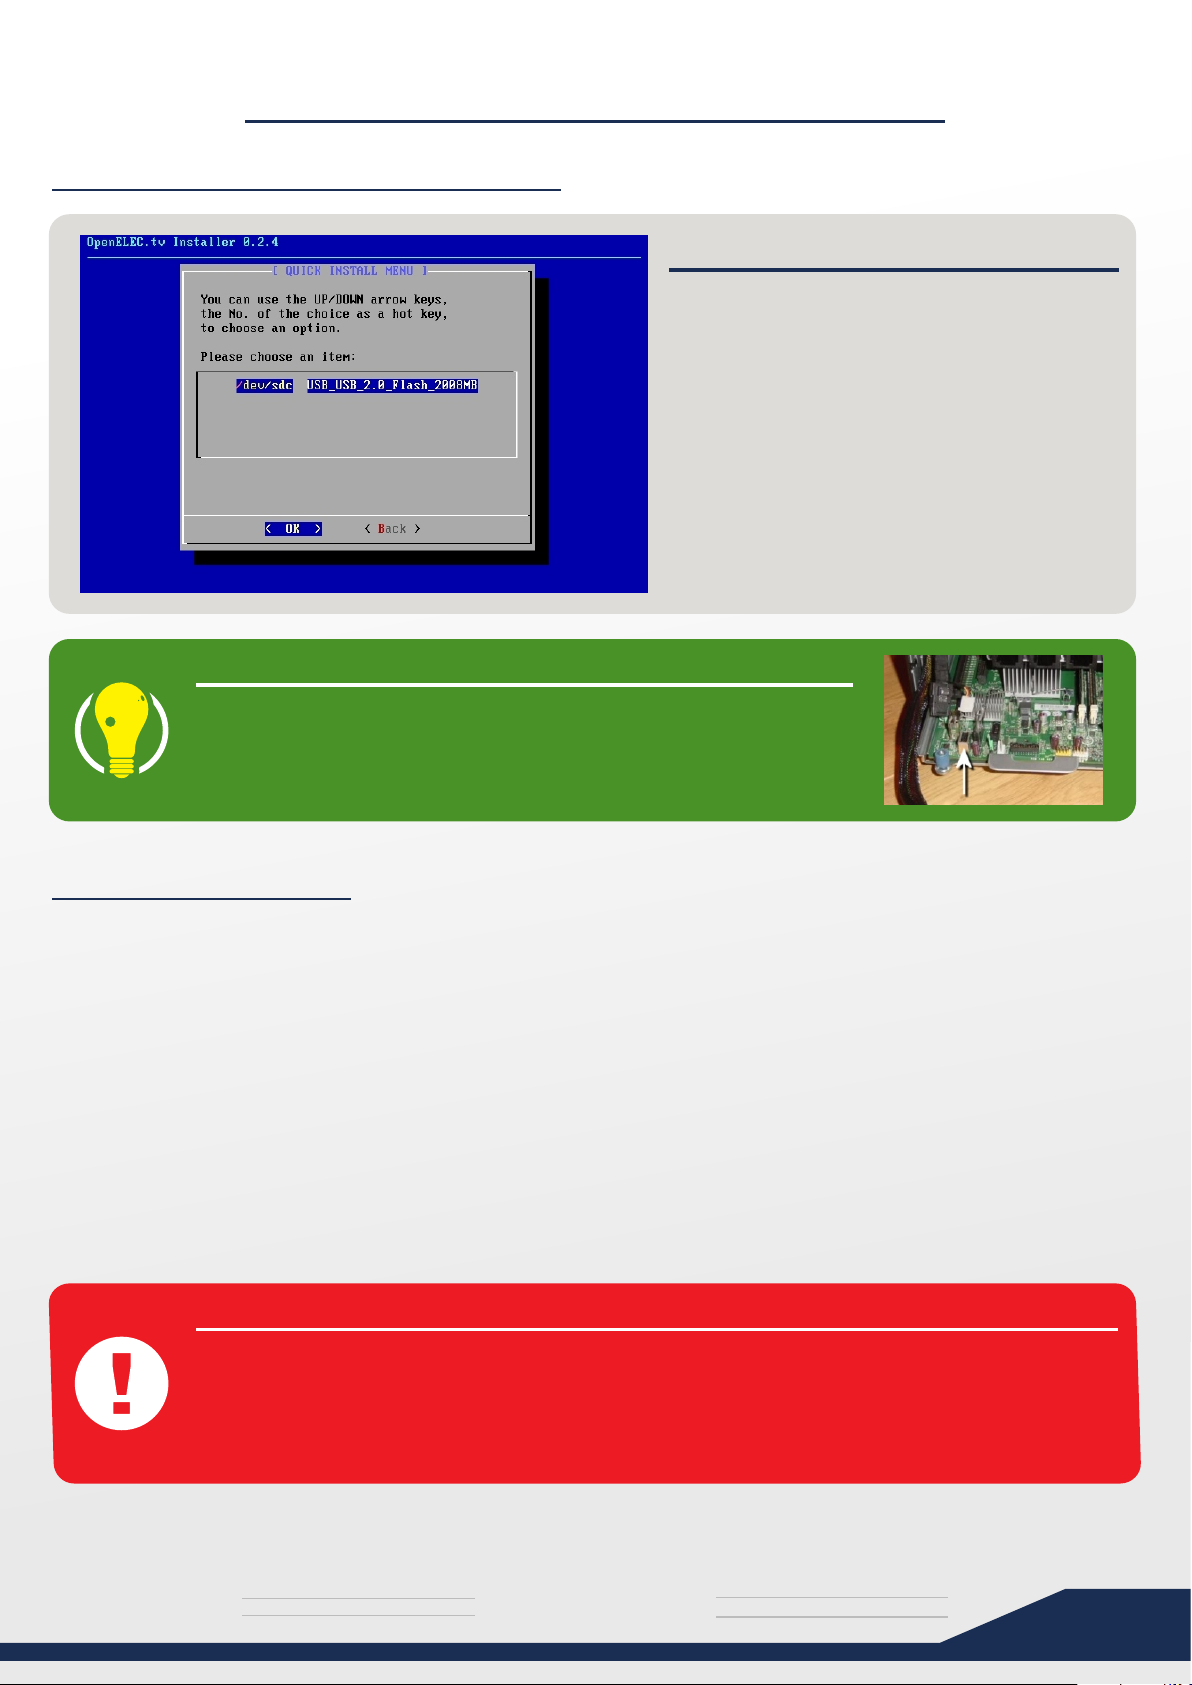
SELECTING THE OS DRIVE
Select the Drive you would like to install to
by pressing up/down.
You can install OpenELEC to flash drives,
hard drives, or even SSD.
Note: You cannot install to the same flash
drive that is plugged in.
There is a hidden USB Port located inside the HP ProLiant
MicroServer, on the motherboard itself.
Not only is this connected directly to the motherboard, but it will
be out of sight as well.
So what should I do?
I prefer installing to Hard Drive. I would suggest installing on the included 250GB Drive HP
has provided you with. Hard drives are just faster than USB drives.
Also remember that your whole OpenELEC/XBMC installation will be on this drive, and
although that only takes around 80-120MB, all your media’s high quality covers and fanart
will be stored in the XBMC database, which can take up a lot of space.
Installing to USB though, gives you the ability to format and re-install at will, while a 250GB
hard drive might need some backing up first (If you intend to use that 250GB of freespace
for some media) before formatting.
It’s all up to you really - this is your system at the end of the day.
WARNING! GOTCHA AHEAD
Please note that even if your Hard drive was formatted to NTFS, OpenELEC will format the
drive to a Linux file system on installation, and the drive will not be readable if you plug it
into a Windows Computer. Files will be accesable through the Network though.
Also make sure you select the correct drive. I personally disconnect all other drives (that
contain Media) temporarily when installing OpenELEC.
T H E U L T I M A T E
media
s y s t e m
9

INSTALLING OPENELEC
Installing OpenELEC on your HTPC
TIME TO RELAX
After selecting your Installation drive, it
should start to install.
Come on progress bar, almost there!
Go ahead, get yourself some coffee - we
will soon start to configure Samba and other
interesting things soon.
After Installing has completed, it’s a good idea to reboot your HTPC. Note that excellent boot-time!
CONGRATULATIONS!
You have just completed your very first
Installation of OpenELEC!
XBMC should now be ready to go!
You can have a bit of a break and play
around the menu’s if you want, but if you are
new to XBMC, try not to fiddle around too
much until you get the hang of things.
BUT THERE ISN’T MUCH GOING ON HERE?
We don’t have any media on there yet, so XBMC is gonna be a tad boring....
Once you add your media, scrape covers and fan art, install cool skins and other add-ons,
you will be watching your movies and series in style!
The default XBMC skin you can see pictured above is called Confluence.
T H E U L T I M A T E
media
s y s t e m
10
CONFIGURING SAMBA
What is Samba?
Your HTPC needs a protocol to connect to a Windows based computer, since it’s running in
a Linux environment (OpenELEC). Samba is that protocol that takes care of this.
Samba is already pre-installed for you on both OpenELEC and your Windows PC.
You don’t even have to install it, it’s actually already running....right now. Isn’t that great?
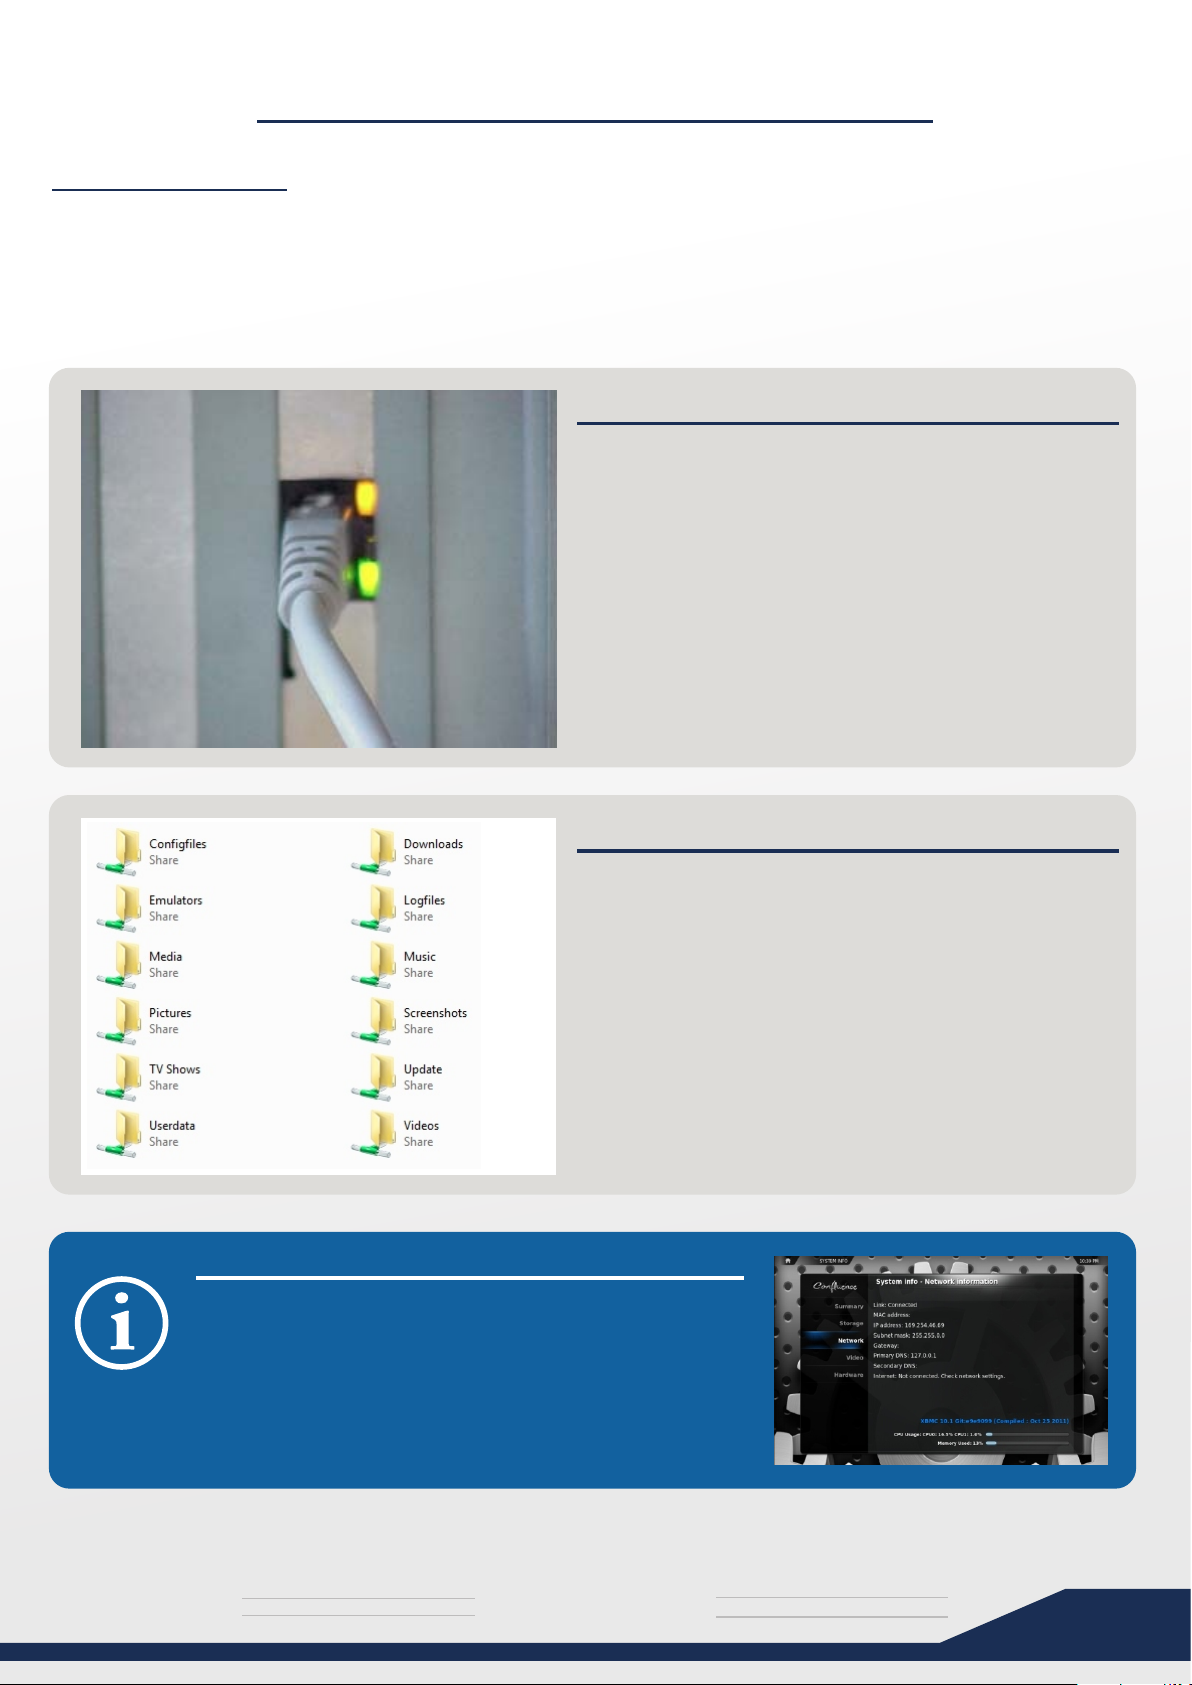
STEP 1: CONNECT LAN CABLE
Connect you HTPC to your computer via network
cable.
You could also connect the HTPC to a Switch/Hub.
Usually you will see the Link Lights flashing on your
network card once it makes a connection.
You might also see a network being established on
the network icon on your Windows System Tray.
IS THAT ALL I HAVE TO DO?
Yep. It’s all automatic.
Just give it a minute or so to do it’s thing after
connecting your HTPC to your computer.
Type \\OPENELEC into Windows Explorer. Once it’s
connected you should see the default shares.
If an error message pop’s up, wait another minute
and try again... it could take around 3 minutes for it to
do it’s thing.
Once connected, you will see your “default shares”
IT WON’T CONNECT TO MY HTPC!
You can view the IP of the HTPC by highlighting the
“System” Tab in XBMC, pressing RIGHT, and then
selecting “System Info”.
Go to the network section for detailed network
information, and type the IP into Windows Explorer
and see if that works.
T H E U L T I M A T E
media
s y s t e m
11
CONFIGURING SAMBA
Configuring Samba Shares
The first thing to do is to navigate to \\OPENELEC\Configfiles\ and open the file called
“samba.conf.sample”. You should open it with WordPad (Not Notepad).
Most people prefer to delete the default shares and only have ConfigFiles, the Root File
system and all their hard drives visible.
I agree - we don’t need to see Screenshot, Logfile and Emulator folders, etc....
You also need to share additional hard drives as it is not automatically done for you.
Around the middle of the document you will find a section with the following text:
# Using the following configurations as a template allows you to add
# writable shares of disks and paths under /storage
All the default shares seen previously can be edited or removed below this section.
I have removed all of those useless default shares, and replaced them with the following:
[Configfiles]
path = /storage/.config
available = yes
browsable = yes
public = yes
writable = yes
root preexec = mkdir -p /storage/.config
[Root File System]
path = /
available = yes
browsable = yes
public = yes
writable = yes
[Disk 1]
path = /storage
available = yes
browsable = yes
public = yes
writable = yes
[Disk 2]
path = /media/Local Disk
available = yes
browsable = yes
public = yes
writable = yes
[Disk 3]
path = /media/Local Disk_
available = yes
browsable = yes
public = yes
writable = yes
[Disk 4]
path = /media/Local Disk__
available = yes
browsable = yes
public = yes
writable = yes
CAN I COPY THIS CONFIG?
Copying and Pasting the text from
Adobe Reader will not work properly.
I have included my Samba.conf file
along with this PDF if you want to
Copy and Paste from my config file.
T H E U L T I M A T E
media
s y s t e m
12
CONFIGURING SAMBA
What’s going on here?
As you can see my HTPC has 4 Drives in it right now. Note the paths of each hard drive.
I would recommend you replace the default shares, but If you are happy with them and
prefer not to remove the them at this moment, that’s ok.
Just be sure to add the [Disk] sections for all your hard drives, or you will not be able to
access them.
If you decide to use my Samba configuration, just remove the [Disk] sections of drives you
do not have installed in your HTPC yet.
WARNING!
Do not remove the [ConfigFiles] share! If you remove it you will probably not have access
to this Configuration file again, and might need to re-install OpenELEC to have access to it.
Saving your changes
Once you are done editing your shares, save the file as “samba.conf” in the same folder.
(\\OPENELEC\Configfiles\)
Restart your HTPC.
Your network icon on the windows system tray should flash again, and soon \\OPENELEC
will be available like before.
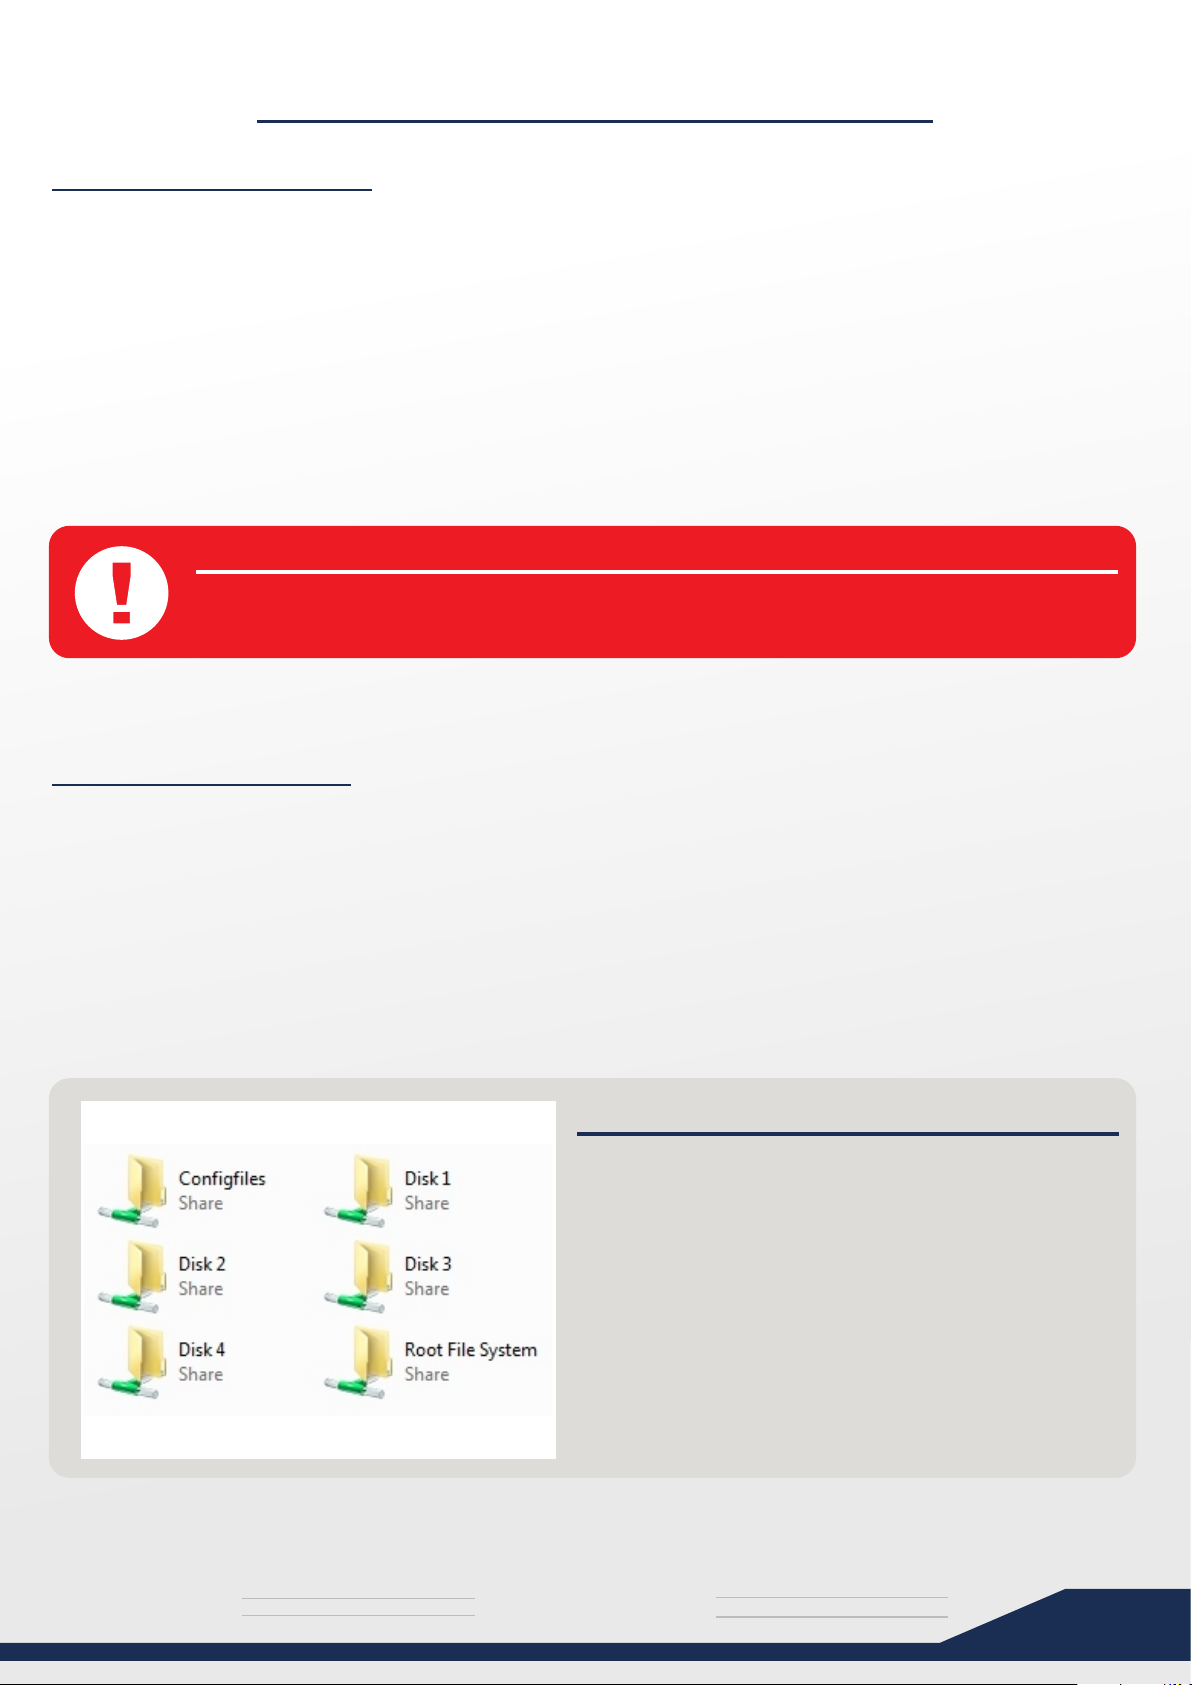
DID IT WORK?
Your shares should now look more manageable like
the image on the left.
Note: The pre-created folders named Music, Videos,
TV-Shows, Emulators, Downloads, Logfiles, etc
are still available on Disk 1.
You may also delete them entirely now, if you want.
T H E U L T I M A T E
Congratulations!
Your Samba configuration is complete and your hard
drives are now ready to receive files!
media
s y s t e m
13
 Loading...