

Page 1

Intelligent Provisioning User Guide for
ProLiant Gen8 Servers
Abstract
This document details how to access and use the Intelligent Provisioning software, including
tasks such as installing operating systems, updating firmware, software, and drivers, and
performing some diagnostic tests. Intelligent Provisioning is included in the optimized ProLiant
server support software from the SPP. This document is intended for administrators
experienced in ProLiant server configuration.
Part Number: 679795-401
Published: October 2017
Edition: 1
Page 2

Contents
Introduction............................................................................................. 5
Using Intelligent Provisioning............................................................... 6
Overview....................................................................................................................................... 6
Navigating Intelligent Provisioning..................................................................................... 6
Completing initial configuration and registration tasks..................................................................7
Step 1: Setting Intelligent Provisioning preferences...........................................................7
Step 2: Activating Intelligent Provisioning.......................................................................... 9
Step 3: Registering for Insight Remote Support ................................................................9
HPE embedded remote support..............................................................................9
Data collected by HPE remote support................................................................. 10
HPE Proactive Care service.................................................................................. 11
Prerequisites for remote support registration.........................................................11
Registering for Insight Online direct connect ........................................................12
Registering for Insight Remote Support central connect ......................................15
Registering for remote support after the initial configuration and registration
tasks...................................................................................................................... 16
Configuring the server and installing an OS............................................................................... 17
Source media types and installation methods supported for each OS............................ 17
Using an SD card as a boot device....................................................................... 17
Step 1: Hardware Settings............................................................................................... 18
Step 2: OS Selection........................................................................................................19
Available install methods, source media types, and formats supported for each OS
family................................................................................................................................23
Step 3: OS Information.....................................................................................................25
OS information required for recommended installations....................................... 25
OS information required for customized installations............................................ 26
Step 4: Review................................................................................................................. 27
Checking installation parameters..................................................................................... 28
Performing maintenance.............................................................................................................28
Downloading Active Health System data ........................................................................ 29
Logging in to Active Health System Viewer...........................................................29
Uploading an AHS log to AHSV............................................................................ 30
Firmware Update..............................................................................................................31
Determining the installed Intelligent Provisioning version..................................... 31
Updating Intelligent Provisioning and component firmware.................................. 31
Intelligent Provisioning Preferences.................................................................................32
Deployment Settings........................................................................................................ 32
Creating a Deployment Settings package (overview)........................................... 32
Using a Deployment Settings package to configure a single server (overview)....33
Performing Deployment Settings package-level actions....................................... 33
Entering or changing individual settings for a Deployment Settings package.......34
Using HPE Smart Storage Administrator (HPE SSA) ..................................................... 38
Diagnostics/SmartSSD.....................................................................................................39
Using Insight Diagnostics ................................................................................................39
Quick Configs...................................................................................................................40
Intelligent Provisioning Quick Configs settings and corresponding RBSU
settings.................................................................................................................. 41
iLO configuration.............................................................................................................. 42
2 Contents
Page 3

Viewing iLO summary information.........................................................................42
Editing iLO Access Settings.................................................................................. 43
Editing iLO Management Settings.........................................................................45
Modifying Network Settings...................................................................................47
Editing User Administration................................................................................... 51
Resetting iLO.........................................................................................................53
Insight Remote Support................................................................................................... 53
Unregistering from remote support........................................................................53
Editing the web proxy settings...............................................................................54
License Management.......................................................................................................55
Erase................................................................................................................................55
Reinstalling Intelligent Provisioning............................................................................................ 56
Advanced topics................................................................................... 57
Using the HPE USB Key Utility................................................................................................... 57
Prerequisites............................................................................................................................... 57
AutoRun files...............................................................................................................................57
Creating a bootable USB key......................................................................................................57
Troubleshooting.................................................................................... 59
Troubleshooting overview........................................................................................................... 59
General issues............................................................................................................................ 59
Windows-specific issues............................................................................................................. 60
Linux-specific issues................................................................................................................... 60
VMware-specific issues...............................................................................................................61
Intelligent Provisioning Recovery................................................................................................61
Websites................................................................................................ 62
Support and other resources...............................................................63
Accessing Hewlett Packard Enterprise Support......................................................................... 63
Accessing updates......................................................................................................................63
Customer self repair....................................................................................................................64
Remote support.......................................................................................................................... 64
Warranty information...................................................................................................................64
Regulatory information................................................................................................................65
Documentation feedback............................................................................................................ 65
Contents 3
Page 4

©
Copyright 2012, 2017 Hewlett Packard Enterprise Development LP
Notices
The information contained herein is subject to change without notice. The only warranties for Hewlett
Packard Enterprise products and services are set forth in the express warranty statements accompanying
such products and services. Nothing herein should be construed as constituting an additional warranty.
Hewlett Packard Enterprise shall not be liable for technical or editorial errors or omissions contained
herein.
Confidential computer software. Valid license from Hewlett Packard Enterprise required for possession,
use, or copying. Consistent with FAR 12.211 and 12.212, Commercial Computer Software, Computer
Software Documentation, and Technical Data for Commercial Items are licensed to the U.S. Government
under vendor's standard commercial license.
Links to third-party websites take you outside the Hewlett Packard Enterprise website. Hewlett Packard
Enterprise has no control over and is not responsible for information outside the Hewlett Packard
Enterprise website.
Acknowledgments
Microsoft® and Windows® are either registered trademarks or trademarks of Microsoft Corporation in the
United States and/or other countries.
Linux® is the registered trademark of Linus Torvalds in the U.S. and other countries.
Red Hat® is a registered trademark of Red Hat, Inc. in the United States and other countries.
Page 5

Introduction
Intelligent Provisioning is a single-server deployment tool embedded in ProLiant Gen8 servers that
replaces the SmartStart CDs and Smart Update Firmware DVD used with previous generations of
ProLiant servers. Intelligent Provisioning simplifies ProLiant server setup, providing a reliable and
consistent way to deploy ProLiant servers.
• Intelligent Provisioning assists with the OS installation process by preparing the system for installing
"off-the-shelf" and HPE-branded versions of leading OS software and integrating HPE ProLiant server
support software from the SPP. SPP is a comprehensive systems software and firmware solution for
ProLiant servers and server blades and their enclosures. ProLiant Gen8 servers are preloaded with a
basic set of firmware and OS components, which are installed along with Intelligent Provisioning. After
the server is running, use the Intelligent Provisioning Firmware Update utility to install additional
components and update any components that have been outdated since the server was
manufactured.
Although ProLiant Gen8 servers are pre-loaded with firmware and drivers, use Firmware Update
upon initial setup to ensure you have the latest versions. Using Firmware Update also ensures you
have the latest version of Intelligent Provisioning for the latest supported features, such as Microsoft
Windows 2012 installations. For Microsoft Windows 2012 installations, you must run Intelligent
Provisioning version 1.30 or later.
NOTE:
Intelligent Provisioning does not function within multihomed configurations. A multihomed host is
one that is connected to two or more networks or has two or more IP addresses.
IMPORTANT:
Do not update firmware if the version you are currently running is required for compatibility.
• Intelligent Provisioning provides maintenance-related tasks through Perform Maintenance Options
features.
• Intelligent Provisioning provides installation help for the following operating systems:
◦ Microsoft Windows Server
◦ Red Hat Enterprise Linux
◦ SuSE Linux Enterprise Server
◦ VMware ESXi/vSphere Custom Image
Not all versions of an OS are supported. For information about specific versions of a supported
operating system, see the OS Support Matrix at
http://www.hpe.com/info/ossupport.
Introduction 5
Page 6
Using Intelligent Provisioning
Overview
To access Intelligent Provisioning, power on or reboot the server and press F10 when prompted during
the server POST.
When accessing Intelligent Provisioning, one of the following happens:
• For first-time Intelligent Provisioning users, onscreen prompts guide you through initial configuration
and registration tasks.(
• If Intelligent Provisioning was previously accessed and the initial configuration and registration tasks
are complete, the Intelligent Provisioning home page is displayed. In the home screen, select one of
the following menus to use Intelligent Provisioning:
◦ Configure and Install menu (Configuring the server and installing an OS on page 17)
◦ Perform Maintenance menu (Performing maintenance on page 28)
To exit Intelligent Provisioning, reboot the server by clicking the power icon at the top right of the page.
Navigating Intelligent Provisioning
Completing initial configuration and registration tasks on page 7).
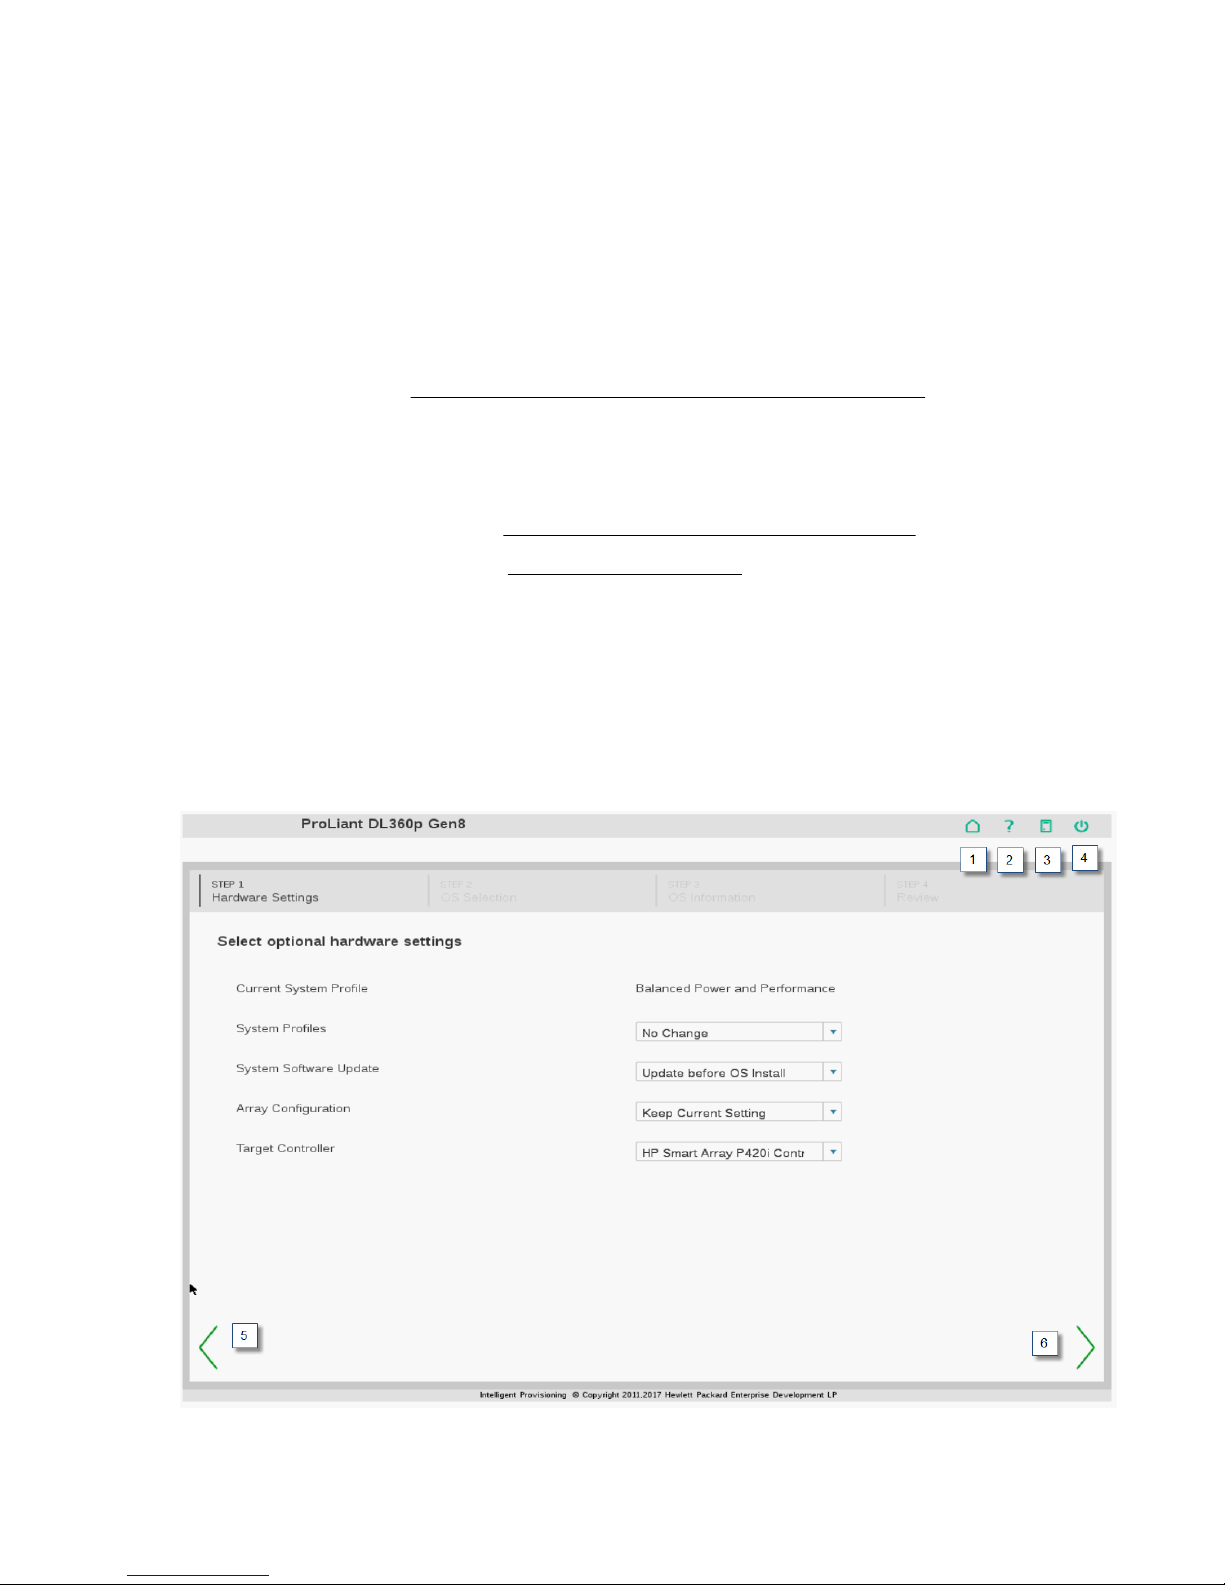
To navigate through and modify settings in this menu-driven interface, use the navigation icons displayed
at the top right-hand corner and bottom left- and right-hand corners of the Intelligent Provisioning window.
These navigation icons are screen sensitive and are not displayed on all screens.
6 Using Intelligent Provisioning
Page 7

Item Icon name Function
1
2
3
4
5
6
Home
Help
System Information
Power
Previous
Continue
Returns to the Intelligent Provisioning home page, with the
Configure and Install and Perform Maintenance menus.
This icon is available only after completing the initial
configuration and registration tasks. For more information,
see Completing initial configuration and registration
tasks on page 7.
Opens the online help to the section about the current
screen.
Displays system information, including the Intelligent
Provisioning version.
Powers down or reboots the server.
Returns you to the previous screen after validating and
saving your choices.
Takes you forward to the next screen after validating and
saving your choices.
Completing initial configuration and registration tasks
When using Intelligent Provisioning for the first time, follow the onscreen prompts to perform the following
tasks:
Procedure
1. Setting Preferences (Step 1: Setting Intelligent Provisioning preferences on page 7)
2. Activating Intelligent Provisioning (Step 2: Activating Intelligent Provisioning on page 9)
3. Registering for Insight Remote Support ( Registering for Insight Remote Support central connect )
NOTE:
Storage controller information is not displayed in System Information in these initial three
configuration pages.
Step 1: Setting Intelligent Provisioning preferences
Procedure
1. Choose your interface language and keyboard language.
2. Read the End User License Agreement (EULA).
• To continue using Intelligent Provisioning, click Accept.
Completing initial configuration and registration tasks 7
Page 8

Included in the EULA is a link for ancillary software, which contains a list of open source and
proprietary software developed or obtained through third parties. This link and all other links in the
EULA are not enabled, but can be accessed if entered into a browser.
• To cancel using Intelligent Provisioning, click Reboot to exit the utility and reboot the server.
Intelligent Provisioning remains accessible.
3. Enter network settings.
Select the active NIC from the list, and then choose from one of the following IP addressing schemes:
• DHCP Auto-Configuration—HPE recommends selecting DHCP to have IP addresses assigned
automatically to your server.
• IPv4 Static—Selecting IPv4 adds four new fields: the static IPv4 address, network mask, gateway
address, and DNS address.
• IPv6 Static—Selecting IPv6 adds two fields: the static IP address and the Gateway address.
4. Specify whether you are using a proxy. If you have a proxy on your network, you might need to
configure it for use with features that communicate across the network. If you choose Use Proxy,
enter a Proxy Address and Port.
5. Enter iLO network settings.
Select one of the following iLO network IP addressing schemes:
• DHCP Auto-Configuration—HPE recommends selecting DHCP to have IP addresses assigned
automatically to your server.
• IPv4 Static—Selecting IPv4 adds four new fields: the static IPv4 address, network mask, gateway
address, and DNS address.
• Off—Selecting Off makes this server unavailable through iLO.
For more information about using iLO, see the HPE iLO 4 User Guide on the HPE website (http://
www.hpe.com/info/ilo/docs).
6. Select a delivery option for System Software Updates for Intelligent Provisioning.
• HPE website—HPE recommends selecting this option to be prompted when updates are available
and download all software updates for your server from HPE.com.
• HTTP/FTP—When prompted, enter an address in the URL field.
• Disable—Select this to disable automatic updates if you plan to update your system software
manually.
7. Confirm that the system date and time are accurate.
To change the date or time, click the displayed date or time and use the displayed calendar or clock to
select the new values.
8. Click the Continue right arrow to proceed automatically to Step 2: Activating Intelligent
Provisioning on page 9.
8 Using Intelligent Provisioning
Page 9

NOTE:
To access this screen change preferences at a later time, open the Perform Maintenance menus,
and then click Intelligent Provisioning Preferences (Intelligent Provisioning Preferences on
page 32).
Step 2: Activating Intelligent Provisioning
When logging on to Intelligent Provisioning for the first time, the Activation screen is viewable after the
Setting Preferences screen.
To activate Intelligent Provisioning and make it available during server POST:
Procedure
1. Select Activate (Recommended).
2. Click the Continue right arrow to proceed automatically to Step 3: Registering for Insight Remote
Support .
To disable Intelligent Provisioning:
• Select Disable (Not Recommended).
• Click the Continue right arrow. The server reboots. During POST, F10 is in red text on the screen,
indicating that the F10 key is disabled and Intelligent Provisioning is no longer accessible.
To re-enable Intelligent Provisioning:
• Reboot the server and, when prompted, press F9 to access the ROM-Based Setup Utility (RBSU) or
UEFI System Utilities.
◦ In the RBSU, select Server Security > Intelligent Provisioning (F10 Prompt) > Enabled.
For more information on using RBSU, see the ROM-Based Setup Utility User Guide at
www.hpe.com/support/rbsu.
◦ In the UEFI System Utilities, select System Configuration > ROM-Based Setup Utility (RBSU) >
Intelligent Provisioning (F10 Prompt) > Enabled.
For more information on UEFI System Utilities, see the UEFI System Utilities User Guide at http://
www.hpe.com/support/UEFI_UG_en.
Step 3: Registering for Insight Remote Support
HPE Insight Remote Support provides automatic submission of hardware events to HPE to prevent
downtime and enable faster issue resolution. You can register directly to HPE or through an Insight RS
Hosting Device.
HPE embedded remote support
Intelligent Provisioning includes the embedded remote support feature, which allows you to register
supported servers for HPE remote support.
http://
Connecting a server to Hewlett Packard Enterprise allows it to be remotely supported and to send
diagnostic, configuration, telemetry, and contact information to Hewlett Packard Enterprise. No other
business information is collected, and the data is managed according to the Hewlett Packard Enterprise
privacy statement, which you can review at the following website: http://www.hpe.com/info/privacy.
Step 2: Activating Intelligent Provisioning 9
Page 10

When you use the embedded remote support feature, choose from the following configuration options:
Insight Online direct connect and Insight Remote Support central connect.
Insight Online direct connect
Register a server directly with Insight Online without the need to set up an Insight Remote Support
centralized host server in your local environment. Insight Online will be your primary interface for remote
support information.
Insight Online is a Hewlett Packard Enterprise Support Center feature that enables you to view your
remotely monitored devices anywhere, anytime. It provides a personalized dashboard for simplified
tracking of IT operations and support information, including a mobile dashboard for monitoring when you
are on the go.
Insight Remote Support central connect
Register a server with Hewlett Packard Enterprise through an Insight Remote Support centralized host
server in your local environment. All configuration and service event information is routed through the
host server. This information can be viewed by using the local Insight RS Console or the web-based view
in Insight Online (if it is enabled in Insight RS).
Device support
Embedded remote support registration is supported for the following device types:
Insight Online direct connect
• ProLiant Gen8 servers
• ProLiant Gen9 servers
Insight Remote Support central connect
• ProLiant Gen8 servers
• ProLiant Gen9 servers
If you use HPE OneView to manage your environment, use HPE OneView to register for remote support.
For more information, see the HPE OneView user guide.
Data collected by HPE remote support
When a server is registered for remote support, iLO collects Active Health System and server
configuration information, and then iLO or the Insight RS host server sends this information to Hewlett
Packard Enterprise. Active Health System information is sent every 7 days, and configuration information
is sent every 30 days. The following information is included:
• Registration—During server registration, iLO collects data to uniquely identify the server hardware.
Registration data includes the following:
◦ Server model
◦ Serial number
◦ iLO NIC address
• Service events—When service events are recorded, iLO collects data to uniquely identify the relevant
hardware component. Service event data includes the following:
10 Data collected by HPE remote support
Page 11

◦ Server model
◦ Serial number
◦ Part number of the hardware component
◦ Description, location, and other identifying characteristics of the hardware component
• Configuration—During data collection, iLO collects data to enable proactive advice and consulting.
Configuration data includes the following:
◦ Server model
◦ Serial number
◦ Processor model, speed, and utilization
◦ Storage capacity, speed, and utilization
◦ Memory capacity, speed, and utilization
◦ Firmware/BIOS
◦ Installed drivers, services, and applications (if AMS is installed)
• Active Health System—During data collection, iLO collects data about the health, configuration, and
runtime telemetry of the server. This information is used for troubleshooting issues and closed-loop
quality analysis.
For information about data collection, see the iLO user guide.
HPE Proactive Care service
HPE Proactive Care service customers must register their servers for remote support to receive the
following Proactive Care features: Proactive Scan Report and Firmware and Software Version Report.
• The direct connect option requires the installation of AMS.
• The central connect option requires the installation of AMS or the SNMP/WBEM agents.
For more information, see the following website: .
Prerequisites for remote support registration
Procedure
1. The server supports embedded remote support registration through Intelligent Provisioning.
2. Your environment meets the requirements for remote support registration.
For more information, see the Insight Remote Support and Insight Online setup guide for ProLiant
Servers and BladeSystem c-Class Enclosures at the following website: .
3. A supported version of Intelligent Provisioning is installed.
Version 2.01 or later is required for remote support registration.
4. iLO is configured as follows:
HPE Proactive Care service 11
Page 12

See: substeps
For information about configuring iLO, see the iLO 4 user guide.
a. A supported version of the iLO firmware is installed.
To address third-party software vulnerabilities, Hewlett Packard Enterprise recommends using iLO
4 2.03 or later.
b. The time zone is set in iLO.
c. A DNS server is configured in iLO.
This is required for communication between iLO and Insight Online.
5. For Insight Remote Support central connect only: A supported version of the Insight RS software is
installed and configured on the Insight RS host server.
6. For Insight Remote Support central connect only: The RIBCL protocol credentials for the server are
configured in the Insight RS Console.
For more information about the RIBCL protocol credentials, see the Insight Remote Support
installation and configuration guide.
Registering for Insight Online direct connect
When you register for Insight Online direct connect, you must complete steps in both Intelligent
Provisioning and the Insight Online portal.
Registering for Insight Online direct connect (step 1)
Prerequisites
• Your environment meets the prerequisites for Insight Online direct connect registration.
• You have an HP Passport account. For more information, see http://www.hpe.com/info/
insightonline.
Procedure
1. The remote support registration page opens after you complete Step 1 and Step 2 of the Intelligent
Provisioning initial configuration and registration tasks. It opens immediately if you navigated to the
Perform Maintenance page.
2. If the Get Connected to Hewlett Packard Enterprise window is not already open from the previous
step of the initial configuration and registration tasks, navigate to the Perform Maintenance page in
Intelligent Provisioning, and then select HPE Insight Remote Support.
3. Select Connect this server directly to HPE.
12 Registering for Insight Online direct connect
Page 13
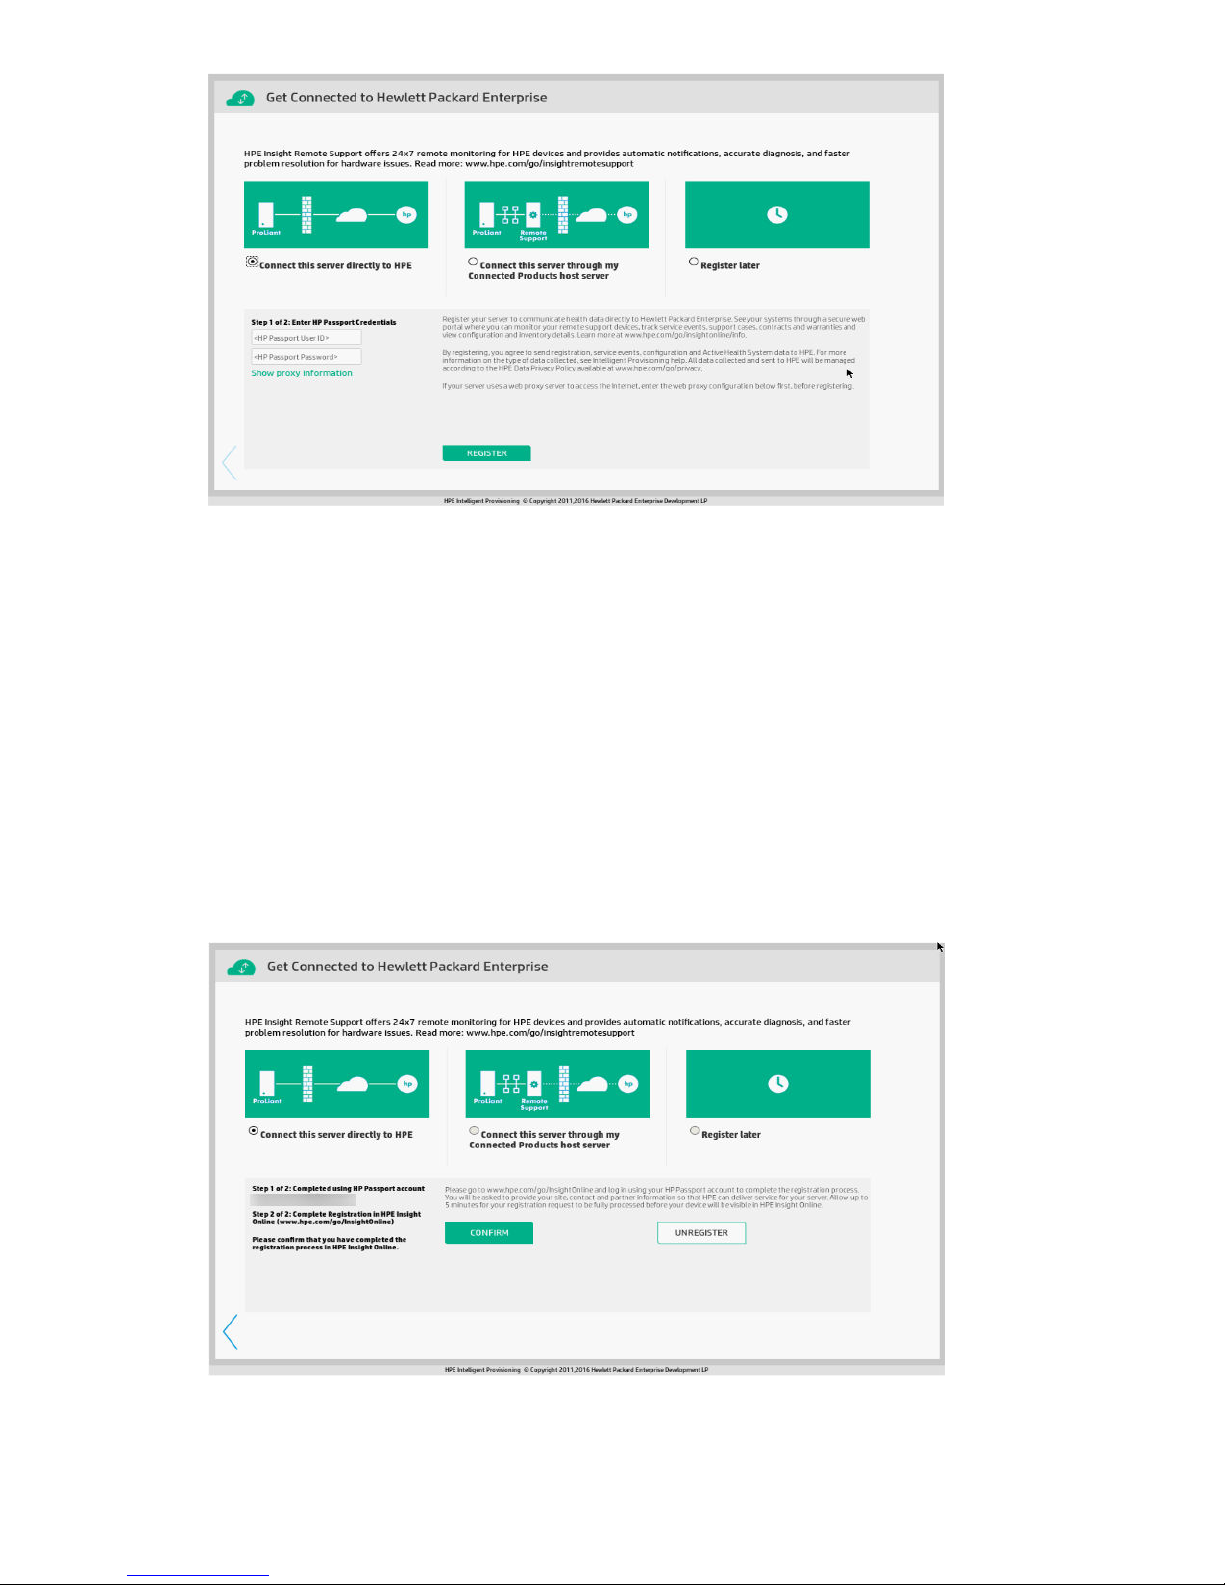
4. Enter your HP Passport user ID and password.
5. Optional: If the server uses a web proxy server to access the Internet, click Show proxy information,
and then enter the following:
a. Web Proxy Server
—Enter the hostname or IP address.
b. Web Proxy Port
c. Web Proxy Username
d. Web Proxy Password
6. Click Register.
7. Intelligent Provisioning notifies you that Step 1 of the registration process is finished, and prompts you
to complete Step 2.
8. Allow up to 5 minutes for your registration request to be fully processed.
Using Intelligent Provisioning 13
Page 14

Registering for Insight Online direct connect (step 2)
• Navigate to the Insight Online website at , and then log in with your HP Passport credentials.
• Follow the onscreen instructions in Insight Online, and provide your site, contact, and partner
information so Hewlett Packard Enterprise can deliver service for your server.
• To streamline the process when you have multiple servers to register, complete Step 1 for all of the
servers, and then complete Step 2 for all of the servers during one Insight Online session.
• For detailed instructions, see the Insight Remote Support and Insight Online setup guide for ProLiant
servers and BladeSystem c-Class enclosures.
Confirming that registration is complete
• Return to the remote support registration page in Intelligent Provisioning, and then click Confirm.
• Intelligent Provisioning notifies you that the registration process is finished.
• To proceed to the Intelligent Provisioning home page, click the Continue right arrow.
Completing the post-registration steps
To ensure successful remote support operation, complete the following steps after you install the system
software:
• Optional: Verify that the server operating system is running and AMS is installed.
• Hewlett Packard Enterprise recommends installing AMS. For more information, see the iLO 4 user
guide.
•
• AMS is installed automatically if you use the Intelligent Provisioning Recommended installation
method for Windows installation.
• Proactive Care customers only: AMS installation is required to receive the following Proactive Care
services features: Proactive Scan Report and Firmware and Software Version Report.
• Using AMS is one way in which iLO can obtain the server name. If iLO cannot obtain the server name,
the displayed server name in Insight Online and Insight RS is derived from the server serial number.
• If you did not install AMS, do one of the following to ensure that the server name is displayed correctly
in Insight Online and Insight RS:
◦ For Windows systems only, start the operating system. Insight Online and Insight RS will use the
Windows computer name to identify the server.
◦ Configure the Server Nameon the Administration > Access Settingspage in the iLO web
interface.
To protect your privacy, do not use sensitive information in the names of your ProLiant servers.
When you register a server for remote support, the server name is displayed in Insight Online and
Insight RS.
• Verify that the ProLiant iLO 3/4 Channel Interface Driver is installed.
• This driver is installed automatically if you use the Intelligent Provisioning Recommended installation
method for Windows installation.
• This driver ships standard with SUSE Linux Enterprise Server 11 and 12 and Red Hat Enterprise Linux
6 and 7, and it is automatically loaded.
14 Using Intelligent Provisioning
Page 15
• For more information, see the iLO 4 user guide.
• Optional: If you want to receive email alerts about system events, configure AlertMail on the
Administration > Management > AlertMail page in iLO.
• For more information, see the iLO 4 user guide.
Registering for Insight Remote Support central connect
Registering for Insight Remote Support central connect
Prerequisites
Your environment meets the prerequisites described in Prerequisites for remote support registration
on page 11.
Procedure
1. The remote support registration page opens after you complete Step 1 and Step 2 of the Intelligent
Provisioning initial configuration and registration tasks. It opens immediately if you navigated to the
Perform Maintenance page.
2. If the Get Connected to Hewlett Packard Enterprise window is not already open from the previous
step of the initial configuration and registration tasks, navigate to the Perform Maintenance page in
Intelligent Provisioning, and then select HPE Insight Remote Support.
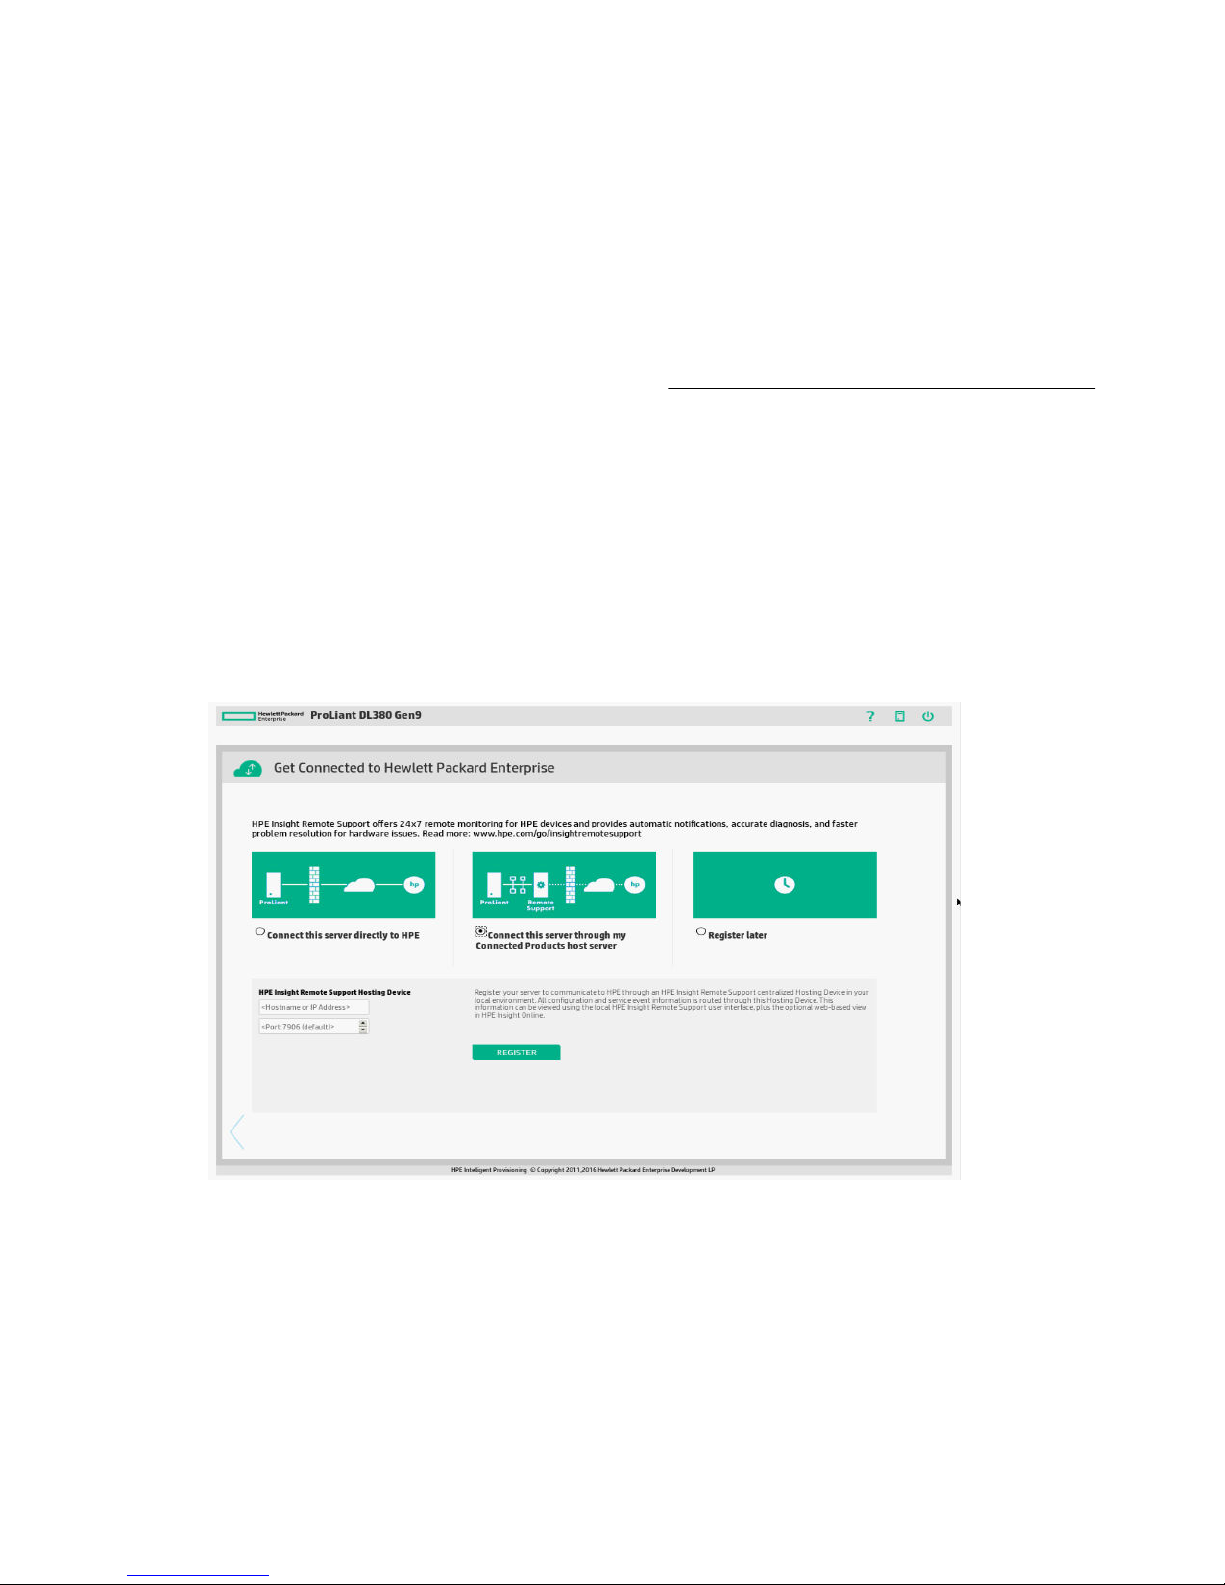
3. Select Connect this server through my Connected Products host server.
4. Enter the host server host name or IP address and port number.
5. The default port is 7906.
6. Click Register.
7. Intelligent Provisioning notifies you that the registration process is finished.
8. To proceed to the Intelligent Provisioning home page, click the Continue right arrow.
Completing the post-registration steps
Registering for Insight Remote Support central connect 15
Page 16

To ensure successful remote support operation, complete the following steps after you install the system
software:
• Optional: Verify that the server operating system is running and AMS is installed.
• Hewlett Packard Enterprise recommends installing AMS. For more information, see the iLO 4 user
guide.
•
• AMS is installed automatically if you use the Intelligent Provisioning Recommended installation
method for Windows installation.
• Proactive Care customers only: AMS installation is required to receive the following Proactive Care
services features: Proactive Scan Report and Firmware and Software Version Report.
• Using AMS is one way in which iLO can obtain the server name. If iLO cannot obtain the server name,
the displayed server name in Insight Online and Insight RS is derived from the server serial number.
• If you did not install AMS, do one of the following to ensure that the server name is displayed correctly
in Insight Online and Insight RS:
◦ For Windows systems only, start the operating system. Insight Online and Insight RS will use the
Windows computer name to identify the server.
◦ Configure the Server Name on the Administration > Access Settings page in the iLO web
interface.
To protect your privacy, do not use sensitive information in the names of your ProLiant servers.
When you register a server for remote support, the server name is displayed in Insight Online and
Insight RS.
• Verify that the ProLiant iLO 3/4 Channel Interface Driver is installed.
• This driver is installed automatically if you use the Intelligent Provisioning Recommended installation
method for Windows installation.
• This driver ships standard with SUSE Linux Enterprise Server 11 and 12 and Red Hat Enterprise Linux
6 and 7, and it is automatically loaded.
• For more information, see the iLO 4 user guide.
Registering for remote support after the initial configuration and registration tasks
If you want to register this server for remote support after the initial configuration and registration tasks:
Procedure
1. Select Register Later on the registration page.
2. Click the Continue right arrow.
3. When you are ready to register this server for remote support, navigate to the Perform Maintenance
screen and select HPE Insight Remote Support.
4. For registration instructions, see Registering for Insight Online direct connect on page 12 and
Registering for Insight Remote Support central connect on page 15.
16 Registering for remote support after the initial configuration and registration tasks
Page 17

Configuring the server and installing an OS
To use Intelligent Provisioning to configure the hardware and install an OS on your HPE ProLiant server,
follow the onscreen prompts in the Configure and Install menu to complete the tasks in the following
topics:
• Step 1: Hardware Settings on page 18
• Step 2: OS Selection on page 19
• Step 3: OS Information on page 25
• Step 4: Review on page 27
Source media types and installation methods supported for each OS
Each Express OS Install screen provides a guided method for configuring the server, installing an OS,
and updating the system software.
IMPORTANT:
Intelligent Provisioning only supports original, licensed vendor media or Hewlett Packard Enterprisebranded versions. Demo or developer versions of the OS, or media that has been modified to
slipstream custom software or service packs, are not supported and might not be correctly identified
by the installation process.
For more information about source media and installation methods supported by each OS, see the
Intelligent Provisioning Release Notes.
Using an SD card as a boot device
With Intelligent Provisioning, you can use an Hewlett Packard Enterprise-supplied SD card as a target for
deploying an OS. Only the following SD cards are supported as an alternative OS boot device:
VMware
• 8 GB USB Enterprise Mainstream Flash Media Drive Key Kit (737953-B21)
• 8 GB microSD Enterprise Mainstream Flash Media Kit (726116-B21)
Windows, Red Hat Enterprise Linux, and SUSE Linux Enterprise Server
• 32 GB SD Enterprise Mainstream Flash Media Kit (700136-B21)
• 32 GB microSD Enterprise Mainstream Flash Media Kit (700139–B21)
NOTE:
• SD Boot does not support deployment installations.
• Red Hat does not support installation to USB drives or SD memory cards. For information about
the support for third-party virtualization technologies, see the Red Hat Hardware Compatibility
List, available online at https://hardware.redhat.com.
These SD cards can be used as an alternative to hard drive or solid state drive storage for deploying an
OS on ProLiant Gen9 servers. Using an SD card as a target for deploying an OS provides the following
advantages:
Configuring the server and installing an OS 17
Page 18

• Deploys OSs to diskless servers and SAN storage
• Uses less power than traditional drives
• Reduces temperature, decreasing throttling and A/C costs
• Reduces vibration, particularly in environments with high G-force
• Frees drive bays for other uses
Step 1: Hardware Settings
In the first configuration screen, enter global settings to control power use, software updates, and array
configuration.
IMPORTANT:
If unsupported media devices, including non-HPE SD cards (Available install methods, source
media types, and formats supported for each OS family ), are connected at this point, an error
appears. To resolve the issue, remove the unsupported media device, and make sure you have
network share information available, or a disk or ISO, FTP, or USB drive installed when prompted.
Procedure
1. Select the power management System Profile to use. These profiles set a basic policy for performance
versus power usage without having to configure individual settings through RBSU or UEFI System
Utilities menus.
The current (or a recommended) profile is displayed, but to change the settings, the options include:
• No Change
• Balanced Power and Performance
• Minimum Power Usage
• Maximum Performance
The suggested default varies. If Intelligent Provisioning detects existing settings on the server that
match one of these profiles, that profile is displayed in the System Profiles field. If Intelligent
Provisioning detects settings that do not match one of the profiles, No Change is displayed in this
field.
For more information about these options, see Quick Configs on page 40.
2. Select whether to perform a software update before the OS is installed.
3. Enter array configuration specifications for the server's storage subsystem.
Options include:
• Keep Current Setting—Uses existing settings to maintain any previously constructed arrays. Use
this option when reprovisioning a server. This option is displayed only when valid logical drives are
present on the server. For new server installations, this option is not displayed.
• Recommended Settings—The HPE Smart Storage Administrator polls any drives that are present
and builds an appropriate array for those drives. For example, if two drives are connected to the
18 Step 1: Hardware Settings
Page 19

Smart Array card, the setup defaults to RAID 1. HPE recommends selecting this option when
initially provisioning a server.
CAUTION:
Selecting this choice resets all disks (and arrays, if any are present). Because no arrays or
disk data are present during a first-time setup, this does not affect your server. However, if
you choose this option when reprovisioning your server, you can lose your data and any disk
arrays. For more information about the HPE Smart Storage Administrator, see the HPE Smart
Storage Administrator User Guide (http://www.hpe.com/support/SSA_UG_en).
• Customize—Opens the HPE Smart Storage Administrator (after clicking the right arrow) and
allows you to choose array settings. For more information about using the HPE SSA, see Using
HPE Smart Storage Administrator (HPE SSA) on page 38.
NOTE:
Some controllers other than HPE Smart Array controllers can be configured through HPE
Smart Storage Administrator.
4. Select the Target Controller you want to use from the drop-down menu if more than one is available.
5. Confirm Fibre Channel and iSCSI configuration settings.
If discovered, the Fibre Channel and iSCSI information is displayed at the bottom of the screen.
Intelligent Provisioning supports installation to iSCSI targets and to shared storage devices. Before
starting an installation, the devices need to be set up outside of Intelligent Provisioning, using options
that appear during POST, or through their setup applications. In addition, the boot controller order
needs to be set correctly in RBSU or UEFI System Utilities before installation
6. Confirm SD Card Configuration settings. If a supported SD card is installed, the device details appear.
7. Click the Continue right arrow.
Step 2: OS Selection
In this screen, specify the OS family to install and the installation method.
IMPORTANT:
If unsupported media devices, including SD cards other than HPE 32GB SD or microSD Enterprise
Mainstream Flash Media, are connected at this point, the following error appears: There are no
physical disks attached.
To resolve the issue, remove the unsupported media device, and make sure you have network
share information available, or a disk or ISO, FTP, or USB drive installed when prompted.
Procedure
1. Select an OS family. Available supported OS families include:
• Microsoft Windows
• VMware ESXi/vSphere Custom Image
Step 2: OS Selection 19
Page 20

• SUSE Linux Enterprise Server
• Red Hat Enterprise Linux
If the OS you want to install is not listed, it might not be supported for use with your controller model,
or you might need to update HPE ProLiant firmware. For information about supported OSs and OS
drivers, see the operating systems and virtualization software support for ProLiant servers.
NOTE:
If updates are available, a message appears on the screen directing you to the proper steps for
incorporating them into Intelligent Provisioning.
IMPORTANT:
When installing VMware, download an HPE Custom ISO before the installation from the HPE
website (http://www.hpe.com/info/esxidownload). Ethernet port 0 must be active.
2. Select an installation method.
Depending on the OS family selected, installation choices vary, including the suggested default. For
more information, see Available install methods, source media types, and formats supported for
each OS family on page 23.
Options may include:
• Recommended—Uses HPE-defined defaults to configure the server software and firmware,
partition storage, and install the OS with HPE drivers. HPE recommends selecting this option for
first-time server setup. For more information about recommended installation options, see OS
information required for recommended installations.
The following table describes the most common OS-specific installation issues and the
recommended solutions.
20 Using Intelligent Provisioning
Page 21

Linux edition Issue Solution
Red Hat Enterprise
Linux 5, 6, or 7
Red Hat Enterprise
Linux 5, 6, or 7
Unable to proceed with
Recommended installation with
valid OS images through FTP
source media.
Unable to browse Red Hat OS files
while saving the Deployment
Setting profile.
While performing Red Hat
recommended installation using
FTP source media, make sure that
all the required files extracted
correctly from the ISO and are
present in the OS flat file folder. If
files are missing or incorrectly
placed, you might not be able to
continue with installation. Also
make sure that two TRANS.TBL
files are present in the Red Hat OS
flat files folder. One file should be
present in the main OS file folder,
and another should be present
inside the “Server” folder inside the
main OS file folder.
While selecting Red Hat OS flat
files in Deployment Settings, if a
“This media does not match
the selected OS. Missing:”
message appears, either the wrong
OS family is selected, or some of
the OS files are missing from the
OS flat file folder. Make sure all the
required Red Hat OS files are
present in the OS Flat file folder.
VMware When installing a VMware OS to a
storage controller with an SD card
installed, using Recommended or
Custom installation methods, the
Remove the SD card before
performing a Recommended or
Custom installation of VMware to a
storage controller.
OS continues reinstallation after
reboot.
• Customized—Enables you to individually configure the options for server software and firmware
updates, storage partitioning, and OS installation with HPE drivers. Select this option if you have
specific parameters that differ from the recommended settings, such as for storage partitioning. For
more information about customized installation options, see OS information required for
customized installations on page 26.
• Manual—Installs the OS from a custom OS CD/DVD. After selecting this option, insert the provided
CD/DVD so that the server can reboot from the OS CD/DVD.
When using the Manual Installation method, the Virtual Install Disk (VID) is enabled automatically,
and a USB mass-storage device appears with the name of the VID during the OS installation
process. The VID contains a limited set of storage and networking drivers, so any required SAS/
iSCSI/FCoE adapter can be loaded in the event that the OS disc does not have the appropriate
drivers. Because the VID and the custom CD/DVD might not contain all of the needed drivers, you
might need to create a driver CD/DVD to ensure that all required drivers are installed and that the
OS can install successfully. For information about creating a driver disk, see the OS installation
guide.
Using Intelligent Provisioning 21
Page 22

To disable VID, reboot the server and press F9 during POST to access RBSU or UEFI System
Utilities.
• In the RBSU, navigate to Advanced Options > Advanced System ROM Options > Virtual Install
Disk.
• In the UEFI System Utilities, navigate to System Configuration > ROM-Based Setup Utility
(RBSU) > Advanced Options > Advanced System ROM Options > Virtual Install Disk.
In all Linux environments, add linux dd on the command line to provide a driver location only when
installing the OS in special storage devices such as iSCSI and FC LUNs.
In Red Hat Enterprise Linux 6 installations with a SATA controller, the selected Install Target Device
must be a drive connected to the lowest bay number.
The following table contains information about Linux boot driver parameters.
Linux edition Issue Solution Example
SUSE Linux
Enterprise Server
Because of a
naming convention
conflict between
SUSE Linux
Enterprise Server
To access the SP2
drivers in the VID,
include the updatedir
kernel parameter for
the appropriate OS.
updatedir=
/linux/suse/i386–
sles11.2broken_modules=ahc
i for sles10 and sles11
11 SP1 and SP2,
the SP2 drivers are
located in a
directory that the
SUSE installer does
not see.
Red Hat
Enterprise Linux
6, U3
The non-RAID AHCI
driver attempts to
attach to the HPE
Dynamic Smart
Array B120i
Enter the following
boot parameters to
prevent the driver
from taking over the
controller.
blacklist=ahci for rhel6
Controller,
preventing logical
drive recognition.
3. Select the source media from which you are installing the OS. Media types include:
• Disc (default)—A standard bootable OS DVD/CD-ROM media, and virtual media through iLO
• Network share—The network share that contains the OS installation files
• FTP—The FTP server that contains OS installation files.
• USB— The USB flash drive that contains the OS installation files
NOTE:
Both exFAT and FAT-formatted USB drives are supported.
4. If you are installing from a CD/DVD disk or USB drive, insert the media.
5. Click the Continue right arrow to go to the next screen, which varies, depending on the media type.
22 Using Intelligent Provisioning
Page 23

Insert the disc or USB media, or enter the information needed to access the installation files on the
network share or FTP site. Depending on the media type, supply the following information.
Media type Required information/action
Disc Insert the disc.
Network share Enter network connection information, including:
• Server Name or IP Address—Server name or IP address of the
server that hosts the OS contents. If a server name is specified, a
DNS entry is also required.
• Share Name—The name of the network share using Server
Message Block (SMB) protocol that hosts the OS contents.
• Network Share User—User name used to access the network
share.
• Network Share Password (not encrypted)—Password for the
user name used to access the network share.
FTP Enter network connection information, including:
Server Name or IP Address—FTP server name or IP address of
the server that hosts the OS contents. FTP support requires
anonymous access to the FTP server and does not support
connecting to an FTP server through a proxy.
IMPORTANT:
When entering an FTP path, remove spaces and punctuation.
The FTP server directory structure cannot contain spaces or
special characters (including punctuation).
USB Insert the USB drive and browse to the location of the OS
installation files. Then, double-click the ISO file.
6. Click the Continue right arrow to proceed to the next screen in the automated process.
Available install methods, source media types, and formats supported for
each OS family
Each Configure and Install screen provides a guided method of configuring the server, installing an OS,
and updating the system software. The following table shows the install methods, source media types,
and formats supported for each OS family.
Available install methods, source media types, and formats supported for each OS family 23
Page 24

Recommended install method Customized install method Manual
Microso
ft
Window
s (64–
bit)
VMware
ESXi
SUSE
Linux
Enterpri
se
Server
Red Hat
Enterpri
se
Linux
Formats:
Disc Network
Share
ISO VM
Flat ISO — Flat ISO ISO VM
ISO
ISO VM
Flat ISO Flat Flat ISO ISO VM
ISO
ISO VM
Flat ISO — — — — — — ISO VM
ISO
ISO VM
— Flat — — — — — ISO VM
ISO
FTP USB Disc Network
Share
Flat ISO — Flat ISO ISO VM
ISO
Flat ISO Flat Flat ISO ISO VM
ISO
FTP USB Disc
ISO
ISO
ISO
ISO
• Flat—Standard folder structure
• ISO—ISO or UDF file
• VM ISO—iLO Virtual Media ISO
• VM NET—iLO Virtual Media folder share
• VM USB—iLO Virtual Media USB
For more information about supported operation systems, software, and firmware, see the links in
Introduction on page 5.
SD Boot
With Intelligent Provisioning, you can use an HPE SD card as a target for deploying an OS. The following
HPE-supplied SD cards are supported as an alternative OS boot device:
• HPE 32GB SD Enterprise Mainstream Flash Media Kit (700136-B21)
• HPE 32GB microSD Enterprise Mainstream Flash Media Kit (700139–B21)
NOTE:
You cannot perform an OS install on an SD card when there is a hard disk connected to the server.
Either of these SD cards can be used as an alternative to hard drive or solid state drive storage for
deploying an OS on HPE ProLiant servers. Using an SD card as a target for deploying an OS provides
the following advantages:
24 Using Intelligent Provisioning
Page 25

• Deploys OSs to diskless servers and SAN storage
• Uses less power than traditional drives
• Reduces temperature, decreasing throttling and A/C costs
• Reduces vibration, particularly in environments with high G-force
• Frees drive bays for other uses
NOTE:
SD Boot does not support deployment (Deployment Settings on page 32) installation.
Requirements:
• iLO 4 1.30 or later
• Intelligent Provisioning 1.50 or later
• System ROM from the SPP 2013.09.0 or later baseline
You can find information about using an SD card with Intelligent Provisioning in Step 3: OS Information
on page 25.
Step 3: OS Information
OS information required for recommended installations
Depending on the OS you are installing, you may be prompted to enter or confirm the following
information:
Procedure
1. Select the OS family and edition.
When installing Windows 2012 Hyper-V, you must select the Windows 2012 OS family and the HyperV OS. If a different OS family is selected, the installation will fail, generating the following error
message:
Unattended settings error
Also, when installing windows 2012 R2 Hyper-V, you must select Windows 2012 R2 as OS family and
the Hyper-V OS.
2. Select the OS and the keyboard language.
IMPORTANT:
The HPE SD or microSD Enterprise Mainstream Flash Media cards are the only SD cards that
currently support the SD Boot option. Windows and Linux OS families support the SD Boot
option for Recommended installations.
3. Enter the product key. (Not displayed for all OSs)
This is the Product Identification (Product ID) number. If you do not enter a product key and one is
required, the OS installation pauses indefinitely, prompting you to enter the key. The installation
resumes after you enter the product key.
Step 3: OS Information 25
Page 26

4. Enter and re-enter an Administrator password, if preferred. This step is optional.
5. Click the Continue right arrow to proceed to Step 4: Review on page 27.
OS information required for customized installations
If you selected a Windows-based OS and a Customized installation method on the OS Selection screen
Step 2: OS Selection on page 19), additional screens are displayed for you to enter custom operating
(
installation and monitoring management protocol information.
Microsoft Windows configuration information for a Customized installation
Depending on the type of Microsoft OS you are installing, you may be prompted to enter the following
information:
Procedure
1. Select the OS family and edition.
When installing Windows 2012 Hyper-V, you must select the Windows 2012 OS family and the HyperV OS. If a different OS family is selected, the installation will fail, generating the following error
message: Unattended settings error.
NOTE:
When installing Windows 2012 R2, you must select Windows 2012 R2 as the OS family and an
appropriate OS must be selected.
2. Select the OS and keyboard language.
IMPORTANT:
The HPE SD and microSD Enterprise Mainstream Flash Media cards are the only SD cards that
currently support the SD Boot option. Windows and Linux OS families support the SD Boot
option for Recommended installations. See Available install methods, source media types,
and formats supported for each OS family for more information.
3. Select a partition size.
This is the size of the partition to create as the C: drive and in which to install the OS.
By default, the value is set to the maximum-allowed size (the size of the logical drive.) The minimumallowed size varies and is determined by the selected OS.
• To change the size of the partition from the default, slide the bar above the field left or right to
reduce or increase size. This option is not available when installing Microsoft Windows Essentials
OSs, because custom partitioning is not supported in the Essentials OSs.)
• To create a partition size based on the provided default, but reducing it by the amount set aside for
the swap space (pagefile), select Disallow swap space (not recommended). Select this option
only when the pagefile is located elsewhere.
4. Enter the product key.
This is the Microsoft Product Identification (Product ID) number. (Not displayed for all OSs).
5. Enter the computer name and an administrator password (optional).
26 OS information required for customized installations
Page 27

HPE recommends entering a personalized name instead of using the suggested default. When
installing Microsoft Smart Business Server, HPE recommends entering the final system name during
the installation.
To protect your privacy, do not use sensitive information for the computer name. This name is visible in
HPE Insight RS and HPE Insight Online, and can be viewed by HPE support and your authorized
service provider, reseller/distributor, and installer.
If an administrator password is not entered at this time, you are prompted for a password during the
first login. (Not displayed for all OSs. For Microsoft Windows Small Business Server 2011 Essentials,
the initial administrator password defaults to “admin.”)
6. Select a time zone.
The time zone is used by the OS to perform daylight saving time updates and other time-related
functions.
7. Enter organization and owner names (optional).
VMware Configuration information for Customized Installation
If you selected a VMware OS and a Customized installation method on the OS Selection screen (Step 2:
OS Selection on page 19), additional screens are displayed for you enter custom operating installation
and monitoring management protocol information.
1. Enter a host name (optional).
This name must be a minimum of three characters.
2. Enter a root password.
For VMware, the initial password defaults to “password”.
3. Specify the network type.
Select from DHCP or Static.
Step 4: Review
The Review screen displays your hardware and OS settings. Continuing past the Review screen installs
the OS and configures the server.
CAUTION:
Continuing past this screen resets the drives to a newly installed state and installs the selected OS.
Any existing information on the server is erased. This does not affect a first-time setup, because
there is no data present on the server.
Procedure
1. Review the information on the screen and confirm its accuracy.
2. If you want to use these same settings at a later time to install and configure a different server, select
Create a deployment setting from the assisted install. (Because Deployment Settings profiles
support only the settings provided in the Recommended installation methods, if this is a Customized
installation, settings that are unique to the Customized installation method are not captured.)
3. Click the Continue right arrow to begin the automated installation and configuration process.
Depending on the Deployment Settings, a variety of screens are displayed, providing progress
Step 4: Review 27
Page 28

information about the installation. For more information, see Checking installation parameters on
page 28.
Checking installation parameters
During the installation and configuration process, consider the following:
• A EULA might be displayed for Windows installations.
• The Firmware Update screen might be displayed at this time, depending on the following two system
settings:
◦ In the Step 1: Set Preferences screen, System Software Update must have been enabled.
◦ In the Step 1: Hardware Settings screen, Update before OS Install must have been selected.
If the Firmware Update screen is displayed, follow the on-screen prompts to obtain and install the
latest firmware on server components. When the updates are complete, the Installing OS page is
displayed, ready to begin the OS installation. For more information about updating firmware, see the
following sections:
◦
Step 1: Setting Intelligent Provisioning preferences on page 7
◦ Step 1: Hardware Settings on page 18
◦ Firmware Update on page 31
• If you attempt to deploy an OS on a server with no installed drives, the server reboots and, after
POST, a page is displayed indicating that the settings are being applied. The deployment does not
proceed, but messages are written to the IML.
• For Windows installations, messages about an untested Windows version and hpkeyclick messages
might be displayed while the drivers are installed. This is expected behavior. No action is required.
Performing maintenance
The Perform Maintenance menu contains the following maintenance-related tasks:
• Downloading Active Health System data
• Firmware Update on page 31
• Intelligent Provisioning Preferences on page 32
• Deployment Settings on page 32
• Using HPE Smart Storage Administrator (HPE SSA) on page 38
• Using Insight Diagnostics on page 39
• Quick Configs on page 40
• iLO configuration on page 42
• Insight Remote Support on page 53
• License Management on page 55
• Erase on page 55
28 Checking installation parameters
Page 29

Downloading Active Health System data
HPE Support uses the Active Health System (AHS) log file for problem resolution.
The high level steps for submitting a case are:
1. Download an AHS Log from the server experiencing a support issue using the following procedure.
2. Upload the AHS Log to the Active Health System Viewer (http://www.hpe.com/servers/AHSV). See
Uploading an AHS log to AHVS.
3. Review the Fault Detection Analytics for any self-repair actions/recommendations. See the AHSV User
Guide for more information.
4. Create a support case using the AHSV Navigation menu. See the AHSV User Guide for more
information.
Use the Active Health System Log screen to download AHS telemetry data from the server onto a USB
key in the form of an AHS log file case number or a default string with an .ahs extension. Use this screen
to select the duration for which data needs to be extracted and the USB key as destination media. You
can select a specific start and end date to limit the duration of data extraction.
If connected through iLO, locally connected USB keys shared through virtual devices can also be used for
saving AHS log information.
Using the Intelligent Provisioning Active Health System Download option
Procedure
1. Insert a USB key into the server.
2. Press the F10 key to boot to Intelligent Provisioning during server boot.
3. Click Active Health System download from the Intelligent Provisioning Maintenance screen.
4. In the Active Health System download screen, select the USB key from the drop down list.
NOTE:
If you inserted the USB key after launching Active Health System Download, click Rescan.
5. Select the duration of data retrieval from the menu. Hewlett Packard Enterprise recommends retrieving
seven days of data, which creates a 10 to 15 MB file.
6. Enter contact information (optional) in the form provided. The contact information helps customer
services to provide better assistance.
7. Click Download to save the data to the USB key.
Once the data has been downloaded, upload it to the Active Health System Viewer. See Uploading an
AHS log to AHVS for information about uploading AHS logs.
Logging in to Active Health System Viewer
Procedure
1. To access the AHSV web page, go to http://www.hpe.com/servers/ahsv in a supported browser.
Supported browsers include:
Downloading Active Health System data 29
Page 30

• Internet Explorer 11
• Chrome 51 or later
• Firefox 46 or later
2. Enter your User ID (email address) and Password and click Sign In.
NOTE:
To log in using an HPE Passport account, or to create an HPE Passport account, go to http://
www.hpe.com/info/insightonline. In most cases, your HPE Passport account is the same as
the email address you used during the HPE Passport account registration process. If you
changed your user ID in the Hewlett Packard Enterprise Support Center, be sure to log in with
your user ID and not your email address.
NOTE:
To have the system remember your log in credentials, select Remember Me before clicking Sign
In.
Uploading an AHS log to AHSV
The maximum file size limit is 250 MB. For logs that are larger than 250 MB, contact the HPE Support
Center for assistance.
This task in done from the AHSV, not from System Utilties.
Prerequisites
Procedure
1. Select Upload AHS Log.
2. Navigate to your log file and click Open.
A window is displayed that shows parsing and log loading states. As the AHS log loads, the screen
displays the estimated time of completion.
IMPORTANT:
The server from which the AHS log was created must have a valid warranty. If the server is out of
warranty, an error message is displayed: "Server is not Entitled. Check these options for renewing
your license." The options include:
• Buy more licenses.
• Find partner for license purchase.
• Contact HPE Support.
TIP:
This window also displays videos for different platforms. You can search and play different videos
while you are waiting for the log file to load.
30 Uploading an AHS log to AHSV
Page 31

To cancel the load process, click Cancel.
Firmware Update
HPE ProLiant Gen8 servers and their installed hardware options are pre-loaded with the latest firmware,
but updated firmware might be available. Use the Firmware Update utility to find and apply the latest
firmware for your HPE ProLiant server and installed options. Intelligent Provisioning updates can be
performed when an SPP update is available.
Determining the installed Intelligent Provisioning version
To check the Intelligent Provisioning version, click the System Information
Image version is listed.
Updating Intelligent Provisioning and component firmware
NOTE:
Firmware Update reflects the latest updates available as per the baseline defined in the latest SPP.
Newer updates that were added outside of the latest SPP baseline do not appear on the updates
list.
To update Intelligent Provisioning and component firmware:
Procedure
1. Select Firmware Update in the Perform Maintenance window.
2. Immediately after selecting this option, the system searches for firmware on the source configured in
the System Software Update settings (Intelligent Provisioning Preferences on page 32). This
might take a few minutes; wait for the display to generate the results.
3. While the system is retrieving the data, click More or Less to show or hide search details.
4. If preferred, download and copy the SPP ISO to a DVD or USB key. To download SPP, see the HPE
website at http://www.hpe.com/servers/spp/download. For instructions on using the ISO, see the
HPE Service Pack for ProLiant Quick Start Guide on the HPE website (http://www.hpe.com/support/
SPP_UG_en).
Intelligent Provisioning
5. After the system retrieves the firmware data, it checks the installed hardware components to suggest
items to update. Depending on the search, you might be prompted to click Continue to begin the
hardware components check. This might take a few minutes; wait for the display to generate the
results.
NOTE:
If the Installed Version (displayed on the left side of the window) is newer than the version listed
on the right side of the window, do not select the check box and install that component.
6. Select the items to update, and then click Install. The table is redisplayed, with only the selected items
listed.
7. To install all of the listed components, click Continue. If you are ready to perform the installation, click
Continue at the warning.
After each component is installed, a green check automatically appears in the left column next to the
component name.
Firmware Update 31
Page 32

8. After all components are installed, click Exit to return to the Perform Maintenance screen.
9. Restart the OS.
Intelligent Provisioning Preferences
Use Intelligent Provisioning Preferences to change basic preferences, including the interface and
keyboard languages, network and share setting, system date and time, and software update settings. In
addition, the End User License Agreement is accessible from this screen.
When Intelligent Provisioning is run for the first time on a server, this is the first screen that is displayed
within Intelligent Provisioning. For more information about the fields in this screen, see Step 1: Setting
Intelligent Provisioning preferences on page 7.
Deployment Settings
Deployment Settings allows you to create a server configuration package that you can deploy to one or
more HPE ProLiant Gen8 servers and Gen8 server blades using a USB key, HPE iLO Scripting. Using
Deployment Settings is an alternative to using the Scripting Toolkit.
To use Deployment Settings, you must be running Intelligent Provisioning 1.20 or later with iLO 4
firmware version 1.10 or later.
NOTE:
Creating a deployment setting from the Assisted Installation option is only supported for Windows
installs.
When you open Deployment Settings, you can choose to manage an existing Deployment Settings profile
or create a new one.
• To create a new, custom Deployment Settings profile or modify an existing Deployment Settings
profile, click Manage.
• To create a new Deployment Settings profile based on one of the provided default profiles, select one
of the templates at the bottom of the page.
Creating a Deployment Settings package (overview)
To create a Deployment Settings package:
Procedure
1. Navigate through the options in the Deployment Settings windows.
2. Click Save. When prompted, enter a name and navigate to a USB key on which to save the
Deployment Settings. The name cannot include spaces.
IMPORTANT:
Deployment Settings package names cannot include spaces.
32 Intelligent Provisioning Preferences
Page 33

Using a Deployment Settings package to configure a single server (overview)
IMPORTANT:
• Before using a deployment to install an OS, be sure that the drives and arrays are configured.
• Do not interrupt the configuration process.
• Deployment Settings are not compatible with an SD card (Available install methods, source
media types, and formats supported for each OS family) OS installation.
To use a Deployment Settings package to configure a single server:
Procedure
1. To use the deployment you just created on the server, click Deploy.
2. To use a previously created deployment, insert the USB key containing the deployment:
a. Save the deployment from the USB key to the local server.
b. In the Select a Deployment window, select the deployment from the list and click Deploy. If the
USB key and their stored deployments are not displayed, click Rescan.
3. As the deployment runs, validation settings are applied for the following elements:
• ROM Settings
• Array Settings
• System Options
• Firmware Update
• ERS Settings
The results of the validation settings are displayed, using the icons described in the following table.
Icon Result
Question mark Status unknown
Red box Error
Gray box Element not needed
Green check Element successfully applied
Information icon Click for additional information
Performing Deployment Settings package-level actions
Package-level actions manipulate the Deployment Settings package, not individual settings within a
deployment.
After making a selection in the initial page, the Select a Deployment window opens.
Using a Deployment Settings package to configure a single server (overview) 33
Page 34

In Select a Deployment window, existing Deployment Settings packages that are stored on the server
are displayed in the left pane, existing Deployment Settings packages that are stored on an installed USB
drive are displayed in the right pane, and package-level action icons are displayed in the center of the
window. If a USB drive is installed , its name is displayed near the top of the window in the Target USB
Key field.
• To perform a package-level action on a Deployment Settings package, select one of the displayed
packages, and then select an action icon in the middle pane.
• To open a specific Deployment Settings package to change individual settings, double-click one of the
displayed packages.
The following table defines the available actions.
Task Description
Click the Copy to local server icon to copy a selected deployment
from the attached USB key to a local server.
Click the Copy to USB key icon to copy a selected deployment
from the server to the attached USB key.
Click the Create new deployment icon to create a new deployment
on the local server.
Click the Rename icon to rename the selected deployment. Use
only alphanumeric characters and underscores in the deployment
name. Do not include spaces in the name.
Click the Duplicate icon to duplicate the selected deployment or
template.
Click the Delete icon to delete the selected deployment.
Entering or changing individual settings for a Deployment Settings package
After double-clicking a displayed Deployment Settings package, the Deployment Settings page is
redisplayed, with setting categories listed on the left side of the page, and the Deployment Settings
package you are modifying near the top of the page. To switch to a different Deployment Settings
package, expand the drop-down menu.
Clicking a category displays the associated data fields. The fields are optional and can be left blank or
unchanged.
• To record new values, click Save.
• To execute the Deployment Settings package on the server, click Deploy.
• To go back to the previous page, click Manage.
• To exit Deployment Settings screens, click Exit.
The following sections define the available Deployment Settings categories.
Entering version information
Use the Version Information screen to enter any type of user-defined identifying information that you
want to assign to the deployment.
34 Entering or changing individual settings for a Deployment Settings package
Page 35

Entering firmware update settings
Use the Firmware Update screen to enter information about performing firmware updates as part of the
deployment installation process.
Options include:
• No Update—System firmware is not updated during the deployment installation process.
• HPE.com—During the deployment installation process, the system uses the server's Internet
connections to obtain the latest firmware from the HPE website and install it on the server.
• Local Repository—The URL of the local repository where the firmware has previously been
uploaded.
Array Configuration settings
Use the Array Configuration screen to enter the following RAID settings.
• RAID Level.
• Stripe Size.
• Read and Write Cache ratios. Make sure that these values total 100%.
Entering operating system information
Use the Operating System screens to enter OS information and installation settings. The included fields
are the same as those in the Recommended installation method.
Not all source media types are supported for every OS.
Procedure
1. Select an OS family.
2. Enter the OS media path, which can be a Windows Share or an FTP site on the local network.
Based on this setting, the system automatically pulls the ISO from the specified location to install it.
• For a Windows share location, enter the following network connection settings:
◦ Server Name or IP Address
—Server name or IP address of the server that hosts the OS contents. If a server name is
specified, a DNS entry is also required.
◦ Share Name—The name of the network share using Server Message Block (SMB) protocol that
hosts the OS contents.
Using Intelligent Provisioning 35
Page 36

◦ Network Share User—User name used to access the network share.
◦ Network Share Password—Password for the user name used to access the network share.
• For an FTP site, enter the following network connection settings:
◦ Server Name or IP Address—FTP server name or IP address of the server that hosts the OS
contents. FTP support requires anonymous access to the FTP server and does not support
connecting to an FTP server through a proxy.
IMPORTANT:
When entering an FTP path, do not include spaces and punctuation. The FTP server
directory structure cannot contain spaces or special characters (including punctuation).
3. Enter the user name and password for the Deployment Settings package to use to access the network
share.
This password is not encrypted. For a more secure access method, use FTP.
4. Select the OS and the keyboard language.
5. Enter the product key.
If you do not enter a product key and one is required, the OS installation pauses indefinitely, prompting
you to enter the key. The installation resumes after you enter the product key.
6. After clicking Deploy, verify that you are ready to create the new OS. Click Apply to install the OS.
NOTE:
When the command is sent to iLO, the system will reboot. Disc drives that you had previously
deployed may be erased.
Entering Remote Support information
Use the Remote Support screen to enable or disable Central Connect Remote Support. Direct Connect
Remote Support is not supported with the Deployment Settings feature.
If you enable Remote Support, enter the following settings:
• Local Remote Support Server—The hostname or IP address of the Insight RS server. In the Insight
RS software, the Insight RS server is called the hosting device.
• Local Remote Support Server Port—The port number to use. The default port number for Insight RS
is 7906.
For more information about the Central Connect Remote Support requirements, see Step 3: Registering
for Insight Remote Support .
Entering ROM settings
Use the ROM Settings screen to enter ROM-level settings.
Procedure
1. If this Deployment Settings package might be used to reprovision a server already in use, consider
whether to reset the server to its default settings before applying the settings in the Deployment
36 Using Intelligent Provisioning
Page 37

Settings package. For stability reasons, the Standard Boot Order and the PCI Device enable/disable
settings are not cleared.
If you choose to keep the existing settings, the settings in the Deployment Settings package that differ
from the existing settings are used to modify the existing settings.
2. Select the power management package to use. These packages set a basic policy for performance
versus power usage without having to configure individual settings through RBSU or UEFI System
Utilities menus.
A recommended package is displayed, but to change the settings, the options include:
• Balanced Power and Performance
• Minimum Power Usage
• Maximum Performance
For more information about these options, see Quick Configs on page 40.
3. Select the boot order.
4. Choose whether to enable SATA devices when they are available.
5. Choose whether to install a Virtual Install Disk (VID) that contains drivers from HPE .
When VID is enabled, during the OS installation process, a USB mass-storage device appears with
the name of VID. This drive contains a limited set of storage and networking drivers, so any required
SAS/iSCSI/FCoE adapter can be loaded, in the event that the OS disc does not have the appropriate
drivers. For more information about how to load additional drivers, see the OS installation guide.
Entering system options
Use the System Options screen to enter basic system settings.
Procedure
1. Select the user interface and keyboard language.
2. Accept the Intelligent Provisioning EULA.
3. Choose whether to enable or disable Intelligent Provisioning on the server being configured with the
To disable VID at a later time, reboot the server and press F9 during POST to access RBSU or UEFI
System Utilities.
• In the RBSU, navigate to Advanced Options > Advanced System ROM Options > Virtual Install
Disk.
• In the UEFI System Utilities, navigate to System Configuration > ROM-Based Setup Utility
(RBSU) > Advanced Options > Advanced System ROM Options > Virtual Install Disk.
Deployment Settings package.
If Intelligent Provisioning is disabled, it cannot be accessed on the server. During POST, F10 is in red
text on the screen, indicating that the F10 key is disabled and Intelligent Provisioning is no longer
accessible.
4. To re-enable Intelligent Provisioning, reboot the server and, when prompted, press F9 to access the
RBSU or UEFI System Utilities.
Using Intelligent Provisioning 37
Page 38

• In the UEFI System Utilities, select System Configuration > ROM-Based Setup Utility (RBSU) >
Server Security > Intelligent Provisioning (F10 Prompt) > Enabled.
• In the RBSU, select Server Security > Intelligent Provisioning (F10 Prompt) > Enabled.
Using HPE Smart Storage Administrator (HPE SSA)
These utilities provide high-availability configuration, management, and diagnostic capabilities for all HPE
Smart Array products.
To use HPE SSA:
Procedure
1. On the Intelligent Provisioning home screen, click Perform Maintenance.
2. Select HPE Smart Storage Administrator (SSA) from the maintenance options. The Smart Storage
Administrator window is displayed.
HPE SSA is a browser-based utility that runs in either offline or online mode. HPE SSA:
• Supports online array capacity expansion, logical drive extension, assignment of online spares, and
RAID or stripe size migration
• Suggests the optimum configuration for an unconfigured system
• Provides different operating modes, enabling faster configuration or greater control over the
configuration options
• Displays on-screen tips for individual steps of a configuration procedure
In HPE SSA, you can select a controller from the menu at the top left-hand side of the screen, or you can
choose to configure or diagnose an available controller from the same menu.
Available tasks include:
• Controller settings—Configures the supported controller settings. Depending on the controller, these
can include setting the array accelerator cache ratio, transform and rebuild priorities, and surface scan
delay.
• Caching settings—Configures the supported caching settings which can help increase performance
by taking advantage of cache memory. Caching also helps protect data integrity when used with a
battery or capacitor.
• Clear configuration—Resets the controller's configuration to its default state. Existing arrays or
logical drives are deleted, and data on the logical drives is lost. Confirm this is the preferred action
before proceeding.
• Physical drive write cache settings—Enables or disables the write cache on physical drives
attached to a controller. This feature can improve performance but precautions must be taken to
ensure data integrity.
• Modify spare activation mode—Switches the spare activation mode from the default
behavior(activate on failure only) to predictive spare activation and back.
• Set Bootable Logical Drive/Volume—Sets the primary and secondary boot logical drives and
volumes. Local logical drives as well as remote logical drives and volumes are listed for selection.
38 Using HPE Smart Storage Administrator (HPE SSA)
Page 39

• Manage License Keys—Allows the user to add or remove license keys. Depending on the keys
entered or removed, various features can be enabled or disabled.
• More information — Provides an in-depth display of available information for the currently selected
device and all of its child devices, when applicable.
Diagnostics/SmartSSD
Insight Diagnostics > Diagnose and the screen allows you to access the diagnostic reporting tools.
• Array Diagnostics Report—Run reports on selected controllers to display available diagnostic tasks.
Reports include SmartSSD Wear Gauge information for supported solid state drives.
◦ View Diagnostic Report—Generate and display a diagnostic report for the selected devices. The
report includes SmartSSD Wear Gauge information for supported Solid State Drives, and usage
and estimated lifetime information.
◦ Save Diagnostic Report —Generate a diagnostic report for the selected devices for export without
presenting a graphical display.
• SmartSSD Wear Gauge Report—View or generate a report:
◦ View SmartSSD Wear Gauge Report—Display SSD usage and estimated lifetime information.
◦ Save SmartSSD Wear Gauge Report—Generate a report for export, without presenting a
graphical display.
Using Insight Diagnostics
Insight Diagnostics provides a comprehensive suite of offline system and component tests, providing indepth testing of critical hardware components for devices such as processors, memory, and hard drives.
Insight Diagnostics captures system configuration information and provides detailed diagnostic testing
capabilities.
Insight Diagnostics simplifies the process of effectively identifying, diagnosing, and isolating hardware
issues. System availability is maintained through the following key features:
Procedure
1. Surveying the current configuration, with various levels and categories
2. Testing and diagnosing apparent hardware failures
3. Documenting system configurations for upgrade planning, standardization, inventory tracking, disaster
recovery, and maintenance
4. Sending configuration information to another location for more in-depth analysis
5. Managing the Integrated Management Log (IML)
In addition to system management tools, service tools can resolve system problems quickly. To streamline
the service process and resolve problems quickly, you must have the right information available at the
time that a service call is placed. This combination of features simplifies the service process and
minimizes downtime.
Diagnostics/SmartSSD 39
Page 40

NOTE:
If you accidentally double-click the Insight Diagnostics icon, a message is displayed, notifying you
that you attempted to have two sessions of Insight Diagnostics open at the same time. To correct
the situation, follow the instructions provided in the message.
To access HP Insight Diagnostics:
• On the Intelligent Provisioning home screen, click Perform Maintenance.
• Select Insight Diagnostics from the maintenance options.
• The HP Insight Diagnostics window is displayed.
During offline testing, the user-installed OS is not running. Therefore, software information from the
system is not reported. Insight Diagnostics (Offline Edition) runs when the computer is started with one of
the following products:
• Intelligent Provisioning on HP servers
• HP Service Pack for ProLiant (SPP)
Clicking Exit Diagnostics exits the Insight Diagnostics application and returns to Intelligent Provisioning.
Insight Diagnostics is also available online as a web-based application. For more information, see the
Insight Diagnostics User Guide on the website (http://www.hpe.com/info/intelligentprovisioning/
docs).
Quick Configs
Use this feature to set a power management policy through Intelligent Provisioning without having to
configure individual settings through the RBSU or UEFI System Utilities.
NOTE:
Quick Configs is disabled for RBSU password-protected systems.
When initially configuring and provisioning a server through Intelligent Provisioning, Quick Configs is
presented in the Step 1: Hardware Settings on page 18 screen.
If the server does not have HPE DIMMs installed, the following Power Profiles might not all be available:
• Balanced Power and Performance—Optimum settings to maximize power savings with minimal
impact to performance for most OSs and applications.
• Minimum Power Usage—Enables power reduction mechanisms that might negatively affect
performance. This mode guarantees a lower maximum power usage by the system.
• Maximum Performance—Disables all power management options that might negatively affect
performance.
After selecting and applying a profile, a confirmation message appears.
To customize the individual settings, press the F9 key during server reboot to go to RBSU or UEFI
System Utilities.
40 Quick Configs
Page 41

Intelligent Provisioning Quick Configs settings and corresponding RBSU settings
Available for HPE ProLiant Gen8 servers, Intelligent Provisioning Quick Configs options provide the
capability to select a basic policy for performance versus power usage, without having to configure
individual settings through RBSU menus.
The following tables show the three Intelligent Provisioning Quick Configs profiles and their corresponding
RBSU option settings.
NOTE:
Not all of the options in this table are adjustable on all servers. However, even if you do not have the
option of adjusting some of these settings, they will default to the values shown here.
Table 1: RBSU settings on Gen8 servers with AMD processors
Intelligent Provisioning Quick Configs settings
RBSU power
management options
HPE Power Profile
HPE Power Regulator
Minimum Processor Idle
Power Core C6 State
Minimum Processor Idle
Power Core C1e State
Maximum memory Bus
Frequency
Memory Interleaving
PCI Express Generation
2.0 Support
HyperTransport
Frequency
Balanced power and
performance
Balanced Power and
Performance
HPE Dynamic Power
Savings Mode
Enabled Enabled Disabled
Disabled Enabled Disabled
Auto Auto Auto
Channel Interleaving No Interleaving Channel Interleaving
Auto Force PCIe Generation1Auto
HT Full Performance
Mode
Minimum power usage Maximum performance
Minimum Power Usage Maximum Performance
HPE Static Low Power
Mode
HT Power Saving Mode HT Full Performance
HPE Static High
Performance Mode
Mode
Dynamic Power Savings
Mode Response
DIMM Voltage
Preference
Intelligent Provisioning Quick Configs settings and corresponding RBSU settings 41
Fast Slow Fast
Optimized for
Performance
Optimized for Power Optimized for
Performance
Page 42

Table 2: RBSU settings on Gen8 servers with Intel processors
RBSU power
management options
HPE Power Profile
HPE Power Regulator
Intel QPI Link Power
Management
Minimum Processor Idle
Power Core State
Minimum Processor Idle
Power Package State
Energy/Performance
Bias
Maximum Memory Bus
Frequency
Intelligent Provisioning Quick Configs settings
Balanced power and
performance
Balanced Power and
Performance
HPE Dynamic Power
Savings Mode
Enabled Enabled Disabled
C6 State C6 State No C-states
Package C6 (retention)
State
Balanced Performance Power Savings Mode Maximum Performance
Auto Auto Auto
Minimum power usage Maximum performance
Minimum Power Usage Maximum Performance
HPE Static Low Power
Mode
Package C6 (retention)
State
HPE Static High
Performance Mode
No Package State
Channel Interleaving
Maximum PCI Express
Speed
Enabled Disabled Enabled
Maximum Supported PCIe Generation 1 Maximum Supported
iLO configuration
Use the iLO Configuration Utility to view and change iLO settings through Intelligent Provisioning, instead
of through the iLO web interface. For more information about iLO, see the iLO 4 User Guide.
You must configure iLO network settings to register the server with the Insight Remote Support
registration process.
When changing iLO settings, if the display is not as expected or an undefined error message is displayed,
press F5 to refresh the screen display. It is possible that the change was being made at the same time
through the iLO web interface.
Viewing iLO summary information
To view iLO summary information:
Procedure
1. In the Maintenance window, click iLO. The iLO Configuration Utility window is displayed.
2. Click Summary. The following information is displayed:
42 iLO configuration
Page 43

• iLO Hostname—The DNS name of the iLO subsystem, for example, ilo instead of
ilo.example.com. This name can be used only if DHCP and DNS are configured to connect to the
iLO subsystem name instead of the IP address.
• iLO Firmware Version—The version of the installed iLO firmware
• iLO IP Address—The network IP address of the iLO subsystem
• Server Model—The type of system in which this iLO processor is integrated
• System ROM—The family and version of the active system ROM
You can also view this information on the iLO Network—IP & NIC Settings and Overview screens in the
iLO web interface. For more information, see the iLO 4 User Guide on the HPE website (
www.hpe.com/info/ilo/docs).
NOTE:
The rest of the procedures in this section are written with the assumption that you have selected
iLO from the Maintenance window.
Editing iLO Access Settings
Access Settings–Access Options
Procedure
http://
NOTE:
The iLO functionality cannot be disabled on server blades.
The 38400 speed is not currently supported by the system ROM RBSU.
1. Idle Connection Timeout (minutes) —This setting specifies how long a user can be inactive, in
minutes, before the iLO web interface and Remote Console session end automatically. The following
settings are valid: 15, 30 (default), 60, or 120 minutes, or Infinite. Inactive users are not logged out
when this option is set to Infinite. Failure to log out of iLO by either browsing to a different site or
closing the browser also results in an idle connection. The iLO firmware supports a finite number of
iLO connections. Misuse of the Infinite timeout option might make iLO inaccessible to other users.
Idle connections are recycled after they time out. This setting applies to local and directory users.
Directory server timeouts might preempt the iLO setting. Changes to the setting might not take effect
immediately in current user sessions, but will be enforced immediately in all new sessions.
2. iLO Functionality—The iLO network and communications with OS drivers are terminated when iLO
functionality is disabled. If iLO functionality is disabled (including the iLO Diagnostic Port), you must
use the server Security Override Switch to enable iLO. See the server documentation to locate the
Security Override Switch, and then set it to Override. Power up the server, and then use the iLO
RBSU to set iLO Functionality to Enabled.
3. iLO ROM-Based Setup Utility—This setting enables or disables iLO RBSU. The iLO Option ROM
prompts you to press F8 to start iLO RBSU, but if iLO is disabled or iLO RBSU is disabled, this
prompt is not displayed.
4. Require Login for iLO RBSU—This setting determines whether a user-credential prompt is
displayed when a user accesses iLO RBSU. If this setting is Enabled, and you press F8 during
POST, a login dialog box opens.
5. Show iLO IP during POST—This setting enables the display of the iLO network IP address during
host server POST.
Editing iLO Access Settings 43
Page 44

6. Serial Command Line Interface Status—This setting enables you to change the login model of the
CLI feature through the serial port.
7. Serial Command Line Interface Speed—This setting enables you to change the speed of the serial
port for the CLI feature. The following speeds (in bits per second) are valid: 9600 (default), 19200,
38400, 57600, and 115200. The serial port configuration must be set to no parity, 8 data bits, and 1
stop bit (N/8/1) for correct operation. The serial port speed set by this option should match the speed
of the serial port configured in the system ROM.
8. Virtual Serial Port Log—This setting enables or disables logging of the Virtual Serial Port. When
enabled, Virtual Serial Port activity is logged to a 150-page circular buffer in the iLO memory, and
can be viewed using the CLI command vsp log.
The Virtual Serial Port buffer size is 128 KB. This feature and many others are part of an iLO
licensing package. For more information about iLO licensing, see the HPE website http://
www.hpe.com/info/ilo/licensing.
9. Minimum Password Length—This setting specifies the minimum number of characters allowed
when a user password is set or changed. The character length must be a value from 0 to 39. Default
is 8.
10. Server Name—This setting enables you to specify the host server name. You can assign this value
manually, but it might be overwritten by the host software when the OS loads. You can enter a server
name that is up to 49 bytes. To force the browser to refresh, save this setting, and then press F5.
11. Server FQDN/IP address—This setting enables you to specify the server FQDN or IP address. You
can assign this value manually, but it might be overwritten by the host software when the OS loads.
You can enter an FQDN or IP address that is up to 255 bytes. To force the browser to refresh, save
this setting, and then press F5.
12. Authentication Failure Logging—This setting enables you to configure logging criteria for failed
authentications. All login types are supported; each login type works independently. The following
settings are valid:
a. Enabled–Every Failure—A failed login log entry is recorded after every failed login attempt.
b. Enabled–Every 2nd Failure—A failed login log entry is recorded after every second failed login
attempt.
c. Enabled–Every 3rd Failure—A failed login log entry is recorded after every third failed login
attempt.
d. Enabled–Every 5th Failure—A failed login log entry is recorded after every fifth failed login
attempt.
e. Disabled—No failed login log entry is recorded.
Various iLO access settings can be edited from the three tabs on the Access Settings window: Access
Options, Service and IPMI/DCMI.
To edit access settings on the Access Options tab:
1. In the iLO Configuration Utility window, click Access Settings.
2. Edit the option(s) as necessary. Click Apply.
Access Settings–Service
44 Using Intelligent Provisioning
Page 45

• Secure Shell (SSH) Access—Enables you to specify whether the SSH feature on iLO is enabled or
disabled. SSH provides encrypted access to the iLO CLP. The default is Enabled.
• Secure Shell (SSH) Port—Default is 22
• Remote Console Port—Default is 17990
• Web Server Non-SSL Port (HTTP)—Default is 80
• Web Server SSL Port (HTTPS) —Default is 443
• Virtual Media Port—Default is 17988
• SNMP Access—Specifies whether iLO should respond to external SNMP requests. The default
setting is Enabled. If you set SNMP Access to Disabled, the iLO Management Engine continues to
operate, and the information displayed in the iLO web interface is updated, but no alerts are generated
and SNMP access is not permitted. When SNMP Access is set to Disabled, most of the boxes on the
Administration → Management → SNMP Settings page are unavailable and will not accept input.
• SNMP Port —The industry-standard (default) SNMP port is 161 for SNMP access. If you customize
the SNMP Port value, some SNMP clients might not work correctly with iLO unless those clients
support the use of a nonstandard SNMP port.
• SNMP Port Trap—The industry-standard (default) SNMP trap port is 162 for SNMP alerts (or traps). If
you customize the SNMP Trap Port value, some SNMP monitoring applications (such as HPE SIM)
might not work correctly with iLO unless those applications support the use of a nonstandard SNMP
trap port.
To edit access settings on the Service tab:
• In the iLO Configuration Utility window, click Access Settings.
• Click the Service tab. The Service tab data appears.
• Edit the option(s) as necessary. Click Apply.
Access Settings–IPMI/DCMI
iLO enables you to send industry-standard IPMI and DCMI commands over the LAN. The IPMI/DCMI port
is set to 623 and is not configurable.
To edit access settings on the IPMI/DCMI tab:
1. In the iLO Configuration Utility window, click Access Settings. The Access Options tab data is
displayed.
2. Click the IPMI/DCMI tab.
3. Select the check box to enable IPMI/DCMI, or clear the box to disable it. Click Apply.
Editing iLO Management Settings
Management–SNMP Settings
Editing iLO Management Settings 45
Page 46

Procedure
NOTE:
Read Community supports the following formats: A community string (for example, public). A community
string followed by an IP address or FQDN (for example, public 192.168.0.1). Use this option to specify that
SNMP access will be allowed from the specified IP address or FQDN. For iLO 4 1.10 or later, you can enter
an IPv4 address or FQDN.
1. System Location (Agentless Management only)—A string of up to 49 characters that specifies the
physical location of the server.
2. System Contact (Agentless Management only)—A string of up to 49 characters that specifies the
system administrator or server owner. The string can include a name, email address, or phone
number.
3. System Role (Agentless Management only)—A string of up to 64 characters that describes the server
role or function.
4. System Role Detail (Agentless Management only)—A string of up to 512 characters that describes
specific tasks that the server might perform.
5. Read Community (Agentless Management only)—The configured SNMP read-only community string.
6. Trap Community—The configured SNMP trap community string.
7. SNMP Alert Destination(s)—The IP addresses or FQDNs of up to three remote management
systems that will receive SNMP alerts from iLO.
8. SNMP Port—The port used for SNMP communications. This value is read-only, but can be modified
on the Access Settings > Service page. Navigate to the Access Settings > Service page in the iLO
Management utility to edit the SNMP port. For more information, see Editing iLO Access Settings on
page 43
Various iLO management settings can be edited from the three tabs on the Management window: SNMP
Settings, SNMP Alerts and Insight Management Integration.
To edit management settings on the SNMP Settings tab:
1. In the iLO Configuration Utility window, click Management. The SNMP Settings tab data appears.
2. Click the radio button to select Agentless Management or SNMP Pass-Thru.
3. Enter data in the fields as necessary. Click Apply.
Management — SNMP Alerts
• Trap Source Identifier —This setting determines the host name that is used in the SNMP-defined
sysName variable when iLO generates SNMP traps. The default setting is iLO Hostname.
• iLO SNMP Alerts—Alert conditions that iLO detects independently of the host OS can be sent to
specified SNMP alert destinations, such as HPE SIM.
• Forward Insight Management Agent SNMP Alerts—Alert conditions detected by the host
management agents can be forwarded to SNMP alert destinations through iLO. These alerts are
generated by the Insight Management Agents, which are available for each supported OS. Insight
Management Agents must be installed on the host server to receive these alerts.
46 Using Intelligent Provisioning
Page 47

• Cold Start Trap Broadcast—Cold Start Trap is broadcast to a subnet broadcast address if there are
no trap destinations configured in the SNMP Alert Destination(s) boxes. The subnet broadcast address
for an IPv4 host is obtained by performing a bitwise logical OR operation between the bit complement
of the subnet mask and the host IP address. For example, the host 192.168.1.1, which has the subnet
mask 255.255.252.0, has the broadcast address 192.168.1.1 | 0.0.3.255 = 192.168.3.255.
• SNMPv1 Traps—When enabled, SNMPv1 traps are sent to the remote management systems
configured in the SNMP Alert Destination(s) boxes.
To edit the settings on the SNMP Alerts tab:
• In the iLO Configuration Utility window, click Management. The SNMP Settings tab data appears.
• Click the SNMP Alerts tab.
• Click the radio button to select the Trap Source Identifier.
• Click the drop-down list by each setting to select to enable or disable the setting.
• If you choose to send an alert, click Send Test Alert.
• Click Apply.
Management — Insight Management Integration
• HPE System Management Homepage (HPE SMH) FQDN/IP Address—This value sets the browser
destination of the Insight Agent link on iLO pages. Enter the FQDN or IP address of the host server.
The protocol (https://) and port number (:2381) are added automatically to the IP address or
DNS name to allow access from iLO. If the URL is set through another method (for example,
CPQLOCFG), click the browser refresh button to display the updated URL.
• Level of Data Returned—This setting controls the content of an anonymous discovery message
received by iLO. The information returned is used for HPE SIM HTTP identification requests. The
following options are available:
◦ Enabled (iLO+Server Association Data) (default)—Enables HPE SIM to associate the
management processor with the host server, and provides sufficient data to enable integration with
HPE SIM.
◦ Disabled (No Response to Request)—Prevents iLO from responding to HPE SIM requests.
To edit the settings on the Insight Management Integration tab:
• In the iLO Configuration Utility window, click Management. The SNMP Settings tab data appears.
• Click the Insight Management Integration tab. The Insight Management Integration tab data is
displayed.
• Edit the setting(s) that you want. Click Apply.
Modifying Network Settings
Network Settings — Summary
Modifying Network Settings 47
Page 48

Procedure
1. NIC in use—The current NIC configuration you are using (for example, iLO Dedicated Network Port,
2. iLO Host Name—The DNS name of the iLO subsystem (for example, iLO instead of
3. MAC Address—The NIC MAC address.
4. Link State—The current link state (iLO Dedicated Network Port only).
5. Duplex Option—The current duplex option (Full Duplex or Half Duplex).
6. DHCPv4 Status—Enabled or Disabled.
7. IPv6 Stateless Address Auto-Configuration (SLAAC)—Enabled or Disabled.
8. SLAAC Address—Physical address of IPv6 created by iLO.
Network Settings–General
• iLO Hostname Settings
or Shared Network Port.
ilo.example.com). This name can be used only if DHCP and DNS are configured to connect to the iLO
subsystem name instead of the IP address. For more information, see the iLO 4 User Guide.
◦ iLO Hostname—The DNS name of the iLO subsystem (for example, ilo instead of
ilo.example.com). This name can be used only if DHCP and DNS are configured to connect to the
iLO subsystem name instead of the IP address. For more information, see the iLO 4 User Guide.
◦ Domain Name—The iLO domain name. If DHCP is not used, enter a domain name.
• NIC Settings
◦ Use iLO Dedicated Network Port—If the checkbox is selected, you are indicating that your
system uses a NIC with a connector on the back of the server. The NIC handles iLO traffic only. If
you leave the checkbox blank, you are indicating that your system is using a shared network port.
There are two types of shared network ports:
– LOM—Uses a NIC that is built into the server. The NIC handles server network traffic and can, if
iLO is configured to do so, handle iLO traffic at the same time.
– FlexibleLOM—Uses an optional NIC that connects to a special connector on the server. The
NIC handles server network traffic and can, if iLO is configured to do so, handle iLO traffic at the
same time. Not all servers support a FlexibleLOM. For the list of servers that support the Shared
Network Port–FlexibleLOM option, see the iLO 4 User Guide.
• Link State (iLO Dedicated Network Port only).
◦ Automatic (Default)—Enables iLO to negotiate the highest supported link speed and duplex
settings when connected to the network.
◦ 1000Base T, Full-duplex—Forces a 1 Gb connection that uses full duplex (not supported for BL c-
Class servers).
◦ 1000Base T, Half-duplex—Forces a 1 Gb connection that uses half duplex (not supported for BL
c-Class servers).
48 Using Intelligent Provisioning
Page 49

◦ 100BaseT, Full-duplex—Forces a 100 Mb connection using full duplex.
◦ 100BaseT, Half-duplex—Forces a 100 Mb connection using half duplex.
◦ 10Base T, Full-duplex—Forces a 10 Mb connection using full duplex
◦ 10Base T, Half-duplex—Forces a 10 Mb connection using half duplex.
To edit the settings on the General tab:
• In the iLO Configuration Utility window, click Network Settings. The General tab data appears.
• Edit the setting(s) as required. Click Apply.
Network Settings–IPv4
• Enable DHCPv4—Enables iLO to obtain its IP address (and many other settings) from a DHCP
server.
◦ Use DHCPv4 Supplied Gateway—Specifies whether iLO uses the DHCP server-supplied
gateway. If DHCP is not used, enter a gateway address in the Gateway IPv4 Address box.
◦ Use DHCPv4 Supplied Static Routes—Specifies whether iLO uses the DHCP server-supplied
static routes. If not, enter the static route destination, mask, and gateway addresses in the Static
Route #1, Static Route #2, and Static Route #3 boxes.
◦ Use DHCPv4 Supplied Domain Name—Specifies whether iLO uses the DHCP server-supplied
domain name. If DHCP is not used, enter a domain name in the Domain Name box on the Shared
Network Port page.
◦ Use DHCPv4 Supplied DNS Servers—Specifies whether iLO uses the DHCP server-supplied
DNS server list. If not, enter the DNS server addresses in the Primary DNS Server, Secondary
DNS Server, and Tertiary DNS Server boxes.
◦ Use DHCPv4 Supplied Time Settings—Specifies whether iLO uses the DHCPv4 server-supplied
time.
◦ Use DHCPv4 Supplied WNS Servers—Specifies whether iLO uses the DHCP server-supplied
WINS server list. If not, enter the WINS server addresses in the Primary WINS Server and
Secondary WINS Server boxes.
• IPv4 Address—The iLO IP address. If DHCP is used, the iLO IP address is supplied automatically. If
DHCP is not used, enter a static IP address.
• Subnet Mask—The subnet mask of the iLO IP network. If DHCP is used, the subnet mask is supplied
automatically. If DHCP is not used, enter a subnet mask for the network.
• Gateway IPv4 Address—The iLO gateway IP address. If DHCP is used, the iLO gateway IP address
is supplied automatically. If DHCP is not used, enter the iLO gateway IP address.
• Static Route #1, Static Route #2, and Static Route #3—The iLO static route destination, mask, and
gateway addresses. If Use DHCPv4 Supplied Static Routes is used, these values are supplied
automatically. If not, enter the static route values.
• Primary DNS Server—Enter the IPv4 address for the primary DNS service.
• Secondary DNS Server—Enter the IPv4 address for the secondary DNS service.
• Tertiary DNS Server—Enter the IPv4 address for the tertiary DNS service.
Using Intelligent Provisioning 49
Page 50

NOTE:
When DNS server locations are configured in both IPv4 and IPv6, both sources are used, with
preference given according to the iLO Client Applications use IPv6 first configuration option, primary
sources, then secondary, and then tertiary.
• Enable DDNS Server Registration—Specify whether iLO registers its IPv4 address and name with a
DNS server.
• Primary WINS Server—Enter the IPv4 address for the primary WINS server.
• Secondary WINS Server—Enter the IPv4 address for the secondary WINS server.
• Enable WINS Server Registration—Select this check box to enable iLO to register the IPv4 address
for the WINS server(s).
• Ping Gateway on Startup—Select this check box to have iLO send request packets to the gateway
when iLO initializes.
To edit the settings on the IPv4 tab:
• In the iLO Configuration Utility window, click Network Settings. The General tab data appears.
• Click the IPv4 tab. The IPv4 tab data appears.
• If you have enabled DHCPv4, uncheck the check box.
• Edit the setting(s) as necessary. Click Apply.
Network Settings–IPv6
• iLO Client Applications use IPv6 first—When both IPv4 and IPv6 service addresses are configured
for iLO client applications, this option specifies which protocol iLO tries first when accessing a client
application. This setting also applies to lists of addresses received from the name resolver when using
FQDNs to configure NTP.
◦ Select this check box if you want iLO to use IPv6 first.
◦ Clear this check box if you want iLO to use IPv4 first.
If communication fails using the first protocol, iLO automatically tries the second protocol.
• Enable Stateless Address Auto Configuration (SLAAC)—Select this check box to enable iLO to
create IPv6 addresses for itself from router advertisement messages.
NOTE:
iLO will create its own link-local address even when this option is not selected.
• Primary DNS Server, Secondary DNS Server, Tertiary DNS Server—Enter the IPv6 addresses for
the DNS service.When DNS server locations are configured in both IPv4 and IPv6, both sources are
used, with preference given according to the iLO Client Applications use IPv6 first configuration option,
primary sources, then secondary, and then tertiary.
• Use DHCPv6 Supplied NTP Servers—Specifies whether iLO uses the DHCPv6 server-supplied time.
• Enable DDNS Server Registration—Specify whether iLO registers its IPv6 address and name with a
DNS server.
50 Using Intelligent Provisioning
Page 51

• Static IPv6 Address 1—4– Enter up to four static IP addresses if they are not automatically assigned.
You must specify the prefix length for the addresses.
• Static Default Gateway—Enter a default IPv6 gateway address for cases in which no router
advertisement messages are present in the network.
• Static Route #1 (Destination/Gateway), Static Route #2 (Destination), Static Route #3—Enter static
IPv6 route destination prefix and gateway address pairs. You must specify the prefix length for the
destination. Link-local addresses are not allowed for the destination, but are allowed for the gateway.
To edit the settings on the IPv6 tab:
• In the iLO Configuration Utility window, click Network Settings. The General tab data appears.
• Click the IPv6 tab. The IPv6 tab data appears.
• Edit the setting(s) as necessary. Click Apply.
Network Settings–SNTP
• Use DHCPv4 Supplied Time Settings—Specifies whether iLO uses the DHCP server-supplied time.
• Use DHCPv6 Supplied Time Settings—Specifies whether iLO uses version 6 of the DHCP serversupplied time.
• Propagate NTP Time to Host—Specifies whether ILO uses NTP time instead of the DHCP serversupplied time.
• Primary Time Server—If DHCPv4 or DHCPv6 SNTP is not used, enter a time server address in the
Primary Time Server box.
• Secondary Time Server—If DHCPv4 or DHCPv6 SNTP is not used, enter a secondary time server
address in the Secondary Time Server box.
• Time Zone—A drop-down list of worldwide time zones.
To edit the settings on the SNTP tab:
• In the iLO Configuration Utility window, click Network Settings. The General tab data appears.
• Click the SNTP tab. The SNTP tab data appears.
• If you enabled DHCPv4 or DHCPv6 time settings, uncheck the appropriate check box.
• Edit the setting(s) as necessary. Click Apply.
Editing User Administration
Procedure
1. User Accounts—Displays available users.
Editing User Administration 51
Page 52

• User Name—Appears in the user list on the User Administration page and on the iLO Overview
page. It does not have to be the same as the Login Name. The maximum length for a user name is
39 characters. The user name must use printable characters.
• Login Name—Is the name that you must use when logging in to iLO. The maximum length for a
login name is 39 characters. The login name must use printable characters.
IMPORTANT:
The Login Name cannot be modified, after it is set.
2. Privileges—Select from the following permissions:
• Administer User Accounts—Enables a user to add, edit, and delete local iLO user accounts. A
user with this privilege can change privileges for all users. If you do not have this privilege, you can
view your own settings and change your own password.
• Configure iLO Settings—Enables a user to configure most iLO settings, including security
settings, and to remotely update the iLO firmware. This privilege does not enable local user
account administration.
• Remote Console Access—Enables a user to remotely access the host system Remote Console,
including video, keyboard, and mouse control.
• Virtual Media —Enables a user to use the Virtual Media feature on the host system.
• Virtual Power and Reset—Enables a user to power-cycle or reset the host system. These
activities interrupt the system availability. A user with this privilege can diagnose the system by
using the button.
To view the User Administration window:
In the iLO Configuration Utility window, click User Administration. The User Administration window
appears.
To add a new user:
• In the iLO Configuration Utility window, click User Administration. The User Administration window
appears.
• Click New. The Add User window appears.
• Enter the user name. The maximum length for a user name is 39 characters. The user name must use
printable characters.
• Enter the login name. The maximum length for a login name is 39 characters. The login name must
use printable characters.
IMPORTANT:
The Login Name cannot be modified, once it is set.
• Enter the password. The minimum length for a password is set on the Access Settings page. The
maximum length for a password is 39 characters.
• Re-enter the password to confirm it.
52 Using Intelligent Provisioning
Page 53

• Select the appropriate user permission(s) for the user you are adding.
• Click Add.
To edit an existing user’s account:
• In the iLO Configuration Utility window, click User Administration. The User Administration window
appears.
• Click Edit. The Edit User window appears.
• Enter the User Name for the user’s account you are editing.
• Enter the user’s password. Re-enter the password to confirm it.
• Click the check boxes to modify the user’s permissions.
• Click Update.
To delete a user:
• In the iLO Configuration Utility window, click User Administration. The User Administration window
appears.
• In the User Accounts drop-down list, select the user you want to delete.
• Click Delete. Click OK to delete the user, or click Cancel.
Resetting iLO
Use this screen to reset iLO, or to restore iLO to factory default settings.
• Reset iLO—Click to reset iLO.
• Reset to Factory Default Settings—Click to restore factory default settings.
To reset iLO:
Procedure
1. In the iLO Configuration Utility window, click Reset. The Reset iLO window appears.
2. Select the check box for the option you want. Click Reset. iLO will be reset. You will have to log in
again.
Insight Remote Support
Insight Remote Support provides automatic submission of hardware events to HPE to prevent downtime
and enable faster issue resolution.
Unregistering from remote support
The process to unregister from remote support depends on whether you used the Insight Online direct
connect or the Insight Remote Support central connect registration method.
Use this procedure to discontinue monitoring of an HPE ProLiant server that is registered for Insight
Online direct connect.
Resetting iLO 53
Page 54

1. Navigate to the Perform Maintenance page and select the Insight Remote Support option.
2. Click Unregister.
Unregistering from Insight Remote Support central connect
Procedure
1. Log in to the Insight RS Console.
2. Do one of the following:
The following message appears:
This server is not registered.
a. To stop monitoring a ProLiant server temporarily, select the server on the Devices > Device
Summary tab in the Insight RS Console, and then select ACTIONS > DISABLE SELECTED.
NOTE:
Unregistering the server directly from Intelligent Provisioning is the same as temporarily
disabling the server in the Insight RS Console.
b. To stop monitoring a ProLiant server permanently, delete the server from the Insight RS Console.
To delete the server, select it on the Device Summary tab, and then select ACTIONS > DELETE
SELECTED.
3. Navigate to the Perform Maintenance > HPE Insight Remote Support page in Intelligent
Provisioning.
4. Verify that the server is unregistered.
Editing the web proxy settings
Proxy settings must be maintained to enable a server to continue to send remote support data to HPE. If
the proxy settings change, use the following procedure to edit them:
Procedure
1. Navigate to the Perform Maintenance page and select HPE Insight Remote Support.
The HPE Insight Remote Support page opens.
2. On the HPE Insight Remote Support page, click Update Proxy.
3. In the Update Web Proxy Settings dialog box, update the following settings, as needed:
a. Web Proxy Server
b. Web Proxy Port
c. Web Proxy Username
d. Web Proxy Password
4. Click Update Proxy.
54 Editing the web proxy settings
Page 55

License Management
Use the License Management feature to activate the iLO Advanced License Pack and the HPE
SmartCache License Pack.
1. Navigate to the Perform Maintenance window and click the License Management icon.
2. On the License Management page, you will see a list of licenses appropriate for your server.
3. Enter the License Key for the iLO Advanced License Pack and/or the HPE SmartCache License Pack.
• The iLO Advanced License Pack allows remote media access and enhanced diagnostics and
runtime functions.
• The HPE SmartCache License Pack allows the Smart Array Controller to make use of solid state
devices to accelerate access to data residing on hard drives.
4. Click Apply to activate your licenses.
Erase
Use the Erase Utility to clear hard drives and the Active Health System logs, and to reset RBSU or UEFI
System Utilities settings.
CAUTION:
Perform a backup before running the Erase Utility. The utility sets the system to its original factory
state, deletes the current hardware configuration information, including array setup and disk
partitioning, and erases all connected hard drives completely. Based on your selections in this utility,
the Erase Utility erases data from the specified areas of the system. Existing data and system
configuration settings are lost
Do Not Erase Reset Secure Erase Mode
All Hard Drives
Does not erase any hard
drive operations
Erases the master boot
record of the hard
drives, so they are no
Performs an overwrite
pattern erase, so no
data is recoverable
1
longer bootable
Active Health System
log
RBSU
1
Hard Drive Secure Erases may take hours, or, for larger drives, days to complete. This is expected behavior for this
thorough erase procedure.
2
For an RBSU password protected server, AHS logs are not reset.
Does not erase AHS
logs
Does not reset RBSU
settings
Mounts AHS partitions
and erases all files in
the partition
2
Resets the RBSU
settings to default
Not an available option
Not an available option
NOTE:
For an RBSU password-protected server, the Erase utility will be disabled
To use the Erase utility:
License Management 55
Page 56

Procedure
1. In the Perform Maintenance window, click Erase. The Erase Utility window appears.
2. After making the appropriate selections, click Erase. A Confirm Erase window appears, prompting
you to click OK to initiate the Erase procedure, or click Cancel to cancel the Erase.
Reinstalling Intelligent Provisioning
You can reinstall Intelligent Provisioning instead of using the Firmware Update Utility to ensure you have
the latest version. To reinstall Intelligent Provisioning:
1. Download the latest Intelligent Provisioning ISO from the HPE Intelligent Provisioning website (http://
www.hpe.com/info/intelligentprovisioning).
NOTE:
The ISO is PXE bootable.
2. Boot to the Intelligent Provisioning recovery media. The installation automatically begins.
3. When the update is complete, the server automatically reboots.
56 Reinstalling Intelligent Provisioning
Page 57

Advanced topics
Using the HPE USB Key Utility
The HPE USB Key Utility is a Windows application that copies Intelligent Provisioning or HPE SPP
contents, and other CD or DVD images to a USB flash drive. After copying data to the USB flash drive,
you can run Intelligent Provisioning or SPP from the USB flash drive instead of from a CD or DVD. This
process is beneficial in headless-server operations. It also simplifies the storage, transportation, and
usage of the contents by allowing you to retrieve their images from the web and customize them as
needed.
Prerequisites
Installing applications onto a USB flash drive requires a supported source CD, DVD, or ISO, and a USB
flash drive with adequate storage space for storing the source contents. The USB Key Utility requires a
USB 2.0 flash drive with a storage size larger than the media or ISO image (2 GB or greater).
AutoRun files
AutoRun files do not start automatically from the utility. To start an AutoRun file, double-click the
autorun.exe file in the appropriate CD or DVD folder on the USB Key.
Creating a bootable USB key
Installing the utility adds a shortcut in HPE System Tools in the Programs Start menu folder. To create a
bootable USB key:
Procedure
1. Double-click the HPE USB Key Utility shortcut in the HPE System Tools folder.
2. Complete each step as presented by the application:
a. Click Next at the splash screen.
b. Read the End-User License Agreement, and then select Agree and click Next.
c. Select Create a bootable USB key from CD/DVD, and then click Next.
d. Place the USB flash drive in an available USB port. Insert the media in the optical drive or mount
the ISO image, and then click Next.
e. Choose the drive letter of the source, choose the drive letter of the target USB flash drive, and click
Next.
TIP:
Click Rescan Target if you do not see your drive key or inserted a new one.
CAUTION:
All data on the target USB key will be deleted.
Advanced topics 57
Page 58

f. Click Next on the warning message screen. The USB flash drive is formatted, and the source
contents are copied to the USB flash drive.
g. Click Finish to display the README.TXT file.
58 Advanced topics
Page 59

Troubleshooting
Troubleshooting overview
This section describes common installation and operational issues in Intelligent Provisioning, and
provides directions for corrective action, where possible.
General issues
• When a profile containing OS settings is deployed on a server which does not have disks connected,
the OS settings are applied and the installation is interrupted without displaying a There are no
physical disks attached error message to indicate a problem has occurred.
Suggested action: Attach the disks and retry.
• When selecting the Secure Erase option for Onboard NAND Flash, the Active Health System (AHS)
log option is also selected by default. However, the AHS secure erase process does not initiate with
the Onboard NAND Flash option in the Erase Utility.
Suggested action: The process is working as designed.
• While performing offline flashing with Service Pack for ProLiant (SPP), the System Information page
does not display information for Infiniband cards.
Suggested action: You can see system information by booting a full operating system and running
Insight Diagnostics, which shows what hardware is connected.
• On the OS selection page, if you select ESX as the OS family, Manual install as the installation type,
and insert a CD for the ESX/ESXi OS, the Continue arrow is not enabled on the OS selection page
when the server is not connected to the network.
Suggested action: You must be connected to an operational network if you are installing the ESX/
ESXi operating system. Either resume installation when the network is operational, or connect the
networking ports to a functioning network before continuing.
• Intelligent Provisioning is not able to install the drivers for the LPe1605 16Gb card to see the boot
LUNs while installing Red Hat Enterprise Linux 5.10 and Microsoft Windows Server 2008 R2 operating
systems on BL420c Gen8 and BL465c Gen8 servers, respectively.
Suggested action: This is not supported. The LPe1605 16Gb LUN is not usable as a boot controller
because the drivers are not available in the correct form.
• The OS-recommended DVD is acting as a manual installation when the server is set up to be
password protected.
Suggested action: The Intelligent Provisioning installation process is working as designed. Because
the system is password protected, no changes can be applied that will bypass this issue.
• Unable to use Network share/FTP source media for installing Intelligent Provisioning.
Suggested action: Use DVD/USB source media for installations in place of Network share/FTP
source media.
Troubleshooting 59
Page 60

Windows-specific issues
• Only flat files are supported over FTP. ISO files are not supported.
• A standalone NIC card on the motherboard of the server takes the position of eth0 and eth1, pushing
the embedded NIC to eth2 and eth3.
• After installing Windows, when viewing the Integrated Management Log (IML), the log may not
generate and the following error message may be displayed: No system management driver is
loaded. Suggested action: Use the Run as administrator option to launch the IML Viewer.
• SNMP cannot be installed on HP-branded Windows Server 2008 Combo media using Intelligent
Provisioning. SNMP can be installed on HP-branded Windows Server 2008 R2 Combo media, which
is supported. Suggested action: Upgrade to Windows Server 2008 R2 or install the operating system
manually without Intelligent Provisioning.
• No information is populated on the System Management Homepage after a Recommended installation
on Windows. This is expected behavior because by default only AMS is installed. Suggested action:
To populate the information in the SMH, install WBEM or SNMP agents.
Linux-specific issues
• When using the Manual installation method SUSE Linux Enterprise Server 11 SP3 with an SD card,
the GNU GRUB screen appears, and the OS installation is not completed.
Suggested action: Perform the installation outside of Intelligent Provisioning by installing the DUD
from HPSC. A future upgrade will support the installation using Intelligent Provisioning.
• The system displays an “Unsupported Hardware detected” message when you perform a
Recommended installation of Red Hat Enterprise Linux 6.3 on an SD card.
Suggested action: Click OK in the dialog box. The installation will proceed normally and concludes
successfully.
• When using the Recommended installation method for one of the following:
◦ Red Hat Enterprise Linux 5.8 or 5.9 with DVD source media
◦ Red Hat Enterprise Linux 5.9 with DVD/FTP as source media on a Smart Array (SA) controller
◦ Red Hat Enterprise Linux 5.X or 6.3 with an iSCSI media source
◦ a Red Hat OS installation with FTP source mediayou might encounter one of the situations listed:
◦ the installation hangs during reboot and a “The Red Hat Enterprise Linux Server CD was not found”
error appears.
◦ the installation hangs and a “Could not allocate requested partitions” error appears.
◦ the installation does not complete successfully, or
◦ the installation completes successfully even if there are missing flat files for the OS installation.
• Suggested action: To remedy any of the situations above, perform the installation outside of
Intelligent Provisioning by installing the DUD from HPSC.
60 Windows-specific issues
Page 61

VMware-specific issues
• Only flat files are supported over FTP. ISO files are not supported.
• A standalone NIC card on the motherboard of the server takes the position of eth0 and eth1, pushing
the embedded NIC to eth2 and eth3.
• VMware ESX and ESXi Custom Image require a custom HP ISO.
Suggested action: Download the ISO from the VMware website.
• For VMware ESXi 4.1 U2 Custom installations, the message No matching licenses appears.
Suggested action: On the OS information screen, either enter the correct license key or leave the
field blank. This field is optional.
• On the OS Information screen for ESXi Custom installation, the Continue arrow is visible. If a host
name is entered in the Host Name field, the Continue arrow disappears.
Suggested action: Make sure the Host Name field contains at least three characters.
Intelligent Provisioning Recovery
Download and use the Intelligent Provisioning recovery media when a mass update is required for several
servers, a new board has become corrupted, or a NAND error has occurred. Mass update of several
systems is available through iLO/RIBCL using recovery media mount and one time boot.
Reinstalling Intelligent Provisioning for the steps to download Intelligent Provisioning recovery
See
media and reinstall.
For more information, see HP Intelligent Provisioning - Upcoming Changes to the HPE Website and
Firmware Access May Affect Access to the Firmware Updates From Inside the Intelligent Provisioning
F10 Console:
http://h20566.www2.hpe.com/hpsc/doc/public/display?docId=emr_na-c04947495
VMware-specific issues 61
Page 62

Websites
General websites
Hewlett Packard Enterprise Information Library
www.hpe.com/info/EIL
Single Point of Connectivity Knowledge (SPOCK) Storage compatibility matrix
www.hpe.com/storage/spock
Storage white papers and analyst reports
www.hpe.com/storage/whitepapers
For additional websites, see Support and other resources.
Intelligent Provisioning websites
Intelligent Provisioning
www.hpe.com/servers/intelligentprovisioning
HPE iLO 4
www.hpe.com/info/ilo
HPE Active Health System
www.hpe.com/servers/ahs
HPE Systems Insight Manager
www.hpe.com/info/hpsim
Service Pack for ProLiant
www.hpe.com/servers/spp
Insight Remote Support
www.hpe.com/info/insightremotesupport/docs
62 Websites
Page 63

Support and other resources
Accessing Hewlett Packard Enterprise Support
• For live assistance, go to the Contact Hewlett Packard Enterprise Worldwide website:
http://www.hpe.com/assistance
• To access documentation and support services, go to the Hewlett Packard Enterprise Support Center
website:
http://www.hpe.com/support/hpesc
Information to collect
• Technical support registration number (if applicable)
• Product name, model or version, and serial number
• Operating system name and version
• Firmware version
• Error messages
• Product-specific reports and logs
• Add-on products or components
• Third-party products or components
Accessing updates
• Some software products provide a mechanism for accessing software updates through the product
interface. Review your product documentation to identify the recommended software update method.
• To download product updates:
Hewlett Packard Enterprise Support Center
www.hpe.com/support/hpesc
Hewlett Packard Enterprise Support Center: Software downloads
www.hpe.com/support/downloads
Software Depot
www.hpe.com/support/softwaredepot
• To subscribe to eNewsletters and alerts:
www.hpe.com/support/e-updates
• To view and update your entitlements, and to link your contracts and warranties with your profile, go to
the Hewlett Packard Enterprise Support Center More Information on Access to Support Materials
page:
www.hpe.com/support/AccessToSupportMaterials
Support and other resources 63
Page 64

IMPORTANT:
Access to some updates might require product entitlement when accessed through the Hewlett
Packard Enterprise Support Center. You must have an HPE Passport set up with relevant
entitlements.
Customer self repair
Hewlett Packard Enterprise customer self repair (CSR) programs allow you to repair your product. If a
CSR part needs to be replaced, it will be shipped directly to you so that you can install it at your
convenience. Some parts do not qualify for CSR. Your Hewlett Packard Enterprise authorized service
provider will determine whether a repair can be accomplished by CSR.
For more information about CSR, contact your local service provider or go to the CSR website:
http://www.hpe.com/support/selfrepair
Remote support
Remote support is available with supported devices as part of your warranty or contractual support
agreement. It provides intelligent event diagnosis, and automatic, secure submission of hardware event
notifications to Hewlett Packard Enterprise, which will initiate a fast and accurate resolution based on your
product's service level. Hewlett Packard Enterprise strongly recommends that you register your device for
remote support.
If your product includes additional remote support details, use search to locate that information.
Remote support and Proactive Care information
HPE Get Connected
www.hpe.com/services/getconnected
HPE Proactive Care services
www.hpe.com/services/proactivecare
HPE Proactive Care service: Supported products list
www.hpe.com/services/proactivecaresupportedproducts
HPE Proactive Care advanced service: Supported products list
www.hpe.com/services/proactivecareadvancedsupportedproducts
Proactive Care customer information
Proactive Care central
www.hpe.com/services/proactivecarecentral
Proactive Care service activation
www.hpe.com/services/proactivecarecentralgetstarted
Warranty information
To view the warranty for your product or to view the Safety and Compliance Information for Server,
Storage, Power, Networking, and Rack Products reference document, go to the Enterprise Safety and
Compliance website:
www.hpe.com/support/Safety-Compliance-EnterpriseProducts
64 Customer self repair
Page 65

Additional warranty information
HPE ProLiant and x86 Servers and Options
www.hpe.com/support/ProLiantServers-Warranties
HPE Enterprise Servers
www.hpe.com/support/EnterpriseServers-Warranties
HPE Storage Products
www.hpe.com/support/Storage-Warranties
HPE Networking Products
www.hpe.com/support/Networking-Warranties
Regulatory information
To view the regulatory information for your product, view the Safety and Compliance Information for
Server, Storage, Power, Networking, and Rack Products, available at the Hewlett Packard Enterprise
Support Center:
www.hpe.com/support/Safety-Compliance-EnterpriseProducts
Additional regulatory information
Hewlett Packard Enterprise is committed to providing our customers with information about the chemical
substances in our products as needed to comply with legal requirements such as REACH (Regulation EC
No 1907/2006 of the European Parliament and the Council). A chemical information report for this product
can be found at:
www.hpe.com/info/reach
For Hewlett Packard Enterprise product environmental and safety information and compliance data,
including RoHS and REACH, see:
www.hpe.com/info/ecodata
For Hewlett Packard Enterprise environmental information, including company programs, product
recycling, and energy efficiency, see:
www.hpe.com/info/environment
Documentation feedback
Hewlett Packard Enterprise is committed to providing documentation that meets your needs. To help us
improve the documentation, send any errors, suggestions, or comments to Documentation Feedback
([email protected]). When submitting your feedback, include the document title, part number,
edition, and publication date located on the front cover of the document. For online help content, include
the product name, product version, help edition, and publication date located on the legal notices page.
Regulatory information 65
 Loading...