

Page 1

Installing the HP DL360 G7 Server
January 2012
Page 2

©
2012 Avaya Inc.
All Rights Reserved.
Notice
While reasonable efforts have been made to ensure that the
information in this document is complete and accurate at the time of
printing, Avaya assumes no liability for any errors. Avaya reserves
the right to make changes and corrections to the information in this
document without the obligation to notify any person or organization
of such changes.
Documentation disclaimer
“Documentation” means information published by Avaya in varying
mediums which may include product information, operating
instructions and performance specifications that Avaya may generally
make available to users of its products and Hosted Services.
Documentation does not include marketing materials. Avaya shall not
be responsible for any modifications, additions, or deletions to the
original published version of documentation unless such
modifications, additions, or deletions were performed by Avaya. End
User agrees to indemnify and hold harmless Avaya, Avaya's agents,
servants and employees against all claims, lawsuits, demands and
judgments arising out of, or in connection with, subsequent
modifications, additions or deletions to this documentation, to the
extent made by End User.
Link disclaimer
Avaya is not responsible for the contents or reliability of any linked
websites referenced within this site or documentation provided by
Avaya. Avaya is not responsible for the accuracy of any information,
statement or content provided on these sites and does not
necessarily endorse the products, services, or information described
or offered within them. Avaya does not guarantee that these links will
work all the time and has no control over the availability of the linked
pages.
Warranty
Avaya provides a limited warranty on Avaya hardware and software.
Refer to your sales agreement to establish the terms of the limited
warranty. In addition, Avaya’s standard warranty language, as well as
information regarding support for this product while under warranty is
available to Avaya customers and other parties through the Avaya
Support website:
http://support.avaya.com or such successor site as
designated by Avaya. Please note that if You acquired the product(s)
from an authorized Avaya Channel Partner outside of the United
States and Canada, the warranty is provided to You by said Avaya
Channel Partner and not by Avaya.
Licenses
THE SOFTWARE LICENSE TERMS AVAILABLE ON THE AVAYA
WEBSITE,
HTTP://SUPPORT.AVAYA.COM/LICENSEINFO OR
SUCH SUCCESSOR SITE AS DESIGNATED BY AVAYA, ARE
APPLICABLE TO ANYONE WHO DOWNLOADS, USES AND/OR
INSTALLS AVAYA SOFTWARE, PURCHASED FROM AVAYA INC.,
ANY AVAYA AFFILIATE, OR AN AVAYA CHANNEL PARTNER (AS
APPLICABLE) UNDER A COMMERCIAL AGREEMENT WITH
AVAYA OR AN AVAYA CHANNEL PARTNER. UNLESS
OTHERWISE AGREED TO BY AVAYA IN WRITING, AVAYA DOES
NOT EXTEND THIS LICENSE IF THE SOFTWARE WAS
OBTAINED FROM ANYONE OTHER THAN AVAYA, AN AVAYA
AFFILIATE OR AN AVAYA CHANNEL PARTNER; AVAYA
RESERVES THE RIGHT TO TAKE LEGAL ACTION AGAINST YOU
AND ANYONE ELSE USING OR SELLING THE SOFTWARE
WITHOUT A LICENSE. BY INSTALLING, DOWNLOADING OR
USING THE SOFTWARE, OR AUTHORIZING OTHERS TO DO SO,
YOU, ON BEHALF OF YOURSELF AND THE ENTITY FOR WHOM
YOU ARE INSTALLING, DOWNLOADING OR USING THE
SOFTWARE (HEREINAFTER REFERRED TO
INTERCHANGEABLY AS “YOU” AND “END USER”), AGREE TO
THESE TERMS AND CONDITIONS AND CREATE A BINDING
CONTRACT BETWEEN YOU AND AVAYA INC. OR THE
APPLICABLE AVAYA AFFILIATE (“AVAYA”).
Avaya grants You a license within the scope of the license types
described below, with the exception of Heritage Nortel Software, for
which the scope of the license is detailed below. Where the order
documentation does not expressly identify a license type, the
applicable license will be a Designated System License. The
applicable number of licenses and units of capacity for which the
license is granted will be one (1), unless a different number of
licenses or units of capacity is specified in the documentation or other
materials available to You. “Software” means computer programs in
object code, provided by Avaya or an Avaya Channel Partner,
whether as stand-alone products, pre-installed on hardware products,
and any upgrades, updates, patches, bug fixes, or modified versions
thereto. “Designated Processor” means a single stand-alone
computing device. “Server” means a Designated Processor that
hosts a software application to be accessed by multiple users.
“Instance” means a single copy of the Software executing at a
particular time: (i) on one physical machine; or (ii) on one deployed
software virtual machine (“VM”) or similar deployment.
License types
Designated System(s) License (DS). End User may install and use
each copy or an Instance of the Software only on a number of
Designated Processors up to the number indicated in the order.
Avaya may require the Designated Processor(s) to be identified in
the order by type, serial number, feature key, Instance, location or
other specific designation, or to be provided by End User to Avaya
through electronic means established by Avaya specifically for this
purpose.
Concurrent User License (CU). End User may install and use the
Software on multiple Designated Processors or one or more Servers,
so long as only the licensed number of Units are accessing and using
the Software at any given time. A “Unit” means the unit on which
Avaya, at its sole discretion, bases the pricing of its licenses and can
be, without limitation, an agent, port or user, an e-mail or voice mail
account in the name of a person or corporate function (e.g.,
webmaster or helpdesk), or a directory entry in the administrative
database utilized by the Software that permits one user to interface
with the Software. Units may be linked to a specific, identified Server
or an Instance of the Software.
Database License (DL). End User may install and use each copy or
an Instance of the Software on one Server or on multiple Servers
provided that each of the Servers on which the Software is installed
communicates with no more than one Instance of the same
database.
CPU License (CP). End User may install and use each copy or
Instance of the Software on a number of Servers up to the number
indicated in the order provided that the performance capacity of the
Server(s) does not exceed the performance capacity specified for the
Software. End User may not re-install or operate the Software on
Server(s) with a larger performance capacity without Avaya’s prior
consent and payment of an upgrade fee.
Named User License (NU). You may: (i) install and use the Software
on a single Designated Processor or Server per authorized Named
User (defined below); or (ii) install and use the Software on a Server
so long as only authorized Named Users access and use the
Software. “Named User”, means a user or device that has been
expressly authorized by Avaya to access and use the Software. At
Avaya’s sole discretion, a “Named User” may be, without limitation,
designated by name, corporate function (e.g., webmaster or
helpdesk), an e-mail or voice mail account in the name of a person or
corporate function, or a directory entry in the administrative database
utilized by the Software that permits one user to interface with the
Software.
Shrinkwrap License (SR). You may install and use the Software in
accordance with the terms and conditions of the applicable license
agreements, such as “shrinkwrap” or “clickthrough” license
accompanying or applicable to the Software (“Shrinkwrap License”).
Copyright
Except where expressly stated otherwise, no use should be made of
materials on this site, the Documentation, Software, Hosted Service,
or hardware provided by Avaya. All content on this site, the
documentation, Hosted Service, and the product provided by Avaya
including the selection, arrangement and design of the content is
owned either by Avaya or its licensors and is protected by copyright
and other intellectual property laws including the sui generis rights
relating to the protection of databases. You may not modify, copy,
reproduce, republish, upload, post, transmit or distribute in any way
any content, in whole or in part, including any code and software
unless expressly authorized by Avaya. Unauthorized reproduction,
transmission, dissemination, storage, and or use without the express
Page 3

written consent of Avaya can be a criminal, as well as a civil offense
under the applicable law.
Third Party Components
“Third Party Components” mean certain software programs or
portions thereof included in the Software or Hosted Service may
contain software (including open source software) distributed under
third party agreements (“Third Party Components”), which contain
terms regarding the rights to use certain portions of the Software
(“Third Party Terms”). As required, information regarding distributed
Linux OS source code (for those products that have distributed Linux
OS source code) and identifying the copyright holders of the Third
Party Components and the Third Party Terms that apply is available
in the products, Documentation or on Avaya’s website at:
support.avaya.com/Copyright or such successor site as designated
by Avaya. You agree to the Third Party Terms for any such Third
Party Components.
Preventing Toll Fraud
“Toll Fraud” is the unauthorized use of your telecommunications
system by an unauthorized party (for example, a person who is not a
corporate employee, agent, subcontractor, or is not working on your
company's behalf). Be aware that there can be a risk of Toll Fraud
associated with your system and that, if Toll Fraud occurs, it can
result in substantial additional charges for your telecommunications
services.
Avaya Toll Fraud intervention
If You suspect that You are being victimized by Toll Fraud and You
need technical assistance or support, call Technical Service Center
Toll Fraud Intervention Hotline at +1-800-643-2353 for the United
States and Canada. For additional support telephone numbers, see
the Avaya Support website:
successor site as designated by Avaya. Suspected security
vulnerabilities with Avaya products should be reported to Avaya by
sending mail to: [email protected].
Trademarks
The trademarks, logos and service marks (“Marks”) displayed in this
site, the Documentation, Hosted Service(s), and product(s) provided
by Avaya are the registered or unregistered Marks of Avaya, its
affiliates, or other third parties. Users are not permitted to use such
Marks without prior written consent from Avaya or such third party
which may own the Mark. Nothing contained in this site, the
Documentation, Hosted Service(s) and product(s) should be
construed as granting, by implication, estoppel, or otherwise, any
license or right in and to the Marks without the express written
permission of Avaya or the applicable third party.
Avaya is a registered trademark of Avaya Inc.
All non-Avaya trademarks are the property of their respective owners.
Linux® is the registered trademark of Linus Torvalds in the U.S. and
other countries.
Downloading Documentation
For the most current versions of Documentation, see the Avaya
Support website:
designated by Avaya.
Contact Avaya Support
See the Avaya Support website:
or Hosted Service notices and articles, or to report a problem with
your Avaya product or Hosted Service. For a list of support telephone
numbers and contact addresses, go to the Avaya Support website:
http://support.avaya.com (or such successor site as designated by
Avaya), scroll to the bottom of the page, and select Contact Avaya
Support.
http://support.avaya.com, or such successor site as
http://support.avaya.com or such
http://support.avaya.com for product
http://
Page 4

Contents
Chapter 1: Installing the HP ProLiant DL360 G7 Server........................................................ 5
HP DL360 G7 Server overview................................................................................................. 5
How to use this document........................................................................................................ 5
Downloading HP documentation............................................................................................... 5
HP DL360 document set.......................................................................................................... 6
Front view of HP DL360 G7 Server........................................................................................... 6
Back view of HP DL360 G7 Server........................................................................................... 7
HP DL360 G7 Server specifications.......................................................................................... 8
HP DL360 G7 Server power specifications................................................................................ 9
HP DL360 G7 Server environmental specifications.................................................................... 9
HP DL360 G7 Server physical specifications............................................................................. 9
Installing the server in the rack............................................................................................... 10
4 Installing the HP DL360 G7 Server January 2012
Comments on this document? [email protected]
Page 5

Chapter 1: Installing the HP ProLiant DL360
G7 Server
HP DL360 G7 Server overview
The Avaya Common Servers category includes the HP ProLiant DL360 G7 1U server that supports
several Avaya software solutions, some requiring additional hardware and memory requirements
beyond the standard configuration. This book covers the standard configuration only—consult
specific Avaya product documentation for application-specific or solution-specific server
configurations.
How to use this document
This guide contains information for installing the HP DL360 Server as part of an Avaya deployment
and provides:
• • Instructions for how to find the appropriate online server documentation from HP.
• • References to specific topics in standard HP documentation
• • Suggested changes, details, and notes to assist the user in interpreting the manufacturer’s
documentation and to clarify Avaya's recommended implementation of the equipment
• • Additional topics not covered in standard HP documentation but which are necessary for
successful installation and maintenance of Avaya products
Downloading HP documentation
Use this procedure to find and download the HP ProLiant DL360 G7 documentation.
Procedure
1. Open a browser and go to http://support.avaya.com.
2. Expand Documentation in the left hand menu.
3. Click View All Documents.
4. Click C in the alphabetical list along the top of the screen.
January 2012 Installing the HP DL360 G7 Server 5
Comments on this document? [email protected]
Page 6
Installing the HP ProLiant DL360 G7 Server
5. Scroll down to Common Servers in the C products.
6. Download the documents that you need.
HP DL360 document set
See the following documents for HP DL360 server information and procedures.
Documents
• HP ProLiant Servers Safety Information
• HP ProLiant DL360 G7 Server Maintenance and Service Guide
• HP ProLiant Servers Troubleshooting Guide
• HP ProLiant DL360 G7 Server User Guide
Documents included in the shipping container
Abbreviation Title Part number
1URH 1U Rack Hardware Installation
Instructions
PCS Power Cord Strain Relief Kit 407 454–021
365 494–004
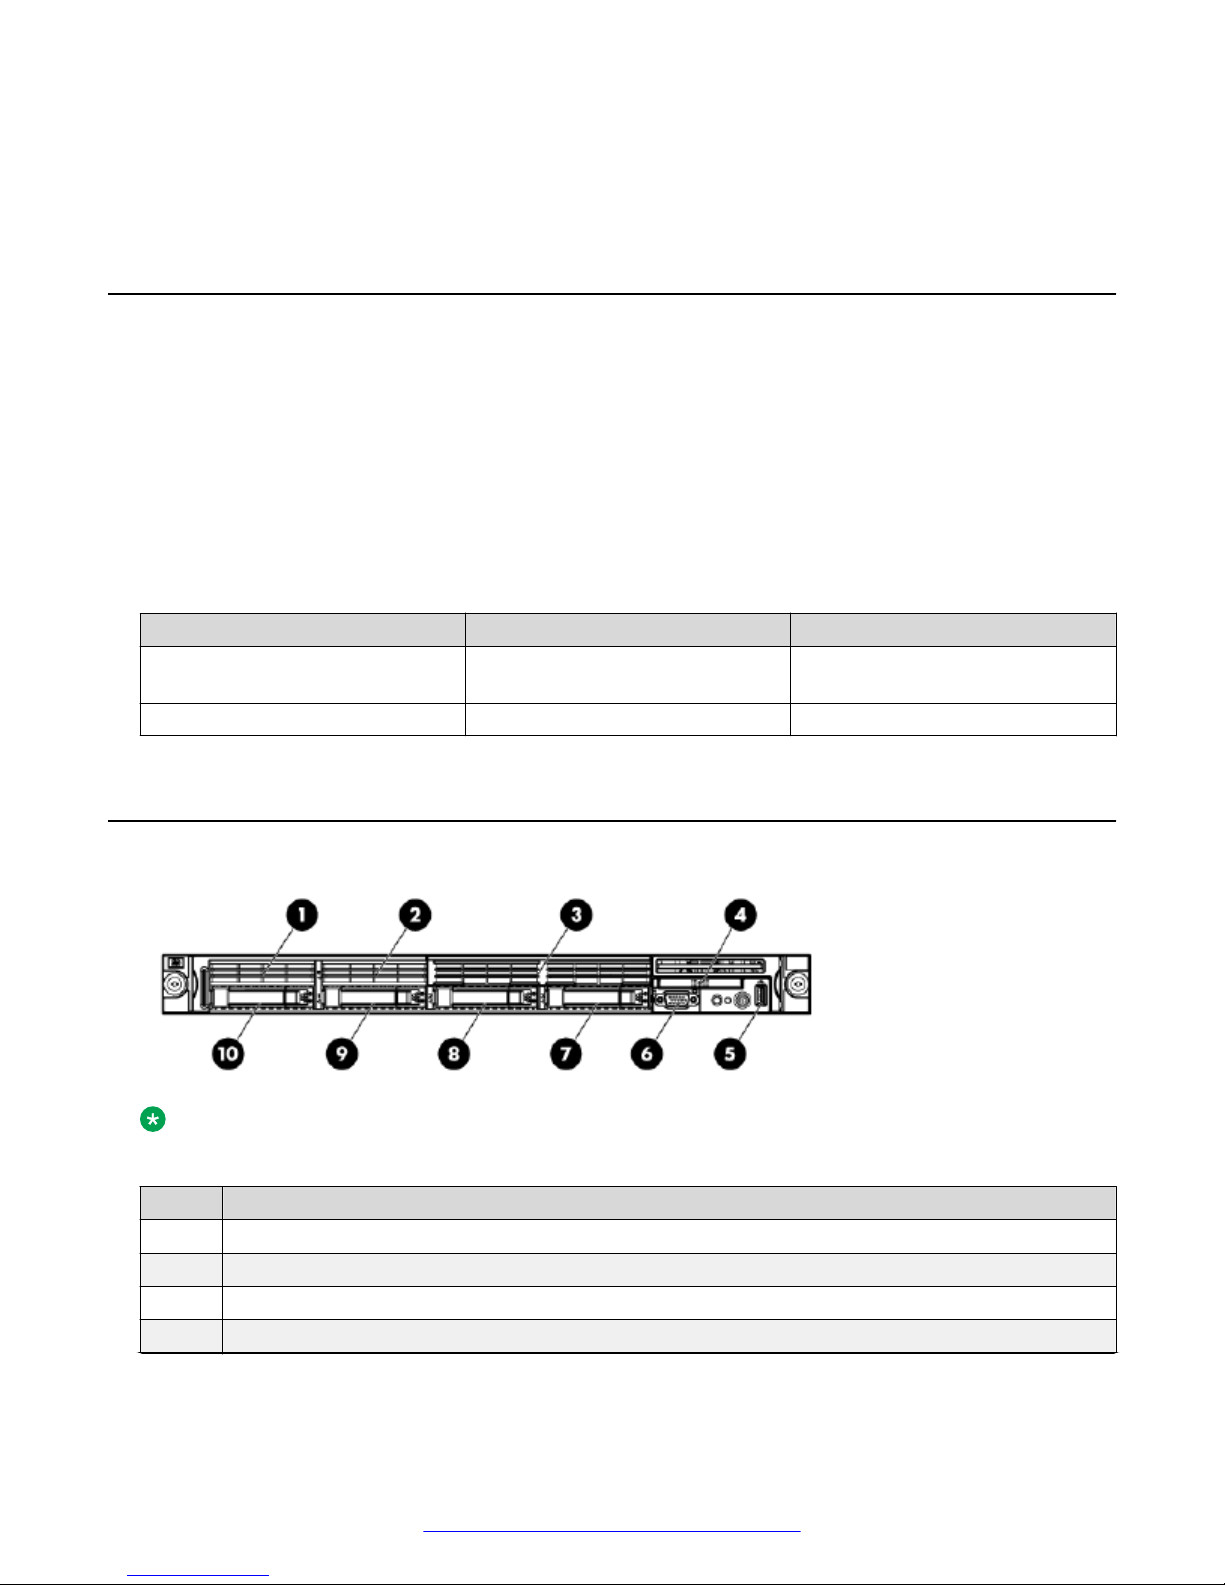
Front view of HP DL360 G7 Server
Note:
Servers ship with 2–4 hard disk drives, depending upon product requirements.
No. Description
1 Not present
2 Not present
3 DVD-RW
4 HP Systems Insight Display
Table continues…
6 Installing the HP DL360 G7 Server January 2012
Comments on this document? [email protected]
Page 7
No. Description
5 Front USB connector
6 Video connector
7 Hard drive bay 4
8 Hard drive bay 3
9 Hard drive bay 2
10 Hard drive bay 1
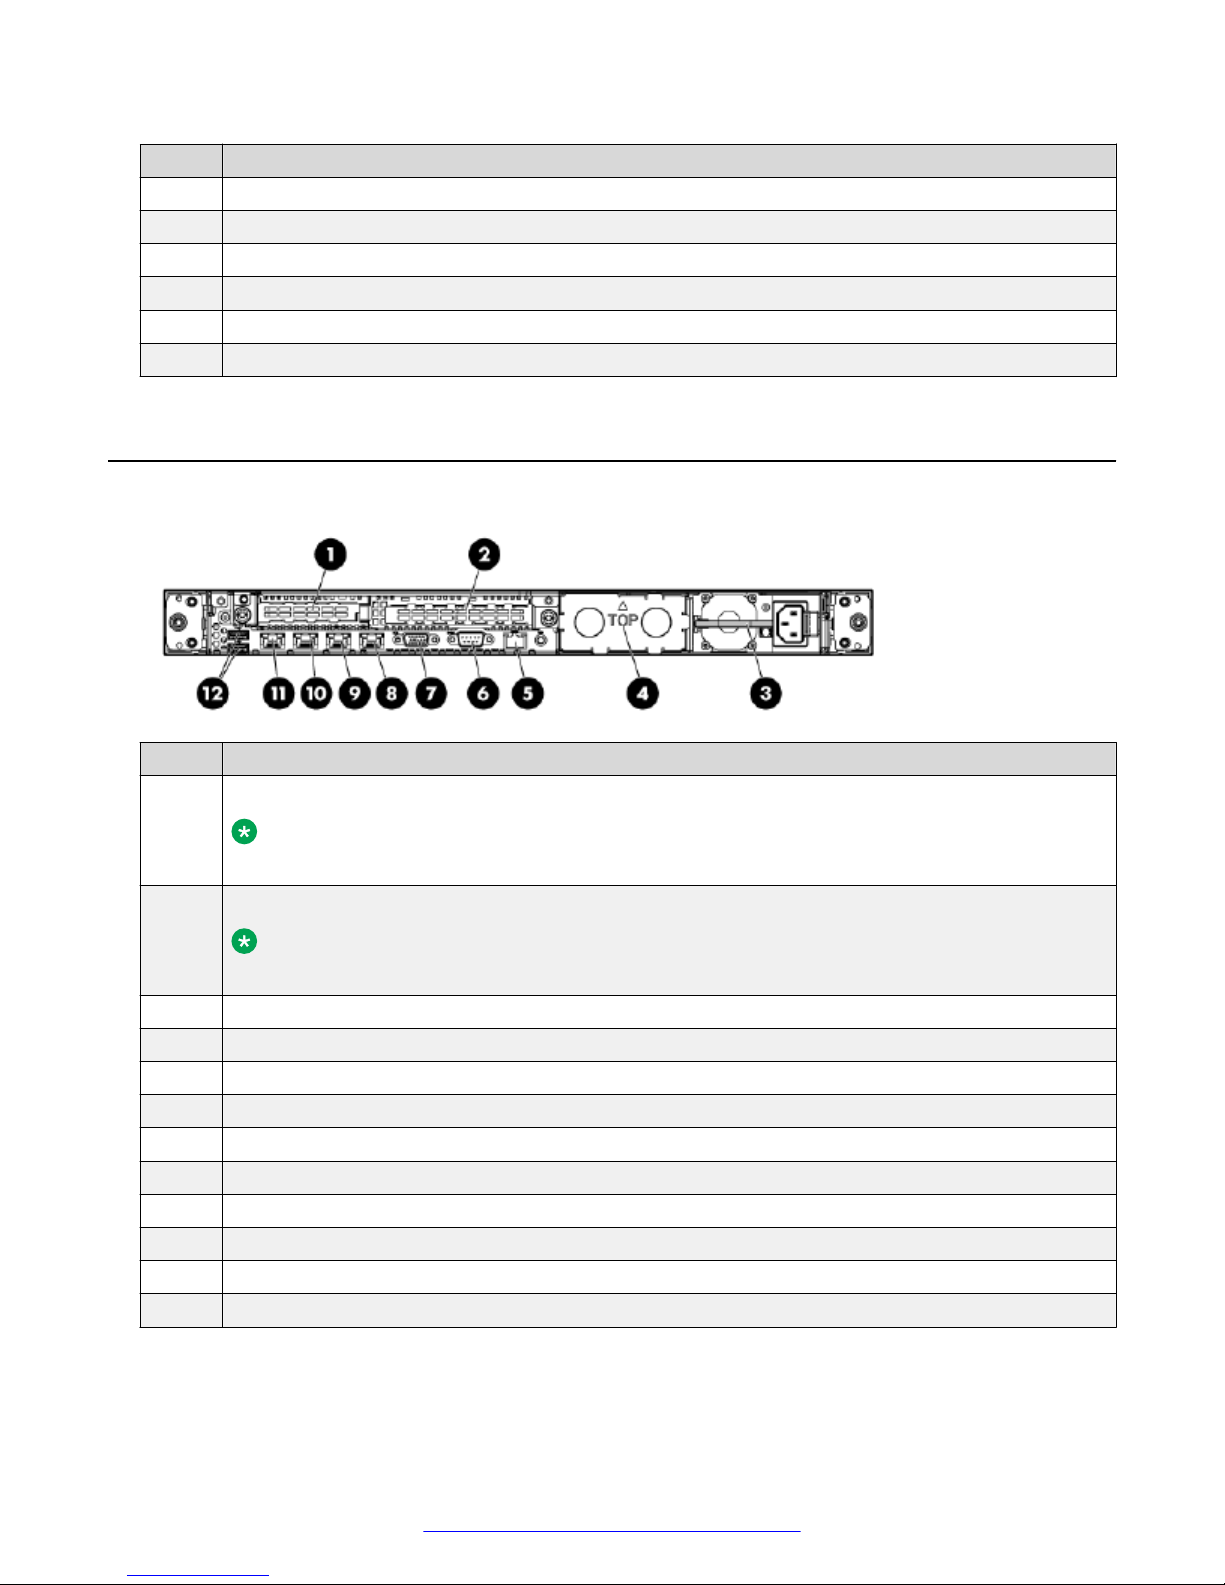
Back view of HP DL360 G7 Server
Back view of HP DL360 G7 Server
No. Description
1 Slot 1 PCIe2 x8 (8, 4, 2, 1)
Note:
Servers might ship with a PCI card installed, depending upon product requirements.
2 Slot 2 PCIe2 x16 (16, 8, 4, 2, 1), 75W +EXT 75W*
Note:
Servers might ship with a PCI card installed, depending upon product requirements.
3 Power supply bay 1 (populated)
4 Power supply bay 2
5 iLO 3 connector
6 Serial connector
7 Video connector
8 NIC 4 connector
9 NIC 3 connector
10 NIC 2 connector
11 NIC 1 connector
12 USB connectors (2)
January 2012 Installing the HP DL360 G7 Server 7
Comments on this document? [email protected]
Page 8
Installing the HP ProLiant DL360 G7 Server
*This expansion slot provides 75 W of power to an adapter, with an additional 75 W of power
supplied by external power.
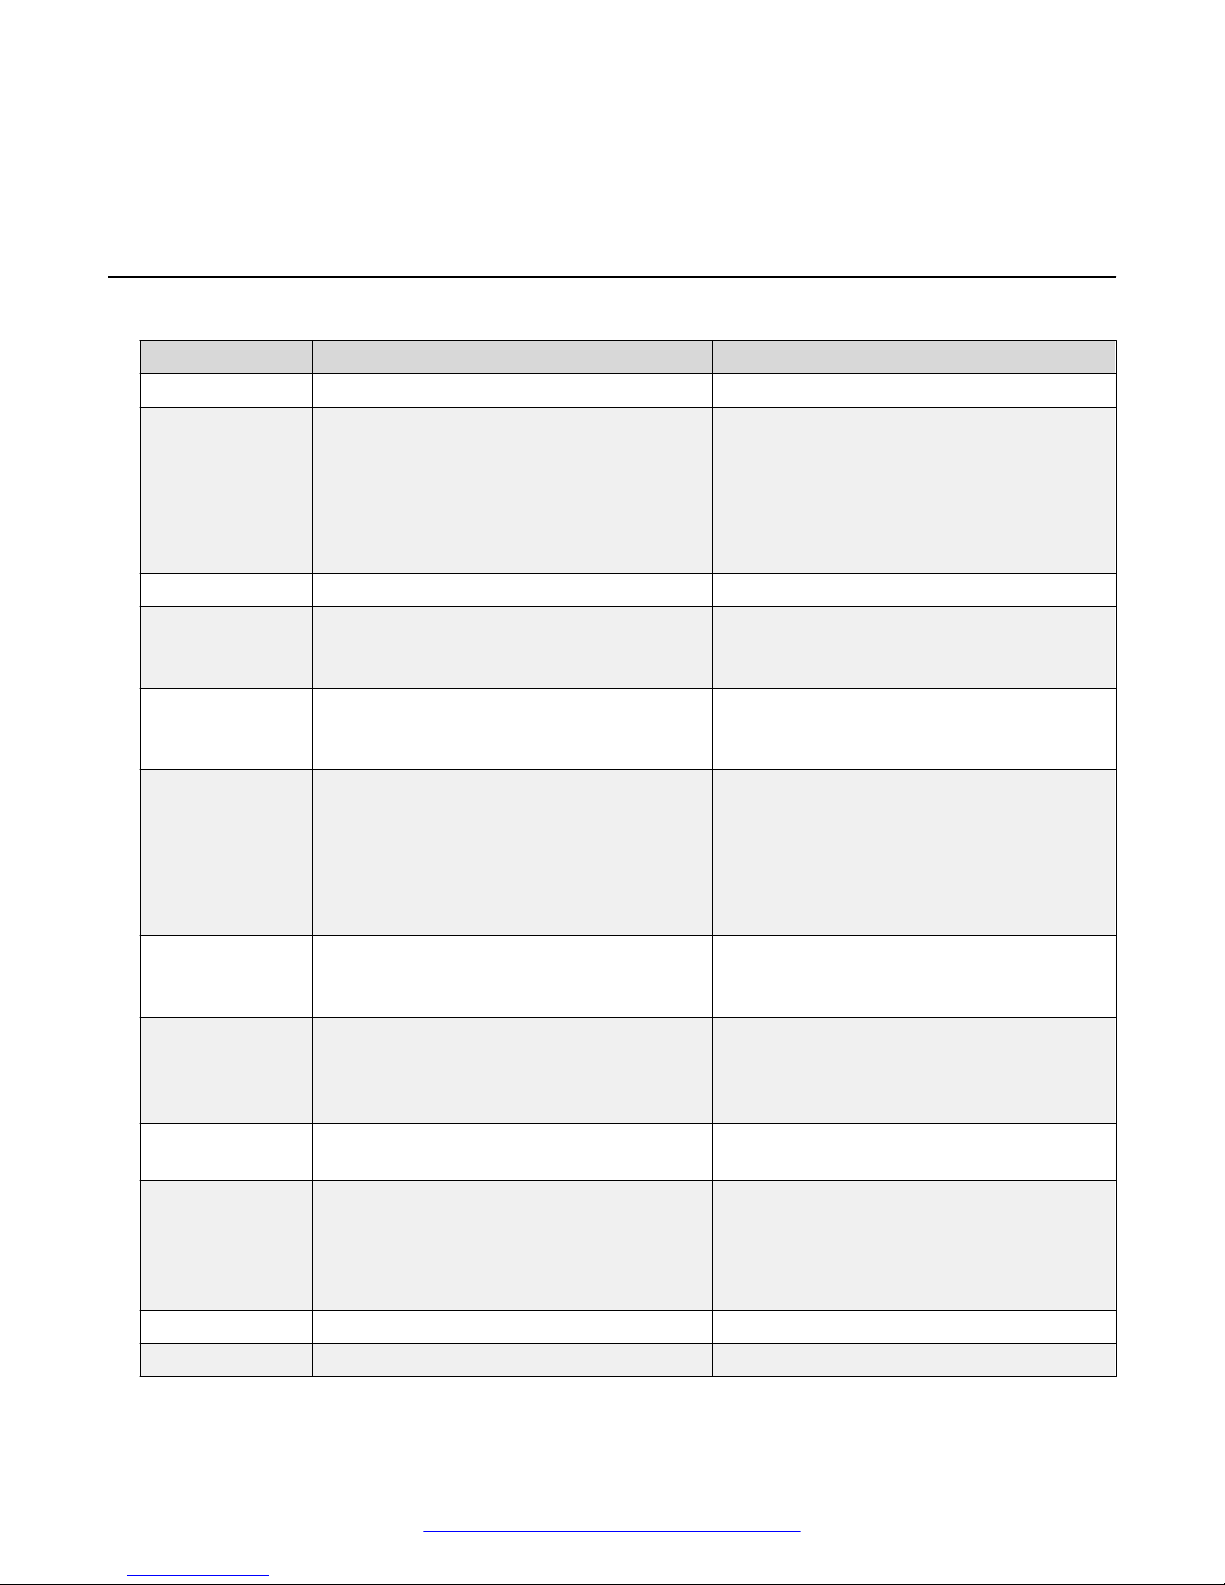
HP DL360 G7 Server specifications
Base unit Baseline Options
DL360 G7 1U chassis, dual socket No additional options supported.
Processor Intel E5620 Quad Core /2.4 GHz
(Westmere)
• Intel X5670 six Core/2.93 GHz
(Westmere)
3 memory channels per CPU with up to 3
RDIMMs per channel (most applications
use 1 or 2 RDIMMs per channel to
optimize memory speed)
Memory 2 GB DDR3 RDIMMs (1333 MHz) 4 GB DDR3 RDIMMs (1333 MHz)
HW RAID 1 P410i RAID controller with 256MB cache
and battery backup. Optioned as RAID 1 or
5
Hot-Plug disk
drive cage
Disk drive 146GB SAS 2.5" 10K RPM 6G DP Hard
NICs 4 integrated ENET Gigabit NIC ports with
PCI slots Two PCI-Express Gen 2 expansion slots:
Removable
media
Power supply 460 W hotplug AC power supply • 750W AC power supply
4 Small Form Factor 2.5” hot-plug hard
drives bays are available when an optical
drive is installed.
Drive. Two base configurations:
• 136 total: RAID 1, 2 x 146GB drives
• 272 total: RAID 5, 3 x 146GB drives
TCP offload engine (included on
motherboard)
(1) full-length, full-height slot and (1) lowprofile slot (1-FL/FH x 16 PCIe & 1-LP x 8
PCIe Riser
Slim line SATA DVD-RW optical drive
(used in all Avaya configurations)
• Upgradable to dual processors for either
E5620 or X5670
N/A
HP offers servers with 8 drive bays that do
not support an optical drive (not supported
by Avaya).
Options:
• Additional 146GB 10K RPM drive (4 max.
with optical drive)
• High performance 146GB 15K drives
• 300GB 10K HDD
HP NC382T PCI Express Dual Port Gigabit
NIC expansion card (Broadcom 5709
silicon)
Meeting Exchange Recording uses a PCI-X
riser in place of the low profile PCIe riser in
the standard server.
No additional options supported.
Fans 3 fan modules (fan redundancy standard) No additional options supported.
Additional items 1 front USB, 2 back USB, 1 internal USB
8 Installing the HP DL360 G7 Server January 2012
• 1200W DC power supply
• Single and dual power supply
configurations
Comments on this document? [email protected]
Page 9
HP DL360 G7 Server power specifications
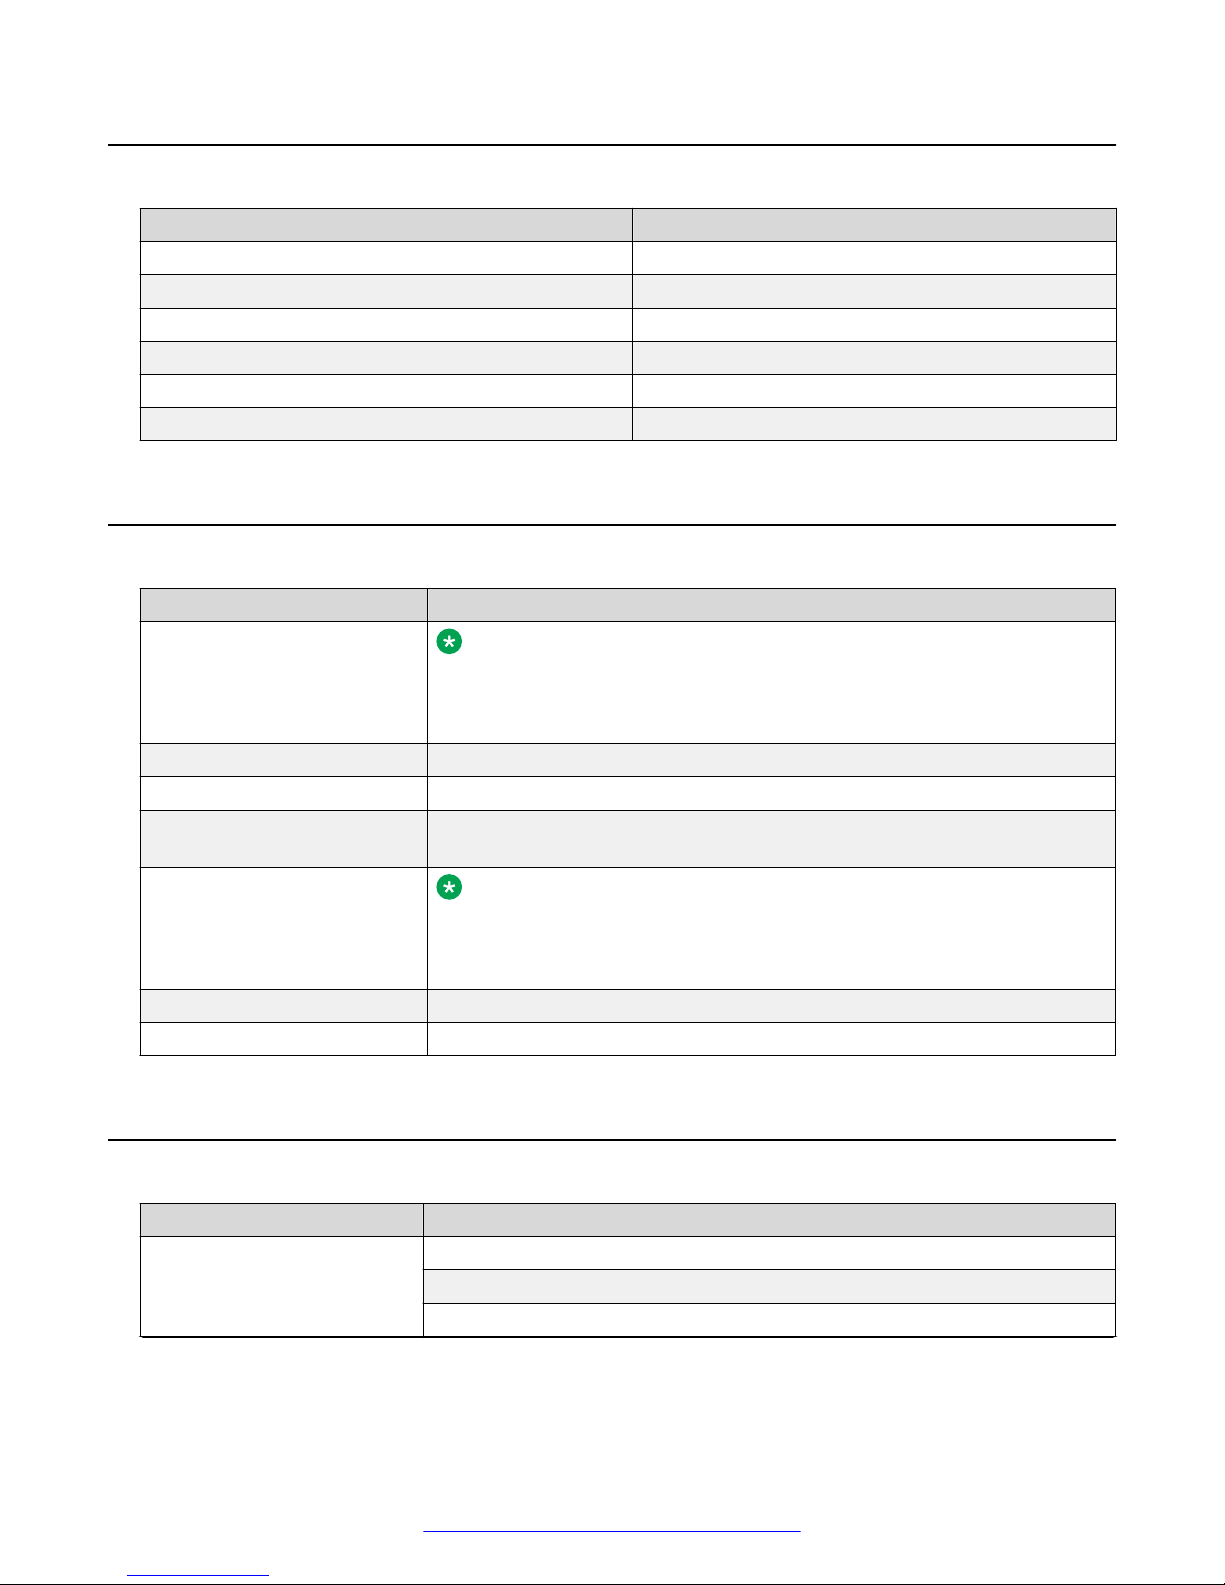
HP DL360 G7 Server power specifications
Specification Value
BTU 1794
Voltage 120 VAC
Plug Type NEMA 5–15P
Circuit Breaker 15 amp
Pole 1
AMP Draw 5.5
HP DL360 G7 Server environmental specifications
Specification Value
Temperature range
Note:
All temperature ratings shown are for sea level. An altitude derating of
1°C per 300 m (1.8° per 1,000 ft.) to 3048 m (10,000 ft.) is applicable.
No direct sunlight allowed.
Operating 10°C to 35°C (50°F to 95°F)
Shipping -40°C to 70°C (-40°F to 158°F)
Maximum wet bulb
temperature
Relative humidity
(noncondensing)
Operating 10% to 90%
Non-operating 5% to 95%
28°C (82.4°F)
Note:
Storage maximum humidity of 95% is based on a maximum
temperature of 45° C (113°F). Altitude maximum for storage
corresponds to a pressure minimum of 70 kPa.
HP DL360 G7 Server physical specifications
Type
Dimensions
Description
Height: 4.32 cm (1.70 in)
Width: 42.62 cm (16.78 in)
Depth: 69.53 cm (27.38 in)
January 2012 Installing the HP DL360 G7 Server 9
Table continues…
Comments on this document? [email protected]
Page 10
Installing the HP ProLiant DL360 G7 Server
Type Description
Weight (maximum; two
processors, two power
supplies, eight hard disk
drives)
Weight (minimum; one
processor, one power supply,
no hard drives)
Weight (no drives installed) 14.06 kg (31.00 lb)
15.97 kg (35.20 lb)
14.51 kg (32.00 lb)
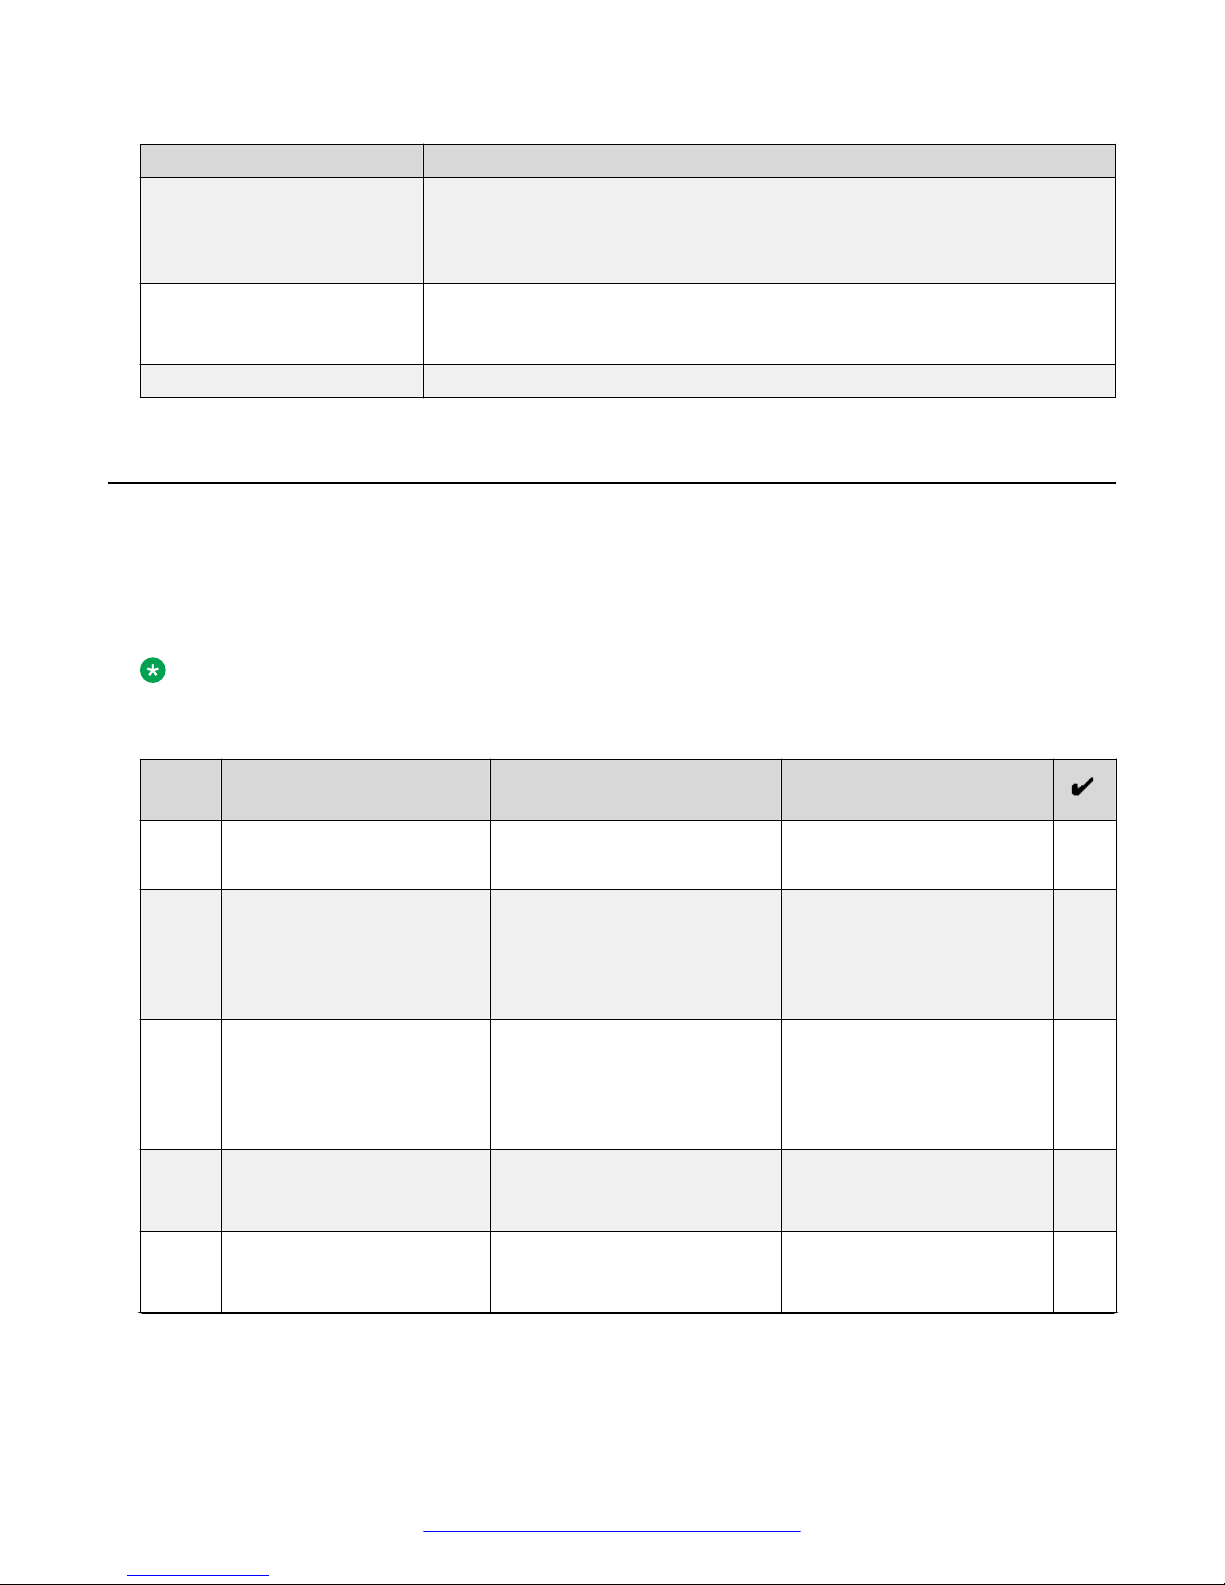
Installing the server in the rack
This installation checklist contains the principle steps that are necessary to install the server in the
rack. Each task refers to an existing HP document and the topic title(s) that contains the step-bystep procedures. Where applicable, additional information and clarifications appear in the Avaya
recommendation column. Perform each task in the order specified.
Note:
Although not used frequently, Avaya customers are required to have a monitor, keyboard, and
mouse available for use by servicing technicians.
No. Task Reference Avaya recommendation
1 Observe safety warnings ISI
UG: Rack warnings
2 Examine contents of
shipping container (Avaya
provided equipment)
3 Verify that the rack is
installed according to the
manufacturer's instructions
and in accordance with all
local codes and laws
4 Examine installation
environment (customer
provided equipment)
5 Verify that the rack is
grounded in accordance
with local electrical code.
UG: Contents of the server
shipping carton
UG: Optimum environment
UG: Electrical grounding
requirements
Ensure that the 6-digit
material code on the order
matches the 6-digit material
code on the shipping
container.
10 Installing the HP DL360 G7 Server January 2012
Table continues…
Comments on this document? [email protected]
Page 11
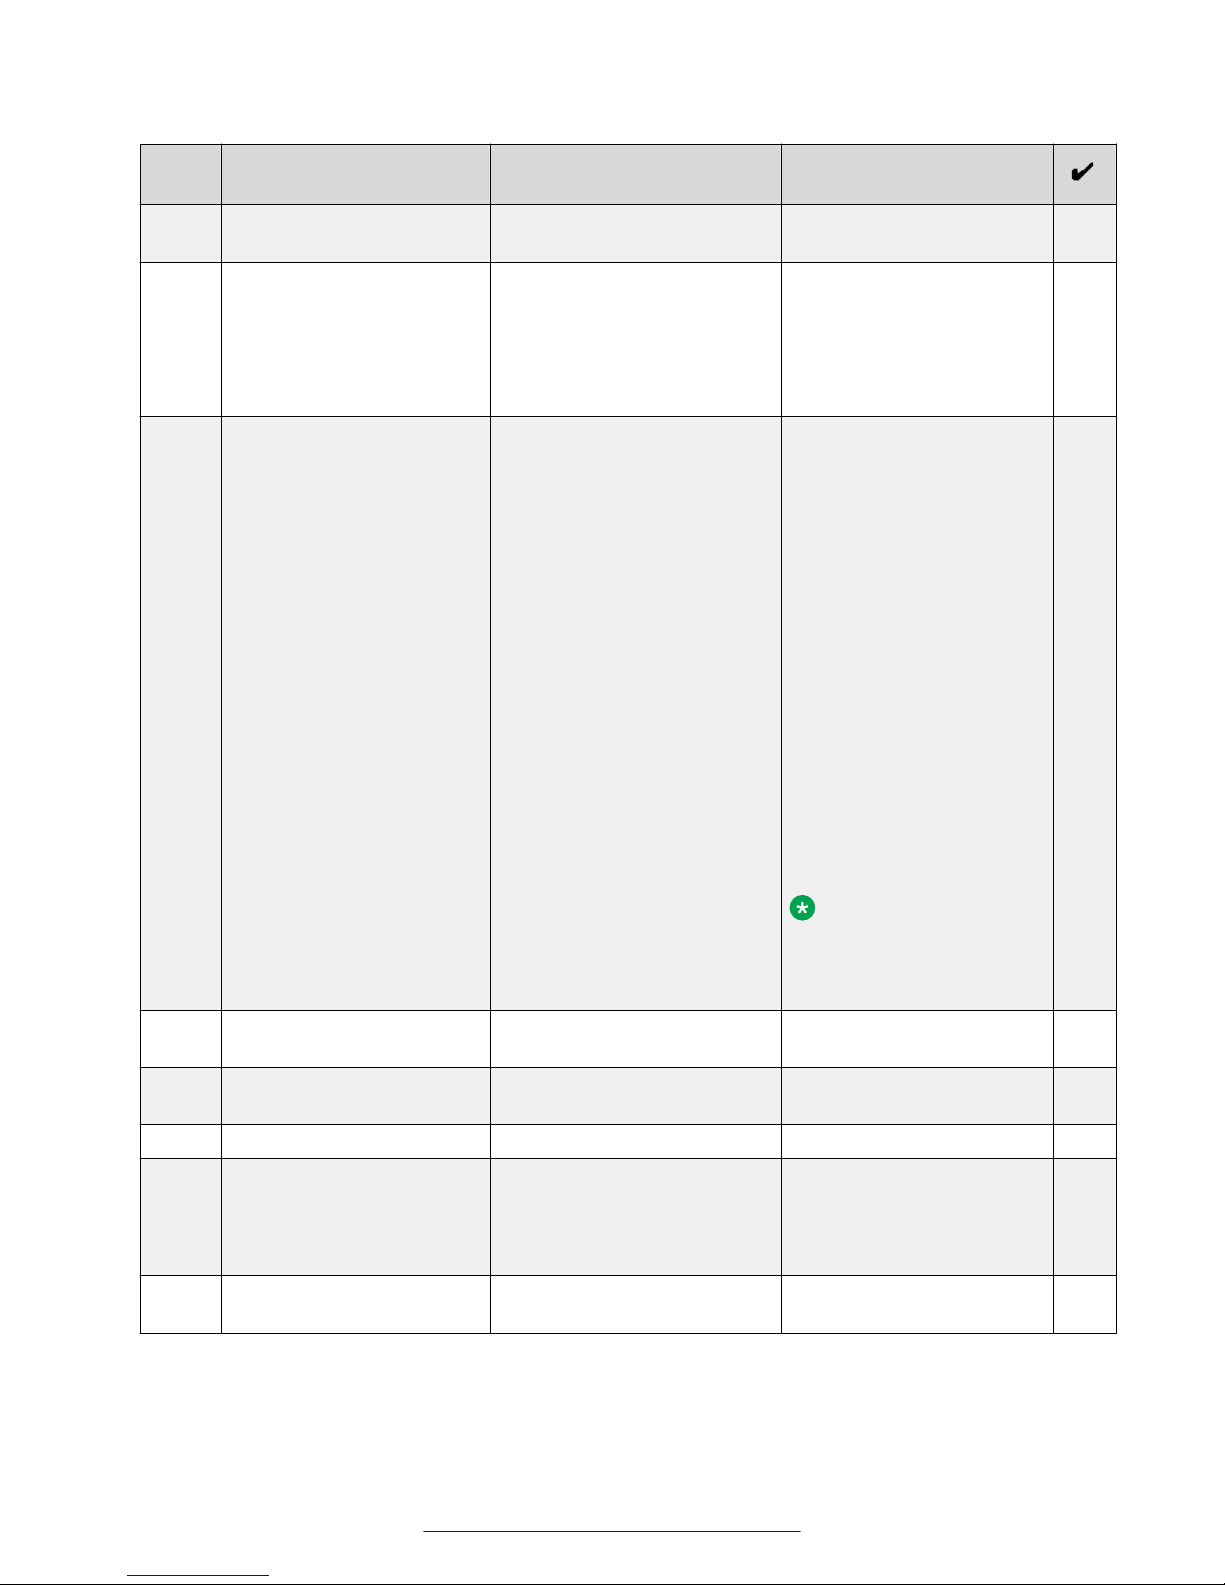
Installing the server in the rack
No. Task Reference Avaya recommendation
6 Remove the cabinet doors,
if necessary.
7 Determine and plan the
vertical spacing of the
servers in the frame.
Note that air flows into the
front of the server and out
the air vents located on the
top surface of the server
chassis. A 1U spacing is
sufficient.
8 Attach the rails to the rack. The rails included with the
server will accommodate
most square-hole racks. If
these rails do not fit the
rack, the customer must
provide rails or a shelf for
rack installation. Also, the
rails included with the server
might not work with roundhole racks, in which case
the customer can obtain
rails and/or a shelf from any
distributor, for example
http://
www.racksolutions.com/.
The customer-provided rails
and rack must be on site
prior to the first day of
installation.
9 Attach the server to the
rack.
UG: Installing the server into
the rack
10 (Optional) Install the cable
management arm.
11 Connect to the network.
12 Connect the power cord(s). SP: Connecting the power
cord to the power supply
UG: Powering up and
configuring the server
13 Power up the server. UG: Powering up and
configuring the server
Note:
The customer is
responsible for any
rack screws.
January 2012 Installing the HP DL360 G7 Server 11
Comments on this document? [email protected]
Page 12

Index
C
checklist
installation .....................................................................10
D
documentation
document set .................................................................. 6
downloading ................................................................... 5
how to use this document ...............................................5
H
HP DL360 G7
baseline specifications, configuration, and options ........ 8
HP DL360 G7 Server
back view ........................................................................7
electrical specifications ...................................................9
environmental specifications .......................................... 9
front view ........................................................................ 6
physical specifications ....................................................
power specifications ....................................................... 9
HP DL360 G7 Server overview ..............................................5
9
12 Installing the HP DL360 G7 Server January 2012
Comments on this document? [email protected]
 Loading...