

Page 1
ProCurve Radio Port 230
P r o C u r v e R a d i o P o r t 2 1 0
http://www.procure.com
December 2005
DRAFTv.12
Radio Port Install Guide
Page 2

© Copyright 2005 Hewlett-Packard Development Company, L.P.
The information contained herein is subject to change without
notice.
This document contains proprietary information, which is
protected by copyright. No part of this document may be
photocopied, reproduced, or translated into another
language without the prior written consent of HewlettPackard.
Publication Number 5991 3780
Applicable Products
HP ProCurve Radio Port 230
HP ProCurve Radio Port 210
J9006A
J9004A
Disclaimer
HEWLETT-PACKARD COMPANY MAKES NO WARRANTY
OF ANY KIND WITH REGARD TO THIS MATERIAL,
INCLUDING, BUT NOT LIMITED TO, THE IMPLIED
WARRANTIES OF MERCHANTABILITY AND FITNESS
FOR A PARTICULAR PURPOSE. Hewlett-Packard shall not
be liable for errors contained herein or for incidental or
consequential damages in connection with the furnishing,
performance, or use of this material.
The only warranties for HP products and services are set
forth in the express warranty statements accompanying
such products and services. Nothing herein should be
construed as constituting an additional warranty. HP shall
not be liable for technical or editorial errors or omissions
contained herein.
Hewlett-Packard assumes no responsibility for the use or
reliability of its software on equipment that is not furnished
by Hewlett-Packard.
Trademark Credits
Windows NT®, Windows®, and MS Windows® are US
registered trademarks of Microsoft Corporation.
Warranty
See the Customer Support/Warranty booklet included with
the product.
A copy of the specific warranty terms applicable to your
Hewlett-Packard products and replacement parts can be
obtained from your HP Sales and Service Office or
authorized dealer.
Page 3

Introduction
The ProCurve Radio Port 230 and ProCurve Radio Port 210, components of the ProCurve Wireless LAN System, link
wireless 802.11a/b/g devices to the Ethernet network through a wireless services-enabled switch. These devices are
to be used with the HP ProCurve Switch 5300xl with a ProCurve Wireless EDGE Services xl Module or other
compatible wireless services-enabled switch products. These Radio Ports are designed to be simple plug-and-play
devices that require no individual device configuration before being installed into a network. All Radio port
configurations, including country-specific settings, radio channels, radio power, SSID settings, security settings,
management information, and Radio Port firmware is provided through the wireless services-enabled switch.
NOTE: Before installing Radio Ports, a ProCurve wireless services-enabled switch (such as the ProCurve Switch
5300xl with Wireless EDGE Services xl Module installed) should be deployed, configured and operating in a Normal
mode. See the “ProCurve Wireless EDGE Services xl Module Getting Started Guide” for details.
ProCurve Radio Port 230 and 210 Package Contents
• ProCurve Radio Port 230 or Radio Port 210
• Two wall mount screws
• Two wall anchors
• Radio Port Install Guide
• Customer Support/Warranty booklet
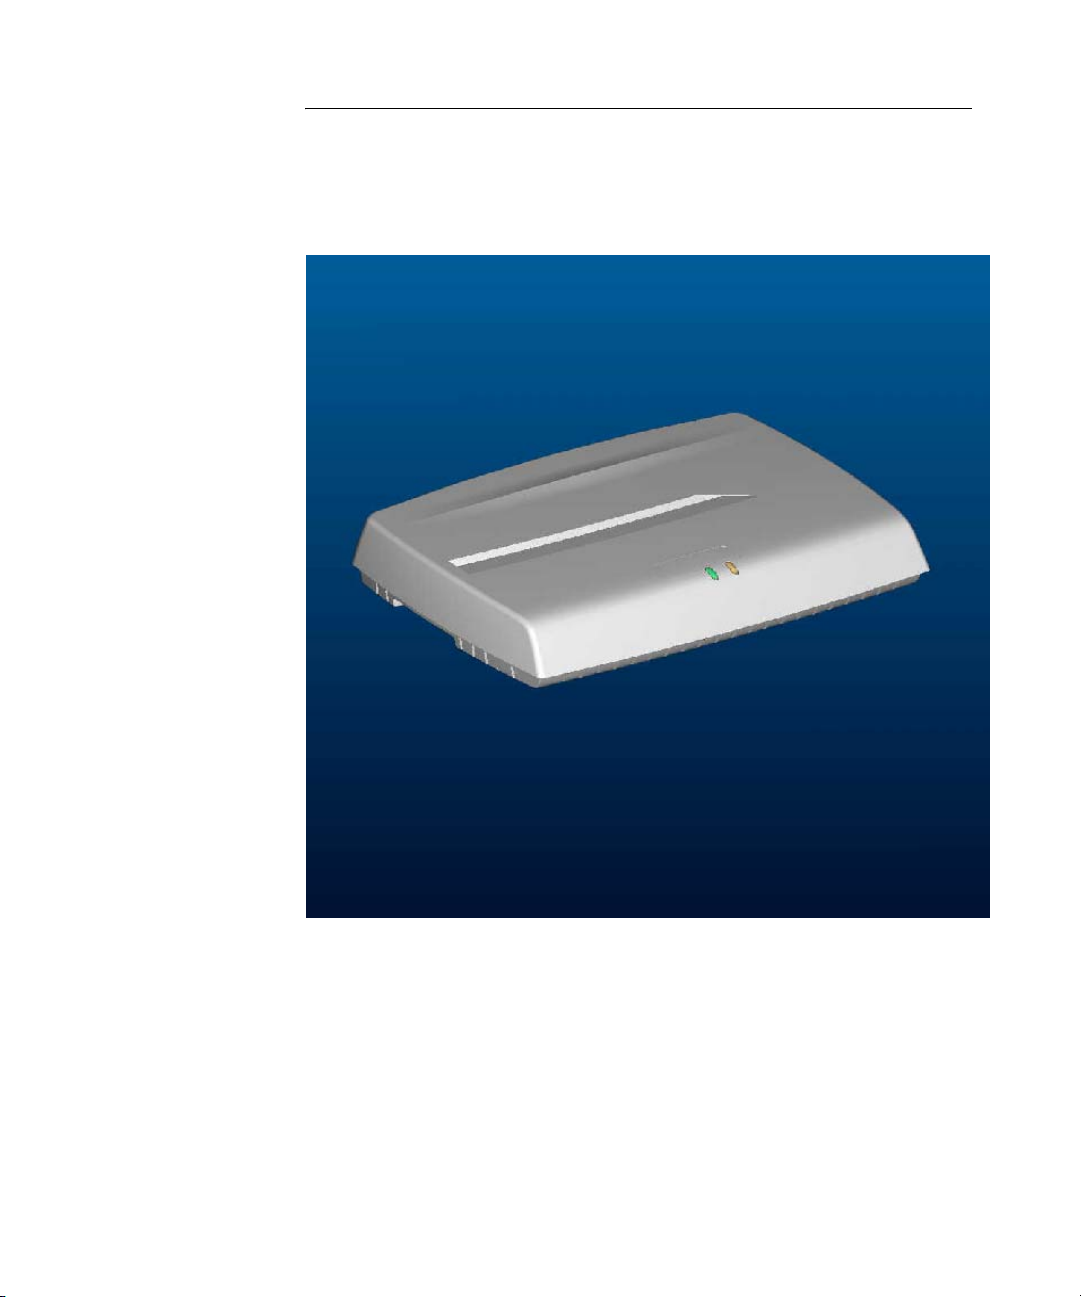
Description
The ProCurve Radio Port 230 is a dual-radio IEEE 802.11-compliant device supporting simultaneous 802.11a and b/g
wireless Ethernet connections. It contains two embedded 802.11 b/g (2.4 GHz) omni directional diversity antennas,
and two embedded 802.11a (5.4 GHz) omni directional diversity antennas.
The ProCurve Radio Port 210 is a single radio IEEE 802.11-compliant device supporting 802.11 b/g wireless Ethernet
connections. It contains two embedded 802.11 b/g (2.4 GHz) omni directional diversity antennas.
Both Radio Ports are designed for installation in office environments, either using the wall mount or suspendedceiling T-Bar mountings built into the underside of the plastic case. Each Radio Port has one RJ-45 connector
supporting 10/100 Ethernet and requires power from any UL-listed, 802.3af-compatible Power over Ethernet (PoE)
switch or power injector.
Technical Specifications
Operating Voltage 48VDC (from 802.3af-compliant power source)
Operating Current 148mA (typical)
Power 7W (typical)
Operating Temperature 32 to 104° F (0 to 40° C)
Non-Operating/Storage Temperature -40°F to 158°F (-40 to 70°C )
Operating Humidity 5 to 95% (non-condensing)
Non-Operating/Storage Humidity 5 to 95% (non-condensing)
Operating Altitude (max) 10,000 ft (3,048 m)
Non-Operating/Storage Altitude 15,000ft.(4,572 m)
Dimensions & Weight
Length 249.2mm (9.81in.)
Width 174.9mm (56.88in.)
Height 42.4mm (1.67in.)
Radio Port 230 Weight 0.55kg (1.214lbs)
Radio Port 210 Weight 0.50kg (1.096lbs)
Features
• High-performance 802.11-compliant radios
3
Page 4
• Embedded omni directional diversity antennas
• Integrated 10/100 Base TX RJ-45 port
• Two LED indicators
• Safety wire tie point
• Lap-style lock port
• Slots for wall mounting
• Clips for mounting on a suspended ceiling T-Bar
LEDs
Radio Characteristics
The ProCurve Radio Port 230 comprises two 802.11 radios: (1) a 802.11 b/g radio operating in the 2.4 to 2.5 GHz band
and (2) an 802.11a radio operating in the 4.9 to 5.875 GHz band. The ProCurve Radio Port 210 has a single 802.11b/
g radio. Both units contain two embedded 2.4-2.5GHz omni-directional diversity antennas and the Radio Port 230 also
contains two embedded 4.9-5.875 GHz omni-directional diversity antennas.
The following table lists the 802.11-compliant operating modes. The three supported 802.11g modes are
simultaneous CCK and OFDM, CCK only, or OFDM only.
Device Mbps Data Rate Support Utilizing Diversity GHz
802.11a 6, 9, 12, 18, 24, 36, 48, 54 OFDM Transmit and receive 4.9 to 5.875 range
802.11b/g 1, 2, 5.5, 11 CCK
6, 9, 12, 18, 24, 36, 48, 54 OFDM
Transmit and receive 2.4 to 2.5 ISM range
Integrated RJ-45 Port
The ProCurve Radio Port 230 and 210 has one RJ-45 connector supporting a full-duplex 10/100 Base-TX Ethernet port
and requires IEEE 802.3af-compliant Power-over-Ethernet (PoE) from an external source such as a PoE switch or
power injector. This Ethernet port is configured as an MDI port and can be connected to any MDIX switch port using
standard straight-through CAT-5 Ethernet cables. For details on cable pinouts, see the Appendices of the 'Installation
and Getting Started Guide' for your ProCurve switch. Installers can use a single CAT-5 cable to supply both Ethernet
connectivity and power to the Radio Port allowing these Radio Ports to be installed up to 100 m (300 ft.) from a PoEcompliant 10/100 Ethernet port. There is no additional power supply required.
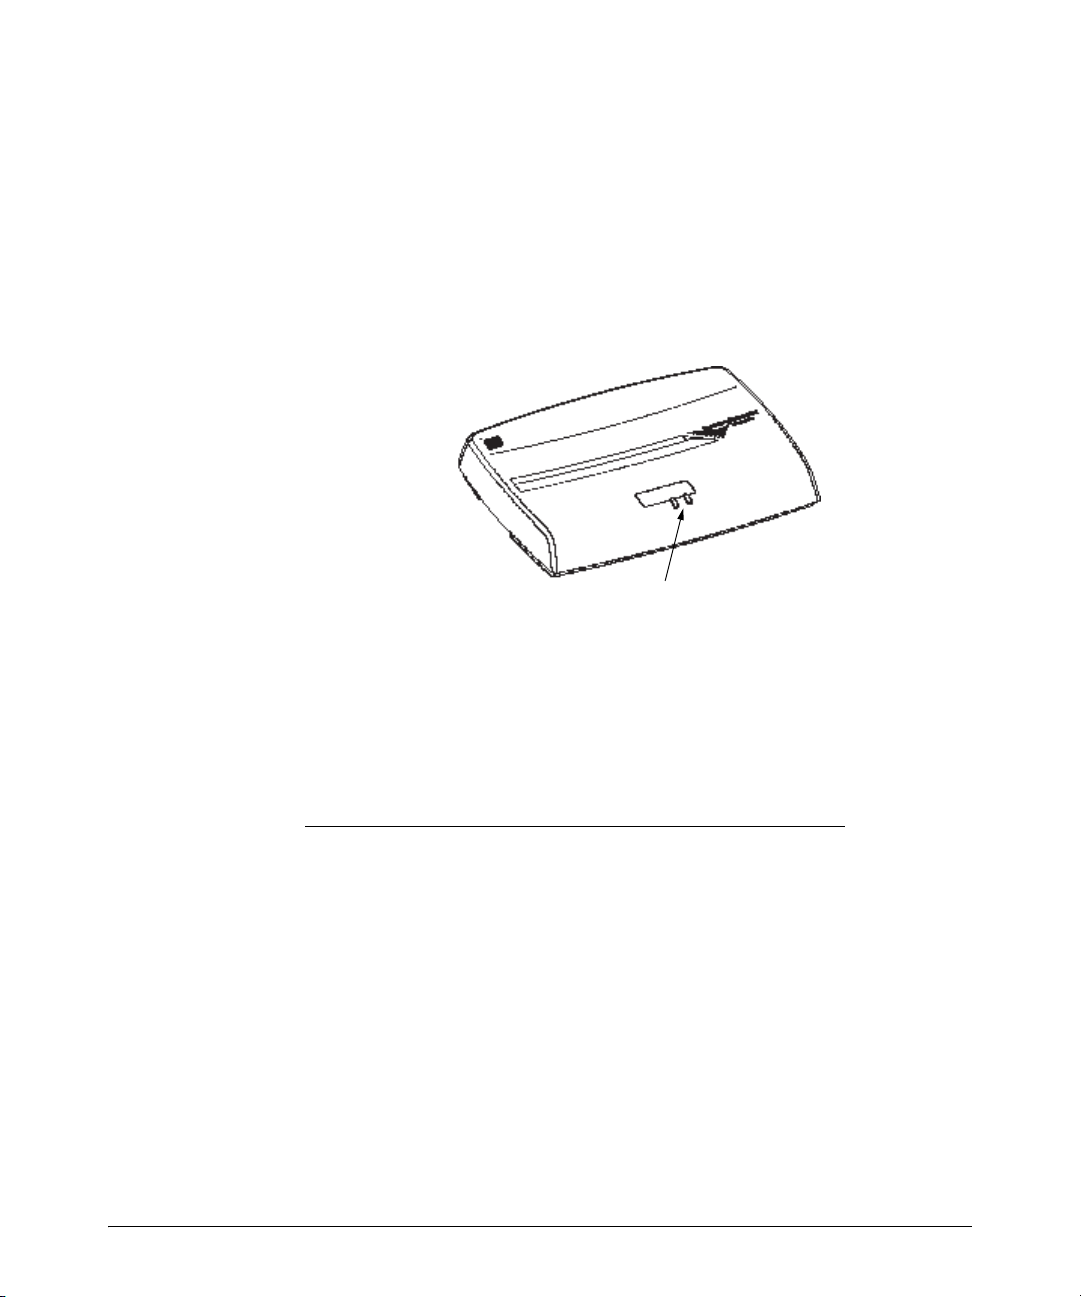
LED Indicators
Each Radio Port has LED indicators on the front of the case that visually display the status of the device. The LED
indicators display connection status and error conditions, as well as network activity for the individual radios in the
Radio Port.
Radio Port 230 LED Indicators
4
Page 5

The Radio Port 230 has two LEDs indicators displaying connection status, error conditions, and networking
activity for each of the two radios. Operation is as follows:
Startup:
Radio Port Startup occurs immediately following the application of PoE power, or following a power or
software reset.
1. Both GREEN and AMBER LEDs light steadily for several seconds, while the Radio Port performs an
internal self-test.
2. The AMBER LED then flashes 3 times per second, while the GREEN LED is off. This indicates that the
Radio POrt is attempting to communicate to a compatible wireless services-enabled switch.
3. Both LEDs then go off for a moment, followed by both LEDs lighting steadily for a few seconds.
4. After this sequence, assuming no error conditions have occurred, the Radio Port will enter Normal
operation mode. This means that the Radio Port has successfully communicated with and been
adopted by a wireless services-enabled switch. If this startup sequence repeats itself, then it is likely
that the Radio Port is unable to contact a compatible wireless services-enabled switch, and the
installer should review the Troubleshooting section below.
Normal Operation:
Once the Radio Port has established a connection to a compatible wireless services-enabled switch, the
Radio Port will begin normal operation. During normal operation, the GREEN LED indicates status of the
802.11 b/g radio, and the AMBER LED indicates status of the 802.11a radio.
•Without Wireless Traffic: Each LED will briefly flash once every 5 seconds, to indicate that power is
on, and the Radio Port is communicating normally to its wireless services-enabled switch. The flashing
may not be synchronous between the two LED indicators.
•With Wireless Traffic: Each LED will briefly flash more frequently than once every 5 seconds, and in an
irregular fashion, to represent wireless traffic on that radio.
Radio Error Mode:
• The GREEN LED flashes on and off steadily once per second if an error prevents the 802.11b/g radio
from operating normally.
• The AMBER LED flashes on and off steadily once per second if an error prevents the 802.11a radio
from operating normally.
Radio Port 210 LED Indicators
The Radio Port 210 has two LEDs indicators displaying connection status, error conditions, and networking
activity for its 802.11 b/g radio. Operation is as follows:
Startup Radio:
•Operation of the indicators is identical to the Radio Port 230 during Startup.
Normal Operation:
•During Normal Operation, the GREEN LED will flash to indicate connection and traffic on the 802.11b/
g radio, similar to the Radio Port 230. The AMBER LED will remain off.
Radio Error Mode:
•The GREEN LED flashes on and off steadily once per second if an error prevents the 802.11b/g radio
from operating normally.
Installation Instructions.
The ProCurve Radio Port 230 and 210 can be mounted either on a wall or on a suspended ceiling T-bar. The Radio Port
are not designed for mounting on a desk. The diagrams on the next page note the key installation features.
To prepare for installation, perform the following steps:
5
Page 6
1. Match the model number on the purchase order with the model numbers in the packing list and on the case
of the device shipped.
2. Verify that the contents of the box include the intended ProCurve Radio Port 230 or 210 and mounting
hardware:
Radio Port Item Notes
230 J9006A 802.11a & 802.11b/g integrated antenna configuration.
210 J9004A 802.11b/g integrated antenna configuration.
3. Review site survey and network analysis reports to determine the location and mounting position for the
ProCurve Radio Port 230 and 210.
4. Connect a CAT-5 cable to a compatible 802.3af power source and run the cable to the installation site. Ensure
that there is sufficient slack on the cable to perform the installation steps.
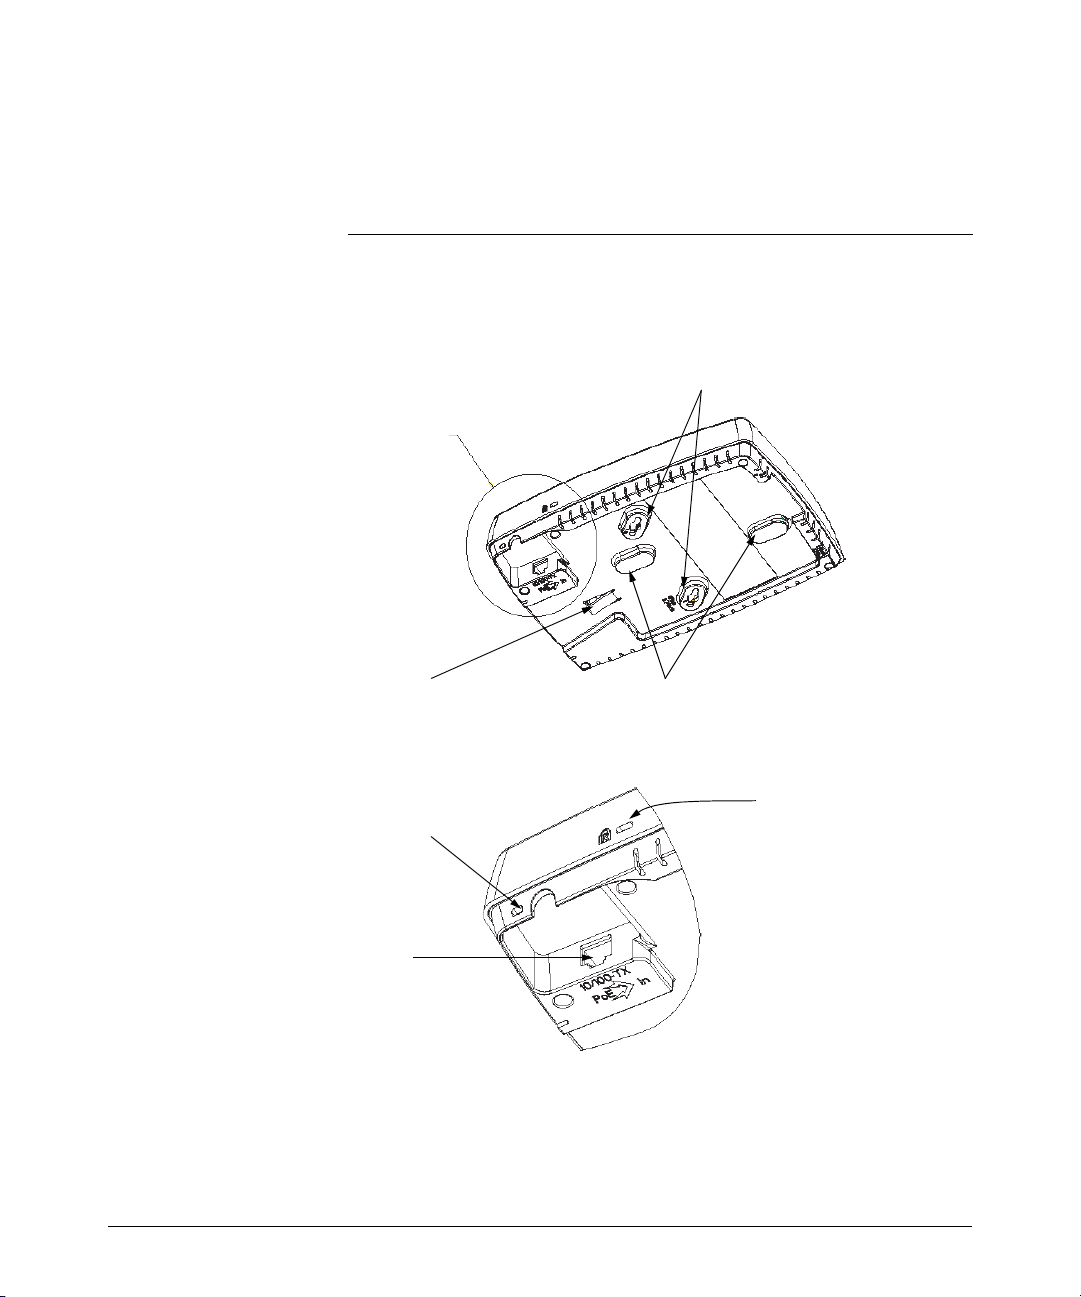
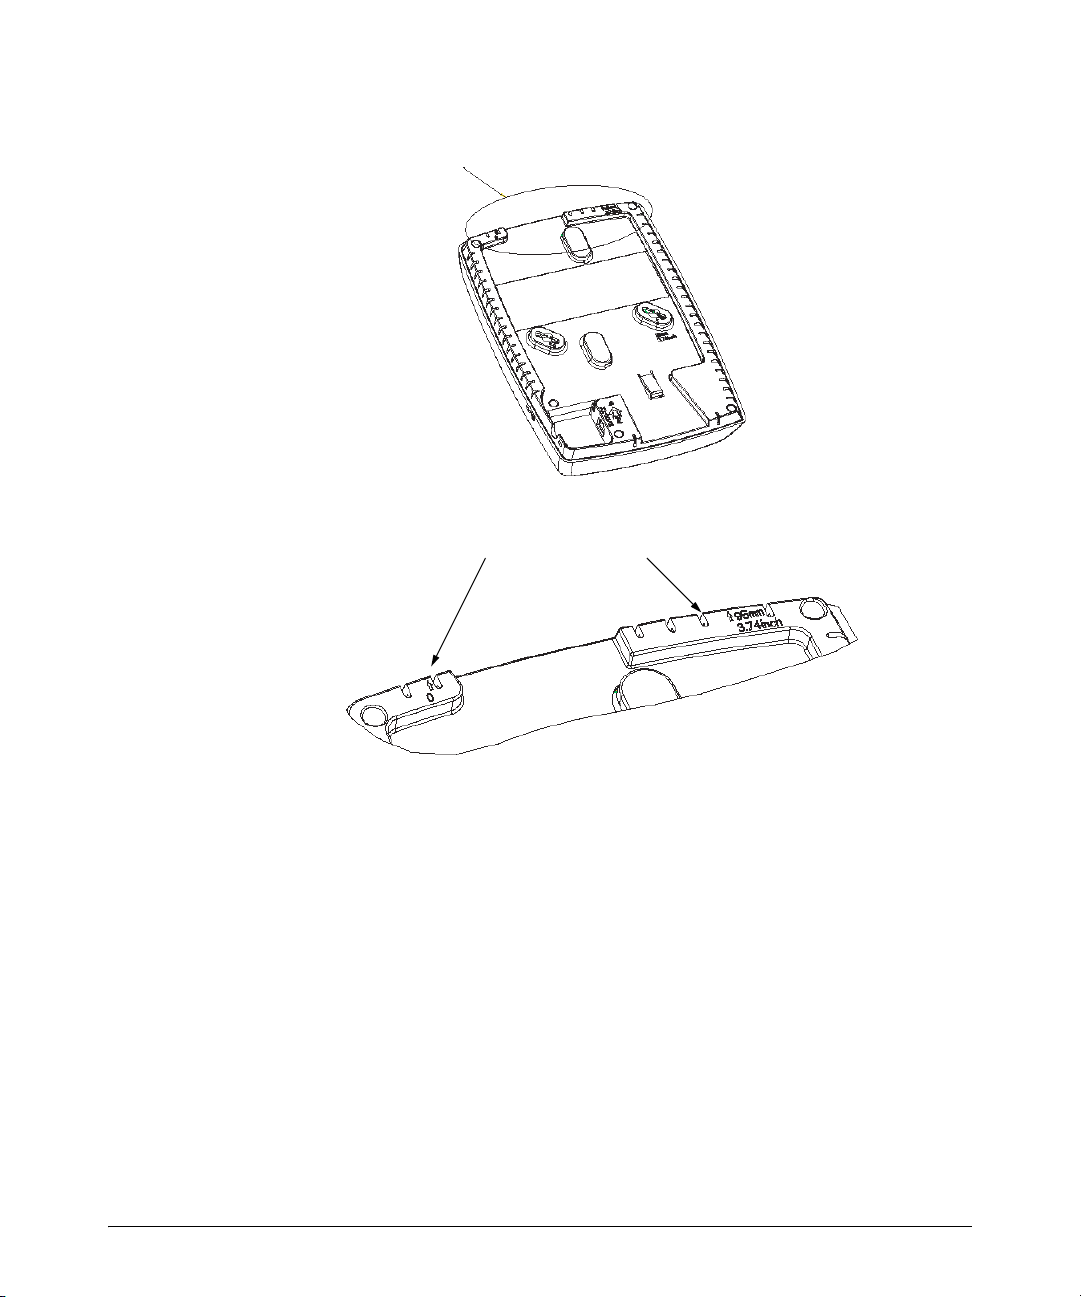
Wall Mount Slot
See Detail Below
T-Bar Retaining Clip
T-Bar Suspension Clips
Lock Port
Safety Wire Tie Point
RJ-45 Port
Wall Mount
6
Page 7
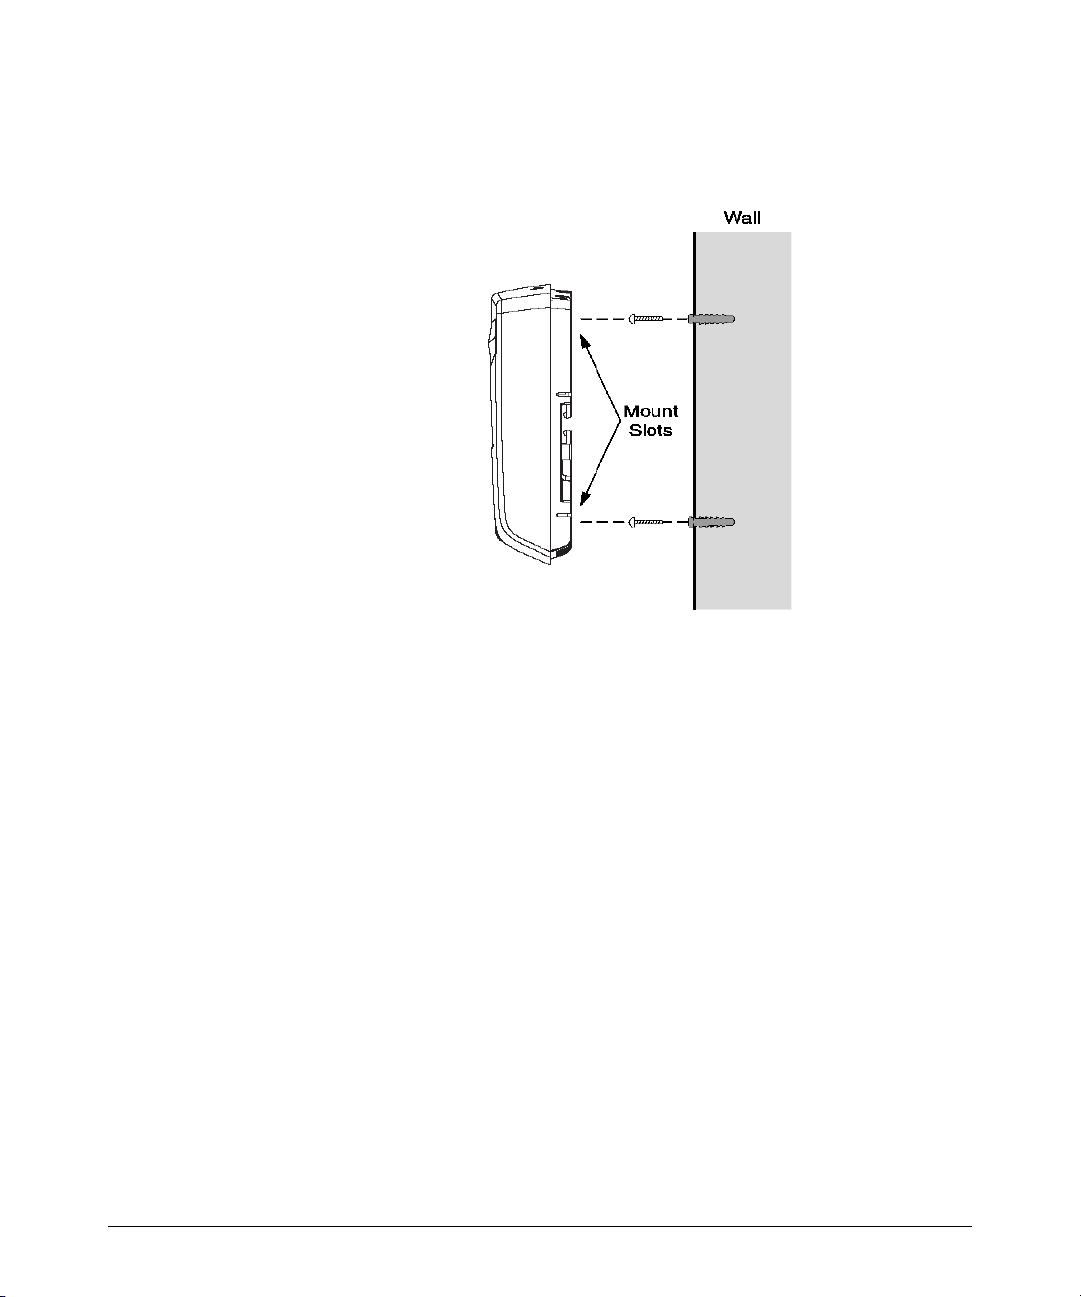
Wall mounting consists of hanging the ProCurve Radio Port 230 or 210 along its width or length using the pair of wideshoulder screws provided and mounting slots on the underside of the Radio Port. The ProCurve Radio Port 230 or 210
can be mounted onto any wood, plaster, or cement wall surface using the provided wall anchors when necessary. The
illustration shows a horizontal mount.
Wall Mount Hardware
• Two wide-shoulder Phillips pan head self-tapping screws.
• Two wall anchors.
• Safety wire (recommended) and security cable (optional)
In the event that the original mounting screws are lost, the following screws can be used instead: ANSI Standard)
#6-18 X 0.875in. Type A or AB Self-Tapping Screw, or (ANSI Standard Metric) M3.5 X 0.6 X 20mm Type D SelfTapping Screw.
Wall Mount Procedure
1. Lightly mark a vertical line on the wall at the location where the midline of the Radio Port is to be located.
2. Using the alignment arrows on one edge of the Radio Port case as guides, move the edge of the Radio Port to the
midline from step 1. and mark the two points on the midline for the location of the mounting screws. (See diagrams
below)
3. At each of the two points, drill a hole in the wall, insert an anchor (if required), screw the wall mounting screw
into the anchor and stop when there is 2 mm remaining between the screw head and the wall
Note: When pre-drilling holes, the recommended hole size is 3mm (0.125 or 1/8 in.) if the screws are going directly
into the wall and 6mm (0.25 or 1/4 in.) if the provided wall anchors are being used.
4. If required, loop a safety wire, between 1.0 mm (.04in.) and 1.6 mm (.0625in.) in diameter, through the safety wire
tie point and secure the loop. Attach the opposite end of the safety wire to a secure point on the wall.
5. If required, install and attach a security cable to the Radio Port's lock port. The lock port, compatible with laptopstyle security cables, is on the side of the case. Attach the opposite end of the security cable to a secure, stationary
point.
6. Plug the Ethernet cable to the Radio Port's RJ-45 port and connect the opposite end of the cable to a switch with
an 802.3af compatible power source. The Ethernet cable can be tucked inside the cable recess on the underside
of the Radio Port case for a completely clean installation. See diagram below.
7. Place the middle of each of the case's mounting slots over the mounting screw heads.
8. Slide the case down along the mounting surface to hang the mounting slots on the mounting screws.
9. Verify the Radio Port has power by observing that the LED indicators are lit or flashing.
7
Page 8
See Detail Below
U
lli
se these alignment arrows to mark the wall in preparation for insta
ng mounting screws
8
Page 9

RJ45 Wiring Options
The Radio Port case is designed to accommodate multiple options for routing the RJ-45 cable.
Cable exits vertically
Cable exits horizontally
RJ-45 cable tucked into cable recess and routed through wall or tile
RJ-45 cable
connection
9
Page 10

Suspended Ceiling Tile T-Bar Mount
Mounting the Radio Port 230 or 210 to a suspended ceiling T-Bar grid consists of attaching the Radio Port to the
underside of a T-Bar in a suspended ceiling grid, and twisting the Radio Port to lock the case onto the T-Bar.
Ceiling Mount Hardware
• Safety wire (recommended) and security cable (optional)
Ceiling Mount Procedure
1. Lift the ceiling tiles around the T-Bar where the Radio Port is to be installed.
2. If required, loop a safety wire, between 1.01mm (.04in.) and 1.58mm (.0625in.) in diameter, around the safety
wire tie point and secure the loop. Attach the opposite end of the safety wire to a secure point on the ceiling
or T-bar grid.
3. If required, install and attach a security cable to the Radio Port's lock port. The lock port, compatible with
laptop-style security cables, is on the side of the Radio Port case. Secure the opposite end of the security
cable to a secure, stationary point on the ceiling.
4. Plug the Ethernet cable into the Radio Port's RJ-45 jack and connect the opposite end of the cable to a switch
with an 802.3af-compatible power source. Thread the Ethernet cable through the suspende d ceiling T-Bar grid
on the side of the T-Bar where the top of the Radio Port will be located after installation.
5. Position the Radio Port so the back of the Radio Port faces the bottom of the T-Bar. The Radio Port's RJ-45 jack
should be positioned on the same side of the T-Bar as the Ethernet cable descending from above the ceiling.
Position the Radio Port case so that the T-Bar fits into the channel formed into the underside of the Radio Port
case (see diagram).
6. To install the Radio Port on the T-Bar, slide the Radio Port so that the T-Bar Suspension Clip on the opposite
side of the Radio Port case from the RJ-45 connector slips over the T-Bar. Then rotate the Radio Port slightly
(approximately 15 degrees), to lock the remaining T-Bar Suspension Clip into place on the T-Bar. (see diagram).
The T-Bar Retaining Clip will click into place as the Suspension Clips fasten onto the T-Bar.
7. Verify the Radio Port has power by observing the LED indicators
8. Tuck the Ethernet cable into the cable recess on the underside of the Radio Port so that the cable lies next to
the T-Bar. Replace the ceiling tiles around the T-Bar to complete the installation.
T-Bar Suspension Clip (Lock first)
10
T-Bar Suspension Clip (Lock second)
T-Bar Retaining Clip
Page 11

To Remove the Radio Port from the T-Bar
1. Lift the ceiling tiles away from the T-Bar to which the Radio Port is attached.
2. Using your finger, depress the T-Bar Retaining Clip that locks the Radio Port to the T-Bar
3. Rotate the Radio Port counter clock-wise to release the T-Bar from the Radio Port’s T-Bar Suspension Clips.
Troubleshooting Radio Port Installation
This section describes how to troubleshoot the installation of your ProCurve Radio Port primarily from a hardware
perspective. You can perform more in-depth troubleshooting of your wireless LAN system from the console or web
UI on your wireless services-enabled ProCurve switch. For more information on software configuration or troubleshooting, see the "ProCurve Wireless EDGE Services xl Module Getting Started Guide" for details.
Basic troubleshooting relies on the LED indicators to diagnose the condition of the Radio Port. The table below shows
LED patterns on the Radio Port that indicate problem conditions.
LED Error Indicators
Off steadily while Ethernet cable is
linked to a PoE source. Remains off
even when Radio Port is disconnected
from Ethernet cable and reconnected.
Both GREEN and AMBER LED Indicators light steadily for several seconds,
followed by the AMBER LED flashing steadily on and off three times a second for
several seconds, then this cycle repeats itself continuously.
Flashes on and off steadily once per
second
GREEN LED AMBER LED Diagnostic Tips
Off steadily while Ethernet cable is
linked to a PoE source. Remains off
even when Radio Port is disconnected
from Ethernet cable and reconnected.
*
Flashes on and off steadily once per
*
second
* This LED Indicator is not important for this diagnosis
Startup Error Checklist
Startup errors occur when the Radio Port is unable to communicate with a compatible wireless services-enable switch,
or when the Radio Port successfully communicates to a compatible switch but the switch is not able to adopt and
manage the Radio Port. The following steps can be used to determine the different circumstances that may be
preventing the Radio Port from being adopted by the switch and operating normally.
1. The network connection between the Radio Port and the wireless services-enabled switch has been disrupted.
Verify that network connectivity between the Ethernet cable and the wireless services-enabled switch by
connecting another device, such as a laptop, to the Ethernet cable and confirming network connectivity to the
switch. Verify that the Ethernet port to which the Radio Port is connected has not been disabled, and if 802.1x
port security is turned on, that the 802.1x Port security is compatible with the Radio Port's 802.1x settings.The
network between the Radio Port and the wireless services-enabled switch has a Layer 3 compatibility issue
(e.g. the two devices are on different subnets.
Radio Port is not receiving PoE power. Verify that the Ethernet
cable is connected directly to an IEEE 802.3af-compatible PoE
source, and that all cable connections are tight and secure.
Verify that the PoE source device is powered on, and that the
PoE function has been administratively enabled on the source
port connected to the Radio Port. Verify that the network cable
is functioning properly, or try a different cable. Try plugging
the Radio Port into another PoE power source, or connect
another PoE device to the port to confirm if the PoE source is
functioning appropriately.
The Radio Port is encountering a Startup Error, and is unable to
successfully communicate with or be adopted by a compatible
wireless services-enabled switch. See the Startup Error
checklist below for further diagnostic tips.
The Radio Port has encountered an error that prevents the
802.11b/g radio from operating normally.
(Radio Port 230 only) The Radio Port has encountered an error
that prevents the 802.11a radio from operating normally.
11
Page 12

2. The network between the Radio Port and the wireless services-enabled switch has a Layer 2 compatibility issue
(e.g. the two devices are on different VLANs.)
3. The wireless services-enabled switch may not be configured properly. In the case of the ProCurve Switch 5300xl,
verify that the Wireless EDGE Services xl Module is properly installed, configured, and operational. In particular,
verify that the wireless services' country-code setting has been properly configured, as this setting must be
configured to enable the wireless service to function. Refer to the "ProCurve Wireless EDGE Services xl Module
Getting Started Guide" for details.
4. The wireless services-enabled switch may not be functioning normally. Refer to the "ProCurve Wireless EDGE
Services xl Module Getting Started Guide" for details on verifying operation.
5. The wireless service may have adopted Radio Ports up to it's Authorization Level and may not be authorized to
adopt additional Radio Ports. Review the number of Radio Ports the wireless services-enabled switch has
currently adopted and compare this number to the number of Radio Ports authorized based on the licenses
installed.
CAUTION All HP ProCurve devices are designed to be compliant with the rules and regulations in locations they are sold and
will be labeled as required. Any changes or modifications to HP ProCurve Equipment, not expressly approved by HP,
could void the user’s authority to operate this device.
This device is to be used only with HP ProCurve Switch 5300xl with a ProCurve Wireless EDGE Services xl Module,
or other compatible wireless services-enabled switch. Information on configuration this device to operate in a
compliant manner can be found in the ProCurve 5300 xl Module Installation Guide.
HP Customer Service
If you are still having trouble with your Radio Port or ProCurve wireless services-enabled switch, Hewlett-Packard
offers support 24 hours a day, seven days a week through the use of a number of automated electronic services. See
the Customer Support/Warranty booklet that came with your Radio Port for information on how to use these services
to get technical support. The HP ProCurve web site, www.procurve.com also provides up-to-date support information
under product support. In addition, your HP-authorized network reseller can provide you with assistance, both with
services that they offer and with services offered by HP.
Before Calling Support.
To make the support process most efficient, before calling your networking dealer or HP Support, you first should
retrieve the following information
Information Item Information Location
• product identification • the front of the module,J9004A or J9006A
• product identification for the wireless services-enabled switch to which the Radio
Port is intended to connect, and any modules installed in that switch, if any
• the front of the switch
12
Page 13

Information Item Information Location
• details about the Radio Port's status and the
status of the wireless services-enabled
switch including the software (OS) version
of the switch and any installed modules, a
copy of the wireless services configuration,
• a copy of the switch Event Log,
• a copy of the switch status
• counters information
• copy of your network topology map, including network addresses assigned to the relevant devices
See your Warranty Booklet for the appropriate phone number in your area.
Service Information: For the latest version of this Guide, go to: http://www.procurve.com
• Switch console (Wireless Services Configuration Level): show command
• switch event Log
• Syslog server entry file, if configured
• your network records
Safety and Regulatory Statements
Safety Information
Documentation reference symbol. If the product is marked with this symbol, refer to the product
documentation to get more information about the product.
WARNING A WARNING in the manual denotes a hazard that can cause injury or death.
CAUTION A CAUTION in the manual denotes a hazard that can damage the equipment or create a non-compli-
ant condition.
Do not proceed beyond a WARNING or CAUTION notice until you have understood the hazardous
conditions and have taken appropriate steps.
Grounding
• If your LAN covers an area served by more than one power distribution system, be sure their safety
grounds are securely interconnected.
• LAN cables may occasionally be subject to hazardous transient voltages (such a s lightning or disturbances
in the electrical utilities power grid). Handle exposed metal components of the network with caution.
Servicing
There are no user-serviceable parts inside this product. Any servicing, adjustment, maintenance or repair must be
performed only by service trained personnel.
This product does not have a power switch; it is powered on when the LAN cable is plugged in.
13
Page 14

Regulatory Model Identification Number
For regulatory identification purposes, this product has been assigned a Regulatory Model Number (RMN). The
RMN for your product is RSVLC-0502. The RMN should not be confused with the marketing name (ProCurve Radio
Port 210, ProCurve Radio Port 230) or the Product Number (J9004A, J9006A).
Regulatory Statements
Notice for U.S.A.
Manufacturer's FCC Declaration of Conformity Statement
Tes ted to Co mply
with FCC Standards
Product No: J9004A, J9006A
FCC ID No: B94RSVLC-0502, B94RSVLC-0505
Regulatory Model No: RSVLC-0502
Manufacturer:: Hewlett-Packard Company
3000 Hanover Street
Palo Alto, CA 94394-1185 USA
Phone: 650-857-1501
For questions regarding this declaration, contact the Product Regulations Manager at the above address or phone
number.
This device complies with Part 15 of the FCC rules. Operation is subject to the following two conditions: 1) this
device may not cause harmful interference, and 2) this device must accept any interference received, including interference that may cause undesired operation.
This device has been tested and found to comply with the limits for a Class B digital device, pursuant to part 15 of
the FCC Rules. These limits are designed to provide reasonable protection against harmful interference in
a residential installation. This equipment generates, uses and can radiate radio frequency energy and, if
not installed and used in accordance with the instructions, may cause harmful interference to radio communications. However, there is no guarantee that interference will not occur in a particular installation. If
this equipment does cause harmful interference to radio or television reception, which can be determined
by turning the equipment off and on, the user is encouraged to try to correct the interference by one or
more of the following measures:
• Reorient or relocate the receiving antenna.
• Increase the separation between the equipment and the receiver.
• Connect the equipment into an outlet on a circuit different from that to which the receiver is connected.
• Consult the dealer or an experienced radio/television technician for help.
The FCC requires the user to be notified that any changes or modifications made to the device that are not expressly
approved by the Hewlett-Packard Company may void the user’s authority to operate the equipment.
14
Page 15

z The antenna(s) used for this transmitter must be installed to provide a separation
distance of at least 20 cm from all persons and must not be co-located or operating
in conjunction with any other antenna or transmitter.
Page 16

5 GHz Operation:
• "This device requires the user to properly enter the current country of operation during the initial setup
of the Radio Port. Once the country of operation has been entered, the Radio Port will automatically limit
the available channels, ensuring compliant operation in the selected country. Incorrectly entering the
country of operation may result in illegal operation and may cause h armful interference to other systems.
The user is obligated to ensure the device is operating according to the channel limitations, indoor/
outdoor restrictions and license requirements for each European Community country as described in this
document. Information on configuring this device can be found in the ProCurve 5300xl Module Installation
Guide.
• "This device employs a radar detection feature required for European Community and EFTA country
operation in the 5GHz band. This feature is automatically enabled when the country of operation is
correctly configured for any European Community or EFTA country. The presence of nearby radar operation
may result in temporary interruption of operation of this device. The radar detection feature will
automatically restart operation on a channel free of radar.
• "This device is restricted to indoor use when operated in EU and EFTA countries using the 5.15-5.35GHz
band (Channels 36, 40, 44, 48, 52, 56, 60 and 64). See the table below for the allowed 5GHz channels
in each band.
Operation Using 5 GHz Channels in the European Community
The user must ensure operation of this device is in conformance with European National spectrum usage laws as
shown below and elsewhere in this document
.
Frequency Band
(MHz)
Allowed Channels Usage Maximum EIRP
(mW)
5150-5250 36,40,44,48 Indoor Use only 200 23
5250-5350 52,56,60,64 Indoor Use only 200 23
5470-5725 100, 104, 108, 112, 116, 120, 124, 128, 132,
136, 140
Indoor or outdoor
use
1000 30
Maximum EIRP
(dBm)
16
Page 17

Notice for Canada
This device complies with the limits for a Class B digital device and conforms to Industry
Canada standard ICES-003. Products that contain a radio transmitter comply with Industry
Canada standard RSS210 and are labeled with an IC approval number.
Cet appareil numérique de la classe B est conforme à la norme ICES-003 de Industry Canada.
La radio sans fil de ce dispsitif est conforme à la certification RSS 210 de Industry Canada et
est étiquetée avec un numéro d'approbation IC.
This device complies with the Class B limits of Industry Canada. Operation is subject to the
following two conditions: 1) this device may not cause harmful interference, and 2) this device
must accept interference received, including interference that may cause undesired
operation.
17
Page 18

EU Declaration of Conformity
DECLARATION OF CONFORMITY
according to ISO/IEC Guide 22 and EN 45014
Manufacturer's Name: Hewlett-Packard Company
Manufacturer's Address: 8000 Foothills Blvd.
Roseville, CA 95747-5502
U.S.A.
declares, that the product
Product Name: HP Procurve Radio Port 210, 230
Product Number(s): J9004A, J9006A
Regulatory Model: RSVLC-0502
conforms to the following Product Specifications:
Safety: EN 60950-1:2001 / IEC 60950-1:2001
Health: EU 1999/519/EC
EMC: EN 55022:1998 +A1+A2 / CISPR 22:1997 +A1+A2 Class B
EN 301 489-1 V1.4.1 (2002-08)
EN 301 489-17 V1.2.1 (2002-08)
EN 60601-1-2:2001 / IEC 60601-1-2:2001
Radio: EN 300 328 V1.4.1 (2003-04)
EN 301 893 V1.2.3 (2003-08)
Supplementary Information:
The product herewith complies with the requirements of the Low Voltage Directive
73/23/EEC, the EMC Directive 89/336/EEC and the R&TTE Directive 1999/5/EC and
carries the CE marking accordingly.
1) The Product was tested in a typical configuration with a laptop computer.
1
18
Roseville, December 20 2005
European Contact: Your local Hewlett-Packard Sales and Service Office or Hewlett-Packard GmbH, Department
HQ-TRE, Herrenberger Straße 140, D-71034 Böblingen (FAX: + 49-7031-14-3143)
Page 19

Notice For Japan
Notice For Taiwan:
DGT LPD (Low Power devices) Statement
19
Page 20

Recycle Statements
Waste Electrical and Electronic Equipment (WEEE) Statements
Recycle Statements
Waste Electrical and Electronic
Equipment (WEEE) Statements
Disposal of Waste Equipment by Users in Private Household in the European Union
This symbol on the product or on its packaging indicates that this product must not be disposed of with
your other household waste. Instead, it is your responsibility to dispose of your waste equipment by
handing it over to a designated collection point for the recycling of waste electrical and electronic
equipment. The separate collection and recycling of your waste equipment at the time of disposal will
help to conserve natural resources and ensure that it is recycled in a manner that protects human health
and the environment. For more information about where you can drop off your waste equipment for
recycling, please contact your local city office, your household waste disposal service or the shop where
you purchased the product.
1
20
Likvidace zařízení soukromými domácími uživateli v Evropské unii
Tento symbol na produktu nebo balení označuje výrobek, který nesmí být vyhozen spolu s ostatním
domácím odpadem. Povinností uživatele je předat takto označený odpad na předem určené sběrné
místo pro recyklaci elektrických a elektronických zařízení. Okamžité třídění a recyklace odpadu
pomůže uchovat přírodní prostředí a zajistí takový způsob recyklace, který ochrání zdraví a životní
prostředí člověka. Další informace o možnostech odevzdání odpadu k recyklaci získáte na
příslušném obecním nebo městském úřadě, od firmy zabývající se sběrem a svozem odpadu nebo v
obchodě, kde jste produkt zakoupili.
Bortskaffelse af affald fra husstande i den Europæiske Union
Hvis produktet eller dets emballage er forsynet med dette symbol, angiver det, at produktet ikke må
bortskaffes med andet almindeligt husholdningsaffald. I stedet er det dit ansvar at bortskaffe kasseret
udstyr ved at aflevere det på den kommunale genbrugsstation, der forestår genvinding af kasseret
elektrisk og elektronisk udstyr. Den centrale modtagelse og genvinding af kasseret udstyr i forbindelse
med bortskaffelsen bidrager til bevarelse af naturlige ressourcer og sikrer, at udstyret genvindes på en
måde, der beskytter både mennesker og miljø. Yderligere oplysninger om, hvor du kan aflevere kasseret
udstyr til genvinding, kan du få hos kommunen, den lokale genbrugsstation eller i den butik, hvor du købte
produktet.
Page 21

Waste Electrical and Electronic Equipment (WEEE) Statements
Έ
Recycle Statements
Seadmete jäätmete kõrvaldamine eramajapidamistes Euroopa Liidus
See tootel või selle pakendil olev sümbol näitab, et kõnealust toodet ei tohi koos teiste
majapidamisjäätmetega kõrvaldada. Teie kohus on oma seadmete jäätmed kõrvaldada, viies need elektrija elektroonikaseadmete jäätmete ringlussevõtmiseks selleks ettenähtud kogumispunkti. Seadmete
jäätmete eraldi kogumine ja ringlussevõtmine kõrvaldamise ajal aitab kaitsta loodusvarasid ning tagada,
et ringlussevõtmine toimub viisil, mis kaitseb inimeste tervist ning keskkonda. Lisateabe saamiseks selle
kohta, kuhu oma seadmete jäätmed ringlussevõtmiseks viia, võtke palun ühendust oma kohaliku
linnakantselei, majapidamisjäätmete kõrvaldamise teenistuse või kauplusega, kust Te toote ostsite.
Laitteiden hävittäminen kotitalouksissa Euroopan unionin alueella
Jos tuotteessa tai sen pakkauksessa on tämä merkki, tuotetta ei saa hävittää kotitalousjätteiden mukana.
Tällöin hävitettävä laite on toimitettava sähkölaitteiden ja elektronisten laitteiden kierrätyspisteeseen.
Hävitettävien laitteiden erillinen käsittely ja kierrätys auttavat säästämään luonnonvaroja ja
varmistamaan, että laite kierrätetään tavalla, joka estää terveyshaitat ja suojelee luontoa. Lisätietoja
paikoista, joihin hävitettävät laitteet voi toimittaa kierrätettäväksi, saa ottamalla yhteyttä jätehuoltoon tai
liikkeeseen, josta tuote on ostettu.
Élimination des appareils mis au rebut par les ménages dans l'Union européenne
Le symbole apposé sur ce produit ou sur son emballage indique que ce produit ne doit pas être jeté avec
les déchets ménagers ordinaires. Il est de votre responsabilité de mettre au rebut vos appareils en les
déposant dans les centres de collecte publique désignés pour le recyclage des équipements électriques
et électroniques. La collecte et le recyclage de vos appareils mis au rebut indépendamment du reste
des déchets contribue à la préservation des ressources naturelles et garantit que ces appareils seront
recyclés dans le respect de la santé humaine et de l'environnement. Pour obtenir plus d'informations
sur les centres de collecte et de recyclage des appareils mis au rebut, veuillez contacter les autorités
locales de votre région, les services de collecte des ordures ménagères ou le magasin dans lequel vous
avez acheté ce produit.
Entsorgung von Altgeräten aus privaten Haushalten in der EU
Das Symbol auf dem Produkt oder seiner Verpackung weist darauf hin, dass das Produkt nicht über den
normalen Hausmüll entsorgt werden darf. Benutzer sind verpflichtet, die Altgeräte an einer
Rücknahmestelle für Elektro- und Elektronik-Altgeräte abzugeben. Die getrennte Sammlung und
ordnungsgemäße Entsorgung Ihrer Altgeräte trägt zur Erhaltung der natürlichen Ressourcen bei und
garantiert eine Wiederverwertung, die die Gesundheit des Menschen und die Umwelt schützt.
Informationen dazu, wo Sie Rücknahmestellen für Ihre Altgeräte finden, erhalten Sie bei Ihrer
Stadtverwaltung, den örtlichen Müllentsorgungsbetrieben oder im Geschäft, in dem Sie das Gerät
erworben haben
Απόρριψη άχρηστου εξοπλισμού από χρήστες σε ιδιωτικά νοικοκυριά στην Ευρωπαϊκή
νωση
Το σύμβολο αυτό στο προϊόν ή τη συσκευασία του υποδεικνύει ότι το συγκεκριμένο προϊόν δεν
πρέπει να διατίθεται μαζί με τα άλλα οικιακά σας απορρίμματα. Αντίθετα, είναι δική σας ευθύνη να
απορρίψετε τον άχρηστο εξοπλισμό σας παραδίδοντάς τον σε καθορισμένο σημείο συλλογής για την
ανακύκλωση άχρηστου ηλεκτρικού και ηλεκτρονικού εξοπλισμού
ανακύκλωση του άχρηστου εξοπλισμού σας κατά την απόρριψη θα συμβάλει στη διατήρηση των
φυσικών πόρων και θα διασφαλίσει ότι η ανακύκλωση γίνεται με τρόπο που προστατεύει την
ανθρώπινη υγεία και το περιβάλλον. Για περισσότερες πληροφορίες σχετικά με το πού μπορείτε να
παραδώσετε τον άχρηστο εξοπλισμό σας
γραφείο, την τοπική υπηρεσία διάθεσης οικιακών απορριμμάτων ή το κατάστημα όπου αγοράσατε το
προϊόν.
για ανακύκλωση, επικοινωνήστε με το αρμόδιο τοπικό
. Η ξεχωριστή συλλογή και
21
Page 22

Recycle Statements
A
A
A
V
Waste Electrical and Electronic Equipment (WEEE) Statements
Készülékek magánháztartásban történő selejtezése az Európai Unió területén
készüléken, illetve a készülék csomagolásán látható azonos szimbólum annak jelzésére szolgál,
hogy a készülék a selejtezés során az egyéb háztartási hulladéktól eltérő módon kezelendő. A
vásárló a hulladékká vált készüléket köteles a kijelölt gyűjtőhelyre szállítani az elektromos és
elektronikai készülékek újrahasznosítása céljából. A hulladékká vált készülékek selejtezéskori
begyűjtése és újrahasznosítása hozzájárul a természeti erőforrások megőrzéséhez, valamint
biztosítja a selejtezett termékek környezetre és emberi egészségre nézve biztonságos feldolgozását.
begyűjtés pontos helyéről bővebb tájékoztatást a lakhelye szerint illetékes önkormányzattól, az
illetékes szemételtakarító vállalattól, illetve a terméket elárusító helyen kaphat.
Smaltimento delle apparecchiature da parte di privati nel territorio dell'Unione Europea
Questo simbolo presente sul prodotto o sulla sua confezione indica che il prodotto non può essere
smaltito insieme ai rifiuti domestici. È responsabilità dell'utente smaltire le apparecchiature
consegnandole presso un punto di raccolta designato al riciclo e allo smaltimento di apparecchiature
elettriche ed elettroniche. La raccolta differenziata e il corretto riciclo delle apparecchiature da smaltire
permette di proteggere la salute degli individui e l'ecosistema. Per ulteriori informazioni relative ai punti
di raccolta delle apparecchiature, contattare l'ente locale per lo smaltimento dei rifiuti, oppure il negozio
presso il quale è stato acquistato il prodotto.
Nolietotu iekārtu iznīcināšanas noteikumi lietotājiem Eiropas Savienības privātajās
mājsaimniecībās
Šāds simbols uz izstrādājuma vai uz tā iesaiņojuma norāda, ka šo izstrādājumu nedrīkst izmest kopā ar
citiem sadzīves atkritumiem. Jūs atbildat par to, lai nolietotās iekārtas tiktu nodotas speciāli iekārtotos
punktos, kas paredzēti izmantoto elektrisko un elektronisko iekārtu savākšanai otrreizējai pārstrādei.
tsevišķa nolietoto iekārtu savākšana un otrreizējā pārstrāde palīdzēs saglabāt dabas resursus un
garantēs, ka šīs iekārtas tiks otrreizēji pārstrādātas tādā veidā, lai pasargātu vidi un cilvēku veselību.
Lai uzzinātu, kur nolietotās iekārtas var izmest otrreizējai pārstrādei, jāvēršas savas dzīves vietas
pašvaldībā, sadzīves atkritumu savākšanas dienestā vai veikalā, kurā izstrādājums tika nopirkts.
artotojų iš privačių namų ūkių įrangos atliekų šalinimas Europos Sąjungoje
Šis simbolis ant gaminio arba jo pakuotės rodo, kad šio gaminio šalinti kartu su kitomis namų ūkio
atliekomis negalima. Šalintinas įrangos atliekas privalote pristatyti į specialią surinkimo vietą elektros ir
elektroninės įrangos atliekoms perdirbti. Atskirai surenkamos ir perdirbamos šalintinos įrangos atliekos
padės saugoti gamtinius išteklius ir užtikrinti, kad jos bus perdirbtos tokiu būdu, kuris nekenkia žmonių
sveikatai ir aplinkai. Jeigu norite sužinoti daugiau apie tai, kur galima pristatyti perdirbtinas įrangos
atliekas, kreipkitės į savo seniūniją, namų ūkio atliekų šalinimo tarnybą arba parduotuvę, kurioje
įsigijote gaminį.
Verwijdering van afgedankte apparatuur door privé-gebruikers in de Europese Unie
Dit symbool op het product of de verpakking geeft aan dat dit product niet mag worden gedeponeerd bij
het normale huishoudelijke afval. U bent zelf verantwoordelijk voor het inleveren van uw afgedankte
apparatuur bij een inzamelingspunt voor het recyclen van oude elektrische en elektronische apparatuur.
Door uw oude apparatuur apart aan te bieden en te recyclen, kunnen natuurlijke bronnen worden
behouden en kan het materiaal worden hergebruikt op een manier waarmee de volksgezondheid en het
milieu worden beschermd. Neem contact op met uw gemeente, het afvalinzamelingsbedrijf of de winkel
waar u het product hebt gekocht voor meer informatie over inzamelingspunten waar u oude apparatuur
kunt aanbieden voor recycling.
22
Page 23

Waste Electrical and Electronic Equipment (WEEE) Statements
Recycle Statements
Pozbywanie się zużytego sprzętu przez użytkowników w prywatnych gospodarstwach
domowych w Unii Europejskiej
Ten symbol na produkcie lub jego opakowaniu oznacza, że produktu nie wolno wyrzucać do zwykłych
pojemników na śmieci. Obowiązkiem użytkownika jest przekazanie zużytego sprzętu do
wyznaczonego punktu zbiórki w celu recyklingu odpadów powstałych ze sprzętu elektrycznego i
elektronicznego. Osobna zbiórka oraz recykling zużytego sprzętu pomogą w ochronie zasobów
naturalnych i zapewnią ponowne wprowadzenie go do obiegu w sposób chroniący zdrowie człowieka
i środowisko. Aby uzyskać więcej informacji o tym, gdzie można przekazać zużyty sprzęt do
recyklingu, należy się skontaktować z urzędem miasta, zakładem gospodarki odpadami lub sklepem,
w którym zakupiono produkt.
Descarte de Lixo Elétrico na Comunidade Européia
Este símbolo encontrado no produto ou na embalagem indica que o produto não deve ser descartado
no lixo doméstico comum. É responsabilidade do cliente descartar o material usado (lixo elétrico),
encaminhando-o para um ponto de coleta para reciclagem. A coleta e a reciclagem seletivas desse
tipo de lixo ajudarão a conservar as reservas naturais; sendo assim, a reciclagem será feita de uma
forma segura, protegendo o ambiente e a saúde das pessoas. Para obter mais informações sobre locais
que reciclam esse tipo de material, entre em contato com o escritório da HP em sua cidade, com o serviço
de coleta de lixo ou com a loja em que o produto foi adquirido.
Likvidácia vyradených zariadení v domácnostiach v Európskej únii
Symbol na výrobku alebo jeho balení označuje, že daný výrobok sa nesmie likvidovať s domovým
odpadom. Povinnosťou spotrebiteľa je odovzdať vyradené zariadenie v zbernom mieste, ktoré je
určené na recykláciu vyradených elektrických a elektronických zariadení. Separovaný zber a
recyklácia vyradených zariadení prispieva k ochrane prírodných zdrojov a zabezpečuje, že recyklácia
sa vykonáva spôsobom chrániacim ľudské zdravie a životné prostredie. Informácie o zberných
miestach na recykláciu vyradených zariadení vám poskytne miestne zastupiteľstvo, spoločnosť
zabezpečujúca odvoz domového odpadu alebo obchod, v ktorom ste si výrobok zakúpili.
Odstranjevanje odslužene opreme uporabnikov v zasebnih gospodinjstvih v Evropski uniji
Ta znak na izdelku ali njegovi embalaži pomeni, da izdelka ne smete odvreči med gospodinjske
odpadke. Nasprotno, odsluženo opremo morate predati na zbirališče, pooblaščeno za recikliranje
odslužene električne in elektronske opreme. Ločeno zbiranje in recikliranje odslužene opreme
prispeva k ohranjanju naravnih virov in zagotavlja recikliranje te opreme na zdravju in okolju neškodljiv
način. Za podrobnejše informacije o tem, kam lahko odpeljete odsluženo opremo na recikliranje, se
obrnite na pristojni organ, komunalno službo ali trgovino, kjer ste izdelek kupili.
Eliminación de residuos de equipos eléctricos y electrónicos por parte de usuarios particulares en la
Unión Europea
Este símbolo en el producto o en su envase indica que no debe eliminarse junto con los desperdicios
generales de la casa. Es responsabilidad del usuario eliminar los residuos de este tipo depositándolos
en un "punto limpio" para el reciclado de residuos eléctricos y electrónicos. La recogida y el reciclado
selectivos de los residuos de aparatos eléctricos en el momento de su eliminación contribuirá a
conservar los recursos naturales y a garantizar el reciclado de estos residuos de forma que se proteja
el medio ambiente y la salud. Para obtener más información sobre los puntos de recogida de residuos
eléctricos y electrónicos para reciclado, póngase en contacto con su ayuntamiento, con el servicio de
eliminación de residuos domésticos o con el establecimiento en el que adquirió el producto.
23
Page 24

Waste Electrical and Electronic Equipment (WEEE) Statements
Bortskaffande av avfallsprodukter från användare i privathushåll inom Europeiska Unionen
Om den här symbolen visas på produkten eller förpackningen betyder det att produkten inte får
slängas på samma ställe som hushållssopor. I stället är det ditt ansvar att bortskaffa avfallet genom att
överlämna det till ett uppsamlingsställe avsett för återvinning av avfall från elektriska och elektroniska
produkter. Separat insamling och återvinning av avfallet hjälper till att spara på våra naturresurser och
gör att avfallet återvinns på ett sätt som skyddar människors hälsa och miljön. Kontakta ditt lokala
kommunkontor, din närmsta återvinningsstation för hushållsavfall eller affären där du köpte produkten
för att få mer information om var du kan lämna ditt avfall för återvinning.
24
 Loading...