

Page 1

Users’ Guide
www.procurve.com
ProCurve Network Access Controller 800
Page 2

Page 3

ProCurve
Network Access Controller 800
Users Guide
Release 1.1
Page 4

© Copyright 2007-2008 Hewlett-Packard Development Company, L.P.
All Rights Reserved.
This document contains information which is protected by
copyright. Reproduction, adaptation, or translation without
prior permission is prohibited, except as allowed under the
copyright laws.
Publication Number
5990-8851
April 2008
(rev-l)
Disclaimer
The information contained in this document is subject to
change without notice.
HEWLETT-PACKARD COMPANY MAKES NO WARRANTY
OF ANY KIND WITH REGARD TO THIS MATERIAL,
INCLUDING, BUT NOT LIMITED TO, THE IMPLIED
WARRANTIES OF MERCHANTABILITY AND FITNESS
FOR A PARTICULAR PURPOSE. Hewlett-Packard shall not
be liable for errors contained herein or for incidental or
consequential damages in connection with the furnishing,
performance, or use of this material.
Hewlett-Packard assumes no responsibility for the use or
reliability of its software on equipment that is not furnished
by Hewlett-Packard.
Trademark Credits
Adobe® and Acrobat® are trademarks of Adobe Systems
Incorporated. Microsoft®, Windows®, Windows NT®,
Windows XP®, and Windows Vista® are U.S. registered
trademarks of Microsoft Corporation. UNIX® is a registered
trademark of The Open Group.
Warranty
See the Customer Support/Warranty booklet included with
the product.
A copy of the specific warranty terms applicable to your
Hewlett-Packard products and replacement parts can be
obtained from your HP Sales and Service Office or
authorized dealer.
Hewlett-Packard Company
8000 Foothills Boulevard, m/s 5551
Roseville, California 95747-5551
http://www.procurve.com
Page 5

Contents
1 Introduction
What you Need to get Started . . . . . . . . . . . . . . . . . . . . . . . . . . . . . . . . . . . . . 1-2
Additional Documentation . . . . . . . . . . . . . . . . . . . . . . . . . . . . . . . . . . . . . . . . 1-3
NAC 800 Home Window . . . . . . . . . . . . . . . . . . . . . . . . . . . . . . . . . . . . . . . . . 1-4
System Monitor . . . . . . . . . . . . . . . . . . . . . . . . . . . . . . . . . . . . . . . . . . . . . . . . . 1-6
Overview . . . . . . . . . . . . . . . . . . . . . . . . . . . . . . . . . . . . . . . . . . . . . . . . . . . . . . 1-8
The NAC 800 Process . . . . . . . . . . . . . . . . . . . . . . . . . . . . . . . . . . . . . . . . 1-10
About NAC 800 . . . . . . . . . . . . . . . . . . . . . . . . . . . . . . . . . . . . . . . . . . . . . 1-10
NAC Policy Definition 1-10
Endpoint Testing 1-11
Compliance Enforcement 1-12
Automated and Manual Repair 1-12
Targeted Reporting 1-12
Technical Support . . . . . . . . . . . . . . . . . . . . . . . . . . . . . . . . . . . . . . . . . . . . . . 1-14
Upgrading . . . . . . . . . . . . . . . . . . . . . . . . . . . . . . . . . . . . . . . . . . . . . . . . . . . . 1-15
Conventions Used in This Document . . . . . . . . . . . . . . . . . . . . . . . . . . . . . . 1-16
Navigation Paragraph . . . . . . . . . . . . . . . . . . . . . . . . . . . . . . . . . . . . . . . . 1-16
Tip Paragraph . . . . . . . . . . . . . . . . . . . . . . . . . . . . . . . . . . . . . . . . . . . . . . 1-16
Note Paragraph . . . . . . . . . . . . . . . . . . . . . . . . . . . . . . . . . . . . . . . . . . . . . 1-16
Caution Paragraph . . . . . . . . . . . . . . . . . . . . . . . . . . . . . . . . . . . . . . . . . . . 1-16
Warning Paragraph . . . . . . . . . . . . . . . . . . . . . . . . . . . . . . . . . . . . . . . . . . 1-17
Bold Font . . . . . . . . . . . . . . . . . . . . . . . . . . . . . . . . . . . . . . . . . . . . . . . . . . 1-17
Task Paragraph . . . . . . . . . . . . . . . . . . . . . . . . . . . . . . . . . . . . . . . . . . . . . 1-17
Italic Text . . . . . . . . . . . . . . . . . . . . . . . . . . . . . . . . . . . . . . . . . . . . . . . . . . 1-17
Courier Font . . . . . . . . . . . . . . . . . . . . . . . . . . . . . . . . . . . . . . . . . . . . . . . . 1-18
Angled Brackets . . . . . . . . . . . . . . . . . . . . . . . . . . . . . . . . . . . . . . . . . . . . 1-18
Square Brackets . . . . . . . . . . . . . . . . . . . . . . . . . . . . . . . . . . . . . . . . . . . . . 1-18
Terms . . . . . . . . . . . . . . . . . . . . . . . . . . . . . . . . . . . . . . . . . . . . . . . . . . . . . 1-19
Copying Files . . . . . . . . . . . . . . . . . . . . . . . . . . . . . . . . . . . . . . . . . . . . . . . . . . 1-20
SCP . . . . . . . . . . . . . . . . . . . . . . . . . . . . . . . . . . . . . . . . . . . . . . . . . . . . . . 1-20
PSCP . . . . . . . . . . . . . . . . . . . . . . . . . . . . . . . . . . . . . . . . . . . . . . . . . . . . . 1-20
2 Clusters and Servers
Overview . . . . . . . . . . . . . . . . . . . . . . . . . . . . . . . . . . . . . . . . . . . . . . . . . . . . . . 2-2
Installation Examples . . . . . . . . . . . . . . . . . . . . . . . . . . . . . . . . . . . . . . . . . . . . 2-3
Single-server Installation . . . . . . . . . . . . . . . . . . . . . . . . . . . . . . . . . . . . . . . 2-3
Multiple-server Installations . . . . . . . . . . . . . . . . . . . . . . . . . . . . . . . . . . . . 2-3
iii
Page 6

Contents
3 System Configuration
Introduction . . . . . . . . . . . . . . . . . . . . . . . . . . . . . . . . . . . . . . . . . . . . . . . . . . . . 3-4
Enforcement Clusters and Servers . . . . . . . . . . . . . . . . . . . . . . . . . . . . . . . . . 3-6
Enforcement Clusters . . . . . . . . . . . . . . . . . . . . . . . . . . . . . . . . . . . . . . . . . . . . 3-7
Adding an Enforcement Cluster . . . . . . . . . . . . . . . . . . . . . . . . . . . . . . . . . 3-7
Editing Enforcement Clusters . . . . . . . . . . . . . . . . . . . . . . . . . . . . . . . . . . . 3-9
Viewing Enforcement Cluster Status . . . . . . . . . . . . . . . . . . . . . . . . . . . . 3-10
Deleting Enforcement Clusters . . . . . . . . . . . . . . . . . . . . . . . . . . . . . . . . . 3-11
Enforcement Servers . . . . . . . . . . . . . . . . . . . . . . . . . . . . . . . . . . . . . . . . . . . 3-12
Adding an ES . . . . . . . . . . . . . . . . . . . . . . . . . . . . . . . . . . . . . . . . . . . . . . . 3-12
Cluster and Server Icons . . . . . . . . . . . . . . . . . . . . . . . . . . . . . . . . . . . . . . 3-13
Editing ESs . . . . . . . . . . . . . . . . . . . . . . . . . . . . . . . . . . . . . . . . . . . . . . . . 3-14
Changing the ES Network Settings . . . . . . . . . . . . . . . . . . . . . . . . . . . . . . 3-15
Changing the ES Date and Time . . . . . . . . . . . . . . . . . . . . . . . . . . . . . . . . 3-16
Modifying the ES SNMP Settings . . . . . . . . . . . . . . . . . . . . . . . . . . . . . . . 3-17
Modifying the ES root Account Password . . . . . . . . . . . . . . . . . . . . . . . . 3-17
Viewing ES Status . . . . . . . . . . . . . . . . . . . . . . . . . . . . . . . . . . . . . . . . . . . 3-17
Deleting ESs . . . . . . . . . . . . . . . . . . . . . . . . . . . . . . . . . . . . . . . . . . . . . . . 3-19
ES Recovery . . . . . . . . . . . . . . . . . . . . . . . . . . . . . . . . . . . . . . . . . . . . . . . 3-19
Management Server . . . . . . . . . . . . . . . . . . . . . . . . . . . . . . . . . . . . . . . . . . . . 3-20
Viewing Network Settings . . . . . . . . . . . . . . . . . . . . . . . . . . . . . . . . . . . . . 3-20
Modifying MS Network Settings . . . . . . . . . . . . . . . . . . . . . . . . . . . . . . . 3-22
Selecting a Proxy Server . . . . . . . . . . . . . . . . . . . . . . . . . . . . . . . . . . . . . . 3-23
Setting the Date and Time . . . . . . . . . . . . . . . . . . . . . . . . . . . . . . . . . . . . . 3-24
Automatically Setting the Time . . . . . . . . . . . . . . . . . . . . . . . . . . . . . . . . . 3-24
Manually Setting the Time . . . . . . . . . . . . . . . . . . . . . . . . . . . . . . . . . . . . 3-24
Selecting the Time Zone . . . . . . . . . . . . . . . . . . . . . . . . . . . . . . . . . . . . . . 3-25
Enabling SNMP . . . . . . . . . . . . . . . . . . . . . . . . . . . . . . . . . . . . . . . . . . . . . 3-25
Modifying the MS root Account Password . . . . . . . . . . . . . . . . . . . . . . . . 3-26
Checking for NAC 800 Upgrades . . . . . . . . . . . . . . . . . . . . . . . . . . . . . . . 3-26
Changing the NAC 800 Upgrade Timeout . . . . . . . . . . . . . . . . . . . . . . . . 3-27
User Accounts . . . . . . . . . . . . . . . . . . . . . . . . . . . . . . . . . . . . . . . . . . . . . . . . . 3-28
Adding a User Account . . . . . . . . . . . . . . . . . . . . . . . . . . . . . . . . . . . . . . . 3-28
Searching for a User Account . . . . . . . . . . . . . . . . . . . . . . . . . . . . . . . . . . 3-31
Sorting the User Account Area . . . . . . . . . . . . . . . . . . . . . . . . . . . . . . . . . 3-32
Copying a User Account . . . . . . . . . . . . . . . . . . . . . . . . . . . . . . . . . . . . . . 3-32
Editing a User Account . . . . . . . . . . . . . . . . . . . . . . . . . . . . . . . . . . . . . . . 3-33
Deleting a User Account . . . . . . . . . . . . . . . . . . . . . . . . . . . . . . . . . . . . . . 3-34
User Roles . . . . . . . . . . . . . . . . . . . . . . . . . . . . . . . . . . . . . . . . . . . . . . . . . . . . 3-36
Adding a User Role . . . . . . . . . . . . . . . . . . . . . . . . . . . . . . . . . . . . . . . . . . 3-36
iv
Page 7

Contents
Editing User Roles . . . . . . . . . . . . . . . . . . . . . . . . . . . . . . . . . . . . . . . . . . . 3-39
Deleting User Roles . . . . . . . . . . . . . . . . . . . . . . . . . . . . . . . . . . . . . . . . . . 3-40
Sorting the User Roles Area . . . . . . . . . . . . . . . . . . . . . . . . . . . . . . . . . . . 3-40
License . . . . . . . . . . . . . . . . . . . . . . . . . . . . . . . . . . . . . . . . . . . . . . . . . . . . . . . 3-41
Updating your License . . . . . . . . . . . . . . . . . . . . . . . . . . . . . . . . . . . . . . . . 3-41
Test Updates . . . . . . . . . . . . . . . . . . . . . . . . . . . . . . . . . . . . . . . . . . . . . . . . . . 3-43
Manually Checking for Test Updates . . . . . . . . . . . . . . . . . . . . . . . . . . . . 3-43
Selecting Test Update Times . . . . . . . . . . . . . . . . . . . . . . . . . . . . . . . . . . . 3-44
Viewing Test Update Logs . . . . . . . . . . . . . . . . . . . . . . . . . . . . . . . . . . . . 3-44
Quarantining, General . . . . . . . . . . . . . . . . . . . . . . . . . . . . . . . . . . . . . . . . . . 3-46
Selecting the Quarantine Method . . . . . . . . . . . . . . . . . . . . . . . . . . . . . . . 3-46
Selecting the Access Mode . . . . . . . . . . . . . . . . . . . . . . . . . . . . . . . . . . . . 3-48
Quarantining, 802.1X . . . . . . . . . . . . . . . . . . . . . . . . . . . . . . . . . . . . . . . . . . . 3-49
Entering Basic 802.1X Settings . . . . . . . . . . . . . . . . . . . . . . . . . . . . . . . . . 3-49
Authentication Settings . . . . . . . . . . . . . . . . . . . . . . . . . . . . . . . . . . . . . . . 3-50
Selecting the RADIUS Authentication method 3-50
Configuring Windows Domain Settings 3-50
Configuring OpenLDAP Settings 3-52
Configuring Novell eDirectory Settings 3-55
Adding 802.1X Devices . . . . . . . . . . . . . . . . . . . . . . . . . . . . . . . . . . . . . . 3-58
Testing the Connection to a Device . . . . . . . . . . . . . . . . . . . . . . . . . . . . . . 3-59
Cisco IOS . . . . . . . . . . . . . . . . . . . . . . . . . . . . . . . . . . . . . . . . . . . . . . . . . . 3-60
Cisco CatOS . . . . . . . . . . . . . . . . . . . . . . . . . . . . . . . . . . . . . . . . . . . . . . . 3-62
CatOS User Name in Enable Mode 3-64
Enterasys . . . . . . . . . . . . . . . . . . . . . . . . . . . . . . . . . . . . . . . . . . . . . . . . . . 3-65
Extreme ExtremeWare . . . . . . . . . . . . . . . . . . . . . . . . . . . . . . . . . . . . . . . 3-66
Extreme XOS . . . . . . . . . . . . . . . . . . . . . . . . . . . . . . . . . . . . . . . . . . . . . . . 3-68
Foundry . . . . . . . . . . . . . . . . . . . . . . . . . . . . . . . . . . . . . . . . . . . . . . . . . . . 3-70
HP ProCurve Switch . . . . . . . . . . . . . . . . . . . . . . . . . . . . . . . . . . . . . . . . . 3-71
HP ProCurve WESM . . . . . . . . . . . . . . . . . . . . . . . . . . . . . . . . . . . . . . . . . 3-74
HP ProCurve 420 AP or HP ProCurve 530 AP . . . . . . . . . . . . . . . . . . . . . 3-77
Nortel . . . . . . . . . . . . . . . . . . . . . . . . . . . . . . . . . . . . . . . . . . . . . . . . . . . . . 3-79
Other . . . . . . . . . . . . . . . . . . . . . . . . . . . . . . . . . . . . . . . . . . . . . . . . . . . . . 3-80
Quarantining, DHCP . . . . . . . . . . . . . . . . . . . . . . . . . . . . . . . . . . . . . . . . . . . 3-83
DHCP Server Configuration . . . . . . . . . . . . . . . . . . . . . . . . . . . . . . . . . . . 3-83
Setting DHCP Enforcement . . . . . . . . . . . . . . . . . . . . . . . . . . . . . . . . . . . . 3-83
Adding a DHCP Quarantine Area . . . . . . . . . . . . . . . . . . . . . . . . . . . . . . . 3-85
Sorting the DHCP Quarantine Area . . . . . . . . . . . . . . . . . . . . . . . . . . . . . 3-87
Editing a DHCP Quarantine Area . . . . . . . . . . . . . . . . . . . . . . . . . . . . . . . 3-87
Deleting a DHCP Quarantine Area . . . . . . . . . . . . . . . . . . . . . . . . . . . . . . 3-88
Quarantining, Inline . . . . . . . . . . . . . . . . . . . . . . . . . . . . . . . . . . . . . . . . . . . . 3-89
v
Page 8

Contents
Post-connect . . . . . . . . . . . . . . . . . . . . . . . . . . . . . . . . . . . . . . . . . . . . . . . . . . . 3-90
Allowing the Post-connect Service Through the Firewall . . . . . . . . . . . . . 3-90
First Time Selection . . . . . . . . . . . . . . . . . . . . . . . . . . . . . . . . . . . . . . . . . . 3-90
Setting NAC 800 Properties . . . . . . . . . . . . . . . . . . . . . . . . . . . . . . . . . . . 3-91
Configuring a Post-connect System . . . . . . . . . . . . . . . . . . . . . . . . . . . . . 3-91
Launching Post-connect Systems . . . . . . . . . . . . . . . . . . . . . . . . . . . . . . . 3-93
Post-connect in the Endpoint Activity Window . . . . . . . . . . . . . . . . . . . . 3-93
Adding Post-connect System Logos and Icons . . . . . . . . . . . . . . . . . . . . . 3-94
Maintenance . . . . . . . . . . . . . . . . . . . . . . . . . . . . . . . . . . . . . . . . . . . . . . . . . . 3-96
Initiating a New Backup . . . . . . . . . . . . . . . . . . . . . . . . . . . . . . . . . . . . . . 3-96
Restoring From a Backup . . . . . . . . . . . . . . . . . . . . . . . . . . . . . . . . . . . . . 3-98
Downloading Support Packages . . . . . . . . . . . . . . . . . . . . . . . . . . . . . . . . . . 3-99
Cluster Setting Defaults . . . . . . . . . . . . . . . . . . . . . . . . . . . . . . . . . . . . . . . . 3-100
Testing Methods . . . . . . . . . . . . . . . . . . . . . . . . . . . . . . . . . . . . . . . . . . . 3-100
Selecting Test Methods 3-100
Ordering Test Methods 3-101
Recommended Test Methods 3-102
Selecting End-user Options . . . . . . . . . . . . . . . . . . . . . . . . . . . . . . . . . . . 3-103
Accessible Services . . . . . . . . . . . . . . . . . . . . . . . . . . . . . . . . . . . . . . . . . 3-103
Exceptions . . . . . . . . . . . . . . . . . . . . . . . . . . . . . . . . . . . . . . . . . . . . . . . . 3-105
Always Granting Access to Endpoints and Domains 3-106
Always Quarantine Endpoints and Domains 3-107
Notifications . . . . . . . . . . . . . . . . . . . . . . . . . . . . . . . . . . . . . . . . . . . . . . 3-107
Enabling Notifications 3-107
End-user Screens . . . . . . . . . . . . . . . . . . . . . . . . . . . . . . . . . . . . . . . . . . . 3-109
Specifying an End-user Screen Logo 3-109
Specifying the End-user Screen Text 3-110
Specifying the End-user Test Failed Pop-up Window 3-111
Agentless Credentials . . . . . . . . . . . . . . . . . . . . . . . . . . . . . . . . . . . . . . . 3-112
Adding Windows Cred entials 3-112
Testing Windows Credentials 3-114
Editing Windows Credentials 3-115
Deleting Windows Credentials 3-115
Sorting the Windows Credentials Area 3-115
Logging . . . . . . . . . . . . . . . . . . . . . . . . . . . . . . . . . . . . . . . . . . . . . . . . . . . . . 3-116
Setting ES Logging Levels . . . . . . . . . . . . . . . . . . . . . . . . . . . . . . . . . . . 3-116
Setting 802.1X Devices Logging Levels . . . . . . . . . . . . . . . . . . . . . . . . . 3-117
Setting IDM Logging Levels . . . . . . . . . . . . . . . . . . . . . . . . . . . . . . . . . . 3-117
Advanced Settings . . . . . . . . . . . . . . . . . . . . . . . . . . . . . . . . . . . . . . . . . . . . . 3-119
Setting the Agent Read Timeout . . . . . . . . . . . . . . . . . . . . . . . . . . . . . . . 3-119
Setting the RPC Command Timeout . . . . . . . . . . . . . . . . . . . . . . . . . . . . 3-120
vi
Page 9

4 Endpoint Activity
Overview . . . . . . . . . . . . . . . . . . . . . . . . . . . . . . . . . . . . . . . . . . . . . . . . . . . . . . 4-2
Filtering the Endpoint Activity Window . . . . . . . . . . . . . . . . . . . . . . . . . . . . 4-4
Filtering by Access Control or Test Status . . . . . . . . . . . . . . . . . . . . . . . . . 4-4
Filtering by Time . . . . . . . . . . . . . . . . . . . . . . . . . . . . . . . . . . . . . . . . . . . . . 4-5
Limiting Number of Endpoints Displayed . . . . . . . . . . . . . . . . . . . . . . . . . 4-6
Searching . . . . . . . . . . . . . . . . . . . . . . . . . . . . . . . . . . . . . . . . . . . . . . . . . . . 4-7
Access Control States . . . . . . . . . . . . . . . . . . . . . . . . . . . . . . . . . . . . . . . . . . . . 4-9
Endpoint Test Status . . . . . . . . . . . . . . . . . . . . . . . . . . . . . . . . . . . . . . . . . . . 4-10
Enforcement Cluster Access Mode . . . . . . . . . . . . . . . . . . . . . . . . . . . . . . . . 4-14
Viewing Endpoint Access Status . . . . . . . . . . . . . . . . . . . . . . . . . . . . . . . . . . 4-16
Selecting Endpoints to Act on . . . . . . . . . . . . . . . . . . . . . . . . . . . . . . . . . . . . 4-18
Acting on Selected Endpoints . . . . . . . . . . . . . . . . . . . . . . . . . . . . . . . . . . . . 4-19
Manually Retest an Endpoint . . . . . . . . . . . . . . . . . . . . . . . . . . . . . . . . . . 4-19
Immediately Grant Access to an Endpoint . . . . . . . . . . . . . . . . . . . . . . . . 4-19
Immediately Quarantine an Endpoint . . . . . . . . . . . . . . . . . . . . . . . . . . . . 4-20
Clearing Temporary Endpoint States . . . . . . . . . . . . . . . . . . . . . . . . . . . . 4-20
Viewing Endpoint Information . . . . . . . . . . . . . . . . . . . . . . . . . . . . . . . . . . . 4-21
Troubleshooting Quarantined Endpoint s . . . . . . . . . . . . . . . . . . . . . . . . . . . 4-23
Contents
5 End-user Access
Overview . . . . . . . . . . . . . . . . . . . . . . . . . . . . . . . . . . . . . . . . . . . . . . . . . . . . . . 5-2
Test Methods Used . . . . . . . . . . . . . . . . . . . . . . . . . . . . . . . . . . . . . . . . . . . . . . 5-3
Agent Callback . . . . . . . . . . . . . . . . . . . . . . . . . . . . . . . . . . . . . . . . . . . . . . 5-3
Endpoints Supported . . . . . . . . . . . . . . . . . . . . . . . . . . . . . . . . . . . . . . . . . . . . 5-5
Browser Version . . . . . . . . . . . . . . . . . . . . . . . . . . . . . . . . . . . . . . . . . . . . . . . . 5-7
Firewall Settings . . . . . . . . . . . . . . . . . . . . . . . . . . . . . . . . . . . . . . . . . . . . . . . . 5-8
Managed Endpoints . . . . . . . . . . . . . . . . . . . . . . . . . . . . . . . . . . . . . . . . . . . 5-8
Unmanaged Endpoints . . . . . . . . . . . . . . . . . . . . . . . . . . . . . . . . . . . . . . . . . 5-8
Making Changes to the Firewall . . . . . . . . . . . . . . . . . . . . . . . . . . . . . . . . . 5-8
Windows Endpoint Settings . . . . . . . . . . . . . . . . . . . . . . . . . . . . . . . . . . . . . . . 5-9
IE Internet Security Setting . . . . . . . . . . . . . . . . . . . . . . . . . . . . . . . . . . . . . 5-9
Agent-based Test Method . . . . . . . . . . . . . . . . . . . . . . . . . . . . . . . . . . . . . . 5-9
Ports Used for Testing 5-9
Windows Vista Settings 5-9
vii
Page 10

Contents
Agentless Test Method . . . . . . . . . . . . . . . . . . . . . . . . . . . . . . . . . . . . . . . 5-10
Configuring Windows 2000 Professional for Agentless Testing 5-10
Configuring Windows XP Professional for Agentless Testing 5-11
Configuring Windows Vista for Agentless Testing 5-12
Ports Used for Testing 5-15
Allowing the Windows RPC Service through the Firewall 5-15
ActiveX Test Method . . . . . . . . . . . . . . . . . . . . . . . . . . . . . . . . . . . . . . . . 5-18
Ports Used for Testing 5-18
Windows Vista Settings 5-18
Mac OS X Endpoint Settings . . . . . . . . . . . . . . . . . . . . . . . . . . . . . . . . . . . . . 5-19
Ports Used for Testing . . . . . . . . . . . . . . . . . . . . . . . . . . . . . . . . . . . . . . . . 5-19
Allowing NAC 800 through the OS X Firewall . . . . . . . . . . . . . . . . . . . . 5-19
End-user Access Windows . . . . . . . . . . . . . . . . . . . . . . . . . . . . . . . . . . . . . . . 5-23
Opening Window . . . . . . . . . . . . . . . . . . . . . . . . . . . . . . . . . . . . . . . . . . . . 5-24
Windows NAC Agent Test Windows . . . . . . . . . . . . . . . . . . . . . . . . . . . . 5-25
Automatically Installing the Windows Agent 5-25
Removing the Agent 5-28
Manually Installing the Windows Agent 5-28
How to View the Windows Agent Version Installed 5-30
Mac OS Agent Test Windows . . . . . . . . . . . . . . . . . . . . . . . . . . . . . . . . . . 5-30
Installing the MAC OS Agent 5-30
Verifying the Mac OS Agent 5-33
Removing the Mac OS Agent 5-37
ActiveX Test Windows . . . . . . . . . . . . . . . . . . . . . . . . . . . . . . . . . . . . . . . 5-38
Agentless Test Windows . . . . . . . . . . . . . . . . . . . . . . . . . . . . . . . . . . . . . . 5-38
Testing Window . . . . . . . . . . . . . . . . . . . . . . . . . . . . . . . . . . . . . . . . . . . . 5-41
Test Successful Window . . . . . . . . . . . . . . . . . . . . . . . . . . . . . . . . . . . . . . 5-42
Testing Cancelled Window . . . . . . . . . . . . . . . . . . . . . . . . . . . . . . . . . . . . 5-43
Testing Failed Window . . . . . . . . . . . . . . . . . . . . . . . . . . . . . . . . . . . . . . . 5-43
Error Windows . . . . . . . . . . . . . . . . . . . . . . . . . . . . . . . . . . . . . . . . . . . . . 5-45
Customizing Error Messages . . . . . . . . . . . . . . . . . . . . . . . . . . . . . . . . . . . . . 5-46
6 NAC Policies
Overview . . . . . . . . . . . . . . . . . . . . . . . . . . . . . . . . . . . . . . . . . . . . . . . . . . . . . . 6-2
Standard NAC Policies . . . . . . . . . . . . . . . . . . . . . . . . . . . . . . . . . . . . . . . . . . . 6-4
NAC Policy Group Tasks . . . . . . . . . . . . . . . . . . . . . . . . . . . . . . . . . . . . . . . . . 6-5
Add a NAC Policy Group . . . . . . . . . . . . . . . . . . . . . . . . . . . . . . . . . . . . . . 6-5
Editing a NAC Policy Group . . . . . . . . . . . . . . . . . . . . . . . . . . . . . . . . . . . . 6-5
Deleting a NAC Policy Group . . . . . . . . . . . . . . . . . . . . . . . . . . . . . . . . . . . 6-6
NAC Policy Tasks . . . . . . . . . . . . . . . . . . . . . . . . . . . . . . . . . . . . . . . . . . . . . . . 6-8
Enabling or Disabling an NAC Policy . . . . . . . . . . . . . . . . . . . . . . . . . . . . 6-8
viii
Page 11

Contents
Selecting the Default NAC Policy . . . . . . . . . . . . . . . . . . . . . . . . . . . . . . . . 6-8
Creating a New NAC Policy . . . . . . . . . . . . . . . . . . . . . . . . . . . . . . . . . . . . 6-8
Editing a NAC Policy . . . . . . . . . . . . . . . . . . . . . . . . . . . . . . . . . . . . . . . . 6-15
Copying a NAC Policy . . . . . . . . . . . . . . . . . . . . . . . . . . . . . . . . . . . . . . . 6-15
Deleting a NAC Policy . . . . . . . . . . . . . . . . . . . . . . . . . . . . . . . . . . . . . . . 6-16
Moving a NAC Policy Between NAC Policy Groups . . . . . . . . . . . . . . . . 6-16
Assigning Endpoints and Domains to a Policy . . . . . . . . . . . . . . . . . . . . . 6-16
NAC Policy Hierarchy . . . . . . . . . . . . . . . . . . . . . . . . . . . . . . . . . . . . . . . . 6-17
Setting Retest Time . . . . . . . . . . . . . . . . . . . . . . . . . . . . . . . . . . . . . . . . . . 6-17
Setting Connection Time . . . . . . . . . . . . . . . . . . . . . . . . . . . . . . . . . . . . . . 6-17
Defining Non-supported OS Access Settings . . . . . . . . . . . . . . . . . . . . . . 6-18
Setting Test Properties . . . . . . . . . . . . . . . . . . . . . . . . . . . . . . . . . . . . . . . . 6-18
Selecting Action Taken . . . . . . . . . . . . . . . . . . . . . . . . . . . . . . . . . . . . . . . 6-19
About NAC 800 Tests . . . . . . . . . . . . . . . . . . . . . . . . . . . . . . . . . . . . . . . . . . . 6-21
Viewing Information About Tests . . . . . . . . . . . . . . . . . . . . . . . . . . . . . . . 6-21
Selecting Test Properties . . . . . . . . . . . . . . . . . . . . . . . . . . . . . . . . . . . . . . 6-21
Entering Software Required/Not Allowed 6-21
Entering Service Names Required/Not Allowed 6-22
Entering the Browser Version Number 6-23
Test Icons . . . . . . . . . . . . . . . . . . . . . . . . . . . . . . . . . . . . . . . . . . . . . . . . . . 6-23
7 Quarantined Networks
Endpoint Quarantine Precedence . . . . . . . . . . . . . . . . . . . . . . . . . . . . . . . . . . 7-2
Using Ports in Accessible Services and Endpoints . . . . . . . . . . . . . . . . . . . . . 7-4
Always Granting Access to an Endpoint . . . . . . . . . . . . . . . . . . . . . . . . . . . . 7-6
Always Quarantining an Endpoint . . . . . . . . . . . . . . . . . . . . . . . . . . . . . . . . . 7-8
New Users . . . . . . . . . . . . . . . . . . . . . . . . . . . . . . . . . . . . . . . . . . . . . . . . . . . . . 7-9
Shared Resources . . . . . . . . . . . . . . . . . . . . . . . . . . . . . . . . . . . . . . . . . . . . . . 7-10
Untestable Endpoints and DHCP Mode . . . . . . . . . . . . . . . . . . . . . . . . . . . . 7-11
Windows Domain Authentication and Quarantined Endpoints . . . . . . . . 7-12
8 High Availability and Load Balancing
High Availability . . . . . . . . . . . . . . . . . . . . . . . . . . . . . . . . . . . . . . . . . . . . . . . . 8-2
Load Balancing . . . . . . . . . . . . . . . . . . . . . . . . . . . . . . . . . . . . . . . . . . . . . . . . . 8-6
9 Inline Quarantine Method
Inline . . . . . . . . . . . . . . . . . . . . . . . . . . . . . . . . . . . . . . . . . . . . . . . . . . . . . . . . . 9-2
ix
Page 12

Contents
10 DHCP Quarantine Method
Overview . . . . . . . . . . . . . . . . . . . . . . . . . . . . . . . . . . . . . . . . . . . . . . . . . . . . . 10-2
Configuring NAC 800 for DHCP . . . . . . . . . . . . . . . . . . . . . . . . . . . . . . . . . 10-4
Setting up a Quarantine Area . . . . . . . . . . . . . . . . . . . . . . . . . . . . . . . . . . . 10-4
Router Configuration . . . . . . . . . . . . . . . . . . . . . . . . . . . . . . . . . . . . . . . . . 10-4
Configuring the Router ACLs 10-5
Configuring Windows Update Service for XP SP2 . . . . . . . . . . . . . . . . . . 10-5
11 802.1X Quarantine Method
About 802.1X . . . . . . . . . . . . . . . . . . . . . . . . . . . . . . . . . . . . . . . . . . . . . . . . . . 11-2
NAC 800 and 802.1X . . . . . . . . . . . . . . . . . . . . . . . . . . . . . . . . . . . . . . . . . . . 11-4
Setting up the 802.1X Components . . . . . . . . . . . . . . . . . . . . . . . . . . . . . . . . 11-7
Setting up the RADIUS Server . . . . . . . . . . . . . . . . . . . . . . . . . . . . . . . . . 11-7
Using the NAC 800 IAS Plug-in to the Microsoft IAS RADIUS Server
11-7
Configuring the Microsoft IAS RADIUS Server 11-9
Proxying RADIUS Requests to an Existing RADIUS Server Using the
Built-in NAC 800 RADIUS Server 11-32
Using the Built-in NAC 800 RADIUS Server for Authentication 11-35
Configuring Non-HP Switches . . . . . . . . . . . . . . . . . . . . . . . . . . . . . . . . 11-35
Enabling NAC 800 for 802.1X . . . . . . . . . . . . . . . . . . . . . . . . . . . . . . . . 11-38
NAC 800 User Interface Configuration 11-38
Setting up the Supplicant . . . . . . . . . . . . . . . . . . . . . . . . . . . . . . . . . . . . . 11-39
Windows XP Professional Setup 11-39
Windows XP Home Setup 11-41
Windows 2000 Professional Setup 11-42
Windows Vista Setup 11-44
Setting up the Authenticator . . . . . . . . . . . . . . . . . . . . . . . . . . . . . . . . . . 11-47
Cisco® 2950 IOS 11-48
Cisco® 4006 CatOS 11-49
Enterasys® Matrix 1H582-25 11-49
Extreme® Summit 48si 11-50
ExtremeWare 11-51
ExtremeXOS 11-51
Foundry® FastIron® Edge 2402 11-52
HP ProCurve 420AP 11-52
HP ProCurve 530AP 11-53
HP ProCurve 3400/3500/5400 11-55
Nortel® 5510 11-55
Creating Custom Expect Scripts 11-56
x
Page 13

12 Remote Device Activity Capture
Creating a DAC Host . . . . . . . . . . . . . . . . . . . . . . . . . . . . . . . . . . . . . . . . . . . 12-2
Downloading the EXE File . . . . . . . . . . . . . . . . . . . . . . . . . . . . . . . . . . . . 12-3
Running the Windows Installer . . . . . . . . . . . . . . . . . . . . . . . . . . . . . . . . . 12-3
Adding Additional Interfaces . . . . . . . . . . . . . . . . . . . . . . . . . . . . . . . . . 12-12
Configuring the MS and ES for DAC . . . . . . . . . . . . . . . . . . . . . . . . . . . 12-13
Starting the Windows Service . . . . . . . . . . . . . . . . . . . . . . . . . . . . . . . . . 12-14
Viewing Version Information . . . . . . . . . . . . . . . . . . . . . . . . . . . . . . . . . 12-15
Removing the Software . . . . . . . . . . . . . . . . . . . . . . . . . . . . . . . . . . . . . . 12-16
NAC 800 to Infoblox Connector . . . . . . . . . . . . . . . . . . . . . . . . . . . . . . . . . 12-18
Configuring the Infoblox Server . . . . . . . . . . . . . . . . . . . . . . . . . . . . . . . 12-18
Configuring NAC 800 . . . . . . . . . . . . . . . . . . . . . . . . . . . . . . . . . . . . . . . 12-18
13 DHCP Plug-in
Overview . . . . . . . . . . . . . . . . . . . . . . . . . . . . . . . . . . . . . . . . . . . . . . . . . . . . . 13-2
Installation Overview . . . . . . . . . . . . . . . . . . . . . . . . . . . . . . . . . . . . . . . . . . . 13-4
DHCP Plug-in and the NAC 800 User Interface . . . . . . . . . . . . . . . . . . . . . 13-7
Installing the Plug-in . . . . . . . . . . . . . . . . . . . . . . . . . . . . . . . . . . . . . . . . . 13-7
Enabling the Plug-in and Adding Servers . . . . . . . . . . . . . . . . . . . . . . . . 13-11
Viewing DHCP Server Plug-in Status . . . . . . . . . . . . . . . . . . . . . . . . . . . 13-13
Editing DHCP Server Plug-in Configurations . . . . . . . . . . . . . . . . . . . . . 13-13
Deleting a DHCP Server Plug-in Configuration . . . . . . . . . . . . . . . . . . . 13-14
Disabling a DHCP Server Plug-in Configuration . . . . . . . . . . . . . . . . . . 13-14
Enabling a DHCP Server Plug-in Configuration . . . . . . . . . . . . . . . . . . . 13-14
Contents
14 Reports
Report Types . . . . . . . . . . . . . . . . . . . . . . . . . . . . . . . . . . . . . . . . . . . . . . . . . . 14-2
Generating Reports . . . . . . . . . . . . . . . . . . . . . . . . . . . . . . . . . . . . . . . . . . . . . 14-4
Viewing Report Details . . . . . . . . . . . . . . . . . . . . . . . . . . . . . . . . . . . . . . . . . . 14-6
Printing Reports . . . . . . . . . . . . . . . . . . . . . . . . . . . . . . . . . . . . . . . . . . . . . . . 14-8
Saving Reports to a File . . . . . . . . . . . . . . . . . . . . . . . . . . . . . . . . . . . . . . . . . 14-9
Converting an HTML Report to a Word Document . . . . . . . . . . . . . . . . . 14-10
15 System Administration
Launching NAC 800 . . . . . . . . . . . . . . . . . . . . . . . . . . . . . . . . . . . . . . . . . . . . 15-3
Launching and Logging into NAC 800 . . . . . . . . . . . . . . . . . . . . . . . . . . . 15-3
Logging out of NAC 800 . . . . . . . . . . . . . . . . . . . . . . . . . . . . . . . . . . . . . . 15-3
Important Browser Settings . . . . . . . . . . . . . . . . . . . . . . . . . . . . . . . . . . . . 15-3
Downloading New Tests . . . . . . . . . . . . . . . . . . . . . . . . . . . . . . . . . . . . . . . . . 15-4
xi
Page 14

Contents
System Settings . . . . . . . . . . . . . . . . . . . . . . . . . . . . . . . . . . . . . . . . . . . . . . . . 15-5
DNS/Windows Domain Authentication and Quarantined Endpoints . . . . 15-5
Matching Windows Domain Policies to NAC Policies . . . . . . . . . . . . . . . 15-6
Setting the Access Mode . . . . . . . . . . . . . . . . . . . . . . . . . . . . . . . . . . . . . . 15-7
Naming your Enforcement Cluster . . . . . . . . . . . . . . . . . . . . . . . . . . . . . . 15-7
Changing the MS Host Name . . . . . . . . . . . . . . . . . . . . . . . . . . . . . . . . . . 15-8
Changing the ES Host Name . . . . . . . . . . . . . . . . . . . . . . . . . . . . . . . . . . . 15-8
Changing the MS or ES IP Address . . . . . . . . . . . . . . . . . . . . . . . . . . . . . 15-8
Resetting your System . . . . . . . . . . . . . . . . . . . . . . . . . . . . . . . . . . . . . . . . 15-8
Resetting your Test Data . . . . . . . . . . . . . . . . . . . . . . . . . . . . . . . . . . . . . 15-10
Changing Properties . . . . . . . . . . . . . . . . . . . . . . . . . . . . . . . . . . . . . . . . 15-11
Specifying an Email Server for Sending Notifications . . . . . . . . . . . . . . 15-12
Entering Networks Using CIDR Format . . . . . . . . . . . . . . . . . . . . . . . . . . 15-13
Database . . . . . . . . . . . . . . . . . . . . . . . . . . . . . . . . . . . . . . . . . . . . . . . . . . . . . 15-14
Creating a Backup File . . . . . . . . . . . . . . . . . . . . . . . . . . . . . . . . . . . . . . 15-14
Restoring from Backup . . . . . . . . . . . . . . . . . . . . . . . . . . . . . . . . . . . . . . 15-14
Restoring the Original Database . . . . . . . . . . . . . . . . . . . . . . . . . . . . . . . 15-15
Generating a Support Package . . . . . . . . . . . . . . . . . . . . . . . . . . . . . . . . . 15-15
Supported VPNs . . . . . . . . . . . . . . . . . . . . . . . . . . . . . . . . . . . . . . . . . . . . . . 15-16
End-user Access Windows . . . . . . . . . . . . . . . . . . . . . . . . . . . . . . . . . . . . . . 15-17
How NAC 800 Handles Static IP Addresses . . . . . . . . . . . . . . . . . . . . . . . . 15-18
Managing Passwords . . . . . . . . . . . . . . . . . . . . . . . . . . . . . . . . . . . . . . . . . . 15-19
Resetting the NAC 800 Server Password . . . . . . . . . . . . . . . . . . . . . . . . 15-20
Resetting the NAC 800 Database Password . . . . . . . . . . . . . . . . . . . . . . 15-21
Changing the NAC 800 Administrator Password . . . . . . . . . . . . . . . . . . 15-21
When the Password is Known 15-21
When the Password is Unknown 15-21
Working with Ranges . . . . . . . . . . . . . . . . . . . . . . . . . . . . . . . . . . . . . . . . . . 15-23
Creating and Replacing SSL Certificates . . . . . . . . . . . . . . . . . . . . . . . . . . 15-25
Creating a New Self-signed Certificate . . . . . . . . . . . . . . . . . . . . . . . . . . 15-25
Using an SSL Certificate from a known Certificate Authority (CA) . . . 15-2 7
Moving an ES from One MS to Another . . . . . . . . . . . . . . . . . . . . . . . . . . 15-29
Recovering Quickly from a Network Failure . . . . . . . . . . . . . . . . . . . . . . . 15-30
VLAN Tagging . . . . . . . . . . . . . . . . . . . . . . . . . . . . . . . . . . . . . . . . . . . . . . . 15-31
iptables Wrapper Script . . . . . . . . . . . . . . . . . . . . . . . . . . . . . . . . . . . . . . . . 15-34
Supporting Network Management System . . . . . . . . . . . . . . . . . . . . . . . . . 15-35
Enabling ICMP Echo Requests . . . . . . . . . . . . . . . . . . . . . . . . . . . . . . . . 15-35
Enable Temporary Ping 15-35
Enable Persistent Ping 15-35
Restricting the ICMP Request 15-36
xii
Page 15

SNMP MIBs . . . . . . . . . . . . . . . . . . . . . . . . . . . . . . . . . . . . . . . . . . . . . . 15-37
16 Patch Management
Patch Management . . . . . . . . . . . . . . . . . . . . . . . . . . . . . . . . . . . . . . . . . . . . . 16-2
Flagging a Test to Launch a Patch Manager . . . . . . . . . . . . . . . . . . . . . . . . 16-3
Selecting the Patch Manager . . . . . . . . . . . . . . . . . . . . . . . . . . . . . . . . . . . . . 16-4
Specifying the Number of Retests . . . . . . . . . . . . . . . . . . . . . . . . . . . . . . . . . 16-5
Specifying the Retest Frequency . . . . . . . . . . . . . . . . . . . . . . . . . . . . . . . . . . 16-6
SMS Patch Management . . . . . . . . . . . . . . . . . . . . . . . . . . . . . . . . . . . . . . . . 16-7
SMS Concepts . . . . . . . . . . . . . . . . . . . . . . . . . . . . . . . . . . . . . . . . . . . . . . . . . 16-8
NAC 800/SMS/NAC 800 Process . . . . . . . . . . . . . . . . . . . . . . . . . . . . . . . . . . 16-9
NAC 800 Setup . . . . . . . . . . . . . . . . . . . . . . . . . . . . . . . . . . . . . . . . . . . . . . . 16-10
Learning More About SMS . . . . . . . . . . . . . . . . . . . . . . . . . . . . . . . . . . . . . 16-11
A Configuring the Post-connect Server
Overview . . . . . . . . . . . . . . . . . . . . . . . . . . . . . . . . . . . . . . . . . . . . . . . . . . . . . . A-2
Extracting the ZIP File . . . . . . . . . . . . . . . . . . . . . . . . . . . . . . . . . . . . . . . . . . . A-3
Windows . . . . . . . . . . . . . . . . . . . . . . . . . . . . . . . . . . . . . . . . . . . . . . . . . . . A-3
Linux . . . . . . . . . . . . . . . . . . . . . . . . . . . . . . . . . . . . . . . . . . . . . . . . . . . . . . A-3
ZIP File Contents . . . . . . . . . . . . . . . . . . . . . . . . . . . . . . . . . . . . . . . . . . . . . . . A-4
Setting up a Post-connect Host . . . . . . . . . . . . . . . . . . . . . . . . . . . . . . . . . . . . A-5
Windows . . . . . . . . . . . . . . . . . . . . . . . . . . . . . . . . . . . . . . . . . . . . . . . . . . . A-5
Linux . . . . . . . . . . . . . . . . . . . . . . . . . . . . . . . . . . . . . . . . . . . . . . . . . . . . . . A-6
Viewing Logs . . . . . . . . . . . . . . . . . . . . . . . . . . . . . . . . . . . . . . . . . . . . . . . . . . . A-9
Testing the Service . . . . . . . . . . . . . . . . . . . . . . . . . . . . . . . . . . . . . . . . . . . . . A-10
Configuring your Sensor . . . . . . . . . . . . . . . . . . . . . . . . . . . . . . . . . . . . . . . . A-11
Allowing NAC 800 Through the Firewall . . . . . . . . . . . . . . . . . . . . . . . . . . . A-12
Contents
B Tests Help
Overview . . . . . . . . . . . . . . . . . . . . . . . . . . . . . . . . . . . . . . . . . . . . . . . . . . . . . . B-3
Browser Security Policy – Windows . . . . . . . . . . . . . . . . . . . . . . . . . . . . . . . . B-4
Browser Version . . . . . . . . . . . . . . . . . . . . . . . . . . . . . . . . . . . . . . . . . . . . . B-5
Internet Explorer (IE) Internet Security Zone . . . . . . . . . . . . . . . . . . . . . . . B-6
Internet Explorer (IE) Local Intranet Security Zone . . . . . . . . . . . . . . . . . . B-7
Internet Explorer (IE) Restricted Site Security Zone . . . . . . . . . . . . . . . . . B-8
Internet Explorer (IE) Trusted Sites Security Zone . . . . . . . . . . . . . . . . . . . B-9
Operating System – Windows . . . . . . . . . . . . . . . . . . . . . . . . . . . . . . . . . . . . B-11
IIS Hotfixes . . . . . . . . . . . . . . . . . . . . . . . . . . . . . . . . . . . . . . . . . . . . . . . . B-11
Internet Explorer Hotfixes . . . . . . . . . . . . . . . . . . . . . . . . . . . . . . . . . . . . . B-11
xiii
Page 16

Contents
Microsoft Office Hotfixes . . . . . . . . . . . . . . . . . . . . . . . . . . . . . . . . . . . . . B-12
Microsoft Applications Hotfixes . . . . . . . . . . . . . . . . . . . . . . . . . . . . . . . . B-12
Microsoft Servers Hotfixes . . . . . . . . . . . . . . . . . . . . . . . . . . . . . . . . . . . . B-13
Microsoft Tools Hotfixes . . . . . . . . . . . . . . . . . . . . . . . . . . . . . . . . . . . . . . B-13
Service Packs . . . . . . . . . . . . . . . . . . . . . . . . . . . . . . . . . . . . . . . . . . . . . . . B-14
Windows 2000 SP4 Hotfixes . . . . . . . . . . . . . . . . . . . . . . . . . . . . . . . . . . . B-14
Windows 2003 SP1 Hotfixes . . . . . . . . . . . . . . . . . . . . . . . . . . . . . . . . . . . B-15
Windows 2003 SP2 Hotfixes . . . . . . . . . . . . . . . . . . . . . . . . . . . . . . . . . . . B-15
Windows Automatic Updates . . . . . . . . . . . . . . . . . . . . . . . . . . . . . . . . . . B-16
Windows Media Player Hotfixes . . . . . . . . . . . . . . . . . . . . . . . . . . . . . . . . B-17
Windows Vista™ SP0 Hotfixes . . . . . . . . . . . . . . . . . . . . . . . . . . . . . . . . B-17
Windows XP SP1 Hotfixes . . . . . . . . . . . . . . . . . . . . . . . . . . . . . . . . . . . . B-18
Windows XP SP2 Hotfixes . . . . . . . . . . . . . . . . . . . . . . . . . . . . . . . . . . . . B-19
Security Settings – OS X . . . . . . . . . . . . . . . . . . . . . . . . . . . . . . . . . . . . . . . . B-20
Mac AirPort WEP Enabled . . . . . . . . . . . . . . . . . . . . . . . . . . . . . . . . . . . . B-20
Mac AirPort Preference . . . . . . . . . . . . . . . . . . . . . . . . . . . . . . . . . . . . . . . B-20
Mac AirPort User Prompt . . . . . . . . . . . . . . . . . . . . . . . . . . . . . . . . . . . . . B-21
Mac Anti-virus . . . . . . . . . . . . . . . . . . . . . . . . . . . . . . . . . . . . . . . . . . . . . . B-21
Mac Bluetooth . . . . . . . . . . . . . . . . . . . . . . . . . . . . . . . . . . . . . . . . . . . . . . B-22
Mac Firewall . . . . . . . . . . . . . . . . . . . . . . . . . . . . . . . . . . . . . . . . . . . . . . . B-22
Mac Internet Sharing . . . . . . . . . . . . . . . . . . . . . . . . . . . . . . . . . . . . . . . . . B-23
Mac QuickTime® Updates . . . . . . . . . . . . . . . . . . . . . . . . . . . . . . . . . . . . B-23
Mac Security Updates . . . . . . . . . . . . . . . . . . . . . . . . . . . . . . . . . . . . . . . . B-24
Mac Services . . . . . . . . . . . . . . . . . . . . . . . . . . . . . . . . . . . . . . . . . . . . . . . B-24
Security Settings – Windows . . . . . . . . . . . . . . . . . . . . . . . . . . . . . . . . . . . . . B-25
Allowed Networks . . . . . . . . . . . . . . . . . . . . . . . . . . . . . . . . . . . . . . . . . . . B-25
Microsoft Excel Macros . . . . . . . . . . . . . . . . . . . . . . . . . . . . . . . . . . . . . . B-25
Microsoft Outlook Macros . . . . . . . . . . . . . . . . . . . . . . . . . . . . . . . . . . . . B-26
Microsoft Word Macros . . . . . . . . . . . . . . . . . . . . . . . . . . . . . . . . . . . . . . B-27
Services Not Allowed . . . . . . . . . . . . . . . . . . . . . . . . . . . . . . . . . . . . . . . . B-28
Services Required . . . . . . . . . . . . . . . . . . . . . . . . . . . . . . . . . . . . . . . . . . . B-29
Windows Bridge Network Connection . . . . . . . . . . . . . . . . . . . . . . . . . . . B-30
Windows Wireless Network SSID Connections . . . . . . . . . . . . . . . . . . . . B-30
Windows Security Policy . . . . . . . . . . . . . . . . . . . . . . . . . . . . . . . . . . . . . B-31
Windows Startup Registry Entries Allowed . . . . . . . . . . . . . . . . . . . . . . . B-32
Wireless Network Connections . . . . . . . . . . . . . . . . . . . . . . . . . . . . . . . . . B-33
Software – Windows . . . . . . . . . . . . . . . . . . . . . . . . . . . . . . . . . . . . . . . . . . . . B-35
Anti-spyware . . . . . . . . . . . . . . . . . . . . . . . . . . . . . . . . . . . . . . . . . . . . . . . B-35
Anti-virus . . . . . . . . . . . . . . . . . . . . . . . . . . . . . . . . . . . . . . . . . . . . . . . . . . B-35
High-risk Software . . . . . . . . . . . . . . . . . . . . . . . . . . . . . . . . . . . . . . . . . . B-36
xiv
Page 17

Microsoft Office Version Check . . . . . . . . . . . . . . . . . . . . . . . . . . . . . . . . B-37
P2P . . . . . . . . . . . . . . . . . . . . . . . . . . . . . . . . . . . . . . . . . . . . . . . . . . . . . . . B-37
Personal Firewalls . . . . . . . . . . . . . . . . . . . . . . . . . . . . . . . . . . . . . . . . . . . B-37
Software Not Allowed . . . . . . . . . . . . . . . . . . . . . . . . . . . . . . . . . . . . . . . . B-38
Software Required . . . . . . . . . . . . . . . . . . . . . . . . . . . . . . . . . . . . . . . . . . . B-39
Worms, Viruses, and Trojans . . . . . . . . . . . . . . . . . . . . . . . . . . . . . . . . . . B-39
C Important Browser Settings
Pop-up Windows . . . . . . . . . . . . . . . . . . . . . . . . . . . . . . . . . . . . . . . . . . . . . . . . C-2
Active Content . . . . . . . . . . . . . . . . . . . . . . . . . . . . . . . . . . . . . . . . . . . . . . . . . . C-4
Minimum Font Size . . . . . . . . . . . . . . . . . . . . . . . . . . . . . . . . . . . . . . . . . . . . . C-6
Page Caching . . . . . . . . . . . . . . . . . . . . . . . . . . . . . . . . . . . . . . . . . . . . . . . . . . . C-8
Temporary Files . . . . . . . . . . . . . . . . . . . . . . . . . . . . . . . . . . . . . . . . . . . . . . . . C-9
D Installation and Configuration Check List
Minimum System Requirements . . . . . . . . . . . . . . . . . . . . . . . . . . . . . . . . . . . D-2
Installation Location . . . . . . . . . . . . . . . . . . . . . . . . . . . . . . . . . . . . . . . . . . . . . D-3
Installation Media . . . . . . . . . . . . . . . . . . . . . . . . . . . . . . . . . . . . . . . . . . . . . . . D-4
IP Addresses, Hostname, Logins, and Passwords . . . . . . . . . . . . . . . . . . . . . D-5
Single-server Installation . . . . . . . . . . . . . . . . . . . . . . . . . . . . . . . . . . . . . . . D-5
Multiple-server Installations . . . . . . . . . . . . . . . . . . . . . . . . . . . . . . . . . . . . D-5
Management Server D-6
Enforcement Server 1 D-6
Enforcement Server 2 D-7
Enforcement Server 3 D-7
Proxy Server . . . . . . . . . . . . . . . . . . . . . . . . . . . . . . . . . . . . . . . . . . . . . . . . D-8
Agentless Credentials . . . . . . . . . . . . . . . . . . . . . . . . . . . . . . . . . . . . . . . . . . . . D-9
Quarantine . . . . . . . . . . . . . . . . . . . . . . . . . . . . . . . . . . . . . . . . . . . . . . . . . . . . D-10
802.1X . . . . . . . . . . . . . . . . . . . . . . . . . . . . . . . . . . . . . . . . . . . . . . . . . . . . D-10
802.1X Devices . . . . . . . . . . . . . . . . . . . . . . . . . . . . . . . . . . . . . . . . . . . . . D-10
DHCP . . . . . . . . . . . . . . . . . . . . . . . . . . . . . . . . . . . . . . . . . . . . . . . . . . . . . D-11
Accessible services . . . . . . . . . . . . . . . . . . . . . . . . . . . . . . . . . . . . . . . . . . D-12
Notifications . . . . . . . . . . . . . . . . . . . . . . . . . . . . . . . . . . . . . . . . . . . . . . . . . . . D-14
Test Exceptions . . . . . . . . . . . . . . . . . . . . . . . . . . . . . . . . . . . . . . . . . . . . . . . . D-15
Contents
xv
Page 18

Contents
E Ports used in NAC 800
F Glossary
Index
xvi
Page 19

Introduction
Chapter Contents
What you Need to get Started . . . . . . . . . . . . . . . . . . . . . . . . . . . . . . . . . . . . . . . 1-2
Additional Documentation . . . . . . . . . . . . . . . . . . . . . . . . . . . . . . . . . . . . . . . . . 1-3
NAC 800 Home Window . . . . . . . . . . . . . . . . . . . . . . . . . . . . . . . . . . . . . . . . . . 1-4
System Monitor . . . . . . . . . . . . . . . . . . . . . . . . . . . . . . . . . . . . . . . . . . . . . . . . . . 1-6
Overview . . . . . . . . . . . . . . . . . . . . . . . . . . . . . . . . . . . . . . . . . . . . . . . . . . . . . . . 1-8
Technical Support . . . . . . . . . . . . . . . . . . . . . . . . . . . . . . . . . . . . . . . . . . . . . . . 1-14
Upgrading . . . . . . . . . . . . . . . . . . . . . . . . . . . . . . . . . . . . . . . . . . . . . . . . . . . . . 1-15
Conventions Used in This Document . . . . . . . . . . . . . . . . . . . . . . . . . . . . . . . . 1-16
Copying Files . . . . . . . . . . . . . . . . . . . . . . . . . . . . . . . . . . . . . . . . . . . . . . . . . . 1-20
1
The NAC 800 Process . . . . . . . . . . . . . . . . . . . . . . . . . . . . . . . . . . . . . . . . 1-10
About NAC 800 . . . . . . . . . . . . . . . . . . . . . . . . . . . . . . . . . . . . . . . . . . . . . 1-10
Navigation Paragraph . . . . . . . . . . . . . . . . . . . . . . . . . . . . . . . . . . . . . . . . 1-16
Tip Paragraph . . . . . . . . . . . . . . . . . . . . . . . . . . . . . . . . . . . . . . . . . . . . . . 1-16
Note Paragraph . . . . . . . . . . . . . . . . . . . . . . . . . . . . . . . . . . . . . . . . . . . . . 1-16
Caution Paragraph . . . . . . . . . . . . . . . . . . . . . . . . . . . . . . . . . . . . . . . . . . . 1-16
Warning Paragraph . . . . . . . . . . . . . . . . . . . . . . . . . . . . . . . . . . . . . . . . . . 1-17
Bold Font . . . . . . . . . . . . . . . . . . . . . . . . . . . . . . . . . . . . . . . . . . . . . . . . . . 1-17
Task Paragraph . . . . . . . . . . . . . . . . . . . . . . . . . . . . . . . . . . . . . . . . . . . . . 1-17
Italic Text . . . . . . . . . . . . . . . . . . . . . . . . . . . . . . . . . . . . . . . . . . . . . . . . . . 1-17
Courier Font . . . . . . . . . . . . . . . . . . . . . . . . . . . . . . . . . . . . . . . . . . . . . . . . 1-18
Angled Brackets . . . . . . . . . . . . . . . . . . . . . . . . . . . . . . . . . . . . . . . . . . . . 1-18
Square Brackets . . . . . . . . . . . . . . . . . . . . . . . . . . . . . . . . . . . . . . . . . . . . . 1-18
Terms . . . . . . . . . . . . . . . . . . . . . . . . . . . . . . . . . . . . . . . . . . . . . . . . . . . . . 1-19
SCP . . . . . . . . . . . . . . . . . . . . . . . . . . . . . . . . . . . . . . . . . . . . . . . . . . . . . . 1-20
PSCP . . . . . . . . . . . . . . . . . . . . . . . . . . . . . . . . . . . . . . . . . . . . . . . . . . . . . 1-20
1-1
Page 20

Introduction
What you Need to get Started
The following hardware and software is required to operate NAC 800:
■ One or more ProCurve NAC 800 appliances
■ Configuration information – See “Installation and Configuration
■ An Internet connection or a Web proxy server that allows outbound
■ Workstation – A workstation running one of the following browsers:
What you Need to get Started
Check List” on page D-1
HTTPS communications from the MS
•Windows –
Mozilla version 1.7
Mozilla Firefox version 1.5 or later
Internet Explorer 6.0
• Linux –
Mozilla version 1.7
Mozilla Firefox version 1.5 or later
• Mac OS X –
Mozilla Firefox version 1.5 or later
■ A ProCurve NAC Implementation Start-up Service, from an autho-
rized ProCurve partner or ProCurve.
■ A ProCurve NAC Endpoint Integrity Agent License
ProCurve NAC 800 is delivered as a hardware appliance that you install in your
network. After NAC 800 is installed in your network, you configure it using a
workstation with browser software installed.
The browser software must be configured as described in “Important Browser
Settings” on page C-1.
1-2
Page 21

Introduction
Additional Documentation
Additional Documentation
The following documents provide information on installation and configuration, and are available at http://www.hp.com/rnd/support/manual/
NAC800.htm:
1. ProCurve Network Access Controller 800 Hardware Installation Guide
– Refer to this document first to see how to prepare for and perform the
physical installation of the appliance and how to establish initial
management access. This document contains appliance specifications,
safety information, and appliance certifications.
2. ProCurve Network Access Controller 800 Configuration Guide – Refer
to this document second, to understand the product's features,
capabilities, and use. This document explains how to configure the
appliance based on the usage model you choose to deploy in your
network.
3. ProCurve Network Access Controller 800Users’ Guide – Refer to this
document last for information on configuring, monitoring activities,
creating NAC policies, and running reports.
1-3
Page 22

Introduction
NAC 800 Home Window
NAC 800 Home Window
The NAC 800 Home window (figure 1-1) is a centralized management user
interface that allows you to quickly assess the status of your network. The
following list and figure describe and show the key features:
1. Important status announcements – If there is anything that needs your
immediate attention, a status announcement is displayed at the top of the
window. Click clear to remove the announcement.
2. Username’s account – Click this link to open the user account editing
window. See “User Accounts” on page 3-28 for details on creating and
editing user accounts. You must have administrator privileges to create
user accounts; however, any user can edit their own account.
3. Top 5 failed tests area – The Top 5 failed tests area indicates the tests that
fail the most. Click on an endpoint number or the Test results report option
to view details.
4. Window actions – Use these links to refresh the window, log out of the
user interface, and access online help.
5. Navigation pane – The menu items shown in this pane vary depending on
your permission level. See “User Roles” on page 3-36 for more information
on permissions. You must have administrator privileges to create and edit
user roles. Once you select a menu item from the navigation pane, use the
bread crumbs at the top of the windows to navigate throughout the user
interface (see figure 1-2. System Monitor Window on page 1-7).
6. Endpoint test status area – The Endpoint tests area displays the total
number of endpoints that NAC 800 has attempted to test, and what the
test status is for each endpoint. Click the number of endpoints to view
details.
7. Access control status area – The Access control area displays the total
number of endpoints that have attempted to connect to your network, and
what the access state is as a percentage and as a number. Click on the
number of endpoints to view details.
8. Enforcement server (ES) status area – The Enforcement server status area
provides status on your ESs. Click the System monitor option to view
details.
1-4
Page 23
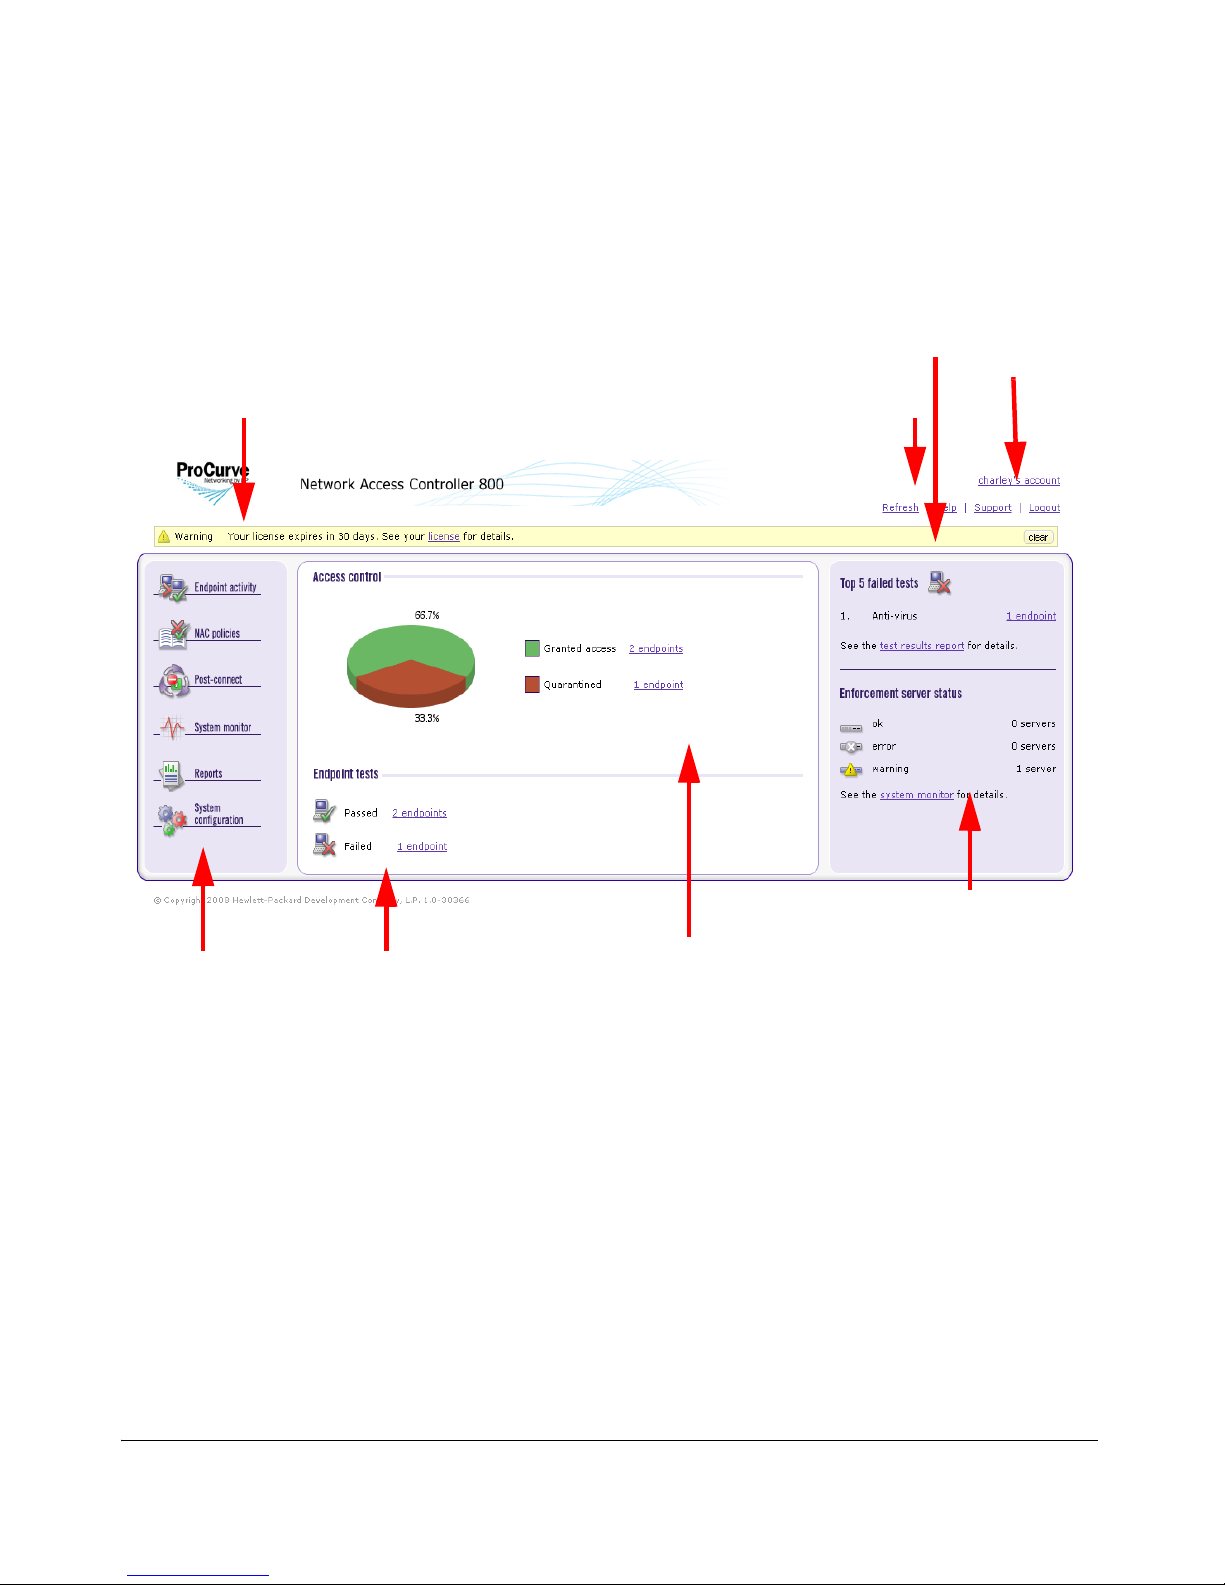
NAC 800 Home Window
3. Top 5 failed
tests area
Introduction
1. Important status
announcements
2. User name
4. Window actions
8. Enforcement server
status area
5. Navigation
pane
6. Test
status area
Figure 1-1. NAC 800 Home Window
7. Access control
status area
status area
1-5
Page 24

Introduction
System Monitor
System Monitor
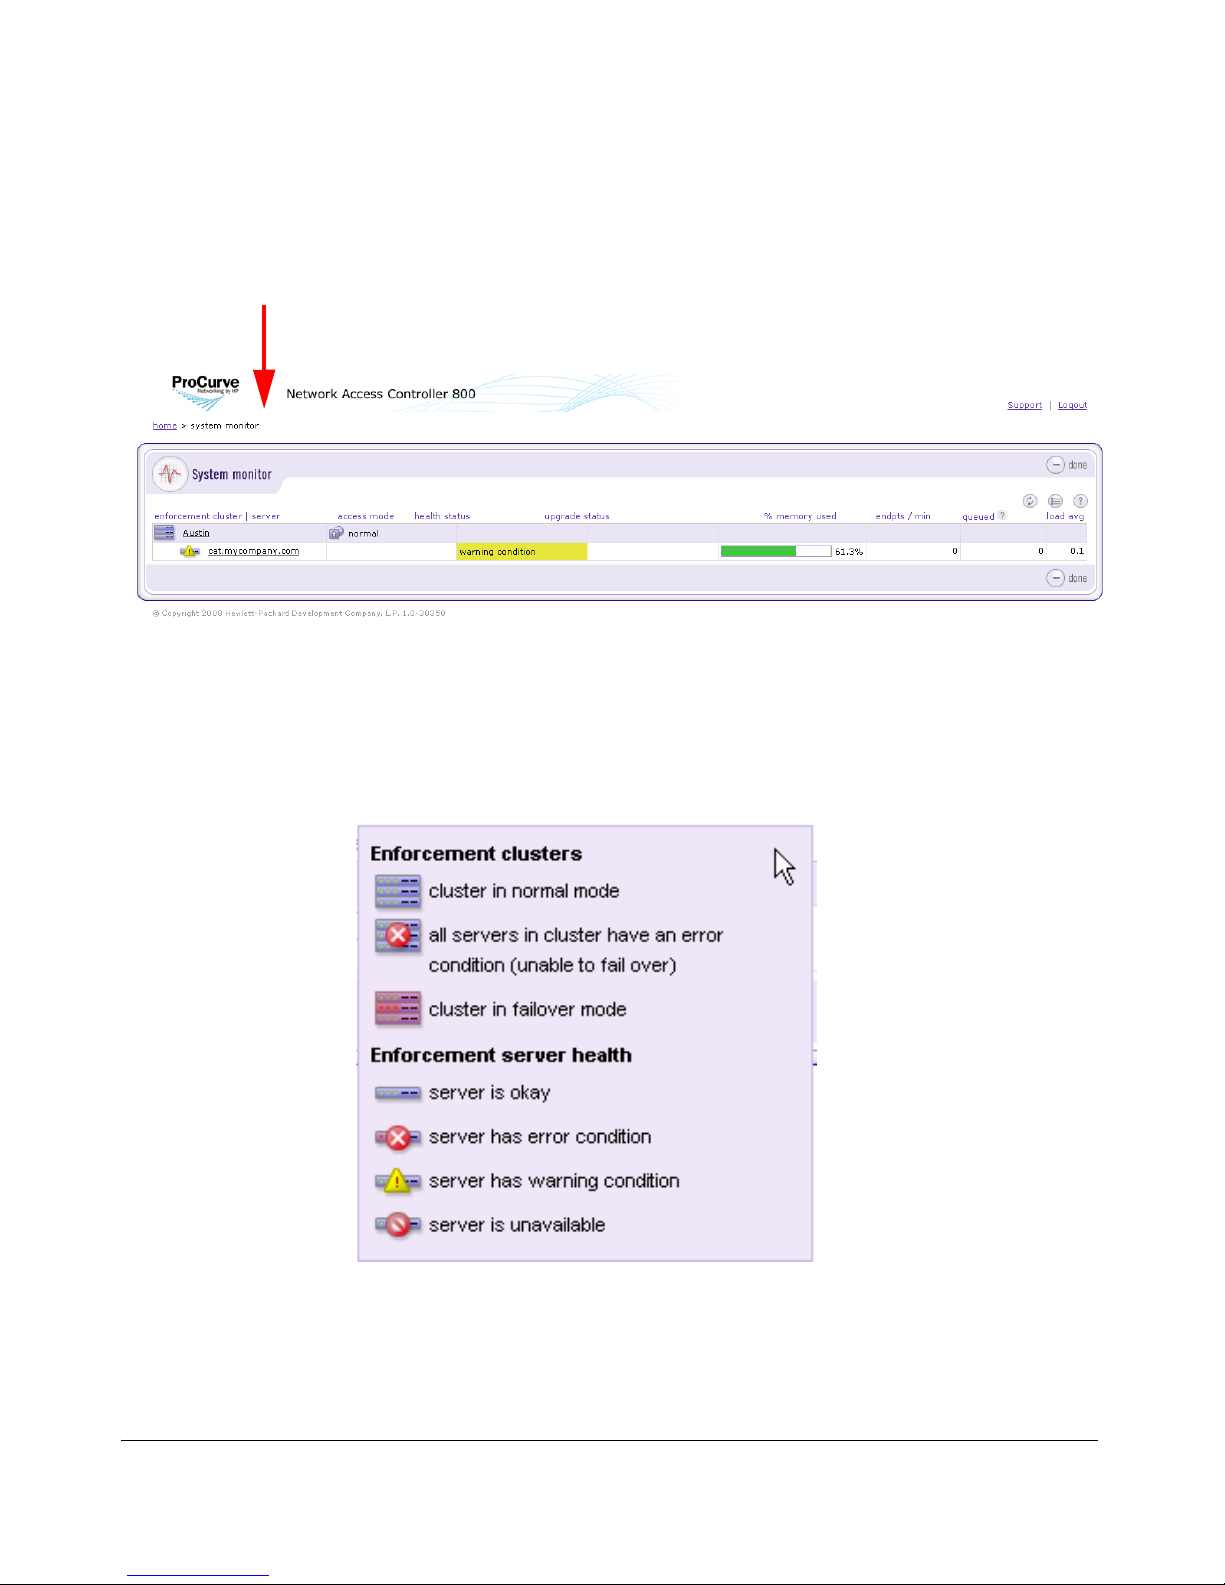
The System monitor window provides the following information:
■ Enforcement cluster name – The Enforcement clusters are listed by
name in the order they were created. Click on a cluster name to view
cluster details. You must have cluster-editing permissions to view and
edit cluster details.
■ Server name by cluster – The servers for each cluster are listed by
name in the order they were created. Click on a server name to view
server details. You must have cluster-editing permissions to view and
edit server details.
■ Cluster access mode – The cluster access mode is either normal or
allow all. See “Enforcement Clusters and Servers” on page 3-6 for
instructions on making the access mode selection.
■ Health status – Health status shows ok for servers with no problems,
and either warning or error for servers with problems. Click the server
name to view details.
■ Upgrade status – Upgrade status shows the status of any upgrades in
process.
■ % memory used – The amount of memory currently used by each
server is shown as a percentage of total memory available.
■ Endpoints tested/minute – The number of endpoints tested over the
last 15 minutes or less.
■ Endpoints queued – The number of tests running or scheduled to run
on that ES.
■ System load average – The number of processes waiting to run (top
command). In Linux, entering top at the command line returns a realtime look at processor activity.
1-6
Page 25
Breadcrumbs for navigation
Introduction
System Monitor
Figure 1-2. System Monitor Window
The following figure shows the legend for the System monitor window icons:
Figure 1-3. System Monitor Window Legend
1-7
Page 26

Introduction
Overview
Overview
NAC 800 protects the network by ensuring that endpoints are free from threats
and in compliance with the organization's IT security standards. NAC 800
systematically tests endpoints—with or without the use of a client or agent—
for compliance with organizational security policies, quarantining non-compliant machines before they damage the network.
NAC 800 ensures that the applications and services running on endpoints
(such as LAN, RAS, VPN, and WiFi endpoints) are up-to-date and free of
worms, viruses, trojans, P2P and other potentially damaging software. It
dramatically reduces the cost and effort of securing your network's weakest
links—the endpoints your IT group might not adequately control.
There are advantages and disadvantages inherent with each of the test method
technologies. Having a choice of testing solutions enables you to maximize
the advantages and minimize the disadvantages.
TIP: Agentless testing uses an existing Windows service (RPC). ActiveX testing
uses an ActiveX control. ProCurve agent testing installs an agent (ProCurve
NAC EI Agent) and runs as a new Windows service.
The trade-offs in the test methods are described in the following table:
Test method Trade-offs
Pros Cons
Agentless • Truly agentless, no install or download.
• No extra memory load on the client machine.
• Can begin testing, view test results, and give
network access without any end-user
interaction for
domains.
• Easiest of the three test methods to deploy.
• Saves administration time and is therefore
less expensive than agent-based solutions.
Table 1-1. Test Methods
endpoints on your Windows
• Requires RPC Service to be available to the
NAC 800 server (ports 139 or 445).
• Requires file and print sharing to be enabled.
• Not supported by legacy Windows™
operating systems and non-Windows
operating systems.
• If the endpoint is not on a domain, the user
must specify local credentials. A user often
does not know what credentials to enter.
1-8
Page 27

Test method Trade-offs
Pros Cons
Introduction
Overview
ActiveX plug-in • No installation or upgrade to maintain.
• Supports all Windows operating systems.
• Only Internet Explorer application access
required through personal firewall. Must
open port 1500.
ProCurve NAC EI
Agent
• Always available for retesting.
• The agent is automatically updated with
product updates.
• Supports all Windows platforms.
Table 1-1. Test Methods (cont.)
The following list highlights key features:
■ Enforcement options – NAC 800 provides multiple enforcement
options for quarantining endpoints that do not comply with your
security policy (Inline, DHCP, and 802.1X). This enables NAC 800 to
enforce compliance across complex, heterogeneous networks.
• No retesting of endpoint once browser is
closed.
• Not supported by non-Windows operating
systems.
• Browser security settings must allow
ActiveX control operation of signed and safe
controls. This is the default for the Internet
zone. Raise the Internet zone setting and
make
NAC 800 part of the trusted zone.
• Requires interaction from end-users—they
must download the control before they can
access network.
• Install and upgrade to maintain.
• Requires one-time interaction from endusers—they must download and install
before they can access network.
■ High availability and load balancing – A multi-server NAC 800 deploy-
ment is mutually supporting. Should one server fail, other nodes
within a cluster will automatically provide coverage for the affected
network segment.
Load balancing is achieved by an algorithm that spreads the endpoint
testing load across all ESs in a cluster.
■ Multiple-user, role-based access – In enterprise deployments
numerous individuals, each with varying responsibilities, typically
require access to information within NAC 800. Role-based access
enables system administrators to control who has access to the data,
the functions they are allowed to perform, and the information they
can view and act on. Role-based access ensures the integrity of the
enterprise-wide NAC 800 deployment and creates the separation of
duties that conforms to security best-practices.
1-9
Page 28

Introduction
Overview
■ Extensible – NAC 800’s easy-to-use open API allows administrators
to create custom tests for meeting unique organizational requirements. The API is fully exposed and thoroughly documented. Custom
tests are created using scripts and can be seamlessly added to existing
policies.
■ Compatible with existing heterogeneous network infrastructure – No
upgrades to your existing network infrastructure are required.
■ Variety of enforcement options – Permit, deny, or quarantine based
on test results.
■ Self-remediation – Reduces IT administration by empowering users
to bring their machines into compliance.
■ Subscription-based licensing – Includes all test updates and software
upgrades.
The NAC 800 Process
NAC 800 administrators create "NAC policies" that define which applications
and services are permitted, and specify the actions to be taken when endpoints
do not comply. NAC 800 automatically applies the NAC policies to endpoints
as they log into the network, and periodically as the endpoints remain logged
into the network. Based on results, endpoints are either permitted or quarantined to a specific part of the network, thus enforcing the organizational
security standards. NAC 800 tracks all testing and connection activity and
produces a range of reports for auditors, managers, and IT staff.
1-10
NAC 800 performs pre-connect testing; when an endpoint passes the NAC
policy tests (or is otherwise granted access), the endpoint is allowed access
to the network. If you have external Intrusion Detection System/Intrusion
Prevention System (IDS/IPS) systems that monitor your network for attacks,
you can configure these external systems in NAC 800 so they can request that
NAC 800 quarantine an endpoint after it has been connected (post-connect).
About NAC 800
NAC Policy Definition
NAC policies consist of individual tests that evaluate the security status of
endpoints attempting to access the network. Specific tests assess operating
systems, verify that key hotfixes and patches have been installed, ensure
antivirus and other security applications are present and up-to-date, detect
Page 29

Introduction
Overview
the presence of worms, trojans, and viruses, and check for potentially dangerous applications such as file sharing, peer-to-peer (P2P), or spyware. See
“Tests Help” on page B-1 for more information.
Key features include:
■ Out-of-the-box NAC policies – High, medium, and low security are
ready to use with no additional configuration required.
■ Standard tests – NAC 800 comes with a broad range of tests.
■ Automatic test updates – NAC 800 is automatically updated with tests
that cover newly released patches, hotfixes, software updates,
worms, and trojans, and recommended security settings for common
applications. New tests are automatically added to the test database
as frequently as hourly, ensuring immediate protection against newly
discovered threats.
■ Organization-specific policies – Any number of NAC policies can be
created and tailored to your organizational needs. Create policies for
like endpoints (for example, all Windows 2000 workstations), for an
IP range or specific IPs, or by geographic location.
Endpoint Testing
NAC 800 automatically tests all endpoints attempting to access your network
through a LAN, RAS, VPN, or WiFi connection. Tests are fast and you are kept
informed of test progress and results. After the initial compliance tests, NAC
800 periodically tests endpoints that have been granted access to ensure that
real-time system changes do not violate the NAC policy.
TIP: NAC 800 passes approximately 9 to 16 kilobytes of total data between a single
endpoint and a single NAC 800 server for a single testing session with the High
Security NAC policy (approximately 20 tests). It typically takes between 5 and
10 seconds to all tests in a policy on a 100Mb LAN. If your endpoints are taking
longer to test, there might be a configuration problem with DNS on the NAC
800 server.
NOTE: If the end-user selects ActiveX test and then closes the browser, their endpoint
is not retested until the end-user opens another browser session, reloading
the ActiveX agent.
Key features include:
■ Multiple test method options – Agentless, ActiveX, or ProCurve NAC
EI Agent. Select the most appropriate method for your environment
or endpoint.
1-11
Page 30

Introduction
Overview
■ Rapid testing and robust endpoint management – Thousands of
endpoints can be tested and managed simultaneously.
■ Continual testing – Endpoints are retested on an administrator-
defined interval as long as they remain connected to the network.
Compliance Enforcement
Based on endpoint test results, NAC 800 takes the appropriate action. Endpoints that test compliant with the applied policy are permitted access. Noncompliant endpoints are either quarantined, or are given access for a temporary period. Implement the necessary fixes during this period.
Key features include:
■ Flexible enforcement options – Grant or quarantine access criteria is
designated by the administrator and driven by the criticality of
selected tests and corporate security standards.
■ Manual overrides – Administrators can retest, quarantine, or grant
access to endpoints on demand.
■ User notifications – Users of non-compliant endpoints receive imme-
diate notification about the location of the endpoint deficiencies, as
well as step-by-step information about implementing the corrections
to achieve compliance.
■ Administrator notifications – Administrators receive a variety of noti-
fications and alerts based on testing and access activity.
■ Graduated enforcement – Allows controlled system rollout.
Automated and Manual Repair
■ Self-remediation – End-users are notified of where their endpoints are
deficient and provided with remediation instructions.
■ Access "grace period" – Non-compliant endpoints are granted access
for a temporary, administrator-defined period to facilitate remediation.
■ Patch Management – NAC 800 can integrate with patch manage-
ment software, automating the process to get an endpoint updated
and on the network.
Targeted Reporting
NAC 800 reports provide concise security status information on endpoint
compliance and access activity. Specific reports are available for auditors,
managers, and IT staff members.
1-12
Page 31

For more information, see “Reports” on page 14-1.
Introduction
Overview
1-13
Page 32

Introduction
Technical Support
Technical Support
Technical support is available through www.procurve.com.
1-14
Page 33

Introduction
Upgrading
Upgrading
Upgrading is described in“Checking for NAC 800 Upgrades” on page 3-26.
CAUTION: Installing third-party software on the NAC 800 server is not supported. If you
install additional software on the NAC 800 server, you need to remove it in
order to troubleshoot any NAC 800 issues, and it will likely be partially or fully
overwritten during NAC 800 release upgrades or patch installs, compromising
the third-party software functionality. Additionally, installing third-party software and/or modifying the NAC 800 software can violate your license agreement.
1-15
Page 34

Introduction
Conventions Used in This Document
Conventions Used in This Document
The conventions used in this document are described in this section:
Navigation Paragraph
Navigation paragraphs provide a quick visual on how to get to the screen or
area discussed.
Example:
Home window>>Configure system
Tip Paragraph
Tips provide helpful, but not required information.
Example:
TIP: Hover the cursor over the “x dhcp servers with errors” text to get additional
information in a pop-up window.
Note Paragraph
Notes notify you of important information.
Example:
NOTE: If there is no activity for 30 minutes, the configuration window times out and
you must log in again.
Caution Paragraph
Cautions notify you of conditions that can cause errors or unexpected results.
Example:
CAUTION: Do not rename the files or they will not be seen by NAC 800.
1-16
Page 35

Introduction
Conventions Used in This Document
Warning Paragraph
Warnings notify you of conditions that can lock your system or cause damage
to your data.
Example:
WARNING: Do not log in using SSH—this kills your session and causes your session to
hang.
Bold Font
Bold font indicates the text that appears on a window or screen.
Example:
9. If the Domains connection method is enabled (Credentials tab, enabled
check box), you must specify your Windows domain controller here.
Task Paragraph
Task paragraphs summarize the instructions that follow.
Example:
To enter LDAP information:
Italic Text
Italic text is used in the following cases:
■ Showing emphasis –
Low – You are not protected from potentially unsafe macros. (Not
recommended).
■ Indicating document titles –
NAC 800 Installation Guide
■ Indicating a variable entry in a command –
https://<IP_address>/index.html
In this case, you must replace <IP_address> with the actual IP
address, such as 10.0.16.99. Do not type the angled brackets.
1-17
Page 36

Introduction
Conventions Used in This Document
Courier Font
Courier font is used in the following cases:
■ Indicating path names –
Change the working directory to the following:
C:\Program Files\<MyCompany>\
■ Indicating text; enter exactly as shown –
ProCurve NAC EI Agent
Enter the following URL in the browser address field:
https://<IP_address>/index.html
In this case, you must replace <IP_address> with the actual IP
address, such as 10.0.16.99. Do not type the angled brackets.
■ Indicating file names –
SAIASConnector.ini
Angled Brackets
Angled brackets enclose variable text that needs to be replaced with your
specific values.
Example:
https://<IP_address>/index.html
In this case, you must replace <IP_address> with the actual IP address, such
as 10.0.16.99. Do not type the angled brackets.
Square Brackets
Square brackets are used in the following cases:
■ Indicating keys to press on the keyboard –
[Ctrl]+[Shift]+[r]
1-18
Page 37

Conventions Used in This Document
■ Indicating a variable section in a *.INI file –
[Global]
NASList=192.168.200.135
■ Indicating a list in a properties file –
Compliance.ObjectManager.DHCPConnectorServers=[192.168.51.130, 192.168.99.1]
Terms
Terms are defined in the “Glossary” on page F-1.
Example:
MAC Media Access Control – The unique number that identifies a
physical endpoint. Generally referred to as the MAC address.
Introduction
1-19
Page 38

Introduction
Copying Files
Copying Files
Whenever you copy a file from one machine to another, copy it using a secure
copy utility that uses the Secure Shell (SSH) protocol. The exact syntax of the
copy command will vary based on the utility you use.
Example:
10. Copy the /usr/local/nac/properties/NACAVPs.txt file from the
NAC 800 server to the ACS server using PSCP (or other secure copy
utility).
SCP
scp is a Linux/UNIX command used to copy files between Linux/UNIX
machines. It has the following syntax:
scp user@source:/directory/file user@destination:/directory/file
scp is included with Linux/UNIX.
PSCP
pscp is a program used to copy files between Windows and Linux/UNIX
machines.
To us e pscp, you must first save it from the following location to the Windows
machine:
http://www.chiark.greenend.org.uk/~sgtatham/putty/download.html
Next, open a DOS (command) window on the Windows machine, and enter
the commands as follows:
To copy a file from a Linux machine to a Windows machine, enter the
following:
<pscp directory>\pscp [email protected]:/etc/hosts
c:\temp\example-hosts.txt
You will be prompted to enter a password for the Linux/UNIX machine.
1-20
Page 39

Introduction
Copying Files
To copy a file from a Windows machine to a Linux machine, enter the
following:
<pscp directory>\pscp c:\documents\foo.txt fred@example.com:/tmp/foo
You will be prompted to enter a password for the Linux/UNIX machine.
NOTE: You can either enter the path to the PSCP.EXE file as part of the command,
or cd to the directory where you saved the PSCP.EXE file before entering the
pscp command.
1-21
Page 40

(This page intentionally left blank.)
Page 41

Clusters and Servers
Chapter Contents
Overview . . . . . . . . . . . . . . . . . . . . . . . . . . . . . . . . . . . . . . . . . . . . . . . . . . . . . . . 2-2
Installation Examples . . . . . . . . . . . . . . . . . . . . . . . . . . . . . . . . . . . . . . . . . . . . . 2-3
2
2-1
Page 42

Clusters and Servers
Overview
Overview
NAC 800 uses clusters and servers. A "cluster" is a logical grouping of one or
more ESs that are managed by one MS.
A single-server installation is one where the MS and ES are on one server. The
ES is assigned to a Default cluster. This configuration is illustrated in figure 2-
1.
A multiple-server installation is one where the MS is on one server and there
are one or more ESs on separate servers. Each ES must be assigned to a
cluster. This configuration is illustrated in figure 2-2.
The responsibilities of the MS and ES are as follows:
■ MS
•Configuration
• NAC policies
• Quarantining
• Endpoint activity
• License
• Test updates
■ ES
•Testing
• Access control
The quarantine method is defined per cluster; all of the ESs in a given cluster
use the same quarantine method (Inline, DHCP, or 802.1X). When using
multiple clusters, each cluster can have a different quarantine method. Clusters cooperate to test and control access to the network, although the ESs in
each cluster are not able to communicate with any ES in any other cluster.
2-2
Page 43
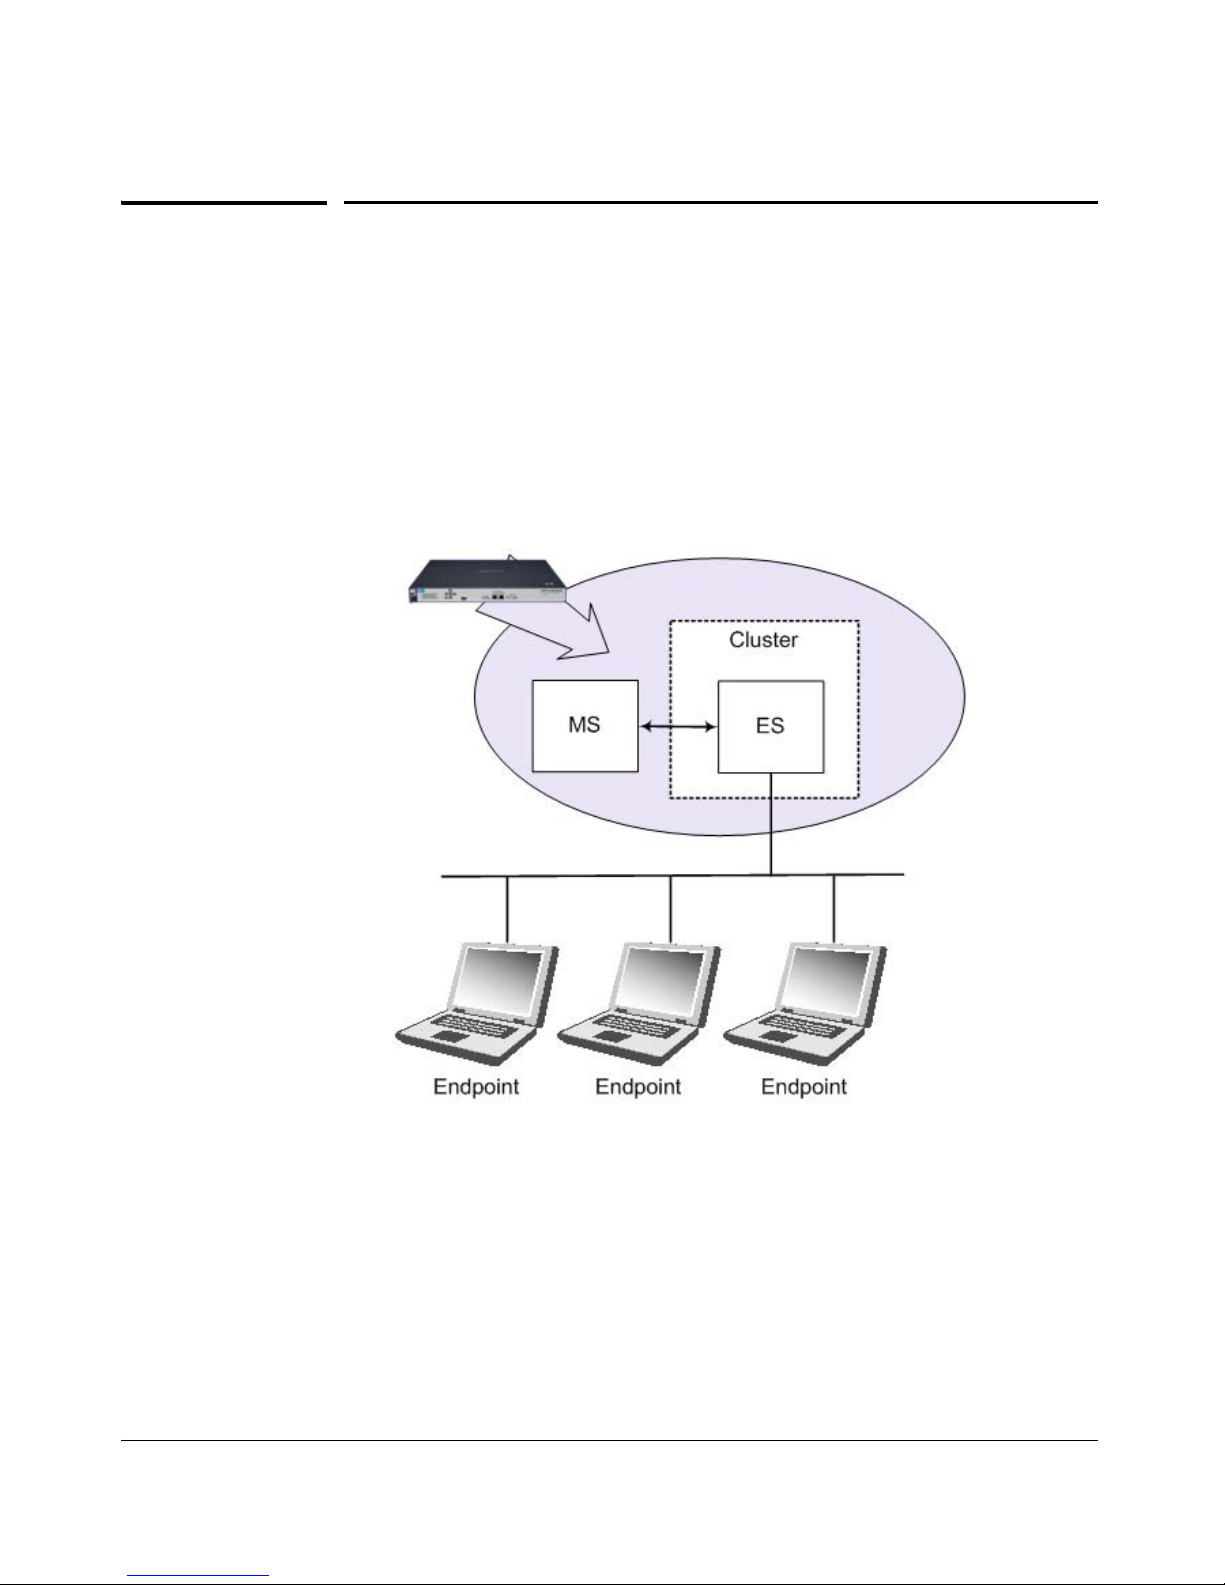
Clusters and Servers
Installation Examples
Installation Examples
Single-server Installation
The simplest installation is where the MS and ES are installed on the same
physical server as shown in the following figure:
Figure 2-1. Single-server Installation
Multiple-server Installations
By using at least three servers, one for the MS and two for ESs, you gain the
advantage of high availability and load balancing.
2-3
Page 44
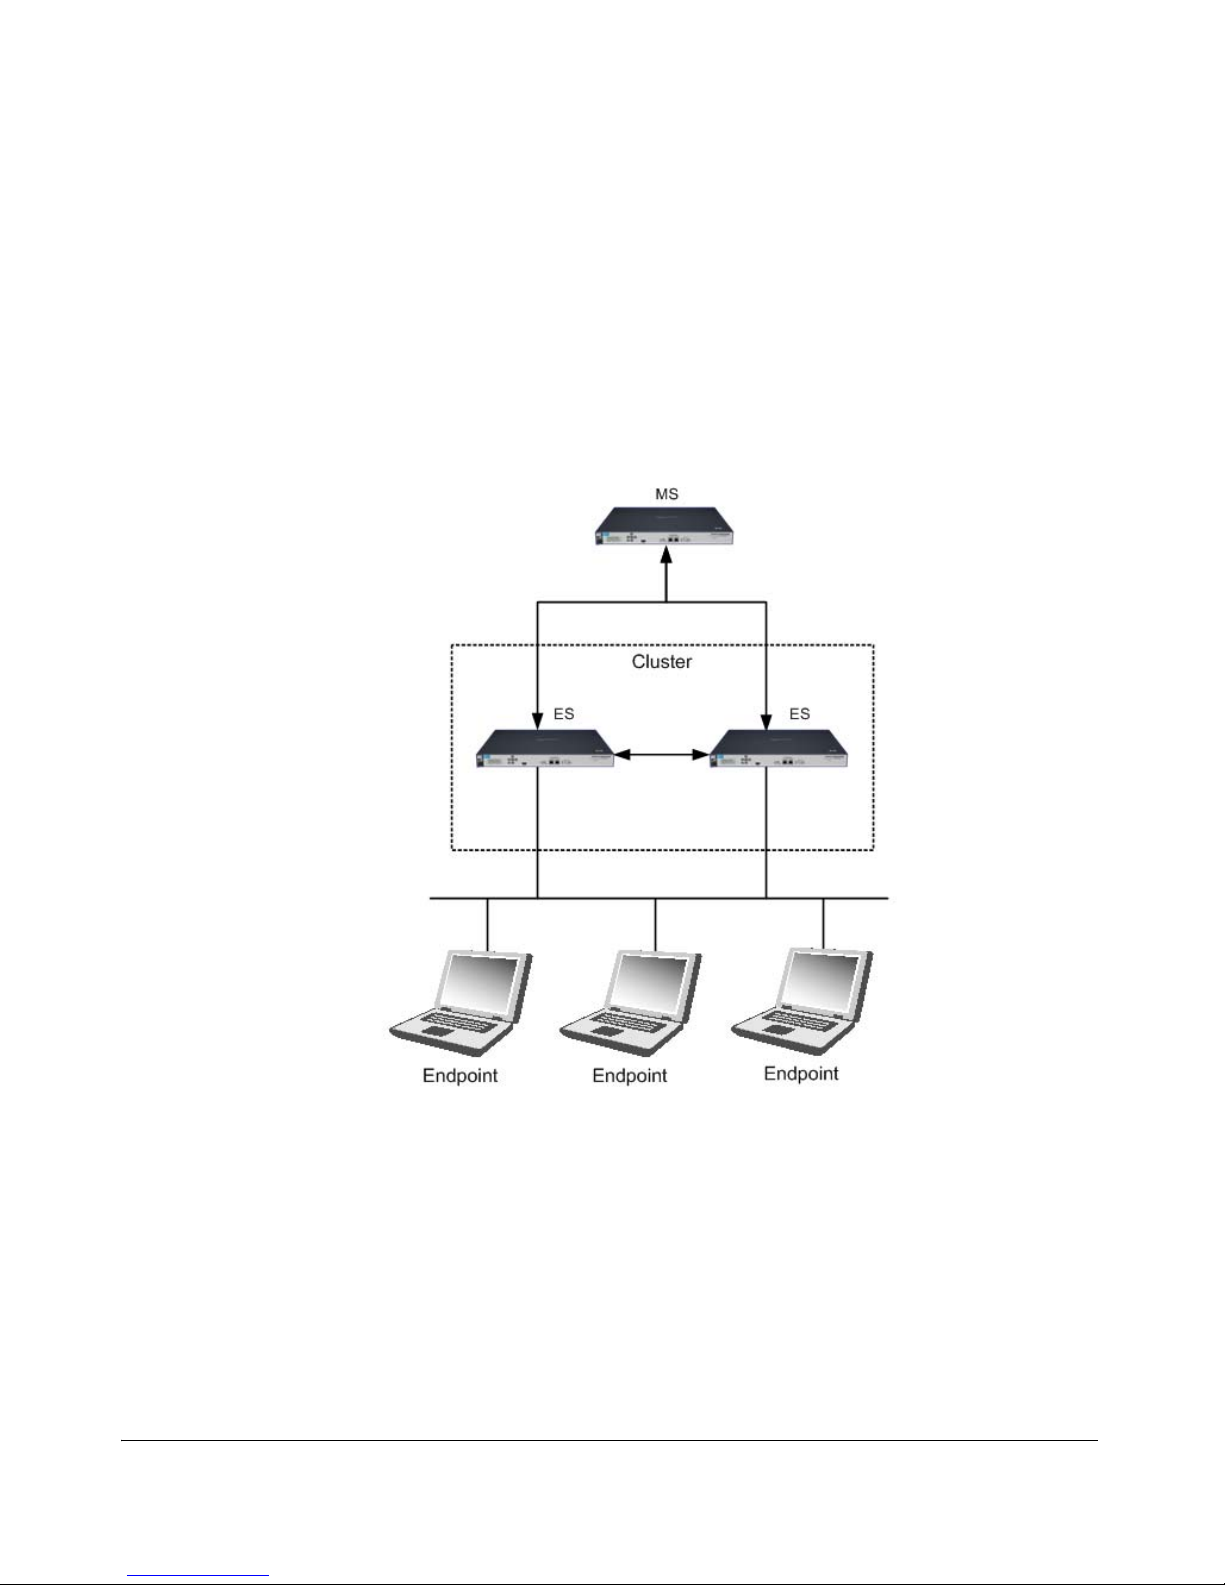
Clusters and Servers
Installation Examples
High availability is where ESs take over for any other ES or servers that
become unavailable. Load balancing is where the testing of endpoints is
spread evenly over all of the ESs. A three-server installation is shown in the
following figure:
Figure 2-2. Multiple-server Installation
2-4
Page 45
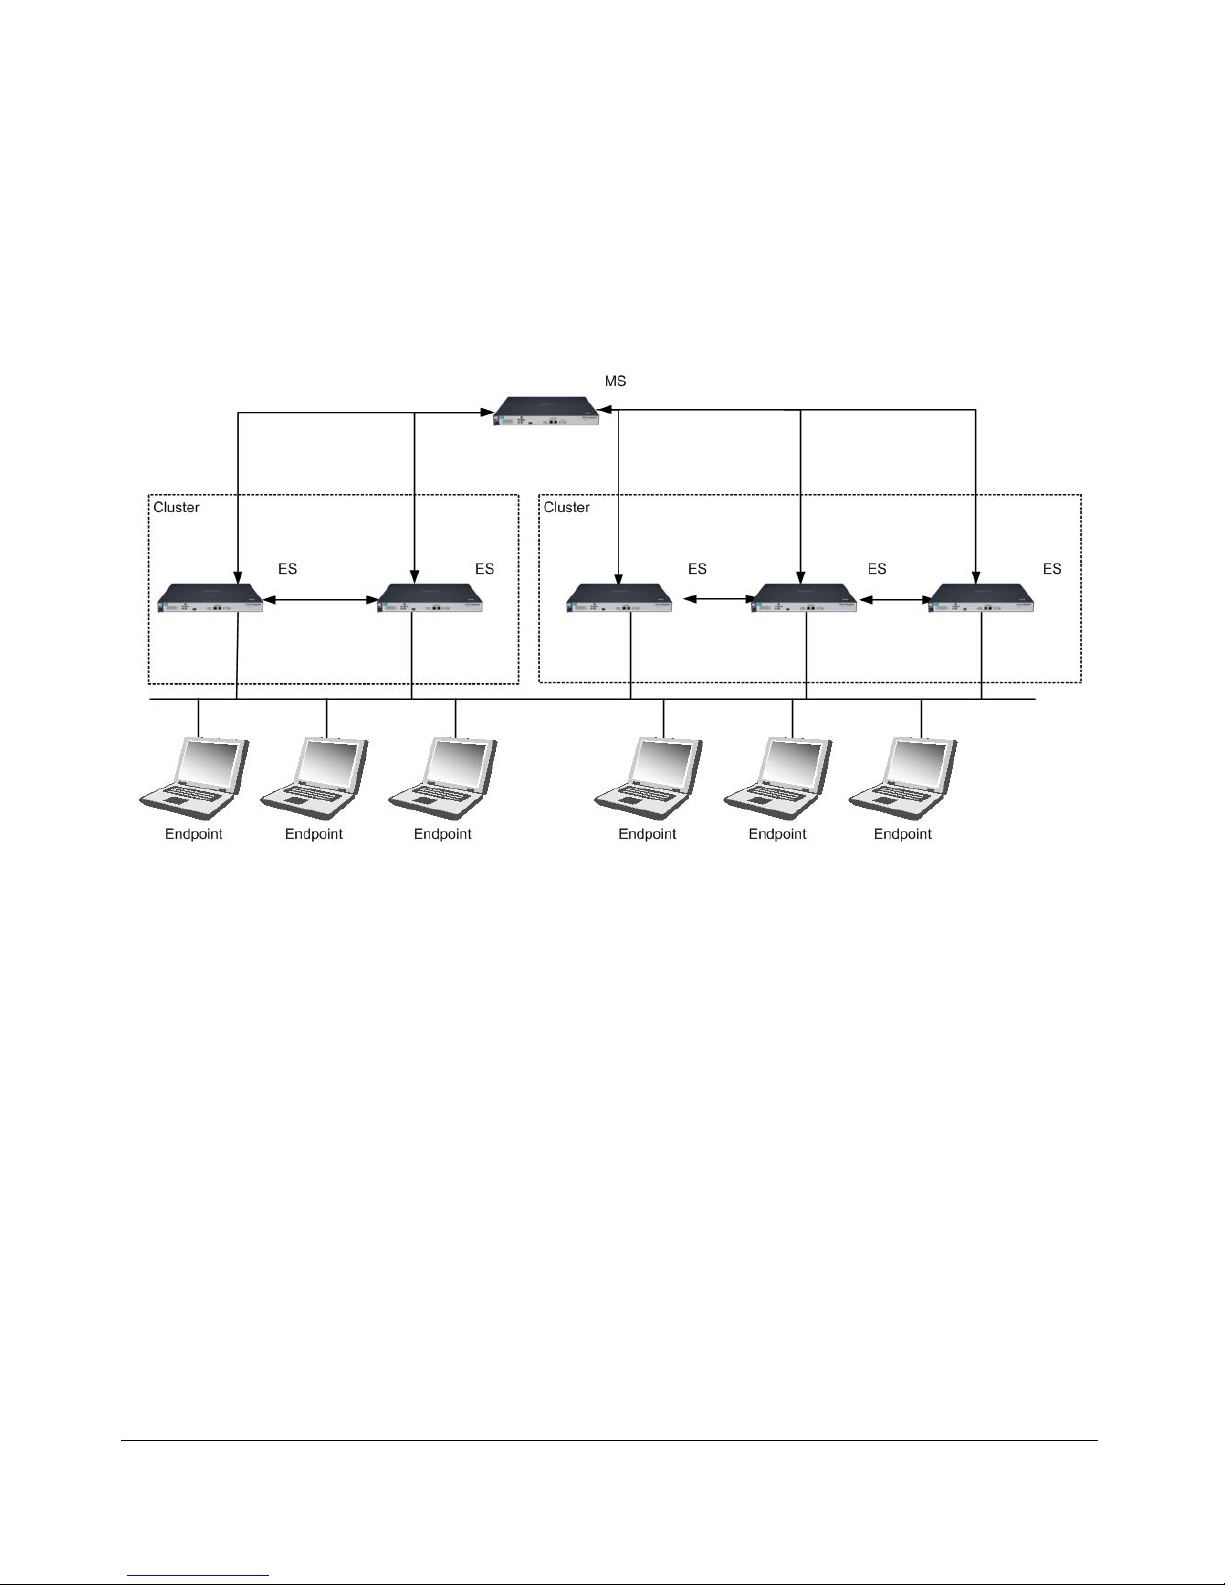
Clusters and Servers
Installation Examples
When your network is more complex, you can continue to add clusters as
shown in the following figure:
Figure 2-3. Multiple-server, Multiple-cluster Installation
The system configuration area allows you to select default settings for all
clusters, as well as override the default settings on a per-cluster basis. See
“System Configuration” on page 3-1 for task-based instructions.
The following recommendations should be followed when configuring your
network for best performance results:
■ A maximum of 30,000 endpoints per MS
■ A maximum of five ESs per cluster
■ A maximum of 3000 endpoints per ES
■ A maximum of 10 ESs per MS
When these recommendations are followed, the following applies:
■ 80% of the 3000 endpoints will be tested in 30 seconds or less
2-5
Page 46

Clusters and Servers
Installation Examples
■ All endpoints are returned to the proper status within 15 minutes after
a network recovery (power failure, all endpoints attempting to reconnect, 3000 endpoints per ES)
2-6
Page 47

System Configuration
Chapter Contents
Introduction . . . . . . . . . . . . . . . . . . . . . . . . . . . . . . . . . . . . . . . . . . . . . . . . . . . . . 3-4
Enforcement Clusters and Servers . . . . . . . . . . . . . . . . . . . . . . . . . . . . . . . . . . . 3-6
Enforcement Clusters . . . . . . . . . . . . . . . . . . . . . . . . . . . . . . . . . . . . . . . . . . . . . 3-7
Adding an Enforcement Cluster . . . . . . . . . . . . . . . . . . . . . . . . . . . . . . . . . 3-7
Editing Enforcement Clusters . . . . . . . . . . . . . . . . . . . . . . . . . . . . . . . . . . . 3-9
Viewing Enforcement Cluster Status . . . . . . . . . . . . . . . . . . . . . . . . . . . . 3-10
Deleting Enforcement Clusters . . . . . . . . . . . . . . . . . . . . . . . . . . . . . . . . . 3-11
Enforcement Servers . . . . . . . . . . . . . . . . . . . . . . . . . . . . . . . . . . . . . . . . . . . . . 3-12
Adding an ES . . . . . . . . . . . . . . . . . . . . . . . . . . . . . . . . . . . . . . . . . . . . . . . 3-12
Cluster and Server Icons . . . . . . . . . . . . . . . . . . . . . . . . . . . . . . . . . . . . . . 3-13
Editing ESs . . . . . . . . . . . . . . . . . . . . . . . . . . . . . . . . . . . . . . . . . . . . . . . . 3-14
Changing the ES Network Settings . . . . . . . . . . . . . . . . . . . . . . . . . . . . . . 3-15
Changing the ES Date and Time . . . . . . . . . . . . . . . . . . . . . . . . . . . . . . . . 3-16
Modifying the ES SNMP Settings . . . . . . . . . . . . . . . . . . . . . . . . . . . . . . . 3-17
Modifying the ES root Account Password . . . . . . . . . . . . . . . . . . . . . . . . 3-17
Viewing ES Status . . . . . . . . . . . . . . . . . . . . . . . . . . . . . . . . . . . . . . . . . . . 3-17
Deleting ESs . . . . . . . . . . . . . . . . . . . . . . . . . . . . . . . . . . . . . . . . . . . . . . . 3-19
ES Recovery . . . . . . . . . . . . . . . . . . . . . . . . . . . . . . . . . . . . . . . . . . . . . . . 3-19
Management Server . . . . . . . . . . . . . . . . . . . . . . . . . . . . . . . . . . . . . . . . . . . . . 3-20
Viewing Network Settings . . . . . . . . . . . . . . . . . . . . . . . . . . . . . . . . . . . . . 3-20
Modifying MS Network Settings . . . . . . . . . . . . . . . . . . . . . . . . . . . . . . . 3-22
Selecting a Proxy Server . . . . . . . . . . . . . . . . . . . . . . . . . . . . . . . . . . . . . . 3-23
Setting the Date and Time . . . . . . . . . . . . . . . . . . . . . . . . . . . . . . . . . . . . . 3-24
Automatically Setting the Time . . . . . . . . . . . . . . . . . . . . . . . . . . . . . . . . . 3-24
Manually Setting the Time . . . . . . . . . . . . . . . . . . . . . . . . . . . . . . . . . . . . 3-24
Selecting the Time Zone . . . . . . . . . . . . . . . . . . . . . . . . . . . . . . . . . . . . . . 3-25
Enabling SNMP . . . . . . . . . . . . . . . . . . . . . . . . . . . . . . . . . . . . . . . . . . . . . 3-25
Modifying the MS root Account Password . . . . . . . . . . . . . . . . . . . . . . . . 3-26
Checking for NAC 800 Upgrades . . . . . . . . . . . . . . . . . . . . . . . . . . . . . . . 3-26
Changing the NAC 800 Upgrade Timeout . . . . . . . . . . . . . . . . . . . . . . . . 3-27
User Accounts . . . . . . . . . . . . . . . . . . . . . . . . . . . . . . . . . . . . . . . . . . . . . . . . . . 3-28
Adding a User Account . . . . . . . . . . . . . . . . . . . . . . . . . . . . . . . . . . . . . . . 3-28
3
3-1
Page 48

System Configuration
Searching for a User Account . . . . . . . . . . . . . . . . . . . . . . . . . . . . . . . . . . 3-31
Sorting the User Account Area . . . . . . . . . . . . . . . . . . . . . . . . . . . . . . . . . 3-32
Copying a User Account . . . . . . . . . . . . . . . . . . . . . . . . . . . . . . . . . . . . . . 3-32
Editing a User Account . . . . . . . . . . . . . . . . . . . . . . . . . . . . . . . . . . . . . . . 3-33
Deleting a User Account . . . . . . . . . . . . . . . . . . . . . . . . . . . . . . . . . . . . . . 3-34
User Roles . . . . . . . . . . . . . . . . . . . . . . . . . . . . . . . . . . . . . . . . . . . . . . . . . . . . . 3-36
Adding a User Role . . . . . . . . . . . . . . . . . . . . . . . . . . . . . . . . . . . . . . . . . . 3-36
Editing User Roles . . . . . . . . . . . . . . . . . . . . . . . . . . . . . . . . . . . . . . . . . . . 3-39
Deleting User Roles . . . . . . . . . . . . . . . . . . . . . . . . . . . . . . . . . . . . . . . . . . 3-40
Sorting the User Roles Area . . . . . . . . . . . . . . . . . . . . . . . . . . . . . . . . . . . 3-40
License . . . . . . . . . . . . . . . . . . . . . . . . . . . . . . . . . . . . . . . . . . . . . . . . . . . . . . . 3-41
Updating your License . . . . . . . . . . . . . . . . . . . . . . . . . . . . . . . . . . . . . . . . 3-41
Test Updates . . . . . . . . . . . . . . . . . . . . . . . . . . . . . . . . . . . . . . . . . . . . . . . . . . . 3-43
Manually Checking for Test Updates . . . . . . . . . . . . . . . . . . . . . . . . . . . . 3-43
Selecting Test Update Times . . . . . . . . . . . . . . . . . . . . . . . . . . . . . . . . . . . 3-44
Viewing Test Update Logs . . . . . . . . . . . . . . . . . . . . . . . . . . . . . . . . . . . . 3-44
Quarantining, General . . . . . . . . . . . . . . . . . . . . . . . . . . . . . . . . . . . . . . . . . . . . 3-46
Selecting the Quarantine Method . . . . . . . . . . . . . . . . . . . . . . . . . . . . . . . 3-46
Selecting the Access Mode . . . . . . . . . . . . . . . . . . . . . . . . . . . . . . . . . . . . 3-48
Quarantining, 802.1X . . . . . . . . . . . . . . . . . . . . . . . . . . . . . . . . . . . . . . . . . . . . 3-49
Entering Basic 802.1X Settings . . . . . . . . . . . . . . . . . . . . . . . . . . . . . . . . . 3-49
Authentication Settings . . . . . . . . . . . . . . . . . . . . . . . . . . . . . . . . . . . . . . . 3-50
Adding 802.1X Devices . . . . . . . . . . . . . . . . . . . . . . . . . . . . . . . . . . . . . . 3-58
Testing the Connection to a Device . . . . . . . . . . . . . . . . . . . . . . . . . . . . . . 3-59
Cisco IOS . . . . . . . . . . . . . . . . . . . . . . . . . . . . . . . . . . . . . . . . . . . . . . . . . . 3-60
Cisco CatOS . . . . . . . . . . . . . . . . . . . . . . . . . . . . . . . . . . . . . . . . . . . . . . . 3-62
Enterasys . . . . . . . . . . . . . . . . . . . . . . . . . . . . . . . . . . . . . . . . . . . . . . . . . . 3-65
Extreme ExtremeWare . . . . . . . . . . . . . . . . . . . . . . . . . . . . . . . . . . . . . . . 3-66
Extreme XOS . . . . . . . . . . . . . . . . . . . . . . . . . . . . . . . . . . . . . . . . . . . . . . . 3-68
Foundry . . . . . . . . . . . . . . . . . . . . . . . . . . . . . . . . . . . . . . . . . . . . . . . . . . . 3-70
HP ProCurve Switch . . . . . . . . . . . . . . . . . . . . . . . . . . . . . . . . . . . . . . . . . 3-71
HP ProCurve WESM . . . . . . . . . . . . . . . . . . . . . . . . . . . . . . . . . . . . . . . . . 3-74
HP ProCurve 420 AP or HP ProCurve 530 AP . . . . . . . . . . . . . . . . . . . . . 3-77
Nortel . . . . . . . . . . . . . . . . . . . . . . . . . . . . . . . . . . . . . . . . . . . . . . . . . . . . . 3-79
Other . . . . . . . . . . . . . . . . . . . . . . . . . . . . . . . . . . . . . . . . . . . . . . . . . . . . . 3-80
Quarantining, DHCP . . . . . . . . . . . . . . . . . . . . . . . . . . . . . . . . . . . . . . . . . . . . . 3-83
Setting DHCP Enforcement . . . . . . . . . . . . . . . . . . . . . . . . . . . . . . . . . . . . 3-83
Adding a DHCP Quarantine Area . . . . . . . . . . . . . . . . . . . . . . . . . . . . . . . 3-85
Sorting the DHCP Quarantine Area . . . . . . . . . . . . . . . . . . . . . . . . . . . . . 3-87
Editing a DHCP Quarantine Area . . . . . . . . . . . . . . . . . . . . . . . . . . . . . . . 3-87
3-2
Page 49

System Configuration
Deleting a DHCP Quarantine Area . . . . . . . . . . . . . . . . . . . . . . . . . . . . . . 3-88
Quarantining, Inline . . . . . . . . . . . . . . . . . . . . . . . . . . . . . . . . . . . . . . . . . . . . . 3-89
Maintenance . . . . . . . . . . . . . . . . . . . . . . . . . . . . . . . . . . . . . . . . . . . . . . . . . . . 3-96
Initiating a New Backup . . . . . . . . . . . . . . . . . . . . . . . . . . . . . . . . . . . . . . 3-96
Restoring From a Backup . . . . . . . . . . . . . . . . . . . . . . . . . . . . . . . . . . . . . 3-98
Downloading Support Packages . . . . . . . . . . . . . . . . . . . . . . . . . . . . . . . . . . . . 3-99
Cluster Setting Defaults . . . . . . . . . . . . . . . . . . . . . . . . . . . . . . . . . . . . . . . . . 3-100
Testing Methods . . . . . . . . . . . . . . . . . . . . . . . . . . . . . . . . . . . . . . . . . . . 3-100
Selecting End-user Options . . . . . . . . . . . . . . . . . . . . . . . . . . . . . . . . . . . 3-103
Accessible Services . . . . . . . . . . . . . . . . . . . . . . . . . . . . . . . . . . . . . . . . . 3-103
Exceptions . . . . . . . . . . . . . . . . . . . . . . . . . . . . . . . . . . . . . . . . . . . . . . . . 3-105
Notifications . . . . . . . . . . . . . . . . . . . . . . . . . . . . . . . . . . . . . . . . . . . . . . 3-107
End-user Screens . . . . . . . . . . . . . . . . . . . . . . . . . . . . . . . . . . . . . . . . . . . 3-109
Agentless Credentials . . . . . . . . . . . . . . . . . . . . . . . . . . . . . . . . . . . . . . . 3-112
Logging . . . . . . . . . . . . . . . . . . . . . . . . . . . . . . . . . . . . . . . . . . . . . . . . . . . . . . 3-116
Setting ES Logging Levels . . . . . . . . . . . . . . . . . . . . . . . . . . . . . . . . . . . 3-116
Setting 802.1X Devices Logging Levels . . . . . . . . . . . . . . . . . . . . . . . . . 3-117
Setting IDM Logging Levels . . . . . . . . . . . . . . . . . . . . . . . . . . . . . . . . . . 3-117
Advanced Settings . . . . . . . . . . . . . . . . . . . . . . . . . . . . . . . . . . . . . . . . . . . . . 3-119
Setting the Agent Read Timeout . . . . . . . . . . . . . . . . . . . . . . . . . . . . . . . 3-119
Setting the RPC Command Timeout . . . . . . . . . . . . . . . . . . . . . . . . . . . . 3-120
3-3
Page 50

System Configuration
Introduction
Introduction
User logins and associated user roles determine the access permissions for
specific functionality within NAC 800. The following table shows the default
home window menu options that are available by user role:
User role Home window menu options available
System Administrator • Endpoint activity
• NAC policies
• System monitor
• Reports
• System configuration
Cluster Administrator • Endpoint activity
• System monitor
• Reports
• Enforcement clusters & servers
Help Desk Technician • Endpoint activity
• Reports
View-Only User • Endpoint activity
• Reports
Table 3-1. Default Menu Options
Only a system administrator can assign access permissions and access the
System configuration window. See Figure 1-1 on page 1-5 for the NAC 800 home
window of a user with system administration permissions. If you do not see
the System configuration menu option, you do not have system administrator
permissions.
NAC 800 configuration includes the following:
■ Enforcement clusters & servers – “Enforcement Clusters and
Servers” on page 3-6
■ MS – “Management Server” on page 3-20
■ User accounts – “User Accounts” on page 3-28
■ User roles – “User Roles” on page 3-36
■ License – “License” on page 3-41
■ Test updates – “Test Updates” on page 3-43
3-4
Page 51

System Configuration
Introduction
■ Quarantining – “Quarantining, General” on page 3-46
■ Maintenance – “Maintenance” on page 3-96
■ Cluster setting defaults
• Testing Methods – “Testing Methods” on page 3-100
• Accessible services – “Accessible Services” on page 3-103
• Exceptions – “Exceptions” on page 3-105
• Notifications – “Notifications” on page 3-107
• End-user screens – “End-user Screens” on page 3-109
• Agentless credentials – “Agentless Credentials” on page 3-112
• Logging – “Logging” on page 3-116
• Advanced – “Advanced Settings” on page 3-119
NOTE: You can override any of the cluster default settings on a per-cluster basis.
3-5
Page 52

System Configuration
Enforcement Clusters and Servers
Enforcement Clusters and Servers
The Enforcement clusters & servers menu option (figure 3-3) is where you
configure Enforcement clusters and servers. You can perform the following
tasks:
■ Enforcement clusters
■ ESs
• Add, edit, or delete Enforcement clusters
• Set operating parameters for specific Enforcement clusters, which
differ from the default Enforcement cluster and server settings set up
on the System configuration window
• View available Enforcement clusters and associated servers
• View status of Enforcement clusters and servers
• Select cluster access mode (normal or allow all)
• Add, edit, or delete ESs
• Set ES network settings, date and time, SNMP settings, and password
• View available ESs
• View status, memory usage, and disk space usage of ESs
3-6
Page 53
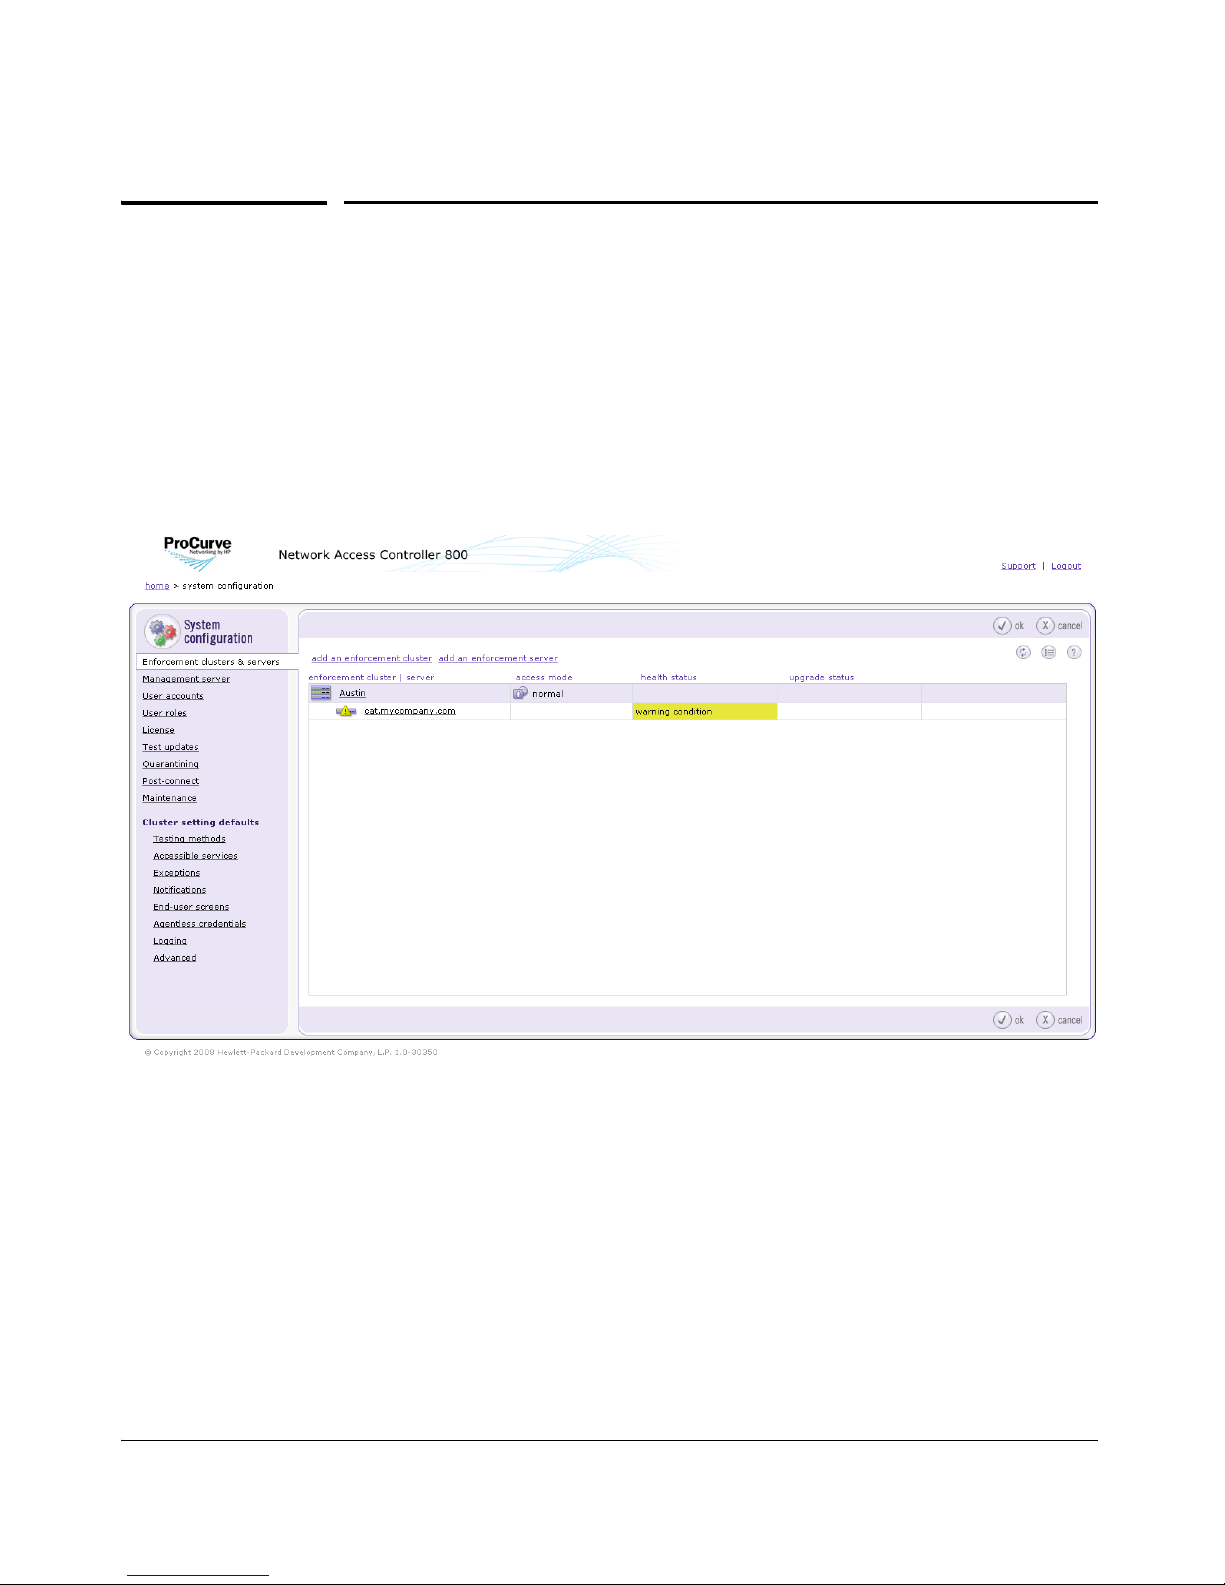
System Configuration
Enforcement Clusters
Enforcement Clusters
Adding an Enforcement Cluster
To add an Enforcement cluster:
Home window>>System configuration>>Enforcement clusters & servers
Figure 3-1. System Configuration, Enforcement Clusters & Servers
3-7
Page 54
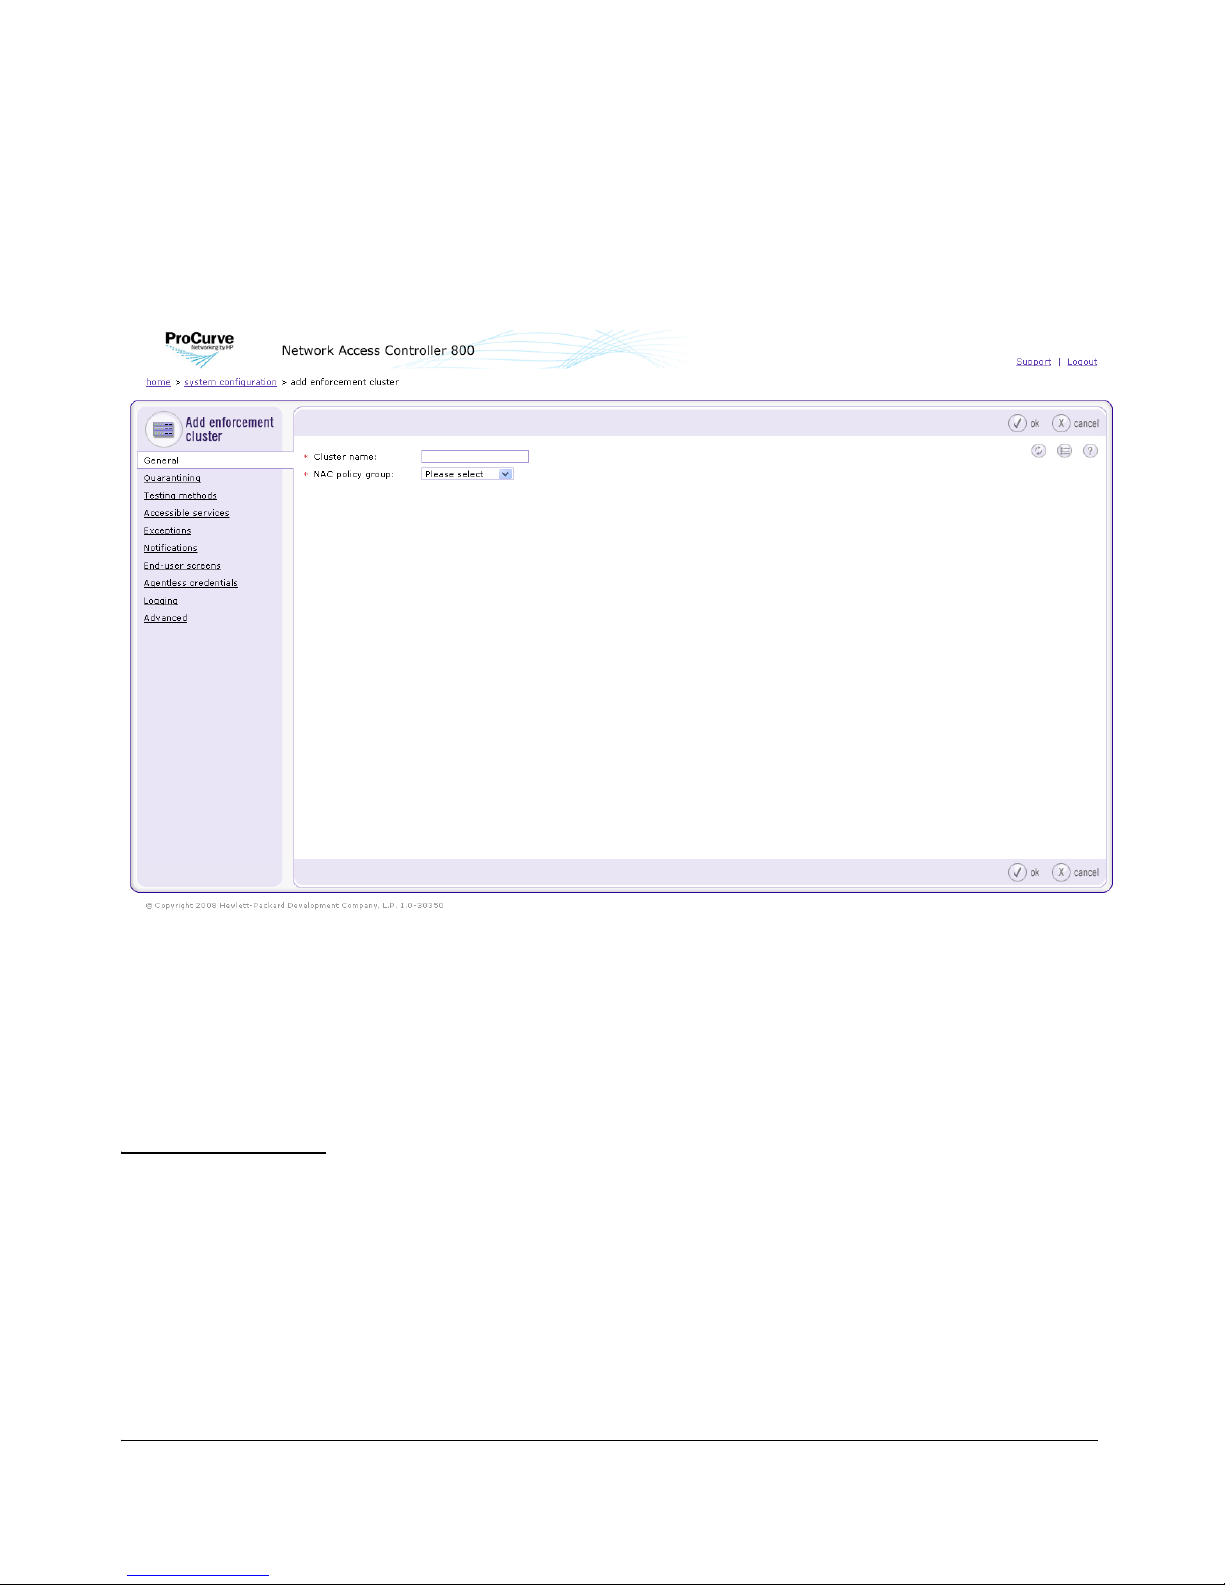
System Configuration
Enforcement Clusters
1. Click Add an Enforcement cluster in the Enforcement clusters & servers area.
The Add Enforcement cluster window appears. The General area is
displayed by default.
Figure 3-2. Add Enforcement Cluster
a. Enter a name for the Enforcement cluster in the Cluster name field.
b. Select a NAC policy group from the NAC policy group drop-down list
(see “NAC Policies” on page 6-1).
2. Click Quarantining in the Add Enforcement cluster window. Complete the
steps described in “Quarantining, General” on page 3-46.
TIP: You can also access the quarantine area Enforcement cluster by clicking
Quarantining in the System configuration window (see “Quarantining, General” on page 3-46 for more information).
3. The following cluster settings take on default values set from the System
configuration window. To set up operating parameters that differ from
those default settings, select the menu item of the settings you want to
3-8
Page 55

System Configuration
Enforcement Clusters
change, then select the For this cluster, override the default settings check
box, and make the desired changes. Refer to the sections listed below to
set up the default values, or for more information on the specific settings.
• Testing methods – See “Testing Methods” on page 3-100
• Accessible services – See “Accessible Services” on page 3-103
• Exceptions – See “Exceptions” on page 3-105
• Notifications – See “Notifications” on page 3-107
• End-user screens – See “End-user Screens” on page 3-109
• Agentless credentials – See “Agentless Credentials” on page 3-112
• Logging – See “Logging” on page 3-116
• Advanced – See “Advanced Settings” on page 3-119
Editing Enforcement Clusters
To edit the Enforcement clusters settings:
Home window>>System configuration>>Enforcement clusters & servers
1. Click the cluster you want to edit. The Enforcement cluster window
appears, as shown in Figure 3-3 on page 3-10.
2. Click a menu option to access the cluster settings:
• General
• Quarantining
• Testing methods
• Accessible services
• Exceptions
• Notifications
• End-user screens
• Agentless credentials
• Logging
• Advanced
3. Enter or change information in the fields you want to modify, as described
in “Adding an Enforcement Cluster” on page 3-7.
4. Click ok.
3-9
Page 56
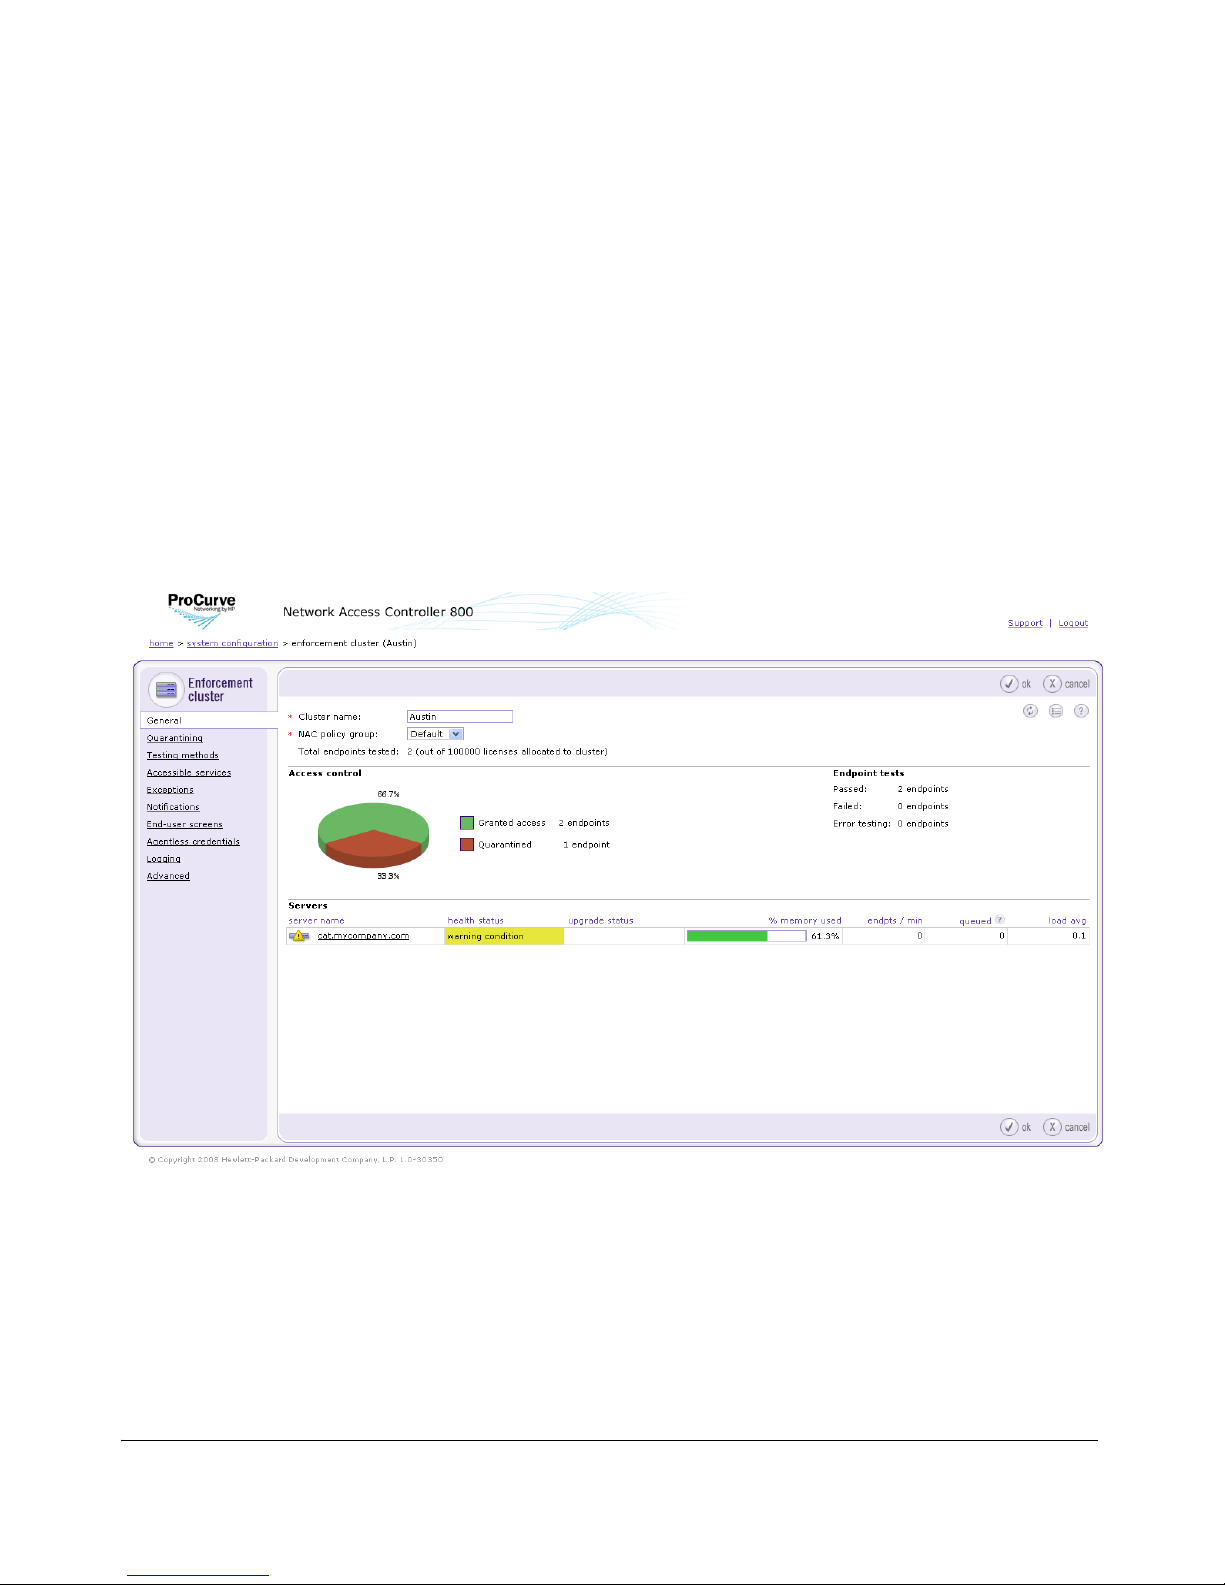
System Configuration
Enforcement Clusters
Viewing Enforcement Cluster Status
There are two ways NAC 800 provides Enforcement cluster status:
■ The icons next to the cluster name (see Figure 3-4 on page 3-12)
■ The Enforcement cluster window (see the following steps)
To view Enforcement cluster statistics:
Home window>>System configuration>>Enforcement clusters & servers
Click a cluster name, for example Austin. The Enforcement cluster window
appears:
Figure 3-3. Enforcement Cluster, General
The statistics shown in this window are per cluster, where the statistics shown
in the Home window are system-wide. See “System Monitor” on page 1-6 for
column descriptions.
3-10
Page 57

System Configuration
Enforcement Clusters
Deleting Enforcement Clusters
NOTE: Enforcement clusters need to be empty before the delete option appears next
to the name in the NAC 800 user interface.
To delete Enforcement clusters:
Home window>>System configuration>>Enforcement clusters & servers
1. Click delete next to the cluster you want to remove. The Delete Enforcement
cluster confirmation window appears.
2. Click yes. The System configuration window appears (figure 3-1).
3-11
Page 58
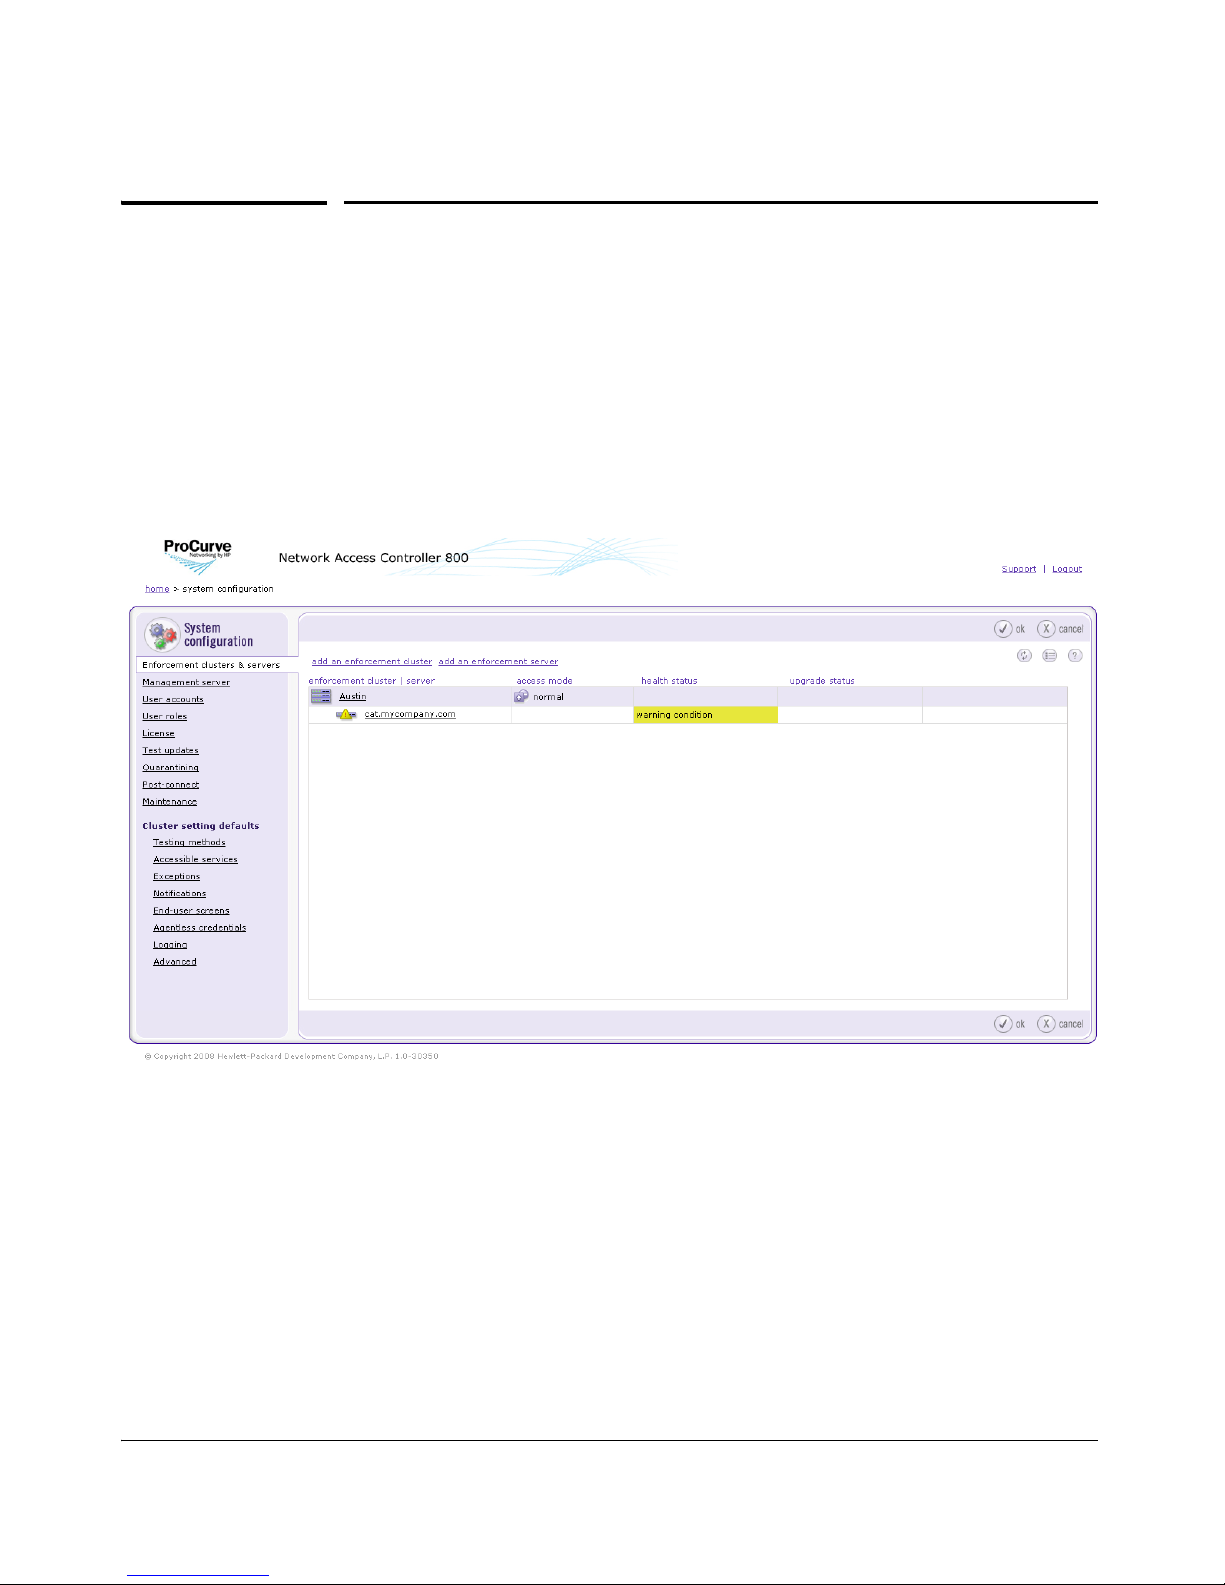
System Configuration
Enforcement Servers
Enforcement Servers
Adding an ES
To add an ES:
Home window>>System configuration>>Enforcement clusters & servers
Figure 3-4. System Configuration, Enforcement Clusters & Servers
3-12
Page 59
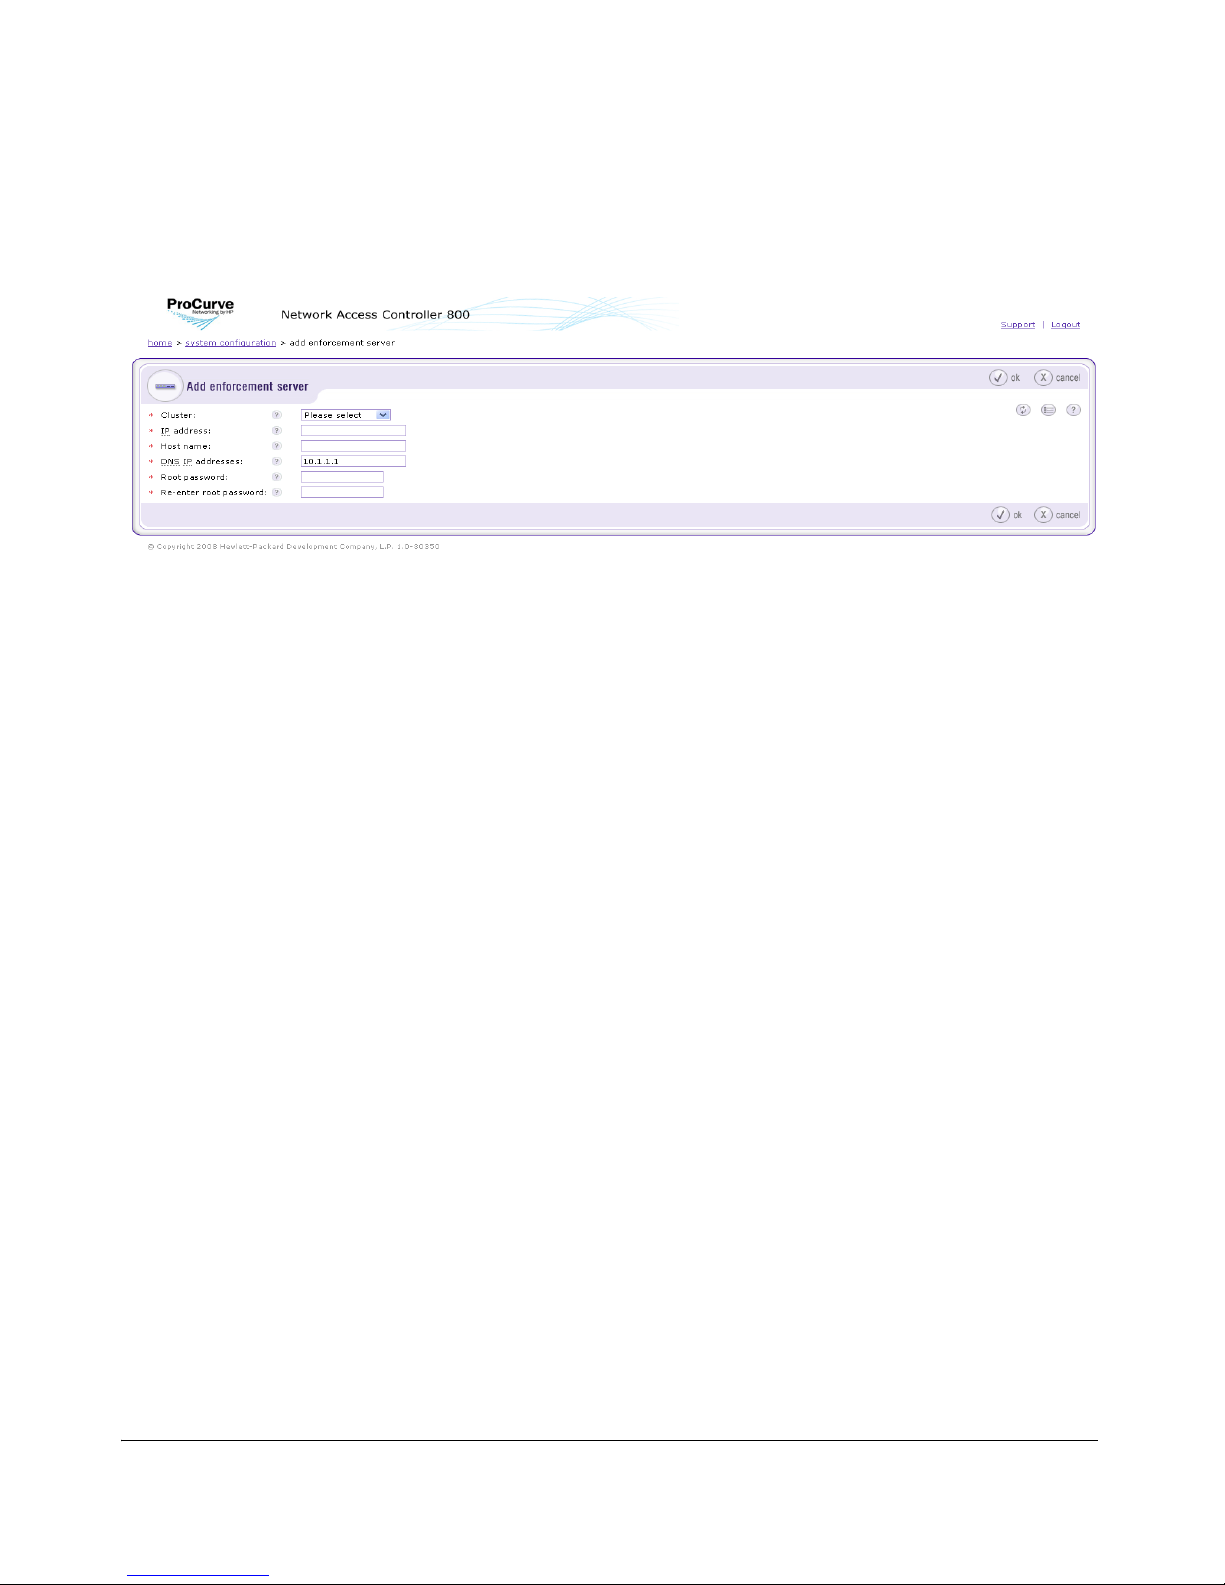
1. Click Add an Enforcement server in the Enforcement clusters & servers area.
The Add Enforcement server window appears.
Figure 3-5. Add Enforcement Server
2. Select a cluster from the Cluster drop-down list.
3. Enter the IP address for this ES in the IP address text box.
System Configuration
Enforcement Servers
4. Enter the fully qualified hostname to set on this server in the Host name
text box.
5. Enter one or more DNS resolver IP addresses, separated by a commas,
semicolons, or spaces in the DNS IP addresses text box. For example,
10.0.16.100,10.0.1.1
6. Enter the password to set for the root user of the ES server’s operating
system in the Root password text box.
7. Re-enter the password to set for the root user of the ES server’s operating
system in the Re-enter root password text box.
8. Click ok.
Cluster and Server Icons
To view the cluster and server icons:
Home window>>System configuration>>Enforcement clusters & servers
1. Move the mouse over the legend icon. The legend pop-up window appears.
3-13
Page 60
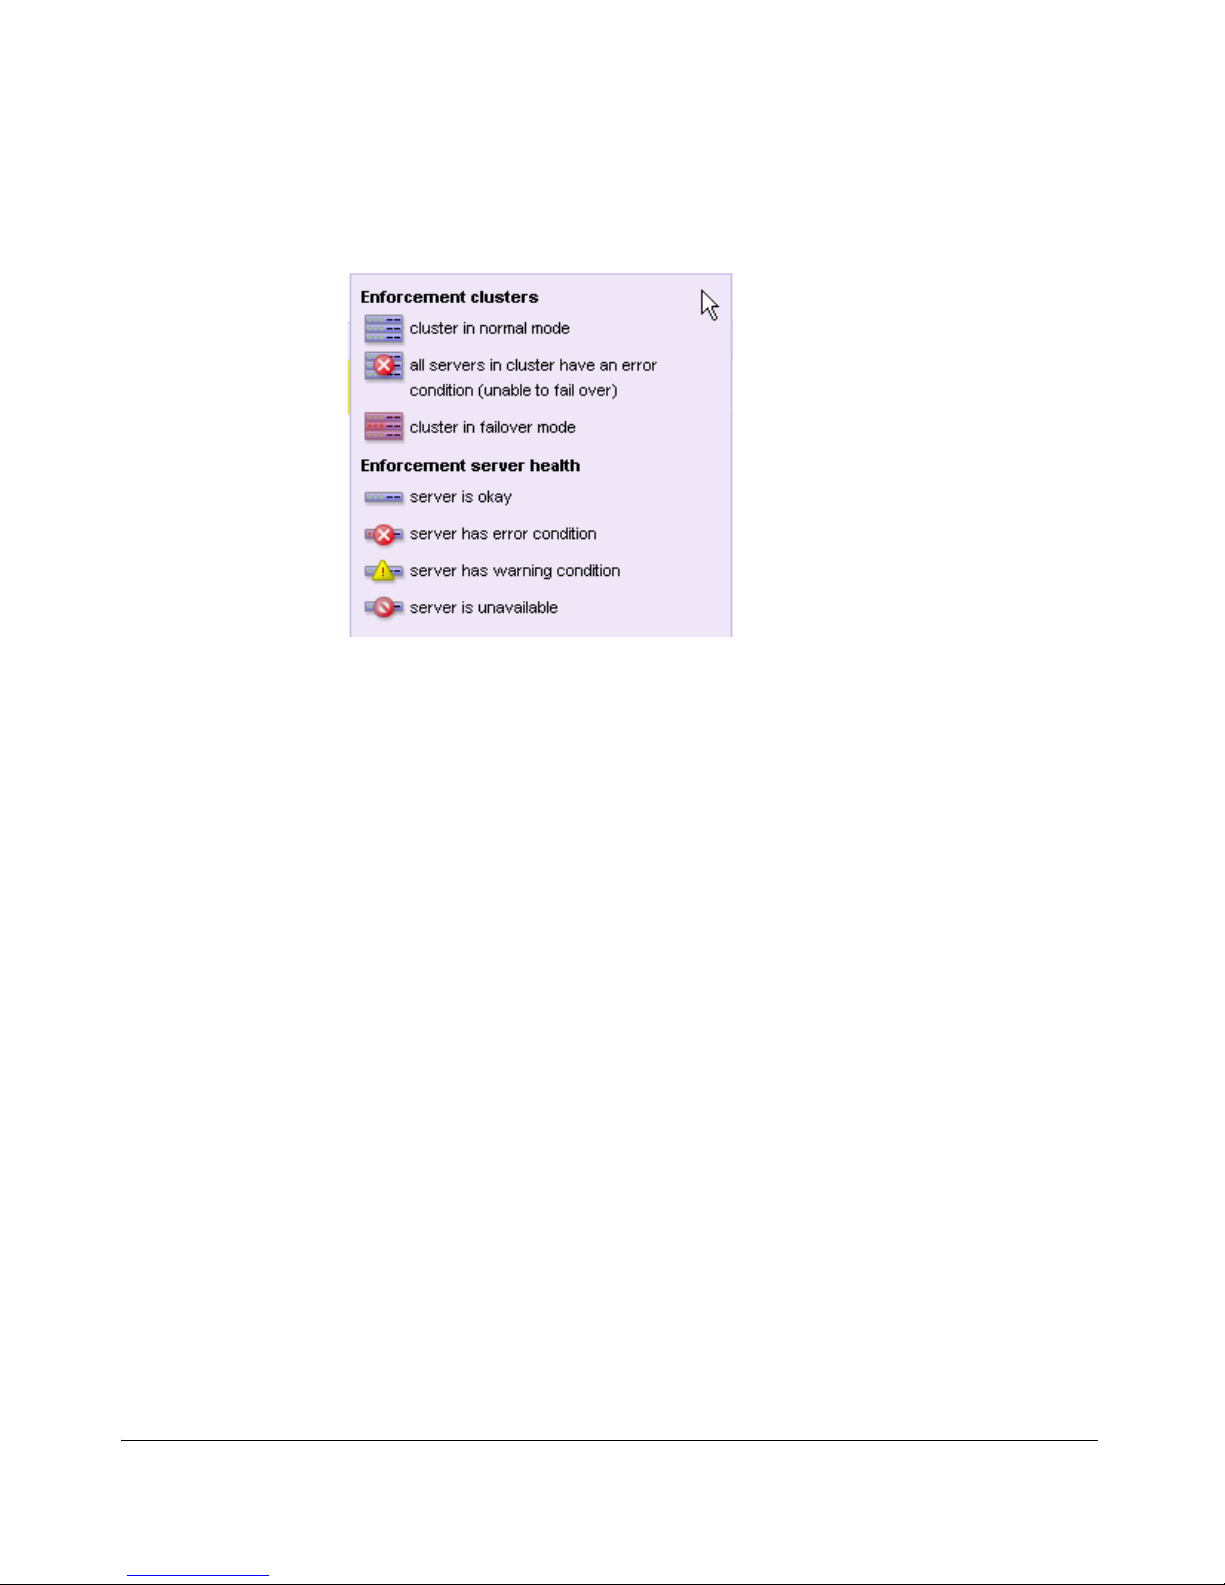
System Configuration
Enforcement Servers
2. Move the mouse away from the legend icon to hide pop-up window.
Figure 3-6. Enforcement Cluster Legend
Editing ESs
To edit ES settings:
Home window>>System configuration>>Enforcement clusters & servers
1. Click the ES you want to edit. The Enforcement server window appears, as
shown in Figure 3-7 on page 3-15.
3-14
Page 61
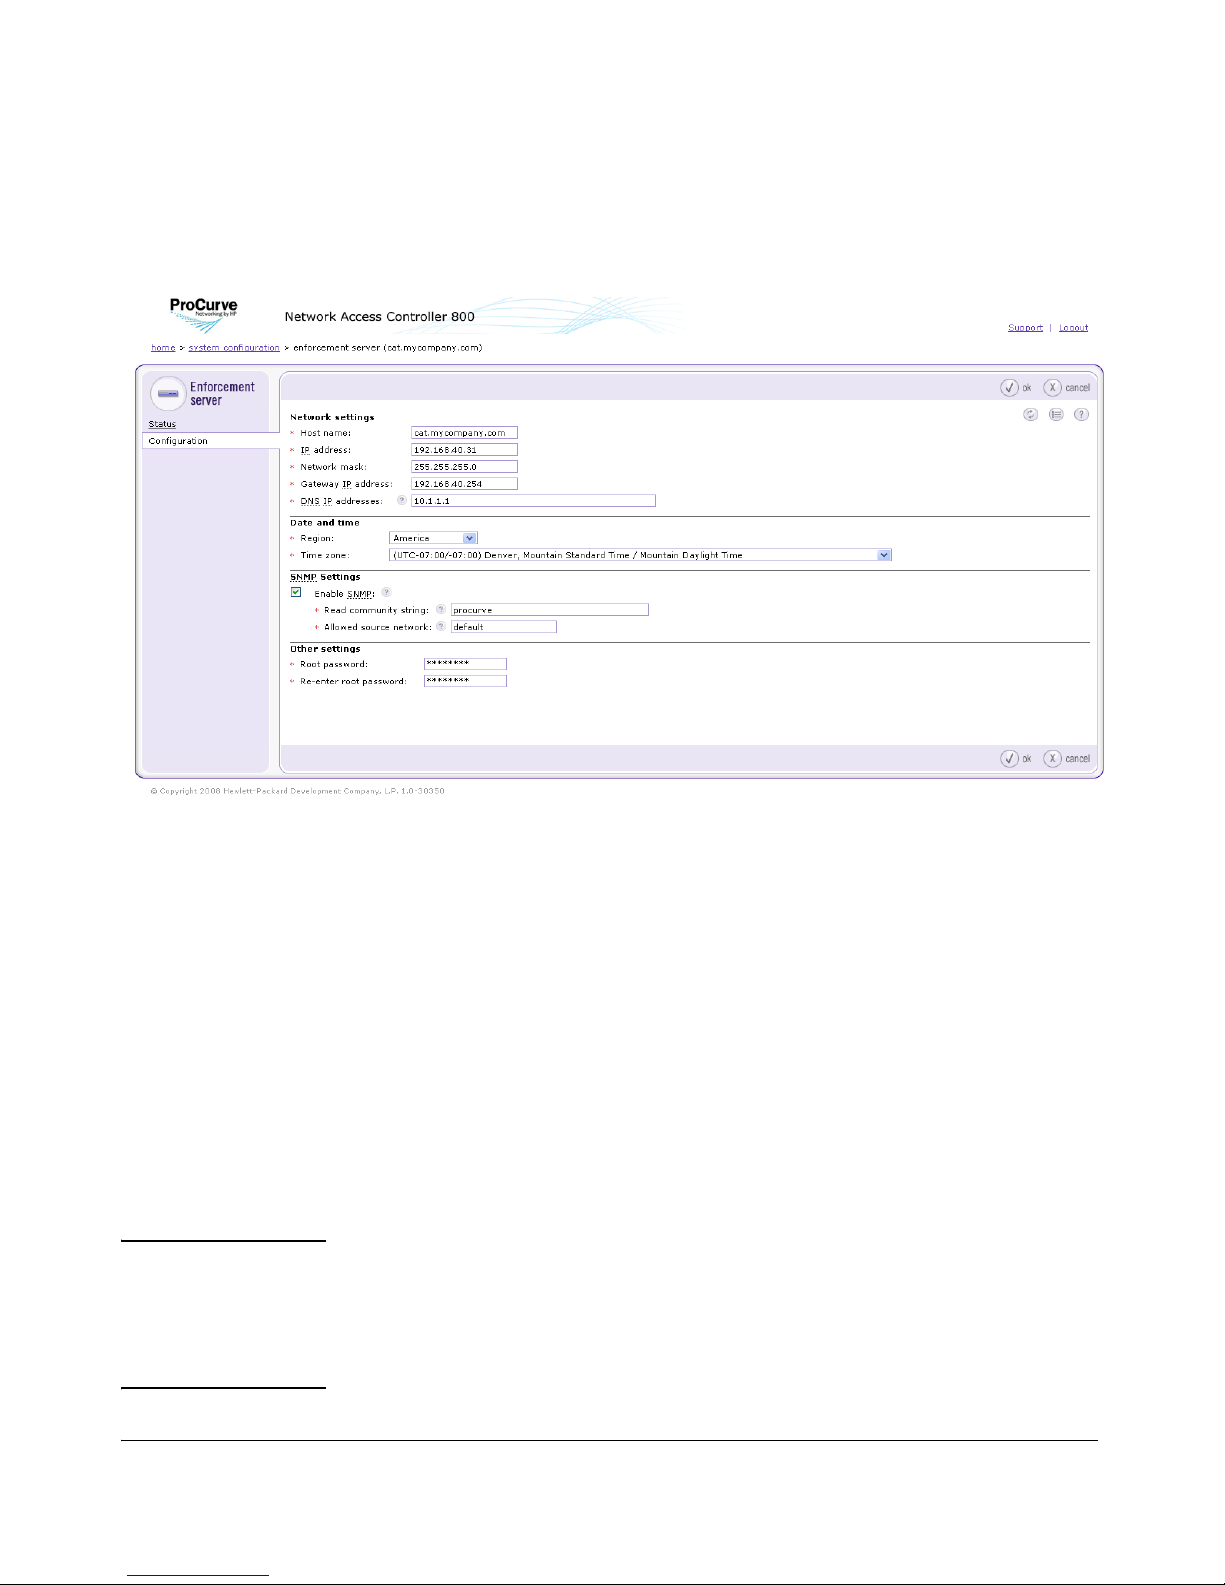
System Configuration
Enforcement Servers
2. Click the Configuration menu option to access the Enforcement Server’s
settings. The Configuration area is displayed:
Figure 3-7. Enforcement Server
3. Edit the following settings:
• ES Network settings – “Changing the ES Network Settings” on page 3-
15
• ES Date and time – “Changing the ES Date and Time” on page 3-16
• ES SNMP settings – “Modifying the ES SNMP Settings” on page 3-17
• Other settings – “Modifying the ES root Account Password” on page 3-
17
4. Click ok.
Changing the ES Network Settings
CAUTION: Back up your system immediately after changing the MS or ES IP address. If
you do not back up with the new IP address, and later restore your system, it
will restore the previous IP address which can show an ES error condition
and cause authentication problems. See “Maintenance” on page 3-96 for
instructions on backing up and restoring your system.
3-15
Page 62

System Configuration
Enforcement Servers
To change the ES network settings:
Home window>>System configuration>>Enforcement clusters &
servers>>Select an ES>>Configuration
Modify any of the following Network settings you want to change:
■ Enter a new ES in the Host name text field. For example,
garp.mycompany.com
■ Enter a new ES address in the IP address text field. For example,
192.168.153.35
■ Enter a new netmask in the Network mask text field. For example,
255.255.255.0
■ Enter a new gateway in the Gateway IP address text field. For example
192.168.153.2
■ Enter one or more DNS resolver IP addresses, separated by commas,
semicolons, or spaces in the DNS IP addresses text box. For example:
10.0.16.100,10.0.1.1
NOTE: The NAC 800 ESs host name must be a fully qualified domain name (FQDN).
For example, the FQDN should include the host and the domain name—
including the top-level domain.
For example, waldo.mycompany.com. Select names that are short, easy to
remember, have no spaces or underscores, and the first and last character
cannot be a dash (-).
NOTE: You cannot change the ES IP address for a single-server installation. You can
change the MS IP address for a single-server installation.
Changing the ES Date and Time
To change the ES date and time:
Home window>>System configuration>>Enforcement clusters &
servers>>Select an ES>>Configuration
1. Select a Region from the Region drop-down list in the Date and time area.
2. Select a time zone from the Time zone drop-down list.
3. Click ok.
3-16
Page 63

System Configuration
Enforcement Servers
NOTE: See “Selecting the Time Zone” on page 3-25 for information on changing the
time zone settings for the MS.
WARNING: Manually changing the date/time by a large amount (other than a time zone
change) will require a restart of all servers. Rolling back the clock will have
adverse effects on the system.
Modifying the ES SNMP Settings
To change the ES SNMP settings:
Home window>>System configuration>>Enforcement clusters &
servers>>Select an ES>>Configuration
1. Select the Enable SNMP check box.
2. Enter a Read community string, such as Public2.
3. Enter the Allowed source network. This value must be either default or
a network specified in CIDR notation.
Modifying the ES root Account Password
To change the ES root account password:
Home window>>System configuration>>Enforcement clusters &
servers>>Select an ES>>Configuration
1. Enter the new password in the Root password text box in the Other settings
area.
2. Re-enter the password in the Re-enter root password text box.
3. Click ok.
Viewing ES Status
There are two ways NAC 800 provides ES status:
■ The icons next to the server name (see Figure 3-6 on page 3-14)
■ The Status window (see the following steps). The Enforcement server
window allows you to view the following information:
•Health status
3-17
Page 64
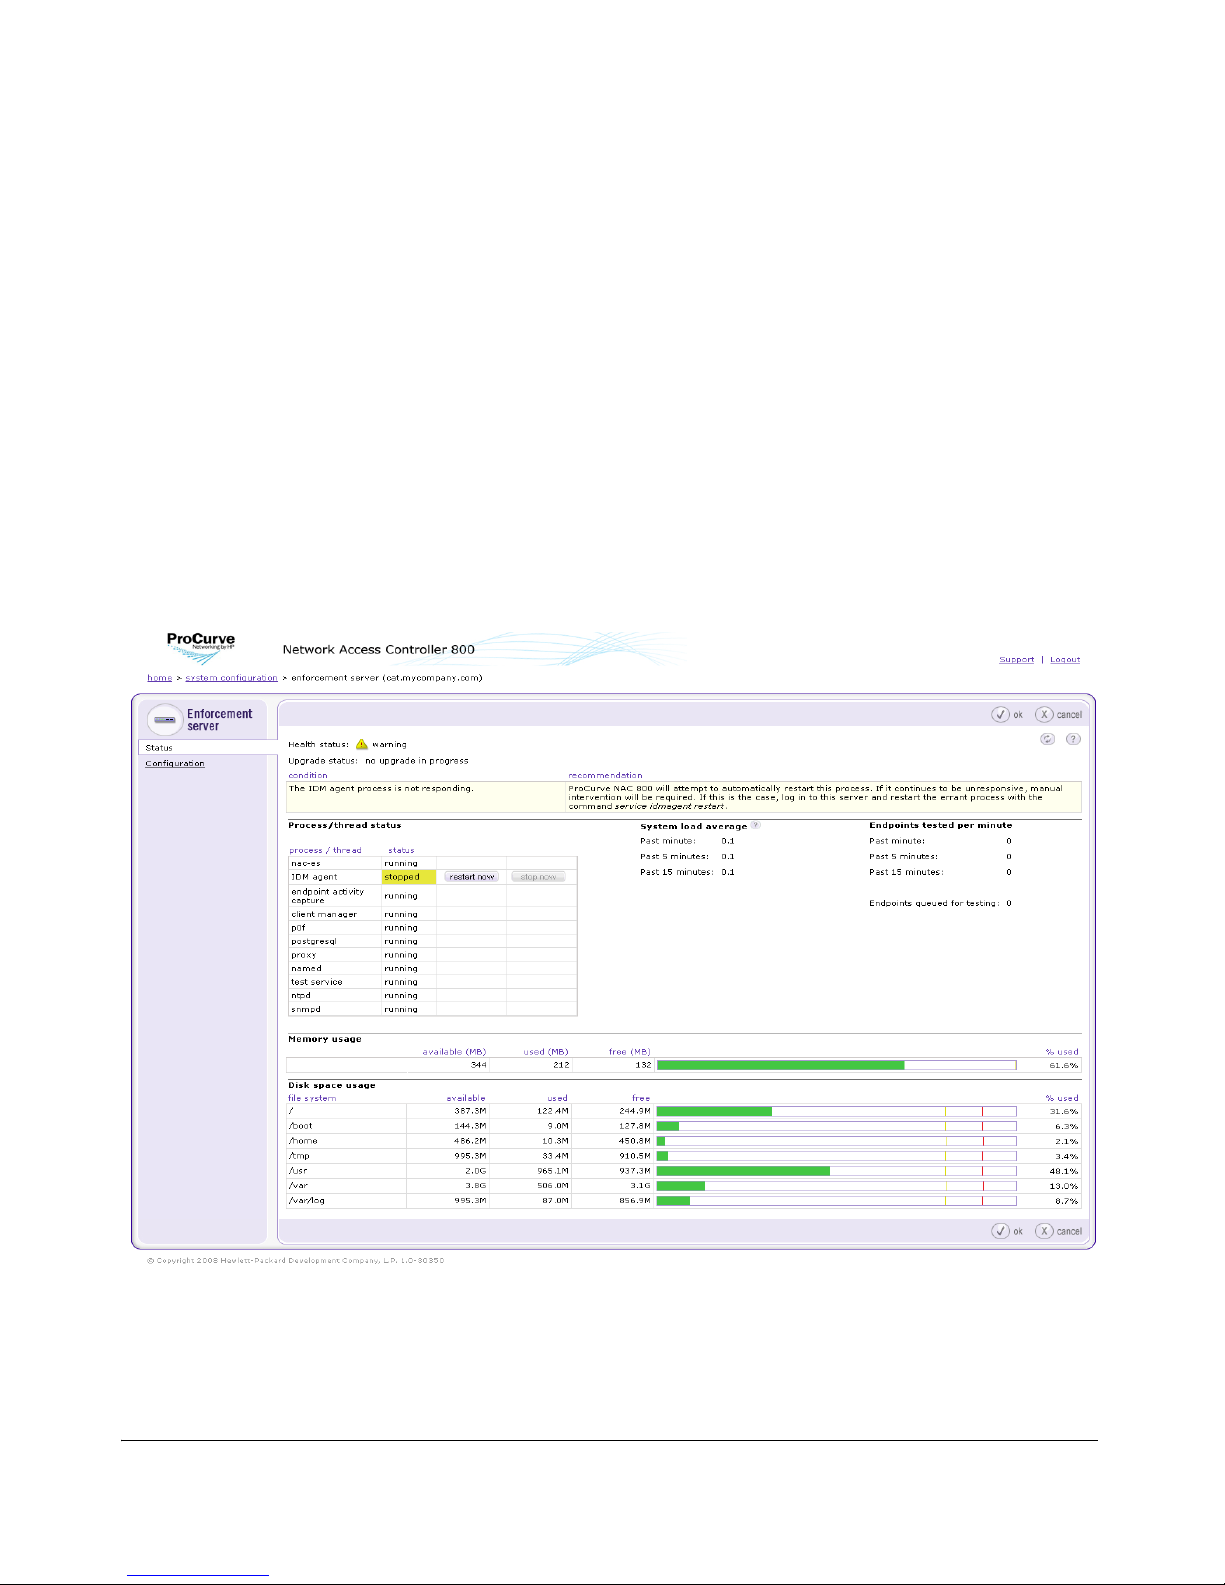
System Configuration
Enforcement Servers
• Upgrade status
• Process/thread status
• System load average for the server
• Current endpoints being tested/minute for the server
• Percentage of memory used on the server
• Disk space usage for the server
To view ES status:
Home window>>System configuration>>Enforcement clusters & servers
1. Click the server for which you want to view the status. The Enforcement
server window appears:
Figure 3-8. Enforcement Server, Status
2. Click ok or cancel.
3-18
Page 65

System Configuration
Enforcement Servers
Deleting ESs
NOTE: Servers need to be powered down for the delete option to appear next to the
name in the NAC 800 user interface.
To dele te ES s:
Home window>>System configuration>>Enforcement clusters & servers
1. Click delete next to the server you want to remove from the cluster. The
Delete Enforcement server confirmation window appears.
2. Click yes. The System configuration window appears.
ES Recovery
If an existing ES goes down and comes back up, it can participate in its
assigned cluster, even if the MS is not available.
When a new ES is created, the MS must be available before the ES can
participate in a cluster.
3-19
Page 66

System Configuration
Management Server
Management Server
Viewing Network Settings
To view MS status:
Home window>>System configuration>>Management server
3-20
Page 67
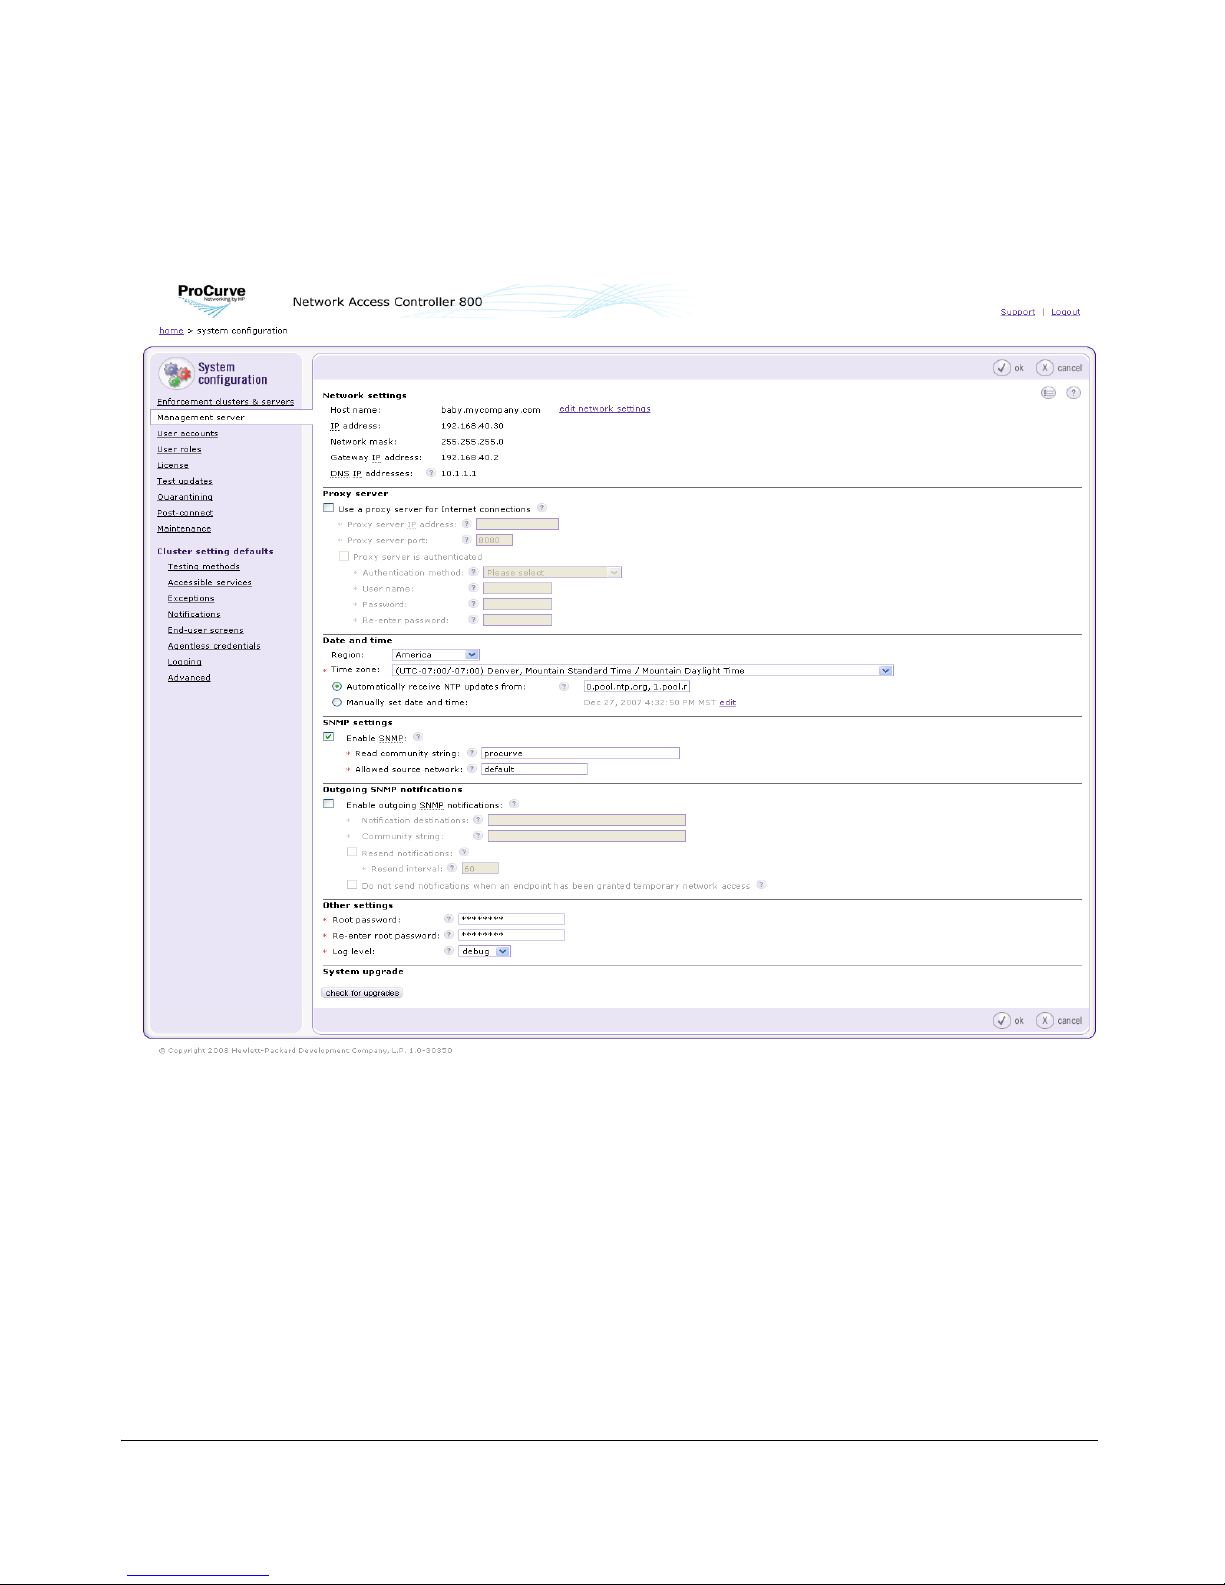
System Configuration
Management Server
Figure 3-9. System Configuration, Management Server
1. Server status is shown in the Network settings area.
2. Click ok or cancel.
3-21
Page 68
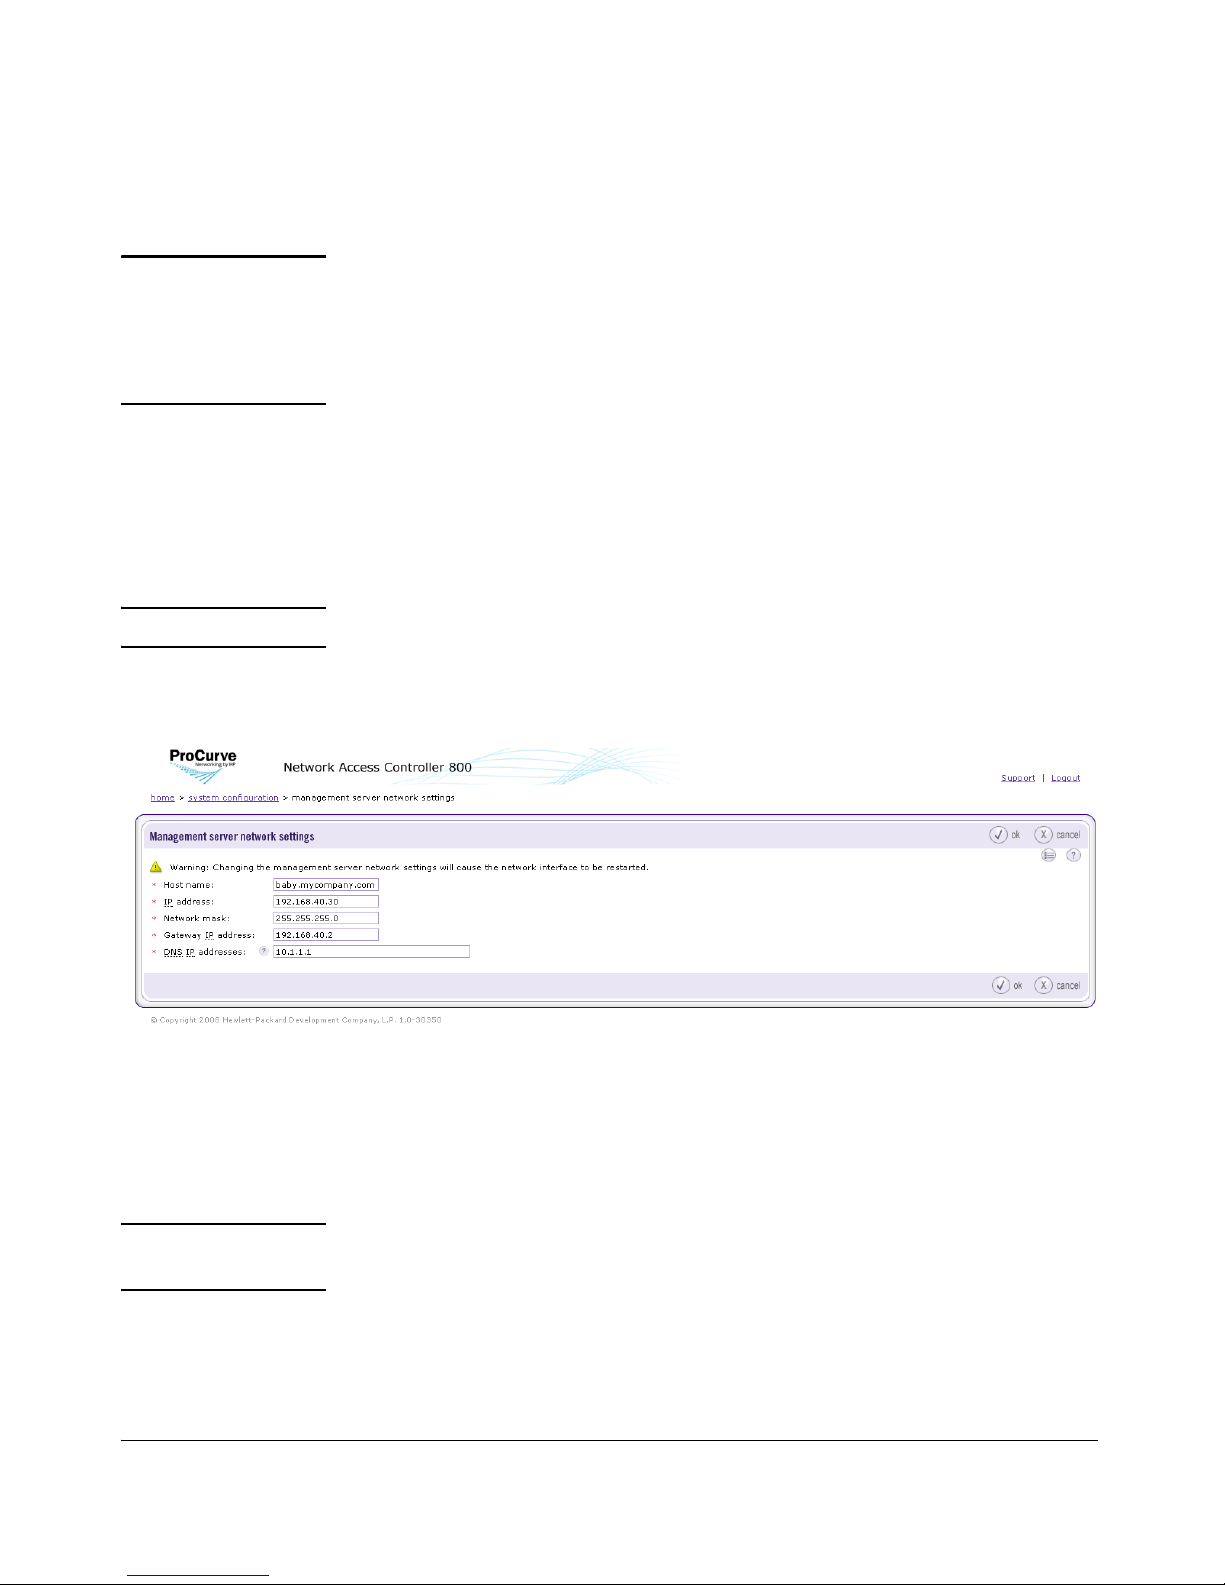
System Configuration
Management Server
Modifying MS Network Settings
CAUTION: Back up your system immediately after changing the MS or ES IP address. If
you do not back up with the new IP address, and later restore your system, it
will restore the previous IP address which can show an ES error condition
and cause authentication problems. See “Maintenance” on page 3-96 for
instructions on backing up and restoring your system.
To modify MS network settings:
Home window>>System configuration>>Management server
WARNING: Changing the MS network settings will cause the network interface to restart.
1. Click edit network settings in the Network settings area.
Figure 3-10. Management Server Network Settings
2. Enter the values you want to modify:
• Enter a new name in the Host name text field. For example,
NOTE: Select names that are short, easy to remember, have no spaces or under-
scores, and the first and last character cannot be a dash (-).
• Enter a new address in the IP address text field. For example,
3-22
garp.mycompany.com
192.168.153.35
Page 69

System Configuration
Management Server
• Enter a new netmask in the Network mask text field. For example,
255.255.255.0
• Enter a new gateway in the Gateway IP address text field. For example
192.168.153.2
• Enter one or more DNS resolver IP addresses, separated by commas,
semicolons, or spaces in the DNS IP addresses text box. For example:
10.0.16.100,10.0.1.1
3. Click ok.
Selecting a Proxy Server
Connecting to the Internet is necessary for updating tests, validating license
keys, and sending support packages.
To select a proxy server:
Home window>>System configuration>>Management server
1. Select Use a proxy server for Internet connections.
2. Enter the IP address or hostname of the server that will act as the proxy
for Internet connections in the Proxy server IP address text field.
3. Enter the port used for connecting to the proxy server in the Proxy server
port text field.
4. If your proxy server requires authentication, select the Proxy server is
authenticated check box.
a. Authentication method – Select the scheme used to authenticate
credentials on the proxy server. The following methods are
supported:
– Basic (not recommended) – The original and most compatible
authentication scheme for HTTP. Also the least secure because it
sends the user ID and password to the server unencrypted.
– Digest – Added in the HTTP 1.1 protocol, this scheme is signifi-
cantly more secure than basic authentication because it never
transfers the actual password across the network, but instead
uses it to encrypt a "nonce" value sent from the server.
– Negotiable – Using this scheme, the client and the proxy server
negotiate a scheme for authentication. Ultimately, either the basic
or digest scheme will be used.
b. Enter the ID of a user account on the proxy server in the User name
text box.
3-23
Page 70

System Configuration
Management Server
c. Enter the password of the user account specified in the User name text
box in the Password text box.
d. Re-enter the password.
5. Click ok.
Setting the Date and Time
The Date and time area allows you to configure the following:
■ Allow automatic synchronization with an NTP server
■ Manually set date and time for the MS
■ Edit date and time:
• Set time zone
•Set date
• Set time
NOTE: Date and time settings are applied to the MS; however, you can set the time
zone for each ES.
Automatically Setting the Time
To automatically set the time:
Home window>>System configuration>>Management server
1. Select Automatically receive NTP updates from and enter one or more
Network Time Protocol (NTP) servers, separated by commas. The NTP
protocol allows NAC 800 to synchronize its date and time with other
endpoints on your network. For example, time.nist.gov.
2. Click ok.
TIP: Use of NTP is strongly recommended.
Manually Setting the Time
To manually set the time:
Home window>>System configuration>>Management server
3-24
Page 71
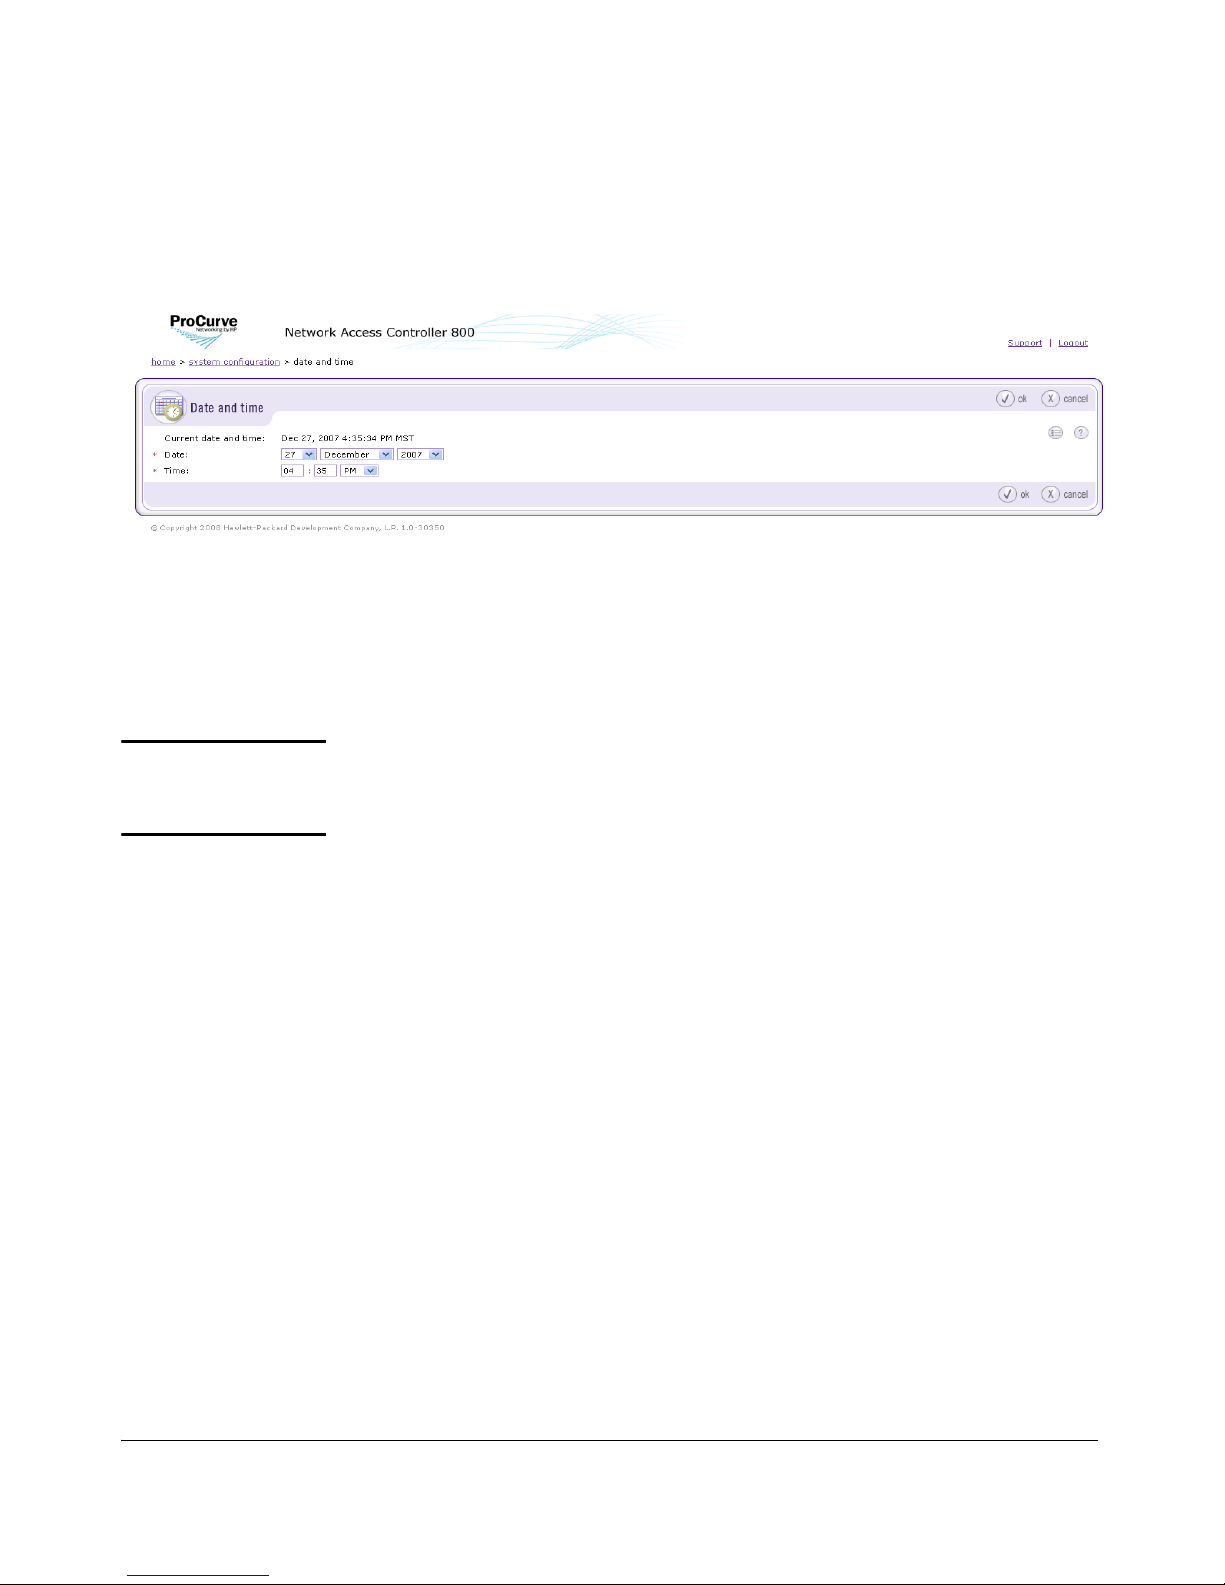
Figure 3-11. Date & Time
System Configuration
Management Server
1. Select Manually set date & time.
2. Click edit. The Date and time window appears:
3. Select the correct date and time.
4. Click ok.
5. Click ok.
CAUTION: Manually changing the date/time (other than a time zone change) a large
amount will require a restart of all servers. Rolling back the clock will have
adverse effects on the system.
Selecting the Time Zone
To set the time zone:
Home window>>System configuration>>Management server
1. Select the following:
a. Select a region from the Region drop-down list in the Date and time
area.
b. Select a time zone from the Time zone drop-down list.
2. Click ok.
Enabling SNMP
To select SNMP settings:
3-25
Page 72

System Configuration
Management Server
Home window>>System configuraton>>Management server>>SNMP
settings
1. Select the Enable SNMP check box to select the SNMP settings.
a. Enter the SNMP read community string.
b. Enter the SNMP allowed source network. The value must be either
“default” or a network specified in CIDR notation.
2. Select the Outgoing SNMP notifications check box.
3. Enter a comma-separated list of IP address or hostnames that can receive
the SNMP notifications.
4. Enter the community string used to authorize SNMP notifications from
NAC 800.
5. Select one or both of the following:
a. Select the Resend notifications check box and enter the resend interval,
for example 60.
NOTE: NAC policy tests can be configured such that if an endpoint fails the test, it
will be granted network access temporarily. In these cases, it might be
desirable not to send an SNMP notification.
b. Select the Do not send notifications when an endpoint has been granted
temporary network access check box to disable these notifications.
Modifying the MS root Account Password
To change the MS root account password:
Home window>>System configuration>>Management server
1. Enter the new password in the Root password text box in the Other settings
area.
2. Re-enter the password in the Re-enter root password text box.
3. Click ok.
Checking for NAC 800 Upgrades
To check for system upgrades:
Home window>>System configuration>>Management server
3-26
Page 73

System Configuration
Management Server
1. Click check for upgrades in the System upgrade area. A progress window
appears.
2. A status window appears indicating if upgrades are available.
a. If no upgrades are available, click ok to clear the status window.
b. Click ok to return to System configuration.
c. If an upgrade is available, click yes to upgrade your system.
CAUTION: Installation of an upgrade can take several hours to download all the software.
You can continue to use NAC 800 during the download process. NAC 800 will
automatically shutdown and restart after the software downloads.
TIP: Since upgrading can take longer than the default timeout (45 minutes) setting
of the NAC 800 Update, ProCurve recommends that you increase the timeout
value when you have limited bandwidth by performing the steps described in
“Changing the NAC 800 Upgrade Timeout”.
Changing the NAC 800 Upgrade Timeout
Since upgrading can take longer than the default timeout (45 minutes) setting
of the NAC 800 Update, ProCurve recommends that you increase the timeout
value when you have limited bandwidth by performing these steps.
To change the inactivity timeout value for upgrades:
Command window
1. Log in to the NAC 800 server as root, either using SSH or directly with a
keyboard.
2. Enter the following at the command line:
setProperty.py -m
Compliance.UpgradeManager.UpgradeTimeout=<minutes>
Where:
<minutes> is the number of minutes of inactivity NAC 800 will wait before
assuming the upgrade failed. For example, 30. The default value is 45.
3-27
Page 74

System Configuration
User Accounts
User Accounts
NAC 800 allows you to create multiple user accounts. User accounts provide
and limit access to NAC 800 functions based on permissions (user roles) and
clusters assigned. See “User Roles” on page 3-36 for more information on
setting permissions for the user roles.
The User accounts menu option allows you to do the following:
■ View user accounts
■ Search by user ID, user name, or email address
■ Add a user account
■ Edit a user account
■ Delete a user account
Adding a User Account
To add a user account:
Home window>>System configuration>>User accounts
3-28
Page 75
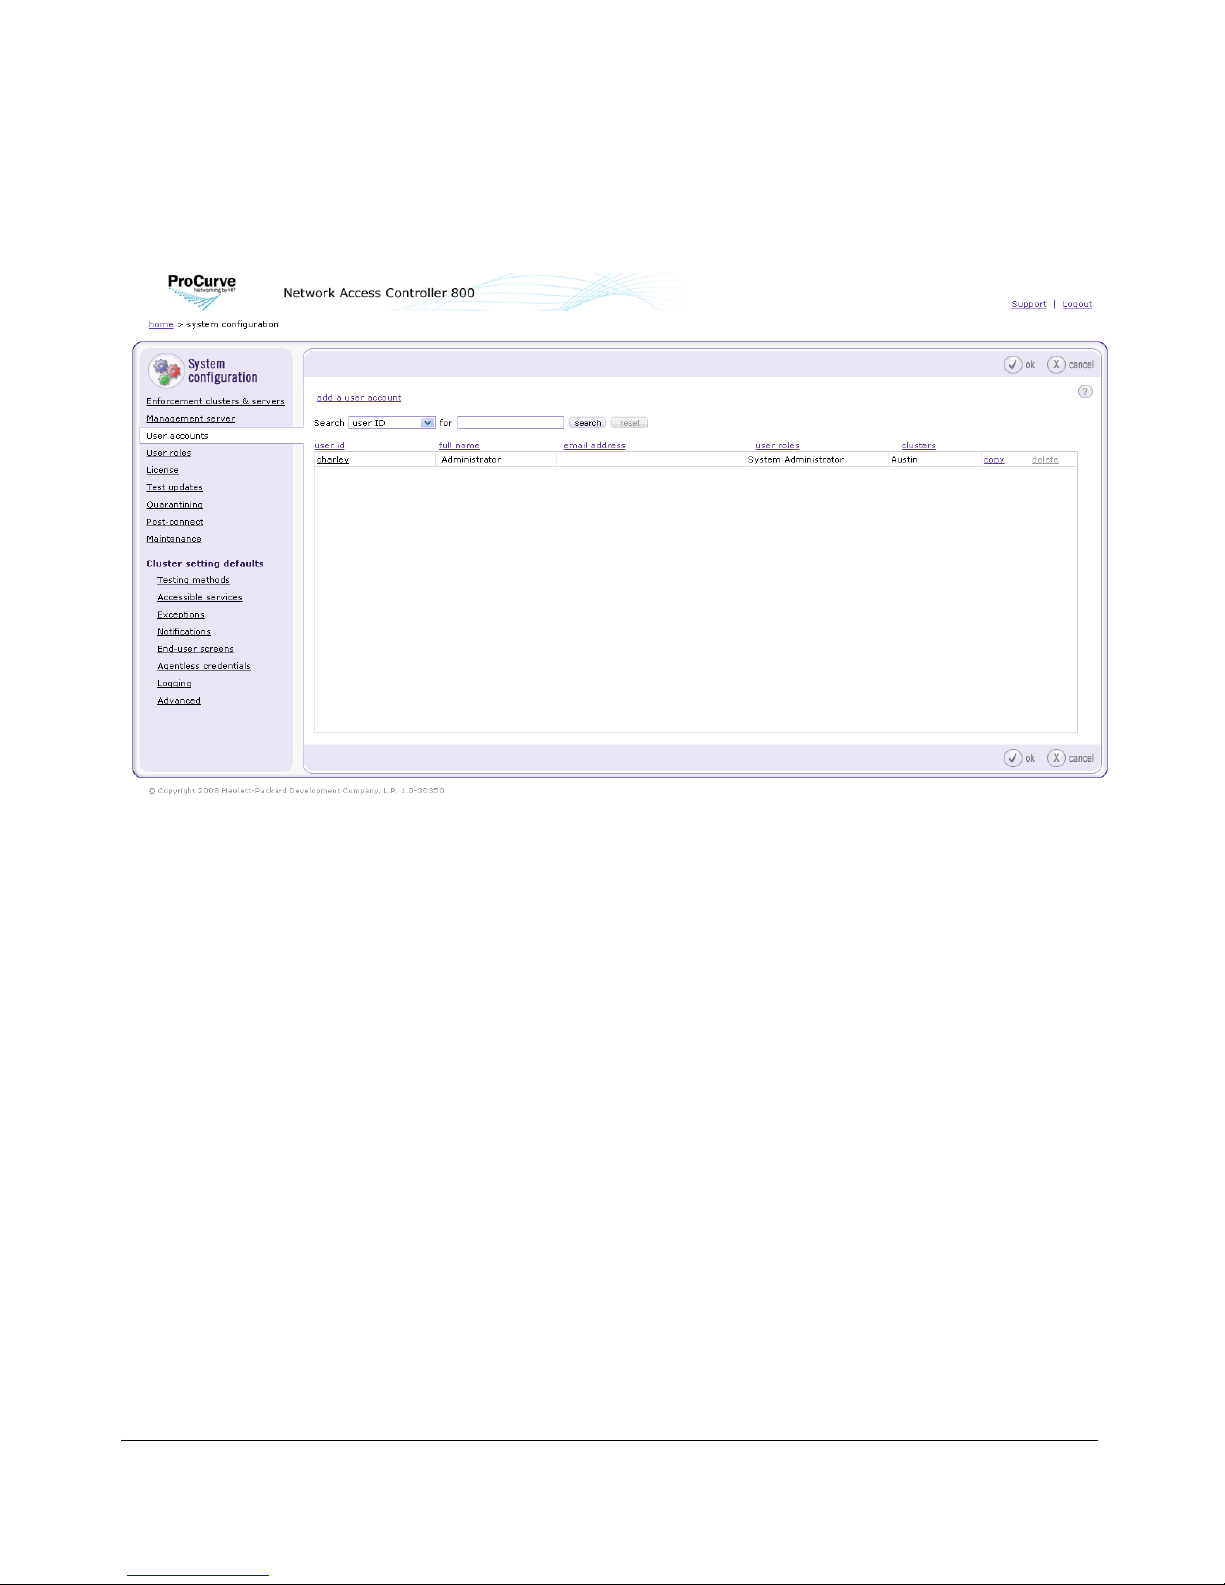
System Configuration
User Accounts
Figure 3-12. System Configuration, User Accounts
3-29
Page 76
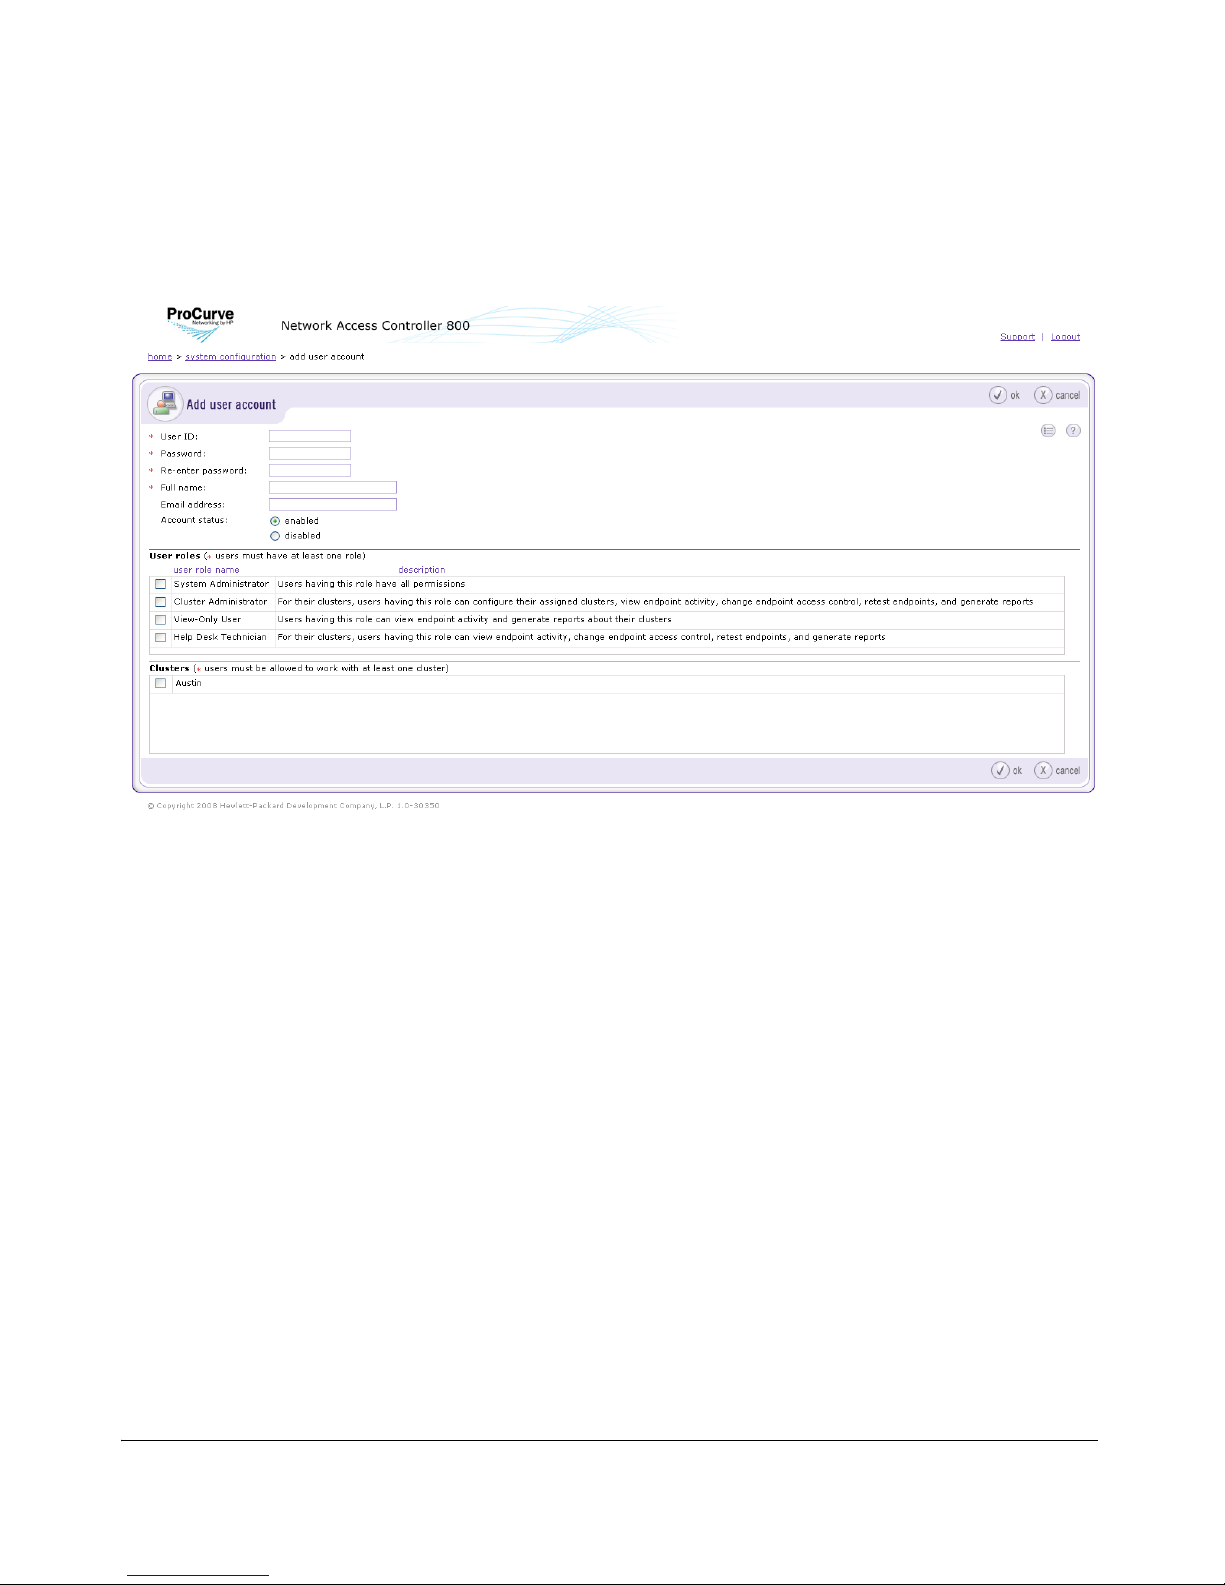
System Configuration
User Accounts
1. Click Add a user account. The Add user account window appears:
Figure 3-13. Add User Account
2. Enter the following information:
3. Select an Account status:
4. In the User roles area, select one of the following default roles for the user
• User ID – The user ID used to log into NAC 800
• Password – The password used to log into NAC 800
• Full name – The name associated with the user account
• Email address – The email address used for notifications
• enabled – This status allows an account to log into the user interface
• disabled – This status prevents an account from logging into the user
interface
account: (See “User Roles” on page 3-36 for more information about user
roles and permissions associated with user roles.)
• Cluster Administrator
• View-Only User
• System Administrator
3-30
Page 77

• Help Desk Technician
• You can select a custom user role if you have created any.
NOTE: Users must be assigned at least one role.
5. In the Clusters area, select a cluster or clusters.
NOTE: Users must be assigned at least one Enforcement cluster.
6. Click ok.
User Role Name Description
Cluster Administrator For their clusters, users having this role can configure their assigned
clusters, view endpoint activity, change endpoint access control, retest
endpoints, and generate reports.
System Configuration
User Accounts
View-Only User Users having this role can view endpoint activity and generate reports
System Administrator Users having this role have all permissions.
Help Desk Technician For their clusters, users having this role can view endpoint activity,
User-defined role Create your own user roles and definitions.
Table 3-2. Default User Roles
Searching for a User Account
To search for a user account:
Home window>>System configuration>>User accounts
1. Select one of the following from the Search drop-down list:
• user ID
• full name
• email address
about their clusters.
change endpoint access control, retest endpoints, and run reports.
2. Enter the text to search for in the for field.
3. Click search.
3-31
Page 78

System Configuration
User Accounts
TIP: Click reset to clear the text field and to refresh the display to show all accounts
after a search.
Sorting the User Account Area
To sort the user account area:
Home window>>System configuration>>User accounts
Click the column heading for user id, full name, email address, user roles, or
clusters. The user accounts reorder according to the column heading selected.
Click the column heading again to change from ascending to descending.
Copying a User Account
To copy a user account:
Home window>>System configuration>>User accounts
3-32
Page 79
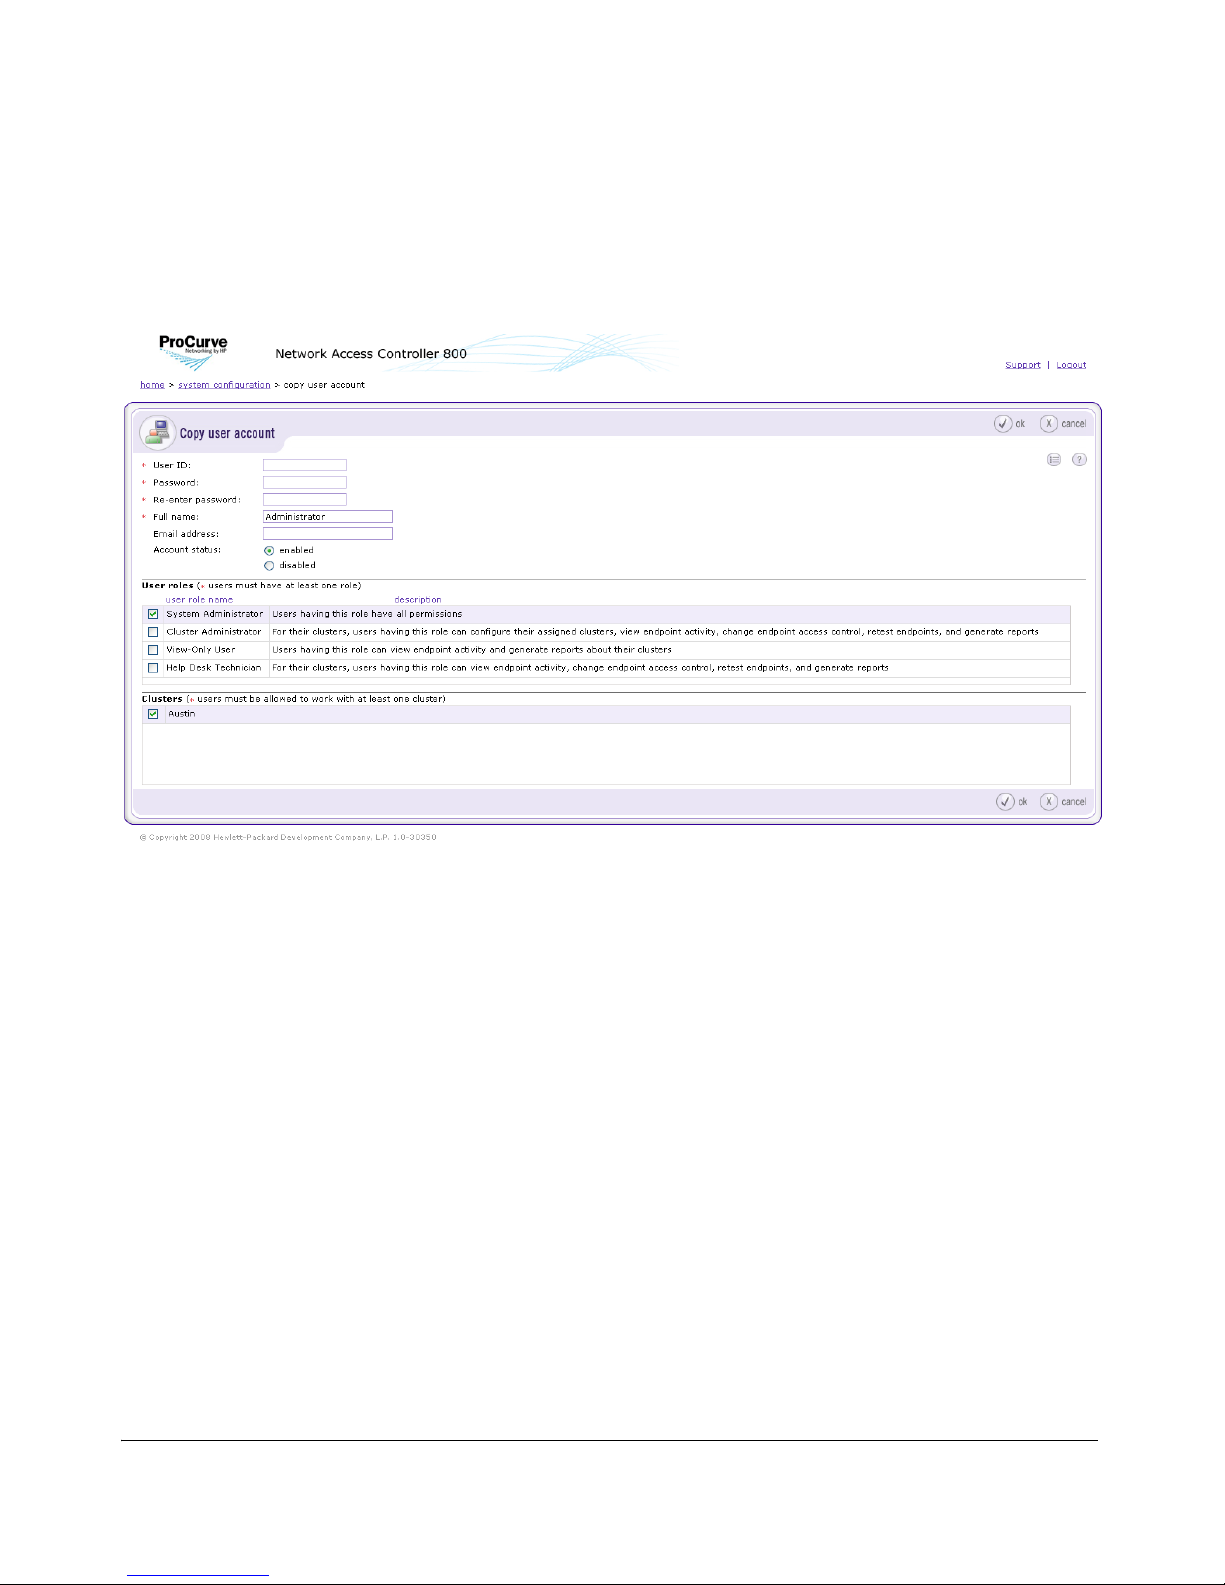
System Configuration
User Accounts
1. Click copy next to the user account you want to duplicate. The Copy user
account window appears. The account information is duplicated from the
original account.
Figure 3-14. Copy User Account
2. Enter the User ID of the new account.
3. Enter the Password.
4. Re-enter the password.
5. Select the Account status (enable or disable).
6. Select the User role for the account.
7. Select the Clusters that the user account can access.
8. Click ok.
Editing a User Account
To edit a user account:
Home window>>System configuration>>User accounts
3-33
Page 80
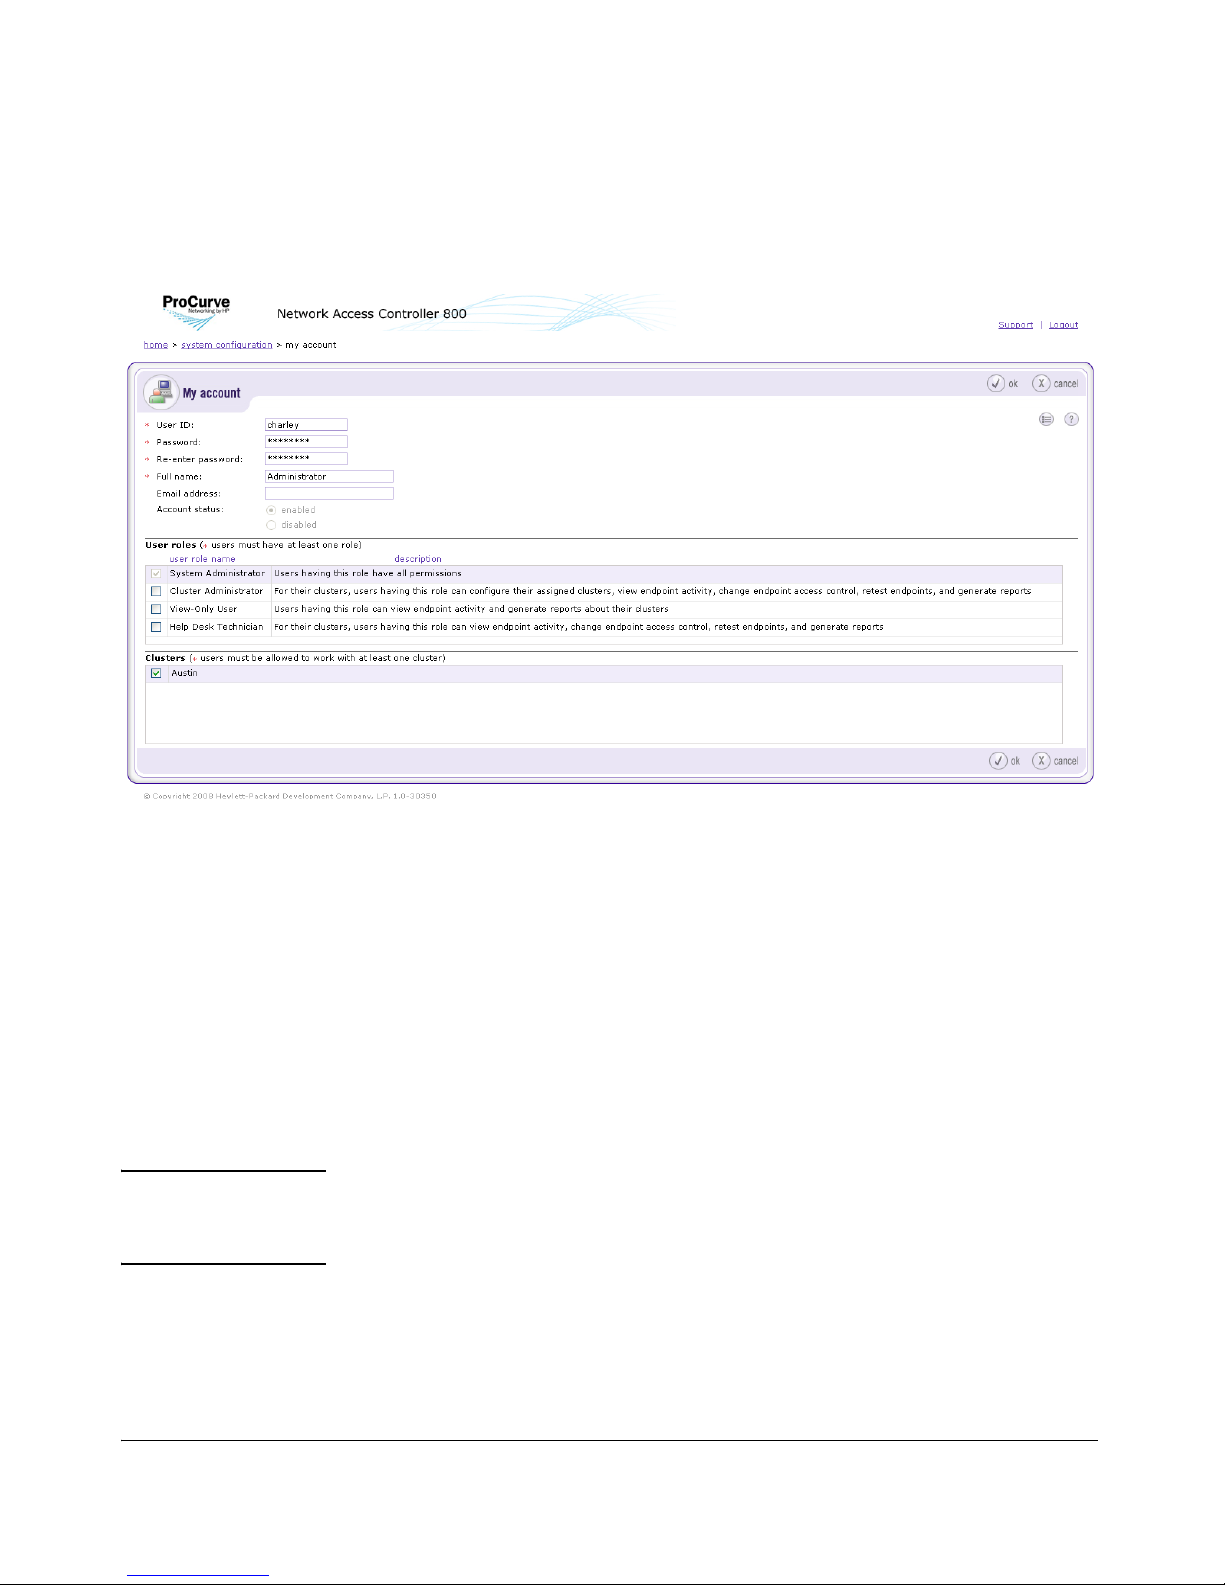
System Configuration
User Accounts
1. Click the name of the user account that you want to edit. The User account
window appears:
Figure 3-15. User Account
2. Change or enter information in the fields you want to change. See “Adding
a User Account” on page 3-28 for information on user account settings.
3. Click ok.
Deleting a User Account
You must always have at least one account with System Administrator permissions.
CAUTION: Do not delete or edit the account with which you are currently accessing the
interface. Doing so can produce an error and lock you out of the interface
until your session has timed out.
To delete a user account:
Home window>>System configuration>>User accounts
3-34
Page 81

System Configuration
User Accounts
1. Click delete next to the user account you want to remove. The Delete user
account confirmation window appears.
2. Click yes.
3-35
Page 82

System Configuration
User Roles
User Roles
The User roles menu option allows you to configure the following:
■ View current user roles and details associated with those roles
■ Add a new user role
• Name the new user role
• Provide a detail description for the new user role
• Assign permissions to the new user role
■ Edit a user role
• Edit the name of the user role
• Edit the detail description of the user role
• Edit the assigned permissions for the user role
■ Delete a user role
Adding a User Role
To add a user role:
Home window>>System configuration>>User roles
3-36
Page 83
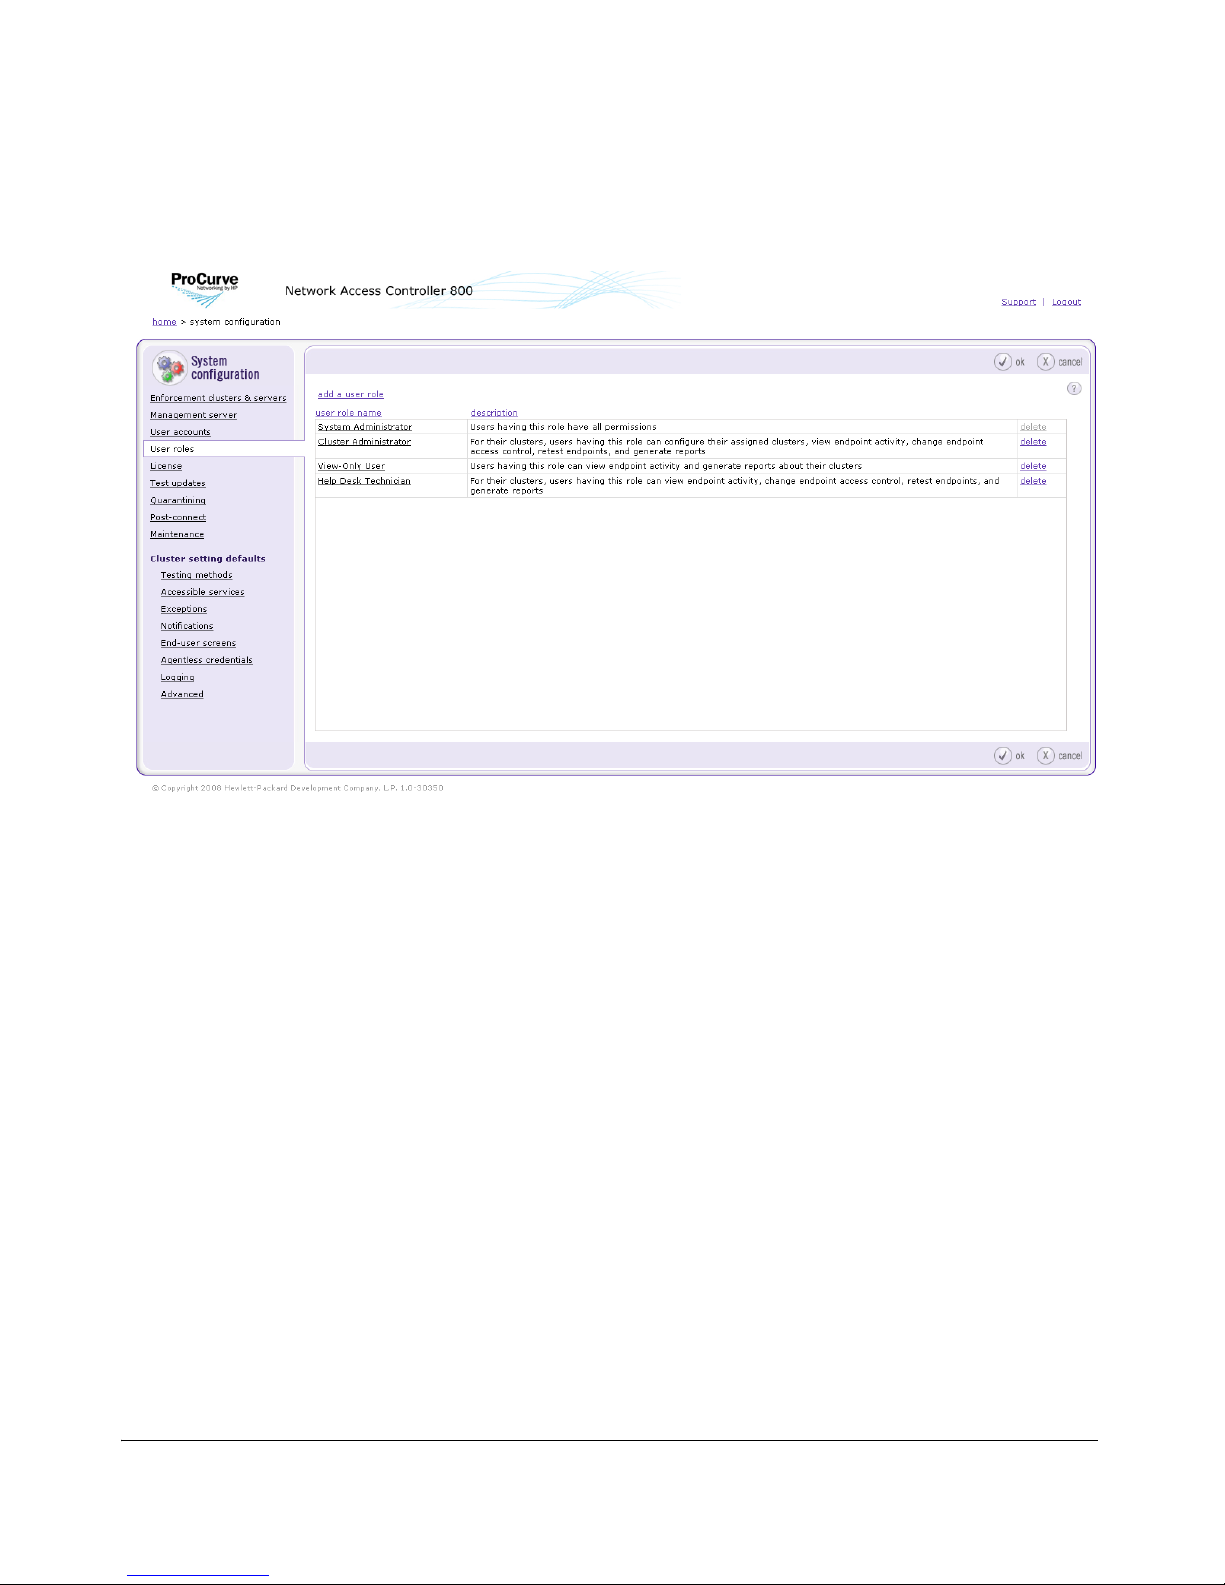
System Configuration
User Roles
Figure 3-16. System Configuration, User Roles
3-37
Page 84
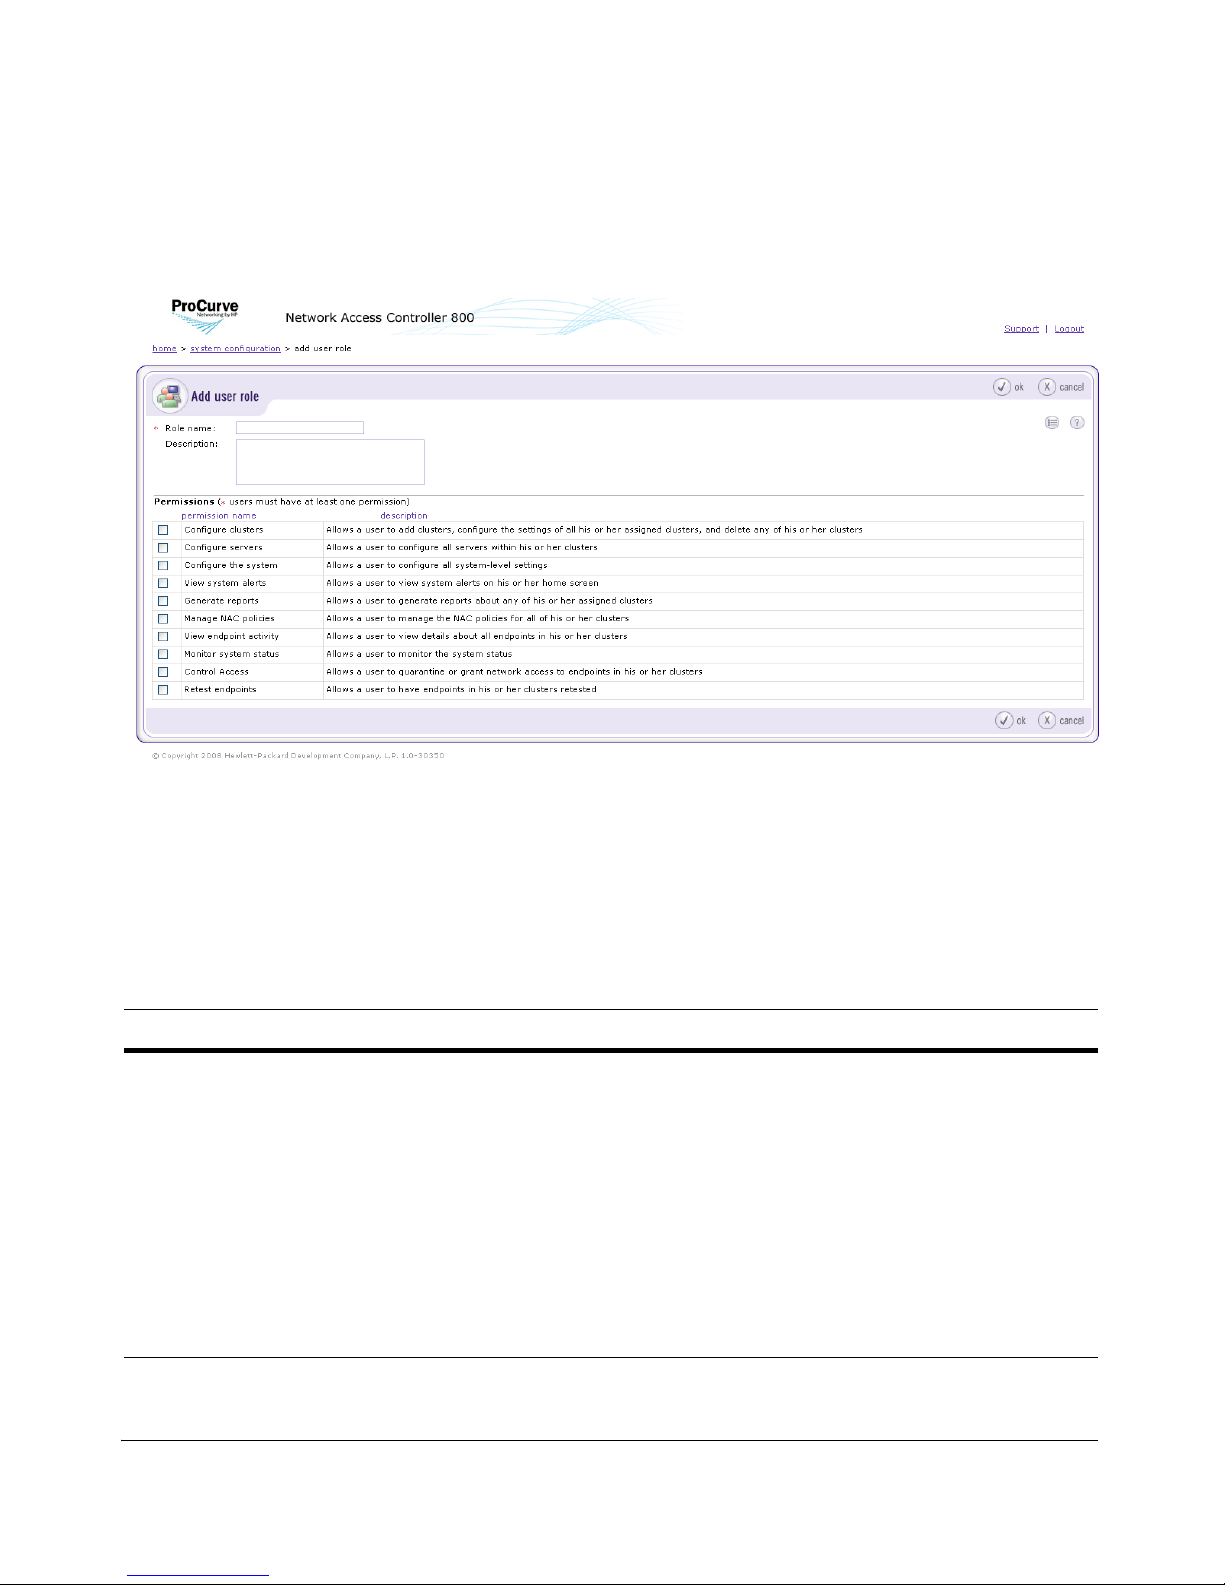
System Configuration
User Roles
1. Click add a user role in the User roles area. The Add user role window
appears.
Figure 3-17. Add User Role
2. Enter a descriptive name in the Role name field.
3. Enter a description of the role in the Description field.
4. Select the permissions for the user role. For more information about
permissions, the following table:
Permission Description
Configure clusters Allows you to add clusters, configure the settings of all your assigned clusters, and delete
any of your clusters.
Configure servers Allows you to configure all servers within your clusters
Configure the system Allows you to configure all system-level settings
View system alerts Allows you to view system alerts on your home screen
Generate reports Allows you to generate reports about any of your assigned clusters
Manage NAC policies Allows you to manage the NAC policies for all of your clusters
View endpoint activity Allows you to view details about all endpoints in your clusters
Table 3-3. User Role Permissions
3-38
Page 85
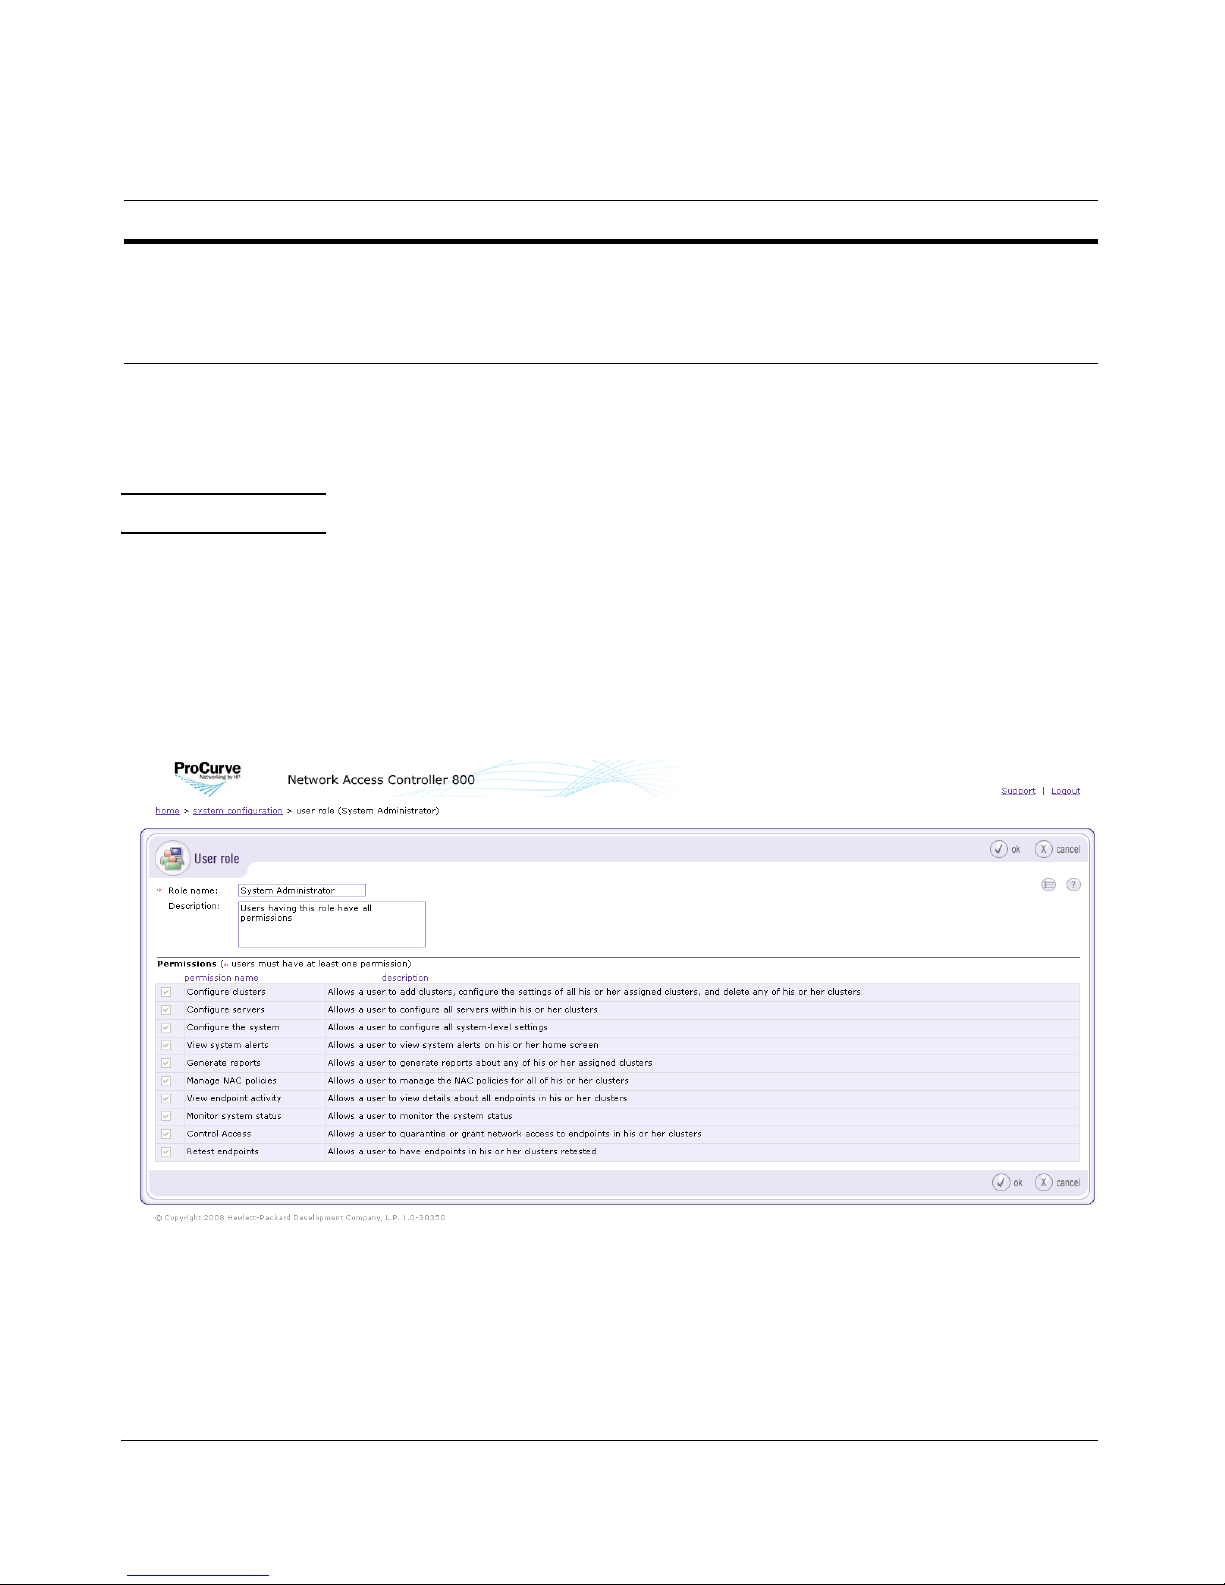
System Configuration
Permission Description
Monitor system status Allows you to monitor the system status
Control Access Allows you to quarantine or grant network access to endpoints in your clusters
Retest endpoints Allows you to have endpoints in your clusters retested
Table 3-3. User Role Permissions (cont.)
Editing User Roles
NOTE: You cannot edit the System Administrator user role.
To edit user roles :
Home window>>System configuration>>User roles
1. Click the role you want to edit. The user role window appears:
User Roles
Figure 3-18. User Role
2. Enter the information in the fields you want to change. See “Adding a User
Role” on page 3-36 for information on user role settings.
3-39
Page 86

System Configuration
User Roles
3. Click ok.
Deleting User Roles
NOTE: You cannot delete the System Administrator role.
To delete user roles:
Home window>>System configuration>>User roles
1. Click delete next to the user role you want to remove. The Delete user role
confirmation window appears.
2. Click yes.
Sorting the User Roles Area
To sort the user roles area:
Home window>>System configuration>>User roles
1. Click user role name or description column heading. The selected category
sorts in ascending or descending order.
2. Click ok.
3-40
Page 87
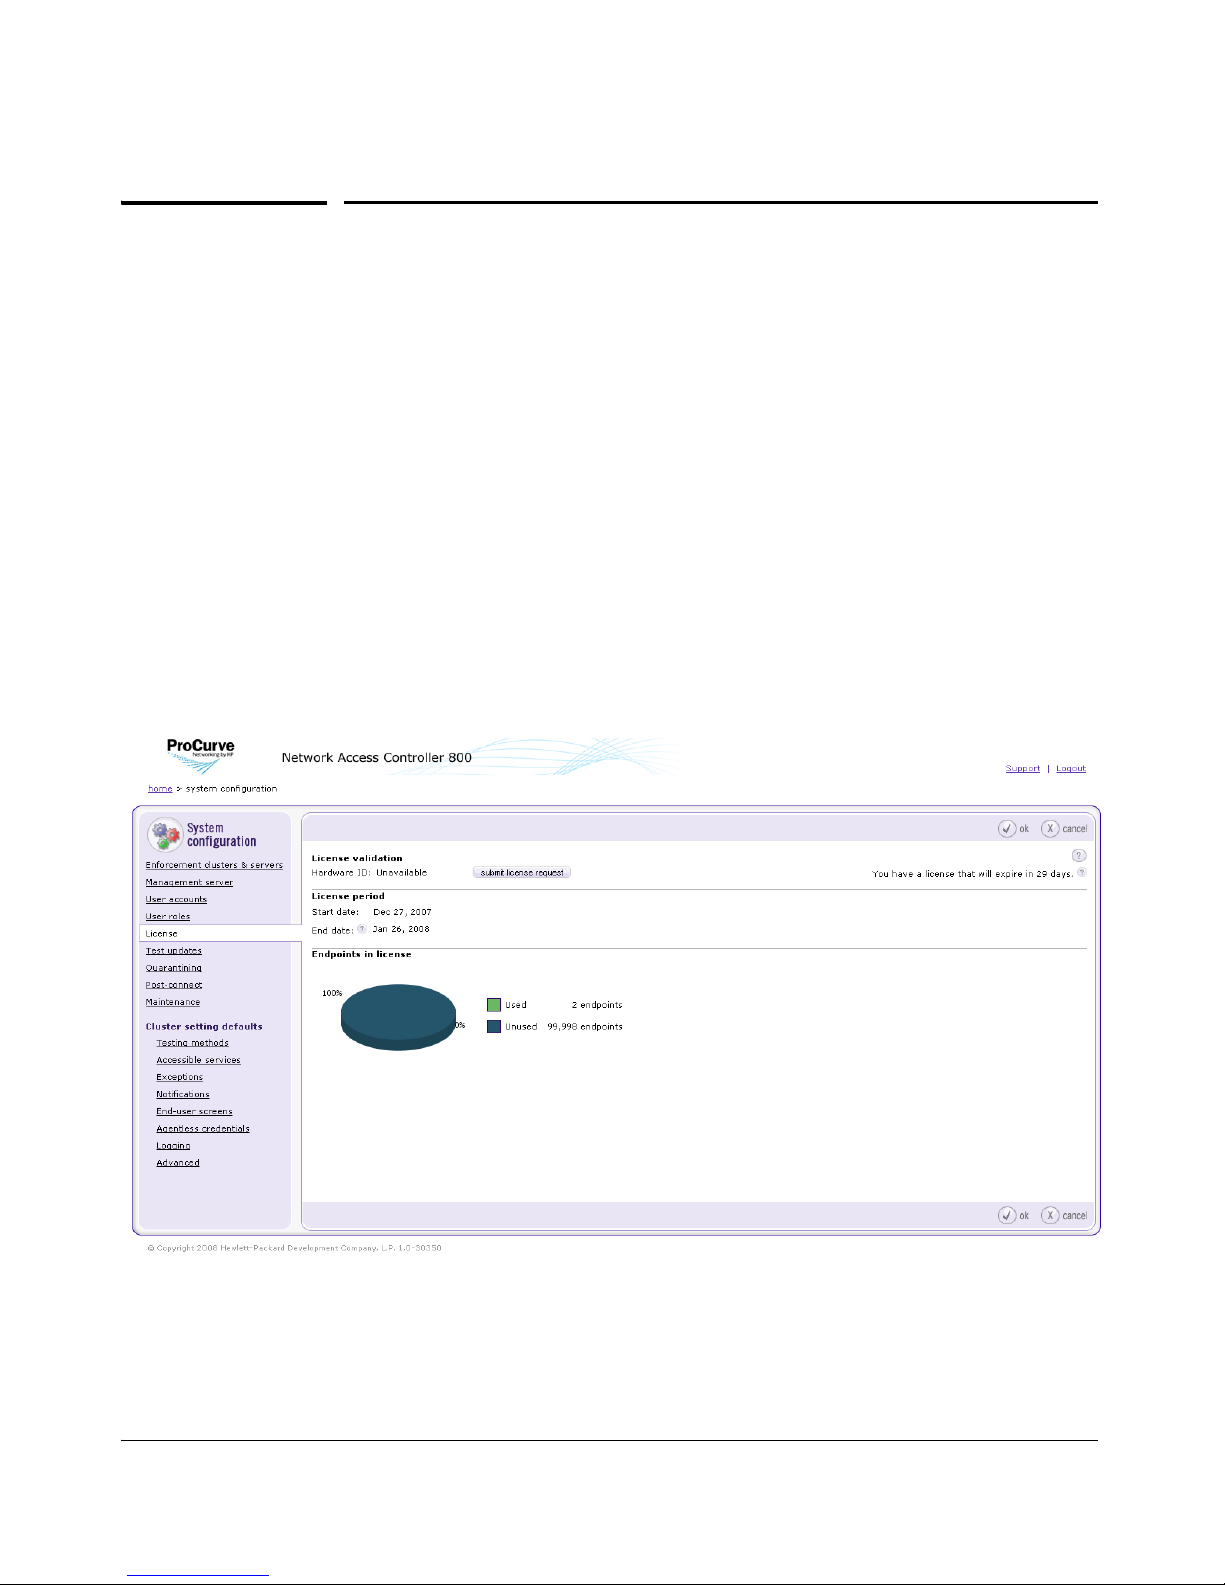
System Configuration
License
The License menu option allows you to configure the following:
■ View license start and end dates
■ View number of days remaining on license, and associated renewal
date
■ View remaining endpoints and servers available under license
Updating your License
To update your license:
Home window>>System configuration>>License
License
Figure 3-19. System Configuration, License
1. Click submit license request.
3-41
Page 88

System Configuration
License
2. Click ok on the license validated pop-up window.
3-42
Page 89
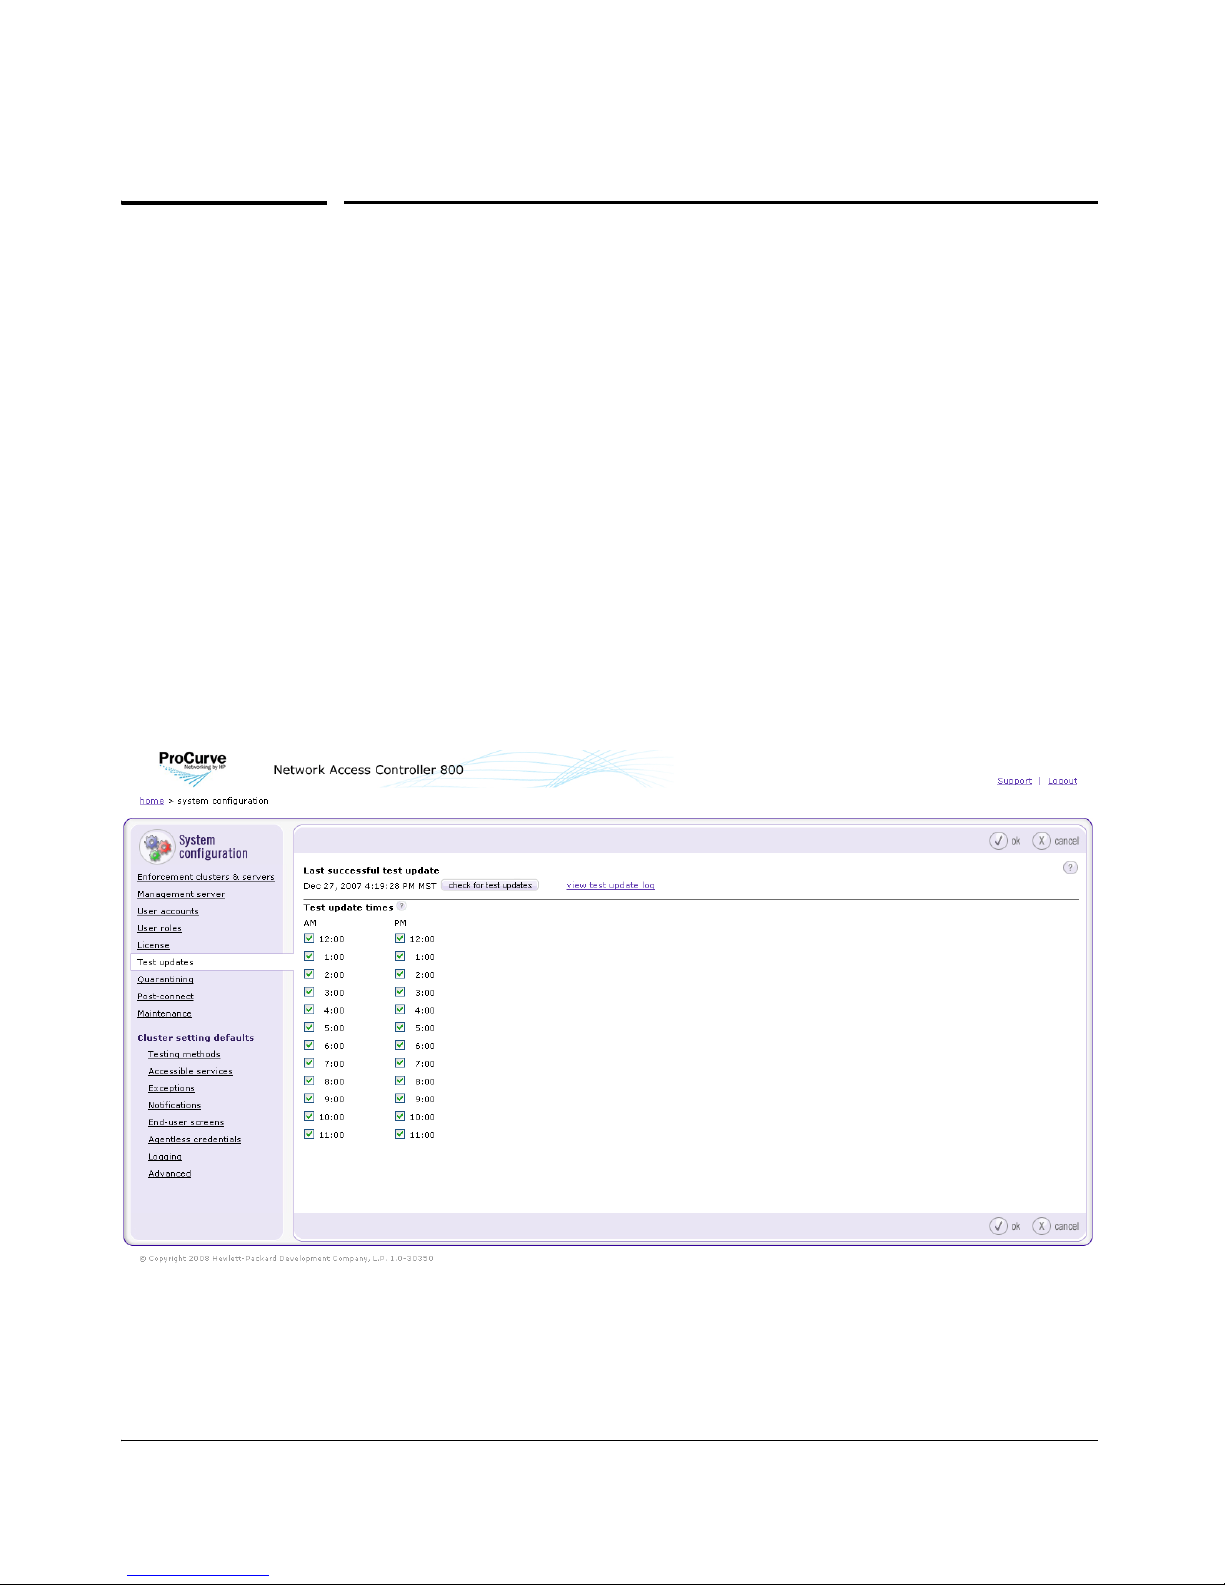
System Configuration
Test Updates
Test Updates
The Test updates menu option allows you to configure the following:
■ View last successful test update date/time
■ Check for test updates (forces an immediate check for test updates)
■ Set time or times for downloading test updates
■ View test update logs
Manually Checking for Test Updates
To manually check for test updates:
Home window>>System configuration>>Test updates
Figure 3-20. System Configuration, Test Updates
1. In the Last successful test update area, click check for test updates.
3-43
Page 90

System Configuration
Test Updates
2. Click ok.
NOTE: It is important to check for test updates during the initial configuration of
NAC 800.
NOTE: See “Supporting Network Management System” on page 15-35 to update tests
with no Internet connection.
Selecting Test Update Times
To select test update times:
Home window>>System configuration>>Test updates
1. Using the hour check boxes, select the time periods in which you would
like NAC 800 to check for available test updates.
By default, NAC 800 checks once every hour using the ProCurve Secure
Rule Distribution Center. All times listed are dependent upon the clock
setting and time zone of the hardware on which NAC 800 is running.
2. Click ok.
Viewing Test Update Logs
To view test update logs:
Home window>>System configuration>>Test updates
3-44
Page 91
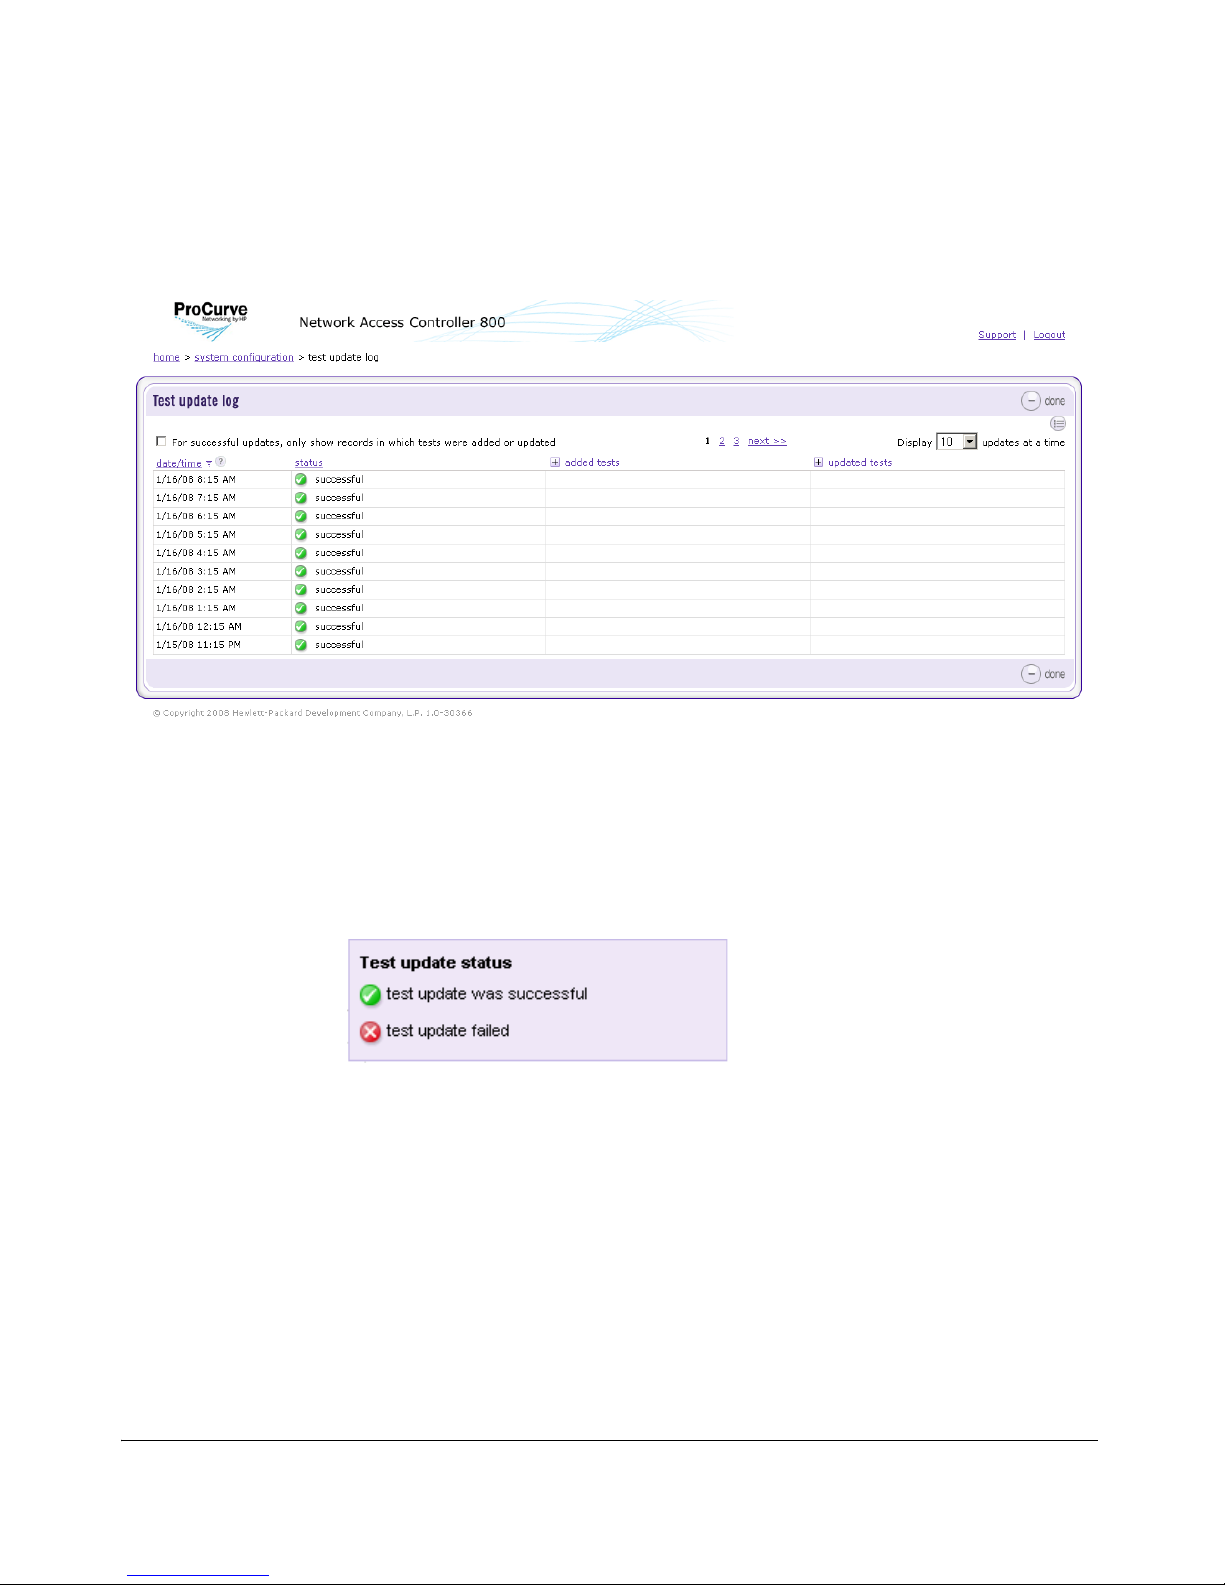
System Configuration
Test Updates
1. Click the View test update log link just to the right of the Check for test
updates button. The Test update log window appears:
Figure 3-21. Test Update Log
The Test update log window legend is shown in the following figure:
Figure 3-22. Test Update Log Window Legend
3-45
Page 92

System Configuration
Quarantining, General
Quarantining, General
The Quarantining menu option allows you to configure the following by
cluster:
■ Select the quarantine method
■ Select the access mode
■ Basic 802.1X settings
■ Authentication settings
■ Add, edit, delete 802.1X devices
Selecting the Quarantine Method
To select the quarantine method:
Home window>>System configuration>>Quarantining
3-46
Page 93
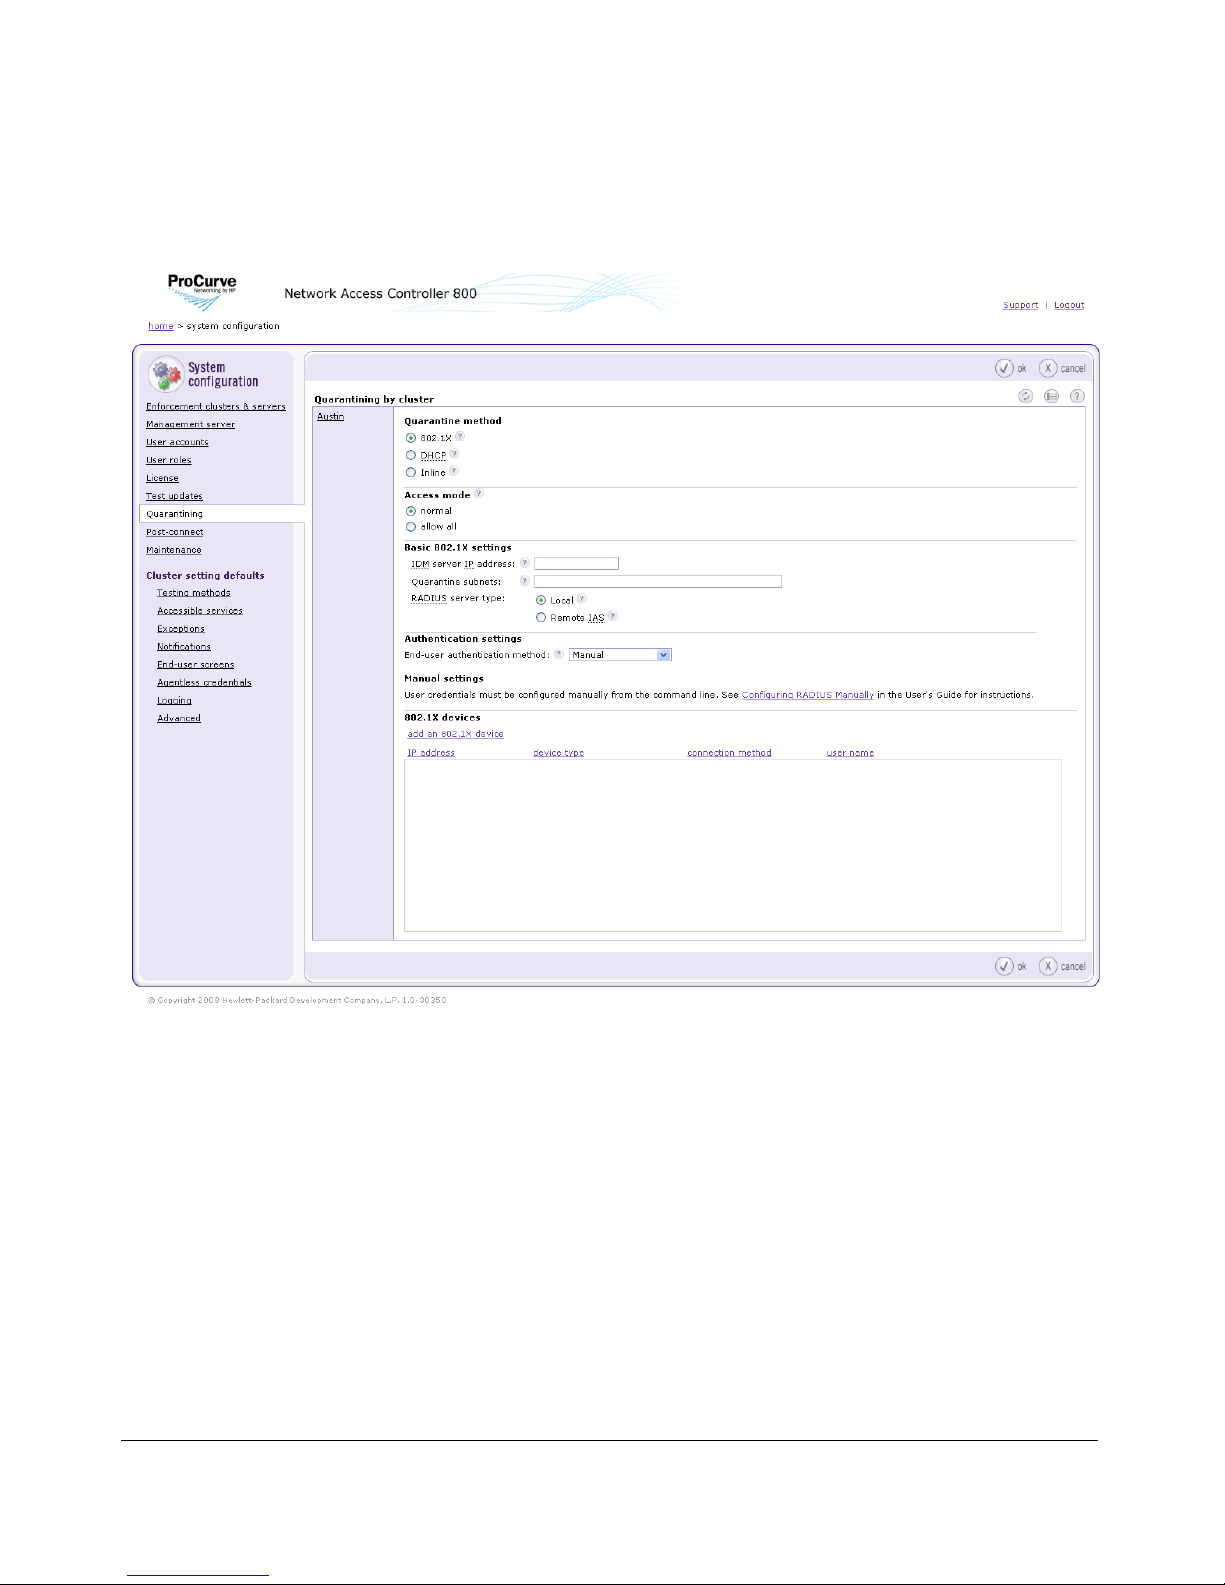
System Configuration
Quarantining, General
Figure 3-23. System Configuration, Quarantining
1. Select a cluster.
2. In the Quarantine method area, select one of the following quarantine
methods:
• 802.1X – When using the 802.1X quarantine method, NAC 800 must sit
• DHCP – When configured with a DHCP quarantine area, NAC 800 must
in a place on the network where it can communicate with your
RADIUS server, which communicates with your switch or router,
which performs the quarantining.
sit inline with your DHCP server. All endpoints requesting a DHCP IP
address are issued a temporary address on a quarantine subnetwork.
3-47
Page 94

System Configuration
Quarantining, General
Once the endpoint is allowed access, the IP address is renewed, and
the main DHCP server assigns an address to the main LAN. With a
multiple subnetwork or VLAN network, one quarantine area must be
configured for each subnetwork. See “Remote Device Activity Capture” on page 12-1 for information on using multiple DHCP servers.
• Inline – When using the inline quarantine method, NAC 800 must be
placed on the network where all traffic to be quarantined passes
through NAC 800. It must be inline with an endpoint like a VPN.
3. Click ok.
Selecting the Access Mode
To select the access mode:
Home window>>System configuration>>Quarantining
1. Select one of the following in the Access mode area:
• normal – Either allows or quarantines endpoints depending on the
setup of the enforcement sever.
• allow all – Endpoints are tested; however, they are always given
access to the production network.
NOTE: If you are setting up a cluster for the first time, and you have not yet added
an ES, select allow all until you have finished configuring NAC 800.
3-48
Page 95

System Configuration
Quarantining, 802.1X
Quarantining, 802.1X
The 802.1X quarantine (enforcement) method is enabled by default.
To select the 802.1X quarantine method:
Home window>>System configuration>>Quarantining
1. Select a cluster.
2. In the Quarantine method area, select the 802.1X radio button.
3. Click ok.
Entering Basic 802.1X Settings
To enter basic 802.1X settings:
Home window>>System configuration>>Quarantining>>802.1X quarantine
method radio button
1. Enter an IP address in the Identity Driven Manager (IDM) server IP address
text field.
• remote – Disables the local RADIUS server so that an IAS server config-
ured with the NAC IAS plug-in to point to an enforcement server can be
used instead. When possible, a local RADIUS server that proxies to the IAS
server should be the preferred configuration.
2. Enter one or more non-quarantined subnets, separated by commas in the
Quarantine subnets text field. All subnets should be entered using CIDR
addresses.
3. Select a RADIUS server type by selecting one of the following radio buttons:
• Local – Enables a local RADIUS server on the ES which can be
configured to perform authentication itself or proxy to another server.
• Remote IAS – Disables the local RADIUS server so that an IAS server
configured with the NAC IAS plug-in to point to an ES can be used
instead. When possible, a local RADIUS server that proxies to the IAS
server should be the preferred configuration.
4. Click ok.
3-49
Page 96

System Configuration
Quarantining, 802.1X
Authentication Settings
Selecting the RADIUS Authentication method
To select the RADIUS authentication method:
Home window>>System configuration>>Quarantining>>802.1X quarantine
method radio button
1. Select the Local radio button in the Basic 802.1X settings area.
2. Select an End-user authentication method:
• Manual – RADIUS server authentication settings are configured man-
ually from the command line. See “Enabling NAC 800 for 802.1X” on
page 11-38 for configuration information.
• Windows domain – Authentication requests are handled by a Windows
domain through NTLM protocol. The ES must be able to join to the
domain for this to work. See “Configuring Windows Domain Settings”
on page 3-50 for more information.
• OpenLDAP – User credentials are queried from an OpenLDAP direc-
tory service. See “Configuring OpenLDAP Settings” on page 3-52 for
more information.
• Novell eDirectory – User credentials are queried from a Novell eDirec-
tory directory service. See “Configuring Novell eDirectory Settings”
on page 3-55 for more information.
• Proxy – Authentication requests are proxied to a remote RADIUS
server configured to allow the ES as a client NAS.
3. Click ok.
Configuring Windows Domain Settings
To configure Windows domain settings:
Home window>>System configuration>>Quarantining>>802.1X Quarantine
method radio button>>Local radio button
3-50
Page 97
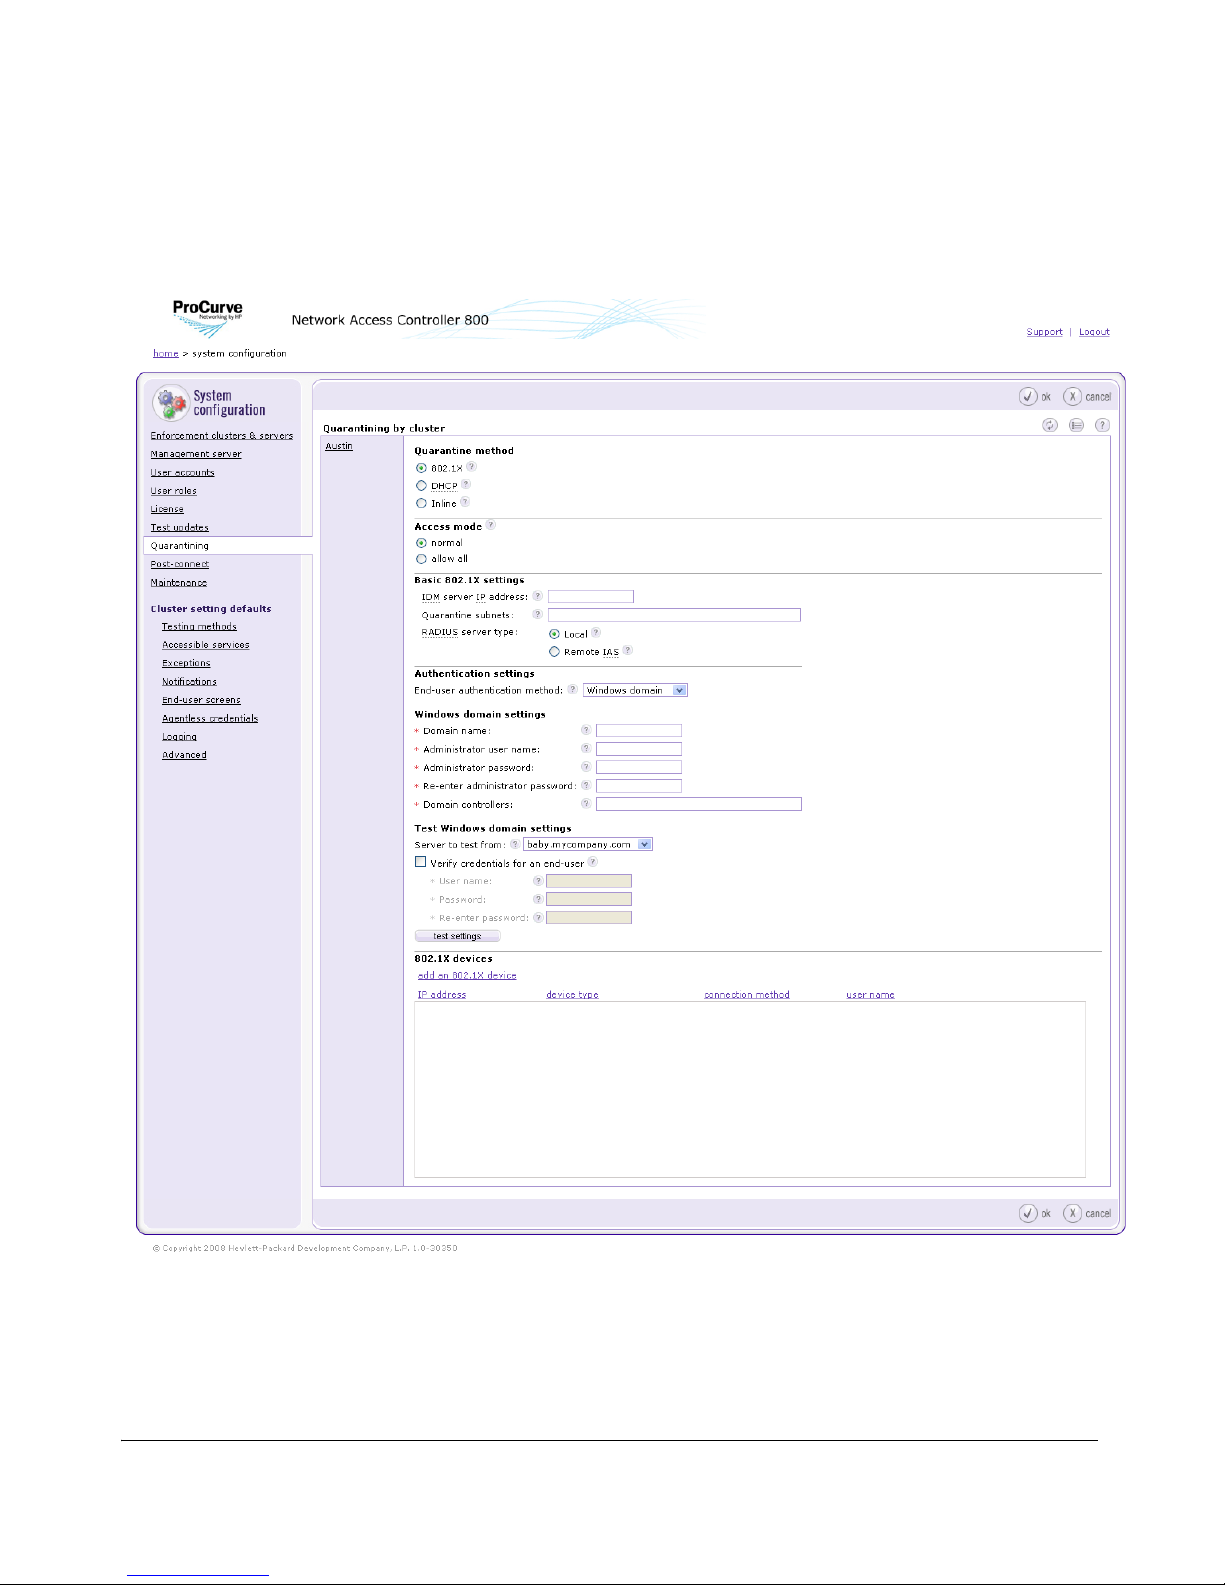
System Configuration
Quarantining, 802.1X
1. Select Windows domain from the End-user authentication method drop-down
list.
Figure 3-24. System Configuration, Windows Domain
2. Enter the Fully Qualified Domain Name (FQDN) of the domain to be
joined in the Domain name text field.
3-51
Page 98

System Configuration
Quarantining, 802.1X
3. Enter the user name of an account with sufficient administrative rights to
join an ES to the domain in the Administrator user name text field.
4. Enter the password of the account entered into the Administrator user name
field in the Administrator password text field.
5. Enter the list of domain controllers, separated by commas, for this domain
in the Domain controllers text field.
6. To test the Windows domain settings:
a. Select one of the following from the Server to test from drop-down list
in the Test Windows domain settings area:
– The ES in this cluster to test from, or
–The MS
NOTE: If you have a single-server installation, the Server to test from drop-down list
is not available.
b. To verify a specific set of user credentials in addition to the Windows
domain settings, select the Verify credentials for an end-user check box,
and specify the following:
i. Enter the user name of the end-user in the User name text box.
ii. Enter the password of the end-user in the Password text box.
iii. Re-enter the password of the end-user in the Re-enter password
text box.
c. Click test settings.
3-52
7. Click ok.
Configuring OpenLDAP Settings
To configure OpenLDAP settings:
Home window>>System configuration>>Quarantining>>802.1X Quarantine
method radio button>>Local radio button
Page 99
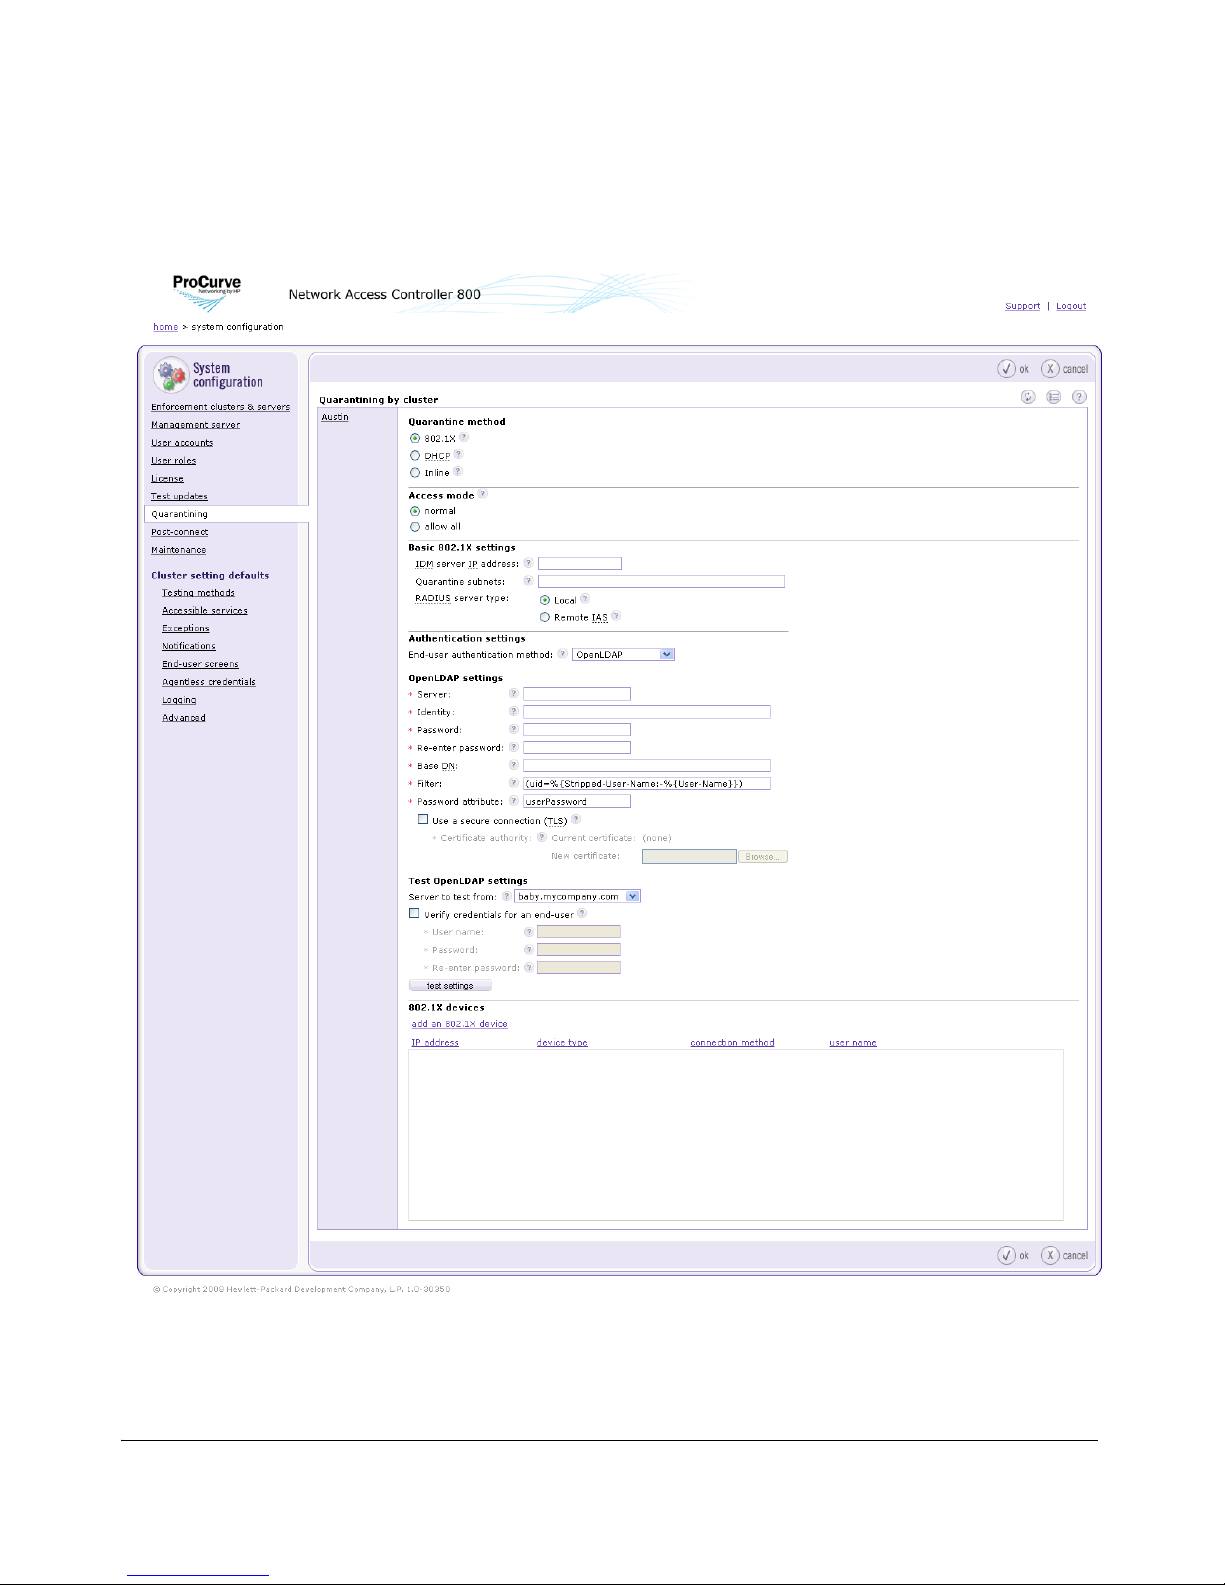
System Configuration
Quarantining, 802.1X
1. Select OpenLDAP from the End-user authentication method drop-down list.
Figure 3-25. System Configuration, OpenLDAP
3-53
Page 100

System Configuration
Quarantining, 802.1X
2. Enter the LDAP server hostname or IP address and optional port number
in the Server text field. For example: 10.0.1.2:636
3. Enter the DN under which LDAP searches should be done in the Identity
text field. For example: cn=admin,o=My Org,c=UA
4. Enter the password that authenticates the DN entered into the Identity text
field in the Password text field.
5. Type the same password you entered into the Password field in the Re-
enter password field.
6. Enter the base DN of LDAP searches in the Base DN text field. For
example: o=My Org,c=UA
7. Enter the LDAP search filter used to locate user objects from name
supplied by endpoint in the Filter text field. For example: (uid=%u)
8. Enter the LDAP attribute which contains end-user passwords in the
Password attribute text field. This is initially set to userPassword to use
the universal password of the eDirectory user.
9. To use a secure Transport Layer Security (TLS) connection with the LDAP
server that is verified with a certificate authority:
a. Select the Use a secure connection (TLS) check box.
b. Enter a PEM-encoded file name that contains the CA certificate used
to sign the LDAP server's TLS certificate in the New certificate text
field. Click Browse to search for file names. The current certificate
selected is shown by Current certificate.
10. To test the OpenLDAP settings:
a. Select one of the following from the Server to test from drop-down list
in the Test Windows domain settings area:
– The ES in this cluster to test from, or
–The MS
b. To verify a specific set of user credentials in addition to the
OpenLDAP settings, select the Verify credentials for an end-user check
box, and specify the following:
i. Enter the user name of the end-user in the User name text box.
ii. Enter the password of the end-user in the Password text box.
iii. Re-enter the password of the end-user in the Re-enter password
text box.
c. Click test settings.
11. Click ok.
3-54
 Loading...