

HP J4813A, ProCurve Identity Driven Manager User Manual

ProCurve
Identity Driven Manager
User’s Guide
Software Release 2.0

© Copyright 2004, 2005 Hewlett-Packard Company
All Rights Reserved.
This document contains information which is protected by
copyright. Reproduction, adaptation, or translation without
prior permission is prohibited, except as allowed under the
copyright laws.
Publication Number
5990-8851
November, 2005
Disclaimer
The information contained in this document is subject to
change without notice.
HEWLETT-PACKARD COMPANY MAKES NO WARRANTY
OF ANY KIND WITH REGARD TO THIS MATERIAL,
INCLUDING, BUT NOT LIMITED TO, THE IMPLIED
WARRANTIES OF MERCHANTABILITY AND FITNESS
FOR A PARTICULAR PURPOSE. Hewlett-Packard shall not
be liable for errors contained herein or for incidental or
consequential damages in connection with the furnishing,
performance, or use of this material.
Hewlett-Packard assumes no responsibility for the use or
reliability of its software on equipment that is not furnished
by Hewlett-Packard.
Trademark Credits
Microsoft, Windows, Windows 95, and Microsoft Windows
NT are registered trademarks of Microsoft Corporation.
Internet Explorer is a trademark of Microsoft Corporation.
Ethernet is a registered trademark of Xerox Corporation.
Netscape is a registered trademark of Netscape Corporation.
Warranty
See the Customer Support/Warranty booklet included with
the product.
A copy of the specific warranty terms applicable to your
Hewlett-Packard products and replacement parts can be
obtained from your HP Sales and Service Office or
authorized dealer.
Hewlett-Packard Company
8000 Foothills Boulevard, m/s 5551
Roseville, California 95747-5551
http://www.procurve.com

Contents
1 About ProCurve Identity Driven Manager
Introduction . . . . . . . . . . . . . . . . . . . . . . . . . . . . . . . . . . . . . . . . . . . . . . . . . . . . 1-2
Why IDM? . . . . . . . . . . . . . . . . . . . . . . . . . . . . . . . . . . . . . . . . . . . . . . . . . . 1-3
IDM Architecture . . . . . . . . . . . . . . . . . . . . . . . . . . . . . . . . . . . . . . . . . . . . 1-5
Terminology . . . . . . . . . . . . . . . . . . . . . . . . . . . . . . . . . . . . . . . . . . . . . . . . . . . 1-7
IDM Specifications . . . . . . . . . . . . . . . . . . . . . . . . . . . . . . . . . . . . . . . . . . . . . . 1-9
Supported Devices . . . . . . . . . . . . . . . . . . . . . . . . . . . . . . . . . . . . . . . . . . . . 1-9
Operating Requirements . . . . . . . . . . . . . . . . . . . . . . . . . . . . . . . . . . . . . . . 1-9
Additional Requirements . . . . . . . . . . . . . . . . . . . . . . . . . . . . . . . . . . . . . . 1-10
Upgrading from Previous Versions of PCM and IDM . . . . . . . . . . . . . . . 1-10
Registering Your IDM Software . . . . . . . . . . . . . . . . . . . . . . . . . . . . . . . . . . 1-12
Learning to Use ProCurve IDM . . . . . . . . . . . . . . . . . . . . . . . . . . . . . . . . . . 1-15
ProCurve Support . . . . . . . . . . . . . . . . . . . . . . . . . . . . . . . . . . . . . . . . . . . . . . 1-15
2 Getting Started
Before You Begin . . . . . . . . . . . . . . . . . . . . . . . . . . . . . . . . . . . . . . . . . . . . . . . 2-2
Installing the IDM Agent . . . . . . . . . . . . . . . . . . . . . . . . . . . . . . . . . . . . . . . 2-2
Using the IDM Auto-Discover Feature . . . . . . . . . . . . . . . . . . . . . . . . . . . . 2-3
IDM Configuration Process Overview . . . . . . . . . . . . . . . . . . . . . . . . . . . . 2-3
IDM Usage Strategies . . . . . . . . . . . . . . . . . . . . . . . . . . . . . . . . . . . . . . . . . 2-4
Understanding the IDM Model . . . . . . . . . . . . . . . . . . . . . . . . . . . . . . . . . . 2-5
IDM GUI Overview . . . . . . . . . . . . . . . . . . . . . . . . . . . . . . . . . . . . . . . . . . . . . 2-6
IDM Dashboard . . . . . . . . . . . . . . . . . . . . . . . . . . . . . . . . . . . . . . . . . . . . . . 2-8
Using the Navigation Tree . . . . . . . . . . . . . . . . . . . . . . . . . . . . . . . . . . . . . . 2-9
Toolbars and Menus . . . . . . . . . . . . . . . . . . . . . . . . . . . . . . . . . . . . . . . . . 2-13
Using IDM as a Monitoring Tool . . . . . . . . . . . . . . . . . . . . . . . . . . . . . . . . . . 2-14
IDM Preferences . . . . . . . . . . . . . . . . . . . . . . . . . . . . . . . . . . . . . . . . . . . . 2-15
Using IDM Reports . . . . . . . . . . . . . . . . . . . . . . . . . . . . . . . . . . . . . . . . . . . . . 2-18
Scheduling a Report . . . . . . . . . . . . . . . . . . . . . . . . . . . . . . . . . . . . . . . . . . 2-21
IDM Session Cleanup Policy . . . . . . . . . . . . . . . . . . . . . . . . . . . . . . . . . . . 2-27
User Session Information . . . . . . . . . . . . . . . . . . . . . . . . . . . . . . . . . . . . . . . . 2-29
iii

Contents
3 Using Identity Driven Manager
IDM Configuration Model . . . . . . . . . . . . . . . . . . . . . . . . . . . . . . . . . . . . . . . . 3-2
Configuration Process Review . . . . . . . . . . . . . . . . . . . . . . . . . . . . . . . . . . 3-2
Configuring Identity Management . . . . . . . . . . . . . . . . . . . . . . . . . . . . . . . 3-3
Configuring Locations . . . . . . . . . . . . . . . . . . . . . . . . . . . . . . . . . . . . . . . . . . . 3-5
Configuring Times . . . . . . . . . . . . . . . . . . . . . . . . . . . . . . . . . . . . . . . . . . . . . 3-10
Configuring Network Resources . . . . . . . . . . . . . . . . . . . . . . . . . . . . . . . . . . 3-16
Configuring Access Profiles . . . . . . . . . . . . . . . . . . . . . . . . . . . . . . . . . . . . . . 3-21
Defining Access Policy Groups . . . . . . . . . . . . . . . . . . . . . . . . . . . . . . . . . . . 3-31
Configuring User Access . . . . . . . . . . . . . . . . . . . . . . . . . . . . . . . . . . . . . . . . 3-37
Using Global Rules . . . . . . . . . . . . . . . . . . . . . . . . . . . . . . . . . . . . . . . . . . 3-39
Deploying Configurations to the Agent . . . . . . . . . . . . . . . . . . . . . . . . . . . . 3-42
Using Manual Configuration . . . . . . . . . . . . . . . . . . . . . . . . . . . . . . . . . . . . . 3-43
Defining New Realms . . . . . . . . . . . . . . . . . . . . . . . . . . . . . . . . . . . . . . . . 3-43
Modifying and Deleting Realms . . . . . . . . . . . . . . . . . . . . . . . . . . . . . . . . 3-44
Defining RADIUS Servers . . . . . . . . . . . . . . . . . . . . . . . . . . . . . . . . . . . . 3-45
Modifying and Deleting RADIUS Servers . . . . . . . . . . . . . . . . . . . . . . . . 3-46
Adding New Users . . . . . . . . . . . . . . . . . . . . . . . . . . . . . . . . . . . . . . . . . . . 3-47
Adding users in IDM: Manual Process . . . . . . . . . . . . . . . . . . . . . . . . . . . 3-47
Modifying and Deleting Users . . . . . . . . . . . . . . . . . . . . . . . . . . . . . . . . . 3-49
Using the User Import Wizard . . . . . . . . . . . . . . . . . . . . . . . . . . . . . . . . . . . 3-50
Importing Users from Active Directory . . . . . . . . . . . . . . . . . . . . . . . . . . 3-51
Importing Users from an LDAP Server . . . . . . . . . . . . . . . . . . . . . . . . . . . 3-57
Importing Users from XML files . . . . . . . . . . . . . . . . . . . . . . . . . . . . . . . . 3-68
4 Troubleshooting IDM
IDM Events . . . . . . . . . . . . . . . . . . . . . . . . . . . . . . . . . . . . . . . . . . . . . . . . . . . . 4-2
Using Event Filters . . . . . . . . . . . . . . . . . . . . . . . . . . . . . . . . . . . . . . . . . . . 4-4
Using Activity Logs . . . . . . . . . . . . . . . . . . . . . . . . . . . . . . . . . . . . . . . . . . . 4-8
Using Decision Manager Tracing . . . . . . . . . . . . . . . . . . . . . . . . . . . . . . . . . . 4-9
Miscellaneous . . . . . . . . . . . . . . . . . . . . . . . . . . . . . . . . . . . . . . . . . . . . . . 4-10
A IDM Technical Reference
Device Support for IDM Functionality . . . . . . . . . . . . . . . . . . . . . . . . . . . . . A-1
Best Practices . . . . . . . . . . . . . . . . . . . . . . . . . . . . . . . . . . . . . . . . . . . . . . . . . . A-2
Types of User Events . . . . . . . . . . . . . . . . . . . . . . . . . . . . . . . . . . . . . . . . . . . A-5
Index
iv

About ProCurve Identity Driven Manager
Chapter Contents
Introduction . . . . . . . . . . . . . . . . . . . . . . . . . . . . . . . . . . . . . . . . . 1-2
Why IDM? . . . . . . . . . . . . . . . . . . . . . . . . . . . . . . . . . . . . . . . . 1-3
IDM Architecture . . . . . . . . . . . . . . . . . . . . . . . . . . . . . . . . . . 1-5
Terminology . . . . . . . . . . . . . . . . . . . . . . . . . . . . . . . . . . . . . . . . . 1-7
IDM Specifications . . . . . . . . . . . . . . . . . . . . . . . . . . . . . . . . . . . 1-9
Supported Devices . . . . . . . . . . . . . . . . . . . . . . . . . . . . . . . . . 1-9
Operating Requirements . . . . . . . . . . . . . . . . . . . . . . . . . . . . . 1-9
Additional Requirements . . . . . . . . . . . . . . . . . . . . . . . . . . . 1-10
Upgrading from Previous Versions of PCM and IDM . . . . . 1-10
Learning to Use ProCurve IDM . . . . . . . . . . . . . . . . . . . . . . . 1-15
Getting ProCurve Documentation From the Web . . . . . . . . 1-15
ProCurve Support . . . . . . . . . . . . . . . . . . . . . . . . . . . . . . . . . . . 1-15
1
1-1
About ProCurve Identity Driven Manager
Introduction
Introduction
Network usage has skyrocketed with the expansion of the Internet, wireless,
and convergence technologies. This increases the burden on network managers working to control network usage. Also, the complexity of large networks
makes it difficult to control network access and usage by individual users.
ProCurve Identity Driven Manager (IDM) is an add-on module to the ProCurve
Manager plus (PCM+) application that extends the functionality of PCM+ to
include authorization control features for edge devices in networks using
RADIUS servers and Web-Authentication, MAC-Authentication, or 802.1x
security protocols.
Using IDM simplifies user access configuration by automatically discovering
Microsoft IAS RADIUS Servers, Realms, and users. You can use IDM to
monitor users on the network, and to create and assign "access policies" that
work to dynamically configure edge switches and manage network resources
available to individual users. Using IDM, access rights, quality of service
(QoS), and VLAN enrollment are associated with a user and applied at the
point of entry or "edge" of the network.
1-2
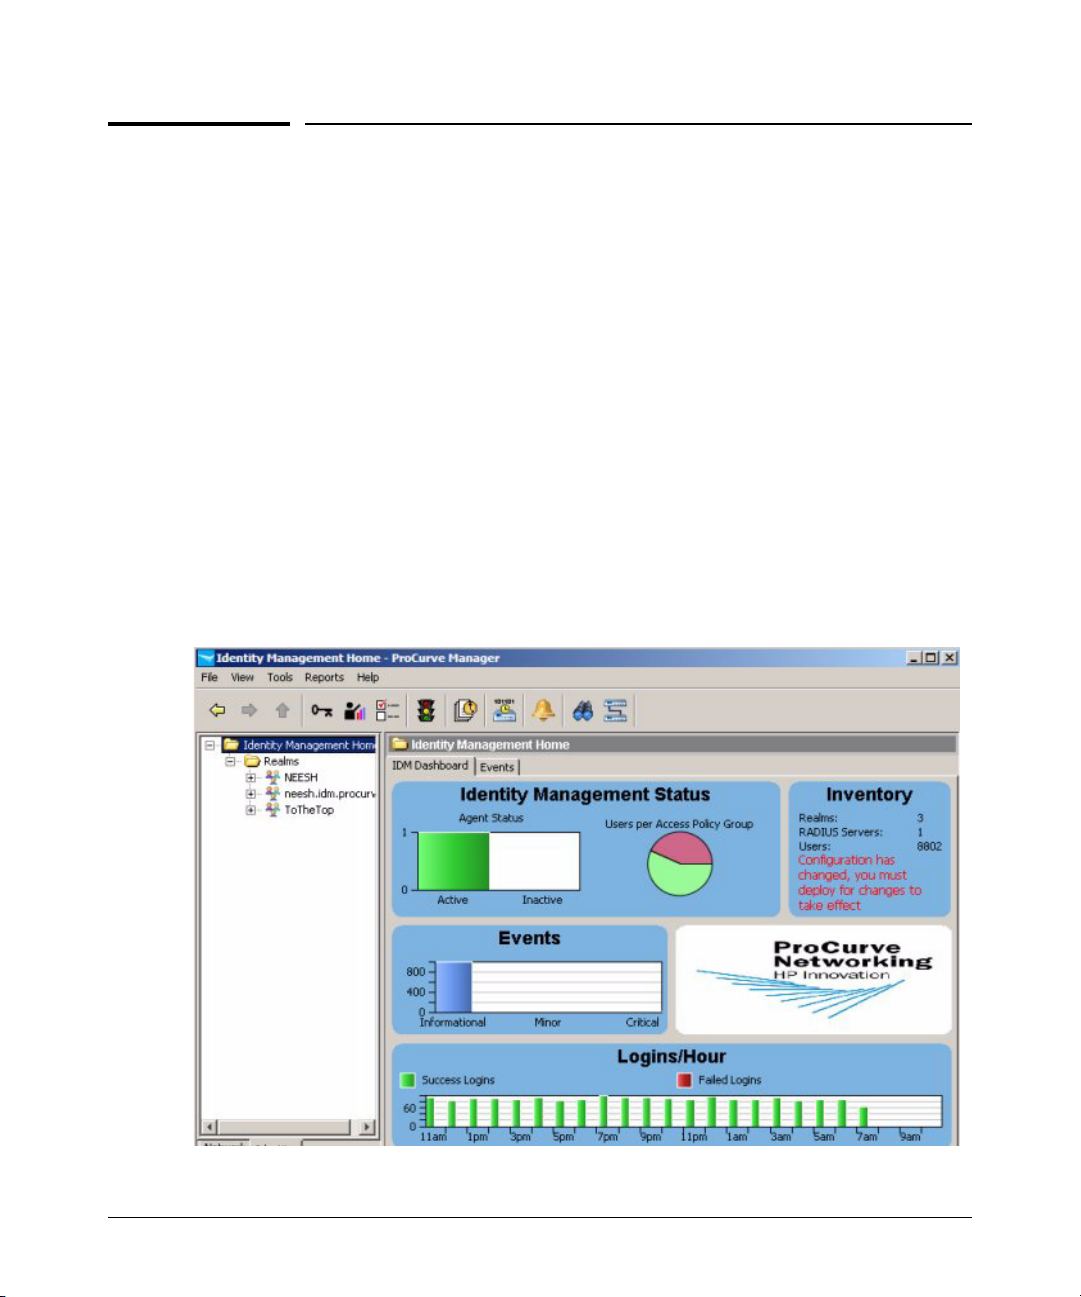
Figure 1-1. ProCurve Identity Driven Manager, Client Interface
About ProCurve Identity Driven Manager
Introduction
Why IDM?
Today, access control using a RADIUS system and ProCurve devices (switches
or wireless access points) is typically made up of several steps.
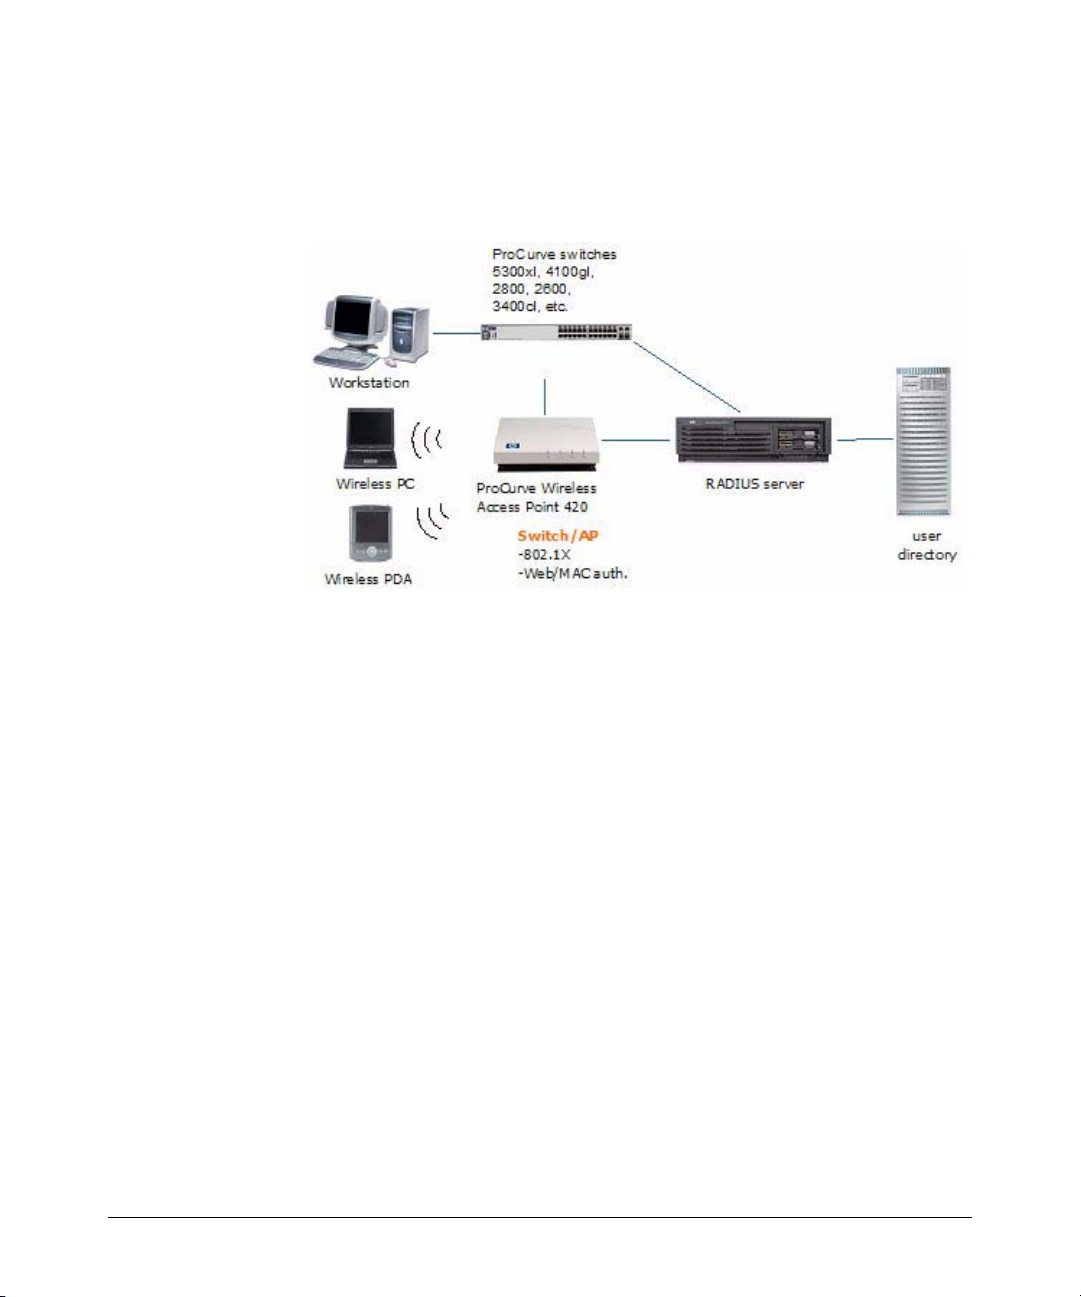
Figure 1-2. Current Access Control process
1. A client (user) attempts to connect to the network.
2. The edge device recognizes a connection state change, and requests
identifying information about the client. This can include MAC address,
username and password, or more complex information.
3. The switch forwards an access request, including the client information
to the authentication server (RADIUS).
4. The RADIUS server validates the user’s identity in the user directory,
which can be an Active Directory, database or flat file. Based on the
validation result received from the user directory, the authentication
server returns an accept or deny response to the switch.
5. If the user is authenticated, the ProCurve device grants the user access to
the network. If the user is not authenticated, access is denied.
For networks using IDM, access control is enhanced to include authorization
parameters along with the authentication response. IDM enhances existing
network security by adding network authorization information, with access
and resource usage parameters, to the existing authentication process. Using
IDM you can assign access rights and connection attributes at the network
switch, with dynamic configuration based on the time, place, and client that
is generating the access request.
1-3
About ProCurve Identity Driven Manager
Introduction
When using IDM, the authentication process proceeds as described in the first
three steps, but from that point the process changes as follows:
4. The RADIUS server validates the user’s identity in the user directory.
Based on the validation result received from the user directory, the
authentication server returns an accept or deny response to the switch. If
the user is accepted (authenticated), the IDM Agent on the RADIUS server
processes the user information. IDM then inserts the network access
rights configured for the user into the Authentication response sent to the
switch.
5. If the user is authenticated, the switch grants the user access to the
network. The (IDM) authorization information included in the authentication response is used to configure VLAN access, QoS and Bandwidth
parameters for the user, and what network resources the user can access
based on time and location of the user’s login.
If the user is authenticated by the RADIUS server, but IDM’s authorization
data indicates that the user is attempting to access the network at the
wrong time, or from the wrong location or system, the user’s access
request is denied by IDM.
1-4
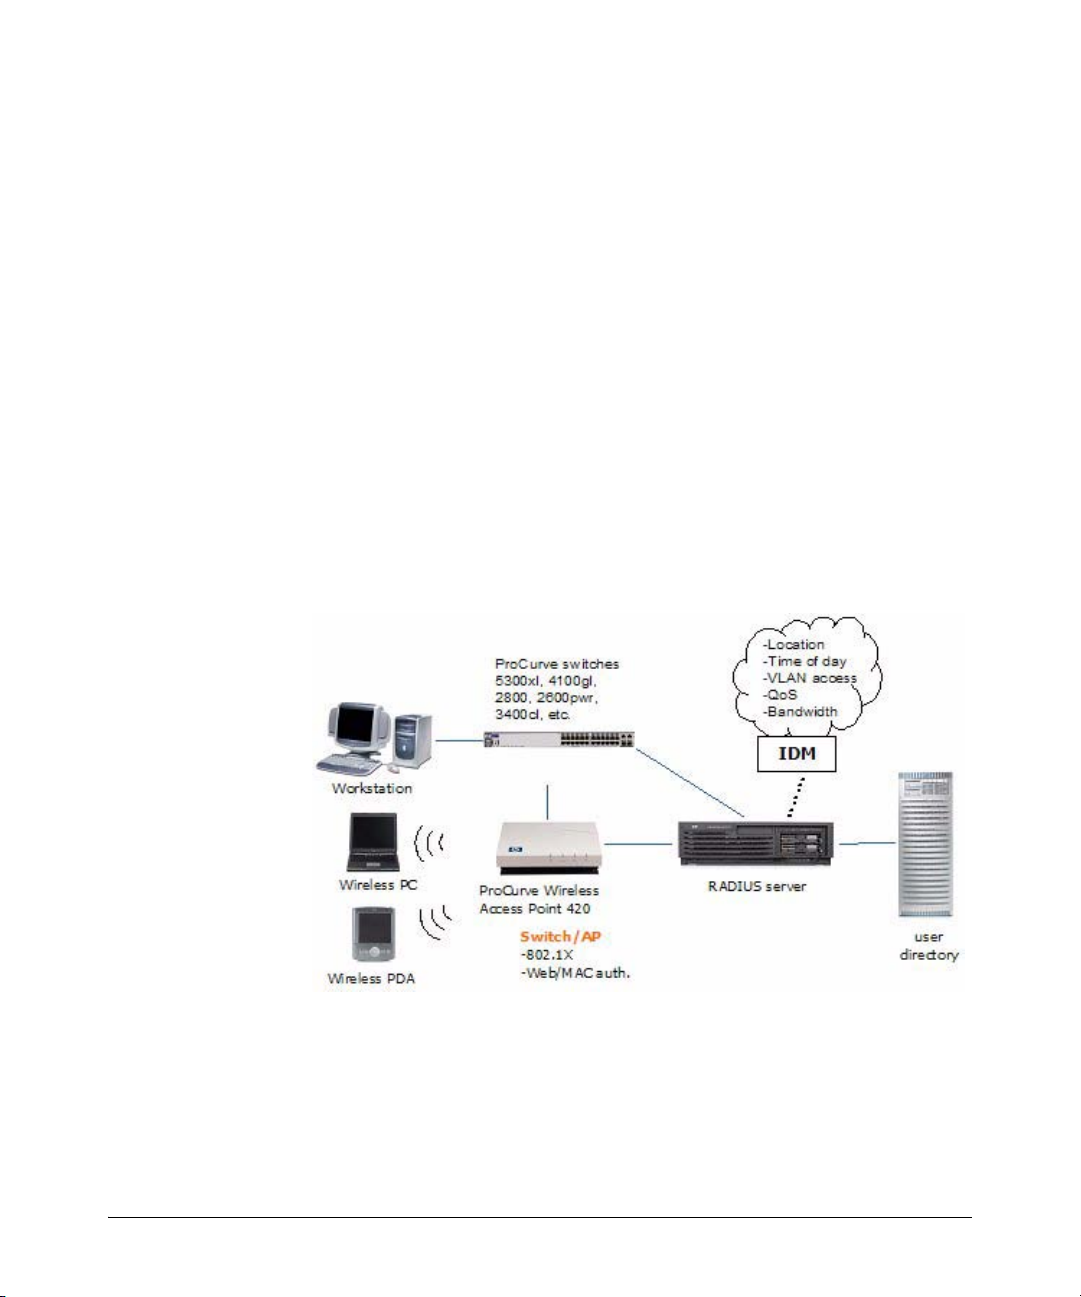
Figure 1-3. Access Control using IDM
If a user is authenticated in RADIUS, but is unknown to IDM, IDM will not
override RADIUS authentication and default switch settings, unless you
configure it to do so. You can create a "guest" profile in IDM to provide
limited access for unknown users.

About ProCurve Identity Driven Manager
Introduction
IDM Architecture
In IDM, when a user attempts to connect to the network through an edge
switch, the user is authenticated via the RADIUS Server and user directory.
Then, IDM is used to return the user’s "access profile" along with the authentication response from RADIUS to the switch. The IDM information is used to
dynamically configure the edge switch to provide the appropriate authorizations to the user, that is, what VLAN the user can access, and what resources
(QoS, bandwidth) the user gets.
The following figure illustrates the IDM architecture and how it fits in with
RADIUS.
Figure 1-4. IDM Architecture
IDM consists of an IDM Agent that is co-resident on the RADIUS server, and
an IDM Server that is co-resident with PCM+. Configuration and access
management tasks are handled via the IDM GUI on the PCM+ management
workstation.
The IDM agent includes:
• A RADIUS interface that captures user authentication information
from the RADIUS server and passes the applicable user data (username, location, time of request) to the IDM Decision Manager. The
interface also passes user access parameters from IDM to the RADIUS
server.
1-5

About ProCurve Identity Driven Manager
Introduction
• A Decision Manager that receives the user data and checks it against
user data in the local IDM data store. Based on the parameters defined
in the data store for the user data received, the Decision Manager
outputs access parameters for VLAN, QoS, bandwidth, and network
resource access to the RADIUS interface component.
• A Local Data Store that contains information on Users and the Access
Policy Groups to which the user belongs. The Access Policy Group
defines the rules that determine the user’s access rights.
The IDM Server provides configuration and monitoring of Identity Driven
Manager. It operates as an add-on module to PCM+, using the PCM model
database to store IDM data, and a Windows GUI (client) to provide access to
configuration and monitoring tools for IDM.
You use the IDM GUI to monitor IDM Agent status and users logged into the
network, and to manage IDM configuration, including:
• Defining access parameters for the network, such as locations, times,
network resources, and access profiles.
• Creating access profiles that define the network resources and
attributes (VLAN, QoS, bandwidth) assigned to users in an Access
Policy Group.
• Creating Access Policy Groups with rules (access policies) that will
be assigned to users in that Group.
• Assigning users to Access Policy Groups.
• Deploying IDM configuration data to the IDM Agent on the RADIUS
server.
1-6

About ProCurve Identity Driven Manager
Terminology
Terminology
Authentication The process of proving the user’s identity. In networks this involves the use
of usernames and passwords, network cards (smartcards, token cards, etc.),
and a device’s MAC address to determine who and/or what the "user" is.
Authentication
Server
Authorization The process that determines what an authenticated user can do. It establishes
Bandwidth Amount of network resources available. Generally used to define the amount
Client An end-node device such as a management station, workstation, or mobile PC
Edge Device A network device (switch or wireless access point) that connects the user to
Endpoint Integrity Also referred to as "Host Integrity," this refers to the use of applications that
IDM Agent The IDM Agent resides on the RADIUS server. It inspects incoming authenti-
Authentication servers are responsible for granting or denying access to the
network. Also referred to as RADIUS servers because most current authentication servers implement the RADIUS protocol.
what network resources the user is, or is not permitted to use.
of network resources a specific user can consume at any given time. Also
referred to as rate-limiting.
attempting to access the network. Clients are linked to the switch through a
point-to-point LAN link, either wired or wireless.
the rest of the network. The edge devices can be engaged in the process of
granting user access and assigning a user’s access rights and restrictions.
check hosts attempting to connect to the network to ensure they meet
requirements for configuration and security. Generally to make sure that virus
checking and spyware applications are in place and up to date.
cation requests, and inserts appropriate authorization information (IDM
Access Profiles) into the outgoing authentication reply.
QoS Quality of Service, relates to the priority given to outbound traffic sent from
the user to the rest of the network.
RADIUS Remote Authentication Dial-in User Service, (though it also applies to authen-
tication service in non-dial-in environments)
RADIUS Server A server running the RADIUS application on your network. This server
receives user connection requests from the switch, authenticates users, and
then returns all necessary information to the edge device.
1-7

About ProCurve Identity Driven Manager
Terminology
Realm A Realm is similar to an Active Directory Domain, but it works across non-
Windows (Linux, etc.) systems. Generally specified in User-name as
"user@realm."
VLAN A port-based Virtual LAN configured on the switch. When the client connec-
tion terminates, the port drops its membership in the VLAN.
1-8

About ProCurve Identity Driven Manager
IDM Specifications
IDM Specifications
Supported Devices
ProCurve Identity Driven Manager (IDM) supports authorization control functions on the following ProCurve devices*:
■ ProCurve Switches:
5300xl Series (5304, 5308, 5348, 5372)
3400cl Series (3424, 3448)
4100gl Series (4104, 4108, 4124)
2800 Series (2824, 2848)
2600 Series (2650, 2626, 2650-PWR, 2626-PWR, 2608-PWR, 6108)
2500 Series (2512, 2524)
ProCurve Wireless Access Points (420wl)
ProCurve Wireless Access Points (520wl, 420)
* Not all devices support all features of IDM. Refer to Appendix A for details.
Operating Requirements
The system requirements for IDM (Server and Client installation) are:
■ Minimum Processor: 2.0 GHz Intel Pentium, or equivalent
■ Recommended Processor: 3.0 GHz Intel Pentium, or equivalent
■ Minimum Memory: 1 GB RAM
■ Recommended Memory: 2 GB RAM
■ Disk Space: 500 MB free hard disk space minimum. (A total of 1 GB
will be required for PCM+ and IDM.)
■ Implementation of one of the following RADIUS services. The IDM
agent will be installed on this system.
• Microsoft’s Internet Authentication Service, RADIUS authentication
server on Windows 2003 Server (Enterprise or Standard Edition).
• Funk’s Steel Belted RADIUS (SBR).
■ Supported Operating Systems for PCM+ and IDM Remote Client:
• MS Windows XP Pro (Service Pack 1 or better)
• MS Windows 2000
(Server, Advanced Server, or Pro with Service Pack 4 or better)
• MS Windows 2003 (Server or Enterprise Edition)
1-9

About ProCurve Identity Driven Manager
IDM Specifications
■ ProCurve Manager Plus software must be installed for IDM to operate.
The IDM software cannot be installed as a separate component.
Additional processing power and additional disk space may be required for
larger networks.
Additional Requirements
■ Implementation of an access control method, using either MAC-auth,
Web-auth, or an 802.1x supplicant application.
For assistance with implementation of RADIUS and access control methods for use with ProCurve switches, refer to the Access Security Guide
that came with your switch. All ProCurve Switch manuals can also be
downloaded from the ProCurve web site.
For assistance with using RADIUS and 802.1x access control methods,
contact the ProCurve Elite Partner nearest you that can provide ProCurve
Access Control Security solutions. You can find ProCurve Direct Elite
partners on the web at:
http://hp.via.infonow.net/locator/us_partner/index.jsp
■ If you plan to restrict user access to specific network segments, you
will need to configure VLANs within your network. For information
on using VLANs, refer to the ProCurve Manager Network Adminis-
trator’s Guide, or the configuration guides that came with your
switch.
Upgrading from Previous Versions of PCM and IDM
The installation CD for PCM 2.1 contains the IDM 2.0 installation files. If you
are running IDM 1.0 or 1.0.x, you must select the IDM option during the PCM
2.1 install process. This is required to support changes made in the underlying
PCM and IDM databases.
If you have not purchased the IDM 2.0 license, your installation will include
the IDM interface changes made for IDM 2.0, but all new functionality (FUNK
SBR support, User Import/Export, Access Control, and Endpoint integrity
support) will be disabled until you purchase and register an IDM 2.0 license.
If you want to test the IDM 2.0 functionality using the free 30-day trial provided
on the PCM 2.1 CD, you need to install the software on a separate system that
has no previous IDM version installed or in use.
1-10

About ProCurve Identity Driven Manager
IDM Specifications
When you upgrade to IDM 2.0, you need to manually install the IDM Agent
upgrade on your RADIUS Server. Refer to “Installing the IDM Agent” on page 22 for detailed instructions.
1-11
About ProCurve Identity Driven Manager
Registering Your IDM Software
Registering Your IDM Software
The ProCurve Manager installation CD includes a fully operable version of the
PCM application, and a 30 day trial version of the PCM+ application and the
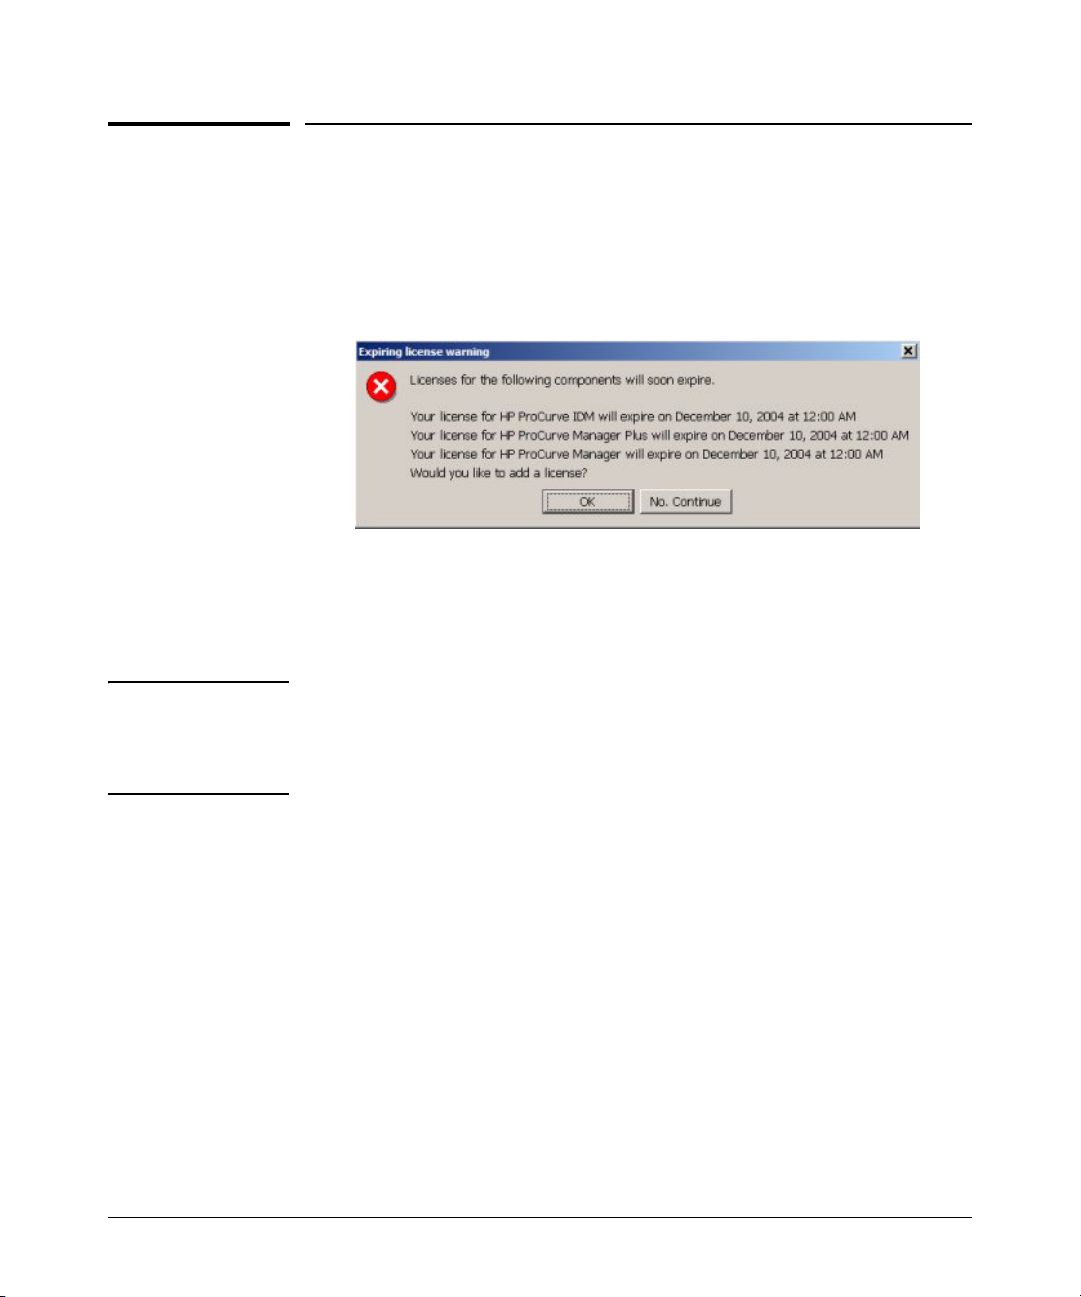
IDM application. Until you have registered your IDM application, an Expiring
License warning will be displayed each time you log in, similar to the following.
Figure 1-5. ProCurve Expiring License warning dialogue
Click No, Continue to close the dialogue and just start the program.
Click OK to launch the Licensing administration screen.
NOTE: You must first purchase a copy of ProCurve Identity Driven Manager from
your networking reseller to get the Registration ID. You do not need to reinstall the software from the purchased CD, but you need the Registration
ID from that CD to complete the registration process.
1-12
About ProCurve Identity Driven Manager
Registering Your IDM Software
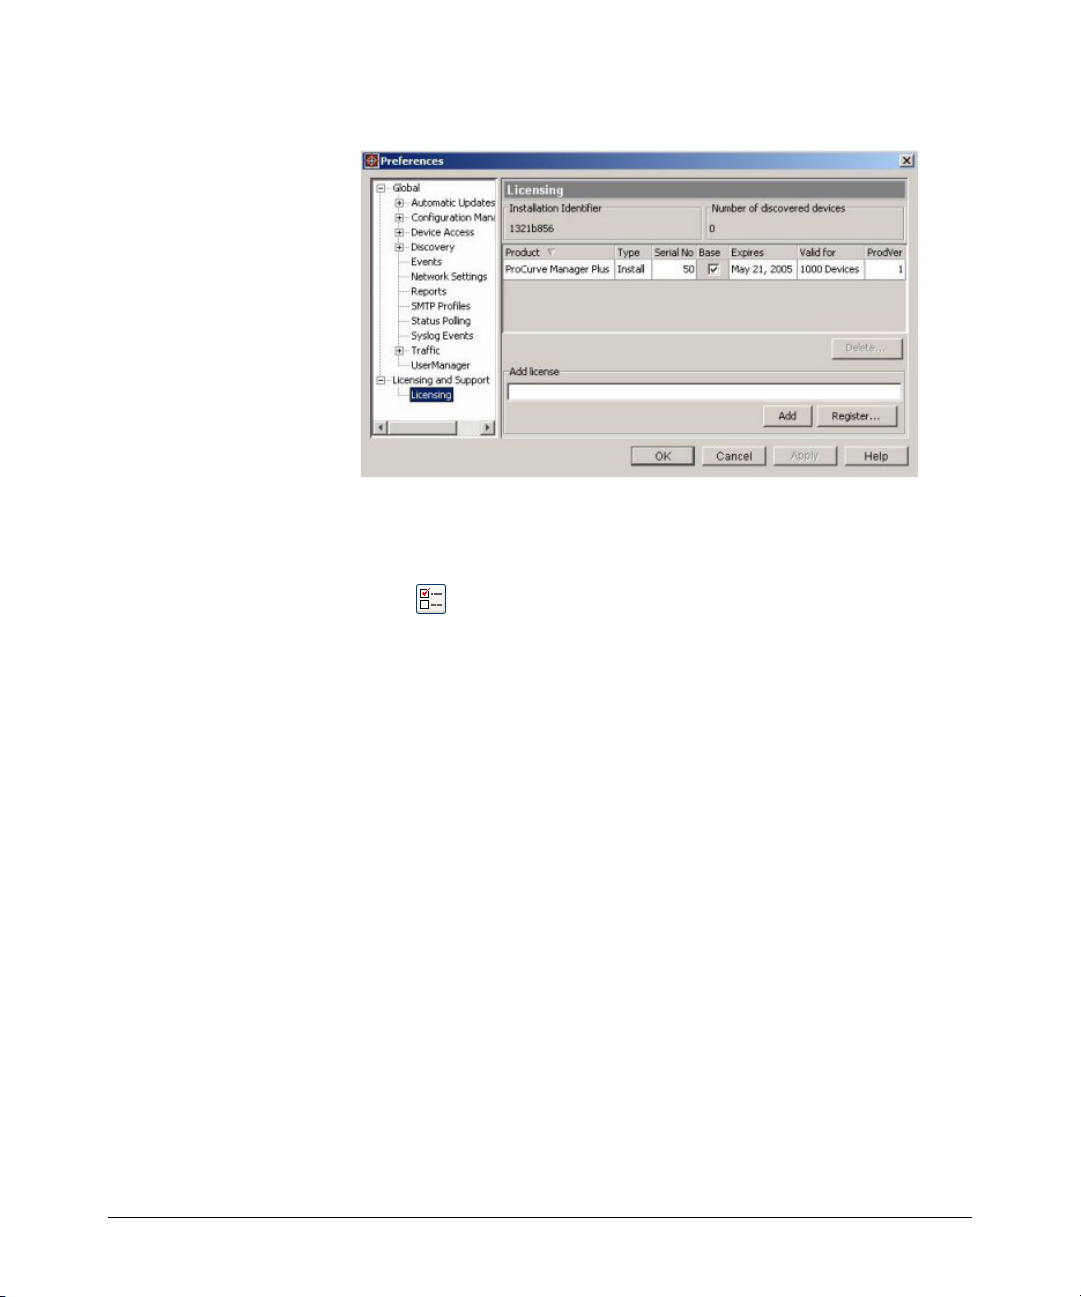
Figure 2. ProCurve License Administration dialogue
You can also get to this screen from the Preferences window which can be
accessed from the PCM Tools menu or by clicking on the Preferences icon in
the tool bar.
To register the IDM software:
1. Contact your HP Sales Representative or HP Reseller to purchase the PCM+ and
IDM software. You will receive a Registration ID for the purchased software—
either on the Software CD case, or a separate registration card sent with the
purchase information.
2. Go to the Licensing window in PCM [Preferences→Licensing and Support→ Licensing].
Write down the Installation Identifier for the software as it appears in the upper
left corner of the window. You can also leave this window open and use the “copy
and paste” functions to enter the Install ID in the My ProCurve software registration window.
3. Click the Register button to go to the PCM registration web site.
4. If this is an upgrade, log in with your My ProCurve ID and password.
If you are a new user, click the “Register Here” button, and then enter the required
information to create a user account, including user name, password, company
name, and E-mail address.
5. In the Registration window:
a. select the product to register from the Product Type pull-down menu.
b. enter the Registration ID, found on the back of the software CD case, or on
the registration card you received when you purchased the software.
c. enter the Installation Identifier (from the Licensing window in PCM).
d. Click the Generate License button.
1-13

About ProCurve Identity Driven Manager
Registering Your IDM Software
The window is refreshed and the registration information, including your License
key is displayed. The license key is also sent to you via e-mail.
e. To get the license key for the next software package, click
Generate Another License and repeat the process in step 5, above.
6. When you receive the License key, go back to the Licensing window in PCM.
Enter the License key number in the Add license field, then click Add.
To avoid data entry errors, you can copy and paste the number from the e-mail or
My ProCurve (My Software) Web page.
NOTE: You must first purchase a copy of ProCurve Manager Plus and,/or Identity
Driven Manager to get the Registration ID. You do not need to re-install the
software from the purchased CD, but you need the Registration ID to complete
the registration process.
1-14

About ProCurve Identity Driven Manager
Learning to Use ProCurve IDM
Learning to Use ProCurve IDM
The following information is available for learning to use ProCurve Identity
Driven Manager (IDM):
■ This User’s Guide—helps you become familiar with using the appli-
cation tools for access control management.
■ Online help information—provides information through Help buttons
in the application GUI that provide context-sensitive help, and a table
of contents with hypertext links to additional procedures and reference information.
■ ProCurve Manager, Getting Started Guide—provides details on
installing the application and licensing, and an overview of ProCurve
Manager functionality.
■ For additional information on configuring your network, refer to the
documentation that came with your switch.
Getting ProCurve Documentation From the Web
1. Go to the Procurve website at http://www.procurve.com.
2. Click on Technical Support.
3. Click on Product manuals.
4. Click on the product for which you want to view or download a manual.
ProCurve Support
Product support is available on the Web at: http://www.procurve.com
Click on Technical Support. The information available at this site includes:
• Product Manuals
• Software updates
• Frequently asked questions (FAQs)
• Links to Additional Support information.
You can also call your HP Authorized Dealer or the nearest HP Sales and
Support Office, or contact the ProCurve Elite Partner nearest you for information on ProCurve Access Control Security solutions.
You can find ProCurve Elite partners on the web at:
http://hp.via.infonow.net/locator/us_partner/index.jsp
1-15

About ProCurve Identity Driven Manager
ProCurve Support
1-16

Getting Started
Chapter Contents
2
Before You Begin . . . . . . . . . . . . . . . . . . . . . . . 2-2
Installing the IDM Agent . . . . . . . . . . . . . 2-2
Using the IDM Auto-Discover Feature . . 2-3
IDM Configuration Process Overview . . 2-3
IDM Usage Strategies . . . . . . . . . . . . . . . 2-4
Understanding the IDM Model . . . . . . . . 2-5
IDM GUI Overview . . . . . . . . . . . . . . . . . . . . 2-6
IDM Dashboard . . . . . . . . . . . . . . . . . . . . 2-8
Using the Navigation Tree . . . . . . . . . . . 2-9
Toolbars and Menus . . . . . . . . . . . . . . . . 2-13
Using IDM as a Monitoring Tool . . . . . . . . . 2-14
IDM Preferences . . . . . . . . . . . . . . . . . . . 2-15
Using IDM Reports . . . . . . . . . . . . . . . . . . . 2-18
IDM Session Cleanup Policy . . . . . . . . . 2-27
User Session Information . . . . . . . . . . . . . . . 2-29
2-1

Getting Started
Before You Begin
Before You Begin
If you have not already done so, please review the list of supported devices
and operating requirements under “IDM Specifications” on page 1-9.
If you intend to restrict user access to specific areas of the network using
VLANs, make sure you have set up your network for use of VLANs. For details
on configuring VLANs, refer to the ProCurve Manager Network Administra-
tor’s Guide, or the Advanced Traffic Management Guide for your ProCurve
switch
Installing the IDM Agent
The IDM application components are installed on your system when you select
the IDM option from the PCM+ software CD. To install the IDM Agent on a
RADIUS server:
1. If the PCM software is not on the same system as your RADIUS server,
you need to configure "Client/Server" access permissions on the PCM
server to allow the RADIUS server to communicate with IDM. This is done
by adding the IP address of the RADIUS server to the access.txt file on the
PCM server. For details, refer to the ProCurve Manager Getting Started
Guide, under "Configuring Client/Server Access Permissions."
2-2
2. Open a Web browser window on the RADIUS server and for the URL, type
in the IP address of the PCM server computer, followed by a colon and
the port ID 8040.
For example, if the IP address of the PCM server is 10.15.20.25, then on
the RADIUS server, enter http://10.15.20.25:8040 on the web browser
address line.
3. In the install scripts page that appears, select the IDM Agent to download
it to the RADIUS server system.
4. Run the Install.exe that is downloaded to the RADIUS server. The Install
Wizard guides you through the installation process. During installation
you will be prompted to enter the IP Address of the IDM Server, which is
the same as the PCM Server.
You cannot install the IDM Agent on a system without the RADIUS server.
Also, if the IP address of the RADIUS server is not in the access.txt file on the
PCM server, you will get an alert message during the IDM Agent install.
Once installed the IDM Agent begins collecting User, Realm, and RADIUS data.

Getting Started
Before You Begin
The IDM Client is included with the PCM+ software. To install a remote PCM/
IDM Client, download the PCM Client to a remote PC using the same process
as for installing the IDM Agent, just select the PCM Client option from the PCM
server. For details, see the ProCurve Manager Getting Started Guide.
Using the IDM Auto-Discover Feature
You can manually configure the RADIUS server, Realms, and Users in IDM, or
you can let IDM do the hard work for you. Just install the IDM Agent on the
system with the RADIUS Server, then let it run to collect the information as
users log into the network. Even after you begin creating configurations in
IDM, it will continue to collect information on new users, and Realms and pass
that information to the IDM server.
If you are using multiple RADIUS servers, you need to install an IDM Agent
on each of the servers. The IDM Agent collects information only on the system
where it is installed. The IDM client can display information for all RADIUS
servers where the IDM Agent is installed.
When you start the IDM Client and expand the navigation tree in the IDM Home
tab, you will see any discovered or defined Realms found on the RADIUS
server, along with the IP Address for the RADIUS Server(s).
IDM Configuration Process Overview
To configure IDM to provide access control on your network, first let IDM run
long enough to "discover" the Realms, RADIUS servers, and users on your
network. Once IDM has performed these tasks for you, your configuration
process would be as follows:
1. If you intend to use them, define "locations" from which users will access
the network. A location may relate to port-based VLANS, or to all ports
on a device. (See page 3-6)
2. If you intend to use them, define "times" at which users are allowed or
denied access. This can be by day, week or even hour. (See page 3-11)
3. Define any "network resources" (systems and applications) that you want
to specifically allow or restrict users from accessing.
4. If you intend to restrict a user access to specific systems, you need to set
the User profile to include the MAC address for each system that the user
is allowed to login on. (See page 3-48)
2-3

Getting Started
Before You Begin
5. Create the Access Profiles, to set the VLAN, QoS, rate-limits (bandwidth)
attributes, and the network resources that are available, to users in an
Access Policy Group. (See page 3-23)
6. Create an Access Policy Group, with rules containing the Location, Time,
System, and Access Profile that is applied to users when they login. (See
page 3-32)
7. Assign Users to the appropriate Access Policy Group. (See page 3-38)
8. Deploy the configuration policies to the IDM Agent on the RADIUS server.
(See page 3-42)
IDM Usage Strategies
You can use IDM to simply monitor user activity on the network, or to apply
user authentication rules to improve network security and performance. The
following table identifies the IDM configuration for various deployment and
usage strategies for IDM.
Authenticate Authorize Strategy Description
VLAN QoS Rate-
x
xx
xx
xxx
xxxxx
Limit
Network
Resources
Monitor and report user activity.
Enhance normal RADIUS authentication with
Location, Time, and System rules
Provide rudimentary VLAN segregation
(Unknown Users, Guests, Visitors, Contractors)
Provide complete VLAN placement for all
Users
Provide QoS and Rate-limits per User
VLAN, QoS, and Rate-limit attributes, and
accessibility of defined Network Resources for
all users, based on Location, Time, and System
Table 2-1: IDM Deployment and Usage Strategies
2-4

Getting Started
Before You Begin
Understanding the IDM Model
The first thing to understand, is that IDM works within the general concept of
‘domains’ or ‘realms’. Basically, realms are very large organizational units;
every user belongs to one, and only one, realm. While it is possible to have
multiple realms, most organizations have only one, for example, hp.com or
csuchico.edu.
The basic operational model of IDM involves Users and Groups. Every User
belongs to a Group – in IDM these are called Access Policy Groups (APGs).
Each APG has an Access Policy defined for it, which governs the access rights
that are applied to its Users as they enter the network.
In the IDM GUI, the top level of the navigation tree is the Realm, with all other
information for APGs, and RADIUS Servers beneath the Realm in the navigation tree. Users are linked to the Realm to which they belong, and the Access
Policy Group to which they are assigned.
The IDM configuration tools are available at the top level. The definition of
times, locations, network resources, and access profiles is independent of
individual Realms or Groups. You can define multiple locations, times, and
network resources, then create multiple access profiles to be applied to any
Access Policy Group, in any Realm that exists within IDM.
2-5
Getting Started
IDM GUI Overview
IDM GUI Overview
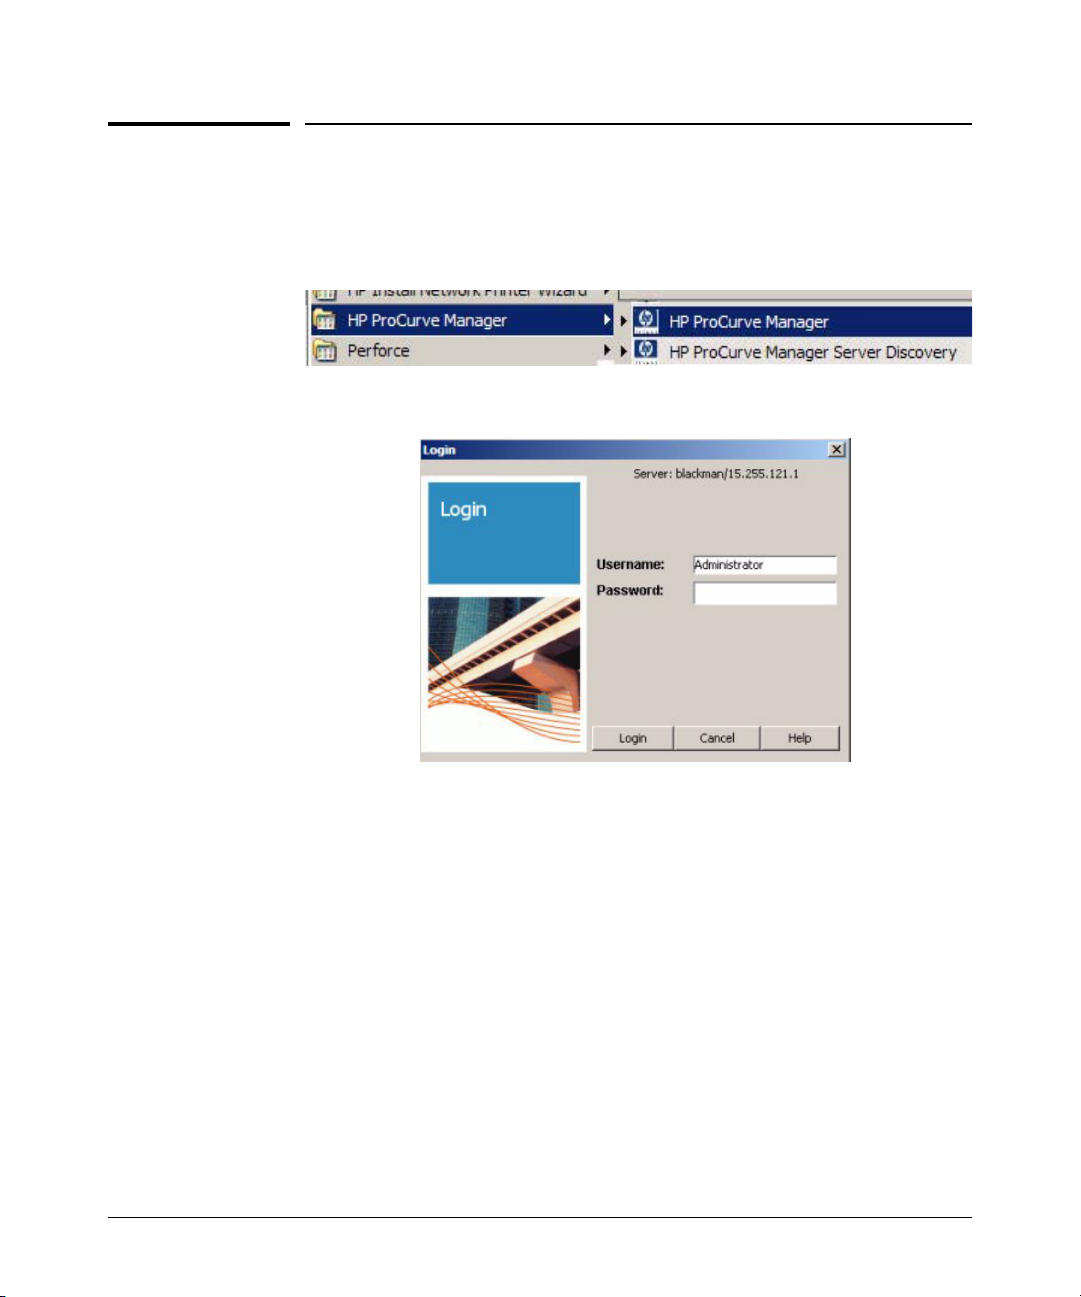
To use the IDM client, launch the PCM Client on your PC. Select the ProCurve
Manager option from the Windows Program menu to launch the PCM Client.
The PCM Client will start up and the Login dialogue is launched.
2-6
Figure 2-1. PCM Client Login dialogue.
If you did not enter a Username or Password during install, type in the default
Username, Administrator, then Click Login to complete the login and startup.
For additional information on using the PCM Client, refer to the ProCurve
Manager Network Administrator’s Guide.
Getting Started
IDM GUI Overview
Select the IDM Tree tab at the bottom left of the PCM window to display the
IDM Home window.
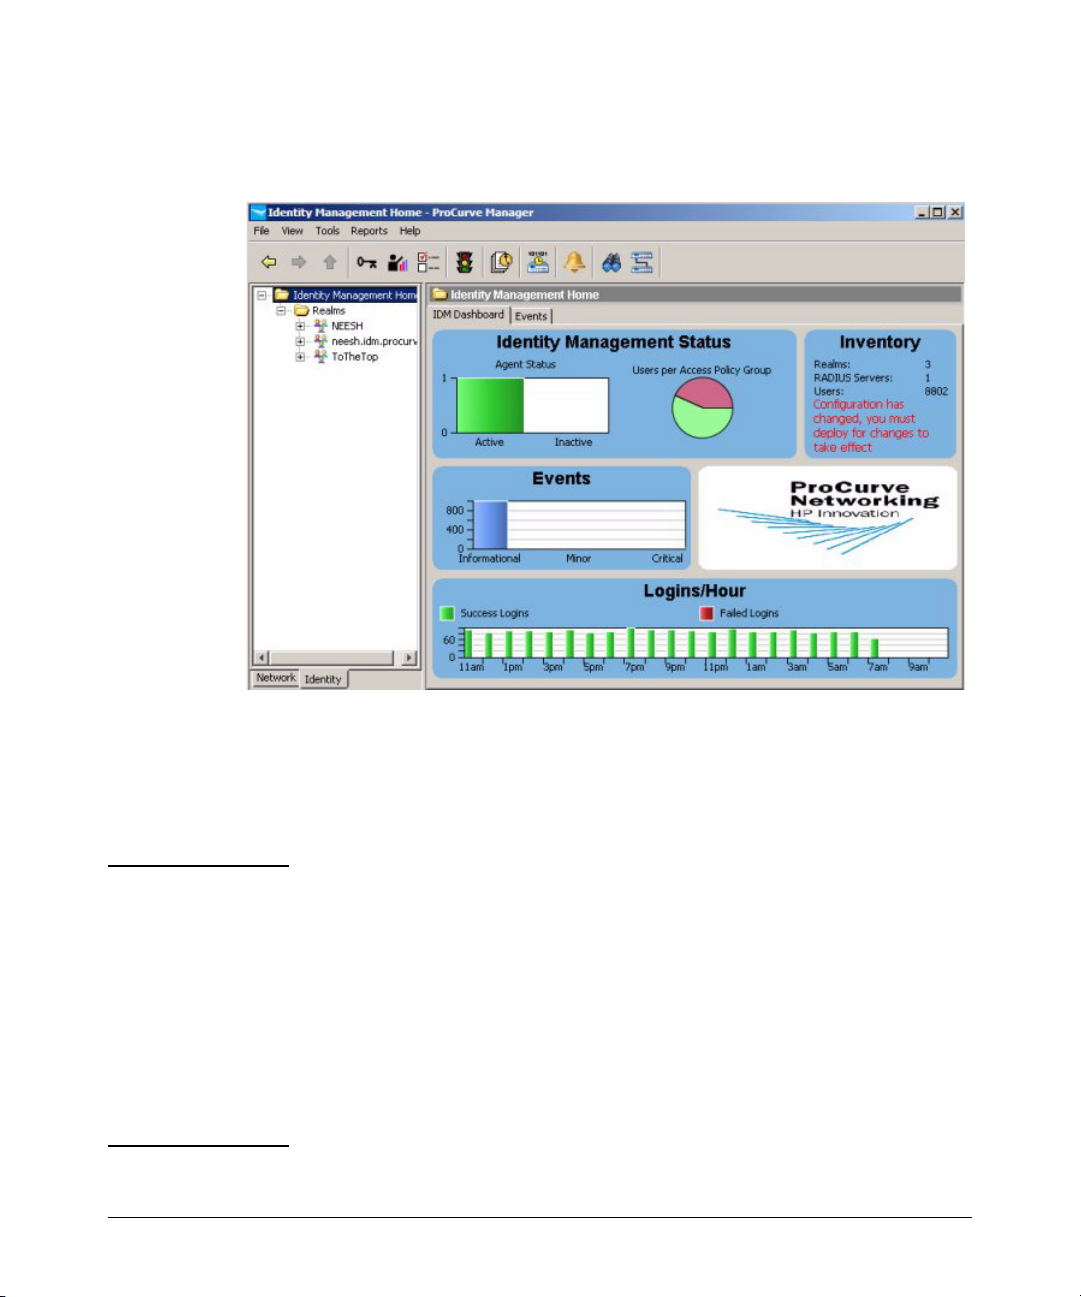
Figure 2-2. IDM Home Window
The IDM Home display provides a quick view of IDM status in the IDM Dashboard
tab, along with a navigation tree and access to menu and toolbar functions.
You can resize the entire window, and/or resize the panes (sub-windows)
within the Identity Management Home window frame.
NOTE: If the IDM Dashboard shows the IDM Agent Status as inactive, and the Inventory and
Logins panes show no data:
■ Check the PCM Events tab for the following entry:
"PCM remote client authentication failure: <ip address>"
■ Check for IDM application events related to devices "supporting" or
"not supporting" the configuration.
■ Check to make sure the access.txt file on the PCM (IDM) Server
system includes an IP address entry for each RADIUS server where
the IDM Agent is installed. See “Installing the IDM Agent” on page 22 for details.
2-7

Getting Started
IDM GUI Overview
IDM Dashboard
The IDM Dashboard tab (window) contains four separate panels, described
below.
Identity Management Status: The IDM Agent Status pane uses a color-coded histo-
gram to indicate the number of currently active (green) and inactive (red) IDM
Agents. Hovering with the mouse pointer over the bar displays the specific
number.
The Users per Access Policy Group pane uses a pie-chart to indicate the percentage
users currently assigned to various APGs. You can hover with the mouse
pointer over the segment to display the APG name and number of assigned
users.
Inventory: The Inventory panel lists the current number of Realms, RADIUS
Servers, Users, Access Policy Groups, Access Profiles, Locations, and Times
that are defined in IDM.
IDM Events: The IDM Events panel provides a summary of IDM Events by severity
type. Hovering with the mouse pointer over the event type displays the total
number of events of that type currently in the log. Clicking on the Events panel
will display the IDM Events tab, with a detailed event listing.
2-8
Logins/Hour: The Logins per Hour panel is a scrolling 24-hour display that summa-
rizes the total number of successful and failed IDM user logins at any given
time during the past 24 hours. Information in this panel is updated every
minute Hovering with the mouse pointer over the bar for a specific time period
displays the specific number of logins.
Getting Started
IDM GUI Overview
Using the Navigation Tree
The navigation tree in the left pane of the IDM window provides access to IDM
features using the standard Windows file navigation system. Click the nodes
to expand the list and change the display in the right window panel.
The IDM tree is organized as follows:
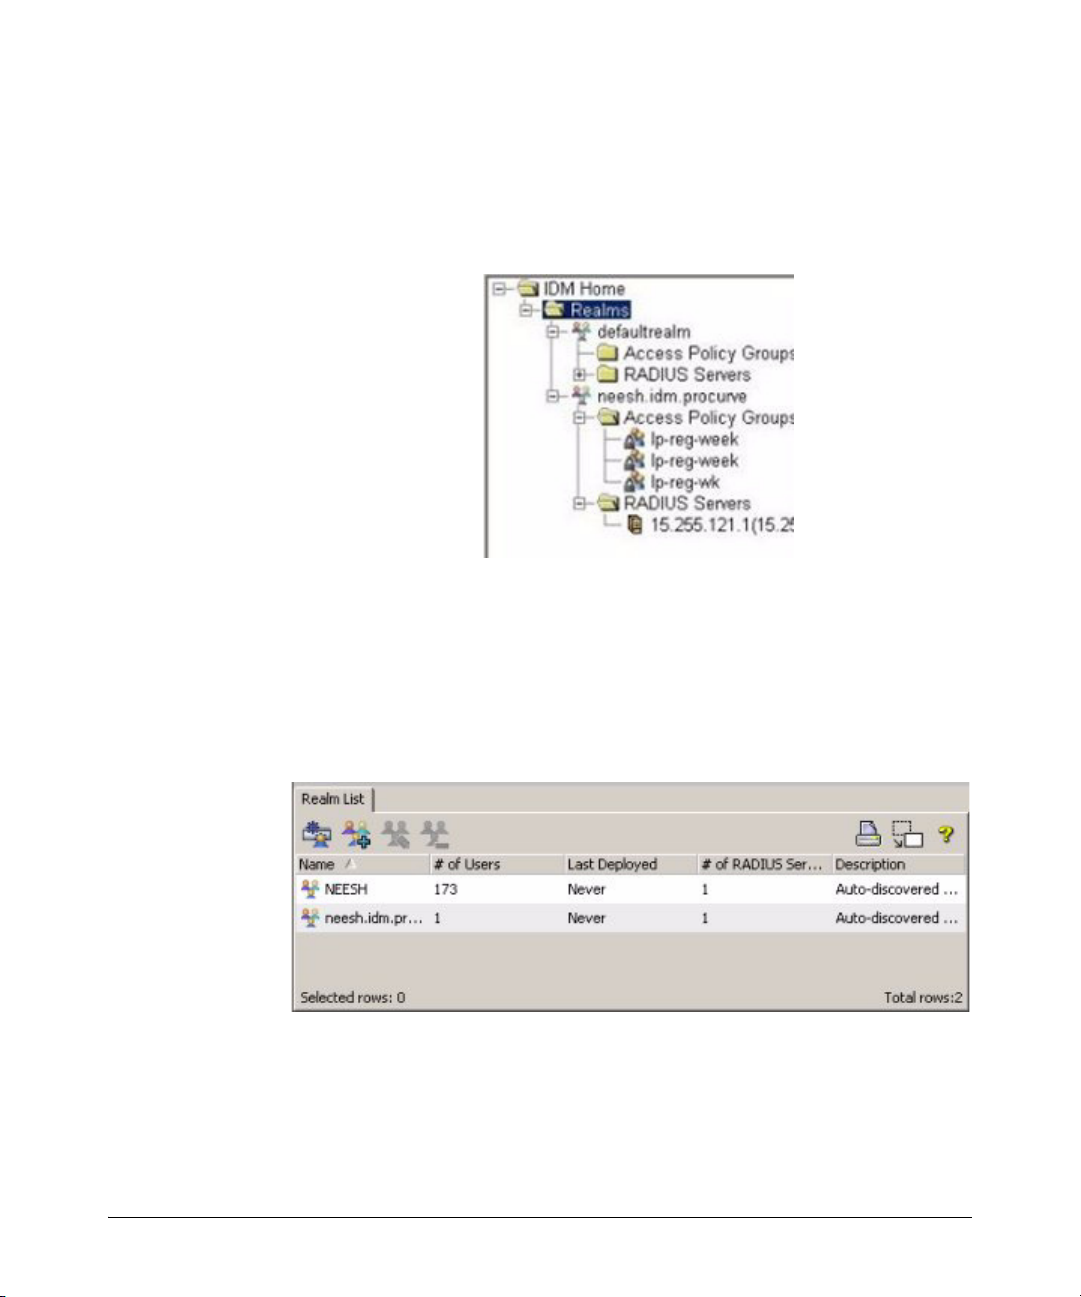
Realms: The top level of the tree lists each of the Realms that have been
discovered by an IDM Agent or defined manually. Clicking on the Realms node
in the tree displays the Realms List in the right panel of the window. Expanding
the node displays each Realm name in the tree, and Unassigned RADIUS
Servers if they exist.
Figure 2-3. Realms List tab
Clicking on the individual realm name in the tree displays the Realm Properties
tab in the right panel.
2-9
Getting Started
IDM GUI Overview
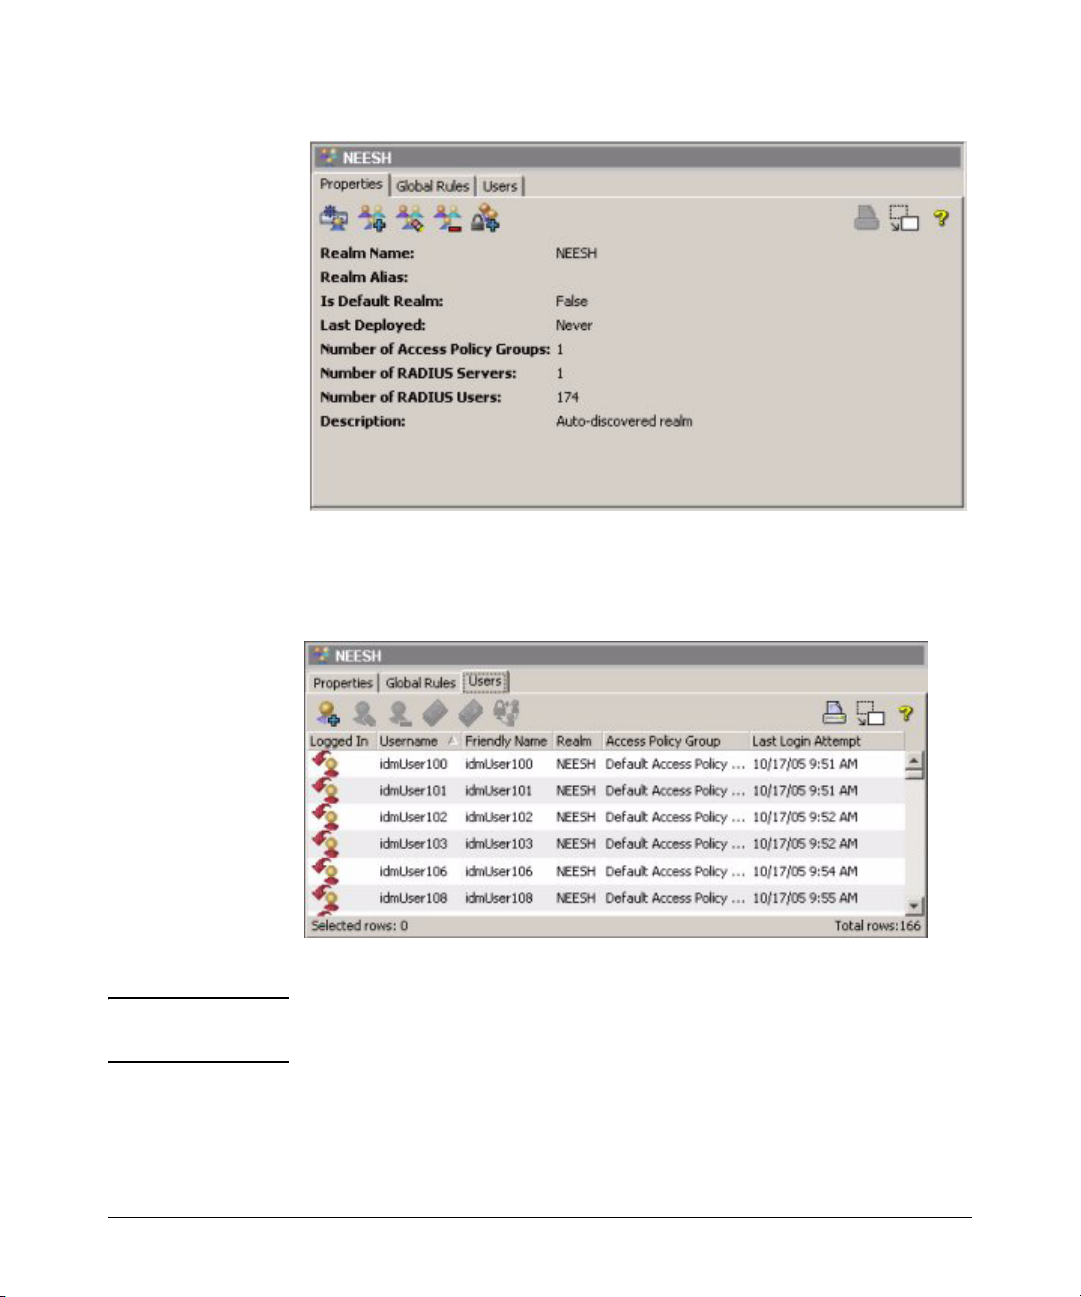
Figure 2-4. Realm Properties tab
Click the Users tab, underneath the realm Properties tab, to view a list of users
in the Realm that were discovered by the IDM Agent, or defined manually.
Figure 2-5. Realm Users tab
NOTE: There will be no auto-discovered Realm, Users, or RADIUS server until a user
has logged in to the network.
Expanding the Realm node in the tree will display the Access Policy Groups
and RADIUS server nodes for the Realm.
2-10
 Loading...