

Page 1

ProCurve 5400zl Switches
Installation and Getting Started Guide
HP ProCurve Guest Management Software Administrator Guide
HP ProCurve Guest Management Software
Administrator Guide
Page 2

Page 3

HP ProCurve Guest Management
Software
Administrator Guide
Page 4

Copyright and Disclaimer Notices
© Copyright 2010 Hewlett-Packard Development Company, L.P. The
information contained herein is subject to change without notice.
This document contains proprietary information, which is
protected by copyright. No part of this document may be
photocopied, reproduced, or translated into another language
without the prior written consent of Hewlett-Packard.
Publication Number
5998-0488
April 2010
Release 5.4
Applicable Products
Guest Management Software
MSM710 Access controller J9328A
MSM710 Mobility controller J9325A
MSM730 Access controller J9329A
MSM730 Mobility controller J9326A
MSM750 Access controller J9330A
MSM750 Mobility controller J9327A
MSM760 Access controller J9421A
MSM760 Mobility controller J9420A
MSM765zl Mobility controller J9370A
Disclaimer
HEWLETT-PACKARD COMPANY MAKES NO WARRANTY
OF ANY KIND WITH REGARD TO THIS MATERIAL,
INCLUDING, BUT NOT LIMITED TO, THE IMPLIED
WARRANTIES OF MERCHANTABILITY AND FITNESS FOR
A PARTICULAR PURPOSE. Hewlett-Packard shall not be
liable for errors contained herein or for incidental or
consequential damages in connection with the furnishing,
performance, or use of this material.
The only warranties for HP products and services are set forth
in the express warranty statements accompanying such
products and services. Nothing herein should be construed as
constituting an additional warranty. HP shall not be liable for
technical or editorial errors or omissions contained herein.
Hewlett-Packard assumes no responsibility for the use or
reliability of its software on equipment that is not furnished by
Hewlett-Packard.
Warranty
A copy of the specific warranty terms applicable to your
Hewlett-Packard products and replacement parts can be
obtained from your HP Sales and Service Office or authorized
dealer.
Trademark Credits
Windows NT®, Windows®, and MS Windows® are US
registered trademarks of Microsoft Corporation.
Hewlett-Packard Company
8000 Foothills Boulevard
Roseville, California 95747
www.hp.com/go/procurve/
Page 5

Contents
Chapter 1
Introduction 1
Introducing the Guest Management Software ...................................2
About this guide................................................................................3
Important terms..........................................................................3
Conventions ................................................................................3
Related documentation ...............................................................4
HP ProCurve Networking support .....................................................4
Chapter 2
Installation 5
Typical deployments .........................................................................6
Multiple computer deployment ...................................................6
Installation requirements ..................................................................7
Computer requirements ........................................................7
Controller requirements ........................................................7
Installation ........................................................................................7
Installing on a single computer ...................................................8
Installing on multiple computers ................................................8
Starting for the first time...................................................................8
A. Single or multiple computer installation ...........................9
B. Database selection............................................................9
C. Certificate Authority (CA) certificate creation..................10
D. Addition of a controller to the database..........................12
E. Log in to the Guest Management Software .....................13
F. Define operator accounts.................................................14
G. Enable guest tracking .....................................................14
Chapter 3
Working with the Guest Management Software 15
Key concepts ..................................................................................16
Guest account management .....................................................16
Access levels ............................................................................16
Database options ......................................................................16
Security.....................................................................................16
CA certificate.......................................................................16
User certificates ..................................................................17
Accounts tab ..................................................................................17
Accounts list .............................................................................18
Filters..................................................................................18
Account list.........................................................................18
Account list operations .......................................................19
Buttons .....................................................................................19
Refresh ...............................................................................19
New Account(s) ..................................................................20
Edit .....................................................................................20
Reset Subscription Plan......................................................20
Suspend..............................................................................20
Activate/Resume .................................................................20
Delete..................................................................................20
Print....................................................................................20
Remaining Online Time.......................................................21
New account creation .....................................................................22
Service Controllers tab ...................................................................28
Service Controllers list ..............................................................28
Service Controller list operations........................................30
Service Controller elements menu ......................................32
Buttons .....................................................................................34
Refresh ...............................................................................34
Add Service Controller ........................................................35
Edit Service Controller ........................................................35
Restore Service Controller ..................................................36
Remove Service Controller .................................................36
Customize Login Pages.......................................................36
Events Log tab ...............................................................................37
Events Log list ..........................................................................37
Event Log list operations ....................................................38
Filter..........................................................................................38
Buttons .....................................................................................38
Refresh ...............................................................................38
Delete..................................................................................38
User Tracking tab............................................................................38
Tracking guests.........................................................................39
Setting tracking on controllers ............................................39
Setting tracking on a single station.....................................40
Setting tracking on multiple stations...................................41
User Tracking table ...................................................................42
Guest tracking connection list operations ...........................42
Filter..........................................................................................42
Buttons .....................................................................................43
File menu .......................................................................................43
Password..................................................................................43
Preferences...............................................................................44
Guest List Colors ................................................................44
Application options .............................................................45
Guest accounts ...................................................................46
Predefined durations...........................................................48
Voucher options..................................................................49
Database menu ..............................................................................49
Backup......................................................................................50
Retrieve.....................................................................................50
Administrator menu .......................................................................50
Recreate the CA ........................................................................50
Create User Certificate ..............................................................50
Revoke User Certificate.............................................................50
Page 6

Guest Management Software Administrator Guide vi Contents
Page 7

Chapter 1: Introduction
Contents
Introducing the Guest Management Software - - - - - - - - - - - - - - - 2
About this guide - - - - - - - - - - - - - - - - - - - - - - - - - - - - - 3
1
Introduction
HP ProCurve Networking support - - - - - - - - - - - - - - - - - - - - - 4
Page 8

Guest Management Software Administrator Guide 2 1 Introduction
Introducing the Guest Management Software
The Guest Management Software makes it easy for office staff to manage guest accounts for an
HP ProCurve public access wireless network. Key features include:
• Running the Guest Management Software on a single or across multiple computers.
• Managing guest accounts connected to APs on either a single or across multiple controllers.
• Single or batch guest account creation.
• A variety of account options, including specific start and end dates and times, predefined
durations, and support for MSM7xx controller subscription plans.
• Ability to quickly activate, edit, and suspend accounts.
• Printing of account vouchers.
• Copying of guest account information to the clipboard for use in other programs.
• Using its own internal database or an external third-party database for guest account data
storage.
• Easy customization of the logo on the guest wireless network HTML login page.
• Security using X.509 certificates, which the Guest Management Software can automatically
generate.
Page 9
Guest Management Software Administrator Guide 31 Introduction
About this guide
This guide explains how to install, configure, and operate the Guest Management Software.
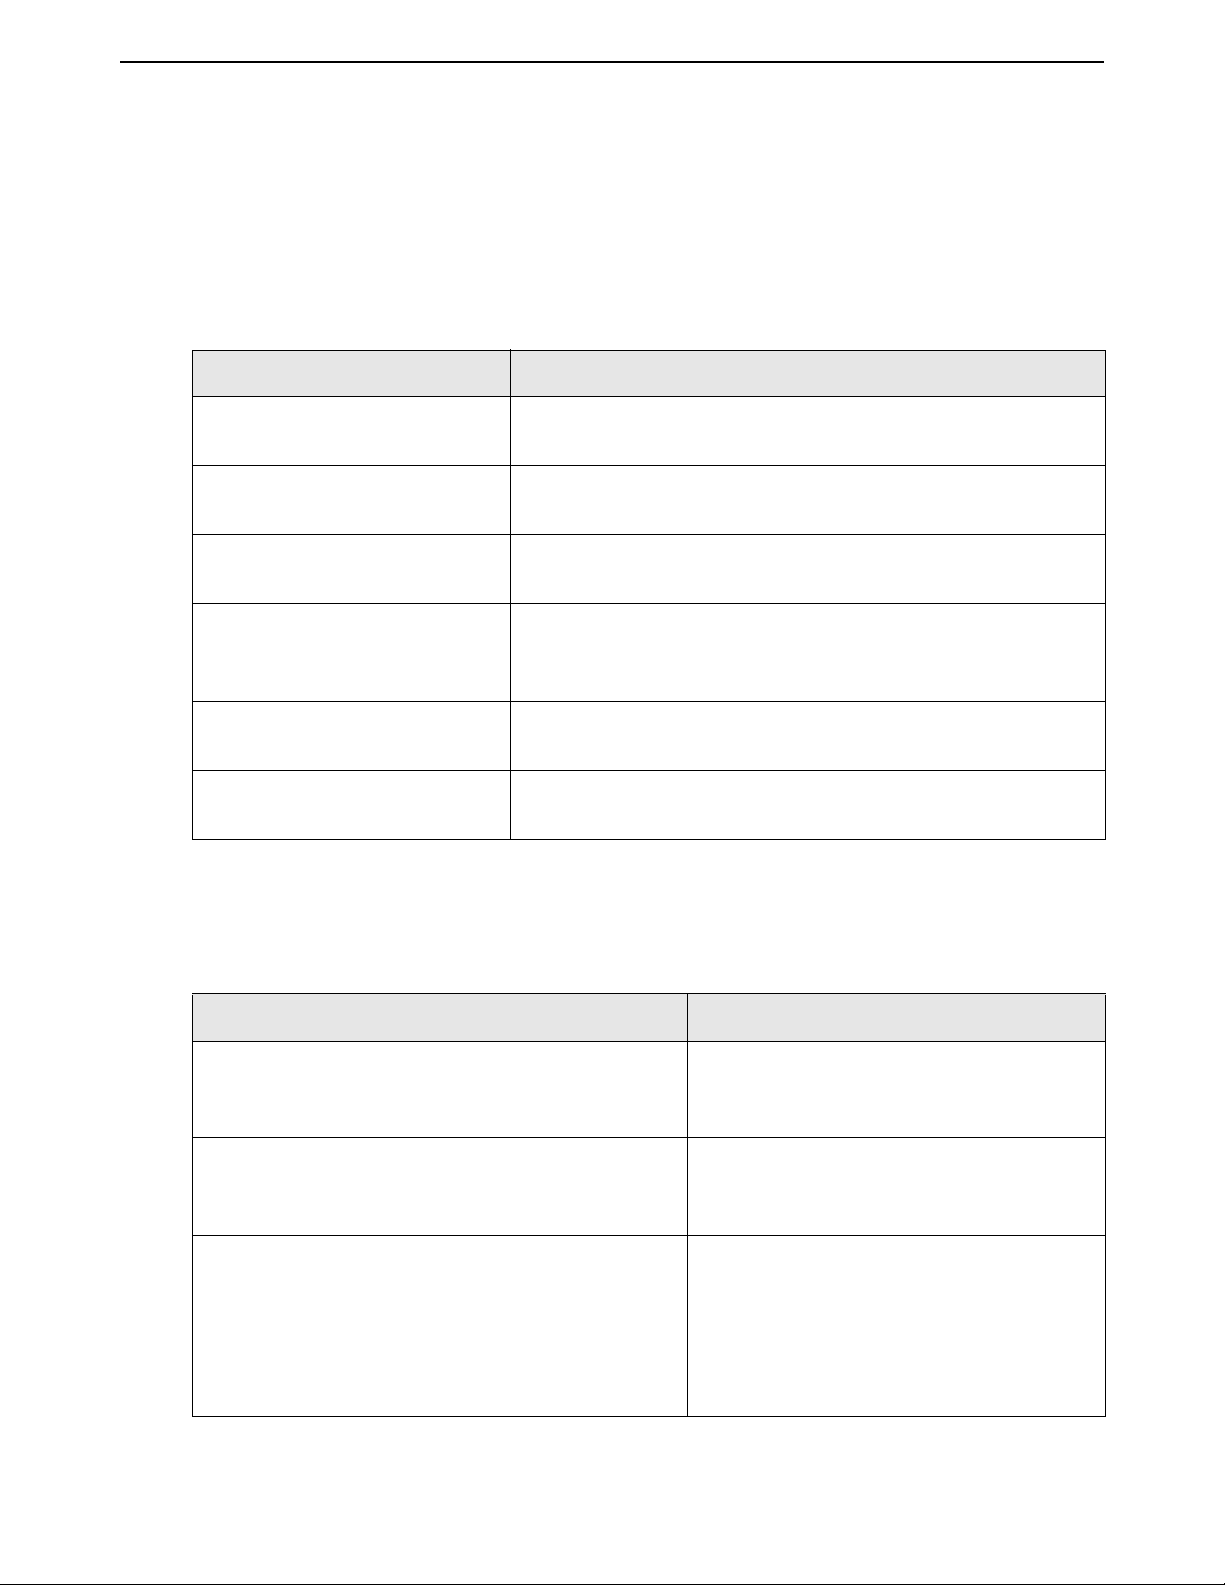
Important terms
The following terms are used in this guide.
Term Description
Controller Refers to the MSM7xx controllers, both the Access controllers
and Mobility controllers.
VSC Virtual service community. VSCs are used to define the
characteristics of a wireless network on a controller.
SSID Service set identifier. Also known as the wireless network
name.
Operator account The account used to log in and operate the Guest
Management Software. The Guest Management Software
supports two types of accounts: administrator and operator.
Guest account Accounts that are managed by the Guest Management
Guest Management Software
station
Conventions
This guide uses specific syntax when directing you to interact with the Guest Management
Software user interface and the controller management tool.
Example directions in this guide What to do in the user interface
Select File > Preferences. In the Guest Management Software
For Password, specify secret22. In the Guest Management Software
Select Controller >> Wireless > Radios In the controller management tool, in the
Software and what guests use to log into the wireless network.
A computer on which the Guest Management Software is
installed.
interface, on the main menu, select File and
then select Preferences on the sub-menu.
interface, in the Password field, enter the
text secret22 exactly as shown.
Network Tree, select Controller, select
Wireless from the main menu, and then
select Radios from the submenu. All
elements to the left of the double angle
brackets >> are found in the Network Tree.
Page 10

Guest Management Software Administrator Guide 4 1 Introduction
Related documentation
For information on related documentation, see the HP ProCurve Website at
www.hp.com/go/procurve/manuals.
HP ProCurve Networking support
HP ProCurve Networking offers support 24 hours a day, seven days a week through a number of
automated electronic services.
The HP ProCurve Networking Web site, www.hp.com/go/procurve/support, provides up-to-date
support information.
Additionally, your HP-authorized network reseller can provide you with assistance, both with
services that they offer and with services offered by HP.
Page 11

Chapter 2: Installation
Contents
Typical deployments - - - - - - - - - - - - - - - - - - - - - - - - - - - 6
Installation requirements - - - - - - - - - - - - - - - - - - - - - - - - - 7
2
Installation
Installation - - - - - - - - - - - - - - - - - - - - - - - - - - - - - - - - 7
Starting for the first time - - - - - - - - - - - - - - - - - - - - - - - - - 8
Page 12
Guest Management Software Administrator Guide 6 2 Installation
Typical deployments
The Guest Management Software can be installed on one or more computers, and works with any
MSM7xx controller with a matching software version.
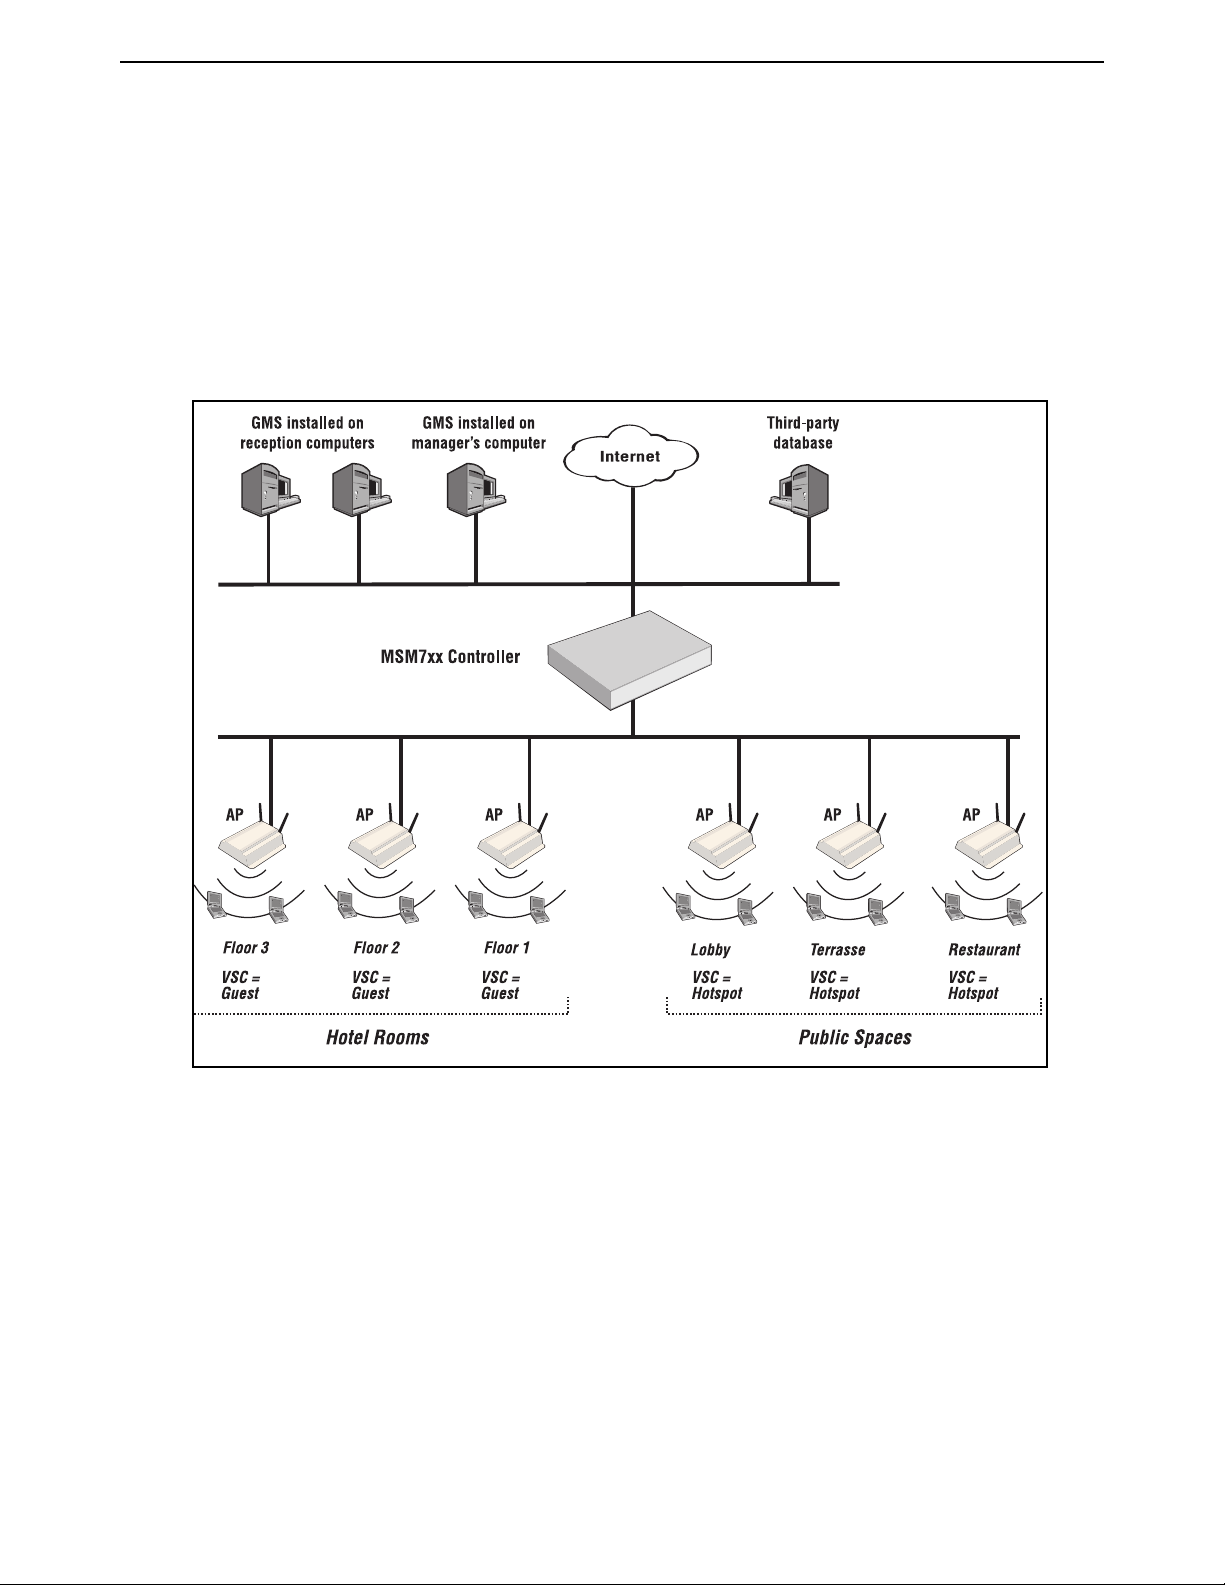
Multiple computer deployment
The following diagram shows a sample MSM7xx deployment with the Guest Management Software
(GMS) installed on multiple computers.
In this scenario, the Guest Management Software is installed on multiple computers at the
reception desk in a large hotel. In addition, it is also installed on the hotel manager’s computer. To
support this scenario, the Guest Management Software makes use of a third-party database
installed on the network. The third-party database can be installed on one of the computers on
which the Guest Management Software is also installed. The Guest Management Software must
be installed on each computer from where it will be used.
Note: You must use a third-party database when the Guest Management Software is
installed on more than one computer. If the Guest Management Software is installed
on only one computer, the additional option of using a local internal database is
available.
This scenario uses two VSCs:
• Hotspot: Provides free access to information about the hotel in all public spaces.
• Guest: Provides paying hotel guests with premium access in their rooms.
Page 13

Guest Management Software Administrator Guide 72 Installation
Installation requirements
MSM7xx Controllers purchased on April 15, 2010 or later, are entitled to the HP ProCurve Guest
Management Software v5.4. Customers who have an active CarePack or Support Contract for an
MSM7xx Controller are also entitled to the Guest Management Software. Printed instructions
provided with the MSM7xx Controllers describe how to download the Guest Management Software
installation package.
Computer requirements
Note: Installing the Guest Management Software on a mobile computer is not
recommended.
To install and run the Guest Management Software, a computer requires the following software and
hardware:
• Operating system: Windows XP (SP2 recommended), Windows Vista.
• Memory: Minimum of 512 MB.
• HD space: Minimum of 200 MB free disk space to run the Guest Management Software
program, 2 GB for the station hosting the database.
• Processor: Minimum 1 GHz. Pentium 4 (or equivalent).
• Network connection to an HP ProCurve MSM7xx controller.
If a third-party database is used, a blank database must be created before running the Guest
Management Software and, if required by the third-party database, database driver software must
be installed.
For a list of supported databases, see “Database selection” on page 9.
Controller requirements
The Guest Management Software 5.4 requires one of the following controllers at version 5.4 or
higher:
• MSM7xx controllers: MSM710, MSM730, MSM750, MSM760 or MSM765zl.
Note: The SOAP interface must be enabled on the port that the controller uses to
communicate with the Guest Management Software. By default, SOAP is enabled for
the LAN port on all MSM controllers. To verify that SOAP is enabled on a controller,
open the controller management tool and select Controller >> Management >
SOAP and verify that SOAP server configuration is checked.
Installation
If running the Guest Management Software on a single computer, you can use its own internal
database or a third-party database. If you plan to run the Guest Management Software on multiple
computers, you must use a third-party database.
Note: External RADIUS/Active Directory accounts cannot be managed with the Guest
Management Software.
Page 14

Guest Management Software Administrator Guide 8 2 Installation
Note: The Guest Management Software should be installed from a Windows account that
has administrator rights.
Installing on a single computer
To install the Guest Management Software, double-click the GMS_xxxx_Bxxx_install.exe file,
which is located in the downloaded installation package. Follow the on-screen directions. The
Guest Management Software will be installed in the folder of your choice. After the installation is
completed, you are prompted to either view the README file or to start the Guest Management
Software.
Installing on multiple computers
To install the Guest Management Software on multiple computers, do the following:
1. Install a third-party database to store Guest Management Software data. The database must
be installed on a server that is accessible to all computers that will run the Guest Management
Software. This can include a computer on which the Guest Management Software is also
installed.
2. Create a blank database using the third-party database software before installing the Guest
Management Software.
Make note of the following parameters when configuring the third-party database for the Guest
Management Software.
• Username/password that has read/write/create privileges for the database.
• Database name.
• Database IP or hostname.
• Database port number.
3. To ensure that the database is correctly initialized, the Guest Management Software must be
installed, started, and configured on a single computer. The administrator account, of which
there can be only one, is created during the initial installation.
4. You can then install the Guest Management Software on all other computers. To install the
Guest Management Software, double-click the GMS_xxxx_Bxxx_install.exe file, which is
located in the downloaded installation package. Follow the on-screen directions. The Guest
Management Software will be installed in the folder of your choice. After the installation is
completed, you are prompted to either view the README file or to start the Guest
Management Software.
Starting for the first time
To start the Guest Management Software, select Start > All Programs > Colubris > Visitor
Management Tool > Visitor Management Tool.
The first time you start the Guest Management Software, the configuration wizard guides you
through the following procedures.
Page 15

Guest Management Software Administrator Guide 92 Installation
A. Single or multiple computer installation
Choose whether the Guest Management Software will be configured to run on a single or
multiple computers and select Next.
B. Database selection
Choose the database that the Guest Management Software will use to store guest account
information and select Next to configure its settings.
Page 16

Guest Management Software Administrator Guide 10 2 Installation
If running the Guest Management Software on a single computer, you can select Local (to use
its own internal database) or a third-party database. If you plan to run the Guest Management
Software on multiple computers, select a third-party database.
See “Installing on multiple computers” on page 8 for more information.
The Guest Management Software has been tested with the following third-party database
engines:
• PostGRE SQL 8.3.7 (Linux). This is the recommended external database.
• Microsoft SQL Server 9.0.1399 (Windows)
• Oracle XE 10.2.0.1-1.0 (Linux)
• MySQL Standard 5.0.51 (Linux).
Note: To use the MySQL database, you must first install the driver. Proceed as
follows:
1. Acquire a commercial license for the Connector/J (JDBC driver) component of MySQL,
version 5.0.2 or greater.
2. Copy the driver file (which should be called mysql-connector-java-x.x.x-bin.jar where
x.x.x is the version number of the driver) to the lib subdirectory of where you installed
the Guest Management Software.
3. Modify the file VisitorManagementTool.cmd to reflect the exact version of the driver
used. Look for the line starting with @set MYSQL and change the version number
there.
Note: The Guest Management Software may work with the listed databases under
other operating systems, provided the same version is used. However, you
assume the risks of running the Guest Management Software on any non-tested
platform or database.
Note: The database type cannot be changed without re-installing the Guest
Management Software.
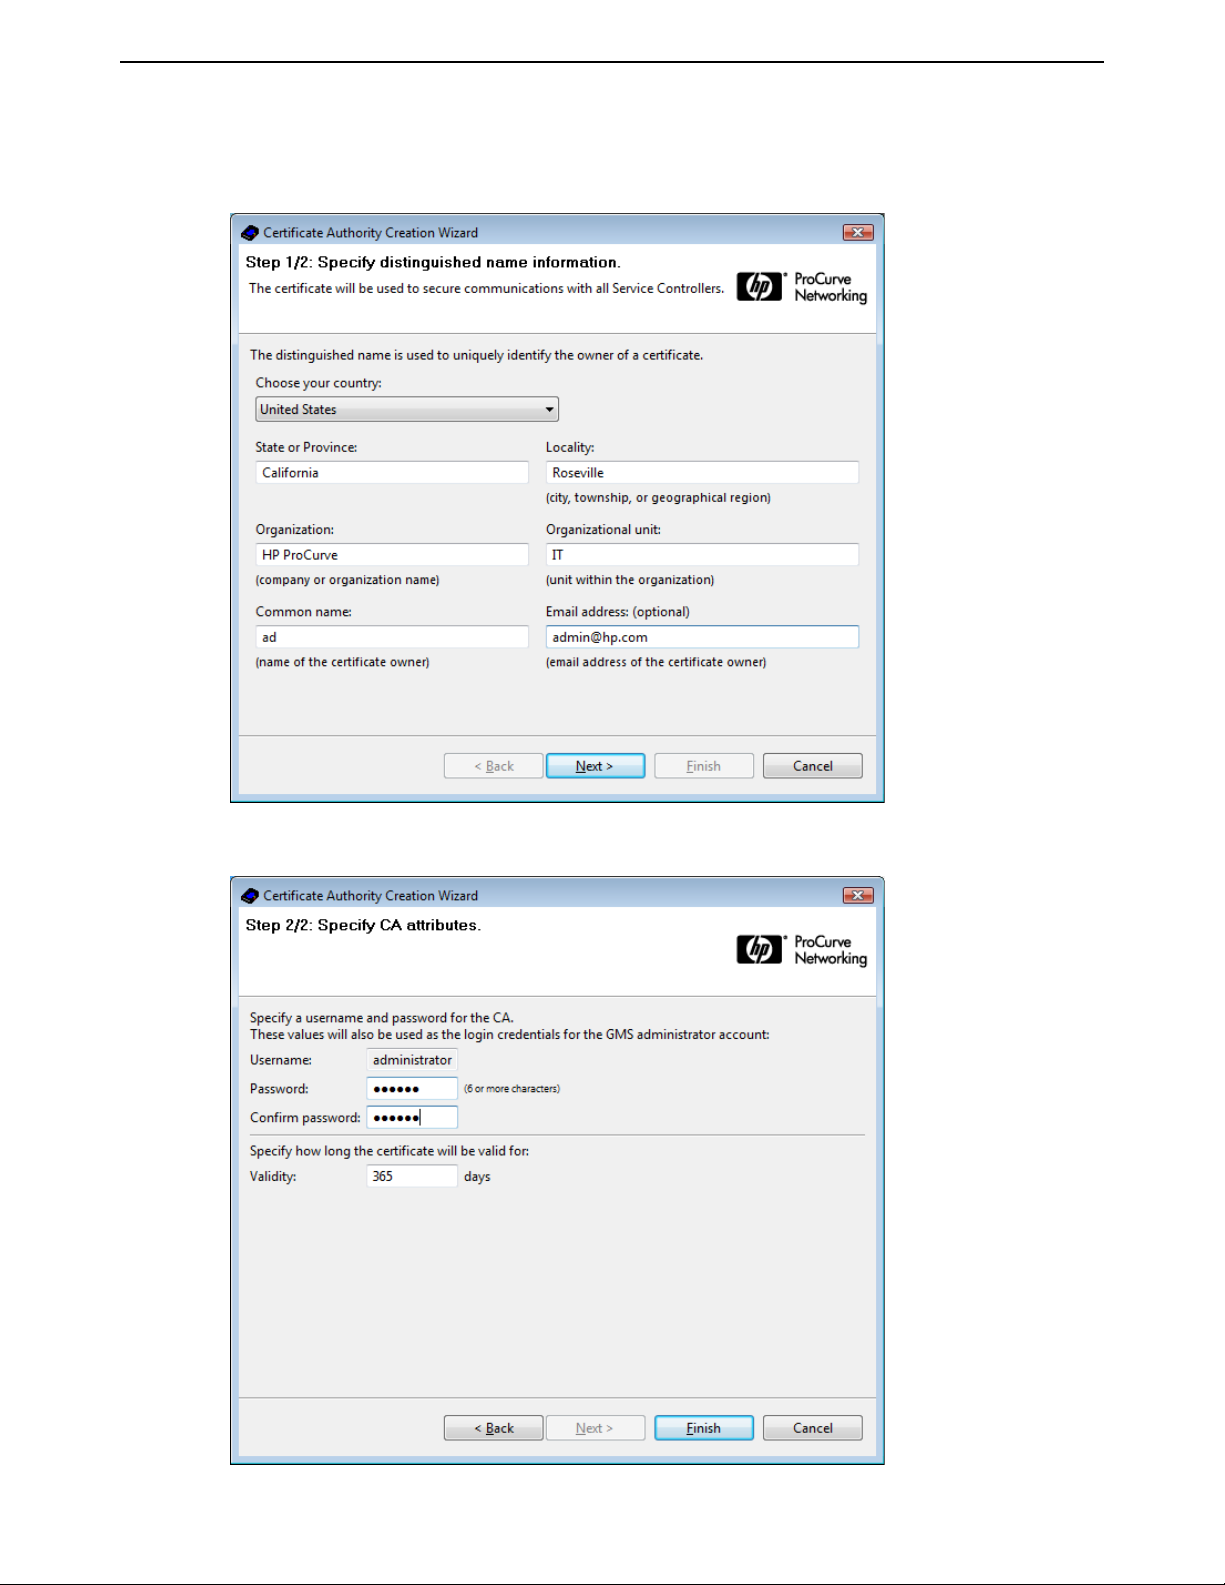
C. Certificate Authority (CA) certificate creation
After the database selection is complete, the Certificate Authority Creation Wizard starts.
The Certificate authority is used as follows:
• When a controller is added to the Guest Management Software database, the CA
certificate is automatically installed on the controller. This certificate is used to validate the
identities of the Guest Management Software and the controller when they exchange
information.
• The CA certificate is used to sign the certificates for operator accounts.
• The username and password defined for the CA certificate are used as the login
credentials for the administrator account.
Page 17
Guest Management Software Administrator Guide 11 2 Installation
To create a certificate:
1. Complete the certificate properties and select Next.
2. Define the certificate password and select Finish.
Caution: The certificate password is also the administrator password. If you
lose this password, you must re-install the software.
Page 18
Guest Management Software Administrator Guide 12 2 Installation
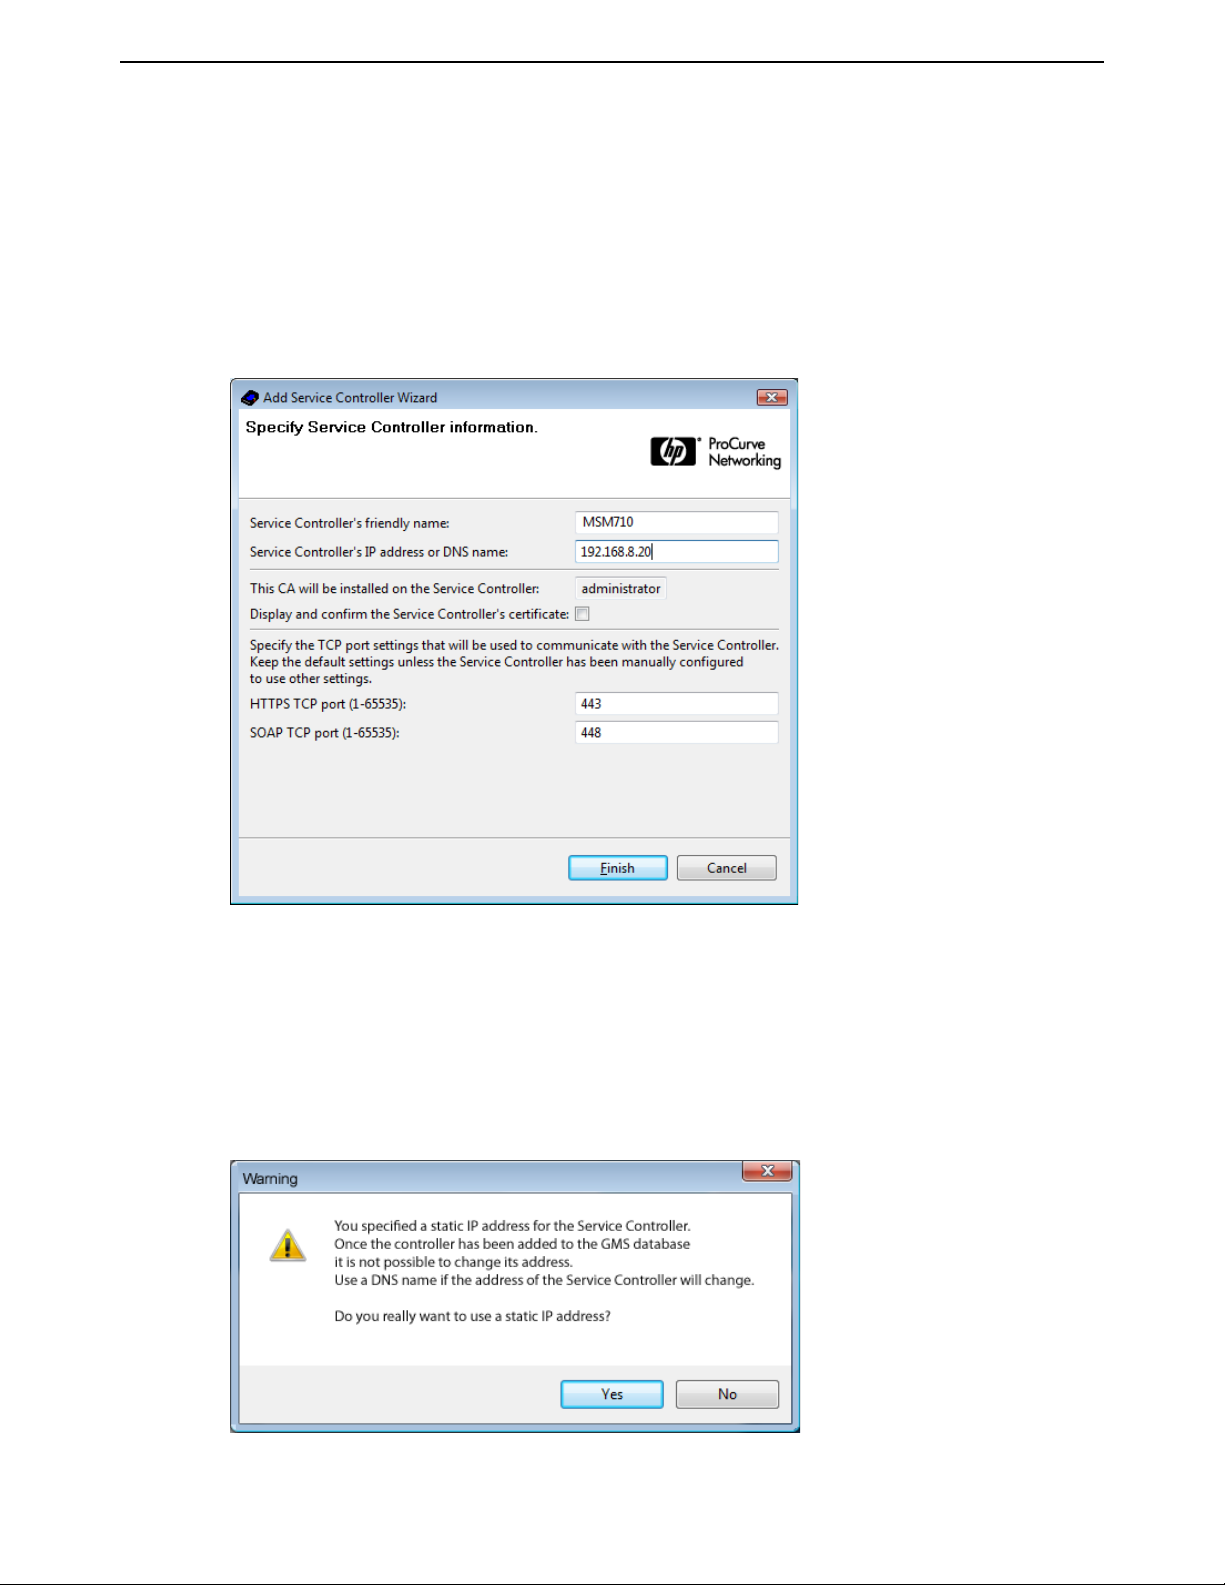
D. Addition of a controller to the database
This step is optional. Controllers can be added later if desired.
Note: Before adding a controller, make sure that no user is currently logged in to the
controller management tool.
After the CA certificate has been created, the Add Service Controller Wizard starts. Define
the settings for a controller on your network and select Finish. The HTTPS TCP port and
SOAP TCP port fields are both predefined, at 443 and 448 respectively.
When selected, Display and confirm the service controller’s certificate ensures increased
security. For example, you can create certificates and digitally sign them. Because this
signature appears on each certificate when it is displayed, a different signature appearing on a
certificate would indicate suspicious behavior, such as a compromised or hacked device being
used to connect to the service.
If you specify a static IP address in the Specify Service Controller information window, a
Warning appears:
Select Yes to continue.
Page 19

Guest Management Software Administrator Guide 13 2 Installation
The Guest Management Software prompts you for the username and password used to access
the controller. (The default values for both on all HP ProCurve controllers is admin, but if the
controller has already been configured, the password at least will have been changed.)
Select OK to complete initial configuration.
Note: Any guest accounts already defined on the controller are removed during the
initialization process. You are prompted before this action is completed.
E. Log in to the Guest Management Software
The Guest Management Software displays the login window. Enter the username and
password you defined in “Certificate Authority (CA) certificate creation” on page 10, and select
Login to continue.
Page 20

Guest Management Software Administrator Guide 14 2 Installation
The Guest Management Software launches and the default Accounts tab appears.
F. Define operator accounts
(Optional)
See “Create User Certificate” on page 50.
G. Enable guest tracking
See “Tracking guests” on page 39.
Page 21

Chapter 3: Working with the Guest Management Software
3
Working with the Guest Management
Software
Contents
Key concepts- - - - - - - - - - - - - - - - - - - - - - - - - - - - - - - 16
Accounts tab - - - - - - - - - - - - - - - - - - - - - - - - - - - - - - - 17
New account creation- - - - - - - - - - - - - - - - - - - - - - - - - - - 22
Service Controllers tab - - - - - - - - - - - - - - - - - - - - - - - - - - 28
Events Log tab - - - - - - - - - - - - - - - - - - - - - - - - - - - - - - 37
User Tracking tab- - - - - - - - - - - - - - - - - - - - - - - - - - - - - 38
File menu - - - - - - - - - - - - - - - - - - - - - - - - - - - - - - - - 43
Database menu - - - - - - - - - - - - - - - - - - - - - - - - - - - - - 49
Administrator menu- - - - - - - - - - - - - - - - - - - - - - - - - - - - 50
Page 22

Guest Management Software Administrator Guide 16 3 Working with the Guest Management Software
Key concepts
This section covers key concepts for working with the Guest Management Software.
Guest account management
Guest account information created using the Guest Management Software is stored in the local
Guest Management Software database or in a third-party database. When a guest account is
created, the Guest Management Software uploads the account information to the controller so that
it can manage guest logins.
The Guest Management Software provides the following guest account features:
• Delayed activation of guest accounts.
• Batch creation of guest accounts.
• Ability to activate, edit, and suspend accounts quickly.
• Printing of account vouchers.
Access levels
The Guest Management Software has two different levels of access, administrator and operator.
• Administrator account: There can be only one administrator account. The administrator has
access to all Guest Management Software program functions.
• Operator account: Multiple operator accounts can be created. Operators have access only to
program functions related to managing guest accounts. Some Guest Management Software
configuration and customizing options are not available to operator accounts.
Database options
The first time you run the Guest Management Software, you are prompted to choose the type of
database that will be used to store guest account information. After a database option has been
selected, it cannot be changed without re-installing the Guest Management Software. External
RADIUS/Active Directory operator accounts cannot be managed with the Guest Management
Software.
Security
Security is provided using X.509 certificates that the Guest Management Software can
automatically generate. See “Certificate Authority (CA) certificate creation” on page 10.
CA certificate
The CA certificate is used to validate the identities of the Guest Management Software application
and the controller when they exchange information. The CA certificate is also used to sign the
certificates for operator accounts. See “Certificate Authority (CA) certificate creation” on page 10.
Note: The username and password defined for the CA certificate are used as the login
credentials for the administrator account.
Page 23

Guest Management Software Administrator Guide 17 3 Working with the Guest Management Software
User certificates
The login credentials for each operator account are defined using a certificate. These certificates
are automatically created by the Guest Management Software based on information that you
supply. See “Create User Certificate” on page 50.
Accounts tab
The Accounts tab enables operators and the administrator to view and manage guest accounts.
Page 24

Guest Management Software Administrator Guide 18 3 Working with the Guest Management Software
Accounts list
By default, the Accounts list shows all defined guest accounts.
Filters
You can filter the display of guest accounts by selecting parameters in the Service Controller, State,
VSC, Validity, and Features filters. In the Service Controller and VSC columns, you can select
multiple items for a specific filter by holding down the Shift or Ctrl key as you select.
Account list
The following information is displayed for each guest account:
State
Current state of the guest account. By default, accounts are color-coded as described below. To
change these colors, select File > Preferences > Guest List Colors. (Administrator only.)
• Dark grey (Unscheduled): Account is inactive and is not scheduled for activation. To activate
the account immediately, select Activate/Resume. To schedule an activation time, select Edit.
• Pink (Scheduled): Account is inactive, but scheduled for activation at the listed date and time.
• Red (Pending): The Guest Management Software is attempting to communicate with the
controller to complete a configuration change for the account. Normally, accounts will only
show red for a short period of time. However, if the controller is unreachable (for example, due
to a network problem), the account remains red until the action is completed by the Guest
Management Software.
• Green (Active): Account is active and is ready for use by the guest.
Page 25

Guest Management Software Administrator Guide 19 3 Working with the Guest Management Software
• Blue (Suspended): Account is inactive because it was suspended by an operator. Use the
Activate/Resume button to re-activate the account. (Only Active accounts can be suspended.)
• Yellow (Expired): Account is inactive because its duration has expired.
Unique ID
Unique account identifier. This number is automatically generated by the Guest Management
Software when the account is created. The Unique ID is printed on the voucher and may be used
to search for the account in the account list.
Username
The login name assigned to the account.
Batch
Batch name assigned to the account. Batch names are assigned when multiple accounts are
created simultaneously using the New Accounts Wizard.
Error description
Provides information when the Guest Management Software is unable to define an account on a
controller.
Account list operations
The following operations can be performed in the Accounts list pane:
• Sort the list by selecting the column title.
• Select an account to display its details in the Account pane to the right of the accounts list. You
• Double-click an account to edit it using the Edit Guest Account Wizard.
• Select multiple accounts by holding down the Shift or Ctrl key as you select accounts in the
• Press Delete to remove the selected account.
• Press Ctrl-A to select all accounts in the list.
• Press Ctrl-C to copy all selected accounts and their details to the clipboard. Each account is
Buttons
The Accounts tab buttons provide quick access to all configuration and management functions for
guest accounts. Some buttons are only active when one or more guest accounts in the list are
selected.
may have to scroll down in the Account pane to view all of the details.
list. Account details are not displayed when multiple accounts are selected.
treated as a paragraph with the details separated by tabs. You can then paste the information
into another application.
Refresh
Select the Refresh button to manually synchronize the Guest Management Software with the
database. When using the Guest Management Software with an external database and multiple
operators, synchronization occurs automatically on a regular basis. Manual synchronization
enables you to force an update to view database changes immediately when made by other
operators or at the controller level.
Page 26

Guest Management Software Administrator Guide 20 3 Working with the Guest Management Software
New Account(s)
Starts the Guest Account Creation Wizard, which guides you through the process of creating one
or more new guest accounts. See “New account creation” on page 22.
Edit
Starts the Edit Guest Account Wizard, which guides you through the process of modifying
existing guest account settings.
Note: The account password can be edited only if Allow guest account passwords to be
modified manually is enabled. See “Allow guest account passwords to be modified
manually” on page 46.
Reset Subscription Plan
Resets the access times for the selected account(s) to their initial values. For example, if a guest
was assigned 60 minutes initially, selecting Reset Subscription Plan would allow the guest to
remain online for another 60 minutes. Any time remaining from the original amount is discarded. If
a guest is logged in when the account is reset, the guest is automatically logged out. Selecting the
Reset Subscription Plan button activates a warning. Select OK to confirm the reset. The Reset
Subscription Plan option applies both to local Custom Validity plans and to subscription plans
defined on the controller.
Suspend
Deactivates an account so that it cannot be used by a guest. However, the account is not removed
from the database, enabling it to be re-activated by selecting Activate/Resume at a later time.
• If a guest is logged in when the account is suspended, the guest is automatically logged out.
• Only Active accounts can be suspended.
Activate/Resume
Re-activates a suspended account with the same settings the account had before it was
suspended.
Delete
Deletes the account from the database. If a guest is logged in when the account is deleted, the
guest is automatically logged out.
Prints a voucher for an account.
Page 27

Guest Management Software Administrator Guide 21 3 Working with the Guest Management Software
Voucher contents
• Unique ID: This number is automatically generated by the Guest Management Software when
the account is created.
• Creation date/time: Date and time the account was created.
• Username: The name the guest must use to log in to the network.
• Password: The password the guest must use to log in to the network.
Note: The account password is only printed if the “Allow guest account passwords to
be reprinted” on page 47 option is enabled (File > Preferences > Guest
accounts).
• WLAN name (SSID): Name of the wireless network to which the guest can connect. The SSID
name is obtained from the VSC that the account is assigned to when it is created.
• Encryption mode: The type of wireless encryption that is enabled on the VSC.
• Encryption key: The key that the guest must use when WEP or WPA encryption is active.
• Encryption key format: Indicates whether the WEP key must be specified in ASCII or
hexadecimal.
• Valid period: Indicates the starting and ending date and time for which the account is valid if
custom validity was selected when creating the account.
• Subscription plan:
was selected when creating the account.
•Disclaimer: Additional text which can be customized. See “Voucher options” on page 49 for
more information.
Indicates the subscription plan that was selected, if a subscription plan
Remaining Online Time
Displays the remaining online time available for the selected account, depending on the
subscription plan associated with that account. This option is only active if the account is
associated with an MSM7xx controller that uses a subscription plan. See Defining subscription
plans in the MSM7xx Controllers Management and Configuration Guide, and “New account
creation” on page 22.
Page 28

Guest Management Software Administrator Guide 22 3 Working with the Guest Management Software
New account creation
When you select the New Account(s) button in the Accounts tab, the Guest Account Creation
Wizard is launched. This wizard guides you through the process of creating one or more new
guest accounts. You can create either individual accounts of a batch of accounts with the same
parameters.
To create a new account:
1. In the Accounts tab, select the New Account(s) button to launch the Guest Account Creation
Wizard.
2. Enter a username, or leave the field blank to have the Guest Management Software
automatically generate a guest name.
3. If the administrator has enabled passwords to be modified manually, enter a password.
Otherwise, passwords are assigned automatically. See “Guest accounts” on page 46.
4. Select the controller with which this new account will be associated from the drop-down menu.
Page 29

Guest Management Software Administrator Guide 23 3 Working with the Guest Management Software
5. The Access-Controlled option must remain selected. From the Validity drop-down list select
one of the following:
• Custom Validity to define the access in the Guest Management Software.
• Subscription Plan to use a subscription plan which has been pre-defined on the
controller. See Defining subscription plans in the HP ProCurve MSM7xx Controllers
Management and Configuration Guide.
6. Select Next.
7. Select the VSC with which to associate the new account from the drop-down list and select
Next.
Page 30

Guest Management Software Administrator Guide 24 3 Working with the Guest Management Software
8. Depending on which access control option you selected in the in the Define Account(s)
Details window, do one of the following:
a. If you selected Custom Validity in the first window of the Wizard, use the Define Custom
Validity window to specify when this account becomes valid and the duration of this
validity.
or
Page 31

Guest Management Software Administrator Guide 25 3 Working with the Guest Management Software
b. If you selected Subscription Plan in the Define Account(s) Details window, select the
subscription plan from the drop-down menu in the Select a Subscription Plan window.
Note: The subscription plans displayed in the drop-down menu are those that have
been defined in the controller. Once you select a subscription plan, the plan
attributes are displayed in this window. See Defining subscription plans in the
MSM7xx Controllers Management and Configuration Guide.
Select Next to continue.
9. If profiles have been configured on the controller, use the Select Account Profiles window to
activate them. Select Next to continue.
10. Select the Print Voucher(s) option, and select Finish to continue. The voucher contains the
information a new account holder needs to access the wireless service. See “Print” on
page 20.
Page 32

Guest Management Software Administrator Guide 26 3 Working with the Guest Management Software
To create several accounts:
1. In the Accounts tab, select the New Account(s) button to launch the Guest Account Creation
Wizard.
2. From the Number of accounts drop-down list, select the number of new accounts to create or
enter a value.
Page 33

Guest Management Software Administrator Guide 27 3 Working with the Guest Management Software
3. Complete the fields in the Define Account(s) Details window. Optionally, specify the prefix
that will be assigned to each new operator account. For example, with a prefix of “Cafe,” each
operator account will be defined by a unique numerical suffix, for example Cafe000001,
Cafe000002, etc.
4. Continue with the wizard, as described in “To create a new account:” on page 22.
Page 34

Guest Management Software Administrator Guide 28 3 Working with the Guest Management Software
Service Controllers tab
The Service Controllers tab lets you view all controllers on which the Guest Management Software
is currently managing guest accounts. Also, the Service Controllers tab allows you to add, edit,
remove and restore controllers.
The Service Controllers tab also lets you customize the guest login page.
Select a controller in the list to view configuration information in the bottom two panes. The left
pane displays configuration elements, and the right pane shows the configuration settings for a
selected element.
Note: All controller attributes are read-only.
Service Controllers list
The Service Controllers list displays all controllers and their attributes on which Guest
Management Software is currently managing guest accounts.
Page 35

Guest Management Software Administrator Guide 29 3 Working with the Guest Management Software
State
Current state of the controller. By default, controllers are color-coded as follows. These colors are
not configurable.
•Red: The Guest Management Software is unable to communicate with the controller. This can
occur for a number of reasons. For example:
• There are network problems, or the controller is not operational. The Guest Management
Software automatically attempts to re-establish communications at one-minute intervals.
Note: Although The Guest Management Software is unable to communicate with
the controller, guests are still be able to log in to active accounts on the
controller.
• The SOAP certificates are no longer valid on the Guest Management Software or the
controller. In this case, restore the controller or generate a new Guest Management
Software SOAP CA (certificate authority).
•Green: The Guest Management Software is able to communicate with the controller.
Name
Name that identifies the controller. The name is a friendly name assigned by the Guest
Management Software administrator when the controller is added to the Guest Management
Software database.
Hostname
Controller hostname or IP address used to communicate with the Guest Management Software.
IP address
The controller IP address associated with the hostname.
Product name
Product name/model.
Account
Number of accounts currently defined/maximum number of supported accounts.
HTTPS port
Indicates the HTTPS port used by the Guest Management Software to communicate with the
controller.
SOAP port
Indicates the SOAP port used by the Guest Management Software to communicate with the
controller.
Certificate valid
Indicates if the CA certificate is valid.
Page 36

Guest Management Software Administrator Guide 30 3 Working with the Guest Management Software
Service Controller list operations
• To select multiple controllers, hold down the Shift or Ctrl key as you select controllers in the
list.
• Select a column title to sort the events by the values in the column.
• Select a controller in the list to view configuration information in the bottom two panes. The left
pane displays configuration elements, and the right pane shows their configuration settings.
Page 37

Guest Management Software Administrator Guide 31 3 Working with the Guest Management Software
• Double-click a controller in the list to edit its IP address or DNS name, or the HTTPS or SOAP
port values. See “Add Service Controller” on page 35.
• Press Delete to remove the selected controller. In the Warning window, confirm that you want
to remove the controller from the Group Management Software.
• Press Ctrl-A to select all entries in the list.
• Press Ctrl-C to copy all selected entries to the clipboard. This enables you to then paste the
entries into another application. Each controller line is treated as a paragraph, with the cells
separated by tabs.
Page 38

Guest Management Software Administrator Guide 32 3 Working with the Guest Management Software
Service Controller elements menu
The elements menu displays additional information associated with the controller. This information
includes VSCs, Subscription plans, and Account profiles. When you select a controller element in
the list, the Guest Management Software displays basic configuration attributes for the controller
menu items. The information is read-only. Controller attributes can only be set from the controller
management tool.
Page 39

Guest Management Software Administrator Guide 33 3 Working with the Guest Management Software
VSCs
A VSC (virtual service community) is a collection of configuration settings that define key operating
characteristics of the controller and controlled access points. In most cases, a VSC is used to
define the characteristics of a wireless network.
The VSCs list displays the virtual service community elements associated with the controller.
•VSC Name
Name that identifies the virtual service community. The name is defined by a controller
administrator when defining a VSC.
• Service Controller
Controller hostname or IP address used to communicate with the Guest Management
Software.
• WLAN name (SSID)
Name of the wireless network.
See Working with VSCs in the HP ProCurve MSM7xx Controllers Management and Configuration
Guide.
Page 40

Guest Management Software Administrator Guide 34 3 Working with the Guest Management Software
Subscription plans
A subscription plan for a guest account defines the time period during which the account is
available, the total amount of time allowed, and the billing information.
Subscription plans are defined in the controller. The details displayed here are read-only. See
Defining subscription plans in the HP ProCurve MSM7xx Controllers Management and
Configuration Guide.
Account profiles
Account profiles are defined at the controller level. The details displayed here are read-only. An
account profile is used to define a specific set of features for a user account. Multiple account
profiles can be applied to a user account, allowing the feature sets of each profile to be added to
the account.
See Defining account profiles in the HP ProCurve MSM7xx Controllers Management and
Configuration Guide for more information.
Buttons
The controller tab buttons provide quick access to all configuration and management functions for
controller definitions.
Some buttons are only active when you have selected one or more controllers.
Refresh
Manually synchronizes the display with the database. When using the Guest Management
Software with an external database and multiple operators, it automatically synchronizes
periodically. Manual synchronization enables you to force an update to view database changes
immediately when made by other operators or at the controller level.
Page 41

Guest Management Software Administrator Guide 35 3 Working with the Guest Management Software
Add Service Controller
(Administrator only)
Starts the Add Service Controller Wizard, which guides you through the process of adding a new
controller.
When selected, Display and confirm the service controller’s certificate ensures increased
security. For example, you can create certificates and digitally sign them. Because this signature
appears on each certificate when it is displayed, a different signature appearing on a certificate
would indicate suspicious behavior, such as a compromised or hacked device being used to
connect to the service.
After adding a controller, the Guest Management Software periodically retrieves VSCs, account
profiles, and subscription plans from the controller. It may take several minutes for this
synchronization process to complete, during which new accounts cannot be created on the
controller.
Edit Service Controller
(Administrator only)
Starts the Edit Service Controller Wizard, which guides you through the process of changing a
controller IP address or DNS name, or the HTTPS or SOAP port values. See “Add Service
Controller” on page 35.
Page 42

Guest Management Software Administrator Guide 36 3 Working with the Guest Management Software
Restore Service Controller
(Administrator only)
Performs the following operations on a controller:
• Uploads the current CA, overwriting any existing CA that is already loaded.
• Deletes all existing guest accounts on the controller.
• Upload all active guest account definitions from the database to the controller.
Remove Service Controller
(Administrator only)
Removes a selected controller from the Service Controller list.
Note: Guest accounts are not deleted from the controller when the controller is removed
from the Guest Management Software.
Customize Login Pages
(Administrator only)
Starts the Login Page Wizard, which enables you to customize the logo that guests see on the
HTML login page when they access the wireless network.
Page 43

Guest Management Software Administrator Guide 37 3 Working with the Guest Management Software
Events Log tab
Shows events that have been recorded by the Guest Management Software. This provides a
history of all significant actions executed by each operator.
Events Log list
Select a column title to sort the events by the values in the column.
•Timestamp: Time the event occurred.
•Level: Severity level assigned to the event.
• Operator: Operator that generated the event.
• Details: Event description.
Events are stored in the Guest Management Software database.
Page 44

Guest Management Software Administrator Guide 38 3 Working with the Guest Management Software
Event Log list operations
• To select multiple events, hold down the Shift or Ctrl key as you select events in the list.
• Select a column title to sort the events by the values in the column.
• Press Delete to remove the selected events.
• Press Ctrl-A to select all entries in the list.
• Press Ctrl-C to copy all selected entries to the clipboard. This enables you to then paste the
entries into another application.
Filter
Enables you to filter the event log based on Timestamp, Operator, or Details.
Buttons
Refresh
Updates the event log, while applying any filtering.
Delete
(Administrator only)
Removes the selected event.
User Tracking tab
This page is used to display guest connection details.
• When the Guest Management Software is installed on a single computer, connection
information is reported by the controllers and forwarded to the Guest Management Software.
• When the Guest Management Software is installed on multiple computers, connection
information is reported by the controllers and forwarded to the Guest Management Software on
a specified station (called the user tracking server). This station then shares the information
with all other Guest Management Software installations on your network.
An administrator or operator must be logged into the station acting as the user tracking server for
guest tracking information to be sent to the other Guest Management Software stations. If no
administrator or operator is signed in, the Guest Management Software remains inactive, and
guest tracking information will not be sent to other stations. Once the administrator or an operator
has logged in to the user tracking server, even if the administrator or operator session times out,
the Guest Management Software will continue to track events and guest activity and send the
information to the other stations. See “Prompt for authentication if session is idle for” on page 45.
Page 45

Guest Management Software Administrator Guide 39 3 Working with the Guest Management Software
Select a row in the list to view detailed information in the Info box.
Tracking guests
To enable guest activity to be displayed through the User Tracking tab, guest tracking must be
enabled both at the controller level and in the Guest Management Software.
Setting tracking on controllers
Each controller that sends logs to the Guest Management Software must be configured for User
tracking according to the following procedure:
1. On an MSM7xx controller, select Controller >> Tools > User tracking.
Page 46

Guest Management Software Administrator Guide 40 3 Working with the Guest Management Software
2. Enable the Remote syslog destination option.
3. Set the Server address field to the IP address of the computer that is running the Guest
Management Software.
4. Define the User tracking filter if you want to reduce the number of logs that are sent. If the
filter is blank, all logs are sent.
5. Select Save.
Setting tracking on a single station
When the Guest Management Software is installed on a single computer:
1. Select File > Preferences > Application options.
2. Under User tracking server:
• Enable Activate user tracking server.
• Leave Server hostname blank.
• Set the Server UDP port field to match the setting on the controller.
3. Select OK.
Page 47

Guest Management Software Administrator Guide 41 3 Working with the Guest Management Software
Setting tracking on multiple stations
Select one station to act as the user tracking server. This station will send user tracking information
to the other Guest Management Software stations.
Note: An administrator or operator must be logged into the station acting as the user
tracking server for user tracking information to be sent to the other Guest
Management Software stations. See “User Tracking tab” on page 38.
Configure the station acting as the user tracking server as follows:
1. Select File > Preferences > Application options.
2. Under User tracking server:
• Enable Activate user tracking server.
• In the Server hostname field, enter the IP address of this computer.
• Set Server UDP port to match the setting on the controller. Make sure that this port is not
already used by another application (like another syslog server). This should show as an
error in the Guest Management Software events log.
3. Select OK.
Configure the other stations as follows:
1. Select File > Preferences > Application options.
2. Under User tracking server:
• Set Server hostname to the IP address or hostname of the Guest Management Software
station that is operating as the user tracking server.
Page 48

Guest Management Software Administrator Guide 42 3 Working with the Guest Management Software
• Set Server UDP port to match the setting on the controller. Make sure that this port is not
already used by another application (like another syslog server). This should show as an
error in the Guest Management Software events log.
3. Select OK.
User Tracking table
The User Tracking table displays the following information for each connection.
Timestamp
Time the connection was created. The timestamp is assigned by the controller. To ensure that the
time filter functions correctly, make sure that the system time on the controller and the computer
running the Guest Management Software are both accurately set.
Protocol
Protocol used to make the connection.
Client username
Login name assigned to the guest.
Client MAC
MAC address of the guest station.
Client IP
IP address of the guest station.
Client port
Ethernet port on the guest station.
Target IP
Target IP address where the connection is established.
Target port
Target port where the connection is established.
SC serial #
Serial number of the controller that is handling the connection.
SC Internet port address
IP address of the Internet port on the controller that is handling the connection.
Guest tracking connection list operations
• To select multiple events, hold down the Shift or Ctrl key as you select events in the list.
Filter
• Select a column title to sort the events by the values in the column.
• Press Ctrl-A to select all entries in the list.
Enables you to filter the connection log based on the values of columns in the connection list.
Page 49

Guest Management Software Administrator Guide 43 3 Working with the Guest Management Software
Buttons
Refresh
Update the list with the selected filter options.
File menu
The following configuration options are available on the File menu.
Password
Changes the login password for the current operator or administrator account.
• If logged in as administrator, this will change the administrator password.
• If logged in as an operator, the operator password will change.
The first time you run the Guest Management Software, the Certificate Authority Creation
Wizard guides you through the process of creating the administrator certificate. The password for
the administrator account is the same as the password you specified when creating the certificate.
See “Certificate Authority (CA) certificate creation” on page 10 for more information on creating the
administrator account.
Operator accounts are created by the administrator using the Administrator > Create User
Certificate option. See “Create User Certificate” on page 50.
Guest passwords can also be changed manually by the operator and administrator. See “Allow
guest account passwords to be modified manually” on page 46 for more information.
Page 50

Guest Management Software Administrator Guide 44 3 Working with the Guest Management Software
Preferences
(Administrator account only)
Guest List Colors
Enables you to set the colors that are used to indicate account states on the Accounts tab.
Page 51

Guest Management Software Administrator Guide 45 3 Working with the Guest Management Software
Application options
Enables you to define global options for the application.
Prompt for authentication if session is idle for
When enabled, the Guest Management Software automatically logs out an administrator or
operator if they are idle for more than the defined number of seconds. The login box is
automatically displayed so the session can be re-established. The Guest Management Software
will continue to operate in the background.
Check for guest accounts state change every
When enabled, the Guest Management Software automatically checks all guest accounts for
expiration at the specified interval.
Automatically delete expired accounts after
When enabled, the Guest Management Software automatically deletes guest accounts that have
been in the expired state for the specified number of days.
Limit the number of expired accounts to
When enabled, the Guest Management Software limits the number of expired accounts to the
value you set here. Expired accounts beyond this limit are deleted.
Activate debug log
When enabled, activates the recording of program events to an external log file for debugging
purposes.
Page 52

Guest Management Software Administrator Guide 46 3 Working with the Guest Management Software
User tracking server
These parameters control display of information on the User Tracking tab.
• When the Guest Management Software is installed on a single computer with the local
database option, guest tracking information is reported by the controllers and is forwarded to
the Guest Management Software guest tracking server.
• When the Guest Management Software is installed on multiple computers, connection
information is reported by the controllers and forwarded to the guest tracking server on one
Guest Management Software station. This station then shares the information with all other
Guest Management Software installations. For this type of setup, configure guest tracking as
follows:
See “Tracking guests” on page 39.
Automatically delete logs after
Specify how long logs will remain in the database before they are automatically deleted.
Guest accounts
Enables you to define global guest account settings.
Allow guest account passwords to be modified manually
Controls access to guest account passwords.
• When disabled: Guest account passwords are automatically generated by the Guest
Management Software. Operators do not define a guest’s password when creating a new
account and cannot change it afterwards.
Page 53

Guest Management Software Administrator Guide 47 3 Working with the Guest Management Software
• When enabled: An operator or administrator can both define and change guest account
passwords.
Allow guest account passwords to be reprinted
Controls the printing of guest account passwords.
• When disabled: Vouchers that display guest account passwords can only be printed once.
After that the password values are represented by a string of asterisks.
• When enabled: Vouchers that display guest account passwords can be printed as many times
as required. Each time a voucher with the password included is printed, an entry is added to
the event log.
Allow guest account passwords to be exported to the clipboard
Controls the export of guest account passwords.
• When disabled: guest account passwords cannot be exported.
• When enabled: guest account passwords can be exported along with the rest of the guest
information to the clipboard. See “Account list operations” on page 19.
Activate idle timeout for guest accounts
When enabled, the Guest Management Software uses the specified value when accounts are
added to the controller. When disabled, the Guest Management Software uses the value 0.
On the controller, idle timeout controls how long a guest session can be inactive before the guest’s
session is terminated. Setting the idle timeout to 0 disables this option. This means that the guest
is not disconnected, regardless of how long their connection remains idle while logged in to the
service.
Select the security level for automatically generated usernames and passwords
Specifies the security level that will be used when the Guest Management Software generates a
username and password.
• Weak security: Usernames and passwords are generated using six characters in the
range [a - z].
• Strong security: Usernames and passwords are generated using 8 to12 characters in the
range [0-9, a-z, A-Z]. Word formation is prevented.
Page 54

Guest Management Software Administrator Guide 48 3 Working with the Guest Management Software
Predefined durations
Enables you to customize the set of predefined durations that appear in the Define Custom Validity
screen of the New / Edit Account Wizard when guest accounts are created.
Page 55

Guest Management Software Administrator Guide 49 3 Working with the Guest Management Software
Voucher options
Enables you to customize what is printed on a voucher. To see what is printed on a voucher by
default, see “Voucher contents” on page 21.
Voucher disclaimer
Enables you to customize the text that appears at the bottom of a printed voucher.
Multiple vouchers per page
Prints the maximum number of vouchers on a page. When disabled, only one voucher is printed
per page.
Voucher logo
Enables you to select the logo that appears on printed vouchers. If you are using your own custom
logo, the file must be a bitmap (.gif, .bmp, or .jpg) with a maximum size of 300 by 250 pixels (width/
height).
Database menu
These options only apply when you are using the Local database option to store the Guest
Management Software information.
Page 56

Guest Management Software Administrator Guide 50 3 Working with the Guest Management Software
Backup
(Administrator and operator)
This option creates a backup of the current database. The backup is created in the folder where the
Guest Management Software was installed. By default this is:
C:\Program Files\Colubris\Visitor Management Tool.
Each time you create a backup, it is stored in a new folder identified with the backup date and time.
The Guest Management Software retains the last five backups. Older backups are automatically
deleted.
Retrieve
(Administrator only)
Overwrites the contents of the current database with the contents of the last backup.
This will replace all current settings with those from the backup database.
Administrator menu
(Administrator only)
Use these options to manage the certificates for operator accounts.
Recreate the CA
Recreates the CA certificate using the same information you specified when the Guest
Management Software was first installed. You can use this to regenerate the CA when it has
expired.
Create User Certificate
Each operator requires their own certificate. This certificate defines the login username and
password for the operator account. The Create User Certificate option starts the User Certificate
Creation Wizard, which guides you through the certificate creation process for an operator.
Revoke User Certificate
Revokes the certificate for a Guest Management Software operator account.
Page 57

Page 58

April 2010
Manual Part Number
5998-0488
Technology for better business outcomes
To learn more, visit www.hp.com/go/procurve/
© Copyright 2010 Hewlett-Packard Development Company, L.P. The information
contained herein is subject to change without notice. The only warranties for HP products
and services are set forth in the express warranty statements accompanying such products
and services. Nothing herein should be construed as constituting an additional warranty.
HP will not be liable for technical or editorial errors or omissions contained herein.
 Loading...