

HP ProCurve 9304M, J4139A, ProCurve 9308M, J4874A, ProCurve 9408sl Security Manual
...
9304m
9308m
9315m
9408sl
ProCurve Routing Switches
Software versions 07.8.00a (9300 series)
and 01.0.02 (9408sl)
Security Guide
www.procurve.com


Security Guide
for
ProCurve 9300/9400 Series Routing
Switches
Software versions 07.8.00a (9300 series)
and 01.0.02 (9408sl)

©
Copyright 2000, 2003, 2005 Hewlett-Packard
Development Company, L.P. The information
contained herein is subject to change without
notice.
Publication number
5990-6029
June 2005
Applicable Products
ProCurve 9304M (J4139A)
ProCurve 9308M (J4138A)
ProCurve 9315M (J4874A)
ProCurve 9408sl (J8680A)
Trademark Credits
®
Microsoft
, Windows®, and Windows NT® are US
registered trademarks of Microsoft Corporation.
Disclaimer
The information contained in this document is
subject to change without notice.
HEWLETT-PACKARD COMPANY MAKES NO
WARRANTY OF ANY KIND WITH REGARD TO
THIS MATERIAL, INCLUDING BUT NOT LIMITED
TO, THE IMPLIED WARRANTIES OF
MERCHANTABILITY AND FITNESS FOR A
PARTICULAR PURPOSE. Hewlett-Packard shall
not be liable for errors contained herein or for
incidental or consequential damages in connection
with the furnishing, performance or use of this
material.
The only warranties for HP products and services
are set forth in the express warranty statements
accompanying such products and services. Nothing
herein should be construed as constituting an
additional warranty. HP shall not be liable for
technical or editorial errors or omissions contained
herein.
Hewlett-Packard assumes no responsibility for the
use or reliability of its software on equipment that is
not furnished by Hewlett-Packard.
A copy of the specific warranty terms applicable to
your HP product and replacement parts can be
obtained from your HP Sales and Service Office or
authorized dealer.
Warranty
See the Customer Support/Warranty booklet
included with the product.
A copy of the specific warranty terms applicable to
your Hewlett-Packard products and replacement
parts can be obtained from your HP Sales and
Service Office or authorized dealer.
Safety Considerations
Prior to the installation and use of this product,
review all safety markings and instructions.
Instruction Manual Symbol.
If the product is marked with the above symbol, refer
to the product manual to protect the product from
damage.
WARNING Denotes a hazard that can cause injury.
CAUTION Denotes a hazard that can damage
equipment or data.
Do not proceed beyond a WARNING or CAUTION
notice until you have understood the hazard and
have taken appropriate precautions.
Use of control, adjustments or performance
procedures other than those specified herein may
result in hazardous radiation exposure.
Grounding
This product provides a protective earthing terminal.
There must be an uninterrupted safety earth ground
from the main power source to the product’s input
wiring terminals, power cord or supplied power cord
set. Whenever it is likely that the protection has
been impaired, disconnect the power cord until the
ground has been restored.
If your LAN covers an area served by more than one
power distribution system, be sure their safety
grounds are securely interconnected.
LAN cables may occasionally be subject to
hazardous transient voltages (such as lightning or
disturbances in the electrical utilities power grid).
Handle exposed metal components of the network
with caution.
For more safety information, see the Installation and
Basic Configuration Guide for ProCurve 9300 Series
Routing Switches and the Quick Start Guide for your
HP 9300M Routing Switch product.
Servicing
There are no user-serviceable parts inside the userinstallable modules comprising the product. Any
servicing, adjustment, maintenance or repair must
be performed only by service-trained personnel.
June 2005 ii

Contents
Organization of Product Documentation ............................................... ix
HAPTER
C
ETTING STARTED
G
I
NTRODUCTION
S
OFTWARE VERSIONS COVERED
A
UDIENCE
C
ONVENTIONS
T
ERMINOLOGY
S
UPPORT AND WARRANTY INFORMATION
R
ELATED PUBLICATIONS
C
HAPTER
ECURING ACCESS TO MANAGEMENT FUNCTIONS
S
S
ECURING ACCESS METHODS
R
ESTRICTING REMOTE ACCESS TO MANAGEMENT FUNCTIONS
U
SING
R
ESTRICTING REMOTE ACCESS TO THE DEVICE TO SPECIFIC
R
ESTRICTING TELNET AND
S
PECIFYING THE MAXIMUM NUMBER OF LOGIN ATTEMPTS FOR TELNET ACCESS
R
ESTRICTING REMOTE ACCESS TO THE DEVICE TO SPECIFIC
D
ISABLING SPECIFIC ACCESS METHODS
D
ISABLING AN INTERFACE’S ACCESS TO MANAGEMENT FUNCTIONS
S
ETTING PASSWORDS
S
ETTING A TELNET PASSWORD
S
ETTING PASSWORDS FOR MANAGEMENT PRIVILEGE LEVELS
R
ECOVERING FROM A LOST PASSWORD
D
ISPLAYING THE
D
ISABLING PASSWORD ENCRYPTION
1
...................................................................................... 1-1
...........................................................................................................................................1-1
.................................................................................................................1-1
..................................................................................................................................................1-1
............................................................................................................................................1-2
............................................................................................................................................1-2
.....................................................................................................1-2
.............................................................................................................................1-2
2
.....................................................................................................................2-1
.....................................................................2-3
ACL
S TO RESTRICT REMOTE ACCESS
SSH A
CCESS BASED ON A CLIENT’S
..............................................................................................................................2-13
.........................................................................................................2-13
SNMP C
OMMUNITY STRING
...................................................................................................2-16
.......................................................................................2-4
IP A
MAC A
VLAN IDS ...............................................2-9
.............................................................................................2-10
..............................................................2-14
..............................................................................................2-15
......................................................................................2-16
....................................... 2-1
DDRESSES
.....................................................2-12
.........................................2-7
DDRESS
....................................2-8
....................................2-8
June 2005 iii

Security Guide for ProCurve 9300/9400 Series Routing Switches
S
PECIFYING A MINIMUM PASSWORD LENGTH
S
ETTING UP LOCAL USER ACCOUNTS
C
ONFIGURING A LOCAL USER ACCOUNT
C
ONFIGURING
E
NABLING THE
I
MPORTING DIGITAL CERTIFICATES AND
G
ENERATING AN
C
ONFIGURING
H
OW
TACACS/TACACS+ A
TACACS/TACACS+ C
I
DENTIFYING THE
S
PECIFYING DIFFERENT SERVERS FOR INDIVIDUAL
S
ETTING OPTIONAL
C
ONFIGURING AUTHENTICATION-METHOD LISTS FOR
C
ONFIGURING
C
ONFIGURING
C
ONFIGURING AN INTERFACE AS THE SOURCE FOR ALL
D
ISPLAYING
C
ONFIGURING
RADIUS A
RADIUS C
RADIUS C
C
ONFIGURING
I
DENTIFYING THE
S
PECIFYING DIFFERENT SERVERS FOR INDIVIDUAL
S
ETTING
C
ONFIGURING AUTHENTICATION-METHOD LISTS FOR
C
ONFIGURING
C
ONFIGURING
C
ONFIGURING AN INTERFACE AS THE SOURCE FOR ALL
D
ISPLAYING
C
ONFIGURING AUTHENTICATION-METHOD LISTS
NCONFIGURATION CONSIDERATIONS FOR AUTHENTICATION-METHOD LISTS
E
XAMPLES OF AUTHENTICATION-METHOD LISTS
SSL S
ECURITY FOR THE WEB MANAGEMENT INTERFACE
SSL S
ERVER ON THE
SSL C
ERTIFICATE
TACACS/TACACS+ S
TACACS+ D
IFFERS FROM
UTHENTICATION
ONFIGURATION CONSIDERATIONS
TACACS/TACACS+ S
TACACS/TACACS+ P
TACACS+ A
TACACS+ A
TACACS/TACACS+ S
RADIUS S
UTHENTICATION
ONFIGURATION CONSIDERATIONS
ONFIGURATION PROCEDURE
HP-S
ECURITY
PECIFIC ATTRIBUTES ON THE
RADIUS S
RADIUS P
RADIUS C
ARAMETERS
RADIUS A
RADIUS A
ONFIGURATION INFORMATION
UTHORIZATION
CCOUNTING
.......................................................................................................2-16
HP D
....................................................................................................2-20
ECURITY
TACACS .........................................................................................2-20
UTHORIZATION
CCOUNTING
TATISTICS AND CONFIGURATION INFORMATION
............................................................................................................2-38
, A
UTHORIZATION, AND ACCOUNTING
ERVER TO THE
........................................................................................................2-44
......................................................................................2-16
.............................................................................................2-17
EVICE
................................................................................2-19
RSA P
RIVATE KEY FILES
.........................................................................................2-20
, A
UTHORIZATION, AND ACCOUNTING
....................................................................2-24
ERVERS
...............................................................................2-25
AAA F
ARAMETERS
UNCTIONS
.....................................................................2-26
TACACS/TACACS+ .........................................2-27
.........................................................................................2-29
..............................................................................................2-32
TACACS/TACACS+ P
......................................................................................2-42
..............................................................................................2-42
HP D
RADIUS S
EVICE
AAA F
ERVER
......................................................................2-43
UNCTIONS
RADIUS ............................................................2-45
.............................................................................................2-47
.................................................................................................2-48
RADIUS P
..........................................................................2-50
........................................................................................2-54
..................................................................................2-56
.....................................................2-19
........................................................2-19
.......................................2-21
...................................................2-25
ACKETS
......................2-33
..............................2-33
..........................................................2-39
....................................................2-42
...................................................2-44
ACKETS
.........................................2-49
.........................................2-55
C
HAPTER
ONFIGURING SECURE SHELL
C
O
VERVIEW
SSH V
C
ONFIGURING
S
ETTING THE HOST NAME AND DOMAIN NAME
G
ENERATING A HOST
C
ONFIGURING
S
ETTING OPTIONAL PARAMETERS
3
..................................................................................................................................................3-1
ERSION
2 S
UPPORT
...................................................................................................................3-1
SSH ....................................................................................................................................3-2
RSA KEY P
RSA C
HALLENGE-RESPONSE AUTHENTICATION
..................................................................... 3-1
......................................................................................3-3
AIR
...................................................................................................3-3
..............................................................3-4
.........................................................................................................3-6
June 2005 iv

D
ISPLAYING
S
AMPLE
U
SING SECURE COPY
C
HAPTER
ONFIGURING
C
O
VERVIEW
IETF RFC S
H
OW
D
C
C
M
A
802.1X P
C
ONFIGURING
C
S
E
S
C
R
S
S
S
S
S
S
I
A
D
C
D
ISPLAYING
D
D
C
D
D
D
S
AMPLE
P
H
SSH C
SSH C
ONNECTION INFORMATION
ONFIGURATION
.................................................................................................................3-11
.............................................................................................3-9
...............................................................................................................................3-11
4
802.1X P
..................................................................................................................................................4-1
UPPORT
802.1X P
EVICE ROLES IN AN
OMMUNICATION BETWEEN THE DEVICES
ONTROLLED AND UNCONTROLLED PORTS
ESSAGE EXCHANGE DURING AUTHENTICATION
UTHENTICATING MULTIPLE HOSTS CONNECTED TO THE SAME PORT
ORT SECURITY WORKS
ORT SECURITY AND SFLOW
802.1X P
ONFIGURING AN AUTHENTICATION METHOD LIST FOR
ETTING
RADIUS P
NABLING
ETTING THE PORT CONTROL
ONFIGURING PERIODIC RE-AUTHENTICATION
E-AUTHENTICATING A PORT MANUALLY
ETTING THE QUIET PERIOD
ETTING THE INTERVAL FOR RETRANSMISSION OF
PECIFYING THE SECURITY HOLD TIME
PECIFYING THE NUMBER OF
PECIFYING A TIMEOUT FOR RETRANSMISSION OF MESSAGES TO THE AUTHENTICATION SERVER
PECIFYING A TIMEOUT FOR RETRANSMISSION OF
NITIALIZING
LLOWING ACCESS TO MULTIPLE HOSTS
EFINING
ONFIGURING DYNAMIC
802.1X P
802.1X
MAC F
802.1X I
ISPLAYING
ISPLAYING
LEARING
ISPLAYING DYNAMICALLY ASSIGNED
ISPLAYING INFORMATION ABOUT DYNAMICALLY APPLIED
ISPLAYING
802.1X C
802.1X S
802.1X S
802.1X M
802.1X C
OINT-TO-POINT CONFIGURATION
UB CONFIGURATION
............................................................................................................................4-1
802.1X C
ORT SECURITY
ARAMETERS
ORT SECURITY
ON A PORT
ILTERS FOR
NFORMATION
ONFIGURATION INFORMATION
TATISTICS
TATISTICS
ULTIPLE-HOST AUTHENTICATION INFORMATION
ONFIGURATIONS
(R
ORT SECURITY
....................................................... 4-1
........................................................................................................4-1
ONFIGURATION
......................................................................................4-1
.............................................................................................4-2
...........................................................................................4-3
...................................................................................4-4
....................................................4-6
...................................................................................................4-9
.......................................................................................................4-9
802.1X ...........................................................4-10
........................................................................................................4-10
....................................................................................................4-10
............................................................................................................4-11
....................................................................................4-12
............................................................................................4-12
...............................................................................................................4-12
EAP-R
EQUEST/IDENTITY FRAMES
...............................................................................................4-13
EAP-R
EQUEST/IDENTITY FRAME RETRANSMISSIONS
EAP-R
EQUEST FRAMES TO THE CLIENT
..............................4-13
.........................................................................................................4-14
............................................................................................4-14
EAP F
VLAN A
RAMES
........................................................................................4-16
SSIGNMENT FOR
802.1X P
ORTS
........................................................4-16
............................................................................................................4-18
............................................................................4-18
.........................................................................................................4-21
...........................................................................................................4-22
VLAN I
NFORMATION
.................................................................4-22
MAC F
ILTERS AND
(R
ELEASE
IP ACLS .......................4-23
07.8.00
...........................................................................................................4-28
.......................................................................................................4-28
ELEASES PRIOR TO
07.8.00) .........................................................................4-29
Contents
...........................4-12
.........4-13
..................4-14
AND LATER
) ..4-24
C
HAPTER
SING THE
U
June 2005 v
5
MAC P
ORT SECURITY FEATURE
................................................ 5-1

Security Guide for ProCurve 9300/9400 Series Routing Switches
O
VERVIEW
C
ONFIGURING THE
D
ISPLAYING PORT SECURITY INFORMATION
C
HAPTER
..................................................................................................................................................5-1
L
OCAL AND GLOBAL RESOURCES
MAC P
E
NABLING THE
S
ETTING THE MAXIMUM NUMBER OF SECURE
S
ETTING THE PORT SECURITY AGE TIMER
S
PECIFYING SECURE
A
UTOSAVING SECURE
S
PECIFYING THE ACTION TAKEN WHEN A SECURITY VIOLATION OCCURS
MAC P
ORT SECURITY FEATURE
ORT SECURITY FEATURE
MAC A
MAC A
.........................................................................................................5-1
....................................................................................5-2
....................................................................................5-2
MAC A
DDRESSES FOR AN INTERFACE
............................................................................................5-2
DDRESSES
DDRESSES TO THE STARTUP-CONFIG FILE
................................................................................................5-3
.................................................................................................5-4
D
ISPLAYING AUTOSAVED
D
ISPLAYING PORT SECURITY SETTINGS
D
ISPLAYING THE SECURE
D
ISPLAYING PORT SECURITY STATISTICS
MAC A
MAC A
DDRESSES
..........................................................................................5-4
................................................................................................5-4
DDRESSES ON THE DEVICE
..............................................................................................5-5
6
..............................5-2
...............................................5-3
...............................................5-3
.................................................................5-5
ONFIGURING MULTI-DEVICE PORT AUTHENTICATION
C
O
VERVIEWN
H
OW MULTI-DEVICE PORT AUTHENTICATION WORKS
RADIUS A
A
D
S
C
ONFIGURING MULTI-DEVICE PORT AUTHENTICATION
E
S
S
D
C
S
S
E
C
D
S
D
ISPLAYING MULTI-DEVICE PORT AUTHENTICATION INFORMATION
D
D
D
...............................................................................................................................................6-1
...................................................................................6-1
UTHENTICATION
UTHENTICATION-FAILURE ACTIONS
YNAMIC
UPPORT FOR AUTHENTICATING MULTIPLE
VLAN A
SSIGNMENT
...................................................................................................................6-1
.....................................................................................................6-2
..............................................................................................................6-2
MAC A
DDRESSES ON AN INTERFACE
..................................................................................6-2
NABLING MULTI-DEVICE PORT AUTHENTICATION
PECIFYING THE FORMAT OF THE
PECIFYING THE AUTHENTICATION-FAILURE ACTION
EFINING
ONFIGURING DYNAMIC
PECIFYING TO WHICH
AVING DYNAMIC
NABLING DENIAL OF SERVICE ATTACK PROTECTION
LEARING AUTHENTICATED
ISABLING AGING FOR AUTHENTICATED
PECIFYING THE AGING TIME FOR BLOCKED
E
XPIRES
MAC A
DDRESS FILTERS
VLAN A
VLAN A P
........................................................................................................................................6-5
VLAN A
MAC A
DDRESSES SENT TO THE
.......................................................................................................6-4
SSIGNMENT
ORT IS MOVED AFTER ITS
SSIGNMENTS TO THE STARTUP-CONFIG FILE
MAC A
DDRESSES
MAC A
.................................................................................6-3
RADIUS S
..............................................................................6-3
........................................................................................6-4
RADIUS-S
............................................................................6-6
......................................................................................6-7
DDRESSES
MAC A
....................................................................6-7
DDRESSES
.............................................................6-8
................................................................6-8
ISPLAYING AUTHENTICATED
ISPLAYING MULTI-DEVICE PORT AUTHENTICATION CONFIGURATION INFORMATION
ISPLAYING MULTI-DEVICE PORT AUTHENTICATION INFORMATION FOR A SPECIFIC
MAC A
DDRESS INFORMATION
..................................................................6-8
6-10
D
ISPLAYING MULTI-DEVICE PORT AUTHENTICATION SETTINGS AND AUTHENTICATED
D
ISPLAYING THE AUTHENTICATED
D
ISPLAYING THE NON-AUTHENTICATED
MAC A
MAC A
DDRESSES
DDRESSES
...........................................................................6-13
...................................................................6-13
.................................. 6-1
...................................6-2
ERVER
............................6-3
PECIFIED
.................................................6-6
VLAN A
SSIGNMENT
...............................6-9
MAC A
DDRESS OR PORT
MAC A
DDRESSES
6-11
June 2005 vi

C
HAPTER
Contents
7
ROTECTING AGAINST DENIAL OF SERVICE ATTACKS
P
P
ROTECTING AGAINST SMURF ATTACKS
A
VOIDING BEING AN INTERMEDIARY IN A SMURF ATTACK
A
VOIDING BEING A VICTIM IN A SMURF ATTACK
P
ROTECTING AGAINST
TCP S
ECURITY ENHANCEMENT IN RELEASE
D
ISPLAYING STATISTICS ABOUT PACKETS DROPPED BECAUSE OF DO
C
HAPTER
ONFIGURING
C
O
VERVIEW
H
OW THE
C
ONDITIONS
A
CTIONS
C
ONFIGURING
E
NABLING
D
EFAULT
S
PECIFYING ACTIONS
D
ISPLAYING
D
ISPLAYING CONDITION INFORMATION
D
ISPLAYING ACTION INFORMATION
8
..................................................................................................................................................8-1
CPU P
..............................................................................................................................................8-2
CPU P
CPU P
CPU P
CPU P
TCP SYN A
CPU P
ROTECTION FEATURE WORKS
ROTECTION
.........................................................................................................................................8-1
ROTECTION
ROTECTION
ROTECTION CONDITIONS AND ACTIONS
...........................................................................................................................8-4
ROTECTION INFORMATION
......................................................................................................7-1
.......................................................................7-2
.....................................................................................7-2
TTACKS
.................................................................................................7-3
07.6.06 .............................................................................7-4
................................................................ 8-1
....................................................................................8-1
................................................................................................................8-2
...............................................................................................................8-2
........................................................................8-3
..............................................................................................8-4
..................................................................................................8-4
........................................................................................................8-5
.................................. 7-1
S A
TTACKS
.........................................7-5
C
HAPTER
ONFIGURING UNICAST
C
O
VERVIEW
C
ONFIGURING UNICAST
S
PECIFYING A PREFIX LIST FOR UNICAST
D
ISPLAYING UNICAST
C
LEARING UNICAST
C
HAPTER
ECURING
S
E
STABLISHING
E
NCRYPTION OF
A
DDING AN
D
ISPLAYING THE
U
SING THE USER-BASED SECURITY MODEL
C
ONFIGURING YOUR
C
ONFIGURING
D
EFINING THE ENGINE
D
EFINING AN
D
EFINING AN
D
ISPLAYING THE ENGINE
9
RPF....................................................................... 9-1
..................................................................................................................................................9-1
RPF ......................................................................................................................9-3
RPF I
NFORMATION
RPF CAM E
NTRIES
10
SNMP A
SNMP C
SNMP C
SNMP C
SNMP C
SNMP V
SNMP G
SNMP U
CCESS
OMMUNITY STRINGS
OMMUNITY STRINGS
OMMUNITY STRING
OMMUNITY STRINGS
NMS .................................................................................................................10-6
ERSION
ID ...................................................................................................................10-6
ROUP
SER ACCOUNT
3 ON HP D
..............................................................................................................10-7
ID ...............................................................................................................10-9
RPF ......................................................................................9-4
....................................................................................................9-4
...............................................................................................9-5
....................................................................... 10-1
.............................................................................................10-1
...................................................................................10-2
.............................................................................................10-2
....................................................................................10-5
..............................................................................................10-5
EVICES
..............................................................................10-6
.................................................................................................10-8
June 2005 vii

Security Guide for ProCurve 9300/9400 Series Routing Switches
D
ISPLAYING
D
ISPLAYING USER INFORMATION
I
NTERPRETING VARBINDS IN REPORT PACKETS
D
EFINING
I
NDEX
..................................................................................................Index-1
SNMP G
SNMP V
ROUPS
..............................................................................................................10-9
......................................................................................................10-10
.................................................................................10-10
IEWS
.........................................................................................................................10-10
viii June 2005

Organization of Product Documentation
NOTE: HP periodically updates the ProCurve 9300/9400 Series Routing Switch documentation. For the latest
version of any of these publications, visit the ProCurve website at:
http://www.procurve.com
Click on Technical Support, then Product manuals.
NOTE: All manuals listed below are available on the ProCurve website, and also on the Documentation CD
shipped with your HP product.
Installation and Basic Configuration Guide for ProCurve 9300 Series Routing Switches
This is an electronic (PDF) guide containing product safety and EMC regulatory statements as well as installation
and basic configuration information, and software and hardware specifications.
Topics Specific to the 9300 Series Routing Switches
• Product mounting instructions
• Module installation
• Basic access and connectivity configuration (passwords, IP addresses)
• Redundant management module commands and file systems
• Cooling system commands and information
• Basic software feature configuration (SNMP, clock, mirror/monitor ports)
• Configuring for these features:
• Uni-Directional Link Detection (UDLD)
• Metro Ring Protocol (MRP)
• Virtual Switch Redundancy Protocol (VSRP)
• GVRP (dynamic VLANs)
• Software update instructions
• Hardware specs
• Software specs (e.g. RFC support, IEEE compliance)
June 2005 ix

Security Guide for ProCurve 9300/9400 Series Routing Switches
Information on Configuring Features for 9300 Series and 9408sl Routing Switches
• Port settings
• VLANS
• Trunks
• Spanning Tree Protocol
• Syslog
Quick Start Guide for ProCurve 9300 Series Routing Switches
This is a printed guide you can use as an easy reference to the installation and product safety information needed
for out-of-box setup, plus the general product safety and EMC regulatory statements of which you should be aware
when installing and using a Routing Switch.
Installation and Basic Configuration Guide for the ProCurve 9408sl Routing Switch
This is a printed guide that describes the ProCurve 9408sl and provides procedures for installing modules and AC
power supplies into the ProCurve 9408sl, cabling the 10-Gigabit Ethernet interface ports, and performing a basic
configuration of the software.
Topics Specific to the 9408sl Routing Switch
• Product overview and architecture
• Product mounting instructions
• Module installation
• Basic access and connectivity configuration (passwords, IP addresses)
• Management Module redundancy and file systems
• Interacting with the cooling system, switch fabric module, and interface modules
• Basic software feature configuration (SNMP, clock, mirror/monitor ports)
• Hardware maintenance instructions
• Software update instructions
• Hardware specs
• Safety and regulatory statements
• Software specs (e.g. RFC support, IEEE compliance)
Advanced Configuration and Management Guide for ProCurve 9300/9400 Series Routing Switches
This is an electronic (PDF) guide that contains advanced configuration information for routing protocols and
Quality of Service (QoS). In addition, appendixes in this guide contain reference information for network
monitoring, policies, and filters.
Information on Configuring Features
• Quality of Service (QoS)
• Access Control Lists (ACLs)
• Rate limiting
• IPv4 routing
• RIP
• IP Multicast
• OSPF
• BGP4
• Multi-protocol BGP (MBGP)
• Network Address Translation (NAT)
June 2005 x

• VRRP and VRRPE (VRRP extended)
• IPX routing
• AppleTalk routing
• Route health injection
• RMON, NetFlow, and sFlow monitoring
IPv6 Configuration Guide for the ProCurve 9408sl Routing Switch
This is an electronic (PDF) guide that describes the IPv6 software and features. It provides conceptual information
about IPv6 addressing and explains how to configure basic IPv6 connectivity and the IPv6 routing protocols. The
software procedures explain how to perform tasks using the CLI.
Command Line Interface Reference for ProCurve 9300/9400 Series Routing Switches
This is an electronic (PDF) guide that provides a dictionary of CLI commands and syntax.
Security Guide for ProCurve 9300/9400 Series Routing Switches
This is an electronic (PDF) guide that provides procedures for securing management access to HP devices and for
protecting against Denial of Service (DoS) attacks.
Diagnostic Guide for ProCurve 9300/9400 Series Routing Switches
This is an electronic (PDF) guide that describes the diagnostic commands available on HP devices. The software
procedures show how to perform tasks using the Command Line Interface (CLI).
Removing and Installing XENPAK Optics
This is a printed instruction sheet describing the correct preparation and procedure for removing and installing
XENPAK optics on the 10-Gigabit Ethernet modules.
Read Me First
The "Read Me First" document, printed on bright yellow paper, is included with every chassis and module. It
contains an overview of software release information, a brief "Getting Started" section, an included parts list,
troubleshooting tips, operating notes, and other information that is not included elsewhere in the product
documentation. It also includes:
• software update instructions
• operating notes for this release
Release Notes
These documents describe features and other information that becomes available between revisions of the main
product guides. New releases of such documents will be available on HP's ProCurve website. To register to
receive email notice from HP when a new software release is available, visit:
http://www.procurve.com
In the "My Procurve" box on the right, click on "Register".
Product Documentation CD: A Tool for Finding Specific Information and/or Printing Selected Pages
This CD is shipped with your ProCurve Routing Switch product and provides the following:
• A README file describing the CD contents and use, including easy instructions on how to search the book
files for specific information
• A Contents file to give you easy access to the documentation on the CD
• Separate PDF files of the individual chapters and appendixes in the major guides, enabling you to easily print
individual chapters, appendixes, and selected pages
• Single PDF files for each of the major guides, enabling you to use the Adobe® Acrobat® Reader to easily
search for detailed information
• Additional files. These may include such items as additional Read Me files and release notes.
June 2005 xi

Security Guide for ProCurve 9300/9400 Series Routing Switches
June 2005 xii

Chapter 1
Getting Started
Introduction
This guide describes how to secure access to management functions on the following ProCurve Routing
Switches:
• ProCurve Routing Switch 9315M
• ProCurve Routing Switch 9308M
• ProCurve Routing Switch 9304M
• ProCurve Routing Switch 9408sl
In addition, this guide explains how to secure SNMP access to these ProCurve Routing Switches, as well as how
to protect them from Denial of Service (DoS) attacks.
Software Versions Covered
This edition describes software release 07.8.00a for the following ProCurve products:
• 9304M
• 9308M
• 9315M
This edition also describes software release 01.0.02 for the ProCurve 9408sl Routing Switch.
NOTE: The software release for the 9408sl is 02.1.00. See the Release Notes for the most current information,
which supercedes the information in this guide.
Audience
This manual is designed for system administrators with a working knowledge of Layer 2 and Layer 3 switching and
routing.
If you are using a ProCurve Routing Switch, you should be familiar with the following protocols if applicable to your
network—IP, RIP, OSPF, BGP4, IGMP, PIM, DVMRP, IPX, AppleTalk, and VRRP.
1 - 1

Security Guide for ProCurve 9300/9400 Series Routing Switches
Conventions
This guide uses the following typographical conventions:
Italic highlights the title of another publication and occasionally emphasizes a word or phrase.
Bold highlights a CLI command.
Bold Italic highlights a term that is being defined.
Underline
Capitals highlights field names and buttons that appear in the Web management interface.
NOTE: A note emphasizes an important fact or calls your attention to a dependency.
WAR NING: A warning calls your attention to a possible hazard that can cause injury or death.
CAUTION: A caution calls your attention to either a possible hazard that can damage equipment or an action
that can produce an operating problem or other unwanted results.
highlights a link on the Web management interface.
Terminology
The following table defines basic product terms used in this guide.
Term
chassis
or
Chassis device
EP
and
Standard
Routing Switch
or
router
Switch
ProCurveRS#
Definition
A Routing Switch that accepts optional modules or power supplies. The
ProCurve 9304M, 9308M, 9315M, and 9408sl Routing Switches are Chassis
devices.
9300 Series Chassis devices can be EP or Standard devices, depending on
whether the management module is an EP or Standard module.
A Layer 2 and Layer 3 device that switches and routes network traffic. The
term router is sometimes used in this document in descriptions of a Routing
Switch’s Layer 3 routing protocol features.
A Layer 2 device that switches network traffic.
An example Command Line Interface (CLI) prompt. Actual prompts show
the product number for the device, such as HP9304#.
Support and Warranty Information
Refer to Support is as Close as the World Wide Web, which was shipped with your ProCurve Routing Switch.
Related Publications
Refer to the “Organization of Product Documentation” on page vii for a list of publications for your HP Routing
Switch.
1 - 2

Chapter 2
Securing Access to Management Functions
This chapter explains how to secure access to management functions on an HP device.The ProCurve Routing
Switches provide the following methods for securing access to the device. You can use one or more of these
methods:
• “Securing Access Methods” on page 2-1 lists the management access methods available on an HP device
and the ways you can secure each one
• “Restricting Remote Access to Management Functions” on page 2-3 explains how to restrict access to
management functions from remote sources, including Telnet, the Web management interface, and SNMP
• “Setting Passwords” on page 2-13 explains how to set passwords for Telnet access and management
privilege levels
• “Setting Up Local User Accounts” on page 2-16 explains how to define user accounts to regulate who can
access management functions
• “Configuring TACACS/TACACS+ Security” on page 2-20 explains how to configure SNMP read-only and
read-write community strings on an HP device
• “Configuring TACACS/TACACS+ Security” on page 2-20 explains how to configure TACACS/TACACS+
authentication, authorization, and accounting
• “Configuring RADIUS Security” on page 2-38 explains how to configure RADIUS authentication,
authorization, and accounting
• “Configuring Authentication-Method Lists” on page 2-54 explains how to set the order that authentication
methods are consulted when more than one is used with an access method
Securing Access Methods
The following table lists the management access methods available on an HP device, how they are secured by
default, and the ways in which they can be secured.
Table 2.1: Ways to secure management access to HP devices
Access method How the access Ways to secure the access method See
method is secured page
by default
Serial access to the CLI Not secured Establish passwords for management privilege
levels
June 2005 2 - 1
2-14

Security Guide for ProCurve 9300/9400 Series Routing Switches
Table 2.1: Ways to secure management access to HP devices (Continued)
Access method How the access Ways to secure the access method See
method is secured page
by default
Access to the Privileged EXEC Not secured Establish a password for Telnet access to the 2-13
and CONFIG levels of the CLI CLI
Establish passwords for management privilege 2-14
levels
Set up local user accounts 2-16
Configure TACACS/TACACS+ security 2-20
Configure RADIUS security 2-38
Telnet access Not secured Regulate Telnet access using ACLs 2-4
Allow Telnet access only from specific IP 2-7
addresses
Restrict Telnet access based on a client’s MAC 2-8
address
Allow Telnet access only to clients connected 2-9
to a specific VLAN
Specify the maximum number of login 2-8
attempts for Telnet access
Disable Telnet access 2-10
Establish a password for Telnet access 2-13
Establish passwords for privilege levels of the
CLI
Set up local user accounts 2-16
Configure TACACS/TACACS+ security 2-20
Configure RADIUS security 2-38
Secure Shell (SSH) access Not configured Configure SSH 3-1
Regulate SSH access using ACLs 2-5
Allow SSH access only from specific IP 2-7
addresses
Restrict SSH access based on a client’s MAC 2-8
address
Establish passwords for privilege levels of the
CLI
2-14
2-14
Set up local user accounts 2-16
Configure TACACS/TACACS+ security 2-20
Configure RADIUS security 2-38
2 - 2 June 2005

Securing Access to Management Functions
Table 2.1: Ways to secure management access to HP devices (Continued)
Access method How the access Ways to secure the access method See
method is secured page
by default
Web management access SNMP read or read- Regulate Web management access using 2-5
write community ACLs
strings
Allow Web management access only from 2-8
specific IP addresses
Allow Web management access only to clients 2-9
connected to a specific VLAN
Disable Web management access 2-10
Configure SSL security for the Web 2-19
management interface
Set up local user accounts 2-16
Establish SNMP read or read-write community 10-1
strings for SNMP versions 1 and 2
Establishing user groups for SNMP version 3 10-7
Configure TACACS/TACACS+ security 2-20
Configure RADIUS security 2-38
SNMP access SNMP read or read-
write community
strings and the
password to the Super
User privilege level
Note: SNMP read or
read-write community
strings are always
required for SNMP
access to the device.
TFTP access Not secured Allow TFTP access only to clients connected
Regulate SNMP access using ACLs 2-5
Allow SNMP access only from specific IP
addresses
Disable SNMP access 2-11
Allow SNMP access only to clients connected
to a specific VLAN
Establish passwords to management levels of
the CLI
Set up local user accounts 2-16
Establish SNMP read or read-write community 2-20
strings
to a specific VLAN
Restricting Remote Access to Management Functions
You can restrict access to management functions from remote sources, including Telnet, the Web management
interface, and SNMP. The following methods for restricting remote access are supported:
2-8
2-9
2-14
2-9
• Using ACLs to restrict Telnet, Web management interface, or SNMP access
• Allowing remote access only from specific IP addresses
• Allowing remote access only to clients connected to a specific VLAN
• Specifically disabling Telnet, Web management interface, or SNMP access to the device
June 2005 2 - 3

Security Guide for ProCurve 9300/9400 Series Routing Switches
The following sections describe how to restrict remote access to an HP device using these methods.
Using ACLs to Restrict Remote Access
You can use standard ACLs to control the following access methods to management functions on an HP device:
• Telnet access
• SSH access
• Web management access
• SNMP access
To configure access control for these management access methods:
1. Configure an ACL with the IP addresses you want to allow to access the device
2. Configure a Telnet access group, SSH access group, web access group, and SNMP community strings. Each
of these configuration items accepts an ACL as a parameter. The ACL contains entries that identify the IP
addresses that can use the access method.
The following sections present examples of how to secure management access using ACLs. See the “IP Access
Control Lists (ACLs)” chapter in the Advanced Configuration and Management Guide for ProCurve 9300/9400
Series Routing Switches for more information on configuring ACLs.
NOTE: In releases prior to 07.7.00, ACL filtering for remote management access was done in software (that is,
by the CPU). Starting with release 07.7.00, you can configure EP devices to perform the filtering in hardware.
See
“Hardware Filtering for Remote Management Access ( EP Devices Running Release 07.7.00 and Higher)” on
page 2-6.
Using an ACL to Restrict Telnet Access
To configure an ACL that restricts Telnet access to the device, enter commands such as the following:
ProCurveRS(config)# access-list 10 deny host 209.157.22.32 log
ProCurveRS(config)# access-list 10 deny 209.157.23.0 0.0.0.255 log
ProCurveRS(config)# access-list 10 deny 209.157.24.0 0.0.0.255 log
ProCurveRS(config)# access-list 10 deny 209.157.25.0/24 log
ProCurveRS(config)# access-list 10 permit any
ProCurveRS(config)# telnet access-group 10
ProCurveRS(config)# write memory
Syntax: telnet access-group <num>
The <num> parameter specifies the number of a standard ACL and must be from 1 – 99.
The commands above configure ACL 10, then apply the ACL as the access list for Telnet access. The device
allows Telnet access to all IP addresses except those listed in ACL 10.
To configure a more restrictive ACL, create permit entries and omit the permit any entry at the end of the ACL.
For example:
ProCurveRS(config)# access-list 10 permit host 209.157.22.32
ProCurveRS(config)# access-list 10 permit 209.157.23.0 0.0.0.255
ProCurveRS(config)# access-list 10 permit 209.157.24.0 0.0.0.255
ProCurveRS(config)# access-list 10 permit 209.157.25.0/24
ProCurveRS(config)# telnet access-group 10
ProCurveRS(config)# write memory
The ACL in this example permits Telnet access only to the IP addresses in the permit entries and denies Telnet
access from all other IP addresses.
2 - 4 June 2005

Securing Access to Management Functions
Using an ACL to Restrict SSH Access
To configure an ACL that restricts SSH access to the device, enter commands such as the following:
ProCurveRS(config)# access-list 12 deny host 209.157.22.98 log
ProCurveRS(config)# access-list 12 deny 209.157.23.0 0.0.0.255 log
ProCurveRS(config)# access-list 12 deny 209.157.24.0/24 log
ProCurveRS(config)# access-list 12 permit any
ProCurveRS(config)# ssh access-group 12
ProCurveRS(config)# write memory
Syntax: ssh access-group <num>
The <num> parameter specifies the number of a standard ACL and must be from 1 – 99.
These commands configure ACL 12, then apply the ACL as the access list for SSH access. The device denies
SSH access from the IP addresses listed in ACL 12 and permits SSH access from all other IP addresses. Without
the last ACL entry for permitting all packets, this ACL would deny SSH access from all IP addresses.
NOTE: In this example, the command ssh access-group 10 could have been used to apply the ACL configured
in the example for Telnet access. You can use the same ACL multiple times.
Using an ACL to Restrict Web Management Access
To configure an ACL that restricts Web management access to the device, enter commands such as the following:
ProCurveRS(config)# access-list 12 deny host 209.157.22.98 log
ProCurveRS(config)# access-list 12 deny 209.157.23.0 0.0.0.255 log
ProCurveRS(config)# access-list 12 deny 209.157.24.0/24 log
ProCurveRS(config)# access-list 12 permit any
ProCurveRS(config)# web access-group 12
ProCurveRS(config)# write memory
Syntax: web access-group <num>
The <num> parameter specifies the number of a standard ACL and must be from 1 – 99.
These commands configure ACL 12, then apply the ACL as the access list for Web management access. The
device denies Web management access from the IP addresses listed in ACL 12 and permits Web management
access from all other IP addresses. Without the last ACL entry for permitting all packets, this ACL would deny
Web management access from all IP addresses.
Using ACLs to Restrict SNMP Access
To restrict SNMP access to the device using ACLs, enter commands such as the following:
June 2005 2 - 5

Security Guide for ProCurve 9300/9400 Series Routing Switches
NOTE: The syntax for using ACLs for SNMP access is different from the syntax for controlling Telnet, SSH, and
Web management access using ACLs.
ProCurveRS(config)# access-list 25 deny host 209.157.22.98 log
ProCurveRS(config)# access-list 25 deny 209.157.23.0 0.0.0.255 log
ProCurveRS(config)# access-list 25 deny 209.157.24.0 0.0.0.255 log
ProCurveRS(config)# access-list 25 permit any
ProCurveRS(config)# access-list 30 deny 209.157.25.0 0.0.0.255 log
ProCurveRS(config)# access-list 30 deny 209.157.26.0/24 log
ProCurveRS(config)# access-list 30 permit any
ProCurveRS(config)# snmp-server community public ro 25
ProCurveRS(config)# snmp-server community private rw 30
ProCurveRS(config)# write memory
Syntax: snmp-server community <string> ro | rw <num>
The <string> parameter specifies the SNMP community string the user must enter to gain SNMP access.
The ro parameter indicates that the community string is for read-only (“get”) access. The rw parameter indicates
the community string is for read-write (“set”) access.
The <num> parameter specifies the number of a standard ACL and must be from 1 – 99.
These commands configure ACLs 25 and 30, then apply the ACLs to community strings.
ACL 25 is used to control read-only access using the “public” community string. ACL 30 is used to control readwrite access using the “private” community string.
NOTE: When snmp-server community is configured, all incoming SNMP packets are validated first by their
community strings and then by their bound ACLs. Before software release 07.7.00, packets are denied if filters are
not configured for an ACL. Beginning with software release 07.7.00, packets are permitted if no filters are
configured for an ACL.
Hardware Filtering for Remote Management Access ( EP Devices Running Release 07.7.00 and Higher)
In releases prior to 07.7.00, ACL filtering for remote management access was done in software (that is, by the
CPU). Starting with release 07.7.00, you can configure EP devices to perform the filtering in hardware.
Configuring Hardware-Based Remote Access Filtering on Routing Switches
The following is an example of configuring an EP Routing Switch to perform hardware filtering for Telnet access.
ProCurveRS(config)# vlan 3 by port
ProCurveRS(config-vlan-3)# untagged ethe 3/1 to 3/5
ProCurveRS(config-vlan-3)# router-interface ve 3
ProCurveRS(config-vlan-3)# exit
ProCurveRS(config)# interface ve 3
ProCurveRS(config-ve-1)# ip address 10.10.11.1 255.255.255.0
ProCurveRS(config-ve-1)# exit
ProCurveRS(config)# access-list 10 permit host 10.10.11.254
ProCurveRS(config)# access-list 10 permit host 192.168.2.254
ProCurveRS(config)# access-list 10 permit host 192.168.12.254
ProCurveRS(config)# access-list 10 permit host 192.64.22.254
ProCurveRS(config)# access-list 10 deny any
ProCurveRS(config)# telnet access-group 10 vlan 3
ProCurveRS(config)# ssh access-group 10 vlan 3
2 - 6 June 2005

Securing Access to Management Functions
ProCurveRS(config)# web access-group 10 vlan 3
ProCurveRS(config)# snmp-server community private rw 10 vlan 3
In this example, a Layer 3 VLAN is configured as a remote-access management VLAN and a router interface. The
IP address specified for the router interface becomes the management IP address of the VLAN.
When you make changes to the ACL configuration and/or make changes to the management VLAN, you must
enter the following command after making the configuration changes:
ProCurveRS(config)# remote-management rebind
Syntax: remote-management rebind
The show cam l4 command displays the following information about the hardware filtering in this configuration:
ProCurveRS# show cam l4 3/1
Sl Index Src IP_Addr SPort Dest IP_Addr DPort Prot Age Out Port
3 40960 192.64.22.254/32 Any 10.10.11.1/24 23 TCP dis Use L2/L3
3 40962 192.168.12.254/32 Any 10.10.11.1/24 23 TCP dis Use L2/L3
3 40964 192.168.2.254/32 Any 10.10.11.1/24 23 TCP dis Use L2/L3
3 40966 10.10.11.254/32 Any 10.10.11.1/24 23 TCP dis Use L2/L3
3 40968 Any Any 10.10.11.1/24 23 TCP dis Discard
The IP address in standard ACL 10 is the source IP address of the filter entry, and the IP address of the router
interface is the destination IP address of the filter entry.
Restricting Remote Access to the Device to Specific IP Addresses
By default, an HP device does not control remote management access based on the IP address of the managing
device. You can restrict remote management access to a single IP address for the following access methods:
• Telnet access
• Web management access
• SNMP access
In addition, if you want to restrict all three access methods to the same IP address, you can do so using a single
command.
The following examples show the CLI commands for restricting remote access. You can specify only one IP
address with each command. However, you can enter each command ten times to specify up to ten IP addresses.
NOTE: You cannot restrict remote management access using the Web management interface.
Restricting Telnet Access to a Specific IP Address
To allow Telnet access to the HP device only to the host with IP address 209.157.22.39, enter the following
command:
ProCurveRS(config)# telnet-client 209.157.22.39
Syntax: [no] telnet-client <ip-addr>
Restricting SSH Access to a Specific IP Address
To allow SSH access to the HP device only to the host with IP address 209.157.22.39, enter the following
command:
ProCurveRS(config)# ip ssh client 209.157.22.39
Syntax: [no] ip ssh client <ip-addr>
June 2005 2 - 7

Security Guide for ProCurve 9300/9400 Series Routing Switches
Restricting Web Management Access to a Specific IP Address
To allow Web management access to the HP device only to the host with IP address 209.157.22.26, enter the
following command:
ProCurveRS(config)# web-client 209.157.22.26
Syntax: [no] web-client <ip-addr>
Restricting SNMP Access to a Specific IP Address
To allow SNMP access to the HP device only to the host with IP address 209.157.22.14, enter the following
command:
ProCurveRS(config)# snmp-client 209.157.22.14
Syntax: [no] snmp-client <ip-addr>
Restricting All Remote Management Access to a Specific IP Address
To allow Telnet, Web, and SNMP management access to the HP device only to the host with IP address
209.157.22.69, you can enter three separate commands (one for each access type) or you can enter the following
command:
ProCurveRS(config)# all-client 209.157.22.69
Syntax: [no] all-client <ip-addr>
Restricting Telnet and SSH Access Based on a Client’s MAC Address
Starting in release 07.8.00, you can restrict remote management access to the HP device based on the MAC
address of a connecting client. This feature applies to Telnet and SSH access to the device.
For example, the following command allows Telnet access to the HP device only to the host with IP address
209.157.22.39 and MAC address 0007.e90f.e9a0:
ProCurveRS(config)# telnet-client 209.157.22.39 0007.e90f.e9a0
Syntax: [no] telnet-client <ip-addr> <mac-addr>
The following command allows Telnet access to the HP device to a host with any IP address and MAC address
0007.e90f.e9a0:
ProCurveRS(config)# telnet-client any 0007.e90f.e9a0
Syntax: [no] telnet-client any <mac-addr>
To allow SSH access to the HP device only to the host with IP address 209.157.22.39 and MAC address
0007.e90f.e9a0, enter the following command:
ProCurveRS(config)# ip ssh client 209.157.22.39 0007.e90f.e9a0
Syntax: [no] ip ssh client <ip-addr> <mac-addr>
To allow SSH access to the HP device to a host with any IP address and MAC address 0007.e90f.e9a0, enter the
following command:
ProCurveRS(config)# ip ssh client any 0007.e90f.e9a0
Syntax: [no] ip ssh client any <mac-addr>
Specifying the Maximum Number of Login Attempts for Telnet Access
If you are connecting to the HP device using Telnet, the device prompts you for a username and password. By
default, you have up to 4 chances to enter a correct username and password. If you do not enter a correct
username or password after 4 attempts, the HP device disconnects the Telnet session.
In this release, you can specify the number of attempts a Telnet user has to enter a correct username and
password before the device disconnects the Telnet session. For example, to allow a Telnet user up to 5 chances
to enter a correct username and password, enter the following command:
2 - 8 June 2005

Securing Access to Management Functions
ProCurveRS(config)# telnet login-retries 5
Syntax: [no] telnet login-retries <number>
You can specify from 0 – 5 attempts. The default is 4 attempts.
Restricting Remote Access to the Device to Specific VLAN IDs
You can restrict management access to an HP device to ports within a specific port-based VLAN. VLAN-based
access control applies to the following access methods:
• Telnet access
• Web management access
• SNMP access
• TFTP access
By default, access is allowed for all the methods listed above on all ports. Once you configure security for a given
access method based on VLAN ID, access to the device using that method is restricted to only the ports within the
specified VLAN.
VLAN-based access control works in conjunction with other access control methods. For example, suppose you
configure an ACL to permit Telnet access only to specific client IP addresses, and you also configure VLAN-based
access control for Telnet access. In this case, the only Telnet clients that can access the device are clients that
have one of the IP addresses permitted by the ACL and are connected to a port that is in a permitted VLAN.
Clients who have a permitted IP address but are connected to a port in a VLAN that is not permitted still cannot
access the device through Telnet.
Restricting Telnet Access to a Specific VLAN
To allow Telnet access only to clients in a specific VLAN, enter a command such as the following:
ProCurveRS(config)# telnet server enable vlan 10
The command in this example configures the device to allow Telnet management access only to clients connected
to ports within port-based VLAN 10. Clients connected to ports that are not in VLAN 10 are denied management
access.
Syntax: [no] telnet server enable vlan <vlan-id>
Restricting Web Management Access to a Specific VLAN
To allow Web management access only to clients in a specific VLAN, enter a command such as the following:
ProCurveRS(config)# web-management enable vlan 10
The command in this example configures the device to allow Web management access only to clients connected
to ports within port-based VLAN 10. Clients connected to ports that are not in VLAN 10 are denied management
access.
Syntax: [no] web-management enable vlan <vlan-id>
Restricting SNMP Access to a Specific VLAN
To allow SNMP access only to clients in a specific VLAN, enter a command such as the following:
ProCurveRS(config)# snmp-server enable vlan 40
The command in this example configures the device to allow SNMP access only to clients connected to ports
within port-based VLAN 40. Clients connected to ports that are not in VLAN 40 are denied access.
Syntax: [no] snmp-server enable vlan <vlan-id>
Restricting TFTP Access to a Specific VLAN
To allow TFTP access only to clients in a specific VLAN, enter a command such as the following:
ProCurveRS(config)# tftp client enable vlan 40
June 2005 2 - 9

Security Guide for ProCurve 9300/9400 Series Routing Switches
The command in this example configures the device to allow TFTP access only to clients connected to ports within
port-based VLAN 40. Clients connected to ports that are not in VLAN 40 are denied access.
Syntax: [no] tftp client enable vlan <vlan-id>
Disabling Specific Access Methods
You can specifically disable the following access methods:
• Telnet access
• Web management access
• SNMP access
NOTE: If you disable Telnet access, you will not be able to access the CLI except through a serial connection to
the management module. If you disable SNMP access, you will not be able to use SNMP management
applications.
NOTE: In software releases 07.7.00 and later, you can disable access to the Management IP address through
the device’s Content Addressable Memory (CAM). See
Functions” on page 2-12.
Disabling Telnet Access
“Disabling an Interface’s Access to Management
Telnet access is enabled by default. You can use a Telnet client to access the CLI on the device over the network.
If you do not plan to use the CLI over the network and want to disable Telnet access to prevent others from
establishing CLI sessions with the device, enter the following command:
ProCurveRS(config)# no telnet-server
To re-enable Telnet operation, enter the following command:
ProCurveRS(config)# telnet-server
Syntax: [no] telnet-server
Disabling Web Management Access
If you want to prevent access to the device through the Web management interface, you can disable the Web
management interface.
NOTE: As soon as you make this change, the device stops responding to Web management sessions. If you
make this change using your Web browser, your browser can contact the device, but the device will not reply once
the change takes place.
USING THE CLI
To disable the Web management interface, enter the following command:
ProCurveRS(config)# no web-management
To re-enable the Web management interface, enter the following command:
ProCurveRS(config)# web-management
Syntax: [no] web-management
2 - 10 June 2005
Securing Access to Management Functions
USING THE WEB MANAGEMENT INTERFACE
1. Log on to the device using a valid user name and password for read-write access.
2. Select the Management
panel.
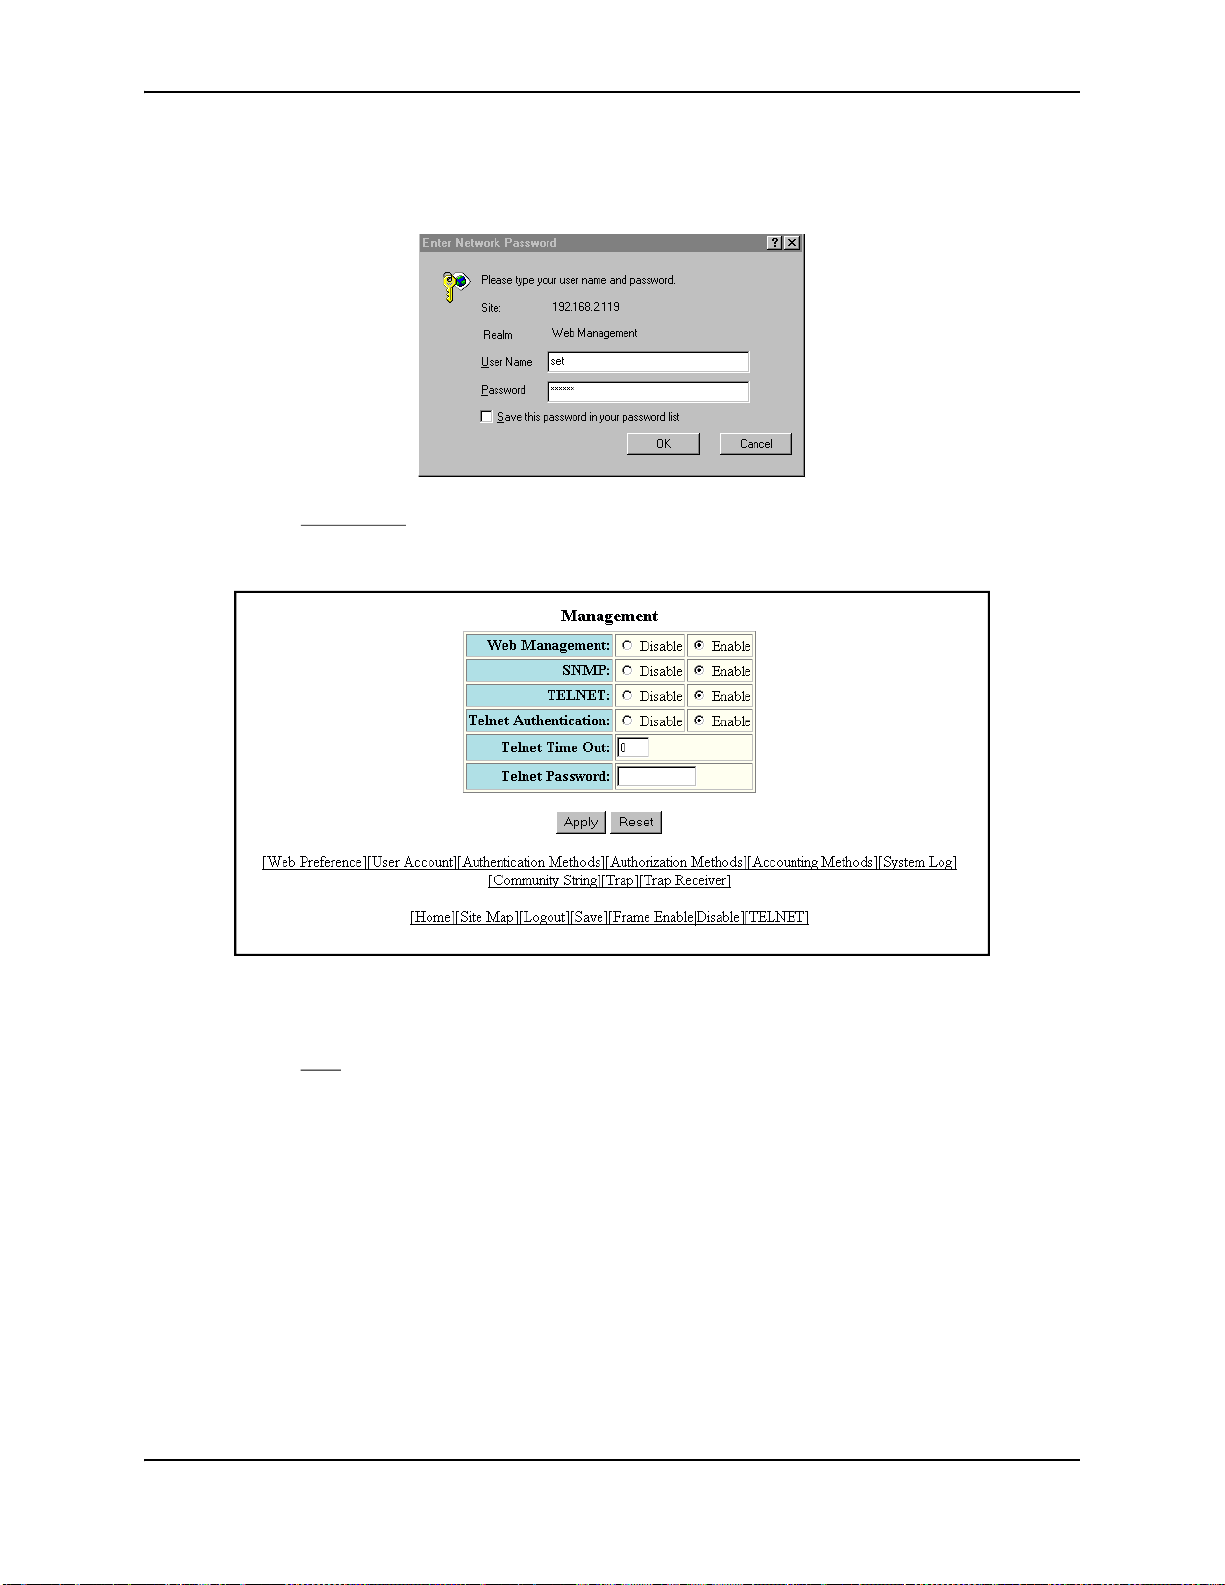
3. Click Disable next to Web Management.
4. Click the Apply button to save the change to the device’s running-config file.
5. Select the Save
to the startup-config file on the device’s flash memory.
link at the bottom of the dialog. Select Yes when prompted to save the configuration change
link from the System configuration panel to display the Management configuration
Disabling SNMP Access
SNMP is enabled by default on all HP devices. To disable SNMP, use one of the following methods.
USING THE CLI
To disable SNMP management of the device:
ProCurveRS(config)# snmp disable
To later re-enable SNMP management of the device:
ProCurveRS(config)# no snmp disable
Syntax: [no] snmp disable
June 2005 2 - 11

Security Guide for ProCurve 9300/9400 Series Routing Switches
USING THE WEB MANAGEMENT INTERFACE
1. Log on to the device using a valid user name and password for read-write access. The System configuration
dialog is displayed.
2. Select the Management
panel.
3. Click Disable next to SNMP.
4. Click the Apply button to save the change to the device’s running-config file.
link from the System configuration panel to display the Management configuration
5. Select the Save link at the bottom of the dialog. Select Ye
to the startup-config file on the device’s flash memory.
s when prompted to save the configuration change
Disabling an Interface’s Access to Management Functions
Beginning In software release 07.7.00, you can protect the CPU from remote access to management functions
such as:
• Telnet
• SSH
• Web Management Interface
• SNMP
• TFTP
• RADIUS
• TACACS
• TACACS+
To enable this feature, disable access to the Management IP address through the device’s Content Addressable
Memory (CAM). The following shows an example configuration.
NOTE: This feature does not affect Layer 3 routing functions.
ProCurveRS(config)# int e 3/10
ProCurveRS(config-if-e1000-3/10)# ip address 10.10.10.1 255.255.255.0
ProCurveRS(config-if-e1000-3/10)# exit
ProCurveRS(config)# int e 3/11
ProCurveRS(config-if-e1000-3/11)# ip address 11.11.11.1 255.255.255.0
ProCurveRS(config-if-e1000-3/11)# management-ip-disable
ProCurveRS(config-if-e1000-3/11)# exit
ProCurveRS(config)# int e 3/12
ProCurveRS(config-if-e1000-3/12)# ip address 12.12.12.1 255.255.255.0
ProCurveRS(config-if-e1000-3/12)# management-ip-disable
ProCurveRS(config-if-e1000-3/12)# exit
ProCurveRS(config)# int e 3/13
ProCurveRS(config-if-e1000-3/13)# ip address 13.13.13.1 255.255.255.0
ProCurveRS(config-if-e1000-3/13)# management-ip-disable
ProCurveRS(config-if-e1000-3/13)# exit
Syntax: [no] ip address <ip-addr> <ip-mask>
where <ip-addr> and <ip-mask> are the destination IP address and subnet mask.
Syntax: [no] management-ip-disable
Use the no form of the command to re-enable access to the Management IP address.
2 - 12 June 2005

Securing Access to Management Functions
Viewing Information about Disabled Management IP Addresses
Use the show cam l4 command to display information about CAM entries for disabled management IP addresses.
Setting Passwords
Passwords can be used to secure the following access methods:
• Telnet access can be secured by setting a Telnet password. See “Setting a Telnet Password” on page 2-13.
• Access to the Privileged EXEC and CONFIG levels of the CLI can be secured by setting passwords for
management privilege levels. See “Setting Passwords for Management Privilege Levels” on page 2-14.
This section also provides procedures for enhancing management privilege levels, recovering from a lost
password, and disabling password encryption.
NOTE: You also can configure up to 16 user accounts consisting of a user name and password, and assign each
user account a management privilege level.
Setting a Telnet Password
By default, the device does not require a user name or password when you log in to the CLI using Telnet. You can
assign a password for Telnet access using one of the following methods.
USING THE CLI
To set the password “letmein” for Telnet access to the CLI, enter the following command at the global CONFIG
level:
ProCurveRS(config)# enable telnet password letmein
See “Setting Up Local User Accounts” on page 2-16.
Syntax: [no] enable telnet password <string>
USING THE WEB MANAGEMENT INTERFACE
1. Log on to the device using a valid user name and password for read-write access. The System configuration
panel is displayed.
2. Select the Management
panel.
3. Enter the password in the Telnet Password field.
4. Click the Apply button to save the change to the device’s running-config file.
5. Select the Save
to the startup-config file on the device’s flash memory.
link at the bottom of the dialog. Select Yes when prompted to save the configuration change
link from the System configuration panel to display the Management configuration
Suppressing Telnet Connection Rejection Messages
By default, if an HP device denies Telnet management access to the device, the software sends a message to the
denied Telnet client. You can optionally suppress the rejection message. When you enable the option, a denied
Telnet client does not receive a message from the HP device. Instead, the denied client simply does not gain
access.
To suppress the connection rejection message, use the following CLI method.
USING THE CLI
To suppress the connection rejection message sent by the device to a denied Telnet client, enter the following
command at the global CONFIG level of the CLI:
ProCurveRS(config)# telnet server suppress-reject-message
Syntax: [no] telnet server suppress-reject-message
June 2005 2 - 13

Security Guide for ProCurve 9300/9400 Series Routing Switches
USING THE WEB MANAGEMENT INTERFACE
You cannot configure this option using the Web management interface.
Setting Passwords for Management Privilege Levels
You can set one password for each of the following management privilege levels:
• Super User level – Allows complete read-and-write access to the system. This is generally for system
administrators and is the only management privilege level that allows you to configure passwords.
• Port Configuration level – Allows read-and-write access for specific ports but not for global (system-wide)
parameters.
• Read Only level – Allows access to the Privileged EXEC mode and CONFIG mode of the CLI but only with
read access.
You can assign a password to each management privilege level. You also can configure up to 16 user accounts
consisting of a user name and password, and assign each user account to one of the three privilege levels. See
“Setting Up Local User Accounts” on page 2-16.
NOTE: You must use the CLI to assign a password for management privilege levels. You cannot assign a
password using the Web management interface.
If you configure user accounts in addition to privilege level passwords, the device will validate a user’s access
attempt using one or both methods (local user account or privilege level password), depending on the order you
specify in the authentication-method lists.
USING THE CLI
To set passwords for management privilege levels:
1. At the opening CLI prompt, enter the following command to change to the Pr
See “Configuring Authentication-Method Lists” on page 2-54.
ivileged level of the EXEC mode:
ProCurveRS> enable
ProCurveRS#
2. Access the CONFIG level of the CLI by entering the following command:
ProCurveRS# configure terminal
ProCurveRS(config)#
3. Enter the following command to set the Super User level password:
ProCurveRS(config)# enable super-user-password <text>
NOTE: You must set the Super User level password before you can set other types of passwords. The
Super User level password can be an alphanumeric string, but cannot begin with a number.
4. Enter the following commands to set the Port Configuration level and Read Only level passwords:
ProCurveRS(config)# enable port-config-password <text>
ProCurveRS(config)# enable read-only-password <text>
NOTE: If you forget your Super User level password, see “Recovering from a Lost Password” on page 2-15.
Augmenting Management Privilege Levels
Each management privilege level provides access to specific areas of the CLI by default:
• Super User level provides access to all commands and displays.
• Port Configuration level gives access to:
• The User EXEC and Privileged EXEC levels
• The port-specific parts of the CONFIG level
2 - 14 June 2005
 Loading...