

HP ProCurve 530 NA (J8986A), ProCurve 530 WW (J8987A), ProCurve 530 NA, ProCurve 530 WW Management And Configuration Manual
Page 1

Management and
Configuration Guide
www.procurve.com
ProCurve Wireless Access Point 530
Page 2

Page 3

ProCurve
Wireless Access Point 530
Management and Configuration Guide
Page 4

© Copyright 2008 Hewlett-Packard Development Company, L.P. The
information contained herein is subject to change without notice.
This document contains proprietary information, which is
protected by copyright. No part of this document may be
photocopied, reproduced, or translated into another
language without the prior written consent of HewlettPackard.
Publication Number
5991-2193
December 2008
Applicable Products
ProCurve Wireless Access Point 530 NA (J8986A)
ProCurve Wireless Access Point 530 WW (J8987A)
Disclaimer
HEWLETT-PACKARD COMPANY MAKES NO WARRANTY
OF ANY KIND WITH REGARD TO THIS MATERIAL,
INCLUDING, BUT NOT LIMITED TO, THE IMPLIED
WARRANTIES OF MERCHANTABILITY AND FITNESS
FOR A PARTICULAR PURPOSE. Hewlett-Packard shall not
be liable for errors contained herein or for incidental or
consequential damages in connection with the furnishing,
performance, or use of this material.
The only warranties for HP products and services are set
forth in the express warranty statements accompanying
such products and services. Nothing herein should be
construed as constituting an additional warranty. HP shall
not be liable for technical or editorial errors or omissions
contained herein.
Hewlett-Packard assumes no responsibility for the use or
reliability of its software on equipment that is not furnished
by Hewlett-Packard.
Trademark Credits
Windows NT®, Windows®, and MS Windows® are US
registered trademarks of Microsoft Corporation.
Warranty
See the Customer Support/Warranty booklet included with
the product.
A copy of the specific warranty terms applicable to your
Hewlett-Packard products and replacement parts can be
obtained from your HP Sales and Service Office or
authorized dealer.
Open Source Software Acknowledgement
Statement
This software incorporates open source components that
are governed by the GNU General Public License (GPL),
version 2. In accordance with this license, ProCurve
Networking will make available a complete, machinereadable copy of the source code components covered by
the GNU GPL upon receipt of a written request. Send a
request to:
Hewlett-Packard Company, L.P.
AP 530 Program
GNU GPL Source Code
Attn: ProCurve Networking Support
MS: 5551
Roseville, CA 95747 USA
Open source licenses pertaining to the open source software
included with the product can be found in Appendix C in this
guide.
Page 5

Contents
1 Getting Started
Overview . . . . . . . . . . . . . . . . . . . . . . . . . . . . . . . . . . . . . . . . . . . . . . . . . . . . . . 1-3
Conventions . . . . . . . . . . . . . . . . . . . . . . . . . . . . . . . . . . . . . . . . . . . . . . . . 1-3
Command Syntax Statements . . . . . . . . . . . . . . . . . . . . . . . . . . . . . . . . . 1-3
Command Prompts . . . . . . . . . . . . . . . . . . . . . . . . . . . . . . . . . . . . . . . . . . 1-4
Screen Examples . . . . . . . . . . . . . . . . . . . . . . . . . . . . . . . . . . . . . . . . . . . . 1-4
Related Publications . . . . . . . . . . . . . . . . . . . . . . . . . . . . . . . . . . . . . . . . . 1-4
Getting Documentation from the Web . . . . . . . . . . . . . . . . . . . . . . . . . . 1-5
Sources for More Information . . . . . . . . . . . . . . . . . . . . . . . . . . . . . . . . . 1-5
Need Just a Quick Start? . . . . . . . . . . . . . . . . . . . . . . . . . . . . . . . . . . . . . . . . . 1-6
IP Addressing . . . . . . . . . . . . . . . . . . . . . . . . . . . . . . . . . . . . . . . . . . . . . . . 1-6
To Set Up and Install the Access Point in Your Network . . . . . . . . . . 1-7
2 Selecting a Management Interface
Contents . . . . . . . . . . . . . . . . . . . . . . . . . . . . . . . . . . . . . . . . . . . . . . . . . . . . . . . 2-2
Overview . . . . . . . . . . . . . . . . . . . . . . . . . . . . . . . . . . . . . . . . . . . . . . . . . . . . . . 2-3
Understanding Management Interfaces . . . . . . . . . . . . . . . . . . . . . . . . . . . . . 2-4
Advantages of Using the CLI . . . . . . . . . . . . . . . . . . . . . . . . . . . . . . . . . . . . . . 2-5
Advantages of Using the ProCurve Access Point 530 Browser Interface . 2-6
3 Using the Command Line Interface (CLI)
Contents . . . . . . . . . . . . . . . . . . . . . . . . . . . . . . . . . . . . . . . . . . . . . . . . . . . . . . . 3-2
Overview . . . . . . . . . . . . . . . . . . . . . . . . . . . . . . . . . . . . . . . . . . . . . . . . . . . . . . 3-3
Accessing the CLI . . . . . . . . . . . . . . . . . . . . . . . . . . . . . . . . . . . . . . . . . . . . . . . 3-4
Direct Console Access . . . . . . . . . . . . . . . . . . . . . . . . . . . . . . . . . . . . . . . 3-4
Telnet Access . . . . . . . . . . . . . . . . . . . . . . . . . . . . . . . . . . . . . . . . . . . . . . . 3-5
Secure Shell Access . . . . . . . . . . . . . . . . . . . . . . . . . . . . . . . . . . . . . . . . . 3-5
Using the CLI . . . . . . . . . . . . . . . . . . . . . . . . . . . . . . . . . . . . . . . . . . . . . . . . . . . 3-6
iii
Page 6

Password Security . . . . . . . . . . . . . . . . . . . . . . . . . . . . . . . . . . . . . . . . . . . 3-6
Logging In . . . . . . . . . . . . . . . . . . . . . . . . . . . . . . . . . . . . . . . . . . . . . . . . . . 3-7
Command Levels . . . . . . . . . . . . . . . . . . . . . . . . . . . . . . . . . . . . . . . . . . . 3-8
Manager Exec Level . . . . . . . . . . . . . . . . . . . . . . . . . . . . . . . . . . . . . . 3-8
Global Configuration Level . . . . . . . . . . . . . . . . . . . . . . . . . . . . . . . . 3-8
Context-Specific Configuration Levels . . . . . . . . . . . . . . . . . . . . . . 3-9
Moving Between Command Levels . . . . . . . . . . . . . . . . . . . . . . . . . . . . 3-10
When Changes are Applied . . . . . . . . . . . . . . . . . . . . . . . . . . . . . . . . . . 3-10
Options for Getting Help in the CLI . . . . . . . . . . . . . . . . . . . . . . . . . . . 3-11
Displaying All Available Commands . . . . . . . . . . . . . . . . . . . . . . . 3-11
Completing the Current Command . . . . . . . . . . . . . . . . . . . . . . . . 3-13
Displaying Available Command Options . . . . . . . . . . . . . . . . . . . . 3-14
CLI Control and Editing . . . . . . . . . . . . . . . . . . . . . . . . . . . . . . . . . . . . . . . . . 3-15
4 Using the ProCurve Web Browser Interface
Contents . . . . . . . . . . . . . . . . . . . . . . . . . . . . . . . . . . . . . . . . . . . . . . . . . . . . . . . 4-2
Overview . . . . . . . . . . . . . . . . . . . . . . . . . . . . . . . . . . . . . . . . . . . . . . . . . . . . . . 4-3
Starting a Web Browser Interface Session with the Access Point . . . . . . . 4-4
Description of the Web Interface . . . . . . . . . . . . . . . . . . . . . . . . . . . . . . . . . . 4-6
The Home Page . . . . . . . . . . . . . . . . . . . . . . . . . . . . . . . . . . . . . . . . . . . . . 4-6
Support Window . . . . . . . . . . . . . . . . . . . . . . . . . . . . . . . . . . . . . . . . . . . . 4-7
Online Help for the ProCurve Web Browser Interface . . . . . . . . . . . . . 4-7
Using the Help in the Browser Interface . . . . . . . . . . . . . . . . . . . . . . . . 4-8
Web Interface Screens . . . . . . . . . . . . . . . . . . . . . . . . . . . . . . . . . . . . . . . . . . . 4-9
Device Information Group . . . . . . . . . . . . . . . . . . . . . . . . . . . . . . . . . . . 4-10
Device Information Summary . . . . . . . . . . . . . . . . . . . . . . . . . . . . 4-11
Wireless Stations Screen . . . . . . . . . . . . . . . . . . . . . . . . . . . . . . . . . 4-12
AP/LAN Statistics Screen . . . . . . . . . . . . . . . . . . . . . . . . . . . . . . . . 4-14
Wireless Statistics Screen . . . . . . . . . . . . . . . . . . . . . . . . . . . . . . . . 4-15
Event Log Screen . . . . . . . . . . . . . . . . . . . . . . . . . . . . . . . . . . . . . . . 4-17
Network Setup Group . . . . . . . . . . . . . . . . . . . . . . . . . . . . . . . . . . . . . . . 4-18
Network Setup Summary . . . . . . . . . . . . . . . . . . . . . . . . . . . . . . . . 4-19
Management Group . . . . . . . . . . . . . . . . . . . . . . . . . . . . . . . . . . . . . . . . . 4-20
Management Summary . . . . . . . . . . . . . . . . . . . . . . . . . . . . . . . . . . 4-21
Special Features Group . . . . . . . . . . . . . . . . . . . . . . . . . . . . . . . . . . . . . 4-22
Special Features Summary . . . . . . . . . . . . . . . . . . . . . . . . . . . . . . . 4-23
Tasks for Your First ProCurve Web Browser Interface Session . . . . . . . 4-24
iv
Page 7

Changing the Management Password . . . . . . . . . . . . . . . . . . . . . . . . . . 4-24
If You Lose the Password . . . . . . . . . . . . . . . . . . . . . . . . . . . . . . . . 4-26
Rebooting or Resetting the Access Point . . . . . . . . . . . . . . . . . . . . . . 4-26
Setting SNMP Community Names . . . . . . . . . . . . . . . . . . . . . . . . . . . . . 4-26
Setting the Radio Mode and Channel . . . . . . . . . . . . . . . . . . . . . . . . . . 4-28
Configuring TCP/IP Settings . . . . . . . . . . . . . . . . . . . . . . . . . . . . . . . . . 4-29
Setting WLAN SSID and Security Settings . . . . . . . . . . . . . . . . . . . . . . 4-31
5 General System Configuration
Overview . . . . . . . . . . . . . . . . . . . . . . . . . . . . . . . . . . . . . . . . . . . . . . . . . . . . . . 5-4
AP Network Configuration Checklist . . . . . . . . . . . . . . . . . . . . . . . . . . . . . . 5-5
Modifying Management Passwords . . . . . . . . . . . . . . . . . . . . . . . . . . . . . . . . 5-6
Web: Setting the Management Password . . . . . . . . . . . . . . . . . . . . . . . . 5-6
CLI: Setting the Management Password . . . . . . . . . . . . . . . . . . . . . . . . . 5-8
Setting Management Access Controls . . . . . . . . . . . . . . . . . . . . . . . . . . . . . 5-9
Web: Configuring Access Controls . . . . . . . . . . . . . . . . . . . . . . . . . . . . 5-10
CLI: Configuring Management Controls . . . . . . . . . . . . . . . . . . . . . . . . 5-12
Modifying System Information . . . . . . . . . . . . . . . . . . . . . . . . . . . . . . . . . . . 5-15
Web: Setting the System Name, Location, and Contact . . . . . . . . . . . 5-15
CLI: Setting the System Name . . . . . . . . . . . . . . . . . . . . . . . . . . . . . . . . 5-17
Configuring Ethernet Settings . . . . . . . . . . . . . . . . . . . . . . . . . . . . . . . . . . . 5-19
Web: Configuring IP Settings Statically or via DHCP . . . . . . . . . . . . 5-19
CLI: Configuring IP Settings Statically or via DHCP . . . . . . . . . . . . . . 5-23
Configuring SNMP . . . . . . . . . . . . . . . . . . . . . . . . . . . . . . . . . . . . . . . . . . . . . 5-25
MIB Support . . . . . . . . . . . . . . . . . . . . . . . . . . . . . . . . . . . . . . . . . . . . . . . 5-26
Web: Setting Basic SNMP Parameters . . . . . . . . . . . . . . . . . . . . . . . . . 5-26
CLI: Setting Basic SNMP Parameters . . . . . . . . . . . . . . . . . . . . . . . . . . 5-28
Web: Configuring SNMP v1 and v2c Traps . . . . . . . . . . . . . . . . . . . . . 5-32
SNMP Traps . . . . . . . . . . . . . . . . . . . . . . . . . . . . . . . . . . . . . . . . . . . 5-32
SNMP Trap Hosts . . . . . . . . . . . . . . . . . . . . . . . . . . . . . . . . . . . . . . . 5-35
CLI: Configuring SNMP v1 and v2c Traps . . . . . . . . . . . . . . . . . . . . . . 5-36
CLI: Configuring SNMP v1 and v2c Trap Destinations . . . . . . . . . . . . 5-36
Configuring SNMPv3 . . . . . . . . . . . . . . . . . . . . . . . . . . . . . . . . . . . . . . . . . . . 5-38
Web: Enabling & Disabling SNMPv3 . . . . . . . . . . . . . . . . . . . . . . . . . . . 5-38
v
Page 8

CLI: Enabling & Disabling SNMPv3 . . . . . . . . . . . . . . . . . . . . . . . . . . . 5-39
Web: Managing SNMPv3 Users . . . . . . . . . . . . . . . . . . . . . . . . . . . . . . . 5-40
CLI: Managing SNMPv3 Users . . . . . . . . . . . . . . . . . . . . . . . . . . . . . . . . 5-42
CLI: Displaying SNMPv3 Settings . . . . . . . . . . . . . . . . . . . . . . . . . . . . . 5-43
Enabling System Logging . . . . . . . . . . . . . . . . . . . . . . . . . . . . . . . . . . . . . . . 5-44
Web: Setting Logging Parameters . . . . . . . . . . . . . . . . . . . . . . . . . . . . . 5-45
CLI: Setting Logging Parameters . . . . . . . . . . . . . . . . . . . . . . . . . . . . . . 5-46
Configuring the Time (SNTP) . . . . . . . . . . . . . . . . . . . . . . . . . . . . . . . . . . . . 5-48
Web: Setting SNTP Parameters . . . . . . . . . . . . . . . . . . . . . . . . . . . . . . . 5-48
CLI: Setting SNTP Parameters . . . . . . . . . . . . . . . . . . . . . . . . . . . . . . . . 5-50
Configuring RADIUS Accounting . . . . . . . . . . . . . . . . . . . . . . . . . . . . . . . . . 5-51
Web: Setting RADIUS Accounting Server Parameters . . . . . . . . . . . . 5-52
CLI: Enabling RADIUS Accounting Parameters . . . . . . . . . . . . . . . . . 5-54
Setting Up Filter Control . . . . . . . . . . . . . . . . . . . . . . . . . . . . . . . . . . . . . . . . 5-55
Web: Setting Traffic Filters . . . . . . . . . . . . . . . . . . . . . . . . . . . . . . . . . . 5-55
CLI: Setting Traffic Filters . . . . . . . . . . . . . . . . . . . . . . . . . . . . . . . . . . . 5-56
Configuring VLAN Support . . . . . . . . . . . . . . . . . . . . . . . . . . . . . . . . . . . . . . 5-57
Web: Setting A Management VLAN . . . . . . . . . . . . . . . . . . . . . . . . . . . . 5-58
Web: Changing the Untagged VLAN ID . . . . . . . . . . . . . . . . . . . . . . . . 5-59
CLI: Enabling VLAN Support . . . . . . . . . . . . . . . . . . . . . . . . . . . . . . . . . 5-61
vi
Managing Group Configuration . . . . . . . . . . . . . . . . . . . . . . . . . . . . . . . . . . 5-63
Guidelines for Deploying Group Configuration . . . . . . . . . . . . . . . . . 5-64
The Synchronization Process . . . . . . . . . . . . . . . . . . . . . . . . . . . . . 5-64
Security and Integrity Recommendations . . . . . . . . . . . . . . . . . . . 5-65
Web: Enabling Group Configuration . . . . . . . . . . . . . . . . . . . . . . . . . . . 5-65
CLI: Enabling Group Configuration . . . . . . . . . . . . . . . . . . . . . . . . . . . 5-67
6 Wireless Interface Configuration
Overview . . . . . . . . . . . . . . . . . . . . . . . . . . . . . . . . . . . . . . . . . . . . . . . . . . . . . . 6-3
Setting the Country Code . . . . . . . . . . . . . . . . . . . . . . . . . . . . . . . . . . . . . . . . 6-4
CLI: Setting the Country Code . . . . . . . . . . . . . . . . . . . . . . . . . . . . . . . . . 6-4
Configuring the Radio . . . . . . . . . . . . . . . . . . . . . . . . . . . . . . . . . . . . . . . . . . . 6-6
Configuring the Radio Working Mode . . . . . . . . . . . . . . . . . . . . . . . . . . 6-7
Web: Setting the Radio Working Mode . . . . . . . . . . . . . . . . . . . . . . . . . . 6-9
Page 9

CLI: Setting the Radio Working Mode . . . . . . . . . . . . . . . . . . . . . . . . . 6-11
Configuring the Radio Channel and Other Basic Settings . . . . . . . . . 6-12
Web: Configuring Basic Radio Settings . . . . . . . . . . . . . . . . . . . . . . . . 6-12
Web: Configuring Advanced Radio Settings . . . . . . . . . . . . . . . . . . . . 6-14
Configuring Advanced Radio Settings . . . . . . . . . . . . . . . . . . . . . . 6-16
Configuring B + G Mode . . . . . . . . . . . . . . . . . . . . . . . . . . . . . . . . . 6-17
Configuring G- Only Mode . . . . . . . . . . . . . . . . . . . . . . . . . . . . . . . 6-19
Configuring Pure G Mode . . . . . . . . . . . . . . . . . . . . . . . . . . . . . . . . 6-20
CLI: Configuring Radio Settings . . . . . . . . . . . . . . . . . . . . . . . . . . . . . . 6-21
Modifying Antenna Settings . . . . . . . . . . . . . . . . . . . . . . . . . . . . . . . . . . . . . 6-23
Web: Setting the Tx Power Reduction . . . . . . . . . . . . . . . . . . . . . . . . . 6-23
Web: Setting the Antenna Type and Antenna Mode . . . . . . . . . . . . . . 6-25
CLI: Setting the Transmit Power Reduction and Antenna Parameters 627
Adaptive Tx Power Control . . . . . . . . . . . . . . . . . . . . . . . . . . . . . . . . . . . . . . 6-29
Feature Overview . . . . . . . . . . . . . . . . . . . . . . . . . . . . . . . . . . . . . . . . . . 6-29
Scope of Neighboring APs . . . . . . . . . . . . . . . . . . . . . . . . . . . . . . . . . . . 6-30
Adaptive Mode . . . . . . . . . . . . . . . . . . . . . . . . . . . . . . . . . . . . . . . . . . . . . 6-30
Power Reduction Limit . . . . . . . . . . . . . . . . . . . . . . . . . . . . . . . . . . . . . . 6-31
Configuration Strategy . . . . . . . . . . . . . . . . . . . . . . . . . . . . . . . . . . . . . . 6-31
Web: Configuring Adaptive Tx Power Control . . . . . . . . . . . . . . . . . . 6-32
CLI: Configuring Adaptive Tx Power Control . . . . . . . . . . . . . . . . . . . 6-34
Managing Multiple WLAN (BSS/SSID) Interfaces . . . . . . . . . . . . . . . . . . . 6-36
Web: Configuring SSID Interfaces . . . . . . . . . . . . . . . . . . . . . . . . . . . . . 6-37
CLI: Naming an SSID Interface . . . . . . . . . . . . . . . . . . . . . . . . . . . . . . . 6-40
CLI: Modifying WLAN (BSS/SSID) Interface Settings . . . . . . . . . . . . 6-41
7 Wireless Security Configuration
Overview . . . . . . . . . . . . . . . . . . . . . . . . . . . . . . . . . . . . . . . . . . . . . . . . . . . . . . 7-5
Wireless Security Overview . . . . . . . . . . . . . . . . . . . . . . . . . . . . . . . . . . . . . . 7-6
User Authentication . . . . . . . . . . . . . . . . . . . . . . . . . . . . . . . . . . . . . . . . . 7-6
MAC Authentication . . . . . . . . . . . . . . . . . . . . . . . . . . . . . . . . . . . . . 7-6
802.1X User Authentication . . . . . . . . . . . . . . . . . . . . . . . . . . . . . . . 7-7
Access Point Authentication . . . . . . . . . . . . . . . . . . . . . . . . . . . . . . . . . . 7-7
vii
Page 10

Encryption . . . . . . . . . . . . . . . . . . . . . . . . . . . . . . . . . . . . . . . . . . . . . . . . . 7-8
Wired Equivalent Privacy (WEP) . . . . . . . . . . . . . . . . . . . . . . . . . . . 7-8
Temporal Key Integrity Protocol (TKIP) . . . . . . . . . . . . . . . . . . . . 7-8
Counter Mode/CBC-MAC Protocol (CCMP) . . . . . . . . . . . . . . . . . . 7-9
Key Management . . . . . . . . . . . . . . . . . . . . . . . . . . . . . . . . . . . . . . . . . . . . 7-9
Security Profiles . . . . . . . . . . . . . . . . . . . . . . . . . . . . . . . . . . . . . . . . . . . . 7-9
No Security . . . . . . . . . . . . . . . . . . . . . . . . . . . . . . . . . . . . . . . . . . . . . 7-9
Static Wired Equivalent Privacy (WEP) . . . . . . . . . . . . . . . . . . . . 7-10
Dynamic Wired Equivalent Privacy (WEP) . . . . . . . . . . . . . . . . . 7-10
TKIP with Preshared Key . . . . . . . . . . . . . . . . . . . . . . . . . . . . . . . . 7-10
AES with Preshared Key . . . . . . . . . . . . . . . . . . . . . . . . . . . . . . . . . 7-10
TKIP with 802.1X . . . . . . . . . . . . . . . . . . . . . . . . . . . . . . . . . . . . . . . 7-11
AES with 802.1X . . . . . . . . . . . . . . . . . . . . . . . . . . . . . . . . . . . . . . . . 7-11
Other Security Features . . . . . . . . . . . . . . . . . . . . . . . . . . . . . . . . . . . . . 7-12
Establishing Security . . . . . . . . . . . . . . . . . . . . . . . . . . . . . . . . . . . . . . . . . . . 7-16
Web: Setting Security Options . . . . . . . . . . . . . . . . . . . . . . . . . . . . . . . . 7-18
Manual Configuration Using the CLI . . . . . . . . . . . . . . . . . . . . . . . . . . . . . . 7-24
CLI: Configuring Security Settings . . . . . . . . . . . . . . . . . . . . . . . . . . . . 7-24
Configuring RADIUS Client Authentication . . . . . . . . . . . . . . . . . . . . . . . . 7-32
Web: Setting RADIUS Server Parameters . . . . . . . . . . . . . . . . . . . . . . 7-33
CLI: Setting RADIUS Server Parameters . . . . . . . . . . . . . . . . . . . . . . . 7-35
Web: Establishing Local RADIUS Accounts . . . . . . . . . . . . . . . . . . . . 7-36
Managing Existing RADIUS Accounts . . . . . . . . . . . . . . . . . . . . . . 7-36
Adding New RADIUS Accounts . . . . . . . . . . . . . . . . . . . . . . . . . . . 7-37
Managing the RADIUS User Database . . . . . . . . . . . . . . . . . . . . . 7-39
CLI: Setting Local RADIUS Server Parameters . . . . . . . . . . . . . . . . . . 7-41
Configuring MAC Address Authentication . . . . . . . . . . . . . . . . . . . . . . . . . 7-43
Authentication Order . . . . . . . . . . . . . . . . . . . . . . . . . . . . . . . . . . . . . . . 7-43
Access Control List and RADIUS Server . . . . . . . . . . . . . . . . . . . . . . . 7-43
MAC Lockout and Client/Station Deauthentication . . . . . . . . . . . . . . 7-44
Web: Configuring Access Control List . . . . . . . . . . . . . . . . . . . . . . . . . 7-45
Web: Configuring MAC Address Authentication . . . . . . . . . . . . . . . . . 7-46
CLI: Configuring MAC Address Authentication . . . . . . . . . . . . . . . . . 7-47
Web: Configuring MAC Lockout . . . . . . . . . . . . . . . . . . . . . . . . . . . . . . 7-50
CLI: Configuring MAC Lockout . . . . . . . . . . . . . . . . . . . . . . . . . . . . . . . 7-51
CLI: Configuring Client/Station Deauthentication . . . . . . . . . . . . . . . 7-52
Configuring 802.1X AP Authentication . . . . . . . . . . . . . . . . . . . . . . . . . . . . 7-53
viii
Page 11

Guidelines for AP Authentication . . . . . . . . . . . . . . . . . . . . . . . . . . . . . 7-53
Web: Configuring AP Authentication . . . . . . . . . . . . . . . . . . . . . . . . . . 7-54
CLI: Configuring AP Authentication . . . . . . . . . . . . . . . . . . . . . . . . . . . 7-55
Web Authentication for Mobile Users . . . . . . . . . . . . . . . . . . . . . . . . . . . . . 7-57
The Web-Auth Process . . . . . . . . . . . . . . . . . . . . . . . . . . . . . . . . . . . . . . 7-57
Associating with the AP-530 . . . . . . . . . . . . . . . . . . . . . . . . . . . . . . 7-57
URL Intercept . . . . . . . . . . . . . . . . . . . . . . . . . . . . . . . . . . . . . . . . . . 7-58
Logging In . . . . . . . . . . . . . . . . . . . . . . . . . . . . . . . . . . . . . . . . . . . . . 7-58
Authenticating . . . . . . . . . . . . . . . . . . . . . . . . . . . . . . . . . . . . . . . . . 7-58
Redirecting to the Destination URL . . . . . . . . . . . . . . . . . . . . . . . . 7-60
Web-Auth Security . . . . . . . . . . . . . . . . . . . . . . . . . . . . . . . . . . . . . . . . . 7-60
User Credentials . . . . . . . . . . . . . . . . . . . . . . . . . . . . . . . . . . . . . . . . 7-60
Optional Encryption . . . . . . . . . . . . . . . . . . . . . . . . . . . . . . . . . . . . 7-60
Other Security Features . . . . . . . . . . . . . . . . . . . . . . . . . . . . . . . . . 7-60
The Web-Auth Address Pool . . . . . . . . . . . . . . . . . . . . . . . . . . . . . . . . . 7-61
Customizing the Authentication Screens . . . . . . . . . . . . . . . . . . . . . . . 7-61
Default Text Values for Authentication Screens . . . . . . . . . . . . . . . . . 7-62
Login Screen Default Values . . . . . . . . . . . . . . . . . . . . . . . . . . . . . . 7-62
Welcome Screen Default Values . . . . . . . . . . . . . . . . . . . . . . . . . . 7-63
Failed Screen Default Values . . . . . . . . . . . . . . . . . . . . . . . . . . . . . 7-63
Guidelines for Deploying Web-Auth . . . . . . . . . . . . . . . . . . . . . . . . . . . 7-63
Configuration Summary . . . . . . . . . . . . . . . . . . . . . . . . . . . . . . . . . . . . . 7-64
Web: Configuring the Global Address Pool . . . . . . . . . . . . . . . . . . . . . 7-64
CLI: Configuring the Global Address Pool . . . . . . . . . . . . . . . . . . . . . . 7-65
Web: Configuring Global Guest Account Settings . . . . . . . . . . . . . . . 7-66
CLI: Configuring Global Guest Account Settings . . . . . . . . . . . . . . . . 7-67
Web: Configuring Web-Auth on a WLAN . . . . . . . . . . . . . . . . . . . . . . . 7-68
Prerequisites . . . . . . . . . . . . . . . . . . . . . . . . . . . . . . . . . . . . . . . . . . . 7-68
CLI: Configuring Web-Auth on a WLAN . . . . . . . . . . . . . . . . . . . . . . . . 7-70
Prerequisites . . . . . . . . . . . . . . . . . . . . . . . . . . . . . . . . . . . . . . . . . . . 7-70
Web: Customizing the Login, Welcome, and Failed Screens . . . . . . . 7-72
CLI: Customizing the Login, Welcome, and Failed Screens . . . . . . . . 7-74
8 Special Features
Overview . . . . . . . . . . . . . . . . . . . . . . . . . . . . . . . . . . . . . . . . . . . . . . . . . . . . . . 8-3
QoS Commands . . . . . . . . . . . . . . . . . . . . . . . . . . . . . . . . . . . . . . . . . . . . . . . . 8-4
Web: Configuring QoS Parameters . . . . . . . . . . . . . . . . . . . . . . . . . . . . . 8-5
ix
Page 12

CLI: Configuring QoS Parameters . . . . . . . . . . . . . . . . . . . . . . . . . . . . . . 8-8
sFlow . . . . . . . . . . . . . . . . . . . . . . . . . . . . . . . . . . . . . . . . . . . . . . . . . . . . . . . . 8-12
Flow Sampling by the sFlow Agent . . . . . . . . . . . . . . . . . . . . . . . . . . . 8-12
Counter Polling by the sFlow Agent . . . . . . . . . . . . . . . . . . . . . . . . . . . 8-13
sFlow Collector . . . . . . . . . . . . . . . . . . . . . . . . . . . . . . . . . . . . . . . . . . . . 8-13
Configuring sFlow Receiver Instances . . . . . . . . . . . . . . . . . . . . . . . . . 8-13
sFlow Instances . . . . . . . . . . . . . . . . . . . . . . . . . . . . . . . . . . . . . . . . 8-13
Wireless Distribution System (WDS) and Spanning Tree Protocol (STP) 8-15
Web: Configuring WDS Parameters . . . . . . . . . . . . . . . . . . . . . . . . . . . 8-19
CLI: Configuring WDS Links . . . . . . . . . . . . . . . . . . . . . . . . . . . . . . . . . 8-23
Web: Configuring STP Parameters . . . . . . . . . . . . . . . . . . . . . . . . . . . . 8-26
CLI: Establishing STP Settings . . . . . . . . . . . . . . . . . . . . . . . . . . . . . . . 8-27
AP Detection Commands . . . . . . . . . . . . . . . . . . . . . . . . . . . . . . . . . . . . . . . 8-30
Web: Configuring AP Detection Parameters . . . . . . . . . . . . . . . . . . . . 8-30
CLI: Configuring AP Detection . . . . . . . . . . . . . . . . . . . . . . . . . . . . . . . 8-33
Probe Table . . . . . . . . . . . . . . . . . . . . . . . . . . . . . . . . . . . . . . . . . . . . . . . . . . . 8-35
Probe Table Description . . . . . . . . . . . . . . . . . . . . . . . . . . . . . . . . . . . . . 8-35
Guidelines for Configuring the Probe Table . . . . . . . . . . . . . . . . . . . . 8-35
Identity Driven Management . . . . . . . . . . . . . . . . . . . . . . . . . . . . . . . . . . . . 8-36
IDM VLAN . . . . . . . . . . . . . . . . . . . . . . . . . . . . . . . . . . . . . . . . . . . . . . . . 8-36
IDM ACL . . . . . . . . . . . . . . . . . . . . . . . . . . . . . . . . . . . . . . . . . . . . . . . . . . 8-37
Configuring an ACL in a RADIUS Server . . . . . . . . . . . . . . . . . . . 8-37
IDM Rate Limiting . . . . . . . . . . . . . . . . . . . . . . . . . . . . . . . . . . . . . . . . . . 8-37
9 Command Line Reference
Contents . . . . . . . . . . . . . . . . . . . . . . . . . . . . . . . . . . . . . . . . . . . . . . . . . . . . . . . 9-2
Overview . . . . . . . . . . . . . . . . . . . . . . . . . . . . . . . . . . . . . . . . . . . . . . . . . . . . . . 9-8
General Commands . . . . . . . . . . . . . . . . . . . . . . . . . . . . . . . . . . . . . . . . . . . . 9-10
configure . . . . . . . . . . . . . . . . . . . . . . . . . . . . . . . . . . . . . . . . . . . . . . . . . . 9-10
end . . . . . . . . . . . . . . . . . . . . . . . . . . . . . . . . . . . . . . . . . . . . . . . . . . . . . . . 9-11
exit . . . . . . . . . . . . . . . . . . . . . . . . . . . . . . . . . . . . . . . . . . . . . . . . . . . . . . . 9-11
logout . . . . . . . . . . . . . . . . . . . . . . . . . . . . . . . . . . . . . . . . . . . . . . . . . . . . 9-12
ping . . . . . . . . . . . . . . . . . . . . . . . . . . . . . . . . . . . . . . . . . . . . . . . . . . . . . . 9-12
reload . . . . . . . . . . . . . . . . . . . . . . . . . . . . . . . . . . . . . . . . . . . . . . . . . . . . 9-13
Page 13

show . . . . . . . . . . . . . . . . . . . . . . . . . . . . . . . . . . . . . . . . . . . . . . . . . . . . . 9-14
terminal . . . . . . . . . . . . . . . . . . . . . . . . . . . . . . . . . . . . . . . . . . . . . . . . . . . 9-16
System Management Commands . . . . . . . . . . . . . . . . . . . . . . . . . . . . . . . . . 9-16
country . . . . . . . . . . . . . . . . . . . . . . . . . . . . . . . . . . . . . . . . . . . . . . . . . . . 9-17
hostname . . . . . . . . . . . . . . . . . . . . . . . . . . . . . . . . . . . . . . . . . . . . . . . . . 9-19
domain . . . . . . . . . . . . . . . . . . . . . . . . . . . . . . . . . . . . . . . . . . . . . . . . . . . 9-20
password manager . . . . . . . . . . . . . . . . . . . . . . . . . . . . . . . . . . . . . . . . . 9-21
buttons . . . . . . . . . . . . . . . . . . . . . . . . . . . . . . . . . . . . . . . . . . . . . . . . . . . 9-21
cli-confirmation . . . . . . . . . . . . . . . . . . . . . . . . . . . . . . . . . . . . . . . . . . . . 9-22
console . . . . . . . . . . . . . . . . . . . . . . . . . . . . . . . . . . . . . . . . . . . . . . . . . . . 9-23
telnet . . . . . . . . . . . . . . . . . . . . . . . . . . . . . . . . . . . . . . . . . . . . . . . . . . . . . 9-23
ssh . . . . . . . . . . . . . . . . . . . . . . . . . . . . . . . . . . . . . . . . . . . . . . . . . . . . . . . 9-24
web-management . . . . . . . . . . . . . . . . . . . . . . . . . . . . . . . . . . . . . . . . . . 9-24
show buttons . . . . . . . . . . . . . . . . . . . . . . . . . . . . . . . . . . . . . . . . . . . . . . 9-25
show console . . . . . . . . . . . . . . . . . . . . . . . . . . . . . . . . . . . . . . . . . . . . . . 9-26
show ssh . . . . . . . . . . . . . . . . . . . . . . . . . . . . . . . . . . . . . . . . . . . . . . . . . . 9-26
show system-information . . . . . . . . . . . . . . . . . . . . . . . . . . . . . . . . . . . . 9-27
show version . . . . . . . . . . . . . . . . . . . . . . . . . . . . . . . . . . . . . . . . . . . . . . 9-29
System Logging Commands . . . . . . . . . . . . . . . . . . . . . . . . . . . . . . . . . . . . . 9-30
log . . . . . . . . . . . . . . . . . . . . . . . . . . . . . . . . . . . . . . . . . . . . . . . . . . . . . . . 9-30
logging . . . . . . . . . . . . . . . . . . . . . . . . . . . . . . . . . . . . . . . . . . . . . . . . . . . . 9-31
show debug . . . . . . . . . . . . . . . . . . . . . . . . . . . . . . . . . . . . . . . . . . . . . . . 9-32
show logging . . . . . . . . . . . . . . . . . . . . . . . . . . . . . . . . . . . . . . . . . . . . . . 9-32
System Clock Commands . . . . . . . . . . . . . . . . . . . . . . . . . . . . . . . . . . . . . . . 9-34
sntp . . . . . . . . . . . . . . . . . . . . . . . . . . . . . . . . . . . . . . . . . . . . . . . . . . . . . . 9-34
show sntp . . . . . . . . . . . . . . . . . . . . . . . . . . . . . . . . . . . . . . . . . . . . . . . . . 9-35
show time . . . . . . . . . . . . . . . . . . . . . . . . . . . . . . . . . . . . . . . . . . . . . . . . . 9-35
Network Management Application Commands . . . . . . . . . . . . . . . . . . . . . 9-37
snmp-server community restricted | unrestricted . . . . . . . . . . . . . . . . 9-38
snmp-server contact . . . . . . . . . . . . . . . . . . . . . . . . . . . . . . . . . . . . . . . . 9-39
snmp-server host . . . . . . . . . . . . . . . . . . . . . . . . . . . . . . . . . . . . . . . . . . . 9-40
snmp-server location . . . . . . . . . . . . . . . . . . . . . . . . . . . . . . . . . . . . . . . 9-41
snmp-server port . . . . . . . . . . . . . . . . . . . . . . . . . . . . . . . . . . . . . . . . . . . 9-42
snmp-server trap . . . . . . . . . . . . . . . . . . . . . . . . . . . . . . . . . . . . . . . . . . . 9-43
show snmp-server . . . . . . . . . . . . . . . . . . . . . . . . . . . . . . . . . . . . . . . . . . 9-45
xi
Page 14

snmpv3 enable . . . . . . . . . . . . . . . . . . . . . . . . . . . . . . . . . . . . . . . . . . . . . 9-46
snmpv3 user-name . . . . . . . . . . . . . . . . . . . . . . . . . . . . . . . . . . . . . . . . . 9-47
show snmpv3 . . . . . . . . . . . . . . . . . . . . . . . . . . . . . . . . . . . . . . . . . . . . . . 9-48
lldp . . . . . . . . . . . . . . . . . . . . . . . . . . . . . . . . . . . . . . . . . . . . . . . . . . . . . . . 9-48
show lldp . . . . . . . . . . . . . . . . . . . . . . . . . . . . . . . . . . . . . . . . . . . . . . . . . 9-49
Flash/File Commands . . . . . . . . . . . . . . . . . . . . . . . . . . . . . . . . . . . . . . . . . . 9-50
copy . . . . . . . . . . . . . . . . . . . . . . . . . . . . . . . . . . . . . . . . . . . . . . . . . . . . . . 9-51
copy custom-default startup-config . . . . . . . . . . . . . . . . . . . . . . . . . . . 9-51
copy startup-config . . . . . . . . . . . . . . . . . . . . . . . . . . . . . . . . . . . . . . . . . 9-52
copy factory-default . . . . . . . . . . . . . . . . . . . . . . . . . . . . . . . . . . . . . . . . 9-53
copy running-config . . . . . . . . . . . . . . . . . . . . . . . . . . . . . . . . . . . . . . . . 9-53
erase . . . . . . . . . . . . . . . . . . . . . . . . . . . . . . . . . . . . . . . . . . . . . . . . . . . . . 9-54
write . . . . . . . . . . . . . . . . . . . . . . . . . . . . . . . . . . . . . . . . . . . . . . . . . . . . . 9-55
show config . . . . . . . . . . . . . . . . . . . . . . . . . . . . . . . . . . . . . . . . . . . . . . . 9-56
show copy . . . . . . . . . . . . . . . . . . . . . . . . . . . . . . . . . . . . . . . . . . . . . . . . 9-57
show tech . . . . . . . . . . . . . . . . . . . . . . . . . . . . . . . . . . . . . . . . . . . . . . . . . 9-57
show custom-default . . . . . . . . . . . . . . . . . . . . . . . . . . . . . . . . . . . . . . . . 9-58
show running-config . . . . . . . . . . . . . . . . . . . . . . . . . . . . . . . . . . . . . . . . 9-60
Group Configuration . . . . . . . . . . . . . . . . . . . . . . . . . . . . . . . . . . . . . . . . . . . 9-61
group-config . . . . . . . . . . . . . . . . . . . . . . . . . . . . . . . . . . . . . . . . . . . . . . . 9-61
group-config name . . . . . . . . . . . . . . . . . . . . . . . . . . . . . . . . . . . . . . . . . 9-62
group-config member-id . . . . . . . . . . . . . . . . . . . . . . . . . . . . . . . . . . . . . 9-62
show group-config . . . . . . . . . . . . . . . . . . . . . . . . . . . . . . . . . . . . . . . . . . 9-63
RADIUS Accounting/Authentication . . . . . . . . . . . . . . . . . . . . . . . . . . . . . . 9-65
radius-accounting . . . . . . . . . . . . . . . . . . . . . . . . . . . . . . . . . . . . . . . . . . 9-65
radius failover-to-local | retransmit . . . . . . . . . . . . . . . . . . . . . . . . . . . . 9-66
radius primary | secondary . . . . . . . . . . . . . . . . . . . . . . . . . . . . . . . . . . . 9-67
RADIUS Users . . . . . . . . . . . . . . . . . . . . . . . . . . . . . . . . . . . . . . . . . . . . . . . . . 9-69
radius-local . . . . . . . . . . . . . . . . . . . . . . . . . . . . . . . . . . . . . . . . . . . . . . . . 9-69
show radius-local . . . . . . . . . . . . . . . . . . . . . . . . . . . . . . . . . . . . . . . . . . 9-70
MAC Address Authentication . . . . . . . . . . . . . . . . . . . . . . . . . . . . . . . . . . . . 9-72
mac-auth-local . . . . . . . . . . . . . . . . . . . . . . . . . . . . . . . . . . . . . . . . . . . . . 9-72
mac-auth-remote . . . . . . . . . . . . . . . . . . . . . . . . . . . . . . . . . . . . . . . . . . . 9-73
show mac-auth-local . . . . . . . . . . . . . . . . . . . . . . . . . . . . . . . . . . . . . . . . 9-74
xii
Page 15

MAC Lockout . . . . . . . . . . . . . . . . . . . . . . . . . . . . . . . . . . . . . . . . . . . . . . . . . 9-75
lockout-mac . . . . . . . . . . . . . . . . . . . . . . . . . . . . . . . . . . . . . . . . . . . . . . . 9-75
show lockout-mac . . . . . . . . . . . . . . . . . . . . . . . . . . . . . . . . . . . . . . . . . . 9-76
lockout-mac clear . . . . . . . . . . . . . . . . . . . . . . . . . . . . . . . . . . . . . . . . . . 9-76
Client/Station Deauthentication . . . . . . . . . . . . . . . . . . . . . . . . . . . . . . . . . . 9-78
deauth-mac . . . . . . . . . . . . . . . . . . . . . . . . . . . . . . . . . . . . . . . . . . . . . . . . 9-78
Web Authentication Commands . . . . . . . . . . . . . . . . . . . . . . . . . . . . . . . . . . 9-79
web-auth (Global Address Pool) . . . . . . . . . . . . . . . . . . . . . . . . . . . . . . 9-80
web-auth (Global Guest User) . . . . . . . . . . . . . . . . . . . . . . . . . . . . . . . . 9-81
web-auth (WLAN Configuration) . . . . . . . . . . . . . . . . . . . . . . . . . . . . . 9-82
web-auth (WLAN Screen Customization) . . . . . . . . . . . . . . . . . . . . . . 9-83
show web-auth . . . . . . . . . . . . . . . . . . . . . . . . . . . . . . . . . . . . . . . . . . . . . 9-85
AP Authentication Commands . . . . . . . . . . . . . . . . . . . . . . . . . . . . . . . . . . . 9-86
ap-authentication . . . . . . . . . . . . . . . . . . . . . . . . . . . . . . . . . . . . . . . . . . . 9-86
show ap-authentication . . . . . . . . . . . . . . . . . . . . . . . . . . . . . . . . . . . . . 9-87
Filtering Commands . . . . . . . . . . . . . . . . . . . . . . . . . . . . . . . . . . . . . . . . . . . . 9-87
inter-station-blocking . . . . . . . . . . . . . . . . . . . . . . . . . . . . . . . . . . . . . . . 9-88
wireless-mgmt-block . . . . . . . . . . . . . . . . . . . . . . . . . . . . . . . . . . . . . . . . 9-88
show filters . . . . . . . . . . . . . . . . . . . . . . . . . . . . . . . . . . . . . . . . . . . . . . . . 9-89
Ethernet Interface Commands . . . . . . . . . . . . . . . . . . . . . . . . . . . . . . . . . . . 9-90
interface . . . . . . . . . . . . . . . . . . . . . . . . . . . . . . . . . . . . . . . . . . . . . . . . . . 9-90
enable (ethernet) . . . . . . . . . . . . . . . . . . . . . . . . . . . . . . . . . . . . . . . . . . . 9-91
disable (ethernet) . . . . . . . . . . . . . . . . . . . . . . . . . . . . . . . . . . . . . . . . . . 9-91
description . . . . . . . . . . . . . . . . . . . . . . . . . . . . . . . . . . . . . . . . . . . . . . . . 9-92
dns primary . . . . . . . . . . . . . . . . . . . . . . . . . . . . . . . . . . . . . . . . . . . . . . . 9-92
dns secondary . . . . . . . . . . . . . . . . . . . . . . . . . . . . . . . . . . . . . . . . . . . . . 9-93
ip address . . . . . . . . . . . . . . . . . . . . . . . . . . . . . . . . . . . . . . . . . . . . . . . . 9-94
ip default-gateway . . . . . . . . . . . . . . . . . . . . . . . . . . . . . . . . . . . . . . . . . . 9-95
speed-duplex . . . . . . . . . . . . . . . . . . . . . . . . . . . . . . . . . . . . . . . . . . . . . . 9-96
show ip . . . . . . . . . . . . . . . . . . . . . . . . . . . . . . . . . . . . . . . . . . . . . . . . . . . 9-96
show interface . . . . . . . . . . . . . . . . . . . . . . . . . . . . . . . . . . . . . . . . . . . . . 9-97
show ip . . . . . . . . . . . . . . . . . . . . . . . . . . . . . . . . . . . . . . . . . . . . . . . . . . . 9-98
Wireless Interface Commands . . . . . . . . . . . . . . . . . . . . . . . . . . . . . . . . . . 9-100
radio . . . . . . . . . . . . . . . . . . . . . . . . . . . . . . . . . . . . . . . . . . . . . . . . . . . . 9-101
xiii
Page 16

ssid . . . . . . . . . . . . . . . . . . . . . . . . . . . . . . . . . . . . . . . . . . . . . . . . . . . . . 9-102
description . . . . . . . . . . . . . . . . . . . . . . . . . . . . . . . . . . . . . . . . . . . . . . . 9-103
closed-system . . . . . . . . . . . . . . . . . . . . . . . . . . . . . . . . . . . . . . . . . . . . . 9-103
mode . . . . . . . . . . . . . . . . . . . . . . . . . . . . . . . . . . . . . . . . . . . . . . . . . . . . 9-104
antenna . . . . . . . . . . . . . . . . . . . . . . . . . . . . . . . . . . . . . . . . . . . . . . . . . . 9-105
antenna mode . . . . . . . . . . . . . . . . . . . . . . . . . . . . . . . . . . . . . . . . . . . . 9-105
basic-rate . . . . . . . . . . . . . . . . . . . . . . . . . . . . . . . . . . . . . . . . . . . . . . . . 9-106
supported-rate . . . . . . . . . . . . . . . . . . . . . . . . . . . . . . . . . . . . . . . . . . . . 9-107
channel-policy . . . . . . . . . . . . . . . . . . . . . . . . . . . . . . . . . . . . . . . . . . . . 9-107
beacon-interval . . . . . . . . . . . . . . . . . . . . . . . . . . . . . . . . . . . . . . . . . . . 9-108
dtim-period . . . . . . . . . . . . . . . . . . . . . . . . . . . . . . . . . . . . . . . . . . . . . . . 9-109
max-stations . . . . . . . . . . . . . . . . . . . . . . . . . . . . . . . . . . . . . . . . . . . . . . 9-110
preamble . . . . . . . . . . . . . . . . . . . . . . . . . . . . . . . . . . . . . . . . . . . . . . . . . 9-110
protected-mode . . . . . . . . . . . . . . . . . . . . . . . . . . . . . . . . . . . . . . . . . . . 9-111
fragmentation-thresh . . . . . . . . . . . . . . . . . . . . . . . . . . . . . . . . . . . . . . 9-111
inactivity-timeout . . . . . . . . . . . . . . . . . . . . . . . . . . . . . . . . . . . . . . . . . 9-112
slot-time . . . . . . . . . . . . . . . . . . . . . . . . . . . . . . . . . . . . . . . . . . . . . . . . . 9-113
rts-threshold . . . . . . . . . . . . . . . . . . . . . . . . . . . . . . . . . . . . . . . . . . . . . . 9-113
tx-power-reduction . . . . . . . . . . . . . . . . . . . . . . . . . . . . . . . . . . . . . . . . 9-114
enable (wireless) . . . . . . . . . . . . . . . . . . . . . . . . . . . . . . . . . . . . . . . . . . 9-115
disable (wireless) . . . . . . . . . . . . . . . . . . . . . . . . . . . . . . . . . . . . . . . . . 9-116
show radio . . . . . . . . . . . . . . . . . . . . . . . . . . . . . . . . . . . . . . . . . . . . . . . 9-116
show ssid . . . . . . . . . . . . . . . . . . . . . . . . . . . . . . . . . . . . . . . . . . . . . . . . 9-117
show wlan . . . . . . . . . . . . . . . . . . . . . . . . . . . . . . . . . . . . . . . . . . . . . . . 9-119
show basic-rate . . . . . . . . . . . . . . . . . . . . . . . . . . . . . . . . . . . . . . . . . . . 9-121
show stations . . . . . . . . . . . . . . . . . . . . . . . . . . . . . . . . . . . . . . . . . . . . . 9-122
show supported-rate . . . . . . . . . . . . . . . . . . . . . . . . . . . . . . . . . . . . . . . 9-123
Wireless Security Commands . . . . . . . . . . . . . . . . . . . . . . . . . . . . . . . . . . . 9-124
security . . . . . . . . . . . . . . . . . . . . . . . . . . . . . . . . . . . . . . . . . . . . . . . . . . 9-125
wep-default-key . . . . . . . . . . . . . . . . . . . . . . . . . . . . . . . . . . . . . . . . . . . 9-127
wep-key-ascii . . . . . . . . . . . . . . . . . . . . . . . . . . . . . . . . . . . . . . . . . . . . . 9-128
wep-key-length . . . . . . . . . . . . . . . . . . . . . . . . . . . . . . . . . . . . . . . . . . . . 9-129
wep-key . . . . . . . . . . . . . . . . . . . . . . . . . . . . . . . . . . . . . . . . . . . . . . . . . . 9-129
open-system-auth . . . . . . . . . . . . . . . . . . . . . . . . . . . . . . . . . . . . . . . . . 9-130
shared-key-auth . . . . . . . . . . . . . . . . . . . . . . . . . . . . . . . . . . . . . . . . . . . 9-131
xiv
Page 17

wpa-allowed | wpa2-allowed . . . . . . . . . . . . . . . . . . . . . . . . . . . . . . . . 9-131
wpa-pre-shared-key . . . . . . . . . . . . . . . . . . . . . . . . . . . . . . . . . . . . . . . . 9-132
wpa-cipher-tkip . . . . . . . . . . . . . . . . . . . . . . . . . . . . . . . . . . . . . . . . . . . 9-133
wpa-cipher-aes . . . . . . . . . . . . . . . . . . . . . . . . . . . . . . . . . . . . . . . . . . . . 9-133
wpa-psk-ascii . . . . . . . . . . . . . . . . . . . . . . . . . . . . . . . . . . . . . . . . . . . . . 9-134
wpa-psk-hex . . . . . . . . . . . . . . . . . . . . . . . . . . . . . . . . . . . . . . . . . . . . . . 9-134
rsn-preauthentication . . . . . . . . . . . . . . . . . . . . . . . . . . . . . . . . . . . . . . 9-135
Neighbor AP Detection Commands . . . . . . . . . . . . . . . . . . . . . . . . . . . . . . 9-136
ap-detection . . . . . . . . . . . . . . . . . . . . . . . . . . . . . . . . . . . . . . . . . . . . . . 9-136
ap-detection duration . . . . . . . . . . . . . . . . . . . . . . . . . . . . . . . . . . . . . . 9-137
ap-detection expire-time . . . . . . . . . . . . . . . . . . . . . . . . . . . . . . . . . . . 9-137
ap-detection interval . . . . . . . . . . . . . . . . . . . . . . . . . . . . . . . . . . . . . . . 9-138
ap-detection max-entries . . . . . . . . . . . . . . . . . . . . . . . . . . . . . . . . . . . 9-138
show detected-ap . . . . . . . . . . . . . . . . . . . . . . . . . . . . . . . . . . . . . . . . . 9-139
Adaptive Tx Power Control Commands . . . . . . . . . . . . . . . . . . . . . . . . . . 9-140
atpc . . . . . . . . . . . . . . . . . . . . . . . . . . . . . . . . . . . . . . . . . . . . . . . . . . . . . 9-140
atpc avoid-other-aps . . . . . . . . . . . . . . . . . . . . . . . . . . . . . . . . . . . . . . . 9-141
atpc rf-group-name . . . . . . . . . . . . . . . . . . . . . . . . . . . . . . . . . . . . . . . . 9-141
atpc adapt . . . . . . . . . . . . . . . . . . . . . . . . . . . . . . . . . . . . . . . . . . . . . . . . 9-142
atpc max-atpc-atten . . . . . . . . . . . . . . . . . . . . . . . . . . . . . . . . . . . . . . . 9-143
show atpc . . . . . . . . . . . . . . . . . . . . . . . . . . . . . . . . . . . . . . . . . . . . . . . . 9-143
VLAN Commands . . . . . . . . . . . . . . . . . . . . . . . . . . . . . . . . . . . . . . . . . . . . . 9-145
vlan . . . . . . . . . . . . . . . . . . . . . . . . . . . . . . . . . . . . . . . . . . . . . . . . . . . . . 9-145
untagged-vlan . . . . . . . . . . . . . . . . . . . . . . . . . . . . . . . . . . . . . . . . . . . . . 9-146
management-vlan . . . . . . . . . . . . . . . . . . . . . . . . . . . . . . . . . . . . . . . . . 9-146
QoS Commands . . . . . . . . . . . . . . . . . . . . . . . . . . . . . . . . . . . . . . . . . . . . . . 9-148
qos ap-params . . . . . . . . . . . . . . . . . . . . . . . . . . . . . . . . . . . . . . . . . . . . 9-149
qos sta-params . . . . . . . . . . . . . . . . . . . . . . . . . . . . . . . . . . . . . . . . . . . . 9-151
. . . . . . . . . . . . . . . . . . . . . . . . . . . . . . . . . . . . . . . . . . . . . . . . qos wmm 9-153
show qos . . . . . . . . . . . . . . . . . . . . . . . . . . . . . . . . . . . . . . . . . . . . . . . . . 9-154
rate-limit . . . . . . . . . . . . . . . . . . . . . . . . . . . . . . . . . . . . . . . . . . . . . . . . . 9-156
Wireless Distribution System (WDS) . . . . . . . . . . . . . . . . . . . . . . . . . . . . . 9-157
description (wds) . . . . . . . . . . . . . . . . . . . . . . . . . . . . . . . . . . . . . . . . . 9-157
disable (wds) . . . . . . . . . . . . . . . . . . . . . . . . . . . . . . . . . . . . . . . . . . . . . 9-158
xv
Page 18

enable (wds) . . . . . . . . . . . . . . . . . . . . . . . . . . . . . . . . . . . . . . . . . . . . . 9-158
wds-ssid . . . . . . . . . . . . . . . . . . . . . . . . . . . . . . . . . . . . . . . . . . . . . . . . . 9-159
radio-used . . . . . . . . . . . . . . . . . . . . . . . . . . . . . . . . . . . . . . . . . . . . . . . . 9-159
remote-mac (wds) . . . . . . . . . . . . . . . . . . . . . . . . . . . . . . . . . . . . . . . . . 9-160
show wds . . . . . . . . . . . . . . . . . . . . . . . . . . . . . . . . . . . . . . . . . . . . . . . . 9-160
wep-key (wds) . . . . . . . . . . . . . . . . . . . . . . . . . . . . . . . . . . . . . . . . . . . . 9-161
wep-key-ascii (wds) . . . . . . . . . . . . . . . . . . . . . . . . . . . . . . . . . . . . . . . 9-162
wep-key-length (wds) . . . . . . . . . . . . . . . . . . . . . . . . . . . . . . . . . . . . . . 9-162
wpa-pre-shared-key (wds) . . . . . . . . . . . . . . . . . . . . . . . . . . . . . . . . . . 9-163
Spanning Tree Protocol (STP) . . . . . . . . . . . . . . . . . . . . . . . . . . . . . . . . . . 9-164
stp . . . . . . . . . . . . . . . . . . . . . . . . . . . . . . . . . . . . . . . . . . . . . . . . . . . . . . 9-164
A File Uploads, Downloads, and Resets
Contents . . . . . . . . . . . . . . . . . . . . . . . . . . . . . . . . . . . . . . . . . . . . . . . . . . . . . . A-2
Overview . . . . . . . . . . . . . . . . . . . . . . . . . . . . . . . . . . . . . . . . . . . . . . . . . . . . . A-3
Downloading Access Point Software . . . . . . . . . . . . . . . . . . . . . . . . . . . . . . A-4
General Software Download Rules . . . . . . . . . . . . . . . . . . . . . . . . . . . . A-4
Assumptions for Using TFTP, FTP, or SCP To Download Software from
a Server . . . . . . . . . . . . . . . . . . . . . . . . . . . . . . . . . . . . . . . . . . . . . . . . . . . A-4
Web: TFTP, FTP, or STP Software Download to the Access Point . A-5
CLI: Viewing Software Versions . . . . . . . . . . . . . . . . . . . . . . . . . . . . . . A-7
xvi
Transferring Configuration Files . . . . . . . . . . . . . . . . . . . . . . . . . . . . . . . . . A-8
Web: Configuration File Upload and Download . . . . . . . . . . . . . . . . . A-8
CLI: Performing Configuration File Commands . . . . . . . . . . . . . . . . A-10
Rebooting the Access Point . . . . . . . . . . . . . . . . . . . . . . . . . . . . . . . . . . . . A-14
Web: Rebooting the System . . . . . . . . . . . . . . . . . . . . . . . . . . . . . . . . . A-14
CLI: Rebooting the System . . . . . . . . . . . . . . . . . . . . . . . . . . . . . . . . . . A-15
Manual: Using the Reset and Clear Buttons . . . . . . . . . . . . . . . . . . . A-15
Disabling the Access Point Push Buttons . . . . . . . . . . . . . . . . . . . . . . . . . A-18
Web: Disabling the Push Buttons . . . . . . . . . . . . . . . . . . . . . . . . . . . . A-18
CLI: Disabling the Access Point Buttons . . . . . . . . . . . . . . . . . . . . . . A-19
BDefaults
Contents . . . . . . . . . . . . . . . . . . . . . . . . . . . . . . . . . . . . . . . . . . . . . . . . . . . . . . B-2
Page 19

Overview . . . . . . . . . . . . . . . . . . . . . . . . . . . . . . . . . . . . . . . . . . . . . . . . . . . . . B-3
System Management . . . . . . . . . . . . . . . . . . . . . . . . . . . . . . . . . . . . . . . . . . . B-4
System Logging . . . . . . . . . . . . . . . . . . . . . . . . . . . . . . . . . . . . . . . . . . . . . . . . B-4
System Clock. . . . . . . . . . . . . . . . . . . . . . . . . . . . . . . . . . . . . . . . . . . . . . . . . . B-4
SNMP . . . . . . . . . . . . . . . . . . . . . . . . . . . . . . . . . . . . . . . . . . . . . . . . . . . . . . . . B-5
Group Configuration . . . . . . . . . . . . . . . . . . . . . . . . . . . . . . . . . . . . . . . . . . . B-5
RADIUS Accounting/Authentication. . . . . . . . . . . . . . . . . . . . . . . . . . . . . . . B-6
RADIUS Users. . . . . . . . . . . . . . . . . . . . . . . . . . . . . . . . . . . . . . . . . . . . . . . . . B-6
MAC Address Authentication . . . . . . . . . . . . . . . . . . . . . . . . . . . . . . . . . . . . B-6
Web Authentication . . . . . . . . . . . . . . . . . . . . . . . . . . . . . . . . . . . . . . . . . . . . B-6
AP Authentication . . . . . . . . . . . . . . . . . . . . . . . . . . . . . . . . . . . . . . . . . . . . . B-7
Filtering . . . . . . . . . . . . . . . . . . . . . . . . . . . . . . . . . . . . . . . . . . . . . . . . . . . . . . B-7
Ethernet Interface . . . . . . . . . . . . . . . . . . . . . . . . . . . . . . . . . . . . . . . . . . . . . B-7
Wireless Interface . . . . . . . . . . . . . . . . . . . . . . . . . . . . . . . . . . . . . . . . . . . . . . B-8
Wireless Security . . . . . . . . . . . . . . . . . . . . . . . . . . . . . . . . . . . . . . . . . . . . . . B-9
AP Detection . . . . . . . . . . . . . . . . . . . . . . . . . . . . . . . . . . . . . . . . . . . . . . . . . . B-9
VLAN . . . . . . . . . . . . . . . . . . . . . . . . . . . . . . . . . . . . . . . . . . . . . . . . . . . . . . . B-10
Adaptive Tx Power Control . . . . . . . . . . . . . . . . . . . . . . . . . . . . . . . . . . . . . B-10
QoS . . . . . . . . . . . . . . . . . . . . . . . . . . . . . . . . . . . . . . . . . . . . . . . . . . . . . . . . . B-11
Wireless Distribution System (WDS) . . . . . . . . . . . . . . . . . . . . . . . . . . . . . B-12
C Adaptive Tx Power Control Use Cases
Contents . . . . . . . . . . . . . . . . . . . . . . . . . . . . . . . . . . . . . . . . . . . . . . . . . . . . . . C-2
Use Model: Airport Deployment . . . . . . . . . . . . . . . . . . . . . . . . . . . . . . . . . . C-3
Airport Case 1 – No RF Group Name . . . . . . . . . . . . . . . . . . . . . . . . . . C-3
Settings . . . . . . . . . . . . . . . . . . . . . . . . . . . . . . . . . . . . . . . . . . . . . . . C-4
Decisions: AP #1 . . . . . . . . . . . . . . . . . . . . . . . . . . . . . . . . . . . . . . . . C-4
Decisions: AP #4 . . . . . . . . . . . . . . . . . . . . . . . . . . . . . . . . . . . . . . . . C-4
Results with No RF Group Name . . . . . . . . . . . . . . . . . . . . . . . . . . C-4
xvii
Page 20

Airport Case 2 – With RF Group Name . . . . . . . . . . . . . . . . . . . . . . . . C-5
Settings . . . . . . . . . . . . . . . . . . . . . . . . . . . . . . . . . . . . . . . . . . . . . . . C-5
Decisions: AP #1 . . . . . . . . . . . . . . . . . . . . . . . . . . . . . . . . . . . . . . . . C-5
Decisions: AP #4 . . . . . . . . . . . . . . . . . . . . . . . . . . . . . . . . . . . . . . . . C-5
Results with RF Group Name . . . . . . . . . . . . . . . . . . . . . . . . . . . . . C-6
Airport Model Analysis . . . . . . . . . . . . . . . . . . . . . . . . . . . . . . . . . . . . . . C-6
Use Model: Warehouse Deployment . . . . . . . . . . . . . . . . . . . . . . . . . . . . . . C-7
Warehouse Case 1 – Adaptive Mode AP . . . . . . . . . . . . . . . . . . . . . . . . C-7
Settings . . . . . . . . . . . . . . . . . . . . . . . . . . . . . . . . . . . . . . . . . . . . . . . C-8
Decisions: AP #1 and AP #4 . . . . . . . . . . . . . . . . . . . . . . . . . . . . . . C-8
Results with Adaptive Mode AP . . . . . . . . . . . . . . . . . . . . . . . . . . . C-8
Warehouse Case 2 – Adaptive Mode AP + Clients . . . . . . . . . . . . . . . C-9
Settings . . . . . . . . . . . . . . . . . . . . . . . . . . . . . . . . . . . . . . . . . . . . . . . C-9
Results with Adaptive Mode AP + Clients . . . . . . . . . . . . . . . . . . C-9
Warehouse Model Analysis . . . . . . . . . . . . . . . . . . . . . . . . . . . . . . . . . C-10
D Open Source Licenses
Contents . . . . . . . . . . . . . . . . . . . . . . . . . . . . . . . . . . . . . . . . . . . . . . . . . . . . . . D-2
Overview . . . . . . . . . . . . . . . . . . . . . . . . . . . . . . . . . . . . . . . . . . . . . . . . . . . . . D-3
GPL2 (GNU General Public License, v.2) . . . . . . . . . . . . . . . . . . . . . . . . . . D-4
GPL + Linking Exception . . . . . . . . . . . . . . . . . . . . . . . . . . . . . . . . . . . . . . . D-9
ClearSilver . . . . . . . . . . . . . . . . . . . . . . . . . . . . . . . . . . . . . . . . . . . . . . . . . . . D-10
Dropbear License . . . . . . . . . . . . . . . . . . . . . . . . . . . . . . . . . . . . . . . . . . . . . D-12
sFlow License . . . . . . . . . . . . . . . . . . . . . . . . . . . . . . . . . . . . . . . . . . . . . . . . D-14
LGPL (GNU Lesser General Public License) . . . . . . . . . . . . . . . . . . . . . . D-18
Intel (2) . . . . . . . . . . . . . . . . . . . . . . . . . . . . . . . . . . . . . . . . . . . . . . . . . . . . . D-27
MIT . . . . . . . . . . . . . . . . . . . . . . . . . . . . . . . . . . . . . . . . . . . . . . . . . . . . . . . . . D-28
BSD . . . . . . . . . . . . . . . . . . . . . . . . . . . . . . . . . . . . . . . . . . . . . . . . . . . . . . . . . D-29
CMU (Carnegie Mellon University) . . . . . . . . . . . . . . . . . . . . . . . . . . . . . . D-30
OpenSSL . . . . . . . . . . . . . . . . . . . . . . . . . . . . . . . . . . . . . . . . . . . . . . . . . . . . D-31
xviii
Page 21

Getting Started
1
1-1
Page 22

Getting Started
Contents
Overview . . . . . . . . . . . . . . . . . . . . . . . . . . . . . . . . . . . . . . . . . . . . . . . . . . . . . . 1-3
Conventions . . . . . . . . . . . . . . . . . . . . . . . . . . . . . . . . . . . . . . . . . . . . . . . . 1-3
Command Syntax Statements . . . . . . . . . . . . . . . . . . . . . . . . . . . . . . . . . 1-3
Command Prompts . . . . . . . . . . . . . . . . . . . . . . . . . . . . . . . . . . . . . . . . . . 1-4
Screen Examples . . . . . . . . . . . . . . . . . . . . . . . . . . . . . . . . . . . . . . . . . . . . 1-4
Related Publications . . . . . . . . . . . . . . . . . . . . . . . . . . . . . . . . . . . . . . . . . 1-4
Getting Documentation from the Web . . . . . . . . . . . . . . . . . . . . . . . . . . 1-5
Sources for More Information . . . . . . . . . . . . . . . . . . . . . . . . . . . . . . . . . 1-5
Need Just a Quick Start? . . . . . . . . . . . . . . . . . . . . . . . . . . . . . . . . . . . . . . . . . 1-6
IP Addressing . . . . . . . . . . . . . . . . . . . . . . . . . . . . . . . . . . . . . . . . . . . . . . . 1-6
To Set Up and Install the Access Point in Your Network . . . . . . . . . . 1-7
1-2
Page 23

Getting Started
Overview
Overview
This Management and Configuration Guide is intended to support the
following access points:
■ ProCurve Wireless Access Point 530 NA (J8986A)
■ ProCurve Wireless Access Point 530 WW (J8987A)
This guide describes how to use the command line interface (CLI) and Web
browser interface to configure, manage, and monitor access point operation.
The ProCurve Wireless Access Point 530 is referenced as the Access Point 530
or AP 530 throughout the remainder of this document.
For information on other product documentation for this access point, see
“Related Publications” on page 1-4.
Conventions
This section describes the conventions used for command syntax and
displayed information.
Command Syntax Statements
Syntax: radius-local<username> [disabled] [password <password>] [realname <real-
name>]
■ Vertical bars ( | ) separate alternative, mutually exclusive elements.
■ Square brackets ( [ ] ) indicate optional elements.
■ Braces ( < > ) indicate a required choice.
■ Curly brackets surrounding several sets of square brackets
({ [ ] | [ ] ..[ ] }) indicate that at least one choice is required from the group
of optional elements.
■ Boldface indicates commands and option names, and also the exact words
that the user types. For example:
“Use the copy tftp command to download the key from a TFTP server.”
■ Italics indicate arguments for which you must supply a variable value. For
example, the command syntax <username> indicates that you must
provide a username:
Syntax: radius-local <username>
1-3
Page 24

Getting Started
Overview
Command Prompts
In the default configuration, your access point displays the following CLI
prompt:
ProCurve Access Point 530#
Screen Examples
Figures containing examples of screen text and command output look like
this:
ProCurve Access Point 530# show version
Image Software Version WA.02.00.0412
Boot Software Version WAB.01.00
ProCurve Access Point 530#
Commands typed by the user are shown in boldface. In some cases, brief
command-output sequences appear outside a numbered figure. For example:
ProCurve Access Point 530(ethernet)# ip address 192.168.1.2
255.255.255.0 192.168.1.253
ProCurve Access Point 530(ethernet)# dns primary-server
192.168.1.55
Related Publications
Installation and Getting Started Guide. Use the Installation and
Getting Started Guide shipped with your access point to prepare for and
perform the physical installation. That guide also steps you through the
process of connecting the access point to your network and assigning IP
addressing, as well as describes the LED indications for correct operation and
trouble analysis.
The Installation and Getting Started Guide and the Management and
Configuration Guide can be downloaded from the ProCurve Networking Web
site. (See “Getting Documentation from the Web” on page 1-5.)
Release Notes. Release notes are posted on the ProCurve Networking Web
site and provide information on new software updates:
■ New features and how to configure and use them
■ Software management, including downloading software to the access
point
■ Software fixes addressed in current and previous releases
1-4
Page 25

Getting Started
Overview
To view and download a copy of the latest release notes for your access point,
see “Getting Documentation from the Web” on page 1-5.
Getting Documentation from the Web
1. Go to the ProCurve Networking Web site at
http://www.procurve.com/manuals
2. Click on the name of the product for which you want documentation.
3. On the resulting web page, double-click on a document you want.
4. Save the document to your hard disk.
Sources for More Information
■ The AP530 Web browser interface provides online help, as described in
“Online Help for the ProCurve Web Browser Interface” on page 4-7.
■ For more information on ProCurve technology, visit the ProCurve
Networking Web site at:
http://www.procurve.com
1-5
Page 26

Getting Started
Need Just a Quick Start?
Need Just a Quick Start?
IP Addressing
If you just want to give the access point an IP address so that it can communicate on your network, HP recommends that you use the CLI to quickly
configure IP addressing. To do so, do one of the following:
1. Log in to the CLI interface using the default username and password
(“admin and admin”).
ProCurve Access Point 530 login# admin
Password: admin
ProCurve Access Point 530#
2. Enter config for global configuration at the CLI level prompt.
ProCurve Access Point 530# config
3. Enter interface ethernet for global configuration at the CLI level prompt.
ProCurve Access Point 530(config)# interface
ethernet
4. Enter ip address, followed by the address and the subnet mask at the CLI
Ethernet Configuration level prompt.
ProCurve Access Point 530(ethernet)# ip address
<address> <subnet_mask>
5. (Optional) Enter an address for the default IP gateway at the CLI Ethernet
Configuration level prompt.
ProCurve Access Point 530(ethernet)# ip default-
gateway <gateway>
6. Save the current running configuration to the startup configuration.
ProCurve Access Point 530(ethernet)# write mem
For more on using the CLI, see Chapter 9, “Using the Command Line Interface (CLI)”.
1-6
Page 27

Getting Started
Need Just a Quick Start?
To Set Up and Install the Access Point in Your Network
Important! Use the Installation and Getting Started Guide shipped with your access
point for the following:
■ Instructions for physically installing the access point in your network
■ Quickly assigning an IP address, subnet mask, and gateway, setting a
Manager password, and (optionally) configuring other basic features
■ Interpreting LED behavior
■ Notes, cautions, and warnings related to installing and using the access
point
For the latest version of the Installation and Getting Started Guide and other
documentation for your access point, visit the ProCurve Networking Web site.
(See “Getting Documentation from the Web” on page 1-5.)
1-7
Page 28

Getting Started
Need Just a Quick Start?
— This page is intentionally unused. —
1-8
Page 29

Selecting a Management Interface
2
2-1
Page 30

Selecting a Management Interface
Contents
Contents
Overview . . . . . . . . . . . . . . . . . . . . . . . . . . . . . . . . . . . . . . . . . . . . . . . . . . . . . . 2-3
Understanding Management Interfaces . . . . . . . . . . . . . . . . . . . . . . . . . . . . . 2-4
Advantages of Using the CLI . . . . . . . . . . . . . . . . . . . . . . . . . . . . . . . . . . . . . . 2-5
Advantages of Using the ProCurve Access Point 530 Browser Interface . 2-6
2-2
Page 31

Overview
This chapter describes the following:
■ Access Point management interfaces
■ Advantages of using each interface type
Selecting a Management Interface
Overview
2-3
Page 32

Selecting a Management Interface
Understanding Management Interfaces
Understanding Management Interfaces
The Access Point 530 management interfaces enable you to reconfigure the
access point and to monitor its status and performance. Interface types
include:
■ CLI—a command line interface offering the full set of access point
commands through the VT-100/ANSI console built into the access point.
See “Advantages of Using the CLI” on page 2-5
■ Web browser interface—an access point interface offering status infor-
mation and access point configuration, see“Advantages of Using the ProCurve
Access Point 530 Browser Interface” on page 2-6
■ SNMP—a network management application such as the ProCurve
Manager to manage the access point via the Simple Network Management
Protocol (SNMP) from a network management station.
This manual describes how to use the CLI and the Web browser interface, and
how to use these interfaces to configure and monitor the access point.
Note This manual does describe how to configure SNMP functions on the AP530,
but does not describe how to manage the access point using SNMP. For further
information, see the documentation of your SNMP management application.
2-4
Page 33

Selecting a Management Interface
Advantages of Using the CLI
Advantages of Using the CLI
ProCurve Access Point
Manager Exec Level
530#
ProCurve Access Point
Global Configuration Level
530(config)#
ProCurve Access Point
530(<interface>)#
Interface Configuration Levels
Context-specific configurations, such as (ethernet, wds1, radio1,
radio1-wlan1).
Figure 2-1. Command Prompt Examples
■ Provides access to the complete set of the access point configuration
features.
■ Offers out-of-band access, through the RS-232 connection, or in-band
access using Telnet or Secure Shell.
■ Enables quick, detailed system configuration and management access to
system operators and administrators experienced in command prompt
interfaces.
■ Provides help at each level for determining available options and vari-
ables.
CLI Usage
■ For information on how to use the CLI, refer to Chapter 3, "Using the Command
Line Interface (CLI)".
■ To perform specific procedures (such as configuring IP addressing), use
the Table of Contents at the front of this manual to locate the information
you need.
■ For information on individual CLI commands, refer to Chapter 9, "Command
Line Reference" or use the online Help provided in the CLI interface.
2-5
Page 34

Selecting a Management Interface
Advantages of Using the ProCurve Access Point 530 Browser Interface
Advantages of Using the ProCurve
Access Point 530 Browser Interface
Figure 2-2. Example of the ProCurve Access Point 530 Browser Interface
■ Easy access to the access point from anywhere on the network.
■ Familiar browser interface--locations of window objects consistent
with commonly used browsers, uses mouse clicking for navigation, no
terminal setup.
■ Many features have all their fields in one screen so you can view all
values at once.
■ More visual cues, using colors, status bars, device icons, and other
graphical objects instead of relying solely on alphanumeric values.
■ Display of acceptable ranges of values available in configuration
lists.
2-6
Page 35

Using the Command Line Interface (CLI)
3
3-1
Page 36

Using the Command Line Interface (CLI)
Contents
Contents
Overview . . . . . . . . . . . . . . . . . . . . . . . . . . . . . . . . . . . . . . . . . . . . . . . . . . . . . . 3-3
Accessing the CLI . . . . . . . . . . . . . . . . . . . . . . . . . . . . . . . . . . . . . . . . . . . . . . . 3-4
Direct Console Access . . . . . . . . . . . . . . . . . . . . . . . . . . . . . . . . . . . . . . . 3-4
Telnet Access . . . . . . . . . . . . . . . . . . . . . . . . . . . . . . . . . . . . . . . . . . . . . . . 3-5
Secure Shell Access . . . . . . . . . . . . . . . . . . . . . . . . . . . . . . . . . . . . . . . . . 3-5
Using the CLI . . . . . . . . . . . . . . . . . . . . . . . . . . . . . . . . . . . . . . . . . . . . . . . . . . . 3-6
Password Security . . . . . . . . . . . . . . . . . . . . . . . . . . . . . . . . . . . . . . . . . . . 3-6
Logging In . . . . . . . . . . . . . . . . . . . . . . . . . . . . . . . . . . . . . . . . . . . . . . . . . . 3-7
Command Levels . . . . . . . . . . . . . . . . . . . . . . . . . . . . . . . . . . . . . . . . . . . 3-8
Manager Exec Level . . . . . . . . . . . . . . . . . . . . . . . . . . . . . . . . . . . . . . 3-8
Global Configuration Level . . . . . . . . . . . . . . . . . . . . . . . . . . . . . . . . 3-8
Context-Specific Configuration Levels . . . . . . . . . . . . . . . . . . . . . . 3-9
Moving Between Command Levels . . . . . . . . . . . . . . . . . . . . . . . . . . . . 3-10
When Changes are Applied . . . . . . . . . . . . . . . . . . . . . . . . . . . . . . . . . . 3-10
Options for Getting Help in the CLI . . . . . . . . . . . . . . . . . . . . . . . . . . . 3-11
Displaying All Available Commands . . . . . . . . . . . . . . . . . . . . . . . 3-11
Completing the Current Command . . . . . . . . . . . . . . . . . . . . . . . . 3-13
Displaying Available Command Options . . . . . . . . . . . . . . . . . . . . 3-14
3-2
CLI Control and Editing . . . . . . . . . . . . . . . . . . . . . . . . . . . . . . . . . . . . . . . . . 3-15
Page 37

Using the Command Line Interface (CLI)
Overview
Overview
The Command Line Interface (CLI) is a text-based command interface for
configuring and monitoring the access point. The CLI gives you access to the
access point’s full set of commands while providing the same password
protection that is used in the Web browser interface.
3-3
Page 38

Using the Command Line Interface (CLI)
Accessing the CLI
Accessing the CLI
The CLI is accessed through the access point console. You can access the
console out-of-band by directly connecting a terminal device to the access
point, or in-band by using Telnet or a Secure Shell (SSH) client.
NOTE Out-of-Band Requirements: To emulate the access point system console on
a serial port connection, terminal emulation software needs to be installed on
your PC (such as HyperTerminal or TeraTerm, which is available at http://
www.ayera.com/teraterm).
In-Band Requirements:
through an in-band connection, Telnet or SSH software needs to be installed
on your PC (such as PUTTY, which is available at http://
www.chiark.greenend.org.uk/~sgtatham/putty/).
To emulate the access point system console
Direct Console Access
To connect a console directly to the access point, use a null-modem cable or
an HP serial cable, part number 5184-1894 (shipped with many HP ProCurve
switches)
emulator and the access point’s Console port. Configure either one to operate
with these settings:
. Connect the serial cable between a VT-100 terminal or a PC terminal
• If using a PC terminal emulator, configure it as a DEC VT-100 (ANSI)
terminal.
• Port is COM1 (COM1 is the standard port, however, your PC might
use a different COM port (e.g. COM2)
• 9600 baud (default is set to 9600)
• 8 data bits, 1 stop bit, parity set to None, and flow control set to None.
• For the Windows Terminal program, also disable (uncheck) the “Use
Function, Arrow, and Ctrl Keys for Windows” option.
• For the HyperTerminal program, select the “Terminal keys” option for
the “Function, arrow, and ctrl keys act as” parameter.
Hint To clear unreadable console messages, change the Baud rate.
For example, on TeraTerm: (1) Access "Control" menu and select "Reset"
terminal, (2) Change Baud rate, and if necessary, (3) Access "Setup" menu ,
select "Window" and change the "Scroll buffer" value.
3-4
Page 39

Using the Command Line Interface (CLI)
Accessing the CLI
When correctly connected to the access point, press [Enter] to initiate the
console session.
For more information on connecting to the access point’s Console port, refer
to the Installation and Getting Started Guide.
Note The default Static IP address is 192.168.1.10. If there is no DHCP server on the
network, the access point retains this static IP address at first-time startup.
Telnet Access
To configure the access point through a Telnet session, make sure the access
point is configured with an IP address and that it is reachable from the PC that
is running the Telnet session (for example, use a ping command to the access
point’s IP address).
Start the Telnet program on the PC using the access point’s IP address (or DNS
name).
telnet 10.11.12.195
telnet AP530
[Enter] Example of an IP address.
[Enter] Example of a DNS-type name.
Secure Shell Access
Configuring the access point through an SSH client provides a secured connection as traffic is encrypted.
To configure the access point through an SSH session, make sure the access
point is configured with an IP address and that it is reachable from the PC that
is running the SSH session (for example, use a ping command to the access
point’s IP address).
Start the SSH program on the PC using the access point’s IP address (or DNS
name).
ssh 10.11.12.195
ssh AP530
After boot up, the SSH server needs about two minutes to generate host
encryption keys. The SSH server is disabled while the keys are being generated.
For more information on the Secure Shell, see “Setting Management Access Controls”
on page 5-9.
[Enter] Example of an IP address.
[Enter] Example of a DNS-type name.
3-5
Page 40

Using the Command Line Interface (CLI)
Using the CLI
Using the CLI
The CLI commands are organized into the following levels:
1. Manager EXEC
2. Global Configuration
3. Interface Configuration
4. Radio Configuration
5. WLAN Configuration
Note Except for most of the user-entered parameters (e.g. SSID strings, passwords,
etc.), CLI commands are not generally case-sensitive.
For the conventions used in this manual for CLI command syntax, see “Command
Syntax Statements” on page 1-3.
The access point supports one user account: the Manager account with full
privileges. The number of commands available are delineated by the configuration levels.
When you use the CLI to make a configuration change, you must save the
configuration to retain the changes upon rebooting the access point.
Password Security
By default, the access point defaults the Manager user name to ’admin’ for CLI
access with the password defaulted to ’admin’. To secure management access
to the access point, you must set the Manager password. Without a Manager
password configured, anyone having serial port or Telnet access to the access
point can reach all CLI command modes.
Caution HP strongly recommends that you configure a Manager password. If a
Manager password is not configured, the access point is not passwordprotected, and anyone having in-band or out-of-band access to the access
point may be able to compromise access point and network security.
For additional security, it is also possible to disable CLI management access
through the serial port, ssh, or Telnet. For more information, see “Web: Configuring
Access Controls” on page 5-10.
3-6
Page 41

Using the Command Line Interface (CLI)
Logging In
When you log onto the access point CLI, you will be prompted to enter an
account user name (the default is admin).
After entry of the user name, you will be prompted for the password. The
default password is admin.
For example:
ProCurve AP-530: admin
Password Prompt
Password:
Figure 3-1. Example of CLI Log-On Screen with Password
When you successfully log onto the CLI, you will see the following command
prompt:
Using the CLI
ProCurve Access Point 530#
3-7
Page 42
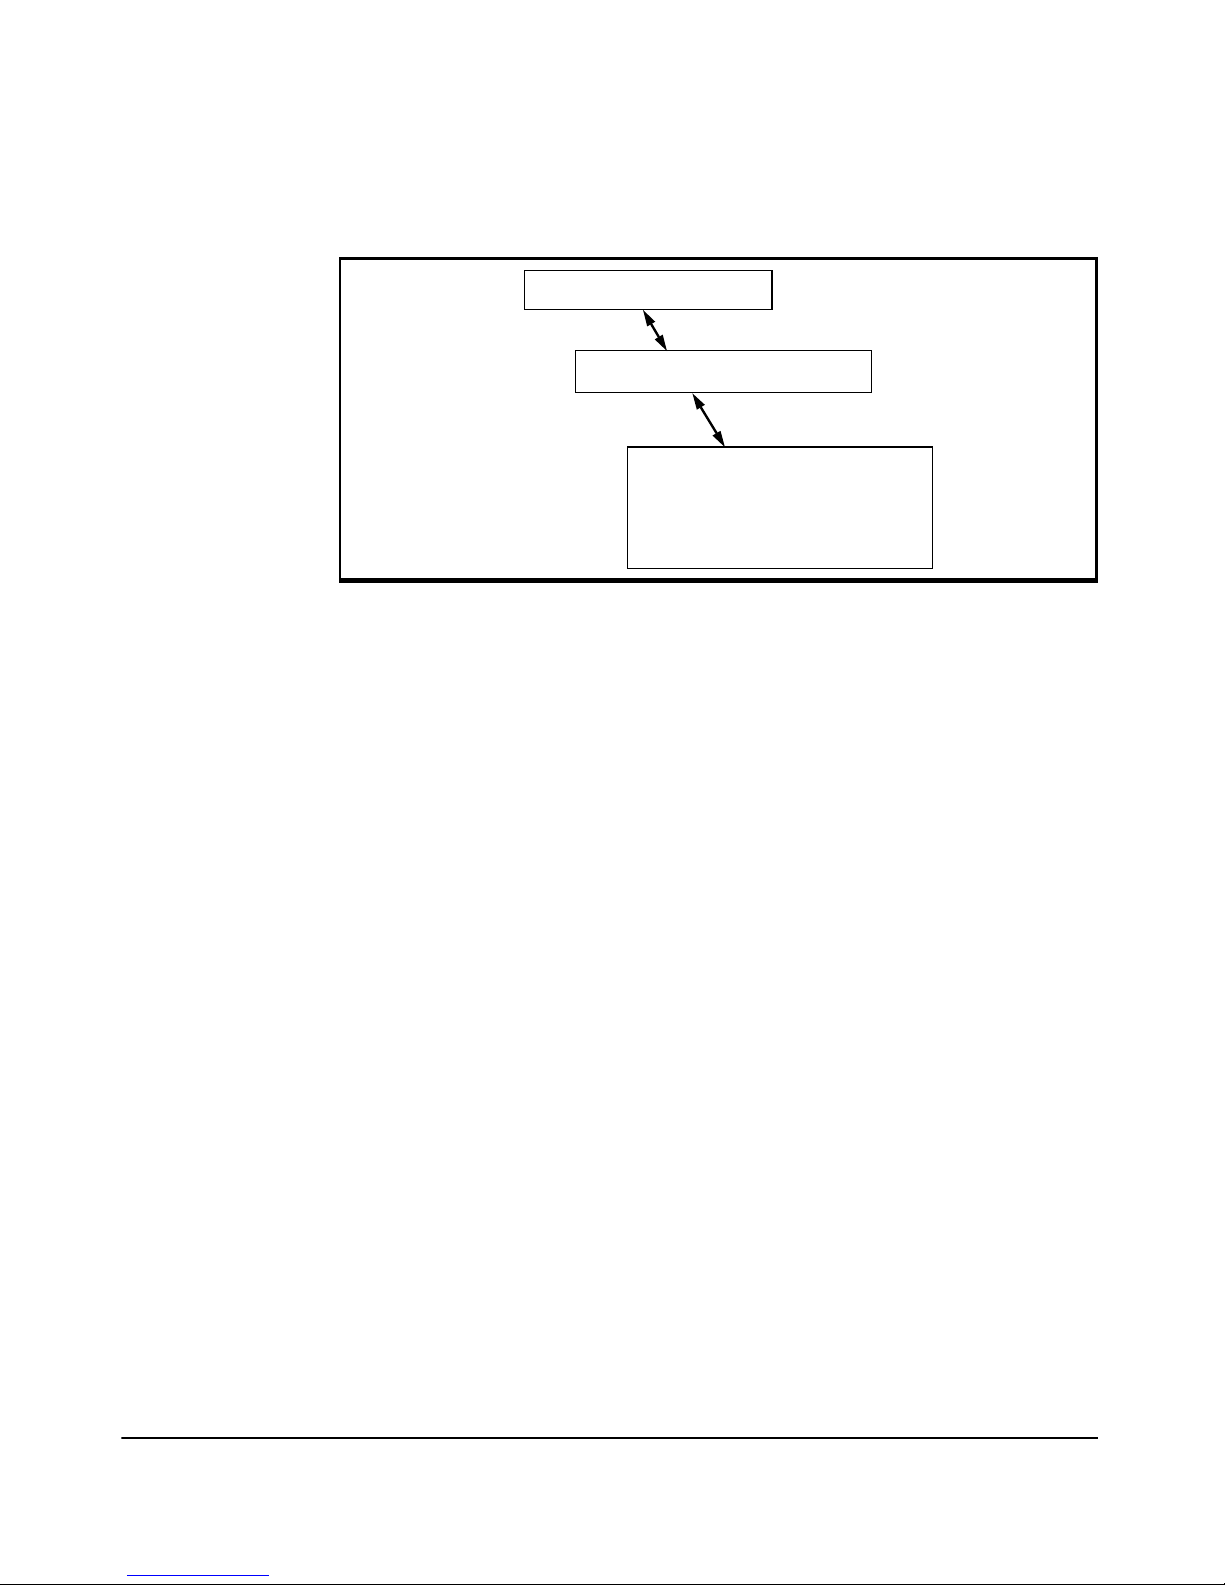
Using the Command Line Interface (CLI)
Using the CLI
Command Levels
Figure 3-2. Access Sequence for Command Levels
Configuration commands on the Access Point 530 are grouped into three
levels:
1. Manager Exec Level
2. Global Configuration Level
3. Context Configuration Level
Interface & WDS Levels
Radio Level:
WLAN Sub Configuration
Manager Exec Level
Manager Exec level allows you to examine the current configuration, perform
basic system-level actions, reset the access point, and move to the configuration access levels. The prompt for the Manager Exec level contains only the
system name and the "#" delimiter. For example:
ProCurve Acess Point 530 #
Global Configuration Level
Global Configuration level gives access to commands for configuring the
access point’s software features, plus all the commands available at the lower
Manager Exec level (except for the "configure [terminal]" command).
To enter this level, enter the configure command at the Exec prompt. The
prompt for this level adds the word "(config)" before the "#" delimiter. For
example:
ProCurve Acess Point 530# configure
ProCurve Acess Point 530(config)#
3-8
Page 43

Using the Command Line Interface (CLI)
Using the CLI
Context-Specific Configuration Levels
The Context Configuration level gives access to specific groups of commands
depending on whether you are configuring the Ethernet interface, a WDS
interface, a Radio, or a WLAN. Additionally, all the commands available at the
lower Manager Exec and Global Configuration levels are available.
The prompt changes according to the configuration context.
■ Ethernet Configuration: To enter the Ethernet configuration context,
enter the interface ethernet command at the Exec prompt. For example:
ProCurve Acess Point 530(config)# interface ethernet
ProCurve Acess Point 530(ethernet)#
■ WDS Configuration: To enter the WDS configuration context for WDS
2, for example, enter interface wds2 at the Exec prompt:
ProCurve Acess Point 530(config)# interface wds2
ProCurve Acess Point 530(wds2)#
■ Radio Configuration: To enter the Radio context for radio 1, for
example, enter radio 1 at the Global Config prompt:
ProCurve Acess Point 530(config)# radio 1
ProCurve Acess Point 530(radio1)#
■ WLAN Configuration: To enter the WLAN context for WLAN 1 on radio
1, enter wlan 1 at the "(radio 1)" prompt:
ProCurve Acess Point 530(radio1)# wlan 1
ProCurve Acess Point 530(radio1-wlan1)#
Table 3-1. Command Level Hierarchy
Command Level Example of Prompt and Permitted Operations
Manager Exec
ProCurve Acess Point 530# Perform system-level actions
(Default)
Global
ProCurve Acess Point 530(config)# Execute configuration
Configuration
Interface
Configuration
ProCurve Acess Point 530(ethernet)#
ProCurve Acess Point 530(wds1)#
ProCurve Acess Point 530(radio1)#
ProCurve Acess Point 530
(radio1-wlan1)#
such as system control,
monitoring, and diagnostic
commands.
commands.
Execute context-specific
configuration commands, such
as a particular access point
interface. This is useful for
entering a series of commands
for the same context.
3-9
Page 44

Using the Command Line Interface (CLI)
Using the CLI
Moving Between Command Levels
Table 3-2. Moving Between Command Levels
Change in Levels Example of Prompt, Command, and Result
Manager Exec
to
Global configuration
Global Configuration
to a
Context Configuration
Move from any level to the preceding level
ProCurve Acess Point 530# config
ProCurve Acess Point 530(config)#
ProCurve Acess Point 530(config)# interface
ethernet
ProCurve Acess Point 530(ethernet)#s
ProCurve Acess Point 530(ethernet)# exit
ProCurve Acess Point 530(config)# exit
ProCurve Acess Point 530#
Move from any level to Manager Exec ProCurve Acess Point 530(ethernet)# end
ProCurve Acess Point 530#
—or—
ProCurve Acess Point 530(config)# end
ProCurve Acess Point 530#
When Changes are Applied
Regardless of which interface is used (CLI, or Web browser interface), the
most recently configured version of a parameter setting overrides any earlier
settings for that parameter. For example, if you use the Web interface to
configure an IP address of “X” for the Ethernet interface and later use the CLI
to configure a different IP address of “Y”, then “Y” replaces “X” as the IP
address for the Ethernet interface.
Changes made through the Web interface are immediately applied to the
startup configuration, whereas changes made through the CLI interface are
only made to the running configuration, and must be saved using the "copy"
or "write memory" command if they are to persist following a reboot.
To save the running configuration changes to the startup configuration using
the CLI Interface:
ProCurve Acess Point 530(ethernet)# write memory
3-10
Page 45

Using the Command Line Interface (CLI)
Using the CLI
Options for Getting Help in the CLI
At any command level in the AP530 CLI you can:
■ Display all commands available at that level
■ Display the completion of a command you have started to type
■ Display the next options available for the command you are currently
entering.
Displaying All Available Commands
To display all commands available at the current command level, type "?" or
press the
Note At a given command level you can display the commands that level offers, plus
any relevant commands available at preceding levels. For example, at the
Global Configuration level, you can display Global Configuration commands
plus all the commands available at the lower Manager Exec level.
[Tab] key.
For example, typing "?" at the Manager Exec level produces this listing:
ProCurve Access Point 530# ?
configure Enter the Configuration context.
copy Copy data and configuration files to/from this device.
deauth-mac Enter MAC address to de-authenticate from this device.
end Return to the Manager level context.
erase Erase stored files.
exit Return to the previous context or terminate current cons
ole/telnet session if you are in the Manager context lev
el.
log Display all the entries in the event log.
logout Terminate this session.
page Toggle paging mode.
ping Send ICMP Ping requests to a device on the network.
reload Warm reboot of the device.
show Show operation information and parameters for this devic
e.
terminal Set the dimensions of the terminal window.
write View or save the running configuration of this device.
ProCurve Access Point 530#
Figure 3-3. Example of the Manager Exec Level Command Listing
3-11
Page 46

Using the Command Line Interface (CLI)
Using the CLI
Typing ? at the Global Configuration level produces this listing:
ProCurve Access Point 530(config)# ?
ap-authentication Configure username/password this access point uses to au
thenticate to the network.
buttons Enable/disable the ability to clear the password(s) and/
or configuration(s) via the buttons on this device.
cli-confirmation Enable/disable all confirmation dialogs for all CLI inte
rfaces on this device.
console Enable/disable the serial console on this device.
copy Copy data and configuration files to/from this device.
country Set the country code for the IEEE 802.11d regulatory dom
ain support.
deauth-mac Enter MAC address to de-authenticate from this device.
dns Configure DNS parameters.
domain Set the system domain name suffix to use when a domain n
ame suffix is not obtained through DHCP.
end Return to the Manager level context.
erase Erase stored files.
exit Return to the previous context or terminate current cons
ole/telnet session if you are in the Manager context lev
el.
group-config Add to a group, remove from a group, or re-configure gro
up-config settings.
hostname Set the system hostname.
inter-station-blockingEnable/disable blocking of direct communication between
wireless stations on this device.
interface Enter the Interface Configuration level context for the
specified interface.
lldp Enable/disable the Link Layer Discovery Protocol (LLDP)
service on this device.
lockout-mac Add or remove MAC addresses to be locked out of this dev
ice.
logging Configure logging/syslog-related settings for this devic
e.
logout Terminate this session.
mac-auth-local Add/remove local MAC address authentication control list
s entries on this device.
page Toggle paging mode.
password Configure local passwords.
ping Send ICMP Ping requests to a device on the network.
radio Enter the Radio Configuration level context for a specif
ic radio.
radius-local Configure user accounts for the internal RADIUS server o
n this device.
....
Figure 3-4. Example of the Configuration-Level Command Listing (Partial Listing)
3-12
Page 47

Using the Command Line Interface (CLI)
Using the CLI
Typing ? at the Context Configuration level produces similar results,
depending on the context.
If - - MORE - - appears below the help list, then there are more commands to be
displayed.
■ To show the next page of commands, press the [Space] bar.
■ To list the remaining commands one-by-one, repeatedly press [Enter].
■ To quit the listing, type [Ctrl] [C].
Completing the Current Command
You can use [Tab] to quickly complete the current word in a command. To do
so, type the first few consecutive characters for a command and then press
[Tab] (with no spaces allowed). If you have typed enough of the word for the
CLI to distinguish it from other options, the CLI completes the current word,
otherwise it displays the available completions.
For example, at the Global Configuration level, if you press
[Tab] immediately
after typing "s", the CLI displays the command that begins with "s". For
example:
ProCurve Acess Point 530(config)# s[Tab]
show
snmp-server
snmpv3
sntp
ssh
stp
Use Shorthand Entries. The CLI accepts abbreviated commands and
options as long as they contain enough characters to be distinguished from
any other currently available commands or options. For example, both of the
following examples will switch to Global Configuration level:
ProCurve Acess Point 530# configure
ProCurve Acess Point 530(config)#
ProCurve Acess Point 530# config
ProCurve Acess Point 530(config)#
3-13
Page 48

Using the Command Line Interface (CLI)
Using the CLI
Displaying Available Command Options
You can display a reminder of the options available for the current command
by entering "?" or the [Tab] key in place of the next option. For example, to see
the command options for configuring SNMP:
ProCurve Access Point 530(config)# snmp-server ?
community Add/remove an SNMP community.
contact Specify a text string that identifies the main contact f
or this device.
host Add/remove an SNMP trap destination host/community.
location Specify a text string that identifies the location of th
is device.
port Specify the port to use for the SNMP server on this devi
ce.
trap Enable/disable specific SNMP traps.
enable Enable SNMPv1/v2c.
ProCurve Access Point 530(config)#
Figure 3-5. Example of How To List the Options for a Specific Command
3-14
Page 49

Using the Command Line Interface (CLI)
CLI Control and Editing
CLI Control and Editing
Keyst roke s Function
[Ctrl] [A] Jumps to the first character of the command line.
[Ctrl] [B] or [<] Moves the cursor back (to the left) one character.
[Ctrl] [C] Terminates a task if one is running and displays the command line.
[Ctrl] [D] Deletes the character at the cursor.
[Ctrl] [E] Jumps to the end of the current command line (the character position after the
last character in the CLI command input buffer).
[Ctrl] [F] or [>] Moves the cursor forward (to the right) one character if the cursor is not at the
end of the current command line.
[Ctrl] [H] Deletes the first character to the left of the command line.
[Ctrl] [K] Deletes from the cursor to the end of the command line.
[Ctrl] [L] or [Ctrl] [R] Repeats current command line on a new line.
[Ctrl] [N] or [v] Enters the next command line in the history buffer.
[Ctrl] [P] or [^] Enters the previous command line in the history buffer.
[Ctrl] [R] Repeats current command line on a new line.
[Ctrl] [U] or [Ctrl] [X] Deletes from the cursor to the beginning of the command line.
[Ctrl] [W] Deletes the last word typed.
[Ctrl] [Y] Recalls the most recent entry in the delete buffer.
[Ctrl] [Z] This character closes the current session, returning the operator to the previous
context (config).
[Esc] [B] Moves the cursor backward (to the left) one word.
[Esc] [D] Deletes from the cursor to the end of the word.
[Esc] [F] Moves the cursor forward (to the right) one word.
[Ctrl] [H], [Delete], or
[Backspace]
Tab or "?" Completes the current word of a command.
Deletes the first character to the left of the command line.
3-15
Page 50

Using the Command Line Interface (CLI)
CLI Control and Editing
— This page is intentionally unused. —
3-16
Page 51

Using the ProCurve Web Browser Interface
4
4-1
Page 52

Using the ProCurve Web Browser Interface
Contents
Contents
Overview . . . . . . . . . . . . . . . . . . . . . . . . . . . . . . . . . . . . . . . . . . . . . . . . . . . . . . 4-3
Starting a Web Browser Interface Session with the Access Point . . . . . . . 4-4
Description of the Web Interface . . . . . . . . . . . . . . . . . . . . . . . . . . . . . . . . . . 4-6
The Home Page . . . . . . . . . . . . . . . . . . . . . . . . . . . . . . . . . . . . . . . . . . . . . 4-6
Support Window . . . . . . . . . . . . . . . . . . . . . . . . . . . . . . . . . . . . . . . . . . . . 4-7
Online Help for the ProCurve Web Browser Interface . . . . . . . . . . . . . 4-7
Using the Help in the Browser Interface . . . . . . . . . . . . . . . . . . . . . . . . 4-8
Web Interface Screens . . . . . . . . . . . . . . . . . . . . . . . . . . . . . . . . . . . . . . . . . . . 4-9
Device Information Group . . . . . . . . . . . . . . . . . . . . . . . . . . . . . . . . . . . 4-10
Device Information Summary . . . . . . . . . . . . . . . . . . . . . . . . . . . . 4-11
Wireless Stations Screen . . . . . . . . . . . . . . . . . . . . . . . . . . . . . . . . . 4-12
AP/LAN Statistics Screen . . . . . . . . . . . . . . . . . . . . . . . . . . . . . . . . 4-14
Wireless Statistics Screen . . . . . . . . . . . . . . . . . . . . . . . . . . . . . . . . 4-15
Event Log Screen . . . . . . . . . . . . . . . . . . . . . . . . . . . . . . . . . . . . . . . 4-17
Network Setup Group . . . . . . . . . . . . . . . . . . . . . . . . . . . . . . . . . . . . . . . 4-18
Network Setup Summary . . . . . . . . . . . . . . . . . . . . . . . . . . . . . . . . 4-19
Management Group . . . . . . . . . . . . . . . . . . . . . . . . . . . . . . . . . . . . . . . . . 4-20
Management Summary . . . . . . . . . . . . . . . . . . . . . . . . . . . . . . . . . . 4-21
Special Features Group . . . . . . . . . . . . . . . . . . . . . . . . . . . . . . . . . . . . . 4-22
Special Features Summary . . . . . . . . . . . . . . . . . . . . . . . . . . . . . . . 4-23
4-2
Tasks for Your First ProCurve Web Browser Interface Session . . . . . . . 4-24
Changing the Management Password . . . . . . . . . . . . . . . . . . . . . . . . . . 4-24
If You Lose the Password . . . . . . . . . . . . . . . . . . . . . . . . . . . . . . . . 4-26
Rebooting or Resetting the Access Point . . . . . . . . . . . . . . . . . . . . . . 4-26
Setting SNMP Community Names . . . . . . . . . . . . . . . . . . . . . . . . . . . . . 4-26
Setting the Radio Mode and Channel . . . . . . . . . . . . . . . . . . . . . . . . . . 4-28
Configuring TCP/IP Settings . . . . . . . . . . . . . . . . . . . . . . . . . . . . . . . . . 4-29
Setting WLAN SSID and Security Settings . . . . . . . . . . . . . . . . . . . . . . 4-31
Page 53

Using the ProCurve Web Browser Interface
Overview
Overview
The Access Point 530 Web browser interface lets you easily access the access
point from a browser-based PC on your network.
This chapter covers the following:
■ Starting a Web browser interface session
■ Description of the Web browser interface
■ An overview of the Web browser interface screens
■ Tasks for your first Web browser interface session
4-3
Page 54

Using the ProCurve Web Browser Interface
Starting a Web Browser Interface Session with the Access Point
Starting a Web Browser Interface
Session with the Access Point
You can start a Web browser session using a standalone Web browser on a
network connection from a PC in the following ways:
• Directly connected to your network
• Connected through remote access to your network
This procedure assumes that you have a supported Web browser installed on
your PC or workstation, and that an IP address has been configured on the
access point. If you are using a Domain Name Server (DNS), your device may
have a name associated with it (for example, AP530) that you can type in the
Location or Address field instead of the IP address. Using DNS names typically
improves browser performance. See your network administrator for any name
associated with the access point. (For more information on assigning an IP
address, refer to “Configuring IP Parameters” on page 4-29.
Web browser support recommended to manage the access point include:
• Microsoft Internet Explorer version 5.5 or 6.x (with up-to-date patch
level for either major version) on Microsoft Windows XP or Microsoft
Windows 2000
• Netscape Mozilla 1.7.x on Redhat Linux version 2.4
• Mozilla/5.0 (Windows; U; Windows NT 5.1; en-US; rv:1.8.1.3) Gecko/
20070309 Firefox/2.0.0.3
4-4
The administration Web browser must have JavaScript enabled to support the
interactive features of the administration interface. It must also support HTTP
uploads to use the software upgrade feature.
Page 55

Using the ProCurve Web Browser Interface
Starting a Web Browser Interface Session with the Access Point
Note Access point management can be limited to access from the Ethernet inter-
face. For more on this feature, see “Setting Up Filter Control” on page 5-55.
Type the IP address (or DNS name) of the access point in the browser Location
or Address field and press
[Enter]. (It is not necessary to include http://.)
10.11.12.195
AP530
[Enter] Example of an IP address.
[Enter] Example of a DNS-type name.
Alternatively, the access point also supports a secure Web (HTTPS) browser
connection. In this case, type https:// followed by the IP address (or DNS name)
in the browser Location or Address field and press
https://10.11.12.195
https://AP530
[Enter] Example of an IP address.
[Enter] Example of a DNS-type name.
[Enter].
Note Internet Explorer on Windows XP: To ensure proper screen refresh, be
sure that the browser options are configured as follows: Under the menu
“Tools / Internet Options / Temporary Internet Files / Settings,” the setting for
item “Check for newer versions of stored pages” should be set to “Automatically”. In Internet Explorer 7, this setting is found under the menu “Tools /
Internet Options / General / Browsing history / Settings”.
4-5
Page 56

Using the ProCurve Web Browser Interface
Description of the Web Interface
Description of the Web Interface
Subjects covered in this section include:
■ The Home Page
■ The Support Page
■ Online Help
The Home Page
The home page is the entry point for the Web browser interface. The following
figure identifies the various parts of the screen.
Active Screen
Menu Sashes
Figure 4-1. The Home Page
4-6
Page 57

Using the ProCurve Web Browser Interface
Description of the Web Interface
Support Window
Clicking on the Support option in the upper-right corner of any of the Web
browser interface screens displays a pop-up window displaying links to online
support options.
The support page provides key information regarding your access point,
including links to white papers, software updates, and more.
Online Help for the ProCurve Web Browser Interface
Online Help is available for the Web browser interface. The help is context
sensitive and maps topics to the Web page you have accessed.
Figure 4-2. The Help and Support Options
The Help Option
The Support Option
4-7
Page 58

Using the ProCurve Web Browser Interface
Description of the Web Interface
Using the Help in the Browser Interface
Clicking on the Help option in the upper-right corner of any of the Web browser
interface screens displays a pop-up window displaying details about the page
you are viewing.
Click Help and open context-sensitive help page.
Figure 4-3. Viewing Online Help
At the top left of the Online Help page is a Topic and Menu bar display for easy
access to further information. Options include, Contents, Index, and Search,
as shown in Figure 4-4.
Figure 4-4. Example of the Online Help Panel
4-8
Page 59

Using the ProCurve Web Browser Interface
Web Interface Screens
Web Interface Screens
The four menu sashes at the left side of the Web interface contain the four
main screen groups:
■ Device Information
■ Network Setup
■ Management
■ Special Features.
Clicking on the group sash reveals a list of the screens in the group and
displays the summary screen for the group .
Clicking on the name of a screen below the group sash displays the corresponding screen.
Figure 4-5. The Main Web Interface Screen
4-9
Page 60

Using the ProCurve Web Browser Interface
Web Interface Screens
Device Information Group
The Device Information sash is the first logical group available on the Webinterface menu. This sash provides access to the following screens:
• Device Information (Access Point 530 Home Page)
• Wireless Stations
• AP/LAN Statistics
• Wireless Statistics
• Event log
These screens are primarily informational screens and are described in the
following pages.
Table 4-1. Index of Device Information Group Screens
Screen Name Page
Device Information summary screen 4-11
Wireless Stations screen 4-12
AP/LAN Statistics screen 4-14
Wireless Statistics screen 4-15
Event Log screen / Log tab 4-17
Event Log screen / Settings tab 5-45
4-10
Page 61

Using the ProCurve Web Browser Interface
Web Interface Screens
Device Information Summary
The Device Information summary screen is primarily informational, but also
serves as the configuration screen for basic system information (as described
in “Web: Setting the System Name, Location, and Contact” on page 5-15).
Figure 4-6. The Device Information Summary Screen
The Device Information screen displays the basic system configuration
settings:
■ System Name: The name assigned to this access point. Modifiable field.
■ Location: The access point’s assigned location. Modifiable field. Max
length of 255 characters.
■ Contact: Administrator responsible for the system. Modifiable field. Max
length of 255 characters.
■ IP Address: IP address of the management interface for this device.
■ MAC Address: The physical layer address for the Ethernet port interface.
■ Software Version: The version number for the runtime software.
■ Serial Number: The serial number of the access point.
■ Country Code: The access point’s current Country Code setting.
■ System Up Time: Length of time the access point has been up (days,
hours, minutes, seconds).
■ [Update]: Updates the access point with the modifiable parameters.
4-11
Page 62
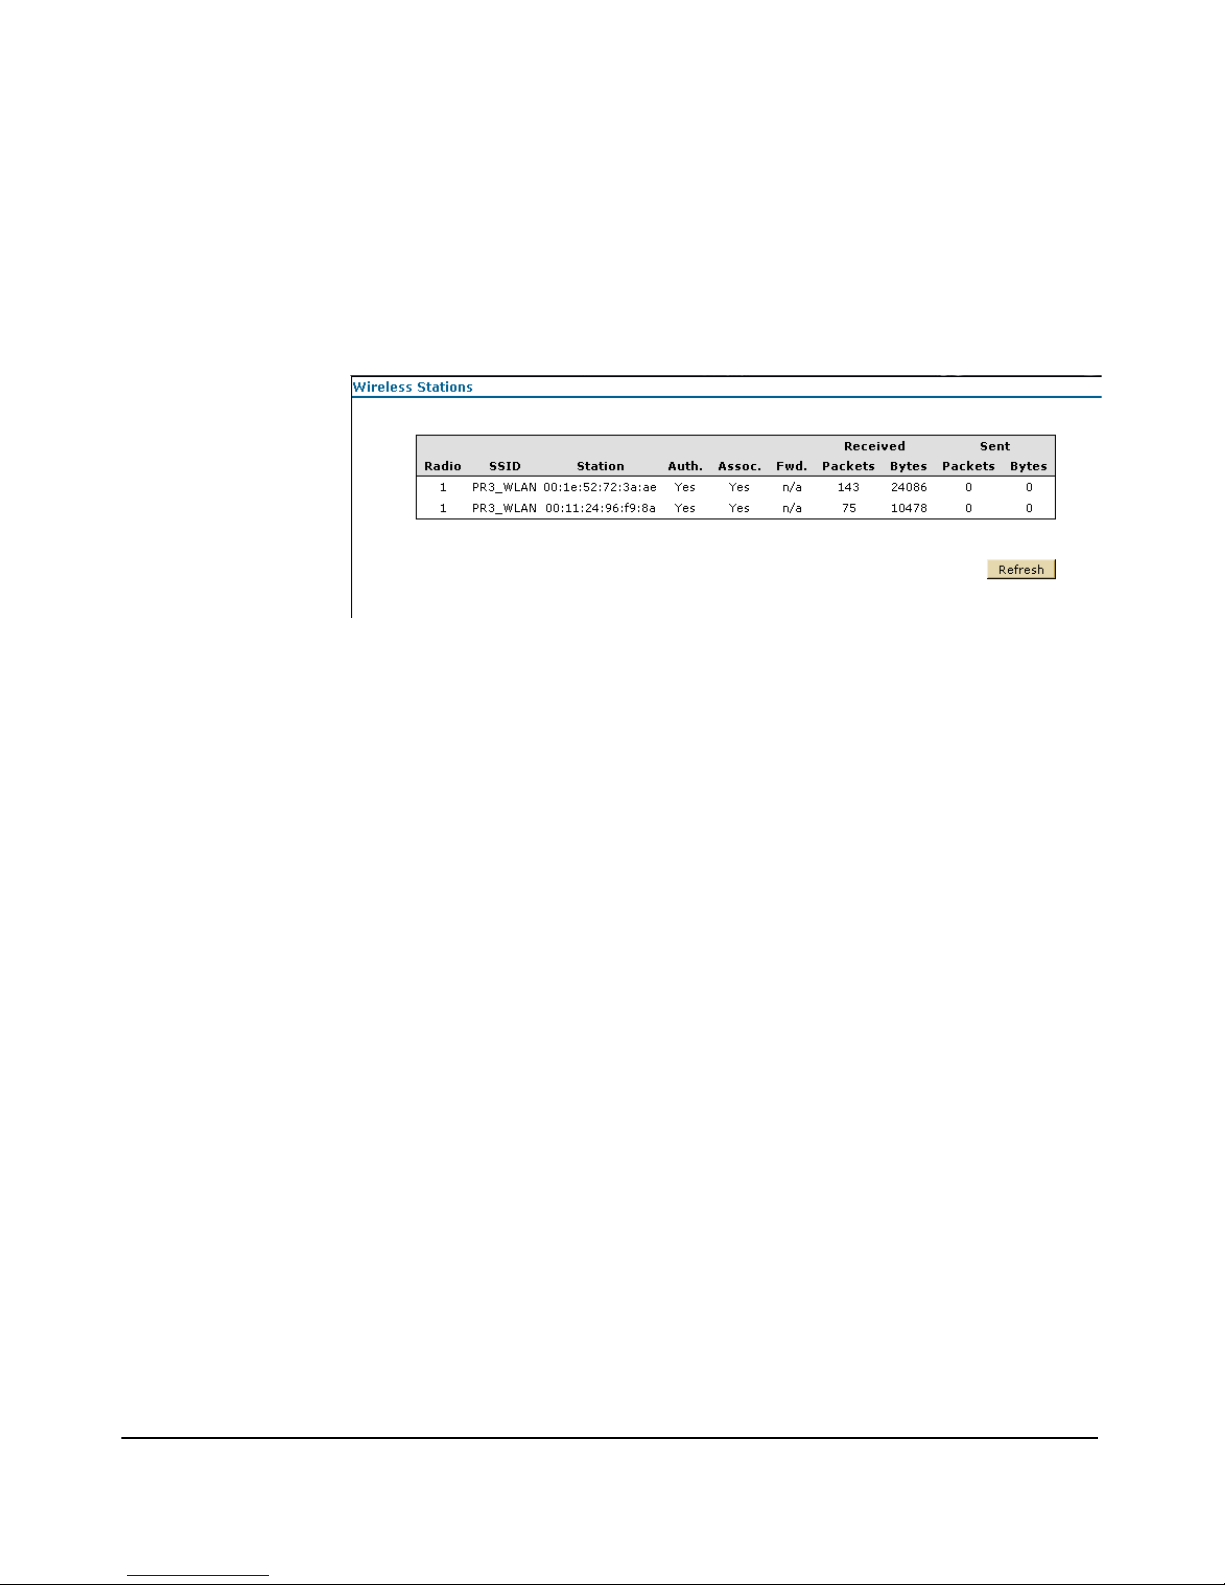
Using the ProCurve Web Browser Interface
Web Interface Screens
Wireless Stations Screen
Accessed through the Wireless Stations option on the Device Information
sash, the Wireless Stations screen displays radio and network station status
details.
Figure 4-7. The Wireless Stations Screen
The Wireless Stations screen displays client stations associated with a particular access point. The associated stations are displayed along with information about packet traffic transmitted and received for each station.
■ Radio: Indicates the access point radio.
■ SSID: Indicates the Service Set Identifier (SSID) of the WLAN to which
the access point is connected.
■ Station: The MAC address of the wireless client.
■ Auth.: Shows if the station has been authenticated. The two basic
methods of authentication supported for 802.11 wireless networks are
“open system” and “shared key.” Open-system authentication accepts any
client attempting to connect to the access point without verifying its
identity. The shared-key approach uses Wired Equivalent Privacy (WEP)
to verify client identity by distributing a shared key to stations before
attempting authentication.
■ Assoc.: Shows if the station has been successfully associated with the
access point. Once authentication is completed, stations can associate
with the current access point, or reassociate with a new access point.
The association procedure allows the wireless system to track the location of each mobile client, and ensures that frames destined for each client
are forwarded to the appropriate access point.
■ Fwd: If 802.1X is used, this parameter indicates the station passed 802.1X
authentication and traffic can be forwarded to the access point. It also
indicates whether a wireless station has the correct WPA pre-shared key
4-12
Page 63

Using the ProCurve Web Browser Interface
Web Interface Screens
when the access point is using "wpa-psk" security on the WLAN. If the
WLAN is set to “static-wep” or “no-security”, this parameter displays “n/
a” as it does not apply.
■ Received Packets: Indicates total packets received by this access point.
■ Received Bytes: Indicates total bytes received by this access point.
■ Sent Packets: Indicates total packets sent by this access point.
■ Sent Bytes: Indicates total bytes sent by this access point.
■ [Refresh]: Refreshes the Wireless station results.
4-13
Page 64
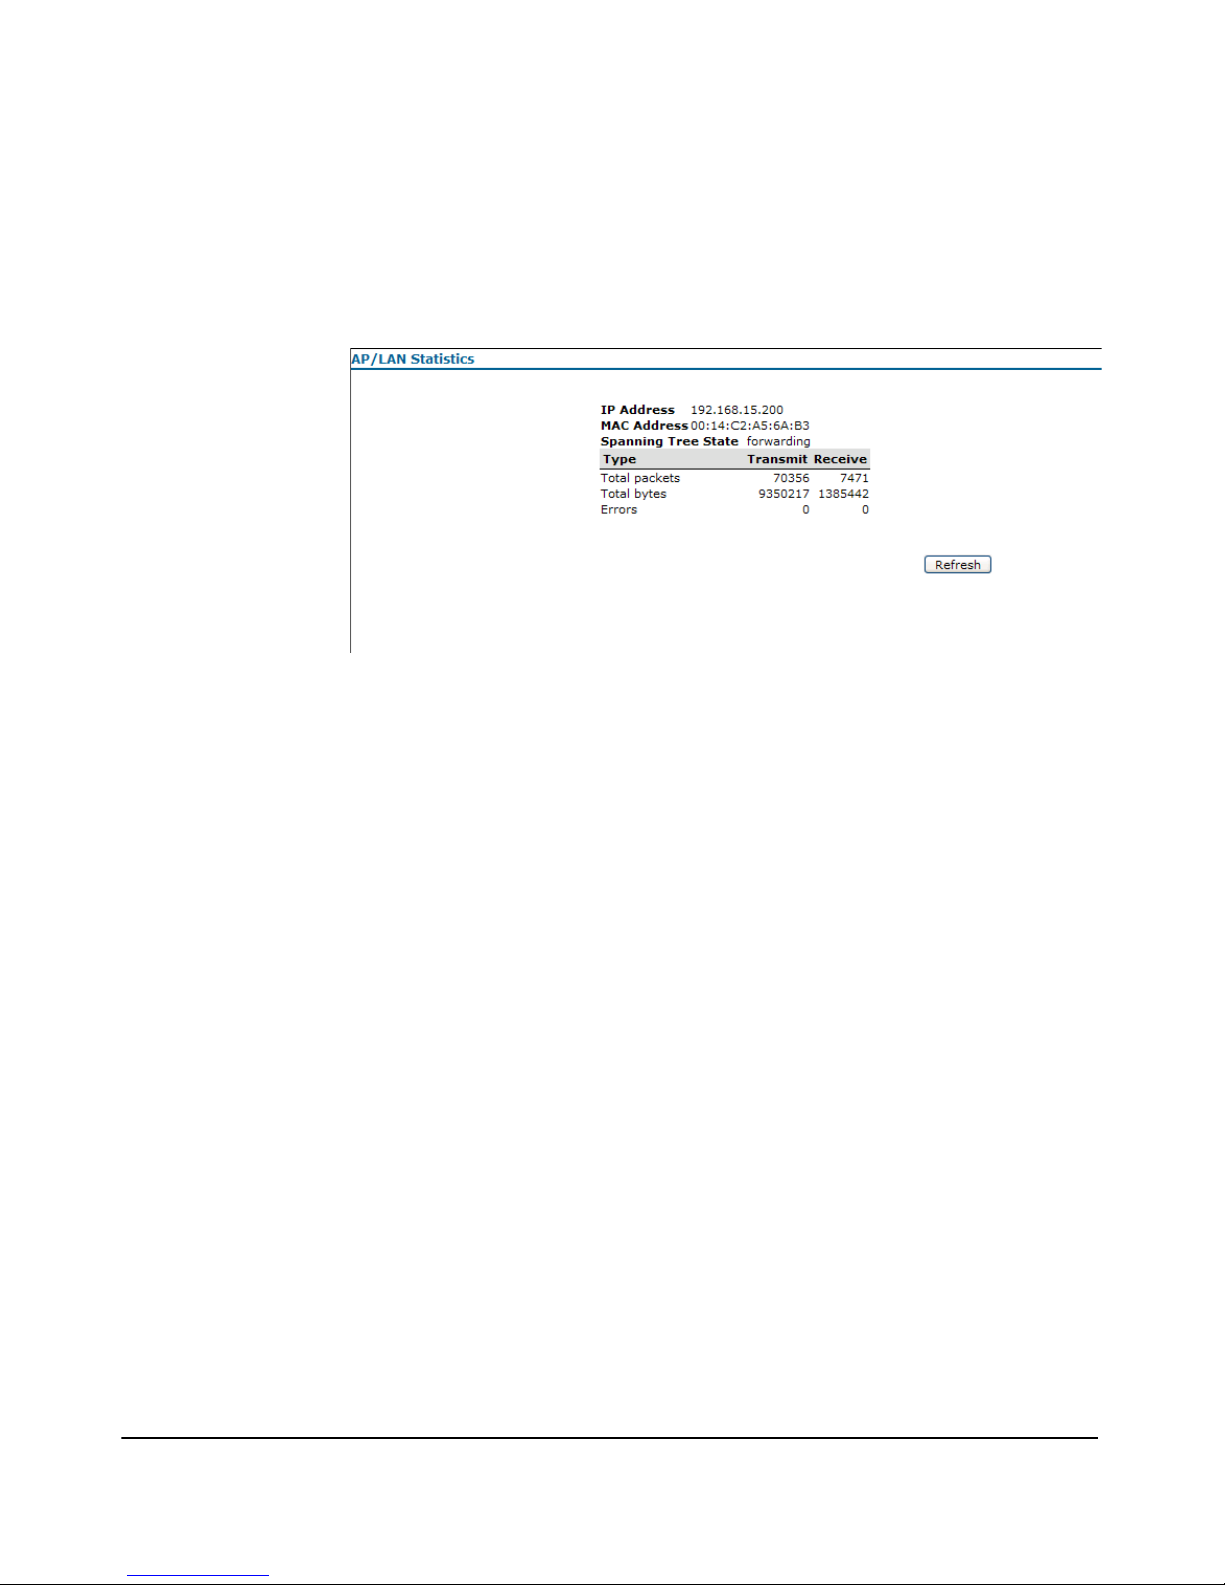
Using the ProCurve Web Browser Interface
Web Interface Screens
AP/LAN Statistics Screen
Accessed through the AP/LAN Statistics option on the Device Information
sash, the AP/LAN Statistics screen displays transmit/receive details.
Figure 4-8. The AP/LAN Statistics Screen
The AP/LAN Statistics screen displays the following information:
■ IP Address: IP address of the management interface for this device.
■ MAC Address: The physical layer address for the Ethernet port interface.
■ Spanning Tree State: Indicates the spanning tree state if used. Possible
states include: disabled, listening, learning, forwarding, or blocking.
■ Tran sm it Tot al P ac ke ts : Indicates total packets transmitted by this
access point.
■ Receive Total Packets: Indicates total packets received by this access
point.
■ Tran sm it Tot al B y t es : Indicates total bytes sent by this access point.
■ Receive Total Bytes: Indicates total bytes received by this access point.
■ Transmit Errors: Indicates the number of transmission errors.
■ Receive Errors: Indicates the number of packet errors received.
■ [Refresh]: Refreshes the AP/LAN statistics results.
4-14
Page 65
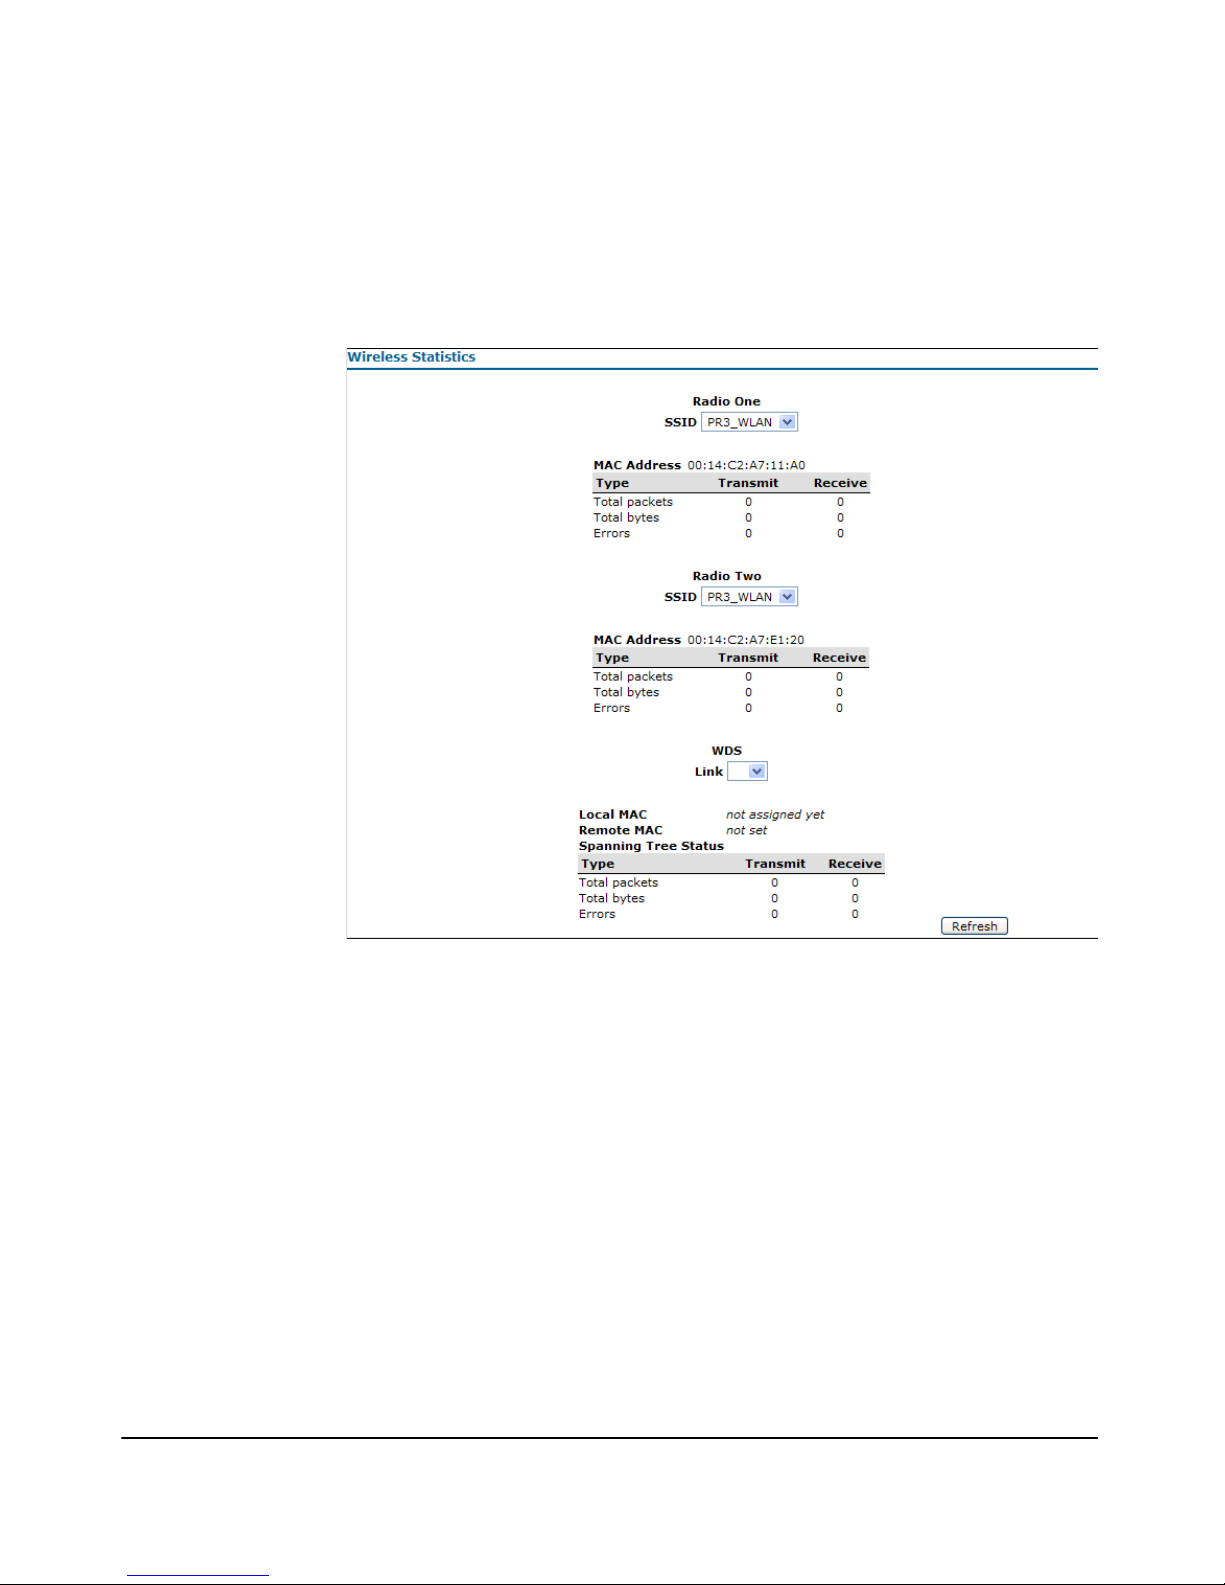
Using the ProCurve Web Browser Interface
Web Interface Screens
Wireless Statistics Screen
Accessed through the Wireless Statistics option on the Device Information
sash, the Wireless Statistics screen displays transmit/receive details.
Figure 4-9. The Wireless Statistics Screen
The Wireless Statistics screen displays dual radio information:
■ Radio One / Two SSID: Indicates the Service Set Identifier (SSID) for
Radio 1 or Radio 2 .
■ MAC Address: Indicates the physical layer address for the Ethernet port
interface.
■ WDS LINK: Indicates the configured WDS link.
■ Local MAC: Indicates the remote MAC address of the WDS link.
■ Remote MAC: Indicates the remote MAC address of the WDS link.
■ Spanning Tree Status: Indicates the spanning tree status if used.
■ Tran sm it Tot al P ac ke ts : Indicates total packets transmitted over the
radio or WDS link.
4-15
Page 66

Using the ProCurve Web Browser Interface
Web Interface Screens
■ Receive Total Packets: Indicates total packets received over the radio
or WDS link.
■ Tran sm it Tot al B yt es : Indicates total bytes sent over the radio or WDS
link.
■ Receive Total Bytes: Indicates total bytes received over the radio or
WDS link.
■ Transmit Errors: Indicates total errors related to sending data.
■ Receive Errors: Indicates total errors related to receiving data
■ [Refresh]: Refreshes the Wireless Statistics results.
4-16
Page 67
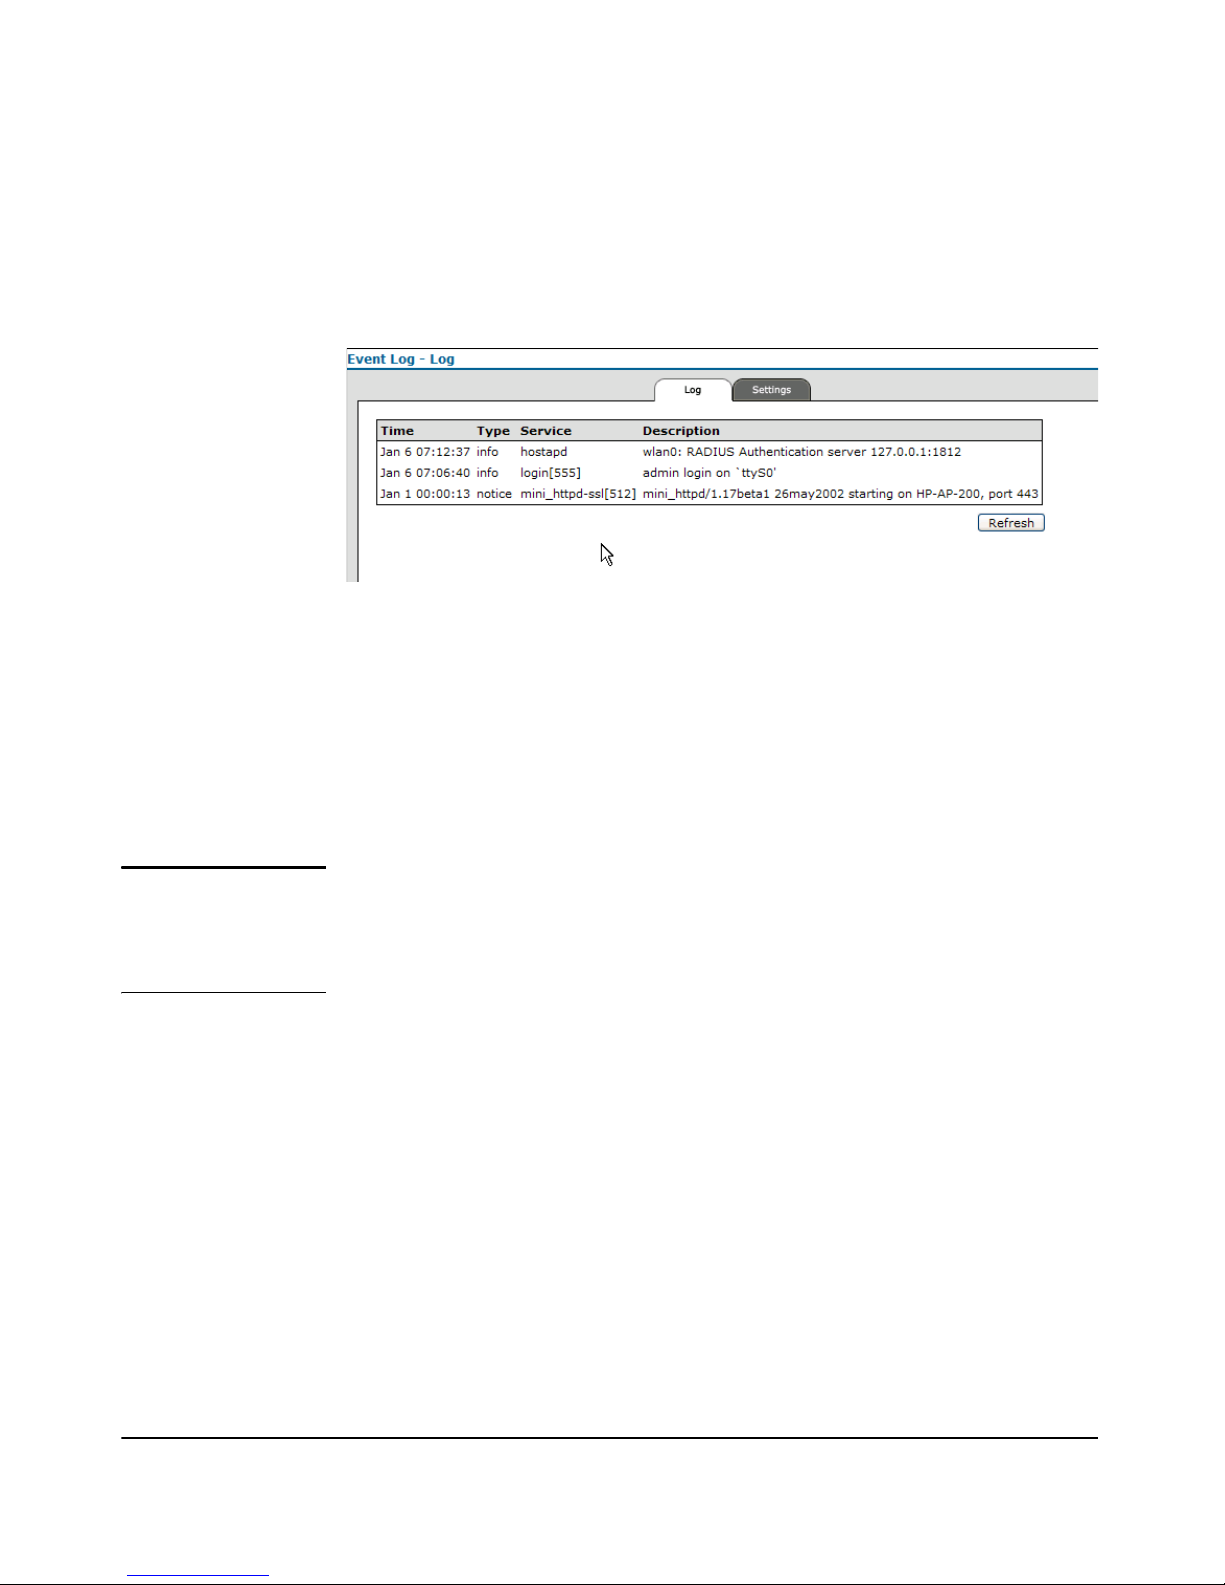
Using the ProCurve Web Browser Interface
Web Interface Screens
Event Log Screen
Accessed through the Wireless Statistics option on the Device Information
sash, the Wireless Statistics screen displays transmit/receive details.
Figure 4-10. The Event Log Screen
The Event Log tab displays the following information:
■ Time: Indicates the time the log message was generated.
■ Ty pe: Indicates the logging (type) level associated with this message.
■ Service: Indicates the service (type) associated with this message.
■ Description: Indicates the content of the log message.
■ [Refresh]: Refreshes the Event log results.
Note The Web user interface has a limited amount of memory for containing and
displaying the event log. When the size of the event log has grown larger than
the amount of memory allocated to the event log, all messages are purged from
the display. To view a complete list of events, use the CLI command show log.
4-17
Page 68

Using the ProCurve Web Browser Interface
Web Interface Screens
Network Setup Group
The Network Setup sash is the second logical group available on the Webinterface menu. Once accessed, it defaults to the Network Setup screen. This
group provides access to the following screens:
• Network Setup
•Ethernet
• Radio
•WLANs
The screens belonging to the Network Setup group are described in their
respective configuration sections.
Table 4-2. Index of Network Setup Group Screens
Screen Name Page
Network Setup summary screen 4-19
Ethernet screen 5-19
Radio screen 6-9, 6-12
Advanced Settings sub-screen 6-14
WLANs screen 6-37
Security sub-screen / Security tab 7-18
Security sub-screen / RADIUS Servers tab 7-33
Security sub-screen / Accounting Servers tab 5-52
Security sub-screen / MAC Authentication tab 7-46
Security sub-screen / Web Authentication tab / Login tab 7-68
4-18
Page 69
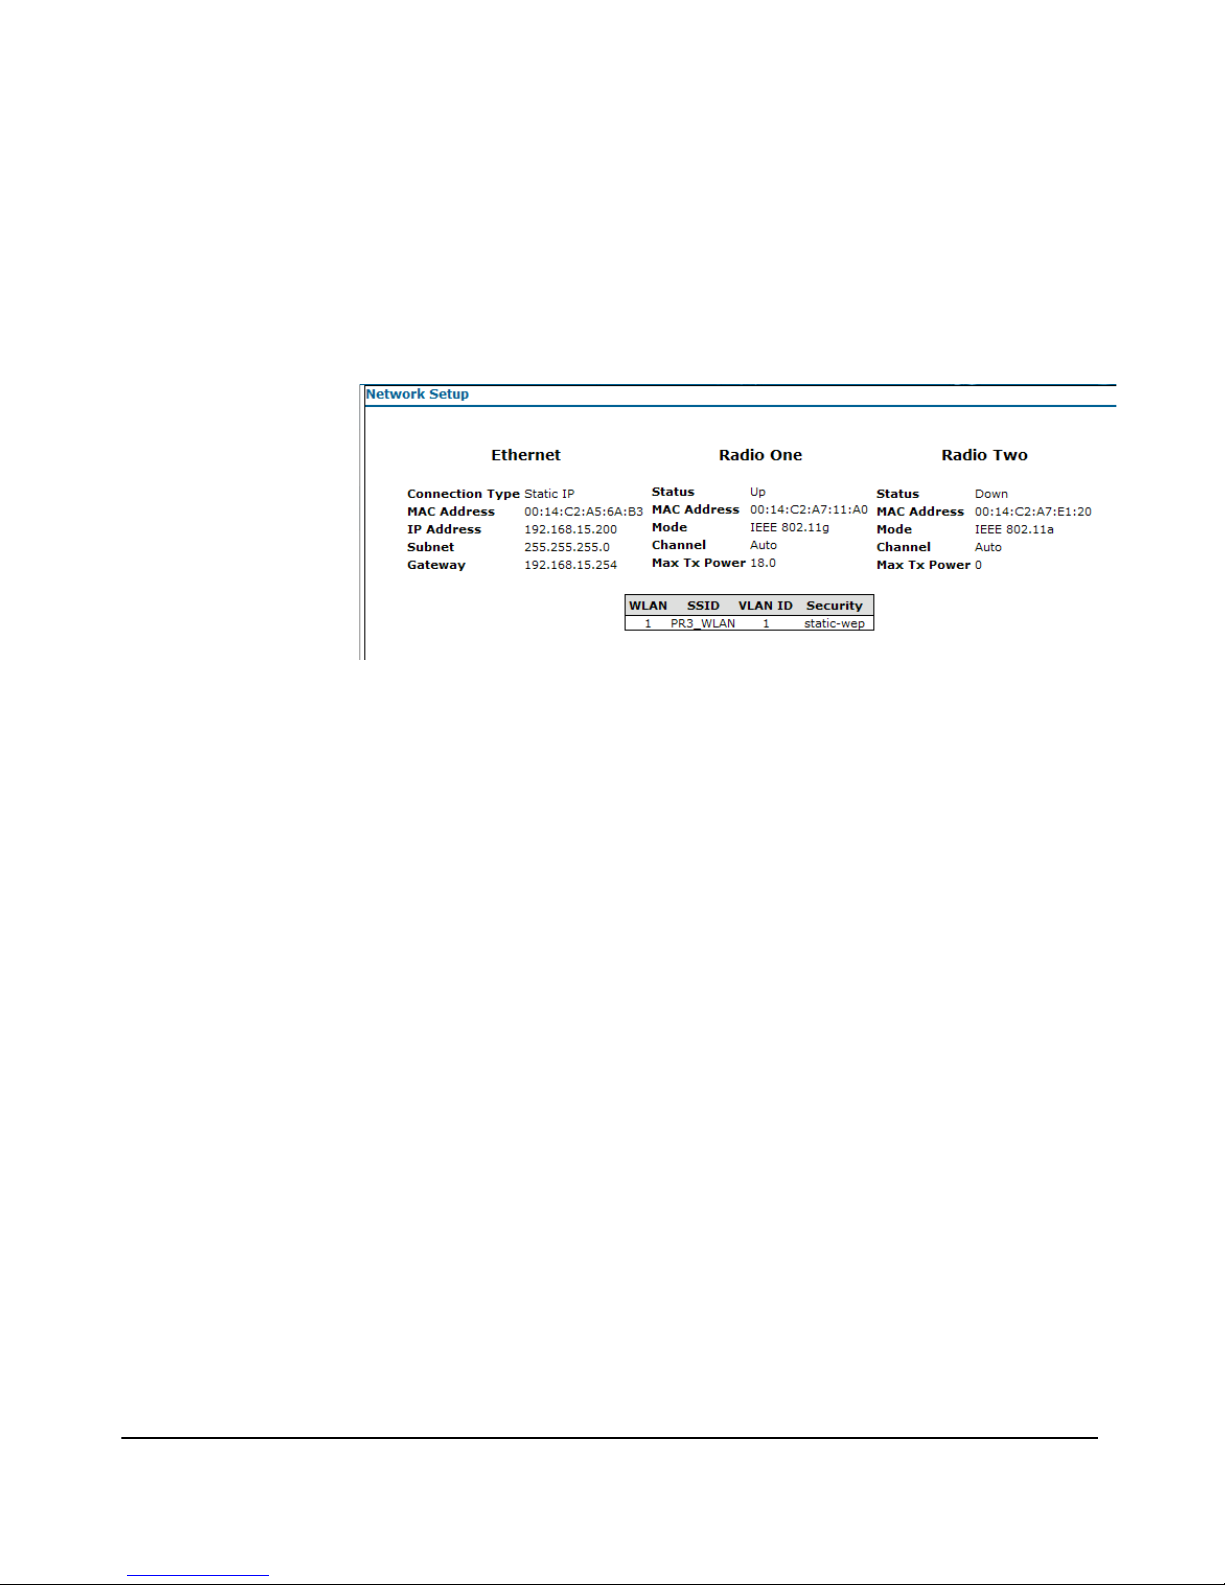
Using the ProCurve Web Browser Interface
Web Interface Screens
Network Setup Summary
Accessed through the Network Setup sash, the Network Setup screen displays
the Ethernet and radio features within the network setup group.
Figure 4-11. The Network Setup Summary Screen
The Network Setup screen summarizes:
■ Ethernet: details basic Ethernet parameters.
• Connection Type: Indicates the type of connection.
• MAC Address: The physical layer address for the Ethernet port
interface.
• IP Address: IP address of this device.
• Subnet: Subnet mask of this device.
• Gateway: Gateway address of this device.
■ Radio One / Two: details basic Radio One & Two parameters.
• Status: Indicates if the radio is up or down.
• MAC Address: The physical layer address.
• Mode: Displays the radio mode for Radio One (IEEE 802.11b or IEEE
802.11g).
• Channel: Displays the channel on which the access point is currently
broadcasting.
• Max Tx Power: Displays the maximum radio power level for the
selected mode in dBm.
■ WLAN / SSID / VLAN ID / Security: details basic WLAN parameters.
• WLAN: Indicates the WLAN identifier. There can be up to 16 WLANs.
• SSID: Indicates the Service Set Identifier (SSID) for the WLAN.
• VLAN ID: Indicates the VLAN the WLAN is operating on.
• Security: Indicates the configured security for the WLAN.
4-19
Page 70

Using the ProCurve Web Browser Interface
Web Interface Screens
Management Group
The Management sash is the third logical group available on the Web interface
menu. Once accessed, it defaults to the Management screen. This group
provides access to the following screens:
• Local MAC Authentication
• Web Authentication
•SNMP
• Group Configuration
•AP Authentication
• AP Access
• System Maintenance
The screens belonging to the Management group are described in their respective configuration sections.
Table 4-3. Index of Management Group Screens
Screen Name Page
Management summary screen 4-21
Local MAC Authentication screen 7-45
Web Authentication screen / Address Pool tab 7-64
Web Authentication screen / Guest Account tab 7-66
SNMP screen / Settings tab 5-26
SNMP screen / Traps tab 5-32
SNMP screen / Trap Hosts tab 5-32
SNMP screen / SNMPv3 Users tab 5-40
Group Configuration screen 5-65
AP Authentication screen 7-54
AP Access screen / Access tab 5-10
AP Access screen / Password tab 5-6
System Maintenance screen / Reboot tab A-14
System Maintenance screen / Software tab A-5
System Maintenance screen / Configuration Files tab A-8
4-20
Page 71
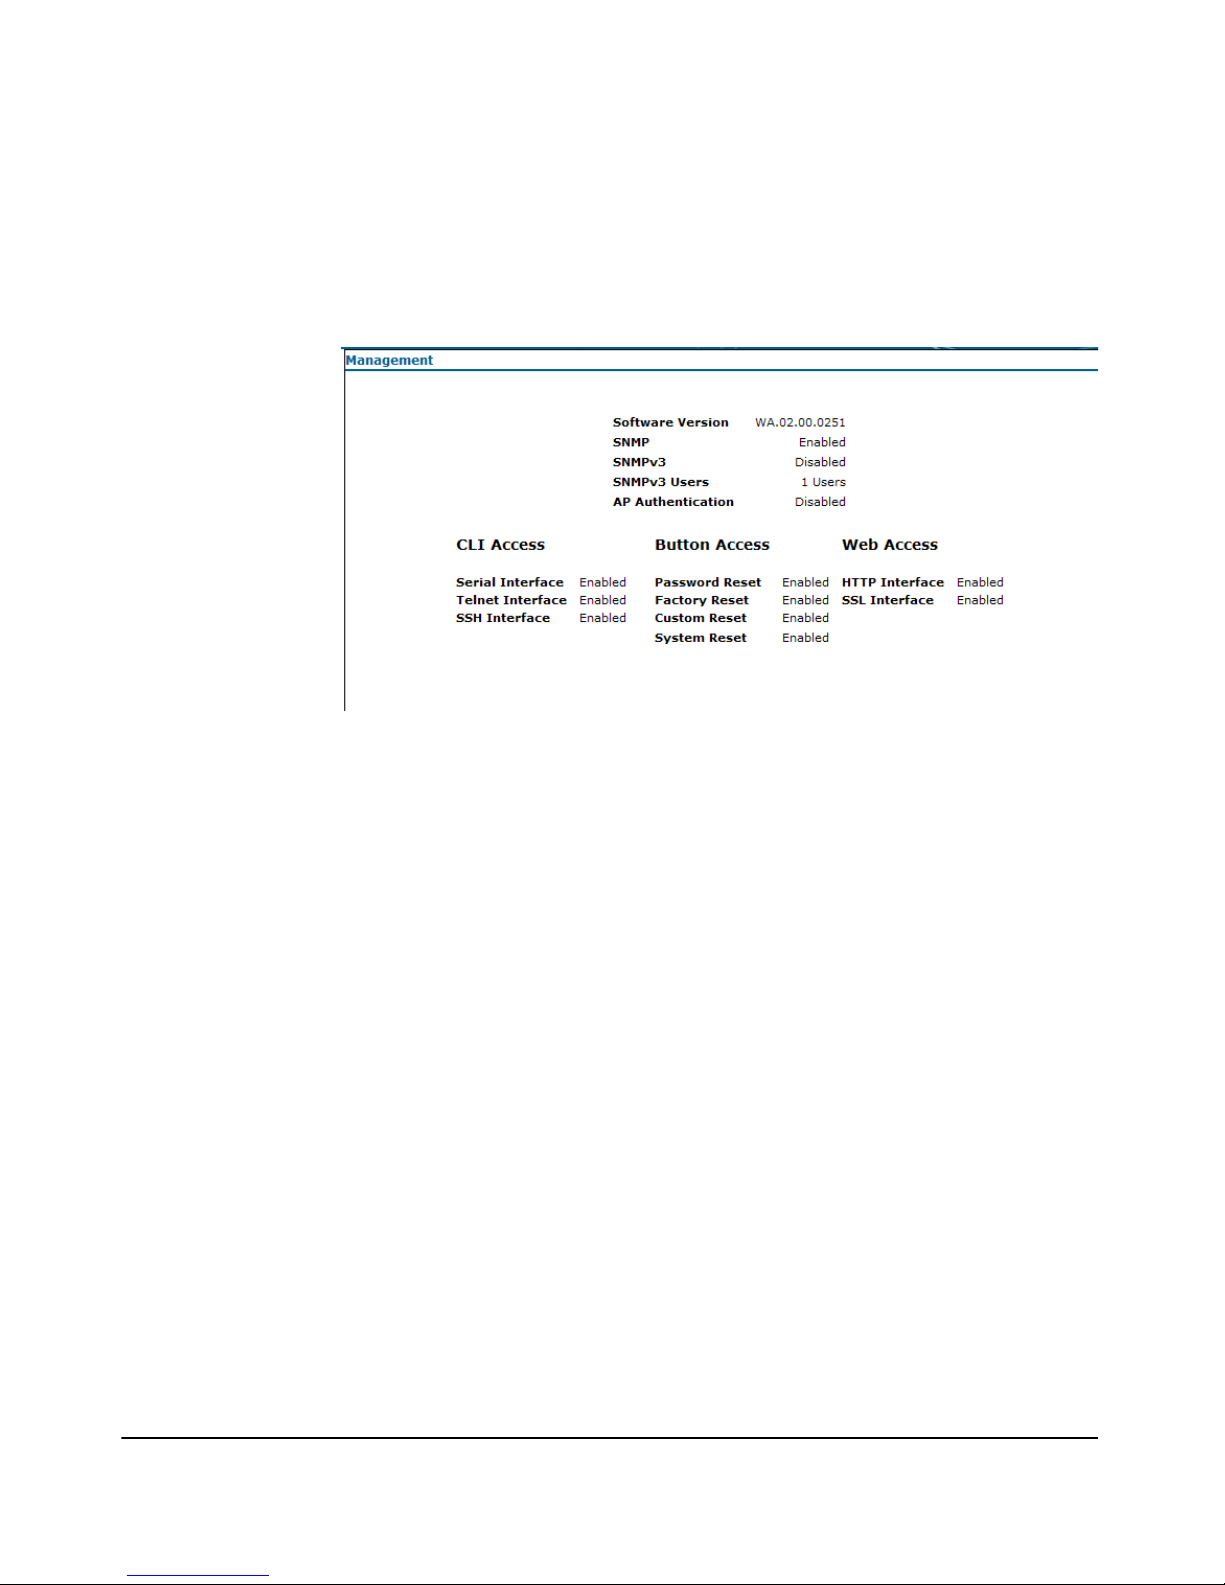
Using the ProCurve Web Browser Interface
Web Interface Screens
Management Summary
Accessed through the Management sash, the Management screen displays a
summary of access point management settings.
Figure 4-12. The Management Summary Screen
The Management screen summarizes:
■ Software Version: Displays the version of the running software.
■ SNMP: Indicates if SNMP is enabled or disabled.
■ SNMPv3: Indicates if SNMPv3 is enabled or disabled.
■ SNMPv3 Users: Indicates the number of SNMPv3 users registered.
■ CLI Access: Indicates the status (enable or disable) of CLI access inter-
faces: through the serial port, using Telnet ,or using SSH.
■ Button Access: Indicates the status (enable or disable) for password,
factory, custom, and system resetting using the buttons on the back of the
access point.
■ Web Access: Indicates the status (enable or disable) of support for Web
(HTTP) browser access and Secure Socket Layer (SSL) access, which
provides a secure encrypted connection to the access point’s Web interface.
4-21
Page 72

Using the ProCurve Web Browser Interface
Web Interface Screens
Special Features Group
The Special Features sash is the fourth logical group available on the Web
interface menu. Once accessed, it defaults to the Special Features screen. This
group provides access to the following screens:
•QoS
•WDS
• Local RADIUS
• MAC Lockout
•AP Detection
• Filters
•Time
The screens belonging to the Special Features group are described in their
respective configuration sections.
Screen Name Page
Special Features summary screen * 4-23
QoS screen 8-5
WDS screen 8-19
Local RADIUS screen 7-36
User Database screen 7-39
MAC Lockout screen 7-50
AP Detection screen / Settings tab 8-30
AP Detection screen / AP List tab 8-30
Filters screen 5-55
Time screen 5-48
4-22
Page 73
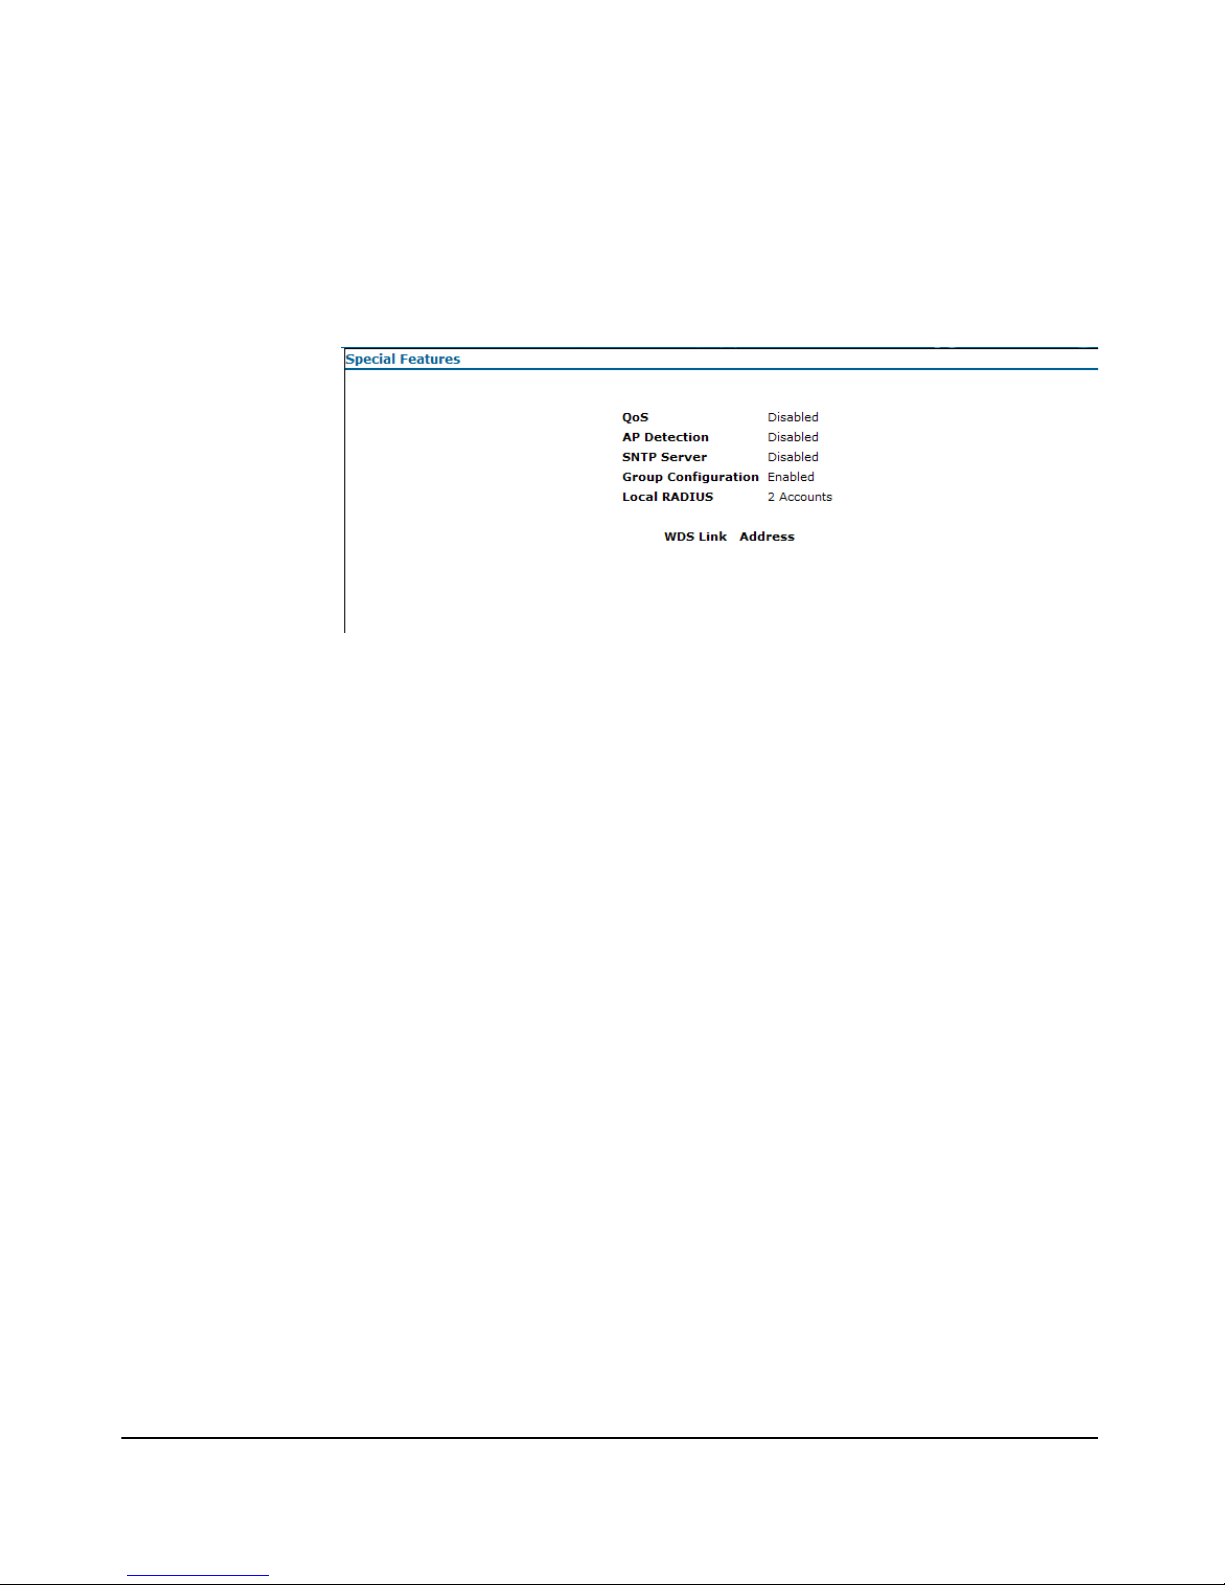
Using the ProCurve Web Browser Interface
Web Interface Screens
Special Features Summary
Accessed through the Special Features sash, the Special Features screen
displays a summary of special feature statistics.
Figure 4-13. The Special Features Summary Screen
The Special Features screen summarizes:
■ QoS: Indicates if Quality of Service packet prioritization (also referred to
as WiFi Multimedia or WMM) is enabled or disabled.
■ AP Detection: Indicates if AP Detection is enabled or disabled.
■ SNTP Server: Indicates if the SNTP Server is enabled or disabled.
■ Group Configuration: Indicates whether Group Configuration is
enabled or disabled for the access point.
■ Local RADIUS: The number of accounts registered on the local RADIUS
server.
■ WDS Link/Address: Indicates the WDS interface number and the config-
ured remote MAC address for each respective enabled WDS link.
4-23
Page 74

Using the ProCurve Web Browser Interface
Tasks for Your First ProCurve Web Browser Interface Session
Tasks for Your First ProCurve Web
Browser Interface Session
The ProCurve AP530 Installation and Getting Started Guide includes
instructions for a minimal initial configuration using the CLI on a console
attached to the access point. This configuration included:
■ Setting the administrator password (which secures the access point
management interface from unauthorized access)
■ Setting the IP address and subnet mask of the access point to be consistent
with your local network settings (which allows inband access to the Web
browser interface from the wired network)
■ Setting the access point country code (which, if needed, can only be done
using the CLI)
■ Optionally enabling one of the radios (which allows inband access to the
Web browser interface from the wireless network)
After performing the initial out-of-band configuration, it is usually more
convenient to continue the configuration process inband, using the Web
browser interface.
Some of important tasks that you may wish to be familiar with are described
below:
■ Changing the management password
■ Settings SNMP community names
■ Setting the radio mode and channel
■ Change TCP/IP settings
■ Setting the WLAN SSID and security options
■ Rebooting and resetting the access point
Changing the Management Password
You normally want to change the password to enhance access security for the
management interface on your access point. The password allows read and
write access to the Web browser interface.
4-24
Page 75

Using the ProCurve Web Browser Interface
Tasks for Your First ProCurve Web Browser Interface Session
Note If you want security beyond that achieved with user names and passwords,
you can disable access to the either the or the CLI and limit management
access to, for example, only the Web browser interface, only the CLI via the
console port, Telnet, or SSH. For more information, see “Web: Configuring Access
Controls” on page 5-10
Figure 4-14. Setting the Management Password
To Set the Management Password:
1. Click Management > AP Access and select the Password tab.
2. In the New Password field, enter a new password.
3. In the Confirm Password field, re-enter the new password.
4. Click [Update] to activate the new password.
Notes ■ The password is case sensitive and must be at least 1 character and at
most 32 characters long. However, only the first 8 characters of the
password are used; character number 9 and above are ignored at log in.
■ The password you assign in the Web browser interface will overwrite the
previous settings assigned in either the Web browser interface or the
access point console. That is, the most recently assigned user password
is immediately effective for the access point, regardless of which interface
was used to assign these parameters.
4-25
Page 76

Using the ProCurve Web Browser Interface
Tasks for Your First ProCurve Web Browser Interface Session
The Manager user name and password control access to both the CLI and the
Web browser management interfaces for the access point. You are prompted
to supply the user name and password every time you try to access the access
point through either of these interfaces.
If You Lose the Password
If you lose the password, you can reset it by pressing the Clear button on the
back of the access point for more than one second. This action resets the
password to the factory default settings for all of the access point’s interfaces.
For details on resetting configuration files, see “File Uploads, Downloads, and Resets”
on page A-1.
Rebooting or Resetting the Access Point
You can also use the Web interface to:
• Reset the configuration file back to the factory default:
Click Management > System Maintenance and select the Configuration Files
tab. Then click the Reset to Factory Default [Reset] button in the
Reset Configuration area.
• Reboot the AP:
Click Management > System Maintenance and select the Reboot tab. Then
click the Reboot the Access Point [Reboot] button.
NOTE For details on manual reset of the access point, reference the Installation and
Configuration Guide and see “File Uploads, Downloads, and Resets” on page A-1.
Setting SNMP Community Names
You can manage the access point from a network management station running
a Simple Network Management Protocol (SNMP) management application
such as ProCurve Manager.
The access point SNMP agent supports SNMP versions 1 and 2c. Management
access from SNMP v1 or v2c stations is controlled by community names. To
communicate with the access point, an SNMP v1 or v2c management station
must first submit a valid community name for authentication. The default
community names are “public” for read-only access and “private” for read/
write access. If you intend to support SNMP v1 or v2c managers, it is recommended that you change the default community names to prevent unauthorized access. For SNMP parameter details, see “Web: Setting Basic SNMP Parameters”
on page 5-26.
4-26
Page 77

Using the ProCurve Web Browser Interface
Tasks for Your First ProCurve Web Browser Interface Session
.
Figure 4-15. Setting SNMP Community Names
To Change A Default SNMP Community Name:
1. Click Management > SNMP and select the Settings tab.
2. To activate the SNMP feature on the access point, click SNMPv1/v2c Enabled.
3. To establish a public read-only SNMP community, type a name text string
to replace the default community name (public) in the Community Name
(RO) field.
4. To establish a private read-write SNMP community, type a name text string
to replace the default community name (private) in the Community Name
(R/W) field.
5. To activate SNMPv3 functions on the access point, click SNMPv3 Enabled.
6. Click [Update] to activate the new SNMP community name.
4-27
Page 78

Using the ProCurve Web Browser Interface
Tasks for Your First ProCurve Web Browser Interface Session
Setting the Radio Mode and Channel
The access point’s radio channel settings are limited by local regulations,
which determine the number of channels that are available. You can manually
set the access point’s radio channel or allow it to automatically select an
unoccupied channel.
Notes ■ Radio 1 operates in 802.11b/g mode, but Radio 2 operates in either 802.11b/
g or 802.11a modes. If radio 2 is to be configured in 802.11b or 802.11g
mode, it must be connected to an external antenna to ensure adequate
separation between the two radios operating in the same frequency. See
“Radio Configuration Summary Table” on page 6-6.
■ If using the worldwide product, before configuring radio settings on the
access point, you must first use the CLI to set the Country Code so that
the radio channels used conform to your local regulations. It is your
responsibility to select a correct country setting, otherwise radio operation may fail to comply with legal requirements for use of the access point
in your country. See “Setting the Country Code” on page 6-4.
Adjacent access points operating in the same band should be configured to
use non-overlapping channels. See “Radio Configuration Summary Table” on page 6-6 and
“Web: Configuring Basic Radio Settings” on page 6-12.
.
Figure 4-16. Setting Radio Mode and Channel
4-28
Page 79

Using the ProCurve Web Browser Interface
Tasks for Your First ProCurve Web Browser Interface Session
To Set Radio Mode and Channel:
1. Select Radio.
2. Using the Radio drop-down, select the radio (1 or 2) you want to configure.
3. To enable the radio, click the Status On button.
4. Select the Mode (default is IEEE 802.11g).
5. Select the Channel
6. Click
[Update] to save the settings.
(auto is the default).
Note If you are configuring the worldwide product, the Radio screen is not available
for configuration until the Country Code is set using the CLI.
Configuring TCP/IP Settings
You can use the Web browser interface to manage the access point only if it
already has an IP address that is reachable through your network. You can set
an initial IP address for the access point by using the CLI interface.
After you have network access to the access point, you can then use the Web
browser interface to modify the initial IP configuration. For IP parameter
details, see “Web: Configuring IP Settings Statically or via DHCP” on page 5-19.
Figure 4-17. Configuring IP Parameters
4-29
Page 80

Using the ProCurve Web Browser Interface
Tasks for Your First ProCurve Web Browser Interface Session
To Set IP Parameters i:
1. Select Ethernet.
2. To set a dynamic connection, select DHCP in the Connection Type drop-
down.
3. To set a manual connection, select Static IP in the Connection Type drop-
down.
4. If you chose Static IP, enter the IP address and the subnet mask in the Static
IP Address and Subnet Mask fields. The defaults automatically populate.
5. If a management station exists on another network segment, in the Default
Gateway field enter the IP address of a gateway that can route traffic between
these segments.
6. Enter the IP address for the primary and secondary DNS servers to be used
for host-name to IP address resolution.
7. Optionally enter the domain suffix for hostname/domain-name lookups
in the Domain field.
8. Click
[Update] to save these IP settings.
Note If you change the IP address using the Web interface, you must log in again
using the new address.
4-30
Page 81

Using the ProCurve Web Browser Interface
Tasks for Your First ProCurve Web Browser Interface Session
Setting WLAN SSID and Security Settings
Wireless stations can read the SSIDs from the access point’s beacon frame. If
the “closed system” option is selected when configuring the access point, the
SSID is not broadcast in the beacon frame. For more secure data transmissions, the access point provides client authentication and data encryption
based on shared keys that are distributed to all stations.
Wired Equivalent Privacy (WEP) is implemented to provide a basic level of
security, preventing unauthorized access to the network and encrypting data
transmitted between wireless stations and the access point.
The access point allows configuration of up to 16 SSIDs . The Web interface
provides easy screens to configure SSID parameters, including: enabling, SSID
names, closed system, VLAN IDs, and security settings. For Security parameter details, see “Web: Setting Security Options” on page 7-18.
NOTE Configuring WLAN security establishes WDS Link Security. For a summary of
the configuration relationship, see “Web: Setting Security Options” on page 7-18.
4-31
Page 82

Using the ProCurve Web Browser Interface
Tasks for Your First ProCurve Web Browser Interface Session
.
Figure 4-18. The WLANs Screen
4-32
Page 83
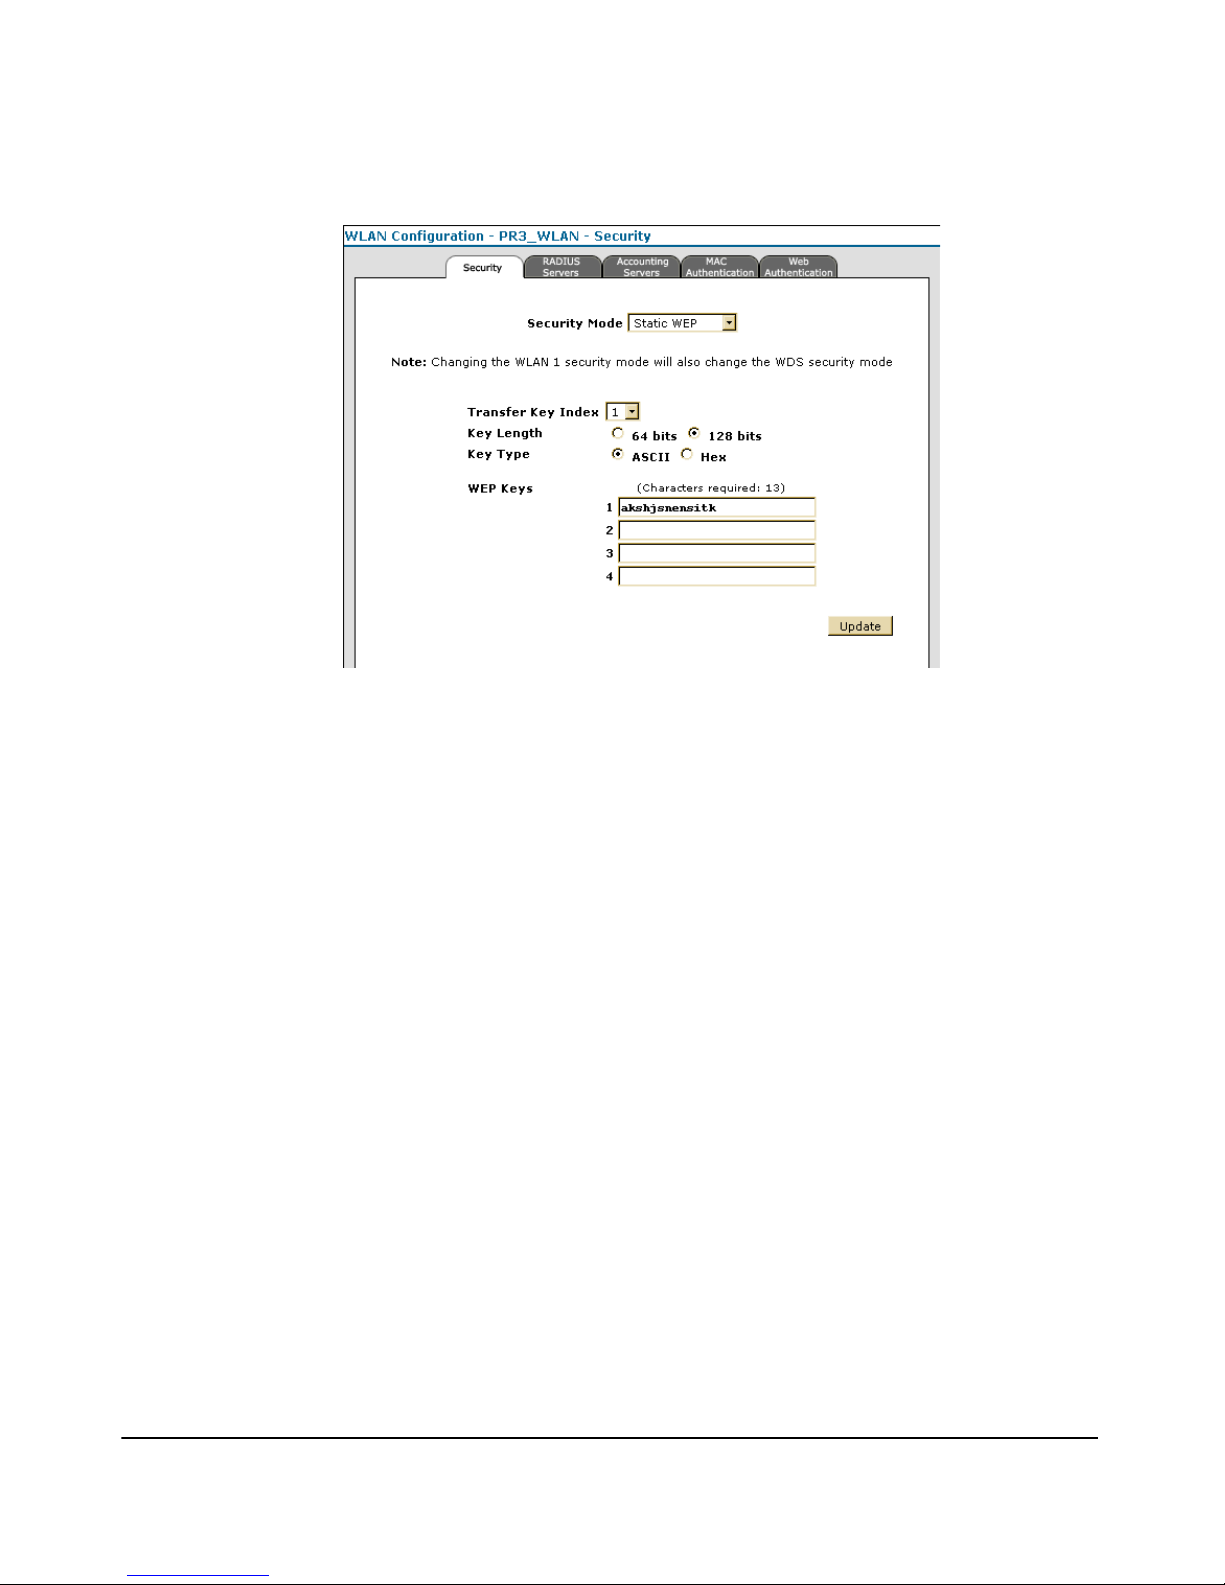
Tasks for Your First ProCurve Web Browser Interface Session
Figure 4-19. Configuring WLAN Security
Using the ProCurve Web Browser Interface
To Configure WEP Security:
1. Select WLANs.
2. Check the Radio 1 box, and the SSID name and VLAN ID fields populate
with defaults.
3. Enter a unique SSID name in the SSID name field and check the Closed System
box to prevent broadcasting of the SSID.
4. Click
5. Click the [
[Update] to save these IP settings.
Edit] button to open the Security pop-up window (see Figure 4-
19).
6. Select Static WEP in the Security Mode drop-down.
7. Check Shared for the Authentication option.
8. Select 1 in the Transfer Key Index drop-down to be used for the SSID
interface.
9. Select the key length to be used by all stations either 64 or 128 (default)
bits.
10. Select the Key Type, Hex (default) or ASCII.
11. Enter one WEP key conforming to the length and type already selected. You
can enter up to 4 WEP keys at a time.
4-33
Page 84

Using the ProCurve Web Browser Interface
Tasks for Your First ProCurve Web Browser Interface Session
12. Click [Update] to save these Security settings.
WEP is the security protocol initially specified in the IEEE 802.11 standard
for wireless communications. While WEP provides a margin of security for
environments with light network traffic, it is not sufficient for enterprise use
where highly-sensitive data is transmitted.
For more robust wireless security, you should consider implementing other
features supported by the access point. Wi-Fi Protected Access (WPA) and
IEEE 802.1X-2004 (Port-based network access control using the physical
access characteristics of IEEE 802® Local Area Networks (LAN) infrastructures to provide a means of authenticating and authorizing devices attached
to a LAN port that has point-to-point connection characteristics) provide
improved data encryption and user authentication. See “Wireless Security Configu-
ration” on page 7-1
.
4-34
Page 85

General System Configuration
5
5-1
Page 86

General System Configuration
Contents
Overview . . . . . . . . . . . . . . . . . . . . . . . . . . . . . . . . . . . . . . . . . . . . . . . . . . . . . . 5-4
AP Network Configuration Checklist . . . . . . . . . . . . . . . . . . . . . . . . . . . . . . 5-5
Modifying Management Passwords . . . . . . . . . . . . . . . . . . . . . . . . . . . . . . . . 5-6
Setting Management Access Controls . . . . . . . . . . . . . . . . . . . . . . . . . . . . . 5-9
Modifying System Information . . . . . . . . . . . . . . . . . . . . . . . . . . . . . . . . . . . 5-15
Web: Setting the Management Password . . . . . . . . . . . . . . . . . . . . . . . . 5-6
CLI: Setting the Management Password . . . . . . . . . . . . . . . . . . . . . . . . . 5-8
Web: Configuring Access Controls . . . . . . . . . . . . . . . . . . . . . . . . . . . . 5-10
CLI: Configuring Management Controls . . . . . . . . . . . . . . . . . . . . . . . . 5-12
Web: Setting the System Name, Location, and Contact . . . . . . . . . . . 5-15
CLI: Setting the System Name . . . . . . . . . . . . . . . . . . . . . . . . . . . . . . . . 5-17
Configuring Ethernet Settings . . . . . . . . . . . . . . . . . . . . . . . . . . . . . . . . . . . 5-19
Web: Configuring IP Settings Statically or via DHCP . . . . . . . . . . . . 5-19
CLI: Configuring IP Settings Statically or via DHCP . . . . . . . . . . . . . . 5-23
Configuring SNMP . . . . . . . . . . . . . . . . . . . . . . . . . . . . . . . . . . . . . . . . . . . . . 5-25
MIB Support . . . . . . . . . . . . . . . . . . . . . . . . . . . . . . . . . . . . . . . . . . . . . . . 5-26
Web: Setting Basic SNMP Parameters . . . . . . . . . . . . . . . . . . . . . . . . . 5-26
CLI: Setting Basic SNMP Parameters . . . . . . . . . . . . . . . . . . . . . . . . . . 5-28
Web: Configuring SNMP v1 and v2c Traps . . . . . . . . . . . . . . . . . . . . . 5-32
SNMP Traps . . . . . . . . . . . . . . . . . . . . . . . . . . . . . . . . . . . . . . . . . . . 5-32
SNMP Trap Hosts . . . . . . . . . . . . . . . . . . . . . . . . . . . . . . . . . . . . . . . 5-35
CLI: Configuring SNMP v1 and v2c Traps . . . . . . . . . . . . . . . . . . . . . . 5-36
CLI: Configuring SNMP v1 and v2c Trap Destinations . . . . . . . . . . . . 5-36
Configuring SNMPv3 . . . . . . . . . . . . . . . . . . . . . . . . . . . . . . . . . . . . . . . . . . . 5-38
Web: Enabling & Disabling SNMPv3 . . . . . . . . . . . . . . . . . . . . . . . . . . . 5-38
CLI: Enabling & Disabling SNMPv3 . . . . . . . . . . . . . . . . . . . . . . . . . . . 5-39
Web: Managing SNMPv3 Users . . . . . . . . . . . . . . . . . . . . . . . . . . . . . . . 5-40
CLI: Managing SNMPv3 Users . . . . . . . . . . . . . . . . . . . . . . . . . . . . . . . . 5-42
CLI: Displaying SNMPv3 Settings . . . . . . . . . . . . . . . . . . . . . . . . . . . . . 5-43
Enabling System Logging . . . . . . . . . . . . . . . . . . . . . . . . . . . . . . . . . . . . . . . 5-44
Web: Setting Logging Parameters . . . . . . . . . . . . . . . . . . . . . . . . . . . . . 5-45
5-2
Page 87

General System Configuration
CLI: Setting Logging Parameters . . . . . . . . . . . . . . . . . . . . . . . . . . . . . . 5-46
Configuring the Time (SNTP) . . . . . . . . . . . . . . . . . . . . . . . . . . . . . . . . . . . . 5-48
Web: Setting SNTP Parameters . . . . . . . . . . . . . . . . . . . . . . . . . . . . . . . 5-48
CLI: Setting SNTP Parameters . . . . . . . . . . . . . . . . . . . . . . . . . . . . . . . . 5-50
Configuring RADIUS Accounting . . . . . . . . . . . . . . . . . . . . . . . . . . . . . . . . . 5-51
Web: Setting RADIUS Accounting Server Parameters . . . . . . . . . . . . 5-52
CLI: Enabling RADIUS Accounting Parameters . . . . . . . . . . . . . . . . . 5-54
Setting Up Filter Control . . . . . . . . . . . . . . . . . . . . . . . . . . . . . . . . . . . . . . . . 5-55
Web: Setting Traffic Filters . . . . . . . . . . . . . . . . . . . . . . . . . . . . . . . . . . 5-55
CLI: Setting Traffic Filters . . . . . . . . . . . . . . . . . . . . . . . . . . . . . . . . . . . 5-56
Configuring VLAN Support . . . . . . . . . . . . . . . . . . . . . . . . . . . . . . . . . . . . . . 5-57
Web: Setting A Management VLAN . . . . . . . . . . . . . . . . . . . . . . . . . . . . 5-58
Web: Changing the Untagged VLAN ID . . . . . . . . . . . . . . . . . . . . . . . . 5-59
CLI: Enabling VLAN Support . . . . . . . . . . . . . . . . . . . . . . . . . . . . . . . . . 5-61
Managing Group Configuration . . . . . . . . . . . . . . . . . . . . . . . . . . . . . . . . . . 5-63
Guidelines for Deploying Group Configuration . . . . . . . . . . . . . . . . . 5-64
The Synchronization Process . . . . . . . . . . . . . . . . . . . . . . . . . . . . . 5-64
Security and Integrity Recommendations . . . . . . . . . . . . . . . . . . . 5-65
Web: Enabling Group Configuration . . . . . . . . . . . . . . . . . . . . . . . . . . . 5-65
CLI: Enabling Group Configuration . . . . . . . . . . . . . . . . . . . . . . . . . . . 5-67
5-3
Page 88

General System Configuration
Overview
Overview
This Chapter describes how to:
■ Secure your access point
■ Modify system management passwords
■ Set management access controls
■ View and modify access point system information
■ Configure IP, SNMP, SNTP, RADIUS Accounting, and VLAN parameters
■ Set up filter control between wireless stations, between wireless stations
and the management interface, or for specified protocol types
5-4
Page 89

General System Configuration
AP Network Configuration Checklist
AP Network Configuration Checklist
In setting up your Access Point for network installation, this manual covers
many of the tasks that should be considered for proper security and management. Each of these tasks are detailed in their respective sections, however,
this summary is provided as an aid for establishing your network.
Table 5-1. Network Installation & Security Configuration Summary
Physical Security
Using a Kensington Lock. See the ProCurve AP 530 Installation and Getting Started Guide.
Using back panel covers to hide access to buttons and cable connections. See the ProCurve AP 530 Installation and Getting
Started Guide.
Disabling device reset and clear buttons. page A-18
Disabling console access to the CLI interface. page 5-9
Management Interfaces
Changing the default settings for password. page 5-6
Limiting management access to the Ethernet side of the AP (disabling wireless access to remote management interfaces). page 5-9
Disabling unused remote management interfaces (Web, Telnet, SSH, SNMP). page 5-9
Changing the default settings for SNMP read and read/write community names. page 5-25
Changing the default settings for SNMPv3. page 5-38
Configuring capture of operating events to a server. page 5-46
Configuring the access point to limit remote management to a management VLAN. page 5-57
Wireless LAN Security
Setting WLAN security to utilize WPA/WPA2. page 5-57
Configuring multiple SSIDs to utilize separate VLANs. page 5-57
Configuring local user authentication. page 5-57
Configuring primary and secondary remote RADIUS user authentication. page 5-57
Configuring Identity-Driven Management features. page 5-57
Restricting access between wireless client devices associated with the same access point. page 5-57
5-5
Page 90

General System Configuration
Modifying Management Passwords
Modifying Management Passwords
Management access to the access point’s CLI and Web interfaces is controlled
through an administrator password.
Additional in-band access security can also be gained by setting management
access controls (see “Setting Management Access Controls” on page 5-9) and using
traffic filters (see “Setting Up Filter Control” on page 5-55).
Caution HP strongly recommends that you configure a new Manager password and
not use the default. If a Manager password is not configured, then the access
point is not password-protected, and anyone having in-band or out-of-band
access to the access point may be able to compromise access point and
network security.
Pressing the Clear button on the back of the access point for more than two
seconds removes password protection.
Web: Setting the Management Password
The Password screen enables the access point’s password to be set.
The Web interface enables you to modify these parameters:
■ New Password: New password to gain access to the administration of
the access point.
Note: The password is case sensitive and must be at least 1 character and
at most 32 characters long. However, only the first 8 characters of the
password are used; character number 9 and above are ignored at log in.
■ Confirm New Password: Re-entered new password to gain access to the
administration of the access point.
■ [Update]: Updates the new password.
5-6
Page 91

Figure 5-1. Creating a Password
To Create a Password:
General System Configuration
Modifying Management Passwords
1. Click Management > AP Access and select the Password tab.
2. In the Current Password field, enter the current password.
3. In the New Password field, enter a new password.
Note: The password is case sensitive and must be at least 1 character and
at most 32 characters long. However, only the first 8 characters of the
password are used; character number 9 and above are ignored at log in.
4. In the Confirm Password field, re-enter the new password.
5. Select [Update].
Note The password you assign in the Web browser interface will overwrite the
previous settings assigned in either the Web browser interface or the access
point console. That is, the most recently assigned user password is immediately effective for the access point, regardless of which interface was used to
assign these parameters.
5-7
Page 92

General System Configuration
Modifying Management Passwords
CLI: Setting the Management Password
CLI Commands Used in This Section
Command Syntax CLI Reference Page
password manager <password> 9-21
This example shows how to create a manager password.
Caution If you modify the password through CLI, you also modify the Web password.
Note The password is case sensitive and must be at least 1 character and at most
32 characters long. However, only the first 8 characters of the password are
used; character number 9 and above are ignored at log in.
ProCurve Access Point 530# configure
ProCurve Access Point 530(config)# password manager 9gY2dV7G
ProCurve Access Point 530(config)#
5-8
Page 93

General System Configuration
Setting Management Access Controls
Setting Management Access Controls
To provide more security for the access point, management interfaces that are
not required can be disabled. This includes the Web, Telnet, and Secure Shell
(SSH), as well as the serial console port and Reset button.
Note The access point’s serial port and Reset button cannot be disabled at the same
time. When the Reset button is disabled, it is not possible to disable the serial
port.
HTTP and HTTPS. The access point supports both a Web (HTTP) and
secure Web (HTTPS) browser interface. The secure hypertext transfer
protocol (HTTPS) over the Secure Socket Layer (SSL) provides a secure
encrypted connection to the access point’s Web interface. Both the HTTP and
HTTPS service can be enabled independently.
Note The HTTP and HTTPs services do not allow modification of the configured
port numbers.
Secure Shell (SSH). Telnet is a remote management tool that can be used
to configure the access point from anywhere in the network. However, Telnet
is not secure from hostile attacks. SSH can act as a secure replacement for
Telnet. The SSH protocol uses generated public keys to encrypt all data
transfers passing between the access point and SSH-enabled management
station stations and ensures that data traveling over the network arrives
unaltered. stations can then securely use the local user name and password
for access authentication.
Note that SSH client software needs to be installed on the management station
to access the access point for management via the SSH protocol.
Note The access point supports only SSH version 2.0.
After boot up, the SSH server needs about one minute to generate host
encryption keys. The SSH server is disabled while the keys are being generated.
5-9
Page 94

General System Configuration
Setting Management Access Controls
Web: Configuring Access Controls
The AP Access screen configures access to management interfaces and
button.
The Web interface enables you to modify these parameters:
CLI Access
■ Serial Interface: Enables or disables management access through the
access point’s serial console port. (The default is Enabled.)
NOTE You can not disable the serial interface, if you already have disabled the
Factory Reset option.
■ Telnet Interface: Enables or disables management access through
Telnet. (The default is Enabled.)
■ SSH Interface: Enables or disables management access through a
Secure Shell version 2.0 client. (The default is Enabled.)
Web Access
■ HTTP Interface: Enables or disables management access through and
HTTP interface . (The default is Enabled.)
■ SSL Interface: Enables or disables management access through an SSL
interface. (The default is Enabled.)
Button Access - For managing button access see, “Disabling the Access Point Push
Buttons” on page A-18.
■ Factory Reset: Enables or disables button control access (back panel of
the access point) to a factory default file reset. (The default is Enabled.)
■ Custom Reset: Enables or disables button control access (back panel of
the access point) to a custom config file reset. (The default is Enabled.)
■ System Reset: Enables or disables button control access (back panel of
the access point) to a system reset. (The default is Enabled.)
5-10
Page 95
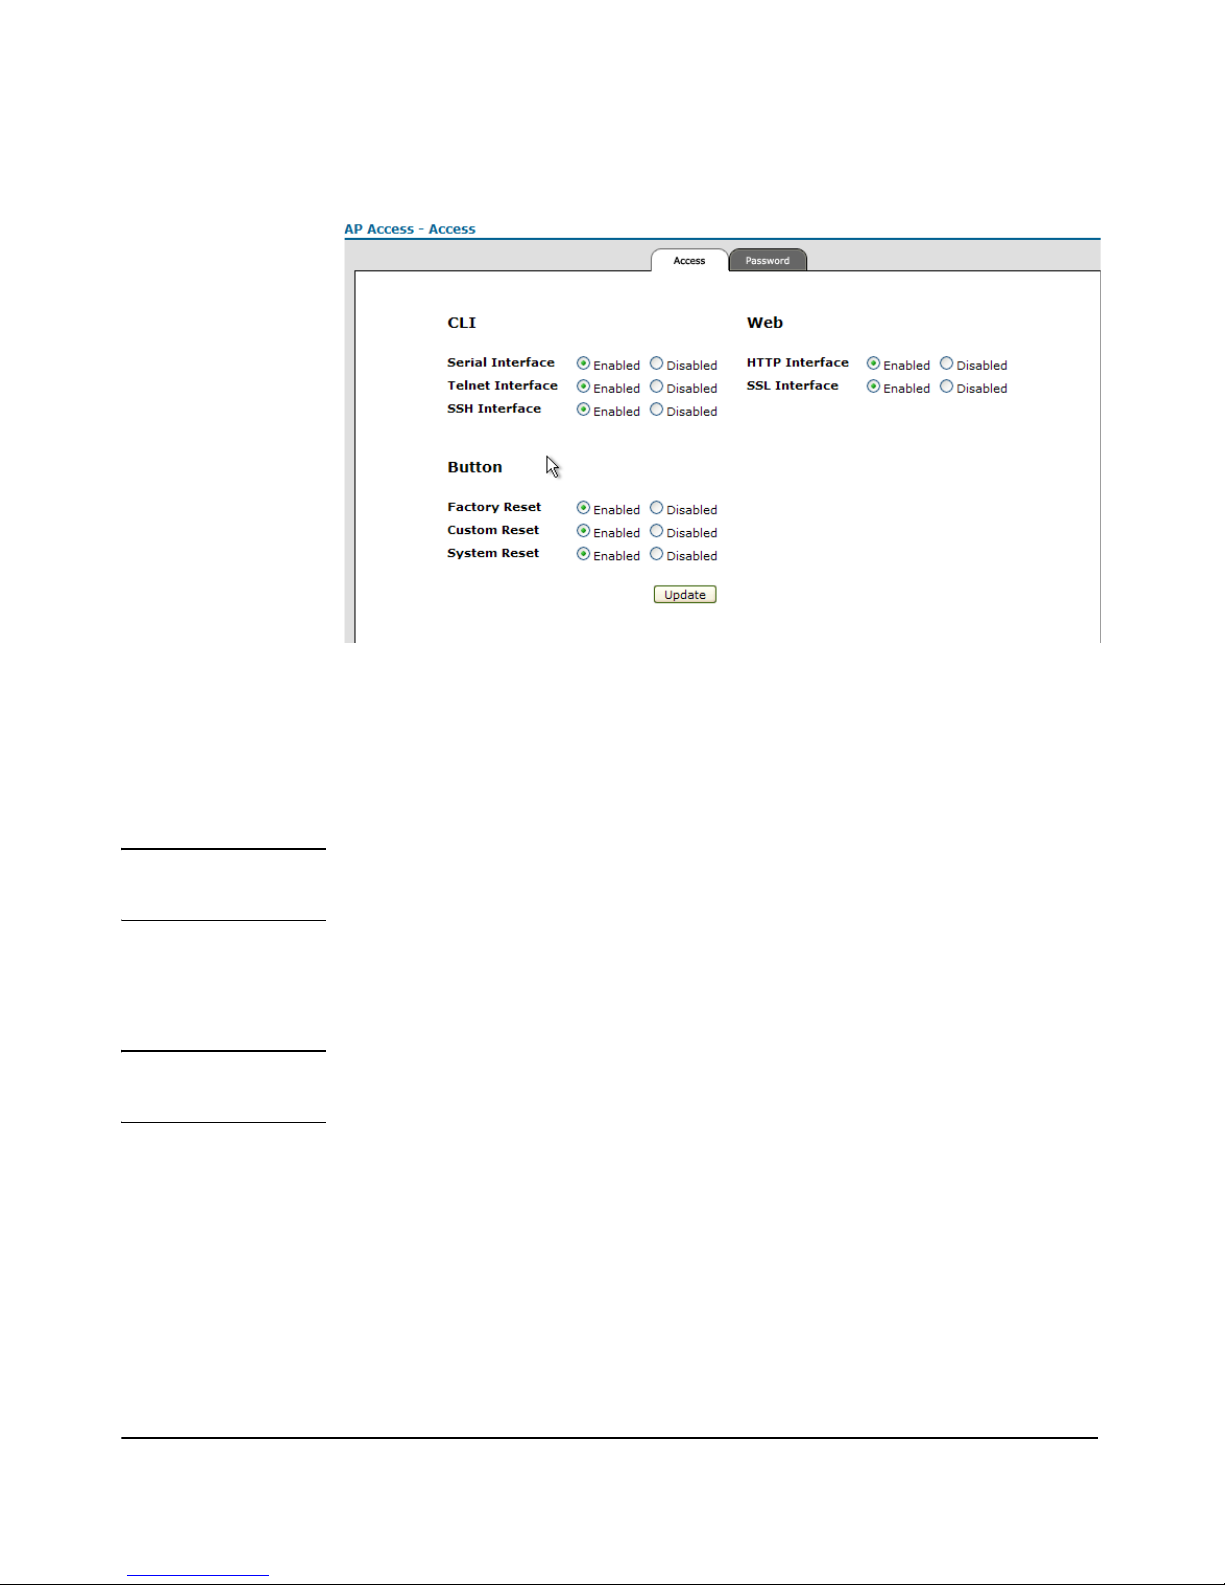
Figure 5-2. Configuring Access Controls
General System Configuration
Setting Management Access Controls
To Configure Access Control Settings:
1. Click Management > AP Access and select the Access tab.
2. As required, enable or disable the serial, Telnet, or SSH interfaces.
Note If using SSH for secure access to the CLI over a network connection, you may
want to disable the Telnet server.
3. As required, enable or disable the HTTP or SSL interfaces.
4. As required, enable or disable the manual push button options on the
access point.
Note The access point does not allow you to disable Factory Reset and the Serial
Interface at the same time.
5. Click [Update].
5-11
Page 96

General System Configuration
Setting Management Access Controls
CLI: Configuring Management Controls
CLI Commands Used in This Section
Command Syntax CLI Reference Page
[no] console 9-23
[no] ssh 9-24
[no] telnet 9-23
show console 9-27
show system 9-27
The following example shows how to enter management configuration context and control access to the Access Point device.
This example shows how to disable the console access to this device using
the no ssh command and display the current status of the access routes using
the show console command.
Note Enter management commands, one per line.
ProCurve Access Point 530# configure
ProCurve Access Point 530(config)# no console
ProCurve Access Point 530(config)# show console
-----------------------------------------------------------CLI Access:
Serial Interface Disabled
Telnet Interface Enabled
SSH Interface Enabled
CLI Confirmation Dialogs Enabled
Web Access:
HTTP Interface Enabled
SSL Interface Enabled
ProCurve Access Point 530(config)#
5-12
Page 97

General System Configuration
Setting Management Access Controls
The following example demonstrates the no ssh command to disable the
serial SSH port, and the show ssh command to display the current status.
ProCurve Access Point 530# configure
ProCurve Access Point 530(config)# no ssh
ProCurve Access Point 530(config)# show ssh
SSH Status Disabled
ProCurve Access Point 530(config)#
The following example shows using the no telnet command to disable the
serial Telnet connection to this device.
Caution You should use the no telnet command only when you are connected to the
access point through another method. Once you disable Telnet, the Telnet
connection is immediately lost.
ProCurve Access Point 530# configure
ProCurve Access Point 530(config)# no telnet
-----------------------------------------------------------C:connection is lost
5-13
Page 98

General System Configuration
Setting Management Access Controls
To display the current status for management access controls, use the show
system command.
ProCurve Access Point 530# show system
Serial Number TW633VV01D
System Name HP-AP-200
System Up Time 23 hours 17 mins 11 secs
System Location 2FS17
System Country Code us
Software Version WA.02.00.0412
Ethernet MAC Address 00:14:C2:A5:6A:B3
IP Address 192.168.15.200
Subnet Mask 255.255.255.0
Default Gateway 192.168.15.254
DHCP Client Disabled
Management VLAN ID 1
Untagged-VLAN ID 1
Radio 1 MAC Address 00:14:C2:A7:11:A0
Radio 1 Status Enabled (802.11g)
Radio 2 MAC Address 00:14:C2:A7:E1:20
Radio 2 Status Enabled (802.11g)
HTTP Interface Enabled
SSL Interface Enabled
SSH Interface Enabled
Telnet Interface Enabled
Serial Interface Enabled
ProCurve Access Point 530#
5-14
Page 99

General System Configuration
Modifying System Information
Modifying System Information
The access point’s system name can be left at its default setting. However,
modifying this parameter can help you to more easily distinguish one device
from another in your network.
Note You should also set the applicable WLANs (BSS/SSID) to identify the wireless
network service provided by the access point. See “Configuring the Radio” on page 6-
6.
Web: Setting the System Name, Location, and Contact
To modify the access point’s system parameters, use the Device Information
screen (the Home page or default screen).
The Web interface enables you to modify these parameters:
■ System Name: An alias for the access point only, enabling the device to
be uniquely identified on the network. Setting must be at least 1 character
and a maximum of 63 characters long . (The default is ProCurve AP-530.)
■ Location: The access point’s assigned location. (The default is not set.)
■ Contact: The name of the Administrator responsible for the system. (The
default is not set.)
■ [Update]: Updates the system information.
5-15
Page 100
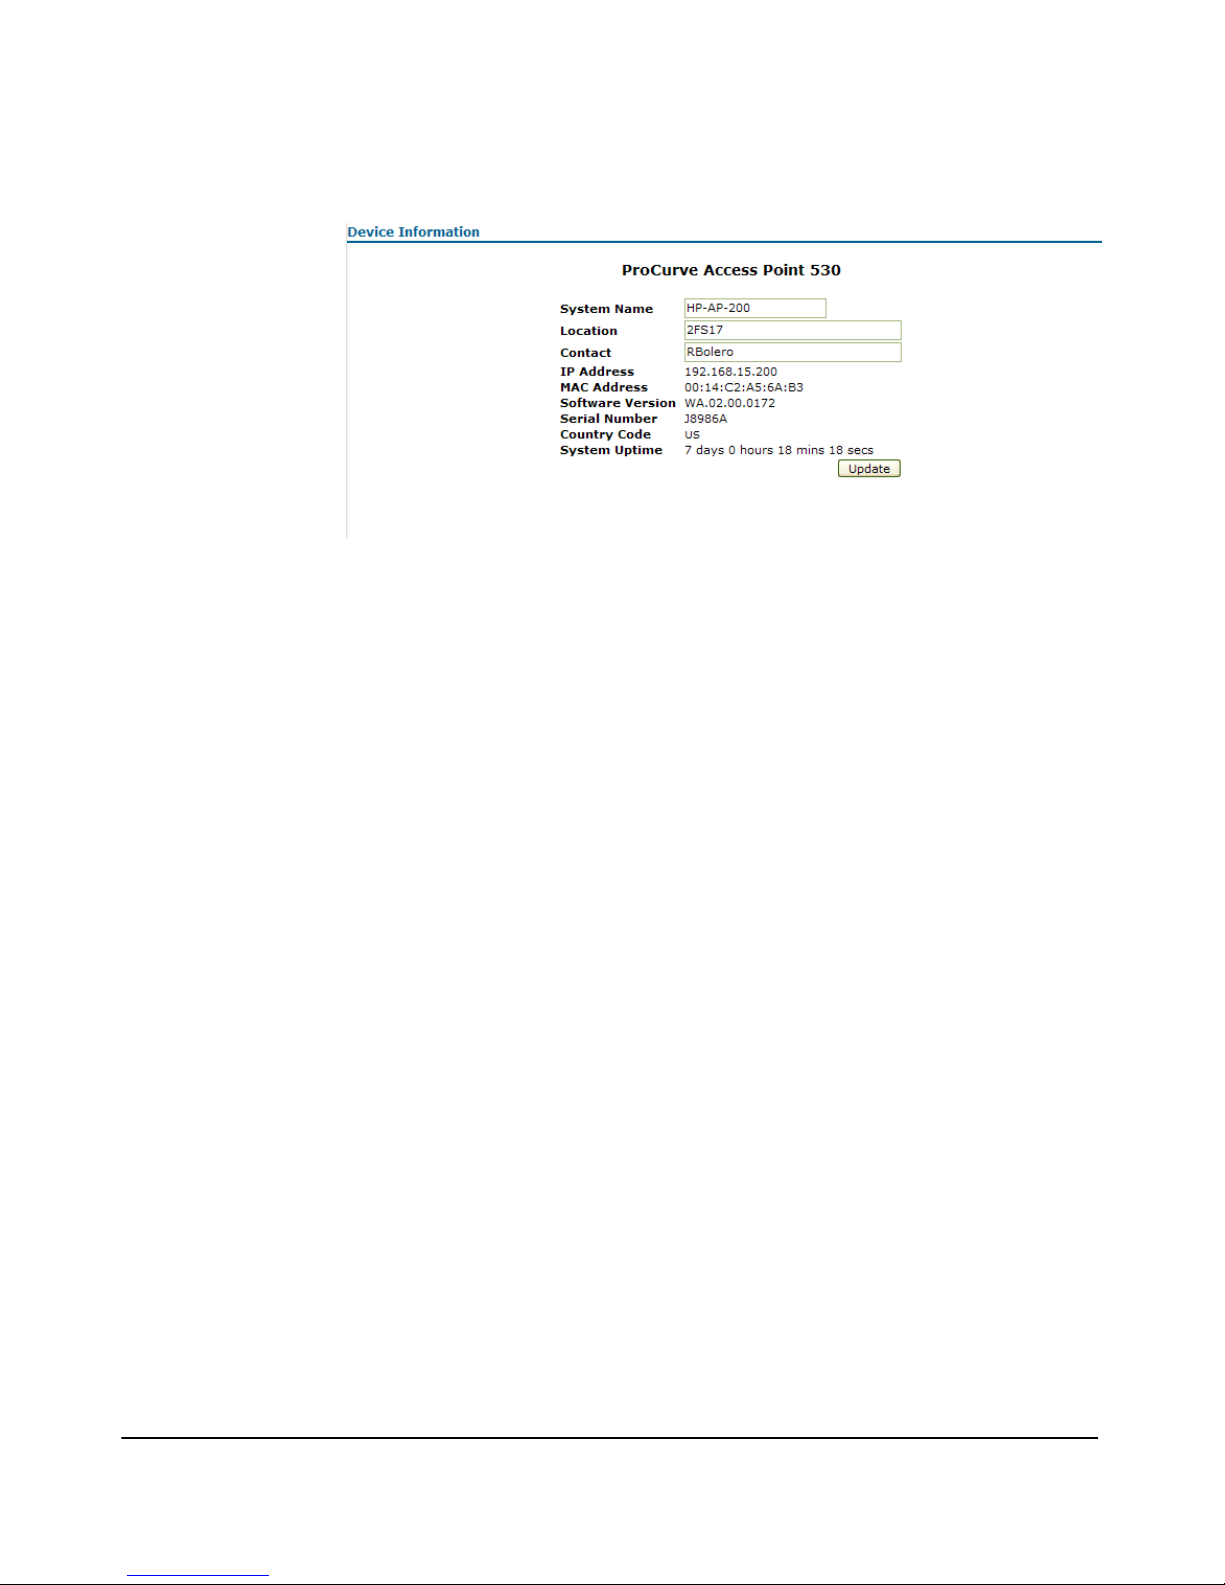
General System Configuration
Modifying System Information
Figure 5-3. Configuring System Information
To Configure System Information:
1. Select Device Information in the navigation bar.
2. Type a name to uniquely identify the access point in the System Name
field.
3. Type a location to identify where the access point it located in the Location
field.
4. Type a name to identify the contact in the Contact field.
5. Select [Update] to modify the system information.
5-16
 Loading...