

Page 1
LASERJET PRO CP1020
COLOR PRINTER SERIES
User Guide
Page 2

Page 3

HP LaserJet Pro CP1020 Color Printer
Series
User Guide
Page 4

Copyright and License
© 2010 Copyright Hewlett-Packard
Development Company, L.P.
Reproduction, adaptation, or translation
without prior written permission is
prohibited, except as allowed under the
copyright laws.
The information contained herein is subject
to change without notice.
The only warranties for HP products and
services are set forth in the express
warranty statements accompanying such
products and services. Nothing herein
should be construed as constituting an
additional warranty. HP shall not be liable
for technical or editorial errors or omissions
contained herein.
Edition 2, 10/2010
Part number: CE913-90901
Trademark Credits
®
, Acrobat®, and PostScript® are
Adobe
trademarks of Adobe Systems
Incorporated.
Intel® Core™ is a trademark of Intel
Corporation in the U.S. and other countries.
Java™ is a US trademark of Sun
Microsystems, Inc.
Microsoft®, Windows®, Windows® XP, and
Windows Vista® are U.S. registered
trademarks of Microsoft Corporation.
®
is a registered trademark of The
UNIX
Open Group.
ENERGY STAR and the ENERGY STAR
mark are registered U.S. marks.
Page 5

Conventions used in this guide
TIP: Tips provide helpful hints or shortcuts.
NOTE: Notes provide important information to explain a concept or to complete a task.
CAUTION: Cautions indicate procedures that you should follow to avoid losing data or damaging
the product.
WARNING! Warnings alert you to specific procedures that you should follow to avoid personal
injury, catastrophic loss of data, or extensive damage to the product.
ENWW iii
Page 6

iv Conventions used in this guide ENWW
Page 7

Table of contents
1 Product basics ................................................................................................................................................ 1
Product comparison ............................................................................................................................. 2
Environmental features ........................................................................................................................ 2
Accessibility features ............................................................................................................................ 3
Product views ....................................................................................................................................... 4
Product front view ................................................................................................................ 4
Product back view ................................................................................................................ 5
Serial number and model number location .......................................................................... 5
Control panel layout ............................................................................................................. 6
2 Software for Windows .................................................................................................................................... 7
Supported operating systems for Windows .......................................................................................... 8
Supported printer drivers for Windows ................................................................................................. 8
Change print job settings for Windows ................................................................................................. 9
Change printer-driver settings for Windows ....................................................................................... 10
Change the settings for all print jobs until the software program is closed ........................ 10
Change the default settings for all print jobs ...................................................................... 10
Change the product configuration settings ........................................................................ 10
Remove software for Windows ........................................................................................................... 11
Supported utilities for Windows (network models only) ...................................................................... 12
3 Use the product with Mac ............................................................................................................................ 13
Software for Mac ................................................................................................................................ 14
Supported operating systems for Mac ............................................................................... 14
Supported printer drivers for Mac ...................................................................................... 14
Install software for Mac operating systems ........................................................................ 14
Remove software from Mac operating systems ................................................................. 16
Change printer-driver settings for Mac .............................................................................. 17
Software for Mac computers .............................................................................................. 18
Print with Mac ..................................................................................................................................... 19
Cancel a print job with Mac ................................................................................................ 19
Change the paper size and type with Mac ......................................................................... 19
Resize documents or print on a custom paper size with Mac ............................................ 19
Create and use printing presets with Mac ......................................................................... 19
ENWW v
Page 8

Print a cover page with Mac .............................................................................................. 20
Print multiple pages on one sheet of paper with Mac ........................................................ 20
Print on both sides of the page (duplex) with Mac ............................................................. 21
Set the color options with Mac ........................................................................................... 21
4 Connect the product ..................................................................................................................................... 23
Supported network operating systems (network models only) ........................................................... 24
Printer sharing disclaimer .................................................................................................. 24
Connect with USB .............................................................................................................................. 25
CD installation .................................................................................................................... 25
Connect to a network (network models only) ..................................................................................... 26
Supported network protocols ............................................................................................. 26
Install the product on a wired network ............................................................................... 26
Install the product on a wireless network ........................................................................... 27
Configure network settings ................................................................................................ 31
5 Paper and print media .................................................................................................................................. 33
Understand paper use ........................................................................................................................ 34
Special paper guidelines .................................................................................................... 34
Change the printer driver to match the paper type and size .............................................................. 36
Supported paper sizes ....................................................................................................................... 37
Supported paper types ....................................................................................................................... 39
Load paper trays ................................................................................................................................ 41
Load the input tray ............................................................................................................. 41
Tray capacity ..................................................................................................................... 42
Paper orientation for loading trays ..................................................................................... 42
6 Print tasks ...................................................................................................................................................... 43
Cancel a print job with Windows ........................................................................................................ 44
Basic print tasks with Windows .......................................................................................................... 45
Open the printer driver with Windows ................................................................................ 45
Get help for any printing option with Windows ................................................................... 45
Change the number of print copies with Windows ............................................................. 46
Save custom print settings for reuse with Windows .......................................................... 46
Improve print quality with Windows ................................................................................... 49
Print on both sides (duplex) with Windows ........................................................................ 50
Print multiple pages per sheet with Windows .................................................................... 52
Select page orientation with Windows ............................................................................... 54
Set color options with Windows ......................................................................................... 56
Additional print tasks with Windows ................................................................................................... 57
Print colored text as black (grayscale) with Windows ........................................................ 57
Print on preprinted letterhead or forms with Windows ....................................................... 58
Print on special paper, labels, or transparencies with Windows ........................................ 60
vi ENWW
Page 9

Print the first or last page on different paper with Windows ............................................... 62
Scale a document to fit page size with Windows ............................................................... 63
Add a watermark to a document with Windows ................................................................. 65
Create a booklet with Windows ......................................................................................... 65
7 Color ............................................................................................................................................................... 67
Adjust color ......................................................................................................................................... 68
Change the color theme for a print job .............................................................................. 68
Change the color options ................................................................................................... 68
Manual color options .......................................................................................................... 69
Match colors ....................................................................................................................................... 71
8 Manage and maintain the product ............................................................................................................... 73
Print information pages ...................................................................................................................... 74
Print the configuration page ............................................................................................... 74
Print the supplies status page ............................................................................................ 74
Use the HP Embedded Web Server (network models only) .............................................................. 75
Open the HP Embedded Web Server ................................................................................ 75
HP Embedded Web Server features ................................................................................. 75
Product security features .................................................................................................................... 77
Lock the product ................................................................................................................ 77
Assign a system password ................................................................................................ 77
Economy settings ............................................................................................................................... 78
Set Auto-On/Auto-Off mode ............................................................................................... 78
Manage supplies and accessories ..................................................................................................... 79
Print when a print cartridge or imaging drum is at estimated end of life ............................ 79
Manage print cartridges and imaging drums ..................................................................... 80
Replacement instructions .................................................................................................. 82
Clean the product ............................................................................................................................... 90
Clean the paper path ......................................................................................................... 90
Clean the exterior .............................................................................................................. 90
Product updates ................................................................................................................................. 90
9 Solve problems ............................................................................................................................................. 91
Self help ............................................................................................................................................. 92
Solve problems checklist .................................................................................................................... 93
Step 1: Make sure that the product is set up correctly ....................................................... 93
Step 2: Check the cabling or wireless connection (network models only) ......................... 93
Step 3: Check to see if any control-panel lights are lit ....................................................... 93
Step 4: Check the paper .................................................................................................... 93
Step 5: Check the software ................................................................................................ 94
Step 6: Test print functionality ........................................................................................... 94
Step 7: Check the supplies ................................................................................................ 94
ENWW vii
Page 10

Step 8: Try sending a print job from a computer ................................................................ 94
Factors that affect product performance ............................................................................................ 95
Restore factory settings ...................................................................................................................... 96
Interpret control panel light patterns ................................................................................................... 97
Status alert messages ...................................................................................................................... 100
Paper feeds incorrectly or becomes jammed ................................................................................... 105
The product does not pick up paper ................................................................................ 105
The product picks up multiple sheets of paper ................................................................ 105
Prevent paper jams .......................................................................................................... 105
Clear jams ........................................................................................................................ 106
Improve print quality ......................................................................................................................... 111
Use the correct paper type setting in the printer driver .................................................... 111
Adjust color settings in the printer driver .......................................................................... 112
Use paper that meets HP specifications .......................................................................... 113
Print a cleaning page ....................................................................................................... 114
Calibrate the product to align colors ................................................................................ 114
Check the print cartridges ................................................................................................ 114
The product does not print or it prints slowly .................................................................................... 119
The product does not print ............................................................................................... 119
The product prints slowly ................................................................................................. 119
Solve connectivity problems ............................................................................................................. 120
Solve direct-connect problems ........................................................................................ 120
Solve network problems .................................................................................................. 120
Solve wireless network problems ..................................................................................................... 122
Wireless connectivity checklist ........................................................................................ 122
The product does not print after the wireless configuration completes ............................ 122
The product does not print, and the computer has a third-party firewall installed ........... 123
The wireless connection does not work after moving the wireless router or product ...... 123
Cannot connect more computers to the wireless product ................................................ 123
The wireless product loses communication when connected to a VPN .......................... 123
The network does not appear in the wireless networks list ............................................. 123
The wireless network is not functioning ........................................................................... 123
Solve product software problems ..................................................................................................... 125
Solve common Mac problems .......................................................................................................... 126
The printer driver is not listed in the Print & Fax list ........................................................ 126
The product name does not appear in the product list in the Print & Fax list .................. 126
The printer driver does not automatically set up the selected product in the Print &
Fax list ............................................................................................................................. 126
A print job was not sent to the product that you wanted .................................................. 126
When connected with a USB cable, the product does not appear in the Print & Fax list
after the driver is selected. ............................................................................................... 127
You are using a generic printer driver when using a USB connection ............................. 127
viii ENWW
Page 11

Appendix A Supplies and accessories ........................................................................................................ 129
Order parts, accessories, and supplies ............................................................................................ 130
Part numbers .................................................................................................................................... 130
Print cartridges ................................................................................................................. 130
Imaging drums ................................................................................................................. 130
Cables and interfaces ...................................................................................................... 130
Appendix B Service and support ................................................................................................................. 131
Hewlett-Packard limited warranty statement .................................................................................... 132
HP's Premium Protection Warranty: LaserJet print cartridge limited warranty statement ................ 134
HP's LaserJet imaging drum limited warranty statement for replacement imaging drums ............... 135
Data stored on the print cartridge and imaging drum ....................................................................... 136
End User License Agreement .......................................................................................................... 137
OpenSSL .......................................................................................................................................... 139
Customer support ............................................................................................................................. 139
Repack the product .......................................................................................................................... 140
Appendix C Specifications ............................................................................................................................ 141
Physical specifications ..................................................................................................................... 142
Power consumption, electrical specifications, and acoustic emissions ............................................ 142
Environmental specifications ............................................................................................................ 142
Appendix D Regulatory information ............................................................................................................ 143
FCC regulations ............................................................................................................................... 144
Environmental product stewardship program ................................................................................... 145
Protecting the environment .............................................................................................. 145
Ozone production ............................................................................................................ 145
Power consumption ......................................................................................................... 145
Paper use ........................................................................................................................ 145
Plastics ............................................................................................................................ 145
HP LaserJet print supplies ............................................................................................... 145
Return and recycling instructions ..................................................................................... 146
Paper ............................................................................................................................... 147
Material restrictions .......................................................................................................... 147
Disposal of waste equipment by users in private households in the European Union .... 147
Chemical substances ....................................................................................................... 147
Material Safety Data Sheet (MSDS) ................................................................................ 147
For more information ....................................................................................................... 147
Declaration of conformity (base models) .......................................................................................... 148
Declaration of conformity (wireless models) ..................................................................................... 150
Safety statements ............................................................................................................................. 152
Laser safety ..................................................................................................................... 152
Canadian DOC regulations .............................................................................................. 152
ENWW ix
Page 12

VCCI statement (Japan) .................................................................................................. 152
Power cord instructions ................................................................................................... 152
Power cord statement (Japan) ......................................................................................... 152
EMC statement (Korea) ................................................................................................... 152
Laser statement for Finland ............................................................................................. 153
GS statement (Germany) ................................................................................................. 153
Substances Table (China) ............................................................................................... 154
Restriction on Hazardous Substances statement (Turkey) ............................................. 154
Additional statements for wireless products ..................................................................................... 155
FCC compliance statement—United States .................................................................... 155
Australia statement .......................................................................................................... 155
Brazil ANATEL statement ................................................................................................ 155
Canadian statements ....................................................................................................... 155
European Union regulatory notice ................................................................................... 155
Notice for use in France ................................................................................................... 156
Notice for use in Russia ................................................................................................... 156
Korean statement ............................................................................................................ 156
Taiwan statement ............................................................................................................ 156
Index ................................................................................................................................................................. 157
x ENWW
Page 13

1 Product basics
Product comparison
●
Environmental features
●
Accessibility features
●
Product views
●
ENWW 1
Page 14
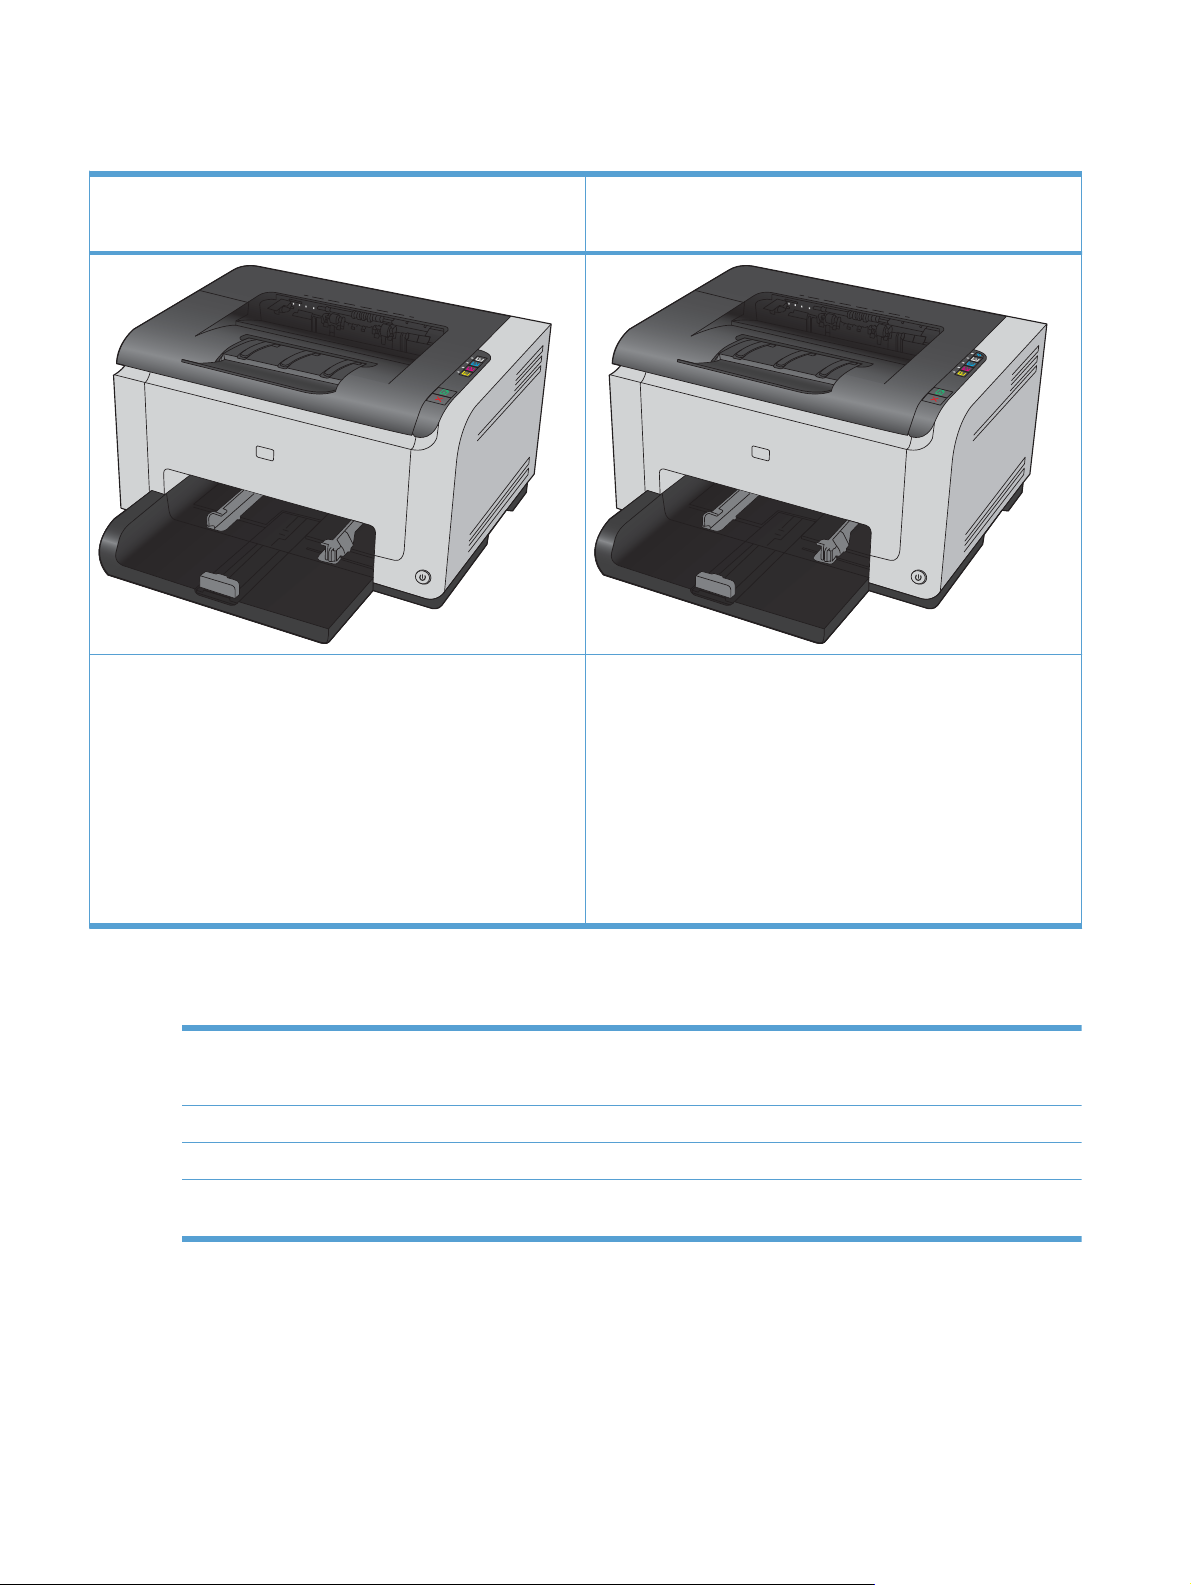
Product comparison
HP LaserJet Pro CP1025
CE913A
● Speed: Prints up to 16 A4-size pages per minute (ppm) or 17
letter-size ppm monochrome and 4 ppm color
●
Tray: 150 sheets of 75 g/m
●
Output bin: 50 sheets of 75 g/m
2
(20 lb)
2
(20 lb)
HP LaserJet Pro CP1025nw
CE914A
HP LaserJet Pro CP1025 plus:
Connectivity: 802.11b/g/n wireless networking, built-in
●
networking to connect to 10Base-T/100Base-TX networks
Internal networking: HP internal networking port
●
● Connectivity: Hi-Speed USB 2.0 port
Two-sided printing (duplexing): Manual duplexing (using
●
the printer driver)
Introductory print cartridge: Supplied with product
●
Environmental features
Recycling Reduce waste by using recycled paper.
Recycle print cartridges by using the HP return process.
Energy savings Save energy with HP Auto-On/Auto-Off Technology.
Manual duplex printing Save paper by using the manual duplex printing setting.
Print multiple pages per
sheet
Save paper by printing two or more pages of a document side-by-side on one sheet of paper.
Access this feature through the printer driver.
2 Chapter 1 Product basics ENWW
Page 15

Accessibility features
The product includes several features that aid users with accessibility issues.
Online user guide that is compatible with text screen-readers.
●
Print cartridges and the imaging drum can be installed and removed by using one hand.
●
All doors and covers can be opened by using one hand.
●
ENWW Accessibility features 3
Page 16
Product views
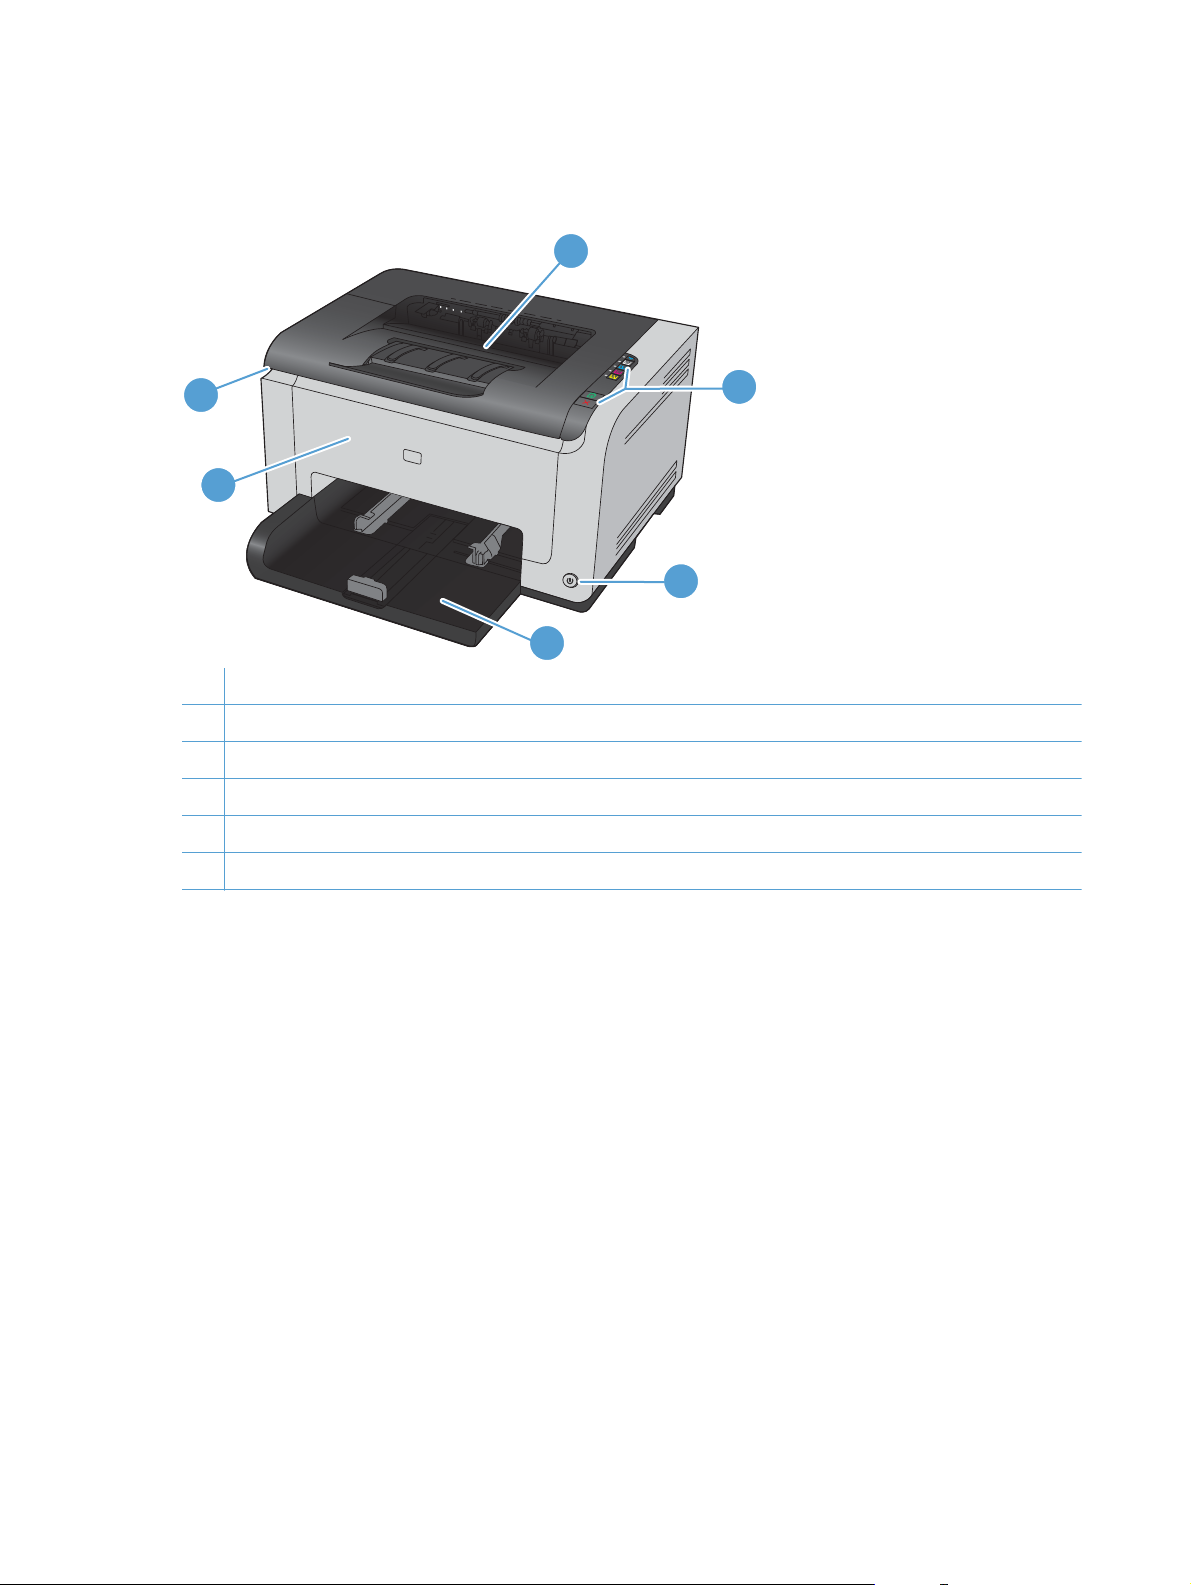
Product front view
1
6
2
5
3
4
1 Output bin
2 Control panel
3 Power button
4 Main-input tray
5 Front cover (provides access to the imaging drum)
6 Print cartridge door (provides access to the cyan, magenta, yellow, and black print cartridges)
4 Chapter 1 Product basics ENWW
Page 17

Product back view
1
1 Kensington lock
2 Rear jam-access door
3 HP internal network port (network models only)
4 USB port
2
3
4
5
5 Power receptacle
Serial number and model number location
The label that contains the product and serial numbers is on the inside of the front cover.
ENWW Product views 5
Page 18

Control panel layout
1
2
3
4
5
6
7
1
2-5
6
7
8
9
9
Wireless button and light
Cartridge buttons and lights
Attention light
Ready light
Resume button
Cancel button
8
Press and hold the button to enable Wi-Fi Protected
Setup (WPS) (network models only). The light
indicates the state of the wireless connection.
When the print cartridge door is closed, press the
button to access the print cartridge of the
corresponding color. The light indicates the state of
the print cartridge.
Indicates that the print-cartridge door is open or
other errors exist.
When the light is on, the product is ready to print,
When the light is blinking, the product is processing
data.
Press to resume a print job.
Press to cancel a print job.
6 Chapter 1 Product basics ENWW
Page 19

2 Software for Windows
Supported operating systems for Windows
●
Supported printer drivers for Windows
●
Change print job settings for Windows
●
Change printer-driver settings for Windows
●
Remove software for Windows
●
Supported utilities for Windows (network models only)
●
ENWW 7
Page 20

Supported operating systems for Windows
The product comes with software for the following Windows® operating systems:
Windows 7 (32-bit and 64-bit)
●
Windows Vista (32-bit and 64-bit)
●
Windows XP (32-bit, Service Pack 2)
●
Windows Server 2003 (32-bit, Service Pack 3)
●
Windows Server 2008 (32-bit and 64-bit)
●
Supported printer drivers for Windows
The product comes with software for Windows that allows the computer to communicate with the
product. This software is called a printer driver. Printer drivers provide access to product features,
such as printing on custom-sized paper, resizing documents, and inserting watermarks.
NOTE: The most recent drivers are available at www.hp.com/support/ljcp1020series.
8 Chapter 2 Software for Windows ENWW
Page 21

Change print job settings for Windows
Tool for changing the settings Method for changing the
Software program settings On the File menu in the software
Printer Properties in the
software program
Default printer driver settings 1. Open the list of printers on
settings
program, click Page Setup or a
similar command.
The steps vary for each
software program. This
procedure is most common.
1. On the File menu in the
software program, click
Print.
2. Select the product, and
then click Properties or
Preferences.
3. Change the settings on any
of the tabs.
your computer, and select
this product.
NOTE: This step varies
for each operating system.
2. Click Printer, and then
click Printing
Preferences.
Duration of changes Hierarchy of changes
These settings are in effect for
the current print job only.
These settings are in effect for
the current session of the
software program.
These settings remain in effect
until you change them again.
NOTE: This method changes
the default settings for the
printer driver for all software
programs.
Settings changed here override
settings changed anywhere
else.
Settings changed here override
default printer driver settings
and default product settings.
You can override these settings
by changing settings in the
software program.
3. Change the settings on any
of the tabs.
ENWW Change print job settings for Windows 9
Page 22

Change printer-driver settings for Windows
Change the settings for all print jobs until the software program is closed
1. On the File menu in the software program, click Print.
2. Select the driver, and then click Properties or Preferences.
The steps can vary; this procedure is most common.
Change the default settings for all print jobs
1. Windows XP, Windows Server 2003, and Windows Server 2008 (using the default Start
menu view): Click Start, and then click Printers and Faxes.
Windows XP, Windows Server 2003, and Windows Server 2008 (using the Classic Start
menu view): Click Start, click Settings, and then click Printers.
Windows Vista: Click Start, click Control Panel, and then in the category for Hardware and
Sound click Printer.
Windows 7: Click Start, and then click Devices and Printers.
2. Right-click the driver icon, and then select Printing Preferences.
Change the product configuration settings
1. Windows XP, Windows Server 2003, and Windows Server 2008 (using the default Start
menu view): Click Start, and then click Printers and Faxes.
Windows XP, Windows Server 2003, and Windows Server 2008 (using the Classic Start
menu view): Click Start, click Settings, and then click Printers.
Windows Vista: Click Start, click Control Panel, and then in the category for Hardware and
Sound click Printer.
Windows 7: Click Start, and then click Devices and Printers.
2. Right-click the driver icon, and then select Properties or Printer properties.
3. Click the Configure tab.
10 Chapter 2 Software for Windows ENWW
Page 23

Remove software for Windows
Windows XP
1. Click Start, and then click Programs.
2. Click HP, and then click the product name.
3. Click Uninstall, and then follow the onscreen instructions to remove the software.
Windows Vista and Windows 7
1. Click Start, and then click All Programs.
2. Click HP, and then click the product name.
3. Click Uninstall, and then follow the onscreen instructions to remove the software.
ENWW Remove software for Windows 11
Page 24

Supported utilities for Windows (network models only)
HP Embedded Web Server (The HP EWS is only accessible when the product is network
●
connected, not when the product is connected via USB.)
12 Chapter 2 Software for Windows ENWW
Page 25

3 Use the product with Mac
Software for Mac
●
Print with Mac
●
ENWW 13
Page 26
Software for Mac
Supported operating systems for Mac
The product supports the following Mac operating systems:
● Mac OS X 10.5, 10.6, and later
NOTE: For Mac OS X 10.5 and later, PPC and Intel® Core™ Processor Macs are supported. For
Mac OS X 10.6, Intel Core Processor Macs are supported.
Supported printer drivers for Mac
The HP LaserJet software installer provides PostScript® Printer Description (PPD) files, and Printer
Dialog Extensions (PDEs) for use with Mac OS X computers. The HP printer PPD and PDE files, in
combination with the product printer driver, provide full printing functionality and access to specific
HP printer features.
Install software for Mac operating systems
Install software for Mac computers connected directly to the product
This product supports a USB 2.0 connection. Use an A-to-B type USB cable. HP recommends using
a cable that is no longer than 2 m (6.5 ft).
1. Connect the USB cable to the product and the computer.
2. Install the software from the CD.
3. Click HP Installer icon, and follow the onscreen instructions.
4. On the Congratulations screen, click the OK button.
5. Print a page from any program to make sure that the printing software is correctly installed.
14 Chapter 3 Use the product with Mac ENWW
Page 27

Install software for Mac computers on a wired network
Configure the IP address
1. Connect the network cable to the product and to the network.
2. Wait for 60 seconds before continuing. During this time, the network recognizes the product and
assigns an IP address or host name for the product.
3. Press and hold the Resume
a supplies status page.
4. Find the IP address on the configuration report.
LASERJET PROFESSIONAL
Install the software
1. Quit all programs on the computer.
2. Install the software from the CD.
3. Click the HP Installer icon, and follow the onscreen instructions.
4. On the Congratulations screen, click the OK button.
5. Print a page from any program to make sure that the printing software is correctly installed.
button for two to three seconds to print a configuration page and
ENWW Software for Mac 15
Page 28

Install software for Mac computers on a wireless network
Before installing the product software, make sure the product is not connected to the network using a
network cable.
If your wireless router does not support Wi-Fi Protected Setup (WPS), obtain the wireless router
network settings from your system administrator, or complete the following tasks:
Obtain the wireless network name or service set identifier (SSID).
●
Determine the security password or encryption key for the wireless network.
●
Connect the product to a wireless network using WPS
If your wireless router supports Wi-Fi Protected Setup (WPS), this is the simplest way to set up the
product on a wireless network.
1. Press the WPS button on your wireless router.
2. Press and hold the Wireless
button when the wireless light starts blinking.
3. Wait up to two minutes while the product establishes a network connection with the wireless
router.
NOTE: If this method is not successful, try using the wireless network using USB cable method.
Connect the product to a wireless network using a USB cable
If your wireless router does not support WiFi-Protected Setup (WPS), use this method to set up the
product on a wireless network. Using a USB cable to transfer settings makes setting up a wireless
connection easier. After the setup is complete, you can disconnect the USB cable and use the
wireless connection.
1. Insert the software CD into the computer CD tray.
2. Follow the on-screen instructions. When prompted, select the Connect through a wireless
network option. Connect the USB cable to the product when prompted.
CAUTION: Do not connect the USB cable until the installation program prompts you.
3. When the installation is complete, print a configuration page to make sure that the product has a
SSID name.
4. When installation is complete, disconnect the USB cable.
button on the product control panel for two seconds. Release the
Remove software from Mac operating systems
You must have administrator rights to remove the software.
1. Disconnect the product from the computer.
2. Open Applications.
3. Select Hewlett Packard.
4. Select HP Uninstaller.
16 Chapter 3 Use the product with Mac ENWW
Page 29

5. Select the product from the list of devices, and then click the Uninstall button.
6. After the software is uninstalled, restart the computer and empty the Trash.
Change printer-driver settings for Mac
Change the settings for all print jobs
until the software program is closed
1. On the File menu, click the Print
button.
2. Change the settings that you want
on the various menus.
Change the default settings for all
print jobs
1. On the File menu, click the Print
button.
2. Change the settings that you want
on the various menus.
3. On the Presets menu, click the
Save As... option and type a name
for the preset.
These settings are saved in the
Presets menu. To use the new
settings, you must select the saved
preset option every time you open a
program and print.
Change the product configuration
settings
Mac OS X 10.5 and 10.6
1.
From the Apple menu
System Preferences menu and
then click the Print & Fax icon.
2. Select the product in the left side
of the window.
3. Click the Options & Supplies
button.
4. Click the Driver tab.
5. Configure the installed options.
, click the
ENWW Software for Mac 17
Page 30

Software for Mac computers
Supported utilities for Mac (network models only)
HP Utility for Mac
Use the HP Utility to set up product features that are not available in the printer driver.
You can use the HP Utility when the product uses a universal serial bus (USB) cable or is connected
to a TCP/IP-based network.
Open the HP Utility
From the dock, click HP Utility.
▲
-or-
From Applications, click Hewlett Packard, and then click HP Utility.
HP Utility features
Use the HP Utility software to perform the following tasks:
Obtain information about supplies status.
●
Obtain information about the product, such as the firmware version and the serial number.
●
Print a configuration page.
●
For products connected to an IP-based network, obtain network information and open the
●
HP Embedded Web Server.
Configure the paper type and size for the tray.
●
Transfer files and fonts from the computer to the product.
●
● Update the product firmware.
● Display the color usage page.
Supported utilities for Mac
HP Embedded Web Server
The product is equipped with an embedded Web server, which provides access to information about
product and network activities.
18 Chapter 3 Use the product with Mac ENWW
Page 31

Print with Mac
Cancel a print job with Mac
1. If the print job is currently printing, cancel it by pressing the Cancel button on the product
control panel.
NOTE: Pressing the Cancel button clears the job that the product is currently processing. If
more than one process is running, pressing the Cancel
currently appears on the product control panel.
2. You can also cancel a print job from a software program or a print queue.
Software program: Typically, a dialog box appears briefly on the computer screen,
●
allowing you to cancel the print job.
Mac print queue: Open the print queue by double-clicking the product icon in the dock.
●
Highlight the print job, and then click Delete.
Change the paper size and type with Mac
1. On the File menu in the software program, click the Print option.
2. In the Copies & Pages menu, click the Page Setup button.
3. Select a size from the Paper Size drop-down list, and then click the OK button.
button clears the process that
4. Open the Finishing menu.
5. Select a type from the Media-type drop-down list.
6. Click the Print button.
Resize documents or print on a custom paper size with Mac
Mac OS X 10.5 and 10.6
Use one of these methods.
1. On the File menu, click the Print option.
2. Click the Page Setup button.
3. Select the product, and then select the correct settings for the Paper Size
and Orientation options.
1. On the File menu, click the Print option.
2. Open the Paper Handling menu.
3. In the Destination Paper Size area, click the Scale to fit paper size box,
and then select the size from the drop-down list.
Create and use printing presets with Mac
Use printing presets to save the current printer driver settings for reuse.
ENWW Print with Mac 19
Page 32

Create a printing preset
1. On the File menu, click the Print option.
2. Select the driver.
3. Select the print settings that you want to save for reuse.
4. In the Presets menu, click the Save As... option, and type a name for the preset.
5. Click the OK button.
Use printing presets
1. On the File menu, click the Print option.
2. Select the driver.
3. In the Presets menu, select the printing preset.
NOTE: To use printer-driver default settings, select the standard option.
Print a cover page with Mac
1. On the File menu, click the Print option.
2. Select the driver.
3. Open the Cover Page menu, and then select where to print the cover page. Click either the
Before Document button or the After Document button.
4. In the Cover Page Type menu, select the message that you want to print on the cover page.
NOTE: To print a blank cover page, select the standard option from the Cover Page Type
menu.
Print multiple pages on one sheet of paper with Mac
1. On the File menu, click the Print option.
2. Select the driver.
3. Open the Layout menu.
20 Chapter 3 Use the product with Mac ENWW
Page 33

4. From the Pages per Sheet menu, select the number of pages that you want to print on each
sheet (1, 2, 4, 6, 9, or 16).
5. In the Layout Direction area, select the order and placement of the pages on the sheet.
6. From the Borders menu, select the type of border to print around each page on the sheet.
Print on both sides of the page (duplex) with Mac
1. Insert enough paper into one of the trays to accommodate the print job.
2. On the File menu, click the Print option.
3. Open the Layout menu, and click the Manual Duplex tab or open the Manual Duplex menu.
4. Click the Manual Duplex box, and select a binding option.
5. Click the Print button. Follow the instructions in the pop-up window that appears on the
computer screen before replacing the output stack in Tray 1 for printing the second half.
6. Go to the product, and remove any blank paper that is in Tray 1.
7. Retrieve the printed stack from the output bin, and, maintaining the paper orientation, place it
with the printed-side facing down in the input tray.
8. At the computer, click the Continue button to print the second side of the job. If at the product,
press the Resume
button.
Set the color options with Mac
Use the Color Options menu or the Color/Quality Options menu to control how colors are
interpreted and printed from software programs.
1. On the File menu, click the Print option.
2. Select the driver.
3. Open the Color Options menu or the Color/Quality Options menu.
4. Open the Advanced menu, or select the appropriate tab.
5. Adjust the individual settings for text, graphics, and photographs.
ENWW Print with Mac 21
Page 34

22 Chapter 3 Use the product with Mac ENWW
Page 35

4 Connect the product
Supported network operating systems (network models only)
●
Connect with USB
●
Connect to a network (network models only)
●
ENWW 23
Page 36

Supported network operating systems (network models only)
The product supports the following operating systems for wireless printing:
Windows 7 (32-bit and 64-bit)
●
Windows Vista (32-bit and 64-bit)
●
Windows XP (32-bit, Service Pack 2)
●
Windows Server 2003 (32-bit, Service Pack 3)
●
Windows Server 2008 (32-bit and 64-bit)
●
Mac OS X v10.5 and v10.6
●
Printer sharing disclaimer
HP does not support peer-to-peer networking, as the feature is a function of Microsoft operating
systems and not of the HP printer drivers. Go to Microsoft at
www.microsoft.com.
24 Chapter 4 Connect the product ENWW
Page 37

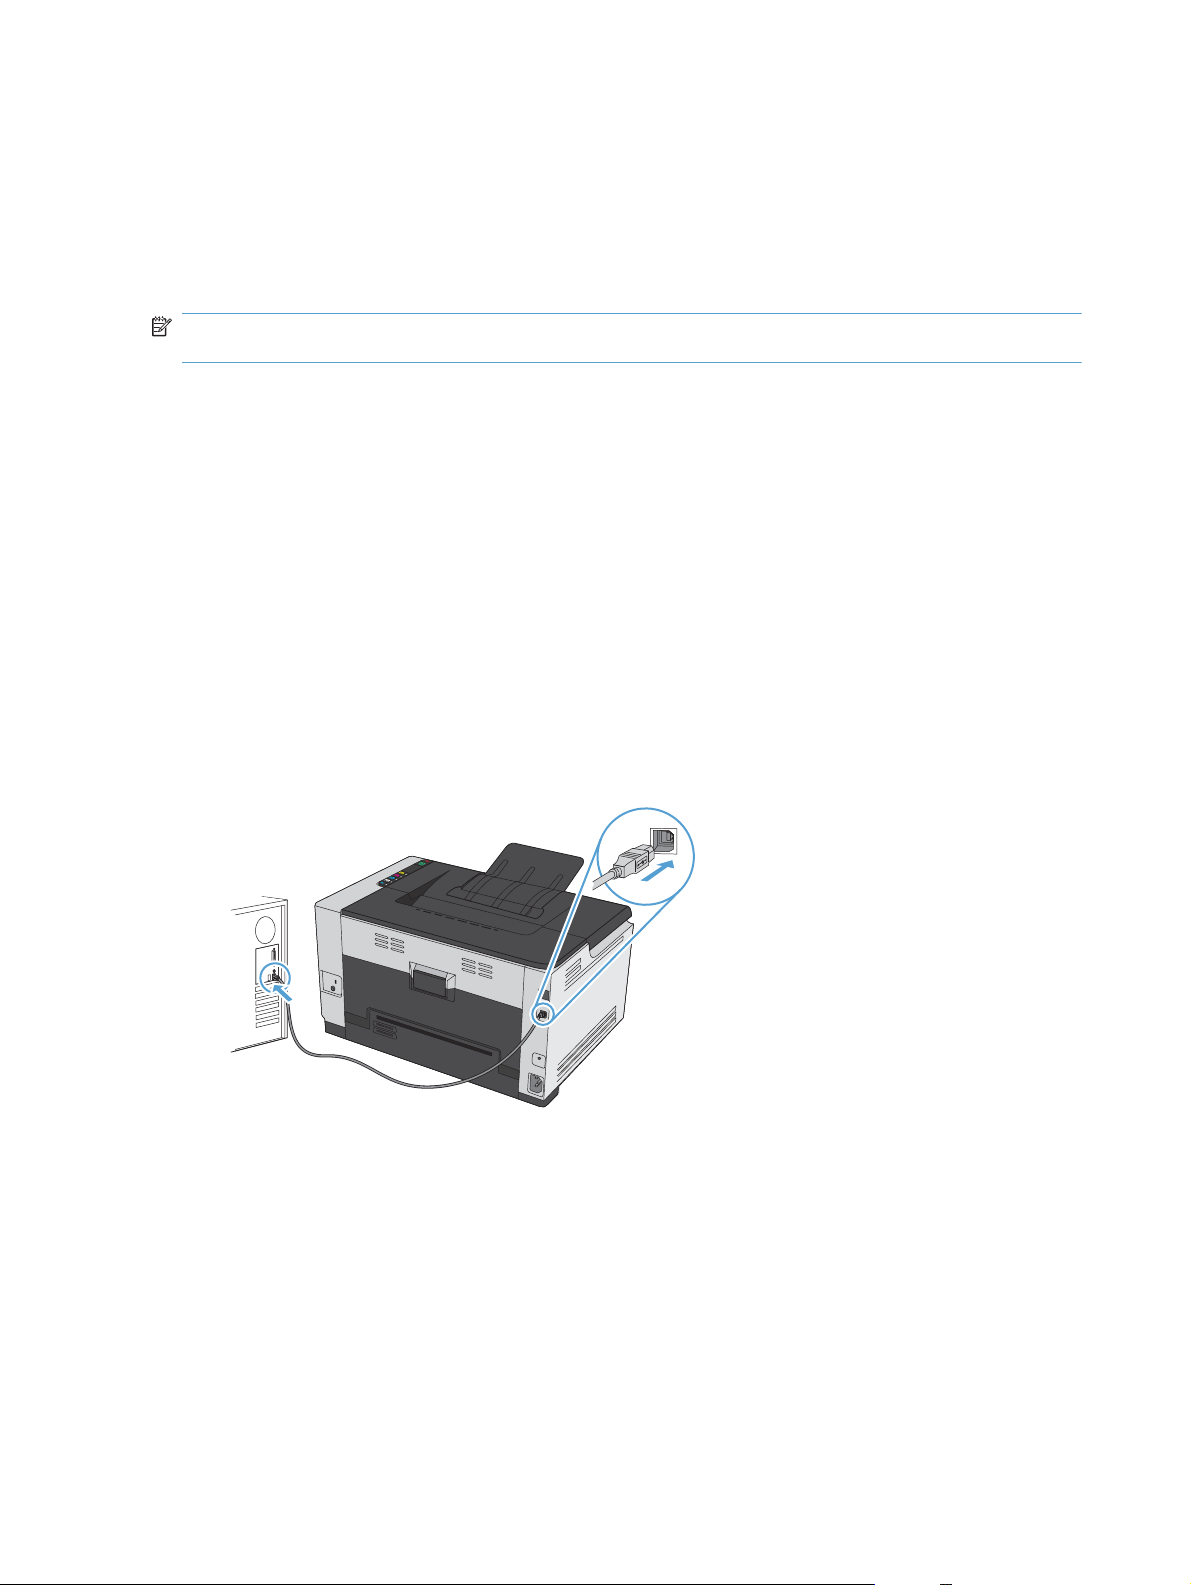
Connect with USB
This product supports a USB 2.0 connection. Use an A-to-B type USB cable. HP recommends using
a cable that is no longer than 2 m (6.5 ft).
CAUTION: Do not connect the USB cable until the installation software prompts you to connect it.
CD installation
1. Quit all open programs on the computer.
2. Install the software from the CD, and follow the onscreen instructions.
3. When prompted, select the Directly connect to this computer using a USB cable option, and
then click the Next button.
4. When the software prompts you, connect the USB cable to the product and the computer.
5. At the end of the installation, click the Finish button.
6. On the More Options screen, you can install more software, or click the Finish button.
7. Print a page from any program to make sure that the printing software is correctly installed.
ENWW Connect with USB 25
Page 38

Connect to a network (network models only)
The product can connect to wired or wireless networks.
NOTE: You cannot connect to a wired and wireless network simultaneously. Wired connections
take precedence.
Supported network protocols
To connect a networking-equipped product to a network, you need a network that uses one of the
following protocols.
TCP/IP (IPv4 or IPv6)
●
Port 9100
●
LPR
●
DHCP
●
AutoIP
●
SNMP
●
Bonjour
●
SLP
●
WSD
●
NBNS
●
Install the product on a wired network
Configure the IP address
1. Connect the network cable to the product and to the network.
2. Wait for 60 seconds before continuing. During this time, the network recognizes the product and
assigns an IP address or host name for the product.
26 Chapter 4 Connect the product ENWW
Page 39

3. Press and hold the Resume button for two to three seconds to print a configuration page and
a supplies status page.
4. Find the IP address on the configuration report.
LASERJET PROFESSIONAL
Install the software
1. Quit all programs on the computer.
2. Install the software from the CD.
3. Follow the onscreen instructions.
4. When prompted, select the Connect through a wired network option, and then click the Next
button.
5. From the list of available printers, select the printer that has the correct IP address.
6. Click the Finish button.
7. On the More Options screen, you can install more software, or click the Finish button.
8. Print a page from any program to make sure that the printing software is correctly installed.
Install the product on a wireless network
Before installing the product software, make sure the product is not connected to the network using a
network cable.
If your wireless router does not support Wi-Fi Protected Setup (WPS), obtain the wireless router
network settings from your system administrator, or complete the following tasks:
Obtain the wireless network name or service set identifier (SSID).
●
Determine the security password or encryption key for the wireless network.
●
Connect the product to a wireless network using WPS
If your wireless router supports Wi-Fi Protected Setup (WPS), this is the simplest way to set up the
product on a wireless network.
1. Press the WPS button on your wireless router.
2. Press and hold the Wireless
button when the wireless light starts blinking.
3. Wait up to two minutes while the product establishes a network connection with the wireless
router.
ENWW Connect to a network (network models only) 27
button on the product control panel for two seconds. Release the
Page 40

NOTE: If this method is not successful, try using the wireless network setup using the USB cable
method.
Connect the product to a wireless network using a USB cable
If your wireless router does not support WiFi-Protected Setup (WPS), use this method to set up the
product on a wireless network. Using a USB cable to transfer settings makes setting up a wireless
connection easier. After the setup is complete, you can disconnect the USB cable and use the
wireless connection.
1. Insert the software CD into the computer CD tray.
2. Follow the on-screen instructions. When prompted, select the Connect through a wireless
network option. Connect the USB cable to the product when prompted.
CAUTION: Do not connect the USB cable until the installation program prompts you.
3. When the installation is complete, print a configuration page to make sure that the product has a
SSID name.
4. When installation is complete, disconnect the USB cable.
Install the software for a wireless product currently on the network
If the product already has an IP address on a wireless network and you want to install product
software on a computer, complete the following steps.
1. From the product control panel, print a configuration page to obtain the product IP address.
2. Install the software from the CD.
3. Follow the on-screen instructions.
4. When prompted, select the Connect through a wireless network option, and then click the
Next button.
5. From the list of available printers, select the printer that has the correct IP address.
Disconnect from the wireless network
If you want to disconnect the product from a wireless network, you can turn off the wireless unit in the
product.
1. At the product control panel, press and release the Wireless
2. To confirm that the wireless unit is turned off, print a configuration page and then verify that the
status is specified as disabled on the configuration page.
button.
28 Chapter 4 Connect the product ENWW
Page 41

Reduce interference on a wireless network
The following tips can reduce interference in a wireless network:
Keep the wireless devices away from large metal objects, such as filing cabinets, and other
●
electromagnetic devices, such as microwaves and cordless telephones. These objects can
disrupt radio signals.
Keep the wireless devices away from large masonry structures and other building structures.
●
These objects can absorb radio waves and lower signal strength.
Position the wireless router in a central location in line of sight with the wireless products on the
●
network.
Advanced wireless setup
Wireless communication modes
You can use one of two wireless communication modes: infrastructure or ad-hoc.
ENWW Connect to a network (network models only) 29
Page 42

Infrastructure wireless
network (recommended)
Ad-hoc wireless network The product communicates directly with other wireless devices without using a wireless
The product communicates with other devices on the network through a wireless router.
router.
All devices on the ad hoc network must have the following:
● 802.11b/g compatibility
The same SSID
●
The same subnet and channel
●
● The same 802.11b/g security settings
Wireless security
To make your wireless network easy to distinguish from other wireless networks, use a unique
network name (SSID) for your wireless router. Your wireless router might have a default network
name, which is typically the manufacturer's name. For information on how to change the network
name, see the documentation that came with the wireless router.
30 Chapter 4 Connect the product ENWW
Page 43

To prevent other users from accessing your network, turn on WPA or WEP data encryption.
Wired Equivalent Privacy (WEP): WEP is the original native security mechanism in the 802.11
●
standard. You create a unique key containing hexadecimal or alphanumeric characters, which
other users must provide before they can access your network.
Wi-Fi Protected Access (WPA): WPA uses the temporal key integrity protocol (TKIP) for
●
encryption and employs 802.1X authentication. It addresses all known weaknesses of WEP. You
create a unique passphrase containing a combination of letters and numbers, which other users
must provide before they can access your network.
WPA2 provides the advanced encryption standard (AES), and is an improvement over WPA.
●
Install the product on an ad-hoc wireless network
You can connect the product wirelessly to a computer through a peer-to-peer (ad-hoc) installation.
NOTE: To accomplish this task, you must temporarily connect the product to the network by using a
network cable.
1. Connect the network cable to the product and to the network.
2. Wait for 60 seconds before continuing. During this time, the network recognizes the product and
assigns an IP address or host name for the product.
3. Press and hold the Resume
a supplies status page.
4. Find the IP address on the configuration page.
5. Open a Web browser, and type the IP address into the address line. The HP Embedded Web
Server opens.
6. Click the Networking tab, and select the Wireless Configuration link from the left pane.
7. Select the option to enable wireless networking, and then disconnect the network cable.
8. In the Configuration Method area, select the Create a new Ad hoc wireless network (peer-
to-peer) option.
9. Provide a unique network name, select a channel, and select the type of security to use.
10. Click the Apply button.
Configure network settings
View or change network settings
Use the embedded Web server to view or change IP configuration settings.
1. Print a configuration page, and locate the IP address.
button for two to three seconds to print a configuration page and
If you are using IPv4, the IP address contains only digits. It has this format:
●
xxx.xxx.xxx.xxx
● If you are using IPv6, the IP address is a hexadecimal combination of characters and digits.
It has a format similar to this:
ENWW Connect to a network (network models only) 31
Page 44

xxxx::xxxx:xxxx:xxxx:xxxx
2. To open the HP Embedded Web Server, type the IP address (IPv4) into the address line of a
Web browser. For IPv6, use the protocol established by the Web browser for entering IPv6
addresses.
3. Click the Networking tab to obtain network information. You can change settings as needed.
32 Chapter 4 Connect the product ENWW
Page 45

5 Paper and print media
Understand paper use
●
Change the printer driver to match the paper type and size
●
Supported paper sizes
●
Supported paper types
●
Load paper trays
●
ENWW 33
Page 46

Understand paper use
This product supports a variety of paper and other print media in accordance with the guidelines in
this user guide. Paper or print media that does not meet these guidelines might cause poor print
quality, increased jams, and premature wear on the product.
For best results, use only HP-brand paper and print media designed for laser printers or multiuse. Do
not use paper or print media made for inkjet printers. Hewlett-Packard Company cannot recommend
the use of other brands of media because HP cannot control their quality.
It is possible for paper to meet all of the guidelines in this user guide and still not produce satisfactory
results. This might be the result of improper handling, unacceptable temperature and/or humidity
levels, or other variables over which Hewlett-Packard has no control.
CAUTION: Using paper or print media that does not meet Hewlett-Packard's specifications might
cause problems for the product, requiring repair. This repair is not covered by the Hewlett-Packard
warranty or service agreements.
Special paper guidelines
This product supports printing on special media. Use the following guidelines to obtain satisfactory
results. When using special paper or print media, be sure to set the type and size in the printer driver
to obtain the best results.
CAUTION: HP LaserJet products use fusers to bond dry toner particles to the paper in very precise
dots. HP laser paper is designed to withstand this extreme heat. Using inkjet paper could damage the
product.
Media type Do Do not
Envelopes
Labels
Transparencies
Letterhead or preprinted forms ● Use only letterhead or forms
Store envelopes flat.
●
● Use envelopes where the seam
extends all the way to the corner
of the envelope.
● Use peel-off adhesive strips that
are approved for use in laser
printers.
Use only labels that have no
●
exposed backing between them.
● Use labels that lie flat.
Use only full sheets of labels.
●
Use only transparencies that are
●
approved for use in color laser
printers.
Place transparencies on a flat
●
surface after removing them from
the product.
approved for use in laser printers.
●
●
●
●
●
●
● Do not use raised or metallic
Do not use envelopes that are
wrinkled, nicked, stuck together, or
otherwise damaged.
Do not use envelopes that have
clasps, snaps, windows, or coated
linings.
Do not use self-stick adhesives or
other synthetic materials.
Do not use labels that have
wrinkles or bubbles, or are
damaged.
Do not print partial sheets of
labels.
Do not use transparent print media
not approved for laser printers.
letterhead.
34 Chapter 5 Paper and print media ENWW
Page 47

Media type Do Do not
Heavy paper ● Use only heavy paper that is
approved for use in laser printers
and meets the weight
specifications for this product.
Glossy or coated paper ● Use only glossy or coated paper
that is approved for use in laser
printers.
● Do not use paper that is heavier
than the recommended media
specification for this product
unless it is HP paper that has
been approved for use in this
product.
● Do not use glossy or coated paper
designed for use in inkjet products.
ENWW Understand paper use 35
Page 48

Change the printer driver to match the paper type and size
NOTE: If you change the page settings in the software program, those settings override any
settings in the printer driver.
1. On the File menu in the software program, click Print.
2. Select the product, and then click the Properties or Preferences button.
3. Click the Paper/Quality tab.
4. Select a size from the Size is drop-down list.
5. Select a paper type from the Type is drop-down list.
6. Click the OK button.
36 Chapter 5 Paper and print media ENWW
Page 49

Supported paper sizes
This product supports various paper sizes, and it adapts to various media.
NOTE: To obtain best print results, select the appropriate paper size and type in your print driver
before printing.
Table 5-1 Supported paper and print media sizes
Size Dimensions
Letter 216 x 279 mm (8.5 x 11 in)
Legal 216 x 356 mm (8.5 x 14 in)
A4 210 x 297 mm (8.27 x 11.69 in)
Executive 184 x 267 mm (7.25 x 10.5 in)
8.5 x 13 216 x 330 mm (8.5 x 13 in)
4 x 6 101.6 x 152.4 mm (4 x 6 in)
10 x 15 cm 101.6 x 152.4 mm (4 x 6 in)
5 x 8 127 x 203 mm (5 x 8 in)
RA4 215 x 305 mm (8.46 x 12.01 in)
A5 148 x 210 mm (5.83 x 8.27 in)
A6 105 x 148 mm (4.13 x 5.83 in)
B5 (JIS) 182 x 257 mm (7.17 x 10.12 in)
16k 184 x 260 mm (7.24 x 10.23 in)
195 x 270 mm (7.68 x 10.62 in)
197 x 273 mm (7.75 x 10.75 in)
Custom Minimum: 76 x 127 mm (3 x 5 in)
Maximum: 216 x 356 mm (8.5 x 14.0 in)
NOTE: When defining custom sizes using the printer driver, always specify the short
edge of the page as the width and the long edge as the length.
Table 5-2 Supported envelopes and postcards
Size Dimensions
Envelope #10 105 x 241 mm (4.13 x 9.49 in)
Envelope DL 110 x 220 mm (4.33 x 8.66 in)
Envelope C5 162 x 229 mm (6.93 x 9.84 in)
Envelope B5 176 x 250 mm (6.7 x 9.8 in)
Envelope Monarch 98 x 191 mm (3.9 x 7.5 in)
Japanese Postcard
Postcard (JIS)
100 x 148 mm (3.93 x 5.82 in)
ENWW Supported paper sizes 37
Page 50

Table 5-2 Supported envelopes and postcards (continued)
Size Dimensions
Double Japan Postcard Rotated
Double Postcard (JIS)
Custom Minimum: 76 x 127 mm (3 x 5 in)
148 x 200 mm (5.83 x 7.87 in)
Maximum: 216 x 356 mm (8.5 x 14.0 in)
NOTE: When defining custom sizes using the printer driver, always specify the short
edge of the page as the width and the long edge as the length.
38 Chapter 5 Paper and print media ENWW
Page 51

Supported paper types
For a complete list of specific HP-brand paper that this product supports, go to www.hp.com/support/
ljcp1020series.
Everyday
●
Plain
◦
Light
◦
Bond
◦
Recycled
◦
Presentation
●
Matte paper
◦
Glossy paper
◦
Heavy paper
◦
Heavy glossy paper
◦
Brochure
●
Matte paper
◦
◦
◦
◦
◦
Photo/Cover
●
◦
◦
◦
◦
Other
●
◦
◦
◦
◦
Glossy paper
Tri-fold paper
Extra heavy paper
Extra heavy glossy paper
Matte cover paper
Matte photo paper
Photo glossy paper
Glossy cards
Color laser transparency
Labels
Letterhead
Envelope
Heavy envelope
◦
Preprinted
◦
Prepunched
◦
ENWW Supported paper types 39
Page 52

Colored
◦
Rough
◦
Heavy rough
◦
HP Tough paper
◦
40 Chapter 5 Paper and print media ENWW
Page 53

Load paper trays
Load the input tray
NOTE: When you add new paper make sure that you remove all of the paper from the input tray
and straighten the stack of new paper. Do not fan the paper. This reduces jams by preventing
multiple sheets of paper from feeding through the product at one time.
NOTE: When printing on small sizes or custom paper, load the short edge (width) into the product
first.
1. Load the paper face-up, top forward in the
input tray.
2. Adjust the guides until they are snug against
the paper.
ENWW Load paper trays 41
Page 54

Tray capacity
Tray or bin Paper type Specifications Capacity
Input tray Paper
Envelopes
Transparencies 0.12-0.13 mm (0.0047-.0.0051
Postcards
Glossy
Paper orientation for loading trays
If you are using paper that requires a specific orientation, load it according to the information in the
following table.
Paper type How to load paper
Preprinted or letterhead ● Face up
Top edge leading into the product
●
Prepunched ● Face up
2
60-220 g/m
Print quality is assured for HP
media.
60-90 g/m
in)
135-176 g/m
130-220 g/m
(16-59 lb)
2
(16-24 lb)
2
(36-47 lb)
2
(35-59 lb)
150 sheets of 75 g/m
Up to 10 envelopes
Up to 50 transparencies
2
(20 lb)
Holes toward the left side of the product
●
Envelope ● Face up
Right short edge leading into the product
●
42 Chapter 5 Paper and print media ENWW
Page 55

6Print tasks
Cancel a print job with Windows
●
Basic print tasks with Windows
●
Additional print tasks with Windows
●
ENWW 43
Page 56

Cancel a print job with Windows
1. If the print job is currently printing, cancel it by pressing the Cancel button on the product
control panel.
NOTE: Pressing the Cancel button clears the job that the product is currently processing. If
more than one process is running, pressing the Cancel
currently appears on the product control panel.
2. You can also cancel a print job from a software program or a print queue.
Software program: Typically, a dialog box appears briefly on the computer screen,
●
allowing you to cancel the print job.
Windows print queue: If a print job is waiting in a print queue (computer memory) or print
●
spooler, delete the job there.
Windows XP, Server 2003, or Server 2008: Click Start, click Settings, and then click
◦
Printers and Faxes. Double-click the product icon to open the window, right-click the
print job that you want to cancel, and then click Cancel.
Windows Vista: Click Start, click Control Panel, and then, under Hardware and
◦
Sound, click Printer. Double-click the product icon to open the window, right-click the
print job that you want to cancel, and then click Cancel.
Windows 7: Click Start, and then click Devices and Printers. Double-click the
◦
product icon to open the window, right-click the print job that you want to cancel, and
then click Cancel.
button clears the process that
44 Chapter 6 Print tasks ENWW
Page 57

Basic print tasks with Windows
The methods to open the print dialog from software programs can vary. The procedures that follow
include a typical method. Some software programs do not have a File menu. See the documentation
for your software program to learn how to open the print dialog.
Open the printer driver with Windows
1. On the File menu in the software program,
click Print.
2. Select the product, and then click the
Properties or Preferences button.
Get help for any printing option with Windows
1. Click the Help button to open the online Help.
ENWW Basic print tasks with Windows 45
Page 58

Change the number of print copies with Windows
1. On the File menu in the software program, click Print.
2. Select the product, and then select the number of copies.
Save custom print settings for reuse with Windows
Use a printing shortcut with Windows
1. On the File menu in the software program,
click Print.
2. Select the product, and then click the
Properties or Preferences button.
46 Chapter 6 Print tasks ENWW
Page 59

3. Click the Printing Shortcuts tab.
4. Select one of the shortcuts, and then click the
OK button.
NOTE: When you select a shortcut, the
corresponding settings change on the other
tabs in the printer driver.
Create printing shortcuts
1. On the File menu in the software program,
click Print.
ENWW Basic print tasks with Windows 47
Page 60

2. Select the product, and then click the
Properties or Preferences button.
3. Click the Printing Shortcuts tab.
4. Select an existing shortcut as a base.
NOTE: Always select a shortcut before
adjusting any of the settings on the right side
of the screen. If you adjust the settings and
then select a shortcut, or if you select a
different shortcut, all your adjustments are
lost.
48 Chapter 6 Print tasks ENWW
Page 61

5. Select the print options for the new shortcut.
NOTE: You can select the print options on
this tab or on any other tab in the printer
driver. After selecting options on other tabs,
return to the Printing Shortcuts tab before
continuing with the next step.
6. Click the Save As button.
7. Type a name for the shortcut, and click the
OK button.
Improve print quality with Windows
Select the page size with Windows
1. On the File menu in the software program, click Print.
2. Select the product, and then click the Properties or Preferences button.
3. Click the Paper/Quality tab.
4. Select a size from the Size is drop-down list.
ENWW Basic print tasks with Windows 49
Page 62

Select a custom page size with Windows
1. On the File menu in the software program, click Print.
2. Select the product, and then click the Properties or Preferences button.
3. Click the Paper/Quality tab.
4. Click the Custom button.
5. Type a name for the custom size and specify the dimensions.
The width is the short edge of the paper.
●
The length is the long edge of the paper.
●
NOTE: Always load paper into the trays short edge first.
6. Click the Save button, and then click the Close button.
Select the paper type with Windows
1. On the File menu in the software program, click Print.
2. Select the product, and then click the Properties or Preferences button.
3. Click the Paper/Quality tab.
4. From the Type is drop-down list, click the More... option.
5. Select the category of paper types that best describes your paper, and then click the paper type
that you are using.
Print on both sides (duplex) with Windows
Print on both sides manually
1. Load paper face-up in the input tray.
50 Chapter 6 Print tasks ENWW
Page 63

2. On the File menu in the software program,
click Print.
3. Select the product, and then click the
Properties or Preferences button.
4. Click the Finishing tab.
ENWW Basic print tasks with Windows 51
Page 64

5. Select the Print on Both Sides (Manually)
check box. Click the OK button to print the
first side of the job.
6. Retrieve the printed stack from the output bin,
and, maintaining the paper orientation, place
it with the printed-side facing down in the
input tray.
7. At the computer, click the Continue button to
print the second side of the job. If at the
product, press the Resume
button.
Print multiple pages per sheet with Windows
1. On the File menu in the software program,
click Print.
52 Chapter 6 Print tasks ENWW
Page 65

2. Select the product, and then click the
Properties or Preferences button.
3. Click the Finishing tab.
ENWW Basic print tasks with Windows 53
Page 66

4. Select the number of pages per sheet from
the Pages Per Sheet drop-down list.
5. Select the correct Print Page Borders, Page
Order, and Orientation options.
Select page orientation with Windows
1. On the File menu in the software program,
click Print.
54 Chapter 6 Print tasks ENWW
Page 67

2. Select the product, and then click the
Properties or Preferences button.
3. Click the Finishing tab.
4. In the Orientation area, select the Portrait or
Landscape option.
To print the page image upside down, select
the Rotated option.
ENWW Basic print tasks with Windows 55
Page 68

Set color options with Windows
1. On the File menu in the software program, click Print.
2. Select the product, and then click the Properties or Preferences button.
3. Click the Color tab.
4. In the Color Options area, click the Manual option, and then click the Settings button.
5. Adjust the general settings for Edge Control, and settings for text, graphics, and photographs.
56 Chapter 6 Print tasks ENWW
Page 69

Additional print tasks with Windows
Print colored text as black (grayscale) with Windows
1. On the File menu in the software program, click Print.
2. Select the product, and then click the Properties or Preferences button.
3. Click the Paper/Quality tab.
4. Click the Print all Text as Black check box. Click the OK button.
ENWW Additional print tasks with Windows 57
Page 70

Print on preprinted letterhead or forms with Windows
1. On the File menu in the software program,
click Print.
2. Select the product, and then click the
Properties or Preferences button.
3. Click the Paper/Quality tab.
58 Chapter 6 Print tasks ENWW
Page 71

4. From the Type is drop-down list, click the
More... option.
5. Select the Other option.
6. Select the option for the type of paper you are
using, and click the OK button.
ENWW Additional print tasks with Windows 59
Page 72

Print on special paper, labels, or transparencies with Windows
1. On the File menu in the software program,
click Print.
2. Select the product, and then click the
Properties or Preferences button.
3. Click the Paper/Quality tab.
60 Chapter 6 Print tasks ENWW
Page 73

4. From the Type is drop-down list, click the
More... option.
5. Select the category of paper types that best
describes your paper.
NOTE: Labels and transparencies are in the
list of Other options.
6. Select the option for the type of paper you are
using, and click the OK button.
ENWW Additional print tasks with Windows 61
Page 74

Print the first or last page on different paper with Windows
1. On the File menu in the software program,
click Print.
2. Select the product, and then click the
Properties or Preferences button.
62 Chapter 6 Print tasks ENWW
Page 75

3. Click the Paper/Quality tab.
4. Click the Use different paper check box, and
then select the necessary settings for the
front cover, other pages, and back cover.
Scale a document to fit page size with Windows
1. On the File menu in the software program,
click Print.
ENWW Additional print tasks with Windows 63
Page 76

2. Select the product, and then click the
Properties or Preferences button.
3. Click the Effects tab.
4. Select the Print Document On option, and
then select a size from the drop-down list.
64 Chapter 6 Print tasks ENWW
Page 77

Add a watermark to a document with Windows
1. On the File menu in the software program, click Print.
2. Select the product, and then click the Properties or Preferences button.
3. Click the Effects tab.
4. Select a watermark from the Watermarks drop-down list.
Or, to add a new watermark to the list, click the Edit button. Specify the settings for the
watermark, and then click the OK button.
5. To print the watermark on the first page only, select the First Page Only check box. Otherwise,
the watermark is printed on each page.
Create a booklet with Windows
1. On the File menu in the software program,
click Print.
2. Select the product, and then click the
Properties or Preferences button.
ENWW Additional print tasks with Windows 65
Page 78

3. Click the Finishing tab.
4. Click the Print on Both Sides (Manually)
check box.
5. In the Booklet Printing drop-down list, select
a binding option. The Pages Per Sheet
option automatically changes to 2 Pages Per
Sheet.
66 Chapter 6 Print tasks ENWW
Page 79

7 Color
Adjust color
●
Match colors
●
ENWW 67
Page 80

Adjust color
Manage color by changing the settings on the Color tab in the printer driver.
Change the color theme for a print job
1. On the File menu in the software program, click Print.
2. Click Properties or Preferences.
3. Click the Color tab.
4. Select a color theme from the Color Themes drop-down list.
● Default (sRGB): This theme sets the product to print RGB data in raw device mode. When
using this theme, manage color in the software program or in the operating system for
correct rendering.
Vivid: The product increases the color saturation in the midtones. Use this theme when
●
printing business graphics.
Photo: The product interprets RGB color as if it were printed as a photograph using a
●
digital mini lab. The product renders deeper, more saturated colors differently than with the
Default (sRBG) theme. Use this theme when printing photos.
Photo (Adobe RGB 1998): Use this theme with printing digital photos that use the
●
AdobeRGB color space rather than sRGB. Turn off color management in the software
program when using this theme.
None: No color theme is used.
●
Change the color options
Change the color options settings for the current print job from the color tab of the printer driver.
1. On the File menu in the software program, click Print.
2. Click Properties or Preferences.
3. Click the Color tab.
68 Chapter 7 Color ENWW
Page 81

4. Click the Automatic or Manual setting.
Automatic setting: Select this setting for most color print jobs
●
Manual setting: Select this setting to adjust the color settings independent from other
●
settings.
NOTE: Changing color settings manually can impact output. HP recommends that only
color graphics experts change these settings.
5. Click the Print in Grayscale option to print a color document in black and shades of gray. Use
this option to print color documents for photocopying or faxing. You can also use this option to
print draft copies or to save color toner.
6. Click the OK button.
Manual color options
Use manual color options to adjust the Neutral Grays, Halftone, and Edge Control options for text,
graphics, and photographs.
Table 7-1 Manual color options
Setting description Setting options
Edge Control
The Edge Control setting determines the rendering
of edges. Edge control has two components:
adaptive halftoning and trapping. Adaptive
halftoning increases edge sharpness. Trapping
reduces the effect of color-plane misregistration by
overlapping the edges of adjacent objects slightly.
Off turns off both trapping and adaptive halftoning.
●
● Light sets trapping at a minimal level. Adaptive halftoning is on.
Normal sets trapping at a medium level. Adaptive halftoning is
●
on.
Maximum is the most aggressive trapping setting. Adaptive
●
halftoning is on.
ENWW Adjust color 69
Page 82

Table 7-1 Manual color options (continued)
Setting description Setting options
Halftone
Halftone options affect color output clarity and
resolution.
Neutral Grays
The Neutral Grays setting determines the method
for creating gray colors used in text, graphics, and
photographs.
● Smooth provides better results for large, solid-filled print areas
and enhances photographs by smoothing color gradations.
Select this option when uniform and smooth area fills are
important.
Detail is useful for text and graphics that require sharp
●
distinctions among lines or colors, or images that contain a
pattern or a high level of detail. Select this option when sharp
edges and small details are important.
● Black Only generates neutral colors (grays and black) by using
only black toner. This guarantees neutral colors without a color
cast. This setting is best for documents and grayscale
viewgraphs.
4-Color generates neutral colors (grays and black) by combining
●
all four toner colors. This method produces smoother gradients
and transitions to other colors, and it produces the darkest black.
70 Chapter 7 Color ENWW
Page 83

Match colors
For most users, the best method for matching colors is to print sRGB colors.
The process of matching printer output color to your computer screen is complex, because printers
and computer monitors use different methods of producing color. Monitors display colors by using
light pixels that use an RGB (red, green, blue) color process, but printers print colors by using a
CMYK (cyan, magenta, yellow, and black) process.
Several factors can influence your ability to match printed colors to those on your monitor:
Print media
●
Printer colorants (inks or toners, for example)
●
Printing process (inkjet, press, or laser technology, for example)
●
Overhead lighting
●
Personal differences in perception of color
●
Software programs
●
Printer drivers
●
Computer operating systems
●
Monitors
●
Video cards and drivers
●
Operating environment (humidity, for example)
●
Keep these factors in mind when colors on your screen do not perfectly match your printed colors.
ENWW Match colors 71
Page 84

72 Chapter 7 Color ENWW
Page 85

8 Manage and maintain the product
Print information pages
●
Use the HP Embedded Web Server (network models only)
●
Product security features
●
Economy settings
●
Manage supplies and accessories
●
Clean the product
●
Product updates
●
ENWW 73
Page 86

Print information pages
You can print the following information pages.
Page Description
Configuration page Prints a list of the product settings
Supplies Status page The supplies status page includes the following information:
Print the configuration page
● Approximate percentage of print cartridge life remaining
Warranty status of print cartridges and imaging drum
●
Part numbers for HP print cartridges
●
● Number of pages printed
Information about ordering new HP print cartridges and
●
recycling used HP print cartridges
The imaging drum's estimated life remaining and
●
installation date display if less than 30% of its estimated
life remains.
The configuration page lists current product settings and properties. This page also contains a status
log report. To print a configuration page, do one of the following:
Select Print configuration page on the Services tab in the Printer Preferences.
●
Press and hold the Resume
●
a supplies status page (English only).
Print the supplies status page
To print a supplies status page, do one of the following:
Select Print supplies status page on the Services tab in the Printer Preferences.
●
Press and hold the Resume
●
a supplies status page (English only).
button for two to three seconds to print a configuration page and
button for two to three seconds to print a configuration page and
74 Chapter 8 Manage and maintain the product ENWW
Page 87

Use the HP Embedded Web Server (network models only)
This product is equipped with an embedded Web server (EWS), which provides access to information
about product and network activities. A Web server provides an environment in which web programs
may run, much in the same way that an operating system, such as Windows, provides an
environment for programs to run on a computer. The output from these programs can then be
displayed by a Web browser, such as Microsoft Internet Explorer, Safari, or Netscape Navigator.
An “embedded” Web server resides on a hardware device (such as an HP LaserJet product) or in
firmware, rather than as software that is loaded on a network server.
The advantage of an EWS is that it provides an interface to the product that anyone with a networkconnected product and computer can use. There is no special software to install or configure, but you
must have a supported Web browser on the computer. To gain access to the EWS, type the IP
address for the product in the address line of the browser. To find the IP address, print a configuration
page.
NOTE: For Mac operating systems, you can use the EWS over a USB connection after installing the
Mac software included with the product.
Open the HP Embedded Web Server
To open the HP Embedded Web Server, type the IP address or host name of the product in the
address field of a supported Web browser. To find the IP address, print a configuration page. Select
Print configuration page on the Services tab in the Printer Preferences.
TIP: After you open the URL, bookmark it so that you can return to it quickly in the future.
HP Embedded Web Server features
The table below describes the basic screens of the embedded Web server.
ENWW Use the HP Embedded Web Server (network models only) 75
Page 88

Tab or section Description
Status tab
Provides product, status, and
configuration information.
● Device Status: Shows the product status and shows the life remaining of
HP supplies, with 0% indicating that a supply is empty.
Supplies Status: Shows the approximate percent life remaining of HP supplies.
●
When the estimated life remaining is less than 10% but has not reached the
estimated end of life, Less Than 10% displays. When a supply reaches its
estimated end of life –% displays. Actual supply life remaining can vary. Consider
having a replacement supply available to install when print quality is no longer
acceptable. The supply does not need to be replaced unless the print quality is no
longer acceptable. When an HP supply has reached “Very Low”, HP’s Premium
Protection Warranty on that supply ends.
The imaging drum's estimated remaining life and installation date displays when
less than approximately 30% of its estimated life remains.
● Device Configuration: Shows the information found on the product Configuration
page.
Network Summary: Shows the information found on the product Network
●
Configuration page.
● Reports: Allows you to print the configuration and supplies status pages that the
product generates.
● Event Log: Shows a list of all product events and errors.
Support button: Provides a link to the product support page. The Support button
●
can be password-protected.
Shop for Supplies button: Provides a link to a page where you can order supplies
●
for the product. The Shop for Supplies button can be password-protected.
System tab
Provides the ability to configure
the product from your computer.
Networking tab
Provides the ability to change
network settings from your
computer.
● Paper Setup: Allows you to change the paper-handling defaults for the product.
Print Quality: Allows you to change the print quality defaults for the product,
●
including calibration settings.
Print Density: Allows you to change the contrasts, highlights, midtones, and
●
shadows values for each supply.
Paper Types: Allows you to configure print modes that correspond to the media
●
types that the product accepts.
System Setup: Allows you to change the system defaults for the product.
●
Service: Allows you to start the cleaning procedure on the product.
●
● Product Security: Allows you to set or change the Administrator password.
Support button: Provides a link to the product support page. The Support button
●
can be password-protected.
Shop for Supplies button: Provides a link to a page where you can order supplies
●
for the product. The Shop for Supplies button can be password-protected.
: The System tab can be password-protected. If this product is on a network,
E
NOT
always consult with the printer administrator before changing settings on this tab.
Network administrators can use this tab to control network-related settings for the
product when it is connected to an IP-based network. This tab does not appear if the
product is directly connected to a computer.
76 Chapter 8 Manage and maintain the product ENWW
Page 89

Product security features
The product supports security standards and recommended protocols that help you keep the product
secure, protect critical information on your network, and simplify the way you monitor and maintain
the product.
For in-depth information about HP's secure imaging and printing solutions, visit
secureprinting. The site provides links to white papers and FAQ documents about security features.
Lock the product
1. You can attach a security cable to the slot on
the back of the product.
Assign a system password
www.hp.com/go/
Assign a password for the product so that unauthorized users cannot change the product settings.
1. Open the HP Embedded Web Server by entering the product IP address into the address line of
a Web browser.
2. Click the System tab.
3. On the left side of the window, click the Product Security menu.
4. Type the password in the Password box, and type it again in the Confirm Password box.
5. Click the Apply button. Make note of the password and store it in a safe place.
ENWW Product security features 77
Page 90

Economy settings
Set Auto-On/Auto-Off mode
Auto-On\Auto-Off is an energy-saving feature of this product. After a user-specified time period, the
product automatically reduces its power consumption. The product returns to the ready state when a
button is pressed or a print job is received.
NOTE: Although the product lights are off in Auto-Off mode, the product will work normally when it
receives a print job.
Change the Auto-On\Auto-Off setting
You can change how long the product remains idle (Auto-Off delay) before it enters Auto-Off mode.
You can also select which events cause the product to turn on.
1.
In the Windows system tray, right-click the Device Settings
name.
2. Click the Device Settings button.
3. Click the AutoOFF after delay button, and then select the Auto-Off delay from the drop-down
list.
4. Under AutoON to these events click the desired events (optional).
icon and then click the product
78 Chapter 8 Manage and maintain the product ENWW
Page 91

Manage supplies and accessories
Correctly using, storing, and monitoring the print cartridge and imaging drum can help ensure highquality print output.
Print when a print cartridge or imaging drum is at estimated end of life
Supplies messages
<Supply> Low message—where <Supply> is the color print cartridge: The product indicates when a
supply level is low. Actual print cartridge life remaining may vary. Consider having a replacement
available to install when print quality is no longer acceptable. The supply does not need to be
replaced now. This alert appears only when <Supply> Very Low is set to Stop.
<Supply> Very Low message—where <Supply> is either the color print cartridge or imaging drum or
a combination of multiple print cartridges and/or the imaging drum: The product indicates when a
supply level is very low. Actual print cartridge life remaining may vary. Consider having a replacement
available to install when print quality is no longer acceptable. Print-quality problems may occur when
using a supply that is at its estimated end of life. The supply does not need to be replaced now unless
the print quality is no longer acceptable.
Once an HP print cartridge has reached “Very Low”, HP’s Premium Protection Warranty on that print
cartridge has ended. HP’s Premium Protection Warranty applies only to the print cartridge for this
product.
The imaging drum installed in this product is covered by the product warranty. Replacement imaging
drums have a one year limited warranty from the date of installation. The imaging drum installation
date displays on both the configuration page and on the supplies status page when the imaging drum
reaches approximately 30% of its estimated remaining life.
Enable or disable the At Very Low settings
You can change the default settings at any time and do not need to re-enable the settings when a
new print cartridge is installed. The <Supply> Very Low alert message displays when a print
cartridge is set to Continue At Very Low. Once an HP print cartridge has reached “Very Low”, HP’s
Premium Protection Warranty on that cartridge has ended.
1.
In the Windows system tray, right-click the Device Settings
name.
2. Click the System Setup tab.
3. From the At Very Low drop-down list, select one of the following options:
Select the Continue option set the product to alert you that the print cartridge is very low,
●
but to continue printing.
Select the Stop option to set the product to alert you and stop printing until you replace the
●
print cartridge.
Select the Prompt (the default) option to set the product to stop printing and prompt you to
●
replace the print cartridge. You can acknowledge the prompt and continue printing.
icon and then click the product
ENWW Manage supplies and accessories 79
Page 92

Manage print cartridges and imaging drums
Print-cartridge and imaging drum storage
Do not remove the print cartridge or imaging drum from their packages until you are ready to use
them.
HP policy on non-HP supplies
Hewlett-Packard Company cannot recommend the use of non-HP print cartridges and imaging
drums, either new or remanufactured.
NOTE: Non-HP Laser Print Cartridge Use
For HP printer products, the use of a non-HP toner cartridge or imaging drum, or a refilled toner
cartridge, does not affect either the warranty to the customer or any HP support contract with the
customer. However, if product failure or damage is attributable to the use of a non-HP or refilled toner
cartridge, HP will charge its standard time and materials charges to service the product for the
particular failure or damage.
HP fraud hotline and Web site
Call the HP fraud hotline (1-877-219-3183, toll-free in North America) or go to www.hp.com/go/
anticounterfeit when you install an HP print cartridge and the supplies status page message says the
cartridge is non-HP or used. HP will help determine if the cartridge is genuine and take steps to
resolve the problem.
Your print cartridge might not be a genuine HP print cartridge if you notice the following:
The supplies status page indicates that a non-HP supply is installed.
●
You are experiencing a high number of problems with the print cartridge.
●
The cartridge does not look like it usually does (for example, the packaging differs from
●
HP packaging).
Recycle supplies
To recycle a genuine HP print cartridge or imaging drum, place the used supply in the box in which
the supply arrived. Use the enclosed return label to send the used supply to HP for recycling. For
complete information, see the recycling guide that is included with each new HP supply item.
Print cartridge layout
1
1 Print cartridge E-label
2
2 Plastic shield
80 Chapter 8 Manage and maintain the product ENWW
Page 93

Imaging drum layout
1 Imaging drum E-label
2 Plastic shield
1
2
ENWW Manage supplies and accessories 81
Page 94

Replacement instructions
Replace the print cartridges
When a print cartridge approaches the end of its useful life, you can continue printing with the current
print cartridge until it no longer yields acceptable print quality.
Once an HP print cartridge has reached “very low”, HP’s Premium Protection Warranty on that supply
has ended. All print defects or print cartridge failures incurred when an HP supply is used in continue
at very low mode will not be considered to be defects in materials or workmanship in the supply under
the HP Print Cartridge Warranty Statement.
NOTE: Once an HP print cartridge has reached “very low”, the corresponding cartridge light on the
control panel turns on.
1. Press the Cartridge button of the print
cartridge that requires replacement to rotate
the print cartridge carousel for removal.
NOTE: All doors must be closed when
pressing the Cartridge
NOTE: Wait until the Cartridge
not flashing and the rotation sounds stops
before opening the print cartridge door.
2. Open the print cartridge door.
button.
light is
82 Chapter 8 Manage and maintain the product ENWW
Page 95

3. Grasp the old print cartridge by the center
handle and remove.
4. Remove the new print cartridge from the
packaging. Place the used print cartridge in
the bag and box for recycling.
CAUTION: To prevent damage to the print
cartridge, hold the print cartridge at each end.
Do not touch the roller on the print cartridge.
5. Grasp both sides of the print cartridge and
gently rock the print cartridge to distribute the
toner evenly inside the print cartridge.
6. Remove the tape from the print cartridge.
Place the tape in the print-cartridge box to
return for recycling.
ENWW Manage supplies and accessories 83
Page 96

7. Remove the protective shielding from the new
print cartridge.
8. Grasp the print cartridge by the center handle
and insert into the product.
NOTE: Compare the color label on the print
cartridge to the color label in the carousel slot
to make sure the print cartridge color matches
the carousel position.
CAUTION: If toner gets on your clothing,
wipe it off with a dry cloth and wash the
clothing in cold water. Hot water sets toner
into the fabric.
84 Chapter 8 Manage and maintain the product ENWW
Page 97

9. Close the print cartridge door.
NOTE: After closing the print cartridge door,
the Ready
light and Attention light will
flash. Allow up to three minutes for the
product to calibrate.
NOTE: If replacing another print cartridge,
you must close the print cartridge door before
pressing the Cartridge
button of the next
print cartridge.
You do not need to wait for the product to
calibrate when replacing the second print
cartridge. Instead, press the Cartridge
button for the next color to rotate the carousel
into position. After you have replaced the print
cartridges, the product calibrates.
NOTE: After every other black cartridge
change, a cleaning page prints automatically
to clean the fuser. This cleaning page process
takes two minutes to complete.
10. When printing, if you receive the status alert
message Wrong Cartridge in <Color> Slot,
remove the print cartridge from the specified
slot and compare the color label on the print
cartridge to the color label in the slot to
determine the correct print cartridge for the
slot.
ENWW Manage supplies and accessories 85
Page 98

Replace the imaging drum
NOTE: The imaging drum installed in this product is covered by the product warranty. Replacement
imaging drums have a one-year limited warranty from the date of installation. The imaging drum
installation date displays on both the configuration page and on the supplies status page when the
imaging drum reaches approximately 30% of its estimated remaining life. HP's Premium Protection
Warranty applies only to the print cartridges for the product.
1. Open the print cartridge door.
2. Open the front cover.
86 Chapter 8 Manage and maintain the product ENWW
Page 99

3. Lift the two levers that hold the imaging drum.
4. Remove the old imaging drum.
5. Remove the new imaging drum from the
packaging. Place the used imaging drum in
the bag and box for recycling.
ENWW Manage supplies and accessories 87
Page 100

6. Remove the protective shielding from the new
imaging drum.
CAUTION: To prevent damage, do not
expose the imaging drum to light. Cover it
with a piece of paper.
CAUTION: Do not touch the green roller.
Fingerprints on the imaging drum can cause
print-quality problems.
7. Insert the new imaging drum in the product.
8. Lower the two levers that hold the imaging
drum.
88 Chapter 8 Manage and maintain the product ENWW
 Loading...