

Page 1
LASERJET PRO 400
Software Technical Reference
M401
Page 2

Page 3

HP LaserJet Pro 400 M401 Printer Series
Software Technical Reference
Page 4

Copyright and License
© 2012 Copyright Hewlett-Packard
Development Company, L.P.
Trademark Credits
®
, Acrobat®, and PostScript® are
Adobe
trademarks of Adobe Systems Incorporated.
Reproduction, adaptation, or translation
without prior written permission is
prohibited, except as allowed under the
copyright laws.
The information contained herein is subject
to change without notice.
The only warranties for HP products and
services are set forth in the express warranty
statements accompanying such products and
services. Nothing herein should be
construed as constituting an additional
warranty. HP shall not be liable for technical
or editorial errors or omissions contained
herein.
Edition 1, 4/2012
Apple and the Apple logo are trademarks of
Apple Computer, Inc., registered in the U.S.
and other countries. iPod is a trademark of
Apple Computer, Inc. iPod is for legal or
rightholder-authorized copying only. Don't
steal music.
Bluetooth is a trademark owned by its
proprietor and used by Hewlett-Packard
Company under license.
Java™ is a US trademark of Sun
Microsystems, Inc.
Microsoft®, Windows®, Windows® XP,
and Windows Vista® are U.S. registered
trademarks of Microsoft Corporation.
®
is a registered trademark of The
UNIX
Open Group.
Page 5

Table of contents
1 Document and product basics ........................................................................................... 1
Purpose and scope ................................................................................................................... 2
Software availability and localization ......................................................................................... 3
Printing-system software on the Web ........................................................................... 3
In-box printing-system software CD .............................................................................. 3
HP LaserJet Software CD — Windows partition .............................................. 3
CD versions and language support ............................................................... 4
Driver languages ......................................................................... 6
Installer languages ...................................................................... 7
Documentation languages ............................................................ 8
2 Windows software description and installation ............................................................... 11
Introduction ........................................................................................................................... 11
Install overview ...................................................................................................................... 12
Software installation types for Windows .................................................................... 12
Installation options .................................................................................................. 12
CD installation and HP Smart Install installation .......................................................................... 13
Supported operating systems for Windows ................................................................. 13
Installation for software components from the Web .................................................................... 13
Supported operating systems for Windows ................................................................. 13
HP LaserJet software components for Windows .......................................................................... 14
Installer .................................................................................................................. 14
Uninstaller .............................................................................................................. 14
Print drivers ............................................................................................................ 14
HP PCL 6 print driver and PS Universal Print Driver ....................................... 14
Print driver version numbers for Windows operating systems ......................... 14
HP PCL 6 print driver for Windows ............................................................. 15
Introduction .............................................................................. 15
Access print drivers ................................................................... 15
Help system .............................................................................. 17
Incompatible print settings messages ............................................ 17
ENWW iii
Page 6

Advanced tab features ............................................................... 19
Printing Shortcuts tab features ..................................................... 22
Paper/Quality tab features ......................................................... 26
Effects tab features .................................................................... 32
Finishing tab features ................................................................. 39
Services tab features .................................................................. 44
Device Settings tab features ........................................................ 45
About tab features ..................................................................... 49
Driver configuration for Windows ............................................................................. 50
Driver autoconfiguration ............................................................................ 50
Bidirectional communication ...................................................................... 51
Enterprise AutoConfiguration ..................................................................... 51
Update Now ........................................................................................... 53
HP Reconfiguration Utility ......................................................................................... 54
Font support ........................................................................................................... 54
Basic fonts ............................................................................................... 54
HP ePrint ................................................................................................................ 55
HP Update ............................................................................................................. 55
Help & Learn Center ................................................................................................ 55
Toner Cartridge Authentication ................................................................................. 56
HP Device Toolbox .................................................................................................. 57
Home tab ................................................................................................ 59
Device Status ............................................................................ 59
Supplies Status .......................................................................... 60
Device Configuration page ......................................................... 60
Network Summary page ............................................................ 61
Reports .................................................................................... 61
Event Log page ......................................................................... 62
System tab .............................................................................................. 62
Device Information page ............................................................ 63
Paper Setup page ..................................................................... 63
Print Quality page ..................................................................... 64
EcoSMART Console page ........................................................... 64
Paper Types page ..................................................................... 64
System Setup page .................................................................... 65
Service page ............................................................................ 65
Save and Restore page .............................................................. 65
Administration Page .................................................................. 66
Print tab .................................................................................................. 66
Printing .................................................................................... 66
PCL5 ....................................................................................... 66
iv ENWW
Page 7

PostScript ................................................................................. 66
Networking tab ........................................................................................ 67
Network Summary ..................................................................... 68
IPv4 Configuration .................................................................... 68
IPv6 Configuration .................................................................... 69
Wireless Configuration (wireless models only) .............................. 70
Wireless Direct Setup (wireless models only) ................................. 70
Network Identification ................................................................ 70
Advanced page ........................................................................ 71
Certificates page ....................................................................... 71
HTTPS Enforcement page ........................................................... 72
SNMP page ............................................................................. 72
HP Web Services tab ................................................................................ 73
Web Services Setup page .......................................................... 73
HP ePrint page .......................................................................... 73
Apps page ............................................................................... 74
Proxy Settings page ................................................................... 74
HP Smart Install tab .................................................................................. 74
HP Product Improvement Study .................................................................................. 74
Online product registration ....................................................................................... 76
Detailed Windows installation instructions ................................................................................. 77
Use the Recommended installation with HP Smart Install or the CD ................................ 77
Perform a custom installation with HP Smart Install or the CD ........................................ 85
Point-and Print installation ....................................................................................................... 97
Remove Windows software ..................................................................................................... 98
Use the HP Uninstall utility to remove the product software ........................................... 98
Use the software CD to remove the product software ................................................. 100
Remove the print driver by using the Windows Add or Remove Programs feature .......... 103
Remove the print driver by using the Server Properties feature ..................................... 105
3 Mac software and utilities ............................................................................................ 107
Software installation methods ................................................................................................ 108
CD installation ...................................................................................................... 108
Supported operating systems for Mac ....................................................... 108
Supported languages .............................................................................. 108
HP LaserJet software components and utilities for Mac ............................................... 108
HP LaserJet Pro 400 M401 Printer Series PPD ............................................ 109
HP LaserJet Pro 400 M401 Printer Series PDE ............................................ 109
HP USB EWS Gateway ........................................................................... 109
HP Utility for Mac ................................................................................... 109
Open the HP Utility .................................................................. 110
ENWW v
Page 8

HP Utility toolbar ..................................................................... 110
Supplies Status ........................................................................ 111
Device Information .................................................................. 112
File Upload ............................................................................ 112
HP ePrintCenter ....................................................................... 113
Test ....................................................................................... 114
Upload Fonts .......................................................................... 114
Auto-off .................................................................................. 115
Network Settings ..................................................................... 116
Supplies Management ............................................................. 117
Trays Configuration ................................................................. 118
Additional Settings .................................................................. 119
Message Center ...................................................................... 120
Supported print drivers for Mac ............................................................... 120
Priority for print settings for Mac .............................................................. 120
Install the Mac printing-system software ................................................................................... 121
General installation for Mac operating systems ......................................................... 121
Detailed Mac installation ....................................................................................... 122
Setup instructions .................................................................................................. 132
Set up a printer with a Mac ..................................................................... 132
Troubleshoot the product setup ................................................................. 133
Remove the printing-system software from Mac operating systems .............................................. 134
4 Linux and Unix ............................................................................................................. 139
Linux information .................................................................................................................. 140
Unix information .................................................................................................................. 141
5 Engineering details ....................................................................................................... 143
Introduction ......................................................................................................................... 143
Network Diagnostic Utility (NDU) ........................................................................................... 144
Printer Diagnostic Utility (PDU) ............................................................................................... 145
SAP and Citrix Printing ......................................................................................................... 146
Index ............................................................................................................................... 147
vi ENWW
Page 9

1 Document and product basics
Purpose and scope
●
Software availability and localization
●
ENWW 1
Page 10

Purpose and scope
This software technical reference (STR) provides information about and troubleshooting tips for the
printing-system software for the product.
This STR is prepared in an electronic format to serve as a quick-reference tool for Global Support
Center (GSC) agents, support engineers, system administrators, management information systems (MIS)
personnel, and end users, as appropriate.
NOTE: This STR describes drivers that are available from the product firmware and shipped on the
printing-system software CD that comes with the product. This STR does not describe drivers that will
become available on the Web.
The following information is included in this STR:
Descriptions of drivers, operating systems, and system environments
●
Descriptions of installing and uninstalling the printing-system software components
●
For information about the location of information within chapters, see the table of contents. An index is
also provided in this STR.
Additional detailed information about the printing-system software is published in an addendum to this
STR. The following information is available in the addendum:
Lists of installed files
●
System-modification information, such as files added or modified
●
2 Chapter 1 Document and product basics ENWW
Page 11

Software availability and localization
This section provides information about the availability of the product printing-system software and
related software and firmware. Printing-system software on a CD is available from HP fulfillment
centers.
Printing-system software on the Web
All software that is contained on the installation CD is also available on the Web.
Web deployment is the preferred method for obtaining the latest software. The Web site offers an
option for automatic email notification about new software releases.
NOTE: This STR describes drivers that are shipped with the printing-system software CD. This STR
does not describe any drivers that might be released for use by support personnel.
To view the product support Web site, complete the following steps.
1. In the main screen of the installer, click the More Options button, and then click the
Documentation button.
2. Click the HP Help and Learn Center button.
3. In the HP Help and Learn Center screen, click the Web Support tab, and then select the
product model number.
In-box printing-system software CD
The software CD contains a variety of files for installing the printing-system software on the computer.
This section describes the files that are available on the software CD and provides additional
information about support and availability.
The product comes with one printing-system software CD with software for both Windows operating
systems and Mac OS X operating systems.
The files on the CD include documentation files and files that are required in order to install and
uninstall the printing-system components.
NOTE: For the latest software and printer drivers, go to www.hp.com/support/ljm401series.
HP LaserJet Software CD — Windows partition
NOTE: For information about the contents of the Mac partition, see Mac software and utilities
on page 107.
The root directory of the Windows software partition contains the AUTORUN.EXE file, the SETUP.EXE
file, and the following directories:
Documents
●
ENWW
Installer
●
Installer Content
●
Software availability and localization
3
Page 12

Languages
●
Prerequisites
●
Setup
●
Utilities
●
x64
●
The Utilities folder contains the files to run these stand-alone utilities:
FileToEmail
●
LogAnalyzer.exe
●
Scrubber
●
CD versions and language support
The product printing-system software CD is available with the following components and languages.
Table 1-1 Software CD supported languages
Language Two-letter abbreviation HP-preferred name File designation
Arabic AR Arabic ARWW
Bulgarian BG Bulgarian BGWW
Catalan CA Catalan CAWW
Croatian HR Hrvatski HRWW
Czech CS Cestina CSWW
Danish DA Dansk DAWW
Dutch NL Nederlands NLWW
English EN English ENWW
Estonian ET Estonian ETWW
Farsi (Persian) FA Farsi (Persian) FAWW
Finnish FI Suomi FIWW
French FR Francais FRWW
German DE Deutsch DEWW
Greek EL Greek ELWW
Hebrew HE Hebrew HEWW
Hungarian HU Magyar HUWW
Italian IT Italiano ITWW
Japanese JA Japanese JAWW
Korean KO Korean KOWW
4 Chapter 1 Document and product basics ENWW
Page 13

Table 1-1 Software CD supported languages (continued)
Language Two-letter abbreviation HP-preferred name File designation
Latvian LV Latvian LVWW
Lithuanian LT Lithuanian LTWW
Norwegian NO Norsk NOWW
Polish PL Polski PLWW
Portuguese PT Portugues PTWW
Romanian RO Romanian ROWW
Russian RU Russian RUWW
Serbian SR Serbian SRWW
Simplified Chinese ZHCN Simplified Chinese ZHCN
Slovak SK Slovak SKWW
Slovenian SL Slovenian SLWW
Spanish ES Espanol ESWW
Swedish SV Svenska SVWW
Thai TH Thai THWW
Traditional Chinese ZHTW Traditional Chinese ZHTW
Turkish TR Turkce TRWW
Ukrainian UK Ukrainian UKWW
ENWW
Software availability and localization
5
Page 14

Driver languages
The product provides discrete driver support in the following languages.
Table 1-2 Supported discrete driver languages
Component Language list
HP PCL 6 Print Driver
●
●
●
●
●
●
●
●
●
●
●
●
●
●
●
Arabic
Bulgarian
Catalan
Croatian
Czech
Danish
Dutch
English
Estonian
Farsi
Finnish
French
German
Greek
Hebrew
Lithuanian
●
Norwegian
●
Polish
●
Portuguese
●
Romanian
●
Russian
●
Serbian
●
Simplified Chinese
●
Slovak
●
Slovenian
●
Spanish
●
Swedish
●
Thai
●
Traditional Chinese
●
Turkish
●
●
●
●
●
●
Hungarian
Italian
Japanese
Korean
Latvian
●
Ukrainian
6 Chapter 1 Document and product basics ENWW
Page 15

Installer languages
The product provides installer component support in the following languages.
Table 1-3 Installer component languages
Component Language list
Administrator install
Installer
Common Windows installer
Web registration *
Arabic
●
Bahasa Indonesian
●
Catalan
●
Croatian
●
Czech
●
Danish
●
Dutch
●
English
●
Finnish
●
French
●
German
●
Greek
●
Hebrew
●
Hungarian
●
Italian
●
Norwegian
●
Polish
●
Portuguese
●
Romanian
●
Russian
●
Simplified Chinese
●
Slovak
●
Slovenian
●
Spanish
●
Swedish
●
Thai
●
Traditional Chinese
●
Turkish
●
ENWW
Japanese
●
Korean
●
* Arabic and Hebrew support in English only
* Catalan support in Spanish only
* No support for Bulgarian, Estonian, Japanese, Kazakh, Lithuanian, Latvian, Serbian, Ukrainian, or
Vietnamese
Software availability and localization
7
Page 16

Documentation languages
The product provides documentation in the following languages.
Table 1-4 Documentation languages
Language User Guide Help and Learn
Center
ArabicXXXXX
Bahasa IndonesianXXXXX
Bulgarian X
CatalanXXXXX
CzechXXXXX
DanishXXXXX
DutchXXXXX
EnglishXXXXX
Estonian X
Farsi X
FinnishXXXXX
FrenchXXXXX
GermanXXXXX
GreekXXXXX
Warranty and
Legal Guide
Install Notes
(Windows)
Hardware
Install Guide
HebrewXXXXX
HungarianXXXXX
ItalianXXXXX
Japanese X X X
Kazakh XX X
KoreanXXXXX
Latvian X
Lithuanian X
NorwegianXXXXX
PolishXXXXX
PortugueseXXXXX
RomanianXXXXX
RussianXXXXX
Serbian X
8 Chapter 1 Document and product basics ENWW
Page 17

Table 1-4 Documentation languages (continued)
Language User Guide Help and Learn
Center
SlovakXXXXX
SlovenianXXXXX
SpanishXXXXX
SwedishXXXXX
ThaiXXXXX
TurkishXXXXX
Ukranian X
Simplified ChineseXXXXX
Traditional
Chinese
XXXXX
Warranty and
Legal Guide
Install Notes
(Windows)
Hardware
Install Guide
ENWW
Software availability and localization
9
Page 18

10 Chapter 1 Document and product basics ENWW
Page 19

2 Windows software description and
installation
Introduction
The product comes with software and installers for Microsoft Windows and Apple Computer, Inc., Mac
systems. Linux and UNIX systems are supported, and software is available on the Web. For information
about specific system installers, drivers, and components, see the section that corresponds to that
system. For information about Mac software, see
This section contains information about the following topics:
Install overview
●
Mac software and utilities on page 107.
CD installation and HP Smart Install installation
●
Installation for software components from the Web
●
HP LaserJet software components for Windows
●
Detailed Windows installation instructions
●
Point-and Print installation
●
Remove Windows software
●
ENWW
Introduction
11
Page 20

Install overview
The printing-system software CD contains the product software. The printing-system software can also
be installed when the product is connected to the computer through Smart Install.
For all supported operating systems, each install option presents a series of screens that guide you
through the installation process.
Software installation types for Windows
The following printing-system software installation types are available:
Select the recommended software (default)
●
Select the minimum software
●
Selecting Click here for more install options allows you to choose between the installation types
and allows you to view the software components that are installed with each installation type.
Installing the recommended software installs these software components:
HP Device Toolbox
●
HP Help & Learn Center
●
HP Printer Status and Alerts
●
HP Product Improvement Study
●
Reconfigure your HP Device
●
Uninstall Product Software
●
The installer guides the installation, whether you are configuring a direct-connected or a networkconnected product.
The installer additionally detects hardware and network connections, and helps guide the installation.
For example, if the installer detects an HP LaserJet Pro 400 M401 Printer Series, it automatically
configures the software connection to that product. This saves several steps. If the installer detects a
network, it also guides setting up those features.
Installation options
The printing-system software can be installed when the product is connected to the computer in the
following configurations:
Directly connected via a USB port
●
NOTE: Smart Install will begin when a USB cable is connected.
Connected via a wired or wireless network
●
12 Chapter 2 Windows software description and installation ENWW
Page 21
CD installation and HP Smart Install installation
Supported operating systems for Windows
The product comes with software for the following Windows operating systems:
Windows 7 (32-bit and 64-bit)
●
Windows Vista (32-bit and 64-bit)
●
Windows XP (32-bit, Service Pack 2)
●
Windows Server 2003 (32-bit, Service Pack 3)
●
NOTE: Basic print and scan components only
Windows Server 2008 and 2008 R2 (32-bit and 64-bit)
●
NOTE: Basic print and scan components only
Installation for software components from the Web
Supported operating systems for Windows
The product comes with software for the following Windows operating systems:
Windows 7 (32-bit and 64-bit)
●
Windows Vista (32-bit and 64-bit)
●
Windows XP (32-bit, Service Pack 2)
●
Windows Server 2003 (32-bit, Service Pack 3)
●
NOTE: Basic print and scan components only
Windows Server 2008 and 2008 R2 (32-bit and 64-bit)
●
NOTE: Basic print and scan components only
ENWW
CD installation and HP Smart Install installation
13
Page 22

HP LaserJet software components for Windows
Installer
The Installer is a Windows–only software component that provides an installer for the driver files,
connects the product to the user's computer, installs software components, launches configuration
utilities, and provides links to Web sites or documentation.
Uninstaller
The uninstall program removes files and folders that were installed when the printing-system software
was originally installed on the computer.
Print drivers
Print drivers provide the printing features and communication between the computer and the product.
The software CD includes software for end users and network administrators who are working in the
following operating environments:
Windows XP (32-bit and 64-bit), Windows Server 2003 (32-bit and 64-bit), Windows
●
Server 2008 and 2008 R2 (32-bit and 64-bit), and Windows Vista (32-bit and 64-bit), and
Windows 7 (32-bit and 64-bit)
Mac OS X v10.5 and later
●
In Windows operating systems, automatic configuration, driver updates after a new product
configuration, and preconfiguration features are available with the product.
NOTE: For additional information about installing the printing-system software, see the HP LaserJet
Pro 400 M401 Printer Series Install Notes on the printing-system software CD.
All of the drivers provide access to the paper-handling and print-quality features.
HP PCL 6 print driver and PS Universal Print Driver
Windows drivers are supported by Microsoft 32-bit and 64-bit operating systems. The HP PCL 6 driver
is included on the HP LaserJet Pro 400 M401 Printer Series printing-system software CD. The PS
Universal Print Driver is available for download at the following Web site:
www.hp.com/support/ljm401series
NOTE: If you select the recommended installation by clicking Install Now on the main screen of the
Installer, the HP PCL 6 print driver is installed by default.
Print driver version numbers for Windows operating systems
Access to print driver version numbers varies, depending on the operating system in which the product
is installed.
14 Chapter 2 Windows software description and installation ENWW
Page 23

NOTE: For a list of HP LaserJet Pro 400 M401 print drivers, updated HP printing-system software,
and product-support information, go to:
www.hp.com/support/ljm401series
The Windows XP, Windows Server 2003, Windows Server 2008 and 2008 R2, Windows Vista, and
Windows 7 operating systems support the HP PCL 6, PCL 5 Universal Print Driver, and PS Emulation
Universal Print Drivers. If you are using an HP print driver in a Windows environment, follow these
steps to find driver-version information:
1. Depending on your operating system, click the Start button and then do one of the following to
find the list of installed printers:
Click Devices and Printers or Printers and Faxes
●
Click Control Panel and then click Printers, or first click Hardware and Sound, and
●
then click Printers
Click Settings, and then click Printers or Printers and Faxes
●
2. Right-click the product icon.
3. Click Printer Properties.
4. Click the About tab.
You can also gain information about driver versions by clicking the About button that appears on most
driver tabs.
HP PCL 6 print driver for Windows
Introduction
You can change the print job settings through the product control panel, the software program, or the
print driver.
Generally, for features that are duplicated in more than one location (for instance, you can select the
paper input tray from any of them), settings that are established in the software program take
precedence over print driver settings. Print driver settings, in turn, override product control-panel
settings.
Access print drivers
Depending on the operating system on which you are installing the print drivers, you can gain access
to the print drivers and different print-driver interfaces in several ways.
To gain access to the print driver settings from within most software programs, follow these steps:
1. Click the File menu.
ENWW
2. Click the Print item.
3. Click the Properties button.
HP LaserJet software components for Windows
15
Page 24

The appearance and names of the driver tabs can vary, depending on the operating system. These
driver settings apply only while that software program is open.
You can control the drivers directly from the Printers folder. Here you have access to two sets of driver
tabs: the Printing Preferences tabs and the Properties tabs. The settings that you make on the
Printing Preferences driver tabs control the driver default settings for each user profile. Installable
options can be configured in Properties driver tabs.
Printing Preferences driver tabs
The Printing Preferences driver tabs change the default settings that are used across all software
programs. To gain access to these tabs, follow these steps:
1. Depending on your operating system, click the Start button and then do one of the following to
find the list of installed printers:
Click Devices and Printers or Printers and Faxes
●
Click Control Panel and then click Printers, or first click Hardware and Sound, and
●
then click Printers
Click Settings, and then click Printers or Printers and Faxes
●
2. Right-click the product icon.
3. Click the Printing Preferences item.
The following Printing Preferences print-driver tabs are available:
Advanced
●
Printing Shortcuts
●
Paper/Quality
●
Effects
●
Finishing
●
Services
●
16 Chapter 2 Windows software description and installation ENWW
Page 25

Printer Properties driver tabs
This set of tabs controls the driver behavior and driver connections. To gain access to the Printer
Properties tabs, follow these steps:
1. Depending on your operating system, click the Start button and then do one of the following to
find the list of installed printers:
Click Devices and Printers or Printers and Faxes
●
Click Control Panel and then click Printers, or first click Hardware and Sound, and
●
then click Printers
Click Settings, and then click Printers or Printers and Faxes
●
2. Right-click the product icon.
3. Click the Properties or Printer Properties item.
The following Printer Properties print-driver tabs are available:
General
●
Sharing
●
Ports
●
Advanced
●
Security
●
Device Settings
●
About
●
Help system
The HP PCL 6 print driver includes a full-featured Help system to provide assistance with printing and
configuration options.
Right-click a feature or control. A pop-up Help window appears.
●
Click a feature or control, and then press the F1 key. The Help window for the currently selected
●
control appears.
Incompatible print settings messages
Incompatible print settings (constraint) messages are unsolicited messages that appear in response to
specific print-driver selections. These messages alert you to selections that are illogical or impossible
given the product capabilities or the current settings of other controls.
NOTE: Constraint messages are limited, and the underlying software architecture might accept some
settings that are illogical or impossible for the product to perform. Sending a job with incompatible
settings can lead to unexpected results. If print jobs do not print as expected, check the product
documentation for the product capabilities.
ENWW
HP LaserJet software components for Windows
17
Page 26
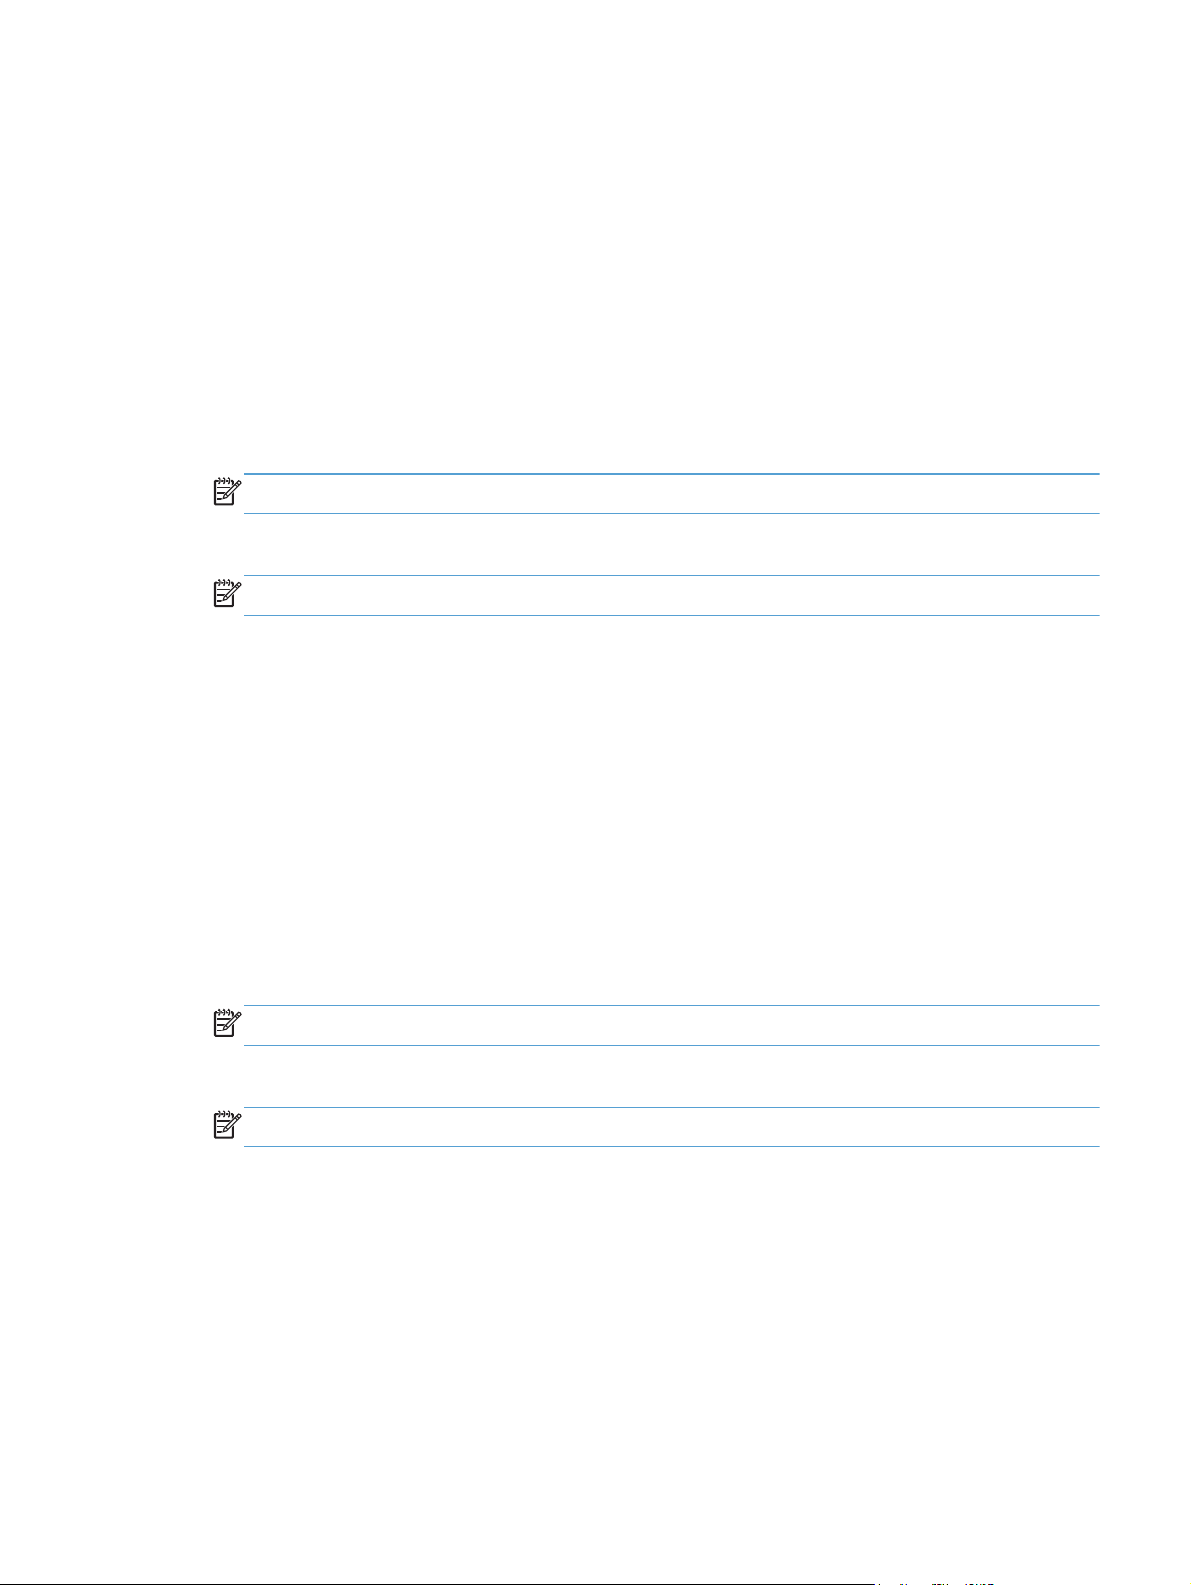
In supported Windows operating environments, some technically invalid print-driver configurations
result in warning messages. For example, duplexing is not possible when printing an envelope. The
following figure shows an incompatible print settings warning.
Figure 2-1 Incompatible print settings warning
If you click the OK button, the Incompatible Print Settings dialog appears.
Figure 2-2 Incompatible Print Settings dialog
To resolve the conflicting settings, click the Restore my previous settings option, and then click the
OK button. The driver resets the conflicting control back to its previous state.
18 Chapter 2 Windows software description and installation ENWW
Page 27

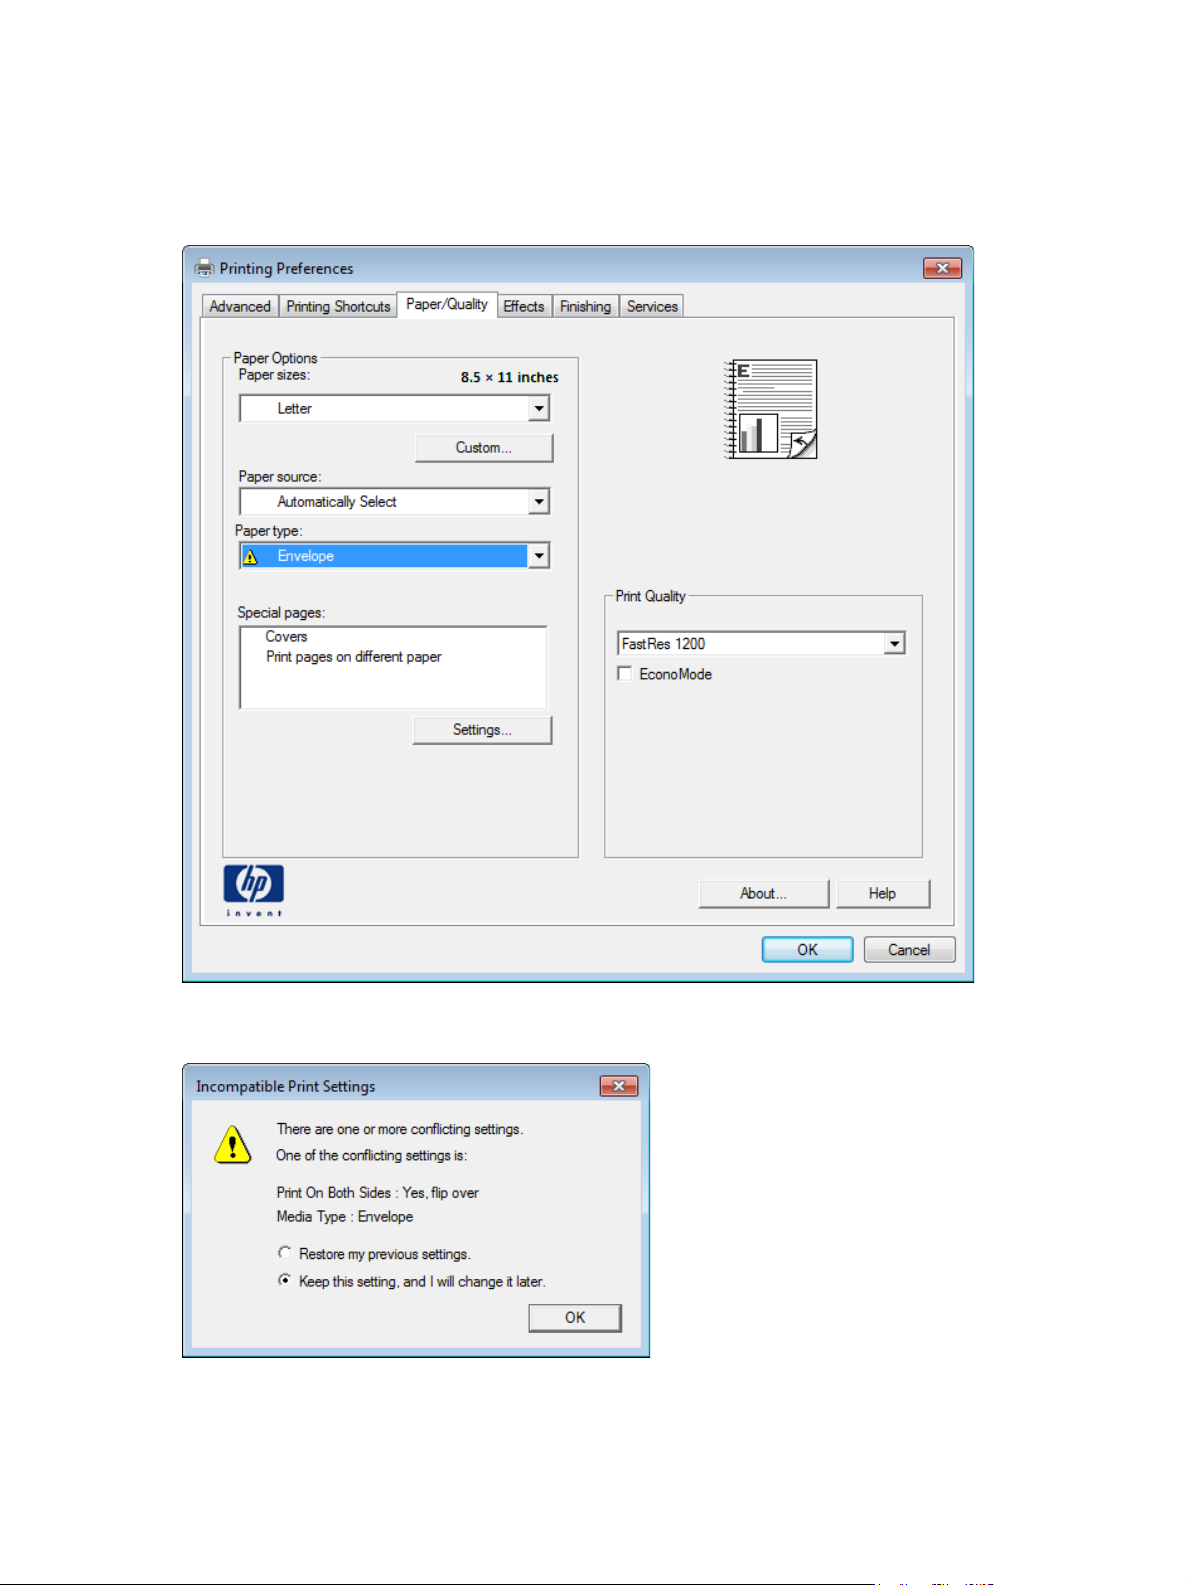
If you want to keep the conflicting setting, click the Keep this setting, and I will change it later
option, and then click the OK button.
NOTE: In this example, the conflict can be resolved manually. If the conflict is not resolved when the
driver is closed, then the same dialog appears again when a print job is sent to the product.
Advanced tab features
NOTE: The Advanced tab is located on the Printing Preferences tab set. For information about
how to access these tabs, see
Use the Advanced tab to change the layout of printed pages. Use this tab to configure special
controls that are not commonly used, as well as to control features such as collating and font
management in the driver (although most current software programs support these features in the print
dialog box or through the page settings in the software program). The following figure shows the
Advanced tab.
Figure 2-3 Advanced tab
Printing Preferences driver tabs on page 16,
ENWW
The Advanced tab contains the following controls:
Graphic
●
Document Options
●
HP LaserJet software components for Windows
19
Page 28

Graphic
The Graphic setting contains the following controls:
True Type Font settings
●
True Type Font
Use the Substitute with Device Font option (the default setting) to print documents that contain
TrueType fonts by using equivalent printer fonts. This permits faster printing; however, you might lose
special characters that the equivalent printer font does not support. Select the Download as
Softfont option to download TrueType fonts for printing instead of using printer fonts.
Document Options
The Document Options setting contains the following controls:
Advanced Printing Features
●
Printer Features
●
Layout Options
●
Advanced Printing Features
When the Advanced Printing Features setting is Enabled, metafile spooling is turned on and
Finishing tab options such as Page Order, Booklet Layout, and Pages per Sheet are
available, depending on the product.
Enhanced metafile spooling is used to greatly reduce the amount of time that elapses between a request
to print (initiated by a software program) and the return of control to the software program by the
operating system.
For normal printing, leave the Advanced Printing Features setting at the default (Enabled). If
compatibility problems occur, you can disable the feature. However, some advanced printing features
might still appear in the print driver, even though they have been disabled. If you select an advanced
printing feature in the print driver that has been disabled on the Advanced tab, the feature is
automatically re-enabled.
20 Chapter 2 Windows software description and installation ENWW
Page 29

Printer Features
The Printer Features setting contains the following controls:
Print All Text as Black
●
The feature is Disabled by default. When Enabled is selected, the driver prints all text as black
regardless of the original document text color. Color text is printed as black, except for white text,
which remains white. (White text is a reliable method of printing reverse typeface against a dark
background.) This setting does not affect graphic images on the page, nor does it affect any text
that is part of a graphic.
Send True Type as Bitmap
●
Send True Type as Bitmap provides an alternative for software programs that have trouble
using TrueType fonts for special graphic aspects such as shading, rotation, or slanting. The setting
is Disabled (off) by default. The TrueType fonts are converted to bitmap soft fonts before
downloading. The Enabled setting causes the driver to send TrueType fonts to the product as
outlines, which retains the standard format (outline) of the fonts.
Raster Compression
●
Use the Raster Compression feature to select the graphics-compression method:
◦
Automatic. The software determines the best compression method to use.
◦
◦
Print Data Optimization
●
When selected, this feature allows the print job to use the host memory to ensure quick and highquality printing. The print speed increases without any print quality degradation.
When this option is selected, you must use one of the following settings:
◦
◦
◦
Layout Options
The Layout Options setting contains the Page Order setting.
Page Order specifies the order in which the pages of your document are printed. Front to Back
prints the document so that page 1 prints first. Back to Front prints the document so that page 1
prints last.
Best Quality. This option forces the software to use a lossless compression method.
(Lossless means that no data is lost during compression.)
Maximum Compression. Where applicable, this option requires the software to always
use a lossy compression method (some data is lost).
Auto (the default setting)
Optimize for Raster
Optimize for Text and Vector
ENWW
NOTE: The page-ordering operation works on whole sheets of paper rather than on individual logical
pages. Accordingly, if you set Pages per Sheet (on the Finishing tab) to be greater than one, the
ordering of logical pages on a physical sheet of paper does not change.
HP LaserJet software components for Windows
21
Page 30
Printing Shortcuts tab features
Use defined printing shortcuts
●
Create a custom printing shortcut
●
NOTE: The Printing Shortcuts tab is located on the Printing Preferences tab set. For
information about how to access these tabs, see
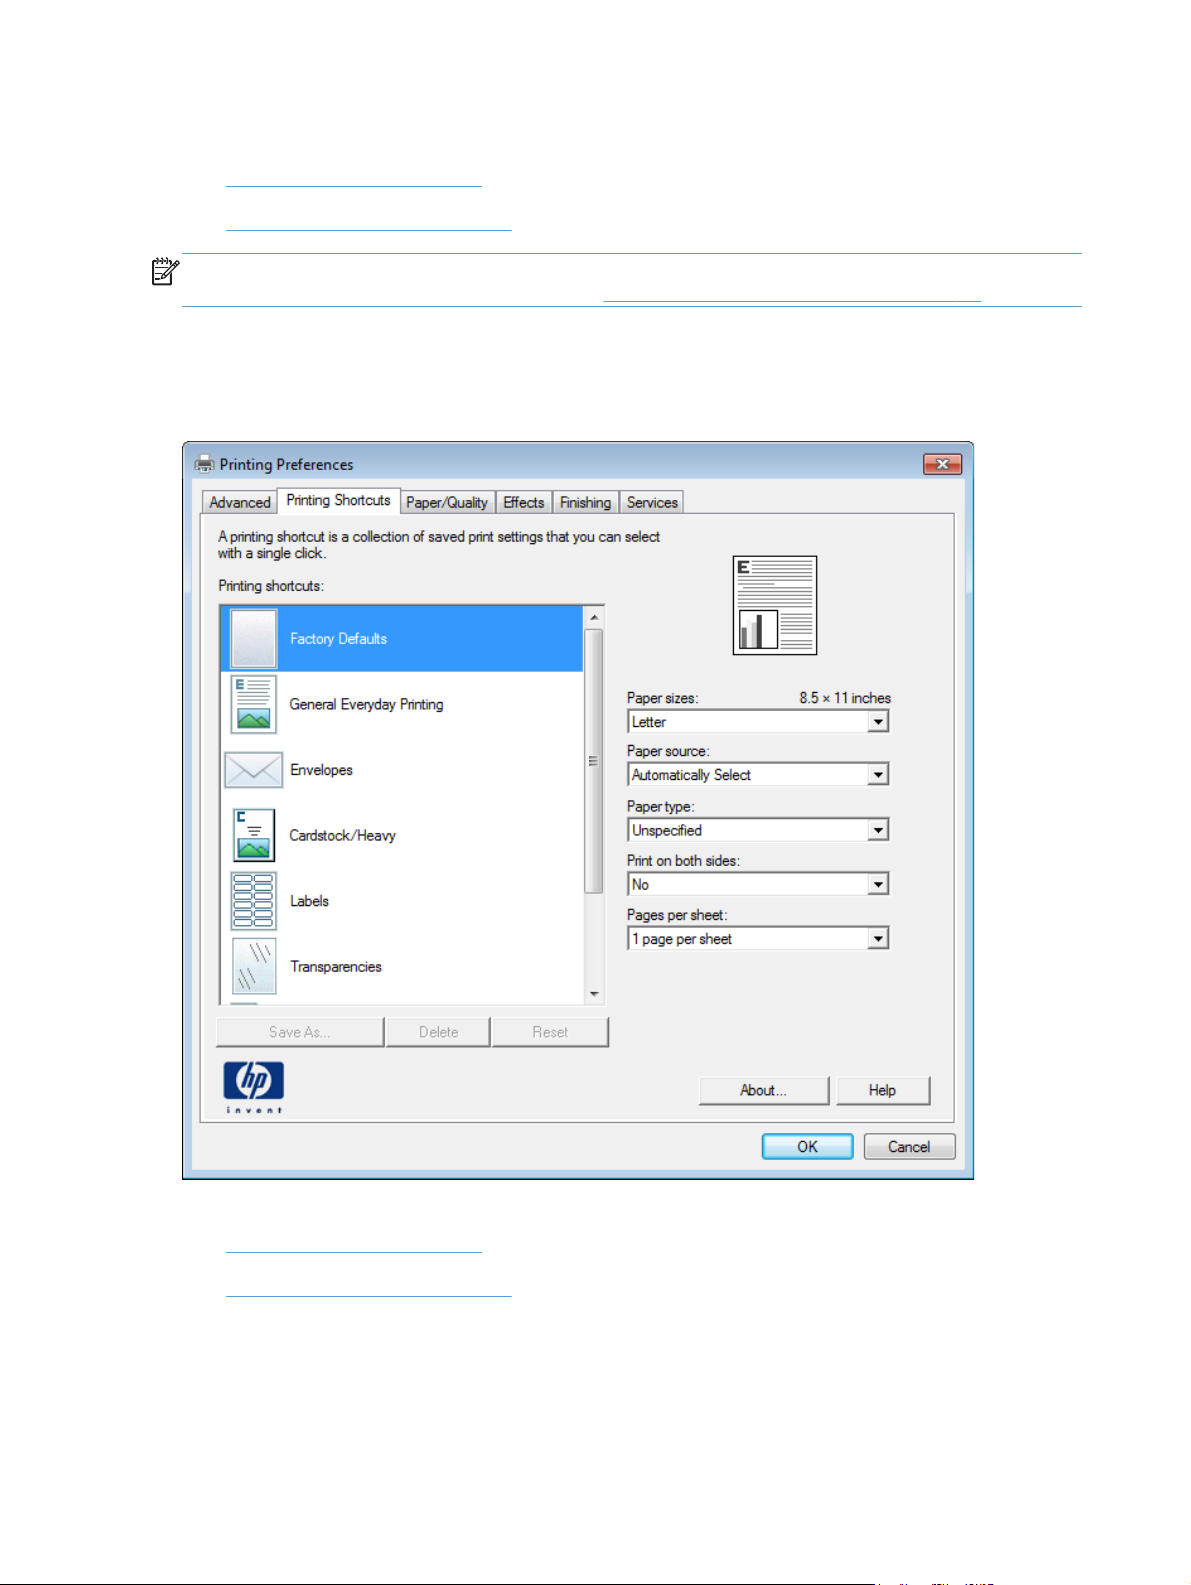
Use the Printing Shortcuts tab to store specific combinations of driver settings for easy use.
The following figure shows the Printing Shortcuts tab.
Figure 2-4 Printing Shortcuts tab
Printing Preferences driver tabs on page 16,
The Printing Shortcuts tab saves commonly used driver settings under a shortcut name.
Use defined printing shortcuts
●
Create a custom printing shortcut
●
Use defined printing shortcuts
The Printing Shortcuts tab contains the following pre-defined shortcuts:
22 Chapter 2 Windows software description and installation ENWW
Page 31

Factory Defaults
●
General Everyday Printing
●
Envelopes
●
Cardstock Heavy
●
Labels
●
Transparencies
●
EcoSMART Settings
●
Booklet Printing
●
Factory Defaults
The Factory Defaults are as follows:
Paper sizes: Letter (This setting changes according to country/region.)
●
Paper source: Automatically Select
●
Paper type: Unspecified
●
Print on both sides: No
●
Pages per sheet: 1 page per sheet
●
General Everyday Printing
When General Everyday Printing is selected, the following controls are available:
Paper sizes: Letter (This setting changes according to country/region.)
●
Paper source: Automatically Select
●
Paper type: Unspecified
●
Print on both sides: No
●
Pages per sheet: 1 page per sheet
●
When options other than the defaults are selected, the Save as... and Reset buttons become active.
Click Save As... to create a custom printing shortcut.
Click Reset to change customized settings back to the default settings.
Paper sizes
ENWW
The Paper sizes setting is a drop-down menu that lists all of the supported paper sizes. For detailed
information on the supported paper sizes, see the user guide.
HP LaserJet software components for Windows
23
Page 32

Paper source
The following options are available:
Automatically Select (default)
●
Printer auto select
●
Manual Feed in Tray 1
●
Tray 1
●
Tray 2
●
Paper type
The Paper type setting is a drop-down menu that lists all of the supported paper types. For detailed
information on the supported paper types, see the user guide.
Print on both sides
The following options are available:
No (default)
●
Yes, flip over
●
Yes, flip up
●
Pages per sheet
The following options are available:
1 page per sheet (default)
●
2 pages per sheet
●
4 pages per sheet
●
6 pages per sheet
●
9 pages per sheet
●
16 pages per sheet
●
Envelopes
These settings are automatically selected:
Paper sizes: Envelope #10
●
Paper source: Automatically Select
●
Paper type: Envelope
●
24 Chapter 2 Windows software description and installation ENWW
Page 33

Cardstock Heavy
These settings are automatically selected:
Paper sizes: Letter (This setting changes according to country/region.)
●
Paper source: Automatically Select
●
Paper type: Unspecified
●
Print on both sides: No
●
Labels
These settings are automatically selected:
Paper sizes: Letter (This setting changes according to country/region.)
●
Paper source: Automatically Select
●
Paper type: Labels
●
Transparencies
These settings are automatically selected:
Paper sizes: Letter (This setting changes according to country/region.)
●
Paper source: Automatically Select
●
Paper type: Monochrome Laser Transparency
●
EcoSMART Settings
Paper sizes: Letter (This setting changes according to country/region.)
●
Paper source: Automatically Select
●
Paper type: Unspecified
●
Print on both sides: Yes, flip over
●
Pages per sheet: 1 page per sheet
●
Booklet Printing
Paper sizes: Letter (This setting changes according to country/region.)
●
Paper source: Automatically Select
●
Paper type: Unspecified
●
ENWW
Booklet Layout: Left binding
●
HP LaserJet software components for Windows
25
Page 34

Create a custom printing shortcut
1. Select General Everyday Printing as a base.
2. Select the appropriate print settings on the Printing Shortcuts tab or use the settings on any of
the Printing Preferences tabs.
3. On the Printing Shortcuts tab, click Save As.... The Printing Shortcuts dialog box
appears.
4. Type a name for the custom printing shortcut, and then click the OK button. The custom printing
shortcut appears in the Printing Shortcuts list.
5. To delete a custom printing shortcut, click the custom shortcut, and then click the Delete button.
Paper/Quality tab features
NOTE: The Paper/Quality tab is located on the Printing Preferences tab set. For information
about how to access these tabs, see
Use the Paper/Quality tab to specify paper size, type, and source. You can also use this tab to
specify different paper selections for the front cover, first page, other pages, last page, and back cover
of the document. The following figure shows the Paper/Quality tab.
Printing Preferences driver tabs on page 16,
26 Chapter 2 Windows software description and installation ENWW
Page 35
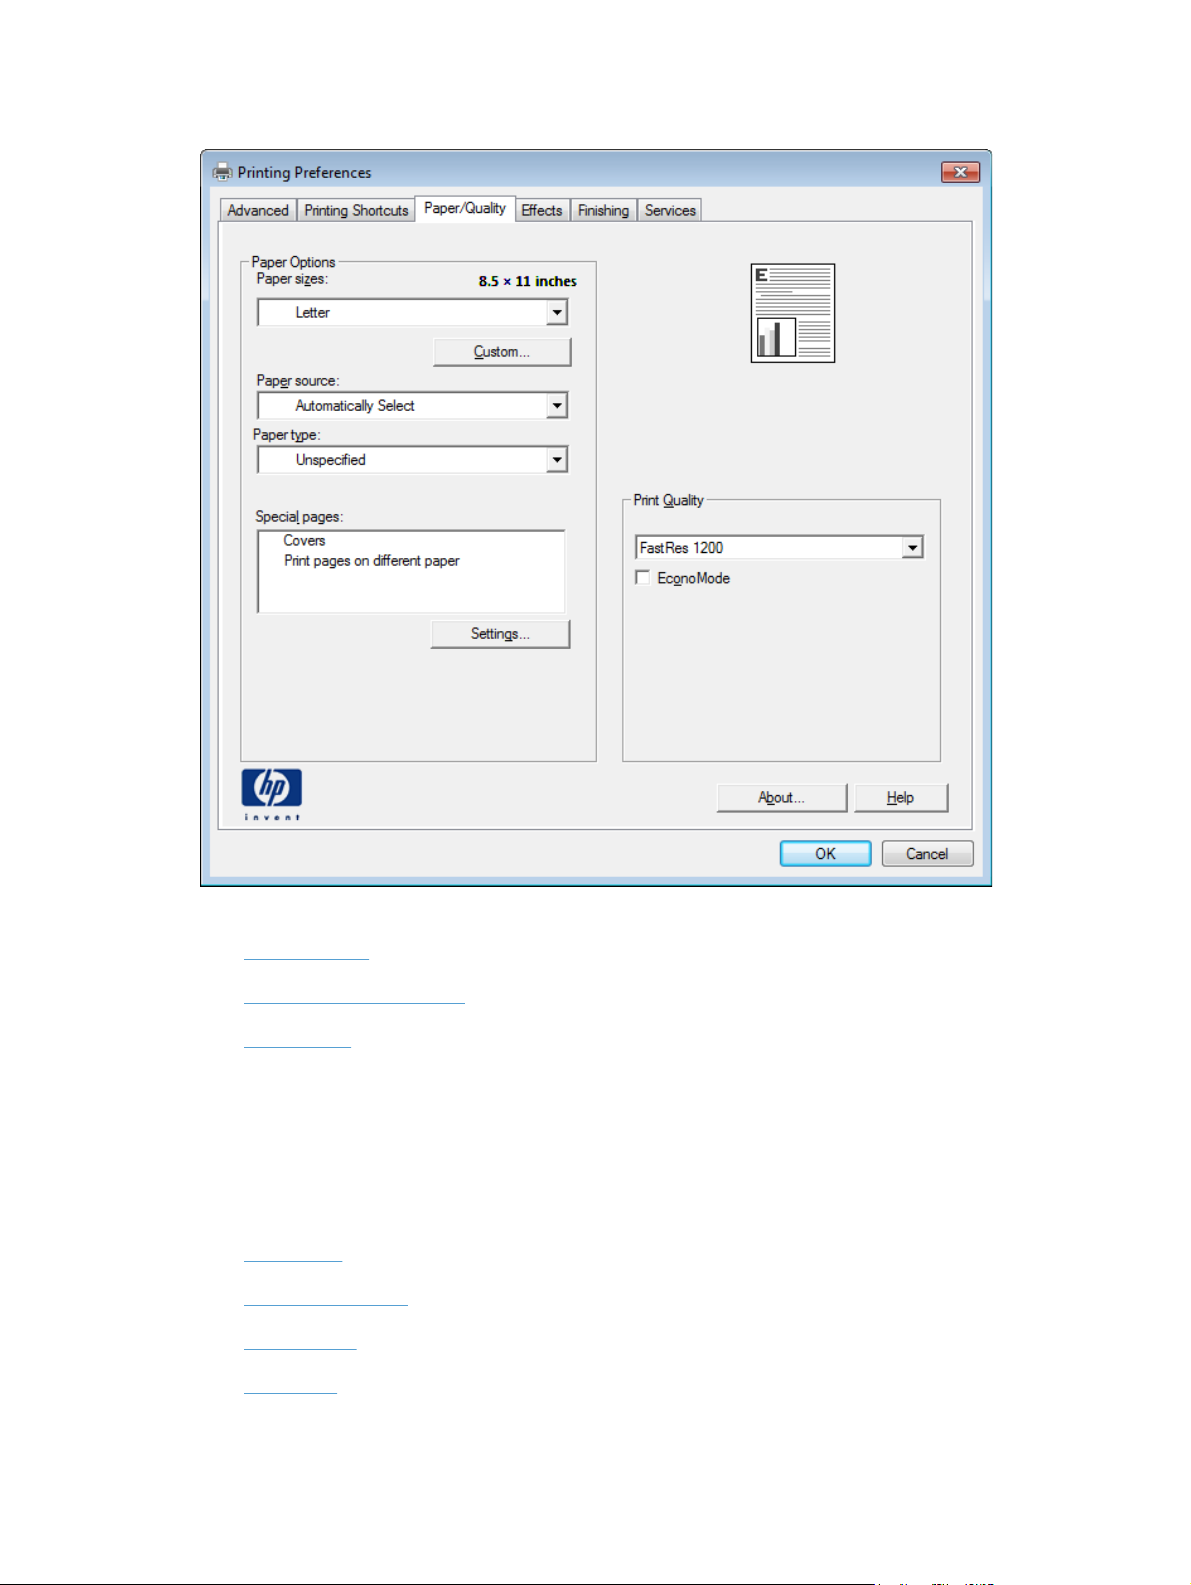
Figure 2-5 Paper/Quality tab
The Paper/Quality tab contains the following control sets:
●
●
●
Paper Options
The settings specified in the Paper Options group box on the Paper/Quality tab apply to all of the
pages of the document.
The settings in the Paper Options group box are described in the following order:
●
●
●
●
Paper Options
Document preview image
Print Quality
Paper sizes
Custom Paper Size
Paper source
Paper type
ENWW
HP LaserJet software components for Windows
27
Page 36

●
Paper sizes
The Paper sizes setting is a drop-down menu that lists all of the supported paper sizes.
When you move the mouse over the dimensions label, the mouse cursor changes from an arrow to a
gloved hand. Click the dimensions label to toggle between English and metric units.
Because paper-size settings in most software programs override driver settings, it is generally best to
use the driver to set paper size only when you are printing from software programs that do not include
a paper-size setting, such as NotePad, or when you are producing a book or a booklet that does not
require different paper sizes.
NOTE: Certain software programs can override the size command and specify different paper sizes
within a single document.
When you change the print-driver setting to a paper size that is not currently loaded in the product, a
control-panel message appears that prompts you to load the paper size or select another tray.
When the Settings under the Special Pages section have been changed, the Paper sizes, Paper
source, and Paper type menus change also, offering a variety of options. For more information, see
Special pages on page 30.
Special pages
Custom Paper Size
The Custom Paper Size dialog box appears when you click Custom… on the Paper/Quality
tab. The following figure shows the initial appearance of the Custom Paper Size dialog box.
NOTE: The HP LaserJet Pro 400 M401 Printer Series product supports custom paper sizes from 3
inches to 8.5 inches in width and 5 inches to 14 inches in length. To use this paper size, set the custom
paper size to match the custom paper size that you are using.
Name
Use the Name text box to type a new name for a custom paper size. When you change the name to
something other than Custom, the Save and OK buttons become active.
The name that appears in the Name text box depends on the following conditions:
If a saved custom paper size has been selected from the drop-down menu on the Paper/Quality
●
tab, then the Name text box shows the name of the selected custom paper size.
If a standard paper size has been selected on the Paper/Quality tab, then the Name text box
●
shows the default name of Custom .
If a new name has been typed into the Name text box for the purpose of saving a new size or
●
renaming an existing size, then that new name will remain in the text box until the new size is
saved or the dialog box is closed.
If you type a new name into the Name text box, but then do not click Save, you can change the
width and height values without losing the name. However, if you close the dialog box without clicking
Save, any unsaved name or size values are lost without warning.
28 Chapter 2 Windows software description and installation ENWW
Page 37

Paper size
The width and height values can be changed by typing numeric strings into the edit boxes in the
Paper Size group box.
Any entry that is greater than the maximum limits of the width and height control is rounded down to
the maximum valid entry, while any entry that is smaller than the minimum limits of the width and height
control is rounded up to the minimum valid entry.
If units are in millimeters, the custom paper-size range minimum is the limit rounded up to the nearest
whole millimeter. The custom paper-size range maximum is the limit rounded down to the nearest whole
millimeter. Any non-numerical entry reverts to the minimum value. Width and height entries are
validated when the focus has changed.
The resolution of each control is 1 millimeter or 1/10 of an inch, depending on the current
measurement units.
NOTE: If the paper size is not physically supported by the product, the driver will scale the page
data down to a size that will fit on a letter size paper.
Units
To change measurement units, click one of the options in the Units group box (either Inches or
Millimeters).
Custom width and height control limits
The minimum paper size for the product is 76 x 127 mm (3 x 5 in) and the maximum is 215.90 x
355.60 mm (8.50 x 14.00 in).
Paper source
The Paper source setting specifies the source tray to use for printing a document. The list of source
trays depends on the product accessories that are installed. Any optional source trays that are installed
through the Device Settings tab also appear here.
The Paper source drop-down menu can contain the following options, depending on what has been
installed on the product:
Automatically select
●
Printer auto select
●
Manual Feed in Tray 1
●
Tray 1
●
Tray 2
●
The default setting is Automatically Select. When this setting is selected, the product uses the source
tray that supports the paper size that you have selected. If you select a source tray other than
Automatically select, make sure that the correct paper size is loaded in the source tray.
ENWW
HP LaserJet software components for Windows
29
Page 38

Paper type
The Paper type drop-down menu shows the first few paper types that the product supports and an
entry for More. Clicking More opens the Type Is dialog box. Click the + next to Type Is and its
subcategories to view all of the paper types that the product supports. For detailed information on the
supported paper types, see the user guide.
The default setting is Unspecified.
No mechanism exists for manually adding custom paper types through the driver. Use HP Web
Jetadmin to add custom paper types. Custom types can be added only by using bidirectional
communication, so they must already exist in the product when the bidirectional query occurs. If
bidirectional communication is enabled, then an updated list of paper types is returned. If bidirectional
communication is not enabled, then the driver looks for custom paper types that have been saved from
a previous bidirectional communication query, and uses those. Otherwise, no custom paper types are
available through the driver.
NOTE: To download a current version of HP Web Jetamin and for the latest list of supported host
systems, go to the following Web site:
www.hp.com/go/webjetadmin
If you select a setting other than the default, make sure that the correct paper type is loaded in the tray
that you selected in the Paper source setting.
When you change the print-driver setting to a paper type that is not currently loaded in the product, a
control-panel message appears that prompts you to load the paper type or select another tray.
Special pages
To specify special pages to be used, click the Settings button under the Special Pages list.
Covers
To use specific cover settings, click the Covers item in the Special Pages list.
Use the Covers options to include a blank or preprinted cover on a document, or to include a front/
back cover from a source tray that is different from the one used for the remainder of the document.
The following are the Covers options:
●
●
●
Add a blank or preprinted cover: Select which cover is customized: Front, Back, or Both.
Paper source: The Paper source setting specifies the source tray to use for adding a front
and/or back cover to the document. The list of source trays depends on the accessories that are
installed. Any optional trays that are installed through the Device Settings tab also appear here.
Paper type: The Paper type setting specifies the paper size to use for front and/or back
covers. Changes made to the Paper type setting here override any previous Paper type
settings using the same paper source.
NOTE: The same size of paper will be used for the entire print job.
When you change the type and source of the paper and covers, the settings remain configured until
you close the software program.
30 Chapter 2 Windows software description and installation ENWW
Page 39

Print pages on different paper
Use the Print pages on different paper options to select an alternative paper type or source for
the first, last, or other pages of a document.
The following are the Print pages on different paper options:
Pages in document. Select which pages are customized: the First page, the Last page, or
●
specify a page range with the Pages option.
Paper source: The Paper source setting specifies the source tray to use for printing a
●
document. The list of source trays depends on the accessories that are installed. Any optional trays
that are installed through the Device Settings tab also appear here.
Paper type: The Paper type drop-down menu shows all of the paper types that the HP LaserJet
●
Pro 400 M401 Printer Series supports.
NOTE: The same type of paper is used for the entire print job.
When you change the type and source of the paper and covers, the settings remain configured until
you close the software program.
Document preview image
The document preview image is a line-drawn image of a page that represents graphics and text. The
document preview image is always oriented so that the contents of the page are right-side-up. The
document preview image appears in the upper-right corner of the following Printing Preferences
driver tabs:
Printing Shortcuts
●
Paper/Quality
●
Effects
●
Finishing
●
Switching between tabs does not change the location or appearance of the document preview image.
When you move the mouse over the document preview image, the mouse cursor changes from an
arrow to a gloved hand. You can toggle between portrait and landscape page orientation by clicking
the image.
Print Quality
The Print Quality group box contains the following control:
Print Quality drop down menu
●
EconoMode
●
Print Quality drop down menu
Use this control to select print quality. ImageREt settings precisely control colors by combining up to 4
colors and varying the amount of toner in a given area to create many smooth colors, sharp images,
and crisp text.
ENWW
HP LaserJet software components for Windows
31
Page 40

The Print Quality drop-down menu contains the following resolution options.
600 dpi
●
FastRes 1200 (the default setting)
●
ProRes 1200 (180 lpi)
●
ProRes 1200 (132 lpi)
●
EconoMode
Select the EconoMode check box to enable this feature. When this feature is turned on, the product
uses less toner on each page, extending the life of the toner cartridge and reducing the cost per page.
Because less toner is used on each page, the print quality is also reduced.
The default setting for the EconoMode option is off (not selected).
NOTE: HP does not recommend the full-time use of EconoMode. If EconoMode is used full-time,
the toner supply might outlast the mechanical parts in the toner cartridge. If print quality begins to
degrade and is no longer acceptable, consider replacing the toner cartridge.
Effects tab features
NOTE: The Effects tab is located on the Printing Preferences tab set. For information about how
to access these tabs, see
Printing Preferences driver tabs on page 16,
Use the Effects tab to create unique paper effects such as scaling and watermarks. The following
figure shows the Effects tab.
32 Chapter 2 Windows software description and installation ENWW
Page 41
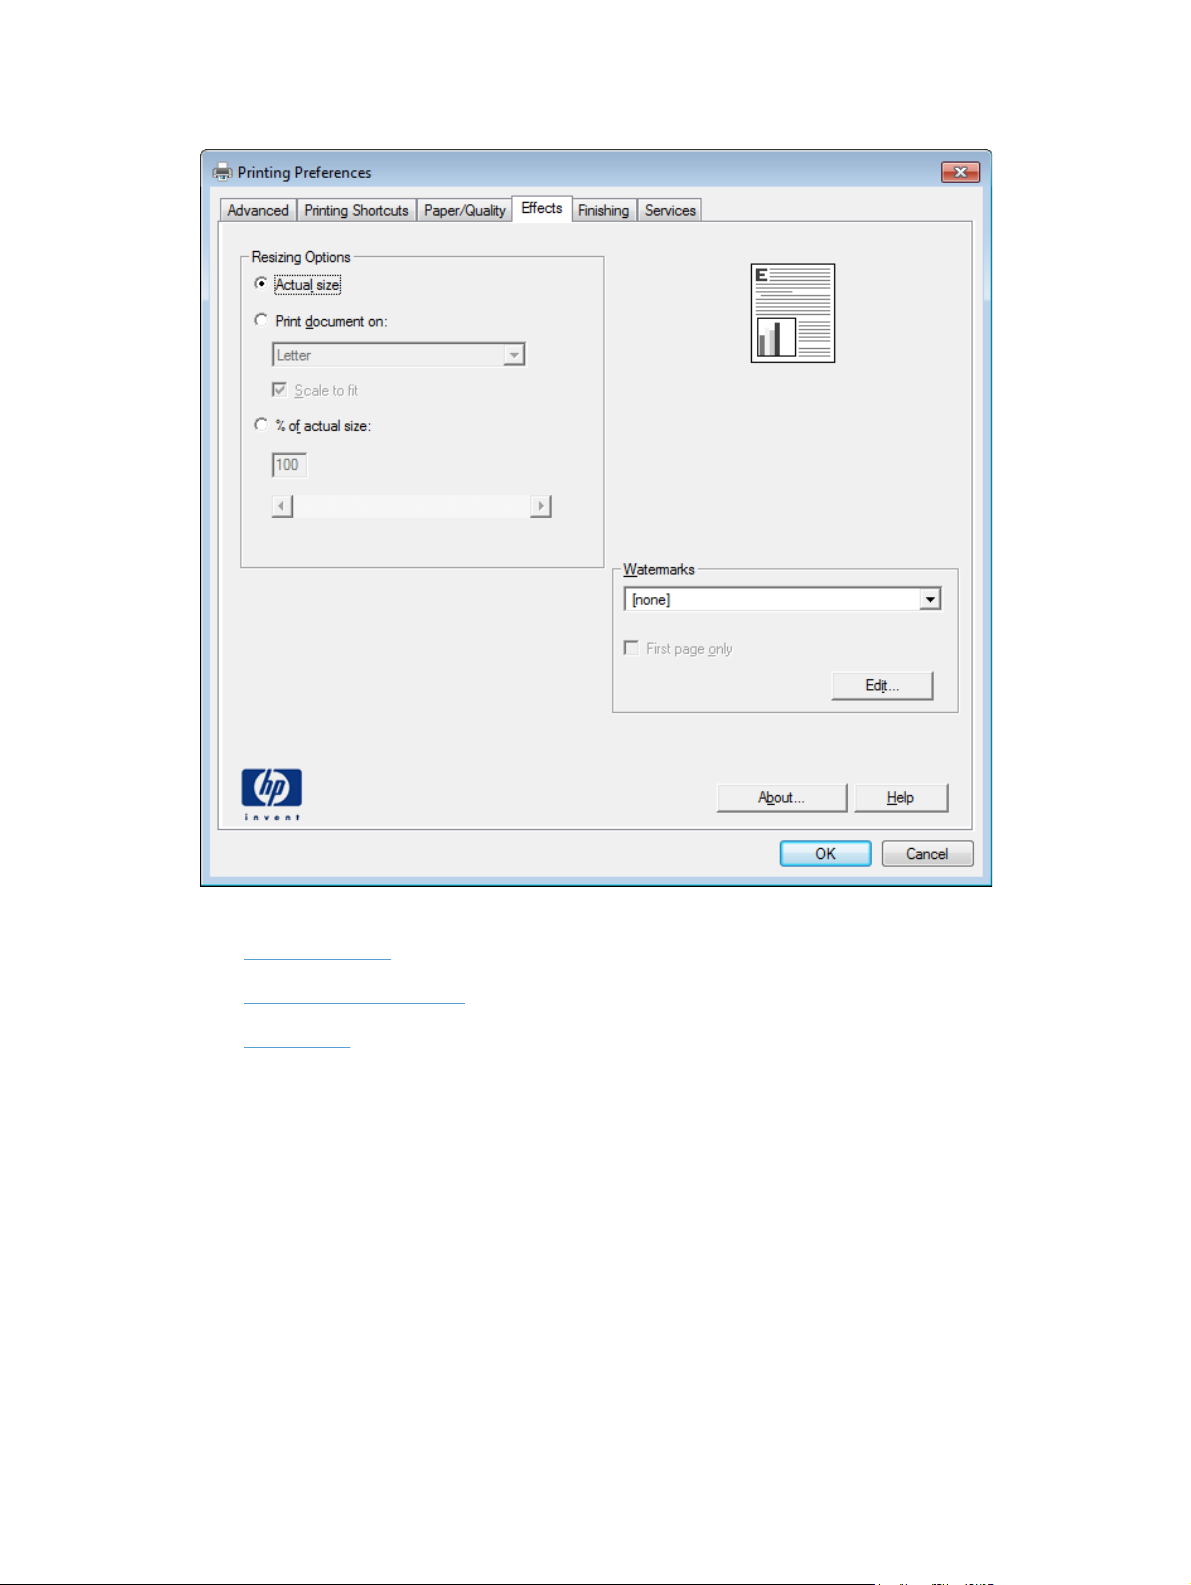
Figure 2-6 Effects tab
The Effects tab contains the following controls:
Resizing Options
●
Document preview image
●
Watermarks
●
Resizing Options
The Resizing Options group box consists of the following controls:
Actual size (default)
●
Print document on
●
Scale to fit
●
% of actual size
●
Actual size
Actual size is the default setting. It prints the document without changing the document size.
ENWW
HP LaserJet software components for Windows
33
Page 42

Print document on
Click the Print document on option to format the document for one paper size and then print the
document on a different paper size, with or without scaling the image to fit the new paper size.
The Print document on control is disabled by either of the following conditions:
The % of actual size value is not 100.
●
The Pages per sheet value (on the Finishing tab) is not 1.
●
When Print Document On is selected, the drop-down menu shows the paper sizes on which you
can print. The list contains all of the standard paper sizes that the selected paper source supports and
any custom sizes that you have created. When Print document on is selected, Scale to fit is
automatically selected. Clear this check box if you do not want your document reduced or enlarged to
fit on the selected paper.
Scale to fit
The Scale to fit option box specifies whether each formatted document page image is scaled to fit the
target paper size. By default, Scale to fit is selected when Print document on is selected. If the
setting is turned off, then the document page images will not be scaled, and are instead centered at full
size on the target paper. If the document size is larger than the target paper size, then the document
image is clipped. If it is smaller, then it is centered within the target paper.
When the size for which the document is formatted (that is, the logical size) differs from the target size,
the preview image uses a dashed gray line to show the boundaries of the logical page in relation to
the target paper size.
% of actual size
The % of actual size option provides a slider bar and input box to use for scaling the percentage
setting. The default setting in the entry box is 100% of actual size. Actual size is defined as the paper
size that is selected within the driver or what the driver receives from the software program (if the
software program does not negotiate the paper size with the driver). The driver scales the page by the
appropriate factor and sends it to the product.
The limits of the range are from 25% to 400%, and any values outside the range are adjusted to those
limits as soon as the focus is removed from the control (that is, when the Tab key is pressed or another
control is selected).
Any change to the scale also changes the page preview, which increases or decreases from the upperleft corner of the preview.
The slider bar controls the scale directly. The value in the edit box changes as the slider-bar indicator is
dragged, and the document preview image is updated to the new image scale. Each click on the
arrows increases or decreases the scale by 1%. Each click on the slider bar affects the scale by 10%.
You cannot achieve an exact value by dragging the slider-bar indicator. Instead, either use the sliderbar indicator to approximate the value that you want and then use the arrows to refine the value, or
type the value into the entry box.
34 Chapter 2 Windows software description and installation ENWW
Page 43

The following settings disable % of actual size:
Print document on (on the Effects tab) is selected
●
Pages per sheet (on the Finishing tab) is not 1
●
Document preview image
The document preview image is a line-drawn image of a page that represents graphics and text. The
document preview image is always oriented so that the contents of the page are right-side-up. The
document preview image appears in the upper-right corner of the following Printing Preferences driver
tabs:
Printing Shortcuts
●
Paper/Quality
●
Effects
●
Finishing
●
Switching between tabs does not change the location or appearance of the document preview image.
When you move the mouse over the document preview image, the mouse cursor changes from an
arrow to a gloved hand. You can toggle between portrait and landscape page orientation by clicking
the image.
Watermarks
Use the Watermarks feature to select a watermark, create a new watermark (text only), or edit an
existing watermark. The following watermarks are preset in the driver:
●
●
●
●
●
The Watermarks feature can be configured using the Driver Configuration Utility.
If the [Username] watermark is selected, the driver will use the network username of the logged in
user for the watermark.
The drop-down menu shows alphabetically sorted watermarks that are currently available on the
system, plus the string "(none)," which indicates that no watermark is selected. This is the default
setting. Any watermark that is selected from this list appears in the preview image.
When the First page only check box is selected, the watermark is printed only on the first page of
the document. The First page only check box is disabled when the current watermark selection is
"(none).”
(none)
[Username]
Confidential
Draft
SAMPLE
ENWW
HP LaserJet software components for Windows
35
Page 44
Watermarks are applied to logical pages. For example, when Pages per sheet is set to "4" and
First page only is turned off, four watermarks appear on the physical page (one on each logical
page).
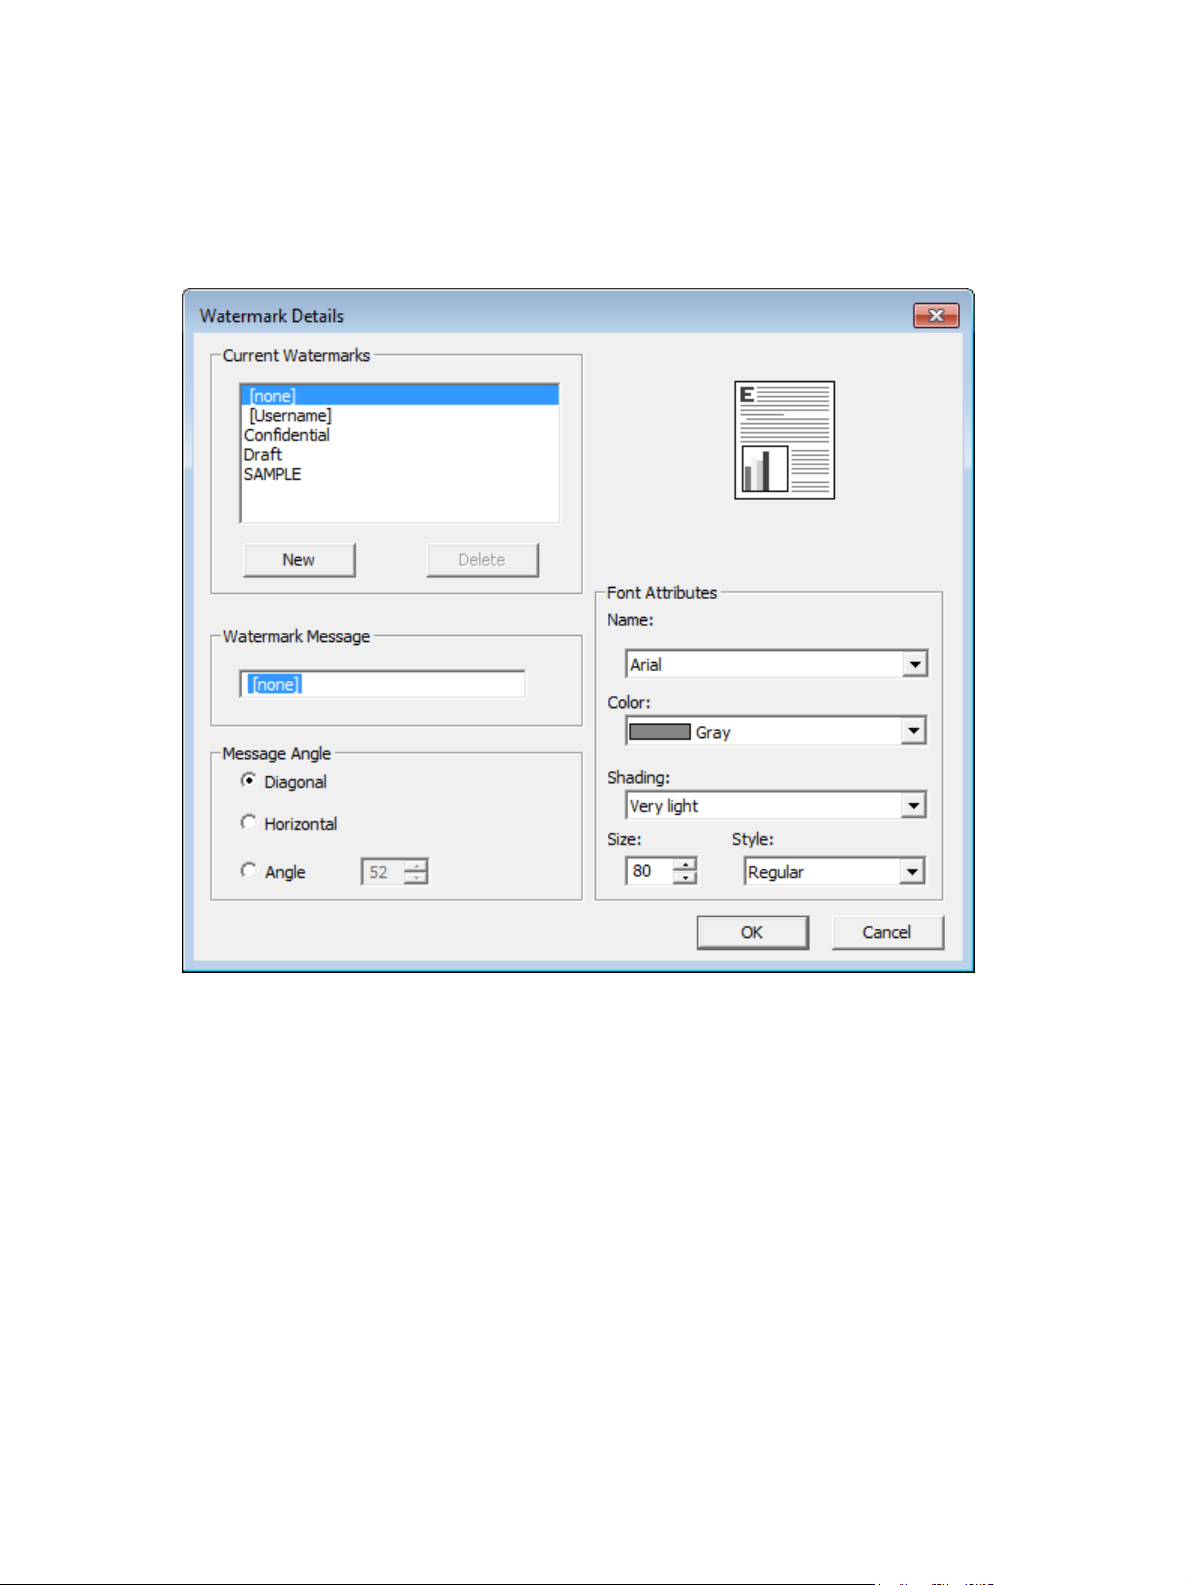
Click Edit, and the Watermark Details dialog box appears.
Figure 2-7 Watermark Details dialog box
The dialog box shows a preview image and provides options for creating a new watermark and
controlling the message angle and font attributes.
Click OK to accept all of the changes that are made in the Watermark Details dialog box.
However, clicking Cancel does not cancel all of the changes. If you make changes to a watermark
and then select a different watermark or click New, all of the changes are saved, and only the current,
unsaved changes can be canceled.
Current Watermarks
The Current Watermarks group box contains a list of available watermarks, both predefined
watermarks that are available in the driver and any new watermarks that you have created.
To create a new watermark, click New. The new watermark appears in the Current Watermarks
list and in the Watermark Message edit box as "Untitled" until you name it. The name that you
type in the Watermark Message field appears in the Current Watermarks group box in the
Watermark Details dialog box and in the Watermarks group box on the Effects tab.
36 Chapter 2 Windows software description and installation ENWW
Page 45

To name the new watermark, type the selected watermark text in the Watermark Message edit
box.
To delete a watermark, select the watermark in the Current Watermarks list, and then click Delete.
A warning appears asking whether you are sure you want to delete the selected item. Click Cancel if
you want to keep the watermark. Click OK to delete the selected watermark.
NOTE: You can have no more that 30 watermarks in the Current Watermarks list at one time.
When you reach the limit of 30 watermarks, the New button is disabled.
To edit an existing watermark, select the watermark in the Current Watermarks list. If you change
the Watermark Message for that watermark, you are, in effect, creating a new watermark.
Watermark Message
The Watermark Message is also the name that identifies the watermark in the Current
Watermarks list, except when more than one watermark has the same message. For example, you
might want several different watermarks with the message DRAFT, each with a different typeface or font
size. When this occurs, the string is appended with a space, a pound sign, and a number (for
example, Draft #2). When a number is added, the number two is used first, but if the resulting name
is also in the list, then the number increases until the name is unique (Draft #3, Draft #4, and so on).
Message Angle
Use the controls in the Message Angle group box to print the watermark in different orientations on
the page. All settings center the watermark string within the page; the selection of a particular setting
affects only the angle of the string placement. The following settings are available:
Diagonal. This is the default setting. Select this setting to place the text along a line that spans
●
the lower-left to upper-right corners of the page.
Horizontal. Select this setting to place the text along a line that spans the mid-left and mid-right
●
edges of the page.
Angle. Select this setting to place the text at the specified angle across the page. Use the numeric
●
spin box to select the angle.
Font Attributes
Use the controls in the Font Attributes group box to change the font and the shading, size, and style
of the font.
The Font Attributes group box contains the following controls:
Name
●
The Name drop-down menu lists fonts that are currently installed on the system. The default is
language-dependent.
ENWW
Color
●
The Color drop-down menu contains the following selections:
Gray
◦
HP LaserJet software components for Windows
37
Page 46

Shading
●
The default Shading setting for new and preset watermarks is Very light. The following range
of shades is available from the Shading drop-down menu:
Lightest
◦
Very light (default)
◦
Light
◦
Medium light
◦
Medium
◦
Medium dark
◦
Dark
◦
Very dark
◦
Darkest
◦
These values represent the intensity of the gray that is used. Select Light to produce a lightly
saturated gray watermark. Select Lightest to produce the lightest shade of watermark. Select
Darkest to produce a black watermark.
Size
●
Font sizes from 1 to 999 points are available from the Size menu. The default point size is
language-dependent.
Style
●
The following settings are available:
Regular
◦
Bold
◦
Italic
◦
Bold Italic
◦
The default Style setting for new and preset watermarks is Regular.
Default watermark settings
The following table shows Font Attribute settings for new and preset watermarks.
Table 2-1 Font Attribute settings for new and preset watermarks
Setting New watermark Preset watermark
Name Arial Varies by language
Color Gray Gray
Shading Very light Very light
38 Chapter 2 Windows software description and installation ENWW
Page 47
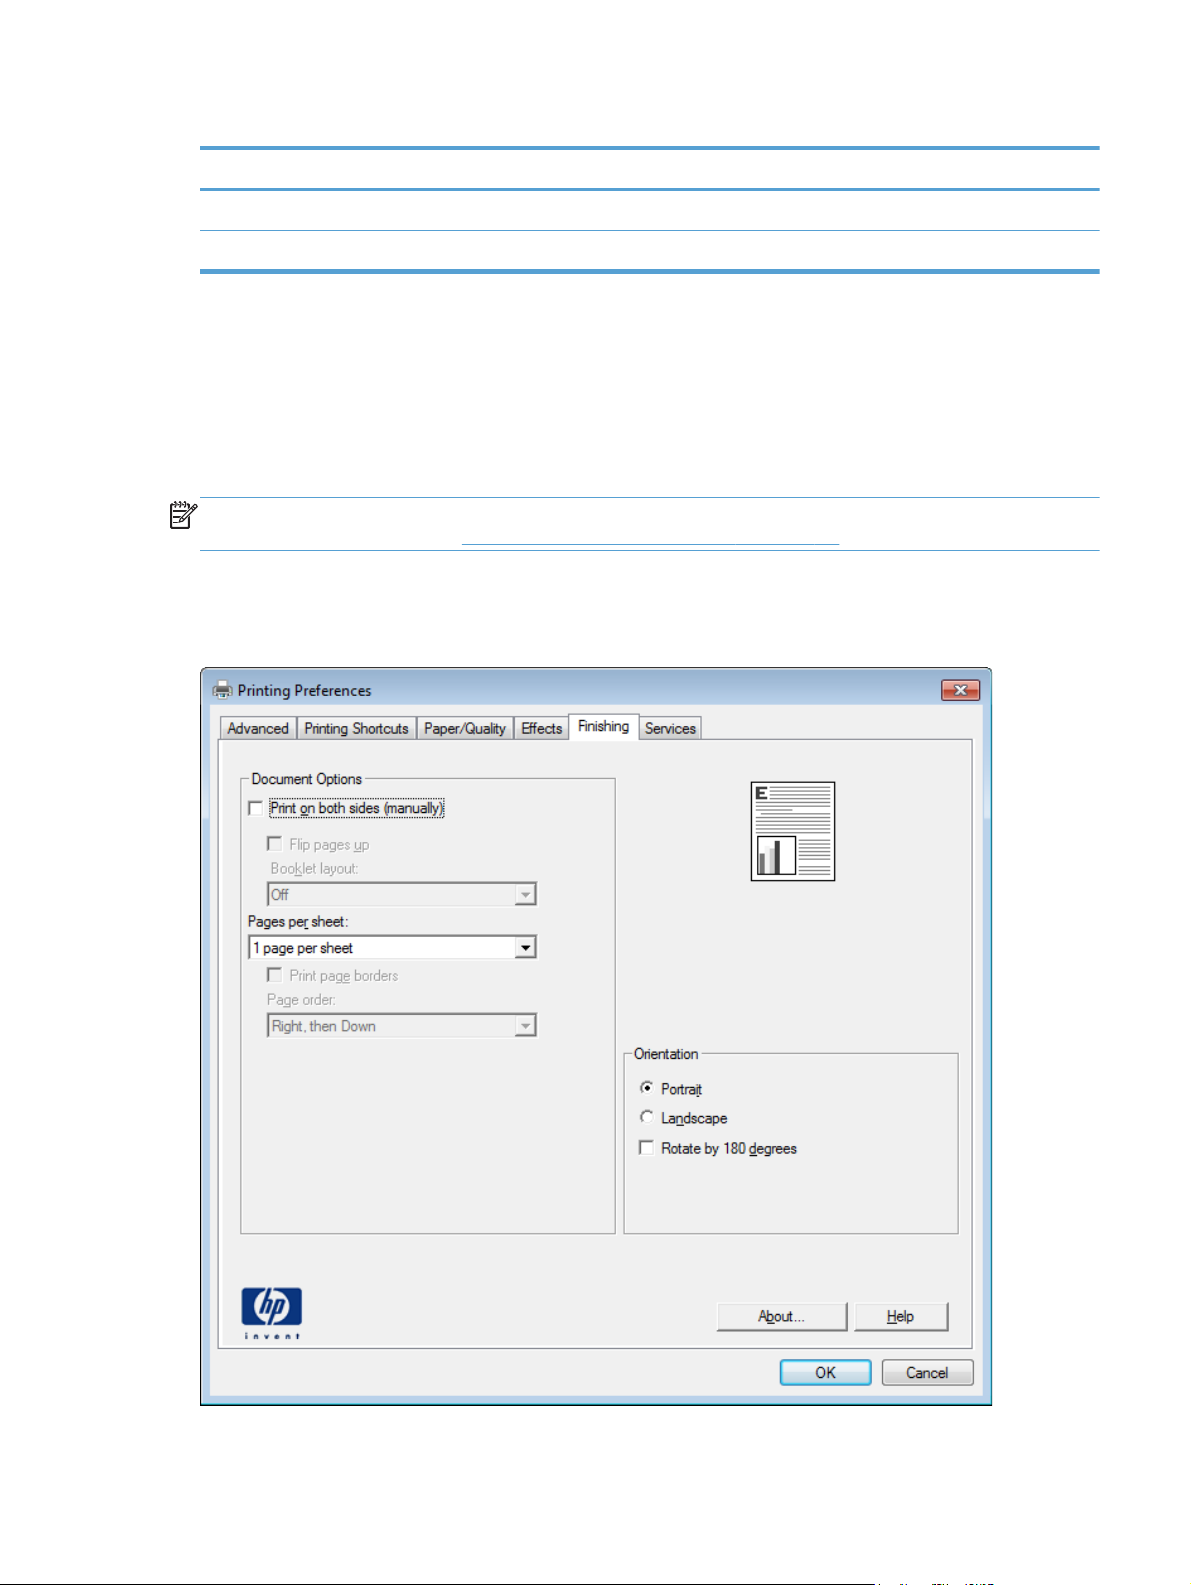
Table 2-1 Font Attribute settings for new and preset watermarks (continued)
Setting New watermark Preset watermark
Size 80 Varies by language
Style Regular Regular
Click the OK button to accept all of the changes that have been made in the Watermark Details
dialog box. Clicking the Cancel button does not cancel all of the changes. If you make changes to a
watermark and then select a different watermark or click New, all of the changes are saved, and only
the current, unsaved changes can be canceled.
Finishing tab features
NOTE: The Finishing tab is located on the Printing Preferences tab set. For information about
how to access these tabs, see
Use the Finishing tab to print booklets and control the paper output. The following figure shows the
Finishing tab.
Figure 2-8 Finishing tab
Printing Preferences driver tabs on page 16.
ENWW
The Finishing tab contains the following controls:
HP LaserJet software components for Windows
39
Page 48

Document Options
●
Document preview image
●
Orientation
●
Document Options
The Document Options group box contains the following controls:
Print on both sides
●
Flip pages up
●
Booklet layout
●
Pages per sheet
●
Print page borders
●
Page order
●
Print on both sides
NOTE: For models that do not have the automatic duplexing feature, this feature appears as Print
on both sides (manually).
The default setting for the Print on both sides option is off (not selected).
Print on both sides is available when the following conditions exist:
Paper type on the Paper/Quality tab is set to any paper type except for the following
●
types:
Labels
◦
Laser Transparency
◦
Envelope
◦
Opaque Film
◦
Paper sizes is set to any paper size except for the following sizes:
●
Envelope #10
◦
Double Japan Postcard Rotated
◦
Envelope Monarch
◦
Envelope B5
◦
Envelope C5
◦
Envelope DL
◦
Select the Print on Both Sides check box to print on the second side of the paper.
40 Chapter 2 Windows software description and installation ENWW
Page 49

NOTE: To make the Print on Both Sides check box available in the document options, set the
Duplex Unit (for 2–sided printing) setting to Installed on the Device Settings tab in the print-
driver Properties tab set.
Cardstock paper can be manually printed on the second side. Transparencies and labels should never
be printed on the second side.
To print a multiple-page document, follow these steps:
1. From the software program, select the Print option.
2. Select the product, and then click the Properties or Preferences button.
3. Click the Finishing tab.
4. Select the Print on Both Sides check box.
5. Click the OK button, and then click the Print button.
Flip pages up
Use the Flip pages up check box to specify the duplex-binding option. By default, the Flip pages
up check box is not available. It is available only when Print on both sides is selected. The
following table demonstrates the results of selecting this check box, depending on the paper orientation
selected on the Finishing tab.
Table 2-2 Page orientation
Orientation (Finishing tab) Flip Pages Up selected Flip Pages Up not selected
Portrait Short-edge binding Long-edge binding
Landscape Long-edge binding Short-edge binding
When Print on both sides is selected, the document preview image changes to show a spiral
binding along either the left edge or the top edge of the page. In addition, a folded-over corner
appears in the lower-right portion of the preview image, indicating that printing occurs on the back
side. An arrow on the folded-over corner points in the direction that the pages would be flipped if they
were bound together.
Short-side binding is for print jobs with pages that read by flipping over like the pages of a calendar.
Long-side binding is for print jobs with pages that read by turning like the pages of a book.
Booklet layout
The Booklet layout drop-down menu, visible when Print on both sides is selected, offers choices
that are based on the current paper size. The default setting for the Booklet Printing drop-down
menu is Off. The other settings have the following format, where [paper size] depends on the paper
size that is set on the Paper/Quality tab:
ENWW
Left binding
●
Right binding
●
HP LaserJet software components for Windows
41
Page 50

When you select Left binding or Right binding, the document preview image changes to show the
location of the binding. If the Pages per sheet setting is on the default setting of 1, it automatically
changes to 2 pages per sheet. If you change the Pages per sheet setting manually to 4, 6, 9, or
16 pages per sheet, the booklet setting is disabled. See
information.
Book and Booklet Printing
The HP LaserJet Pro 400 M401 Printer Series supports book and booklet printing.
A book is a print job consisting of at least two pages. It can have a different paper type for the front
cover, first page, other pages, last page, or back cover. Use the Covers and Print pages on
different paper settings on the Paper/Quality tab to select different paper for the front cover, first
page, other pages, and back cover. For more information, see
A booklet is a print job that places two pages on each side of a sheet that can then be folded into a
booklet that is half the size of the paper. Use the Booklet layout drop-down menu on the Finishing
tab to control booklet settings.
Print a booklet
1. From the software program, select the Print option.
2. Select the product, and then click the Properties or Preferences button.
Pages per sheet on page 42 for more
Paper/Quality tab features on page 26.
3. Click the Finishing tab.
4. Click the Print on Both Sides check box.
5. In the Booklet Printing drop-down list, select a binding option. The Pages Per Sheet option
automatically changes to 2 Pages Per Sheet.
Pages per sheet
Use the Pages per sheet option to select the number of pages that you want to print on a single
sheet of paper. If you choose to print more than one page per sheet, the pages appear smaller and are
arranged on the sheet in the order that they would otherwise be printed. The Pages per sheet dropdown menu provides six settings:
1 page per sheet (this is the default)
●
2 pages per sheet
●
4 pages per sheet
●
6 pages per sheet
●
9 pages per sheet
●
16 pages per sheet
●
NOTE: When you select an option other than 2 pages per sheet, booklet printing is unavailable.
Related controls indented beneath Pages per Sheet are Print page borders and Page order,
which become active when Pages per sheet is greater than 1.
42 Chapter 2 Windows software description and installation ENWW
Page 51

Print page borders
Print page borders sets a line around each page image on a printed sheet to help visually define
the borders of each logical page.
Page order
The Page order drop-down menu contains four selections:
Right, then Down
●
Down, then Right
●
Left, then Down
●
Down, then Left
●
Document preview image
The document preview image is a line-drawn image of a page that represents graphics and text. The
document preview image is always oriented so that the contents of the page are right-side-up. The
document preview image appears in the upper-right corner of the following Printing Preferences
driver tabs:
Printing Shortcuts
●
●
●
●
Switching between tabs does not change the location or appearance of the document preview image.
When you move the mouse over the document preview image, the mouse cursor changes from an
arrow to a gloved hand. You can toggle between portrait and landscape page orientation by clicking
the image.
Orientation
Orientation refers to the layout of the image on the page, and does not affect the way that paper feeds
into the product. You can specify the orientation of the print job. The three available orientations are
portrait, landscape, and rotated. The default orientation is Portrait.
NOTE: Nearly all software programs establish the orientation for the printed page, so the page
orientation in the driver is useful only for the few software programs that do not set an orientation.
The Orientation group box contains the following options:
●
●
Paper/Quality
Effects
Finishing
Portrait. The top edge of the document is the shorter edge of the paper.
Landscape. The top edge of the document is the longer edge of the paper.
ENWW
Rotate by 180 degrees. This creates a landscape or portrait orientation in which the image is
●
rotated 180°. This setting is useful for printing prepunched paper.
HP LaserJet software components for Windows
43
Page 52

You can toggle orientation between portrait and landscape by clicking the document preview image. If
you select the Rotate by 180 degrees check box, no change occurs in the document preview
image.
Services tab features
NOTE: The Services tab is located on the Printing Preferences tab set. For information about
how to access these tabs, see
The Services tab is shown in the following figure.
Figure 2-9 Services tab
Printing Preferences driver tabs on page 16.
The Services tab contains the following group:
Internet Services
●
44 Chapter 2 Windows software description and installation ENWW
Page 53

Internet Services
The Internet Services group box contains the Select a destination drop-down menu with the
following selections:
Online diagnostic tools. Download diagnostic tools
●
Support and troubleshooting. This is the main Web site for HP LaserJet Pro 400 M401
●
Printer Series product support.
Product manuals. View or download product manuals.
●
If you have Internet access, select any of these items and click Go! to open the corresponding HP Web
page.
Device Settings tab features
NOTE: The Device Settings tab is located on the Printer Properties tab set. For information
about how to access these tabs, see
Available options depend on the feature. The following figure shows the Device Settings tab.
Figure 2-10 Device Settings tab
Printer Properties driver tabs on page 17,
ENWW
The Device Settings tab contains controls for paper-handling devices and controls for managing the
product.
The Device Settings tab contains the following controls:
Form to Tray Assignment
●
Font Substitution Table
●
Installable Options
●
HP LaserJet software components for Windows
45
Page 54

Form to Tray Assignment
A network administrator can use Form to Tray Assignment to specify the paper size in each input
tray.
The product supports more than one source of paper. You can assign a form (which defines the paper
size and margins) to each paper source. When a form is matched to a source, you can select the form
when you print. The product prints from the tray to which that form is assigned.
Network administrators can use the Form to Tray Assignment setting to specify, in the driver, the
paper size that is loaded into each available input tray. The use of forms constrains the choices that are
available in the paper-size list on the Paper/Quality tab in the Printing Preferences driver tabs.
This constraint prevents (or reduces the likelihood of) tying up the product with paper-mount messages
that occur when users request sizes or types that are not available.
The trays listed in the Form to Tray Assignment setting include standard trays and optional
accessory trays. Generally, items that are installed separately have a separate Installable Options
setting.
The input trays listed here are also listed as paper sources on the Paper/Quality tab.
Configuring the trays
1. Select the appropriate tray in the Form to Tray Assignment list.
2. Use the drop-down menu to select the paper size (or form) that is loaded in that tray.
3. Repeat steps 1 and 2 for the remaining trays.
4. Click the OK button to enable your settings, or, if necessary, click the Cancel button to
reconfigure all the trays, and remove the size and type constraints that have been imposed on the
Paper/Quality tab.
Font Substitution Table
Use the Font Substitution Table settings to change the TrueType to printer font mapping and to
install and remove external fonts for the product through the External Fonts option. External fonts can
be soft fonts or DIMM fonts.
Click the Font Substitution Table option to open a list of fonts. Use the settings to change the
TrueType-to-product font mappings.
External Fonts
Use the External Fonts option to install and remove external fonts for the product. External fonts can
be soft fonts or DIMM fonts.
Click the External Fonts option to make the Properties button available. Click the Properties
button to open the HP Font Installer dialog box.
46 Chapter 2 Windows software description and installation ENWW
Page 55

Installing external fonts
Follow these steps to install external fonts.
1. Depending on your operating system, click the Start button and then do one of the following to
find the list of installed printers:
Click Devices and Printers or Printers and Faxes
●
Click Control Panel and then click Printers, or first click Hardware and Sound, and
●
then click Printers
Click Settings, and then click Printers or Printers and Faxes
●
2. Right-click the name of the product.
3. Click Properties or Printer Properties.
4. Click the Device Settings tab.
5. Click the External Fonts option. The Properties button appears.
6. Click Properties. The HP Font Installer dialog box appears.
Figure 2-11 HP Font Installer dialog box
ENWW
7. Type the name and path of the font metric file in the Printer Font File Location text box, or
click Browse to locate the file on the computer. The font file names appear in the Font(s) to be
Added window.
8. Select the fonts that you want to add, and then click Add. The fonts are installed and the file
names appear in the Installed Font(s) window.
9. Click OK to close the HP Font Installer dialog box.
HP LaserJet software components for Windows
47
Page 56

Removing external fonts
1. Depending on your operating system, click the Start button and then do one of the following to
find the list of installed printers:
Click Devices and Printers or Printers and Faxes
●
Click Control Panel and then click Printers, or first click Hardware and Sound, and
●
then click Printers
Click Settings, and then click Printers or Printers and Faxes
●
2. Right-click the name of the product.
3. Click Properties or Printer Properties.
4. Click the Device Settings tab.
5. Click the External Fonts option. The Properties button appears.
6. Click Properties. The HP Font Installer dialog box appears. The external fonts that are
installed appear in the Installed Fonts window.
7. Select the fonts that you want to remove, and then click Remove. The fonts are removed.
8. Click OK to close the HP Font Installer dialog box.
Installable Options
Items under Installable Options are automatically populated and their default settings are set when
the driver is installed.
The product has printing options that you can install and configure in this section. The following controls
are available:
Automatic Configuration
●
Printer Status Notification
●
Duplex Unit (for 2-Sided Printing)
●
Allow Manual Duplexing
●
Printer Memory
●
Tray 3
●
Job Separator
●
Automatic Configuration
Use the Device Settings tab to tell the driver about the hardware configuration of the product. If
bidirectional communication is enabled in a supported environment, update this tab by selecting the
Update Now setting in the Automatic Configuration setting. The default setting is Off. After an
automatic configuration, the setting returns to Off after the changes are made.
48 Chapter 2 Windows software description and installation ENWW
Page 57

If your environment does not support bidirectional communication, the Update Now setting is
unavailable, so you must manually configure the options on this tab.
If you have more than one driver installed for the product (for example, the default HP PCL 6 print
driver and the HP PCL 5 Universal Print Driver), the Update Now feature works automatically only on
the driver on which it is activated. The other driver will not be updated, and might show the default
setting for the specific product model.
Printer Status Notification
When enabled, this option displays a small status-notification window in the lower-right corner of the
screen. This window is visible while printing a document or while viewing the print driver settings. It
provides information about the status of the document being printed as well as information about the
printer, including the current status of the printer supplies.
Duplex Unit (for 2-Sided Printing)
Set the Duplex Unit (for 2-Sided Printing) item to installed to print on both sides of any supported
size and most types of paper (except transparencies, envelopes, and labels). To use this feature, you
must reinsert the paper stack into the input tray to print the second side. The product pauses while you
make this adjustment.
This setting is enabled by default.
Allow Manual Duplexing
Set the Allow Manual Duplexing item to Enabled for product models that do not include the
automatic duplexing feature (HP LaserJet Pro 400 M401a Printer and HP LaserJet Pro 400 M401n
Printer).
Printer Memory
Specifies the amount of memory in the product.
Tray 3
Set the Tray 3 item to Installed if you have optional Tray 3 attached to the product.
Job Separator
Use this control to specify whether a print job identifier page should be printed between print jobs.
This setting is disabled by default.
About tab features
NOTE: The About tab is located on the Printer Properties tab set. For information about how to
access these tabs, see
Printer Properties driver tabs on page 17.
ENWW
The About tab provides detailed information about driver component versions. It contains an overall
build version number (in parentheses after the model name) together with specific information about
each of the components. The information varies according to the product model number, driver, date,
and versions. The About tab is shown in the following figure.
HP LaserJet software components for Windows
49
Page 58

Figure 2-12 About tab
The About tab lists driver installation file names and their version numbers. The About tab also
indicates whether the driver was autoconfigured, whether administrator preferences were set, the date
the driver was last configured, and whether the configuration is autoconfigured or user-configured.
The About button is also available on most driver screens. The About button provides a driver version
number and creation date.
Driver configuration for Windows
The HP print drivers feature bidirectional communication technology which, in supported environments,
provide automatic discovery and driver configuration for product accessories at the time of installation.
Some accessories that are automatically discovered and configured include the duplexing unit, optional
paper trays, printer hard disk, and dual inline memory modules (DIMMs).
Driver autoconfiguration
Automatic discovery and driver configuration through bidirectional communication occurs in the
following circumstances:
When a print driver is installed by using the installer
●
When using the Update Now feature for a driver that is already installed
●
However, as shown in the following table, driver autoconfiguration and Update Now are not available
in Windows XP, Windows Server 2003, Windows Server 2008 and 2008 R2, Windows Vista, or
Windows 7 operating systems over a direct connection when the product is installed by using the Add
Printer Wizard.
50 Chapter 2 Windows software description and installation ENWW
Page 59

Table 2-3 Automatic discovery and driver configuration through bidirectional communication
Connection type Add Printer Wizard install Common installer
Network Yes Yes
Direct connection No Yes
1
The table applies to Windows XP, Windows Server 2003, Windows Server 2008 and 2008 R2, Windows Vista, and
Windows 7.
Bidirectional communication
In environments that support bidirectional communication, the computer communicates with the product
during installation, determines the physical configuration, and then configures the driver accordingly.
Bidirectional communication is the capability of the product to respond to data inquiries from the
computer and report information back, such as what type of print paper is available or what
accessories are connected to the product. Bidirectional communication depends on the network
operating system and on the type of connection that exists between the computer and the product. If the
connection does not have this capability (that is, if it has no bidirectional mode), it can only accept
commands from the host and cannot report information back to the host computer.
Enterprise AutoConfiguration
1
Enterprise AutoConfiguration (EAC) uses bidirectional communication to provide autoconfiguration
functionality for installation of the print driver over a network, whether you use the installer on the
printing-system software CD or the Add Printer Wizard to install the driver. Driver installation that
includes EAC is configured with the same settings as the physical configuration of the product.
Configuration occurs without user interaction.
If bidirectional-communication software has been installed previously, EAC is not activated, and the
pre-existing bidirectional-communication software is used to configure the print driver.
If bidirectional communication software has not been installed, EAC installs bidirectionalcommunication software that allows it to communicate with the product and automatically match the
print driver with the actual product configuration. EAC is activated during installation of the driver or
whenever the Update Now feature is used.
If the product configuration changes after installation, the driver can be automatically updated with the
new configuration in environments that support bidirectional communication by using the Update Now
feature. For more information, see
Update Now on page 53.
The following tables show the availability of EAC for various operating systems and network
environments that support bidirectional communication.
ENWW
HP LaserJet software components for Windows
51
Page 60

Table 2-4 EAC availability in Microsoft Windows and Microsoft Share
Method Connection type
Microsoft Share
1
2000 XP 2000/XP
host with
2000/XP
client/
Windows
Server 2008
and 2008
R2/Windows
Vista
USB
Network Jetdirect TCP/IP x x x
IPX/SPX x x x
Standard TCP/IP (HP) x x x
TCP/IP (MS) x x x
IPX/SPX (HP) x x x
Add Printer Direct connect Parallel
USB
Network Jetdirect TCP/IP x x x
IPX/SPX x x x
Standard TCP/IP (HP) x x x
TCP/IP (MS) x x x
IPX/SPX (HP) x x x
1
This column represents the following Microsoft Share configurations: Windows 2000, Windows XP, Windows Server 2003,
Windows Server 2008, or Windows Vista host with Windows 2000, Windows XP, Windows Server 2003, Windows Server
2008, or Windows Vista client.
52 Chapter 2 Windows software description and installation ENWW
Page 61

Table 2-5 EAC availability in Novell Netware environments
Method Connection type Novell
Netware 4.x Netware 5.x
Bindery queue NDS queue Bindery queue
USB
Network Jetdirect TCP/IP x x x
IPX/SPX
Standard TCP/IP (HP)
1
Bidirectional functionality is supported only with the client software from Novell. It is not supported with Microsoft Client
Service for NetWare.
Update Now
If you have modified the configuration of the HP LaserJet Pro 400 M401 Printer Series product since
installation, the driver can be automatically updated with the new configuration in environments that
support bidirectional communication. Use the Update Now feature to automatically reflect the new
configuration in the driver.
For example, if the product is installed and an optional paper-handling accessory is added later, use
the Update Now feature to query the product and update the settings to match the new product
configuration.
The feature automatically updates the registry and changes the configuration information that appears
on the Device Settings tab.
NOTE: Depending on which settings were updated, the Update Now feature might change the
configuration information that displays on the print-driver tabs, instead of (or in addition to) changing
the information on the Device Settings tab.
TCP/IP (MS
IPX/SPX (HP)
1
)
ENWW
NOTE: The Update Now feature is not supported in environments where shared Windows XP clients
are connected to Windows XP hosts.
To activate the Update Now feature, follow these steps:
1. Depending on your operating system, click the Start button and then do one of the following to
find the list of installed printers:
Click Devices and Printers or Printers and Faxes
●
Click Control Panel and then click Printers, or first click Hardware and Sound, and
●
then click Printers
Click Settings, and then click Printers or Printers and Faxes
●
2. Right-click the product name.
HP LaserJet software components for Windows
53
Page 62

3. Click the Properties or Printer Properties item.
4. Click the Device Settings tab.
5. If necessary, click the Installable Options list to expand it and show the options.
6. In the Automatic Configuration drop-down menu, select the Update Now item.
7. Click the OK button to save the setting.
HP Reconfiguration Utility
If you are already using the product and you wish to change the way it is connected, use the HP
Reconfiguration Utility to set up the connection. For example, you can reconfigure the product to
use a different wireless address, to connect to a wired or wireless network, or change from a network
connection to a USB connection. You can change the configuration without inserting the product CD.
After you select the type of connection you wish to make, the program goes directly to the portion of
the product setup procedure that needs to change.
The HP Reconfiguration Utility is located in the HP programs group on your computer.
Font support
The basic fonts listed here are included with Microsoft Windows software.
Basic fonts
Microsoft Windows software includes these basic fonts, which can be used with any HP printing
product:
●
●
●
●
●
●
●
●
●
●
●
Arial
Courier New Italic
Times New Roman Italic
Arial Italic
Courier New Bold
Times New Roman Bold
Arial Bold
Courier New Bold Italic
Times New Roman Bold Italic
Arial Bold Italic
Symbol
Wingdings
●
54 Chapter 2 Windows software description and installation ENWW
Page 63

Courier New
●
Times New Roman
●
HP ePrint
With HP ePrint , you can print anywhere, anytime, from a mobile phone, laptop, or any other mobile
device. HP ePrint works with any email-capable device. If you can e-mail, you can print to an HP ePrintenabled product. For more details, go to
NOTE: The product must be connected to a network and have Internet access to use HP ePrint.
HP ePrint is disabled as a default setting in the product. Use this procedure to enable it.
1. Type the product IP address into the address line of a Web browser to open the HP Embedded
Web Server.
2. Click the HP Web Services tab.
3. Select the option to enable Web Services.
HP Update
HP Update proactively checks for updates specific to your product including software, drivers,
applications, firmware/BIOS, tools and utilities, and gives you the choice of which to install.
www.hpeprintcenter.com.
The default interval for the HP Update program is to check for updates once every 7 days. However,
the HP Update program will check for new updates at an interval that you specify.
To change the way the HP Update program runs, use the following steps:
1. Click Start.
2. Click All Programs.
3. Click the HP folder.
4. Click the HP Update icon to start the HP Update program.
5. In the HP Update window, click the Settings button.
6. In the Settings menu, you can change how often the HP Update program checks for updates.
Help & Learn Center
The HP Help & Learn Center and other documentation are on the CD that came with the product or in
the HP Program folder on your computer. The HP Help and Learn Center is a product help tool that
provides easy access to product information, HP product Web support, troubleshooting, and regulatory
and safety information.
ENWW
HP LaserJet software components for Windows
55
Page 64

Click the Help & Learn Center link on the Documentation screen of the installer to open an HTML help
system that provides step-by-step instructions for performing specific tasks, including clearing jams and
loading trays.
Figure 2-13 Help & Learn Center
The Help & Learn Center can also be opened from the Windows Start menu.
1. Click the Start button, select the Programs or All Programs item, and then click the HP item.
2. Click the product name item, and then click the Help & Learn Center item.
Toner Cartridge Authentication
The HP Toner Cartridge Authentication software verifies that Original HP LaserJet toner cartridges are
being used in the product. Specific countries/regions can reward customers for using Original
56 Chapter 2 Windows software description and installation ENWW
Page 65

HP LaserJet toner cartridges. This software was developed for home, micro, and small business
environments.
Customer downloads the HP Toner Authentication software from HP.com and installs it on his or
●
her computer.
The software checks to see if the product needs software or firmware upgrades
●
Software or firmware upgrades can be installed by the customer.
◦
The software checks the e-labels on the toner cartridges and displays the results.
●
By default the software checks every 60 minutes, but the time period setting can be changed
◦
on the Settings tab.
The correct versions of software, firmware, e-labels, and an active internet connection are
◦
required for HP Toner Authentication to work properly.
HP Device Toolbox
The HP Device Toolbox allows users to control settings on the product through a Web browser. This
program opens the HP Embedded Web Server (HP EWS).
To access the HP Device Toolbox, complete one of the following procedures:
Click the Windows Start button, click the Programs or All Programs item, click the HP item,
●
click the product group, and then click the HP Device Toolbox item.
On network-connected products, you can open a Web browser and type the product IP address in
●
the address bar.
The product IP address displays on the product control panel. If that feature is disabled, the IP address
is documented on a configuration page. Print a configuration page by following these steps on the
product control panel.
Print a configuration page on a LCD control panel
1. At the product control panel, press the OK button to open the menus.
2. Use the arrow buttons to select the Reports menu, and then press the OK button.
3. Use the arrow buttons to highlight the Configuration Report option, and then press the OK
button.
ENWW
HP LaserJet software components for Windows
57
Page 66

4. Find the IP address on the configuration page.
Figure 2-14 IP address location on the configuration page
HP LASERJET 400 M401A
Configuration Report
Product Settings
Product Name = HP LaserJet 400 M01a
Formatted Number = V400005F
Serial Number = VNBA22S504
Service ID = 22058
Firmware Date = 2010601_1440 Phoexix Firmware
Smart Install SW Version = 10/27/2010.1.0.10301.31
Location = USA
Device Location =
ADF Installed = Yes
Max Monochrome Print Quality = FastRes 1200
Controller Number = 2
Memory
Total Memory = 128 MBytes
Available Memory = 56.45 MBytes
Device Description = HP LaserJet 400 M01a
Language = English
Asset Number =
Company Name =
Contact Person =
Product Security = Off
Quiet Print Mode = Off
Hardware Address = XX:XX:XX:XX:XX:XX
Host Name = XXXXXXXXX
IPv4 Status = 192.168.0.10
IPv6 Status = XXXX::XXXX::XXXX::XXXX
Show IP Address = Enabled
Installed Personalities and Options
PCL6 = (20040201)
URF = (20040201)
PCL = (20040201)
PDF = (20040201)
PS = (20040201)
Print a configuration page on a touchscreen control panel
1.
From the Home screen on the product control panel, touch the Setup
2. Touch the Reports button
3. Touch the Configuration Report item.
4. Find the IP address on the configuration page.
Figure 2-15 IP address location on the configuration page
HP LASERJET 400 M401A
Configuration Report
Product Settings
Product Name = HP LaserJet 400 M01a
Formatted Number = V400005F
Serial Number = VNBA22S504
Service ID = 22058
Firmware Date = 2010601_1440 Phoexix Firmware
Smart Install SW Version = 10/27/2010.1.0.10301.31
Location = USA
Device Location =
ADF Installed = Yes
Max Monochrome Print Quality = FastRes 1200
Controller Number = 2
Memory
Total Memory = 128 MBytes
Available Memory = 56.45 MBytes
Device Description = HP LaserJet 400 M01a
Language = English
Asset Number =
Company Name =
Contact Person =
Product Security = Off
Quiet Print Mode = Off
Hardware Address = XX:XX:XX:XX:XX:XX
Host Name = XXXXXXXXX
IPv4 Status = 192.168.0.10
IPv6 Status = XXXX::XXXX::XXXX::XXXX
Show IP Address = Enabled
Installed Personalities and Options
PCL6 = (20040201)
URF = (20040201)
PCL = (20040201)
PDF = (20040201)
PS = (20040201)
The following tabs are available in the HP Device Toolbox:
Home tab
●
System tab
●
button.
Print tab
●
Networking tab
●
HP Web Services tab
●
HP Smart Install tab
●
58 Chapter 2 Windows software description and installation ENWW
Page 67

Home tab
Use the Home tab to access and print detailed information regarding product and supply status,
product configuration, network configuration, and usage.
The Home tab contains the following pages:
●
●
●
●
●
●
Device Status
The Device Status page shows product status messages. The Device Status page also contains
some pertinent product information and settings.
Figure 2-16 HP Device Toolbox, Home tab – Device Status page
Device Status
Supplies Status
Device Configuration page
Network Summary page
Reports
Event Log page
ENWW
HP LaserJet software components for Windows
59
Page 68

Supplies Status
The Supplies Status page shows the status of all of the product supplies, including the toner
cartridges.
Figure 2-17 HP Device Toolbox, Home tab – Supplies Status page
Device Configuration page
The Device Configuration page shows the values of all of the settings that are available in the
product. The contents of this page are consistent with the configuration page that the firmware
generates.
Figure 2-18 HP Device Toolbox, Home tab – Device Configuration page
60 Chapter 2 Windows software description and installation ENWW
Page 69

Network Summary page
The Network Summary page contains information about the network and its enabled features.
Figure 2-19 HP Device Toolbox, Home tab – Network Summary page
Reports
Use the Reports page to print the internal special pages the device generates. The following
information pages are available:
Configuration Report
●
Supplies Status
●
Network Summary
●
Usage Page
●
Diagnostics Page
●
PCL Font List
●
PCL6 Font List
●
ENWW
HP LaserJet software components for Windows
61
Page 70

PS Font List
●
Demo Page
●
Figure 2-20 HP Device Toolbox, Home tab – Reports page
Event Log page
Use the Event Log page to track the events that occur on the product.
Figure 2-21 HP Device Toolbox, Home tab – Event Log page
System tab
Use the System tab to view and change settings for the following features:
●
●
●
●
●
●
●
●
●
Device Information page
Paper Setup page
Print Quality page
EcoSMART Console page
Paper Types page
System Setup page
Service page
Save and Restore page
Administration Page
62 Chapter 2 Windows software description and installation ENWW
Page 71

Device Information page
The Device Information page contains identifying information about the product:
Device Description. This field shows the version of the HP LaserJet Pro 400 M401 Printer Series
●
product that is installed.
Asset Number. Use this field to assign an identifying asset control number to the product.
●
Company Name.
●
Contact Person.
●
Device Location
●
Figure 2-22 HP Device Toolbox, System tab – Device Information page
Paper Setup page
Use Paper Setup page to configure the paper-setup settings for the product. Change the default
settings by clicking the black arrow next to each option and highlighting the selection.
Figure 2-23 HP Device Toolbox, System tab – Paper Setup page
ENWW
HP LaserJet software components for Windows
63
Page 72

Print Quality page
Use the Print Quality page to change the print quality defaults for the product.
Figure 2-24 HP Device Toolbox, System tab – Print Quality page
EcoSMART Console page
Use the EcoSMART Console page to control the energy-saving settings on the product.
Figure 2-25 HP Device Toolbox, System tab – EcoSMART Console page
Paper Types page
Use the Paper Types page to set the default paper type settings for the product.
Figure 2-26 HP Device Toolbox, System tab – Paper Types page
64 Chapter 2 Windows software description and installation ENWW
Page 73

System Setup page
Use the System Setup page to change settings on the product such as Jam Recovery and Auto
Continue.
Figure 2-27 HP Device Toolbox, System tab – System Setup page
Service page
Use the Service page to start the cleaning mode procedure on the product.
Figure 2-28 HP Device Toolbox, System tab – Service page
Save and Restore page
Use the Save and Restore page to save, load, or restore product settings.
Figure 2-29 HP Device Toolbox, System tab — Save and Restore page
ENWW
HP LaserJet software components for Windows
65
Page 74

Administration Page
Use the Administration page to set or change the administrator password.
Figure 2-30 HP Device Toolbox, System tab – Administration page
Print tab
Printing
●
PCL5
●
PostScript
●
Printing
PCL5
Use the Printing page to change the printing defaults for the product.
Figure 2-31 HP Device Toolbox, Print tab – Printing page
Use the PCL5 page to change the PCL defaults for the product.
Figure 2-32 HP Device Toolbox, Print tab – PCL5 page
PostScript
Use the PostScript pane to turn off/on PostScript printing errors.
66 Chapter 2 Windows software description and installation ENWW
Page 75

If Print PostScript errors is set to On, the product will print multiple pages of PostScript characters
when an error is encountered.
If Print PostScript errors is set to Off (default), the product suppresses this printing behavior.
Figure 2-33 HP Device Toolbox, Print tab – PostScript page
Networking tab
Use the Networking tab to view and change settings for the network connection and communication
with the product. The following pages are available:
Network Summary
●
IPv4 Configuration
●
IPv6 Configuration
●
Wireless Configuration (wireless models only)
●
Wireless Direct Setup (wireless models only)
●
Network Identification
●
Advanced page
●
Certificates page
●
HTTPS Enforcement page
●
SNMP page
●
ENWW
HP LaserJet software components for Windows
67
Page 76

Network Summary
The Network Summary page contains all the information about the network and its enabled
features.
Figure 2-34 , Networking tab – Network Summary page
IPv4 Configuration
Use the IPv4 Configuration pane to modify settings for basic TCP/IPv4 network configuration.
If Automatic IP is configured, the Manual IP address configuration settings are disabled, but the
values for these settings are still displayed if they have been set.
If the configuration is switched from Automatic IP to Manual IP, the IP Address fields are cleared,
and the desired IP address must be entered before continuing.
68 Chapter 2 Windows software description and installation ENWW
Page 77

Click Apply to keep changes. When you click the Apply button, a confirmation dialog appears. Click
the Yes button to continue.
Figure 2-35 HP Device Toolbox, Networking tab – IPv4 Configuration page
IPv6 Configuration
The IPv6 Configuration page shows the status of the IPv6 network configuration settings. This page
is read-only and no settings can be modified here.
Up to seven IPv6 addresses can be shown on this page, depending upon the automatic configuration of
the networking firmware. All available IPv6 addresses are shown.
Figure 2-36 HP Device Toolbox, Networking tab – IPv6 Configuration page
ENWW
HP LaserJet software components for Windows
69
Page 78

Wireless Configuration (wireless models only)
Use the Wireless Configuration page to turn off/on the wireless capabilities for the product.
Figure 2-37 HP Device Toolbox, Networking tab – Wireless Configuration page
Wireless Direct Setup (wireless models only)
Use the Wireless Direct Setup page to enable devices within wireless range to connect to the
product and print.
Figure 2-38 HP Device Toolbox, Networking tab — Wireless Direct Setup page
Network Identification
Use the Network Identification pane to configure the host name and domain name(s) used to
identify the product on the network.
The values for host name and domain names are retrieved from the firmware, and displayed on this
pane. The networking firmware determines what host name and domain name(s) to use.
The information under Available Host name / Domain names is for information only and cannot
be modified.
The text entries are disabled under certain circumstances. The following table defines when the entities
are disabled:
70 Chapter 2 Windows software description and installation ENWW
Page 79

Table 2-6 Network Identification pane – Text Entities
Text Entity Disabled status
Host name Disabled if configured by BOOTP
Domain name (IPv4/IPv6) Disabled if configured by BOOTP, DHCPv4, or DHCPv6
Domain name (IPv6) Disabled if configured by DHCPv6
Bonjour Service name Disabled if Bonjour is disabled
Figure 2-39 HP Device Toolbox, Networking tab – Network Identification page
Advanced page
Use the Advanced page to configure the enabled settings and other settings for the product.
Figure 2-40 HP Device Toolbox, Networking tab – Advanced page
Certificates page
Use the Certificates page to change the product certificate to more accurately identify the printer and
to update the length of time the certificate is valid.
ENWW
HP LaserJet software components for Windows
71
Page 80

You may also use the Certificates page to upload a Certificate Authority (CA) certificate to verify the
email server's certificate, for increased security
Figure 2-41 HP Device Toolbox, Networking tab — Certificates page
HTTPS Enforcement page
Use the HTTPS Enforcement page to securely manage the network device using a Web browser and
the HTTPS protocol. By forcing all connections to use HTTPS, the embedded Web server encrypts all
Web communication.
Figure 2-42 HP Device Toolbox, Networking tab — HTTPS Enforcement page
SNMP page
Use the SNMP page to configure the SNMP settings for the product.
Figure 2-43 HP Device Toolbox, Networking tab – SNMP page
72 Chapter 2 Windows software description and installation ENWW
Page 81

HP Web Services tab
Web Services Setup page
Use the Web Services Setup page to enable or disable the HP Web Services feature.
Figure 2-44 HP Device Toolbox, Web Services Setup page
HP ePrint page
Use the HP ePrint page to print the HP ePrint information page.
Figure 2-45 HP Device Toolbox, HP ePrint page
ENWW
HP LaserJet software components for Windows
73
Page 82

Apps page
Use the Apps page to enable or disable the Apps feature.
Figure 2-46 HP Device Toolbox, Apps page
Proxy Settings page
Use the Proxy Settings page to set the HP Web Services proxy server.
Figure 2-47 HP Device Toolbox, Proxy Settings page
HP Smart Install tab
Use the HP Smart Install tab to enable or disable the HP Smart Install installation method.
Figure 2-48 HP Device Toolbox, HP Smart Install tab
HP Product Improvement Study
After the product is installed, you have the option of participating in HP's voluntary program for
communication between your system and HP. This feature, available through software that is included
on the printing-system software installation CD, helps HP monitor toner usage.
74 Chapter 2 Windows software description and installation ENWW
Page 83

At the time of the invitation, about two weeks after installation, full disclosure of the information to be
communicated is provided. Participation is entirely voluntary, and the impact on processing and
connection speeds is negligible. Personal information is never sent to HP unless permission is given.
Figure 2-49 Welcome screen
To participate in the study, click the Participate button.
To be reminded later about the opportunity to participate, click the Remind me later button.
To decline to participate, click the Decline button.
If you decline the invitation, the dialog box does not appear again and no data will be gathered.
ENWW
HP LaserJet software components for Windows
75
Page 84

Online product registration
When the product has been successfully installed and configured, and when an active Internet
connection exists, you can select the option to register the product with HP on the final installation
screen. The following Product Registration screen is provided for registration information.
Figure 2-50 Online product registration
76 Chapter 2 Windows software description and installation ENWW
Page 85

Detailed Windows installation instructions
The dialog boxes shown here appear in the Windows XP Professional installation sequence. The order
and appearance of dialog boxes can vary among operating systems.
Use the Recommended installation with HP Smart Install or the CD
NOTE: If HP Smart Install does not start automatically, AutoPlay might be disabled on your computer.
Browse to the computer and double-click the HP Smart Install CD drive. Double-click the Setup.exe file
to run the program to install the product. If you cannot find the HP Smart Install CD drive, use the
software CD to install the product.
1. Connect the product to the computer using a USB cable. The HP Smart Install program will start
and a licensing agreement dialog will open.
Figure 2-51 HP Smart Install — automatic update dialog box
ENWW
Detailed Windows installation instructions
77
Page 86

2. A licensing agreement dialog opens. Click the I have reviewed and accept the
installation agreements check box, and then click the Next button. Wait a few minutes while
the program sets up, and then the Software Install dialog box appears.
Figure 2-52 HP Smart Install — Software Install dialog box
3. Select a connection type option on the Connection Type screen, based on how the product
connects to the computer.
NOTE: If you are installing a base unit (which does not have a network connection option), this
screen does not appear. Proceed to the next step.
Figure 2-53 Software installation — Connection Type screen
78 Chapter 2 Windows software description and installation ENWW
Page 87

For USB-connected products, follow these steps:
●
Connect the product to the computer when prompted at the Connect the Product
▲
screen. The installer program opens a progress bar as it automatically starts the
software installation.
Figure 2-54 Software installation — Connect the Product screen
ENWW
Detailed Windows installation instructions
79
Page 88

For wired network connected products, follow these steps:
●
a. Select the Connect through a wired network option.
Figure 2-55 Software installation — Connection Type screen for wired network
installation
b. If the product's network settings are not known, select the Automatically find my
product on the network option.
c. If the product's networking settings are known, enter either the product's host name, IP
address, or hardware address.
NOTE: At the product control panel, record the product network IP address.
d. Click the Next button.
80 Chapter 2 Windows software description and installation ENWW
Page 89

e. The Network Product(s) Found screen displays a list of products. Select the product
to install and then click the Next button
Figure 2-56 Software installation — Network Product(s) Found screen
For wireless network connected products, follow these steps:
●
a. Select the Connect through a wireless network option, and then click the Next
button.
Figure 2-57 Software installation — Connection Type screen for wireless connected
installation
ENWW
Detailed Windows installation instructions
81
Page 90

b. In the Network Product(s) Found screen, select the correct network, and then click
the Next button.
Figure 2-58 Software installation — Network Product(s) Found screen for wireless
connected installation
NOTE: If the correct network does not appear, click the Search Again button, or
click the I do not see my wireless network. I will specify it manually. check
box and manually enter the network information.
82 Chapter 2 Windows software description and installation ENWW
Page 91

c. In the Product Settings screen, determine whether or not you want to enable the
HP Wireless Direct Printing, and then click the Next button.
Figure 2-59 Software installation — Product Settings screen for wireless connected
installation
ENWW
Detailed Windows installation instructions
83
Page 92

4. When the installation completes, the Finish screen appears.
Figure 2-60 Software installation — Finish screen
Open the HP ePrint Center by checking the Open the HP ePrint Center web site check
●
box.
Have the product print a test page to verify successful installation by checking the Print a
●
test page check box.
Click the Next button to continue.
84 Chapter 2 Windows software description and installation ENWW
Page 93

5. A confirmation dialog box opens.
Figure 2-61 Software installation — confirmation dialog box
Open the HP ePrint Center by checking the Open the HP ePrint Center web site check
●
box.
Register the product with HP by selecting the Register the product with HP check box.
●
6. Click the Finish button to complete the product installation.
Perform a custom installation with HP Smart Install or the CD
The custom installation allows you to customize the software installed with your product.
The dialog boxes shown here appear in the Windows 7 installation sequence. The order and
appearance of dialog boxes can vary among operating systems.
For a USB installation, do not connect the USB cable between the product and the computer yet.
●
You will be instructed to connect the USB cable during the installation process.
For a wired network installation, connect the product to the network before starting the installation
●
process. The product will need a few minutes to receive a network address.
For a wireless network installation, do not connect the USB cable between the product and the
●
computer yet. You will be instructed to connect the USB cable during the installation process.
A series of dialog boxes appears during installation of the product printing-system software in
Windows environments.
ENWW
Detailed Windows installation instructions
85
Page 94

NOTE: You can return to the previous dialog box by clicking the Back button, or exit the printing-
system software installation by clicking the Cancel button.
1. Close all programs.
2. Insert the printing system software CD into the CD-ROM drive. The software installer detects the
language of the operating system, and then displays the main menu of the installation program in
the same language.
If the installer program has not started after 30 seconds, complete these steps:
a. On the Start menu, click the Run option.
b. Type the following: X:\SETUP.EXE (where X is the letter of the CD-ROM drive).
c. Click the OK button. The installer program starts.
3. The license agreement screen opens.
Figure 2-62 Software installation — License agreement screen
86 Chapter 2 Windows software description and installation ENWW
Page 95

4. Select Click here for more install options to customize the software components that are
installed with the product. When you have finished customizing the installation, click the I have
reviewed and accept the installation agreements check box, and then click the Next
button to continue to the Connection Type screen.
Figure 2-63 Software Installation — Customize software installation
5. Select a connection type option on the Connection Type screen, based on how the product
connects to the computer.
NOTE: If you are installing a base unit (which does not have a network connection option), this
screen does not appear. Proceed to the next step.
ENWW
Detailed Windows installation instructions
87
Page 96

Figure 2-64 Software installation — Connection Type screen
For USB-connected products, follow these steps:
●
Connect the product to the computer when prompted at the Connect the Product
▲
screen. The installer program opens a progress bar as it automatically starts the
software installation.
Figure 2-65 Software installation — Connect the Product screen
88 Chapter 2 Windows software description and installation ENWW
Page 97

For wired network connected products, follow these steps:
●
a. Select the Connect through a wired network option.
Figure 2-66 Software installation — Connection Type screen for network connected
installation
b. If the product's network settings are not known, select the Automatically find my
product on the network option.
c. If the product's networking settings are known, enter either the product's host name, IP
address, or hardware address.
NOTE: At the product control panel, record the product network IP address.
d. Click the Next button.
ENWW
Detailed Windows installation instructions
89
Page 98

e. A list of products is displayed on the Network Product(s) Found screen. Select the
product to install and then click the Next button
Figure 2-67 Software installation — Network Product(s) Found screen
90 Chapter 2 Windows software description and installation ENWW
Page 99

For wireless network connected products, follow these steps:
●
a. Select the Connect through a wireless network option, and then click one of the
check boxes.
Figure 2-68 Software installation — Connection Type screen for wireless connected
installation
If you click the Yes, retrieve the wireless settings on my computer option,
the installer program searches for wireless network and then opens the Network
Product(s) Found screen.
If you click the No, I will enter the wireless settings manually, provide the
required information.
ENWW
Detailed Windows installation instructions
91
Page 100

b. Click the Next button. The installer program prompts you to connect the USB cable,
momentarily, between the computer and the product. Connect the cable and the installer
program continues automatically.
Figure 2-69 Software installation — Connect USB screen for wireless connected
installation
92 Chapter 2 Windows software description and installation ENWW
 Loading...