

HP Presario 5116 Quick Start Manual

Contents
Chapter 1 Introduction . . . . . . . . . . . . . . . . . . . . . . . . . . . . . . . . . . .1-1
Who Should Read This Guide?. . . . . . . . . . . . . . . . . . . . . . . . . . .1-2
Using My Presario - Getting Started and Beyond . . . . .1-2
Symbols and Graphics Used. . . . . . . . . . . . . . . . . . . . . . . . . . . . .1-3
Computer Illustrations and Features . . . . . . . . . . . . . . . .1-3
Where Can I Find Information?. . . . . . . . . . . . . . . . . . . . . . . . . .1-4
Safety . . . . . . . . . . . . . . . . . . . . . . . . . . . . . . . . . . . . . . . . . . . . . . . . . . 1-5
Safety and Comfort . . . . . . . . . . . . . . . . . . . . . . . . . . . . . . . . . 1-5
Chapter 2 Setting Up Your Computer . . . . . . . . . . . . . . . . . . . . . 2-1
Your Presario 5000 Series at a Glance . . . . . . . . . . . . . . . . . . 2-2
What’s at the Front? (5000 Series) . . . . . . . . . . . . . . . . . 2-2
What’s at the Back? (5000 Series) . . . . . . . . . . . . . . . . . . 2-2
Your Presario 7000 Series at a Glance . . . . . . . . . . . . . . . . . . 2-3
Plug In and Go! . . . . . . . . . . . . . . . . . . . . . . . . . . . . . . . . . . . . . . . . 2-4
MY P
RESARIO—GETTING STARTED AND BEYOND
What’s at the Front? (7000 Series) . . . . . . . . . . . . . . . . . 2-3
What’s at the Back? (7000 Series) . . . . . . . . . . . . . . . . . . 2-3
Setting Up Your Computer . . . . . . . . . . . . . . . . . . . . . . . . . 2-4
C
ONTENTS
i

Registration . . . . . . . . . . . . . . . . . . . . . . . . . . . . . . . . . . . . . . . . . . . 2-5
Registering your PC . . . . . . . . . . . . . . . . . . . . . . . . . . . . . . . . 2-5
Microsoft product registration key . . . . . . . . . . . . . . . . . 2-5
Printer Setup . . . . . . . . . . . . . . . . . . . . . . . . . . . . . . . . . . . . . . . . . .2-6
Setting Up Your Printer . . . . . . . . . . . . . . . . . . . . . . . . . . . .2-6
Connecting your TV to your Computer . . . . . . . . . . . . . . . . . . 2-7
Networking Computers . . . . . . . . . . . . . . . . . . . . . . . . . . . . . . . . 2-8
What is a Home Network? . . . . . . . . . . . . . . . . . . . . . . . . . . 2-8
Setting Up a Network . . . . . . . . . . . . . . . . . . . . . . . . . . . . . . . . . .2-9
Installing the Network Protocols . . . . . . . . . . . . . . . . . . . .2-9
Mapping a Network Drive . . . . . . . . . . . . . . . . . . . . . . . . . 2-11
Securing Files . . . . . . . . . . . . . . . . . . . . . . . . . . . . . . . . . . . . . 2-11
Sharing Folders and Files . . . . . . . . . . . . . . . . . . . . . . . . . . 2-12
Sharing a Printer . . . . . . . . . . . . . . . . . . . . . . . . . . . . . . . . . . 2-12
C
ONTENTS
Sharing Internet Access . . . . . . . . . . . . . . . . . . . . . . . . . . . 2-12
Chapter 3 Windows Basics . . . . . . . . . . . . . . . . . . . . . . . . . . . . . . .3-1
Features of the Windows Desktop . . . . . . . . . . . . . . . . . . . . . . 3-2
Viewing the Windows Desktop . . . . . . . . . . . . . . . . . . . . . 3-2
Using the Start Menu . . . . . . . . . . . . . . . . . . . . . . . . . . . . . . 3-3
Help . . . . . . . . . . . . . . . . . . . . . . . . . . . . . . . . . . . . . . . . . . . . . . . . . . . 3-4
Accessing Online Help . . . . . . . . . . . . . . . . . . . . . . . . . . . . .3-4
Chapter 4 Using Your Computer . . . . . . . . . . . . . . . . . . . . . . . . . 4-1
Keyboard Basics. . . . . . . . . . . . . . . . . . . . . . . . . . . . . . . . . . . . . . . .4-2
Getting to Know the Standard Keyboard Keys . . . . . . . 4-2
Keyboard Language Setting . . . . . . . . . . . . . . . . . . . . . . . .4-3
ii MY P
RESARIO—GETTING STARTED AND BEYOND

Keyboard Buttons . . . . . . . . . . . . . . . . . . . . . . . . . . . . . . . . . . . . . 4-4
Using CD/DVD Control Buttons . . . . . . . . . . . . . . . . . . . . 4-4
Using Internet Zone Buttons . . . . . . . . . . . . . . . . . . . . . . . 4-5
Using Quick Launch Web Buttons . . . . . . . . . . . . . . . . . . 4-6
Assigning the My Program Button . . . . . . . . . . . . . . . . . .4-7
Adjusting the Volume . . . . . . . . . . . . . . . . . . . . . . . . . . . . . .4-7
Reassigning the My Program Button . . . . . . . . . . . . . . . 4-8
Customizing the Internet Zone Buttons . . . . . . . . . . . . 4-9
Putting Your Computer to Sleep . . . . . . . . . . . . . . . . . . 4-10
Waking Your Computer . . . . . . . . . . . . . . . . . . . . . . . . . . 4-10
Understanding the System Status Lights . . . . . . . . . . . 4-11
Cordless Scroll Mouse . . . . . . . . . . . . . . . . . . . . . . . . . . . . . . . . .4-12
Setting Up Your Cordless Scroll Mouse . . . . . . . . . . . . .4-12
Making Screen Selections . . . . . . . . . . . . . . . . . . . . . . . . . .4-13
MY P
RESARIO—GETTING STARTED AND BEYOND
Accessing Software and Files . . . . . . . . . . . . . . . . . . . . . . 4-13
Scrolling . . . . . . . . . . . . . . . . . . . . . . . . . . . . . . . . . . . . . . . . . .4-13
Autoscrolling . . . . . . . . . . . . . . . . . . . . . . . . . . . . . . . . . . . . .4-14
Speakers . . . . . . . . . . . . . . . . . . . . . . . . . . . . . . . . . . . . . . . . . . . . . .4-15
Turning on the Speakers . . . . . . . . . . . . . . . . . . . . . . . . . .4-15
Adjusting the Volume . . . . . . . . . . . . . . . . . . . . . . . . . . . . .4-15
Diskette, Hard Drive, CD-ROM, CD-RW
and DVD-ROM Drives . . . . . . . . . . . . . . . . . . . . . . . . . . . . . . . . . 4-16
Using the Diskette Drive . . . . . . . . . . . . . . . . . . . . . . . . . . 4-16
Using the Hard Drive . . . . . . . . . . . . . . . . . . . . . . . . . . . . . 4-16
Inserting a CD into the CD-ROM, CD-RW,
or DVD-ROM Drive . . . . . . . . . . . . . . . . . . . . . . . . . . . . . . . . . 4-17
C
ONTENTS
iii

Removing a Disc from a Drive . . . . . . . . . . . . . . . . . . . . . 4-18
Playing an Audio CD . . . . . . . . . . . . . . . . . . . . . . . . . . . . . . 4-18
Playing a DVD-ROM Movie . . . . . . . . . . . . . . . . . . . . . . . . 4-19
Creating Your Own CDs . . . . . . . . . . . . . . . . . . . . . . . . . . 4-20
Internet Video Camera . . . . . . . . . . . . . . . . . . . . . . . . . . . . . . . . 4-21
Using Logitech QuickCam Internet
Video Camera . . . . . . . . . . . . . . . . . . . . . . . . . . . . . . . . . . . . 4-21
Chapter 5 Connecting to the Internet . . . . . . . . . . . . . . . . . . . . . .5-1
Get Connected . . . . . . . . . . . . . . . . . . . . . . . . . . . . . . . . . . . . . 5-2
56K Modem. . . . . . . . . . . . . . . . . . . . . . . . . . . . . . . . . . . . . . . . . . . . 5-3
Identifying Your 56K Modem . . . . . . . . . . . . . . . . . . . . . . . 5-3
Using the ITU V.90 56K Standard Modem . . . . . . . . . . . 5-3
Surfing the Web . . . . . . . . . . . . . . . . . . . . . . . . . . . . . . . . . . . . . . . 5-4
Searching the Web . . . . . . . . . . . . . . . . . . . . . . . . . . . . . . . . . . . . . 5-5
C
ONTENTS
Content Advisor . . . . . . . . . . . . . . . . . . . . . . . . . . . . . . . . . . . . . . .5-6
Restricting Internet Content . . . . . . . . . . . . . . . . . . . . . . .5-6
E-mail . . . . . . . . . . . . . . . . . . . . . . . . . . . . . . . . . . . . . . . . . . . . . . . . . 5-7
Setting Up Outlook Express e-mail . . . . . . . . . . . . . . . . . 5-7
Typing an e-mail Message . . . . . . . . . . . . . . . . . . . . . . . . . 5-7
Understanding e-mail Addresses . . . . . . . . . . . . . . . . . . . 5-8
Sending an e-mail Using Outlook Express . . . . . . . . . . .5-9
Reading Your Outlook Express e-mail Messages . . . . .5-9
Advanced e-mail Functions. . . . . . . . . . . . . . . . . . . . . . . . . . . . 5-10
Sending an e-mail Attachment in Microsoft
Outlook Express . . . . . . . . . . . . . . . . . . . . . . . . . . . . . . . . . . 5-10
iv MY P
RESARIO—GETTING STARTED AND BEYOND

Opening an e-mail Attachment . . . . . . . . . . . . . . . . . . . . 5-11
Enabling and Disabling the Automatic
E-mail notification feature . . . . . . . . . . . . . . . . . . . . . . . . 5-12
Chapter 6 Common Tasks . . . . . . . . . . . . . . . . . . . . . . . . . . . . . . . 6-1
Print Basics . . . . . . . . . . . . . . . . . . . . . . . . . . . . . . . . . . . . . . . . . . . 6-2
Using the Menu to Print . . . . . . . . . . . . . . . . . . . . . . . . . . . 6-2
Games . . . . . . . . . . . . . . . . . . . . . . . . . . . . . . . . . . . . . . . . . . . . . . . . 6-3
Playing Preinstalled Games on Your Computer . . . . . 6-3
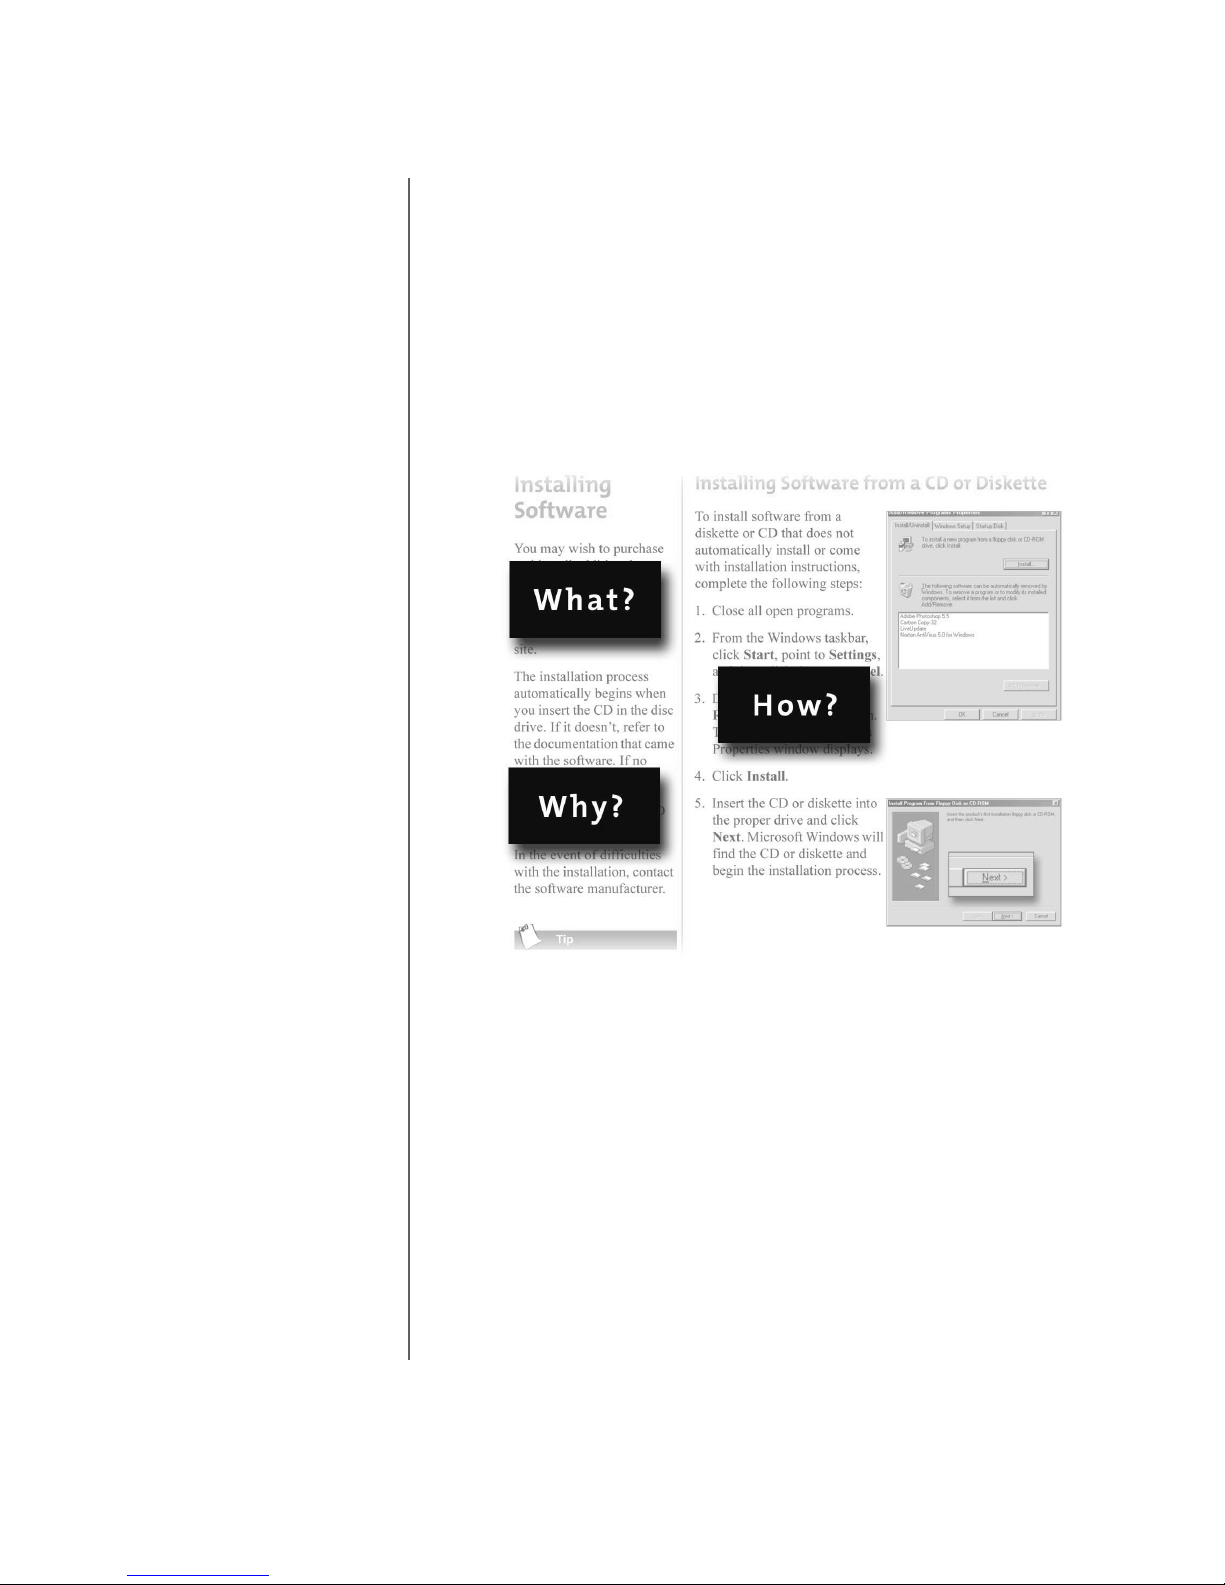
Software . . . . . . . . . . . . . . . . . . . . . . . . . . . . . . . . . . . . . . . . . . . . . . 6-4
Installing Software from a CD, DVD, or Diskette . . . . 6-4
Installing Software Downloaded from
the Internet . . . . . . . . . . . . . . . . . . . . . . . . . . . . . . . . . . . . . . . 6-5
Chapter 7 Computer Upgrades . . . . . . . . . . . . . . . . . . . . . . . . . . .7-1
Internal Components. . . . . . . . . . . . . . . . . . . . . . . . . . . . . . . . . . .7-2
Accessing Internal Computer Components . . . . . . . . . .7-2
Chapter 8 Getting Help . . . . . . . . . . . . . . . . . . . . . . . . . . . . . . . . . 8-1
MY P
RESARIO—GETTING STARTED AND BEYOND
Upgrading Components . . . . . . . . . . . . . . . . . . . . . . . . . . . . . . . .7-3
Upgrading the CD-ROM, CD-RW, and
DVD-ROM Drives . . . . . . . . . . . . . . . . . . . . . . . . . . . . . . . . . . .7-3
Upgrading Computer Memory . . . . . . . . . . . . . . . . . . . . . 7-6
Determining Your Hard Drive Size . . . . . . . . . . . . . . . . . .7-7
Adding Components . . . . . . . . . . . . . . . . . . . . . . . . . . . . . . . . . . 7-8
Adding an Additional Hard Drive . . . . . . . . . . . . . . . . . . 7-8
Adding an Expansion or Option Card . . . . . . . . . . . . . . 7-9
Helpful Hints. . . . . . . . . . . . . . . . . . . . . . . . . . . . . . . . . . . . . . . . . . 8-2
Entering BIOS (CMOS) Setup . . . . . . . . . . . . . . . . . . . . . . . 8-2
Contacting Technical Support . . . . . . . . . . . . . . . . . . . . . 8-2
C
ONTENTS
v

Recovery Process . . . . . . . . . . . . . . . . . . . . . . . . . . . . . . . . . . . . . . . 8-3
Compaq “QuickRestore” Software Tools . . . . . . . . . . . .8-3
Using the “QuickRestore” Tools . . . . . . . . . . . . . . . . . . . . .8-4
Creating an Emergency Recovery Diskette . . . . . . . . . . 8-5
User Backup . . . . . . . . . . . . . . . . . . . . . . . . . . . . . . . . . . . . . . .8-6
Increasing the Size of the User Backup Partition . . . . .8-7
User Restore . . . . . . . . . . . . . . . . . . . . . . . . . . . . . . . . . . . . . . .8-8
Factory Restore . . . . . . . . . . . . . . . . . . . . . . . . . . . . . . . . . . . .8-9
Exiting the Compaq Recovery CD . . . . . . . . . . . . . . . . . .8-10
Selective Restore . . . . . . . . . . . . . . . . . . . . . . . . . . . . . . . . . . 8-11
Troubleshooting . . . . . . . . . . . . . . . . . . . . . . . . . . . . . . . . . . . . . . 8-12
Audio . . . . . . . . . . . . . . . . . . . . . . . . . . . . . . . . . . . . . . . . . . . . 8-12
CD-ROM, CD-RW, or DVD-ROM . . . . . . . . . . . . . . . . . . . . 8-14
Diskette Drive . . . . . . . . . . . . . . . . . . . . . . . . . . . . . . . . . . . . 8-15
C
ONTENTS
Display (Monitor) . . . . . . . . . . . . . . . . . . . . . . . . . . . . . . . . . 8-18
Hard Drive . . . . . . . . . . . . . . . . . . . . . . . . . . . . . . . . . . . . . . . 8-20
Internet Access . . . . . . . . . . . . . . . . . . . . . . . . . . . . . . . . . . .8-22
Keyboard and Cordless Scroll Mouse . . . . . . . . . . . . . . .8-23
Memory . . . . . . . . . . . . . . . . . . . . . . . . . . . . . . . . . . . . . . . . . .8-25
Power . . . . . . . . . . . . . . . . . . . . . . . . . . . . . . . . . . . . . . . . . . . 8-26
Printer . . . . . . . . . . . . . . . . . . . . . . . . . . . . . . . . . . . . . . . . . . .8-28
Fax Modem . . . . . . . . . . . . . . . . . . . . . . . . . . . . . . . . . . . . . . 8-31
Games . . . . . . . . . . . . . . . . . . . . . . . . . . . . . . . . . . . . . . . . . . .8-33
vi MY P
RESARIO—GETTING STARTED AND BEYOND

Chapter 9 Preventative Maintenance . . . . . . . . . . . . . . . . . . . . . 9-1
What is Preventative Maintenance?. . . . . . . . . . . . . . . . . . . . 9-2
Backing Up Your Files. . . . . . . . . . . . . . . . . . . . . . . . . . . . . . . . . . 9-3
Using Microsoft Backup . . . . . . . . . . . . . . . . . . . . . . . . . . . 9-3
Deleting Unwanted Files . . . . . . . . . . . . . . . . . . . . . . . . . . . . . . 9-4
Taking Inventory of Your Hard Disk . . . . . . . . . . . . . . . . 9-4
Increasing Temporary Internet File Space . . . . . . . . . . 9-5
Deleting the Internet History File . . . . . . . . . . . . . . . . . . 9-6
Emptying the Recycle Bin . . . . . . . . . . . . . . . . . . . . . . . . . . 9-7
Optimizing the Computer Hard Disk . . . . . . . . . . . . . . . . . . . 9-8
Using ScanDisk . . . . . . . . . . . . . . . . . . . . . . . . . . . . . . . . . . . 9-8
Using Disk Defragmenter . . . . . . . . . . . . . . . . . . . . . . . . . . 9-8
Anti-Virus Software . . . . . . . . . . . . . . . . . . . . . . . . . . . . . . . . . . . 9-9
Installing Anti-Virus Software . . . . . . . . . . . . . . . . . . . . . 9-9
MY P
RESARIO—GETTING STARTED AND BEYOND
Uninstalling your Anti-Virus Software . . . . . . . . . . . . . 9-9
Scanning for Viruses . . . . . . . . . . . . . . . . . . . . . . . . . . . . . . 9-9
Updating McAfee VirusScan . . . . . . . . . . . . . . . . . . . . . . 9-10
Upgrading McAfee VirusScan software . . . . . . . . . . . 9-10
Creating an Anti-Virus Emergency Diskette . . . . . . . . 9-11
Compaq Support . . . . . . . . . . . . . . . . . . . . . . . . . . . . . . . . . . . . . .9-12
Compaq Service Connection . . . . . . . . . . . . . . . . . . . . . . .9-12
Diagnosing Symptoms . . . . . . . . . . . . . . . . . . . . . . . . . . . .9-13
C
ONTENTS
vii

Chapter 10 Creating Your Own CDs . . . . . . . . . . . . . . . . . . . . . .10-1
CD-RW Drive . . . . . . . . . . . . . . . . . . . . . . . . . . . . . . . . . . . . . . . . . . 10-2
Creating CDs with a CD-RW Drive . . . . . . . . . . . . . . . . . . 10-2
Adaptec Easy CD Creator . . . . . . . . . . . . . . . . . . . . . . . . . . . . . . 10-3
Installing Adaptec Easy CD Creator Software . . . . . . . 10-3
Using Easy CD Creator. . . . . . . . . . . . . . . . . . . . . . . . . . . . . . . . . 10-5
Starting Easy CD Creator . . . . . . . . . . . . . . . . . . . . . . . . . . 10-5
Creating Audio and Data CDs. . . . . . . . . . . . . . . . . . . . . . . . . .10-6
Creating an Audio CD . . . . . . . . . . . . . . . . . . . . . . . . . . . . .10-6
Creating a Data CD . . . . . . . . . . . . . . . . . . . . . . . . . . . . . . . 10-7
Copying Data from a CD with Easy CD Creator. . . . . . . . . . 10-8
Duplicating a CD . . . . . . . . . . . . . . . . . . . . . . . . . . . . . . . . . .10-8
What is DirectCD? . . . . . . . . . . . . . . . . . . . . . . . . . . . . . . . .10-9
Jewel Case Creator . . . . . . . . . . . . . . . . . . . . . . . . . . . . . . . . . . . 10-13
C
ONTENTS
Using Jewel Case Creator . . . . . . . . . . . . . . . . . . . . . . . . . 10-13
Troubleshooting . . . . . . . . . . . . . . . . . . . . . . . . . . . . . . . . . . . . . 10-16
Getting Help . . . . . . . . . . . . . . . . . . . . . . . . . . . . . . . . . . . . . 10-16
Chapter 11 Government Approvals . . . . . . . . . . . . . . . . . . . . . . . 11-1
Notices and Regulations . . . . . . . . . . . . . . . . . . . . . . . . . . . . . . 11-2
Federal Communications Commission Notice . . . . . . 11-2
Modifications . . . . . . . . . . . . . . . . . . . . . . . . . . . . . . . . . . . . . .11-3
European Union Notice
(Declaration of Conformity) . . . . . . . . . . . . . . . . . . . . . . . 11-4
Telecom Network Approvals . . . . . . . . . . . . . . . . . . . . . . . . . . . .11-5
Telecommunications Device Approvals . . . . . . . . . . . . .11-5
Ringer Equivalence Number (REN) . . . . . . . . . . . . . . . . . 11-6
viii MY P
RESARIO—GETTING STARTED AND BEYOND

Glossary
Safety and Compliance Statements . . . . . . . . . . . . . . . . . . . . 11-8
Safety . . . . . . . . . . . . . . . . . . . . . . . . . . . . . . . . . . . . . . . . . . . . 11-8
Important Safety Instructions . . . . . . . . . . . . . . . . . . . . . 11-8
Batteries . . . . . . . . . . . . . . . . . . . . . . . . . . . . . . . . . . . . . . . . . . 11-9
Energy Compliance. . . . . . . . . . . . . . . . . . . . . . . . . . . . . . . . . . . 11-10
Energy Star Compliance . . . . . . . . . . . . . . . . . . . . . . . . . . 11-10
Using the Computer . . . . . . . . . . . . . . . . . . . . . . . . . . . . . . .11-11
MY P
RESARIO—GETTING STARTED AND BEYOND
C
ONTENTS
ix

C
ONTENTS
x MY P
RESARIO—GETTING STARTED AND BEYOND
Introduction
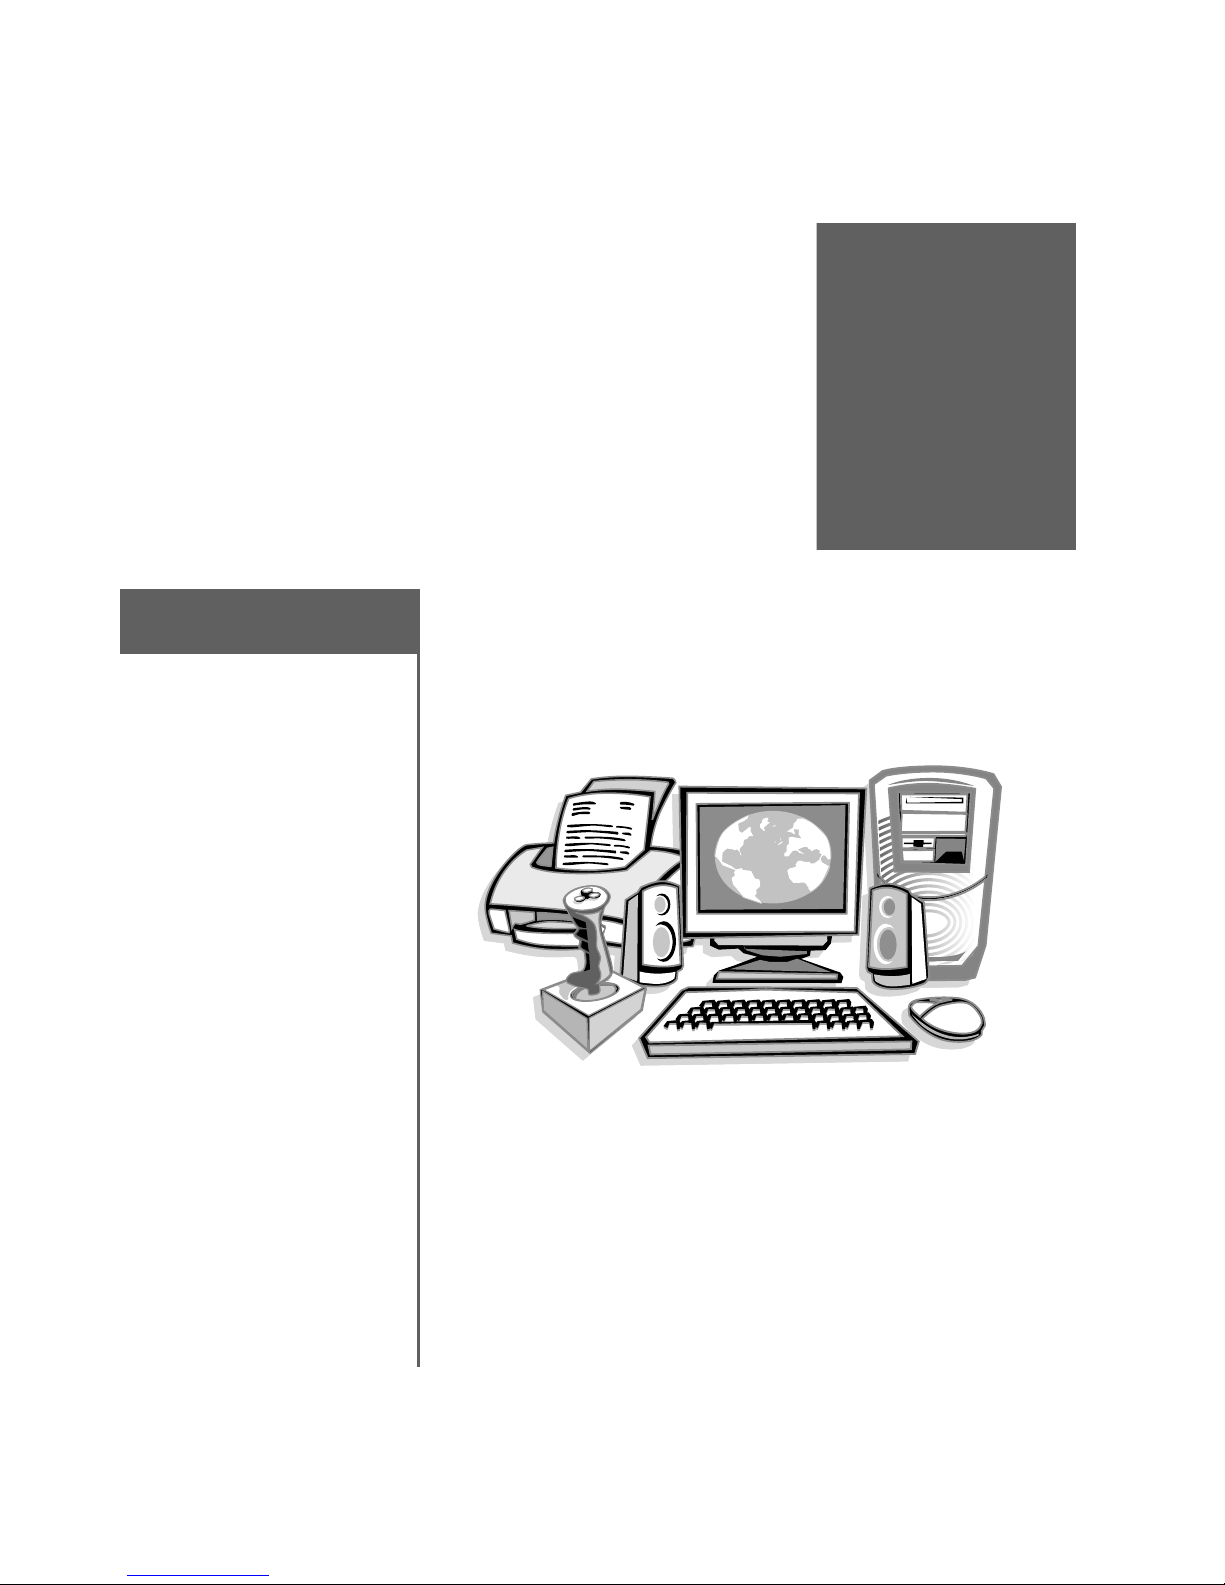
Congratulations! As the owner of a new Compaq Internet PC,
In This Chapter
Who Should Read This
Guide?, 1-2
Symbols and Graphics
Used, 1-3
Where Can I Find
Information?, 1-4
Safety, 1-5
you have joined the world-wide community of Presario
computer users. Once your compute r is set up and connected to
the Internet, you can explore vast regions of information,
entertainment, and online services.
1
MY P
RESARIO—GETTING STARTED AND BEYOND
This guide is designed to help you:
Get acquainted with computer features you’ll want to try
➜
during the first few days or weeks.
Keep your computer r unni ng smoothly with the tool s on y our
➜
computer.
Solve problems if they occur.
➜
I
NTRODUCTION
1-1
Who Should
Read This
Who Should Read This Guide?
Using My Presario—Getting Started and
Beyond
Guide?
This guide is designed for
both beginners and
experienced computer
users. You can read from
cover to cover to learn
basic information about
your computer or scan the
guide for information on a
specific topic.
The Glossary, at the back
of this guide, has brief
definitions of compute r
terms in everyday
language.
This chapter shows you
how to use this guide and
directs you to other
sources of information.
This easy- to-scan guide helps you f ind the infor mation you want
as quickly as possible. The page layout lets you see, at a glanc e,
how the information is organized.
1-2 I
NTRODUCTION
The first column lists major topics. It explains
why
and
warnings and use ful tips, and it directs you to additional
reference material as needed.
The second column explains
contains step-by-step instructions.
The third column uses graphics to help you visualize the task
and to validate what you are doing as you do it. Complex or
detailed graphics may span both columns.
it is important to you. This col umn also lists important
how
to perform a procedure. It
MY P
RESARIO—GETTING STARTED AND BEYOND
what
the topic is
Symbols and
Graphics Used
Symbols and Graphics Used
The following words and symbols have special meaning in this
guide:
Warnings and cautions are
displayed to protect you
from injury, your
equipment from damage,
and your files from data
loss.
Caution:
▲
equipment or loss of data.
Failure to follow directions may result in damage to
Failure to follow directions
may result in bodily harm or
loss of life.
Understanding the background
or concept may help you solve
a problem.
Helpful hints make using your
computer easier and faster.
Another document or another
page in this document has
related information.
MY P
RESARIO—GETTING STARTED AND BEYOND
Computer Illustrations and Features
The computer illustrations shown and the featur es described in
this guide may differ slightly from your Compaq Presario
Internet PC.
I
NTRODUCTION
1-3
Where Can I
Where Can I Find Information?
Warranty Certificate
Find
Information?
Information is available in
several form s : prin te d
documents, and the
Compaq W eb s ite. Use this
guide as your f irst point of
reference, and then refer to
the following document s:
Quick Set-Up poster
➜
Warranty Ce rt if icat e
➜
Getting Started:
➜
Microsoft Windows
manual
The warranty details Compaq’s commi tment to repair or repl ace
parts during the warranty period, and it lists important Compaq
telephone numbers.
Keep the warranty in a safe place for future reference.
Replacing Parts
The Easy Access design of your Internet PC allows you to
access internal components: in most cases, without using any
tools.
Upgrading Your Computer
Expand your Presario performance with upgrades like memory
and additional peripherals, such as digital cameras and printers.
To learn mo r e, visi t the Onli ne St o re at:
http://www.compaq.co.uk
The Compaq Web site is
availabl e wor ldwide. As you
explo re the I n te r n et , go to
the following address for
information about products,
services, and other activities:
http://www.compaq.co.uk
1-4 I
NTRODUCTION
MY P
RESARIO—GETTING STARTED AND BEYOND
Safety
Safety
Safety and Comfort
Your computer is an
electrical device. Treat it
with care to avoid pe rsonal
injury and damage to the
equipment.
To reduce the risk of electric
shock and damage to th e
equipment, read the Safety
and Comfort document
before performing any
pr oce dures involving the
internal components of your
computer.
The Compaq
Safety and Comfort Guide
contains Safety and
Comfort information on how to:
Set up your work area for maximum comfort.
➜
Practice good postu re, ha nd position , work hab its, a nd health
➜
habits while using your computer.
Use a grounding plug to prevent electrical shorts, shocks, or
➜
fires.
Become static-free before removing the side panel.
➜
During an electrical storm,
disconnec t your computer
(and all peri pherals) fr om the
power source.
MY P
RESARIO—GETTING STARTED AND BEYOND
I
NTRODUCTION
1-5

1-6 I
NTRODUCTION
MY P
RESARIO—GETTING STARTED AND BEYOND
Setting Up
Your
Computer
Your Internet PC is designed for complete ease of use—from
In this chapter
Your Presario 5000 Series
at a Glance, 2-2
Your Presario 7000 Series
at a Glance, 2-3
Plug In and Go!, 2-4
setting up to upgrading new components. This chapter
introduces you to the internal and external features of your
computer. It also walks you through the process of registering
your computer and setting up an Internet Service Provider (ISP)
account. The remaining chapters of this guide show you how
easy it is to use your Compaq Presario.
Note:
Illustrations and features shown may differ slightly from your
Computer.
2
Registration, 2-5
Printer Setup, 2-6
Connecting your TV to
your Computer, 2-7
Networking Computers,
2-8
Setting Up a Network, 2-9
MY P
RESARIO—GETTING STARTED AND BEYOND
S
ETTING UP YOUR COMPUTER
2-1
Your Presario
5000 Series at
aGlance
Before you begin, you’ll
want to become familiar
with the com p onents o f
your Compaq Presario
5000 series.
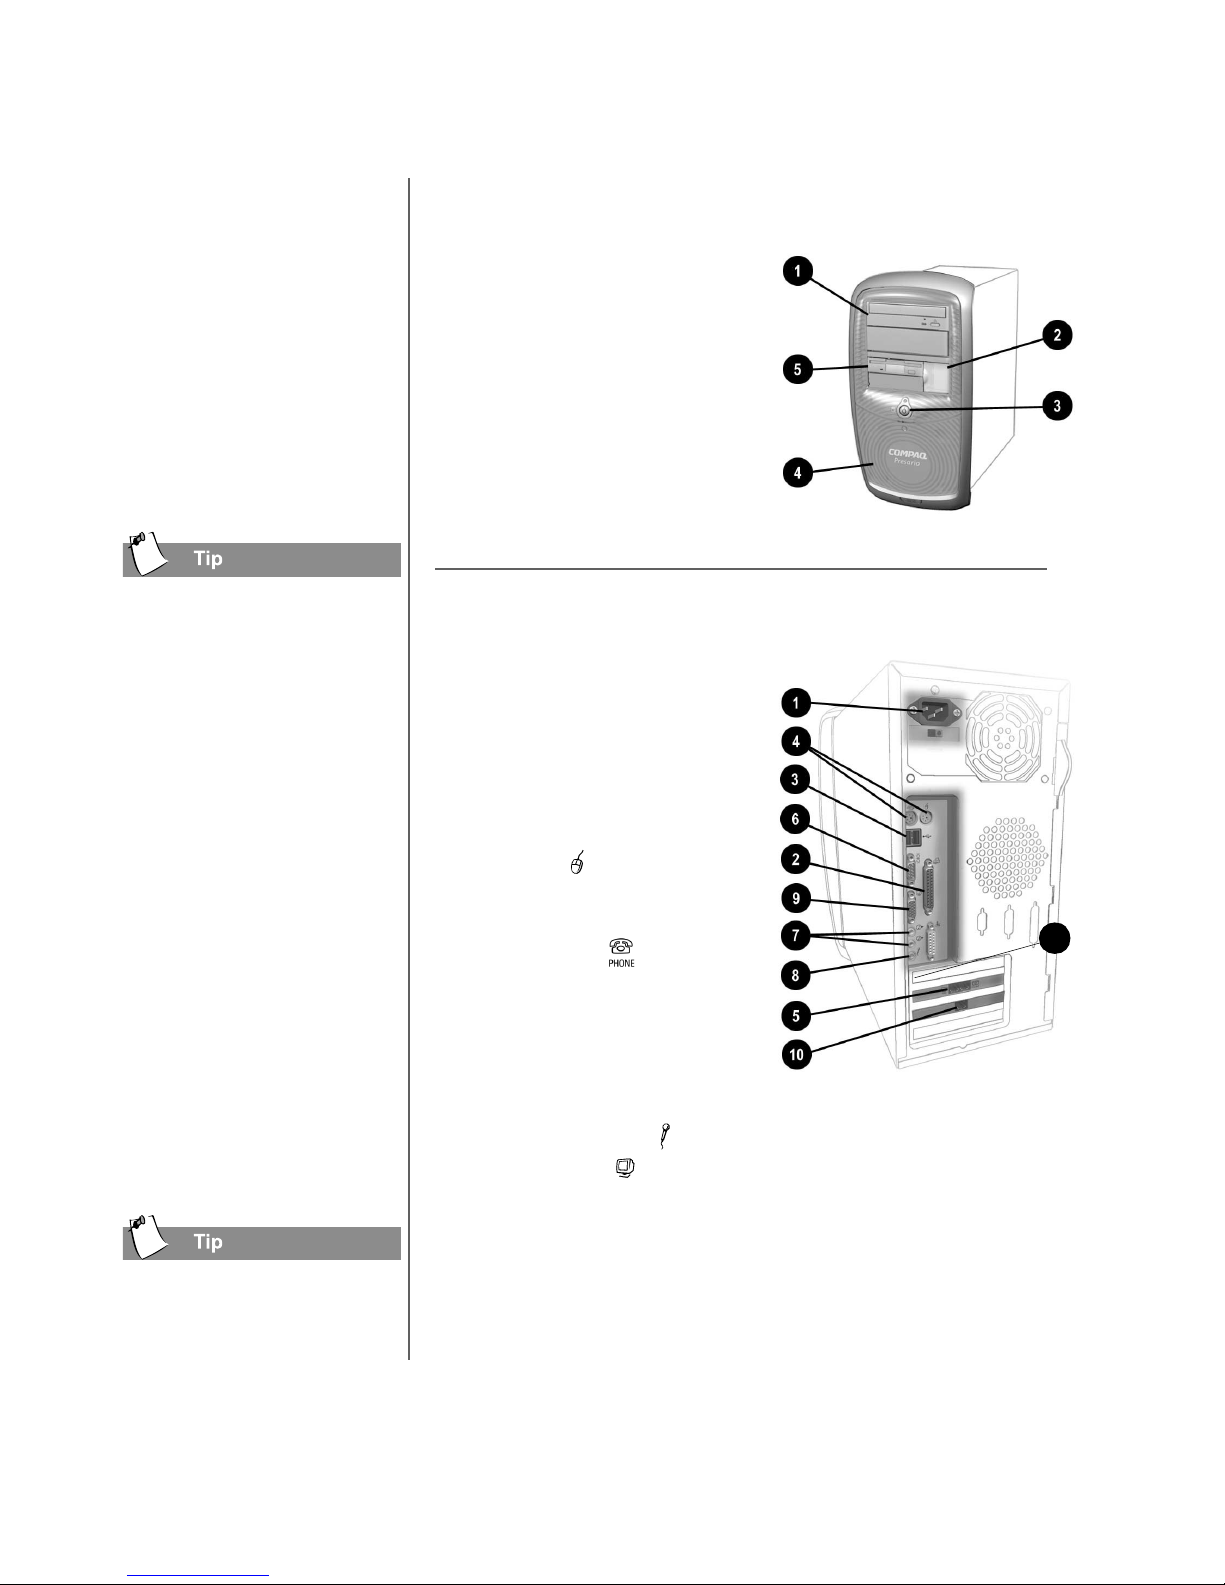
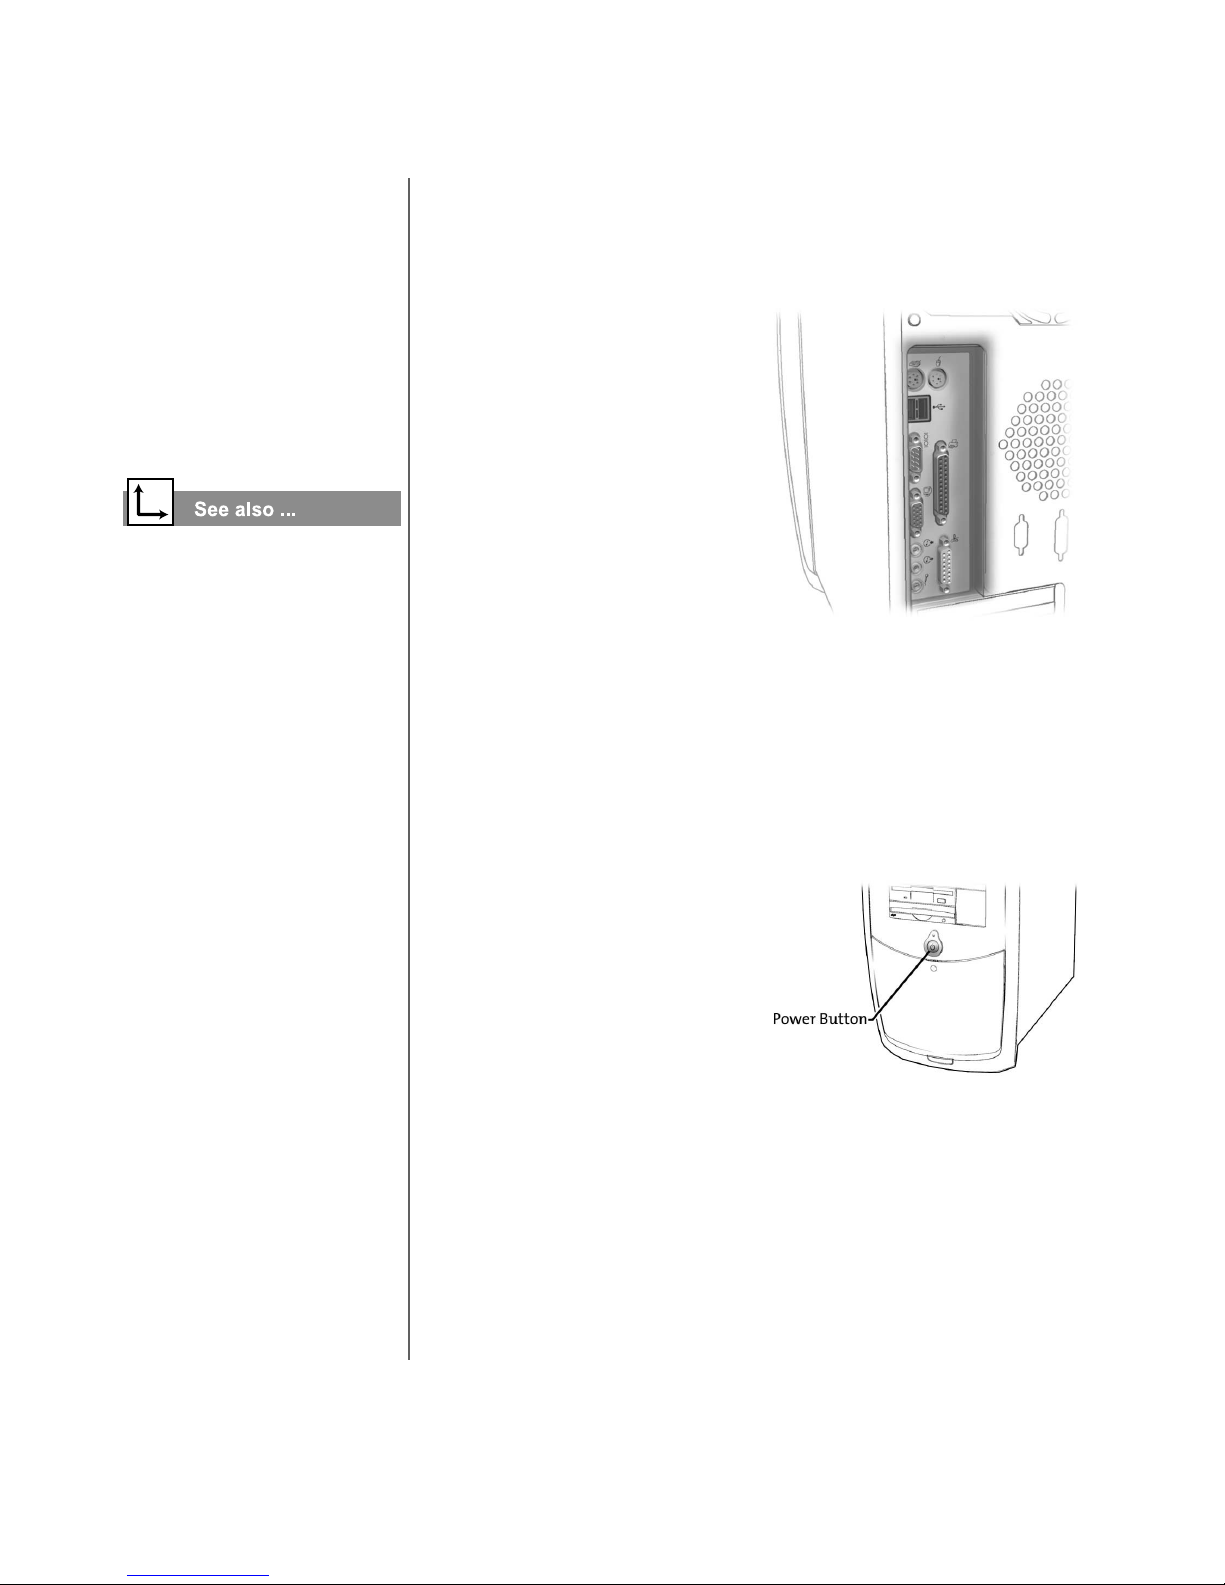
Your Presari o 5000 S eries at a Gla nce
What’s at the Front? (5000 Series)
CD-ROM , CD - RW, or
1
DVD-ROM drive
Two USB connectors for
2
connecting USB devices,
such as gamepa ds, joystic ks,
and video cameras
Power button
3
CD storage for storing a
4
maximum of five CDs
Diskette drive
5
Some com p onents have
colour- c ode d connec tors th at
match the ports on the back
of your computer.
Always make sure that you
follow the colour coding,
connecting the same colour
connector to the same colour
port.
What’s at the Back? (5000 Series)
Power port
1
Parallel port for connecting
2
peripheral devices, such as
printers
USB port for connecting an
3
Internet keyboard or other
USB devices
PS2 port for connecting a
4
keyboard, mouse, or mouse
receiver
Modem port for
5
connecting to a phone line
Serial port for connecting a
6
peripheral device
Audio ports (Audio In =
7
middle; Audio Out = top)
Microphone port
8
Monitor port (selected models only)
9
Ethernet port for connecting to an Ethernet network
-
(if equipped)
9
See “Connecting your TV to
your computer” later in the
chapter.
2-2 S
ETTING UP YOUR COMPU TER
Select models of f er TV Out functi onal ity. The S-VHS connector
is located next to the VGA monitor connector.
Note:
Connectors may vary by model.
MY P
RESARIO—GETTING STARTED AND BEYOND
Your Presario
7000 Series at
aGlance
Before you begin, you’ll
want to become familiar
with the com p onents o f
your Compaq Presario
7000 series.
Some com p onents have
color-coded connectors that
match the ports on the back
of your computer.
Select models offer TV Out
functionality. The S-V HS
connector is located next to
the VGA monitor conne ctor.
Your P resar io 7000 Seri es at a Gla nce
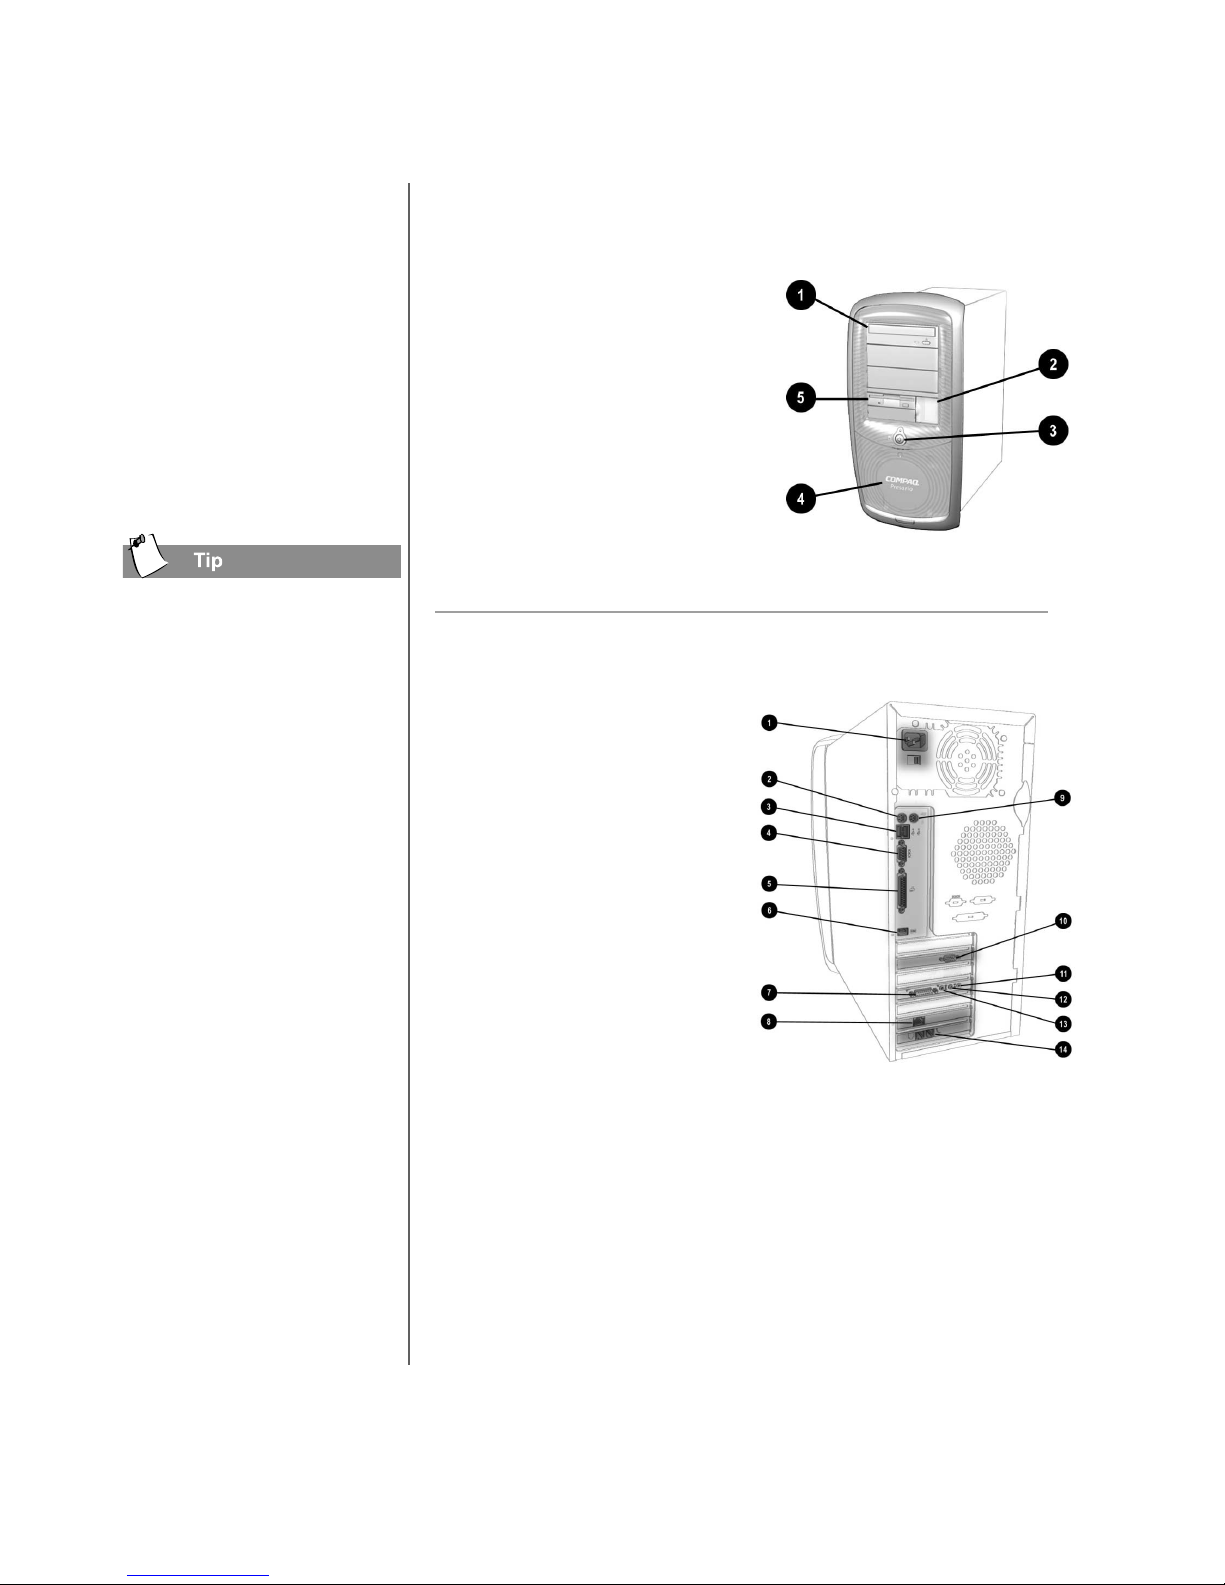
What’s at the Front? (7000 Series)
CD-ROM , CD - RW, or
1
DVD-ROM drive
Dual USB and 1394 (varies
2
by model) port for
connecting peripheral
devices, such as gamepads,
joysticks, and video cameras
Power button
3
CD storage for storing a
4
maximum of five CDs
Diskette drive
5
What’s at the Back? (7000 Series)
Power port
1
PS2 port for connecting a
2
keyboard, mouse, or
mouse rece iv er
USB port for connecting
3
an Internet keyboard or
other USB devices
Serial port
4
Parallel port
5
1394 high speed port
6
Game/MIDI port
7
Ethernet port (if equippe d)
8
PS2 port for connecting a
9
mouse
SVGA connector to connect a m onitor
:
Audio Out for connecting your speakers (light green)
;
Audio In for connecting audio devices (light blue)
<
Microphone port (light pink)
=
Modem port
>
MY P
RESARIO—GETTING STARTED AND BEYOND
Note:
The Soundblaster LIVE soundcard is equipped with 2 additional ports:
the SPDIF Digital Out (yellow) and an additional audio out (black).
Note:
Connectors may vary by model.
S
ETTING UP YOUR COMPUTER
2-3
Plug In and Go!
Plug In and Go!
Setting Up Your Computer
If a cable is disconnected
or you move your
computer to another
location, this topic helps
you to quickly set up
again.
The Quick Set-Up poste r that
came wit h yo u r com pu ter is a
visual guide to setting up
your computer.
Note:
Do not set up the printer until your computer has been set up.
1. Connect the monitor
according to the colour
coding, icons, and the
instructions from the
monitor manufacturer.
2. Connect the speaker cable
and microphone cable (if
applicable).
3. Connect the power cable.
4. Connect the keyboard to the
rear USB port and the mous e
or mouse receiver to the PS2
port (green).
5. Connect the telephone cable
between the Modem Line In
~
port and your telephone line
socket.
2-4 S
ETTING UP YOUR COMPU TER
6. Plug the monitor and
computer power cables into
the wall outlet.
7. Tur n on the monitor and
press the
Power
button to
1
turn on your computer.
Note:
If you are setting up your
computer for the first time, follow the on-screen instructions to register
both your operating system and your computer. The next two topics
discuss the registration process.
MY P
RESARIO—GETTING STARTED AND BEYOND

Registration
Registration
Registering your PC
The first time you turn on
your computer , you will be
guided through the
registration process before
accessing the Windows
desktop. It is very
important tha t you register
Windows with Microsoft.
Registration activates the
warranties by entering your
serial numbers in the
manufacturer s’ databases.
Anytime you install new
software or hardware, be
sure to register it with the
manufacturer to activate the
warranty.
To register the Windows operating system with Microsoft,
follow the on-screen instructions. Aft er e ntering the appropriate
information on each screen, click the
Next
button to move to the
next screen.
Registering with Microsoft enables you to receive technica l
support for the Windows operating system, sof tware updates,
and notices about new Microsoft products.
Microsoft product registration key
If you ever need the Microsoft Product key, you can find this on
the Microsoft Certificate of Authenticity (COA) sti cker on the
back of your PC.
This number is important, as it is required to access your
Windows Operatin g System for the first time. It is also requ ired
anytime you restore the software to its original factory
condition.
MY P
RESARIO—GETTING STARTED AND BEYOND
S
ETTING UP YOUR COMPUTER
2-5
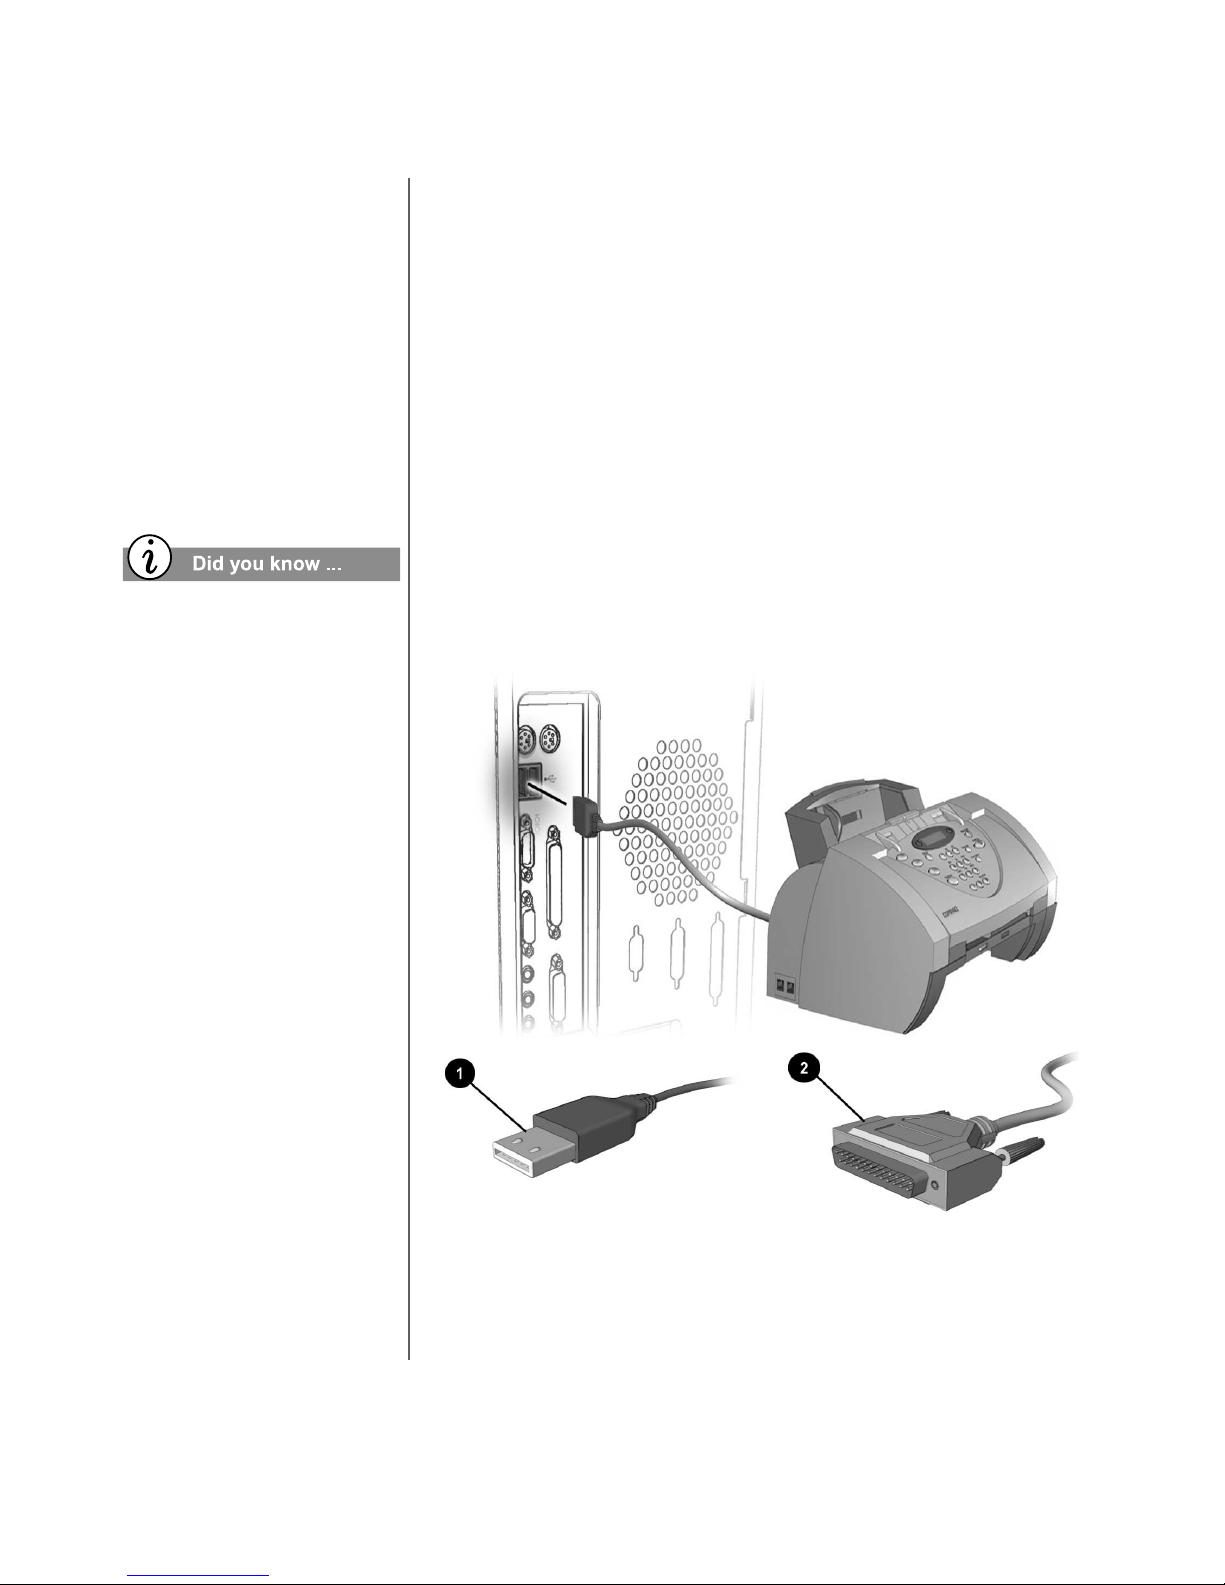
Printer Setup
Printer Setup
Setting Up Your Printer
After setting up and
registering your computer,
you are ready to set up
your printer.
A printer allows you to
print any document from
your e-mail, and Web
sites.
Most new computers have a
Universal Serial Bus (USB)
port for a new printer that
uses the latest technology.
Older printer s, which plug
into a parallel port, cannot
be connected to a USB port.
Your printer may use a USB
plug
parallel plug
installation.
(rather than a
1
) for
2
1. Complete “Plug In and Go!” and “Registration” first
(described on previous pages).
2. Set up the printer according to the printer manufacturer’s
instructions.
3. Connect the printer to the back of your computer according to
the icons.
4. Tur n on your computer (if it’s not already on).
5. Tur n on the printe r.
6. Follow the on-screen instructions. If prompted, insert the
printer set-up software.
2-6 S
ETTING UP YOUR COMPUTER
Note:
Location and style of connectors may vary by model.
MY P
RESARIO—GETTING STARTED AND BEYOND

Connecting
your TV to
your Computer
Connecting your TV to your Computer
Some Presario models are equipped with a TV Out feature.
You need an S-VHS cable to make the connection. The S-VHS
connector is located right beside the VGA monitor connector at
the back of your PC.
To enable the TV Out feature:
1. Connect the S-Video Cable to the TV Out Card on your PC
and to th e TV.
2. Close all applications and restart the unit.
3. Right click on the desktop and select
4. Select the
5. Click on
Settings
tab.
Advanced.
This will open Properties for
NVIDATNT2.
6. Click on the
7. Select TV. Click on
Output Device
Change Format to
Tab.
according to what country you are in.
8. Change the Video Output Format from
S-Video-Out
Auto Select
9. Click
Apply
10. On the TV click
. Depending on the connection with your TV
can be left on.
then Click
Yes
OK
to change to TV.
to accept the output.
Properties
.
change the format
Auto Select
to
,
MY P
RESARIO—GETTING STARTED AND BEYOND
S
ETTING UP YOUR COMPUTER
2-7

Networking
Computers
A network, in its simplest
terms, is two or more
computers connected to
each other. Each computer
must have a network
adapter card installe d. The
adapter cards are then
connected t o eac h oth er
with some form of
communication cable.
Networks are created so
that one computer can use
a device – such as a colour
printer – that is connected
to a different comp uter.
Networking Computers
What is a Home Network?
A home network can be used to share a single Internet
connection among several computers or to share files between
computers on the network.
A home network can be a s simple or compli cated a s you want. It
can consist of two computers linked to share files and an
Internet connection, or it can be expanded to a complex
household network with many computers connected at once.
The benefits of home networking include the following:
Simultaneous Int erne t connections
➜
Multiple computers sharing one printer, modem, scanner,
➜
and other equipment
Sharing files and applications
➜
Multi-player ga ming
➜
All home networks are compatible with the following Internet
access methods:
Analogue, dial-up modem (56K ITU V.90)
➜
Digital xDSL modem
➜
Cable modem
➜
ISDN modem
➜
The modem installed in your Internet Presario PC is a 56K data/
fax modem.
2-8 S
ETTING UP YOUR COMPUTER
MY P
RESARIO—GETTING STARTED AND BEYOND
Setting Up a
Network
To set up a network, you
must:
Install the network
➜
protocols and se rvices
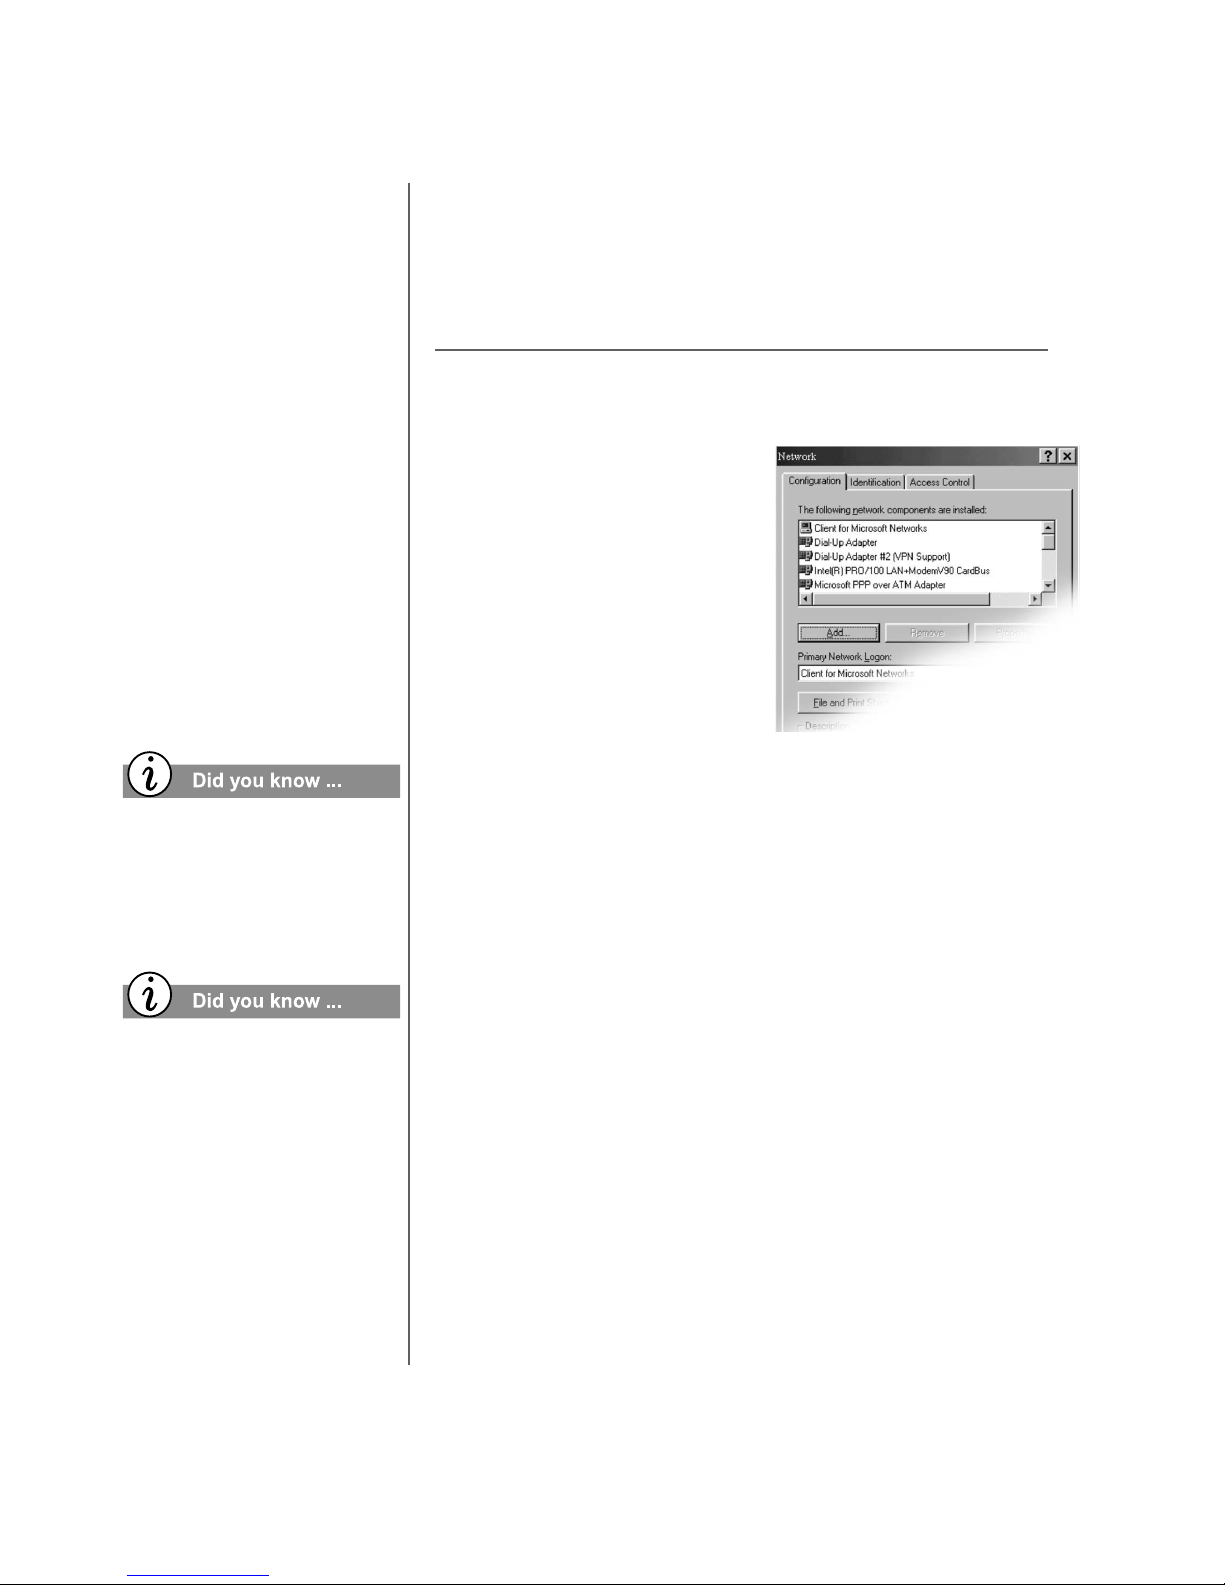
Setting Up a Network
Your network protocols should alrea dy be installed, however, if
these are accidental ly delet ed you can re-instal l them, and set up
your network again by following these instructions.
Installing the Network Protocols
Map the network drive
➜
Share printers and
➜
folders
However, the easiest way
is to use t he network setup
wizard that is provided
with your network
hardware.
The Network Neighbourhood
icon will not appear on the
W indows des ktop until the
network protocols are
installed.
A protocol is the language
compu te rs us ed to
communicate over a ne tw ork.
Computers must use the same
pr otocol t o communica te w ith
one another.
1. If a network is not yet set up,
from the Windows desktop
Start
click
Settings
Control Panel
, point to
, and then click
.
2. Double-click the
Network
3. When the message
icon.
Your
network is not complete.
Do you want to c ontinue?
displayed, click
Yes
.
4. In the Network window, the
OK
Add
.
Client
and click
Microsoft
Client for Microsoft Networks
.
File and Print Sharing…
a. Click
b. Select
c. Select
d. Select
e. Select
is
Configuration
Add
.
.
boxes.
f. Click OK. In the Network window, the
tab is displayed. Cli ck
Add
.
tab is displayed:
, and then click
, then select both check
Configuration
MY P
RESARIO—GETTING STARTED AND BEYOND
5. In the Select Network Component Type window:
a. Click
b. Click
Protocol
Add
.
.
S
ETTING UP YOUR COMPUTER
2-9

c. Select
Microsoft
.
d. Click
e. Select
f. Select
Add
.
Microsoft
TCP/IP
.
.
g. Click OK.
6. Select the
Identifica ti on Tab
in the Network window and
complete the following steps:
a. Type a name for the c omputer. This name m ust be unique
– different from the name of every othe r computer in the
network. The name can contai n a maximum of 15 letters,
numbers, and the followi ng special characters:
! @ # $ % ^ & ( ) - _ ' {} ~
not
Do
use blank spaces in the Computer name box.
b. Type a Workgroup name. If you would l ike all computers
to have access to each other, the Workgroup name must
be the same for all of the computers on the network. The
name can contain a maximum of 15 letters , numbers, and
the following special characters:
! @ # $ % ^ & ( ) - _ ' {} ~
not
Do
use blank spaces in the Workgroup name box.
2-10 S
ETTING UP YOUR COMPUTER
c. Click OK. The
displayed. Clic k
System Settings Change
Yes
to restart your computer. The
window is
Microsoft Networking window is displayed.
7. Complete the following steps:
a. Type a User name. Your user name needs to be easy to
remember because you will use it every time you log on
to your network.
b. Type a Password.
c. Click OK.
8. Close the Control Panel window.
9. Repeat this procedure to add the next computer to the network.
MY P
RESARIO—GETTING STARTED AND BEYOND

Mapping a Network Drive
Mapping to a directory means making a permanen t connection
to another computer.
Do this by clicking on Tools on the Windows Explorer taskbar,
choose the option
Map Network Drive
. Map the drive to the
path of your choice.
For furthe r ins tructions a bout dr ive m apping, refer to the Getting
Started Microsoft Windows documentation that came with your
computer.
Securing Files
Microsoft Networking enables file sharing at the folder level;
that is, either all or none of the files in a folder must be shared.
You cannot share some files in a folder and keep others private.
If you want to share files on the network, you should create a
special folder for those files and share only that folder. This
feature allows file sharing while keeping all programs and
sensitive files on your hard drive secure.
MY P
RESARIO—GETTING STARTED AND BEYOND
S
ETTING UP YOUR COMPUTER
2-11
To access a shared folder on
another computer
automatically each time you
turn on your computer and
log on to the networ k, you
must map to the network
drive first.
Sharing Folders and Files
Sharing folde r s can be very useful if you have a lar ge amount of
data that you want to share with someone else. Remember,
however , th at any one with who m you sha re files c an a dd, del ete,
and modify informati on.
For informa tio n on h ow t o creat e sha red folders and files, refer
to the Microsoft Windows documentation that came with your
computer.
Sharing a Printer
To prevent others on the
network from accessing
sensiti ve files on your
computer, you can set the
access level of a folder by
adjusting the shared files
properties.
While two or more use rs are
online, they share the
bandwidth of the connection,
which means that it may take
longer to download files.
One of the advantages of installing a network is the ability to
share resources, such as a printer.
After a printer is set up for sharing, all your networked
computers can acce ss it. The Microsof t W indows documentation
that came with your computer provides information about
setting up a printer for sharing, and connecting to it.
Sharing Internet Access
With home networking, multiple family members can
simultaneous ly surf the Internet from diffe rent computers using
a single ISP account. This is accom plished by designating the
computer that is physically connecte d to the Internet as the
Internet-Sharing PC. Its connection provide s all the other
network computers (referred to as “client computers”) with
Internet acce s s.
2-12 S
ETTING UP YOUR COMPUTER
MY P
RESARIO—GETTING STARTED AND BEYOND
Windows
Basics
Microsoft Windows is the operating system that runs on your
In This Chapter
Features of the Windows
Desktop, 3-2
Help, 3-4
For mor e information on the
Windows desktop, refer to the
Getting Sta rted: Microsoft
W indows manual that came
with your computer.
computer. This mea ns tha t Windows controls and manage s your
computer by translating your mouse and keyboard instructions
into a language your computer can understand.
The Wind ows deskt op is your personal workspace. On the
Windows de sktop, you give your computer instructions to
perform tasks: Access files, copy files, connect to the Internet,
read e-mail, and more.
In this chapter, you learn how to use the standard features of the
Windows de sktop.
3
MY P
RESARIO—GETTING STARTED AND BEYOND
W
INDOWS BASICS
3-1
Features of
the Windows
Desktop
Although computers vary
based on specific hardware
and software, the W indows
desktop has many standard
features.
In this section, you are
introduced to the major
components of the desktop:
Icons
➜
Taskbar
➜
Star t menu
➜
Help
➜
Features of the Windows Desktop
Viewing the Windows Desktop
When you turn on your computer, Microsoft Windows
automatically starts. The first screen you see after Windows
goes through the startup process is the Windows desk top, the
area in which you work.
Note:
The programs and icons displayed vary by model.
Each time you access a
program, a button for that
program appears on the
Windows taskbar
each button to switch to tha t
program.
. Click
3
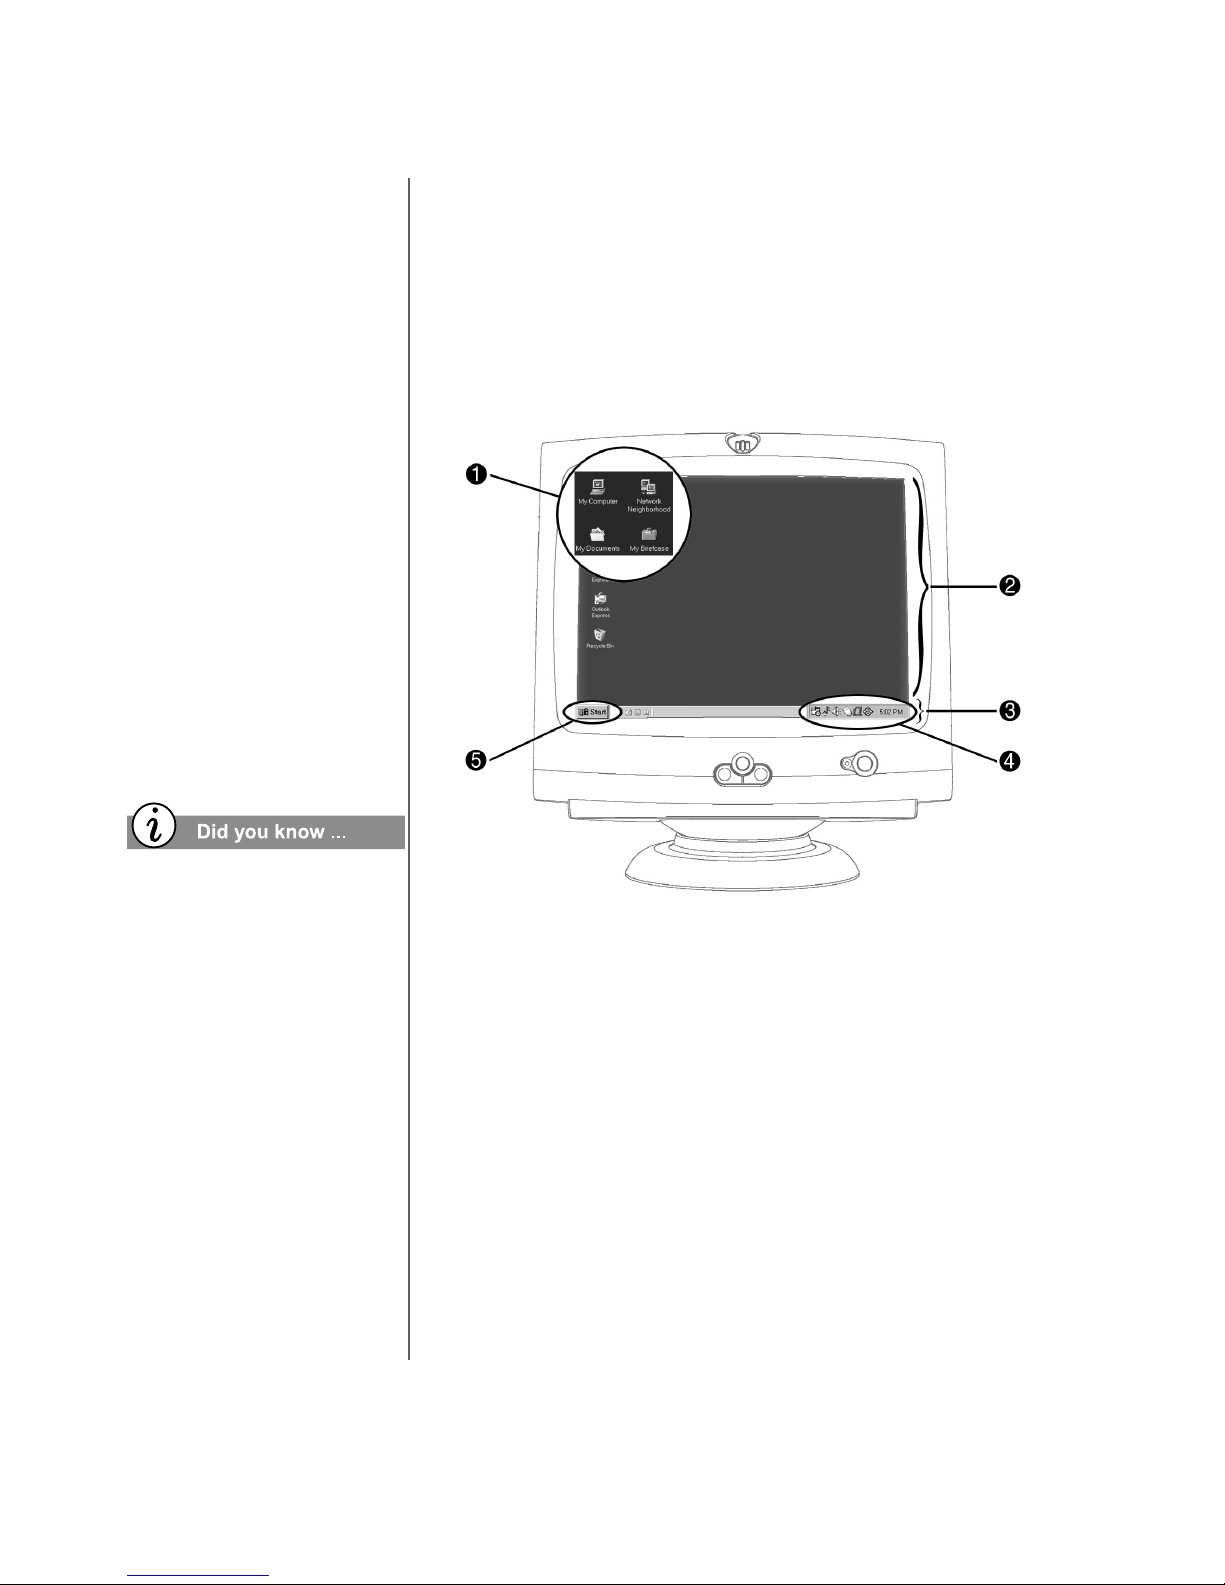
On the Windows desktop 2 there are several small graphics 1
(called icons). An icon represents a program, disk drive, file, or
folder, and provides eas y acce s s to th e programs or document s
you use on a regular basis.
Across the bottom of the desktop is a grey bar (called the
Windows taskbar 3). The taskbar includ es the
Start
button 5,
the Quick Launch area (which provides easy access to Internet
Explorer , Outlo ok Express, Show De skto p, and Wi ndows Media
Player), buttons f or each active program, and the system tray
(systray) 4. The taskbar allows you to pick and choose options
or activities, and it is always displayed on your desktop.
The systray 4 contains icons for some of the system programs
that load automatically at startup . The sys t em clock is also
displayed on the systray.
3-2 W
INDOWS BASICS
MY P
RESARIO—GETTING STARTED AND BEYOND
 Loading...